
INSTRUCTIONS FOR:
SPARK PLUG THREAD REPAIR KIT
MODEL No: VS301.V2
Comprehensive and time saving kit of spark plug thread repair tools especially suitable for the repair of deep seated plug configurations. Kit of
tools incorporates taper and plug taps together with intergrated ream. Stepped tap ensures correct alignment of seat cleaner in existing spark
plug hole. Extension tools allow easy access to the bottom of the plug recess. Includes set of plug inserts.
Model No: ..........................................VS301.V2
Plug tap: ........................................... M14x1.25
Step tap: .................................. M14x1.25; M16x1.25
Insert lengths: ..................................9mm and 15mm
Replacement inserts; .............VS301.9 (10pcs), VS301.15 (10pcs)
Original Language Version
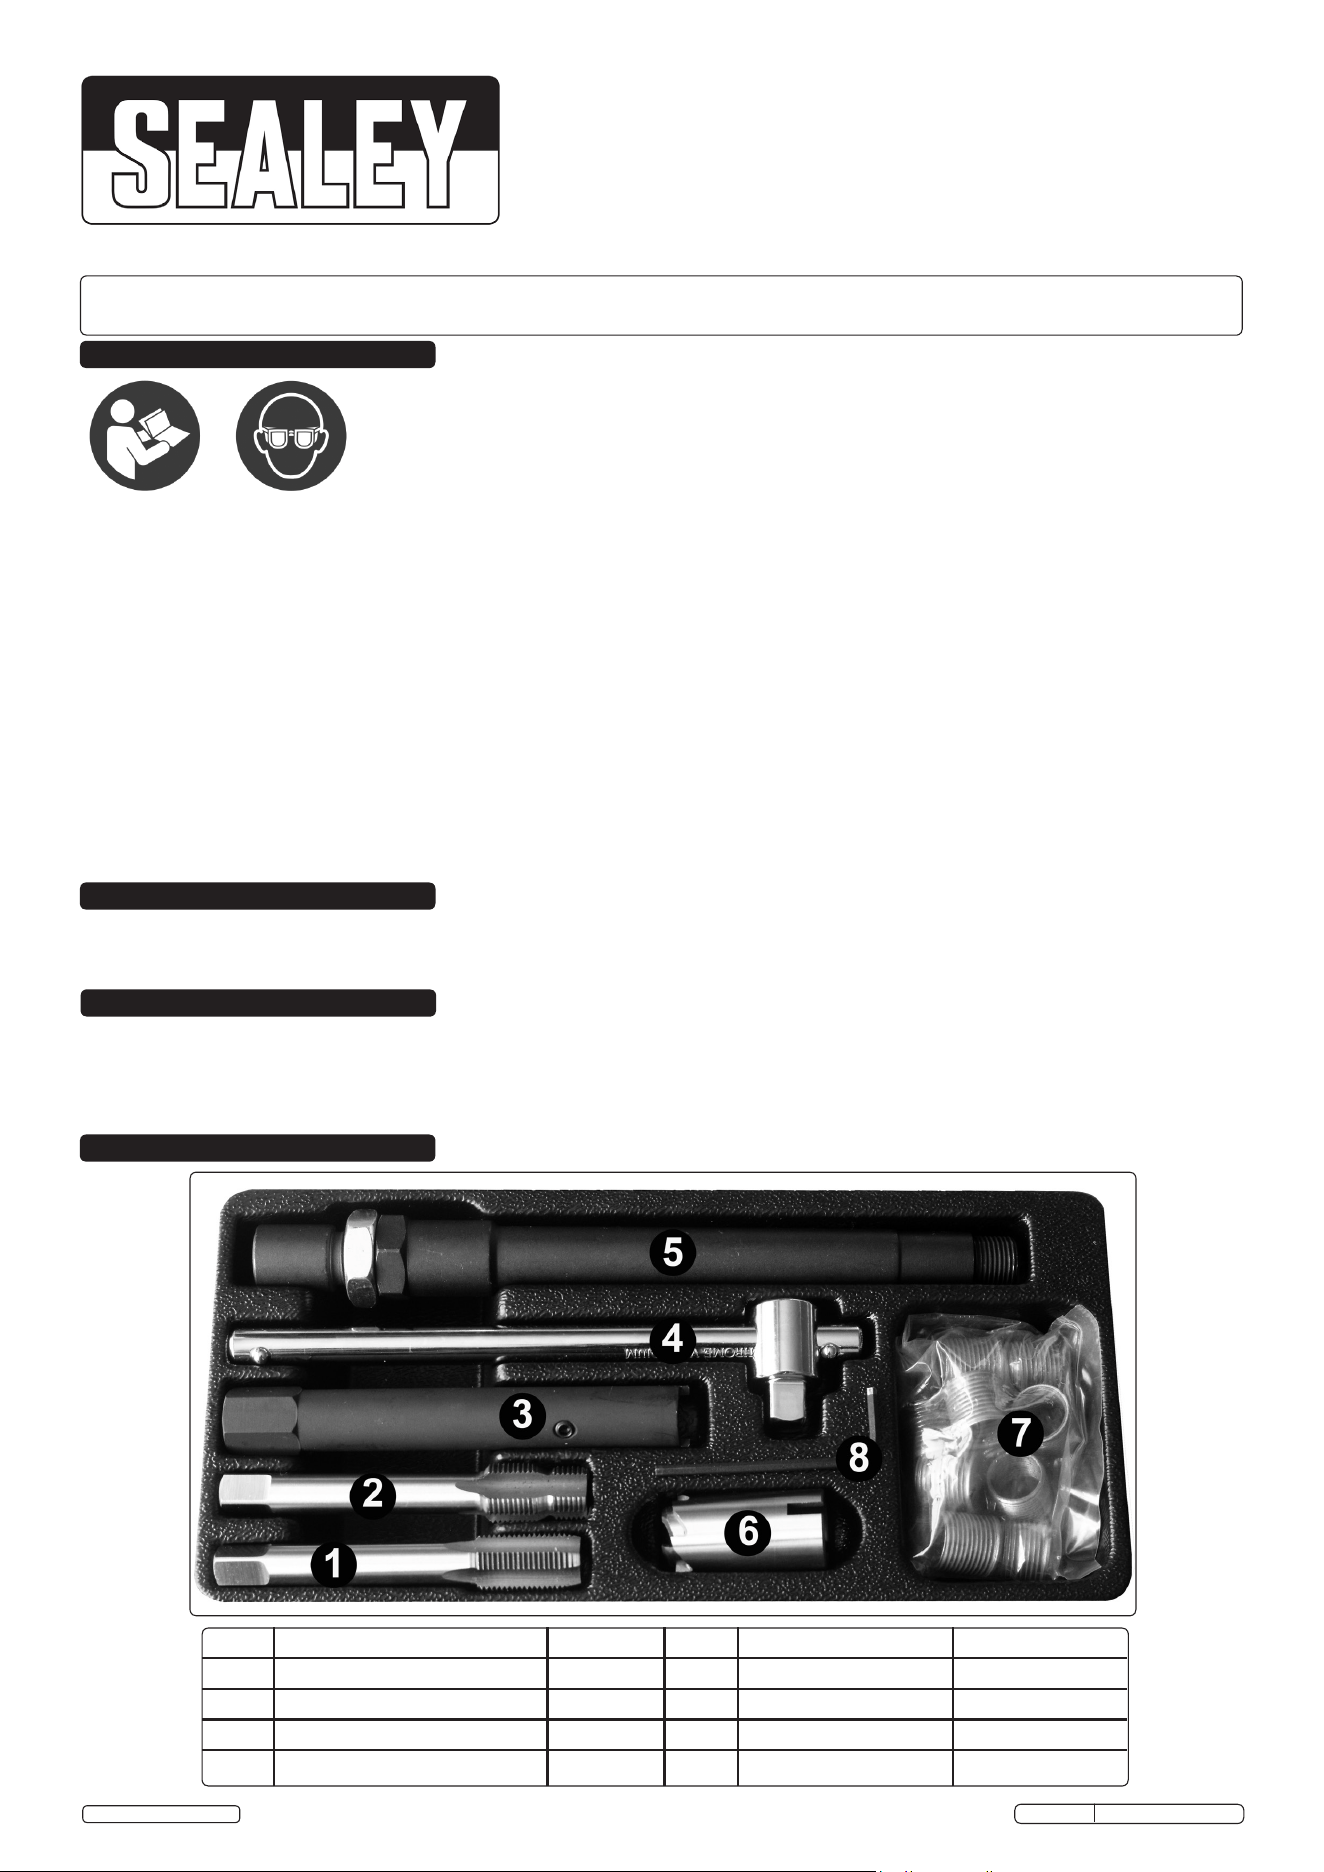
Item Description Part No: Item Description Part No:
1 Plug Tap (M14x1.25) VS301.05 5 Insert Drive VS301.02
2 Step Tap (M14x1.25; M16x1.25) VS301.06 6 Seat Cleaner VS301.04
3 Wrench VS301.03 7 Inserts 9mm/15mm VS301.9/VS301.15
4 T-bar VS301.01 8 Allen Key (2.5mm)
VS301.V2 Issue No: 1- 23/01/15
© Jack Sealey Limited
IMPORTANT: PLEASE READ THESE INSTRUCTIONS CAREFULLY. NOTE THE SAFE OPERATIONAL REQUIREMENTS, WARNINGS & CAUTIONS. USE THE PRODUCT
CORRECTLY AND WITH CARE FOR THE PURPOSE FOR WHICH IT IS INTENDED. FAILURE TO DO SO MAY CAUSE DAMAGE AND/OR PERSONAL INJURY AND WILL
INVALIDATE THE WARRANTY. KEEP THESE INSTRUCTIONS SAFE FOR FUTURE USE.
Thank you for purchasing a Sealey product. Manufactured to a high standard, this product will, if used according to these instructions,
and properly maintained, give you years of trouble free performance.
1. SAFETY
2. INTRODUCTION
3. SPECIFICATION
4. CONTENTS
WARNING! Wear approved eye protection. Wear appropriate Personal Protective Equipment. A full range of Personal Protective Equipment is
available from your Sealey dealer.
WARNING! Ensure that Health & Safety, Local Authority Regulations and general workshop practice Regulations are adhered to when using tools.
DO NOT use tools if damaged.
Maintain tools to ensure that they are in an adequate condition for safe use and optimum performance.
Ensure that a vehicle that has been raised by a jack is adequately supported. Use axle stands.
DO NOT attempt to start or move a vehicle whilst in gear and with timing devices fitted.
Wear suitable clothing to avoid snagging. DO NOT wear jewellery. Tie back long hair.
Account for all tools, parts and components being used. DO NOT leave these in or near the engine. Return tools to suitable storage after use.
When not in use, store in a safe, dry childproof place.
Keep children and unauthorised persons away from the work area.
s IMPORTANT! These instructions are provided as a guide only. Always refer to the vehicle manufacturer’s service instructions
or a proprietary manual to establish the correct procedure and data.
WARNING! The warnings, cautions and instructions in this manual cannot cover all possible conditions and situations. The Operator / user must
apply caution and common sense (good practical sense).
Refer to instruction
manual
Wear eye
protection

NOTE: To minimise the possibility of damage to the engine, it is
advisable to remove the cylinder head from the engine
prior to commencing work of this nature. Alternatively
use a suitable method of removing any swarf/debris from
the combustion chamber, ensuring that the piston is at
top dead centre. Wear eye protection when removing any
swarf/debris from the engine. A full range of personal safety
equipment is available from your Sealey Dealer.
4.1. Remove the spark plug from the cylinder head.
4.2. Place the plug tap (1) into the wrench (3) and lock into
placewiththegrubscrewusingtheallenkey(8)(g.1).
4.3. Attach the T-bar (4) to the wrench (3) and run the plug tap
(1) down the damaged spark plug hole in the cylinder head.
Remove the swarf/debris.
4.4. Remove the plug tap (1) from the wrench (3). Insert the
step tap (2) into the wrench (3) and lock into place with the
grub screw using the allen key (8). Attach the T-bar (4) to
thetopofthewrench(3)(g.2).
4.5. Carefully cut a M16x1.25 thread (using a suitable cutting
uid)intothedamagedsparkplugholeinthecylinderhead
and remove the swarf/debris.
4.6. Remove the step tap (2) from the wrench (3) and place
the seat cleaner (6) over the plug tap (1) so that it locates
intheutes(g.3).Placetheplugtap(1)andtheseat
cleaner (6) into the wrench (3) so that the lugs on the
wrench (3) locate into the seat cleaner recesses (6). Lock
intoplacewiththegrubscrewusingtheallenkey(8)(g.4).
4.7. Attach the T-bar (4) to the top of the wrench (3). Carefully
place the seat cleaner (6) over the spark plug seat on the
cylinder head and using a suitable lubricant, clean the
spark plug seat by rotating the seat cleaner clockwise
whilst applying moderate pressure. DO NOT apply
excessive force. Remove any debris.
4.8. Select the size of insert (7) required and screw about three
quarters of the way onto the insert drive (5). Check the
insert(7)isushandtightagainsttheinsertdrivesleeve
and lock into position with the locking nut on the insert drive
(5)usingsuitablespanners(g.5).
4.9. Apply a suitable thread locking solution to the exterior
thread of the insert (7). Attach the T-bar (4) to the insert
drive (5) and carefully screw the insert (7) into the
M16x1.25 threaded hole in the cylinder head until it is
fully located. Loosen the locking nut on the insert drive
(5) and release the sleeve from the insert (7). Tighten
the lock nut and carefully completely remove the insert
drive(5)fromtheinsert(7).Allowsufcienttimeforthe
thread lock to cure before proceeding to the next step.
4.10. Thoroughly clean away any swarf/debris, especially any
that may have accumulated in the combustion chamber if
the cylinder head has not been removed. Test the internal
thread of the insert (7) with a spark plug.
4.11. Ensure that all tools are removed from the work area/
engine bay and returned to the tool tray. Store in a safe,
dry, childproof location.
fig.2
fig.4
fig.1
fig.3
fig.5
NOTE: It is our policy to continually improve products and as such we reserve the right to alter data, specifications and component parts without prior notice.
IMPORTANT: No liability is accepted for incorrect use of this product.
WARRANTY: Guarantee is 12 months from purchase date, proof of which will be required for any claim.
01284 757500
01284 703534
sales@sealey.co.uk
Sole UK Distributor, Sealey Group,
Kempson Way, Suffolk Business Park,
Bury St. Edmunds, Suffolk,
IP32 7AR
www.sealey.co.uk
Original Language Version
VS301.V2 Issue No: 1- 23/01/15
© Jack Sealey Limited
5. INSTRUCTIONS
Environmental Protection
Recycle unwanted materials instead of disposing of them
as waste. All tools, accessories and packaging should be
sorted, taken to a recycling centre and disposed of in a
manner which is compatible with the environment.
When the product becomes completely unserviceable and
requires disposal, drain off any fluids (if applicable)
into approved containers and dispose of the product and
the fluids according to local regulations.
Parts support is available for this product. To obtain a parts listing and/or diagram,
please log on to www.sealey.co.uk, email sales@sealey.co.uk or telephone 01284 757500.