

Model 241-0982
For questions / comments, technical assistance or repair parts.
Please Call Toll Free at: 1-888-686-1484 (M-F 8am – 6pm)
7” SANDER / POLISHER
Operation and Safety Instructions
1
6
5
7
2
3 4
3
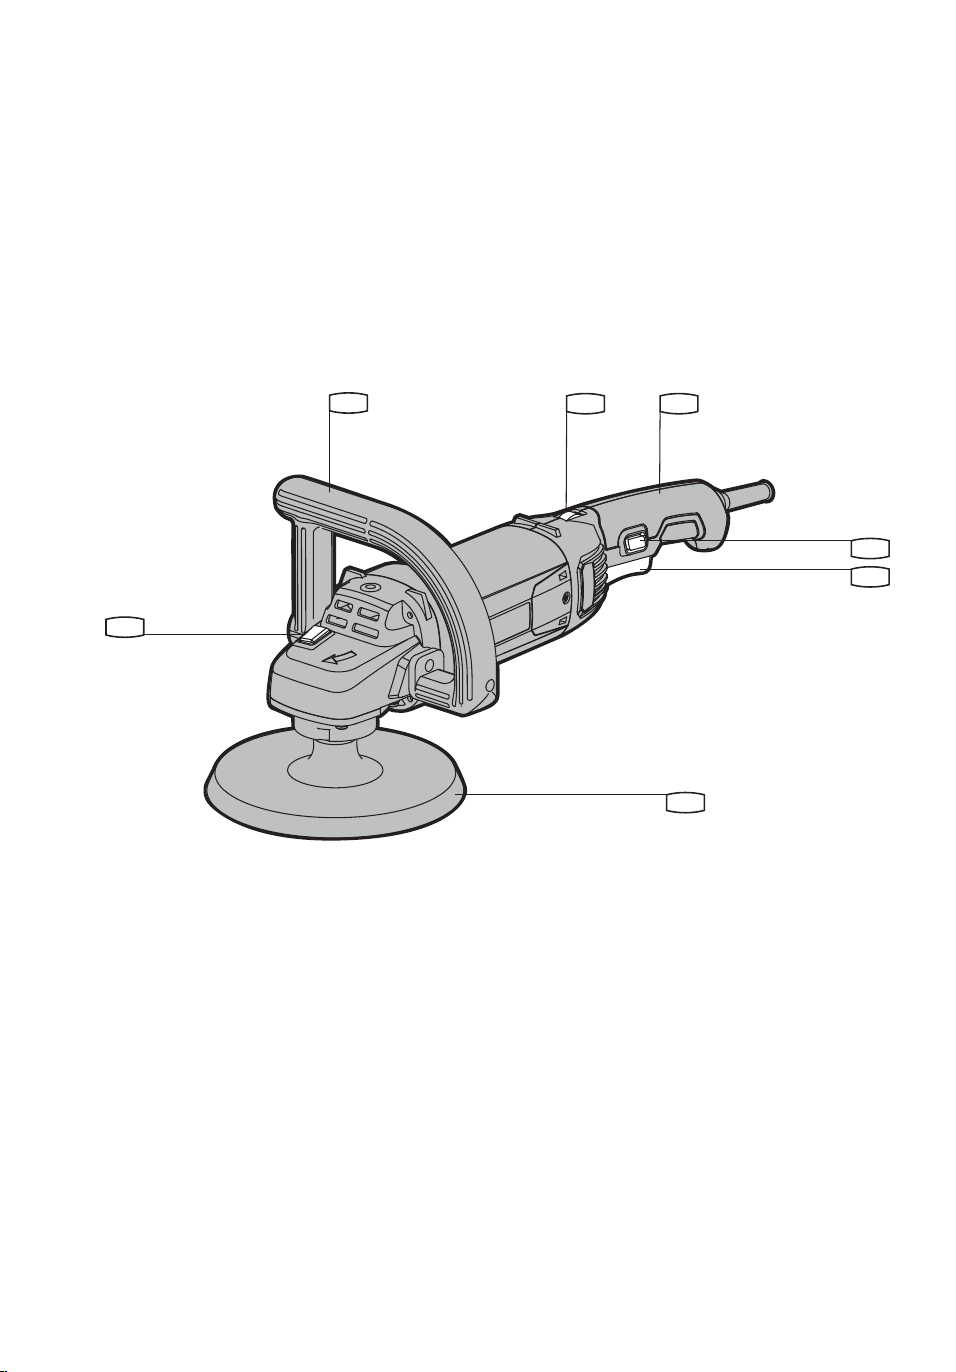
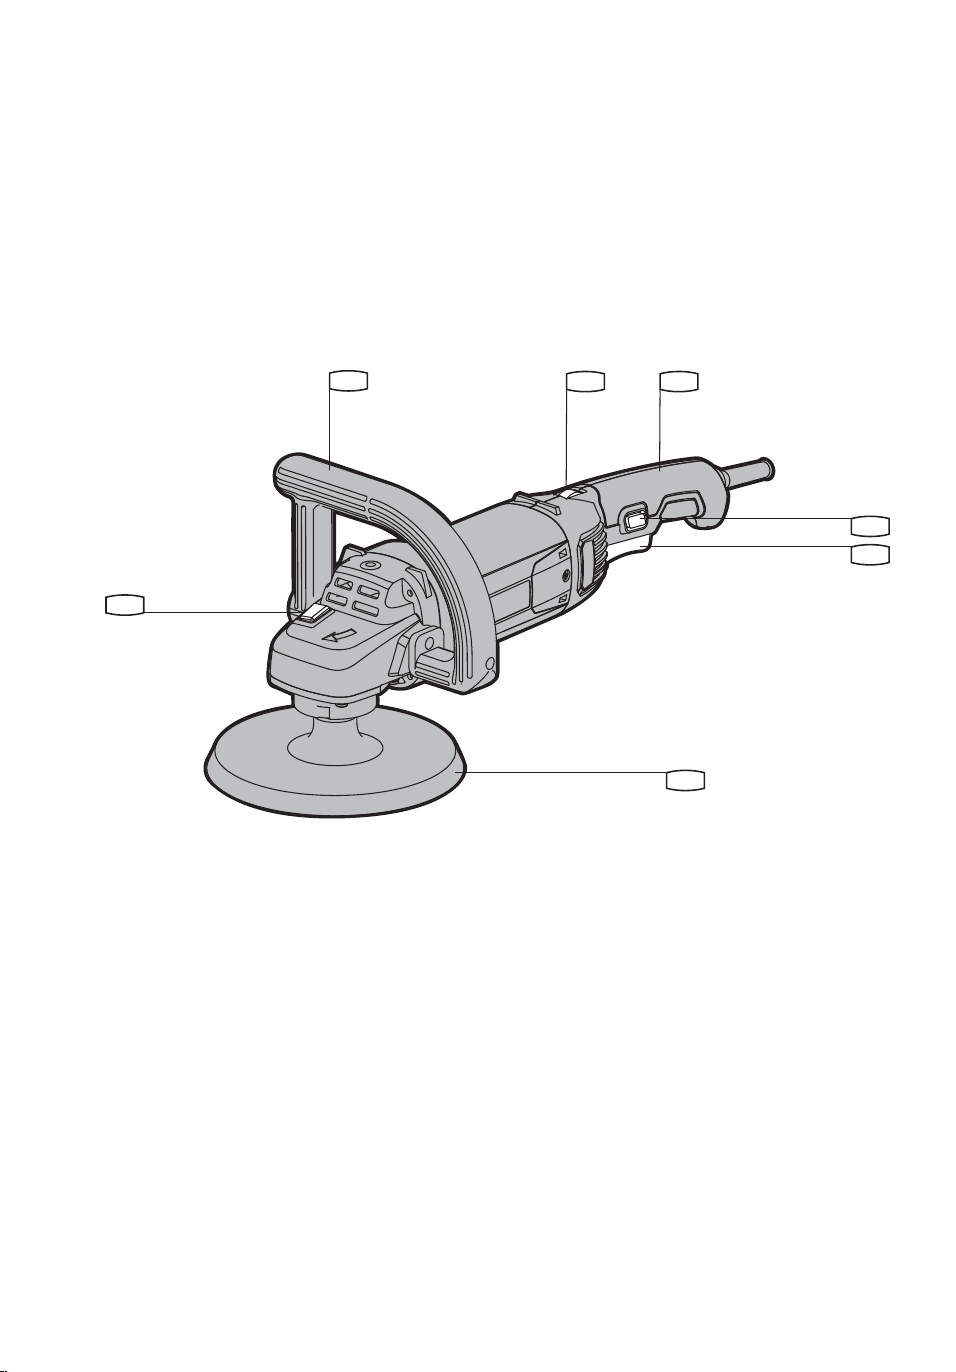
Spindle lock button
Front handle
Variable speed control
Rear handle
Switch trigger
Lock-on switch
Hook-and-loop pad
* Not all the accessories illustrated or described are included in standard delivery.
Component list
1
2
3
4
5
6
7
! " # !
! " $ % ! % % " &
! % % ' "
WARNING: Some dust created by power sanding, sawing, grinding, drilling and other
construction activities contains chemicals known to the state of California to cause
cancer, birth defects or other reproductive harm. Some examples of these chemicals are:
• Lead from lead-based paints,
• Crystalline silica from bricks and cement and other masonry products,
• Arsenic and chromium from chemically-treated lumber.
Your risk from these exposures varies, depending on how often you do this type of work.
To reduce your exposure to these chemical: work in a well ventilated area, and work with
out microscopic particles.
WARNING: This product may contain lead, phthalate or other chemicals known
to the State of California to cause cancer, birth defects and other reproductive harm.
Please wash your hands after use.
Accessories

4
General power tool
safety warnings
WARNING: Read all safety warnings
and instructions. Failure to follow the
warnings and instructions may result in electric
VKRFN¿UHDQGRUVHULRXVLQMXU\
Save all warnings and instructions for future
reference.
7KHWHUPSRZHUWRROҏLQWKHZDUQLQJVUHIHUVWR
your electric (corded) power tool or battery-
operated (cordless) power tool.
Work area safety
• Keep work area clean and well lit.
Cluttered or dark areas invite accidents.
• Do not operate power tools in explosive
atmospheres, such as in the presence of
ÀDPPDEOHOLTXLGVJDVHVRUGXVWPower
tools create sparks which may ignite the dust
or fumes.
• Keep children and bystanders away
while operating a power tool. Distractions
can cause you to lose control.
Electrical safety
• Power tool plugs must match the outlet.
Never modify the plug in any way. Do not
use any adapter plugs with grounded power
WRROV8QPRGL¿HGSOXJVDQGPDWFKLQJ
outlets will reduce risk of electric shock.
• Avoid body contact with grounded
surfaces such as pipes, radiators,
ranges and refrigerators. There is an
increased risk of electric shock if your body
is grounded.
• Do not expose power tools to rain or wet
conditions. Water entering a power tool
will increase the risk of electric shock.
• Do not abuse the cord. Never use the
cord for carrying, pulling or unplugging
the power tool. Keep cord away from
heat, oil, sharp edges or moving parts.
Damaged or entangled cords increase the
risk of electric shock.
• When operating a power tool outdoors,
use an extension cord suitable for
outdoor use. Use of a cord suitable for
outdoor use reduces the risk of electric shock.
• If operating a power tool in a damp
location is unavoidable, use a residual
current device (RCD) protected supply.
Use of an RCD reduces the risk of electric
shock.
Personal safety
• Stay alert, watch what you are doing and
use common sense when operating a
power tool. Do not use a power tool while
\RXDUHWLUHGRUXQGHUWKHLQÀXHQFHRI
drugs, alcohol or medication. A moment of
inattention while operating power tools may
UHVXOWLQVHULRXVSHUVRQDOLQMXU\
• Use personal protective equipment.
Always wear eye protection. Protective
equipment such as dust mask, non-skid
safety shoes, hard hat, or hearing protection
used for appropriate conditions will reduce
SHUVRQDOLQMXULHV
• Prevent unintentional starting. Ensure
the switch is in the off-position before
connecting to power source and/or
battery pack, picking up or carrying the
tool.&DUU\LQJSRZHUWRROVZLWK\RXU¿QJHU
on the switch or energizing power tools that
have the switch on invites accidents.
• Remove any adjusting key or wrench
before turning the power tool on. A
wrench or a key left attached to a rotating
part of the power tool may result in personal
LQMXU\
• Do not overreach. Keep proper
footing and balance at all times. This
enables better control of the power tool in
unexpected situations.
• Dress properly. Do not wear loose
clothing or jewellery. Keep your hair,
clothing and gloves away from moving
SDUWV/RRVHFORWKHVMHZHOOHU\RUORQJKDLU
can be caught in moving parts.
• If devices are provided for the
connection of dust extraction and
collection facilities, ensure these are
connected and properly used. Use of
a dust collection device can reduce dust-
related hazards.
Power tool use and care
• Do not force the power tool. Use the
correct power tool for your application.
7KHFRUUHFWSRZHUWRROZLOOGRWKHMRE
better and safer at the rate for which it was
designed.
• Do not use the power tool if the switch
does not turn it on and off. Any power tool

5
that cannot be controlled with the switch is
dangerous and must be repaired.
• Disconnect the plug from the power
source and/or the battery pack from
the power tool before making any
adjustments, changing accessories,
or storing power tools. Such preventive
safety measures reduce the risk of starting
the power tool accidentally.
• Store idle power tools out of the reach
of children and do not allow persons
unfamiliar with the power tool or these
instructions to operate the power tool.
Power tools are dangerous in the hands of
untrained users.
• Maintain power tools. Check for
misalignment or binding of moving parts,
breakage of parts and any other condition
that may affect the power tool’s operation.
If damaged, have the power tool repaired
before use. Many accidents are caused by
poorly maintained power tools.
• Keep cutting tools sharp and clean.
Properly maintained cutting tools with sharp
cutting edges are less likely to bind and are
easier to control.
• Use the power tool, accessories and
tool bits etc., in accordance with
these instructions and in the manner
intended for the particular type of
power tool, taking into account the
working conditions and the work to be
performed. Use of the power tool.
Service
• Have your power tool serviced by a
TXDOL¿HGUHSDLUSHUVRQXVLQJRQO\
identical replacement parts. This will
ensure that the safety of the power tool is
maintained.
Safety warnings common for polishing
operations:
• This power tool is intended to function
as a sander/polisher. Read all safety
warnings, instructions, illustrations and
VSHFL¿FDWLRQVSURYLGHGZLWKWKLVSRZHU
tool. Failure to follow all instructions listed
EHORZPD\UHVXOWLQHOHFWULFVKRFN¿UHDQG
RUVHULRXVLQMXU\
• Do not use accessories which are not
VSHFL¿FDOO\GHVLJQHGDQGUHFRPPHQGHG
by the tool manufacturer. The fact that an
DFFHVVRU\LWHPPD\¿WWKHSRZHUWRROLVQRW
an assurance of safe operation.
• The rated speed of the accessory must
be at least equal to the maximum speed
marked on the power tool. Accessories
running faster than their rated speed can
EUHDNDQGÀ\DSDUW
• The outside diameter and the thickness
of your accessory must be within the
capacity rating of your power tool.
Incorrectly sized accessories cannot be
adequately guarded or controlled.
• Threaded mounting of accessories must
match the sander/polisher spindle thread.
For accessories mounted by FLANGES,
the arbour hole of the accessory must
¿WWKHORFDWLQJGLDPHWHURIWKH)/$1*(
Accessories that do not match the mounting
hardware of the power tool will run out of
balance, vibrate excessively and may cause
loss of control.
• Do not use a damaged accessory. Before
each use inspect the accessory such as
abrasive wheels for chips and cracks,
backing pad for cracks, tears or excess
wear, wire brush for loose or cracked
wires. If power tool or accessory is
dropped, inspect for damage or install an
undamaged accessory. After inspecting
and installing an accessory, position
yourself and bystanders away from the
plane of the rotating accessory and run
the power tool at maximum no-load speed
for one minute. Damaged accessories will
normally break apart during this test time.
• Wear personal protective equipment.
Depending on application, use face
shield, safety goggles or safety glasses.
As appropriate, wear dust mask, hearing
protectors, gloves and workshop apron
capable of stopping small abrasive or
workpiece fragments. The eye protection
PXVWEHFDSDEOHRIVWRSSLQJÀ\LQJGHEULV
generated by various operations. The
dust mask or respirator must be capable
RI¿OWHULQJRXWSDUWLFOHVJHQHUDWHGE\\RXU
operation. Prolonged exposure to high
intensity noise may cause hearing loss.
• Keep bystanders a safe distance away
Safety instructions for
all operations

6
from work area. Anyone entering the
work area must wear personal protective
equipment. Fragments of workpiece or of a
EURNHQDFFHVVRU\PD\À\DZD\DQGFDXVH
LQMXU\EH\RQGLPPHGLDWHDUHDRIRSHUDWLRQ
• Position the cord clear of the spinning
accessory. If you lose control, the cord may
be cut or snagged and your hand or arm
may be pulled into the spinning accessory.
• Never lay the power tool down until the
accessory has come to a complete stop.
The spinning accessory may grab the
surface and pull the power tool out of your
control.
• Do not run the power tool while carrying
it at your side. Accidental contact with
the spinning accessory could snag your
clothing, pulling the accessory into your
body.
• Regularly clean the power tool’s air vents.
The motor’s fan will draw the dust inside
the housing and excessive accumulation
of powdered metal may cause electrical
hazards.
• Do not operate the power tool near
ÀDPPDEOHPDWHULDOVSparks could ignite
these materials.
• Do not use accessories that require
liquid coolants. Using water or other liquid
coolants may result in electrocution or
shock.
Kickback and related warnings:
Kickback is a sudden reaction to a pinched or
snagged rotating wheel, backing pad, brush
or any other accessory. Pinching or snagging
causes rapid stalling of the rotating accessory
which in turn causes the uncontrolled power
tool to be forced in the direction opposite of the
accessory’s rotation at the point of the binding.
For example, if an abrasive wheel is snagged or
pinched by the workpiece, the edge of the wheel
that is entering into the pinch point can dig into
the surface of the material causing the wheel
WRFOLPERXWRUNLFNRXW7KHZKHHOPD\MXPS
toward or away from the operator, depending on
direction of the wheel’s movement at the point
of pinching. Abrasive wheels may also break
under these conditions. Kickback is the result
of power tool misuse and/or incorrect operating
procedures or conditions and can be avoided by
taking proper precautions as given below.
0DLQWDLQD¿UPJULSRQWKHSRZHUWRRO
and position your body and arm to allow
you to resist kickback forces. Always use
auxiliary handle, if provided, for maximum
control over kickback or torque reaction
during start-up. The operator can control
torque reactions or kickback forces, if
proper precautions are taken.
• Never place your hand near the rotating
accessory. Accessory may kickback over
your hand.
• Do not position your body in the area
where power tool will move if kickback
occurs. Kickback will propel the tool in
direction opposite to the wheel’s movement
at the point of snagging.
• Use special care when working corners,
sharp edges etc. Avoid bouncing and
snagging the accessory. Corners, sharp
edges and bouncing have a tendency to
snag the rotating accessory and cause loss
of control or kickback.
• Do not attach a saw chain, woodcarving
blade or toothed saw blade. Such blades
create frequently kickback and cause loss
of control.
6DIHW\ZDUQLQJVVSHFL¿FIRUSROLVKLQJ
operations:
• Do not allow any loose portion of the
polishing bonnet or its attachment strings
to spin freely. Tuck away or trim any loose
attachment strings. Loose and spinning
attachment strings can entangle your
¿QJHUVRUVQDJRQWKHZRUNSLHFH
Further safety instruc-
tions for all operations
Additional safety
instructions for
polishing operations
7
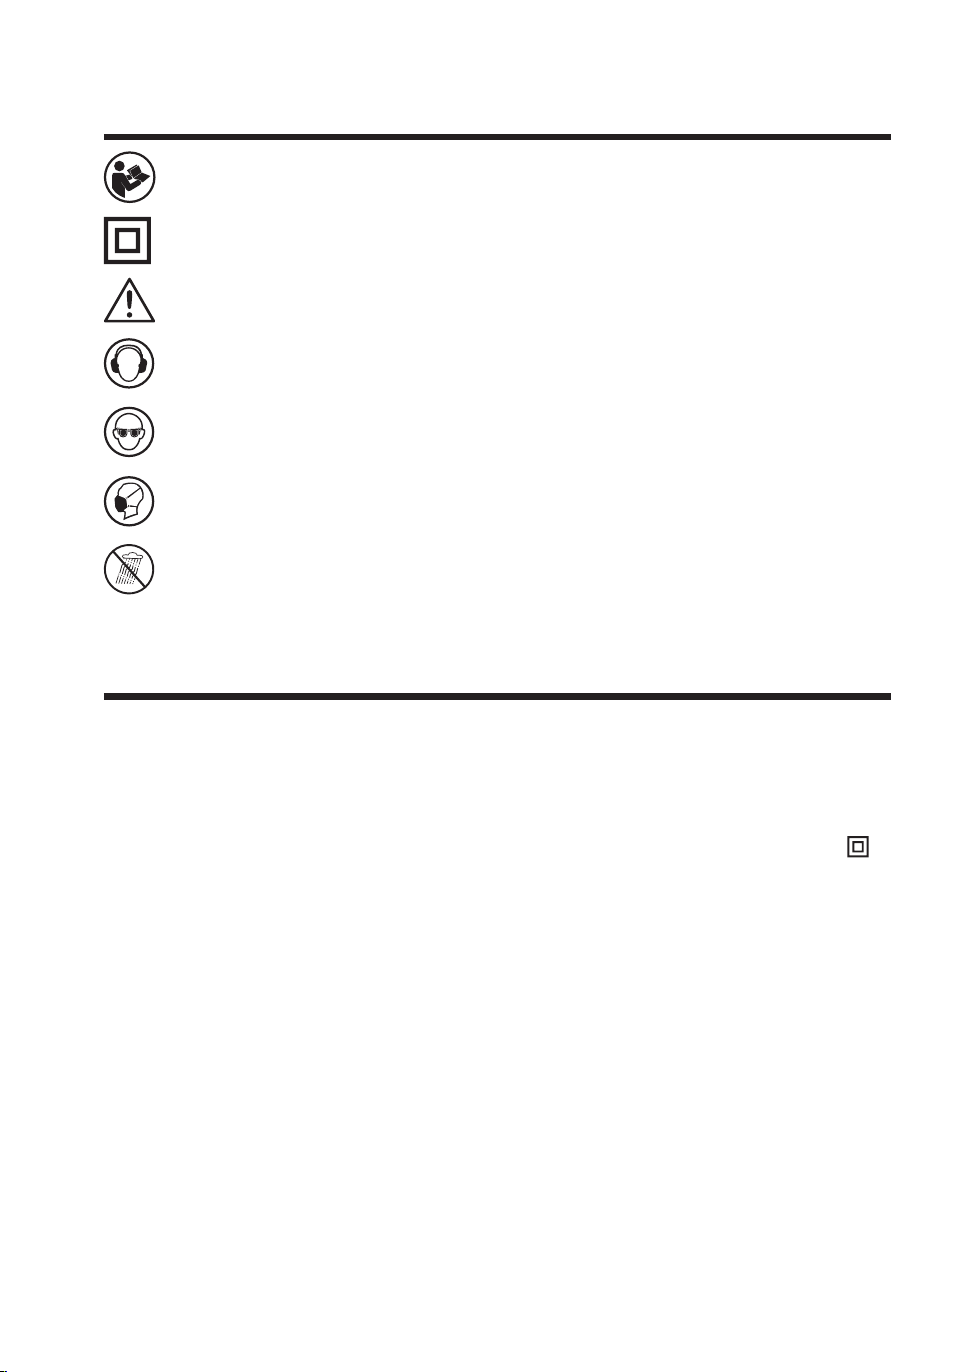
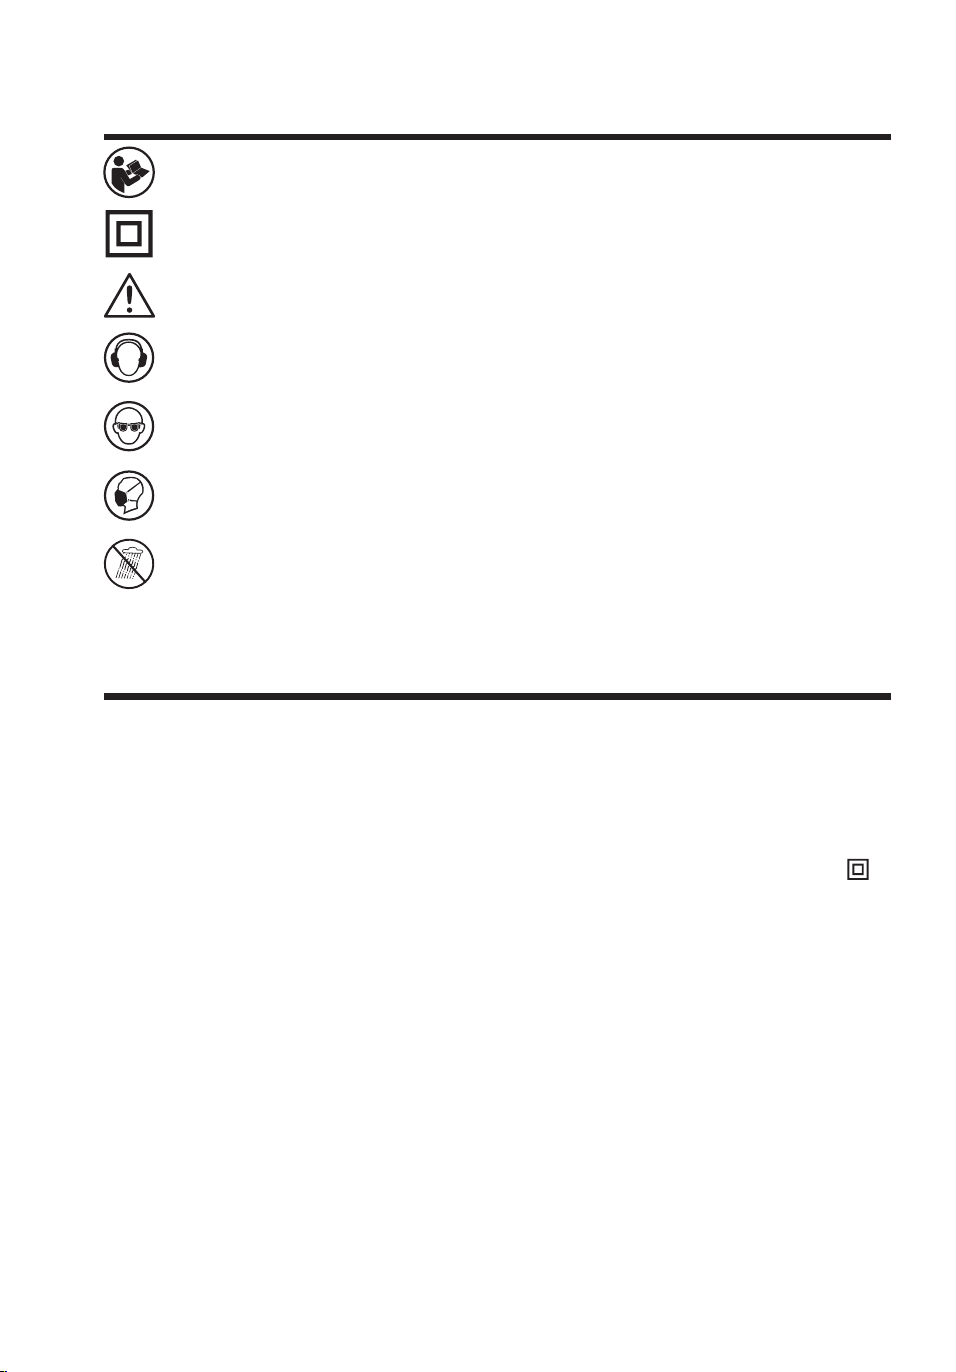
To reduce the risk of injury, user must read instruction manual
Double insulation
Warning
Wear ear protection
Wear eye protection
Wear dust mask
Don’t use in the rain
Voltage: 120V~60Hz
Amps: 10A
No load speed: 1000–3000/min
3DGVL]H ÝPP
Pad type: Hook and loop fastening system
6SLQGOHWKUHDG Ý
Protection class:
/ II
Weight: 7 lb 3 oz (3.2 kg)
Symbols
Technical specifications

8
NOTE: Before using the tool, read the
instruction book carefully.
PLACE THE BONNET (Fig. A)
Place the required bonnet securely over
the hook-and-loop pad and make sure it’s
centrosymmetric, otherwise the polisher
vibrates badly.
SPREAD THE POLISH (Fig. B)
Spread about a tablespoonful of polish evenly
over the entire surface of the pad cover. Do not
DSSO\SROLVKGLUHFWO\WRFDU7KLV¿UVWDSSOLFDWLRQ
should do about 1/3 of an average size car.
For the second and third applications of polish,
repeat as above. The pad cover will not adsorb
as much when reloading.
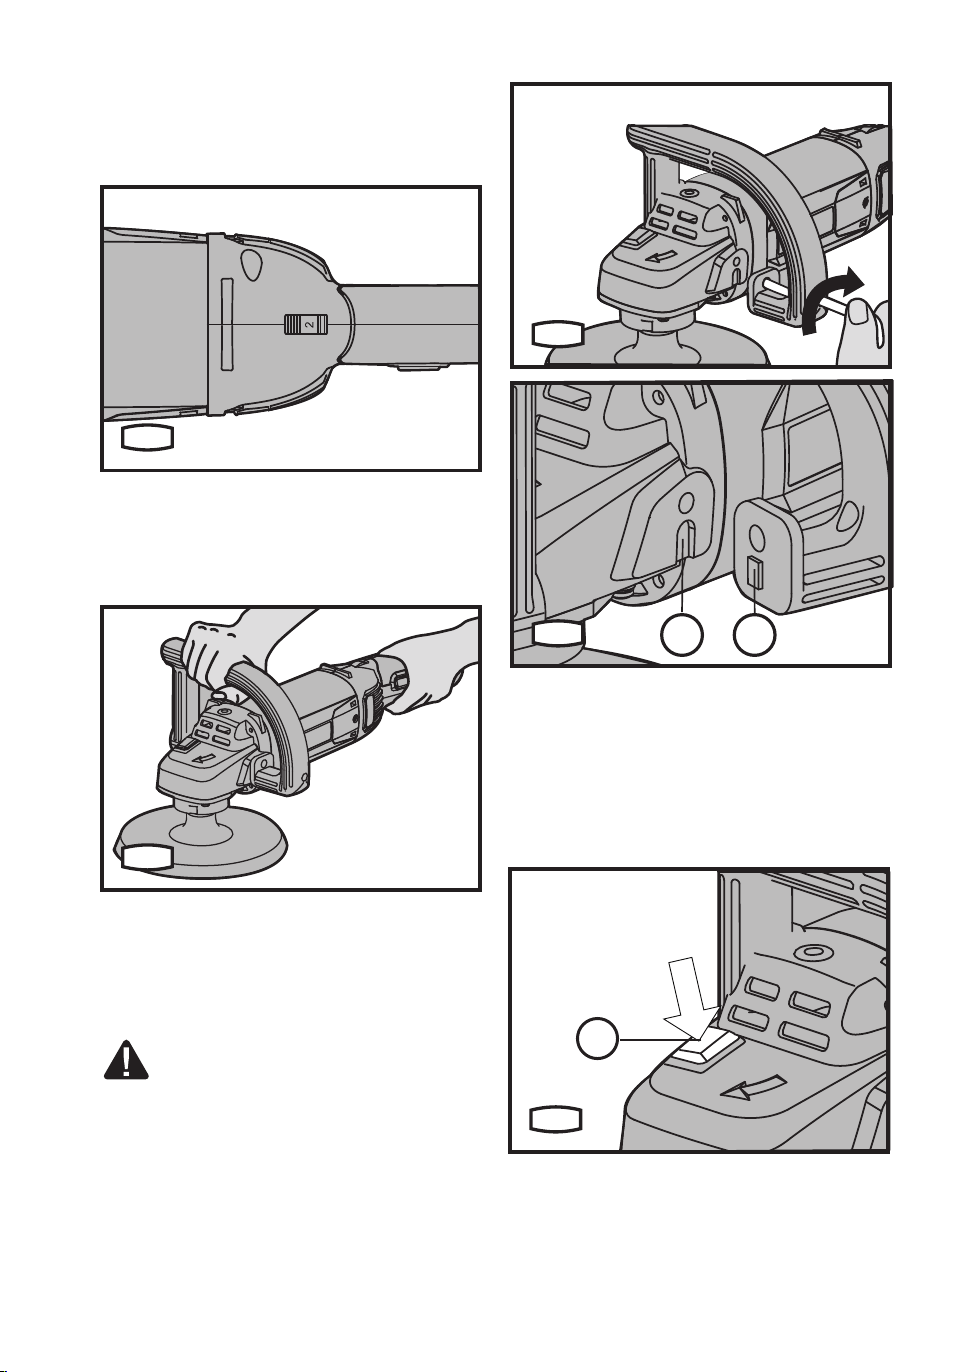
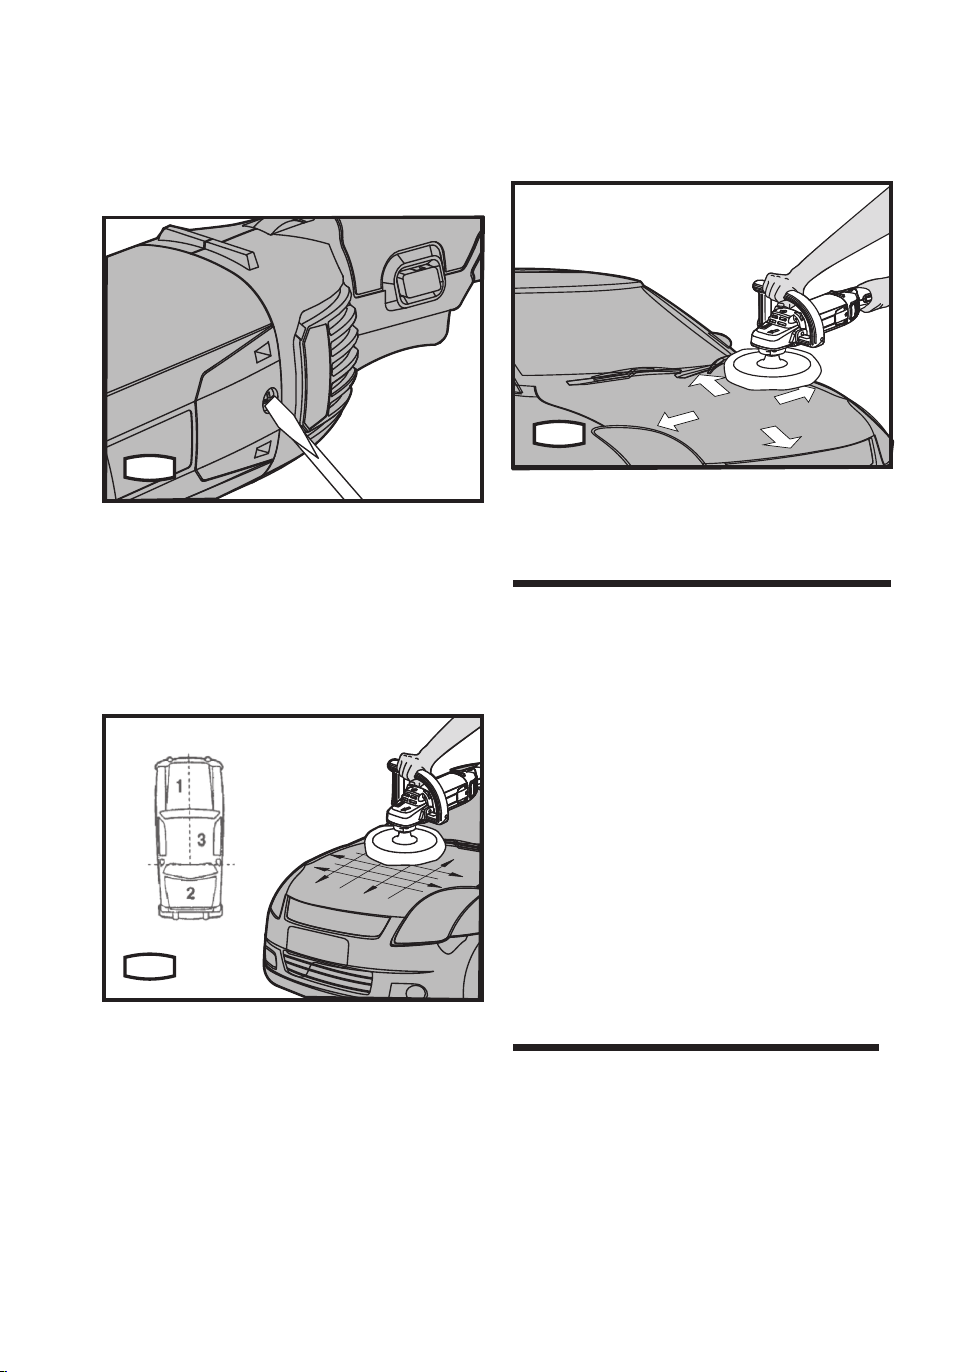
FITTING THE SANDING PAPER (Fig. C)
Sanding paper is easily attached on the pad of
your polisher. Fit the paper over the plate so that
it covers the entire area, push and slightly twist
to make sure the coated sanding paper is even
on the plate. Make sure the sanding paper
is even with the edges and that it’s
centrosymmetric, otherwise the polisher
vibrates badly. Remove the abrasive paper by
pinching an edge and peeling off.
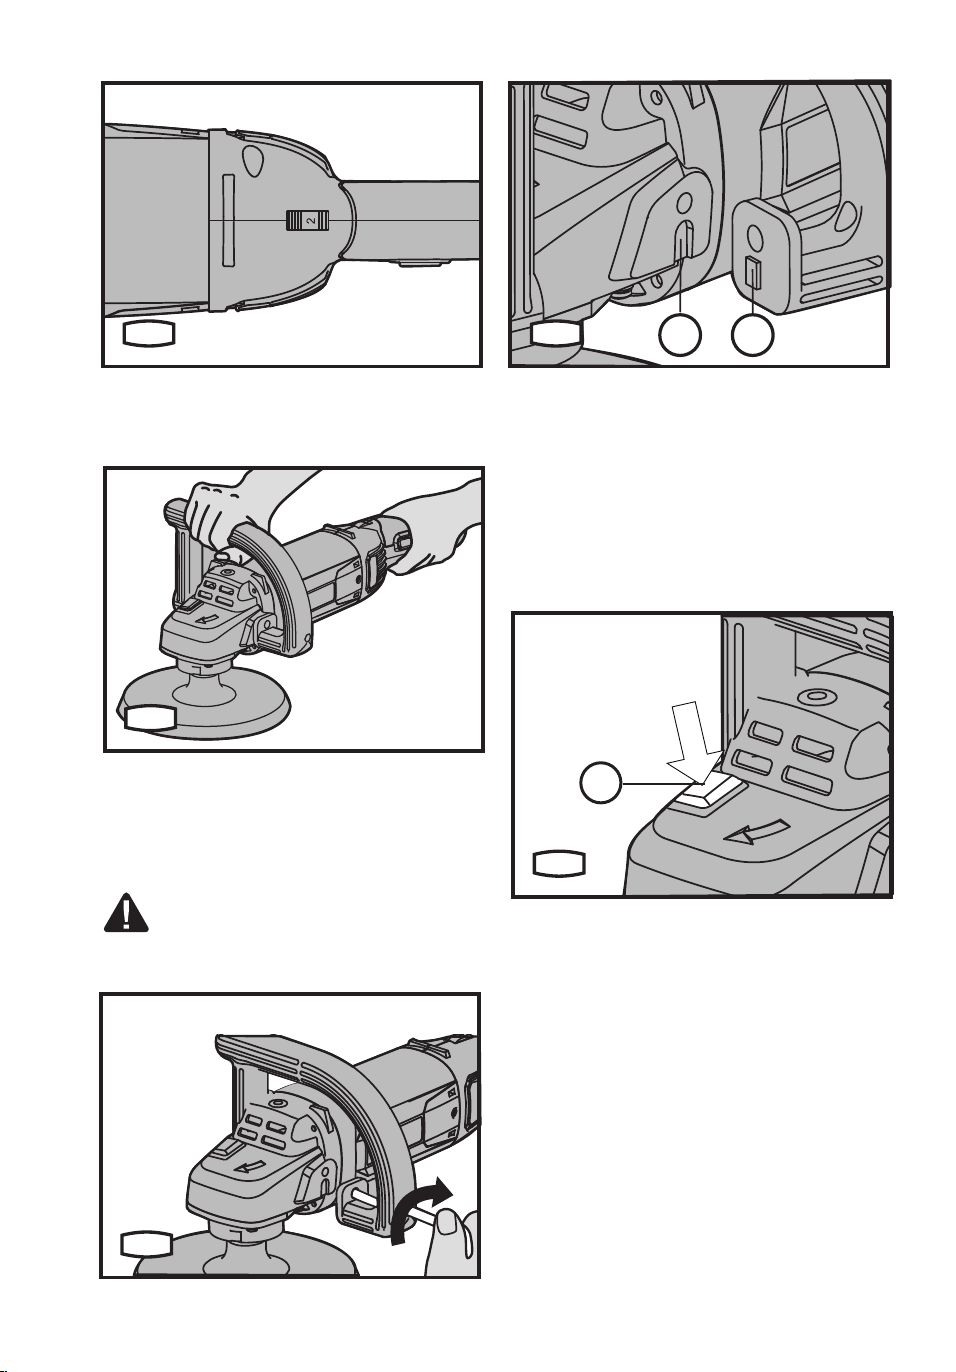
LOCK-ON SWITCH (Fig. D)
Depress on/off switch (5) then lock-on button
(6). Your switch is now locked on for continuous
XVH7RVZLWFKRII\RXUWRROMXVWUHOHDVHWKHRQ
off switch.
Operation instrutions
A
B
C
D
9
VARIABLE SPEED CONTROL (Fig.E)
The speed increases as you turn the switch
to a higher number and decreases at a lower
number.
HAND GRIP AREAS (Fig. F)
$OZD\VKROG\RXUFDUSROLVKHU¿UPO\ZLWKERWK
hands when operating.
INSTALLING THE FRONT HANDLE (Fig. G1,
G2)
For your personal safety, use the front handle
at all times. Tighten the screw with the hex key
clockwise.
WARNING!
• Make sure the protrusion (b) on the
handle is locked in the groove (a) of the
machine to secure the handle.
SPINDLE LOCK BUTTON (Fig. H)
Press in the spindle lock button and rotate the
hook-and-look pad by hand until it is locked.
ATTENTION: The spindle lock button must only
be used when changing a pad. Never press it
when the pad is rotating. Remove the plug from
WKHVRFNHWEHIRUHFDUU\LQJRXWWKHDGMXVWPHQW
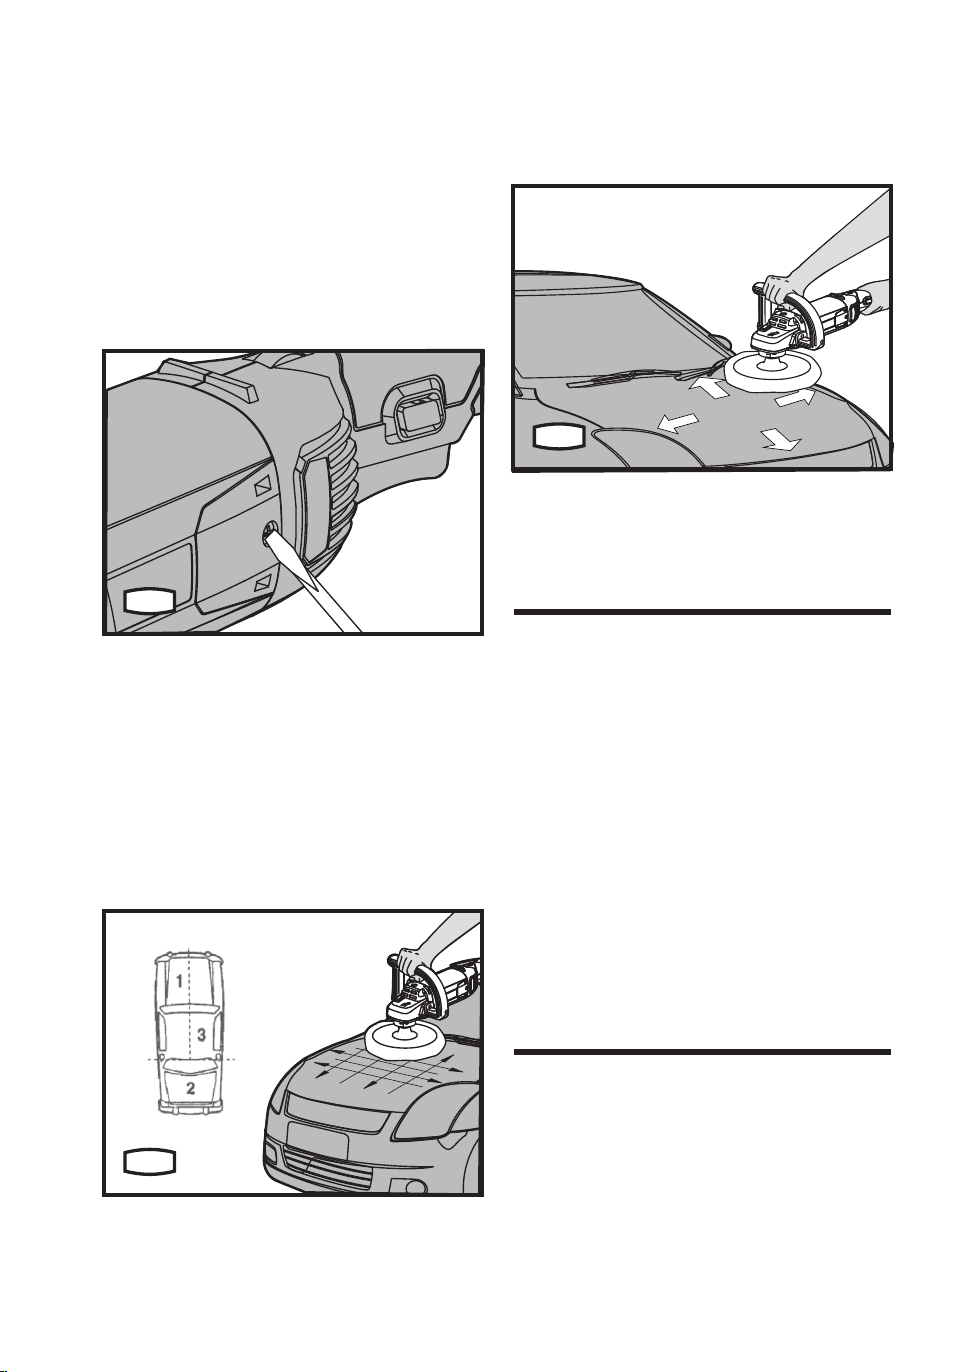
TO REPLACE THE BRUSHES (Fig. I)
Remove the brush holder with the use of a
screwdriver. Check the length of the brush and
replace if under 7mm. When brushes need
E
F
G1
a
b
G2
1
H
10
replacement always renew both brushes, even
if one is still more than 7 mm long. Put the brush
holder into the body. Tighten the brush holder.
Check that the tool is working before use and
allow it to run for a few minutes to enable the
brushes to stabilize.
TO USE THE CAR POLISHER (Fig. J)
Hold extension cord over the shoulder and
GRÀDWVXUIDFHV¿UVWLHKRRGWUXQNOLGDQG
roof. Cover areas quickly with broad sweeping
strokes in a crisscross pattern. Do not press
down on polisher. The machine without any
SUHVVXUHZLOOGRWKHEHVWMRE
FINAL WORK (Fig. K)
Use long, sweeping strokes in a crisscross
pattern to bring out the shine. Do not over-press
the polisher.
Remove the plug from the socket before
carrying out any adjustment, servicing or
maintenance.
Never use water or chemical cleaners to clean
your power tool. Wipe clean with a dry cloth.
Always store your power tool in a dry place.
Keep the motor ventilation slots clean. Keep all
working controls free of dust. Occasionally you
may see sparks through the ventilation slots.
This is normal and will not damage your power
tool.
If the supply cord is damaged, it must be
replaced by the manufacturer, its service agent
RUVLPLODUO\TXDOL¿HGSHUVRQVLQRUGHUWRDYRLGD
hazard.
• If your power tool does not start, check the
SOXJRQWKHSRZHUVXSSO\¿UVW
• If the polisher does not abrade surface,
check the bonnet. If the bonnet has been
worn, replace with new bonnet and try
again.
,IDIDXOWFDQQRWEHUHFWL¿HGUHWXUQWKHWRRO
to an authorized dealer for repair
I
J
K
Troubleshooting
Maintenance

Warranty statement
Printed in China
PERFORMAX
®
7’’ SANDER / POLISHER WARRANTY
30-DAY MONEY BACK GUARANTEE:
This PERFORMAX
®
brand power tool carries our 30-Day Money Back Guarantee. If you are not
FRPSOHWHO\VDWLV¿HGZLWK\RXU3(5)250$;
®
brand power tool for any reason within thirty (30) days
from the date of purchase, return the tool with your original receipt to any MENARDS
®
retail store, and
we will provide you a refund – no questions asked.
2-YEAR LIMITED WARRANTY:
This PERFORMAX
®
brand power tool carries a 2-Year Limited Warranty to the original purchaser.
If, during normal use, this PERFORMAX
®
power tool breaks or fails due to a defect in material or
workmanship within two (2) years from the date of original purchase, simply bring this tool with the
original sales receipt back to your nearest MENARDS
®
retail store. At its discretion, PERFORMAX
®
agrees to have the tool or any defective part(s) repaired or replaced with the same or similar
PERFORMAX
®
product or part free of charge, within the stated warranty period, when returned by the
original purchaser with original sales receipt. Not withstanding the foregoing, this limited warranty does
not cover any damage that has resulted from abuse or misuse of the Merchandise. This warranty: (1)
excludes expendable parts including but not limited to blades, brushes, belts, bits, light bulbs, and/or
batteries; (2) shall be void if this tool is used for commercial and/or rental purposes; and (3) does not
FRYHUDQ\ORVVHVLQMXULHVWRSHUVRQVSURSHUW\RUFRVWV7KLVZDUUDQW\GRHVJLYH\RXVSHFL¿FOHJDOULJKWV
and you may have other rights, which vary from state to state. Be careful, tools are dangerous
LILPSURSHUO\XVHGRUPDLQWDLQHG6HOOHU¶VHPSOR\HHVDUHQRWTXDOL¿HGWRDGYLVH\RXRQWKHXVHRIWKLV
Merchandise. Any oral representation(s) made will not be binding on seller or its employees. The rights
under this limited warranty are to the original purchaser of the Merchandise and may not be transferred
to any subsequent owner. This limited warranty is in lieu of all warranties, expressed or implied including
ZDUUDQWLHVRUPHUFKDQWDELOLW\DQG¿WQHVVIRUDSDUWLFXODUSXUSRVH6HOOHUVKDOOQRWEHOLDEOHIRUDQ\
special, incidental, or consequential damages. The sole exclusive remedy against the seller will be for
the replacement of any defects as provided herein, as long as the seller is willing or able to replace this
product or is willing to refund the purchase price as provided above. For insurance purposes, seller is
not allowed to demonstrate any of these power tools for you.
For questions / comments, technical assistance or repair parts –
Please Call Toll Free at: 1-888-686-1484 ( (M-F 8am–6pm)
SAVE YOUR RECEIPTS. THIS WARRANTY IS VOID WITHOUT THEM.
Modelo 241-0982
Para preguntas / comentarios, asistencia técnica o partes de reparación
Por favor llame al número telefónico gratuito al: 1-888-686-1484 (Lunes-Viernes 8am – 6pm)
7” LIJADORA / PULIDORA
Instrucciones de operación yseguridad
13
1
6
5
7
2
3 4

14
Botón de bloqueo de husillo
Manija frontal
Control de velocidad variable
Manija posterior
Gatillo de interruptor
Interruptor de bloqueo
Almohadilla envolvente
* No todos los accesorios ilustrados o descritos se incluyen junto con el producto estándar.
Lista de partes
1
2
3
4
5
6
7
'LVFRGHOLMDGRGHJUDQRFRQUHVSDOGRHQYROYHQWH
Bonete de lana 1
Almohadilla envolvente (7’’ diametro) 1
Use accesorios de buena calidad una marca bien conocida. Seleccione los que más convengan
DOWUDEDMRTXHLQWHQWDKDFHU&RQVXOWHHOHPSDTXHGHORVDFFHVRULRVSDUDREWHQHUPiVGHWDOOHV(O
SHUVRQDOGHODWLHQGDWDPELpQSXHGHD\XGDUOH\DFRQVHMDUOH
¡ADvERtENCIA! El polvo creado al lijar, serruchar, pulir, taladrar o realizar otras
actividades de la construcción, contiene substancias químicas que se sabe producen
cáncer, defectos de nacimiento u otros daños al sistema reproductor. Algunos ejemplos de
esos productos químicos son:
• l El plomo de las pinturas a base de plomo
• l la sílice cristalina de los ladrillos, del cemento y de otros productos de albañilería
• l El arsénico y el cromo de la madera tratada químicamente
El riesgo que se corre a causa del contacto con esos productos varía según la frecuencia
FRQTXHXVWHGUHDOLFHHVWHWLSRGHWUDEDMRV&RQHO¿QGHUHGXFLUVXH[SRVLFLyQDHVDV
substancias químicas:l trabaje en un área bien ventilada, l utilice un equipo de seguridad
DGHFXDGRWDOFRPRXQDPiVFDUDFRQWUDHOSROYRHVSHFLDOPHQWHGLVHxDGDSDUD¿OWUDU
partículas microscópicas.
ADVERTENCIA: Este producto podría contener plomo, ftalato y otros químicos
LGHQWL¿FDGRVSRUHO(VWDGRGH&DOLIRUQLDFRPRFDXVDQWHVGHFiQFHUGHIHFWRV
congénitos y otras lesiones reproductivas. Lávese las manos después de utilizar.
Accessorios

15
General power tool
safety warnings
ADVERTENCIA: Lea y comprenda
todas las instrucciones. El no seguir
todas las instrucciones a continuación puede
ocasionar descargas eléctricas, incendios y/o
heridas graves.
Conserve todas las advertencias e
instrucciones para consulta futura.
(OWpUPLQR³KHUUDPLHQWDHOpFWULFD´TXH¿JXUD
en todas las advertencias que aparecen a
continuación hace referencia a la herramienta
que funciona con la red de suministro eléctrico
(con cable) o a la herramienta eléctrica
accionada a baterías (sin cable).
Área de trabajo
• Mantenga su lugar de trabajo limpio
y bien iluminado. %DQFRVGHWUDEDMR
desordenados y lugares oscuros invitan a
los accidentes.
• No utilice herramientas eléctricas en
atmósferas explosivas, como por ejemplo
HQSUHVHQFLDGHOtTXLGRVLQÀDPDEOHV
gases o polvo.
Las herramientas eléctricas
crean chispas que pueden encender el
polvo o los vapores.
• Mantenga a los espectadores, niños
y visitantes a una distancia prudente
cuando esté utilizando una herramienta
eléctrica.
Las distracciones pueden
hacerle perder el control.
Seguridad eléctrica
• Los enchufes de las herramientas
eléctricas deben coincidir con el
WRPDFRUULHQWH1RPRGL¿TXHGHDOJ~Q
modo el enchufe. No utilice enchufes
adaptadores con herramientas eléctricas
conectadas a tierra. 6LQRVHPRGL¿FDQORV
enchufes y se utilizan los tomacorrientes
adecuados, se reducirá el riesgo de una
descarga eléctrica.
• Evite el contacto del cuerpo con las
VXSHU¿FLHVFRQHFWDGDVDWLHUUDWDOHVFRPR
tuberías, radiadores, estufas de cocina y
refrigeradores. Existe mayor riesgo de que
se produzcan descargas eléctricas si su
cuerpo está conectado a tierra.
• No exponga las herramientas eléctricas
a la lluvia ni a los ambientes húmedos. La
entrada de agua en una herramienta eléctrica
aumenta el riesgo de que se produzcan
descargas eléctricas.
• No abuse del cable. Nunca use el cable
para transportar las herramientas ni para
sacar el enchufe de un tomacorriente.
0DQWHQJDHOFDEOHDOHMDGRGHOFDORUHO
DFHLWHORVERUGHVD¿ODGRVRODVSLH]DV
móviles. Los cables dañados aumentan
el riesgo de que se produzcan descargas
eléctricas.
• Cuando opere una herramienta eléctrica
en exteriores, use un cable de extensión
adecuado para uso en exteriores. El uso de
un cable adecuado para uso en exteriores
reduce el riesgo de descargas eléctricas.
• Si operar una herramienta eléctrica en
un lugar húmedo es inevitable, use un
elemento protegido del dispositivo de
corriente residual (RCD). El uso de un RCD
reduce el riesgo de descargas eléctricas.
Seguridad personal
• Manténgase alerta, fíjese en lo que está
haciendo y use el sentido común cuando
utilice una herramienta eléctrica. No use
la herramienta cuando esté cansado o se
HQFXHQWUHEDMRODLQÀXHQFLDGHGURJDV
alcohol o medicamentos. Un momento
de distracción al utilizar herramientas
eléctricas puede dar lugar a lesiones
personales graves.
• Utilice equipo de seguridad. Use siempre
protección ocular. La utilización del equipo
de seguridad como mascara antipolvo,
zapatos de seguridad antideslizantaes,
casco o protección auditiva para
condiciones adecuadas reducirá el riego
de lesiones personales.
• Evite el arranque accidental. Asegúrese
de que el interruptor esté en la posición
de trabado o de apagado antes
de instalar el paquete de baterías.
Transportar herramientas con el dedo en el
interruptor o instalar el paquete de batería
cuando el interruptor está encendido invitan
a los accidentes.
• Retire las llaves o claves de ajuste antes de
encender la herramienta. Una llave o clave
GHDMXVWHGHMDGDHQXQDSDUWHJLUDWRULDGH
la herramienta puede causar una lesión
personal.

16
• No intente alcanzar demasiado lejos.
Mantenga un apoyo de los pies y un
equilibrio adecuados en todo momento.
El apoyo de los pies y el equilibrio
DGHFXDGRVSHUPLWHQXQPHMRUFRQWUROGHOD
herramienta en situaciones inesperadas.
• Vístase apropiadamente. No se ponga ropa
holgada ni joyas. Mantenga su cabello,
ropa y guantes alejados de las piezas
móviles./DURSDKROJDGDODVMR\DVRHO
pelo largo pueden quedar atrapados en las
piezas móviles.
• Si se proporcionan dispositivos para
la extracción y recolección de polvo,
asegúrese que estos estén conectados
y utilizados correctamente. El uso de
estos dispositivos puede reducir peligros
relacionados con el polvo.
Uso y cuidado de la herramienta
• No fuerce la herramienta. Emplee la
herramienta correcta para la aplicación
que desea. La herramienta correcta hará
HOWUDEDMRPHMRU\FRQPiVVHJXULGDGD
la capacidad nominal para la que está
diseñada.
• No utilice la herramienta si el interruptor no
la enciende o apaga. Toda herramienta que
no se pueda controlar con el interruptor es
peligrosa y debe ser reparada.
• Desconecte la batería de la herramienta
o ponga el interruptor en la posición de
trabado o de apagado antes de hacer
cualquier ajuste, cambio de accesorios o
guardar la herramienta. Estas medidas de
seguridad preventivas reducen el riesgo de
encender la herramienta accidentalmente.
• Guarde las herramientas que no esté
usando fuera del alcance de los niños
y otras personas no capacitadas. Las
herramientas son peligrosas en las manos
de los usuarios no capacitados.
• Mantenga las herramientas con cuidado.
Compruebe la desalineación o el atasco de
las piezas móviles, la ruptura de piezas y
cualquier otra situación que pueda afectar
el funcionamiento de las herramientas.
Si la herramienta está dañada, hágala
arreglar antes de usarla. Muchos
accidentes son causados por herramientas
PDQWHQLGDVGH¿FLHQWHPHQWH
• Conserve las herramientas de corte
D¿ODGDV\OLPSLDV Las herramientas
mantenidas adecuadamente, con
ERUGHVGHFRUWHD¿ODGRVWLHQHQPHQRV
probabilidades de atascarse y son más
fáciles de controlar.
• Utilice la herramienta eléctrica, accesorios,
brocas de la herramienta, etc. de acuerdo
con estas instrucciones y de la manera
adecuada para el tipo de herramienta
eléctrica, teniendo en cuenta las
condiciones de trabajo y el trabajo que se
realizará. La utilización de la herramienta
eléctrica para operaciones diferentes
de aquellas para las que se encuentra
diseñada podría dar lugar a una situación
peligrosa.
Reparación
• La herramienta debe ser reparada por
XQDSHUVRQDFDOL¿FDGDGHVHUYLFLR
técnico y se deben utilizar partes de
reemplazo idénticas. Esto asegurará
el mantenimiento de la seguridad de la
herramienta eléctrica.
Advertencias de seguridad comunes para
operaciones de pulido:
• Esta herramienta eléctrica está
diseñada para funcionar como lijadora/
pulidora. Lea todas las advertencias de
seguridad, instrucciones, ilustraciones
\HVSHFL¿FDFLRQHVSURYLVWDVFRQHVWD
herramienta eléctrica. La falla en seguir
todas las instrucciones indicadas a
continuación puede resultar en choque
eléctrico, incendio y/o lesiones serias.
• No use accesorios que no estén diseñados
\UHFRPHQGDGRVHVSHFt¿FDPHQWHSRU
el fabricante de la herramienta. El hecho
que un elemento de accesorio pueda
adaptarse a la herramienta eléctrica no es
una garantía de operación segura.
• La velocidad nominal del accesorio debe
ser por lo menos igual a la velocidad
máxima marcada en la herramienta
eléctrica. Los accesorios que operen más
rápido que u velocidad nominal se pueden
romper y salir expulsados.
Instrucciones de
seguridad para
Todas las operaciones

17
• El diámetro exterior y el espesor de
su accesorio debe estar dentro de
ODFODVL¿FDFLyQGHFDSDFLGDGGHVX
herramienta eléctrica. Los accesorios
dimensionados incorrectamente
no se pueden proteger o controlar
adecuadamente.
• El montaje roscado de accesorios debe
igualar la rosca del husillo de la lijadora/
pulidora. Para accesorios montados por
%5,'$6HORUL¿FLRGHOHMHGHODFFHVRULR
debe adaptarse al diámetro de ubicación
de la BRIDA. Los accesorios que no
LJXDOHQHOKDUGZDUHGHPRQWDMHGHOD
herramienta eléctrica se saldrán de
balance, vibrarán excesivamente y pueden
causar pérdida de control.
• No use un accesorio dañado. Antes de
cada uso, revise el accesorio tal como
ruedas abrasivas respecto a astillas
o grietas, la almohadilla de respaldo
respecto a griegas, desgarre o desgaste
excesivo, el cepillo de alambre respecto
a alambres sueltos o agrietados. Si la
herramienta eléctrica o accesorio cae
al suelo, revise que no haya daños o
instale un accesorio que no esté dañado.
Después de revisar e instalar el accesorio,
colóquese usted y a los demás alejados
del plano del accesorio giratorio y opere
la herramienta eléctrica a velocidad
máxima sin carga durante un minuto.
Los accesorios dañados generalmente
se despedazan durante este periodo de
prueba.
• Utilice equipo de protección personal.
Dependiendo de la aplicación, use
un protector facial, gafas o lentes de
seguridad. Conforme sea apropiado,
utilice una máscara de polvo, protectores
de audición, guantes y delantal de taller
capaces de detener pequeños fragmentos
abrasivos o de la pieza de trabajo. La
protección para ojos debe ser capaz de
detener desechos que sea expulsados
generados por varias operaciones. La
máscara para polvo o respirador debe ser
FDSD]GH¿OWUDUSDUWtFXODVJHQHUDGDVSRU
su operación. La exposición prolongada
a ruido de alta intensidad puede causar
pérdida de audición.
• Mantenga a las demás personas a una
distancia segura del área de trabajo.
Cualquier persona que entre al área de
trabajo debe usar equipo de protección
personal. Los fragmentos de la pieza de
WUDEDMRRGHXQDFFHVRULRURWRSXHGHQVHU
expulsados más allá del área inmediata de
operación.
• Coloque el cable lejos del accesorio de
giro. Si pierde el control, el cable se puede
cortar o enredar y su mano o brazo puede
VHUMDODGRKDFLDHODFFHVRULRJLUDWRULR
• Nunca suelte la herramienta eléctrica
hasta que el accesorios se haya detenido
completamente. El accesorio giratorio
SXHGHDGKHULUVHDODVXSHU¿FLH\MDODUOD
herramienta eléctrica fuera de su control.
• No opere la herramienta eléctrica mientras
la lleva a su lado. El contacto accidental
con el accesorio giratorio podría atrapar su
URSDMDODQGRHODFFHVRULRKDFLDVXFXHUSR
• Limpie regularmente las ventilas de aire
de la herramienta eléctrica. El ventilador
del motor succionará el polvo dentro del
DORMDPLHQWR\ODDFXPXODFLyQH[FHVLYD
de metal en polvo puede causar riesgos
eléctricos.
• No opere la herramienta eléctrica cerca
GHPDWHULDOHVLQÀDPDEOHVLas chispas
podrían encender estos materiales.
• No use accesorios que requieran
refrigerantes líquidos. Usar agua u otros
refrigerantes líquidos podría resultar en
electrocución o choque eléctrico.
Contragolpe y advertencias relacionadas:
El contragolpe es una reacción repentina a
un disco giratorio, almohadilla de respaldo,
cepillo o cualquier otro accesorio apretados
o atorados. El apriete o atoramiento ocasiona
una rápida pérdida de estabilidad del
accesorio giratorio que a su vez ocasiona que
la herramienta eléctrica descontrolada sea
HPSXMDGDHQODGLUHFFLyQRSXHVWDDODURWDFLyQ
del accesorio en el punto de atoramiento.
3RUHMHPSORVLXQDUXHGDDEUDVLYDVHDWRUD
RDSULHWDSRUODSLH]DGHWUDEDMRHOERUGH
de la rueda que está entrando al punto de
Instrucciones de
seguridad adicionales
para todas las
operaciones

18
DSULHWHSXHGHSHUIRUDUODVXSHU¿FLHGHO
material causando que la rueda suba o dé
un contragolpe repentinamente. La rueda
puede saltar hacia o o en dirección opuesta
del operador, dependiendo de la dirección
del movimiento de la rueda en el punto de
apriete. Las ruedas abrasivas también pueden
URPSHUVHEDMRHVWDVFRQGLFLRQHV
El contragolpe es resultado de un mal uso o
procedimientos o condiciones de operación
incorrectas de la herramienta eléctrica que
se pueden evitar tomando precauciones
apropiadas como se indica a continuación.
0DQWHQJDXQDJDUUH¿UPHVREUHOD
herramienta eléctrica y coloque su cuerpo
y brazo para permitir resistir las fuerzas
de contragolpe. Siempre use la manija
auxiliar, si está provista, para un control
máximo contra el contragolpe o reacción
de torsión durante el arranque. El operador
puede controlar las reacciones de torsión
o fuerzas de contragolpe, si se toman las
precauciones adecuadas.
• Nunca coloque su mano cerca del
accesorio giratorio. El accesorio puede
causar un contragolpe sobre su mano.
• No coloque su cuerpo en el área donde se
moverá la herramienta eléctrica si ocurre
el contragolpe. El contragolpe puede
impulsar la herramienta en la dirección
opuesta al movimiento de la rueda en el
punto de atrapamiento.
• Tenga especial cuidado cuando trabaje en
HVTXLQDVERUGHV¿ORVRVHWF(YLWHUHERWDU
o dejar que el accesorio quede atrapado.
/DVHVTXLQDVERUGHV¿ORVRV\HOUHERWH
tienen la tendencia de atrapar el accesorio
giratorio y causar la pérdida de control o
contragolpe.
• No sujete una cadena de sierra, aspa
para talado de madera o aspa de cierra
dentada. Tales aspas crean un contragolpe
frecuente y causan la pérdida de control.
$GYHUWHQFLDVGHVHJXULGDGHVSHFt¿FDVSDUD
operaciones de pulido:
• No permita que ninguna porción suelta
del bonete de pulido o sus cadenas de
conexión gire libremente. Inserte o recorte
cualquier cadena de conexión suelta. Las
cadenas de conexión sueltas o giratorias
se pueden enredar con sus dedos o
TXHGDUDWUDSDGDVHQODSLH]DGHWUDEDMR
Instrucciones de
seguridad adicionales
para operaciones de
pulido
19
Para reducir el riesgo de lesiones, el usuario deberá leer el manual de instrucciones
Doble aislamiento
Advertencia
Use protección auditiva
Use lentes de seguridad
Use máscara contra el polvo
No lo use en la lluvia
9ROWDMH 9a+]
Amps: 10A
Velocidad sin carga: 1000–3000/min
7DPDxRGHDOPRKDGLOOD ÝPP
7LSRGHDOPRKDGLOOD 6LVWHPDGHVXMHFLyQHQYROYHQWH
5RVFDGHKXVLOOR Ý
Clase de protección:
/ II
Peso: 7 lb 3 oz (3.2 kg)
Símbolos
Especificaciones técnicas

20
NOTA: Antes de usar la herramienta, lea
atentamente el manual de instrucciones.
COLOQUE EL BONETE (Fig. A)
&RORTXHHOERQHWHUHTXHULGR¿UPHPHQWHVREUH
la almohadilla envolvente y asegúrese que esté
simétrica al centro, de otra manera la pulidora
vibra demasiado.
EXTIENDA EL PULIDOR (Fig. B)
Extienda aproximadamente una cucharada
GHSXOLGRUXQLIRUPHPHQWHVREUHODVXSHU¿FLH
completa de la cubierta de la almohadilla. No
aplique pulidor directamente al automóvil. Esta
SULPHUDDSOLFDFLyQGHEHVHUVX¿FLHQWHSDUD
aproximadamente 1/3 de un automóvil tamaño
promedio. Para la segunda y tercera aplicación
de pulidor, repita lo anterior. La cubierta de a
almohadilla no absorberá tanto cuando vuelva
a cargar.
COLOCACIÓN DE LIJA (Fig. C)
/DOLMDVHSXHGHVXMHWDUIiFLOPHQWHVREUHOD
DOPRKDGLOODGHVXSXOLGRUD$MXVWHODOLMDVREUH
la placa de forma que cubra el área completa,
HPSXMH\JLUHOLJHUDPHQWHSDUDDVHJXUDUVH
TXHODOLMDUHFXELHUWDHVWHXQLIRUPHVREUHOD
SODFD$VHJ~UHVHTXHODOLMDHVWpXQLIRUPHFRQ
los bordes y que esté simétrica al centro, de
otra manera la pulidora vibrará demasiado.
5HWLUHHOSDSHODEUDVLYRVXMHWDQGRXQERUGH\
desprendiéndolo.
INTERRUPTOR DE BLOQUEO (Fig. D)
Presione el interruptor de encendido/apagado
(5) y después el botón de bloqueo (6). Su
interruptor ahora está bloqueado para uso
continuo. Para apagar su herramienta sólo
libere el interruptor de encendido/apagado.
CONTROL DE VELOCIDAD VARIABLE
(Fig.E)
La velocidad se incrementa conforme gire el
interruptor a un número mayor y disminuye en
un número menor.
Instrucciones de uso
A
B
C
D
21
ÁREAS DE SUJECIÓN MANUAL (Fig. F)
Siempre sostenga su pulidora de automóvil
¿UPHPHQWHFRQDPEDVPDQRVFXDQGRODRSHUH
INSTALACIÓN DE MANIJA FRONTAL (Fig. G1, G2)
Por su seguridad personal, use la manija
frontal en todo momento. Apriete el tornillo
con la llave hexagonal en sentido de las
manecillas del reloj.
¡ADVERTENCIA!
• Asegúrese que la protuberancia (b)
VREUHODPDQLMDHVWpDVHJXUDGDHQODUDQXUDD
GHODPiTXLQDSDUDDVHJXUDUODPDQLMD
BOTÓN DE BLOQUEO DE HUSILLO (Fig. H)
Presione el botón de bloqueo del husillo y gire
la almohadilla envolvente a mano hasta que
esté bloqueado.
ATENCIÓN: El botón de boqueo del husillo sólo
se debe usar cuando cambie la almohadilla.
Nunca lo presione cuando la almohadilla esté
girando. Retire el enchufe del receptáculo antes
GHUHDOL]DUHODMXVWH
E
F
G1
a
b
G2
1
H
22
PARA REEMPLAZAR LOS CEPILLOS (Fig. I)
Retire el soporte del cepillo por medio de un
destornillador. Revise la longitud del cepillo
y reemplace si es menor a 7mm. Cuando los
cepillos necesiten reemplazo, siempre renueve
ambos cepillos, incluso si uno tiene más de 7
mm de largo. Coloque el soporte del cepillo en
el cuerpo. Apriete el soporte del cepillo. Revise
que la herramienta esté funcionando antes
de usarla y permita que opere durante unos
cuantos minutos para permitir que los cepillos
se estabilicen.
PARA USAR LA PULIDORA DE AUTOMÓVIL
(Fig. J)
Sostenga el cable de extensión sobre el
KRPEUR\WUDEDMHODVVXSHU¿FLHVSODQDV
SULPHURHVGHFLUHOFRIUHODWDSDGHODFDMXHOD
y el techo. Cubra las áreas rápidamente con
amplias pasadas de barrido en un patrón de
]LJ]DJ1RSUHVLRQHKDFLDDEDMRODSXOLGRUD/D
PiTXLQDVLQQLQJXQDSUHVLyQUHDOL]DUiHOPHMRU
WUDEDMR
TRABAJO FINAL (Fig. K)
Use pasadas de barrido largas en un patrón
de zig-zag para sacar el brillo. No presione en
exceso la pulidora.
Extraiga el enchufe de la toma eléctrica antes
de llevar a cabo cualquier reparación o ajuste.
Nunca emplee agua o productos químicos para
limpiar su herramienta. Use simplemente un
paño seco. Guarde siempre su herramienta en
un lugar seco. Mantenga limpias las ranuras
de ventilación del motor. La observación de
FKLVSDVTXHGHVWHOODQEDMRODVUDQXUDVGH
ventilación, indica operación normal que no
dañará su herramienta.
Si el cable de alimentación se encuentra dañado
deberá ser reemplazado por el fabricante, su
agente de servicio o algún otro profesional
LJXDOPHQWHFXDOL¿FDGRSDUDOOHYDUDFDERGLFKDV
RSHUDFLRQHVFRQHO¿QGHHYLWDUULHVJRV
• Si su herramienta eléctrica no arranca,
revise el enchufe en el suministro de
energía primero.
6LODSXOLGRUDQRSXOHODVXSHU¿FLHUHYLVH
el bonete. Si el bonete se desgastó,
reemplácelo con un nuevo bonete e intente
de nuevo.
6LQRVHSXHGHUHFWL¿FDUODIDOODUHJUHVHOD
herramienta a un concesionario autorizado
para la reparación.
Solución de problemas
Mantenga las herra-
mientas con cuidado
I
J
K

23
Declaración de garantía
Printed in China
GARANTÍA DE PERFORMAX
®
7’’ LIJADORA / PULIDORA
GARANTÍA DE DEVOLUCIÓN DE DINERO DE 30 DÍAS:
Esta herramienta eléctrica de la marca PERFORMAX
®
tiene nuestra Garantía de devolución de dinero
de 30 DÍAS. Si no está completamente satisfecho con su herramienta eléctrica marca PERFORMAX
®
por cualquier razón dentro de treinta (30) días desde la fecha de compra, regrese la herramienta con su
recibo original a cualquier tienda al menudeo MENARDS
®
, y le proporcionaremos un reembolso – sin
hacer ninguna pregunta.
GARANTÍA LIMITADA DE 2 AÑOS:
Esta herramienta eléctrica marca PERFORMAX
®
tiene nuestra Garantía Limitada de 2 Años para
el comprador original. Si, durante el uso normal, esta herramienta eléctrica PERFORMAX
®
se
descompone o falla debido a un defecto en material o mano de obra dentro de dos (2) años desde
la fecha de la compra original, simplemente lleve esta herramienta con el recibo de ventas original
de regreso a su tienda al menudeo MENARDS
®
más cercana. A su criterio, PERFORMAX
®
acuerda
que la herramienta o cualquier parte defectuosa se repare o reemplace con el mismo producto o
parte PERFORMAX
®
o similar libre de cargo, dentro del periodo de garantía mencionado, cuando
sea devuelta por el comprador original con el recibo de ventas original. Sin importar lo presente,
esta garantía limitada no cubre ningún daño que haya resultado a partir de abuso o mal uso de
la Mercancía. Esta garantía: (1) excluye partes desechables que incluyen, sin limitarse a aspas,
cepillos, bandas brocas, focos, y/o baterías; (2) se anulará si esta herramienta se usa para propósitos
comerciales y/o de renta; y (3) no cubre ninguna pérdida, lesiones a personas/daño a la propiedad o
FRVWRV(VWDJDUDQWtDOHRWRUJDGHUHFKRVOHJDOHVHVSHFt¿FRV\SXHGHWHQHURWURVGHUHFKRVTXHYDUtDQ
de un estado a otro. Tenga cuidado, las herramientas son peligrosas si se usan incorrectamente o se
OHVGDPDQWHQLPLHQWRLQDGHFXDGR/RVHPSOHDGRVGHOYHQGHGRUQRHVWiQFDOL¿FDGRVSDUDDFRQVHMDUOR
sobre el uso de esta Mercancía. Cualquier representación verbal realizada no será vinculante para el
YHQGHGRURVXVHPSOHDGRV/RVGHUHFKRVEDMRHVWDJDUDQWtDOLPLWDGDVRQSDUDHOFRPSUDGRURULJLQDOGH
la Mercancía y no se pueden transferir a ningún propietario subsecuente. Esta garantía limitada está en
lugar de todas las garantías, expresas o implícitas incluyendo garantías o comerciabilidad o adecuación
para un propósito particular. El vendedor no será responsable por cualquier daño especial, incidental o
en consecuencia. El único remedio exclusivo contra el vendedor será el reemplazo de cualquier defecto
como se indica en el presente, siempre y cuando el vendedor desee o pueda reemplazar este producto
o desee reembolsar el precio de compra como se indica anteriormente. Para propósitos de seguro, no
se permite que el vendedor demuestre ninguna de estas herramientas eléctricas para usted.
Para preguntas / comentarios, asistencia técnica o partes de reparación -
Por favor llame al número telefónico gratuito al: 1-888-686-1484 ( (Lunes-Viernes 8am–6pm)
CONSERVE SUS RECIBOS. ESTA GARANTÍA ES NULA SIN ELLOS.
