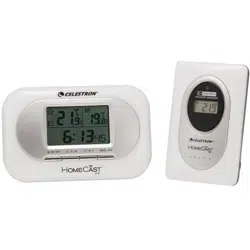

Personal Weather Station
with Wireless Sensors for
Temperature &
Humidity/Wind
Speed/Rain
Model # 47009
Thank you for purchasing this Celestron personal weather station. Please read the instructions prior
to using it and we hope you will have many years of pleasure with it.
Insert the base to the bottom of the Receiver by pushing it in until it clicks. The correct position is
shown in the images below. If you are going to mount the Receiver on a wall (or other level surface),
remove the base after set up and see the “Placement” on the last page.
You will need the following tools and supplies to mount the Anemometer and Rain Gauges --- small
Phillips screwdriver, hex key – 5mm (3/16”), drill, level, pencil and mast.
Set Up Power for the Receiver
Open the battery compartment door on the rear of the Receiver
(located in top center of image on the left). Then insert six AA
batteries (user supplied) with polarity as indicated in the battery
compartment (see image on the right). After installation, put the battery
compartment door back on.
For optimum performance, please place the Receiver away from
metal and other sources of interference such as mobile phones, TVs,
computers, appliances, etc. If the Receiver stops showing the display
or dims, replace the batteries.
ENGLISH

2
Set Up the Power, Installation & Make Settings for the Anemometer (Wind Gauge) and
Wireless Remote Sensor
Installation/Mounting-- the first step is to select the location for the Anemometer that is outdoor and
not blocked on the top or sides so wind can freely reach it. The distance can be from 328ft (100m) to
the Receiver or closer in an open area (the closer the better for transmission reception). The best
location is usually on a mast on a roof or other high open position. The Wireless Sensor is built into
the Anemometer.
Before mounting the Anemometer it is best to perform a transmission test where you install the
batteries (new ones) in the Anemometer (see section below) to make sure all is ok and save a lot of
time if you have to relocate the Anemometer.
Place the Anemometer horizontally in your selected outdoor location and install the batteries. Press
and hold the “CHANNEL/SEARCH” button for a few seconds and you will see wind direction,
temperature, and humidity icons flash on the display as the Receiver is now searching for remote
sensors. If the readings for the outdoor information are shown within ten minutes, the transmission is
successful and you can go ahead with the mounting. If the readings are not shown after ten minutes,
then relocate the place you want to mount the Anemometer closer to the Receiver and remove the
batteries and try the procedure again. Remove the batteries from the Anemometer prior to mounting
and calibration.
Remove the four small screws (shown in above image) from the door of the Anemometer with a small
screwdriver. Insert two AA batteries (user supplied) as indicated in the sensor (see right image
above). Replace the door of the Anemometer by installing the four small screws to hold it in place.
To mount the Anemometer, you need a mast (user supplied) about 1 to 1.25” (2.54 to 3.1cm) in
diameter and hardware to mount permanently in the location where you want to mount the
Anemometer – see drawing below. Note that if you have an existing mast for mounting an antenna or
similar device, you can mount the Anemometer on it. You should mount and ground a mast as
directed in the instructions provided with the mast. If you do not have a mast, you can purchase them
at aerial or antenna suppliers.
Place the U-shaped metal plates around the mast. Insert the four hex screws through the holes of the
U-shaped plates and the holes on the Anemometer mounting bracket. The wind vane is to be above
the metal bar of the Anemometer when it is in the horizontal position per the diagram below. Tighten
the hex nut onto the hex screws.
MAST
NORTH
MAST

3
Calibrating & Installing the Batteries of the Anemometer
After mounting the Anemometer, you need to calibrate the wind direction so that the Anemometer
properly measures the wind direction and transmits this information to the Receiver. Be sure the
batteries have been removed from the Anemometer before the calibration. You will have to
recalibrate the Anemometer whenever you replace the batteries.
Use the compass on the Anemometer and turn the wind vane so it is pointing due north (see drawing).
Hold the wind vane pointing due north and install the batteries. The red LED above the battery door
will flash a few times right after battery installation. Be sure the vane is pointing due north at the
moment when the red LED flashes and then the calibration is completed. Replace the battery door.
Press and hold the “CHANNEL/SEARCH” button a few seconds and the Channel 1 readings will
appear within 10 minutes if the wireless sensor transmission is successful.
Set Up the Power and Installation of the Rain Gauge
Choose a mounting location for the Rain Gauge that is a flat and level surface 164ft (50m) or closer in
an open area from the Receiver where data can be transmitted easily. The Rain Gauge should not be
blocked on the top or sides so that rain can freely reach the gauge (do not put under an overhang or
too close to a building or fence). Also, do not mount too close to the ground or to trees or plants.
To install the batteries in the Rain Gauge, turn it upside down (image below). Then, at the same time
push the two clips (inside of the two large holes at the ends) inward and lift off the cover and battery
compartment. Now turn the removed part upside down (image to the right) and pull out on the two
clips of the battery cover. Insert two AA batteries (user supplied) per the polarity markings on the
battery compartment. Then, replace the battery cover. Finally, replace the battery compartment and
cover into the outer housing by aligning with the clips and then pushing down on the cover over the
clips until they are secure.
Push and hold the “CHANNEL/SEARCH” button for a few seconds and the total rainfall will flash.
The total rainfall reading should appear within two minutes. If no display for total rainfall after two
minutes, then move the Rain Gauge closer and remove the batteries and repeat the above steps again.
Once the transmission to the Receiver is ok, then you are ready to
mount the Rain Gauge. Hold the base of the Rain Gauge flat
against the mounting surface and then use a level to make sure the
Rain Gauge is horizontally level. Use a pencil to trace the inside
of the mounting holes on the base of the Rain Gauge to mark the
screw locations. Drill a hole in the center of each marked screw
location and insert the supplied plastic screw plugs. Hold the Rain
Gauge against the mounting surface so the holes on the base are aligned with the plastic screw plugs
and then thread the supplied screws into each hole and use a screwdriver to tighten them.

4
Settings and Operation of the Receiver
•
Indoor & Outdoor Temperature & Humidity – the indoor temperature and humidity is shown
on the top right of the LCD display. Press the “CHANNEL/SEARCH” button to switch from
indoor data to outdoor data (Channel 1). You can also have the indoor and outdoor information
automatically switch about every five seconds when you push the “CHANNEL/SEARCH”
button where you see an icon “CH ” that means in “switch” mode. When switching channels
you may see Channel 2 with meaningless data and just ignore it.
• Data displayed in “C” or “F” – push the “C/F” button (rear of Receiver) to change from “C”
(Centigrade) or “F” (Fahrenheit) for the display you desire.
• Clock & Calendar – Press the “CLOCK” button and toggle between time, calendar
(day/month), and day of week. Press the CLOCK” button and hold down for a couple of seconds
to enter the setup mode. Use the “UP” or “DOWN” buttons to make changes. Press the
“CLOCK” after each setting is correct. The settings in sequence will be → 12-24hr
format/hour/minute/year/day-month sequence/month/day/exit. To check the time in another
geographic zone, you first set the time differential in hours by pressing & holding the “ZONE”
button on the rear of the Receiver to enter the set up. Then push the “UP” or “DOWN” buttons
to change the hour differential and then push “ZONE” to accept. To check the alternate time
zone just press the “ZONE” button.
• Max/Min Memory – press the button “MEMORY” to see the maximum temperature, humidity,
heat index, dew point, wind speed, and wind chill readings. Press the button again to see the
minimum readings and press the button again to return to the normal mode. The memory will
clear if you push and hold the “MEMORY” button for a few seconds when in the maximum or
minimum readings.
• Barometer & Weather Forecast – the weather station has a built-in barometer to measure
atmospheric pressure and forecasts the weather with icons for Sunny/Partly
Cloudy/Cloudy/Rainy/Stormy. The unit predicts the weather conditions for the next 12 to 24
hours based on the atmospheric pressure change and is about 70% correct. The company
accepts no liability for any incorrect forecast.
If you do not live near sea level, the altitude must be set so that the air pressure will be accurate.
Press the “PRESSURE” button to change the barometric pressure from hPa to inHg or mb/Hg.
You can obtain your location air pressure from many internet weather stations (or local sources),
to input the information, press and hold the “PRESSURE” button for a few seconds and then
enter the correct data by using the up and down buttons.
The pressure history bar displays the moving atmospheric pressure history of the past 12 hours
which allows reasonable tendencies.

5
• Heat Index – combines the effects of temperature and humidity and is the apparent temperature
of how hot the heat/humidity combination makes it feel. Push the button “Heat Index/Dew
Point” to display either the heat index or the dew point.
• Dew Point – is the saturation point of the air, or the temperature to which the air has to be
cooled in order to get condensation. Push the “Heat Index/Dew Point” button to obtain the
information the same way as noted above under “Heat Index”.
• Ice Alert – an ice alert icon (*) appears on the display next to the wind chill reading when the
outdoor temperature falls to or below 4° C (39.2° F).
• Wind Speed & Direction – the Anemometer allows you to sample the wind speed and
direction. Set the display to read the wind speed type by pushing the button on the rear of the
Receiver called “WIND UNIT” to the choice you desire – kmp (kilometers per hour), mph
(miles per hour), m/s (meters per second), knots, or Beaufort. The display shows 16 wind
directions as “N” for north, “SW” for southwest, etc. and displays the average wind direction
over a two minute period. Press the “WIND” button to select gust wind speed and it will show
the maximum wind speed over a ten minute period and press the button again to show the
average wind speed over a two minute period.
• Wind Chill – is the apparent temperature felt on exposed skin due to the combination of air
temperature and wind speed. The wind chill reading on the display is calculated based on the
temperature measured by the Anemometer and the average wind speed.
• Wind Gust & Wind Chill Alarm – you can set the Receiver to sound an alarm for about one
minute when wind gust reaches or exceeds a set limit. Press the “WIND ALARM” button to
silence the alarm sound but the related high alarm icons will continue to flash until the alarm
condition is no longer met.
Press the “WIND ALARM” to show high wind gust alarm display and alarm icons appear in the
wind gust area. Press and hold the “WIND ALARM” button to enter the setting mode and
wind gust digits will flash. Use the up and down buttons to set the values you want and then
press “WIND ALARM” to exit.
You can set the Receiver to sound an alarm for about one minute when the wind chill reaches or
falls below the set limit. Press the “WIND ALARM” to silence the alarm sound. The related
low alarm icon will continue to flash until the alarm condition is no longer met.
Press the “WIND ALARM” repeatedly until the alarm icon appears in the wind chill display
area. Press and hold the “WIND ALARM” button to enter its setting mode and the wind chill
digits will flash. Press the up and down buttons to set the values you want to use and press
“WIND ALARM” to confirm the setting and exit.
Press the “WIND ALARM” button on the rear of the Receiver repeatedly to enable or disable
the wind gust alarm or the wind chill alarm. When enabled, the Receiver will have icons of
“Hi” and/or “Lo” for the functions.
• Rainfall Measurement – The wireless Rain Gauge provides daily, weekly, monthly and
accumulated rainfall measurements. Press the “RAIN/CLEAR” button repeatedly to switch
between the different modes and the corresponding daily, weekly, monthly, or total icon will
appear indicating your current display mode. In each mode, press and hold the “RAIN/CLEAR”
button for a few seconds to clear the readings. Press the “RAIN UNIT”
button on the rear of the
Receiver to change the rain measurement unit between mm and inch to your choice.
• Rainfall History – the Receiver has a large capacity memory that can store and display – daily
rainfall (up to the last six days as well as the current day), weekly rainfall (up to the last six weeks
as well as the current week), and monthly rainfall (up to the last six months as well as the current
month).

Press “RAIN HISTORY” repeatedly to scroll through the history data corresponding to your
selection. On the bar shown in the rainfall display area, the “0” represents the current period
and the “-1”, “-2”, etc. indicate the prior periods. As an example, during the month of April,
press the “RAIN HISTORY” button repeatedly in the monthly mode until “-3” bar chart is
shown. The bar chart and reading indicate the monthly rainfall record for the month of January
(1
st
through 31
st
).
• Alarm Setting – press the “ALARM” button to show the alarm time and the “ALARM” icon
will appear. Press again to enable or disable the alarm – when enabled a bell icon will appear”.
Press and hold the “ALARM” button to
enter the setting mode. Enter the desired
hour and minute values by pressing the
“UP” and “DOWN” button and then
pressing “ALARM” to set each.
• Snooze – when the alarm goes off, press
“SNOOZE/LIGHT” button (rear of
Receiver) to go into snooze mode and the
alarm will go off again in 10 minutes and
continue over and over as long as you hit
the “SNOOZE”. To stop the snooze or
alarm, press the “ALARM” button.
• Channel – if your Sensor is set correctly to Channel 1, then a small icon to the left of wind chill
display will show “ch1”. If you do not have an outdoor temperature and humidity display, make
sure that the “1” is displayed and if not (shows a 2 or 3), then push the “CH” button until is
shows the “1”.
• Low Battery Indication – the Receiver and remote sensors will be display an icon and you
should change batteries as soon as possible.
• Placement – the Receiver can be put on a table, desk, or other flat surface or it can (by using a
hanger cut out (in two places) on the rear of the Receiver) be hung on a wall or other location.
Specifications:
• Indoor Temperature Range = 0º to +50º C (+ 32º to + 122º F)
• Remote Sensor Temperature Range = -20º to + 60º C ( -4º to + 140º F)
• Indoor/Outdoor Humidity Range = 20% to 99% Relative Humidity
• Resolution = ± .5º C (± 1.5º F) for temperature & ± 1.5% humidity
• Wind Speed Range = 0 to 108 km/h, 0 to 67 mph, 0 to 30 m/s, 0 to 58 knots, 0 to 11 Beaufort
• Rain Gauge Reading = 0 to 9999mm, 0 to 394 in
• Clock = digital quartz
• Transmission = RF433 MHz
• Dimensions = Receiver – 7.6” x 1.1” x 4.5” (193x28x114mm) Anemometer/Sensor – 8.0” x 7.8” x
14.3” (203x198x363mm) Rain Gauge – 5.8” x 2.3” x 3.3” (147x58x84mm)
• Weight = Receiver - 15oz/425g Sensor - 9oz/255g Rain Gauge - 6oz/170g
2835 Columbia St.
Torrance, California 90503 U.S.A.
www.celestron.com
Printed in China 0110
RoHS

Persönliche Wetterstation
mit drahtlosen Sensoren
für Temperatur und
Luftfeuchtigkeit/Windges
chwindigkeit/Regen
Modell 47009
Vielen Dank für Ihren Kauf dieser persönlichen Wetterstation von Celestron. Bitte lesen Sie vor dem
Gebrauch die Bedienungsanleitung. Wir hoffen, dass Sie viele Jahre damit zufrieden sein werden.
Schieben Sie das Fußteil unten im Empfänger so weit ein, bis Sie ein Klicken hören. Die richtige
Position ist in den Fotos und unten gezeigt. Wenn Sie den Empfänger an einer Wand (oder anderen
flachen Oberfläche) aufhängen wollen, entfernen Sie nach der Einrichtung das Fußteil und lesen Sie
die Informationen unter dem Punkt „Aufstellung“ auf der letzten Seite.
Sie benötigen die folgenden Werkzeuge und Hilfsmittel zur Installation des Anemometers und
der Regenmesser: kleinen Kreuzschlitzschraubendreher, 5 mm (3/16 Zoll) Sechskantschlüssel,
Bohrmaschine, Wasserwaage, Bleistift und Mast.
Stromversorgung des Empfängers
Öffnen Sie die Batteriefachtür auf der Rückseite des Empfängers (oben
in der Mitte des Fotos links) und legen Sie sechs AA-Batterien (nicht
im Lieferumfang enthalten) ein, wie durch die Polaritätssymbole im
Batteriefach angezeigt (siehe Foto rechts). Legen Sie dann die
Batteriefachtür wieder an.
Um seine optimale Leistung sicherzustellen, stellen Sie den
Empfänger nicht in der Nähe von Metall oder anderen
Störungsquellen, z.B. Handys, Fernsehgeräten, Computern,
Haushaltsgeräten, auf. Die Batterien müssen ersetzt werden, wenn
der Empfänger nichts mehr anzeigt oder die Anzeige schwächer
wird.
DEUTSCH

2
Leistungseinstellungen, Installation und Konfiguration der Typeinstellungen des Anemometers
(Windmessers) und des drahtlosen Fernsensors
Installation/Anbringung—Der erste Schritt ist die Auswahl des Standorts für das Anemometer. Er muss
sich draußen befinden und darf nicht oben oder seitlich blockiert sein, damit es der Wind ungehindert
erreichen kann. Die maximale Entfernung vom Empfänger ist 100 m (328 Fuß) in einem offenen Bereich
(je dichter am Empfänger, desto besser der Empfang der übertragenen Daten). Der beste Standort ist in der
Regel ein Mast auf einem Dach oder ein anderer höherer offener Standort. Der drahtlose Sensor ist im
Anemometer integriert.
Vor der Installation des Anemometers empfiehlt es sich, einen Übertragungstest durchzuführen. Legen Sie
dazu die (neuen) Batterien im Anemometer ein (siehe Abschnitt unten), um die ordnungsgemäße Funktion
sicherzustellen. Damit sparen Sie sich viel Zeit, falls Sie das Anemometer verlegen müssen.
Platzieren Sie das Anemometer horizontal an Ihrem ausgewählten Standort im Freien und legen Sie die
Batterien ein. Drücken und halten Sie die Taste „CHANNEL/SEARCH“ (KANAL/SUCHE) für ein paar
Sekunden gedrückt. Daraufhin blinken die Symbole für Windrichtung, Temperatur und Luftfeuchtigkeit auf
dem Display auf, während der Empfänger nun Fernsensoren ortet. Wenn die Messwerte für die Außendaten
innerhalb von zehn Minuten angezeigt werden, ist die Übertragung erfolgreich, und Sie können die
Installation in Angriff nehmen. Wenn nach zehn Minuten keine Messwerte angezeigt werden, wählen Sie
einen anderen Installationsort für das Anemometer in geringerem Abstand vom Empfänger. Nehmen Sie
die Batterien heraus und probieren Sie das Verfahren noch einmal aus. Nehmen Sie vor der Installation und
Kalibrierung die Batterien aus dem Anemometer.
Entfernen Sie die vier kleinen Schrauben (siehe Foto oben) an der Tür des Anemometers mit einem kleinen
Schraubendreher. Legen Sie zwei AA-Batterien (nicht im Lieferumfang enthalten) ein, wie im Sensor
angezeigt (siehe Foto rechts oben). Legen Sie die Tür des Anemometers wieder an, indem Sie die vier
kleinen Schrauben wieder eindrehen.
Zur Installation des Anemometers benötigen Sie einen Mast (vom Benutzer bereitgestellt) mit einem
Durchmesser von ca. 2,5 bis 3,0 cm (1 bis 1,25 Zoll) sowie Befestigungsmittel zur permanenten Installation
des Anemometers an der gewünschten Stelle – siehe Zeichnung unten. Ein bestehender Mast zur
Anbringung einer Antenne oder einer ähnlichen Vorrichtung bietet sich zur Installation des Anemometers
an. Der Mast ist entsprechend seiner Anleitung zu installieren und verankern. Wenn Sie keinen Mast haben,
können Sie einen beim Antennenhändler kaufen.
Legen Sie die U-förmigen Metallplatten um den Mast. Stecken Sie die vier Sechskantschrauben durch die
Löcher in der U-förmigen Platte und die Löcher in der Anbauplatte des Anemometers. Die Windfahne muss
sich über der Metallschiene des Anemometers befinden, wenn sie sich entsprechend dem nachstehenden
Diagramm in horizontaler Position befindet. Ziehen Sie die Sechskantmutter auf den Sechskantschrauben an.
MAST
NORDEN
MAST

3
Kalibrierung und Einlegen der Batterien des Anemometers
Nach der Installation des Anemometers müssen Sie die Windrichtung kalibrieren, so dass das
Instrument die Windrichtung richtig misst und diese Daten korrekt an den Empfänger überträgt.
Achten Sie darauf, dass die Batterien vor der Kalibrierung aus dem Anemometer entfernt wurden.
Das Anemometer muss bei jedem Ersatz der Batterien neu kalibriert werden.
Orientieren Sie sich am Kompass des Anemometers und drehen Sie die Windfahne, so dass sie nach
Norden zeigt (siehe Zeichnung). Belassen Sie die Windfahne in der Nordrichtung und legen Sie die
Batterien ein. Die rote LED über der Batterietür blinkt nach dem Einlegen der Batterien einige Male auf.
Achten Sie darauf, dass die Windfahne in dem Moment des Aufleuchtens der roten LED in Richtung
Norden zeigt. Nun ist die Kalibrierung beendet. Legen Sie die Batteriefachtür wieder an. Drücken und
halten Sie die Taste „CHANNEL/SEARCH“ (KANAL/SUCHE) einige Sekunden lang gedrückt. Innerhalb
von 10 Minuten werden dann bei erfolgreicher Übertragung des drahtlosen Sensors die Messwerte von
Kanal 1 angezeigt.
Leistungseinstellungen und Installation des Regenmessers
Wählen Sie als Installationsort für den Regenmesser eine flache, glatte Oberfläche im Abstand von
max. 50 m (164 Fuß) vom Empfänger in einem offenen Bereich, von dem die Daten leicht übertragen
werden können. Der Regenmesser sollte oben oder seitlich nicht blockiert sein, so dass Regen
ungehindert auf das Gerät treffen kann (nicht unter einem Überhang oder zu dicht an einem Gebäude
oder Zaun installieren). Auch nicht zu dicht am Erdboden oder an Bäumen oder Pflanzen installieren.
Drehen Sie den Regenmesser um (siehe Foto unten), um die Batterien einzulegen. Drücken Sie dann die
beiden Klemmen (im Innern der beiden großen Öffnungen an den Enden) gleichzeitig nach innen und
heben Sie die Abdeckung und das Batteriefach heraus. Drehen Sie jetzt das entfernte Teil um (siehe Foto
rechts) und ziehen Sie die beiden Klemmen der Batteriefachabdeckung nach außen. Legen Sie zwei AA-
Batterien (nicht im Lieferumfang enthalten) entsprechend der auf dem Batteriefach angegebenen Polarität
ein. Legen Sie dann die Batteriefachabdeckung wieder an. Setzen Sie dann das Batteriefach und die
Abdeckung wieder im Außengehäuse ein, indem Sie sie mit den Klemmen ausrichten und dann die
Abdeckung über den Klemmen fest andrücken.
Drücken und halten Sie die Taste „CHANNEL/SEARCH“ (KANAL/SUCHE) einige Sekunden lang
gedrückt. Daraufhin blinkt die Gesamtniederschlagsmenge auf. Die Angabe für die
Gesamtniederschlagsmenge sollte innerhalb von zwei Minuten angezeigt werden. Wenn nach zwei
Minuten keine Gesamtniederschlagsmenge angezeigt wird, verringern Sie den Abstand des
Regenmessers und nehmen Sie die Batterien heraus, um die vorstehenden Schritte noch einmal zu
wiederholen.
Nach erfolgreicher Übertragung an den Empfänger können Sie die Installation des Regenmessers in Angriff
nehmen. Halten Sie das Unterteil des Regenmessers flach an die
Installationsfläche und stellen Sie mit einer Wasserwaage sicher, dass
der Regenmesser horizontal waagerecht ist. Ziehen Sie mit einem
Bleistift die Befestigungslöcher am Unterteil des Regenmessers nach,
um die Schraubenpositionen zu markieren. Bohren Sie in der Mitte
jeder markierten Schraubenposition ein Loch und stecken Sie die im
Lieferumfang enthaltenen Kunststoff-Verschlussschrauben ein. Halten
Sie den Regenmesser so an der Befestigungsoberfläche an, dass die Löcher am Unterteil mit den Kunststoff-
Verschlussschrauben ausgerichtet sind. Schrauben Sie dann die mitgelieferten Schrauben in jedes Loch ein
und ziehen Sie sie mit einem Schraubendreher fest.

4
Einstellungen und Betrieb des Empfängers
• Innen- und Außentemperatur und -luftfeuchtigkeit – Die Innentemperatur und –luftfeuchtigkeit
werden oben rechts auf dem LCD-Display angezeigt. Drücken Sie die Taste „CHANNEL/SEARCH“
(KANAL/SUCHE), um von den Innendaten zu den Außendaten zu wechseln (Kanal 1). Sie können
auch automatisch ca. alle fünf Sekunden von den Innen- zu den Außendaten wechseln, wenn Sie die
Taste „CHANNEL/SEARCH“ (KANAL/SUCHE) drücken, wenn Sie ein Symbol „CH “ sehen, d.h.
wenn Sie im „Wechseln“-Modus sind. Wenn Sie die Kanäle wechseln, sehen Sie möglicherweise
Kanal 2 mit bedeutungslosen Daten. Sie können diese einfach ignorieren.
•
Datenanzeige in „C“ oder „F“ – Drücken Sie den Knopf „C/F“ (auf der Rückseite des
Empfängers), um die Anzeige auf „C“ (Celsius) oder „F“ (Fahrenheit) einzustellen.
•
Uhrzeit und Kalender – Drücken Sie die Taste „CLOCK“ (UHR) und schalten Sie zwischen
Uhrzeit, Kalender (Tag/Monat) und Wochentag hin und her. Drücken Sie die Taste „CLOCK“ (UHR)
und halten Sie sie einige Sekunden gedrückt, um den Konfigurationsmodus aufzurufen. Nehmen Sie
Änderungen mit Hilfe der Tasten „UP“ (AUF) oder „DOWN“ (AB) vor. Drücken Sie, nachdem jede
Einstellung richtig vorgenommen wurde, „CLOCK“ (UHR). Die Einstellungen ihrer Reihenfolge nach
sind: 12-24-Stunden-Format/Stunde/Minute/Jahr/Tag-Monat-Sequenz/Monat/Tag/Beenden. Um die
Uhrzeit in einer anderen Zeitzone prüfen zu können, müssen Sie zuerst den Zeitunterschied in Stunden
einstellen. Drücken und halten Sie dazu die Taste „ZONE“ (ZONE) auf der Rückseite des Empfängers
gedrückt, um die Konfiguration aufzurufen. Drücken Sie dann die Tasten „UP“ (AUF) oder „DOWN“
(AB), um die Stundendifferenz zu ändern, und drücken Sie dann „ZONE“ (ZONE), um die Eingabe zu
akzeptieren. Drücken Sie hinterher einfach die Taste „ZONE“ (ZONE), um die alternative Zeitzone
anzuzeigen.
•
Max/Min-Speicher – Drücken Sie die Taste „MEMORY“ (SPEICHER), um die Höchstmesswerte
für Temperatur, Luftfeuchtigkeit, Hitzeindex, Taupunkt, Windgeschwindigkeit und Windkühle
anzuzeigen. Drücken Sie die Taste erneut, um die Mindestmesswerte zu sehen. Nach nochmaligem
Drücken der Taste kehren Sie wieder in den Normalmodus zurück. Der Speicher wird gelöscht, wenn
Sie die Taste „MEMORY“ (SPEICHER) einige Sekunden drücken und halten, wenn Sie sich im
Anzeigemodus für die Höchst- oder Mindestmesswerte befinden.
•
Barometer und Wettervorhersage – In der Wetterstation ist ein Barometer zur Messung des
Atmosphärendrucks integriert. Es sagt das Wetter mit Symbolen für sonnig/teilweise
bewölkt/bewölkt/regnerisch/stürmisch voraus. Das Gerät sagt die Wetterbedingungen für die nächsten
12 bis 24 Stunden auf der Grundlage von Änderungen des Atmosphärendrucks voraus. Die
Korrektheit der Vorhersage beträgt ca. 70 %. Der Hersteller übernimmt keine Haftung für falsche
Vorhersagen.
Wenn Ihr Standort nicht ungefähr auf Meereshöhe liegt, muss die Höhe über NN eingestellt werden,
so dass die Luftdruckanzeigen korrekt sind. Drücken Sie die Taste „PRESSURE“ (DRUCK), um den
Luftdruck von hPa auf inHg oder mb/Hgl umzustellen. Sie können den Luftdruck für Ihren Standort
aus Wetterstationen im Internet (oder lokalen Stationen) beziehen. Zur Eingabe der Informationen
drücken und halten Sie die Taste „PRESSURE“ (DRUCK) einige Sekunden lang gedrückt und geben
dann die korrekten Daten ein, indem Sie die Tasten „UP“ (AUF) und „DOWN“ (AB) drücken.

5
Der Druckverlaufbalken zeigt den sich ändernden Atmosphärendruckverlauf in den letzten 12 Stunden an, was
eine angemessene Trendvorhersage ermöglicht.
• Hitzeindex – Kombination der Auswirkungen von Temperatur und Luftfeuchtigkeit und die scheinbare
Temperatur, die man bei der Hitze/Luftfeuchtigkeit-Kombination fühlt. Drücken Sie die Taste „Heat Index/Dew
Point“ (Hitzeindex/Taupunkt), um entweder den Hitzeindex oder den Taupunkt anzuzeigen.
• Taupunkt –
Der Luft-Sättigungspunkt oder die Temperatur, auf die die Luft abgekühlt werden muss, um zu
kondensieren. Drücken Sie die Taste „Heat Index/Dew Point“ (Hitzeindex/Taupunkt), um die Informationen auf
die gleiche Weise abzurufen, wie oben unter „Hitzeindex“ beschrieben.
• Eisalarm –
Ein Eisalarmsymbol (*) erscheint auf dem Display neben dem Windkühle-Messwert, wenn die
Außentemperatur auf oder unter 4 °C (39,2 °F) fällt.
• Windgeschwindigkeit und -richtung –
Das Anemometer ermöglicht Ihnen, Stichproben der
Windgeschwindigkeit und -richtung zu nehmen. Stellen Sie die Anzeige auf die gewünschte
Windgeschwindigkeitsmaßeinheit durch Drücken der Taste auf der Rückseite des Empfängers mit der
Bezeichnung „WIND UNIT“ (WINDEINHEIT) ein: kmh (Stundenkilometer), mph (Meilen pro Stunde), m/s
(Meter pro Sekunde), Knots (Knoten) oder Beaufort. Die Anzeige zeigt 16 Windrichtungen, z.B. „N“ für Nord,
„SW“ für Südwest etc., und die durchschnittliche Windgeschwindigkeit in einem Zeitraum von 2 Minuten an.
Drücken Sie die Taste „WIND“ (WIND), um die Windböengeschwindigkeit zu wählen. Dann wird die
Windhöchstgeschwindigkeit über einen Zeitraum von zehn Minuten angezeigt. Wenn Sie die Taste noch einmal
drücken, wird die durchschnittliche Windgeschwindigkeit über einen zweiminütigen Zeitraum angezeigt.
• Windkühle – Scheinbare Temperatur, die aufgrund der Kombination von Lufttemperatur und
Windgeschwindigkeit an der exponierten Haut gefühlt wird. Der Windkühle-Messwert auf dem Display wird
auf der Grundlage der vom Anemometer gemessenen Temperatur und durchschnittlichen Windgeschwindigkeit
berechnet.
• Windböen- und Windkühle-Alarm – Sie können den Empfänger auf Abgabe eines einminütigen Alarms
einstellen, wenn die Windböen einen voreingestellten Grenzwert erreichen oder überschreiten. Sie können den
Alarmton durch Drücken der Taste „WIND ALARM“ (WINDALARM) abstellen, jedoch blinken die damit
verbundenen Höchstgrenzwert-Alarmsymbole weiterhin auf, bis die Alarmbedingung nicht mehr erfüllt ist.
Durch Drücken der Taste „WIND ALARM“ (WINDALARM) wird die Windböen-Alarmanzeige angezeigt
und im Windböenbereich erscheinen Alarmsymbole. Drücken und halten Sie die Taste „WIND ALARM“
(WINDALARM) gedrückt, um den Einstellungsmodus aufzurufen. Die Ziffern für Windböen blinken auf.
Stellen Sie die gewünschten Werte mit den Tasten „UP“ (AUF) und „DOWN“ (AB) ein und drücken Sie zum
Beenden die Taste „WIND ALARM“ (WINDALARM).
Sie können den Empfänger auf Abgabe eines ca. einminütigen Alarmtons einstellen, wenn die Windkühle den
voreingestellten Wert erreicht oder unterschreitet. Drücken Sie die Taste „WIND ALARM“ (WINDALARM),
um den Alarmton abzustellen. Das damit verbundene Mindestgrenzwert-Alarmsymbol blinkt weiterhin auf, bis
die Alarmbedingung nicht mehr erfüllt ist.
Drücken Sie die Taste „WIND ALARM“ (WINDALARM) wiederholt, bis das Alarmsymbol im Windkühle-
Anzeigebereich erscheint. Drücken und halten Sie die Taste „WIND ALARM“ (WINDALARM) gedrückt, um
den Einstellungsmodus aufzurufen. Die Ziffern für Windkühle blinken auf. Stellen Sie die gewünschten Werte
mit den Tasten „UP“ (AUF) und „DOWN“ (AB) ein und drücken Sie zum Bestätigen der Einstellung und
Beenden die Taste „WIND ALARM“ (WINDALARM).
Drücken Sie die Taste „WIND ALARM“ (WINDALARM) auf der Rückseite des Empfängers wiederholt, um
den Windböenalarm oder Windkühlealarm zu aktivieren oder zu deaktivieren. Bei Aktivierung erscheinen am
Empfänger die Symbole „Hi“ (Hoch) und/oder „Lo“ (Niedrig) für die Funktionen.
• Niederschlagsmessung – Der drahtlose Regenmesser liefert tägliche, wöchentliche, monatliche und
akkumulierte Niederschlagsmessungen. Drücken Sie die Taste „RAIN/CLEAR“ (REGEN/LÖSCHEN)
wiederholt, um zwischen den verschiedenen Modi hin und her zu wechseln. Das entsprechende Symbol für
täglich, wöchentlich, monatlich oder insgesamt erscheint, um Ihren aktuellen Anzeigemodus anzuzeigen. In
jedem Modus können Sie die Taste „RAIN/CLEAR“ (REGEN/LÖSCHEN) drücken und einige Sekunden lang
gedrückt halten, um die Messwerte zu löschen. Drücken Sie die Taste „RAIN UNIT“ (REGENEINHEIT) auf
der Rückseite des Empfängers, um die Regenmaßeinheit je nach Wunsch auf mm oder Zoll einzustellen.
• Niederschlag Verlauf – Der Empfänger hat einen Speicher mit hoher Speicherkapazität, der folgende Daten
speichern und anzeigen kann: tägliche Niederschlagsmenge (max. letzte sechs Tage und aktueller Tag),
wöchentliche Niederschlagsmenge (max. letzte sechs Wochen und aktuelle Woche) und monatliche
Niederschlagsmenge (max. letzte sechs Monate und aktueller Monat).

Drücken Sie die Taste „RAIN HISTORY“ (REGEN VERLAUF) wiederholt, um durch die Verlaufsdaten je
nach Ihrer gewählten Option zu scrollen. Auf dem im Anzeigebereich für Niederschlag angezeigten Balken
steht „0“ für den aktuellen Zeitraum und „-1“, „-2“ etc. für die vorherigen Zeiträume. Sie können zum Beispiel
im Monat April wiederholt auf die Taste „RAIN HISTORY“ (REGEN VERLAUF) im monatlichen Modus
drücken, bis das Balkendiagramm „-3“ angezeigt wird. Das Balkendiagramm und der Messwert zeigen in
diesem Fall die aufgezeichnete monatliche Niederschlagsmenge für den Monat Januar (1. bis 31.) an.
• Weckereinstellung – Wenn Sie auf die Taste „ALARM“ (WECKER) drücken, werden die Weckzeit und
das Weckersymbol angezeigt. Wenn Sie diese Taste noch einmal drücken, wird die Weckfunktion aktiviert oder
deaktiviert. Bei Aktivierung erscheint ein
Glockensymbol. Drücken und halten Sie die Taste
„ALARM“ (WECKER) gedrückt, um den
Einstellungsmodus aufzurufen. Geben Sie die
gewünschten Stunden- und Minutenwerte ein, indem
Sie die Tasten „UP“ (AUF) oder „DOWN“ (AB)
drücken und die Taste „ALARM“ (WECKER) zur
Einstellung jedes Wertes drücken.
•
Schlummerfunktion (Snooze) – Wenn der
Wecker klingelt, können Sie auf die Taste
„SNOOZE/LIGHT“ (Schlummern
/Beleuchtung) (hinten am Empfänger) drücken, um den Schlummermodus aufzurufen. Dann ertönt der
Wecker in 10 Minuten noch einmal und nach jeder Betätigung der Schlummertaste erneut. Um die
Schlummerfunktion oder den Wecker zu deaktivieren, drücken Sie die Taste „ALARM“ (WECKER).
•
Kanal – Wenn der Sensor richtig auf Kanal 1 eingestellt ist, zeigt ein kleines Symbol links von der
Windkühleanzeige „ch1“ an. Wenn Sie keine Außentemperatur- und -luftfeuchtigkeitsanzeige haben, stellen Sie
sicher, dass die „1“ angezeigt wird. Ist das nicht der Fall (d.h. wenn eine 2 oder 3 angezeigt wird), drücken Sie
die Taste „CH“ (KANAL) so lange, bis die „1“ angezeigt wird.
•
Anzeige für geringe Batterieladung – Wenn der Empfänger und die Fernsensoren ein entsprechendes
Symbol anzeigen, sollten Sie die Batterien so schnell wie möglich ersetzen.
• Aufstellung – Der Empfänger kann auf einem Tisch, Schreibtisch oder einer sonstigen flachen Oberfläche
aufgestellt werden oder mit dem Aufhänger an zwei Stellen an der Rückseite an einer Wand oder einem anderen
Ort aufgehängt werden.
Technische Daten:
• Innentemperaturbereich = 0 ºC bis +50 ºC (+32 ºF bis +122 ºF)
• Fernsensor-Temperaturbereich = -20 ºC bis +60 ºC (-4 ºF bis +140 ºF)
• Innen-/Außenluftfeuchtigkeitsbereich = 20 % bis 99 % relative Luftfeuchtigkeit
• Auflösung = ±0,5 ºC (±1,5 ºF) für Temperatur und ±1,5 % Luftfeuchtigkeit
• Windgeschwindigkeitsbereich = 0 bis 108 km/h, 0 bis 67 mph, 0 bis 30 m/s, 0 to 58 Knoten, 0 bis 11
Beaufort
• Regenmesser-Anzeige = 0 bis 9999 mm, 0 bis 394 Zoll
• Uhr = Digitalquarzuhr
• Übertragung = HF 433 MHz
• Abmessungen = Empfänger – 193 x 28 x 114 mm (7,6 x 1,1 x 4,5 Zoll) Anemometer/Sensor – 203 x
198 x 363 mm (8,0 x 7,8 x 14,3 Zoll) Regenmesser – 147 x 58 x 84 mm (5,8 x 2,3 x 3,3 Zoll)
• Gewicht = Empfänger – 425 g (15 oz.) Sensor = 255 g (9 oz.) Regenmesser - 170 g (6 oz.)
2835 Columbia St.
Torrrance, California 90503 USA
www.celestron.com
Gedruckt in China 0110 RoHS

Estación meteorológica
personal con sensores
inalámbricos para
temperaturas, humedad,
velocidad del viento y
lluvia;
Modelo Nº 47009
Le agradecemos su compra de esta estación meteorológica personal de Celestron. Lea las
instrucciones antes de utilizarla y esperamos que disfrute de su uso durante muchos años.
Introduzca la base en la parte inferior del receptor empujándola hacia adentro hasta oír un clic.
La posición correcta se muestra en las imágenes a continuación. Si va a colgar el receptor en una
pared (o en otra superficie nivelada), retire la base después de su instalación y consulte la sección
“Colocación” en la última página.
Necesitará las siguientes herramientas y artículos para montar el anemómetro y el pluvímetro:
destornillador pequeño Phillips, llave hexagonal de 5 mm, taladro, nivelador, lápiz y mástil.
Configuración de energía en el receptor
Abra el compartimiento de las pilas en la parte posterior del receptor
(ubicado en el centro superior de la imagen a la derecha). Introduzca
entonces seis pilas AA (proporcionadas por el usuario) con la polaridad
orientada según se indica en el compartimiento de las mismas (vea la
imagen de la derecha). Después de la instalación, coloque la tapa del
compartimiento de las pilas en su lugar.
Para obtener un rendimiento óptimo, coloque el receptor alejado de todo metal y
otras fuentes de interferencias, tales como los teléfonos móviles, televisiones,
ordenadores, electrodomésticos, etc. Si el receptor deja de mostrar la pantalla o ésta
se oscurece, cambie las pilas.
ESPAÑOL

2
Establezca la configuración de energía, instalación y fabricante del anemómetro (medidor del
viento) y del sensor remoto inalámbrico.
Instalación y montaje: el primer paso a dar es seleccionar la ubicación del anemómetro que está en
el exterior sin bloquear su parte superior y sus laterales de forma que el viento pueda fácilmente llegar
al mismo. La distancia puede se de 100 m al receptor o más cerca en una zona abierta (cuanto más
cerca mejor para la recepción de la transmisión). El mejor lugar es, por lo general, en un mástil en el
tejado u otra ubicación alta a la intemperie. El sensor inalámbrico está incorporado en el anemómetro.
Antes de montar el anemómetro, es mejor realizar una transmisión de prueba con pilas nuevas
instaladas en el mismo (vea la sección al respecto a continuación) para asegurarse de que todo está
bien y ahorrar tiempo si tiene que reubicar el dispositivo.
Coloque el anemómetro horizontalmente en su ubicación a la intemperie seleccionada e instale las
pilas. Pulse el botón “CHANNEL/SEARCH” (canal y búsqueda) y manténgalo pulsado durante unos
segundos hasta ver los iconos parpadeando de la dirección del viento, temperatura y humedad en la
pantalla a medida que el receptor busca ahora los sensores remotos. Si las lecturas de la información
exterior se muestran dentro del periodo de tiempo de diez minutos, la transmisión ha tenido éxito y
puede continuar con el montaje. Si las lecturas no aparecen en diez minutos, entonces elija otro lugar
donde montar el anemómetro más cerca del receptor, quite las pilas y realice el procedimiento de
nuevo. Quite las pilas del anemómetro antes del montaje y de la calibración.
Extraiga los cuatro pequeños tornillos (que se muestran en la imagen anterior) de la tapa del
anemómetro con un destornillador pequeño. Introduzca dos pilas AA (proporcionadas por el usuario)
como se indica en el sensor (vea la imagen anterior). Coloque la tapa del anemómetro instalando los
cuatro pequeños tornillos que la sujetan en su lugar.
Para montar el anemómetro, necesita un mástil (proporcionado por el usuario) aproximadamente de
2,5 a 3 cm en diámetro y herramientas para montarlo permanentemente en la ubicación elegida (vea el
dibujo a continuación). Si tiene ya un mástil para el montaje de una antena o un dispositivo similar,
puede colocar el anemómetro en el mismo. Debe montar y conectar a tierra un mástil de acuerdo a las
instrucciones que se proporcionen con el mismo. Si no tiene un mástil, puede conseguirlo donde
vendan antenas o artículos similares.
Coloque las placas metálicas en forma de U alrededor del mástil. Introduzca los cuatro tornillos
hexagonales en los orificios de las placas y del soporte del montaje del anemómetro. La veleta debe
colocarse por encima de la barra metálica del anemómetro cuando está en posición horizontal según
se muestra en el diagrama a continuación. Apriete la tuerca hexagonal en los tornillos.
MASTIL
NORTE
MASTIL

3
Calibración e instalación de las pilas del anemómetro
Después de montar el anemómetro, tendrá que calibrar la dirección del viento de forma que el
anemómetro mida correctamente la misma y transmita esta información al receptor. Las pilas deben
quitarse del anemómetro antes de la calibración. Tendrá que recalibrar el anemómetro siempre que
reemplace las pilas.
Utilice el compás en el anemómetro y gire la veleta de forma que apunte hacia el norte (vea el
dibujo). Mantenga la veleta apuntada hacia el norte e instale las pilas. La luz roja situada encima de la
tapa de las pilas parpadeará unas cuantas veces después de instalarlas. La veleta debe apuntar hacia el
norte en el momento en que parpadee la luz roja y entonces la calibración estará completa. Coloque la
tapa del compartimiento de las pilas. Pulse el botón “CHANNEL/SEARCH” (canal y búsqueda) y
manténgalo pulsado durante unos segundos y la lectura del Canal 1 aparecerá dentro de 10 minutos si
la transmisión del sensor inalámbrico tiene éxito.
Energía e instalación del pluvímetro
Elija una superficie plana y nivelada donde colocar el pluvímetro, y en una zona abierta a
aproximadamente 50m o más del receptor donde datos puedan transmitirse fácilmente.
El pluvímetro no puede estar bloqueado por la parte superior o en los laterales para que la lluvia
pueda así llegar libremente al mismo (no colocarlo debajo de un saliente o demasiado cerca de un
edificio o valla). También, no se debe colocar demasiado cerca del suelo o en árboles o plantas.
Para instalar las pilas en el pluvímetro, déle la vuelta (vea la imagen a continuación). Al mismo
tiempo, empuje los dos clips (dentro de los dos grandes orificios en los extremos) hacia adentro y
eleve la cubierta y el compartimiento de las pilas. Ahora ponga la parte extraída hacia abajo (imagen
de la derecha) y tire de los dos clips de la tapa del compartimiento de pilas. Introduzca dos pilas AA
(proporcionadas por el usuario) con su polaridad orientada según se indica en el compartimiento de
pilas. A continuación, coloque la tapa del compartimiento de pilas. Finalmente, coloque el
compartimiento y la tapa en la carcasa exterior alineándolo con los clips; presione en la cubierta hacia
abajo y sobre los clips hasta que estén asegurados.
Pulse el botón “CHANNEL/SEARCH” (canal y búsqueda) y manténgalo pulsado durante unos
segundos; el indicador de la precipitación total parpadeará. La lectura de la precipitación total deberá
aparecer en dos minutos. Si no aparece la información sobre la precipitación total en dos minutos,
mueva el pluvímetro más cerca y retire las pilas antes de repetir lo anterior.
Cuando la transmisión al receptor sea apropiada, ya podrá montar
el pluvímetro. Sujete la base del pluvímetro en la superficie del
montaje y después utilice un nivelador para asegurarse que el
pluvímetro está completamente horizontal. Utilice un lápiz para
marcar dentro de los orificios de montaje en la base del
pluvímetro el sitio de los tornillos. Taladre un orificio en el centro
de cada sitio marcado para el tornillo e introduzca las tapas de
plástico de los tornillos que se proporcionan. Sujete el pluvímetro a la superficie del montaje de forma
que los orificios en la base estén alineados con las tapas de plástico de los tornillos y después, con un
atornillador, atornille bien en cada orificio los tornillos que se proporcionan.

4
Configuración y funcionamiento del receptor
• Temperatura y humedad interior y exterior: la temperatura y la humedad interior se muestra en la
parte superior derecha de la pantalla LCD. Pulse el botón “CHANNEL/SEARCH” (canal y búsqueda)
para cambiar de datos del interior a los del exterior (Canal 1). También es posible ver cambiar
automáticamente la información del interior a la del exterior, y viceversa, cada cinco segundos
aproximadamente al pulsar el botón “CHANNEL/SEARCH” cuando vea un icono “CH ” que indica
estar en el modo de cambio. Al cambiar de canal quizás vea el Canal 2 con información sin
significado, por lo que debe ignorar estos datos.
• Datos en “C” o “F”: pulse el botón “C/F” (parte posterior del receptor) para cambiar de “C”
(Centígrados) o “F” (Fahrenheit) en la pantalla que desee.
• Reloj y calendario: pulse el botón “CLOCK” (reloj) y cambie entre hora, calendario (día/mes) y día
de la semana. Pulse el botón “CLOCK” (reloj) y manténgalo pulsado durante un par de segundos para
introducir el modo de configuración. Utilice los botones “UP” (arriba) o “DOWN” (abajo) para
realizar cambios. Pulse “CLOCK” después de que cada configuración sea correcta. Los valores de
configuración en secuencia serán: 12-24 horas formato/hora/minuto/año/secuencia de día-
mes/mes/día/salir. Para ver la hora en otra zona geográfica, primero hay que establecer en horas el
diferencial horario pulsando, y manteniendo pulsado, el botón "ZONE” (zona) en la parte posterior del
receptor para introducir la configuración. A continuación, pulse los botones “UP” (arriba) o “DOWN”
(abajo) para cambiar el diferencial horario y después pulse “ZONE” (zona) para aceptarlo. Para ver la
zona horaria alternativa, pulse simplemente el botón “ZONE”.
• Memoria máxima y mínima: pulse el botón “MEMORY” (memoria) para ver las lecturas máximas
de temperatura, humedad, índice de calor, punto de rocío, velocidad del viento y sensación térmica.
Pulse el botón de nuevo para ver las lecturas mínimas y púlselo otra vez para volver al modo normal.
La memoria se borrará si pulsa el botón “MEMORY” (memoria) y lo mantiene pulsado unos segundos
cuando se está en las lecturas de máximos y mínimos.
• Barómetro y pronóstico del tiempo: la estación meteorológica tiene un barómetro incorporado para
medir la presión atmosférica y pronostica el tiempo con iconos para soleado, parcialmente nublado,
nublado, lluvioso y tormentoso. La unidad predice las condiciones del tiempo de las siguientes 12 a 24
horas según el cambio de la presión atmosférica y su exactitud es de aproximadamente el 70%. La
compañía no acepta responsabilidad alguna por cualquier pronóstico incorrecto.
Si no vive cerca del nivel del mar, la altitud debe establecerse para que la presión del aire sea correcta.
Pulse el botón “PRESSURE” (presión) para cambiar la presión barométrica de hPa a pulg./Hg o
mb/Hg. Puede obtener la presión del aire de su localización en muchas estaciones
meteorológicas de
Internet (o fuentes locales). Para introducir la información, pulse el botón “PRESSURE” (presión) y
manténgalo pulsado unos segundos y después introduzca la información correcta utilizando los
botones de desplazamiento hacia arriba y abajo.

5
La barra del historial de la presión muestra el historial cambiante de la presión atmosférica de las
últimas 12 horas, lo que permite obtener tendencias razonables.
• Índice de calor: combina los efectos de la temperatura y la humedad y es la temperatura aparente que
se siente como resultado del calor junto a la humedad. Pulse el botón “Heat Index/Dew Point” (índice
de calor y punto de rocío) para que aparezca el índice de calor o el punto de rocío.
• Punto de rocío: es el punto de saturación del aire o la temperatura a la que el aire tiene que enfriarse
para obtener condensación. Pulsar el botón “Heat Index/Dew Point” (índice de calor/punto de rocío)
para obtener la información de la misma forma que se indica debajo de “Heat Index” (índice de calor).
• Alerta de hielo: aparece un icono de alerta de hielo (*) en la pantalla junto a la lectura de la sensación
térmica cuando la temperatura del exterior baja a 4 °C (39,2 °F) o más.
• Velocidad y dirección del viento: el anemómetro le permite obtener muestras de la velocidad y
dirección del viento. Configure la pantalla para leer el tipo de velocidad del viento empujando el botón
de la parte posterior del receptor llamado “WIND UNIT” (unidad del viento) hacia la opción que
desee: kmp (kilómetros por hora), mph (millas por hora), m/s (metros por segundo), knots (nudos) o
Beaufort. La pantalla mostrará 16 direcciones de viento, como “N” de norte, “SW” de suroeste, etc., y
mostrará también la media de la dirección del viento durante el periodo de dos minutos. Pulse el botón
“WIND” (viento) para seleccionar la velocidad de las ráfagas de viento y mostrará la máxima
velocidad durante el periodo de diez minutos; pulse el botón de nuevo para ver la media de la
velocidad del viento durante el periodo de dos minutos.
• Sensación térmica: es la temperatura aparente que se siente al exponer la piel debido a la
combinación de la temperatura del aire y la velocidad del viento. La lectura de la sensación térmica en
la pantalla se calcula basándose en la temperatura medida por el anemómetro y la velocidad media del
viento.
• Alarma de ráfagas de aire y de la sensación térmica: puede establecer una alarma en el receptor
que dure un minuto cuando la ráfaga de viento alcance o exceda un límite establecido. Pulse el botón
“WIND ALARM” (alarma del viento) para silenciar el sonido de la alarma aunque los iconos
relacionados con la alta alarma continuarán parpadeando hasta que la condición para la misma ya no
se cumpla.
Pulse “WIND ALARM” (alarma del viento) para mostrar la alarma de grandes ráfagas de viento y los
iconos de la alarma aparecen en el área de las ráfagas. Pulse el botón “WIND ALARM” y manténgalo
pulsado para introducir el modo de configuración y los dígitos de las ráfagas de viento parpadearán.
Utilice los botones de desplazamiento hacia arriba y hacia abajo para establecer los valores que desee
y después, pulse “WIND ALARM” (alarma del viento) para salir.
Puede configurar el receptor de forma que suene una alarma durante un minuto cuando la sensación
térmica alcance el límite establecido o sea menor que éste. Pulse “WIND ALARM” para silenciar la
alarma. El icono relacionado con la baja alarma continuará parpadeando hasta que las condiciones de
ésta ya no se cumplan.
Pulse “WIND ALARM” repetidamente hasta que el icono de la alarma aparezca en el área de la
pantalla para la sensación térmica. Pulse el botón “WIND ALARM” (alarma del viento) y manténgalo
pulsado para introducir su modo de configuración y los dígitos de la sensación térmica parpadearán.
Pulse los botones de desplazamiento hacia arriba y hacia abajo para establecer los valores que desee y
después, pulse “WIND ALARM” para confirmar la configuración y salir.
Pulse el botón “WIND ALARM” en la parte posterior del receptor repetidamente para activar o
desactivar la alarma de las ráfagas de viento o para la sensación térmica. Cuando está activado, el
receptor tendrá unos iconos de “Hi” y/o “Lo” para esas funciones.
• Medida de precipitaciones: el pluvímetro inalámbrico proporciona las medidas de las precipitaciones
acumuladas diaria, semanal y mensualmente. Pulse el botón “RAIN/CLEAR” (lluvia/borrar) repetidamente para
cambiar entre los diferentes modos y los iconos correspondientes de diaria, semanal, mensual y totalmente
aparecerán indicando el modo de su pantalla actual. En cada modo, pulse el botón “RAIN/CLEAR” y manténgalo
pulsado durante unos segundos para borrar
las lecturas. Pulse el botón “RAIN UNIT” (unidad de lluvia) en la
parte posterior del receptor para cambiar la unidad de medida de la lluvia entre mm y pulgadas.
• Historial de precipitaciones: el receptor tiene una gran capacidad de memoria que puede acumular y
mostrar datos de la precipitación de días (hasta los últimos seis días junto con el día
actual), de
semanas (hasta las últimas seis semanas junto con la semana actual) y de meses (hasta los últimos seis
meses junto con el mes actual).

Pulse “RAIN HISTORY” (historial de precipitaciones) repetidamente para desplazarse por la
información acumulada correspondiente a su selección. En la barra que se muestra en el área de la
pantalla de precipitaciones, el “0” representa el periodo actual y el “-1”, “-2”, etc. indica los periodos
anteriores. Un ejemplo sería pulsar el botón “RAIN HISTORY” repetidamente durante el mes de abril
en el modo 'mensualmente’ hasta que aparezca el gráfico de la barra “-3”. El gráfico de la barra y la
lectura indica el historial de precipitaciones mensuales durante el mes de enero (del 1 al 31 inclusive
del mes
).
• Configuración de la alarma: pulse el botón “ALARM” (alarma) para mostrar la hora de la alarma y
el icono. Pulse de nuevo para activar o desactivar la alarma. El icono en forma de campana aparecerá
cuando está activada. Pulse el botón “ALARM” (alarma) para introducir el modo de configuración.
Introduzca la hora y los minutos con los botones
para desplazarse hacia arriba y hacia abajo, “UP”
y “DOWN”; pulse el botón “ALARM” para
establecer cada uno.
• Posponer:
cuando la alarma suene, pulse el botón
“SNOOZE/LIGHT” (posponer/luz), ubicado en
la parte posterior del receptor, para poner la
unidad en el modo 'posponer'; la alarma sonará de
nuevo en 10 minutos, y continuará repetidamente
haciéndolo, mientras que siga pulsando
“SNOOZE” (posponer). Para interrumpir el
modo “posponer” o la alarma, pulse el botón “ALARM” (alarma
).
• Canal: si su sensor no está establecido correctamente en el Canal 1, entonces observará que un pequeño
icono a la izquierda de la pantalla de la sensación térmica muestra “ch1”. Si no tiene una pantalla para la
temperatura y la humedad exterior, asegúrese de que aparezca el “1”; si no es así, es decir, si se muestra
un 2 o un 3 en vez de un 1, entonces pulse el botón “CH” hasta que aparezca el “1”.
• Poca carga en las pilas: el receptor y los sensores remotos mostrarán el icono y deberá entonces
cambiar las pilas tan pronto como sea posible.
• Colocación: el receptor puede colocarse sobre una mesa, un escritorio u otra superficie plana, o se
puede colgar (de los dos hueco en su parte posterior) en la pared o en otro lugar
.
Especificaciones:
• Gama de temperaturas interiores = de 0 a +50 ºC (de + 32 a + 122 ºF)
• Gama de temperaturas del sensor remoto = de -20 a + 60 ºC (de -4 a + 140 ºF)
• Límites de humedad exterior e interior = del 20 al 99% de humedad relativa
• Resolución = ± 0,5 ºC (± 1,5 ºF) para la temperatura y ± 1,5% para la humedad
• Límites de la velocidad del viento = de 0 a 108 km/h, de 0 a 67 millas/hr, de 0 a 30 m/s, de 0 a 58
nudos, de 0 a 11 Beaufort
• Lectura del pluvímetro = de 0 a 9999 mm, de 0 a 394 pulgadas
• Reloj = digital de cuarzo
• Transmisión = RF433 MHz
• Dimensiones = receptor: 193 x 28 x 114 mm; anemómetro o sensor: (203 x 198 x 363 mm);
pluvímetro: 147 x 58 x 84 mm
• Peso = receptor: 425 g sensor: 255 g pluvímetro: 170 g
2835 Columbia St.
Torrance, California 90503 U.S.A.
www.celestron.com
Impreso en China 0110
RoHS

Station météo personnelle
avec capteurs sans fil de
température et
humidité/vitesse du
vent/pluviosité
Modèle n° 47009
Nous vous remercions d’avoir fait l’acquisition de cette station météo personnelle Celestron. Veuillez lire
les instructions avant toute utilisation. Nous espérons que ce produit vous procurera des années de
satisfaction.
Insérez le socle dans la partie inférieure du récepteur et enfoncez-le jusqu’au déclic. La bonne position est
indiquée sur les images et ci-dessous. Si vous avez l’intention d’installer le récepteur sur un mur (ou toute
autre surface à niveau), retirez le socle une fois l’appareil configuré et consultez la rubrique « Placement »
en dernière page.
Prévoyez les outils et fournitures suivants pour installer l’anémomètre et les pluviomètres : petit tournevis
cruciforme, clé hexagonale de 5 mm (3/16 po), perceuse, niveau, crayon et mât.
Préparation à la mise sous tension du récepteur
Ouvrez le couvercle du compartiment à piles situé à l’arrière du
récepteur (voir partie supérieure au centre de l’image de gauche).
Insérez ensuite six piles AA (fournies par l’utilisateur) en respectant
la polarité indiquée à l’intérieur du compartiment (voir illustration
de droite). Après installation des piles, remettez le couvercle en
place.
Pour une performance optimale, veuillez éloigner le récepteur de tout
objet métallique ou autres sources d’interférences telles que les téléphones
portables, téléviseurs, ordinateurs, appareils électriques, etc. Si l’affichage
du récepteur disparaît ou diminue d’intensité, remplacez les piles.
FRANÇAIS

2
Mise sous tension, installation et paramétrage de l’anémomètre (pour mesurer la vitesse du vent) et
du capteur à distance sans fil.
Installation/montage—la première étape consiste à sélectionner l'emplacement de l'anémomètre à l'extérieur
en évitant toute obstruction sur le dessus ou les côtés afin qu’il soit parfaitement exposé au vent. Il peut être
placé jusqu’à 100 m (328 pieds) du récepteur ou plus près dans une zone dégagée (plus il est proche, mieux
cela vaut pour l’émission et la réception). Le meilleur endroit est généralement sur un mât en toiture ou dans
tout autre lieu élevé et dégagé. L’anémomètre dispose d’un capteur sans fil intégré.
Avant d’installer l’anémomètre, il est préférable d’effectuer un test d’émission lorsque vous mettez des
piles (neuves) dans l’appareil (voir rubrique ci-dessous) pour vérifier que tout fonctionne correctement et
pour gagner du temps en évitant d’avoir à déplacer l’anémomètre par la suite.
Installez l’anémomètre sur un plan horizontal et à l’extérieur à l’endroit retenu, puis mettez les piles.
Appuyez sur le bouton « CHANNEL/SEARCH » (Canal/Rechercher) et maintenez-le enfoncé pendant
quelques secondes. Les icônes indiquant sens du vent, température et humidité vont clignoter sur
l’afficheur pendant que le récepteur recherche les capteurs à distance. Si les informations extérieures
s’affichent en l’espace de dix minutes, la transmission est réussie et vous pouvez poursuivre le montage.
Si rien n’apparaît au bout de dix minutes, changez le lieu d’installation de l’anémomètre en le rapprochant
du récepteur. Retirez les piles, puis recommencez la procédure. Retirez les piles de l’anémomètre avant de
l'installer et de le calibrer.
Retirez les quatre petites vis (illustrées dans l’image ci-dessus) situées sur le couvercle de l’anémomètre à
l’aide d’un petit tournevis. Insérez deux piles AA (fournies par l’utilisateur) comme indiqué dans le
capteur (voir image de droite ci-dessus). Remettez le couvercle de l’anémomètre en réinstallant les quatre
petites vis qui le maintiendront en position.
Pour installer l'anémomètre, il vous faut un mât (fourni par l’utilisateur) de 2,54 à 3,1 cm (1 à 1,25 po) de
diamètre et des boulons pour l'attacher de manière définitive à l’endroit choisi – voir schéma ci-dessous.
Notez que si vous disposez déjà d’un mât pour votre antenne TV ou d’un dispositif similaire, vous pouvez
monter l’anémomètre dessus. Il est nécessaire de monter et de fixer le mât en respectant le mode d’emploi
livré avec. Si vous ne possédez pas de mât, vous pouvez vous en procurer un chez un revendeur d’antennes.
Mettez les plaques métalliques en forme de U autour du mât. Insérez les quatre vis hexagonales à travers
les trous des plaques en forme de U ainsi que les trous du support de montage de l’anémomètre. La
girouette doit être placée au-dessus de la barre métallique de l’anémomètre lorsqu’il est en position
horizontale, comme illustré ci-dessous. Serrez les écrous hexagonaux sur les vis hexagonales.
MÂT
NORD
MÂT

3
Calibration et installation des piles de l’anémomètre
Une fois l’anémomètre installé, vous devez calibrer le sens du vent pour que l’appareil puisse
correctement mesurer le sens du vent et transmettre ces informations au récepteur. Assurez-vous que les
piles ont bien été retirées de l’anémomètre avant la calibration. Il est nécessaire de recalibrer
l’anémomètre lorsque l’on remplace les piles.
Utilisez la boussole de l’anémomètre pour diriger la girouette vers le nord (voir schéma). Tenez la
girouette pointée vers le nord et installez les piles. La LED rouge située au-dessus du couvercle du
compartiment à piles va clignoter à plusieurs reprises après la mise en place des piles. Vérifiez que la
girouette est bien orientée vers le nord lorsque la diode LED rouge clignote, pour terminer la calibration.
Remettez le couvercle du compartiment à piles. Appuyez sur le bouton « CHANNEL/SEARCH »
(Canal/Rechercher) pendant quelques secondes. Les données du canal 1 apparaîtront en moins de 10
minutes si la transmission du capteur sans fil est réussie.
Mise sous tension et installation du pluviomètre
Choisissez un lieu d'installation plat et à niveau pour le pluviomètre, à 50 m (164 pieds) de distance ou
moins, dans une zone dégagée par rapport au récepteur pour faciliter la transmission des données. L’accès
au pluviomètre doit être parfaitement dégagé sur le dessus ou les côtés afin que la pluie puisse parvenir
facilement dans la jauge (ne pas le mettre sous un surplomb ou à proximité d’un bâtiment ou d’une
barrière). Ne montez pas le pluviomètre trop proche du sol, d’arbres ou de plantes.
Pour installer les piles dans le pluviomètre, retournez l’appareil sur l’envers (image ci-dessous). Pressez
simultanément les deux languettes (à l’intérieur des deux gros orifices à chaque extrémité) vers l’intérieur
et soulevez le couvercle ainsi que le compartiment à piles. Ensuite, tournez le module que vous venez de
retirer sur l’envers (image de droite) et tirez sur les deux languettes du compartiment à piles. Insérez deux
piles AA (fournies par l’utilisateur) en respectant le marquage de polarité du compartiment à piles.
Remettez ensuite le couvercle. Pour finir, remettez le compartiment à piles et le couvercle dans le boîtier
extérieur en alignant les languettes puis en enclenchant le couvercle sur les languettes jusqu'à ce qu'il soit
parfaitement bien positionné.
Appuyez sur le bouton « CHANNEL/SEARCH » (Canal/Rechercher) pendant quelques secondes. La
pluviosité totale va clignoter. La pluviosité totale devrait apparaître en moins de deux minutes. Si aucun
affichage de pluviosité totale n’apparaît après deux minutes, rapprochez le pluviomètre, retirez les piles et
refaites les étapes décrites ci-dessus.
Une fois que la qualité de la transmission au récepteur est
correcte, vous pouvez installer le pluviomètre. Posez le
pluviomètre à plat contre la surface de montage, puis vérifiez avec
un niveau que le pluviomètre est bien horizontal. À l’aide d’un
crayon, marquez l’intérieur des trous de montage sur le socle du
pluviomètre pour connaître l’emplacement des vis. Percez un trou
au centre de chaque emplacement de vis marqué et insérez les
bouchons à vis en plastique fournis. Maintenez le pluviomètre contre la surface de montage de manière à
ce que les trous du socle soient alignés sur les bouchons à vis en plastique, puis introduisez les vis
fournies dans chaque trou. Serrez à l’aide d’un tournevis.

4
Réglages et fonctionnement du récepteur
• Température et humidité intérieures et extérieures – ces données sont affichées dans la partie
supérieure droite de l’écran LCD. Appuyez sur le bouton « CHANNEL/SEARCH » (Canal/Rechercher)
pour basculer des données intérieures aux données extérieures (Canal 1). Vous pouvez également passer
automatiquement des données intérieures aux données extérieures toutes les cinq secondes en appuyant sur
le bouton « CHANNEL/SEARCH » (Canal/Rechercher), là où s'affiche l'icône « CH » qui signifie que
vous êtes en mode « basculer ». Lorsque vous changez de canal, il est possible que le canal 2 présente des
données n'ayant aucun sens. Il suffit de les ignorer.
• Données affichées en degrés « C » ou « F » – appuyez sur le bouton « C/F » (au dos du récepteur) pour passer
des degrés « C » (Celsius) aux degrés « F » (Fahrenheit) si vous le souhaitez.
• Heure et calendrier – Appuyez sur le bouton « CLOCK » (Heure) pour passer de l’heure au calendrier
(jour/mois) et aux jours de la semaine. Appuyez sur le bouton « CLOCK » (Heure) et maintenez-le enfoncé
pendant quelques secondes pour accéder au mode de configuration. Utilisez les boutons « UP » (Vers le haut)
ou « DOWN » (Vers le bas) pour effectuer des changements. Appuyez sur « CLOCK » (Heure) chaque fois
que le bon paramètre a été saisi. La séquence des réglages est : → format 12-24
h/heure/minute/année/séquence jour-mois/mois/jour/quitter. Pour vérifier l’heure dans une autre zone
géographique, vous devez d'abord régler le décalage horaire en appuyant sur le bouton « ZONE » situé au dos
du récepteur et en le maintenant enfoncé pour configurer ce paramètre. Appuyez ensuite sur les boutons
« UP » (Vers le haut) ou « DOWN » (Vers le bas) pour modifier le décalage horaire, puis appuyez sur
« ZONE » pour valider. Pour consulter l’autre fuseau horaire, il suffit d’appuyer sur le bouton « ZONE ».
• Mémoire Max/Min – appuyez sur le bouton « MEMORY » (Mémoire) pour afficher la température
maximum, l’humidité, l’indice de chaleur, le point de rosée, la vitesse de vent et la froideur du vent. Appuyez
de nouveau sur le bouton pour afficher les valeurs minimum, puis appuyez encore dessus pour retourner au
mode normal. Pour effacer les données mises en mémoire, appuyez sur le bouton « MEMORY » (Mémoire) et
maintenez-le enfoncé quelques secondes pendant les affichages maximum ou minimum.
• Baromètre et prévisions météo – la station météo est équipée d’un baromètre intégré pour mesurer la
pression atmosphérique et prévoir la météo à l’aide des icônes Ensoleillé/Partiellement
nuageux/Nuageux/Pluvieux/Orageux. L’appareil prévoit les conditions météo sur 12 à 24 heures en se
basant sur le changement de pression atmosphérique avec une précision de 70%. La société rejette toute
responsabilité pour des prévisions incorrectes.
Si vous n’habitez pas au niveau de la mer, il est nécessaire de régler l’altitude pour obtenir une pression
atmosphérique précise. Appuyez sur le bouton « PRESSURE » (Pression) pour faire passer la pression
barométrique de hPa en inHg (poHg) ou mb/Hg. Vous pouvez obtenir la pression atmosphérique du lieu où vous
vous trouvez à l’aide de nombreuses stations météo sur Internet (ou de sources locales). Pour saisir ces
informations, appuyez sur le bouton « PRESSURE » (Pression) et maintenez-le enfoncé pendant quelques
secondes, puis saisissez les données exactes en utilisant les boutons vers le haut et vers le bas.
La barre d’affichage de l’historique de la pression donne l’historique des fluctuations de la pression
atmosphérique au cours des 12 dernières heures, afin de prévoir les tendances convenablement.
• Indice de chaleur – associe les effets de la température et de l’humidité et correspond à la température
apparente ressentie avec la combinaison chaleur/humidité. Appuyez sur le bouton « Heat Index/Dew Point »
(Indice de chaleur/Point de rosée) pour afficher l’indice de chaleur ou le point de rosée.
• Point de rosée – correspond au point de saturation de l’air, ou à la température à laquelle l’air doit s’être
refroidi afin de se condenser. Appuyez sur le bouton « Heat Index/Dew Point » (Indice de chaleur/Point de
rosée) pour obtenir des informations de la même manière que celle indiquée ci-dessus sous « Indice de
chaleur ».

5
• Alerte de givre – une icône d’alerte de givre (*) apparaît sur l’affichage à côté des chiffres de froideur du
vent lorsque la température extérieure descend sous 4° C (39,2° F).
• Vitesse et sens du vent – l’anémomètre vous permet d’obtenir la vitesse et le sens du vent. Réglez l’affichage de
manière à obtenir les unités de vitesse de vent souhaitées en appuyant sur le bouton situé au dos du récepteur
appelé « WIND UNIT » (Unité de vent) pour faire votre sélection : kmp (kilomètres/heure), mph (milles par
heure), m/s (mètres par secondes), nœuds ou Beaufort. L’affichage donne 16 directions de vent sous la forme
« N » pour nord, « SW » pour sud-ouest, etc., et indique la direction moyenne du vent sur une période de deux
minutes. Appuyez sur le bouton « WIND » (Vent) pour sélectionner la vitesse des rafales. L’appareil indique alors
la vitesse maximum du vent sur une période de dix minutes. Appuyez de nouveau sur le bouton et maintenez-le
enfoncé pour obtenir la vitesse moyenne du vent sur une période de deux minutes.
• Froideur du vent– il s’agit de la température apparente ressentie sur une peau exposée par l’association de
la température de l’air et de la vitesse du vent. La froideur du vent affichée est calculée d’après la
température mesurée par l’anémomètre et la vitesse moyenne du vent.
• Alarme de rafale et froideur du vent – vous pouvez régler le récepteur pour faire sonner une alarme
d’une minute environ lorsque les rafales de vent atteignent ou dépassent une limite pré-établie. Appuyez
sur le bouton « WIND ALARM » (Alarme de vent) pour éteindre l’alarme sonore. Les icônes d’alarme
majeure lumineuses correspondantes continueront à clignoter jusqu’à disparition de la condition d’alarme.
Appuyez sur « WIND ALARM » (Alarme de vent) pour obtenir l’affichage de l’alarme de rafales importantes.
Les icônes d’alarme s’affichent dans la zone des rafales. Appuyez sur « WIND ALARM » (Alarme de vent) et
maintenez ce bouton enfoncé pour passer au mode de réglage. Les chiffres des rafales vont clignoter. Utilisez les
boutons vers le haut et vers le bas pour régler les valeurs souhaitées, puis appuyez sur « WIND ALARM »
(Alarme de vent) pour quitter.
Vous pouvez régler le récepteur pour faire sonner une alarme d’environ une minute lorsque la froideur du
vent atteint ou est inférieure à la limite établie. Appuyez sur « WIND ALARM » (Alarme de vent) pour
éteindre l’alarme sonore. L’icône d’alarme mineure correspondante continuera à clignoter jusqu’à
disparition de la condition d’alarme.
Appuyez sur « WIND ALARM » (Alarme de vent) à plusieurs reprises jusqu’à ce que l’icône d’alarme apparaisse
dans la zone d'affichage de la froideur du vent. Appuyez sur le bouton « WIND ALARM » (Alarme de vent) pour
entrer en mode de configuration. Les chiffres de la froideur du vent vont clignoter. Utilisez les boutons vers le
haut et vers le bas pour régler les valeurs souhaitées, puis appuyez sur « WIND ALARM » (Alarme de vent) pour
valider votre choix et quitter.
Appuyez sur le bouton « WIND ALARM » (Alarme de vent) au dos du récepteur à plusieurs reprises pour
activer ou désactiver l’alarme de rafale ou l’alarme de froideur du vent. Lorsque le récepteur est activé, les
icônes « Hi » (élevé) et/ou « Lo » (bas) s’affichent pour ces fonctions.
• Mesure de la pluviosité – le pluviomètre sans fil mesure la pluviosité quotidienne, hebdomadaire,
mensuelle et cumulée. Appuyez sur le bouton « RAIN/CLEAR » (Pluie/Supprimer) à plusieurs reprises
pour basculer sur les différents modes. Les icônes quotidienne, hebdomadaire, mensuelle ou totale
correspondantes vont s’afficher avec le mode en cours. Pour chaque mode, appuyez sur le bouton
« RAIN/CLEAR » (Pluie/Supprimer) et maintenez-le enfoncé pendant quelques secondes pour effacer les
résultats. Appuyez sur le bouton « RAIN/UNIT » (Pluie/Unité) situé au dos du récepteur pour modifier
l’unité de mesure de la pluviosité en mm ou pouces, au choix.
• Historique de pluviosité – le récepteur dispose d’une importante capacité de mémoire pour stocker et afficher
la pluviosité quotidienne (jusqu’aux six derniers jours de même que le jour actuel), la pluviosité hebdomadaire
(jusqu’aux six dernières semaines ainsi que la semaine en cours), et la pluviosité mensuelle (jusqu’aux six
derniers mois ainsi que le mois en cours).
• Appuyez à plusieurs reprises sur « RAIN HISTORY » (Historique pluviosité) pour faire défiler les données
de l’historique correspondant à votre sélection. Sur la barre figurant dans la zone d’affichage de la
pluviosité, le « 0 » représente la période actuelle et le « -1 », le « -2 », etc. les périodes précédentes. À titre
d’exemple, pour le mois d’avril, appuyez à plusieurs reprises sur le bouton « RAIN HISTORY »
(Historique pluviosité) en mode mensuel jusqu’à ce que l’histogramme « -3 » s’affiche. L’histogramme et
les chiffres indiquent la pluviosité mensuelle du mois de janvier (du 1
er
au 31).

• Réglage de l’alarme – appuyez sur le bouton « ALARM » (Alarme) pour obtenir l’heure de l’alarme.
L’icône d’alarme s’affiche. Appuyez de nouveau pour activer ou désactiver l’alarme. Si l’alarme est
activée, une icône de cloche s’affiche. Appuyez sur le bouton « ALARM » (Alarme) et maintenez-le
enfoncé pour passer en mode de configuration. Entrez l’heure et les minutes voulues en appuyant sur les
boutons fléchés vers le haut et vers le bas puis sur
« ALARM » (Alarme) pour régler ces différents
paramètres.
• Rappel d’alarme – lorsque l’alarme sonne, appuyez
sur le bouton “SNOOZE/LIGHT” (Rappel d’alarme /
Rétro éclairage) (au dos du récepteur) pour passer en
mode rappel. L’alarme sonnera à nouveau au bout de
10 minutes et recommencera indéfiniment jusqu’à ce
que vous appuyiez sur « SNOOZE ». Pour arrêter le
rappel d’alarme ou l’alarme, appuyez sur le bouton
« ALARM » (Alarme).
• Canal – si votre capteur est correctement réglé sur le canal 1, une petite icône s’affiche à gauche de
l’affichage de froideur du vent en indiquant « 1 ». Si vous n’avez pas d’affichage de température et
d’humidité extérieures, vérifiez que le « 1 » est affiché et sinon (si vous avez le chiffre 2 ou 3), appuyez sur
le bouton « CH » (Canal) jusqu’à apparition du « 1 ».
• Témoin de piles faibles – le récepteur et les capteurs à distance affichent une icône indiquant qu’il est
nécessaire de remplacer les piles le plus rapidement possible.
• Placement – le récepteur peut être placé sur une table, un bureau ou toute autre surface plane, ou il peut
(en utilisant les orifices prévus à cet effet au dos du récepteur) être accroché à un mur ou tout autre endroit.
Spécifications :
• Plage de température intérieure = 0º à +50º C (+ 32º à + 122º F)
• Plage de température du capteur à distance = -20º à + 60º C (-4º à + 140º F)
• Plage d’humidité intérieure/extérieure = 20% à 99% d’humidité relative
• Résolution = ± 0,5º C (± 1,5º F) pour la température et ± 1,5% pour l’humidité
• Plage de vitesse du vent = 0 à 108 km/h, 0 à 67 mph, 0 à 30 m/s, 0 à 58 noeuds, 0 à 11 Beaufort
• Lecture du pluviomètre = 0 à 9999 mm, 0 à 394 po
• Heure = quartz digital
• Transmission = RF433 MHz
• Dimensions = Récepteur – 193 x 28 x 114 mm (7,6 po x 1,1 po x 4,5 po) Anémomètre /Capteur –
203 x 198 x 363 mm (8,0 po x 7,8 po x 14,3 po) Pluviomètre
– 147 x 58 x 84 mm (5,8 po x 2,3 po x 3,3 po)
• Poids = Récepteur - 425 g/15 oz Capteur - 255 g/9 oz Pluviomètre - 170g/6 oz
2835 Columbia St.
Torrance, California 90503 U.S.A.
www.celestron.com
Imprimé en Chine 0110
RoHS

Stazione meteo wireless
personale per
temperatura e
umidità/velocità del
vento/pioggia
Modello n. 47009
Ringraziamo per l’acquisto di una stazione meteo personale Celestron. Preghiamo di leggere le
istruzioni prima dell’uso e ci auguriamo che il prodotto si dimostri gradito per molti anni.
Inserire la base sul fondo del ricevitore spingendola finché non scatta in posizione. La posizione
corretta è quella mostrata nelle fotografie e sotto. Quando si intende montare il ricevitore su di una
parete (o altra superficie piana), togliere la base dopo l’impostazione e vedere “Sistemazione”
nell’ultima pagina.
Per montare l’anemometro e gli igrometri occorrono i seguenti utensili e materiali: piccolo cacciavite
con testa a croce, chiave esagonale di 5 mm (3/16 di pollice), trapano, livella, matita e montante.
Impostazione dell’alimentazione per il ricevitore
Aprire lo scomparto delle batterie sulla parte posteriore del ricevitore
(in alto al centro della fotografia di sinistra). Inserire sei batterie AA
(fornite dall‘utente) orientando la polarità come indicato nello
scomparto stesso (vedere la fotografia di destra). Dopo l’inserimento,
rimettere a posto il coperchio dello scomparto delle batterie.
Per ottenere i migliori risultati, sistemare il ricevitore lontano da
metallo e altre fonti di interferenza come, ad esempio, telefonini,
televisori, computer, apparecchi domestici, e così via. Sostituire le
batterie se il display del ricevitore non mostra i dati o si attenua.
ITALIANO

2
Impostazione dell’alimentazione, installazione e impostazione dell’anemometro (misuratore
della velocità del vento) e del sensore wireless a distanza
Installazione/montaggio – la prima fase consiste nello scegliere una posizione per l’anemometro che
sia all’aperto e senza impedimenti in alto e ai lati in modo che il vento possa fluirvi liberamente. La
distanza dal ricevitore può essere un Massimo di 100 m (328 piedi) in un’area aperta (la ricezione
della trasmissione è tanto migliore quanto minore è la distanza). La posizione migliore è
normalmente su di un montante sul tetto o in altro spazio libero. Il sensore wireless è incorporato
nell’anemometro.
Prima di montare l’anemometro è consigliabile eseguire una trasmissione di prova per la quale si
installeranno nell’anemometro delle batterie nuove: così facendo si accerterà che tutto è a posto e si
risparmierà il tempo per spostare l’anemometro se la trasmissione non funziona.
Sistemare l’anemometro in posizione orizzontale nella località esterna scelta e installare le batterie.
Premere e tenere premuto per alcuni secondi il pulsante “CHANNEL/SEARCH” (canale/ricerca) e
sul display si vedranno lampeggiare le icone della direzione del vento, della temperatura e
dell’umidità mentre il ricevitore tenta di mettersi in contatto con i sensori a distanza. Se le letture dei
valori rilevati all’esterno appaiono entro dieci minuti, la trasmissione è riuscita e si può procedere con
l’installazione. Se le letture non appaiono entro dieci minuti, spostarsi a un’altra posizione di
montaggio dell’anemometro che sia più vicina al ricevitore e togliere le batterie ed eseguire di nuovo
la procedura di prova. Togliere le batterie dall’anemometro prima di montarlo e tararlo.
Servendosi di un piccolo cacciavite, togliere le quattro viti piccole (vedere la fotografia soprastante)
dalla copertura dell’anemometro. Inserire due batterie AA (non in dotazione) nel modo indicato sul
sensore stesso (vedere la foto soprastante). Rimettere a posto il coperchio posteriore
dell’anemometro e rimettere le quattro viti piccole che lo tengono fisso.
Per montare l’anemometro serve un montante (non in dotazione) del diametro di circa 2,54 - 3,1 cm
(1 - 1,25 pollici) e gli articoli necessari a installarlo in modo permanente nel posto in cui si desidera
sistemare l’anemometro: vedere il disegno sottostante. Notare che se già c’è un montante, ad esempio
uno usato per un’antenna o simile, si può montare l’anemometro su di esso. L’anemometro dovrebbe
essere montato e messo a terra seguendo le istruzioni fornite con il montante. Se non si possiede già
un montante, si potrà acquistarlo presso un negozio di articoli per antenna.
Posizionare le piastre di metallo a U attorno al montante. Inserire le Quattro viti con testa esagonale
attraverso i fori delle piastre a U e quelli della staffa di montaggio dell’anemometro. La banderuola
deve trovarsi sopra la sbarra metallica dell’anemometro quando è nella posizione orizzontale, come
indicato nel diagramma sottostante. Serrare le viti con testa esagonale servendosi dei dadi esagonali.
MONTANTE
NORD
MONTANTE

3
Taratura e installazione delle batterie dell’anemometro
Dopo avere montato l’anemometro, si deve tararlo in modo che misuri correttamente la direzione del
vento e trasmetta le relative informazioni al ricevitore. Prima di eseguire la taratura, accertarsi che le
batterie siano state tolte dall’anemometro. L’anemometro deve essere tarato di nuovo ogni volta che
si sostituiscono le batterie.
Usare la bussola sull’anemometro e girare la banderuola in modo che punti verso nord (vedere il
disegno). Tenere la banderuola orientata verso nord e inserire le batterie. Subito dopo l’inserimento
delle batterie, la spia a LED rossa sopra il coperchio delle batterie lampeggia alcune volte. Accertarsi
che la banderuola punti verso nord mentre la spia a LED rossa lampeggia e completare così la
taratura. Rimettere a posto il coperchio dello scomparto delle batterie. Premere e tenere premuto per
alcuni secondi il pulsante “CHANNEL/SEARCH” (canale/ricerca) e nel giro di 10 minuti vengono
visualizzate le letture del canale 1 se la trasmissione wireless è riuscita.
Impostazione dell’alimentazione e installazione dell’igrometro
Selezionare una superficie di montaggio dell’igrometro che sia piana e a livello e a una distanza
massima di 50 m (164 piedi) dal ricevitore in un'area aperta dove i dati possano essere trasmessi
facilmente. L’igrometro non dovrebbe avere nessun impedimento sulla parte alta e sui lati in modo
che la pioggia possa arrivarvi facilmente (non montare sotto una sporgenza o troppo vicino a un
edificio o recinzione). Inoltre, non montare l’igrometro troppo vicino al suolo o ad alberi o piante.
Capovolgere l’igrometro per installarvi le batterie (vedere la fotografia sottostante) Quindi spingere
contemporaneamente in dentro i due fermagli (all’interno dei due larghi fori alle estremità) e
sollevare il coperchio dello scomparto delle batterie. A questo punto raddrizzare la parte tolta
(fotografia a destra) e tirare i due fermagli del coperchio delle batterie. Inserire due batterie AA
(fornite dall’utente) secondo le polarità marcate nello scomparto delle batterie. Quindi rimettere a
posto il coperchio delle batterie.Infine, rimettere lo scomparto delle batterie con il suo coperchio nella
sede esterna allineando i fermagli e spingendo in basso sul coperchio, finché non scatta in posizione
con i fermagli fissati in modo sicuro.
Premere e tenere premuto per alcuni secondi il pulsante “CHANNEL/RESEARCH” (canale/ricerca):
l’indicatore del totale di precipitazione lampeggia. La lettura del totale di precipitazione piovosa
appare nel giro di due minuti. Se il totale di precipitazione non appare entro due minuti, spostare
l'igrometro più vicino al ricevitore, togliere le batterie e ripetere i punti di cui sopra.
Si è pronti a montare l’igrometro, quando la trasmissione al
ricevitore riesce. Tenere la base dell’igrometro piatta contro la
superficie di montaggio e servirsi di una livella per accertarsi che
l’igrometro sia orizzontale. Servirsi di una matita per tracciare
l’interno dei fori di montaggio sulla base dell’igrometro e segnare
così la posizione delle viti. Praticare un foro al centro di ogni
marcatura di posizione delle viti e inserire i tasselli di plastica in
dotazione. Tenere l’igrometro appoggiato alla superficie di montaggio in modo che i fori della base
siano allineati con i tasselli di plastica delle viti e quindi, servendosi del cacciavite, avvitare una vite
in ciascun foro e serrare.

4
Impostazione e uso del ricevitore
• Temperatura e umidità interna e esterna – la temperatura e l’umidità all’interno sono visualizzate
sulla parte alta a destra del display a LCD. Premere il pulsante “CHANNEL/SEARCH”
(canale/ricerca) per passare dai valori all’interno a quelli all’esterno (canale 1). Si può anche
impostare il display in modo che i valori interni ed esterni vengano visualizzati in modo automatico
alternativamente ogni cinque secondi; per questa impostazione, premendo il pulsante
"CHANNEL/SERARCH” (canale/ricerca) fino a vedere l’icona “CH ” (canale ) che indica che ci
si trova in modalità di “commutazione”. Quando si cambia canale si potrà vedere il canale 2 con dati
senza significato che basta ignorare.
• Visualizzazione dati in “C” o “F” – premere il pulsante “C/F” (sulla parte posteriore del ricevitore)
per cambiare i dati visualizzati da “C” (gradi centigradi) o da “F” (gradi Fahrenheit), come preferito.
• Orologio e calendario – premere il pulsante “CLOCK” (orologio) per visualizzare alternativamente
l’ora, la data (giorno/mese) e il giorno della settimana. Per accedere alla modalità d’impostazione,
premere il pulsante “CLOCK” (orologio) e tenerlo premuto per un paio di secondi. Servirsi dei pulsanti
“UP” (su) e “DOWN” (giù) per eseguire le modifiche. Dopo ogni impostazione corretta, premere
“CLOCK” (orologio). Le impostazioni sono, in ordine: formato a 12-24 ore/ore/minuti/anno/sequenza
giorno-mese/mese/giorno/uscita. Per vedere che ore sono in un altro fuso orario, si deve impostare
dapprima il numero di ore di differenza tra i fusi premendo e tenendo premuto il pulsante “ZONE” (fuso)
sul lato posteriore del ricevitore e accedere all'impostazione. Quindi premere “UP” (su) o “DOWN” (giù)
per immettere il numero di ore di differenza e premere “ZONE” (fuso) per accettare il valore immesso.
Per vedere l’ora del fuso orario impostato, premere semplicemente il pulsante “ZONE” (fuso).
• Memoria max/min – premere il pulsante “MEMORY” (memoria) per visualizzare le letture di
massima per temperatura, umidità, indice di calore, punto di rugiada, velocità del vento e indice di
freddo da vento. Premere il pulsante una seconda volta per vedere le letture minime e premere il
pulsante una volta ancora per tornare alla visualizzazione normale. La memoria si azzera se si preme e
tiene premuto il pulsante “MEMORY” (memoria) per alcuni secondi, quando si stanno visualizzando i
dati di massima o di minima.
• Barometro e previsione del tempo – la stazione meteo è dotata di un barometro incorporato che misura
la pressione atmosferica e mostra la previsione del tempo tramite icone che rappresentano sole/cielo
parzialmente nuvoloso/cielo nuvoloso/pioggia/perturbazione. L’unità fa le previsioni del tempo per le
successive 12-24 ore basandosi sul cambiamento della pressione barometrica ed è accurata al 70%. La
ditta non assume nessuna responsabilità per previsioni incorrette.
Se non si risiede a livello del mare o quasi, è necessario impostare il valore dell’altitudine per ottenere
valori di pressione accurati. Premere il pulsante “PRESSURE” (pressione) per cambiare l’unità di
misura della pressione da hPa (ettoPascal) a inHg (pollici di mercurio) o a mb/Hgl (millibar/Hg). Si
può ottenere il valore della pressione atmosferica su diverse stazioni meteo in Internet (o fonti di
informazioni locali); per immettere il dato, premere e tenere premuto per alcuni secondi il pulsante
“PRESSURE” (pressione) e quindi inserire il valore corretto servendosi dei pulsanti freccia su e giù.

5
La barra dei dati storici della pressione visualizza i valori registrati durante le 12 ore precedenti che
consentono di fare previsioni attendibili.
• Indice di calore – unisce l’effetto della temperatura e dell’umidità per creare il valore apparente della
temperatura che produce un disagio equivalente alla combinazione di temperatura/umidità. Premere il
pulsante “Heat Index/Dew Point” (indice di calore/punto di rugiada) per visualizzare l’indice di calore
oppure il punto di rugiada.
• Punto di rugiada – rappresenta il punto di saturazione dell’aria, ovvero la temperatura alla quale
l’aria deve essere raffreddata perché si verifichi la condensazione. Premere il pulsante “Heat
Index/Dew Point” (indice di calore/punto di rugiada) per visualizzare il dato, come indicato sopra per
quanto riguarda l’indice di calore.
• Allarme ghiaccio – l’icona di allarme ghiaccio (*) viene visualizzata sul display accanto al valore del
raffreddamento da vento quando la temperatura esterna scende sotto 4 °C (39,2 °F).
• Velocità e direzione del vento – l’anemometro consente di eseguire misure della velocità e della direzione
del vento. Impostare il display per la lettura di velocità del vento premendo il pulsante sulla parte posteriore
del ricevitore con la scritta “WIND UNIT” (unità vento) e scegliendo l’unità di misura desiderata: kmp
(kilometri l’ora), mph (miglia l’ora), knots (nodi) o Beaufort. Il display indica 16 direzioni del vento, ad
esempio “N” per nord, “SW” per sudovest e così via; e mostra la direzione media per un periodo di due
minuti. Premere il pulsante “WIND” (vento) per selezionare la velocità delle raffiche di vento e il display
mostra la velocità massima del vento in un periodo di dieci minuti; premere il pulsante di nuovo per
visualizzare la velocità media su un periodo di due minuti.
• Raffreddamento da vento – rappresenta sensazione di temperatura apparente provata sulla pelle
esposta e dovuta all’effetto combinato della temperatura dell’aria e della velocità del vento. Il valore
del raffreddamento da vento visualizzato sul display rappresenta il risultato di un calcolo basato sulla
temperatura misurata dall’anemometro e la velocità media del vento.
• Allarme raffiche di vento e raffreddamento da vento – si può impostare il ricevitore in modo da
emettere un allarme acustico per circa un minuto quando le raffiche del vento raggiungono o superano un
valore prestabilito. Premere il pulsante “WIND ALARM” (allarme vento) per silenziare l’allarme
lasciando però che l’icona corrispondente lampeggi sino a quando la condizione di allarme non esiste più.
Premere “WIND ALARM” (allarme vento) per visualizzare il display di allarme raffiche di vento e le
icone appaiono nell’area del vento. Premere e tenere premuto il pulsante “WIND ALARM” (allarme
vento) per accedere alla modalità di impostazione e le cifre delle raffiche di vento lampeggiano. Usare i
pulsanti freccia su e giù per impostare i valori desiderati e quindi premere “WIND ALARM” (allarme
vento) per uscire.
Si può impostare il ricevitore perché emetta un allarme sonoro per circa un minuto quando il
raffreddamento da vento raggiunge o scende al disotto di un valore impostato. Premere “WIND
ALARM” (allarme vento) per silenziare l’allarme. L’icona di allarme corrispondente continua a
lampeggiare fino a quando la condizione di allarme non esiste più.
Premere ripetutamente “WIND ALARM” (allarme vento) fino a quando l’icona di allarme appare
nell’area di display del raffreddamento da vento. Premere e tenere premuto il pulsante “WIND
ALARM” (allarme vento) per accedere alla modalità di impostazione e le cifre del raffreddamento da
vento lampeggiano. Usare i pulsanti freccia su e giù per impostare i valori desiderati e quindi premere
“WIND ALARM” (allarme vento) per confermare il valore impostato e uscire.
Premere ripetutamente il pulsante “WIND ALARM” sul lato posteriore del ricevitore per attivare o
disattivare l’allarme per le raffiche di vento o quello del raffreddamento da vento. Quando l’allarme è
abilitato il ricevitore mostra sul display un'icona “Hi” (alto) e/o “Lo” (basso) per le funzioni.
• Misurazione della precipitazione piovosa – l’igrometro wireless fornisce misure delle precipitazioni
piovose su base giornaliera, settimanale, mensile e totale cumulativo. Premere ripetutamente il pulsante
“RAIN/CLEAR” (pioggia/annulla) per passare dall’una all’altra delle modalità e corrispondenti icone
giornaliera, settimanale, mensile o totale che appare per indicare la modalità corrente in cui ci si trova. In
ogni modalità, premere e tenere premuto per alcuni secondi il pulsante “RAIN/CLEAR” (pioggia/annulla)
per azzerare le letture. Premere il pulsante “RAIN UNIT” (unità pioggia) sul lato posteriore del ricevitore
per cambiare l’unità di misura della pioggia da mm a pollici, come desiderato.
• Storico delle precipitazioni piovose – il ricevitore è dotato di un’ampia memoria per la conservazione di
dati e può visualizzare precipitazioni giornaliere (per i sei giorni precedenti oltre al giorno corrente),
settimanali (per le sei settimane precedenti oltre alla settimana corrente) e mensili (per i sei mesi
precedenti oltre che per il mese corrente).

Premere ripetutamente “RAIN HISTORY” (storico delle precipitazioni piovose) per scorrere tra i valori
memorizzati corrispondenti alla scelta fatta.Nella barra mostrata nell’area di display delle precipitazioni
piovose, “o” rappresenta il periodo corrente e le indicazioni “-1”, “-2” ecc. indicano i periodi precedenti.
Ad esempio, se durante il mese di aprile si preme ripetutamente il pulsante “RAIN HISTORY” (storico
delle precipitazioni piovose) in modalità mensile fino a visualizzare la barra “-3”,il grafico e le letture
indicano le registrazioni di precipitazione mensile per il mese di gennaio (dall’1 al 31)
• Impostazione della‘allarme – premere il pulsante “ALARM” (allarme) per visualizzare l’orario
dell’allarme e appare l’icona “ALARM” (allarme). Premere di nuovo per abilitare o disabilitare l’allarme;
quando l’allarme è abilitato appare l’icona di
una campanella. Premere e tenere premuto il
pulsante “ALARM” (allarme) per accedere alla
modalità di impostazione. Inserire i valori
desiderati per ora e minuti servendosi dei
pulsanti “UP” (su) e “DOWN” (giù) e quindi
premendo "ALARM" (allarme) per impostarli.
• Snooze – quando l’allarme suona, premere il
pulsante “SNOOZE/LIGHT” (snooze/luce)
(sulla parte posteriore del ricevitore) per entrare
in modalità di snooze: l’allarme suonerà di
nuovo dieci minuti più tardi, e continuerà a tempo indeterminato fino a quando si continua a premere il
pulsante “SNOOZE”. Per fermare lo snooze o la sveglia, premere il pulsante “ALARM” (allarme).
• Canale – quando il sensore è correttamente impostato sul canale 1, appare una piccola icona
contenente “ch1” in una casella accanto al valore della temperatura esterna. Se la visualizzazione
della temperatura e umidità esterne non appare, controllare per verificare che il numero “1” del canale
ci sia e, in caso contrario (se appare 2 o 3), premere il pulsante “CH” (canale) fino a quando non
appare “1”.
• Indicazione di batteria scarica – quando il ricevitore e i sensori a distanza visualizzano un’icona di
batteria quasi scarica, le batterie vanno sostituite il più presto possibile.
• Posizionamento – il ricevitore può essere sistemato su di una tavola, una scrivania o altra superficie
piana o, utilizzando il gancio intagliato (in due punti) nella sua parte posteriore, lo si può appendere su
di una parete o altro posto.
Dati tecnici:
• Intervallo di temperatura interna = da 0º a +50º C (da + 32º a + 122º F)
• Intervallo di temperatura del sensore a distanza = da -20º a + 60º C (da -4º a + 140º F)
• Intervallo di umidità interna/esterna = da 20% a 99% di umidità relativa
• Risoluzione = ± 0,5º C (± 1,5º F) per la temperatura e ± 1,5% per l’umidità
• Intervallo di velocità del vento – da 0 a 108 km/ora, da 0 a 67 miglia/ora, da 0 a 58 nodi, da 0 a 11
Beaufort
• Lettura dell’igrometro = da 0 a 9999 mm, da 0 a 394 pollici
• Orologio = quarzo digitale
• Trasmissione = RF433 MHz
• Dimensioni = ricevitore: 193 x 28 x 114 mm (7,6 x 1,1 x 4,5 pollici), anemometro/sensore: 203 x 198
x 363 mm (8,0 x 7,8 x 14,3 pollici), igrometro: 147 x 58 x 84 mm (5,8 x 2,3 x 3,3 pollici)
• Peso = ricevitore: 425 g / 15 once sensore: 255 g / 9 once igrometro: 170 g / 6 once
2835 Columbia St.
Torrance, California 90503 U.S.A.
www.celestron.com
Stampato in Cina 0110
RoHS