Loading ...
Loading ...
Loading ...

4
Settings and Operation of the Receiver
•
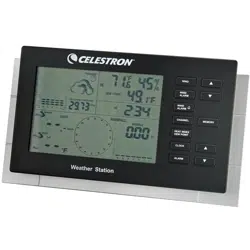
Indoor & Outdoor Temperature & Humidity – the indoor temperature and humidity is shown
on the top right of the LCD display. Press the “CHANNEL/SEARCH” button to switch from
indoor data to outdoor data (Channel 1). You can also have the indoor and outdoor information
automatically switch about every five seconds when you push the “CHANNEL/SEARCH”
button where you see an icon “CH ” that means in “switch” mode. When switching channels
you may see Channel 2 with meaningless data and just ignore it.
• Data displayed in “C” or “F” – push the “C/F” button (rear of Receiver) to change from “C”
(Centigrade) or “F” (Fahrenheit) for the display you desire.
• Clock & Calendar – Press the “CLOCK” button and toggle between time, calendar
(day/month), and day of week. Press the CLOCK” button and hold down for a couple of seconds
to enter the setup mode. Use the “UP” or “DOWN” buttons to make changes. Press the
“CLOCK” after each setting is correct. The settings in sequence will be → 12-24hr
format/hour/minute/year/day-month sequence/month/day/exit. To check the time in another
geographic zone, you first set the time differential in hours by pressing & holding the “ZONE”
button on the rear of the Receiver to enter the set up. Then push the “UP” or “DOWN” buttons
to change the hour differential and then push “ZONE” to accept. To check the alternate time
zone just press the “ZONE” button.
• Max/Min Memory – press the button “MEMORY” to see the maximum temperature, humidity,
heat index, dew point, wind speed, and wind chill readings. Press the button again to see the
minimum readings and press the button again to return to the normal mode. The memory will
clear if you push and hold the “MEMORY” button for a few seconds when in the maximum or
minimum readings.
• Barometer & Weather Forecast – the weather station has a built-in barometer to measure
atmospheric pressure and forecasts the weather with icons for Sunny/Partly
Cloudy/Cloudy/Rainy/Stormy. The unit predicts the weather conditions for the next 12 to 24
hours based on the atmospheric pressure change and is about 70% correct. The company
accepts no liability for any incorrect forecast.
If you do not live near sea level, the altitude must be set so that the air pressure will be accurate.
Press the “PRESSURE” button to change the barometric pressure from hPa to inHg or mb/Hg.
You can obtain your location air pressure from many internet weather stations (or local sources),
to input the information, press and hold the “PRESSURE” button for a few seconds and then
enter the correct data by using the up and down buttons.
The pressure history bar displays the moving atmospheric pressure history of the past 12 hours
which allows reasonable tendencies.
Loading ...
Loading ...
Loading ...