Loading ...
Loading ...
Loading ...

CAREANDCLEANING
RemovableParts
(_ CAUTION: YOUmust
disconnectelectdcal
power to theovenat the
maincircuitbreakeror
rusebox beforeattemptingto
replaceovenlightbulbs. Donot
touchthe lightbulbswith bare
hands.The bulbsget veryhotvery
quickly.Wrapfoamrubberfrom bulb
packagearoundbulbwhen
installing.When removingthe bulb,
wait untilthe bulbhas cooledand
usea dry cloth.
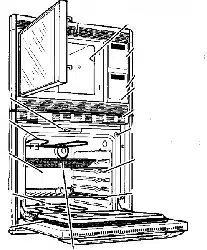
To give you the best lightingavailable,
your oven has twohalogen bulbs. Both
lightsare on the ceiling of the ovencavity.
Receptacle Socket
Bu,
TO REMOVE Cover
1. Youmust disconnecterectricalpower
to the ovenat the maincircuit breaker
or fusebox.
2. Turnthe glass cover
counterclockwiseV4turn untilthetabs
of the glasscover clearthe grooves of
thesocket.
3. Pullstraight outto removethe bulb
TO REPLACE
1, Wrapbulb with cotton clothor bulb
packaging material Don'ttouch bulb
withyour fingers
2, Pushbulb straightinto receptacle all
theway. Use only a 120wolt, 35-watt
halogen bulb.
3. Placethetabs of the glass cover into
the groovesof the socket
4. Turnthe glass cover clockwise
'/4turn.
5. Reconnectelectrical power to the
ovenat the maincircuit breakeror
fuse box.
l;l=i_llJrl:Y:ll|cJrJ=Avl:Fi|l_i_-!
CLEANINGMATERIALS
• Dishwashing detergent
• Warmwater
• Scouring pad or soap-filled pad
Bump
In Rack
e.ok- j- Ill
of the Rack_
TO REMOVE
1. Pullthe r_cks outto the stop lock
position
2. Pull upthe frontof the rackand slide
under the bump offthe i_ackguide.
TO CLEAN
Cleanwith warm water and detergent,
Forhard to remove stains, gently scrub
with a scouring pad or a soap-filled pad.
Rinsewell.
Grayporcelain-coatedoven racksmay
also be cleaned inthe oven duringthe
self-cleancycte. [t is necessaryto wipe
the edges of gray porcelain-coatedoven
rackswith a light coatingof vegetab4eoil
aftercleaning.Thiswill help maintainthe
easeof sliding the racks in and out
of the oven.
TO REPLACE
1. Placethe raised back of the rack onto
therack guides.
2. Liftthe frontof the rack untilthe raised
backslides underthe bump of the
rackguides.
3. Slide the rack allthe way back
30
20P311-2 ENv01 2J14103, 1:18 PM
Loading ...
Loading ...
Loading ...