Anker Innovations Limited. All rights reserved. Eufy and
the Eufy logo
are trademarks of Anker Innovations Limited,
registered in the United States and other countries. All other
trademarks are the property of their respective owners.
51005001290 V02
User Manual
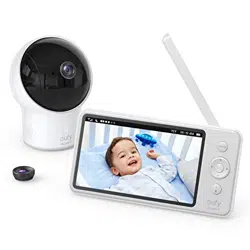
eufy Security SpaceView
Baby Monitor
Kurzanleitung | Guía de inicio rápido
Guide de démarrage rapide
English
01
Tabel of Content
What’s in the Box 01
Feature Introduction 02
Setting Up the Camera and Monitor 03
Replacing the Camera lens 11
Safety 12
English 01
Deutsch 17
Español 31
Français 45
English
01
Tabel of Content
What’s in the Box 01
Feature Introduction 02
Setting Up the Camera and Monitor 03
Replacing the Camera lens 11
Safety 12
English 01
Deutsch 17
Español 31
Français 45

02
English English
03
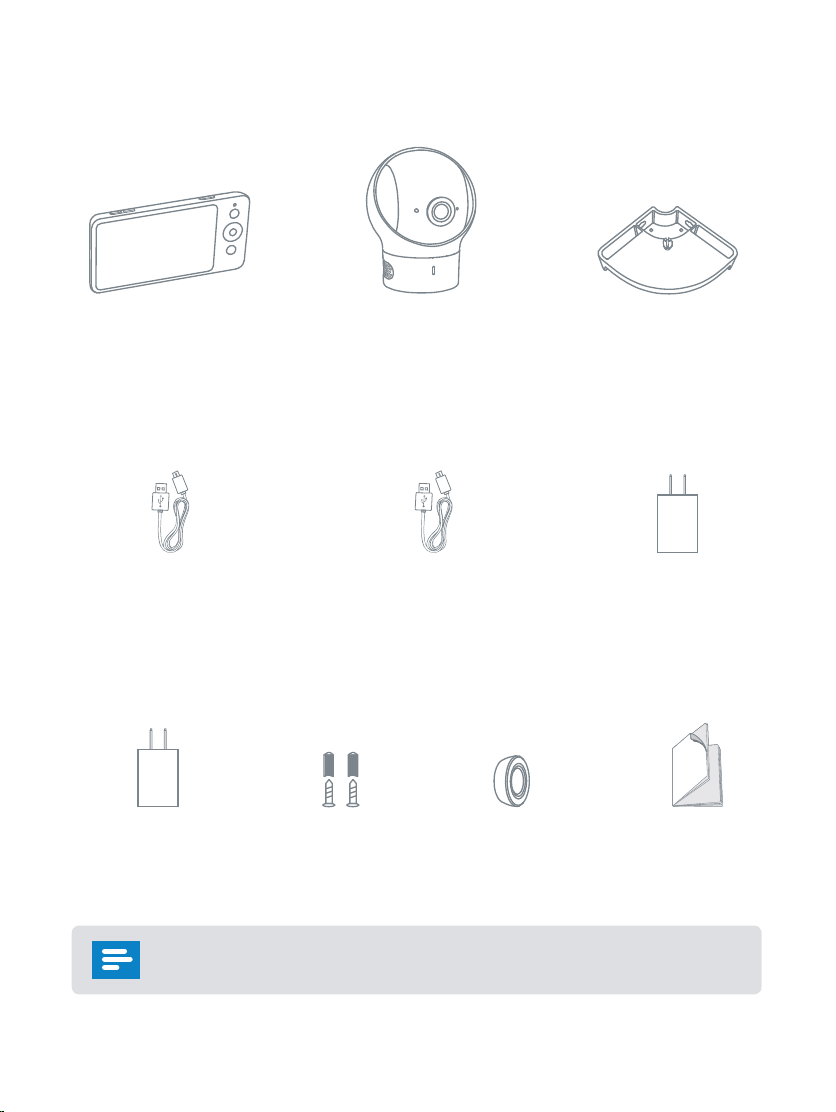
What’s in the Box
Baby Monitor
(T8300-C)
Monitor Micro-USB
Power Cable (1.5 m)
Monitor Adapter
(5V 2A)
Mounting
Screws
User manualWide-Angle Lens
Camera Micro-USB
Power Cable (3 m)
Camera Adapter
(5V 2A)
Baby Camera
(T8300-M)
Wall Mount
Power adapter varies by region.
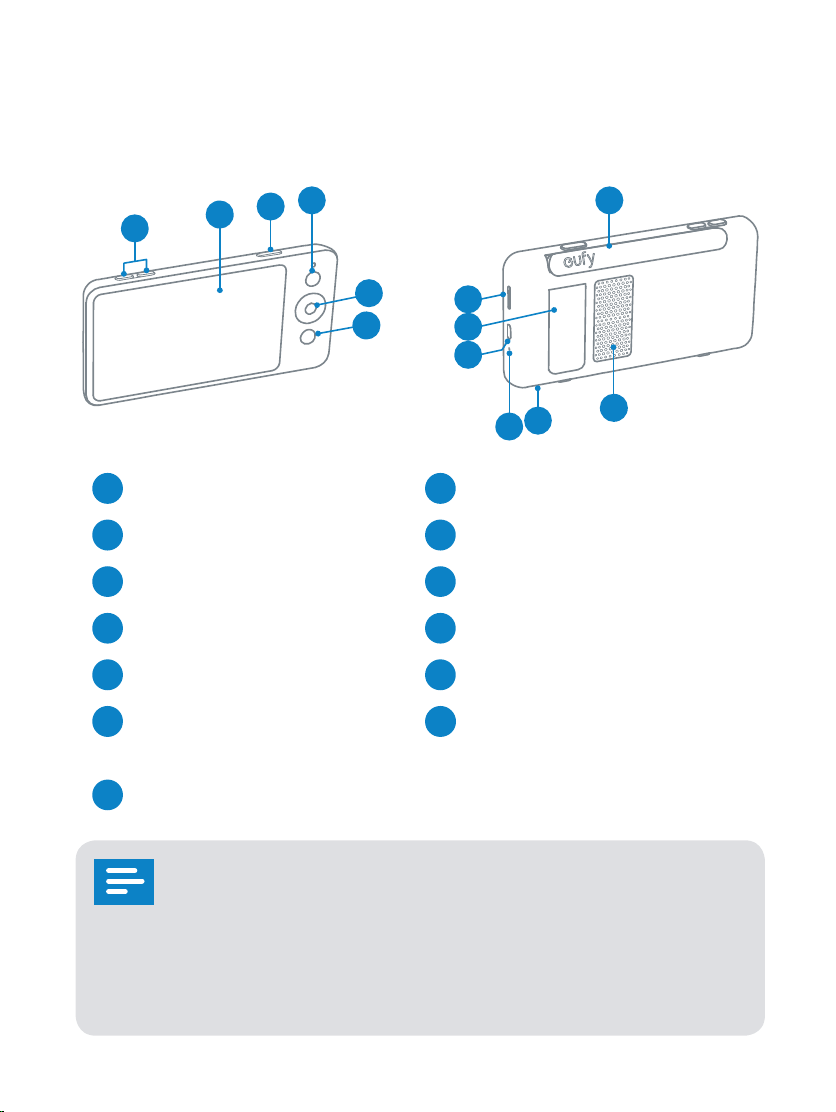
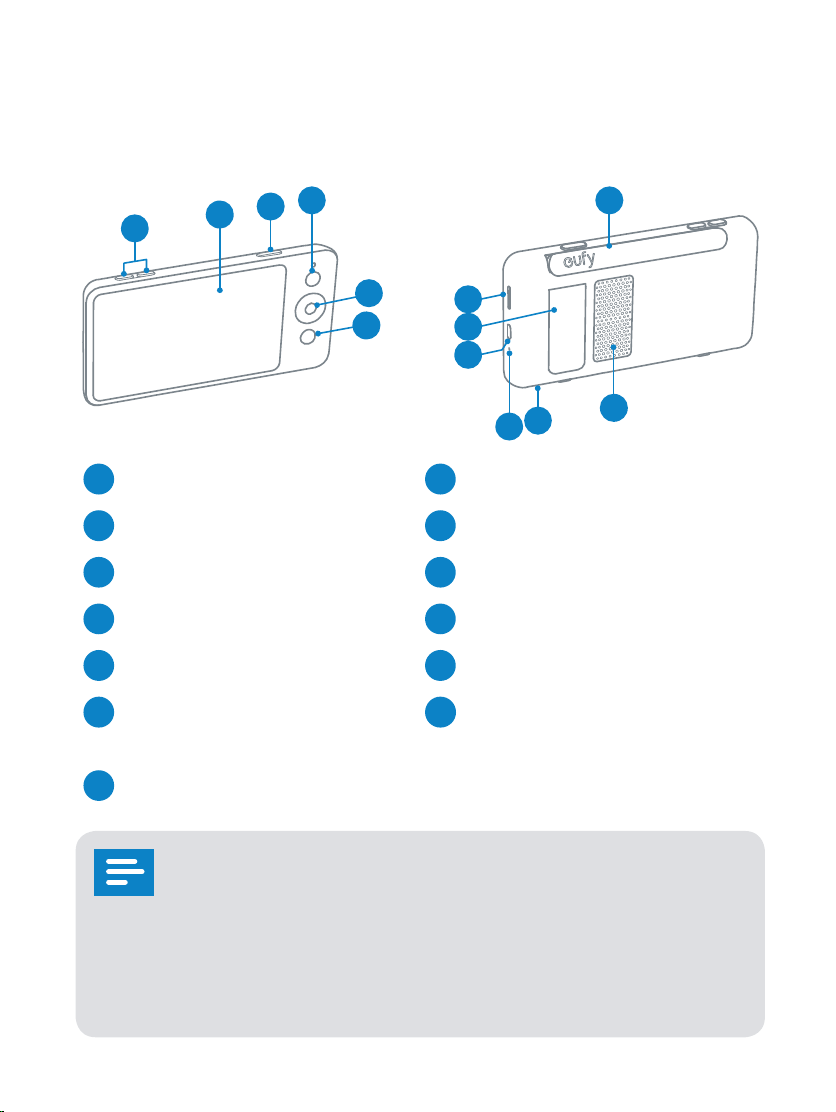
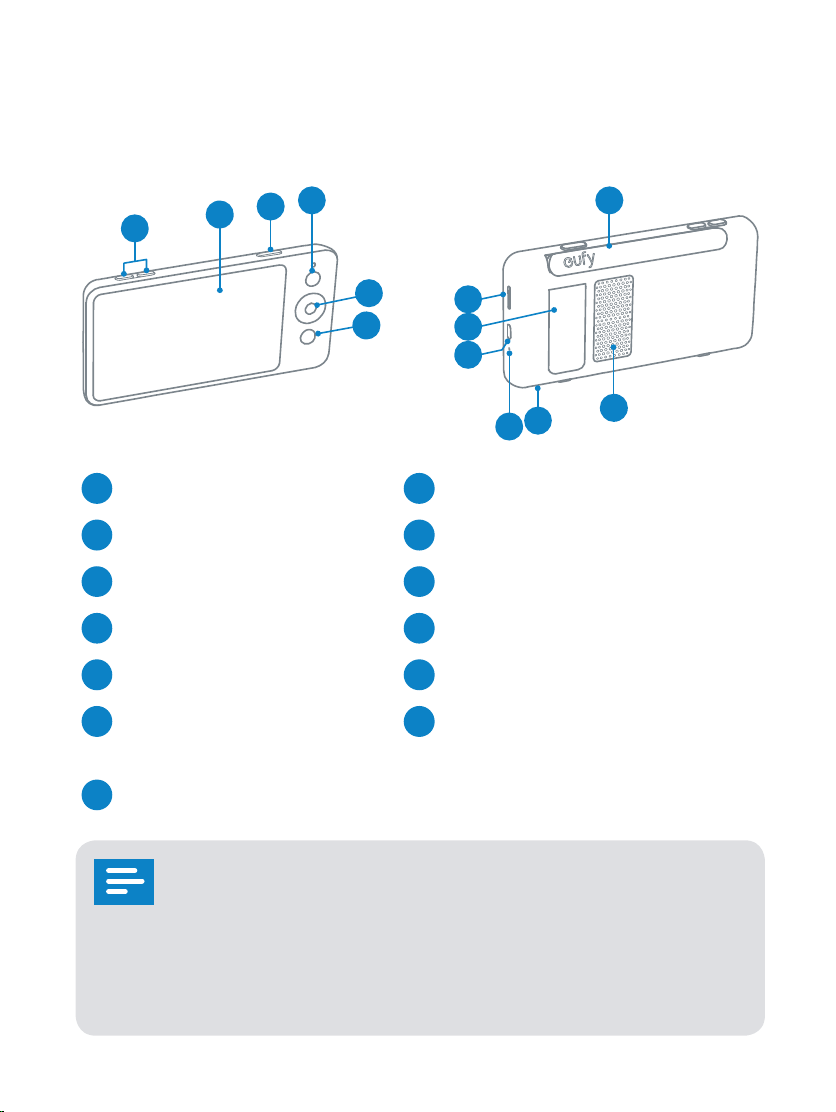
Feature Introduction
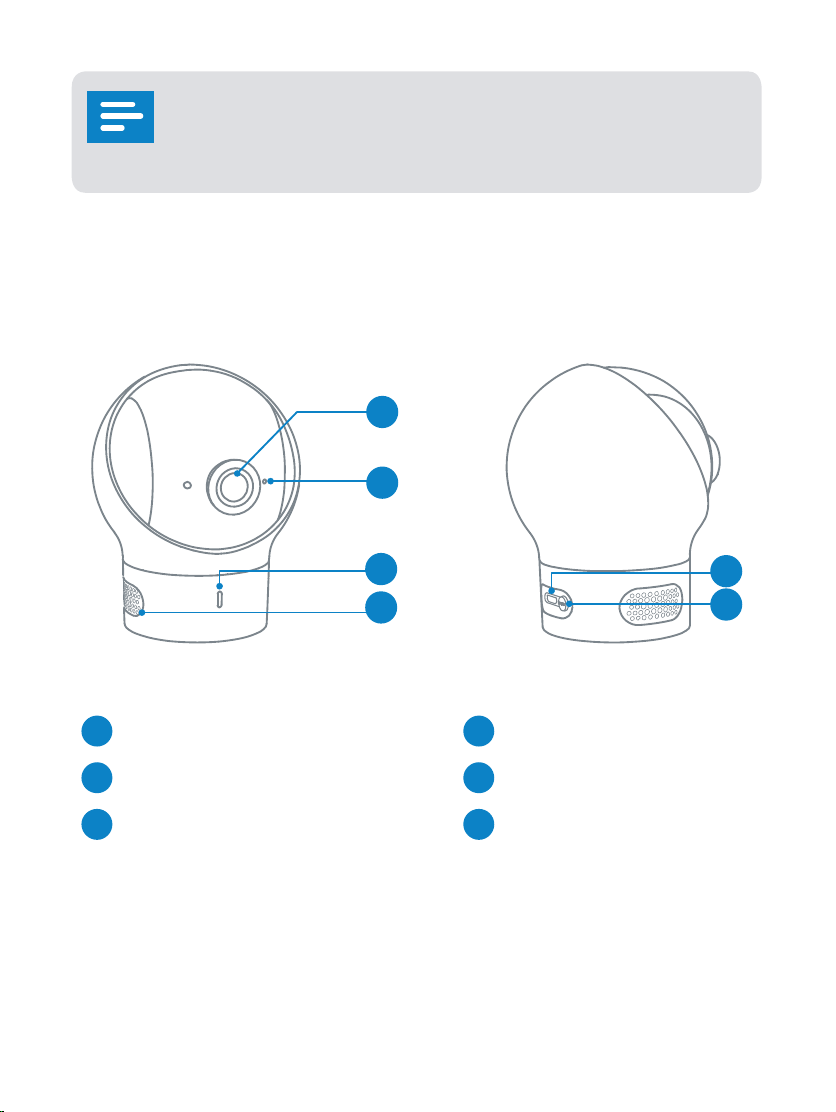
Monitor Features:
6
5
2
1
3
4
9
10
8
12
11
13
7
1
Volume controls
8
microSD card slot
2
Screen
9
Support stand
3
Power button
10
Micro USB charging port
4
Menu button
11
LED indicator
5
Navigation buttons
12
Microphone
6
Return to previous level
of menu / Talk button
13
Speaker
7
Monitor Antenna
Press and hold the Talk button to speak to the
camera. When Menu is opened, press Talk button
once to return to previous level of menu.
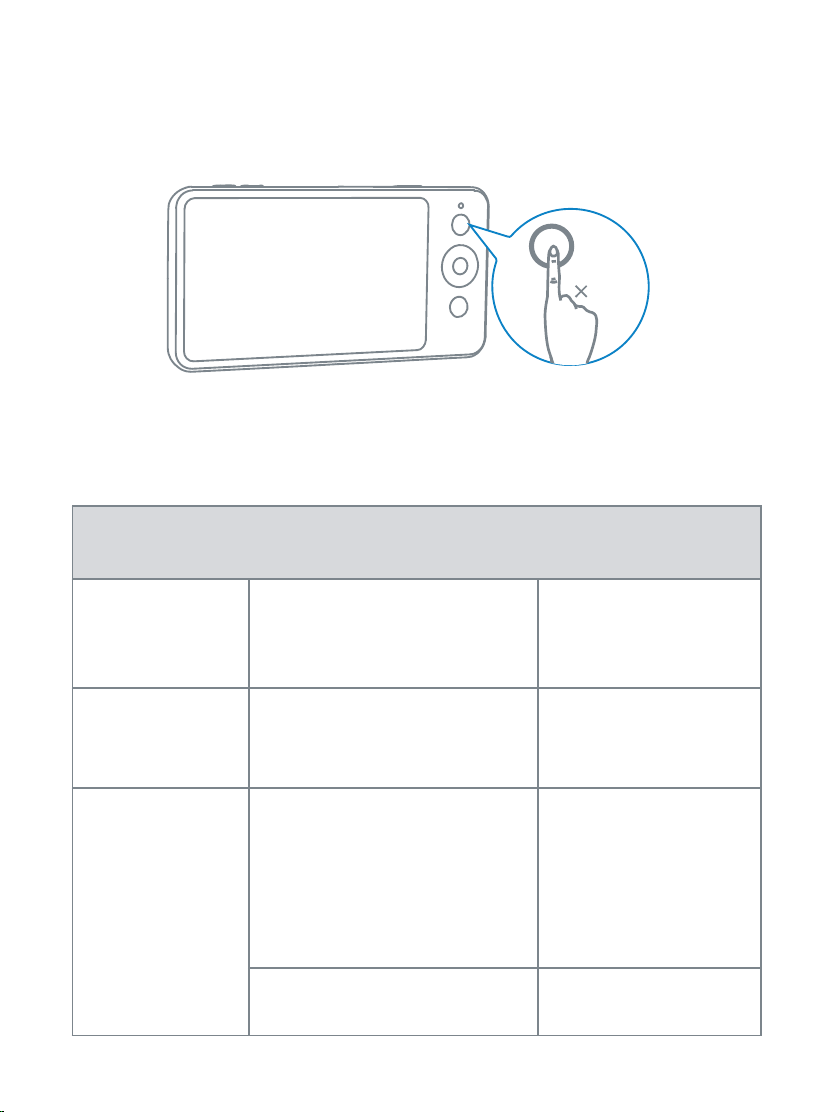
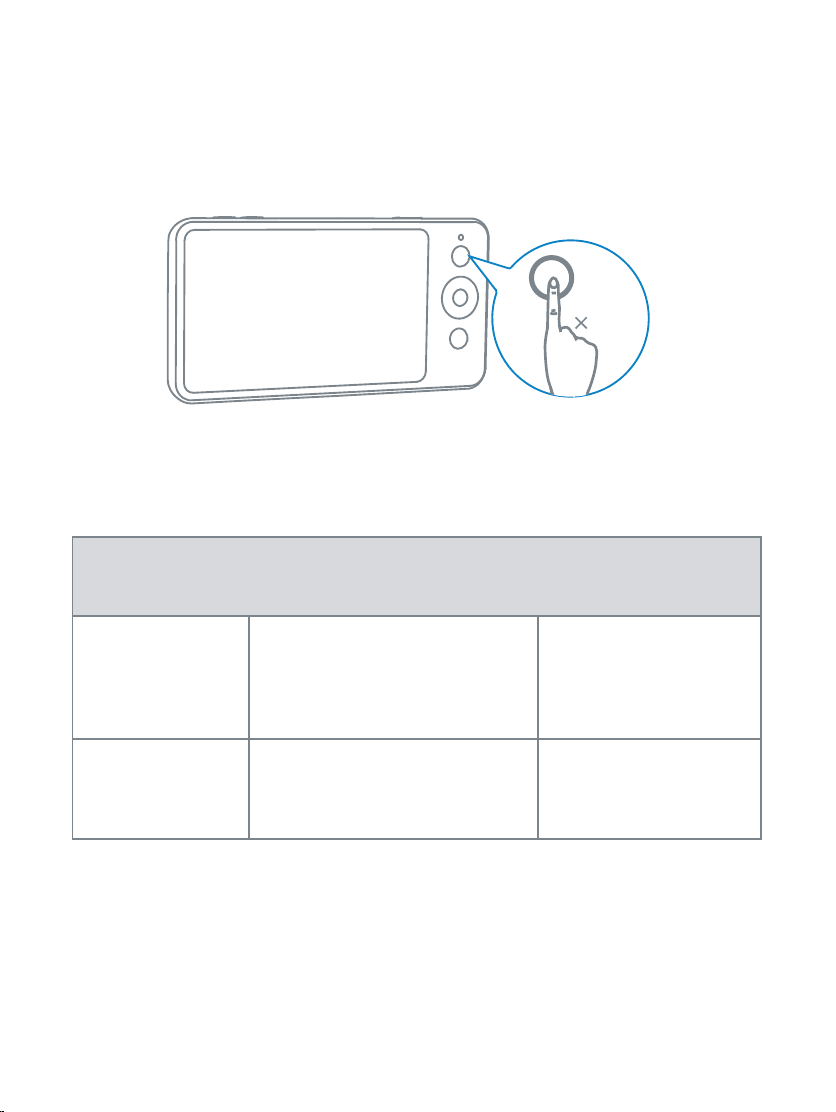
Press Power button to switch on / off the monitor
screen. Press and hold the Power button for 2
seconds to switch on / off the monitor.
02
English English
03
What’s in the Box
Baby Monitor
(T8300-C)
Monitor Micro-USB
Power Cable (1.5 m)
Monitor Adapter
(5V 2A)
Mounting
Screws
User manualWide-Angle Lens
Camera Micro-USB
Power Cable (3 m)
Camera Adapter
(5V 2A)
Baby Camera
(T8300-M)
Wall Mount
Power adapter varies by region.
Feature Introduction
Monitor Features:
6
5
2
1
3
4
9
10
8
12
11
13
7
1
Volume controls
8
microSD card slot
2
Screen
9
Support stand
3
Power button
10
Micro USB charging port
4
Menu button
11
LED indicator
5
Navigation buttons
12
Microphone
6
Return to previous level
of menu / Talk button
13
Speaker
7
Monitor Antenna
Press and hold the Talk button to speak to the
camera. When Menu is opened, press Talk button
once to return to previous level of menu.
Press Power button to switch on / off the monitor
screen. Press and hold the Power button for 2
seconds to switch on / off the monitor.
04
English English
05
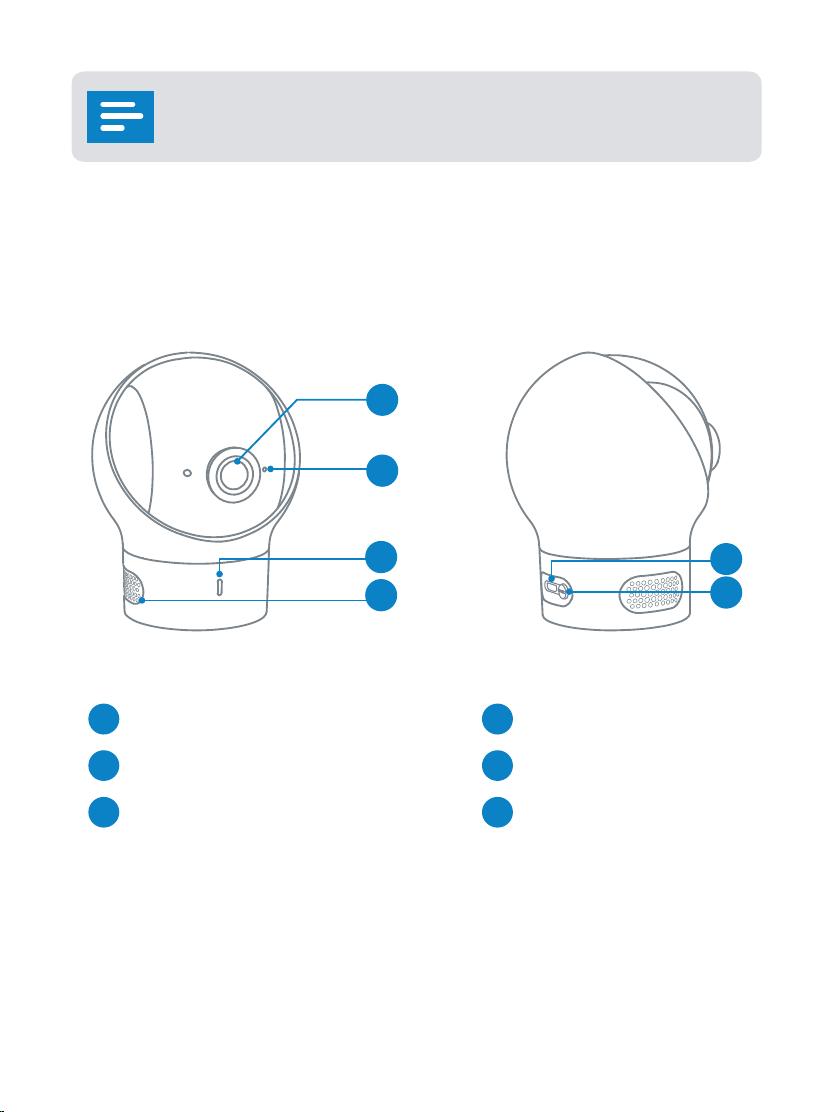
microSD memory card can only be used for firmware
upgrade, it cannot be used to store video recordings.
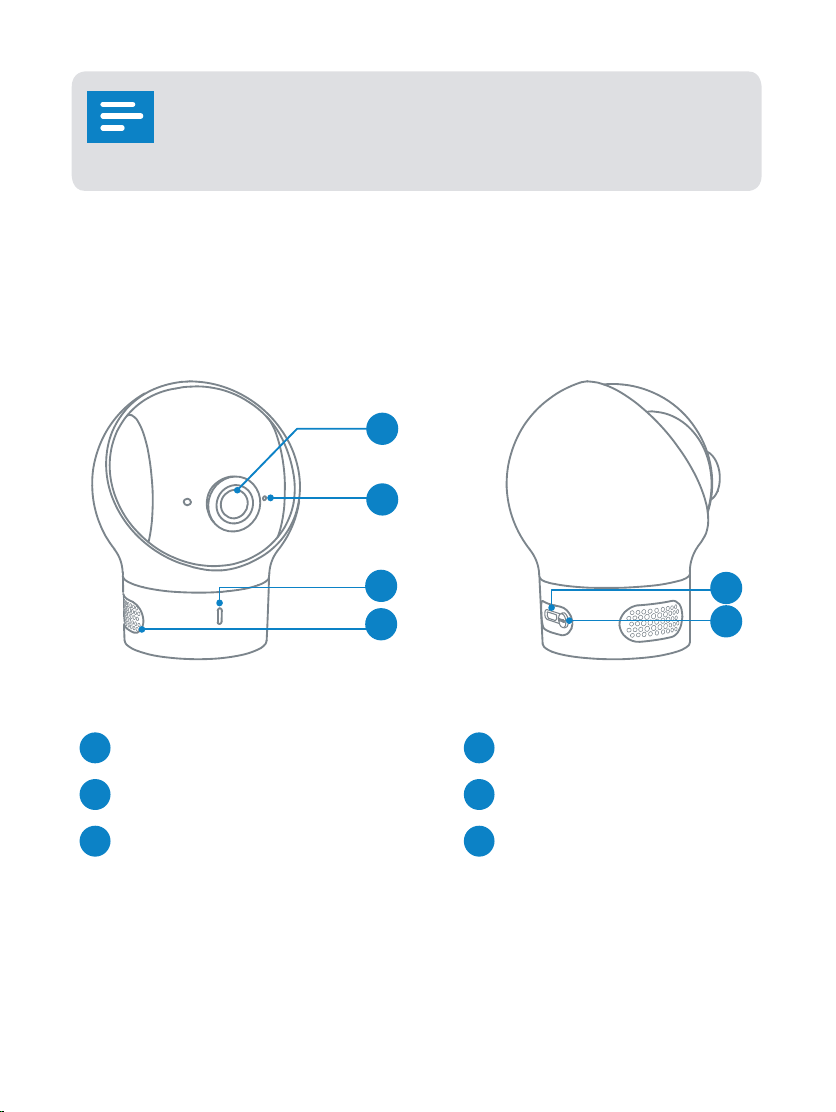
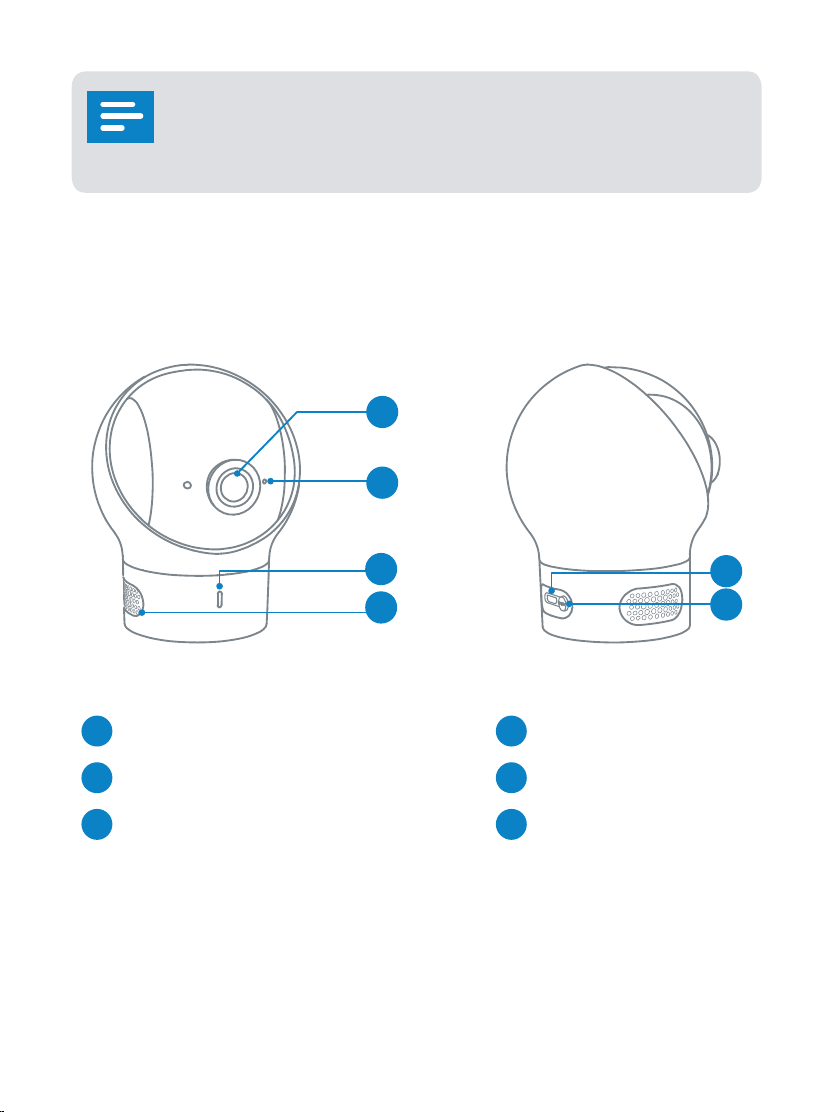
Camera Features:
2
1
3
4
5
6
1
Standard camera lens
4
Speaker
2
Microphone
5
Micro USB port
3
Power LED Status indicator
6
Pairing button
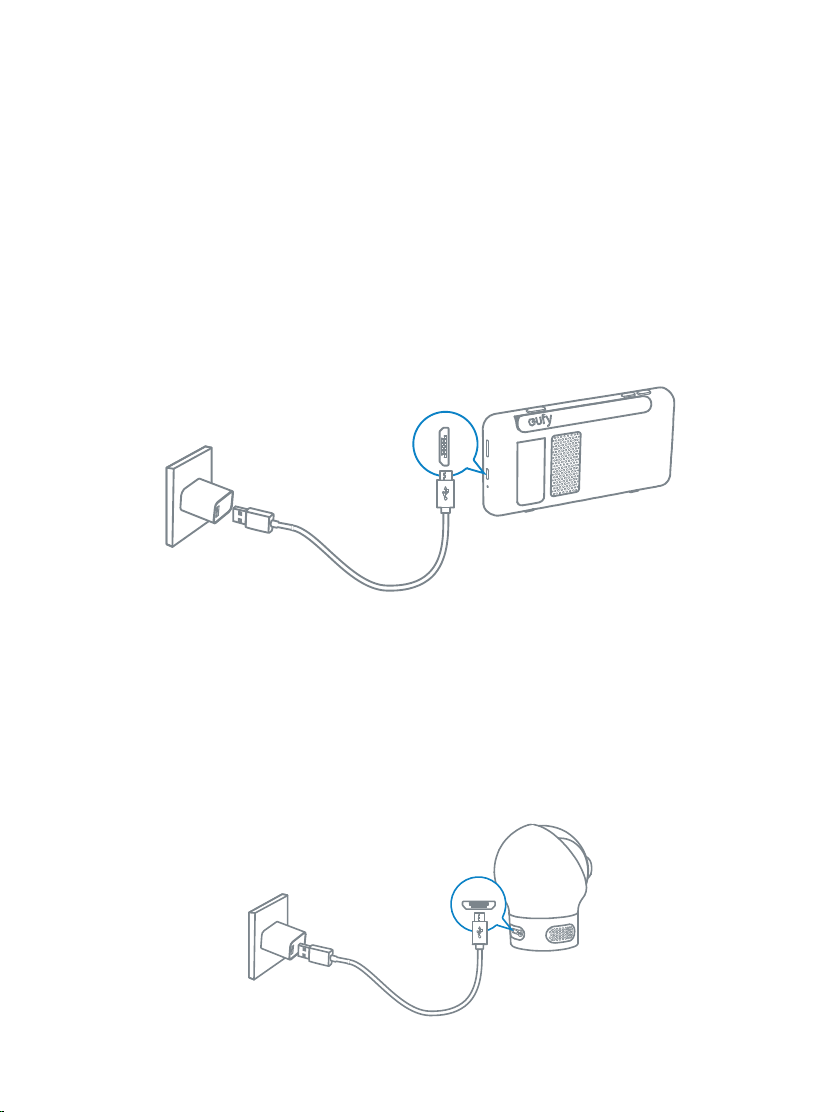
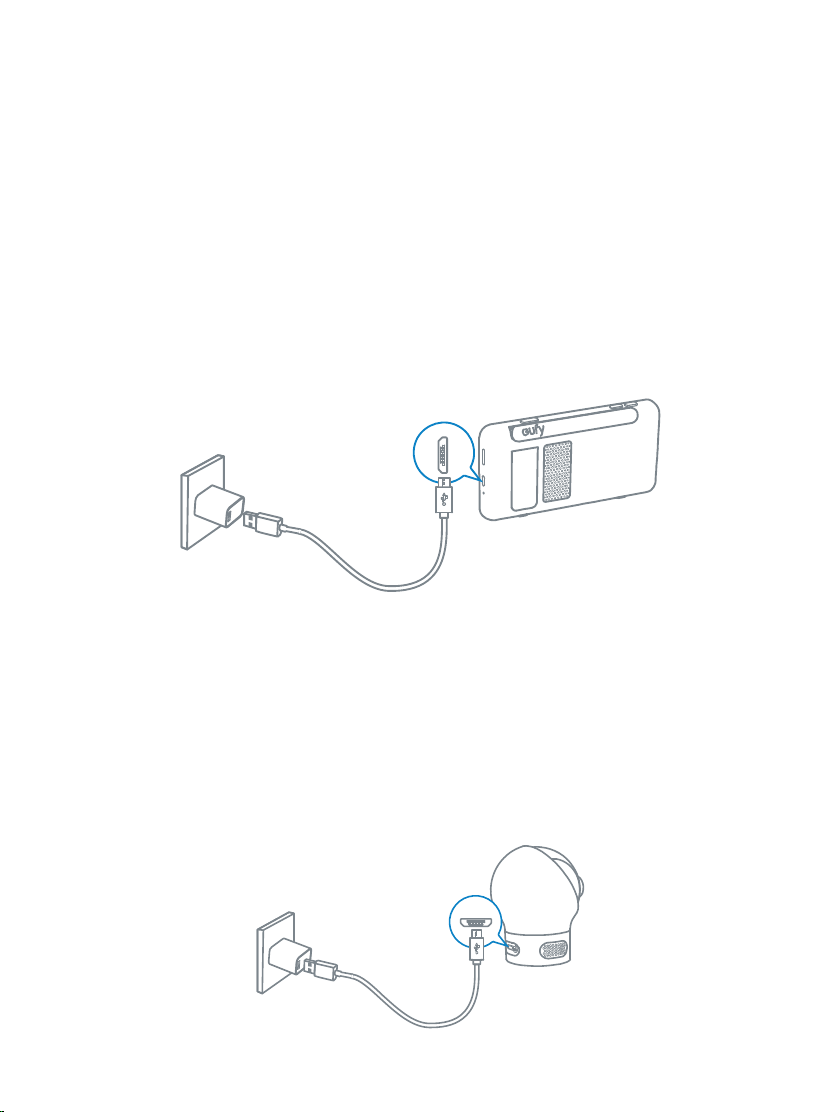
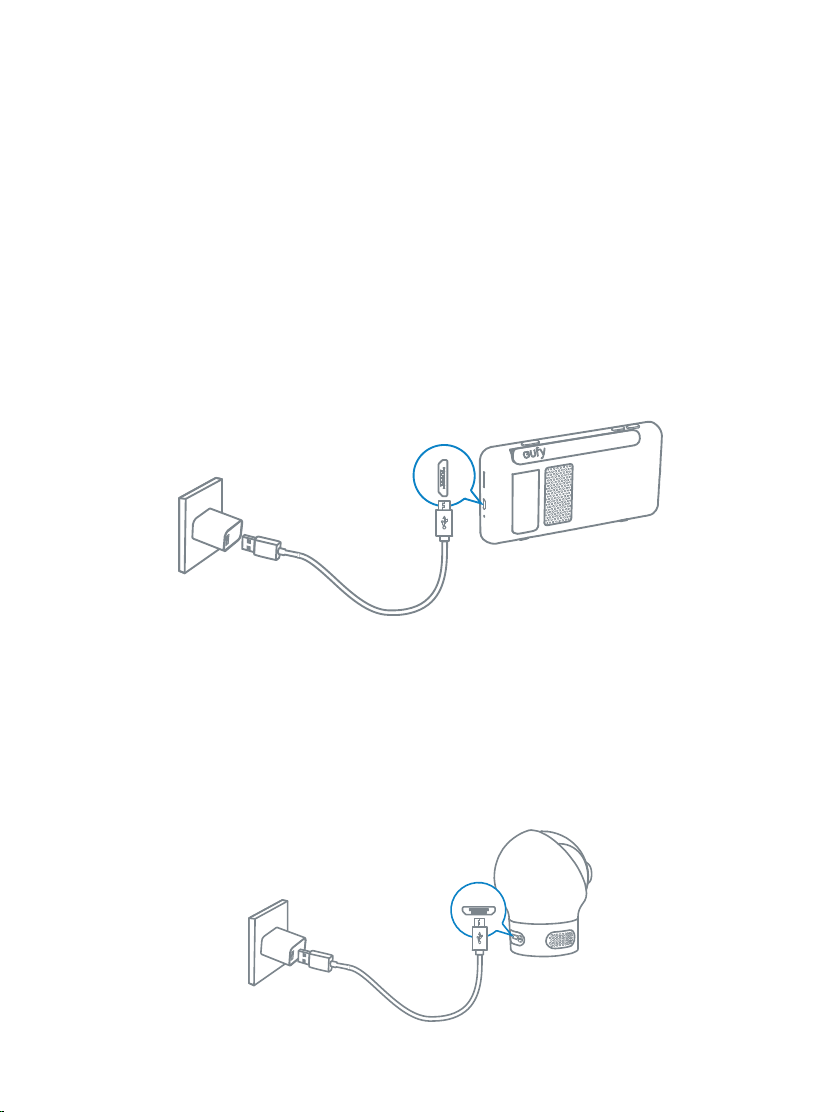
Setting Up the Camera and Monitor
Monitor Installation
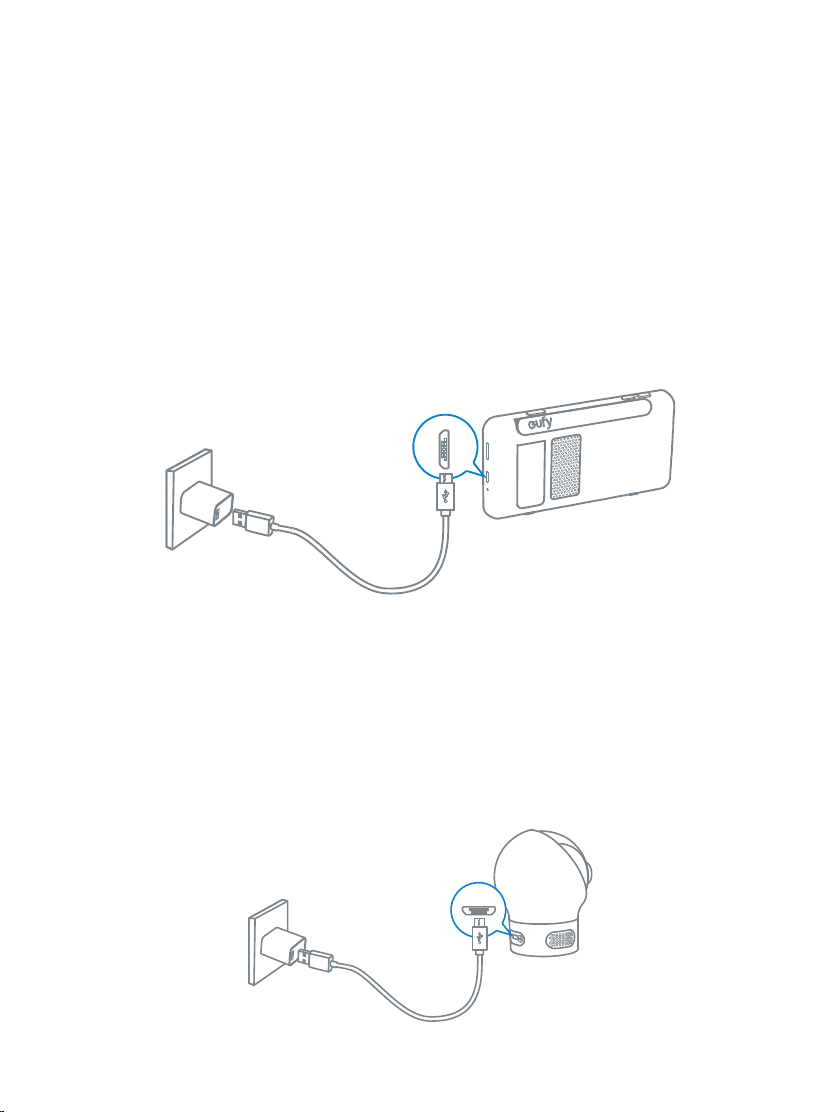
Fully charge the monitor before use. To charge:
Connect the baby monitor to the monitor adapter with the Micro
USB cable, and then connect the adapter to a power outlet. Connect
the other end of the baby monitor’s Micro USB power cable to
the Micro USB port in the monitor to charge it. Press and hold the
power button for 2 seconds to turn the baby monitor on.
Camera Installation
Connect the baby camera’s Micro USB power cable to the camera
adapter (5V 2A), and then connect the adapter to a power outlet.
Finally, connect the other end of the baby camera’s micro USB
power cable to the micro USB port in the camera.
04
English English
05
microSD memory card can only be used for firmware
upgrade, it cannot be used to store video recordings.
Camera Features:
2
1
3
4
5
6
1
Standard camera lens
4
Speaker
2
Microphone
5
Micro USB port
3
Power LED Status indicator
6
Pairing button
Setting Up the Camera and Monitor
Monitor Installation
Fully charge the monitor before use. To charge:
Connect the baby monitor to the monitor adapter with the Micro
USB cable, and then connect the adapter to a power outlet. Connect
the other end of the baby monitor’s Micro USB power cable to
the Micro USB port in the monitor to charge it. Press and hold the
power button for 2 seconds to turn the baby monitor on.
Camera Installation
Connect the baby camera’s Micro USB power cable to the camera
adapter (5V 2A), and then connect the adapter to a power outlet.
Finally, connect the other end of the baby camera’s micro USB
power cable to the micro USB port in the camera.
06
English English
07
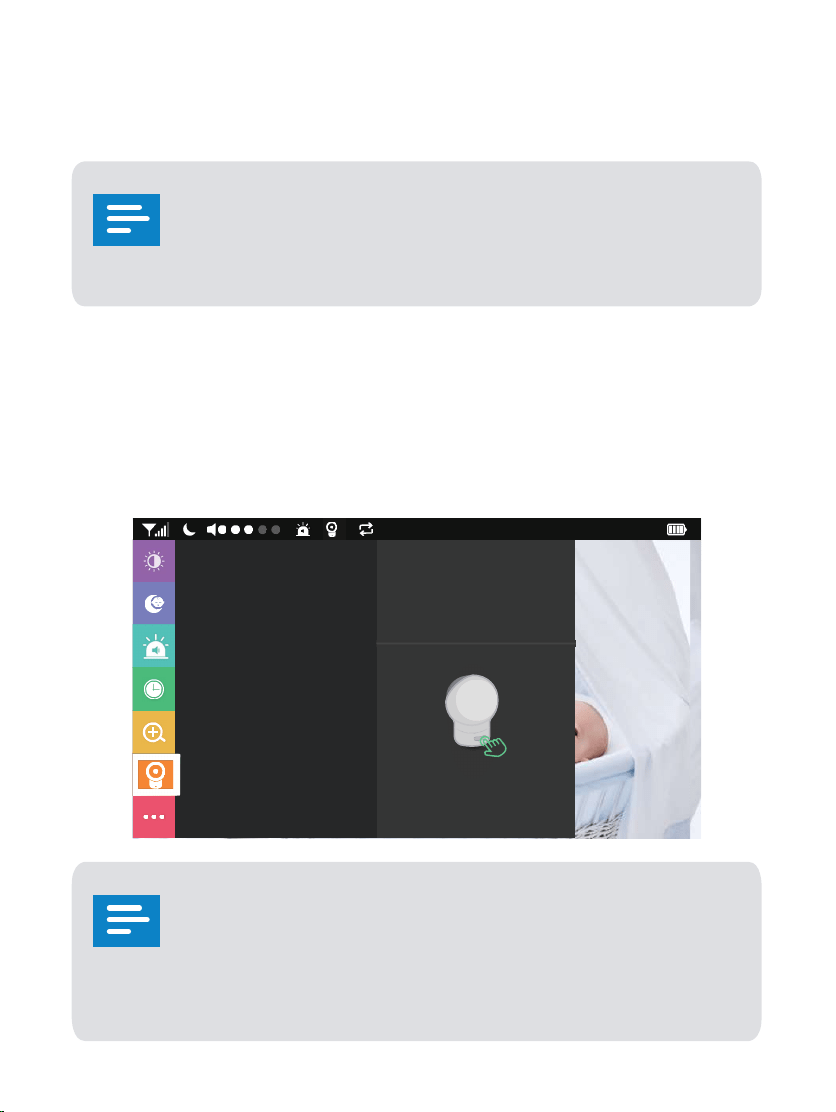
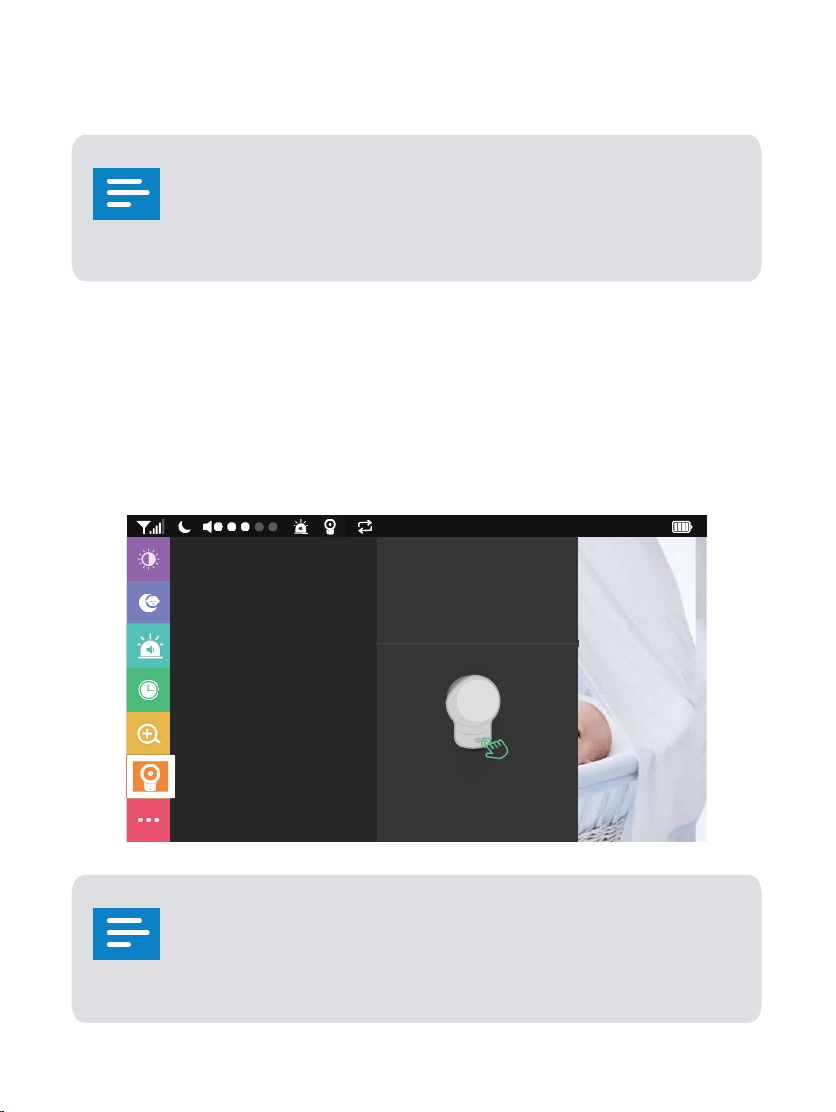
Adding a new Camera to the Monitor
The baby camera and baby monitor are paired out
of the box. Refer to the following steps when adding
extra baby cameras or after resetting a baby camera.
1. Enter menu settings, go to Camera -> Add Camera, then
follow onscreen instructions to start the pairing.
2. Press and hold the pairing button on the rear of the
camera for 1 second until a notification prompt is heard.
:
4
Add Camera
Delete Camera
Cycle Cameras
60
sec
Scanning for new camera
Push the button on the
camera to pair.
1Secs
06 12 AM
When volume is set to high, monitor will emit a loud
noise if placed close to the camera. This is normal
phenomenon and can be resolved when camera is
moved away from the monitor.
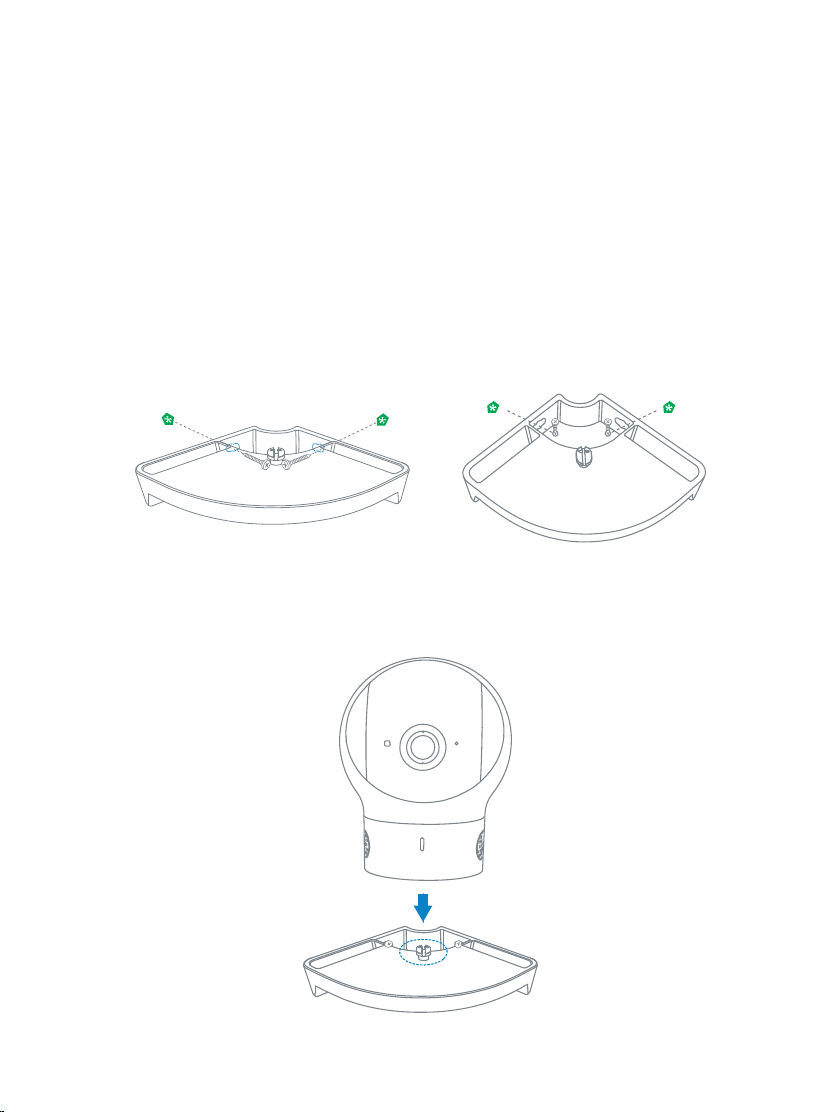
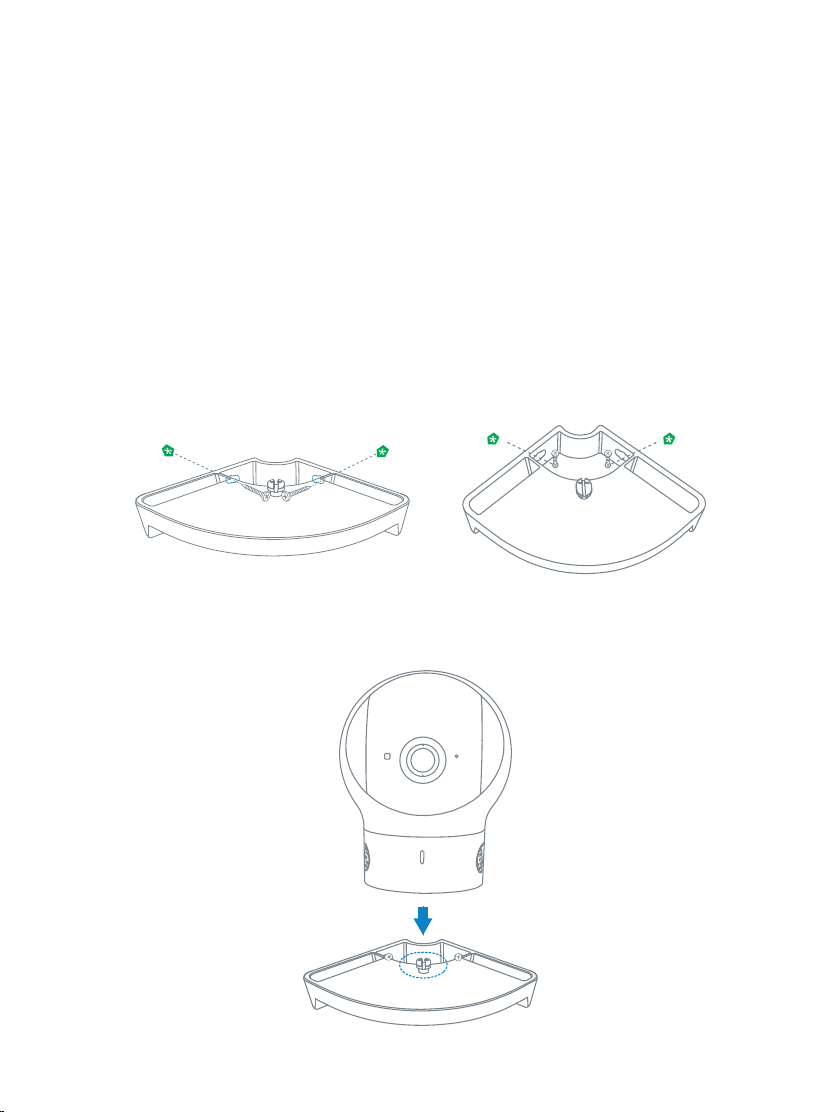
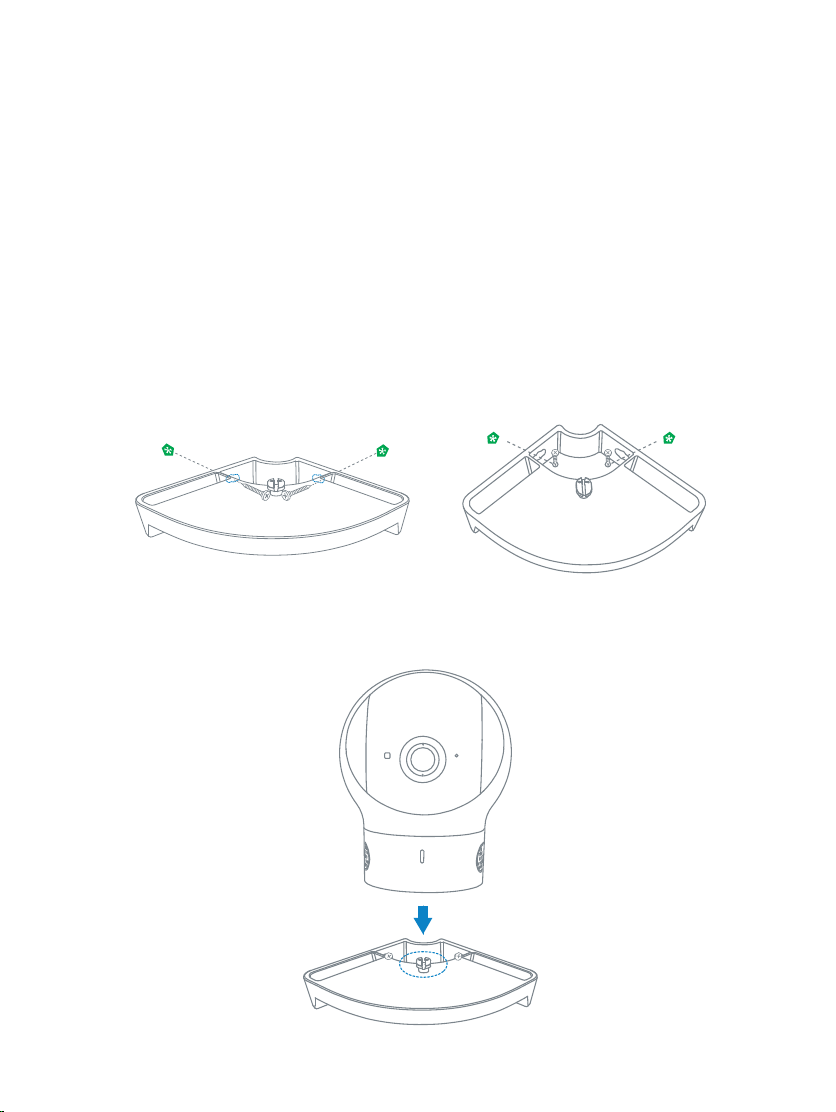
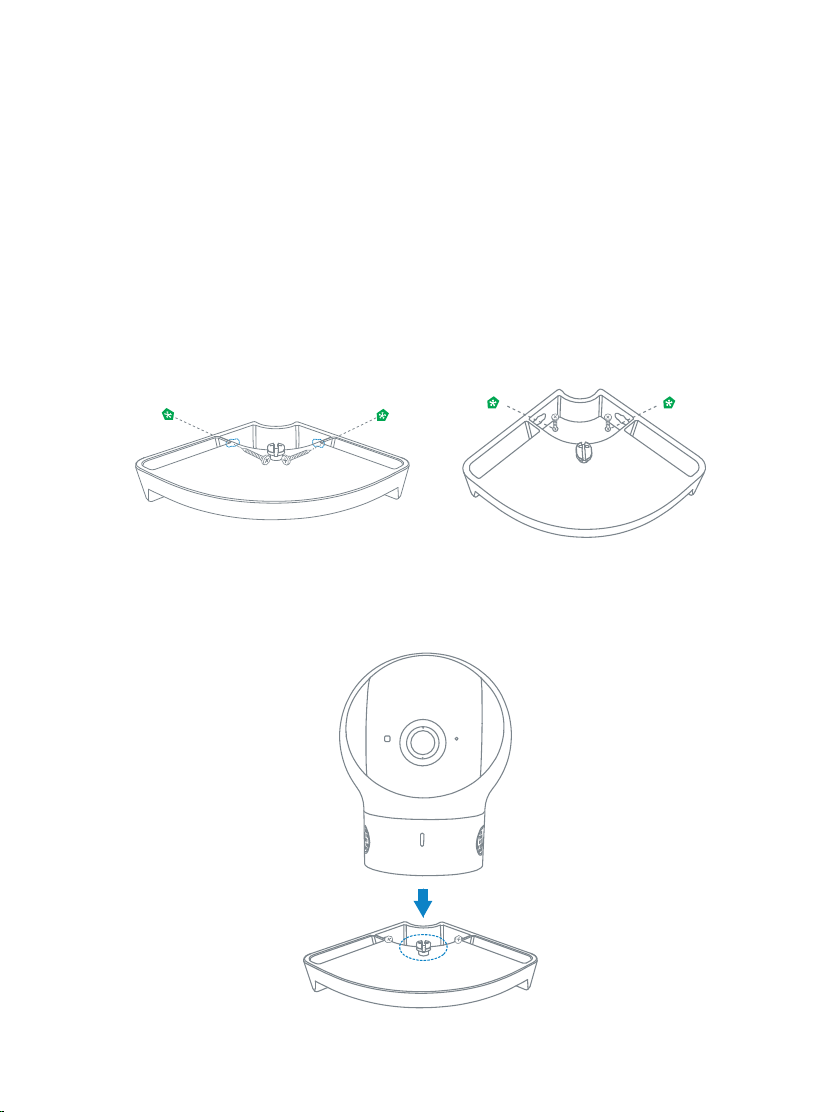
Camera Placement (on the Wall Mount)
1. Use the monitor to test the viewing angle from your
desired mounting spot.
2. Mark the screw holes with a pencil.
3. Drill 1/5” holes into the wall and then insert the anchors
into the holes.
4. Insert the screws through the mounting holes of the wall
mount and screw into the anchors.
5. Place the camera on the wall mount.
06
English English
07
Adding a new Camera to the Monitor
The baby camera and baby monitor are paired out
of the box. Refer to the following steps when adding
extra baby cameras or after resetting a baby camera.
1. Enter menu settings, go to Camera -> Add Camera, then
follow onscreen instructions to start the pairing.
2. Press and hold the pairing button on the rear of the
camera for 1 second until a notification prompt is heard.
:
4
Add Camera
Delete Camera
Cycle Cameras
60
sec
Scanning for new camera
Push the button on the
camera to pair.
1Secs
06 12 AM
When volume is set to high, monitor will emit a loud
noise if placed close to the camera. This is normal
phenomenon and can be resolved when camera is
moved away from the monitor.
Camera Placement (on the Wall Mount)
1. Use the monitor to test the viewing angle from your
desired mounting spot.
2. Mark the screw holes with a pencil.
3. Drill 1/5” holes into the wall and then insert the anchors
into the holes.
4. Insert the screws through the mounting holes of the wall
mount and screw into the anchors.
5. Place the camera on the wall mount.
08
English English
09
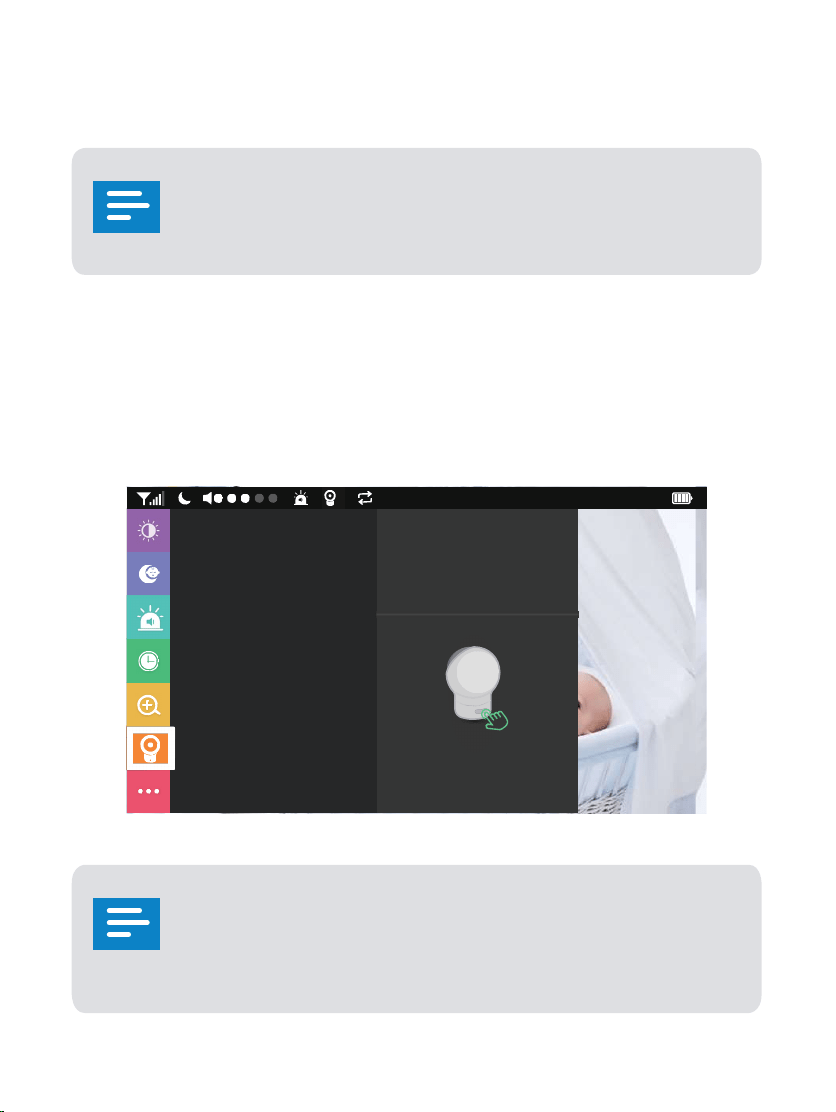
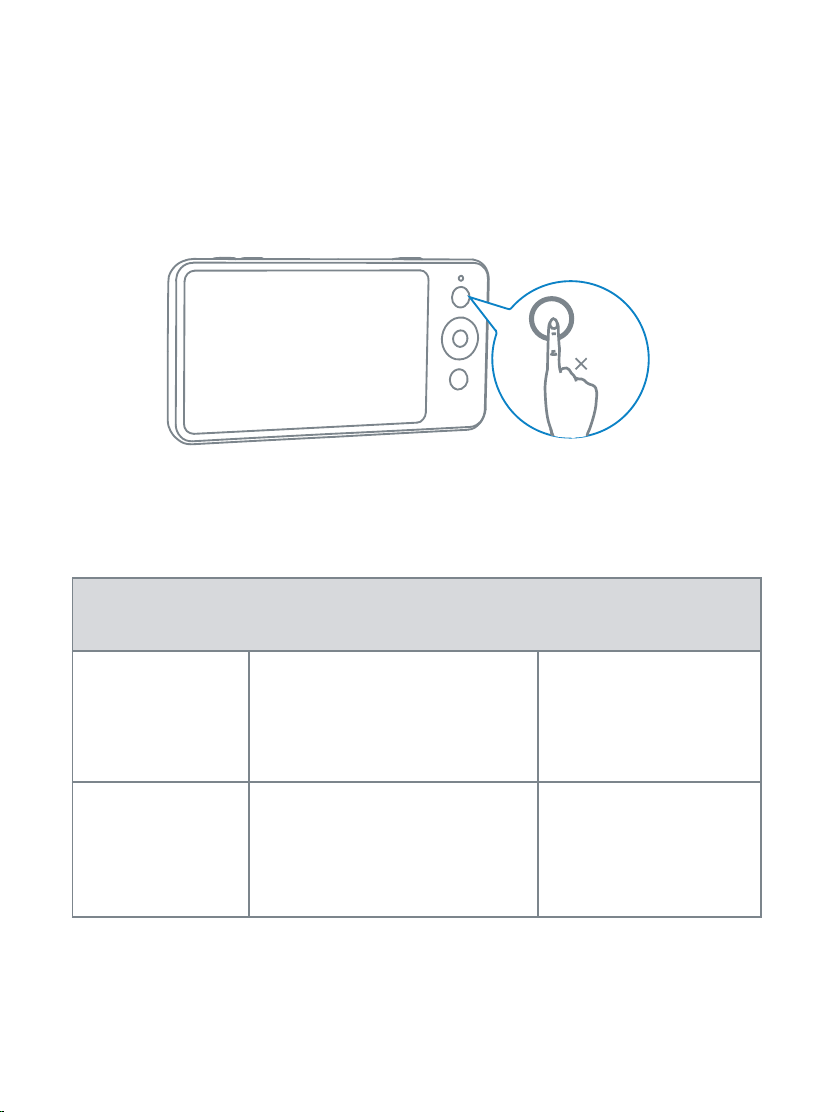
Press and hold the power button to power on the monitor.
Press the menu button to open Menu Settings.
1
Monitor Menu Settings
Menu Options Description Available Options
Brightness
Set the brightness of the
screen.
Use the navigation
buttons to adjust
the brightness
level
Sleep Mode Select to turn off the
screen after 1 min, 3 min,
or 5 min.
Off / 1 min / 3 min
/ 5 min
Sound Alert
Sound Level
Note: You can set the
baby monitor to alert you
when a specific noise
level is detected.
Off / Level 1 / Level
2 / Level 3 / Level
4 / Level 5
Note: Level 1 has
the best sensitivity.
Alert Duration
10 Secs / 20 Secs /
30 Secs / 60 Secs
Time
Set the time on the
monitor.
Zoom Set the zoom level. Off / 1.5x / 2x
Camera
Add Camera
Note: You can add up
to 4 cameras per baby
monitor.
Delete Camera Delete / Cancel
Cycle Cameras
Note: Cycles through the
list of connected baby
cameras according to
preset intervals.
Off / 5 Secs / 10
Secs / 15 Secs / 30
Secs
Night Vision
Mode
When enabled, the camera
will change the screen
color accordingly to the
light conditions in the
room. When disabled,
the camera will stick to
daylight screen color and
will not change when the
surrounding environment
is getting dark.
On / Off
Anti-Screen
Flicker
Changes the refresh rate
of the screen to prevent
flickering.
Mode A / Mode B

08
English English
09
Press and hold the power button to power on the monitor.
Press the menu button to open Menu Settings.
1
Monitor Menu Settings
Menu Options Description Available Options
Brightness
Set the brightness of the
screen.
Use the navigation
buttons to adjust
the brightness
level
Sleep Mode Select to turn off the
screen after 1 min, 3 min,
or 5 min.
Off / 1 min / 3 min
/ 5 min
Sound Alert
Sound Level
Note: You can set the
baby monitor to alert you
when a specific noise
level is detected.
Off / Level 1 / Level
2 / Level 3 / Level
4 / Level 5
Note: Level 1 has
the best sensitivity.
Alert Duration
10 Secs / 20 Secs /
30 Secs / 60 Secs
Time
Set the time on the
monitor.
Zoom Set the zoom level. Off / 1.5x / 2x
Camera
Add Camera
Note: You can add up
to 4 cameras per baby
monitor.
Delete Camera Delete / Cancel
Cycle Cameras
Note: Cycles through the
list of connected baby
cameras according to
preset intervals.
Off / 5 Secs / 10
Secs / 15 Secs / 30
Secs
Night Vision
Mode
When enabled, the camera
will change the screen
color accordingly to the
light conditions in the
room. When disabled,
the camera will stick to
daylight screen color and
will not change when the
surrounding environment
is getting dark.
On / Off
Anti-Screen
Flicker
Changes the refresh rate
of the screen to prevent
flickering.
Mode A / Mode B
10
English English
11
Language
Sets the on-screen
display menu language.
English / French /
German / Spanish
Default
Settings
Resets all options to their
default setting.
Yes / No
About
Displays the current
software version.
Software version
Connect with
Us
Contact details. Cancel / OK
The interval duration between each sound alert is 30
seconds. It will not alert during this interval even if
there is alert trigger condition.
4
06 12 AM
:
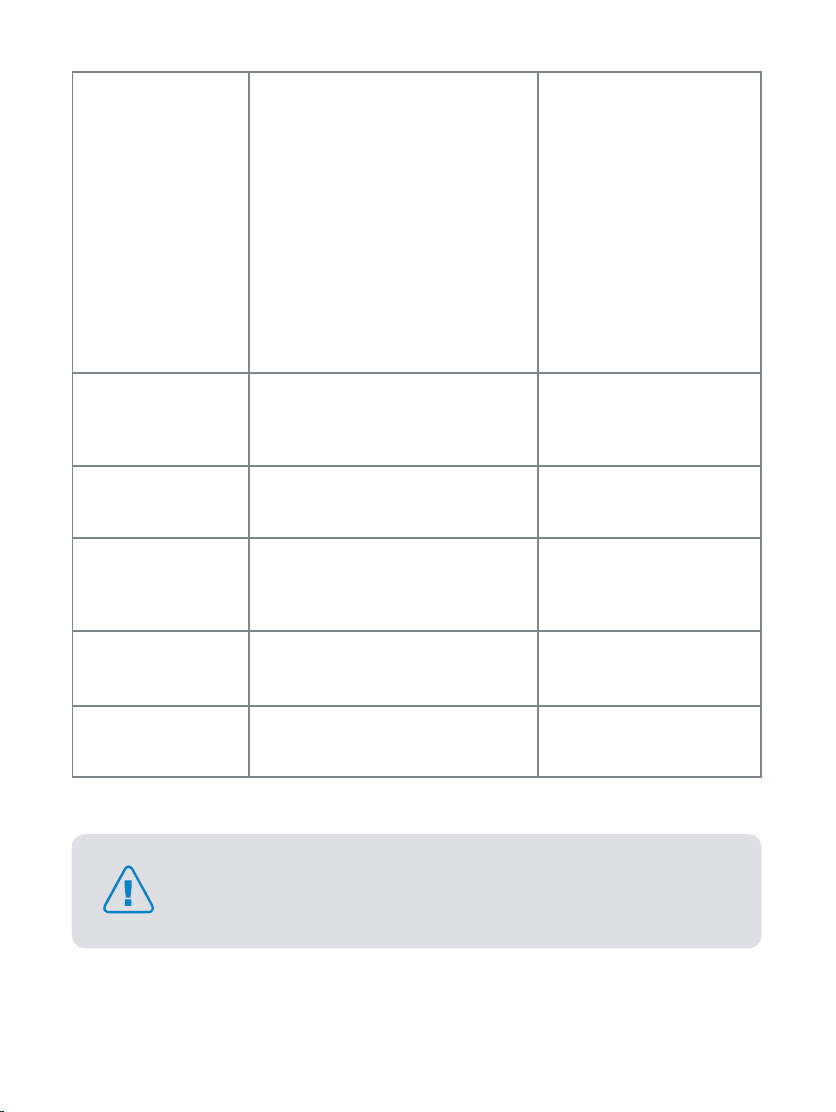
Brightness
On-screen Menu Icons
Icon Icon Description
Wireless signal strength
Night Vision Mode is enabled
1
Shows the camera that is currently presenting
on the baby monitor screen
Note: This icon will not appear on the screen
when there is only one camera connected to
monitor.
Cycle Cameras enabled
Sound Alert enabled
Sound level of the room the camera is in
17: 30
Current time
Current battery level of the baby monitor

10
English English
11
Language
Sets the on-screen
display menu language.
English / French /
German / Spanish
Default
Settings
Resets all options to their
default setting.
Yes / No
About
Displays the current
software version.
Software version
Connect with
Us
Contact details. Cancel / OK
The interval duration between each sound alert is 30
seconds. It will not alert during this interval even if
there is alert trigger condition.
4
06 12 AM
:
Brightness
On-screen Menu Icons
Icon Icon Description
Wireless signal strength
Night Vision Mode is enabled
1
Shows the camera that is currently presenting
on the baby monitor screen
Note: This icon will not appear on the screen
when there is only one camera connected to
monitor.
Cycle Cameras enabled
Sound Alert enabled
Sound level of the room the camera is in
17: 30
Current time
Current battery level of the baby monitor
12
English
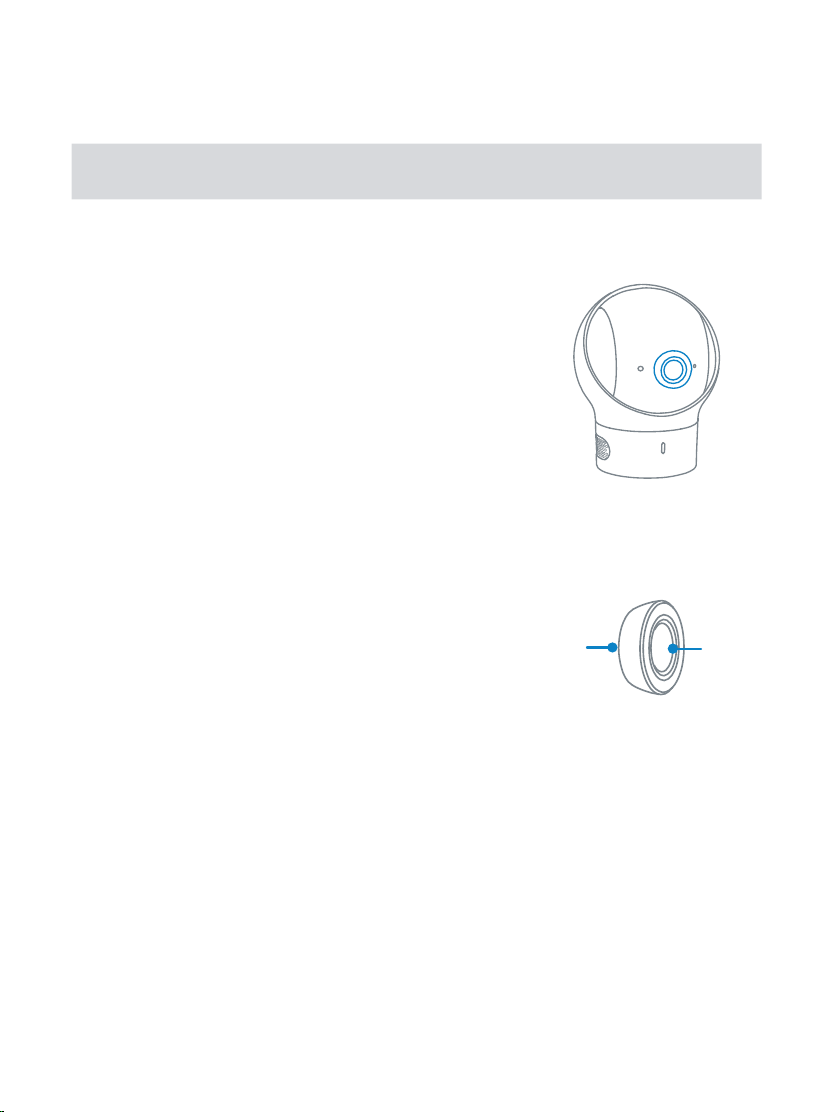
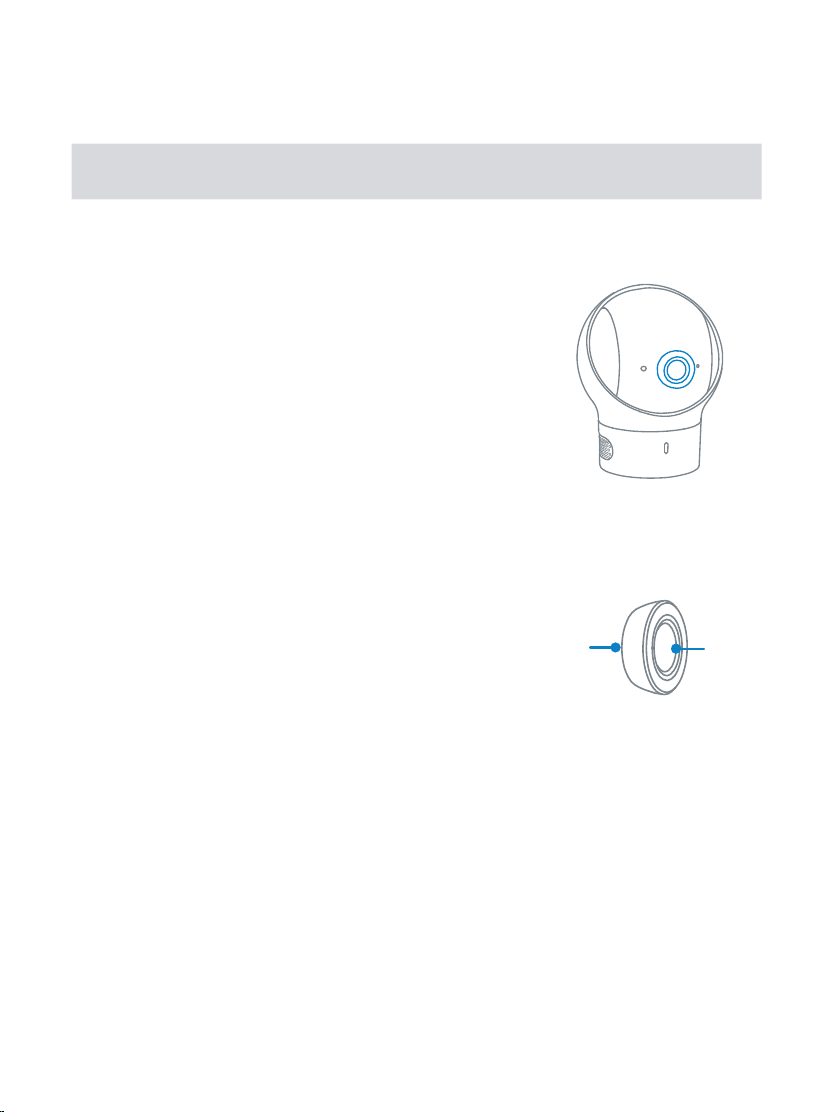
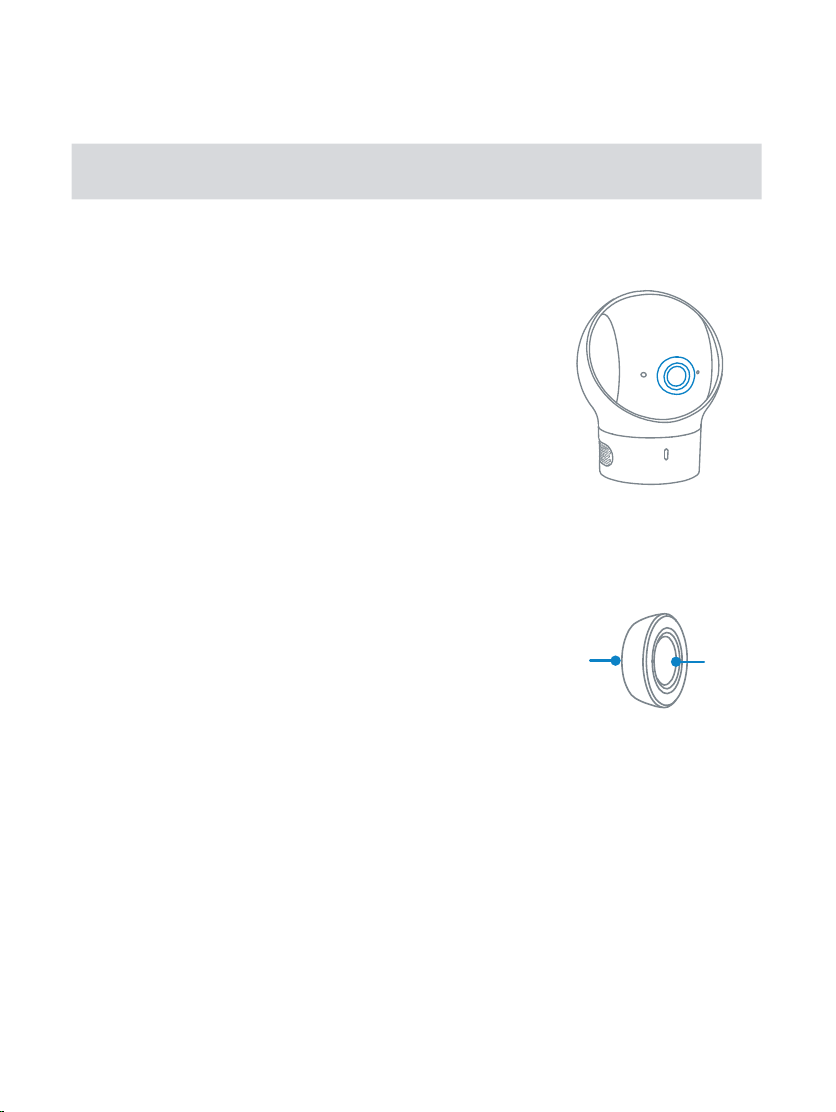
Replacing the Camera lens
Lens type Usage Lens
Standard camera
lens (default lens)
This lens is
recommended for
general viewing;
infants are clearly
seen within a 2~3m
range.
The lens angle of
view for standard
camera lens is 62°.
Wide-angle lens This lens provides a
wide-angle view of
the room. The lens
angle of view for
wide-angle lens is
110°.
Back
Front
The standard camera lens is not removable. When you want
to use the wide-angle lens, simply place it over the standard
camera lens and fasten.
Safety
Warning
Strangulation Hazard: Children have STRANGLED in cords. Keep this cord out
of the reach of children (more than 1m (3ft) away). Never use extension cords
with AC Adapters. Only use the AC Adapters provided.
This product complies with the radio interference requirements of
the European Community.
Declaration of Conformity
Hereby, Anker Innovations Limited declares that this device is in compliance
with the essential requirements and other relevant provisions of Directive
2014/53/EU.For the declaration of conformity, visit the Web site https://
www.eufylife.com/.
This product can be used across EU member states.
Due to the used enclosure material, the product shall only be connected to a
USB Interface of version 2.0 or higher. The connection to so called power USB
is prohibited.
A statement regarding the AC/DC adapter as disconnect device is missing in
the user manual.
The statement shall require a socket outlet that is installed near equipment
and that shall be easily accessible.
The adapter shall be installed near the equipment and shall be easily
accessible.
Do not use the Device in the environment at too high or too low temperature,
never expose the Device under strong sunshine or too wet environment.
The suitable temperature for T8300-M and accessories is -20°C-45°C.
The suitable temperature for T8300-C and accessories is -20°C-40°C.
When charging, please place the device in an environment that has a normal
room temperature and good ventilation.
It is recommended to charge the device in an environment with a
temperature that ranges from -10°C~40°C.
English
13

12
English
Replacing the Camera lens
Lens type Usage Lens
Standard camera
lens (default lens)
This lens is
recommended for
general viewing;
infants are clearly
seen within a 2~3m
range.
The lens angle of
view for standard
camera lens is 62°.
Wide-angle lens This lens provides a
wide-angle view of
the room. The lens
angle of view for
wide-angle lens is
110°.
Back
Front
The standard camera lens is not removable. When you want
to use the wide-angle lens, simply place it over the standard
camera lens and fasten.
Safety
Warning
Strangulation Hazard: Children have STRANGLED in cords. Keep this cord out
of the reach of children (more than 1m (3ft) away). Never use extension cords
with AC Adapters. Only use the AC Adapters provided.
This product complies with the radio interference requirements of
the European Community.
Declaration of Conformity
Hereby, Anker Innovations Limited declares that this device is in compliance
with the essential requirements and other relevant provisions of Directive
2014/53/EU.For the declaration of conformity, visit the Web site https://
www.eufylife.com/.
This product can be used across EU member states.
Due to the used enclosure material, the product shall only be connected to a
USB Interface of version 2.0 or higher. The connection to so called power USB
is prohibited.
A statement regarding the AC/DC adapter as disconnect device is missing in
the user manual.
The statement shall require a socket outlet that is installed near equipment
and that shall be easily accessible.
The adapter shall be installed near the equipment and shall be easily
accessible.
Do not use the Device in the environment at too high or too low temperature,
never expose the Device under strong sunshine or too wet environment.
The suitable temperature for T8300-M and accessories is -20°C-45°C.
The suitable temperature for T8300-C and accessories is -20°C-40°C.
When charging, please place the device in an environment that has a normal
room temperature and good ventilation.
It is recommended to charge the device in an environment with a
temperature that ranges from -10°C~40°C.
English
13

Please ensure to use only the charger offered by the manufacturer. Using
unauthorized charger may cause danger and violate the authorization of the
projecter and the guarantee article.
The charger output voltage/current is 5Vdc/2A. The plug considered as
disconnect device of adapter.
If you use a third-party charger, the recommended outputvoltage/current of
the adaptor is 5Vdc/2A,and the adapter shall be CE approval type.
CAUTION RISK OF EXPLOSION IF BATTERY IS REPLACED BY AN INCORRECT
TYPE. DISPOSE OF USED BATTERIES ACCORDING TO THE INSTRUCTIONS
RF exposure information: The Maximum Permissible Exposure (MPE) level
has been calculated based on a distance of d=20 cm between the device and
the human body. To maintain compliance with RF exposure requirement, use
product that maintain a 20cm distance between the device and human body.
Operating Frequency Range: 2410-2477MHz
The T8300-C Max Output Power: 18.04dBm, The T8300-M Max Output
Power: 14.89dBm
This T3800-M was tested for typical body-worn operations with the back
of the handset kept 0 mm from the body. The SAR limit of Europe is 4.0 W/
kg. Device types T8300-M has also been tested against this SAR limit. The
highest SAR value reported under this standard during product certification
for use at the limb is1.707W/kg . This device was tested for typical hand held
operations with the back of the device kept 0mm from the Limb.
The T3800-C device has been evaluated to meet general RF exposure
requirements and can be used in fixed exposure condition. RF exposure
information: The Maximum Permissible Exposure (MPE) level has been
calculated based on a distance of d=20 cm between the device and the
human body. To maintain compliance with RF exposure requirement, use
product that maintain a 20cm distance between the device and human body.
The following importer is the responsible party (contact for EU matters only)
Importer:Anker Technology (UK) Ltd
Importer Address:Suite B, Fairgate House, 205 Kings Road, Tyseley,
Birmingham,United Kingdom B11 2AA
This product is designed and manufactured with high quality
materials and components, which can be recycled and reused.
This symbol means the product must not be discarded as household
waste, and should be delivered to an appropriate collection facility
for recycling. Proper disposal and recycling helps protect natural
resources, human health and the environment. For more information
on disposal and recycling of this product, contact your local
municipality, disposal service, or the shop where you bought this
product.
FCC Statement
This device complies with Part 15 of the FCC Rules. Operation is subject
to the following two conditions: (1) this device may not cause harmful
interference, and (2) this device must accept any interference received,
including interference that may cause undesired operation.
Warning: Changes or modifications not expressly approved by the party
responsible for compliance could void the user's authority to operate the
equipment.
Note: This equipment has been tested and found to comply with the limits
for a Class B digital device, pursuant to Part 15 of the FCC Rules. These limits
are designed to provide reasonable protection against harmful interference
in a residential installation.
This equipment generates uses and can radiate radio frequency energy and, if
not installed and used in accordance with the instructions, may cause harmful
interference to radio communications. However, there is no guarantee that
interference will not occur in a particular installation. If this equipment does
cause harmful interference to radio or television reception, which can be
determined by turning the equipment off and on, the user is encouraged to
try to correct the interference by one or more of the following measures:
(1) Reorient or relocate the receiving antenna. (2) Increase the separation
between the equipment and receiver. (3) Connect the equipment into an outlet
on a circuit different from that to which the receiver is connected. (4) Consult
the dealer or an experienced radio/TV technician for help.
FCC Radio Frequency Exposure Statement
14
English English
15

Deutsch
17
Inhalt
Im Lieferumfang 18
Vorstellung der Funktionen 19
Einrichten der Kamera und des Monitors 21
Austauschen des Kameraobjektivs 28
Sicherheit 29
The T8300-C device has been evaluated to meet general RF exposure
requirements. The T8300-C can be used in fixed exposure condition. The min
separation distance is 20cm.
This T8300-M was tested for typical body-worn operations with the back of
the handset kept 0 mm from the body.
RF Exposure Information(SAR)
The Extremity SAR limit of FCC for Hand held is 4.0W/kg.
Device is recommended to use in hand held only and SAR when hand held is
1.804W/kg
Worn on body will have unexpected RF exposure RISK.
The following importer is the responsible partyCompany Name:
POWER MOBILE LIFE, LLC
Address: 400 108th Ave NE Ste 400, Bellevue, WA 98004-5541
Telephone:1-206-383-8247

18
Deutsch Deutsch
19
Im Lieferumfang
Babyphon-Monitor
(T8300-C)
Mikro-USB-Netzkabel
für Monitor (1,5 m)
Monitor-Netzteil
(5 V 2 A)
Befestigun-
gsschrauben
Gebrauch-
sanweisung
Weitwinkelobjektiv
Mikro-USB-Netzkabel
für Kamera (3 m)
Kamera-Netzteil
(5 V 2 A)
Babyphon-Kamera
(T8300-M)
Wandhalterung
Das Netzteil ist je nach Region unterschiedlich.
Vorstellung der Funktionen
Monitorfunktion :
6
5
2
1
3
4
9
10
8
12
11
13
7
1
Lautstärkeregler
8
microSD-Kartensteckplatz
2
Display
9
Standfuß
3
Ein- / Aus-Taste
10
Mikro-USB-Ladeanschluss
4
Menütaste
11
LED-Anzeige
5
Navigationstasten
12
Mikrofon
6
Zurück zur vorherigen
Menüebene / Sprechtaste
13
Lautsprecher
7
Monitorantenne
Halten Sie die Sprechtaste gedrückt, um mit der
Kamera zu sprechen. Drücken Sie bei geöffnetem Menü
einmal die Sprechtaste, um zur vorherigen Menüebene
zurückzukehren. Drücken Sie die Ein- / Aus-Taste, um den
Monitorbildschirm ein- bzw. auszuschalten. Halten Sie
die Ein- / Aus-Taste 2 Sekunden lang gedrückt, um den
Monitor ein- bzw. auszuschalten.
20
Deutsch Deutsch
21
Die microSD-Speicherkarte kann nur für Firmware-
Upgrades verwendet werden, nicht aber zum Speichern
von Videoaufzeichnungen.
Kamerafunktion:
2
1
3
4
5
6
1
Standard-Kameraobjektiv
4
Lautsprecher
2
Mikrofon
5
Mikro-USB-Anschluss
3
Ein- / Aus-LED-Statusanzeige
6
Kopplungstaste
Einrichten der Kamera und des Monitors
Installation des Monitors
Laden Sie den Monitor vor dem Gebrauch vollständig auf. Zum Laden:
Verbinden Sie den Babyphon-Monitor über das Mikro-USB-Kabel
mit dem Monitor-Netzteil und schließen Sie den Adapter dann
an eine Steckdose an. Verbinden Sie das andere Ende des Mikro-
USB-Netzkabels mit dem Mikro-USB-Anschluss des Monitors, um
diesen aufzuladen. Halten Sie die Ein- / Aus-Taste 2 Sekunden lang
gedrückt, um den Babyphon-Monitor einzuschalten.
Installation der Kamera
Verbinden Sie das Micro-USB-Netzkabel der Babyphon-Kamera mit
dem Kamera-Netzteil (5 V 2 A) und schließen Sie den Adapter dann
an eine Steckdose an. Verbinden Sie abschließend das andere Ende
des Mikro-USB-Netzkabels der Babyphon-Kamera mit dem Mikro-
USB-Anschluss der Kamera.
22
Deutsch Deutsch
23
Hinzufügen einer neuen Babyphon-Kamera zum
Babyphon-Monitor
Die Babyphon-Kamera und der Babyphon-Monitor sind
werkseitig gekoppelt. Beachten Sie die folgenden Schritte
beim Hinzufügen zusätzlicher Babyphon-Kameras oder
nach dem Zurücksetzen einer Babyphon-Kamera.
1. Rufen Sie die Menüeinstellungen auf, gehen Sie zu
Kamera -> Kamera hinzufügen
und befolgen Sie dann die
Anweisungen auf dem Display, um die Kopplung zu starten.
2. Halten Sie die Kopplungstaste an der Rückseite der Kamera 1
Sekunde lang gedrückt, bis eine Benachrichtigung zu hören ist.
:
4
Add Camera
Delete Camera
Cycle Cameras
60
sec
Scanning for new camera
Push the button on the
camera to pair.
1Secs
06 12 AM
Wenn die Lautstärke auf „Hoch“ eingestellt ist, gibt
der Monitor ein lautes Geräusch aus, wenn er zu nah
an der Kamera platziert wird. Dies ist normal und kann
behoben werden, indem die Kamera vom Monitor weg
bewegt wird.
Befestigen der Kamera (an der Wandhalterung)
1. Verwenden Sie den Monitor, um den Blickwinkel vom
gewünschten Befestigungsort zu testen.
2. Markieren Sie die Position der Schraubenlöcher mit einem
Bleistift.
3. Bohren Sie Löcher mit einem Durchmesser von 5,08 mm
in die Wand und setzen Sie die Dübel in die Löcher ein.
4. Drücken Sie die Schrauben durch die Befestigungslöcher der
Wandhalterung und schrauben Sie sie in die Dübel hinein
.
5. Platzieren Sie die Kamera auf der Wandhalterung.
24
Deutsch Deutsch
25
Halten Sie die Ein- / Aus-Taste gedrückt, um den Monitor
einzuschalten.
Drücken Sie die Menütaste, um die Menüeinstellungen zu
öffnen.
1
Monitor-Menüeinstellungen
Menüoptionen
Beschreibung Verfügbare Optionen
Helligkeit Stellen Sie die Helligkeit
des Bildschirms ein.
Passen Sie die
Helligkeitsstufe über
die Navigationstasten
an.
Standby-
Modus
Wählen Sie aus, ob
der Bildschirm nach 1
Min., 3 Min. oder 5 Min.
ausgeschaltet werden soll.
Aus / 1 Min. / 3 Min.
/ 5 Min.
Warnton
Geräuschpegel
Hinweis: Sie können das
Babyphon so einstellen,
dass Sie benachrichtigt
werden, wenn ein
bestimmter Geräuschpegel
erkannt wird.
Aus / Pegel 1/ Pegel
2 / Pegel 3 / Pegel 4
/ Pegel 5
Hinweis: Pegel 1
hat die höchste
Empfindlichkeit.
Warnungsdauer
10 Sek. / 20 Sek. / 30
Sek. / 60 Sek.
Uhrzeit
Stellen Sie die Uhrzeit auf
dem Monitor ein.
Zoom Zoomstufe einstellen Aus / 1,5x / 2x
Kamera
Kamera hinzufügen
Hinweis: Sie können bis zu
4 Kameras pro Babyphon
hinzufügen.
Kamera löschen
Löschen / Abbrechen
Kameras umschalten
Hinweis: Schaltet
den voreingestellten
Intervallen entsprechend
durch die Liste der
angeschlossenen
Babyphon-Kameras.
Aus / 5 Sek. / 10 Sek.
/ 15 Sek. / 30 Sek.

26
Deutsch Deutsch
27
Nachtsich-
tmodus
Wenn diese Option aktiviert
ist, wird die Bildschirmfarbe
den Lichtverhältnissen
im Raum entsprechend
angepasst. Ist die Option
deaktiviert, behält die Kamera
die Tageslichteinstellung
und passt sich nicht an die
Verdunklung der Umgebung
an.
Ein / Aus
Flimmerfrei
Ändert die
Aktualisierungsrate
des Bildschirms, um ein
Flackern zu verhindern.
Modus A / Modus B
Sprache
Legt die Anzeigesprache
des Bildschirmmenüs fest.
Englisch /
Französisch /
Deutsch / Spanisch
Standardein-
stellungen
Setzt alle Optionen auf
ihre Standardeinstellung
zurück.
Ja / Nein
Info
Zeigt die aktuelle
Softwareversion an.
Softwareversion
Kontakt Kontaktdetails. Abbrechen / OK
Die Intervalldauer zwischen den einzelnen
Warntönen beträgt 30 Sekunden. Innerhalb des
Intervalls gibt es keine weiteren Warntöne, selbst
wenn eine bestimmte Warnbedingung eintritt.
4
06 12 AM
:
Brightness
Symbole auf dem Bildschirm
Symbol Symbolbeschreibung
Stärke des WLAN-Signals
Nachtsichtmodus ist aktiviert.
1
Zeigt die Kamera, deren Bild derzeit auf dem
Babyphon-Monitor zu sehen ist.
Hinweis: Dieses Symbol wird nicht auf dem
Bildschirm angezeigt, wenn nur eine Kamera
an den Monitor angeschlossen ist.
„Kameras umschalten“ aktiviert
Warnton aktiviert
Geräuschpegel des Zimmers, in dem sich die
Kamera befindet
17: 30 Aktuelle Uhrzeit
Aktueller Akkustand des Babyphon-Monitors
28
Deutsch
Austauschen des Kameraobjektivs
Objektivtyp Verwendung Objektiv
Standard-
Kameraobjektiv
(Standardobjektiv)
Dieses Objektiv wird
für die allgemeine
Betrachtung empfohlen;
Säuglinge sind innerhalb
einer Reichweiter von
2 bis 3 Metern klar
erkennbar.
Beim Standard-
Kameraobjektiv beträgt
der Objektivwinkel 62°.
Weitwinkelobjektiv Dieses Objektiv bietet
eine Weitwinkelansicht
des Zimmers. Der
Objektivwinkel des
Weitwinkelobjektivs
beträgt 110°.
Back
Front
Das Standard-Kameraobjektiv kann nicht entfernt werden.
Wenn Sie das Weitwinkelobjektiv verwenden möchten,
setzen Sie es einfach auf das Standard-Kameraobjektiv und
befestigen es.
Sicherheit
Dieses Produkt entspricht den EU-Bestimmungen zur Störfestigkeit.
VORSICHT: EXPLOSIONSGEFAHR, WENN DIE BATTERIE DURCH EINEN
FALSCHEN BATTERIETYP ERSETZT WIRD. ENTSORGEN SIE VERBRAUCHTE
BATTERIEN GEMÄß DEN ANWEISUNGEN.
Dieses Produkt ist mit hochwertigen Materialien und Komponenten
für Recycling und Wiederverwertung konzipiert.
Dieses Symbol bedeutet, dass das Produkt nicht als Hausmüll
entsorgt werden darf, sondern einer angemessenen
Sammelstelle für das Recycling zugeführt werden muss. Durch
das ordnungsgemäße Entsorgen und Recyceln tragen Sie zum
Schutz natürlicher Ressourcen und zur Vermeidung von Umwelt-
und Gesundheitsschäden bei. Weitere Informationen zum
Entsorgen und Recyceln dieses Produkts erhalten Sie von Ihrer
Gemeindeverwaltung, Ihrem zuständigen Entsorgungsdienst oder
dem Geschäft, in dem Sie dieses Produkt erworben haben.
Deutsch
29

Español
31
Índice
Contenido de la caja 32
Características 33
Configuración de la cámara y el monitor 35
Sustitución de la lente de la cámara 42
Seguridad 43

Español
31
Índice
Contenido de la caja 32
Características 33
Configuración de la cámara y el monitor 35
Sustitución de la lente de la cámara 42
Seguridad 43

32
Español Español
33
Contenido de la caja
Monitor para
bebés (T8300-C)
Cable de alimentación
micro-USB del
monitor (1,5 m)
Adaptador del
monitor (5 V, 2 A)
Tornillos de
montaje
Manual del
usuario
Lente gran
angular
Cable de alimentación
micro-USB de la
cámara (3 m)
Adaptador de la
cámara (5 V, 2 A)
Cámara para
bebés (T8300-M)
Soporte de
montaje en pared
El adaptador de alimentación varía según la región.
Características
Características del monitor:
6
5
2
1
3
4
9
10
8
12
11
13
7
1
Controles de volumen
8
Ranura para tarjeta microSD
2
Pantalla
9
Soporte de apoyo
3
Botón de encendido
10
Puerto de carga micro-USB
4
Botón de menú
11
Indicador LED
5
Botones de navegación
12
Micrófono
6
Botón para hablar/volver
al nivel anterior del menú
13
Altavoz
7
Antena del monitor
Mantenga pulsado el botón Hablar para hablar a la
cámara. Si tiene abierto el menú, pulse el botón Hablar
una vez para volver al nivel anterior de este. Pulse el
botón de encendido para encender o apagar la pantalla
del monitor. Mantenga pulsado el botón de encendido
durante 2 segundos para encender o apagar el monitor.
34
Español Español
35
La tarjeta de memoria microSD solo se puede utilizar
para realizar actualizaciones de firmware, no para
almacenar grabaciones de vídeo.
Características de la cámara:
2
1
3
4
5
6
1
Lente estándar de la cámara
4
Altavoz
2
Micrófono
5
Puerto micro-USB
3
Indicador LED del estado de
la alimentación
6
Botón de
emparejamiento
Configuración de la cámara y el monitor
Instalación del monitor
Cargue por completo el monitor antes de utilizarlo. Para cargarlo:
Conecte el monitor para bebés al adaptador del monitor con el cable
micro-USB y, a continuación, enchufe el adaptador a una toma de
corriente. Conecte el otro extremo del cable de alimentación micro-
USB del monitor para bebés al puerto micro-USB del monitor
para cargarlo. Mantenga pulsado el botón de encendido durante 2
segundos para encender el monitor para bebés.
Instalación de la cámara
Conecte el cable de alimentación micro-USB de la cámara para
bebés al adaptador de la cámara (5 V, 2 A) y, a continuación, enchufe
el adaptador a una toma de corriente. Por último, conecte el otro
extremo del cable de alimentación micro-USB de la cámara para
bebés al puerto micro-USB de la cámara.
36
Español Español
37
Adición de una nueva cámara al monitor para bebés
La cámara y el monitor para bebés vienen emparejados
de fábrica. Consulte los siguientes pasos para añadir
cámaras para bebés adicionales o si ha restablecido
una cámara para bebés.
1. Acceda al menú de configuración, vaya a Cámara ->
Añadir cámara y, a continuación, siga las instrucciones que
aparecen en la pantalla para iniciar el emparejamiento.
2. Mantenga pulsado el botón de emparejamiento de la
parte posterior de la cámara durante 1 segundo hasta que
escuche un sonido de notificación.
:
4
Add Camera
Delete Camera
Cycle Cameras
60
sec
Scanning for new camera
Push the button on the
camera to pair.
1Secs
06 12 AM
Si establece el volumen en Alto, el monitor emitirá
un sonido fuerte si se coloca cerca de la cámara. Este
fenómeno es normal y puede resolverlo colocando la
cámara lejos del monitor.
Colocación de la cámara (sobre el soporte de montaje
en pared)
1. Utilice el monitor para comprobar el ángulo de
visualización desde la ubicación de montaje que desee.
2. Marque los orificios para los tornillos con un lápiz.
3. Haga agujeros de 2,54 cm en la pared e introduzca las
fijaciones en los orificios.
4. Introduzca los tornillos a través de los orificios del soporte
de montaje en pared y atorníllelos a las fijaciones.
5. Coloque la cámara en el soporte de montaje en pared.
38
Español Español
39
Mantenga pulsado el botón de encendido para encender el
monitor.
Pulse el botón de menú para abrir el menú de configuración.
1
Configuración del menú del monitor
Opciones de
menú
Descripción
Opciones
disponibles
Brillo Permite definir el brillo de
la pantalla.
Utilice los botones
de navegación para
ajustar el nivel de
brillo.
Modo de
suspensión
Seleccione este modo para
apagar la pantalla después
de 1, 3 o 5 minutos.
Desactivado/
1 min/3 min/5 min
Alerta sonora
Nivel de sonido
Nota:Puede configurar el
monitor para bebés para
que le avise cuando se
detecte un nivel de ruido
determinado.
Desactivada/Nivel
1/Nivel 2/Nivel 3/
Nivel 4/Nivel 5
Nota: La opción
Nivel 1 tiene mayor
sensibilidad.
Duración de la alerta 10 s/20 s/30 s/60 s
Hora
Permite establecer la hora
del monitor.
Zoom
Permite establecer el nivel
de zoom.
Desactivado/
1,5x/2x
Cámara
Añadir cámara
Nota: Puede añadir hasta
4 cámaras a cada monitor
para bebés.
Eliminar cámara Eliminar/Cancelar
Ciclo de cámaras
Nota: Se desplaza por
la lista de cámaras para
bebés conectadas a
intervalos predefinidos.
Desactivado/
5 s/10 s/15 s/30 s
40
Español Español
41
Modo de visión
nocturna
Al activar este modo, la
cámara cambiará el color
de la pantalla en función
de las condiciones de
iluminación de la habitación.
Al desactivarlo, la cámara
utilizará el color diurno de
la pantalla y no lo cambiará
aunque el entorno se
oscurezca.
Activado/
Desactivado
Antiparpadeo
de pantalla
Cambia la frecuencia de
actualización de la pantalla
para evitar el parpadeo.
Modo A/Modo B
Idioma
Permite definir el idioma
del menú.
Inglés/Francés/
Alemán/Español
Ajustes
predeterminados
Restablece todas las
opciones a sus valores
predeterminados.
Sí/No
Acerca de
Muestra la versión actual
del software.
Versión de software
Contacte con
nosotros
Muestra los detalles de
contacto.
Cancelar/Aceptar
La duración del intervalo entre cada alerta sonora
es de 30 segundos. No se emitirá ninguna alerta
durante este intervalo incluso si se activa una.
4
06 12 AM
:
Brightness
Iconos del menú en la pantalla
Icono Descripción del icono
Intensidad de la señal inalámbrica
Modo de visión nocturna activado
1
Indica la cámara que se está mostrando
actualmente en la pantalla del monitor para
bebés.
Nota: Este icono no aparecerá en la pantalla
si solo hay una cámara conectada al monitor.
Ciclo de cámaras activado
Alerta sonora activada
Nivel de sonido en la sala de la cámara
17: 30
Hora actual
Nivel actual de la batería del monitor para bebés
42
Español
Sustitución de la lente de la cámara
Tipo de lente Uso Lente
Lente estándar
de la cámara
(predeterminada)
Esta lente está
recomendada para la
visualización general;
los niños se ven
claramente a una
distancia de 2-3 m.
El ángulo de
visualización de la
lente estándar de la
cámara es de 62°.
Lente gran
angular
Esta lente proporciona
una perspectiva más
amplia de la habitación.
El ángulo de visión de
la lente gran angular
es de 110°.
Back
Front
La lente estándar de la cámara no se puede extraer. Si desea
utilizar una lente gran angular, simplemente colóquela sobre la
lente estándar de la cámara y fíjela.
Seguridad
Este producto cumple los requisitos de interferencias radioeléctricas
de la Comunidad Europea.
PRECAUCIÓN: SI SE SUSTITUYE LA BATERÍA POR OTRA DE UNA CLASE
INCORRECTA, PUEDE EXISTIR RIESGO DE EXPLOSIÓN. DESECHE LAS
BATERÍAS USADAS COMO SE INDICA EN LAS INSTRUCCIONES.
Este producto se ha diseñado y fabricado con materiales y
componentes de gran calidad que pueden reciclarse y reutilizarse.
Este símbolo indica que el producto no debe desecharse como
residuo doméstico, sino que debe depositarse en un lugar de
recogida adecuado para su reciclaje. La eliminación y el reciclaje
ayudan a proteger los recursos naturales, la salud humana y
el medio ambiente. Para obtener más información acerca de la
eliminación y el reciclaje de este producto, póngase en contacto con
su ayuntamiento, servicio de retirada de desechos o la tienda donde
compró el producto.
Español
43

Français
45
Table des matières
Contenu de la boîte 46
Présentation des fonctions 47
Configuration de la caméra et du moniteur 49
Remplacement de l'objectif de la caméra 56
Sécurité 57

Français
45
Table des matières
Contenu de la boîte 46
Présentation des fonctions 47
Configuration de la caméra et du moniteur 49
Remplacement de l'objectif de la caméra 56
Sécurité 57
46
Français Français
47
Contenu de la boîte
Moniteur
(T8300-C)
Câble d'alimentation
micro-USB du
moniteur (1,5 m)
Adaptateur
moniteur (5 V 2 A)
Vis de
montage
Manuel de
l'utilisateur
Objectif grand-
angle
Câble d'alimentation
micro-USB de la
caméra (3 m)
Adaptateur
caméra (5 V 2 A)
Caméra
(T8300-M)
Support mural
l'adaptateur d'alimentation varie selon la région.
Présentation des fonctions
Fonctions du moniteur :
6
5
2
1
3
4
9
10
8
12
11
13
7
1
Contrôles de volume
8
Emplacement de carte
MicroSD
2
Écran
3
Bouton d'alimentation
9
Socle
4
Bouton de menu
10
Port de charge micro USB
5
Boutons de navigation
11
Voyant LED
6
Retour au niveau précédent du
menu/bouton de conversation
12
Microphone
7
Antenne du moniteur
13
Haut-parleur
Appuyez et maintenez enfoncé le bouton de conversation
pour parler à la caméra. Lorsque le menu est ouvert,
appuyez une fois sur le bouton de conversation pour revenir
au niveau de menu précédent. Appuyez sur le bouton
d'alimentation pour allumer/éteindre l'écran du moniteur.
Appuyez sur le bouton d'alimentation pendant 2 secondes,
puis relâchez-le pour allumer/éteindre le moniteur.
48
Français Français
49
la carte mémoire microSD peut uniquement être utilisée
pour la mise à niveau du firmware, elle ne peut pas être
utilisée pour stocker des enregistrements vidéo.
Caractéristiques de la caméra :
2
1
3
4
5
6
1
Objectif de caméra standard
4
Haut-parleur
2
Microphone
5
Port micro USB
3
Indicateur d'état d'alimentation
6
Bouton de couplage
Configuration de la caméra et du moniteur
Installation du moniteur
Chargez complètement le moniteur avant l'utilisation. Pour
charger le moniteur :
Connectez le Babyphone Vidéo à l'adaptateur de moniteur avec le
câble micro USB, puis branchez l'adaptateur à une prise de courant.
Connectez l'autre extrémité du câble d'alimentation micro USB
du moniteur bébé au port micro USB du moniteur pour le charger.
Appuyez sur le bouton d'alimentation pendant 2 secondes pour
allumer le Babyphone Vidéo.
Installation de la caméra
Connectez le câble d'alimentation micro USB de la caméra à
l'adaptateur caméra (5 V 2 A), puis branchez l'adaptateur à une prise
de courant. Enfin, connectez l'autre extrémité du câble d'alimentation
micro USB de la caméra au port micro USB de la caméra.

50
Français Français
51
Ajout d'une nouvelle caméra au Babyphone Vidéo
la caméraet le Babyphone Vidéo sont déjà couplés.
Reportez-vous aux étapes suivantes lors de l'ajout de
caméras supplémentaires ou après la réinitialisation
d'une caméra.
1. Dans les paramètres de menu, allez à Caméra -> Ajouter
caméra, puis suivez les instructions à l'écran pour lancer le
couplage.
2. Appuyez sur le bouton de couplage situé à l'arrière de la
caméra pendant 1 seconde jusqu'à ce que vous entendiez
une notification.
:
4
Add Camera
Delete Camera
Cycle Cameras
60
sec
Scanning for new camera
Push the button on the
camera to pair.
1Secs
06 12 AM
lorsque le volume est réglé sur élevé, le moniteur
émet un bruit fort s'il est placé près de la caméra. Ce
phénomène est normal et peut être résolu lorsque la
caméra est éloignée du moniteur.
Positionnement de la caméra (sur le montage mural)
1. Utilisez le moniteur pour tester l'angle de vue du lieu de
montage souhaité.
2. Marquez les orifices pour fixation avec un crayon.
3. Percez des trous de 1/5 de pouces dans le mur et insérez
les ancrages dans les orifices.
4. Insérez les vis dans les orifices de fixation du support
mural et vissez les ancrages.
5. Placez la caméra sur le support mural.
52
Français Français
53
Appuyez sur le bouton d'alimentation et maintenez-le enfoncé
pour allumer le moniteur.
Appuyez sur le bouton de menu pour ouvrir les paramètres de
menu.
1
Réglages du menu du moniteur
Options de
menu
Description
Options
disponibles
Luminosité Réglez la luminosité de
l'écran.
Utilisez les boutons
de navigation pour
régler le niveau de
luminosité.
Mode veille Sélectionnez ce mode
pour éteindre l'écran
après 1 min, 3 min ou
5 min.
Éteint/1 min/
3 min/5 min
Alerte sonore
Niveau sonore
Remarque : vous pouvez
configurer le Babyphone
Vidéo pour être alerté
lorsqu'un niveau de bruit
spécifique est détecté.
Éteint/niveau 1/
niveau 2/niveau 3/
niveau 4/niveau 5
Remarque :
le niveau 1 a
la meilleure
sensibilité.
Durée de l'alerte
10 sec/20 sec/
30 sec/60 sec
Heure
Réglez l'heure sur le
moniteur.
Zoom
Définissez le niveau de
zoom
Éteint/1,5x/2x
Caméra
Ajouter une caméra
Remarque : vous pouvez
ajouter jusqu'à 4 caméras
par Babyphone Vidéo.
Supprimer une caméra Supprimer/annuler
Mettre une/des caméras
en cycles
Remarque : effectue des
cycles à travers la liste
des caméras connectées
selon des intervalles
prédéfinis.
Éteint/5 sec/10 sec
/15 sec/30 sec
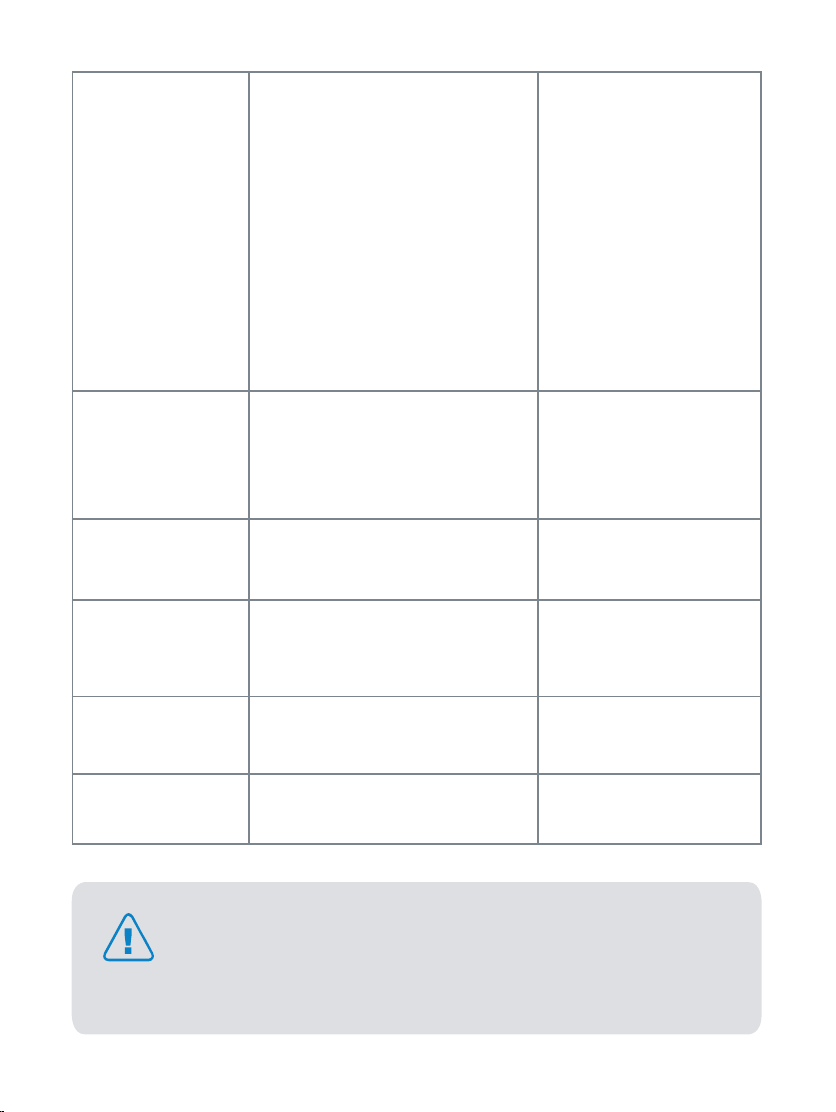
54
Français Français
55
Mode vision
nocturne
Lorsque cette option est
activée, la caméra change
la couleur de l'écran selon
les conditions de luminosité
de la pièce. Lorsqu'elle est
désactivée, la caméra s'en
tient à la couleur d'écran de
journée et ne change pas
lorsque l'environnement
ambiant devient sombre.
Allumé/éteint
Anti-
clignotement
de l'écran
Modifie le taux de
rafraîchissement de
l'écran pour éviter un
clignotement.
Mode A/mode B
Langue
Définit la langue du menu
d'affichage à l'écran.
Allemand/Anglais/
Espagnol/Français
Paramètres
par défaut
Réinitialise toutes les
options à leur paramètre
par défaut.
Oui/non
À propos
Affiche la version actuelle
du logiciel.
Version du logiciel
Contactez-
nous
Coordonnées. Annuler/OK
La durée de l'intervalle entre chaque alerte sonore
est de 30 secondes. L'alerte ne se déclenche pas
pendant cet intervalle, même s'il y a une condition de
déclenchement d'alerte.
4
06 12 AM
:
Brightness
Icônes du menu à l'écran
Icône Description de l'icône
Puissance du signal sans fil
Le Mode vision nocturne est activé
1
Montre la caméra qui diffuse actuellement
des images sur l'écran du Babyphone Vidéo
Remarque : cette icône ne s'affiche pas
sur l'écran lorsqu'il n'y a qu'une caméra
connectée au moniteur.
Mode caméras en cycles activé
Alerte sonore activée
Niveau sonore de la pièce dans laquelle se
situe la caméra
17: 30
Heure actuelle
Niveau actuel de la batterie du Babyphone Vidéo

56
Français
Remplacement de l'objectif de la caméra
Type d'objectif Utilisation Objectif
Objectif de la
caméra standard
(objectif par défaut)
Cet objectif est
recommandé pour
la vue générale ; les
nourrissons sont
clairement vus dans
une plage de 2-3 m.
L'angle de vue de
l'objectif de caméra
standard est de 62 °.
Objectif grand-
angle
Cet objectif offre un
grand angle de vision
de la pièce. L'angle
de vue de l'objectif
grand-angle de
caméra est de 110 °.
Back
Front
L'objectif de la caméra standard n'est pas amovible. Lorsque
vous voulez utiliser l'objectif grand-angle, il suffit de le placer
sur l'objectif de caméra standard et de le fixer.
Sécurité
Ce produit est conforme aux exigences en matière d'interférences
radio de la Communauté européenne.
AVERTISSEMENT RISQUE D'EXPLOSION SI LA PILE EST REMPLACÉE PAR
UN TYPE INCORRECT. JETER LES PILES USAGÉES CONFORMÉMENT AUX
INSTRUCTIONS.
Ce produit a été conçu et fabriqué avec des matériaux et composants
de haute qualité, qui peuvent être recyclés et réutilisés.
Ce symbole signifie que le produit ne doit pas être jeté avec les
déchets ménagers, mais doit être transmis à un établissement de
collecte adapté pour permettre son recyclage. L'élimination et le
recyclage appropriés aident à protéger les ressources naturelles,
la santé humaine et l'environnement. Pour plus d'informations
sur l'élimination et le recyclage de ce produit, contactez votre
municipalité locale, le service de mise au rebut ou la boutique où
vous avez acheté ce produit.
Français
57

Customer Service
Kundenservice | Servicio de atención al cliente | Service client
Servizio clienti
• Warranty
Garantie | Garantía | Garantie | Garanzia
12-month limited warranty
12 Monate eingeschränkte Garantie
Garantía limitada de 12 meses
Garantie limitée de 12 mois | Garanzia limitata di 12 mesi
• Call Us
Rufen Sie uns an | Contacto por teléfono | Par téléphone
Telefono
United States +1 (800) 988 7973 Mon-Fri 9AM-5PM (PT)
United Kingdom +44 (0) 1604 936 200 Mon-Fri 6AM-11AM (GMT)
Germany +49 (0) 69 9579 7960 Mon-Fri 6:00-11:00
• Email Us
Senden Sie uns eine E-Mail | Contacto por correo electrónico
Par e-mail | E-mail
Customer Support: [email protected]

Customer Service
Kundenservice | Servicio de atención al cliente | Service client
Servizio clienti
• Warranty
Garantie | Garantía | Garantie | Garanzia
12-month limited warranty
12 Monate eingeschränkte Garantie
Garantía limitada de 12 meses
Garantie limitée de 12 mois | Garanzia limitata di 12 mesi
• Call Us
Rufen Sie uns an | Contacto por teléfono | Par téléphone
Telefono
United States +1 (800) 988 7973 Mon-Fri 9AM-5PM (PT)
United Kingdom +44 (0) 1604 936 200 Mon-Fri 6AM-11AM (GMT)
Germany +49 (0) 69 9579 7960 Mon-Fri 6:00-11:00
• Email Us
Senden Sie uns eine E-Mail | Contacto por correo electrónico
Par e-mail | E-mail
Customer Support: support@eufylife.com


Anker Innovations Limited. All rights reserved. Eufy and
the Eufy logo
are trademarks of Anker Innovations Limited,
registered in the United States and other countries. All other
trademarks are the property of their respective owners.
51005001290 V02
User Manual
eufy Security SpaceView
Baby Monitor
Kurzanleitung | Guía de inicio rápido
Guide de démarrage rapide