Anker Innovations Limited. All rights reserved.
eufy and the eufy logo
are
trademarks of Anker Innovations Limited, registered in the United States and other
countries. All other trademarks are the property of their respective owners.
51005002526 V01
User Manual
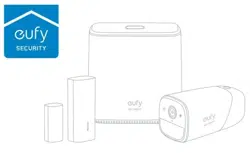
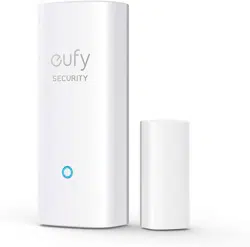
Entry Sensor
X1
TABLE OF
CONTENTS
What’s Included
01 03
Status Led
Battery Placement
01 03
FAQ
Adding Entry Sensor to Your
System
02 04
Notice
Mounting the Sensor
02
English 01
Deutsch 08
Español 12
Français 16
Italiano 20
Português
24
Nederlands
28
ةي
ِ
ب
َ
ر
َ
عل
32

TABLE OF
CONTENTS
What’s Included
01 03
Status Led
Battery Placement
01 03
FAQ
Adding Entry Sensor to Your
System
02 04
Notice
Mounting the Sensor
02
English 01
Deutsch 08
Español 12
Français 16
Italiano 20
Português
24
Nederlands
28
ةي
ِ
ب
َ
ر
َ
عل
32
01
ENGLISH ENGLISH
02
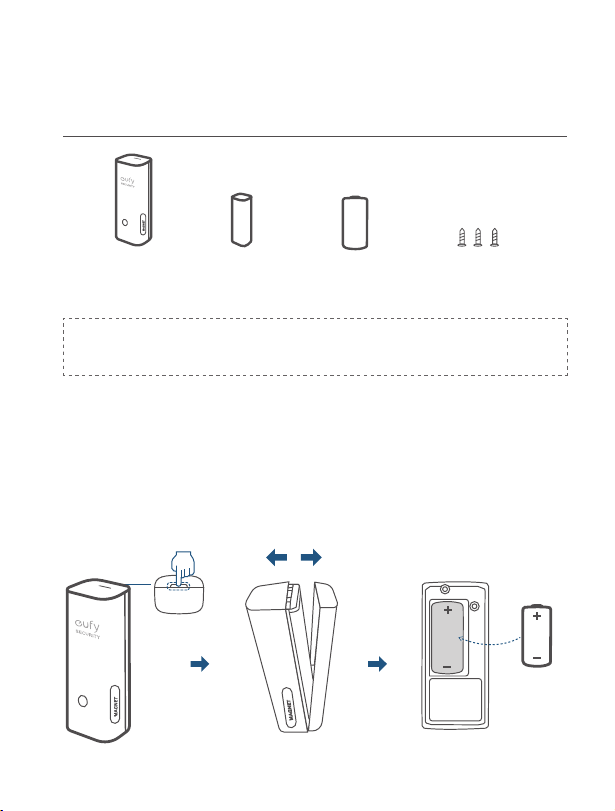
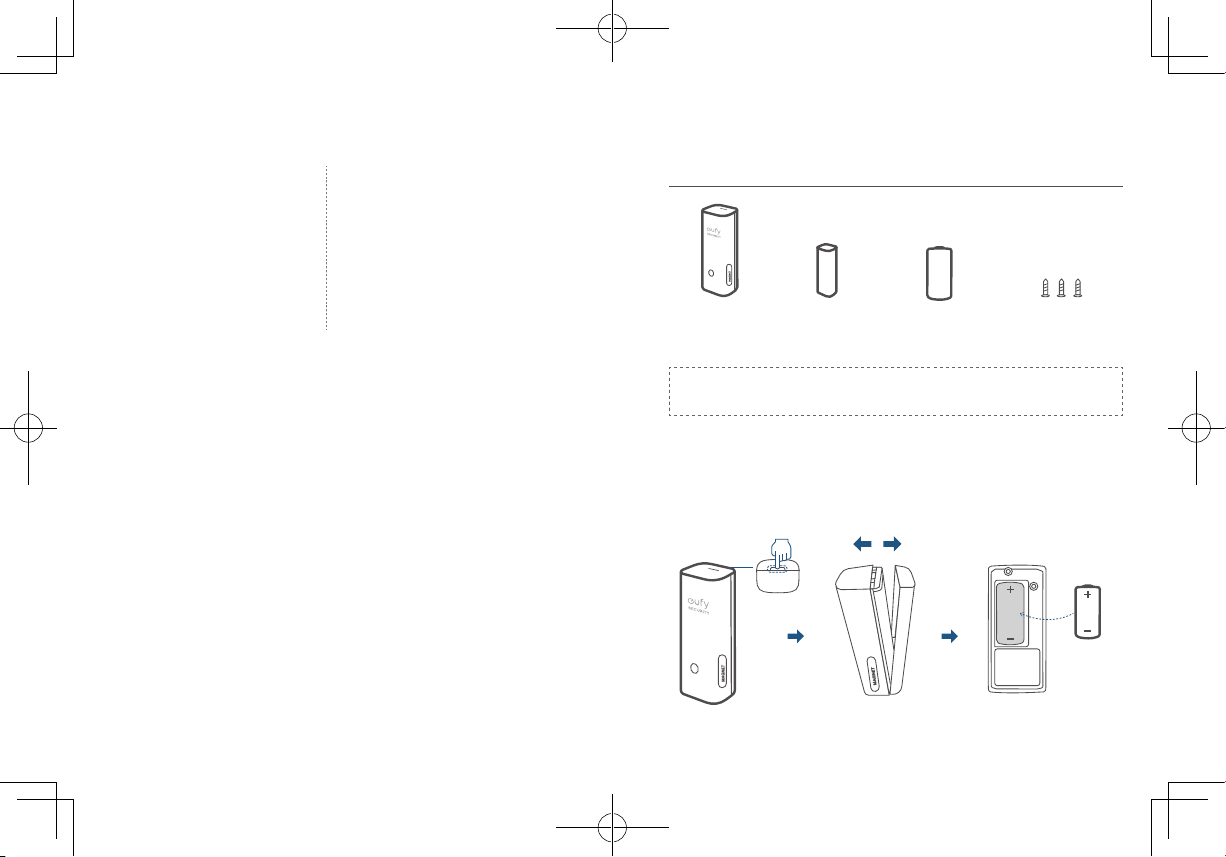
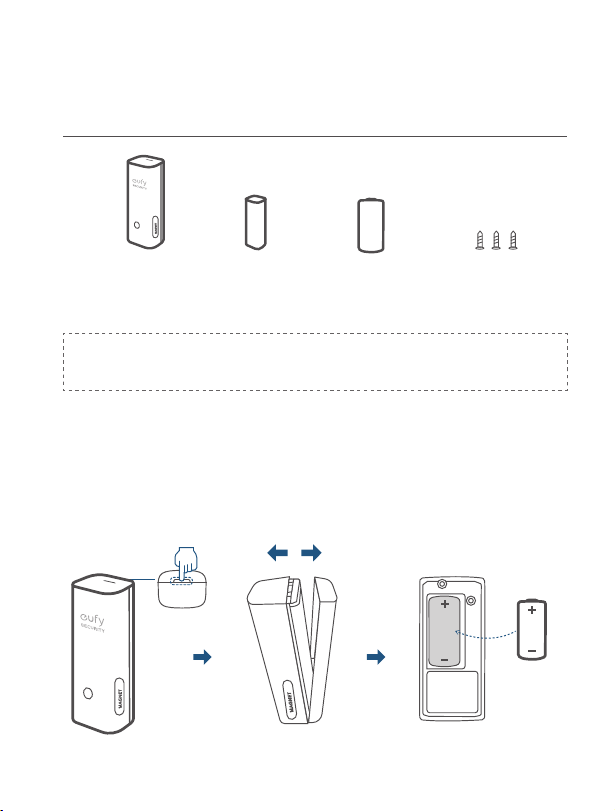
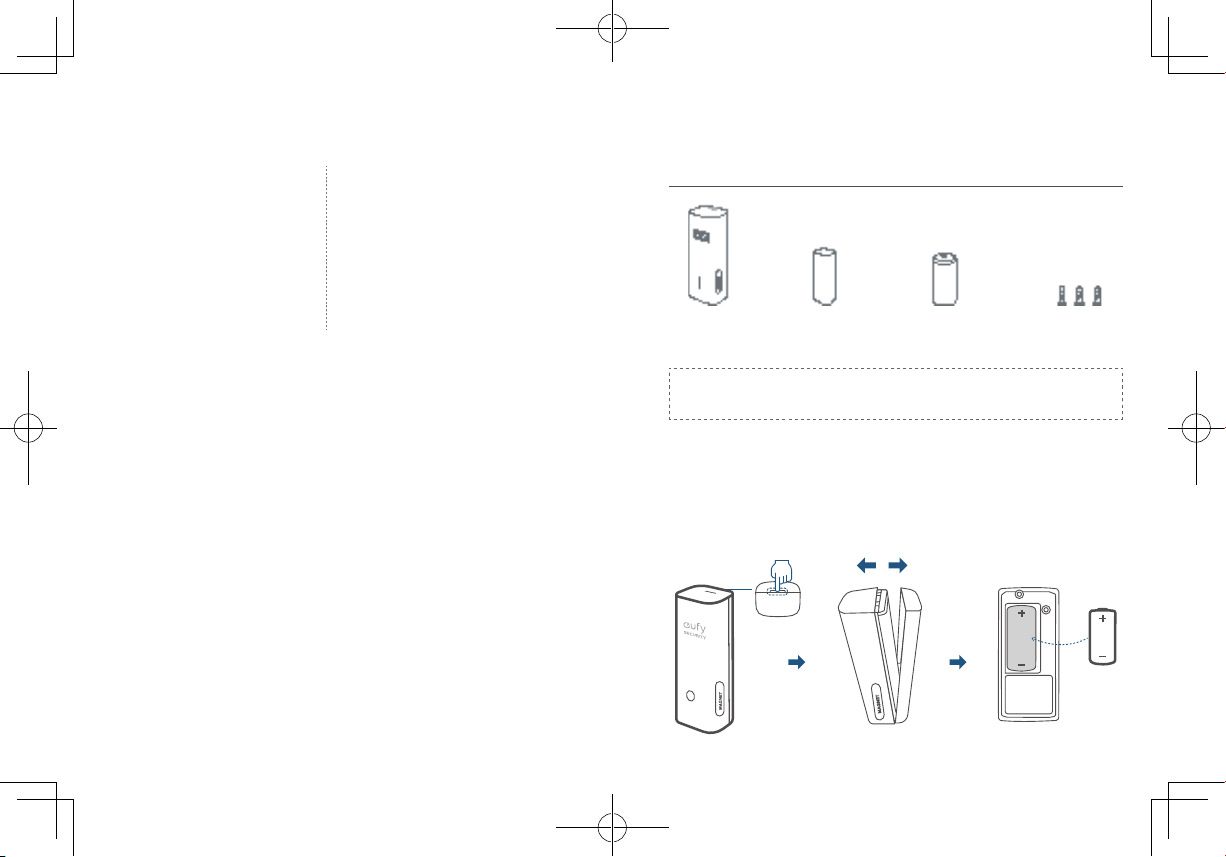
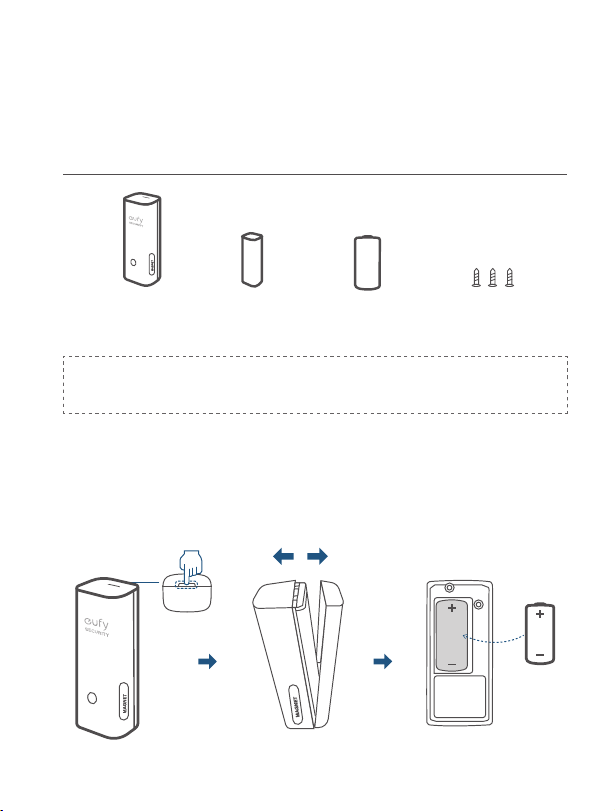
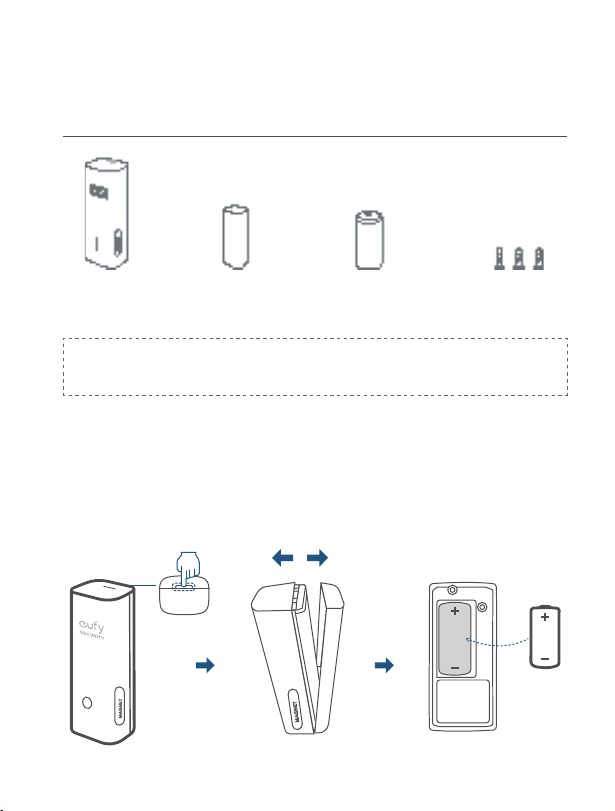
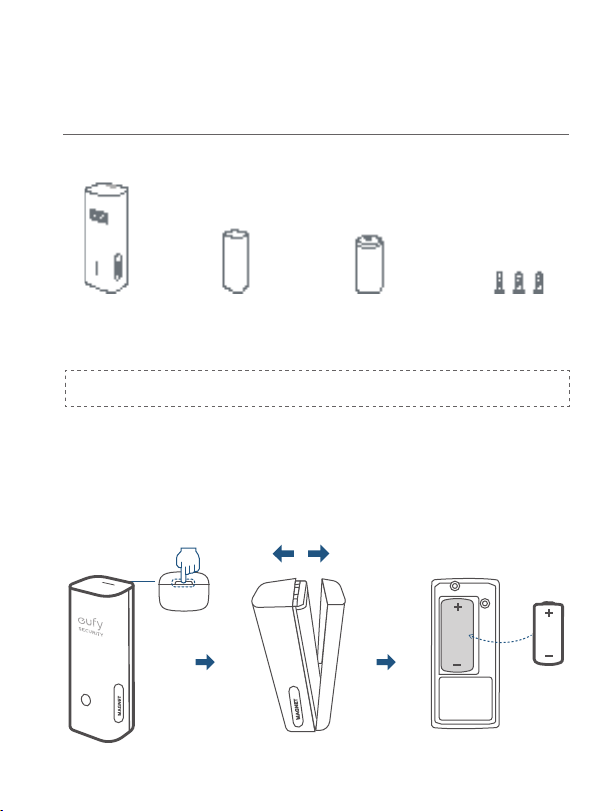
WHAT’S INCLUDED
For Entry Sensor Installation
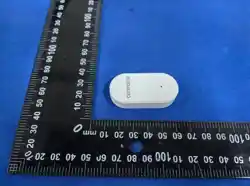
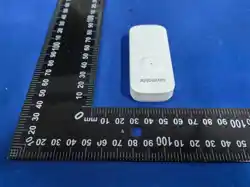
Mounting Screws CR123A BatteryEntry Sensor
(T8900)
Sensor Magnet
Entry Sensor
(T8900)
Sensor
Magnet
CR123A
Battery
Mounting
Screws
Note:
Entry Sensor is only compatible with the eufy Security
Homebase or Homebase E.
BATTERY PLACEMENT
Remove the battery compartment lid on the Entry Sensor and insert the
provided CR123A battery. Replace the lid.
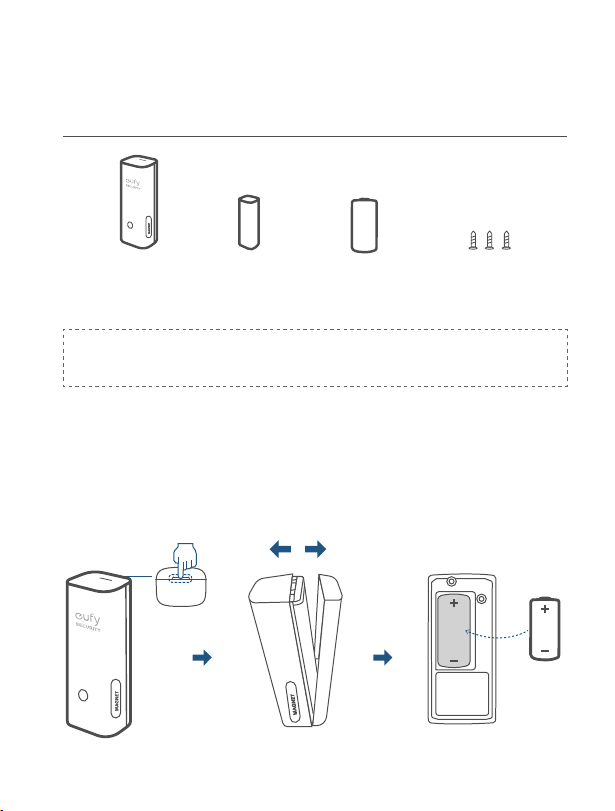
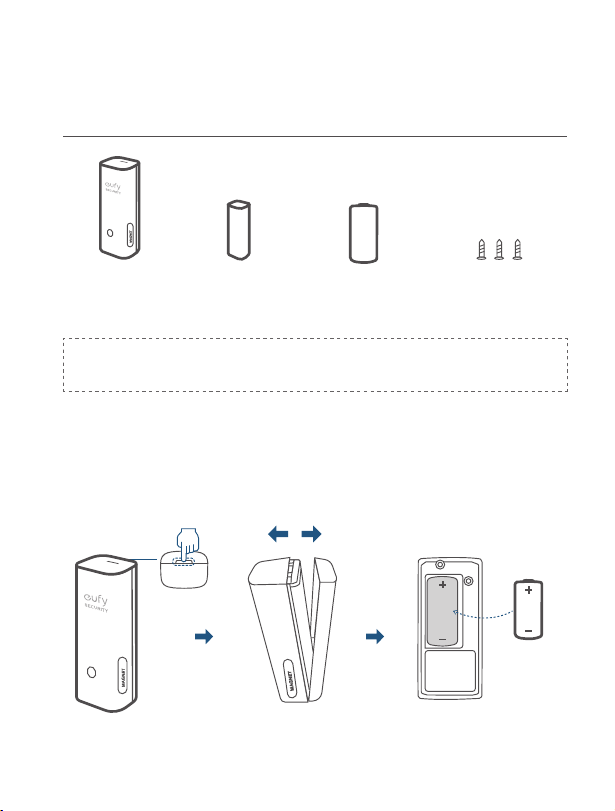
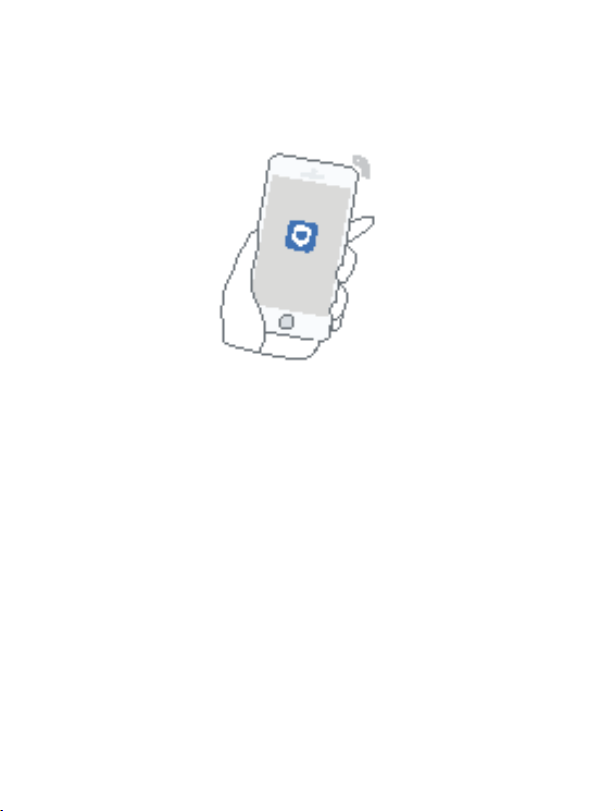
ADDING ENTRY SENSOR TO
YOUR SYSTEM
O
n eufy Security app follow the on-screen instructions to add your eufy
Security devices. Choose
Add Device
, then select
Entry Sensor
to add it
to your system.
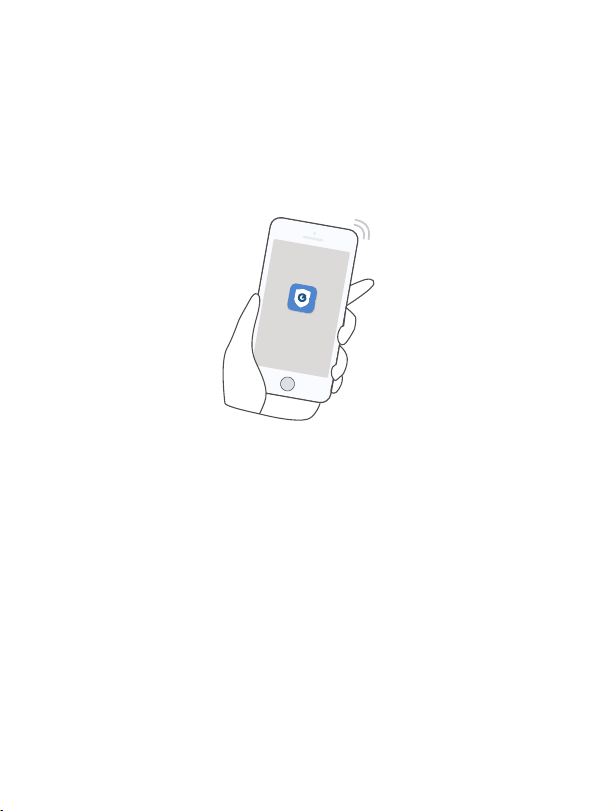
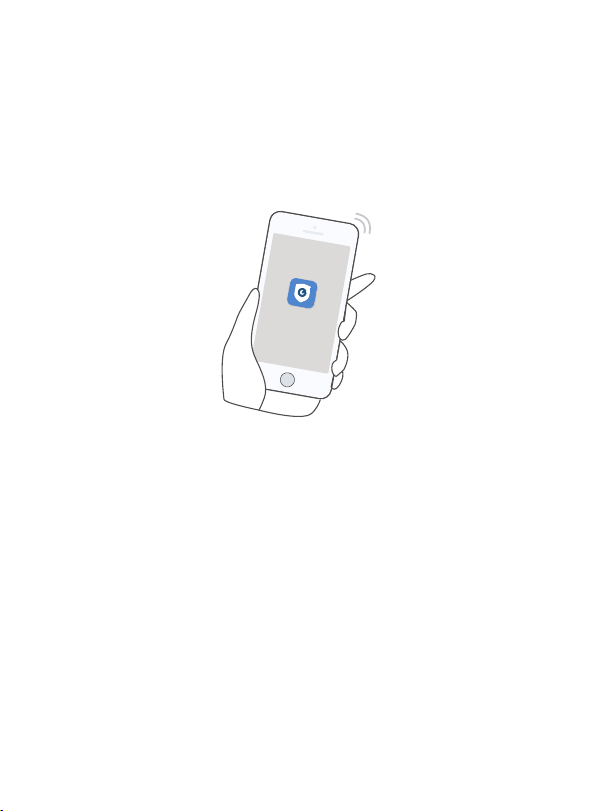
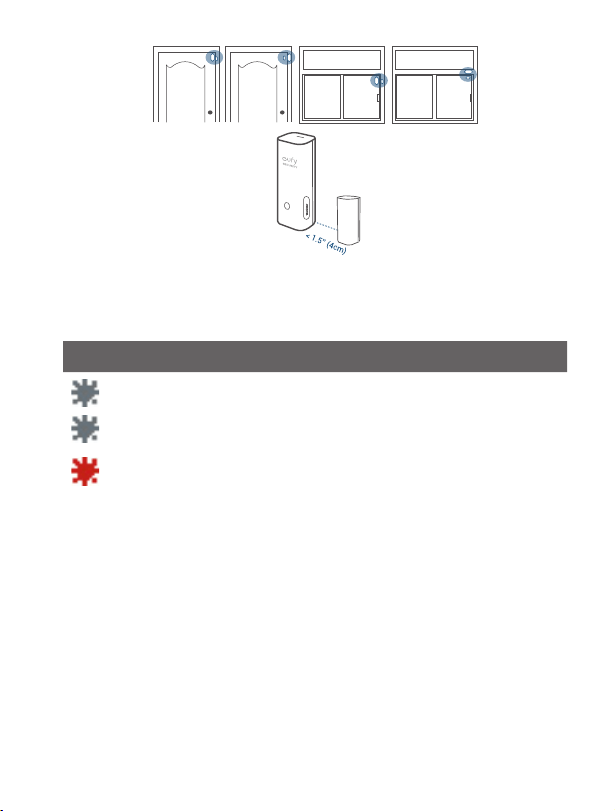
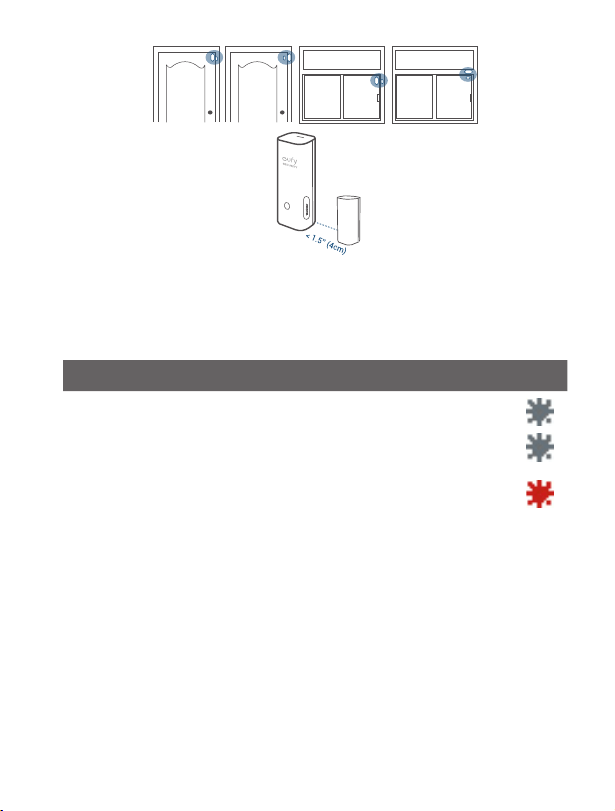
MOUNTING THE SENSOR
Place the sensor on the edge of a door or window. Use the adhesive strips (On
the back of the sensor) or mounting screws provided to mount the sensor.
• Make sure the gap between Entry Sensor and the sensor magnet is less
than
1.6 in (4 cm)
when the door or window is closed.
• The bottom of the sensor magnet should align with the
bottom
of Entry
Sensor.
01
ENGLISH ENGLISH
02
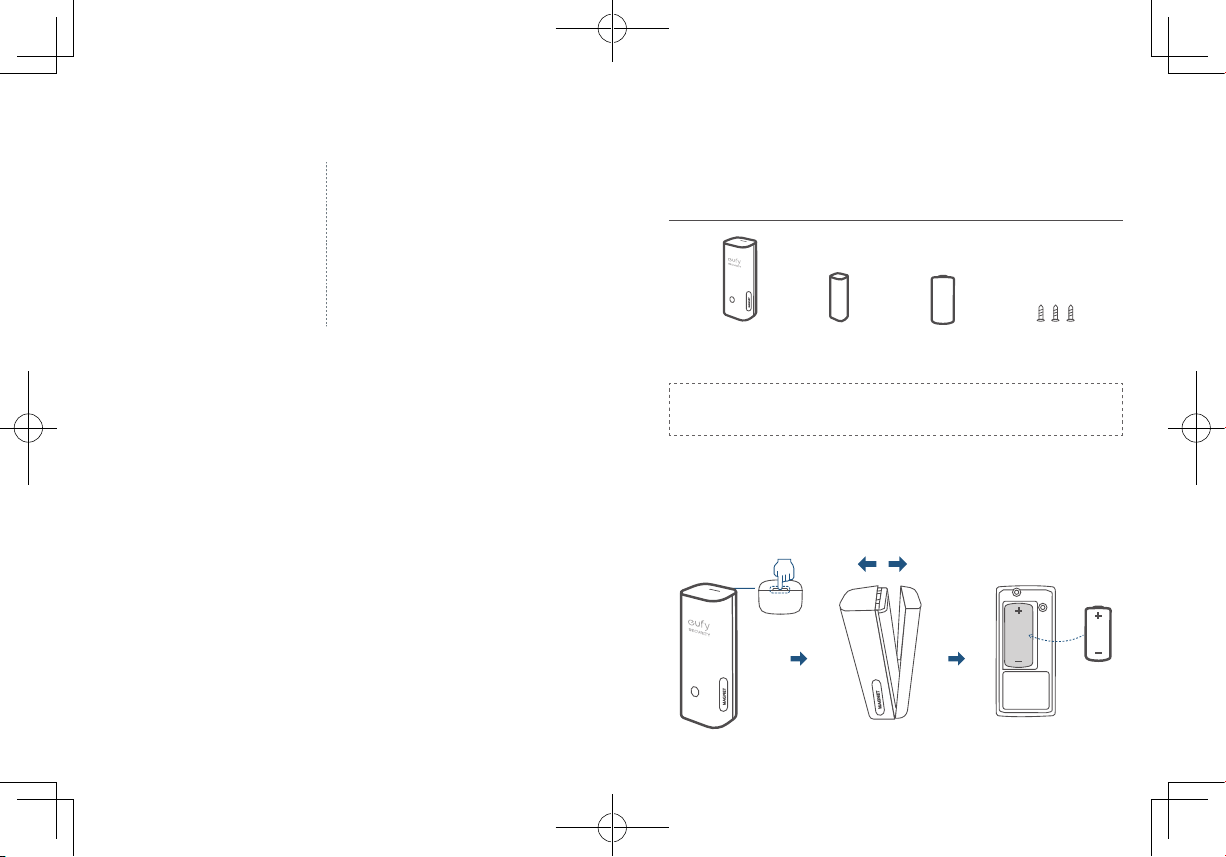
WHAT’S INCLUDED
For Entry Sensor Installation
Mounting Screws CR123A BatteryEntry Sensor
(T8900)
Sensor Magnet
Entry Sensor
(T8900)
Sensor
Magnet
CR123A
Battery
Mounting
Screws
Note:
Entry Sensor is only compatible with the eufy Security
Homebase or Homebase E.
BATTERY PLACEMENT
Remove the battery compartment lid on the Entry Sensor and insert the
provided CR123A battery. Replace the lid.
ADDING ENTRY SENSOR TO
YOUR SYSTEM
O
n eufy Security app follow the on-screen instructions to add your eufy
Security devices. Choose
Add Device
, then select
Entry Sensor
to add it
to your system.
MOUNTING THE SENSOR
Place the sensor on the edge of a door or window. Use the adhesive strips (On
the back of the sensor) or mounting screws provided to mount the sensor.
• Make sure the gap between Entry Sensor and the sensor magnet is less
than
1.6 in (4 cm)
when the door or window is closed.
• The bottom of the sensor magnet should align with the
bottom
of Entry
Sensor.
03
ENGLISH ENGLISH
04
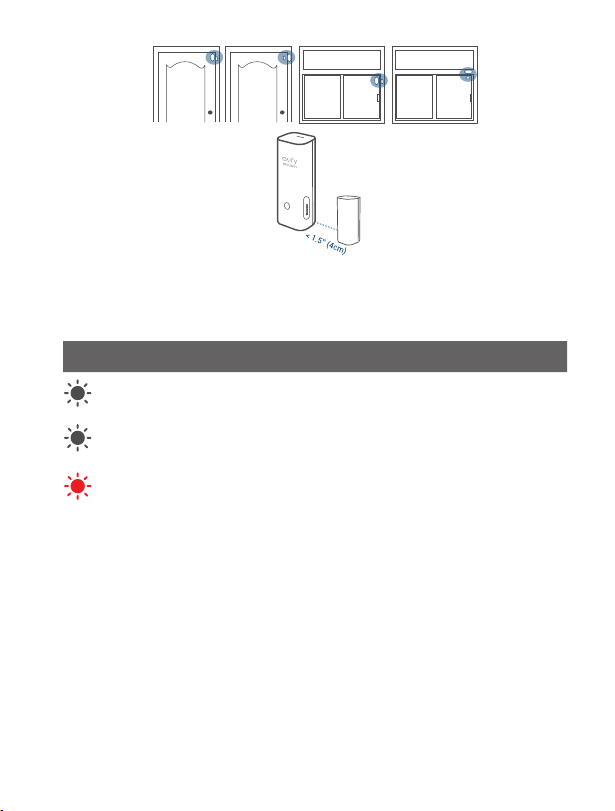
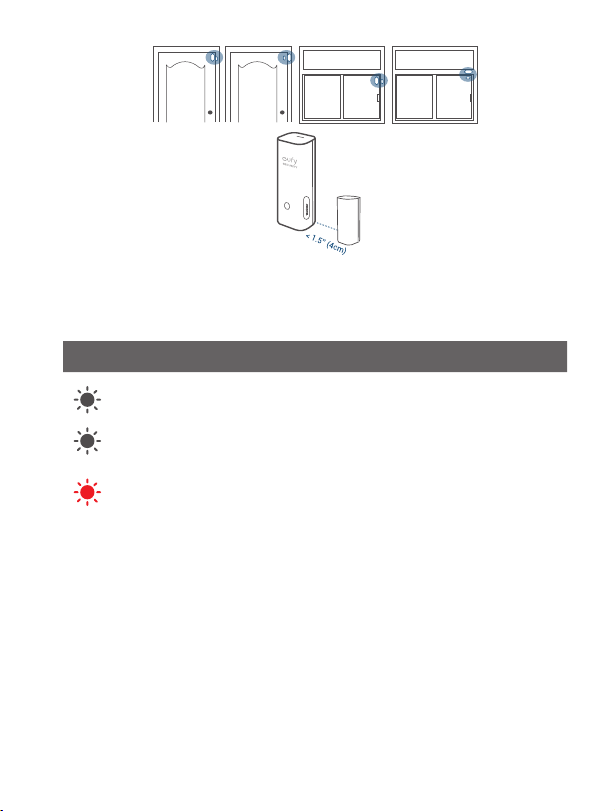
STATUS LED
Sensor LED indicator Entry Sensor status
Flashing blue Adding to HomeBase
Flashing blue (
Once)
Sensor detects an open/close activity
Flashing red (Once)
Sensor battery is low or disconnects
from HomeBase
FAQ
1. What battery does the Entry Sensor use?
Entry Sensor uses a CR123A battery with 3V output.
2. How long does the battery last?
One CR123A battery usually lasts up to 2 years, but depends on the
usage.
Please visit our official website to download the user manual:
www.eufylife.com
NOTICE
T
his product complies with the radio interference requirements
of the European Community.
Declaration of Conformity
Hereby, Anker Innovations Limited declares that this device is in compliance
with the essential requirements and other relevant provisions of Directive
2014/53/EU. For the declaration of conformity, visit the Web site
https://www.eufylife.com/.
Do not use the Device in the environment at too high or too low
temperature, never expose the Device under strong sunshine or too wet
environment.
The suitable temperature for the product and accessories is 0
°C
- 40
°C
.
RF exposure information: The Maximum Permissible Exposure (MPE) level
has been calculated based on a distance of d=20 cm between the device and
the human body. To maintain compliance with RF exposure requirement, use
product that maintain a 20cm distance between the device and human body.
CAUTION RISK OF EXPLOSION IF BATTERY IS REPLACED BY AN
INCORRECT TYPE. DISPOSE OF USED BATTERIES ACCORDING TO THE
INSTRUCTIONS
SUB-1G Frequency range: 866~866.8MHz 868.2~869MHz
Sub-1G Max Output Power: 8.865dBm(ERIP for 868.2~869MHz); 11.746dBm
(ERIP for 866~866.8MHz)
Anker Innovations Deutschland GmbH | Georg-Muche-Strasse 3-5, 80807
Munich, Germany
Anker Technology (UK) Ltd | Suite B, Fairgate House, 205 Kings Road, Tyseley,
Birmingham, B11 2AA, United Kingdom
This product is designed and manufactured with high quality materials
and components, which can be recycled and reused.
03
ENGLISH ENGLISH
04
STATUS LED
Sensor LED indicator Entry Sensor status
Flashing blue Adding to HomeBase
Flashing blue (
Once)
Sensor detects an open/close activity
Flashing red (Once)
Sensor battery is low or disconnects
from HomeBase
FAQ
1. What battery does the Entry Sensor use?
Entry Sensor uses a CR123A battery with 3V output.
2. How long does the battery last?
One CR123A battery usually lasts up to 2 years, but depends on the
usage.
Please visit our official website to download the user manual:
www.eufylife.com
NOTICE
T
his product complies with the radio interference requirements
of the European Community.
Declaration of Conformity
Hereby, Anker Innovations Limited declares that this device is in compliance
with the essential requirements and other relevant provisions of Directive
2014/53/EU. For the declaration of conformity, visit the Web site
https://www.eufylife.com/.
Do not use the Device in the environment at too high or too low
temperature, never expose the Device under strong sunshine or too wet
environment.
The suitable temperature for the product and accessories is 0
°C
- 40
°C
.
RF exposure information: The Maximum Permissible Exposure (MPE) level
has been calculated based on a distance of d=20 cm between the device and
the human body. To maintain compliance with RF exposure requirement, use
product that maintain a 20cm distance between the device and human body.
CAUTION RISK OF EXPLOSION IF BATTERY IS REPLACED BY AN
INCORRECT TYPE. DISPOSE OF USED BATTERIES ACCORDING TO THE
INSTRUCTIONS
SUB-1G Frequency range: 866~866.8MHz 868.2~869MHz
Sub-1G Max Output Power: 8.865dBm(ERIP for 868.2~869MHz); 11.746dBm
(ERIP for 866~866.8MHz)
Anker Innovations Deutschland GmbH | Georg-Muche-Strasse 3-5, 80807
Munich, Germany
Anker Technology (UK) Ltd | Suite B, Fairgate House, 205 Kings Road, Tyseley,
Birmingham, B11 2AA, United Kingdom
This product is designed and manufactured with high quality materials
and components, which can be recycled and reused.

05
ENGLISH ENGLISH
06
This symbol means the product must not be discarded as household
waste, and should be delivered to an appropriate collection facility
for recycling. Proper disposal and recycling helps protect natural
resources, human health and the environment. For more information
on disposal and recycling of this product, contact your local
municipality, disposal service, or the shop where you bought this
product.
FCC Statement
This device complies with Part 15 of the FCC Rules. Operation is subject
to the following two conditions: (1) this device may not cause harmful
interference, and (2) this device must accept any interference received,
including interference that may cause undesired operation.
Note:
This equipment has been tested and found to comply with the limits
for a Class B digital device, pursuant to Part 15 of the FCC Rules. These limits
are designed to provide reasonable protection against harmful interference in
a residential installation.
This equipment generates uses and can radiate radio frequency energy and, if
not installed and used in accordance with the instructions, may cause harmful
interference to radio communications. However, there is no guarantee that
interference will not occur in a particular installation. If this equipment does
cause harmful interference to radio or television reception, which can be
determined by turning the equipment off and on, the user is encouraged to
try to correct the interference by one or more of the following measures:
(1) Reorient or relocate the receiving antenna. (2) Increase the separation
between the equipment and receiver. (3) Connect the equipment into an
outlet on a circuit different from that to which the receiver is connected. (4)
Consult the dealer or an experienced radio/TV technician for help.
FCC Radio Frequency Exposure Statement
The device has been evaluated to meet general RF exposure requirements.
The device can be used in fixed / mobile exposure condition. The min
separation distance is 20cm.
The following importer is the responsible party
Company Name: POWER MOBILE LIFE, LLC
English 01
Deutsch 11
Español 18
Français 25
Italiano 32
Address: 400 108th Ave NE Ste 400, Bellevue, WA 98004-5541
Telephone: 1-800-988-7973
This device complies with Industry Canada licence-exempt RSS standard(s).
Operation is subject to the following two conditions:
(1) this device may not cause interference, and
(2) this device must accept any interference, including interference that may
cause undesired operation of the device."
Le présent appareil est conforme aux CNR d'Industrie Canada applicables
aux appareils radio exempts de licence. L'exploitation est autorisée aux deux
conditions suivantes:
(1) l'appareil nedoit pas produire de brouillage, et
(2) l'utilisateur de l'appareil doit accepter tout brouillage radioélectrique subi,
même si le brouillage est susceptible d'en compromettre le fonctionnement."
This Class B digital apparatus complies with Canadian ICES-003.
Cet appareil numérique de la classe B est conforme à la norme NMB-003
du Canada.
IC RF Statement:
When using the product, maintain a distance of 20cm from the body to
ensure compliance with RF exposure requirements.
Lors de l'utilisation du produit, maintenez une distance de 20 cm du corps
an de vous conformer aux exigences en matière d'exposition RF.
DEUTSCH
08
INHALTSVERZEICHNIS IM LIEFERUMFANG
Für die Einbruchsensor-Installation
Einbruchsensor
(T8900)
Sensormagnet
CR123A-Batterie
Befestigungs-
schrauben
Mounting Screws CR123A BatteryEntry Sensor
(T8900)
Sensor Magnet
Note:
Der Eingangssensor ist nur mit der eufy Security Homebase
oder Homebase E kompatibel.
BATTERIE EINLEGEN
Nehmen Sie den Deckel des Batteriefachs des Einbruchsensors ab und
setzen Sie die im Lieferumfang enthaltene CR123A-Batterie ein. Bringen
Sie den Deckel wieder an.
Im Lieferumfang
08 09
Sensor Anbringen
Batterie Einlegen
08 10
Led
Den Einbruchsensor Ihrem
System Hinzufügen
09 10
Häug Gestellte Fragen
09
DEUTSCH DEUTSCH
10
DEN EINBRUCHSENSOR IHREM
SYSTEM HINZUFÜGEN
Befolgen Sie in der Eufy Security-App die Anweisungen auf dem Display, um
Ihre Eufy Security-Geräte hinzuzufügen. Wählen Sie
Gerät hinzufügen
aus und
dann
Einbruchsensor
, um diesen Ihrem System hinzuzufügen
.
SENSOR ANBRINGEN
Bringen Sie den Sensor an der Kante einer Tür oder eines Fensters an.
Verwenden Sie dazu die Klebestreifen (auf der Rückseite des Sensors)
oder die im Lieferumfang enthaltenen Befestigungsschrauben.
• Stellen Sie sicher, dass der Abstand zwischen dem Einbruchsensor und dem
Sensormagneten weniger als
4 cm
beträgt, wenn die Tür oder das Fenster
geschlossen ist.
• Die Unterseite des Sensormagneten sollte an der Unterseite des
Einbruchsensors ausgerichtet sein.
LED
Farbe der Sensor-LED-Anzeige Status des Einbruchsensors
Blinkt weiß Wird der HomeBase hinzugefügt
Blinkt einmal weiß
Sensor erkennt eine Aktivität des Typs
Öffnen / Schließen
Blinkt einmal rot
Ladestand der Sensorbatterie ist niedrig,
oder der Sensor hat keine Verbindung zur
HomeBase
HÄUFIG GESTELLTE FRAGEN
1. Welche Batterie wird für den Einbruchsensor verwendet?
Für den Einbruchsensor wird eine CR123A-Batterie mit einer
Ausgangsleistung von 3 V verwendet.
2. Wie lange hält die Batterie?
Eine CR123A-Batterie hält in der Regel bis zu 2 Jahre, je nach Nutzung.
Laden Sie das Benutzerhandbuch über unsere ofzielle Website herunter:
www.eufylife.com
ESPAÑOL
12
TABLA DE CONTENIDOS
Contenido
12 13
Montaje del Sensor
Colocación de La batería
12 14
Led
Cómo Añadir el Sensor de
Entrada al Sistema
13 14
Preguntas Frecuentes
CONTENIDO
Instalación de sensores de entrada
Sensor de
entrada (T8900)
Imán del sensor
Batería CR123A
Tornillos de
montaje
Mounting Screws CR123A BatteryEntry Sensor
(T8900)
Sensor Magnet
Note:
Entry Sensor solo es compatible con eufy Security Homebase
o Homebase E.
COLOCACIÓN DE LA BATERÍA
Retire la tapa del compartimento de la batería del sensor de entrada e
inserte la batería CR123A. Vuelva a colocar la tapa.
13
ESPAÑOL ESPAÑOL
14
CÓMO AÑADIR EL SENSOR DE
ENTRADA AL SISTEMA
En la aplicación eufy Security siga las instrucciones que aparecen en la pantalla
para agregar sud dispositivos de seguridad eufy. Elija
Agregar dispositivo
y, a
continuación, seleccione
Sensor de entrada
para añadirlo a su sistema
.
MONTAJE DEL SENSOR
Coloque el sensor en el borde de una puerta o ventana. Utilice las
bandas adhesivas (en la parte posterior del sensor) o tornillos de montaje
suministrados para montar el sensor.
• Asegúrese de que la separación entre el sensor de entrada y el imán del
sensor es inferior a
4 cm
cuando la puerta o la ventana están cerradas.
• La parte inferior del imán del sensor debe alinearse con la parte inferior del
sensor de entrada.
LED
Color del indicador LED del sensor
Estado del sensor de entrada
Parpadeo blanco Se está añadiendo a HomeBase
Parpadeo blanco (una vez)
El sensor detecta una actividad de
apertura/cierre
Parpadeo rojo (una vez)
La batería del sensor se está agotando
o se desconecta de HomeBase
PREGUNTAS FRECUENTES
1. ¿Qué batería utiliza el sensor de entrada?
El sensor de entrada utiliza una batería CR123A con salida de 3 V.
2. ¿Cuánto dura la batería?
La batería CR123A dura hasta 2 años, pero depende del uso.
Visite nuestro sitio web ocial para descargar el manual del usuario:
www.eufylife.com

FRANÇAIS
16
TABLE DES MATIÈRES
Contenu
16 17
Montage du Capteur
Placement de la Pile
16 18
LED
Ajout d'un Capteur D'entrée
à Votre système
17 18
FAQ
CONTENU
Pour l'installation du capteur d'entrée
Capteur d'entrée
(T8900)
Aimant de
capteur
Pile CR123A Vis de montage
Mounting Screws CR123A BatteryEntry Sensor
(T8900)
Sensor Magnet
Note:
Le capteur d'entrée est uniquement compatible avec l'eufy
Security Homebase ou Homebase E.
PLACEMENT DE LA PILE
Retirez le couvercle du compartiment à pile du capteur d'entrée et insérez
la pile CR123A fournie. Replacez le couvercle.
17
FRANÇAIS FRANÇAIS
18
AJOUT D'UN CAPTEUR D'ENTRÉE
À VOTRE SYSTÈME
Sur l'application Eufy Security, suivez les instructions à l'écran pour ajouter
vos périphériques Eufy Security. Choisissez
Ajouter un périphérique
, puis
sélectionnez
Capteur d'entrée
pour l'ajouter à votre système
.
MONTAGE DU CAPTEUR
Placez le capteur sur le bord d'une porte ou d'une fenêtre. Utilisez les
bandes adhésives (à l'arrière du capteur) ou les vis de montage fournies
pour monter le capteur.
• Assurez-vous que l'écart entre le capteur d'entrée et l'aimant du capteur est
inférieur à
4 cm
lorsque la porte ou la fenêtre est fermée.
• Le bas de l'aimant du capteur doit s'aligner avec le bas du capteur d'entrée.
LED
Couleur du voyant LED du capteur
État du capteur d'entrée
Blanc clignotant Ajouter à HomeBase
Blanc clignotant (une fois)
Le capteur détecte une activité ouverte/
fermée
Rouge clignotant (une fois)
La pile du capteur est faible ou se
déconnecte de HomeBase
FAQ
1. Quelle pile le capteur d'entrée utilise-t-il ?
Le capteur d'entrée utilise une pile CR123A à sortie 3 V.
2. Quelle est la durée de vie de la pile ?
Une pile CR123A dure généralement jusqu'à 2 ans, mais cela dépend de
l'utilisation.
Rendez-vous sur notre site officiel pour télécharger le manuel de
l'utilisateur : www.eufylife.com

ITALIANO
20
CONTENUTO DELLA
CONFEZIONE
Per l'installazione del sensore per ingresso
Sensore per
ingresso (T8900)
Magnete del
sensore
Batteria CR123A Viti di montaggio
Mounting Screws CR123A BatteryEntry Sensor
(T8900)
Sensor Magnet
Note:
Il sensore di ingresso è compatibile solo con eufy Security
Homebase o Homebase E.
SOSTITUZIONE DELLA BATTERIA
Rimuovere il coperchio del vano batteria sul sensore per ingresso e
inserire la batteria CR123A in dotazione. Rimettere il coperchio.
INDICE DEI CONTENUTI
Contenuto Della
Confezione
20 21
Montaggio del Sensore
Sostituzione Della Batteria
20 22
Led
Aggiunta del Sensore per
Ingresso al Sistema
21 22
Domande frequenti

21
ITALIANO ITALIANO
22
AGGIUNTA DEL SENSORE PER
INGRESSO AL SISTEMA
Nell'app Eufy Security, seguire le istruzioni visualizzate sullo schermo per
aggiungere dispositivi Eufy Security. Scegliere
Aggiungi dispositivo
, quindi
selezionare
Sensore per ingresso
per aggiungerlo al sistema
.
MONTAGGIO DEL SENSORE
Posizionare il sensore sul bordo di una nestra o di una porta. Usare le
strisce adesive (posizionate sul retro del sensore) o le viti in dotazione
per montare il sensore.
• Assicurarsi che lo spazio tra il sensore per ingresso e il magnete del sensore
sia inferiore a
4 cm
quando la porta o la nestra è chiusa.
• La parte inferiore del magnete del sensore deve allinearsi con la parte
inferiore del sensore per ingresso.
LED
Colore spia LED sensore Stato sensore per ingresso
Bianco lampeggiante Aggiunto alla base di ricarica
Bianco lampeggiante (una volta)
Il sensore rileva un'attività di
apertura/chiusura
Rosso lampeggiante (una volta)
La batteria del sensore è scarica o
disconnessa dalla base di ricarica
DOMANDE FREQUENTI
1. Che batteria usa il sensore per ingresso?
Il sensore per ingresso usa una batteria CR123A con uscita da 3V.
2. Quanto dura la batteria?
Una batteria CR123A dura solitamente fino a 2 anni, ma la durata varia in
base all'utilizzo.
Visita il nostro sito Web ufciale per scaricare il manuale utente:
www.eufylife.com

PORTUGUÊS
24
ÍNDICE CONTENTS
Está Incluído
24 25
Instalar o Sensor
Colocação da Bateria
24 26
Led
Adicionar o Sensor de
Entrada ao Seu Sistema
25 26
Perguntas Frequentes
ESTÁ INCLUÍDO
Para a instalação do sensor de entrada
Mounting Screws CR123A BatteryEntry Sensor
(T8900)
Sensor Magnet
Entry Sensor
(T8900)
Sensor
Magnet
CR123A
Battery
Mounting
Screws
Nota:
O sensor de entrada apenas é compatível com a eufy Security
HomeBase ou a HomeBase E.
COLOCAÇÃO DA BATERIA
Remova a tampa do compartimento da bateria no sensor de entrada e
insira a bateria CR123A fornecida. Volte a colocar a tampa.
25
PORTUGUÊS PORTUGUÊS
26
ADICIONAR O SENSOR DE
ENTRADA AO SEU SISTEMA
Na aplicação eufy Security siga as instruções no ecrã para adicionar os
seus dispositivos eufy Security. Selecione Adicionar dispositivo e, em
seguida, selecione Sensor de entrada para o adicionar ao seu sistema.
INSTALAR O SENSOR
Coloque o sensor no parapeito de uma porta ou janela. Utilize as fitas
adesivas (na parte de trás do sensor) ou os parafusos de instalação
fornecidos para instalar o sensor.
• Certique-se de que o espaço entre o sensor de entrada e o íman do sensor
é inferior a 4 cm (1,6 pol) quando a porta ou a janela estiver fechada.
• O fundo do íman do sensor deve ser alinhado com o fundo do sensor de
entrada.
LED
indicador LED do sensor Estado do sensor de entrada
Azul intermitente Adicionar à HomeBase
Azul intermitente (uma vez)
O sensor deteta uma atividade de
abrir/fechar
Vermelho intermitente (uma
vez)
A bateria do sensor está fraca ou
este desligou-se da HomeBase
PERGUNTAS FREQUENTES
1. Qual a bateria utilizada no sensor de entrada?
O sensor de entrada utiliza uma bateria CR123A com uma saída de 3 V.
2. Quanto tempo dura a bateria?
Normalmente, uma bateria CR123A dura até 2 anos, mas depende da
utilização.
Visite o nosso website oficial para transferir o manual do utilizador:
www.eufylife.com

NEDERLANDS
28
INHOUDSOPGAVE
Wat Zit er in de Doos?
28 29
De sensor Monteren
Plaatsing Van de Batterij
28 30
Led
Openingssensor Aan uw
Systeem Toevoegen
29 30
Faq
WAT ZIT ER IN DE DOOS?
Voor de installatie van de openingssensor:
Openingssensor
(T8900)
Sensormagneet CR123A-batterij Bevestigingss-
chroeven
Nota:
De openingssensor is alleen compatibel met het eufyCam
Security-systeem.
PLAATSING VAN DE BATTERIJ
Verwijder het klepje van het batterijvak op de openingssensor en plaats de
meegeleverde CR123A-batterij. Plaats het klepje terug.

29
NEDERLANDS NEDERLANDS
30
OPENINGSSENSOR AAN UW
SYSTEEM TOEVOEGEN
Volg in de eufy Security-app de instructies op het scherm om uw eufy
Security-apparaten toe te voegen. Kies
Apparaat toevoegen
en selecteer
Openingssensor
om deze toe te voegen aan uw systeem
.
DE SENSOR MONTEREN
Plaats de sensor op de rand van een deur of raam. Bevestig de sensor
met behulp van de zelfklevende strips (op de achterkant van de sensor)
of de meegeleverde bevestigingsschroeven.
• Zorg ervoor dat de afstand tussen de openingssensor en de sensormagneet
minder dan
4 cm
is wanneer de deur of het raam gesloten is.
• De onderkant van de magneet moet zijn uitgelijnd met de onderkant van de
sensor.
LED
Kleur LED-indicator van sensor Status van openingssensor
Knippert wit Toevoegen aan HomeBase
Knippert één keer wit
Sensor detecteert een opening/sluiting
Knippert één keer
rood
De batterij van de sensor is bijna leeg of
maakt geen verbinding met de HomeBase
FAQ
1. Welke batterij gebruikt de openingssensor?
Openingssensor maakt gebruik van een CR123A-batterij met
3V-uitgangsvermogen.
2. Hoe lang gaat de batterij mee?
Een CR123A-batterij gaat meestal maximaal 2 jaar mee, maar dit is
afhankelijk van het gebruik.
Bezoek onze ofciële website om de gebruikershandleiding te
downloaden: www.eufylife.com

32
ةي
ِ
ب
َ
ر
َ
عل
تايوتحملا لودج
ةن
ّ
مضملا مزاوللا
32 33
راعشتسا زاهج بيكرت
ةيراطبلا عضو ناكم
32 34
LED
Entry Sensor زاهج ةفاضإ
ماظنلا ىلإ
33 34
FAQ
ةن
ّ
مضملا مزاوللا
Entry Sensor زاهج تيبثتل
Entry Sensor
(T8900)
زاهج سيطنغم
راعشتسا
CR123A ةيراطب بيكرتلل يغارب
.طقف eufyCam ناما ماظن عم Entry Sensor زاهج قفاوتي :Nota
ةيراطبلا عضو ناكم
CR123A ةيراطب لخدأو Entry Sensor ىلع دوجوملا ةيراطبلا ةرجح ءاطغ لزأ
.ءاطغلا لدبتسا .ةن
ّ
مضملا
33 34
ةي
ِ
ب
َ
ر
َ
علةي
ِ
ب
َ
ر
َ
عل
ماظنلا ىلإ Entry Sensor زاهج ةفاضإ
Eufy ةزهجأ ةفاض ةشاشلا ىلع رهظت يتلا تاميلعتلا عبتا ،Eufy Security قيبطت يف
.ماظنلا ىلإ هتفاض Entry Sensor ددح مث ،زاهج ةفاضإ رتخا .Security
راعشتسا زاهج بيكرت
نم يفلخلا بناجلا ىلع( ةقصلا طئارشلا مدختسا .ةذفان وأ باب ةفاح ىلع راعشتسا زاهج عض
.راعشتسا زاهج تيبثتل ةن
ّ
مضملا بيكرتلا يغارب وأ )راعشتسا زاهج
1,6 نم لقأ راعشتسا زاهج سيطنغمو Entry Sensor زاهج نيب ةوجفلا نوكت نأ نم دكأت •
.ةذفانلا وأ بابلا قغإ دنع )مس 4( تاصوب
Entry زاهجل ةيلفسلا ةهجلا عم راعشتسا زاهج سيطنغمل ةيلفسلا ةهجلا ةاذاحم متت نأ بجي •
.Sensor
LED
rosneS yrtnE زاهج ةلاح راعشتسا زاهجل DEL رشؤم نول
HomeBase ىلإ ةفاضا ضماو ضيبأ
قغإ / حتف طاشن راعشتسا زاهج فشتكي )ةدحاو ةرم( ضماو ضيبأ
وأ ةضفخنم راعشتسا زاهج ةيراطب ةقاط
HomeBase نع ةلوصفم
)ةدحاو ةرم( ضماو رمحأ
FAQ
؟Entry Sensor زاهج اهمدختسي يتلا ةيراطبلا ام .1
.تلوف 3 جارخإب CR123A ةيراطب Entry Sensor زاهج مدختسي
؟ةيراطبلا مودت مك .2
.مادختسا ىلع كلذ دمتعي نكلو ،ىصقأ دحك ني
َ
تنس ىتح
ً
ةداع CR123A ةيراطب مودت
www.eufylife.com :مدختسملا ليلد ليزنتل بيولا ىلع يمسرلا انعقوم ةرايز ىجري

CUSTOMER SERVICE
Kundendienst | Servicio de atención al cliente | Service clientèle
Servizio clienti | Klantenservice | Serviço de apoio ao cliente |
Warranty
Garantie | Garantía | Garantie | Garanzia | Garantie | Garantia |
12-month limited warranty
12 Monate eingeschränkte Garantie
Garantía limitada de 12 meses
Garantie limitée de 12 mois
Garanzia limitata di 12 mesi
12 maanden beperkte garantie
Garantie limitée de 12 mois
ا
ً
رهش 12 ةدمل دودحم نامض
+1 (800) 988 7973 Mon-Fri 9AM-5PM (PT)
+44 (0) 1604 936 200 Mon-Fri 6AM-11AM (GMT)
+49 (0) 69 9579 7960 Mon-Fri 6:00-11:00
Customer Support: suppor[email protected]

CUSTOMER SERVICE
Kundendienst | Servicio de atención al cliente | Service clientèle
Servizio clienti | Klantenservice | Serviço de apoio ao cliente |
Warranty
Garantie | Garantía | Garantie | Garanzia | Garantie | Garantia |
12-month limited warranty
12 Monate eingeschränkte Garantie
Garantía limitada de 12 meses
Garantie limitée de 12 mois
Garanzia limitata di 12 mesi
12 maanden beperkte garantie
Garantie limitée de 12 mois
ا
ً
رهش 12 ةدمل دودحم نامض
+1 (800) 988 7973 Mon-Fri 9AM-5PM (PT)
+44 (0) 1604 936 200 Mon-Fri 6AM-11AM (GMT)
+49 (0) 69 9579 7960 Mon-Fri 6:00-11:00
Customer Support: support@eufylife.com

Anker Innovations Limited. All rights reserved.
eufy and the eufy logo
are
trademarks of Anker Innovations Limited, registered in the United States and other
countries. All other trademarks are the property of their respective owners.
51005002526 V01
User Manual
Entry Sensor
X1