V2.4
Quick Start Guide
Smart IP Camera with Battery
Please read the Quick Start Guide carefully before
using the product and keep it properly.
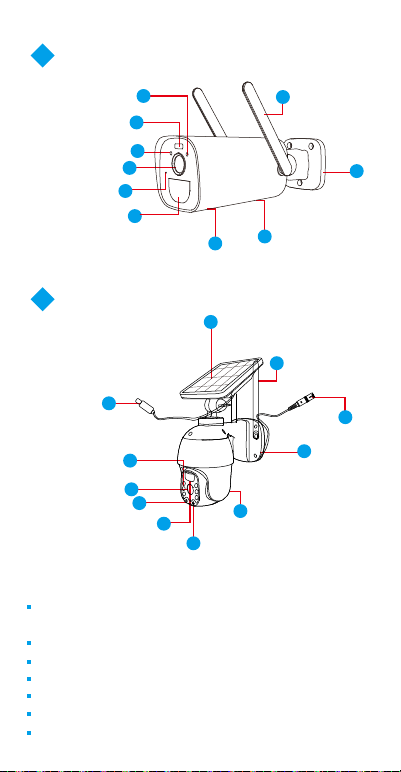
2.2 Battery Bullet Camera
Speaker
Indicator light
Lens
Photosensitive
Button/SD card slot /USB charging port
6
2
7
5
MIC
Antenna
Spot light
1
9
8
10
Base
4
3
Human Infrared
Sensor (PIR)
2.3 Solar Dome Camera
Battery output
Indicator light
Lens
Photosensitive
Power
Speaker/ Button/SD card slot
6
3
9
7
5
MIC
Antenna
Solar panel
1
11
8
10
Base
2
4
Human Infrared
Sensor (PIR)
(*Note: Please open the speaker cover
when using the reset button / SD card
slot.)
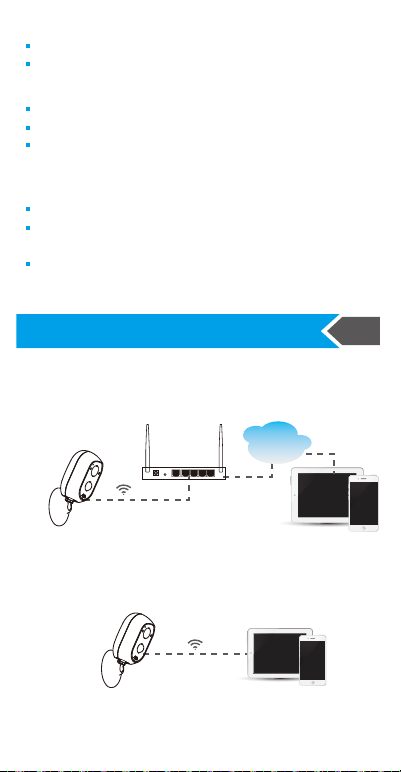
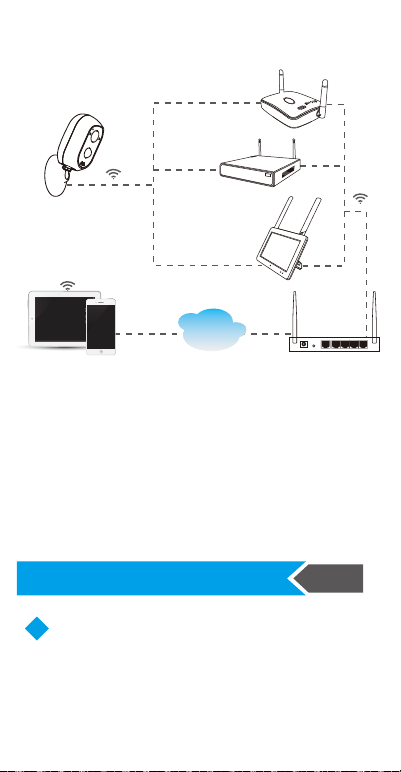
3. Working network diagram
The battery camera supports 3 connecting modes:
1. Remote view by connecting the router
(as the picture shows);
2. Direct connection through mobile phone (as the picture
shows);
Red light is always on: Low battery
The trac light is always o: In standby
Button operation for single button model:
Press and hold 2s in the o state: Power on (green light for 1s)
Press countinuously for 3 time: Power o (red light ashes 3 times)
Press and hold for 8s: Reset to enter the pairing state (red light
ashes)
Button operation for Two-button model:
Press the power button and hold 2s: turn on or turn o
Press the reset button and hold 5s: reset and enter the pairing
state (red light ashes continuously after the Indicator voice)
Press the reset button twice for continuous reading: DV/default
working mode switch (Indicator voice)
The instructions of LED light :
Green light + red light is always on: The camera is being
previewed remotely (privacy light)
Green light is always on: The device is turned on or is woken up
Green light ashes continuously: Upgrading
Green light ashes continuously and slowly: Charging
Red light ashes 3 times quickly: Power o
Red light ashes countinuously fast: Matching code
Red light ashes countinuously slowly: Connecting to the internet
Power Reset
WAN 1
2
3
4
Battery camera
Internet
Home router
Mobile device
Battery camera Mobile device
WiFi/4G Base station
Tablet
WNVR
Battery camera
Power Reset
WAN 1
2
3
4
Internet
Home routerMobile device
3. Pair to wireless NVR (WiFi/4G Base station, WNVR,
Tablet),as the picture shows.
When remote view by connecting the router, the camera’
WIFI should be connected to the router and the video is
stored on the SD card of the camera or on the Cloud.
When using in the local direct connecting mode, the WIFI
of your mobile phone should be connected to the camera
and the video can only store on the SD card of the camera.
When working by pairing to the wireless NVR, the video is
stored on the NVR and you can use mobile phone remotely
to view and set up the camera through the wireless NVR.
1. Click “local direct
connection”, set a
password for the WIFI
of the device itself and
proceed to the next step.
2. Using the device to scan the
QR code on the mobile phone
according to the operation the
gure shows, then proceed to
the next step after hearing the
prompt tone or seeing the
light
status
.
3. After the network conguration is successful, set the name
and password for the device to add successfully;
Adding mode of local direct connection
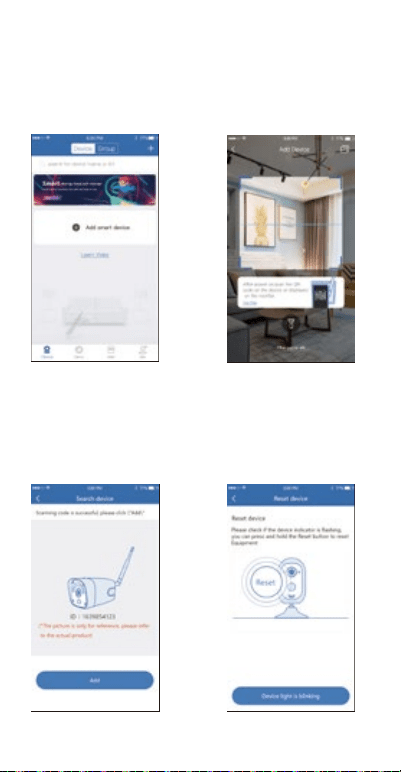
3.Open the APP and click
on the "+" in theupper right
corner to enter the scan
code interface;
4. Scan the QR code
on the device ;
5. On the search device
interface, click "Add";
6.Reset the device and
wait for the device
indicator to ash and
proceed to the next step;
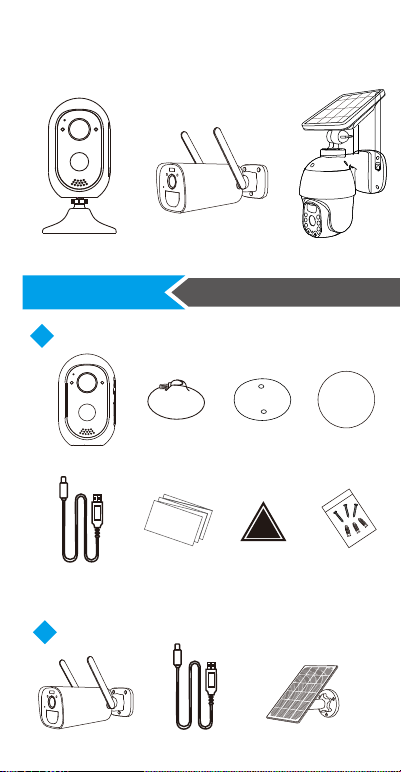
1.3 Solar Camera
1.2 Battery Bullet Camera
1.1 Battery camera
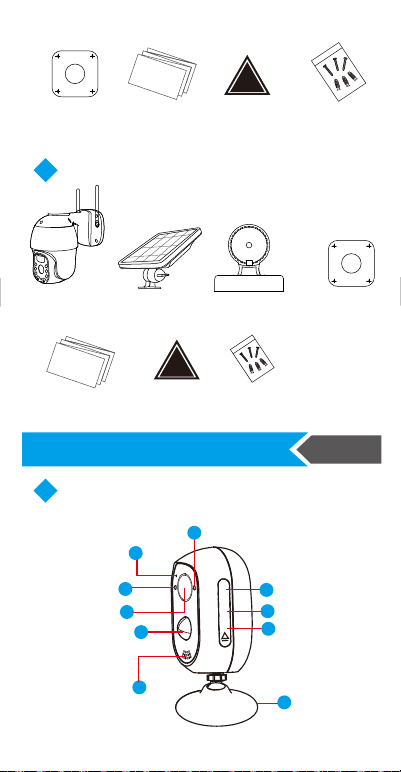
2. Interface description
6
4
9
8
7
1
10
2
3
5
Lens
Photosensitive
MIC
Speaker
Button
SD card interface
USB charging port
Indicator light
Base
Human Infrared
Sensor (PIR)
Solar panel mount x1
Mounting sticker x1
H113/115
Quick Start Guide x1
Quick Start Guide
Certicate x1
Certicate
Screw package x1
Dome Camera x1
Solar panel x1
4.3 Add Camera to APP
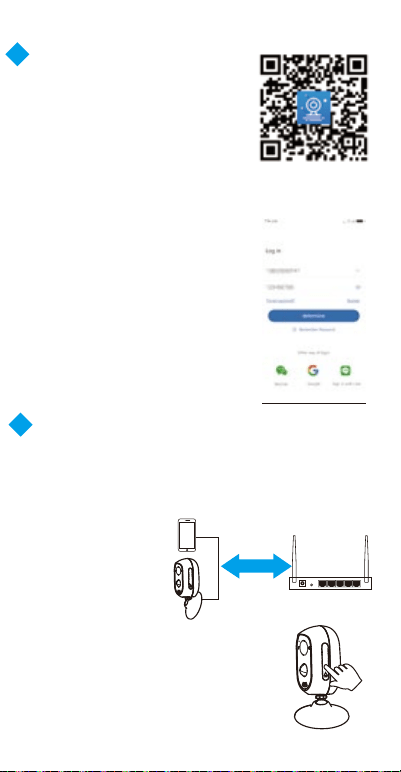
Account login: On the login interface,
enter the account/phone number/email,
and the corresponding password,
and click the "OK" button to log in.
Third-party login: APP supports
third-party login. Click the
third-party social software icon,
jump to the APP to complete
the authorization and log in.
1.Put both of your mobile
phone and camera near
the router,and the distance
should be 30-100cm.
Adding method 1: Scanning directly the QR code on the
camera when the battery camera is used by connecting
the network and local direct way.
30-100cm
Power Reset
WAN 1
2
3
4
4.2.2 Account login
2. After the battery camera is power-on,there
is a voice prompt “start match code” and the
red LED light is ashing. (Otherwise please
press the RESET button on the camera for 8
seconds, it will be available after the voice
prompt “reset successfully”).
4.2 App Installation
Users can search “EseeCloud” on
APP store or “IP PRO” onGoogle
Play,or scan the QR code below to
install the APP.
Note: For iOS system, it requires
iOS 9.0 version or above.
For Android,Android 5.1 or above.
Download
"EseeCloud" APP
4.2.1 APP Download and Installation
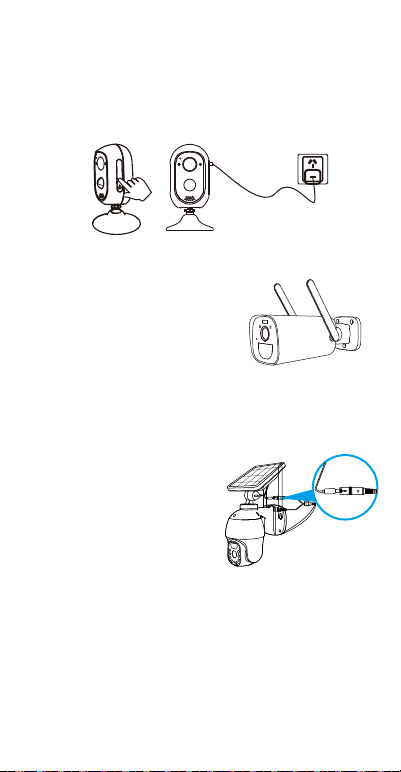
4.1 Boot up
4. Setup and installation
When remote view by connecting to the router and direct
connection method, please boot the device after insertting
the SD card. When using by pairing to the wireless NVR,
please make sure the memory(SD card, HDD etc.) of the
wireless NVR is ready.
4.1.1 Battery camera
Please press the power button for 2s to turn on the battery
camera. If the button does not turn on, please try to turn it
on again.
Please press the button for 2s to
turn on the battery bullet camera.
If the button does not turn on,
please try to turn it on again.
Note:If you cannot turn on
the phone after plugging it
in, please open the speaker
cover and plug in the power
supply to charge or put the
solar panel in the sun for
1~2 hours and try again.
4.1.3 Solar Dome Camera
4.1.2 Battery Bullet Camera
Plug the power cord of the solar
panel into the tail cable
of the solar battery camera.
1 .Packing list
Product sales conguration is dierent
Please refer to the actual product
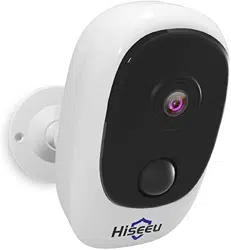
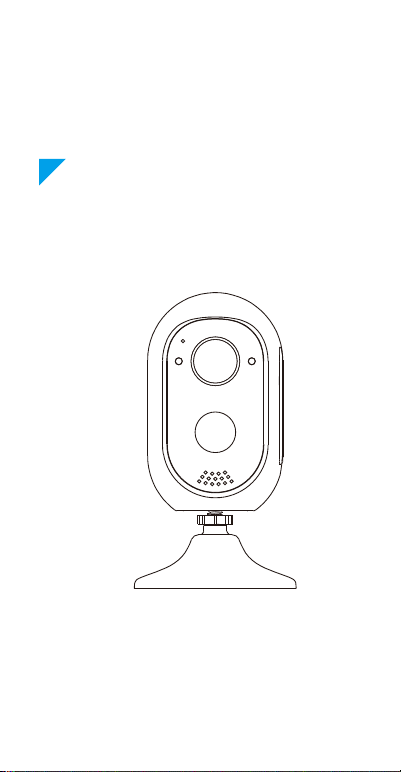
1.1 Battery camera
This guide is applicable to various types of battery
cameras. Some of the illustrations are based on BA12-H.
3M
PEFOAM
3M
PEFOAM 3M PEFOAM
3M PEFOAM
3M PEFOAM
3M PEFOAM
3M PEFOAM
3M PEFOAM 3M PEFOAM
3M
PEFOAM
Battery camera x1
Base x1 Wall-mounted
iron sheet x1
3M Glue x1
Charging cable x1
Quick Start Guide x1
Quick Start Guide
Certicate x1
Certicate
Screw package x1
BA12-H BC13-H
BP-HSD2030-W
1. Click “Remote View”,
choose the WIFI the
device needs to connected
with, enter the password
and click “next step”.
2. Using the device to scan the
QR code on the mobile phone
according to the operation the
gure shows, then proceed to
the next step after hearing the
prompt tone or seeing the light
status.
Adding mode when remote view
7.To view and use via WiFi or
other networks, please select
Remote View; If there is no network,
if you connect to the camera at
close range,please select Direct
Connection;
Camera x1 Charging cable x1
Quick Start Guide x1
Quick Start Guide
Certicate x1
Certicate
Screw package x1
Mounting sticker x1
H113/115
Solar panel x1(*option)
V2.4
Quick Start Guide
Smart IP Camera with Battery
Please read the Quick Start Guide carefully before
using the product and keep it properly.
2.2 Battery Bullet Camera
Speaker
Indicator light
Lens
Photosensitive
Button/SD card slot /USB charging port
6
2
7
5
MIC
Antenna
Spot light
1
9
8
10
Base
4
3
Human Infrared
Sensor (PIR)
2.3 Solar Dome Camera
Battery output
Indicator light
Lens
Photosensitive
Power
Speaker/ Button/SD card slot
6
3
9
7
5
MIC
Antenna
Solar panel
1
11
8
10
Base
2
4
Human Infrared
Sensor (PIR)
(*Note: Please open the speaker cover
when using the reset button / SD card
slot.)
3. Working network diagram
The battery camera supports 3 connecting modes:
1. Remote view by connecting the router
(as the picture shows);
2. Direct connection through mobile phone (as the picture
shows);
Red light is always on: Low battery
The trac light is always o: In standby
Button operation for single button model:
Press and hold 2s in the o state: Power on (green light for 1s)
Press countinuously for 3 time: Power o (red light ashes 3 times)
Press and hold for 8s: Reset to enter the pairing state (red light
ashes)
Button operation for Two-button model:
Press the power button and hold 2s: turn on or turn o
Press the reset button and hold 5s: reset and enter the pairing
state (red light ashes continuously after the Indicator voice)
Press the reset button twice for continuous reading: DV/default
working mode switch (Indicator voice)
The instructions of LED light :
Green light + red light is always on: The camera is being
previewed remotely (privacy light)
Green light is always on: The device is turned on or is woken up
Green light ashes continuously: Upgrading
Green light ashes continuously and slowly: Charging
Red light ashes 3 times quickly: Power o
Red light ashes countinuously fast: Matching code
Red light ashes countinuously slowly: Connecting to the internet
Power Reset
WAN 1
2
3
4
Battery camera
Internet
Home router
Mobile device
Battery camera Mobile device
WiFi/4G Base station
Tablet
WNVR
Battery camera
Power Reset
WAN 1
2
3
4
Internet
Home routerMobile device
3. Pair to wireless NVR (WiFi/4G Base station, WNVR,
Tablet),as the picture shows.
When remote view by connecting the router, the camera’
WIFI should be connected to the router and the video is
stored on the SD card of the camera or on the Cloud.
When using in the local direct connecting mode, the WIFI
of your mobile phone should be connected to the camera
and the video can only store on the SD card of the camera.
When working by pairing to the wireless NVR, the video is
stored on the NVR and you can use mobile phone remotely
to view and set up the camera through the wireless NVR.
1. Click “local direct
connection”, set a
password for the WIFI
of the device itself and
proceed to the next step.
2. Using the device to scan the
QR code on the mobile phone
according to the operation the
gure shows, then proceed to
the next step after hearing the
prompt tone or seeing the
light
status
.
3. After the network conguration is successful, set the name
and password for the device to add successfully;
Adding mode of local direct connection
3.Open the APP and click
on the "+" in theupper right
corner to enter the scan
code interface;
4. Scan the QR code
on the device ;
5. On the search device
interface, click "Add";
6.Reset the device and
wait for the device
indicator to ash and
proceed to the next step;
1.3 Solar Camera
1.2 Battery Bullet Camera
1.1 Battery camera
2. Interface description
6
4
9
8
7
1
10
2
3
5
Lens
Photosensitive
MIC
Speaker
Button
SD card interface
USB charging port
Indicator light
Base
Human Infrared
Sensor (PIR)
Solar panel mount x1
Mounting sticker x1
H113/115
Quick Start Guide x1
Quick Start Guide
Certicate x1
Certicate
Screw package x1
Dome Camera x1
Solar panel x1
4.3 Add Camera to APP
Account login: On the login interface,
enter the account/phone number/email,
and the corresponding password,
and click the "OK" button to log in.
Third-party login: APP supports
third-party login. Click the
third-party social software icon,
jump to the APP to complete
the authorization and log in.
1.Put both of your mobile
phone and camera near
the router,and the distance
should be 30-100cm.
Adding method 1: Scanning directly the QR code on the
camera when the battery camera is used by connecting
the network and local direct way.
30-100cm
Power Reset
WAN 1
2
3
4
4.2.2 Account login
2. After the battery camera is power-on,there
is a voice prompt “start match code” and the
red LED light is ashing. (Otherwise please
press the RESET button on the camera for 8
seconds, it will be available after the voice
prompt “reset successfully”).
4.2 App Installation
Users can search “EseeCloud” on
APP store or “IP PRO” onGoogle
Play,or scan the QR code below to
install the APP.
Note: For iOS system, it requires
iOS 9.0 version or above.
For Android,Android 5.1 or above.
Download
"EseeCloud" APP
4.2.1 APP Download and Installation
4.1 Boot up
4. Setup and installation
When remote view by connecting to the router and direct
connection method, please boot the device after insertting
the SD card. When using by pairing to the wireless NVR,
please make sure the memory(SD card, HDD etc.) of the
wireless NVR is ready.
4.1.1 Battery camera
Please press the power button for 2s to turn on the battery
camera. If the button does not turn on, please try to turn it
on again.
Please press the button for 2s to
turn on the battery bullet camera.
If the button does not turn on,
please try to turn it on again.
Note:If you cannot turn on
the phone after plugging it
in, please open the speaker
cover and plug in the power
supply to charge or put the
solar panel in the sun for
1~2 hours and try again.
4.1.3 Solar Dome Camera
4.1.2 Battery Bullet Camera
Plug the power cord of the solar
panel into the tail cable
of the solar battery camera.
1 .Packing list
Product sales conguration is dierent
Please refer to the actual product
1.1 Battery camera
This guide is applicable to various types of battery
cameras. Some of the illustrations are based on BA12-H.
3M
PEFOAM
3M
PEFOAM 3M PEFOAM
3M PEFOAM
3M PEFOAM
3M PEFOAM
3M PEFOAM
3M PEFOAM 3M PEFOAM
3M
PEFOAM
Battery camera x1
Base x1 Wall-mounted
iron sheet x1
3M Glue x1
Charging cable x1
Quick Start Guide x1
Quick Start Guide
Certicate x1
Certicate
Screw package x1
BA12-H BC13-H
BP-HSD2030-W
1. Click “Remote View”,
choose the WIFI the
device needs to connected
with, enter the password
and click “next step”.
2. Using the device to scan the
QR code on the mobile phone
according to the operation the
gure shows, then proceed to
the next step after hearing the
prompt tone or seeing the light
status.
Adding mode when remote view
7.To view and use via WiFi or
other networks, please select
Remote View; If there is no network,
if you connect to the camera at
close range,please select Direct
Connection;
Camera x1 Charging cable x1
Quick Start Guide x1
Quick Start Guide
Certicate x1
Certicate
Screw package x1
Mounting sticker x1
H113/115
Solar panel x1(*option)
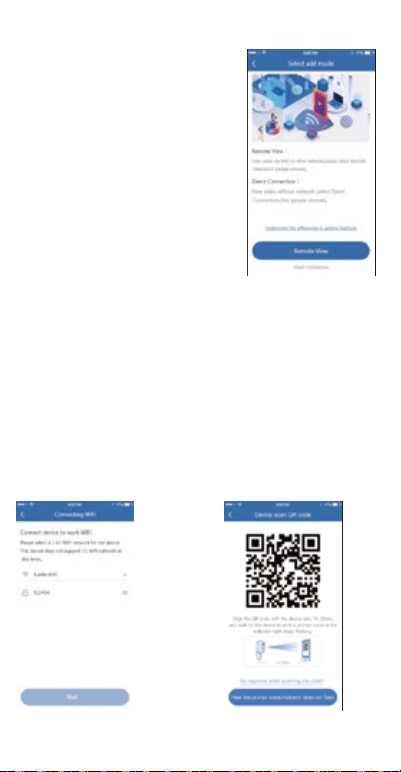
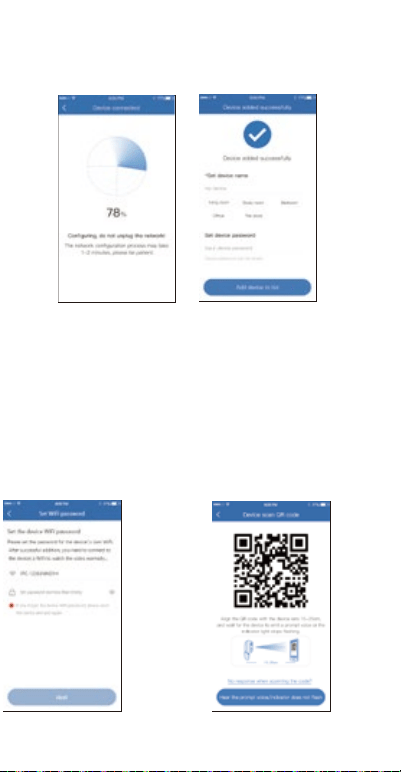
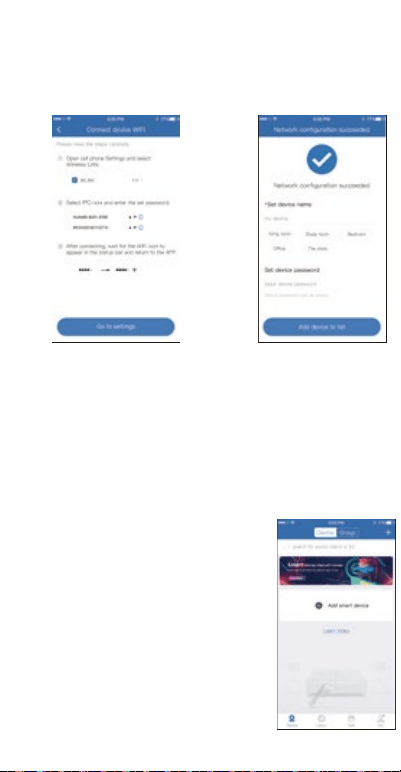
Device is
oine
Check your router's Internet connection.
Check the connection between the camera and
the router. If you change the router or change the
WiFi password, you need to reset the camera and
recongure the network.
Check the connection between the wireless NVR
and the router and the connection between the
camera and the wireless NVR. If you change the
router or change the wi password, you may
need to recongure the WNVR’s network.
Check if the camera battery is exhausted, you
can try to plug in the power and try again.
No preview
The server may be congested, try restarting the
app.
No push
notication
Make sure the app has notication permissions.
Please conrm that the alarm message push
switch is turned on in the App Personal Center
settings.Please conrm that the alarm message
push switch is turned on in the camera settings.
No recording
For direct connection to the router, please insert
SD card before booting.
Make sure the camera PIR (monitering) switch is
turned on.
Please make sure the camera recording switch is
turned on.
Please check the recording settings on the
wireless NVR.
Please check whether the SD card status is
normal in the App. If it is abnormal, try to format
the SD card.
2
3
4
5
8. FAQ
Q: Why does the battery run out quickly?
A: The App will count the daily recording time when playback
video. Please check if there are more videos every day. If
there are many false triggers, please try to lower the trigger
sensitivity setting.
4.5.1 Battery camera
4.5 Installation and placement
3M
Video playback
Cloud storage playbackAlarm information
1.Place on a desk or table,
As shown below.
2. Fix the battery camera on the wall or glass
First x the wall-mounted iron sheet to the wall with 3M glue
(smooth surface such as glass) or screws (brick wall, etc.),
put the magnetic base of the battery camera on the iron sheet,
and adjust the angle.
Q: What should I do if I forget my password?
A: If you have forgotten the login password of the App
account, please reset the password through the "Forgot
Password" option in the login interface as instructed.
Check if the WiFi signal between the camera and the
wireless NVR or router is weak. You can try to change the
WiFi channel of the wireless NVR or router; or adjust the
position of the wireless NVR, router or camera to improve
the signal transmission.
Q: How to conrm that the network connection between the
camera and the router or wireless NVR is normal?
A: Actively trigger PIR in front of the camera and wait for
about 10s.
If the camera ashes red, it means that the camera cannot
connect to the router or wireless NVR smoothly.
If it is connected to a wireless NVR, you can click play from
the corresponding channel of the NVR / touch screen. If the
video can be played, the connection is normal;
Whether the indicator of the corresponding channel on the
base station is always on. The blinking of the indicator
indicates that the base station and the battery camera have
been disconnected.
Q: When do wireless NVR (NVR/ touchable monitor / base
station) and battery camera need to be paired?
A: Matching code is to make the camera wi connect to the
wireless NVR automatically. The devices purchased in the
entire package is already matched code in the factory,
and no match code operation is required.
You need to match code when a new battery camera need
to be added to the wireless NVR;
The battery camera needs to be code matched after being
reset to factory settings;
The wireless NVR needs to be code matched after being
restored to the factory settings;
After deleting the paired cameras on the wireless NVR
channel through the App, you need to match code again.
The device's access password is set after the device is
added or modied by the App, and the App remembers it.
Subsequent access does not need to be re-entered. If the
password is changed through other methods (such as
WNVR changed the password in the local interface), please
ll in the new password to access in the corresponding
device column of the device list →More →Edit menu.
If you have lost the password saved by the App, you need
to restore the camera or wireless NVR to the factory settings,
and then reset the password.
FCC STATEMENT
This equipment has been tested and found to comply with the limits
for a Class B digital device, pursuant to part 15 of the FCC Rules.
These limits are designed to provide reasonable protection against
harmful interference in a residential installation.
This equipment generates, uses and can radiate radio frequency
energy and, if not installed and used in accordance with the
instructions,may cause harmful interference to radio communications.
However, there is no guarantee that interference will not occur in a
particular installation.If this equipment does cause harmful
interference to radio or television reception, which can be determined
by turning the equipment o and on, the user is encouraged to try to
correct the interference by one or more of the following measures:
—Reorient or relocate the receiving antenna.
—Increase the separation between the equipment and receiver.
—Connect the equipment into an outlet on a circuit dierent from that
to which the receiver is connected.
—Consult the dealer or an experienced radio/TV technician for help.
This equipment complies with FCC radiation exposure limits set forth
for an uncontrolled environment. This equipment should be installed
and operated with minimum distance 20cm between the radiator &
your body.
FCC NOTICE
This device complies with Part 15 of the FCC rules. Operation is
subject to the following two conditions: (1) This device may not
cause harmful interference; and (2) this device must accept any
interference received, including interference that may cause
undesired operation.
FCC CAUTION
Caution the user that changes or modications not expressly
approved by the party responsiblefor compliance could void
the user’s authority to operate the equipment.)
6. Camera pairing to wireless NVR
30-100cm
The battery camera shipped with the kit has already been
paired with the wireless NVR, no code matching is required.
After the pairing information of the camera and wireless NVR
is cleared, you need to match code again.
Note:
(2). During charging, the indicator
status is: The green light is always
on, and the indicator is o after
charging is completed.
(1). Place the battery camera and the wireless camera/Wireless
Touch Screen System /base station within 30-100 cm.
Please use the original battery, and use the camera or the
original charger to charge the battery.
Using other batteries will result in inaccurate power
display and may damage the camera.
Please charge the battery at room temperature. If the
temperature is too low or too high, the charging time will
be extended, and the battery will be damaged and the
battery life will be aected.
(4). Open the WNVR’s function of match code to add camera.
(2). While the battery camera
is turned on, press and hold the
RESET button for 6 seconds.
(3). When the indicator light
of battery camera become
to red light and fast ashing,
that means enter the code
matching mode.
Right-click the
mouse and select
“Wireless Add” to
check whether it is
added to the device.
If yes, click to exit;
otherwise, repeat
steps 2 and 3
above.
Tablet
WNVR
1.Click the screen,
click the “home”
icon, and click
the [Match
Code] module.
SYNC
NET
DC 5V
RESET
NVR
4
3
2
1
IPCAM
Sync
7. Troubleshooting
Trouble Solution
Unsuccessful
network
conguration
Make sure your phone, camera, and router are
close enough.
Note that the camera cannot support connection
to a 5G router.
Check that the router name and password are
correct.
Check the Internet settings of the wireless NVR.
1
2. Click the
“Match Code”
button. After
the adding is
successful,
click the “Stop”
button. Other-
wise, Otherwise,
repeat steps 2
and 3.
Press the SYNC button of the base station for 3 seconds,
and hear the voice prompts “Start matching code”, that is,
the base station is in matching code mode. When the base
station prompts “matching code successfully”, means the
matching code is completed, if the base station prompts
“The new device is not found", Please repeat steps 2 and
3 above.
Base station
4.5.2 Battery Bullet Camera
(1). Use the mounting sticker to
locate and bore holes, and the
cement wall must be nailed into
the rubber plug;
(1). Use the mounting sticker to locate
and bore holes, and the cement wall
must be nailed into the rubber plug;
(2). Fix the base with screws;
(3). Adjust the camera's pitch
angle to a proper position
and tighten the xing screws;
(3). Adjust the camera's pitch
angle to a proper position
and tighten the xing screws;
(4). The camera can be
charged with solar panels.
H113/115
4.5.3 Solar Dome Camera
H113/115
(2). Fix the base with screws;
Recommended
installing the
camera about
2.5-3M
PIR is sensitive to hot and cold disturbances, please note:
5. Charging instructions
During use, if it is found that the APP pushes low battery
message or the camera has a low battery warning indicator,
you need to charge the camera, as shown in the gure.
(1). Connect the USB power supply to the battery camera .
Avoid installing the camera where the air ow is agitated.
For example: the air outlet of the air conditioner, the heat
dissipation port of the equipment, the side of the fan, the
vicinity of the curtain, etc.
Please to install the camera is about 2.5M-3M.
When installing, avoid direct access to personnel. It is
best to install it on the side of the access route or maintain
an angle. Do not ip the camera upside down (infrared
body sensor on top, lens on bottom).
Battery camera
Batteery bullet camera
(4). When the solar panel is
installed outdoors, it can be
connected with the ball
machine through an
extension cord.
Accessories needed
(not standard conguration)
1xBracket
3.After connecting with
its own WiFi according
to the guiding interface,
return to APP;
4. Set the name and
password for the device
then you can add it to
the device list;
Note: The direct connection needs to be maintained with the
device's own WiFi connection in order to preview the video
of the device normally.
Adding method 2: To use with wireless NVR, please rst
power the wireless NVR and connect it to the Internet.
After adding the wireless NVR by scanning the ID QR
code on the body of NVR or displayed on the screen with
the APP, you can check the battery camera on the APP.
1. When the WNVR (base station,
network hard disk recorder and
touch screen) is powered on,
connect the WLAN network (some
models support wireless connection)
to the router which is already
connected to the Internet;
2. Open the APP and click on the "+"
in the upper right corner to enter the
scan code interface;
4.4 Notication, Preview and Playback
1. Click the push information or "info" button to view the alarm
information of the camera.
2. Click the corresponding play icon on the device list to enter
the preview interface to view real-time video and have voice
intercom.
3.Click the playback or cloud icon to view the video which is
on the device or in the cloud.
4.Tap the share icon to share the camera to others.
Device Remote viewing
Playback
3. Scan the ID QR code on the
wireless NVR body or the screen,
and add the device according to
the simple setting guided by the
APP. The camera paired to the
wireless NVR will be directly
displayed in the device list.
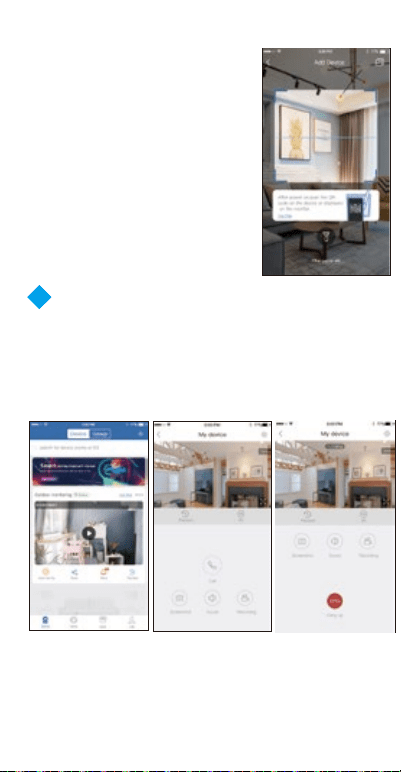
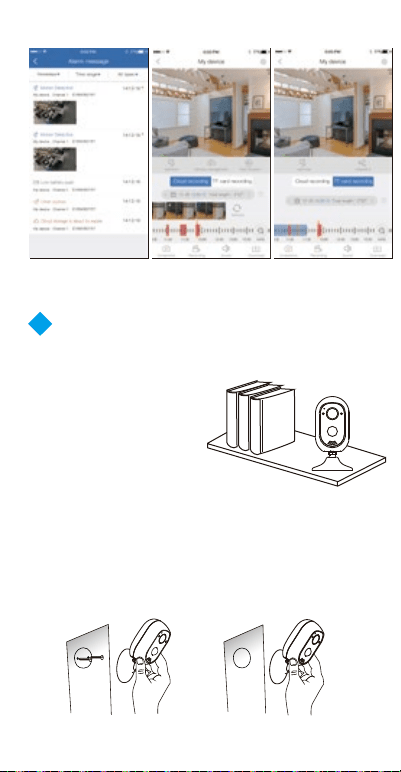
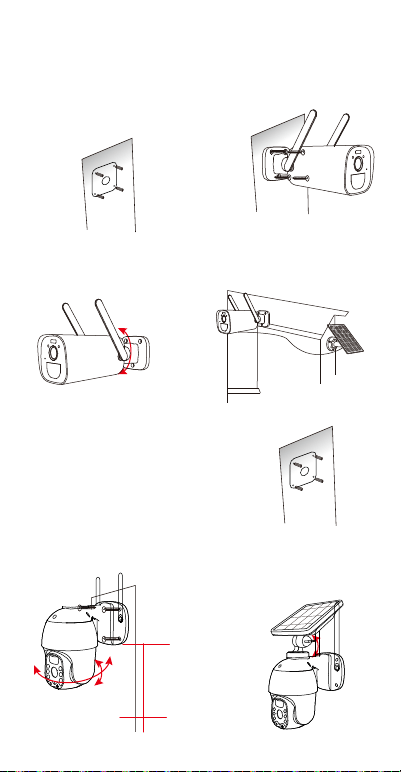
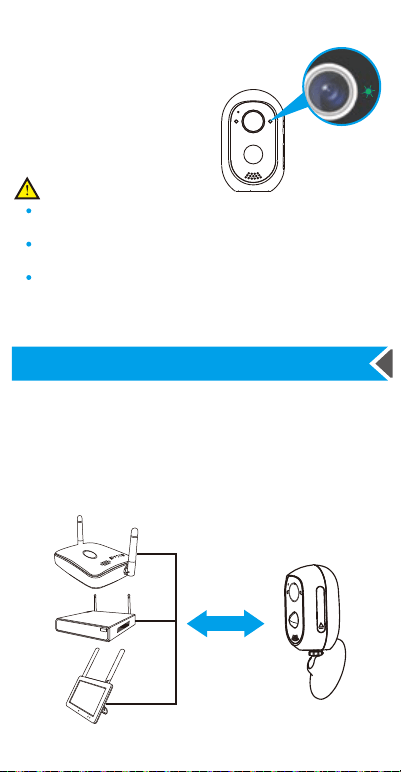
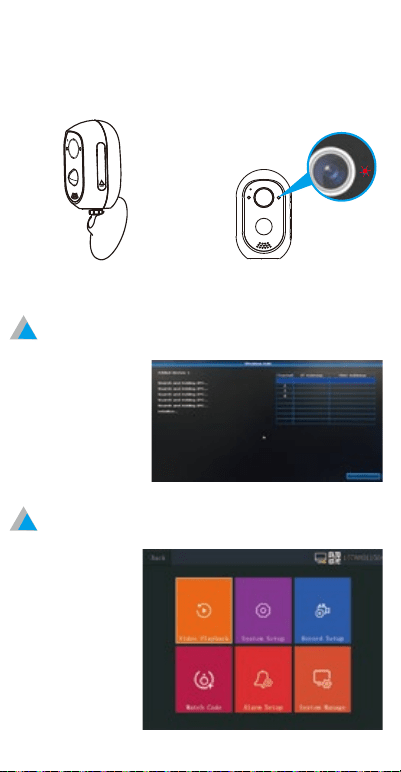
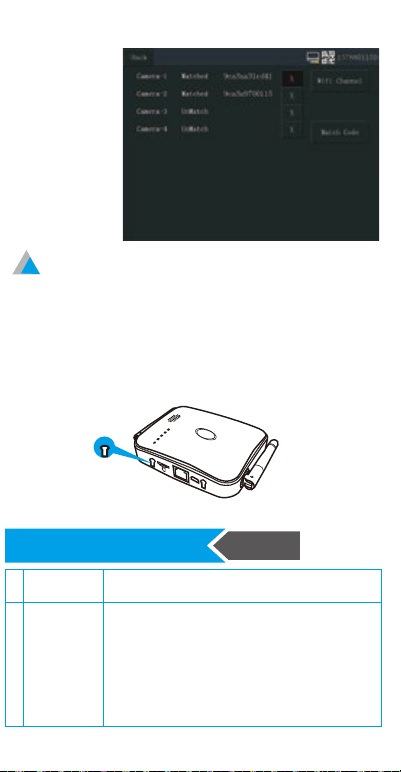
