100%
WIRE-FREE
No cords.No
wires.No worries
E-mail:[email protected]
Telphone:+1 9176882228
Website:www.hiseeu.com
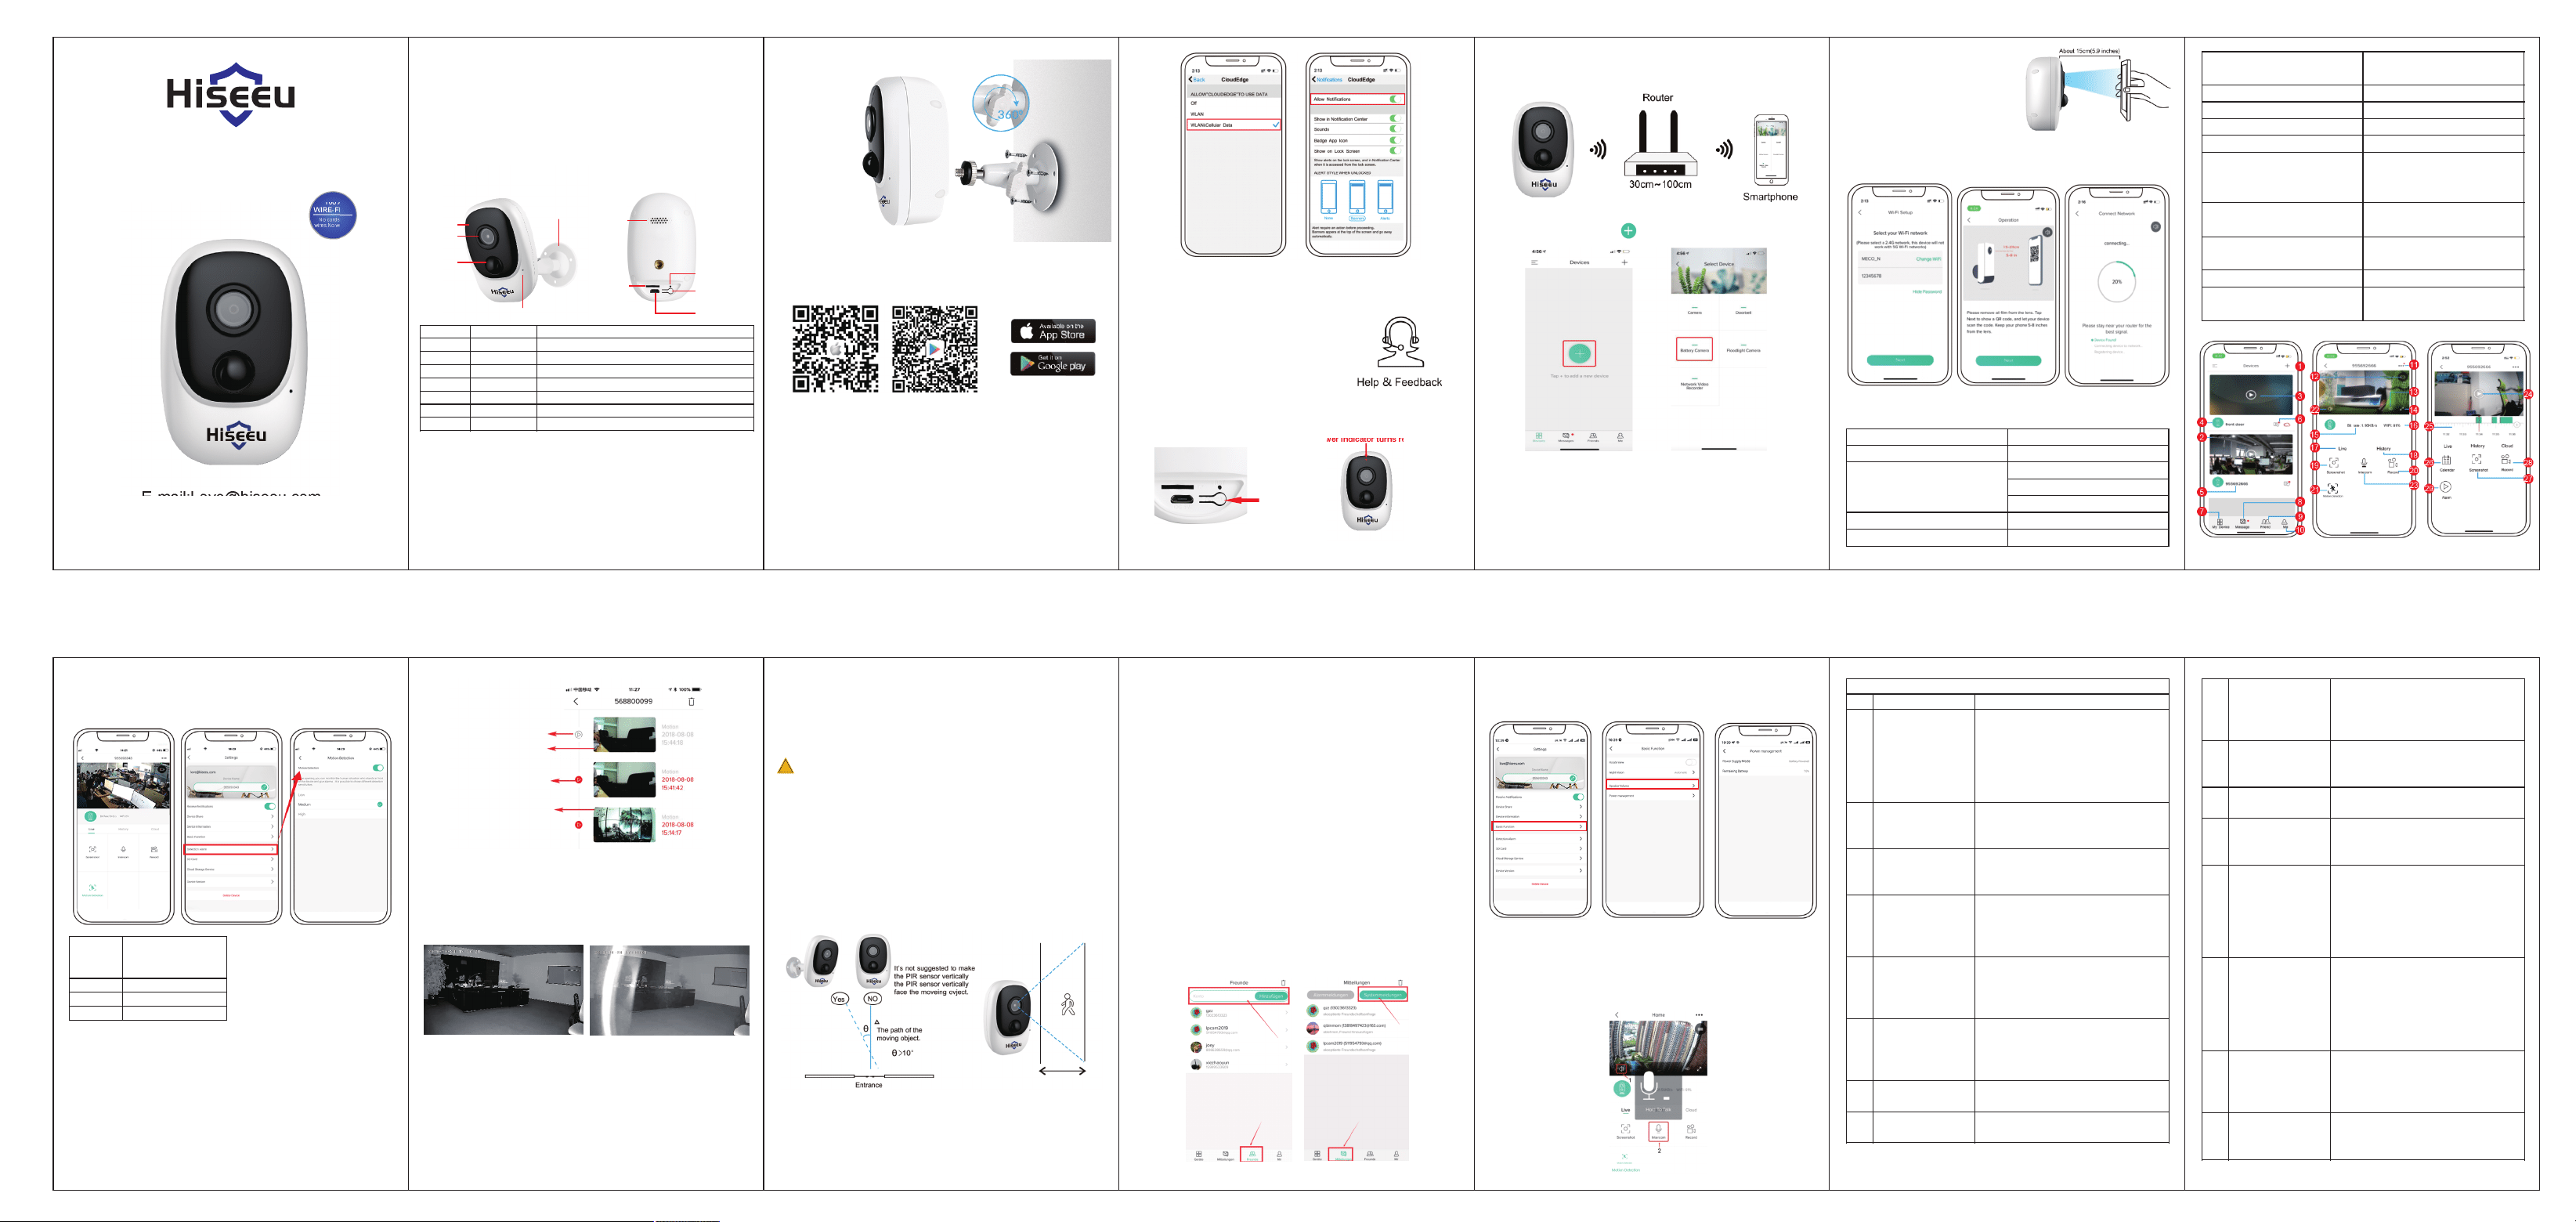
1.Product Details
3.1 Search “Cloudedge” in App store or Google play store, or scan below QR Code to
download and install on smart phone.
iOS
Andriod
NOTE: Please allow below 2 permissions when first running App.
1. Allow CloudEdge use mobile cellular data and wireless LAN (Function: If not allowed,
it will be failed to add IP camera).
2. Allow CloudEdge to get system push message permissions (Function: When the
camera triggers motion detection or audible alarm, the phone can receive alarm push).
Press and hold on the top Power Button for 5 seconds to Turn on Camera (if can not
power on, please plug in DC5V 2A phone adapter to charge 15min first),
11. Important Notes for Reducing False Alarms
!
11.1 To reduce false alarms, please note that:
● Do not install the camera in a place where the bright objects or light is directed,
including sunshine, bright lamp lights, etc.
● Please do not place the camera in the place where the vehicle and people often
come and go.A large number of data results show that the camera can detect
people and vehicles within a distance of 15 meters (55 feet).
● Keep the camera away from outlets such as air conditioning vents.
Humidifier, heat transfer openings of projectors etc. remote.
● Do not leave the camera facing the mirror.
● Keep the camera at least 1 meter away from wireless devices to avoid wireless
interference.
6 9
Wire-Free Rechargeable Security Battery Camera
Quick User Guide(For C10+)
Thank you for your purchase and your trust. If you have a good experience with
our product, Please leave us a review, We will optimize your shopping
experience as much as possible and offer you a great lifetime online service.
……………………………………………………………………………………………
If you have problems in using our product, Please contact with us soon by email
as below. We will offer the best solution for you to any problems in 24 hours.
Any advice will be collected and we will do our best to improve.
……………………………………………………………………………………………
24-Hour-Service Email: [email protected]
IR Led
Bracket
Microphone
TF Card Slot
Power Button
DC5V USB Port
Reset Button
Lens
Speaker
PIR
No Camera Button Operation
1
Power-Button
Press and hold the button for 5 seconds to turn the device on and off.
2
Reset- Button
Press and hold the button for 5 seconds to reset and restart the device.
No LED-Status Operation
1
Flashes red slowly
Waiting for Wi-Fi connection, and start Add devices.
2
Flashes red fast
WiFi connection
3
Constant red
Network is not normal
4
Constant blue
WiFi connected, camera is running normally.
Please fix the bracket first, then install the camera
1. If it is a wooden wall, you can use the nails provided by the product to fix the bracket
and the wall.
2. If it is cement wall or ceramic tile wall, please use the electric drill to drill a hole in the
wall and install the bracket, and install it with the expansion screw provided by the
product.
3. Rotate the button counterclockwise to instantly fix the camera.
2.Install camera
3.Installation Cloudedge APP
3.2 Register Account
New users need to register by e-mail, click "Register", follow the steps to complete the
registration of the account, and log in.
3.3 Help and Feedback
For product issues or questions, please go to the Feedback
page in the CloudEdge APP and write down the detailed
situation ,or send an email to [email protected]om
(We recommend your e-mail address and product
model number,We will reply to you
within 24 hours by e-mail.)
4.Power on camera
Power Button
Power indicator turns red
NOTE: DC5V 2A Power adapter is not included in packing list.
5.1 Bring the camera and your phone within 1 to 3 feet (30 to 100 cm) to the router
and connect Wi-Fi.
5. Add Camera
NOTE:Please note the camera only works with 2.4G Wi-Fi,not supports 5G Wi-Fi.
5.2 Start the CloudEdge app,press and select "Battery Camera".
5.3 Follow the instructions to make sure the camera is activated.(The indicator should
light red and blink slowly.)
5.4 Choose 2.4Ghz WiFi SSID and About 15cm (5.9 inches) Input password, press
“next ".
5.5 Put the QR code in front of the Camera
lens about 15 cm .After the device recognizes
the QR code ,it will sound “bu gu ",after
heard it ,Press“next”.
5.6 After click "Hear tone" , camera will start connecting Wi-Fi and skip To "Search to
Device" page ,after setup finished , you can edit camera name here ,then click "DONE"
to open camera in My Device list,now you can watch real-time videos on your phone.
6.Device Menu
1.Add camera
2.Camera time
3. Live view button
4. Camera type icon
5.Camera name
6. Alarm information icon(red dot
indicates alarm occurred, click it and
view alarm screenshot or video)
7.My device list
8.Message
9. Friends option
10.Personal homepage
11.Camera setting options, such as
alarm SD card, etc.
12. Battery capacity
13.SD, HD option
14. Full screen option
15.Bit rate
16. Network signal strength
17. Preview option
18. Play Option
19.Screenshot button
20. Record button
21.Option for detecting the human
body. It is switched on by default
(green means activated).
22.Sound option
23.Intercom option, long press and
then speak.
24.Alarm video, press it to play/pause.
25. Recording motion detection
26.Calendar option, press it to select
the date.
27.Screenshot options
28. Recording options
29.Alarm point, view all mobile
alarm recordings
PIR “Alarm Setting ” is on by default and the Default sensitivity is “high", but it is
adjustable. “Device” -" Settings"- “Detection Alarm". The detection distance is
10 meters (32ft).
7. PIR Detection
Sensitivity
Low
Medium
High
Up to 4 meters (13ft)
Up to 6 meters (20ft)
Up to 8 meters (26ft)
Detecting Distance
(For moving
and living things)
*NOTE: Higher sensitivity offers longer
detecting distance, but it would lead to
more false alarms.You are advised to set
up the sensitivity level to “Low” or
“Medium” when you install the camera
outdoors.
8. Alarm Push Notification and playback
When PIR is triggered, camera and system actions
1.Alarm sound in the app (please open the permission for the notification the cloudedge app in the
mobile setting and turn off the mobile Volume on).
2. Alarm Messages Notification (please activate the notification via Cloudedge app in the mobile setting).
3.Alarm snapshot and video recordings on Micro SD card /cloud storage(please make sure the TF card
is inserted.) Cloudedge app notification in mobile.
The battery camera with PIR sensor is not designed for 7x24 hours all day recording,
but aims at pushing alarm message notification to app and record video to the micro
SD card or Alicloud(Need to Pay)when PIR sensor detected human body motion events,
when you can play back the motion videos wherever you are via CloudEdge APP
Alarm Record
Alarm Snapshot
Click it to play alarm
video recording clip
Click to preview alarm
snapshot there are 2
frames as per second
9.Best conditions for night vision
When the camera is turned on in night vision mode, if there is obstruction within three
meters of the lens, infrared rays will have a concentrating effect, which will cause the
obstruction part to be extremely bright, and other screens will be darker, and the night
vision effect will be poor.
(No matter where the camera is installed, make sure there are no obstacles within
of the lens)3 meters
No obstruction night vision is normal. Obstruction causes night vision picture unnormal.
10. Battery Management
10.1 The camera has a built-in 10400 mAh 18650 battery, which can be used 60-90Days
in theory, assuming the camera wakes up 15 times per day and watching 5 Minutes
of video.
Note: The battery life depends on how many times the camera wakes up.The more of
the camera is turned on, the faster the battery is consumed.
10.2 If the battery is less than 20%, the app will send a notification to remind you to
charge.
10.3 You can charge the camera with the DC 5V2A Adapter
10.4 If your battery capacity is used up too fast, the possible cause is that the camera
wakes up too often. It is recommended to lower the Sensitivity of "Body Detection"
or occasionally turn it off.
11.2 Cover of the surveillance area
When installing the camera, the PIR sensor should not be vertically aligned with the
moving object, as it may not detect movement. It is recommended that the camera be
tilted more than 10 degrees to capture all motion.
12. Video playback and SD card
Video recording was stored in SD card (SD card is not included in package) or cloud.
12.1. Only supports 2-128 GB
12.2. To ensure the recognition rate and SD card life, we recommend the use of Class
10 Speed Micro SD Card(Samsung, SanDisk, Kinston Micro SD Card)
12.3. It is recommended to check the SD card for damage before using the SD card.
Format the Micro SD card before inserting it into the camera. The format must be
FAT2 or EXFAT32
12.4. After you insert an SD card into the camera properly, in the app “CloudEdge” , it
will show the memory volume. That means the camera SD card is readable.
12.5. If the SD card is not readable, you could contact us.
13.Share the camera with your family
Each camera can only be added to one account. If your family also wants to watch the
camera, he/she has to register a new account as well. Before that you have to give
permission.
Because of sicerhheit, part functions are illegal.
A.First let your family sign up for a cloudedge account, pay attention to register with
a new email account.
B.Get he/she registered email address and enter he/she email address in the friend
search bar and click add.
C.Ask your family to agree the request.
D.After the agree, the account will display a camera icon. Now share the happiest with
your family.
14. Check the battery status
You can go to cloudedge app to check the remaining power of camera battery,
Settings>Basic Function>Power management
15.Talk to camera and hear the camera
Press and hold the Intercom button to talk to it and turn on the audio button then you
can listen to the camera.
Step 1: Activate the audio option
Step 2: Press and hold the Intercom button to speak.
Troubleshooting table
No. Descripon Soluon and operaon
1
Connecon can not be
established
1) Check your Wi-Fi name and password.
2) Make sure your WiFi is 2.4G, it does not
support 5G.
3) Make sure your camera and mobile phone
are near the router.
4) Email hiseeu customer service staff to solve
your problem within 24 hours
2
Reset to default
1) Press and hold the reset buon for 5 seconds.
2) Hear a “bu gu” sound
3) The red light starts to flash slowly.
3
How to connect the
camera to new WIFI
network
1) Press the reset buon to the factory seng.
2) Remove the camera in the CloudEdge APP
3)Re-connecon
4
Alarm picture without
persons
1) The camera needs me to wake up and
people are moving too fast.
2) Some objects with dissipave heat may be
detected by PIR, and it is recommended to lower
the sensivity of the PIR alarm
5
Frequent alarm
1) Because the environment or the number of
vehicles where you install the camera trigger
the cameras frequently. It is recommended to
change the installaon angle.
2) Adjust the camera alarm sensivity to "low”
6
Why is someone crossing
without alarm?
The PIR inspecon area has a range limitaon.
It may be that the person passing the posion is
too far or too close, or the person passes quickly
from a corner of the camera and is not
successfully detected by the PIR.
7
No alarm push
Enable noficaon of the CloudEdge app in the
mobile sengs.
8
No alarm video recording
Please insert the TF card or turn on cloud
storage
9
Device offline
Check if the network works well,It is possible
that the locaon where the camera is installed is
too far from the router, causing the wifi to not
cover the camera.
10
Video delay
Check the WIFI network, the distance between
the camera and the router should not be too
long.
11
Short baery life
The camera was awakened too oen and should
not be placed on the roadside or in the sun.
12
Cannot start camera aer
replacing baery
1) Check if the posive and negave poles of the
baery are correct.
2) Check if the baery is the recommended type.
13
Unable to charge
1) Please use the 5V 2A power adapter to
charge the camera correctly.
2) When the charging is normal, the charging
indicator will light red. If the charging indicator
does not light, the charging is not successful.
Please check if the power adapter and charging
cable are normal.
14
CloudEdge APP Flashback
1) It may be that your phone system version is
too low or too high, resulng in poor
compability. It is recommended that you
uninstall the app and re-download it.
2) Contact customer service staff to provide
informaon such as the model number and
system version number of your mobile phone.
15
Unable to register
account
1) When registering an account, please select
the correct country.
2) When you register your account, you do not
need to enter a verificaon code. Please follow
the process to register your account.
16
Unable to add friend
Your account and friend account must choose
the same country, or the same area. For example,
accounts in Europe and America cannot add
friends.
-1- -2-
-3- -4- -5- -6-
-8-
-9- -10-
-11- -12-
-13-
-7-
Note: When you charging the camera, there is no indicator on the camera. You can
check the battery status on App.