Documents: Go to download!
User Manual
- User Manual - (English)
- STATEMENT
- ALL PRODUCTS & PARTS
- Setup The System
- Menu Do What
- How to setup the record video plan?
- Video Playback
- Delete Repeater
- Frequently Asked Questions
Table of contents
USER MANUAL Wireless Security Camera
STATEMENT
Safety Caution
- Please do not put any fluid container on the product.
- Please use the product in ventilated environment and prevent blocking the vents.
- Please use included power supply with the product to prevent damage to the product.
- Please use the product under its standard working temperature and humidity.(advised in this manual or distributor’s website)
- Dust on PCB may cause short circuit.It is suggested to clean the dust on PCB timely to make the product work properly.
- Please obey the regulation and policy in your country and area during the installation of this
Out Of Box Audit
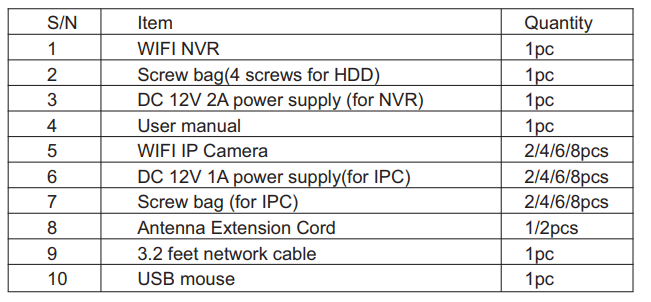
After receiving the product,please check all products and accessording to distributor’s Package Includes information.If any is missed or damaged,please contact the distributor
ALL PRODUCTS & PARTS
This product may require cabling,we suggest to test all products&parts before installation and cabling
NVR

- WIFI Antenna Ports:Double antennas to WIFI range
- WAN Port:Connect your NVR to Internet
- VGA Port:For viewing on VGA monitor
- HDMI Port:For viewing on HDTV
- USB Ports:For mouse and backup
- Power Input
IP Cameras
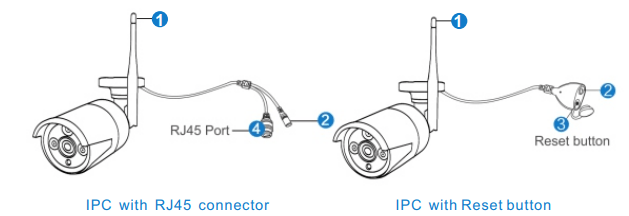
- WiFi antenna:WiFi connection with NVR;
- DC Port:input power 12V 1A;
- Reset Button:press reset button for 10 seconds to restore factory setting and enter into matching-code mode;
- RJ45 Port:for pair the camera with NVR,or connect the camera by wired connection
Note:Working temperature ranging from -13 degrees Fahrenheit to 122 degrees Fahrenheit.
Installation Instruction Of WIFI NVR KIT
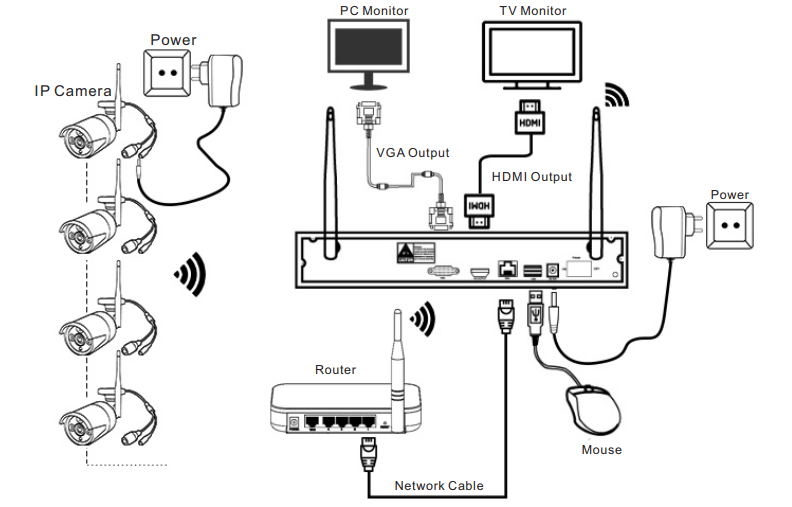
- Install antennas for cameras;
- Connect a screen to the NVR via its HDMI or VGA port(HDMI cables is included for no monitor NVR);
- Plug the NVR to power(use bigger 12V 2A power adapter);
- Plug cameras to power(use smaller 12V 1A power adapters);
- Within seconds, you should see cameras’ images on the screen;
- Plug the mouse(included) to an USB port on back of NVR.Then you can login in the system.
In the OS you can find fullest functionalities including live view,record,playbackvideo backup and all settings
Note:The NVR can work with the router by wireless connection and wired connection
Wired connection: when your NVR connect by RJ45 to your router,it will get network settings automatically
Wireless connection: right click your NVR mouse and choose System Setup→Network Setup→
Wireless Internet→Enable the Wireless LAN→find your own wifi network,and put wifi password here (pls notes it doesn’t work with 5G WIFI network)
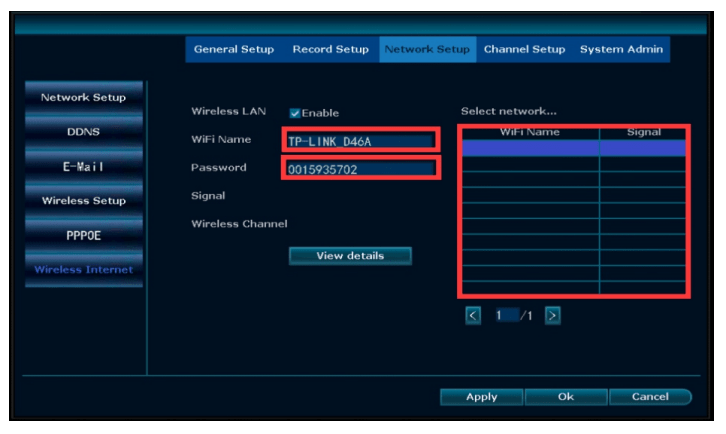
Setup The System
This system is standalone with embedded Linux Operating System in the NVR. Just like a desktop
PC, need to hook a screen to the NVR to enter the OS.Any TV,monitor with VGA or HDMI input should work for it.
If you connect the NVR with monitor shows Hiseeu logo or shows black,normally it is your monitor resolution is lower then the NVR.You can press the left side of the mouse for 30s,then it will reboot.
If still can’t work,pls change a monitor,thanks.
When you turn on the NVR box, the monitor will get below interface:
Setup Wizard→Down→General setup→Next→wireless setup→Next→Fast network→Next→Format the hard drive→Next
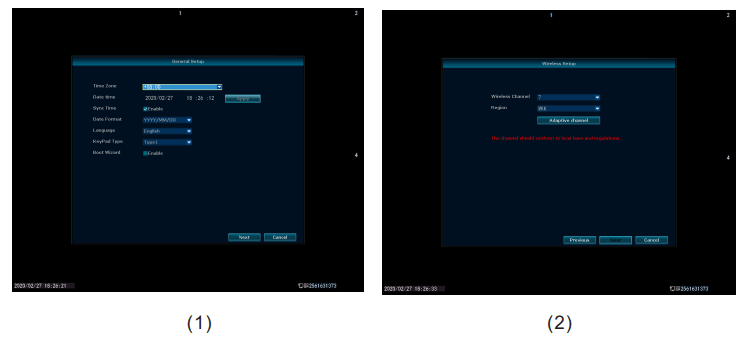
CHECK NVR NETWORK, CHANGE NVR SYSTEM LOGIN PASSWORD
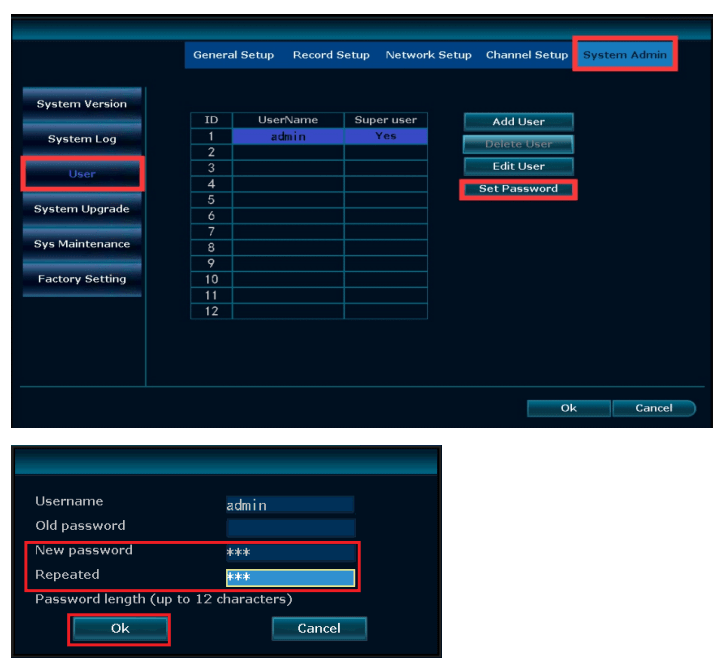
Once you have completed connecting the NVR,wait approximately 2-3 minutes.Next you will see the window below on your monitor screen.For your first time to login in,User name is admin,there is no password,just choose ok to get into the menu. if you forget the password,pls find the solution on the FAQ page)
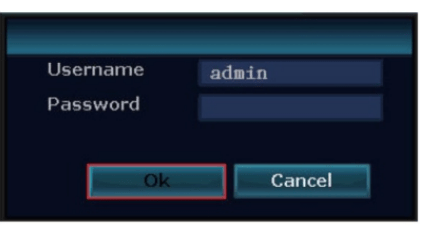
Tips: To protect your privacy,please set your password at earliest convenience(don’t set the password over 8 characters).Right click the mouse→System Setup→System Admin→User to set password.
How to check if your Cloud is online and Network status is healthy ?
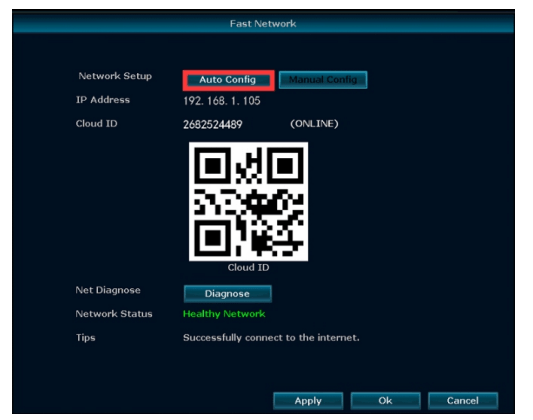
Right click the mouse of the register,choose Fast Network.In the middle of the window you should see Cloud status as ONLINE and Network Status as Healthy Network. If this does not appear, select Manual Config then enable DHCP,Click Apply,then power off the NVR box,wait a few seconds and power up.
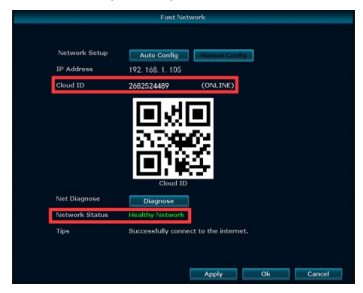
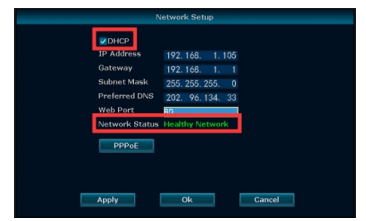
Once you power up, repeat the steps outlined as above.Cloud status must be ONLINE and Network Status must be Healthy Network.If this does not happen,you will not be able to view remotely.
Menu Do What
 Menu bar
Click right button you can enter the main menu;click right button again you can exit the current menu or return.
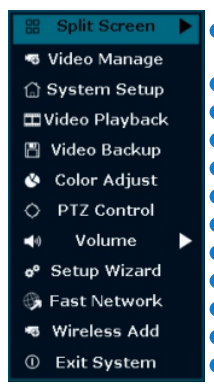
- Split Screen: change status of live view.You can choose to view multiple cameras or any single camera.
- Video Manage: manage IP cameras and NVR channels.
- System Setup: all system settings.
- Video Playback: playback recorded videos.
- Video Backup: backup recorded videos.
- Color Adjust: adjust the image setting of the each camera
- PTZ Control: control PTZ camera
- Volume: Adjust volume of audio cameras(works only for audio cameras).
- Setup Wizard: step by step guide of 1st time general settings.
- Fast Network: shortcut to network settings.
- Wireless Add: add IP cameras into NVR channels wirelessly.
- Exit System: logout,reboot,close screen output and shut down the system.
 System Setup
Click right button→Choose System setup; enter the menu that enables you to do all settings related to this system.
- General setup(This enables you to set)
- Language
- Display Resolution
- Time
- HDD informaion
- Error
- Record setup(This enables you to set) Record plan for each channel video detection
- Network setup(This enables you to set) All network related settings
- Channel setup(This enables you to set) Manage channels and cameras
- System admin(This enables you to set)
- System version
- System maintenance including system upgrade
- User and password management
- Restore to default settings
How to setup the record video plan?
There are 3 modes for reocrd
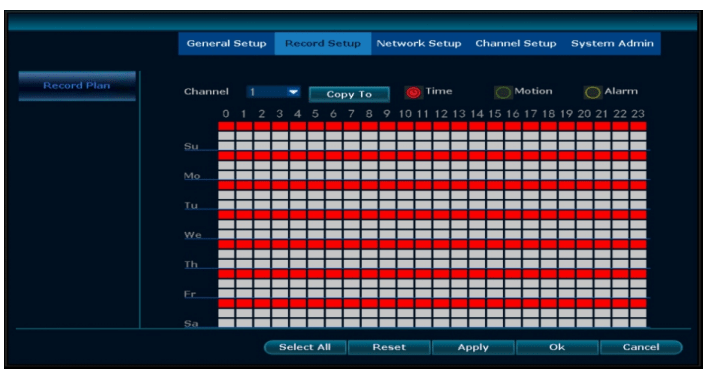
- Time Recording: Setup period of time of recording on NVR GUI.Right click mouse→System Setup→ Record setup→Record Plan.Click “time”and put mouse icon on the upper left corner(for example“1” as picture shows),press and drag the mouse to the right to choose the time.The list will turn to red.
- Motion Recording: Only detect motion and then start recording.Right click mouse→System Setup→Record setup→Record Plan.Click“motion”and put mouse icon on the upper left corner,press and drag the mouse to the right to choose the time.The list will turn to green.
- Alarm recording: Right click mouse→System Setup→Record setup→Record Plan.Click “Alarm” and put mouse icon on the upper left corner,press and drag the mouse to the right to choose the time. The list will turn to yellow.
Note: Users can setup any period of time they want,for example 0:00:00-23:59:59,That’s 24 hours×7 days recording.When NVR detects hard disk,the default setting will be 24 hours×7 days recording.
The priority of Alarm is higher than that of Motion,and the priority of Motion is higher than that of Time.
Video Playback
Steps:right clik mouse in main menu→Video playback→choose date,channel,record mode→click search→then can view playback file.(IE browser can’t check the playback directly,so you can use the Eseecloud software on computer or check on your phone app Eseecloud)
Warm prompt:
- IIIustration for playback button:
 play,
play, pause,
  fast forward×2,×4,×8
 - Play file:Choose the recording file in file list,as number “1” shown in picture.Choose one of the recording,click “play” to play to recording file;
- Video backup:Choose the recording file in file list,as number “1” shown in picture.Insert the U flash disk,click “video backup” to backup the file;
- Timeline: Click “date”and “time”at left bottom to check the timeline of recording,as number “2" shown in picture;
- On the timeline with recording file,left click the mouse,the can playback the file.
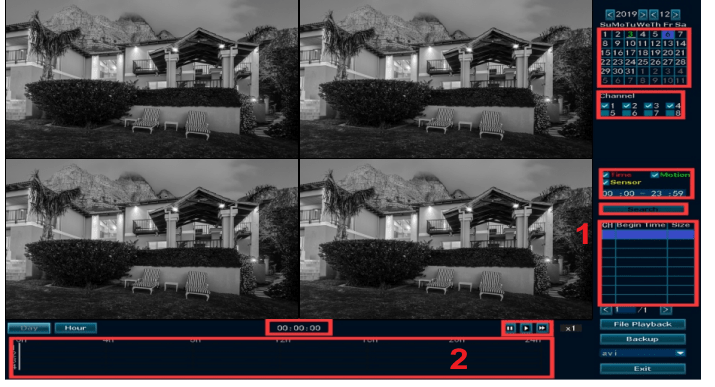
Notes: you can see four channel cameras playback at the same time,if you want to check other channels you need select the correct channel at first,then choose search to find it playback.
How to Backup the video?
Use U disk to copy video,so easy and convenient!
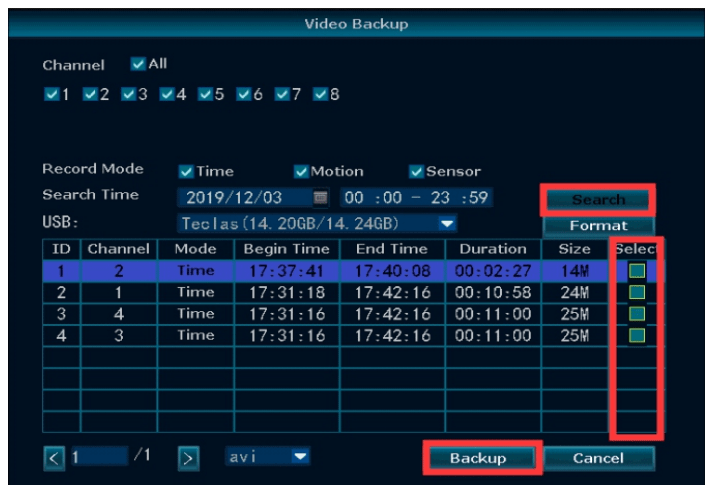
- USB ports: Plug U flash disk into the USB port of NVR. Right click on main menu→Video backup→choose backup channel→choose video mode→setup searching time→search→ choose recording file on the list→video backup (support 32G U flash disk at max.Recording file is packed one hour per time.)
- 1 USB port: Right click on main menu→video backup→choose backup channel→choose video mode→setup searching time→search→choose recording file on the list→video backup, insert U flash disk within reminding 1 minute,then the system will backup recording file to U flash disk.
View on PC via IE or Eseecloud anh Phone APP Eseecloud
View the camera remotely
Tip: before you remotely check it on phone app and Eseecloud,you need make sure cloud ID is online and Network Status is Healthy network.
- To View on the the PC 1
- a) To view on browser,you have to connect the NVR and your computer to the same router.Enter the IP address of NVR on the browser's address bar.(We recommend using IE or Micorosoft Edge) Right click the mouse→system setup→Network Setup→IP address (Start with 192.168... )
You can change language on the right top corner.
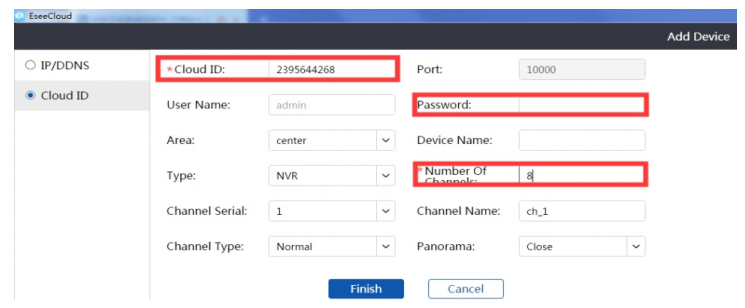
- b) To view on Eseecloud software on PC
Input Cloud ID (Right click the mouse→fast network→Cloud ID)
Input User Name and Password (If you doesn't change the user name and password,User Name is admin ,no password)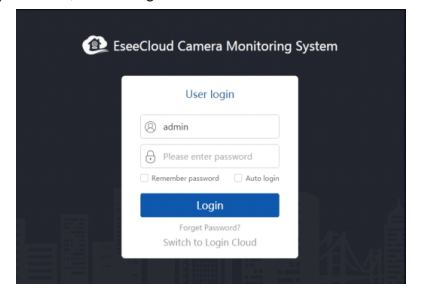
- Select “Add”
- Select “Cloud ID”.enter the cloud ID(9 or 10 numbers).You can find it on your home monitor screen.
Or right click the mouse, choose Fast network find cloud ID here - Username is NVR system user name on your home monitor screen
- Password is your NVR system password on your home monitor screen.(If you don’t change It in your setup,it should be no password)
- Channels: Input 4 or 6 or 8. If you have 4 cameras,enter 4 etc.
- Click Confirm and you will see the video. if you check in the local network,you can use the NVR IP address to add the system (Find the IP address on Fast network page or Network setting page)
if you check in the local network,you can use the NVR IP address to add the system (Find the IP address on Fast network page or Network setting page)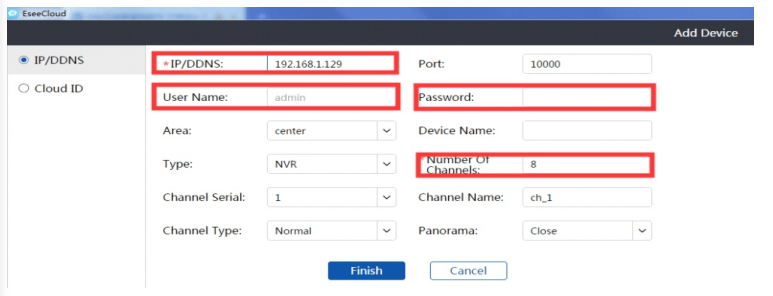
- c)To View on IE browser
You can also visit www.dvr163.com or www.e-seenet.com via IE browser to watch it. Change the language at the right top corner.Choose ID login,input your Cloud ID and Username and Password.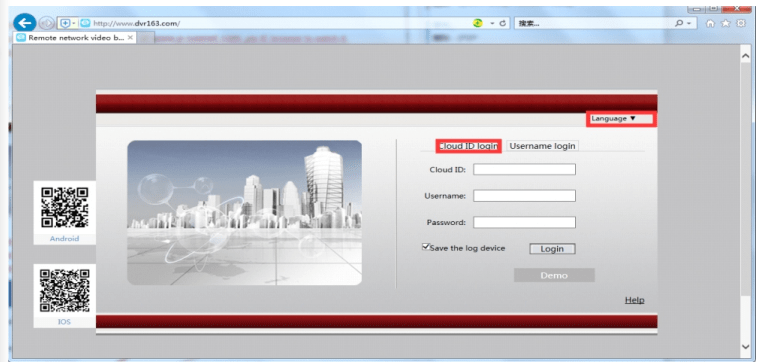
- To view on IE browser by IP address
Find the IP address: right click your mouse and choose Fast network, you will see the IP address here Enter the NVR’s IP address in your IE browser for example: http://192.168.1.105(If the default WEB port has been changed e.g. to 100,you need to add new port number when input IP address in the browser,for example: http://192.168.1.7:100).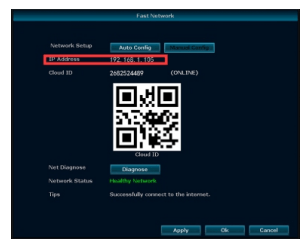
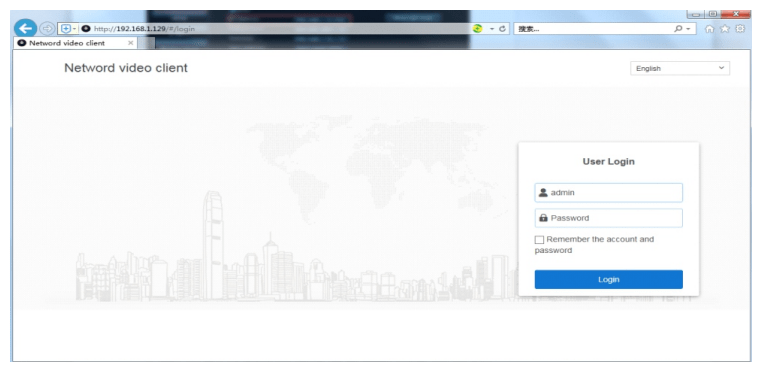
- a) To view on browser,you have to connect the NVR and your computer to the same router.Enter the IP address of NVR on the browser's address bar.(We recommend using IE or Micorosoft Edge) Right click the mouse→system setup→Network Setup→IP address (Start with 192.168... )
- To view on the Phone
Users can use cellphone to scan the QR code below to install the APP free of charge,or users can search Google Play then install the APP
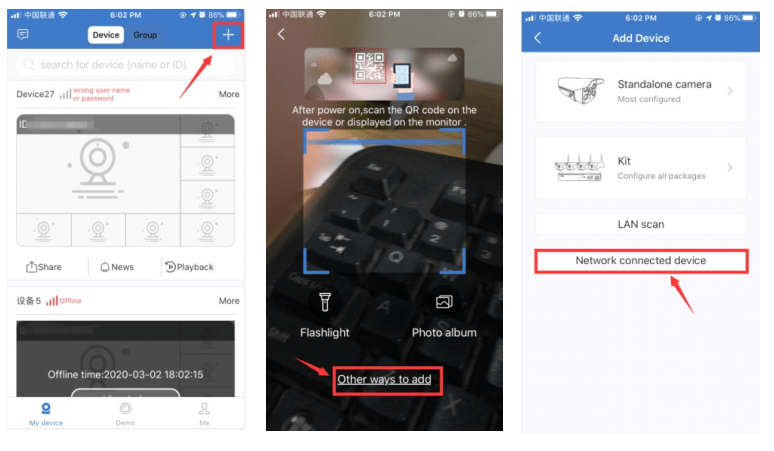
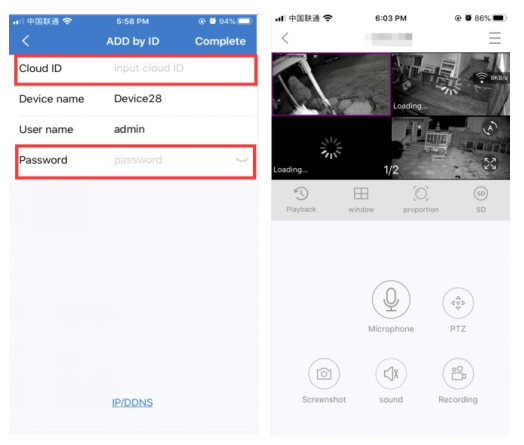
Click "+"→other ways to add/ scan the QR code on your fast network page→Network connected device→input Cloud ID and User name and password (user name and password is the same one you login in NVR)
Tips: if you’ve set a password on your NVR system,please update your password on APP to view. And if your camera loading for a long time and don’t show image,you can right click your NVR mouse and choose System Setup→Network setup,change the MTU to 1000.
Playback On Mobiles
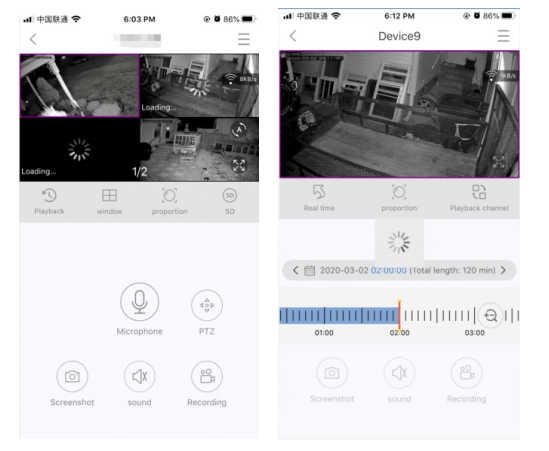
In the Eseecloud APP,while viewing live video of the system,click Playback,you will enter the remote playback menu.The APP Playback only check one channel at one time
Tips: Videos in playback are HD mode for real time which requires very good transmission condition.
We suggest to playback in LAN.Remote playback out of LAN may not 100% work due to connection & network condition
Extend WIFI Range
Wireless connection is easy and convenient, but it’s not universal application.Because of the character of WIFI, the WIFI signal will decrease when going through some obstacles.Some methods can be applied to bypass obstacles and extend WiFi range.
Position The Antenna Correctly
WIFI range is like an apple and the antenna of NVR is in the center of it.WIFI signal is strong all around the WIFI range.Antenna of NVR should be put straight up,if not,WIFI signal will be weak.
According to the signal transmission character of antenna, the antenna of cameras should overlap or parallel to NVR WIFI range,as pictures showed below:

Use Antenna Extension Cord to prolong WIFI distance
Installation method of antenna extension cord
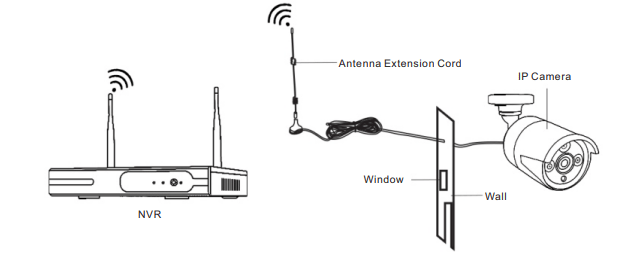
Note:When WIFI signal is not strong enough against walls,users can take off the original antenna and subtitute antenna extension cord.Drill a hole on the wall to let the extension cord go through and simply it where WIFI signal is strong.
Set up cascading connection in a reasonable solution,extend wifi signal transfer distance
Note
- Repeater function can’t strengthen WIFI signal for wireless NVR kit, but can extend the distance by repeaters→WIFI cameras.
- Only when the repeater cameras and repeated cameras are positioned correctly,WIFI distance will be extended.
- Repeater function and 3 meters antenna extension cord are two methods to extend WIFI range. Users can choose one according to real situation.
Repeater Setup
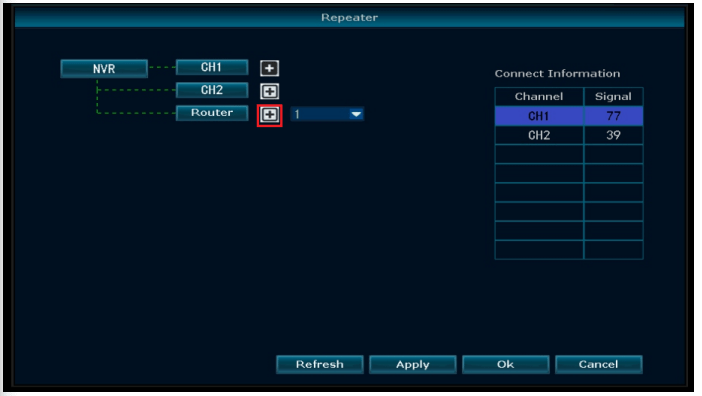
Step 1. Right click the NVR mouse,and choose "Video Manage"→then left click “Repeater”
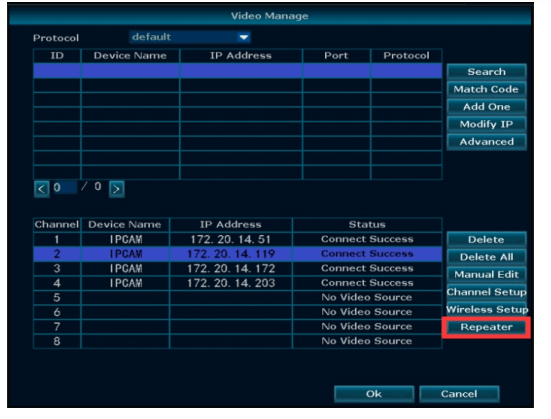
Step 2. Add repeater
As picture shown below,click icon + besides channel 3,choose other channel.
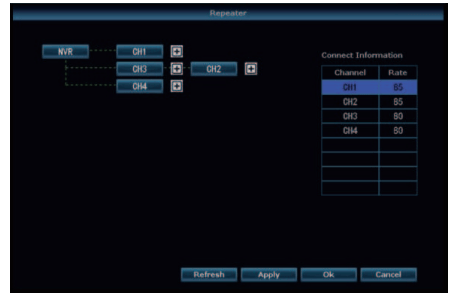
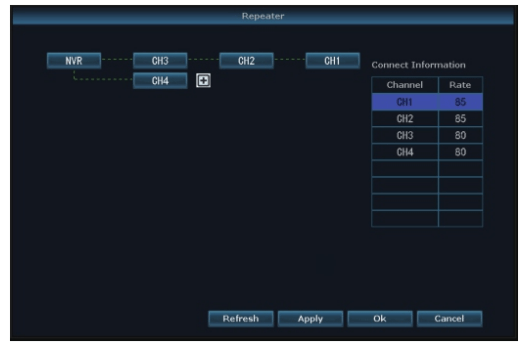
Step 3. As picture shown below, it means IPC1 is connected to NVR through IPC2 and IPC3. IPC2 is connected to NVR through IPC3.IPC3 is connected to NVR directly.

Step 4. Click “Apply” and then click “refresh” to check if the setting is successful.
Delete Repeater
Move the mouse to targeted channels,left click to delete,and then click “Apply” and “OK”.
Application Example

As picture shown above, when IPCAM1 is put somewhere is out of NVR WIFI range,and there is IPCAM2 between them with strong WIFI signal,users can put IPCAM1 close to NVR and power it, setup IPCAM1 repeated by IPCAM2, and then install IPCAM1 to the presupposed place.
WARNING
Device will not in guarantee if caused by below reason:
- Accident;negligence;disaster; mis-operation.
- Do not conform to the environment and conditions,such as power improper, working temperature too hight or too low, lightning stroke.ect.
- Ever be maintained by other center which not belong to the real factory.
- Goods already sold more than 12 months.
Frequently Asked Questions
Q1:How to install the hard drive?
A:If your camera system not include the hard drive,please order it yourself,the hard drive specifications: internal 3.5" SATA HDD or 2.5"SATA HDD,support 500GB to 6TB .
Below are the installation steps of the hard drive (Or Email to [email protected] to get help)
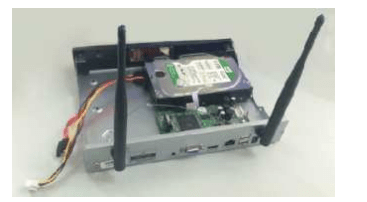
 Unplug your NVR from power,unscrew and remove the top cover.
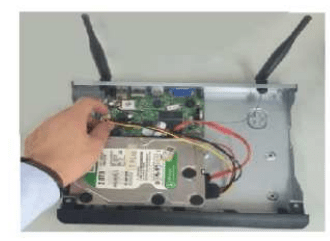
 Connect the SATA power and data cables from the NVR to the corresponding ports on your HDD.

 Holding the hard drive and the NVR,gently turn it over and line up the holes on the hard drive with the holes on the NVR.Using a screwdriver screw the provided screws into the holes and assemble the cover.
Note:New HDD should be formatted before recording.
Pls right click the NVR box mouse→System Setup→General Setup→HDD setup,check format to format the HDD,when HDD is full,if you choose Overwrite,it will delete the old files,and make new record)
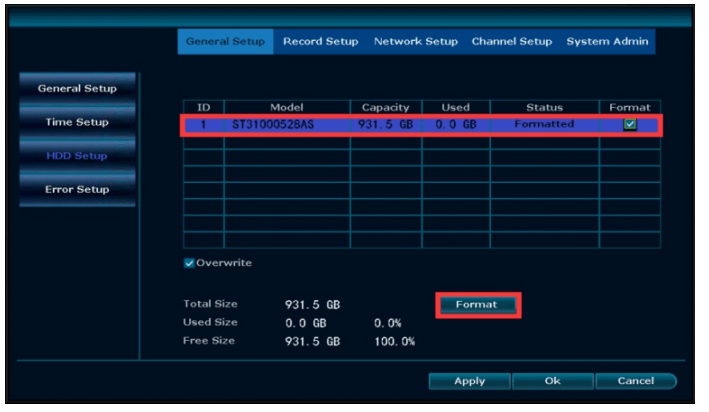
Warm Note: If the hard drive information is not displayed in this list,
- Please check if your NVR box plug the 12V2A power supply,If you connect the 12V 1A power supply to the NVR,the NVR box will not have enough power to drive the hard drive
- Please open NVR with a screwdriver to check whether the cable connecting the hard drive is loose,Unplug the cable to the hard drive and reconnect it.
Q2:How can I troubleshoot camera issues?
A:First check whether the power adapter is working by testing with another power adapter.lf the power adapter is functioning,move the camera close to NVR box to check whether you have video or not.lf there is no video,cover the photocell with your finger as below photo.If the IR-CUT light turns red,the camera is working,please check “Q14".
If it does not turn red,this indicates that the camera has experienced a malfunction.In this case, please contact us for after sale service.

Q3:How do I add a new camera? What should I do when there is no camera display on the screen?
A:In some situations,you may need to add a new camera to your NVR.For example,you may need to replace a broken camera,or if you have an expandable NVR,you can add extra cameras.
1)IPC with RJ45 connector
- Pls use an Ethernet cable connect the camera to your NVR first.
- Right Click the mouse→Video manage→Search→Match Code→“Exit”after adding.
- Matching code completes→Add one
- After that you can unplug the Ethernet cable.
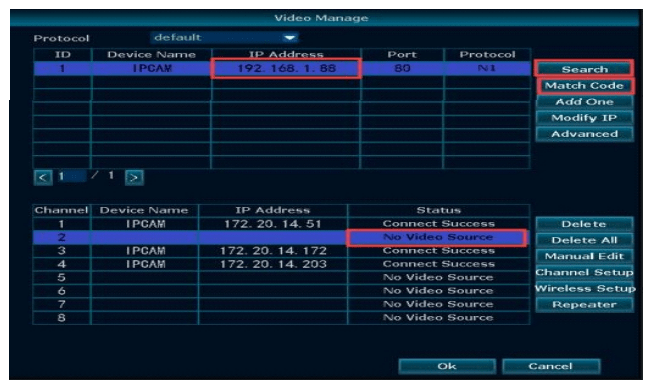
2)IPC with reset button
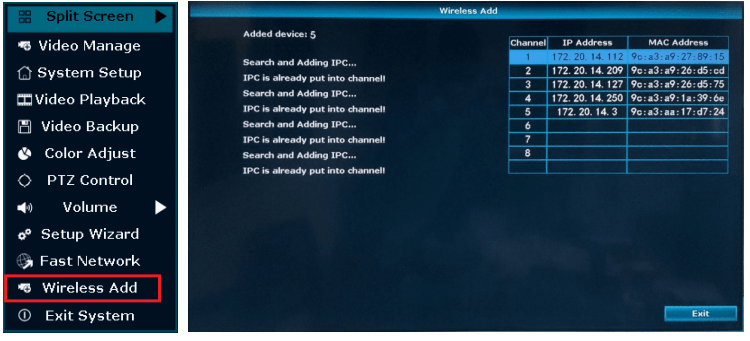
- Connect camera with power adapter,and put it close to your NVR,
- Make camera antenna and the NVR wifi antenna are parallel
- Right click the mouse→Wireless Add
- When camera is blinking,press the camera reset botton for 5 seconds
- Wait for the power port light standing for few seconds,then it will blink again,
- About 1 minute the camera will show on the wireless add page,see IP address 172.20.14.**, then you can exist it if the first time camera doesn't show image,pls try several times,each time pls wait about 1 minutes)
Q4:How can I get motion notifications on my phone?
A:First check the status of your Cloud ID is ONLINE and the Network Status indicates Healthy.
Second,from the home screen of your monitor,right click the mouse,choose System setup→Channel Setup→Video detection.
Next, select the following: Enable for Motion Detection,Alarm,E-mail Notice and APP Alarm.Click Ok.
Note: HumanDetect only work for 3MP cameras.
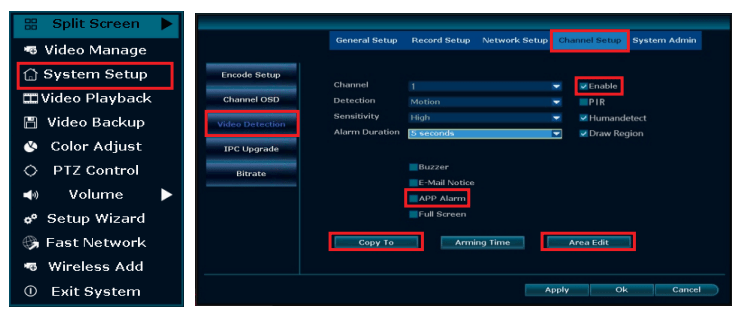
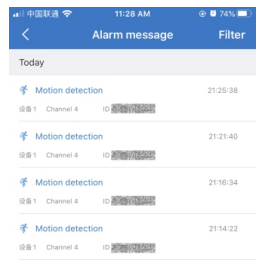
After you have finished setting your preferred channel as outlined above,repeat the process for your remaining preferred channels.Starting from the home screen of your monitor,right click the mouse,navigate to System setup→Channel Setup→Video detection.Next,select Copy to and either select the All option for all cameras, or you can select the specific channel(s) you prefer. Click ok.You can adjust the sensitivity at any time by returning to this screen.When people passed by,you will get motion detection signal and notification as shown.
Q5:How can I receive e-mail notifications for motion detection?
A:First,ensure you follow the steps outlined in the previous question How can I get motion notifications on my Smartphone?
- To receive notifications, you need a Email account (Such as,Hotmail,Gmail,Yahoo,etc.)
- Next,log into the web version of your Email account. In the upper right-hand corner,click on the Settings button,then select Forwarding and POP/IMAP→Check “Enable POP for all mail” and "Enable IMAP”→Save the settings.
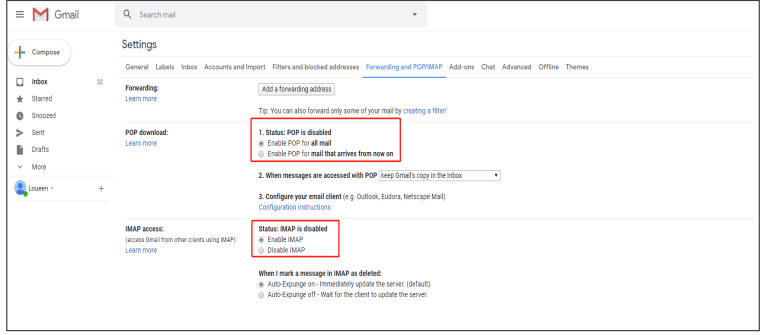
From the home screen of your monitor, right click your mouse and choose System Setup,select Network setup,select Email from the left menu bar.From there,click Enable,enter the information in the fields as shown in the figure below.
- Complete the fields on the screen as follows(take gmail account as an example)
- SMTP Server: smtp.gmail.com
- Port: 587 or 465
- Username: Sender e-mail address (click shift on the virtual keyboard for “@”symbol gmail e-mail address) to send alarm
- Password: Sender E-mail login password
- Encryption Type: SSL
- Sender: Sender e-mail address to send alarm
- Sendee: Receiver e-mail address to receive alarm (it must be different with sender,you can use another Hotmail/Gmail/Yahoo Email address)
- If you use other email account as sender,such as gmail,yahoo,etc,you need find out their own SMTP server and port,or you can contact our service person.
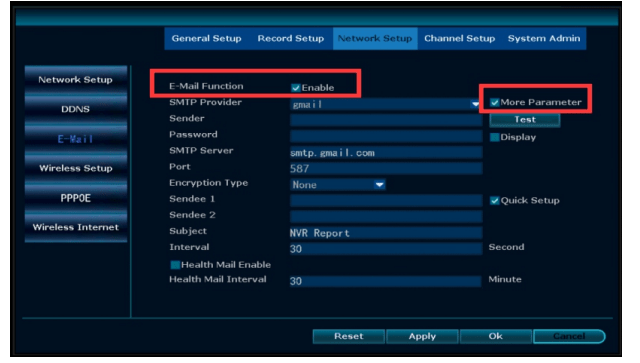
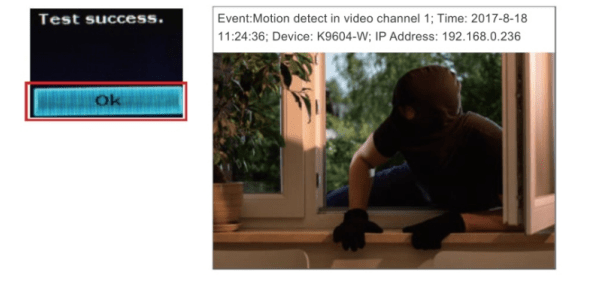
- After you have entered all of your information,click Test until the Test success message appears on the screen.Please allow a few minutes for the testing cycle to complete.If the test failed,try another Email account.Click Ok.Whether or not your test was successful,be sure to click Ok to save your settings.
- To test your alarm,walk past your camera.You will receive an Email notification within 2 to 3 minutes as shown in the sample figure below.
Q6:How do I adjust the Date and Time?
A:First : Check the system is healthy network.Right click the mouse from the home screen of your monitor,choose System setup→Network Setup.Check to see that Network Status says Healthy Network.From the same Window,Choose General setup→Time setup from the left menu bar. Select Enable→Sync now,click ok.
Second :Choose System Setup→General setup&Time setup,please Unselect Enable→Select correct System Date & System Time and click Apply.Click ok.
Q7:How do restore my unit to the Factory Settings?
A:Right click the mouse from the home screen of your monitor,navigate to System setup→ System admin→Factory setting,click Simple Restore,click ok.Next,right click the mouse from the home screen of your monitor and navigate to Video manage,click Search,click Add One,after all IP addresses appear,click Ok.All videos will appear on your monitor screen.
Q8:My system does not recognize that I have a hard drive installed, how to find it?
A:First confirm that the power adapter for NVR is 12V-2A.Once you haveconfirmed,right click the mouse from the home screen of your monitor and navigateto System setup→General setup→HDD setup.Verify if there is HDD information (please also refer to Frequently Asked Question,How do I format my new hard drive and check my hard drive information?).If there is no hard drive information, open the NVR box and check to see if the cable of hard drive is loose.Re-connect the HDD cable.
Q9:How do I reset the NVR login password?
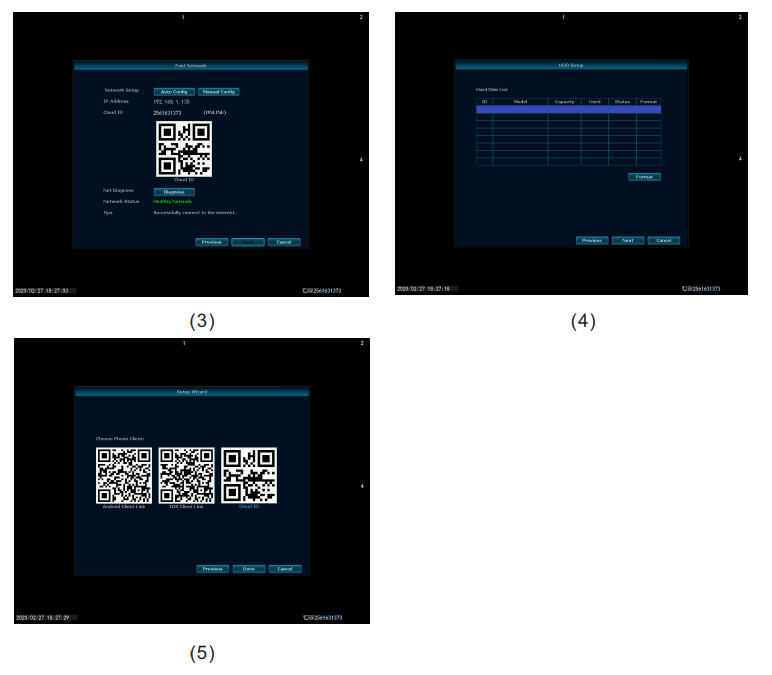
A:In put a wrong password "1"--you will get the picture as below (1)--at the black area continuous rapid left click and right click the mouse lasts 6 times--you will get the picture as below (2)--input a new password--repeated the new password again,needn't put in old password--ok(Note:User name and password should not exceed 8 characters and should not contain such as &*! @ (... #% and other special characters)
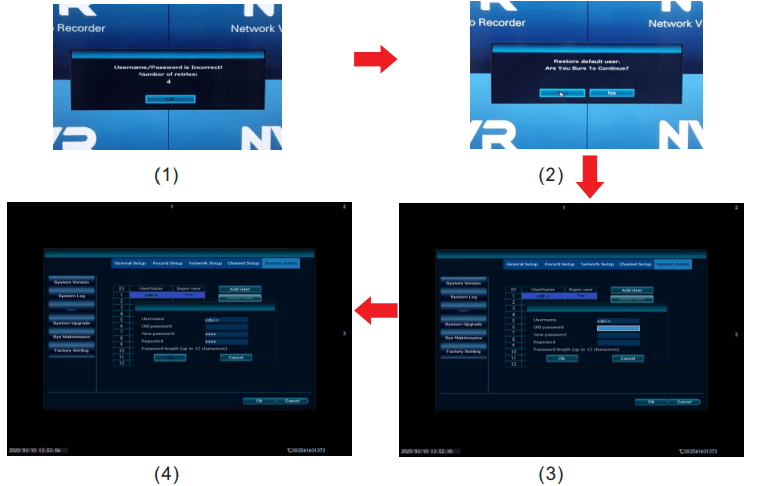
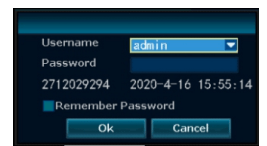
If still can’t work,pls take below photo to our email: [email protected] to get super password
Q10:Purchase repeater to enhance camera signal
If the camera is set as WiFi repeater and the antenna is replaced,the problem of weak signal still cannot be solved,you can buy a dedicated WiFi repeater to extend the wireless signal transmission distance of the camera.
Setup WIFI Reapter
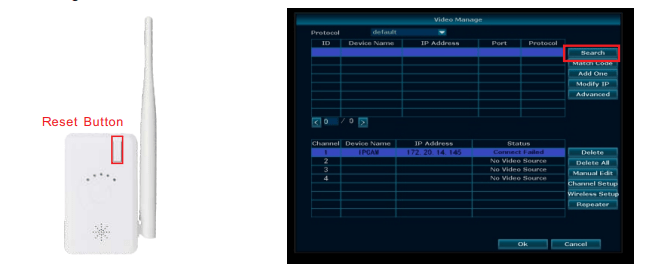
- Press the reset button on the repeater for 10 seconds
- Use an Ethernet cable connect the reapter to NVR
- Video manage→Search→Auto add→Yes→Yes
- Add the camera you want to add after the repeater
Q11:What's the meaning of IRON on the TV/PC monitor?
A:
| Picture | IRON | IRON | Meaning |
 | Green bar | Top Right Corner | Wireless Signal |
 | Red dot | Top Right Corner | Recording |
 | Red Triangle | Bottom Left Screen | Alarm |
 | Little Yellow man | Top Right Corner | Motion Detection |
 | Blue Horn | Bottom Middle Screen | Turn on/off volume |
 | Blue PTZ | Bottom Middle Screen | Camera PTZ |
Q12:What should I do if the NVR always appear Offline?
A
- Pls Connect NVR to your router with an Ethernet cable.After that right click the mouse→Fast network.
- If Step 1 doesn't work,Pls check the Ethenet cable is broken or not
- If there is no problem with the cable.
Pls right click the mouse→system setup→Network setup→Do not choose DHCP→Change - Preferred DNS to 114.114.114.114.114 or 8.8.8.8→Power off the NVR and power on again (Reboot the NVR)
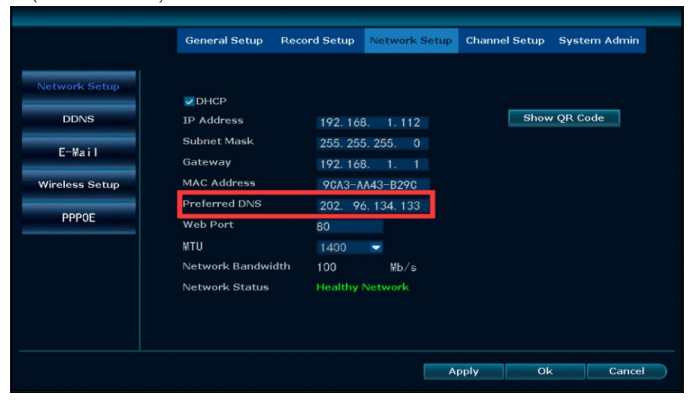
- For Gateway Unreachable or Netwok Error problem pls kindly fellow below steps
Step 1:
- You must check if the network line is faulty or not:check whether the switch and router line connection are correct.
- Can you connect to the external network normally through the computer wired connection?
Notice: Do not directly connect the recorder to the fiber
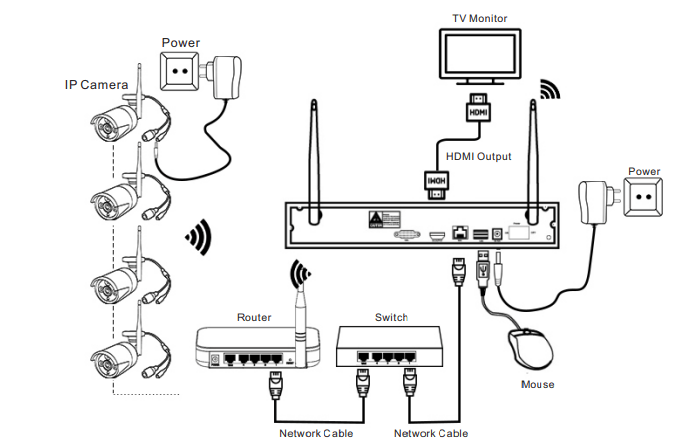
Step 2:
Right click mouse and choose Fast Network→Auto config,check if the network will be healthy or not
Step 3:
If the auto config still can't make it work,pls kindly check the same network computer network setting
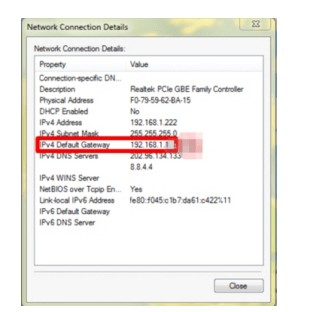
Then "manual configuration" set the recorder network settings,don't choose DHCP,input the same IP address and gateway and submask same as your computer.
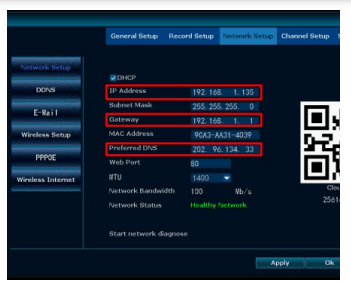
Check computer network parmeters on the same router that can access the internet(Gateway,subnet mask,preferred DNS and computer network parameters settings are the same;the first three settings of the IP address are the same,the last paragraph should not berepeater),if still can’t work, can change DNS to 8.8.8.8 or 114.114.114.114
Q13:How to set up Motion Detection?
A:
- Motion Detection
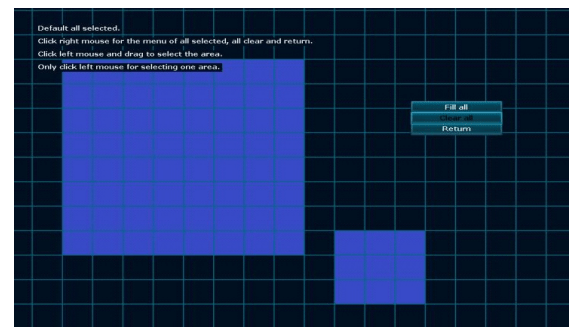
Pls right click the mouse→system setup→Channel Setup→Video detection→Selecting the Channel for Motion Detection→Choose the form of alarm→After you set it up you can Click "Copy to" to set to all channel
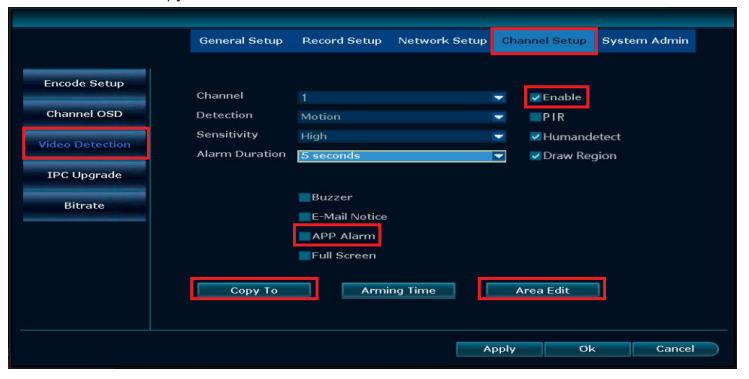
- Set the area of motion detection to be set within the field of view of the camera.
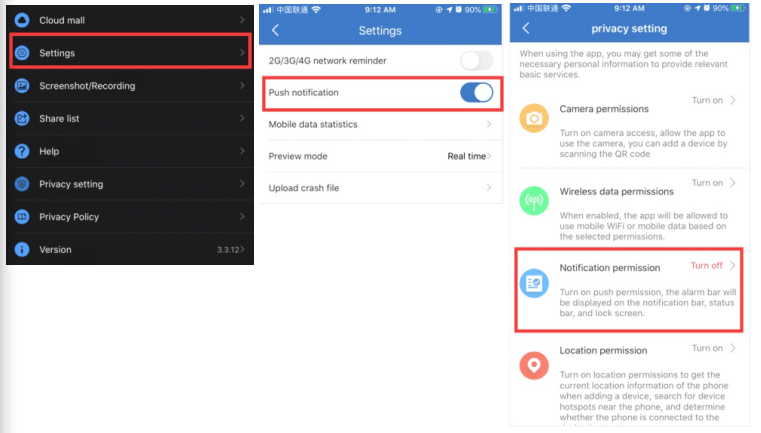
- App Alarm
- a)Select App Alarm on NVR
- b)Click "My center"→Settings→enable Push notification→prviacy setting→turn on Notification permission
Q14:How to solve the problem of IPC disconnect(IPC with Rj45 connector)?
A:
- Cover the sensor under lens on the camera to see if the light is lit or not.
If it's bright, it means camera is not bad.
If it's not lit,You can connect the power of a good camera to the bad camera.
In the case of determining that camera is not broken.
- Right click the mouse→video manage→Search
- If step2 not work,Pls use an Ethernet cable connect the camera to your NVR.
Delete the Connect Failed Channel→Search→Match Code,
After that you can unplug the Ethernet cable.
Q15:I connected the system, why nothing is showing on my monitor?
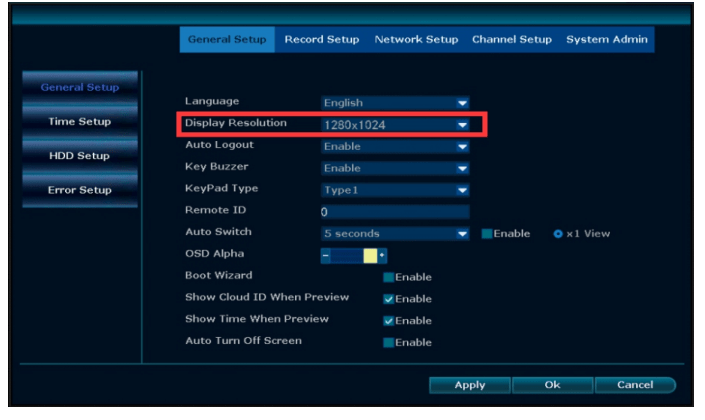
A:The default output resolution of the NVR is 1280*1024, which may not be compatible with some monitor screens.There are a few options you can try to fix it:
- Press the left side of the mouse about 30s,don’t remove your finger from the mouse,and wait the system reboot,it will change to the minimum resolution.
- Connect PC/TV monitor with NVR box by VGA cable first.On the monitor,make sure the "input" is set to VGA. If no VGA cable,try another monitor with HDMI cable until getting video on the monitor screen.Don't forget to change the input to HDMI on a TV.
- When you see the video on another monitor,right click the mouse→System setup→General setup, adjust the Display resolution to 1024x768,click OK.Finally.Change to connect system with the first TV monitor,check if you can see the video once connected.
See other models: WNKIT-4HB312-3T WNKIT-4HB312-1T
