USER MANUAL for Brookstone BKWIFICAMWL2
Table of Contents
- WARRANTY INFORMATION
- SPECIFICATIONS
- FEATURES
- PRODUCT CONFIGURATION
- DOWNLOAD APP
- REGISTRATION AND LOGIN
- ADD DEVICE
- ADJUSTABLE LENS ANGLE
- ONE-TOUCH CALL OUT BUTTON
- PUSH NOTIFICATIONS
- REMOVE A DEVICE
- APP FUNCTIONS
- CONNECTING TO A NEW NETWORK
DOWNLOAD APP
1. Android: download “Brookstone Smart” app on Google Play.
2. iPhone: download “Brookstone Smart” app from the App Store.
REGISTRATION AND LOGIN
1. Run the “Brookstone Smart” app from your smart phone.
2. Register and login.
ADD DEVICE
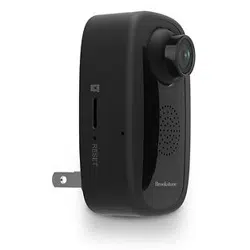
1. Plug in Wi-Fi Camera into the wall. If the red light is not already blinking, insert the provided pin gently into the reset hole for 3-5 seconds, then release. The light should then start blinking red. Camera is now ready to be set up.
2. Make sure phone is connected to your Wi-Fi network and that it is a 2.4GHz network.
3. Press the (+) symbol in the top right corner of the app and select the Smart Camera from the list of devices to add.
4. Press the “next step” button
5. Make sure phone is connected to the Wi-Fi network that the device will be connected to. Enter your password for the Wi-Fi network.
6. Follow the directions in the app and hold the QR code on the screen in front of the view of the camera.
7. Connecting process will begin. Do not turn off Wi-Fi Camera or phone while connecting. Wait for connection process to complete.
8. Once device has been successfully added, name the device what you would like it to be called in the app. The Wi-Fi Camera is ready for use.
ADJUSTABLE LENS ANGLE
The camera is equipped with a lens that can be manually adjusted to your desired direction. Directions can be adjusted to the below angles.
- Up: 25°
- Down: 18°
- Right: 20°
- Left: 20
ONE-TOUCH CALL OUT BUTTON
When a person in front of the camera wishes to reach the app owner, they can press the call button to send out the request for two-way audio. When the app owner accepts the request, the camera will be activated. This feature can be used for in emergency situations.
PUSH NOTIFICATIONS
1. You can turn on/off notifications for all devices connected to app by clicking on the “Me” button at the bottom right of the screen.
2. Then click on ”Settings” button. From there you can turn on/off all notifications.
3. To view notifications in the app, click on “message center” on the “me” tab on the bottom.
REMOVE A DEVICE
1. From the home screen, click on the device you would like to remove.
2. Then click on the edit symbol on the top right of the screen.
3. From there you would then click the “Remove Device” button at the bottom of the screen.
APP FUNCTIONS
Live Video
To view live video simply click on the device under “All devices” and select the camera you just added. Hit the full screen button in the top left corner to see your live footage at full screen on your phone. To hide the control panel, you can press the top right button. To view the control panel again, press the same button again.
Video Recording
To record video press the “camera” button at the top of the control panel. To end recording, press the “camera” button again. The video will be saved in the APP(iOS) or the photos and video section(Android). To view recordings, press “gallery” button.
Installing a Micro SD Card
To install a Micro SD Card, insert it into the slot on the side of the camera. (Please see images below to make sure you have the correct type of memory card.) Once you correctly insert it all the way it should click into place. To remove it, press down on it slightly and it will pop out. The camera can use any memory size of Micro SD Card up to 32 GB in size. Once the Micro SD Card is installed you need to format it. To format the card, go to the settings of the camera by clicking on the icon at the top right corner of the camera screen, then click on “Storage Settings”, then click on “Format”.
Cloud Storage
If you don’t have a Micro SD Card in the camera, Cloud Storage can be purchased by pressing the “Cloud” button on the bottom of the main screen. When a Cloud subscription is purchased all motion detection video is saved in the cloud and is kept safe and secure.
Taking a Photo
To take a photo, press the “camera” button. The photo will be saved in the APP(iOS) or the photos and video section(Android). To view your photos, press the “gallery” button.
Two Way Audio
To activate two way audio, press the “speak” button. When the button is orange, whatever you say into your phone will come out of the speaker on the camera. You can also hear at the same time any sounds from the live video on the camera.
Motion and Sound Detection
The camera uses infrared sensors when someone/something appears within its detection area. It also detects sound so you can hear if your dog is barking or if there is a break in while you are away. Push notifications will be sent to your phone once motion or sound is detected.
To access controls of the detection alarm settings, press the camera setting button at the top right. You can also get to this from pressing the “Motion Detection” or “Sound Detection” button on the main camera page. You can also set a time window of the day that the alarms will go off by pressing “Schedule” on this page.
To view videos recorded via motion detection press “Playback” on the main screen. You must have a Micro SD Card in the camera or have cloud storage enabled to view these saved videos.
Theme Color
The control panel can be set to “Light Mode” or “Dark Mode”. To change this, press “Theme Color” and a pop up menu will let you select light or dark mode.
Private Mode
The camera has a private mode. When the private mode is turned on the camera goes to sleep. You can turn this mode on from the main screen by pressing “Private Mode"
Anti-Flicker
The camera has an “Anti-Flicker” setting if you notice flickering in your footage. Select it from the main screen and choose which frequency works best.
Hub controls (sound, video quality, zoom in/out)
You can control features from the live video feed. There is a volume button that is used to mute and unmute the live feed. There is also a button for the video quality and it can be used to switch between standard and high definition resolution. In the top right there is also a button that can be used for zooming in or out on the footage.
Sharing the Device
To share access to your camera with someone else’s Brookstone Smart account, press the camera settings button at the top right of the main camera screen. Then hit “Share Device”. On the next page press “Add Sharing” at the bottom. After that, enter the email on the person’s Brookstone Smart account that you would like to share the camera with. They will get a notification to accept and after that the other person will have access to view your camera through the Brookstone Smart app on their phone.
CONNECTING TO A NEW NETWORK
How to change the WiFi Network of the camera
If you need to change the WiFi network that your device is connected to, delete the device from the Brookstone Smart App. Then start the set up process again as if you were adding a new device when you are connected to the new WIFI Network that you want to the connect your existing device to. Your device will now remember the new WiFi Network. Once a WiFi Network has been successfully connected to your device, it will remember it even if you unplug it. So if you want to move it to a different part of your home, unplug it after you have set it up and then plug it in some where else in your home and it will automatically connect the WiFi.