
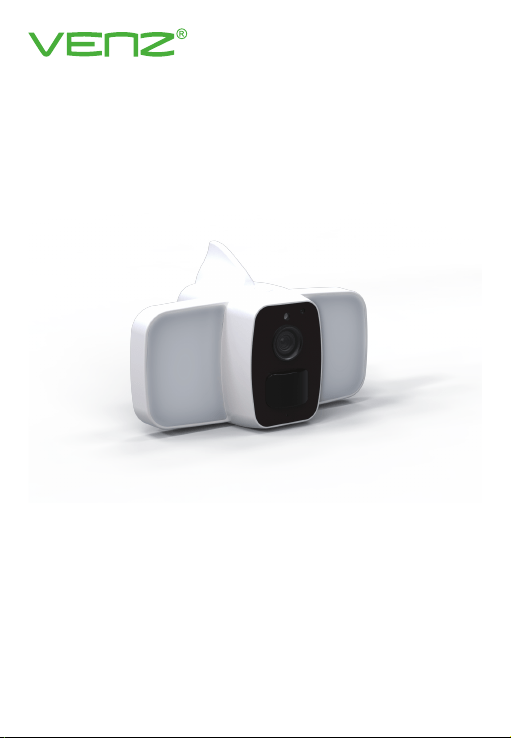
R9052
Sma Floodlight Camera
Quick Guide
Version: 1.0
1
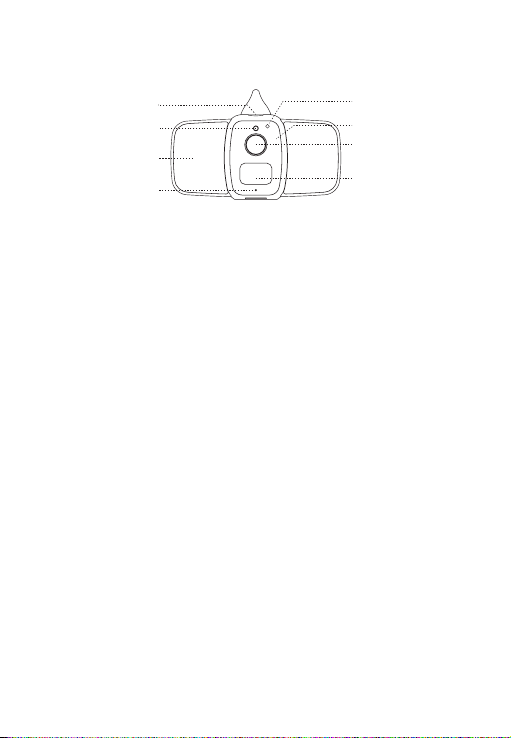
Indicator Light
Power Switch
Light Sensor
Floodlight
Microphone
Indicator Light
Infrared Light
Lens
PIR Detection
Product Appearance
Power Switch
Light Sensor
Floodlight
Microphone
Infrared Light
Lens
PIR Detection
Hold and press the power switch for 3 seconds to turn on/o
the device.
Used to collect ambient brightness values, when the
illumination is lower than 2Lux, light will be on for night vision.
For coloul night vision during the night.
For audio talk, pick up voice distance 5 meters.
Red light flash slowly: the device is waiting for Wi-Fi
connection.
Blue light flash slowly: the device is in normal working
condition.
Red and blue light ash alternately: Wi-Fi connection is failed.
For black and white night vision during the night.
Capture image video.
When a human body moves in front of the device, the PIR will
be triggered, the device will also be woken up and send a ale
notication to mobile phone.
2
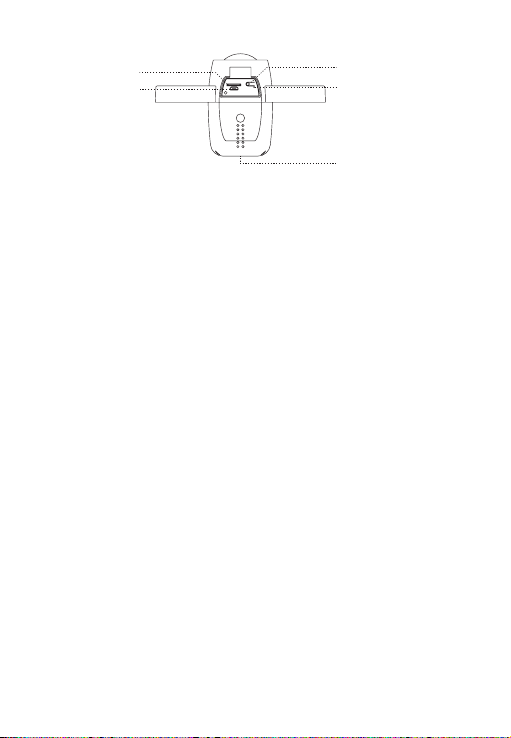
Reset
SD Card
USB Inteace
Charging Indicator
Speaker
SD Card
USB Inteace
Reset
Charging Indicator
Speaker
Install SD card to suppo local video recording. Suppo FAT32
format and Max. 128G capacity. (SD card is not included.)
Charge device batte through the USB inteace.
Hold and press the reset button for 5 seconds to reset the
device.
The indicator light is on when charging batte.
Issue system prompts and implement audio talk.
Warning before use
1. The eective distance of human body movement detection is 7 meters, please
adjust the monitoring angle according to the real condition.
2.
Please avoid to install this device at the place where temperature changes
very often, such as heat source, air output, etc, otherwise it will send alarm
notication to App frequently.
3.
The default PIR sensitivity level is high. You could adjust the sensitivety in device
setting page.
4.
This device doesn't support “Hot-swappable” SD card. Please install the SD
card into camera before power on the device if you wish to use SD card.
Requirement to use
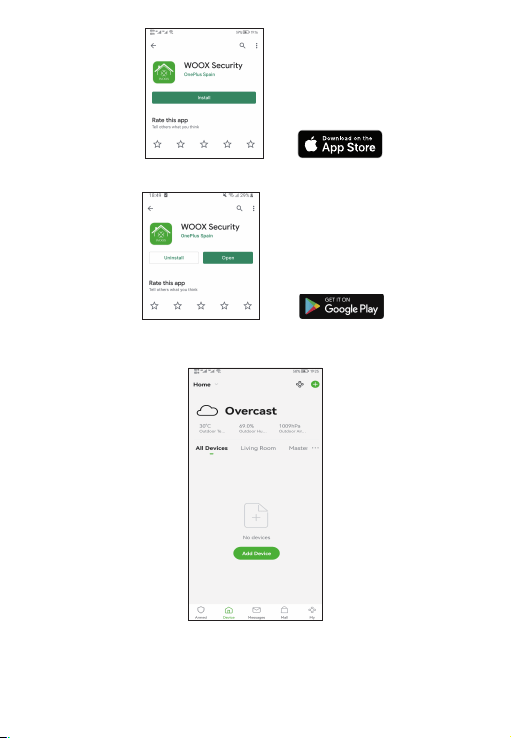
1. WOOX Security app
2.
WLAN-enabled router: 2.4GHz (Separate band), NOT SUPPORTING 5GHz Wi-Fi.
Set up Smart Floodlight Camera to WOOX Security app
1. Download and install the app "WOOX Security" from Apple App Store or Google
Play Store on your smaphone.
Micro SD
DC 5V
Reset
3
2. Launch the app "WOOX Security".
3. Create a new account or log in to your existing account.
4. Tap “+” to add the device.
5. Select the applicable product type from the list of products.

4
6. Ensure the red indicator light is quick ashing (ashing 2 times per second). If
the indicator light isn't ashing: hold and press the reset button on the bottom
of camera until the indicator light stas to ash.
7. Conrm the Wi-Fi network and password.
Note: only 2.4GHz Wi-Fi is suppoed.
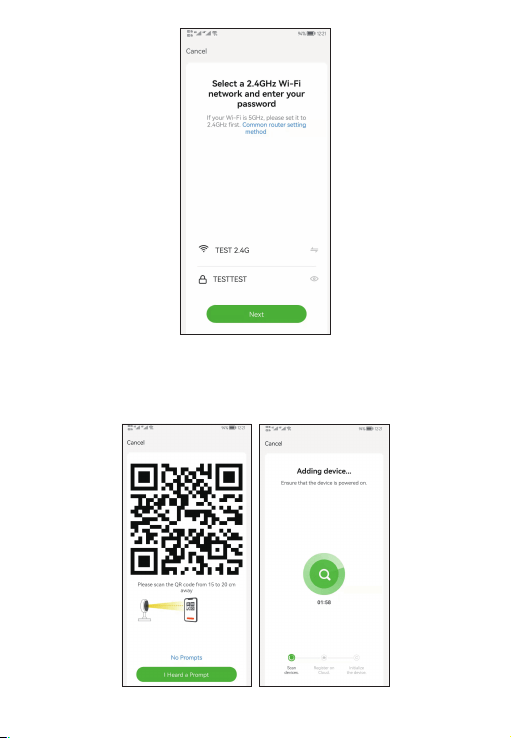
5
8. The App will prompt you to scan a QR code that needs to be read by the
camera in the
smart Floodlight camera to initiate pairing, press continue on the App
and a QR code should now be generated to pair the product to your account. Position
your mobile or tablet device in front of the camera lens and ensure the QR code is in
full frame of view, once you hear the sound prompt conrm this on the App, this will
commence the nal stage of pairing the smart Floodlight camera to your account.

6
9. The app will now search for the device and register is to your account.
10. Enter the device name.
Note: The device name will also be used by Amazon Alexa and Google Home.
Specication
• Item no.: 2940521
• Power: rechargeable batte, DC 5V
• Batte: 4*18650 2600mAh rechargeable batte
• Resolution: 2304x1296P
• Infrared light: 6 pcs IR light
• Floodlight: 12 pcs white light, 350lm
• Night vision distance: up to 5 meters
• Angle of View: Diagonal 114°
• Audio input: Built in Mic, -38dB microphone
• Audio output: Built in speaker, 8Ω1W
• Two-way audio talk: suppo
• Video format: H.265/H.264
• PIR detection distance: Max. 7 meters
• PIR detection angle: 120° horizontal
• Micro SD card: FAT32 format, Max. 128G (not included)
• Wireless connection: 802.11 b/g/n 2.4GHz WiFi
• Wi-Fi security protocol: WPA-PSK/WPA2-PSK, WPA/WPA2, WEP
• Waterproof level: IP65
• Working temperature: -10℃- 55℃
• Working humidity: 0-95%RH, no condensation
• Dimension: 161x104x91mm
Frequently Asked Questions
1.
Can I share with family and friends?
Yes, you can share your cameras with family and friends who will have access
to view the camera and control your bulbs, plugs, and other devices. In the app,
click the Family name at the top and click on the“Home Management”button,
and you will be able to give or revoke sharing permissions. In order to share,
the other user should already have downloaded the app and registered a new
account.
2.
What's the Wireless Range?
The range of your home Wi-Fi is heavily dependent on your home router and
the conditions of the room. Check with your router specifications for exact
range data.
3.
How many cameras can | control?
WOOX Security app can control an unlimited amount of devices in an unlimited
amount of locations. Your router may have a limit of how many devices can be
connected to one router.

7
4.
My device can't be connected to network with App
• Make sure the device is under the config status (indicator light is flashing
quickly).
• Make sure the Wi-Fi is avaliable and the device is not far away from the
router.
• Make sure the Wi-Fi password you input is correct.
• Make sure the Wi-Fi security protocol is not WPA3.
5.
My device shows oine in my App
• Make sure the device is powered on.
• Make sure the network is stable and the Wi-Fi name and password not
modifed. If not, add device again.
• If the network is normal, but its still one. Check if there are too many Wi-Fi
connections. You can resta your router to check the status of the device.
Caution:
This device complies with Pa 15 of the FCC rules and Indust Canada license‐
exempt RSS standard(s). Operation is subject to the following two conditions: (1)
this device may not cause harmful inteerence, and (2) this device must accept any
inteerence received, including inteerence that may cause undesired operation.
The manufacturer is not responsible for any radio or TV interference caused by
unauthorized modications or change to this equipment. Such modications or
change could void the user’s authority to operate the equipment.
This radio transmitter (identify the de vice by certification number or model
number if Catego II) has been approved by Indust Canada to operate with the
antenna types listed below with the maximum permissible gain indicated. Antenna
types not included in this list, having a gain greater than the maximum gain
indicated for that type, are strictly prohibited for use with this device.
This equipment has been tested and found to comply with the limits for a Class
B digital device, pursuant to pa 15 of the FCC Rules. These limits are designed
to provide reasonable protection against harmful interference in a residential
installation. This equipment generates, uses and can radiate radio frequency energy
and, if not installed and used in accordance with the instructions, may cause
harmful inteerence to radio communications. However, there is no guarantee that
inteerence will not occur in a paicular installation. If this equipment does cause
harmful interference to radio or television reception, which can be determined
by turning the equipment o and on, the user is encouraged to t to correct the
inteerence by one or more of the following measures:
‐‐ Reorient or relocate the receiving antenna.
‐‐ Increase the separation between the equipment and receiver.
‐‐ Connect the equipment into an outlet on a circuit dierent from that to which
the receiver is connected.
‐‐ Consult the dealer or an experienced radio/TV technician for help.
The device has been evaluated to meet general RF exposure requirement.
To maintain compliance with FCC’s RF exposure guidelines, this equipment should
be installed and operated with a minimum distance of 20cm between the radiator

8
and your body.
Tech Suppo
*You can nd much more useful information in the Help Center in the App. You can
aslo contact us via the Help Center Feedback in the App or tech suppo email:
suppo.us@venztech.com.
