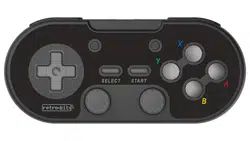
L Button
D-Pad
R Button
ZL Button
Select
Start
ZR Button
Capture Home
X Button
A Button
Y Button
B Button
Left Analog Stick
Right Analog Stick
L Bouton
D-Pad
R Bouton
ZL Bouton
Select
Start
ZR Bouton
Capture Home
X Bouton
A Bouton
Y Bouton
B Bouton
Stick analogique gauche
Stick analogique droit
ZL Button
L Button
ZR Button
R Button
ZL Bouton
L Bouton
ZR Bouton
R Bouton
INSTRUCTION MANUAL
MANUAL DE INSTRUCCIONES
GUIDE D’UTILISATION
Retro-Bit is a registered trademark of Kool Brands, LLC. Nintendo Switch and SNES are registered trademarks of
Nintendo of America, Inc. USB and USB-C are registered trademarks of USB Implementers Forum, Inc. All other
mentioned trademarks are either trademarks or registered trademarks of their respective owners. This product is
not endorsed, manufactured, produced, sponsored, or licensed by Nintendo of America, Inc., USB Implementers
Forum, Inc. or any of their afliates
©2012 Kool Brands, LLC.
Includes receivers for SNES® & USB® ports,
USB®-C Cable and Instruction Manual.
Comprend des récepteurs pour les ports SNES
MD
et USB
MD
, un câble USB
MD
-C et un manuel
d’instructions.
Controller SNES® D-Input X-Input Switch
DPad DPad Dpad Dpad Dpad
Left Analog Dpad Left Analog Left Analog Left Analog
Right Analog - Right Analog Right Analog Right Analog
A A 3 1 A
B B 2 2 B
X X 4 3 X
Y Y 1 4 Y
L L 5 5 L
R R 6 6 R
ZL L 7 Z+ ZL
ZR R 8 Z- ZR
LS - 11 9 LS
RS - 12 10 RS
Capture - - - Capture
Home - 13 - Home
Select Select 9 7 -
Start Start 10 8 +
LED Lights 1 1 1 & 2 1
Connection
SNES®
Receiver
USB® Receiver
Mode Held Input Description
Input Switch Start + B for 5 sec
Switch between D-Input and X-Input.
Some consoles and programs require
X-Input.
SNES® Receiver
• Connect the SNES® receiver to the console.
• Power on the console and the LED on the receiver should start to blink slowly.
• Press and hold the pairing button on the receiver until it begins to blink rapidly.
• Press Start on the controller to power it on. If it does not connect automatically, you
may need to press Start again to force the connection.
USB® Receiver
• Connect the USB® receiver to the console.
• Power on the console and the LED on the receiver should start to blink slowly.
• Press and hold the pairing button on the receiver until it begins to blink rapidly.
• Press Start on the controller to power it on. If it does not connect automatically, you
may need to press Start again to force the connection.
• When paired to a console such as the Switch, the LEDs on the controller will light
up based on the player #. On other devices, the lights will display according to the
input. D-Input is the rst light and X-Input is the rst two lights.
• Some consoles or programs will prefer X-Input in order to function. See Macros for
more information.
• To charge the controller, connect the included USB®-C charge cable to the USB®-C
port on the controller to a charged USB port. If connected to an outlet, it should
enter the fast charging state and fully charge within 2-3 hours.
Factory Reset
• Should you encounter issues with the controller, use a thin, hard item like an unbent
paper clip and insert it into the hole on the back of the controller. The controller
will turn with all connections and settings reset.
Power Issues
• You will get around 10-12 hours of active playtime on a full charge. To charge the
controller, connect the USB-C® cable into the controller and the USB® end into a
powered available port.
• The SNES® receiver is powered by the console. DO NOT connect a powered
Micro USB® cable into the receiver as this may damage your console or receiver.
Firmware Updates
• Visit www.retro-bit.com/support to view any available rmware updates. A Micro
USB to USB cable will be needed for rmware updates on the SNES® receiver.
• Do not install non-ofcial programs or updates. This may damage your product or
affect the performance negatively.
Features Caractéristiques
Layout Diagram Schéma de la dispositionDefault Button Inputs
Macros
Pairing
Charging
Troubleshooting
English
EnglishEnglish
For the latest updates and support,
please visit
www.retro-bit.com/support
For questions or concerns please contact
info@retro-bit.com
@retrobitgaming
• Compatible with SNES®, Nintendo Switch®, and USB® enabled devices
• Includes receivers for SNES® and USB® ports*
• Additional ZL and ZR shoulder buttons
• Features Home and Screenshot buttons
• Additional macros for versatile gameplay
• Includes 3 Ft. (1M) USB-C® cable to charge controller
*Receivers update via Micro-USB® (Not Included)
• Compatible avec les appareils compatibles SNES
MD
, Nintendo Switch
MD
et USB
MD
• Comprend des récepteurs pour les ports SNES
MD
et USB
MD
*.
• Boutons gâchettes supplémentaires ZL et ZR
• Boutons « Home » et « Screenshot »
• Des macros supplémentaires pour un jeu polyvalent
• Comprend câble de 3 pi (1M) USB-C
MD
pour charger la manette
*Les récepteurs sont mis à jour par un câble Micro-USB
MD
(non inclus)
Français
Loading ...
Loading ...
Loading ...
