Outdoor Wireless Solar Camera
Model: S90
R

8335540901 Please text us for any product issues
Thanks for purchasing from Soliom.
Having issues with your Soliom cameras?
Please through either ways below.
Soliom care team staffs would offer you a best
solution to solve any problems within .
Register via below link to get
.
contact us
24 hours
2 Years Extended
Warranty
https://soliom.net/pages/product-registration
Contact Us:
If this manual is not clear enough to
read,please download a PDF file via
below link:
https://soliom.net/pages/download
Warranty Service
Join Soliom Customer group for instant help:
https://www.facebook.com/groups/soliomvip/
15-18
5-14
19-26
Part 5: How to Save and Delete Videos...................27
Part 6: More Settings.............................................................28

1
. Soliom S90 can only be set up with 2.4g Wi-Fi network. (It's ok to
use Cell phone 4G data to live viewing it after the camera was set
up with 2.4g Wi-Fi network firstly.)
3. You may possibly need a Wi-Fi extender if your Wi-Fi signal is
weak around the yard where you want to install it.
4. At least 1-3 hours direct sunlight to the camera every day is
needed, the more sunshine the better to avoid manually charge
it frequently. (North side of the house is not a recommended
installation place)
5. Please charge your Soliom camera before you set it up, it
usually takes up to 10-12 hours to fully charge it.Do not use any
power adaptor exceed 5V/2A,or it may damage the camera.
(There's no indicator to show charging status from the camera)
6. Make sure the distance between your phone,router and the
camera is no more than 1.5 feet when you're ready to pair the
camera. Ensure that the Wi-fi signal strength on your phone is
good.
7. The PIR range is 24 feet around,the recommend camera install
height is 8 feet around.To avoid too much false alarms, we
suggest you do not install the camera with nearby bushes,shrubs,
grasses and tree leaves coming into the PIR range.
8. To ensure an accurate motion detection funtion,it is suggested
to adjust the camera angle physically to focus the motion area
within the PIR suggested 24ft range.
9. If you install the camera on stucco,brick or concrete surface,
please mark 4 holes matching the drill template and then use a drill
driver to drill into the wall and insert the expansion screws to
hold the camera tightly
2. When the battery runs out, the camera can only turn on
automatically after the camera is charged more than 4 hours.
Very Important Tips
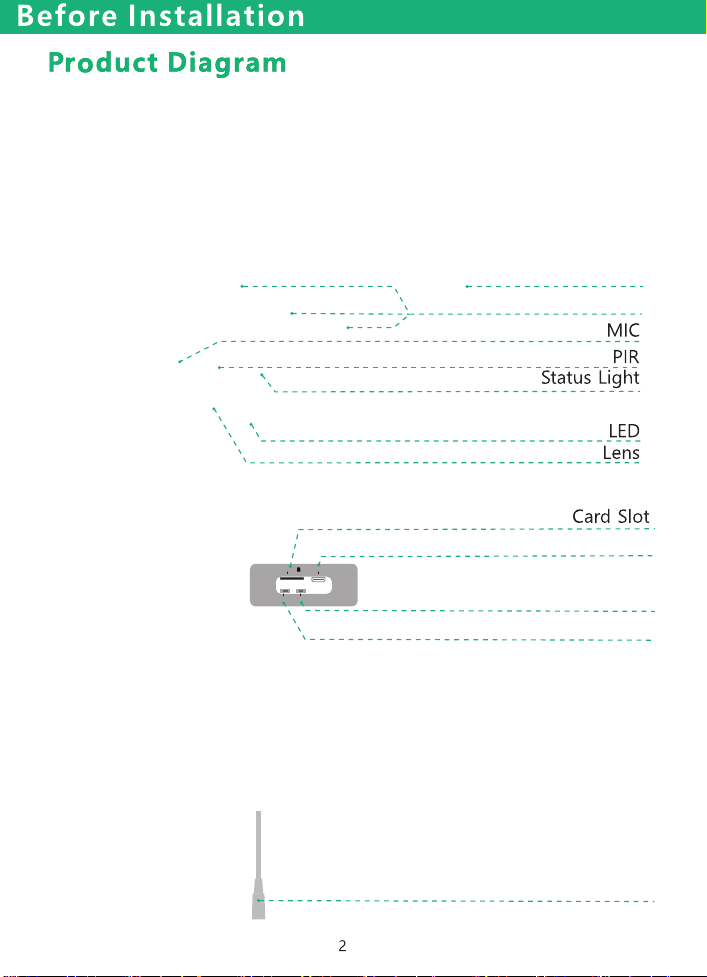
USB port
Micro-SD USB Port
Reset
Power
Power Reset
Cable for connecting external
solar panel
Bracket
Solar Panel
Micro-SD USB Port
Power Reset
Micro-SD USB Port
Power Reset
Micro-SD USB Port
Power Reset
3
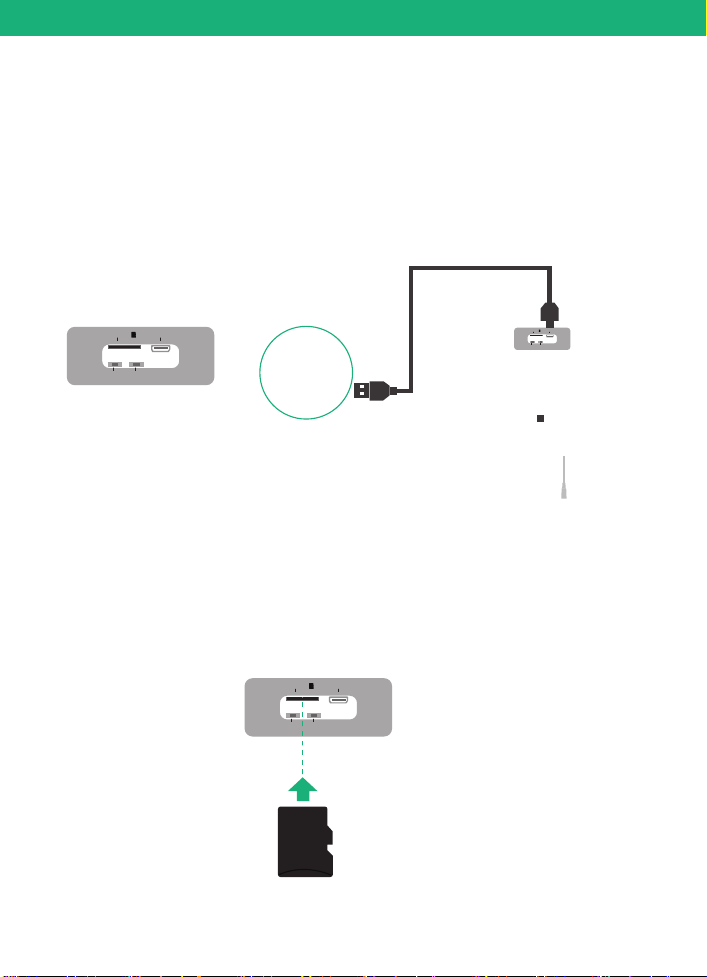
Please charge the camera about 10-12 hours by plugging it
into a power source using the provided USB cable. After
connecting the camera with App, the App will indicate the
battery status.
Charging
Before Installation
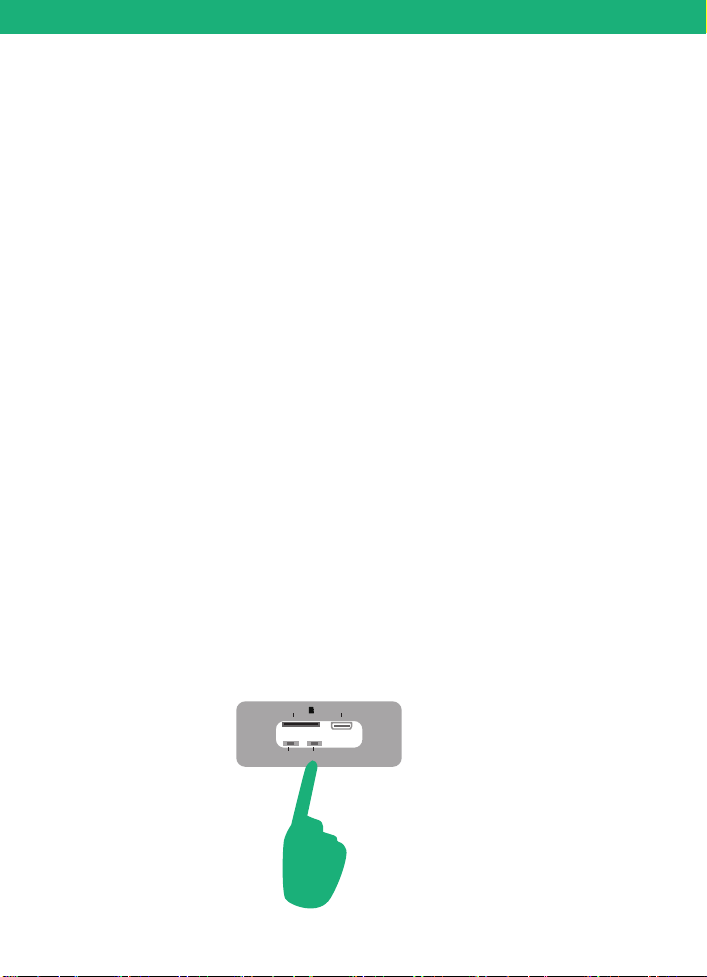
Install a micro SD card
Please insert your micro sd card to the slot correctly according to
the below picture. the camera only support class 10 above quality
micro sd card from capacity 8GB to 64GB.
(There's no indicator to show charging status
from the camera)
SD Card
The text face up
4
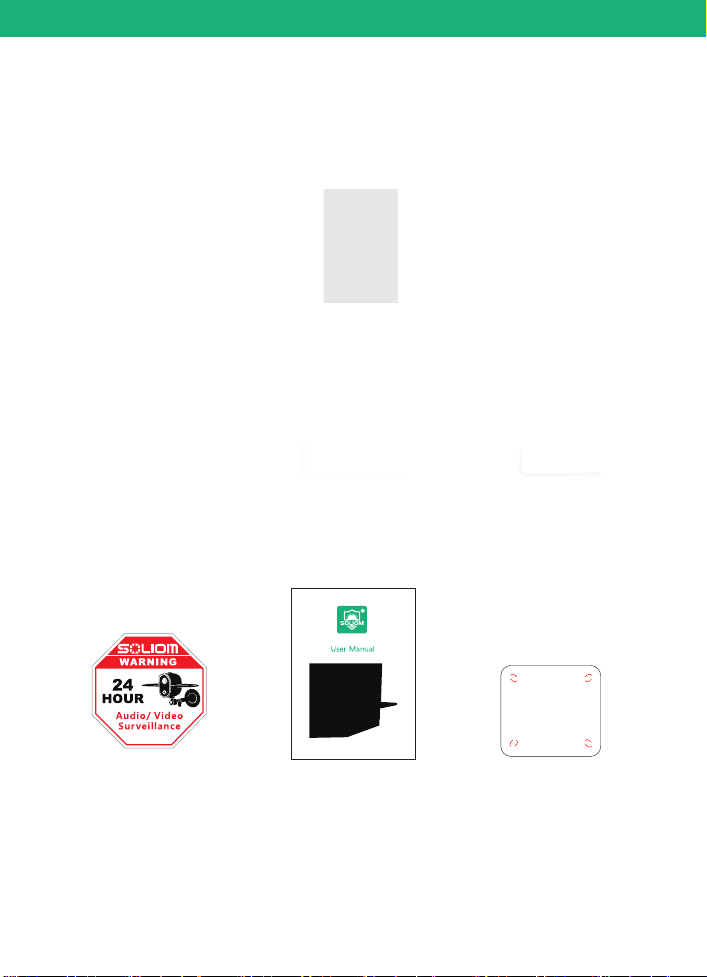
4 x Expansion Screws
1 x USB Cable
2 x Luminescent
Warning Sticker
1 x User Manual
Package Content
Before Installation
1 x Bracket
Camera
1 x Allen key 1 x Allen key
1 x Position Paper
Outdoor Wireless Solar Camera
Model: S90
R
Stick the position paper on the
wall where you want to install
the camera,and drill hole on
the red circle
Tear off after drilling
5
1. Download the App (works only with iOS & Android devices)
Please locate the in your Google Play store or
to download the soliom+ App.
SOLIOM+ App store
In-App Setup
Make sure the distance between your phone,router
and the camera is no more than 1.5 feet when you're
ready to pair the camera.Ensure that the Wi-fi signal
strength on your phone is good.
Tips:Please Allow below 2 permissions when use this App at first time.
1. Allow"SOLIOM+" use mobile cellular data and wireless LAN,
otherwise it may be failed to add S90 camera.
2. Allow "SOLIOM+" to get system push message and location
permissions
6
In-App Setup
Open the App and register your account with your email
address.
(1)Please set a password for your account and make note
to remember it.
(2)Please click "Allow" or "Agree" on all access when you
download soliom+ and during the process of setting up
your account so that the can have full access to soliom+
your camera and phone. otherwise, your camera may
have less function or incomplete setups.
2. Register an account
Click”Add family” and then input your desired family
name, click “next step” and then input required information,
and then click “finished” to save it.
3. Set up the installed location
please pay attention to choose your right "Country/Region"
so that you can connect the camera smoothly later and get
proper notifications from your correct region server
Note: The required fields are country and state.
7
In-App Setup
Micro-SD USB Port
Power Reset
Press the power button to turn on the camera, after 3
seconds, LED flashes blue. Then you will hear the following
voice “The camera is now ready to begin pairing”.
4. Turn on the camera
How to turn off the camera?
Press and hold on the “power” button for 5 seconds, after
you hear music, LED will go off, which means the camera
has been turned off.
Flashes blue
8
In-App Setup
Please Note: connect your phone to the 2.4Ghz wifi firstly
before you pair the camera, make sure your router
password in mind before you start the pairing process.
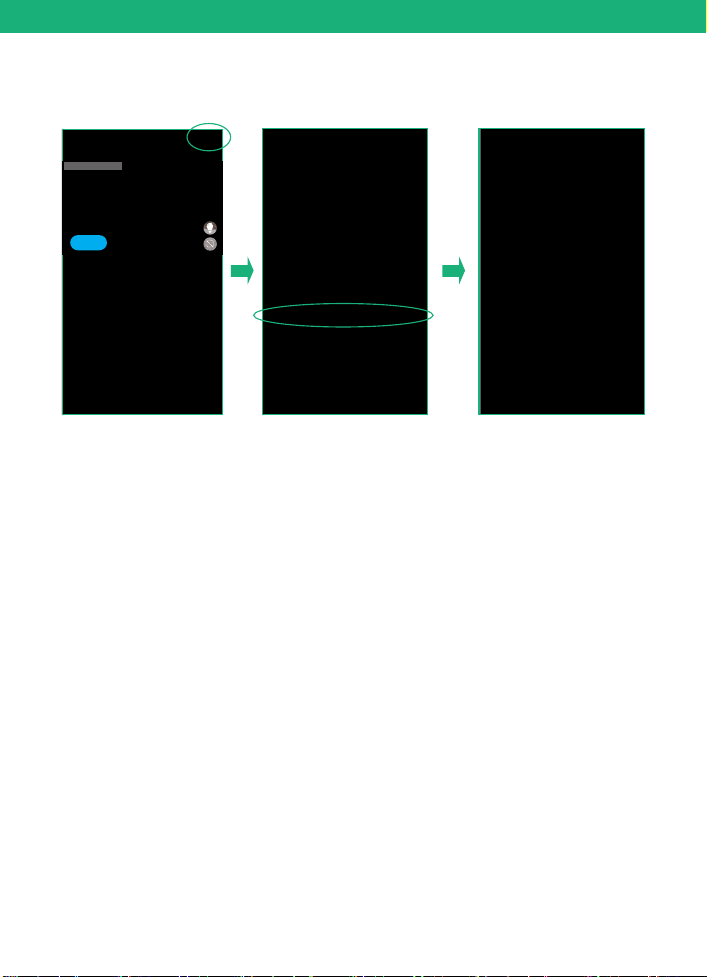
Click "Add a device" and then choose "Setup device",
click "Yes", when you hear the following voice “ The
camera is now ready to begin pairing”.
1)
2) When your phone or tablet connected well with your 2.4G wi-fi
and you allow the access of using the location for the app, your
wi-fi name will be shown here automatically. Otherwise please
check your wi-fi list from your devices and you have to turn on
the location services for the Soliom+.
5. Pairing the camera with the App

In-App Setup
9
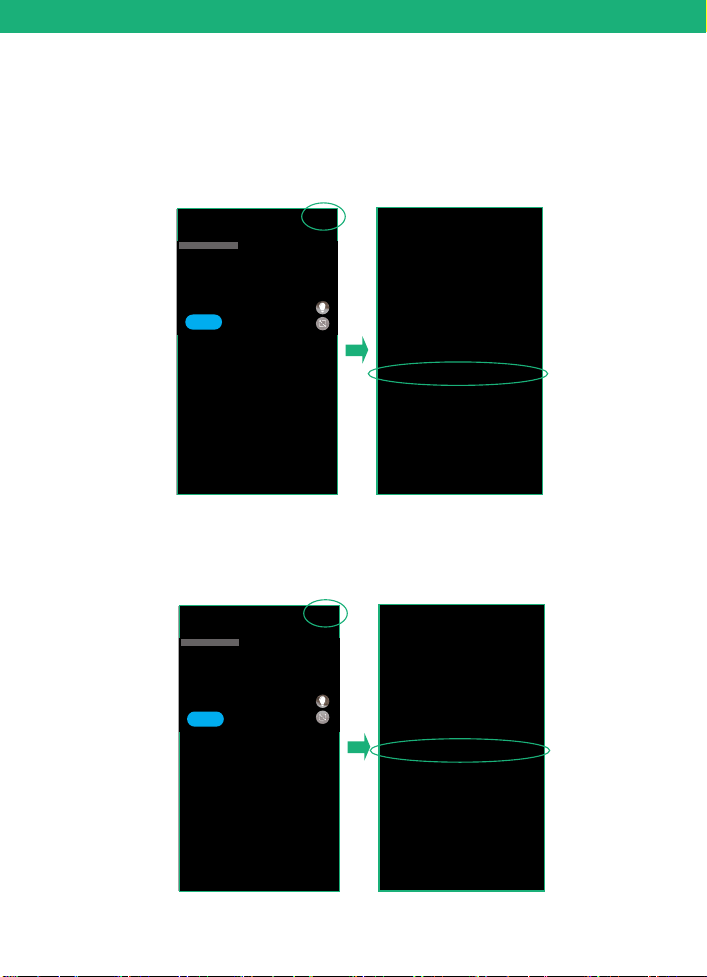
3) Input the CORRECT WiFi password of your router, if you input
a wrong password you will not be able to connect it successfully.
Click the eye icon to double confirm the password you entered
correct
Your Wi-Fi name will be
shown here automatically
Click the icon to double
confirm the password you
entered correct
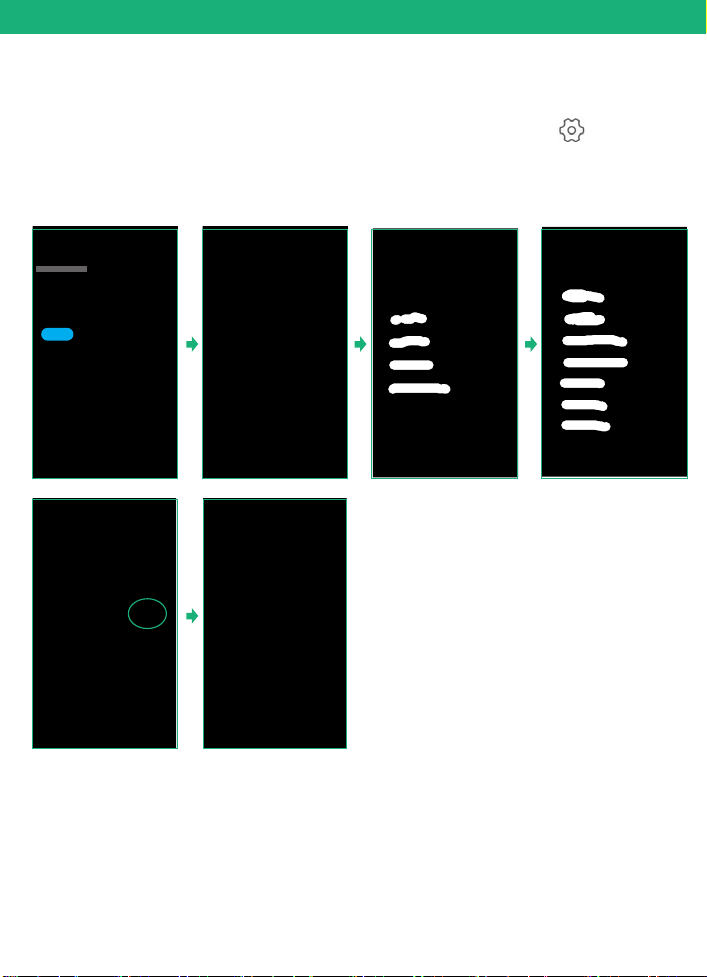
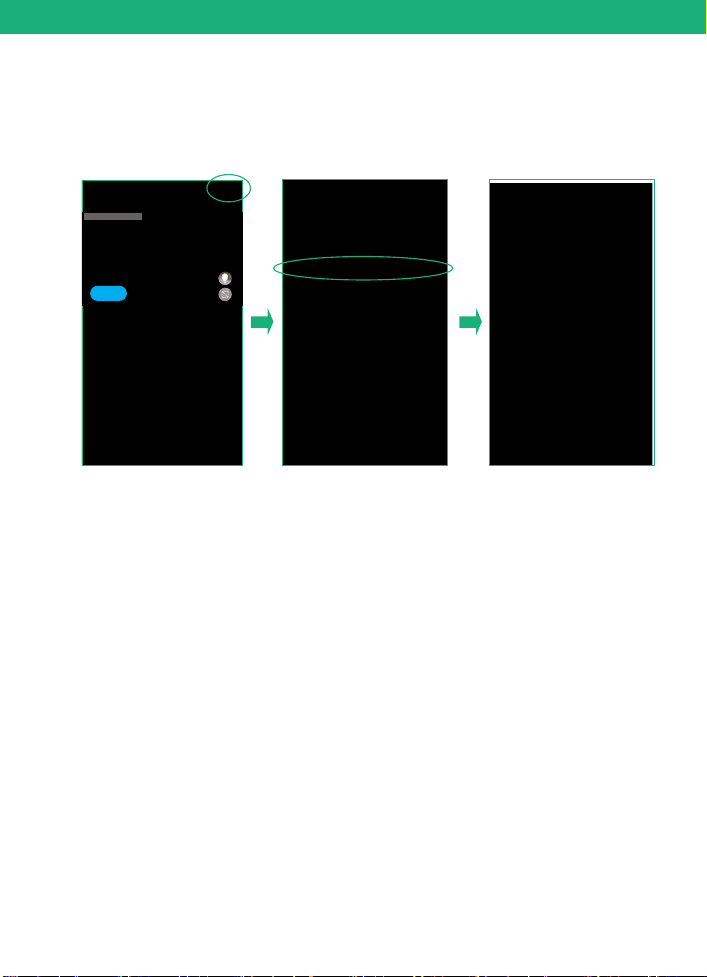
Method 1: QR code configuration
1.1 Click the “QR code configuration”, hold the QR code in front
of the S90 camera, and then you will hear the following voice
“Pairing Information Received”.
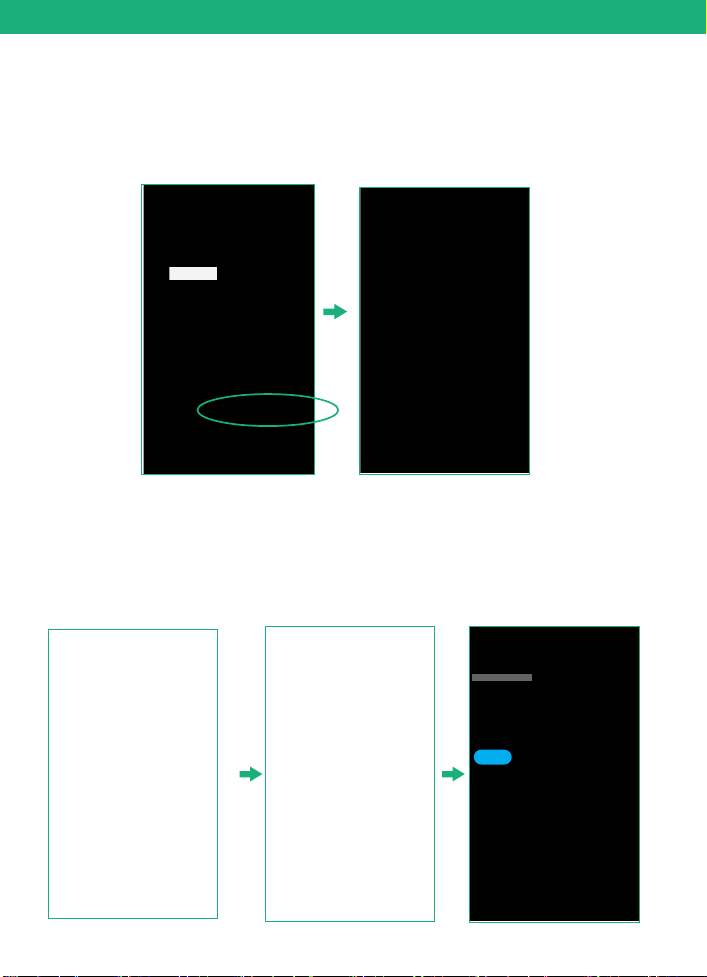
In-App Setup
10
Method 2: Sound wave configuration
2.1
Enter into the “search device” page, make sure to turn up
you phone’s volume to the Maximum, you will hear the
following : “Pairing Information Received”. voice
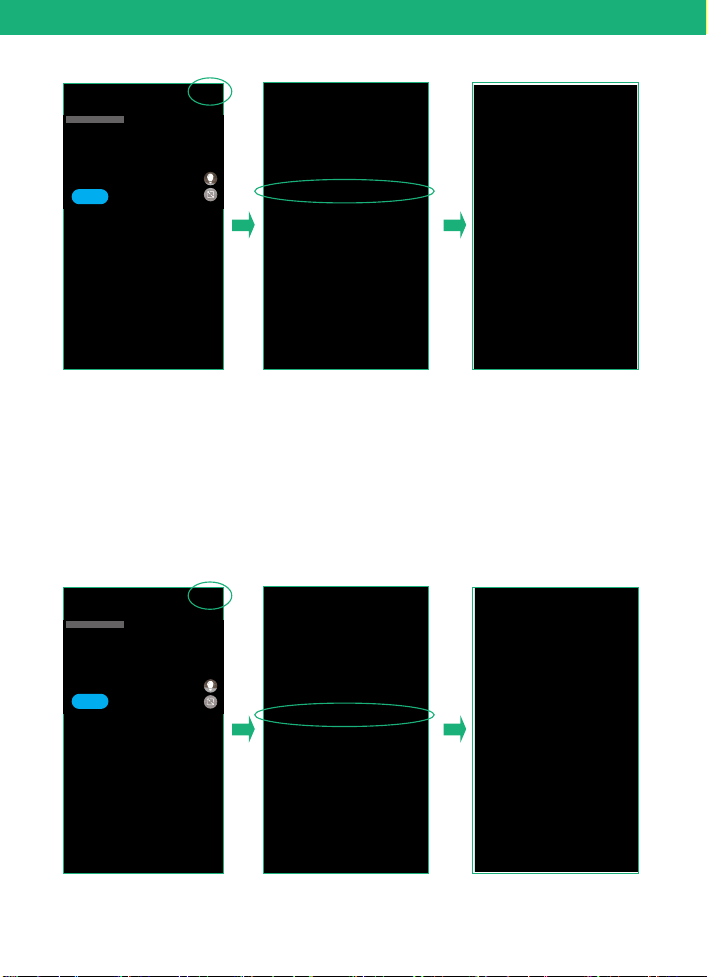
3)
You have connected the device to the App successfully.
Choose a name of the devices from the drop-down choice,
or you can modify one that you want. and then select the
area where device is located. (you have to choose one or
you cannot connect the camera to the app)
2019-12-27 15:00:36
Online
1. Please reset the camera to default
after you fully charged
the camera.
Press and hold on the reset button for 7 seconds to reset the
device. Don’t release the button until you hear the voice"Di",
then you will hear "system reset".
6. How to reset camera:
Micro-SD USB Port
Power Reset
In-App Setup
11
4)
2. Please turn up your phone volume to the maximum, if
you pair up the camera through sound wave.
3. Please put the camera,phone as near as to your router
(within 1.5 feet) to get a strong wifi signal strength.
4. Please click on the eye icon when you input your router
wifi password to make sure your wifi password CORRECT.
5. Please make sure your router setting is DHCP enabled,
otherwise your router will not send out WiFi signal for
any wireless device for pairing up.
6.Reboot your router to refresh your Wi-Fi connection.
Congratulations! You have connected your camera to the
App successfully, now you can live view the camera on your
phone anytime and anywhere.
If you're unable to pair the camera, Please check below
suggestions:
2019-12-27 15:00:36
Online
In-App Setup
12
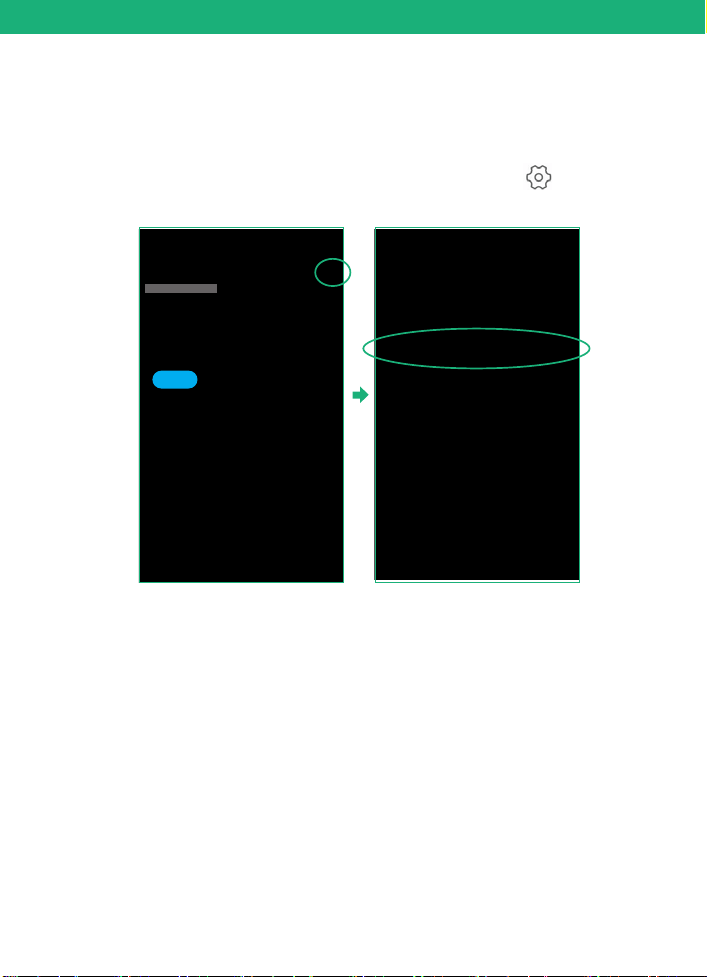
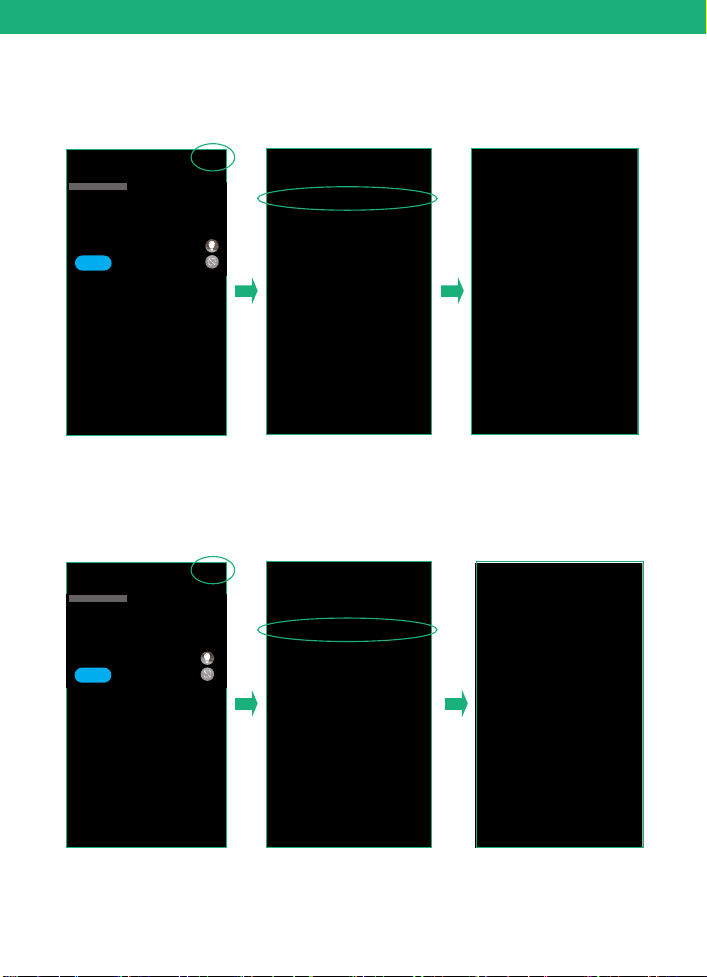
7.How to Share Your Camera with More Users
When you can use your camera properly. You can start to share
your camera to your friends or family members. click“ ”and
choose "share permissions". input the account that you want to
share with. choose a permissions from Administrator, family
member, Visitor, Customize
You can Customize the permissions and turn on or off every permission
as you wish by clicking the blue icon"permissions"
In-App Setup
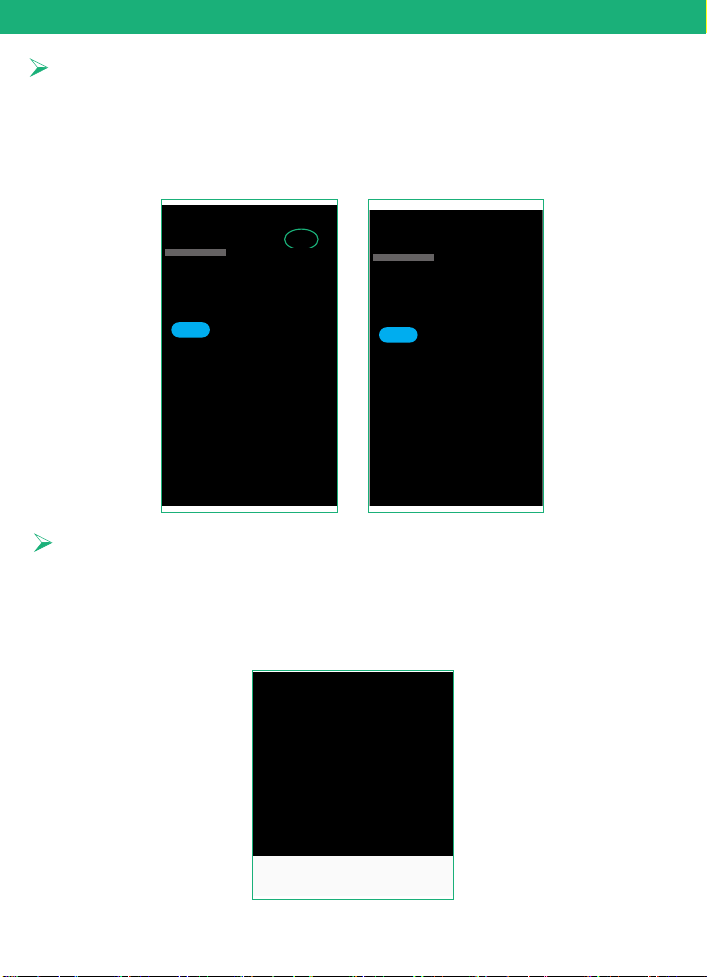
Please do not forget to unbind your camera from your App when
you plan to return the camera, to avoid any personal information
disclosure risk.
And unbind your camera as following steps, click" " and then
choose "delete”
8.How to unbind your camera
2019-12-27 15:00:36
Online
13
In-App Setup
14
Cloud storage
The video clips will be saved in the Cloud. Cloud video length
is 8 seconds defaulted and free for 30 days. And you have to
pay for the service per month or other cloud service. You
can choose a service from the soliom+ provided to purchase.
Push Mode
This icon indicate that the push mode is on, click it to turn off
push mode and then you cannot receive any notifications.
If you want to turn on or off the sound of notification, please
refer to page 28.
2019-12-27 15:00:36
Online
2019-12-27 15:00:36
Online
15
1
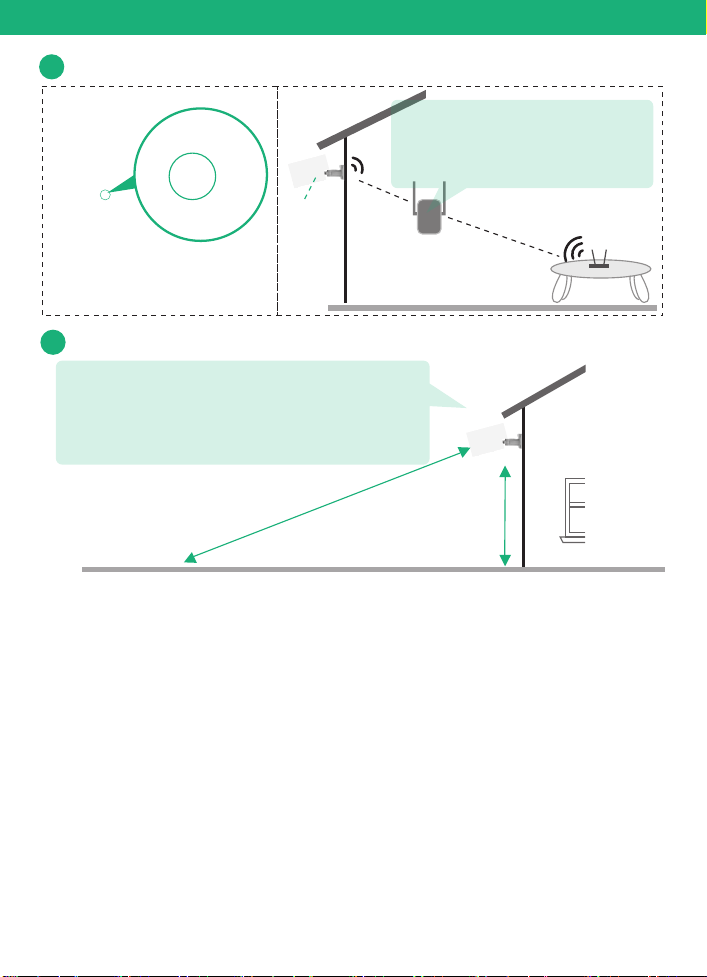
Check your camera signal strength
Camera
Check in App
WiFi extender
Router
Physical Installation
If not satisfied with video smoothness,
and signal strength in App is not strong,
we would suggest adding wifi extender
between the Router and the camera.
2
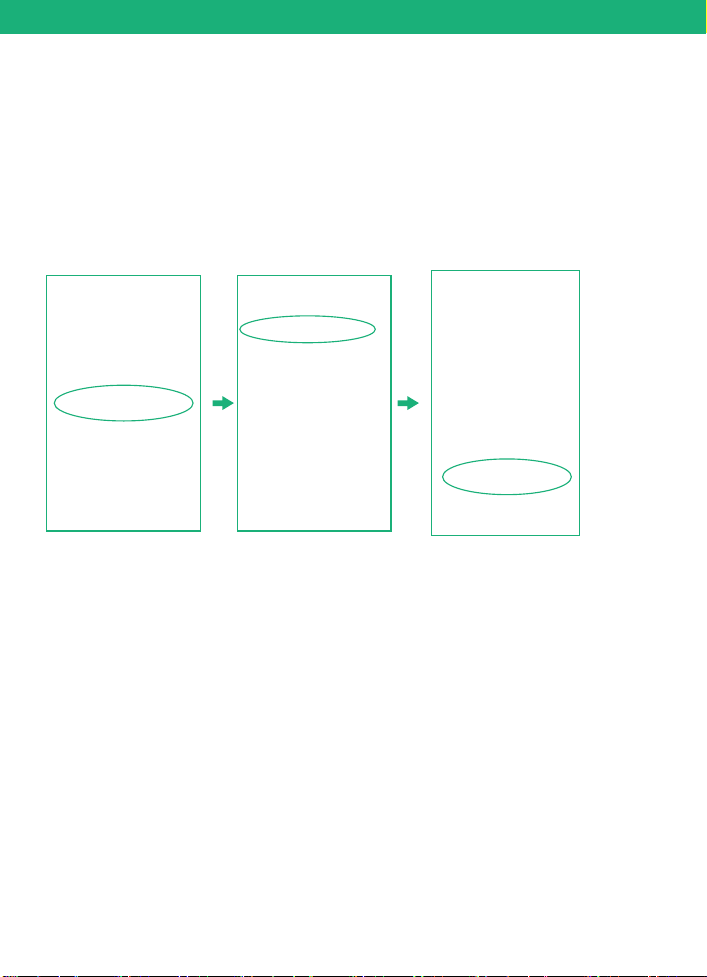
Recommended height to install the camera
We suggest installing the camera about 8ft.
You may adjust the camera angle physically
according to the live view in your mobile.
to focus your motion area to get the more
accurate motion triggered events.
24 f
eet
8 fe
e
t
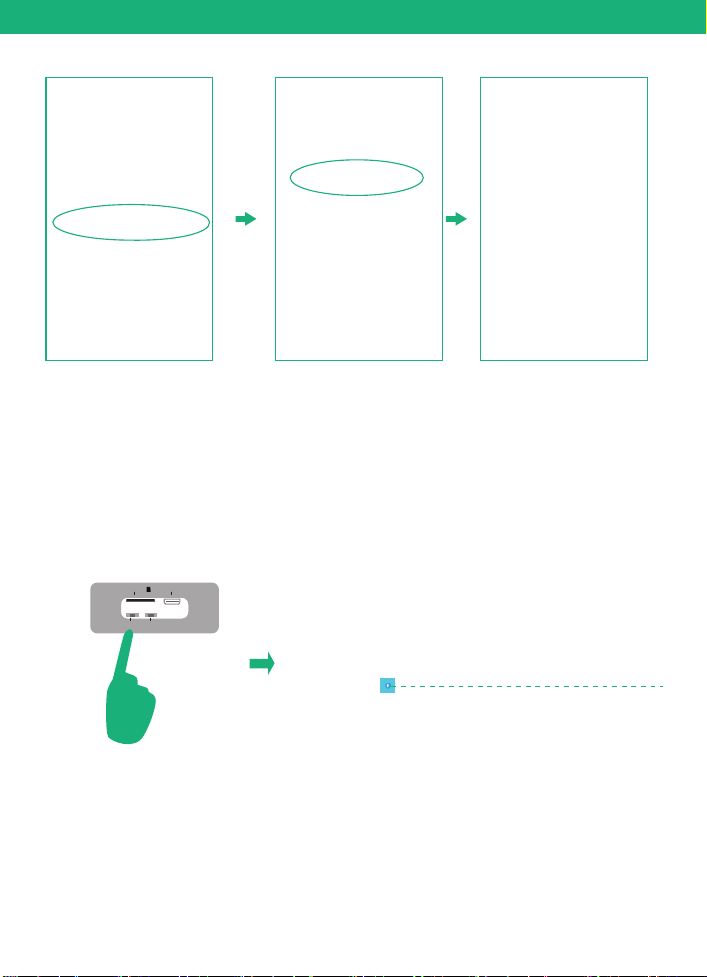
If your camera get numerous motion alerts unexpected
1) Please adjust your camera installation angle a bit down to
focus the motion area.
2) Please change your PIR sensitivity to Low to reduce the PIR
sensitivity.
3) Do not install the camera with nearby bushes,shrubs,
grasses and tree leaves coming into the PIR range.
P
I
R S
ens
iti v
i
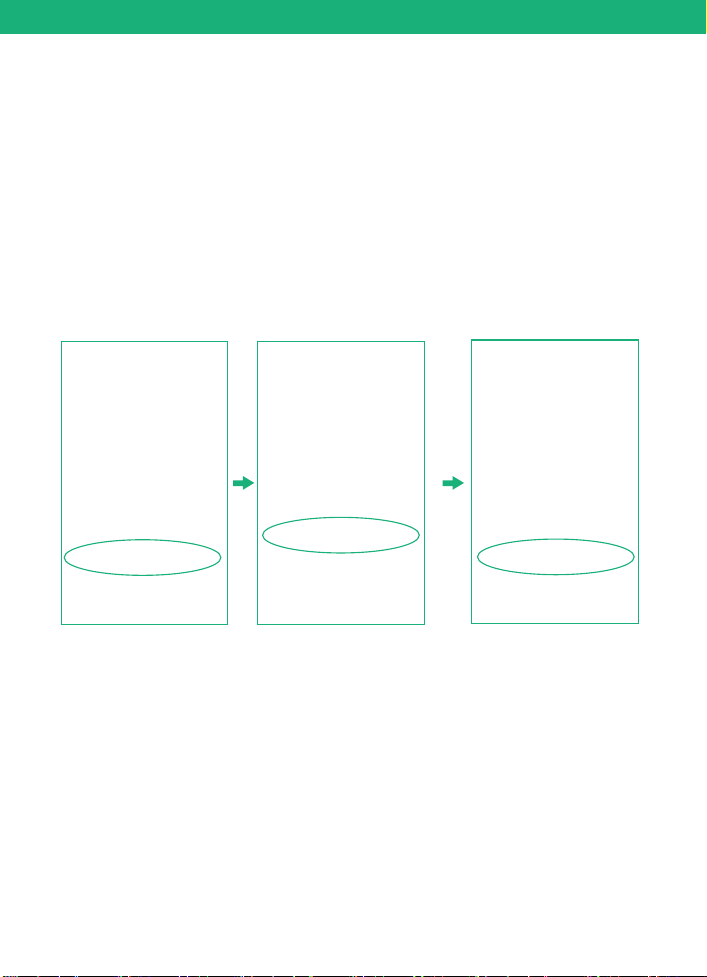
ty ( Hig h)
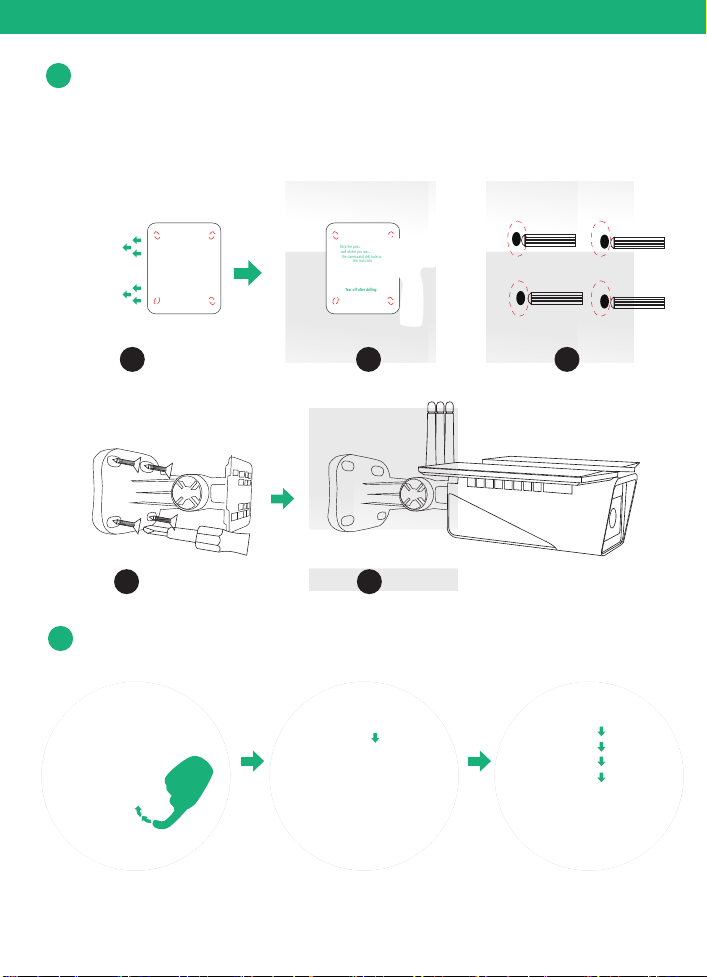
Stick the position paper on the wall where you want to install
the camera. drilling the 4 holes according to the 4 red dots on
16
Physical Installation
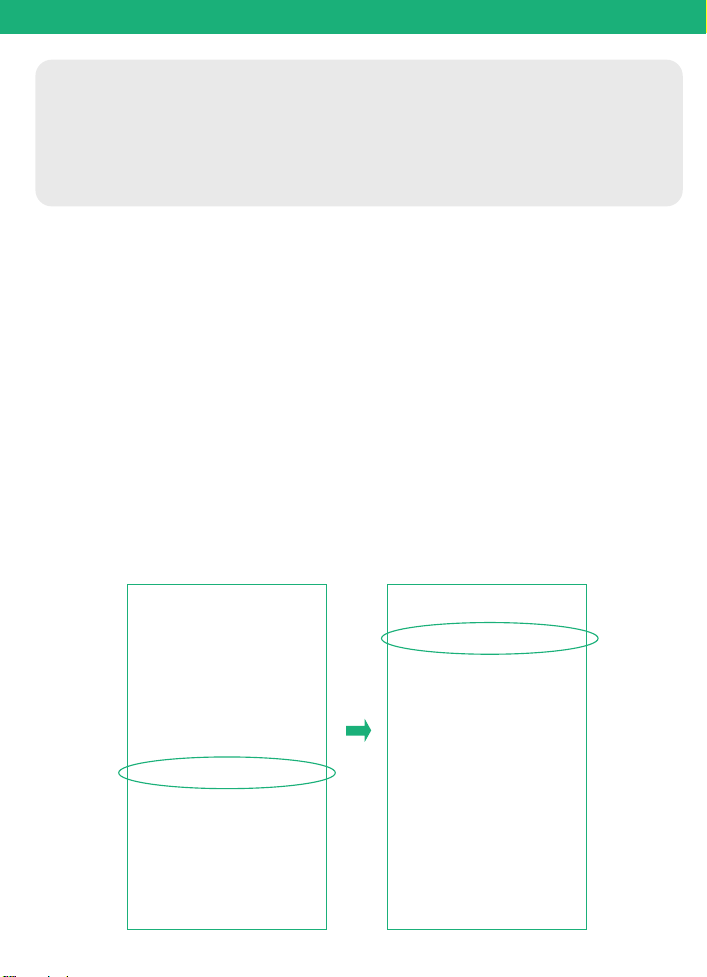
3
How to take apart the bracket?
4
1 2
4 5
Stick the position paper on the
wall where you want to install
the camera,and drill hole on
the red circle
Tear off after drilling
Stick the position paper on the
wall where you want to install
the camera,and drill hole on
the red circle
Tear off after drilling
3
the paper and then fix the bracket using the expansion screws.
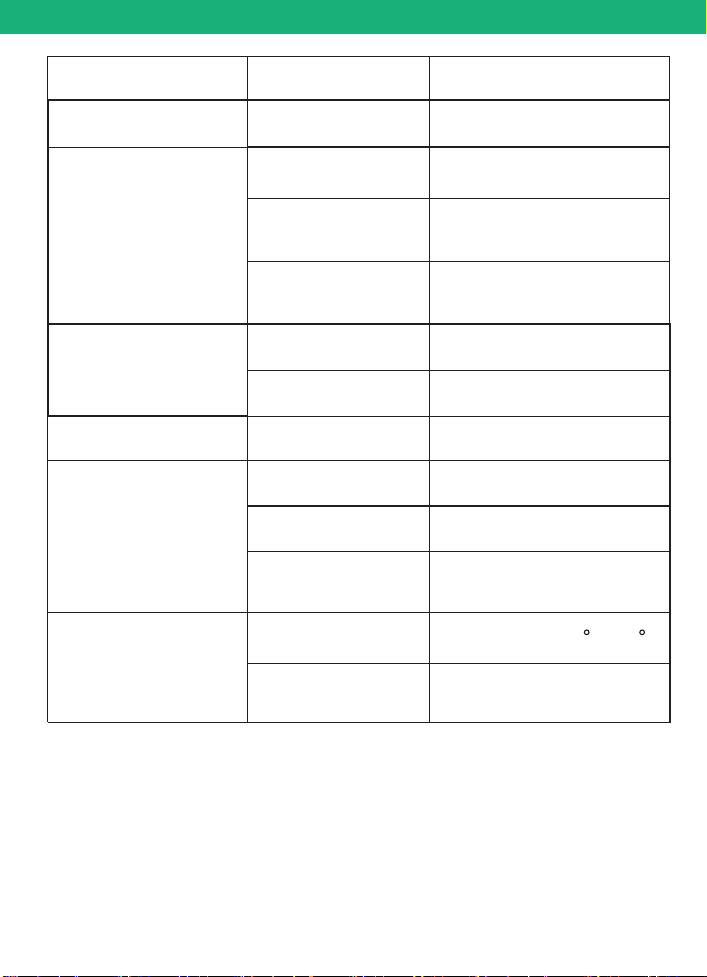
Resolution
Lens angle
Video format
Frames per
second
SD card
support
Output
Intput
Image Quality
Lens
Specifications
Video
Specifications
Audio
1080P
FOV 160°
15fps
H.264
8GB-Max 64GB
Built-in speaker
Built-in microphone
17
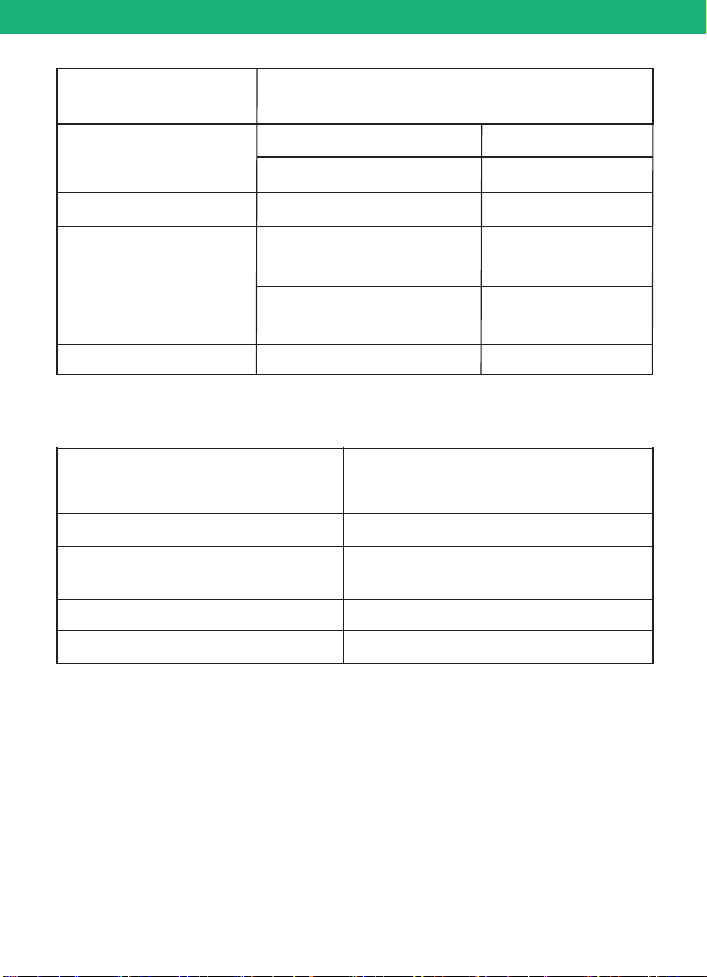
WiFi
Battery capacity
Standby time
Communications
Battery
2.4GHz
10000mAh
Max 8-12 months
Power
consumption
6W(run)/
0.003W (standby)
Applicable
Environment
Temperature
Humidity
-20℃~+60℃(-4 F-140 F)
20%~85%
(Non-condensing)
Technical Specifications
18
Android 2.3 above/ iOS 7.0 above
System
Suppport
PIR
PIR angle
PIR range
FOV 120°
24ft
Night Vision
Range
Up to 32ft
LED flashes red once and goes
Turn on the camera
off and LED flashes blue
Connect network successfully LED stays blue
PIR was triggered
off and LED stays blue
LED flashes red once and goes
Camera working
Standby mode LED goes off
LED Status
Working time for
fully charged
Max 36 hours
Max 14 hours
Continuously daytime
recording time
Continuously night vision
recording time
IP grade
IP66
Waterproof
LED stays blue
Technical Specifications
19
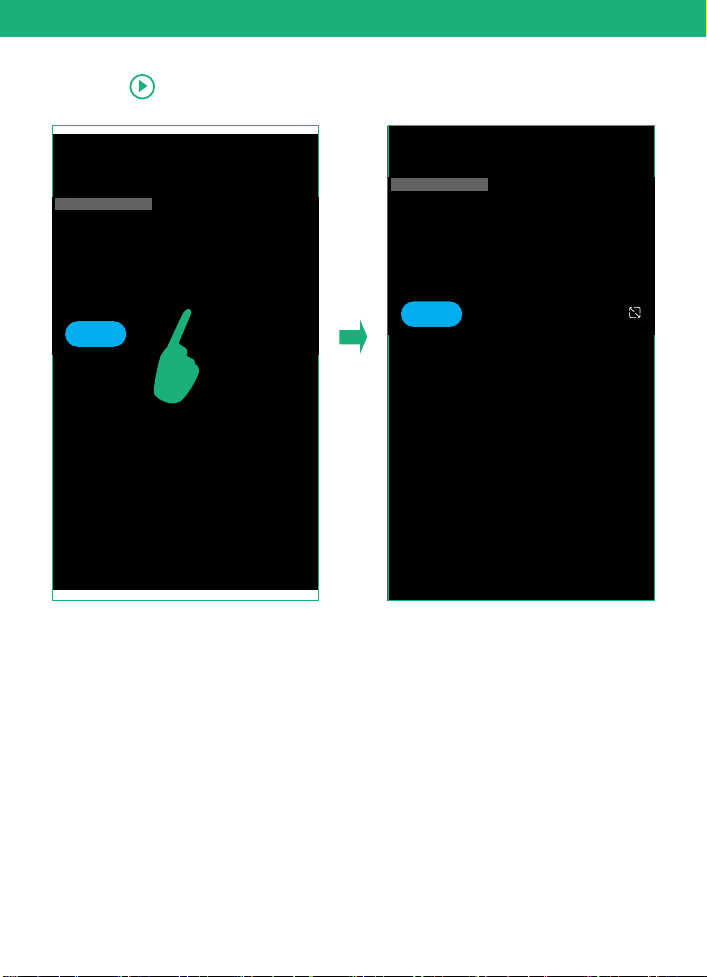
Detailed App Instructions
1.click , you could live viewing videos.
Online
2019-12-27 15:00:36
2019-12-27 15:00:36
Online
2019-12-27 15:00:36
Online
20
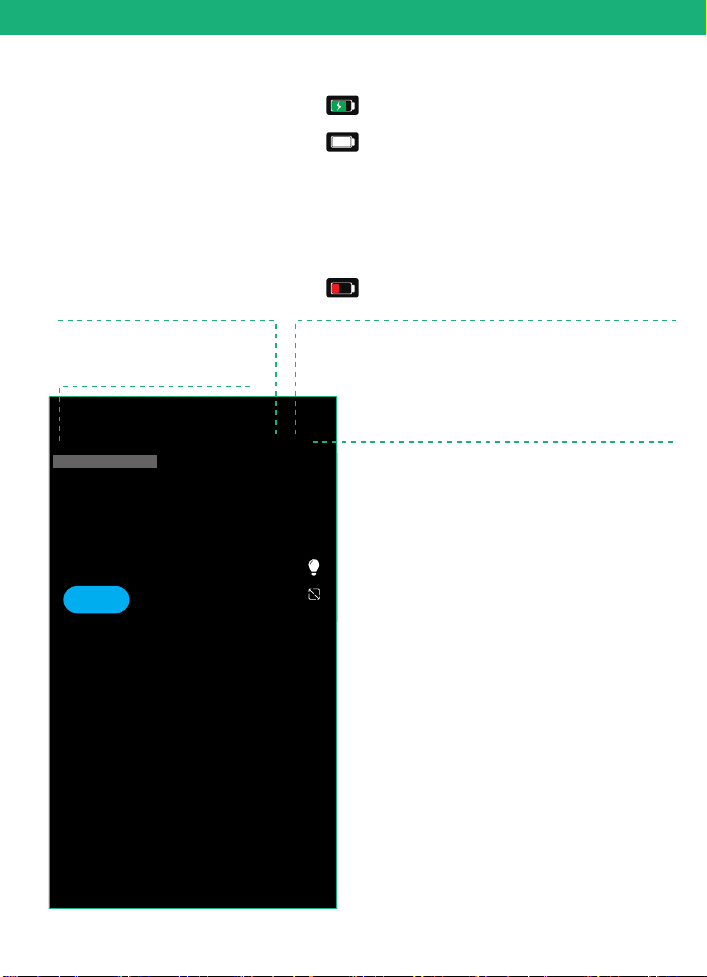
Detailed App Instructions
Wifi signal strength
Tips: Please make sure your camera
has a full bar of wifi strength to
ensure a smooth live view speed.
(A wifi extender is recommended
to install beside the camera if needed)
Battery charging sign
When camera exposed to sunlight,the battery will
keep charging in green.
During night or fully charged,the battery will
stay white.
Tips : If your battery sign will not show correct
status as above,please remove the solar panel
and then re install it to the camera body.Or
contact Soliom support team for a replacement
at [email protected] All friendly customer
service staffs are ready to assist you.
Click here to chose the resolution
to HD(1080P) OR SD(720P)
Number of users
Tips: If you have invited a second users to visit
your camera.Please pay attention to below
points:
1.You can share different permission for every
one as you wish
2. You can Customize the permission as you
wish
Low power indicator,please recharge the camera
manually using the provided USB cable
2019-12-27 15:00:36
Online
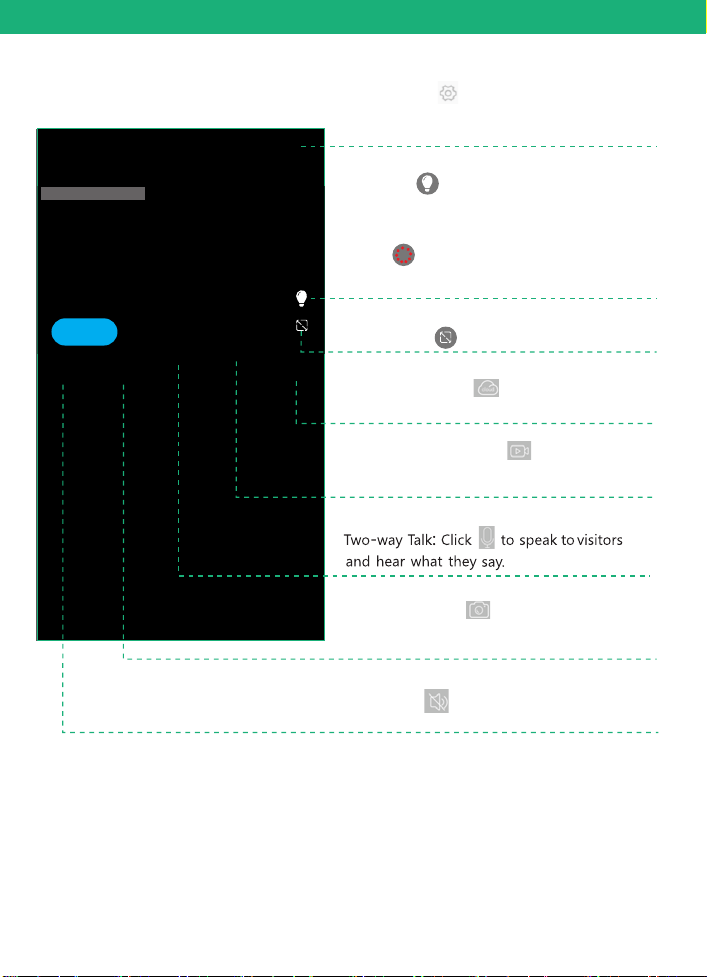
Detailed App Instructions
21
Screenshot: Click to screen capture
and pictures will be saved to your phone's
album.
Manual Recording: Click to manually
record and the videos will be saved to
your phone's Album
Voice: Click to mute the sounds from
the camera.
Cloud storage: Click to playback videos
saved in cloud storage.
Setting: Click to enter into device
settings. ( Check page 21 for more
details)
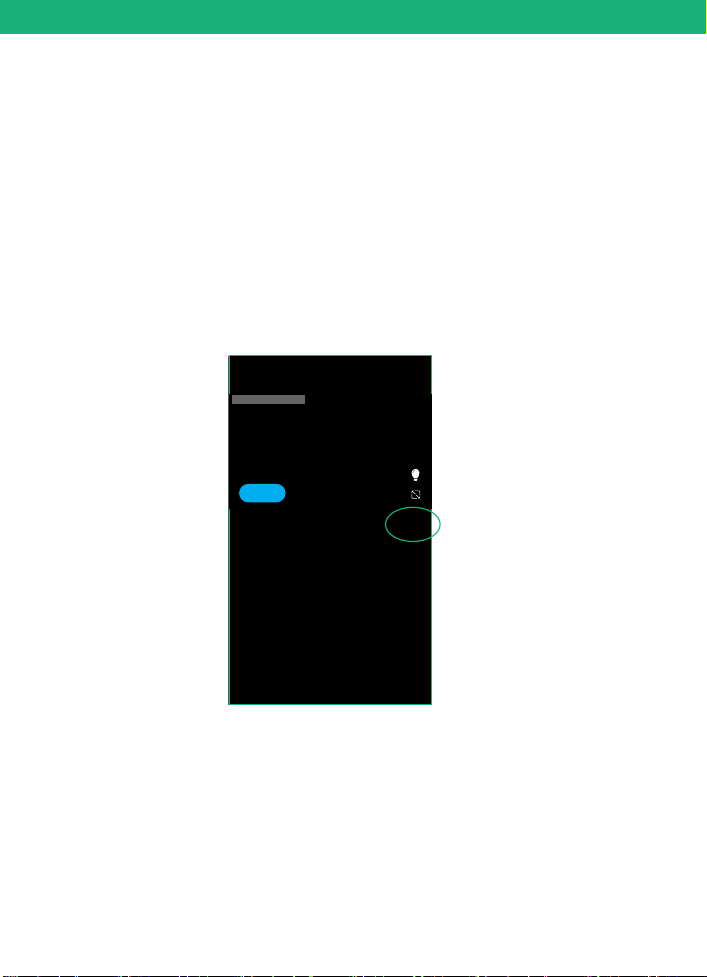
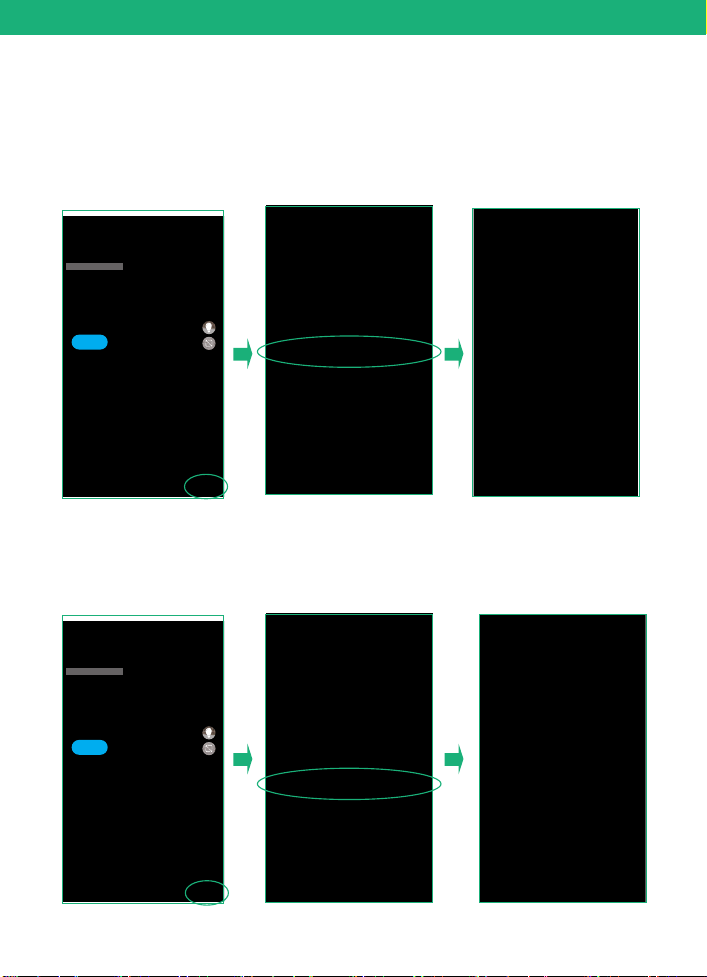
Click the icon to switch to full screen play
This icon “ ” is to turn on the spot light during
night. The spot light will turn on to record a starlight
color video clip when there's motion detected by
the camera. You can click it to switch to infrared
LEDS “ ” night vision mode to disable spot
light.Camera will record motion in black and white
video mode.
2019-12-27 15:00:36
Online
22
Detailed App Instructions
SD Card Setting
1) Please turn on the cloud storage so that you can sync the
camera time with your phone.
Image flip
You can choose Normal Rotate, Mirror or Mirror and rotate
depends on your hardware installation way. The default is
Normal.
2019-12-27 15:00:36
Online
2019-12-27 15:00:36
Online
23
Detailed App Instructions
Scene mode
You can choose to set it as Normal, back light compensation,
night IR, High light compensation or Dynamic according to
your actual light environment of installation place.
PIR Detection Sensitivity
You can set the PIR sensitivity as Disabled, Low, Medium
or High.
1) When you set the PIR as Disabled, you will not record
and receive any motion triggered events.
2) It is recommended to set the PIR Detection to High so
that you could capture as more as a motion triggered
from the beginning part of the event.
3) Try to capture more the beginning of the triggered
event,please adjust your camera angle a bit closer to your
aimed spot (Check page 15 diagram).
2019-12-27 15:00:36
Online
Detailed App Instructions
24
Active time
1) This is the time you could set for the video length recorded
to micro sd card.
2) Always: If you choose this option,you will not allow the
camera enter into standby mode,the camera will keep
recording all the time until battery drains out. ( 60 seconds
per file)
2019-12-27 15:00:36
Online
2019-12-27 15:00:36
Online
25
Detailed App Instructions
Power frequency
Please choose 60 or 50HZ according to your local frequency,
It's defaulted to 60HZ for united states users.
LED indicator
When you choose Enable,the Blue LED will light up to indicate
when you operate the camera as it should be.When you choose
Disabled,the Blue LED will not light up to indicate the operations
or trigger motions.It is recommended to set it as the default
2019-12-27 15:00:36
Online
2019-12-27 15:00:36
Online
26
Detailed App Instructions
Device Name
You can set a desired name for your camera.
2019-12-27 15:00:36
Online
How to save and delete videos
27
1. Videos can be saved in Cloud Storage:
(1). The videos of PIR activity
You could save the videos of PIR activities in cloud storage,
which can be used 30 days for free and then you have to pay
for the services. and the videos in the Cloud can be playback
in the app.
2. Videos can be saved in the SD card:
(1). The videos of PIR activity
(2). The videos of live viewing
You could playback these videos.
3. Videos can be saved in the mobile phone album:
(1). The videos of REC mode
(2). The screenshot
You need to delete the videos of REC mode and the
screenshot from your phone's album.
2019-12-27 15:00:36
Online
2019-12-27 15:00:36
Online
More Settings
Common Settings
Click the common setting, you can choose the resolution to
SD(720P) or HD(1080P) by clicking ”Default resolution”.
You can turn on/off the notification alarm ring tone and vibration
for Andriod devices,this is not workable for iOS devices currently.
Frequently Asked Questions
We summarize the frequently questions here, you can get your
answers when pairing the camera or using the app.
2019-12-27 15:00:36
Online
28