Loading ...
Loading ...
Loading ...
is keyed to the yoke clamp stud, thus permitting the stud
to be rotated when the yoke clamp arm is loosened.
4. Loosen the yoke clamp arm, and with screwdriver or
arbor wrench, rotate the yoke clamp stud a small frac-
tion of a turn (clockwise when viewed from bottom), then
tighten the yoke clamp arm.
5. If the yoke clamp arm still does not line up parallel ta
the radial arm, !oosen it and again move the yoke clamp
stud. Continue this operation until the yoke clamp arm
is properly aligned when tightened.
6. Rotate the locking screw back into position to secure the
adjustment by preventing movement of index plate.
NOTE: It may be necessary to loosen the yoke
clamp arm so that end of lacking screw can
enter a notch of the index plate. This would alter
the arm adjustment slightly but not enough to
be of any consequence.
CARRIAGE
To test for looseness in the carriage, firmly grasp the car-
riage across the two carriage covers and apply a firm
rocking motion. Noticeable looseness may be adjusted L..
follows:
1. Remove the saw guard and blade.
2. Place a block of wood on saw table under the motor
and turn elevation crank until just the weight of motor
rests on the block.
3. Remove the right hand carriage cover by removing the
carriage lock knob and two attaching screws.
4. Loosen carriage bearing retainer nuts one or two turns.
(See figure 14.)
5. Using a 1/8-inch Allen wrench, rotate the two socket-
head set-screws inward (clockwise) a fraction of a turn.
NOTE: If all carriage side play is removed by
tightening the set-screws, when the carriage
bearing retainer nuts are tightened, the car-
riage bearings may bind on the track. This
adjustment should be made, by alternately
adjusting the set-screws and carriage bearing
retainer nuts, until all side play is removed and
the carriage moves with only very slight re-
sistance.
6. Install right-hand carriage cover and carriage lock knob.
PROPER OPERATING
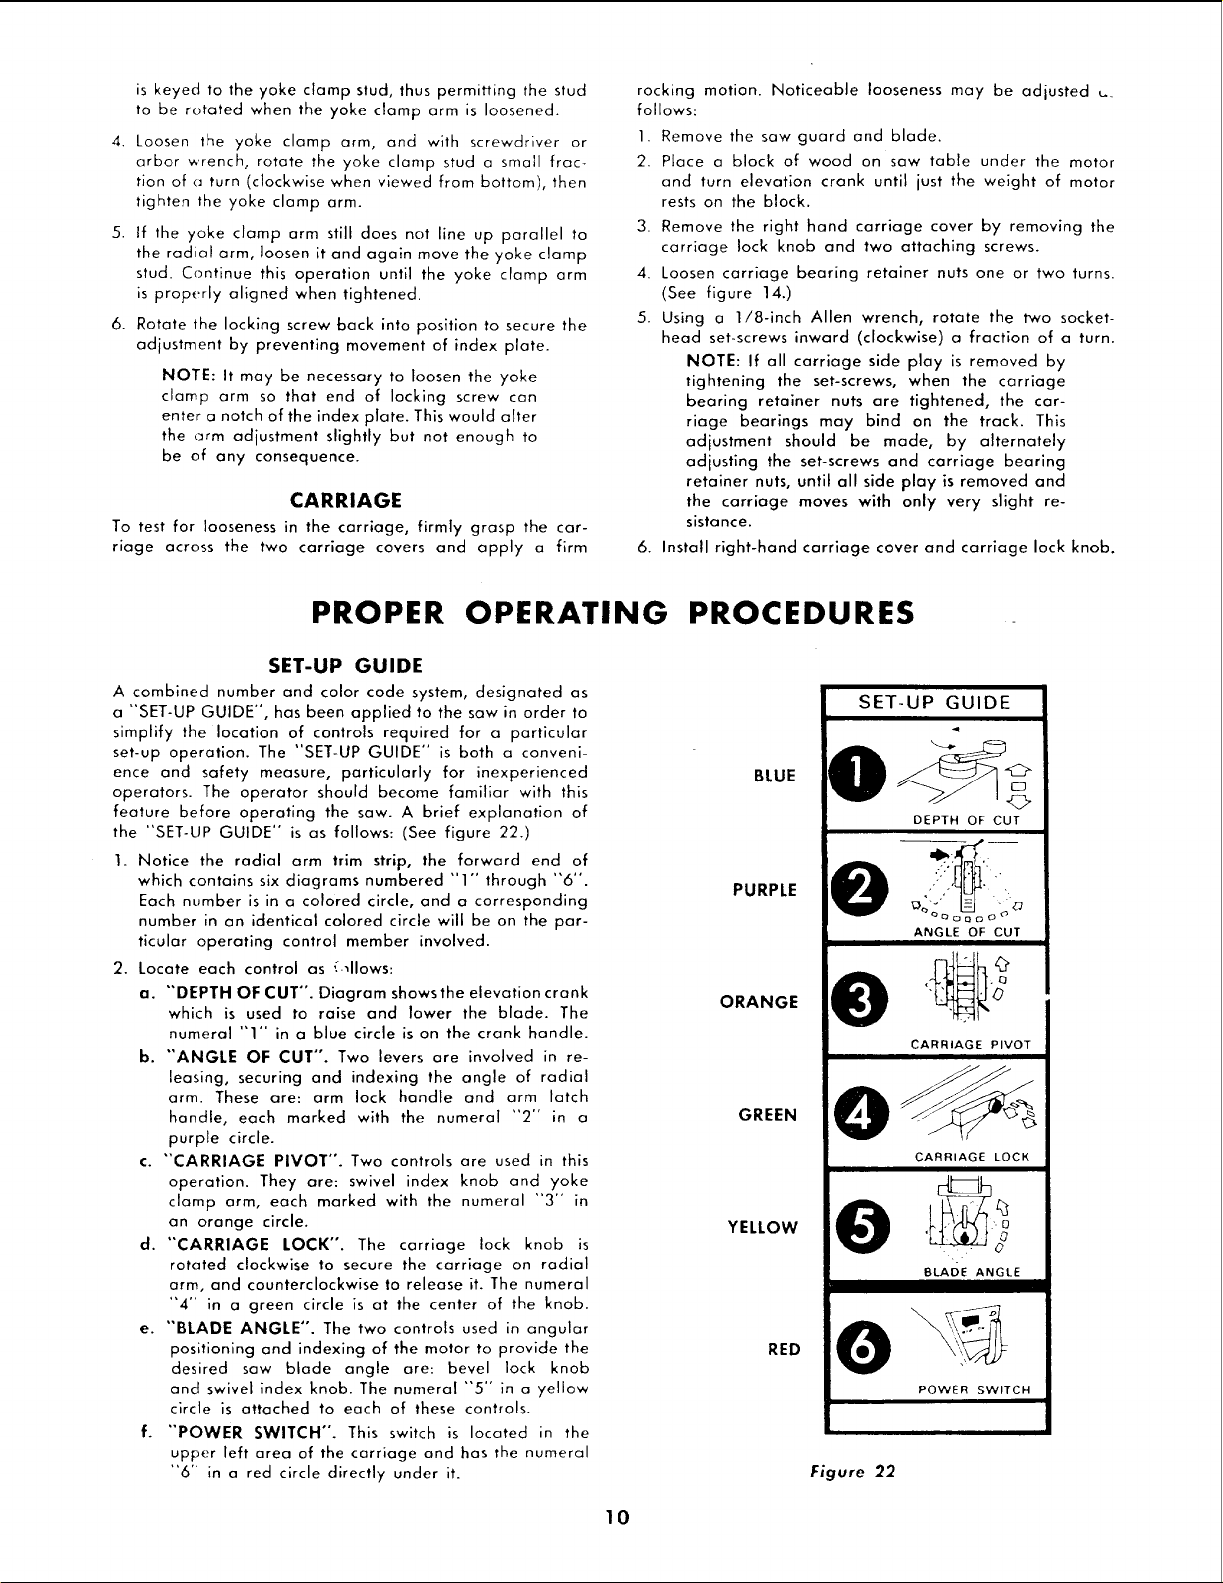
SET-UP GUIDE
A combined number and color code system, designated as
a "SET-UP GUIDE", has been applied to the saw in order to
simplify the location of controls required for a particular
set-up operation. The "SET-UP GUIDE" is both a conveni-
ence and safety measure, particularly for inexperienced
operators. The operator should become familiar with this
feature before operating the saw. A brief explanation of
the "SET-UP GUIDE" is as follows: (See figure 22.)
1. Notice the radial arm trim strip, the forward end of
which contains six diagrams numbered "'1 "° through "6".
Each number is in a colored circle, and a corresponding
number in an identical colored circle will be on the par-
ticular operating control member involved.
2. Locate each control as _.qlows:
a. "'DEPTH OF CUT". Diagram shows the elevation crank
which is used to raise and lower the blade. The
numeral "1" in a blue circle is on the crank handle.
b. "'ANGLE OF CUT". Two levers are involved in re-
leasing, securing and indexing the angle of radial
arm. These are: arm lock handle and arm latch
handle, each marked with the numeral "2" in a
purple circle.
c. "CARRIAGE PIVOT". Two controls are used in this
operation. They are: swivel index knob and yoke
clamp arm, each marked with the numeral "3" in
an orange circle.
d. "CARRIAGE LOCK". The carriage lock knob is
rotated clockwise to secure the carriage on radial
arm, and counterclockwise to release it. The numeral
"4" in a green circle is at the center of the knob.
e. "'BLADE ANGLE". The two controls used in angular
positioning and indexing of the motor to provide the
desired saw blade angle are: bevel lock knob
and swivel index knob. The numeral "'5" in a ye!!ow
circle is attached to each of these controls.
f. "'POWER SWITCH". This switch is located in the
upper left area of the carriage and has the numeral
"6 '_ in a red circle directly under it.
PROCEDURES
BLUE
PURPLE
ORANGE
GREEN
YELLOW
RED
SET-UP GUIDE
ANGLE OF CUT
CARRIAGE PIVOT
O
CARRIAGE LOCK
BLADE ANGLE
Figure 22
10
Loading ...
Loading ...
Loading ...