Loading ...
Loading ...
Loading ...
Whenfullyinsertedtheshelf/trayshouldnotinterfere
with the closed oven door.
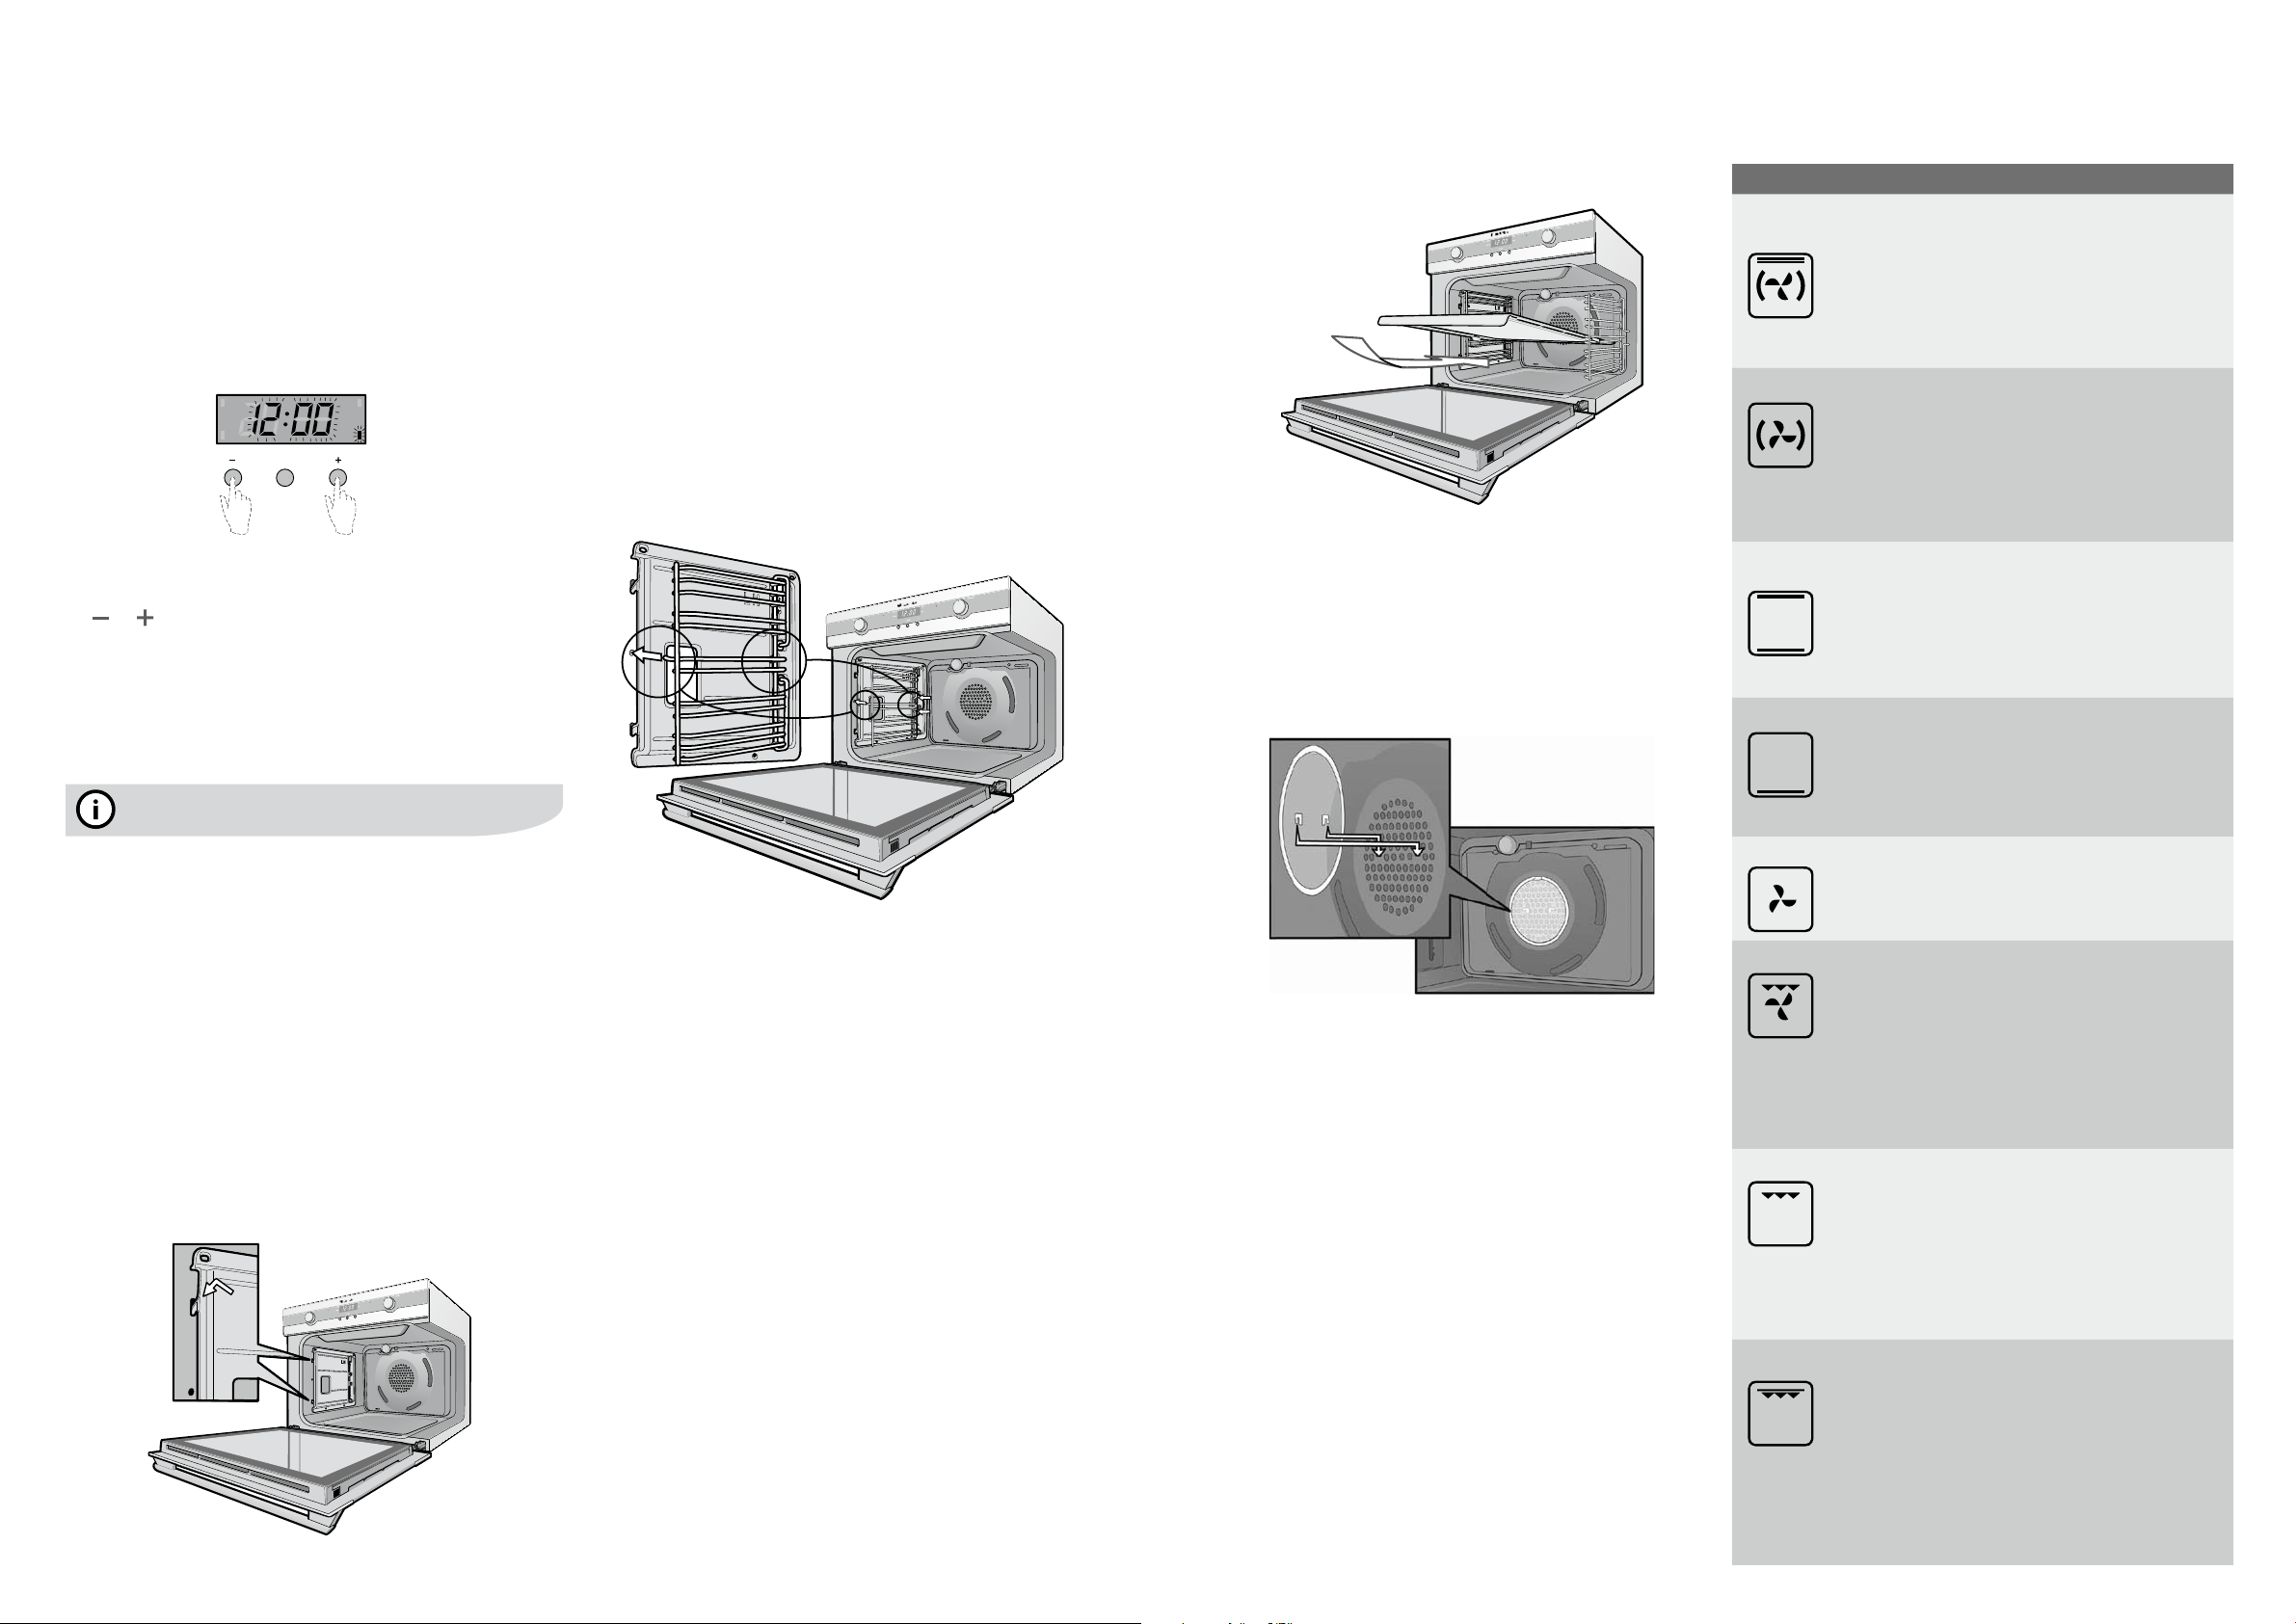
• Fatlter
The fat filter is designed to go onto the front of the fan
coverattherearoftheoven.Whenfullyengagedthe
filter will be positioned in the centre of the fan cover.
1. Locate the mounting slots in the fan cover and the
corresponding tags on the fat filter.
2. Position the fat fiter onto the fan cover with the tags
pointing down.
3. Push the fat filter down into position.
6 before using your rotary control oven electrolux e:line ovens electrolux e:line ovens cooking functions – rotary control oven 7
function description
Rapid
heat
Heat comes from the element surrounding the fan
as well as the smaller element above the food. This
allows you to preheat your oven 30% quicker than
onstandard‘Bake’.‘RapidHeat’isidealforcooking
frozenpre-cookedfoodssuchassavourypastries,
pizzas,minimeals(TVdinners),meatpiesandfruit
pies. Simply place the food in the oven straight from
thefreezerandheat.Cookintheupperhalfofthe
oven for best results.
Fancook
Heat comes from the element surrounding the fan.
This fan circulates the hot air around the oven cavity
so that you can put your food in different places in the
oven and still cook them at the same time. You can use
‘Fancook’functionformulti-shelfcooking,reheating
cookedfoods,pastriesandcompleteovenmeals.It
will cook at a lower temperature and be faster than
baking. Please note that some variation in browning
is normal.
Bake/
pizza
Heat comes from two elements, one above and one
below the food. The bottom element is a clean heat
elementandisbelowtheooroftheoven.Both
elements are controlled by the thermostat and will turn
on and off to maintain set temperature. You can use
the‘Bake/pizza’functionforsingletraysofbiscuits,
scones, muffins, cakes, slices, casseroles, baked
puddings, roasts and delicate egg dishes.
Pastry
Heat comes from the clean heat element below the
food. The element is controlled by the thermostat and
will turn on and off to maintain the set temperature.
The‘Pastry’functioncanbeusedtoaddextra
browningtothebasesofpizzas,pies,andpastries.
Cook in the lower half of the oven when you are using
only one shelf.
Defrost
The‘Defrost’functionuseslowtemperatureairthat
is circulated by the fan. You can defrost (thaw) your
foodbeforeyoucookit.Youcanalsouse‘Defrost’
to raise your yeast dough and to dry fruit, vegetables
and herbs.
Fangrill
‘FanGrill’offersyouthebenetsofboth‘Bake’and
traditional‘Grill’functions.Thegrillelementturns
on and off to maintain set temperature while the fan
circulates the heated air. The oven door remains
closedforfangrill.Youcanuse‘FanGrill’forlarge
cuts of meat, which gives you a result that is similar to
‘rotisserie’cookedmeat.Putyourfoodonashelfin
the second lowest shelf position. Put you grill dish on
thelowestshelftocatchanyspills.Whenusing“Fan
Grill’itisnotnecessarytoturnfoodoverduringthe
cooking cycle. Set temperature to 180°C.
Grill
‘Grill’functiondirectsradiantheatfromthepowerful
upper element onto the food. You can use the
‘Grill’functionfortendercutsofmeatsteak,chops,
sausages, fish, cheese toasties and other quick
cooking foods. Grill with the oven door closed.
Preheat your grill for 3 minutes to get the best results.
Thiswillhelpsealinthenaturaljuicesofsteak,chops
etcforbetteravour.Youcanslideyourgrilldish
into either of the 2 spaces within the uppers pairs of
support rails.
Maxigrill
‘MaxiGrill’directsradiantheatfrom2powerfulupper
elementsontothefood.Youcanusethe‘MaxiGrill’
function for tender cuts of meat, steak, chops,
sausages, fish, cheese toasties and other quick
cooking foods. Grill with the oven door closed. ‘Maxi
Grill’allowsyoutotakefulladvantageofthelargegrill
dishareaandwillcookfasterthannormal‘Grill’.For
best results it is recommended to preheat your grill
for3minutes.Thiswillhelpsealinthenaturaljuicesof
steak,chopsetcforabetteravour.Youcanslideyour
grill dish into either of the 2 spaces within the upper
pairs of support rails.
Preparing your oven
1. Pleaseremoveallstickers,leaetsandboxesfromthe
doorandfromtheooroftheovenbeforeoperation.
2. Please wipe out the oven interior prior to operation with
warm soapy water and polish dry with a soft clean cloth.
Do not close the oven door until the oven is completely dry.
Setting the time
Afterelectricallyconnectingtheappliance,youmustset
the time of day before you can operate your oven.
• Aftertheappliancehasbeenelectricallyconnected‘12:00’
willbedisplayedandtheclock‘indicator’willash.
• Tosetthetimeofdayinhoursandminutespressthe
or buttons.
5secondsafterthelastchange,theclock‘indicator’will
disappear, confirming the time has been set. Once the time
has been entered, the clock advances minute by minute.
Note:
tips and information
Newappliancescanhaveasmellduringrstuse.Itis
recommendedto‘runin’theovenbeforeyoucookfor
the first time. Operate the oven, empty, at a temperature
of180°Cforapproximately2-4hours(seepage8for
operating sequence). Please ensure the room is well
ventilated during this process.
Installing your oven accessories
• Catalyticliners
Theovenwillalreadybettedwithacatalyticfanbafe
andtoppanel.Wehavesuppliedsidepanelsforyou
to fit. They can be fitted before you put the side racks
on but you can omit them, if you wish, with no effect to
cooking performance. Their sole purpose is to make
oven cleaning easier. Of course, you can add them at
any time by removing the side racks (see page 22).
The catalytic liners will attach to each side of the oven.
There will be a left hand and a right hand version.
1. Position the first liner as per the diagram. The black,
shiny side of the liner should be facing the oven wall,
thehookspointingdown.Notethatthediagram
shows the left hand liner. The right hand side will be
a mirror image of this.
2. Line the hooks up with the slots provided in the oven
wall, push them in and then allow the liner to slide
down to its final position. All 4 hooks MUST be
engaged in slots.
3. The access hole for the side racks should be visible
when the liner is correctly positioned – see diagram.
• Sideracks
1.Insertthetwinpeggedsideintotherearaccess
holes provided.
2. Then locate the front peg into the front access hole
and push in firmly.
• Shelvesandtrays
The shelves are designed so that they have maximum
extension but cannot be accidentally pulled right out.
The trays are designed the same way and slot straight
into the side racks.
Totashelfortraytosideracks:
1.Locatetherearedgeoftheshelf/trayinbetween
2 guide rails of the side rack – see diagram. Ensure
the same rail positions on both sides of the oven are
being engaged.
2.Withthefrontedgeraised,begintoslidetheshelfinto
the oven.
3. Once the detents have passed the front edge of the
side rack, the shelf can be pushed completely in.
Beforeusingyourrotarycontrolor
touch oven
cook time
end time
MODE
timer
clock
Cooking functions – rotary control oven
Loading ...
Loading ...
Loading ...