user manual
e:line built in ovens
(EOEM61CS, EOEE62CS, EOEE62CK,
EOEE63CS, EPEE63CS, EPEE63CK,
EUEE63CS, EUEE63CK, EDEE63CS)
2 contents electrolux e:line ovens
These warnings have been provided in the interest of
safety. You MUST read them carefully before installing or
using the appliance.
The symbols you will see in this booklet have these meanings:
warning
This symbol indicates information concerning your
personal safety
This symbol indicates tips and information about use
of the oven
environmental tip
This symbol indicates tips and information about
economical and ecological use of the oven
Installation, cleaning and servicing
• Anauthorisedpersonmustinstallthisappliance.
(Certificate of Compliance to be retained)
• Beforeusingtheappliance,ensurethatallpacking
materials are removed from the appliance.
• Inordertoavoidanypotentialhazard,theenclosed
installation instructions must be followed.
• Ensurethatallspeciedvents,openingsandairspaces
are not blocked.
• Wheretheapplianceisbuiltintoacabinet,thecabinet
material must be capable of withstanding 70°C.
Ifadjacenttovinyl-wrappedsurfaces,useinstallationkit
from vinyl wrap supplier.
• Onlyauthorisedpersonnelshouldcarryoutservicing.
(Certificate of Compliance to be retained)
• Alwaysensuretheapplianceisswitchedoffbefore
cleaning or replacing parts.
• Donotusesteamcleaners,asthismaycausemoisture
build-up.
• Alwayscleantheapplianceimmediatelyafteranyfoodspills.
• Thisappliancemustbeearthed.
warning
Child safety
• Thisapplianceisnotintendedforusebypersons
(including children) with reduced physical, sensory
or mental capabilities, or lack of experience and
knowledge, unless they have been given supervision or
instruction concerning use of the appliance by a person
responsible for their safety.
• Childrenshouldbesupervisedtoensurethattheydo
not play with the appliance.
• Duringusethisappliancebecomeshot.Careshould
be taken to avoid touching hot surfaces, e.g. oven door,
heating elements.
• Accessiblepartswillalsobecomehotwheninuse.
To avoid burns and scalds children should be kept away.
ImportantsafetyinstructionsCongratulations
electrolux e:line ovens important safety instructions 3
warning
General warnings
• Thisappliancemustnotbeusedasaspaceheater.
• Inordertoavoidre,theappliancemustbekeptclean
and vents kept unobstructed.
• Donotsprayaerosolswithinthevicinityoftheappliance
during operation.
• Donotstoreammablematerialsinorunderthe
appliance, e.g. aerosols.
• Donotlinethebottomoftheovenwithfoilorcookware.
• Alwaysusegloveswhenhandlinghotitemsinside
the oven.
• Alwaysturnthegrilloffimmediatelyafteruseasfatleft
behind may catch fire.
Grill
• Donotcoverthegrillinsertwithfoil,asfatlefttheremay
catch fire.
• Alwayskeepthegrilldishcleanasanyfattheremay
catch fire.
• Donotleavethegrillonunattended.
• Toavoidre,ensurethatgrilltraysandttingsarealways
inserted into the appliance in accordance with the
instructions.
• Donotplacethickportionsoffoodunderthegrill.
Foods may curl, catch and ignite.
• Accessiblepartsmaybecomehotwhengrillisinuse.
Children should be kept away.
Oven
• Duringusetheappliancebecomeshot.Careshouldbe
taken to avoid touching the hot surfaces inside the oven.
• Switchtheapplianceoffbeforeremovingtheovenlight
glass for globe replacement.
• Toavoidanaccident,ensurethatovenshelvesand
fittings are always inserted into the appliance in
accordance with the instructions.
• Donotusethedoorasashelf.
• Donotpushdownontheopenovendoor.
warning
To maintain safe operation, it is recommended that
the product be inspected every five years by an
authorisedserviceperson.
environmental tip
To save energy and to help protect the environment,
we recommend these hints:
• Usetheovenefciently,bycookingmanytraysoffood
at the same time.
– Cook 2 trays of scones, small cakes or sausage rolls
at the same time.
• Selectthecorrectshelflocationforfoodbeingcooked.
• Donotopentheovendoormorethannecessary.
• Usethesmallerovencavity(ifyouhaveanEUEE63CS&
EUEE63CK) in preference to the main oven cavity.
tips and information
environmental tip
Informationondisposalforusers
•Mostofthepackingmaterialsarerecyclable.Pleasedispose
of those materials through your local recycling depot or
by placing them in appropriate collection containers.
•Ifyouwishtodiscardthisproduct,pleasecontactyourlocal
authorities and ask for the correct method of disposal.
Congratulations and thank you for choosing our built in
oven.Wearesureyouwillndyournewovenapleasure
touse.Beforeyouusetheoven,werecommendthatyou
read through the whole user manual, which provides the
description of the built in oven and its functions.
To avoid the risks that are always present when you use an
electric appliance, it is important that the oven is installed
correctly and that you read the safety instructions carefully
toavoidmisuseandhazards.
Werecommendthatyoukeepthisusermanualforfuture
reference and pass it on to any future owners.
Afterunpackingthebuiltinovenpleasecheckitisnot
damaged.Ifindoubt,donotusetheappliancebutcontact
your local Electrolux Customer Care Centre.
ThisappliancecomplieswithrequirementsofAustralian
StandardAS/NZ60335.2.6
Contents
•Importantsafetyinstructions 3
•Rotarycontroloven 4
•Electroniccontroloven 4
•Electronictouchcontroloven 4
•Rotarycontrolpanel 5
•Electroniccontrolpanel 5
•Electronictouchcontrolpanel 5
•Beforeusingyourrotarycontroloven 6
•Cookingfunctions– rotary control oven 7
•Operatingsequence– rotary control oven 8
•Cookingwiththetimer– rotary control oven 9
•Beforeusingyourelectroniccontroloven 10
•Cookingfunctions–electronicoven&touchcontrol 12
•Operatingsequence– electronic control oven 14
•Cookingwiththetimer– electronic control oven 15
•Additionalfunctionality – electronic control oven 16
•Cookingguide 17
•Grillingguide 19
•Dealingwithcookingproblems 20
•Gettoknowyouroven 21
•Maintenanceandcleaning 22
•Cleaningyouraccessories 22
•Replacingtheoventoplight
– EPEE63CK, EPEE63CS 23
•Catalyticselfcleaningpanels 24
•Ovendoorremoval 25
•Cleaningthepyrolyticoven 28
•Cleaningthepyrolyticovendoor 29
•Operatingconditions/energytips/inclusions 30
•Troubleshooting 31
•Installation 32
•Technicalspecications 34
•Hardwiringdetails 35
•Warranty 37
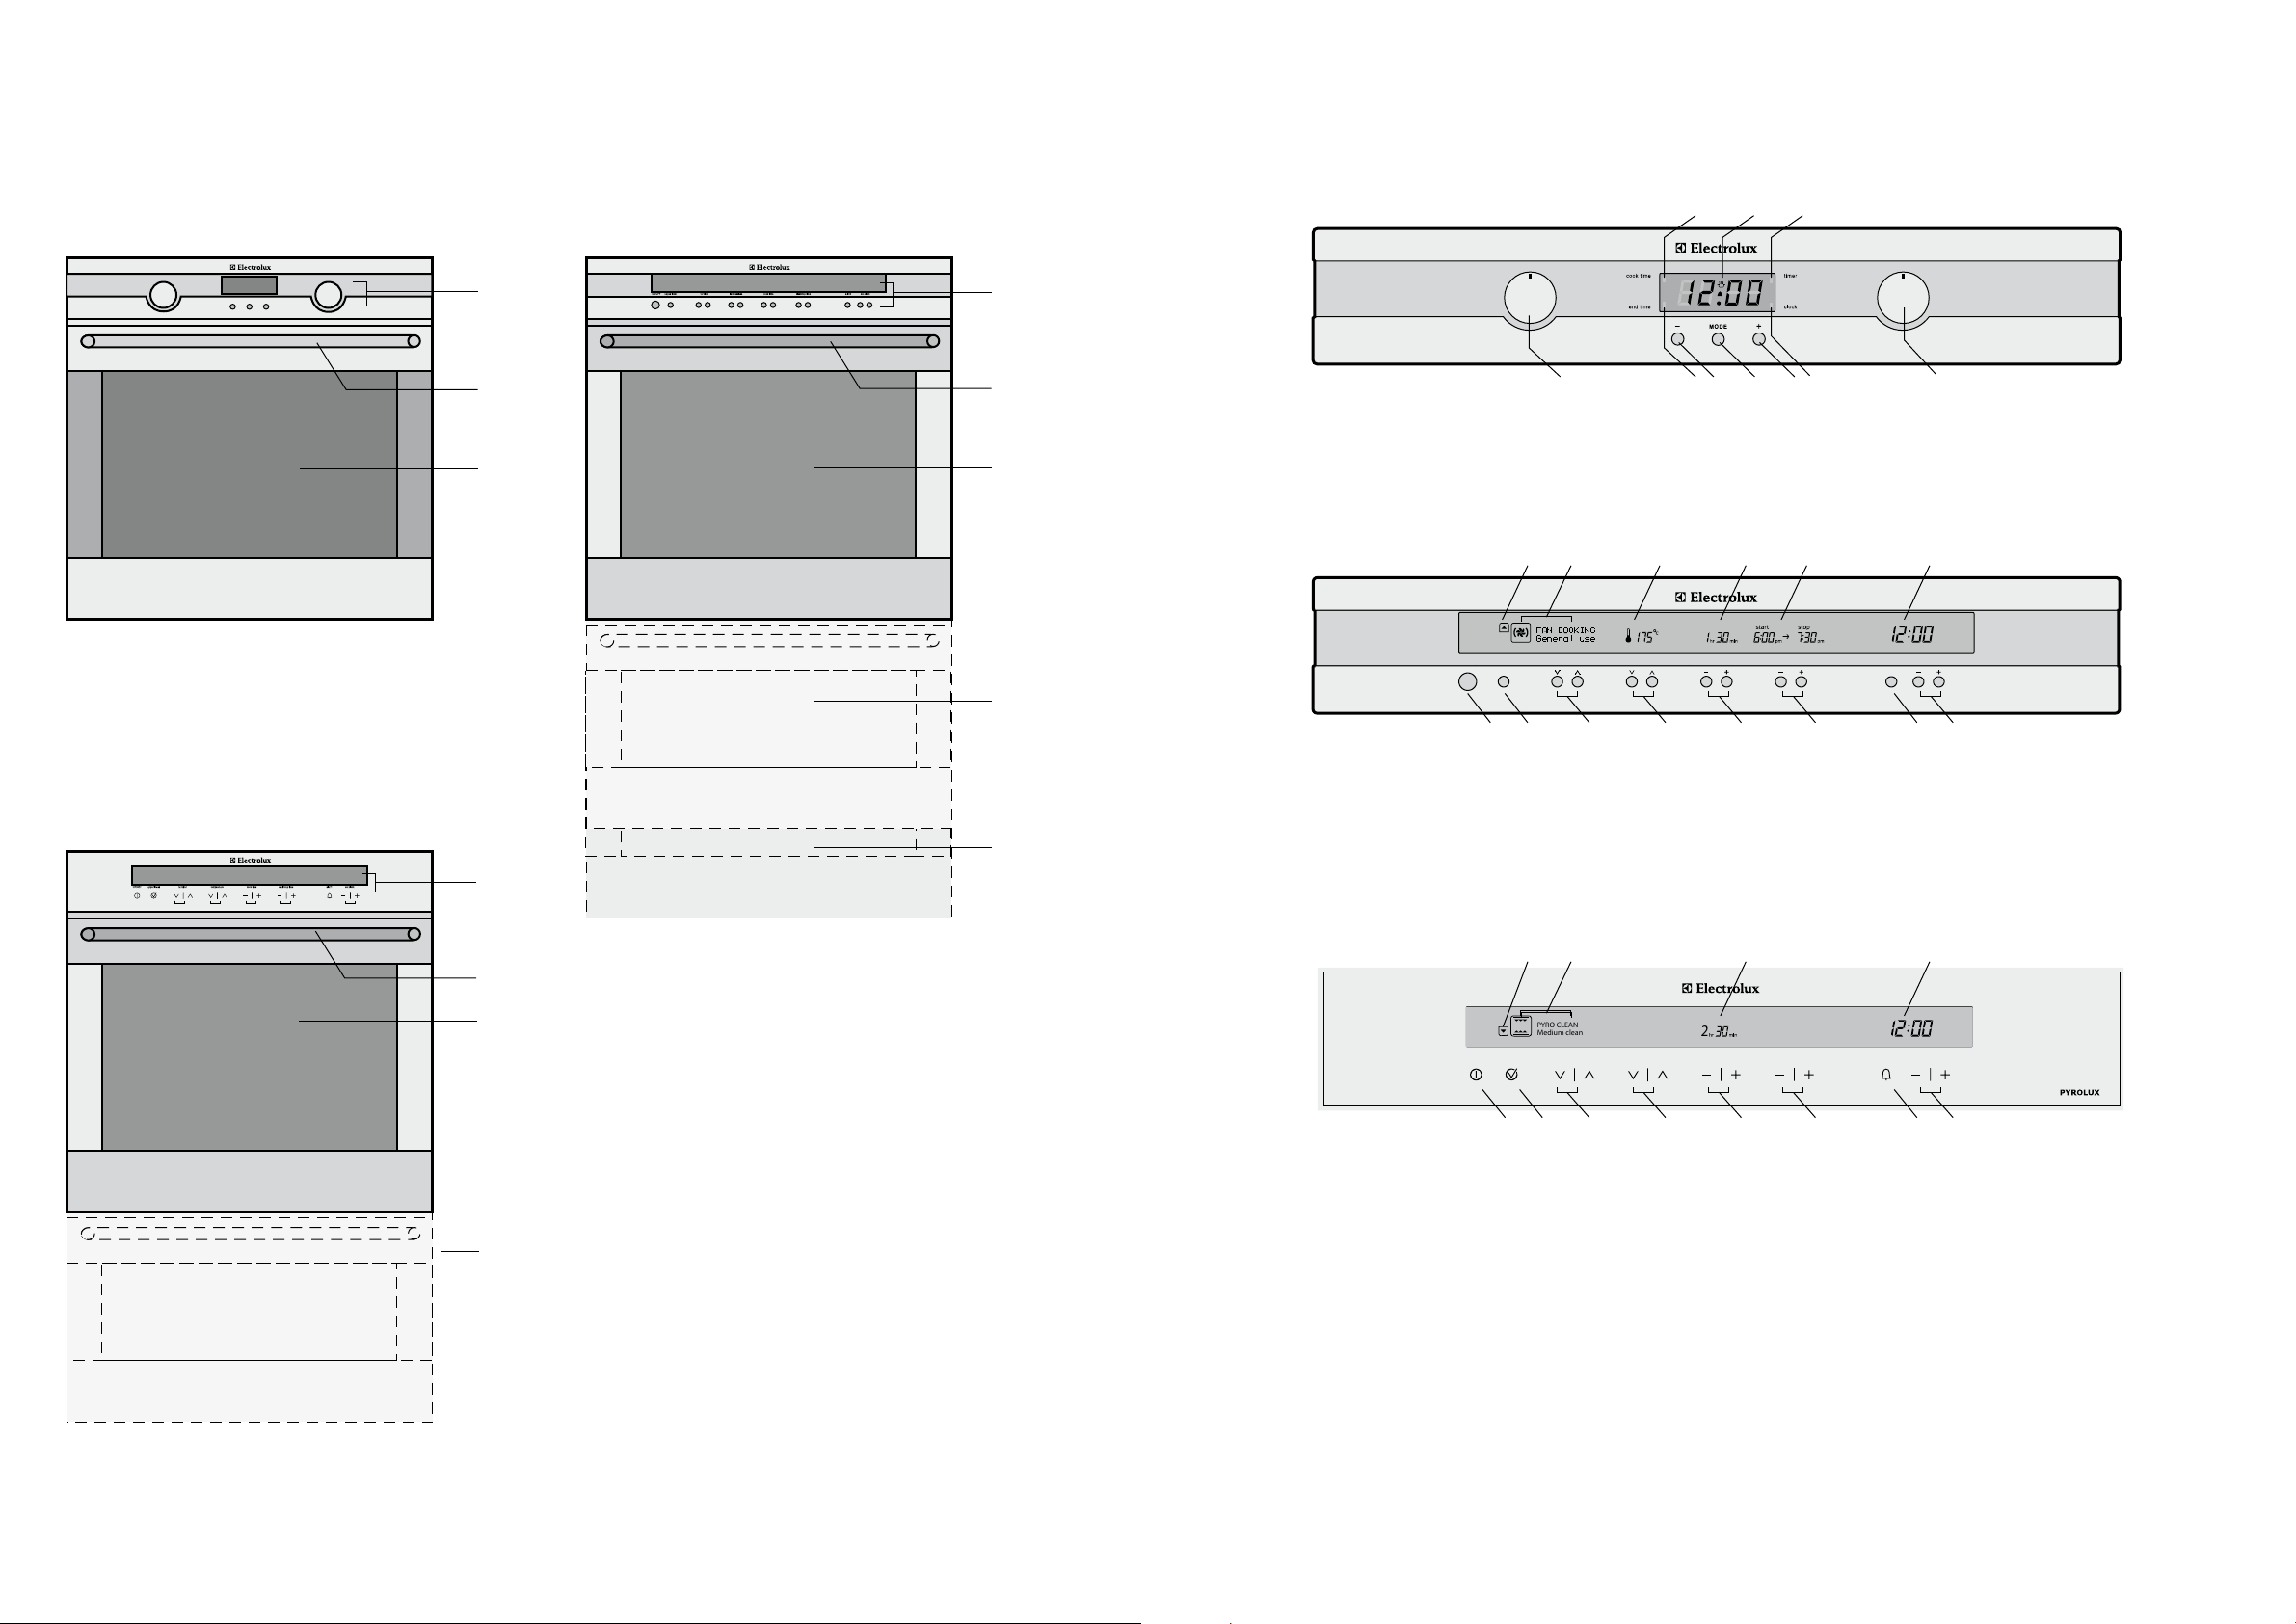
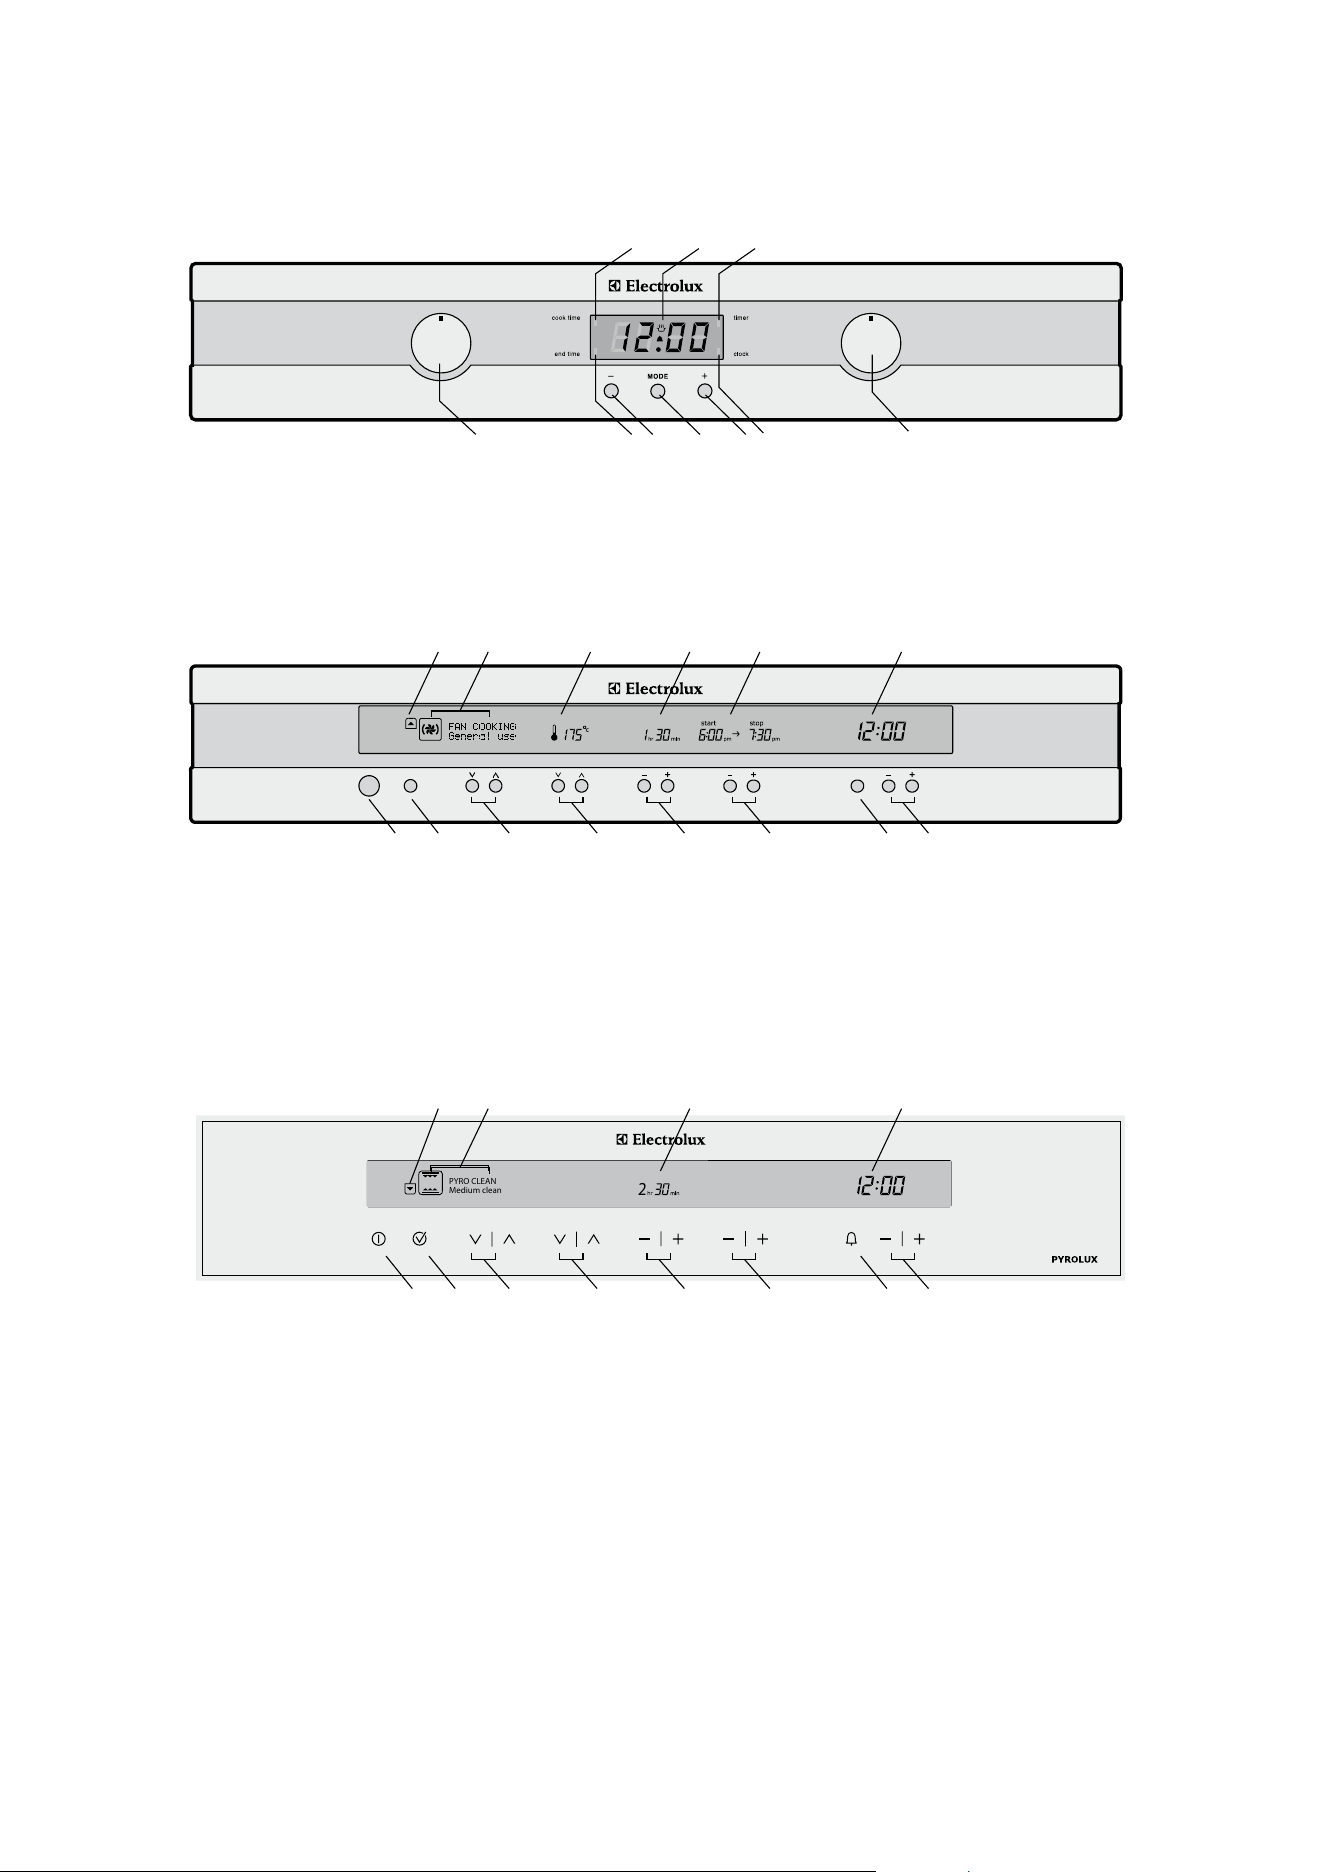
electrolux e:line ovenscontrolpanel54 oven controls electrolux e:line ovens
Rotary control ovens
(EOEM61CS)
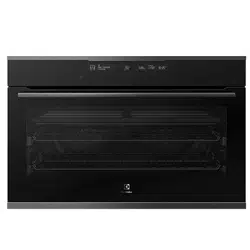
Electronic touch control ovens
(EOEE62CK, EPEE63CK, EUEE63CK)
1
2
3
1 Rotary control panel
2 Oven handle
3 Oven door
9 Electronic control panel
10 Oven handle
11 Oven door
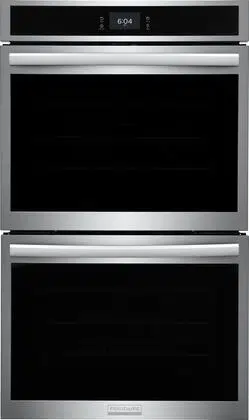
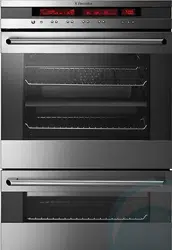
12 Duo oven (EUEE63CK only)
4
5
6
4 Electronic control panel
5 Oven handle
6 Oven door
7 Duo oven (EUEE63CS Only)
8 Double oven (EDEE63CS Only)
7
8
Electronic control ovens
(EOEE62CS, EOEE63CS, EPEE63CS, EUEE63CS, EDEE63CS)
Rotary control panel (EOEM61CS)
Electronic control panel (EOEE62CS, EOEE63CS, EPEE63CS, EUEE63CS, EDEE63CS)
Electronic touch control panel (EOEE62CK, EPEE63CK, EUEE63CK)
11 ON/OFFbutton
12 Upper/lowerovenselector
(EUEE63CS&EDEE63CS)
Pyro accept button
(EPEE63CS only)
13 Cooking function selectors
14 Temperature selectors
15 Cook time selectors
16 Start/stoptimeselectors
17 Timer button
18 Set clock buttons
19 Upper or lower oven display
20 Cooking function display
21 Temperature display
22 Cook time display
23 Start/stoptimedisplay
24 Clock
25 ON/OFFbutton
26 Upper/lowerovenselector
(EUEE63CK only)
Pyro accept button
(EPEE63CK only)
27 Cooking function selectors
28 Temperature selectors
29 Cook/Pyrocleantimeselector
30 Start/stoptimeselectors
31 Timer button
32 Set clock buttons
33 Pyro accept indicator
(EPEE63CK only)
34 Cooking function display
35 Cook time display
36 Clock
1 27 4 3 5 9
6 10 8
1 Oven function selector
2 Oven/grilltemperatureselector
3 Mode selector
4 Decrease time
5 Increasetime
6 Cook time indicator
7 End time indicator
8 Timer indicator
9 Clock indicator
10 Display
19 20 21 22 23 24
11 12 13 14 15 16 17 18
PYRO CLEAN
Medium clean
pyro accept
2
E
33 34 35 36
25 26 27 28 29 30 31 32
9
10
11
12
electrolux e:line ovenscontrolpanel54 oven controls electrolux e:line ovens
Rotary control ovens
(EOEM61CS)
Electronic touch control ovens
(EOEE62CK, EPEE63CK, EUEE63CK)
1
2
3
1 Rotary control panel
2 Oven handle
3 Oven door
9 Electronic control panel
10 Oven handle
11 Oven door
12 Duo oven (EUEE63CK only)
4
5
6
4 Electronic control panel
5 Oven handle
6 Oven door
7 Duo oven (EUEE63CS Only)
8 Double oven (EDEE63CS Only)
7
8
Electronic control ovens
(EOEE62CS, EOEE63CS, EPEE63CS, EUEE63CS, EDEE63CS)
Rotary control panel (EOEM61CS)
Electronic control panel (EOEE62CS, EOEE63CS, EPEE63CS, EUEE63CS, EDEE63CS)
Electronic touch control panel (EOEE62CK, EPEE63CK, EUEE63CK)
11 ON/OFFbutton
12 Upper/lowerovenselector
(EUEE63CS&EDEE63CS)
Pyro accept button
(EPEE63CS only)
13 Cooking function selectors
14 Temperature selectors
15 Cook time selectors
16 Start/stoptimeselectors
17 Timer button
18 Set clock buttons
19 Upper or lower oven display
20 Cooking function display
21 Temperature display
22 Cook time display
23 Start/stoptimedisplay
24 Clock
25 ON/OFFbutton
26 Upper/lowerovenselector
(EUEE63CK only)
Pyro accept button
(EPEE63CK only)
27 Cooking function selectors
28 Temperature selectors
29 Cook/Pyrocleantimeselector
30 Start/stoptimeselectors
31 Timer button
32 Set clock buttons
33 Pyro accept indicator
(EPEE63CK only)
34 Cooking function display
35 Cook time display
36 Clock
1 27 4 3 5 9
6 10 8
1 Oven function selector
2 Oven/grilltemperatureselector
3 Mode selector
4 Decrease time
5 Increasetime
6 Cook time indicator
7 End time indicator
8 Timer indicator
9 Clock indicator
10 Display
19 20 21 22 23 24
11 12 13 14 15 16 17 18
PYRO CLEAN
Medium clean
pyro accept
2
E
33 34 35 36
25 26 27 28 29 30 31 32
9
10
11
12
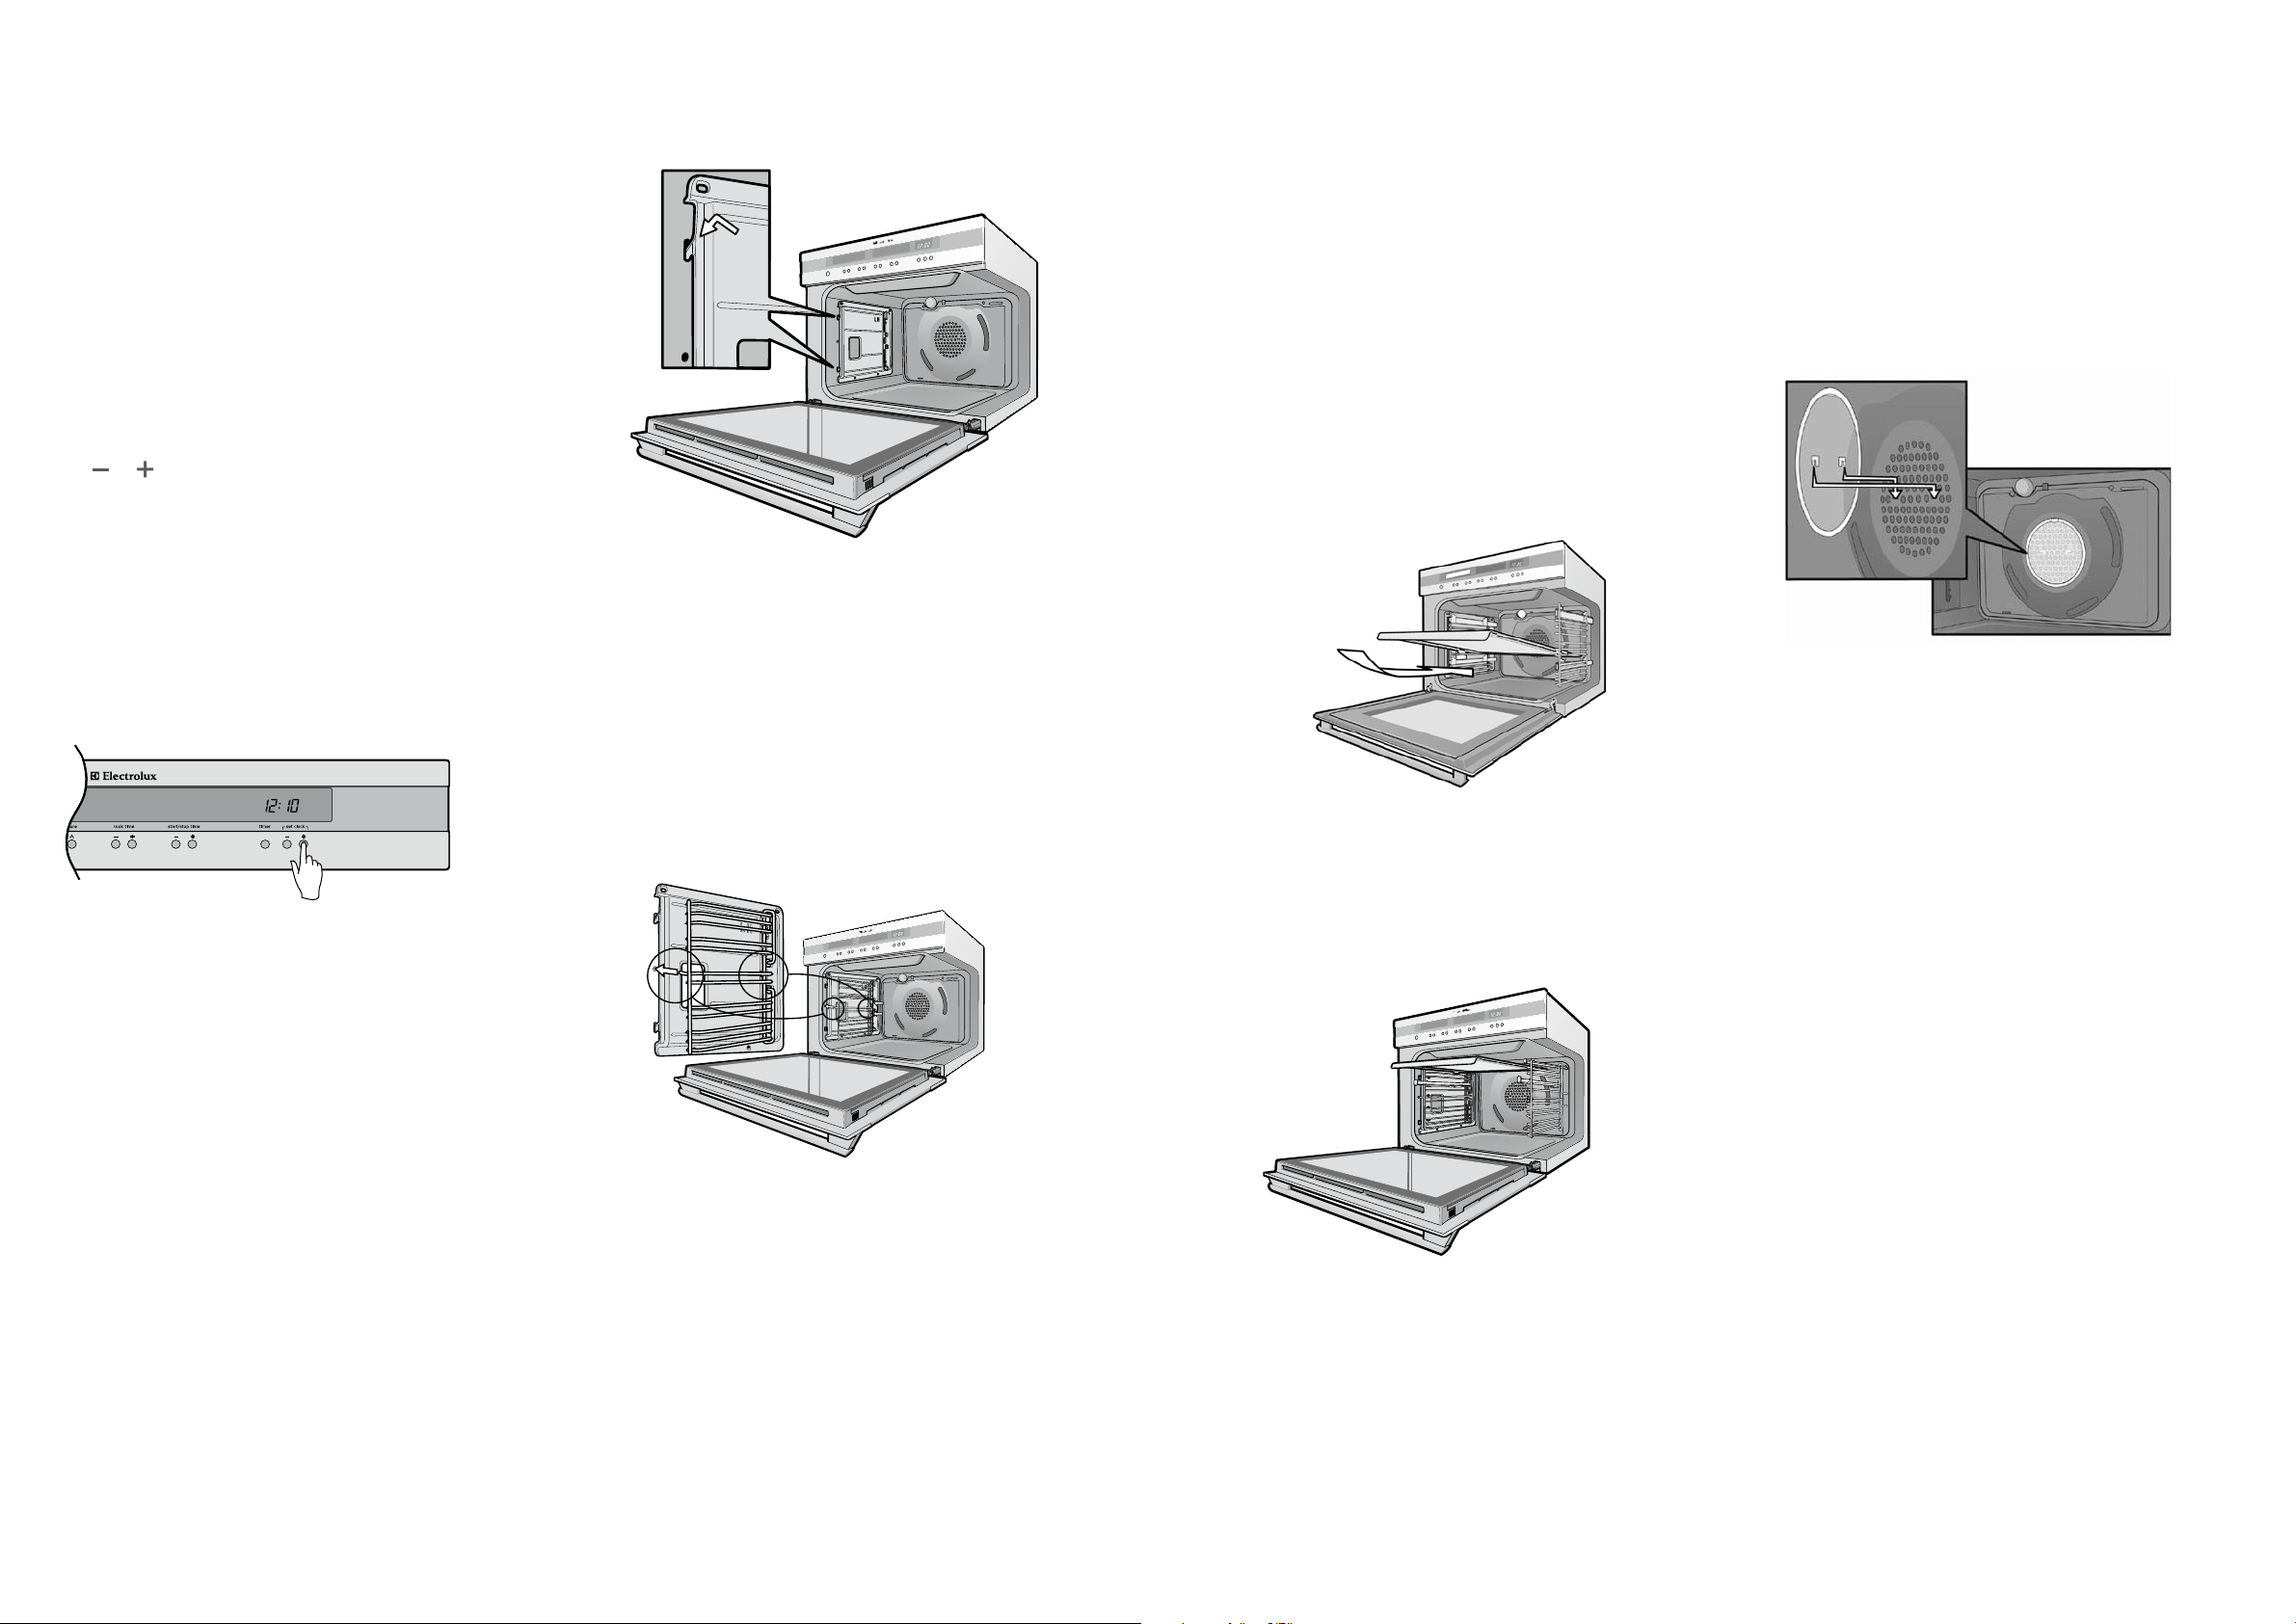
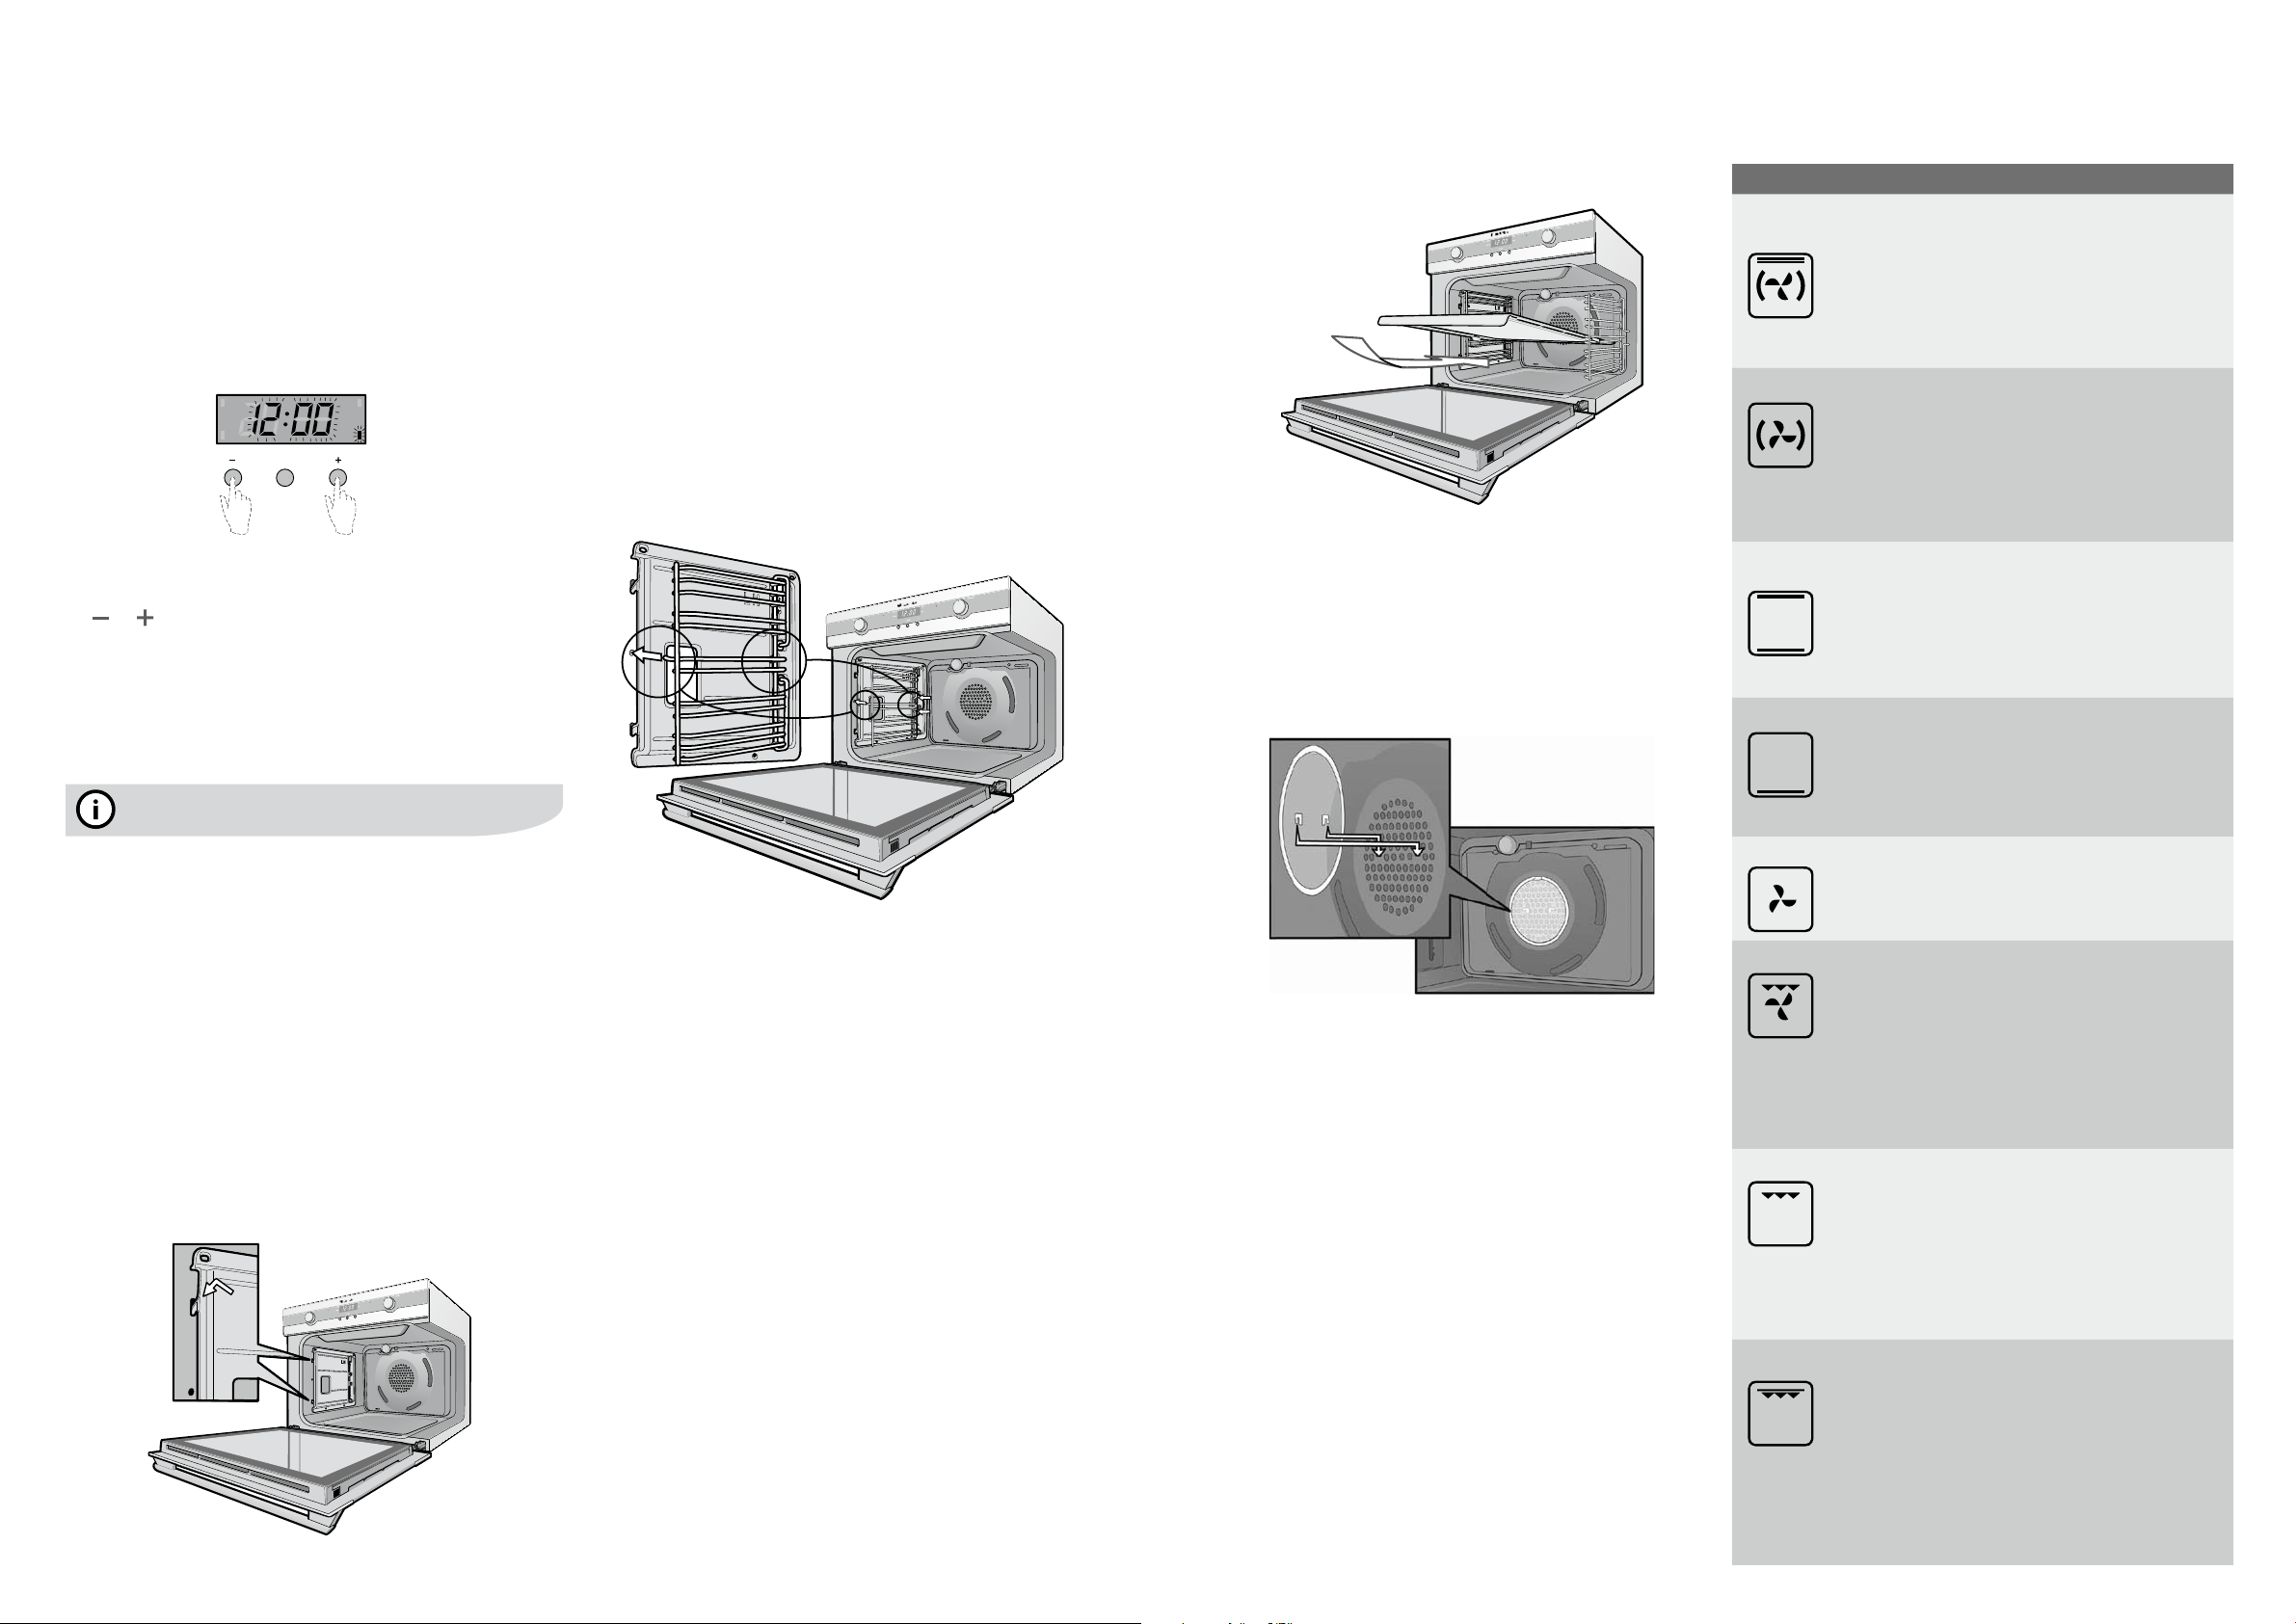
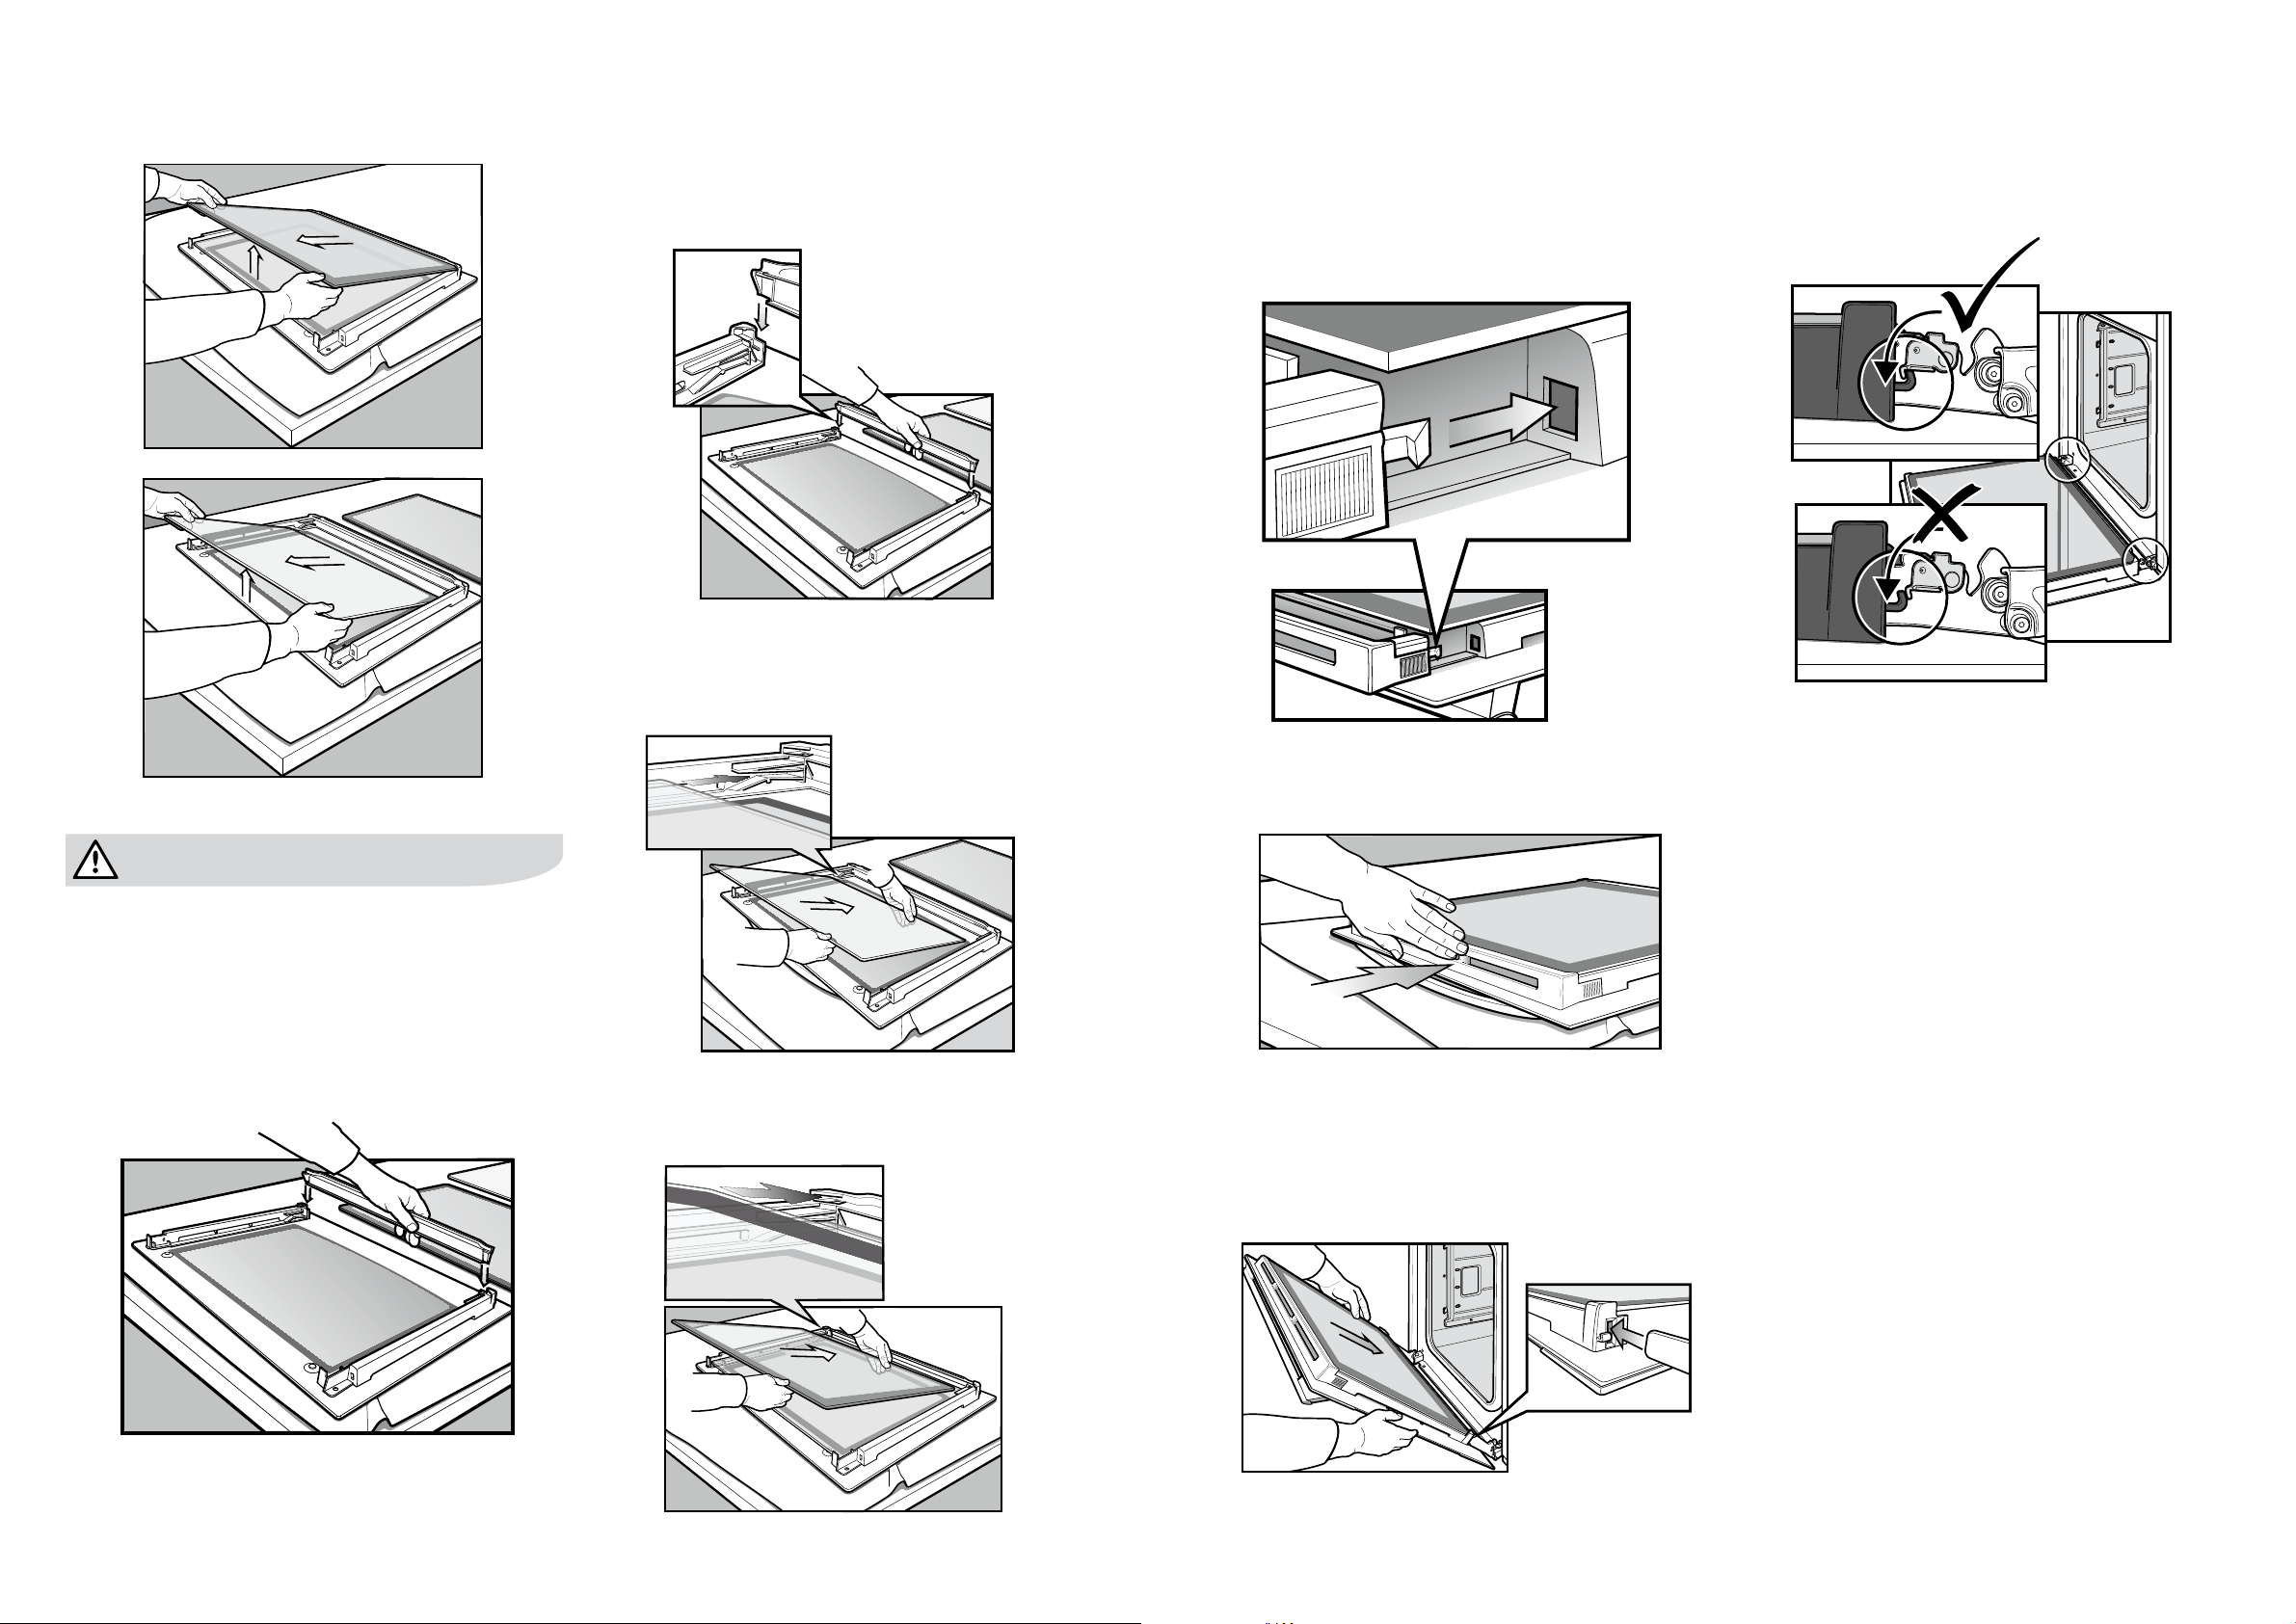
Whenfullyinsertedtheshelf/trayshouldnotinterfere
with the closed oven door.
• Fatlter
The fat filter is designed to go onto the front of the fan
coverattherearoftheoven.Whenfullyengagedthe
filter will be positioned in the centre of the fan cover.
1. Locate the mounting slots in the fan cover and the
corresponding tags on the fat filter.
2. Position the fat fiter onto the fan cover with the tags
pointing down.
3. Push the fat filter down into position.
6 before using your rotary control oven electrolux e:line ovens electrolux e:line ovens cooking functions – rotary control oven 7
function description
Rapid
heat
Heat comes from the element surrounding the fan
as well as the smaller element above the food. This
allows you to preheat your oven 30% quicker than
onstandard‘Bake’.‘RapidHeat’isidealforcooking
frozenpre-cookedfoodssuchassavourypastries,
pizzas,minimeals(TVdinners),meatpiesandfruit
pies. Simply place the food in the oven straight from
thefreezerandheat.Cookintheupperhalfofthe
oven for best results.
Fancook
Heat comes from the element surrounding the fan.
This fan circulates the hot air around the oven cavity
so that you can put your food in different places in the
oven and still cook them at the same time. You can use
‘Fancook’functionformulti-shelfcooking,reheating
cookedfoods,pastriesandcompleteovenmeals.It
will cook at a lower temperature and be faster than
baking. Please note that some variation in browning
is normal.
Bake/
pizza
Heat comes from two elements, one above and one
below the food. The bottom element is a clean heat
elementandisbelowtheooroftheoven.Both
elements are controlled by the thermostat and will turn
on and off to maintain set temperature. You can use
the‘Bake/pizza’functionforsingletraysofbiscuits,
scones, muffins, cakes, slices, casseroles, baked
puddings, roasts and delicate egg dishes.
Pastry
Heat comes from the clean heat element below the
food. The element is controlled by the thermostat and
will turn on and off to maintain the set temperature.
The‘Pastry’functioncanbeusedtoaddextra
browningtothebasesofpizzas,pies,andpastries.
Cook in the lower half of the oven when you are using
only one shelf.
Defrost
The‘Defrost’functionuseslowtemperatureairthat
is circulated by the fan. You can defrost (thaw) your
foodbeforeyoucookit.Youcanalsouse‘Defrost’
to raise your yeast dough and to dry fruit, vegetables
and herbs.
Fangrill
‘FanGrill’offersyouthebenetsofboth‘Bake’and
traditional‘Grill’functions.Thegrillelementturns
on and off to maintain set temperature while the fan
circulates the heated air. The oven door remains
closedforfangrill.Youcanuse‘FanGrill’forlarge
cuts of meat, which gives you a result that is similar to
‘rotisserie’cookedmeat.Putyourfoodonashelfin
the second lowest shelf position. Put you grill dish on
thelowestshelftocatchanyspills.Whenusing“Fan
Grill’itisnotnecessarytoturnfoodoverduringthe
cooking cycle. Set temperature to 180°C.
Grill
‘Grill’functiondirectsradiantheatfromthepowerful
upper element onto the food. You can use the
‘Grill’functionfortendercutsofmeatsteak,chops,
sausages, fish, cheese toasties and other quick
cooking foods. Grill with the oven door closed.
Preheat your grill for 3 minutes to get the best results.
Thiswillhelpsealinthenaturaljuicesofsteak,chops
etcforbetteravour.Youcanslideyourgrilldish
into either of the 2 spaces within the uppers pairs of
support rails.
Maxigrill
‘MaxiGrill’directsradiantheatfrom2powerfulupper
elementsontothefood.Youcanusethe‘MaxiGrill’
function for tender cuts of meat, steak, chops,
sausages, fish, cheese toasties and other quick
cooking foods. Grill with the oven door closed. ‘Maxi
Grill’allowsyoutotakefulladvantageofthelargegrill
dishareaandwillcookfasterthannormal‘Grill’.For
best results it is recommended to preheat your grill
for3minutes.Thiswillhelpsealinthenaturaljuicesof
steak,chopsetcforabetteravour.Youcanslideyour
grill dish into either of the 2 spaces within the upper
pairs of support rails.
Preparing your oven
1. Pleaseremoveallstickers,leaetsandboxesfromthe
doorandfromtheooroftheovenbeforeoperation.
2. Please wipe out the oven interior prior to operation with
warm soapy water and polish dry with a soft clean cloth.
Do not close the oven door until the oven is completely dry.
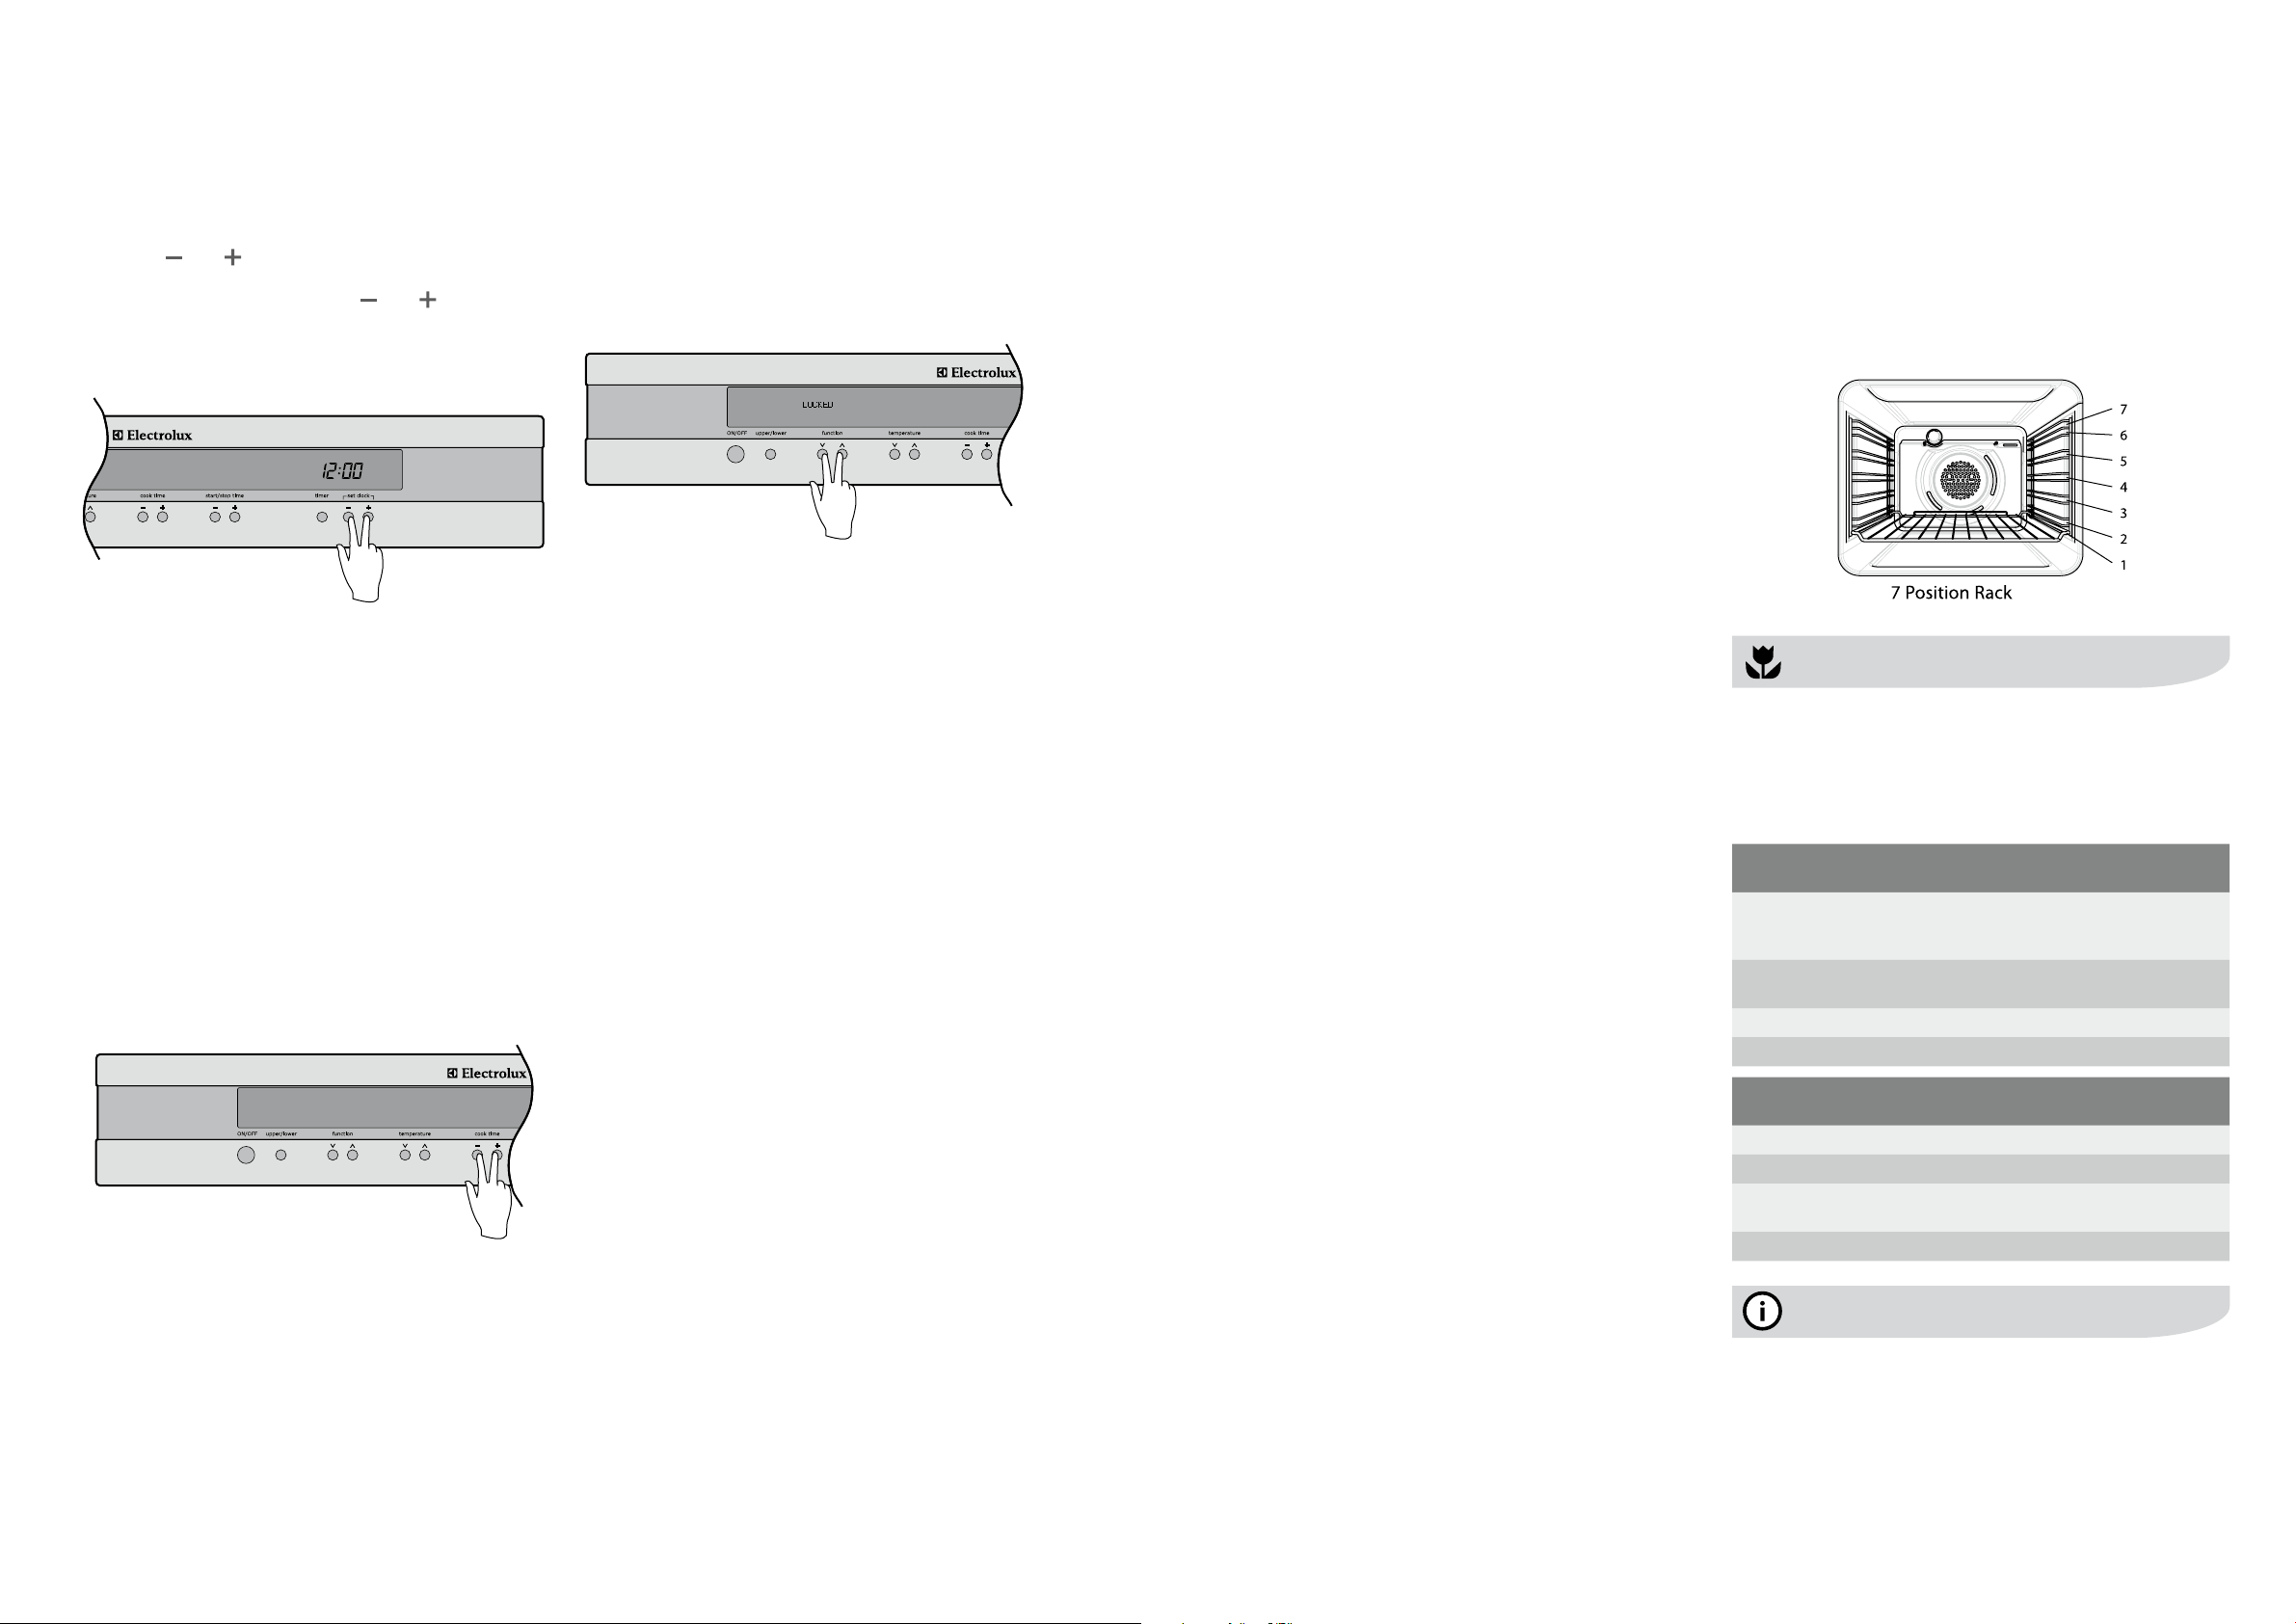
Setting the time
Afterelectricallyconnectingtheappliance,youmustset
the time of day before you can operate your oven.
• Aftertheappliancehasbeenelectricallyconnected‘12:00’
willbedisplayedandtheclock‘indicator’willash.
• Tosetthetimeofdayinhoursandminutespressthe
or buttons.
5secondsafterthelastchange,theclock‘indicator’will
disappear, confirming the time has been set. Once the time
has been entered, the clock advances minute by minute.
Note:
• Theclockhasa24hourdisplay.
tips and information
Newappliancescanhaveasmellduringrstuse.Itis
recommendedto‘runin’theovenbeforeyoucookfor
the first time. Operate the oven, empty, at a temperature
of180°Cforapproximately2-4hours(seepage8for
operating sequence). Please ensure the room is well
ventilated during this process.
Installing your oven accessories
• Catalyticliners
Theovenwillalreadybettedwithacatalyticfanbafe
andtoppanel.Wehavesuppliedsidepanelsforyou
to fit. They can be fitted before you put the side racks
on but you can omit them, if you wish, with no effect to
cooking performance. Their sole purpose is to make
oven cleaning easier. Of course, you can add them at
any time by removing the side racks (see page 22).
The catalytic liners will attach to each side of the oven.
There will be a left hand and a right hand version.
1. Position the first liner as per the diagram. The black,
shiny side of the liner should be facing the oven wall,
thehookspointingdown.Notethatthediagram
shows the left hand liner. The right hand side will be
a mirror image of this.
2. Line the hooks up with the slots provided in the oven
wall, push them in and then allow the liner to slide
down to its final position. All 4 hooks MUST be
engaged in slots.
3. The access hole for the side racks should be visible
when the liner is correctly positioned – see diagram.
• Sideracks
1.Insertthetwinpeggedsideintotherearaccess
holes provided.
2. Then locate the front peg into the front access hole
and push in firmly.
• Shelvesandtrays
The shelves are designed so that they have maximum
extension but cannot be accidentally pulled right out.
The trays are designed the same way and slot straight
into the side racks.
Totashelfortraytosideracks:
1.Locatetherearedgeoftheshelf/trayinbetween
2 guide rails of the side rack – see diagram. Ensure
the same rail positions on both sides of the oven are
being engaged.
2.Withthefrontedgeraised,begintoslidetheshelfinto
the oven.
3. Once the detents have passed the front edge of the
side rack, the shelf can be pushed completely in.
Beforeusingyourrotarycontrolor
touch oven
cook time
end time
MODE
timer
clock
Cooking functions – rotary control oven
Whenfullyinsertedtheshelf/trayshouldnotinterfere
with the closed oven door.
• Fatlter
The fat filter is designed to go onto the front of the fan
coverattherearoftheoven.Whenfullyengagedthe
filter will be positioned in the centre of the fan cover.
1. Locate the mounting slots in the fan cover and the
corresponding tags on the fat filter.
2. Position the fat fiter onto the fan cover with the tags
pointing down.
3. Push the fat filter down into position.
6 before using your rotary control oven electrolux e:line ovens electrolux e:line ovens cooking functions – rotary control oven 7
function description
Rapid
heat
Heat comes from the element surrounding the fan
as well as the smaller element above the food. This
allows you to preheat your oven 30% quicker than
onstandard‘Bake’.‘RapidHeat’isidealforcooking
frozenpre-cookedfoodssuchassavourypastries,
pizzas,minimeals(TVdinners),meatpiesandfruit
pies. Simply place the food in the oven straight from
thefreezerandheat.Cookintheupperhalfofthe
oven for best results.
Fancook
Heat comes from the element surrounding the fan.
This fan circulates the hot air around the oven cavity
so that you can put your food in different places in the
oven and still cook them at the same time. You can use
‘Fancook’functionformulti-shelfcooking,reheating
cookedfoods,pastriesandcompleteovenmeals.It
will cook at a lower temperature and be faster than
baking. Please note that some variation in browning
is normal.
Bake/
pizza
Heat comes from two elements, one above and one
below the food. The bottom element is a clean heat
elementandisbelowtheooroftheoven.Both
elements are controlled by the thermostat and will turn
on and off to maintain set temperature. You can use
the‘Bake/pizza’functionforsingletraysofbiscuits,
scones, muffins, cakes, slices, casseroles, baked
puddings, roasts and delicate egg dishes.
Pastry
Heat comes from the clean heat element below the
food. The element is controlled by the thermostat and
will turn on and off to maintain the set temperature.
The‘Pastry’functioncanbeusedtoaddextra
browningtothebasesofpizzas,pies,andpastries.
Cook in the lower half of the oven when you are using
only one shelf.
Defrost
The‘Defrost’functionuseslowtemperatureairthat
is circulated by the fan. You can defrost (thaw) your
foodbeforeyoucookit.Youcanalsouse‘Defrost’
to raise your yeast dough and to dry fruit, vegetables
and herbs.
Fangrill
‘FanGrill’offersyouthebenetsofboth‘Bake’and
traditional‘Grill’functions.Thegrillelementturns
on and off to maintain set temperature while the fan
circulates the heated air. The oven door remains
closedforfangrill.Youcanuse‘FanGrill’forlarge
cuts of meat, which gives you a result that is similar to
‘rotisserie’cookedmeat.Putyourfoodonashelfin
the second lowest shelf position. Put you grill dish on
thelowestshelftocatchanyspills.Whenusing“Fan
Grill’itisnotnecessarytoturnfoodoverduringthe
cooking cycle. Set temperature to 180°C.
Grill
‘Grill’functiondirectsradiantheatfromthepowerful
upper element onto the food. You can use the
‘Grill’functionfortendercutsofmeatsteak,chops,
sausages, fish, cheese toasties and other quick
cooking foods. Grill with the oven door closed.
Preheat your grill for 3 minutes to get the best results.
Thiswillhelpsealinthenaturaljuicesofsteak,chops
etcforbetteravour.Youcanslideyourgrilldish
into either of the 2 spaces within the uppers pairs of
support rails.
Maxigrill
‘MaxiGrill’directsradiantheatfrom2powerfulupper
elementsontothefood.Youcanusethe‘MaxiGrill’
function for tender cuts of meat, steak, chops,
sausages, fish, cheese toasties and other quick
cooking foods. Grill with the oven door closed. ‘Maxi
Grill’allowsyoutotakefulladvantageofthelargegrill
dishareaandwillcookfasterthannormal‘Grill’.For
best results it is recommended to preheat your grill
for3minutes.Thiswillhelpsealinthenaturaljuicesof
steak,chopsetcforabetteravour.Youcanslideyour
grill dish into either of the 2 spaces within the upper
pairs of support rails.
Preparing your oven
1. Pleaseremoveallstickers,leaetsandboxesfromthe
doorandfromtheooroftheovenbeforeoperation.
2. Please wipe out the oven interior prior to operation with
warm soapy water and polish dry with a soft clean cloth.
Do not close the oven door until the oven is completely dry.
Setting the time
Afterelectricallyconnectingtheappliance,youmustset
the time of day before you can operate your oven.
• Aftertheappliancehasbeenelectricallyconnected‘12:00’
willbedisplayedandtheclock‘indicator’willash.
• Tosetthetimeofdayinhoursandminutespressthe
or buttons.
5secondsafterthelastchange,theclock‘indicator’will
disappear, confirming the time has been set. Once the time
has been entered, the clock advances minute by minute.
Note:
• Theclockhasa24hourdisplay.
tips and information
Newappliancescanhaveasmellduringrstuse.Itis
recommendedto‘runin’theovenbeforeyoucookfor
the first time. Operate the oven, empty, at a temperature
of180°Cforapproximately2-4hours(seepage8for
operating sequence). Please ensure the room is well
ventilated during this process.
Installing your oven accessories
• Catalyticliners
Theovenwillalreadybettedwithacatalyticfanbafe
andtoppanel.Wehavesuppliedsidepanelsforyou
to fit. They can be fitted before you put the side racks
on but you can omit them, if you wish, with no effect to
cooking performance. Their sole purpose is to make
oven cleaning easier. Of course, you can add them at
any time by removing the side racks (see page 22).
The catalytic liners will attach to each side of the oven.
There will be a left hand and a right hand version.
1. Position the first liner as per the diagram. The black,
shiny side of the liner should be facing the oven wall,
thehookspointingdown.Notethatthediagram
shows the left hand liner. The right hand side will be
a mirror image of this.
2. Line the hooks up with the slots provided in the oven
wall, push them in and then allow the liner to slide
down to its final position. All 4 hooks MUST be
engaged in slots.
3. The access hole for the side racks should be visible
when the liner is correctly positioned – see diagram.
• Sideracks
1.Insertthetwinpeggedsideintotherearaccess
holes provided.
2. Then locate the front peg into the front access hole
and push in firmly.
• Shelvesandtrays
The shelves are designed so that they have maximum
extension but cannot be accidentally pulled right out.
The trays are designed the same way and slot straight
into the side racks.
Totashelfortraytosideracks:
1.Locatetherearedgeoftheshelf/trayinbetween
2 guide rails of the side rack – see diagram. Ensure
the same rail positions on both sides of the oven are
being engaged.
2.Withthefrontedgeraised,begintoslidetheshelfinto
the oven.
3. Once the detents have passed the front edge of the
side rack, the shelf can be pushed completely in.
Beforeusingyourrotarycontrolor
touch oven
cook time
end time
MODE
timer
clock
Cooking functions – rotary control oven
8 operating sequence – rotary control oven electrolux e:line ovens electrolux e:line ovens cooking with the timer – rotary control oven 9
Selectthecookingfunction
• Turnthefunctionselectorinanydirectiontothedesired
cooking function. The oven cavity light will come on.
Select the temperature
• Tosetthetemperature,turnthetemperatureselectorin
aclockwisedirectiontothedesiredsetting.Anindicator
light above the temperature selector will come on.
• Athermostatcontrolsthetemperatureinyourappliance.
Whenthetemperatureisreached,theheatingsource
switchesitselfoffandtheindicatorlightgoesout.When
the oven temperature falls below the desired setting,
the heating source switches on and the indicator light
comes on again.
• Oncethefoodiscooked,turnthetemperatureselector
backinananti-clockwisedirection.Donotforceitright
round in a clockwise direction as this will result in
damage to the thermostat.
Note:
• Thedesiredcookingfunctionmustbeselectedbefore
theovenwilloperate.
Temperature estimations
IfarecipecallsforFahrenheit(°F)ornoactual
temperatures, use the following table to determine the
temperature (°C).
oven temperature°C temperature°F
Low heat
Cool
Veryslow
Slow
80
100-110
130-140
175
210-230
265-285
Moderateheat
Moderately slow
Moderate
Moderately hot
150-160
170-180
190-200
300-320
340-355
375-390
Highheat
Hot
Veryhot
Extremely hot
200-210
220-230
240-250
390-410
430-450
465-480
Operating sequence –
rotary control oven
tips and information
Pre-heating
Forbestcookingresultsyoumustpre-heatyouroven
andgrill.Pre-heatingyourapplianceallowsittoreachthe
required temperature quickly and efficiently as well as cook
your food at the correct temperature for the entire cook time.
1.With‘RapidHeat’function
This function allows your oven to reach preset temperature
quicker than any other cooking function. Turn the function
selectorto‘RapidHeat’,thensetthedesiredtemperature,
by rotating your oven temperature selector.
Whentheindicatorlightabovethetemperatureselector
goes out, the oven has reached the desired temperature.
Select the oven function you require for cooking and place
the food in the oven.
2.Withotherovenfunctions
Set the desired temperature by rotating your oven temperature
selector.Whentheindicatorlightgoesouttheovenhas
reached the desired preset temperature, place your food in
the oven, close the door and set the timer if you desire.
3.With‘Grill’function
Pre-heatthegrillforatleast3minutestoobtainbest
results.Thiswillhelptosealthenaturaljuicesofsteak,
chopsandothermeatsforabetteravour.
tips and information
Yourbuilt-inapplianceisttedwithacoolingfan.This
prevents your kitchen cabinet from overheating and
reducesthecondensationinsidetheoven.Itwilloperate
whenever you are using your oven and blow warm air
across the top of the oven door.
Condensation
• Excesscondensationmayfogtheovendoor.Thismay
happen when you are cooking large quantities of food
from a cold start. You can minimise condensation by:
– Keeping the amount of water used whilst cooking to
a minimum.
– Making sure the oven door is firmly closed.
–Bakingcustardinabakingdishthatisslightlysmaller
than the water container.
– Cooking casseroles with the lid on.
Note:
• Ifyouareusingwaterincooking,thiswillturntosteam
andmaycondenseoutsideyourappliance.Thisisnot
aproblemorfaultwithyouroven.
Your oven is equipped with a 3 button timer that has the
following features:
• Timer–youcansetacountdowntimethatwillbeep
when the set time has elapsed.
• Cooktime–youcansetcookingduration.Atimerwill
count down the preset cooking time, beep when the
time has elapsed and turn the appliance off.
• Endtime–insteadofsettingacookingdurationyoucan
setacookingnishtime.Whenthenishtimehasbeen
reached the timer will beep and turn the appliance off.
• Delayedstartcookingtime–youcancombinethe
cooking time and end cooking time to switch oven on
and off at a specific time during the day.
Selecting the timer
• PresstheMODEbuttonuntilthetimer‘indicator’
beginsashing.
• Setthecountdowntimeyouwantbyusingthe
and
buttons.5secondsafterthelastchangethetimer
‘indicator’willstopashingandthecountdownwillstart
in minutes.
• Tostopthebeeper,pressanybutton.
Settingthecookingduration
• Selectthedesiredovenfunctionandtemperature.
• Theovenindicatorlightwillglowandtheheatingsource
will come on.
• PresstheMODEbuttonuntilthecooktime‘indicator’
beginsashing.
• Setthecookingdurationyouwantbyusingthe and
buttons. Five seconds after the last change the cook
time‘indicator’willstopashing,andthetimeofdaywill
be displayed.
Note:
• Remembertoaddpre-heatingtimeifnecessary.
Settingthecookingendtime
1. Check that the clock displays the correct time of day.
2. Select the desired oven function and temperature.
The oven indicator light will glow and the heating
source will come on.
Cooking with the timer –
rotary control oven
3. PressMODEbuttonuntiltheendtime‘indicator’
beginsashing.
4. Enter the time of day you want to finish cooking by
pressing or buttons. Five seconds after the last
change,theendtime‘indicator’willstopashingand
the current time of day will be displayed.
Settingthedelayedstartcookingtime
• Setthecooktimeandendasdescribedinthe
previous sections.
• Onceboththecooktimeandendtimehavebeenset,
thecooktimeandtheendtime‘indicators’willstop
ashingandthecurrenttimeofdaywillbedisplayed.
Tocheckorcancelsettings
• Tocheckyoursettings,presstheMODE button until the
settingyouwantisdisplayed.Aredlightwillashnext
to the mode (cook time, end time etc) that is currently
on display.
• Tocancel“delayedstart”presstheMODE button until
alightashesnextto“endtime”.Pressandholdthe–
button until the clock no longer reverses (you will hear
abeep).Ifyouhaveleftthetemperatureandfunction
knobsatasettingtheovenwillstartoncethe“endtime”
lightstopsashing.
• Tocancel“autoshutoff”presstheMODE button until
alightashesnextto“cooktime”.Pressandholdthe–
button until the clock no longer reverses (at 0:00 you will
hearabeep).Thisautomaticallycancels“delayedstart”.
Ifyouhaveleftthetemperatureandfunctionknobsat
asetting,theovenwillstartoncethe“cooktime”light
stopsashing.Becauseyouhavecancelled“autooff”
the oven will continue to heat until you manually turn it
off.
Oncompletionofcooking
• Theheatsourcewillturnoff,thetimerwillbeepandthe
endtimeand/orcooktime‘indicators’willash.
• Eventhoughtheheatingelementturnsofftheovenwill
still retain substantial heat. This will continue to cook the
fooduntilitisremovedortheovencoolsdown.Ifyou
do not plan on being present when the oven turns off,
you should take this extra heating time into account.
• Turnthefunctionandtemperaturecontrolstotheoff
position.
• Pressanybuttontostopthetimerbeeping.
Adjustingtheclock
• PresstheMODEbuttonuntiltheclock‘indicator’
beginsashing.
• Pressthe or buttons to change the time of day.
5secondsafterthelastchange,theclock‘indicator’
willdisappear,conrmingthetimehasbeenadjusted.
cook time
end time
MODE
timer
clock
cook time
end time
MODE
timer
clock
cook time
end time
MODE
timer
clock
Preparing your oven
1. Pleaseremoveallstickers,leaetsandboxesfromthe
doorsandtheooroftheovenbeforeoperation.
2. Please wipe out the oven interior prior to operation with
warm soapy water and polish dry with a soft clean cloth.
Do not close the oven door until the oven is completely dry.
Setting the time
Afterelectricallyconnectingtheappliance,youmustsetthe
time of day before you can operate your oven.
1. Aftertheappliancehasbeenelectricallyconnected
“12:00”willashontheclockdisplay,alongwiththe
scrollingmessage“WelcometoElectrolux”.
2. To set the time of day in hours and minutes, press the
or buttonsunderneaththe“setclock”graphic.
3. 8 seconds after the last change the time will stop
ashing,conrmingthetimehasbeenset.Oncethe
time has been entered, the clock advances minute
by minute.
Note:
• Theclockhasa12hourdisplay
• Thedisplayhas3levelsofbrightness.
–Brightestillumination:whenevertheovenisinuse.
–Mediumillumination:theovenisnotinuse.
–Lowestillumination:theovenisnotinusebetween
thehoursof10pmand6am.
Installing your oven accessories
• Catalyticliners(ifsupplied)
Theoven/swillalreadybettedwithacatalyticfan
bafeandtoppanel.Wehavesuppliedsidepanels
for you to fit. They can be fitted before you put the side
racks on but you can omit them, if you wish, with no
effect to cooking performance. Their sole purpose is
to make oven cleaning easier. Of course, you can
add them at any time by removing the side racks
(see page 22).
The catalytic liners will attach to each side of the oven.
There will be a left hand and a right hand version.
1. Position the first liner as per the diagram. The black,
shiny side of the liner should be facing the oven wall,
thehookspointingdown.Notethatthediagram
shows the left hand liner. The right hand side will be
a mirror image of this.
2. Line the hooks up with the slots provided in the
oven wall, push them in and then allow the liner to
slide down to its final position. All4hooksMUST
be engaged in slots.
3. The access hole for the side racks should be visible
when the liner is correctly positioned – see diagram.
Beforeusingyourelectroniccontrolor
touch control oven
Note:
• IfyouhavepurchasedanEDEE63CS,EUEE63CSor
EUEE63CKyouwillhaveadditionalcatalyticlinersfor
theextraovencavity.
• PyromodelsEPEE63CSandEPEE63CKdonotrequire
catalyticlinerswhicharenotsuppliedwiththese
models.Cleaningforthesemodelsisdoneviathe
“pyro”function.
• Sideracks
1.Insertthetwinpeggedsideintotherearaccess
holes provided
2. Then locate the front peg into the front access hole
and push in firmly.
Note:
• IfyouhavepurchasedanEUEE63CSorEUEE63CKyou
willhaveadditionalsideracksfortheloweroven/grill.
Thesearettedinasimilarmanner,howevertheleft
handsiderackmustbettedtothelowertwoholesof
theoven/grillcavity.
10 before using your electronic control oven electrolux e:line ovens electrolux e:line ovens before using your electronic control oven 11
• Shelvesandtrays
The shelves are designed so that they have maximum
extension but cannot be accidentally pulled right out.
The trays are designed the same way and slot straight
into the side racks.
Totashelfortraytosideracks:
1.Locatetherearedgeoftheshelf/trayinbetween2
guide rails of the side rack – see diagram. Ensure
the same rail positions on both sides of the oven are
being engaged.
2.Withthefrontedgeraised,begintoslidetheshelfinto
the oven.
3. Once the detents have passed the front edge of the
side rack, the shelf can be pushed completely in.
Whenfullyinsertedtheshelf/trayshouldnotinterfere
with the closed oven door.
To fit a shelf or tray to telescopic slides:
1.Withtheslidesfullypushedin,pushtheshelfortray
along the top of the slide until it hits the back post.
2. Drop the front of the shelf or tray onto the slide
ensuring it sits behind the front post of the slide.
Whenfullyinsertedtheshelf/trayshouldnotinterfere
with the closed oven door.
• Fatlter(ifsupplied)
The fat filter is designed to go onto the front of the fan
coverattherearoftheoven.Whenfullyengagedthe
filter will be positioned in the centre of the fan cover.
1. Locate the mounting slots in the fan cover and the
corresponding tags on the fat filter.
2. Position the fat fiter onto the fan cover with the tags
pointing down.
3. Push the fat filter down into position.
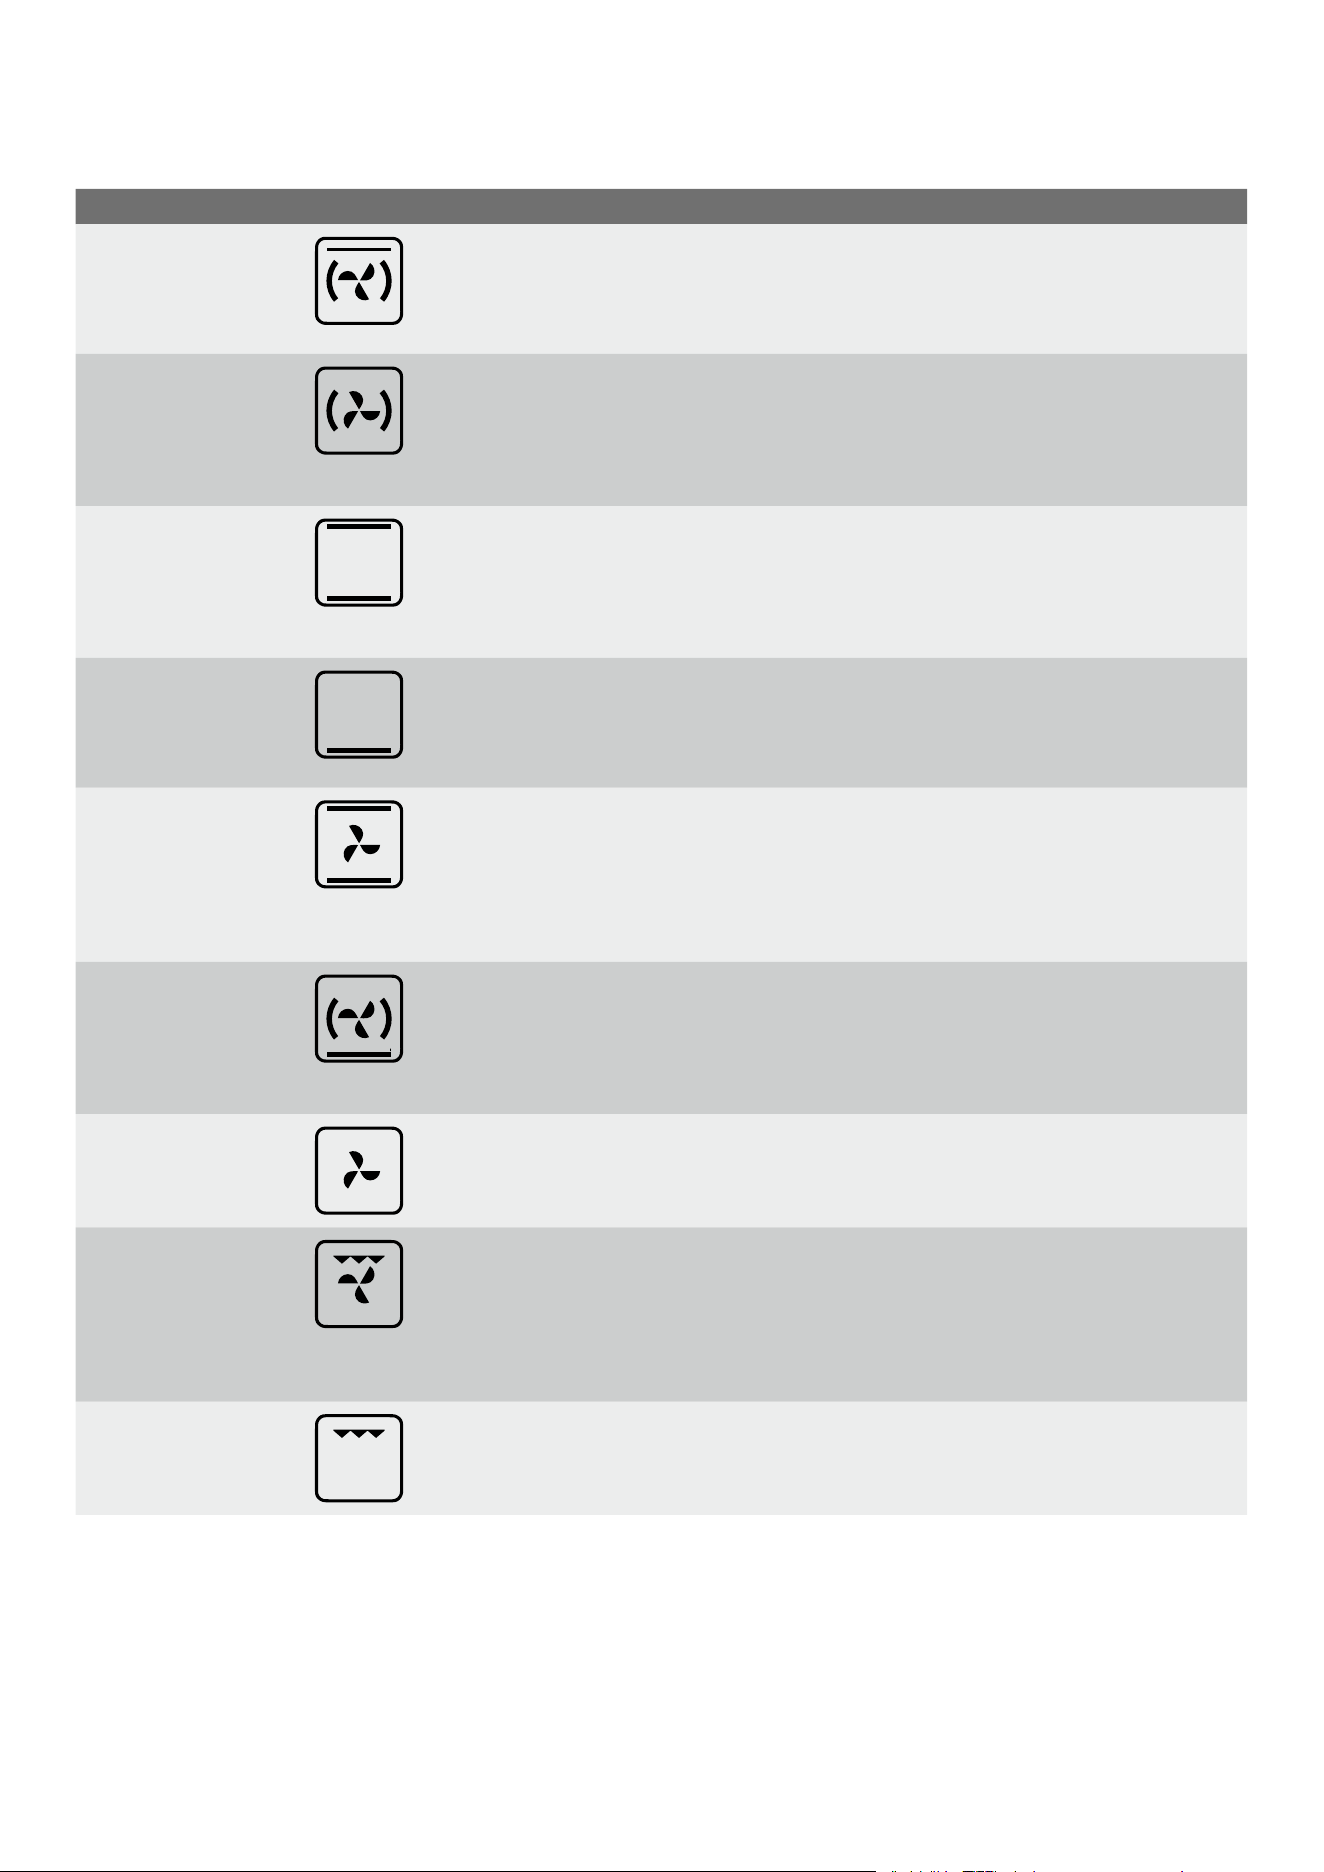
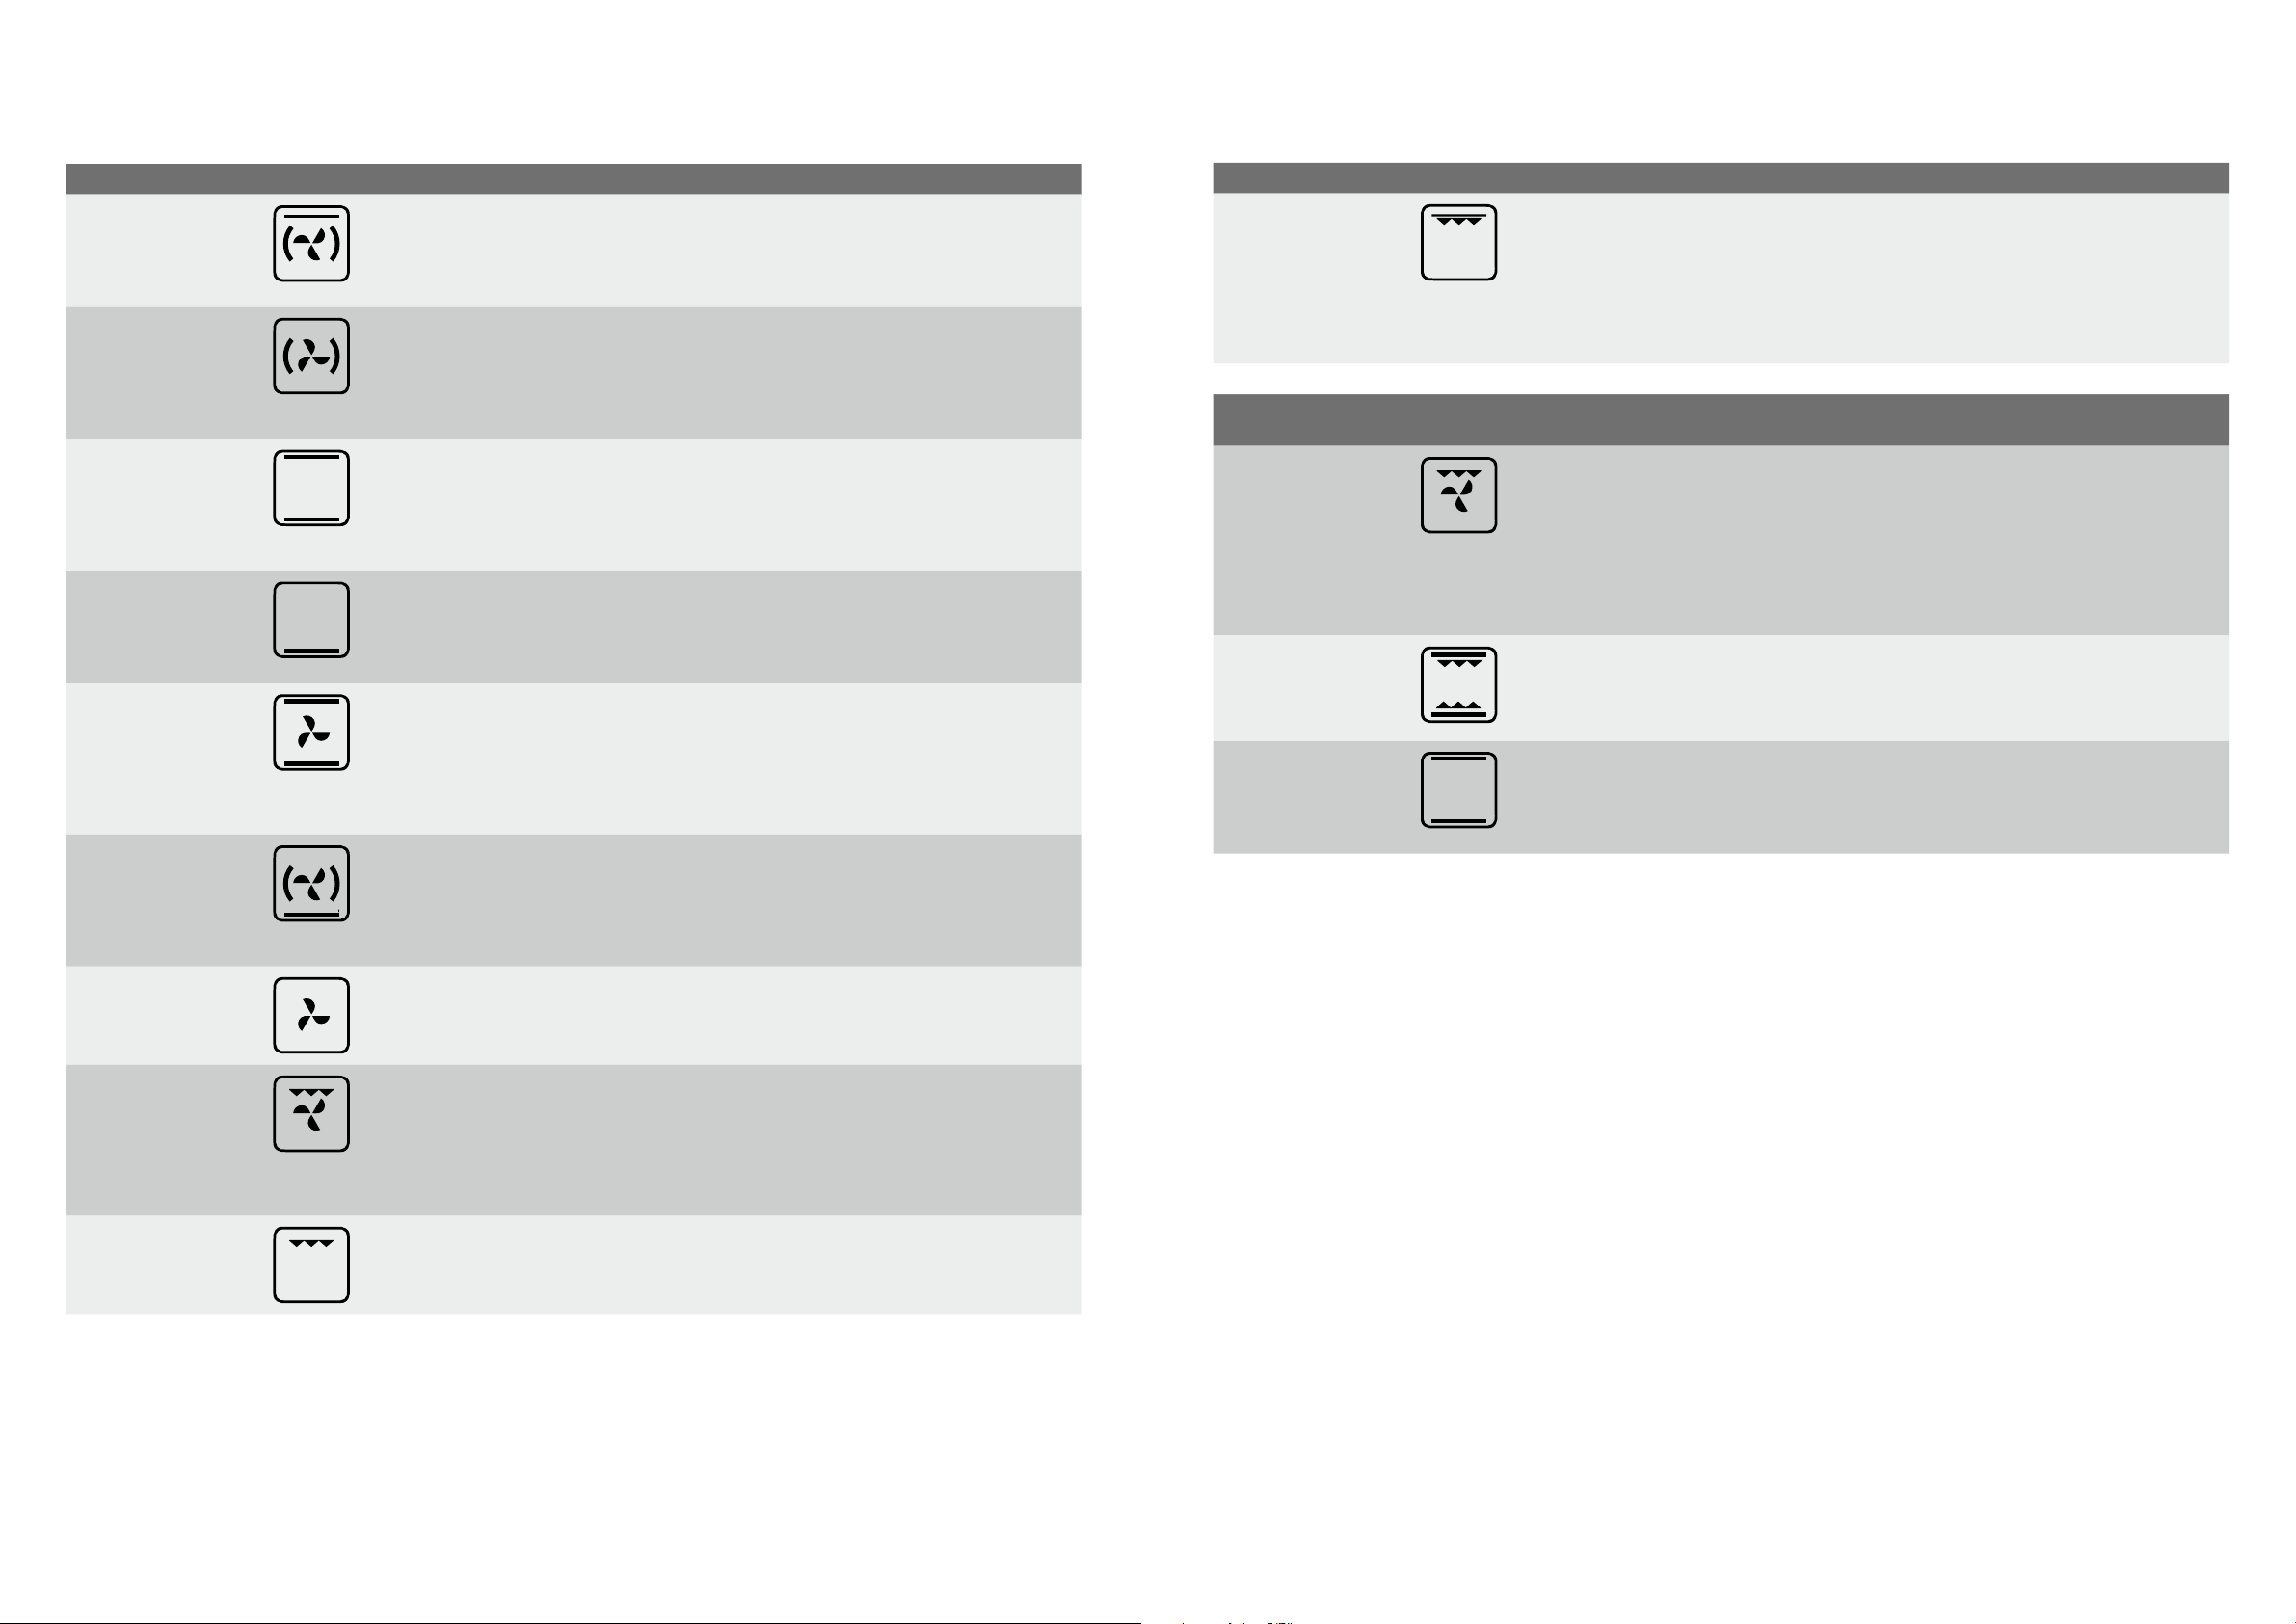
function Symbol description
Cookfromfrozen
The“CookfromFrozen”functionisidealforcookingfrozenprecookedfoods such as
savourypastries,pizzas,minimeals(TVdinners),meatpiesandfruitpies.Heatcomes
from the element surrounding the fan as well as a smaller element above the food.
Simplyplacethefoodintheovenstraightfromthefreezerandheat.Cookintheupper
half of the oven for best results.
Fancooking
Heat comes from the element surrounding the fan. This fan circulates the hot air around
the oven cavity so that you can put your food in different places in the oven and still
cookthematthesametime.Youcanusethe“FanCooking”functionformulti-shelf
cooking,reheatingcookedfoods,pastriesandcompleteovenmeals.Itwillcook
at a lower temperature and be faster than baking. Please note that some variation in
browning is normal.
Traditionalbake
Heat comes from two elements, one above and one below the food. The bottoms
elementisacleanheatelementandisbelowtheooroftheoven.Bothelementsare
controlled by the thermostat and will turn on and off to maintain set temperature. You
canusethe“TraditionalBake”functionforsingleshelfcooking,singletraysof
biscuits,scones,mufns,cakes,slices,casseroles,bakedpuddings,roasts
and delicate egg dishes. This is a general function that can be used for most cooking.
Pastry
The“Pastry”functionisspeciallydesignedforfoodthatrequireextrabrowningsuchas
the bases of pastries and pies.Heatcomesfromtheelementbelowthefood.Ifyou
choose the default setting, the oven will heat up to 230°C in order to brown the food.
You should then drop the temperature to what the recipe required. Cook in the lower
half of the oven when you are using only one shelf.
Fanassistbake
Heat comes from two elements, one above and one below the food. The fan circulates
the hot air around the oven cavity so that you can put the food in different places in
the oven and still cook them at the same time. You should only use a maximum of two
shelveswith“FanAssistBake”.
Donotusethebottomshelf.Ifthetwoshelvesareused,foodontheshelfinthehigher
position will cook first and should then be removed to allow the food on the lower shelf
to finish cooking.
Pizza
“Pizza”isacombinationof“Pastry”and“FanAssistBake”andoffersyouthecombined
benefits of both functions. Heat switches between the element surrounding the fan and
thecleanheatelementbelowtheovenoor.The“Pizza”functionisidealforfoodsthat
requirecookingandbrowningonthebase.Itisforfoodssuchaspizzas,quiches,
meat pies and fruit pies. Simply place the food in the middle of the oven and set the
desired temperature.
Defrost
The“Defrost”functionuseslowtemperatureairthatiscirculatedbythefan.Youcan
defrost(thaw)yourfoodbeforeyoucookit.Youcanalsouse“defrost”toraise your
yeast dough and to dry fruit, vegetables and herbs.The“Defrost”functiondoes
not have a suggested temperature but uses the ambient heat in the oven cavity.
Fangrill
“FanGrill”offersyouthebenetsofbothtraditionalbakeandtraditionalgrillfunctions.
The grill element turns on and off to maintain set temperature while the fan circulates the
heatedovenair.Theovendoorremainsclosedforfangrill.Youcanuse“FanGrill”for
large cuts of meat,whichgivesyouaresultsimilarto“rotisserie”cookedmeat.Put
your food on a shelf in the second lowest shelf position. Put the grill dish on the lowest
shelfpositiontocatchanyspills.Whenusing“FanGrill”itisnotnecessarytoturnthe
food over during the cooking cycle. Set temperature to 180°C.
Halfgrill
The“HalfGrill”directsradiantheatfromonlyoneofthepowerfulupperelementsonto
thefood.The“HalfGrill”functionisusedinsteadof“FullGrill”whenonlyhalftheamount
of heat is needed.
Cooking functions – electronic control and touch control oven
12 cooking functions – electronic touch control and control oven electrolux e:line ovens electrolux e:line ovens cooking functions – electronic touch control and control oven 13
function control oven description
Fullgrill “FullGrill”directradiantheatfromtwopowerfulupperelementsontothefood.Youcan
use“FullGrill”functionfortendercutsofmeat,steak,chops,sausages,sh,
cheesetoastiesandotherquickcookingfoods.Grillwiththeovendoorclosed.“Full
Grill”allowsyoutotakefulladvantageofthelargegrilldishareaandwillcookfasterthan
the“HalfGrill”function.Forbestresultsitisrecommendedtopreheatyourgrillforthree
minutes.Thiswillhelpsealinthenaturaljuicesofsteak,chopsetcforabetteravour.
You can slide your grill dish into either of the two spaces within the upper pairs of support
rails.“FullGrillhas2temperaturesettings,‘LO’and‘HI’.
function control oven
only
description
Keep warm
The“KeepWarm”functionisalowtemperatureovenfunctiondesignedtokeepyour
food at a perfect eating temperature without cooking it further. Heat comes from the
smallerelementsabovethefoodandiscirculatedbythefan.Use“KeepWarm”tokeep
your food warm while you prepare the rest of the meal or afterwards while you wait for the
late arrival.
Note:Aftercooking,theovenretainsenoughheattocontinuetocookfoodevenif
theelementsareturnedoff.The“Keepwarm”functionrecognisesthisbygivingyoua
warningmessage.Ifthishappensthefunctionwillnotstart.
Pyrolytic cleaning
The“Pyrolyticcleaning”functionisusedforcleaningthemainoven.Itcleansbyburning
off the spatters and accumulated dirt and grease from the oven liner, at high temperature.
This process produces ash which can be wiped out of the oven cavity.
Roast
This function starts at a higher temperature to seal the meat. The oven will then
automatically reduce to the selected temperature to cook the meat for as long as desired.
Forexample,ifyouusethedefault200°Cthe“Roast”cyclewillstartat240°Candthen
lower
to 200°C.
14 operating sequence – electronic control oven electrolux e:line ovens electrolux e:line ovenscookingwiththetimer–electroniccontroloven15
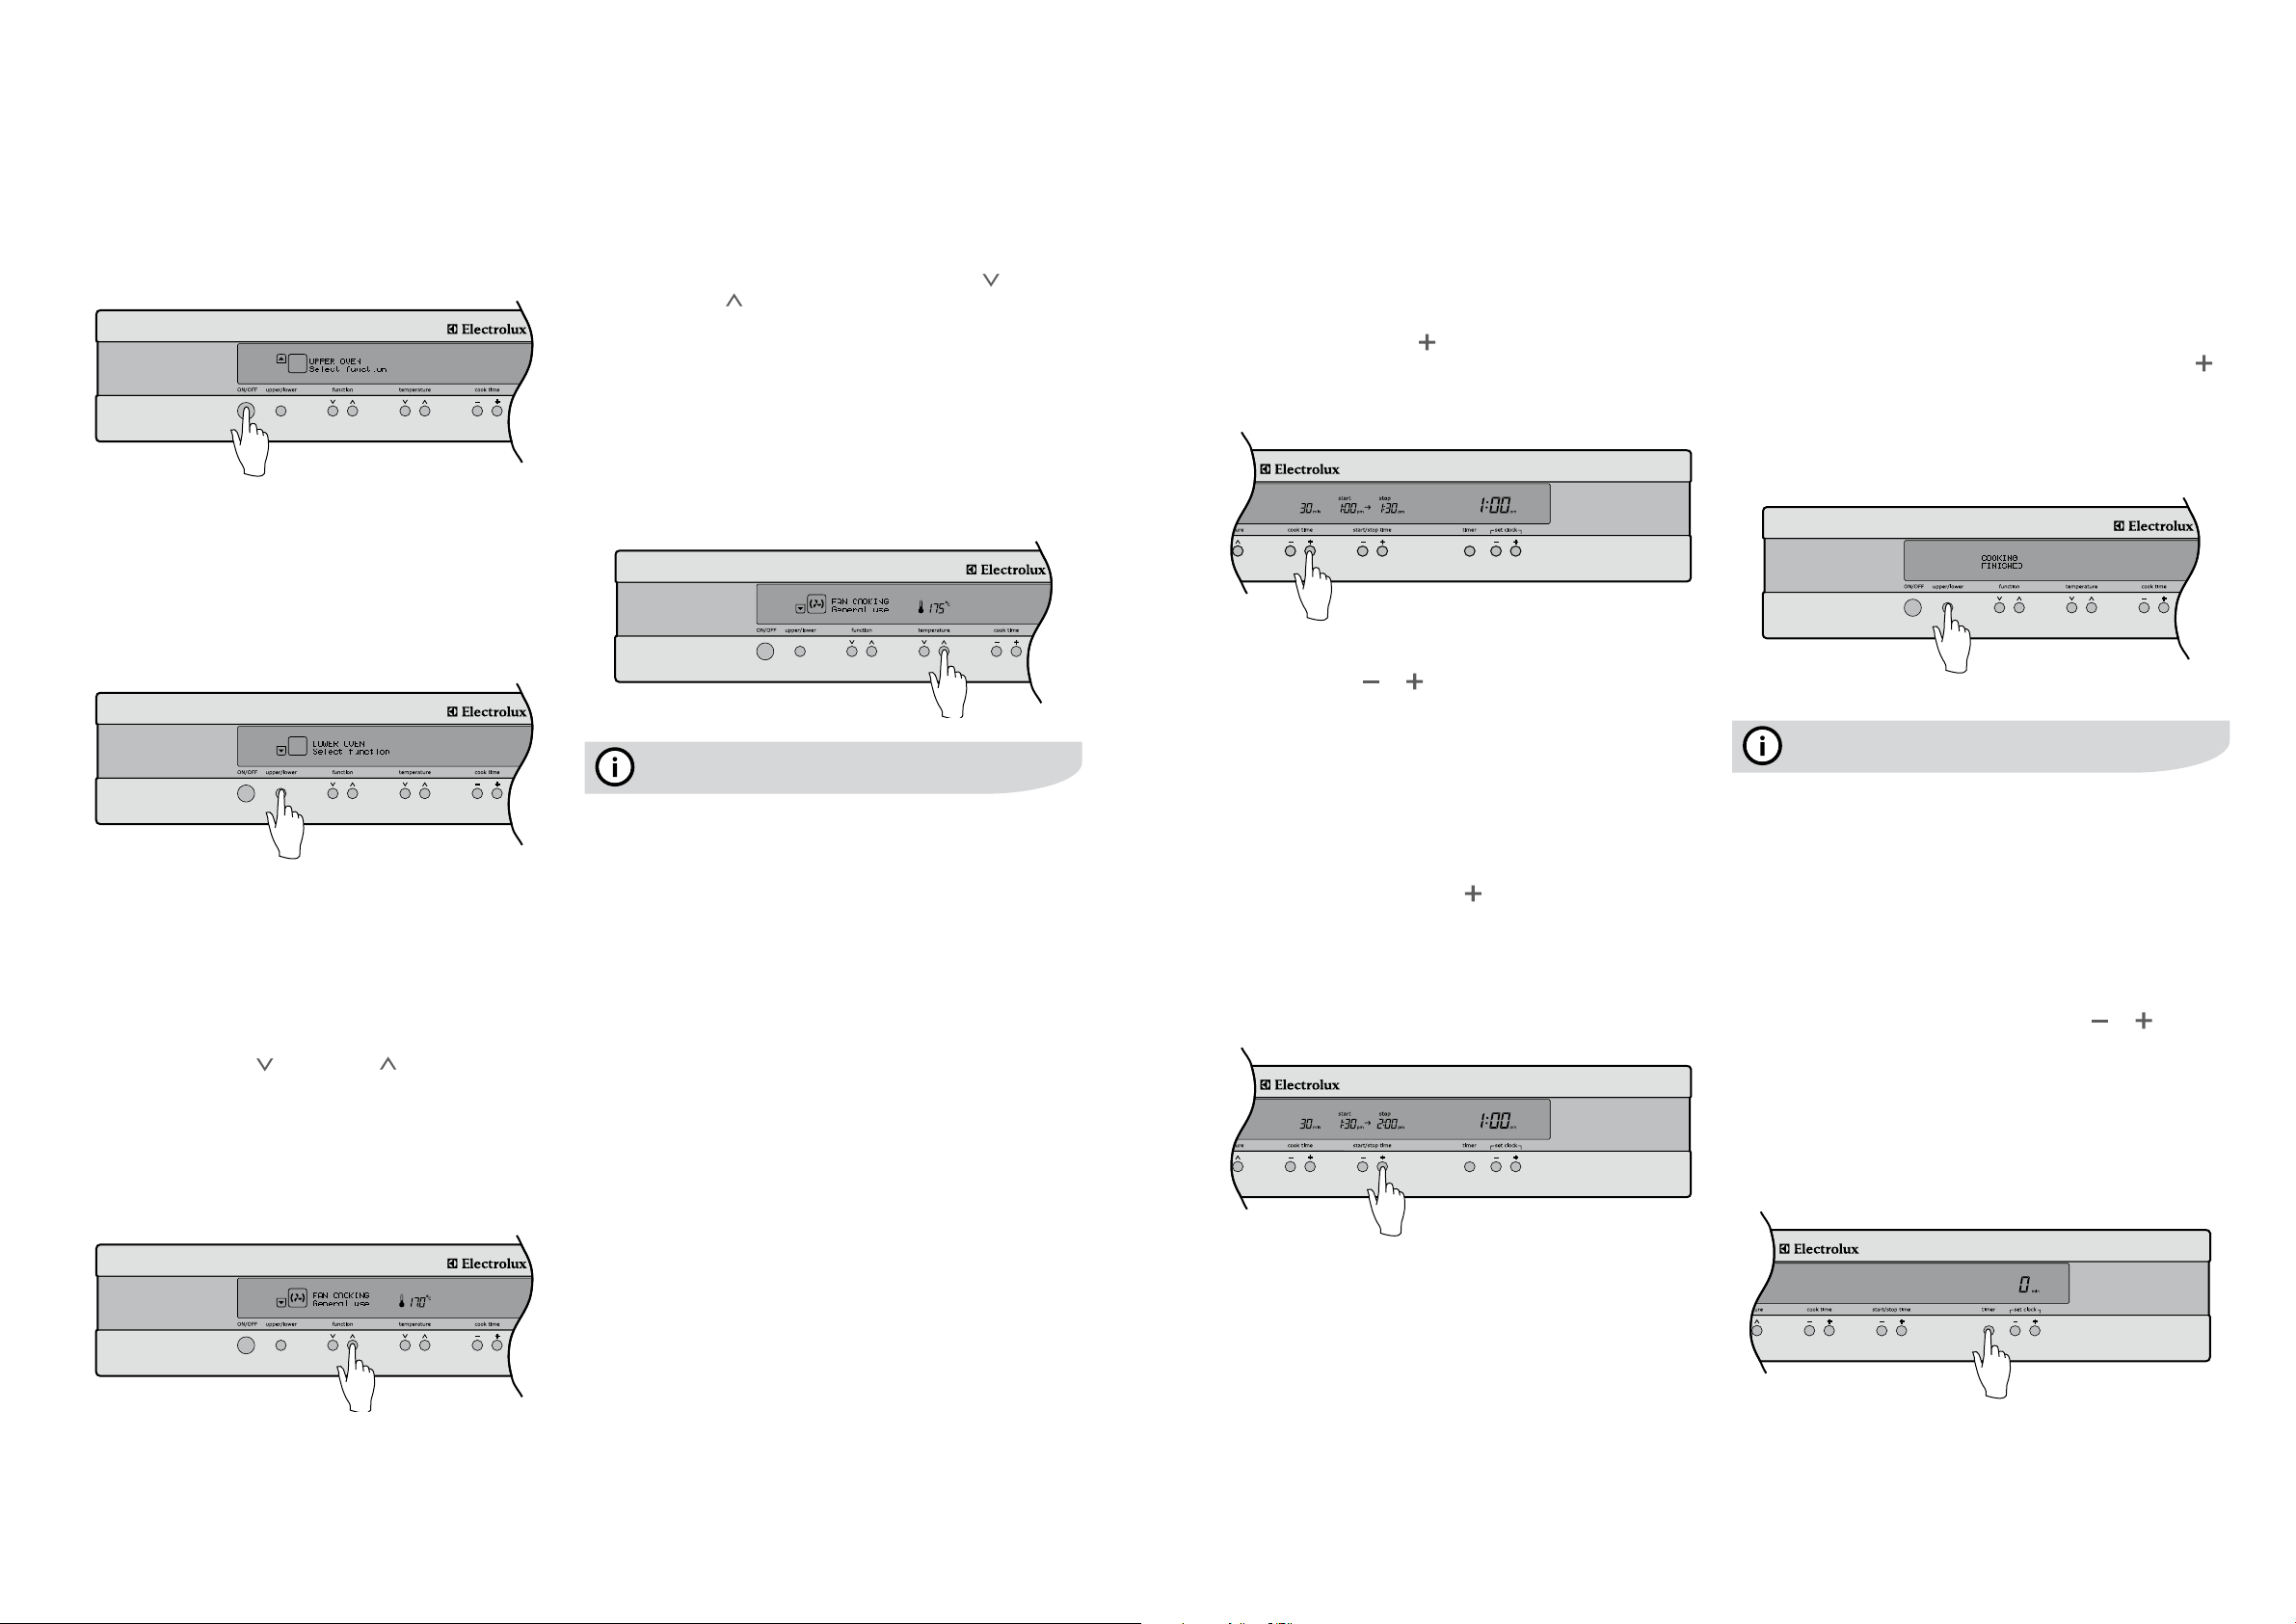
Turning the oven on
• Switchontheovenbypressingthe“ON/OFF”button.
The LCD control panel will come on and inform you that
you need to select a cooking function.
• Ifyoudonotselectafunctionwithin8secondstheoven
will turn off.
SelectingtheUpperorLoweroven
(EDEE63CS,EUEE63CS&EUEE63CKonly)
Your model may be equipped with two ovens. On these
models, use the oven selector button to toggle between the
upper and lower ovens.
• Selectwhichoventousebypressingthe“upper/lower”
button. The oven cavity icon on the LCD control panel
will tell you which oven is currently active.
Note:
• Thelowerovencavitydoesnothaveasmanyfunctions
astheupperovencavity.
Selectacookingfunction
Your oven will have a selection of functions. Refer to the
inside front cover of this manual to confirm what functions
are available to you.
• Pressthe“function
”orfunction ”buttonsasmany
times as necessary until the desired function appears.
• Cookingsuggestionswillappearunderthefunction
name and suggested cooking temperatures will appear
above the temperature selector.
• Ifnootherbuttonistouchedwithin8secondsthe
oven will switch on and begin to heat up to the
displayed temperature.
Operating sequence –
electronic control oven
Selecting a temperature
The temperature in your appliance is electronically
controlled.
• Thetemperaturecanbeselectedwithintherangeof
30°Cto250°Candcanbeadjustedatanytime.To
setthetemperature,pressthetemperature“ ”and
temperature“ ”buttonstoreachthedesiredsetting.
• Ifnofurtherchangesaremadewithin8secondsthe
oven begins to heat. The heating indicators above the
temperature selector will come on and start to rise
slowly, indicating the degree to which the oven
is currently being heated.
• Whenthetemperatureisreached,theindicatorbarsare
fullylit,theheatsourceswitchesitselfoffandthebuzzer
willplayashortsound.Whentheoventemperaturefalls
below the desired setting, the heating source switches
back on.
tips and information
Pre-heatingyourovenisrecommendedinseveralcooking
andgrillingfunctions.Pre-heatingyourapplianceallowsit
to reach the required temperature quickly and efficiently as
well as cook your food at the correct temperature for the
entire cook time.
The programmable controller models are equipped with
abuilt-inrapidheat-upthatactivateseachtimeyoustart
anovenfunction.Duringtherapidheat-upphasetheheat
comes from the element surrounding the fan as well as
the smaller element above the food. This combination will
heat up your oven 30% quicker than it would on standard
“Bake”.Theovenwillautomaticallyreverttothesetcooking
function once the preset temperature is reached.
Turning the oven off
Single cavity models:
1. Press the ON/OFF button to switch off the oven.
Dual cavity models:
1. Presstheupper/lowerovenselectorbuttontotoggleto
the desired oven.
2. Press the ON/OFF button to switch off the desired oven.
The LCD control panel will come off to confirm that the
oven is now switched off.
3. Iftheotherovenisstillactive,after1second,theLCD
control panel will automatically revert to show the setting
of that oven.
4. To turn off both ovens at once, press and hold the
On/Offbuttonfor1second.Allelements,cavitylight
and the LCD control panel will then switch off at the
same time.
Your oven is equipped with a programmable controller that
can be used to turn on and off the oven automatically.
The cook time is used to automatically turn the oven off
after a set amount of time.
Settingthecooktime
1. Select the desired oven function and cooking
temperature.
2. Pressthe“cooktime ”buttonasoftenasnecessary,
until the desired cook time has been set.
3. After8secondsfromthelasttimeadjustmentyouroven
will be programmed and will start cooking.
Note:
• Duringcooking,youcanadjustthecooktimewith
theCooktime or buttonsforbettercooking
performance.
Settingthestart/stoptime
Thestart/stoptimecanbeusedtoswitchtheovenOnand
Off at a specific time during the day.
1. Check the clock displays the correct time of day.
2. Select the desired oven function and cooking
temperature.
3. Set the required cook time.
4. Pressthe“start/stop”time button to move the start
and stop time forward.
5. After8secondsfromthelasttimeadjustmentthe
DELAYSETiconwilllightandyourovenisnow
programmed.
The oven will start cooking when the time of day reaches
the set start time.
Note:
• 30secondsafteraprogrammedcookingfunctionhas
started,itisnolongerpossibletodelaythestarttime.
• Inordertodelayacookingfunctionthathasalready
started,theovenneedstobeswitchedOffusing
theON/Offbutton,thenswitchedonagainand
re-programmed.
Cooking with the timer –
electronic control oven
Oncompletionofcooking
Whenthecooktimehaselapsed,anaudiblesignal
will sound for 10 seconds, the oven will switch off and
COOKINGFINISHEDwillbedisplayedonthelefthandside
of the display. On the right hand side of the display, the
remainingtimeindication“0min”willappeartogetherwith
the cooking start and stop time.
• Tostoptheaudiblesignal,pressanyofthebuttonson
the control panel.
• Ifyouwishtocookabitlonger,pressthe“cooktime ”
button for each additional minute you require. The oven
automatically reverts to the function and temperature
previouslyprogrammed.Thisfeatureisavailablefor5
minutesaftercookinghasnished.Afterthat,theoven
automatically switches off.
tips and information
Even though the heating element turns off the oven will still
retain substantial heat. This will continue to cook the food
untilitisremovedortheovencoolsdown.Ifyoudonot
plan on being present when the oven turns off, you should
take this extra heating time into account.
Setting the timer
The timer can be used independently of the oven for setting
acountdownperiod.Whentheperiodoftimehaselapsed,
an audible signal sounds.
1. Press the timer button.
2. Set the desired length of time using the or buttons
whilstthetimerbellisashing.After8secondsfromthe
lastadjustmentthetimerbellwillstopashingandthe
timer will start to count down.
3. Whenthesettimehaselapsed,anaudiblesignalwill
soundfor10seconds.Thetimeindication“0min”and
thetimerbellwillashonthedisplay.
4. To stop the signal, press any of the 3 buttons below the
Clock/Timerdisplay.
Note:
• Thisfeaturehasnoeffectontheovenoperation.
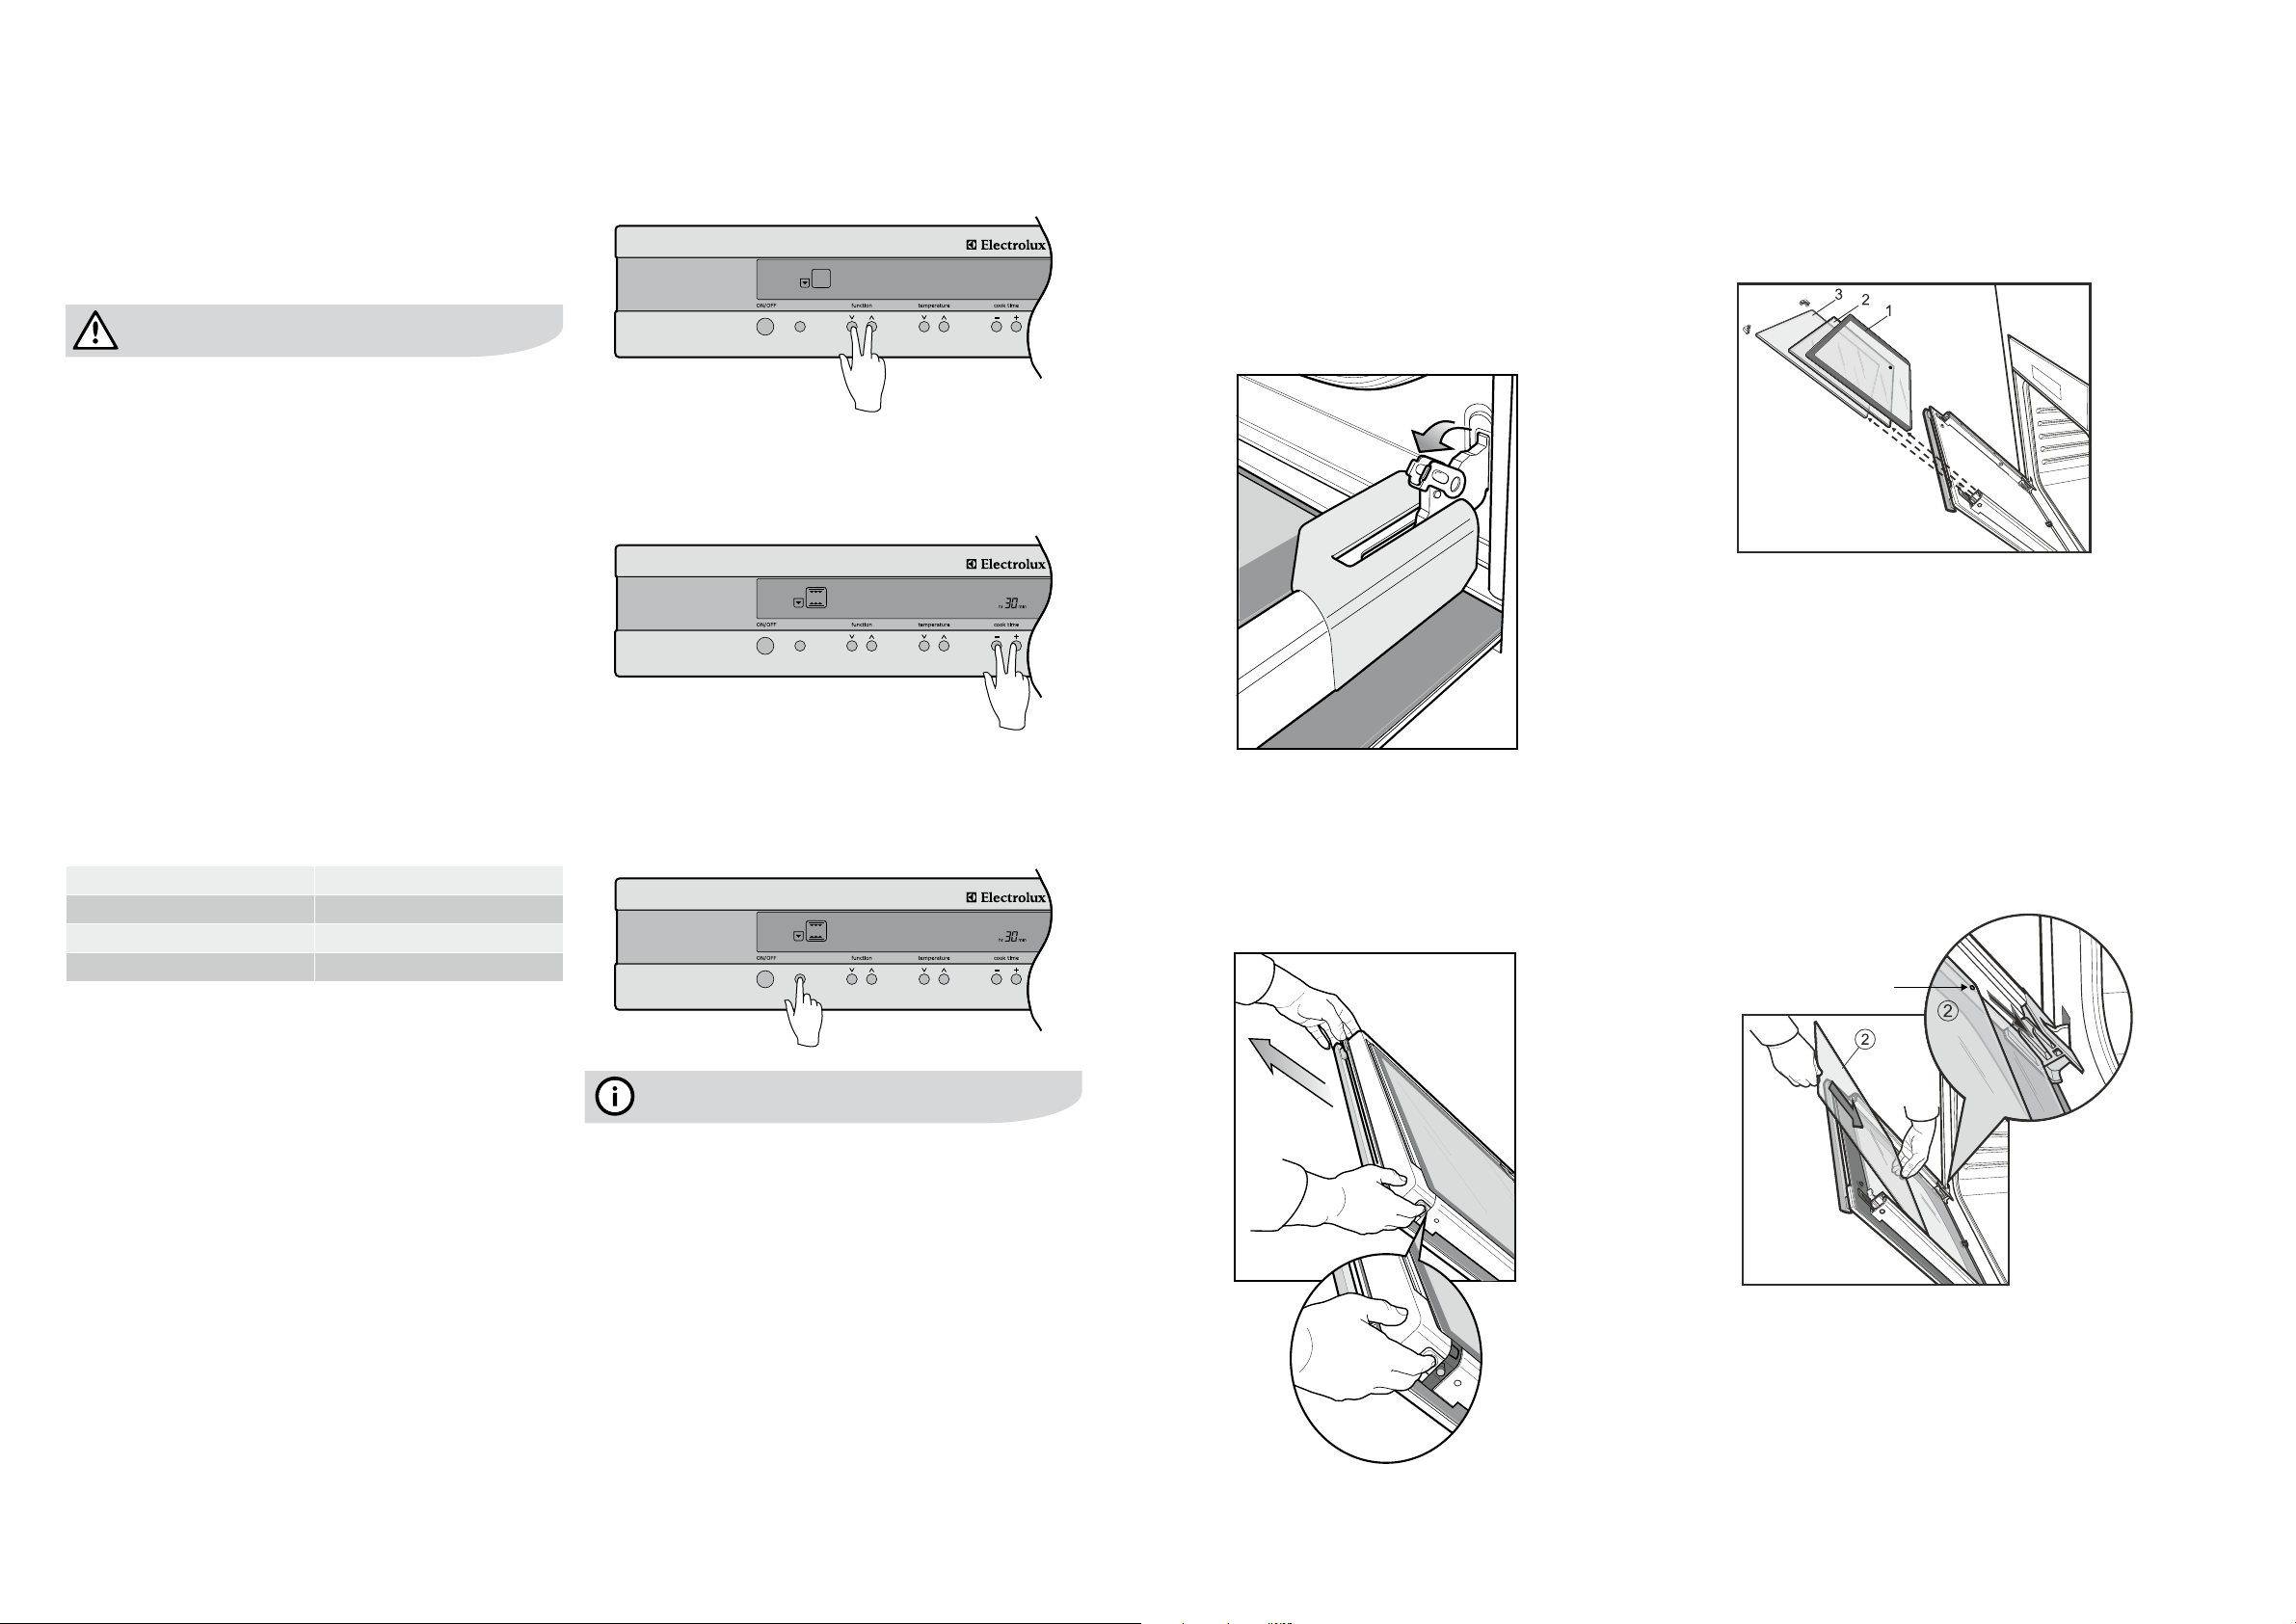
14 operating sequence – electronic control oven electrolux e:line ovens electrolux e:line ovenscookingwiththetimer–electroniccontroloven15
Turning the oven on
• Switchontheovenbypressingthe“ON/OFF”button.
The LCD control panel will come on and inform you that
you need to select a cooking function.
• Ifyoudonotselectafunctionwithin8secondstheoven
will turn off.
SelectingtheUpperorLoweroven
(EDEE63CS,EUEE63CS&EUEE63CKonly)
Your model may be equipped with two ovens. On these
models, use the oven selector button to toggle between the
upper and lower ovens.
• Selectwhichoventousebypressingthe“upper/lower”
button. The oven cavity icon on the LCD control panel
will tell you which oven is currently active.
Note:
• Thelowerovencavitydoesnothaveasmanyfunctions
astheupperovencavity.
Selectacookingfunction
Your oven will have a selection of functions. Refer to the
inside front cover of this manual to confirm what functions
are available to you.
• Pressthe“function
”orfunction ”buttonsasmany
times as necessary until the desired function appears.
• Cookingsuggestionswillappearunderthefunction
name and suggested cooking temperatures will appear
above the temperature selector.
• Ifnootherbuttonistouchedwithin8secondsthe
oven will switch on and begin to heat up to the
displayed temperature.
Operating sequence –
electronic control oven
Selecting a temperature
The temperature in your appliance is electronically
controlled.
• Thetemperaturecanbeselectedwithintherangeof
30°Cto250°Candcanbeadjustedatanytime.To
setthetemperature,pressthetemperature“ ”and
temperature“ ”buttonstoreachthedesiredsetting.
• Ifnofurtherchangesaremadewithin8secondsthe
oven begins to heat. The heating indicators above the
temperature selector will come on and start to rise
slowly, indicating the degree to which the oven
is currently being heated.
• Whenthetemperatureisreached,theindicatorbarsare
fullylit,theheatsourceswitchesitselfoffandthebuzzer
willplayashortsound.Whentheoventemperaturefalls
below the desired setting, the heating source switches
back on.
tips and information
Pre-heatingyourovenisrecommendedinseveralcooking
andgrillingfunctions.Pre-heatingyourapplianceallowsit
to reach the required temperature quickly and efficiently as
well as cook your food at the correct temperature for the
entire cook time.
The programmable controller models are equipped with
abuilt-inrapidheat-upthatactivateseachtimeyoustart
anovenfunction.Duringtherapidheat-upphasetheheat
comes from the element surrounding the fan as well as
the smaller element above the food. This combination will
heat up your oven 30% quicker than it would on standard
“Bake”.Theovenwillautomaticallyreverttothesetcooking
function once the preset temperature is reached.
Turning the oven off
Single cavity models:
1. Press the ON/OFF button to switch off the oven.
Dual cavity models:
1. Presstheupper/lowerovenselectorbuttontotoggleto
the desired oven.
2. Press the ON/OFF button to switch off the desired oven.
The LCD control panel will come off to confirm that the
oven is now switched off.
3. Iftheotherovenisstillactive,after1second,theLCD
control panel will automatically revert to show the setting
of that oven.
4. To turn off both ovens at once, press and hold the
On/Offbuttonfor1second.Allelements,cavitylight
and the LCD control panel will then switch off at the
same time.
Your oven is equipped with a programmable controller that
can be used to turn on and off the oven automatically.
The cook time is used to automatically turn the oven off
after a set amount of time.
Settingthecooktime
1. Select the desired oven function and cooking
temperature.
2. Pressthe“cooktime ”buttonasoftenasnecessary,
until the desired cook time has been set.
3. After8secondsfromthelasttimeadjustmentyouroven
will be programmed and will start cooking.
Note:
• Duringcooking,youcanadjustthecooktimewith
theCooktime or buttonsforbettercooking
performance.
Settingthestart/stoptime
Thestart/stoptimecanbeusedtoswitchtheovenOnand
Off at a specific time during the day.
1. Check the clock displays the correct time of day.
2. Select the desired oven function and cooking
temperature.
3. Set the required cook time.
4. Pressthe“start/stop”time button to move the start
and stop time forward.
5. After8secondsfromthelasttimeadjustmentthe
DELAYSETiconwilllightandyourovenisnow
programmed.
The oven will start cooking when the time of day reaches
the set start time.
Note:
• 30secondsafteraprogrammedcookingfunctionhas
started,itisnolongerpossibletodelaythestarttime.
• Inordertodelayacookingfunctionthathasalready
started,theovenneedstobeswitchedOffusing
theON/Offbutton,thenswitchedonagainand
re-programmed.
Cooking with the timer –
electronic control oven
Oncompletionofcooking
Whenthecooktimehaselapsed,anaudiblesignal
will sound for 10 seconds, the oven will switch off and
COOKINGFINISHEDwillbedisplayedonthelefthandside
of the display. On the right hand side of the display, the
remainingtimeindication“0min”willappeartogetherwith
the cooking start and stop time.
• Tostoptheaudiblesignal,pressanyofthebuttonson
the control panel.
• Ifyouwishtocookabitlonger,pressthe“cooktime ”
button for each additional minute you require. The oven
automatically reverts to the function and temperature
previouslyprogrammed.Thisfeatureisavailablefor5
minutesaftercookinghasnished.Afterthat,theoven
automatically switches off.
tips and information
Even though the heating element turns off the oven will still
retain substantial heat. This will continue to cook the food
untilitisremovedortheovencoolsdown.Ifyoudonot
plan on being present when the oven turns off, you should
take this extra heating time into account.
Setting the timer
The timer can be used independently of the oven for setting
acountdownperiod.Whentheperiodoftimehaselapsed,
an audible signal sounds.
1. Press the timer button.
2. Set the desired length of time using the or buttons
whilstthetimerbellisashing.After8secondsfromthe
lastadjustmentthetimerbellwillstopashingandthe
timer will start to count down.
3. Whenthesettimehaselapsed,anaudiblesignalwill
soundfor10seconds.Thetimeindication“0min”and
thetimerbellwillashonthedisplay.
4. To stop the signal, press any of the 3 buttons below the
Clock/Timerdisplay.
Note:
• Thisfeaturehasnoeffectontheovenoperation.
16 additional functionality – electronic control oven electrolux e:line ovens cooking guide electrolux e:line ovens 17
Adjustingtheclock
The time of day is independent of the oven and can be
adjustedatanypoint.
1. To set the time of day in hours and minutes press and
hold the
and buttons simultaneously for 1 second
untilthedotsontheclockdisplaystartashing.
2. Adjustthetimeofdayusingthe and buttons.
3. After8secondsfromthelastadjustment,thedotswill
stopashing,conrmingthetimehasbeenset.Youcan
also confirm your changes by pressing the timer button.
DemoMode
This mode is intended to be used in retail shops to
demonstrate the oven functionality without any power
consumption except to the oven lamps.
1. EnsuretheovenisoffbypressingtheON/OFFbutton.
2. PressandholdtheON/OFFbuttonuntilthedisplay
turnsONthenOFF.Immediatelyafterpressthecooktime
buttons simultaneously, hold until the words ‘Demo
mode’aredisplayed,asinglebeepwillsoundtoconrm
the operation.
ReleasingDemoMode
1. EnsuretheovenisoffbypressingtheON/OFFbutton.
2. PressandholdtheON/OFFbuttonuntilthedisplay
turnsONthenOFF.Immediatelyafterpressthe
cooktime buttons simultaneously, hold until the words
‘Normalmode’aredisplayed,asinglebeepwillsound
to confirm the operation.
Activatingthechildlock
Whenthechildlockisengaged,theovencannotbe
switched on.
1. Switchofftheapplianceusingthe“ON/OFF”button.
2. Press the function buttons simultaneously, hold until the
words LOCKED are displayed, a single beep will sound
to confirm the operation. The child lock is now engaged.
Note:
• Whenthechildlockfunctionasactive,onlytheclock
andtimercanbeset.
Releasingthechildlock
Press the function buttons at the same time, hold until the
word LOCKED is cleared from the display. The child lock is
now released and the oven is ready to use.
Beepontouch
The beep sound can be activated anytime a button is
pressed.
1. Ensure the oven is off by pressing the ON/OFF button.
2. Press the temperature buttons simultaneously for
one second, a single beep will sound to confirm
operation. Repeat the above procedure to reset the
beepmodetotouchmode.Asdefaultthebeepon
touch mode is off.
Maximumoperationtimesforsafety
The oven automatically switches itself off if the temperature
isnotadjustedortheapplianceisleftoperatingfor:
• 12.5hourswhensetbetween30°Cand120°C
• 8.5hourswhensetbetween120°Cand200°C
• 5.5hourswhensetbetween200°Cand250°C
Additionalfunctionality–
electronic control oven
• Selectthecorrectshelflocationforfoodbeingcooked.
• Makesuredisheswilltintotheovenbeforeyouswitch
it on.
• KeepedgesofnonElectroluxbakingdishesatleast
40mm from the side of the oven. This allows free
circulation of heat and ensures even cooking.
• Donotopentheovendoormorethannecessary.
• Donotplacefoodswithalotofliquidintotheovenwith
other foods. This will cause food to steam and
not brown.
• Aftertheovenisturnedoffitretainstheheatforsome
time. Use this heat to finish custards or to dry bread.
• Donotusealotofcookingoilwhenroasting.Thiswill
prevent splattering oil on the sides of the oven and the
oven door.
• Whencookingitemsthatrequireahighheat(e.g.tarts),
place the cooking dish on a scone tray in the desired
shelf position.
• Forspongesandcakesusealuminium,brightnished
ornon-stickcookware.
Condensation
Excess condensation may fog the oven door. This may
happen when you are cooking large quantities of food from
a cold start. You can minimise condensation by:
• Keepingtheamountofwaterusedwhilstcookingto
a minimum.
• Makingsuretheovendoorisrmlyclosed.
• Bakingcustardinabakingdishthatisslightlysmaller
than the water container.
• Cookingcasseroleswiththelidon.
• Ifyouareusingwaterincooking,thiswillturntosteam
and may condense outside your appliance. This is not
a problem or fault with your oven.
Roastingmeat(useroastingtray&insert)
• Placethemeatintheovenandsetthetemperature
between180°Cand200°C.(Itisrecommendedtowrap
your meats in an oven roasting bag or foil to prevent fats
and oils from splattering. This will make it easier to clean
your oven.)
• Usethegrill/ovendishandsmokelessgrillinsert.Place
the meat on the insert.
• Donotpiercethemeat.
• Whenthemeatiscooked,taketheroastoutofthe
oven, wrap in aluminium foil and leave to stand for
about10minutes.Thiswillhelpretainthejuiceswhen
the meat is carved. The table in the next column shows
temperatures and cooking times for different kinds of
meat. These may vary depending on the thickness and
bone content of the meat.
Roastingpoultryandsh
• Placethepoultryorshinanovensetatamoderate
temperature of 180°C.
• Placealayeroffoilovertheshforaboutthreequarters
of the cooking time The table shows the temperatures
and the cooking times for different kinds of fish and
poultry. These may vary depending on the thickness
and bone content of the meat.
Cooking guide
Oven shelf location
Your oven has 7 positions for shelves (as shown in the
example below), or 8 positions if they are fitted with slides
(selected models).
To give maximum space above and below the shelves,
load them in this way:
• Whencookingwith1shelf,positionat3,4,5or6.
• Whencookingwith2shelves,positionthemat3and7.
Refer to cooking guide.
environmental tip
Use the oven efficiently by cooking many trays of food at
the same time. For example:
• Cook2traysofscones,smallcakesorsausagerolls.
• Cookaroastdinneratthesametimeasyoucookchips
or vegetables.
Cookingguide
meat recommended
temperature°C
minutesperkilogram
Beef 200 Rare 35-40
Medium 45-50
Welldone 55-60
Lamb 200 Medium 40
Welldone 60
Veal 180 Welldone 60
Pork 200 Welldone 60
poultry and
fish
recommended
temperature°C
minutesperkilogram
Chicken 180 45-50
Duck 180-200 60-70
Turkey 180 40-45(<10kg)
35-40(>10kg)
Fish 180 20
tips and information
Your appliance is fitted with a cooling fan. This prevents
your kitchen cabinet from overheating and reduces the
condensation inside the oven.
Itwilloperatewheneveryouareusingyourovenandblow
warm air across the top of the oven door.
Note:
• Iftheovenisstillhotfromcooking,thecoolingfanwill
keeprunningtocooltheovendownandwillswitchoff
byitselfoncecool.
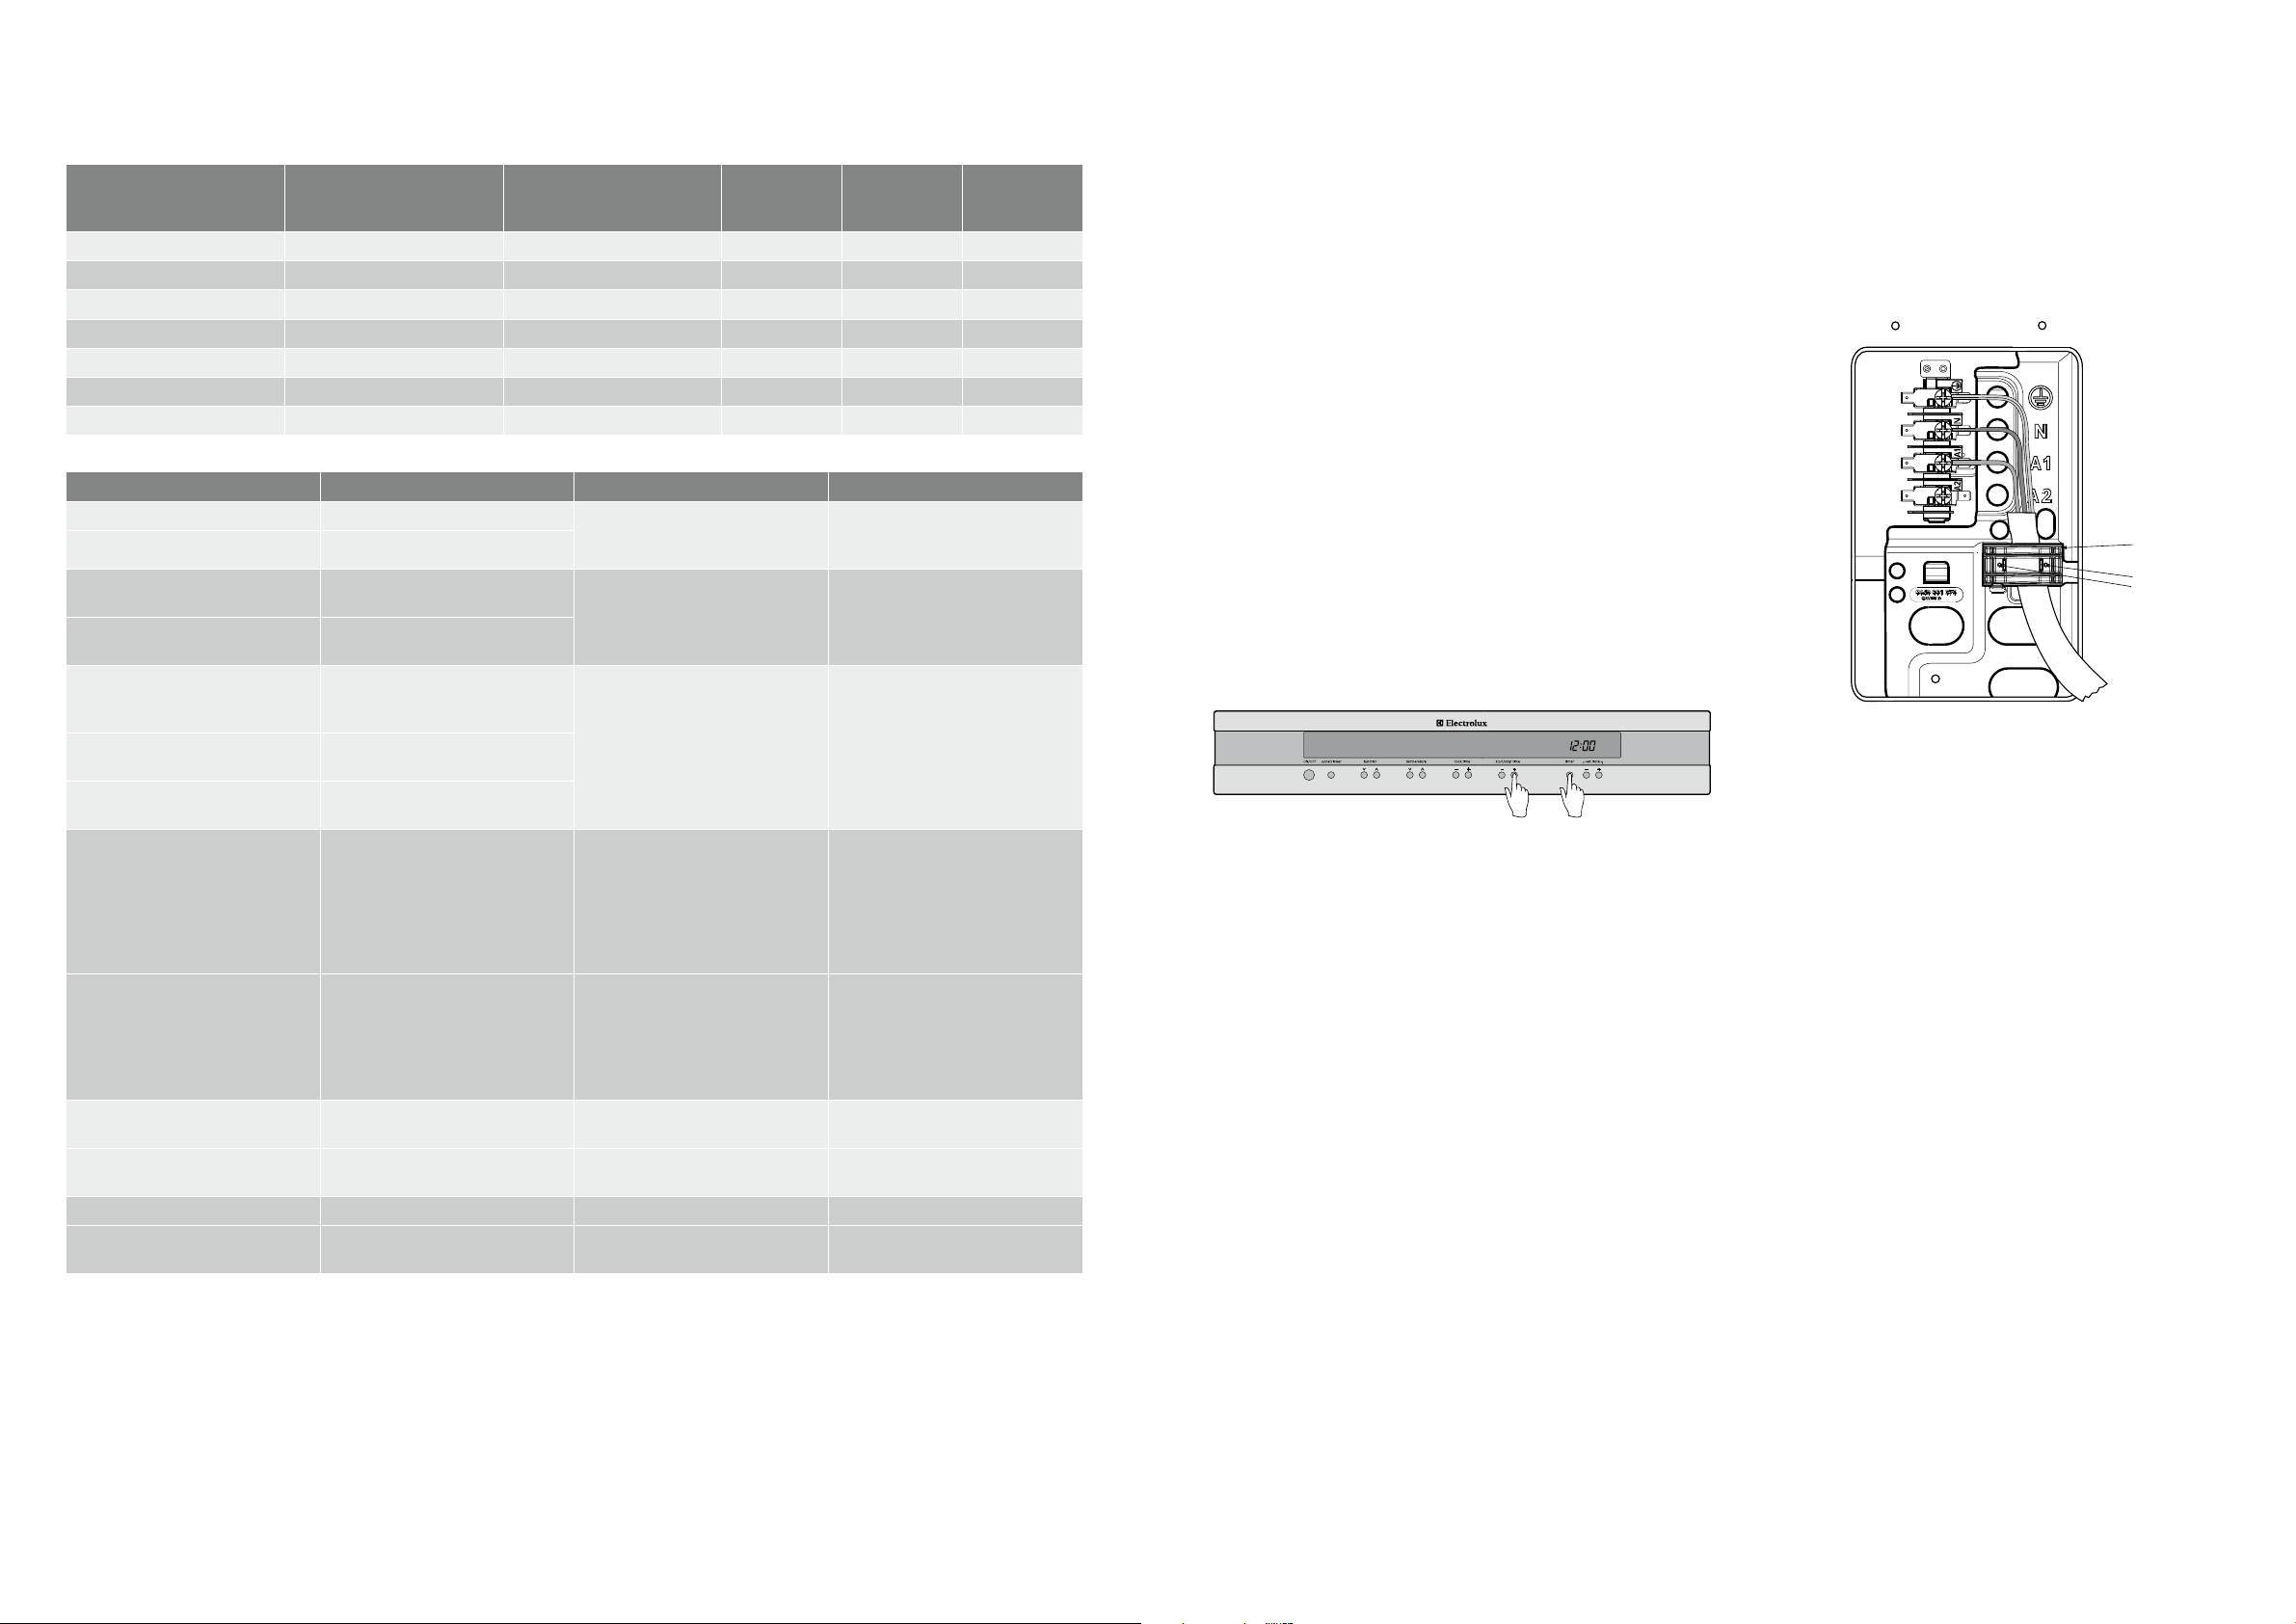
18 cooking guide electrolux e:line ovens grilling guide electrolux e:line ovens 19
tips and information
The following tables are intended as a guide and experience
may show some variation in cooking times necessary to
meet individual requirements.
Temperature estimations
IfarecipecallsforFahrenheit(°F)ornoactualtemperatures,usethefollowingtabletodeterminethetemperature(°C).
oven temperature°C temperature°F
Low heat
Cool
Veryslow
Slow
80
100-110
130-140
175
210-230
265-285
Moderateheat
Moderately slow
Moderate
Moderately hot
150-160
170-180
190-200
300-320
340-355
375-390
Highheat
Hot
Veryhot
Extremely hot
200-210
220-230
240-250
390-410
430-450
465-480
TraditionalBake
food temperature°C oven shelf
position*
time in minutes
Scones Plain or fruit 220 2 10-15
Biscuits Rolled
Spooned
Shortbread biscuits
170
190
160
2
2
1 or 2
10-15
12-15
30-35
Meringues Hard – individual
Soft – individual
Pavlova – 6 eggs
110
180
110
2
2
1
90
15-20
75
Cakes Patty cakes
Sponge – 4 eggs
Shallow butter cake
Rich fruit cake
190
180
180
140
3
2
2
2
15-20
20-30
30-40
180
Pastry – Shortcrust Cornish pasties
Custard tart
200
200/180
2
1
40-45
10/30-30
Pastry – choux Cream puffs 210 2 25-30
Yeast goods Bread 210 1 25-30
*Counting from the bottom shelf up
Fancooking
food temperature°C oven shelf
position*
time in minutes
Scones Plain or fruit 210 Any 10-15
Biscuits Rolled
Spooned
Shortbread biscuits
150
180
150
Any
Any
Any
10-15
12-15
30-35
Meringues Hard – individual
Soft – individual
Pavlova – 6 egg
100
165
100
Any
Any
Any
90
15-20
75
Cakes Patty cakes
Sponge – 4 egg
Shallow butter cake
Rich fruit cake
180
170
170
130
Any
Any
Any
Any
15-20
20-30
30-40
180
Pastry – Shortcrust Cornish pasties
Custard tart
180
190/170
Any
Any
40-45
20-30
Pastry – choux Cream puffs 200 Any 25-30
Yeast goods Bread 200 Any 25-30
*Counting from the bottom shelf up
tips and information
ForbestcookingresultsyoumustPre-Heatyouroven
andgrill.Pre-heatingyourapplianceallowsittoreachthe
required temperature quickly and efficiently as well as cook
your food at the correct temperature for the entire cook time.
For best baking results preheat oven for 30 minutes.
Grilling hints
Asamethodofcooking,grillingcanbeusedto:
• Enhancetheavoursofvegetables,sh,poultryand
meat.
• Sealthesurfaceofthefoodandretainnaturaljuices.
• Youcangrillwiththedooropenorclosed.
This table shows how to grill different types of meat:
food grilling method
Beef Youcanusetenderloin,rumpandsirloin.Brush
with oil or melted butter, especially if the meat is
very lean.
Lamb You can use the loin chops, shortloin chops,
chump chops and forequarter chops. Remove
skinorcutatintervalstoavoidcurling.Brush
with oil or melted butter.
Sausages Prick sausages to stop skin from bursting.
Poultry Divideintoservingpieces.Brushwithoil.
Fish Brushwithoilormeltedbutterandlemonjuice.
Bacon Removerind.Grillatandmakeintorolls.
warning
Note:
• Alwayscleanthegrill/ovendishaftereveryuse.
Excessivefatbuildupmaycauseare.
Guide to better grilling
Nodenitetimescanbegivenforgrillingbecausethis
dependsonyourowntastesandthesizeofthefood.
These times should only be used as a guide and remember
to turn the food over half way through the cooking process.
food time in minutes
Steak 15-20
Chops 20-30
Fish 8-10
Bacon 4-5
For better grilling results, follow these easy instructions:
• Removeoven/grilldishandgrillinsertandpreheatgrill
forabout5minutes.
• Chooseonlyprimecutsofmeatorsh.Ifthecutisless
than5mmthickitwilldryout.Ifthecutismorethan
40mm thick, the outside may burn whilst the inside
remains raw.
• Donotplacealuminiumfoilunderfoodasthisprevents
fats and oils from draining away, which could result in
a fire.
• Bastethefoodduringcookingwithbutter,oliveoil
or marinade. Grilled food is better if marinated
before cooking.
• Usetongstoturnfoodasaforkpiercesthesurfaceand
willletjuicesescape.
Grilling guide
Fangrill
The Fan grill function will assist the grilling process
by circulating the heat evenly around the food. The
recommended temperature setting is 180°C for all fan
grilling functions.
• Usethesmokelessgrillinsertandovendishforall
fan grilling.
• Positionthedishinthelowerhalfoftheoven,
for best results.
• Wipeoffanyoilorfatwhichsplatterswhiletheoven
is still warm.
• Thereisnoneedtoturnmeatasbothsidesarecooked
at the same time which means the food is succulent.
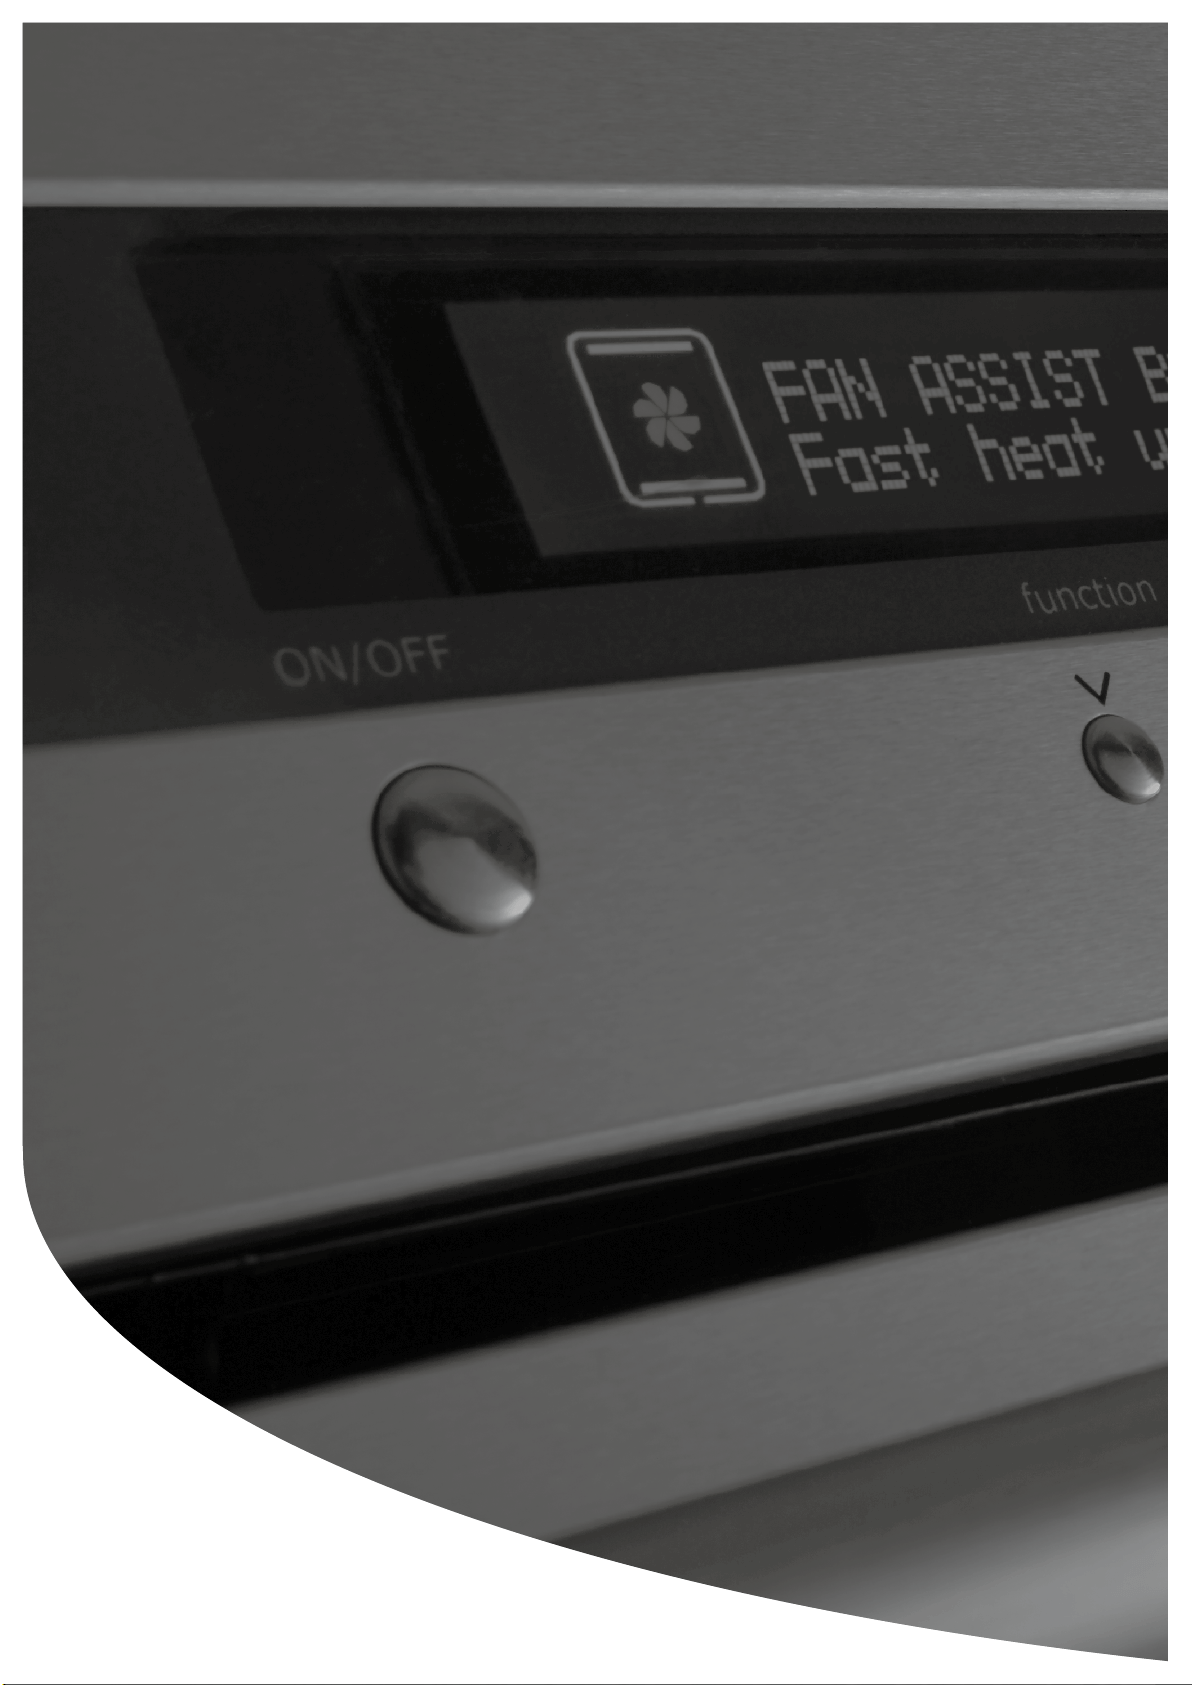
20 dealing with cooking problems electrolux e:line ovens electrolux e:line ovens get to know your oven 21
problem causes remedies
Uneven cooking Incorrectshelfposition Select shelf that puts the food in the centre of
the oven
Oven tray too large Experiment with other trays or dishes
Trays not centralised Centre trays
Airowinovenuneven Rotate food during cooking
Grill dish affecting thermostat Remove grill dish from oven on bake modes
Bakedproductstoobrownontop Oven not preheated Preheat oven
Bakingtinstoolargefortherecipe Usecorrectsizetins
Bakingtinsnotevenlyspaced Stagger baking tins at least 3cm between tins
and oven walls
Productsnotevenlysizedorspacedontrays Makeintosamesizeandshape,andspread
evenly over trays
Bakingtemperaturetoohigh Lower the temperature
Bakedproductstoobrownon
bottom
Bakingtinstoolargefortherecipe Usecorrectsizetins
Bakingtinsareadarkmetalorglass Change to shiny, light tins or lower the temp
by 10°C
Food too low in the oven Cook one shelf higher
Oven door opened too frequently during
baking
Don’topenthedooruntilatleasthalfthe
cooking time has passed
Bakingtemperaturetoohigh Lower the temperature
Grill dish affecting thermostat Remove grill dish from oven and bake on
modes
Cakes have a cracked thin crust Bakingtemperaturetoohigh Lower the temperature
Food too high in oven Cook one shelf lower
Cake batter over mixed Mixjustlongenoughtocombineingredients
Pan too deep Checksizeofpananduse
Bakingpansdark Change to shiny pans
Bakedproductsarepale,atand
undercooked
Bakingtemperaturetoolow Raise the temperature
Food too low in oven Cook one shelf higher
Bakingtimetooshort Increasethecookingtime
Incorrectsizetin Usethecorrectsizetin
Cakes fallen in the centre Bakingtemperaturetoolow Raise the temperature
Bakingtimetooshort Increasethecookingtime
Proportions of ingredients incorrect in the recipe Check recipe
Open door too early in baking Do not open door until the last quarter of
cooking time
Roast meat, potatoes not
browning in fan oven
Poor air circulation Elevate food onto a rack to allow air circulation
Grill dish affecting thermostat Remove grill dish from oven on bake modes
Juices running out of meat Do not pierce meat with a fork
Turn with tongs
Grilled meats outside is
overcooked and centre is raw
Grill at lower insert position
Grilled chops and steaks curling Cut into fat every 2cm
Dealing with cooking problems Get to know your oven
Gettoknowyournewovenwiththis
‘SimpleTestCake’
Althoughwestriveforaperfectperformingoven,it’s
possible that there will be some variation in colour when
baking. Therefore, we suggest this simple, easy and
delicious to make Simple Test Cake, it can help you
understandyournewoven.Allovensdosometimeshave
hotorcoldspots,thereforeitisimportanttojudgewith
your eye as you may require to rotate during baking.
‘SimpleTestCake’
125gbutter,softenedtoroomtemperature
1 cup caster sugar
1 teaspoon pure vanilla essence
4 large eggs
2cupsself-raisingour
pinch of salt
4tablespoons(80mL)full-creammilk
Method:
1. Butterbaseandsidesoftwo,20cmstraight-sided
round or square cake pans. Then line the base with
grease proof or baking paper.
2. Preheatoventomoderate‘180ºC’(170ºCfanforced)
and ensure oven shelf is in the centre position of oven.
3. Cream softened butter and sugar until light in colour.
4. Addvanillaessence.
5. Theneggsoneatatime,beatingwellaftereach
addition.
6. Siftourandsaltintothemixtureandbeatuntil
well combined.
7. Addmilkandbeatorstirtocombine.
8. Spoon mixture equally between prepared cake pans.
9. Bakeinpreheatedoven,middleshelfforabout25to35
minutes or until when tested with a fine cake skewer it
comes out clean or the edges of the cakes have come
away slightly from the sides of the cake pans.
10.Removefromoventowirecakerackandrestfor5
minutes before removing from cake pans.
Cool completely.
ToServe:sandwichtogetherwithyourfavouritejamor
conserve, and dust top with pure icing sugar.
fOOTNOTE:
ifdesiredsubstitutebutterforeithermargarineorolive
oilspread.
RecipeisbasedontheAustralianstandardmetric250mL
cupand20mLtablespoonsets.
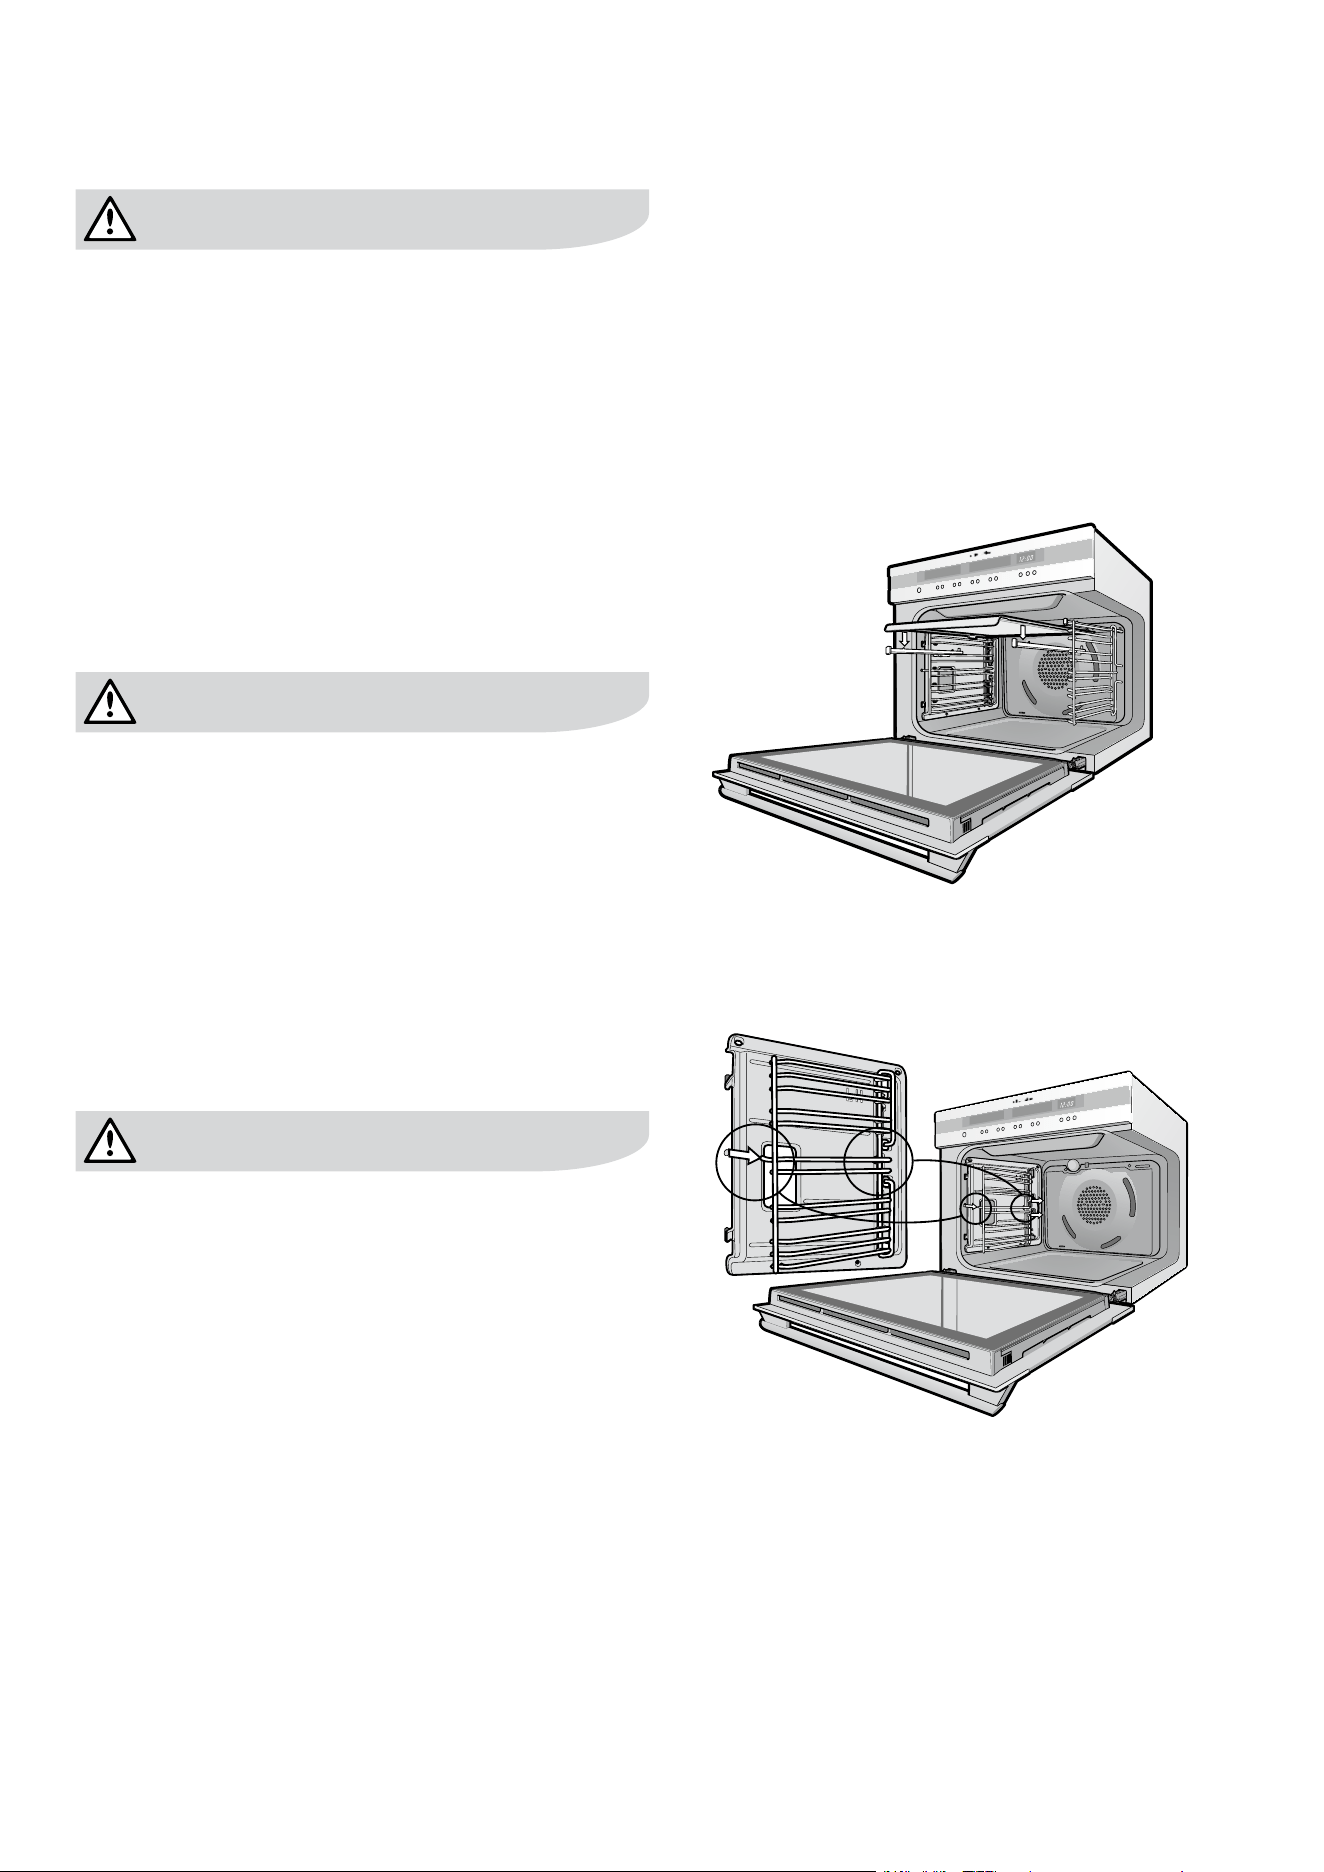
22 electrolux e:line ovens maintenance and cleaning removingandreplacingtheoventoplight(EPEE63CS&EPEE63CKmodelsonly)electrolux e:line ovens 23
warning
• Donotusesteamcleaners.
• Donotlinethebottomoftheovenwithfoil
orcookware.
Stainless steel
• Allgradesofstainlesssteelcanstain,discolourorbecome
greasy. You must clean these areas regularly by following
the procedures below, if you want your appliance to look
its best, perform well and have a long life.
• Caremustbetakenwhenwipingexposedstainless
steel edges, they can be sharp!
• Thefrontframearoundtheovencanbecleaned
with stainless steel cleaners if it becomes soiled or
discoloured.
• AsuitablecleanercanbepurchasedfromElectrolux
Customer Care Centres.
caution
• Theovendoorandcontrolpanelisdecoratedwitha
special stainless steel that resists finger marks and should
only be cleaned with warm water and a mild detergent.
• DONOTusestainlesssteelcleaners,abrasivecleaners
or harsh solvents.
Note:
• Makesureyoufollowthepolishorbrushinglinesinthesteel.
Glass
• Glasssurfacesondoorsandcontrolpanelsarebest
cleaned immediately after soiling.
• Adampclothmayhelpremovebakedonfooddeposits.
• Ovencleanerscanbeusedtoremovestubbornmarks
and stains.
caution
The door glass on this appliance is made from a tough,
durable material that withstands heating and cooling
without breaking.
However,itmustberememberedthatitisGLASS,itmay
break. Treat it accordingly! Should you have any questions
about the glass in your new appliance, please contact the
customer care centre by dialling 1300 363 640.
Do not use harsh abrasive cleaners or sharp metal
scrapers to clean the oven door since they can scratch
the surface, which may result in shattering of the glass.
Oven
• Alwayskeepyourapplianceclean.Ensurefatsandoils
do not accumulate around elements, burners or fans.
• Alwayskeeptheovendish,baketraysandgrilldish
inserts clean, as any fat deposits may catch fire.
• Alwayswrapyourmeatsinfoiloranovenroastingbag
tominimisecleaning.Anypolyunsaturatedfatscanleave
avarnish-likeresiduewhichisverydifculttoremove.
Note:
• ReferalsotoPyroliticovencleaningonpage28.
((EPEE63CS&EPEE63CKmodelsonly)
Grill
• Alwayskeepthegrilldishandgrillinsertclean,asany
fat deposits may catch fire.
Maintenance and cleaning
Removingthetraysandshelvesfromyourappliance
• Slidethedishandshelvestowardsyouuntiltheyreach
the front stop.
• Tiltthemupatthefronttoclearthesidesupports,
taking care not to spill the contents.
• Liftthemclear.
• Washthedishandinserttheshelvesinhotsoapywater.
• Reversetheabovestepstoputthegrilldishandshelves
back again.
• Ensurethattheyareplacedbetweentwosupportwires.
• Toremoveatrayfromaslidingposition:
– Pull tray towards you until it stops.
– Lift the tray clear.
Removingthesideracks
1. Grasp the middle wire at the front.
2. Pull firmly inwards.
Cleaning your accessories
warning
IMPORTANT:Makesuretheapplianceisturnedoff
before you remove or replace parts, to avoid the
possibilityofelectricshock.
Removingandreplacingtheovenbacklightand
side light
• Turnovenlightglassanticlockwisetoremoveitfor
globe replacement.
• Toremovesidelight,placeaspoonunderthelightglass
and lever off. Replace globe and snap glass cover back
into position.
• Aspecialhightemperatureresistantglobeshouldbe
used. This can be purchased from Electrolux Customer
Care Centre.
Releasingthegrillelement
Wehavedesignedtheupperelementwitharotatinglatch
to help you reach your oven roof for cleaning.
• Rotatelatchuntiltheelementdropsdownfreely.
• Thetoplightispositionedbehindthegrilldeectoratthe
top of the oven.
• Toremovetheglobetheshelvesshouldrstberemoved
from the oven and the top element dropped down.
• Insertasmallscrewdriverintotheglasscutoutbetween
the two metal clips on the left hand side, as shown in
the diagram.
• Gentlylevertheglasscoveroff,bypushingthescrew
driver in and moving it upwards, whilst holding the glass
coverwiththeotherhand.(Ifnotsupported,theglass
cover may fall and break).
• Removethefaultyglobebypullingitdirectlyoutof
its holder.
• Replacetheoldglobewithanewone,ensuringnotto
directly touch the surface of the globe with your fingers,
(Atissueorsoftclothisbestforthis.)
• Pickuptheglasscoverandplaceshortedgeintoright
side of housing; push up opposite end of glass cover
until it snaps into position.
• Resecurethetopelementinplace.
Replacing the oven top light
(EPEE63CS&EPEE63CKmodelsonly)
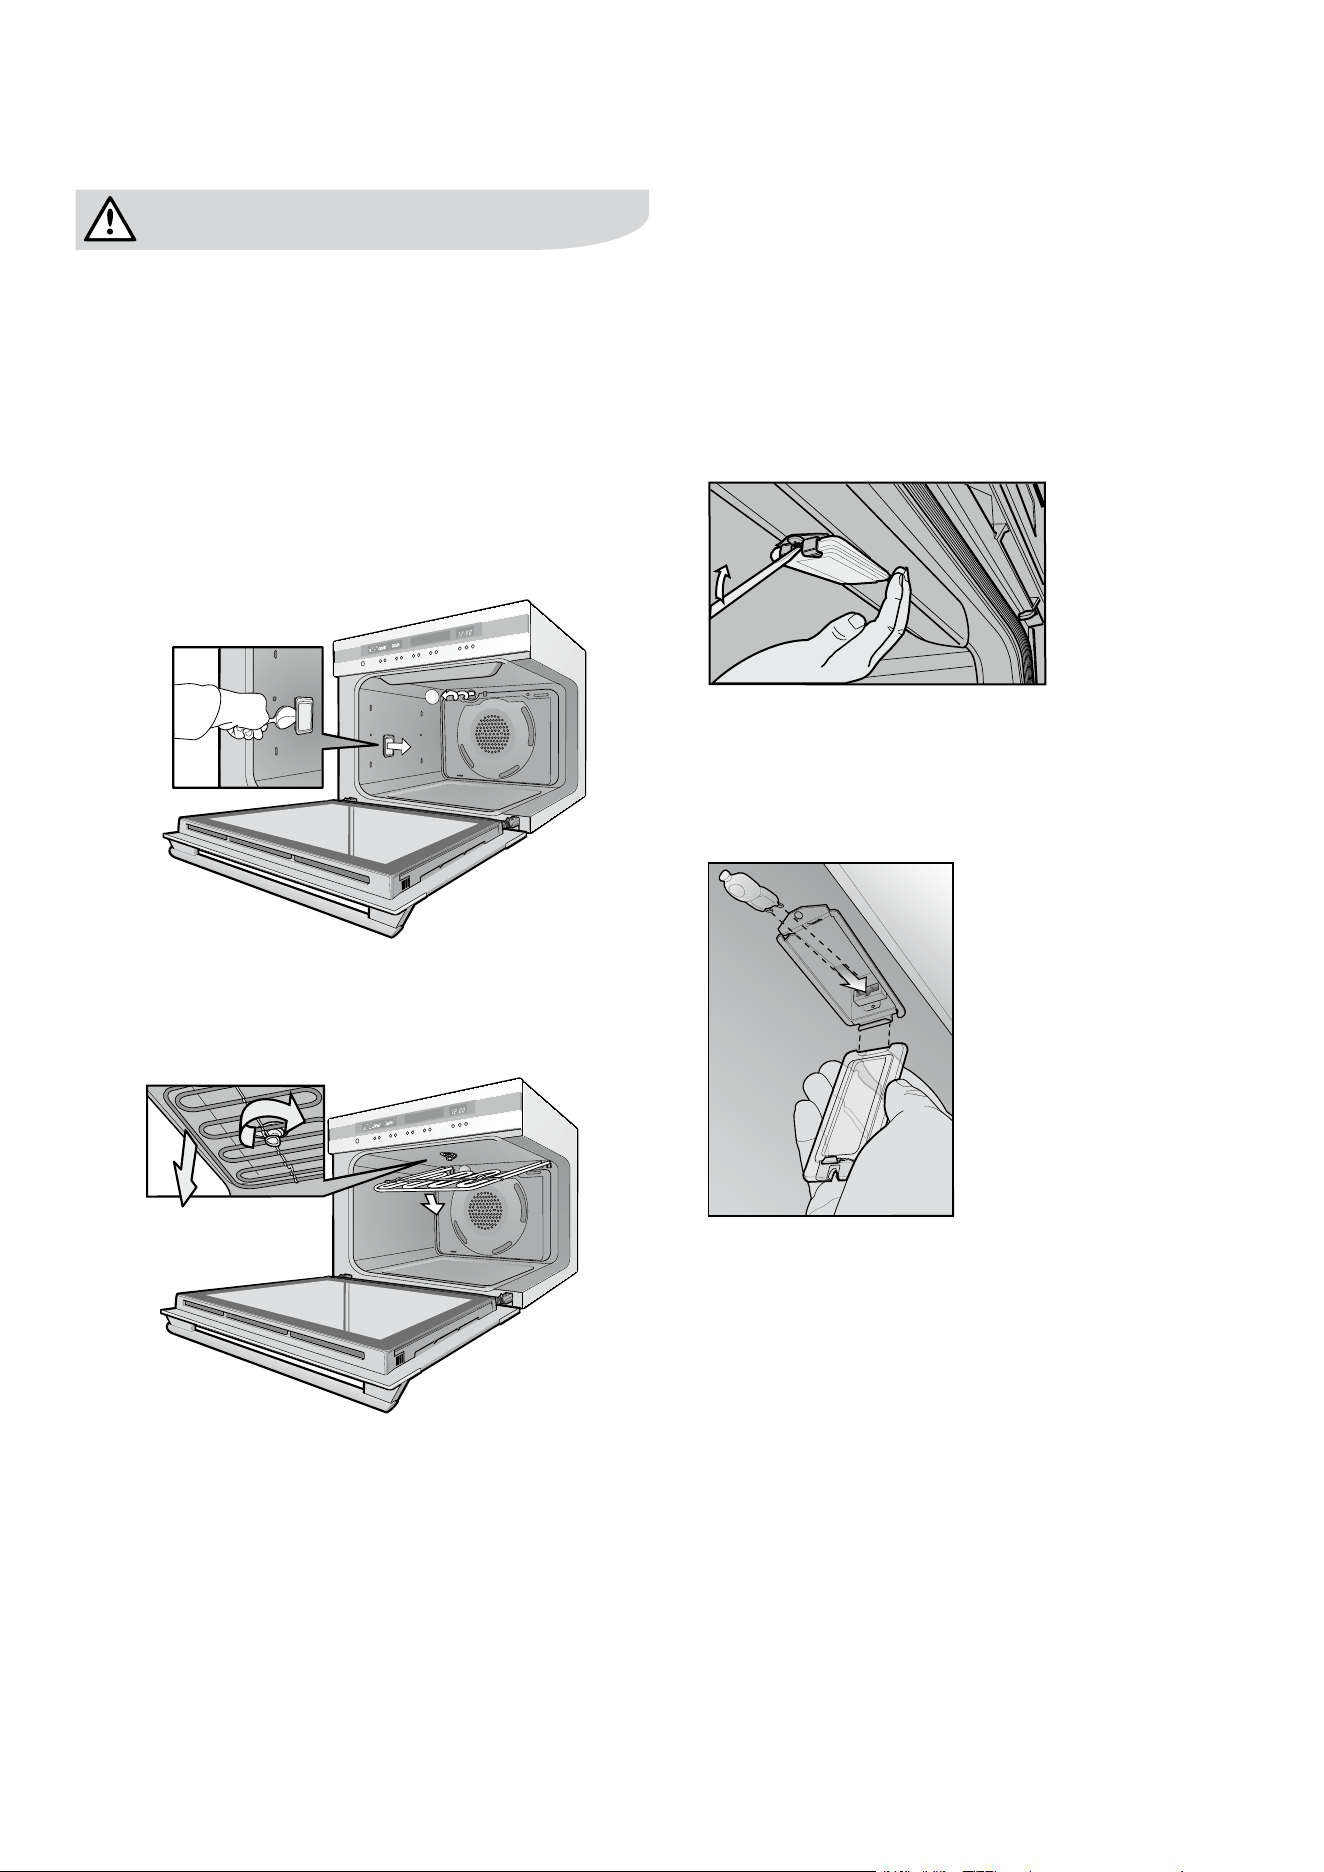
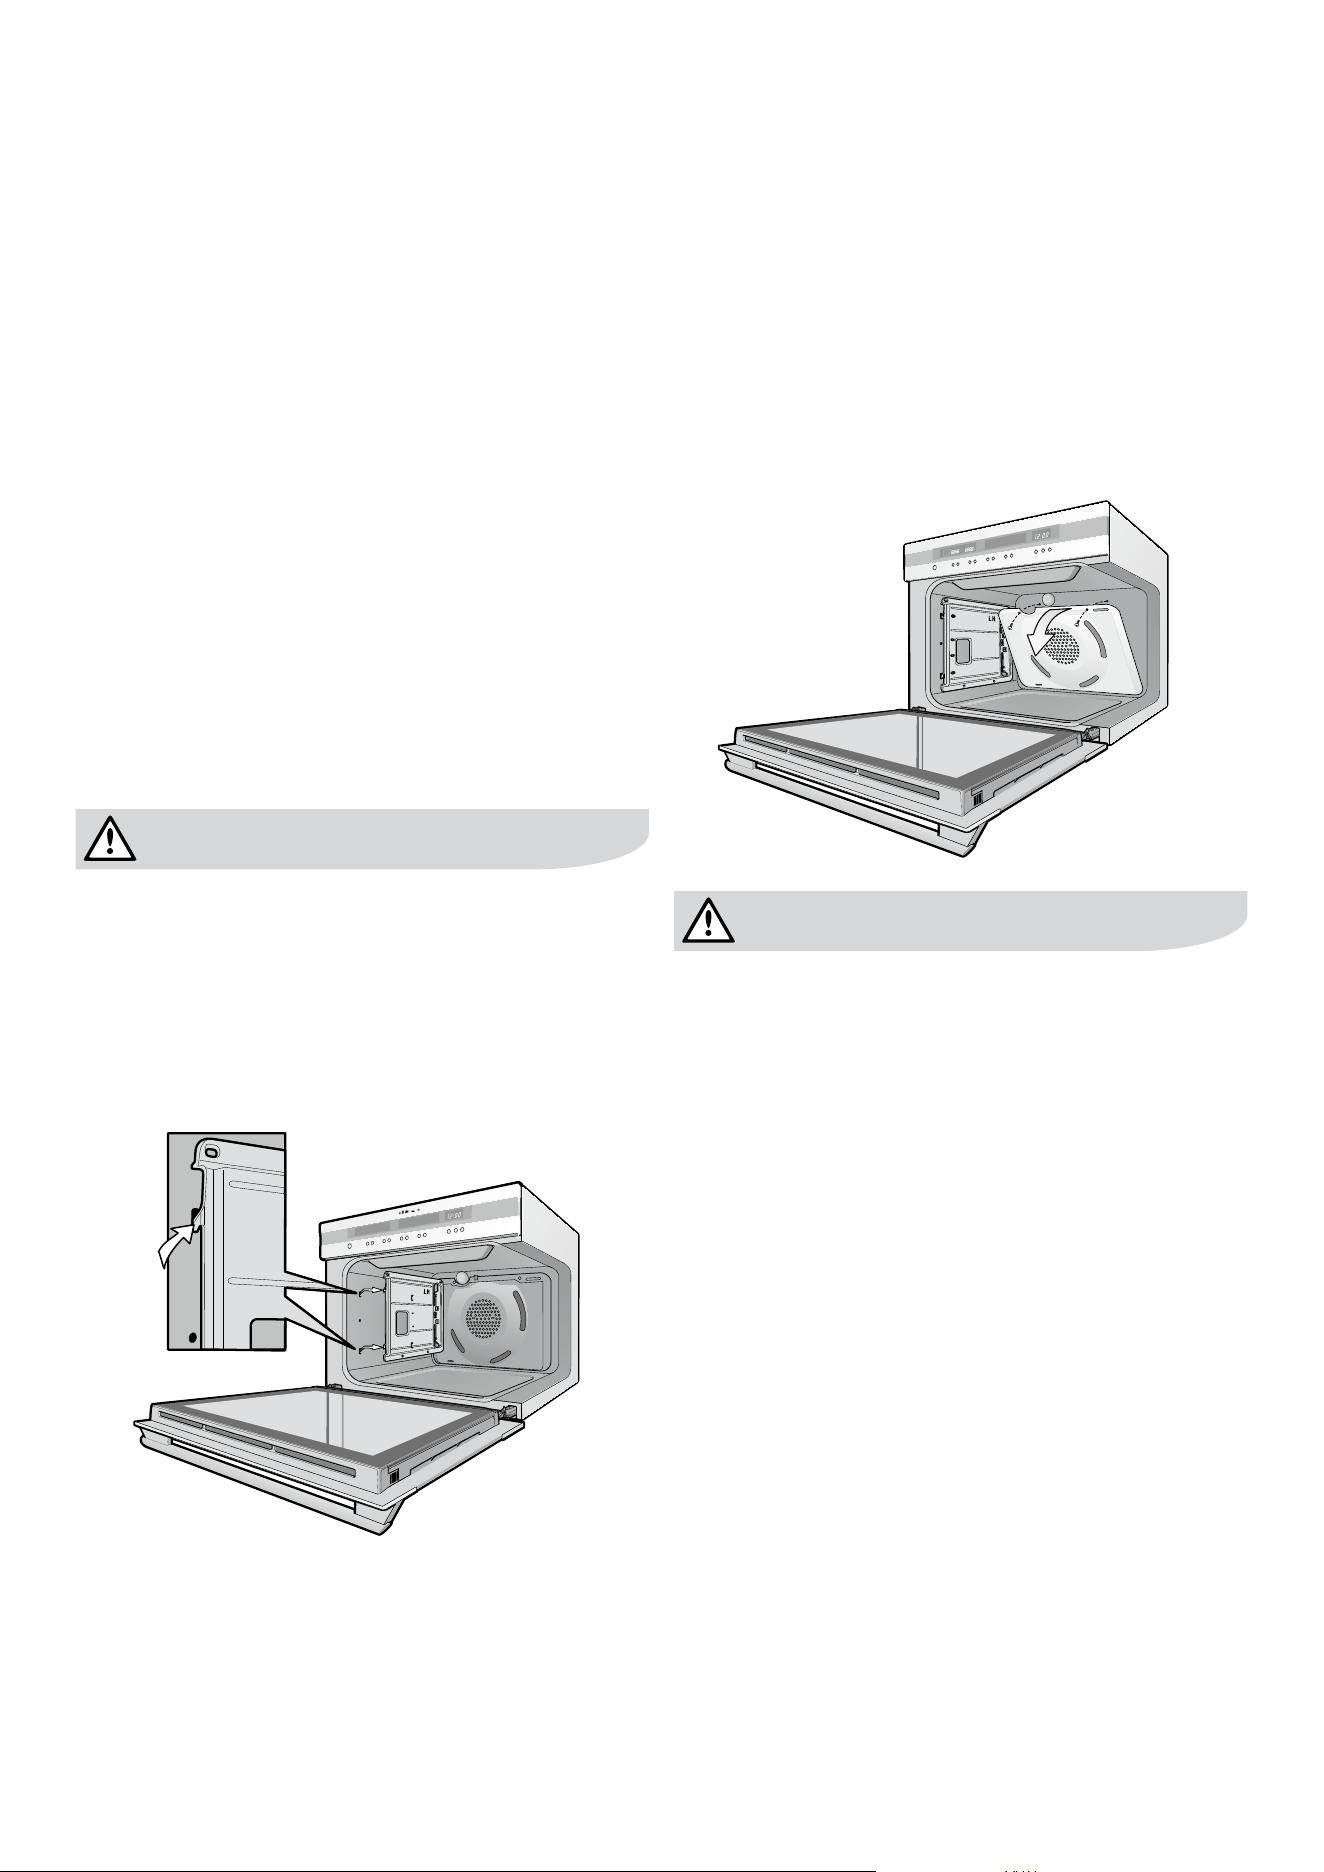
24 electrolux e:line ovens catalytic self cleaning panels oven door removal electrolux e:line ovens25
Operation
Catalytic self clean panels are coated with a specially
formulated enamel coating, over a base of regular enamel.
This enamel coating has a rough surface which is also
porous. During normal cooking, fats and other food splatter
is partially absorbed into the surface and then oxidises
away.
This oxidisation of the fat works best if the oven is set at
high temperatures, You will find that if you do a lot of lower
temperature baking, say around the normal 180°C,
then the cleaning process may not be complete. Every
nowandthenyoushouldturntheovenonto250°Cfor
around one hour to completely remove the soil.
Cleaning
Should the panels become heavily soiled, they will need to
be taken out of the oven and cleaned by hand. They should
be soaked in warm, soapy water for at least 2 hours and
then wiped clean with a soft cloth.
Note:
• Itisnotrecommendedthatthecatalyticlinerinthetop
oftheovenberemoved.
caution
Solid cleaning powders, creamy cleansers, caustic oven
cleaners, steel wool or other scourers will ruin the catalytic
surfaceandmustNEVERBEUSED.
Removingcatalyticliners
• Removethesideracks(seepage22).
• Liftthelineruptodisengagethehooks.
• Thelinersshouldnowbefreetobepulledintowards
the centre of the oven.
Catalytic self cleaning panels (where fitted)
Removingandreplacingthecatalyticfanbafe
• Toremovethefanbafe
– Remove the 2 retaining screws on the top edge of the
fanbafe.
– Pull the top edge towards you and then disengage to
bottom tabs from the oven back.
• Toreplacethefanbafe
–Insertthetwotabsatthebottomofthefanbafeinto
their corresponding slots in the oven back.
– Push the top home and insert screws firmly into
appropriate holes.
–Thefanbafemustnotbeloose.
Itiscriticalthatthefanbafeisreplacedafter
cleaning,beforetheovenisoperatedagain.
FatFilter(see page 11)
• TheFatFiltermustbecleanedeverytimefattyor
oily food has been cooked.
• TheFatFiltercanbecleanedinadishwasher.
warning
warning
Do not lift the door by the handle. Rough handling will
cause glass to break.
Removingtheovendoorexcept(EPEE63CS&
EPEE63CKmodels)
Your oven is equipped with a door that can be
disassembled in order to clean all the panes of glass.
Remove the door before cleaning.
• Openthedoorfullytoaccessthehingesthenrotatethe
‘stirrups’(highlightedintheimage)onbothhingesfully
towards the oven.
• Slowlyclosetheovendooruntilitisstopsagainstthe
‘stirrups’(about45
O
).
• Grasptheovendoorwithahandeachsideofthedoor
and remove it from the oven by pulling it towards you.
• Laytheovendoorwiththeoutersidefacingdownwards
onsomethingsoftandat(forexampleablanketona
kitchen table) to prevent scratches.
Removingovendoortoptrim
• Takeholdofthegridembossedsectionsofthedoor
trim at each end and press inwards to release the clips.
Remove the door trim by pulling it towards you.
Removingdoorglasspanels
warning
Rough handling, especially around the edges can cause
the glass to break.
• Lifttheblackborderedglasspaneloutoftheguide.
• Repeatthisforthesmallerclearglasspanel(whentted).
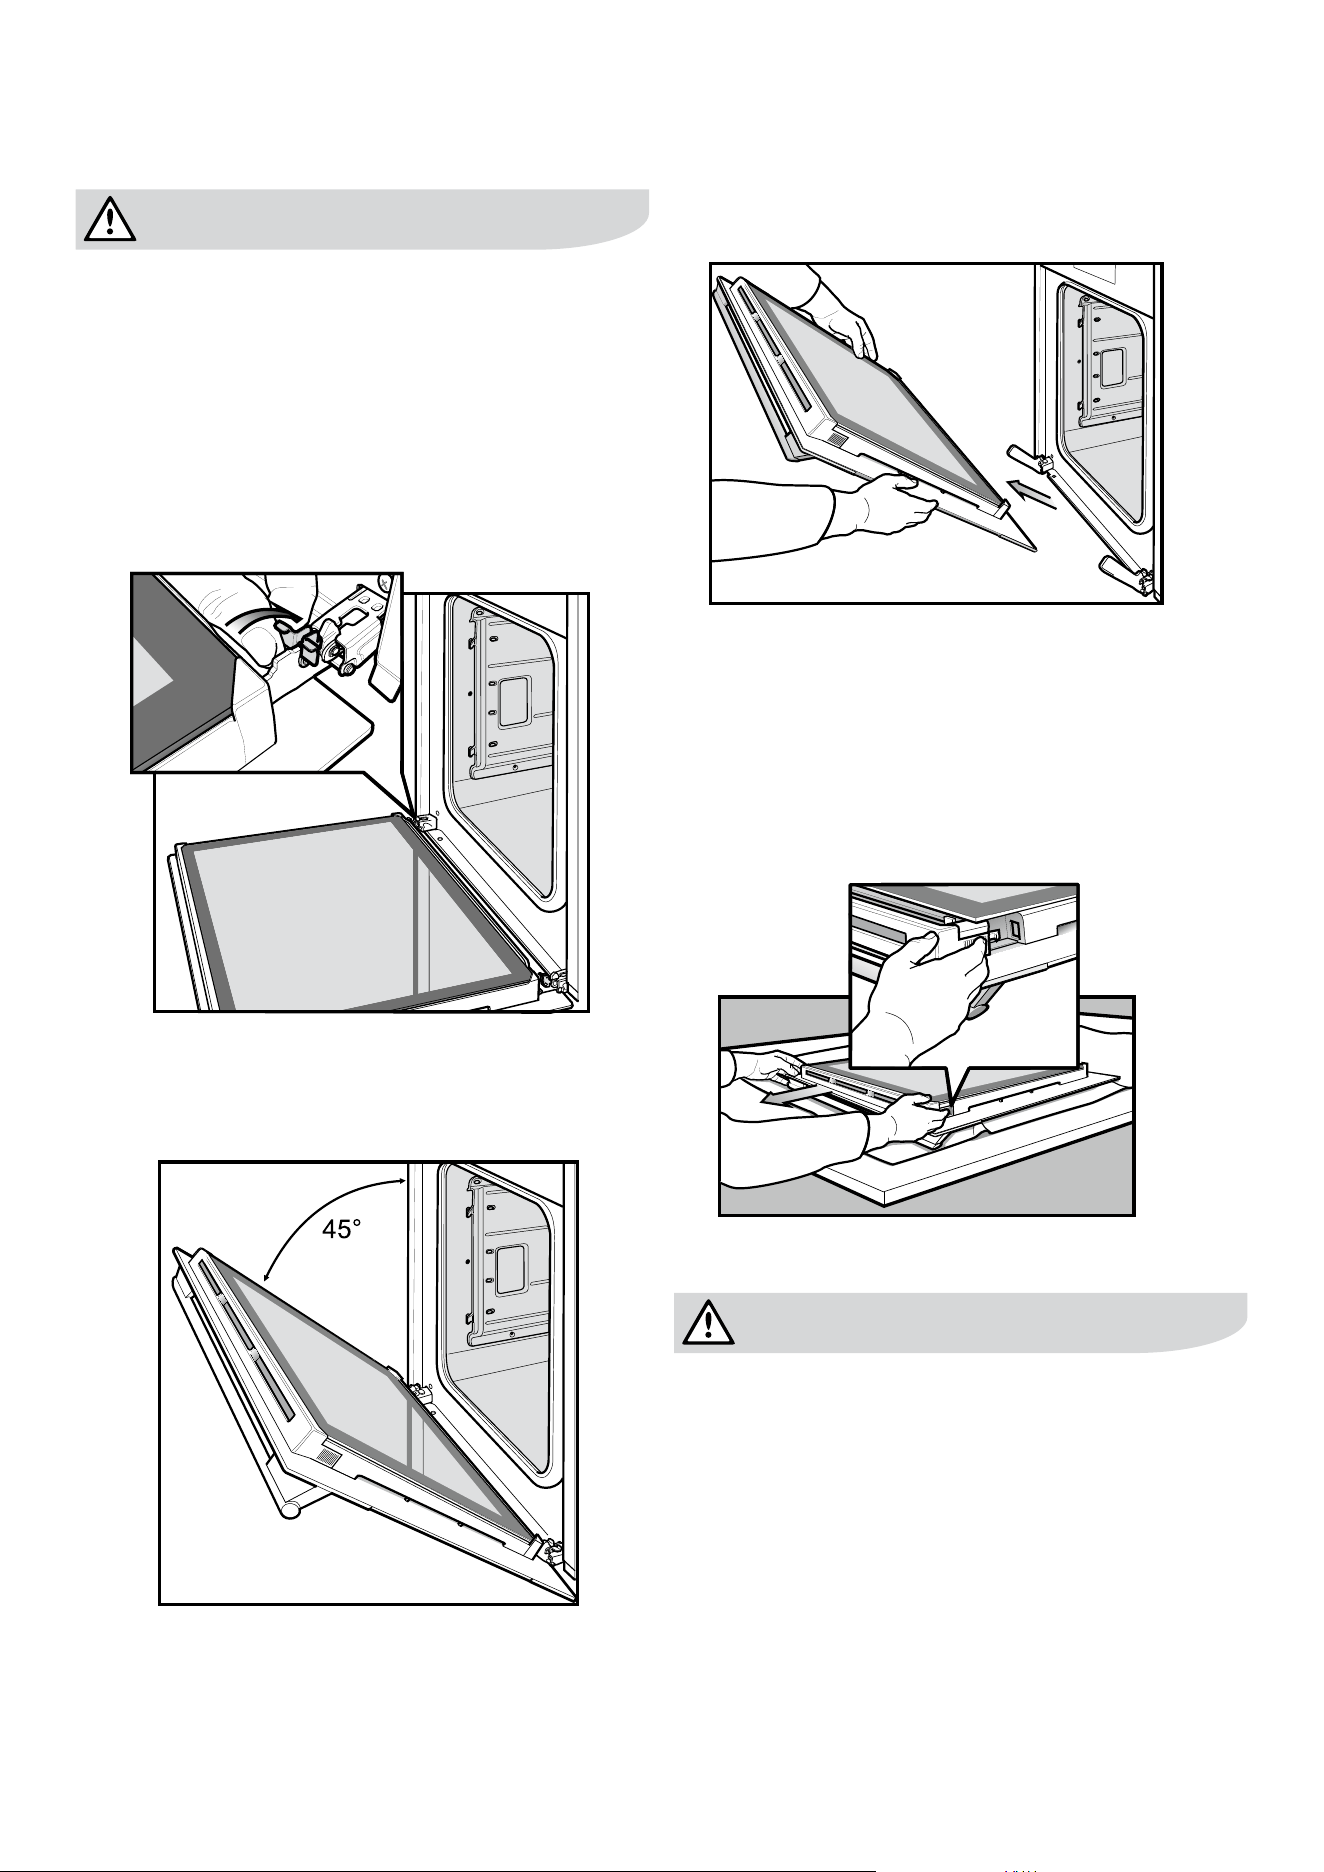
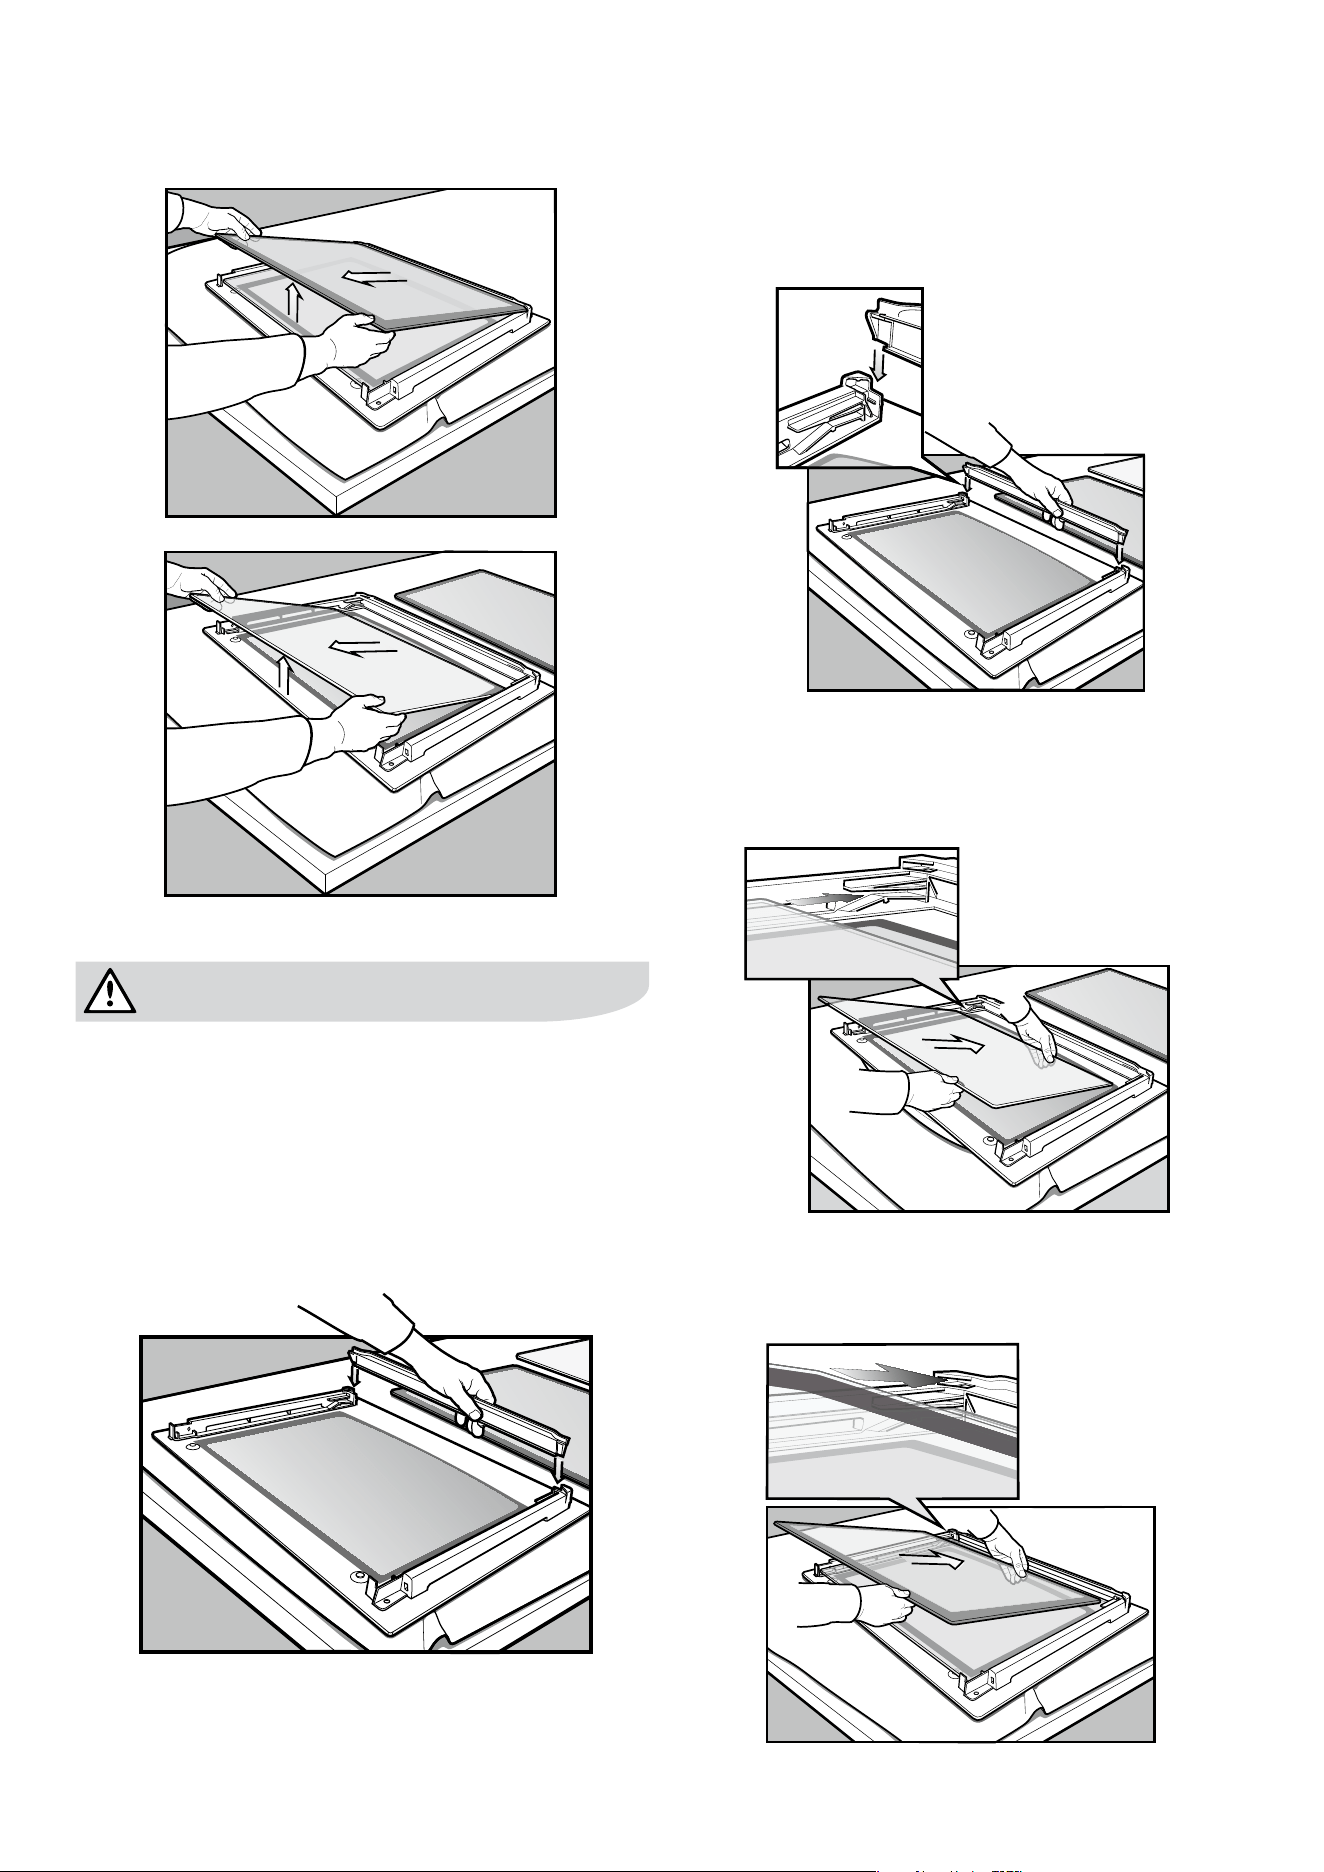
oven door removal electrolux e:line ovens 2726 electrolux e:line ovens oven door removal
Cleaning door glass panels
warning
Do not to use harsh abrasives on the glass panes as the
reectivesurfaceplaysaroleinthefunctionoftheoven.
Do not place glass in dishwasher. Hand wash only with a
softclothandwarmsoapywater.Whendrypolishwitha
soft cloth and ensure the glass is dry before reassembly.
Bottomtrim(onselectedmodels)
• Thebottomtrimmayberemovedforcleaningby
snapping out and lifting away from the glass.
Re-assemblingbottomtrim
• Pushdownto“snap”eachsideofbottomtrimbackinto
door columns.
Re-assemblingdoorglasspanels
• Insertthesmallerclearglasspanel(whentted)rst
from above and at an angle to the profile of the door.
• Repeatfortheblackborderedglasspanelensuringthe
painted surface is facing to the downside.
Re-assemblingtopdoortrim
• Takeholdofthetopdoortrimateachsideandposition
it to the inside edge of the glass.
• Pushthetrimdownwithitstopedgeoverglasspanel
until the clip snaps in on each side of the trim.
• Pushthemiddleofthetrimdowntoensureitisstraight
and firm against the glass panel.
Fittingtheovendoor
• Takeholdoftheovendoorwithahandoneachside
andwiththedooratanangleof45º,positionthe
recesses at the bottom of the door onto the hinge arms
of the oven. Let the door slide down the hinge arms as
far as it will go.
• Openthedoorfullytoaccessthehingesthenrotate
the‘stirrups’(highlightedintheimage)onbothhinges
back to their original positions. The oven door may now
be closed.
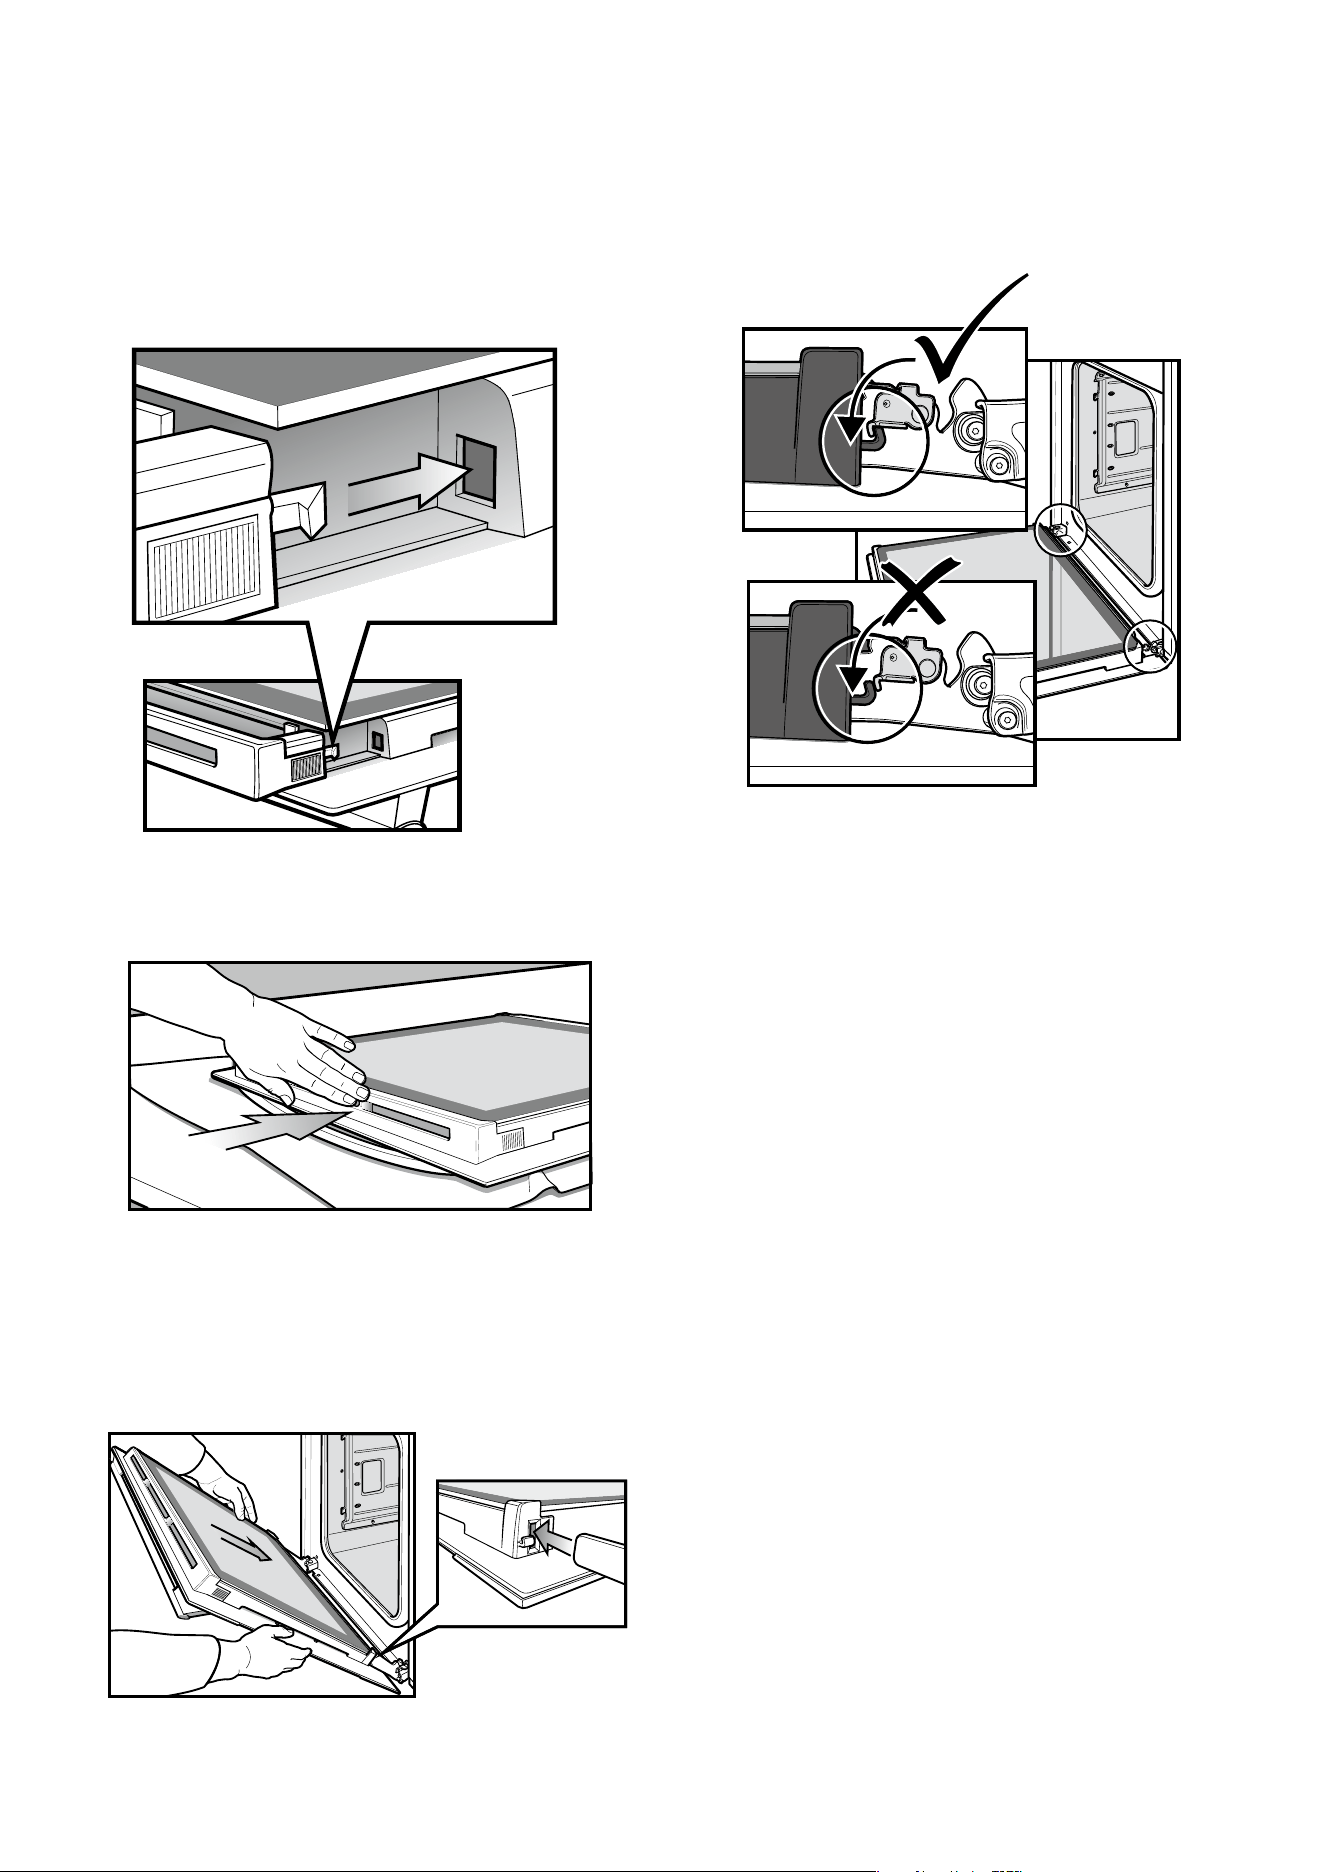
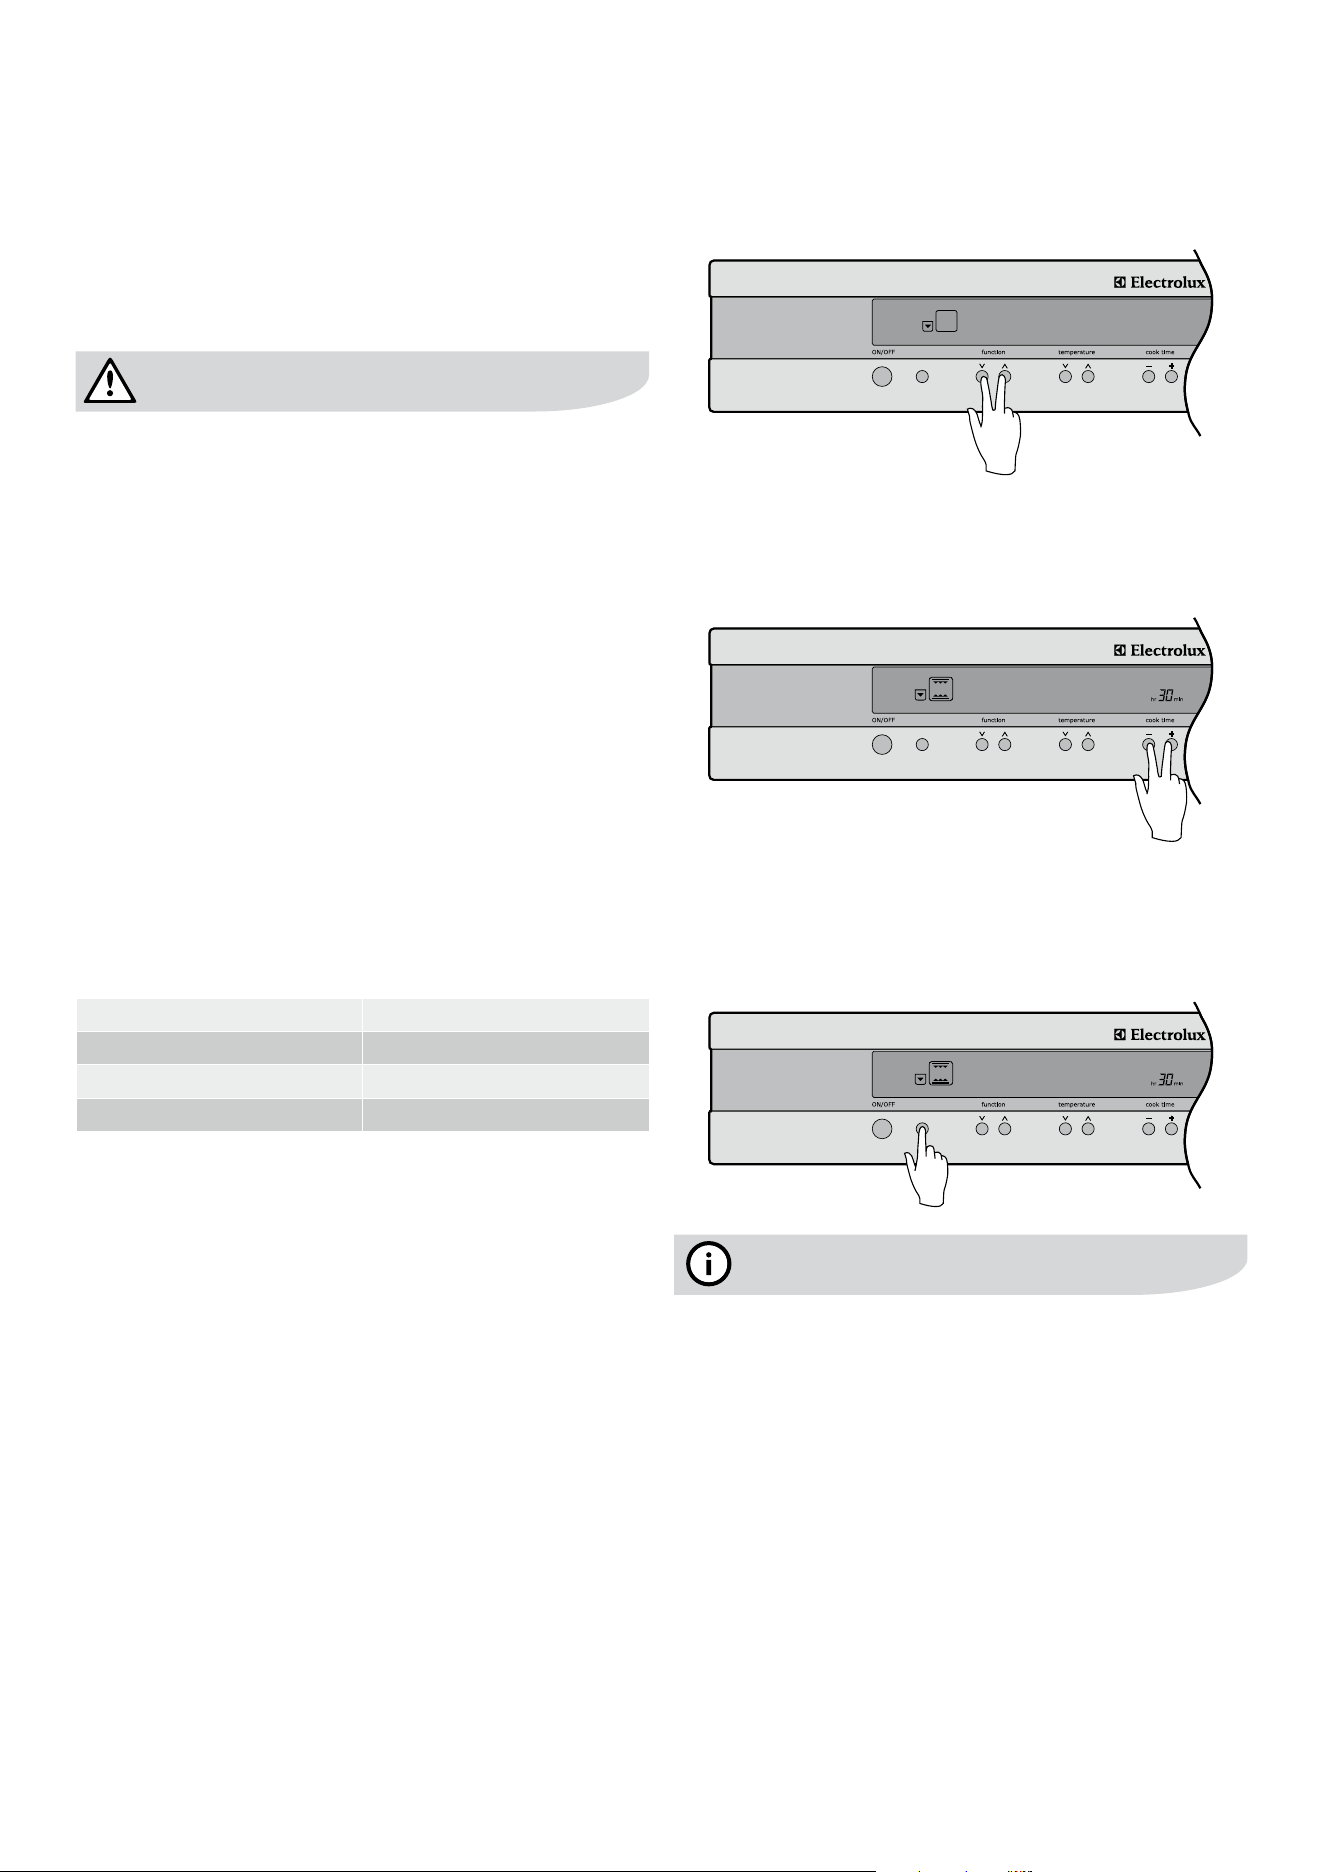
cleaningthepyrolyticovendoor(EPEE63CS&EPEE63CKmodelsonly)electrolux e:line ovens 2928pyrolyticcleaningoftheovencavity(EPEE63CS&EPEE63CKmodelsonly)electrolux e:line ovens
Operation
IfyourovenhasthePyroself-cleaningfunction,itcleans
by burning off the spatters and accumulated dirt and
grease from the oven liner, at high temperature. This
process produces ash which can then be wiped out
of the oven cavity.
During the pyrolytic cleaning process the oven becomes
veryhot(approximately500˚C).
• Pleasekeepsmallchildrenatasafedistance
• Duringpyrolyticcleaningtheairoutletventabovethe
door must be kept clear of any obstruction (eg bulky
tea towels).
• Itisrecommendedyoucleanyourovenregularlyto
keep the oven in its best condition.
• Donotuseyouroventocleanmiscellaneousitems
(eg cookware).
BeforecarryingoutthePyrofunction,
Allaccessoriesmustberemovedfromtheoven.
This includes shelves, trays and side racks.
Clean large pieces of dirt or grease from the oven liner.
Note:
• AsanaddedsafetyfeaturethePyrocyclewillnotstart
ifyouhavelefttherighthandtelescopicsiderackin.
Aswitchdetectsthepresenceoftherackandwillnot
allowPyrotostartuntilitisremoved.
Thereare3Pyrocleaningcyclesyoucanuse.
Soiling Duration
Light Clean 2hrs 00min
Medium clean 2hrs 30min
Heavy clean 3hrs 00min
Durationincludesheat-uptimeandcool-downtimeof45
mins
• Lightclean
This is an energy saving cycle that can be used on a
regular basis if your oven is lightly soiled. Possibly after
every 2nd or 3rd time you roast meat.
• Mediumclean
Use this as your regular cycle about once every
2-3monthstoremovemildlydirtyovens.
• Heavyclean
Whenyourovenisverydirtyitmayneedalongercycle
to clean it thoroughly. This cycle will clean the dirtiest
of ovens.
caution
Selecting the Pyro clean function
Select Pyro clean by using the function button.
PYRO CLEAN
pyro accept
Selectingtherequiredcleaningcycle
Select Light, Medium or Heavy depending on the soiling of
the oven. This is done by pushing the cook time button to
the appropriate time.
PYRO CLEAN
Medium clean
2
pyro accept
Selecting Pyro accept
Afterselectingtherequiredcleaningcycle,pushthePyro
accept button and the function will then start automatically.
The oven light will then go out and the Pyro function
will start.
PYRO CLEAN
Medium clean
2
pyro accept
tips and information
During Pyro cleaning the door will automatically lock when
thetemperatureintheovenapproaches300˚C.(Alock
symbol will appear on the display.)
The door will only unlock when the oven has cooled to a
safe temperature. Turning the function off will not unlock
the door. This will only happen when safe temperatures
are reached.
Note:
• Thecoolingfanwilloperateatanincreasedspeedfor
Pyrocleaningandwillcontinuetorununtiltheovenhas
cooleddown.Thisisnormal.
AfterPyrocleaning
Aftercool-downyoucanwipetheashoutoftheoven
with a soft damp cloth and warm water.
To restore the enamel shine to more difficult areas,
use a damp cloth with vinegar and detergent.
Pyrolytic cleaning of the oven cavity
(EPEE63CS&EPEE63CKmodelsonly)
Your pyrolytic oven is equipped with an oven door that can
be disassembled in order to clean all the panes of glass.
Positioning the door for dismantling
The door needs to be positioned at an angle to aid in the
disassembly of the panes.
• Opentheovendoorfullyandipoutthehingelocating
tab to the open position.
• Afterthelocatingtabhasbeenpositioned,gentlyclose
the oven door until it stops on the locating tab. The door
is now ready for dismantling.
Removingthetopdoortrim
• Pushinthe2buttonsoneithersideofthetrim.
• Liftthetrimawayfromthedoor.
Removingtheglasspanes
• Removethe3panesofglassstartingwithpane1.
• Whenremovingpane3ensurethatthe2rubber
supports are removed before cleaning.
Donotmisplacethem!
Cleaning the glass panes
Clean with a damp cloth.
Do not use scouring agents or abrasive sponges as these
coulddamagethereectivesurface.
Dry thoroughly before reassembly.
Replacingtheglasspanes
• Replacetheglasspanesbackintothedoorstartingwith
pane 3.
• Ensurethispaneisplacedintothecorrectslotandthat
the 2 rubber supports are in place.
• Nextreplacepane2.Thereisareectivecoatingon
this pane. This coating is indicated by a circle printed on
its surface. Ensure this circle is in the same corner as
pictured below.
Circle in this corner
• Replacepane1ensuringtheblackscreeningisfacing
inwards towards the oven.
Replacingthetopdoortrim
Replace the trim ensuring the clips snap into the 2 location
holes. Flip the hinge locating tab back into its original
position and close the door.
Whenthepyrolyticcleaningfunctionison,itisadvisable
not to use a cooktop if it is fitted above the oven. This could
cause overheating and damage to both appliances.
Cleaning the pyrolytic oven door
(EPEE63CS&EPEE63CKmodelsonly)
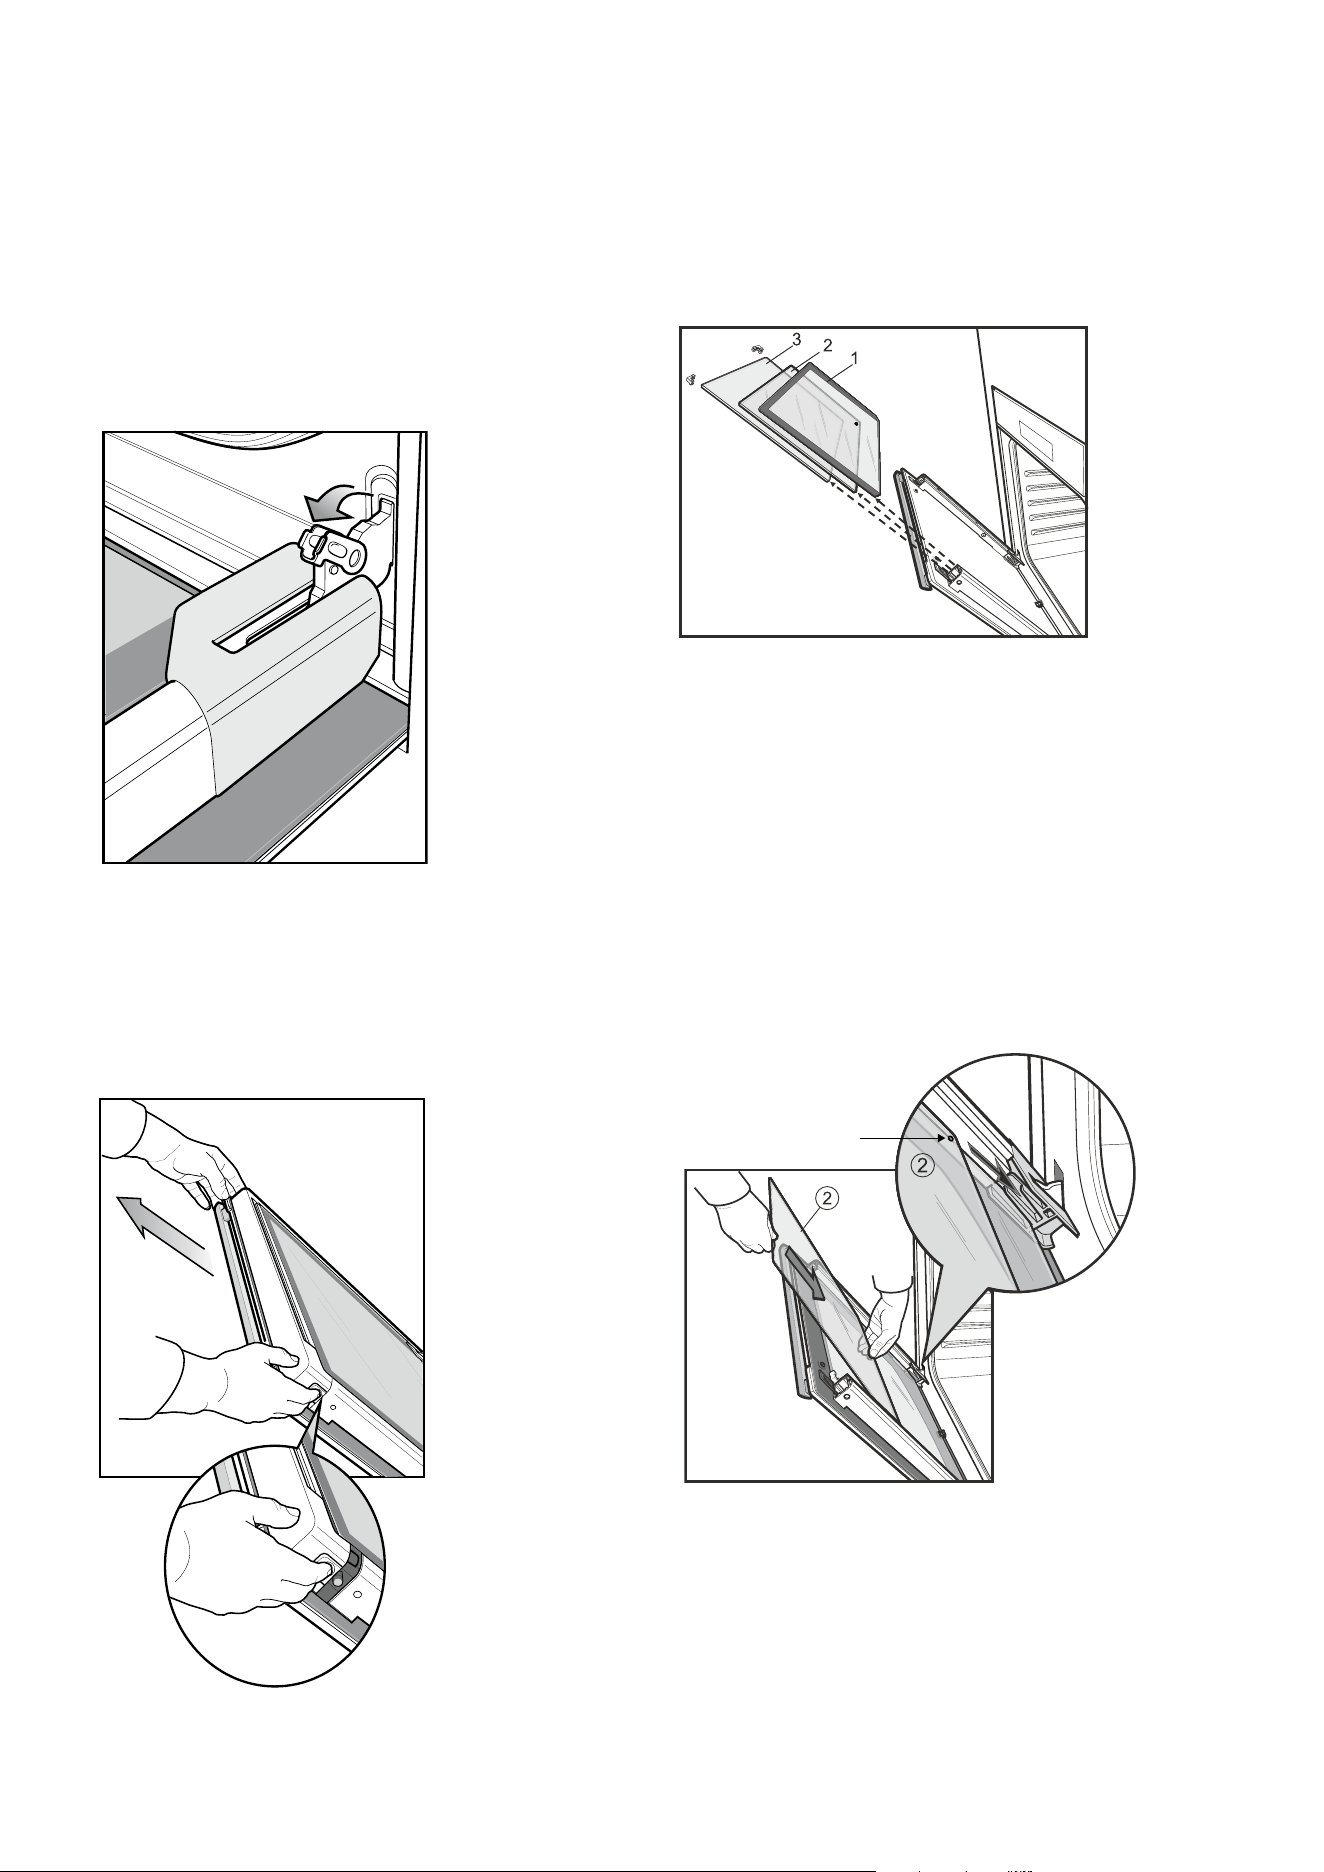

30operatingconditions/energytips/inclusionselectrolux e:line ovens electrolux e:line ovens troubleshooting 31
Faults
Ifthereisaproblemwiththeovenand/orgrill,please:
• Checkthepointslistedbelowbeforecallingforservice.
• Itmaybepossibletoavoidacallbyxingtheproblemyourself–andsocontinuecooking.
Note:
• Wemaychargeforserviceevenintheguaranteeperiodifyourproblemisduetothecauseslistedbelow.
problem possible cause
Oven or grill not working Time of day is not set
Power is not turned on
Controls are incorrectly set
Householdfusehasblownorpowersupplyisoff(Ifthehouseholdfusecontinuestoblow,callthe
Service Centre)
Child-proofovenlockisactivated(Refertooperatinginstructions)
Oven light not working Lamp blown or loose socket
Householdfusehasblown(Ifthehouseholdfusecontinuestoblow,calltheServiceCentre)
Oven not heating enough Foil trays on bottom of oven
Timerisin‘AUTO’mode.(Refertooperatinginstructions)
Householdfusehasblown(Ifthehouseholdfusecontinuestoblow,calltheServiceCentre)
Ovenisin‘Demo’mode,refertoAdditionalFunctionalityonpage16
Clockashingondisplay Power failure or interruption
Reset time of day and any cooking functions you were using. (Refer to CLOCK operating instructions)
Unit smoking when first used Protective oils being removed (see page 6)
Condensation build up Reduce the amount of water used in cooking. (Sometimes condensation is normal)
Door cannot be replaced
after removal
Stirrup not engaged properly
Pyrolytic cycle not working Allaccessoriesmustberemovedfromtheovensee page 28
Functions and
temperature
appear
on display but oven
does not work
Ovenisin‘Demo’mode,refertoAdditionalFunctionalityonpage16
Dataplate
Whenyouneedinformation,serviceorsparepartspleasebepreparedtotellusthe:
• Model
• Modelnumber
• Serialnumbershownonthedataplate.Thedataplateisvisiblewhentheovenorgrilldoorisopen.
Customer Care Centre
Ifyouneedmoreinformation,pleasecontacttheCustomerCareCentre:
Australia–1300363640,8am-5pmESTMon-Fri.
NewZealand–+6495732384,8am-5pmESTMon-Fri.
Ifyouhaveawarrantyorsparepartsenquiry,youshouldcallthenumberlistedonthebackpage.
Troubleshooting
warning
IMPORTANT:Donotturnoffthemainspowersupply
totheovenduringthepyrolyticcycle.Apower
failure could cause a temperature increase of the
surround or cabinet.
UsingtheOven
• Alwayscookwiththeovendoorclosed.
• Standclearwhenopeningthedropdownovendoor.
Donotallowittofallopen.Alwayssupportthedoor
using the door handle, until it is fully open.
• Donot lean on an open oven door, or place heavy
items on it. This could damage the appliance. Take care
in the region of the hinges.
Condensation and Steam
Hot steam may be produced when using some cooking
modes. Take care when opening the oven door and always
use oven mitts or pot holders to handle hot cooking utensils.
This oven is supplied with an exclusive system which
produces a natural circulation of air and the constant
recycling of steam.
This steam makes it possible to cook in a steamy
environment and keep the dishes soft inside and
crusty outside. Moreover, the cooking time and energy
consumption are reduced to a minimum. During cooking
steam may be produced which can be released when
opening the oven door. This is absolutely normal.
Alwaysstandbackfromtheovenwhenopeningthe
ovendoorduringcookingorattheendofittoallow
anybuildupofsteamorheattobereleased.
Whenfoodisheateditproducessteaminthesameway
asaboilingkettledoes.Whensteamcomesincontact
with the oven door glass, it will condense and produce
water droplets. To reduce condensation, ensure the oven
is well heated before placing food in the oven cavity.
Oven preheating will be necessary before any cooking.
Werecommendthatanycondensationbewipedaway
after each use of the oven.
tips and information
Donotplacecookwaredirectlyontheovenbase.
Donotplaceobjectsontheovenbaseanddonotcover
any part of the oven with aluminium foil while cooking, as
thismaycauseaheatbuild-upwhichwouldaffectthe
baking results and damage the oven enamel.
Theeffectsofdishesoncookingresults
Dishes and tins vary in their thickness, conductivity, colour
etc. which affects the way they transmit heat to the food
inside them.
• Aluminium,earthenware,ovenglasswareandbright
shiny utensils reduce cooking and base browning.
• Enamelled,castiron,anodizedaluminium,aluminium
withnon-stickinteriorandcolouredexterioranddark,
heavy utensils increase cooking and base browning.
The middle shelf position allows for the best heat distribution.
To increase base browning simply lower the shelf position.
To increase top browning, raise the shelf position.
Alwaysplacedishescentrallyontheshelftoensureeven
browning.
Donot place dishes, tins or baking trays directly on the
oven base as it becomes very hot and damage will occur.
Single level cooking gives best results in conventional
modes.Ifyourequiremorethanonelevelcookingusethe
fan cooking function.
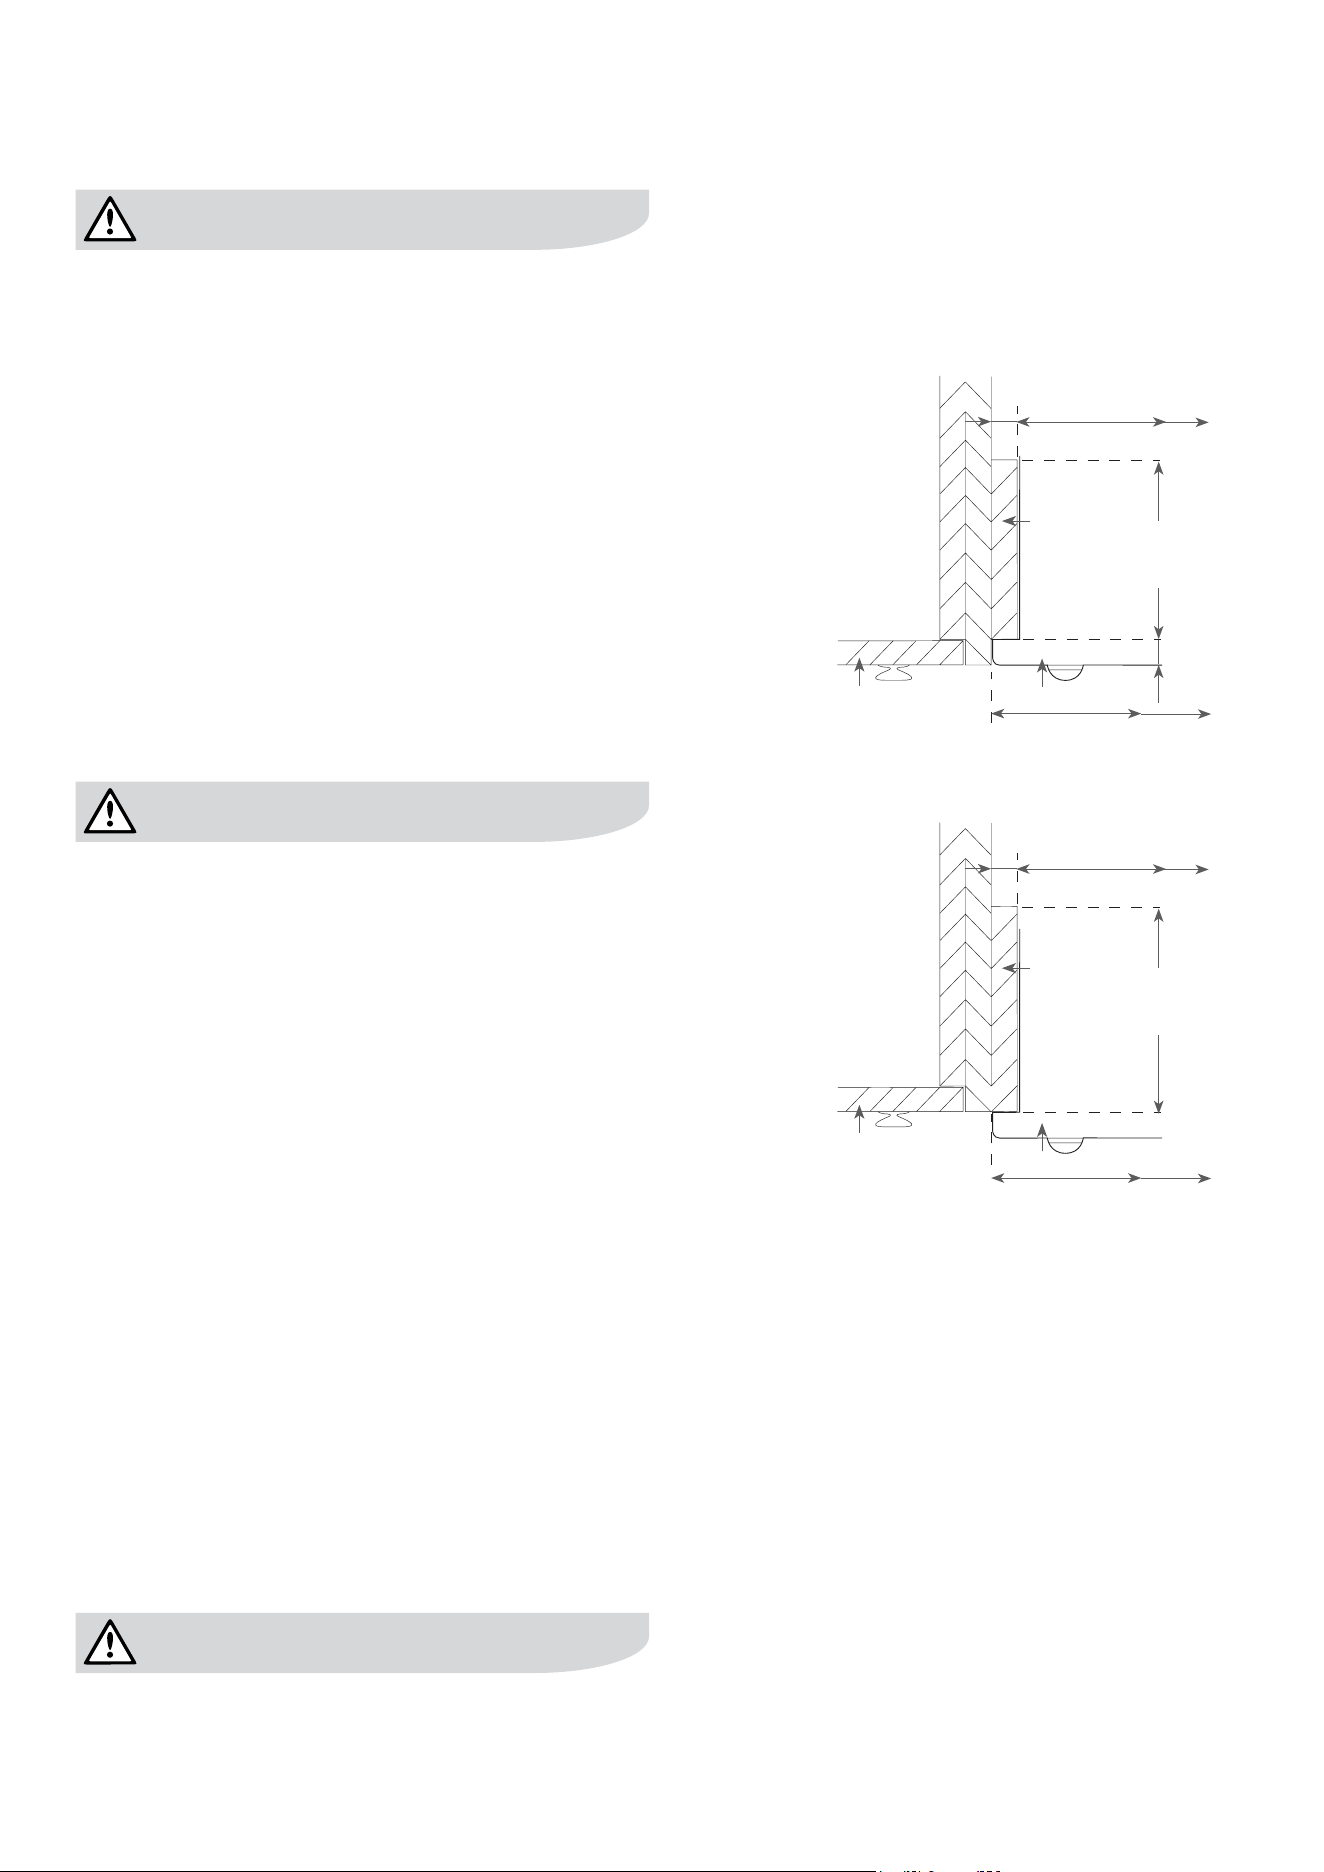
installation electrolux e:line ovens 3332 electrolux e:line ovens installation
warning
Please follow the points below when installing the appliance
Useanauthorisedperson
• Asstatedinthelocalmunicipalbuildingcodesand
other relevant statutory regulations:
• WiringconnectionsmustbeinaccordancewithAS/NZS
3000WiringRulesandanyparticularconditionsofthe
local authority.
• Refertodataplateforratinginformation.Thedata
plate is positioned behind the bottom of the oven door.
The circuit diagram is positioned on the top panel of
the appliance.
• Forapplianceswithopencookingsurfaces,anallpole
disconnect functional switch should be provided near
theapplianceinanaccessibleposition.RefertoAS/
NZS3000clause4.7.1
• Wiringshouldbeprotectedagainstmechanicalfailure.
RefertoAS/NZS3000clauses3.3.2.6,3.9,3.10
• Ameansofdisconnectionwithacontactseparationof
at least 3mm must be supplied in the fixed wiring.
warning
Thisappliancemustbeproperlyearthed.
• Donotlifttheappliancebythedoorhandles.
• Preparethecupboardopeningtomatchyourappliance
measurements. (See diagrams)
• Slideapplianceintothecupboard,ensuringthatthe
supply cable (where fitted) does not kink.
• Topreventtipping,usethescrewssuppliedtosecure
your oven into the cupboard by fastening through the
2 holes to the front panel.
• Wheretheapplianceisbuiltintoacabinet,thecabinet
mustbecapableofwithstanding70°C.Installationinto
lowtemperaturetolerantcabinetry(e.g.Vinylcoated)
may result in deterioration of the low temperature
coating by discolouring or bubbling.
• Iftheapplianceistobeinstalledadjacenttovinyl
wrapped surfaces, use an installation kit available from
thevinyl-wrapsupplier.
• ElectroluxHomeProductscannotacceptresponsibility
for damage caused by installation into low temperature
tolerant cabinets.
• Afterinstallation,testandensurethattheappliance
operates correctly before handing it over to the
customer.
Note:
• Ifapowerpointistteditmustbeaccessiblewiththe
applianceinstalled,astheplugmustbeaccessible
afterinstallation.
warning
To avoid any potential hazard, you must follow our
instructionswhenyouinstallyourappliance.Failure
to install the appliance correctly could invalidate any
warrantyorliabilityclaimsandleadtoprosecution.
Installation
Cabinet construction for your appliance
For the best integration within a kitchen, install this appliance
inastandard600mmwidecupboardthatgivesausht
withthesurroundingcupboardfronts.Itcanalsobeinstalled
using a proud fit.
FlushFit
16mm
568mm
600mm
20mm
Inll
panel
Cupboard
door
Oven
100mm
max for
Pyro oven
ProudFit
16mm
568mm
600mm
Inll
panel
Cupboard
door
Oven
100mm
max for
Pyro oven
Note:
Yourappliancemustbemountedonaatsurfaceforthe
fullwidthanddepthoftheproduct
Underbenchoven
Your underbench oven looks best when the control panel
isdirectlyunderthebenchtop.Anupperinllpanelmay
be added if the cooktop placed above the benchtop is too
deep. Refer to cooktop installation instructions for required
clearance between cooktop and oven.
Cut-out dimensions
type of fit A(width) B(height) C(depth)
Flush fit (mm) 600 600 581min.
Proud fit (mm) 568 590 560min.
A
C
B
561mm
mounting holes
583mm
596mm
DuoovenCut-outdimensions
type of fit A(width) B(height) C(depth)
Flush fit (mm) 600 893 581min.
Proud fit (mm) 568 885 560min.
min. 650mm
A
561mm
mounting
holes
mounting holes
596mm
456mm
B
C
DoubleovenCut-outdimensions
type of fit A(width) B(height) C(depth)
Flush fit (mm) 600 1086 581min.
Proud fit (mm) 568 1078 560min.
min. 650mm
561mm
mounting
holes
A
B
C
mounting holes
596mm
456mm
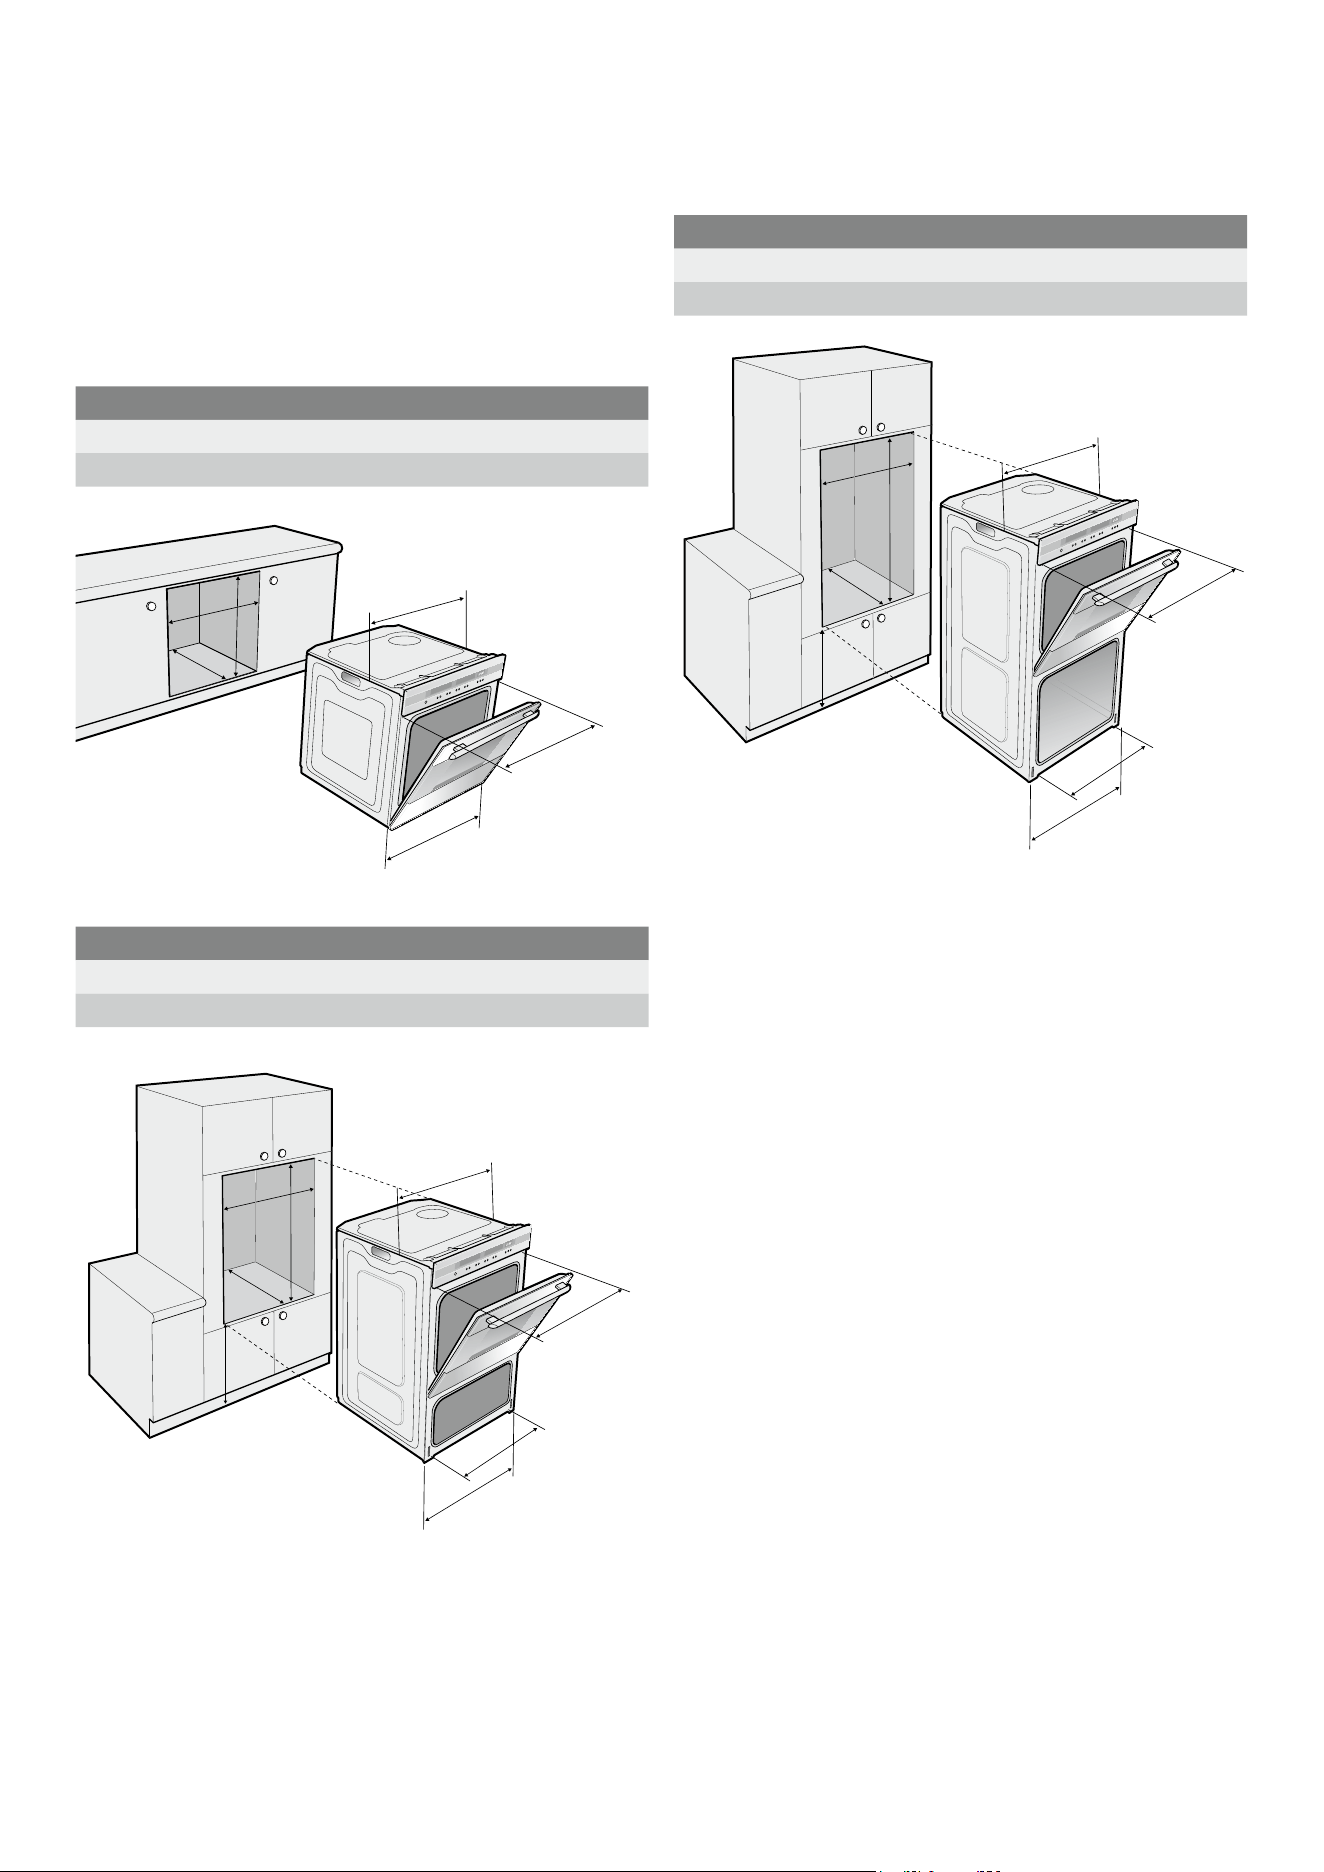
34 technical specifications electrolux e:line ovens technical specifications electrolux e:line ovens35
Technical specifications
model product dimensions
(hxwxd)mm
electrical connection min.fuse
rating
max.power
rating
max.
current
rating
EOEM61CS 595x596x573 230-240v/50Hz 16A 3.1k W 12.9A
EOEE62CS 595x596x573 230-240v/50Hz 16A 3.1kW 12.9A
EOEE62CK 595x596x573 230-240v/50Hz 16A 3.1k W 12.9A
EOEE63CS 595x596x573 230-240v/50Hz 16A 3.1kW 12.9A
EUEE63CS, EUEE63CK 888x596x573 230-240v/50Hz 25A 5.3kW 2 2.1A
EDEE63CS 1081x596x573 230-240v/50Hz 25A 5.8kW 24.2A
EPEE63CS, EPEE63CK 595x596x573 230-240v/50Hz 16A 3.1kW 12.9A
error code description comment fix
F01 or 01 Door lock sensor alarm This relates to a door lock
failure which is only associated
with the Pyro product
Checkwiring/plugsor
replace door lock
F02 or 02 Door lock actuator alarm
F04 or 04 OvenProbe(PT500)outof
range alarm
This relates to the temperature
sensing probe which may be
outoftolerance,orhaveopen/
short circuit connections
Replace probe
F05or05 OvenProbe(PT500)toohigh
temperature alarm
25 BoardTemperatureSensor
(NTC)toohightemperature
alarm
This relates to the temperature
ofthepowerboardand/orthe
temperature-sensingelement
(NTC)onthepowerboard
Cooling fan not working
or replace powerboard
26 BoardTemperatureSensor
(NTC)outofrangewarning
6 BoardTemperatureSensor
(NTC)outofrangealarm
F08 or 08 Communication alarm This relates to an error in
communication between
thepowerboardandtheIOI
controller. This can occur if
theIOIcontrollerisconnected
while the powerboard is
energised
Reset power. (Minimum of
20 sec.) or check or replace
data cable
F09 or 09 Software compatibility code
alarm
This relates to a mismatch
between powerboard firmware
versionandtheIOIcontroller
firmware version. Most likely
causedbyanun-programmed
powerboard
Replace Powerboard
C1 Telescopic runners fitted Only applies to Pyro product Remove both side racks and
re-startpyrocycle
C3 Door open Only applies to Pyro product Close door and restart pyro
cycle
F03 or 03 EEPROM check sum alarm Relates to the controller Replace Controller
F14 or 14 EEPROM compatibility code
alarm
Relates to the controller Replace Controller
Technical specifications Hard wiring details
1. Remove terminal cover plate from rear panel of appliance.
2. Fit wires through hole in cover plate and make
connections to terminals.
3. Engage wires into plastic clip. Secure plastic clip with
two long silver screws (supplied in separate bag).
4. Replace cover plate onto rear panel.
Plastic clips
Plastic clip
securing points
Note:
• DoubleOven(ModelEDEE63CS)
Thisproductistobewiredthroughthebottomaccess
panelonly.
Other Potential complaints
• Whenthedoorisopenedthefanstops(underbench
only) This is a function of the powerboard to help reduce
the blast of air the customer receives when they open
the door.
• Whenanon-fanmodeisselectedthefanstarts.Most
oven modes have a fast heat up function that uses the
fan,fanelement,andtop(boost)element.Autofast
heat up can be overridden by selecting a temperature
of 120ºC or less, allowing the function to start, then
increasing the temperature to the desired level.
• Thelightstaysonwhenthedoorisclosed,doesnot
turn on when the door is open and the oven is off.
The door switch is not activating due to restricted
travel or broken actuator.
TestMode
• Within10secondsofpoweringupsimultaneouslypress
thetimerbuttonandstart/stoptime‘+’button,thiswill
enter‘TESTMODE’foramaximumof5minutes.
Firstly displayed will be the software version and model
No.Thenusingthefunction‘
^
’and‘v’buttonsscroll
through door lock test (Pyro only) individual element and
light, cooking fan, cooling fan and temperature probe
etc. functions.
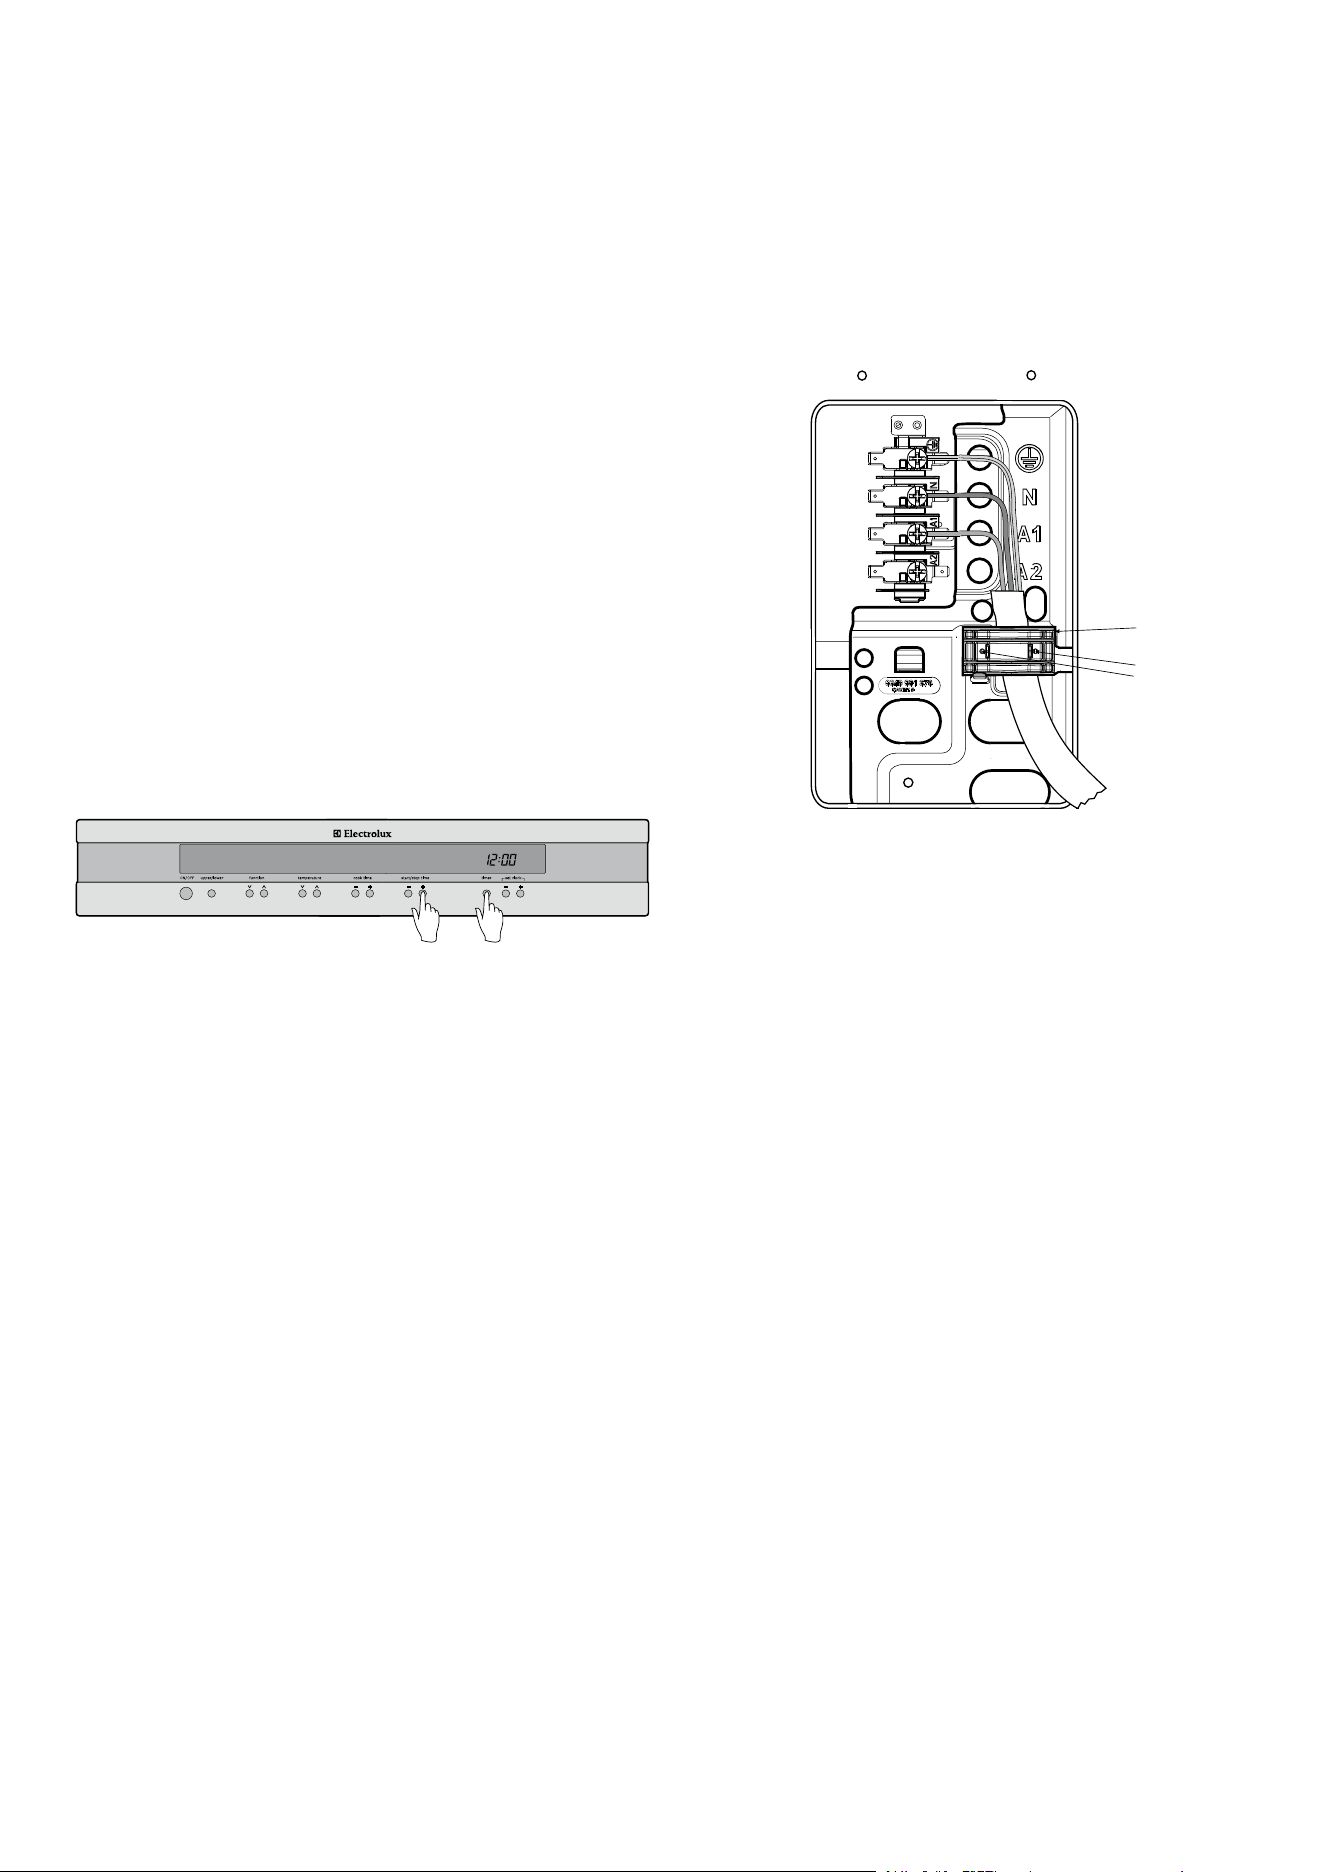

36 notes electrolux e:line ovens electrolux e:line ovens warranty 37
This document sets out the terms and conditions of
productwarrantiesforElectroluxbrandedappliances.Itis
animportantdocument.Pleasekeepitwithyourproofof
purchase documents in a safe place for future reference
shouldyourequireserviceforyourElectroluxappliance.
General Terms and Conditions
1. Inthiswarranty
(a)‘Electrolux’meansElectroluxHomeProductsPtyLtdABN
51004762341inrespectofAppliancespurchasedin
AustraliaandElectrolux(NZ)LimitedinrespectofAppliances
purchasedinNewZealand;
(b)‘Appliance’meansanyElectroluxproductpurchasedbyyou
accompanied by this document;
(c)‘WarrantyPeriod’means
(i) whereyouusetheApplianceforpersonal,domesticor
householdpurposesinAustraliatheperiodof“24”months
andinNewZealandtheperiodof“24”months;
(ii)whereyouusetheApplianceforcommercialpurposes,in
Australiatheperiodof“3”monthsandinNewZealandthe
periodof“3”months,(iftheperiodstatedis0monthsyou
are not covered by this product warranty)
followingthedateoforiginalpurchaseoftheAppliance;
(d)‘you’meansthepurchaseroftheAppliancenothavingpurchased
theapplianceforre-sale,and‘your’hasacorrespondingmeaning.
2. ThiswarrantyonlyappliestoAppliancespurchasedandused
inAustraliaorNewZealandandisinadditionto(anddoesnot
exclude,restrict,ormodifyinanyway)anynon-excludable
statutorywarrantiesinAustraliaorNewZealand.
3. Electrolux warrants that, when dispatched from an Electrolux
warehouse,theApplianceisfreefromdefectsinmaterialsand
workmanshipfortheWarrantyPeriod.
4. DuringtheWarrantyPeriodElectroluxoritsAuthorisedService
Centre will, at no extra charge if your appliance is readily
accessiblewithoutspecialequipment,andsubjecttotheseterms
and conditions, repair or replace any parts which it considers to
bedefective.YouagreethatanyreplacedAppliancesorparts
become the property of Electrolux. This warranty does not apply
to light globes, batteries, filters or similar perishable parts.
5. PartsandAppliancesnotsuppliedbyElectroluxarenotcovered
by this warranty.
6. WhereyouarewithinanElectroluxservicearea,thiswarranty
coversthecostoftransportoftheAppliancetoandfrom
AuthorisedServiceCentresofElectroluxandtravellingcostsfor
representativesoftheAuthorisedServiceCentretoandfrom
yourhomeorbusiness.IfyouareoutsideanElectroluxservice
area, you will bear these costs. For information about whether
you are within an Electrolux service area, please phone 13 13 49
inAustralia,or0800106610inNewZealand.
7. Proof of purchase is required before you can make a claim
under this warranty.
8. You may not make a claim under this warranty unless the defect
claimed is due to faulty or defective parts or workmanship.
Electrolux is not liable in the following situations (which are not
exhaustive):
(a) TheApplianceisdamagedby:
(i) accident
(ii) misuse or abuse, including failure to properly maintain or
service
(iii) normal wear and tear
(iv) power surges, electrical storm damage or incorrect power
supply
(v) incomplete or improper installation
(vi) incorrect, improper or inappropriate operation
(vii) insect or vermin infestation.
(b)TheApplianceismodiedwithoutauthorityfromElectroluxin
writing.
(c)TheAppliance’sserialnumberorwarrantysealhasbeen
removed or defaced.
(d)TheAppliancewasservicedorrepairedbyanyoneotherthan
ElectroluxoritsAuthorisedServiceCentres.
9. This warranty, the contract to which it relates and the relationship
between you and Electrolux are governed by the law applicable
intheAustralianStatewheretheAppliancewaspurchased
orthelawapplicableinNewZealandiftheAppliancewas
purchasedinNewZealand.WheretheAppliancewaspurchased
inNewZealandforbusinesspurposestheConsumerGuarantee
Actdoesnotapply.
Limitation of Liability
10. To the extent permitted by law:
(a) Electrolux excludes all warranties other than as contained in
this document;
(b) Electrolux shall not be liable for any loss or damage whether
direct or indirect or consequential arising from your purchase,
useornon-useoftheAppliance.
11.ProvisionsoftheTradePracticesActandStateconsumer
legislationinAustralia,andtheConsumerGuaranteesAct,the
SaleofGoodsActandtheFairTradingActinNewZealand,imply
warranties or conditions, or impose obligations, upon Electrolux
which cannot be excluded, restricted or modified. To the extent
permitted by law, the liability of Electrolux (if any) arising out of or
inrelationtotheApplianceoranyservicessuppliedbyElectrolux
shall be limited (where it is fair and reasonable to do so),:
(a)inthecaseofAppliances,atitsoption,tothereplacementor
repairoftheAppliancesorthesupplyofequivalentproducts
orthepaymentofthecostofreplacingtheAppliancesor
havingtheAppliancesrepairedorofacquiringequivalent
Appliances.Uponbeingreplaced,partsandAppliances
become the property of Electrolux; or
(b) in the case of services, at its option, to the supply of the
services again or the payment of the cost of having the
servicesre-supplied;
andinthecaseofAppliancesorservicessuppliedinNew
Zealand,lossordamagewhetherdirectorindirector
consequential that is reasonably foreseeable.
Privacy
You acknowledge that in the event that you make a warranty claim
itwillbenecessaryforElectroluxanditsAuthorisedServiceCentres
to exchange information in relation to you to enable Electrolux to
meet its obligations under this warranty.
Warranty
FORSALESINAUSTRALIAANDNEWZEALAND
APPLIANCE:ELECTROLUXE:LINEBUILT-INOVENS
ImportantNotice
BeforeCallingaServiceTechnicianpleasecheckcarefullytheoperatinginstructions,servicebookletandthewarrantytermsandconditions.
FORSERVICE
or to find the address of your nearest
stateservicecentreinAustralia
PLEASECALL131349
Forthecostofalocalcall(Australiaonly)
SERVICEAUSTRALIA
ELECTROLUXHOMEPRODUCTS
FORSPAREPARTS
or to find the address of your nearest
statesparepartscentreinAustralia
PLEASECALL131350
Forthecostofalocalcall(Australiaonly)
FORSERVICE
or to find the address of your nearest
authorisedservicecentreinNewZealand
FREECALL0800106610
(NewZealandonly)
NEWZEALANDSPAREPARTSCENTRES
AUCKLANDPrimeDistributorsLtd.8HighbrookDrive,EastTamaki ............................ (09)2733580
CHRISTCHURCHPrimeDistributorsLtd.Unit1,127MontrealStreet .......................... (03) 377 1009
R.RedpathLtd.55FerryRoad ....................................................... (03) 379 0446
DUNEDINAppliancePartsCompany,590HillsideRoad .............................................. (03)4555443
ELECTROLUXHOMEPRODUCTS
Notes

ElectroluxHomeProductsAustralia
telephone: 1300 363 640
fax: 1800350067
email: customercare@electrolux.com.au
web: www.electrolux.com.au
P/No.0342-001-554(ECN10A002A)08/10Rev.A
© Copyright 2009 Electrolux Home Products Pty Ltd
ABN51004762341
Printcode:EMAN_ELINE_OVEN_May10
TheThoughtfulDesignInnovator.
Do you remember the last time you opened a gift that made you say,
“Oh!Howdidyouknow?That’sexactlywhatIwanted!”That’sthekindof
feeling that we at Electrolux seek to evoke in everyone who chooses or uses
oneofourproducts.Wedevotetime,knowledge,andagreatdealofthought
to anticipating and creating the kind of appliances that our customers really
need and want.
Thiskindofthoughtfulcaremeansinnovatingwithinsight.Notdesignfor
design’ssake,butdesignfortheuser’ssake.Forus,thoughtfuldesign
means
makingapplianceseasiertouseandtasksmoreenjoyabletoperform,
freeing our customers to experience the ultimate 21st century luxury: ease
of mind. Our aim is to make this ease of mind more available to more people
in more parts of their everyday lives, all over the world.
The“Thinkingofyou”promisefromElectroluxgoesbeyondmeetingthe
needsoftoday’sconsumers.Italsomeanswe’recommittedtomaking
appliances safe for the environment – now and for future generations.
Electrolux.Thinkingofyou.
Share more of our thinking at www.electrolux.com.au