Documents: Go to download!
- Owner's manual - (English)
- Package Contents and Technical Specifications
- Operating and Programming
- Maintenance
- Troubleshooting
Table of contents
User manual Robotic Vacuum Cleaner
Package Contents and Technical Specifications
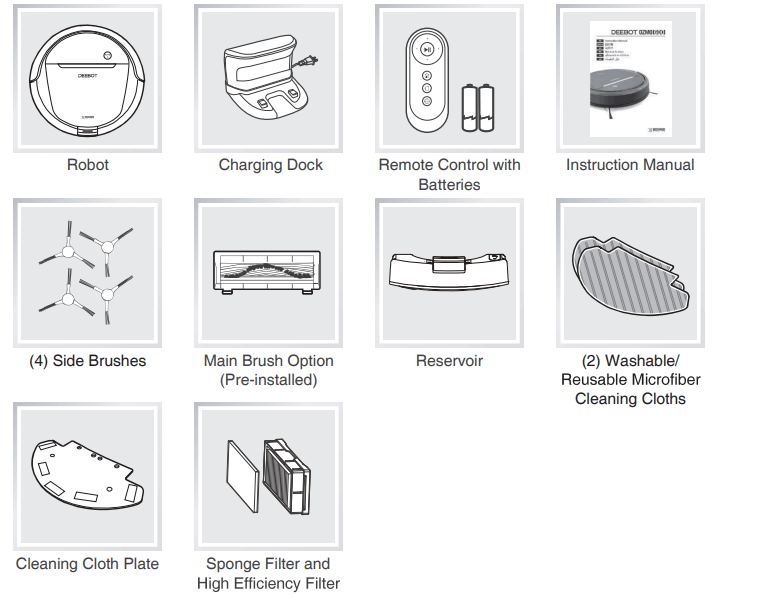
Package Contents
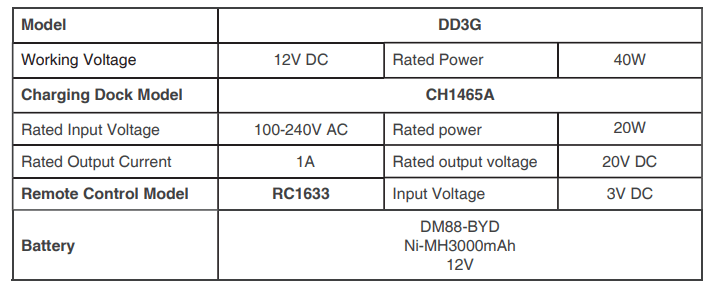
Specifications
Product Diagram
Robot
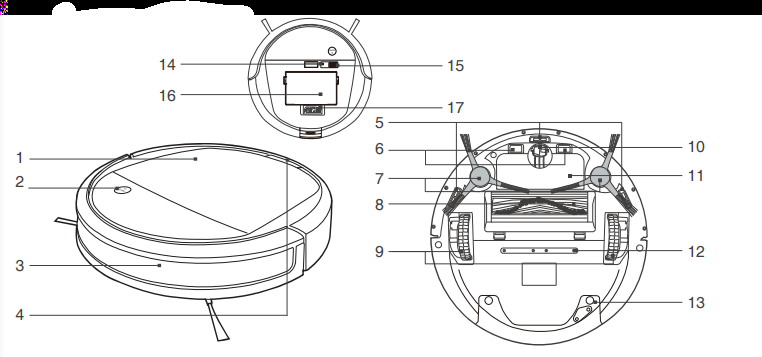
- Cover
- AUTO Mode Button
- Bumper with AntiCollision Sensors
- Reservoir Release Button
- Anti-Drop Sensors
- Charging Contacts
- Side Brushes
- Main Brush Option
- Driving Wheels
- Universal Wheel
- Battery Pack
- Water Outlets
- Reservoir
- RESET Button
- Power Switch
- Dust Bin
- Multi-Function Cleaning Tool
Control Panel

- Status Indicator Light
- Wi-Fi Indicator Light
- AUTO Mode Button
Dust Bin
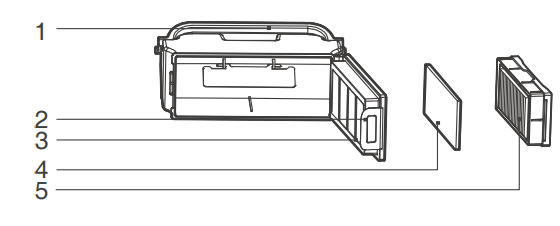
- Dust Bin Handle
- Dust Bin Lock
- Filter Net
- Sponge Filter
- High Effciency Filter
Advanced Mopping System
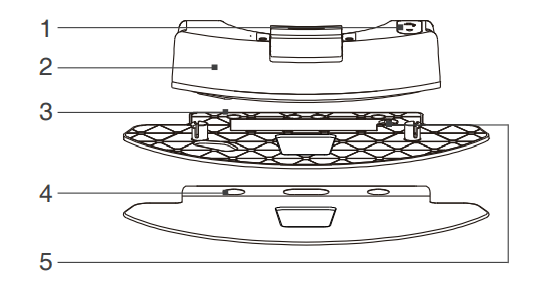
- Water Inlet
- Reservoir
- Cleaning Cloth Plate
- Washable/ Reusable Microfiber Cleaning Cloth
- Magnet
Charging Dock
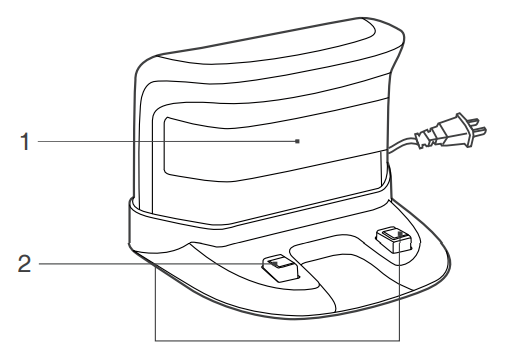
- Infrared Signal Generator
- Charging Dock Pins
Charging Dock
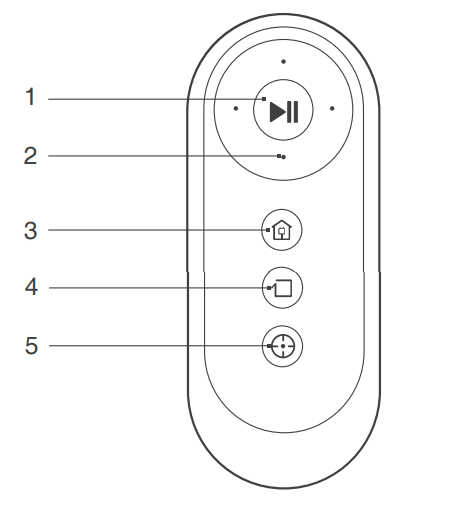
- START/PAUSE Button
- Direction Control Buttons
- Return to Charger Mode Button
- Edge Cleaning Mode Button
- Spot Cleaning Mode Button
Operating and Programming
Notes Before Cleaning
Before operating DEEBOT, take a few moments to survey the area to be cleaned and remove any obstacles.
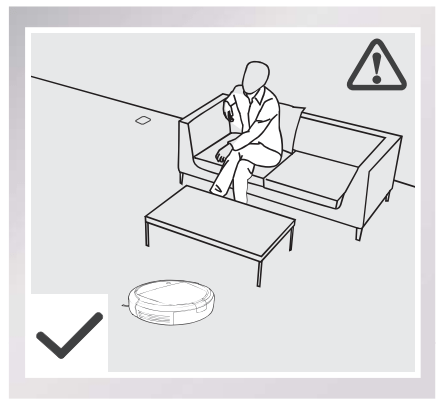
Please take care of DEEBOT and assist it at the cleaning area to put furniture like chairs in their proper place.
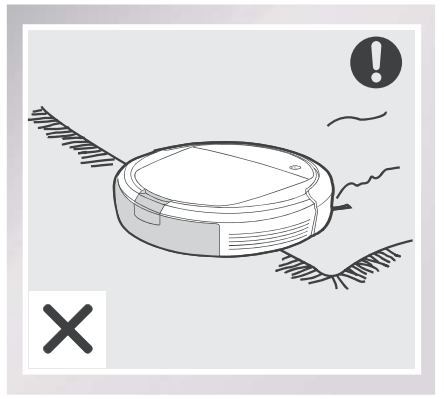
The product is not suitable for use on carpet. Before using the product near an area rug or on a short-pile area rug with tasseled edges, please fold area rug edges under themselves.
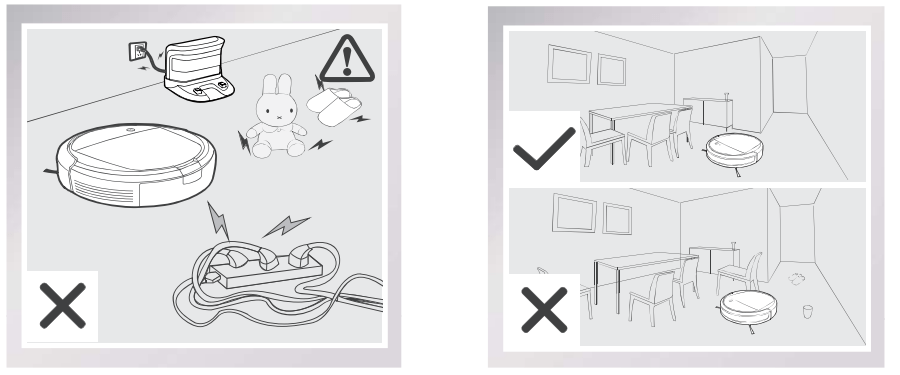
Remove power cords and small objects from the floor that could entagle the product, and tidy up the cleaning area to put furniture like chairs in their proper place.
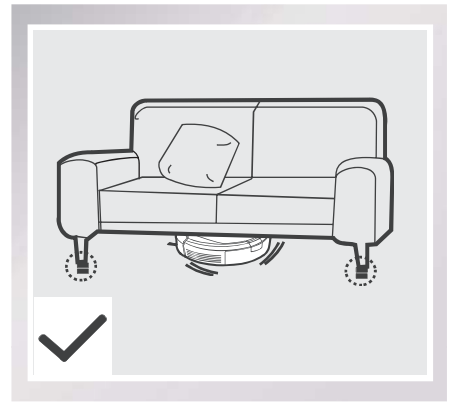
Please be aware that the robot needs at least an 8 cm (3.1") clearance to clean under furniture without complications.
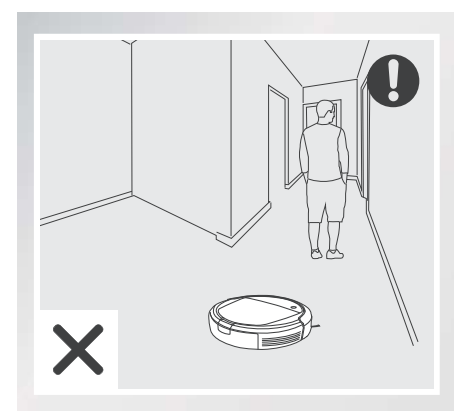
Please do not stand in narrow spaces, such as hallways, or DEEBOT may fail to identify the area to be cleaned.
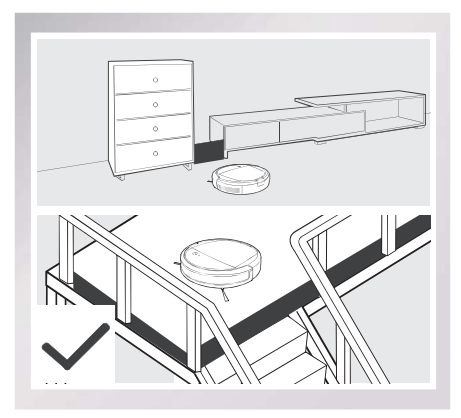
If there is a step or stairs in the cleaning area, please operate DEEBOT to ensure its AntiDrop Sensors can detect the drop off. It may be necessary to place a physical barrier at the edge of the drop off to keep the unit from falling over the edge.
Quick Start
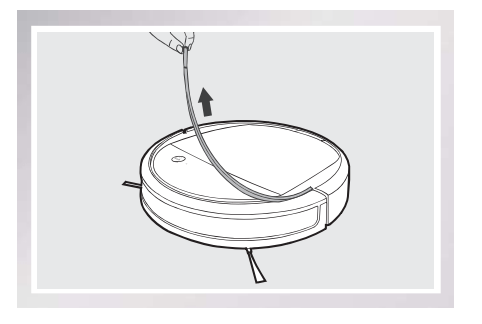
* Remove the protective strip from the robot’s Bumper before use.
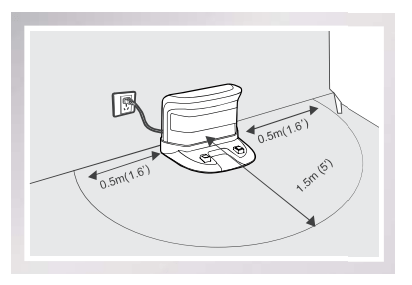
 Charging Dock Placement
- Place the Charging Dock on a level floor surface against the wall with the base perpendicular to the ground. Keep the immediate area 1.5m (5') in front of the charger and 0.5m (1.6') on both sides of the charger clear of objects and reflective object surfaces
- Plug the Charging Dock in.
 Install Side Brushes
- Attach Side Brushes to the bottom of DEEBOT by pressing a brush into each slot with the matching color until it clicks.
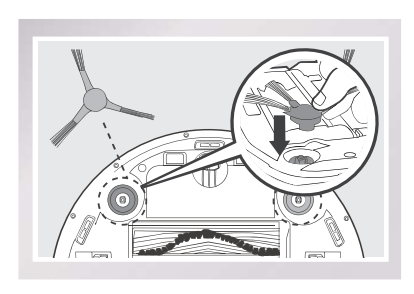
 Power ON
- Open the robot’s Top Cover. Turn the robot's Power Switch to the ON position. DEEBOT is powered ON when DEEBOT emits a musical sound and the AUTO
Mode Button stays illuminated.
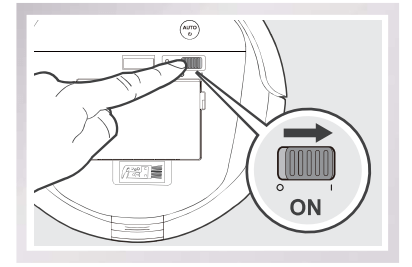
* When DEEBOT is not cleaning, it is suggested to keep it powered ON and charging instead of powered OFF.
 Charge DEEBOT
- Place DEEBOT on the Charging Dock making sure the Charging Contacts on DEEBOT and the Charging Dock Pins make a connection.
- Charge DEEBOT for at least 4 hours before the first use
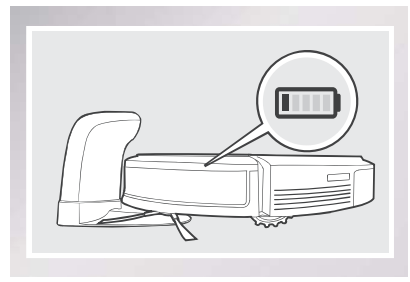
- Make sure to turn the robot’s Power Switch to the ON position before charging.
- AUTO Mode Button blinks when DEEBOT is charging. AUTO Mode Button stops glowing when DEEBOT is fully charged.
- When DEEBOT completes the cleaning cycle or when battery power gets low, DEEBOT automatically returns to the Charging Dock to recharge itself. DEEBOT can also be sent back to the Charging Dock at any time by pressing the Return to Charger Button on the Remote Control.
- Empty any remaining water from the Reservoir and remove the Cleaning Cloth Plate before charging DEEBOT.
 Start
Start
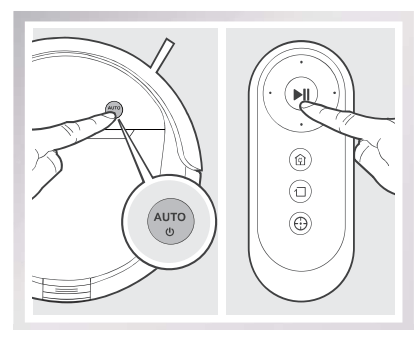
- Press the AUTO Mode Button on DEEBOT or
 on the Remote Control. DEEBOT starts to work immediately in AUTO Cleaning Mode.
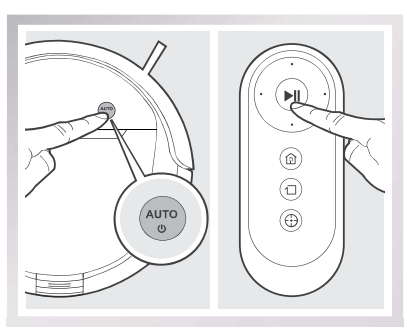
 Pause
Pause
- Pause DEEBOT by pressing the AUTO Mode Button on DEEBOT or
 on the Remote Control.
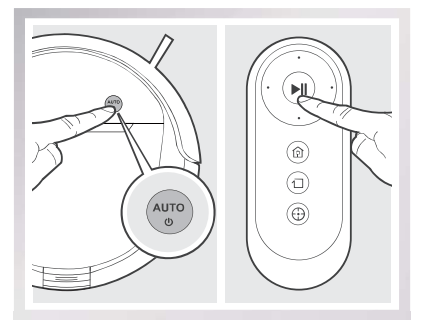
* DEEBOT can be directed to move forward, backward, left and right using the Direction Control Buttons on the Remote Control when it is Paused.
* The AUTO Mode Button on the robot’s Control Panel stops glowing after the robot is paused for more than 10 minutes. Press AUTO Mode Button on the robot or press any button on the Remote Control to wake up the robot.
 Power OFF
- Pause DEEBOT. Open the robot’s Top Cover. Move the Power Switch to the OFF position.
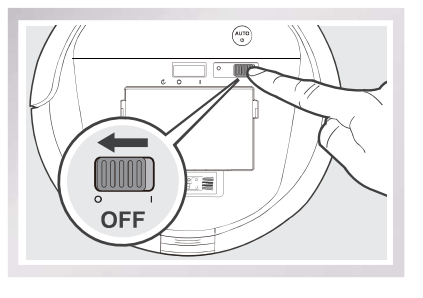
* When DEEBOT is not cleaning, it is suggested to keep it powered ON and charging.
Cleaning Mode Selection
DEEBOT has several cleaning modes to choose from to effectively clean different floors. Cleaning modes are selected using the Remote Control or ECOVACS App.
 AUTO Cleaning Mode
This is the most commonly used mode. In AUTO Cleaning Mode, DEEBOT plans the most efficient route and cleans in a back and forth straight-line pattern.
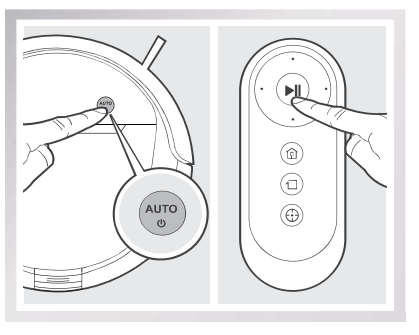
 Spot Cleaning Mode(1-5 minutes)
This mode is applicable for an area of highly concentrated dirt or dust. In Spot Cleaning Mode, DEEBOT focuses on a specific area to clean.
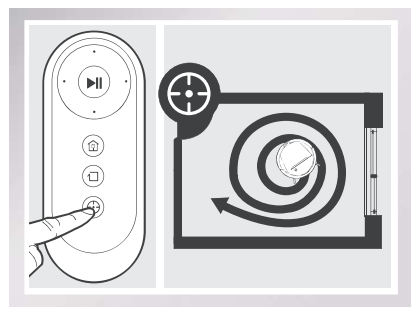
 Edge Cleaning Mode
This mode is good for cleaning the edges and corners of a room. In Edge Cleaning Mode, DEEBOT cleans along a border (e.g. wall).
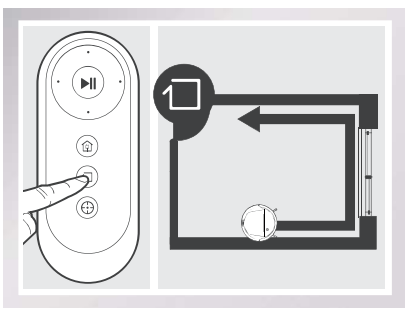
Programming the Robot
DEEBOT has an Intelligent Scheduling and a Time Scheduling function to schedule cleaning times. DEEBOT can be programmed to automatically clean with Intelligent Scheduling using the robot’s Control Panel. DEEBOT can also be programmed with Time Scheduling using the App.
* All scheduled cleanings are performed in AUTO Cleaning Mode.
Intelligent Scheduling
 Set Intelligent Scheduling
DEEBOT can be scheduled to cleaning once per day at the same time, even if nobody is at home. Double-click the AUTO Mode Button on DEEBOT to set the current time as the scheduled cleaning time. Intelligent Scheduling is set when the robot beeps. DEEBOT will automatically clean at the set time every day.
For example: Set Intelligent Scheduling successfully at 9:00am, and DEEBOT automatically cleans at 9:00am every day.
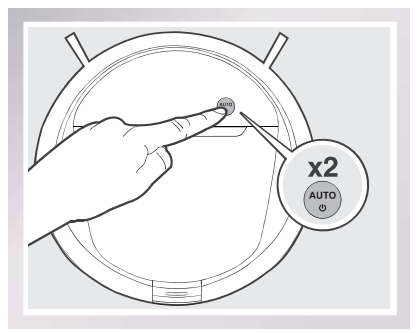
 Cancel Intelligent Scheduling
Double-Click the AUTO Mode Button on DEEBOT when DEEBOT is paused. Intelligent Scheduling is cancelled when the robot beeps.
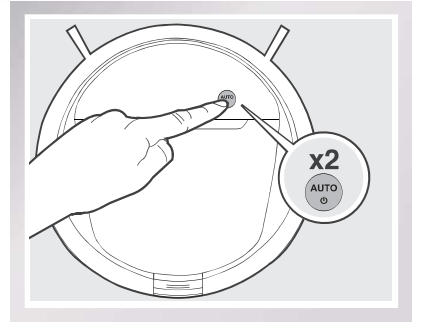
- To automatically clean at another time. first cancel the current Intelligent Scheduling. then set Intelligent Scheduling again at the desired time.
- lf DEEBOT is tured OFF. Intelligent Scheduling is cancelled.
Optional Mopping System
DEEBOT has an optional Mopping System using a Washable/Reusable Microfiber Cleaning Cloth and Cleaning Cloth Plate attached to a proprietary Reservoir. The washable/reusable Cleaning Cloth automatically damp mops the floor to a spotless clean.
- Empty the Reservoir and remove the Cleaning Cloth Plate before cleaning on carpet.
- When using the mopping system. fold area rug edges under themselves so DEEBOT will avoid the rug.
- After DEEBOT finishes mopping. empty any remaining water from the Reservoir.
- Empty any remaining water from the Reservoir and remove the Cleaning Cloth Plate before charging DEEBOT.
- Always keep the Reservoir installed when the robot is cleaning or charging.
 Add Water into the Reservoir.
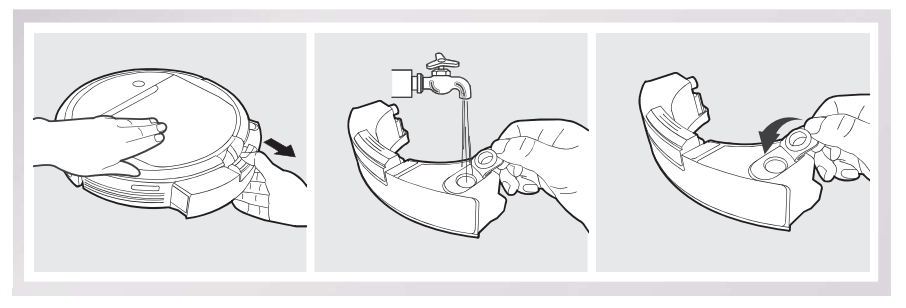
 Attach Cleaning Cloth; Install the Cleaning Cloth Plate and the Reservoir.

 Start
Start
Select the desired Cleaning Mode. DEEBOT sweeps, lifts, vacuums and mops in the selected mode.
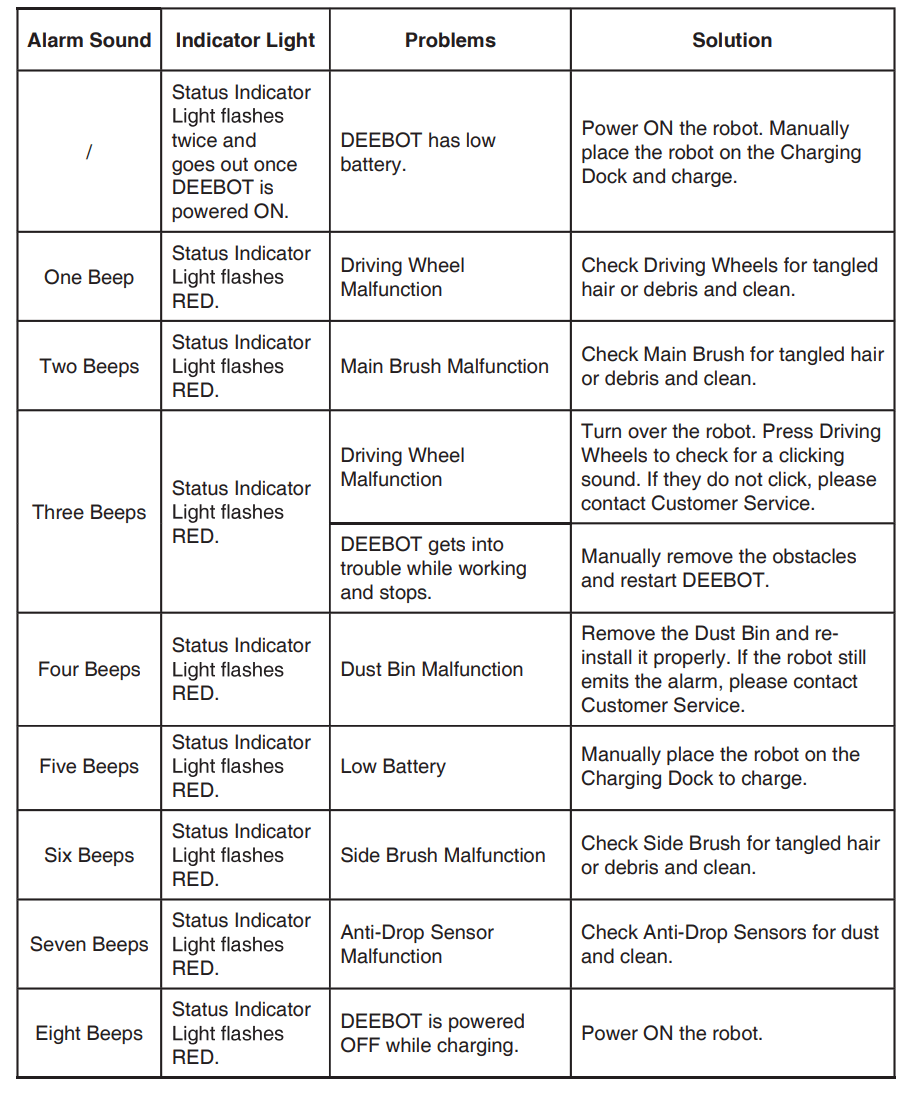
Alarm Indicator and Sounds
If DEEBOT detects a problem and needs your assistance, it emits alarm beeps or the Status Indicator Light illuminates.
Maintenance
Before performing cleaning and maintenance, power OFF DEEBOT and unplug the Charging Dock.
Mopping System
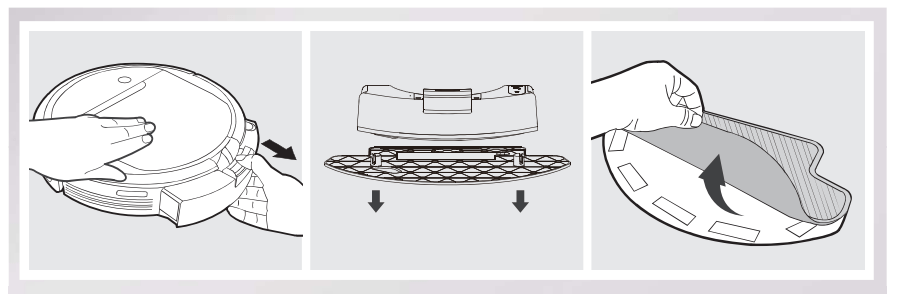
After DEEBOT finishes mopping, remove the Reservoir from DEEBOT, and maintain the Reservoir, the Cleaning Cloth and the Cleaning Cloth Plate immediately.
Press the Release Button and pull to remove the Reservoir. Remove the Cleaning Cloth Plate and the Cleaning Cloth.
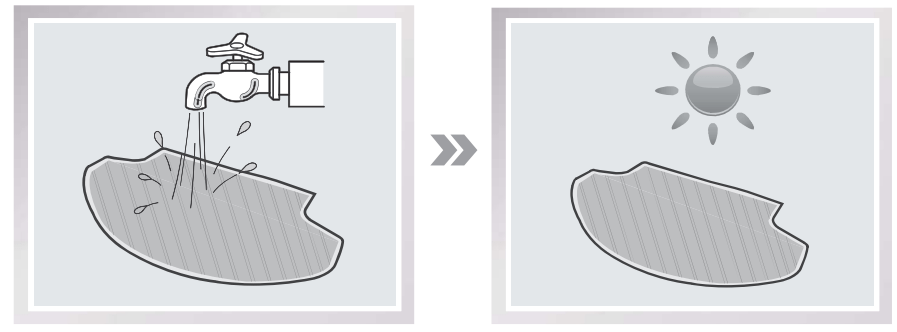
Wash the Cleaning Cloth and lay flat to dry
Empty any remaining water from the Reservoir.
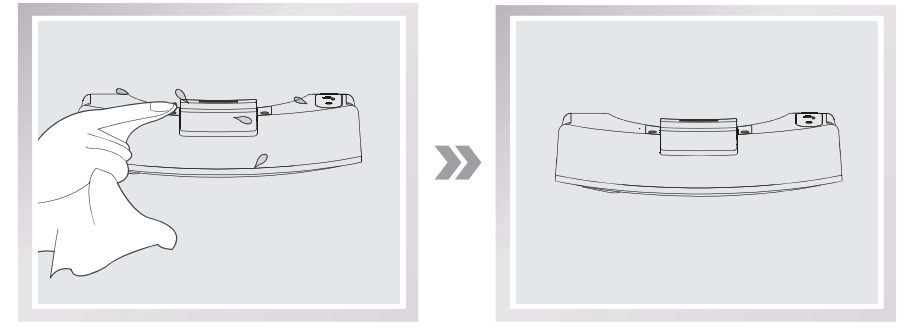
Wipe the outsite of the Reservoir with a dry coth and lay flat to dry. Avoid direct sunlight
Dust Bin and Filters
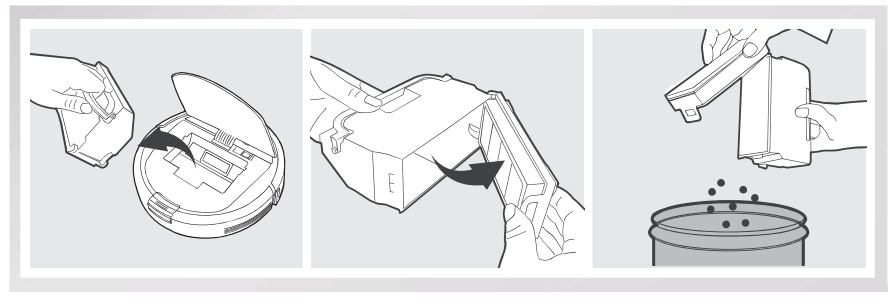
Open the robot’s Top Cover and remove the Dust Bin. Open the Dust Bin Cover and empty the Dust Bin.
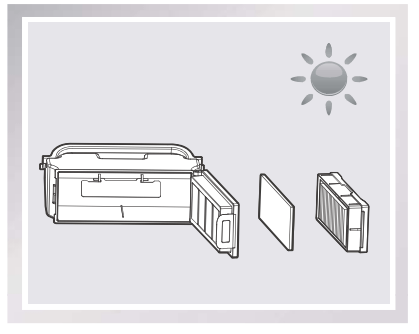
Remove the filters. Pat the High Efficiency clean. Do not rinse the High Efficiency Filter under water.
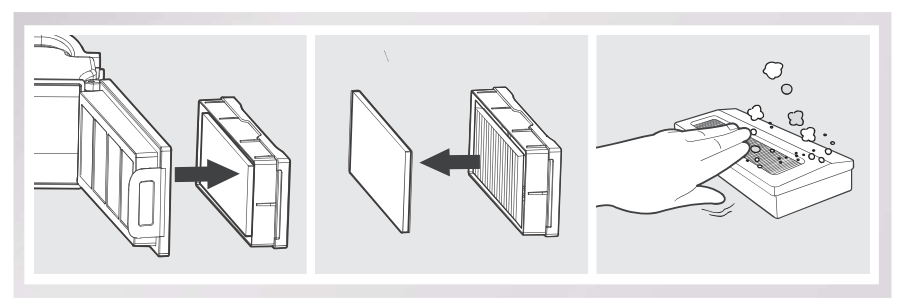
Rinse the Sponge Filter, Dust Bin and Filter Net under running water
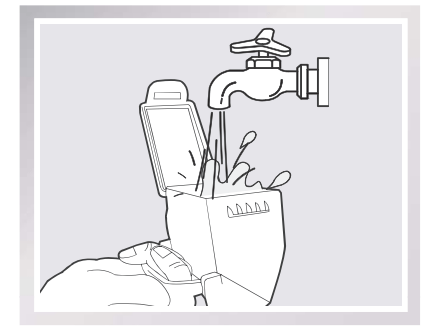
Dry the Dust Bin and filters completely before reinstalling.
Main Brush and Side Brushes
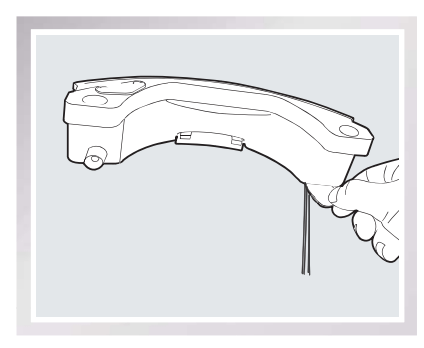
- A Multi-Function Cleaning Tool is provided for easy maintenance. Handle with care, this cleaning tool has sharp edges.
Main Brush
Turn the robot over. Push both buttons on the Main Brush Option and remove the Main Brush cover. Remove the Main Brush. Use the Multi-Function Cleaning Tool to cut off and remove any hair tangled around the Main Brush. Clean any tangled hair or debris from the Main Brush.

Cleaning the Side Brushes
Remove any hair or debris tangled around the Side Brushes with the provided Multi-Function Cleaning Tool. Remove the Side Brushes and wipe the Side Brushes and their slots with a clean cloth.
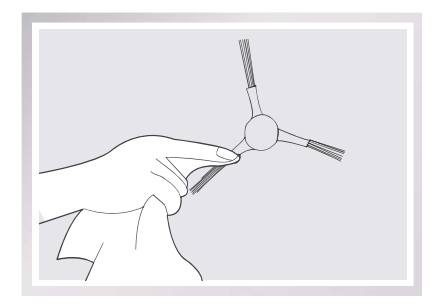
Other Components
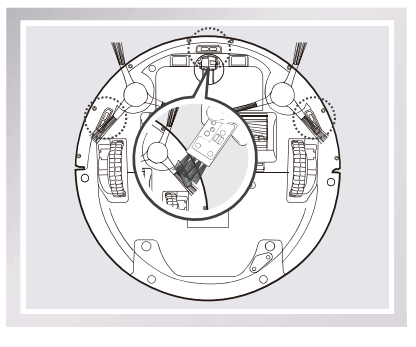
Use the Multi-Function Cleaning Tool to cut off and remove any hair tangled around the Universal Wheel.
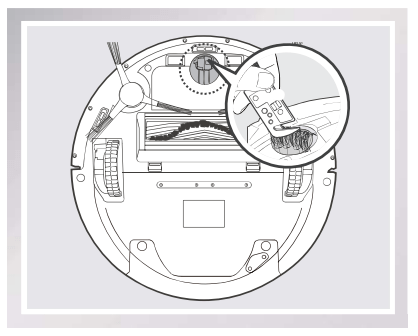
Wipe the Anti-Drop Sensors with the brush of the Multi-Function Cleaning Tool to maintain their effectiveness.
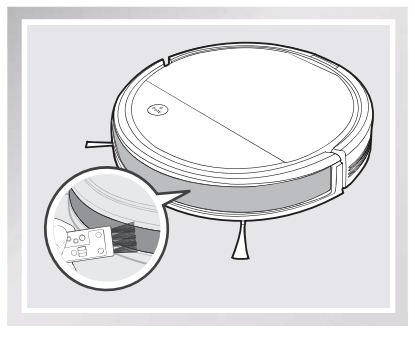
Wipe the Bumper with the brush of the MultiFunction Cleaning Tool.
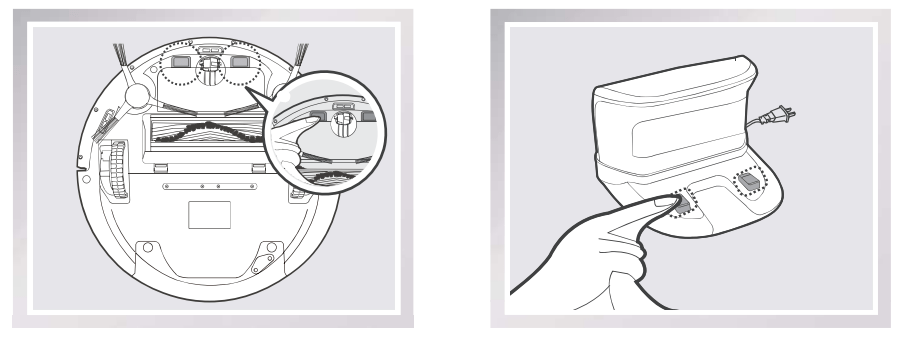
Wipe the robot’s Charging Contacts and Charging Docks Pins with a dry cloth to maintain their effectiveness.
Regular Maintenance
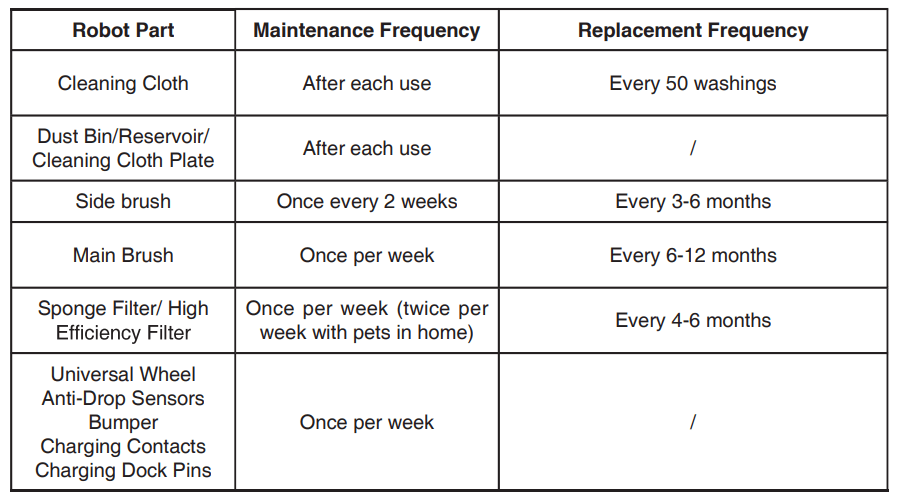
To keep DEEBOT running at peak performance, perform the maintenance and replacement according to the following frequency. A Multi-Function Cleaning Tool is provided for easy maintenance. Handle with care, this cleaning tool has sharp edges.
Note: ECOVACS manufactures various replacement parts and assemblies. Please contact Customer Service for more information on replacement parts.
Troubleshooting
Please use this chart to troubleshoot common problems using DEEBOT.
No. | Malfunction | Possible Causes | Solutions |
| 1 | DEEBOT will not charge. | DEEBOT is not powered ON. | Move the robot’s Power Switch to the ON position. |
| DEEBOT has not made a connection with the Charging Dock. | Be sure that the robot’s Charging Contacts have made a connection with the Charging Dock Pins. You may move the robot manually to make the connection if necessary | ||
| Charging Dock is unplugged while DEEBOT is powered ON, which causes battery consumption. | Plug in the Charging Dock and ensure DEEBOT is powered ON. Keep DEEBOT on the Charging Dock to make sure it has full battery to work at any time. | ||
| The battery is completely discharged. | Re-activate the battery. Place DEEBOT on the Charging Dock by hand, remove after charging for 3 minutes, repeat 3 times; then charge normally. | ||
| 2 | DEEBOT cannot return to the Charging Dock | The Charging Dock is not placed properly. | Refer to section 3.2 to place the Charging Dock properly |
| 3 | DEEBOT gets into trouble while working and stops. | DEEBOT is tangled with something on the floor (electrical cords, drooping curtains, area rug fringe etc.). | DEEBOT will try various ways to get itself out of trouble. If it is unsuccessful, check the Side Brushes and remove anything tangled around the Side Brushes, or manually remove the obstacles and restart. |
| 4 | DEEBOT returns to the Charging Dock before it finishes cleaning. | When battery power gets low, DEEBOT automatically switches to Return to Charger Mode and returns to the Charging Dock to recharge itself. | This is normal. No solution necessary. |
| Working time varies accordingto floor surface, room complexity and the selected Cleaning Mode. | This is normal. No solution necessary. | ||
| 5 | DEEBOT will not clean automatically at scheduled time. | Intelligent Scheduling or Time Scheduling function is cancelled. | Please refer to section 3.4 for details. |
| DEEBOT is powered OFF | Power ON DEEBOT. | ||
| The robot’s battery is low. | Keep DEEBOT powered ON and on the Charging Dock to make sure it has full battery to work at any time. | ||
| The robot’s Suction Intake is blocked and/or its components are tangled with debris. | Turn the robot’s power OFF, clean the Dust Bin and invert the robot. Clean the robot’s Suction Intake and Side Brushes. | ||
| 6 | DEEBOT misses cleaning area. | The cleaning area needs tidying up. | Please remove small objects from the floor, and tidy up cleaning area before DEEBOT starts cleaning. |
| 7 | Remote Control failure (effective control range of Remote Control is 5m (16'). | The batteries in the Remote Control need to be replaced. | Replace with new batteries making sure they are installed correctly. |
| DEEBOT is powered OFF or the robot’s battery is low | Make sure DEEBOT is powered ON and fully charged. | ||
| The infrared signal cannot be transmitted because the Infrared Emitter on Remote Control or the Infrared Receiver on DEEBOT is dirty. | Use clean dry cloth to wipe the Infrared Emitter on Remote Control and the Infrared Receiver on DEEBOT. | ||
| There is other equipment interfering with the infrared signal to DEEBOT | Avoid using the Remote Control near other equipment using infrared signals. | ||
| 8 | The water is not coming out of the Reservoir when DEEBOT is mopping. | The Magnet on the Cleaning Cloth Plate comes off. | Please contact Customer Service. |
| The Reservoir runs out of water. | Add water into the Reservoir. | ||
| The water outlets on the bottom of DEEBOT are clogged. | Check the water outlets on the bottom and clean. |
See other models: WINBOT X WINBOT W710 Deebot N79T Deebot N79W+ Deebot 900
