Instructions Manual
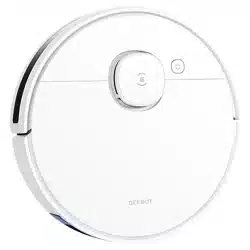
Product Diagram
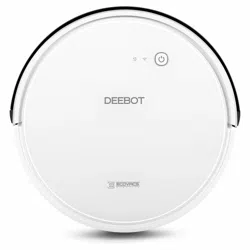
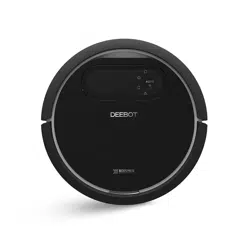
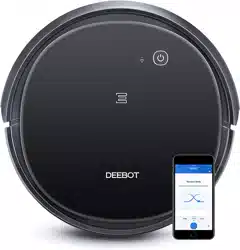
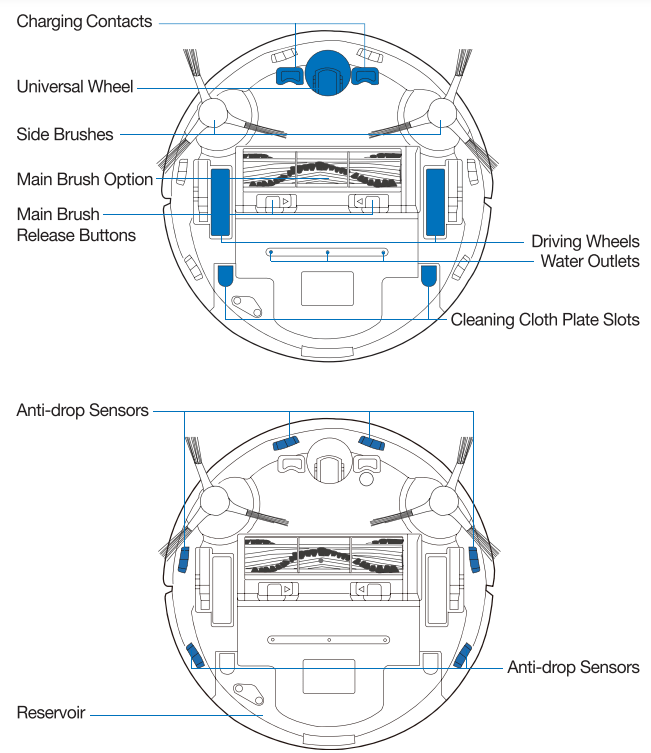
Robot
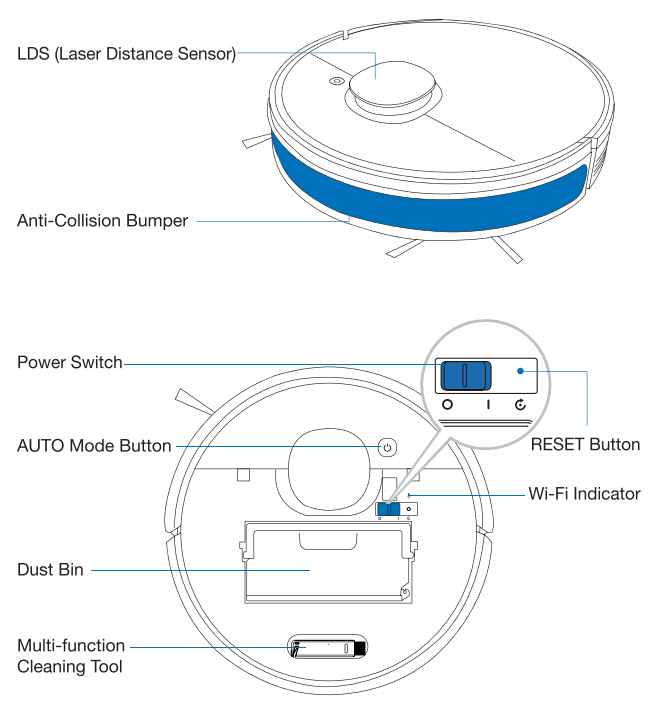
Bottom View
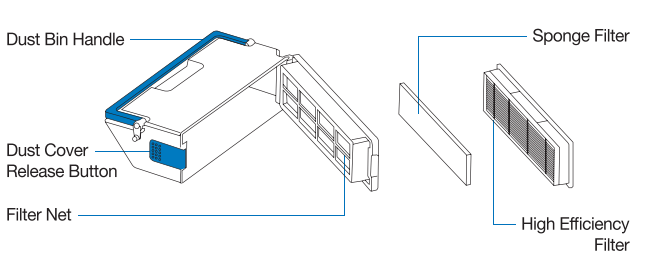
Dust Bin
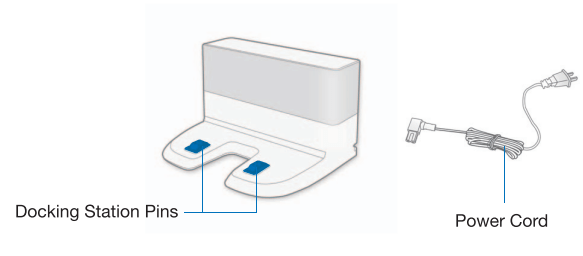
Docking Station
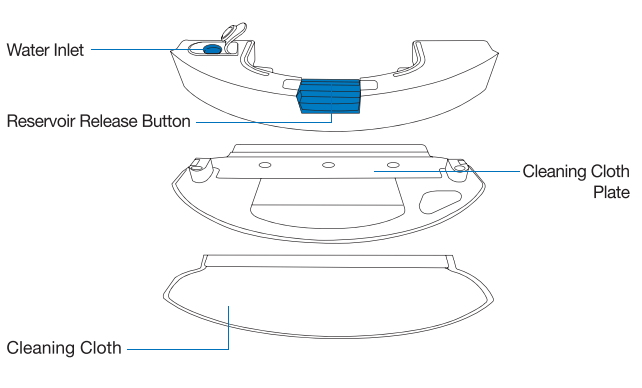
Reservoir
Operating and Programming
Notes Before Cleaning
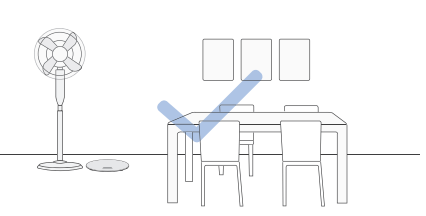
| Tidy up the area to be cleaned by putting furniture, such as chairs, in their proper place. |
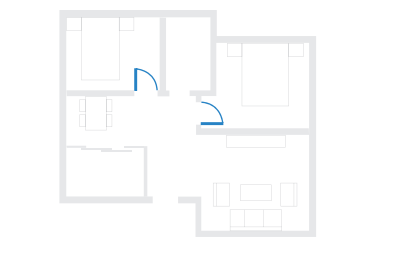
During the first use, make sure each room door is open to help DEEBOT fully explore your house.
|
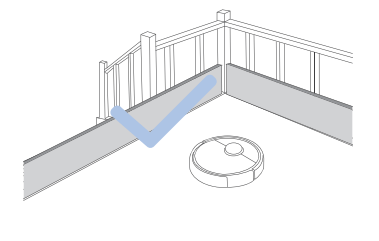
It may be necessary to place a physical barrier at the edge of a drop to stop the unit from falling over the edge.
|
|
|
|
|
|
Put away objects including cables, cloths and slippers, etc- on the floor to improve the cleaning efficiency.
|
Before using the product on a rug with tasseled edges, please fold the rug edges under. |
Please do not stand in narrow spaces, such as hallways, and make sure not to block the LDS Laser Distance Sensor. |
Quick Start
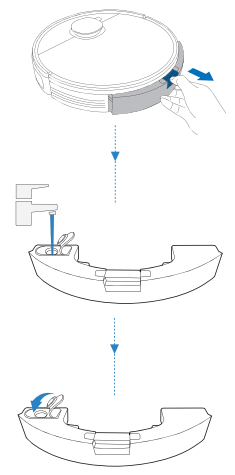
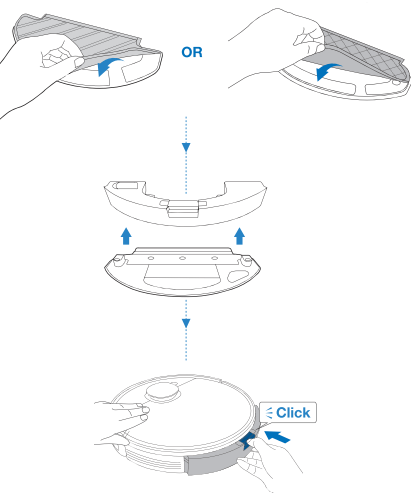
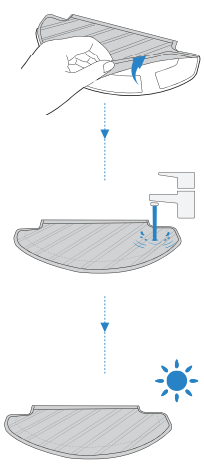
1. Remove Protective Strips and Films
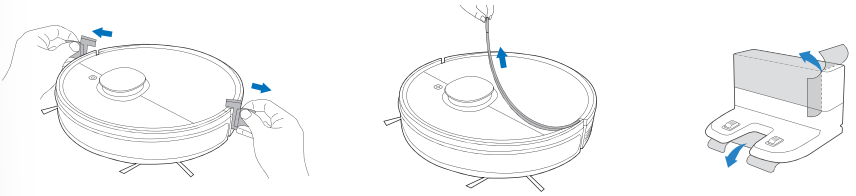
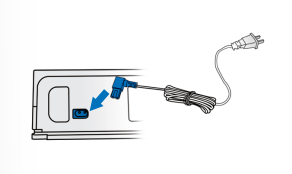
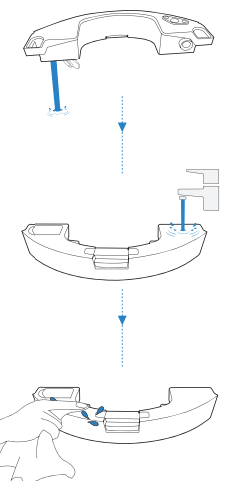
2. Assemble Docking Station
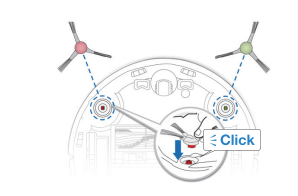
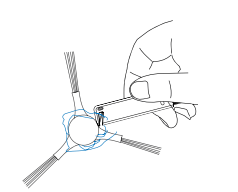
3. Install Side Brushes
Charge DEEBOT
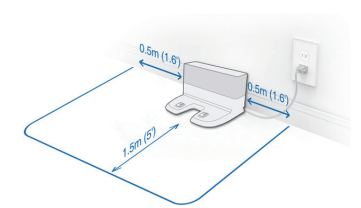
1. Docking Station Placement
2. Power ON
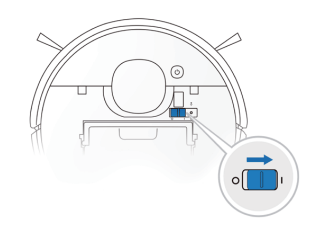
Note: I = ON, O = OFF.
DEEBOT cannot be charged when being powered OFF.
3. Charge DEEBOT
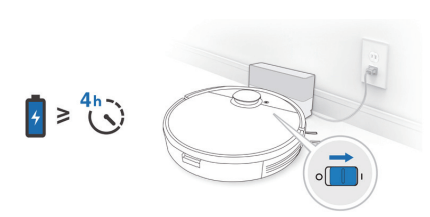
Note: When DEEBOT completes the cleaning cycle or when the battery gets low, DEEBOT automatically returns to the Docking Station to recharge itself. DEEBOT can also be sent back to the Docking Station at any time by using the ECOVACS App or by pressing the AUTO Button on the robot for 3 seconds.
Empty remaining water from the Reservoir and remove the Cleaning Cloth Plate before charging DEEBOT.
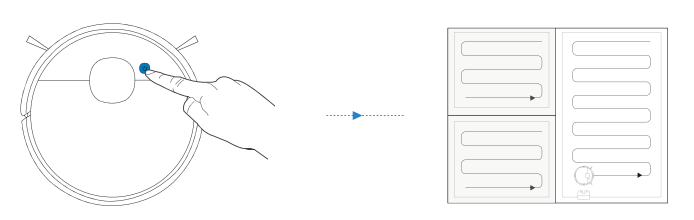
ECOVACS HOME App
To enjoy all available features, it is recommended to control your DEEBOT via the ECOVACS HOME app.
Before you start, make sure that:
- Your mobile phone is connected to a Wi-Fi network.
- The 2.4GHz band wireless signal is enabled on your router.
- The Wi-Fi indicator light on DEEBOT is slowly flashing.
Wi-Fi Indicator Light
|

|
Slowly flashing
|
Disconnected to Wi-Fi or waiting for Wi-Fi connection
|
|
Rapidly flashing
|
Connecting to Wi-Fi
|
|
Solid
|
Connected to Wi-Fi
|
Tips: If you have any problems during the Wi-Fi setup process, refer to the Troubleshooting > Wi-Fi Connection section in this manual.
Operating DEEBOT
During the first cleaning, please supervise DEEBOT and assist it should there be a problem.
1. Start
2. Pause
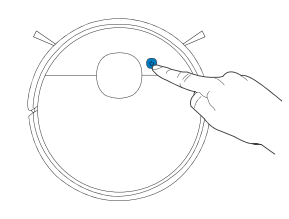
Note: The robot’s Control Panel stops glowing after the robot is paused for a few minutes. Press the AUTO Mode Button on DEEBOT to wake up the robot.
3. Return to Charge
Pressing  for 3 seconds to send DEEBOT back to the Docking Station.
OZMO Mopping System
1. Note: To prolong the service life of the reservoir, it is recommended to use purified water or softened water for OZMO mopping system.
2. Note: When DEEBOT is mopping, DEEBOT automatically detects the carpet and keeps away from it. If you need to clean the carpet, please uninstall the cleaning cloth plate first.
Maintenance
Regular Maintenance
To keep DEEBOT running at peak performance, perform maintenance tasks and replace parts with the following frequencies:
|
Robot Part
|
Maintenance Frequency
|
Replacement Frequency
|
|
Disposable Cleaning Cloth
|
/
|
After each use
|
|
Washable/Reusable Microfiber Cleaning Cloth
|
After each use
|
Every 50 washes
|
|
Reservoir/Cleaning Cloth Plate
|
After each use
|
/
|
|
Side Brush
|
Once every 2 weeks
|
Every 3-6 months
|
|
Main Brush
|
Once per week
|
Every 6-12 months
|
|
Sponge Filter/ High Efficiency Filter
|
Once per week
|
Every 3-6 months
|
|
LDS Laser Distance Sensor Universal Wheel Anti-Drop Sensors Bumper
Charging Contacts Docking Station Pins
|
Once per week
|
/
|
A multi-function Cleaning Tool is provided for easy maintenance. Handle with care, this cleaning tool has sharp edges.
Note: ECOVACS manufactures various replacement parts and fittings. Please contact Customer Service for more information on replacement parts.
OZMO Mopping System
Before performing cleaning and maintenance tasks on DEEBOT, turn the robot OFF and unplug the Docking Station.
1.
2. Washable/Reusable Microfiber Cleaning Cloth
Disposable Cleaning Cloth
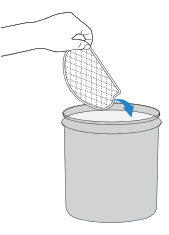
Caution! Clean the water inlet filter on the bottom of the Reservoir if it is clogged.
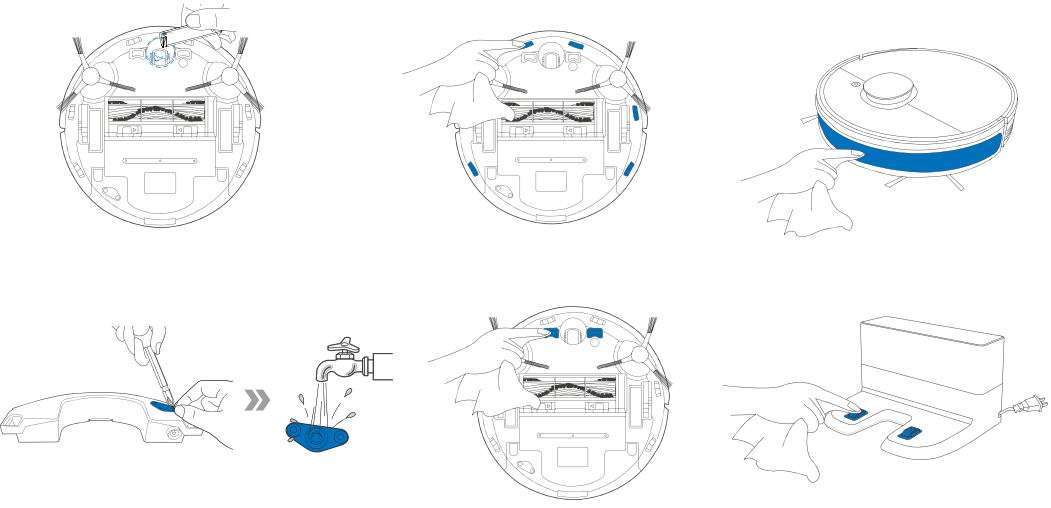
Dust Bin and Filters
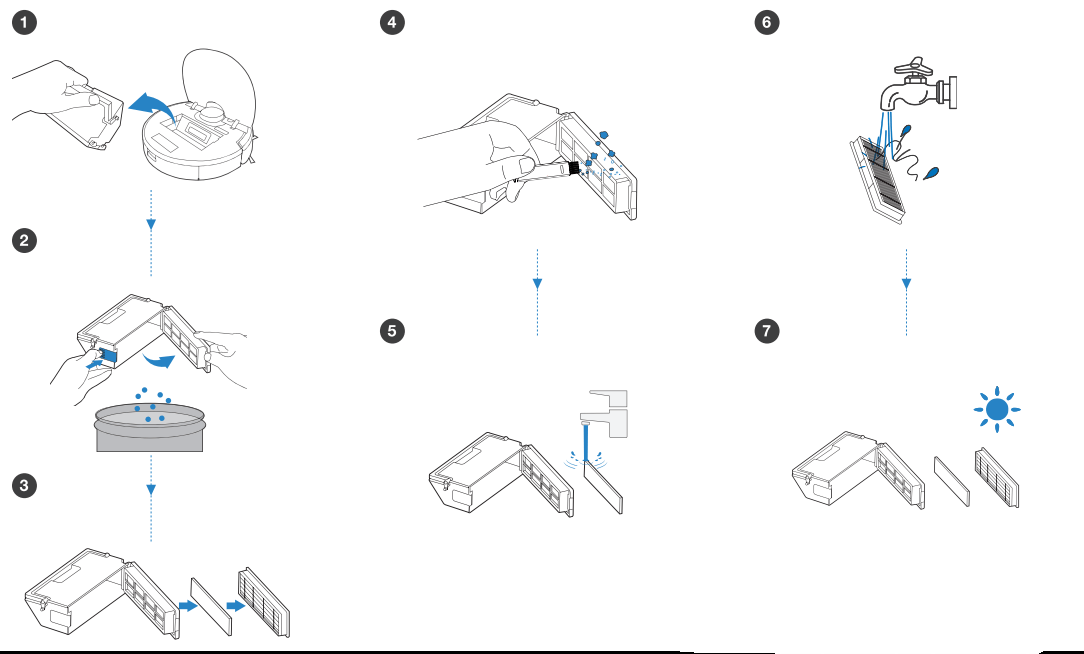
Note:
- Please rinse the filter with water as shown above.
- Do not use finger or brush to clean the filter.
- Be sure to dry out the filter for at least 24 hours after washing.
Main Brush and Side Brushes
Note: A Multi-Function Cleaning Tool is provided for easy maintenance. Handle with care, this cleaning tool has sharp edges.
Main Brush
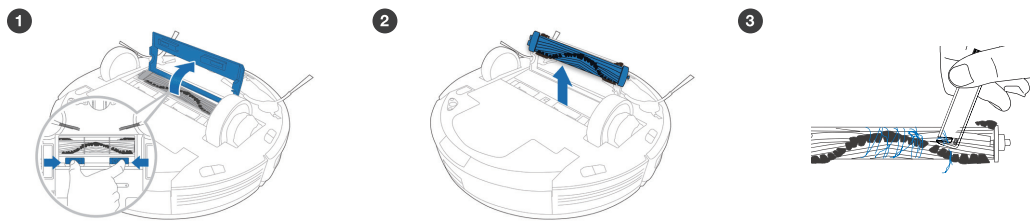
Side Brushes
Other Components
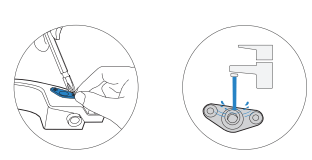
Note: Before cleaning the robot’s Charging Contacts and Docking Station Pins, turn the robot OFF and unplug the Docking Station.
Indicator Light
DEEBOT will tell you something is wrong with an indicator light and voice report. More detailed support is available through the ECOVACS HOME and online website.
|
Indicator Light
|
Scenario
|
|
AUTO Mode Button glows a solid WHITE.
|
The robot is cleaning.
|
|
The robot is paused while cleaning.
|
|
AUTO Mode Button flashes WHITE.
|
The robot is charging.
|
|
The robot is starting.
|
|
The robot is relocating.
|
|
AUTO Mode Button glows a solid RED.
|
The robot has low battery.
|
|
AUTO Mode Button flashes RED.
|
The robot has a problem.
|
Troubleshooting
Troubleshooting
|
No.
|
Malfunction
|
Possible Causes
|
Solutions
|
|
|
|
DEEBOT is not switched ON.
|
Switch ON DEEBOT.
|
|
|
|
DEEBOT has not connected to the Docking Station.
|
Be sure that the robot's Charging Contacts have connected to the Docking Station Pins.
|
|
1
|
DEEBOT is not charging.
|
The Power Cord is not connected to the Docking Station.
|
Make sure the Power Cord is firmly connected to the Docking Station.
|
|
|
|
The battery is completely discharged.
|
Re-activate the battery. Switch ON. Place DEEBOT on the Docking Station by hand, remove after charging for 3 minutes, repeat 3 times; then charge normally.
|
|
|
|
The Docking Station is not connected to the power supply.
|
Make sure the Docking Station is connected to the power supply.
|
|
2
|
DEEBOT cannot return to the Docking Station.
|
The Docking Station is not correctly placed.
|
Refer to section 3.3 to correctly place the Docking Station.
|
|
3
|
DEEBOT gets stuck while working and stops.
|
DEEBOT is tangled with something on the floor (electrical wires, curtains, carpet fringing, etc.).
|
DEEBOT will try various ways to free itself. If it is unsuccessful, manually remove the obstacles and restart.
|
|
4
|
DEEBOT returns to the Docking Station before it has finished cleaning.
|
When the battery gets low, DEEBOT automatically switches to Return to Charger Mode and returns to the Docking Station to recharge itself.
|
This is normal. No solution necessary.
|
|
Working time varies according to floor surface, room complexity and the Cleaning Mode selected.
|
This is normal. No solution necessary.
|
|
5
|
DEEBOT does not clean automatically at the scheduled time.
|
Time Scheduling function is cancelled.
|
Program DEEBOT to clean at specific times using the ECOVACS App.
|
|
The Continued Cleaning function is turned ON and DEEBOT has just finished cleaning the scheduled cleaning area.
|
This is normal. No solution necessary.
|
|
DEEBOT is switched OFF.
|
Switch ON DEEBOT.
|
|
The robot’s battery is low.
|
Keep DEEBOT switched ON and connected to the Docking Station to make sure it has a full battery to work at any time.
|
|
The robot’s Suction Intake is blocked and/or there is debris stuck in its components.
|
Power OFF DEEBOT, clean the Dust Bin and invert the robot. Clean the robot’s Suction Intake, Side Brushes and the Main Brush as described in section 4.
|
|
6
|
DEEBOT does not clean the whole area.
|
The cleaning area is not tidy.
|
Remove small objects from the floor and tidy up the cleaning area before DEEBOT starts cleaning.
|
|
7
|
The water is not coming out of the Reservoir when DEEBOT is mopping.
|
The water inlet filter on the bottom of Reservoir is clogged.
|
Unscrew the water inlet on the bottom of Reservoir and clean the filter.
|
|
The Reservoir runs out of water.
|
Add water into the Reservoir.
|
|
The water outlets on the bottom of DEEBOT are clogged.
|
Check the water outlets on the bottom and clean.
|
|
8
|
DEEBOT is not able to connect to the home Wi-Fi network.
|
Incorrect home Wi-Fi username or password entered.
|
Enter the correct home Wi-Fi username and password.
|
|
DEEBOT is not within range of your home Wi-Fi signal.
|
Make sure DEEBOT is within range of your home Wi-Fi signal.
|
|
Network setup started before DEEBOT was ready.
|
Turn ON Power Switch. Press the RESET Button for 3 seconds. DEEBOT is ready for network setup when it plays a musical tune and its Wi-Fi Indicator light flashes slowly.
|
Wi-Fi Connection
Before Wi-Fi setup, make sure DEEBOT, mobile phone, and Wi-Fi network meet the following requirements.
DEEBOT and Mobile Phone Requirements
- DEEBOT is fully charged and the power switch of DEEBOT is turned on.
- Wi-Fi status light slowly flashes.
- Turn off mobile phone’s cellular data (you can turn it back on after setup).
Wi-Fi Network Requirements
- You are using a 2.4GHz or 2.4/5 GHz mixed network.
- Your router supports 802.11 b/g/n and IPv4 protocol.
- Do not use a VPN (Virtual Private Network) or Proxy Server.
- Do not use a hidden network.
- WPA and WPA2 using TKIP, PSK, AES/CCMP encryption.
- WEP EAP (Enterprise Authentication Protocol) is not supported.
- Use Wi-Fi channels 1-11 in North America and channels 1-13 outside North America (refer to local regulatory agency).
- If you are using a network extender/repeater, the network name (SSID) and password are the same as your primary network.
Technical Specifications
|
Model
|
DLN12
|
|
Rated Input
|
20V = 1A
|
|
Docking Station Model
|
CH1822
|
|
Rated Input
|
100-240V ~ 50-60HZ 0.5A
|
Rated Output
|
20V = 1A
|
Output power of the Wi-Fi module is less than 10OmW.
Note: Technical and design specifications may be changed for continuous product improvement.