VC-1 Owners Manual
NOTE: Please completely read all installation instructions first.
Installation
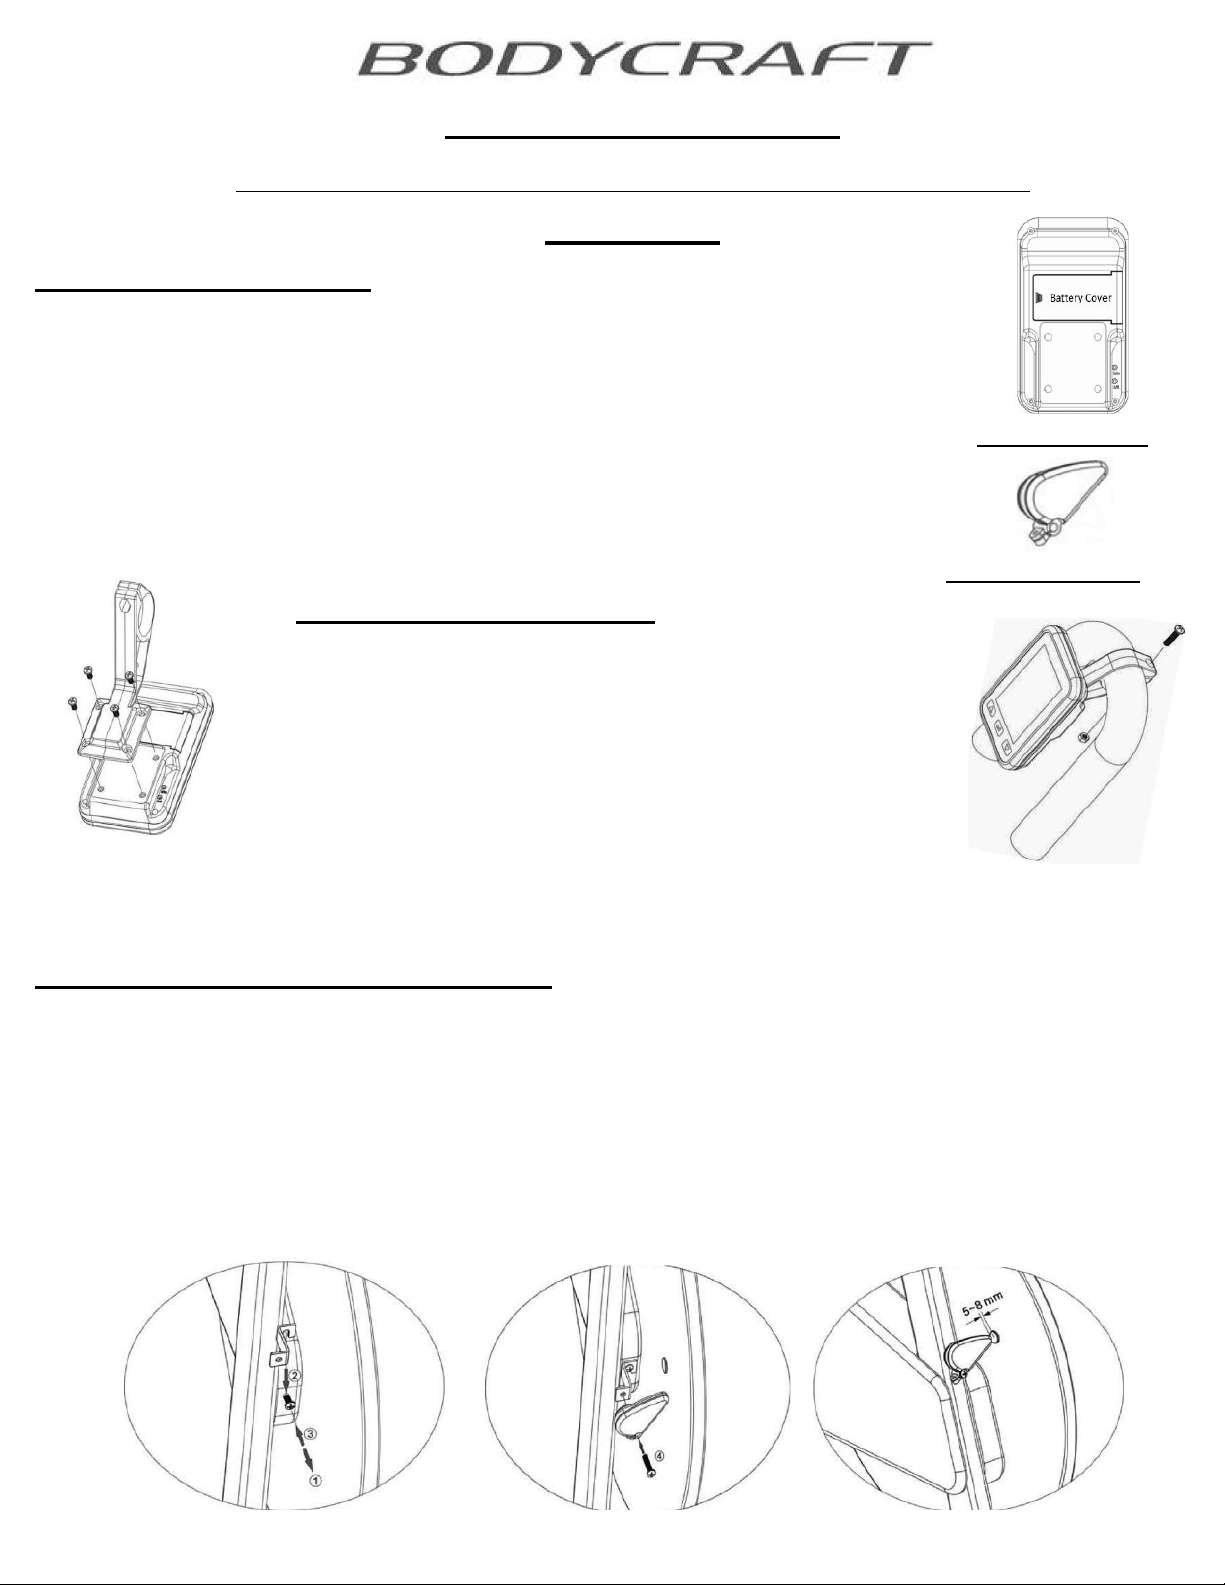
Console Battery Installation:
1.
Open the Battery Cover and install two alkaline AA (UM-3) batteries.
2.
Replace the battery cover.
3.
Press any key to test the LCD display. If the display does not function, check for
proper battery installation or replace with a new set of AA batteries.
Speed Sensor Battery Installation
1.
Install the CR2032 battery, printed side up and carefully install battery cover
using a coin of proper thickness. Rotate clockwise to secure.
2.
After installation of the battery, the sensor will be able to transmit to console.
Mounting Bracket Installation
1.
Remove the 4 pre-installed screws from the rear of the
console and the single screw from the bar clamp.
2.
Attach the Mounting Bracket with the 4 screws as
shown to the left.
3.
Install the bar clamp part of the mounting bracket
over the handlebar* and loosely secure with the screw.
4.
Adjust to the desired viewing angle and tighten screw.*
* The material used for the mounting bracket is highly flexible and designed to open and conform to the shape of the handlebar.
Caution: Do not open bracket gap beyond width of the handlebar.
Speed Pick-up Sensor/Magnet Installation:
1.
Loosen the installed screw on cycle and slide the slotted part of the bracket onto screw, tighten. (Fig. 1)
NOTE: For some cycles, the Sensor may be mounted without the Speed Sensor Bracket, as shown in Fig.3)
2.
Loosely attach Speed Sensor to Speed Sensor Bracket as shown (Fig. 2).
NOTE: There is a second hole in Speed Sensor that is not used in this application.
3.
Magnetically attach Magnet onto Flywheel (DO NOT REMOVE TAPE) so it is aligned with the tip of the
sensor. Adjust angle of sensor so the gap between the magnet and sensor is 5mm and tighten (Fig. 3).
4.
Before permanently attaching magnet, press any key, ride cycle to test the monitor for speed reading.
NOTE: If you do not get a speed reading, adjust sensor angle or replace sensor battery.
6. If everything functions, permanently install magnet with the pre-installed tape.
Fig 1 Fig. 2 Fig. 3
Console Rear View
Speed Pick-up Sensor
Operation Guide
Quickstart
1. Press any key to power-up console. Begin workout, all values will count from zero.
Set Time OR Distance Goals
1.
With the console on, press the ENTER key to set time goal* or press ENTER again to set distance goal.
NOTE: If the speed or distance display a number other than zero, press and hold ENTER/RESET for 5 seconds.
2.
Use the UP and DOWN keys to set the desired time or distance goal and press ENTER to set goal.
NOTE: If the ENTER key is not pressed, the setting will lock automatically after 15-30 seconds.
4. When the time or distance goal is achieved, the computer will beep. Press any key to stop sound.
NOTE: The Console will continue to operate until the user stops exercise.
Display Illumination
Press any key during workout to illuminate the LCD Display for 5 seconds.
NOTE: The Illumination/back-light is limited to 5 seconds to preserve battery life.
Display Values
Press the UP key to select between these display values: SPEED / PULSE DISTANCE / RPM
Reset Display
Press and hold the ENTER/RESET key for 5 seconds to clear all values.
Display Range Values
Time
: 0:00:00 ~ 99:59:59 counting up. 0:05:00 ~ 99:59:00 counting down.
Speed
: 0.0 ~ 999.9 KPH or MPH.
RPM
: 15 ~ 999 .
Distance
: 0.0 ~ 999.9 KPH or MPH counting up. 1.0 ~ 999.0 KPH.MPH counting down.
Calorie
: 0.0 ~ 9999. Calories are displayed in K/Cal.
Pulse (w/optional Heart Rate Belt)
: 40 BPM ~ 200 BPM. The pulse value will display a “P” if no pulse
signal is received after 16 seconds or the unit is receiving an erratic reading. See troubleshooting.
Auto Off/Pause
If you stop your workout, the computer will pause when speed window reads zero.
The computer will automatically power-down after about 60 seconds.
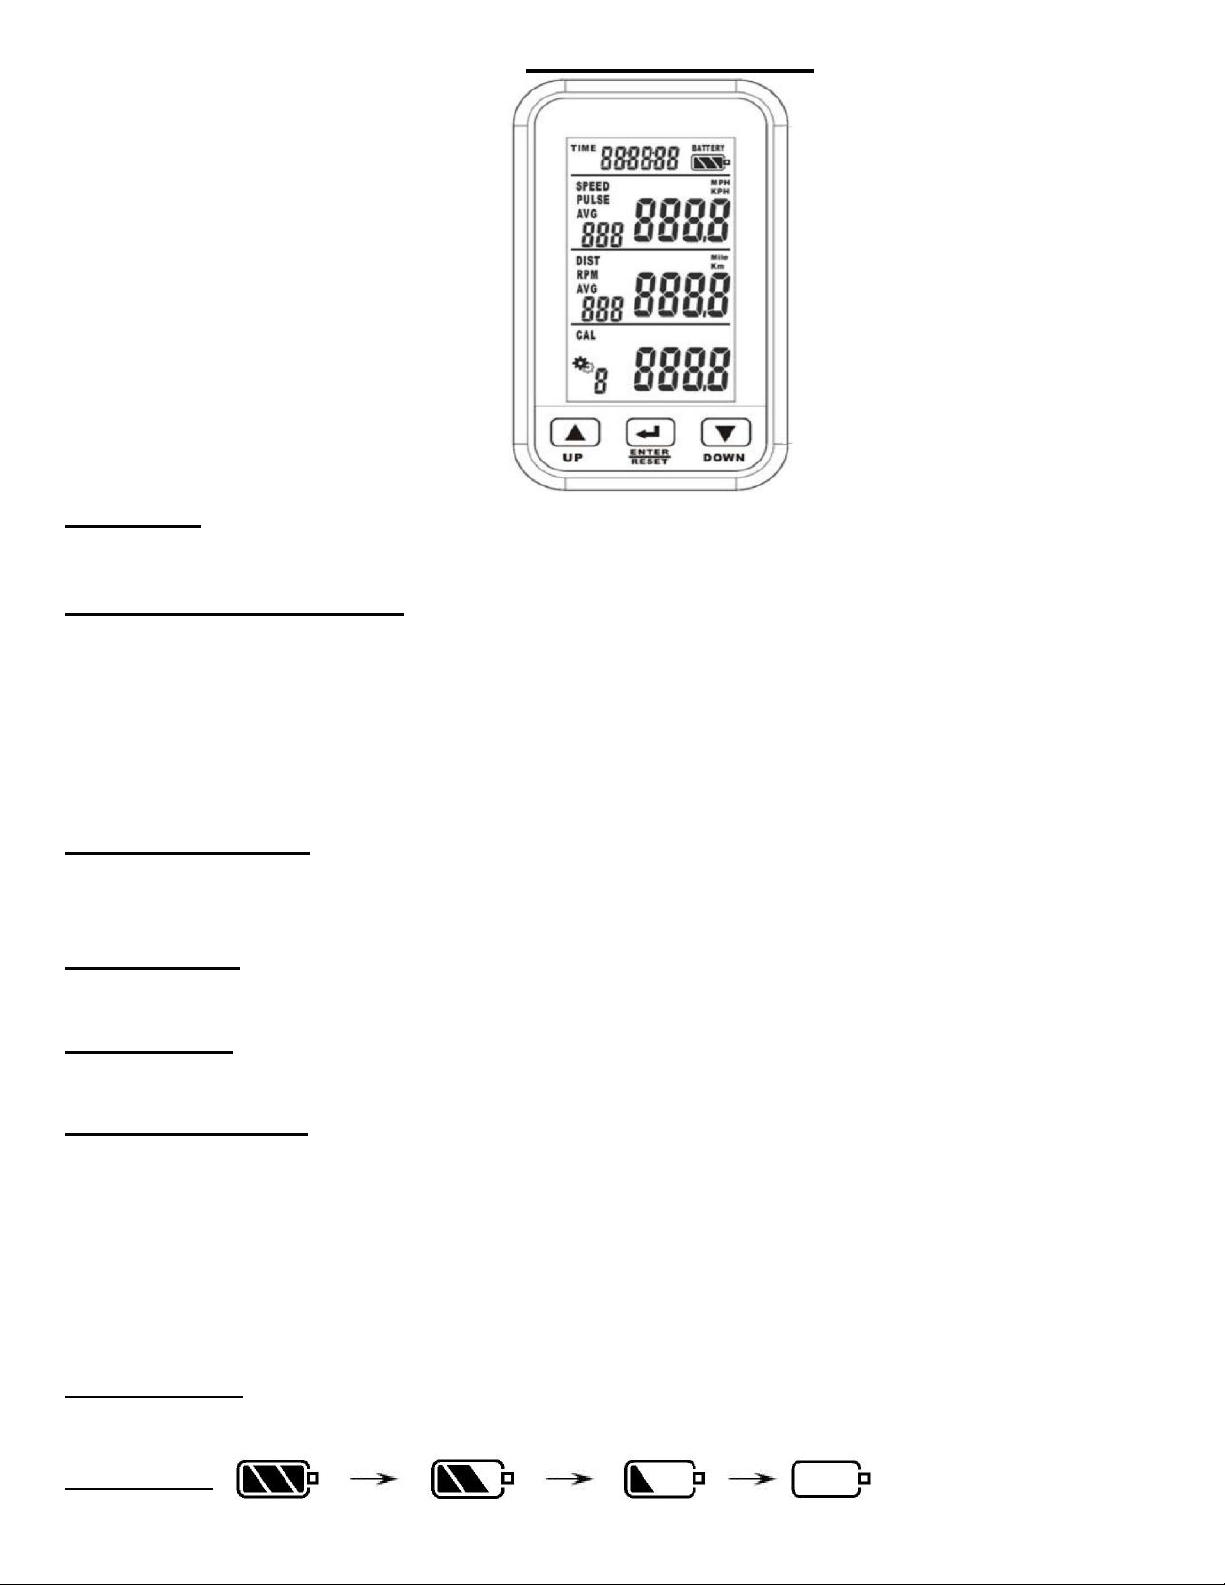
Low Battery
When the battery symbol flashes, replace batteries with new Alkaline AA (UM-3).

Computer Settings/Calibration
English/Metric
Use a pen tip or pin to push the “k/m” button on the back of the console to switch English/Metric.
Calibration (Gear Ratios)
Use a pen tip or pin to push the “3/5” button on the back of the console to switch between 1:3 and
1:5 ratios. (To check gear ratio, Consult your owners manual or count the revolutions of the flywheel
By rotating the pedal crank one 360° revolution. If the flywheel rotates 3 times, your ratio is 1:3, if it
turns 5 times, then it is 1:5.)
NOTE: Operating/Storage Temperatures
Operating temperatures 0°C/32°F – 50°C/122°F. Storage temperatures -10°C/14°F – 60°C/140°F.
Re-syncing Console/Speed Sensor
Note: Pairing of the console and speed sensor has been performed during manufacturing.
Replacing the battery does not break the connection; therefore, pairing should not be required.
The console and speed sensor are paired to a unique frequency to avoid interference from other units.
If the console or speed sensor is replaced, pairing of the two must be performed to re-establish
the connection. If pairing is not performed, the speed sensor will not be able to transmit data to
the console. Follow this procedure to pair the Console and Speed Sensor:
Console/Speed Sensor Procedure
NOTE: Please completely read all pairing instructions before beginning.
1.
Remove battery from Speed Sensor using a coin of proper thickness. Turn counter-clockwise to open.
2.
While the console is off, press and hold the UP and ENTER buttons simultaneously. The word
SPEED will begin flashing and a 30 second countdown will begin.
3.
The console is now ready for pairing. Re-Install the battery into the Speed Sensor and secure
battery cover clockwise WITHIN the 30 second countdown.
4.
When the countdown stops, the pairing procedure should be complete. If the meter displays E1
or E5, the pairing process has failed; please go back to Step 1 to restart the pairing process. If
pairing fails again, contact Bodycraft if you are in the USA or Canada. Or contact your dealer.
Troubleshooting
1. No speed reading or the reading fluctuates too much when pedaling.
a.
Remove CR2032 Battery from Speed Sensor for 30 Seconds. Replace and test.
b.
Speed Sensor/Magnet gap may need adjusted. Adjust gap to about 5mm.
c.
The Magnet and Speed Sensor are out of alignment. The magnet must be aligned to the tip of the Speed Sensor.
d.
Speed Sensor Battery is low. Replace with a new CR2032 Battery.
e.
The Console may be receiving interference. Try relocating the bike.
f.
The Console and Speed Sensor are too far apart. Max range is
2. “LO” is flashing on the Console.
Battery is low in the console. Replace with new Alkaline AA (UM-3) batteries.
3. No pulse reading or the pulse reading fluctuates is is incorrect.
a.
Heart Rate Belt battery* is low. Replace battery and test.
*NOTE: Some heart rate belts do not have a replaceable battery. Purchase a new compatible Heart Rate Belt.
b.
You may be receiving interference from another Heart Rate Belt or an electrical device located near the monitor. You can try
relocating the cycle, or turn off nearby TV's, computer monitors, wireless alarm sensors, lighting that require ballasts, etc.
c.
Console Battery is low. Replace with new Alkaline AA (UM-3) batteries.
4. Distance/RPM/Calories incorrect.
a.
Check that the ratio is properly set for your cycle.
b.
Check that the Metric/English value is properly set.

For Parts, Service and Support in the USA and Canada.*
You must register your product at www.bodycraft.com
If you need parts or service, please contact Bodycraft at
service@bodycraft.com or call 800-990-5556 9am - 5pm EST.
If you have questions about the use of your Bodycraft product, contact your
dealer, email info@bodycraft.com or call us at 1-800-990-5556.
Warranty: USA and Canada only.*
*BODYCRAFT warrants this product to be free of defects in material and
workmanship for 1 year in accordance with the following conditions:
The warranty begins on the original date of purchase at retail and ends when
the original owner disposes of it, either through sale, gift, or otherwise.
In order for the warranty to be valid, the product must be registered with
Bodycraft within 30 days of purchase.
The warranty is not transferable and does not cover normal maintenance.
This warranty does not cover damage resulting from accident, misuse, water,
tampering, unreasonable use, unauthorized repairs, improper repairs,
alterations or normal wear and tear.
If the item exhibits a defect, BODYCRAFT will, at its option, repair or replace it
without cost for parts. Shipping and handling charges may apply. (BODYCRAFT
may request return of the part(s) or photographic evidence of the damaged
part(s) prior to replacement at the owners expense).
Proof of purchase must be supplied to validate warranty and the product
must have been registered with BodyCraft.
This warranty is in lieu of all warranties, expressed or implied, and/or all other
obligations or liabilities on our part and we neither assume nor authorize any
person to assume for us any other obligation or liability in connection with the
sale of the BodyCraft VC-1. Under no circumstances shall we be liable by
virtue of this warranty or otherwise for damage to any person or property
whatsoever for any special, indirect, incidental, secondary or consequential
damage of any nature whatsoever arising out of the use or inability to use
the BodyCraft VC-1.
* If you do not reside within the USA or Canada, please contact your
local Bodycraft distributor for details specific to you.