Loading ...
Loading ...
Loading ...
Practical tips
Charging process display
Fig. 154
Behind the cover of the battery
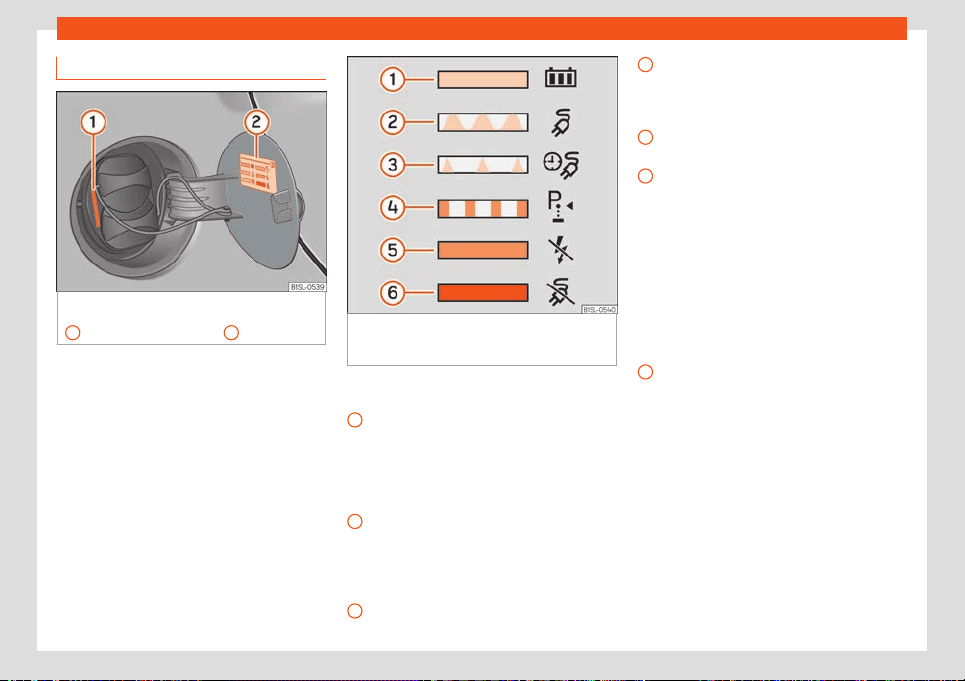
char
ging sock
et: char
ging process indicator
1
and information on sticker
2
.
Fig. 155 On the inside of the cover of the bat-
t
ery char
ging sock
et: sticker with information
on the charging process display.
The charging process display is a diode (LED)
l
ocat
ed ne
xt to charging socket
›››
Fig. 154
1
and it indicates the charge level. There is a
stick
er that e
xpl
ains the different indications
›››
Fig. 155.
Key to the information sticker of the charging
process display
›››
Fig. 155:
The green LED lights up permanently:
The charging process of the high-voltage
battery is complete. The battery has
reached the maximum or set charge lev-
el.
The LED flashes green: The high-voltage
battery is charging.
1
2
The LED flashes green for about 1 mi-
nut
e:
Pr
ogrammed charging is active
(departure time), but has not yet started
›››
page 167.
The LED flashes yellow: The parking
lock P is not engaged.
The yellow LED lights up briefly: The
charging connector is plugged into the
charging socket and the vehicle has de-
tected it.
The yellow LED lights up permanently:
No electrical network has been detected.
Check the power supply and the electri-
cal network. When using the charging ca-
ble for the electrical network, the protec-
tion device will display the status of the
network. Seek specialist assistance.
The red LED lights up permanently: It
has not been possible to lock the charg-
ing connector. Remove the charging con-
nector from the charging socket and plug
in again. If the fault continues, seek spe-
cialist assistance.
The LED flashes red: There is a fault in
the charging system. Seek specialist as-
sistance.
When the charging process is active, this is
displayed on the instrument panel by means
of a control lamp, and on the remaining
charge time is also displayed
›››
page 56.
3
4
5
6
168
Loading ...
Loading ...
Loading ...