User Manual
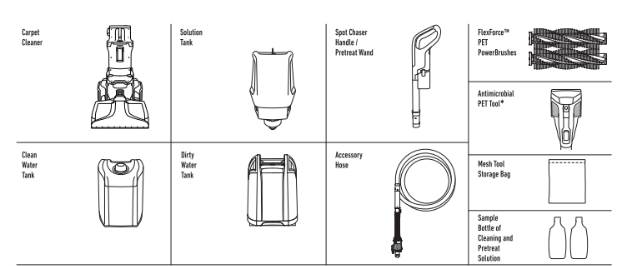
What's in the Box?
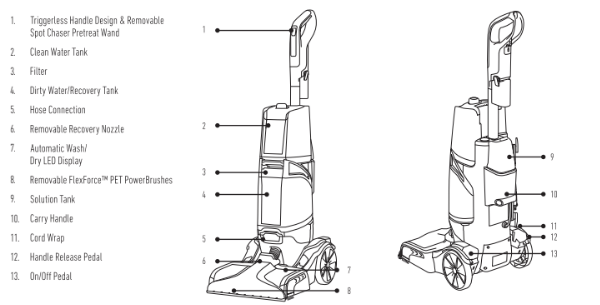
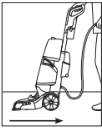
Getting to Know Your HOOVER SmartWash Pet Complete
Before You Begin Cleaning:
Vacuum carpet and upholstery thoroughly with a HOOVER® vacuum before use.
Don't use the carpet cleaner as a traditional vacuum cleaner.
Use your HOOVER® carpet cleaner only if upholstery fabric is marked with a "W" (for "wet clean) or "S/W™" (for solvent/dry" or "wet" clean). Don't clean fabric marked "S" (solvent/dry clean only).
Test for colorfastness in a small, hidden area. Gently rub surface with a dampened white cloth. Wait ten minutes and check for color removal or bleed with a white paper towel.
Mave furniture out of area to be cleaned. Place aluminum foil or wax paper under legs of furniture too heavy to move to prevent wood finishes from staining carpet. Ple up furniture skirts and draperies.
ASSEMBLY
1. Slide the handle into the base until you hear a "click"

2. Wrap the power cord around the cord hooks for convenient storage.

FILL THE CLEAN WATER TANK
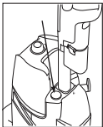
1. Up to remove the Clean Water Tank.

2. Renove the cap and add warm water to the top of tank. Replace cap.

3. Align Clean Water Tanık. with the body of the cleaner and press FIRMLY into place.

FILL THE SOLUTION TANK
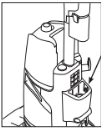
1. Remove the cap and fill with HOOVER Cleaning

2. Solution to the top of the tank. Replace cap.

3. Place the Solution Tank back into the cleaner and press FIRMLY into place

Using Your SmartWash Pet Complete Carpet Cleaner
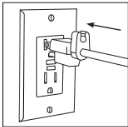
1. Unwrap the power cord and plug cleaner in an electrical outlet.
2. Step on the Handle Relcase Pedal to recline the cleaner to cleaning position
3. Step on the On/Off Pedal to turn ON.
4. Slowly move forward. The cleaner will automatically dispenser the optimal amount of water and cleaningg solution.
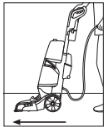
5. Slowly pull backward. The cleaner will automatically dry your carpets by extracting the water and cleaning solution.
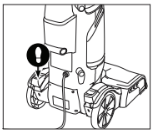
6. When you finish cleaning but further drying is required press the DRY ONLY BUTTON. The Dry Only mode will extract remaining water from yor carpet. Continue inn this mode until little water is visibly passing through the Nozzle.
7. For best result, HOOVER recommendeds rinsing the carpet with clean water only. This will remove residual carpet cleaning solution from your carpet. To rinse with clean water only, remove the Solution Tank and then repeat step 4 through 6.
Maintenance
How to Empty
This product contains no serviceable parts.
If appliance is not working as it should, has been dropped, damaged, left outdoors. ar dropped into water, call customer service at 1-800-944-9200 prior to continuing use.
1. Turn the cleaner off and unplug from electrical
2. Grab the Dirty Water Tank handle and pull up to release. Remove Tank from carpet cleaner base at angel

3. Place on a flat surface and unlatch Dirty Waler Tank lid to remove top of lank.

4. Empty tank, rinse, wipe filter clean and allow to air dry
Auto Shut Off Float: Your carpet cleaner is equipped with a shut off float within your Dirty Water Tank. When the Dirty Water Tank becomes full, the float will rise, shutting off the air flow through the Nozzle. Once the air flow is shut off, empty the Dirty Water Tank
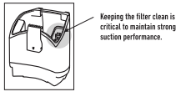
How to Remove and Clean Nozzle
1. To prevent possible leaking. remove and empty Clean Water Tank, Dirty Water Tank and Solution Tank.

2. With handle in upright position, lift up on the Nozzle release ther pul Nozzle forward to remove from carpet cleaner. CAUTION, pull Nozzle carefully outwards and not upwards.

3. Rinse debris from Nozzle.

4 . Position Nozzle onto foot. making sure to align the tabs at the top of the Nozzle with the notches inside the font.

5. Slide Nozzle forward to snap into position.

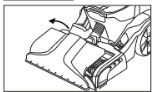
How to Change and Clean Brushes
HOW TO REMOVE
1. To prevent possible leaking, remove Clean Water Tank, Dirty Water Tank and Solution Tank.

2. With handle in upright position, follow "Nozzle: How to Remove and Clean" instructions page 15).
STORAGE
Before storing: Empty Clean Water Tank and let air dry. Replace on cleaner. Empty Dirty Water Tank, clean filter of dirt/debris, rinse tank and lid thoroughly with clean water and let air dry. Empty Solution Tank, rinse tank with clean water and let air dry.
Allow brushes and underside of carpet cleaner to air dry thoroughly before storing carpet cleaner on a carpeted or wood surface.
3. Grab Side A and pull up to remove. Repeat on the other brush.

4. The brushes can be cleaned under running waler.

CORD STORAGE
Wrap the power cord around the cord hooks for convenient storage.
Attach the plug end to the cord.
HOW TO REPLACE
1. At an angle, align side B drive gear.

2. Press Tab A down until brush snaps in place.

LUBRICATION
The motor and brush rolls are equipped with bearings which contain sufficient lubrication for their lifetime.
The addition of lubricant could cause damage. Do not add lubricant to motor bearings or brush rolls.
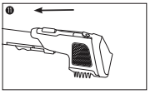
HOW TO ATTACH HOSE
1. Open Hose Connection Port. Insert hose end by inserling FIRMLY into Hose Solution Port.

HOW TO REMOVE HOSE
CAUTION: Always turn off this product before connecting or disconnecting hose.
1. Press trigger on tool to ensure all fluid has discharged from the hose. Press button on end of hose and pull to remove hose and solution connection from unit.

2. Close the Hose Port Door back into place. Make sure to close coor to ensure proper suction. Cleaner may lose suction if not closed on properly

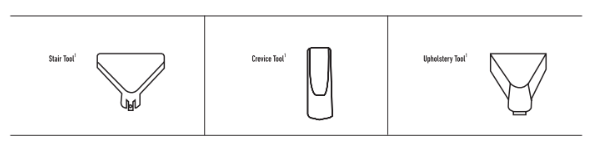
How to Attach Tools
1. To ensure maximum performance and to protect your carpet, be sure to place the handle in the upright position while using the hose. Placing the handle in the upright position shuts off the FlexForce™ PET PowerBrushes.

2. Connect tool to nose by sliding it onto the connector until it securely locks into place

CAUTION: Not to be used for grooming a pet.
3. Using your thumb, push forward and up on the latch to remove tool

How to Use the Pretreat Wand.
1. With the Spot Chaser Pretreat Wand installed into the machine, press both latches and pull down to release Pretreat Bottle.

2. Unscrew cap and fill with a HOOVER spol treatment. (See page 9 instructions).

3. Reinstall Pretreat Bottle by pressing the bottle up into the Spot Chaser handle grip.

4. Press and release the "Wand Release" button next to the Spot Chaser Wand. Next, pull the wand out.

5. Press the button on the front of the Spot Chaser wand to dispense Pretreat solution.

6. Wait 5-10 minutes before using SmartWash over the treated areas.

REMOVING BATTERY
1. Remove battery by removing screws with a phillips head screwdriver.

2. Use 2 AAA batteries.

3. Replace battery door.

CAUTION: Use extra care when cleaning on stairs. To avoid personal injury or damage, and to prevent the cleaner from falling, always place cleaner at the bottom of stairs or on floor. Do not place cleaner on stairs or furniture, as it may result in injury or damage
Cleaning Carpeted Stairs and Upholstery
- Read "Before you Begin Cleaning instruction on page 9.
- Attach hose as instructed (page 18).
- Place handle in upright position. FlexForce™ PET PowerBrushes will not rotate while handle is in the upright position.
- Fill Clean Water Tank according to instructions.
- Fill Solution Tank with HOOVER® solution according to instructions on page 10.
- Attach tool to end of hase.
- Dry hands and plug cleaner into a properly grounded outlet.
- Turn cleaner ON
- Pre-spray the area by holding the tool about one inch above the carpet and push it forward while pressing the trigger.
- Slightly press the tool switch into area cleaning. Press the trigger and pull the tool slowly over the carpet. Release trigger at end of stroke.
- Lift tocl, and position it against Nozzle. Pull tools.owly over carpe: w thout pressing trigger.
- Overlap strokes by ½ inch to help prevent streaking
- It is best to alternate wel and dry strokes as described in steps.

Tips:
To avoid saturating carpet, do not use more than 4 wet strokes over any one area. Always end with dry strokes additional cleaning is necessary, wat antil the carpet is completely day before using the fact again
Empty Dirty Water Tank when the motor stund becomes higher pitched and there a loss of suction, you will also see the float rise and she off suction of the same time
When finished cleaning, follow "After Cleaning and "After Using Tool" instruction.
Troubleshooting:
WARNING: To reduce the risk of personal unplug before cleaning or sen
Cleanor won't run
- Not firmly plagged in
- No voltage in wall plug
- Check fuse or breaker in home
- Blown fuse or tripped breaker
- Replace fuse or reset breaker in home.
- Fuse in cleaner blown
- On/Off pedal not depressed
Low suction
- Water Tank full/automatic shut off engaged
- Remove and empty Dirty Water Tank. See "How to Empty" page 13.
- Blokage in tool on end of hose
- Remove tool and clear blockage.
- Dirty Water Lid not on correctly
- Make sure lid is on securely. See "How to Empty" page 13.
- Dirty Water Tank Debris Filter clogged
- See "How to Clean" page 13
- Blockage in Nezzie
- See "How to Clean" page 15
- Dirty Water Tank not properly secured
- Replace Dirty Water Tank and secure Dirty Water Tank latch
- Dirty Water Nozzle not on correctly
- Remove replace Dirty Water Nozzle. See How to Clean & Remove Nozzle" page 15.
- Blockage in hose
- Drop a cain through, clear with broom handle
Hose Nezzle stops spraying liquid during use
- Clean Water Tank or Detergent Container is empty
- Tum off Cleaner and fill Clean Water Tank & Detergent Container.
- Locse connection to solution port on foot of cleaner
- Check for secure connection to salution port on body of Cleaner.
Accessory Tool will not spray after filling the Clean Water Tank or Solution Tank
- Air is trapped in the hese & pump
- Tum on the Cleaner. If hose does not spray, prime the pump by lowering the hose down to the floor and hold the trigger for or up to one minute.
- Aim downward & squeeze trigger
Hose will not spray after priming pump
- Pump is defective
- Call for service: 1-800-944-9200
- Not connected property
Clean water won't dispense
- Make sure tank is securely locked in position
- Clean Water Tank or Solution Tank not firmly in place
- Refill container according to cleaning instructions.
- Clean Water Tank or Solution Tank empty
Solution won't dispense
- Cleaner is not moving in forward direction
- Must be moving the machine forward to properly dispense water and solution.
Brushes won't ratate during floor cleaning
- Brushroll stall protection activated
- Turn the unit off and back on, then inspect and clean for jams.
- Unit in upright position
- Brushes will not ronate in upright position. Step on handle release to start cleaning.
Water is leaking out of Carpet Cleaner
- Clean Water Tank Solution Tank or Dirty Water Tank not FIRMLY in place.
- Make sure the tank is secure
- Capet Cleaner may drip residual moisture after use Allow cleaner and brusher to dry before storing on hard floor surface.
Spot Chaser Pretreat Wand will not dispense
- Brushes will not rotate in upright position. Step on handie release to start cleaning.
- How to use Spot Chaser Pretreat Wand page 19
- Carpet Cleaner may drip residual moisture after use. Allow cleaner and brushes to dry before storing on hard floor surface.

