User manual Vacuum Cleaner for Hoover FH51000
FEATURES

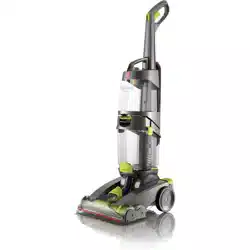
FEATURES
1. Handle Grip
2. Solution Trigger
3. Clean Boost™ Trigger
4. Clean Water/Solution Tank
Release Button
5. Carry Handle
6. Clean Water/Solution Tank
7. Dirty Water Tank Release Latch
8. Dirty Water Tank
9. Accessory Hose Connection Port
10. Solution Tube Connection Port
11. Removable Nozzle
12. ON/OFF Pedal
13. Cord Clip
14. Cord Storage Hook
15. Handle Lock
16. Handle Release Pedal
17. Mesh Tool Storage Bag
CLEANER ASSEMBLY
CARTON CONTENTS

A. Carpet Cleaner Base
B. Handle
C. Clean Water/Solution Tank
D. Upholstery Tool
E. Carpet Cleaning Detergent
F. Hose
Remove all parts from carton and identify each item shown.
Make sure all parts are located before disposing of packing materials.
HOW TO ASSEMBLE
Base and Lower Handle As

2.1 Stand base in upright position. Push handle onto base.
2.2 Turn dial counter clockwise to “LOCK” postion. Dial should stop when locked and handle should feel secure.
2.3 Place clean water tank securely on handle above dirty water tank until it snaps into place.
CORD STORAGE
Wrap cord around cord hooks for convenient storage. Attach the plug end to cord.
Before you begin cleaning
- Vacuum thoroughly - For carpet, use a HOOVER® vacuum cleaner with an agitator for best results. Vacuum upholstery with a vacuum cleaner with cleaning tool attachments. Use a crevice tool to reach into tufts and folds. Do not use the carpet cleaner as a dry vacuum cleaner.
- For upholstery, check cleaning code - Use your HOOVER® carpet washer only if the upholstery fabric is marked with a “W” (for “wet” clean) or “S/W” (for “solvent/dry” or “wet” clean). Do not clean fabric marked “S” (“solvent/dry” clean only). If your upholstery does not have a code, seek professional assistance.
- Test for colorfastness - Wet a white absorbent cloth with the solution. In a small, hidden area, gently rub the surface with the dampened cloth. Wait ten minutes and check for color removal or bleed with white paper towel or cloth. If surface has more than one color, check all colors.
- When cleaning entire floor, move furniture out of area to be cleaned (may not be necessary if only high traffic areas are to be cleaned). For furniture too heavy to move, place aluminum foil or wax paper under legs. This will prevent wood finishes from staining carpet. Pin up furniture skirts and draperies.
- Pretreat spots and heavy traffic areas with an appropriate Hoover Cleaning Solutions, see “Cleaning Solutions” section. Follow Directions on bottle. *Available at additional cost if not included with your model.
- To prevent staining, use plastic or aluminum foil to protect wood or metal surfaces from possible water spray.
- To avoid wetting and possible damage to wood floors underneath area rugs/carpet, either move area rugs/ carpet to a non-wood hard floor surface or place waterproof material (e.g. plastic) underneath them before cleaning.
General Operation
Remove and replace clean water solu- tion tank
3.1 Press Clean Water Solution Tank button on handle (A). Tilt Clean Water Solution Tank away from cleaner and remove (B).
3.2 Rotate measuring cap counter-clockwise from the top of Clean Water Solution Tank and pull up to remove.
3.3 Fill Clean Water Solution Tank with hot tap water to fill line.
3.4 Fill measuring cap with cleaning solution 3 times, (approximately 3 oz.). Pour into clean water solution tank and replace measuring cap.
3.5 Place clean water solution tank back on handle until it snaps in.
NOTE: Using more than the recommended amount of cleaning solution may cause excessive foaming.


Carpet Cleaning
3.6 Plug cord into electrical outlet. Step on handle release pedal, to put unit in cleaning position.
3.7 Step on power switch to turn machine ON (I=ON).
3.8 Squeeze trigger (C) to apply cleaning solution and slowly push cleaner forward (equals one wet stroke). Continue to squeeze trigger and slowly pull cleaner back toward you (second wet stroke).
3.9 Release trigger and slowly push cleaner forward over area just sprayed with solution (dry stroke). Then slowly pull cleaner back toward you without squeezing trigger (dry stroke). Continue using dry strokes until little water is visible passing through the nozzle (Pass over the same area a minimum of 4 times = 2 while squeezing the trigger and 2 without).
For spots and high traffic areas use CLEAN BOOST™. To use CLEAN BOOST™ to remove those tough stains, apply extra cleaning solution by squeezing the trigger as you normally would and also pressing the Clean Boost™ trigger at the same time.
NOTE: For best results, use straight, parallel strokes. Overlap strokes by 1 inch to help prevent streaking.
Keep nozzle flat on floor for both forward and reverse strokes.
For best cleaning results and to aid in faster drying of carpet, end with more dry strokes. (Continue using dry strokes until little water is visible passing through the nozzle.)
NOTE: Empty Dirty Water Tank when the motor sound becomes higher pitched and there is a loss in suction (see “Automatic shut-off”)
For best cleaning results, Hoover recommends to rinse the carpet with water only. This will remove residual carpet cleaning solution from your carpets. To rinse with water only, fill Solution Tank with water and repeat step 3.9.
For heavily soiled areas, repeat cleaning process. Avoid saturating carpet.
NOTE: It is best to alternate wet and dry strokes as described above.
Wrap cord around hooks for convenient storage. Attach the plug end to the cord.


Dirty Water Tank
- Your carpet washer is equipped with a shut off float within your dirty water tank. When the dirty water tank becomes full, the float will rise, shutting off the air flow through the nozzle.
- Once the float is activated, empty the dirty water tank. If the dirty water tank does not appear full, turn the power switch off and wait for the float to settle and reset. If the float repeatedly shuts off the suction, empty the dirty water tank. For best results, use only Hoover® brand cleaning solution. Other Solutions may generate excessive foam which will cause the float to rise prematurely and shut off the suction. A higher concentration of shampoo may cause excessive foaming.
How to Empty
3.10 Grasp dirty water tank handle and push latch to release. Pull tank out at a slight angle.
3.11 To empty dirty water tank, pull up on the 2 latches to open and remove top of tank to empty.
3.12 Replace tank lid with both latches locked after cleaning. Latches will snap when they are locked. Failure to do so will result in poor suction performance.
3.13 Insert dirty water tank back into the cleaner until it snaps into place.
NOTE: Do not open latches before removing tank from machine.

CONNECT HOSE FOR TOOL USE
How to Attach
4.1 Open Accessory Hose Suction Port located at the bottom of the recovery tank (A).Insert hose end and Accessory Hose Solution connector by inserting firmly into Hose Solution Port.
How to Remove
4.2 Press button on end of hose and pull to remove hose and solution connection from machine.
4.3 Close Accessory Hose Suction Port door back into place. Make sure to close door to ensure proper suction. Unit may lose suction if not closed properly.

TOOLS (*Available on select models only.)
A. Upholstery Tool has a built-in brush to help provide the scrubbing action some spots may need for removal.
NOTE: Tools located and stored in Mesh Storage Bag.

How to Attach Tools
4.4 To ensure maximum performance and to protect your carpet, be sure to place the handle in the upright position while using the accessory hose. Placing handle in the upright position shuts off the brushes. NOTE: All tools attach to the hose in the same manner:
4.5 Connect tool to hose by sliding it onto connector until the tab locks it securely (B). Using your thumb, push forward and up on the latch to remove tool (C).

After Using Tool
4.6 Drain suction hose by turning cleaner ON and holding nozzle up for several minutes. Do not press trigger.
- Disconnect hose and solution tube from cleaner.
- Drain solution tube by placing round end in sink and raising the trigger end at the hose nozzle above your head (4.6). Press the trigger to release air and fluid.
- Replace Hose and tools in the Mesh Storage Bag.

Cleaning upholstery
Read “Before You Begin Cleaning” instructions.
Be sure to check Hoover Cleaning Guide on page 6 and the cleaning code on your upholstery. Use your cleaner only on upholstery marked “W” or “W/S”.
- Attach hose and solution tube as instructed.
- Place handle in upright position. Brushes will not rotate while handle is in upright position.
- Fill Clean Water Tank according to instructions on (Pg. 7).
- Attach tool to end of hose.
- Dry hands and plug cleaner into a properly grounded outlet.
- Turn cleaner ON.
- 4.7 Gently press the tool onto the fabric. Press the trigger and slowly pull the nozzle over the fabric.
- Overlap strokes by 1/2 inch to help prevent streaking.
- Make additional strokes without pressing the trigger to remove more solution. To clean in corners or creases, lift the tool one half inch from the fabric and press the solution trigger.
- 4.8 For heavily soiled areas, it may be necessary to repeat the cleaning process. Make crisscrossing strokes to the original pattern; overlap each pass. Make no more than 2 passes with the solution over any one area to prevent over-wetting and damage to fabric.
- For best cleaning results, Hoover recommends to rinse the upholstery with water only. This will remove residual cleaning solution from your upholstery.
Simply fill your clean water tank with water only and repeat steps 7 and 8.
If additional cleaning is necessary, wait until the upholstery is completely dry before using the tool again.
Empty Dirty Water Tank when the motor sound becomes higher pitched and there is a loss in suction (see “Automatic Shut-Off”).
When finished cleaning, follow “After Cleaning” and “After Using Tool” instructions.

MAINTENANCE
Familiarize yourself with these home maintenance tasks as proper use and care of your cleaner will ensure continued cleaning effectiveness.
Any other servicing should be done by an authorized service representative.
If appliance is not working as it should, has been dropped, damaged, left outdoors, or dropped into water, take it to a service center prior to continuing use
Cleaning the dirty water tank
Note: During normal use of cleaning, debris may accumulate inside of dirty water tank. In order to keep your unit functioning properly and to prevent any odors from building up, it is best to rinse out your dirty water tank with fresh water after each use.
5.1 Remove dirty water tank from unit by pressing on latch and pulling the tank out at an angle.
5.2 Pull up on latches to open dirty water tank. Remove top and rinse tank with clean water.

5.3 To clean dirty water tank ducting, place dirty water tank under faucet and dispense high pressure clean water into the inlet port of the dirty water tank to loose debris that has accumulated. Be sure to clean the filter screen that is located in the duct of the recovery tank base.
5.4 Allow tank to air dry completely. Pull up on latches then back down to lock. Latches will snap when locked. Replace dirty water tank back onto unit until it snaps.

Lubrication
- The motor and brushrolls are equipped with bearings which contain sufficient lubrication for their lifetime.
- The addition of lubricant could cause damage. Do not add lubricant to motor or bearings.
REMOVING AND CLEANING NOZZL
Nozzle: How to Clean
If lint or other debris becomes lodged in nozzle, it can be removed for cleaning.
5.6 To prevent possible leaking, remove Clean Water Tank and Dirty Water Tank with handle in upright position, tilt carpet washer back.
5.7 Pull up on nozzle latch slightly to unsnap nozzle from foot of carpet washer.
5.8 Pull nozzle forward to remove from carpet washer.
5.9 Rinse debris from nozzle.
5.10 Position nozzle on to foot, making sure to align the tabs at the bottom of the nozzle with the notches on the foot. Snap nozzle to foot.

STORAGE
Before storing:
- Empty Clean Water Tank and let air dry. Replace on cleaner.
- Empty Dirty Water Tank, rinse tank and lid thoroughly with clean water and let air dry.
Allow brushes and underside of carpet cleaner to air dry thoroughly before storing carpet cleaner on a carpeted or wood surface.
Belt or Brushroll: How to Remove and Replace
How to Remove
5.11 Flip cleaner on its back to expose bottom of cleaner. NOTE: Belt cover is 4 pieces and has 15 screws.
5.12 To remove first piece of belt cover, remove 3 screws. Arrows show location of screws. NOTE: Screw locations are numbered on belt covers.
5.13 Remove belt guard.
5.14 To remove second piece of belt cover, remove the 3
screws. Arrows show location of screws.

5.15 Slide brushroll end cap out to remove.
5.16 Pull both brushrolls toward user to remove from unit. NOTE: Belt will still be attached to unit.
5.17 To remove upper belt cover, remove 7 screws. Arrows show location of screws.
5.18 Flip cleaner upright and remove upper belt cover from foot.
5.19 Remove pivot clamp by unscrewing 2 screws.
5.20 Lift pivot clamp off the unit after removing screws.
5.21 The belt shaft is now exposed (as shown in image 5.22)


How to Replace
5.22 Replace belt by placing on shaft.
5.23 Replace pivot clamp and 2 screws over the belt.
5.24 Replace upper belt cover, flip cleaner, and screw in 7 screws.
5.25 Slip brushrolls through belt. NOTE: Place belt on rounded areas of the brushrolls without brushes.
5.26 With belt in place, push and slide brushrolls into unit, making sure that the brushrolls are in the correct orientation.
5.27 Slide belt roll end cap back into unit and replace 3 screws.
5.28 Replace belt guard and secure with final 3 screws.


TROUBLESHOOTING
If a minor problem occurs, it usually can be solved quite easily when the cause is found by using the checklist below.
Any other servicing should be done by an authorized service representative.
If appliance is not working as it should, has been dropped, damaged, left outdoors, or dropped into water, take it to a service center prior to continuing use.
Cleaner won’t run
1. Power cord not firmly plugged into outlet.
2. Blown fuse or tripped breaker.
- . Check fuse or breaker in home. Replace fuse/reset breaker in home.
3. Needs service
- Take to service center. To find nearest location, visit our website at www.hoover.com or call 1-800-944- 9200.
Cleaner won’t pick-up or low suction
1. Dirty Water Tank is not installed correctly.
Review Placing Dirty Water Tank in base of cleaner - Pg. 8.
2. Dirty Water Tank is full.
Empty Dirty Water Tank - Pg. 8.
3. Dirty water tank is clogged.
Clean Dirty Water Tank - Pg. 11.
4. Air path is clogged.
Unclog air path.
Water escaping from Cleaner
1. Dirty Water Tank is full.
Emptying Dirty Water Tank - Pg. 8.
2. Dirty Water tank is not installed correctly.
Review Placing Dirty Water Tank in base of cleaner - Pg. 8.
3. Clean Water Solution Tank not installed properly.
Review Clean Water Solution Tank Installation - Pg. 7.
Cleaner won’t dispense
1. Clean water solution tank is empty.
Fill cleaner solution tank.
2. Clean Water Solution Tank not installed properly.
Review Clean Water Solution Tank Installation - Pg. 7.
3. Needs service.
Take to service center. To find nearest location, visit our website at www.hoover.com or call 1-800-944- 9200.
Motor noise becomes high-pitched
1. Dirty Water Tank is full.
Empty Dirty Water Tank - Pg. 8.
2. Dirty water tank is clogged
Clean Dirty Water Tank - Pg. 11.
3. Air path is clogged.
Unclog air path.
4. The float in the Dirty Water Tank has been activated
Review Emptying & Cleaning the Dirty Water Tank - Pg. 11.
Brushrolls are not spinning
1. Belt needs to be changed.
Refer to how to change belt - Pg. 13.
2. Something is jammed in the brushroll.
Remove jammed item from cleaner with unit turned off and unplugged.