User Manual for Vacuum Cleaner
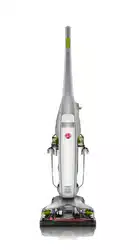
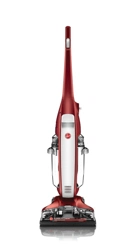
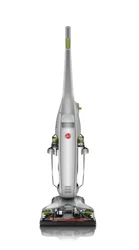
FEATURES
|
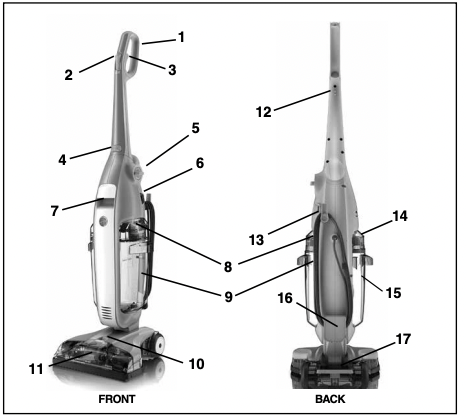
1. D-Shaped Handle
2. Clean Boost™ Trigger
3. Solution Trigger
4. Folding Handle Release Button (FH40165 & FH40170 series)
5. Mode Selection
6. ON/OFF Switch
7. Carry Handle
8. Clean Water/Solution Tank Release Button
9. Clean Water/Solution Tank
|
|
10. Nozzle Release
11. Nozzle
12. Cord Clip
13. Cord Storage Hook (rotates)
14. Dirty Water Tank Release Button
15. Dirty Water Tank
16. Cord Storage Hook
17. Handle Release Pedal
|
HOW TO ASSEMBLE
ATTACH HANDLE FH40150 & FH40160 SERIES
NOTE: PHILLIPS SCREWDRIVER NEEDED FOR ASSEMBLY.
- 2.1 Position upper handle and slide down into hard floor cleaner base.
- 2.2 Insert screw and tighten with screwdriver.
HOW TO FOLD HANDLE FH40165 & FH40170 SERIES
- 2.3 Simply rotate handle to upright position until it locks into place to get started.
- 2.4 For product storage, press folding handle release button and rotate handle down.
ATTACH NOZZLE
- 2.5 Remove nozzle from packaging. Align nozzle’s 2 hooks with 2 slots on front of base.
- 2.6 Tilt nozzle upwards until latch (A) clips in place.
|
|
 |
GENERAL OPERATION
Your HOOVER® FloorMate™ Hard Floor Cleaner is to be used on non-carpeted floor surfaces such as vinyl, tile and sealed wood. It is not intended for use on carpet or rugs.
CAUTION ! To prevent damage to wood floors, follow the flooring manufacturer’s cleaning recommendations. If using cleaner on sealed wood floors, inspect floor surface for worn finish, bare wood or separated joints. Do not use FloorMate™ Hard Floor Cleaner to clean sealed wood floors if any of these conditions exist.
THE TANKS (when facing unit) Clean Water/Solution Tank (right side)
The Solution Tank holds detergent and water that is to be dispersed onto the surface being cleaned.
! WARNING ! To reduce the risk of personal injury, unplug before cleaning or servicing. Do not use cleaner without tank in place.
How to Fill
Place cleaner handle in upright, locked position.
- 3.1 To remove tank, squeeze release button (A) and pull tank straight out. Carry tank to sink.
- 3.2 Rotate tank cap counter-clockwise and lift up to remove cap (B).
- 3.3 Fill tank to fill line with warm water.
IMPORTANT Check for worn spots or joint separations before using, as these conditions could lead to damaged flooring when using water to clean floor.
- 3.4 Turn cap upside down to serve as a measuring cap.
- 3.5 For FloorMate FH40150 Series, fill measuring cap to fill line once (3/4 oz - 22 ml) with Hoover® 2x Multi-Floor Plus Cleaning Solution and pour cleaning concentrate into Solution Tank.
For FloorMate Deluxe FH40160/FH40165/FH40170 Series, fill measuring cap to fill line twice (1.5 oz - 44 ml) and pour cleaning concentrate into Solution Tank.
- 3.6 Replace cap. Rotate cap clockwise until it locks in place (C). Cap must be locked in place for proper performance and to prevent leaking.
- 3.7 Slide tank straight into position until latch snaps in place.
|
|
 |
HOW TO USE
HANDLE RELEASE PEDAL

Step on pedal (A) to lower handle to operating position. Handle does not lock into a single position, but “floats” to allow convenient operation.
|
|
ON/OFF SWITCH

Push switch (A) once to turn cleaner ON. Push switch again to turn cleaner OFF.
|
|
|
TRANSPORTING

To move your cleaner from room to room, put handle in upright position, tilt cleaner back on rear wheels and push forward.

The cleaner may also be lifted using the carry handle (B) on front of cleaner.
|
|
CORD STORAGE

Wrap the cord clockwise around the two cord handle hooks (C). For convenient storage, attach the plug end to the cord.
|
|
|
HOW TO EMPTY
WARNING ! To reduce the risk of personal injury, unplug before cleaning or servicing. Do not use cleaner without tank in place.
Dirty Water Tank (left side when facing unit)
When to Empty
An automatic suction shut-off is built into the dirty water tank to prevent the tank from overflowing.
When the shut-off activates, the cleaner will not pick up water or debris and the sound of the motor will change. The dirty water tank is full and must be emptied.
How to Empty
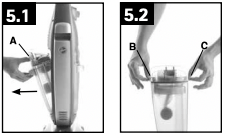
- 5.1 To remove tank, press down on release button (A) and pull tank straight out.
- 5.2 Release tabs (B & C) on each side of the dirty water tank to unlock the top portion of the tank.
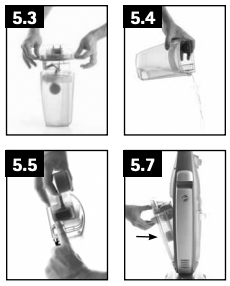
- 5.3 Pull up on tank lid to separate from the base.
- 5.4 Pour dirty water into sink.
- 5.5 Check foam filter for debris before reassembly. If filter has debris, rinse with water.
- 5.6 When finished emptying the tank, simply place lid back onto the tank and make sure to latch the tabs on each side back into the locked position.
- 5.7 Tilt tank straight into position until latch snaps in place.
HOW TO CLEAN
RECOMMENDED CLEANING SEQUENCE
NOTE: Your HOOVER® FloorMate™ Hard Floor Cleaner may be used to clean wood floors that have been sealed with a polyurethane coating and can be cleaned with water.
! CAUTION ! To prevent damage to wood floors, follow the flooring manufacturer’s cleaning recommendations. If using cleaner on sealed wood floors, inspect floor surface for worn finish, bare wood or separated joints. Do not use FloorMateTM Hard Floor Cleaner to clean sealed wood floors if any of these conditions exist.
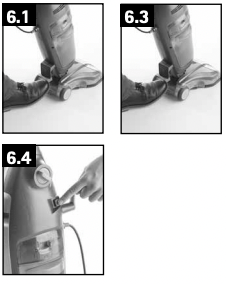
- 6.1 Vacuum floor to remove loose dirt, hair and debris.
- 6.2 Fill Clean Water Solution Tank with Hoover® 2X Multi-Floor Plus Cleaning solution and water (refer to 3.1 thru 3.7).
IMPORTANT
Do not use solvent based cleaning concentrates in your cleaner. Do not use any type of wax in your cleaner.
Dry hands and plug cleaner into a properly grounded outlet.
- 6.3 Step on handle release pedal and lower handle to operating position.
- 6.4 Turn cleaner ON.
CAUTION Do not clean over floor electrical outlets.
! CAUTION ! Water will drip from the brushes and underside of the product after use and may puddle. To avoid damage to wood and laminate flooring and to avoid potential slip hazard, after use A) do not leave the product on wood and laminate surfaces and remove to a hard surface and B) place unit on absorbent material (such as a towel) to soak up drips.
- 6.5 Wash Mode - Lowers the SpinScrub™ brushes to make contact with the floor for scrubbing action.
- 6.6 Dry Mode - Raises the SpinScrub™ brushes off of the floor and also stops the spinning of the brushes.
- 6.7 Scrub Mode - (FH40170 Series only) Lowers the SpinScrub™ brushes to the floor and stops the suction for extra cleaning with solution and water. Switch to dry mode to pick up any remaining dirty water.
- 6.8 To release solution, squeeze trigger (A)
- 6.9 Slowly move cleaner forward and backward over area to be cleaned. Squeeze trigger to release solution as needed.
- 6.10 Overlap strokes by one inch to help prevent streaking. The cleaner’s suction will pick up the dirty water throughout cleaning.
- 6.11 To remove those tough stains, apply extra cleaning solution by squeezing the trigger (B) as you normally would and also pressing the Clean Boost™ trigger (C) at the same time.
To greatly enhance drying of the floor surface, release trigger. Continue to move cleaner over the area to pick up the dirty solution.
Switch to dry mode to pick up any remaining dirty water.
To continue cleaning another area, repeat steps 6.8 through 6.10.
NOTE: When cleaning sealed wood floors, make sure all areas are completely dry. Ensure that no water remains on the floor.
Empty dirty water tank when the motor sound becomes higher in pitch and there is a loss of suction.
|
|
 |
PICKING UP SPILLS
Your cleaner may also be used to pick up small liquid spills one and a half quarts or less in Dry Mode, never to exceed 1/4 inch in depth on noncarpeted floors. Release the trigger and continue to move cleaner over the area to pick up the spill.
! CAUTION ! Do not use the cleaner to pick up flammable or combustible liquids or chemicals.
MAINTENANCE
Any other servicing should be done by an authorized service representative. If appliance is not working as it should, has been dropped, damaged, left outdoors, or dropped into water, take it to a service center prior to continuing use.
CLEANING THE NOZZLE
The cleaner’s nozzle can be removed for easy cleaning.
! CAUTION ! To reduce the risk of injury from moving partsUnplug before servicing. Do not use cleaner without nozzle in place.
- 7.1 Pull on nozzle release latch (A) upward.
- 7.2 Remove nozzle by rotating nozzle. Rinse nozzle under running water. Remove debris from squeegee (C) and wipe with a damp cloth.
- 7.3 To reattach nozzle, tilt cleaner backwards so the front of the foot is 2-3” off of the floor. Secure upper handle with one hand and align nozzle squeegee with base from left to right with your other hand.
- 7.4 Simply rotate nozzle upward to lock in place.
|
|

|
CLEANING THE BRUSHES
The brush assembly can be removed for easy cleaning when the nozzle is completely removed. (See “CLEANING THE NOZZLE” section)
! CAUTION ! To reduce the risk of injury from moving partsUnplug before servicing. Do not use cleaner without brushes in place.
|
Remove both tanks to prevent leaking. Set aside.
Remove nozzle (7.1-7.2).
Release foot pedal and tilt cleaner back so handle rests on floor.
7.5 Push two brush release buttons (B) and remove the brush assembly.
7.6 The brushes can be washed with a mild detergent and rinsed. Do not use a solvent based detergent.
To replace brushes, align post (C) on brush block with hole (D) on bottom of cleaner. Turn brushes slightly until post fits easily into hole. Press brush assembly firmly to snap into place.
Return cleaner to upright position. Replace nozzle (7.4-7.5), making sure it is locked into position.
Return tanks into proper positions.
|
|
 |
LUBRICATION
The motor is equipped with bearings which contain sufficient lubrication for its lifetime. The addition of lubricant could cause damage. Do not add lubricant to motor.
STORAGE
STORING CLEANER
Turn cleaner OFF and disconnect from electrical outlet.
- Empty and rinse Clean Water Solution Tank and Dirty Water Tank. Allow to air dry.
- Make sure that nothing is pressing on the nozzle squeegee.
- Do not store cleaner on a wood surface unless cleaner is completely dry.
- Store approriately indoors in a dry place. Do not expose machine to freezing tempuratures.
- Water will drip from the brushes and underside of the product after use and may puddle. To avoid damage to wood and laminate flooring and to avoid potential slip hazard, after use A) do not leave the product on wood and laminate surfaces and remove to a hard surface and B) place unit on absorbent material (such as a towel) to soak up drips.
TROUBLESHOOTING
If a minor problem occurs, it usually can be solved quite easily when the cause is found by using the checklist below.
Any other servicing should be done by an authorized service representative. If appliance is not working as it should, has been dropped, damaged, left outdoors, or dropped into water, take it to a service center prior to continuing use.
WARNING ! To reduce risk of personal injury - Unplug before cleaning or servicing.
| PROBLEM |
POSSIBLE CAUSE |
POSSIBLE SOLUTION |
| Cleaner won’t run |
Power cord not firmly plugged into outlet. |
Plug unit in firmly. |
| |
No voltage in wall plug. |
Check fuse or breaker in home |
| |
Blown fuse or tripped breaker. |
Replace fuse/reset breaker in home. |
| |
Power switch not on. |
Turn power switch on. |
| Low suction or won’t pick up |
Dirty Water Tank full and the automatic shut-off engaged. |
Empty the Dirty Water Tank. |
| |
Tanks not in place. |
Make sure tanks are locked in place. |
| |
Dirty Water Tank lid not in place. |
Make sure lid is properly positioned. |
| |
Nozzle not in place. |
Make sure Nozzle is replaced properly and locked. |
| Water puddling behind cleaner |
Clean Water Solution Tank not in place. |
Make sure Clean Water Solution Tank is installed properly |
| |
Dirty water tank full. |
Empty dirty water tank. |
| Cleaner solution won’t dispense |
Tanks not in place. |
Make sure tanks are locked in place. |
| |
Clean Water Solution Tank is empty. |
Refill Clean Water Solution Tank. |
| Brushes won’t rotate |
Blown fuse or tripped breaker. |
Check fuse or breaker in home. Replace fuse/reset breaker in home.
(1) Push ON/OFF switch to turn cleaner OFF.
(2) Unplug the cleaner.
(3) Wait one minute.
(4) Plug the cleaner into electrical outlet.
(5) Push the ON/OFF switch again to turn cleaner ON.
If the brushes continue to stall and the breaker trips again, clean the brushes to remove debris.
|
| |
In Dry Mode. |
Switch mode selector to Wash Mode for brushes to rotate. |
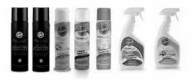
CLEANING PRODUCTS
WARNING: To reduce the risk of fire and electric shock due to internal component damage, use only Hoover ® cleaning products and Hoover ® hard surface attachments intended for use with the appliance as noted below.
Hoover® Cleaning Product Guide
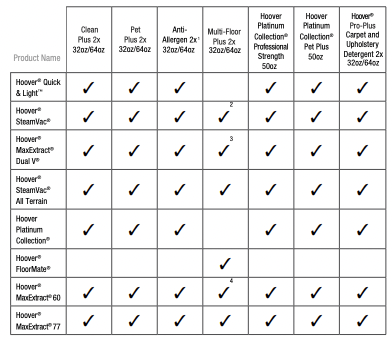
1 Allergens: pollen, pet dander, dirt, and dust.
2 When cleaning a hard surface, the Hoover ® hard surface attachment below must be used (optional if not included):
- 5 Brush/Dual Brush Hoover ® part # 48417008.
3 When cleaning a hard surface, the optional Hoover ® hard surface attachment below must be used:
- 6 Brush Hoover ® part # 36419008
- 5 Brush No longer available.
4 When cleaning a hard surface, the optional Hoover ® hard surface attachment below must be used:
- 6 Brush Hoover ® part # 302658001