USER MANUAL Vacuum
Carton Contents
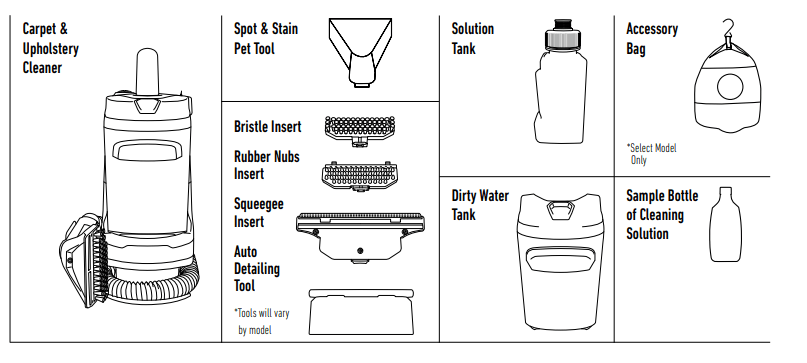
Product Guide

1. Tank Release Button
2. Solution Tank
3. Dirty Water Tank
4. Cleaning Hose
5. Spot & Stain Pet Tool
6. Power Cord
7. Power Button
8. Carry Handle
Cord storage
- Wrap cord around the cord hooks for convenient storage. Attach the plug end to the cord. For fast cord release, simply turn upper cord wrap downward.
Before You Begin Cleaning
- Don’t use the carpet cleaner as a dry vacuum cleaner.
- Use your HOOVER® portable carpet cleaner only if upholstery fabric is marked with a “W” (for “wet” clean) or “S/W” (for “solvent/dry” or “wet” clean). Don’t clean fabric marked “S” (“solvent/dry” clean only).
- Test for colorfastness in a small, hidden area. Gently rub surface with a dampened white cloth. Wait ten minutes and check for color removal or bleed with a white paper towel.
- Move furniture out of area to be cleaned. Place aluminum foil or wax paper under legs of furniture too heavy to move to prevent wood finishes from staining carpet. Pin up furniture skirts and draperies.
ATTENTION: Some Berber, Natural Fiber, and Soft Fiber carpets can fuzz with wear. Some vacuums & carpet cleaners can worsen this carpet wear. Test a hidden area before using on a full room & consult with your carpet manufacturer on cleaning recommendations.
NOTE: To prevent staining, use plastic or aluminum foil to protect wood or metal surfaces from possible water spray.
NOTE: To avoid damage to wood floors underneath area rugs or carpet, place waterproof material (e.g. plastic underneath them before cleaning.
Getting Started
Getting Started With Your PowerDash™ Spot Cleaner
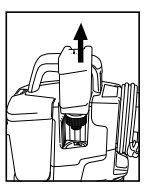
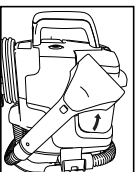
1. Remove Solution Tank from the side of the unit.
2. Remove the cap from the tank.
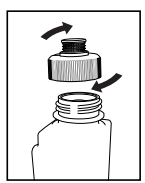
3. Add HOOVER® cleaning solution to the Solution fill line.

4. Replace and Tighten cap. Slide the Tank back into the unit to secure the tank.

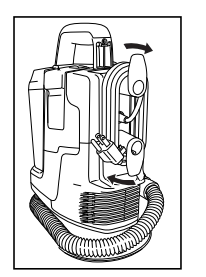
5. Unwrap hose from unit. Select preferred tool and make sure it is attached securely
Cleaning Fluid: SEE THE HOOVER’S SOLUTIONS GUIDE insert or visit Hoover.com/cleaning-solutions.
CAUTION: Not to be used for grooming a pet.
CAUTION: DO NOT USE THIS EXTRACTOR ON HARD FLOORS UNLESS YOU HAVE THE PROPER HARD FLOOR ATTACHMENT. USING THIS PRODUCT ON HARD FLOORS MAY SCRATCH OR DAMAGE YOUR FLOOR.
How to Clean Carpets with your PowerDash™ Spot Cleaner
1. Plug power cord into electrical outlet.

2. Press Red Button on top of unit to turn ON
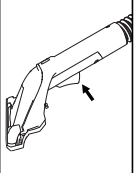
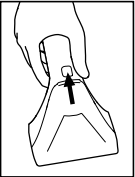
3. Spray a generous amount of cleaning solution over the soiled area by pressing the trigger behind the tool and scrub the stain in a back and forth motion.
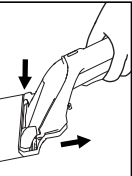
4. To lift the stain, suction up the dirt and cleaning solution by applying downward pressure on the front of the cleaning tool and pulling towards you. Repeat as needed.
*follow these steps for best results
- For best results, pretreat stains with a HOOVER® spot treatment (see HOOVER® Cleaning Solution Guide) to help loosen and remove even the most stubborn stains.
- Distribute a generous amount of pretreat spray on spot, stain, or high traffic area.
- Always follow specific directions found on solution label.
- Wait 5-10 minutes before using machine.
IMPORTANT: For full suction, it is important that the Dirty Water Tank is properly secured before cleaning
CAUTION: Do not clean over floor electrical outlets. Water will drip from the tool after use and may puddle. To avoid damage to wood and laminate flooring and to avoid potential slip hazard, after use (a) do not leave the product on wood and laminate surfaces and move to a hard surface and (b) place unit on an absorbent material (such as a towel) to soak up drips
Continue using dry strokes until little water is visible passing through the nozzle. For best results, HOOVER® recommends rinsing carpet with water only. This removes residual carpet cleaning solution. Fill Solution Tank with water and repeat. For heavily soiled areas, repeat. Avoid saturating carpet
NOTE: Empty Dirty Water Tank when the motor sound becomes higher pitched and there is a loss in suction (see “Automatic shut-off”). You will also see the float rise and shut off suction at the same time.
Maintenance
Keeping your PowerDash™ Spot Cleaner running properly
This product contains no serviceable parts.
If appliance is not working as it should, has been dropped, damaged, left outdoors, or dropped into water, call customer service prior to continuing use.
1. Empty Dirty Water Tank. Press TANK RELEASE button then lift lid off for emptying and rinsing. Clean water will help remove dirt & debris from the tank. Let Air Dry before reinstalling.
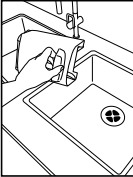
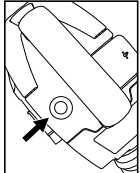
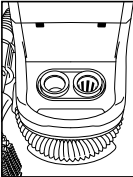
2. Rinse hand Tool under faucet. Remove nozzle cover by pressing release button on top
3. Remove Insert and rinse under faucet.

4. Clean out Debris from red screen after every use for best performance.
5. Empty Solution Tank and let air dry

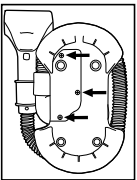
6. You can remove and access the hose for cleaning. by removing the three screws on the bottom of the carpet cleaner. Once removed you will slide the piece away from the unit.
WARNING: To reduce the risk of personal injury - Unplug before cleaning or servicing.
Thermal Protection
A thermal protector has been designed into your cleaner to protect it from overheating. When the thermal protector activates the cleaner will stop running. If this happens proceed as follows:
- Turn cleaner OFF and unplug it from the electrical outlet.
- Empty dirty water tank.
- Inspect for any obstructions. Clear obstructions if present.
- When cleaner is unplugged and motor cools for 30 minutes, the thermal protector will deactivate and cleaning may continue.
If the thermal protector continues to activate after following the above steps, your cleaner needs servicing.
CORD STORAGE
- Wrap the power cord around the cord hooks for convenient storage. Attach the plug end to the cord.
LUBRICATION
- The motor is equipped with bearings which contain sufficient lubrication for their lifetime.
- The addition of lubricant could cause damage. Do not add lubricant to motor bearings.
Troubleshooting
- This product contains no serviceable parts.
- If appliance is not working as it should, has been dropped, damaged, left outdoors, or dropped into water, call customer service prior to continuing use.
- USE TROUBLESHOOTING GUIDE AS A FIRST STEP TO RESOLVE ANY PROBLEMS YOU MAY BE EXPERIENCING.
- WARNING: To reduce risk of fire and electric shock due to internal component damage, use only HOOVER® cleaning products intended for use with the appliance as noted.
- WARNING: To reduce the risk of personal injury - Unplug before cleaning or servicing.
1. Cleaner won’t run
- Power cord not firmly plugged into outlet.
- Blown fuse or tripped breaker.
- Check fuse or breaker in home. Replace fuse/reset breaker in home.
- Needs service.
- Visit our website at www.hoover.com or call 1-800-944-9200
2. Cleaner won’t pick-up or low suction
- Dirty Water Tank is not installed correctly
- Review Placing Dirty Water Tank in base of cleaner
- Dirty Water Tank is full
- Dirty Water Tank is clogged
- Air path is clogged.
- Remove Hose and Flush out with Clean Water.
3. Water escaping from Cleaner
- Dirty Water Tank is full
- Dirty Water tank is not installed correctly
- Review Placing Dirty Water Tank in base of cleaner
- Solution Tank not installed properly
- Review Solution Tank Installation.
4. Cleaner won’t dispense
- Solution Tank is empty.
- Solution Tank not installed properly.
- Review Solution Tank Installation. .
- Needs service
- Visit our website at www.hoover.com or call 1-800-944-9200
5. Hose nozzle will not spray after filling the Clean Water Tank or Detergent Container.
POSSIBLE CAUSE
- Air is trapped in the pump and hose.
POSSIBLE SOLUTION
- Turn on the cleaner. If hose does not spray, prime the pump by lowering the hose down to the floor and hold the trigger for up to 1 minute.
6. Motor noise becomes high-pitched
- Dirty Water Tank is full
- Dirty Water Tank is clogged.
- Clean the Dirty Water Tank.
- Air path is clogged.
- The float in the Dirty Water Tank has been activated.
- Review Emptying & Cleaning the Dirty Water Tank.
IMPORTANT SAFETY INSTRUCTIONS
READ ALL SAFETY WARNINGS AND INSTRUCTIONS BEFORE USING THIS PRODUCT.
WARNING: When using an electrical product, basic precautions should always be followed to avoid electric shock, fire, and/or serious injury, including the following:
- Fully assemble product prior to use.
- Operate cleaner only at voltage specified on data plate on bottom of cleaner.
- Do not leave appliance when plugged in. Unplug from outlet when not in use and before cleaning or servicing.
- Do not expose to rain, store indoors.
- Do not immerse. Use only on surfaces moistened by cleaning process.
- To Reduce the Risk of Fire and Electric Shock due to internal component damage, use only HOOVER® Cleaning Fluids intended for use with this appliance. See the Cleaning Fluid section of this manual.
- Do not allow to be used as a toy. Not intended for use by children age 12 and under. Close supervision is necessary when used by or near children. To avoid injury or damage, keep children away from product, and do not allow children to place fingers or other objects into any openings.
- Use only as described in this manual. Use only manufacturer’s recommended attachments and products.
- Do not use product with damaged cord or plug. If product is not working as it should, has been dropped, damaged, left outdoors, or dropped into water, call customer service prior to continuing use.
- Do not pull or carry by cord, use cord as a handle, close a door on cord, or pull cord around sharp edges or corners. Do not place product on cord. Do not run appliance over cord. Keep cord away from heated surfaces.
- Do not unplug by pulling on cord. To unplug, grasp the plug, not the cord.
- Do not handle plug or appliance with wet hands.
- Do not put any object into openings. Do not use with any opening blocked; keep free of dust, lint, hair, and anything that may reduce air flow.
- Keep hair, loose clothing, fingers, and all parts of body away from openings and moving parts.
- Turn off all controls before unplugging.
- Do not use to pick up flammable or combustible liquids, such as gasoline, or fine wood sandings, or use in areas where they may be present.
- Connect to a properly grounded outlet only. See Grounding Instructions.
- Do not pick up anything that is burning or smoking, such as cigarettes, matches, or hot ashes.
- Do not use without filters and tanks in place.
- Do not clean over-floor electrical outlets.
- Put product away after use to prevent tripping accidents.
CAUTION: TO REDUCE THE RISK OF DAMAGE:
- Avoid picking up hard, sharp objects with this product, as they may cause damage.
- Store appropriately indoors in a dry place. Do not expose machine to freezing temperatures.
- Do not use sharp objects to clean out hose as they can cause damage.
- To assist in reducing drying time, be certain the area is well ventilated when using detergents and other cleaners with this machine.
- To help prevent matting and resoiling, avoid contact with carpets until they are dry. Keep children and pets away from carpets until they are completely dry.
- Do not store extractor with solution in tanks.
- DO NOT USE THIS EXTRACTOR ON HARD FLOORS UNLESS YOU HAVE THE PROPER HARD FLOOR ATTACHMENT. USING THIS PRODUCT ON HARD FLOORS MAY SCRATCH OR DAMAGE YOUR FLOOR.
- Water will drip from the tool after use and may puddle. To avoid damage to wood and laminate flooring and to avoid potential slip hazard, after use (a) do not leave the product on wood and laminate surfaces and remove to a hard surface and (b) place unit on absorbent material (such as a towel) to soak up drips.
GROUNDING INSTRUCTIONS:
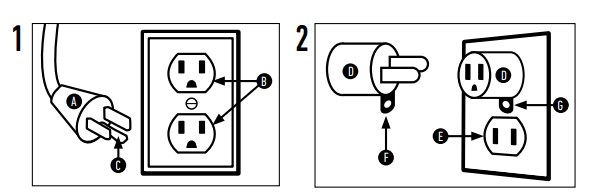
- This appliance must be grounded. If it should malfunction or break down, grounding provides a path of least resistance for electric current to reduce the risk of electric shock. This appliance is equipped with a cord having an equipment-grounding conductor (C) and grounding plug (A). The plug must be inserted into an appropriate outlet (B) that is properly installed and grounded in accordance with all local codes and ordinances.
- WARNING: Improper connection of the equipment-grounding conductor can result in the risk of electric shock. Check with a qualified electrician or service person if you are in doubt as to whether the outlet is properly grounded. Do not modify the plug provided with the appliance - if it will not fit the outlet, have a proper outlet installed by a qualified electrician. This appliance is for use on a nominal 120-volt circuit and has a grounding plug that looks like the plug (A) illustrated in Fig. 1. A temporary adapter (D) may be used to connect this plug to a 2-pole receptacle (E) if a properly grounded outlet is not available (Fig. 2). The temporary adapter should be used only until a properly grounded outlet (B) can be installed by a qualified electrician (Fig. 1). The green colored rigid ear, lug, or the like (F) extending from the adapter must be connected to a permanent ground (G) such as a properly grounded outlet box cover (Fig. 2). Whenever the adapter is used, it must be held in place by a metal screw. NOTE: In Canada, the use of a temporary adapter is not permitted by the Canadian Electrical Code.