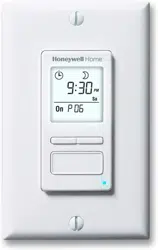
RPLS740B/RPLS741B 1/8
The RPLS740B/RPLS741B programmable wall switch has been designed to control lights and motors:
Cut power at the circuit breaker to avoid electric shock.
Remove the existing switch.
Install the new switch (see the appropriate section below).
Apply power at the circuit breaker.
The RPLS740B/RPLS741B will turn the lights on at sunset and turn them off at 11:00 pm by default. If these
settings are appropriate for you, you only need to set the time and date (see shaded zone in the menu
flowchart sheet). If the switch’s sunset time does not correspond to the actual sunset time, see sections 5.3.3
and 5.3.4.
5.1 Mode Menu
You can use the Mode menu to select one of the three modes of operation (see sections 5.1.1 to 5.1.3).
5.1.1 Manual Mode
In Manual mode, the RPLS740B/RPLS741B operates like a regular switch. To turn the
lights on or off, briefly press the main button. The icon appears when the switch is in
Manual mode.
5.1.2 Automatic Mode
In Automatic mode, the RPLS740B/RPLS741B turns the lights on or off according to the
set programs (see Section 5.4). The icon as well as the current program number are
displayed.
5.1.3 Random Mode
In Random mode, the RPLS740B/RPLS741B has no specific times to turn the lights on or
off. This mode is designed to give the impression the house is occupied during your
absence. It is similar to the Automatic mode except there is no fixed program. The
programs are automatically set to different times by the RPLS740B/RPLS741B every day.
The icon appears when the switch is in Random mode.
The first “On” program occurs at sunset. Each “On” program lasts between 1 hour and 1
hour and 30 minutes; each “Off” program lasts between 15 and 30 minutes. The last “Off”
program occurs between 10:30 pm and midnight.
5.1.4 Temporary Override
When the RPLS740B/RPLS741B is in Automatic or Random mode, you can press the main button at any
time to override the default state for the current program. The lights will turn off if they are on and vice versa.
The icon (On or Off) of the new state flashes to indicate that the state is temporary. The new state is
maintained until you press the main button again or till the next “On” or “Off” program.
5.2 Time Menu
The time display flashes on the screen when the time has not yet been set or after a 4-hour power outage.
Use the Time menu to select the time format (12-hour or 24-hour) and to set the clock and date.
NOTE: The date is used to determine the sunset and sunrise times.
5.3 Configuration Menu (Conf)
Use the Configuration menu to set the following parameters (see sections 5.3.1 to 5.3.4).
5.3.1 Backlight mode (SCRN)
The screen is lit at high intensity for 8 seconds when you press any button. The rest of the time, depending
on the backlight mode selected, the screen behaves as follows:
Scrn Off: The screen is not lit.
Scrn On HI: The screen is lit at high intensity.
Scrn On LO: The screen is lit at low intensity (default mode).
5.3.2 Automatic Daylight Savings Time Changeover (DLS)
When automatic daylight savings time changeover is on (DLS On), the RPLS740B/RPLS741B changes to
daylight savings time (summer time) at 2:00 am on the second Sunday of March and changes back to
normal time (winter time) at 2:00 am on the first Sunday of November. This function is enabled (DLS On) by
default.
5.3.3 Latitude and Longitude Coordinates (
LAT and LONG
)
The coordinates are used to turn the lights on at sunset and off at sunrise. The latitude is set to +45 and lon-
gitude to -75 by default. These settings provide approximate sunset and sunrise times for most North Ameri-
can cities. To obtain your city’s coordinates (or those of a nearby city), see the coordinates table. You can
Applications
1.
Load types Maximum load Examples
Lights and resistive
loads (except tungsten)
1800 W
(15 A @ 120 V)
• fluorescent lights
• compact fluorescent lights (CFL)
• electronic ballasts
• sodium lamps
• block heaters
Tungsten lights
1440 W
(12 A @ 120 V)
• incandescent lights
• halogen lights
Motors 3/4 hp
• pool filter pumps
• fans
Installation
2.
NOTE:
This switch cannot be used if there is no neutral wire
(white wires joint together) inside the electrical box.
Quick Start-up
3.
Set the time and date before using the timer for the first time.
Operation
4.
120
VAC
black
white
black
white
black (LINE)
white (NEUTRAL)
blue (LOAD)
The icon indicates the current
program has been activated at sunset.
The icon indicates the current
program has been activated at sunrise.
The LED illuminates when the load state
is on.
Briefly press this button to turn the
lights on or off. See “Temporary
Override” in Section 5.1.4.
Press for 3 seconds to enter the
setup menus.
Indicates the mode of
operation (see Section 5.1)
Indicates the current program
Indicates the load on/off state
Indicates the time and day
Press this button to display today’s sunrise time.
Press this button to display today’s sunset time.
Setup Menus
5.
Press the main button for 3 seconds to enter the setup menus. Refer to
the menu flowchart sheet on how to navigate the menus.
(3 sec.)
RPLS740B/RPLS741B
User guide
7-day Solar Programmable Wall Switch
69-2455EFS-01_400-071-003-A (TI071_RPLS740B) USA.book Page 1 Tuesday, May 18, 2010 10:49 AM
Loading ...
Loading ...
Loading ...
