Loading ...
Loading ...
Loading ...
20 21
After texturing is complete
• Tap the jug on the counter-top to collapse
any bubbles.
• Swirl the jug to polish and re-integrate the
texture.
• Pour milk directly into the espresso.
• The key is to work quickly, before the milk
begins to separate.
For manual texturing
• Lift the steam wand and insert the steam tip
0.4-0.8 inch / 1-2 cm below the surface of the
milk close to the right hand side of the jug at
the 3 o’clock position. Enter manual frothing
mode by pressing and holding the 'Milk'
button (approx 3secs), and then start frothing
by touching the button once again.
• Keep the tip just under the surface of the
milk until the milk is spinning clockwise,
producing a vortex (whirlpool effect).
• With the milk spinning, slowly lower the jug.
This will bring the steam tip to the surface of
the milk & start to introduce air into the milk.
You may have to gently break the surface of
the milk with the tip to get the milk spinning
fast enough.
• Keep the tip at or slightly below the surface,
continuing to maintain the vortex. Texture
the milk until sufficient volume is obtained.
• Lift the handle of the jug to lower the tip
beneath the surface, but keep the vortex
of milk spinning. Use the touch screen
to monitor the milk temperature. We
recommend 130°F-150°F / 55°C–65°C.
• Touch the Milk button to stop steaming
BEFORE lowering the jug and taking the tip
out of the milk.
HINTS & TIPS
• Fresh, quality coffee beans will give you the
best possible extraction.
• We recommend quality 100% Arabica beans
with a ‘Roasted On’ date stamped on the bag,
not a ‘Best Before’ or ‘Use By’ date.
• Coffee beans are best consumed between
5–20 days after the ‘Roasted On’ date.
Ideally only grind directly before the
extraction to maximize flavor.
• Buy coffee beans in small batches to reduce
the storage time.
• Store coffee beans in a cool, dark and dry
container. Vacuum seal if possible.
TEXTURING MILK
There are two phases to texturing milk.
The first is stretching the milk to aerate it and
the second is swirling the milk to make it silky
smooth. These two operations should blend
into one.
• Always start with fresh cold milk.
• Fill milk jug to below the spout position.
At a minimum, there should be enough milk
to cover the ring around steam wand.
• To remove any condensed water from the
system, ensure the steam wand is in the down
position over the drip tray then touch the
Milk button, allow steam to flow for a few
seconds, then touch the Milk button to stop.
• When texturing milk automatically, ensure
the steam wand is fully down.
HINTS & TIPS
For optimum milk texturing performance it
is critical that the holes around the steam tip
are clear. Even partially blocked holes may
affect the ability of the steam wand to produce
sufficient foam.
Always wipe the wand and tip with a damp
cloth BEFORE returning the wand to the down
position. Wiping the wand will remove the
majority of milk and allow the automatic purge
feature to more effectively remove any
residual milk.
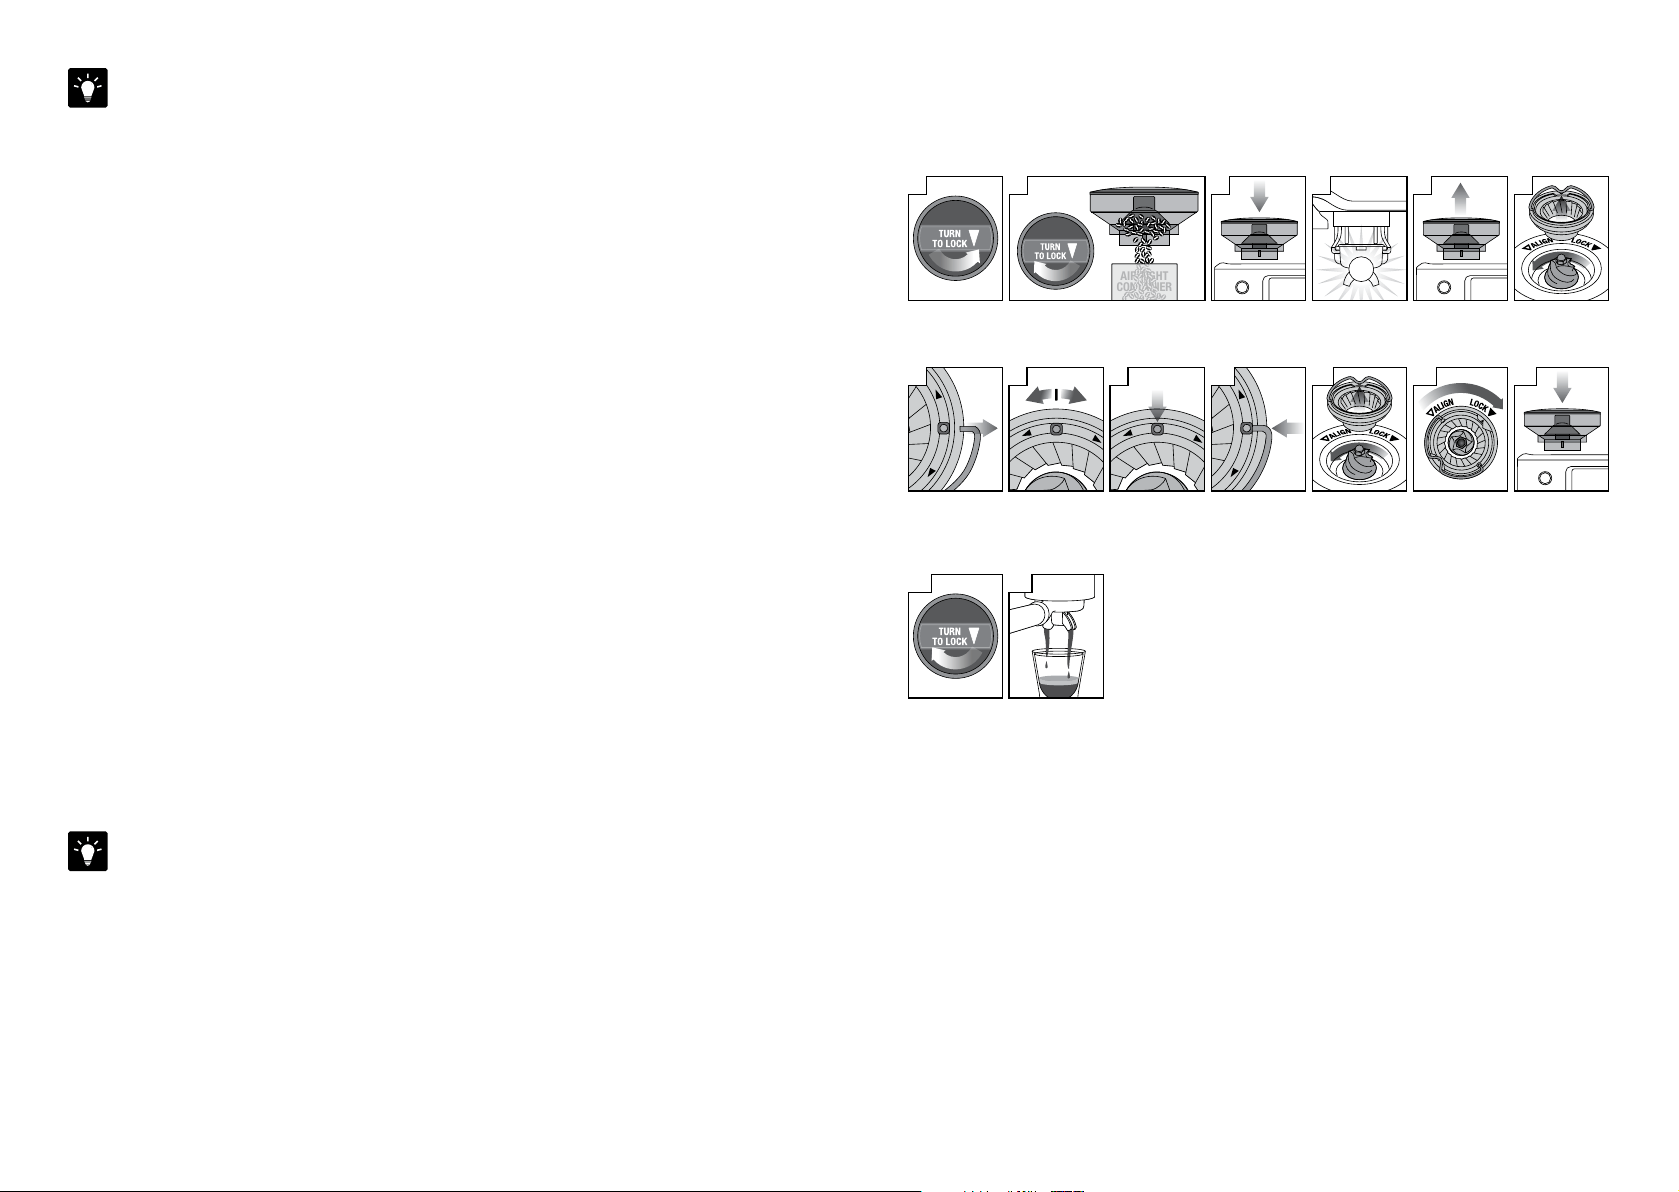
ADJUSTING CONICAL BURRS
Some types of coffee may require a wider grind range to achieve an ideal extraction or brew.
A feature of your Barista Touch™ is the ability to extend this range with an adjustable upper burr.
We recommend making only one adjustment at a time.
6
77
F
I
N
E
C
O
A
R
S
E
4
PUSH
2
AIR TIGHT
CONTAINER
53
13
15
88
F
I
N
E
C
O
A
R
S
E
9
F
I
N
E
C
O
A
R
S
E
4
5
6
7
8
10
F
I
N
E
C
O
A
R
S
E
11 12
Lock upper burr
Hold hopper over container & turn
dial to release beans into container
Align hopper
into position
Run grinder
until empty
Remove hopperUnlock hopper
Move adjustable
top burr, 1 number,
coarser or finer
Remove wire
handle from both
sides of the burr
Align the number
with the handle
opening
Remove upper
burr
Insert wire
handle from both
sides of the burr
Push upper burr
firmly into
position
Align hopper
into position
Lock hopper Check your
extraction
14
1
Loading ...
Loading ...
Loading ...