Loading ...
Loading ...
Loading ...
En 27
Cables necessary for connection (commercially available)
Speaker cables (x the number of speakers)
Audio pin cable (two for connecting two subwoofers)
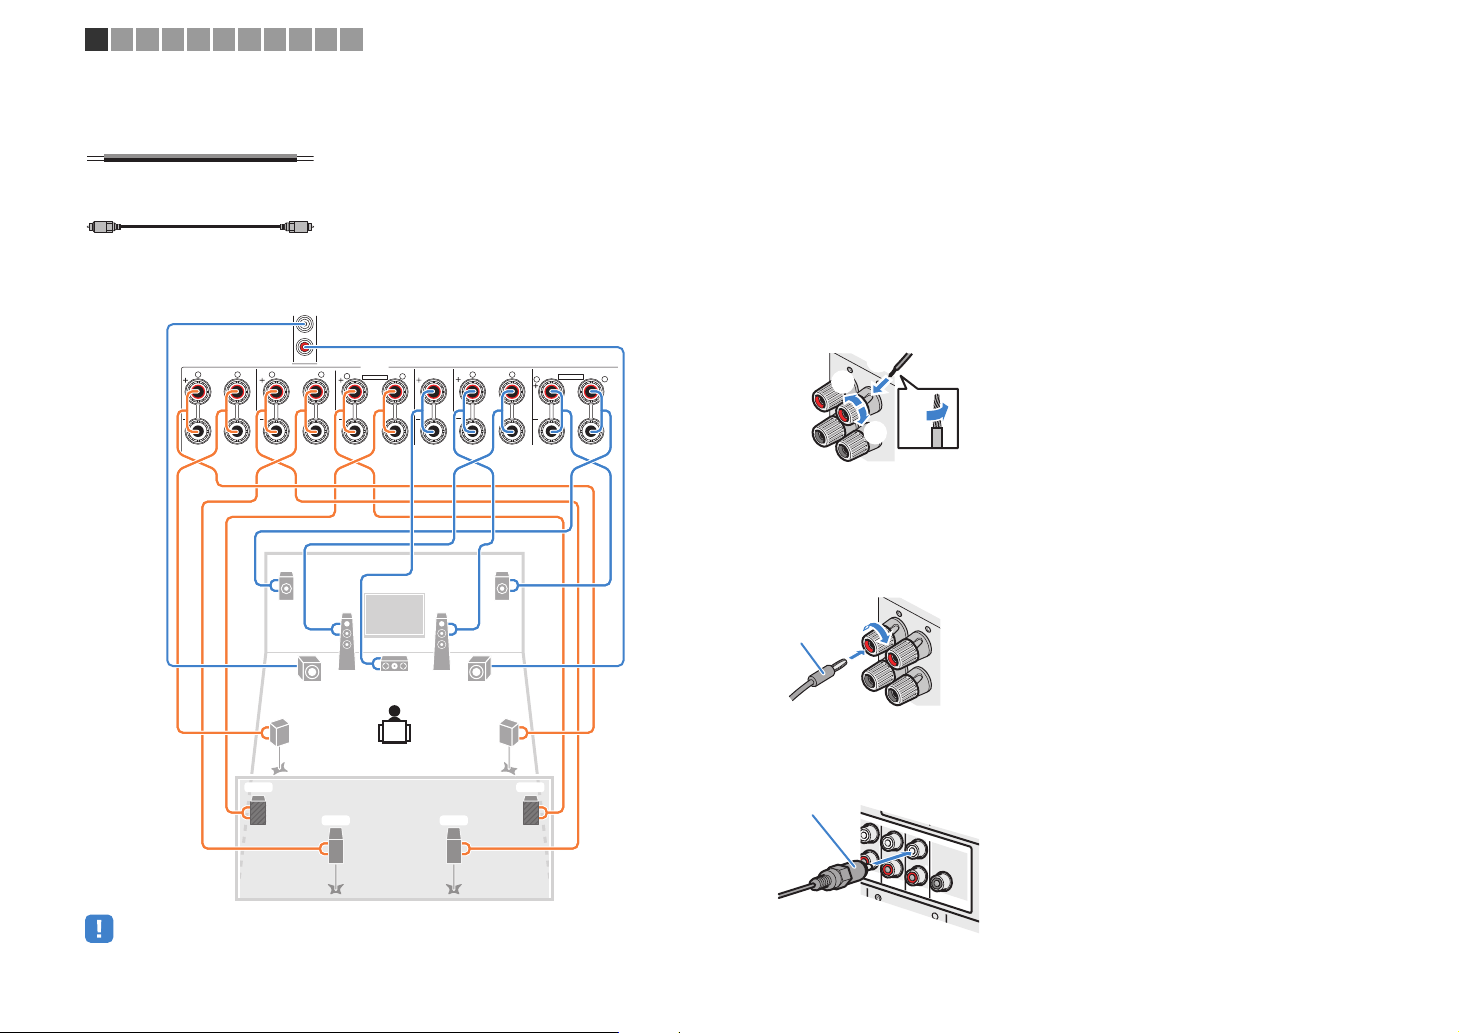
Connection diagram
Refer to the following diagram and connect the speakers to the unit.
• When using only one surround back speaker, connect it to the SINGLE jack (L side).
❑ Connecting speaker cables
Speaker cables have two wires. One is for connecting the negative (-) terminal of the
unit and the speaker, and the other is for the positive (+) terminal. If the wires are
colored to prevent confusion, connect the black wire to the negative and the other wire
to the positive terminal.
a Remove approximately 10 mm (3/8”) of insulation from the ends of the speaker cable, and
twist the bare wires of the cable firmly together.
b Loosen the speaker terminal.
c Insert the bare wires of the cable into the gap on the side (upper right or bottom left) of the
terminal.
d Tighten the terminal.
Using a banana plug
(Australia model only)
a Tighten the speaker terminal.
b Insert a banana plug into the end of the terminal.
❑ Connecting the subwoofer (with built-in amplifier)
Use an audio pin cable to connect the subwoofer.
–
+
–
+
1
2
ZONE OUT/PRE OUT
ZONE 2/
F. PRESENCE
ZONE 3/
R. PRESENCE
SPEAKERS
CENTER FRONT
SURROUND BACK
SURROUND
ZONE 2/ZONE 3/R.PRESENCE
R L R
R
RL
L
L
ZONE 2/ZONE 3/F. PRESENCE/BI-AMP
EXTRA SP1
R
L
SINGLE
PRE OUT
SUBWOOFER
CENTER
FRONT
SURROUND SUR. BACK
(SINGLE)
(FRONT)
(REAR)
EXTRA SP2
12
3
45
99
T
6 7
Y
ER
The unit (rear)
FRONT
-
+
aa
b
d
c
+ (red)
– (black)
FRONT
+
a
b
Banana plug
(
SINGLE
)
PRE OUT
CENTER
SUR. BACK
SURRUND
1
2
SURROUND BACK
L
(
REAR
)
SUBWOOFER
(
FRONT
)
Audio pin cable
1 2 3 4 5 6 7 8 9 10 11
Loading ...
Loading ...
Loading ...