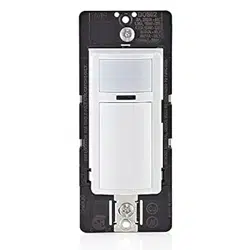
Single Pole and 3-Way Wide View Motion Activated Light Control
Cat. No. IPS15, IPV15 - INDOOR USE ONLY
120VAC, 60Hz - Incandescent: 1800W-15A - Fluorescent: 1800VA-15A - Supplemental: 1/2HP - LED & CFL: 600W
Compatible with incandescent lamps, magnetic fluorescent ballasts, fans, CFL and LED lamps.
INSTALLATION INSTRUCTIONS
WARNINGS AND CAUTIONS:
• TO AVOID FIRE, SHOCK, OR DEATH; TURN OFF POWER AT CIRCUIT BREAKER OR FUSE AND TEST THAT THE POWER IS OFF BEFORE WIRING!
• Tobeinstalledand/orusedinaccordancewithelectricalcodesandregulations.
• Toavoidoverheatingandpossibledamagetothisdeviceandotherequipment,DO NOT install to control a receptacle.
• DO NOT control a load in excess of specified ratings or you may damage property, or cause injury or death.
• Ifyouarenotsureaboutanypartoftheseinstructions,consultanelectrician.
WARNINGS AND CAUTIONS:
• Whenusingina3-wayormoreapplicationuseappropriatematchingorcoordinatingswitchremote(s).
• Cleanoutersurfacegentlywithdampclothonly.DO NOT usesoapsorcleaningliquids.
• Nouserserviceablecomponents.DO NOT attempttoserviceorrepair.
• UsethisdeviceWITH COPPER OR COPPER CLAD WIRE ONLY.
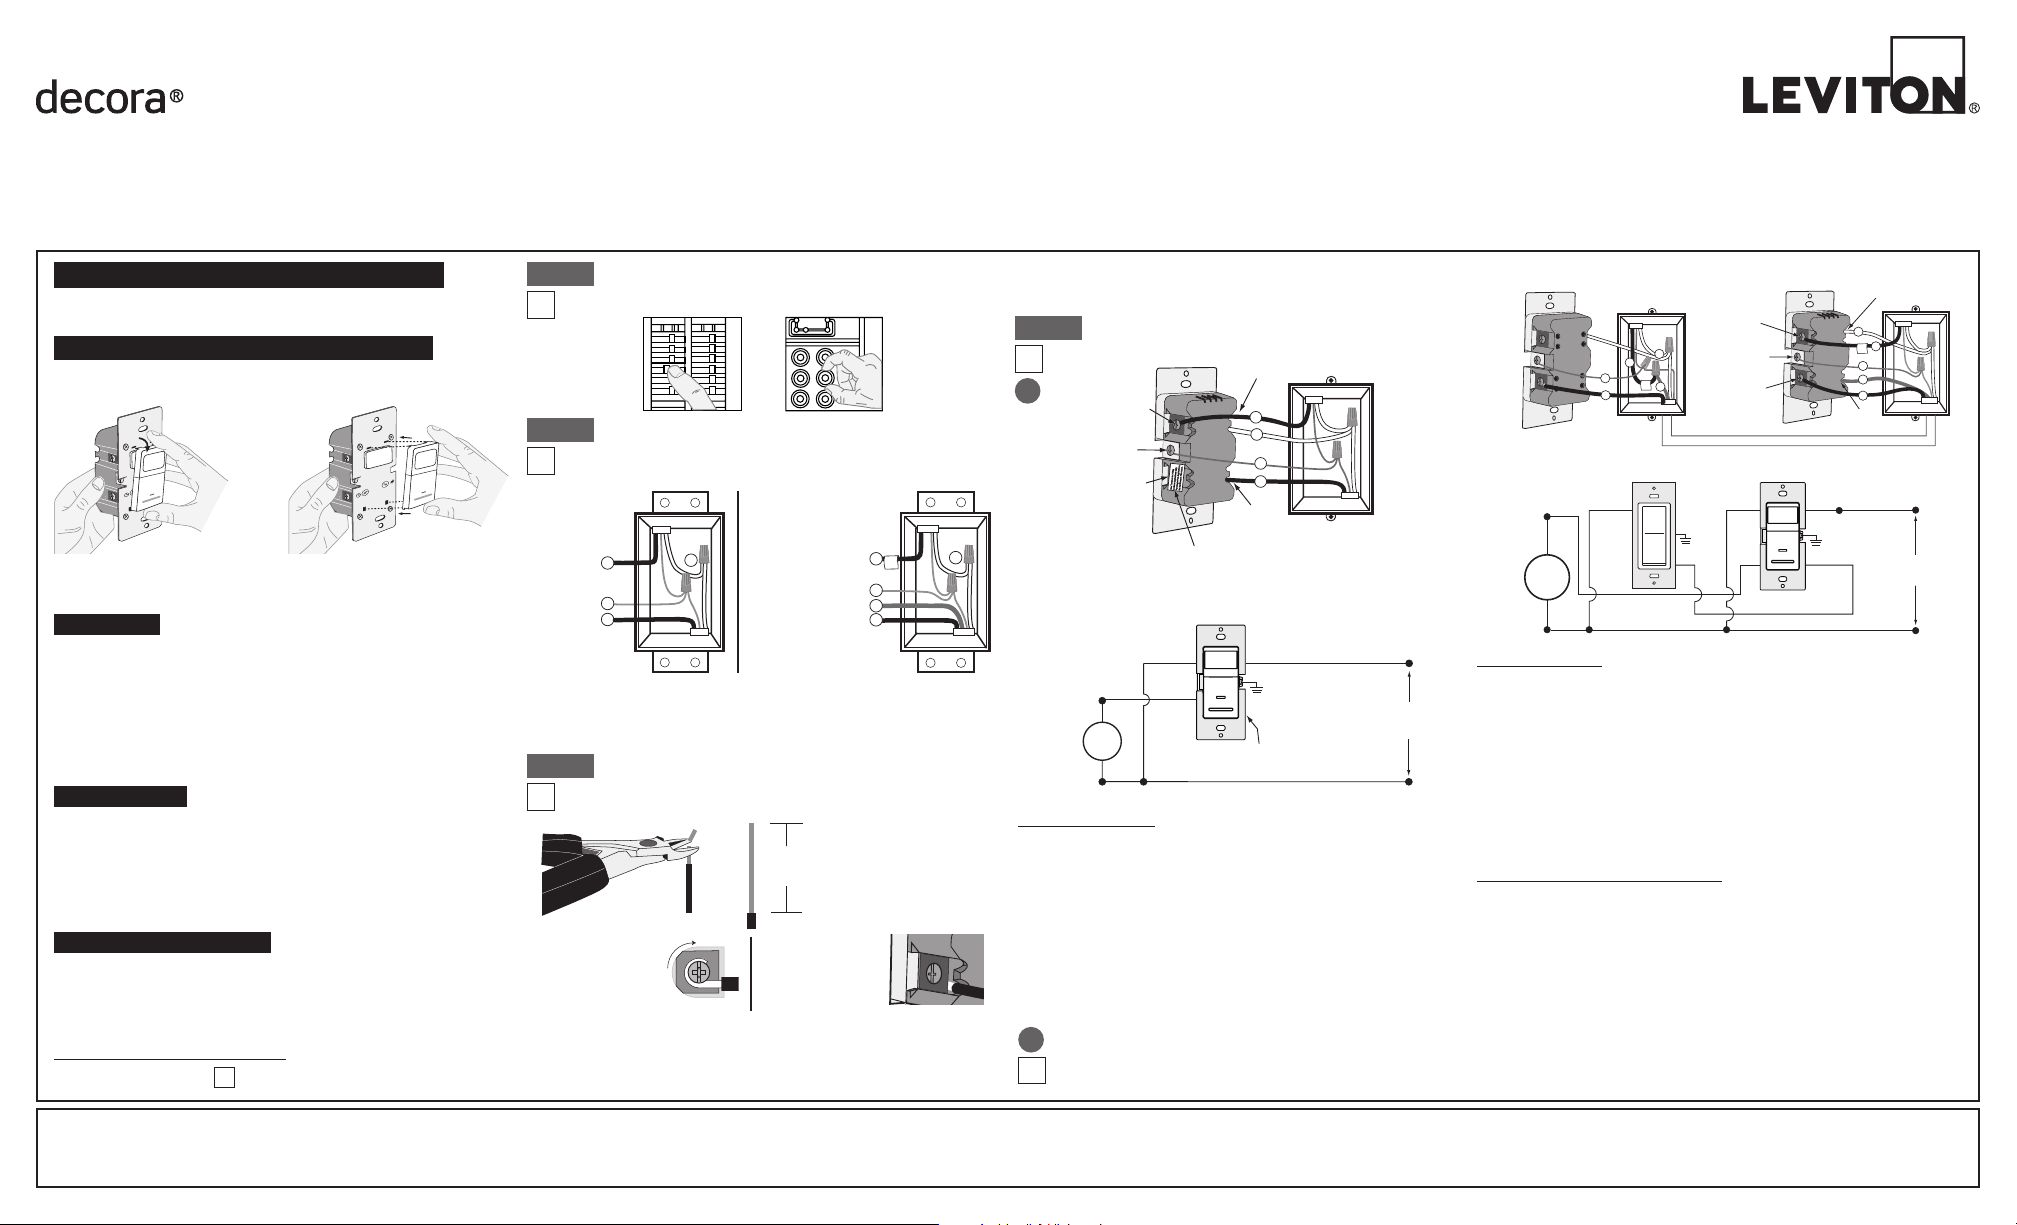
WIRING SENSOR:
Connect wires per WIRING DIAGRAM as follows:
• Green or bare copper wire in wall box to Green terminal screw.
• Line Hot wall box wire to terminal screw marked "BK".
• Load wall box wire to terminal screw marked "RD".
• LineNeutralwallboxwiretoterminalscrewmarked"WH".
• Terminalscrewmarked"3-Way"shouldhaveRedinsulationlabel
affixed.
NOTE: If insulating label is not affixed to terminal screw marked
"3-Way",useelectricaltapetocover.
• ProceedtoStep5.
Hot (Black)
Neutral (White)
Load
BKWH
Sensor
Black
White
RD
Green
Ground
3-Way
Line
120 VAC, 60Hz
Use Terminal for 3-Way Applications Only.
For Single Pole Applications,
Do Not Remove This Label.
BK
WH
RD
3-Way
4
1
3
2
Terminal Screw
Marked White (WH)
Sensor
Terminal
Screw marked
Red (RD)
Terminal
Screw marked
Black (BK)
Brass
Terminal Screw
Marked 3-Way
Terminal Label:
Use Terminal for 3-Way Applications Only.
For Single Pole Applications, Do Not Remove This Label.
Ground
(Green Screw)
PK-93977-10-00-2A
Green
Ground
Hot (Black)
Neutral (White)
YL/RD
3-Way
RD
WH
RD
BK
Black
BKWH
White
Line
120VAC, 60Hz
Green
Ground
(unused)
(unused)
Load
SensorVP0SR-10 Remote
2
BK
WH
RD
3-Way
Sensor
3
5
1
4
2
1
4
VP0SR-10 Remote
Terminal
Screw marked
Black (BK)
Terminal
Screw marked
Red (RD)
Brass Terminal
Screw marked
3-Way
Terminal
Screw marked
White (WH)
BK
RD
YL/RD
WH
3
5
Ground Terminal
Screw (Green)
3-Way Wiring with Vizia
TM
Coordinating Remote
(no LED) Application:
Step 4
WIRING SENSOR:
Connect wires per WIRING DIAGRAM as follows:
NOTE:ThesensormustbeinstalledinawallboxthathasaLineHotconnection.
NOTE:Maximumwirelengthfromsensortoremotecannotexceed300ft(90m).
• GreenorbarecopperwireinwallboxtoGreenterminalscrew.
• LineHot(common)wallboxwireidentied(tagged)whenremovingoldswitchto
terminal screw marked "BK".
• FirstTravelerwallboxwiretoterminalscrewmarked"RD"(note wire color).
• RemoveRedinsulatinglabelfromterminalscrewmarked"3-Way".
• SecondTravelerwallboxwiretoterminalscrewmarked"3-Way"(note wire color).
Thistravelerfromthesensormustgototheterminalscrewontheremotemarked
"YL/RD".
• Neutralwallboxwiretoterminalscrewmarked"WH".
WIRING COORDINATING REMOTE:
Connect wires per WIRING DIAGRAM as follows:
NOTE: "BK" and "RD" terminals on coordinating remote are unused.
Tightenboth
screws.
NOTE:Maximumwirelengthfromsensortoremoteis300ft(90m).
• GreenorbarecopperwireinwallboxtoGreenterminalscrew.
• Loadwallboxwireidentied(tagged)whenremovingoldswitchtoFirstTraveler
(note color as above).
• SecondTravelerwallboxwire(note color as above) to terminal screw marked
"YL/RD".Thistravelerfromtheremotemustgototheterminalscrewonthesensor
marked"3-Way".
• RemoveWhiteinsulatinglabelfromterminalscrewmarked"WH".
• Neutralwallboxwiretoterminalscrewmarked"WH".
• Proceed to Step 5.
TOOLS NEEDED TO INSTALL YOUR DEVICE
CHANGING THE COLOR OF YOUR DEVICE
Push down tabs per
diagram, one at a time and
rotate forward to release
RESET
RESET
TEST
TEST
1 2
0 3
1 2
0 3
1 2
0 3
Attach new face by inserting
bottom hinge tabs, then pivot and
snap the color kit to attach
Yourdevicemayincludecoloroptions.Tochangecoloroftheface
proceed as follows:
INSTALLING YOUR DEVICE
NOTE: Use check boxes when Steps are completed.
√
FEATURES
• Cat.No.IPS15andIPV15haveasensingareaofcoverageof
30ft.x30ft.,andasensingangleof180
O
(see Sensing Area
Coverage figure on page 2).
• Adjustablelightandtime-delaycontrolsarelocatedonthefrontofthe
device.Seeadjustmentsettingsectiononpage2fordetails.
• LEDindicatorisusedtoalerttheuserofthestatusofthedevice.
• AdjustableTimeDelaysettingfor30seconds,5minutes,15minutes
and30minutes.
DESCRIPTION
TheIPV15,whichfeaturesaManual-ONoperation,isCaliforniaTitle
242005compliant.Theunitturnsoffmanuallyorinabsenceofmotion
accordingtothetimeoutselected.TheIPS15providesAutomatic-ON/OFF
operationaswellasManual-OFFwiththepushpad.Theseunitsinstall
inplaceofasingle-poleor3-waywallswitchandtinastandardwall
box.Theseunitscanbeusedforswitchingincandescentlamps,magnetic
fluorescent ballasts, fans, CFL and LED lamps.
LOCATION / MOUNTING
Thedevicerespondstotemperaturechangesandcareshouldbetaken
whenmountingthedevice.DO NOTmountdirectlyaboveaheatsource,
in a location where hot or cold drafts will blow directly on the sensor, or
whereunintendedmotion(e.g.,hallwaytrafc)willbewithinsensor’s
eld-of-view.
Slotted/PhillipsScrewdriver ElectricalTape Pliers
Pencil Cutters Ruler
ONOFF
ONOFF
ONOFF
ONOFF
ONOFF
ONOFF
ONOFFONOFF
ONOFF
ONOFF
ONOFF
ONOFF
Step 1
WARNING: TO AVOID FIRE, SHOCK, OR DEATH;
TURN OFF POWER at circuit breaker or fuse and test that
power is off before wiring!
IMPORTANT:For3-Wayapplications,notethatoneofthescrewterminals
fromtheoldswitchbeingremovedwillusuallybeadifferentcolor(Black)
orlabeledCommon.Tagthatwirewithelectricaltapeandidentifyasthe
common(LineorLoad)inboththesensorwallboxandremotewallbox.
Step 2
Identifying your wiring application
(most common):
NOTE: If the wiring in the wall box does not resemble any of
these configurations, consult an electrician.
2
4
1
5
3
3-Way
1. Line or Load
(See important
note below)
2. Neutral
3. Ground
4. FirstTraveler
– note color
5. SecondTraveler
– note color
2
4
3
1
Single-Pole
1. Line(Hot)
2. Neutral
3. Ground
4. Load
Preparing and connecting wires:
Thisdevicecanbewiredusingsidewireterminalscrews
or backwire openings. Choose appropriate wire stripping
specifications accordingly.
• Makesurethattheendsofthewiresfromthewallboxarestraight
(cut if necessary).
• Removeinsulationfromeachwireinthewallboxasshown.
• For Single Pole Application, go to Step 4a.
• For 3-Way Wiring with Vizia
TM
Coordinating Remote (no LED)
Strip Gage
(measure bare wire
here or use gage on
back of the sensor)
5/8”
(1.6 cm)
Cut
(if necessary)
Step 3
Side Wire
Side wire terminals
accept #14-12 AWG
solid copper wire
only.
Back Wire
Back wire openings
use #14-12 AWG
solid copper wire
only.
BK
RD
YL 3-Way
Single Pole Wiring Application:
Step 4
A
B
LIMITED 5 YEAR WARRANTY AND EXCLUSIONS
Levitonwarrantsto the original consumer purchaser and not for the benet of anyoneelse that this product at the time of its sale by Leviton is free of defects in materials and workmanship under normal and proper use forveyears from the purchase date.Leviton’s only obligation is to correct such defects by repair or replacement,
at its option, if within such five year period the product is returned prepaid, with proof of purchase date, and a description of the problem to Leviton Manufacturing Co., Inc., Att: Quality Assurance Department, 201 North Service Road, Melville, New York 11747.This warranty excludesand there is disclaimed liability for
labor for removal of this product or reinstallation.This warranty is void if this product is installed improperly or in an improper environment, overloaded, misused, opened, abused, or altered in any manner, or is not used under normal operating conditions or not in accordance with any labels or instructions.There are no other or
implied warranties of any kind, including merchantability and fitness for a particular purpose,but if any implied warranty is required by the applicable jurisdiction, the duration of any such implied warranty, including merchantability and fitness for a particular purpose, is limited to five years. Leviton is not liable for incidental,
indirect, special, or consequential damages, including without limitation, damage to, or loss of use of, any equipment, lost sales or profits or delay or failure to perform this warranty obligation.The remedies provided herein are the exclusiveremedies under this warranty, whether based on contract, tort or otherwise.
Application, go to Step 4b.
• For 3-Way Wiring with IPV0R Sensor Remote or Vizia
TM
Matching
Remote (w/LED) Application, go to Step 4c.

•Positionallwirestoprovideroominoutletwallbox
fordevice.
•Ensurethattheword"TOP"isfacingupondevice
strap.
•Partially screw in mounting screws in wall box
mounting holes.
•Removethefacecoverofthesensortoexpose
the adjustment dials (refer to Changing the
Color of your Device on page 1).
•Settimeselectionofthesensorto30seconds
foraquicktimeoutduringtesting(Refer to
ADJUSTMENT SETTINGS section).
•Setthelightleveldialfullclockwise(Refer to ADJUSTMENT SETTINGS
section).
•Placethefacecoverbackonthesensor.
•Restorepoweratcircuitbreakerorfuse.
•ForIPS15lightswillautomaticallyturnonafterpowerisapplied.
•ForIPV15,pressandreleasepushpadtoturnthelightsON.
NOTE: See Locator Light Status chart to confirm the operational state of
thedevice.IflightsstilldonotturnON,refertotheTROUBLESHOOTING
section.
•Leavetheroomoreldofviewtoallowthesensortotimeoutandshutoff
the lights due to absence of motion.
•Within30secondsofthelightstimingoutstepbackintotheroomorthe
eldofviewofthesensorandthelightsshouldturnbackonautomatically.
•Ifthelightsdonotturnoff30secondsafterleavingtheroomdecreasethe
sensitivityofthesensor(refer to the ADJUSTMENT SETTING section).
•Ifthelightstonotturnbackonautomaticallywhenyoustepbackintothe
roomincreasethesensitivityofthesensor(refer to the ADJUSTMENT
SETTING section).
•Settimeselectionandlightlevel(Refer to ADJUSTMENT SETTINGS
section).
•Whenthedesiredlightlevel(IPS15 only),timeselectionandsensitivity
settingsareselectedplacethefacecoverbackonthesensorand
continue to Step 6.
Restore Power: Restore power at circuit breaker or
fuse.
Installation is complete.
Step 7
Device Mounting:
TURN OFF POWER AT
CIRCUIT BREAKER OR FUSE.
Step 6
Installation may now be
completed by tightening
mounting screws into wall
box. Attach wallplate.
Testing your Device prior to mounting in wall box:
Step 5
NOTE: Dress wires with a bend as shown in diagram in order
torelievestresswhenmountingdevice.
ADJUSTMENT SETTINGS
NOTE: Toavoid PERMANENT DAMAGE to the unit, be careful NOT TO
OVERTURN the adjustment dials when setting the Sensor.
1. Withpowerrestoredandwallplateremoved,removefaceofdevicetoexpose
adjustment dials (refer to Changing the Color of your Device on page 1).
Useasmallscrewdrivertoadjustthelightlevel,timeselectionandsensitivity
onthedeviceasfollows (Refer to Diagram):
Light Level Adjustment (IPS15 only):
•Adjustthelightleveldialclockwise.LightswillturnONinlighterconditions.
•Adjustthelightleveldialcounterclockwise.LightswillturnONinlesslighting
conditions.
Time Selection:
•Adjustthetimeselectordialtothedesiredlengthoftimethelightsareto
remainON.LightswillremainONfrom30secondsto30minutesafterthe
roomisvacated.
•AdjustthetimeselectordialclockwisetoincreasethedurationoftheON
timeupto30minutes.
•Adjustthetimeselectordialcounterclockwisetodecreasethedurationofthe
ONtimedownto30sec.
Sensitivity:
•Increaseordecreasethesensitivityofthesensorasfollows.
•Todecreasesensitivityanddetectionrange,rotatethedialcounter-clockwise.
Toincreasethesensitivityanddetectionrange,rotatethedialclockwise.With
thearrowpointingat3thesensitivityisfull.Withthearrowpointingat0,the
sensitivityisreducedbyhalf.Asthedialrotatesfrom2to0,thechangein
sensitivityismadeinnesteps.
2. Attachthefacecoverandtestthatthelightlevel,timeselectionand
sensitivityaresetasdesired.Ifnot,repeatadjustmentsuntilsatised.
For additional information, contact Leviton’s Techline at
1-800-824-3005 or visit Leviton’s website at www.leviton.com
ThisproductiscoveredbyU.S.Pat.No.7,924,155
and corresponding foreign patents.
©2012LevitonManufacturingCo.,Inc.
AllRightsIncludingTradeDressRightsReserved
TROUBLESHOOTING
Lights do not switch ON - IPS15:
• Motionisbeyondsensingrange,moveclosertoswitch.
• Adjustthelightleveladjustmenttowardlighterordarker,dependingon
room conditions.
Lights always stay ON:
• ChecktimedelaysettingsandcomparetohowlongthelightsstayON.
• Besurethatnomotionoccursincoverageareafortimeselected.
• Checkthatswitchisnotinstallednearaheatsource(e.g.,stove,lights,
heatvents)ordetectingmotionfromanadjacentarea(e.g.,hallway
trafc).Ifso,switchmayhavetoberelocated.
•
TryloweringtheSensitivityAdjustmentControl.Rotatetheknob
counterclockwiseabout30°.Iftheproblempersists,tryreducingagain.
NOTE: DO NOT reduce so much that the sensor cannot see normal
occupancy.
Lights do not turn ON with the pushpad - IPV15:
• Checkthatswitchisinstalledcorrectly.
• CheckthatpowerisON.
• Checkthatlightbulbisfunctioning.
NOTE: If problems continue, consult an electrician.
FCC COMPLIANCE STATEMENT
ThisdevicecomplieswithPart15oftheFCCRules.Operationissubject
tofollowingtwoconditions:(1)thisdevicemaynotcauseharmful
interference,and(2)thisdevicemustacceptanyinterferencereceived,
includinginterferencethatmaycauseundesiredoperationofthedevice.
Thisequipmenthasbeentestedandfoundtocomplywiththelimitsfor
aClassBDigitalDevice,pursuanttoPart15oftheFCCRules.These
limitsaredesignedtoprovidereasonableprotectionagainstharmful
interferenceinaresidentialinstallation.Thisequipmentgenerates,uses,
andcanradiateradiofrequencyenergyand,ifnotinstalledandusedin
accordance with the instructions, may cause harmful interference to radio
communications.However,thereisnoguaranteethatinterferencewill
notoccurinaparticularinstallation.Ifthisequipmentdoescauseharmful
interferencetoradioortelevisionreception,whichcanbedetermined
byturningtheequipmentOFFandON,theuserisencouragedtotryto
correct the interference by one or more of the following measures:
• ReorientorrelocatethereceivingAntenna.
• Increasetheseparationbetweentheequipmentandthereceiver.
• Connecttheequipmentintoanoutletonacircuitdifferentfromthatto
whichthereceiverisconnected.
• Consultthedealeroranexperiencedradio/tvtechnicianforhelp.
FCC CAUTION
AnychangesormodicationsnotexpresslyapprovedbyLeviton
ManufacturingCo.,Inc.,couldvoidtheuser'sauthoritytooperatethe
equipment.
LOCATOR LIGHT STATUS
LOAD
IPS15 IPV15
OFF
Blinking Lit
ON
Blinking Blinking
Lens
Push
Pad
Locator
Light
Side (Vertical) Field-of-View
SENSING AREA COVERAGE
Field-of-View (Horizontal)
30ft
9.1m
30ft
9.1m
6ft
1.7m
1.8m
6ft
30ft
9.1m
8.4m
27ft
2.1m
7ft
1.2m
4ft
2.6m
8ft
Light Level
Adjustment
Sensitivity
Adjustment
Time
Selection
1 2
0 3
1 2
0 3
1 2
0 3
Settings
0
1
2
3
Time
30sec
5 min
15 min
30min
PK-93977-10-00-2A©2012LevitonMfg.Co.,Inc.
NOTE:TheOccupancysensormust be installed in a wall box that
hasaLoadconnection.TheSensorremotemust be installed in a
wallboxwithaLineHotconnectionandaNeutralconnection.A
Neutralwiretotheremoteneedstobeaddedasshown.Ifyouare
unsure about any part of these instructions, consult an electrician.
NOTE: Maximum wire length from sensor to all installed remotes
cannotexceed300ft(90m).
WIRING REMOTE
(wall box with Line Hot connection):
Connect wires per WIRING DIAGRAM as follows:
•GreenorbarecopperwireinwallboxtoGreenterminalscrew.
•LineHot(common)wallboxwireidentied(tagged)when
removingoldswitchandFirstTravelertosensorterminalscrew
marked "BK".
•SecondTravelerwallboxwirefromsensortoremoteterminalscrew
marked"3-Way"(note wire color).Thistravelerfromtheremote
mustgototheterminalscrewonthesensormarked"3-Way".
•Neutralwallboxwiretoremoteterminalscrewmarked"WH".
WIRING SENSOR (wall box with Load connection):
Connect wires per WIRING DIAGRAM as follows:
•GreenorbarecopperwireinwallboxtoGreenterminalscrew.
•Loadwallboxwireidentied(tagged)whenremovingoldswitchto
terminal screw marked "RD".
•FirstTravelerLineHottoterminalscrewmarked"BK".
•RemoveRedinsulatinglabelfromterminalscrewmarked"3-Way".
•SecondTravelerwallboxwire(note color as above) to terminal
screwmarked"3-Way".Thistravelerfromthesensormustgotothe
terminalscrewontheremotemarked"3-Way".
•Neutralwallboxwiretoremoteterminalscrewmarked"WH".
•ProceedtoStep5.
3-Way Wiring with Sensor Remote or Vizia
TM
Matching Remote (w/LED) Application:
NOTE: IPV0R sensor remote is depicted.
Additional
Neutral Wire
Terminal
Screw marked
Black (BK)
Brass Terminal
Screw marked
3-Way
BK
WH
RD
3-Way
3
5
1
4
2
BK
WH
RD
3-Way
3
2
1
4
5
Terminal
Screw marked
Red (RD)
Terminal
Screw marked
White (WH)
SensorIPV0R/VP0SR-1L Remote
Ground
Terminal Screw
(Green)
Hot (Bla c k )
Neutral (White)
Sensor IPV0R/VP0SR-1L Remote
3-Way
RD 3-Way
WH
BK BK
Bla c k
White
Line
120 V A C , 60H z
WH
Load
Green
Ground
Green
Ground
C
OPERATION
IPS15
Auto ON: LightswillautomaticallyturnONwhenroomisoccupiedormotion
isdetected.TheIPS15willswitchlightsOFFwhennomotionisdetectedin
un-occupied room after set period of time.
Time delay adjustment: Refer to section on Adjustment Settings.
Manual ON:TheIPS15willmanuallyturn-onlightsortheloadbydepressing
thepushpadonthedevice.TheIPS15canbesettoonlyturnONbythe
pushpad(noautomaticonoperation)byadjustingtheambientlightcontrolto
the "0" position.
IPV15
Manual ON:
TheIPV15requirestheusertomanuallyturnONlightsortheload
by depressing the
push pad
onthedevice.Thelightsorloadwillautomatically
turn-off when the room is left unoccupied for a set period of time.
Time delay adjustment: Refer to section on Adjustment Settings.
NOTE:
Ina3-wayapplication,usingvizia
TM
matching or coordinating remotes,
theremotewillonlyhavetheabilitytomanuallyswitchtheloadON,thesensor
willthentimeoutandswitchtheloadOFFoncemotionisnolongerdetected.
For automatic control at both locations, use IPV0R as the remote.
Locator Light LED:
IPS15:LEDblinkswhenmotionisdetectedandiftheloadisONorOFF.
IPV15: LEDblinkswhenmotionisdetectedandwhenloadisON.LEDwill
remainilluminatedwhenloadisOFF.