Risk of Electric Shock: Electricity can cause personal injury and property damage if handled improperly. If you are not sure about any part of these instructions, please seek professional assistance from a qualified electrician.
Warnings
• Turn off the power at the circuit breaker and test that power is off before wiring.
• Check supported maximum wattage rating: 1250W.
• Replace single pole switch only; DO NOT compatible with 3-way switch.
Prepare Other Tools You’ll Need
• Screwdriver
• Pliers
• Electrical Tester
INSTALLATION
Note
• Make sure that the power at the circuit breaker is off before wiring.
• Neutral Wire is required. Confirm the wall box contains a Neutral Wire (typically white). If the wall box doesn’t have a Neutral Wire, please try another location in your home or call a professional electrician to install the switch.
• The wire colors indicated in this manual are the usual colors and may differ in some homes.
• Ensure the wire conductors are securely fastened to each wire.
• Ensure the WiFi signal is strong before wiring.
• If you don’t have any wiring experience, please call a professional electrician.
STEP 1
Turn off the circuit breaker and use the electrical tester to test the power.
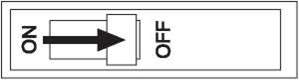
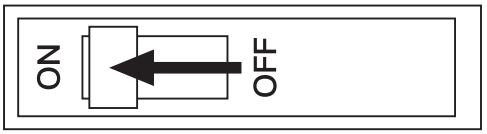
Ensure the switch is off before wiring.
STEP 2
Remove the existing wall plate; turn on the power at the circuit breaker and use an electrical tester to check which wire is line wire; the tester will flash and/or chirp when it comes close to a line wire.
Turn off the power at the circuit breaker and use the electric tester to test if the power is off, and then pull the existing switch out; label the line wire and other wires; disconnect the wires from the existing switch with pliers.
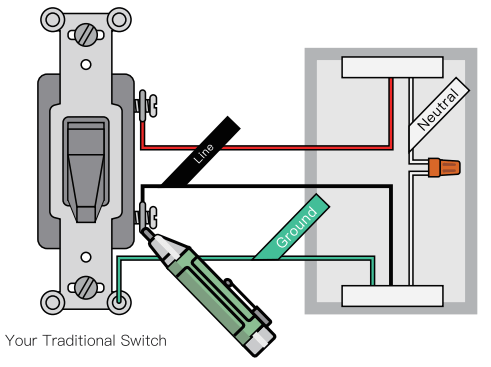
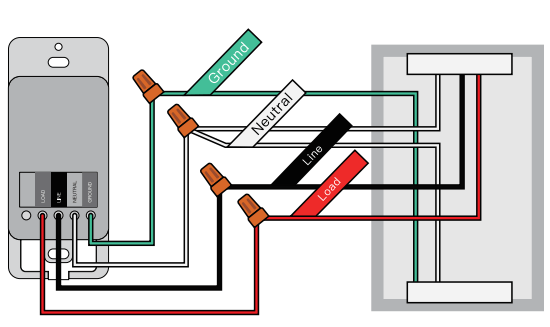
Follow the wiring diagram to connect the switch wires to the wires in the wall box with the wire conductors.
STEP 3
Mount the switch with the provided screws and snap the wall plate on it.
STEP 4
Turn the power back on at the circuit breaker.
STEP 5
Switch the light on.
ADD DEVICES
1. Download Smart Life APP
Please scan the QR code or download Smart Life on App Store or Google Play.
2. Registration or Log In
• Download “Smart Life” Application.
• Enter the Register/Login interface; tap “Register” to create an account by entering your phone number to get verification code and “Set password”. Choose “Log in” If you already have a Smart Life account.
3. Configure the APP to the Switch
Preparation: Ensure the switch has connected with electricity; ensure your phone has connected to WiFi router and is able to connect to the internet.
Note: this switch only supports 2.4G network. If you have connected 5G network, please disconnect 5G network firstly.
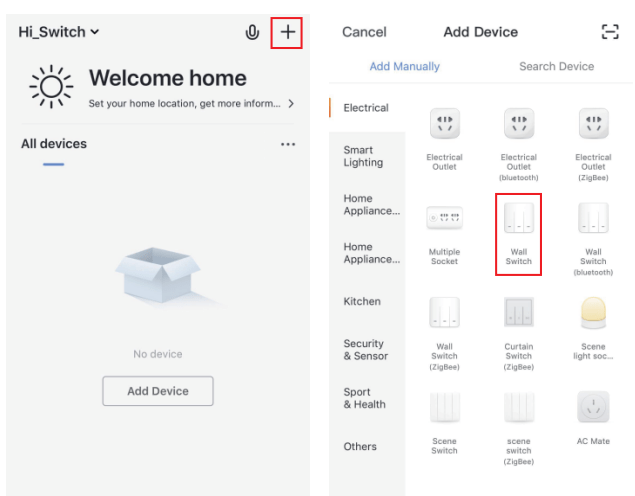
• Tap the icon “+” on the top right corner to add device; choose “Wall Switch”.
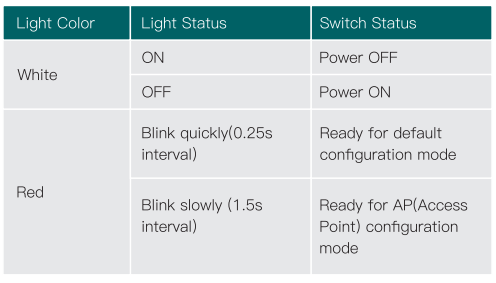
3.1 Default Configuration Mode
• Press and hold the manual switch for 5 seconds until the red indicator light blinks quickly.
• Tap “Confirm indicator rapidly blink”; enter WiFi Password; wait for completing the connection.
• Devices have added successfully.
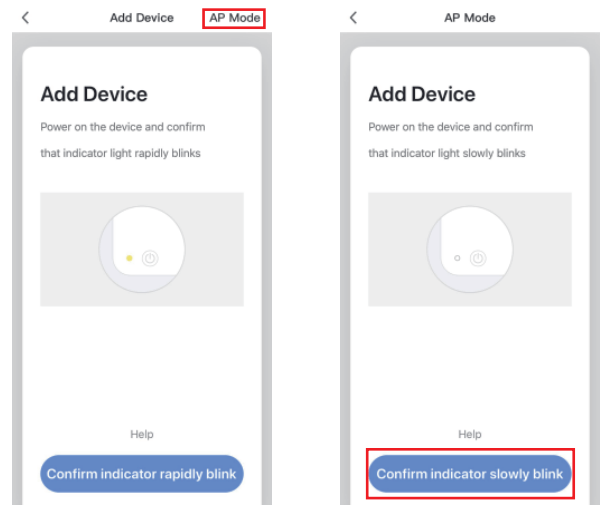
3.2 AP Mode
• If you cannot configure successfully with the default mode, please try to connect with AP Mode.
• Tap “AP Mode” on the top right comer.
• Press and hold the manual switch for 5 seconds, you can see the red Indicator light blinks quickly. Then press and hold for 5s again until the Indicator light blinks slowly.
• Tap “Confirm indicator slowly blink”.
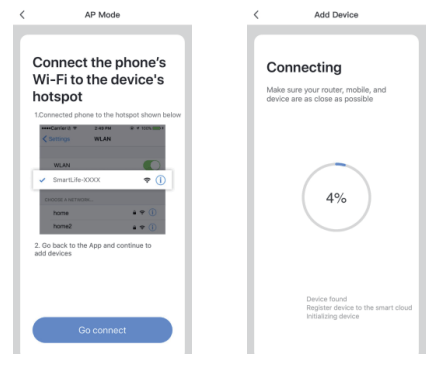
• Enter Wi-Fi Password.
• Open WLAN settings; connect with “SmartLife-xxxx”.
• Back to the App and continue to add the device and wait for completing the connection.
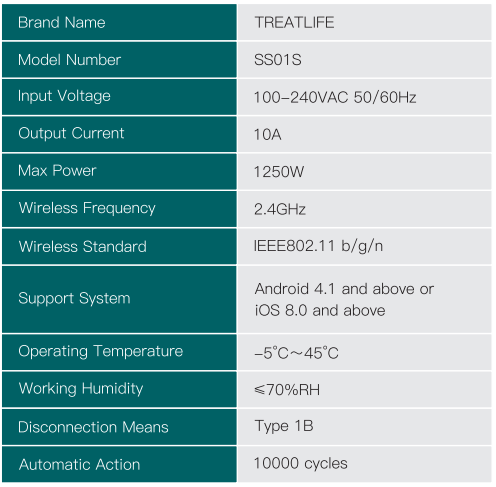
SPECIFICATION
TROUBLESHOOTING GUIDE
Unable to connect the switch with the phone
The switch is not allowed for connection or the switch has been connected
Press and hold the switch for 5s, the switch will initiate configuration
Incorrect wiring
Make sure the switch is wired correctly
Unable to turn the switch on/off manually
No electricity
Check the circuit breaker; make sure that the power is restored to the switch
The light bulb is broken or is not compatible
Replace the light bulb
The switch won’t respond to APP control
Network delays or is disconnected
Check your network connectivity
Permission is denied by your phone
Grant permission on your phone Settings
The switch is out of order
Manually switch on to check the switch
Your light bulb is blinking when switched off
Electric leakage occurs or the light bulb and the switch are not compatible
#1 Is it possible to set the switch up so if it’s turned on manually, that it will auto shut off after a designated amount of time?
Yes, it is possible. You can make use of the Auto-off Rule.
#2 There is no neutral wire on the current switch. Do I just install the ground and the two live load wires?
It would be highly unusual for there not to be a neutral wire run to the box you are trying to install this switch into. Just because there is no neutral wire attached to the older switch does not mean tjere is not one there. Electricians, when installing switches, will sometimes run only the hot wire and the load wire to the switch (both black) as well as the ground wire and simply tie the neutrals (white) together. It is not necessary to run the neutral directly to the older mechanical switch. Look in the switch box and see if there is a white wire in there. If so, that is your neutral wire and all you have to do is tie the neutral wire from the smart switch into it. It is possible that if it is a single switch in the box that the electrician didn't even strip the insulation from the neutral wire and it just runs straight thru the box. If so just pull the wire out, cut it, strip a little more than 1/4" of the insulation, and use the provided wire nuts to tie both ends of the neutral wire to the neutral wire on the smart switch. If there is more than 1 switch, all the neutrals will probably to joined together. As others have said, do not tie the neutral to the ground wire if you do not have an existing neutral wire in the switch box as the smart switch won't work this way. You will have to find some way to run one.
#3 I only have a Black and White cable on my existing switch. Will this work?
Common connection have 3 color: black, red and white, I recommend check everything, because with 2 not going to work