WiFi Treatlife Remote Controls
Product's Documents
Below are documents related to this product, you can read online or download:
- Owner's manual - (English) Read Online | Download pdf
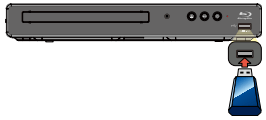
User manual DVD Player
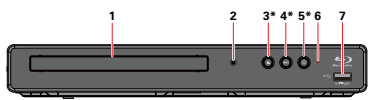
The unit can also be turned on by pressing this button.
1. Disc tray
2. Infrared sensor window
3.  (OPEN/CLOSE) button*
4.  (PLAY/PAUSE) button*
• Press to start playback.
• During playback, press to pause playback.
5.  (POWER) button*
6. Power-on indicator
7. USB input
Caution:
Note: Due to new ENERGY STAR® requirements, this unit will automatically turn on the screen saver after 5 minutes of inactivity and enter standby mode after 25 minutes of inactivity.
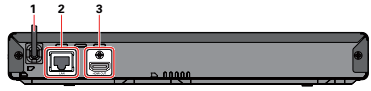
1. AC power cord
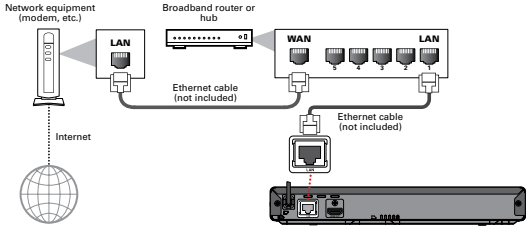
2. LAN terminal
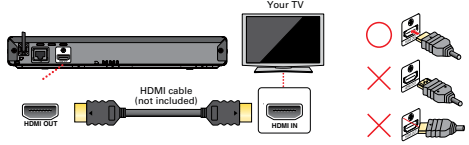
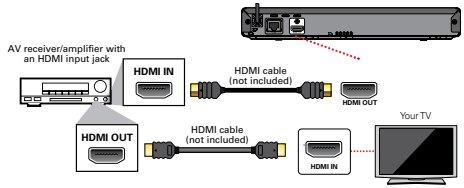
3. HDMI OUT jack
Caution:
HDMI connection (Supports up to 1080i(*1), 1080p(*2), 1080p/24(*3) resolution.)
|
(*1) 1080i: |
Outputs video data with a frame rate of 30 frames per second. |
| (*2) 1080p: | Outputs video data with a frame rate of 60 frames per second. |
| (*3) 1080p/24: | Outputs video data with a frame rate of 24 frames per second. To enable 1080p/24 output, set “Resolution” to “Auto” or “1080p”, and set “HDMI1080p 24Hz” to “On”. |
Note
HDMI audio connection
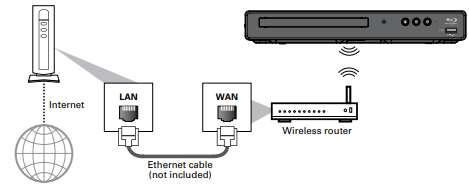
By connecting this unit to the Internet, you can update its software via the Internet, access BD-Live™ and other network services such as Netflix, VUDU and YouTube™.
Note:
Wired connection
Caution
Note:
Wireless connection
Note:
After you have completed all of the connections to your TV, review the steps below.
1. Press [ (POWER)] to turn on the unit.
2. Turn on your TV.
3. Switch your TV's input to the HDMI port which your unit is connected to.

This is the correct HDMI input view.
Please follow the instructions below to complete the initial setup.
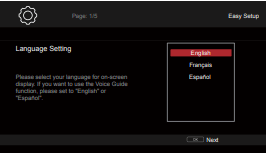
1. While Welcome screen is displayed, press [OK].
2. Language setup screen will appear. Use [ ] to select your language, then press [OK].
3. Voice guide setup screen will appear. Use [] to select “On” or “Off”, then press [OK].
4. HDMI CEC setup screen will appear. Use [] to select “On” or “Off”, then press [OK].
5. Software update setup (automatically checks for the latest software) screen will appear. Use [] to select “On” or “Off”, then press [OK]
6. Network setup screen will appear. Use [] to select “Set up now” or “Not now”, then press [OK].
• If you select “Set up now”, refer to “Network connection” on page 42 for further operation.
• If you select “Not now”, the home menu screen will appear.
How to reset the OSD language
You can reset the OSD language if you selected the wrong language.
1. Press [HOME] to display the home menu.
2. Use [ ] to select “
 ”, then press [OK].
• This item is “Setup” (English) / “Instalación” (Spanish) / “Installation” (French).
• From here on, please select one of the following items you can find on screen:
3. Use [ ] to select ˝
 ˝, then press [OK].
4. Use [] to select “Language” (English) / “Idioma” (Spanish) / “Langue” (French), then press [OK].
5. Use [] to select “OSD”(English) / “OSD”(Spanish) / “Affichage sur l’écran”(French), then press [OK].
6. Use [] to select your desired language, then press [OK].
7. If the items that were set are displayed in your desired language, then press [HOME] to exit.
Photo file list
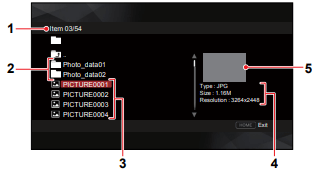
1. Number of folders or files in this directory /
Total number of folders or files in this directory
2. Folder
3. File list
4. File information
5. Thumbnail
Music file list
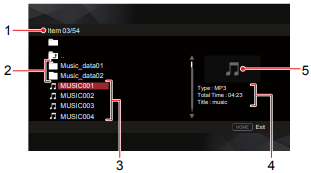
1. Number of folders or files in this directory / Total number of folders or files in this directory
2. Folder
3. File list
4. Track information
5. Cover art (when available)
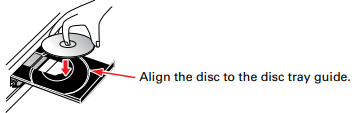
1. Press [ (OPEN/CLOSE)] to open the disc tray.
2. Place the disc on the disc tray with its label side facing up.
3. Press [ (OPEN/CLOSE)] to close the disc tray.
• It may take a while to load the disc.

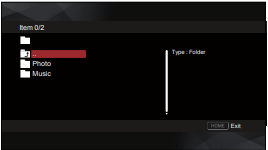
1. Insert a disc (refer to “How to insert a disc” on page 23).
• When the disc is BD / DVD / AVCHD / Audio CD, playback starts automatically. If not, press [ (PLAY/PAUSE)].
• When photo / music files are contained on the disc, the file list will be displayed (see step 2). Even if the content type is of one type only, the file list screen will still be displayed.
• Some discs may show a title or a disc menu. In this case, refer to “Using the title / disc / pop menu” on page 26.
• “BD-ROM Data (USB) Check” message may be displayed while loading a Blu-ray Disc™. In such cases, connect a USB memory stick first, then insert the disc. Refer to “Enjoying BD-Live™ discs using Internet” on page 30.
2. Select the type of the file you want to play back, then press [OK].
| To skip to the next title / chapter / track / file: | Press [  (SKIP)]. (SKIP)]. |
| To skip to the previous title / chapter / track / file: | Press [  (SKIP)]. (SKIP)]. |
| To pause playback: | Press [ (PLAY/PAUSE)] |
| To return to normal playback: | Press [ (PLAY/PAUSE)] |
| To stop playback: | Press [  (STOP)]. (STOP)]. |
Playback will be in resume-on-stop mode. To clear the resume information, press [ (STOP)] again.
Note:
Note for photo file playback
] will turn the Image by 90 degrees when an Image is displayed.Caution
Resume-on-stop mode
Blu-ray Disc™ / DVD / AVCHD
When you press [OK] next time, playback will start from the point where it had been stopped. If you press [RETURN] instead of [OK], playback will start from the beginning.
Audio CD
Playback will start from the point where it was stopped next time you press [OK]. If you press [RETURN] instead of [OK], playback will start from the beginning of the 1st track of the Audio CD instead of resuming from the stop point.
Music file
When you press [ (PLAY/PAUSE)] or [OK] next time, the playback will start from the point where it has been stopped.
Note

You can play back JPEG / PNG / MP3 / FLAC / AAC / WAV files stored on a USB memory stick. With the USB memory stick, you can also enjoy the following functions.
(For more information about the special additional contents, refer to the Instruction book that came with the disc.)
1. Connect a USB memory stick.
2. Press [HOME].
3. Use [] to select “USB”, then press [OK].
4. Select the file type you want to play back, then press [OK].
Caution
Note
• The resume information will be cleared when;
- [ (STOP)] or [HOME] is pressed while in resume-on-stop mode.
- the USB memory stick is disconnected.
- the unit is switched to standby mode.
• If a folder / file name contains an unrecognizable character, the folder / file name will not be displayed.
• This unit can read JPEG / PNG / MP3 / FLAC / AAC / WAV files and AVCHD on an SD memory card by using USB card reader.

Some BD-Videos, DVD-Videos or AVCHD files may contain a title menu which describes the contents of the disc, or a disc menu which guides you through the available functions on the disc.
Note

1. During playback, press [  (FORWARD)] repeatedly for fast forward.
During playback, press [  (REVERSE)] repeatedly for fast reverse.
2. Press [ (PLAY/PAUSE)] to return to normal playback.
Note

1. During playback, press [ (PLAY/PAUSE)]. Then press [ (FORWARD)].
Every time you press [ (FORWARD)], the playback speed changes at 4 different levels.
2. Press [ (PLAY/PAUSE)] to return to normal playback.
Note: Slow Reverse is not available.

Some BD-Videos have the PiP function which enables you to display the secondary video in the primary video.
1. During playback, press [MODE] to display the play menu.
2. Use [] to select “PiP” then press [OK].
• PiP information will appear.
3. Use [] to select the secondary video you want to show.
• The secondary video will be displayed with secondary audio.
4. Press [MODE] to exit.
• To select the secondary audio output, refer to “Switching audio soundtrack” on page 34.
Note: Secondary video may not be displayed all the time, depending on the scene, it may or may not be available for display.
You can enjoy BD-Live™ which enables you to use interactive features when the unit is connected to the Internet.
Examples of BD-Live™ features:
• Online access to additional content such as movie trailers, subtitles, BD-Java applications, etc.
• While downloading, special video data may be played back.
- Service and functions differ depending on the disc. Follow the instructions given by the disc when using the BD-Live™ function.
- Connect a USB memory stick with at least 1 GB of available memory before using BD-Live™ features on a Blu-ray Disc™.
- Do not disconnect the USB memory stick while using BD-Live™ features.
Note
Note for AACS online
HOME -> “Setup” -> “” ->“Network”
Perform the network connection setup in order to use network features, such as BD-Live™, Netflix, VUDU, YouTube™ and the network update function.
Connection test
After you enable a network connection or change network settings, always perform the connection test to check to see if the connection is correctly made.
1. Use [] to select “Setup” in the home menu, then press [OK].
2. Use [] to select “ ”, then press [OK].
3. Use [] to select “Network”, then press [OK].
4. Use [] to select “Connection Test”, then press [OK].
• Connection test will automatically start. The test result will appear right after the test finishes.
5. If the connection test passes, press [OK].
Note
Network status
You can check the current status of network status and wireless status.
1. Follow steps 1 to 3 in “Connection test” on page 42.
2. Use [] to select “Network Status”, then press [OK].
• The current network settings and wireless router setting will be displayed.
3. Press [HOME] to return to the home menu.
Netflix ESN
You can view the ESN (Electronic Serial Number, which Netflix uses to identify your device). Netflix customer service might ask you for this number during troubleshooting.
1. Use [] to select “Setup” in the home menu, then press [OK].
2. Use [] to select “”, then press [OK].
3. Use [] to select “Streaming Content”, then press [OK].
4. Use [] to select “Netflix Information”, then press [OK].
5. Press [HOME] to return to the home menu.
| Problem | Tip |
| No power. |
Check if the AC power cord is properly connected. Try another power outlet. Unplug the AC power cord, and wait for about 5-10 seconds. Plug it back in and attempt to power on the unit. |
| No sound or picture. |
Make sure both the TV and Blu-ray Disc™ player are turned on. Confirm the connections to the TV are made properly as shown in the “CONNECTIONS” on page 12. Check to see whether the connected TV or another device supports HDCP. (This unit will not output a video signal unless the other device supports HDCP.) |
| No reaction to the remote control. |
Reduce the distance to infrared sensor window. Confirm that the player’s AC power cord is plugged into a power outlet. Check the batteries in the remote control and make sure they are inserted properly by + or - symbols. See how to check the remote operation on page 64. |
| No audio / video signal on the display device via HDMI cable. |
If the unit is connected to a non-certified HDMI device, the audio / video signal will not be sent to that device. Make sure the display device is on the correct input / video source. Perform an HDMI hotplug: Disconnecting the HDMI cable from the display device, turn on both devices, and replug the HDMI cable back in. Check with the TV manufacturer, if there are any software updates available for the TV. Check to see if the HDMI cable is a certified version. |
| No high-definition video signal on the TV screen. |
Does the disc contain high-definition video? High-definition video is only available when the disc contains it. Does the TV support high-definition video? High-definition video is only available when the TV supports it. |
| Distorted picture. | Sometimes a small amount of picture distortion may appear. This is not a malfunction. |
| Completely distorted picture or black / white picture with Blu-ray Disc™ / DVD Disc. | Make sure the disc is compatible with this unit. |
| No sound or distorted sound. |
Adjust the volume. Check to see if the speakers are connected correctly. Check the HDMI connection. Make sure the HDMI cable is not plugged into an HDMI-DVI adapter which does not handle digital sound. Check the settings in “Audio Output” menu. |
| Picture freezes momentarily during disc playback. | Check the disc for fingerprints / scratches and clean with a soft cloth wiping from the center to the outer edge. |
| Cannot play back a disc. |
Make sure that the unit supports the disc. Check the region code for the disc. This unit supports the following region codes. - Blu-ray Disc™: “A” - DVD: “ALL” or “1” For DVD-RW/-R, make sure that the disc is finalized. Clean the disc. Is the disc a newer title? This problem may be solved by software update. Refer to “Software update” on page 54. |
| “BD-ROM Data(USB) Check” message appears when attempting to play a Blu-ray Disc™. |
Connect a USB memory stick first, then insert the Blu-ray Disc™. • When this unit starts loading a Blu-ray Disc™, it will check the USB memory stick to which BD-Live™ contents will be saved. |
| A music/photo file does not play. |
Confirm that the file type is supported. Refer to page 20 for the compatible file extensions. The file may be corrupted. Check to see if it is playable on a PC or other devices. |
| No return to start-up screen when disc is removed. |
Soft reset this unit by turning it off for 30 seconds, then on again. To completely reset the unit, press and hold [y(POWER)] on the front panel for 10 seconds to shut down the unit or unplug the AC power cord from the AC outlet for 5-10 seconds. |
 in the upper left hand corner of the TV screen. in the upper left hand corner of the TV screen. |
The operation is not possible. |
| Buttons do not work or the unit stops responding. | To soft reset the unit, press and hold [ (POWER)] on the front panel for 10 seconds to shut down the unit or to hard reset the unit by unplugging the AC power cord from the AC outlet for 5-10 seconds. |
| The unit does not respond to some operating commands during playback. | The operations may be prohibited by the disc. Refer to the instructions for the disc. |
| The unit cannot read Blu-ray Disc™ / DVD/CD Disc. |
Condensation? (Let the unit sit and dry for 1 or 2 hours) Check to see if the disc is compatible with this unit. (Refer to page 19.) Wipe dirt off the disc from the center to the outside or replace the disc. Refer to “Cleaning discs” on page 64. |
| Scene shooting angle does not switch. | Angles cannot be switched for Blu-ray Disc™ / DVD which do not contain multiple angles. in some cases multiple angles are only recorded for specific scenes. |
| Playback does not start when a Title is selected. | Check the settings in “Parental Control” menu. |
| Cannot play back AVCHD file. | This unit cannot play back stand-alone AVCHD files (*.m2ts, *.mts or *.m2t) written to a DVD. The DVD containing AVCHD files must have a proper file and folder structure meeting AVCHD format specifications. Please use AVCHD compliant device / software to burn or copy AVCHD files to DVD. (Please refer to user manuals of the device / software for more information.) |
| The capacity of the USB memory stick decreased. | Data may be written on the USB memory stick when a BD-Video uses the virtual package feature while a USB memory stick is connected to the unit. |
| Cannot play back a MPEG-2 video and audio from the USB memory stick. | MPEG-2 is not compatible with this unit. |
| Cannot read the contents on the USB memory stick. |
The USB memory stick is not compatible with this unit or the contents may be damaged. Turn off the unit, then turn it back on. To soft reset the unit, press and hold [ |
| Cannot play back BD-Video. |
Connect a USB memory stick (1GB or more of available memory). Some discs with BD-Live™ function require memory when playing back content. Do not disconnect the USB memory stick during playback. |
| Repeat setting does not work with a Blu-ray Disc™ | Repeat setting may be unavailable with some Blu-ray™ discs. |
| Cannot play back 3D. | 3D Blu-ray™ discs are not supported by this unit. |
| Cannot load a Blu-ray Disc™ (that is stuck in loading mode and cannot open the disc tray to eject the disc. | Unplug unit from AC outlet for 20 seconds. Plug unit back in and press the [ (OPEN/CLOSE)] on the unit to eject the disc. |
| Cannot read a USB memory stick. | The format of the USB memory stick is not compatible with this unit. If the USB memory stick has been formatted on a PC or another device, the file system may be incompatible with this unit. This unit supports the FAT16 / FAT32 file systems. |
| Cannot play back photo files from a disc. | Make sure that the disc was recorded in the UDF, ISO9660 or JOLIET format. |
| Cannot find a photo file. | Make sure that the file extension is .jpg / .JPG / .jpeg / .JPEG. / .png / or .PNG. |
| Cannot play back music files from a disc. |
Make sure that the disc was recorded in the UDF, ISO9660 or JOLIET format. Confirm that the bitrate and sampling frequency are compatible with this unit. (Refer to page 20) |
| Cannot find a music file. | Make sure that the file extension is MP3, AAC, FLAC or WAV for music files. |
| Music files play choppy. | CDs/DVDs containing FLAC (.flac) files with high frequency and large quantization bit rates may not play properly. In such cases, copy the music files to a Blu-ray Disc™ or USB memory stick, then try playing. |
| No audio signal from surround system of the audio system. |
Make sure the audio system is turned on. Check the input mode on the audio system if it is on the correct channel. Check if the surround system is compatible with either bitstream or LPCM. If not sure please check the user manual or contact the surround manufacturer. Once confirmed check the setting in the “Setup” on this unit. Increase the volume level on the surround system. |
| Cannot connect to the Internet although the connection test passes. |
Make sure that the ethernet cable is properly connected to the modem / router. Confirm that another device, such as a PC, can connect to the Internet. |
| Cannot connect to the network. |
Check to see if the modem / router has power turned on. Make sure that the ethernet cable is properly connected to the modem / router. Confirm if the Internet light is showing activity (light blinking) on the modem / router. Check network settings on the unit. Turn off this unit and the modem/router (if it has a power button), then unplug their AC cords. After 30 seconds, plug them back in and turn the devices back on. If you have a telephone / Internet modem with your cable service, then you may have to use its reset button or remove the backup battery to reset this type of modem. Now wait for the lights to show activity and try reconnecting. Check the cable connection to the router when connecting with an ethernet cable. Confirm “Network Status” in the setup. Turn on the DHCP function on the router. |
| Cannot use “Auto” to connect to the access point. |
If the access point's security mode is set to “WEP”, change the setting to “WPA” or “WPA2 (recommended)”, then try “Auto” again. Refer to “ Connect the unit to the access point using “Scan” or “Manual” mode. |
| Cannot use the wireless connection. | Once you have activated the wireless connection please wait 30 seconds for the connection to be established after turning on the unit, before trying to access network features such as BD-Live™ and third-party network services. |
| Cannot connect to the network while my PC is connected to the network. | Check the content of your Internet service contract to see if your Internet service provider prevents multiple terminals connecting at the same time. |
| You are not sure if the unit is connected to the Internet. |
Perform the connection test. (refer to page 42) Confirm that the “ |
| Cannot use the BD-Live™ function or Internet data does not download properly. |
Confirm that this unit is successfully connected to the internet. Confirm the BD-Live connection setting in the setup. Connect a USB memory stick before inserting a disc. The USB memory stick must have 1GB or more free space. Confirm that the USB memory stick is properly connected to this unit. Make sure that the USB memory stick connected to this unit is not write-protected. |
| Cannot add network services. | On this unit, only the network services of Netflix, Vudu, and YouTube™ can be used. |
| Cannot use Netflix service. | Check to see if the network connection is properly made. |
| The picture quality of Netflix streaming movie is poor. |
Check your Internet connection speed. Contact your Internet service provider. (You may need to improve the broadband speed.) |
| Netflix streaming movie often stops or starts buffering during playback. | Contact your Internet service provider. (You may need to improve the broadband speed.) |
| Cannot use the VUDU service. |
VUDU is only available in the united states. Check to see if the network connection is properly made. |
| Cannot rent or buy movies / TV shows on VUDU. | You need to activate the VUDU account. |
| The picture quality of VUDU movie is poor. | Check your Internet connection speed. You need speeds of at least 9 Mbps to this player for high quality uninterrupted playback. |
| VUDU movie often stops or starts buffering during playback. |
Check your Internet speed. The following are the required connection speeds for picture quality for uninterrupted streaming. SD quality (1 Mbps - 2 Mbps), HD quality (2.25 Mbps - 4.5 Mbps), HDX quality (4.5 Mbps - 9 Mbps). |
| Cannot use the YouTube™ service. | Check to see if the network connection is properly made. |
| No sound with YouTube™. | If this unit is connected to an AAC-compliant device, the sound may not be output. In such cases, configure as follows: “Setup” -> “Audio Setting” ->“Audio Output” ->“HDMI” -> “PCM”. |
| The picture quality of the YouTube™ video is poor. |
You may experience frequent buffering, distorted pictures or no picture at all depending on your network environment and Internet traffic. The picture and sound quality differ depending on the Internet service provider. |
Note:
Servicing
Cleaning the cabinet
Cleaning discs
Cleaning the disc lens
IR signal check

 Note” on page 45. (For access point configuration, please consult its user manual or manufacturer.)
 ” icon appears right after the unit is turned on. If the icon does not appear, the unit is not connected to the Internet. Review the connection settings.