REV B DATE: 12/15/2022
USER MANUALS\21-28573_GROCERANT_USER MANUAL_FB4S-27QN1E-6123_SVC_SOUP-PASTA_IN-LINE PREP CASE
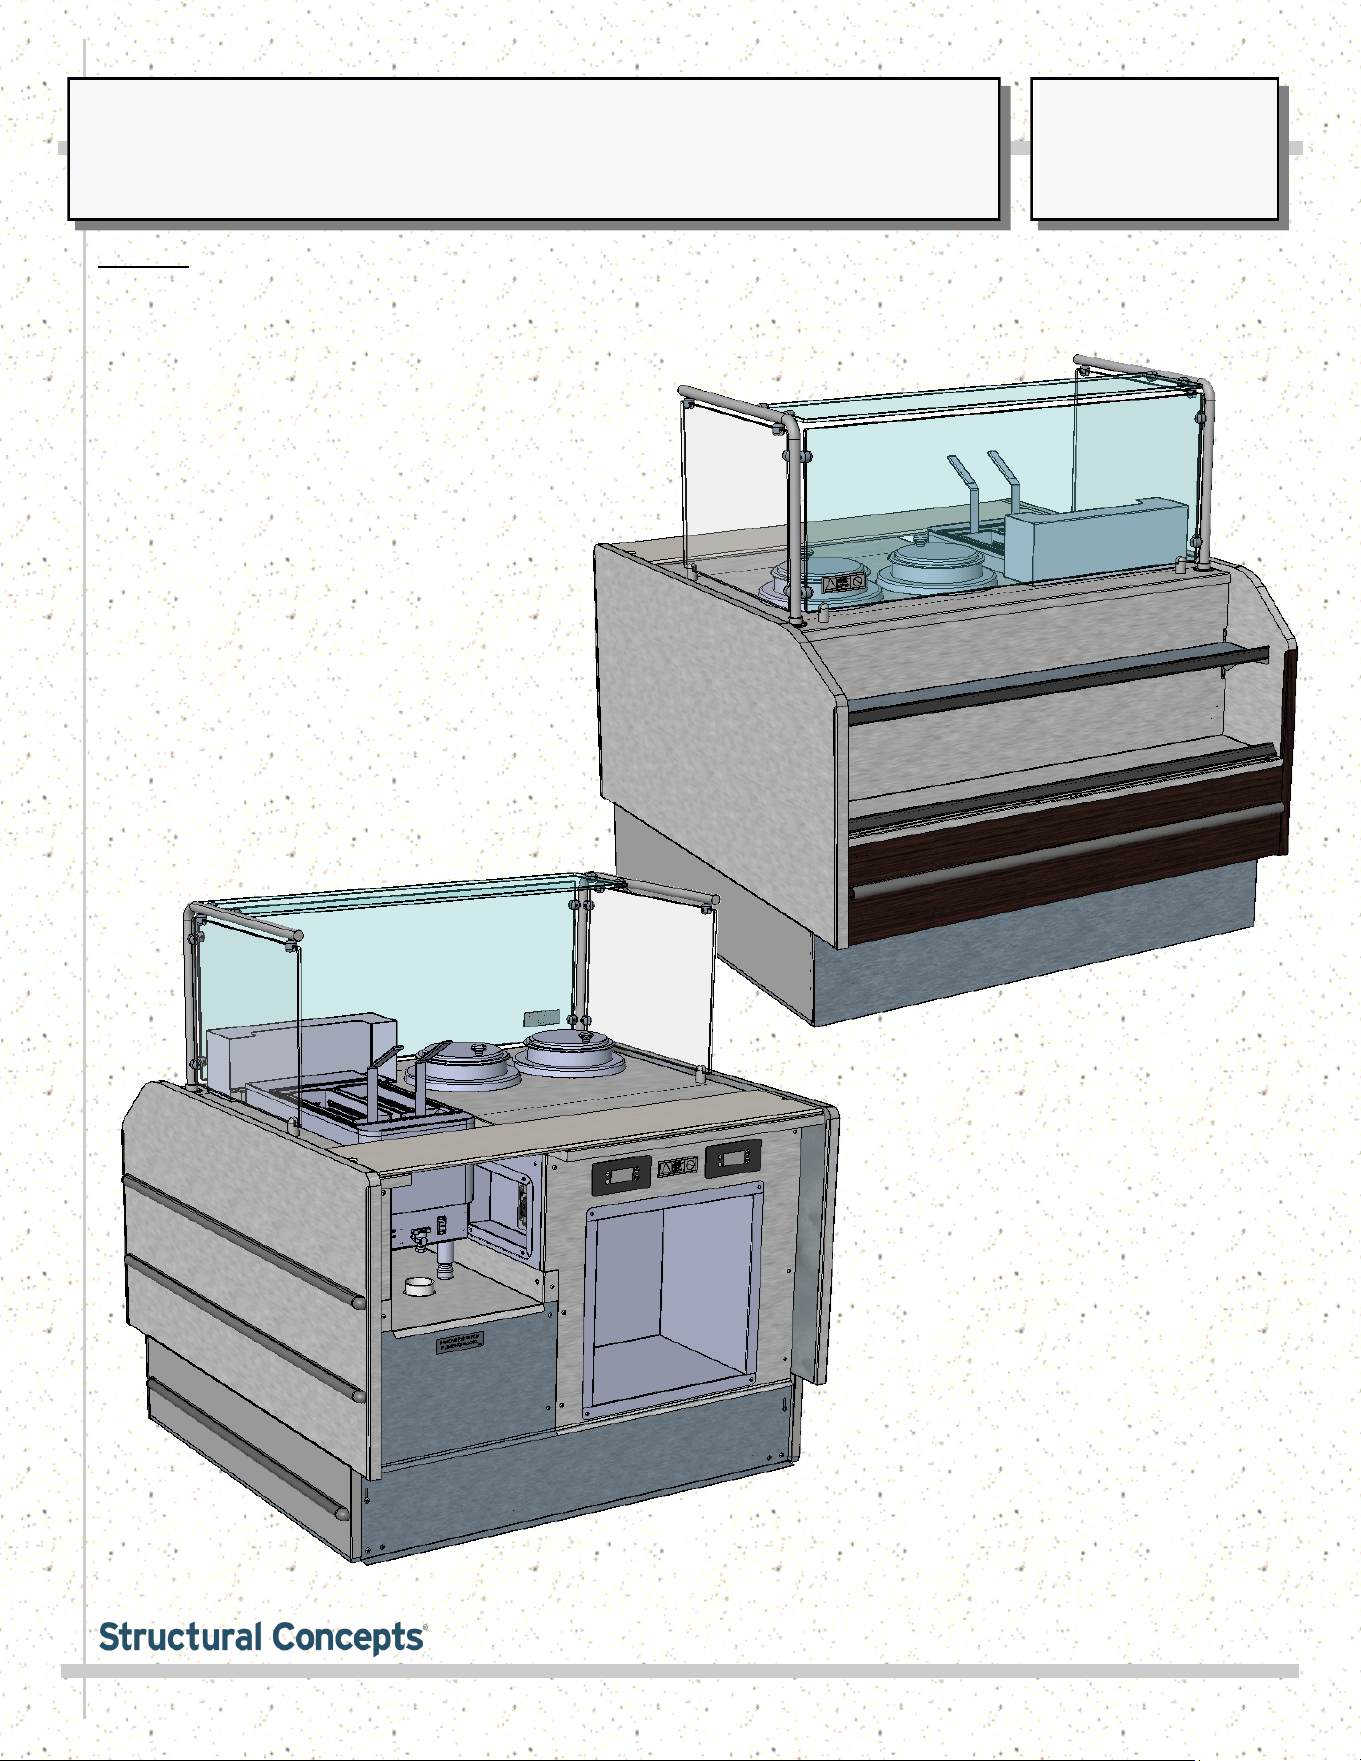
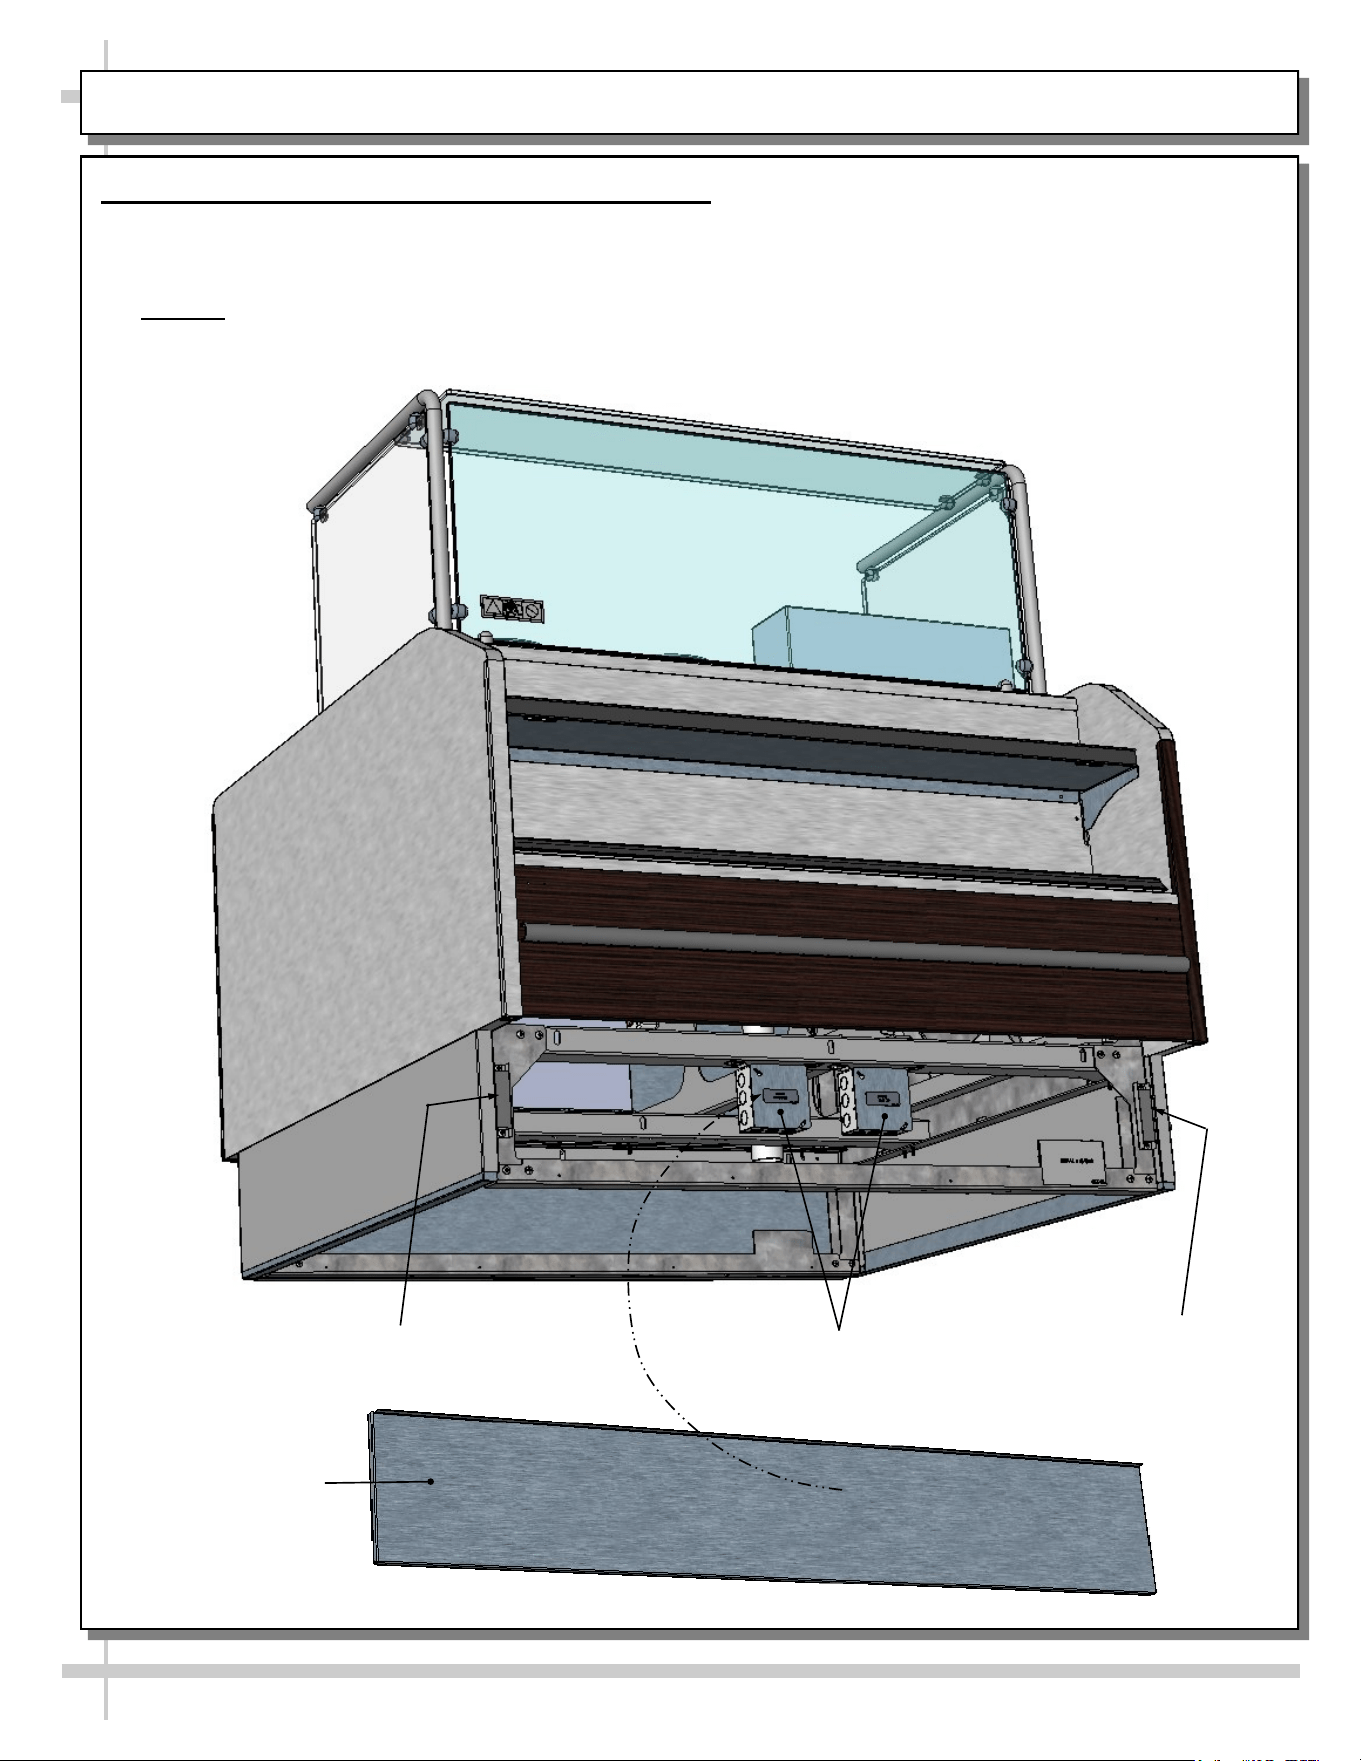
--- Rear View of Unit ---
Structural Concepts Corp. ∙ 888 E. Porter Rd ∙ Muskegon, MI 49441 Phone: 231.798.8888 Fax: 231.798.4960 ∙ www.structuralconcepts.com
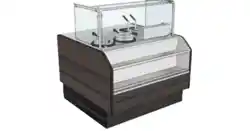
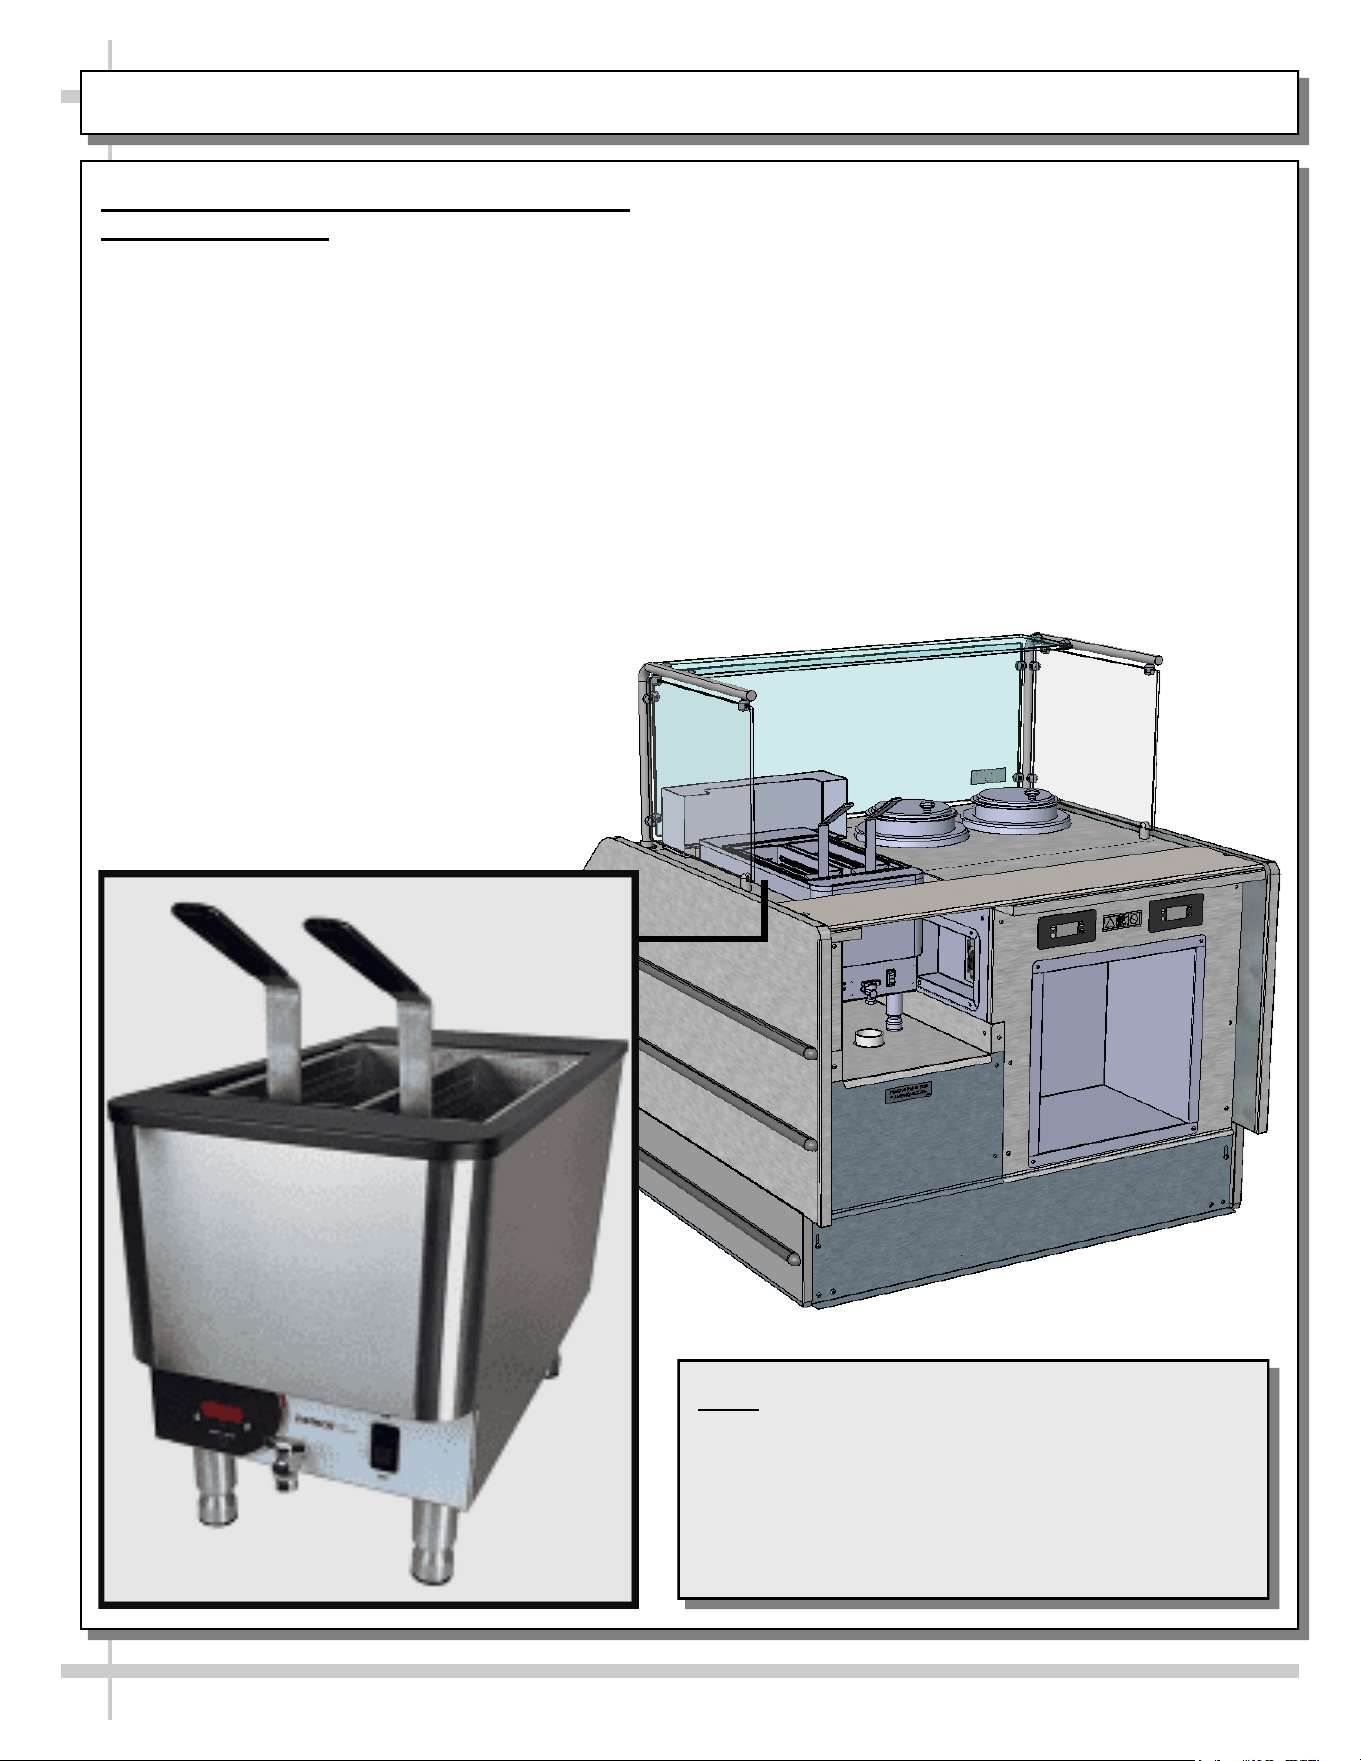
MODEL FB4S-27QN1E.6123: SERVICE 4’ IN-LINE PASTA SERVICE PREP CASE
> 2 SOUP WELLS (7 QUART UNITS) - VOLLRATH® INDUCTION WARMER SOUP WELLS
> 1 NEMCO® COUNTERTOP PASTA BOILING UNIT MODEL 6760-240
> FRONT DISPLAY AREA & SHELF
> REAR AMBIENT OPEN STORAGE
--- Front View of Unit ---
SCC P/N
21-28573
USER
MANUAL
GROCERANT
CAREFULLY FOLLOW THESE INSTRUCTIONS
2
TABLE OF CONTENTS
TABLE OF CONTENTS …..…………………………………………………………………………….…...…...
OVERVIEW / TYPE / COMPLIANCE / WARNINGS / PRECAUTIONS / WIRING / PLUGS ……….........
INSTALLATION: REMOVAL FROM SKID / POSITIONING CASE .....……………..…………......…..…...
INSTALLATION: FRONT & REAR REMOVABLE TOE-KICKS / FRAME SUPPORT RAILS …...….......
INSTALLATION: ATTACHING SPLASH GUARD BRACKET TO FLOOR AT CASE REAR ….………..
FIELD ACCESS BOXES / REMOVABLE FRONT TOE-KICK …….…………………………………………
NEMCO® MODEL 6760-240 COUNTERTOP PASTA BOILING UNIT OPERATING, CLEANING AND
SERVICE INSTRUCTIONS / SERVICE PARTS …………………………………………………….
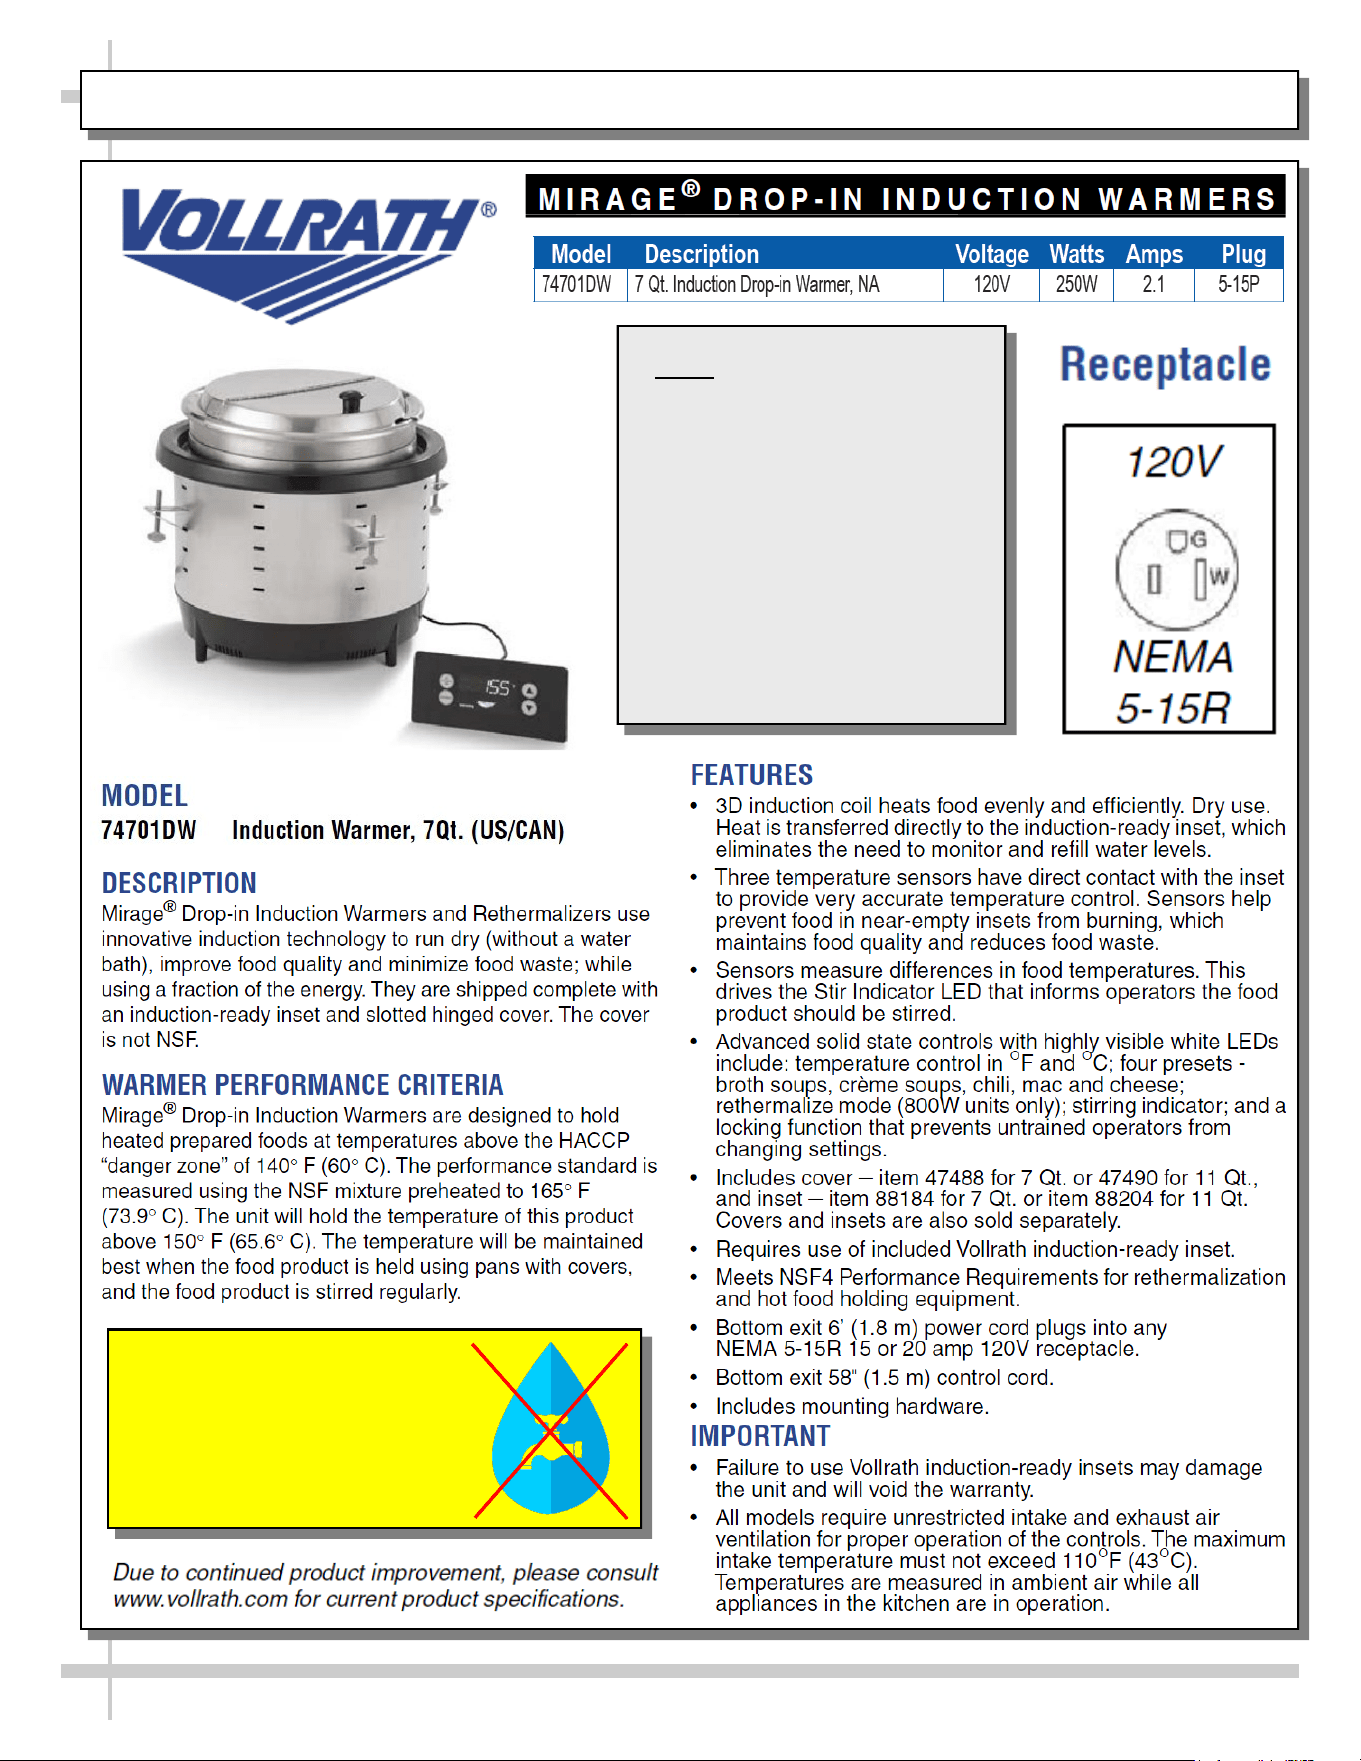
VOLLRATH® INDUCTION WARMERS (SOUP WELLS) - MODEL / SPECS / DESCRIPTION /
CRITERIA / FEATURES ...…………………………………………………………………………….…
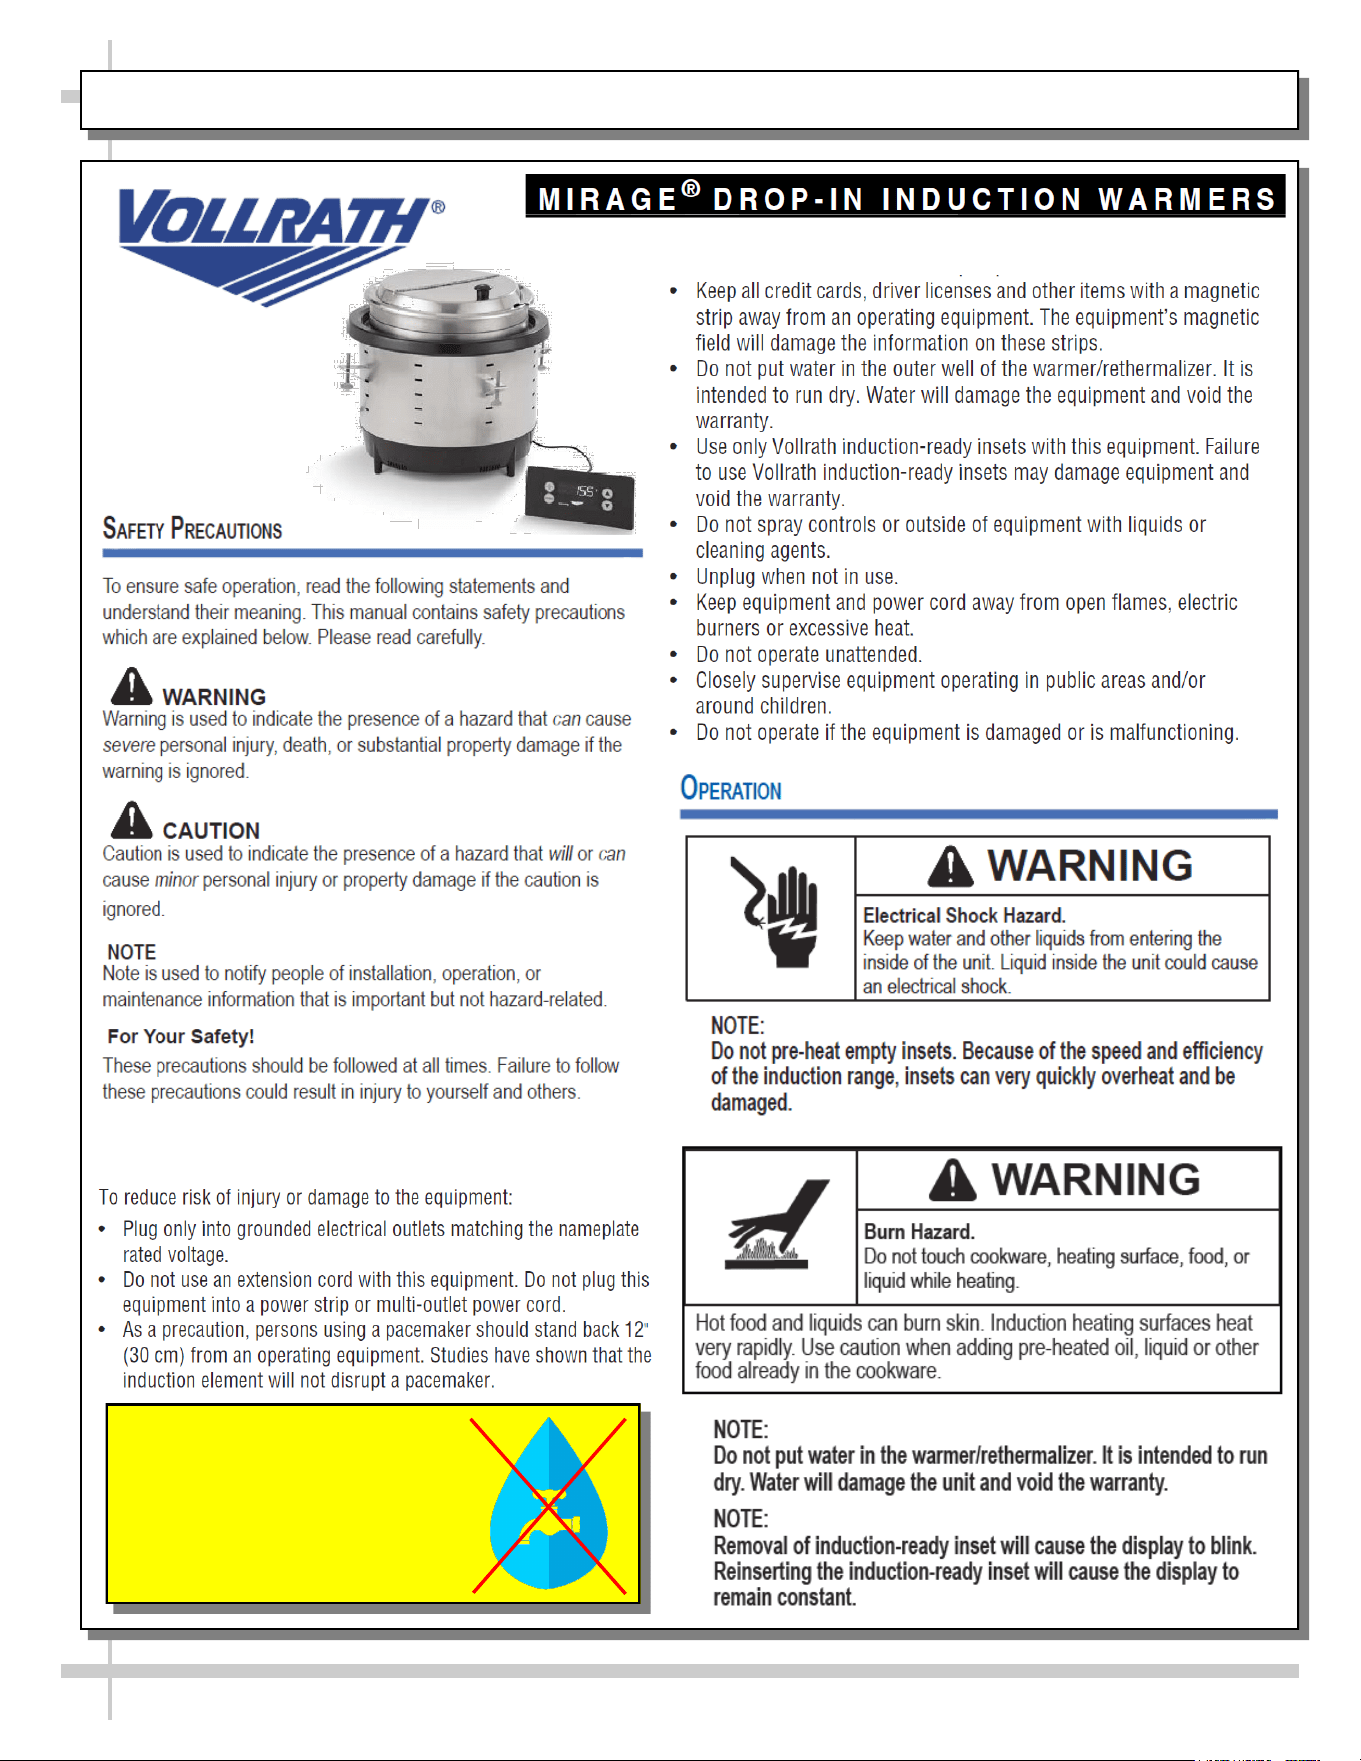
VOLLRATH® INDUCTION WARMERS (SOUP WELLS) - SAFETY PRECAUTIONS / OPERATION /
WARNINGS ………………………………………………………………………………………………..
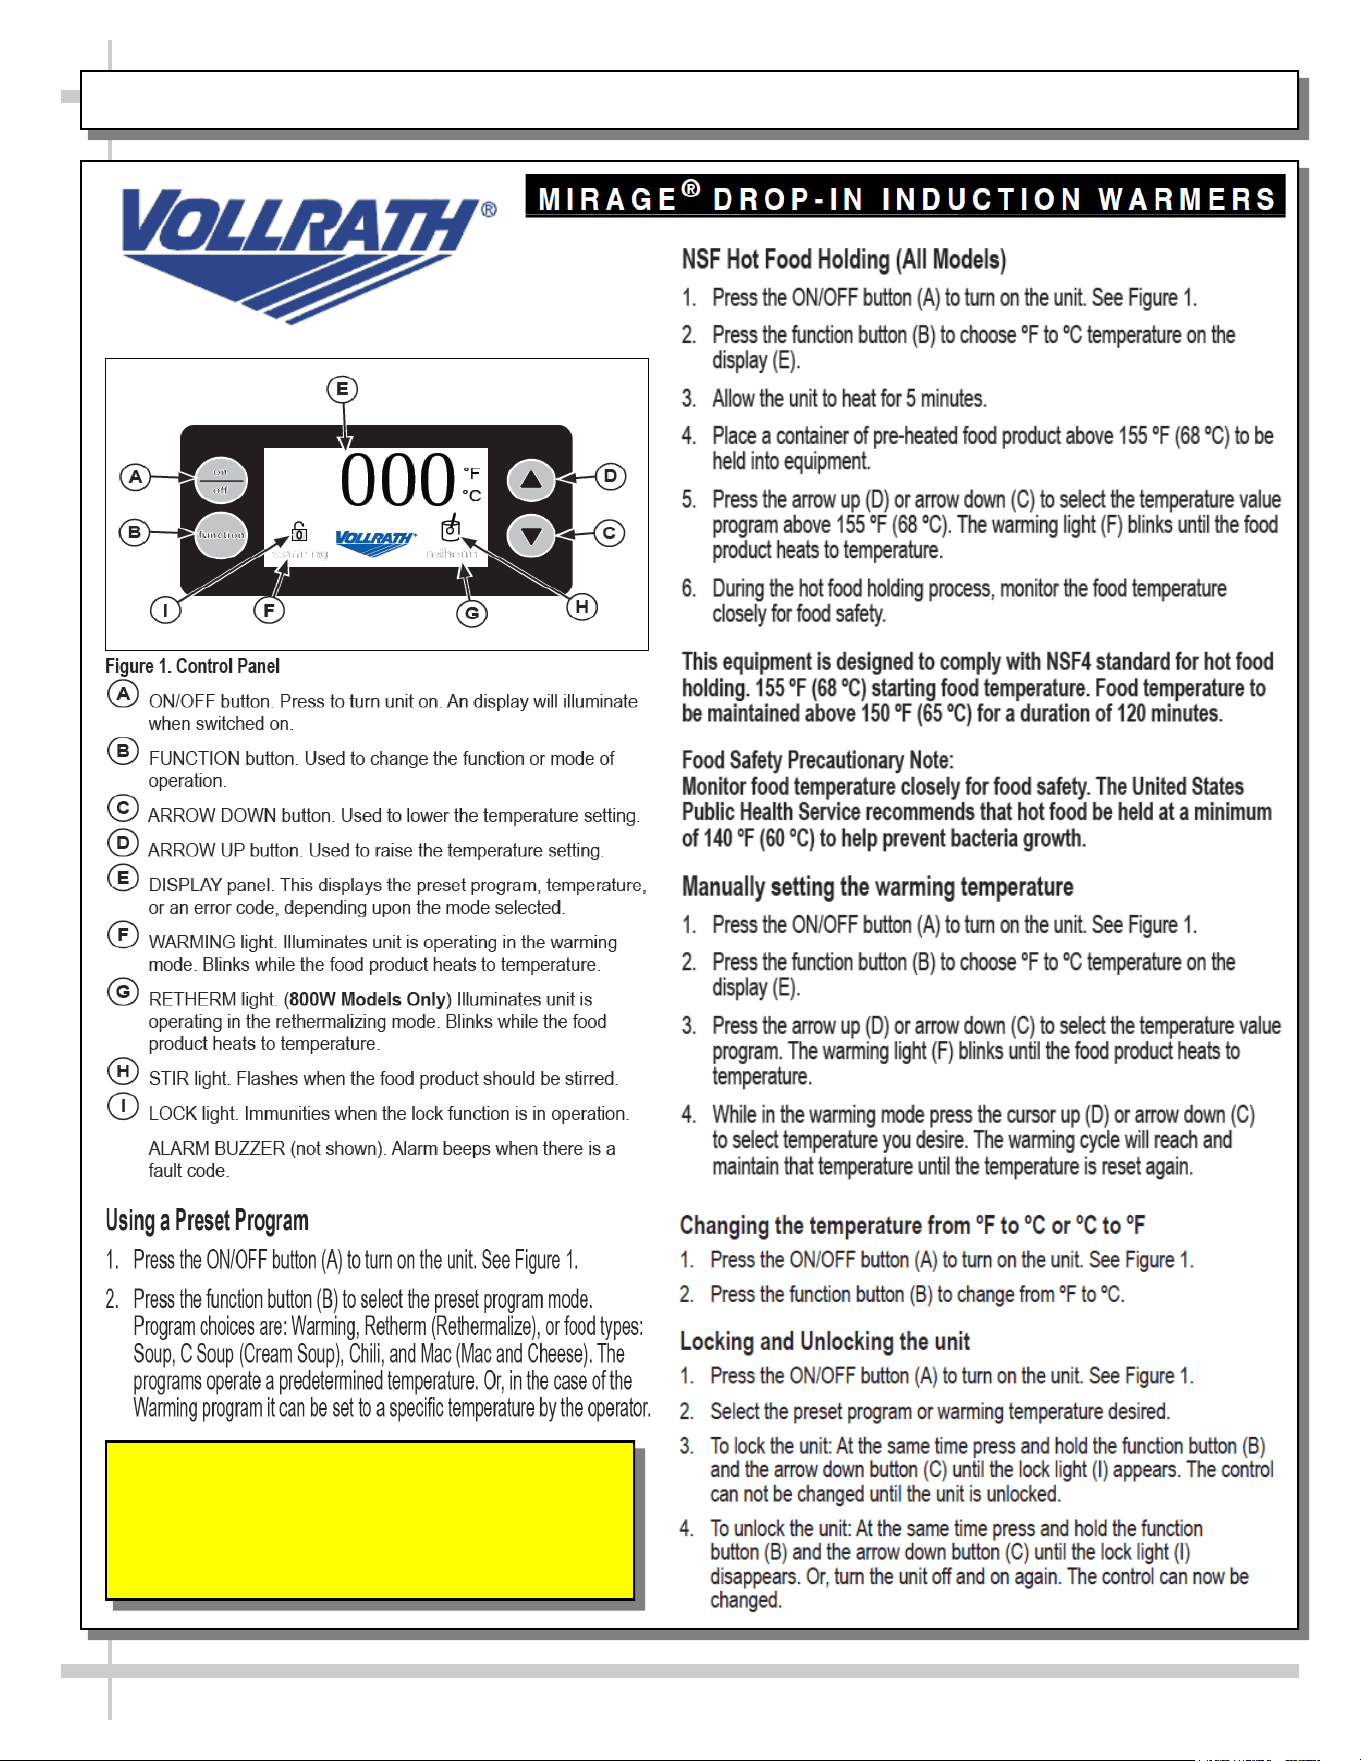
VOLLRATH® INDUCTION WARMERS (SOUP WELLS) - CONTROL PANEL / HOT FOOD
HOLDING / SETTING TEMPERATURE ………………………………………………………………..
VOLLRATH® INDUCTION WARMERS (SOUP WELLS) - CLEANING ……………………………..……..
VOLLRATH® INDUCTION WARMERS (SOUP WELLS) - TROUBLESHOOTING ..……………………..
CLEANING SCHEDULE (GENERAL): ………………………………………………………………..………...
TROUBLESHOOTING - GENERAL CASE ISSUES ……..……………………………….………...…..........
SERIAL LABEL INFORMATION & LOCATION …...……………………………………………….…...…….
TECHNICAL SERVICE CONTACT INFORMATION / WARRANTY INFORMATION ...………...….…….
2
3-4
5
6
7
8
9-11
12
13
14
15
16
17-18
19
20
21
3
OVERVIEW
• These Structural Concepts cases should be installed and
operated according to these instructions to ensure proper
performance. Improper use will void warranty.
• This unit is designed to display of products in ambient
store conditions with a max. temperature of 80 °F (27 °C) .
COMPLIANCE
• Performance issues when in violation of applicable NEC,
federal, state or local electrical codes are not covered by
warranty. See below.
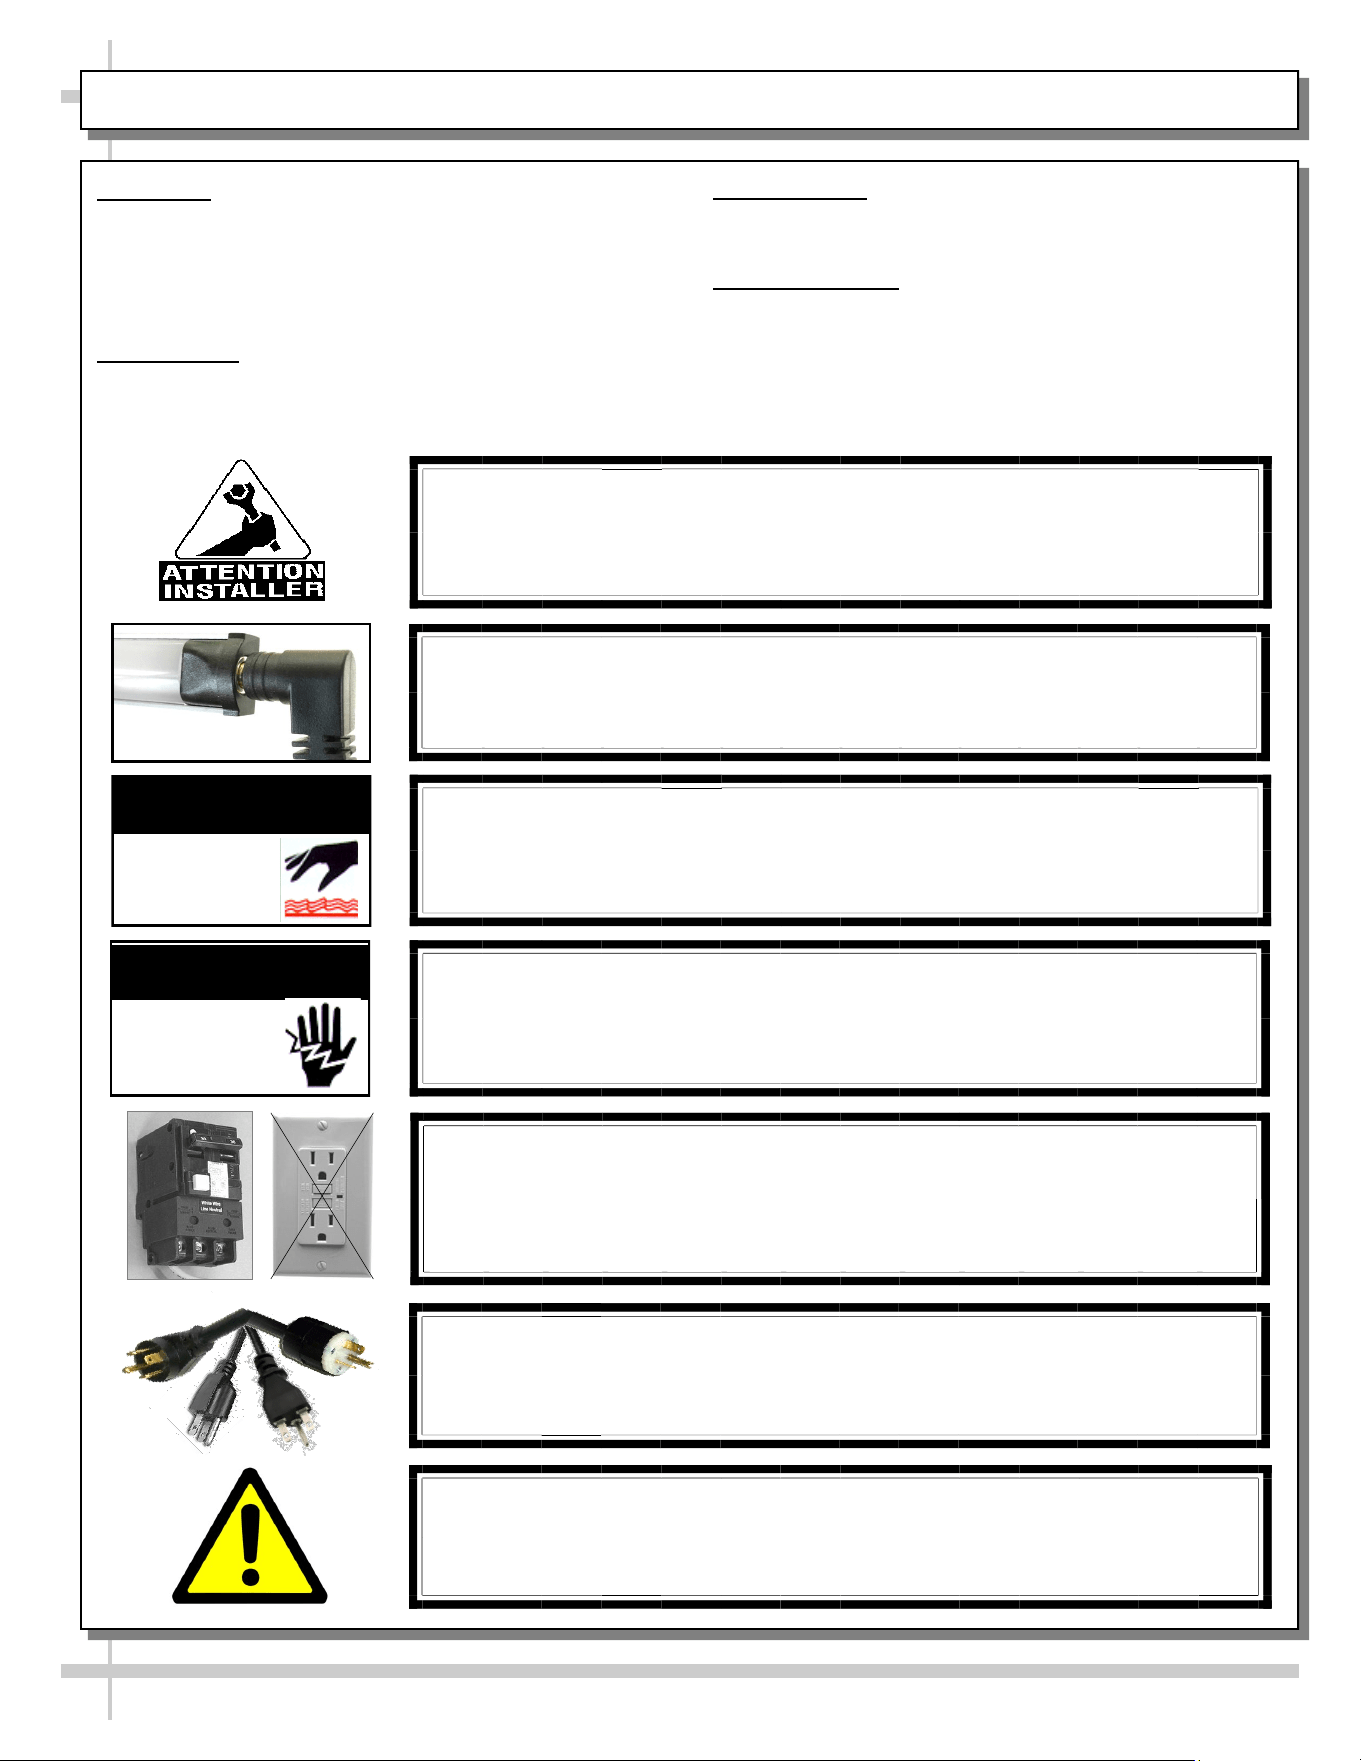
WARNING
Risk of electric shock.
Disconnect ALL ELECTRICAL SOURCES before servicing.
WARNING
ELECTRICAL
HAZARD
COMPLIANCE
This equipment MUST be installed in compliance with all applicable NEC,
federal, state and local electrical and plumbing codes.
PRECAUTIONS
• Following are important precautions to prevent damage
to unit or merchandise. Read carefully!
WIRING DIAGRAM
• Each case has its own wiring diagram folded and in its
own packet. It may be placed near ballast box, field
wiring box, raceway cover, or other related location.
CAUTION! POWER CORD AND PLUG MAINTENANCE
Risk of electric shock. If cord or plug becomes damaged,
replace only with cord and plug of same type.
CAUTION! GFCI BREAKER USE REQUIREMENT
If N.E.C. (National Electric Code) or your local code
requires GFCI (Ground Fault Circuit Interrupter) protection,
you MUST use a GFCI breaker in lieu of a GFCI receptacle.
OVERVIEW / COMPLIANCE / WARNINGS / PRECAUTIONS / WIRING DIAGRAM / CORDS & PLUGS
CAUTION! LAMP REPLACEMENT GUIDELINES
If LED lamps are used, they must be size, shape and overall design.
Any replacements must meet factory specifications.
WARNING: This product can expose you to chemicals, including
Urethane (Ethyl Carbamate), which are known to the state of
California to cause cancer and birth defects or other reproductive
harm. For more information go to P65Warnings.ca.gov.
WARNING
Heated soup wells and pasta boiling unit is hot!
Disconnect and allow to cool 30 minutes before cleaning,
servicing or removing from case.
WARNING
HOT
SURFACE
4
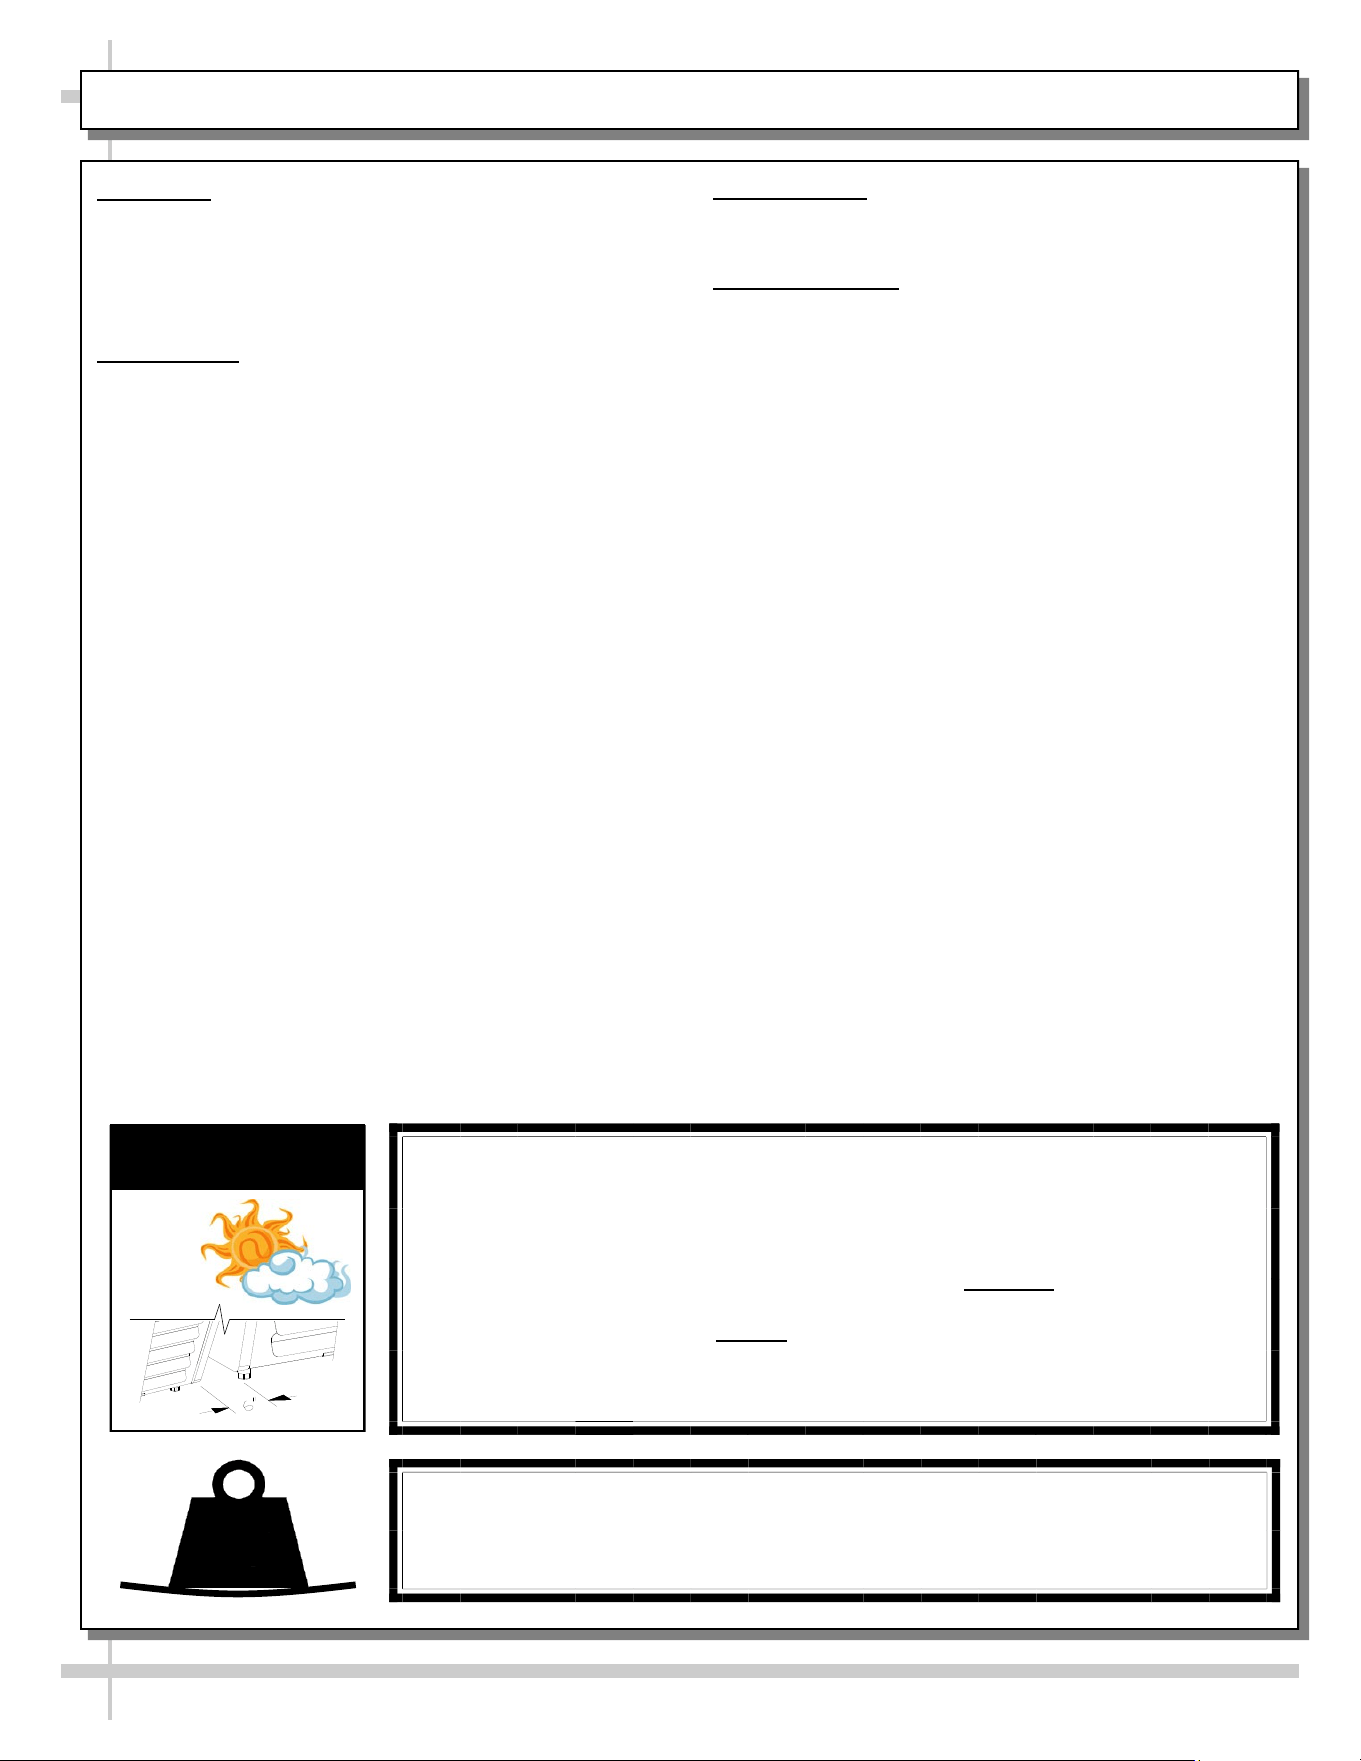
CAUTION! ADVERSE CONDITIONS / SPACING ISSUES
• Performance issues caused by adverse conditions are NOT covered
by warranty.
• End panels must be tightly joined or kept at least 6-inches away from any
structure to prevent condensation.
• Unit must be kept at least 15-feet from exterior doors, overhead HVAC vents
or any air curtain disruption to maintain proper temperatures.
• Do not expose to direct sunlight or heat source (ovens, fryers, etc.).
CAUTION
OVERVIEW / TYPE / COMPLIANCE / WARNINGS / PRECAUTIONS / WIRING / PLUGS - PAGE 2 of 2
OVERVIEW
• These Structural Concepts cases should be installed and
operated according to these instructions to ensure proper
performance. Improper use will void warranty.
• This unit is designed to display of products in ambient
store conditions with a max. temperature of 80 °F (27 °C) .
COMPLIANCE
• Performance issues when in violation of applicable NEC,
federal, state or local electrical codes are not covered by
warranty. See below.
PRECAUTIONS
• Following are important precautions to prevent damage
to unit or merchandise. Please read carefully!
WIRING DIAGRAM
• Each case has its own wiring diagram folded and in its
own packet. It may be placed near ballast box, field
wiring box, raceway cover, or other related location.
CAUTION!
• Cases with glass enclosures: To prevent sagging or breakage, do not exceed
5 LBS (2.3 KG) weight load per top glass section (between vertical supports).
• To prevent scratching or marring, do not place ANY items on glass.
5
LBS
5
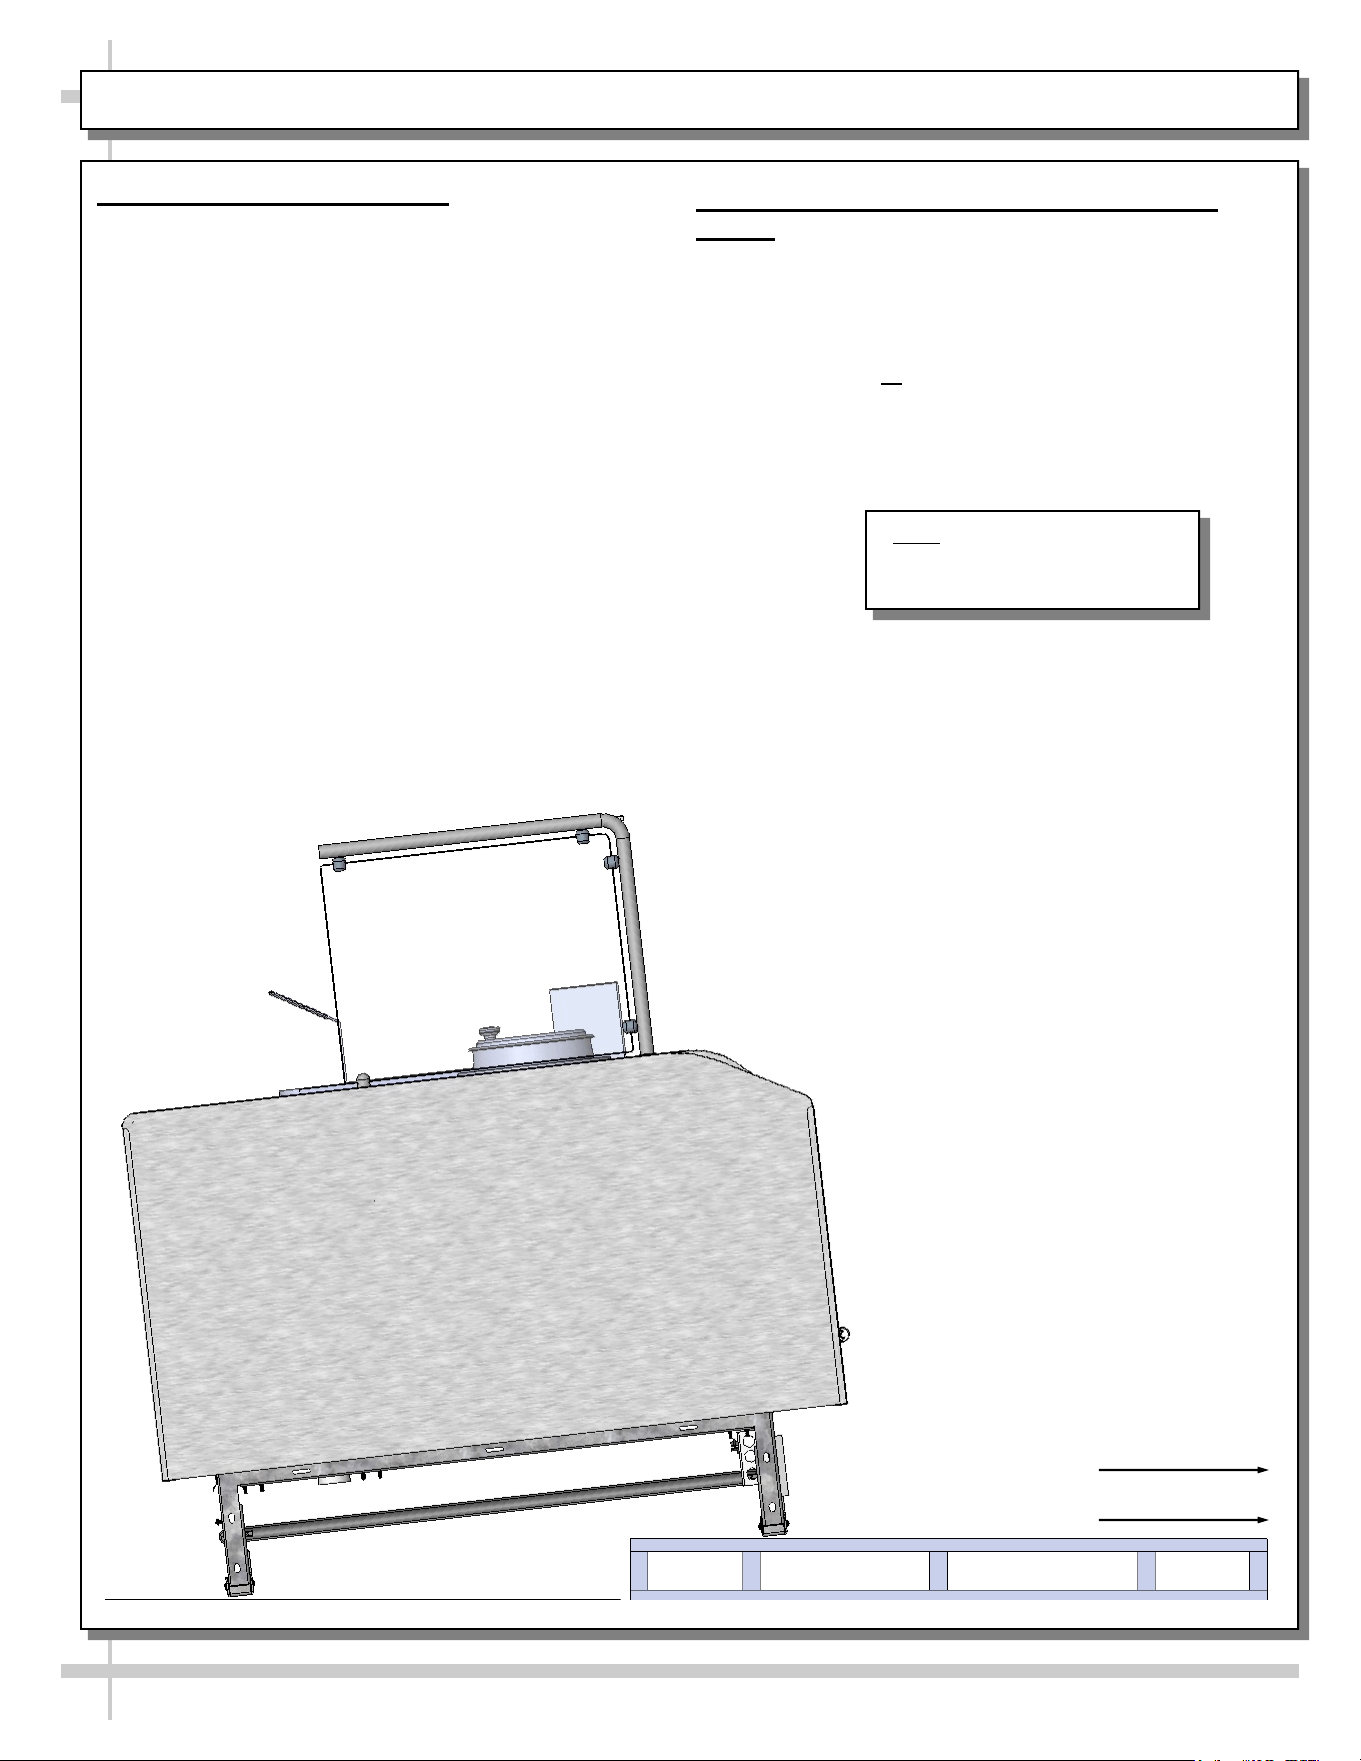
INSTALLATION: REMOVAL FROM SKID / POSITIONING CASE
Slide Skid Out
Note: Illustration shown may
not reflect every feature or
option of your particular case.
1. Remove Case From Skid
• Remove shipping braces or screws that may be
securing case to skid.
• Support case to prevent tipping.
• Caution! Rails can be damaged if case hits floor
with heavy force!
• Slide unit to rear of skid and tip backward off skid.
• Illustration may not reflect every feature or option
of your particular case.
2. Position & Align Case Alongside Other
Cases
• Before shimming frame support rails, make certain
that the case is in proper position and, if required,
aligned with adjoining case.
• This may require the repositioning of the case you
are installing or the already positioned case.
6
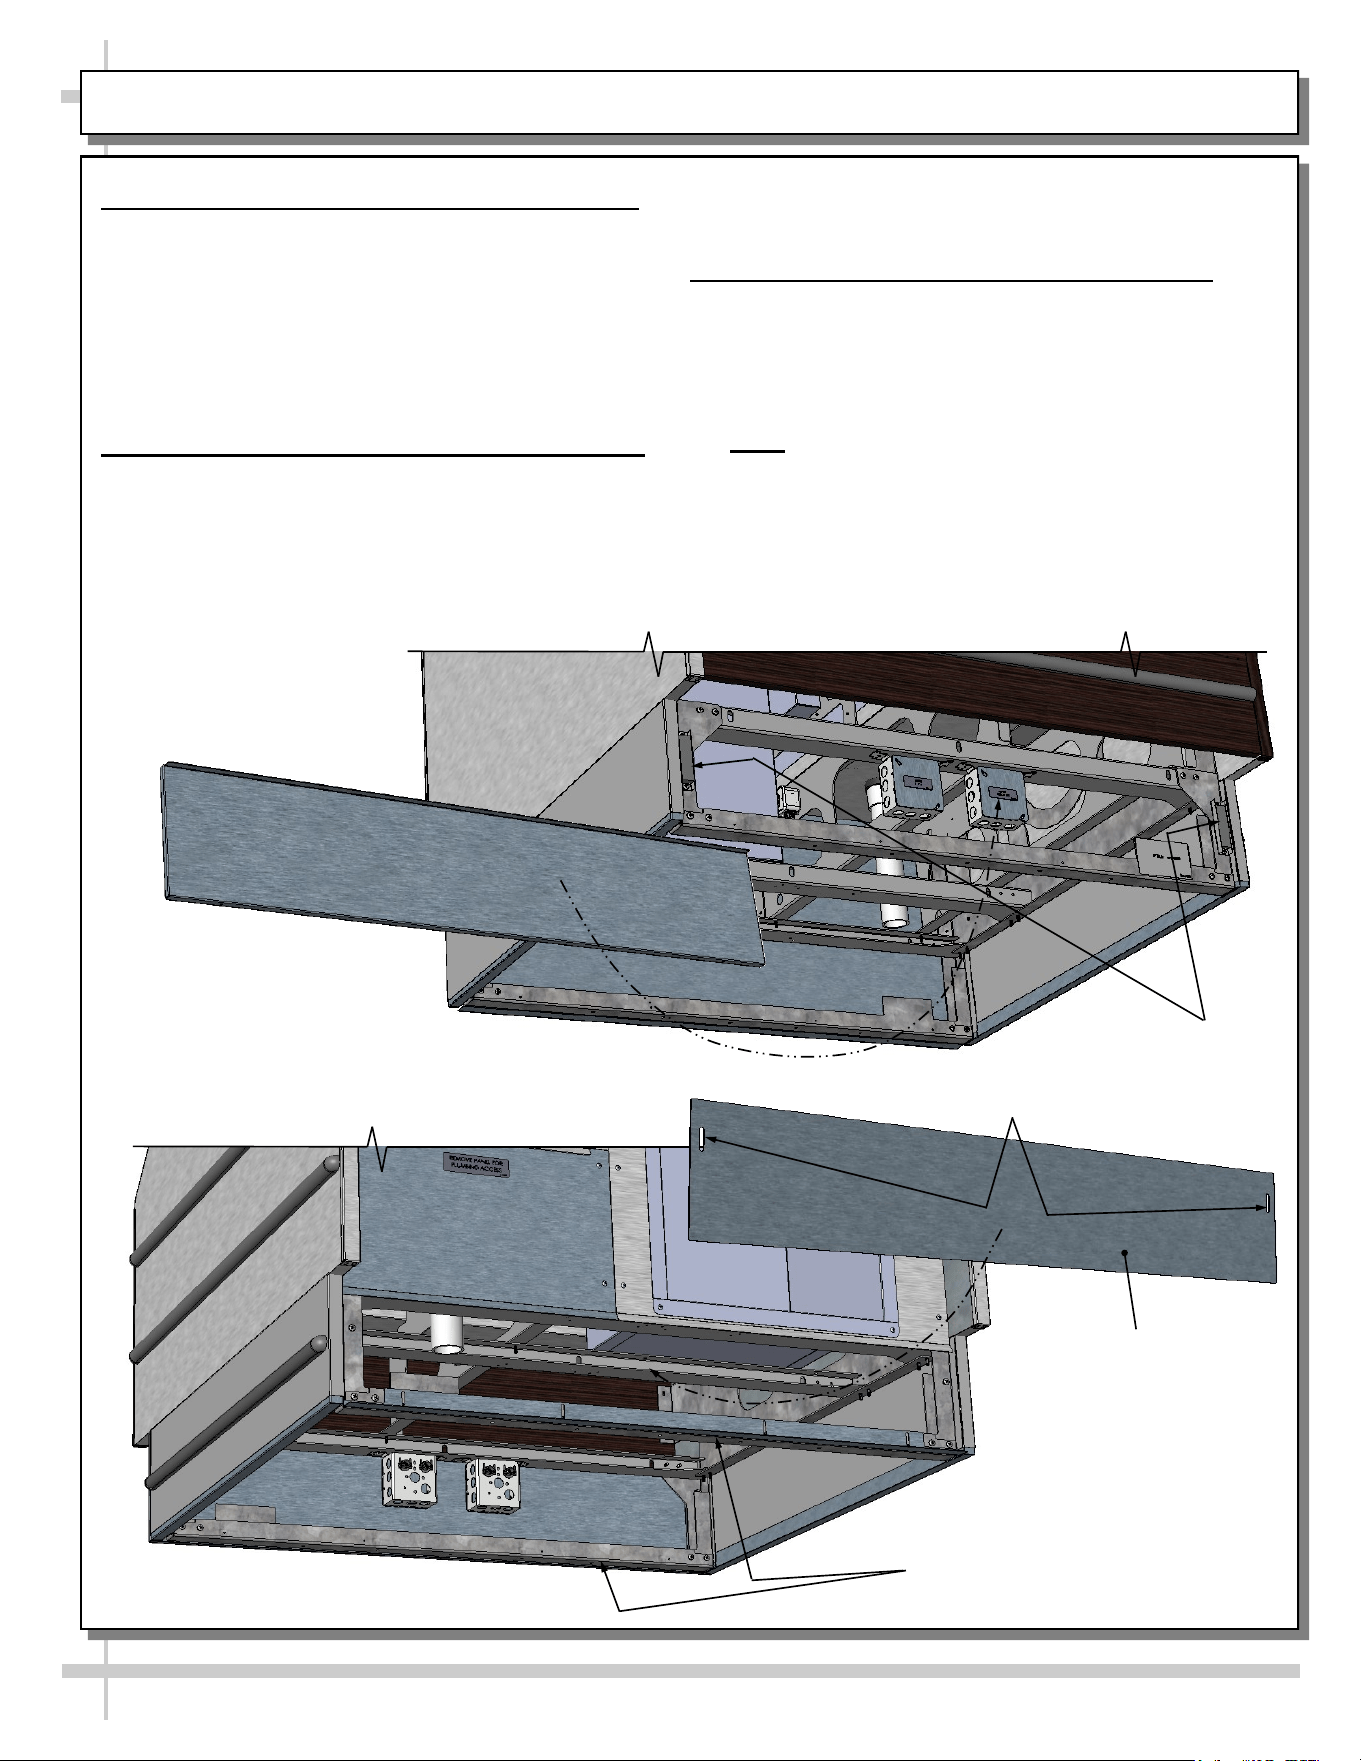
INSTALLATION: FRONT & REAR REMOVABLE TOE-KICKS / FRAME SUPPORT RAILS
3. Removable Front Toe-Kick (Magnetized)
• Toe-kick Is usually shipped separately.
• Toe-kick Is to be placed on case via magnet
attachment method.
• Remove toe-kick by pulling away from lower
magnet and lifting off front of case.
• No screw removal is required.
• See illustrations below.
4. Removable Rear Toe-Kick (Screws Only)
• Toe-kick may be shipped separately.
• Toe-kick Is to be placed on case via screw
attachment (through obrounds).
Removable Toe-Kick
(Shown Rotated For
Illustrative Purposes).
Toe-Kick Obrounds
Frame Support Rails
• Remove removing screws & lifting off case rear.
• See illustration below.
5. Cases With Frame Support Rails: Shim
• Illustration below shows case with frame support
rails.
• Shims will be provided with all cases that have
frame support rails.
• Use shims to level case.
• Note: After case is in position, it must be
sealed to floor to prevent entry or leakage of
liquid or moisture.
Magnets
7
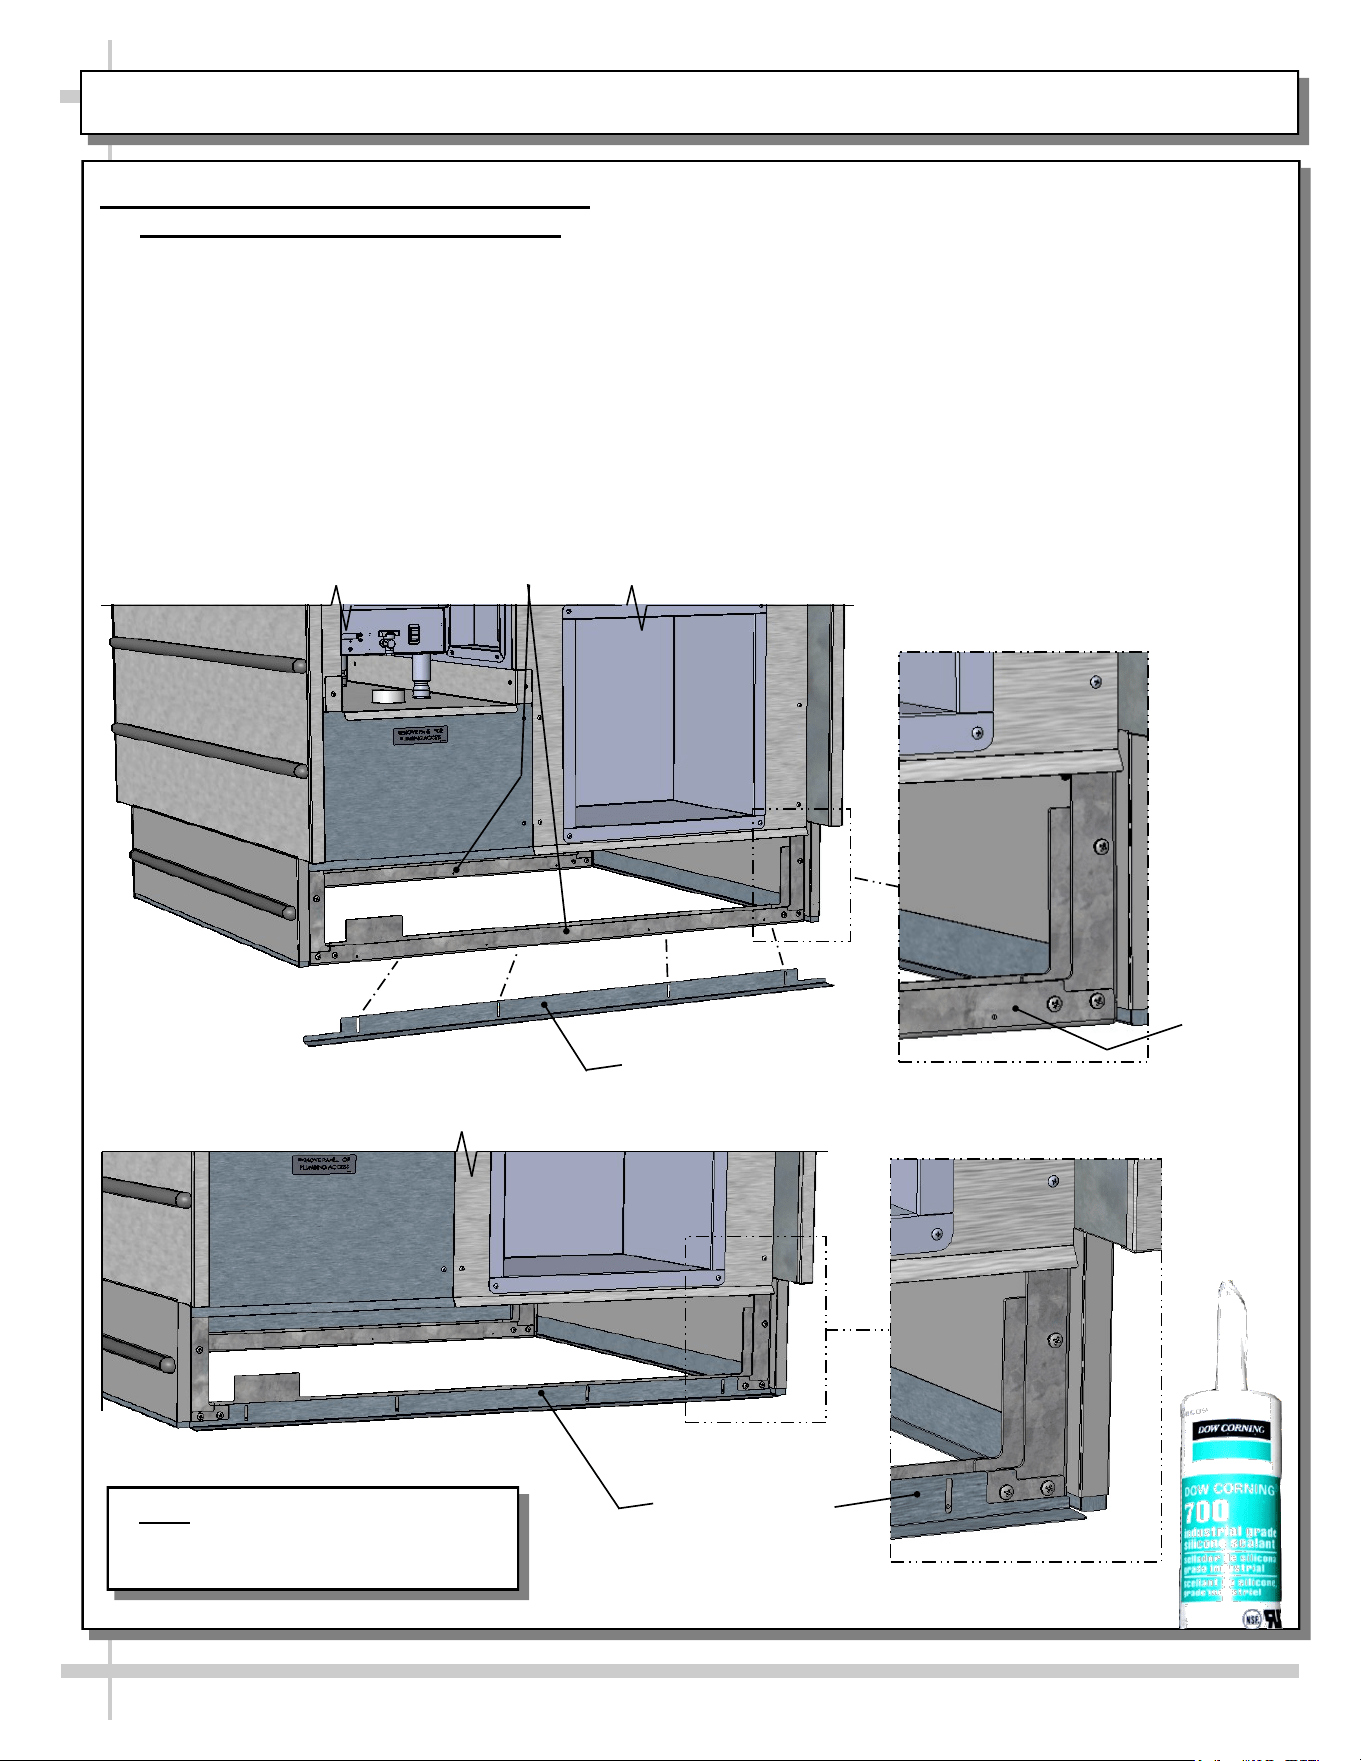
INSTALLATION: ATTACHING SPLASH GUARD BRACKET TO FLOOR AT CASE REAR
6. Attaching and Sealing Splash Guard
Bracket To Floor at Rear of Case
• The splash guard bracket is designed to prevent
entry or leakage of liquid or moisture to underside
of case.
• It may be separately shipped.
• Loosely attach splash guard to frame via screws.
Silicone
Sealant
• After case has been properly positioned and
frame support rails shimmed, place a bead of
silicone sealant to underside of splash guard
bracket (that rests on floor). Center back of
bracket flush against frame support rail.
• Then, tighten screws into frame support rail.
• After splash guard bracket has been secured,
apply another bead of silicone sealant where
front of bracket meets floor.
• See illustrations below.
Splash Guard
Bracket (Shown
Attached)
Splash Guard Bracket
Shown Removed From
Support Rail
Frame
Support
Rail
Frame
Support Rails
Note: Illustration shown may not
reflect every feature or option of
your particular case.
8
FIELD ACCESS BOXES / REMOVABLE FRONT TOE-KICK
Field Access Boxes / Removable Front Toe-Kick
• Field access boxes are accessible at case front.
• Front panel may be removed for greater access (no screw removal required).
• Simply lift front toe-kick off case front.
• Caution! Only certified electricians are to perform electrical connectivity duties.
• See labels on electrical leads for requirements.
• See illustration below.
Magnet
Magnet
Front Panel
Field Access Boxes
(See Labels on Electrical
Leads For Requirements)
9
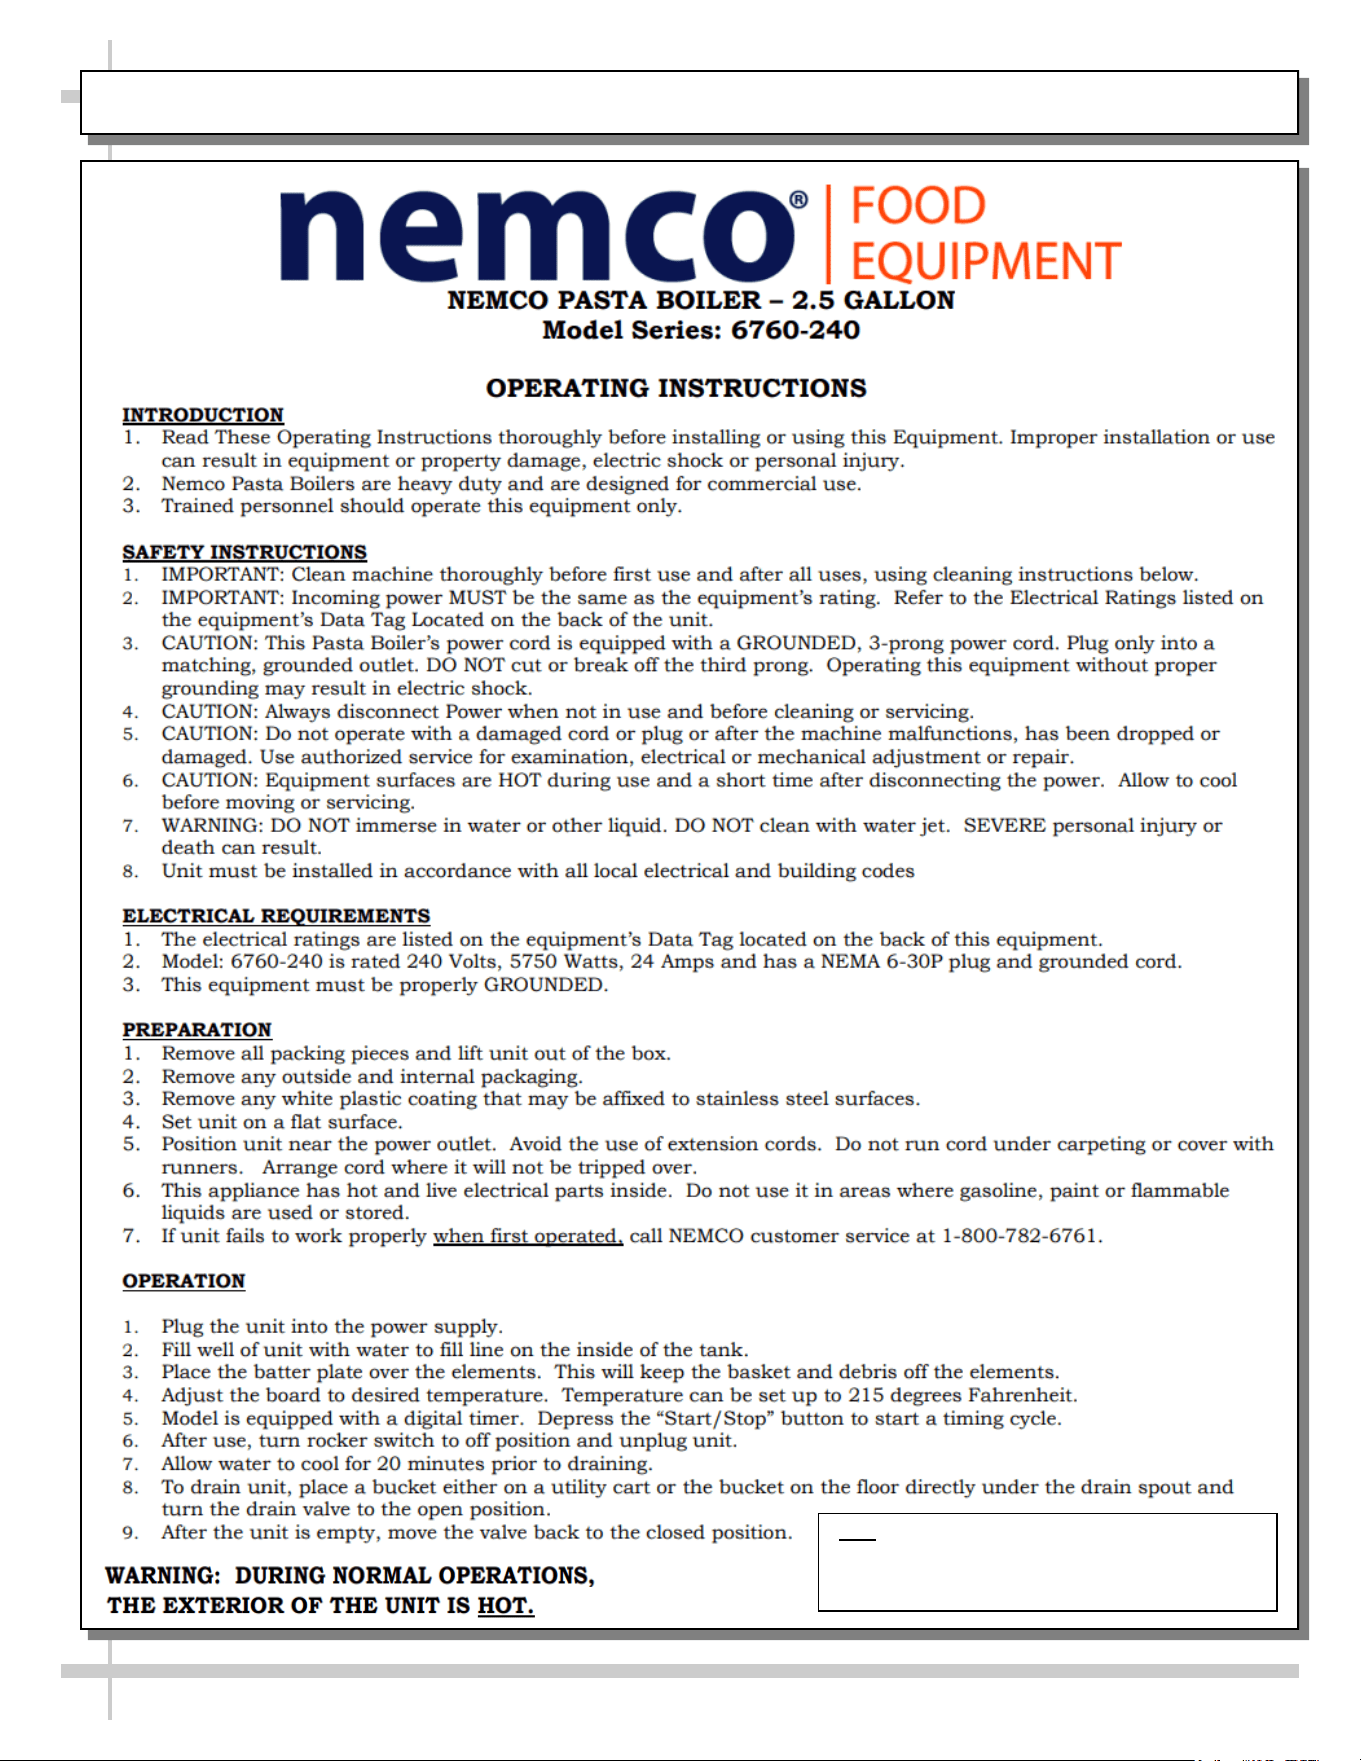
NEMCO® MODEL NO. 6760-240 COUNTER TOP PASTA BOILING UNITS - PAGE 1 OF 3
Nemco® Model No. 6760-240 Counter Top
Pasta Boiling Unit
• The Nemco® boiling unit cooks all types of pas-
ta, vegetables and shell fish.
• They are also ideal for reconstituting food.
• This unit allows you to produce one pound of
spaghetti or three pounds of frozen pasta in just
a couple minutes.
• Initial heat up is 12 minutes and the unit
recovers almost immediately.
• Special features include heavy duty baskets
constructed of stainless steel with durable
plastic coated handles for a cool touch.
• Individual serving servings are possible with
their accessory set of six (6) baskets.
• Control panel assembly is removable for
cleaning and easy maintenance.
Standard Features Include The Following:
• Stainless steel construction
• Powdercoated stainless steel top
• Incoloy tubular heating elements
• Digital thermostat with a temperature range of
between 100 °F to 212 °F
• Programmable digital timing
• Twin baskets with cool touch handles
• Convenient front drain valve
• Four inch adjustable legs
• Single phase
• Six foot cord and plug provided
>> See Next Several Pages in This User Manual
for the Nemco® Operating, Cleaning & Service
Instructions.
Note: The information in this User Guide is
based on information that was accurate
at time of publication.
For the latest information and/or warranty
specifics, consult Nemco’s Operator’s
Manual or www.NemcoFoodEquip.com.
10
NEMCO® MODEL NO. 6760-240 COUNTER TOP PASTA BOILING UNITS - PAGE 2 OF 3
Note: The information in this User Guide is based on
information that was accurate at time of publication. For
the latest information and/or warranty specifics, consult
Nemco’s User Manual or www.NemcoFoodEquip.com.
11
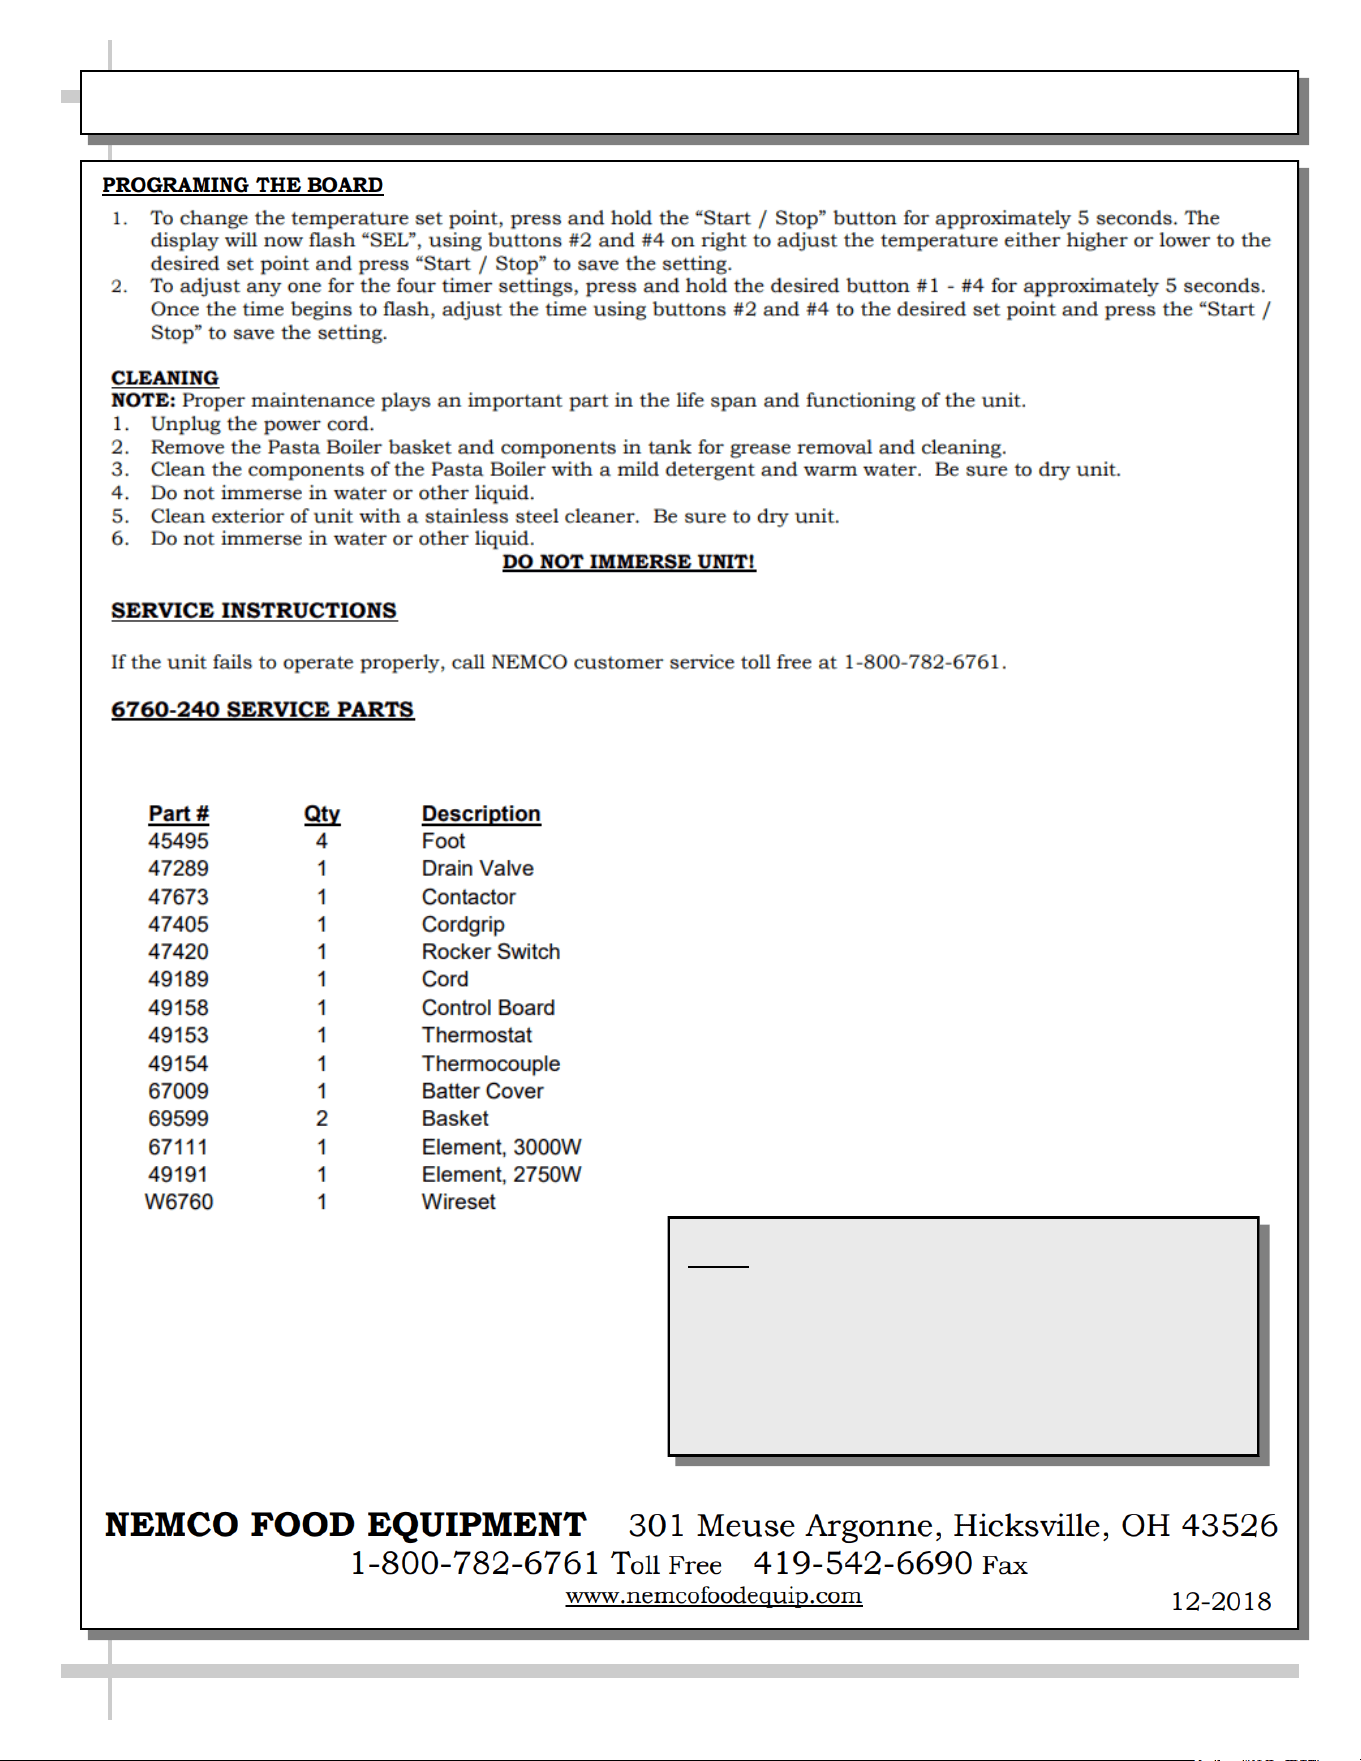
NEMCO® MODEL NO. 6760-240 COUNTER TOP PASTA BOILING UNITS - PAGE 3 OF 3
Note: The information in this User Guide is
based on information that was accurate
at time of publication.
For the latest information and/or warranty
specifics, consult Nemco’s Operator’s
Manual or www.NemcoFoodEquip.com.
12
VOLLRATH® INDUCTION WARMERS - MODEL / SPECS / DESCRIPTION / CRITERIA / FEATURES
Note: The information on
these sheets is based on
Vollrath’s specifications and
Operator’s Manual.
For additional information,
consult Vollrath’s full
Operator’s Manual and/or
www.Vollrath.com for current
product specifications.
Caution!
Do Not Put Water In These
Induction Warmers Or They
Will Be Damaged!
They Are To Run DRY!
13
VOLLRATH® INDUCTION WARMERS - SAFETY PRECAUTIONS / OPERATION / WARNINGS
To reduce risk of injury or damage to the unit, continued:
NOTICE: Notice is used to note information that is important but not
hazard-related.
Caution!
Do Not Put Water In These
Induction Warmers Or They
Will Be Damaged!
They Are To Run DRY!
14
VOLLRATH® INDUCTION WARMERS - CONTROL PANEL / HOT FOOD HOLDING / SETTING TEMP.
FOOD Safety Precautionary Note:
Monitor food temperature closely for food safety.
The United States Public Health Service recommends
that hot food be held at a minimum of 140 °F (60 °C)
to help prevent bacterial growth.

15
VOLLRATH® INDUCTION WARMERS - CLEANING
> Keep water and other liquids from entering the inside of the equipment.
> Liquid inside the equipment could cause an electrical shock.
> Do not spray water or cleaning products.
> Liquid could contact electrical components & cause a short circuit or an electrical shock.
WARNING: Electrical Shock Hazard
CAUTION: Burn Hazard
> Hot surfaces and food can burn skin.
> Allow the hot surfaces to cool before handling.
> Do not drop or spill water onto the cooking surface as it can spray or splatter.
Important: To maintain the appearance and increase the service life, clean this equipment daily.
What you will need:
• Three soft clean cloths, one each for cleaning, rinsing and drying.
• Mild dish washing detergent • Clean warm water
NOTICE: Failure to follow these cleaning instructions may lead to product damage that will not
be covered under warranty.
1. Unplug the equipment and let it completely cool.
2. Use a soft cloth moistened with warm water & mild dish washing detergent to clean the well and rim.
NOTICE: DO NOT use cleaning solutions that
contain chlorine or bleach ingredients.
Use of solutions with these ingredients will
damage the well and will void the warranty.
3. Use the second clean soft clean soft cloth moistened with clean warm water to wipe all detergent
from the well and the rim.
4. Use the third soft clean cloth to dry the well and the rim.
NOTICE: Failure to thoroughly remove all detergent or thoroughly dry the equipment may
result in equipment damage.
5. The stainless steel insert is dishwasher safe.
CHLORINE
BLEACH
16
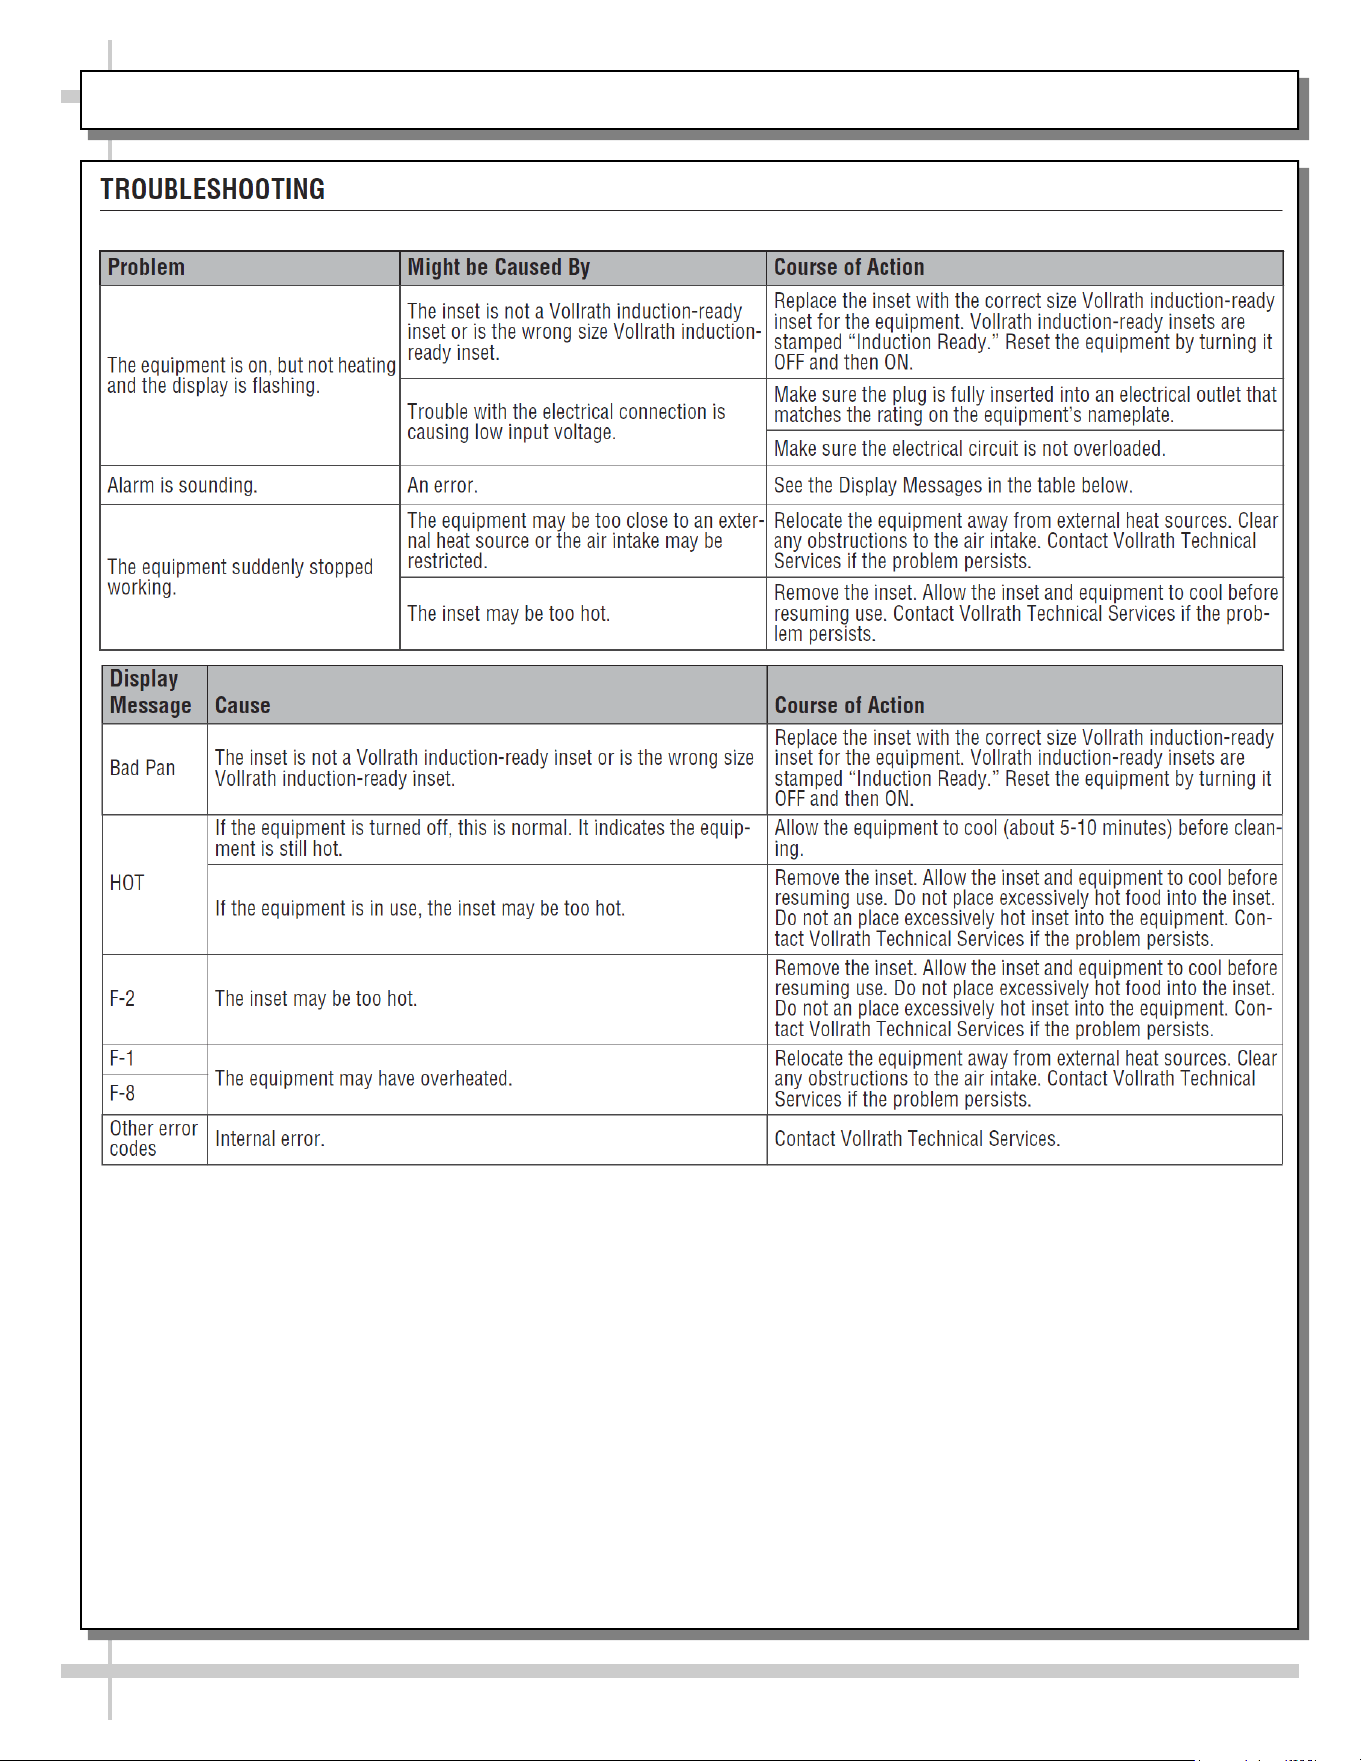
VOLLRATH® INDUCTION WARMERS - TROUBLESHOOTING
17
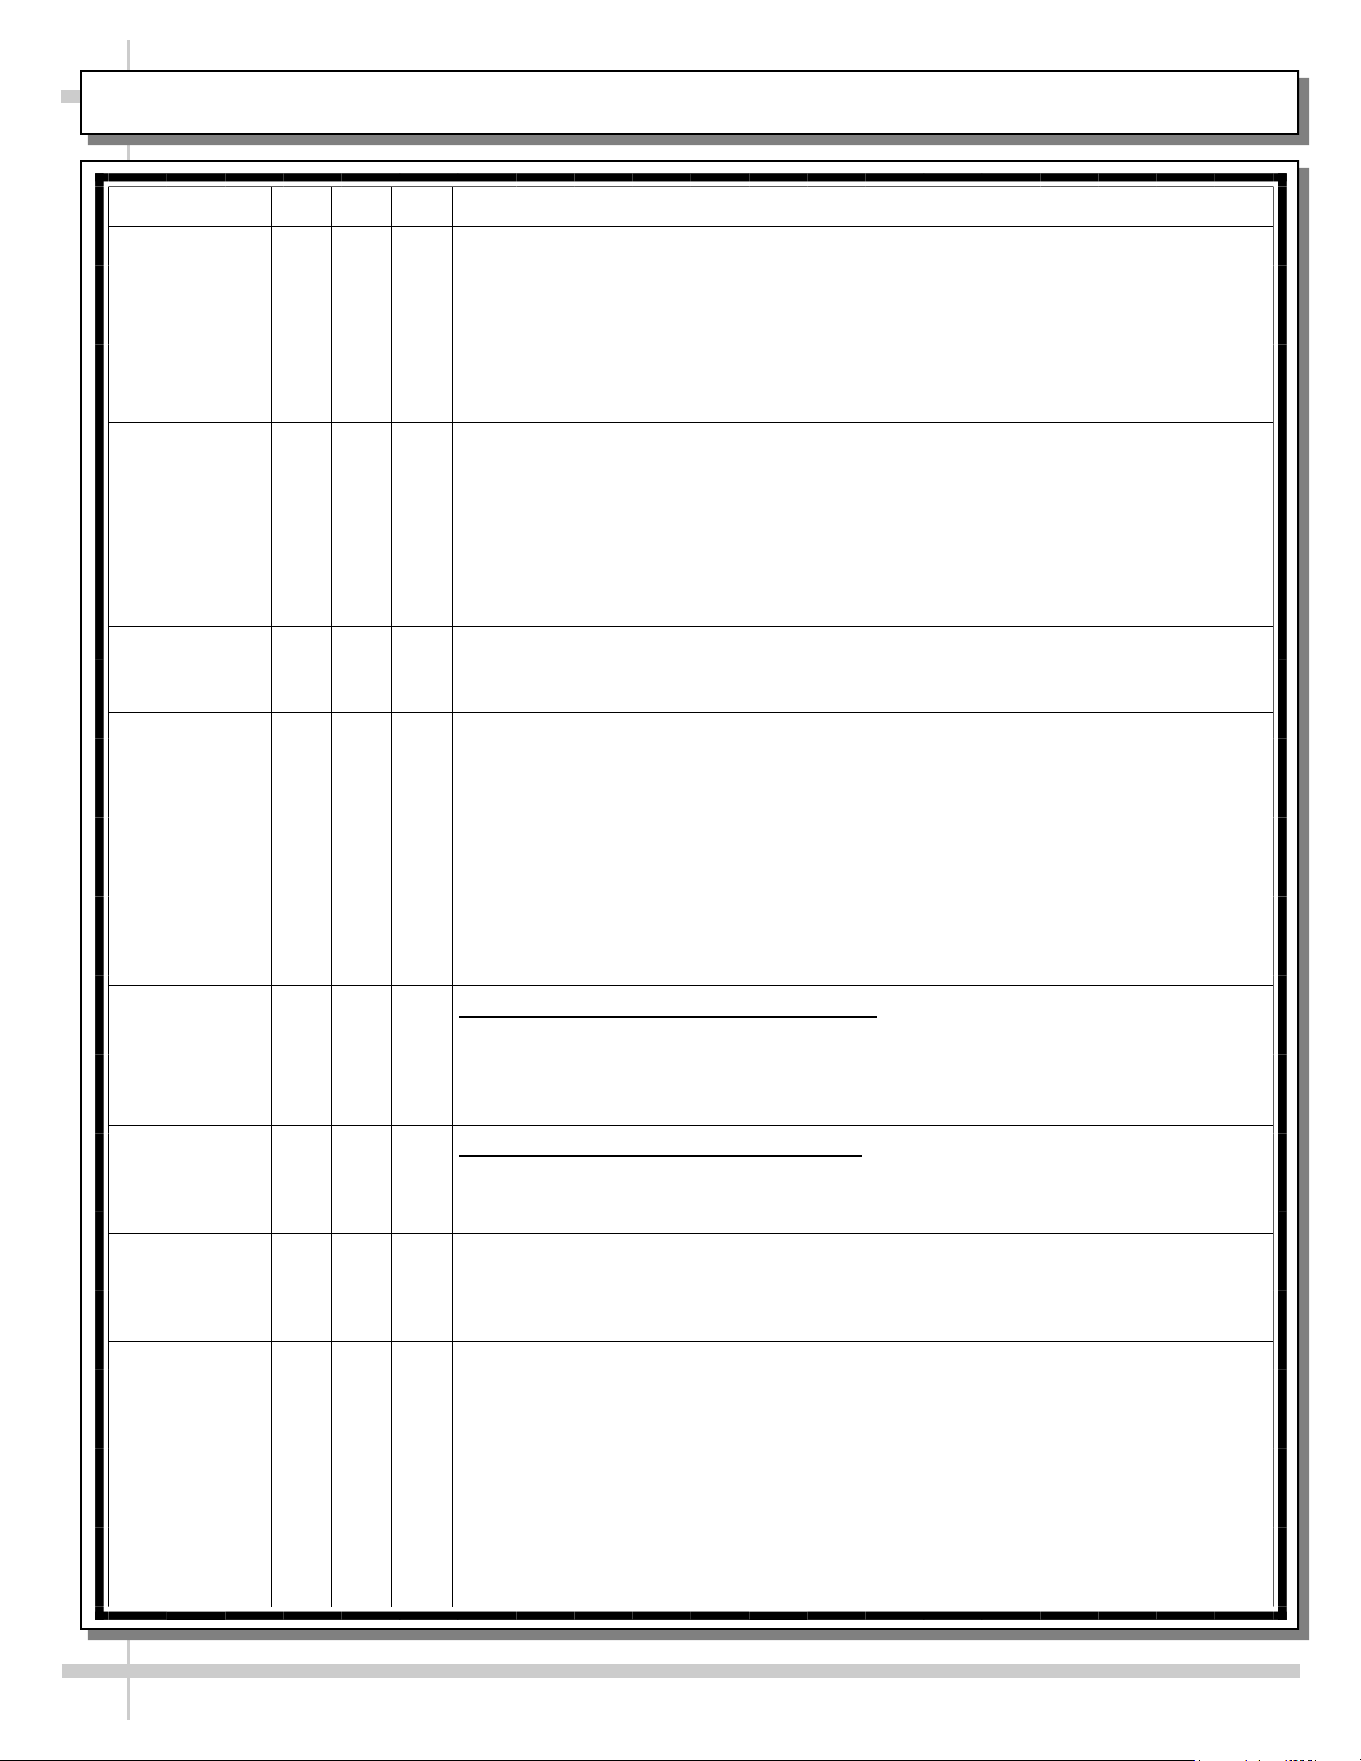
CLEANING SCHEDULE (GENERAL): DAILY “D” / WEEKLY “W” / MONTHLY “M”
Cleaning D W M Task
Clean Case
Exterior
X Wood, laminate, metal posts, shelf and painted surfaces: Clean with a warm
soap and water solution and soft cloth. Never use wire cloth or abrasive
cleaners on case.
X
Rear cutting board and/or Sanalite®. Clean with soapy water or
ammonia-based cleaner; rinse and wipe dry. Should surface become
irreparably marred, board may be replaced.
X
Glass sneeze guard. Clean with a household or commercial glass cleaner.
X
Stainless Steel Work Surfaces: See Next Page
Clean Case
Interior
X
Nemco® Counter Top Pasta Boiling Unit. See NEMCO® MODEL NO.
6760-240 COUNTER TOP PASTA BOILING UNITS section in this manual.
X Vollrath® Inductive Heated Soup Wells. See VOLLRATH® INDUCTION
WARMERS - CLEANING section in this manual.
X Rear ambient storage area: Wipe down with a warm soap and water solution
and soft cloth.
X Under case cleaning. Remove either front or rear toe-kicks. Use vacuum or
broom to clean flooring under case. Do not allow broom to create dust in
store!
18
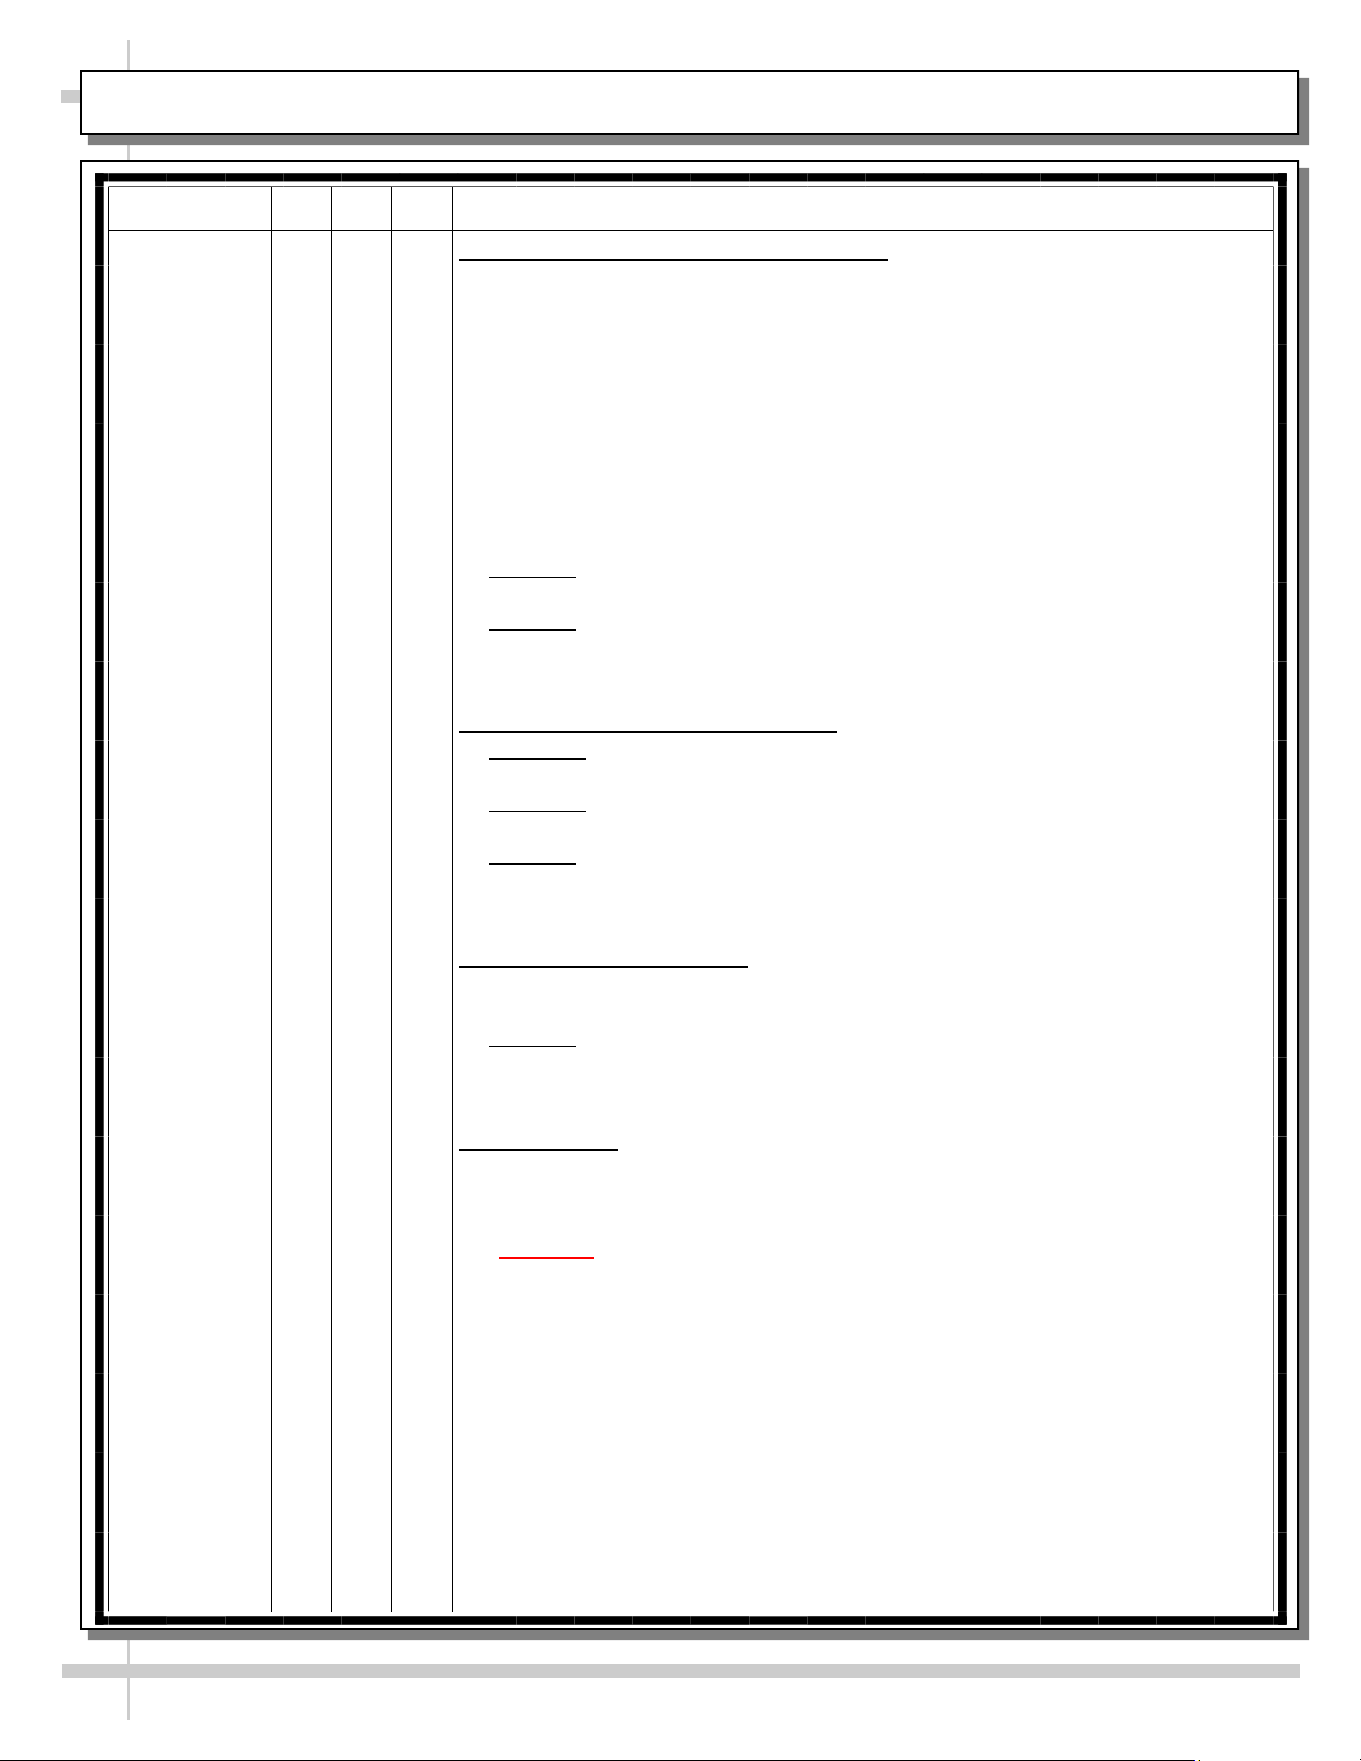
CLEANING SCHEDULE (GENERAL), CONT’D: DAILY “D” / WEEKLY “W” / MONTHLY “M”
Cleaning D W M Task
X General Stainless Steel Surface Cleaning:
• Certain grades of stainless steel, and some are more prone to corrosion
than others.
• Stainless steel can become exposed to a wide variety of contaminants,
which if left untreated can cause stains and rust.
• Stainless steel requires a specific cleaning procedure to maintain its sheen
and remain rust-free.
• Wash with a solution of liquid dishwashing detergent and hot water.
• Rinse with pure hot water from spray bottle. Wipe with clean sponge. This
will remove soap residue that can lodge in stainless steel’s microscopic
grooves, causing rust.
• Dry with clean, soft cloth or paper towel.
• Caution! To prevent rust, you MUST rinse with pure hot water from a spray
bottle while wiping with clean sponge after EACH cleaning.
• Caution! Never clean with scouring powder or steel wool as they can mar,
scratch and/or erode the surface of stainless steel. When the surface
properties of stainless steel have been compromised, rust can form.
Brightening Stainless Steel Surfaces:
• Method 1: Brighten by polishing with a soft cloth or sponge dipped in
vinegar or ammonia.
• Method 2: Sprinkle baking soda on sponge and rub gently with soft cloth
or sponge.
• Caution! To prevent rust, you MUST rinse with pure hot water from a
spray bottle while wiping with clean sponge after EACH cleaning.
• Dry with clean, soft cloth or paper towel.
Removing Streaks or Stains:
• Remove streaks or stains by dipping soft cloth or sponge in club soda
and rubbing gently over area of concern.
• Caution! To prevent rust, you MUST rinse with pure hot water from a spray
bottle while wiping with clean sponge after EACH cleaning.
• Dry with clean, soft cloth or paper towel.
Removing Rust:
• If rust has begun to form, there are a variety of products that can treat it.
• Among these are CLR® (calcium, lime and rust remover) and Chemetall
Oakite 33 (rust, oxides and scale remover).
• Caution! To prevent food contamination, personal injury or further
corrosion, carefully follow the recommended cleaning precautions
and instructions.
19
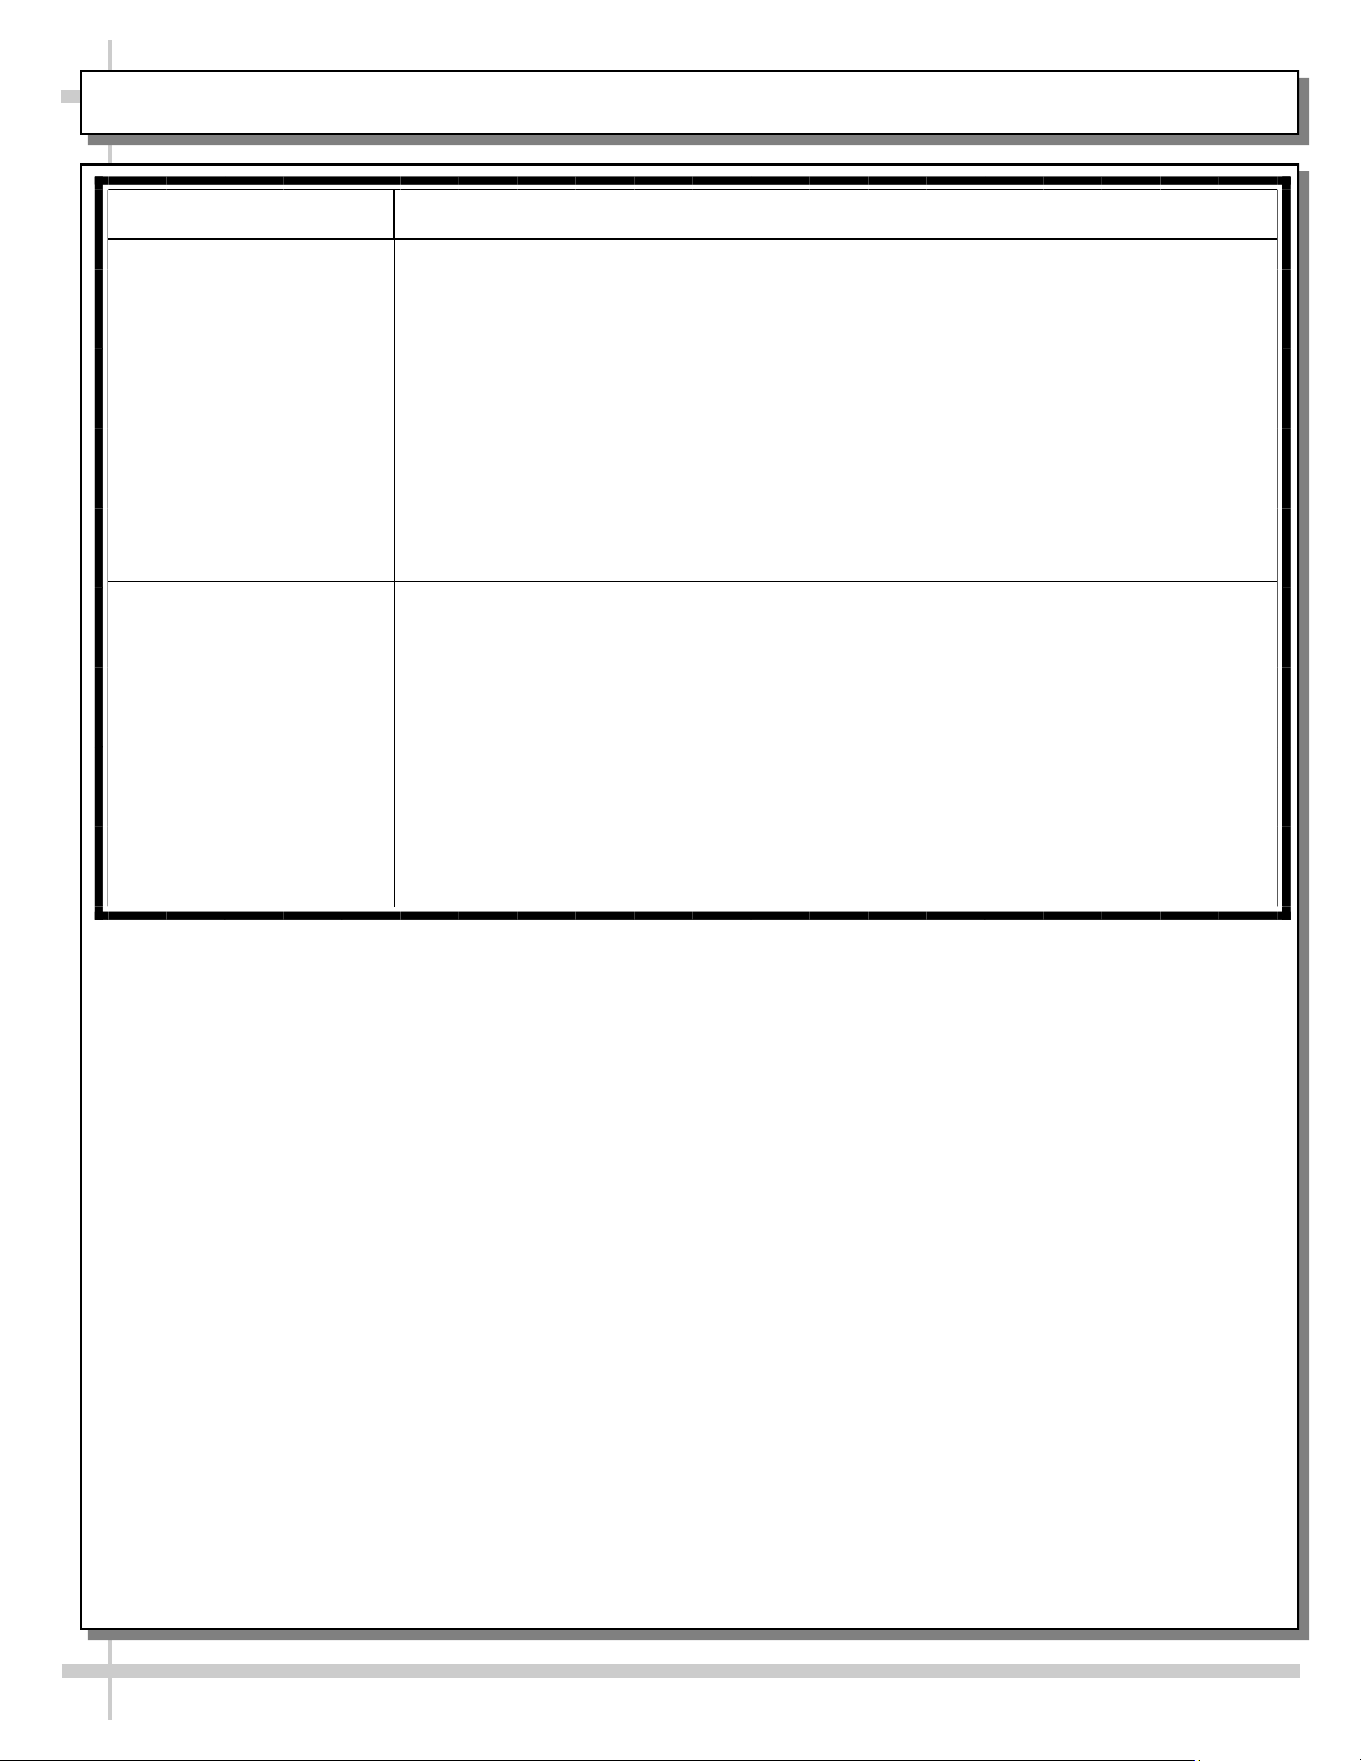
TROUBLESHOOTING - GENERAL CASE ISSUES (TRAINED SERVICE PERSONNEL ONLY)
CONDITION TROUBLESHOOTING - GENERAL CASE ISSUES
System Is Not
Operating
Check that the utility power is on.
Check the circuit breaker box for tripped circuits.
20
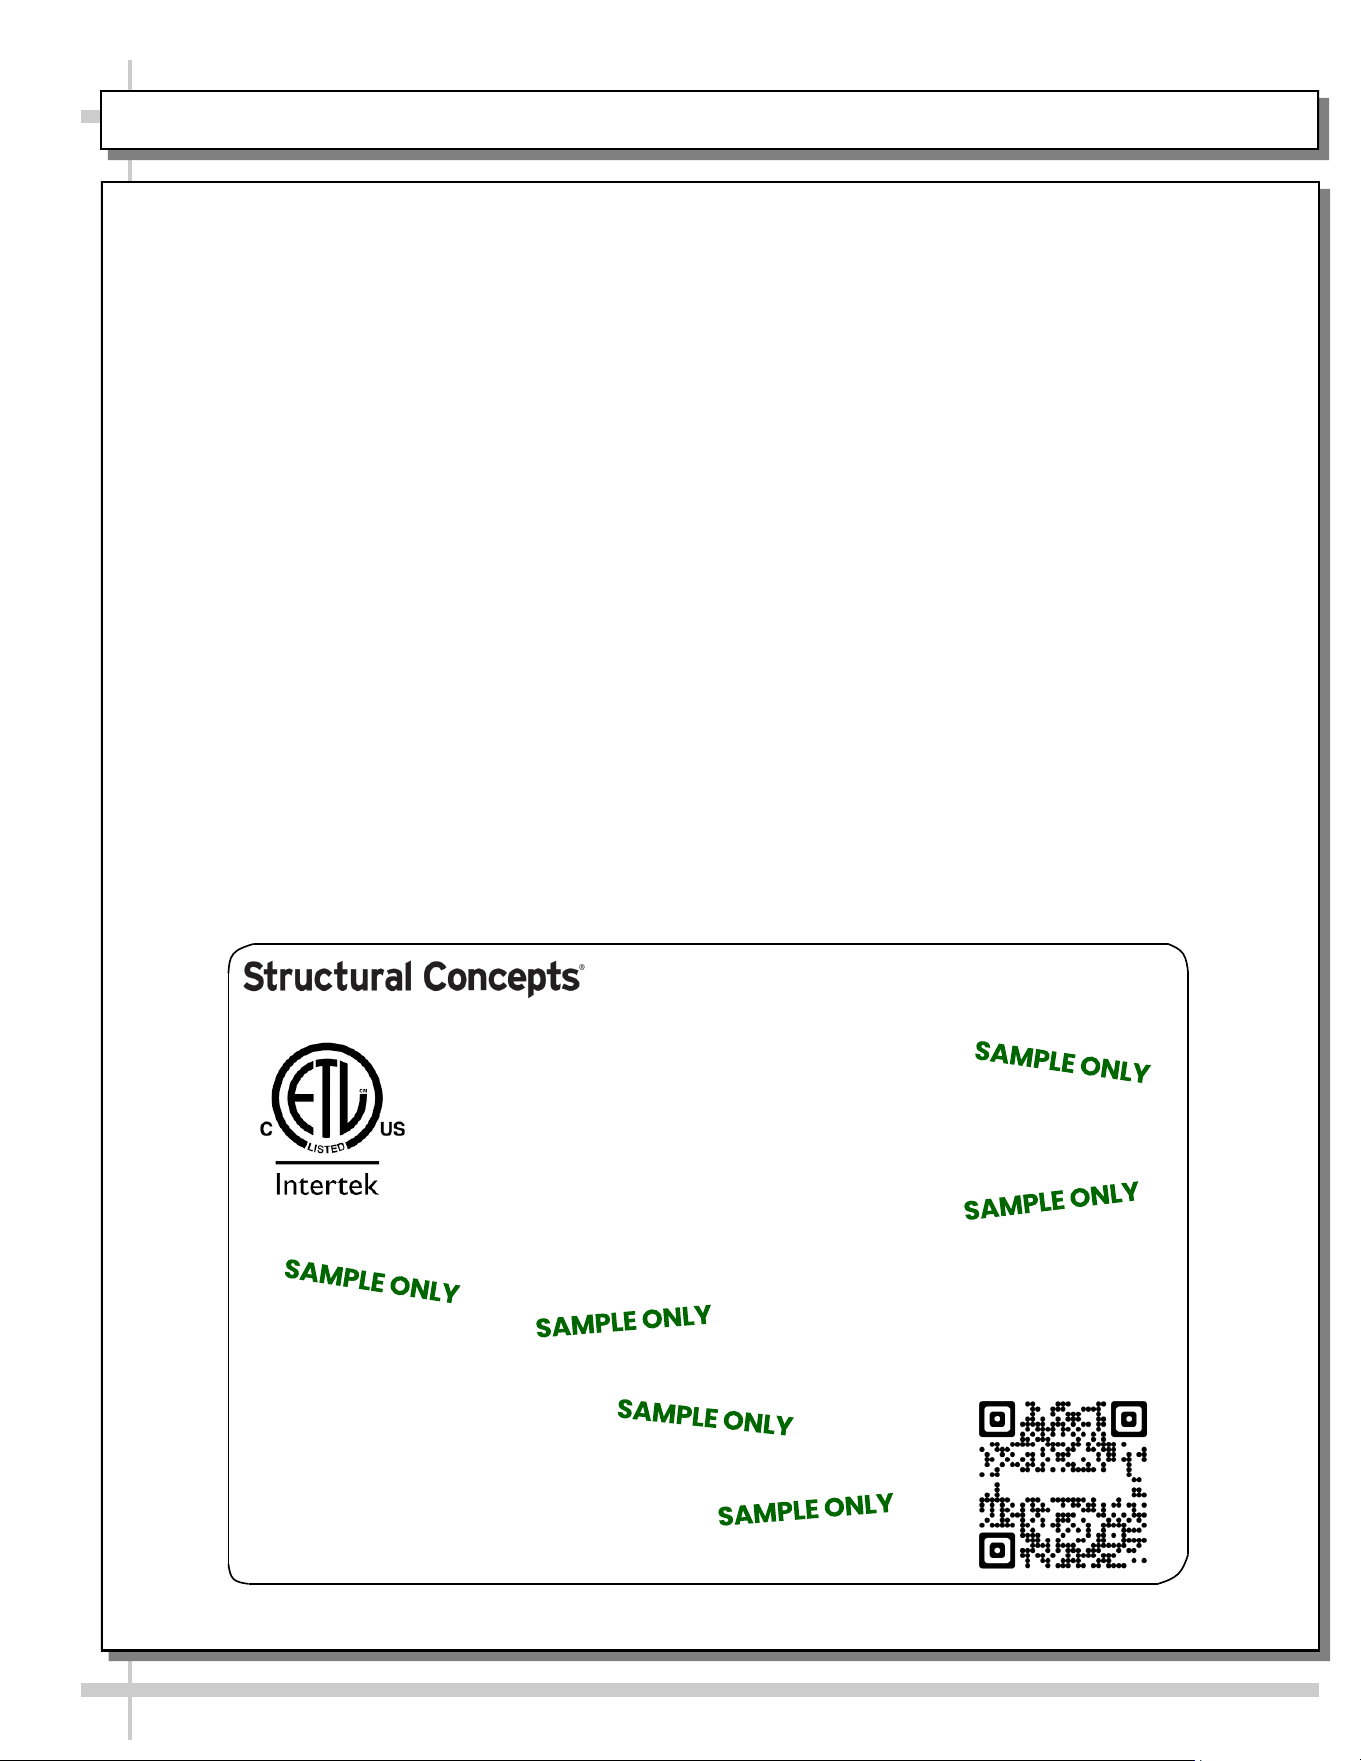
SERIAL LABEL LOCATION & INFO LISTED / TECH INFO & SERVICE - AMBIENT/HEATED CASES ONLY
--- Sample Serial Label For Ambient/Heated Cases ---
MODEL NRS3648RXV-SAMPLE
SERIAL NO. 12345X30DZ098765
888 E. Porter Rd - Muskegon, MI 49441
3048256
Conforms to UL Std. 65
CERTIFIED TO CAN/CSA
STD C22.2 NO 120
120 VOLTS 60HZ
FOR PARTS OR SERVICE CALL
STRUCTURAL CONCEPTS
AT 1-800-433-9489
SINGLE PHASE 1.84 AMPS
Serial Label Location & Information Listed /
Technical Information & Service
• Serial labels are affixed at a wide range of places
(on the header, at case rear, behind panels or
toe-kicks, on electrical boxes, etc.).
• Serial labels contain electrical information as well
as regulatory standards to which the case
conforms.
• Sample serial label shown below.
• For additional technical information and service, see
the TECHNICAL SERVICE page in this manual for
instructions on contacting Structural Concepts’
Technical Service Department.
Sample QR Code
SCAN FOR PRODUCT LITERATURE
Reveal
Harmony
Fusion
Impulse
Addenda
Blend
Grocerant
Oasis
STRUCTURAL CONCEPTS TECHNICAL SERVICE CONTACT INFORMATION & LIMITED WARRANTY
21
TECH SERVICE/WARRANTY CONTACT INFO:
1 (800) 433-9490 / EXTENSION 1
DAYS/HOURS AVAILABLE:
MONDAY - FRIDAY (CLOSED HOLIDAYS)
8:00 a.m. TO 5:00 p.m. EST
YOU MUST HAVE THE FOLLOWING INFO AVAILABLE
BEFORE CONTACTING STRUCTURAL CONCEPTS:
SERIAL NO. / MODEL NO. / STORE NO. / STORE
ADDRESS / DETAILS (PHOTOS, LEAK LOCATIONS,
DAMAGE, STORE’S AMBIENT CONDITIONS, ETC.)
To Access The Limited Warranty To Your
Case, Follow These Instructions:
> If Viewing This Document on Smart Phone,
Tablet or Computer, Select/Click On The QR
Code at Right.
> If Viewing This Document In Print (Hard
Copy), Scan The QR Code at Right With Your
Smart Phone or Tablet.
