Steam Cleaner
with 18-Piece Accessory Set
User Guide
SKU: IVATCSC10

2
INTRODUCTION
INTRODUCTION
Thank you for purchasing the Ivation Steam Cleaner with
18-Piece Accessory Set. This User Guide is intended to
provide you with guidelines to ensure that operation of this
product is safe and does not pose risk to the user. Any use
that does not conform to the guidelines described in this
User Guide may void the limited warranty.
Please read all directions before using this product and
retain this guide for reference. This product is intended for
household use only.
This product is covered by a limited one-year warranty.
Coverage is subject to limits and exclusions. See warranty
for details.
SAFETY PRECAUTIONS
PRODUCT OVERVIEW
ASSEMBLY
USAGE
CARE
TROUBLESHOOTING / SPECS
WARRANTY
GET IN TOUCH!
3
4
6
8
10
11
12
13
TABLE OF CONTENTS

3
SAFETY PRECAUTIONS
SAFETY PRECAUTIONS
WARNING! Please read and understand all safety precautions, assembly
instructions, and operating instructions before using this steam cleaner. Failure
to properly follow the guidelines established could result in injury or product
damage. Retain this guide for future reference.
• Never touch any of the attachments while the steam cleaner is in use, as they
will be very hot and could burn skin.
• Never point the steam cleaner at yourself, other people, or pets.
• If excessive steam comes out of the fill cap, stop using the device, turn it o,
and disconnect it immediately.
• Never use the device without water in the tank.
• Do not open the boiler cap during use. This will allow steam to escape and can
burn skin.
• Never operate the unit without tightening the cap securely.
• Do not overfill the water tank. The maximum capacity is 52 fl. oz. (1,500 mL)
of water. Excessive filling of the water tank may cause malfunctions, property
damage, or injury.
• Do not use any cleaners or chemicals in the water tank.
• Never turn or tilt the unit more than 45° when it is on or if it is still producing
steam.
• Do not attempt to repair this appliance. There are no user-serviceable parts.
• If the power cord is damaged, contact Ivation customer support to get a
replacement. Do not use the unit if the power cord is damaged.
• Do not submerge the unit in water or any other liquid.
• Keep the unit and its power cord out of reach of children. Cleaning and
maintenance should not be done by children.
• Keep hair, loose clothing, fingers, feet, and all body parts away from the nozzle.
• Do not use this device barefoot or with open-toed shoes or sandals.
• Do not leave this device unattended when connected to power.
• Always disconnect the unit when not in use, left unattended, after use, and
before servicing. Stop all controls before unplugging.
• When moving the unit, always use the strap.
• When in use, do not touch the hose as it will be hot.
• Check the condition of the parts and power cord before each use.
• Always use a grounded socket to plug in the unit.
• Do not turn on the unit if it is damaged. Do not use the unit if it has been
dropped, if there are visible signs of damage, or if there is a leak.
• Do not pull or carry the unit by the power cord.
• Do not close a door on the power cord or pull it against sharp edges or
corners.
• Do not unplug the unit by pulling on the power cord.
• Never handle the plug with wet hands.
• Do not use the product to clean electrical appliances. Never direct steam or
water at appliances containing electrical components, such as inside an oven.
• Keep the power cord away from heated surfaces. Do not store or use near
flammable materials.
• Do not place the unit on or under insulation such as blankets, towels, or papers.
• Always store the unit in a dry place.
• Do not expose the unit to frost.
• Only use the original accessories included in the box. Using incompatible
accessories may result in a safety risk to the user.
• Store the unit indoors out of reach of children.
• Do not attempt to use this steam cleaner to heat a room.
4
PRODUCT OVERVIEW
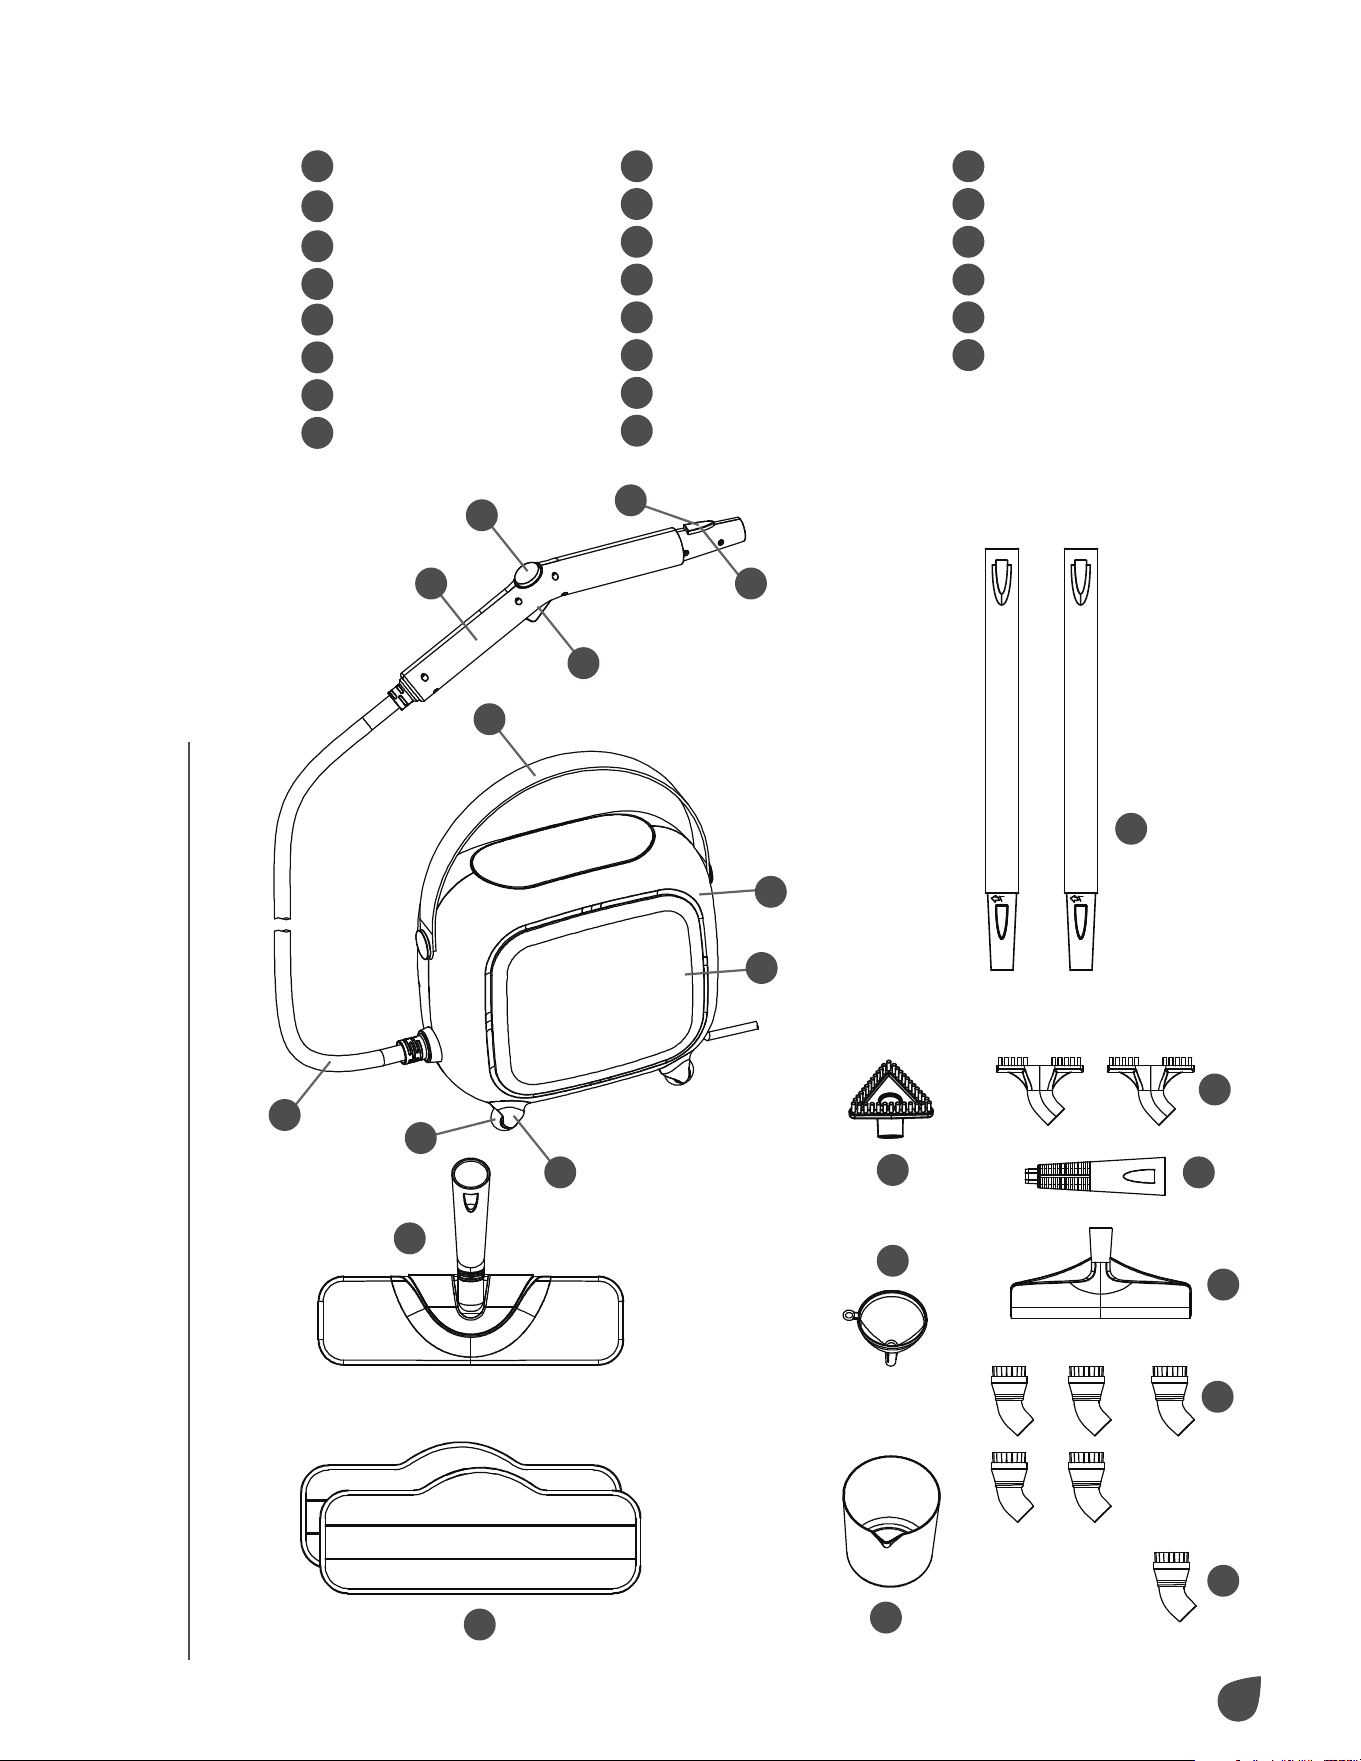
PRODUCT OVERVIEW
1
Wheel
2
Wheel cover
3
Side housing
4
Main body
5
Strap
6
Carry handle
7
Steam button
8
Steam lock button
9
Connection button
10
Steam hose
11
Extension poles (x2)
12
Microfiber pads (x2)
13
Mop head
14
Triangular brush
15
Funnel
16
Measuring cup
17
Gap brushes (x2)
18
Steam jet nozzle
19
Squeegee
20
Nylon brushes (x5)
21
Brass brush
22
Main nozzle
GET TO KNOW YOUR STEAM CLEANER
1
2
3
4
5
22
7
8
9
6
10
13
12
16
21
20
15
14
18
19
17
11

5
PRODUCT OVERVIEW
PRODUCT OVERVIEW
SELECTING ATTACHMENTS
Steam Jet Nozzle
Focuses the flow of steam from the main nozzle. Attach to the main nozzle and use
it to connect the squeegee or any of the brushes.
Squeegee
Connects directly to the steam jet nozzle. Use the squeegee to clean glass and
windows.
Gap Brush
Connects directly to the steam jet nozzle. Use the gap brush to clean the gap
between tiles, floors, and windows.
Triangular Brush
Connects directly to the steam jet nozzle. Use the triangular brush to scrub tough
dirt and scrus from surfaces.
Nylon Brush
Connects directly to the steam jet nozzle. Use the nylon brush when extra scrubbing
is required.
Brass Brush
Connects directly to the steam jet nozzle. Use the brass brush to remove tough
stuck-on grease and grime from durable surfaces.
NOTE: Scratchable surfaces like stainless steel may be scratched or damaged
by the brass bristles. Use care in deciding when to use the brass utility brush. If
you are unsure about using this brush, it is recommended that you test a small,
inconspicuous spot before proceeding.
Mop Head
Connects to the extension pole that attaches to the main nozzle. The mop head and
microfiber pads are ideal for these hard floor surfaces:
Sealed Hardwood Linoleum Marble
Stained Concrete Glazed Ceramic Vinyl
Sealed Laminate Granite Tile
NOTES:
Do not use on unsealed hardwood or unglazed ceramic surfaces as heat and
moisture can warp flooring.
Take care when steaming sealed hardwood floors as prolonged exposure to steam
can cause damage and discoloration. To avoid this, keep the mop head in constant
motion while in use.
Steam may remove the sheen from some floors that have been treated with wax.
Extremely rough textured floors may tear or damage the microfiber pads.

6
ASSEMBLY
ASSEMBLY INSTRUCTIONS
Steam Mopping
Extension Pole
To use the steam mop, begin by connecting the extension pole to the main nozzle.
• Align the extension pole with the main nozzle.
• Hold down the connection button and slide the extension pole onto the main
nozzle until the connection button snaps closed.
• Then, align the second extension pole with the first one.
Mop Head
• Align the mop head with the end of the second extension pole.
• Hold down the lock button and slide the mop head onto the extension pole until
the lock button snaps closed.
Microfiber Pads
• Lay the microfiber pad on a flat surface with the two (2) fastener strips facing
upward.
• Align the mop head above the microfiber pad. Make sure the mop head is oriented
with the pad as shown below.
• Fastener strips will adhere to the pad grips on the bottom of the mop head.
ASSEMBLY
7
ASSEMBLY
Caution: Use care when handling used microfiber pads as they will become hot
during use.
NOTE: Microfiber pads are machine washable. To avoid picking up lint, wash
separately from other fabrics. Use liquid detergent only. Avoid using any fabric
softeners or bleach. Air drying is recommended, but the pads can be dried on low
heat or an air dry setting.
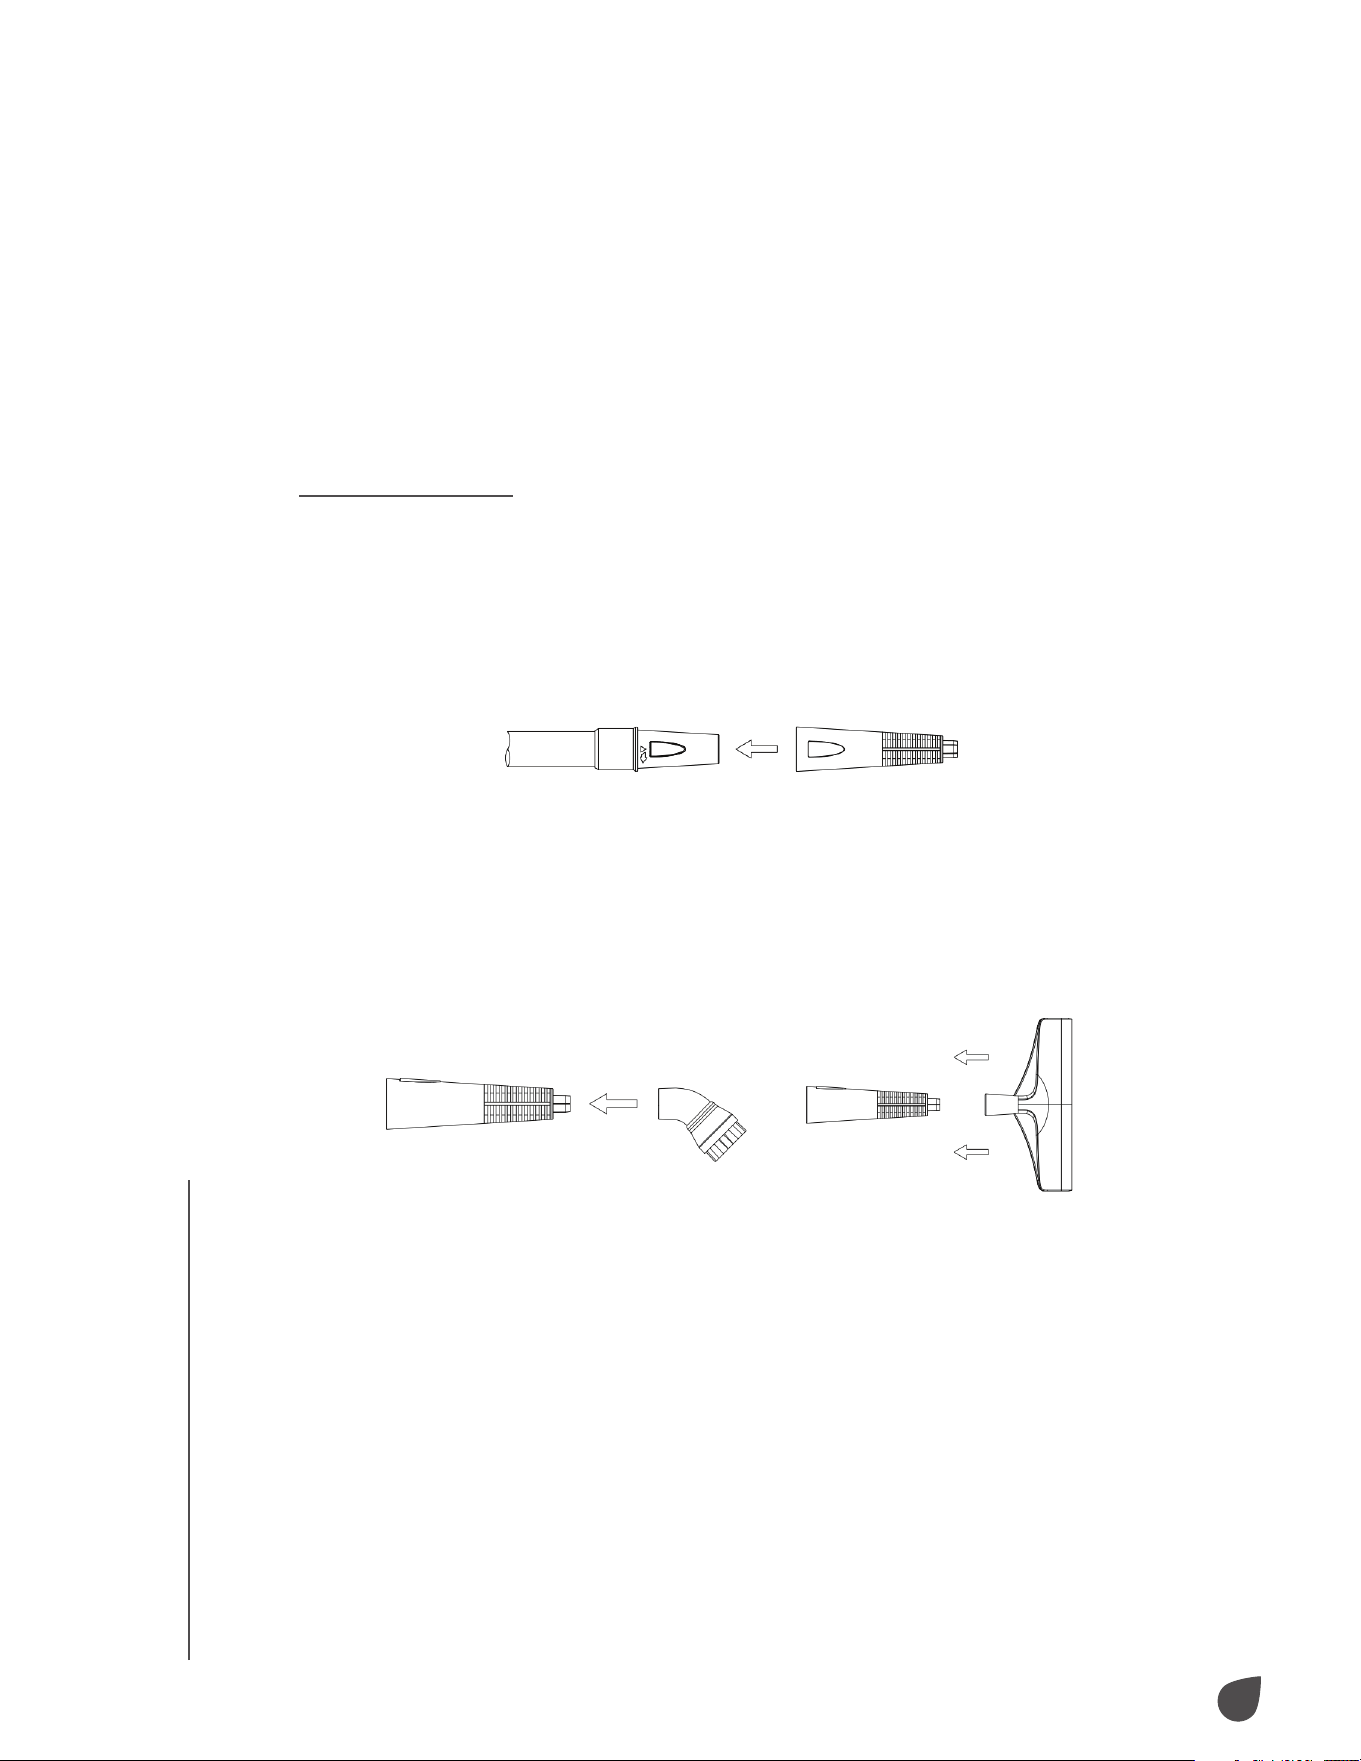
Squeegees/Brushes
Steam Jet Nozzle
To use the squeegee or brushes, begin by connecting the steam jet nozzle to the
main nozzle.
• Align the steam jet nozzle with the main nozzle.
• Hold down the connection button and slide the steam jet nozzle onto the main
nozzle until the connection button snaps closed.
NOTE: For added reach, the steam jet nozzle can be attached to the end of the
extension pole.
Attaching Squeegee and Brushes
To connect the squeegee or brushes to the steam jet nozzle, follow the steps below:
• Align your selected attachment with the steam jet nozzle tip. Make sure the
grooves on the attachment line up with those on the steam jet nozzle.
• Firmly press the attachment onto the steam jet nozzle. Press the attachment onto
the nozzle as far as possible to prevent steam leakage.
• To remove the attachment, firmly grasp it and pull it o the steam jet nozzle.
ASSEMBLY
8
USAGE
USAGE
OPERATING YOUR STEAM CLEANER
Filling the Boiler
1. Place the steam cleaner on a flat, level surface.
2. Ensure that the power light is o and the power cord is unplugged.
NOTE: If the unit has been in use, allow the unit to cool for 20 minutes and press
and hold the steam button to release all steam before removing the boiler cap.
Failure to do so may result in burns from escaping steam.
3. Carefully unscrew and remove the boiler cap. Drain any remaining water from the
boiler into a sink or tub.
NOTE: The boiler should be emptied after each use to prevent mineral build-up
and overfilling.
4. Use the fill cup to fill the boiler.
NOTES:
To prevent mineral build-up, the use of distilled or demineralized water is highly
recommended.
When filling the boiler, use the water funnel to prevent water from spilling onto
the unit and damaging electrical components.
5. Replace the boiler cap and ensure that it is tightly in place before using the steam
cleaner.
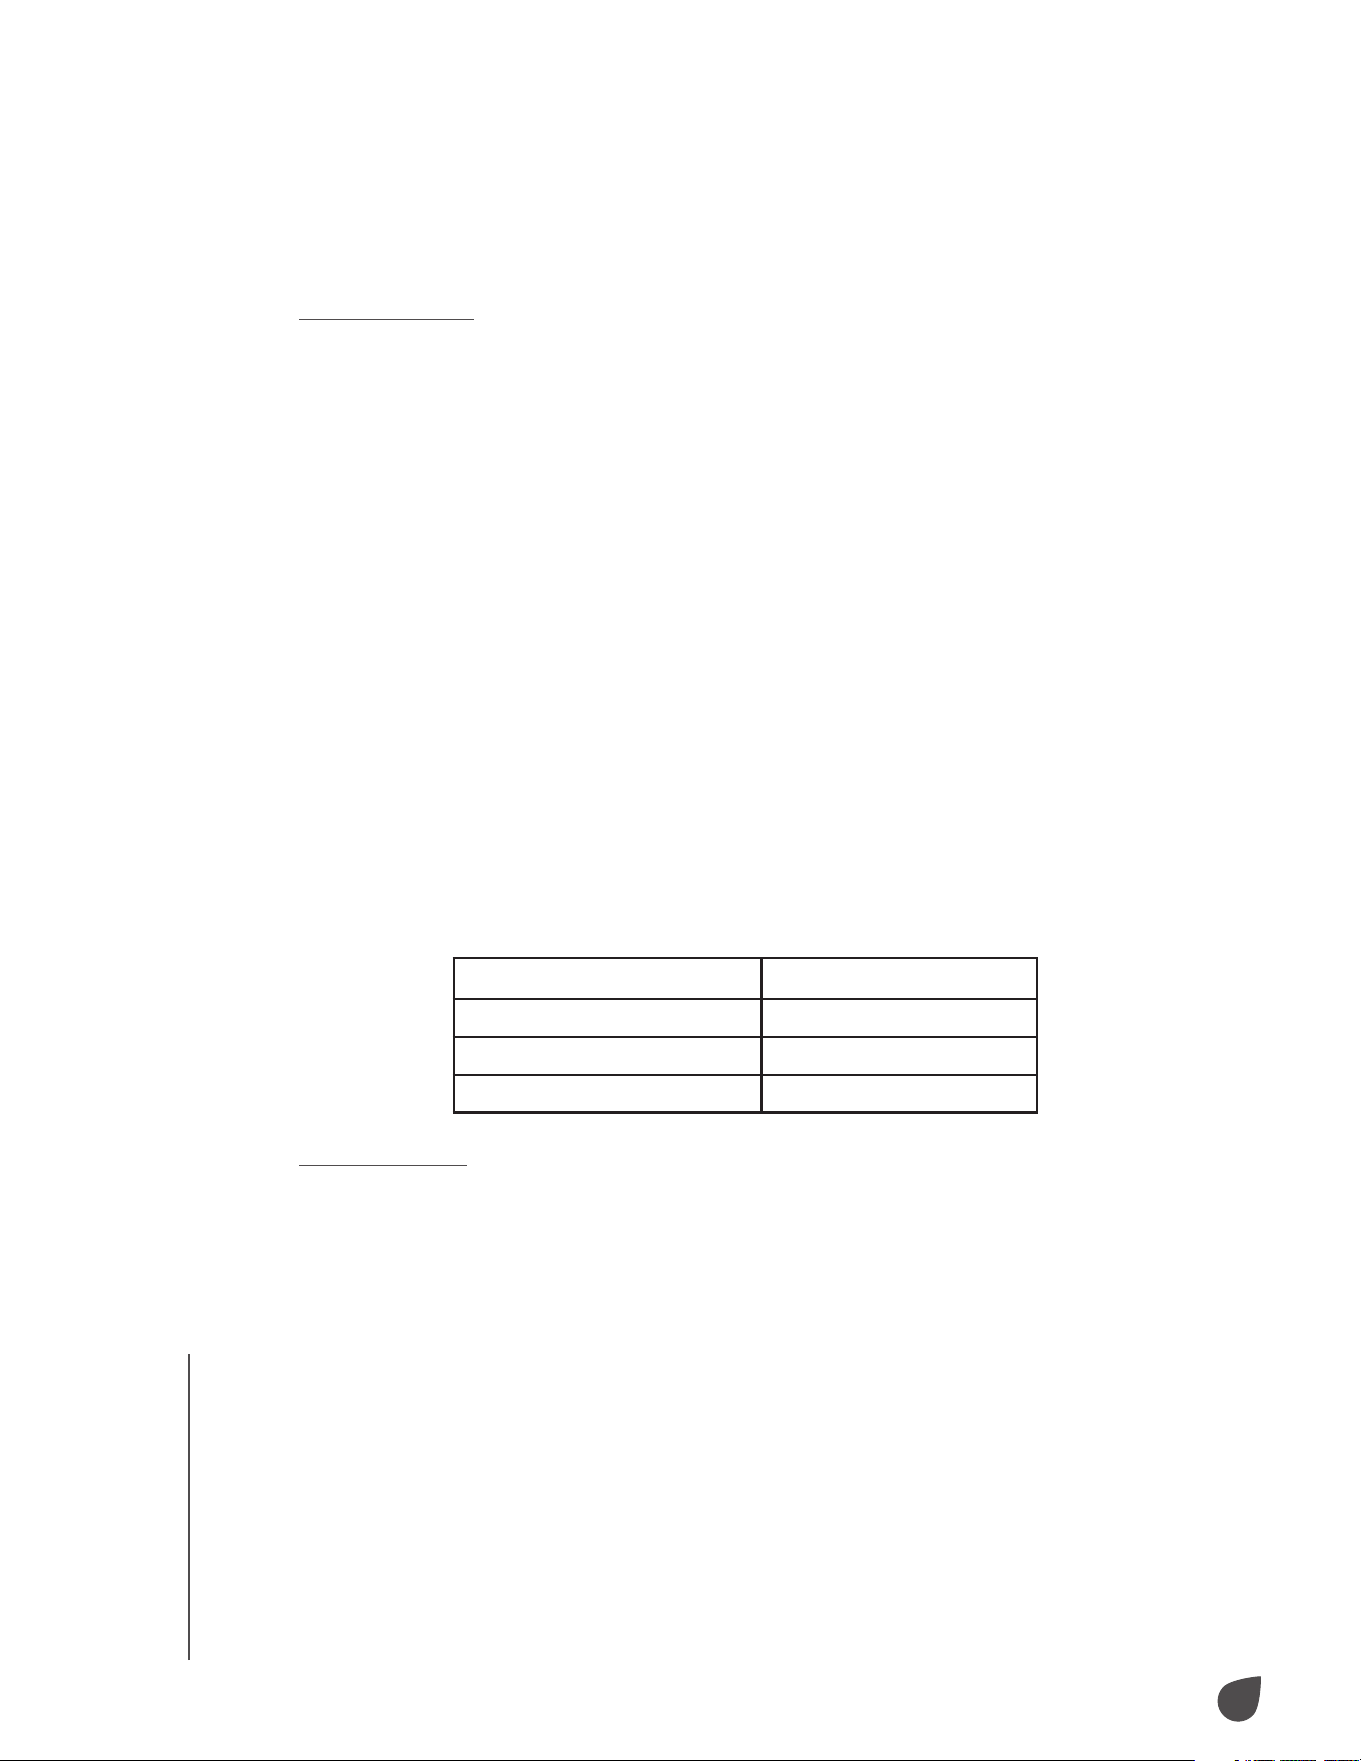
Use the chart below to determine how much water you need to add to the boiler. Do
not exceed the 52 fl. oz. (1,500 mL) fill limit.
Steam Cleaning
Before turning on your steam cleaner, make sure your desired attachment is already
connected to the unit.
1. Plug the power cord into an electrical outlet. For first-time use, remove the plastic
plug cover from the plug.
2. Turn on the power switch to power on the unit. The light will turn red to indicate
the unit is heating (this will take between three (3) to 10 minutes). The light will
turn green to indicate the unit is ready for use.
3. Direct the nozzle (and any connected accessories) toward the surface you wish
to clean and press the steam button. To sanitize surfaces, hold the nozzle about
½ in. (1.25 cm) from the surface for at least five (5) seconds to ensure you have
eliminated germs and bacteria.
NOTE: Make sure the nozzle and any connected accessories are pointed away
from yourself, other people, pets, and plants before pressing the steam button.
Water Amount Duration of Steam
17 fl. oz. (500 mL) Approx. 15 min
35 fl. oz. (1,000 mL) Approx. 30 min
52 fl. oz. (1,500 mL) Approx. 45 min

9
USAGE
USAGE
4. Hold the steam button for a continuous flow of steam or press the steam
lock switch to keep steam flowing continuously. The steam cleaner may
sputter a bit until it produces a consistent stream.
5. Use a slight back-and-forth motion over the area you wish to clean for
best results. Wipe the steamed area while it is still wet with a clean cloth to
remove the loosened dirt and grime. Use caution when wiping surfaces as
they may still be hot.
6. Once cleaning is complete, press the power button to turn o the unit and
unplug the power cord from the outlet.
Steam Mopping
Before turning on your steam cleaner, make sure the mop head and microfiber
pads are already connected to the unit. Refer to the list of compatible
flooring types in the “Selecting Attachments” section before using. It is
not recommended to sweep or vacuum hard floors before mopping. The
microfiber pad will absorb dirt and moisture, but some moisture may be left
on the floor after cleaning. Allow this moisture to air dry or direct a fan toward
the cleaned area.
1. Plug the power cord into an electrical outlet. For first time use, remove the
plastic plug cover from the plug.
2. Turn on the power switch to power on the unit. The light will turn red to
indicate the unit is heating (this will take between three (3) to 10 minutes).
The light will turn green to indicate the unit is ready for use.
3. Use a slight back-and-forth motion over the area you wish to clean for best
results. Work your way backwards over the floor in order to avoid walking
over freshly mopped areas.
4. To eectively eliminate germs and bacteria, repeatedly mop a small area of
roughly 3 ft. x 3 ft. (1 m x 1 m) for at least two (2) minutes.
5. Once cleaning is complete, press the power button to turn o the unit and
unplug the power cord from the outlet.

10
CARE
CARE
CARE & MAINTENANCE
Preparing for Storage
1. Turn o the steam cleaner and unplug the power cord.
2. Allow the unit to cool for at least 30 minutes.
3. Press and hold the steam button to release all remaining pressure.
4. Remove all accessories from the unit.
5. Remove the boiler cap and drain any remaining water from the boiler.
Then, loosely replace the boiler cap.
6. Store accessories safely near the steam cleaner.
7. Store the steam cleaner in a cool, dry location.
Mineral Build-Up
Mineral build-up within your steam cleaner will reduce the ecacy of the unit.
The best way to minimize mineral build-up is to use distilled or demineralized
water in your steam cleaner. If you are unable to use distilled or demineralized
water, it is recommended to perform the procedure outlined below
approximately once a month to remove any mineral build-up.
1. Turn o the steam cleaner and unplug the power cord.
2. Allow the unit to cool for at least 30 minutes.
3. Press and hold the steam button to release all remaining pressure.
4. Remove all accessories from the unit.
5. Remove the boiler cap and drain any remaining water from the boiler.
6. Fill the measuring cup with 17 fl. oz. (500 mL) of distilled vinegar.
7. Carefully pour the vinegar into the boiler. Slowly shake or move the unit
around to agitate the vinegar.
8. Allow the unit to stand with the vinegar inside for at least 40 minutes.
9. Drain the vinegar from the boiler.
10. Rinse the boiler with fresh water and drain it. Repeat this step until the
odor of the vinegar dissipates.
11. Loosely replace the boiler cap and follow the steps under the section
“Preparing for Storage”.
11
TROUBLESHOOTING / SPECS
TROUBLESHOOTING / SPECS
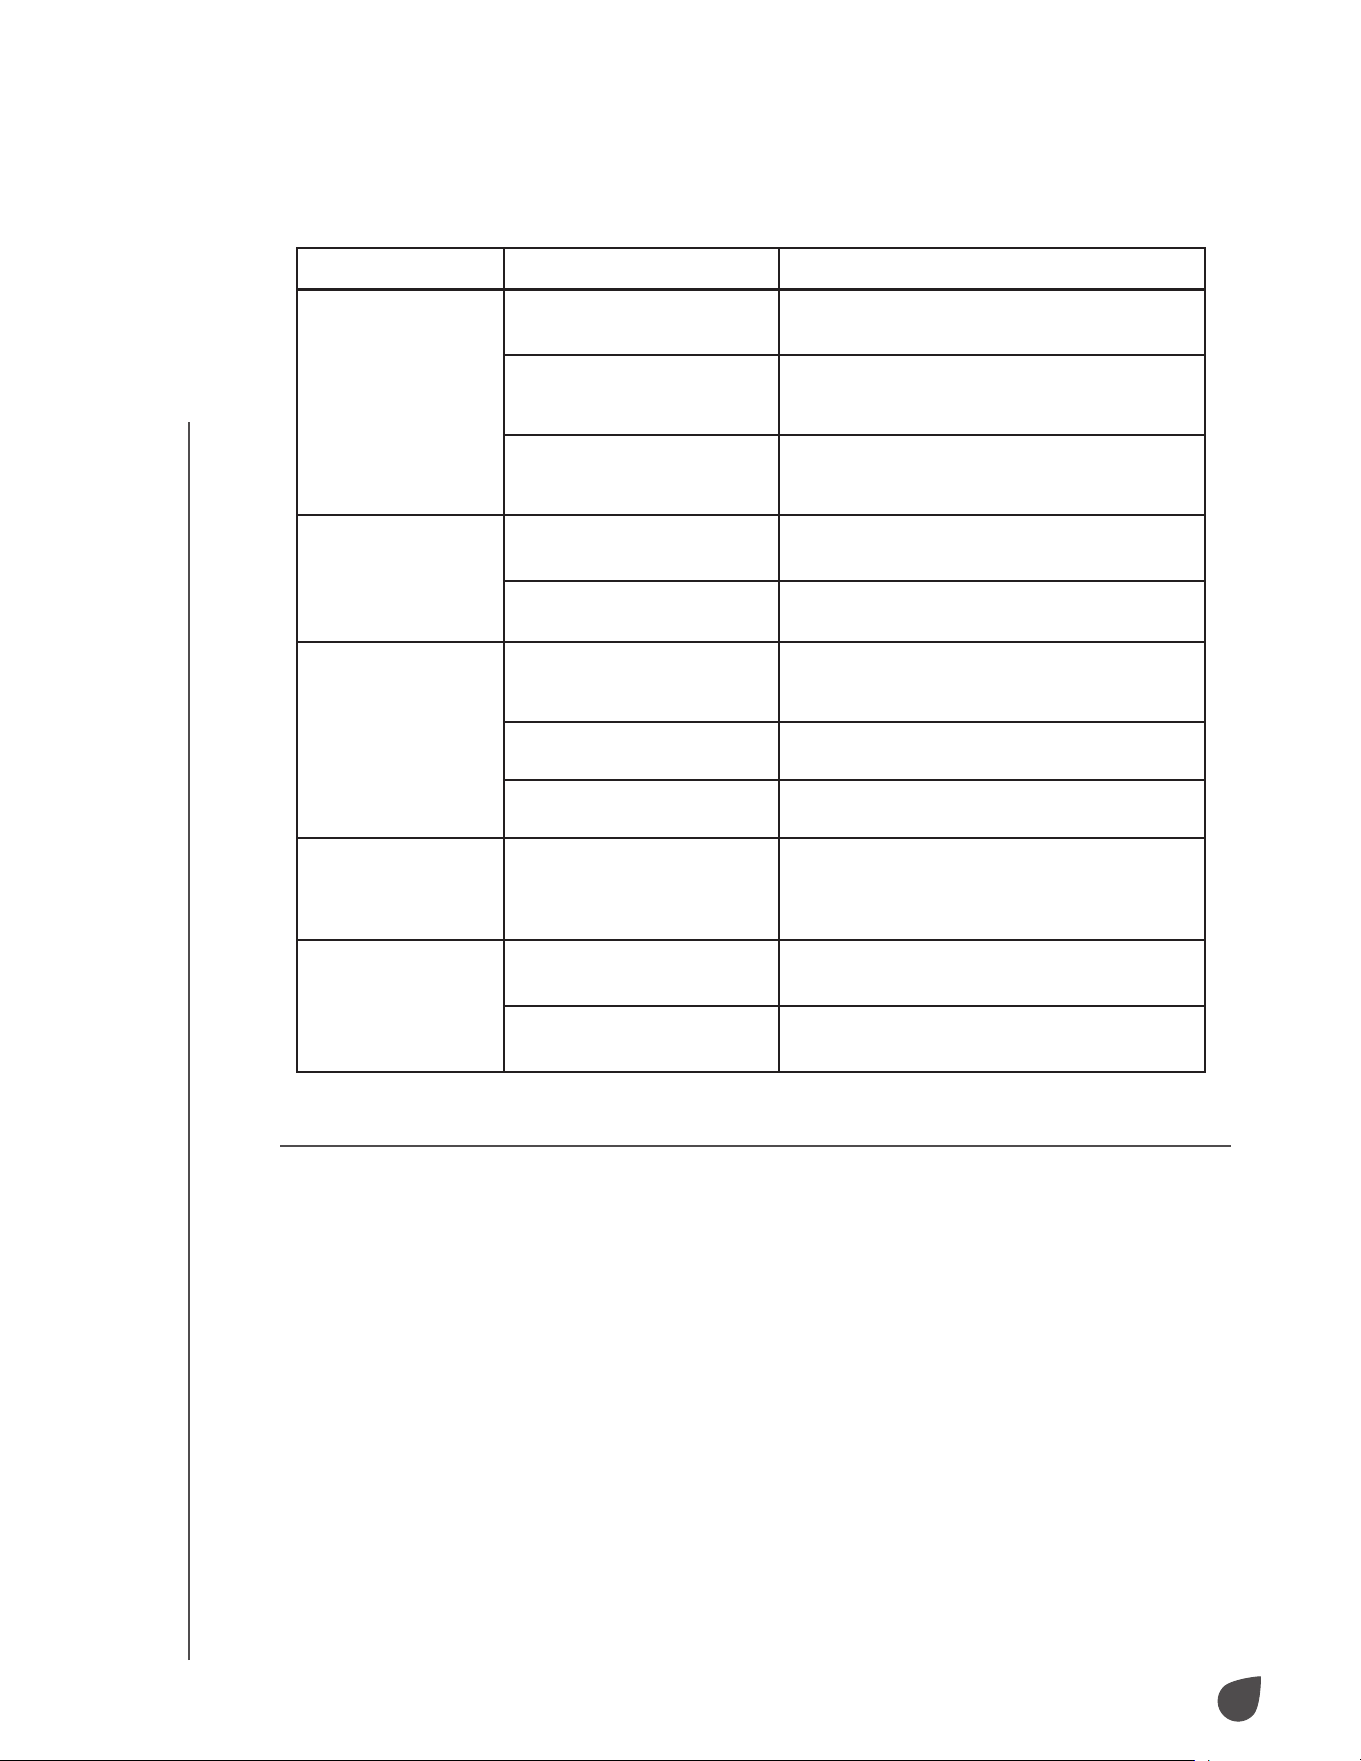
TROUBLESHOOTING
SPECIFICATIONS
Issues Possible Causes Probable Solutions
The steam cleaner
does not turn on.
The steam cleaner is not
plugged in.
Plug the power cord into an outlet.
Power is not flowing to the
outlet.
Check your circuit breaker or replace
the fuse as needed. For additional help,
contact a qualified electrician.
The steam cleaner is
damaged and in need of
repair.
Contact Ivation customer service.
The steam cleaner
does not heat up.
The boiler is empty. Follow the directions outlined in the
section “Filling the Boiler”.
There is mineral build-up in
the steam cleaner.
Follow the directions outlined in the
section “Mineral Build-Up”.
There is an
excessive amount
of water in the
steam.
There is water condensation
in the steam hose.
Point the nozzle towards a sink or tub and
shake while pressing the steam button.
Continue until excess water is drained.
The boiler has been
overfilled.
Drain excess water out of the boiler. Always
use the measuring cup to prevent overfilling.
The steam cleaner has not
fully heated up.
Give the steam cleaner at least 10 minutes to
fully heat up.
The attachments
do not stay firmly
connected to the
main nozzle.
The attachments are not
properly connected.
Follow the directions outlined in the
section “Assembly Instructions”.
Floors appear
cloudy or streaky
after steaming.
The attachments are not
properly connected.
Follow the directions outlined in the
section “Assembly Instructions”.
The attachments are not
properly connected.
Follow the directions outlined in the
section “Assembly Instructions”.
Product type: Steam cleaner
Net weight: 10.1 lbs.
Rated voltage: 120 V
Rated frequency: 60 Hz
Rated current: 12.5 A
Rated power: 1500 W
Max water capacity: 52 oz. (1500 mL)
Max heating temperature: 275 °F
Heating time: Approximately 8 minutes
Continuous steaming time:
Approximately 45 minutes
Power cord length: 15.4'
Location: Indoor use only
Installation required: No
Adult assembly required: Yes
Additional tools required: No
Country of origin: China
Warranty included: Yes
Warranty length: 1 year

12
WARRANTY
WARRANTY
LIMITED WARRANTY TO ORIGINAL CONSUMER
This Ivation Steam Cleaner (“Product”), including any accessories included in the original
packaging, as supplied and distributed new by an authorized retailer is warranted by C&A
Marketing, Inc. (the “Company”) to the original consumer purchaser only, against certain
defects in material and workmanship (“Warranty”) as follows:
To receive Warranty service, the original consumer purchaser must contact the Company or
its authorized service provider for problem determination and service procedures. Proof of
purchase in the form of a bill of sale or receipted invoice, evidencing that the Product is within
the applicable Warranty period(s), MUST be presented to the Company or its authorized service
provider in order to obtain the requested service.
Service options, parts availability, and response times may vary and may change at any time.
In accordance with applicable law, the Company may require that you furnish additional
documents and/or comply with registration requirements before receiving warranty service.
Please contact our customer service for details on obtaining warranty service:
Email: info@myivation.com
Phone: 1-866-849-3049
Shipping expenses to the Company’s Return Facility are not covered by this warranty, and must
be paid by the consumer. The consumer likewise bears all risk of loss or further damage to the
Product until delivery to said facility.
EXCLUSIONS AND LIMITATIONS
The Company warrants the Product against defects in materials and workmanship under
normal use for a period of ONE (1) YEAR from the date of retail purchase by the original end-
user purchaser (“Warranty Period”). If a hardware defect arises and a valid claim is received
within the Warranty Period, the Company, at its sole option and to the extent permitted by law,
will either (1) repair the Product defect at no charge, using new or refurbished replacement
parts, (2) exchange the Product with a Product that is new or which has been manufactured
from new or serviceable used parts and is at least functionally equivalent to the original device,
or (3) refund the purchase price of the Product.
A replacement Product or part thereof shall enjoy the warranty of the original Product for
the remainder of the Warranty Period, or ninety (90) days from the date of replacement or
repair, whichever provides you longer protection. When a Product or part is exchanged, any
replacement item becomes your property, while the replaced item becomes the Company’s
property. Refunds can only be given if the original Product is returned.
This Warranty does not apply to:
(a) Any non-Ivation Steam Cleaner product, hardware or software, even if packaged or sold
with the Product;
(b) Damage caused by use with non-Ivation Steam Cleaner products;
(c) Damage caused by accident, abuse, misuse, flood, fire, earthquake, or other external causes;
(d) Damage caused by operating the Product outside the permitted or intended uses described
by the Company;
(e) Damage caused by third party services;
(f) A Product or part that has been modified to alter functionality or capability without the
written permission of the Company;
(g) Consumable parts, such as batteries, fuses, and bulbs;
(h) Cosmetic damage; or
(i) If any Ivation Steam Cleaner serial number has been removed or defaced.
This Warranty is valid only in the country where the consumer purchased the Product, and only
applies to Products purchased and serviced in that country.
The Company does not warrant that the operation of the Product will be uninterrupted or error-
free. The Company is not responsible for damage arising from your failure to follow instructions
relating to its use.
NOTWITHSTANDING ANYTHING TO THE CONTRARY AND TO THE MAXIMUM EXTENT
PERMITTED BY APPLICABLE LAW, THE COMPANY PROVIDES THE PRODUCT “AS-IS” AND
“AS-AVAILABLE” FOR YOUR CONVENIENCE AND THE COMPANY AND ITS LICENSORS

13
GET IN TOUCH!
GET IN TOUCH!
AND SUPPLIERS EXPRESSLY DISCLAIM ALL WARRANTIES AND CONDITIONS, WHETHER
EXPRESSED, IMPLIED, OR STATUTORY, INCLUDING THE WARRANTIES OF MERCHANTABILITY,
FITNESS FOR A PARTICULAR PURPOSE, TITLE, QUIET ENJOYMENT, ACCURACY, AND NON-
INFRINGEMENT OF THIRD-PARTY RIGHTS. THE COMPANY DOES NOT GUARANTEE ANY
SPECIFIC RESULTS FROM THE USE OF THE PRODUCT, OR THAT THE COMPANY WILL
CONTINUE TO OFFER OR MAKE AVAILABLE THE PRODUCT FOR ANY PARTICULAR LENGTH
OF TIME. THE COMPANY FURTHER DISCLAIMS ALL WARRANTIES AFTER THE EXPRESS
WARRANTY PERIOD STATED ABOVE.
YOU USE THE PRODUCT AT YOUR OWN DISCRETION AND RISK. YOU WILL BE SOLELY
RESPONSIBLE FOR (AND THE COMPANY DISCLAIMS) ANY AND ALL LOSS, LIABILITY, OR
DAMAGES RESULTING FROM YOUR USE OF THE PRODUCT.
NO ADVICE OR INFORMATION, WHETHER ORAL OR WRITTEN, OBTAINED BY YOU FROM
THE COMPANY OR THROUGH ITS AUTHORIZED SERVICE PROVIDERS SHALL CREATE ANY
WARRANTY.
IN NO EVENT WILL THE COMPANY’S TOTAL CUMULATIVE LIABILITY ARISING FROM OR
RELATED TO THE PRODUCT, WHETHER IN CONTRACT OR TORT OR OTHERWISE EXCEED
THE FEES ACTUALLY PAID BY YOU TO THE COMPANY OR ANY OF ITS AUTHORIZED
RESELLERS FOR THE PRODUCT AT ISSUE IN THE LAST YEAR FROM YOUR PURCHASE. THIS
LIMITATION IS CUMULATIVE AND WILL NOT BE INCREASED BY THE EXISTENCE OF MORE
THAN ONE INCIDENT OR CLAIM. THE COMPANY DISCLAIMS ALL LIABILITY OF ANY KIND
OF ITS LICENSORS AND SUPPLIERS. IN NO EVENT WILL THE COMPANY OR ITS LICENSORS,
MANUFACTURERS, AND SUPPLIERS BE LIABLE FOR ANY INCIDENTAL, DIRECT, INDIRECT,
SPECIAL, PUNITIVE, OR CONSEQUENTIAL DAMAGES (SUCH AS, BUT NOT LIMITED TO,
DAMAGES FOR LOSS OF PROFITS, BUSINESS, SAVINGS, DATA, OR RECORDS) CAUSED BY
THE USE, MISUSE, OR INABILITY TO USE THE PRODUCT.
Nothing in these terms shall attempt to exclude liability that cannot be excluded under
applicable law. Some countries, states, or provinces do not allow the exclusion or limitation of
incidental or consequential damages or allow limitations on warranties, so certain limitations
or exclusions may not apply to you. This warranty gives you specific legal rights, and you may
have other rights that vary from state to state or province to province. Contact your authorized
retailer to determine if another warranty applies.
GET IN TOUCH!
info@myivation.com
1-866-849-3049
IVATION is a trademark of C&A IP Holdings LLC in the US, Canada, and the EU.
All other products, brand names, company names, and logos are trademarks of their respective
owners, used merely to identify their respective products, and are not meant to connote any
sponsorship, endorsement, or approval.
Distributed by C&A Marketing, Inc., 114 Tived Lane East, Edison, NJ 08837. Made in China.
© 2023. C&A IP Holdings LLC. All Rights Reserved.
