
'Q
Z<)JIRUSHI
GOURMET
ROASTER
OPERATING
INSTRUCTIONS
EF-VSC40
INDEX
IMPORTANT SAFEGUARDS 2 ........................................
ZOJIRUSHI
PARTS NAMES 6 .............................................................
HOW TO USE 7 . ..............................................................
HOW TO DISASSEMBLE 10 ............................................
CLEANING AND MAINTENANCE
11
. ..............................
TROUBLESHOOTING GUIDE 12 .....................................
SPECIFICATIONS 13 .........................................................
CORPORATION
2
IMPORTANT
SAFEGUARDS
Basic safety precautions should always be followed when using electrical
appliances, including the following:
1.
Read all instructions thoroughly.
2.
Avoid touching hot surfaces and do not close or clog the exaust duct or air duct under any
circumstances. The handles and knobs are provided for your safety and protection.
3.
To safeguard against fire, electric shock and possible injury, keep the power cord, plugs
and the appliance away from water or other liquids.
4.
Close supervision is necessary when any appliance is used by or near children.
5.
Unplug from outlet when not
in
use and before cleaning. Allow the appliance to cool before
adding or removing parts, and before cleaning the appliance. Make sure appliance is OFF
when not
in
use, before putting on or taking off parts, and before cleaning.
6.
Do not operate any appliance with a damaged cord or plug. If the appliance malfunctions
or has been damaged
in
any manner, unplug the appliance and return it to the nearest
authorized service facility for examination, repair or adjustment.
7.
The use of accessories or attachments not recommended by the appliance manufacturer
may result
in
fire, electric shock or other injury to persons.
8.
Do not use outdoors.
9.
Keep the power cord away from hot surfaces and do not let the cord hang over the edge
of tables or counters.
10. Do not place on or near a heated surface such as a gas or electric stove, or
in
a heated
oven.
11. Always use extreme cautions when moving appliances containing hot contents or liquids.
12. Plug the cord into a household electrical outlet. To disconnect, turn the power control to
OFF, then remove plug from wall outlet.
13. Do not use the appliance for other than intended use.
SAVE
THESE
INSTRUCTIONS
THIS APPLIANCE
IS
FOR HOUSEHOLD USE ONLY.
This appliance is supplied with a short power cord to reduce the risk of becoming entangled
in
or tipping over. Extension cords may be used if care is exercised
in
their use. If an extension
cord is used, the marked electrical rating of the cord should be at least as great as the
electrical rating of the appliance, and longer cord should be arranged so that it will not drape
over the countertop or tabletop where it can be pulled on by children or tripped over
unintentionally.
This appliance has a polarized plug (one blade is wider than the other). To reduce the risk of
electric shock, this plug was designed to fit into polarized outlet
in
only one direction. If the
plug does not fit fully into the outlet, do not attempt to force it or modify it
in
any way. Simply
reverse the plug and insert. If it still does not fit, contact a qualified electrician.
IMPORTANTES
MESURES
DE
SECURITE
Pour utiliser des appareils electriques,
ii
faudrait toujours prendre les
precautions de base, y compris les suivantes.
1.
Lisez toutes les instructions.
2.
Veuillez eviter de toucher les surfaces chaudes et ne
JAMAIS
termer ou obstruer le
conduit d'evacuation ou l'amenee d'air. Les poignees et les boutons sont
con<;us
pour
votre securite et votre protection.
3.
Pour eviter les chocs electriques, ne plongez pas
le
cordon, la fiche ou l'appareil portatif
dans l'eau ou un autre liquide.
4.
Surveillez bien les enfants s'ils utilisent un appareil ou s'ils se trouvent a proximite d'un
appareil en marche.
5.
Debranchez l'appareil apres usage ou avant de
le
nettoyer. Laissez l'appareil refroidir
avant d'en retirer ou d'y inserer les accessoires et avant de le nettoyer. Assurez-vous que
l'appareil est sur
OFF lorsque vous ne vous en servez pas, avant d'en retirer ou d'y inserer
les accessoires detachables ou encore avant de
le
nettoyer.
6.
Appareils portatifs. Ne faites pas fonctionner l'appareil
si
le
cordon ou la fiche sont
endommages,
si
l'appareil ne fonctionne pas correctment, s'il est tombe ou s'il a ete
endommage. Confiez au service de reparation recommande
le
plus proche tout examen,
reparation ou reglage electrique ou mecanique de l'appareil.
7.
L'utilisation d'accessoires non recommandes par le fabricant de l'appareil peut causer des
blessures.
8.
N'utilisez pas l'appareil a l'exterieur.
9.
Ne laissez pas
le
cordon pendre par-dessus
le
bord d'une table ou d'un comptoir et
assurez-vous que le cordon n'est pas en contact avec des surfaces chaudes.
1
o.
Ne placez pas l'appareil pres d'un brOleur a gaz allume ou d'un element electrique ou
tension ou dans un four allume.
11. Soyez tres prudent lorsque vous deplacez l'appareil contenant un liquide ou un aliment
chaud.
12. Branchez le cordon dans une prise domestique. Avant de debrancher l'appareil, placez-le
sur la position ARRET puis retirez la fiche de la prise murale.
13. N'utilisez l'appareil que pour la fonction a laquelle
ii
est destine.
CONSERVEZ
CES
INSTRUCTIONS
CET APPAREIL EST UNIQUEMENT A USAGE DOMESTIQUE.
L'appareil est equipe d'un cordon court afin de reduire les risques d'enchevetrement ou de
chutes sur
le
cordon. Des rallonges peuvent etre utilisees a condition que toutes les
precautions soient prises lors de leur utilisation.
Si
vous vous servez d'une rallonge, sa puissance electrique indiquee devra etre egale
ou
superieure a celle de l'appareil;
Le
cordon devra etre arrange de maniere
ace
qu'il ne pende
pas depuis
le
haut d'un comptoir
ou
d'une table ou
ii
serait a portee de main des enfants et ou
ii
occasionnerait des accidents dus a une chute ou a un enchevetrement. L'appareil a une prise
polarisee (l'une des lames est plus large que l'autre). Pour reduire les risques de chocs
electriques, la prise s'insere dans
un
seul sens a l'interieur d'une prise murale polarisee.
Si
la
prise ne s'adapte pas correctement dans la prise murale, retournez-la.
Si
elle ne s'adapte
toujours pas, contactez un electricien specialise. Ne cherchez en aucun cas a modifier la prise.
3
IMPORTANT
SAFEGUARDS
4
Be
sure
to
follow
the
instructions.
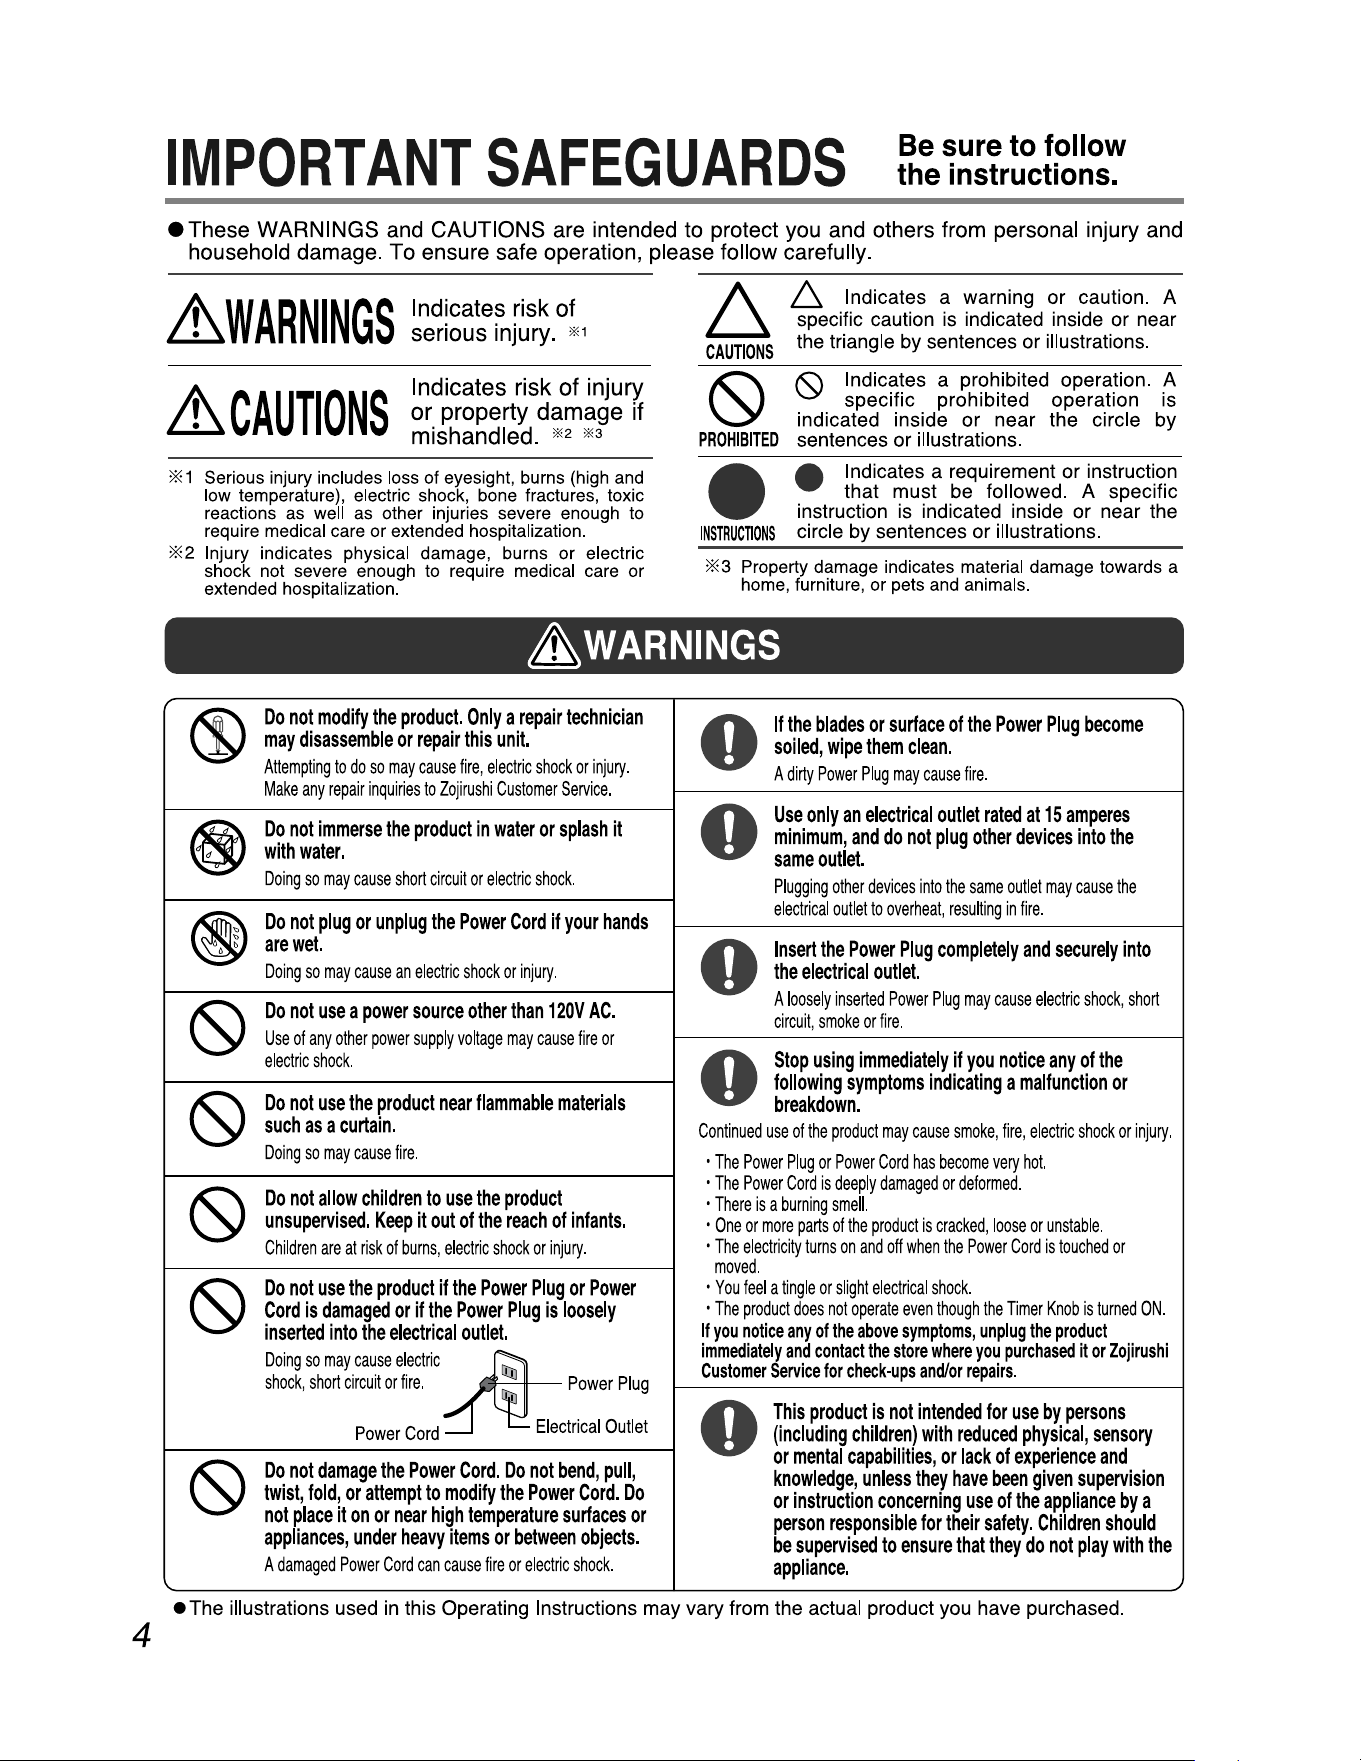
eThese WARNINGS and CAUTIONS are intended to protect you and others from personal injury and
household damage. To ensure safe operation, please follow carefully.
~WARNINGS
Indicates risk of
serious injury.
0 1
~CAUTIONS
Indicates risk of injury
or property damage if
mishandled.
02
0 3
* 1
Serious
injury
includes
loss
of
eyesight
,
burns
{high
and
low
temperature),
electric
shock,
bone
fractures,
toxic
reactions
as
well
as
other
injuries
severe
enough
to
require
medical
care
or
extended
hospitalization
.
*2
Injury
indicates
physical
damage,
burns
or
electric
shock
not
severe
enough
to
require
medical
care
or
extended
hospitalization
.
6
CAUTIONS
(S)
6,
Indicates a warning or caution. A
specific caution
is
indicated inside or near
the triangle
by
sentences or illustrations.
PROHIBITED
Indicates a prohibited operation. A
specific prohibited operation is
indicated inside or near the circle by
sentences or illustrations .
INSTRUCTIONS
•
(S)
• Indicates a requirement or instruction
that must
be
followed. A specific
instruction
is
indicated inside or near the
circle
by
sentences or illustrations.
*3
Property
damage
indicates
material
damage
towards
a
home,
furniture,
or
pets
and
animals.
~WARNINGS
©
Do
not
modify
the
product.
Only
a
repair
technician
may
disassemble
or
repair
this
unit.
Attempting
to
do
so
may
cause
fire,
electric
shock
or
injury.
Make
any
repair
inquiries
to
Zojirushi
Customer
Service
.
Do
not
immerse
the
product
in
water
or
splash
it
with
water.
Doing
so
may
cause
short
circuit
or
electric
shock
.
Do
not
plug
or
unplug
the
Power
Cord
if
your
hands
are
wet.
Doing
so
may
cause
an
electric
shock
or
injury
.
Do
not
use
a
power
source
other
than
120V
AC.
Use
of
any
other
power
supply
voltage
may
cause
fire
or
electric
shock
.
Do
not
use
the
product
near
flammable
materials
such
as
a
curtain.
Doing
so
may
cause
fire
.
Do
not
allow
children
to
use
the
product
unsupervised.
Keep
it
out
of
the
reach
of
infants.
Children
are
at
risk
of
burns,
electric
shock
or
injury
.
Do
not
use
the
product
if
the
Power
Plug
or
Power
Cord
is
damaged
or
if
the
Power
Plug
is
loosely
inserted
into
the
electrical
outlet.
Doing
so
may
cause'"""
shock
,
short
circuit
or
fire
.
A-:
Ql]
Power
Plug
Power
Cord
Electrical
Outlet
Do
not
damage
the
Power
Cord.
Do
not
bend,
pull,
twist,
fold,
or
attempt
to
modify
the
Power
Cord.
Do
not
place
it
on
or
near
high
temperature
surfaces
or
appliances,
under
heavy
items
or
between
objects.
A
damaged
Power
Cord
can
cause
fire
or
electric
shock
.
0
If
the
blades
or
surface
of
the
Power
Plug
become
soiled,
wipe
them
clean.
A
dirty
Power
Plug
may
cause
fire
.
@
0
Use
only
an
electrical
outlet
rated
at
15
amperes
minimum,
and
do
not
plug
other
devices
into
the
same
outlet.
Plugging
other
devices
into
the
same
outlet
may
cause
the
electrical
outlet
to
overheat
,
resulting
in
fire
.
~
0
Insert
the
Power
Plug
completely
and
securely
into
the
electrical
outlet.
(S)
A
loosely
inserted
Power
Plug
may
cause
electric
shock,
short
circuit,
smoke
or
fire
.
0
Stop
using
immediately
if
you
notice
any
of
the
following
symptoms
indicating
a
malfunction
or
breakdown.
(S)
Continued
use
of
the
product
may
cause
smoke,
fire,
electric
shock
or
injury.
•
The
Power
Plug
or
Power
Cord
has
become
very
hot.
(S)
•
The
Power
Cord
is
deeply
damaged
or
deformed
.
•
There
is
a
burning
smell.
•
One
or
more
parts
of
the
product
is
cracked,
loose
or
unstable.
•
The
electricity
turns
on
and
off
when
the
Power
Cord
is
touched
or
moved
.
(S)
•
You
feel
a
tingle
or
slight
electrical
shock
.
•
The
product
does
not
operate
even
though
the
Timer
Knob
is
turned
ON
.
If
you
notice
any
of
the
above
symptoms,
unplug
the
product
immediately
and
contact
the
store
where
you
purchased
it
or
Zojirushi
Customer
Service
for
check-ups
and/or
repairs
.
0
(S)
This
product
is
not
intended
for
use
by
persons
(including
children)
with
reduced
physical,
sensory
or
mental
capabilities,
or
lack
of
experience
and
knowledge,
unless
they
have
been
given
supervision
or
instruction
concerning
use
of
the
appliance
by
a
person
responsible
for
their
safety.
Children
should
be
supervised
to
ensure
that
they
do
not
play
with
the
appliance.
• The illustrations used
in
this Operating Instructions may vary from the actual product
you
have purchased .
A
CAUTIONS
®
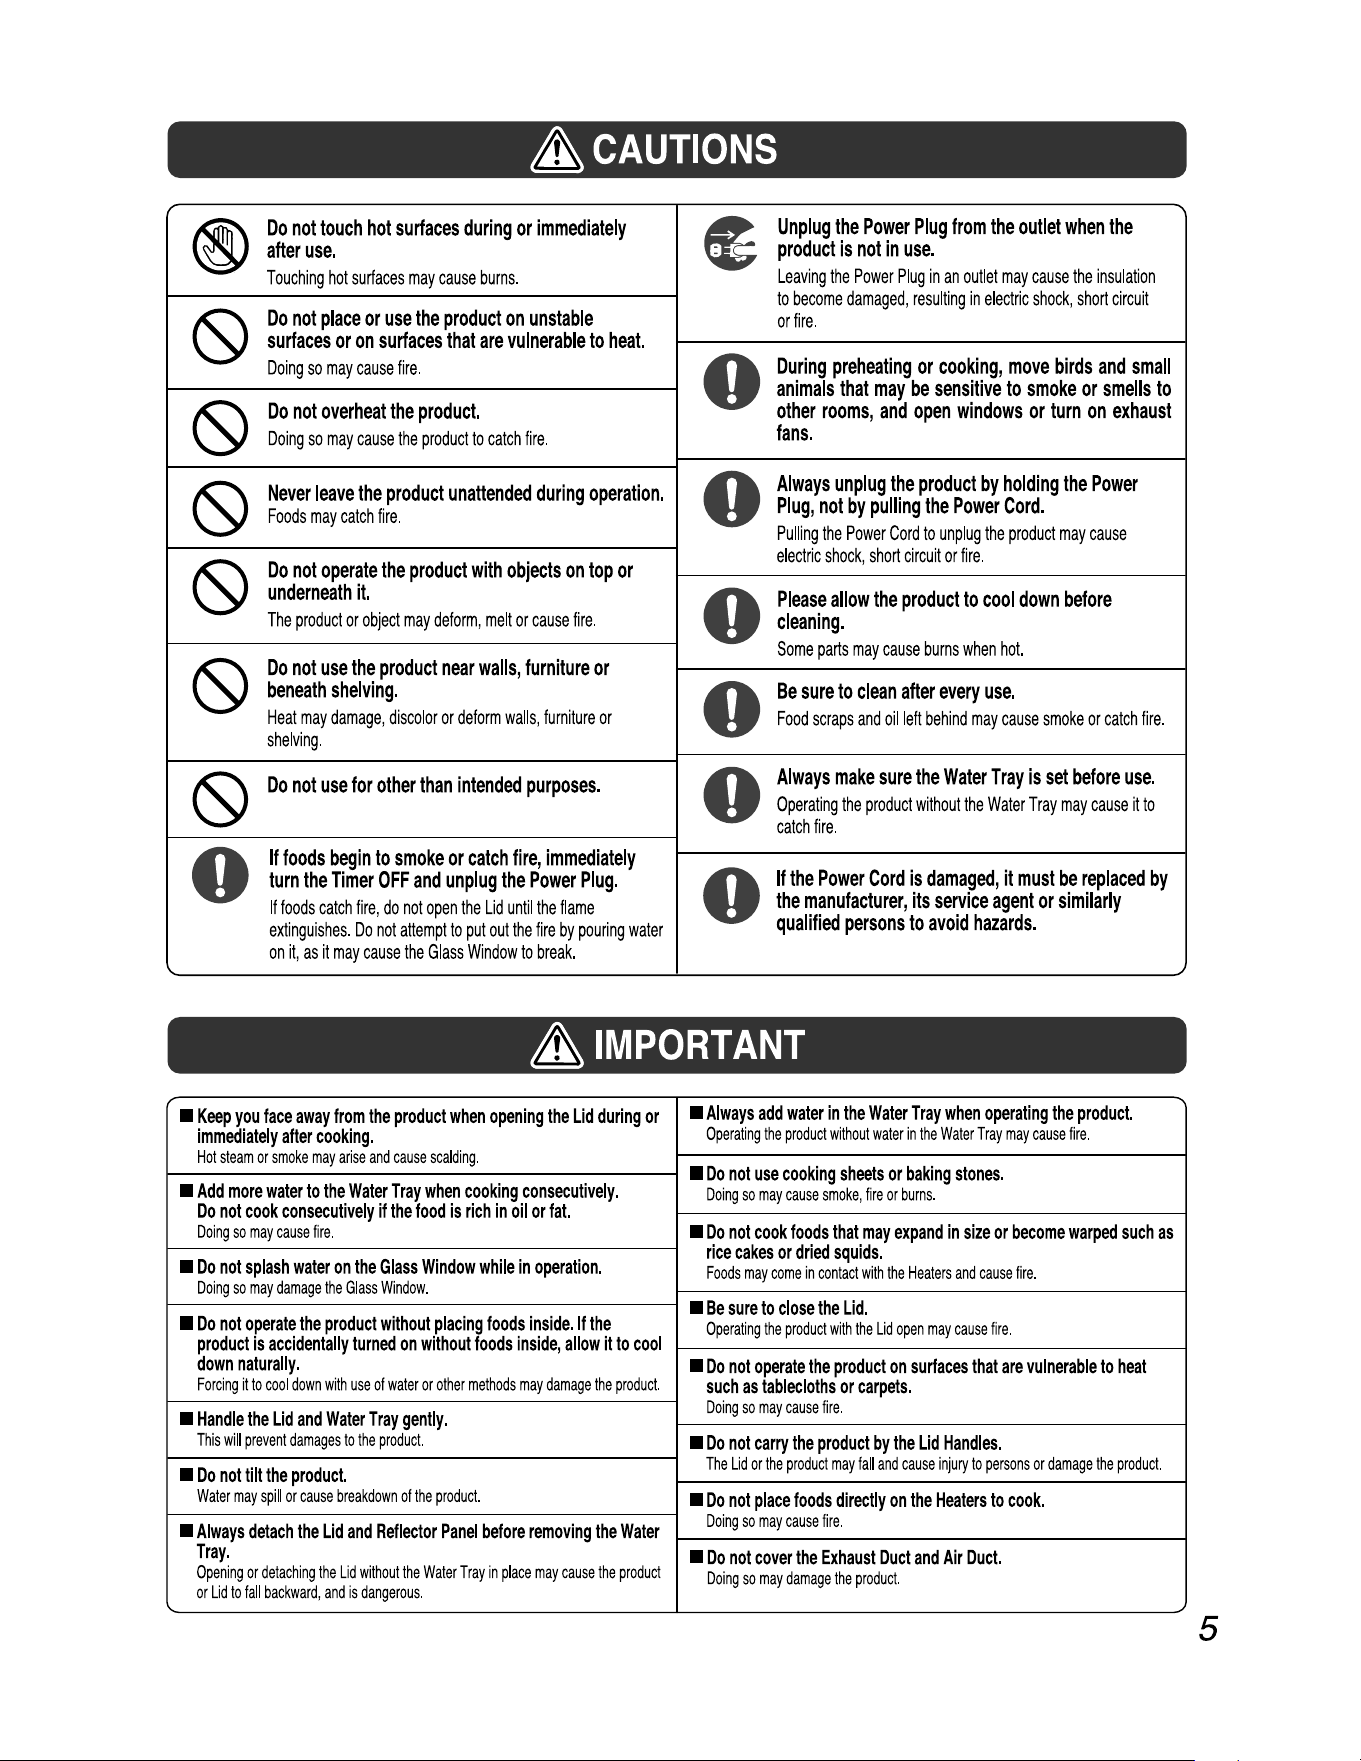
Do
not
touch
hot
surfaces
during
or
immediately
after
use.
Touching
hot
surfaces
may
cause
burns
.
Do
not
place
or
use
the
product
on
unstable
surfaces
or
on
surfaces
that
are
vulnerable
to
heat.
Doing
so
may
cause
fire
.
Do
not
overheat
the
product.
Doing
so
may
cause
the
product
to
catch
fire
.
Never
leave
the
product
unattended
during
operation.
Foods
may
catch
fire
.
Do
not
operate
the
product
with
objects
on
top
or
underneath
it.
The
product
or
object
may
deform
,
melt
or
cause
fire
.
Do
not
use
the
product
near
walls,
furniture
or
beneath
shelving.
Heat
may
damage,
discolor
or
deform
walls,
furniture
or
shelving
.
Do
not
use
for
other
than
intended
purposes.
If
foods
begin
to
smoke
or
catch
fire,
immediately
turn
the
Timer
OFF
and
unplug
the
Power
Plug.
If
foods
catch
fire,
do
not
open
the
Lid
until
the
flame
extinguishes.
Do
not
attempt
to
put
out
the
fire
by
pouring
water
on
it
,
as
it
may
cause
the
Glass
Window
to
break
.
C
Unplug
the
Power
Plug
from
the
outlet
when
the
product
is
not
in
use.
Leaving
the
Power
Plug
in
an
outlet
may
cause
the
insulation
to
become
damaged,
resulting
in
electric
shock,
short
circuit
or
fire.
~
0
During
preheating
or
cooking,
move
birds
and
small
animals
that
may
be
sensitive
to
smoke
or
smells
to
other
rooms,
and
open
windows
or
turn
on
exhaust
fans.
~
~
0
Always
unplug
the
product
by
holding
the
Power
Plug,
not
by
pulling
the
Power
Cord.
Pulling
the
Power
Cord
to
unplug
the
product
may
cause
electric
shock
,
short
circuit
or
fire
.
~
0
Please
allow
the
product
to
cool
down
before
cleaning.
~
Some
parts
may
cause
burns
when
hot.
0
Be
sure
to
clean
after
every
use.
Food
scraps
and
oil
left
behind
may
cause
smoke
or
catch
fire
.
~
0
Always
make
sure
the
Water
Tray
is
set
before
use.
Operating
the
product
without
the
Water
Tray
may
cause
it
to
catch
fire
.
0
0
If
the
Power
Cord
is
damaged,
it
must
be
replaced
by
the
manufacturer,
its
service
agent
or
similarly
qualified
persons
to
avoid
hazards.
A
IMPORTANT
■
Keep
you
face
away
from
the
product
when
opening
the
Lid
during
or
immediately
after
cooking.
Hot
steam
or
smoke
may
arise
and
cause
scalding
.
Add
more
water
to
the
Water
Tray
when
cooking
consecutively.
Do
not
cook
consecutively
if
the
food
is
rich
in
oil
or
fat
.
Doing
so
may
cause
fire
.
Do
not
splash
water
on
the
Glass
Window
while
in
operation.
Doing
so
may
damage
the
Glass
Window
.
Do
not
operate
the
product
without
placing
foods
inside.
If
the
product
is
accidentally
turned
on
without
foods
inside,
allow
it
to
cool
down
naturally.
Forcing
ii
to
cool
down
with
use
of
water
or
other
methods
may
damage
the
product
.
Handle
the
Lid
and
Water
Tray
gently.
This
will
prevent
damages
to
the
product
.
Do
not
tilt
the
product.
Water
may
spill
or
cause
breakdown
of
the
product
.
Always
detach
the
Lid
and
Reflector
Panel
before
removing
the
Water
Tray.
Opening
or
detaching
the
Lid
without
the
Water
Tray
in
place
may
cause
the
product
or
Lid
to
fall
backward
,
and
is
dangerous.
■
Always
add
water
in
the
Water
Tray
when
operating
the
product.
Operating
the
product
without
water
in
the
Water
Tray
may
cause
fire.
■
Do
not
use
cooking
sheets
or
baking
stones
.
■
Doing
so
may
cause
smoke,
fire
or
burns.
■
Do
not
cook
foods
that
may
expand
in
size
or
become
warped
such
as
rice
cakes
or
dried
squids
.
■
Foods
may
come
in
contact
with
the
Heaters
and
cause
fire
.
■
Be
sure
to
close
the
Lid
.
■
Operating
the
product
with
the
Lid
open
may
cause
fire.
■
Do
not
operate
the
product
on
surfaces
that
are
vulnerable
to
heat
such
as
tablecloths
or
carpets.
■
Doing
so
may
cause
fire
.
■
Do
not
carry
the
product
by
the
Lid
Handles
.
■
The
Lid
or
the
product
may
fall
and
cause
injury
to
persons
or
damage
the
product.
■
Do
not
place
foods
directly
on
the
Heaters
to
cook.
■
5
Doing
so
may
cause
fire
.
■
Do
not
cover
the
Exhaust
Duct
and
Air
Duct.
Doing
so
may
damage
the
product
.
PARTS
NAMES
e-ta:J.ii•h••------
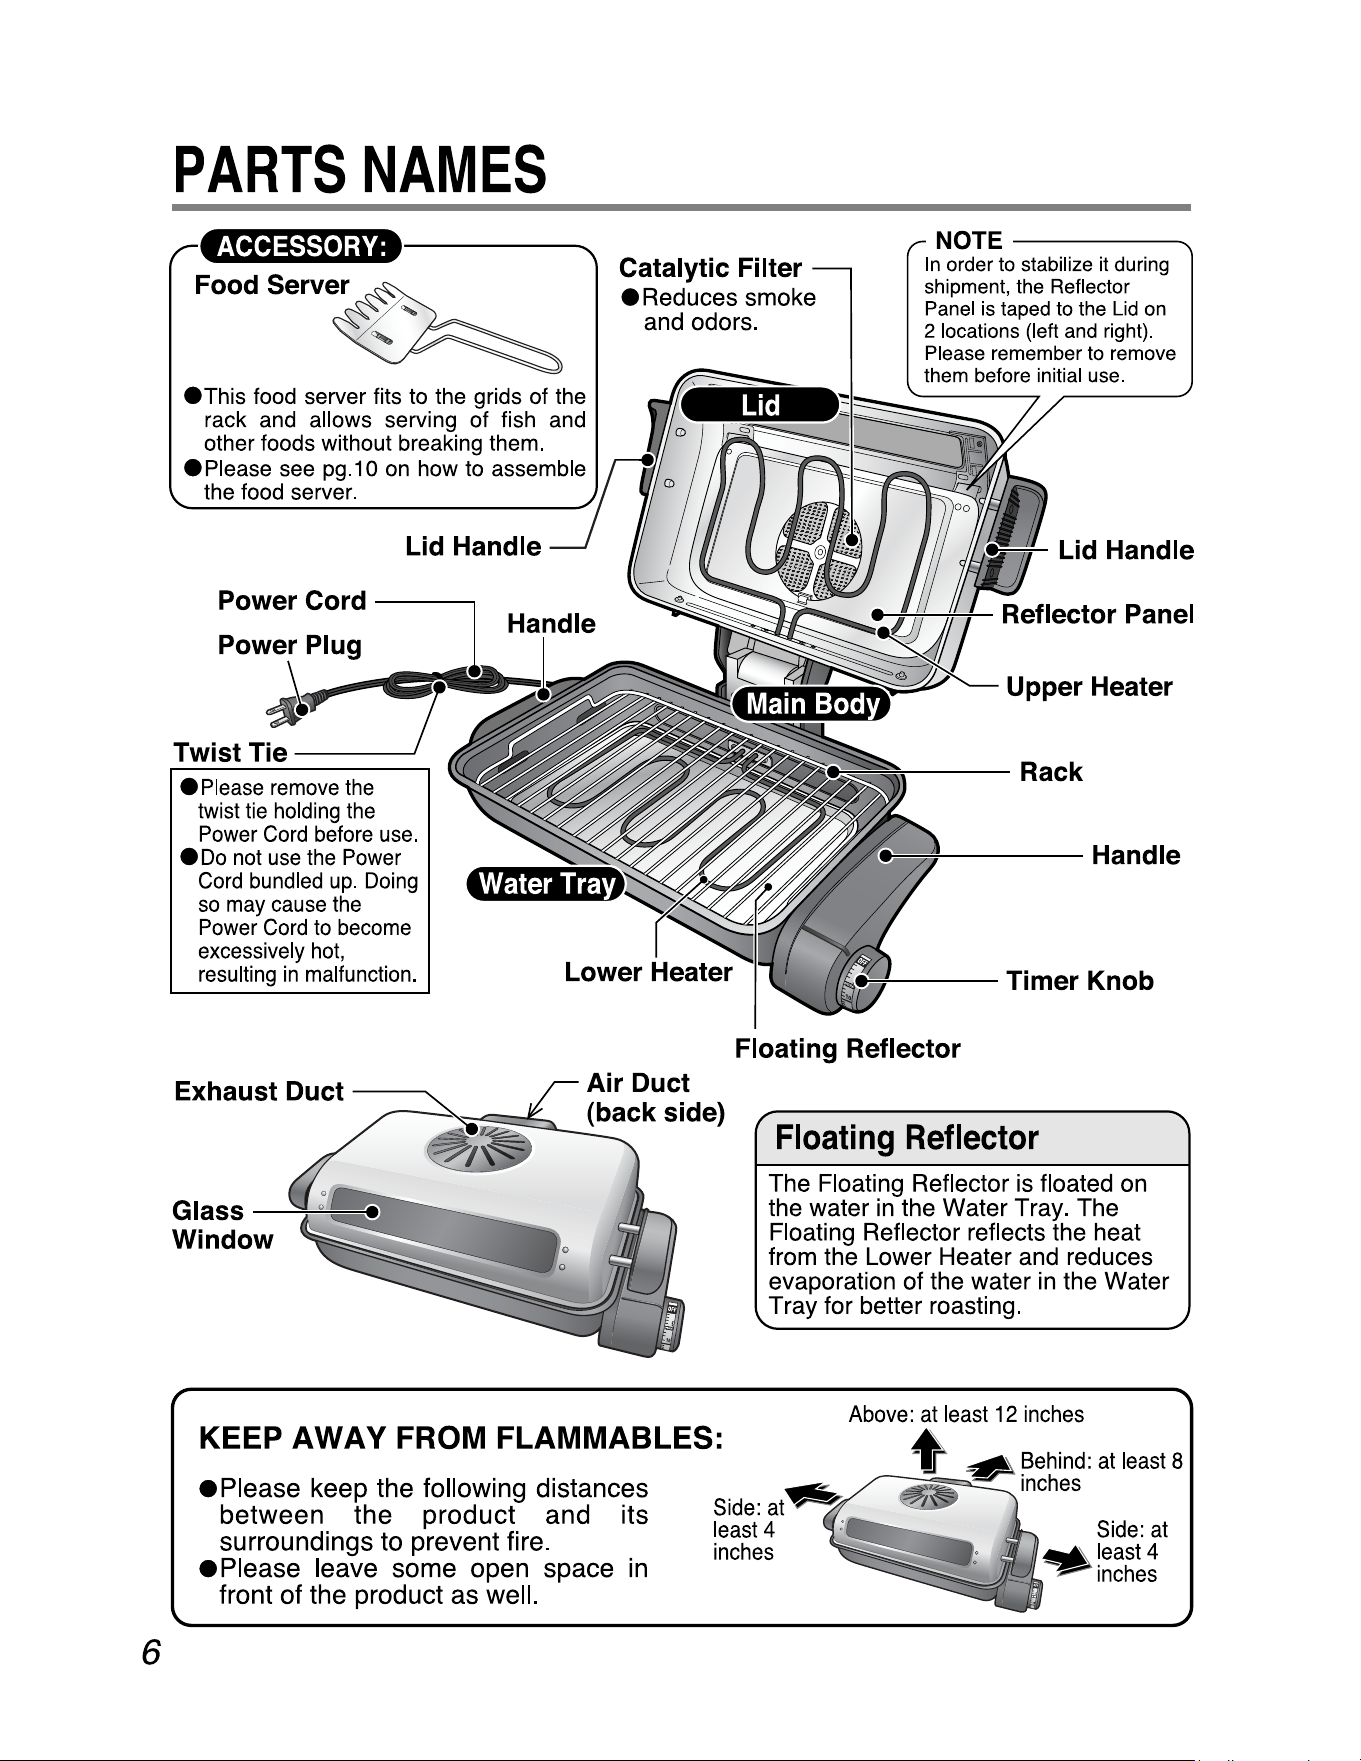
Food Server
eThis food server fits to the grids of the
rack and allows serving of fish and
other foods without breaking them.
• Please see pg.10 on how to
assem~le
the food server.
NOTE------
ln order to stabilize it during
shipment, the Reflector
Panel is taped to the Lid on
2 locations (left and right) .
Please remember to remove
them before initial use.
• Please remove the
twist tie holding the
Power Cord before use.
•
Do
not use the Power
Cord bundled
up
. Doing
so
may cause the
Power Cord
to
become
excessively
hot,
resulting
in
malfunction.
Floating
Reflector
The Floating Reflector is floated on
the water
in
the Water Tray. The
Floating Reflector reflects the heat
from the Lower Heater and reduces
evaporation of the water
in
the Water
Tray for better roasting.
KEEP AWAY FROM FLAMMABLES:
♦
ePlease keep the following distances
between the product and its
surroundings to prevent fire.
• Please leave some open space
in
front of the product as well.
6
Catalytic Filter
~ '
• Reduces smoke
and odors.
CD
CD
Lid Handle
Power Cord
Handle
Power Plug
lector Panel
~
.........
.....
--~
lllll'llii~-.~
<§,
-;;;;;,.,,,
Upper Heater
Twist
Tie---~
Exhaust Duct
Glass
Window
45'
Lower Hea
.-------
Rack
Floating Reflector
r
\,..
Above:atleast12inches
Side
: at-,g,,
least 4
inches
HOW
TO
USE
Before
u
eThis
product
is
designed
for
roasting
foods.
Please
do
not
use
it
for
any
other
purposes.
ePlease
remove
all
packaging
placed
inside
the
product
before
use.
evou
may
see
light
smoke
the
first
time
you
use
the
roaster.
This
is
normal.
The
smoke
is
harmless
and
will
soon
disappear.
ese
sure
to
check
that
the
Lid
and
Reflector
Panel
are
securely
set
(see
pg.1
O
"HOW
TO
DISASSEMBLE").
1 Insert the Power Plug into an electrical outlet.
Be
sure
to
check
that
the
Timer
Knob
is
at
the
OFF
position.
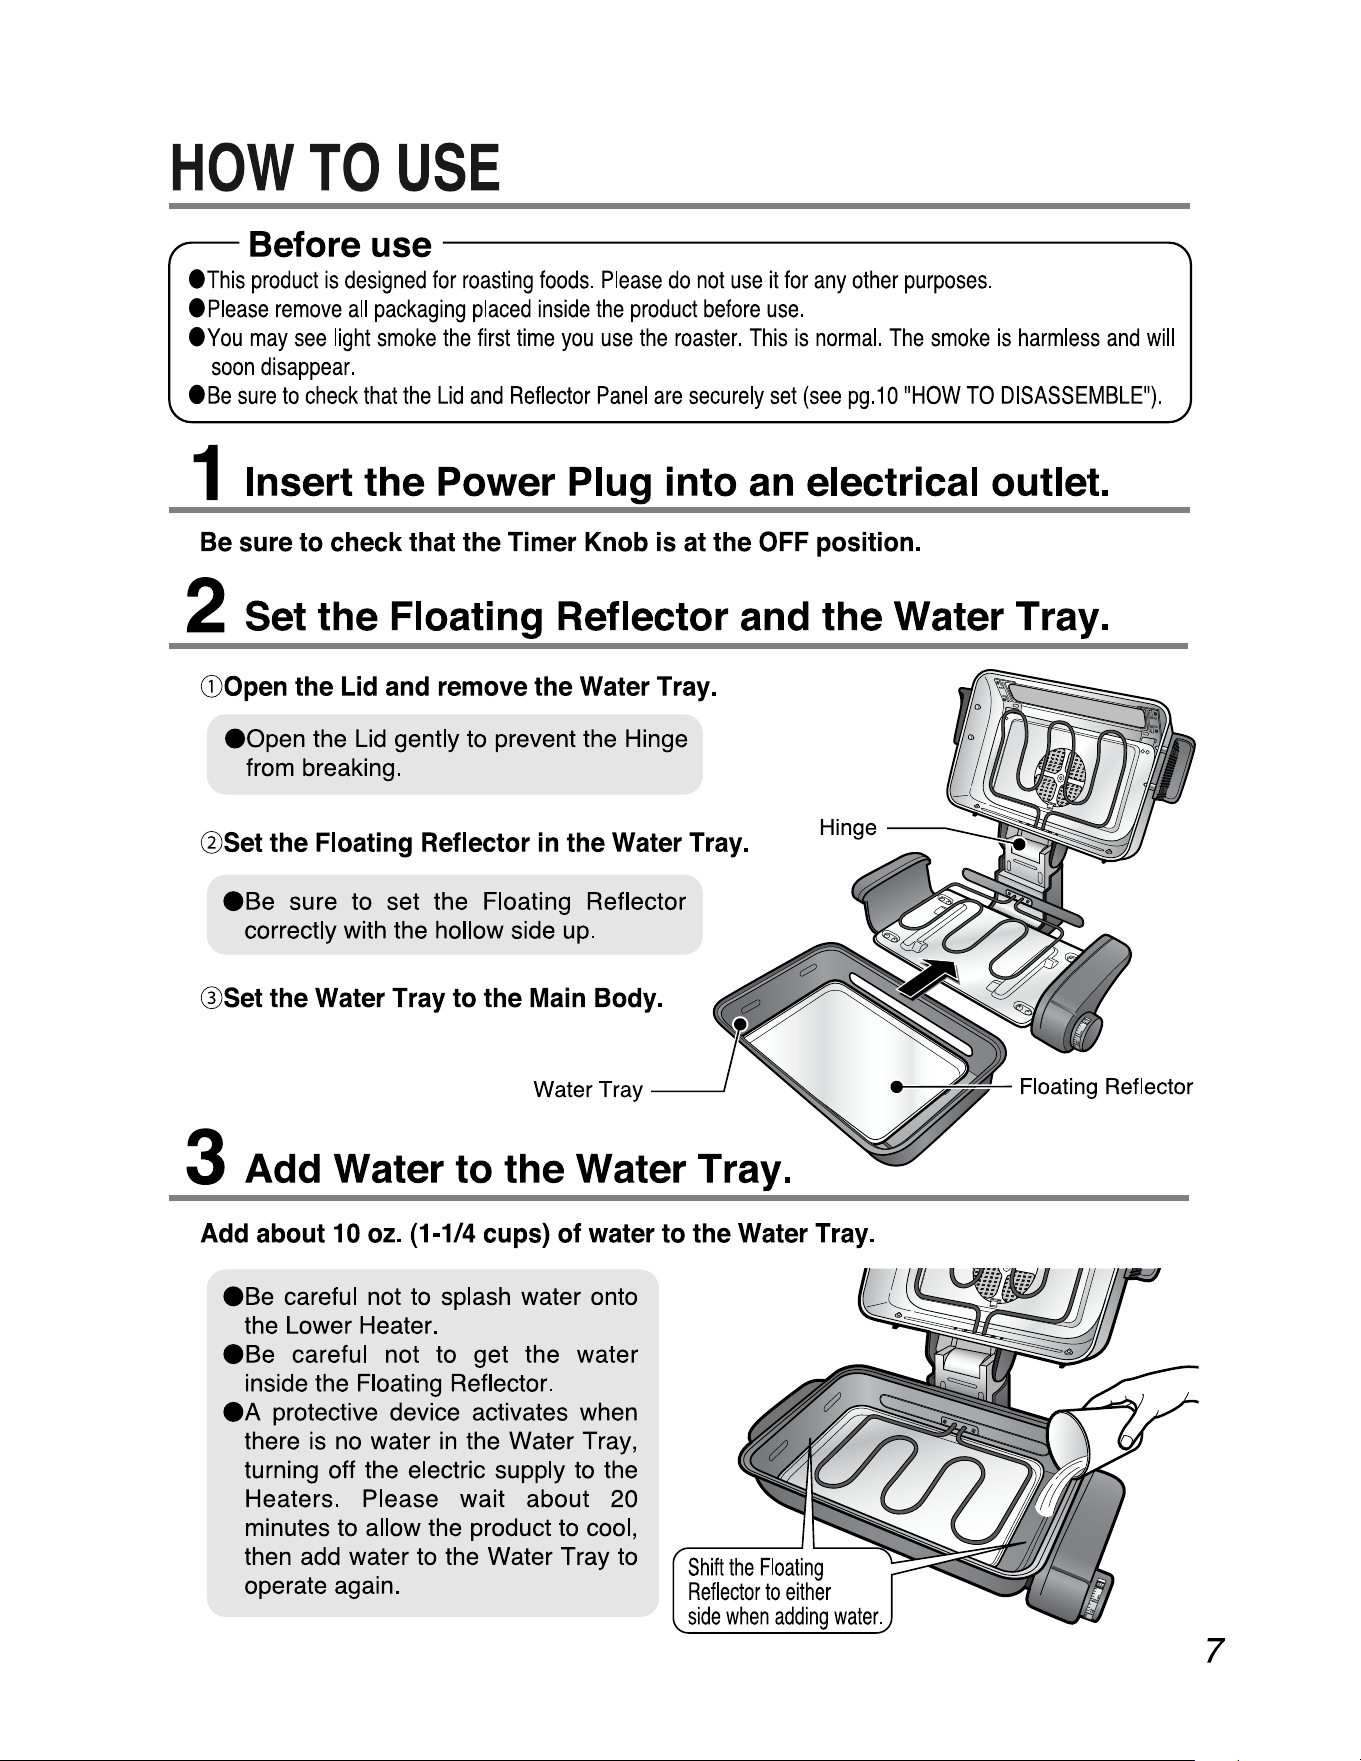
2 Set the Floating Reflector and the Water Tray.
CDOpen
the
Lid
and
remove
the
Water
Tray.
eopen
the
Lid
gently to prevent the Hinge
from breaking.
@Set
the
Floating
Reflector
in
the
Water
Tray.
ese
sure to set the Floating Reflector
correctly with the hollow side
up.
®Set
the
Water
Tray
to
the
Main
Body.
3 Add Water to the Water Tray.
Hinge
Add
about
10
oz.
(1-1/4
cups)
of
water
to
the
Water
Tray.
Floating Reflector
ese
careful not to splash water onto
the Lower Heater.
[L
~
"'
ese
careful not to get the water
inside the Floating Reflector.
eA
protective device activates when
there is
no
water
in
the Water Tray,
turning off the electric supply to the
Heaters. Please wait about 20
minutes to allow the product to cool,
then add water to the Water Tray to
operate again.
r-
se------------------"
~
~
Water
Tray
__J
Shift
the
Floating
Reflector
to
either
side
when
adding
water.
"'
7
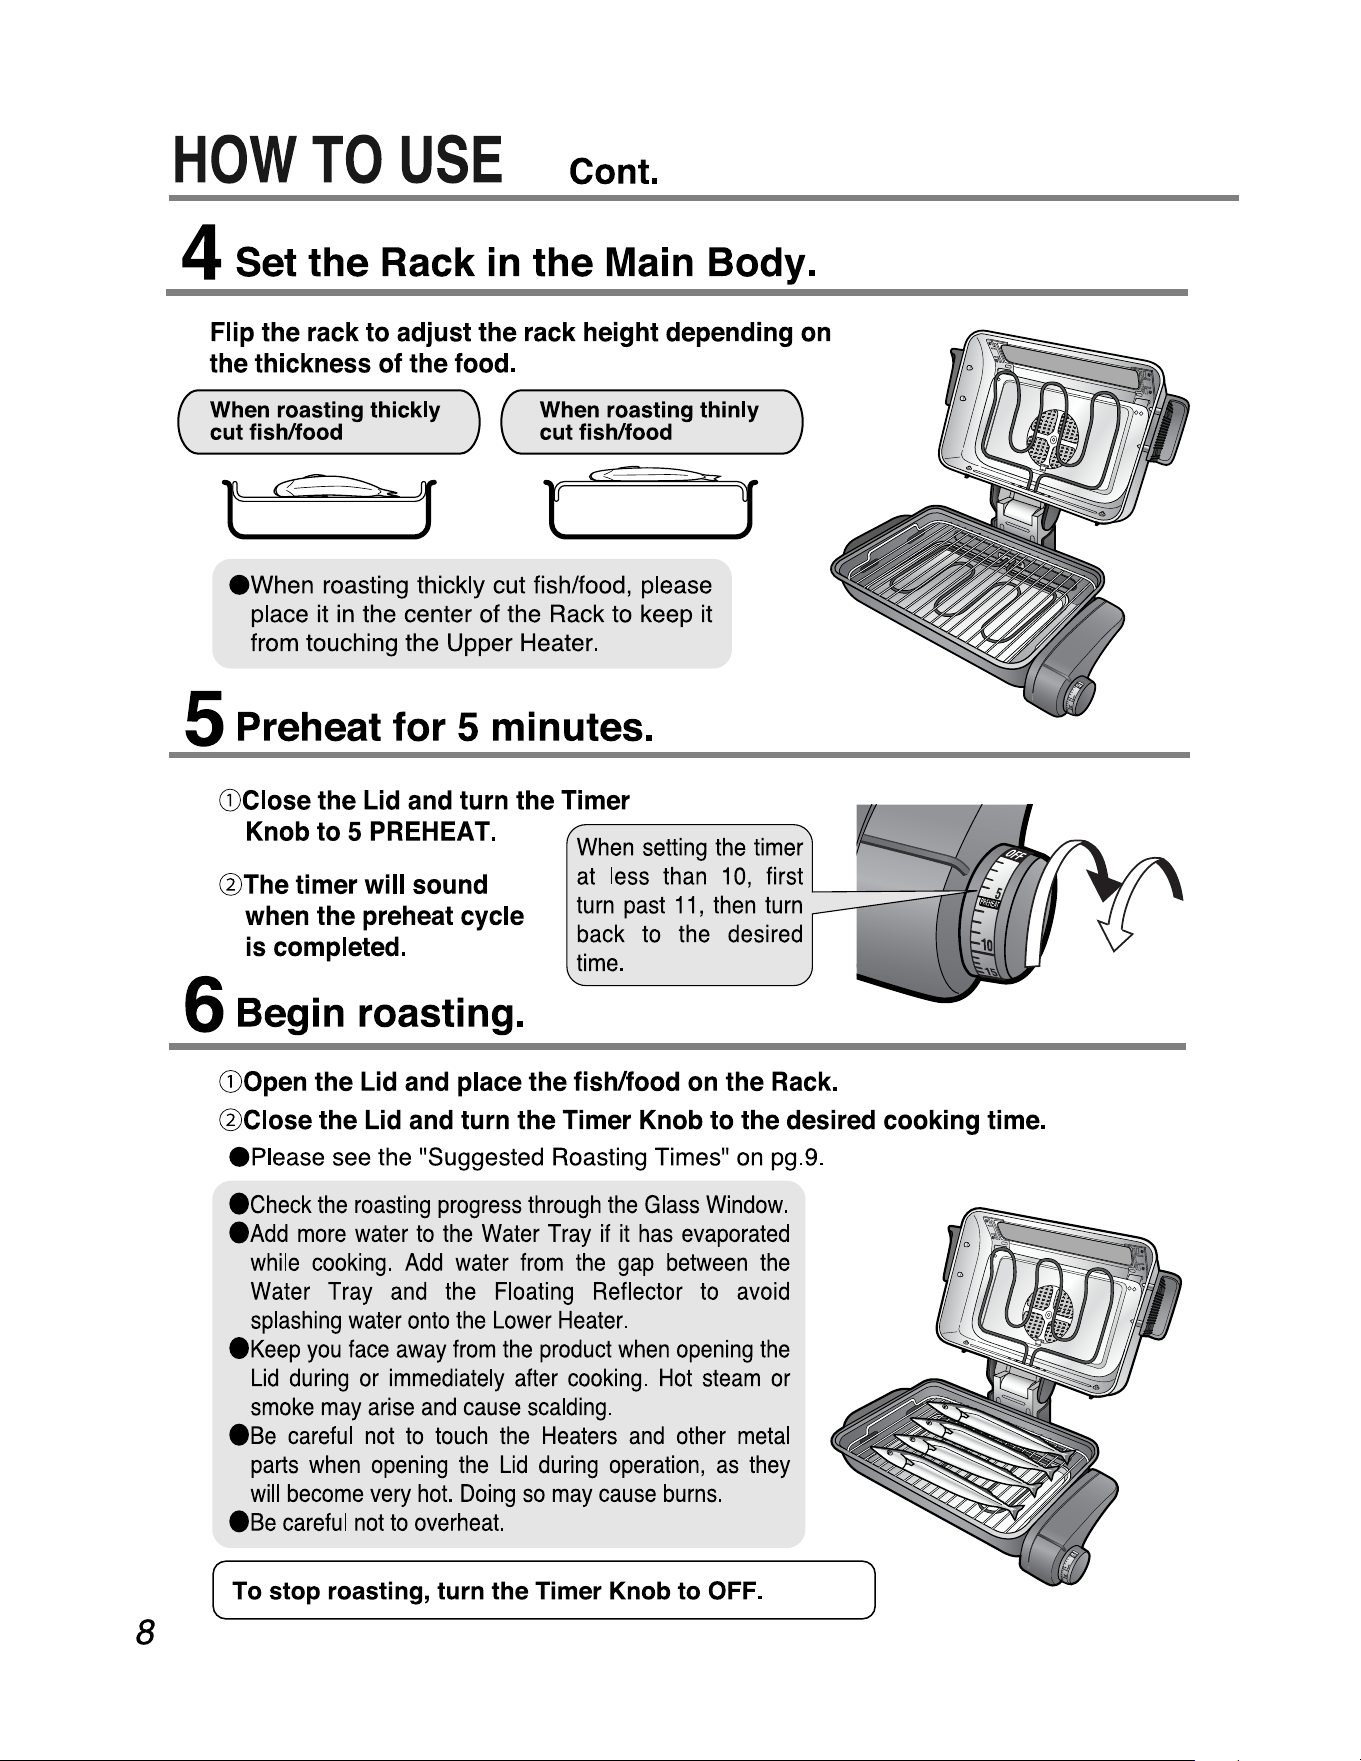
4 Set
the
Rack in
the
Main Body.
8
Flip
the
rack
to
adjust
the
rack
height
depending
on
the
thickness
of
the
food.
When roasting thickly
cutfisMood
When roasting thinly
cutfisMood
l_a:_~_J
ewhen roasting thickly cut fish/food, please
place it
in
the center of the Rack
to
keep it
from touching the Upper Heater.
5 Preheat for 5 minutes.
G)Close
the
Lid
and
turn
the
Timer
Knob
to
5
PREHEAT.
@The
timer
will
sound
when
the
preheat
cycle
is
completed.
When
setting
the
timer
at
less
than
10,
first
turn
past
11,
then
turn
back
to
the
desired
time.
HOW
TO
USE
Cont.
6 Begin roasting.
G)Open
the
Lid
and
place
the
fish/food
on
the
Rack.
@Close
the
Lid
and
turn
the
Timer
Knob
to
the
desired
cooking
time.
ePlease see the "Suggested Roasting Times"
on
pg.9.
echeck
the
roasting
progress
through
the
Glass
Window.
eAdd
more
water
to
the
Water
Tray
if
it
has
evaporated
while
cooking.
Add
water
from
the
gap
between
the
Water
Tray
and
the
Floating
Reflector
to
avoid
splashing
water
onto
the
Lower
Heater.
eKeep
you
face
away
from
the
product
when
opening
the
Lid
during
or
immediately
after
cooking.
Hot
steam
or
smoke
may
arise
and
cause
scalding.
ese
careful
not
to
touch
the
Heaters
and
other
metal
parts
when
opening
the
Lid
during
operation,
as
they
will
become
very
hot.
Doing
so
may
cause
burns.
ese
careful
not
to
overheat.
To stop roasting, turn the Timer Knob
to
OFF.
'------'----::::::::=~c
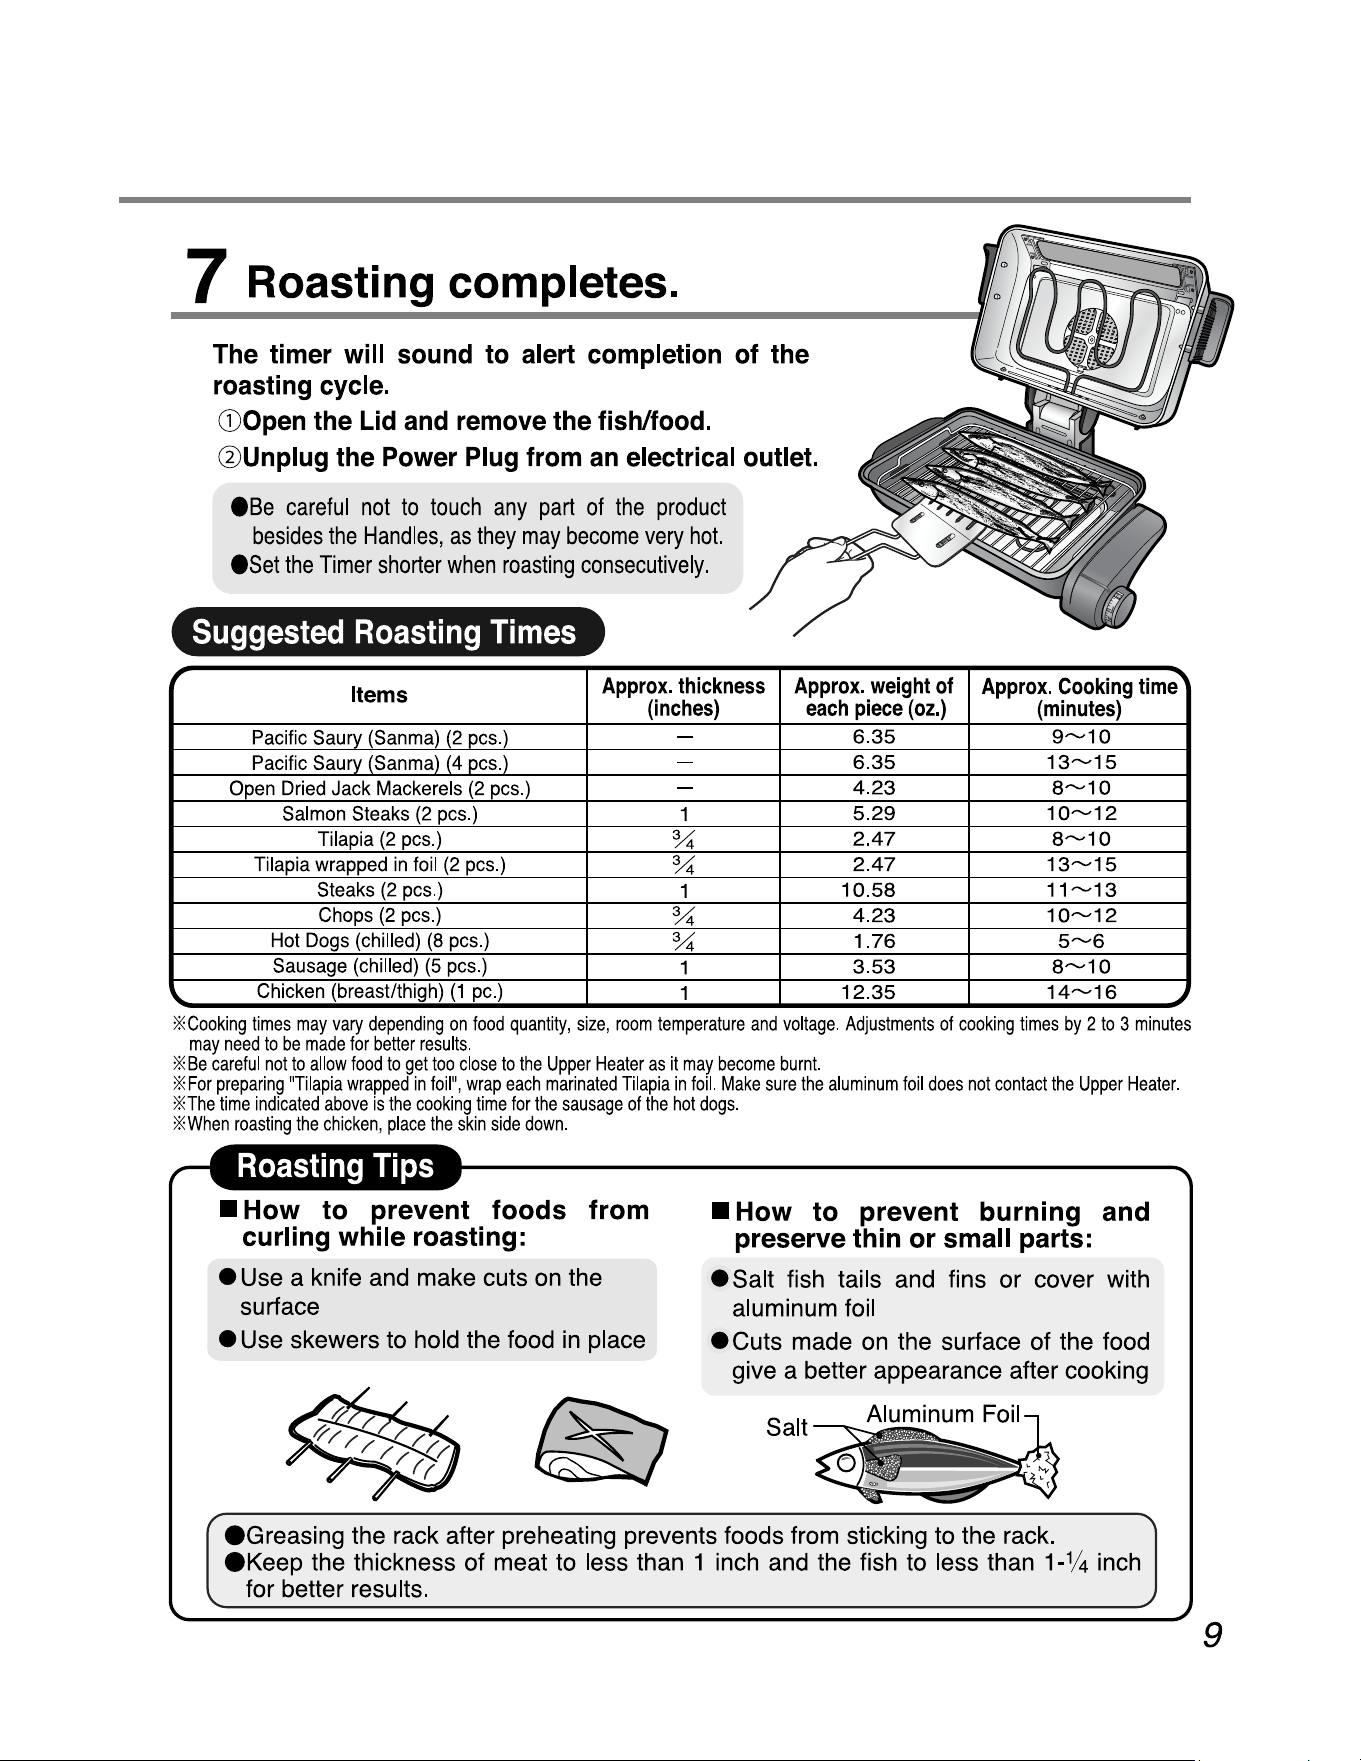
7 Roasting completes.
The timer will sound to alert completion of the
roasting cycle.
G)Open
the
Lid
and remove the fish/food.
@Unplug the Power Plug from
an
electrical outlet.
ese
careful
not
to
touch
any
part
of
the
product
besides
the
Handles,
as
they
may
become
very
hot.
eset
the
Timer
shorter
when
roasting
consecutively.
Suggested
Roasting
Times
~
Items
Approx.
thickness
(inches)
Approx.
weight
of
each
piece
(oz.)
Approx.
Cooking
time.,
(minutes)
Pacific
Saury
(Sanma)
(2
pcs.)
-
6 .
35
9"-'10
Pacific
Saury
(Sanma)
(4
pcs.)
-
6 .
35
13"-'15
Open
Dried
Jack
Mackerels
(2
pcs
.)
-
4 .
23
8"-'10
Salmon
Steaks
(2
pcs
.)
1
5 .
29
10"-'12
Tilapia
(2
pcs
.)
¾
2.47
8"-'10
Tilapia
wrapped
in
foil
(2
pcs
.)
¾
2.47
13"-'15
Steaks
(2
pcs
.)
1
10
.
58
11"-'13
Chops
(2
pcs
.)
¾
4 .
23
10"-'12
Hot
Dogs
(chilled)
(8
pcs.)
¾
1.
76
5"-'6
Sausage
(chilled)
(5
pcs.)
1
3.
53
8"-'10
""
Chicken
(breast/thigh)
(1
pc
.)
1
12
.
35
14"-'16
~
*Cooking
limes
may
vary
depending
on
food
quantity,
size,
room
temperature
and
voltage.
Adjustments
of
cooking
limes
by
2
to
3
minutes
may
need
to
be
made
for
better
results
.
*Be
careful
not
to
allow
food
to
get
too
close
to
the
Upper
Heater
as
it
may
become
burnt.
*For
preparing
"Tilapia
wrapped
in
foil",
wrap
each
marinated
Tilapia
in
foil.
Make
sure
the
aluminum
foil
does
not
contact
the
Upper
Heater.
lHhe
time
indicated
above
is
the
cooking
time
for
the
sausage
of
the
hot
dogs
.
*When
roasting
the
chicken,
place
the
skin
side
down.
r
■
How
to prevent foods from
curling while roasting:
• Use a knife and make cuts on the
surface
• Use skewers to hold the food
in
place
■
How
to prevent burning and
preserve thin or small parts:
•Salt
fish tails and fins or cover with
aluminum foil
• Cuts made on the surface of the food
give a better appearance after cooking
Salt
eGreasing the rack after preheating prevents foods from sticking to the rack.
eKeep the thickness of meat to less than 1 inch and the fish to less than 1-¼ inch
for better results. '"
~
9
HOW
TO
DISASSEMBLE
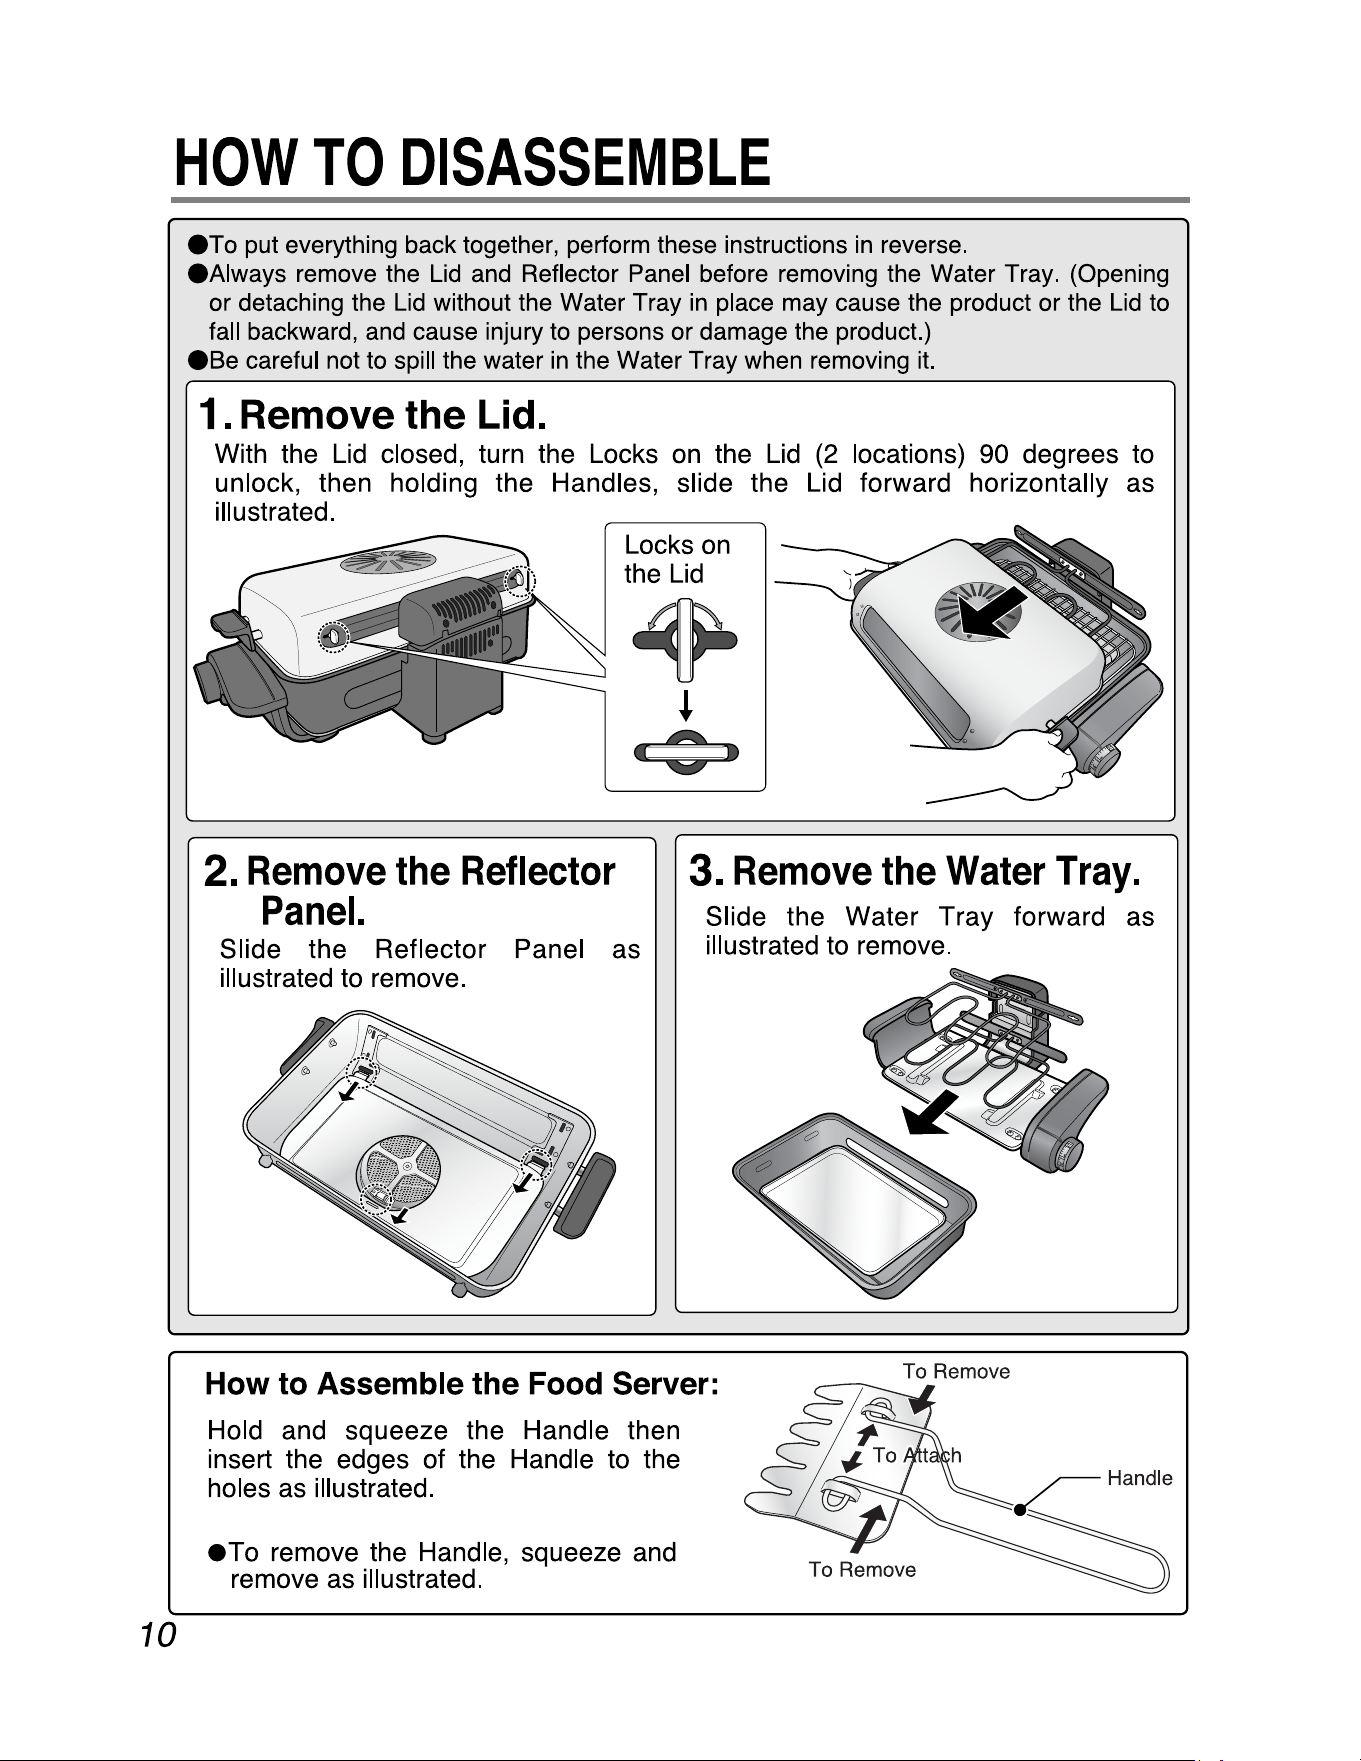
eTo
put everything back together, perform these instructions
in
reverse.
eAlways remove the Lid and Reflector Panel before removing the Water Tray. (Opening
or detaching the Lid without the Water Tray
in
place may cause the product or the Lid to
fall backward, and cause injury to persons or damage the product.)
ese
careful not to spill the water
in
the Water Tray when removing
it.
1. Remove the Lid.
With the
Lid
closed, turn the Locks
on
the
Lid
(2
locations)
90
degrees to
unlock, then holding the Handles, slide the
Lid
forward horizontally as
illustrated.
2.
Remove
the
Reflector
Panel.
Slide the Reflector Panel as
illustrated to remove.
3.
Remove
the
Water
Tray.
Slide the Water Tray forward as
illustrated to remove.
10
Locks
on
the
Lid
How to Assemble the Food Server:
Hold and squeeze the Handle then
insert the edges of the Handle to the
holes
as
illustrated.
eTo remove the Handle, squeeze
and
remove
as
illustrated.
To Remove
-----------~
To Attach
To Remove
Handle
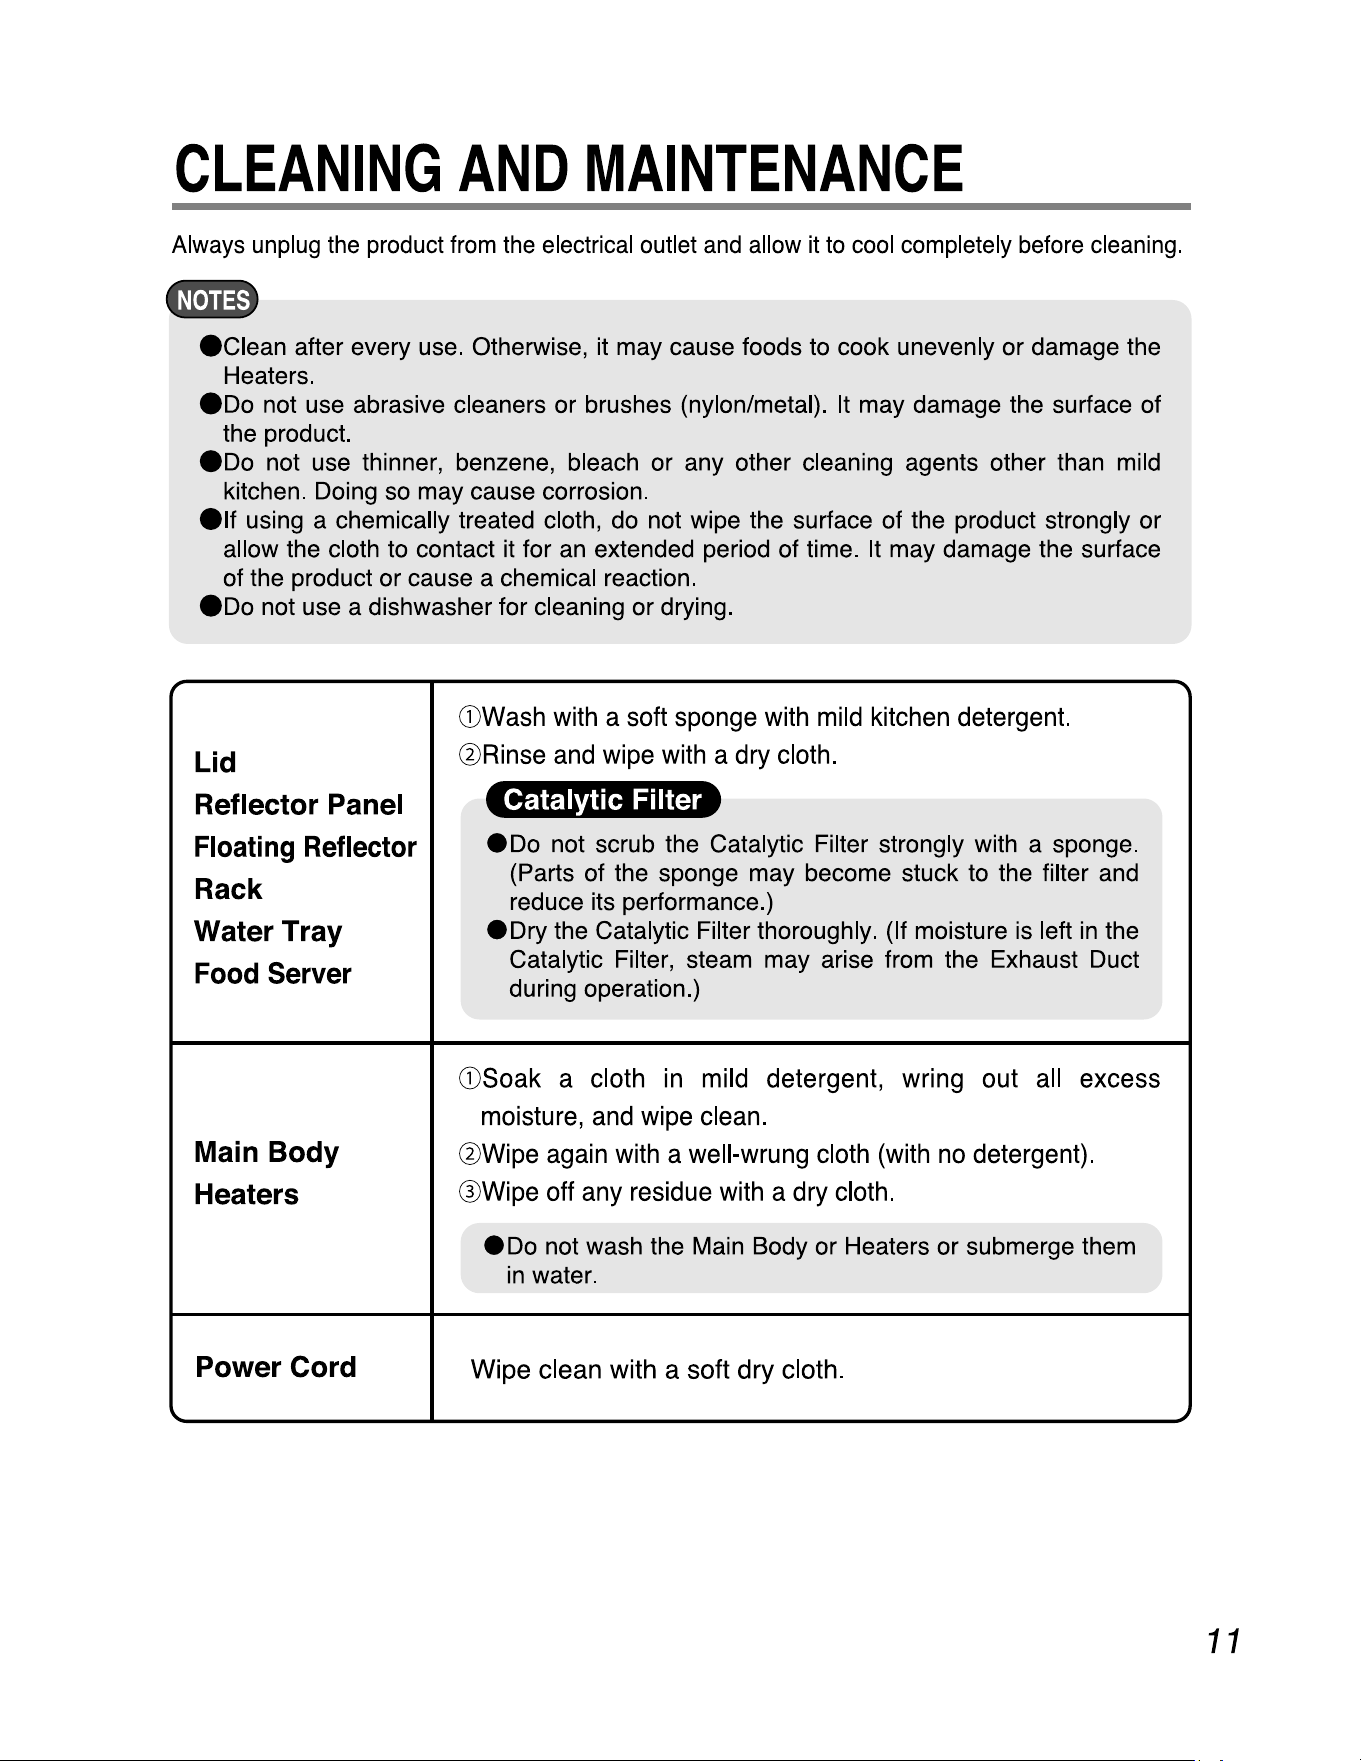
CLEANING
AND
MAINTENANCE
Always unplug
the
product
from
the
electrical outlet
and
allow
it
to
cool
completely before cleaning.
•U•ii4)
ec1ean after every use. Otherwise, it may cause foods to cook unevenly or damage the
Heaters.
eDo
not use abrasive cleaners or brushes (nylon/metal). It may damage the surface of
the product.
eDo
not use thinner, benzene, bleach or any other cleaning agents other than mild
kitchen. Doing
so
may cause corrosion.
e1f using a chemically treated cloth, do not wipe the surface of the product strongly or
allow the cloth to contact it for
an
extended period of time. It may damage the surface
of the product or cause a chemical reaction.
eDo
not use a dishwasher for cleaning or drying.
Lid
Reflector Panel
Floating Reflector
Rack
Water Tray
Food Server
G)Wash with a soft sponge with mild kitchen detergent.
@Rinse and wipe with a dry cloth.
Catalytic Filter
eDo
not scrub the Catalytic Filter strongly with a sponge.
(Parts of the sponge may become stuck to the filter and
reduce its performance.)
eDry
the Catalytic Filter thoroughly. (If moisture is left
in
the
Catalytic Filter, steam may arise from the Exhaust Duct
during operation.)
Main Body
Heaters
G)Soak a cloth in mild detergent, wring out all excess
moisture, and wipe clean.
@Wipe again with a well-wrung cloth (with no detergent).
®Wipe off any residue with a dry cloth.
eDo
not wash the Main Body or Heaters or submerge them
in
water.
Power Cord
Wipe clean with a soft dry cloth.
11
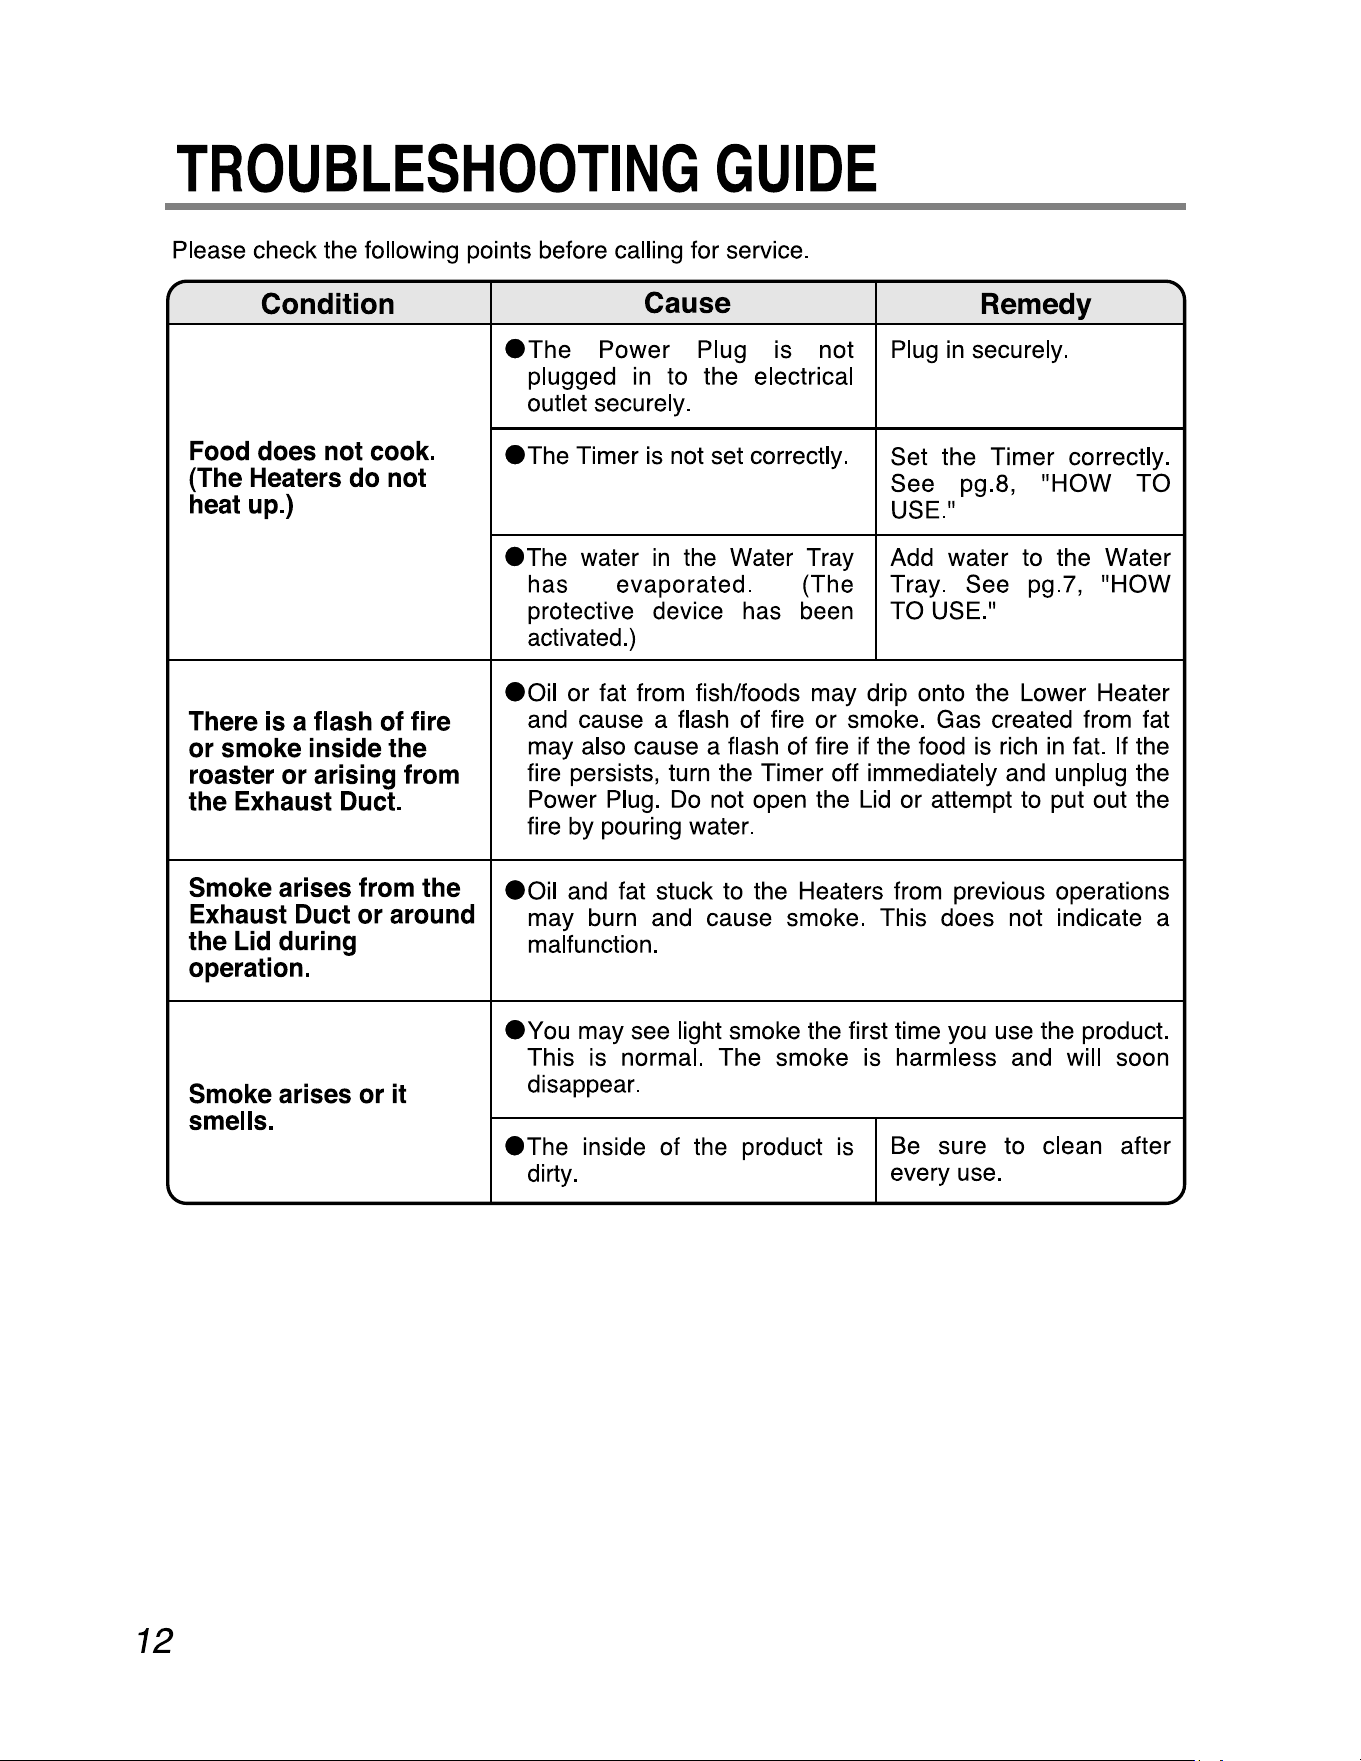
TROUBLESHOOTING
GUIDE
Please check the following points before calling for service.
Condition
Cause
Remedy
Food
does
not
cook.
(The
Heaters
do
not
heat
up.)
eThe
Power Plug is not
plugged
in
to the electrical
outlet securely.
Plug
in
securely.
eThe
Timer is not set correctly.
Set the Timer correctly.
See
pg.8,
"HOW
TO
USE."
eThe
water
in
the
Water Tray
has evaporated. (The
protective device has been
activated.)
Add
water to the Water
Tray. See pg.7, "HOW
TO USE."
There
is
a
flash
of
fire
or
smoke
inside
the
roaster
or
arising
from
the
Exhaust
Duct.
eOil
or fat from fish/foods may drip onto the Lower Heater
and cause a flash of fire or smoke. Gas created from fat
may also cause a flash of fire if the food is rich
in
fat.
If
the
fire persists, turn the Timer off immediately and unplug the
Power
Plug.
Do
not open the
Lid
or attempt to put out the
fire by pouring water.
Smoke
arises
from
the
Exhaust
Duct
or
around
the
Lid
during
operation.
eOil
and fat stuck to the Heaters from previous operations
may burn and cause smoke. This does not indicate a
malfunction.
Smoke
arises
or
it
smells.
evou
may see light smoke the first time
you
use
the product.
This is normal. The smoke is harmless and will soon
disappear.
eThe
inside of the product
is
dirty.
Be
sure to clean after
every use.
,.
12
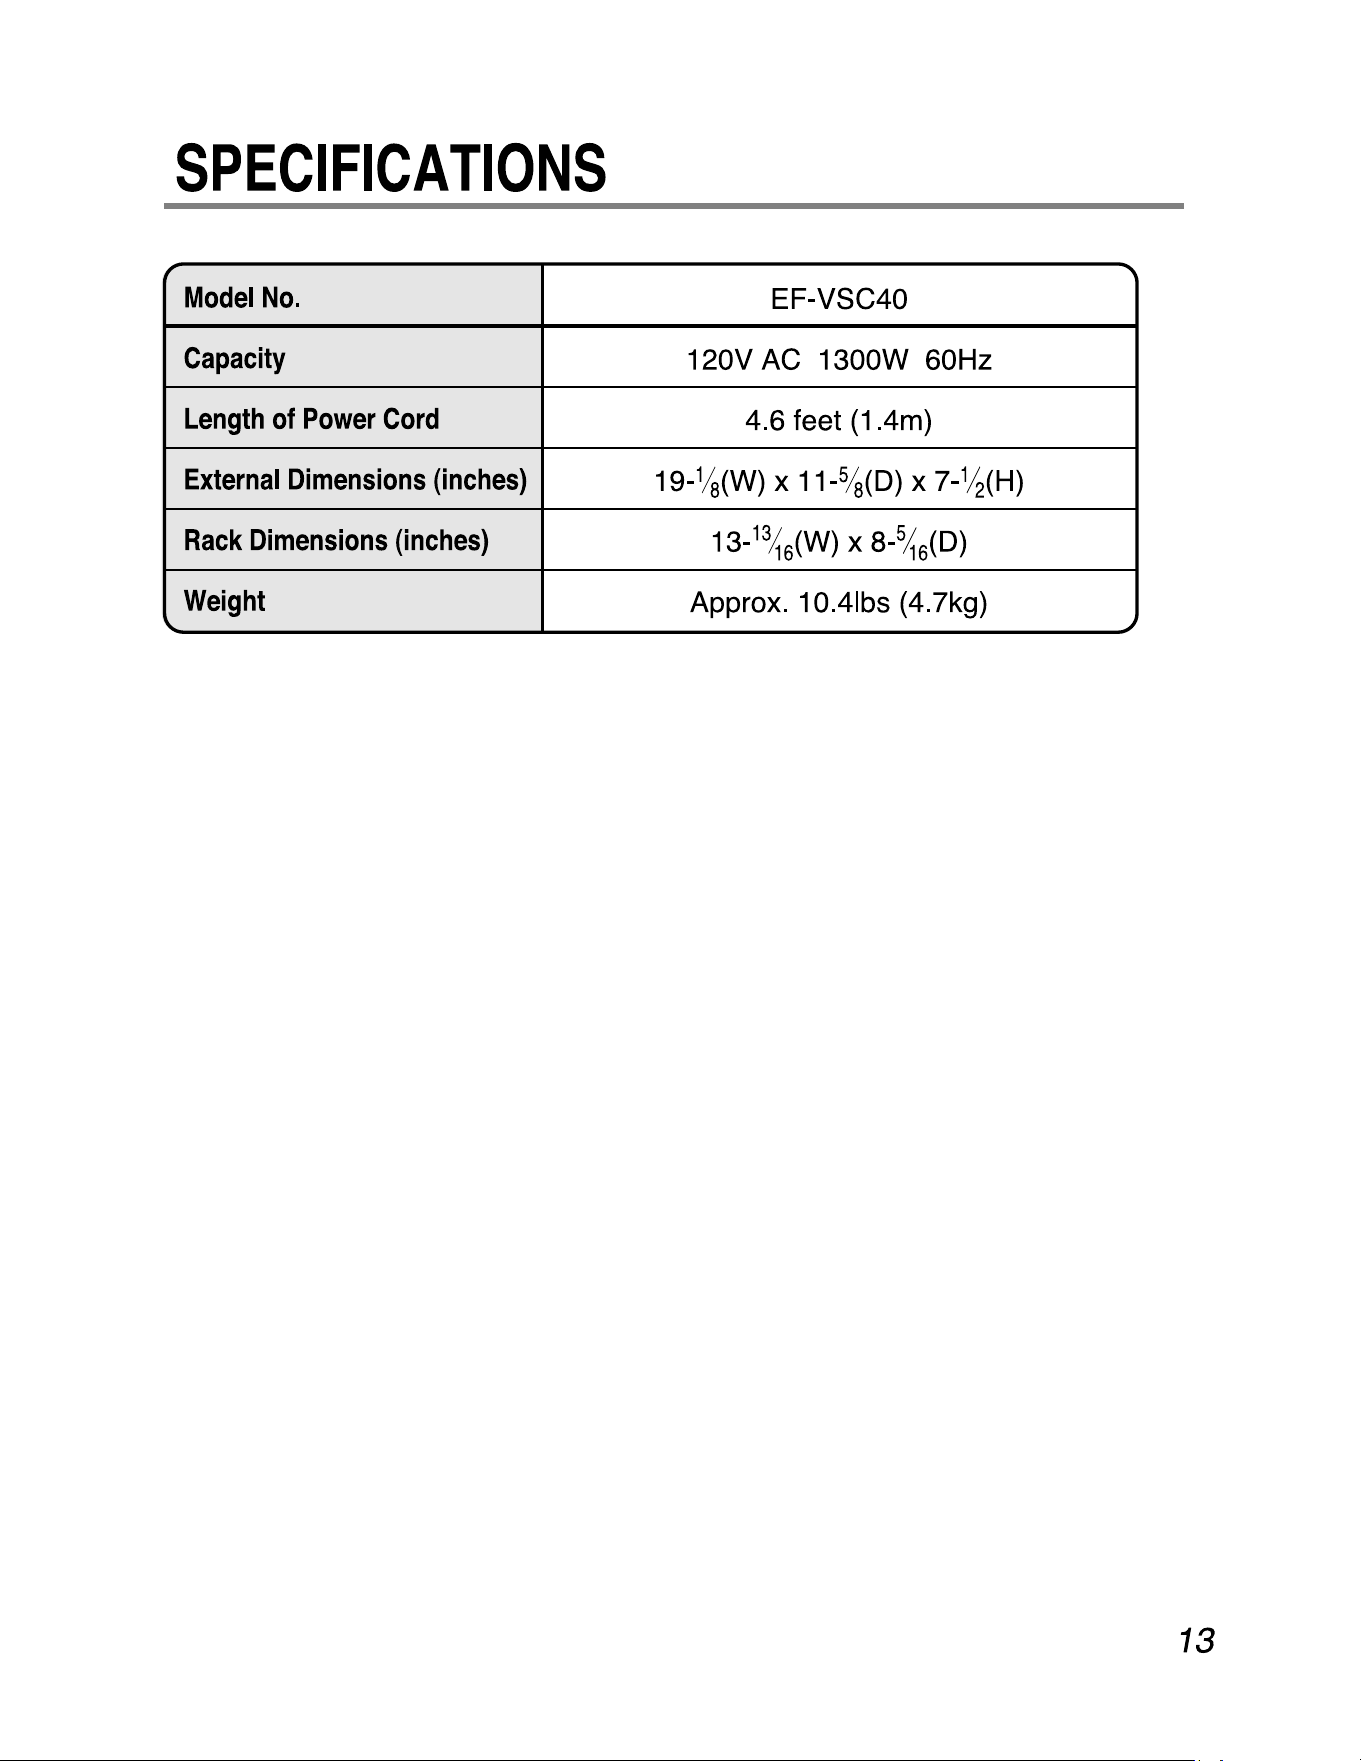
SPECIFICATIONS
,
"I
Model
No.
EF-VSC40
Capacity
120V
AC
1300W
60Hz
Length
of
Power
Cord
4.6 feet
(1
.4m)
External
Dimensions
(inches)
19-1/a(W)
x
11-5/a(D)
x
7-1/2(H)
Rack
Dimensions
(inches)
13-
13
~
6
(W) x 8-
5
~
6
(D)
Weight
Approx. 10.41bs (4.7kg)
.
'-
13