INDEX
IMPORTANT SAFEGUARDS 2
PARTS NAMES AND FUNCTIONS 6
TYPES OF BEEPS 7
REPLACEMENT PARTS 7
BASICS ON HOW TO USE 8
HOW TO USE:
SAUTE/SEAR 10
SIMMER 12
LOW/SLOW COOK 14
STEAM 16
WHITE
RICE/
BROWN
RICE/
QUINOA 18
YOGURT 20
KEEP WARM 22
CLEANING AND MAINTENANCE 23
TROUBLESHOOTING GUIDE 25
ERROR DISPLAYS AND THEIR MEANINGS 27
SPECIFICATIONS 27
.
...
.....
...
.....
...
.....
...
.....
...
.....
...
.....
...
.....
...
.....
...
.....
...
.....................
..
.....
...
.....
...
.....
...
.....
...
.....
...
.....
...
.....
...
.....
...
.....................
.
...
.....
...
.....
...
.....
...
.....
...
.....
...
.....
...
.....
...
.....
...
.....
...
.....
...
.....
...
.....
..
......
..
......
..
.....
...
.....
...
.....
...
.....
...
.....
...
.....
...
.....
...
.....
...
.....
...
.....
...
.....................
....
...
.....
...
.....
...
.....
...
.....
...
.....
...
.....
...
.....
...
.....
...
.....
...
.....................
......
...
.....
...
.....
...
.....
...
.....
...
.....
...
.....
...
.....
...
.....
...
.....
...
.....
...
.....
...
.....
..
......
..
....
..
.....
...
.....
...
.....
...
.....
...
.....
...
.....
...
.....
...
.....
...
.....
...
.....
...
.....
...
.....
...
.....
...
...................
......
...
.....
...
.....
...
.....
...
.....
...
.....
...
.....
...
.....
...
.....
...
.....
...
.....
...
...................
.
...
.....
...
.....
...
.....
...
.....
...
.....
...
.....
...
.....
...
.....
...
.....
...
.....
...
.....
...
.....
...
.....
...
...................
....
...
.....
...
.....
...
.....
...
.....
...
.....
...
.....
...
.....
..
......
..
....
......
...
.....
...
.....
...
.....
...
.....
...
.....
...
.....
...
.....
...
.....
...
.....
...
.....
...
.....
...
.....
...
...................
..
.....
...
.....
...
.....
...
.....
...
.....
...
.....
...
.....
...
.....
...
.....
...
.....
...
.....
...
.....
...
...................
.
...
.....
...
.....
...
.....
...
.....
...
.....
...
.....
...
.....
...
.....
...
...................
..
.....
...
.....
...
.....
...
.....
...
.....
...
.....
...
.....
...
.....
...
.....
...
.....
..
......
..
....
..
...
.....
...
.....
...
.....
...
.....
...
.....
...
.....
...
...................
..
...
.....
...
.....
...
.....
...
.....
...
.....
...
.....
...
.....
...
.....
...
.....
...
.....
...
.....
...
...................
ZOJIRUSHI CORPORATION
IMPORTANT
SAFEGUARDS
BASIC SAFETY PRECAUTIONS SHOULD ALWAYS BE FOLLOWED WHEN USING
ELECTRICAL APPLIANCES, INCLUDING THE FOLLOWING:
1 Read all instructions thoroughly.
2 Avoid touching hot surfaces and do not close or clog the steam vent opening under any
circumstances. The handles are provided for your safety and protection.
3 To prevent hazardous operation or electric shock, do not immerse power cord, power plug,
or
Multicooker (except pot and lid) in water or other liquids.
4 Close supervision is necessary when the appliance is used by or near children.
5 Unplug from outlet when not in use and before cleaning. Allow the appliance to cool before adding
or removing parts, and before cleaning the appliance.
6 Do not use or operate the appliance with a damaged cord or plug. If the appliance malfunctions or
has been damaged in any manner, unplug the appliance and return it to the nearest authorized
service facility or dealer for examination, repair or adjustment.
7 The use of accessories or attachments not recommended by the appliance manufacturer may be
hazardous or may cause malfunction.
8 Do not use outdoors.
9 Keep the power cord away from hot surfaces and do not let the cord hang over the edge of tables
or counters.
10
Do not place the appliance on or near a heated surface such as a gas or electric stove,
or
in
a
heated oven.
11
Always use extreme caution when moving appliances containing hot contents or liquids.
12
Plug the cord into a household electrical outlet. To disconnect, press the START/CANCEL button,
then remove plug from wall outlet.
13
Do not use the appliance for other than intended or specified purposes.
14
To reduce the risk of electric shock, use only the supplied pot.
15
The plug to the appliance should be attached first before plugging the cord into a wall outlet.
SAVE
THESE
INSTRUCTIONS
THIS APPLIANCE
IS
FOR HOUSEHOLD USE ONLY.
This appliance is supplied with a short power cord to reduce the risk of becoming entangled in or
tripping over
it.
Extension cords may be used if care is exercised in their use. If an extension cord is
used, the marked electrical rating of the cord should be at least as great as the electrical rating of the
appliance, and a longer cord should be arranged so that it will not drape over the countertop or
tabletop where it can be pulled on by children
or
tripped over unintentionally.
This appliance has a polarized plug (one blade is wider than the other). To reduce the risk of electric
shock, this plug was designed to
fit
into a polarized outlet in only one direction. If the plug does not
fit
fully into the outlet, do not attempt to force it or modify it
in
any way. Simply reverse the plug and
insert. If it still does not fit, contact a qualified electrician.
2
IMPORTANT
SAFEGUARDS
Be
sure
to
follow
these
instructions.
These
WARNINGS
and
CAUTIONS
are
intended
to
prevent property
damage
or
personal
injury
to
you
and
others.
■
The
degree of danger or damage by the misuse of this product is indicated as follows:
~WARNING Indicates risk of serious injury or death.
~CAUTION Indicates risk of injury, household or property damage if mishandled.
■
Prohibited or required actions are indicated as follows:
----------------------...
I::'\.
\::I
Indicates a prohibited operation. A Indicates a requirement or instruction
that must be followed.
V
~WARNING
Do
not
modify
the
Multicooker.
Only
a
repair
technician
should
disassemble
or
repair
this
unit.
Attempting
to
do
so
may
cause
fire
, electric
shock
or
injury
.
Make
any
repair
inquiries
to
the
store
you
purchased
the
Multicooker
from
or
to
Zojirushi
Customer
Service
.
Do
not
place
your
hands
or
face
near
the
Steam
Vent.
Doing
so
may
cause
burns
or
scalding.
Take
special
precautions
with
children
and
infants.
Do
not
immerse
the
Multicooker
in
liquid
or
splash
liquids
on
it.
Do
not
pour
liquids
directly
into
the
Main
Body.
Doing
so
may
cause
short
circuit
or
electric
shock
.
Do
not
allow
liquids
to
come
in
contact
with
the
Plug
Receptacle,
Power
Plug,
Power
Cord
or
Appliance
Plug.
Doing
so
may
cause
short
circuit
or
electric
shock
.
Do
not
plug
or
unplug
the
Power
Cord
if
your
hands
are
wet.
Doing
so
may
cause
electric
shock
or
injury
.
Do
not
use
the
Multicooker
for
deep
frying.
Doing
so
may
cause
fire
.
Do
not
use
a
power
source
other
than
120V
AC.
Use
of
any
other
power
supply
voltage
may
cause
fire
or
electric
shock
.
Do
not
move
the
Main
Body
while
it
is
in
operation.
Doing
so
may
result
in
burns.
Never
open
the
Lid
or
move
the
Multicooker
during
rice/quinoa
cooking.
Doing
so
may
result
in
burns
.
Do
not
use
the
Multicooker
if
the
Power
Plug
or
Power
Cord
is
damaged
or
if
the
Power
Plug
is
loosely
inserted
into
the
electrical
outlet.
Doing
so
may
cause
electric
shock
,
short
circuit
or
fire
.
Do
not
allow
the
Power
Plug
to
come
into
contact
with
steam.
Allowing
the
Power
Plug
to
come
into
contact
with
steam
after
inserting
it
into
the
electrical
outlet
may
cause
short
circuit
or
fire
.
Do
not
damage
the
Power
Cord.
Do
not
bend,
pull
,
twist,
bundle
or
attempt
to
modify
the
Power
Cord.
Do
not
place
it
on
or
near
high
temperature
surfaces
or
appliances,
under
heavy
items
or
between
objects
. A
damaged
Power
Cord
can
cause
fire
or
electric
shock.
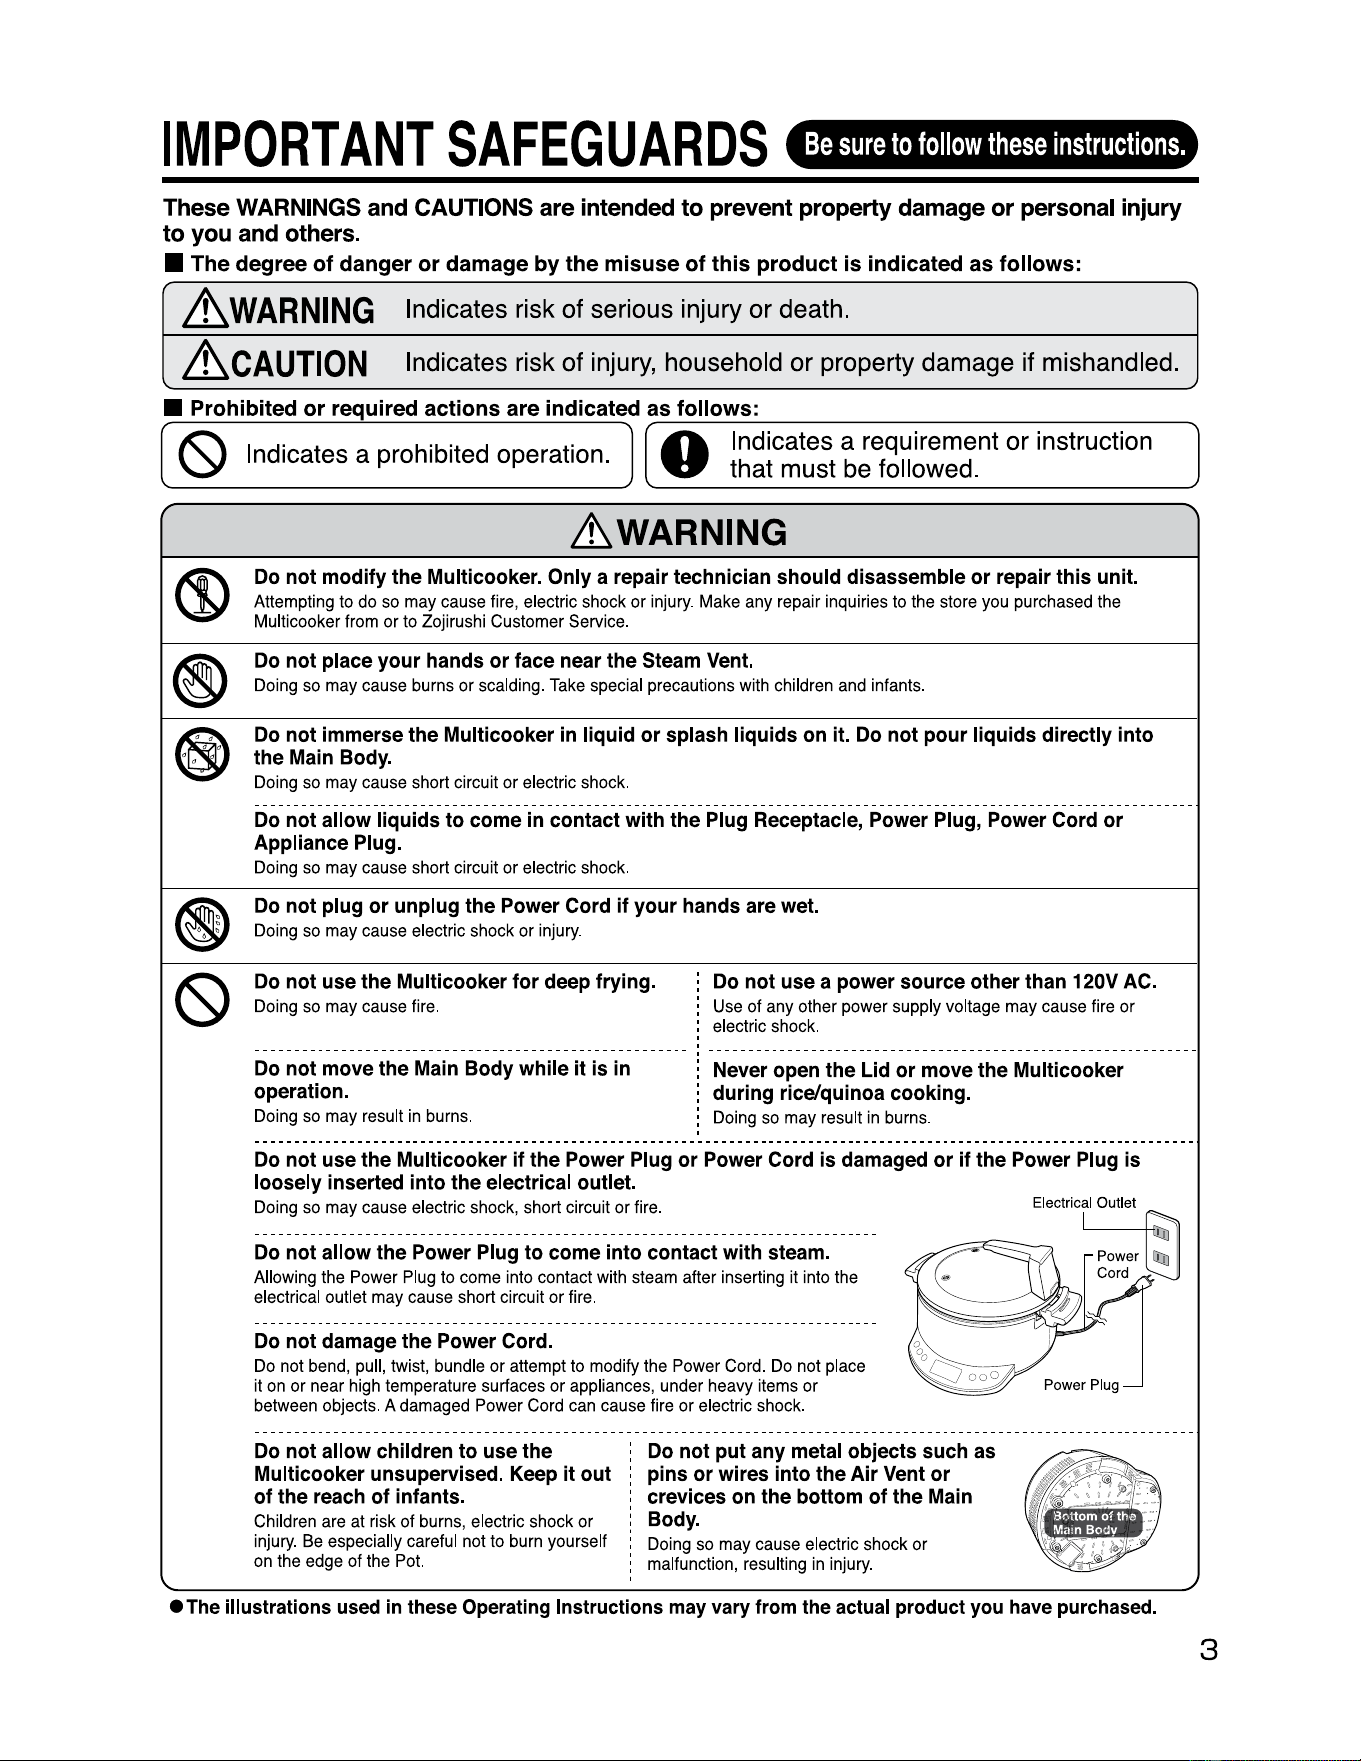
Electrical Outlet
Power
Cord
owerPlug
Do
not
allow
children
to
use
the
Multicooker
unsupervised.
Keep
it
out
of
the
reach
of
infants.
Children
are
at
ri
sk
of
burns,
electric
shock
or
injury
.
Be
especially
careful
not
to
burn
yourself
on
the
edge
of
the
Pot.
Do
not
put
any
metal
objects
such
as
pins
or
wires
into
the
Air
Vent
or
crevices
on
the
bottom
of
the
Main
Body.
Doing
so
may
cause
electric
shock
or
malfunction,
resulting
in
injury.
•The
illustrations
used
in
these
Operating
Instructions
may
vary
from
the
actual
product
you
have
purchased.
3
4
IMPORTANT
SAFEGUARDS
Be
sure
to
follow
these
instructions.
(cont.)
'-
~WARNING
0
Insert
the
Power
Plug
completely
and
securely
into
the
electrical
outlet.
A
loosely
i
nserted
Powe
r
Plug
may
cause
electric
shock
, short circuit,
smoke
or
fire
.
Use
only
an
electrical
outlet
rated
at
15
amperes
minimum,
and
do
not
plug
other
devices
into
the
same
outlet.
Plugging
other
devices
into
the
same
outlet
may
cause
the
electrical outlet
to
overheat,
resulting
in
fire
.
If
the
blades
or
surface
of
the
Power
Plug
become
soiled,
wipe
them
clean.
A dirty
Power
Plug
may
cause
fire.
Stop
using
immediately
if
you
notice
any
of
the
following
symptoms
indicating
a
malfunction
or
breakdown.
Continued
use
of
the
Multicooker
under
these
circumstances
may
cause
smoke,
fire
, electric
shock
or
injury
.
<Examples
of
abnormalities/malfunctionS>
•
The
Power
Plug,
Power
Cord
or
Appliance
Plug
has
become
very
hot.
•
The
Power
Cord
is
damaged
or
the
electr
i
city
turns
on
and
off
when
touched
.
•
The
Main
Body
is
deformed
or
unusually
ho
t.
•
Smoke
is
arising
from
the
Main
Body
or
there
is
a
burning
smell
.
•
Some
part
of
the
Main
Body
is
cracked
,
loose
or
unstable
.
etc
.
If
any
of
the
above
occurs,
unplug
the
Mult
i
cooker
immed
i
ately
and
contact
the
store
where
you
purchased
it
from
or
Zojirushi
Customer
Service
for
check-ups
and/or
repair.
This
appliance
is
not
intended
for
use
by
persons
(including
children)
with
reduced
physical,
sensory
or
mental
capabilities,
or
lack
of
experience
and
knowledge,
unless
they
have
been
given
supervision
or
instruction
concerning
use
of
the
appliance
by
a
person
responsible
for
their
safety.
Children
should
be
supervised
to
ensure
that
they
do
not
play
with
the
appliance.
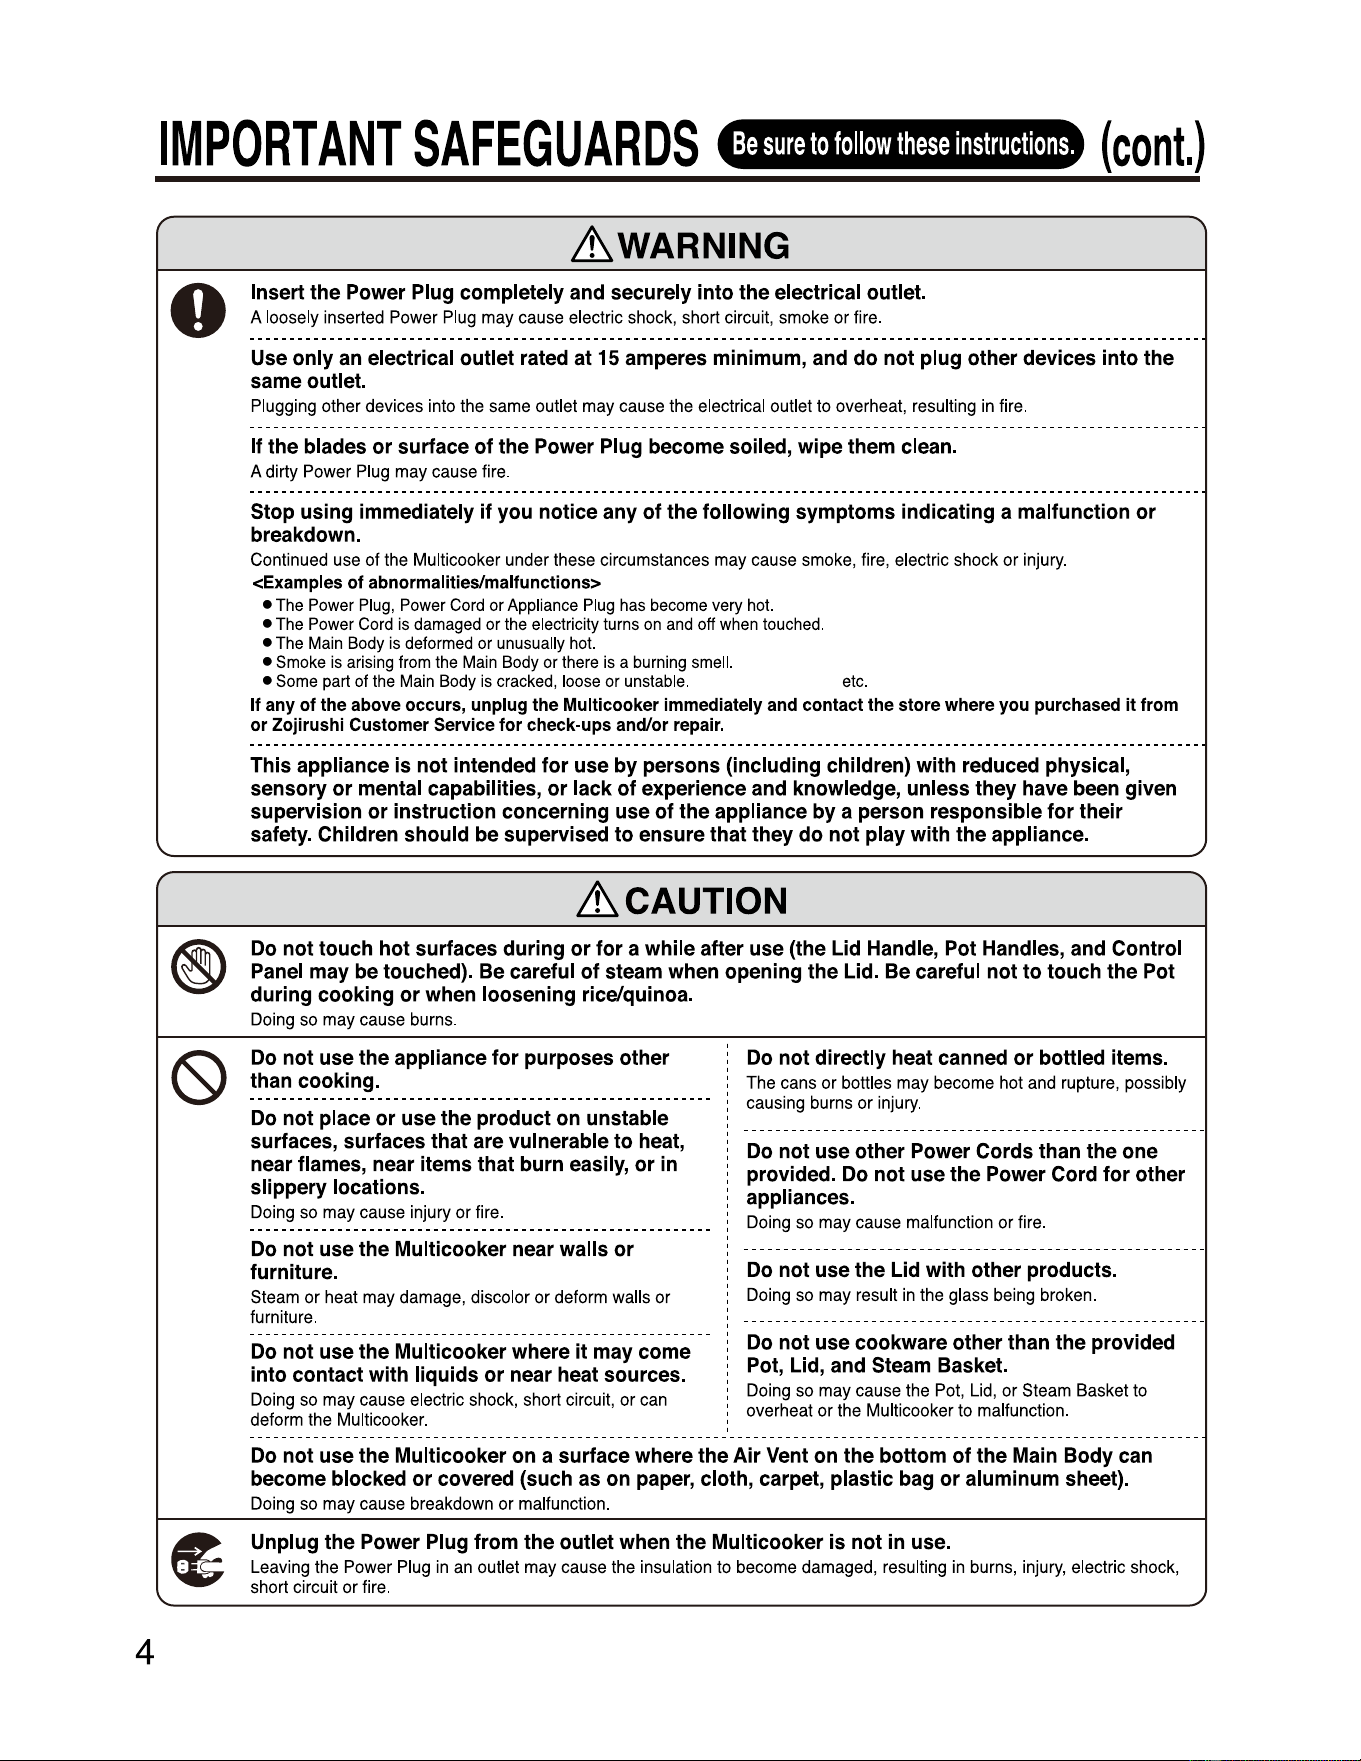
~CAUTION
®
Do
not
touch
hot
surfaces
during
or
for
a
while
after
use
(the
Lid
Handle,
Pot
Handles,
and
Control
Panel
may
be
touched).
Be
careful
of
steam
when
opening
the
Lid.
Be
careful
not
to
touch
the
Pot
during
cooking
or
when
loosening
rice/quinoa.
Do
i
ng
so
may
cause
burns
.
(S)
Do
not
use
the
appliance
for
purposes
other
than
cooking.
Do
not
place
or
use
the
product
on
unstable
surfaces,
surfaces
that
are
vulnerable
to
heat,
near
flames,
near
items
that
burn
easily,
or
in
slippery
locations.
Doing
so
may
cause
injury
or
fire
.
Do
not
use
the
Multicooker
near
walls
or
furniture.
Steam
or
heat
may
damage,
discolor
or
deform
walls
or
furniture.
Do
not
use
the
Multicooker
where
it
may
come
into
contact
with
liquids
or
near
heat
sources.
Doing
so
may
cause
electric
shock
,
short
circuit,
or
can
deform
the
Multicooker.
Do
not
directly
heat
canned
or
bottled
items.
The
cans
or
bottles
may
become
hot
and
rupture
, possibly
causing
burns
or i
njury
.
Do
not
use
other
Power
Cords
than
the
one
provided.
Do
not
use
the
Power
Cord
for
other
appliances.
Doing
so
may
cause
malfunction
or
fire
.
Do
not
use
the
Lid
with
other
products.
Doing
so
may
result
in
the
glass
being
broken
.
Do
not
use
cookware
other
than
the
provided
Pot,
Lid,
and
Steam
Basket.
Doing
so
may
cause
the
Pot,
Lid,
or
Steam
Basket
to
overheat or
the
Multicooker
to
malfunction
.
Do
not
use
the
Multicooker
on
a
surface
where
the
Air
Vent
on
the
bottom
of
the
Main
Body
can
become
blocked
or
covered
(such
as
on
paper,
cloth,
carpet,
plastic
bag
or
aluminum
sheet).
Doing
so
may
cause
breakdown
or
malfunction
.
(t
Unplug
the
Power
Plug
from
the
outlet
when
the
Multicooker
is
not
in
use.
Leaving
the
Power
Plug
in
an
outlet
may
cause
the
insulation
to
become
damaged,
resulting
in
burns
, injury, electric
shock
,
short
circuit
or
fire
.
----------------------------------------------------------
----------------------------------------------------------
-- -- -- -- -- -- -- -- -- -- -- -- -- -- -- -- -- -- -- -- -- -- -- -- -- -- -- -- --
-- -- -- -- -- -- -- -- -- -- -- -- -- -- -- -- -- -- -- -- -- -- -- -- -- -- -- -- --
----------------------------------------------------------
-----------------------------------------------------------------------------------------------------------------------
----------------------------------------------------------
.)
IMPORTANT
SAFEGUARDS
Be
sure
to
follow
these
instructions.
(cont.)
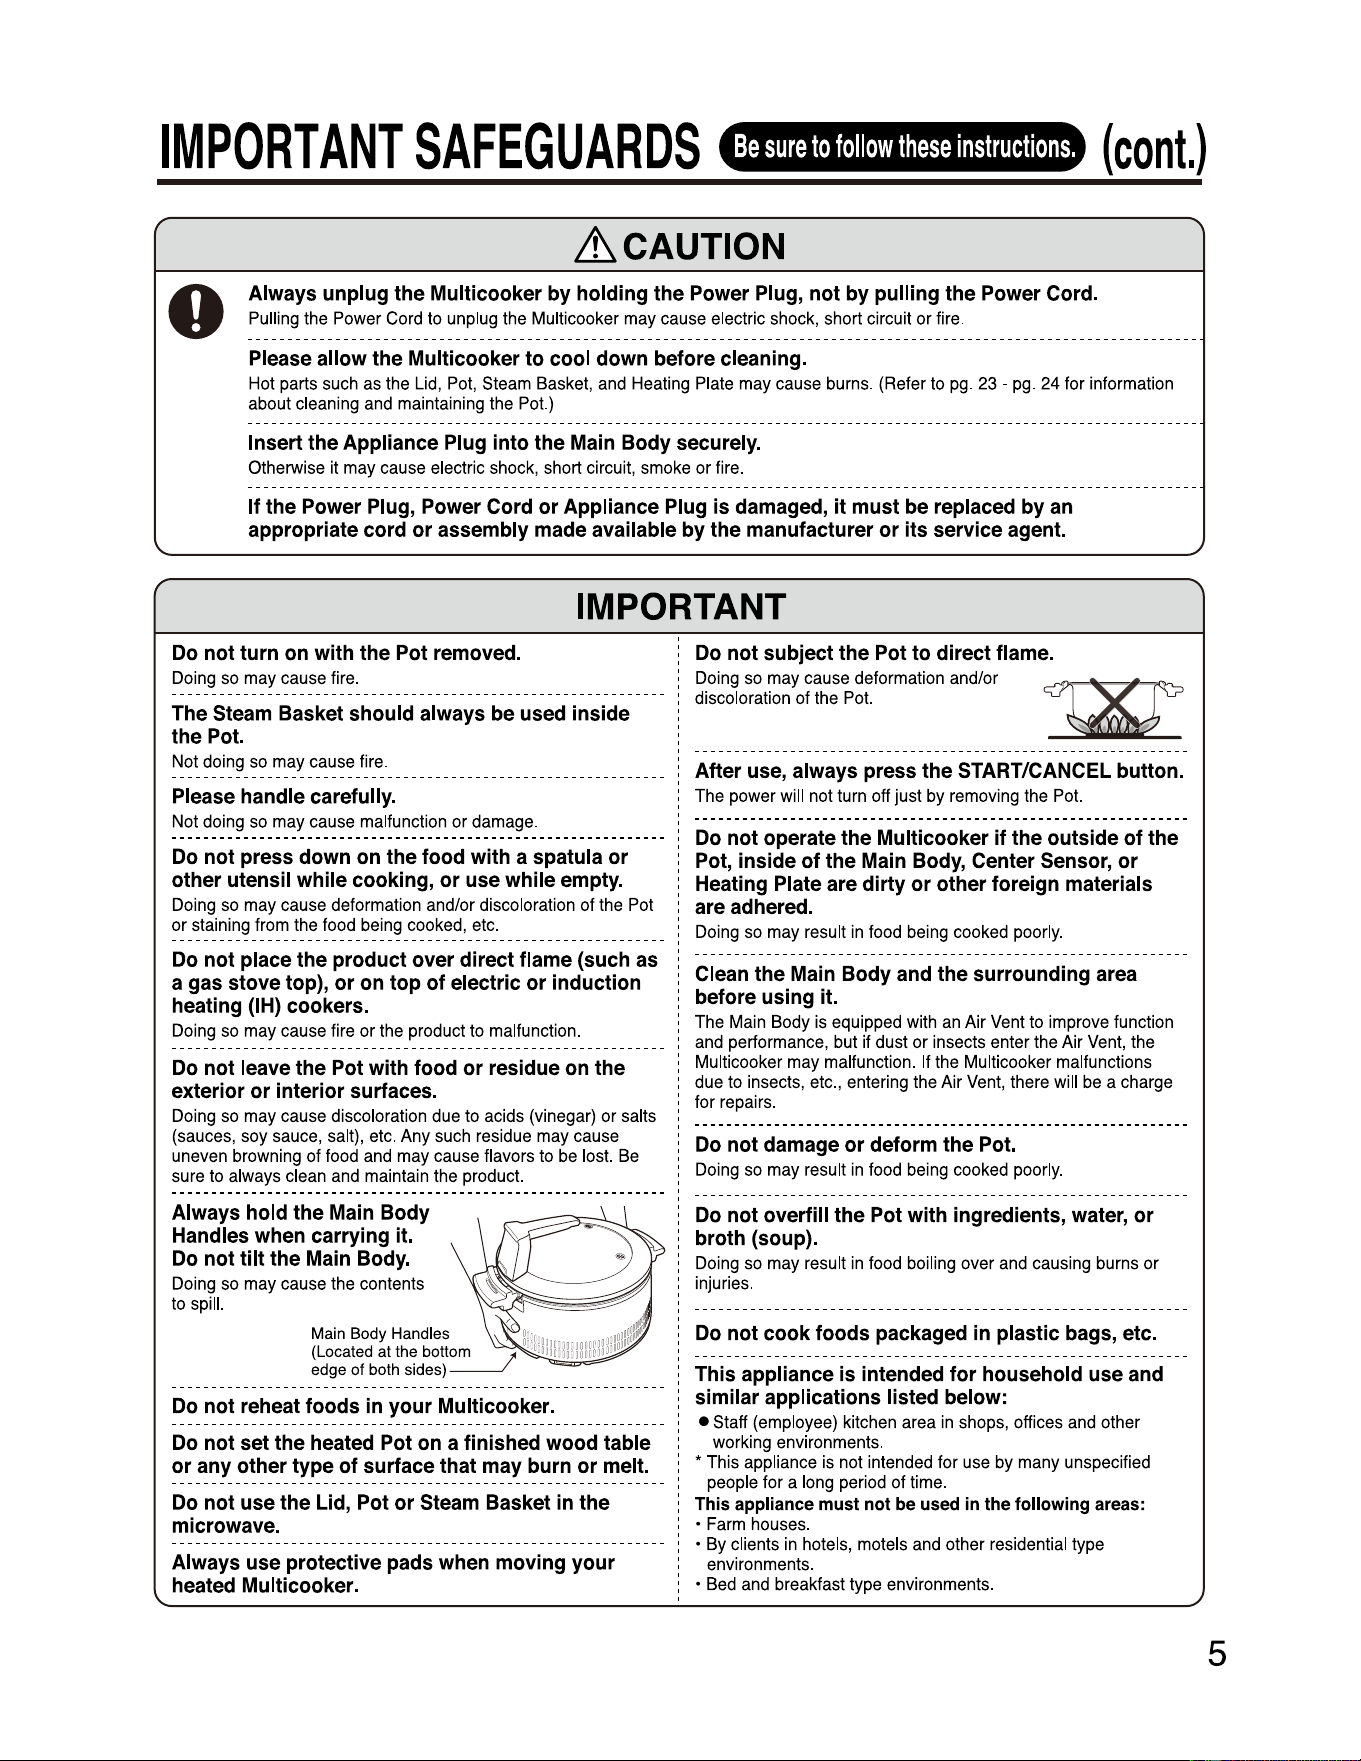
~CAUTION
0
Always
unplug
the
Multicooker
by
holding
the
Power
Plug,
not
by
pulling
the
Power
Cord.
Pulling
the
Power
Cord
to
unplug
the
Mult
i
cooker
may
cause
electric
shock,
short
circuit
or
fire
.
Please
allow
the
Multicooker
to
cool
down
before
cleaning.
Hot
parts
such
as
the
Lid
,
Pot
,
Steam
Basket,
and
Heat
i
ng
Plate
may
cause
burns
.
(Refer
to
pg
.
23
-
pg
.
24
for
i
nformation
about
cleaning
and
maintaining
the
Pot.)
Insert
the
Appliance
Plug
into
the
Main
Body
securely.
Otherwise
it
may
cause
electric
shock,
short
circuit,
smoke
or
fire.
If
the
Power
Plug,
Power
Cord
or
Appliance
Plug
is
damaged,
it
must
be
replaced
by
an
appropriate
cord
or
assembly
made
available
by
the
manufacturer
or
its
service
agent.
IMPORTANT
Do
not
turn
on
with
the
Pot
removed.
Doing
so
may
cause
fire.
The
Steam
Basket
should
always
be
used
inside
the
Pot.
Not
doing
so
may
cause
fire
.
Please
handle
carefully.
Not
doing
so
may
cause
malfunction
or
damage.
Do
not
press
down
on
the
food
with
a
spatula
or
other
utensil
while
cooking,
or
use
while
empty.
Doing
so
may
cause
deformation
and/or
discoloration
of
the
Pot
or
staining
from
the
food
being
cooked
,
etc.
Do
not
place
the
product
over
direct
flame
(such
as
a
gas
stove
top),
or
on
top
of
electric
or
induction
heating
(IH)
cookers.
Doing
so
may
cause
fire
or
the
product
to
malfunction
.
Do
not
leave
the
Pot
with
food
or
residue
on
the
exterior
or
interior
surfaces.
Doing
so
may
cause
discoloration
due
to
acids
(vinegar)
or
salts
(sauces
,
soy
sauce
,
salt)
,
etc
.
Any
such
residue
may
cause
uneven
browning
of
food
and
may
cause
flavors
to
be
lost.
Be
sure
to
always
clean
and
maintain
the
produc
t.
Always
hold
the
Main
Body
Handles
when
carrying
it.
Do
not
tilt
the
Main
Body.
Do
i
ng
so
may
cause
the
contents
to
spill.
Do
not
reheat
foods
in
your
Multicooker.
-
Do
not
set
the
heated
Pot
on
a
finished
wood
table
or
any
other
type
of
surface
that
may
burn
or
melt.
Do
not
use
the
Lid,
Pot
or
Steam
Basket
in
the
microwave.
Always
use
protective
pads
when
moving
your
heated
Multicooker.
Main Body Handles
(Located at the botto
edge of both sides)
Do
not
subject
the
Pot
to
direct
flame.
Doing
so
may
cause
deformation
and/or
discoloration
of
the
Pot.
1Xr
After
use,
always
press
the
START/CANCEL
button.
The
power
will
not
turn
off
just
by
removing
the
Pot.
Do
not
operate
the
Multicooker
if
the
outside
of
the
Pot,
inside
of
the
Main
Body,
Center
Sensor,
or
Heating
Plate
are
dirty
or
other
foreign
materials
are
adhered.
Doing
so
may
result
in
food
being
cooked
poorly.
Clean
the
Main
Body
and
the
surrounding
area
before
using
it.
The
Main
Body
is
equipped
with
an
Air
Vent
to
improve
function
and
performance,
but
if
dust
or
insects
enter
the
Air
Vent
,
the
Multicooker
may
malfunction.
If
the
Multicooker
malfunctions
due
to
insects
,
etc
.,
entering
the
Air
Vent
,
there
will
be
a
charge
for
repairs
.
Do
not
damage
or
deform
the
Pot.
Doing
so
may
result
in
food
being
cooked
poorly.
Do
not
overfill
the
Pot
with
ingredients,
water,
or
broth
(soup).
Doing
so
may
result
in
food
boiling
over
and
causing
burns
or
injuries.
Do
not
cook
foods
packaged
in
plastic
bags,
etc.
This
appliance
is
intended
for
household
use
and
similar
applications
listed
below:
•
Staff
(employee)
kitchen
area
in
shops
, offices
and
other
working
environments.
•
This
appliance
is
not
i
ntended
for
use
by
many
unspecified
people
for
a
long
period
of
time
.
This
appliance
must
not
be
used
in
the
following
areas:
•
Farm
houses
.
•
By
clients
in
hotels,
motels
and
other
residential
type
environments
.
•
Bed
and
breakfast
type
environments
.
5
------------------------------------------------------------
-
6
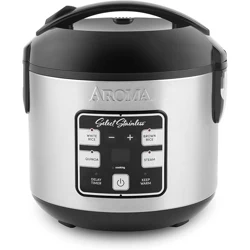
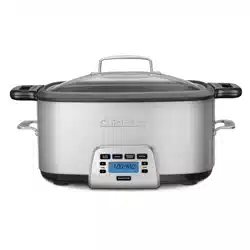
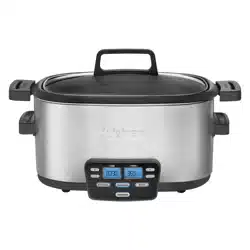
PARTS
NAMES
AND
FUNCTIONS
Lid Glass Type: Tempered Glass
CAUTION
•
Do
not hit or drop.
•
Do
not heat up or cool down too quickly.
• Handle carefully.
•The
glass lid is tempered and likely to shatter into small fragments if broken.
•
Do
not subject to direct flame.
The Lid can be placed
standing up.
;1M½1-1'1ill½
..
Steam Vent
Pot Handles
--------
(Located at 2 positions: right & left
edge)
Gasket
------
Heating Plate
----
• Please remove the
protective sheet placed
between the Heating
Plate and the Pot before
initial use.
Control Panel
___
___,,,
Lid Handle
Power Cord
Appliance Plug
• Please remove the Twist
Tie holding the Power
Cord before use.
• Do not use the Power
Cord bundled up. (Doing
so
may
cause
the Power
Cord
to
become
excessively hot, resulting
in malfunction.)
Power
Plug
Plug Receptacle
[§]
------
Main Body Handles
(Located at the bottom
edge of both sides.)
(Located at the bottom
of the Main Body)
•
.
-----------------------------
steam Basket Measuring Cup
Steam Basket Handles
(For "WHITE
RICE/
BROWN
RICE/
QUINOA" menus)
B
1
cup=
approx.
6.1
oz./
approx.
180
ml
• When cooking white rice, brown rice, or quinoa, use the
included Measuring Cup. When preparing other food,
please use a commercially available measuring cup for
cooking (approx. 8 oz.
I approx. 240
ml)
.
Recipe Book
G•
1
hht•
1
9WUM
PARTS
NAMES
AND
FUNCTIONS
(cont.)
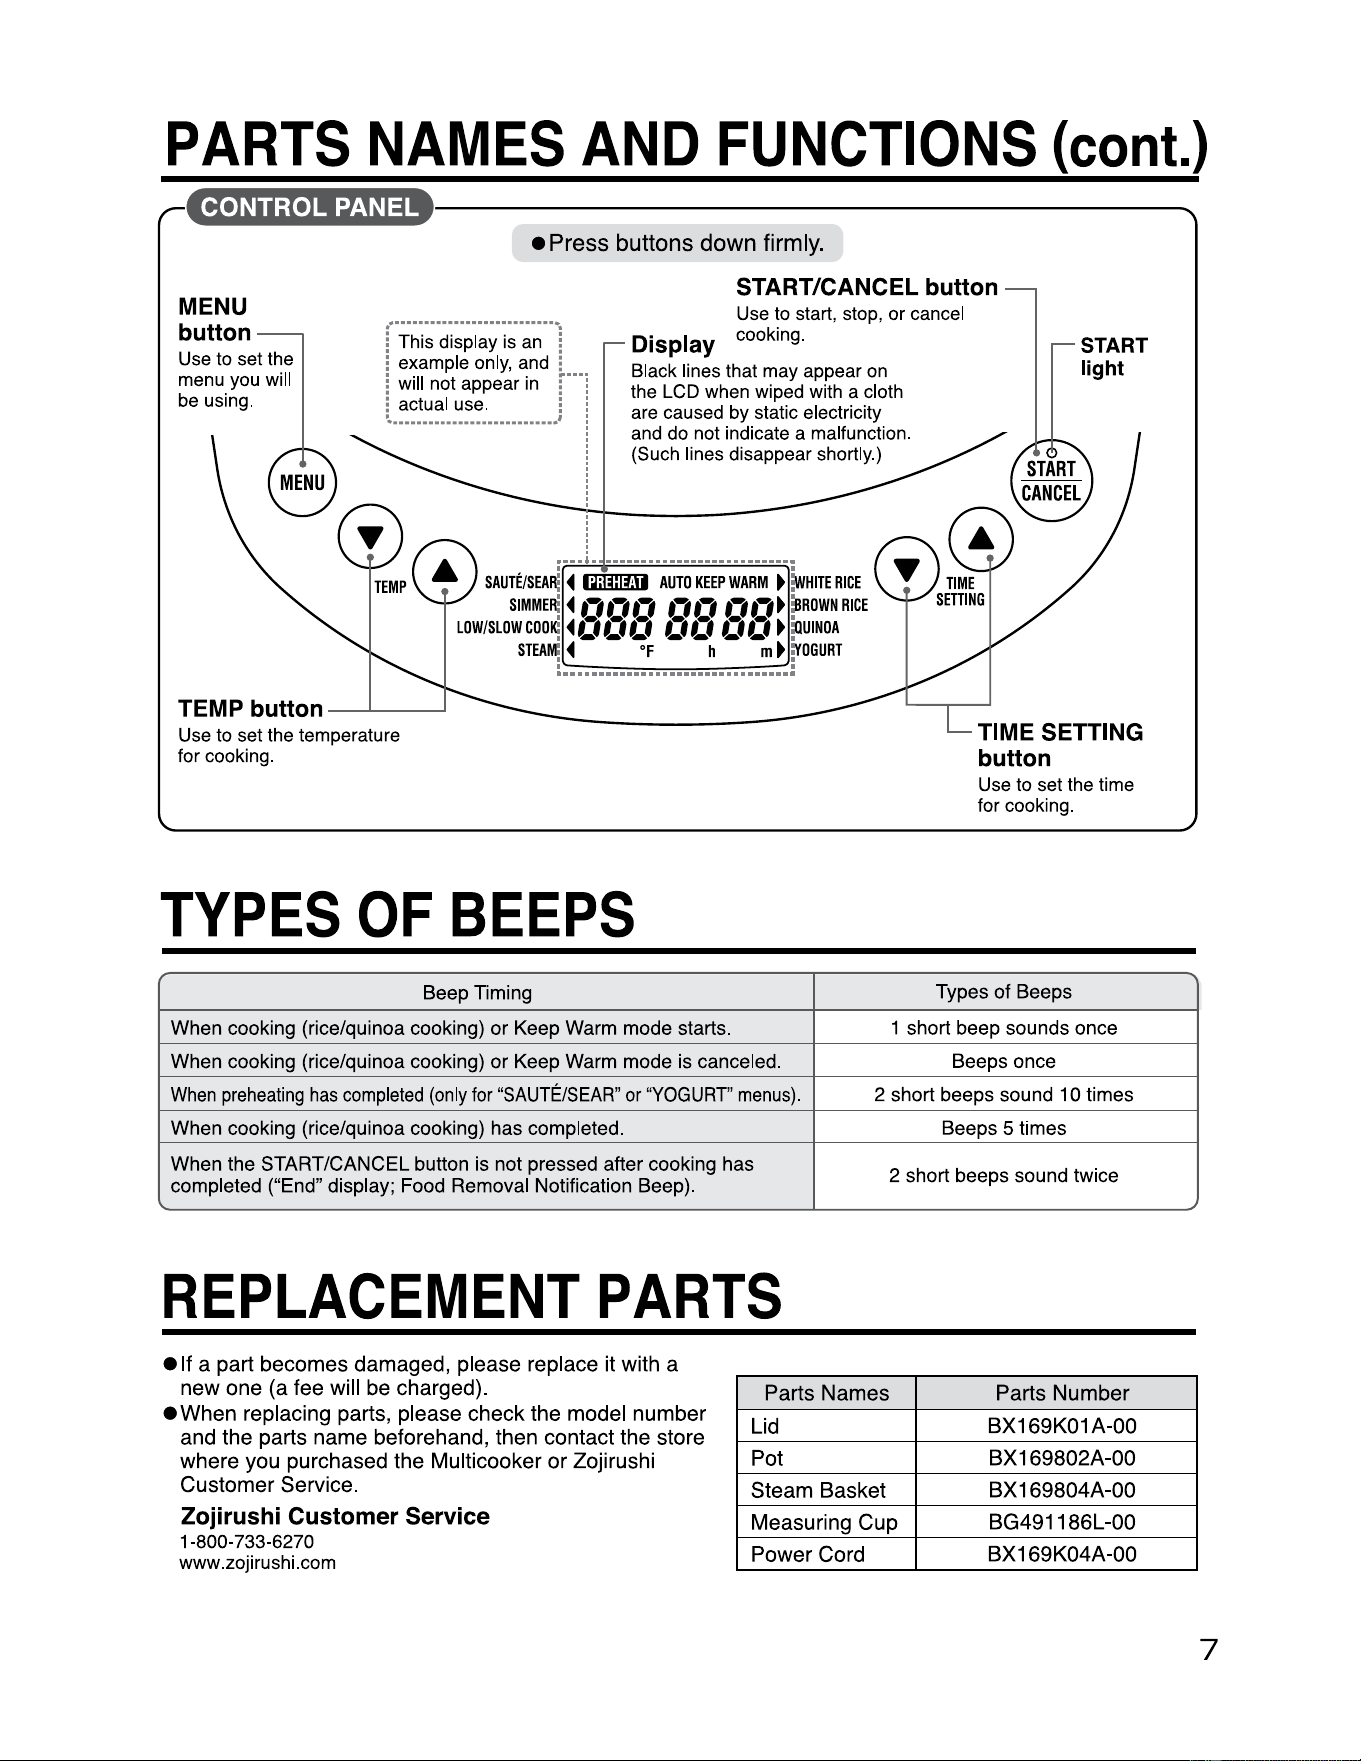
•
----------------------------
• Press buttons down firmly.
START/CANCEL button
MENU
button
Use
to
set
the
menu
you
will
be
using
.
!
This
display
is
an
!
!
example
only
,
and
:
Use
to
start,
stop,
or
cancel
Display
cooking
.
START
light
!
will
not
appear
in
r··i
!
actual
use
. : !
---------------------
' !
Black
lines
that
may
appear
on
the
LCD
when
wi
ped
with
a
cloth
are
caused
by
static electrici
ty
and
do
not
ind
i
cate
a
malfunction.
(Such
lines
disappear shortly.)
-
:-;-
-------
.
.
....
,
...........................
.
SAUTE/SEA
~
◄
(milm
AUTO
KEEP
WARM
►
~
HITE
RICE
SIMME
R:
◄
,., ,.,
,.,
,., ,., ,., ,.,
►
:B
ROWN
RICE
LOW/SLOW
COO
K:
◄
a, a,
a,
a, a, a, a,
►
:O
UINOA
sm
;_~-~-:
..
~~
--
=
--
~~
-=-
~:~
_r
oGURT
TEMP button
-~--
Use
to
set
the
temperature
for
cooking.
TYPES
OF
BEEPS
Beep Timing
Types of Beeps
When cooking (rice/quinoa cooking) or Keep
Warm
mode starts. 1 short beep sounds once
When cooking (rice/quinoa cooking) or Keep
Warm
mode
is
canceled. Beeps once
When
preheating
has
completed
(only
for
"SAUTE/SEAR
"
or
"YOGURT"
menus)
. 2 short beeps sound 1 0 times
When cooking (rice/qu inoa cooking) has completed.
Beeps 5 times
When the START/CANCEL button
is
not pressed after cooking has
completed ("End" display;
Food
Removal Notification Beep).
2 short beeps sound twice
TIME SETTING
button
Use
to
set
the
time
for
cooking.
REPLACEMENT
PARTS
• If a part becomes damaged, please replace it with a
new one (a fee will be charged).
• When replacing parts, please check the model number
and the parts name beforehand, then contact the store
where you purchased the Multicooker or Zojirushi
Customer Service.
Zojirushi Customer Service
1-800-733-6270
www
.
zoj
i
rushi.com
Parts Names
Parts Number
Lid
BX169K01 A-00
Pot
BX 169802A-00
Steam Basket
BX 169804A-00
Measuring Cup
BG491186L-00
Power Cord
BX169K04A-00
7

8
BASICS
ON
HOW
TO
USE
• Please wash the Pot, Lid, Steam Basket, and Measuring Cup before initial use. - pg. 23 - pg. 24
Always wash the
Pot,
Lid,
and
Steam Basket thoroughly before
use.
• Use mild kitchen detergent and rinse thoroughly with water.
IMPORTANT:
When cooking with
"LOW/SLOW
COOK"
or
"YOGURT"
menu settings, use boiling
water to disinfect the Pot and Lid.
<How
to
Disinfect Using Boiling
Water>
G)
Wash the Pot and Lid well using mild kitchen detergent, then rinse thoroughly with water.
(%)
Thoroughly pour boiling water over the Pot and Lid.
• After pouring boiling water, lightly remove any moisture
and
wipe the exterior of the
Pot
with a soft dry
cloth.
Do
not wipe the interior of the Pot or the
Lid.
• The Pot
and
Lid
will
be
hot after pouring boiling water. Please
be
careful when handling these parts.
Prepare ingredients.
Prepare the ingredients according to the included
Recipe Book.
• When cooking white rice, brown rice, or quinoa, use the included
Measuring Cup. When preparing other food, please use a commercially
available measuring cup for cooking (approx. 8 oz. / approx. 240
ml)
.
Place
the
Pot inside
the
Main Body.
•Check
to make sure there is no
moisture or foreign materials on
the outside of the Pot, the inside of
the Main Body, the Heating Plate,
or the Center Sensor.
• Do not move the Pot once it is
placed inside the Main Body. Doing
so may cause the Heating Plate or
bottom of the Pot to be damaged.
• Place the Pot so that it lays flat.
• Be careful as the Pot may boil over
if overfilled with ingredients, water,
or broth (soup).
Pot Markings
BROWN
WHITE
RICE
RICE
QUINOA
8
~ 8
6=l
6 6
4j
4
4
3
3
3
If
cooking
rice/quinoa,
measure
and
place
rice/quinoa,
then
fill
to
the
water
level
that
matches
the
number
of
cups
of
rice/quinoa
you
are
cooking
.
•
Pour
water
to
the
water
level
shown
in
two
locations
on
the
sides
of
the
Pot.
If
the
Pot
is
tilted
,
rice/quinoa
may
be
cooked
poorly.
Insert plugs.
G) Insert the Appliance Plug into the Plug
Receptacle securely.
@ Insert the
Power
Plug into an electrical outlet.
Plug Receptacle
BASICS
ON
HOW
TO
USE
{cont.)
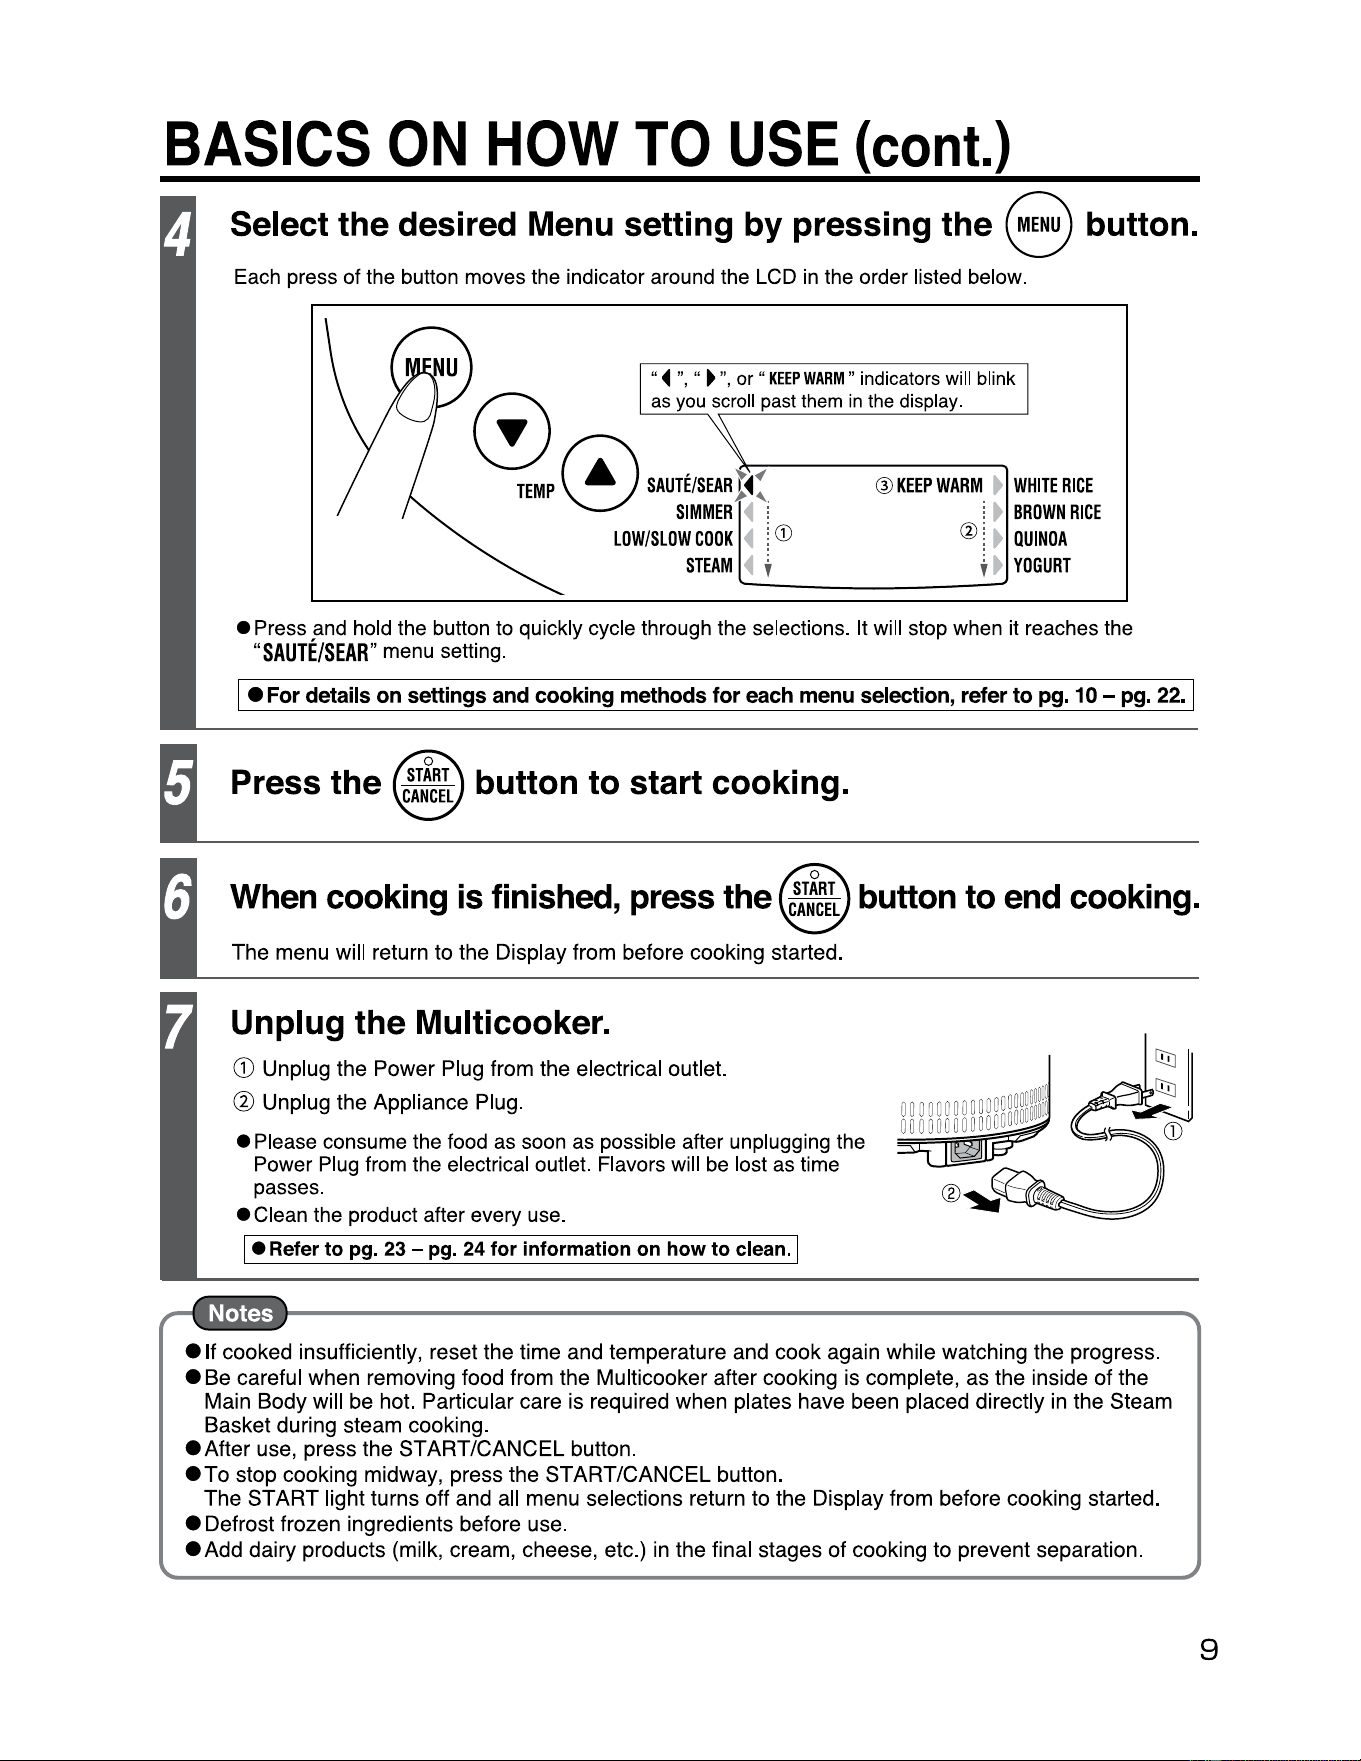
Select
the
desired Menu setting by pressing the button. 8
Each press of the button moves the indicator around the LCD
in
the order listed below.
"◄
",
"
►
",
or
"
KEEP
WARM"
indicators will blink
0
as
yo,
scroll past them
;,
the d;splay.
~EMP
~
SAIJTE/SEAR
t
◄
:
@
KEEPWARM
►
WHITERICE
V
SIMMER
◄
: i
►
BROWN
RICE
LOW/SLOW
COOK
◄
l
CD
@ l
►
QUINOA
STEAM
◄
~ ~
►
YOGURT
• Press and hold the button to quickly cycle through the selections. It will stop when it reaches the
"SAUTE/SEAR
" menu setting.
• I
For
details
on
settings
and
cooking
methods
for
each
menu
selection,
refer
to
pg.
10
-
pg.
22.
I
Press
the
button to start cooking.
When cooking
is
finished, press the button to end cooking.
The menu will return to the Display from before cooking started.
Unplug the Multicooker.
G) Unplug the Power Plug from the electrical outlet.
@ Unplug the Appliance Plug.
• Please consume the food as soon as possible after unplugging the
Power Plug from the electrical outlet. Flavors will
be
lost as time
passes.
• Clean the product after every use.
• I Refer to pg. 23 - pg. 24 for information on how to clean. I
e
1f
cooked insufficiently, reset the time and temperature and cook again while watching the progress.
• Be careful when removing food from the Multicooker after cooking is complete, as the inside
of
the
Main Body will be hot. Particular care is required when plates have been placed directly
in
the Steam
Basket during steam cooking.
eAfter use, press the START/CANCEL button.
eTo
stop cooking midway, press the START/CANCEL button.
The START light turns off and all menu selections return to the Display from before cooking started.
• Defrost frozen ingredients before use.
• Add dairy products (milk, cream, cheese, etc.) in the final stages of cooking to prevent separation.
9
10
HOW TO USE
,
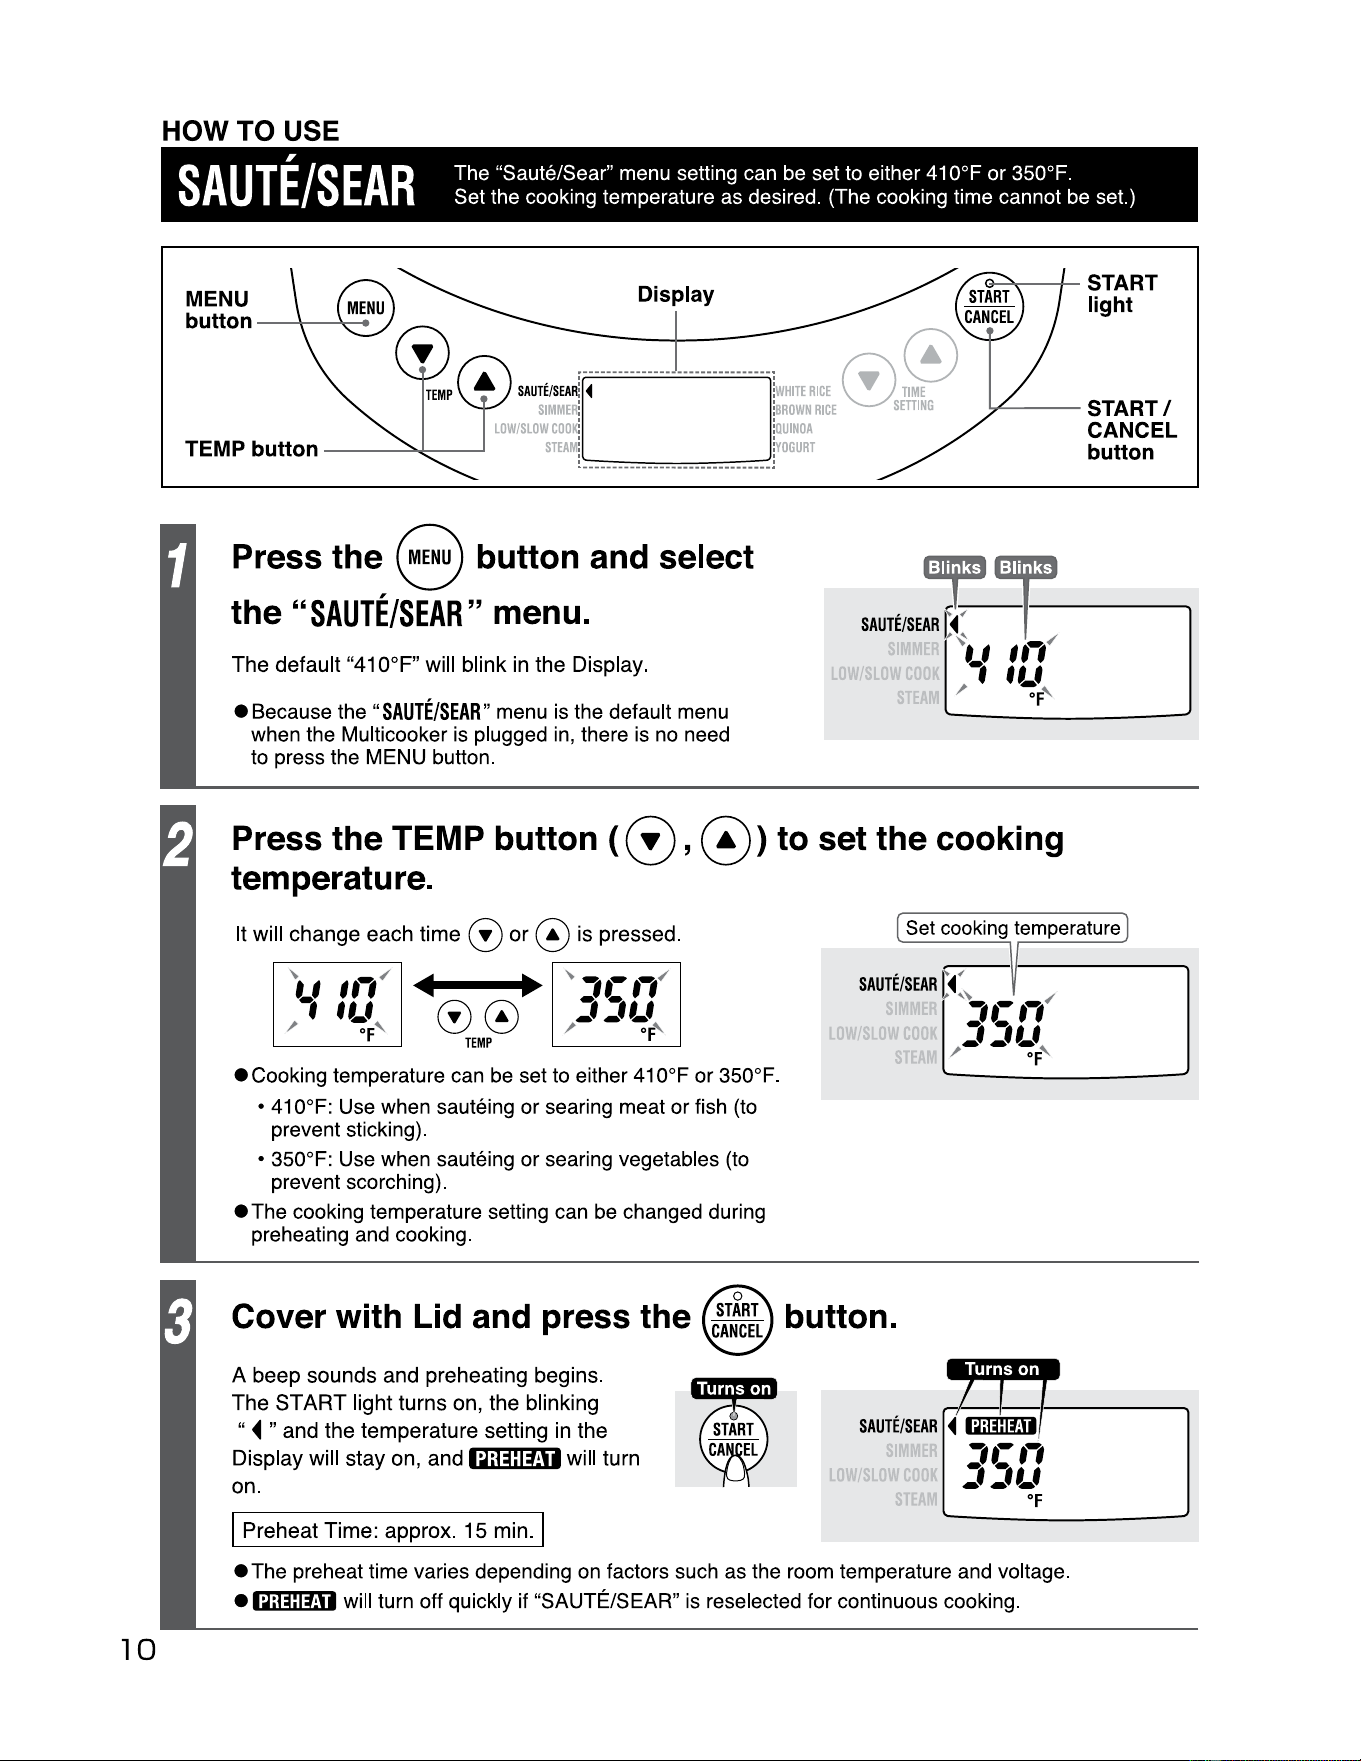
SAUTE/SEAR
The "Saute/Sear" menu setting can be set to either 410°F or 350°F.
Set the cooking temperature as desired. (The cooking time cannot
be
set.)
MENU
button
-----
Display
G---".--------+-
ST
A
RT
light
UTE/SEA
~
-
◄
-------------
---------------
k
HITE
RICE
0
SIMME
~
[·
l!
BROWN
RICE
s
---
START/
/SLOW
COO
K:
:O
UINOA
STEAM
!
________________________________
~
OGURT
CANCEL
button
Press the 8 button and select
the
"SAUTE/SEAR"
menu.
The default
11
410°F" will blink in the Display.
~mp
SAUTE/SEAR
C
◄-
~
---
,~
-----
~.,
,,-
(
LOWSLO
1
ff.f
• Because the
II
SAUTE/SEAR"
menu is the default menu
when the Multicooker is plugged in, there is no need
to press the MENU button.
S1
/
°F
'
Press the TEMP button ( G),
0)
to set the cooking
temperature.
It will change each time (!)
or
0 is pressed.
Ill
-
00
TEMP
• Cooking temperature can be set to either 410°F or 350°F.
• 410°F: Use when sauteing or searing meat or fish (to
prevent sticking).
• 350°F: Use when sauteing or searing vegetables (to
prevent scorching).
•The
cooking temperature setting can be changed during
preheating and cooking.
Cover with Lid and press the button.
A beep sounds and preheating begins.
The
ST
ART
light turns on, the blinking
11
◄
" and the temperature setting in the
Display will stay on, and
1Q;@@H
will turn
on.
I Preheat Time: approx.
15
min. I
Set cooking temperature
SAUTE/SEAR
~
,~
✓
,.-,,
LOW
SLOW
:,
:,,_,
S1
/
•F
'
SAUTE/SE
LOW
SLOwcn
ST
AR
~-r
.
I
'
'
◄
l~il~:IUI
,.-.,
:,
:,,_,
•F
•The
preheat time varies depending on factors such as the room temperature and voltage.
•
1Q;@@H
will turn off quickly if
11
SAUTE/SEAR" is reselected for continuous cooking.
HOW TO USE
SAUTE/SEAR
(cont.)
Remove the Lid and begin cooking
once preheat completes. Preheat
is complete when a beep sounds
(2 short beeps sound 10 times)
and
turns off
in
the Display.
l Turns
off
]
u
SAUTE/SEAR
◄
i :
,.-,,
•~**Mi
• Wait until
1Q;@j::fj1
disappears from the display before
adding ingredients.
Ingredients may stick if they are added before the display
turns off.
Tips to Prevent Sticking
LOW
SLOW
cnnK
j j
Lf
ST
°F
Once preheat completes,
oil
well and wait 2 to 3 minutes before adding ingredients.
• When cooking meat or fish, do not move the pieces quickly, but wait until they come free
naturally using a spatula before turning them.
Changing the cooking temperature during preheating and cooking
1 Press the TEMP
button((!),@)
.
(The
Display blinks.)
2 While the Display is blinking, press
the TEMP button
((!),@)
to
change the cooking temperature.
3 The change is complete when
the Display stops blinking.
◄
•Mr•
1
·
1
The
Display
stops
blinking
'-'
I,,
approximately
3
I t
f.f
seconds
after
the
•F
cooking
temperature
...._____
Press
this
with the
Display blinking.
When cooking is finished, press
the button to end cooking.
A beep sounds, the START light turns off,
and the
"SAUTE/SEAR"
menu returns to the
Display from before cooking started.
r=-----,--.
• For safety reasons, a beep will sound approximately 2
hours after preheating has completed, and cooking will
automatically be terminated. (The START light turns off
and "End" will turn on
in
the Display.)
After that, press the START/CANCEL button. If the
START/CANCEL button is not pressed, "End" will
continue to be shown
in
the Display and the Food
Removal Notification Beep will sound (2 short beeps
sound twice) approximately 1 O minutes later, after which
it will sound
in
approximately 30-minute intervals.
is
changed
.
~:
SAUTE/SEAR
[
◄
:--•1-------,.
,.-,,
✓
LOW
SLOW
:,
:JL•
ST
/
°F
'
[
"End"
turns
on
]
SA
UTE/SEAR
LOW
s
owcnn
ST
◄
.-
.-
-
,,
I
a1
-
e
1t
the START/CANCEL button is pressed,
the"
SAUTE/SEAR"
menu returns to the Display from before
cooking started.
l l
12
HOW TO USE
S
IMME
R
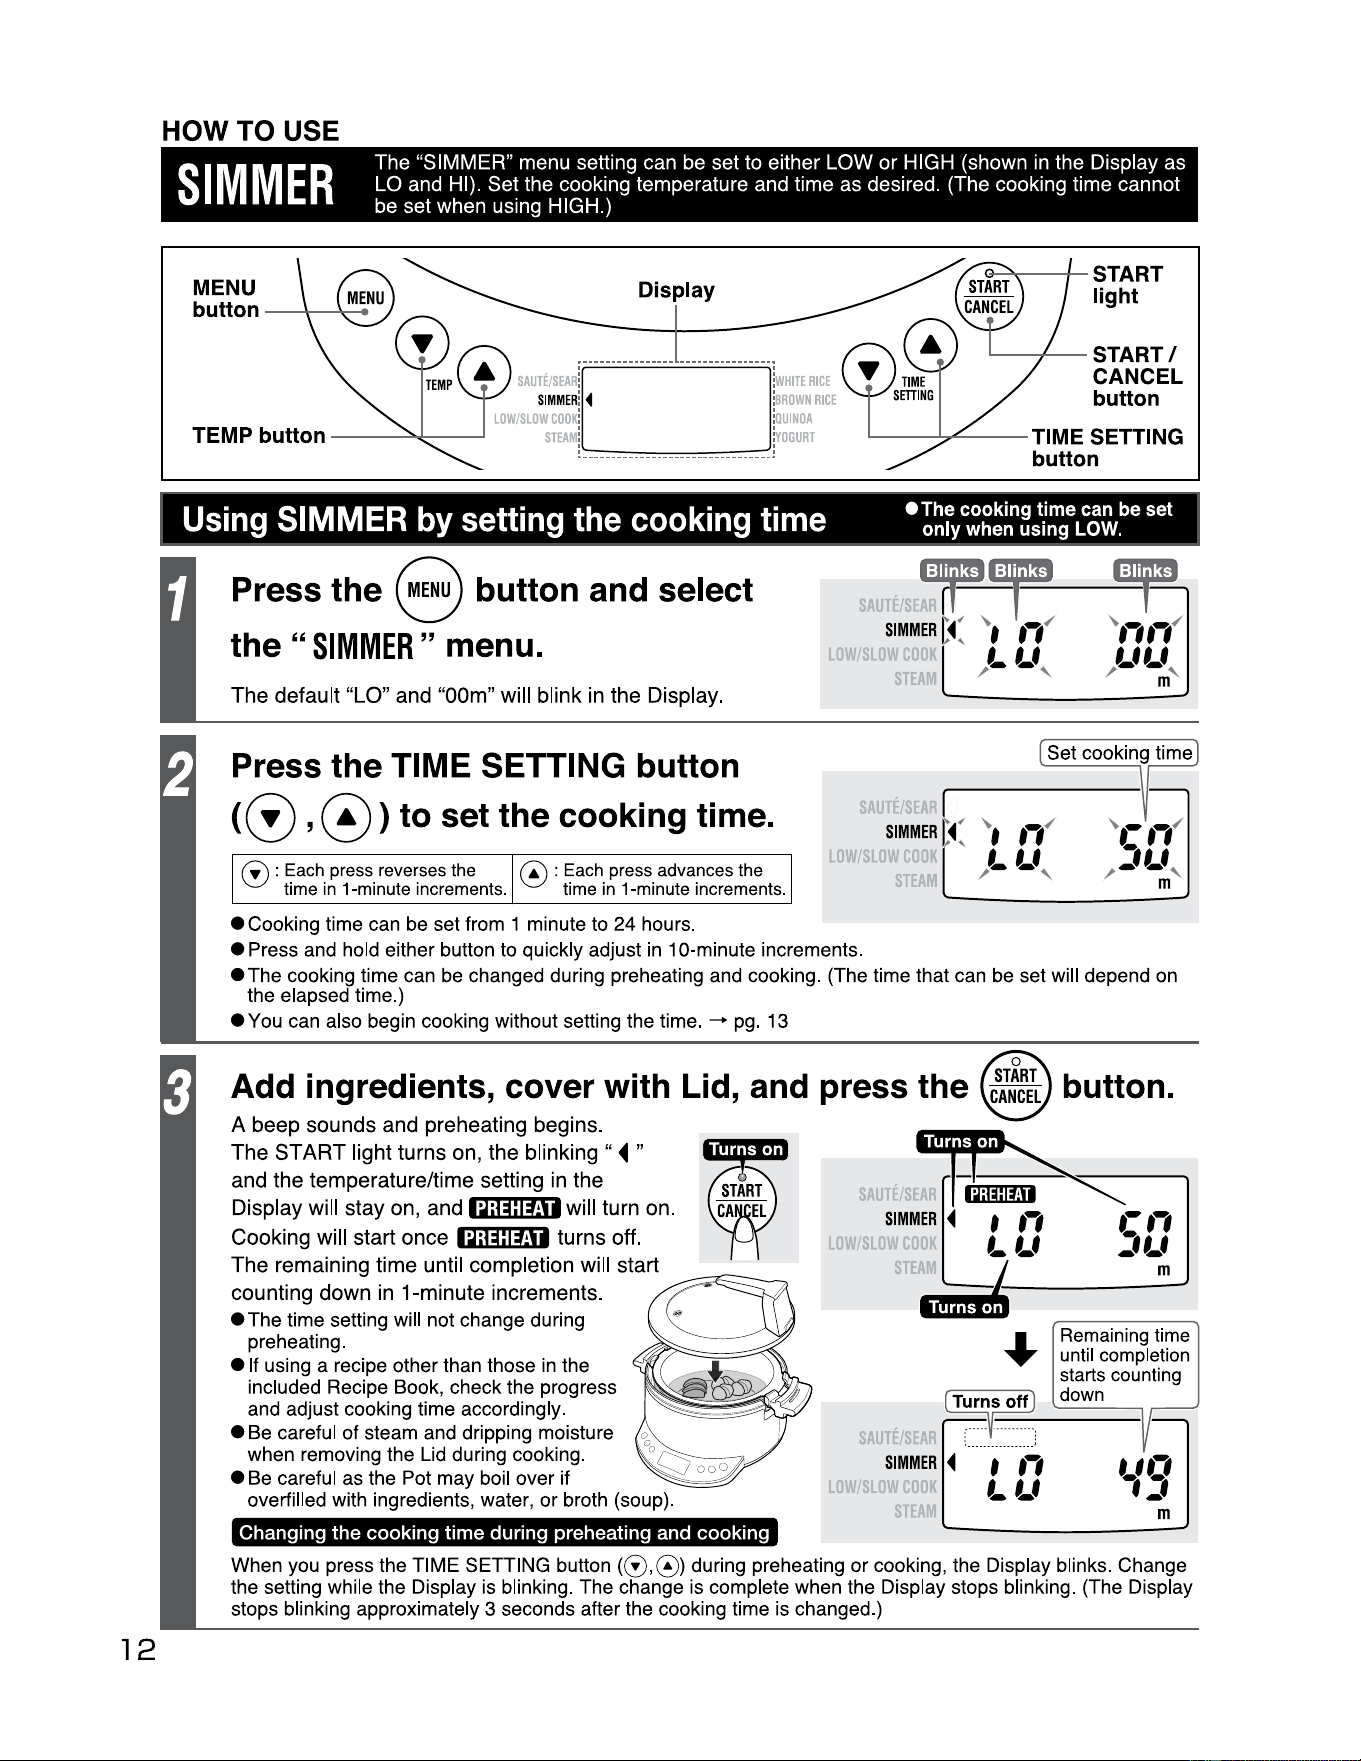
The "SIMMER" menu setting can be set to either LOW or HIGH (shown in the Display as
LO and HI). Set the cooking temperature and time as desired. (The cooking time cannot
be set when using HIGH.)
MENU
button
--+-......,_
◄
Display
Press
the
8 button and select
the
"
SIMMER
" menu.
The
default
"LO"
and
"00m"
will
blink
in
the
Display
.
Press
the
TIME SETTING button
@ ) 0 , to set
the
cooking time.
0 :
Each
press
reverses
the
time
in
1-minute
increments
.
@ :
Each
press
advances
the
time
in
1-minute
increments
.
{
• Cooking time can be set from
1 minute to 24 hours.
• Press and hold either button to quickly adjust
in
10-minute increments.
• The cooking time can be changed during preheating and cooking. (The time that can be set will depend on
the elapsed time.)
• You can also begin cooking without setti
ng
the time.
-+
pg. 13
LO
LO
G->
---+-
START
light
.__--+-_
START/
CANCEL
button
~-----
TIME SETTING
button
ST
SIMMER
t(
~.
.,
✓
ST
LLf
/ '
Add ingredients, cover with Lid, and press
the
button.
A
beep
sounds
and
preheating
begins
.
The
START
light
turns
on,
the
blinking"
◄"
and
the
temperature/time
setting in
the
Display
will
stay
on,
and
•~;@j:ffl
■
will
turn
on.
Cooking
will
start
once
•~;@j:ffl
■
turns
off
.
The
remaining
time
until
completion
will
start
counting
down
in
1-minute
increments.
,.,,--:;:.=E::=::::::
~
• The time setting will not change during
preheating.
e If using a recipe other than those
in
the
included Recipe Book, check the progress
and adjust cooking time accordingly.
• Be careful of steam and dripping moisture
when removing the Lid during cooking.
• Be careful as the Pot may boil over if
overfilled with ingredients, water, or broth (soup).
Changing the cooking time during preheating and cooking
LO
LO
Rema
i
ning
ti
me
until completi
on
starts counti
ng
~1-o
_ff_
:
_d_o_w_n
__
,
: '
SIMMER
◄
f
,-,
LLf
ST
When you press the TIME SETTING button (0,0) during preheating or cooking, the Display blinks. Change
the setting while the Display is blinking. The change is complete when the Display stops blinking. (The Display
stops blinking approximately 3 seconds after the cooking time is changed.)
HOW TO USE
SIMMER
(cont.)
"End" turns
on
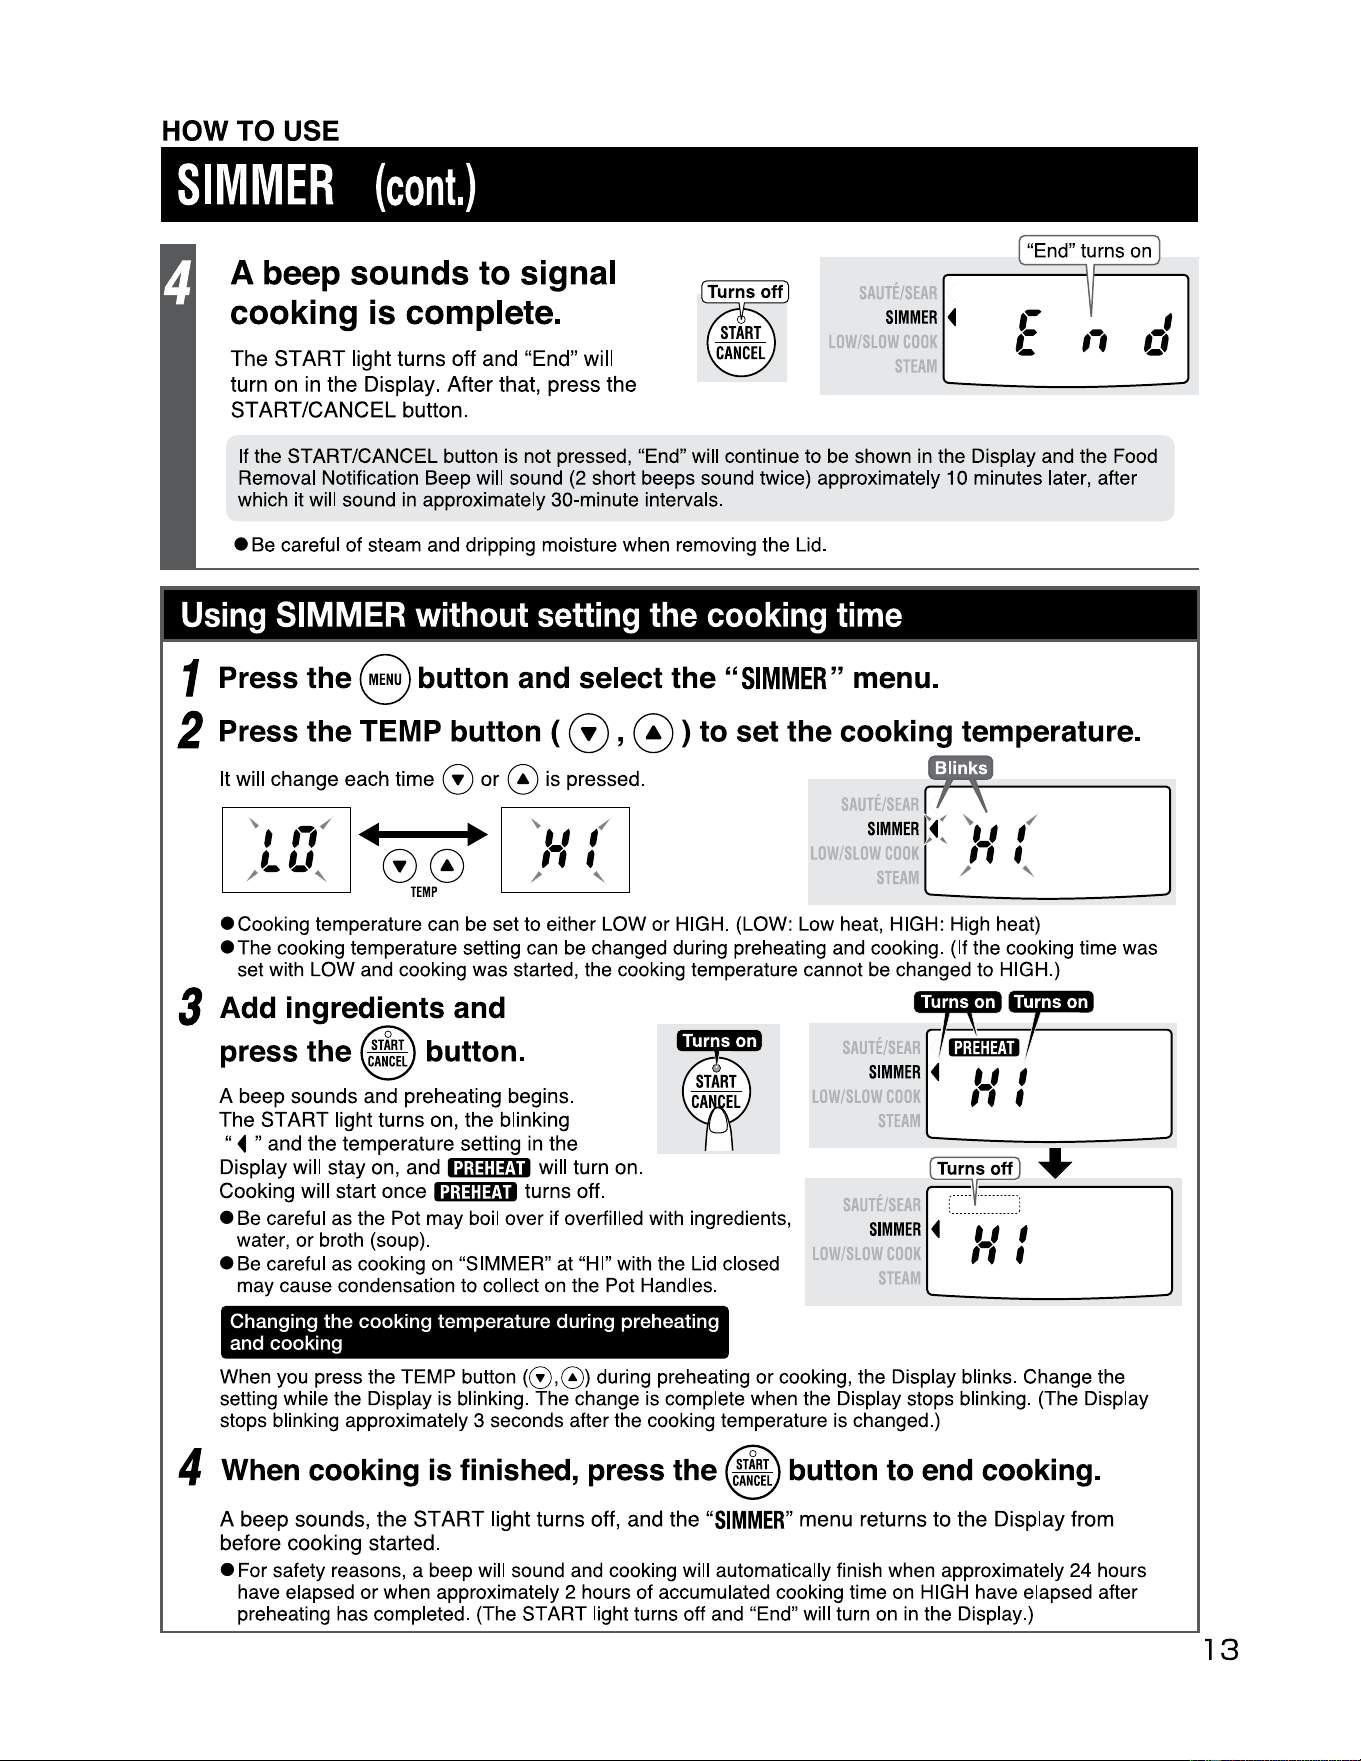
A beep sounds to signal
cooking is complete.
The
ST
ART
light
turns
off
and
"End"
will
turn
on
in
the
Display
.
After
that,
press
the
START/CANCEL
button
.
LO
SIMMER
◄
Sl
'
0
If the START/CANCEL button is not pressed, "End" will continue to be shown
in
the Display and the Food
Removal Notification Beep will sound (2 short beeps sound twice) approximately 10 minutes later, after
which it will sound
in
approximately 30-minute intervals.
• Be careful of steam and dripping moisture when removing the Lid .
Using SIMMER without setting the cooking time
1 Press the 8 button and select the
"SIMMER"
menu.
2 Press the TEMP button (
G)
, 0 ) to set the cooking temperature.
It will change each time
G)
or
@ is pressed.
Ill Ill
00
TEMP
SIMMER
C(
~. '
,
✓
LO\'
11
f
T / '
•cooking
temperature can be set to either LOW or HIGH. (LOW: Low heat, HIGH: High heat)
•The
cooking temperature setting can be changed during preheating and cooking. (If the cooking time was
set with LOW and cooking was started, the cooking temperature cannot be changed to HIGH.)
3 Add ingredients and
press the button.
A beep sounds and preheating begins.
The
ST
ART
light turns on, the blinking
"◄
" and the temperature setting in the
Display will stay on, and
iQ#IM• will turn on.
Cooking will start once
iQ#l#U turns off.
• Be careful as the Pot may boil over if overfilled with ingredients,
water, or broth (soup).
• Be careful as cooking
on
"SIMMER" at "HI" with the Lid closed
may cause condensation to collect on the Pot Handles.
Changing
the
cooking temperature during preheating
and cooking
LO
.
•M:l=r
SIMMER
◄
t_l
I
, ' f
ST
Turnsoff ] +
,:
... '
::
:
:::
:
:::
:
SIMMER
◄
t I I
,,
f
ST
When you press the TEMP
button((!),@)
during preheating or cooking, the Display blinks. Change the
setting while the Display is blinking. The change is complete when the Display stops blinking. (The Display
stops blinking approximately 3 seconds after the cooking temperature is changed.)
4 When cooking is finished, press the
c~!~:L
button to end cooking.
A
beep
sounds,
the
START
light
turns
off,
and
the
"SIMMER"
menu
returns
to
the
Display
from
before
cooking
started
.
• For safety reasons, a beep will sound and cooking will automatically finish when approximately 24 hours
have elapsed or when approximately 2 hours of accumulated cooking time on HIGH have elapsed after
preheating has completed. (The START light turns off and "End" will turn on
in
the Display.)
13
14
HOW TO USE
Low/SLOW
COOK
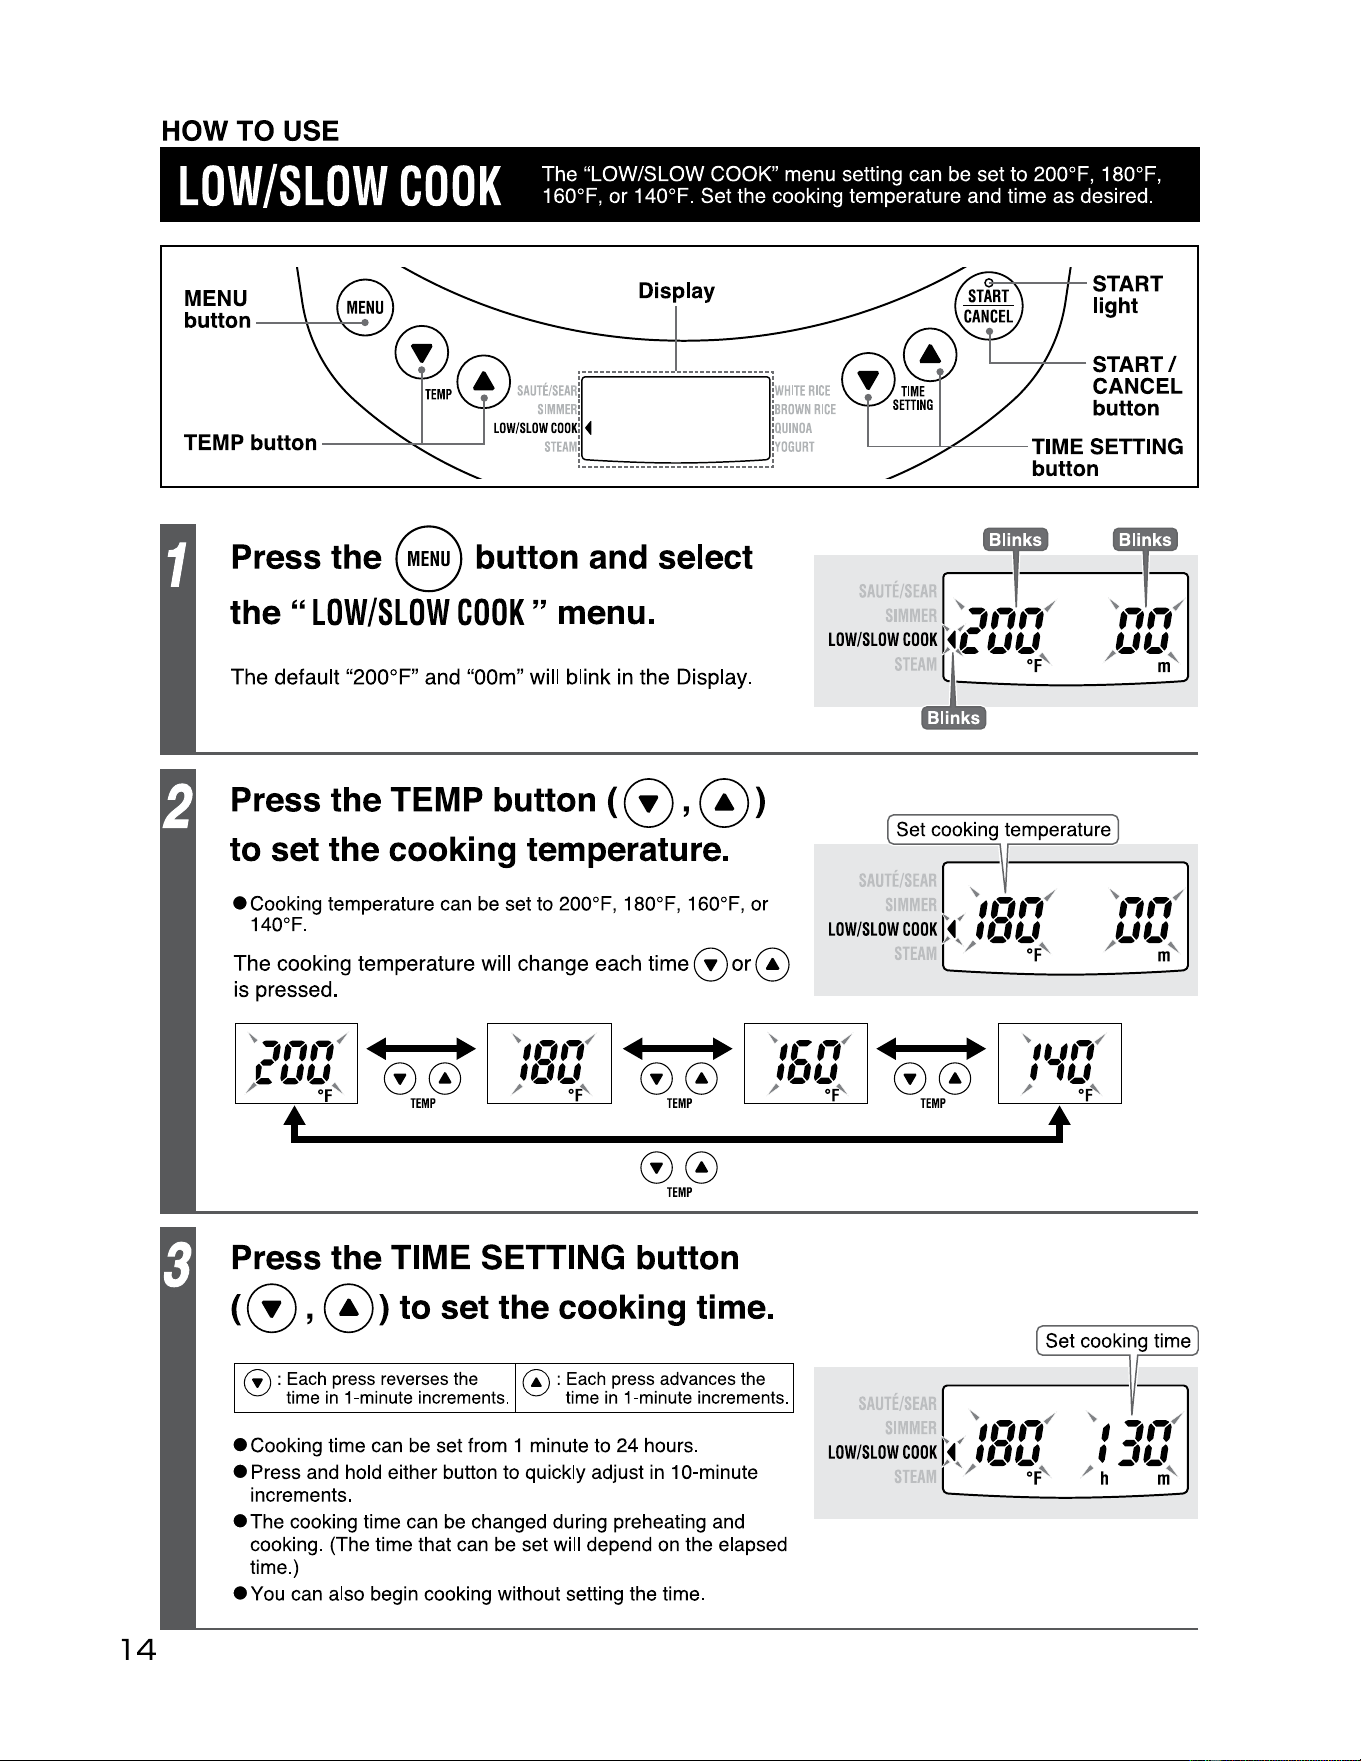
The "LOW/SLOW COOK" menu setting can be set to 200°F, 180°F,
160°F, or 140°F. Set the cooking temperature and time as desired.
MENU
Display
button
---+-----...
....
Press the 8 button and select
the
"LOW/SLOW
COOK
" menu.
The default
"200°F"
and "00m" will blink
in
the Display.
Press the TEMP button ( 0 ,
0)
to set the cooking temperature.
S
•Cooking
temperature can
be
set to 200°F, 180°F, 160°F, or
140°F.
The cooking temperature will change each time
or@
is pressed.
~
,,,,,
✓
Ill
•
~
,,.,,,
✓
Ill
•
~
,,.-,,
✓
cuu
00
,o,_,
00
,o,_,
/
Of
' / of' / of'
t
TEMP TEMP
00
TEMP
Ill
•
~
,,.
,,,
✓
00
,,_,
/ of'
TEMP
t
0
Press the TIME SETTING button
<0,
0>
to set the cooking time.
C!)
: Each press reverses the
time
in
1-minute increments.
0 : Each press advances the
time
in
1-minute increments.
e---a
.----+-
START
light
....._-+-_
START/
CANCEL
button
------
TIME SETTING
button
et cooking temperature
.
SAUTE/
• Cooking time can
be
set from 1 minute to 24 hours.
• Press and hold either button to quickly adjust
in
10-minute
increments.
•The
cooking time can
be
changed during preheating and
cooking. (The time that can be set will depend on the elapsed
time.)
•You
can also begin cooking without setting the time.
~
~
,.,,,
✓
LOW/SLOW
COOK
~
◄
U1
f I
i;
,/
- ~F'
HOW
TO
USE
LOW/SLOW
COOK
(cont.)
Add ingredients, cover with Lid, and press the
A
beep
sounds
and
preheating
begins
.
The
"
ST
ART
light
turns
on,
the
blinking
◄
and
the
temperature
and
time
setting
in
the
Display
will
stay
on,
ana
1Q;@j:ffl1
will
turn
on.
"
Cooking
will
start
once
1Q;@j:ffl1
turns
off
.
The
remaining
time
until
completion
will
start
counting
down
in
1-minute
increments
.
• The time setting will not change during
preheating.
e If using a recipe other than those
in
the included Recipe Book, check the
progress and adjust cooking time
accordingly.
•
Be
careful of steam and dripping
moisture when removing the Lid
during cooking.
•
Be
careful as the Pot may boil over if
overfilled with ingredients, water, or
broth (soup).
AUTE
11111
LOW/SLOW
COOK
◄
f
Cf
l_f
•f
SAUTE
,.,,,
LOW/SLOW
COOK
◄
f
Cf
l_f
•f
',,,
f
:,,_,
h m
Remaining time
until completion
starts counting
down
',.,
,c:,
h m
Changing the cooking time during preheating and cooking
1 Press the TIME SETTING button
(0,0>·
(The
Display
blinks.)
2
While
the Display
is
blinking,
press
the
TIME
SETTING
button (0,0)
to
change
the cooking
time.
Press this with the
Display blinking.
e Press
and
hold
the
TIME
SETTING
button
(0,0)
to
quickly adjust
in
10-minute increments.
3
The
change
is
complete
when
the Display stops blinking.
•Mr•
1
·•
The
Display
stops
blinking
..
I
,1-
approximately
3
f 1 1
seconds
after
the
h -
-m
cooking
time
is
A beep sounds to signal
cooking is complete.
SAt;TE
____
changed
.
"End" turns on
The
START
light
turns
off
and
"End"
will
turn
on
in
the
Display.
After
that,
press
the
START/CANCEL
button
.
LOW/SLOW
COOK
◄
,,
If the START/CANCEL button is not pressed, "End" will continue to be shown
in
the Display and the Food
Removal Notification Beep will sound (2 short beeps sound twice) approximately 10 minutes later, after
which it will sound
in
approximately 30-minute intervals.
• For safety reasons, if the cooking time
was
not set, a beep will sound when approximately
24
hours
has elapsed after preheating has completed, and cooking will automatically finish. (The
START
light
turns off and "End" will turn on in the Display.)
• Be careful
of
steam and dripping moisture when removing the Lid.
15
HOW TO USE
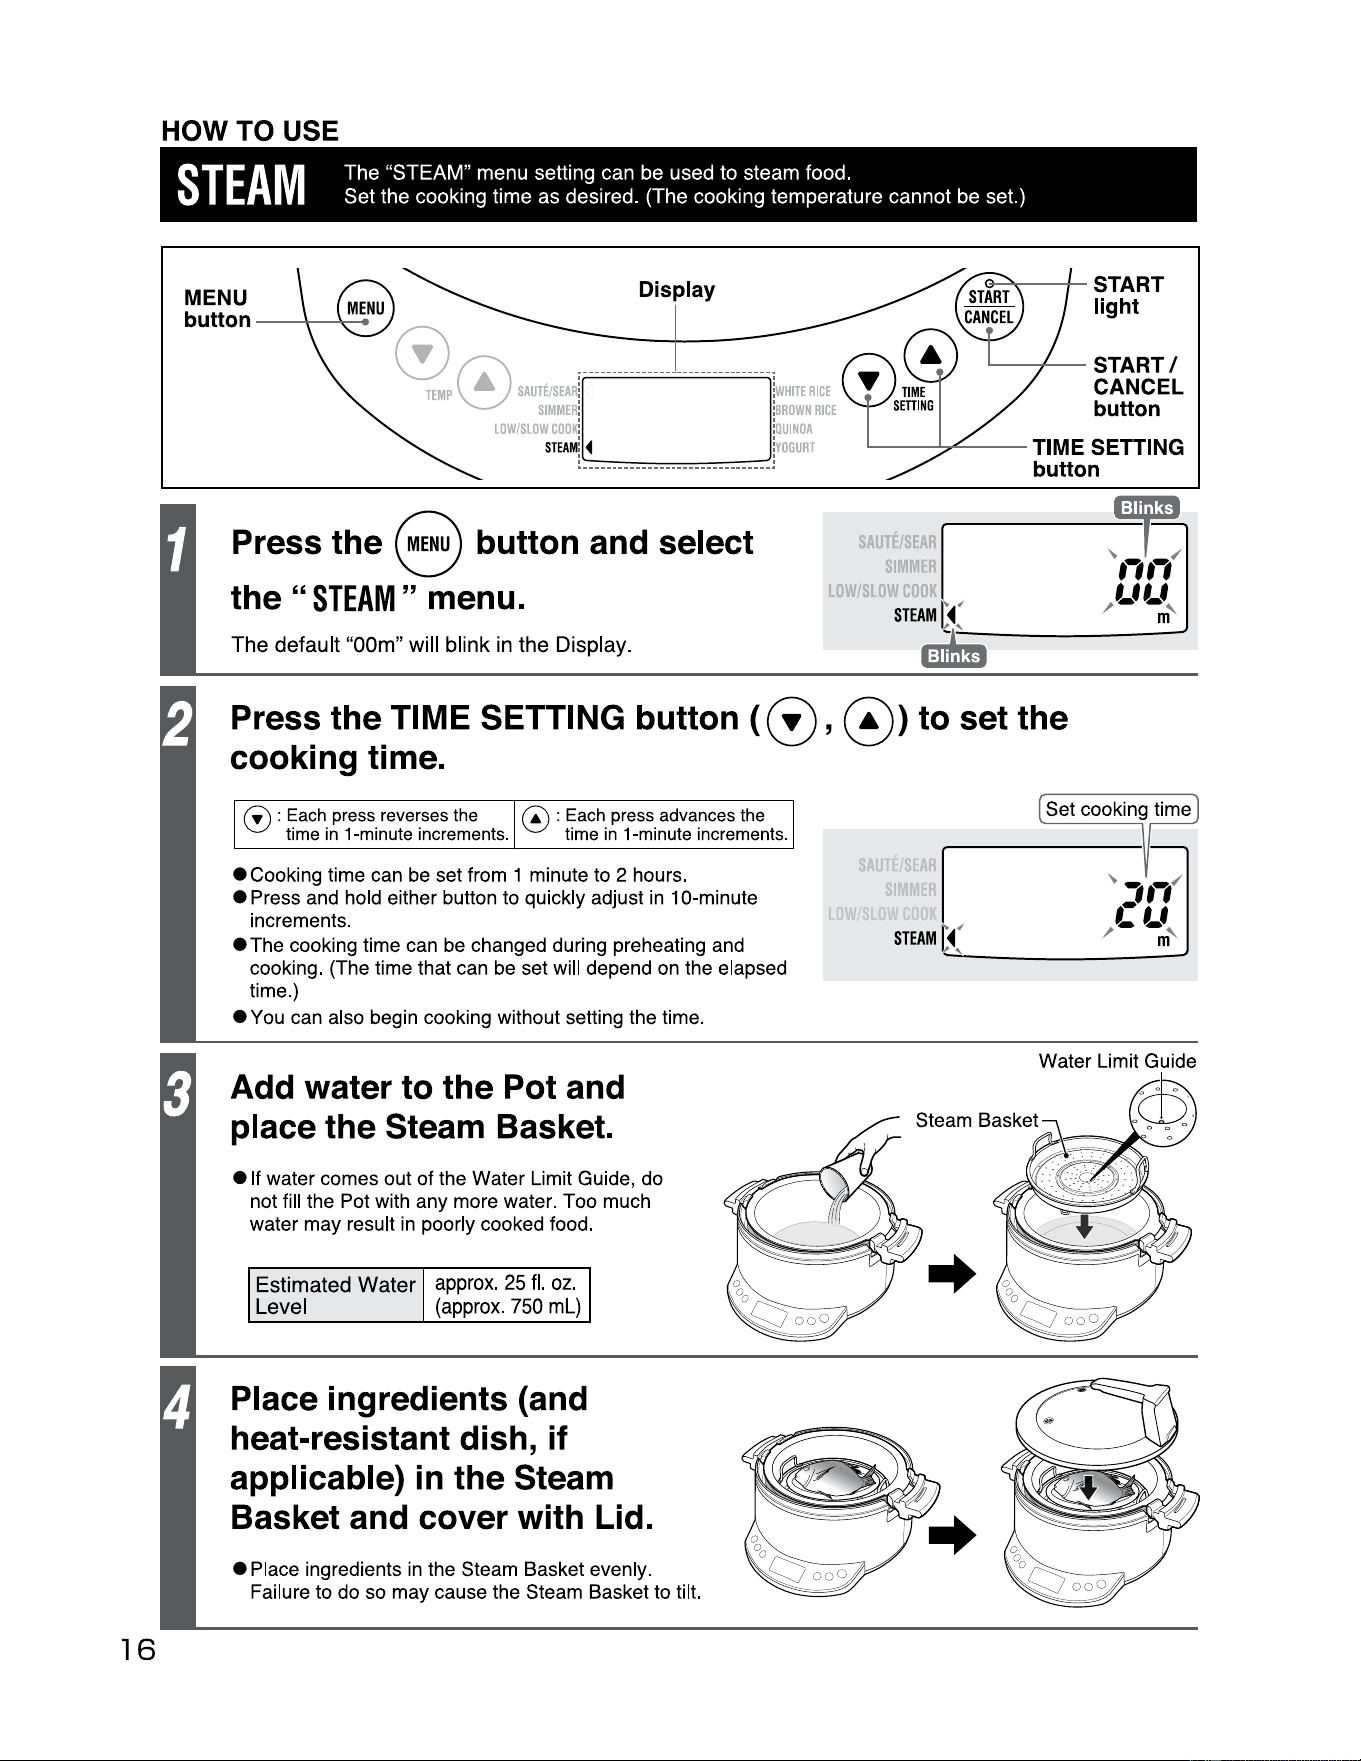
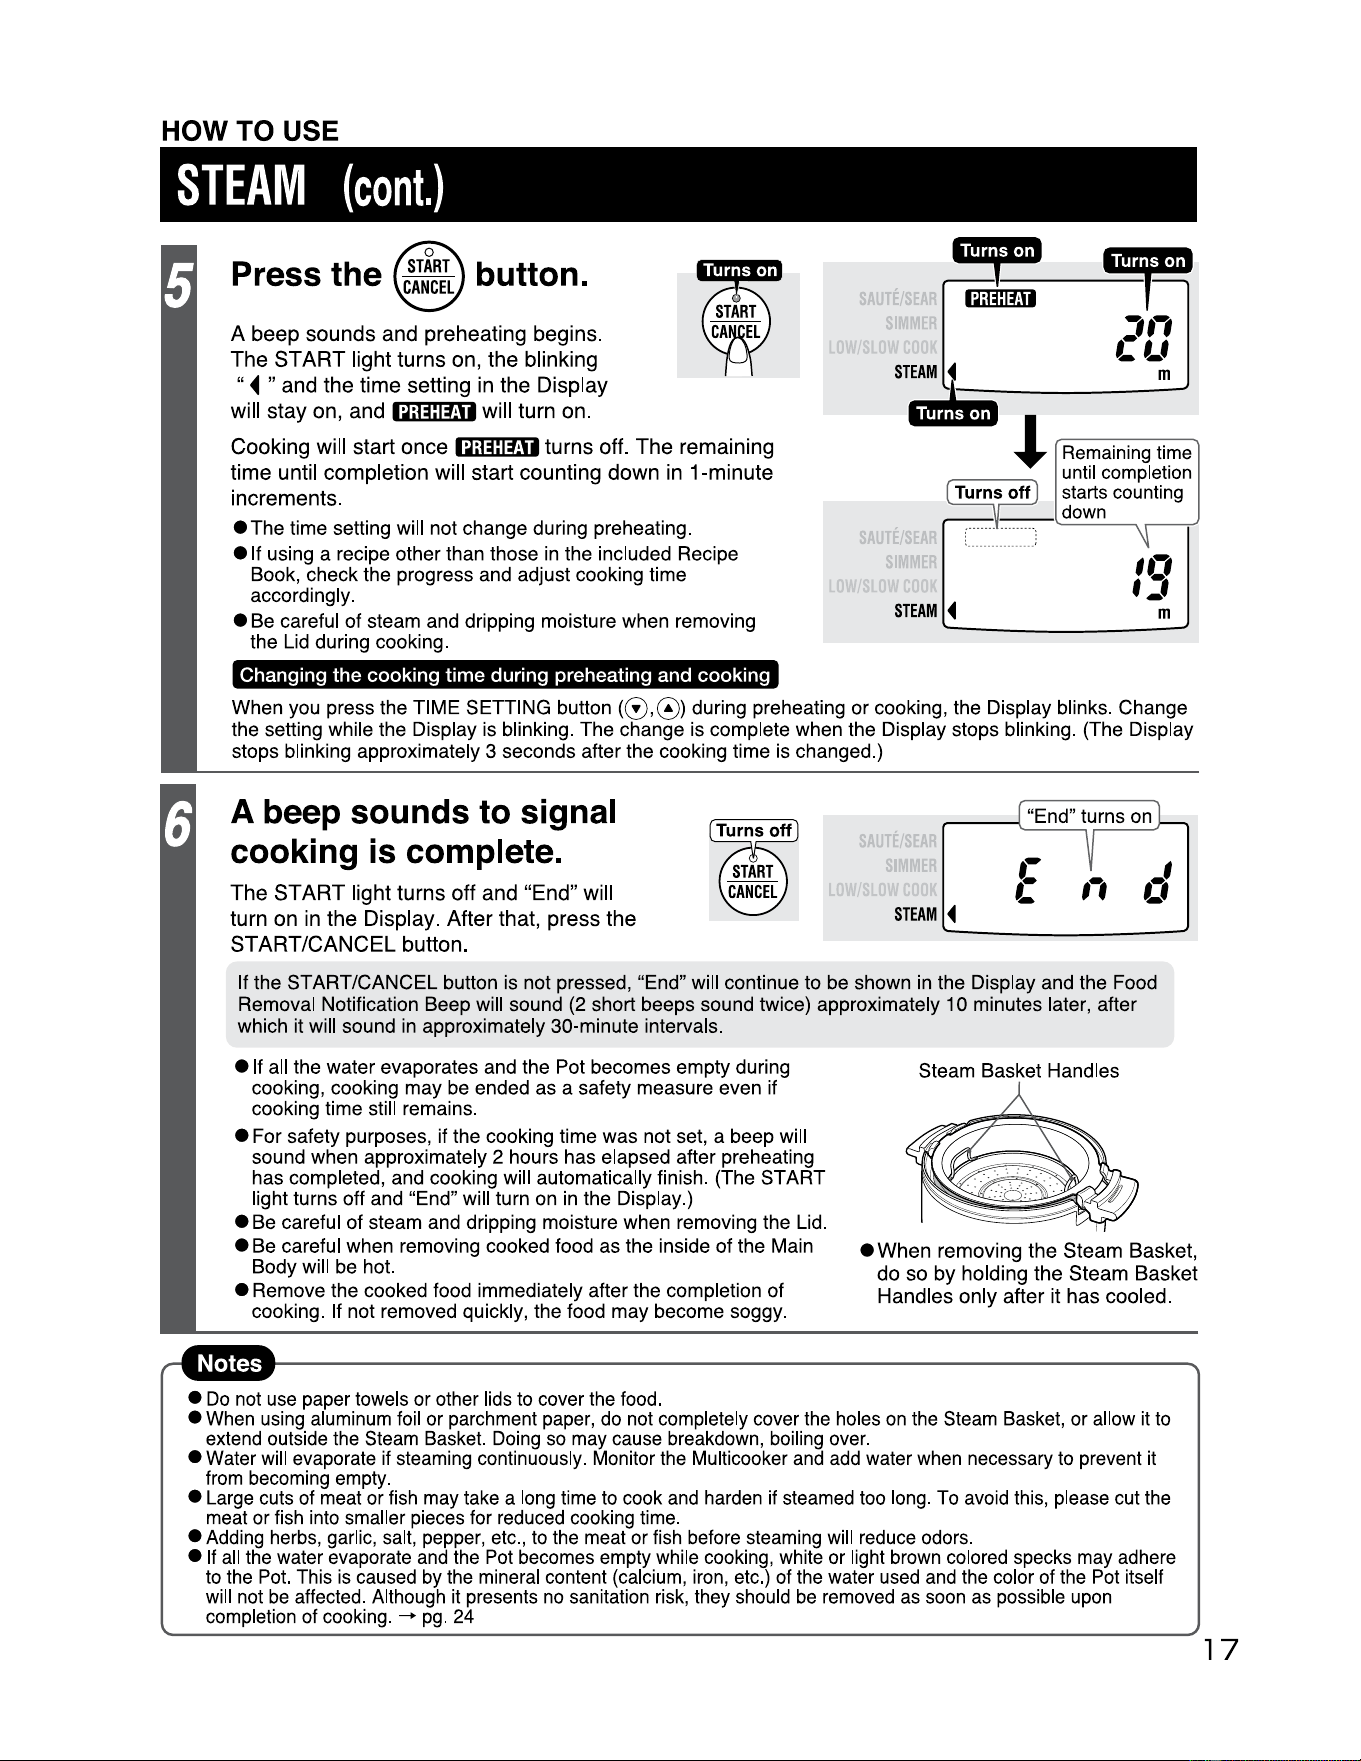
STEAM
The "STEAM" menu setting can be used to steam food.
Set the cooking time as desired. (The cooking temperature cannot be set.)
16
MENU
Display
button
_ _
___..,.......
~0
Mm~
r -
------
-
----
------
-r
..
SIMMER
: :
BROWN
RICE
LOW/SLOW
coo
~ :
QUINOA
STEAM
!
◄
...
........
....
...
........
..
..
!
YOGURT
e---a
..--
--+
- START
light
.__
--+-
_ START/
CANCEL
button
--
--
--
TIME
Press the 8 button and select
the"
STEAM"
menu.
The default
"OOm"
will blink in the Display.
SETTING
SAUTE/
SIM
button
LOW/
STEAM
f'
-
Press the TIME SETTING button (
0,
@) to set the
cooking time.
0 : Each press reverses the
time
in
1 ·minute increments.
@ : Each press advances the
time
in
1 ·minute increments.
• Cooking time can be set from 1 minute to 2 hours.
• Press and hold either button to quickly adjust
in
1 O·minute
increments.
• The cooking time can be changed during preheating and
cooking. {The time that can be set will depend on the elapsed
time.)
• You can also begin cooking without setting the time.
Add water to the Pot and
place the Steam Basket.
• If water comes out of the Water Limit Guide, do
not fill the Pot with any more water. Too much
water may result
in
poorly cooked food.
Estimated Water
Level
approx.
25
fl.
oz.
(approx
.
750
ml)
Place ingredients (and
heat-resistant dish, if
applicable)
in
the Steam
Basket and cover with Lid.
•Place
ingredients in the Steam Basket evenly.
Failure to do so may cause the Steam Basket to tilt.
SAUTE
SIM
Water Limit Guide
HOW TO USE
STEAM
(cont.)
Press the button.
A
beep
sounds
and
preheating
begins
.
The
" "
ST
ART
light
turns
on,
the
blinking
◄
and
the
time
setting
in
the
Display
will
stay
on,
and
1Q;@j:fj1
will
turn
on.
Cooking
will
start
once
1Q;@l:fj1
turns
off.
The
remaining
time
until
completion
will
start
counting
down
in
1-minute
increments.
eThe
time setting will not change during preheating.
e If using a recipe other than those in the included Recipe
Book, check the progress and adjust cooking time
accordingly.
• Be careful of steam and dripping moisture when removing
the Lid during cooking.
Changing
the
cooking
time
during preheating and
cooking
•~
~
~:::::1m1
2
Q
l Remaini
ng
time
until completion
(nirris'ott)
starts counti
ng
":u
r•l
.•
al"'""·"-
-·
'"':: ... ll'IIF'IIP
~
--
down
SAUTE
SIM
STEAM
◄
:
..
...
...
...
..
.
..
. :
When you press the TIME SETTING button (0,0) during preheating or cooking, the Display blinks. Change
the setting while the Display is blinking. The change is complete when the Display stops blinking. (The Display
stops
bl
inking approximately 3 seconds after the cooking time is changed.)
A beep sounds to signal
cooking is complete.
The
START
li
ght
turns
off
and
"End
" w i
ll
turn
on
in
the
Display
.
After
that
,
press
the
START/CANCEL
button.
SAUTE/
SIM
11
"End" turns on
r--
"""'\.......::::..:.:::.
__:;
,,
STEAM
◄
If the START/CANCEL button is not pressed, "End" will continue to be shown in the Display and the Food
Removal Notification Beep will sound (2 short beeps sound twice) approximately 10 minutes later, after
which it will sound in approximately 30-minute intervals.
• If all the water evaporates and the Pot becomes empty during
cooking, cooking may be ended as a safety measure even if
cooking time still remains.
• For safety purposes, if the cooking time was not set, a beep will
sound when approximately 2 hours has elapsed after preheating
has completed, and cooking will automatically finish. (The START
light turns off and "End" will turn on in the Display.)
• Be careful of steam and dripping moisture when removing the Lid.
• Be careful when removing cooked food as the inside of the Main
Body will be hot.
• Remove the cooked food immediately after the completion of
cooking. If not removed quickly, the food may become soggy.
Steam Basket Handles
•
When
removing
the
Steam
Basket
,
do
so
by
holding
the
Steam
Basket
Handles
only
after it
has
cooled.
•
Do
not
use
paper towels or other lids to cover the food.
• When using aluminum
fo
il or parchment paper, do not completely cover the holes
on
the Steam Basket, or allow
it
to
extend outside the Steam Basket.
Do
i
ng
so may cause breakdown,
bo
ili
ng
over.
• Water will evaporate if steaming continuously. Monitor the Multicooker and add water when necessary to prevent it
from becoming empty.
• Large cuts of meat or fish may take a long time to cook and harden
if
steamed too long. To avoid this, please cut the
meat or fish into smaller pieces for reduced cooking time.
• Adding herbs, garlic, salt, pepper, etc., to the meat or fish before steaming will reduce odors.
• If
all
the water evaporate and the Pot becomes empty while cooking, white or light brown colored specks may adhere
to the Pot. This is caused
by
the mineral content (calcium, iron, etc.) of the water used and the color of the Pot itself
will not
be
affected. Although
it
presents no sanitation risk, they should
be
removed as soon as possible upon
completion of cooking.
-+
pg
. 24
17
HOW TO USE
18
MENU
button
----
Display
0
;···············
················;
~
TEMP
SAUTE/SEAR
!l ~
!W
HITE
RICE
~
SIMMER
:
►
:B
ROWN
RICE
S
LOW/SLOW
coo
~
►
:
OUINOA
STEAM
!
••••••••••••••••••••••••••••••••
~
OGURT
Measure the rice/quinoa with
the
included Measuring Cup.
Overfill the Measuring Cup with rice/quinoa, then level off.
1
cup
=
approx.
6.1
oz. /
approx.
180
ml
Clean the rice/quinoa and adjust
the
amount of water.
G)Clean the rice/quinoa before putting it into the Pot.
@On a flat surface, pour water over the rice/quinoa
in
the Pot, filling to
the water level that matches the number of cups of rice/quinoa for
the menu setting.
@For
an
accurate measurement, level the surface of the rice/quinoa.
@Cover with Lid.
Pot
Markings
BROWN
WHITE
RICE
RICE
QUINOA
8
~
8~
63
6 6
4
4
4
3
3
3
Add
water
up
to
the
correct
level
for
the
desired menu.
Using a
water
level
for
a
different menu selection
may result in boiling
over
during cooking.
• Pour water
to
the
water level shown in two locations
on
the sides
of
the Pot.
If
the
Pot is tilted, rice/quinoa
may
be cooked poorly.
•
The
water
level serves
as
a standard guideline and the
amount
of
water
should be adjusted according
to
preference. (Adjust 1
·2mm
above
or
below
the
appropriate
water
level.)
• The rice/quinoa may be cooked immediately after cleaning rice/quinoa, as soaking
is not required. Soaking the rice/quinoa will soften the texture of the rice/quinoa.
•
The
Pot
can
also be used
as
a container for cleaning the rice/quinoa.
TIPS FOR COOKING DELICIOUS RICE/QUINOA
0--"<
,---+-
START
light
..,.._--
START/
CANCEL
button
ec1ean rice/quinoa quickly I
1n
order
to
clean rice/quinoa quickly, prepare a bowl
to
pool water.
© Rinse rice/quinoa ......
First,
pour
plenty
of
water
into
the
Pot
from
the
bowl
and
stir
the
rice/quinoa
loosely
2
to
3
times
(within
about
1 O
seconds)
by
hand.
Drain
the
water
immediately
afterwards.
Repeat
twice.
@ Wash rice/quinoa ......
Wash
by
stirring
the
rice/quinoa
by
hand
30
times
(about
15
seconds)
,
pour
plenty
of
water
from
the
bowl
and
stir
the
rice/quinoa
loosely
again
.
Drain
the
water
immediately.
Repeat
this
washing
process
2
to
4
times
.
@ Rinse rice/quinoa ......
Lastly,
pour
plenty
of
water
from
the
bowl
and
rinse
the
rice/quinoa
.
Repeat
twice
.
""
w_a_s_h -
by
--...
stirring
the
rice/quinoa
Rinse
the
@.
,,,
7
/ .
rice/quinoa
··
!V'll
quickly
with
plenty
of
water
.
(Complete steps
©-@within
10 minutes.)
Do not clean
the
rice/quinoa or adjust
the
amount
of
water using hot water (95°F/35°C
or
above).
Doing
so
will cause the rice/quinoa to
be
cooked improperly.
-
eAdjust
the amount
of
water accordingly
Be sure to adjust the amount of water on a flat surface.
• Pour water
to
the water level shown
in
two locations
on
the sides of the
Pot.
If the
Pot
is
tilted, rice/quinoa may
be
cooked poorly.
• The water level
is
a guideline. The water level serves
as
a standard guideline
and
the amount of water should
be
adjusted according
to
preference.
Type
of rice/quinoa
New
crop Old crop
Water
Adjustment
Reduce
water
slightly
from
the
normal
level
Increase
water
slightly
above
the
normal
level
• Using too
much
water will cause boil•over.
eoo
not use strongly
alkalized ionic water
Do not use alkalized ionic water
that is over pH 9. Rice/quinoa
cooked with strongly alkalized
ionic water may appear yellow or
become too glutinous.
I
HOW TO USE
WHITE
RICE
/
BROWN
RICE
/
QUINOA
(cont.)
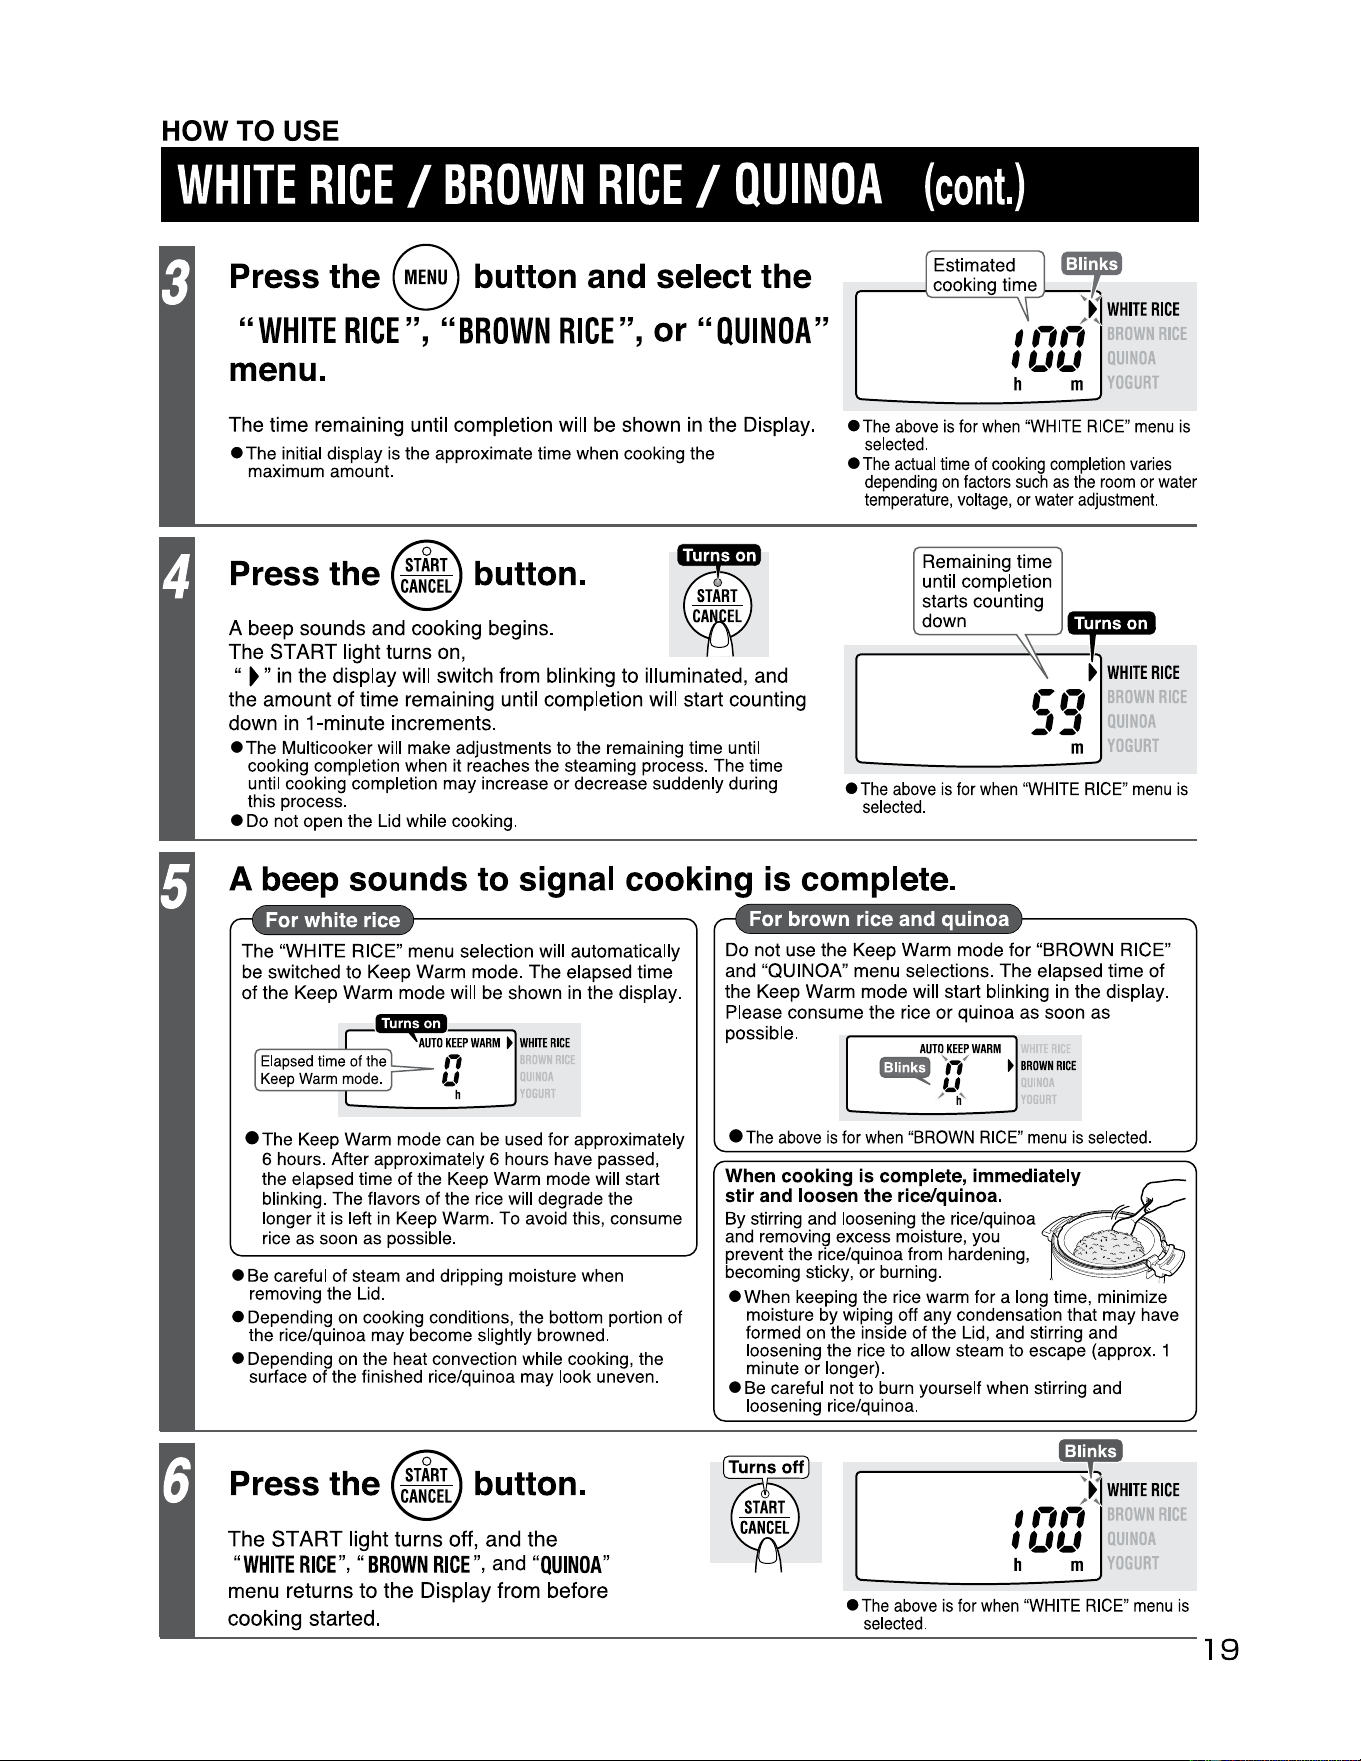
Press the 8 button and select the
"WHITE
RICE",
"BROWN
RICE",
or
"OUINOA"
menu.
~
JJ
WHITE
RICE
,.,.,
f l_fl_f
'DA
h m
IT
The time remaining until completion will be shown in the Display.
• The initial display is the approximate time when cooking the
maximum amount.
•
The
above
is
for
when
"WHITE
RICE
"
menu
is
selected.
•
The
actual
time
of
cooking
completion
varies
depend
i
ng
on
factors
such
as
the
room
or
water
temperature
,
voltage
,
or
water
adjustment.
Press the button.
A beep sounds and cooking begins.
The
"
START light turns on,
►"
in
the display will switch from blinking to illuminated, and
the amount of time remaining until completion will start counting
down
in
1-minute increments.
• The Multicooker will make adjustments to the remaining time until
cooking completion when it reaches the steaming process. The time
until cooking completion may increase
or
decrease suddenly during
this process.
• Do not open the Lid while cooki
ng
.
•
The
above
is
for
when
"WHITE
RICE
"
menu
is
selected.
Rema
ining ti
me
unt
il
complet
i
on
starts counting
down
\.\
~
\
►
WHITE
RICE
.-.,
jj
ll~OA
m
I T
A beep sounds
to
signal cooking
is
complete.
The
"
WHITE
RICE"
menu
selection will automatically
be switched to
Keep
Warm
mode
.
The
elapsed
time
of
the
Keep
Warm
mode
will be shown in
the
display.
1,
1
;;,,
1
-1,1
r----
~
---
AUTO
KEEP
WARM
►
WHITE
RICE
Elapsed
ti
me
of
the
,-,
Keep
Warm
mode
.
LI
h
• The Keep Warm mode can be used for approximately
6 hours. After approximately 6 hours have passed,
the elapsed time of the Keep Warm mode will start
blinking. The flavors of the rice will degrade the
longer it is left in Keep Warm. To avoid this, consume
rice as soon as possible.
• Be careful
of
steam and dripping moisture when
removing the Lid.
• Depending on cooking conditions, the bottom portion
of
the rice/quinoa may become slightly browned.
• Depending on the heat convection while cooking, the
surface of the finished rice/quinoa may look uneven.
Do
not
use
the
Keep
Warm
mode
for
"BROWN
RICE"
and
"QUINOA"
menu
selections.
The
elapsed time
of
the
Keep
Warm
mode
will start blinking in
the
display
.
Please
consume
the
rice
or
qui
noa
as
soon
as
poss
ible.
AUTO
KEEP
WARM
r:ffl!ll'!!I
.
..
✓
►
BROWN
RICE
~
..
,
,, h'
•
The
above
is
for
when
"
BROWN
RICE"
menu
is
selected
.
When
cooking
is
complete,
immediately
stir
and
loosen
the rice/quinoa.
~
By stirring and loosening the rice/quinoa
and removing excess moisture, you
prevent the rice/quinoa from hardening,
becoming sticky, or burning.
~
·
,
::::,::,:::
--··:
·
:_:::_-
,.
• When keeping the rice warm for a long time, minimize
moisture by wiping off any condensation that may have
formed on the inside of the Lid, and stirring and
loosening the rice to allow steam to escape (approx. 1
minute
or
longer).
• Be careful not to burn yourself when stirring and
loosening rice/quinoa.
Press the button.
The
ST
ART
light turns off, and the
"
WHITE
RICE
",
"
BROWN
RICE
", and "
QUINOA
"
menu returns
to
the
Display from before
cooking started.
WHITE
RICE
,.,.,
f l_fl_f
--
~
,,
►
llA
h m , r
•
The
above
is
for
when
"WHITE
RICE
"
menu
is
selected.
19

20
HOW TO USE
Yo
GU
RT
Make
yogurt
using the Multicooker. For detailed instructions, refer to the included Recipe
Book. (The cooking temperature and time
cannot
be set.)
MENU
button - --+___,...,.....
Display
,..........
-
-+-
START
light
TEMP
~
sAure1srul
l·
··
······
······
···
······
·····
J
::
j
wH1TE
RICE
0.
V
SIMMER
: :
BROWN
RICE
s
LOW/SLOW
COO
K:
:
QUINOA
STEAM
! ••••••••••••••••••••••••••••••
►
j
voGURT
"""'-
--
START/
CANCEL
button
Ingredients
•Please
use a commercially available Measuring Cup for cooking (approx. 8 oz. I approx. 240
ml)
.
Whole milk (non-homogenized)·······
··
··
··
···
··
··
· 2 qt. Plain yogurt with active cultures ··· 1.5 cups (12 fl. oz.) ···
··
····
··
Press the 8 button and select the
"YOGURT"
menu.
"4h00m"
will
be
shown
in
the
Display.
(This
does
not
include
PREHEAT.)
•Do
not
cook
any
other
types
of
food using
the
"YOGURT"
menu.
Estimated time
ERICE
t f
,,,,
WN
RICE
1
LfLf
~
h m
►
YOGURT
--
·
Add milk, cover with Lid, and press the
A
beep
sounds
and
preheating
begins.
The
START
light
turns
on,
the
"
►
"
in
the
display
will
switch
from
blinking
to
illuminated,
and
iQ;@l:ffli
will
turn
on
.
•The
time
setting will not
change
during preheating.
•
Do
not
fill
the
Pot with
more
than 2 qts.
of
milk. Doing
so
may
cause
boiling
over
.
When a beep sounds (2 short beeps
sound 10 times) to signal that
preheating is complete and
-•~-;rn"":l...,=ti-1
turns off in the Display, remove the
Lid and add yogurt.
The
START
light
will
start
blinking
.
I
I
Preheat
Time
:
approx
. 4
hours
The preheat time varies depending
on
factors
such as the room temperature and voltage.
•Thoroughly
mix the yogurt and milk together when you add
the yogurt. The yogurt may not solidify if insufficiently mixed.
• Always wait until the
iQ;@ltH
rtisplay has turned off before
adding the yogurt. The yogurt may not solidify properly if the
yogurt is added while
iQ#IMi is displayed.
e
1t
the
START/CANCEL
button
is
not
pressed
within
approximately
30
minutes
of
the
Preheat
Completion
Beep
sounding
,
the
"YOGURT'
menu
returns
to
the
Display
from
before
cooking
started
.
If
this
happens
,
replace
with
new
ingredients
and
restart
from
the
beginning.
•
The
beep
will
sound
in
approximately
5-minute
intervals
until
the
yogurt
is
added
and
the
START/CANCEL
button
is
pressed
.
ERICE
t f
,,
,,
uWN
RICE
1LfLf
h m
►
YOGURT
----
r ........
..
.
----··:
ERICE
t f
,,
,,
uWN
RICE
1LfLf
h m
►
YOGURT

Cover with Lid and press the button.
A beep sounds and cooking begins.
The
ST
ART
light switches from blinking to
illuminated.
The remaining time until completion will start
counting down in 1-minute increments.
Remaining
time
until
completion
starts
counting
down
A beep sounds to signal cooking is complete.
The
ST
ART
light turns off and "End" will
turn on in the Display. After that, press the
START/CANCEL button.
If
the
START/CANCEL button
is
not
pressed,
"
End"
will
continue
to
be
shown
in
the
Display
and
the
Food
Removal
Notification Beep will
sound
(2 short beeps
sound
twice)
approximately
10
minutes later, after which
it
will
sound
in
approximately 30-minute intervals.
•
Be
careful of dripping moisture when
removing the Lid.
HOW TO USE
YOGURT
(cont.)
II
~
,
.-.,
, ,,
---
h
m
►
rE
RICE
UWN
RICE
YOGURT
"End
" turns
on
,,
rE
RIC
I
OWN
RICE
.,
-
►
YOGURT
Notes on Making Yogurt
Yogurts that serve
as starters
• Use plain, unflavored yogurt (containing live and active yogurt cultures) to
make yogurt. The yogurt
may
not solidify if a different type of yogurt is used.
• Use the yogurt immediately after the package is opened. The number of live
bacteria in the yogurt will fall after it has been opened, and the yogurt
may
not solidify well.
• This product cannot be used to make yogurts that require low-temperature
fermentation.
• Do not use the finished yogurt
as
a starter to make additional yogurt.
• The yogurt
may
not solidify well if a yogurt is used in which the number of
live bacteria has decreased, such as due to heating.
Milk
• Use whole milk. The yogurt
may
not solidify if other types of milk are used,
such as 2% milk, 1 % milk,
or
skim milk.
21
----------------------------------------
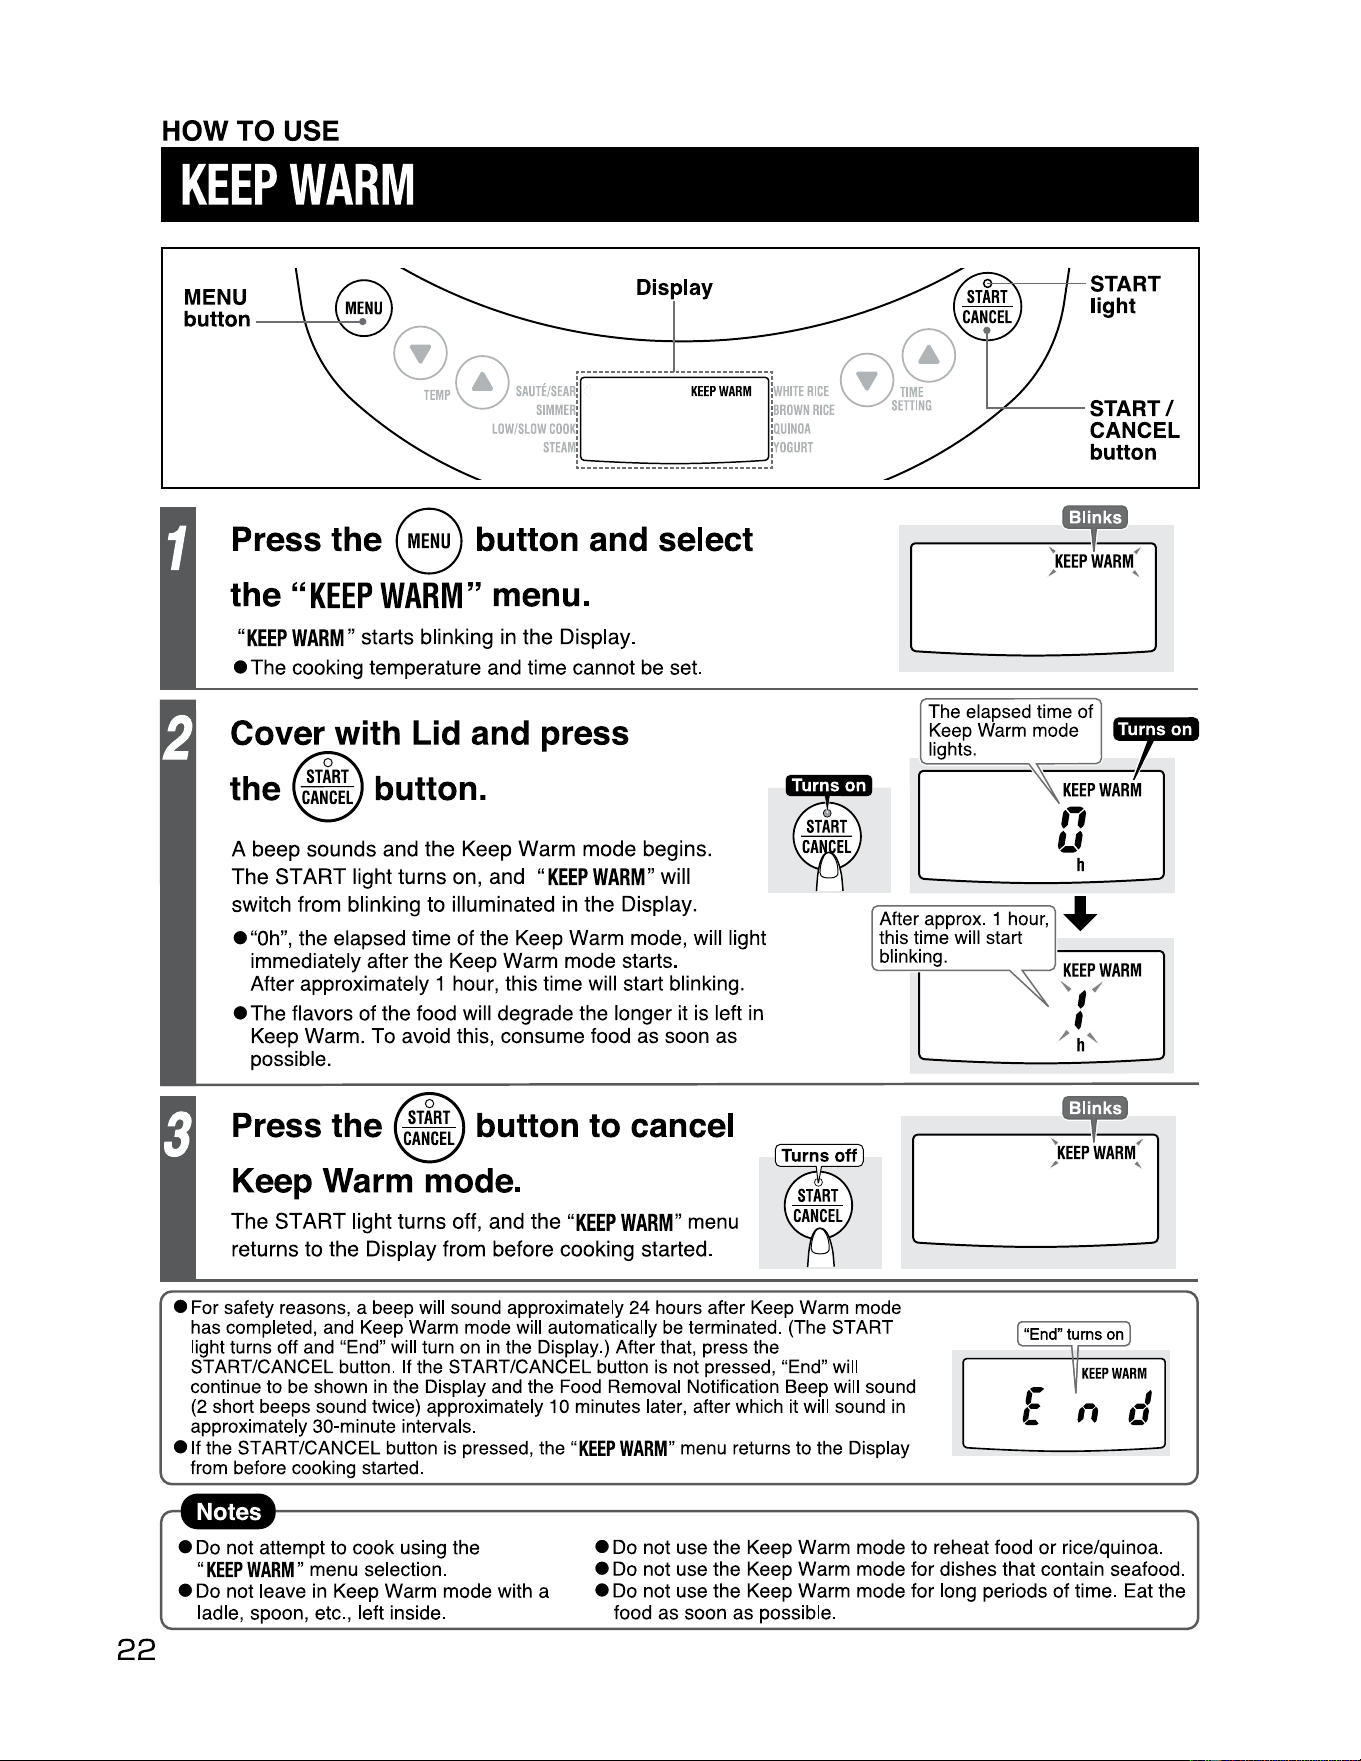
HOW TO USE
KEEP
WARM
Press the 8 button and select
the
"KEEP
WARM"
menu.
"KEEP
WARM"
starts
blinking
in
the
Display
.
•The
cooking temperature and time
cannot
be set.
Cover with
Lid
and press
the button.
A
beep
sounds
and
the
Keep
Warm
mode
begins.
The
START
light
turns
on,
and
"KEEP
WARM"
will
switch
from
blinking
to
illuminated
in
the
Display
.
The elapsed time of
Keep
Warm
mode
lights.
After approx. 1
hour,
this time will start
blinking.
•"Oh",
the elapsed
time
of
the Keep
Warm
mode, will light
immediately after the Keep
Warm
mode
starts.
After approximately 1 hour, this time will start blinking.
•The
flavors
of
the food will degrade the longer it is left in
Keep
Warm
.
To
avoid this,
consume
food
as
soon
as
possible.
~
•
KEEP
WARM
,,
Lf
h
Press the button to cancel
Keep Warm mode.
22
MENU
button
--~-
Dis
lay
e---->
....-----1--
START
light
""
~
7
KEEPWARM
r
..
0
'"~
V
SIMMER:
:
BROWN
RICE
SETTING
LOW/SLOW
COOK:
:OUINOA
STEAM
!
•••••••••
••••••••••••••••
•••••••
~OGURT
---
START/
CANCEL
button
■
:11
•I'
l.._.
T
"
~
KEEP
WARM
; '
KEEP
WARM
~
,
✓
The
START
light
turns
off,
and
the
"KEEP
WARM"
menu
returns
to
the
Display
from
before
cooking
started
.
• For safety reasons, a beep will sound approximately 24 hours after
Keep
Warm mode
has completed,
and
Keep
Warm mode will automatically
be
terminated. (The START
light turns off
and
"End" will turn
on
in
the Display.) After that, press the
START/CANCEL button.
If
the START/CANCEL button
is
not pressed, "End" will
continue
to
be
shown
in
the Display
and
the
Food
Removal Notification Beep will sound
(2
short beeps sound twice) approximately
10
minutes later, after which
it
will sound
in
approximately 30•minute intervals.
e If the START/CANCEL button
is
pressed, the
"KEEP
WARM"
menu
returns to the Display
from
before cooking started.
f
/ h
"-
• Do not attempt to cook using the
"KEEP
WARM"
menu selection.
• Do not leave
in
Keep Warm mode with a
ladle, spoon, etc., left inside.
• Do not use the Keep Warm mode to reheat food
or
rice/quinoa.
• Do not use the Keep Warm mode for dishes that contain seafood.
• Do not use the Keep Warm mode for long periods of time. Eat the
food as soon as possible.

CLEANING
AND
MAINTENANCE
• Clean the product after every use.
• Leaving residue as-is may make
it
difficult to remove.
•
Unplug
the
Multicooker
and
allow
it
to
cool
down
before
cleaning.
•
Do
not
use
the following:
•
Detergents
other
than
mild
kitchen
detergent,
such
as
thinner
and
bleach.
(Using
these
may
cause
discoloration,
cracks,
or
degradation.)
•
Nylon
brushes,
scrubbing
brushes,
anything
made
with
metal,
melamine
sponges,
and
sponges
with
a
nylon
surface
.
(Using
these
may
damage
the
surface
.)
•
Do
not
use
polishing
powder
on
anything
other
than
the
Pot
(stainless
steel
portion).
(Doing
so
may
damage
the
surfaces.)
• If
using
a
cloth
that
is
chemically treated,
do
not
scrub
forcefully
or
leave
it
on
the Multicooker
for
a
long
time.
(Doing
so
may
damage
the
surface
or
cause
chemical
changes
.)
•
Do
not
use
a dishwasher
or
dish-dryer.
(Doing
so
may
cause
discoloration.)
• After cleaning,
wipe
away
any
moisture
using
a
dry,
soft
cloth.
G)Wash
using
a
mild
kitchen
detergent
and
soft
sponge
or
similar
item.
@After
rinsing
thoroughly
with
water,
wipe
with
a
dry
soft
cloth.
• Do not begin cleaning the Lid,
Steam Basket and Pot until they
have cooled.
• Do not use the rough, scrubbing
side of the sponge.
• When washing the Lid, thoroughly
rinse with water to prevent
detergent from remaining.
(Alkaline components in the
detergent that remain may cause
the finish
of
the Lid to become
dull.)
• After cleaning the Steam Basket,
dry it well and carefully wipe off
any moisture on the Steam
Basket Handles and Leg Mounts.
Power
Cord
Wipe
with
a
dry
soft
cloth.
Heating Plate
Wipe
away
any
residue
with
a
warm,
well-wrung
soft
cloth.
• When residue is firmly adhered,
polish using sandpaper
of
about
400 grit.
• Do not splash the product with
water or immerse it in water.
(Doing so may cause malfunction.)
Control
Panel
Wipe
with
a
dry
soft
cloth.
Air
Vent
(Bottom of the Main Body)
Gasket
Wipe
with
a
well-wrung
soft
cloth.
Center Sensor
Wipe
with
a
well-wrung
soft
cloth.
When
foreign
matter
such
as
food
has
become
stuck,
remove
with
a
bamboo
stick.
Main
Body
G)Wipe
with
a
soft
cloth
immersed
in
diluted
mild
kitchen
detergent
and
wrung
well.
@Wipe
with
a
well-wrung
soft
damp
cloth.
Q)Wipe
dry
with
a
soft
dry
cloth.
Measuring
Cup
Wash
using
a
soft
sponge.
To
wash thoroughly,
use a mild kitchen
detergent.
Clean
the
Air
Vent
on
the
bottom
of
the
Main
Body
using
a
vacuum
cleaner.
(Once
a
month.)
Using the Multicooker with a clogged Air Vent may
cause the internal temperature to become
abnormally high, resulting in breakdown.
---------..
---~
.,.......,.,...~.,
~-
-;1---
-
fj
23
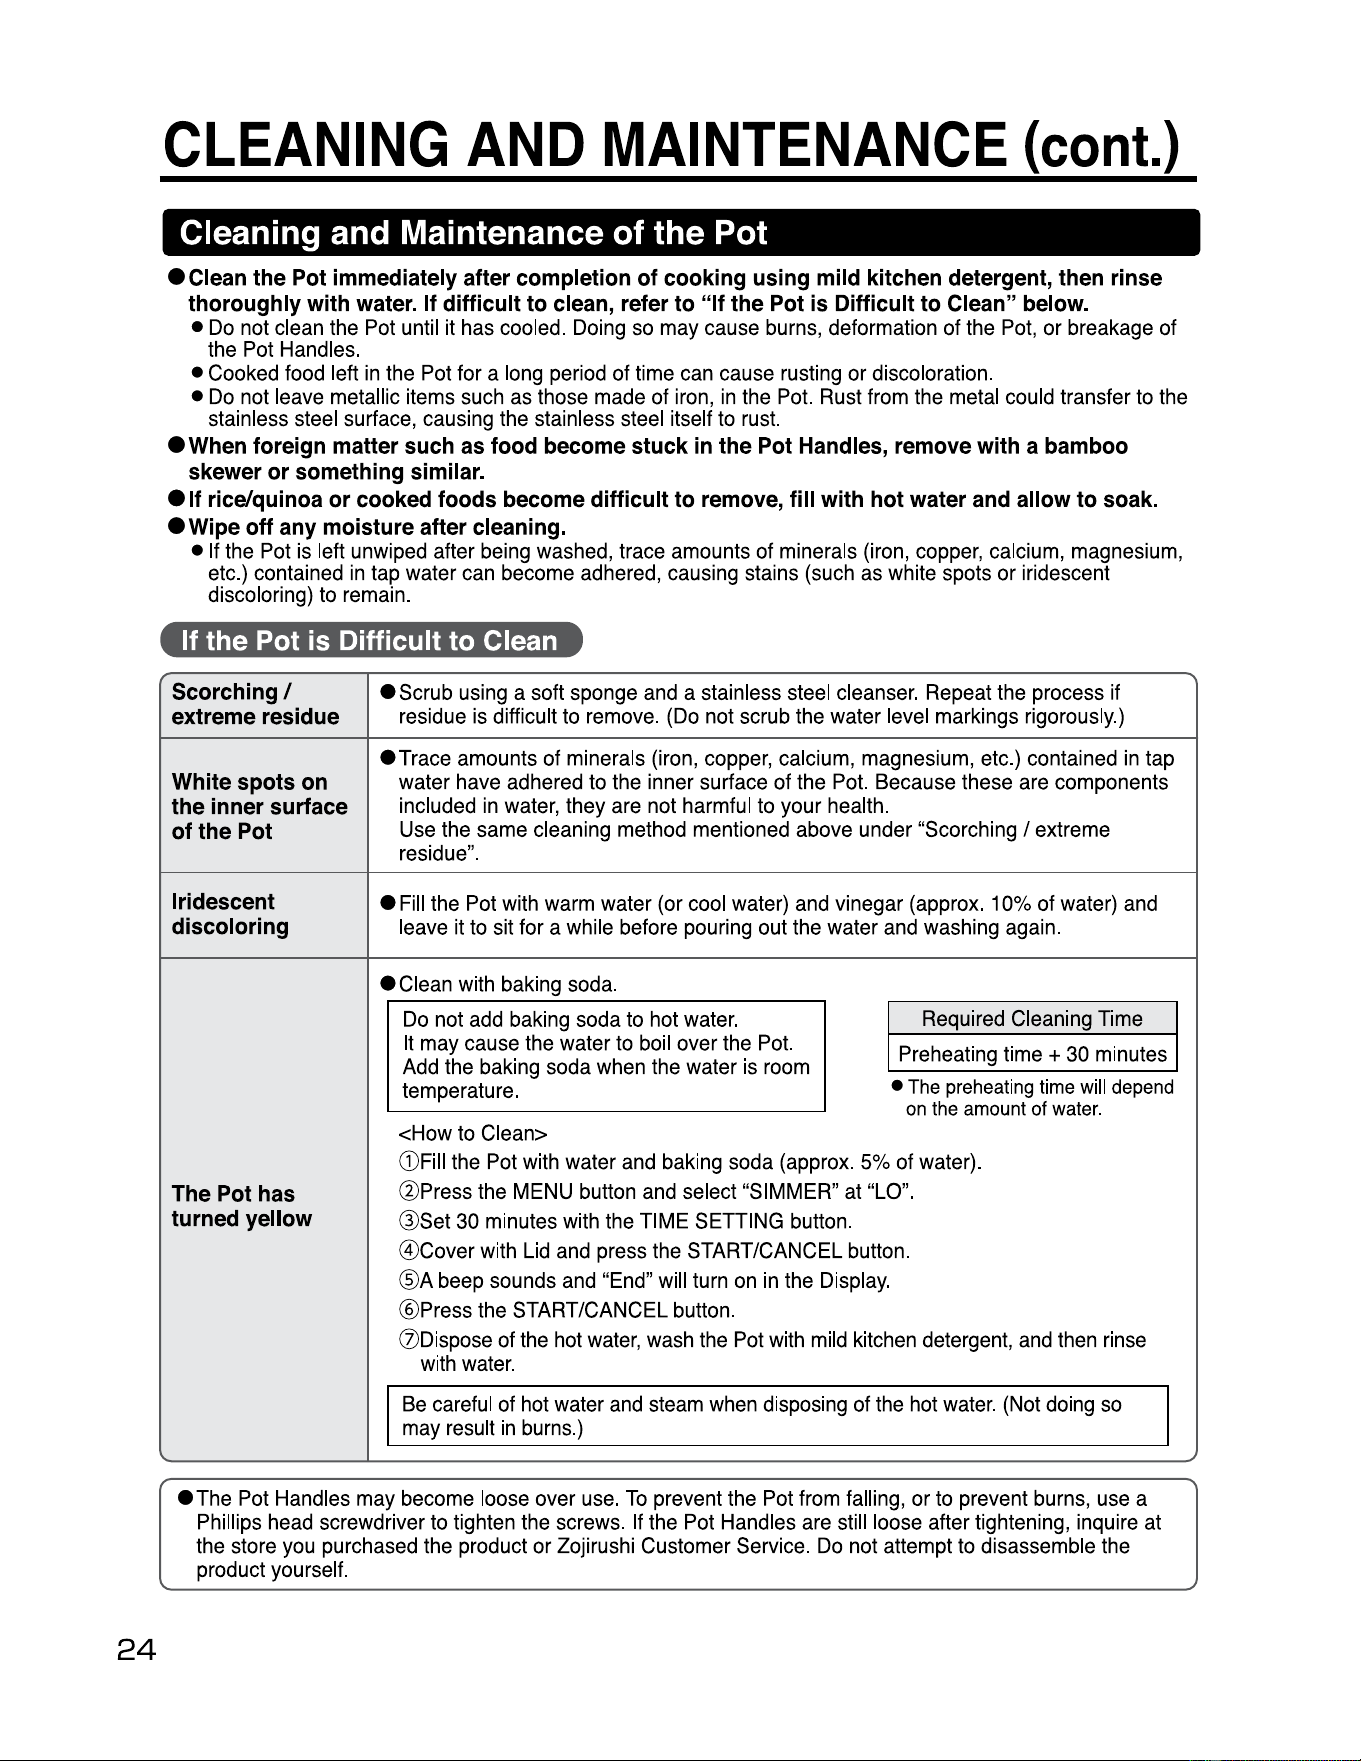
CLEANING
AND
MAINTENANCE
(cont.)
Cleaning and Maintenance of the Pot
24
ec1ean
the
Pot
immediately
after
completion
of
cooking
using
mild
kitchen
detergent,
then
rinse
thoroughly
with
water.
If
difficult
to
clean,
refer
to
"If
the
Pot
is
Difficult
to
Clean"
below.
•
Do
not
clean
the
Pot
until
it
has
cooled.
Doing
so
may
cause
burns,
deformation
of
the
Pot,
or
breakage
of
the
Pot
Handles.
•
Cooked
food
left
in
the
Pot
for
a
long
period
of
time
can
cause
rusting
or
discoloration.
•
Do
not
leave
metallic
items
such
as
those
made
of
iron,
in
the
Pot.
Rust
from
the
metal
could
transfer
to
the
stainless
steel
surface,
causing
the
stainless
steel
itself
to
rust.
•
When
foreign
matter
such
as
food
become
stuck
in
the
Pot
Handles,
remove
with
a
bamboo
skewer
or
something
similar.
e
11
rice/quinoa
or
cooked
foods
become
difficult
to
remove,
fill
with
hot
water
and
allow
to
soak.
•
Wipe
off
any
moisture
after
cleaning.
•
If
the
Pot
is
left
unwiped
after
being
washed,
trace
amounts
of
minerals
(iron,
copper,
calcium,
magnesium,
etc
.)
contained
in
tap
water
can
become
adhered,
causing
stains
(such
as
white
spots
or
iridescent
discoloring)
to
remain
.
If the Pot is Difficult to Clean
Scorching/
extreme
residue
•
Scrub
using
a
soft
sponge
and
a
stainless
steel
cleanser.
Repeat
the
process
if
residue
is
difficult
to
remove
.
(Do
not
scrub
the
water
level
markings
rigorously
.)
White
spots
on
the
inner
surface
of
the
Pot
•Trace
amounts
of
minerals
(iron,
copper,
calcium,
magnesium,
etc.)
contained
in
tap
water
have
adhered
to
the
inner surface
of
the
Pot.
Because
these
are
components
included
in
water,
they
are
not
harmful
to
your
health.
Use
the
same
cleaning
method
mentioned
above
under
"Scorching /
extreme
residue".
Iridescent
discoloring
•
Fill
the
Pot
with
warm
water
(or
cool
water)
and
vinegar
(approx
.
10%
of
water)
and
leave
it
to
sit
for
a
while
before
pouring
out
the
water
and
washing
again.
The
Pot
has
turned
yellow
ec1ean
with
baking
soda
.
Do
not
add
baking
soda
to
hot
water
.
It
may
cause
the
water
to
boil
over
the
Pot.
Add
the
baking
soda
when
the
water
is
room
temperature.
Required
Cleaning
Time
Preheating
time
+
30
minutes
•
The
preheating
time
will
depend
on
the
amount
of
water.
<How
to
Clean>
G)Fill
the
Pot
with
water
and
baking
soda
(approx.
5%
of
water).
@Press
the
MENU
button
and
select "
SIMMER"
at
"LO
".
@Set
30
minutes
with
the
TIME
SETTING
button.
@Cover
with
Lid
and
press
the
START/CANCEL
button
.
@A
beep
sounds
and
"End
"
will
turn
on
in
the
Display
.
@Press
the
START/CANCEL
button.
(Z)Dispose
of
the
hot
water,
wash
the
Pot
with
mild
kitchen
detergent,
and
then
rinse
with
water.
Be
careful
of
hot
water
and
steam
when
disposing
of
the
hot
water
.
(Not
doing
so
may
result
in
burns.)
I
eThe
Pot
Handles
may
become
loose
over
use.
To
prevent
the
Pot
from
falling,
or
to
prevent
burns,
use
a
Phillips
head
screwdriver
to
tighten
the
screws
.
If
the
Pot
Handles
are
still
loose
after
tightening,
inquire
at
the
store
you
purchased
the
product
or
Zojirushi
Customer
Service.
Do
not
attempt
to
disassemble
the
product
yourself.
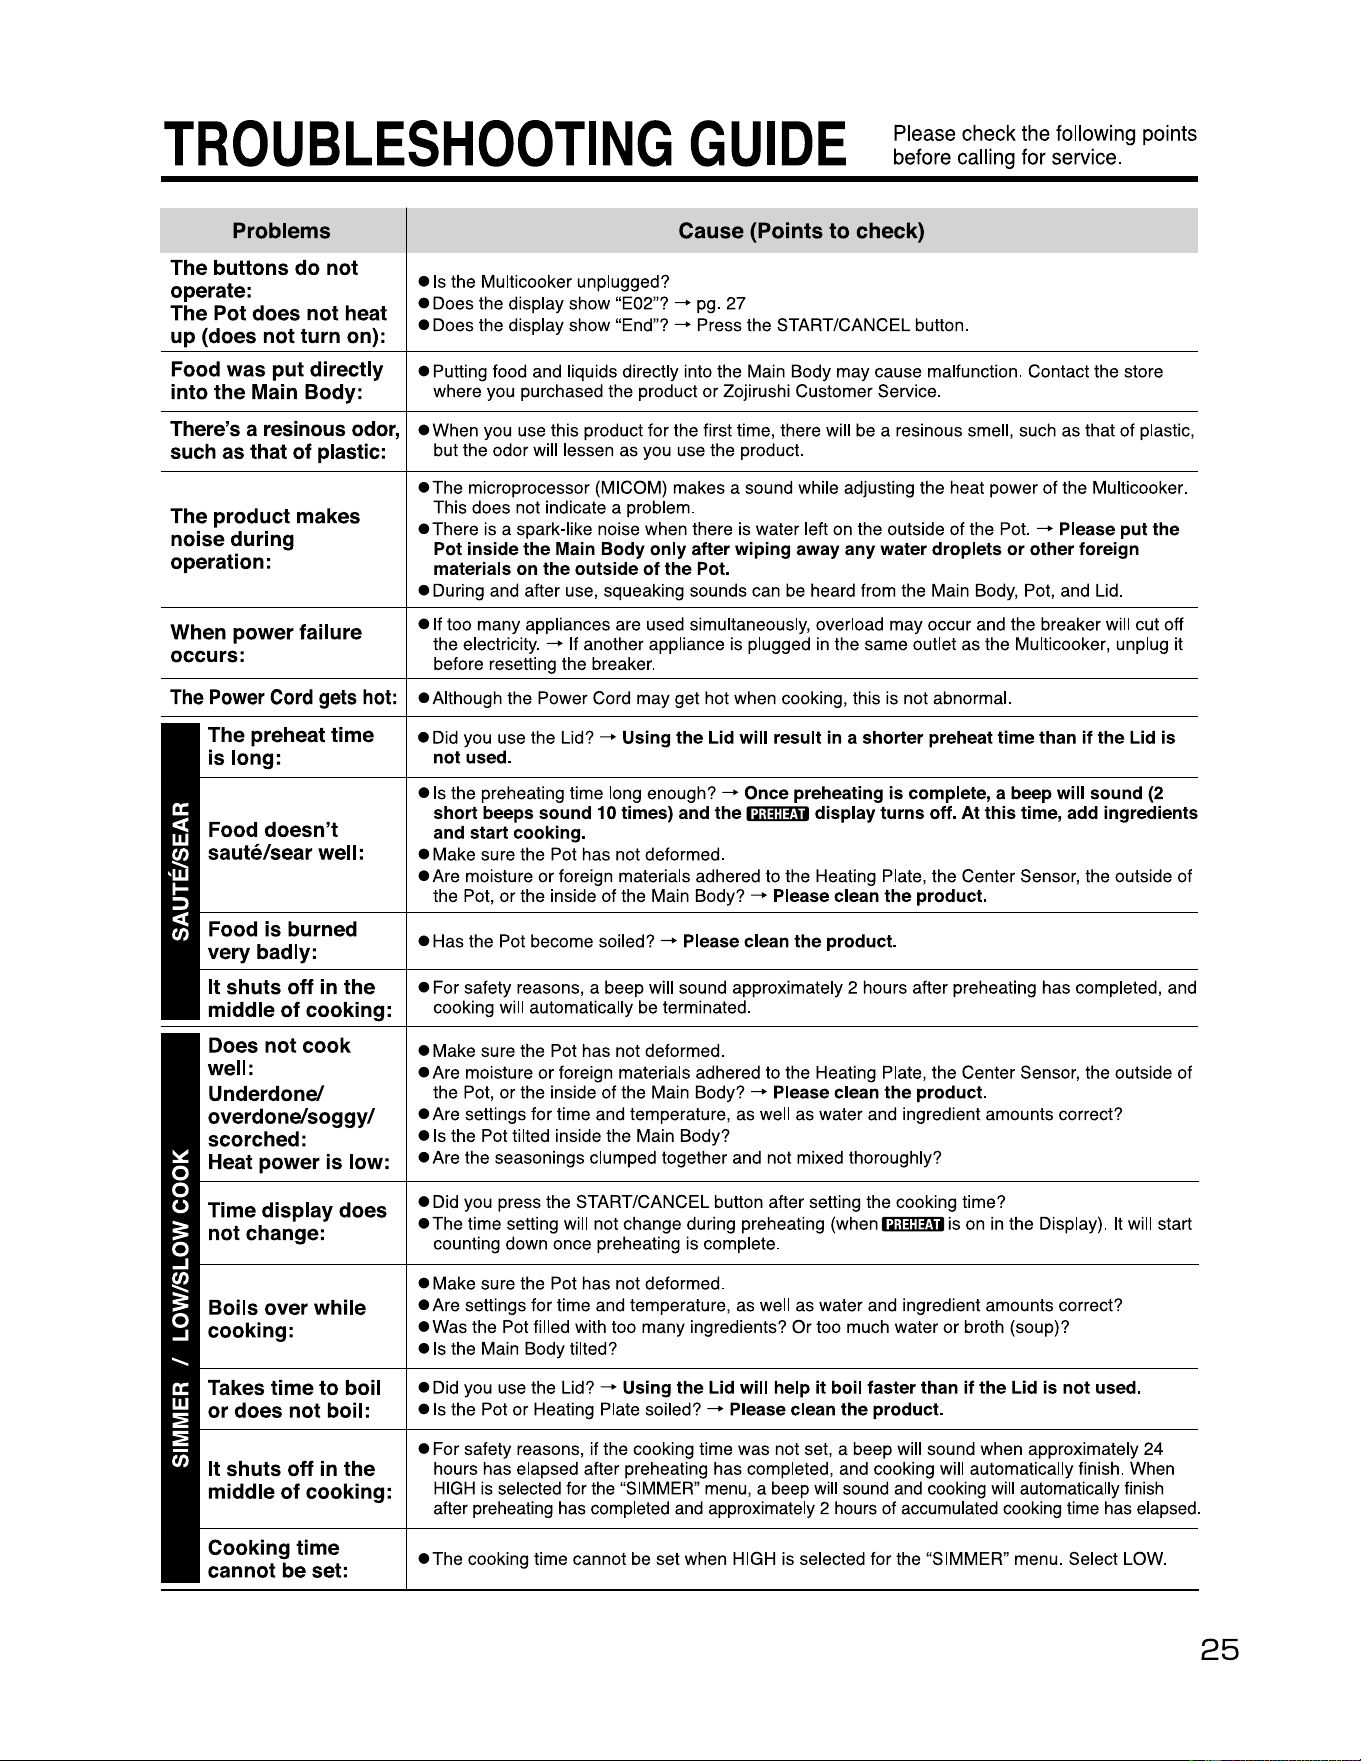
TROUBLESHOOTING
GUIDE
Please
check
the
following
points
before
calling for
service
.
Problems
Cause
(Points
to
check)
The buttons do not
operate:
The Pot does not heat
up (does not turn on):
• Is the Multicooker unplugged?
• Does the display show "E02"?
-+
pg. 27
• Does the display show "End"?
-+
Press the START/CANCEL button.
Food was put directly
into the Main Body:
• Putting food and liquids directly into the Main Body may cause malfunction. Contact the store
where you purchased the product or Zojirushi Customer Service.
There's a resinous
odor,
such as that of plastic:
•
When you use this product for the first time, there will be a resinous smell, such as that
of
plastic,
but the odor will lessen as you use the product.
The product makes
noise during
operation:
• The microprocessor (MICOM) makes a sound while adjusting the heat power of the Multicooker.
This does not indicate a problem.
• There is a spark-like noise when there is water left on the outside
of
the Pot.
-+
Please put the
Pot inside the Main Body only after wiping away any water droplets or other foreign
materials on the outside of the Pot.
• During and after use, squeaking sounds can be heard from the Main Body, Pot, and Lid.
When power failure
occurs:
• It too many appliances are used simultaneously, overload may occur and the breaker will cut off
the electricity.
-+
If another appliance is plugged in the same outlet as the Multicooker, unplug it
before resetting the breaker.
The
Power
Cord
gets
hot:
• Although the Power Cord may get hot when cooking, this is not abnormal.
The preheat time
is long:
• Did you use the Lid?
-+
Using the Lid will result
in
a shorter preheat time than if the Lid is
not used.
Food doesn't
saute/sear well:
• Is the preheating time long enough?
-+
Once preheating is complete, a beep will sound (2
short beeps sound 10 times) and
the~
display turns off. At this time, add ingredients
and start cooking.
• Make sure the Pot has not deformed.
• Are moisture
or
foreign materials adhered to the Heating Plate, the Center Sensor, the outside of
the Pot,
or
the inside
of
the Main Body?
-+
Please clean the product.
Food is burned
very badly:
• Has the Pot become soiled?
-+
Please clean the product.
It shuts off in the
middle of cooking:
• For safety reasons, a beep will sound approximately 2 hours after preheating has completed, and
cooking will automatically be terminated.
Does not cook
well:
Underdone/
overdone/soggy/
scorched:
Heat power is low:
• Make sure the Pot has not deformed.
• Are moisture
or
foreign materials adhered to the Healing Plate, the Center Sensor, the outside of
the Pot,
or
the inside
of
the Main Body?
-+
Please clean the product.
• Are settings for time and temperature, as well as water and ingredient amounts correct?
• Is the Pot tilted inside the Main Body?
• Are the seasonings clumped together and not mixed thoroughly?
Time display does
not change:
• Did you press the START/CANCEL button after setting the cooking time?
• The time setting will not change during preheating
(when~
is on
in
the Display). It will start
counting down once preheating is complete.
Boils over while
cooking:
• Make sure the Pot has not deformed.
• Are settings for time and temperature, as well as water and ingredient amounts correct?
• Was the Pot filled with too many ingredients?
Or
too much water or broth (soup)?
• Is the Main Body tilted?
Takes time to boil
or does not boil:
• Did you use the Lid?
-+
Using the Lid will help it boil faster than if the Lid is not used.
• Is the Pot
or
Heating Plate soiled?
-+
Please clean the product.
It shuts off in the
middle of cooking:
• For safety reasons, if the cooking time was not set, a beep will sound when approximately 24
hours has elapsed after preheating has completed, and cooking will automatically finish. When
HIGH is selected for the "SIMMER" menu, a beep will sound and cooking will automatically finish
after preheating has completed and approximately 2 hours of accumulated cooking time has elapsed.
Cooking time
cannot be set:
• The cooking time cannot be set when HIGH is selected for the "SIMMER" menu. Select LOW.
25
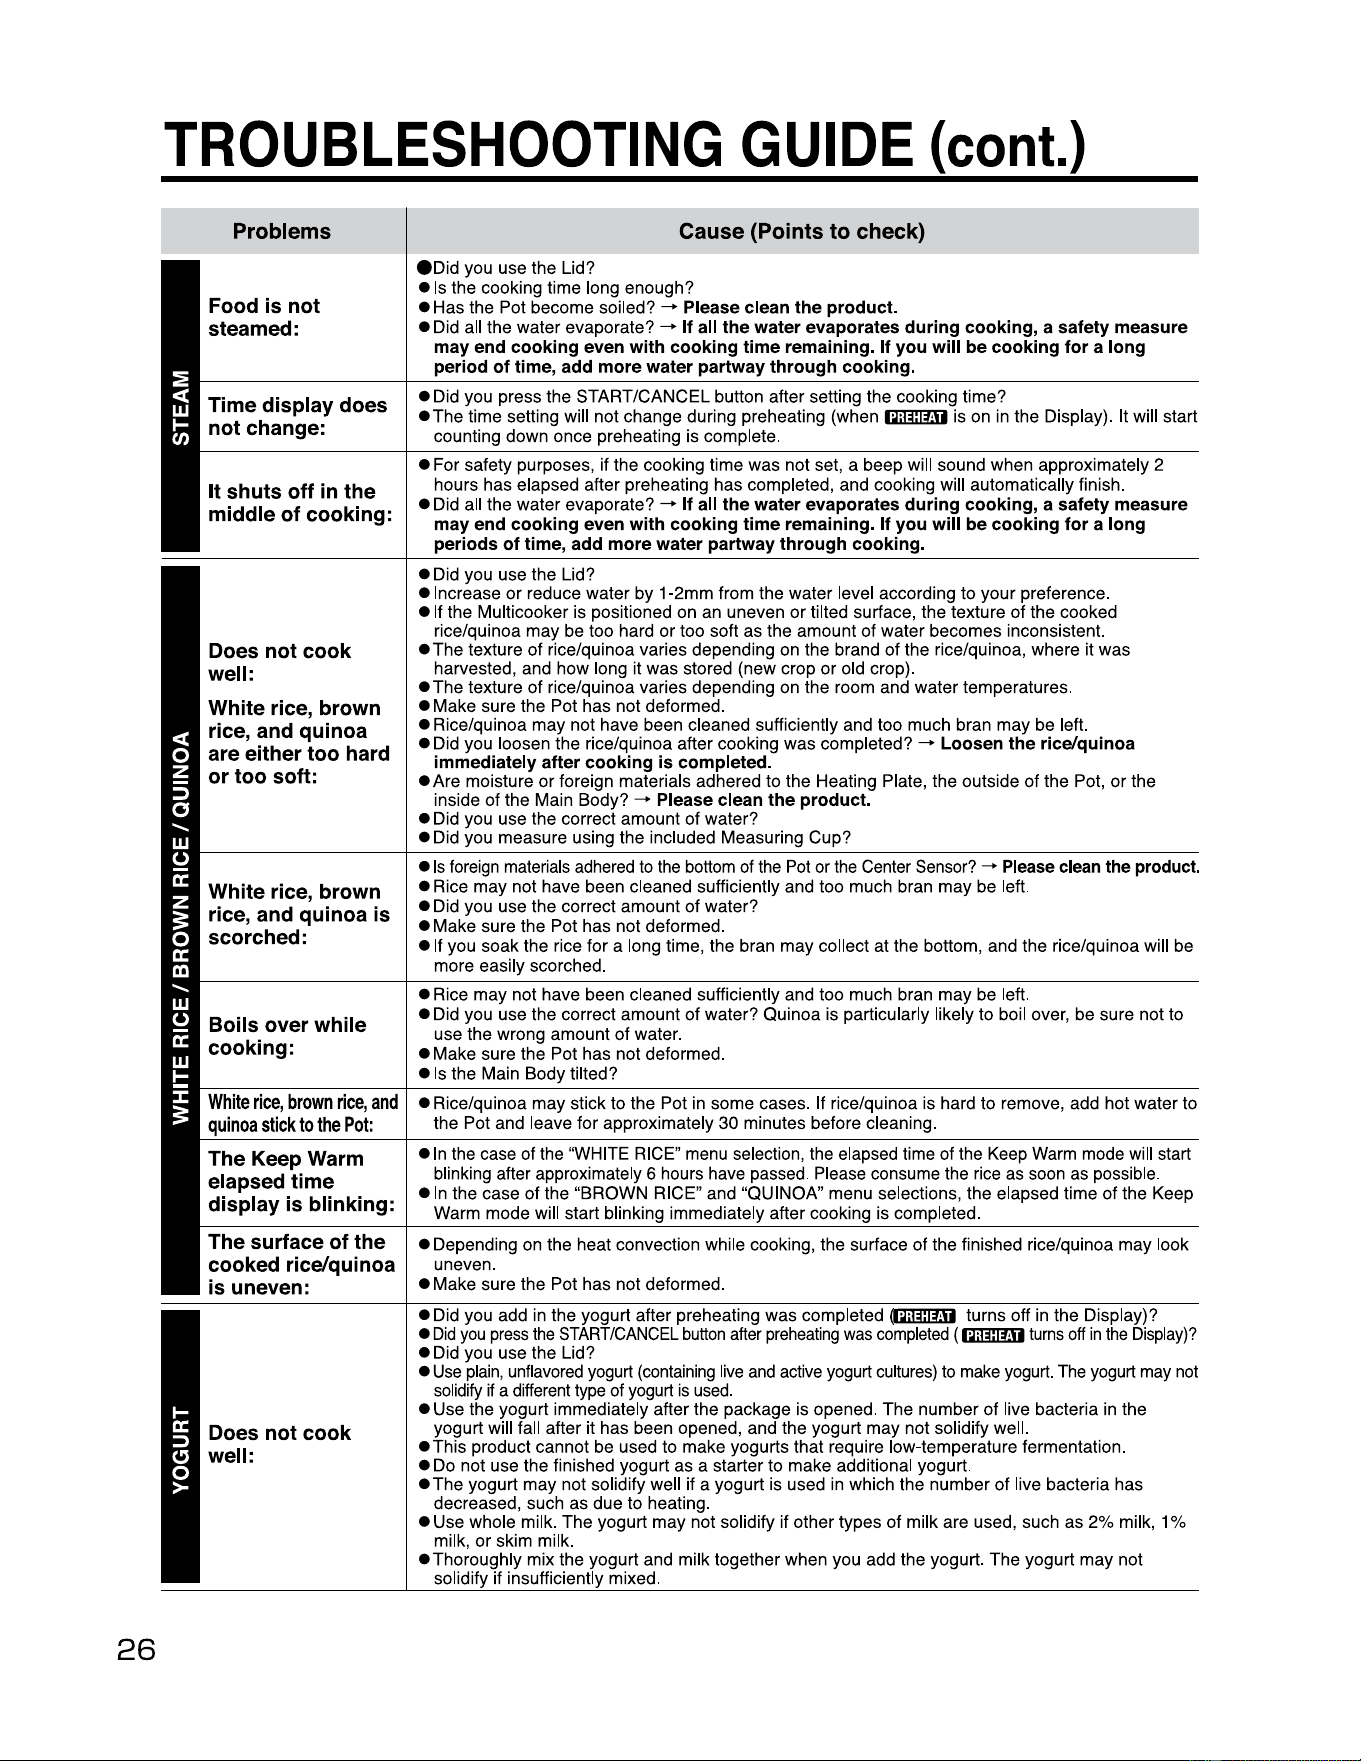
26
TROUBLESHOOTING
GUIDE
(cont.)
Problems
Food is not
steamed:
• Did you use the Lid?
• Is the cooking time long enough?
• Has the Pot become soiled?
--+
Please clean the product.
• Did all the water evaporate?
--+
If all the water evaporates during cooking, a safety measure
may end cooking even with cooking time remaining. If you will be cooking for a long
period of time, add more water partway through cooking.
Time display does
not change:
• Did you press the START/CANCEL button after setting the cooking time?
•The
time setting will not change during preheating
(when~
is on
in
the Display). It will start
counting down once preheating is complete.
It shuts off in the
middle of cooking:
• For safety purposes, if the cooking time was not set, a beep will sound when approximately 2
hours has elapsed after preheating has completed, and cooking will automatically finish.
• Did all the water evaporate?
--+
If all the water evaporates during cooking, a safety measure
may end cooking even with cooking time remaining. If you will be cooking for a long
periods of time, add more water partway through cooking.
Does not cook
well:
White rice, brown
rice, and quinoa
are either too hard
or too soft:
• Did you use the Lid?
• Increase or reduce water by 1-2mm from the water level according to your preference.
• If the Multicooker is positioned on an uneven or tilted surface, the texture
of
the cooked
rice/quinoa may be too hard or too soft as the amount
of
water becomes inconsistent.
•The
texture of rice/quinoa varies depending on the brand of the rice/quinoa, where it was
harvested, and how long it was stored (new crop or old crop).
•The
texture of rice/quinoa varies depending on the room and water temperatures.
• Make sure the Pot has not deformed.
• Rice/quinoa may not have been cleaned sufficiently and too much bran may be left.
• Did you loosen the rice/quinoa after cooking was completed?
--+
Loosen the rice/quinoa
immediately after cooking is completed.
• Are moisture
or
foreign materials adhered to the Heating Plate, the outside
of
the Pot, or the
inside
of
the Main Body?
--+
Please clean the product.
• Did you use the correct amount of water?
• Did you measure using the included Measuring Cup?
White rice, brown
rice, and quinoa is
scorched:
•
Is
foreign materials adhered
to
the
bottom of
the
Pot or
the
Center Sensor?
-+
Please clean the product.
• Rice may not have been cleaned sufficiently and too much bran may be left.
• Did you use the correct amount of water?
• Make sure the Pot has not deformed.
• If you soak the rice for a long time, the bran may collect at the bottom, and the rice/quinoa will be
more easily scorched.
Boils over while
cooking:
• Rice may not have been cleaned sufficiently and too much bran may be left.
• Did you use the correct amount of water? Quinoa is particularly likely to boil over, be sure not to
use the wrong amount
of
water.
• Make sure the Pot has not deformed.
• Is the Main Body tilted?
White
rice,
brown
rice,
and
quinoa
stick
to
the
Pot:
• Rice/quinoa may stick to the Pot in some cases. If rice/quinoa is hard to remove, add hot water to
the Pot and leave for approximately 30 minutes before cleaning.
The Keep Warm
elapsed time
display is blinking:
•
In
the case of the "WHITE RICE" menu selection, the elapsed time of the Keep Warm mode will start
blinking after approximately 6 hours have passed. Please consume the rice
as
soon
as
possible.
• In the case
of
the "BROWN RICE" and "QUI NOA" menu selections, the elapsed time of the Keep
Warm mode will start blinking immediately after cooking is completed.
The surface of the
cooked rice/quinoa
is uneven:
• Depending on the heat convection while cooking, the surface of the finished rice/quinoa may look
uneven.
• Make sure the Pot has not deformed.
Does not cook
well:
• Did you add in the yogurt after preheating was completed
mTim turns off
in
the Display)?
•
Did
you
press
the
START/CANCEL
button
after
preheating
was
completed
(~turns
off
in
the
Display)?
• Did you use the Lid?
•
Use
plain
, unflavored yogurt
(containing
live
and
active yogurt cultures)
to
make yogurt. The yogurt
may
not
solidify if a different type of yogurt
is
used
.
• Use the yogurt immediately after the package is opened. The number of live bacteria in the
yogurt will fall after it has been opened, and the yogurt may not solidify well.
•This
product cannot be used to make yogurts that require low-temperature fermentation.
• Do not use the finished yogurt as a starter to make additional yogurt.
•The
yogurt may not solidify well if a yogurt is used
in
which the number of live bacteria has
decreased, such as due to heating.
• Use whole milk. The yogurt may not solidify if other types of milk are used, such as 2% milk, 1 %
milk, or skim milk.
•Thoroughly
mix the yogurt and milk together when you add the yogurt. The yogurt may not
solidify if insufficiently mixed.
Cause
(Points
to
check)
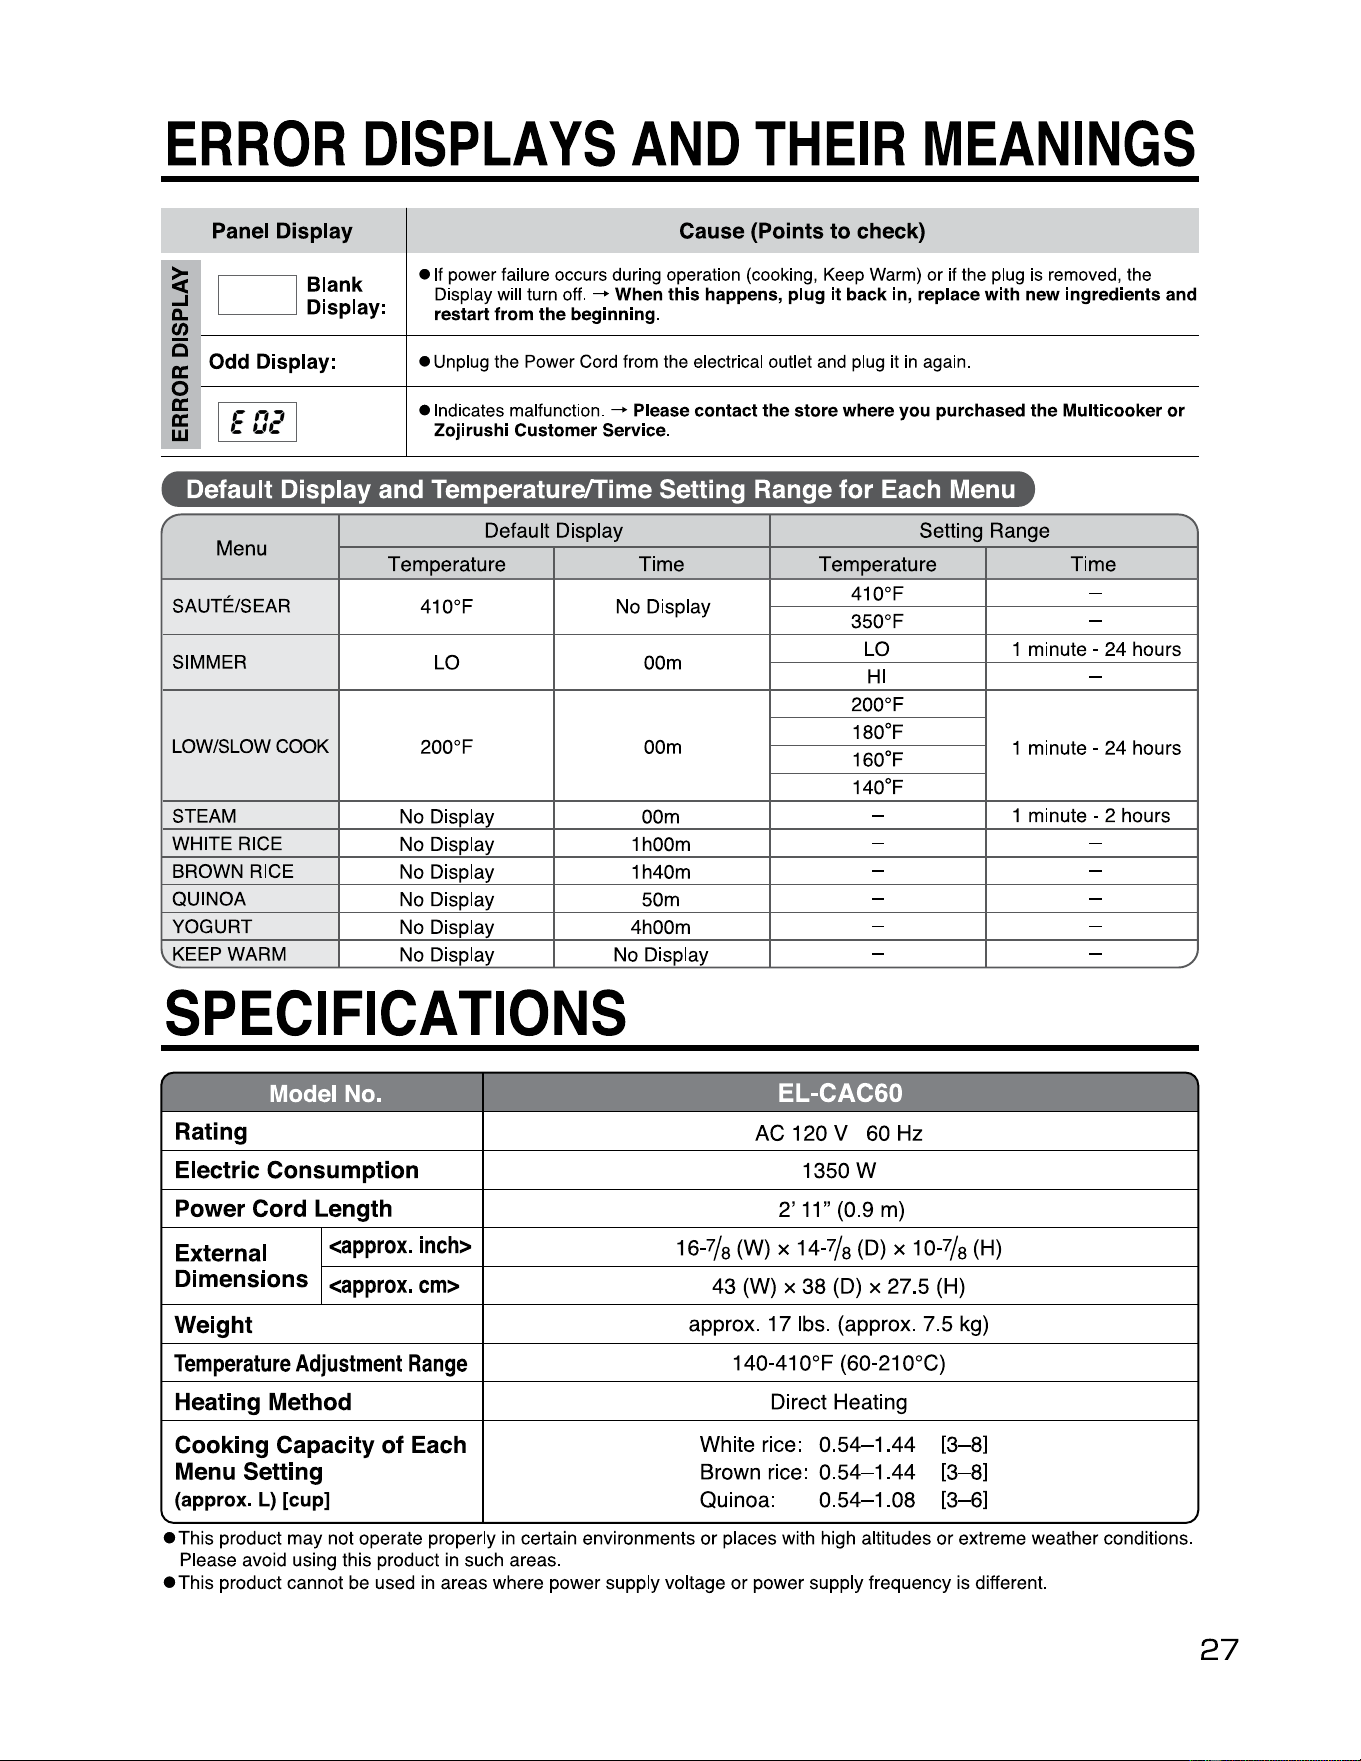
~
~
ERROR
DISPLAYS
AND
THEIR
MEANINGS
i:c
1:C
Q
i:c
0
UJ
a.
...1
~
Panel
Display
Cause
{Points
to
check)
Blank
Display:
•
If
power failure occurs during operation
(cooking,
Keep
Warm)
or
if
the
plug
is
removed,
the
Display
will
turn
off.
-+
When
this happens,
plug
it
back
in,
replace
with
new ingredients
and
restart from the beginning.
Odd
Display:
•
Unplug
the
Power
Cord
from
the electrical outlet
and
plug
it
in
again
.
• Indicates malfunction.
-+
Please contact the store where
you
purchased the Multicooker or
Zojirushi Customer Service.
J
-
CJ
l--
--------+------------------------------
t--
--------+------------------------------
w
-
Default Display and Temperature/Time Setting Range for Each Menu
r
Default
Display
Setting
Range
Menu
Temperature
Time
Temperature
Time
SA UTE/SEAR
410°F No Display
410°F
-
350°F
-
SIMMER
LO 00m
LO 1 minute -
24
hours
HI
-
LOW/SLOW COOK
200°F 00m
200°F
1 minute -
24
hours
180°F
160°F
140°F
STEAM
No Display
00m
-
1 minute - 2 hours
WHITE RICE
No Display
1h00m
- -
BROWN RICE
No Display 1h40m
- -
QUINOA
No Display 50m
- -
YOGURT
No Display 4h00m
- -
'"
KEEP WARM
No Display No Display
- -
SPECIFICATIONS
h'ff•T;-r:ll
~
r~Irfir':"u,r
;11]
Rating
AC
120
V
60
Hz
Electric Consumption
1350W
Power Cord Length
2'
11"
(0.9
m)
External
Dimensions
<approx.
inch>
16-7/
8
(W)
x
14-7/
8
(D) x
10-7/
8
(H)
<approx.
cm>
43
(W)
x
38
(D)
x
27
.5
(H)
Weight
approx
.
17
lbs
.
(approx.
7.5
kg)
Temperature
Adjustment
Range
140-410°F
(60-210°C)
Heating Method
Direct
Heating
Cooking Capacity of Each
Menu Setting
(approx. L) [cup)
White
rice:
0.54-1.44
[3-8]
Brown
rice:
0.54-1.44
[3-8]
Quinoa:
0.
54-1
.
08
[3-6]
"
./
• This product may not operate properly
in
certain environments or places with high altitudes or extreme weather conditions.
Please avoid using this product
in
such areas.
• This product cannot be used
in
areas where power supply voltage or power supply frequency is different.
27