~
Z<)JIRUSHI
USA
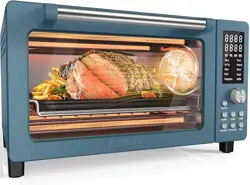
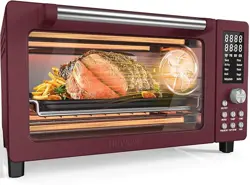
Micom Toaster Oven
OPERATING INSTRUCTIONS
ET-ZLC30
INDEX
IMPORTANT SAFEGUARDS 2 · · · · • • •
INSTALLATION
GUIDELIN
6
E········
COOKING TIPS 6 • • • • • • • • • • • • • • • • • • •
BEFORE USE 7 · · • • • · • • • • • · · · • • • · • • •
FUNCTION LIST 7 · · · • • • • · · · · · · · · • • •
PARTS NAMES 8 · · · · • • • • · · · · · · · · • • •
HOW TO USE 1 0 · · · · · · • • • • · · · · · · · · • • •
HOW TO SET THE FUNCTIONS
(AUTOMATIC COOKING FUNCTIONS)
TOAS
14
T··························
BAGEL 15 • • · · · · · · · · • • • • · · · · · · · · • • •
(MANUAL COOKING FUNCTIONS)
PIZZA 16 • • • · · · · · · · · • • • • · · · · · · · · • • •
COOKIE 16 • · · · · · · · · • • • • · · · · · · · · • • •
BAK
17
E···························
ROAST
18
· · · · · · · · · · · · · · · · · · · · · · · · ·
BROIL
18
··························
HOMEMADE 19 · · · · · • • • • · · · · · · · · • • •
RISE
20
····························
TIMED
TOAST
20
····
·
··
·
···········
REHEAT
21
· · · · · · · · · · · · · · · · · · · · · · · ·
KEEP
WARM
21
········
·
··········
·
RECIPES
Homemade Margherita Pizza 22 · · • • •
Buffalo Chicken Pizza 23 • · · · · · · · · • • •
Oatmeal Raisin Cookies 24 · · · · · · · • • •
Pound
Cake
24
· · · · · · · · · · · · · · · · · · · · ·
Sprinkled Sugar Cookies 25 · · • • • · • • •
White Chocolate Infused
Matcha
Brownie 26 · · · · · · · · · • • • · · · · · · · · · • • •
Baked Potatoes 26 • • • • • • • • • • • • • • • • •
Fluffy Blueberry Muffins 27 • • • • • • • • • •
French Spinach Quiche 28 · · · · · · · • • •
No-Fry Tonkatsu (Pork Cutlet) 29 · · • • •
Cheesy Quesadillas 30 · · · · · · · · · · · · · · · ·
Tender Ribeye
Steak
30
·············
Spicy
Tri-tip Roast 30 • • • • • • • • • • • • • • •
Roasted Lamb Shanks 32 • • • • • • • • • • •
Miso
Roasted Salmon 32 · · · · · · · · · • • •
Brussels Sprouts
with
Pancetta 32 • • •
Spice-Rubbed Pork Tenderloin 34 · • • •
Yakitori (Chicken Skewers) 34 · · · · • • •
Quick-Broiled Ziti 34 • • • • • • • • • • • • • • • •
Doria (Ground Beef and Rice
Casserole) 36 · · · · · · · • • • · · · · · · · · · • • •
Soft
Dinner Rolls 37 · · • • • · · · · · · · · · • • •
Braided Stromboli 38 • • • · · · · · · · · · • • •
Tuna
Melt
39
· · · · · · · · • • • · · · · · · · · · • • •
CLEANING
AND
MAINTENANCE 40 · · ·
HOW TO ATTACH AND REMOVE
PARTS
41
···························
TROUBLESHOOTING GUIDE 42 · · · · • • •
SPECIFICATIONS
43
·················
REPLACEMENT PARTS 43 · · · · · · · · • • •
ZOJIRUSHI CORPORATION
2
IMPORTANT
SAFEGUARDS
Be
sure to follow the instructions.
WHEN
USING
ELECTRICAL
APPLIANCES,
BASIC
SAFETY
PRECAUTIONS
SHOULD
ALWAYS
BE
FOLLOWED,
INCLUDING
THE
FOLLOWING:
1
Read
all
instructions thoroughly.
2
Avoid
touching
hot
surfaces.
The
handles
and
knobs
are
provided for your safety
and
protection.
3
To
prevent hazardous operation
or
electric
shock,
do
not
immerse
power
cord,
power
plug,
or
toaster
oven
in
water
or
other liquids.
4
Close
supervision
is
necessary
when
the
appliance
is
used
by
or
near
children.
5
Unplug
from
outlet
when
the
appliance
is
not
in
use
and
before
cleaning.
Allow
the
appliance
to
cool
before
adding
or
removing
parts,
and
before
cleaning
the
appliance.
6
Do
not
use
or
operate
the
appliance
with
a
damaged
cord
or
plug
.
If
the
appliance malfunctions
or
has
been
damaged
in
any
manner,
unplug
the
appliance
and
return
it
to
the
nearest authorized service
facility
or
dealer for examination, repair
or
adjustment.
7
The
use
of accessories
or
attachments
not
recommended
by
the
appliance manufacturer
may
be
hazardous
or
may
cause
malfunction.
8
Do
not
use
outdoors.
9
Keep
the
power
cord
away
from
hot
surfaces
and
do
not
let
the
cord
hang
over
the
edge
of tables
or
counters.
10
Do
not
place
the
appliance
on
or
near
a
heated
surface
such
as
a
gas
or
electric
stove,
or
in
a
heated
oven.
11
Always
use
extreme
caution
when
moving
appliances containing
hot
contents
or
liquids.
12
To
disconnect,
press
the
CANCEL
Button
twice
and
unplug
the
Power
Plug
from
the
electrical outlet.
Never
pull
on
the
Power
Cord
.
13
Do
not
use
the
appliance
for
other
than
intended
or
specified purposes.
14 Oversized
foods
or
metal
utensils
must
not
be
placed
inside
the
oven
as
they
may
create a
fire
or
risk
of
electric
shock.
15 A
fire
may
occur if
the
appliance
is
covered
or
touching flammable materials, including curtains,
draperies,
walls,
and
the
like,
when
in
operation.
Do
not
store
any
items
on
top
of
the
appliance
when
in
operation.
16
Do
not
clean
with
metal
scouring
pads
.
Pieces
can
break
off
the
pad
and
touch
electrical
parts
involving
a
risk
of electric
shock
.
17
Extreme
caution
should
be
exercised
when
using
containers constructed
of
materials other
than
metal
or
glass.
18
Do
not
store
any
materials other
than
the
manufacturer's
recommended
accessories inside
the
oven
when
not
in
use
.
19
Do
not
place
any
of
the
following materials inside
the
oven
:
paper,
cardboard,
plastic,
etc
.
20
Do
not
cover
the
crumb
tray
or
any
part
of
the
appliance
with
metal
foil.
This
will
cause
overheating of
the
appliance.
21
Use
extreme
caution
when
removing
tray
or
disposing
of
hot
grease.
SAVE
THESE
INSTRUCTIONS
THIS
APPLIANCE
IS
FOR
HOUSEHOLD
USE
ONLY.
NOTE
:
A.
A short
power
cord
is
provided
to
reduce
the
risk
of
becoming
entangled
in
or
tripping over
it.
B.
Extension
cords
may
be
used
if
care
is
exercised
in
their
use.
C.
When
an
extension
cord
is
used
:
(1)
the
marked
electrical
rating
of
the
extension
cord
should
be
at
least
as
great
as
the
electrical
rating
of
the
appliance,
and
(2)
the
longer
cord
should
be
arranged
so
that
it
will
not
drape
over
the
countertop
or
tabletop
where
it
can
be
pulled
on
by
children
or
tripped over unintentionally.
This appliance
has
a polarized
plug
(one
blade
is
wider
than
the
other).
To
reduce
the
risk
of electric
shock,
this
plug
will
fit
in
a polarized outlet only
one
way
.
If
the
plug
does
not
fit
fully
in
the
outlet,
reverse
the
plug.
If
it still
does
not
fit,
contact a qualified electrician.
Do
not attempt
to
defeat this
safety
feature.
IMPORTANT
SAFEGUARDS
(cont.)
These WARNINGS and CAUTIONS are intended
to
prevent
property
damage
or
personal injury
to
you and others.
■
The
degree
of
danger
or
damage
by
the misuse
of
this product is indicated
as
follows:
~
Lil
WARNING
Indicates risk
of
serious injury
or
death.
f
Lil
CAUTION
Indicates risk of injury, household
or property damage if mishandled.
■
Prohibited
or
required actions are indicated
as
follows:
I
{S)
Indicates a prohibited operation.
0
Indicates a requirement or instruction that
must be followed.
AwARNING
©
Do
not
modify
the
product.
Only
a
repair
technician
may
disassemble
or
repair
this
product.
Attempting
to
do
so
may
cause
fire
,
electr
ic
shock
or
injury
.
Make
any
repair
inquiries
to
Zojirushi
Customer
Service
.
®
Do
not
immerse
in
water
or
splash
with
water.
Doing
so
may
cause
short
circuit
or
electric
shock
.
~
Do
not
plug
or
unplug
the
Power
Plug
if
your
hands
are
wet.
Doing
so
may
cause
electric
shock
or
injury
.
~
Do
not
allow
children
to
use
the
product
unsupervised.
Keep
it
out
of
the
reach
of
infants.
Children
and
infants
are
at risk of burns, electric
shock or injury.
Do
not
use
a
power
source
other
than
120VAC.
Using
any
other
power
supply voltage
may
cause
fire
or
electric shock.
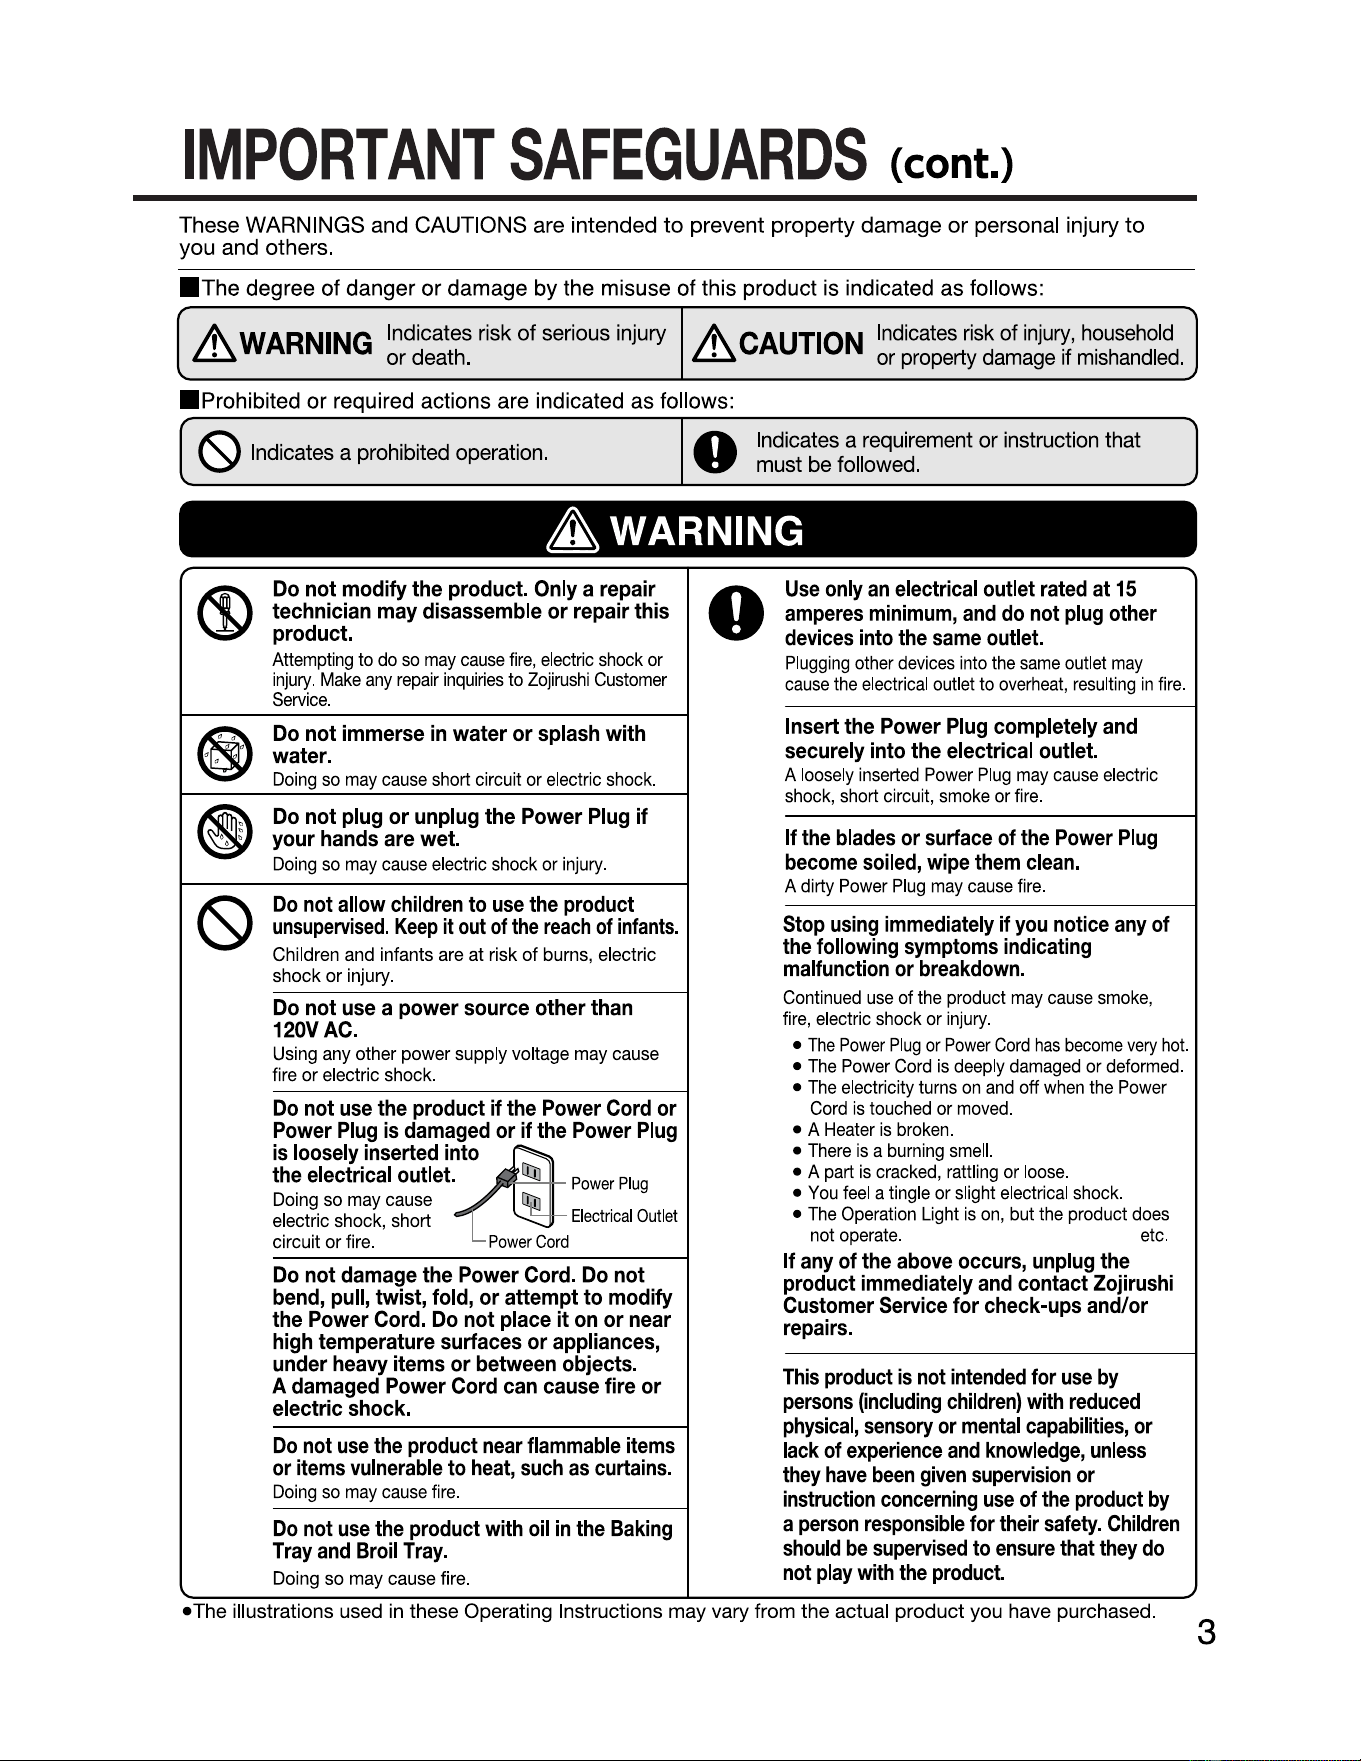
Do
not
use
the
product
if
the
Power
Cord
or
Power
Plug
is
damaged
or
if
the
Power
Plug
is
loosely
inserted
i~
the
electrical
outlet.
Doing
so
may
cause
electric
shock,
short
circuit or
fire
.
Electrical
Outlet
Power
Cord
Power
Plug
Do
not
damage
the
Power
Cord.
Do
not
bend,
pull,
twist,
fold,
or
attempt
to
modify
the
Power
Cord.
Do
not
place
it
on
or
near
high
temperature
surfaces
or
appliances,
under
heavy
items
or
between
objects.
A
damaged
Power
Cord
can
cause
fire
or
electric
shock.
Do
not
use
the
product
near
flammable
items
or
items
vulnerable
to
heat,
such
as
curtains.
Doing
so
may
cause
fire
.
Do
not
use
the
product
with
oil
in
the
Baking
Tray
and
Broil
Tray.
Do
i
ng
so
may
cause
fire.
0
Use
only
an
electrical
outlet
rated
at
15
amperes
minimum,
and
do
not
plug
other
devices
into
the
same
outlet.
Plugging
other
devices
into
the
same
outlet
may
cause
the
electrical
outlet
to
overheat
,
resulting
in
fire
.
Insert
the
Power
Plug
completely
and
securely
into
the
electrical
outlet.
A
loosely
i
nserted
Power
Plug
may
cause
electr
ic
shock,
short
circuit,
smoke
or
fire
.
If
the
blades
or
surface
of
the
Power
Plug
become
soiled,
wipe
them
clean.
A dirty
Power
Plug
may
cause
fire
.
Stop
using
immediately
if
you
notice
any
of
the
following
symptoms
indicating
malfunction
or
breakdown.
Continued
use
of
the
product
may
cause
smoke
,
fi
re,
electric
shock
or
injury
.
•
The
Power
Plug
or
Power
Cord
has
become
very
hot.
•
The
Power
Cord
is
deeply
damaged
or
deformed
.
•
The
electr
ici
ty
turns
on
and
off
when
the
Power
Cord
is
touched
or
moved
.
• A
Heater
is
broken
.
•
There
is
a
burning
smell.
• A
part
is
cracked
,
rattling
or
loose
.
•
You
feel
a
tingle
or
slight
electrical
shock
.
•
The
Operation
Light
is
on
,
but
the
product
does
not
operate
.
etc.
If
any
of
the
above
occurs,
unplug
the
product
immediately
and
contact
Zojirushi
Customer
Service
for
check-ups
and/or
repairs.
This
product
is
not
intended
for
use
by
persons
(including
children)
with
reduced
physical,
sensory
or
mental
capabilities,
or
lack
of
experience
and
knowledge,
unless
they
have
been
given
supervision
or
instruction
concerning
use
of
the
product
by
a
person
responsible
for
their
safety.
Children
should
be
supervised
to
ensure
that
they
do
not
play
with
the
product.
•The
illustrations used in these Operati
ng
Instructions may vary from the actual product you have purchased.
3
IMPORTANT
SAFEGUARDS
(cont.)
4
~CAUTION
Be
sure
to
observe
the
following
to
prevent
fire.
I(:\
■
Never
leave
the
product
unattended
during
operation.
Foods
may
catch
on
fire
.
\Y
■
Do
not
overheat
foods
.
Doing
so
may
cause
fire.
■
Do
not
use
for other
than
the
intended
purposes.
Doing
so
may
cause
fire
.
0
■
Do
not
cook
breads
or
waffles
topped
with
butter
or
jam.
Foods
high
in
sugar, fat or
oil
burn
easily
and
may
cause
fire
.
■
Do
not
cook
greasy
foods
such
as
meat,
fish
or
fried
foods
directly
on
the
Rack.
•
Oil
may
leak
even
when
using
aluminum
foil,
so
be
sure
to cook the foods
on
the
Baking
Tray
or
Broil
Tray
.
• Otherwise
oil
from
the foods
may
drip or spatter
and
cause
fire.
■
Do
not
operate the
product
with
objects
on
top
or
underneath
it.
The
product or object
may
deform, melt or
cause
fire.
■
Do
not
operate the
product
with
the
Door
open.
Foods
may
catch
on
fire.
■
Do
not
let
foods
touch
the
Heaters.
Doing
so
may
cause
fire.
■
Do
not
use
with
the
Rack
removed.
Doing
so
may
cause
fire.
■
Be
sure
to attach the
Crumb
Tray.
Failure
to do
so
may
cause
fire.
■
Always
use
the
Baking
Tray
or
Broil
Tray
for
food
that
may
fall
through
the
Rack.
Not doing
so
may
cause
fire.
If
foods
cause
smoke
or
catch
fire
...
0
®
(S)
■
Press
the
CANCEL
Button
twice immediately
and
unplug
the
Power
Plug.
If foods catch
fire,
do not
open
the
Door
until the
flame
extinguishes.
Do
not attempt to put out the fire
by
pouring water
on
it,
as
it
may
cause
the
Glass
Window to
break
.
Do
not
touch
hot
surfaces
(all
parts
except
the
Control
Panel
and
Door
Handle)
during
use
or
shortly
after
use.
Touching
hot surfaces
may
cause
burns
.
Do
not
place
or
use
the
product
on
unstable
surfaces
or
on
surfaces
that
are
vulnerable
to
heat.
Doing
so
may
cause
injury or fire.
Do
not
use
the
product
near
walls
or
furniture.
Heat
may
damage
, discolor or deform walls or
furniture.
(See
pg
.6
"INSTALLATION
GUIDELINE")
Do
not
use
the
product
where
it
may
come
into
contact
with
water
or
near
heat
sources.
Doing
so
may
cause
electric shock, short circuit
or
fire
.
Do
not
hold
or
carry
the
product
while
it
is
still
hot.
Touching
hot surfaces
may
cause
burns
.
Do
not
directly
heat
canned
or
bottled
foods.
The
can
or bottle
may
burst
and
cause
burns
or
injury.
C
Unplug the Power
Plug
from the
electrical outlet
when
the
product
is
not
in
use.
Leaving
the
Power
Plug
in
an
electrical outlet
may
cause
the insulation to
become
damaged,
resulting
in
electric
shock,
short circuit or
fire.
During
cooking,
move
birds
and
small
animals
that
may
be
sensitive
to
smoke
or
smells
to
other
rooms,
and
open
windows
or
turn
on
exhaust
fans.
0
Always
unplug
the
product
by
holding
the Power
Plug,
not
by
pulling
the
Power
Cord.
Pulling
the
Power
Cord to
unplug
the product
may
cause
electric shock, short circuit or fire.
Allow
the
product
to
cool
down
before
cleaning.
Touching
hot surfaces
may
cause
burns
.
Be sure
to
clean after every use.
Food
crumbs
and
oil
left
behind
may
cause
smoke
or catch
fire
.
If
the
Power
Cord
is
damaged,
it
must
be
replaced
by
the
manufacturer,
its
service
agent
or
similarly
qualified
persons
to
avoid
hazards.
5
IMPORTANT
SAFEGUARDS
(cont.)
IMPORTANT
eoo
not
cook
breads
or
waffles
topped
with
butter
or
jam.
Doing
so
may
cause
fire.
eoo
not
overheat foods.
Doing
so
may
cause
fire.
e ee sure
to
watch
the
following
foods
while cooking. (Never leave
the
product
unattended.)
These
foods
burn easily and
may
catch
fire
.
• Tempura, butter-enriched rolls,
cookies
and
other
foods
high in sugar,
fat
or
oil
• Thinly sliced bread
•
Thinly sliced French bread • Rice cakes • Sliced and
dried
rice
cakes
• Meat, fish and fried foods, etc.
eoo
not
use
parchment
paper
or
paper
cake/cupcake
liners.
Doing
so
may
cause
fire
.
eoo
not
use resin
or
silicone containers.
Doing
so
may
cause
fire
.
ewhen using aluminum foil,
be
careful that it does not touch the Heaters or extend from the Baking Tray or Broil Tray.
If
aluminum
foil
blocks
part
of
the
Oven
Interior
or
touches
the
Heaters,
it
may
cause
fire,
breakdown
or
damage
to
the
product.
~
~
If foods cause smoke
or
catch fire,
do
not open the Door immediately. Press the
CANCEL
Button twice, unplug
the Power Plug, and allow the product to cool down before opening the Door.
eoo
not
splash
water
on
the
Door
(the
glass)
when
hot.
The Glass Window may break and cause injury.
eBe
careful
not
to
apply
strong
impact
to
or
otherwise
damage
the
Door
(the
glass).
Do
not
apply
strong
force
to
the
Door
Handle.
Doing so may break the Glass Window or cause injury, breakdown or damage
to
the product.
eDo
not
place
objects
on
the
opened
Door.
Doing so may cause breakdown or damage to the product, or the product may tip and food may slide out.
eDo
not
open
and
close
the
door
vigorously.
Doing so may cause breakdown or damage to the product.
eoo
not
use
the
Rack,
Baking
Tray
or
Broil
Tray
on
a
gas
stove
or
with
other
cooking
equipment.
Doing so may cause deformation or damage.
eee
sure
to
observe
the
following
to
prevent
damage
to
the
Baking
Tray
and
Broil
Tray.
•
Do
not use rigid utensils such
as
metal spatulas, knives, or nylon brushes.
• Line the bottom of the Baking Tray and Broil Tray with aluminum foil before placing oven-safe dishes
on
top.
•
Do
not turn
on
the product without food inside, unless when preheating.
eoo
not
turn
on
the
product
with
the
Crumb
Tray
and
Rack
removed.
Doing so may cause fire, breakdown or damage to the product.
eoo
not
line
the
Crumb
Tray
with
aluminum
foil.
Doing so may cause breakdown or damage to the product.
eDo
not place the product over direct flame (such as a gas stove top), or
on
top of electric
or
induction heating (IH) cookers. Doing so may cause fire, breakdown or damage
to
the product.
eDo
not steam foods. The steam may cause breakdown or damage to the product.
eThis
product
is
intended for household use and similar applications listed below:
• Staff
(employee)
kitchen
areas
in
shops, offices
and
other working environments.
*This
product
is
not intended for
use
by
many
unspecified people for a
long
period of time.
This
product must not
be
used
in
the following
areas
:
•
Farm
houses.
•
By
clients
in
hotels, motels
and
other residential type environments.
•
Bed
and
breakfast type environments.
IMPORTANT
SAFEGUARDS
(cont.)
INSTALLATION
GUIDELINE
ese
sure
to
keep the distance in the illustration
between the product and flammable items such as
wooden walls and furniture,
to
prevent fire.
(Not doing so may cause fire.)
•
Leave
at
least
12
inches
(30cm)
space
in
front
and
either to the right or left side
of the product.
(Do
not place the product near walls or place
obstructions around the product.)
eMake sure that vinyl cloths and walls
or
furniture etc.
made
of
resin
or
other
heat-sensitive
materials
are
even
further
away
than
specified
in
the
illustration.
(The
heat may deformation or discolor such objects.)
One
Side:
at
least
4
inches
(10cm)
(Installation
Guideline)
COOKING
TIPS
~
W
Use aluminum foil.
• Wrap foods that may spatter oil
in
aluminum foil.
• Cover foods that burn easily or thick foods with aluminum foil once they
are browned.
{l)
~
L!J
Use the Baking Tray and Broil Tray.
• Use the Baking Tray and Broil Tray for small foods that may fall through the Rack, foods that lose their
shape or melt (freshly pounded rice cakes, cheese, etc.),
or
foods with ingredients that may spill out.
rr1
~~~:~~:,~~ij~~i=
~
~~~i-~
~::=:~:~:
(Heat each type of frozen food by referring to the cooking temperature and cooking time recommended
by the manufacturer.)
• Be careful when cooking commercially frozen croquettes, as the contents may pop out if overheated.
• Removing frost from the surface of foods reduces uneven cooking.
• If foods do not warm up, leave them inside the oven for a period after the cooking time ends to warm
using residual heat.
~
l!J
When toasting rice cakes (mochi) ...
• Select the BAKE function to toast rice cakes. Set the temperature to
450°F and adjust the time while watching how they are done.
• Remove rice cakes from the Rack as soon
as
they are cooked.
(Otherwise the rice cakes may stick to the Rack.)
• Depending on the type
of
rice cakes, the inside may be hard even
though the surface is browned. In that case, leave the rice cakes inside
the oven for an additional 1 to 2 minutes.
• Thinly-sliced rice cakes burn easily, so set a shorter cooking time. They also easily
catch fire, so never leave the product unattended, and watch while cooking.
• Use the Baking Tray or Broil Tray for freshly pounded and homemade rice cakes
and
watch while cooking.
Othe
rw
ise
the
rice
cakes
may
stick
to
the
Rack
.
~
~
When reheating tempura ...
• When reheating tempura select the REHEAT function.
• Tempura burns easily depending on the size, so adjust the temperature and cooking time while
watching the cooking condition.
• Always place tempura on the Baking Tray
or
Broil Tray lined with aluminum foil on the bottom.
6
-----------------------------·

BEFORE
USE
This product is used to toast sliced bread, heat pizza, or cook various foods as descriped
in
this
Operating Instructions.
Do not use the product for other than the intended cooking purposes,
or
for commercial purposes.
,
• Be sure
to
remove
all
packaging materials inside the oven before use.
• When the product is used for the first time, it may produce some smoke, but this does not indicate a
malfunction.
The Heaters may turn on and off during use. This does not indicate a malfunction.
• When the Oven Interior becomes hot, the thermistor operates and the Heaters automatically turn on and
off to prevent the product from overheating.
•When
using consecutively, the thermistor operates and the frequency
of
the Heaters turning on and off
increases or the Heaters may not turn on for a while, so the cooking time may need
to
be extended. Watch
the food and adjust the cooking time accordingly.
Cooling Fan
• A Cooling
Fan
is incorporated into this product to protect internal parts. The Cooling
Fan
will rotate while
in
operation, and it may continue rotating for some time after completion
of
the operation. You may hear the
fan rotating.
FUNCTION
LIST
TOAST
Use when toasting unfrozen
or
frozen sliced bread.
BAGEL
Use when baking unfrozen
or
frozen bagels.
PIZZA
Use when baking fresh or frozen pizza.
COOKIE
Use when baking fresh or refrigerated cookie dough.
BAKE
Use when baking cakes, brownies, muffins, pies, baked potatoes, quiche,
quesadillas, pork cutlet, etc.
ROAST
Use when roasti
ng
meats, fish and vegetables.
BROIL
Use to broil the top of casseroles or to finish other dishes. Only the Top
Heaters will turn on.
HOMEMADE
Use for the second proofing and then baking of formed bread dough
such as rolls and stromboli.
RISE
Use to proof bread and pizza dough.
TIMED TOAST
Use to toast English muffins
or
frozen waffles.
REHEAT
Use to reheat various cooked foods.
KEEP WARM
Use to keep various foods warm.
ewhen
cooki
ng
commercially sold foods, refer to the cooking temperature and cooking time recommended
by the manufacturer.
,I
7
8
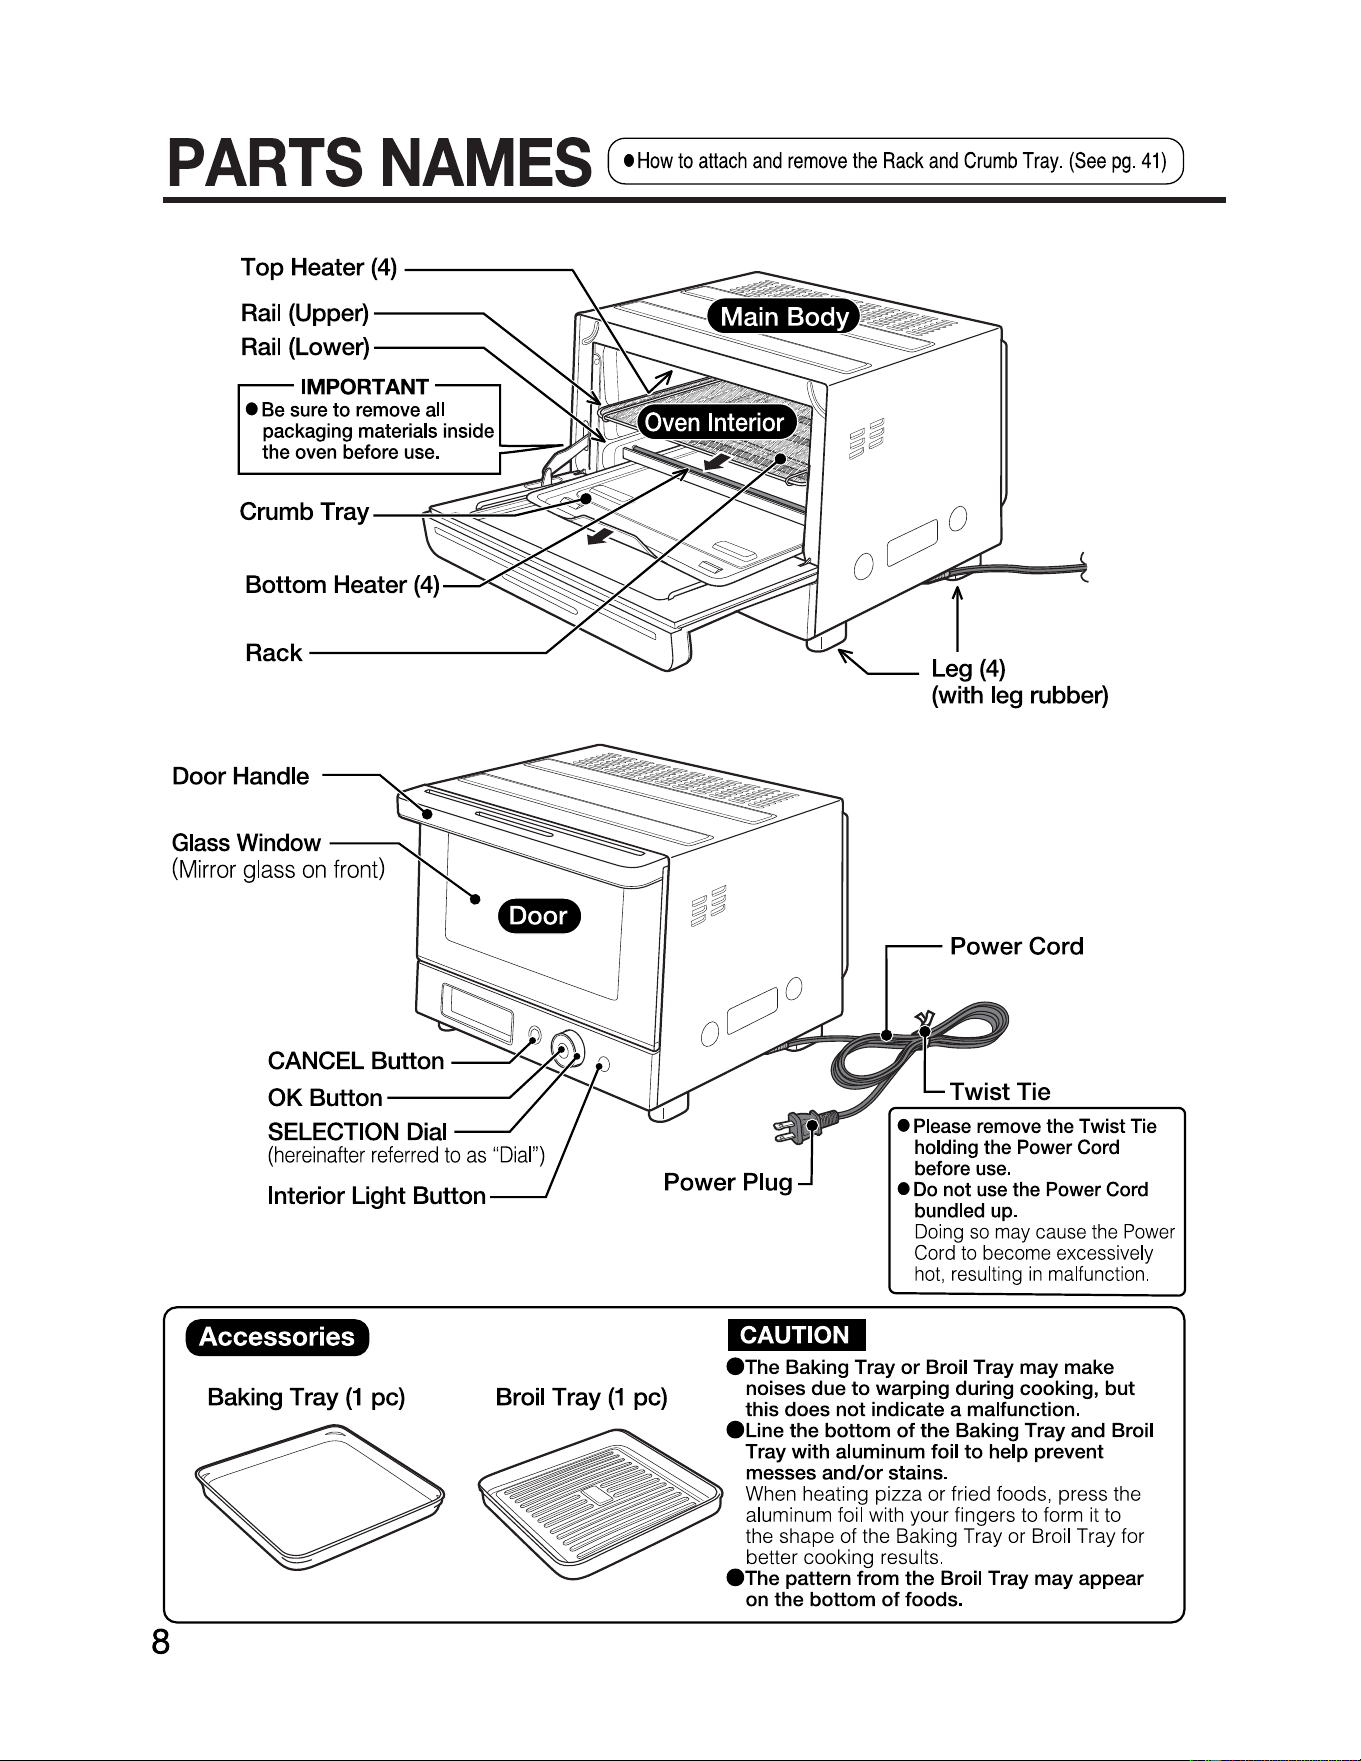
PARTS
NAM
ES
•How
to
attach
and
remove
the
Rack
and
Crumb
Tray
.
(See
pg
.
41)
•
Be
sure to remove all
packaging materials inside
the oven before
use.
Top Heater
(4)
----~
Rail
(Upper)----
Rail
(Lower)----
IMPORTANT-~
'==--
~
Crumb Tray -
Bottom Heater
(4)
Rack--------_,
(Mirror
glass
on
front)
(hereinafter
referred
to
as
"
Dial
")
Door Handle
Glass
Window~
/ -
I
I'.
~ ~
IS\
CANCEL Button
~~
~~f
'.)
OK
Button___//
'
SELECTION
Dial
Interior Light Button
Power Plug
Power Cord
Twist Tie
• Please remove the Twist Tie
holding the Power Cord
before
use.
•
Do
not use the Power Cord
bundled up.
Doing
so
may cause the Power
Cord to become excessively
hot, resulting
in
malfunction.
Accessories
Baking Tray
(1
pc) Broil Tray
(1
pc)
CAUTION
eThe
Baking Tray
or
Broil Tray may make
noises due
to
warping during cooking,
but
this does
not
indicate a malfunction.
eune
the
bottom
of
the
Baking Tray and Broil
Tray with aluminum foil
to
help prevent
messes
and/or
stains.
When heating pizza or fried foods, press the
aluminum foil with your fingers to form it to
the shape of the Baking Tray or Broil Tray for
better cooking results.
eThe
pattern from
the
Broil Tray may appear
on the
bottom
of
foods.
PARTS
NAMES
(cont.)
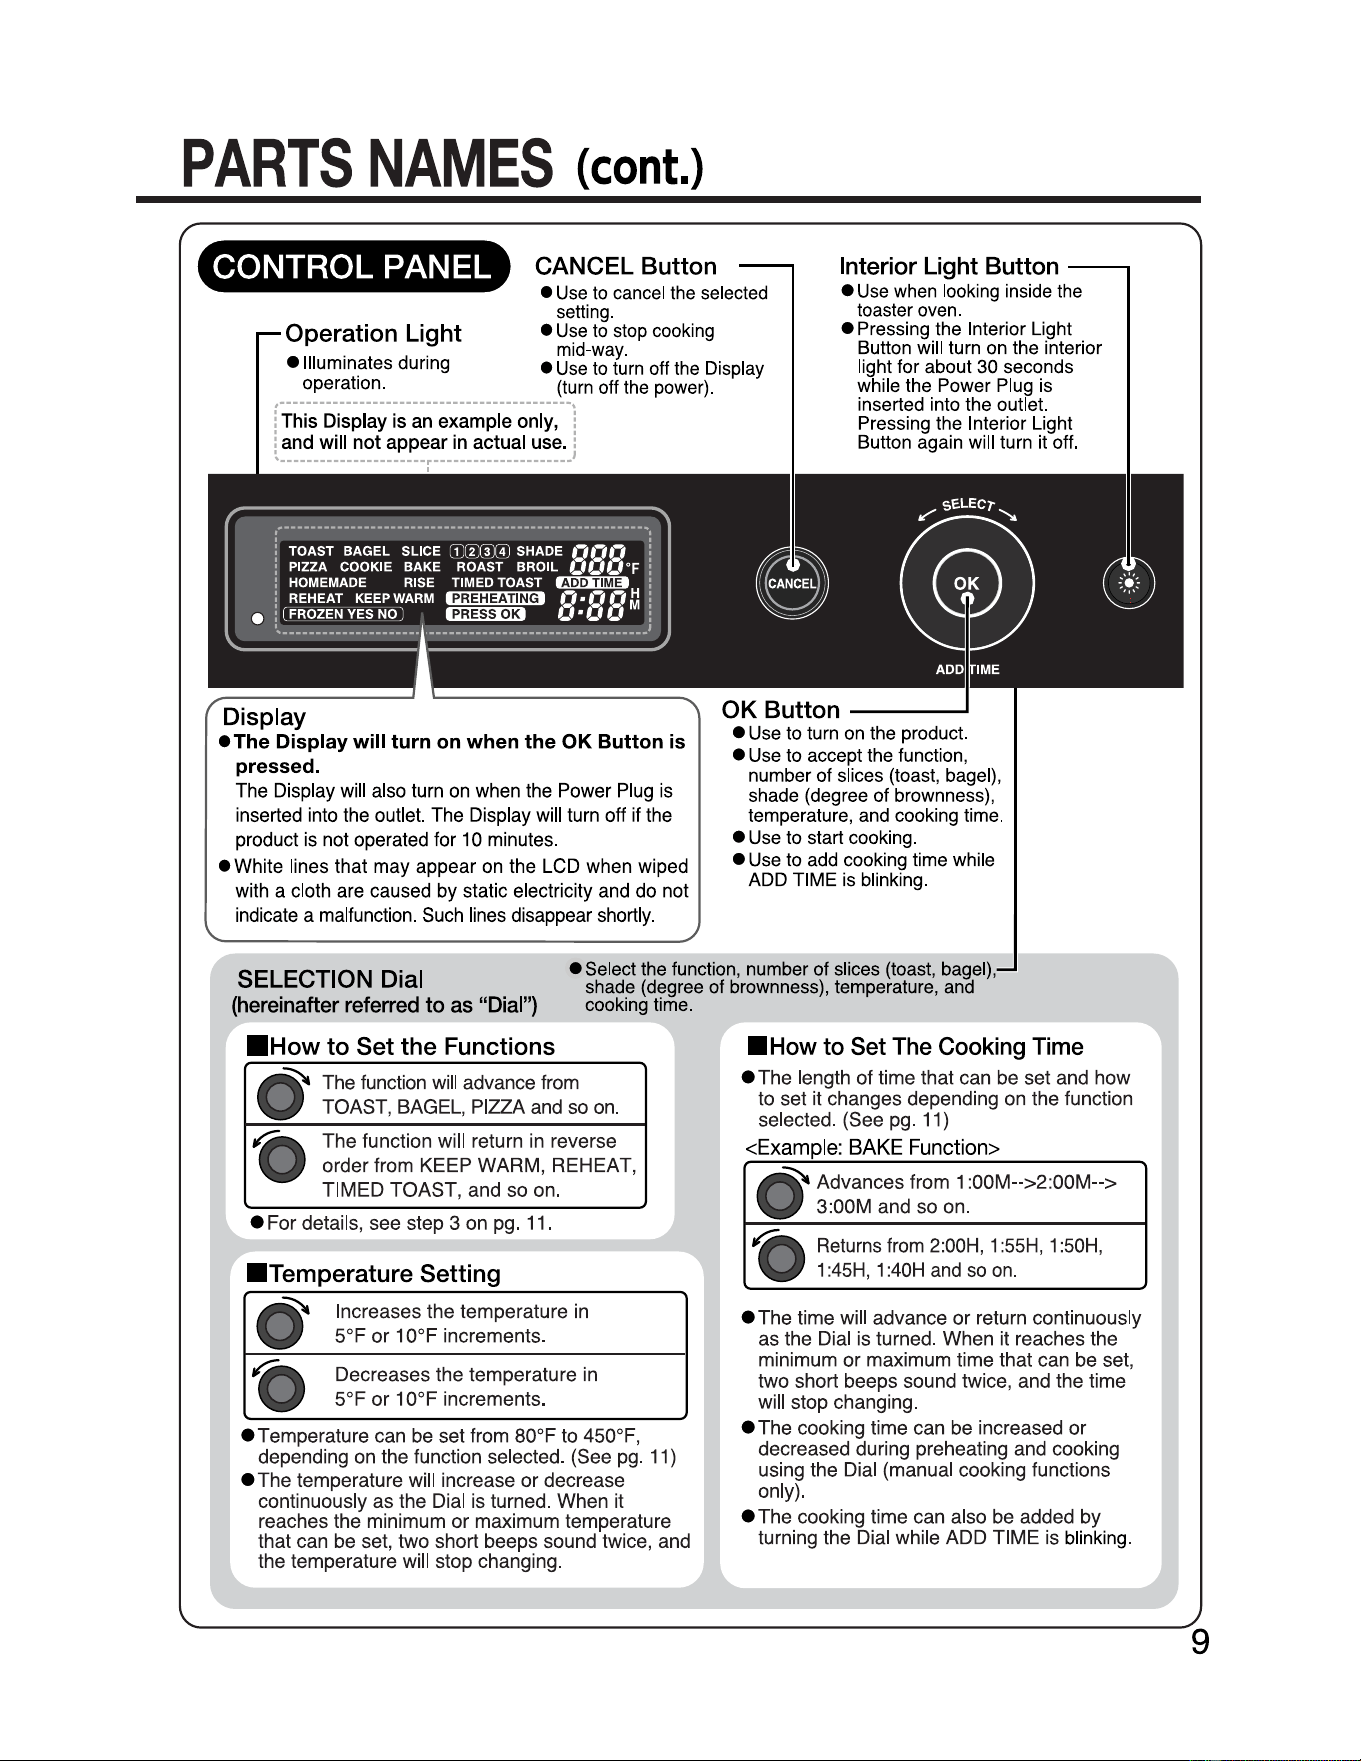
CONTROL PANEL
Operation Light
• Illuminates during
operation.
[
This
Display
is
an
example
only,
and
will
not
appear
in
actual
use.
]
i j
'······················r····················
..
CANCEL Button
•
Use
to
cancel the selected
setting.
•
Use
to
stop cooking
mid-way.
•
Use
to
turn off the Display
(turn off the power).
Interior Light Button
•
Use
when looking inside the
toaster oven.
• Pressing the Interior Light
Button will turn on the interior
light for about 30 seconds
while the Power Plug is
inserted into the outlet.
Pressing the Interior Light
Button again will turn it off.
Display
• The Display will turn
on
when the OK Button is
pressed.
The Display will also turn on when the Power Plug is
inserted into the outlet. The Display will turn off if the
product is not operated for 10 minutes.
• White lines that may appear on the LCD when wiped
with a cloth are caused by static electricity and do not
indicate a malfunction. Such lines disappear shortly.
• Use to turn
on
the product.
• Use to accept the function,
number of slices (toast, bagel),
shade (degree of brownness),
temperature, and cooking time.
• Use to start cooking.
• Use to add cooking time while
ADD TIME is blinking.
SELECTION Dial
(hereinafter
referred
to
as
"Dial")
• Select the function, number of slices (toast, bagel),
shade (degree of brownness), temperature, and
cooking time.
■
How
to
Set
the Functions
•
The function will advance from
TOAST
, BAGEL, PIZZA and so on.
•
The
function will return in reverse
order from KEEP
WARM,
REHEAT,
TIMED
TOAST, and
so
on.
• For details, see step 3 on pg.
11
.
■
Temperature
Setting
•
Increases the temperature in
S°F
or
10°F
increments.
•
Decreases the temperature in
S°F
or
10°F
increments.
• Temperature can be set from 80°F to 4S0°F,
depending on the function selected. (See pg. 11)
•
The
temperature will increase
or
decrease
continuously as the Dial is turned. When it
reaches the mini
mum
or
maximum temperature
that can be
set
,
two
short beeps sound twice, and
the temperature will stop changing.
■
How
to
Set The Cooking Time
•
The
length
of
time that can be set and how
to set it changes depending on the function
selected. (See pg. 11)
<Example:
BAKE
Function>
•
Advances from 1 :O0M-->2:
00M-->
3:
00M
and so on.
•
Returns from 2:00H, 1 :
SSH,
1
:S0H,
1 :
4SH
, 1 :40H and so
on
.
•
The
time will advance
or
return continuously
as the Dial is turned. When it reaches the
minimum
or
maximum time that can be
set
,
two
short beeps sound twice, and the time
will stop changing.
•
The
cooking time can be increased
or
decreased during preheating and cooking
us
ing the Dial (manual cooking functions
only).
•
The
cooking time can also be added by
turning the Dial while ADD TIME is blinking.
9
10
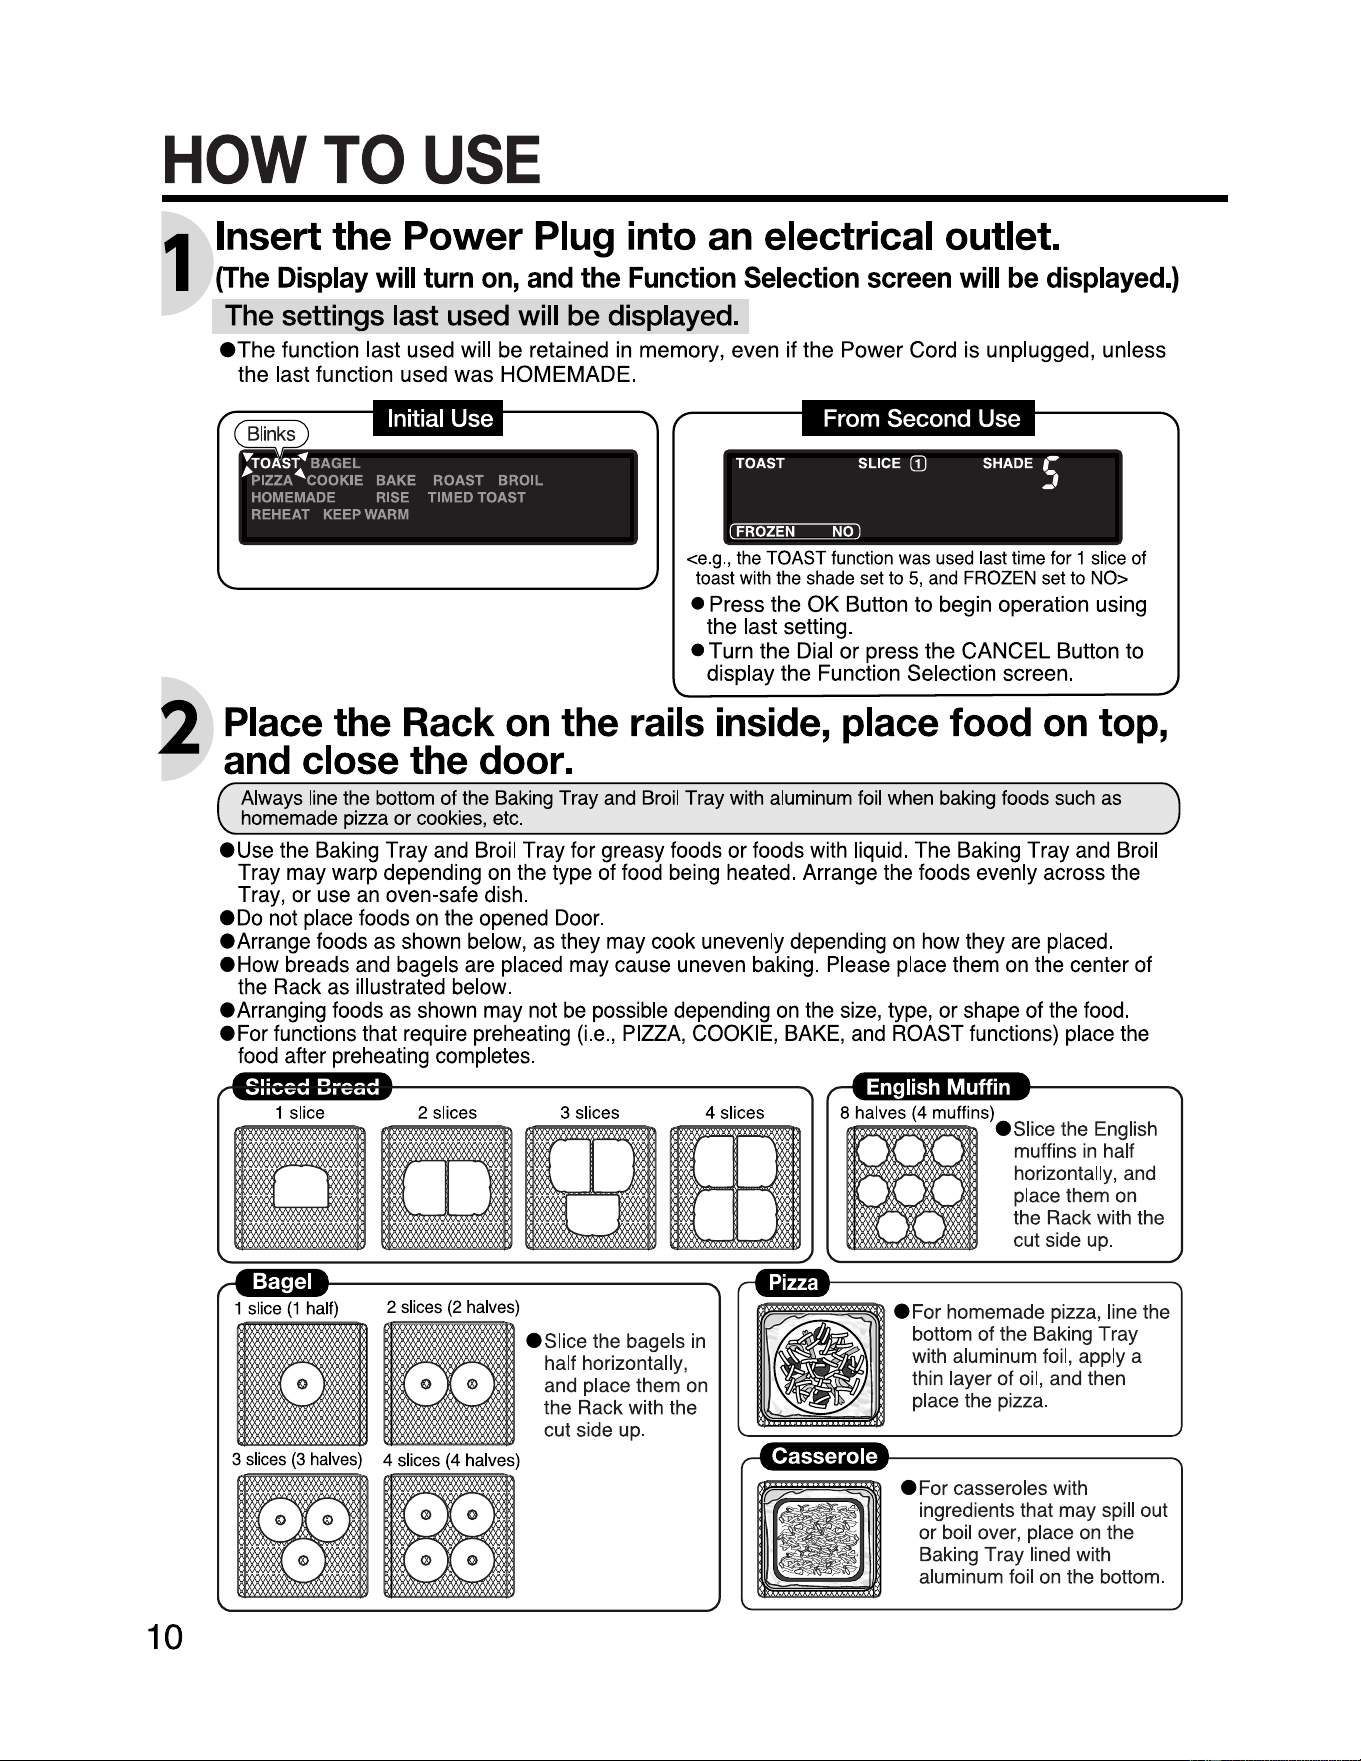
HOW
TO
USE
1
Insert the
Power
Plug into an electrical outlet.
(The
Display
will
turn
on,
and
the
Function
Selection
screen
will
be
displayed.)
The settings last used
will
be displayed.
eThe
function last used will
be
retained
in
memory, even
if
the Power Cord
is
unplugged, unless
the last function used was HOMEMADE.
From Second Use
TOAST SLICE
G)
SHADE
,.-
~
~
<e
.g.,
the
TOAST
function
was
used
last
t
ime
for
1
slice
of
toast
with
the
shade
set to
5,
and
FROZEN
set
to
NO>
•
Press
the
OK
Button
to
begin
operation
using
the last setting.
•
Turn
the
Dial
or press the CANCEL Button
to
display the Function Selection screen.
Place the Rack on the rails inside, place food on top,
and close the door.
Always line the bottom
of
the Baking Tray and Broil Tray with aluminum foil when baking foods such as
homemade pizza or cookies, etc.
euse
the
Baking
Tray
and
Broil
Tray
for
greasy
foods
or
foods
with
liquid
.
The
Baking
Tray
and
Broil
Tray
may
warp
depending
on
the
type
of
food
being
heated
.
Arrange
the
foods
evenly
across
the
Tray,
or
use
an
oven-safe
dish.
•
Do
not
place
foods
on
the
opened
Door.
eArrange
foods
as
shown
below,
as
they
may
cook
unevenly
depending
on
how
they
are
placed
.
eHow
breads
and
bagels
are
placed
may
cause
uneven
baking
.
Please
place
them
on
the
center
of
the
Rack
as
illustrated
below.
eArranging
foods
as
shown
may
not
be
possible
depending
on
the
si
ze,
type,
or
shape
of
the
food
.
eFor
functions
that
require
preheating
(i.e
.,
PIZZA
,
COOKIE,
BAKE
,
and
ROAST
functions)
place
the
food
after
preheating
completes.
3 slices 4 slices 1 slice 2 slices
~m
half)
2 slices
(2
halves)
3 slices
(3
halves) 4 slices (4 halves)
slice (
1 1
~r.r-1
K;Jll;l;J
e
slice
the bagels in
half horizontally,
and place them on
the Rack with the
cut side up.
8 halves (4 muffins)
e
Slice
the English
muffins in half
horizontally, and
place them on
the Rack with the
cut side up.
• For homemade pizza, line the
bottom
of
the Baking Tray
with aluminum foil, apply a
thin layer
of
oil, and then
place the pizza.
• For casseroles with
ingredients that may spill out
or boil over, place on the
Baking Tray lined with
aluminum foil on the bottom.
11
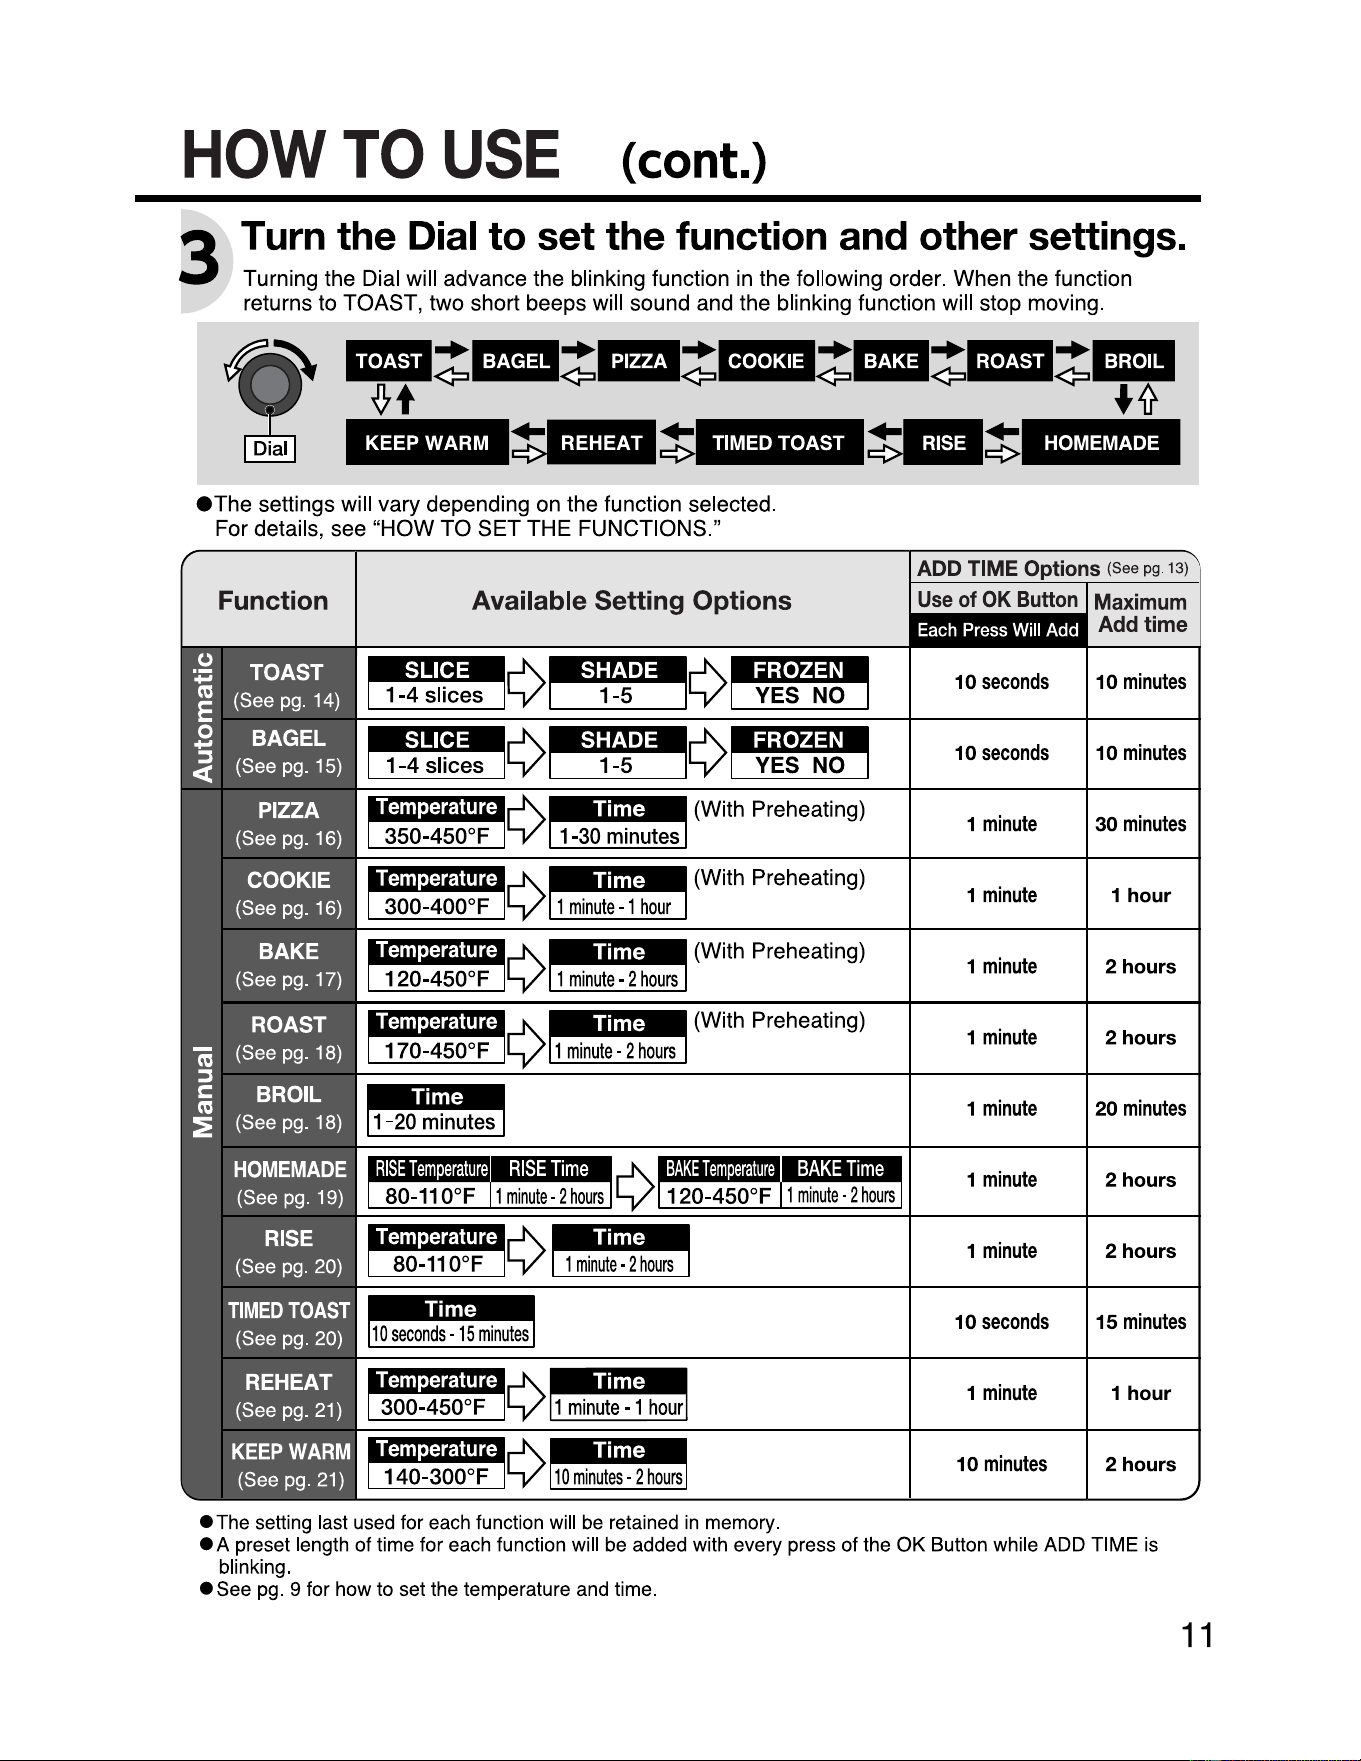
HOW
TO
USE
(cont.)
~
-J
Turn the Dial to set the function and other settings.
Turning the Dial will advance the blinking function in the following order. When the function
returns to TOAST, two short beeps will sound and the blinking function will stop moving.
KEEP WARM HOMEMADE
eThe settings will vary depending on the function selected.
For details, see "HOW
TO
SET
THE FUNCTIONS."
ADD
TIME
Options (See
pg
. 13)
Function Available Setting Options
Use
of
OK
Button
·
Maximum
Add time
10
seconds
10
minutes
10
seconds
10
minutes
fjj•ji,..J\..:mmllli (With Preheating)
50°F _
Ly~
1
minute
30
minutes
(With Preheating)
1
minute
1 hour
(With Preheating)
1
minute
2 hours
(With Preheating)
1
minute
2 hours
1
minute
20
minutes
1
minute
2 hours
1
minute
2 hours
10
seconds
15
minutes
1
minute
1 hour
10
minutes
2 hours
•The
setti
ng
last used for each function will
be
retained
in
memory.
• A preset length of time for each function will be added with every press
of
the
OK
Button while ADD TIME is
blinking.
• See
pg
. 9 for how to set the temperature and time.
2
HOW
TO
USE
(cont.)
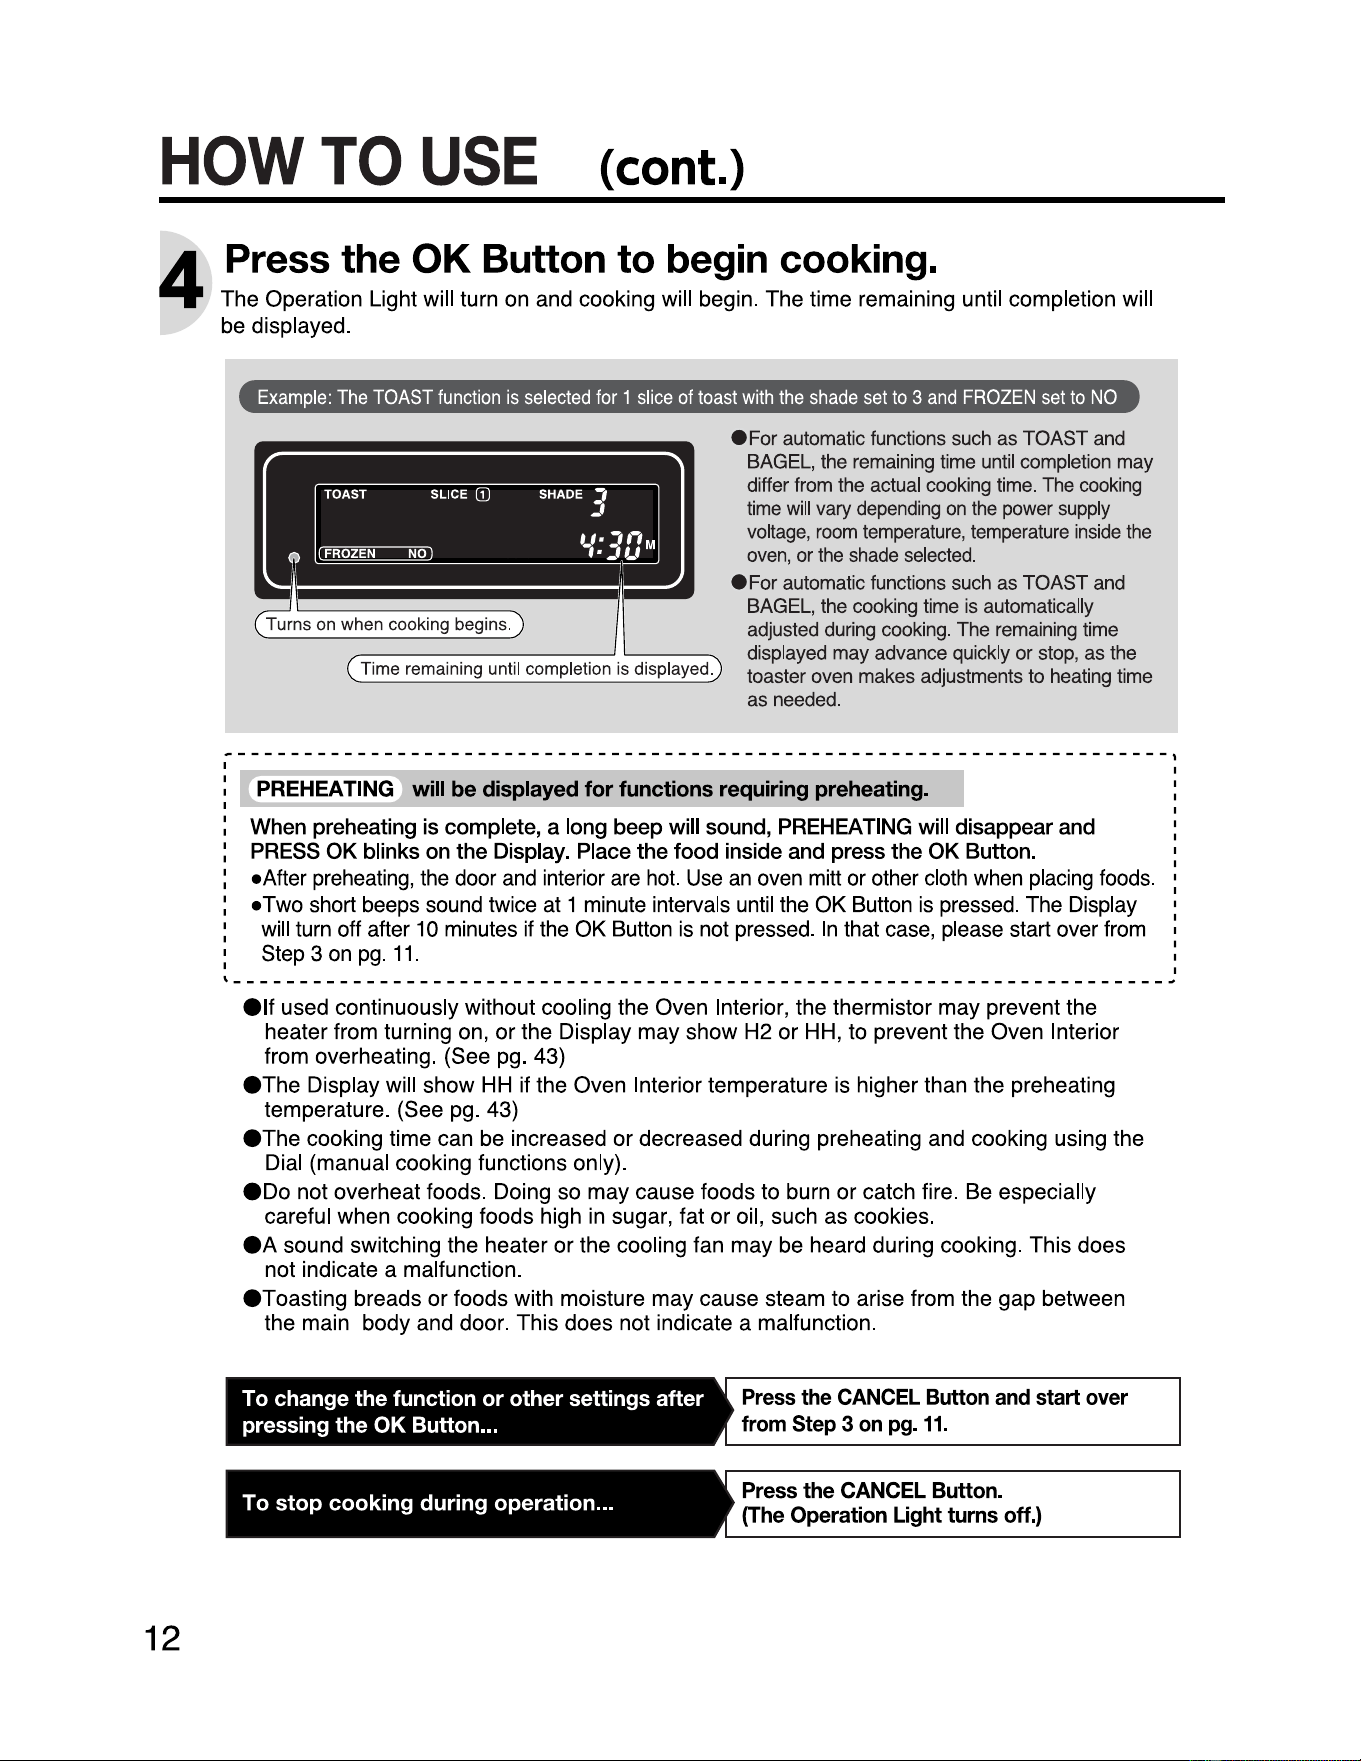
Press the
OK
Button to begin cooking.
1
The Operation Light will turn on and cooking will begin. The time remaining until completion will
be displayed.
Example:
The
TOAST
function
is
selected
for
1
slice
of
toast
with
the
shade
set
to
3
and
FROZEN
set
to
NO
Time remaining until completion is displayed.
•
For
automatic
functions
such
as
TOAST
and
BAGEL
,
the
remaining
time
until
completion
may
differ
from
the
actual
cooking
time.
The
cooking
time
will
vary
depending
on
the
power
supply
voltage
,
room
temperature
,
temperature
inside
the
oven
,
or
the
shade
selected
.
•
For
automatic
functions
such
as
TOAST
and
BAGEL
,
the
cooking
time
is
automatically
adjusted
during
cooking
.
The
remaining
time
displayed
may
advance
quickly
or
stop,
as
the
toaster
oven
makes
adjustments
to
heating
time
as
needed
.
----------------------------------------------------------------------,
PREHEATING
will
be displayed for functions requiring preheating.
When preheating is complete, a long beep will sound, PREHEATING will disappear and
PRESS
OK
blinks on the Display. Place the food inside and press the
OK
Button.
•After preheating, the door
and
interior are
hot.
Use
an
oven mitt or other cloth when placing foods.
• Two short beeps sound twice at 1 minute intervals until the OK Button is pressed. The Display
will turn off after
10
minutes if the OK Button is not pressed.
In
that case, please start over from
Step 3
on
pg
.
11
.
elf
used continuously without cooling the Oven Interior, the thermistor may prevent the
heater from turning on, or the Display may show H2 or HH, to prevent the Oven Interior
from overheating. (See pg. 43)
eThe
Display will show HH if the Oven Interior temperature is higher than the preheating
temperature. (See pg. 43)
eThe
cooking time can be increased
or
decreased during preheating and cooking using the
Dial (manual cooking functions only).
eDo
not overheat foods. Doing so may cause foods to burn or catch fire. Be especially
careful when cooking foods high in sugar, fat or oil, such as cookies.
eA
sound switching the heater
or
the cooling fan may be heard during cooking. This does
not indicate a malfunction.
eToasting breads or foods with moisture may cause steam to arise from the gap between
the main body and door. This does not indicate a malfunction.
To
change the function
or
other settings after
pressing the OK Button ...
Press
the
CANCEL
Button
and
start
over
from
Step
3
on
pg.
11.
To
stop
cooking
during
operation
...
Press
the
CANCEL
Button.
(The Operation Light turns off.)
HOW
TO
USE
(cont.)
5
Cooking completes.
Five long beeps will sound and cooking completes.
ecooking time can
be
added while ADD
TIME is blinking.
Add cooking time while monitoring the
progress
if
the food is
not
cooked
through.
The time that can be added varies by
function. (See
pg.
11)
ewhen
cooking starts, ADD TIME will
stop
blinking and stay on.
HOW TO USE ADD TIME
e
Add
time by pressing the OK Button:
Press the
OK
Button to start immediately. Each press
of
the
OK
Button will add a preset length of time
according to the function.
e
Add
time
by
turning
the
Dial
:
Turn the Dial to the desired cooking time and to start
immediately. Please take caution as pressing the
OK
Button after turning the Dial will add a preset length
of
time.
eADD
TIME will
tum
off
about
5 minutes after cooking completes.
To
add
cooking time
after the ADD TIME turns off,
set
the function and settings again. For TOAST
or
BAGEL
functions, use the TIMED TOAST function
to
add time manually.
eThe
Baking Tray, Broil Tray and other parts are hot. Please use an oven mitt
or
other cloth
when removing foods.
elf
used continuously without cooling the Oven Interior, the thermistor may prevent the
heater from turning on, or the Display may show H2 or HH, to prevent the Oven Interior
from overheating. (See pg. 43)
6
Press
the
CANCEL
Button
twice
to
turn
off
the
power.
The Display turns off.
eFor safety, the Display and power will turn off
in
about 10 minutes if the CANCEL Button is
not pressed.
eunplug the Power Plug from the electrical outlet after use.
(Always hold the Power Plug. Never pull on the Power Cord.)
13
HOW
TO
SET
THE
FUNCTIONS
AUTOMATIC
COOKING
FUNCTIONS
TOAST
t
· TOAST
SLICE
: 1
SHADE:
3
FROZEN
:
NO
Rack Position: Upper
CDUse
the Dial to select
iitt-1-ii
and press the
OK
Button.
@Use the Dial to select the number of slices and press
the
OK
Button.
--------
..
---
-------·
TOAST :SLICE
CD
(1)@
:
·-------~------
lmD_~
® Use the Dial to select the shade and press the
OK
Button.
@Use the Dial to select FROZEN (YES
or
NO) and press
the
OK
Button to start heating.
(The Operation Light turns on.)
TOAST SLICE
CD
SHADE ,
:,
am
~----------------
~-
.!
---
! ________________
----
■
Time
Guidelines
FROZEN
:
YES
FROZEN
:
NO
1-4
slices
5 min. 30 sec.
- 9
min
. 30 sec.
3
min
. 30 sec.
-8m
in.
(The cooking time will vary depending on the power
supply voltage, room temperature, temperature inside
the oven, or the shade selected.)
■
SHADE
Setting
1 I 2 I 3 I 4 I 5
SHADE
-
~
~
~
Lighter
Darker
• Do not use the Automatic Cooking Function
(TOAST) for certain types of breads such as
thinly sliced bread, whole wheat bread, and
breads high in sugar, fat or oil. Use the
TIMED TOAST function while monitoring the
progress.
• The TOAST function is designed to toast the
bottom of the bread lightly.
• Dense or moist breads tend to toast lighter.
Please adjust the SHADE accordingly.
• Dry bread tend to toast darker. Please adjust
the SHADE accordingly.
• Breads stored
in
the refrigerator or cold bread
may not heat thoroughly, or may toast lighter.
When toasting frozen breads ...
• Remove the frost on the surface and bake
while frozen.
• It will take longer to bake as it bakes while
defrosting.
• The shade may differ, or the interior may not
heat sufficiently depending on the state
of
frozenness, power supply voltage, room
temperature, temperature inside the oven, or
the type, size and thickness of the bread.
■
Add
cooking time
if
the food is not
heated through. (See pg. 13)
14
HOW
TO
SET
THE
FUNCTIONS
(cont.)
AUTOMATIC
COOKING
FUNCTIONS
t BAGEL
Rack Position: Upper
G)Use the Dial to select
M,M=HI
and press the
OK
Button.
@Use the Dial to select the number of slices and press
the
OK
Button.
@Use the Dial to select the shade and press the OK
Button.
@Use the Dial to select FROZEN (YES or NO) and press
the
OK
Button to start heating.
(The Operation Light turns on.)
BAGEL SLICE
(ID
SHADE ,
=-
~
:-~1~'
·-~J
■
Time
Guidelines
FROZEN
:
YES
FROZEN
:
NO
1-4
slices
(1-4
halves)
6 min. 30 sec.
-13
min
.
4 min.
-10
min.
(The
cooking
ti
me
will
v
ary
depending
on
the
power
supply
voltage
,
room
temperature
,
temperature
inside
the
oven
,
or
the
shade
selected.)
■
SHADE
Setting
1 I
2 I 3 I 4 I s
SHADE
-
Lighter
• Slice the bagels
in
half
horizontally, and place
them on the Rack with
the cut side up.
.
Darker
• Do not use the Automatic Cooking Function
(BAGEL) for bagels high
in
sugar, fat or oil.
Use the TIMED TOAST function while
monitoring the progress.
• Bagels tend to burn around the edges.
Please monitor the progress and adjust the
SHADE setting.
•The
BAGEL function warms the bottom while
toasting the top. To toast the bottom
of
the
bagel, please use the TIMED TOAST and
monitor the progress.
•The
BAGEL function is designed for a
standard bagel (approx. 95g
I 3.4 oz.).
Heavier bagels will toast lighter, while lighter
bagels will toast darker. Please adjust the
SHADE accordingly.
When baking frozen bagels ...
• Remove the frost on the surface and bake
while frozen.
• It will take longer to bake as it bakes while
defrosting.
•The
shade may differ, or the interior may not
heat sufficiently depending on the state
of
frozenness, power supply voltage, room
temperature, temperature inside the oven, or
the type, size and thickness of the bagel.
■
Add
cooking time
if
the food is not
heated through. (See pg. 13)
15
HOW
TO
SET
THE
FUNCTIONS
(cont.)
(MANUAL
COOKING
FUNCTION~
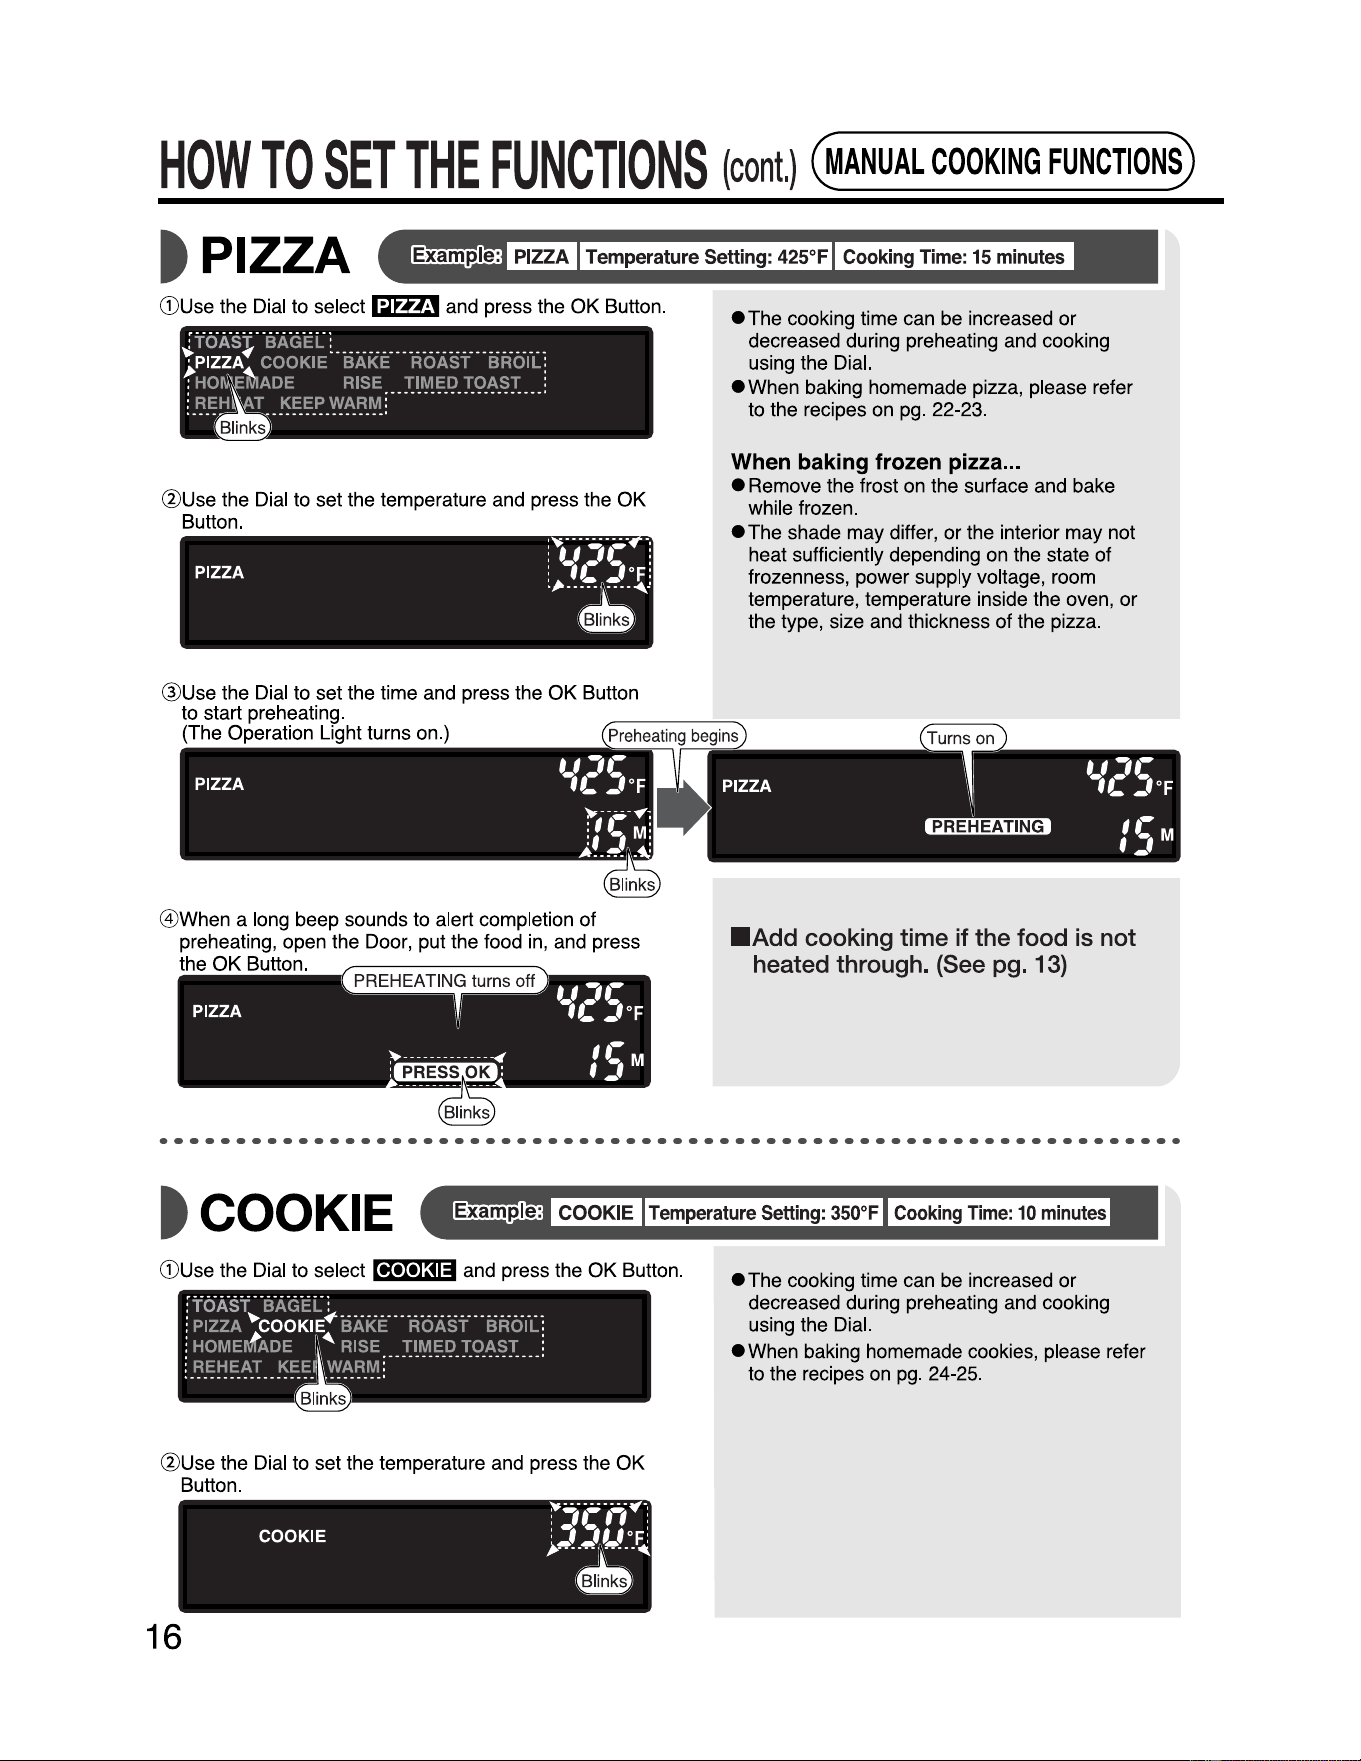
t PIZZA
.
PIZZA
Temperature Setting: 425°F Cooking Time:
15
minutes
G)Use the Dial to select
1it11J
and press the
OK
Button.
:
TOAST
BAGEL
:
~
if
................................
.
>PIZZA~ COOKIE
BAKE
ROAST
BROIL
:
: HO
ii
l\i
\E ADE RISE
...
J:
1.
~~.l?
.
J:
9:~.~
J:
... :
: RE KEEP WARM :
.....
"'
.................
,
@Use the Dial to set the temperature and press the
OK
Button.
@Use the Dial to set the time and press the
OK
Button
to start preheating.
(The Operation Light turns on.)
@When a long beep sounds to alert completion
of
preheating, open the Door, put the food
in,
and press
the
OK
Button.
~---~
~--"".,
,,.-
PIZZA
,c
~°F
~·············-4
ICM
:~:
,_,
.............
• The cooking time can be increased or
decreased during preheating and cooking
using the Dial.
• When baking homemade pizza, please refer
to the recipes on pg. 22-23.
When baking frozen pizza ...
• Remove the frost on the surface and bake
while frozen.
• The shade may differ,
or
the interior may not
heat sufficiently depending on the state of
frozenness, power supply voltage, room
temperature, temperature inside the oven, or
the type, size and thickness
of
the pizza.
■
Add
cooking time
if
the food is
not
heated through. (See pg. 13)
••••••••••••••••••••••••••••••••••••••••••••••••••••••••••••••••••
t COOKIE
: COOKIE Temperature Setting: 350°F Cooking Time:
10
minutes
G)Use the Dial to select
ffl•X•)31=1
and press the
OK
Button.
:
TOAST
BAGEL
:
'
~
~···
·
·······
·
·······
·
·······
·
···
:
PIZZA
J\COOKIE"'
BAKE
ROAST
BROIL
:
: HOMEMADE
I
RISE
TIMED
TOAST
:
1.
~.
~~~~
.
i:
...
~~ ~.~
_[
························
@Use the Dial to set the temperature and press the
OK
Button.
• The cooking time can be increased or
decreased during preheating and cooking
using the Dial.
• When baking homemade cookies, please refer
to the recipes on
pg
. 24-25.
16
HOW
TO
SET
THE
FUNCTIONS
(cont.)
(MANUAL
COOKING
FUNCTION~
@Use the Dial to set the time and press the
OK
Button to
start preheating.
(The Operation Light turns on.)
Blinks
@When a long beep sounds to alert completion
of
preheating, open the Door, put the food
in,
and press
the
OK
Button.
~------~
'""'---~
---~
,.-
,,
COOKIE j
jLf°F
i-, •• •
•••••••
•••
-.
,,,M
:~:
,,_,
■
Add
cooking time if the food is
not
heated through. (See pg. 13)
••••••••••••••••••••••••••••••••••••••••••••••••••••••••••••••••••
t BAKE
· BAKE Temperature Setting: 375°F Cooking Time: 30 minutes
G)
Use the Dial to select
~
and press the
OK
Button.
@Use the Dial to set the temperature and press the
OK
Button.
@Use the Dial to set the time and press the OK Button
to start preheating.
(The Operation Light turns on.)
@When a long beep sounds to alert completion of
preheating, open the Door, put the food in, and press
the
OK
Button
"!
I
~
,
,.-
BAKE
1
1
j I j
0
f
I
i-,
.....•..
'.
....
-.
;1,,M
:~:
_,,_,
• The cooking time can be increased or
decreased during preheating and cooking
using the Dial.
•See
pg. 24-31 for recipes.
■
Add
cooking time if the food is
not
heated through. (See pg. 13)
17
HOW
TO
SET
THE
FUNCTIONS
(cont.)
(MANUAL
COOKING
FUNCTION~
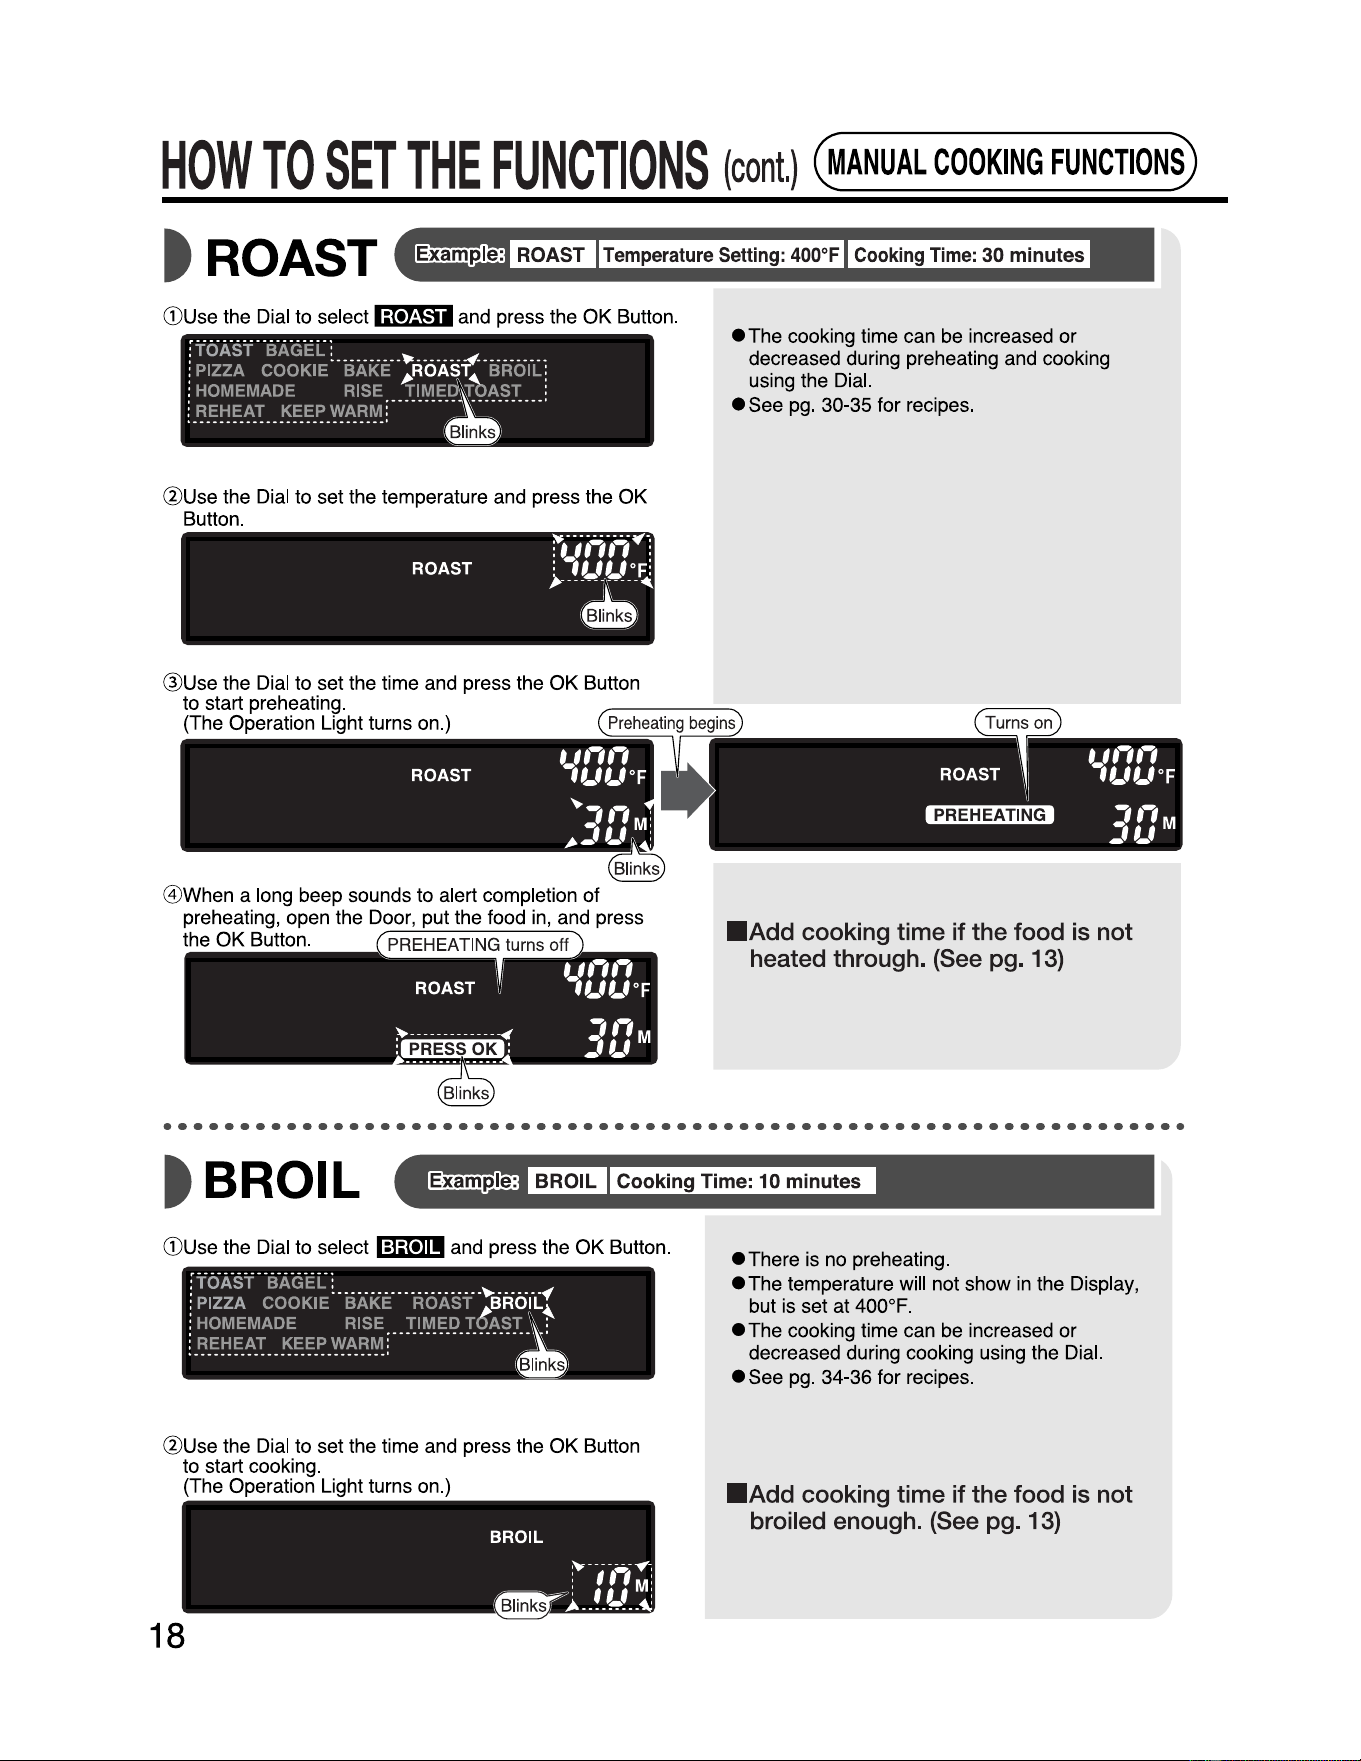
t R Q
AST___
: ROAST Temperature Setting: 400°F Cooking Time: 30
minutes
G)
Use the Dial to select
bt•M~il
and press the OK Button.
@Use the Dial to set the temperature and press the
OK
Button.
@Use the Dial to set the time and press the
OK
Button
to start preheating.
(The Operation Light turns on.)
@When a long beep sounds to alert completion of
preheating, open the Door, put the food
in
, and press
the OK Button.
PREHEATING
turns
off
• The cooking time can be increased
or
decreased during preheating and cooking
using the Dial.
•see
pg.
30-35 for recipes.
■
Add
cooking time
if
the food is
not
heated through. (See
pg
. 13)
••••••••••••••••••••••••••••••••••••••••••••••••••••••••••••••••••
t BROIL
G)
Use the Dial to select
lfilim!I
and press the
OK
Button.
@Use the Dial to set the time and press the
OK
Button
to start cooking.
(The Operation Light turns on.)
BROIL
~-,-,,~-:
,~1.J~t~
• There is no preheating.
•The
temperature will not show
in
the Display,
but is set at 400°F.
• The cooking time can be increased
or
decreased during cooking using the Dial.
•see
pg
. 34-36 for recipes.
■
Add
cooking time
if
the food is
not
broiled enough. (See pg. 13)
18
HOW
TO
SET
THE
FUNCTIONS
(cont.)
(MANUAL
COOKING
FUNCTION~
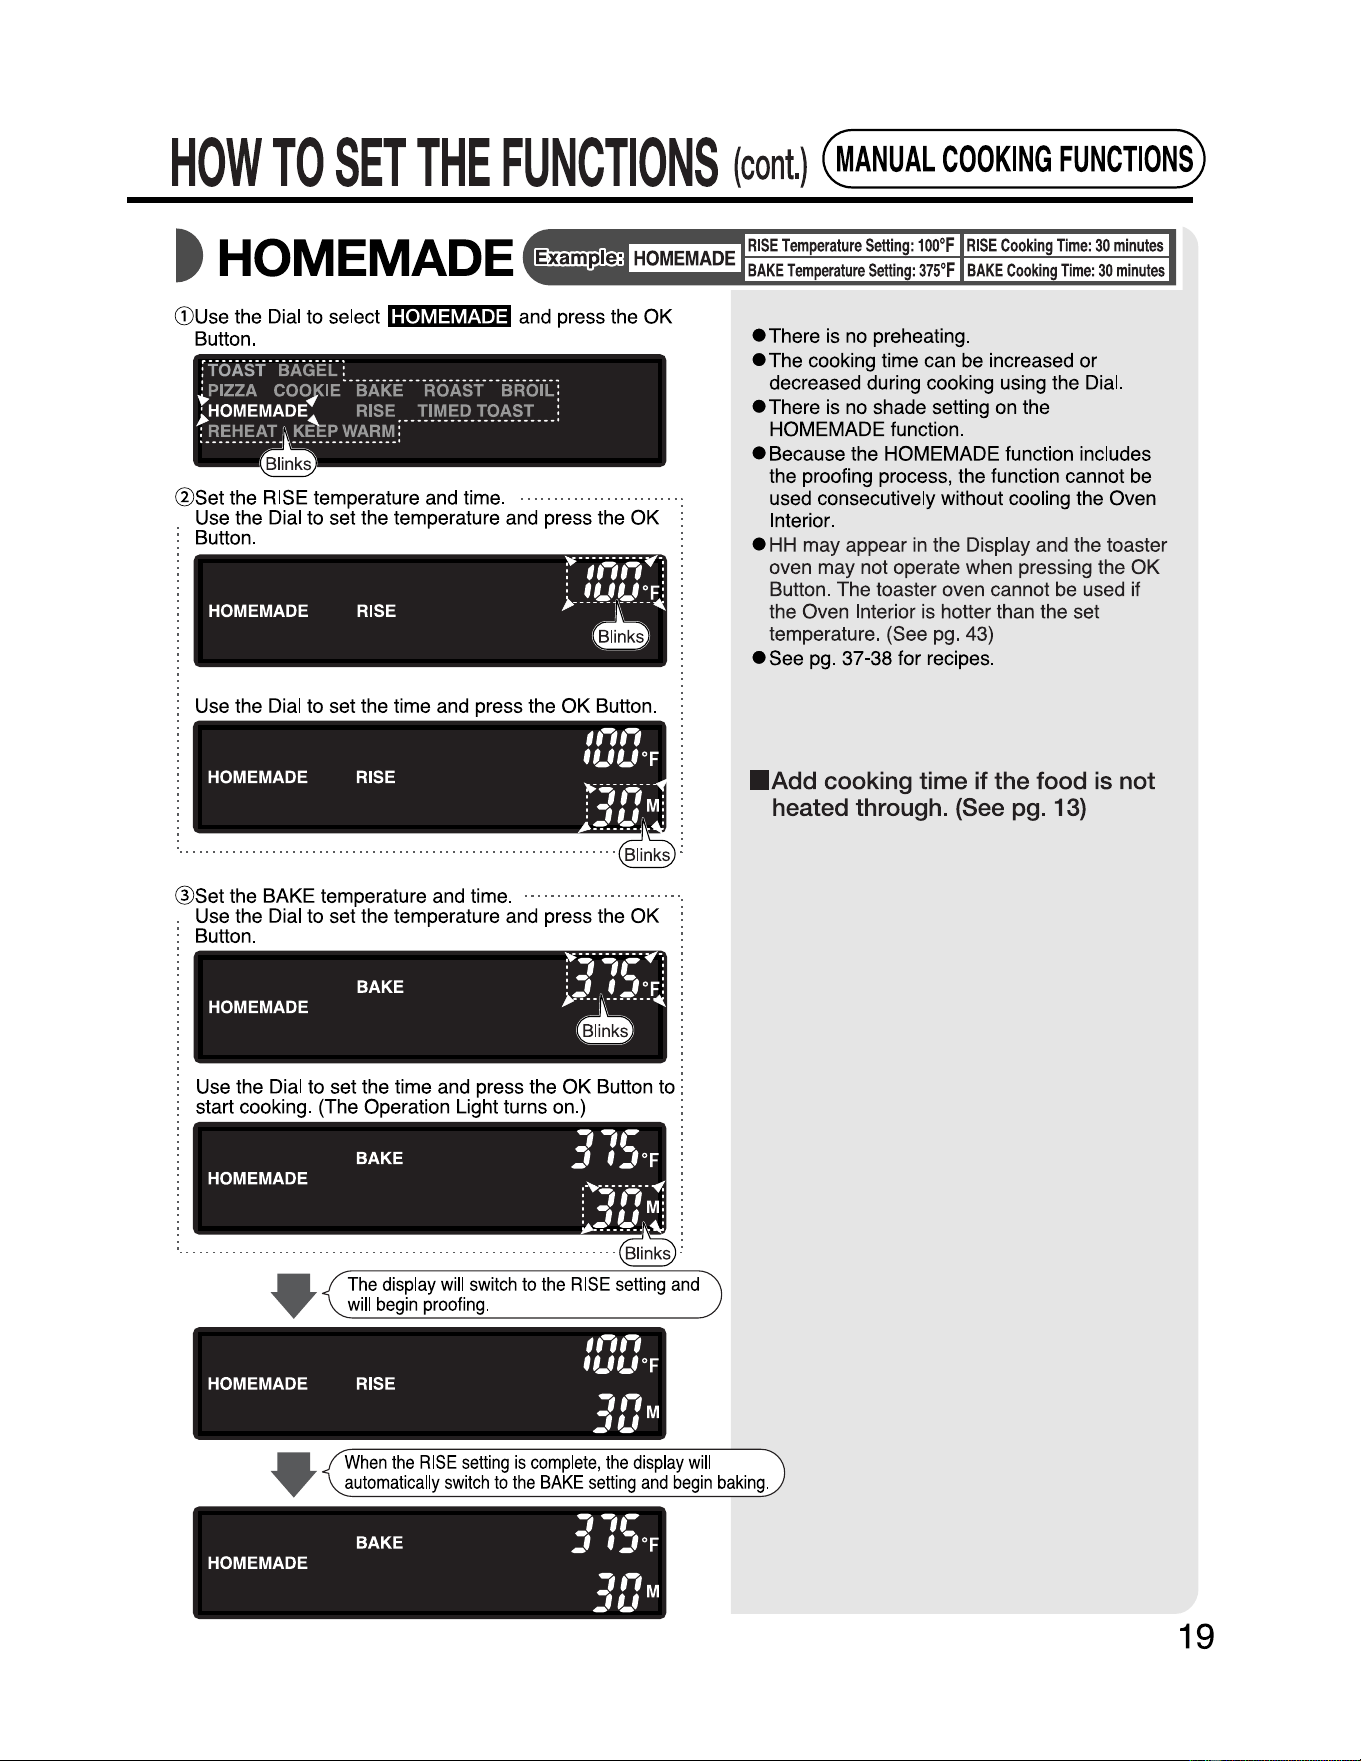
G)Use the Dial to select
1:t•Ml=i~M•)::jj
and press the
OK
Button.
@Set the BAKE temperature and time. · · · · · · · · · · · · · · · · · · · · · · ·
·.
Use the Dial to set the temperature and press the
OK
j
Button. :
•
The
display
will
switch
to
the
RISE
setting
and
will
begin
proofing.
,,,,,
,,_,,_,OF
HOMEMADE
RISE
,,,
1UM
--
• There is no preheating.
• The cooking time can be increased or
decreased during cooking using the Dial.
• There is no shade setting on the
HOMEMADE function.
• Because the HOMEMADE function includes
the proofing process, the function cannot be
used consecutively without cooling the Oven
Interior.
•
HH
may appear
in
the Display and the toaster
oven may not operate when pressing the
OK
Button. The toaster oven cannot be used if
the Oven Interior is hotter than the set
temperature. (See pg. 43)
•See
pg. 37-38 for recipes.
■
Add
cooking time
if
the food is
not
heated through. (See pg. 13)
•
When
the
RISE
setting
is
complete
,
the
di
splay
will
automatically
switch
to
the
BAKE
setting
and
begin
baking.
,,.-
BAKE
j f
.)°F
HOMEMADE
,,,
1UM
--
19
HOW
TO
SET
THE
FUNCTIONS
(cont.)
(MANUAL
COOKING
FUNCTION~
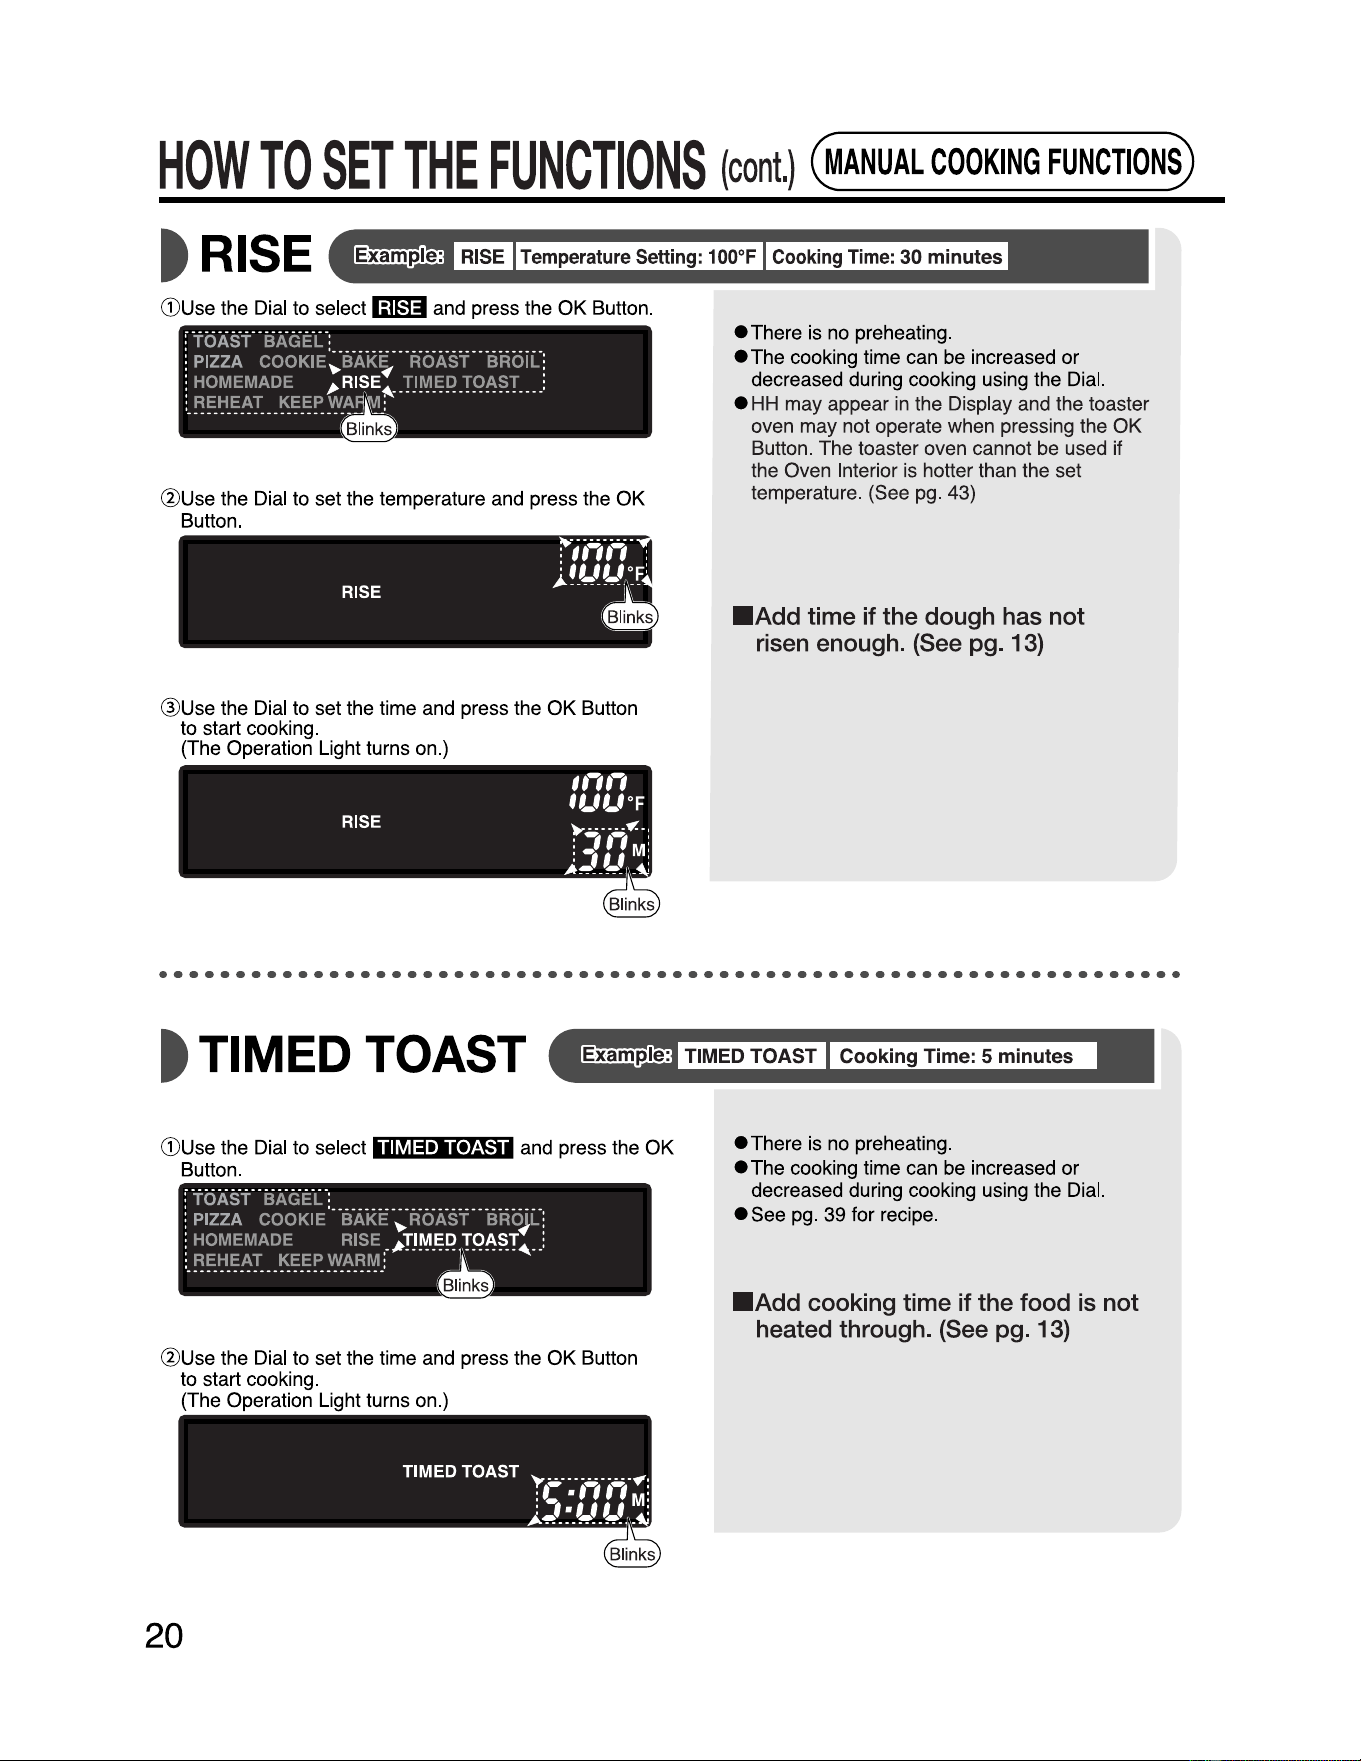
t RISE RISE Temperature Setting: 100°F Cooking Time: 30
minutes
(Duse
the Dial to select
liliffil
and press the
OK
Button.
:
TOAST
BAGEL
:
i PIZZA
COOKIE
.
BAK
~
ROAST
BROIL
:
: HOMEMADE ~RISE1'-_TIMED
TOAST
•.
:
:_
~~1:1
-
~~!
...
~~
-
~!".__\Y
a
@Use the Dial to set the temperature and press the
OK
Button.
®Use
the Dial to set the time and press the
OK
Button
to start cooking.
(The Operation Light turns on.)
• There is no preheating.
• The cooking time can be increased
or
decreased during cooking using the Dial.
• HH may appear in the Display and the toaster
oven may not operate when pressing the
OK
Button. The toaster oven cannot be used if
the Oven Interior is hotter than the set
temperature. (See pg. 43)
■
Add
time
if
the dough has not
risen enough. (See pg. 13)
••••••••••••••••••••••••••••••••••••••••••••••••••••••••••••••••••
t TIMED TOAST
. TIMED TOAST Cooking Time: 5 minutes
(Duse
the Dial to select
Button.
TIMED TOAST and press the
OK
: TOAST BAGEL :
i PIZZA COOKIE BAKE • ROAST BRO
JL
:
: HOMEMADE RISE
_,.TJNl.;R
.
T9~~T
..
,)
:.
~~1:1
-
~~~
--
~~
-
~!"..~~
-
~~
J •
@Use the Dial to set the time and press the
OK
Button
to start cooking.
(The Operation Light turns on.)
• There is no preheating.
• The
cooking time can be increased
or
decreased during cooking using the Dial.
• See pg. 39 for recipe.
■
Add
cooking time
if
the food is not
heated through. (See pg. 13)
20
HOW
TO
SET
THE
FUNCTIONS
(cont.)
(MANUAL
COOKING
FUNCTION~
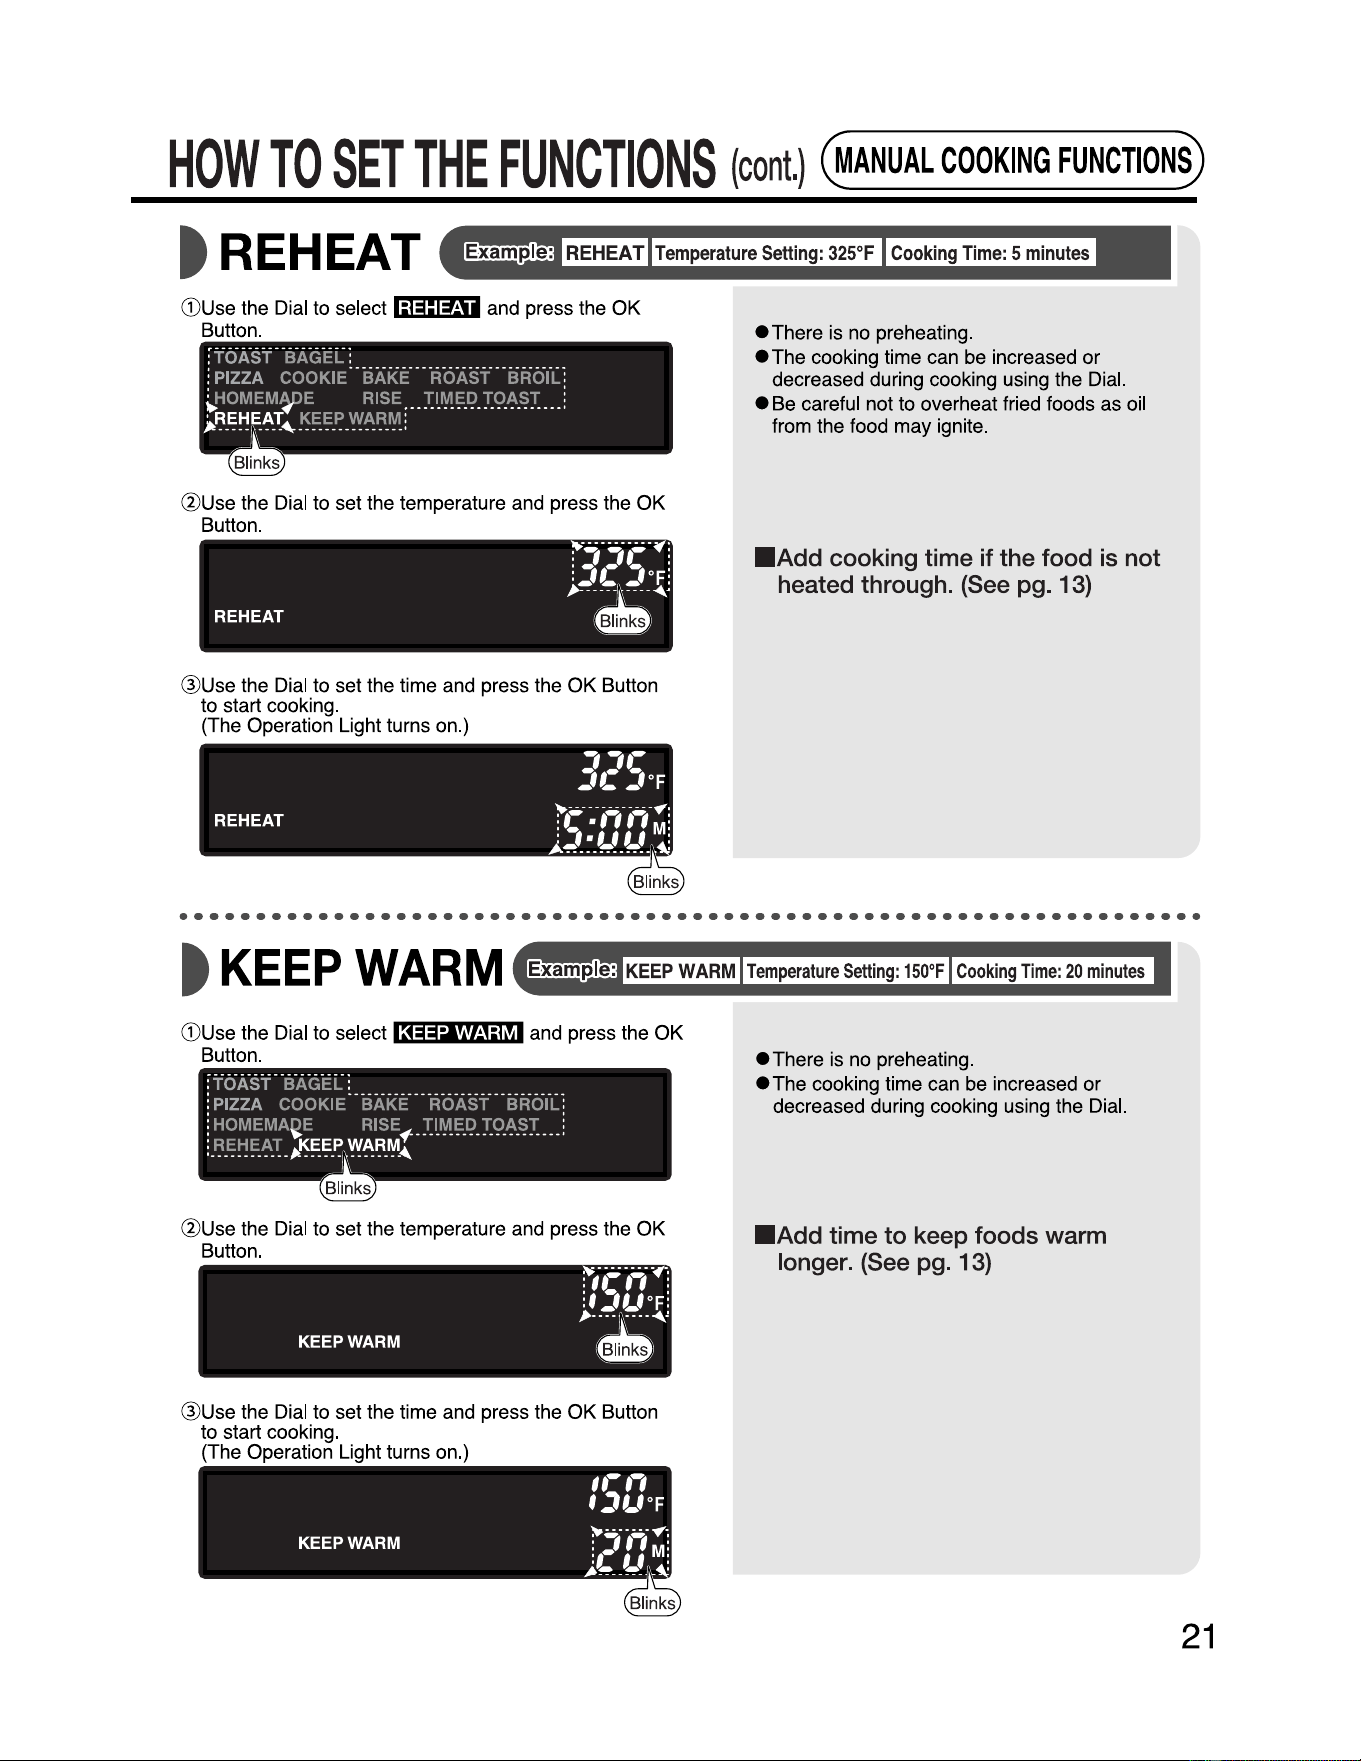
t REHEAT :
REHEAT
Temperature
Setting
:
325°F
Cooking
Time
: 5
minutes
G)
Use the Dial to select
i;j::j:j:f-ii
and press the
OK
Button.
:TOAST BAGEL :
: PIZZA COOKIE
--
BAiff
___
1f6Asf
--
BFfo1"C
:
~
HOMEM~E
RISE
___
::r::~fy'l
-
~_l?
_:_
1:9
_~_
!r!
:
___
i
~REH~AT.._ KEEP WARM :
•
@Use the Dial to set the temperature and press the
OK
Button.
@Use the Dial to set the time and press the
OK
Button
to start cooking.
(The Operation Light turns on.)
• There is no preheating.
• The cooking time can be increased
or
decreased during cooking using the Dial.
• Be careful not to overheat fried foods as oil
from the food may ignite.
■
Add
cooking time
if
the food is not
heated through. (See pg. 13)
••••••••••••••••••••••••••••••••••••••••••••••••••••••••••••••••••
t
KEEP
WARM
ExamP.le:
KEEP
WARM
Temperature
Setting
:
150°F
Cooking
Time
:
20
minutes
G)
Use the Dial to select
U,i::j::j;l!N;.1$i
and press the
OK
Button.
:TOAST BAGEL :
: PIZZA COOKIE
--
BAKE
____
ROASf
--
BROfC
:
i HOMEMA~ E RISE~
_::r::~fy'l
-
~_l?
_
::r::9
_~_
~::r::
---i
:_
f:l
_
~~~
-
~:i.:
-"-~~~-~
,
~~':1-~"
•
@Use the Dial to set the temperature and press the
OK
Button.
@Use the Dial to set the time and press the
OK
Button
to start cooking.
(The Operation Light turns on.)
• There is no preheating.
• The cooking time can be increased or
decreased during cooking using the Dial.
■
Add
time
to
keep foods warm
longer. (See pg. 13)
21
RECIPES
The measurements used
in
these Recipes:
• 1
cup=
237ml
• 1 Tbsp. =
15ml
• 1 tsp. =
5ml
eThe cooking temperatures and times listed below are guidelines. Please stay by the toaster oven and monitor the
foods while they cook. Especially when cooking smaller amounts of foods, the food may burn easily even with the
cooking time listed below, and may cause fire.
eThe actual cooking time
and
how the food is cooked
will
vary according to the power supply voltage, the
room
temperature,
the
temperature inside the oven, the temperature,
size,
amount
and
type of foods,
the
container
used,
and
other factors.
eopen and close the door quickly during preheating and cooking, as opening the door lowers the oven temperature.
eAdd cooking time if the food is not heated through.
euse
one of the following methods to add cooking time:
During Cooking:
Turn the Dial.
After Cooking
(ADD TIME is blinking):
Press the OK Button to start immediately. Each press of the OK Button will add a preset
length of time according to the function.
Turn the Dial to the desired cooking time and to start immediately. Please take caution
as pressing the OK Button after turning the Dial will add a preset length of time.
After Cooking (ADD TIME
not
displayed):
Reset the function and settings.
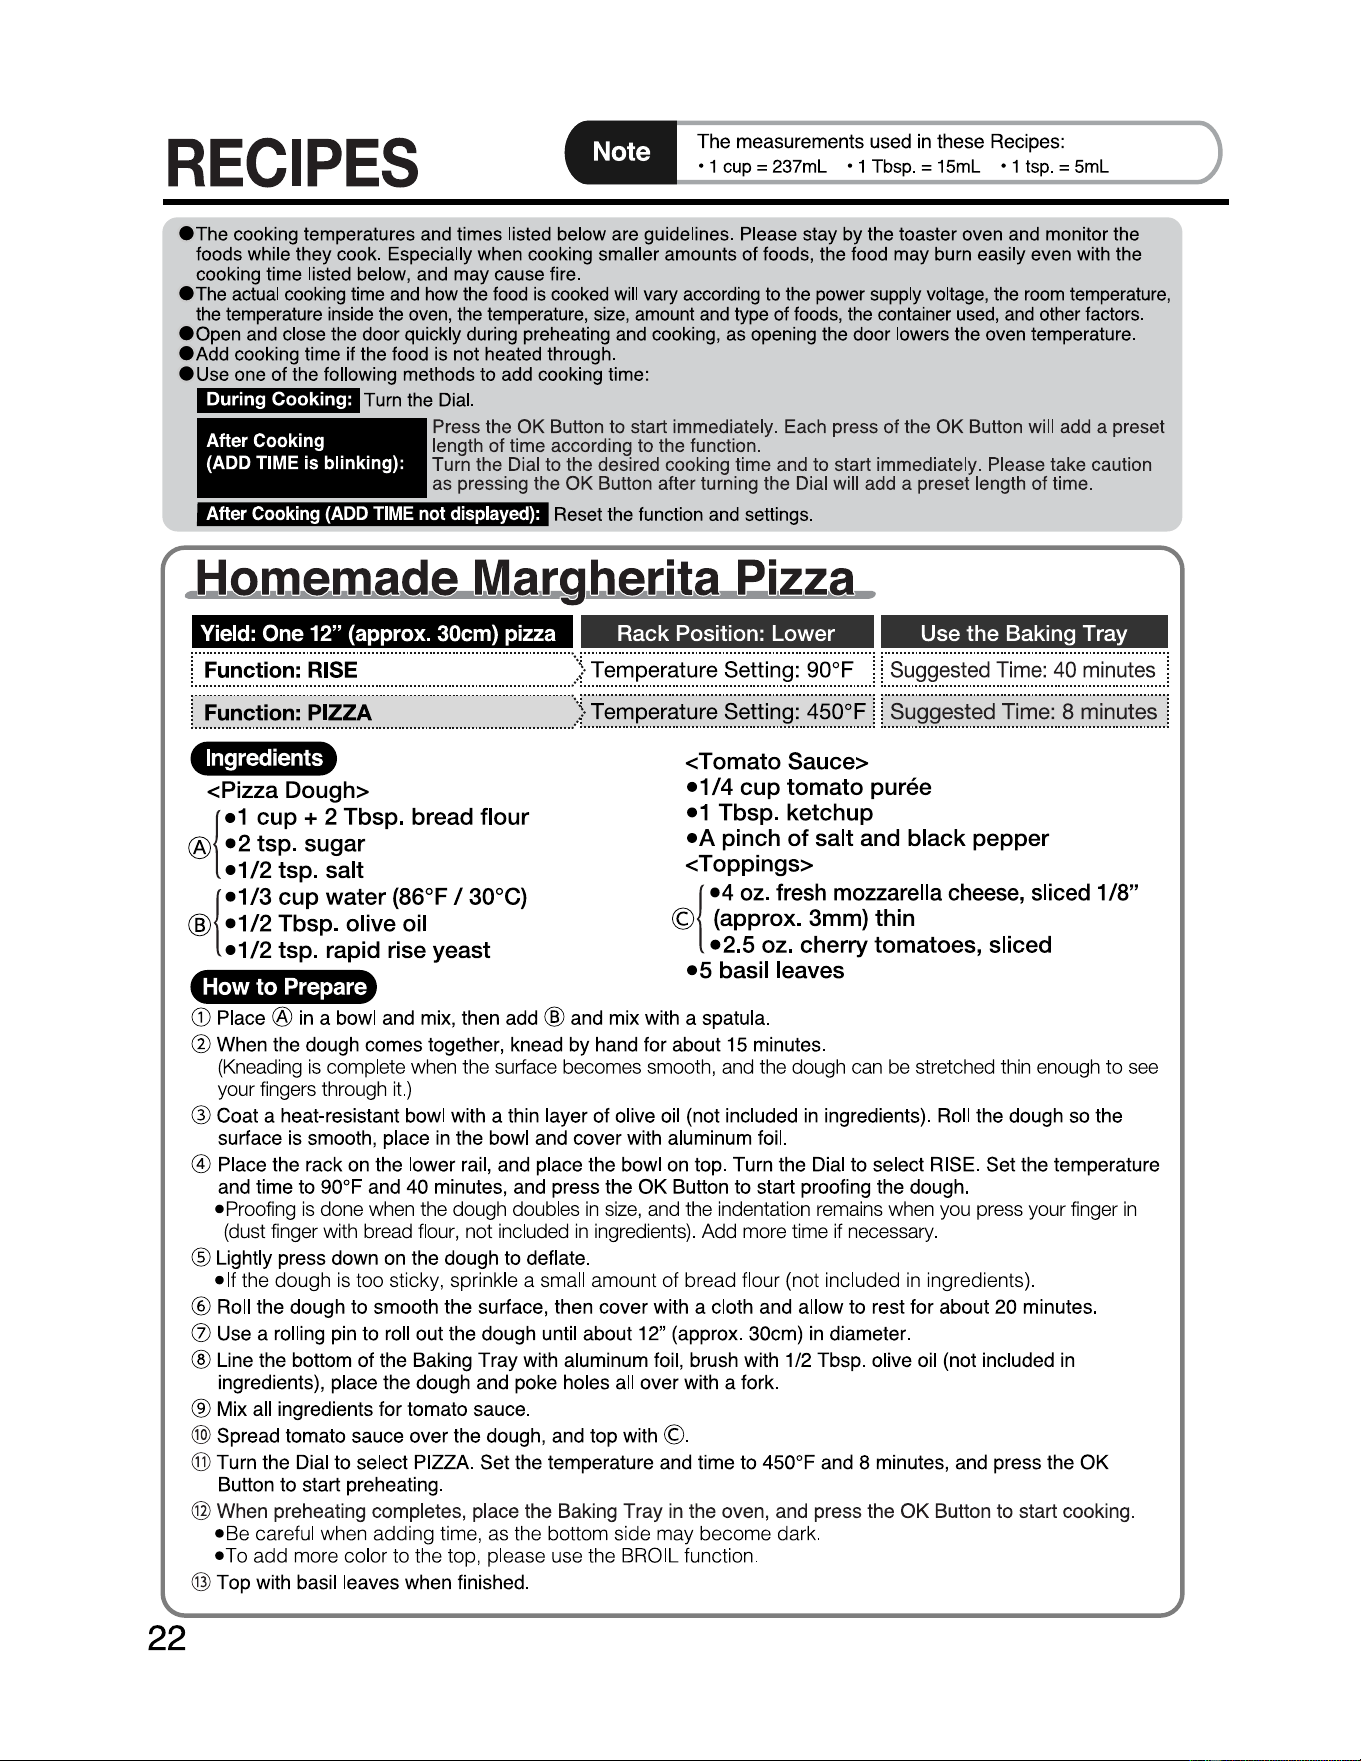
J:lamem
.ade M.a,r
..
g,
ber,
i
ta
_ei,
zz
a_
Yield: One 12" (approx. 30cm) pizza Rack Position: Lower Use the Baking Tray
L_
Function:. RISE .
..
..
.
..
..
.
..
..
..
.
..
..
.
..
..
...
..
...
..
..
..
.
..
..
.
..
..
..
.
)·
.Temperature. Setti
ng:
.. 90°F .j :.
Suggested
.T
i
me
:
.40
. mi
nutes
j
L_
Function:. PIZZA
....
...
..
..
..
...
..
...
..
...
..
...
..
..
..
...
..
...
..
...
)·
.Temperature. Setting: 450°F
..
_:
: Suggested.
Time:
.a .minute
S__l
Ingredients
<Pizza Dough>
®
1
•1
cup+
2 Tbsp. bread
flour
•2
tsp.
sugar
•1/2
tsp.
salt
@
1
•1/3
cup
water
(86°F / 30°C)
•1/2
Tbsp. olive oil
•1/2
tsp.
rapid rise
yeast
<Tomato
Sauce>
•1/4
cup
tomato
puree
•1
Tbsp.
ketchup
•A
pinch
of
salt and
black
pepper
<Toppings>
©
l
•4
oz. fresh mozzarella cheese, sliced 1
/8"
(approx. 3mm) thin
•2.5
oz. cherry tomatoes, sliced
•5
basil leaves
How
to
Prepare
G)
Place ® in a bowl and mix, then add @ and mix with a spatula.
@ When the dough comes together, knead by hand for about 15 minutes.
(Kneading
is
complete when the surface becomes smooth, and the dough can be stretched thin enough
to
see
your fingers through
it.)
CT)
Coat a heat-resistant bowl with a thin layer
of
olive oil (not included in ingredients). Roll the dough so the
surface is smooth, place in the bowl and
cover
with aluminum foil.
@ Place the rack on the lower rail, and place the bowl on top. Turn the Dial to select RISE. Set the temperature
and time to 90°F and
40
minutes, and press the
OK
Button to start proofing the dough.
•Proofing is done when the dough doubles
in
size, and the indentation remains when you press your finger
in
(dust finger with bread flour, not included
in
ingredients). Add more time if necessary.
@ Lightly press down on the dough to deflate.
•If
the
dough
is too sticky, sprinkle a small amount
of
bread flour (not included
in
ingredients).
@ Roll the
dough
to
smooth the surface, then
cover
with a cloth and allow to rest for about
20
minutes.
(f) Use a rolling pin to roll
out
the dough until about 12" (approx. 30cm) in diameter.
® Line the bottom
of
the Baking Tray with aluminum foil, brush with 1/2
Tbsp
. olive oil (not included in
ingredients), place the dough and poke holes all
over
with a fork.
® Mix all ingredients for tomato sauce.
@)
Spread tomato sauce over the dough, and top with ©.
@ Turn the Dial to select PIZZA. Set the temperature and time to 450°F and 8 minutes, and press the
OK
Button to start preheating.
@ When preheating completes, place the Baking Tray in the oven, and press the
OK
Button to start cooking.
•Be
careful when
adding
time, as the bottom side
may
become
dark
.
•To
add
mo
re color to the top, please use the BROIL function.
®
Top
with basil leaves when finished.
22
.
RECIPES
(cont.)
.
Bu
f.f
.a]o Cb.i
c.kea
_ei,
zz
a_
Yield: One 12" (approx. 30cm) pizza
Rack Position: Lower
Use
the Baking Tray
:_,
Function:. RISE
......................................................
) ·.Temperature. Setting: .90°F .
...!
:
..
suggested .
Time:
..
40
. mi
nutes
__:
:_,
Function:.
PIZZA
...................................................
).
Temperature_ Setting: _425°F
_!
:_,
Suggested
_
Time:
.
11
..
minute
s_,:
Ingredients
<Pizza Dough>
!®
•2-1/4
cups bread flour
•1-1/2
Tbsp. sugar
•1
tsp. salt
!
@
•2/3
cup water (86°F / 30°C)
•1
Tbsp. olive
oil
•1
tsp. rapid rise yeast
<Sauce>
•3
Tbsp. Buffalo wing sauce
<Toppings>
©
•6
oz.
cooked chicken, roughly chopped
•1/4
cup
chopped onion
•1/4
cup
chopped celery
•3
Tbsp. Buffalo wing sauce
•1/4
tsp. dried oregano
@{
•4
oz. Monterey Jack cheese, shredded
•2
oz. blue cheese, crumbled
•Ranch
dressing, as desired
How
to
Prepare
CD
Place ® in a large bowl and mix, then add ® and mix with a spatula.
@ When the dough comes together, knead by hand for about 15 minutes.
(Kneading
is
complete when the surface becomes smooth, and the dough can be stretched thin enough to
see your fingers through i
t.)
® Coat a heat-resistant bowl with a thin layer of olive oil (not included in ingredients). Roll the dough so the
surface is smooth, place in the bowl and cover with aluminum foil.
@ Place the rack on the lower rail, and place the bowl on top. Turn the Dial to select RISE. Set the
temperature and time to 90°F and 40 minutes, and press the
OK
Button to start proofing the dough.
•Proofing
is
done when the dough doubles
in
size, and the indentation remains when you press your finger
in
(dust finger with bread flour, not included
in
ingredients). Add more time
if
necessary.
® Lightly press down on the dough to deflate.
•If
the dough is too sticky, sprinkle a small amount of bread flour (not included
in
ingredients).
@ Roll the dough to smooth the surface, then cover with a cloth and allow to rest for about 20 minutes.
0 Use a rolling pin to roll out the dough until about 12" (approx. 30cm) in diameter.
® Line the bottom of the Baking Tray with aluminum foil, brush with 1/2 Tbsp. olive oil (not included in
ingredients), place the dough and poke holes all over with a fork.
®
Mix
© in a bowl.
@)
Spread the sauce over the dough, spoon the ingredients from ® evenly, and top with @.
@ Turn the Dial to select PIZZA. Set the temperature and time to 425°F and
11
minutes, and press the
OK
Button to start preheating.
@ When preheating completes, place the Baking Tray in the oven, and press the
OK
Button to start cooking.
•Be
careful when adding time, as the bottom side may become dark.
•To
add
more color to the top, please use the BROIL function.
@ When finished, serve with ranch dressing if preferred.
23
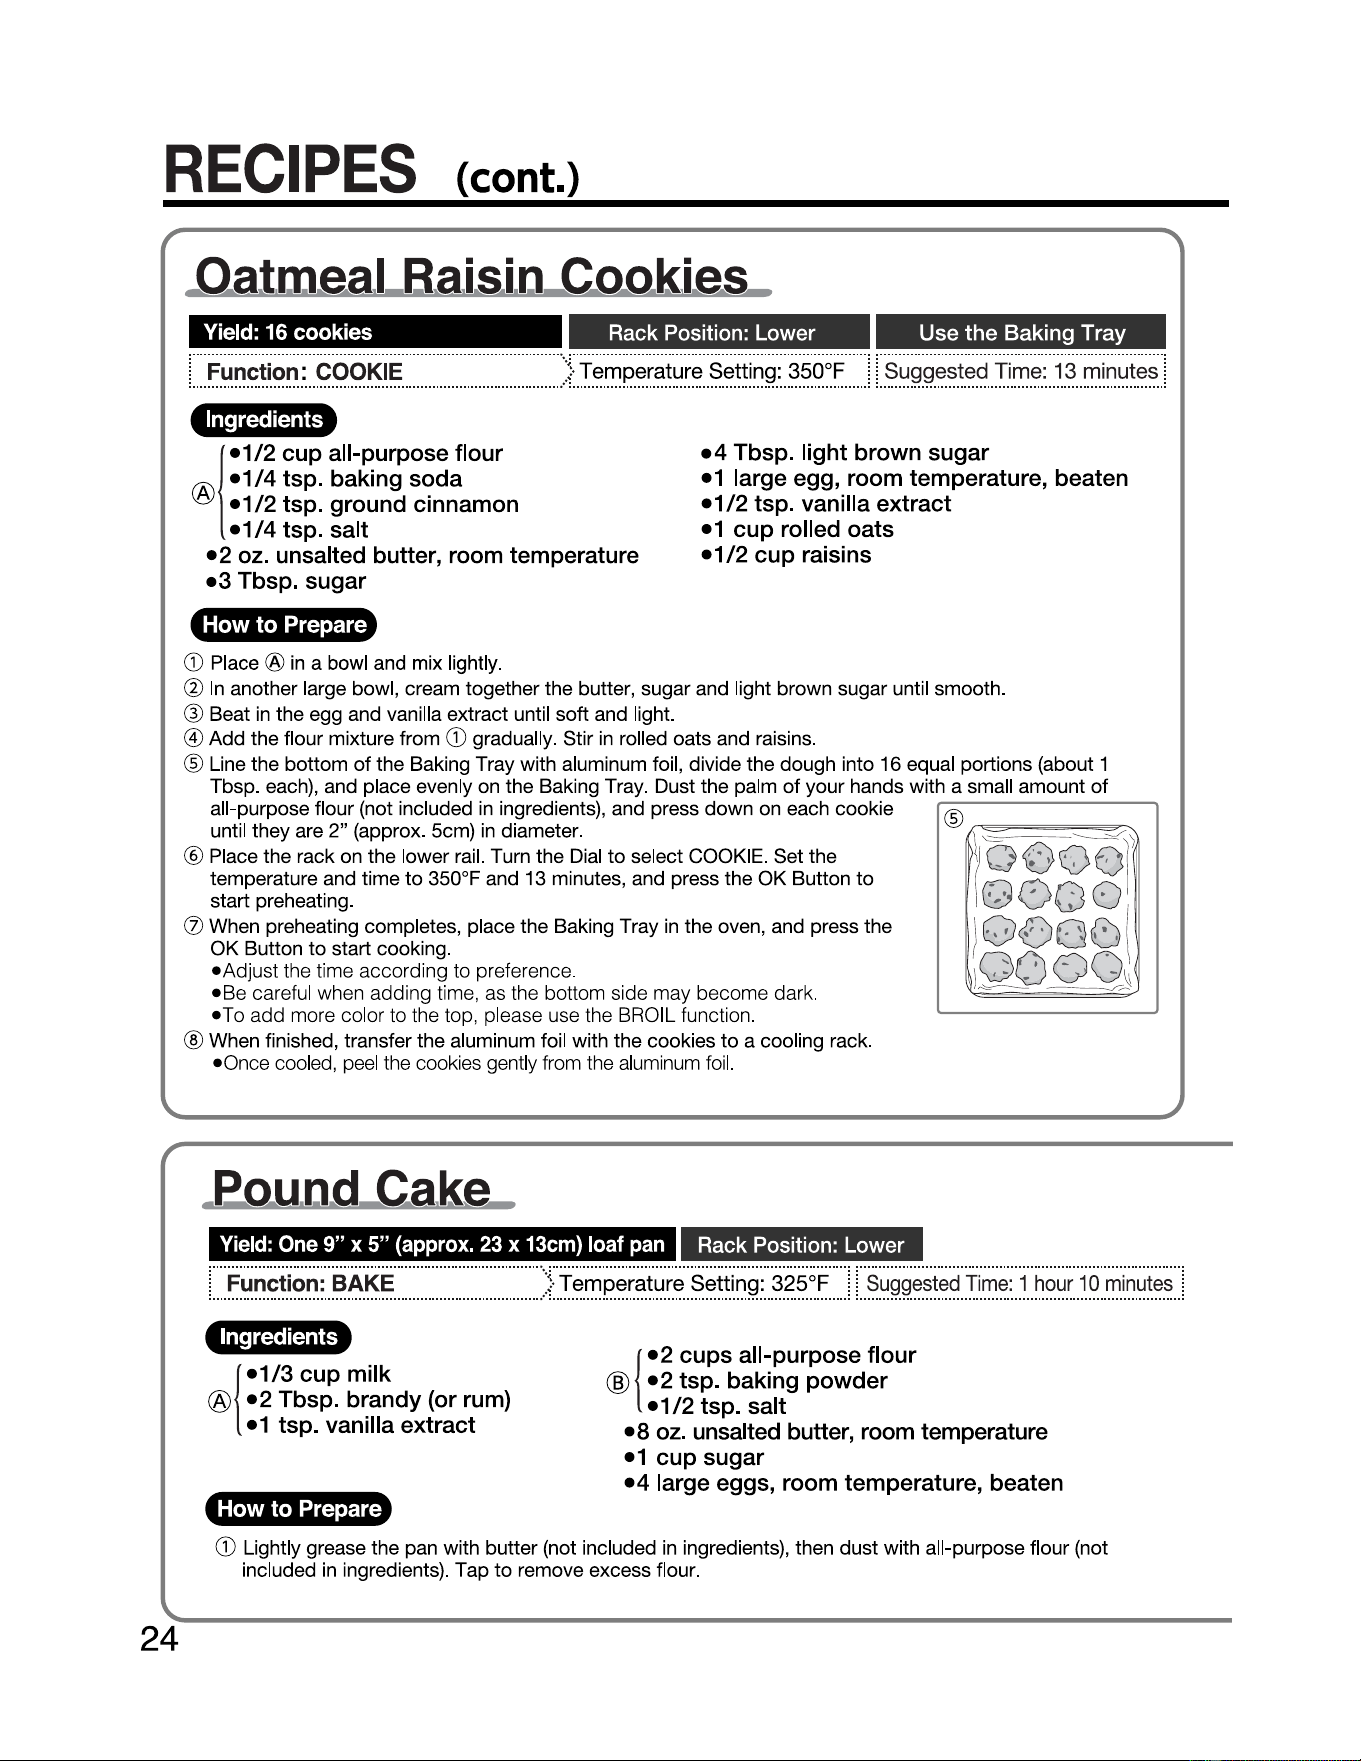
RECIPES
(cont.)
24
Oa
tm
ea
,I_B,a,i.si.a Caak,
ies
Yield:
16
cookies
Rack Position: Lower Use the Baking Tray
1 .
__
...F
unction: COOKIE
........................................
) _Temperature_ Setting:.
350°F
..
...1
:_
Suggested _
Time
:.
13
. minutes
_:
Ingredients
1
®
•1/2
cup
all-purpose flour
•1/4
tsp.
baking
soda
•1/2
tsp.
ground
cinnamon
•1/4
tsp.
salt
•2
oz. unsalted butter, room temperature
•3
Tbsp.
sugar
•4
Tbsp.
light
brown
sugar
•1
large egg, room temperature, beaten
•1/2
tsp.
vanilla
extract
•1
cup
rolled
oats
•1/2
cup
raisins
How to Prepare
G) Place ®
in
a bowl and mix lightly.
@
In
another large bowl, cream together the butter, sugar and light brown sugar until smooth.
® Beat
in
the egg and vanilla extract until soft and light.
@ Add the flour mixture from
CD
gradually. Stir
in
rolled oats and raisins.
@ Line the bottom
of
the Baking Tray with aluminum foil, divide the dough into 16 equal portions (about 1
Tbsp. each), and place evenly on the Baking Tray. Dust the palm
of
your hands with a small amount
of
all-purpose flour (not included
in
ingredients), and press down on each cookie
until they are
2"
(approx. 5cm)
in
diameter.
@
,r'.\ =
'.'::::
= =
===
-----=
=
c:c/~
l
( Q 0 0 Ol
r;;-i
0
r.,
r.'i
0
'u)
V
)
G()Q(()
\
O .
)0
.•
oo
~
~
@ Place the rack on the lower rail. Turn the Dial
to
select COOKIE. Set the
temperature ~nd time
to
350°F and 13 minutes, and press the OK Button
to
start preheating.
(Z)
When preheating compl~tes, place the Baking Tray
in
the oven, and press the
OK Button
to
start cooking.
•Adjust
the time according to preference.
•Be
careful when adding time, as the bottom side may become dark.
----------------
•To
add more color to the top, please use the BROIL function.
® When finished, transfer the aluminum foil with the cookies
to
a cooling rack.
•Once
cooled, peel the cookies gently from the aluminum foi
l.
.eau.ad
Ca
,
ke
Yield:
One
9" x 5"
(approx.
23
x
13cm)
loaf
pan
Rack Position: Lower
L,_
Function: _BAKE
....
......
..
..
...
..
..
..
..
..
...
..
..
..
. ) Temperature _Setting:. 325°F
..
..!
:,_
Suggested
_
Time
: .1
..
hour
_
10
_
minutes
.,:
Ingredients
!
®
•1/3
cup
milk
•2
Tbsp.
brandy
(or rum)
•1
tsp.
vanilla
extract
(
@
•2
cups
all-purpose
flour
•2
tsp.
baking
powder
•1/2
tsp.
salt
•8
oz. unsalted butter, room temperature
•1
cup
sugar
•4
large eggs,
room
temperature, beaten
How to Prepare
CD
Lightly grease the pan with butter (not included
in
ingredients), then dust with all-purpose flour (not
included
in
ingredients). Tap
to
remove excess flour.
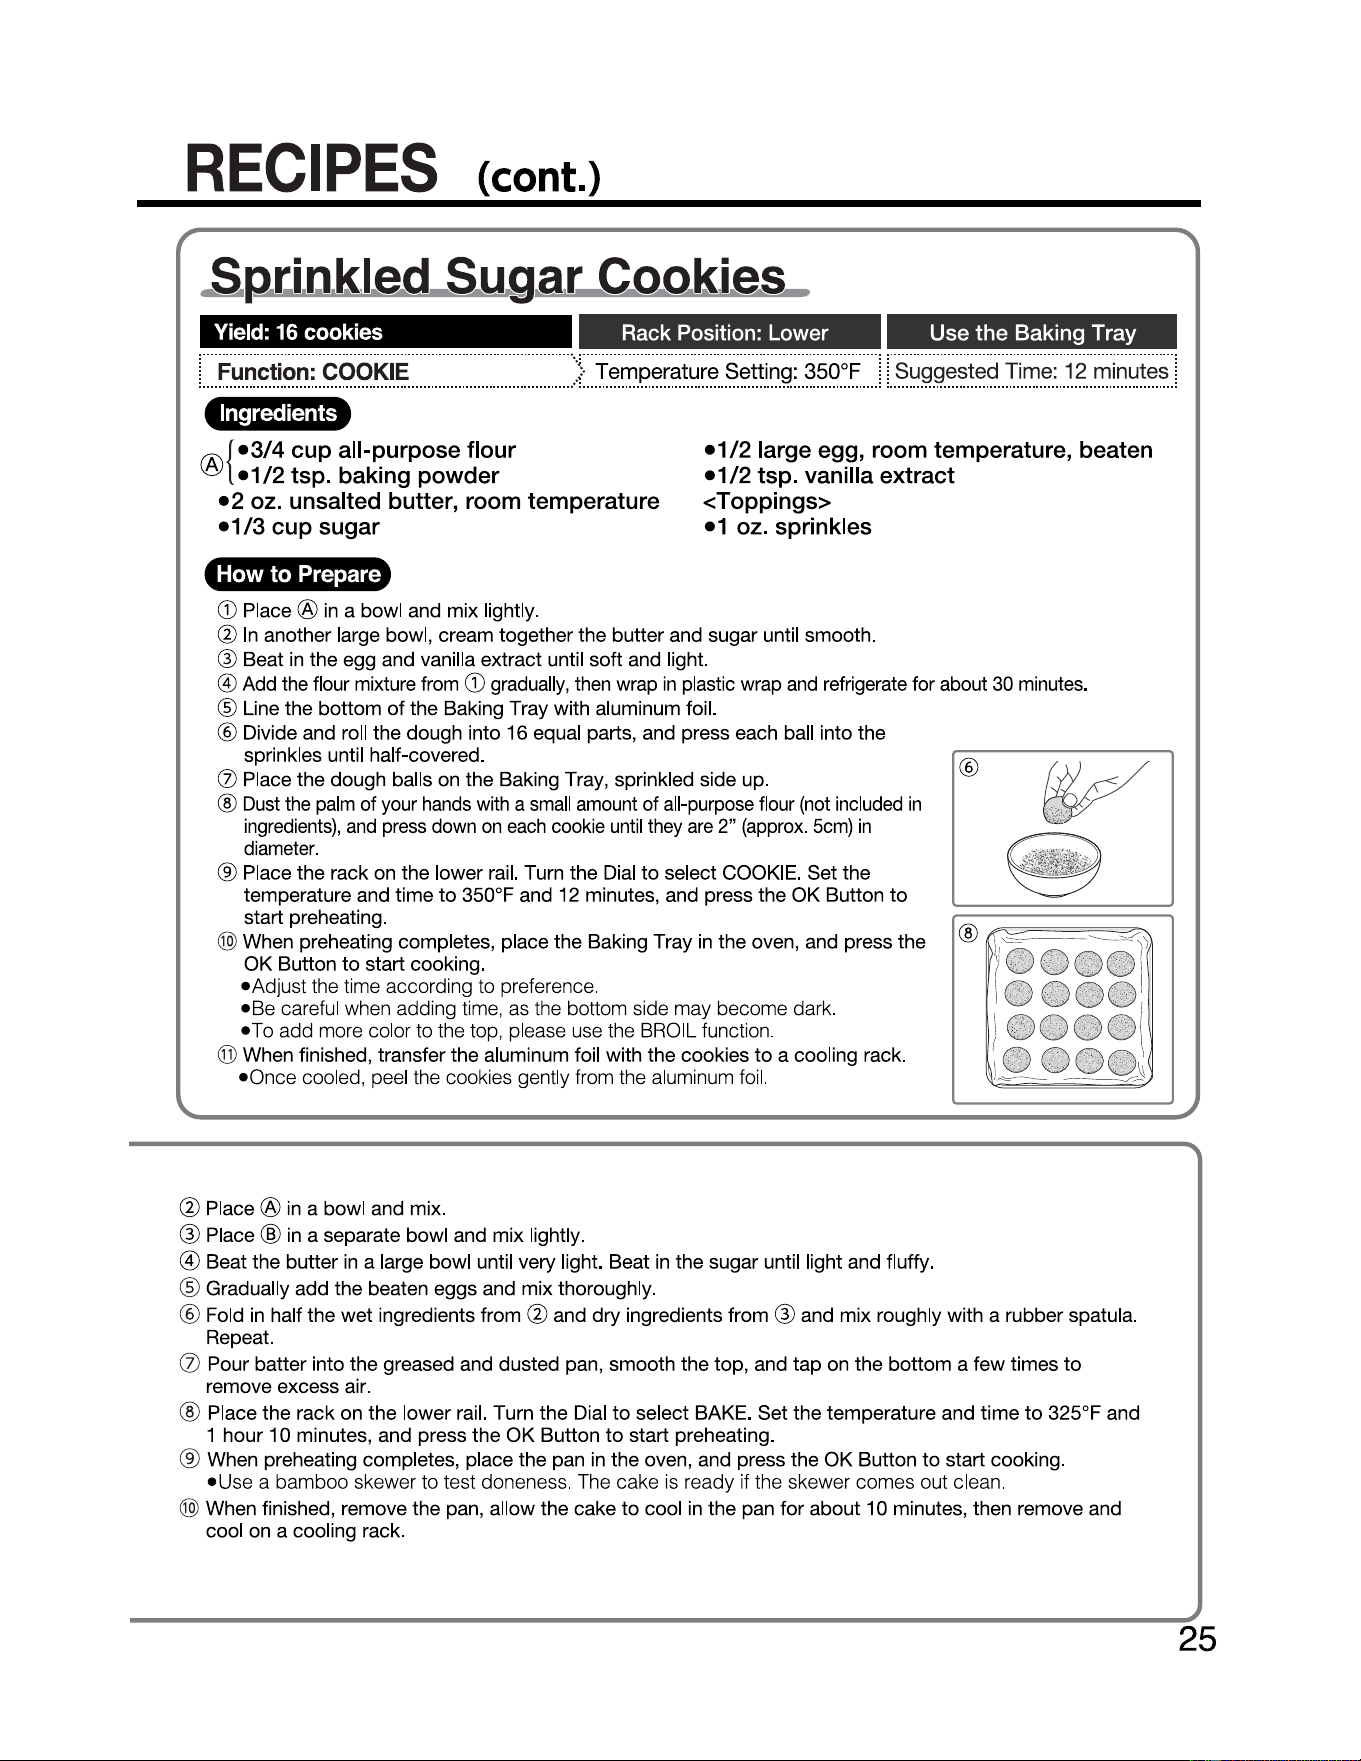
25
RECIPES
(cont.)
.S.p,ti
.a.k,
led
Su,g
.a,
r.
Caak,
ies
Yield: 16 cookies
Rack
Position: Lower Use the Baking Tray
L.Function: COOKIE
..
.........................................
)
..
Temperature.Setting:
350°F
..
....
ll_
Suggested.
Time:
.
12
.
minutes
.!
Ingredients
{@
•3/4
cup
all-purpose flour
•1/2
tsp. baking
powder
•2
oz. unsalted butter, room temperature
•1/3
cup
sugar
•1/2
large egg, room temperature, beaten
•1/2
tsp. vanilla extract
<Toppings>
•1 oz. sprinkles
How to Prepare
G)
Place®
in
a bowl and mix lightly.
@
In
another large bowl, cream together the butter and sugar until smooth.
@ Beat
in
the egg and vanilla extract until soft and light.
@ Add the flour mixture from
CD
gradually, then wrap
in
plastic wrap
and
refrigerate for about
30
minutes.
® Line the bottom
of
the Baking Tray with aluminum foil.
@ Divide and roll the dough into 16 equal parts, and press each ball into the
sprinkles until half-covered.
(J)
Place the dough balls on the Baking Tray, sprinkled side up.
®
Dust
the
palm
of your
hands
with a
small
amount of all-purpose flour
(not
included
in
ingredients),
and
press
down
on
each
cookie until they
are
2" (approx.
5cm)
in
diameter.
® Place the rack on the lower rail. Turn the Dial
to
select COOKIE. Set the
temperature and time
to
350°F and 12 minutes, and press the OK Button
to
start preheating.
@)
When preheating completes, place the Baking Tray
in
the oven, and press the
OK Button
to
start cooking.
•Adjust
the time according to preference.
•Be
careful when adding time, as the bottom side may become dark.
•To add more color to the top, please use the BROIL function.
@ When finished, transfer the aluminum foil with the cookies
to
a cooling rack.
•Once
cooled, peel the cookies gently from the aluminum foil.
@
Place®
in
a bowl and mix.
@
Place@
in
a separate bowl and mix lightly.
® Beat the butter
in
a large bowl until very light. Beat
in
the sugar until light and fluffy.
@
@
Gradually add the beaten eggs and mix thoroughly.
@ Fold
in
half the wet ingredients from @ and dry ingredients from @ and mix roughly with a rubber spatula.
Repeat.
CZ)
Pour batter into the greased and dusted pan, smooth the top, and tap on the bottom a few times
to
remove excess air.
@ Place the rack on the lower rai
l.
Turn the Dial
to
select BAKE. Set the temperature and time
to
325°F and
1 hour 10 minutes, and press the OK Button
to
start preheating.
® When preheating completes, place the pan
in
the oven, and press the OK Button
to
start cooking.
•Use
a bamboo skewer to test doneness. The cake
is
ready if the skewer comes out clean.
@)
When finished, remove the pan, allow the cake
to
cool
in
the pan for about 10 minutes, then remove and
cool on a cooling rack.
26
RECIPES
(cont.)
.
VY.b
,iie Cbaca
l.
ate l,
af
.
used
.M.a
tc.ba
.B
r.a
w.a
,
ie
Yield:
One
8"
(approx.
20cm)
square
cake
pan
Rack
Position:
Lower
L
Function:
.
BAKE
................................................
}
..
Temperature
..
Setting
:.
350°F
_j
LSuggested Time: 35. minutes
_j
..
Ingredients
{ @
•4
oz. white chocolate bar, chopped
•4
oz. unsalted butter
®
{
•3/4
cup all-purpose flour
•3
Tbsp. matcha (powdered green tea)
•1 cup sugar
•2
large eggs, beaten
<Extra Ingredients>
•1/2
cup chopped walnuts, 1/4"
(approx. 6mm) cubes
<Toppings>
•
Powdered sugar, as needed
How
to
Prepare
G) Lightly grease the pan with butter (not included
in
ingredients), then dust with all-purpose flour (not
included
in
ingredients). Tap
to
remove excess flour.
@
Place®
in a heat-resistant bowl over a
pot
of
simmering water and heat until melted.
®
Place@
in
a separate bowl and mix lightly.
@ Add sugar
to
chocolate from
@,
then gradually add the beaten eggs while mixing thoroughly.
® Add the dry ingredients from @ and mix well, and add the walnuts and mix.
@ Pour batter into the greased and dusted pan, smooth the
top
, and tap on the bottom a few times
to
remove excess air.
(J)
Place the rack on the lower rail. Turn the Dial
to
select BAKE. Set the temperature and time
to
350°F and
35
minutes, and press the
OK
Button
to
start preheating.
® When preheating completes, place the pan
in
the oven, and press the OK Button
to
start cooking.
•If
not baked sufficiently, lower the temperature to 325°F and cook a bit longer.
® When finished, remove the pan from the oven, leave the brownie in the pan
to
cool slightly. After about an
hour, remove the brownie from the pan.
@)
Top with powdered sugar .
.
Ba
,k
ed
_eatat
oes
Yield:
4 potatoes
Rack Position:
Lower
Use
the
Baking
Tray
L
Function:
.
BAKE
..
.
..
...
.
..
..
..
.
...
....
.
..
..
..
........
.
..
..
..
).
Temperature
.
Setting
:.
400°F
..
_..l
L
..
..
suggested
. Time: 1
hour
..
..
..
.J
Ingredients
•4
potatoes
(approx.
0.
7 lb. each, 2.8 lbs. total)
•
1 Tbsp. olive oil
•Sour
cream, as desired
•Salt
and black pepper, as desired
•Chopped chives, as desired
27
F
_..::
RECIPES
(cont.)
.
El
.
uf
.
f.y
_
Bl.ueber.r
_y_M.
uf
.
fi
.
as
Yield:
One
6-cup
muffi
2-3/4"
diameter
wells
n
pan,
Rack
Position: Lower
Function:
BAKE
.
L_
.. ....
..
..
..
..
...
.
...
..
..
..
...
.
...
..
..
..
..
..
...
..
)·
Temperature. Setting: .375°
.suggested
.
Time:
.23
minutes
..
__:
Ingredients
I
®
•1
cup
all-purpose flour
•1 tsp. baking
powder
•A
pinch
of
salt
•2
oz. unsalted butter, room temperature
•1/2
cup
sugar
•1 large egg, room temperature, beaten
®
8
{
•1/4
cup
milk
•1/2
tsp. vanilla extract
•3
oz. fresh blueberries
<Toppings>
12-14 fresh blueberries
©{
•1/2
Tbsp. sugar
•A
pinch
of
ground cinnamon
How
to
Prepare
G)
Lightly grease the pan with butter (not included
in
ingredients), then dust with all-purpose flour (not
included
in
ingredients). Tap
to
remove excess flour.
@
Place®
in
a bowl and mix lightly.
@ Beat the butter
in
a large bowl until very light. Beat
in
the sugar until light and fluffy.
@ Gradually add the beaten egg and mix thoroughly.
® Fold
in
half the dry ingredients from @ and the wet ingredients from @, and mix roughly with a rubber
spatula. Repeat. Add the blueberries and mix.
@ Pour batter into the greased and dusted pan, and tap on the bottom a few times
to
remove excess air.
Top with the <Toppings> blueberries, and
sprinkle©
on
top
.
(J)
Place the rack on the lower rail. Turn the Dial
to
select BAKE. Set the temperature and time
to
375°F and
23 minutes, and press the
OK
Button
to
start preheating.
® When preheating completes, place the pan
in
the oven, and press the OK Button
to
start cooking.
•Use
a bamboo skewer to test doneness. The muffins are ready if the skewer comes out clean .
® When finished, remove the pan, allow the muffins
to
cool
in
the pan for about 10 minutes, then remove
and cool on a cooling rack.
How
to
Prepare
G)
Place the rack on the lower rail. Turn the Dial
to
select BAKE. Set the temperature and time
to
400°F and 1
hour, and press the OK Button
to
start preheating.
@ Line the bottom
of
the Baking Tray with aluminum foil.
® Wash and wipe dry the potatoes. Use a fork and prick the potatoes about 10 times, rub olive oil on the
surface, and place on the Baking Tray.
@ When preheating completes, place the Baking Tray
in
the oven, and press the OK Button
to
start cooking.
•The
potatoes are cooked through if a bamboo skewer goes through easily.
®
Top
with sour cream, salt, black pepper
or
chives
to
taste.
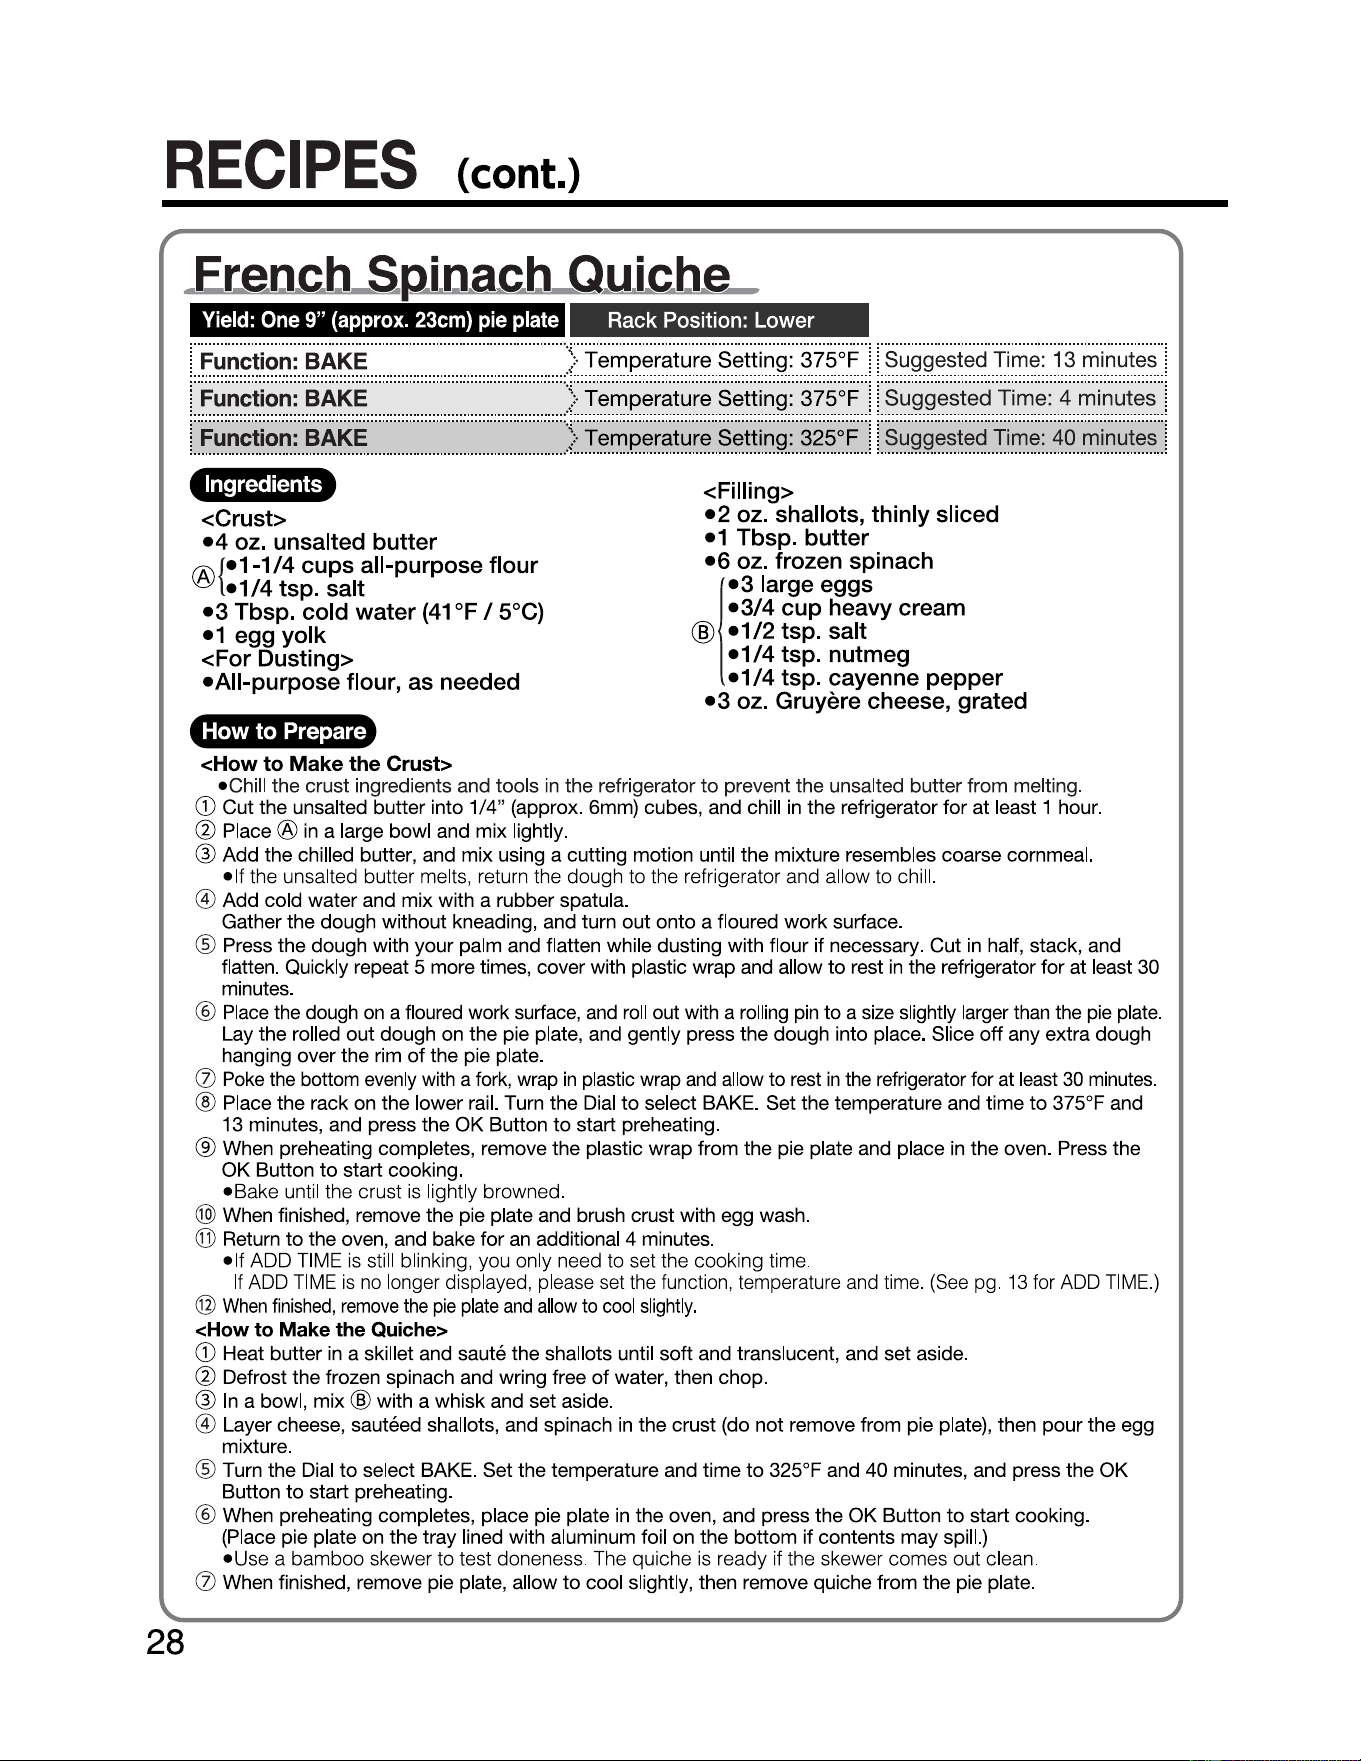
28
RECIPES
(cont.)
.
Er.each
Sp.i
.a.
ac.b
C.u.
ic.be
Yield: One 9" (approx. 23cm) pie plate Rack Position: Lower
:._Function:.BAKE
...
..
..
..
...
......
..
...
....
..
...
....
..
..
...
..
..
..
.
).
Temperature.Setting:.375°F
_Ji_Suggested
.T
ime
:
1.3
minutes.
!
..
Function:
.BAKE
...
.
........
.
.....................
.
........
.
.....
)·
.Temperature .setting:. 375°F.
_1
!.Suggested. Time:. 4. minutes
_j
1
..
Function:.BAKE
...
.
...
..
...
.
...
..
..
...
.
...
..
..
...
.
...
..
...
.
...
..
.
).
Temperature.Setting:.325°F
..
!!.Suggested.Time:.40.
minutes_j
Ingredients
<Crust>
@
•4
oz. unsalted butter
{
•1-1/4
cups all-purpose flour
•1/4
tsp. salt
•3
Tbsp. cold water
(41
°F / 5°C)
•1
egg yolk
<For Dusting>
•All-purpose flour, as needed
<Filling>
•2
oz. shallots,
thinly
sliced
•1
Tbsp.
butter
•6
oz. frozen spinach
@
•3
large
eggs
!
•3/4
cup
heavy cream
•1/2
tsp.
salt
•1/4
tsp.
nutmeg
•1/4
tsp.
cayenne
pepper
•3
oz. Gruyere cheese,
grated
How to Prepare
<How
to
Make
the Crust>
• Chill the crust ingredients and tools in the refrigerator
to
prevent the unsalted butter from melting.
G) Cut the unsalted butter into 1/4" (approx. 6mm) cubes, and chill in the refrigerator
for
at
least 1 hour.
@Place®
in a large bowl and mix lightly.
@ Add the chilled butter, and mix using a cutting motion until the mixture resembles coarse cornmeal.
•If
the unsalted butter melts, return the dough to the refrigerator and allow to chill.
@ Add cold water and mix with a rubber spatula.
Gather the dough without kneading, and turn
out
onto a floured
work
surface.
® Press the dough with your palm and flatten while dusting with flour if necessary.
Cut
in
half, stack, and
flatten. Quickly repeat 5 more times, cover with plastic wrap and allow
to
rest
in
the refrigerator for at least 30
minutes.
@ Place the dough on a floured work surface, and roll out with a rolling pin to a size slightly larger than the pie plate.
Lay the rolled
out
dough on the pie plate, and gently press the dough into place. Slice
off
any extra dough
hanging over the rim
of
the pie plate.
(J)
Poke the bottom evenly with a fork, wrap
in
plastic wrap
and
allow to rest
in
the refrigerator for at least
30
minutes.
@ Place the rack on the lower rail. Turn the Dial
to
select BAKE. Set the temperature and time
to
375°F and
13 minutes, and press the
OK
Button
to
start preheating.
® When preheating completes, remove the plastic wrap from the pie plate and place in the oven. Press the
OK
Button
to
start cooking.
•Bake
until the crust
is
lightly browned.
@)
When finished, remove the pie plate and brush crust with egg wash.
@ Return
to
the oven, and bake for an additional 4 minutes.
•If
ADD TIME is still blinking, you only need to set the cooking time.
If
ADD
TIME
is
no
longer displayed, please set the function, temperature and time.
(See
pg.
13
for ADD
TIME
.)
@
When
finished,
remove
the
pie
plate
and
allow
to
cool
slightly
.
<How to Make the Quiche>
G) Heat butter
in
a skillet and saute the shallots until soft and translucent, and set aside.
@ Defrost the frozen spinach and wring free
of
water, then chop.
@
In
a bowl,
mix@
with a whisk and set aside.
@ Layer cheese, sauteed shallots, and spinach
in
the crust (do not remove from pie plate), then pour the egg
mixture.
® Turn the Dial
to
select BAKE. Set the temperature and time
to
325°F and 40 minutes, and press the
OK
Button
to
start preheating.
@ When preheating completes, place pie plate in the oven, and press the
OK
Button
to
start cooking.
(Place pie plate on the tray lined with aluminum foil on the
bottom
if contents may spill.)
•Use
a bamboo skewer to test doneness. The quiche is ready
if
the skewer comes out clean.
(J)
When finished, remove pie plate, allow
to
cool slightly, then remove quiche from the pie plate.
..
.J
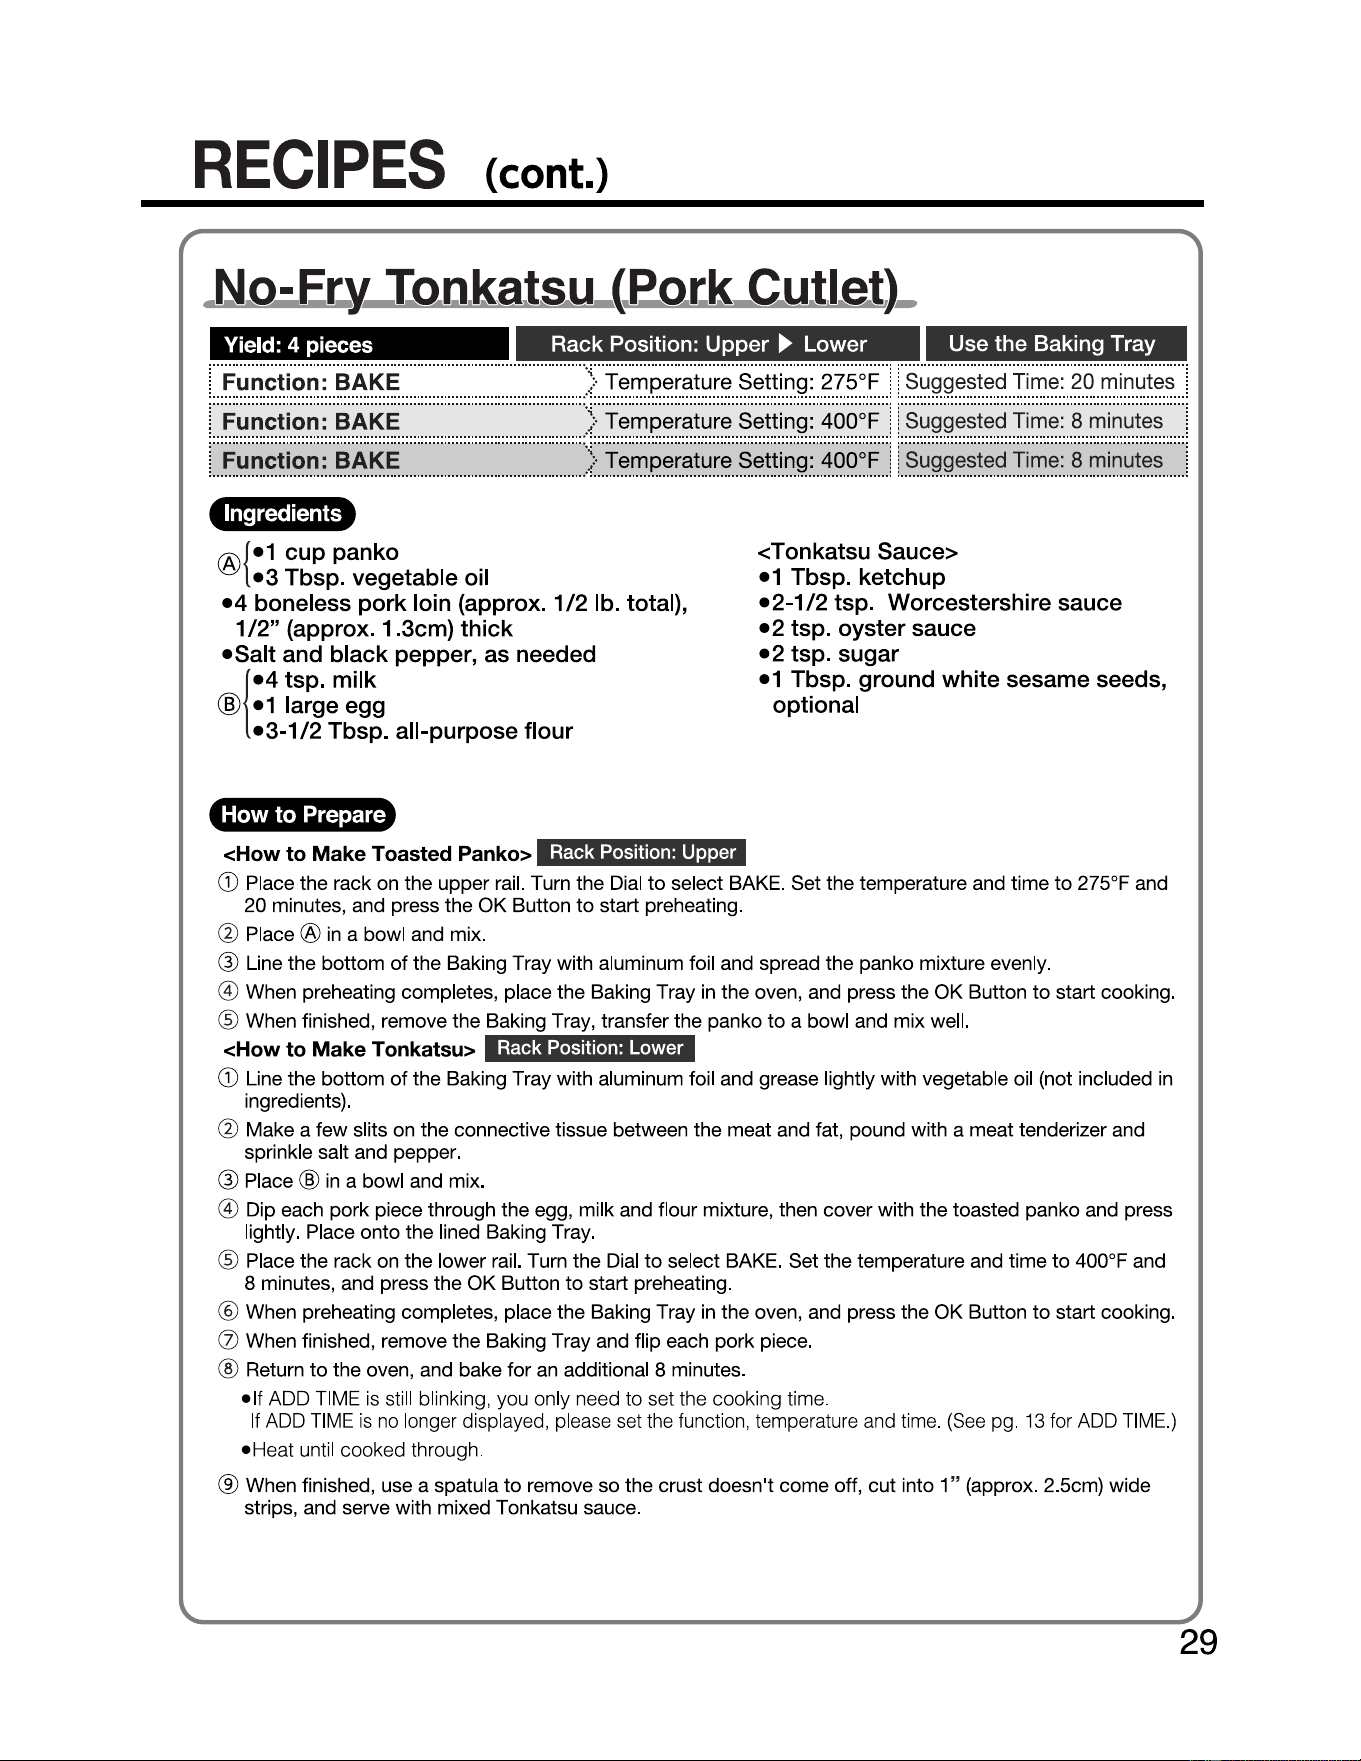
RECIPES
(cont.)
.~
o-
Er
_y_Tao.
kat
su
_
,e
o
ck
Cu
t,l.e.t)_
Yield: 4 pieces
Rack Position:
Upper
►
Lower
Use
the
Baking Tray
l
..
Function:
BAKE
..
...
..
..
..
..
....
.
..
..
..
...
..
..
..
...
..
..
..
..
..
...
} .
..
..
l
l_
.. l
l
..
Temperature Setting:.275°F Suggested.Time:.
20
.minut
es
Function
:
BAKE
..
...............................................
} .Temperature
..
Setting:.400°F
..
\t
..
suggested.Time:.8.minutes
Function: BAKE .
1._
..
.
..........
.
...................
.
..........
.
..
} .
_.1
1_
Temperature
..
Setting:
.400°F
Suggested
.
Time:
.8.
minutes
..
_..1
Ingredients
@ {•1 cup panko
•3
Tbsp. vegetable
oil
•4
boneless pork
loin
(approx.
1/2
lb. total),
1 /2" (approx. 1.3cm) thick
•Salt
and black pepper, as needed
1@
•4
tsp. milk
•1 large egg
•3-1
/2
Tbsp. all-purpose flour
<Tonkatsu Sauce>
•1 Tbsp. ketchup
•2-1/2
tsp. Worcestershire sauce
•2
tsp. oyster sauce
•2
tsp. sugar
•1 Tbsp. ground white sesame seeds,
optional
How
to
Prepare
<How to Make Toasted Panko>
Rack Position: Upper
CD
Place the rack on the upper rai
l.
Turn the Dial
to
select BAKE. Set the temperature and time
to
275°F and
20 minutes, and press the
OK
Button
to
start preheating.
0 Place ®
in
a bowl and mix.
@ Line the bottom
of
the Baking Tray with aluminum foil and spread the panko mixture evenly.
® When preheating completes, place the Baking Tray in the oven, and press the OK Button
to
start
cook
ing.
@ When finished, remove the Baking Tray, transfer the panko
to
a bowl and mix well.
<How to Make Tonkatsu>
Rack Position: Lower
CD
Line the bottom
of
the Baking Tray with aluminum foil and grease lightly with vegetable oil (not included
in
ingredients).
@ Make a few slits on the connective tissue between the meat and fat, pound with a meat tenderizer and
sprinkle salt and pepper.
@ Place @
in
a bowl and mix.
® Dip each pork piece through the egg, milk and flour mixture, then cover with the toasted panko and press
lightly. Place onto the lined Baking Tray.
@ Place the rack on the lower rail. Turn the Di
al
to
select BAKE. Set the temperature and time
to
400°F and
8 minutes, and press the OK Button
to
start preheating.
@ When preheating completes, place the Baking Tray in the oven, and press the OK Button
to
start
cook
ing.
(J)
When finished, remove the Baking Tray and flip each pork piece.
@ Return
to
the oven, and bake for an additional 8 minutes.
•If
ADD TIME
is
still blinking, you only need to set the cooking time.
If
ADD
TIME
is
no
longer displayed, please set the function, temperature and time.
(See
pg.
13
for
ADD
TIME.)
•Heat
until cooked through.
® When finished, use a spatula
to
remove so the crust doesn't come
off
, cut into 1" (approx. 2.5cm) wi
de
strips, and serve with mixed Tonkatsu sauce.
29
_..1
.
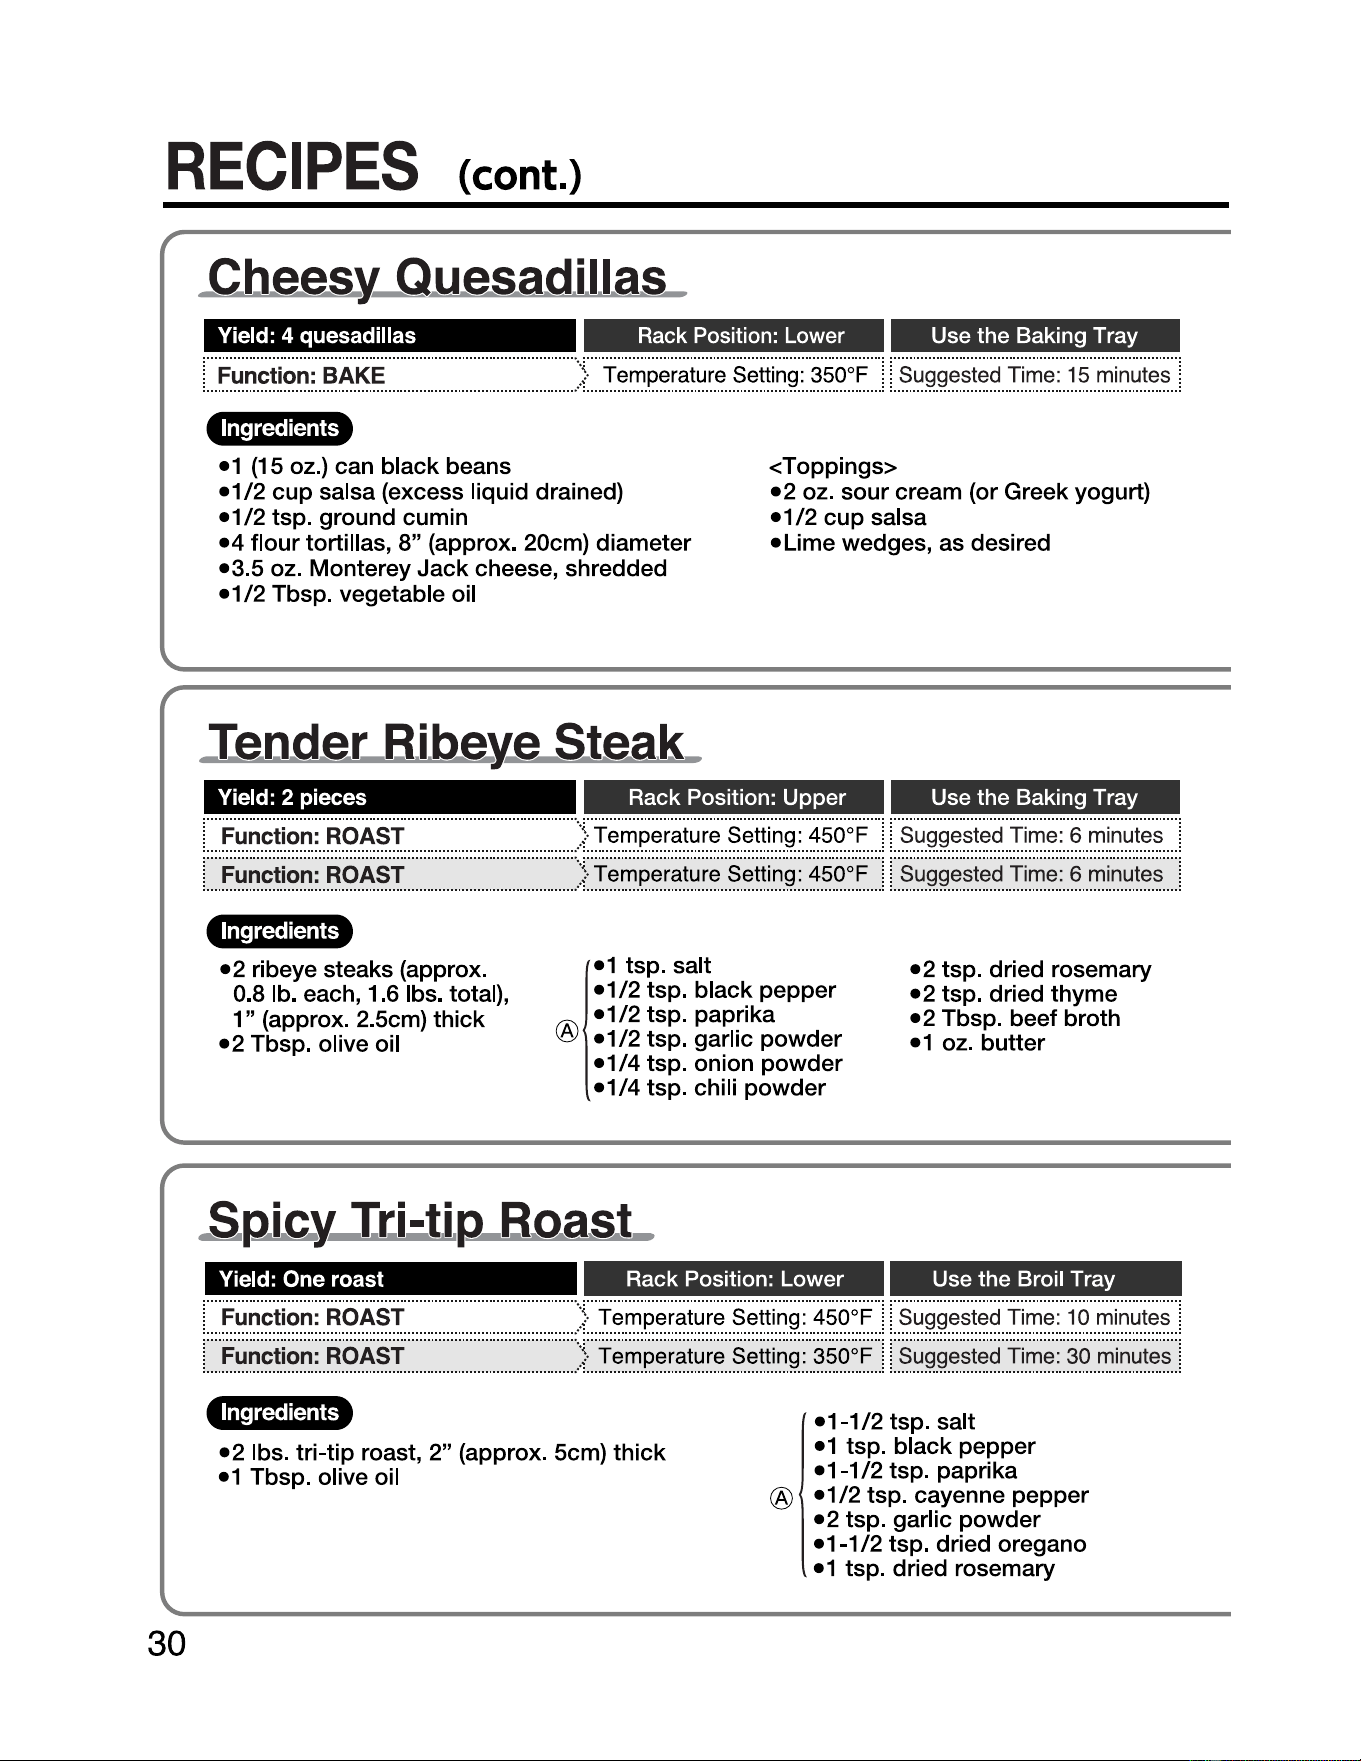
RECIPES
(cont.)
30
Cheesy_Q
_uesad.i.
1.1.as
Yield: 4 quesadillas
Rack
Position: Lower Use the Baking Tray
L
................................................
)
...
__j
l_
..
j
Function:.
BAKE Temperature.
Setting:
. 350°F Suggested.
Time:
.1 s
minutes
Ingredients
•1 (15 oz.) can
black
beans
•1/2
cup
salsa (excess liquid drained)
•1/2
tsp. ground cumin
•4
flour
tortillas,
8"
(approx. 20cm)
diameter
•3.5
oz. Monterey
Jack
cheese, shredded
•1/2
Tbsp. vegetable oil
<Toppings>
•2
oz.
sour
cream (or Greek yogurt)
•1/2
cup
salsa
• Lime wedges, as desired
Yield: 2 pieces Rack Position: Upper Use the Baking Tray
L.
..
...........................................
) .
Function:
ROAST Temperature
..
Setting 450°F Suggested. Time 6 minutes =
..
__j
l_
..
:
..
__j
Function: ROAST L. .. ..
...
.
....
..
..
..
..
..
....
.
...
.
...
.
...
.
....
..
Temperature Setting: 450°F
).
.. ..
__j
l_
Suggested .
Time:
6.
_minutes
__j
..
Ingredients
•2
ribeye steaks (approx.
0.8 lb. each, 1.6 lbs. total),
1 " (approx. 2.5cm)
thick
•2
Tbsp. olive oil
®
•1 tsp. salt
•1/2
tsp.
black
pepper
•1/2
tsp. paprika
•1/2
tsp. garlic
powder
•1/4
tsp. onion
powder
•1/4
tsp. chili
powder
•2
tsp. dried rosemary
•2
tsp. dried
thyme
•2
Tbsp.
beef
broth
• 1 oz.
butter
.S.p.icy
_
Tr..i
.:.
t.i
,p Boast_
Yield: One roast
Rack Position: Lower Use the Broil Tray
Function
: ROAST
..
L.
...........................................
)
..
Temperature.setting: .450°F
_.1
l_
..
Suggested
.
Time
: .1.0 m
in
utes
.J
L. ..
...........................................
)
..
l_
j
Function:
ROAST Temperature _Setting: _350°F
_.1
Suggested
.
Time
: .
30
.
minutes
Ingredients
•2
lbs.
tri-tip
roast,
2"
(approx. 5cm)
thick
•1 Tbsp. olive oil
®
•1-1/2
tsp. salt
•1 tsp.
black
pepper
•1-1/2
tsp. paprika
•1/2
tsp. cayenne
pepper
•2
tsp. garlic
powder
•1-1/2
tsp. dried oregano
•1
tsp. dried rosemary
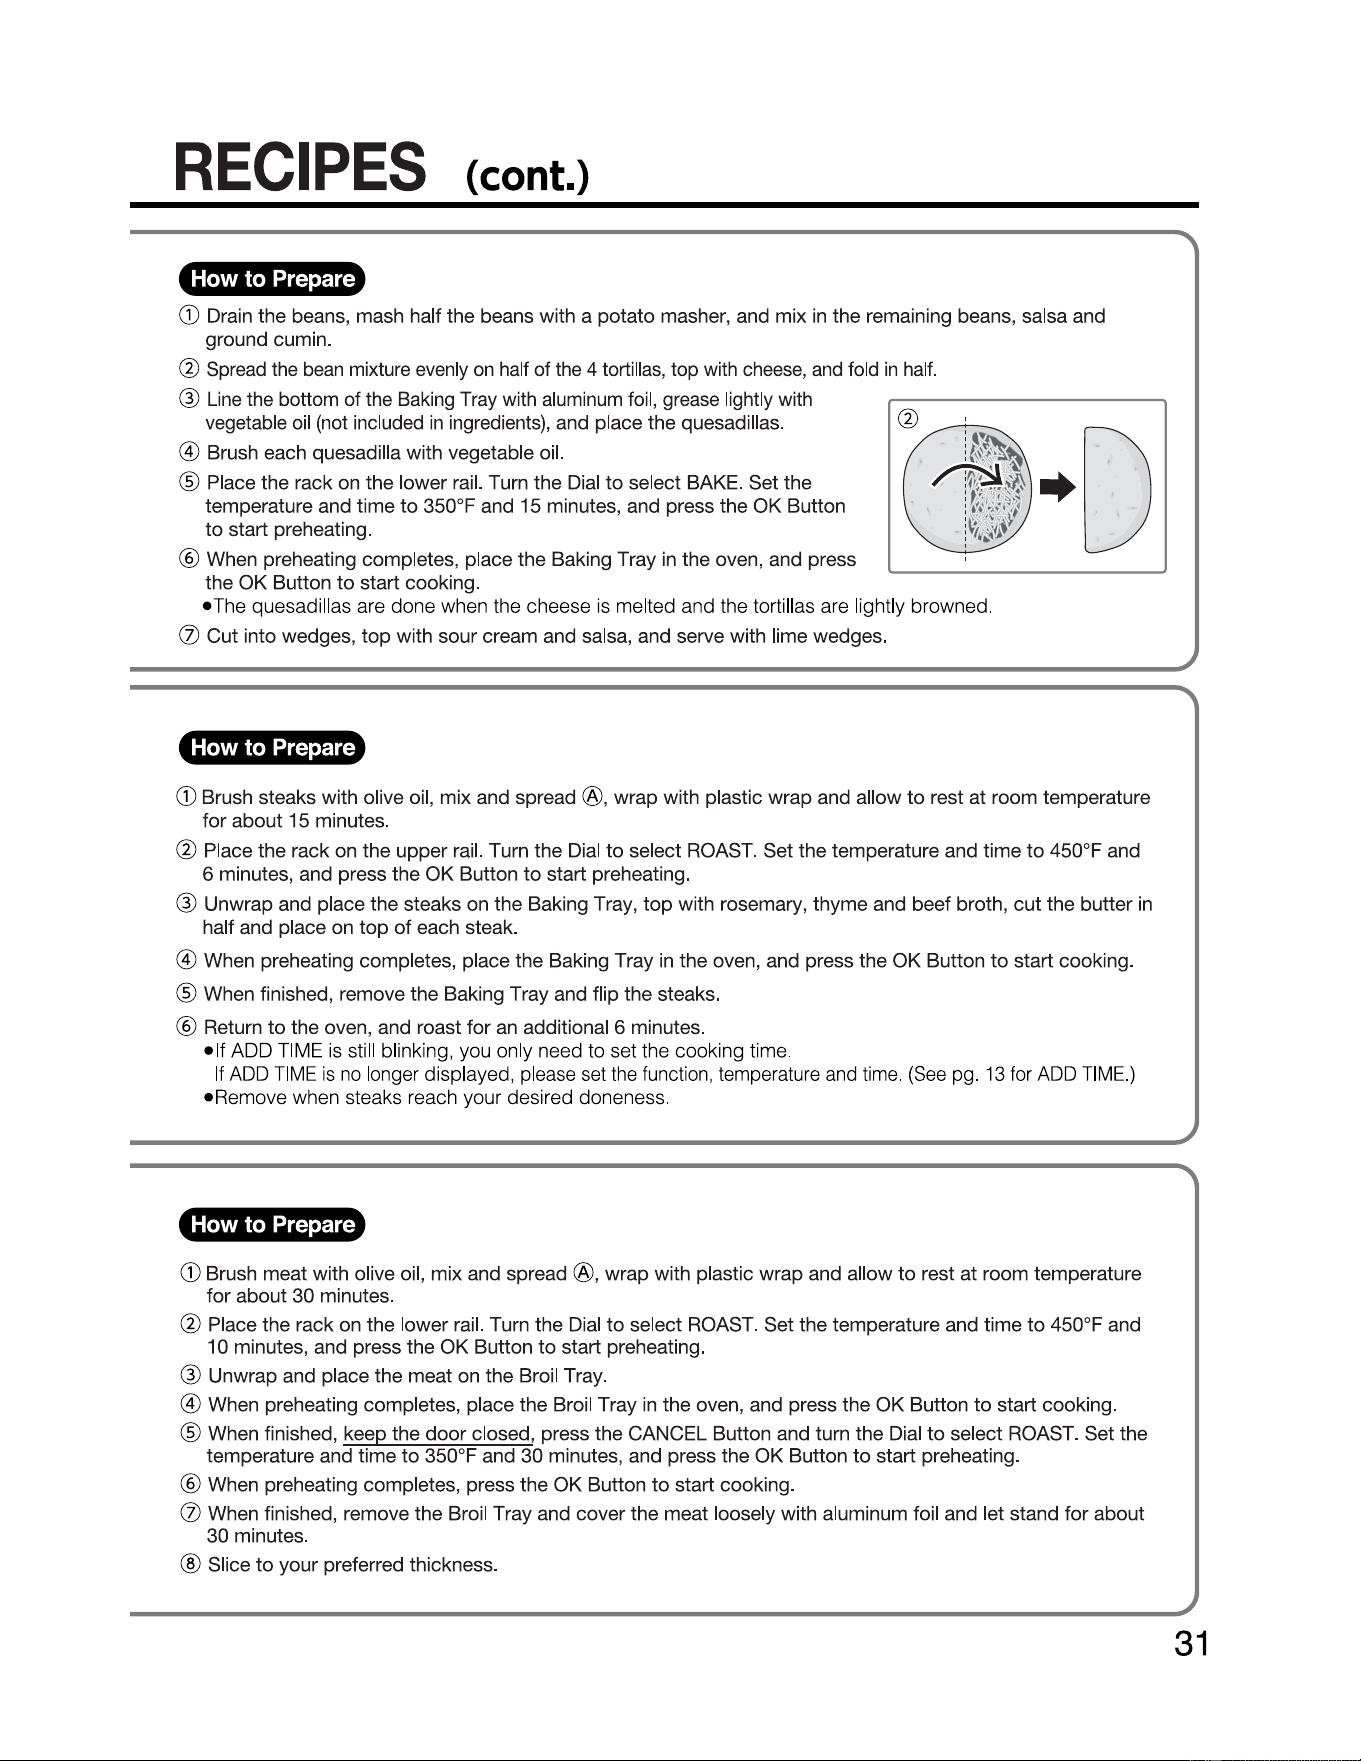
31
RECIPES
(cont.)
How to Prepare
G) Drain the beans, mash half the beans with a potato masher, and mix
in
the remaining beans, salsa and
ground cumin.
@ Spread the
bean
mixture evenly
on
half of the 4 tortillas, top with cheese,
and
fold
in
half.
® Line the bottom
of
the Baking Tray with aluminum foil, grease lightly with
vegetable
oil
(not included
in
ingredients), and place the quesadillas.
@ Brush each quesadilla with vegetable oil.
@ Place the rack on the lower rail. Turn the Dial
to
select BAKE. Set the
temperature and time
to
350°F and 15 minutes, and press the OK Button
to
start preheating.
@ When preheating completes, place the Baking Tray
in
the oven, and press
the OK Button
to
start cooking.
•The
quesadillas are done when the cheese
is
melted and the tortillas are lightly browned.
(Z)
Cut into wedges,
top
with sour cream and salsa, and serve with lime wedges.
How to Prepare
G) Brush steaks with olive oil, mix and spread ®, wrap with plastic wrap and allow
to
rest at room temperature
for about 15 minutes.
@ Place the rack on the upper rail. Turn the Dial
to
select ROAST. Set the temperature and time
to
450°F and
6 minutes, and press the
OK
Button
to
start preheating.
® Unwrap and place the steaks on the Baking Tray,
top
with rosemary, thyme and beef broth,
cut
the butter
in
half and place on
top
of
each steak.
@ When preheating completes, place the Baking Tray in the oven, and press the OK Button
to
start cooking.
@ When finished, remove the Baking Tray and flip the steaks.
@ Return
to
the oven, and roast for an additional 6 minutes.
•If
ADD TIME
is
still blinking, you only need to set the cooking time.
If
ADD
TIME
is
no
longer displayed, please set the function, temperature and time.
(See
pg.
13
for
ADD
TIME.)
•Remove when steaks reach your desired doneness.
How to Prepare
G) Brush meat with olive oil, mix and spread ®, wrap with plastic wrap and allow
to
rest at room temperature
for about 30 minutes.
@ Place the rack on the lower rail. Turn the Dial
to
select ROAST. Set the temperature and time
to
450°F and
10 minutes, and press the OK Button
to
start preheating.
® Unwrap and place the meat on the Broil Tray.
@ When preheating completes, place the Broil Tray
in
the oven, and press the OK Button
to
start cooking.
@ When finished, keep the
door
closed, press the CANCEL Button and turn the Dial
to
select ROAST. Set the
temperature and time
to
350°F and 30 minutes, and press the OK Button
to
start preheating.
@ When preheating completes, press the OK Button
to
start cooking.
(Z)
When finished, remove the Broil Tray and cover the meat loosely with aluminum foil and let stand for about
30 minutes.
@ Slice
to
your preferred thickness.
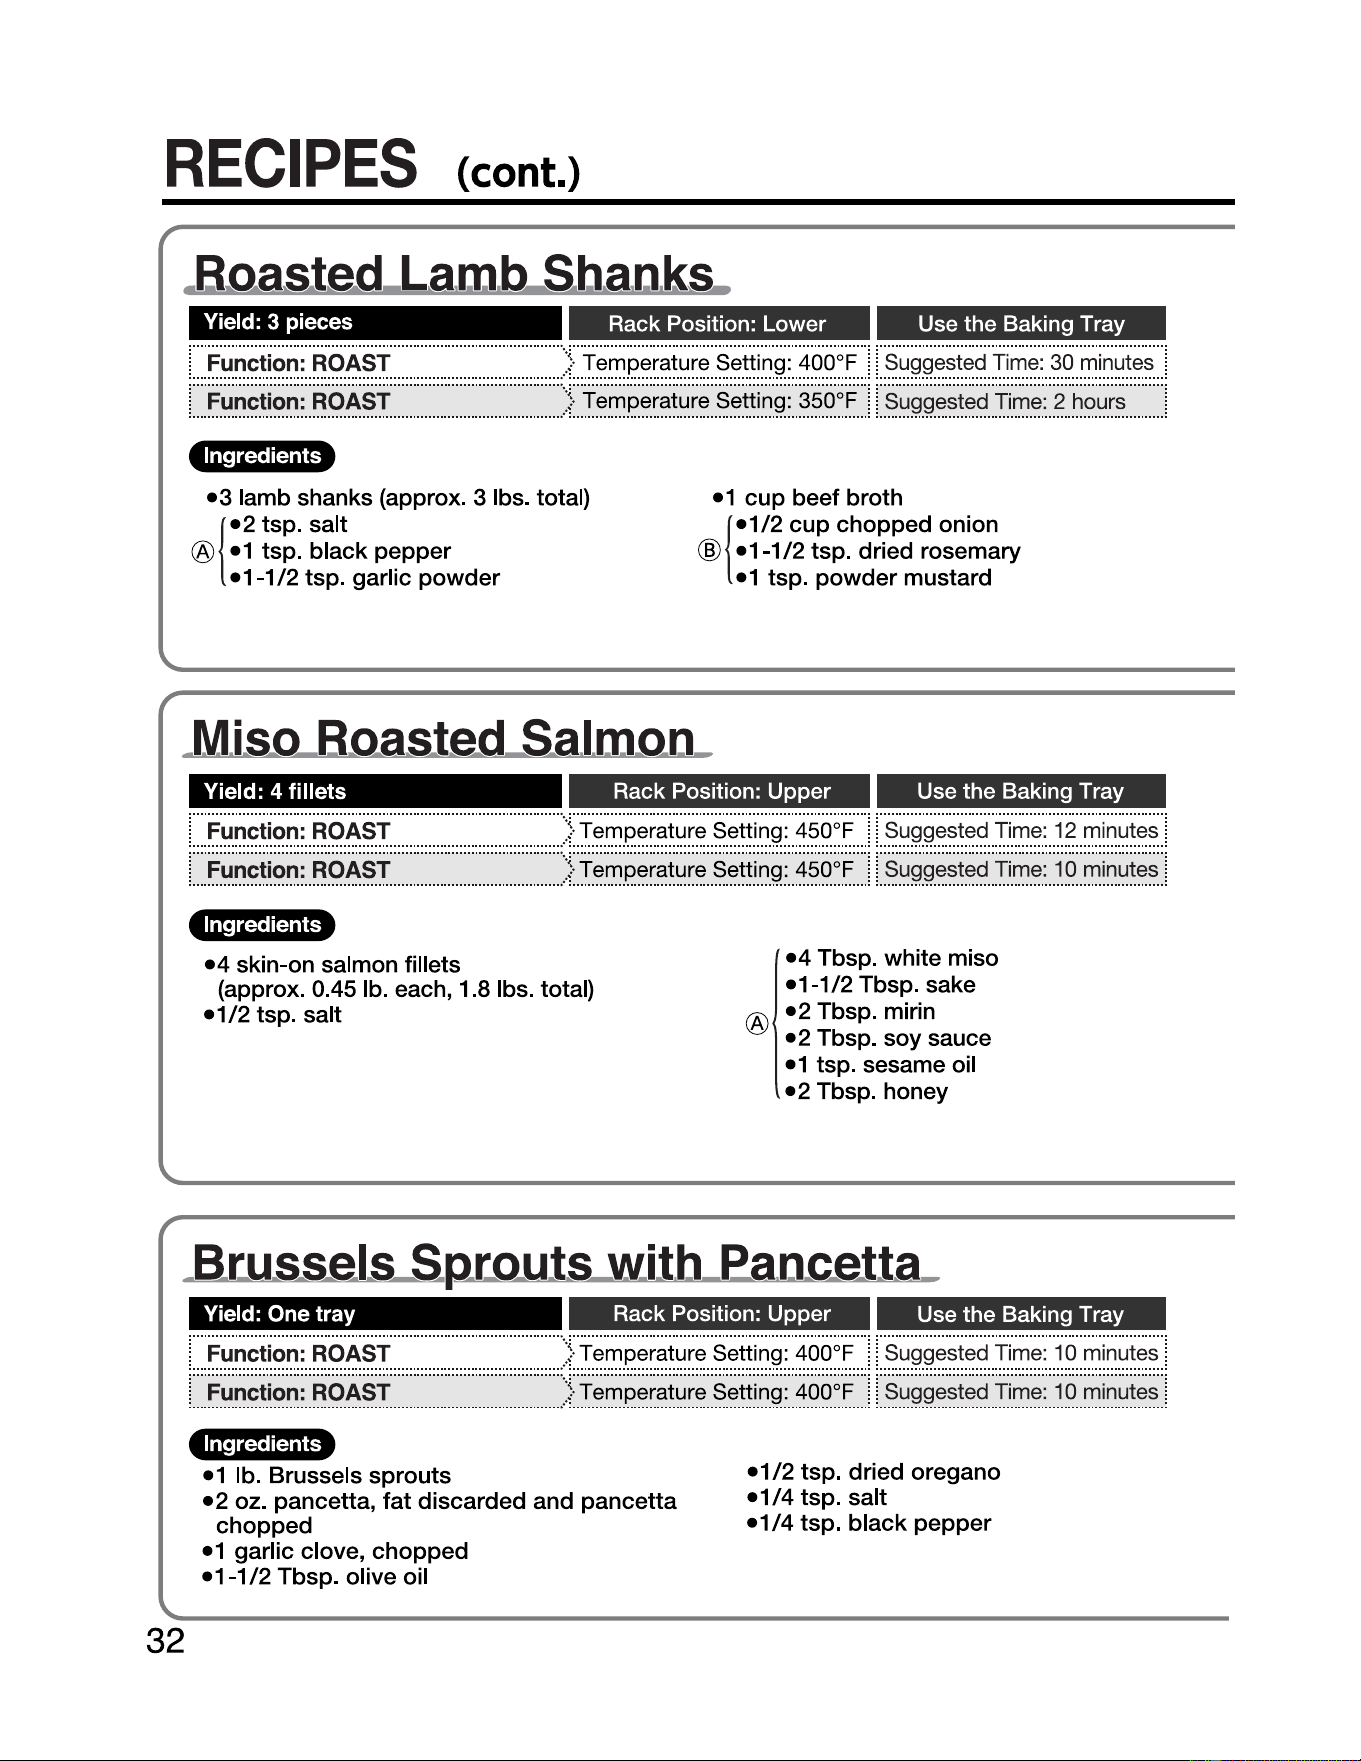
RECIPES
(cont.)
.B,o,a,st
ed
.La,m,b Sb.a,a,ks
Yield: 3 pieces
Rack Position: Lower Use the Baking Tray
L. ..
..
..
..
....
.....
..
........
..
..
..
..
..
..
...... ) . .. j :. !
L. ..
..
..
..
....
.....
..
........
..
..
..
..
..
..
..
.)
. .. .. ! :. ..
..
..
.
..
Function:
ROAST Temperature. Setting: 400°F Suggest
ed.
Time
:.
30
. minutes
..
Function:
ROAST Temperature. Setting: 350°F Suggested
.T
ime:. 2 .hours 1
Ingredients
1
®
•3
lamb shanks (approx. 3 lbs. total)
•2
tsp. salt
•1 tsp. black pepper
•1-1/2
tsp. garlic powder
•1 cup beef broth
@
1
•1/2
cup chopped onion
•1-1/2
tsp. dried rosemary
•1 tsp. powder mustard
. .M
iso
Boasted
Sa
lmoa_
Yield: 4 fillets Rack Position: Upper Use the Baking Tray
L. ..
..
..
..
....
.....
..
........
..
..
..
..
..
..
...... )
___::
.
L. ..
..
..
..
....
.....
..
........
..
..
..
..
..
..
..
.)
..
.
!:
.
Function:
ROAST Temperature.Setting: .450°F Suggested
.T
ime:
.12
.m
inutes
_:
Function:
ROAST Temperature.Setting: .450°F Suggested
.T
ime:.
10
.minutes.
:
Ingredients
•4
skin-on salmon fillets
(approx. 0.45 lb. each, 1.8 lbs. total)
•1/2
tsp. salt
®
•4
Tbsp. white miso
•
1-1
/2 Tbsp. sake
•2
Tbsp. mirin
•2
Tbsp. soy sauce
•1 tsp. sesame oil
•2
Tbsp. honey
_Btussels
Sp.rou
ts
w.
i
t.b
_ea,acetta_
32
Yield: One tray
Rack Position: Upper
Use the Baking Tray
L.
..
..
..
..
......
.
....
...
.
...
.
..
..
..
..
..
..
..
.)
..
.
!:.
L.
..
...........................................
)
___::
.
Function:
ROAST Temperature.Setting: .400°F Suggested .Time:.
10
.minutes.:
Function:
ROAST Temperature.Setting: .400°F Suggested .Time: .
10
.minutes
_:
Ingredients
•1 lb. Brussels sprouts
•2
oz. pancetta, fat discarded and pancetta
chopped
•1 garlic clove, chopped
•1-1/2
Tbsp. olive oil
•1/2
tsp. dried oregano
•1/4
tsp. salt
•1/4
tsp. black pepper
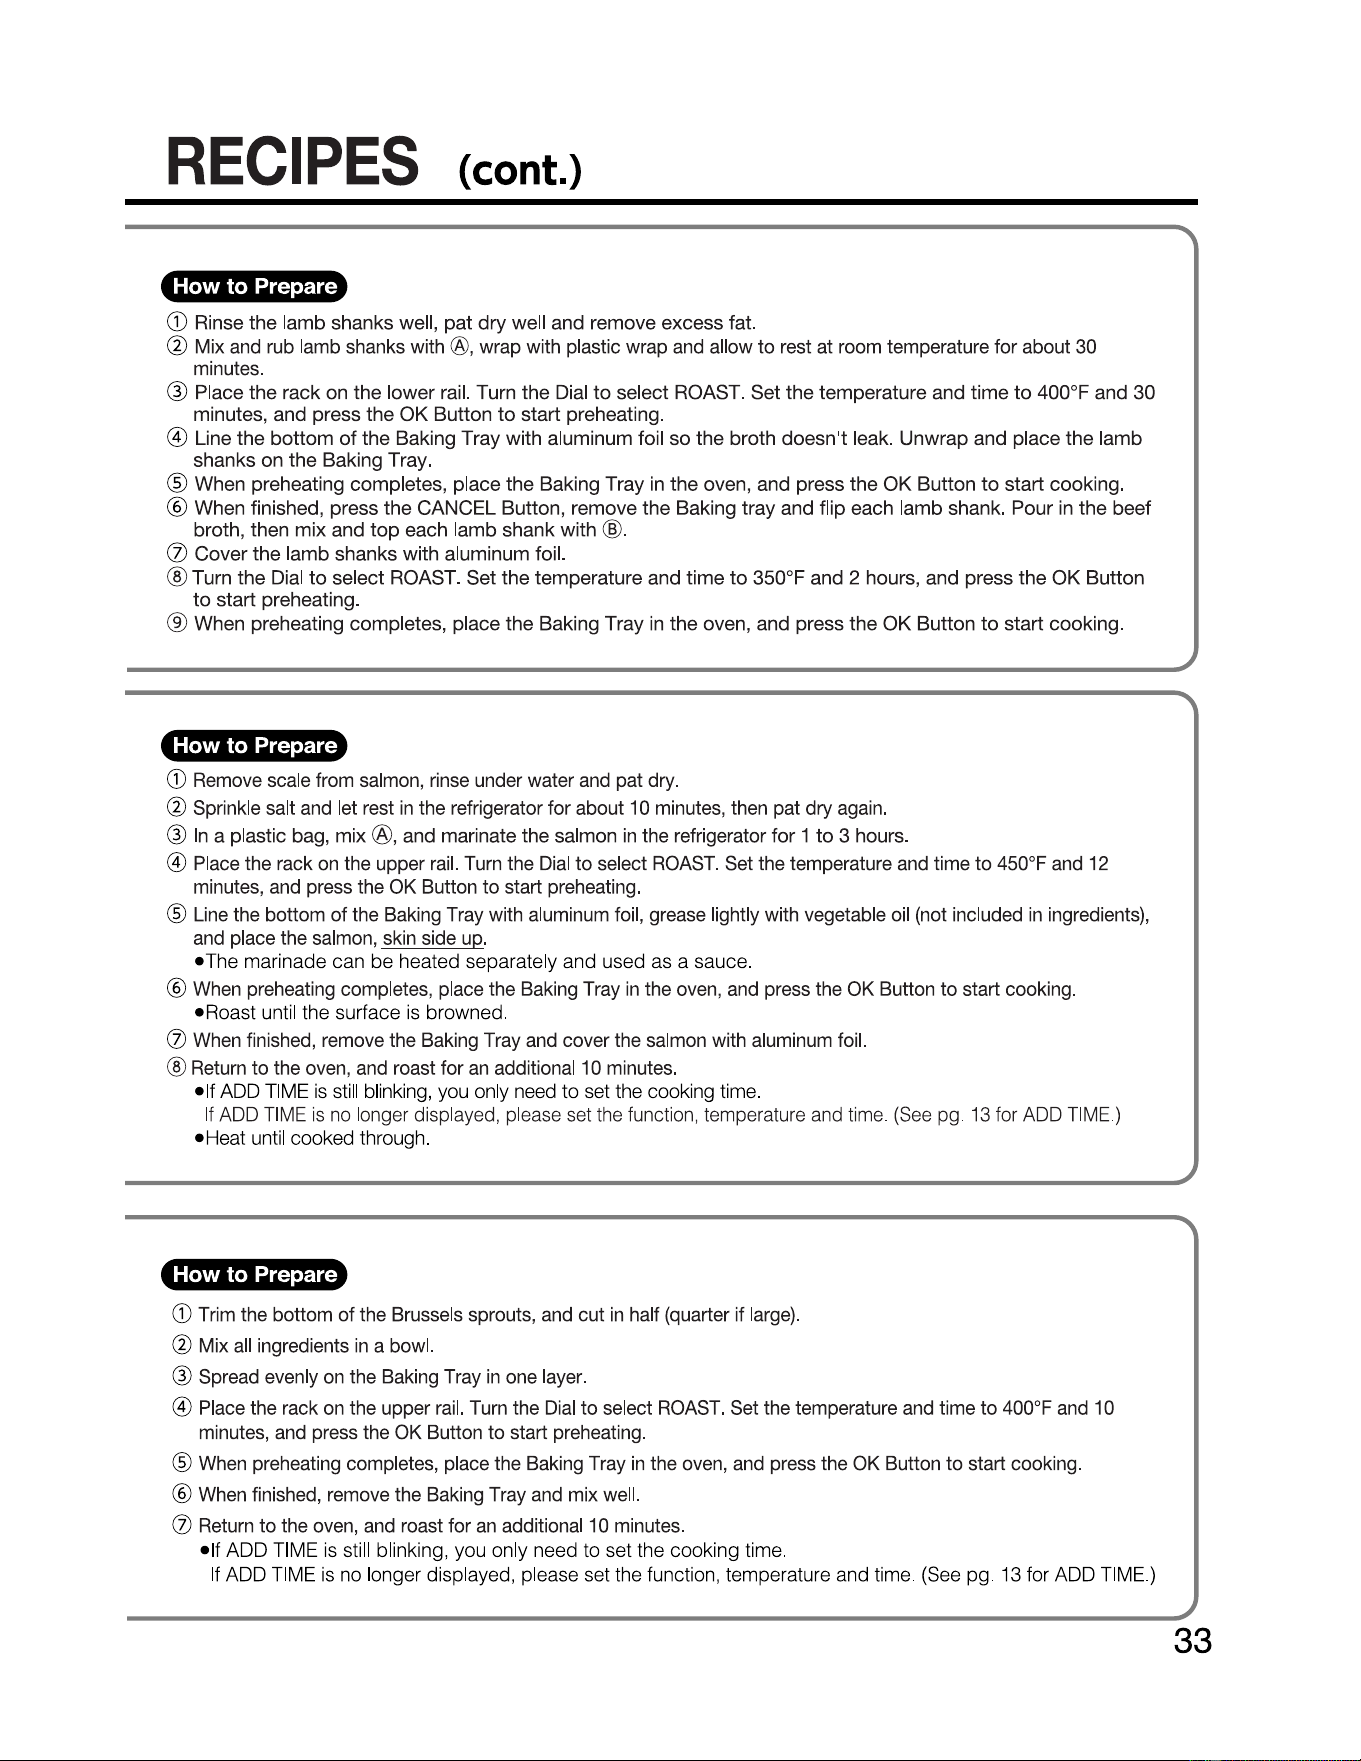
RECIPES
(cont.)
How to Prepare
G)
Rinse
the
lamb
shanks well,
pat
dry
well and remove excess fat.
@ Mix and rub lamb shanks with ®, wrap with plastic wrap and allow
to
rest at room temperature for about 30
minutes.
® Place
the
rack
on
the
lower
rail. Turn
the
Dial
to
select ROAST. Set the temperature and
time
to
400°F and 30
minutes, and press
the
OK
Button
to
start preheating.
@)
Line
the
bottom
of
the
Baking Tray with aluminum foil
so
the
broth
doesn't
leak.
Unwrap
and place
the
lamb
shanks on the Baking Tray.
® When preheating completes, place
the
Baking Tray in the oven, and press the
OK
Button
to
start cooking.
@ When finished, press the CANCEL Button, remove the Baking tray and flip each
lamb
shank. Pour in
the
beef
broth, then mix and
top
each
lamb
shank with ®·
(J)
Cover
the
lamb
shanks with aluminum foil.
@Turn
the
Dial
to
select ROAST. Set the temperature and
time
to
350°F and 2 hours, and press
the
OK
Button
to
start preheating.
® When preheating
completes
, place
the
Baking Tray in
the
oven, and press the
OK
Button
to
start cooking.
How to Prepare
CD
Remove scale from salmon, rinse under water and pat dry.
@ Sprinkle salt and let rest
in
the refrigerator for about 10 minutes, then pat dry again.
®
In
a plastic bag, mix ®, and marinate the salmon
in
the refrigerator for 1
to
3 hours.
@)
Place the rack on the upper rail. Turn the Dial
to
select ROAST. Set the temperature and time
to
450°F and 12
minutes, and press the OK Button
to
start preheating.
® Line the bottom
of
the Baking Tray with aluminum foil, grease lightly with vegetable oil (not included
in
ingredients),
and place the salmon, skin side up.
•The
marinade can be heated separately and used as a sauce.
@ When preheating completes, place the Baking Tray
in
the oven, and press the OK Button
to
start cooking.
•Roast
until the surface is browned.
(J)
When finished, remove the Baking Tray and cover the salmon with aluminum foil.
@ Return
to
the oven, and roast for an additional 10 minutes.
•If
ADD TIME
is
still blinking, you only need
to
set the cooking time.
If
ADD TIME
is
no longer displayed, please set the function , temperature and time. (See pg.
13
for ADD TIME.)
•Heat
until cooked through.
How to Prepare
CD
Trim the bottom
of
the Brussels sprouts, and cut
in
half (quarter if large).
@ Mix all ingredients
in
a bowl.
® Spread evenly on the Baking Tray
in
one layer.
@)
Place the rack on the upper rail. Turn the Dial
to
select ROAST. Set the temperature and time
to
400°F and 10
minutes, and press the OK Button
to
start preheating.
® When preheating completes, place the Baking Tray
in
the oven, and press the OK Button
to
start cooking.
@ When finished, remove the Baking Tray and mix well.
(J)
Return
to
the oven, and roast for
an
additional 1 O minutes.
•If
ADD
TIME is still blinking, you only need to set the cooking time.
If ADD TIME
is
no longer displayed, please set the function, temperature and time. (See
pg
. 13 for ADD TIME.)
33
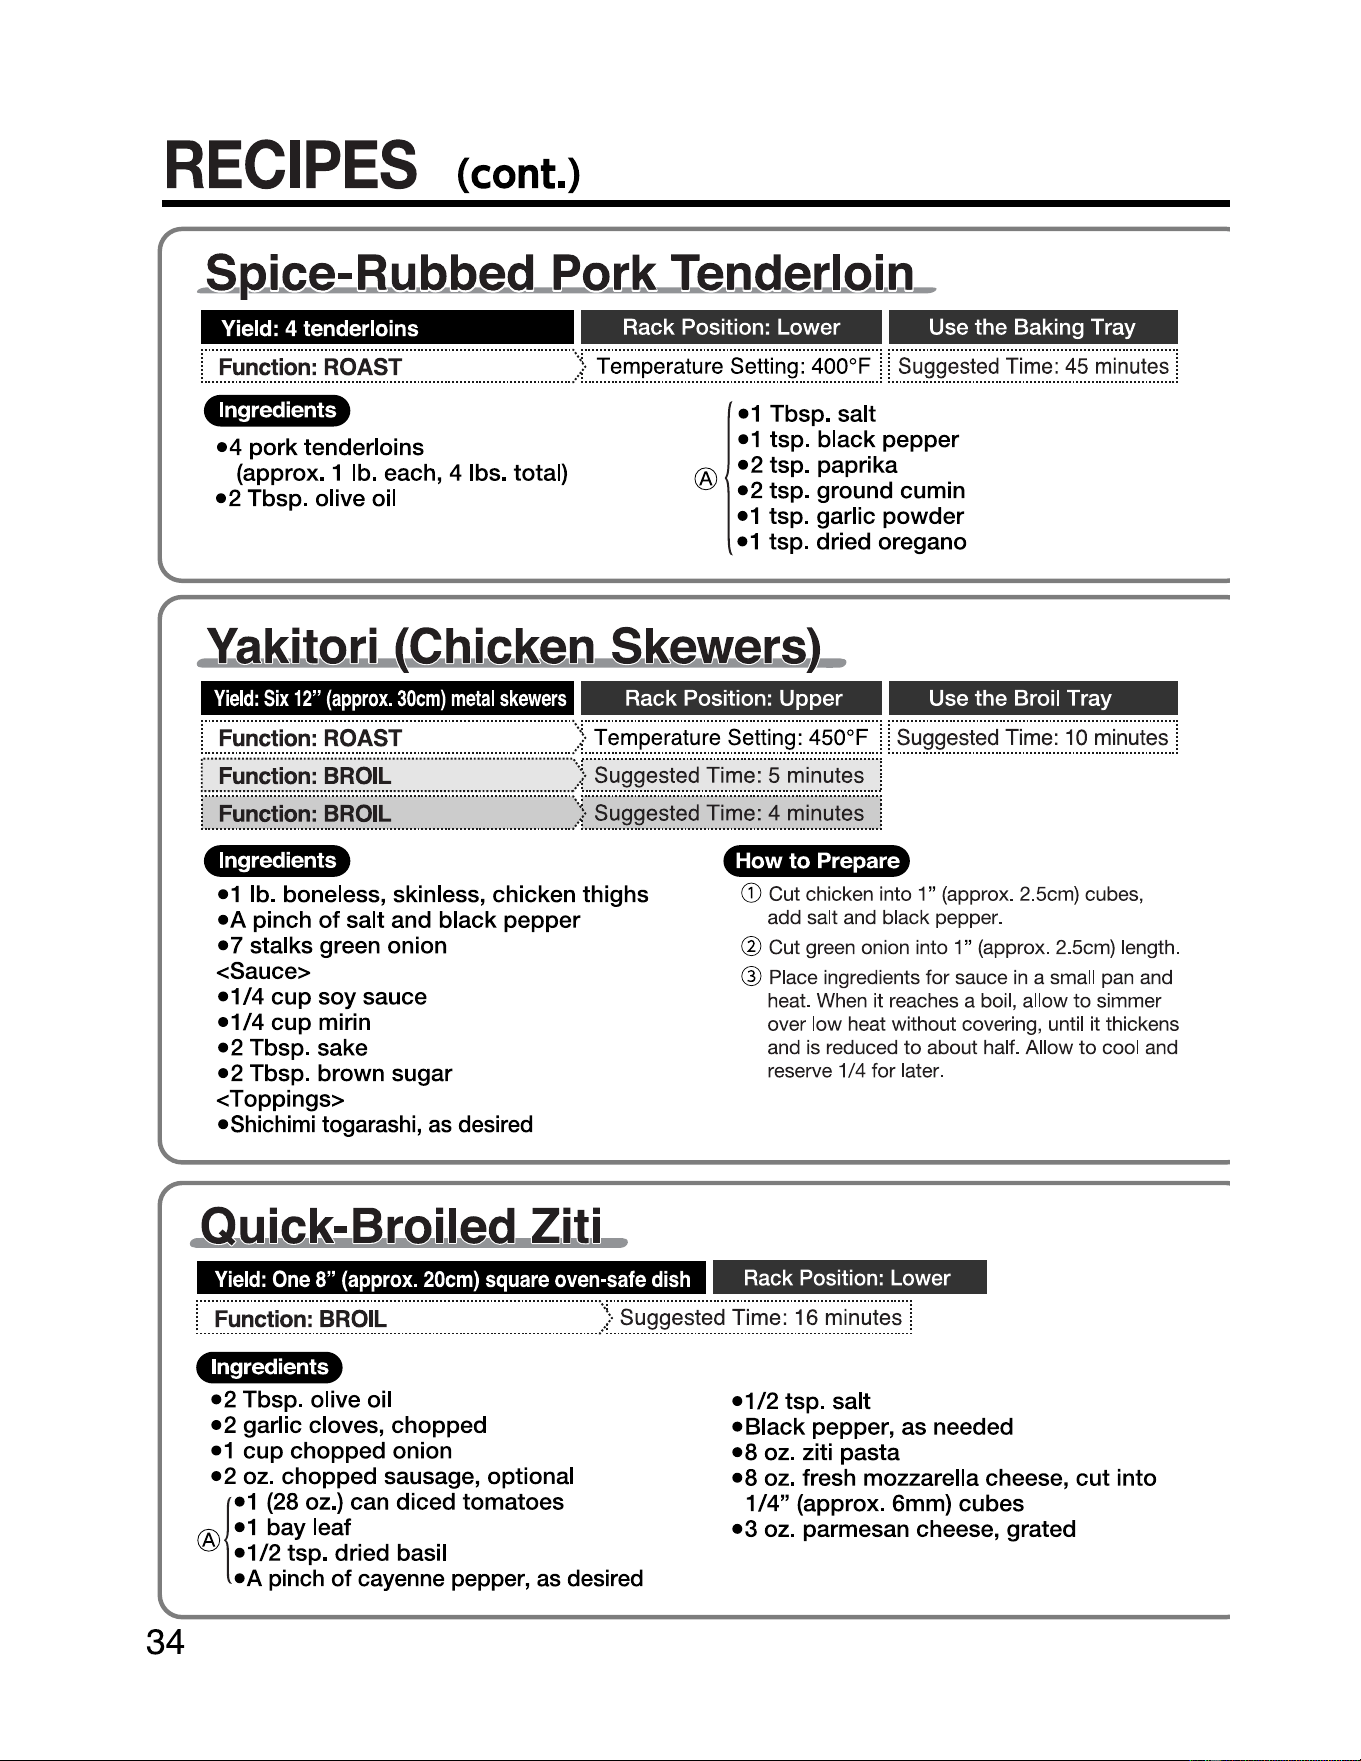
RECIPES
(cont.)
34
Ieade[IOill
Yield: 4 tenderloins
Rack Position: Lower Use the Baking Tray
L.
..
...........................................
)
..
.. ..
Function:
ROAST Temperature.Setting:.400°F
__11
suggested
Time
:.
45
.
minutes
.1
Ingredients
•4
pork
tenderloins
(approx.
1 lb. each, 4 lbs. total)
•2
Tbsp. olive oil
®
•1 Tbsp. salt
•1 tsp.
black
pepper
•2
tsp. paprika
•2
tsp. ground cumin
•1 tsp. garlic
powder
•1 tsp. dried oregano
Y.
a,k,
ito.r,i
_
(C
b.
ic,keo
S
kewer.s)
_
Yield:
Six
12"
(approx.
30cm)
metal
skewers
Rack Position: Upper Use the Broil Tray
L
.. ..
..
..
....
.
...
.
...
.
...
.
....
..
..
..
..
..
....
>.
.Function: ROAST Temperature.Setting
.:.
450°F ..
11.
Suggested.
Time:
.1
O
.minutes
.l
L
....
.
..
...
..
..
..
..
..
..
..
..
..
...
......
.
......
:?·.
.!
L
..
.
..
..
..
..
....
.
...
.
...
.
...
.
....
..
..
..
..
..
....
.. ) .
.. ..
.
...!
.Function:
BROIL.
Suggested. Time:.
5.
minutes
..
.Function:
BROIL
Suggested Time: 4 .minutes
Ingredients
•1 lb. boneless, skinless, chicken
thighs
•A
pinch
of
salt and
black
pepper
•7
stalks green onion
<Sauce>
•1/4
cup
soy
sauce
•1/4
cup
mirin
•2
Tbsp. sake
•2
Tbsp.
brown
sugar
<Toppings>
•Shichimi togarashi, as desired
How to Prepare
CD
Cut chicken into 1" (approx. 2.5cm) cubes,
add salt and black pepper.
@ Cut green onion into 1" (approx. 2.5cm) length.
@ Place ingredients for sauce
in
a small pan and
heat. When it reaches a boil, allow
to
simmer
over low heat without covering, until it thickens
and is reduced
to
about half. Allow
to
cool and
reserve 1/4 for later.
Q,u.
ic,k
;,
Br.oi
.
led
.Z.
it
i .
Yield:
One
8"
(approx.
20cm)
square
oven-safe
dish
Rack
Position: Lower
l
..
..
Function:
.BROIL
.
...
.
...
.
...
.
..
..
..
..
..
..
..
.
...
.
...
.
...
.
..
..
..
..
..
..
.
)·
.
..
suggested
.Time:
1.
6.
minutes
.l
Ingredients
1
•2
Tbsp. olive oil
•2
garlic cloves,
chopped
•1
cup
chopped
onion
•2
oz.
chopped
sausage, optional
®
•1 (28 oz.) can
diced
tomatoes
•1 bay leaf
•1/2
tsp. dried basil
•A
pinch
of
cayenne pepper, as desired
•1/2
tsp. salt
•Black
pepper, as needed
•8
oz. ziti pasta
•8
oz. fresh mozzarella cheese,
cut
into
1/4" (approx. 6mm)
cubes
•3
oz. parmesan cheese, grated
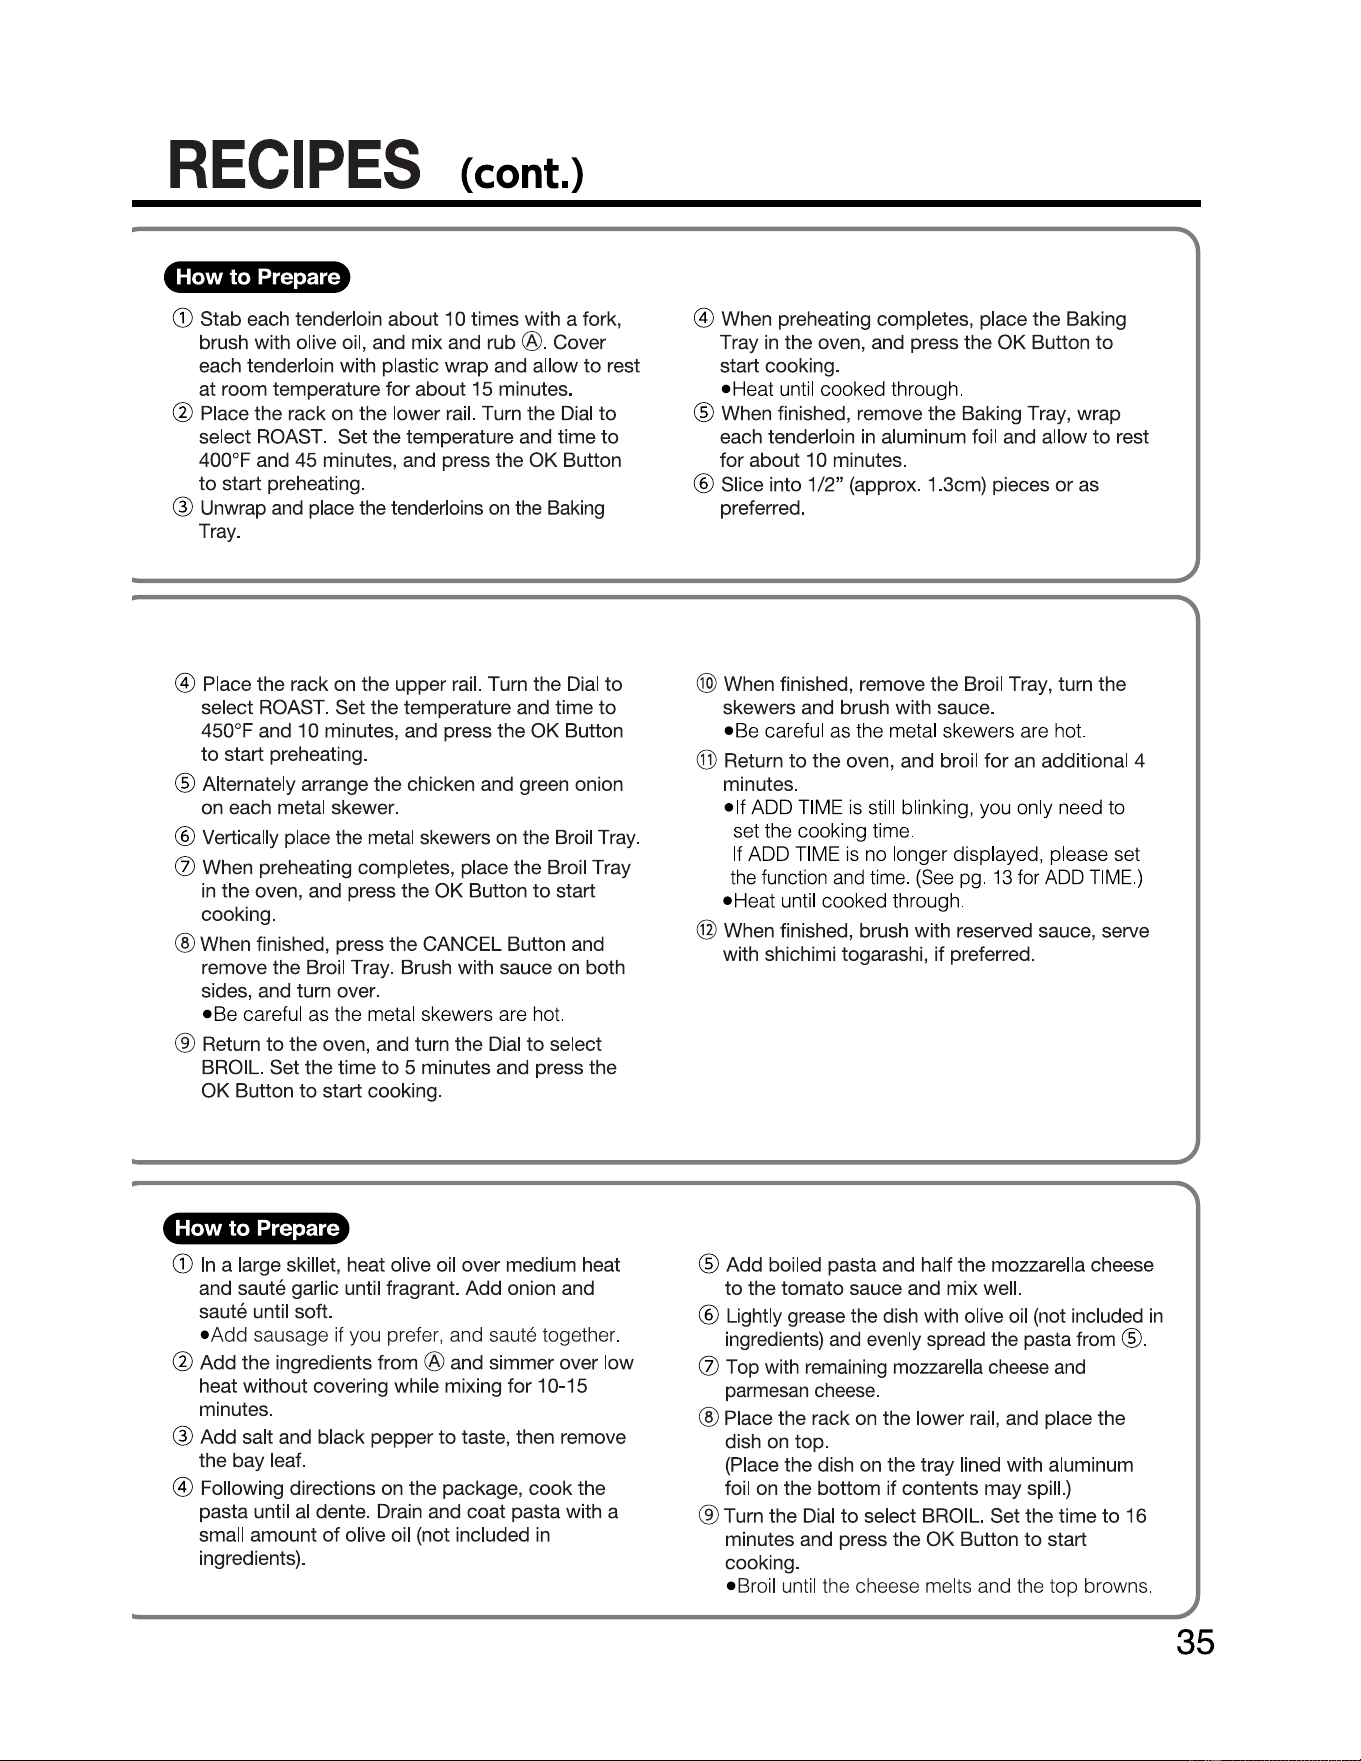
RECIPES
(cont.)
How to Prepare
CD
Stab each tenderloin about 1 O times with a fork,
brush with olive oil, and mix and rub
®· Cover
each tenderloin with plastic wrap and allow
to
rest
at room temperature
for
about 15 minutes.
@ Place the rack on the lower rail. Turn the Dial
to
select ROAST. Set the temperature and time
to
400°F and 45 minutes, and press the OK Button
to
start preheating.
® Unwrap and place the tenderloins on the Baking
Tray.
© When preheating completes, place the Baking
Tray
in
the oven, and press the OK Button
to
start cooking.
•Heat
until cooked through.
® When finished, remove the Baking Tray, wrap
each tenderloin
in
aluminum foil and allow
to
rest
for about 1 O minutes.
@ Slice into 1/2" (approx. 1.3cm) pieces
or
as
preferred.
© Place the rack on the upper rail. Turn the Dial
to
select ROAST. Set the temperature and time
to
450°F and 1 O minutes, and press the OK Button
to
start preheating.
® Alternately arrange the chicken and green onion
on each metal skewer.
@ Vertically place the metal skewers on the Broil Tray.
0 When preheating completes, place the Broil Tray
in
the oven, and press the OK Button
to
start
cooking.
® When finished, press the CANCEL Button and
remove the Broil Tray. Brush with sauce on both
sides, and turn over.
•Be
careful as the metal skewers are hot.
® Return
to
the oven, and turn the Dial
to
select
BROIL. Set the time
to
5 minutes and press the
OK Button
to
start cooking.
@)
When finished, remove the Broil Tray, turn the
skewers and brush with sauce.
•Be
careful as the metal skewers are hot.
@ Return
to
the oven, and broil for an additional 4
minutes.
•If
ADD TIME
is
still blinking, you only need to
set the cooking time.
If ADD TIME
is
no longer displayed, please set
the function and time.
(See
pg.
13
for
ADD
TIME.)
•Heat
until cooked through.
@ When finished, brush with reserved sauce, serve
with shichimi togarashi, if preferred.
How to Prepare
CD
In
a large skillet, heat olive oil over medium heat
and saute garlic until fragrant. Add onion and
saute until soft.
• Add sausage
if
you prefer, and saute together.
@ Add the ingredients from ® and simmer over low
heat without covering while mixing for 10-15
minutes.
® Add salt and black pepper
to
taste, then remove
the bay leaf.
© Following directions on the package,
cook
the
pasta until
al
dente. Drain and coat pasta with a
small amount
of
olive oil (not included
in
ingredients).
® Add boiled pasta and half the mozzarella cheese
to
the tomato sauce and mix well.
@ Lightly grease the dish with olive oil (not included
in
ingredients) and evenly spread the pasta from ® ·
0 Top with remaining mozzarella cheese and
parmesan cheese.
® Place the rack on the lower rail, and place the
dish on top.
(Place the dish on the tray lined with aluminum
foil on the bottom if contents may spill.)
® Turn the Dial
to
select BROIL. Set the time
to
16
minutes and press the OK Button
to
start
cooking.
• Broil until the cheese melts and the top browns.
35
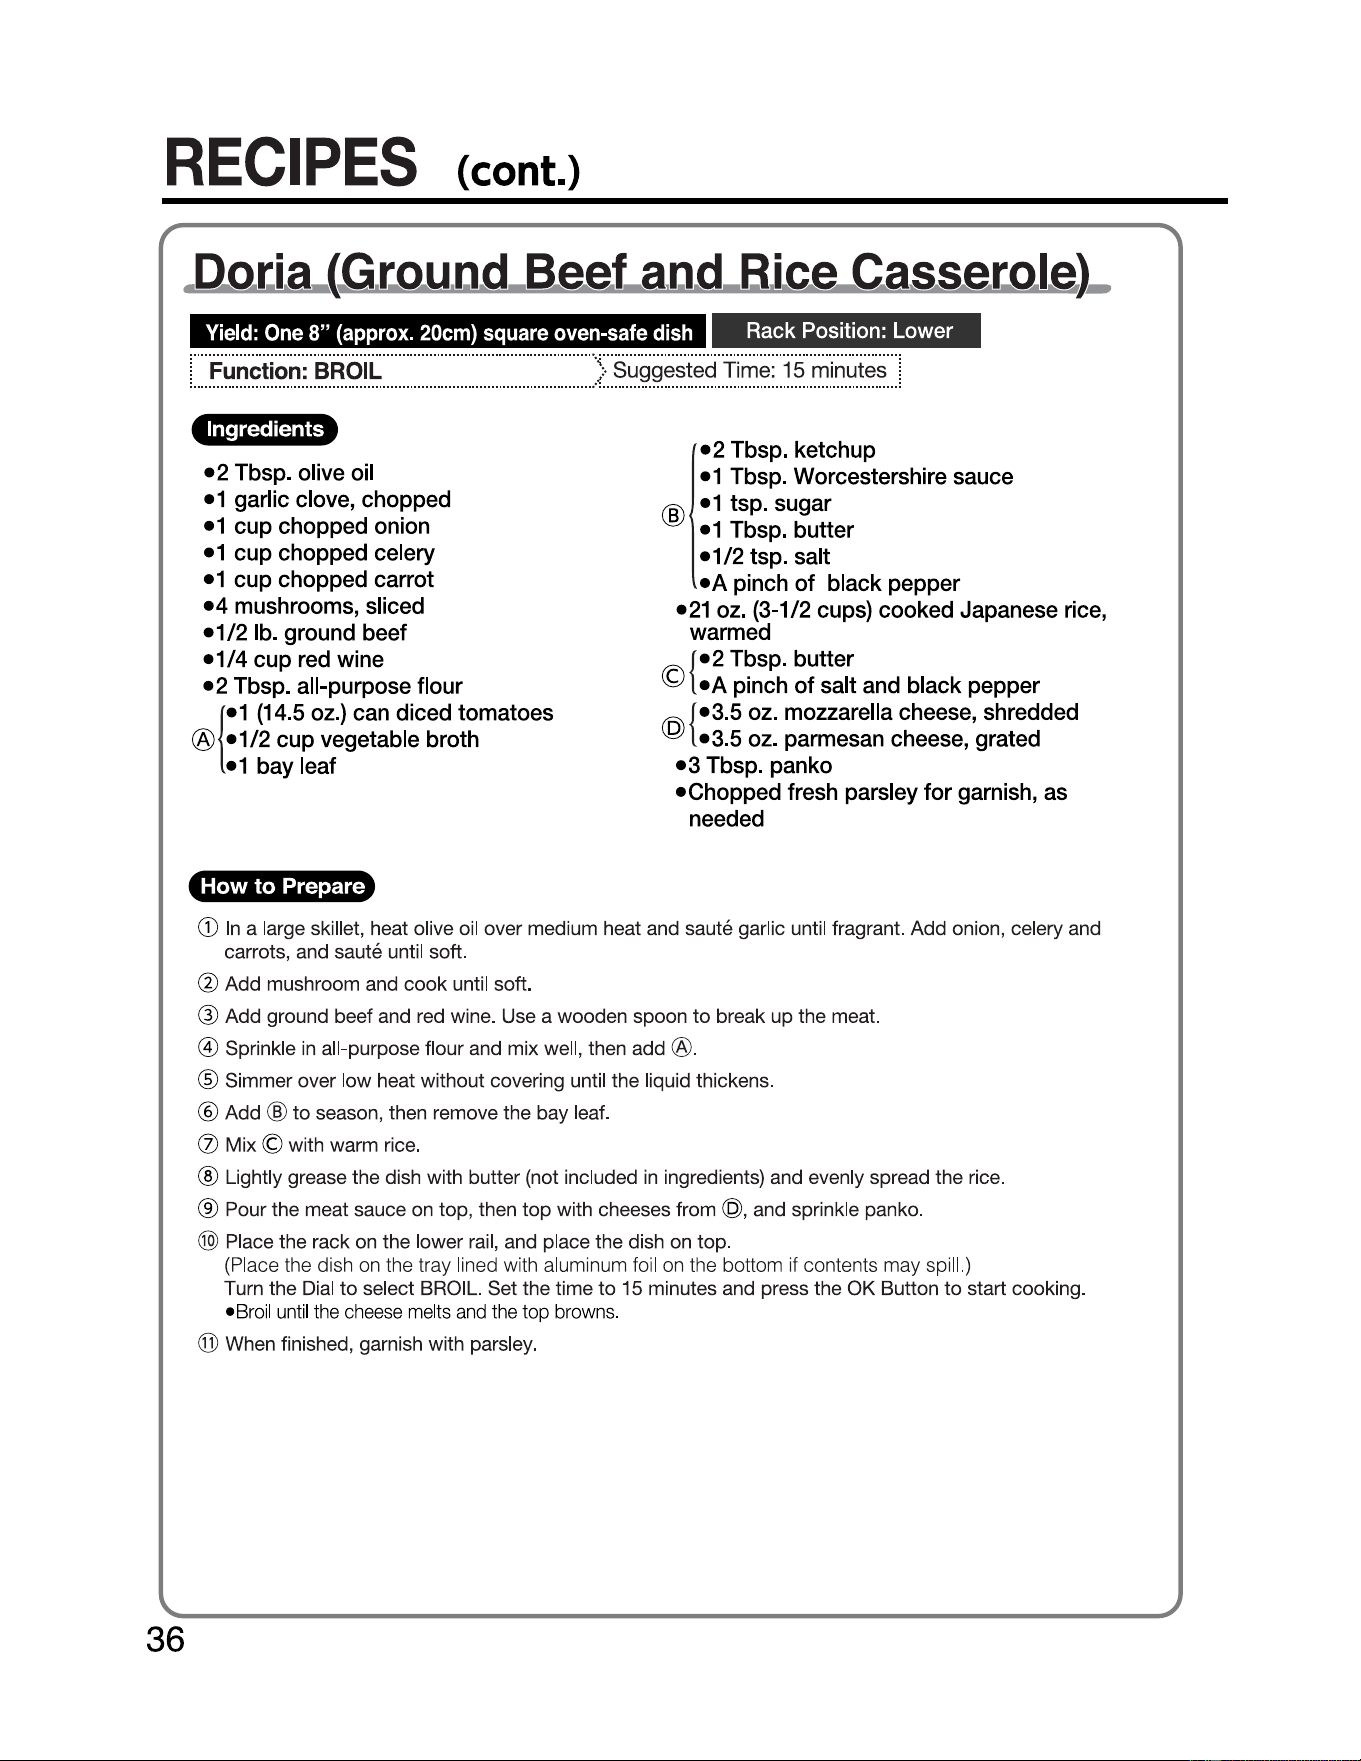
36
RECIPES
(cont.)
.
Doci
.a.
,G
.
r.ou
.
ad
.
Beef
.a,
ad
.B,
ice
Casser.ole)
,.
Yield:
One
8"
(approx.
20cm)
square
oven-safe
dish
Rack Position: Lower
\
....
Function:. BROIL
......................................................
)_
Suggested_
Time:
15
_ minutes
.. ..
l
Ingredients
•2
Tbsp. olive oil
•1 garlic clove, chopped
• 1 cup chopped onion
•1 cup chopped celery
•1 cup chopped carrot
•4
mushrooms, sliced
•1/2
lb. ground beef
•1/4
cup red wine
•2
Tbsp. all-purpose flour
®
1
•1
(14.5 oz.) can diced tomatoes
•1/2
cup vegetable broth
•1 bay leaf
@
•2
Tbsp. ketchup
•1 Tbsp. Worcestershire sauce
•1 tsp. sugar
• 1 Tbsp. butter
• 1
/2
tsp. salt
•A
pinch
of
black pepper
•21 oz. (3-1/2 cups) cooked Japanese rice,
warmed
©
•2
Tbsp. butter
{
• A pinch
of
salt and black pepper
@{
D
•3.5
oz. mozzarella cheese, shredded
•3.5
oz. parmesan cheese, grated
•3
Tbsp. panko
•Chopped
fresh parsley for garnish, as
needed
How to Prepare
G)
In
a large skillet, heat olive oil over medium heat and saute garlic until fragrant. Add onion, celery and
carrots, and saute until soft.
@ Add mushroom and
cook
until soft.
@ Add ground beef and red wine. Use a wooden spoon
to
break up the meat.
© Sprinkle
in
all-purpose flour and mix well, then add ®·
® Simmer over low heat without covering until the liquid thickens.
@ Add @
to
season, then remove the bay leaf.
(J)
Mix © with warm rice.
® Lightly grease the dish with butter (not included in ingredients) and evenly spread the rice.
® Pour the meat sauce on top, then
top
with cheeses from @, and sprinkle panko.
@)
Place the rack on the lower rail, and place the dish on
top
.
(Place the dish on the tray lined with aluminum foil on the bottom if contents may spill.)
Turn the Dial
to
select BROIL. Set the time
to
15 minutes and press the
OK
Button
to
start cooking.
•Broil
until
the
cheese
melts
and
the top browns.
@ When finished, garnish with parsley.
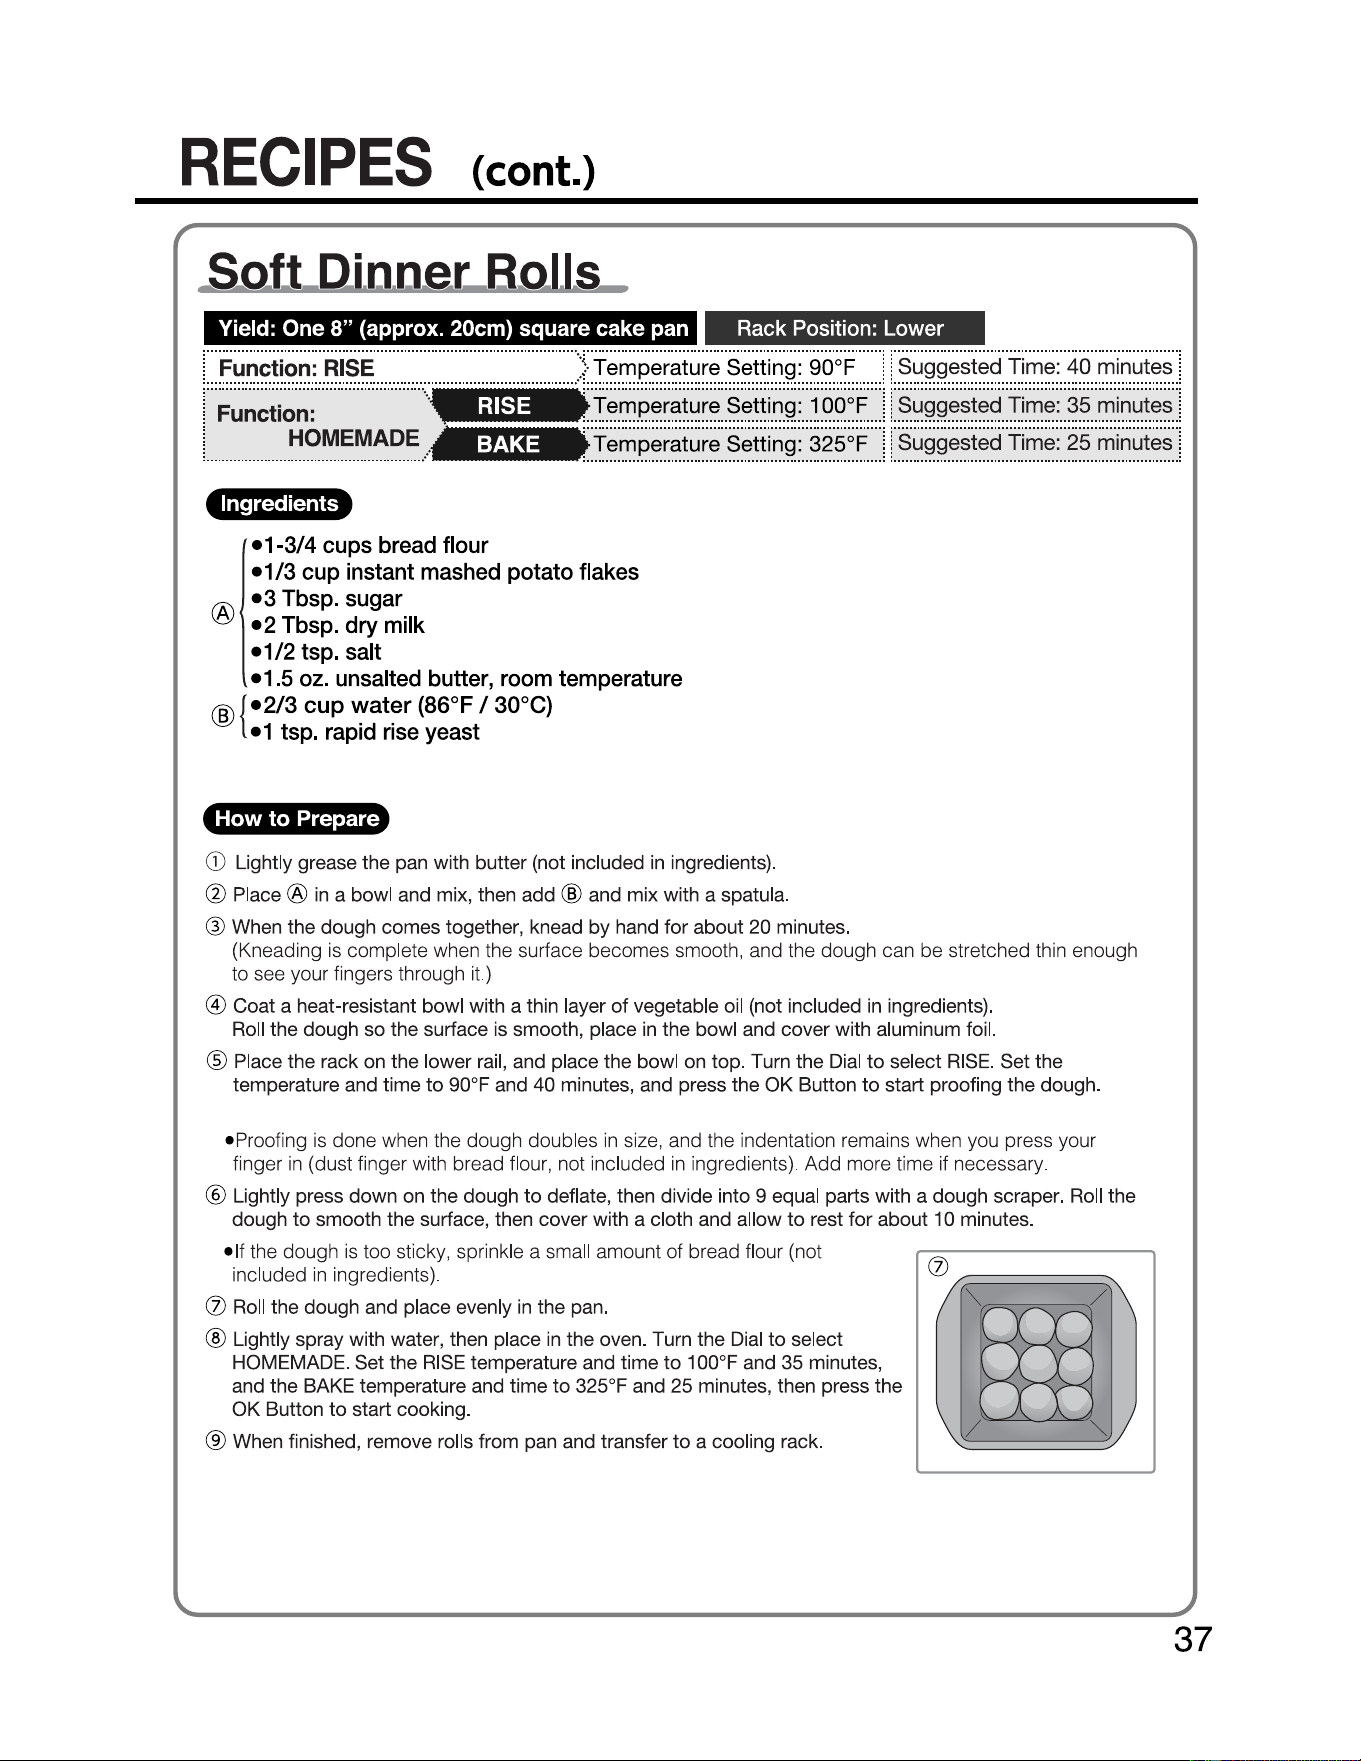
RECIPES
(cont.)
Sof_t_
Di
.n.ner_
Bo,1,1s
Yield: One 8" (approx. 20cm) square cake pan
Rack
Position: Lower
L_
..
..
..
..
..
..
........
.
...
..
.
..
..
..
..
..
..
........
. )
..
...
.11_
.1
!
·•.
1_
J
!.
.
..
...
..
...
..
...
..
...
_..
..
.!
1_
.. .1
Function:
.
RISE
Temperature. Setting: .90°F Suggested. Time: .
40
.minutes
Function:
~.?.~~~~~~
Temperature. Setting:. 100°F
___:
Suggested. Time: .35 .minutes
Temperature. Setting: .325°F Suggested.
Time
: .
2s
minutes
Ingredients
®
•1-3/4
cups bread flour
• 1
/3
cup instant mashed potato flakes
•3
Tbsp. sugar
•2
Tbsp. dry milk
•1/2
tsp. salt
•1
.5
oz. unsalted butter, room temperature
@{•213
cup
water
(86°F / 30°C)
• 1 tsp. rapid rise yeast
How
to
Prepare
G)
Lightly grease the pan with butter (not included
in
ingredients).
@ Place ® in a bowl and mix, then add @ and mix with a spatula.
® When the dough comes together, knead by hand for about 20 minutes.
(Kneading
is
complete when the surface becomes smooth, and the dough can be stretched thin enough
to see your fingers through it.)
® Coat a heat-resistant bowl with a thin layer
of
vegetable oil (not included
in
ingredients).
Roll the dough so the surface is smooth, place
in
the bowl and cover with aluminum foil.
@ Place the rack on the lower rail, and place the bowl on top. Turn the Dial
to
select
RISE.
Set the
temperature and time
to
90°F and 40 minutes, and press the OK Button
to
start proofing the dough.
• Proofing is done when the dough doubles
in
size, and the indentation remains when you press your
finger
in
(dust finger with bread flour, not included
in
ingredients). Add more time if necessary.
@ Lightly press
down
on the dough
to
deflate, then divide into 9 equal parts with a dough scraper. Roll the
dough
to
smooth the surface, then cover with a cloth and allow
to
rest for about 10 minutes.
• If the dough
is
too sticky, sprinkle a small amount of bread flour (not
included
in
ingredients).
(J)
Roll the dough and place evenly
in
the pan.
@ Lightly spray with water, then place in the oven. Turn the Dial
to
select
HOMEMADE. Set the
RISE
temperature and time
to
100°F and 35 minutes,
and the BAKE temperature and time
to
325°F and 25 minutes, then press the
OK Button
to
start cooking.
® When finished, remove rolls from pan and transfer
to
a cooling rack.
37
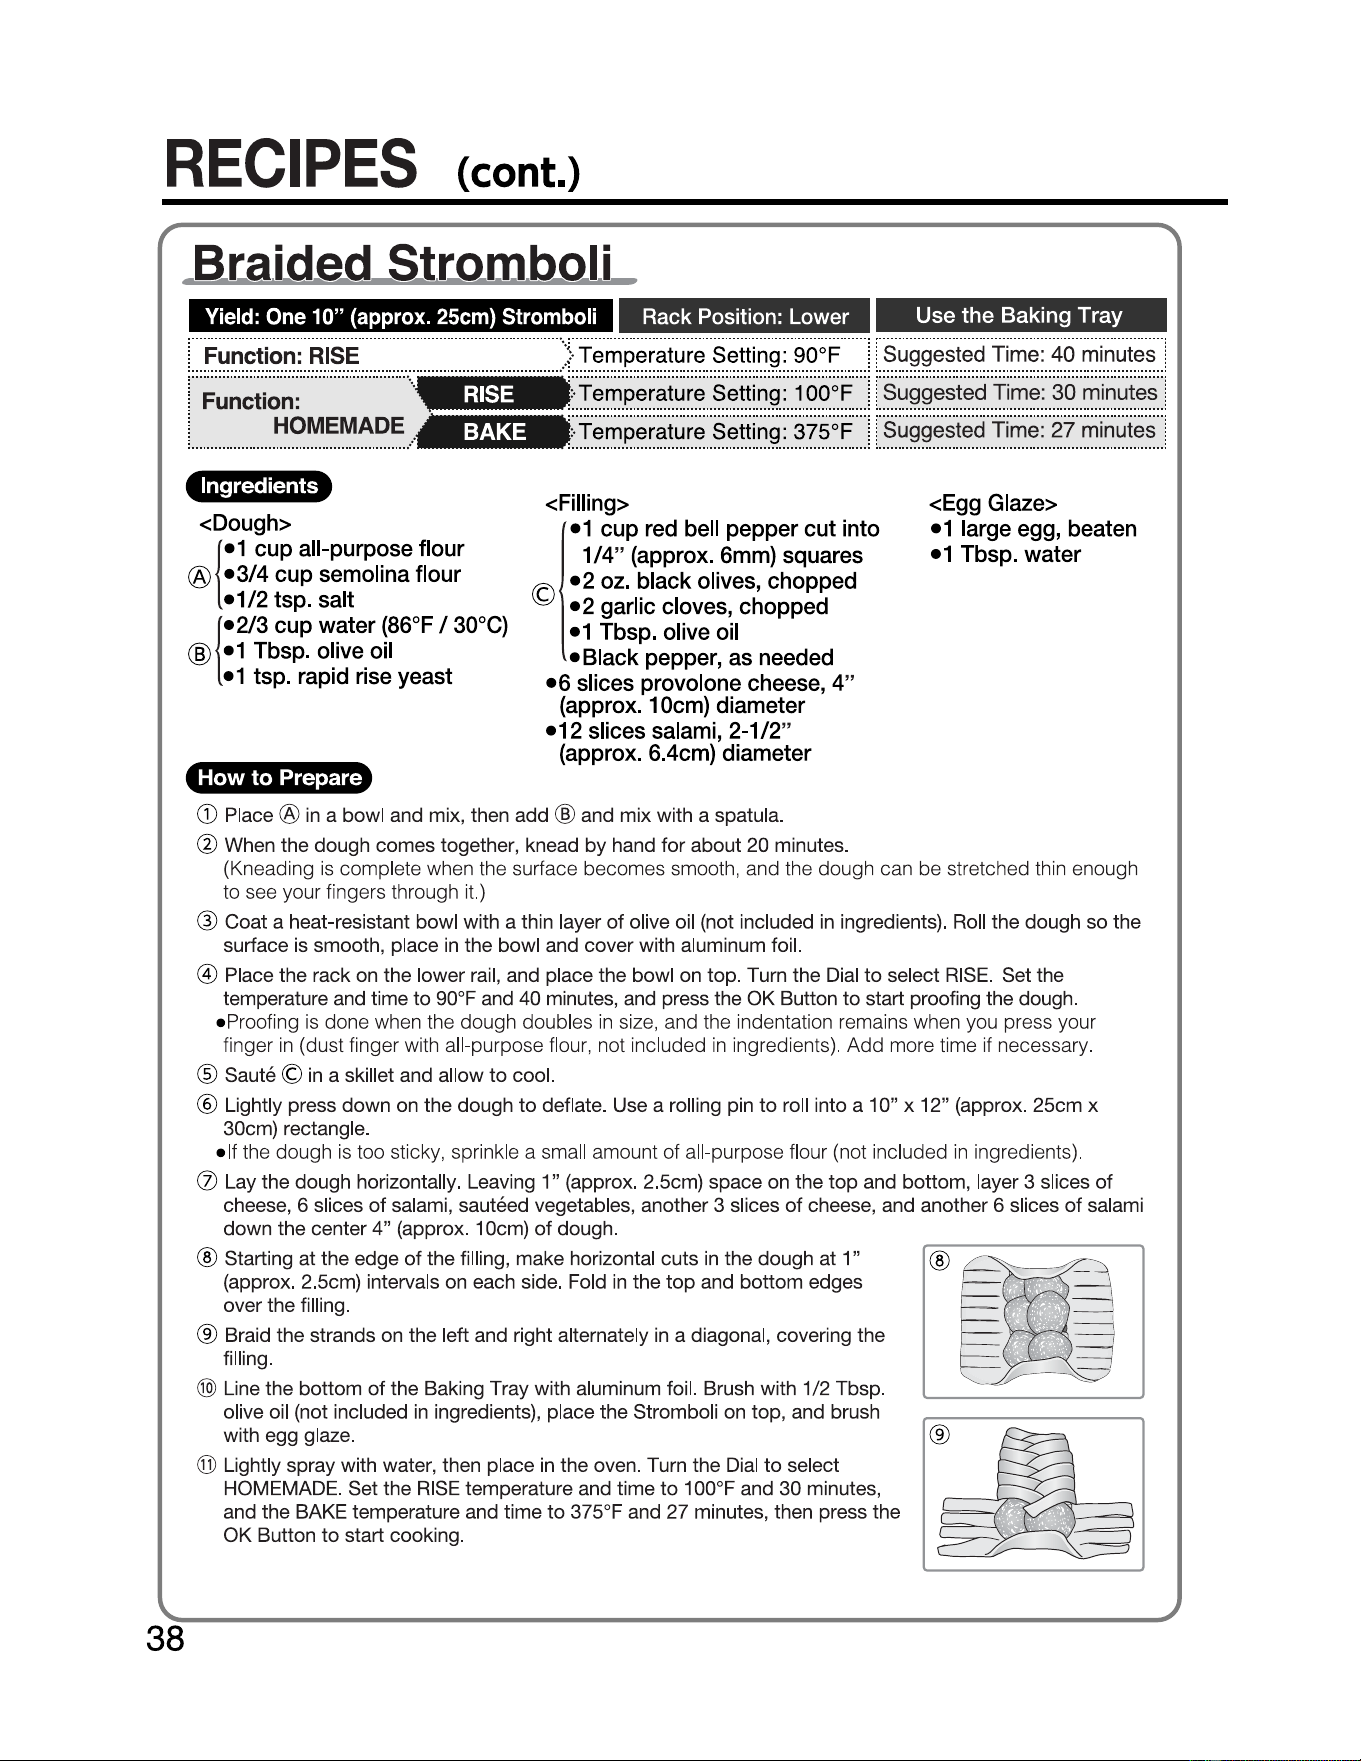
RECIPES
(cont.)
.Bra,ided
St,[Om
,
bol
,i_
Yield: One 10" (approx. 25cm) Stromboli Rack Position: Lower
Use
the
Baking Tray
L
...................................................
) .
..
:
..
...
...l
l_
j
··.
_
__
..J
l_
j
!...
...................
...
__
..J
l.
Function:
.
RISE
Temperatu
re
Setting 90°F Suggested. Time:. 40. minutesj
Function
:
~.
?.~~~~~~
.
Temperature. Setting: 1. 00°F
Suggested_
Time: .30 .minutes
_Temperatu
re
._Setting : 375°F Suggested. Time:_
27_
minutesj
Ingredients
<Dough>
!
®
•1
cup
all-purpose flour
•314
cup
semolina flour
•1/2
tsp. salt
@
!
•2/3
cup
water
(86°F / 30°C)
•1
Tbsp. olive oil
• 1 tsp. rapid rise yeast
<Filling>
©
• 1
cup
red bell
pepper
cut
into
1/4
" (approx. 6mm) squares
•2
oz. black olives,
chopped
• 2 garlic cloves,
chopped
• 1 Tbsp. olive oil
•Black
pepper, as needed
•6
slices provolone cheese, 4"
(approx. 10cm) diameter
•12
slices salami, 2-1/2"
(approx. 6.4cm) diameter
<Egg Glaze>
• 1 large egg, beaten
• 1 Tbsp.
water
How
to
Prepare
G)
Place ®
in
a bowl and mix, then add @ and mix with a spatula.
@ When the dough comes together, knead
by
hand for about 20 minutes.
(Kneading
is
complete when the surface becomes smooth, and the dough can be stretched thin enough
to see your fingers through it.)
® Coat a heat-resistant bowl with a thin layer
of
olive oil (not included
in
ingredients). Roll the dough so the
surface is smooth, place in the bowl and cover with aluminum foil.
© Place the rack on the lower rail, and place the bowl on
top
. Turn the Dial
to
select
RISE
. Set the
temperature and time
to
90°F and 40 minutes, and press the OK Button to start proofing the dough.
• Proofing
is
done when the dough doubles
in
size, and the indentation remains when you press your
finger
in
(dust finger with all-purpose flour, not included
in
ingredients). Add more time if necessary.
@ Saute ©
in
a skillet and allow
to
cool.
@ Lightly press down on the dough
to
deflate. Use a rolling pin
to
roll into a 1
O"
x 12" (approx. 25cm x
30cm) rectangle.
• If the dough
is
too sticky, sprinkle a small amount of all-purpose flour (not included
in
ingredients).
(J)
Lay the dough horizontally. Leaving 1" (approx. 2.5cm) space on the
top
and bottom, layer 3 slices
of
cheese, 6 slices
of
salami, sauteed vegetables, another 3 slices
of
cheese, and another 6 slices
of
salami
down the center
4"
(approx. 10cm)
of
dough.
@ Starting
at
the edge
of
the filling, make horizontal cuts
in
the dough
at
1"
(approx. 2.5cm) intervals on each side. Fold
in
the
top
and bottom edges
over the filling.
® Braid the strands on the left and right alternately
in
a diagonal, covering the
filling.
@ Line the bottom
of
the Baking Tray with aluminum foil. Brush with 1/2 Tbsp.
olive oil (not included
in
ingredients), place the Stromboli on top, and brush
with egg glaze.
(j])
Lightly spray with water, then place
in
the oven. Turn the Dial
to
select
HOMEMADE. Set the
RISE
temperature and time
to
100°F and 30 minutes,
and the BAKE temperature and time
to
375°F and 27 minutes, then press the
OK Button
to
start cooking.
38
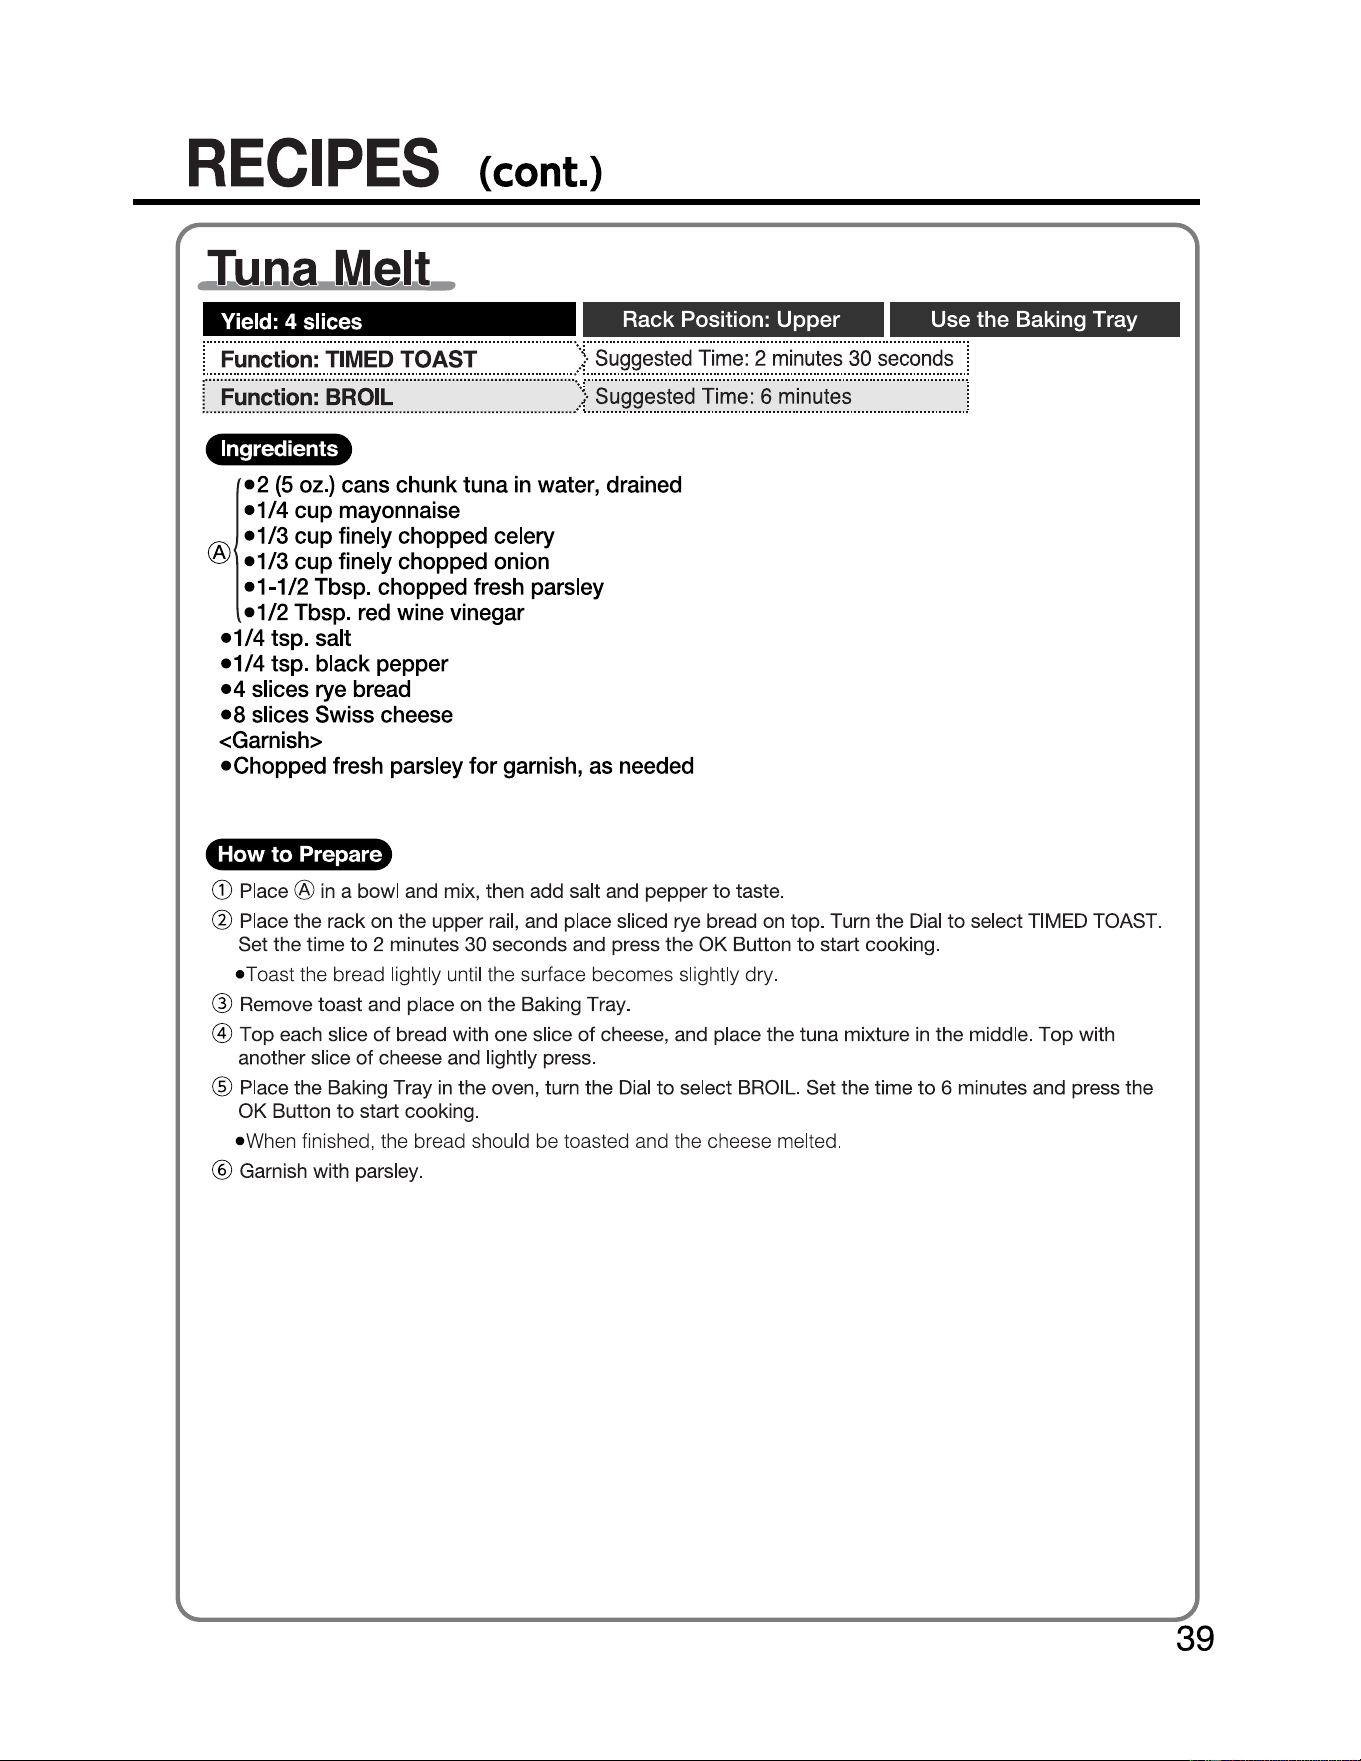
39
RECIPES
(cont.)
.tu.
11
.a.
Me.lt
_
Yield: 4 slices
Rack Position: Upper Use the Baking Tray
:
..
..
..
..
....
.
...
.
...
.
...
.
..
.
).
:
...
. .
..
..
..
..
...
.
...
.
...
.
...
.
...
..
..
..
..
..
..
..
...
. ) .
..
..
...
.
...
.
...
.
...
..
..
..
..
..
Function:
.TIMED.
TOAST
Suggested
.Time
:
.2.
minutes.
30
.
seconds
_..:
Function:.BROIL suggested.Time:.6.minutes l
Ingredients
®
•2
(5
oz.) cans chunk tuna
in
water, drained
•1/4
cup mayonnaise
• 1
/3
cup finely chopped celery
•1/3
cup finely chopped onion
•
1-1
/2
Tbsp. chopped fresh parsley
•1/2
Tbsp. red wine vinegar
•1/4
tsp. salt
•1/4
tsp. black pepper
•4
slices rye bread
•8
slices Swiss cheese
<Garnish>
•Chopped
fresh parsley for garnish, as needed
How to Prepare
G)
Place ®
in
a bowl and mix, then add salt and pepper
to
taste.
@ Place the rack on the upper rail, and place sliced rye bread on top. Turn the Dial
to
select TIMED TOAST.
Set the time
to
2 minutes 30 seconds and press the OK Button
to
start cooking.
• Toast the bread lightly until the surface becomes slightly dry.
@ Remove toast and place on the Baking Tray.
©
Top
each slice
of
bread with one slice
of
cheese, and place the tuna mixture
in
the middle.
Top
with
another slice
of
cheese and lightly press.
® Place the Baking Tray
in
the oven, turn the Dial
to
select BROIL. Set the time
to
6 minutes and press the
OK Button
to
start cooking.
• When finished, the bread should be toasted and the cheese melted.
@ Garnish with parsley.
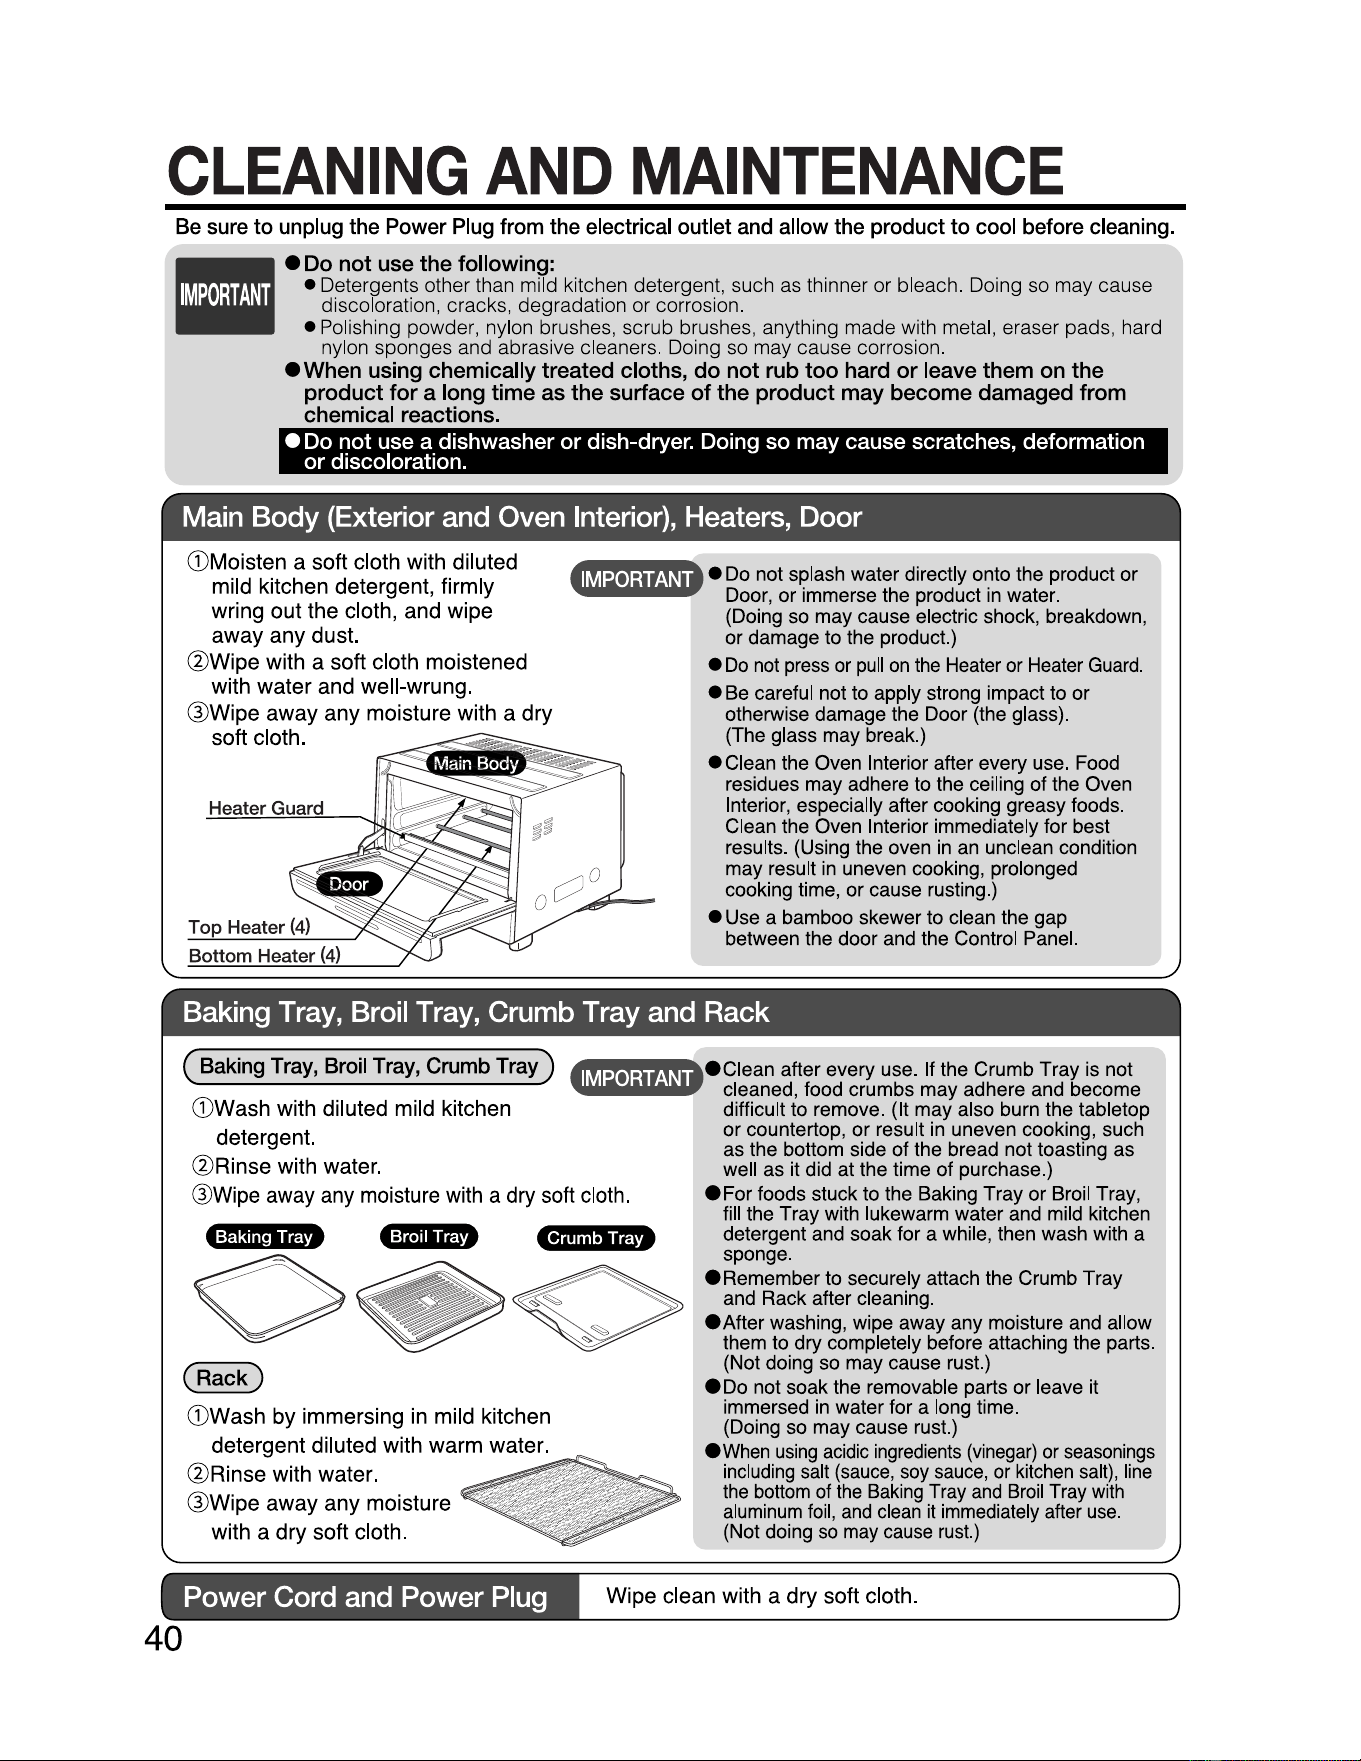
40
CLEANING
AND
MAINTENANCE
Be
sure
to
unplug
the
Power
Plug
from
the
electrical
outlet
and
allow
the
product
to
cool
before
cleaning.
II
•
Do
not
use
the
following:
• Detergents other than mild kitchen detergent, such as thinner or bleach. Doing so may cause
discoloration, cracks, degradation or corrosion.
• Polishing powder, nylon brushes,
scrub
brushes, anything made with metal, eraser pads, hard
nylon sponges and abrasive cleaners. Doing so may cause corrosion.
•
When
using
chemically
treated
cloths,
do
not
rub
too
hard
or
leave
them
on
the
product
for
a
long
time
as
the surface of the product
may
become damaged
from
chemical
reactions.
• Do
not
use a dishwasher
or
dish-dryer. Doing
so
may
cause scratches, deformation
or
discoloration.
Main
Body
(Exterior and Oven Interior), Heaters, Door
CDMoisten a soft cloth with diluted
mild kitchen detergent, firmly
wring out the cloth, and wipe
away any dust.
@Wipe with a soft cloth moistened
with water and well-wrung.
@Wipe away any moisture with a dry
soft cloth.
Heater Guard
Top Heater
Bottom Heater (
4@jQ,j;j,4ba
,,.,,_
........
.-
Do not splash water directly o~to the product or
Door,
or
immerse the product
in
water.
(Doing so may cause electric shock, breakdown,
or
damage to the product.)
•
Do
not press or
pull
on
the Heater or Heater Guard.
• Be careful not to apply strong impact to or
otherwise damage the Door (the glass).
(The glass may break.)
• Clean the Oven Interior after every use. Food
residues may adhere to the ceiling of the Oven
Interior, especially after cooking greasy foods.
Clean the Oven Interior immediately for best
results. (Using the oven in an unclean condition
may result in uneven cooking, prolonged
cooking time,
or
cause rusting.)
• Use a bamboo skewer to clean the gap
between the door and the Control Panel.
Baking Tray, Broil Tray, Crumb Tray and Rack
( Baking Tray, Broil Tray, Crumb
Tray)
(DWash with diluted mild kitchen
detergent.
@Rinse with water.
@Wipe away any moisture with a dry soft cloth.
.J
•=tMi,i•i
■
M•
0
Gi'iniiiM
♦
(Rack)
CDWash
by immersing in mild kitchen
detergent diluted with warm water.
@Rinse with water.
@Wipe away any moisture
with a dry soft cloth.
4!M4tliif-1h•
Clean
after every use. If the Crumb Tray is not
cleaned, food crumbs may adhere and become
difficult to remove. (It may also burn the tabletop
or
countertop,
or
result in uneven cooking, such
as the bottom side
of
the bread not toasting as
well as it did at the time of purchase.)
eFor
foods stuck to the Baking Tray
or
Broil Tray,
fill the Tray with lukewarm water and mild kitchen
detergent and soak for a while, then wash with a
sponge.
eRemember
to securely attach the Crumb Tray
and Rack after cleaning.
eAfter
washing, wipe away any moisture and allow
them to dry completely before attaching the parts.
(Not doing so may cause rust.)
• Do not soak the removable parts
or
leave it
immersed
in
water for a long time.
(Doing so may cause rust.)
ewhen
using
acidic ingredients (vinegar) or seasonings
including salt (sauce, soy sauce, or kitchen salt), line
the bottom of the Baking Tray and Broil Tray with
aluminum
foil,
and clean
it
immediately after use.
(Not doing
so
may cause rust.)
Power Cord and Power Plug
Wipe clean with a dry soft cloth.
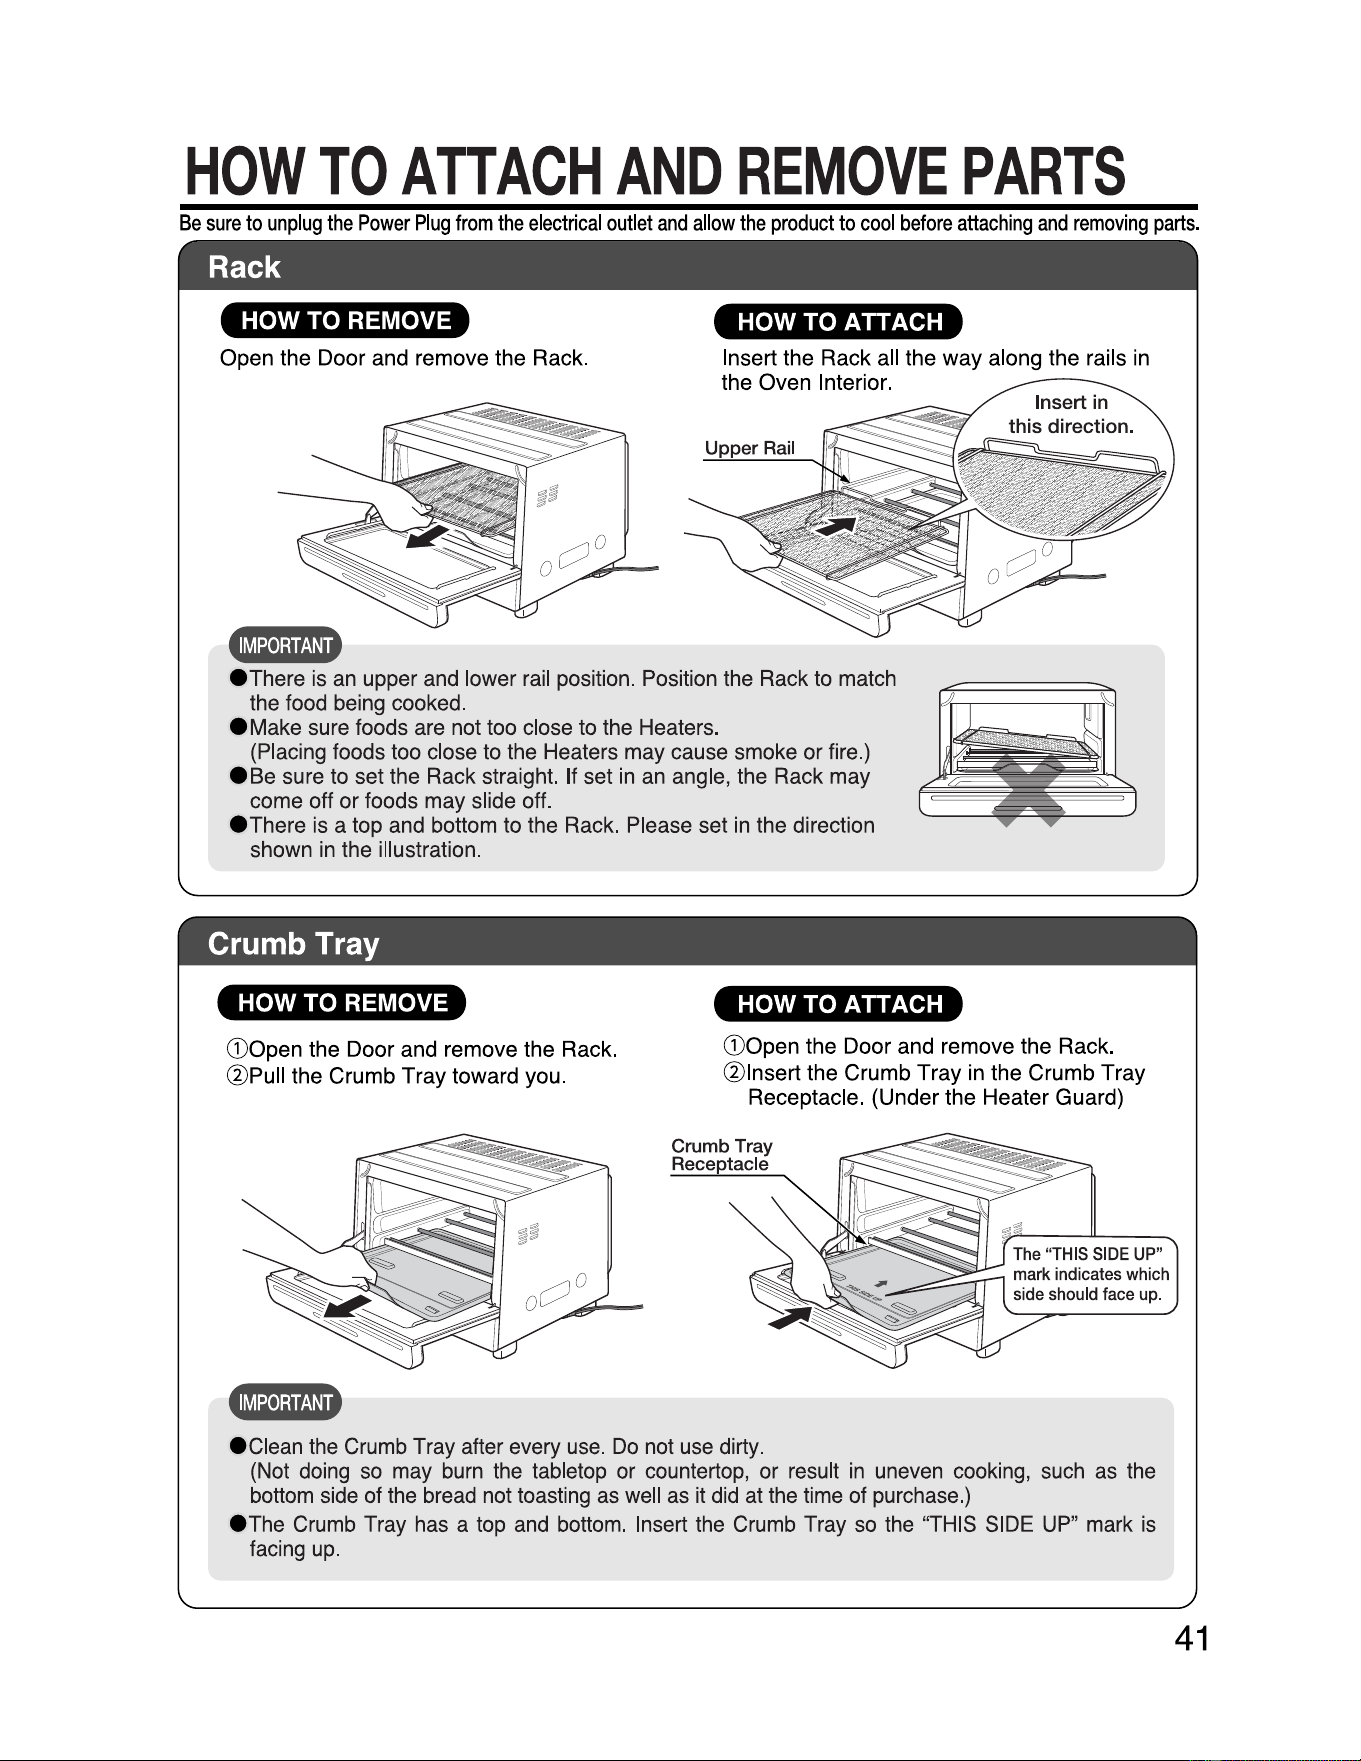
HOW
TO
ATTACH
AND
REMOVE
PARTS
Be
sure
to
unplug
the
Power
Plug
from
the
electrical
outlet
and
allow
the
product
to
cool
before
attaching
and
removing
parts.
Rack
HOW TO REMOVE
Open the Door
and
remove the
Rack.
HOW TO ATTACH
Insert the Rack
all
the way along the rails
in
the Oven Interior.
Upper Rail
Insert
4@i4
❖
iMi•
e
There
is
an
upper
and
lower
rail
position. Position
the
Rack
to
match
the
food
being
cooked.
e
Make
sure
foods
are
not
too
close
to
the
Heaters.
(Placing
foods
too
close
to
the
Heaters
may
cause
smoke
or
fire.)
e se sure
to
set
the
Rack
straight.
If
set
in
an
angle, the
Rack
may
come off or foods
may
slide
off.
e
There
is
a
top
and
bottom
to
the
Rack.
Please set
in
the
direction
shown
in
the
illustration.
Crumb Tray
HOW TO REMOVE
HOW TO ATTACH
G)
Open the Door
and
remove the
Rack.
@
Pull
the Crumb Tray toward you.
G)
Open the Door
and
remove the
Rack.
@Insert the Crumb Tray
in
the Crumb Tray
Receptacle. (Under the Heater Guard)
Crumb Tray
Receptacle
t@i4•
1
;ii@•
e
c1ean
the
Crumb
Tray
after
every
use
.
Do
not
use
dirty.
(Not
doing
so
may
burn
the
tabletop
or
countertop,
or
result
in
uneven
cooking,
such
as
the
bottom
side
of
the
bread
not
toasting
as
well
as
it
did
at
the
time
of
purchase
.)
e
The
Crumb
Tray
has
a
top
and
bottom.
Insert
the
Crumb
Tray
so
the
"THIS
SIDE
UP"
mark
is
facing
up
.
41 41
in
TROUBLESHOOTING
GUIDE
Please
check
the
following
points
before
calling
for
service
.
Problems
Cause
Remedy
The Display does not
turn on.
Food does not cook.
(The
Heaters
do
not
turn
on.)
Is the Power Plug inserted securely into an
electrical outlet?
Insert the Power Plug firmly into
the electrical outlet.
Did you press the
OK
Button?
(~P_r_e_s_s_th_e_O_K_B_u_tt_o_n_
.
42
( )
---~)
This does not indicate a malfunction.
This toaster oven has a thermistor that automatically turns the Heaters
on
and off
while cooking. When using consecutively, the thermistor operates, and the frequency
of the Heaters turning on and off increases,
or
the Heaters may not turn on for a
while, so the cooking time may need to be extended.
CD
Unplug the Power Plug.
@ Remove all objects that block
the vent holes on the bottom
of
the
Ma
in Body.
® Open the Door and cool the
Oven Interior.
@ Insert the Power Plug into the
electrical outlet and cook.
➔
If the problem persists, stop
using the product, unplug the
Power Plug, and contact
Zojirushi Customer Service.
The remaining
time
shown
on
the
Display
changes
quickly
or
does
not
change
for
a
while.
This does not indicate a malfunction. If the Automatic Cooking Function was used, the
cooking time is automatically adjusted during cooking. The cooking time varies,
depending on the power supply voltage, room temperature, temperature inside the
oven,
or
the shade selected (degree of brownness).
The
bottom
side
of
bread
does
not
toast
well.
The
TOAST
function is designed so that the bottom side of the bread is toasted
slightly lighter than the top side. Thick-sliced bread will be closer to the Heater, and
the top side
may
toast slightly darker.
If the Crumb Tray is not cleaned, the
bottom side
of
the bread may not toast
as
well
as
it did at the time of purchase.
Clean the Crumb Tray. (See pg. 40)
Clean the Crumb Tray after every use.
If not cleaned, food crumbs may stick
and become difficult to remove.
Bread
or
bagels
toasts
unevenly.
Place the bread or bagels properly by following the instructions on the placement of bread
or bagels. (See pg. 10)
The toasted color will vary depending on the size, bread
or
bagel type, thickness,
number
of
slices, and other factors.
A ticking
or
roaring
sound
is
heard during
cooking.
This does not indicate a malfunction. It is the heater switching sound
or
cooling fan
operation sound.
The
Display is cloudy.
Depending on your environment and usage, the Display may become cloudy, but the
toaster oven may continue to be used. (Steam may cause the Display to become cloudy,
so please use steam-emitting products away from the toaster oven.) Leaving the toaster
oven for 1-2 hours should improve the cloudiness, but if time does not alleviate
it,
contact
the store where you purchased the product or Zojirushi Customer Service.
The Display turns off.
This does not indicate a malfunction.The Display
will
turn off
if the product is not operated for
10
minutes during setup or
after preheating completes. After cooking
(and
while ADD
TIME
is
blinking), the Display
will
turn off after 5 minutes.
Please reset the toaster
oven.
Steam comes out from
the top of the Door.
This does not indicate a malfunction.
Steam may emit if foods high in moisture such as sliced breads are cooked.

TROUBLESHOOTING
GUIDE
(cont.)
• It any of the following occur, press the Cancel Button twice to confirm that the power has been turned off, and
take the action listed:
)
H2
shows
in
the
Display.
Is
the Oven Interior clean?
(
Clean
the
Oven
Interior.
(See
pg.
40)
Is
there
anything
on
top
of
the
Main
Body?
Do
not
place
anything
on
top
of
the
Main
Body
.
Is
the Main Body tilted?
Place
the
toaster
oven
in
a
stable
location
.
Are
you
using
the
toaster
oven
near
a
wall?
Keep
the
toaster
oven
away
from
the
wall
.
(See
pg
.
6)
Is
the
Oven
Interior
hot
because
you
are
cooking
consecutively
without
cooling
the
Oven
Interior?
Keep
the Door
open
for about 30 minutes
to cool the
Oven
Interior.
HH
shows
in
the
Display.
The
HOMEMADE
function
and
the
RISE
function
cannot
be
used
if
the
room
temperature or
the
temperature
inside
the
oven
is
higher
than
the
set
temperature.
A
function
that
has
preheating
cannot
be
used
if
the
temperature
inside
the
oven
is
higher
than
the
set
temperature.
Keep
the Door
open
for about 30 minutes
to cool the
Oven
Interior.
EO,
E1,
E2, E3 or E4
appears
in
the Display.
This indicates a malfunction.
Unplug the Power
Plug
and contact
Zojirushi Customer Service for repairs.
•Any
other servicing should
be
performed by
an
authorized service representative.
SPECIFICATIONS
Model No.
ET-ZLC30
Electrical Rating
AC 120V 60Hz
Electric Consumption
1535W
Timer
2 hours (maximum)
Length of the Power Cord
3'00" (0.9m)
External
Dimensions
(approx. inch)
16
(W)
x 15-1/4 (D) x 11-5/8 (H)
(approx. cm)
40.5
(W)
x 38.5 (D) x 29.5 (H)
Interior
Dimensions
(Rack
Position:
Lower)
(approx. inch)
12-7/8
(W)
x 13-1/4 (D) x 5 (H)
(approx. cm)
32.5
(W)
x 33.5 (D) x 12.5 (H)
Weight
(Include
Baking
Tray
and
Broil
Tray)
Approx.
21
lbs. (9.5kg)
•
This
product
is
not suitable for
use
in
countries or regions with different power supply voltages or frequencies.
•
This
product
may
not operate properly
in
certain environments or places with
high
altitudes or extreme weather
conditions.
Please
avoid
using this product
in
such
areas
.
REPLACEMENT
PARTS
• Replacement parts may be available for an
additional charge. Please replace damaged
parts only with new parts.
• When replacing parts, please record the model
number and part name beforehand. Parts can
be purchased through Zojirushi.com, by
contacting Zojirushi Customer Service, or the
store where you purchased the product.
Zojirushi
Customer
Service
1-800-733-6270 www.zojirushi.com
Parts Names Parts No.
Baking Tray
BX175067G-00
Broil Tray
BX175068G-00
Rack BX175066G-00
Crumb Tray BX175065G-00
43