User Manual
Version: N0901
VOPLLS


Language
English
01-42
Spanish
43-83
Italian
84-125
Catalog
Important Safety Considerations 04
Basic Configuration 06
Projector Overview 07
Remote Control 08
Focus and Keystone Correction 08
How to clean up the dust? 09
Projector Connections 10
Playing Movie 25
Playing Music 28
Playing Photo 30
Playing Text 32
Settings 34
Product Features 36
Trouble Shooting 37
Connecting to the Mobile Device 10
For iOS System (wired connection) 11
For Android System (wired connection) 12
For iOS System (wireless connection) 15
For Android System (wireless connection) 17
For Android System (USB C to HDMI cable)
12
For Android System (2-in-1 HDMI adapter wired connection)
14
Connecting to the Computer 20
Connecting to Firestick 22
Connecting to the DVD Player 23
Connecting to the External Storage Device
24
01
EN

Video Operation Guide
SUBSCRIBE
VS-KING PROJECTOR
VS-KING
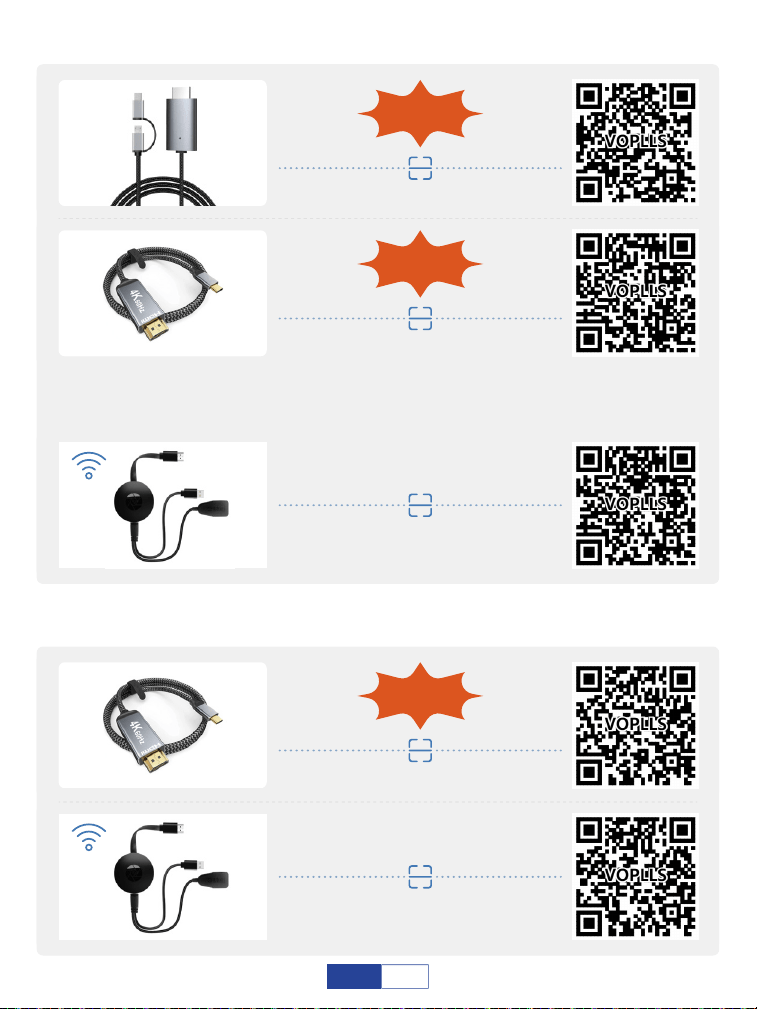
HOW TO CONNECT TO IPHONE?
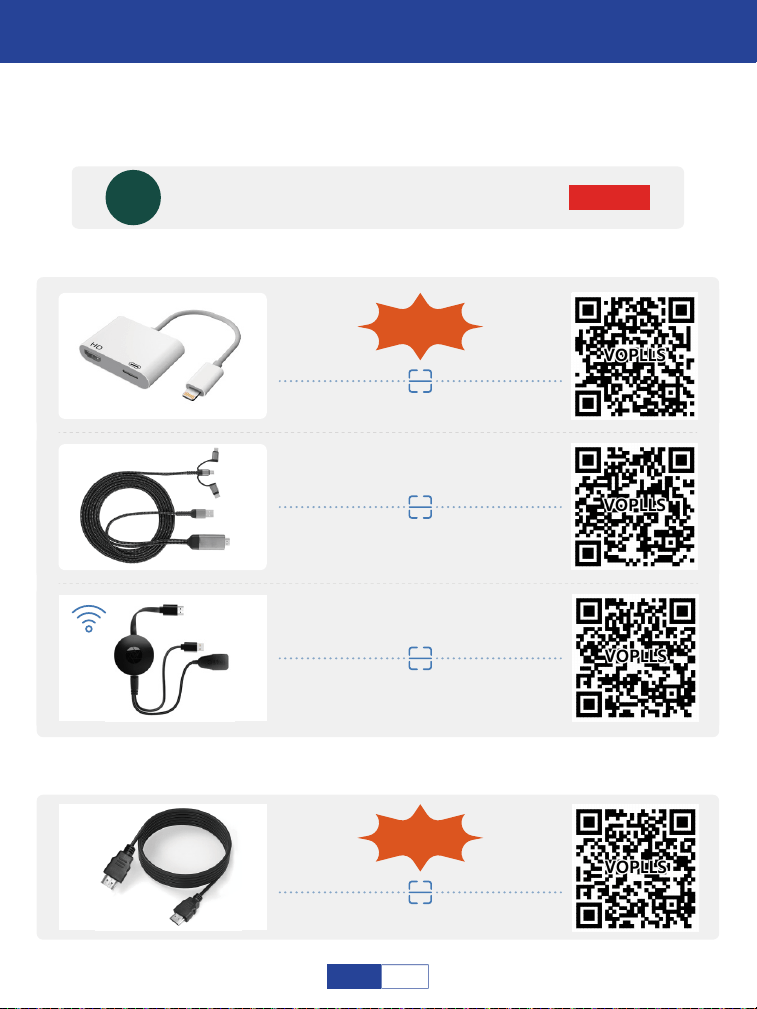
Scan QR codes below or search for "VS-KING PROJECTOR" on YouTube to get videos
(All the following adapters are not included.
Recommended adapters are available in our store.)
iOS to HDMI
Recommended
iOS 3 in 1 HDMI
HOW TO CONNECT TO WINDOWS LAPTOP?
Laptop - HDMI Cable
Included
Recommended
iOS WiFi HDMI
02
EN

Android - 3(2) in 1 HDMI
Recommended
Android - USB C to HDMI
Recommended
Laptop - USB C to HDMI
Recommended
Android - WiFi HDMI
Laptop - WiFi HDMI
HOW TO CONNECT TO ANDROID SMARTPHONE?
HOW TO CONNECT TO MACBOOK?
Please note that when you choose the first type C to HDMI cable, please
make sure that your mobile phone belongs to the phone model mentioned on
the 3th page, if not, please choose the second 2 in 1 HDMI cable.
03
EN
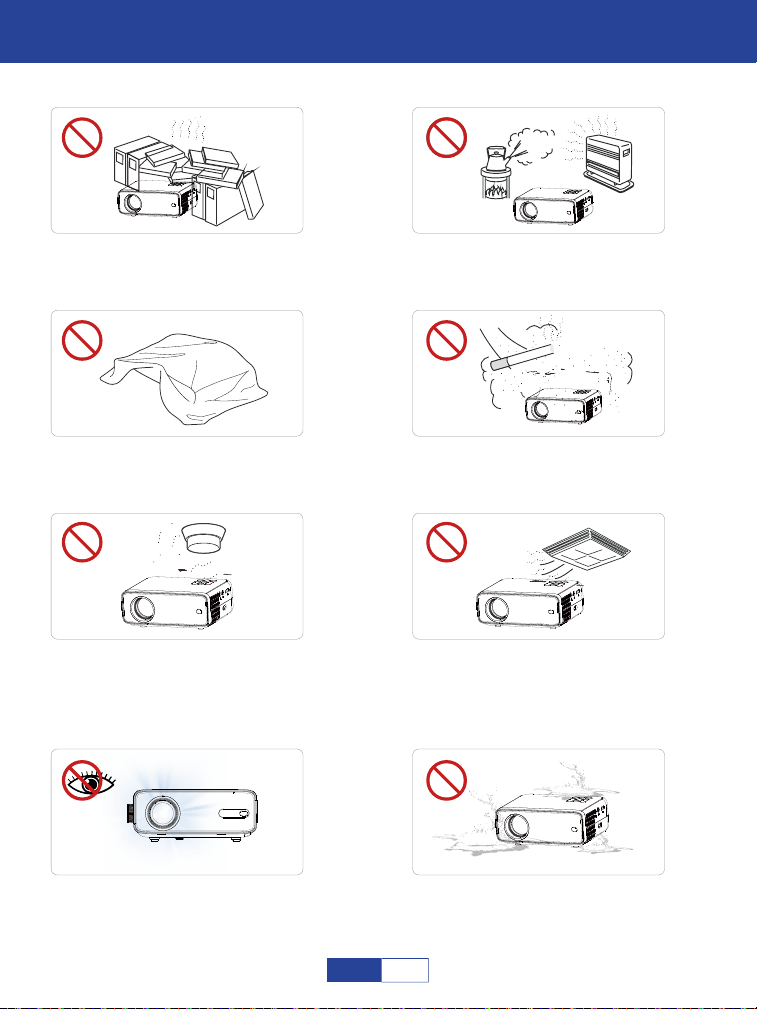
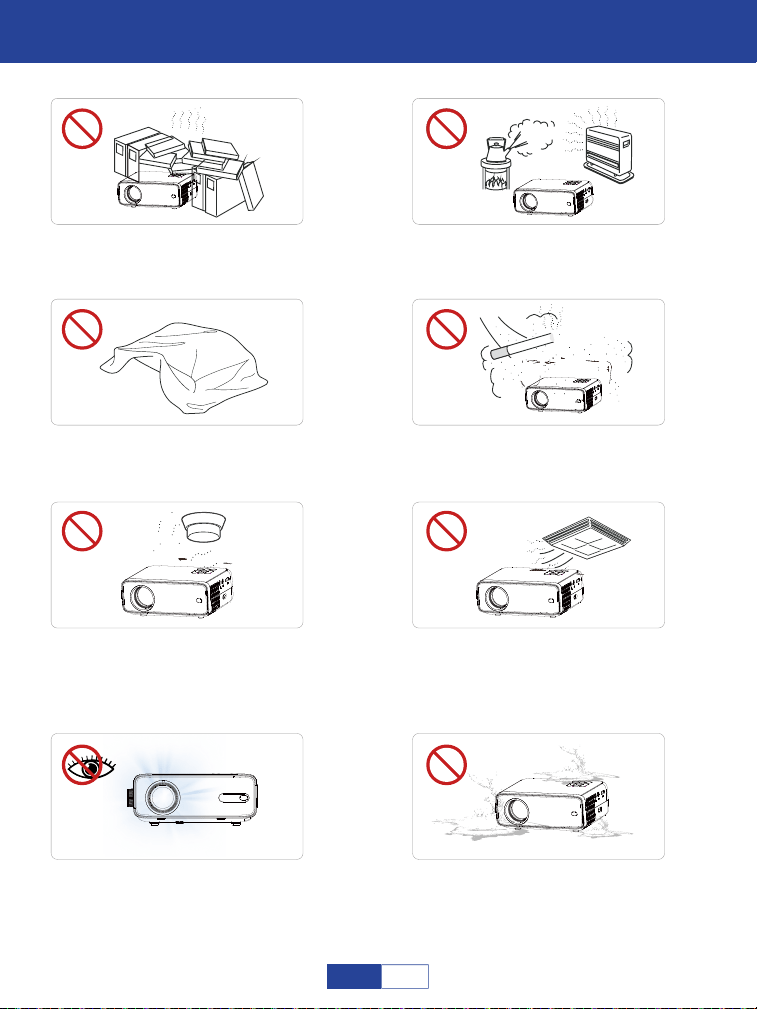
Important Safety Considerations
Important Safety Considerations
Do not install the projector in
hot and humid sites.
Do not block the ventilation
holes (intake or exhaust).
Do not install the projector in
dust and smoke sites.
Do not install the projector in sites
with improper ventilation.
Please keep the projector away
from water or any other liquid as it
is not waterproof.
Do not install the projector in sites
with direct blowing of warm and
cool air-condition wind. Otherwise
it may cause the project failure.
Please do not look into the lens
when the projector is working.
Otherwise it may hurt your eyes.
Do not install the projector near the
temperature and smoke transducer.
It may cause a sensor failure.
04
EN
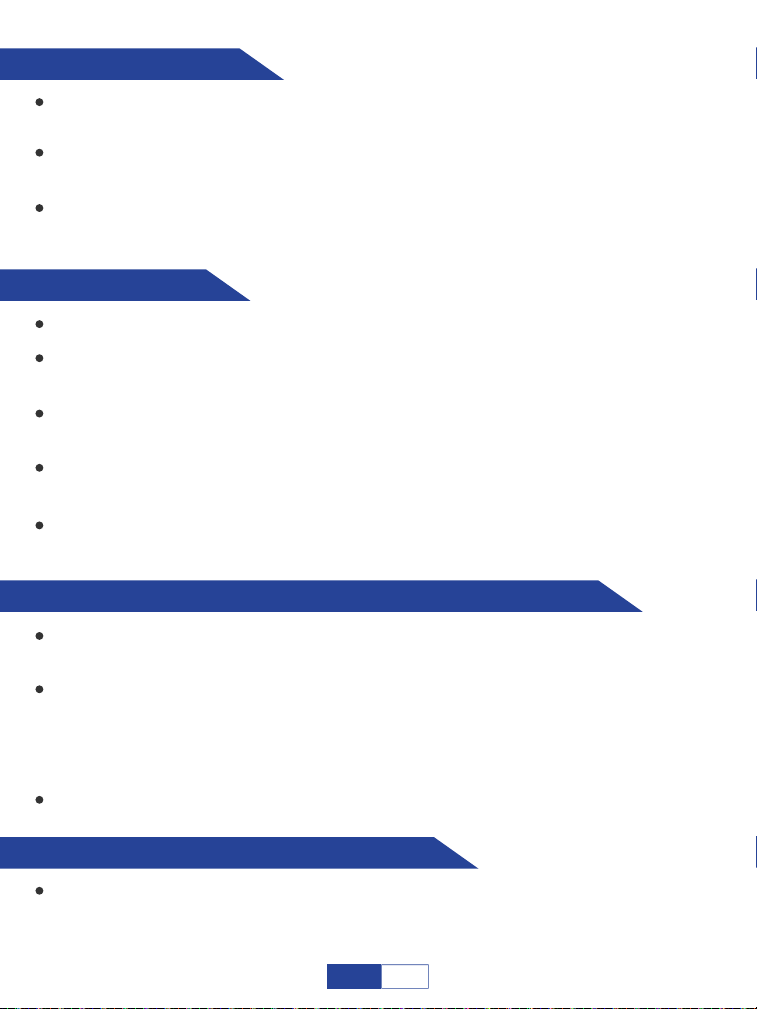
Installation
Please use the projector in a dark room for best watching experience.
Cleaning
Unplug the power cord from the projector.
Notes on Fire and Electric Shock
High Temperature Warning
Do not place any liquid on the projector.
Please use the projector with a soft brush. Do not use rigid accessories, such as a
crevice cleaning tool, to avoid damage to the projector.
Please clean the ventilation opening and the loudspeaker regularly with a cleaner. The
projector will be overheated with blocked dust, causing the failure.
Use an air brush or lens paper to clean the lens and be careful not to scratch or abrade
them.
Use a wet cloth to clean the cabinet regularly. Neutral detergent may be used for
serious smudge. Do not use strong detergent or solvent such as alcohol or diluent.
Use the power cord with caution to avoid unduly bending. Damaged power cord may
cause electric shock.
Please use the projector with caution to avoid dropping or shocking, which may
damage the projector.
Prevent foreign objects from falling into the projector, such as paper clips and paper
scraps, do not attempt to retrieve any such object. Do not insert any metal object, such
as an iron wire or a screwdriver, into the projector. Make sure to immediately turn off
the power and ask qualified professional maintenance personnel to remove any object
falling into the projector.
During and after the projection, the temperature near the outlet will rise, therefore
touching may cause burns. Do not peep at the lens, or it may cause severe eye injury.
Make sure of adequate ventilation and blocked outlet to avoid heat accumulation
within the projector.
05
EN
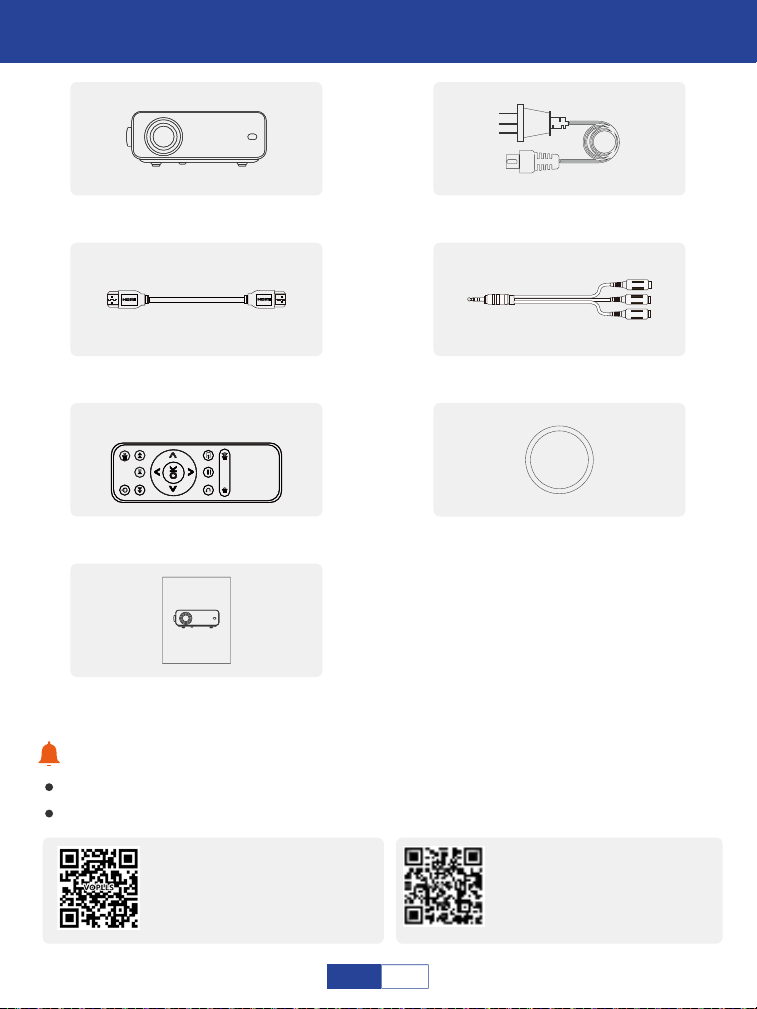
Basic Con�iguration
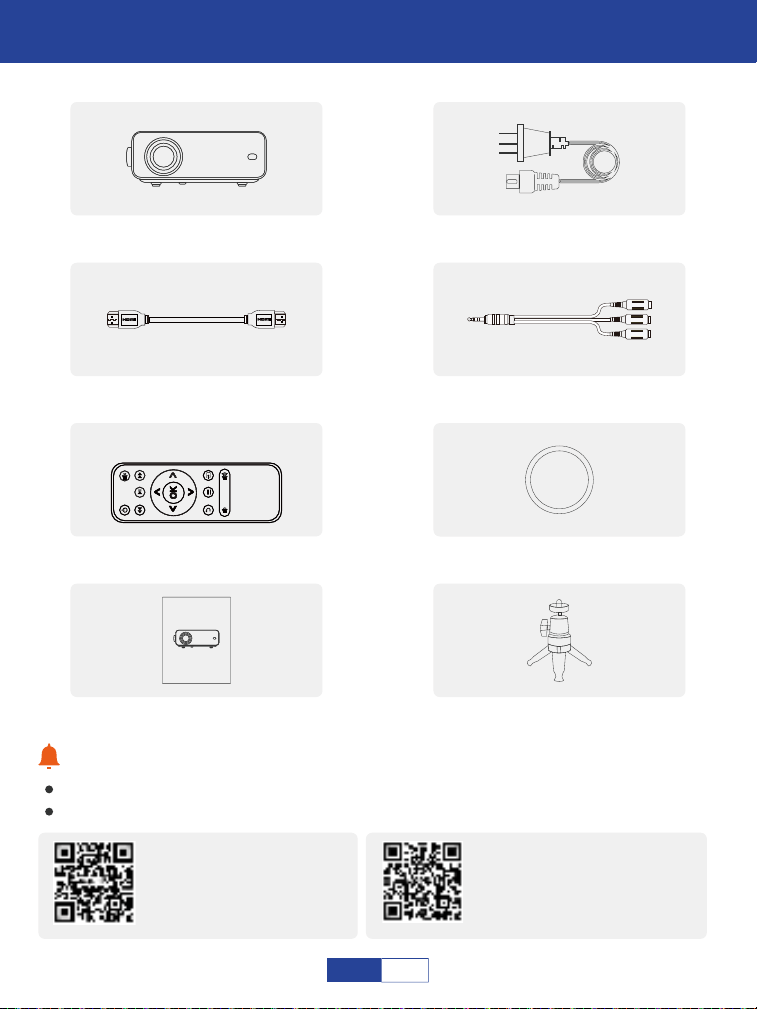
If there is any part missing, please contact VOPLLS support team.
Email address of VOPLLS support team:
Tips:
1 x HDMI Cord 1 x AV Signal Cord
1 x Remote Control
(battery not included)
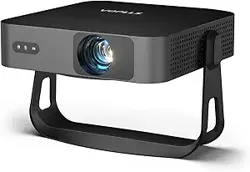
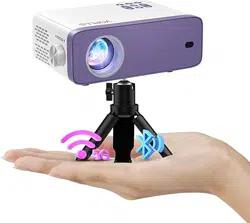
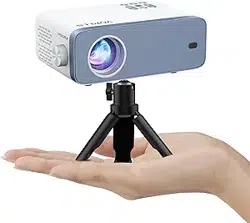
1 x 1080P Projector 1 x Power Cord
1x Lens Cap
1 x User Manual
User Manual
VOPLLS
North America Marketplace:
Europe Marketplace:
1x Tripod
06
EN
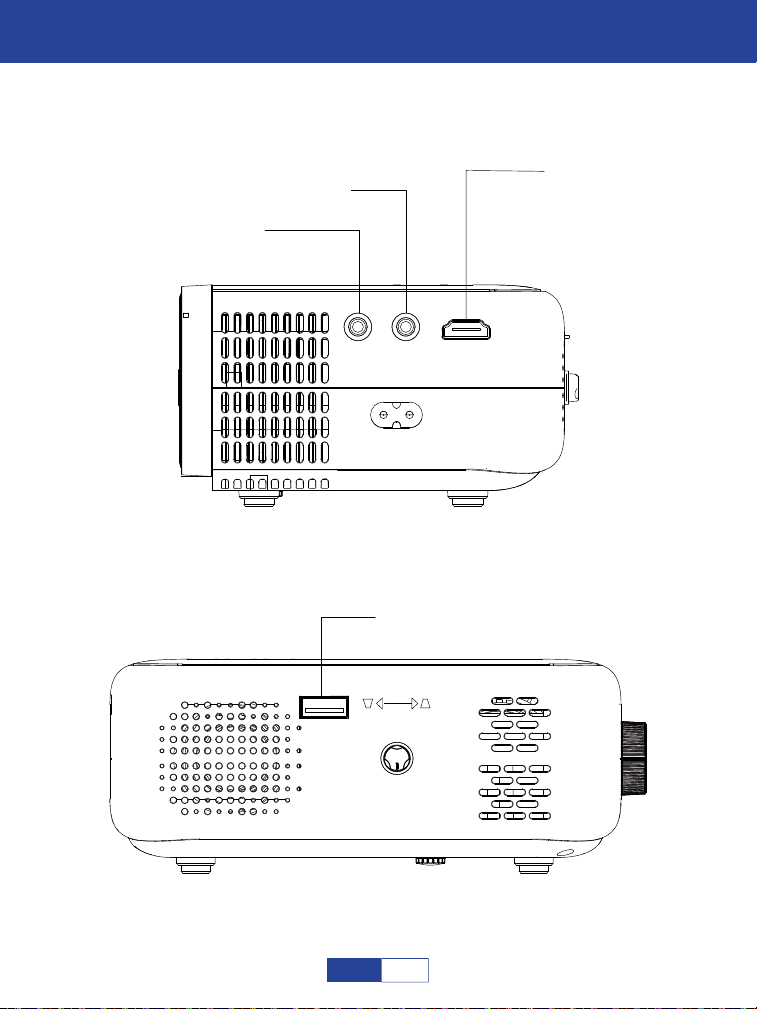
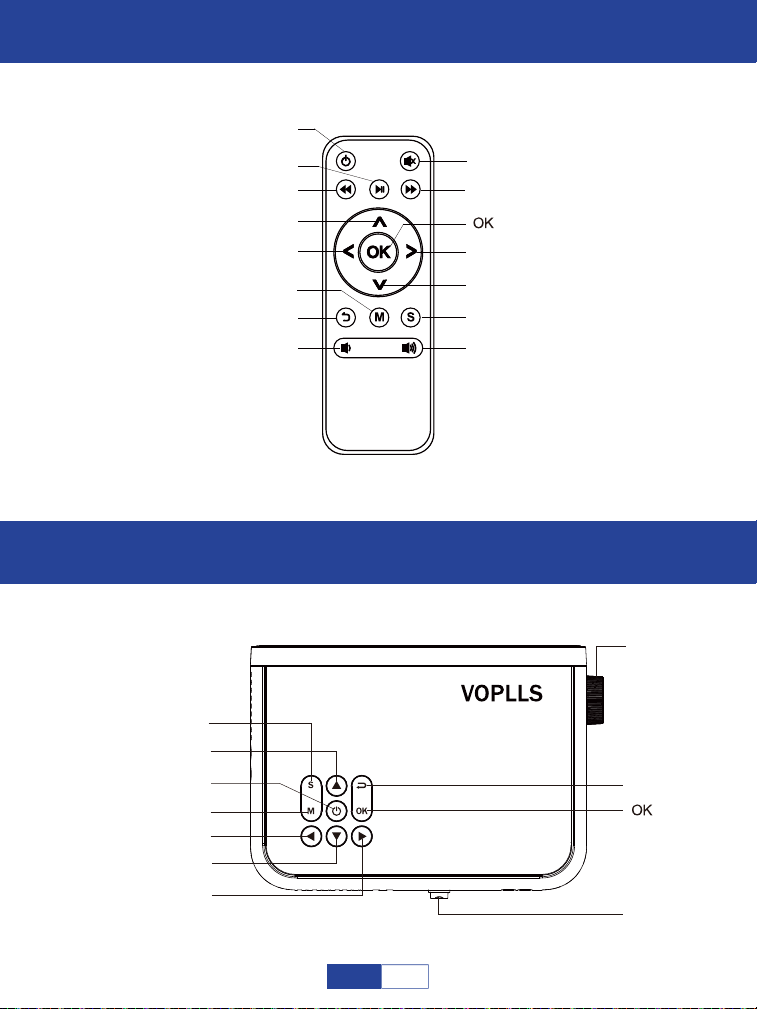
Projector Overview
3.5mm Audio
AV
HDMI
USB
KEYSTONE
/
/
07
EN
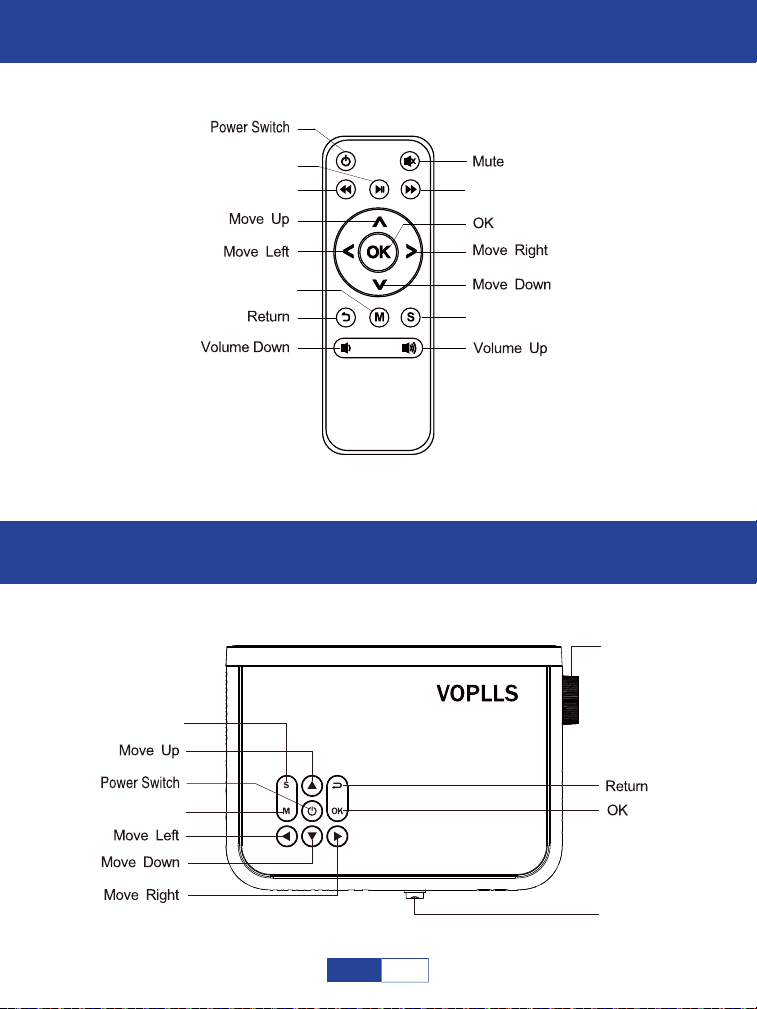
Remote Control
Focus and Keystone Correction
Fast Backward
Pause
Fast Forward
Menu
Signal source
Signal source
Menu
Focus
Keystone
08
EN
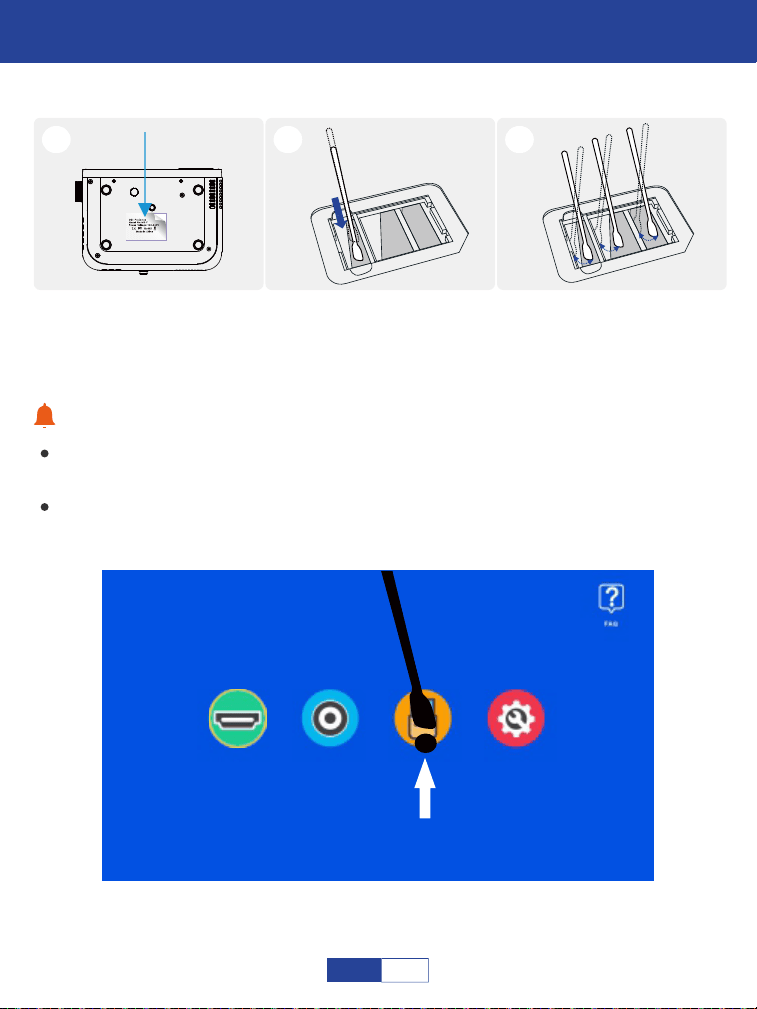
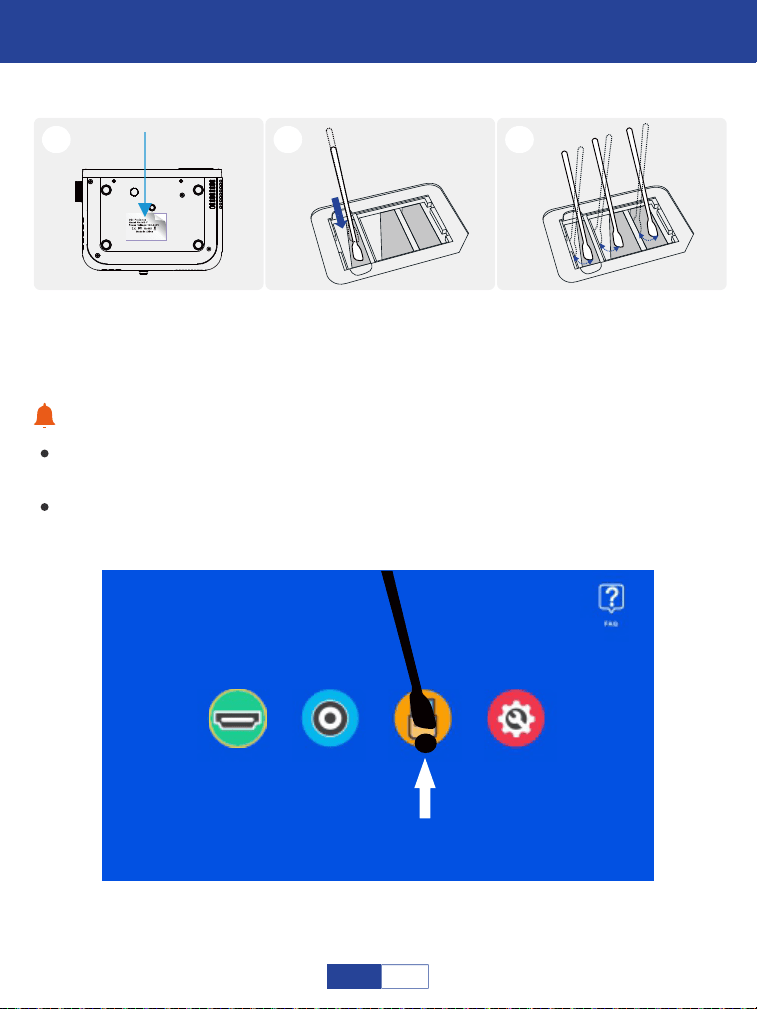
How to clean up the dust?
Tips:
HDMI
1
Tear off the label and
open the lid.
2
Insert the cotton swab
deep inside.
3
Wiped all the 5 sides
(Adjust the “keystone” for
easy wiping).
If there are black spots on screen, please turn on the projector and move the swab
according to the position of the black spot on the screen.
Please wipe the lens regularly to solve or avoid the problem of black spots on the
screen.
AV USB Settings
09
EN

Projector Connections
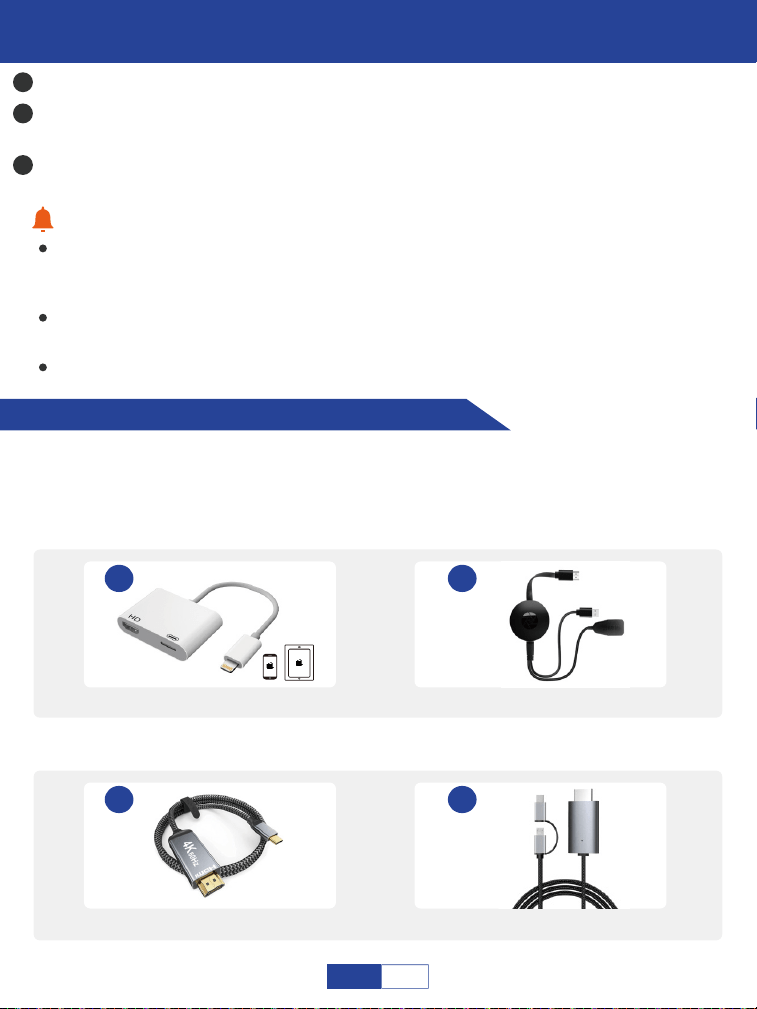
Connecting to the Mobile Device
Warm Tips:
Please purchase an extra HDMI adapter according to your phone; Please make sure
your device must support Multi-Screen/ Wireless display; Use an adapter mentioned
below to transmit the signal. Here are some pictures of the proper cable below for
reference:
1
2
3
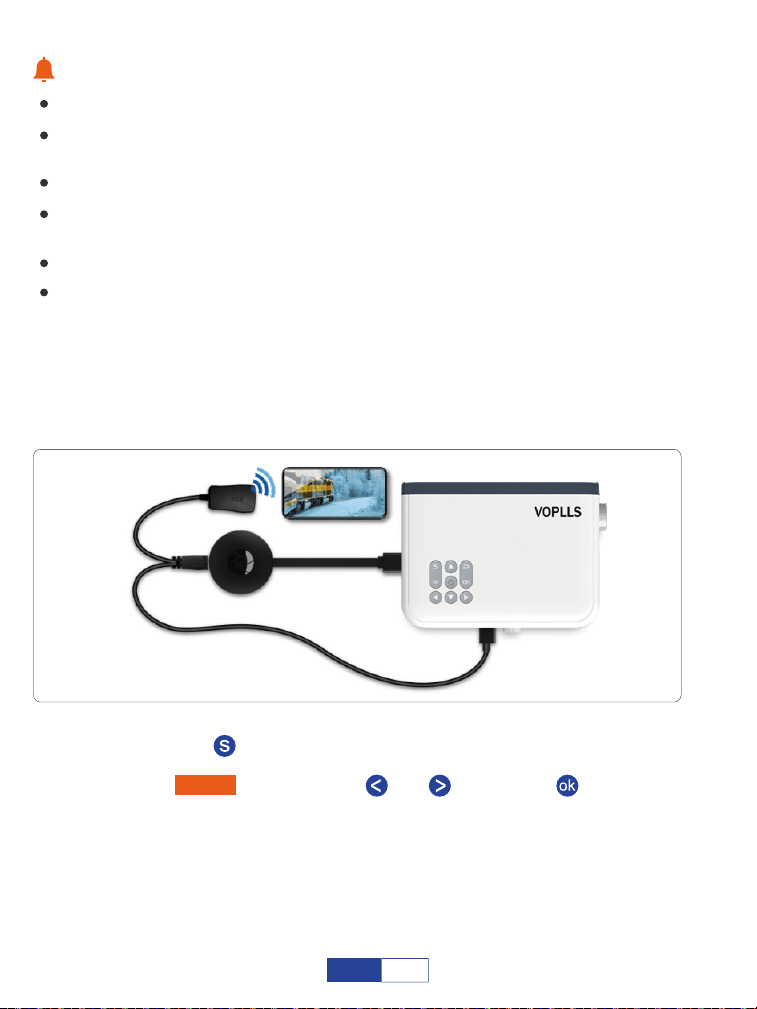
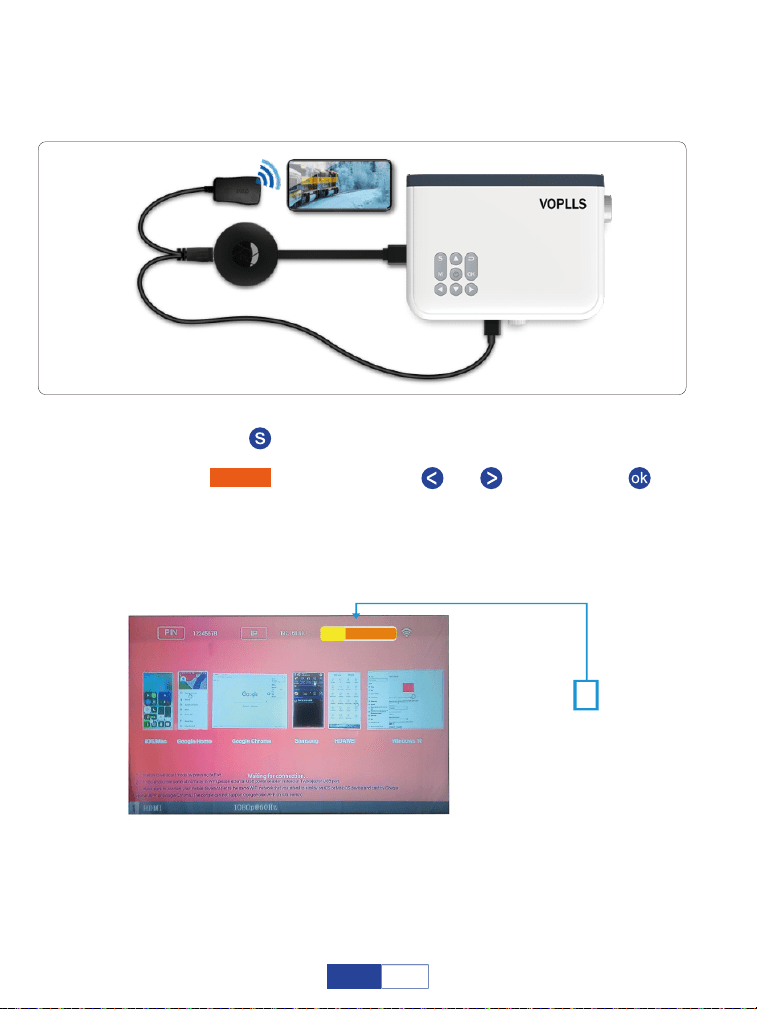
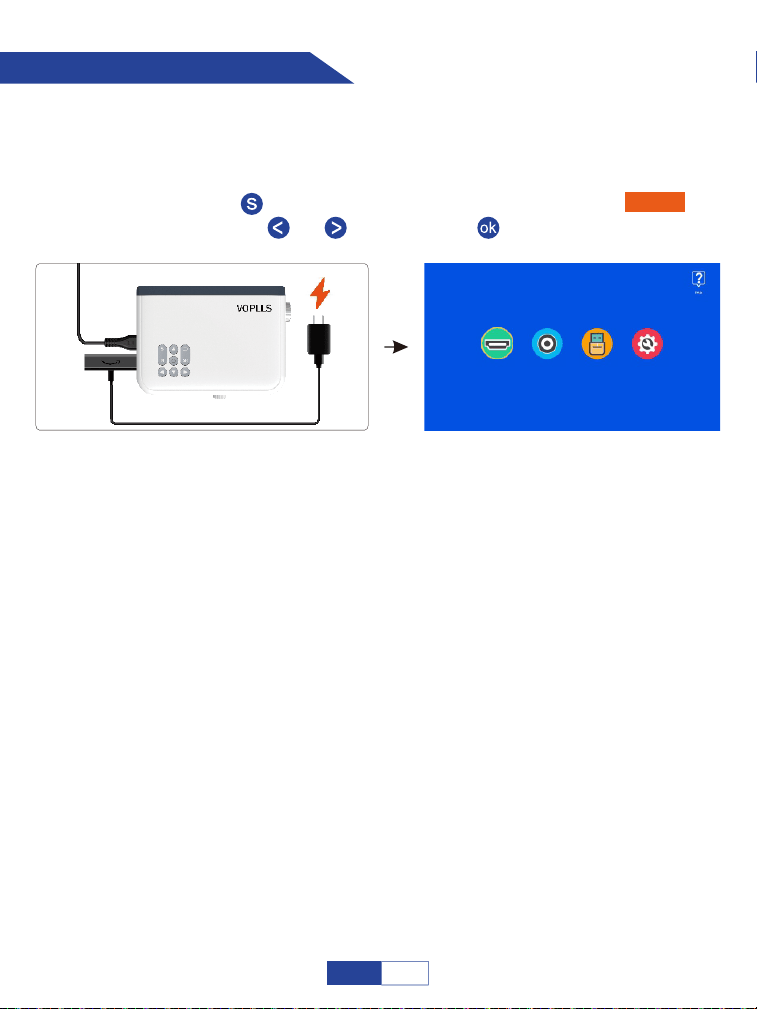
Connect the power cord. The LED indicator on the projector will show solid red.
Long press the power button about 5 seconds to turn on. The LED indicator will show green.
Adjust the focus ring and keystone to get the best image performance.
After you plug the power cord into the inlet, turn on the projector until the LED
indicator on the projector shows solid red. If the projector is turned on and working
properly, the LED indicator shows green;
Never look into the projector lens when the lamp is on. This can damage your eyes
and is especially dangerous for children;
Install 2 pieces of AAA batteries into the remote before using it.
2
Wireless HDMI display dongle adapter
It is recommended when you
connect to iPhone/Tablet.
1
Lightning to HDMI adapter
4
2 in 1 HDMI cable
3
Type C to HDMI cable
HDMI Output
Type-C
HDMI Output
Type-C
Micro USB
10
EN
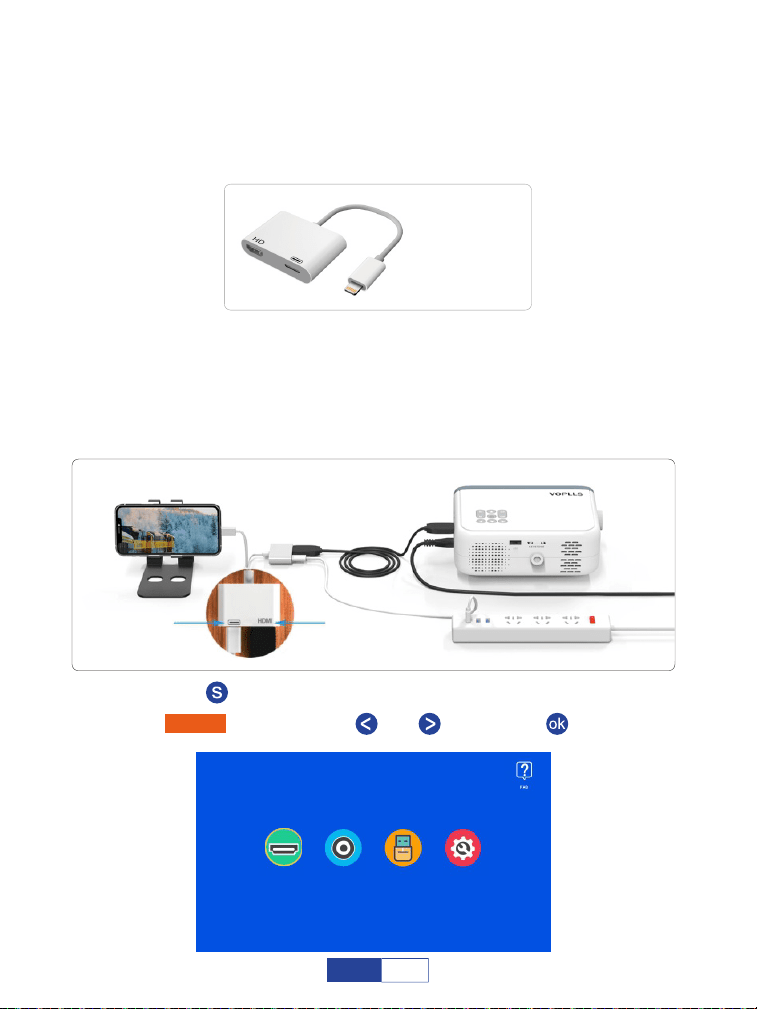
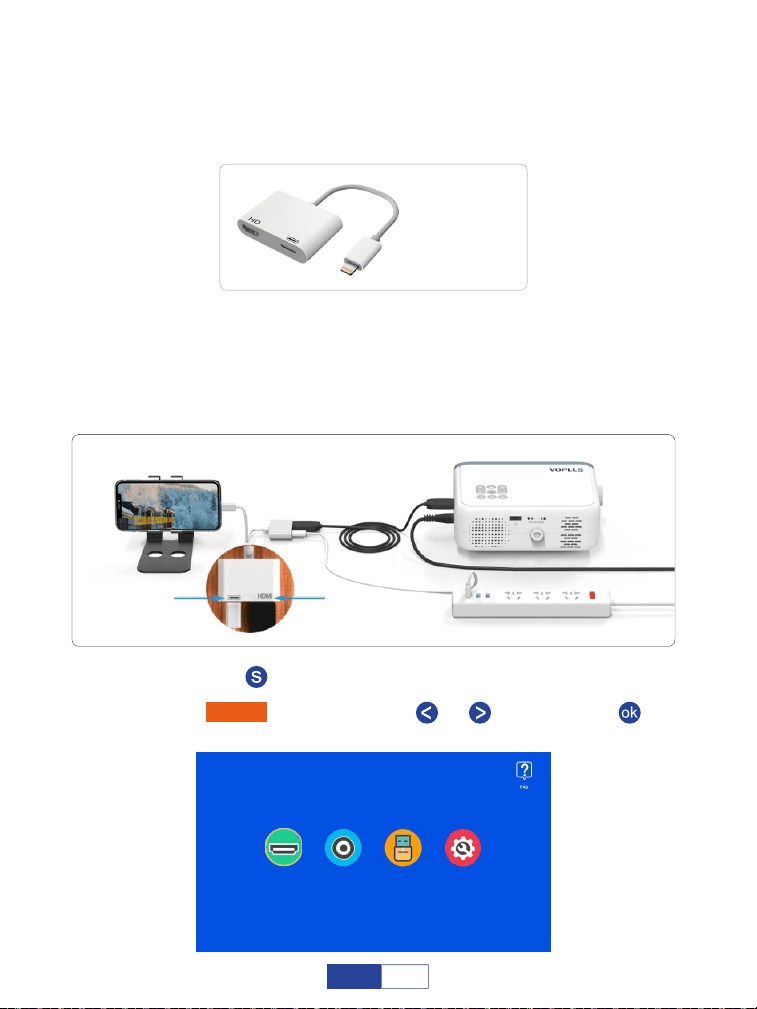
It is recommended when you connect to Android smartphone/Tablet. Please note that
when you choose the third type C to HDMI cable, please make sure that your mobile
phone belongs to the phone model mentioned on the 9th page, if not, please choose
the fourth 2 in 1 HDMI cable.
Step 1:
Step 2:
Turn on your mobile device and the projector;
Connect the HDMI port to your projector;
Step 4: Press the “ ” button to back to home page;
Step 3:
For iOS System (wired connection)
Connect the other end with Lightning port to your mobile device; Please do
not forget to prepare an Apple charger cable for connecting to Apple Lightning
to Digital AV Adapter as below:
(not included)
Charge port HDMI port
Select “HDMI” by pressing the “ ” or “ ” then press “ ” button to confirm.
Step 5:
HDMI AV USB Settings
11
EN
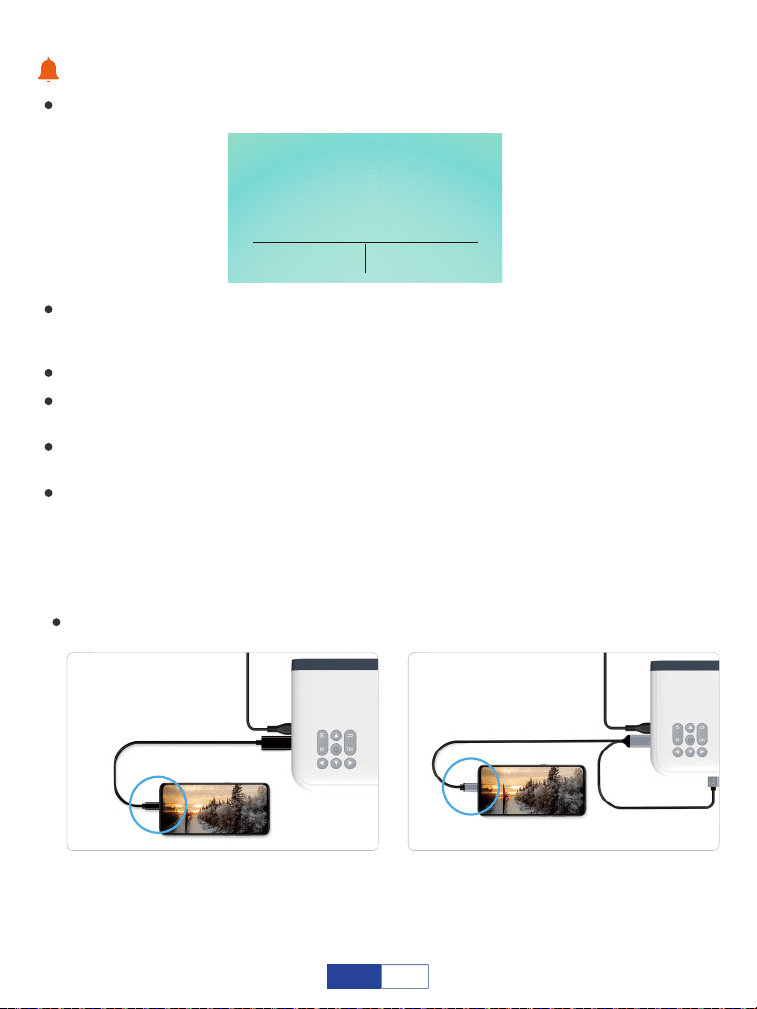
For Android System (wired connection)
Tips:
Select “Trust” when there may be a pop-up window on your mobile device;
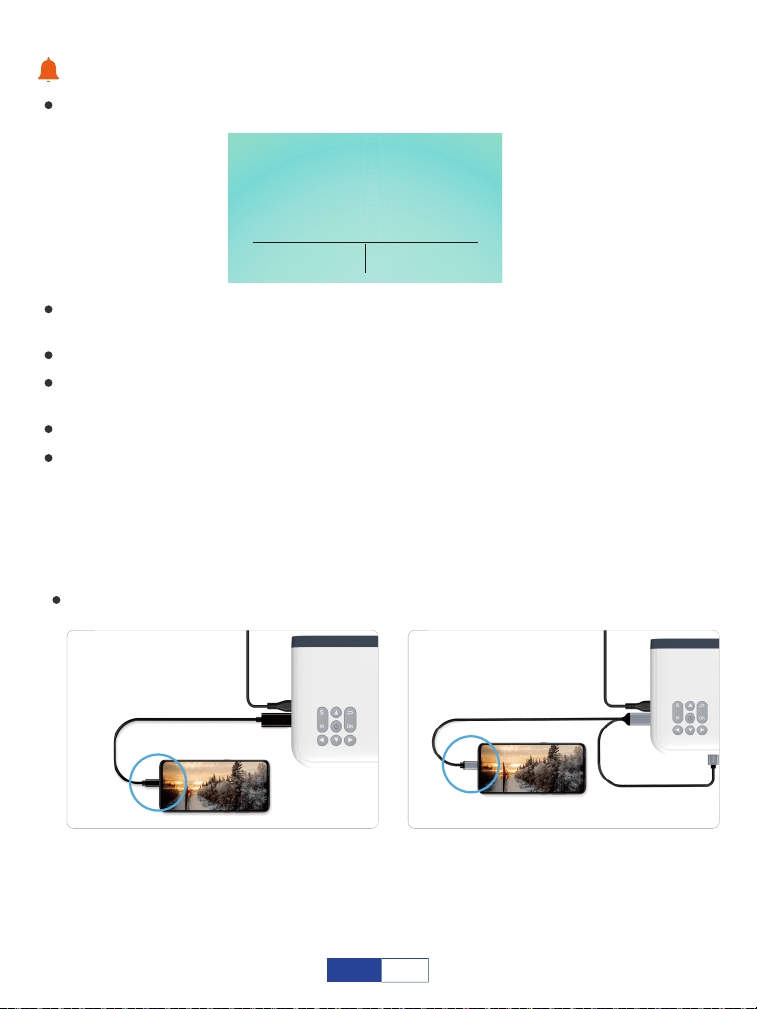
For Android System(USB C to HDMI cable)
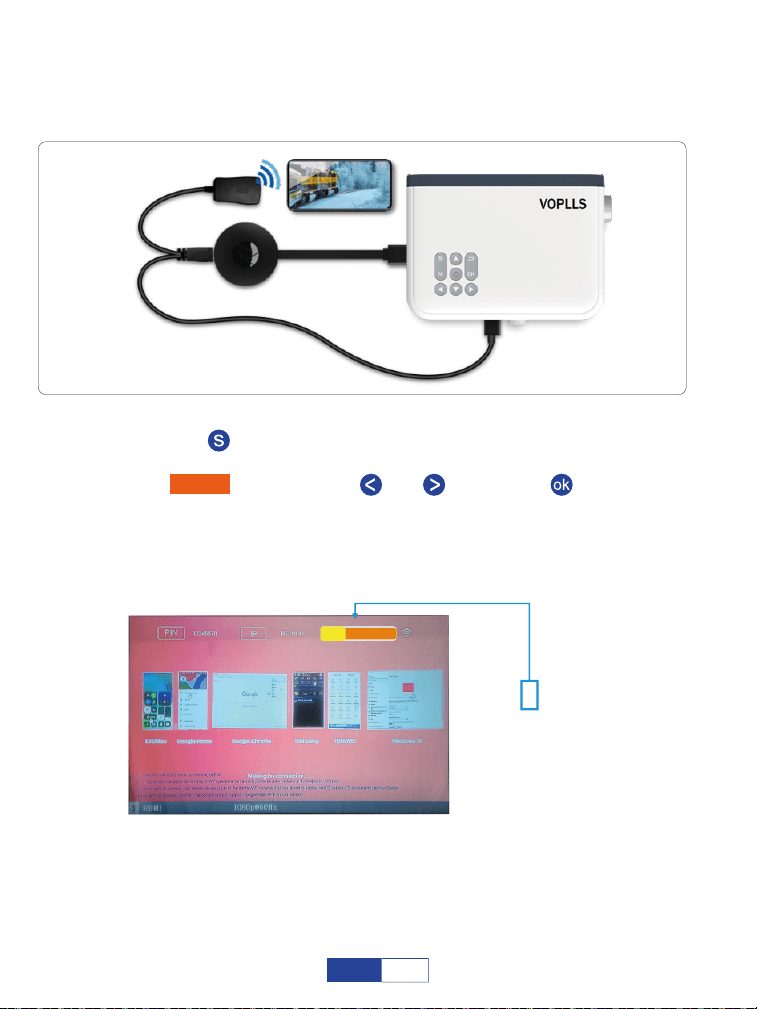
When it shows the screen with some QR codes, butterfly icon and so on after
selecting, please do not scan any QR code and just wait for a moment;
Never directly insert your Lightning cable to the USB port on the projector;
Please connect a power cable for HDMI adapter. (external electric supply socket is
recommended);
Please read the instructions of HDMI adapter carefully before connecting;
Due to copyright issues, Netflix, Amazon prime, Disney and Hulu are not supported
to play directly by mirror screen with phone, it must be connected TV stick to play.
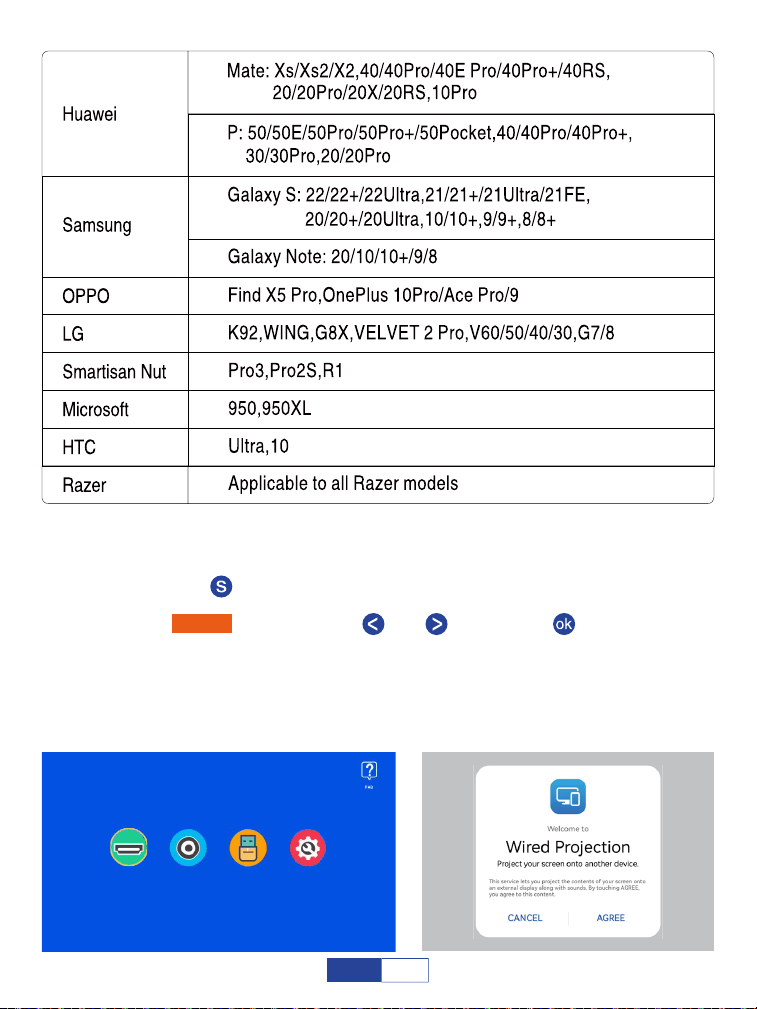
When you use this USB C to HDMI cable, please confirm that your phone belongs
to the following phone models. If it doesn't belong, please connect your phone
through the other 2-in-1 HDMI adapter as the picture shows on the next page.
Trust This Computer
Your settings and data will be
accessible from this computer when
connected winrlessly or using a cable
Trust Don’t Trust
(not included)
USB C
(not included)
USB power
USB C
12
EN
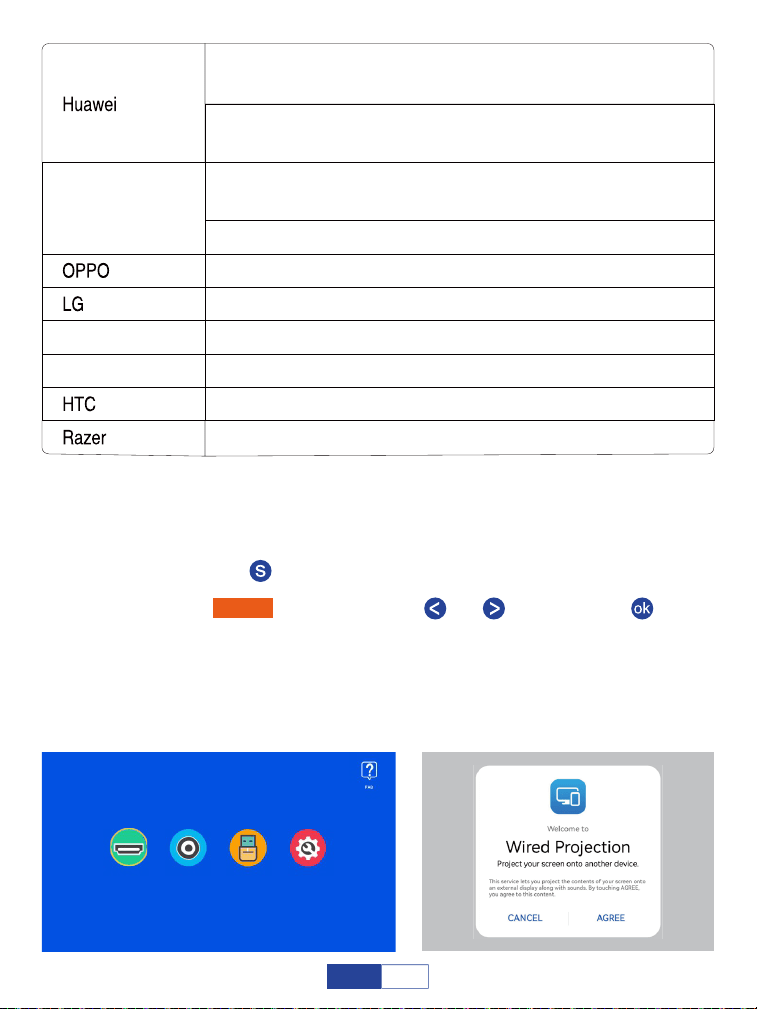
Turn on your Bluetooth on your mobile device and match your HDMI adapter
through Bluetooth. (It is normal if the Bluetooth connection is not successful.)
Step 1:
Press the “ ” button to back to home page;
Step 2:
Connect the HDMI port and USB port to your projector. (If your USB C to
HDMI cable has USB power.) Connect the other end to your phone.
Step 4:
Select "AGREE" when there may be a pop-up window on your phone.
Step 5:
Select “HDMI” by pressing the “ ” or “ ” then press “ ” button to confirm.Step 3:
HDMI AV USB Settings
13
EN
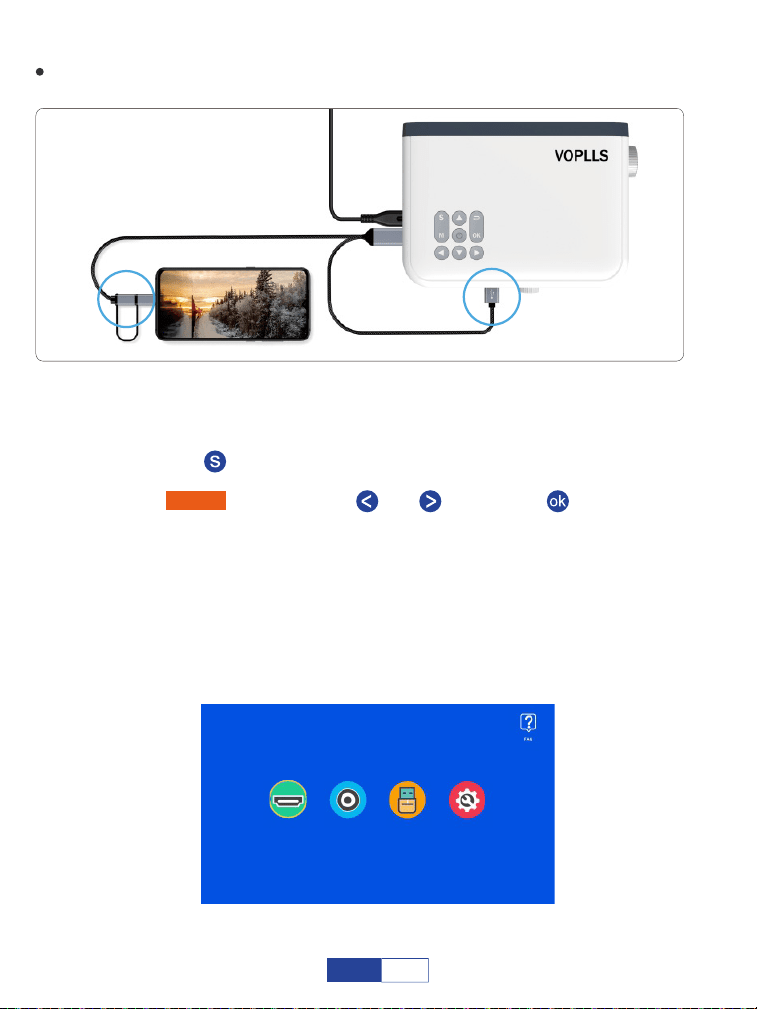
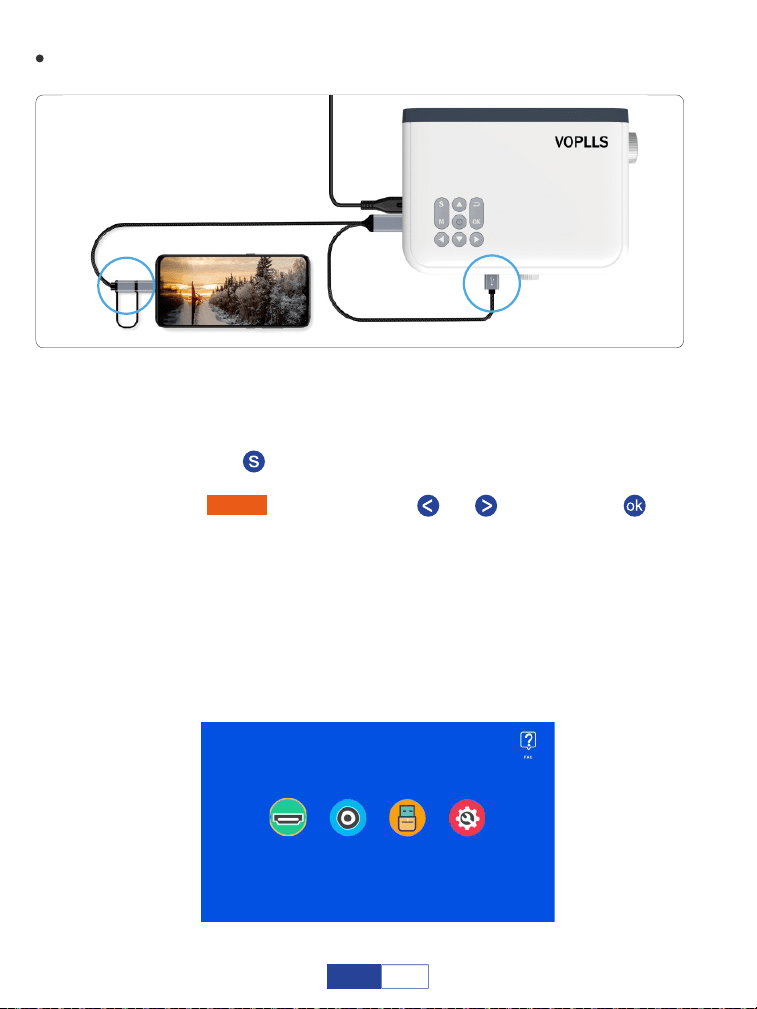
For Android System (2-in-1 HDMI adapter wired connection)
Turn on your Bluetooth on your mobile device and match your HDMI adapter
through Bluetooth. (It is normal if the Bluetooth connection is not successful.)
Step 1:
Press the “ ” button to back to home page;
Step 2:
Connect the HDMI port and USB port to your projector, (If your USB C to
HDMI cable has USB power.)
Step 4:
Connect the other end with Type-C/ Micro USB port to your mobile device;
Step 5:
Scan the QR code on screen through your browser and download it;
Then follow the prompts on your phone.
Step 6:
Select “HDMI” by pressing the “ ” or “ ” then press “ ” button to confirm.Step 3:
HDMI AV USB Settings
(not included)
USB power
2 in 1 HDMI adapter
14
EN
Warm Tips:
If it is failed to connect, please unplug and reinsert the cord more times;
If your phone is vivo or oppo, please ensure that you switch on OTG on Settings of
your phone;
Please read the instructions of HDMI adapter carefully before connecting;
Please connect a power cable for HDMI adapter. (external electric supply socket is
recommended);
Never directly insert your Type-C/ Micro USB cable to the USB port on the projector;
Due to copyright issues, Netflix, Amazon prime, Disney and Hulu are not supported
to play directly by mirror screen with phone, it must be connected TV stick to play.
For iOS System (wireless connection)
Connect the HDMI port to your projector;
Step 1:
Press the “ ” button to back to home page;
Step 2:
Turn on the Wi-Fi Switch in your iOS device. Successfully connected Wi-Fi
on iOS device is not a must unless the live streaming content is needed;
Please ignore the exclamation mark before it;
Step 4:
Select “HDMI” by pressing the “ ” or “ ” then press “ ” button to confirm.Step 3:
(not included)
15
EN

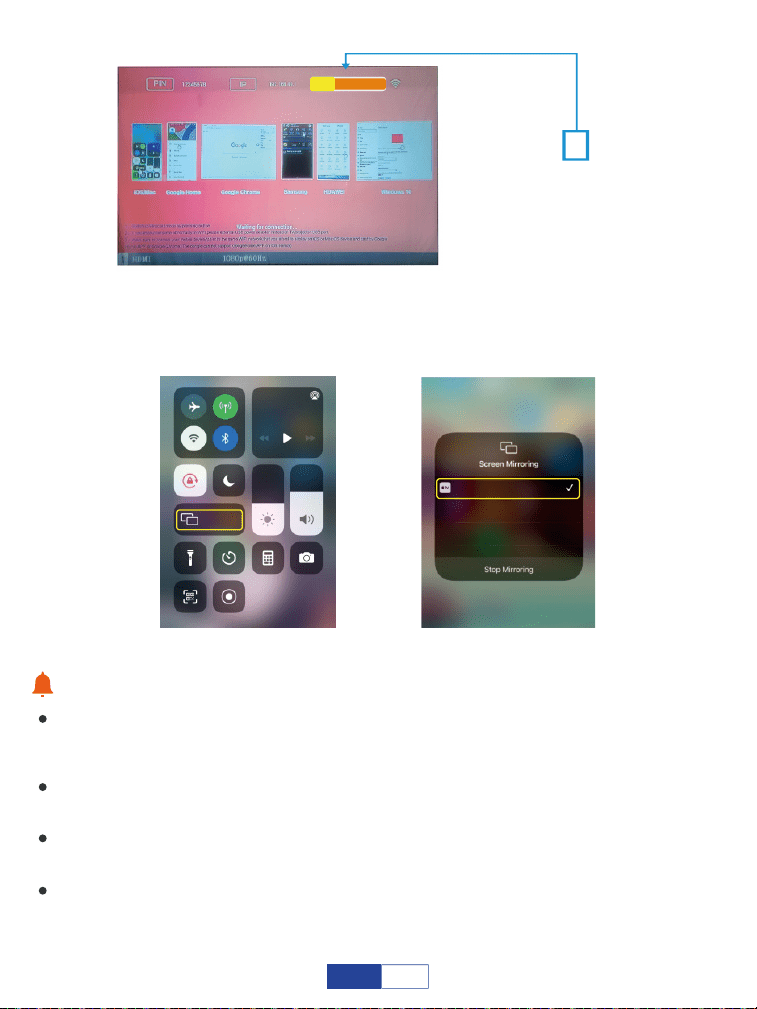
Swipe up the screen of your iOS mobile device, then tap Screen Mirroring/
AirPlay Mirroring and search for the projector.
Step 5:
Warm Tips:
The fluency of screen mirroring with wireless connection will be affected by the
network environment. A bandwidth of 100 Mbit or more is recommended when using
screen mirroring;
Make sure your mobile device is closed to the projector when using wireless connec-
tion. A distance within 1m/3.3ft is recommended;
Some mobile devices may not support screen mirroring due to the compatibility;
Due to copyright issues, Netflix, Amazon prime, Disney and Hulu are not supported
to play directly by mirror screen with phone, it must be connected TV stick to play.
Select it from the
searching results to
connect.
DEVICE DONGLE-*****
Music
Screen
Mirroring
DONGLE-*****
DONGLE-*****
16
EN
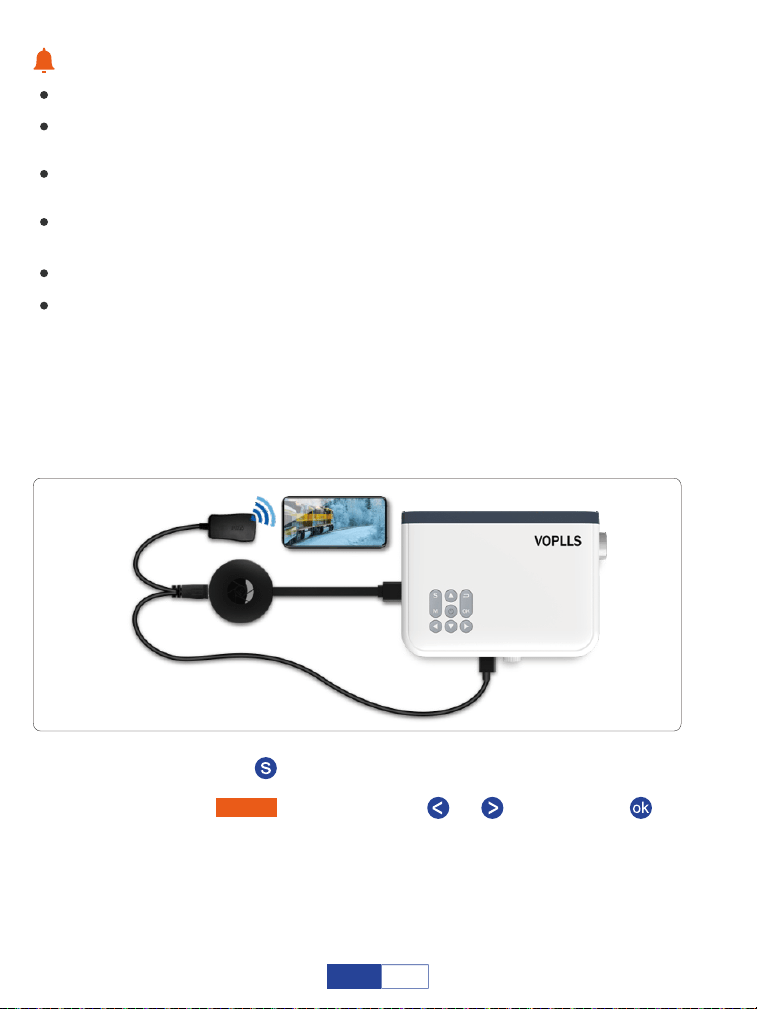
For Android System (wireless connection)
Connect the HDMI port to your projector;
Step 1:
(not included)
Press the “ ” button to back to home page;
Step 2:
Turn on the Wi-Fi Switch in your Android device. Successfully connected
Wi-Fi on Android device is not a must unless the live streaming content is
needed;
Step 4:
Activate Multi-Screen function in your Android device and search for the
projector.
Step 5:
Select “HDMI” by pressing the “ ” or “ ” then press “ ” button to confirm.Step 3:
Select it from the
searching results to
connect.
DEVICE DONGLE-*****
17
EN
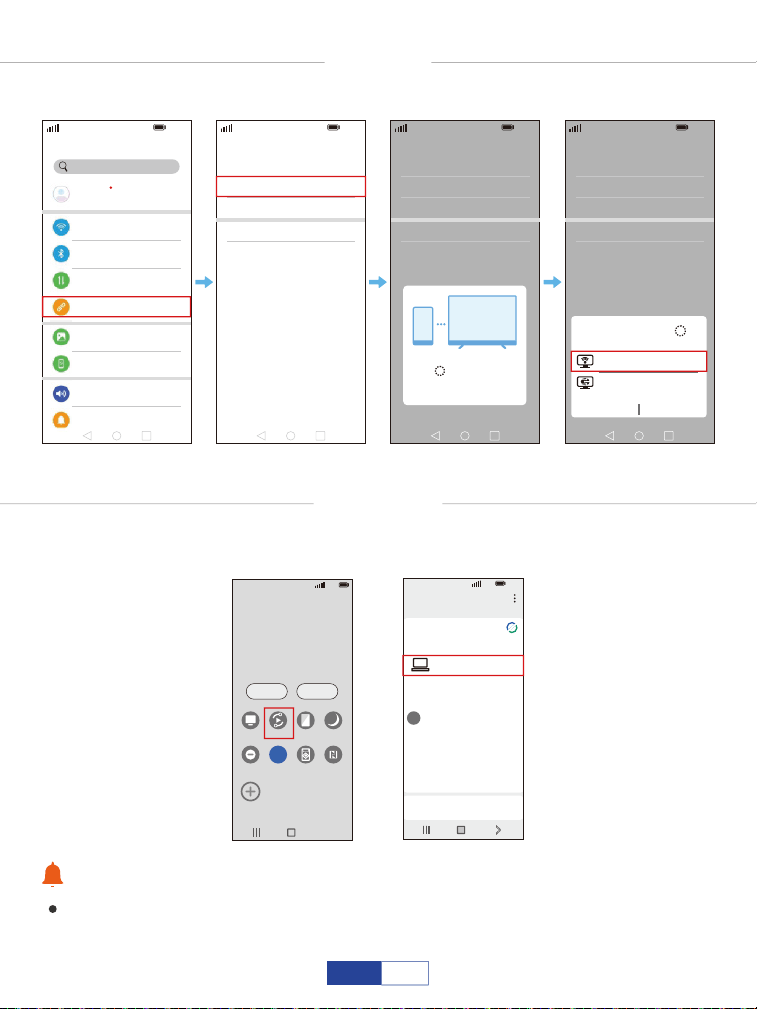
Warm Tips:
Please turn off the DEX function if the projector ONLY shows the home screen of
your phone.
HUAWEI
More connections-Wireless projection.
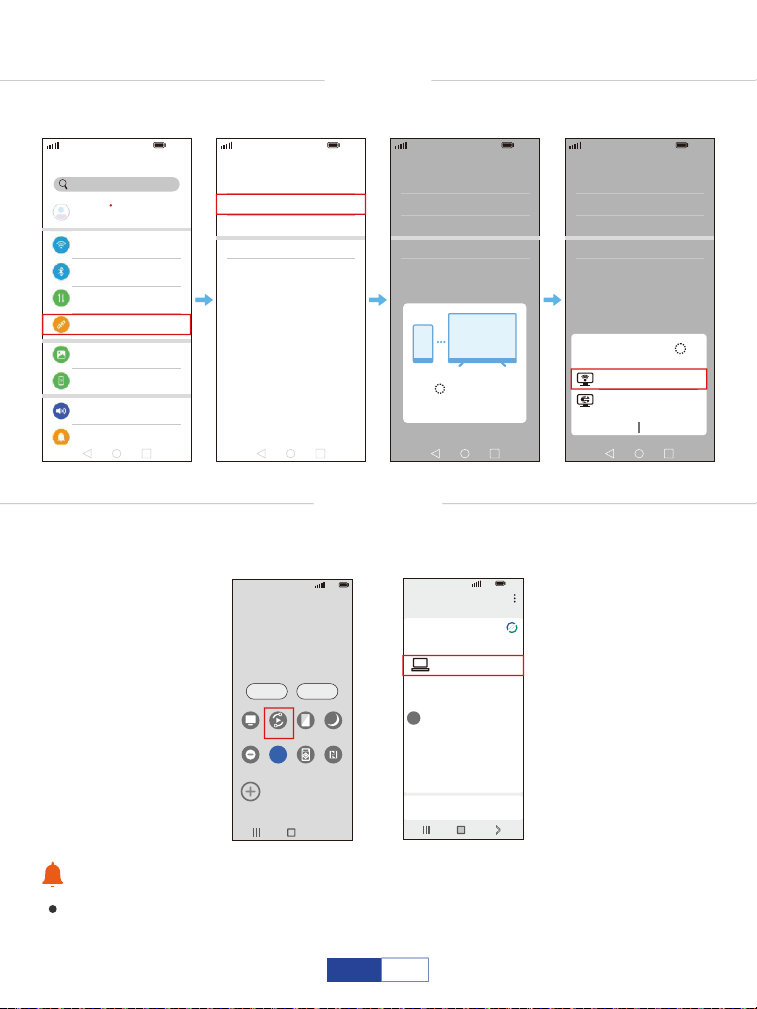
SAMSUNG
Swipe up the screen of your Samsung device, then tap “Smart view”
and search for the projector.
5G
100%
21:05
>
>
>
>
>
Huawei Share
Wireless projection
Pirnting
On
VPN
Private DNS
Of
f
Connecting...
CANCEL
5G
100%
21:05
Search
HUAWEI ID, Payment and purchases,
Cloud,and more
001********79
>
>
>
>
>
>
>
>
>
WLAN
Bluetooth
Mobile network
More connections
Home scree & wallpaper
Display & brightness
Sounds & vibration
Notifications
On
5G
100%
21:05
>
>
>
>
>
Huawei Share
Wireless projection
Pirnting
On
VPN
Private DNS
Of
f
5G
100%
21:05
>
>
>
>
>
Huawei Share
Wireless projection
Pirnting
On
VPN
Private DNS
Of
f
DONGLE-*****
DONGLE-*****
Wireless Projection
Available devices
CANCEL HELP
5G
100%
>
18:45
Monday, July 5
Devices Media
DeX
DeX
Smart View
Blue light
filter
Dark mode
B
Do not
disturb
5G
Hongbao
accelerator
NFC
5G
5G
100%
18:45
>
Smart View
Phone Other device
Select a device below to mirror your phone’s
screen or play content
DONGLE-*****
Mirror screen
>
Other device Phone
→
→
18
EN
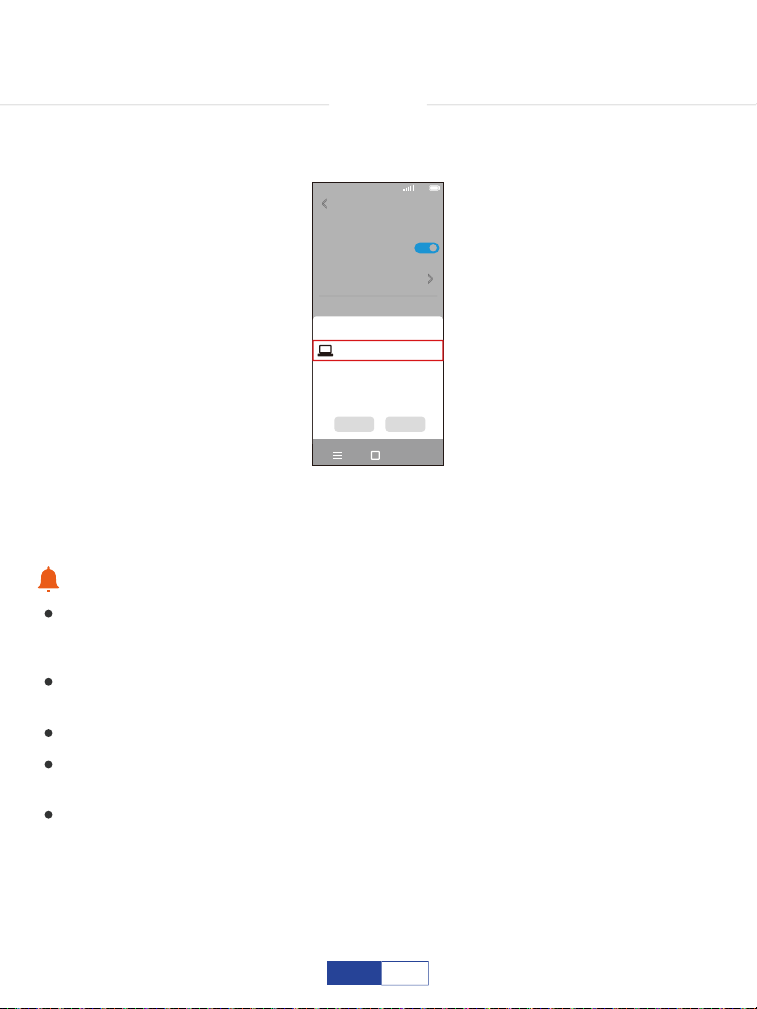
XIAOMI
Swipe up the screen of your Xiaomi device, then tap “Connection&shar-
ing-Cast” and search for the projector.
5G
100%
18:45
>
Cast
Cast
Cast screen contents to an external
monitor
>
Cancel Help
Select device(1)
DONGLE-*****
Demos
Casting documents,games,photos,and
videos
>
SPECIAL FEATURES
Warm Tips:
The fluency of screen mirroring with wireless connection will be affected by the
network environment. A bandwidth of 100 Mbit or more is recommended when
using screen mirroring;
Make sure your mobile device is closed to the projector when using wireless
connection. A distance within 1m/3.3ft is recommended;
Some mobile devices may not support screen mirroring due to the compatibility;
Due to copyright issues, Netflix, Amazon prime, Disney and Hulu are not supported
to play directly by mirror screen with phone, it must be connected TV stick to play.
Google phones and partial Motorola phones prohibit screen mirroring directly from
the projector due to mirroring protocol issues. You need to have a Google Chrome-
cast to connect it.
19
EN
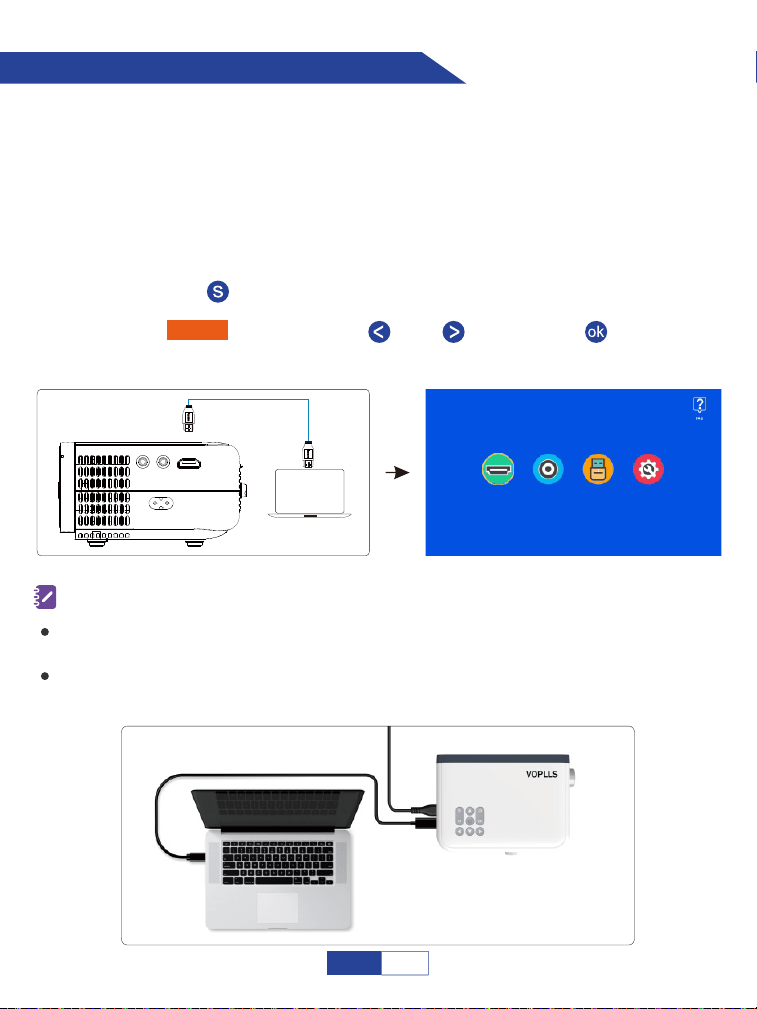
Connecting to the Computer
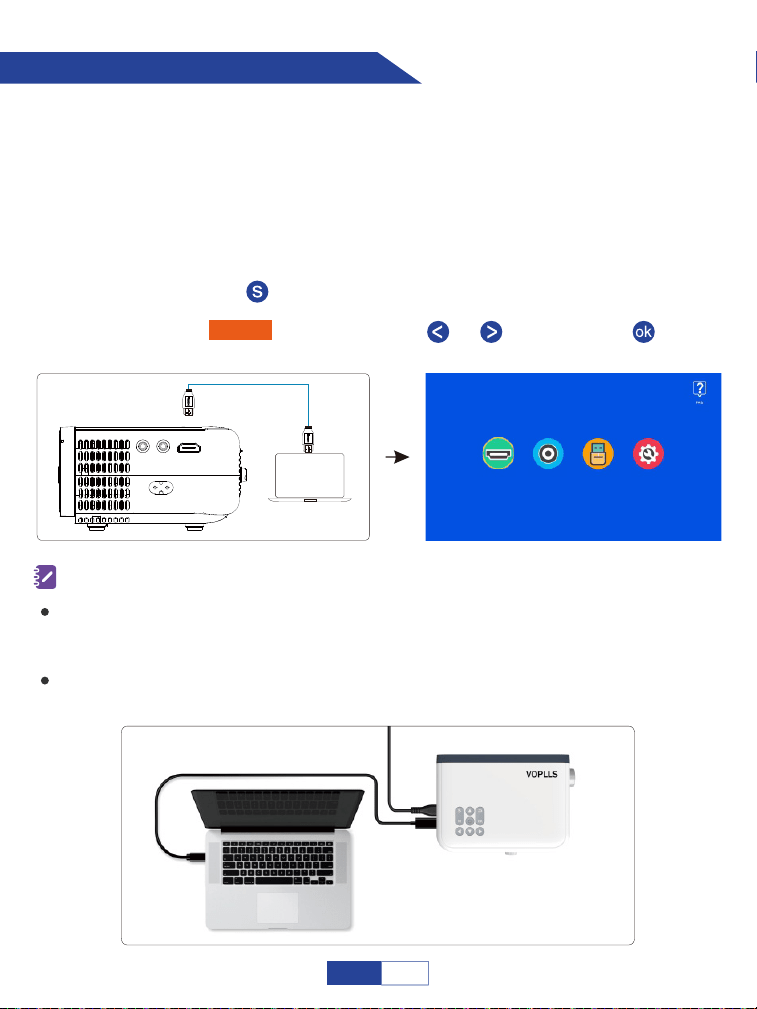
Turn on your computer and the projector;
Step 1:
Connect the HDMI cord to your computer's HDMI port;
Step 2:
Press the “ ” button to back to home page;
Step 4:
Connect the other end to HDMI port on your projector;
Select “HDMI” by pressing the “ ” or “ ” then press “ ” button to
confirm.
Step 5:
Step 3:
(not included)
Connect the projector to your computer by using the HDMI cord in the package. An
HDMI connection is recommended.
To connect a computer that only includes a type C port, you need to purchase an
extra USB C to HDMI cable that allows you to connect to the projector's HDMI port.
You need to select the project option when connecting your computer to the projector
at the first use.
AV USB Settings
HDMI AV USB Settings
Note:
20
EN

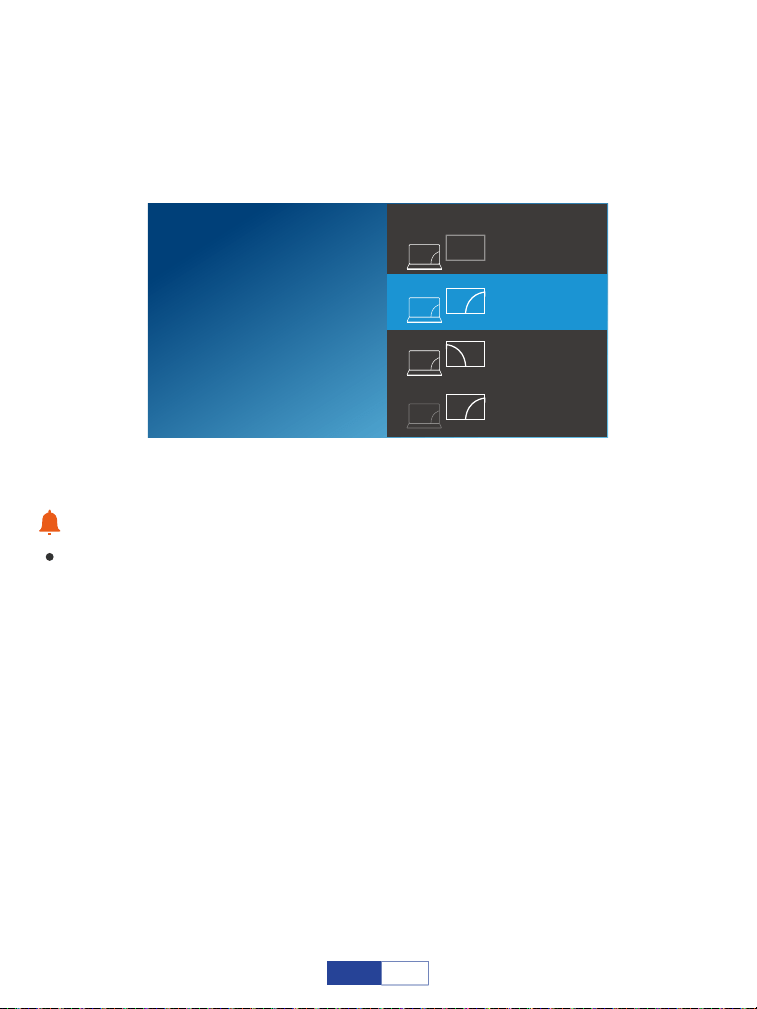
Pressing the Windows logo key + P key at the same time and selecting "DUPLICATE”.
For Windows7 and higher system
Warm Tips:
Due to copyright issues, Netflix, Amazon prime, Disney and Hulu are not supported
to play directly by mirror screen with phone, it must be connected TV stick to play.
SECOND SCOND SCREEN ONLY
Project
PC SEREEN ONLY
DUPLICATE
EXTEND
21
EN

Connecting to Firestick
Insert Firestick;
Your Firestick may in sleep mode, please unplug your Firestick and charger cable of
Firestick, then plug back in to activate the Firestick.
Step 1:
Connect a charger cable for your Firestick;
Step 2:
Press the “ ” button to back to home page and select "HDMI" by pressing
the “ ” or “ ” then press “ ” button to confirm.
Step 3:
(not included)
AV USB Settings
HDMI AV USB Settings
What if projector doesn't recognize Firestick?
Enter "Setting" and find "Display & Sound". Then select "on" for "navigation sounds".
Select "Stereo (or PCM)" for "surround sound".
What if there is no sound?
22
EN
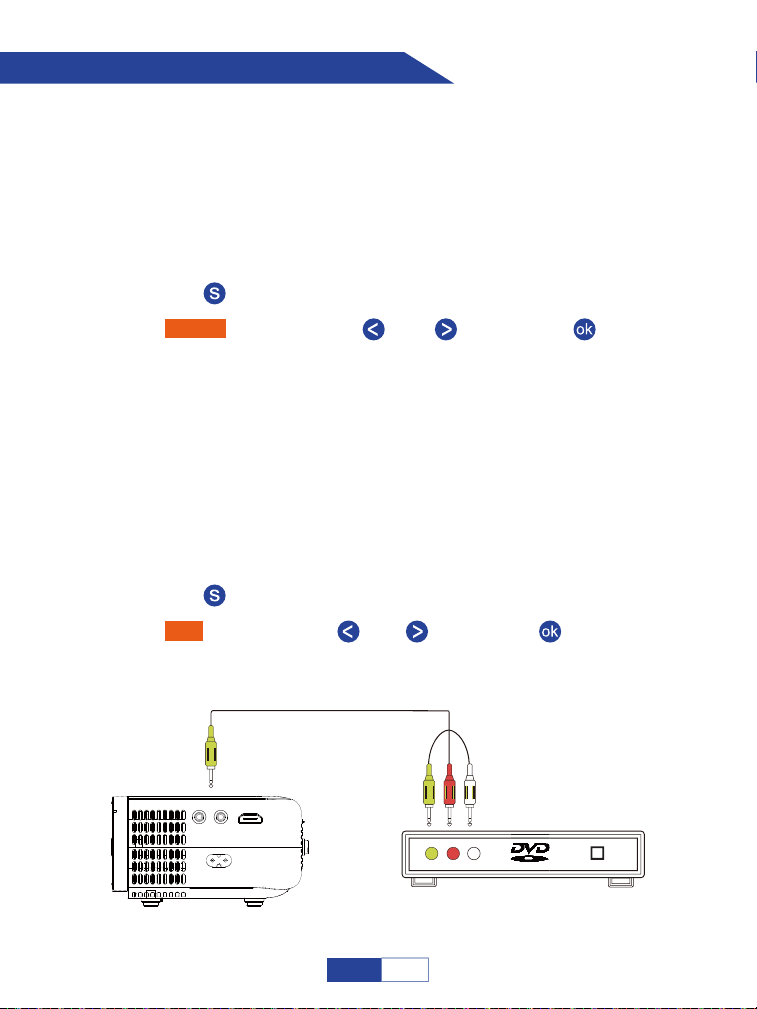
Connecting to the DVD Player
Turn on your DVD player and the projector;
Step 1:
Connect the HDMI cord to your DVD player's HDMI port;
Step 2:
Connect the other end to HDMI port on your projector;
Step 3:
Press the “ ” button to back to home page;
Step 4:
Step 5:
Select “HDMI” by pressing the “ ” or “ ” then press “ ” button to
confirm.
Option 1: Connect the projector to your DVD player by using the HDMI
cord in the package.
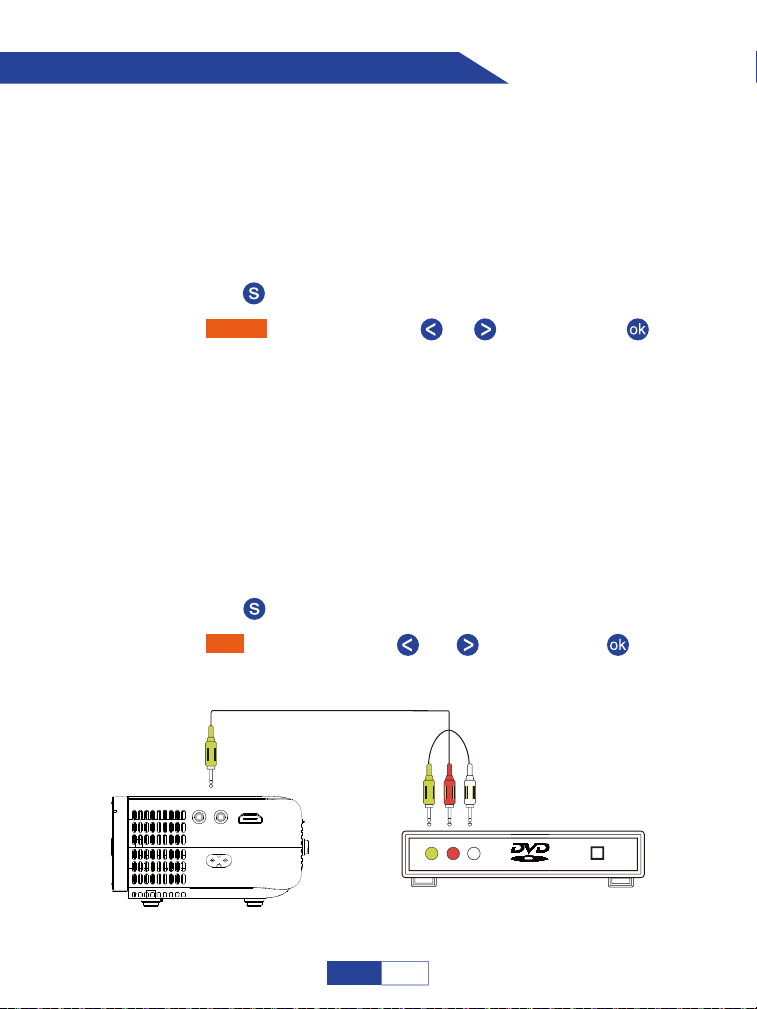
Turn on your DVD player and the projector;
Step 1:
Connect the colorful Female connectors to your DVD player’s RCA cable;
Step 2:
Connect the yellow Male connector to the AV inport on the projector;
Step 3:
Press the “ ” button to enter back to home page;
Step 4:
Step 5:
Select “AV” by pressing the “ ” or “ ” then press “ ” button to confirm.
Option 2: Connect the projector to your DVD player by using the AV
cable in the package.
23
EN
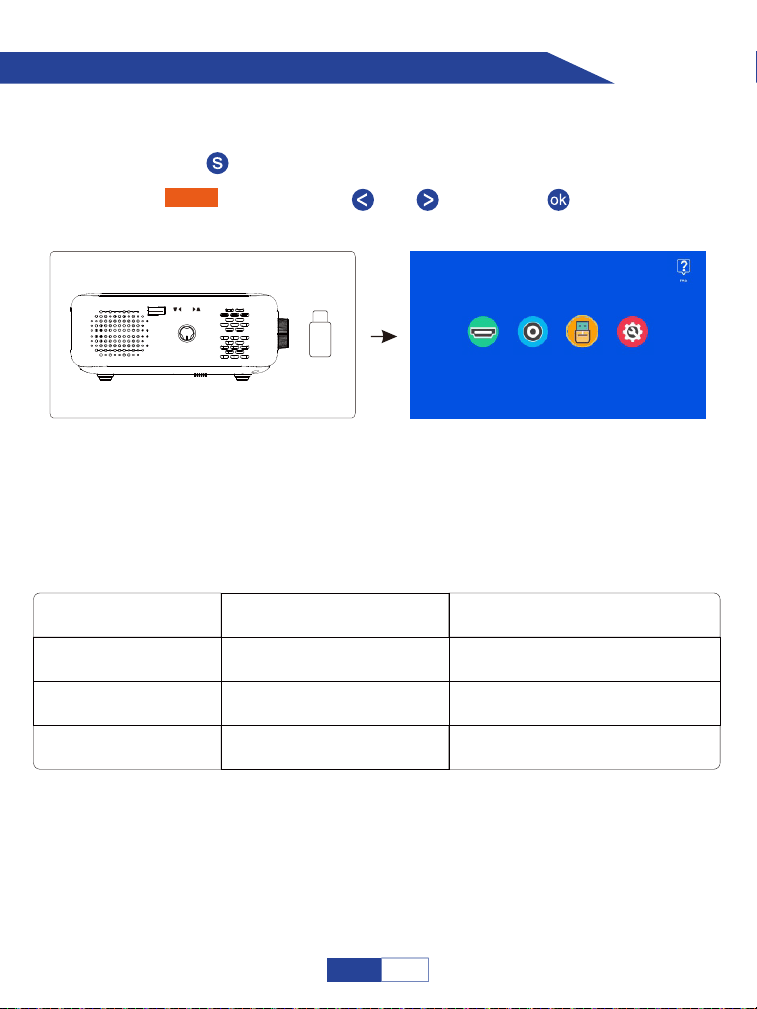
Connecting to the External Storage Device
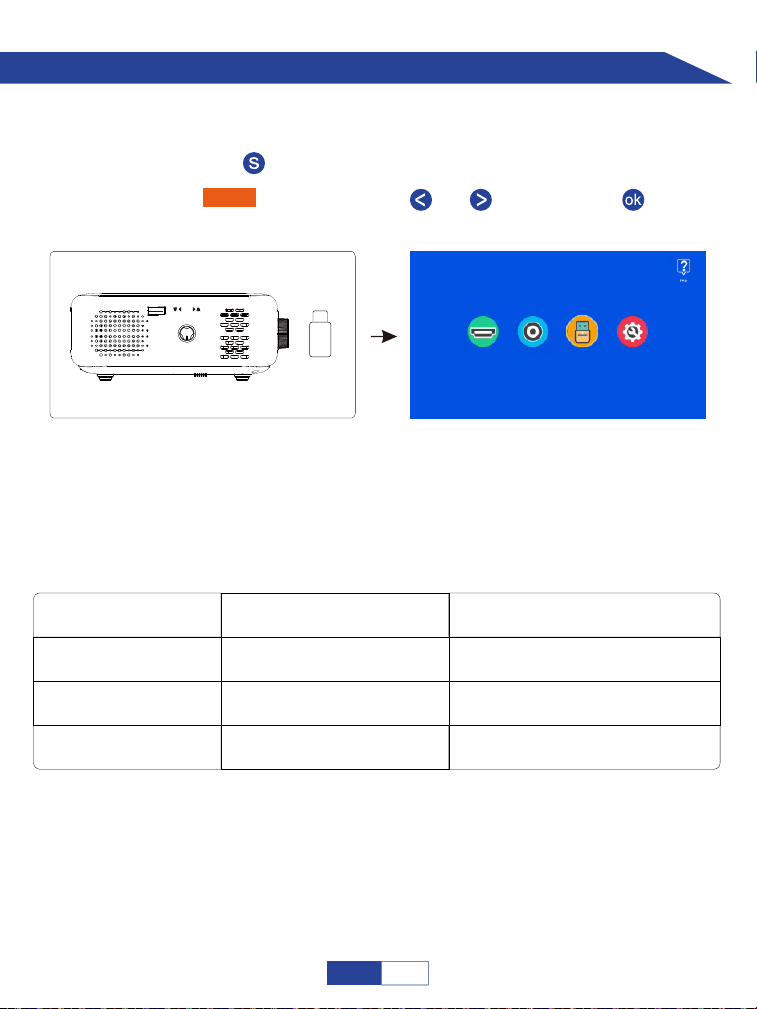
Insert USB drive;
Step 1:
Press the “ ” button to back to home page;
Step 2:
Select “USB” by pressing the “ ” or “ ” then press “ ” button to confirm.
Step 3:
If USB stick is recognized successfully, the icon of the USB drive in the upper right corner
will light up. Please note that your USB drive and files need to meet the following formats.
(for example: If the format of your USB drive is NTFS, the memory capacity of USB drive
must be under 128G and the memory of video must be under 2T.)
Formats of USB Drive
NTFS
FAT32
128G
128G
2T
4G
FAT 128G 2G
Maximum memory capacity
of USB drive
Maximum memory of each video
HDMI AV USB Settings
USB
KEYSTONE
//
24
EN
Important Safety Considerations
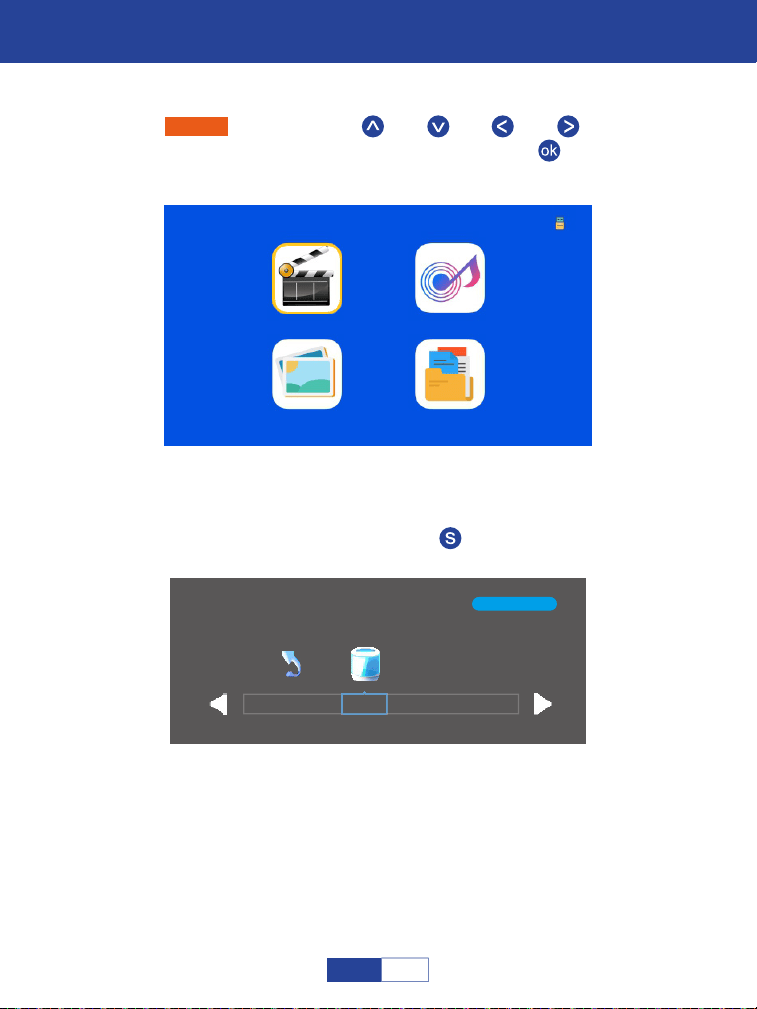
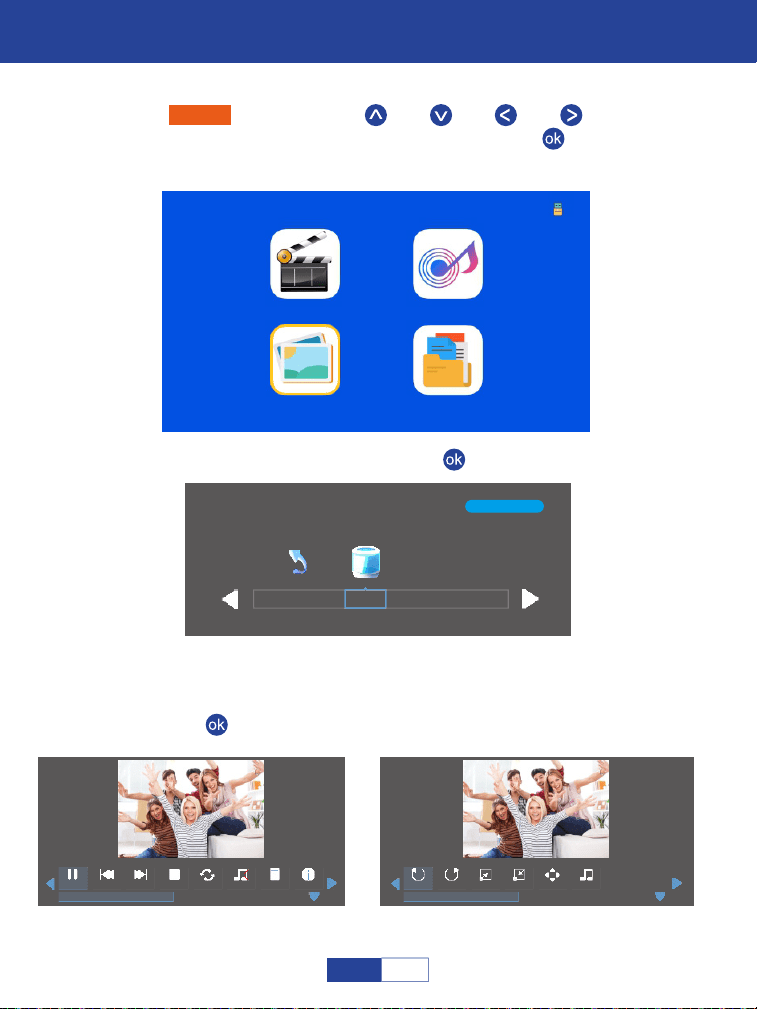
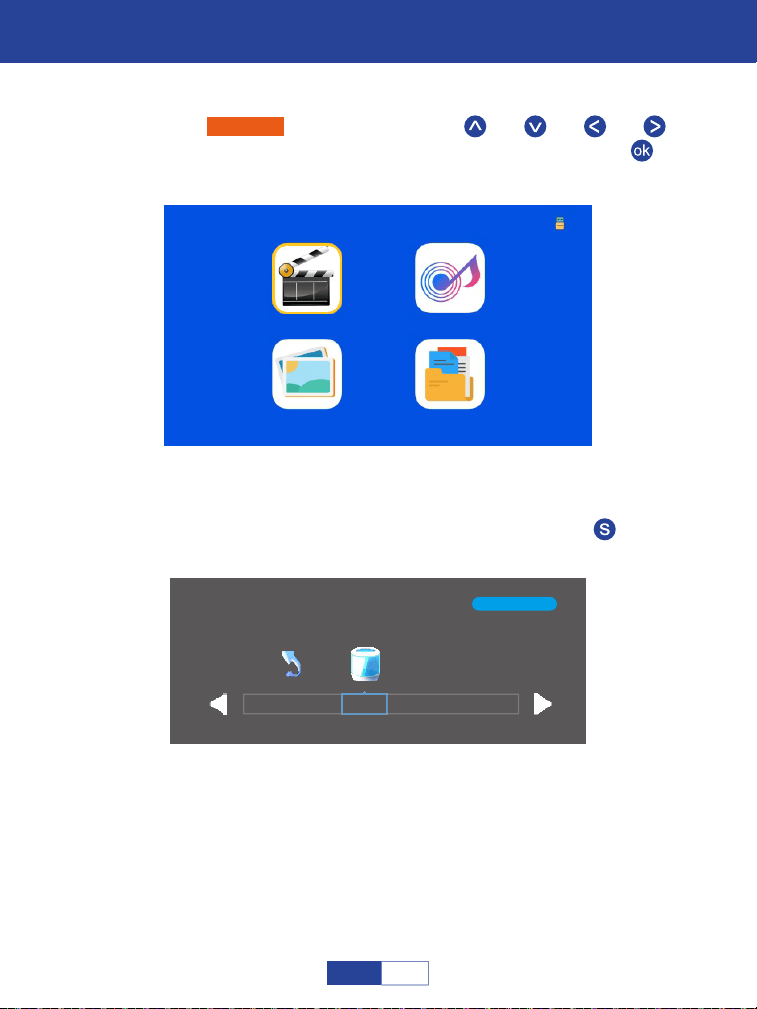
Playing Movie
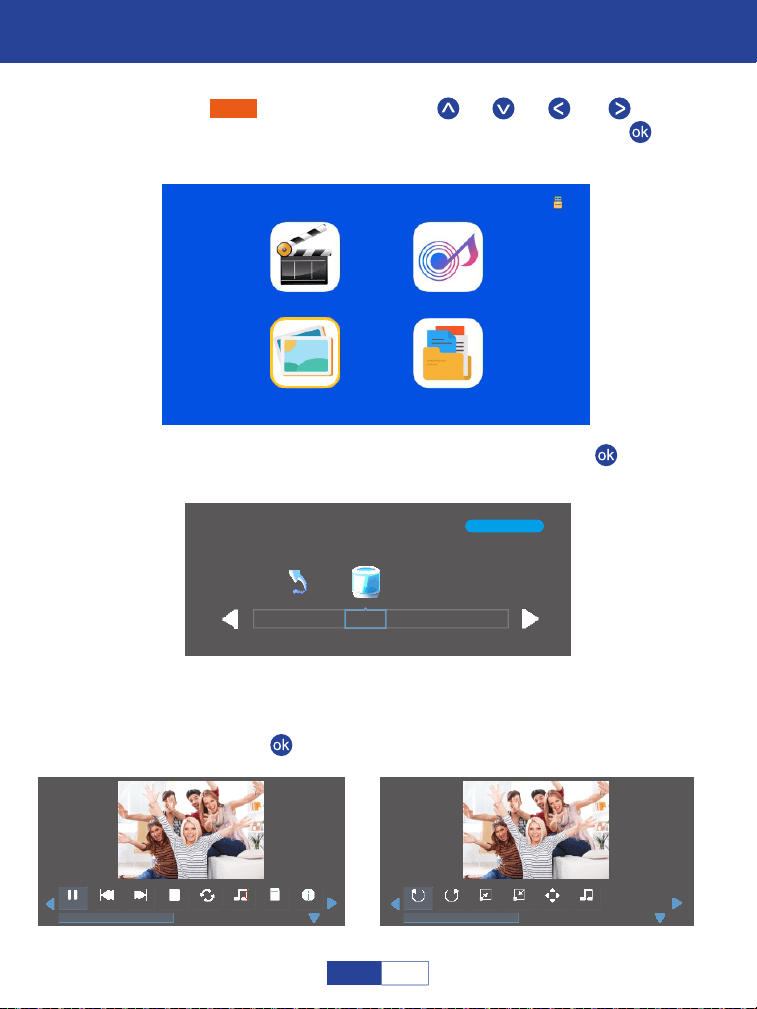
Select “Movie” by pressing the “ ” or “ ” or “ ” or “ ” buttons and
the selected frame will be highlighted. Then press the “ ” button to enter
the following interface;
Step 1:
Select the disk C or USB, then press the “ ” button to enter the disk;
Step 2:
1/1
C
Return
Movie Music
Photo Text
25
EN
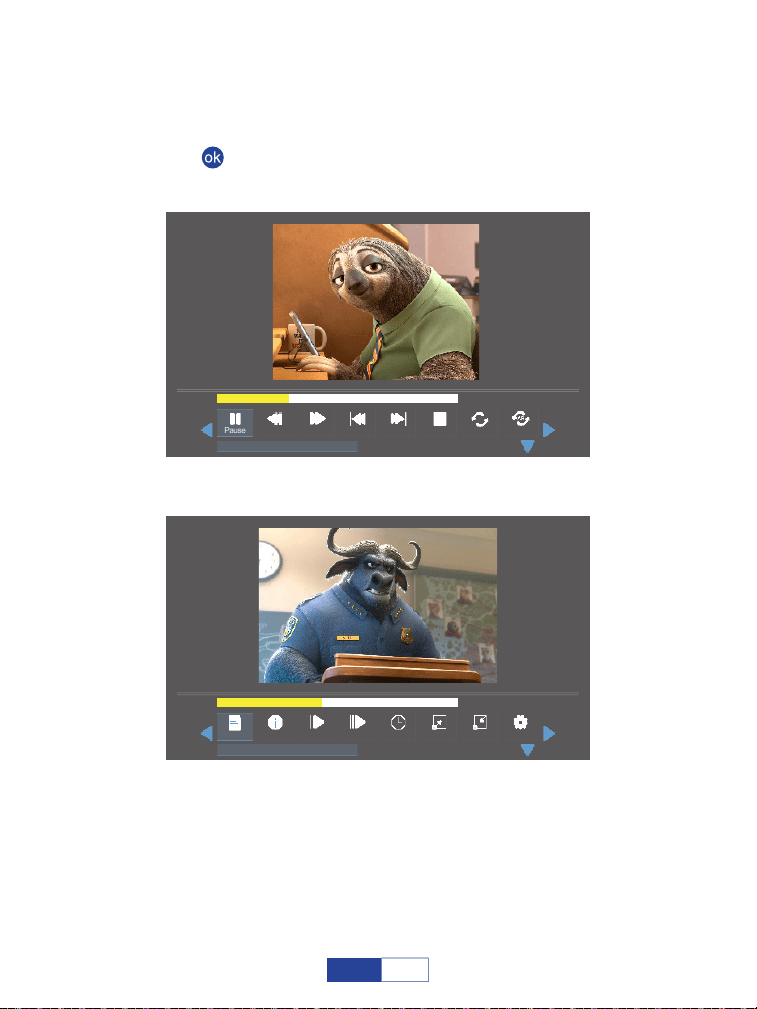
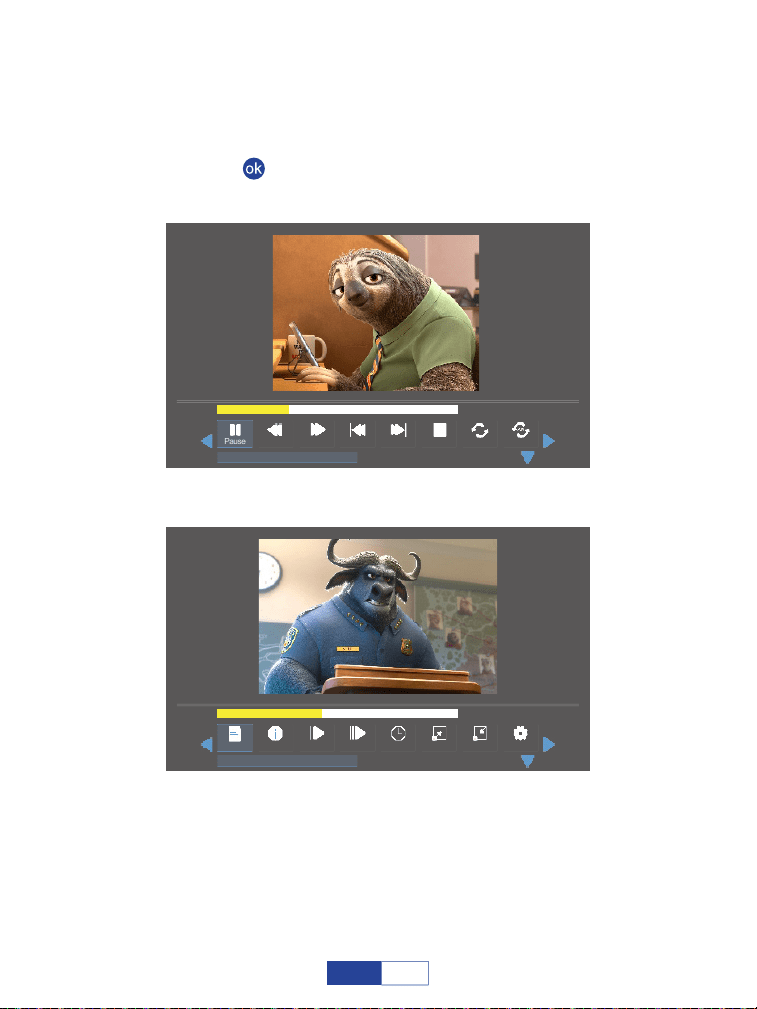
Select the Movie file or click the folder to enter the next directory till you find
the movie you would like to play in the directory;
Step 3:
Press the “ ” button on the projector or remote to select movie.
Step 4:
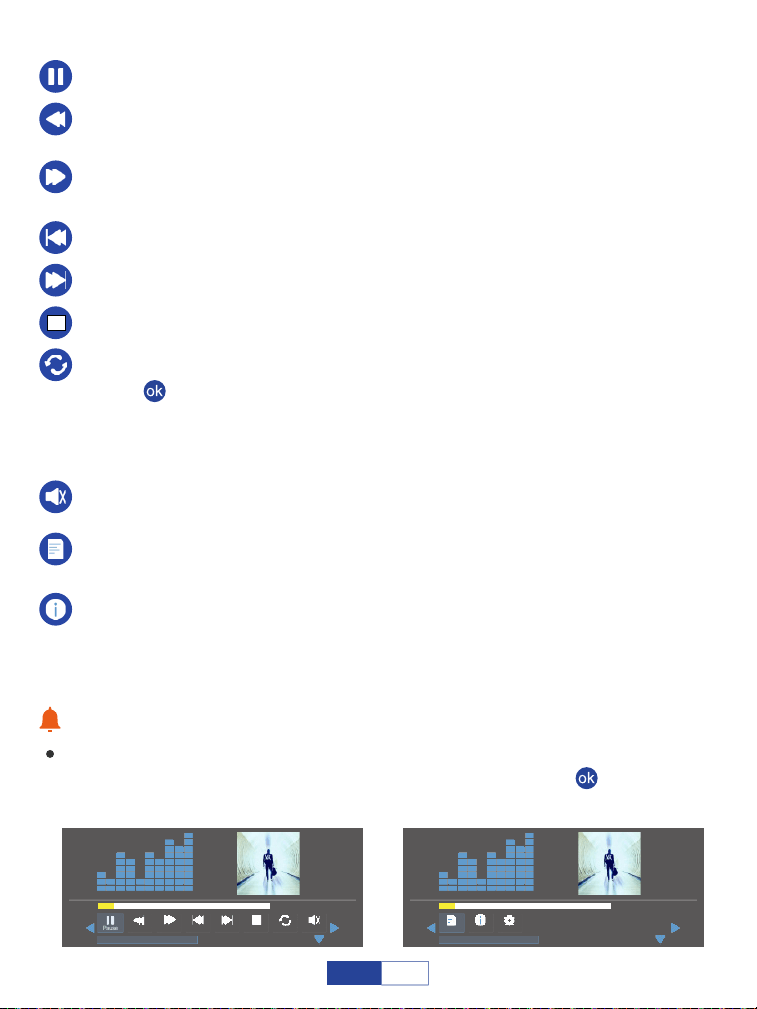
00:01:15 / 00:03:48
Prev StopPause
Repeal All
Set AFB FF Next
anime video.flv
00:01:35 / 00:03:48
StepPlaylist Green R..Info Slow Golotime
anime video.flv
Zoom Out
Zoom In
26
EN
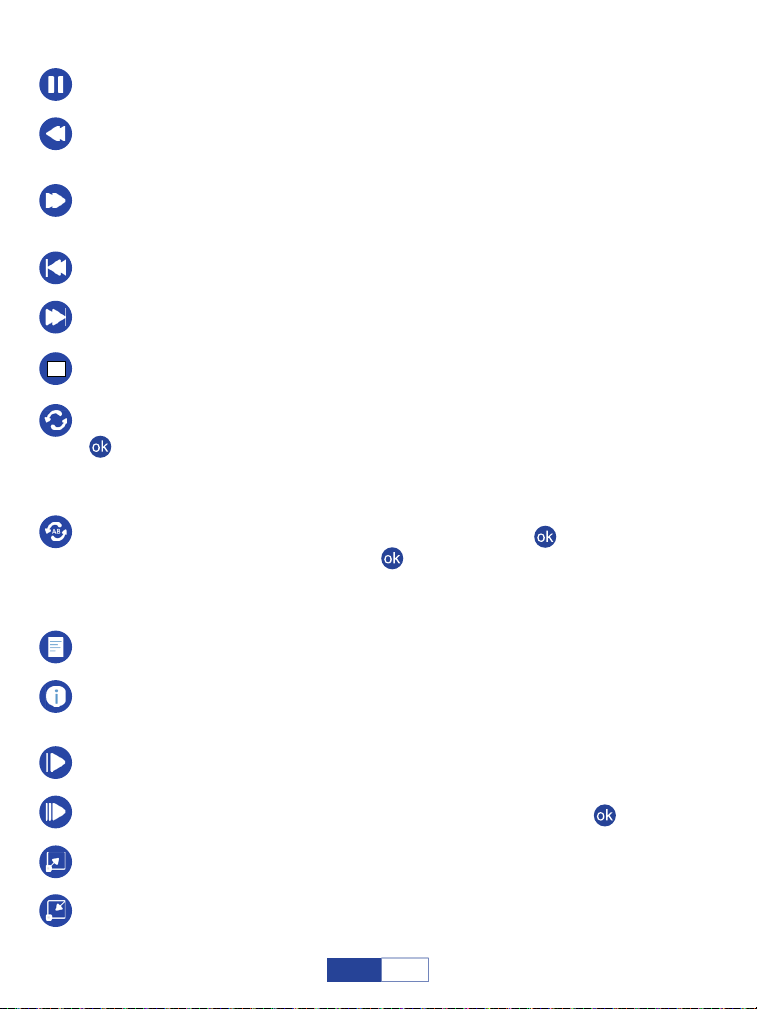
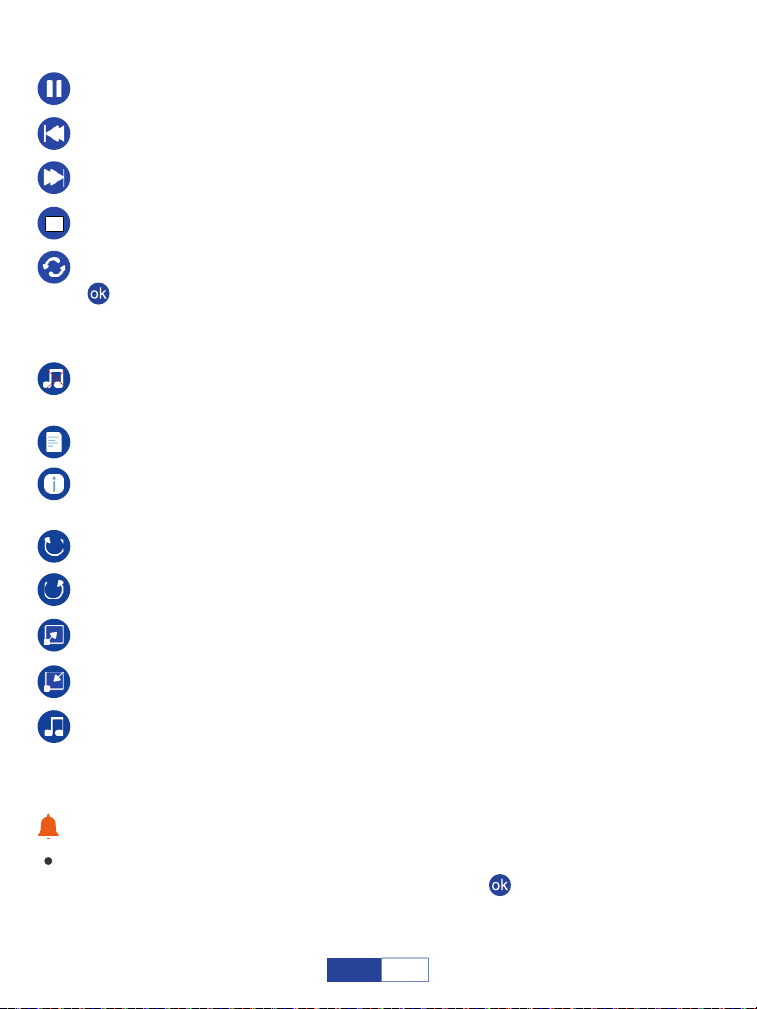
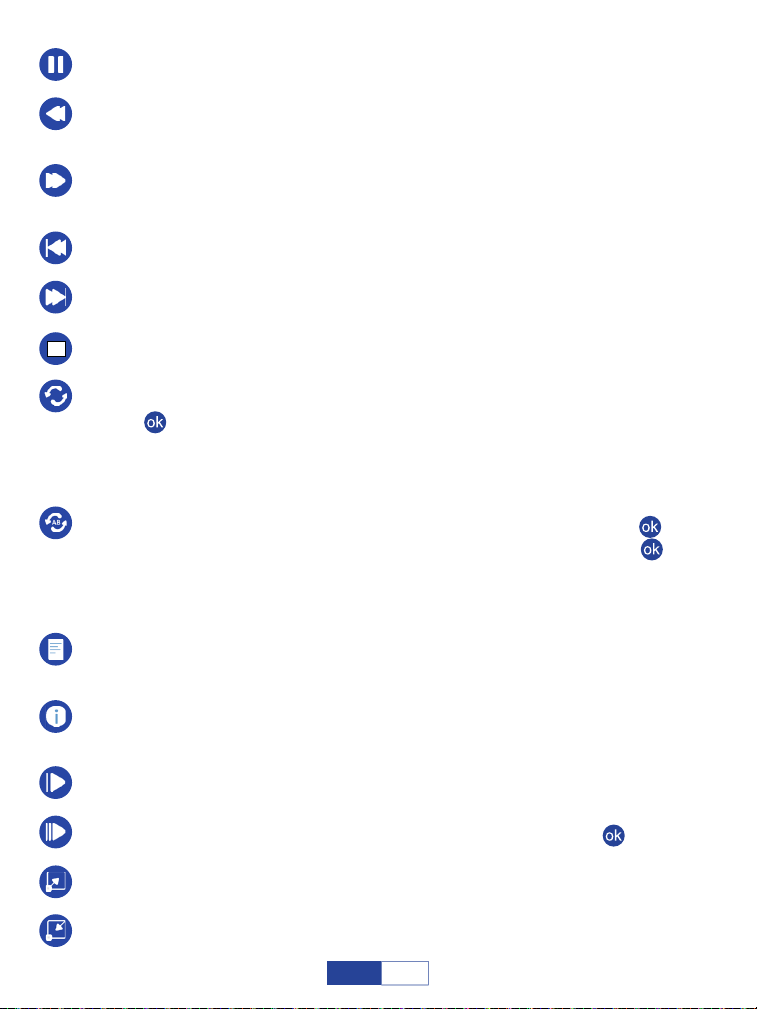
Play/Pause: Plays or pauses the current video.
Prev: Previous, goes back to the previous video.
Next: Goes to the next video.
Stop: Exits from the current video.
FF: Fast Forward, pushes the video to move forward quickly while playing it.
The forward speed ranges from 2X to 32X.
FB: Fast Backward, rewinds the video back quickly while playing it.
The rewinding speed ranges from 2X to 32X.
Repeat: Has the options of Repeat 1, Repeat All and Repeat NONE. Press the
“ ” button to switch among these options. Repeat All loops to play all the videos
in your playlist. Repeat NONE: plays the current video once, then exits from the
current video; Repeat 1 loops to play the current video all the time.
Set A/ Set B/ None: Selects “Set A” by pressing the “ ” button to set a time
point and select “Set B” by pressing “ ” button to set another time point when
playing the video, then it will loop to play the video fragment between these points.
Select None to return to normal playing mode.
Step: Steps forward the video frame by frame by pressing the “ ” button.
Zoom in: Magnify your video image from 2X to 8 X.
Zoom out: Shrink your video image from 1X to 1/8X.
Playlist: A list of video files that can be played from the current folder.
Info: Shows the information about the current video including resolution, size
and so on.
Slow: Plays the video in slow motion with a speed being range from 2X to 16X.
27
EN
Important Safety Considerations
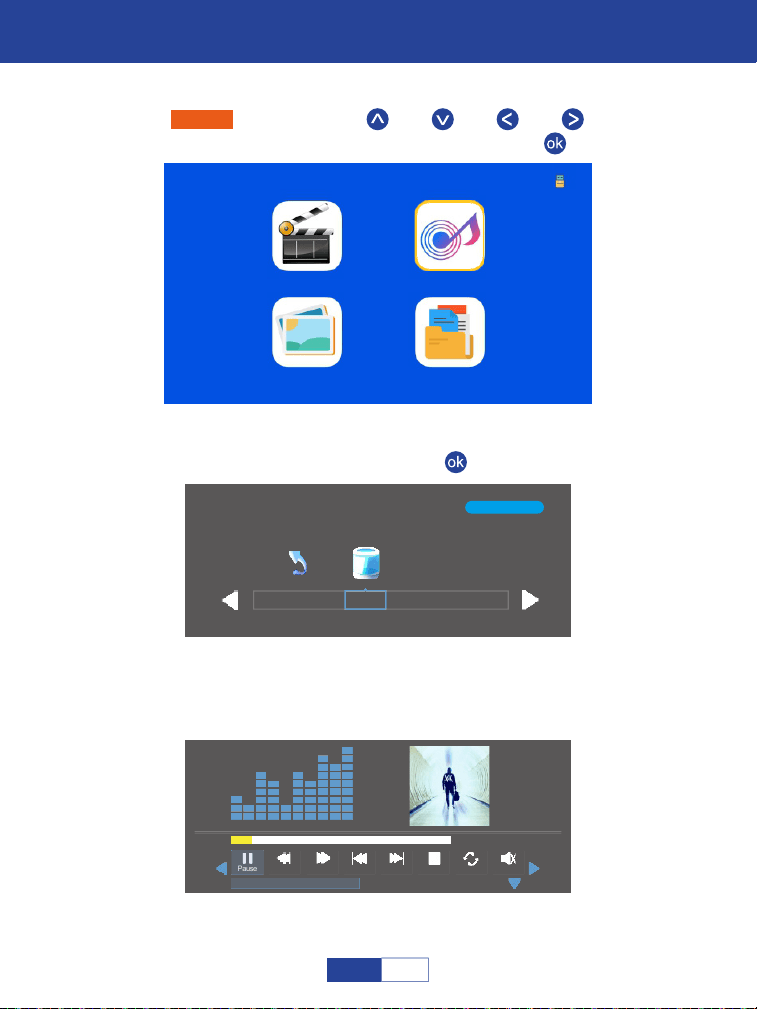
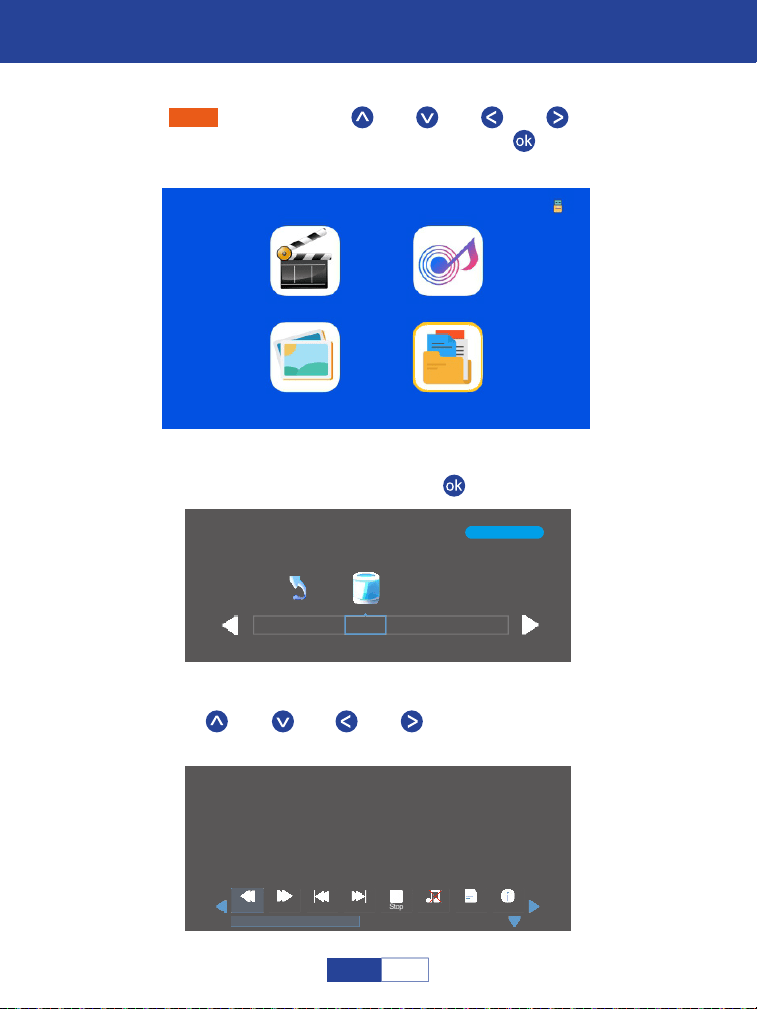
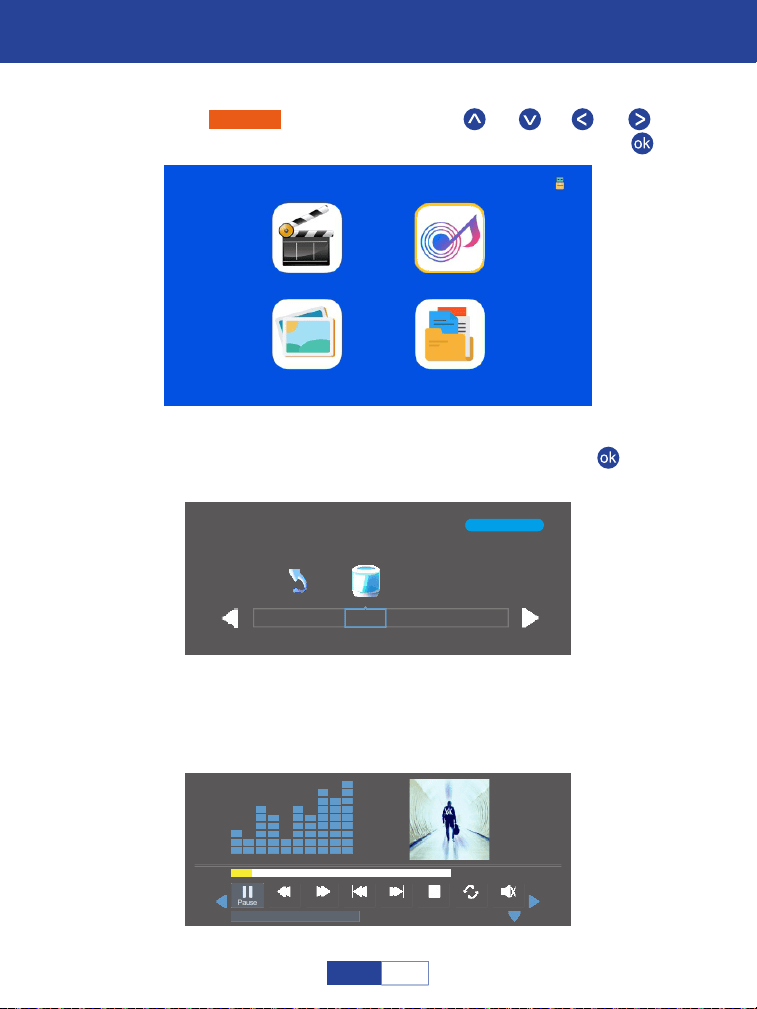
Playing Music
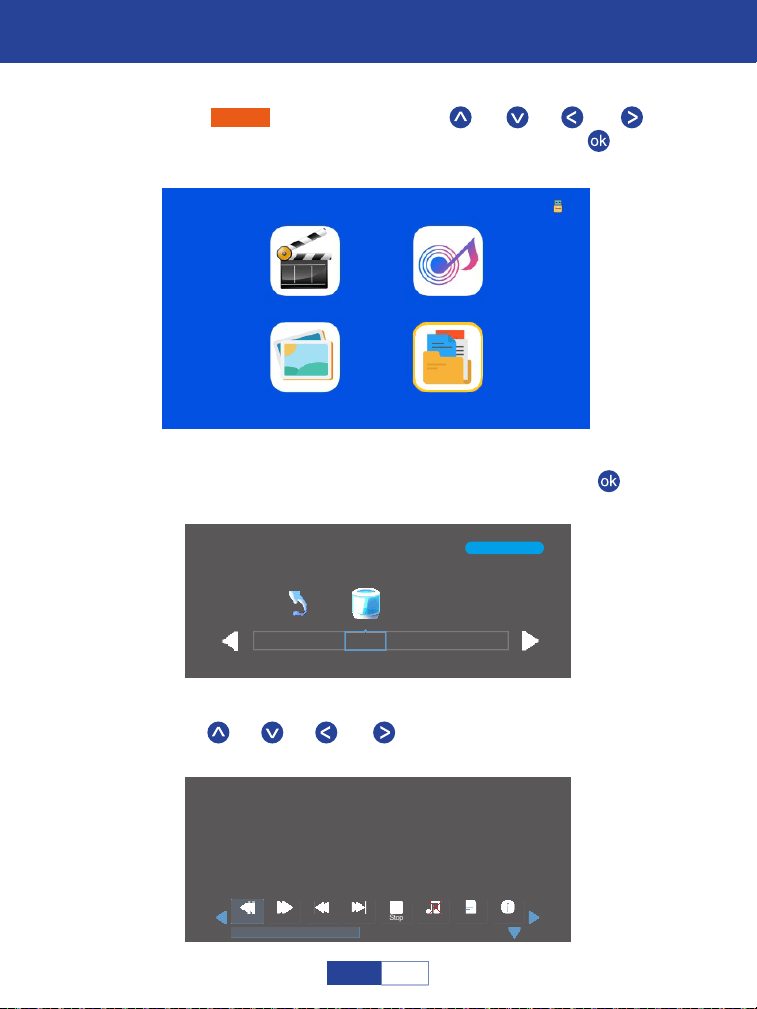
Select “Music” by pressing the “ ” or “ ” or “ ” or “ ” buttons and
the selected frame will be highlighted. Then press the “ ”;
Step 1:
Movie Music
Photo Text
1/1
C
Return
Select the disk C or USB, then press the “ ” button to enter the disk;
Step 2:
Select the music file or click the folder to enter the next directory till you find
the music you would like to play in the directory.
Step 3:
00:00:15 / 00:03:48
Prev StopPause
Repeal All
MuteFB FF Next
Alan Walker· Faded Mp3
28
EN
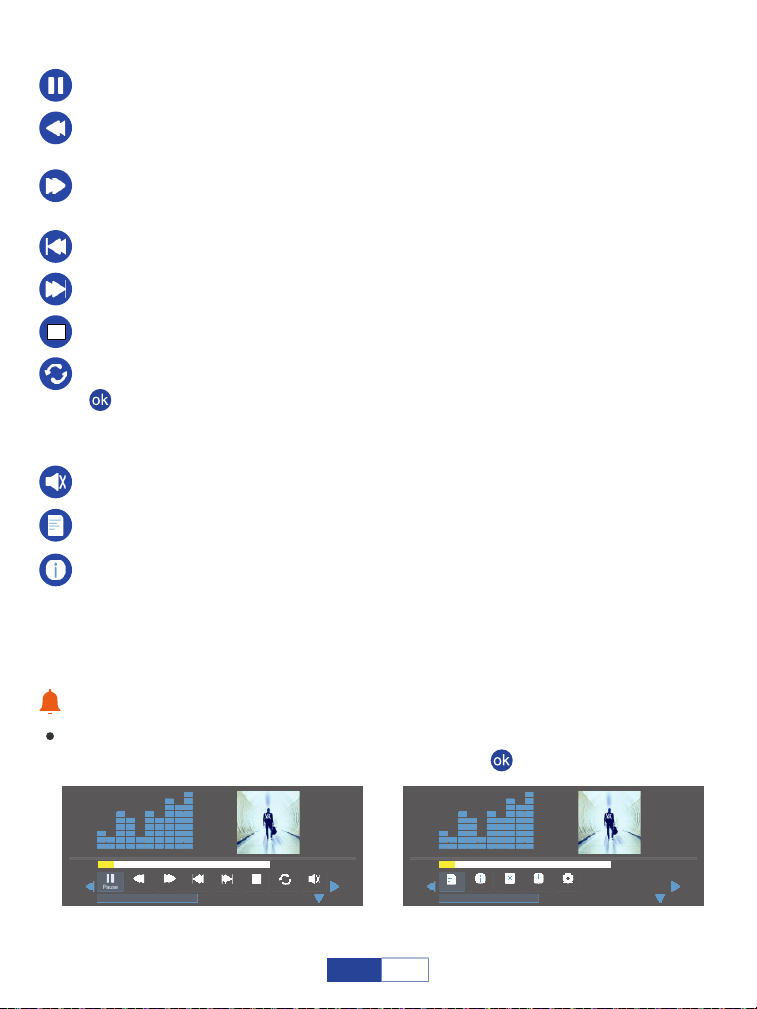
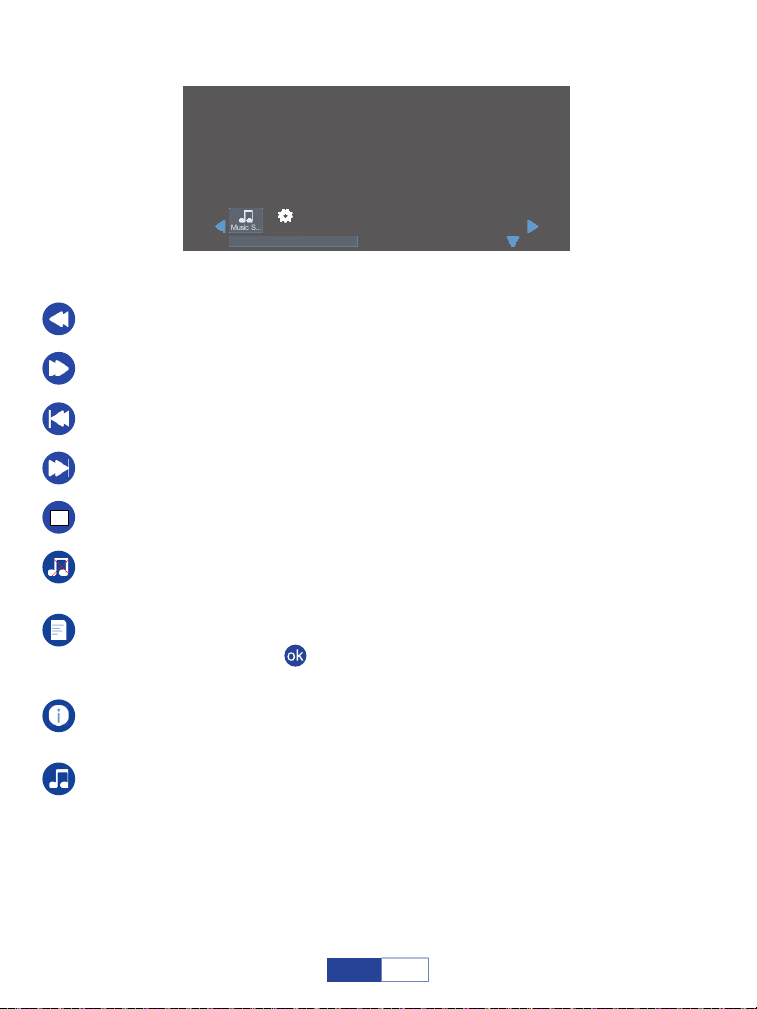
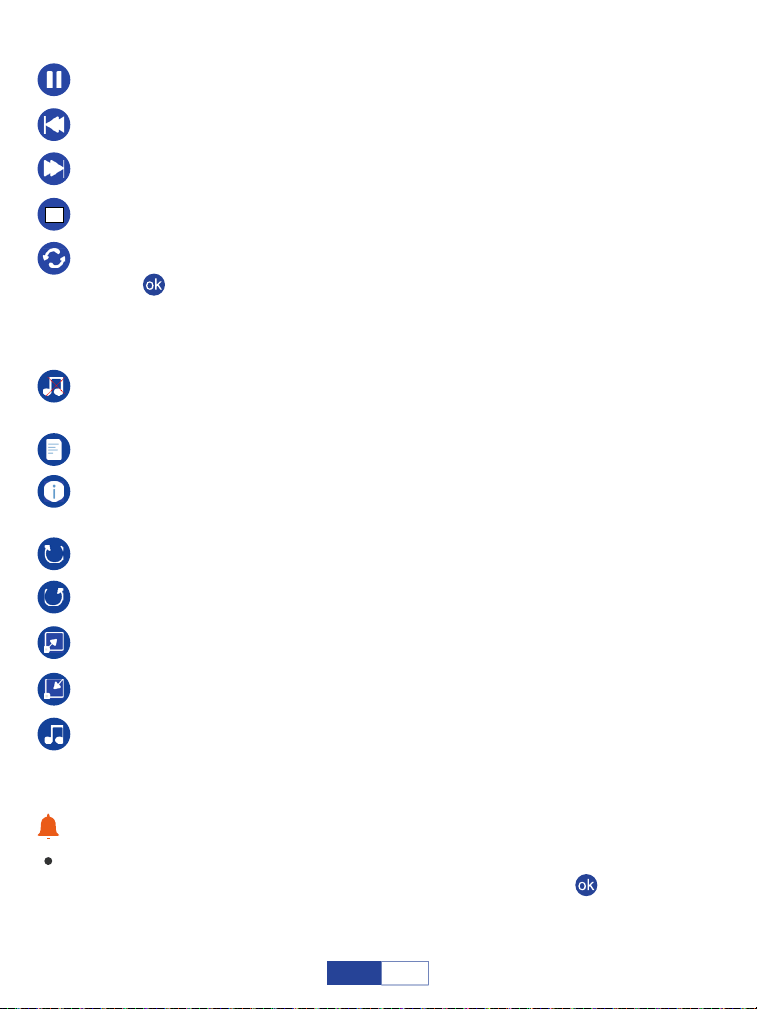
Play/Pause: Plays or pauses the current video.
Prev: Previous, goes back to the previous video.
Next: Goes to the next video.
Stop: Exits from the current video.
FF: Fast Forward, pushes the video to move forward quickly while playing it.
The forward speed ranges from 2X to 32X.
FB: Fast Backward, rewinds the video back quickly while playing it.
The rewinding speed ranges from 2X to 32X.
Repeat: Has the options of Repeat 1, Repeat All and Repeat NONE. Press the
“ ” button to switch among these options. Repeat All loops to play all the videos
in your playlist. Repeat NONE: plays the current video once, then exits from the
current video; Repeat 1 loops to play the current video all the time.
Warm Tips:
It will show a bottom bar with different settings when playing the music. Press the
Down button or the Back button to hide it. Press the “ ” button to show it again.
Mute: Mutes or unmutes the current music.
Playlist: A list of music files that can be played from the current folder.
Info: Shows the information about the current music including Bit Rate, Artist,
Size, and so on.
00:00:15 / 00:03:48
Prev StopPause
Repeal All
MuteFB FF Next
Alan Walker· Faded Mp3
00:00:15 / 00:03:48
GotoTimePlaylist
Info Close P...
Auto
Alan Walker· Faded Mp3
29
EN
Important Safety Considerations
Playing Photo
Select “Photo” by pressing the “ ” or “ ” or “ ” or “ ” buttons and
the selected frame will be highlighted. Then press the “ ” button to enter
the following interface;
Step 1:
Movie Music
Photo Text
1/1
C
Return
Select the disk C or USB, then press the “ ” button to enter the disk;
Step 2:
Select the photo or click the folder to enter the next directory till you find the
photo you would like to play in the directory;
Step 3:
Press the “ ” button on the projector or remote to select photo.
Step 4:
Prev StopPause
Repeal All
Next
Stock-photo-tupian123.jpg
Music Off
Playlist Info
RotateRotate Zoom In
Stock-photo-tupian123.jpg
Music S...
Move
Zoom Out
30
EN
Zoom in: Magnify your video image from 2X to 8 X.
Zoom out: Shrink your video image from 1X to 1/8X.
Music source: Tick some music file(s) for photo background.
Music Off: Turn on/off the music file(s) you ticked under the MUSIC Source for
text background.
Rotate: Rotate the photo clockwise by 90°, 180°, 270°, 360°.
Info: Shows the information about the current photo including resolution, size,
date and time.
Playlist: A list of photo files that can be played from the folder.
Warm Tips:
It will show a bottom bar with different settings when playing the music. Press the
Down button or the Back button to hide it. Press the “ ” button to show it again.
Play/Pause: Plays or pauses the current video.
Prev: Previous, goes back to the previous video.
Stop: Exits from the current video.
Next: Goes to the next video.
Repeat: Has the options of Repeat 1, Repeat All and Repeat NONE. Press the
“ ” button to switch among these options. Repeat All loops to play all the videos
in your playlist. Repeat NONE: plays the current video once, then exits from the
current video; Repeat 1 loops to play the current video all the time.
Rotate: Rotate the photo counterclockwise by 90°, 180°, 270°, 360°.
31
EN
Important Safety Considerations
Playing Text
Select “Text” by pressing the “ ” or “ ” or “ ” or “ ” buttons and the
selected frame will be highlighted. Then press the “ ” button to enter the
following interface;
Step 1:
Press the “ ” or “ ” or “ ” or “ ” on the operation panel to select the
equipment for text storage.
Movie Music
Photo Text
1/1
C
Return
Select the disk C or USB, then press the “ ” button to enter the disk;
Step 2:
Step 3:
Prev StopPs Page Next
An evening in August.txt
Music Off
Playlist Info
An evening in August 1997
Li Ruiying learned the news that her son fell from the building and was injured, and she
was furious.But she was about to star t the live news broadcast, so she couldn't rush to her
son to accompany her right away.In the "News Network" that night, Li Ruiying's
performance was as usual, still calm and calm, her anxiety was well hidden, and she
couldn't see that her son just had an accident.After the live broadcast, Li Ruiying almost
flew to the hospital. Fortunately, her son was only slightly injured, otherwise she would
never have forgiven herself.
Next Page
32
EN
Next Page: Next Page, goes to the next page of the current text.
Ps Page: Previous Page, goes back to the previous page of the current text.
Prev: Previous, goes back to the previous video.
Next: Goes to the next video.
Stop: Exits from the current video.
Info: Shows the information about the current photo including resolution, size,
date and time.
Playlist: A list of text files that can be played from the folder. If you did not tick
the texts by pressing the “ ” button in the sub menu, it will show all the texts that
can be played; otherwise, it will show your ticked text(s).
Music Off: Turn on/off the music file(s) you ticked under the MUSIC Source
for text background.
Music source: Tick some music file(s) for photo background.
An evening in August.txt
An evening in August 1997
Li Ruiying learned the news that her son fell from the building and was injured, and she
was furious.But she was about to star t the live news broadcast, so she couldn't rush to her
son to accompany her right away.In the "News Network" that night, Li Ruiying's
performance was as usual, still calm and calm, her anxiety was well hidden, and she
couldn't see that her son just had an accident.After the live broadcast, Li Ruiying almost
flew to the hospital. Fortunately, her son was only slightly injured, otherwise she would
never have forgiven herself.
Music S...
Auto
33
EN

Important Safety Considerations
Settings
Image Mode
Screen Ratio
Zoom
4:3, 16:9, Full, Zoom1, Zoom2 and Auto
Standard, Dynamic, Mild and Custom
100% to 50%
Color Temperature Cool, Standard and Warm
Sound Mode
Trebie
Bass
50
Standard, Movie, Music, Sports and Custom
Bass
Picture
Image mode
Screen Ratio
Zoom
Color Temperature
< Standard >
< 16:9 >
< 51%>
< Standard >
Sound
Sound mode
T
rebie
Bass
< Standard >
< 50 >
< 50>
34
EN
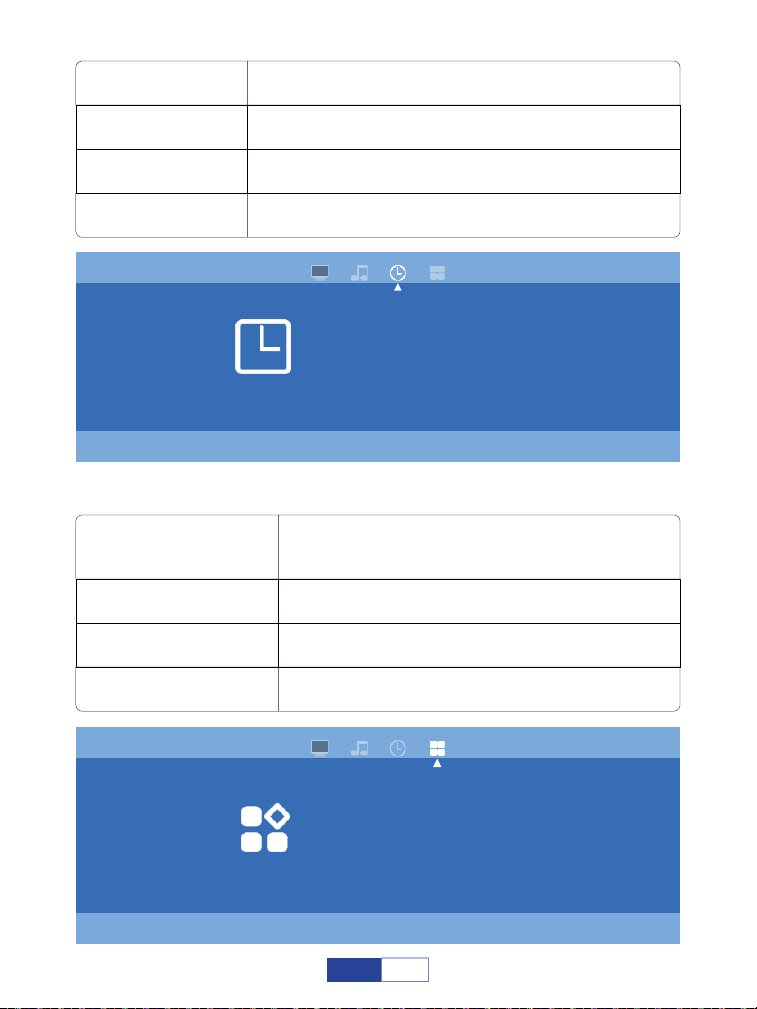
Off Time
On Time
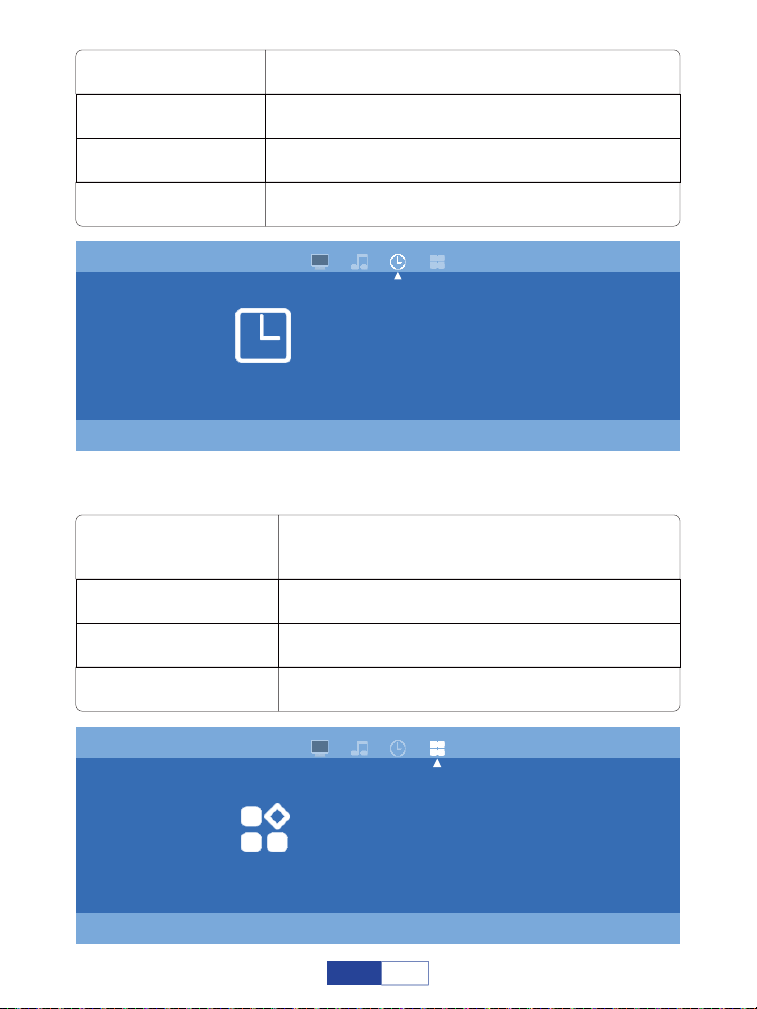
Sleep Timer
Off, Once and Everyday
Off, Once and Everyday
Off, 10min, 20min, 30min, 60min and 90min
Auto Sleep Off, 3H, 4H, 5H
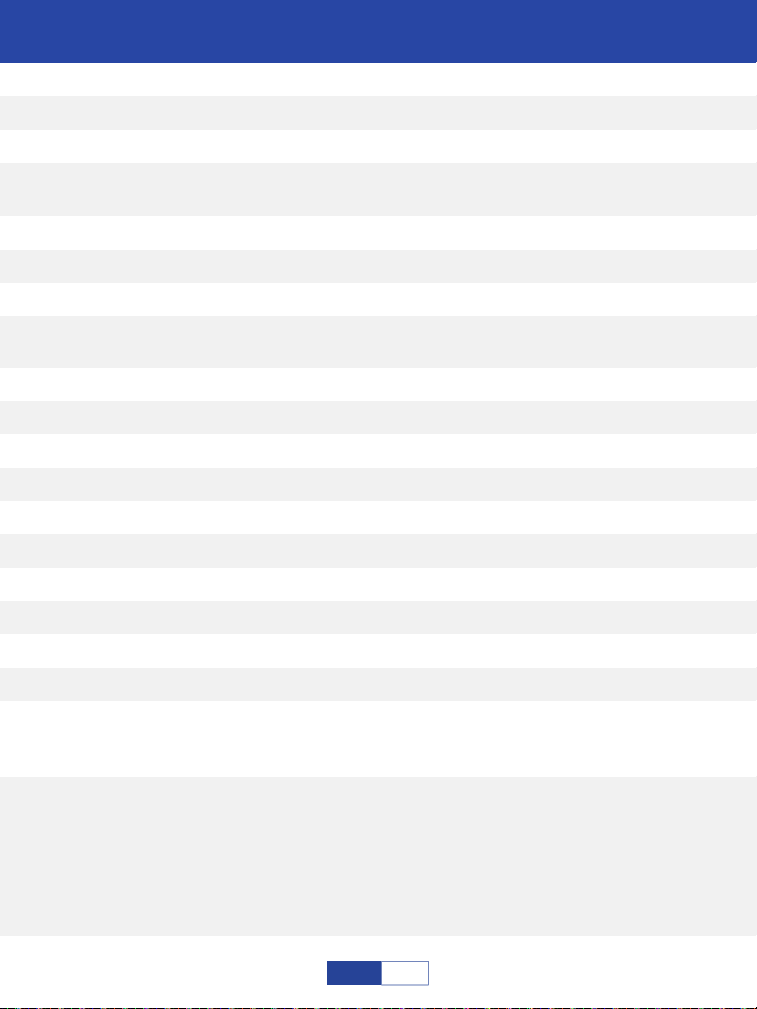
OSD Language
Projection Settings
Reset
Front, Rear, Ceiling Front and Ceiling Rear
English, Deutsch, France, Spanish, Italiano,
Greek, Czech, Finnish, Croatian, Slovak,
Japanese and Chinese for your choice
Reset the projector
USB Upgrade Update the local software
Time
Off Time
On Time
Sleep Timer
< Off >
< Off >
< Off >
Auto Sleep < Off >
Options
OSD Language
Projection Settings
Reset
USB Upgrade
<English>
<Front>
35
EN

Projection Tech:
Display Colors:
Lamp Color Temperature:
Lamp Life Time:
Power Supply:
Projector Consumption:
Lens:
Zoom:
Aspect Ratio:
Correction:
A Single Continuous Use Time:
Projection Size:
Projector Weight:
Noise and Light Leaking:
Dimension:
Ceiling Mount Size:
Audio Frequency:
Signal Ports:
USB Format:
LCD TFT Projection system
16.7M
9000K
55000 hrs
AC IN: 100V-240V 50/60HZ
50W
Multichip Composite Coating Optical Lens
100%-50%
4:3/16:9
±15 Degree
<24hour
30-210inch
0.64Kg
Low Noise, Low Light Leaking
173x126x67mm
M6
2W+2W
Video Input (1.OVp-p +/-5%)
HDMI Input (480i 480p 576i 720p 1080i 1080p)
FAT, FAT32, NTFS
Video Format: MPEG1,MPEG2,
MPEG4RM, RMVB, H264, MJPEG, DivX, FLV.
Music Format: Mp3M4A (AAC)
Photo Format: JPEG, BMP, PNG
Product Features
36
EN
Trouble Shooting
1. Why is the display of the projector available but without audio?
The projector or the connected device (PC, TV, etc.) is muted.
Dolby sound is not supported, exit to play again.
Fire stick: Enter “Setting” and find “Display & Sound”. Then select “on” for “navigation
sounds”. Select “Stereo (or PCM)” for “surround sound”.
Try YouTube if your player is Netflix. The problem will happen when playing Netflix
because of copyright.
2. Why is the audio of the projector available but without display?
The video format is not supported by the projector.
Encryption applied to the videos or media player which holds the video.
If the lamp of the projector is off with only audio playing, the lamp is defective.
Please contact seller for a replacement.
Try another HDMI cord if you select the HDMI input source.
Try YouTube if your player is Netflix. The problem will happens when playing Netflix
because of copyright.
Problems listed below might occur during the operation of your projector. Please refer to the
possible factors which might cause the issue to do troubleshooting. Any questions during
use, please feel free to contact with VOPLLS customer service team correspondingly.
Email address of customer service:
North America Marketplace:
Europe Marketplace:
37
EN

3. Why does the projection screen show No Signal?
Make sure the projector connects with phone via HDMI adapter not USB cable.
Please connect the power supply (5V/1A) to ensure the adapter works properly.
Please read the instructions of the HDMI adapter carefully before connecting.
Please watch the video on how to connect the phone and computer mentioned on the
home page of the manual.
4. How can I connect my smart phone to the projector?
HDMI adapter is needed to delivery display from smart phones.
Please connect the power supply (5V/1A) to ensure the adapter works properly.
(external electric supply socket is recommended)
Please read the instructions of the HDMI adapter carefully before connecting.
Please watch the video on how to connect the phone mentioned on the homepage of the
manual.
5. What kind of screws do I need for mounting this projector?
M6 screw.
6. When we connect the phone/computer with the projector, can we
use the remote of projector to control?
No, because the projected content is from phone/computer, and the remote control
cannot control the phone/computer. So we cannot use the remote of projector to control.
7. How should I do if there is loud noise when using the projector?
Contact VOPLLS Team for assistance.
38
EN

9. What if projector only displays the main screen of your computer?
Macbook: Enter settings of computer, select “Mirror Built-in Display” for Airplay Display.
Windows: Enter settings of computer, select “Duplicate these displays” for Display.
10. How should I do if there is expanding dark spot or smoke when
using the projector?
Check if the fan noise increases or the fan stops working. Unplug the projector and
contact VOPLLS Team for assistance.
Make sure the outlet and projector power adapter are not wet or humid which will cause
sparks or smoke on outlet when power on the projector.
11. Why does the projector is shut off during playing?
Make sure the power plug is working and firmly fitted into the outlet.
If the LED indicator on the projector is light up, but the fan doesn’t work, please contact
VOPLLS Team for assistance.
Overheat on the projector will activate built-in power-off protection panel. Restart the
projector when it gets cooler.
12. Can this projector support 3D effect?
The projector supports 3D video source, and 3D viewing performance is achievable
with Red-Blue 3D Glasses; but please understand the experience will not be better
than in the theater and we do not recommend it if you have a higher expectation about
3D effect.
8. What if the sound comes from the mobile phone or computer
instead of projector?
Phone: Turn on Bluetooth on your phone.
Computer: Enter settings of computer, select “high Definition Audio Device” or “the
name of your HDMI adapter” for Audio.
39
EN

Please contact VOPLLS for assistance when this occurs.
Press “ ” button to back to home page. Enter “Settings” and press “ ”4 times. Enter
“OSD Language”. There are Deutsch, France, Chinese, Italiano, Espanol and
Japanese for your choice.
Press “ ” button to back to home page and access to “Settings”, and press “ ”
button 4 times to choose “Projection Settings”, Press “ ” button to rotate.
14. Why doesn’t the projector’s lamp light up or power on?
15. How can I change the language?
16. How can I do if the image is up side down?
Formats of USB Drive
NTFS
FAT32
128G
128G
2T
4G
FAT 128G 2G
Maximum memory capacity
of USB drive
Maximum memory of each video
13. Why doesn't anything work when external USB flash device
connected?
“USB” input source must be selected when you use the USB disk;
Please make sure your USB drive meets following conditions: (for example: If the
format of your USB drive is NTFS, the memory capacity of USB drive must be under
128G and the memory of video must be under 2T.)
40
EN

Adjust the focus and keystone ring by moving it leftward/rightward till it shows the best
images.
Place projector on a flat surface horizontally or vertically. An inclination of any angle
may result in blurry displays or uneven colors.
Darker environment suggested achieving the best projecting performance.
The eligible distance of 1.16m-5m/ 37inch-150inch between the projector and project-
ing screen/ wall.
Projecting wall or screen is clean white if possible.
17. How can I do if the image is blurry or out of shape?
Make sure the projector is placed on a flat surface with projector light in the middle of
the screen.
Make sure the projector screen is placed horizontally.
18. How can I do if the projection screen is not square or allied
horizontally?
Make sure the video source has a fine resolution.
Adjust the colors: enter Picture Mode/Color Temperature, then select different modes
and adjust the value accordingly.
19. How can I do if there is color distortion?
41
EN
Make sure the batteries are installed correctly and the power is enough.
Please make sure the IR receiver is not covered.
HDMI for all devices mentioned above, Certain DVD players require the AV code cord
connection.
Press “ ” button to back to home page. Enter “Settings” and access “Zoom”. Press
“ ” or “ ” to adjust the display size.
20. How can I do if the remote is unresponsive?
Tap the projector slightly to shake off the dust which may be caused during installing or
shipping.
Clean the lens with clean non-woven fabrics, please see the Cleaning Operation on
Page 5.
21. How should I do if there are small dots on display?
22. How to adjust display size from 100% to 50%?
23. What Kind of cable do I need when connecting TV BOX, TV,
Firestick and DVD Player to the projector?
USB drive: You cannot project PPT from a USB drive.
Phone or Computer: Yes, you can play PPT on your computer or mobile phone and
then project it through the projector.
24. Is it possible to project PPT?
42
EN


Catálogo
46
Configuración básica 48
Vista general del proyec 49
Control remoto 50
Corrección de enfoque y distorsión trapezoidal 50
Cómo limpiar el polvo? 51
Conexiones de proyector 52
Jugar al cine 67
Tocando música 70
Jugar a la foto 72
Reproducir texto 74
Configuración 76
Características del producto 78
Solución de problemas 79
Conexión al dispositivo móvil 52
Para el sistema iOS (conexión por cable) 53
Para el sistema Android (conexión de cable) 54
Para el sistema iOS (conexión inalámbrica) 57
Para el sistema Android (conexión inalámbrica) 59
Para Android (USB C a cable HDMI)
54
Para el sistema Android (conexión de cable con......)
56
Conexión al ordenador 62
Conexión a Firestick 64
Conexión al reproductor de DVD
65
Conexión al dispositivo de almacenamiento externo
66
43
ES
Consideraciones importantes de seguridad
Guía de operación por vídeo
SUBSCRIBE
VS-KING PROYECTOR
VS-KING
CÓMO CONECTARSE A IPHONE?
Escanee los códigos QR a continuación o busque "VS-KING PROYECTOR"
en YouTube para obtener vídeos.
(todos los adaptadores siguientes no están incluidos. Adaptadores
recomendados están disponibles en nuestra tienda.)
iOS to HDMI
Recomendado
iOS 3 in 1 HDMI
CÓMO CONECTARSE A WINDOWS PORTÁTIL?
Laptop - HDMI Cable
incluido
Recomendado
iOS WiFi HDMI
44
ES
Android - 3(2) in 1 HDMI
Recomendado
Android - USB C to HDMI
Recomendado
Laptop - USB C to HDMI
Recomendado
Android - WiFi HDMI
Laptop - WiFi HDMI
CÓMO CONECTARSE A UN SMARTPHONE ANDROID?
CÓMO CONECTARSE A MACBOOK?
Tenga en cuenta que al elegir el primer cable tipo C a HDMI, asegúrese de
que su teléfono móvil pertenece al modelo de teléfono mencionado en la
página 9, si no, elija el segundo cable HDMI 2 en 1.
45
ES
Important Safety Considerations
Consideraciones importantes de seguridad
No instalar el proyector en sitios
calientes y húmedos.
No bloquee los orificios de
ventilación (entrada o salida).
No instale el proyector en sitios
de polvo y humo.
No instalar el proyector en sitios
con ventilación inadecuada.
Mantenga el proyector alejado
del agua o de cualquier otro
líquido, ya que no es resistente al
agua.
No instalel proyector en sitios con
sopldirecto de aire caliente y frío.
De lo contrario puede causar el
fracaso del proyecto.
Por favor, no mires a la lente.
cuando el proyector está funcio-
nando. De lo contrario, puede
lastimar sus ojos.
No instale el proyector cerca del
transductor de temperatura y humo.
Puede causar un fallo en el sensor.
46
ES
Instalación
Utilice el proyector en una habitación oscura para obtener la mejor experiencia de
visualización.
Limpieza
Desconecte el cable de alimentación del proyector.
Notas sobre incendios y descargas eléctricas
Advertencia de alta temperatura
No coloque ningún líquido sobre el proyector.
Utilice el proyector con un cepillo suave. No utilice accesorios rígidos, como un
herramienta de limpieza de grietas, para evitar dañar el proyector.
Limpie la abertura de ventilación y el altavoz regularmente con un limpiador. El el
proyector se sobrecalentará con polvo bloqueado, lo que provocará la falla.
Utilice un cepillo de aire o papel para lentes para limpiar la lente y tenga cuidado de
no rayar ni desgastar a ellos.
Utilice un paño húmedo para limpiar el gabinete con regularidad. Se puede usar un
detergente neutro para mancha grave. No use detergente fuerte o solvente como
alcohol o diluyente.
Utilice el cable de alimentación con precaución para evitar doblarlo indebidamente. El
cable de alimentación dañado puede provocar una descarga eléctrica.
Utilice el proyector con precaución para evitar que se caiga o se golpee, lo que
puede dañar el proyector.
Evite que caigan objetos extraños en el proyector, como clips y papel desechos, no
intente recuperar ninguno de esos objetos. No inserte ningún objeto metálico, como
como un alambre de hierro o un destornillador, en el proyector. Asegúrese de apagar
inmediatamente la energía y pídale al personal de mantenimiento profesional califica-
do que retire cualquier objeto cayendo en el proyector.
Durante y después de la proyección, la temperatura cerca de la salida aumentará, por
lo tanto tocarlo puede causar quemaduras. No mire por la lente, o puede causar
lesiones oculares graves.
Asegúrese de una ventilación adecuada y una salida bloqueada para evitar la
acumulación de calor dentro del proyector.
47
ES
Con�iguración básica
Si falta alguna pieza, póngase en contacto con el equipo de soporte de VOPLLS.
Dirección de correo electrónico del equipo de soporte de VOPLLS:
Consejos:
1x cable HDMI 1x cable de señal AV
1x mando a distancia
(Batería no incluida)
1x Mini proyector 1x cable de alimentación
1x tapa de la lente
1x Manual de usuario
User Manual
VOPLLS
48
ES
Mercado de América del Norte:
Mercado de Europa:

Descripcion general del proyector
Audio de 3.5 mm
AV
HDMI
USB
KEYSTONE
/
/
49
ES
Controla remoto
Corrección de enfoque y distorsión trapezoidal
Retroceso rápido
Mowe Up
Mover hacia la izquierda
Pausa
Interruptor de alimentación
Avance rápido
Mover a la derecha
Mover el amanecer
Mudo
El menú
Retorno
Disminución del volumen
Fuente de señal
Aumento del volumen
Fuente de señal
Moverse hacia arriba
Interruptor de alimentación
El menú
Mover hacia la izquierda
Mover el amanecer
Mover a la derecha
Enfoque
Retorno
Piedra clave
50
ES
Cómo limpiar el polvo?
Consejos:
HDMI
1
Arranque la etiqueta
y abra la tapa
2
Inserte el hisopo de algodón
profundamente adentro
3
Limpie todos los 5 lados
(ajuste la "clave" para una
fácil limpieza)
Si hay manchas negras en la pantalla, por favor encienda el proyector y mueva el
hisopo de acuerdo con la posición del punto negro en la pantalla.
Por favor limpie la lente regularmente para resolver o evitar el problema de las
manchas negras en la pantalla.
AV USB Configuración
51
ES
Conexiones de proyector
Conexión al dispositivo móvil
Consejos:
Por favor, compre un adaptador HDMI adicional de acuerdo a su teléfono; Asegúrese
de que su dispositivo sea compatible con pantalla multipantalla/inalámbrica; Utilice un
adaptador mencionado a continuación para transmitir la señal. Aquí están algunas
imágenes del cable apropiado abajo para referencia:
Después de conectar el cable de alimentación en la entrada, encienda el proyector
hasta que el indicador LED en el proyector muestre rojo sólido. Si el proyector está
encendido y funciona correctamente, el indicador LED muestra verde;
Nunca mire dentro de la lente del proyector cuando la lámpara está encendida. Esto
puede dañar sus ojos yes especialmente peligroso para los niños;
Instale 2 pilas AAA en el control remoto antes de usarlo.
2
Adaptador de dongle de pantalla HDMI inalámbrico
Se recomienda cuando se
conecta a iPhone/iPad.
1
Adaptador de relámpago a HDMI
4
2 in 1 HDMI cable
3
Type C to HDMI cable
HDMI Output
Type-C
HDMI Output
Type-C
Micro USB
52
ES
1
2
3
Conecte el cable de alimentación. El indicador LED del proyector se iluminará en rojo fijo.
Mantenga presionado el botón de encendido unos 5 segundos para encender. El
indicador LED se mostrará en verde.
Ajuste el anillo de enfoque y la distorsión trapezoidal para obtener el mejor rendimiento de
imagen.
Se recomienda cuando se conecta a Android smartphone/Tablet. Tenga en cuenta
que cuando elija el primer cable tipo C a HDMl, asegúrese de que su teléfono móvil
pertenece al modelo de teléfono mencionado en la página 9, si no, elija el segundo
cable 2 en 1 HDMl.
Paso 1:
Paso 2:
Encienda su dispositivo móvil y el proyector;
Conecte el puerto HDMI a su proyector;
Paso 4: Pulse el botón " " para volver a la página de inicio;
Paso 3:
Para el sistema i0S (conexión por cable)
Conecte el otro extremo con el puerto Lightning a su dispositivo móvil;
Por favor, no olvide preparar un cable de carga de Apple para la conexión de
Apple Lightning al adaptador Digital AV como a continuación:
(no incluido)
Puerto de carga Puerto HDMI
Seleccione "HDMI" pulsando el botón " "o " " y luego pulse " " para
confirmar.
Paso 5:
HDMI AV USB Configuración
53
ES
Para el sistema Android (conexión de cable)
Consejo:
Seleccione "confiar" cuando haya una ventana emergente en su dispositivo móvil;
Para sistemas Android (cable USB C a HDMI)
Cuando se muestra la pantalla con algunos códigos QR, icono de mariposa y así
sucesivamente después de seleccionar, por favor no escanear ningún código QR y
sólo esperar un momento;
Nunca inserte directamente el cable relámpago en el puerto USB del proyector;
Conecte un cable de alimentación para adaptador HDMI. (se recomienda una toma
de corriente eléctrica externa);
Por favor lea las instrucciones del adaptador HDMI cuidadosamente antes de
conectarse;
Debido a problemas de derechos de autor, Netflix, Amazon prime, Disney y Hulu no
son compatibles para jugar directamente por pantalla espejo con teléfono, debe
estar conectado TV stick para jugar.
Cuando utilice este cable USB C to HDMI, por favor confirme que su teléfono
pertenece a los siguientes modelos de teléfono. Si no pertenece, por favor conecte
su teléfono a través del otro adaptador HDMI 2-en-1 como muestra la imagen en la
siguiente página.
Confiar en este ordenador
Sus ajustes y datos serán accesibles
desde este ordenador cuando se conecte
de forma inalámbrica o mediante un cable
Confianza
No confíes
(no incluido)
USB C
(no incluido)
USB power
USB C
54
ES
Encienda su Bluetooth en su dispositivo móvil y emparesu adaptador HDMI
a través de Bluetooth. (es normal si la conexión Bluetooth no funciona
correctamente);
Paso 1:
Pulse el botón " " para volver a la página de inicio;
Paso 2:
Conecte el puerto HDMI y el puerto USB a su proyector. (si su cable USB
C a HDMI tiene alimentación USB) conecte el otro extremo al teléfono;
Paso 4:
Seleccione "aceptar" cuando haya una ventana emergente en su teléfono.
Paso 5:
Seleccione "HDMI" pulsando el botón " " o " " y luego pulse " " para
confirmar;
Paso 3:
HDMI AV USB Configuración
Compagnon: Xs/Xs2/X2, 40/40Pro/40E Pro/40Pro+/40RS,
20/20Pro/20X/20RS,10Pro
P: 50/50E/50Pro/50Pro+/50Pocket, 40/40Pro/40Pro+,
30/30Pro, 20/20Pro
Trouver X5 Pro, OnePlus 10Pro/Ace Pro/9
K92, AILE, G8X, VELOURS 2 Pro, V60/50/40/30, G7/8
Pro3, Pro2S, R1
Samsung
Écrou Smartisan
Microsoft
950, 950XL
Ultra,10
Applicable à tous les modèles Razer
Galaxy S: 22/22+/22Ultra, 21/21+/21Ultra/21FE,
20/20+/20Ultra, 10/10+, 9/9+, 8/8+
Note Galaxy: 20/10/10+/9/8
55
ES
Para el sistema Android (conexión de cable con adaptador HDMI de 2 en 1)
Encienda su Bluetooth en su dispositivo móvil y emparesu adaptador HDMI
a través de Bluetooth. (es normal si la conexión Bluetooth no funciona
correctamente);
Paso 1:
Pulse el botón " " para volver a la página de inicio;
Paso 2:
Conecte el puerto HDMI y el puerto USB a su proyector (si su cable USB C
a HDMI tiene alimentación USB);
Paso 4:
Conecte el otro extremo con el puerto -c/Micro USB a su dispositivo móvil;
Paso 5:
Escanear el código QR en la pantalla a través de su navegador y descar-
garlo. A continuación, siga las indicaciones en su teléfono.
Paso 6:
Seleccione "HDMI" pulsando el botón " " o " " y luego pulse " " para
confirmar;
Paso 3:
HDMI AV USB Configuración
(no incluido)
USB power
2 in 1 HDMI adapter
56
ES
Consejos:
Si no se conecta, por favor desenchufe y vuelva a insertar el cable más veces;
Si su teléfono es vivo u Oppo, asegúrese de activar OTG en la configuración de su
teléfono;
Por favor lea las instrucciones del adaptador HDMI cuidadosamente antes de
conectarse;
Conecte un cable de alimentación para adaptador HDMI. (se recomienda una toma
de corriente eléctrica externa);
Nunca inserte directamente el cable tipo C/ Micro USB en el puerto USB del proyector;
Debido a problemas de derechos de autor, Netflix, Amazon prime, Disney y Hulu no
son compatibles para jugar directamente por pantalla espejo con teléfono, debe
estar conectado TV stick para jugar.
Para el sistema iOS (conexión inalámbrica)
Conecte el puerto HDMI a su proyector.
Paso 1:
Pulse el botón " " para volver a la página de inicio;
Paso 2:
Encienda el interruptor Wi-Fi de su dispositivo iOS. La conexión Wi-Fi con
éxito en el dispositivo iOS no es obligatoria a menos que se necesite el
contenido de transmisión en directo; Por favor, ignore el signo de
exclamación antes de que.
Paso 4:
Seleccione "HDMI" pulsando el botón " "o " " y luego pulse " " para
confirmar.
Paso 3:
(no incluido)
57
ES
Deslice la pantalla de su dispositivo móvil iOS, a continuación, toque reflejo
de pantalla/reflejo de AirPlay y busque el proyector.
Paso 5:
Consejos:
La fluidez del reflejo de pantalla con conexión inalámbrica se verá afectada por el
entorno de red. Se recomienda un ancho de banda de 100 Mbit o más cuando se
utiliza el espejo de pantalla;
Asegúrese de que su dispositivo móvil esté cerrado al proyector cuando utilice la
conexión inalámbrica. Se recomienda una distancia dentro de 1m/3.3ft;
Algunos dispositivos móviles pueden no soportar el reflejo de pantalla debido a la
compatibilidad;
Debido a problemas de derechos de autor, Netflix, Amazon prime, Disney y Hulu no
son compatibles para jugar directamente por pantalla espejo con teléfono, debe
estar conectado TV stick para jugar.
Selecciónelo de los
resultados de búsqueda
seleccionar para conectarse.
DEVICE DONGLE-*****
Music
Screen
Mirroring
DONGLE-*****
DONGLE-*****
58
ES
Para sistema Android (conexión inalámbrica)
Conecte el puerto HDMI a su proyector;
Paso 1:
(no incluido)
Pulse el botón " " para volver a la página de inicio;
Paso 2:
Encienda el interruptor Wi-Fi de su dispositivo Android. Conexión Wi-Fi con
éxito en el dispositivo Android no es imprescindible a menos que se necesite
el contenido de transmisión en directo;
Paso 4:
Active la función multipantalla en su dispositivo Android y busque el
proyector.
Paso 5:
Seleccione "HDMI" pulsando el botón " " o " " y luego pulse " " para
confirmar;
Paso 3:
Selecciónelo de los
resultados de búsqueda
seleccionar para conectarse.
DEVICE DONGLE-*****
59
ES
Consejo:
Por favor, apague la función DEX si el proyector sólo muestra la pantalla de inicio de
su teléfono.
HUAWEI
Más proyección inalámbrica de conexiones.
SAMSUNG
Deslice la pantalla de su dispositivo Samsung, luego toque
"Smart view" (vista inteligente) y busque el proyector.
5G
100%
21:05
>
>
>
>
>
Huawei Share
Wireless projection
Pirnting
On
VPN
Private DNS
Of
f
Connecting...
CANCEL
5G
100%
21:05
Search
HUAWEI ID, Payment and purchases,
Cloud,and more
001********79
>
>
>
>
>
>
>
>
>
WLAN
Bluetooth
Mobile network
More connections
Home scree & wallpaper
Display & brightness
Sounds & vibration
Notifications
On
5G
100%
21:05
>
>
>
>
>
Huawei Share
Wireless projection
Pirnting
On
VPN
Private DNS
Of
f
5G
100%
21:05
>
>
>
>
>
Huawei Share
Wireless projection
Pirnting
On
VPN
Private DNS
Of
f
DONGLE-*****
DONGLE-*****
Wireless Projection
Available devices
CANCEL HELP
5G
100%
>
18:45
Monday, July 5
Devices Media
DeX
DeX
Smart View
Blue light
filter
Dark mode
B
Do not
disturb
5G
Hongbao
accelerator
NFC
5G
5G
100%
18:45
>
Smart View
Phone Other device
Select a device below to mirror your phone’s
screen or play content
DONGLE-*****
Mirror screen
>
Other device Phone
→
→
60
ES

Consejos:
La fluidez del espejo de pantalla con conexión inalámbrica se verá afectada por el
entorno de red. Se recomienda un ancho de banda de 100 Mbit o más cuando se
utiliza el espejo de pantalla;
Asegúrese de que su dispositivo móvil esté cerrado al proyector cuando utilice la
conexión inalámbrica. Se recomienda una distancia dentro de 1m/3.3ft;
Algunos dispositivos móviles pueden no soportar el reflejo de pantalla debido a la
compatibilidad;
Debido a problemas de derechos de autor, Netflix, Amazon prime, Disney y Hulu no
son compatibles para jugar directamente por pantalla espejo con teléfono, debe
estar conectado TV stick para jugar.
XIAOMI
Desactiva la pantalla de tu dispositivo Xiaomi, toca "Connection&shar-
ing-Cast" y busca el proyector.
5G
100%
18:45
>
Cast
Cast
Cast screen contents to an external
monitor
>
Cancel Help
Select device(1)
DONGLE-*****
Demos
Casting documents,games,photos,and
videos
>
SPECIAL FEATURES
61
ES
Conexión al ordenador
Encienda el ordenador y el proyector;
Paso 1:
Conecte el cable HDMI al puerto HDMI de su ordenador;
Paso 2:
Pulse el botón " " para volver a la página de inicio;
Paso 4:
Conecte el otro extremo al puerto HDMI en su proyector;
Seleccione "HDMI" pulsando el botón " "o " " y luego pulse " " para
confirmar.
Paso 5:
Paso 3:
(no incluido)
Conecte el proyector a su computadora usando el cable HDMI en el paquete. Se
recomienda una conexión HDMI.
Para conectar un equipo que sólo incluye un puerto de tipo C, necesita comprar un
cable USB adicional de C a HDMI que le permite conectarse al puerto HDMI del
proyector;
Es necesario seleccionar la opción proyecto al conectar el ordenador al proyector en
el primer uso.
AV USB Settings
HDMI AV USB Configuración
Notas:
62
ES
Presionando la tecla del logo de Windows + la tecla P al mismo tiempo y
seleccionando "DUPLICAR"
Para Windows 7 y sistemas superiores
Consejos:
Debido a problemas de derechos de autor, Netflix, Amazon prime, Disney y Hulu no
son compatibles para jugar directamente por pantalla espejo con teléfono, debe
estar conectado TV stick para jugar.
SECOND SCOND SCREEN ONLY
Project
PC SEREEN ONLY
DUPLICATE
EXTEND
63
ES
Conexión a Firestick
Insertar Firestick;
Su Firestick puede en el modo de suspensión, por favor desconecte el Firestick y el
cable de carga de Firestick, luego vuelva a conectarlo para activar el Firestick.
Paso 1:
Conecte un cable de carga para su Firestick;
Paso 2:
Pulse el botón " " para volver a la página de inicio y seleccione "HDMI"
pulsando el botón " "o " " y luego pulse " " para confirmar.
Paso 3:
(no incluido)
AV USB Settings
HDMI AV USB Configuración
Qué pasa si el proyector no reconoce a Firestick?
Introduzca "configuración" y busque "pantalla y sonido ". A continuación, seleccione "on"
para "sonidos de navegación ". Seleccione "esté(o PCM)" para" sonido envolvente ".
Qué pasa si no hay sonido?
64
ES
Conexión al reproductor de DVD
Encienda su reproductor de DVD y el proyector;
Paso 1:
Conecte el cable HDMI al puerto HDMI de su reproductor de DVD;
Paso 2:
Conecte el otro extremo al puerto HDMI en su proyector;
Paso 3:
Pulse el botón " " para volver a la página de inicio;
Paso 4:
Paso 5:
Seleccione "HDMI" pulsando el botón " "o " " y luego pulse " " para
confirmar.
Opción 1: conecte el proyector a su reproductor de DVD usando el cable
HDMI en el paquete.
Encienda su reproductor de DVD y el proyector;
Paso 1:
Conectar los conectores hembra de colores al cable RCA de su reproductor
de DVD;
Paso 2:
Conecte el conector macho amarillo al puerto AV in del proyector;
Paso 3:
Pulse el botón " " para volver a la página de inicio;
Paso 4:
Paso 5:
Seleccione "AV" pulsando el botón " " o " " y luego pulse " " para
confirmar.
Opción 2: conecte el proyector a su reproductor de DVD usando el cable
AV en el paquete.
65
ES
Conexión al dispositivo de almacenamiento externo
Insertar la unidad USB;
Paso 1:
Pulse el botón " " para volver a la página de inicio;
Paso 2:
Seleccione "USB" pulsando el botón " " o " " y luego pulse " " para
confirmar.
Paso 3:
Si la memoria USB se reconoce correctamente, el icono de la unidad USB en la esquina
superior derecha se iluminará. Tenga en cuenta que su unidad USB y archivos deben
cumplir con los siguientes formatos. (por ejemplo: si el formato de la unidad USB es
NTFS, la capacidad de memoria de la unidad USB debe estar en 128G y la memoria de
vídeo debe estar en 2T.)
Formatos de la
unidad USB
NTFS
FAT32
128G
128G
2T
4G
FAT 128G 2G
Capacidad de memoria
máxima de la unidad USB
Memoria máxima de cada vídeo
HDMI AV USB Configuración
USB
KEYSTONE
//
66
ES
Important Safety Considerations
Jugar al cine
Seleccione "película" pulsando los botones " " o " " o " " o " " y el
cuadro seleccionado se iluminará. A continuación, pulse el botón " "para
entrar en la siguiente interfaz;
Paso 1:
Seleccione el disco C o USB, a continuación, pulse el botón " " para
entrar en el disco;
Paso 2:
1/1
C
Volver
Película Música
Foto Texto
67
ES
Seleccione el archivo de película o haga clic en la carpeta para entrar en el
siguiente directorio hasta que encuentre la película que desea reproducir en
el directorio;
Paso 3:
Pulse el botón " " en el proyector o remoto para seleccionar película.
Paso 4:
00:01:15 / 00:03:48
Prev StopPause
Repeal All
Set AFB FF Next
anime video.flv
00:01:35 / 00:03:48
StepPlaylist Green R..
D
et
a
Slow Golotime
anime video.flv
Zoom Out
Zoom In
l
l e
68
ES
Play/pause: Reproduce o detiene el vídeo actual.
Prev: Anterior, vuelve al vídeo anterior.
Siguiente: Va al siguiente video.
Stop: Sale del vídeo actual.
FF: Avance rápido, empuja el vídeo para avanzar rápidamente mientras se
reproduce. La velocidad de avance va de 2X a 32X.
FB: Rápido hacia atrás, rebobina el vídeo rápidamente mientras se reproduce.
La velocidad de rebobvaría de 2X a 32X.
Repeat: Tiene las opciones de repetir 1, repetir todo y repetir ninguno. Pulse el
botón " " para cambiar entre estas opciones. Repita todos los ciclos para
reproducir todos los vídeos de su lista de reproducción. Repeat NONE: reproduce
el vídeo actual una vez y luego sale del vídeo actual; Repita 1 bucle para reprodu-
cir el vídeo actual todo el tiempo.
Set A/ Set B/ None: Selecciona: "Set A" pulsando el botón " " para
establecer un punto de tiempo y seleccione "Set B" pulsando el botón" " para
establecer otro punto de tiempo al reproducir el vídeo, luego se repite para
reproducir el fragmento de vídeo entre estos puntos. Seleccione ninguno para
volver al modo de reproducción normal.
Step: Avanza el cuadro de vídeo por cuadro pulsando el botón " ".
Zoom in: Puede ampliar la imagen de vídeo de 2 a 8 veces.
Zoom out: Reducir la imagen de vídeo de 1X a 1/8X.
Playlist: Una lista de archivos de vídeo que se pueden reproducir desde la
carpeta actual.
Detalle: Muestra la información sobre el vídeo actual incluyendo resolución,
tamaño y así sucesivamente.
Slow: Reproduce el vídeo en cámara lenta con una velocidad que va de 2X a 16X.
69
ES
Important Safety Considerations
Tocando música
Seleccione "Música" pulsando los botones " " , " " , " " o " " y el
marco seleccionado se iluminará. A continuación, pulse el botón " " ;
Paso 1:
Película
Música
Foto Texto
1/1
C
Volv e r
Seleccione el disco C o USB, a continuación, pulse el botón " " para
entrar en el disco;
Paso 2:
Seleccione el archivo de música o haga clic en la carpeta para entrar en el
siguiente directorio hasta que encuentre la música que desea reproducir en
el directorio.
Paso 3:
00:00:15 / 00:03:48
Prev StopPause
Repeal All
MuteoffFB FF Next
Alan Walker· Faded Mp3
70
ES
Play/pause: Reproduce o hace pausa la música actual.
Prev: Anterior, vuelve a la música anterior.
Next: Va a la siguiente música.
Stop: Sale de la música actual.
FF: Avance rápido, empuja la música para avanzar rápidamente mientras la toca.
La velocidad de avance va de 2X a 16X.
FB: Rápido hacia atrás, rebobla la música rápidamente mientras se reproduce.
La velocidad de bobvaría de 2X a 16X.
Repeat: Tiene las opciones de repetir 1, repetir todo y repetir ninguno. Pulse el
botón " " para cambiar entre estas opciones. Repita todos los bucles para
reproducir toda la música de su lista de reproducción. Repeat NONE reproduce la
música actual una vez, y luego sale de la música actual; Repita 1 bucles para
reproducir la música actual todo el tiempo.
Consejos:
Mostrará una barra inferior con diferentes ajustes al reproducir la música. Presione
el botón de abajo o el botón atrás para ocultarlo. Pulse el botón " " para mostrarlo
de nuevo.
Muteoff: Mutes o unmutes la música actual.
Playlist: Una lista de archivos de música que se pueden reproducir desde la
carpeta actual.
Detalle: Muestra la información sobre la música actual, incluyendo tasa de bits,
artista, tamaño, etc.
00:00:15 / 00:03:48
Prev StopPause
Repeal All
MuteFB FF Next
Alan Walker· Faded Mp3
00:00:15 / 00:03:48
Playlist
Detalle
Auto
Alan Walker· Faded Mp3
71
ES
Important Safety Considerations
Jugar a la foto
Seleccione "foto" pulsando los botones " " , " " , " " o " " y el
marco seleccionado se iluminará. A continuación, pulse el botón " " para
entrar en la siguiente interfaz;
Paso 1:
Película Música
Foto
Texto
1/1
C
Volver
Seleccione el disco C o USB, a continuación, pulse el botón " " para
entrar en el disco;
Paso 2:
Seleccione la foto o haga clic en la carpeta para entrar en el siguiente
directorio hasta que encuentre la foto que desea reproducir en el directorio;
Paso 3:
Presione el botón " " en el proyector o en el control remoto para seleccionar
la foto.
Paso 4:
Prev StopPause
Repeal All
Next
Stock-photo-tupian123.jpg
Music Off
Playlist Detalle
RotateRotate Zoom In
Stock-photo-tupian123.jpg
Music S...
Move
Zoom Out
72
ES
Zoom in: Puede ampliar la imagen de vídeo de 2 a 8 veces.
Zoom out: Reducir la imagen de vídeo de 1X a 1/8X.
Fuente de música: Marque algunos archivos de música para el fondo de la
foto.
Música Off: Active/desactive los archivos de música que ha marcado bajo la
fuente de música para el fondo de texto.
Rotate: Rotar la foto en el sentido de las agujas del reloj por 90° 180° 270°, 360°.
Detalle: Muestra la información sobre la foto actual incluyendo resolución,
tamaño, fecha y hora.
Playlist: Una lista de archivos de fotos que se pueden reproducir desde la carpeta.
Consejos:
Mostrará una barra inferior con diferentes ajustes al reproducir la música. Presione
el botón de abajo o el botón atrás para ocultarlo. Pulse el botón " " para mostrarlo
de nuevo.
Play/pause: Reproduce o hace pausa la foto actual.
Prev: Anterior, vuelve a la foto anterior.
Stop: Sale de la foto actual.
Next: Vaya a la siguiente foto.
Repeat: Tiene las opciones de repetir 1, repetir todo y repetir ninguno. Pulse el
botón " " para cambiar entre estas opciones. Repita todos los ciclos para
reproducir todas las fotos de su lista de reproducción. Repeat NONE reproduce la
foto actual una vez, y luego sale de la foto actual; Repita 1 bucle para reproducir
la foto actual todo el tiempo.
Rotate: Rotar la foto en sentido antihorario por 90°,180°, 270°, 360°.
73
ES
Important Safety Considerations
Reproducir texto
Seleccione "Texto" pulsando los botones " " , " " , " " o " " y el
marco seleccionado se iluminará. Luego presione el botón " " para entrar
a la siguiente interfaz;
Paso 1:
Presione " " , " " , " " o " " en el panel de operacion para
seleccionar el equipo para almacenamiento de texto.
Película
Música
Foto Texto
1/1
C
Volver
Seleccione el disco C o USB, a continuación, pulse el botón " " para
entrar en el disco;
Paso 2:
Paso 3:
Prev StopPs Page Next
An evening in August.txt
Music Off
Playlist
Detalle
An evening in August 1997
Li Ruiying learned the news that her son fell from the building and was injured, and she
was furious.But she was about to star t the live news broadcast, so she couldn't rush to her
son to accompany her right away.In the "News Network" that night, Li Ruiying's
performance was as usual, still calm and calm, her anxiety was well hidden, and she
couldn't see that her son just had an accident.After the live broadcast, Li Ruiying almost
flew to the hospital. Fortunately, her son was only slightly injured, otherwise she would
never have forgiven herself.
Next Page
74
ES

Siguiente página: Siguiente página, va a la siguiente página del texto
actual.
Ps Page: Página anterior, vuelve a la página anterior del texto actual.
Prev: Anterior, vuelve al texto anterior.
Next: Va al siguiente texto.
Stop: Sale del texto actual.
Detalle: Muestra el tamaño del texto actual.
Playlist: Una lista de archivos de texto que se pueden reproducir desde la
carpeta. Si no ha marcado los textos pulsando el botón " " en el sub menú,
mostrará todos los textos que se pueden reproducir; De lo contrario, mostrará su
(s) texto (s) marcado (s).
Music Off: Enciende/apaga los archivos de música que ha marcado bajo la
fuente de música para el fondo de texto.
Fuente de la música: Marque algunos archivos de música para el fondo del
texto.
An evening in August.txt
An evening in August 1997
Li Ruiying learned the news that her son fell from the building and was injured, and she
was furious.But she was about to star t the live news broadcast, so she couldn't rush to her
son to accompany her right away.In the "News Network" that night, Li Ruiying's
performance was as usual, still calm and calm, her anxiety was well hidden, and she
couldn't see that her son just had an accident.After the live broadcast, Li Ruiying almost
flew to the hospital. Fortunately, her son was only slightly injured, otherwise she would
never have forgiven herself.
Music S...
Auto
75
ES

Important Safety Considerations
Con�iguración
Modo de imagen
Relación de la pantalla
Zoom
4:3, 16:9, Full, Zoom1, Zoom2 y Auto
Estándar, dinámico, suave y personalizado
50% a 100%
Temperatura del Color Fresco, estándar y cálido
Modo de sonido
Agudos
Graves
50
Estándar, película, música, deportes y personalizado
Bass
Imagen
Modo de imagen
Relación de la pantalla
Zoom
Temperatura del color
< Standard >
< 16:9 >
< 51%>
< Standard >
Sonido
Mode de sonido
Agudos
Graves
< Standard >
< 50 >
< 50>
76
ES
Off Time
On Time
Temp.De Apagado
fuera, una vez y todos los días
Off, una vez y todos los días
Apagado, 10min, 20min, 30min, 60min y 90min
Auto Sleep Apagado,3H, 4H, 5H
Idioma OSD
Ajustes de
proyección
Reiniciar
Frontal, trasera, techo frontal y techo trasero
Inglés, Deutsch, Francia, español, Italiano,
griego, checo, finlandés, croata, eslovaco,
japonés y chino para su elección
Reiniciar el proyector
USB Upgrade Actualizar el software local
Hora
Off Time
On Time
Temp.De Apagado
< Off >
< Off >
< Off >
Auto Sleep < Off >
Opciones
Idioma OSD
Ajustes de proyección
Reiniciar
USB Upgrade
<English>
<Front>
77
ES
Tecnología de proyección:
Colores de la pantalla:
Temperatura del
Color de la lámpara:
Vida útil de la lámpara:
Fuente de alimentación:
Consumo del proyector:
Lente:
Zoom:
Relación de aspecto:
Corrección:
Un único tiempo de uso continuo:
Tamaño de proyección:
Peso del proyector:
Ruido y fugas de luz:
Dimensión:
Tamaño de montaje en el techo:
Frecuencia de Audio:
Puertos de señal:
Formato USB:
Sistema de proyección LCD TFT
16.7M
9000K
55000 hrs
Acina: 100V-240V 50/60HZ
50W
Lente óptica de recubrimiento compuesto
Multi chip
100%-50%
4:3/16:9
±15 Grados
<24hour
30-210pulgadas
0.64Kg
Poco ruido, fugas de poca luz
173x126x67mm
M6
2W+2W
Entrada de vídeo (1.OVp-p +/-5%)
Entrada HDMI (480i 480p 576i 720p 1080i 1080p)
FAT, FAT32, NTFS
Formato de vídeo: MPEG1,MPEG2,
MPEG4RM, RMVB, H264, MJPEG, DivX, FLV.
Formato de música: Mp3M4A (AAC)
Formato de foto: JPEG, BMP, PNG
Características del producto:
78
ES
VS-KING PROJECTOR
1. Por qué la pantalla del proyector está disponible pero sin audio?
El proyector o el dispositivo conectado (PC, TV,etc.) es silenciado.
Sonido Dolby no es compatible, salir para reproducir de nuevo.
Barra de fuego: introduzca "ajuste" y busque "pantalla y sonido ". A continuación,
seleccione "on" para "sonidos de navegación ". Seleccione "esté(o PCM)" para" sonido
envolvente ".
Pruebe YouTube si su reproductor es Netflix. El problema ocurrirá cuando se reproduce
Netflix debido a los derechos de autor.
2. Por qué el audio del proyector está disponible pero sin pantalla?
El formato de vídeo no es compatible con el proyector.
Cifrado aplicado a los vídeos o al reproductor multimedia que contiene el vídeo.
Si la lámpara del proyector está apagcon sólo reproducir audio, la lámpara está
defectuosa.
Por favor, póngase en contacto con el vendedor para un reemplazo.
Pruebe con otro cable HDMI si selecciona la fuente de entrada HDMI.
Pruebe YouTube si su reproductor es Netflix. El problema se produce cuando se
reproduce Netflix debido a los derechos de autor.
Los problemas enumerados a continuación podrían ocurrir durante el funcionamiento de su
proyector. Por favor, consulte los posibles factores que podrían causar el problema para
hacer la solución de problemas. Para cualquier pregunta durante el uso, no dude en
ponerse en contacto con el equipo de servicio al cliente de VOPLLS.
Correo electrónico de atención al cliente:
79
ES
Mercado de América del Norte:
Mercado de Europa:

3. Por qué la pantalla de proyección No muestra ninguna señal?
Asegúrese de que el proyector se conecta con el teléfono a través de un adaptador
HDMI y no a través de un cable USB.
Por favor, conecte la fuente de alimentación (5V/1A) para asegurarse de que el adapta-
dor funciona correctamente.
Por favor lea las instrucciones del adaptador HDMI cuidadosamente antes de conec-
tarse.
Por favor vea el video sobre cómo conectar el teléfono y la computadora mencionado
en la página principal del manual.
4. Cómo puedo conectar mi smartphone al proyector?
El adaptador HDMI es necesario para entregar la pantalla desde teléfonos inteligentes.
Por favor, conecte la fuente de alimentación (5V/1A) para asegurarse de que el adapta-
dor funciona correctamente. (se recomienda una toma de corriente eléctrica externa).
Por favor lea las instrucciones del adaptador HDMI cuidadosamente antes de conec-
tarse.
Por favor vea el video sobre cómo conectar el teléfono mencionado en la página
principal del manual.
5. Qué tipo de tornillos necesito para montar este proyector?
M6.
6. Cuando conectamos el teléfono/ordenador con el proyector,
Podemos usar el control remoto del proyector para controlar?
No, porque el contenido proyectado es del teléfono/computadora, y el control remoto No
puede controlar el teléfono/computadora. Así que no podemos usar el control remoto
del proyector para controlar.
7. Cómo debo hacer si hay ruido fuerte cuando uso el proyector?
Póngase en contacto con el equipo de VOPLLS para obtener asistencia.
8. Qué pasa si el sonido proviene del teléfono móvil o del
ordenador en lugar del proyector?
Teléfono: Enciende Bluetooth en tu teléfono.
Computadora: Introduzca la configuración de la computadora, seleccione "dispositivo
de Audio de alta definición" o "el nombre de su adaptador HDMI" para Audio.
80
ES

Formats of USB Drive
NTFS
FAT32
128G
128G
2T
4G
FAT 128G 2G
Maximum memory capacity
of USB drive
Maximum memory of each video
9. Qué pasa si el proyector sólo muestra la pantalla principal de su
ordenador?
Macbook: Introduzca la configuración del ordenador, seleccione "Mirror Built-in
Display" para la pantalla Airplay.
Windows: Introduzca la configuración de la computadora, seleccione "duplicar estas
pantallas" para la pantalla.
10. Qué debo hacer si hay una mancha oscura o humo en
expansión cuando usando el proyector?
Compruebe si el ruido del ventilador aumenta o el ventilador deja de funcionar. Desen-
chufe el proyector y póngase en contacto con el equipo de VOPLLS para obtener
ayuda.
Asegúrese de que el tomacorriente y el adaptador de corriente del proyector no estén
mojados o húmedos, lo que podría causar chispas o humo en la salida cuando se
enciende el proyector.
11. Por qué el proyector se apaga durante la reproducción?
Asegúrese de que el enchufe de alimentación funcione y esté firmemente conectado a
la toma de corriente.
Si el indicador LED del proyector está encendido, pero el ventilador no funciona,
comuníquese con Equipo VOPLLS por asistencia.
El sobrecalentamiento del proyector activará el panel de protección de apagado
incorporado. Reinicie el proyector cuando se enfríe.
12. Puede este proyector soportar el efecto 3D?
El proyector es compatible con la fuente de video 3D y se puede lograr un rendimiento
de visualización 3D con gafas 3D rojo-azul; pero por favor comprenda que la experien-
cia no será mejor que en el teatro y no lo recomendamos si tienes una expectativa
mayor sobre efecto 3D.
13. Por qué nada funciona cuando un dispositivo flash USB
externo conectado?
La fuente de entrada “USB” debe seleccionarse cuando utilice el disco USB;
Asegúrese de que su unidad USB cumpla con las siguientes condiciones: (por ejemp-
lo: si el El formato de su unidad USB es NTFS, la capacidad de memoria de la unidad
USB debe ser inferior 128G y la memoria de video debe ser inferior a 2T.)
81
ES
Póngase en contacto con VOPLLS para obtener ayuda cuando esto ocurra.
Presione el botón " " para volver a la página principal. Introduzca "Settings" (config-
uración) y pulse " "4 veces. Enter "OSD" Language" (en inglés). Hay Deutsch,
Francia, chino, italiano, español y japonés para su elección.
Presione el botón “ ” para volver a la página de inicio y acceder a “Configuración”, y
presione el botón “ ” 4 veces para elegir “Configuración de proyección”, presione el
botón “ ” para rotar.
14. Por qué la lámpara del proyector no se enciende o enciende?
15. Cómo puedo cambiar el idioma?
16. Cómo puedo hacer si la imagen está boca arriba?
Ajuste el foco y el anillo de la clave moviéndolo hacia la izquierda/derecha hasta que
muestre las mejores imágenes.
Coloque el proyector sobre una superficie plana horizontal o vertic. Una inclinación de
cualquier ángulo puede resultar en exhibiciones borroo colores desigu.
Un entorno más oscuro sugiere lograr el mejor rendimiento de proyección.
La distancia admisible de 1.16m-5m / 37inch-150pulgadas entre el proyector y la
pantalla/pared de proyección.
La pared o pantalla que se proyecta es de color blanco si es posible.
17. Cómo puedo hacer si la imagen está borrosa o fuera de forma?
Asegúrese de colocar el proyector sobre una superficie plana con la luz del proyector
en el centro de la pantalla.
Asegúrese de que la pantalla del proyector esté colocada horizont.
18. Cómo puedo hacer si la pantalla no es cuadrada o no está
alinehorizontalmente?
Asegúrese de que la fuente de video tiene una resolución fina.
Ajuste los colores: introduzca el modo de imagen/temperatura de Color, luego selecci-
one diferentes modos y ajuste el valor en consecuencia.
19. Cómo puedo hacer si hay distorsión de color?
82
ES
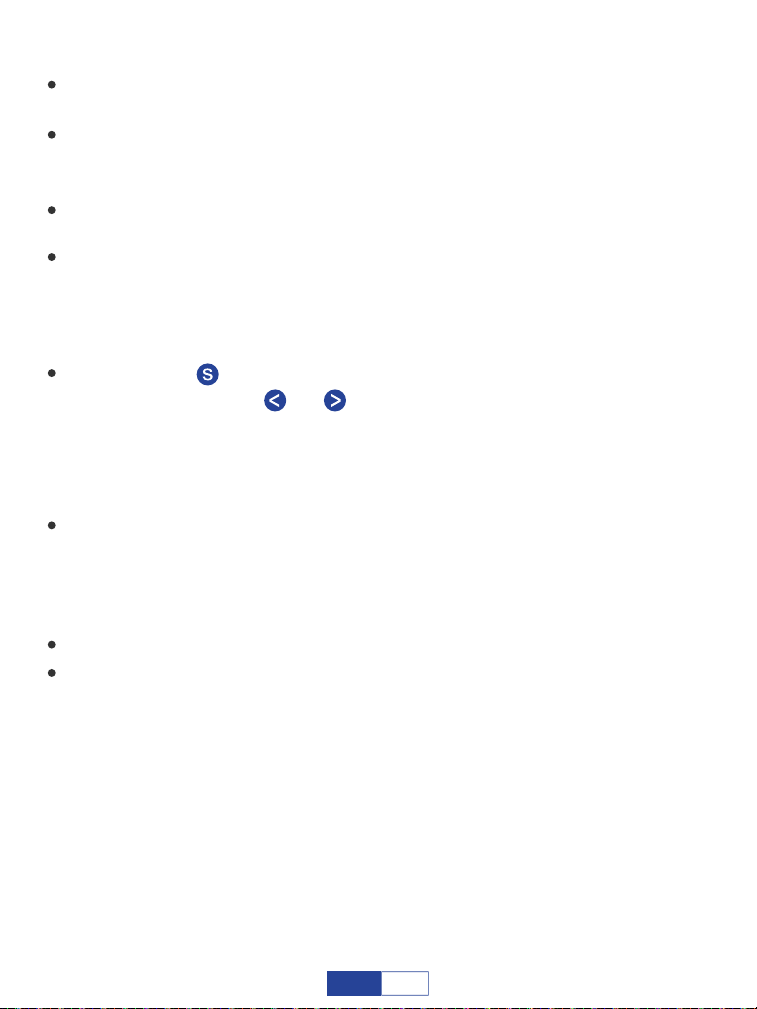
Asegúrese de que las baterías están instaladas correctamente y la energía es
suficiente.
Por favor asegúrese de que el receptor IR no esté cubierto.
HDMI para todos los dispositivos mencionados anteriormente, ciertos reproductores
de DVD requieren la conexión de cable de código AV.
Pulse el botón " " para volver a la página principal. Introduzca "configuración" y
acceda a "Zoom". Pulse " " o " " para ajustar el tamaño de la pantalla.
20. Cómo puedo hacer si el control remoto no responde?
Toque ligeramente el proyector para sacudir el polvo que puede causar durante la
instalación o el envío.
Limpie la lente con tejidos no tejidos limpios, por favor vea la operación de limpieza en
la página.
21. Cómo debo hacer si hay pequeños puntos en la pantalla?
22. Cómo ajustar el tamaño de la pantalla del 100% al 50%?
23. Qué tipo de cable necesito cuando conecto TV, TV, Firestick y
reproductor de DVD al proyector?
Unidad USB: No se puede proyectar PPT desde una unidad USB.
Teléfono o computadora: Sí, usted puede jugar PPT en su ordenador o teléfono
móvil y luego proyectarlo a través del proyector.
24. Ls es posible proyectar PPT?
83
ES

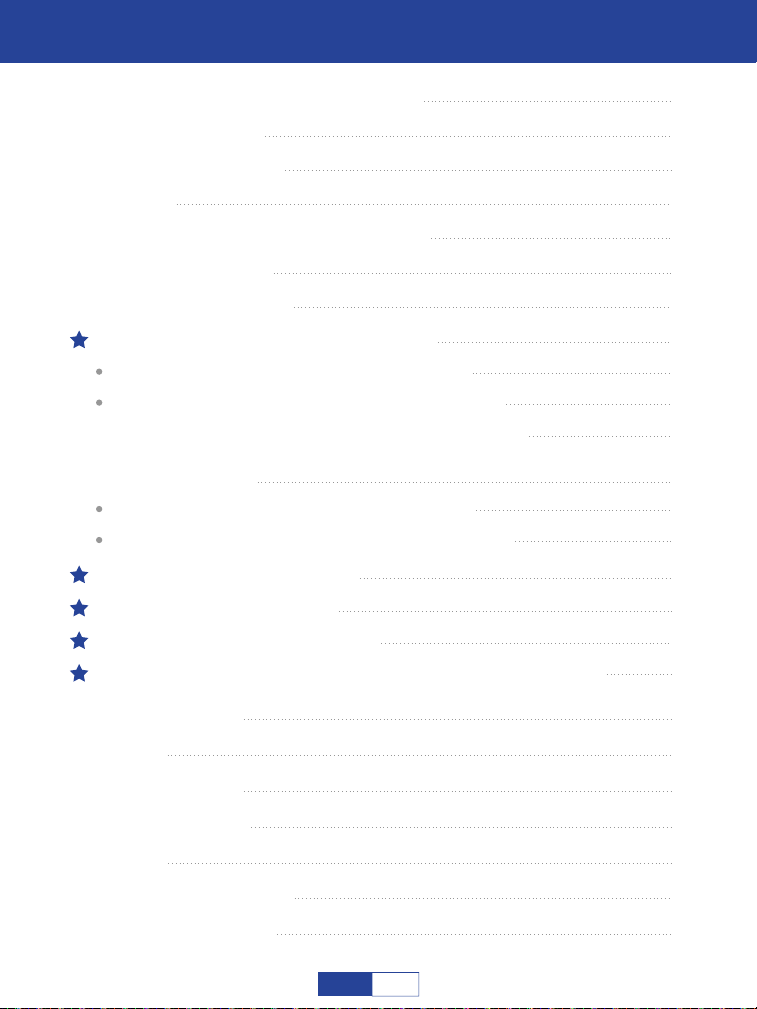
Catalogare
Importanti Considerazioni Sulla Sicurezza 87
Configurazione di Base 89
Panoramica del Proiettore 90
Telecomando 91
Messa a Fuoco e Correzione Trapezoidale 91
Come Pulire la Polvere? 92
Collegamenti del Proiettore 93
Riproduzione di Film 108
Fare Musica 111
Riproduzione di Foto 113
Riproduzione di Testo 115
Impostazioni 117
caratteristiche del Prodotto 119
Risoluzione dei Problemi 120
Connessione al Dispositivo Mobile 93
Per Sistema iOS (connessione cablata) 94
Per Sistema Android (connessione cablata) 95
Per Sistema iOS (connessione wireless) 98
Per Sistema Android (connessione wireless) 100
Per Sistema Android (cavo da USB C a HDMI)
95
Per Sistema Android (connessione cablata adattatore
HDMI 2 in 1) 97
Collegamento al Computer 103
Collegamento a Firestick 105
Collegamento al Lettore DVD 106
Collegamento al Dispositivo di Archiviazione Esterno
107
84
IT
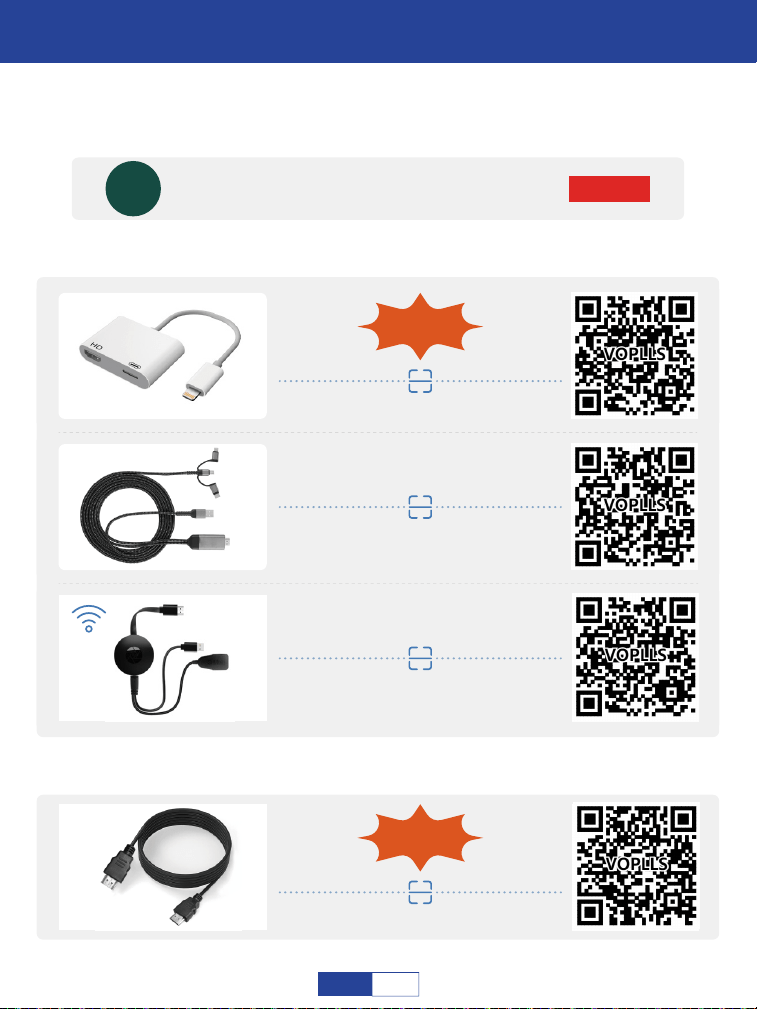
Video Guida Operativa
ISCRIVITI
VS-KING PROIETTORE
VS-KING
COME CONNETTERSI ALL'IPHONE?
Scansiona i codici QR qui sotto o cerca "VS-KING PROIETTORE" su YouTube per
ottenere video.
(Tutti i seguenti adattatori non sono inclusi. Gli adattatori
consigliati sono disponibili nel nostro negozio.)
da iOS a HDMI
Consigliato
iOS 3 in 1 HDMI
COME CONNETTERSI A UN LAPTOP WINDOWS?
Cavo HDMI portatile
Incluso
Consigliato
iOS WiFi HDMI
85
IT
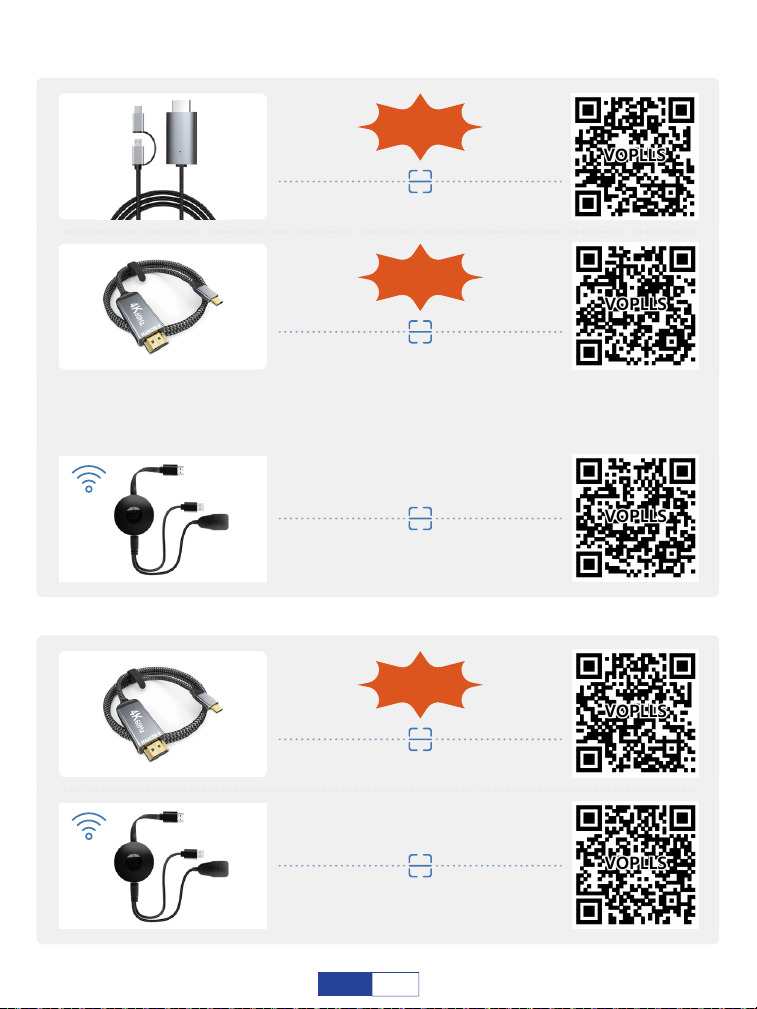
Android-3(2) in 1 HDMI
Consigliato
Android-USB C a HDMI
Consigliato
Laptop-USB C a HDMI
Consigliato
Android WiFi HDMI
Laptop-WiFi HDMI
COME CONNETTERSI ALLO SMARTPHONE ANDROID?
COME CONNETTERSI A MACBOOK
Si prega di notare che quando si sceglie il primo cavo da tipo C a HDMI,
assicurarsi che il telefono cellulare appartenga al modello di telefono indicato
nella terza pagina, in caso contrario, scegliere il secondo cavo HDMI 2 in 1.
86
IT
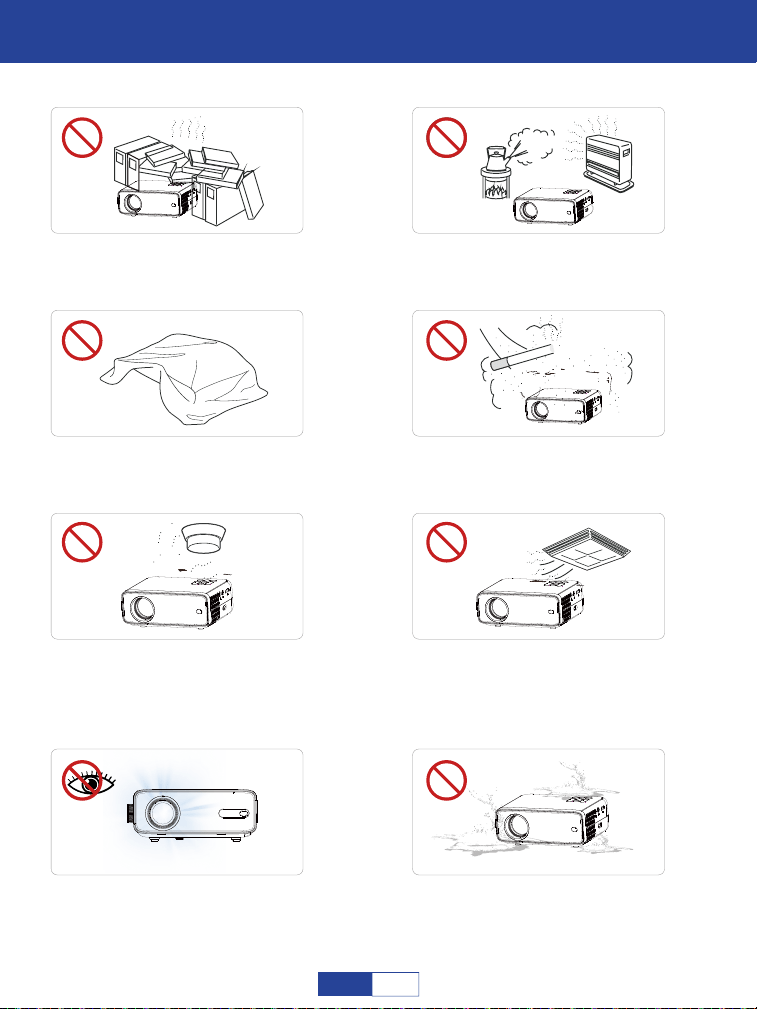
Important Safety Considerations
Importanti considerazioni sulla sicurezza
Non installare il proiettore in luoghi
caldi e umidi.
Non ostruire i fori di ventilazione
(aspirazione o scarico).
Non installare il proiettore in ambienti
polverosi e fumosi.
Non installare il proiettore in
luoghi con ventilazione inadegua-
ta.
Si prega di tenere il proiettore
lontano dall'acqua o da qualsiasi
altro liquido poiché non è
impermeabile.
Non installare il proiettore in
luoghi soggetti a soffiaggio diretto
di vento caldo e freddo. Altrimenti
potrebbe causare il fallimento del
progetto.
Si prega di non guardare
nell'obiettivo quando il proiettore
è in funzione. Altrimenti potreb-
be ferire gli occhi.
Non installare il proiettore vicino al
trasduttore di temperatura e fumo.
Potrebbe causare un guasto del
sensore.
87
IT
Installazione
Si prega di utilizzare il proiettore in una stanza buia per la migliore esperienza di visione.
Pulito
Scollegare il cavo di alimentazione dal proiettore.
Note su fuoco e scosse elettriche
Avviso di alta temperatura
Non versare liquidi sul proiettore.
Utilizzare il proiettore con una spazzola morbida. Non utilizzare accessori rigidi,
come uno strumento per la pulizia delle fessure, per evitare danni al proiettore.
Si prega di pulire regolarmente l'apertura di ventilazione e l'altoparlante con un
detergente. Il proiettore si surriscalda con la polvere bloccata, causando il guasto.
Use an air brush or lens paper to clean the lens and be careful not to scratch or abrade
them.
Utilizzare un panno umido per pulire regolarmente l'armadio. Il detergente neutro
può essere utilizzato per macchie gravi. Non utilizzare detergenti aggressivi o
solventi come alcool o diluenti.
Utilizzare il cavo di alimentazione con cautela per evitare di piegarlo eccessivamente.
Un cavo di alimentazione danneggiato può causare scosse elettriche.
Utilizzare il proiettore con cautela per evitare cadute o urti che potrebbero danneg-
giare il proiettore.
Evitare che oggetti estranei cadano nel proiettore, come pezzetti di carta e frammenti
di carta, non tentare di recuperare tali oggetti, non inserire alcun oggetto metallico,
come un filo di ferro o un cacciavite, nel proiettore. Assicurarsi di spegnere immediata-
mente l'alimentazione e chiedere a personale di manutenzione professionale qualifica-
to di rimuovere qualsiasi oggetto che cada all'interno del proiettore.
Durante e dopo la proiezione, la temperatura in prossimità dell'uscita aumenterà,
pertanto il contatto potrebbe causare ustioni. Non guardare l'obiettivo per evitare gravi
lesioni agli occhi.
Assicurarsi che ci sia una ventilazione adeguata e una presa bloccata per evitare
l'accumulo di calore all'interno del proiettore.
88
IT
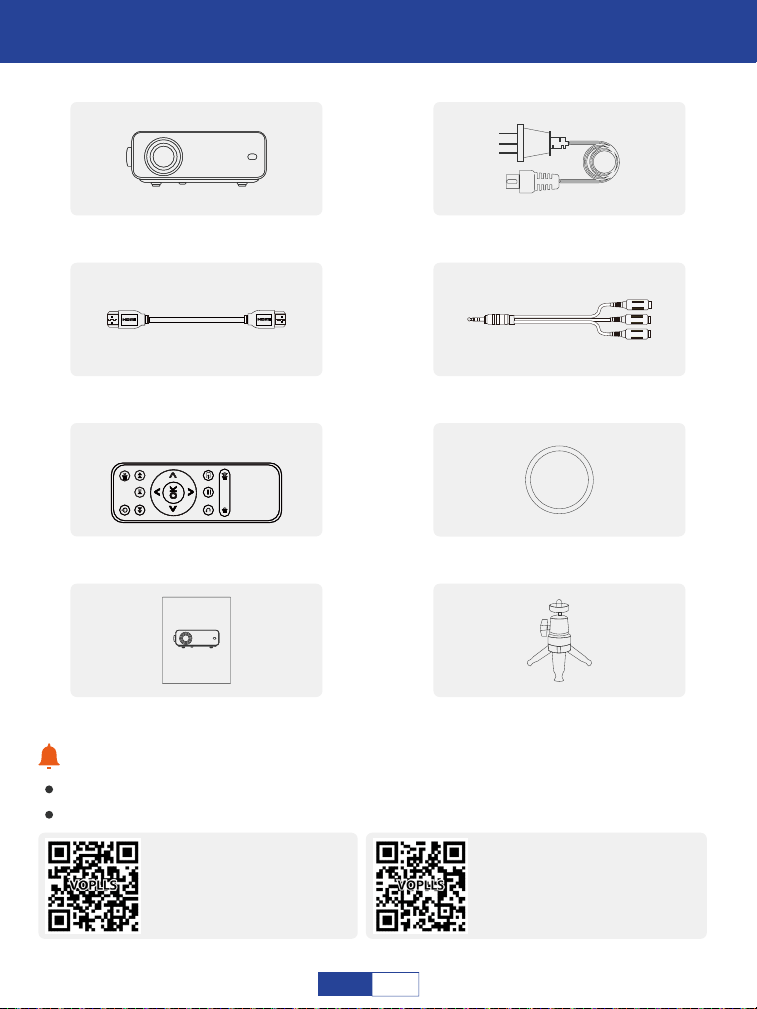
Con�igurazione di base
In caso di parti mancanti, contattare il team di supporto VOPLLS.
Indirizzo e-mail del team di supporto VOPLLS:
Tips:
1x cavo HDMI 1x cavo segnale AV
1x telecomando
(batteria non inclusa)
1x proiettore 1080P 1x cavo di alimentazione
1x copriobiettivo
1x manuale utente
(lingua italiana non garantita).
User Manual
VOPLLS
VOPLLS @vskingtech.com
Mercato del Nord America:
VOPLLS-EU @vskingtech.com
Mercato europeo:
1x treppiede
89
IT
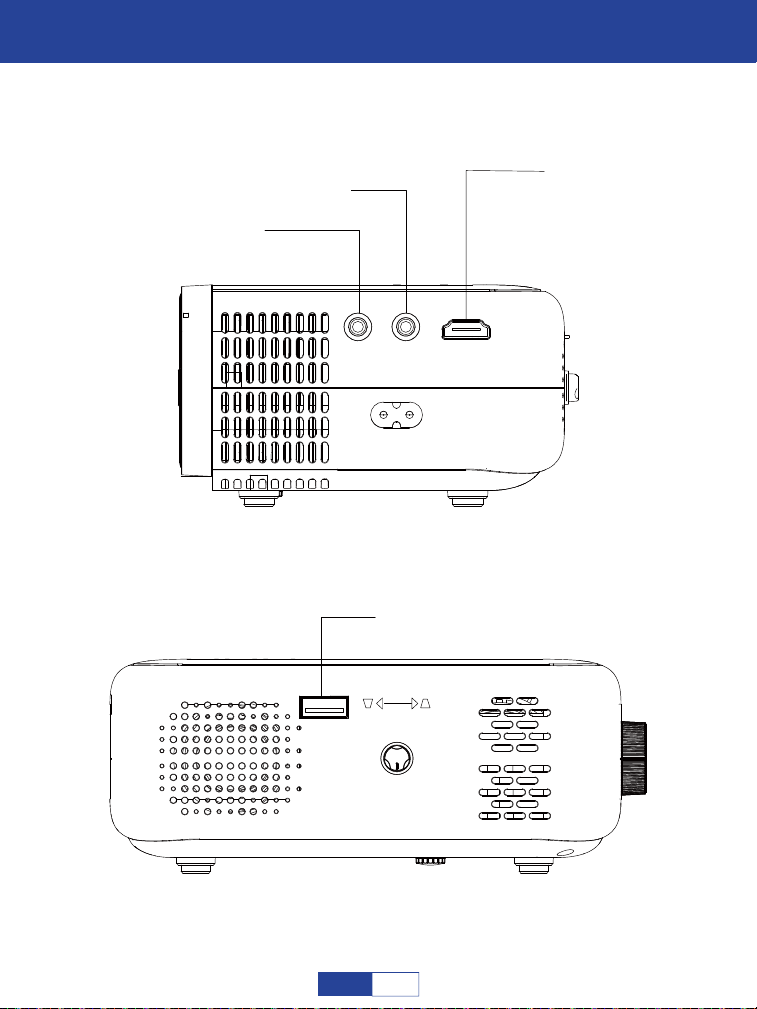
Panoramica del proiettore
Audio da 3.5 mm
AV
HDMI
USB
KEYSTONE
/
/
90
IT
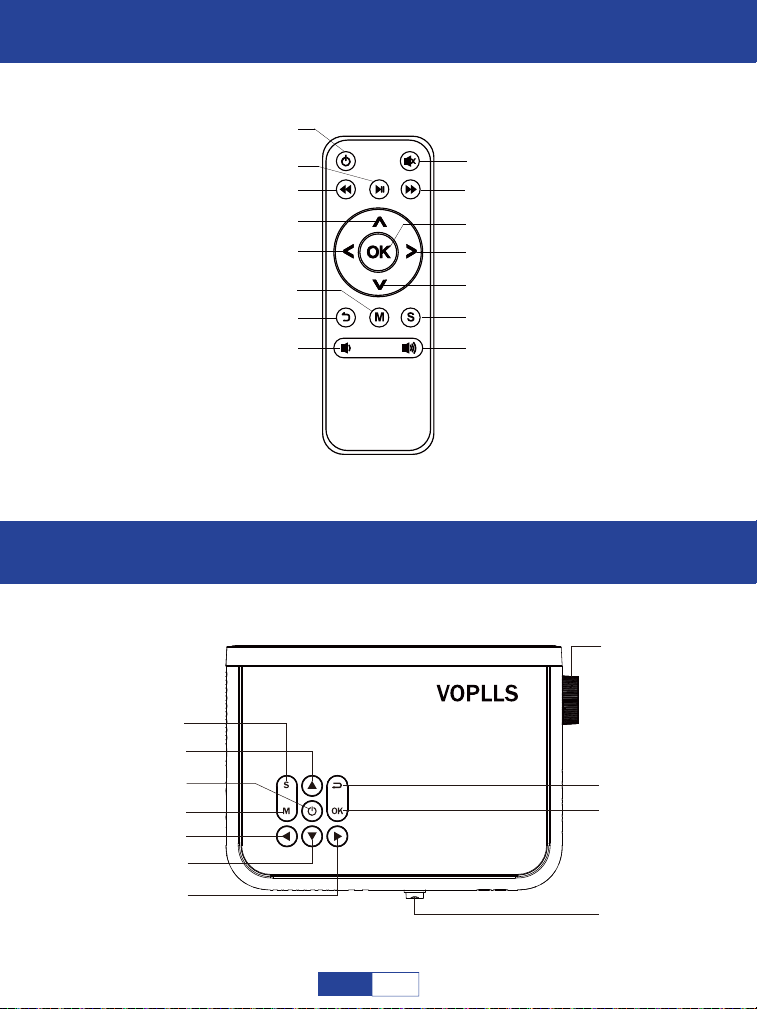
Telecomando
Messa a fuoco e correzione trapezoidale
Pawer Swich
Indietro veloce
Pausa
Menù
Alzati
Muovere a sinistra
Ritorno
Volume basso
Avanti veloce
Volume su
Sorgente del segnale
Abbassati
Vai a destra
OK
Muto
Sorgente del segnale
Chiave di volta
OK
Ritorno
Messa a fuoco
Vai a destra
Sposta Alba
Muovere a sinistra
Menù
Interruttore di alimentazione
Andare avanti
91
IT
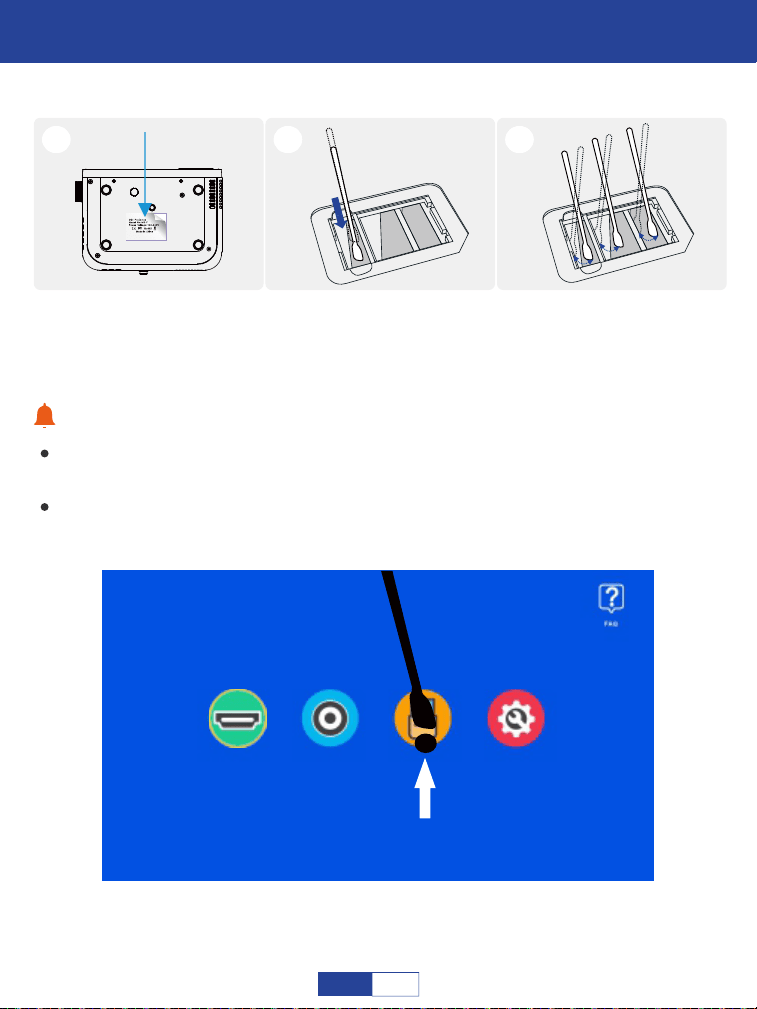
Come pulire la polvere?
Suggerimenti:
HDMI
1 2 3
Se ci sono punti neri sullo schermo, accendi il proiettore e sposta il bastoncino in base
alla posizione del punto nero sullo schermo.
AV USB Impostazione
Strappare l'etichetta e
aprire il coperchio.
Inserire il batuffolo di
cotone in profondità
all'interno
Pulisci tutti e 5 i lati (regola
la "chiave di volta" per una
facile pulizia).
Si prega di pulire regolarmente l'obiettivo per risolvere o evitare il problema dei punti
neri sullo schermo.
92
IT
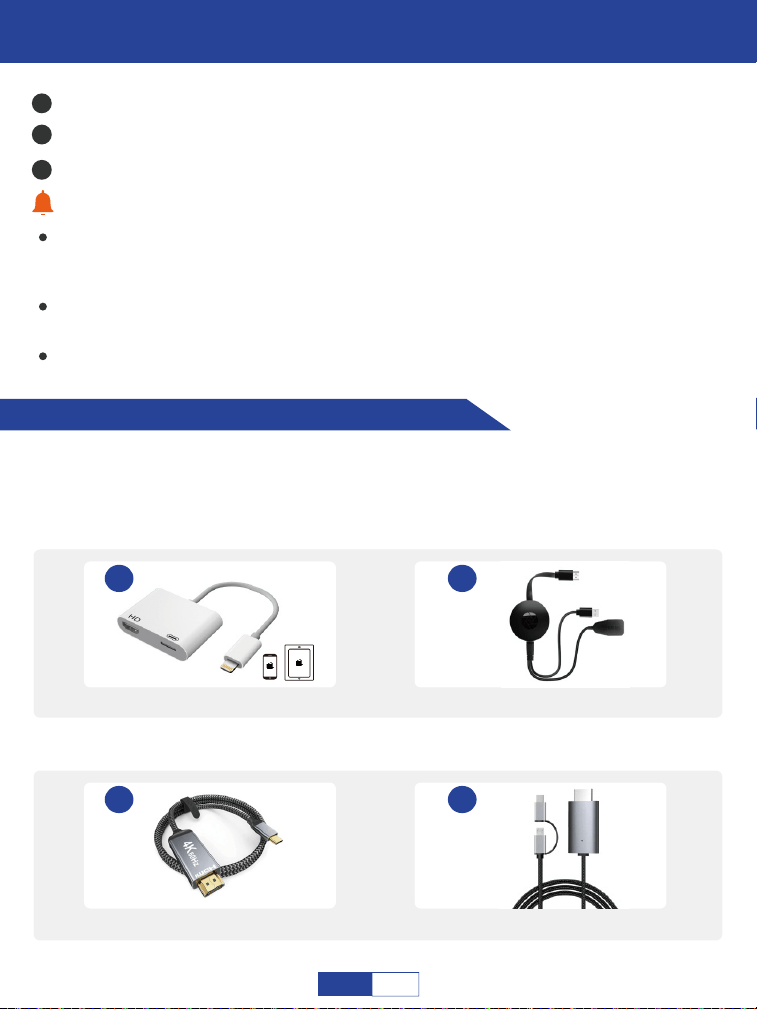
Collegamenti del proiettore
Connessione al dispositivo mobile
Suggerimenti caldi:
Si prega di acquistare un adattatore HDMI aggiuntivo in base al proprio telefono;
Assicurati che il tuo dispositivo supporti il display Multi-Screen/Wireless; Utilizzare un
adattatore indicato di seguito per trasmettere il segnale. Ecco alcune immagini del cavo
corretto di seguito per riferimento:
1
2
3
Dopo aver inserito il cavo di alimentazione nella presa, accendere il proiettore finché
l'indicatore LED sul proiettore non diventa rosso fisso. Se il proiettore è acceso e
funziona correttamente, l'indicatore LED diventa verde;
Non guardare mai nell'obiettivo del proiettore quando la lampada è accesa. Questo
può danneggiare gli occhi ed è particolarmente pericoloso per i bambini;
Installare 2 pezzi di batterie AAA nel telecomando prima di utilizzarlo
2
Adattatore dongle display HDMI
È consigliato quando ti
connetti a iPhone/Tablet.
1
Adattatore da Lightning a HDMI
4
Cavo HDMI 2 in 1
3
Cavo da tipo C a HDMI
HDMI Output
Type-C
HDMI Output
Type-C
Micro USB
Collegare il cavo di alimentazione. L'indicatore LED sul proiettore sarà rosso fisso;
Premere a lungo il pulsante di accensione per circa 5 secondi per accendere. L'indicatore LED sarà
verde.
Regolare l'anello di messa a fuoco e la distorsione trapezoidale per ottenere le migliori prestazioni
93
IT
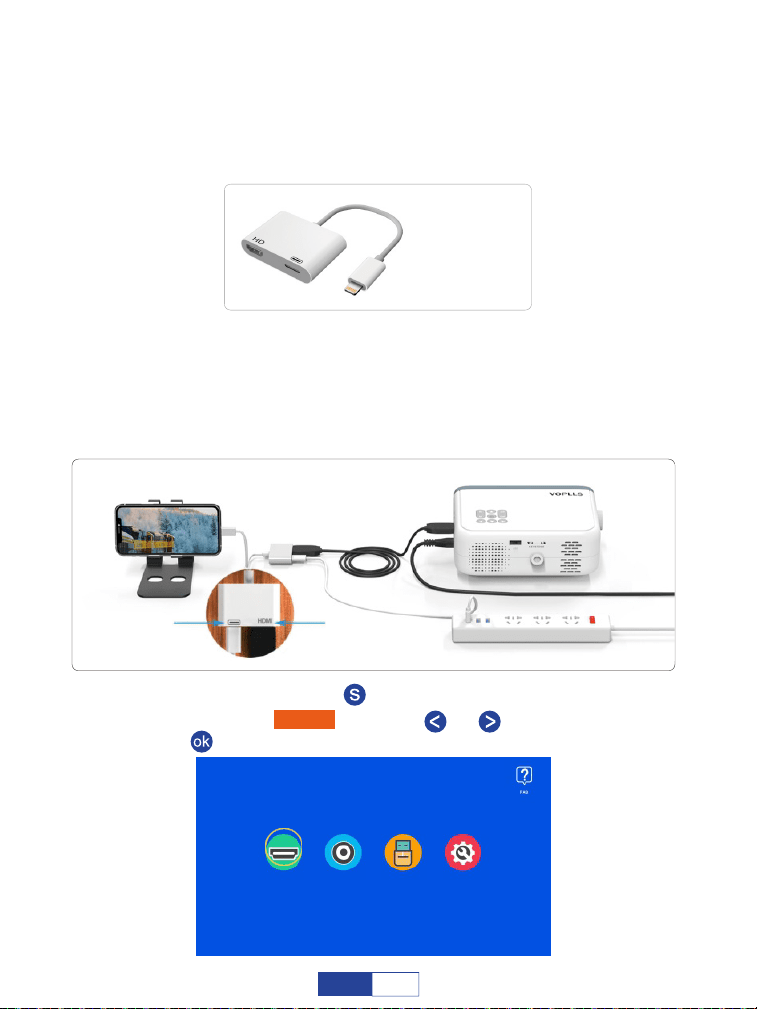
È consigliato quando ci si connette a smartphone/tablet Android. Si prega di notare
che quando si sceglie il primo cavo da tipo C a HDMl, assicurarsi che il telefono
cellulare appartenga al modello di telefono indicato nella nona pagina, in caso
contrario, scegliere il secondo cavo HDMl 2 in 1.
Passaggio 1:
Accendi il dispositivo mobile e il proiettore;
Collegare la porta HDMI al proiettore;
Passaggio 4: Premere il pulsante " " per tornare alla home page;
Per sistema i0S (connessione cablata)
Collega l'altra estremità con la porta Lightning al tuo dispositivo mobile;
Non dimenticare di preparare un cavo di ricarica Apple per il collegamento
all'adattatore Apple da Lightning a AV digitale come di seguito:
(not included)
Porta di ricarica Porta HDMI
Selezionare "HDMI" premendo " " o " ", quindi premere il pulsante
" " per confermare.
Passaggio 5:
HDMI AV USB Impostazione
Passaggio 2:
Passaggio 3:
94
IT
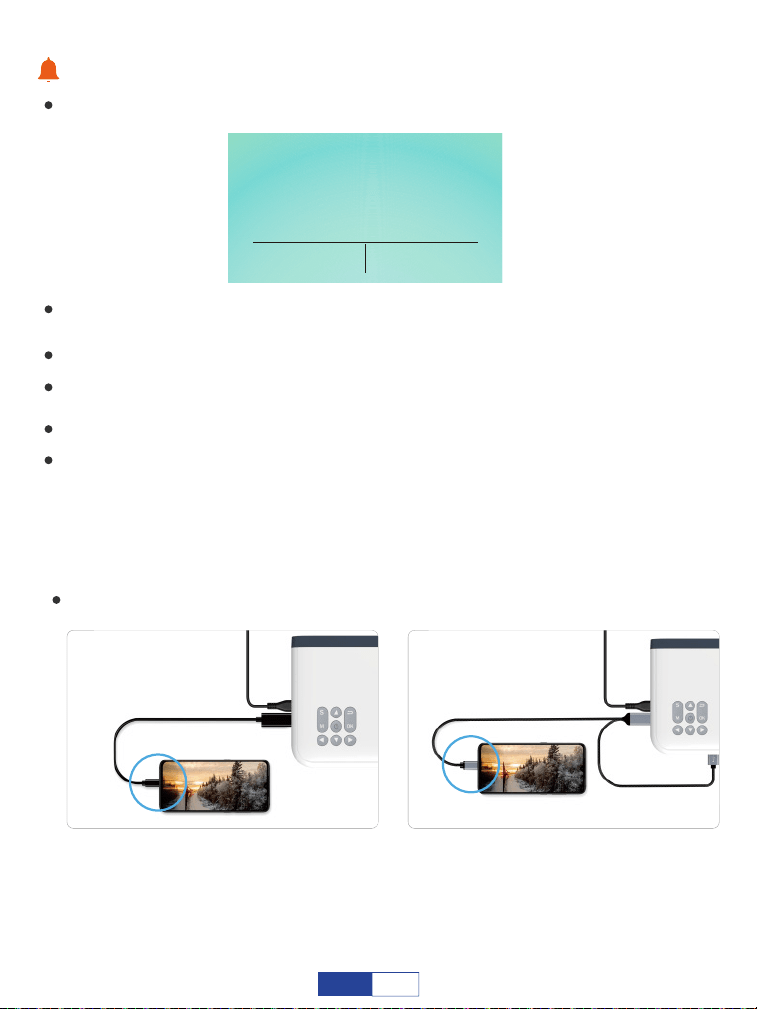
Per sistema Android (connessione cablata)
Suggerimenti:
Seleziona "Trust" quando potrebbe esserci una finestra pop-up sul tuo dispositivo
mobile;
Per sistemi Android (cavo da USB C a HDMI)
Quando si utilizza questo cavo da USB C a HDMI, verificare che il telefono
appartenga ai seguenti modelli di telefono. Se non appartiene, collegare il telefono
tramite l'altro adattatore HDMI 2 in 1 come mostrato nell'immagine nella pagina
successiva.
Fidati di questo computer
Fidati Non fidarti
Le tue impostazioni e i tuoi dati
saranno accessibili da questo
computer quando connesso senza
winrless o utilizzando un cavo
(non incluso)
USB C
(non incluso)
USB power
USB C
Quando mostra lo schermo con alcuni codici QR, l'icona della farfalla e così via dopo aver
selezionato, non scansionare alcun codice QR e attendere solo un momento;
Non inserire mai direttamente il cavo Lightning nella porta USB del proiettore;
Collegare un cavo di alimentazione per l'adattatore HDMI. (si consiglia una presa di alimentazione
esterna)
Leggere attentamente le istruzioni dell'adattatore HDMI prima del collegamento;
A causa di problemi di copyright, Netflix, Amazon Prime, Disney e Hulu non sono supportati per
riprodurre direttamente dallo schermo a specchio con il telefono, è necessario collegare la chiavetta
TV per giocare.
95
IT

Attiva il Bluetooth sul tuo dispositivo mobile e abbina l'adattatore HDMI tramite
Bluetooth. (È normale se la connessione Bluetooth non ha esito positivo.)
Passaggio 1:
Premere il pulsante " " per tornare alla home page;
Passaggio 2:
Collegare la porta HDMI e la porta USB al proiettore. (Se il cavo da USB C a
HDMI è dotato di alimentazione USB,) collega l'altra estremità al telefono.
Passaggio 4:
Selezionare "ACCETTO" quando potrebbe essere visualizzata una finestra
pop-up sul telefono.
Passaggio 5:
Passaggio 3:
HDMI AV USB Impostazione
Compagno: Xs/Xs2/X2,40/40Pro/40E
Pro/40Pro+/40RS,20/20Pro/20X/20RS,10Pro
HUAWEI
P:50/50E/50Pro/50Pro+/50Pock-
et,40/40Pro/40Pro+,30/30Pro,20/20Pro
SAMSUNG
Galaxy S: 22/22+/22Ultra,21/21+/21Ultra/21FE,20/20+/20Ul-
tra,10/10+,9/9+,8/8+
Nota Galaxy: 20/10/10+/9/8
trova X5 Pro, OnePlus 10Pro/Ace Pro/9
K92, ALA, G8X, VELLUTO 2 Pro, V60/50/40/30, G7/8
Dado Smartisan: Pro3, Pro2S, R1
950,950XL
ultra, 10
applicabile a tutti i modelli Razer
OPPO
LG
Smartisan Nut
Microsoft
HTC
Razer
Selezionare "HDMI" premendo il tasto " "o " ", quindi premere il tasto " "
per confermare;
96
IT
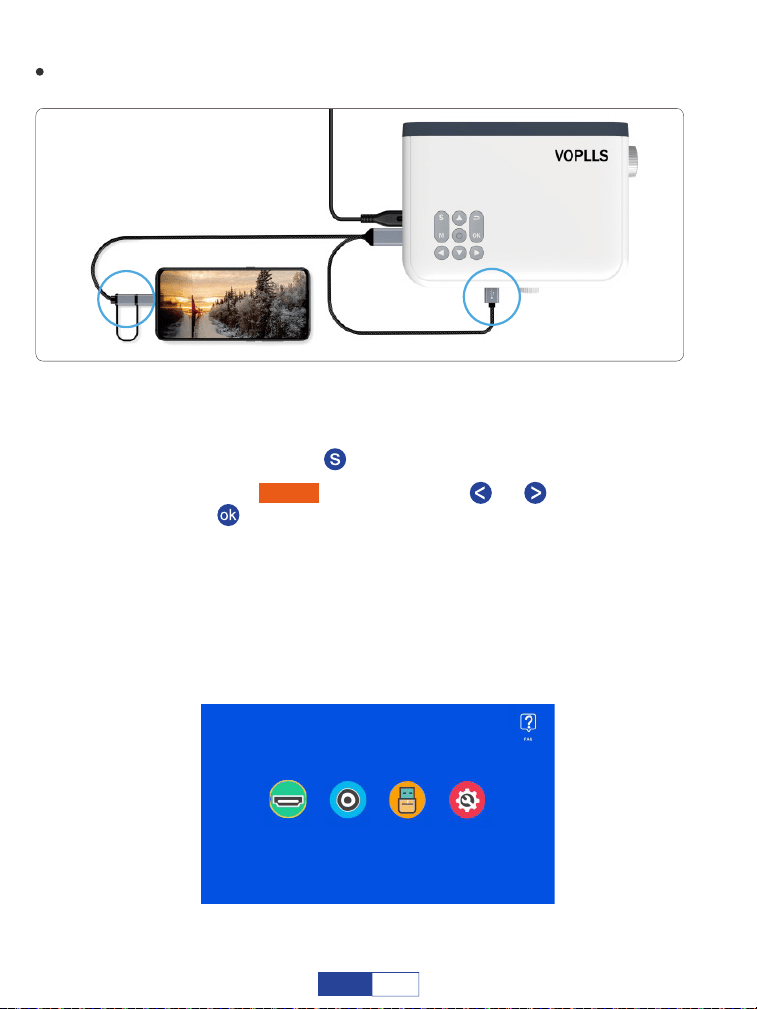
Per sistema Android (connessione cablata adattatore HDMI 2 in 1)
Attiva il Bluetooth sul tuo dispositivo mobile e abbina l'adattatore HDMI
tramite Bluetooth. (È normale se la connessione Bluetooth non ha esito
positivo.)
Selezionare "HDMI" premendo il tasto " "o " ", quindi premere il
tasto " " per confermare;
Passaggio 1:
Passaggio 2:
Premere il pulsante " " per tornare alla home page;
Passaggio 3:
Passaggio 4:
Collegare la porta HDMI e la porta USB al proiettore (se il cavo da USB C
a HDMI è dotato di alimentazione USB).
Collegare l'altra estremità con la porta Type-C/Micro USB al dispositivo
mobile;
Scansiona il codice QR sullo schermo tramite il browser e scaricalo;
Passaggio 5:
Passaggio 6:
HDMI AV USB Impostazione
(not included)
USB power
2 in 1 HDMI adapter
Quindi segui le istruzioni sul tuo telefono.
97
IT
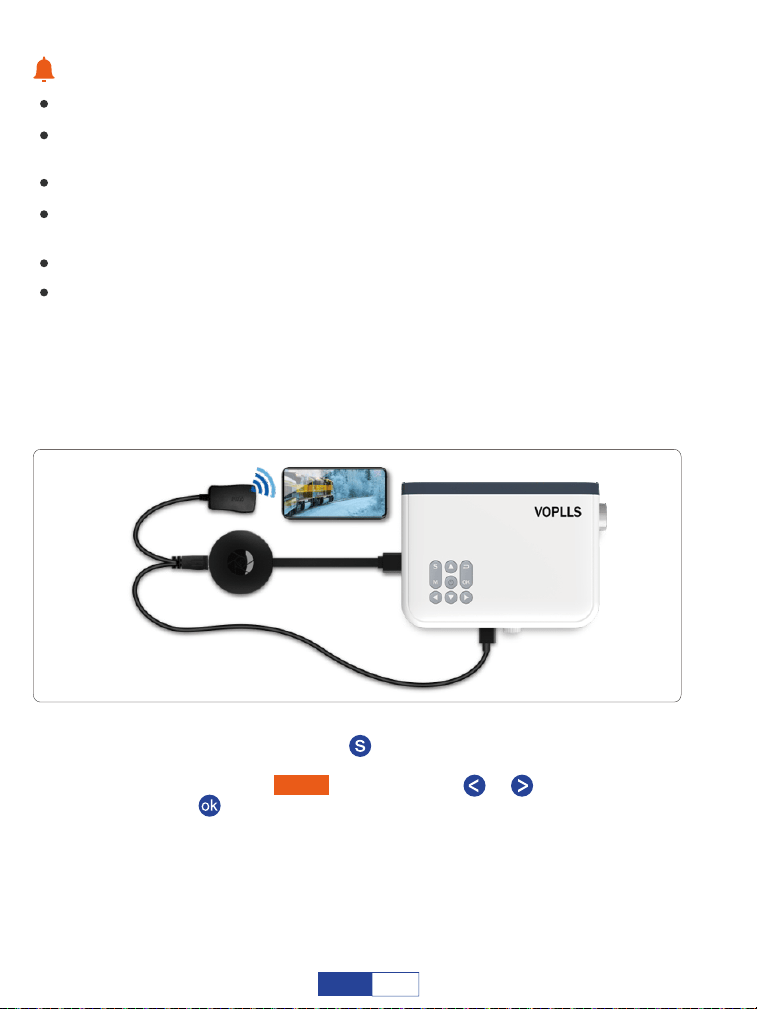
Suggerimenti caldi:
Se la connessione non riesce, scollegare e reinserire il cavo più volte;
Se il tuo telefono è vivo o oppo, assicurati di attivare OTG nelle Impostazioni del tuo
telefono;
Leggere attentamente le istruzioni dell'adattatore HDMI prima del collegamento;
Collegare un cavo di alimentazione per l'adattatore HDMI. (si consiglia una presa di
alimentazione esterna);
Non inserire mai direttamente il cavo Type-C/Micro USB nella porta USB del
A causa di problemi di copyright, Netflix, Amazon Prime, Disney e Hulu non sono
supportati per riprodurre direttamente dallo schermo a specchio con il telefono, è
necessario collegare la chiavetta TV per giocare.
Per sistema iOS (connessione wireless)
Collegare la porta HDMI al proiettore;
Passaggio 1:
Premere il pulsante " " per tornare alla home page;
Passaggio 2:
Passaggio 3:
Selezionare "HDMI" premendo il tasto " "o " ", quindi premere il tasto
" " per confermare;
(not included)
Passaggio 4:
Attiva l'interruttore Wi-Fi nel tuo dispositivo iOS. Il Wi-Fi connesso
correttamente sul dispositivo iOS non è un must a meno che non sia
necessario il contenuto di streaming live; Si prega di ignorare il punto
esclamativo prima di esso;
98
IT
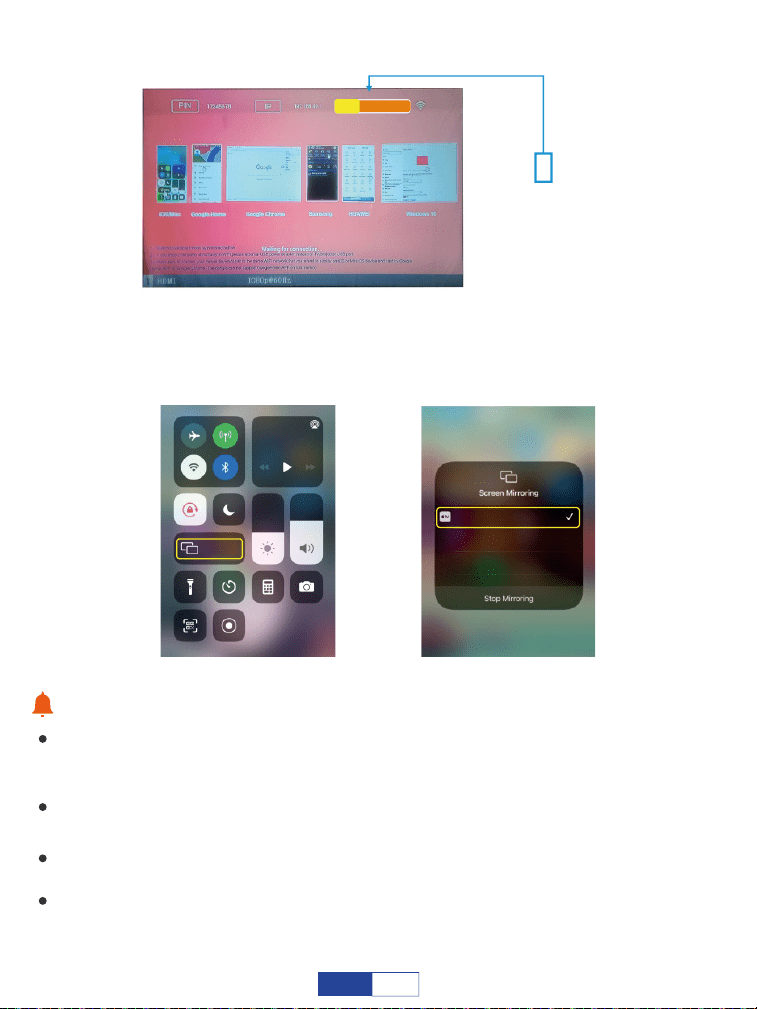
Scorrere verso l'alto lo schermo del dispositivo mobile iOS, quindi
toccare Screen Mirroring/AirPlay Mirroring e cercare il proiettore.
Passaggio 5:
Suggerimenti caldi:
La fluidità del mirroring dello schermo con la connessione wireless sarà influenzata
dall'ambiente di rete. Si consiglia una larghezza di banda di almeno 100 Mbit quando
si utilizza il mirroring dello schermo;
Assicurarsi che il dispositivo mobile sia vicino al proiettore quando si utilizza la
connessione wireless. Si consiglia una distanza entro 1 m/3.3 piedi;
Alcuni dispositivi mobili potrebbero non supportare il mirroring dello schermo a
causa della compatibilità;
A causa di problemi di copyright, Netflix, Amazon Prime, Disney e Hulu non sono
supportati per riprodurre direttamente dallo schermo a specchio con il telefono, è
necessario collegare la chiavetta TV per giocare.
Selezionalo dai risultati
della ricerca per
connetterti.
DEVICE DONGLE-*****
Music
Screen
Mirroring
DONGLE-*****
DONGLE-*****
99
IT
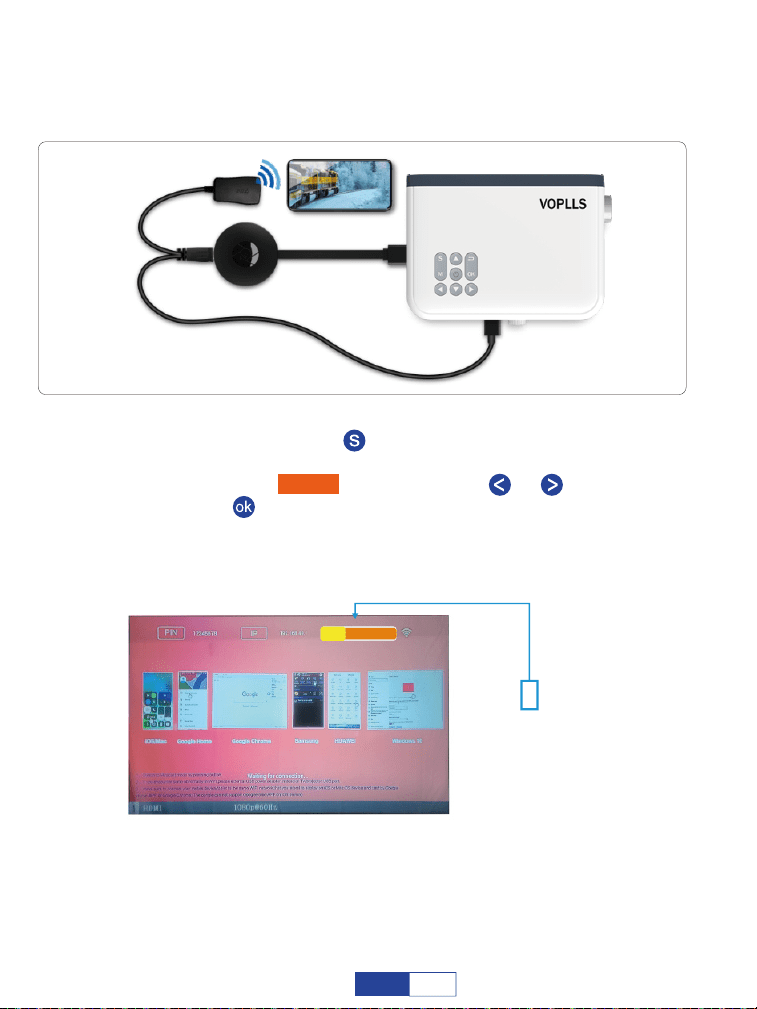
Per sistema Android (connessione wireless)
Collegare la porta HDMI al proiettore;
Passaggio 1:
(not included)
Premere il pulsante " " per tornare alla home page;
Passaggio 2:
Attiva l'interruttore Wi-Fi sul tuo dispositivo Android. Il Wi-Fi
connesso correttamente sul dispositivo Android non è un must a
meno che non sia necessario il contenuto in live streaming;
Passaggio 4:
Attiva la funzione multischermo nel tuo dispositivo Android e cerca il
proiettore.
Passaggio 5:
Passaggio 3:
Selezionalo dai risultati
della ricerca per
connetterti.
DEVICE DONGLE-*****
Selezionare "HDMI" premendo il tasto " "o " ", quindi premere il
tasto " " per confermare;
100
IT
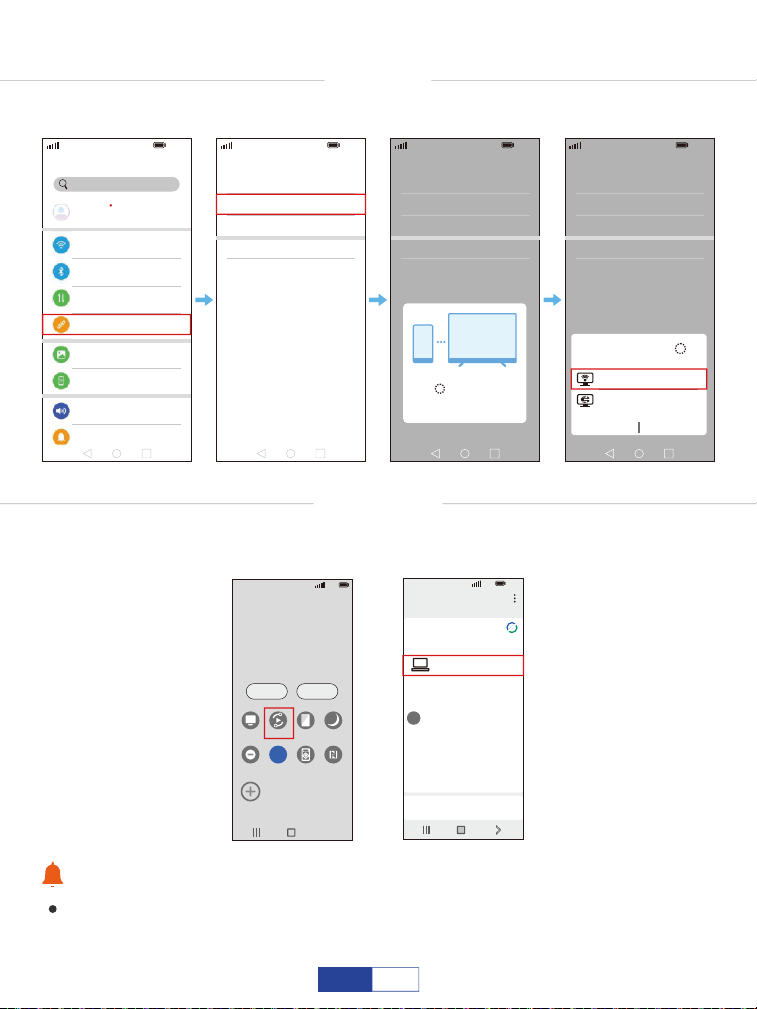
Suggerimenti caldi:
Disattivare la funzione DEX se il proiettore mostra SOLO la schermata iniziale del
telefono.
HUAWEI
Più connessioni: proiezione wireless.
SAMSUNG
Scorri verso l'alto lo schermo del tuo dispositivo Samsung, quindi tocca
"Smart view" e cerca il proiettore.
5G
100%
21:05
>
>
>
>
>
Huawei Share
Wireless projection
Pirnting
On
VPN
Private DNS
Of
f
Connecting...
CANCEL
5G
100%
21:05
Search
HUAWEI ID, Payment and purchases,
Cloud,and more
001********79
>
>
>
>
>
>
>
>
>
WLAN
Bluetooth
Mobile network
More connections
Home scree & wallpaper
Display & brightness
Sounds & vibration
Notifications
On
5G
100%
21:05
>
>
>
>
>
Huawei Share
Wireless projection
Pirnting
On
VPN
Private DNS
Of
f
5G
100%
21:05
>
>
>
>
>
Huawei Share
Wireless projection
Pirnting
On
VPN
Private DNS
Of
f
DONGLE-*****
DONGLE-*****
Wireless Projection
Available devices
CANCEL HELP
5G
100%
>
18:45
Monday, July 5
Devices Media
DeX
DeX
Smart View
Blue light
filter
Dark mode
B
Do not
disturb
5G
Hongbao
accelerator
NFC
5G
5G
100%
18:45
>
Smart View
Phone Other device
Select a device below to mirror your phone’s
screen or play content
DONGLE-*****
Mirror screen
>
Other device Phone
→
→
101
IT

XIAOMI
Scorri verso l'alto lo schermo del tuo dispositivo Xiaomi, quindi tocca
"Connessione e condivisione-Trasmetti" e cerca il proiettore.
5G
100%
18:45
>
Cast
Cast
Cast screen contents to an external
monitor
>
Cancel Help
Select device(1)
DONGLE-*****
Demos
Casting documents,games,photos,and
videos
>
SPECIAL FEATURES
Suggerimenti caldi:
La fluidità del mirroring dello schermo con la connessione wireless sarà influenzata
dall'ambiente di rete Si consiglia una larghezza di banda di almeno 100 Mbit
quando si utilizza il mirroring dello schermo;
Assicurarsi che il dispositivo mobile sia vicino al proiettore quando si utilizza la
connessione wireless. Si consiglia una distanza entro 1 m/3,3 piedi;
Alcuni dispositivi mobili potrebbero non supportare il mirroring dello schermo a
A causa di problemi di copyright, Netflix, Amazon Prime, Disney e Hulu non sono
supportati per riprodurre direttamente dallo schermo a specchio con il telefono, è
I telefoni Google e i telefoni Motorola parziali vietano il mirroring dello schermo
direttamente dal proiettore a causa di problemi relativi al protocollo di mirroring.
Devi avere un Google Chromecast per collegarlo.
102
IT
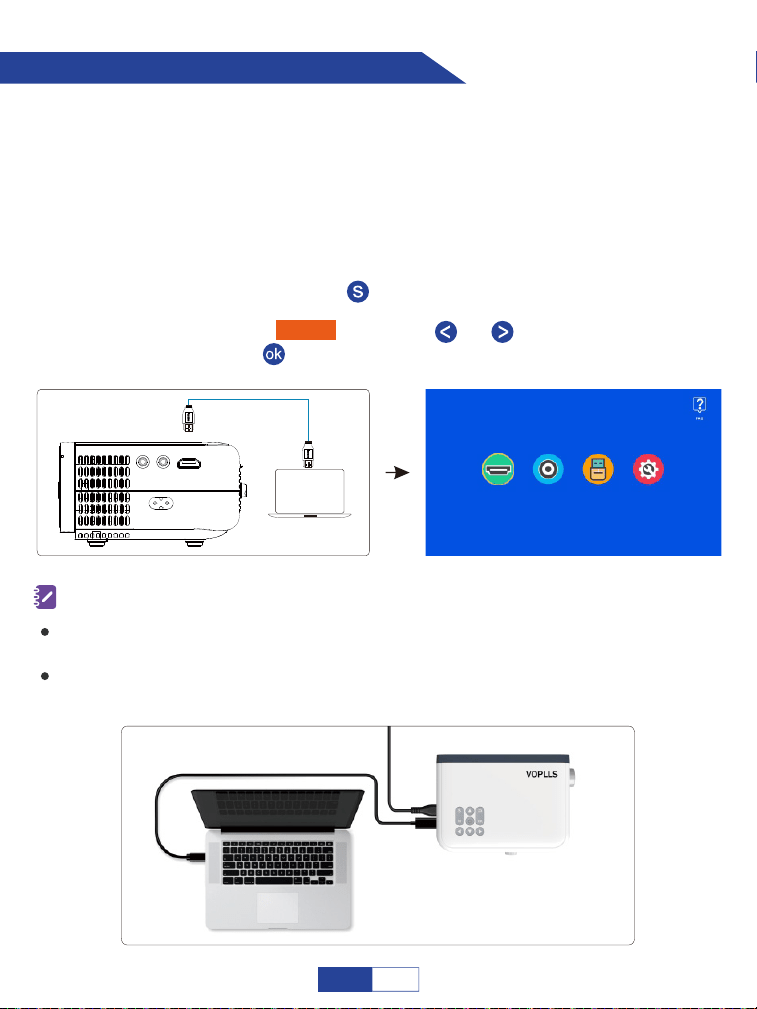
Collegamento al computer
Accendi il computer e il proiettore;
Passaggio 1:
Collegare il cavo HDMI alla porta HDMI del computer;
Passaggio 2:
Premere il pulsante " " per tornare alla home page;
Passaggio 4:
Collegare l'altra estremità alla porta HDMI del proiettore;
Selezionare "HDMI" premendo " "o " ", quindi premere il
pulsante " " per confermare.
Passaggio 5:
Passaggio 3:
(not included)
Collegare il proiettore al computer utilizzando il cavo HDMI nella confezione. Si
consiglia una connessione HDMI.
Per collegare un computer che include solo una porta di tipo C, è necessario acquistare un cavo
da USB C a HDMI aggiuntivo che consenta il collegamento alla porta HDMI del proiettore.
È necessario selezionare l'opzione di progetto quando si collega il computer al proiettore al primo
utilizzo.
AV USB Settings
HDMI AV USB Impostazione
Appunti:
103
IT
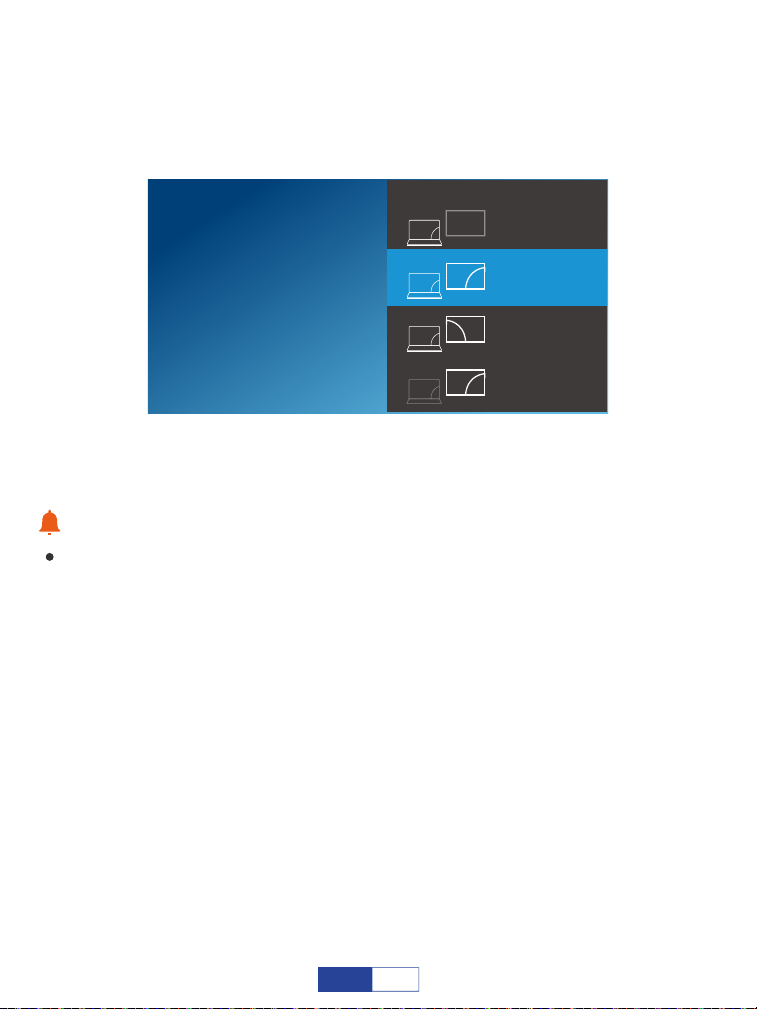
Premendo contemporaneamente il tasto logo Windows + tasto P e selezionando
"DUPLICATE".
Per sistema Windows 7 e versioni successive
Suggerimenti caldi:
A causa di problemi di copyright, Netflix, Amazon Prime, Disney e Hulu non sono
supportati per riprodurre direttamente dallo schermo a specchio con il telefono, è
necessario collegare la chiavetta TV per giocare.
SECOND SCOND SCREEN ONLY
Project
PC SEREEN ONLY
DUPLICATE
EXTEND
104
IT
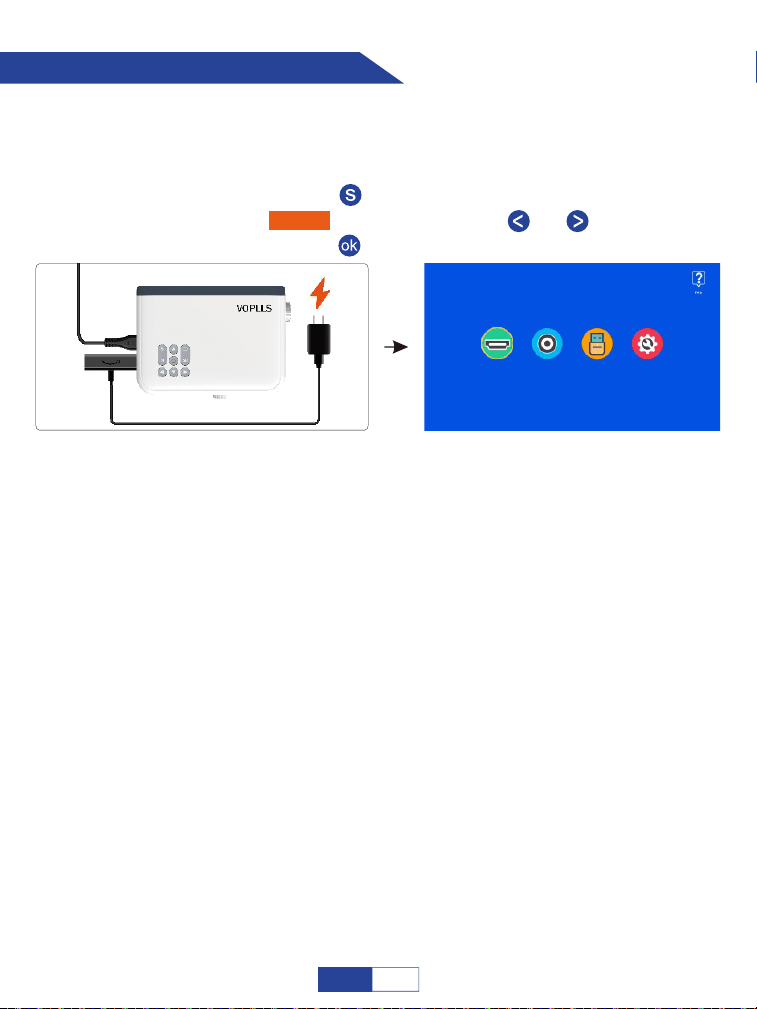
Collegamento a Firestick
Inserire Firestick.
Il tuo Firestick potrebbe essere in modalità di sospensione, scollega il Firestick e il cavo
di ricarica del Firestick, quindi ricollegalo per attivare il Firestick.
Passaggio 1:
Collega un cavo di ricarica per il tuo Firestick;
Passaggio 2:
Premere il pulsante " " per tornare alla home page e
selezionare "HDMI" premendo il pulsante " " o " ", quindi
premere il pulsante " " per confermare.
Passaggio 3:
(non incluso)
AV USB Settings
HDMI AV USB Impostazione
Cosa succede se il proiettore non riconosce Firestick?
Entra in "Impostazioni" e trova "Display e audio". Quindi selezionare "on" per "suoni di
navigazione". Selezionare "Stereo (o PCM)" per "suono surround".
E se non c'è suono?
105
IT
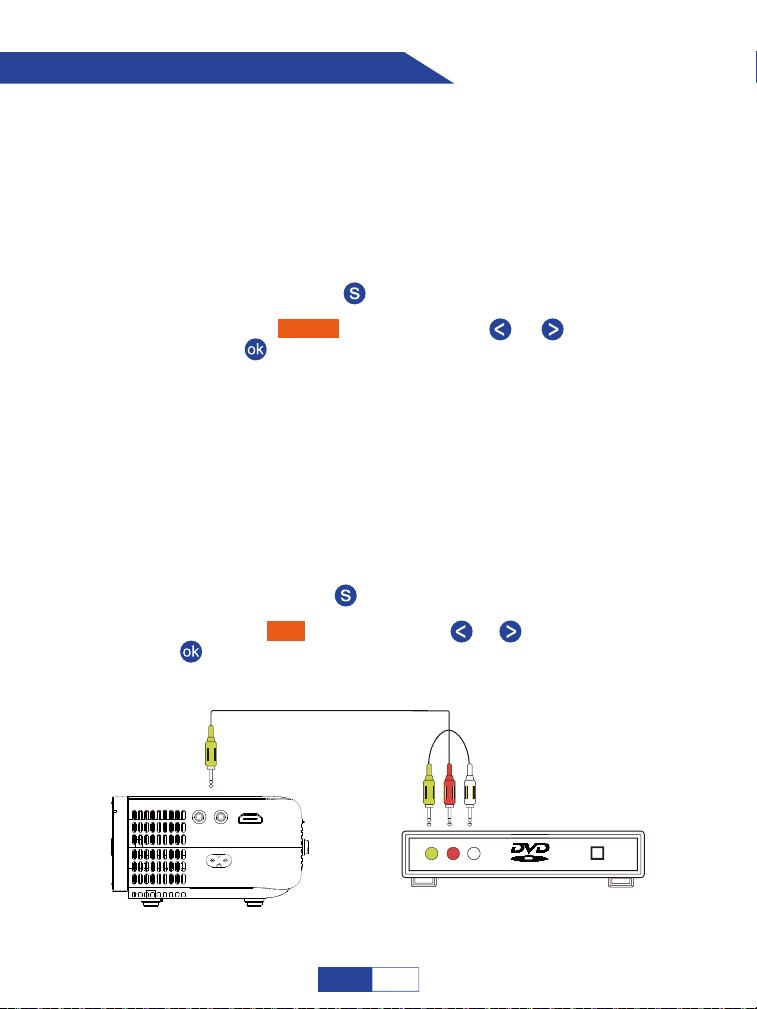
Collegamento al lettore DVD
Accendi il lettore DVD e il proiettore;
Passaggio 1:
Collegare il cavo HDMI alla porta HDMI del lettore DVD;
Passaggio 2:
Collegare l'altra estremità alla porta HDMI del proiettore;
Passaggio 3:
Premere il pulsante " " per tornare alla home page;
Passaggio 4:
Passaggio 5::
Selezionare "HDMI" premendo il tasto " "o " ", quindi premere
il tasto " " per confermare.
Opzione 1: collegare il proiettore al lettore DVD utilizzando il cavo HDMI
nella confezione.
Accendi il lettore DVD e il proiettore;
Passaggio 1:
Collega i colorati connettori femmina al cavo RCA del tuo lettore
Passaggio 2:
Collegare il connettore maschio giallo alla porta di ingresso AV sul
Passaggio 3:
Premere il pulsante " " per tornare alla home page;
Passaggio 4:
Passaggio 5:
Selezionare "AV" premendo il tasto " "o " ", quindi premere il tasto
" " per confermare.
Opzione 2: collegare il proiettore al lettore DVD utilizzando il cavo AV
nella confezione.
106
IT
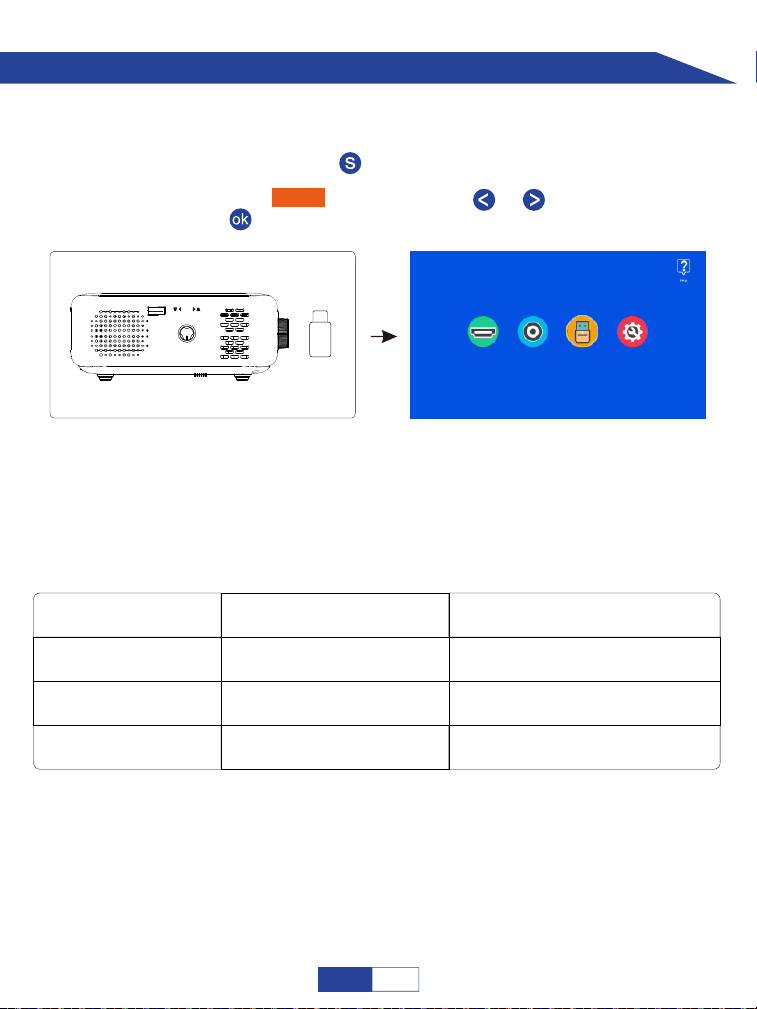
Collegamento al dispositivo di archiviazione esterno
Inserire l'unità USB;
Passaggio 1:
Premere il pulsante " " per tornare alla home page;
Passaggio 1:
Selezionare "USB" premendo il tasto " "o " ", quindi premere il
tasto " " per confermare.
Passaggio 1:
Se la chiavetta USB viene riconosciuta correttamente, l'icona dell'unità USB nell'angolo
in alto a destra si illuminerà. Tieni presente che l'unità USB e i file devono soddisfare i
seguenti formati. (ad esempio: se il formato dell'unità USB è NTFS, la capacità di
memoria dell'unità USB deve essere inferiore a 128G e la memoria del video deve
essere inferiore a 2T.)
Formati di unità USB
NTFS
FAT32
128G
128G
2T
4G
FAT 128G 2G
Memoria massima di ogni video
HDMI AV USB Impostazione
USB
KEYSTONE
//
Capacità di memoria
massima dell'unità USB
107
IT
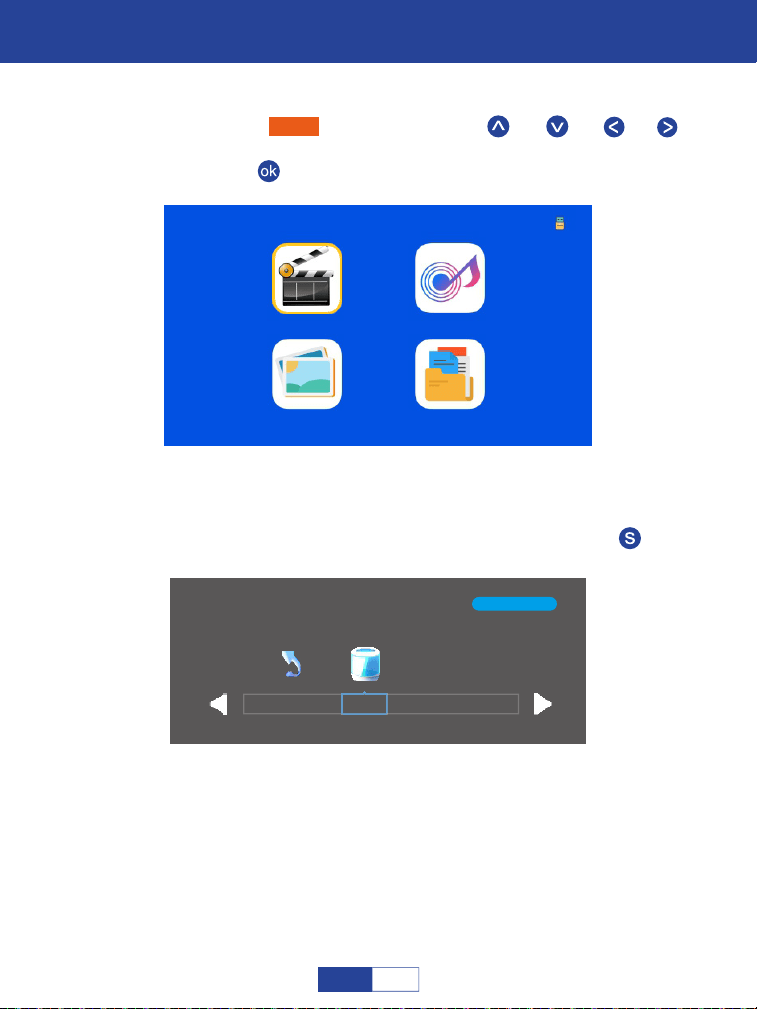
Important Safety Considerations
Riproduzione di Film
Selezionare "Film" premendo i pulsanti " " o " " o " " o " " e
il fotogramma selezionato verrà evidenziato. Quindi premere il
pulsante " " per accedere alla seguente interfaccia;
Passaggio 1:
Selezionare il disco C o USB, quindi premere il pulsante " " per
accedere al disco;
Passaggio 2:
1/1
C
Return
Film Musica
Foto Testo
108
IT
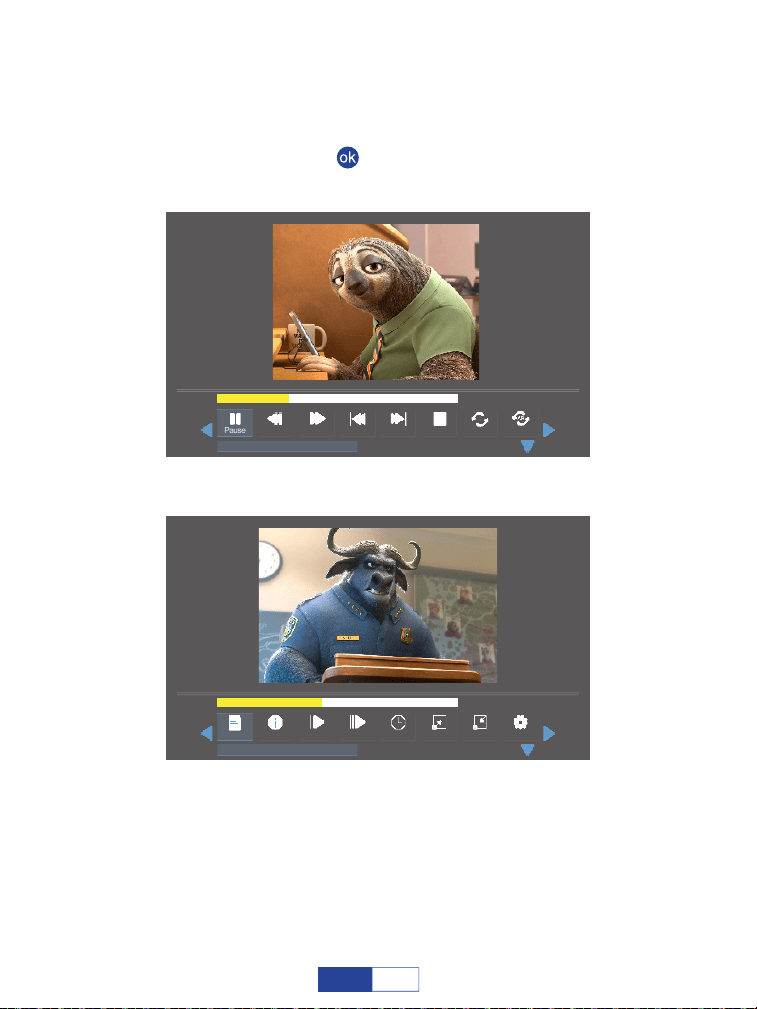
Selezionare il file del film o fare clic sulla cartella per accedere alla
directory successiva finché non si trova il film che si desidera
riprodurre nella directory;
Passaggio 3:
Premere il pulsante " " sul proiettore o sul telecomando per
selezionare il film.
Passaggio 4:
00:01:15 / 00:03:48
Prev StopPause
Repeal All
Set AFB FF Next
anime video.flv
00:01:35 / 00:03:48
StepPlaylist Green R..Info Slow Golotime
anime video.flv
Zoom Out
Zoom In
109
IT
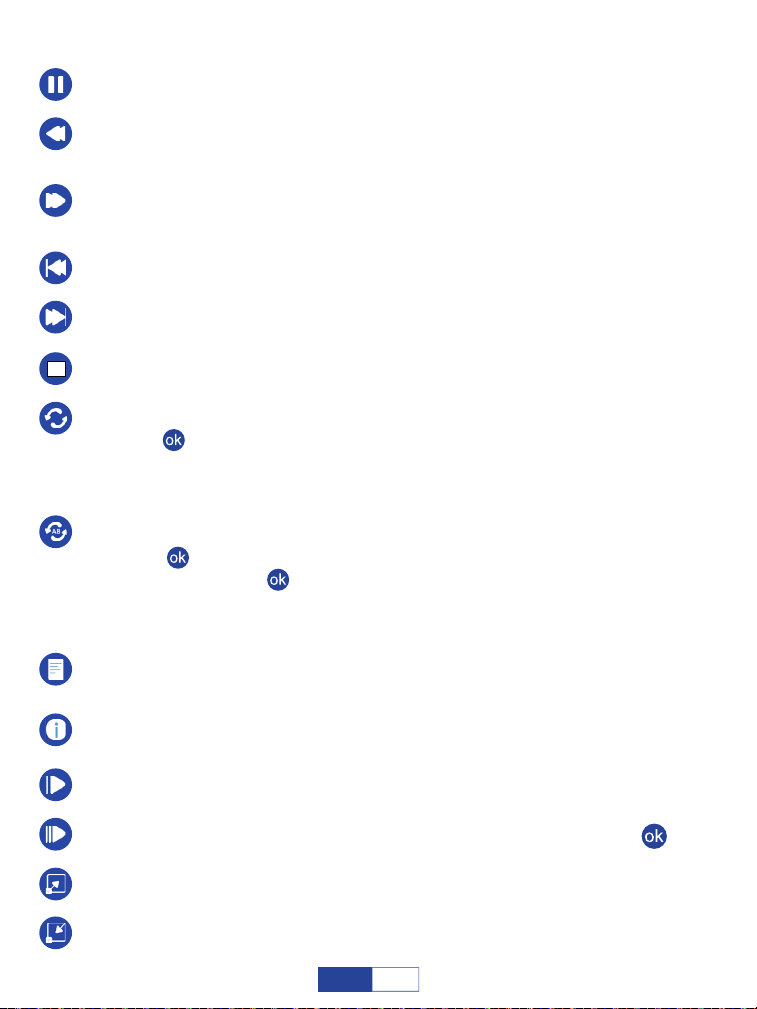
Play/Pause: Riproduce o mette in pausa il video corrente.
Prev: Precedente, torna al video precedente.
Next: Passa al video successivo.
Stop: Esce dal video corrente.
FF: Fast Forward, fa avanzare rapidamente il video durante la riproduzione. La
velocità di avanzamento varia da 2X a 32X.
FB: Fast Backward, riavvolge rapidamente il video durante la riproduzione. La
velocità di riavvolgimento varia da 2X a 32X.
Repeat: Ha le opzioni Ripeti 1, Ripeti tutto e Ripeti NESSUNO. Premi il
pulsante " " per passare da una di queste opzioni all'altra. Ripeti tutti i loop per
riprodurre tutti i video nella tua playlist. Ripeti NONE: riproduce il video corrente
una volta, quindi esce dal video corrente; Ripeti 1 loop per riprodurre sempre il
video corrente.
Imposta A/Imposta B/Nessuno: Seleziona :"Imposta A" premendo il
pulsante " " per impostare un punto temporale e selezionare "Imposta B"
premendo il pulsante " " per impostare un altro punto temporale durante la
riproduzione del video, quindi eseguirà un loop per riprodurre il frammento video
tra questi punti. Selezionare Nessuno per tornare alla modalità di riproduzione
normale.
Step: Fa avanzare il video fotogramma per fotogramma premendo il pulsante " ".
Zoom in: Ingrandisci l'immagine video da 2X a 8X.
Zoom out: Riduce l'immagine video da 1X a 1/8X.
Playlist: Un elenco di file video che possono essere riprodotti dalla cartella
corrente.
Dettaglio: Mostra le informazioni sul video corrente, inclusa la risoluzione, le
dimensioni e così via.
Slow: Riproduce il video al rallentatore con una velocità compresa tra 2X e 16X.
110
IT
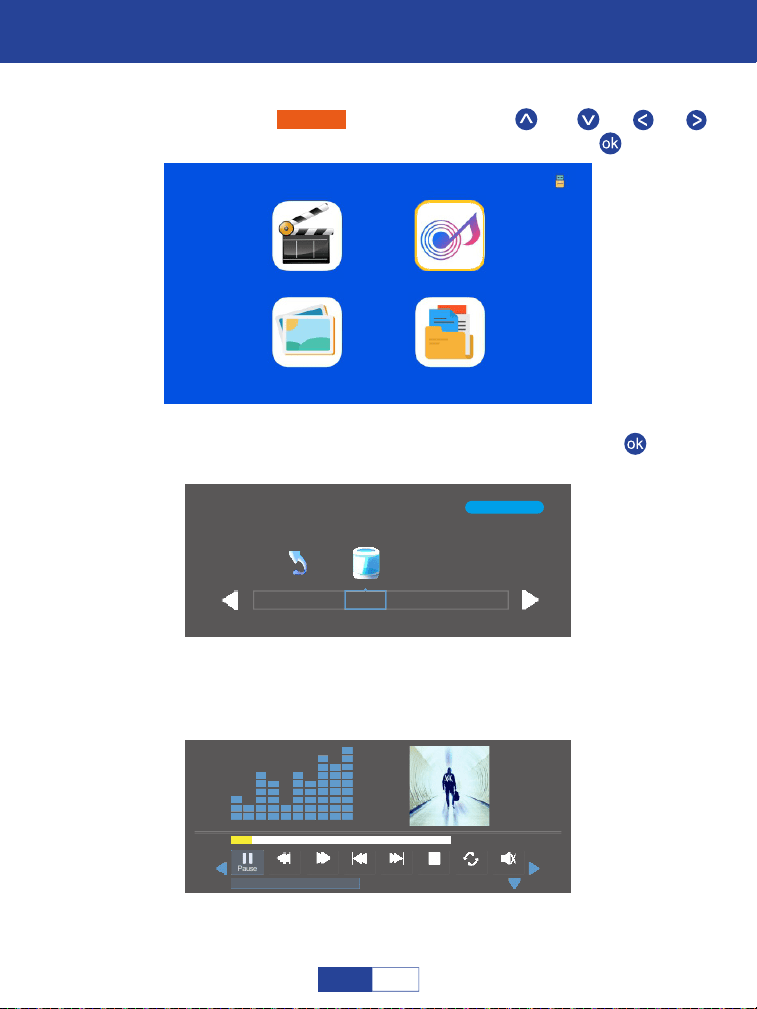
Important Safety Considerations
Fare Musica
Selezionare "Musica" premendo i pulsanti " " o " " o " " o " " e
il riquadro selezionato verrà evidenziato. Quindi premi " "
Passaggio 1:
Movie Music
Photo Text
1/1
C
Return
Selezionare il disco C o USB, quindi premere il pulsante " " per
accedere al disco;
Passaggio 2:
Selezionare il file musicale o fare clic sulla cartella per accedere alla
directory successiva fino a trovare la musica che si desidera
riprodurre nella directory.
Passaggio 3:
00:00:15 / 00:03:48
Prev StopPause
Repeal All
MuteFB FF Next
Alan Walker· Faded Mp3
111
IT
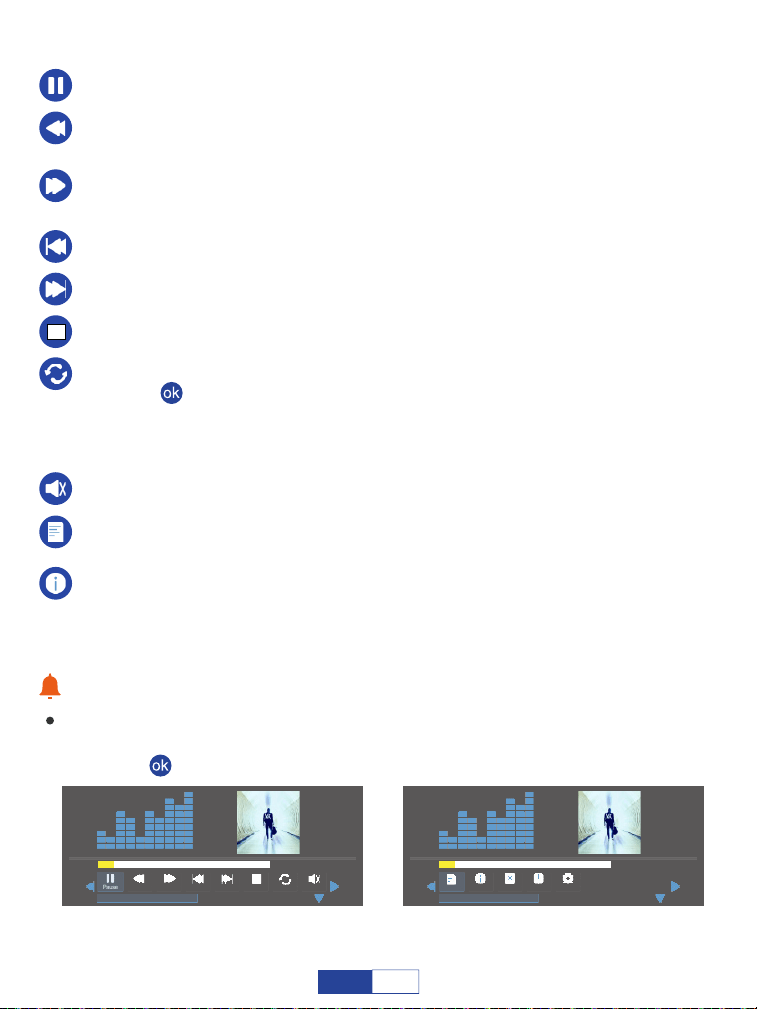
Play/Pause: Riproduce o mette in pausa la musica corrente.
Prev: Precedente, torna alla musica precedente.
Next: Passa alla musica successiva.
Stop: Esce dalla musica corrente.
FF: Fast Forward, fa avanzare rapidamente la musica durante la riproduzione.
La velocità di avanzamento varia da 2X a 16X.
FB: Fast Backward, riavvolge rapidamente la musica durante la riproduzione. La
velocità di avvolgimento varia da 2X a 16X.
Repeat: Ha le opzioni Ripeti 1, Ripeti tutto e Ripeti NESSUNO. Premere il
pulsante " " per passare da una di queste opzioni all'altra. Ripeti Tutti i loop per
riprodurre tutta la musica nella tua playlist. Ripeti NONE riproduce la musica
corrente una volta, quindi esce dalla musica corrente; Ripeti 1 loop per riprodurre
sempre la musica corrente.
Suggerimenti caldi:
Mostrerà una barra in basso con diverse impostazioni durante la riproduzione della
musica. Premi il pulsante Giù o il pulsante Indietro per nasconderlo. Premere il
pulsante " " per visualizzarlo di nuovo.
Muteoff: Disattiva o riattiva la musica corrente.
Playlist: Un elenco di file musicali che possono essere riprodotti dalla cartella
corrente.
IDettaglio: Mostra le informazioni sulla musica corrente, inclusi Bit Rate,
Artista, Dimensione e così via.
00:00:15 / 00:03:48
Prev StopPause
Repeal All
MuteFB FF Next
Alan Walker· Faded Mp3
00:00:15 / 00:03:48
GotoTimePlaylist
Info Close P...
Auto
Alan Walker· Faded Mp3
112
IT
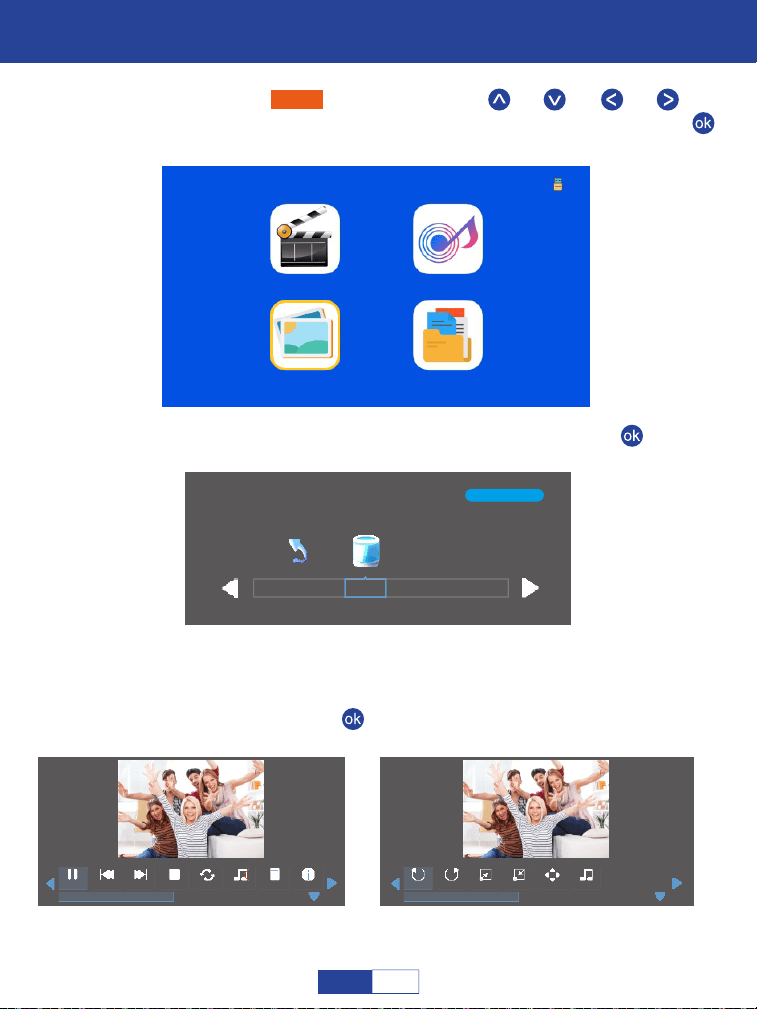
Important Safety Considerations
Riproduzione di Foto
Selezionare "Foto" premendo i pulsanti " " o " " o " " o " " e la
cornice selezionata verrà evidenziata. Quindi premere il pulsante " "
per accedere alla seguente interfaccia;
Passaggio 1:
Movie Music
Photo Text
1/1
C
Return
Selezionare il disco C o USB, quindi premere il pulsante " " per
accedere al disco;
Passaggio 2:
Selezionare la foto o fare clic sulla cartella per accedere alla
directory successiva finché non si trova la foto che si desidera
riprodurre nella directory;
Passaggio 3:
Premere il pulsante " " sul proiettore o sul telecomando per
selezionare la foto.
Passaggio 4:
Prev StopPause
Repeal All
Next
Stock-photo-tupian123.jpg
Music Off
Playlist Info
RotateRotate Zoom In
Stock-photo-tupian123.jpg
Music S...
Move
Zoom Out
113
IT
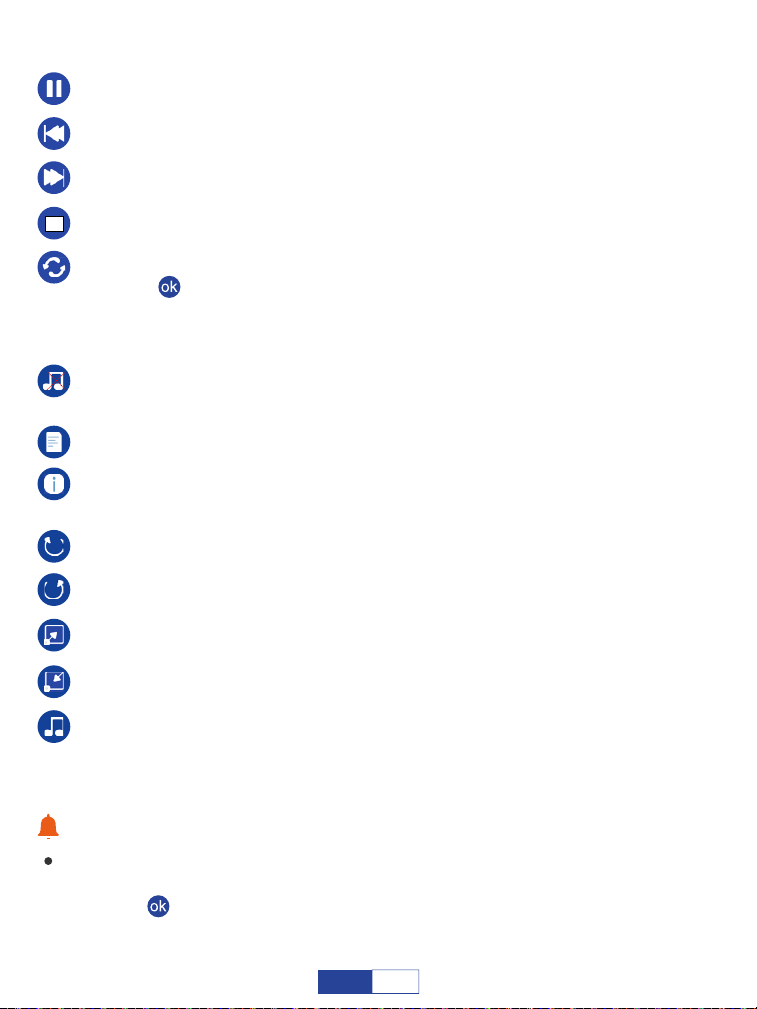
Zoom in: Ingrandisci l'immagine video da 2X a 8X.
Zoom out: Riduce l'immagine video da 1X a 1/8X.
Sorgente musicale: Selezionare alcuni file musicali per lo sfondo della foto.
Music Off: Attiva/disattiva i file musicali selezionati in Sorgente MUSICA per lo
sfondo del testo.
Rotate: Ruota la foto in senso orario di 90° 180° 270°, 360°.
Dettaglio: Mostra le informazioni sulla foto corrente, tra cui risoluzione, dimen-
sioni, data e ora.
Playlist: Un elenco di file di foto che possono essere riprodotti dalla cartella.
Suggerimenti caldi:
Mostrerà una barra in basso con diverse impostazioni durante la riproduzione della
musica. Premi il pulsante Giù o il pulsante Indietro per nasconderlo. Premere il
pulsante " " per visualizzarlo di nuovo.
Play/Pause: Riproduce o mette in pausa la foto corrente.
Prev: Precedente, torna alla foto precedente.
Stop: Esce dalla foto corrente.
Next: Passa alla foto successiva.
Repeat: Ha le opzioni Ripeti 1, Ripeti tutto e Ripeti NESSUNO. Premere il
pulsante " " per passare da una di queste opzioni all'altra. Ripeti Tutti i loop per
riprodurre tutte le foto nella tua playlist. Ripeti NONE riproduce la foto corrente
una volta, quindi esce dalla foto corrente; Ripeti 1 loop per riprodurre sempre la
foto corrente.
Rotate: Ruota la foto in senso antiorario di 90°, 180°, 270°, 360°.
114
IT
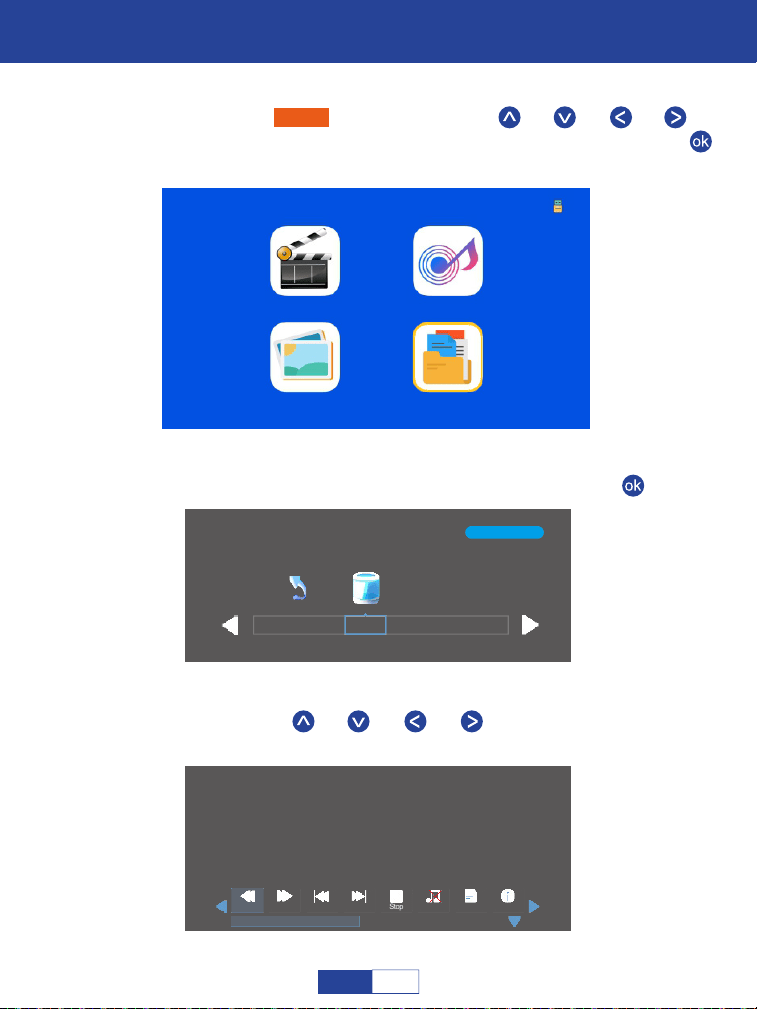
Important Safety Considerations
Riproduzione di Testo
Selezionare "Testo" premendo i pulsanti " " o " " o " " o " " e la
cornice selezionata verrà evidenziata. Quindi premere il pulsante " "
per accedere alla seguente interfaccia:
Passaggio 1:
Passaggio 1: " " o " " o " " o " " sul pannello operativo per
selezionare l'apparecchiatura per la memorizzazione del testo.
Movie Music
Photo Text
1/1
C
Return
Selezionare il disco C o USB, quindi premere il pulsante " " per
Passaggio 2:
Passaggio 3:
Prev StopPs Page Next
An evening in August.txt
Music Off
Playlist Info
An evening in August 1997
Li Ruiying learned the news that her son fell from the building and was injured, and she
was furious.But she was about to star t the live news broadcast, so she couldn't rush to her
son to accompany her right away.In the "News Network" that night, Li Ruiying's
performance was as usual, still calm and calm, her anxiety was well hidden, and she
couldn't see that her son just had an accident.After the live broadcast, Li Ruiying almost
flew to the hospital. Fortunately, her son was only slightly injured, otherwise she would
never have forgiven herself.
Next Page
115
IT
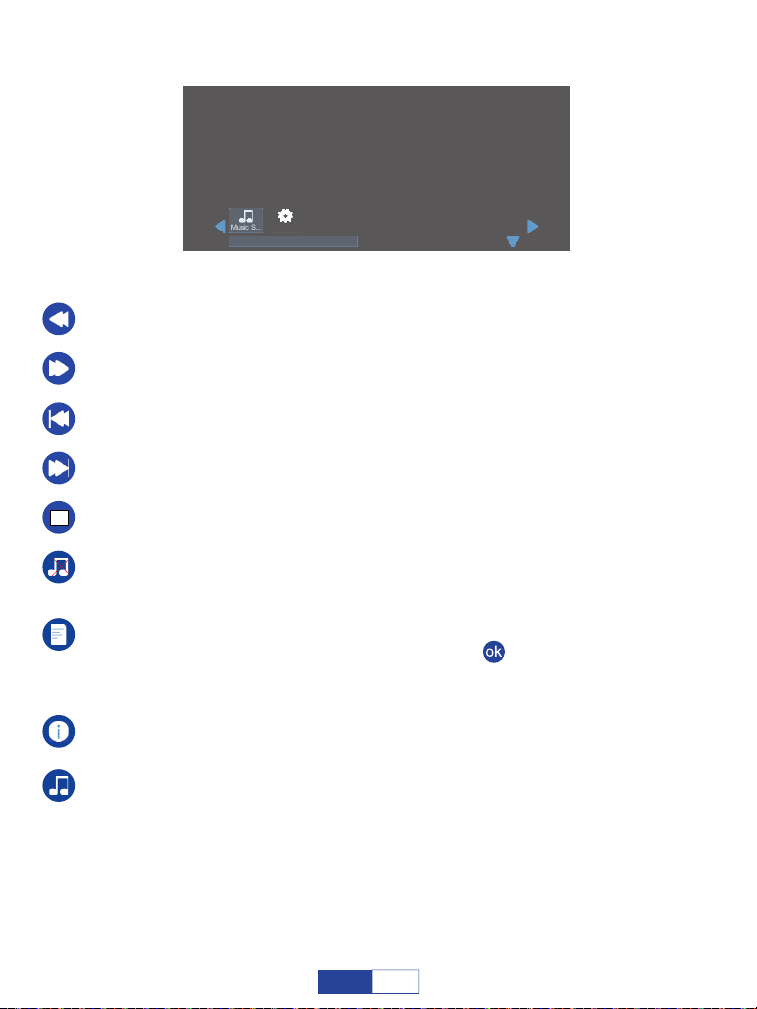
Next Page: Pagina successiva, va alla pagina successiva del testo corrente.
Ps Page: Pagina Precedente, torna alla pagina precedente del testo corrente.
Prev: Precedente, torna al testo precedente.
Next: Va al testo successivo.
Stop: Esce dal testo corrente.
Dettaglio: Mostra la dimensione del testo corrente.
Playlist: Un elenco di file di testo che possono essere riprodotti dalla cartella.
Se non hai spuntato i testi premendo il pulsante " " nel sottomenu, verranno
visualizzati tutti i testi che possono essere riprodotti; in caso contrario, mostrerà il/i
testo/i spuntato/i.
Music Off: Consente di attivare/disattivare i file musicali contrassegnati in
Sorgente MUSICA per lo sfondo del testo.
Sorgente musicale: Selezionare alcuni file musicali per lo sfondo del testo.
An evening in August.txt
An evening in August 1997
Li Ruiying learned the news that her son fell from the building and was injured, and she
was furious.But she was about to star t the live news broadcast, so she couldn't rush to her
son to accompany her right away.In the "News Network" that night, Li Ruiying's
performance was as usual, still calm and calm, her anxiety was well hidden, and she
couldn't see that her son just had an accident.After the live broadcast, Li Ruiying almost
flew to the hospital. Fortunately, her son was only slightly injured, otherwise she would
never have forgiven herself.
Music S...
Auto
116
IT
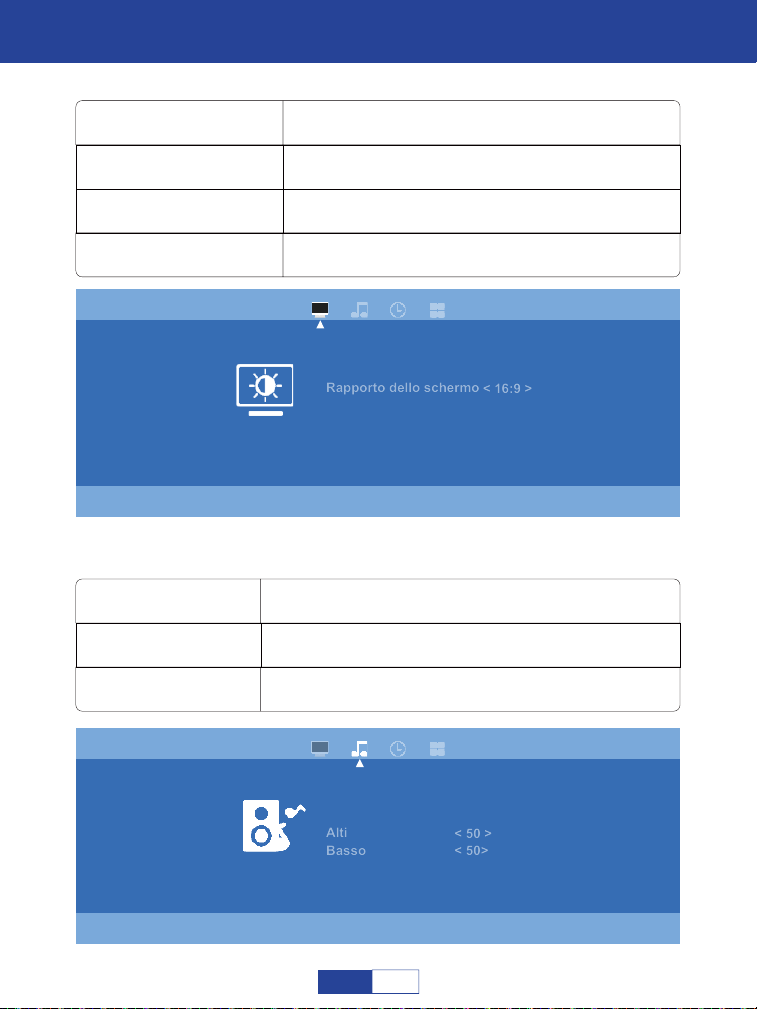
Important Safety Considerations
Impostazioni
Modo di immagine
Rapporto dello schermo
Zoom
4:3, 16:9, Intero, Zoom1, Zoom2 e Auto
standard, dinamica, delicata e personalizzata
dal 50% al 100%
Temperatura di colore fredda, standard e calda
Modalità suono
Alti
Basso
50
standard, film, musica, sport e personalizzata
50
Immagine
Modo di immagine
Rapporto dello schermo
Zoom
Temperatura di colore
< Standard >
< 16:9 >
< 51%>
< Standard >
Suono
Modalità suono
Alti
Basso
< Standard >
< 50 >
< 50>
117
IT
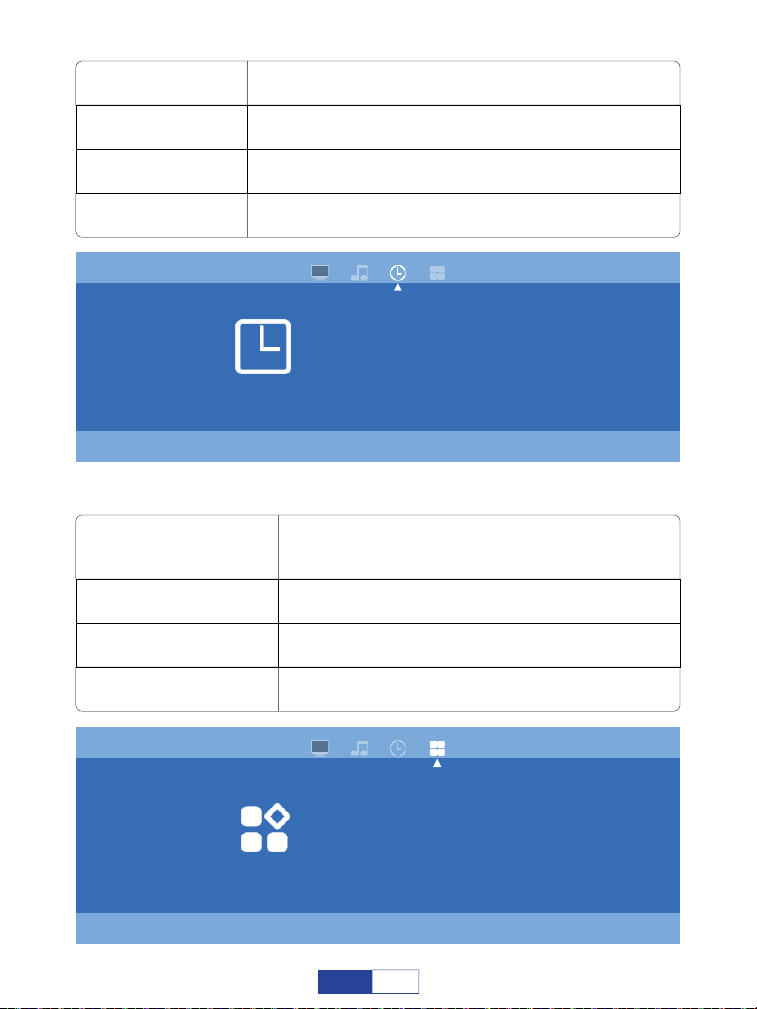
Off Time
On Time
Timer Spegn
spento, una volta e tutti i giorni
spento, una volta e tutti i giorni
spento, 10 min, 20 min, 30 min, 60 min e 90 min
Auto Sleep Spento, 3H, 4H, 5H
Lingua OSD
Impostazioni di proiezione
Ripristina
anteriore, posteriore, soffitto anteriore e soffitto posteriore
inglese, tedesco, francese, spagnolo, italiano,
greco, ceco, finlandese, croato, slovacco,
giapponese e cinese a scelta
ripristina il proiettore
USB Upgrade aggiorna il software locale
Orario
Off Time
On Time
Timer Spegn
< Off >
< Off >
< Off >
Auto Sleep < Off >
Opzioni
Lingua OSD
Impostazioni di proiezione
Ripristina
USB Upgrade
<English>
<Front>
118
IT

Tecnologia di proiezione:
Colori del display:
Temperatura colore della lampada:
Durata della lampada:
Alimentazione:
Consumo del proiettore:
Lente:
Zoom:
Proporzioni:
Correzione:
Un singolo tempo di utilizzo continuo:
Dimensioni di proiezione:
Peso del proiettore:
Rumore e perdita di luce:
Dimensioni:
Dimensioni montaggio a soffitto:
Frequenza audio:
Porte di segnale:
Formato USB:
sistema di proiezione LCD TFT.
16.7 milioni
9000K
55000 ore
ACIN: 100V-240V 50/60HZ
50W
lente ottica con rivestimento composito multi chip
100%-50%
4:3/16:9
± 15 gradi
<24 ore
30-210 pollici
0.64 kg
basso rumore, perdita di luce ridotta
173x126x67mm
M6
2W+2W
Ingresso video (1,0 Vp-p +/-5%)
Ingresso HDMI (480i 480p 576i 720p 1080i 1080p)
FAT, FAT32, NTFS
Formato video: MPEG1,MPEG2,
MPEG4RM, RMVB, H264, MJPEG, DivX, FLV.
Formato musicale: Mp3M4A (AAC)
Formato foto: JPEG, BMP, PNG
Caratteristiche del Prodotto
119
IT
Risoluzione dei problemi
1. Perché il display del proiettore è disponibile ma senza audio?
Il proiettore o il dispositivo collegato (PC, TV, ecc.) è disattivato.
Il suono Dolby non è supportato, esci per riprodurre di nuovo.
Fire stick: inserisci "Impostazioni" e trova "Display e audio". Quindi selezionare "on" per
"suoni di navigazione". Selezionare "Stereo (o PCM)" per "suono surround".
Prova YouTube se il tuo lettore è Netflix. Il problema si verificherà durante la riproduzi-
one di Netflix a causa del copyright.
2. Perché l'audio del proiettore è disponibile ma senza display?
Il formato video non è supportato dal proiettore.
Crittografia applicata ai video o al lettore multimediale che contiene il video.
Se la lampada del proiettore è spenta durante la sola riproduzione audio, la lampada è
difettosa.
Si prega di contattare il venditore per una sostituzione.
Prova un altro cavo HDMI se selezioni la sorgente di ingresso HDMI.
Prova YouTube se il tuo lettore è Netflix. Il problema si verifica durante la riproduzione di
Netflix a causa del copyright.
I problemi elencati di seguito potrebbero verificarsi durante il funzionamento del proiettore.
Fare riferimento ai possibili fattori che potrebbero causare il problema per eseguire la risoluz-
ione dei problemi. Per qualsiasi domanda durante l'uso, non esitate a contattare il team di
Indirizzo e-mail del servizio clienti:
Mercato del Nord America:
Mercato europeo:
120
IT

3. Perché lo schermo di proiezione mostra Nessun segnale?
Assicurarsi che il proiettore si colleghi al telefono tramite adattatore HDMI e non tramite
cavo USB.
Collegare l'alimentatore (5V/1A) per assicurarsi che l'adattatore funzioni correttamente.
Leggere attentamente le istruzioni dell'adattatore HDMI prima del collegamento.
Guardare il video su come collegare il telefono e il computer menzionato nella home
page del manuale.
4. Come posso collegare il mio smartphone al proiettore?
L'adattatore HDMI è necessario per la consegna del display dagli smartphone.
Collegare l'alimentatore (5V/1A) per assicurarsi che l'adattatore funzioni correttamente.
(si consiglia una presa di alimentazione esterna)
Leggere attentamente le istruzioni dell'adattatore HDMI prima del collegamento.
Si prega di guardare il video su come collegare il telefono menzionato nella home page
del manuale.
5. Di che tipo di viti ho bisogno per montare questo proiettore?
M6 screw.
6. Quando colleghiamo il telefono/computer al proiettore,
possiamo usare il telecomando del proiettore per controllare?
No, perché il contenuto proiettato proviene dal telefono/computer e il telecomando non
può controllare il telefono/computer. Quindi non possiamo usare il telecomando del
proiettore per controllare.
7. Come devo comportarmi in caso di forte rumore durante
l'utilizzo del proiettore?
Contattare il team VOPLLS per assistenza.
121
IT

9. Cosa succede se il proiettore visualizza solo la schermata
principale del computer?
Macbook: Inserisci le impostazioni del computer, seleziona "Mirror Built-in Display" per
Airplay Display.
Windows: Immettere le impostazioni del computer, selezionare "Duplica questi display"
per Display.
10. Come devo comportarmi in caso di presenza di macchie scure o
fumo in espansione durante l'utilizzo del proiettore?
Controllare se il rumore della ventola aumenta o la ventola smette di funzionare.
Scollegare il proiettore e contattare il team VOPLLS per assistenza.
Assicurarsi che la presa e l'adattatore di alimentazione del proiettore non siano bagnati
o umidi, il che provocherebbe scintille o fumo sulla presa quando si accende il
proiettore.
11. Perché il proiettore si spegne durante la riproduzione?
Assicurarsi che la spina di alimentazione sia funzionante e inserita saldamente nella
presa.
Se l'indicatore LED sul proiettore è acceso, ma la ventola non funziona, contattare il
team VOPLLS per assistenza.
Il surriscaldamento del proiettore attiverà il pannello di protezione per lo spegnimento
integrato. Riavvia il proiettore quando si raffredda.
12. Questo proiettore può supportare l'effetto 3D?
Il proiettore supporta la sorgente video 3D e le prestazioni di visualizzazione 3D sono
ottenibili con gli occhiali 3D rosso-blu; ma ti preghiamo di comprendere che l'esperien-
za non sarà migliore che a teatro e non lo consigliamo se hai aspettative più elevate
sull'effetto 3D.
8. Cosa succede se il suono proviene dal telefono cellulare o
dal computer anziché dal proiettore?
Telefono: Attiva il Bluetooth sul telefono.
Computer: Inserisci le impostazioni del computer, seleziona "Dispositivo audio ad alta
definizione" o "il nome del tuo adattatore HDMI" per l'audio.
122
IT
Si prega di contattare VOPLLS per assistenza quando ciò si verifica.
Premere il pulsante " " per tornare alla home page. Accedere a "Impostazioni" e
premere " " 4 volte. Inserisci "Lingua OSD". Ci sono tedesco, francese, cinese,
italiano, spagnolo e giapponese tra cui scegliere.
Premere il pulsante " " per tornare alla home page e accedere a "Impostazioni",
quindi premere il pulsante " " 4 volte per scegliere "Impostazioni di proiezione",
premere il pulsante " " per ruotare.
14. Perché la lampada del proiettore non si accende o non si accende?
15. Come posso cambiare la lingua?
16. Come posso fare se l'immagine è capovolta?
Formati di unità USB
NTFS
FAT32
128G
128G
2T
4G
FAT 128G 2G
Capacità di memoria
massima dell'unità USB
Memoria massima di ogni video
13. Perché non funziona nulla quando è collegato un dispositivo
flash USB esterno?
La sorgente di ingresso “USB” deve essere selezionata quando si utilizza il disco USB;
Assicurati che l'unità USB soddisfi le seguenti condizioni: (ad esempio: se il formato
dell'unità USB è NTFS, la capacità di memoria dell'unità USB deve essere inferiore a
128G e la memoria del video deve essere inferiore a 2T.)
123
IT

Regolare la messa a fuoco e l'anello trapezoidale spostandolo verso sinistra/destra
finché non mostra le immagini migliori.
Posizionare il proiettore su una superficie piana orizzontalmente o verticalmente.
Un'inclinazione di qualsiasi angolazione può causare visualizzazioni sfocate o colori
non uniformi.
L'ambiente più scuro suggerisce di ottenere le migliori prestazioni di proiezione.
La distanza idonea di 1.16 m-5 m/37 pollici-150 pollici tra il proiettore e lo schermo/pa-
rete di proiezione.
La parete sporgente o lo schermo devono essere di colore bianco pulito, se possibile.
17. Come posso fare se l'immagine è sfocata o fuori forma?
Assicurarsi che il proiettore sia posizionato su una superficie piana con la luce del
proiettore al centro dello schermo.
Assicurarsi che lo schermo del proiettore sia posizionato orizzontalmente.
18. Come posso fare se lo schermo di proiezione non è quadrato
o allineato orizzontalmente?
Assicurarsi che la sorgente video abbia una buona risoluzione.
Regolare i colori: accedere a Modalità immagine/Temperatura colore, quindi selezion-
are diverse modalità e regolare il valore di conseguenza.
19. Come posso fare se c'è una distorsione del colore?
124
IT
Assicurarsi che le batterie siano installate correttamente e che l'alimentazione sia
sufficiente.
Assicurarsi che il ricevitore IR non sia coperto.
HDMI per tutti i dispositivi sopra menzionati, alcuni lettori DVD richiedono il collega-
mento del cavo del codice AV.
Premere il pulsante " " per tornare alla home page. Entrare in "Impostazioni" e
accedere a "Zoom". Premere " " o " " per regolare le dimensioni del display.
20. Come posso fare se il telecomando non risponde?
Battere leggermente il proiettore per scrollarsi di dosso la polvere che potrebbe essersi
formata durante l'installazione o la spedizione.
Pulire la lente con tessuti non tessuti puliti, vedere Operazione di pulizia a pagina 5.
21. Come devo fare se sono presenti dei puntini sul display?
22. Come regolare le dimensioni del display dal 100% al 50%?
23. Di che tipo di cavo ho bisogno per collegare TV BOX, TV,
Firestick e lettore DVD al proiettore?
Unità USB: non è possibile proiettare PPT da un'unità USB.
Telefono o computer: Sì, puoi riprodurre PPT sul tuo computer o telefono cellulare e
quindi proiettarlo attraverso il proiettore.
24. È possibile proiettare PPT?
125
IT