User Manual
Version: 240315
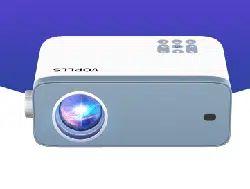
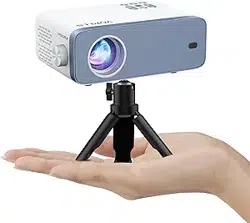
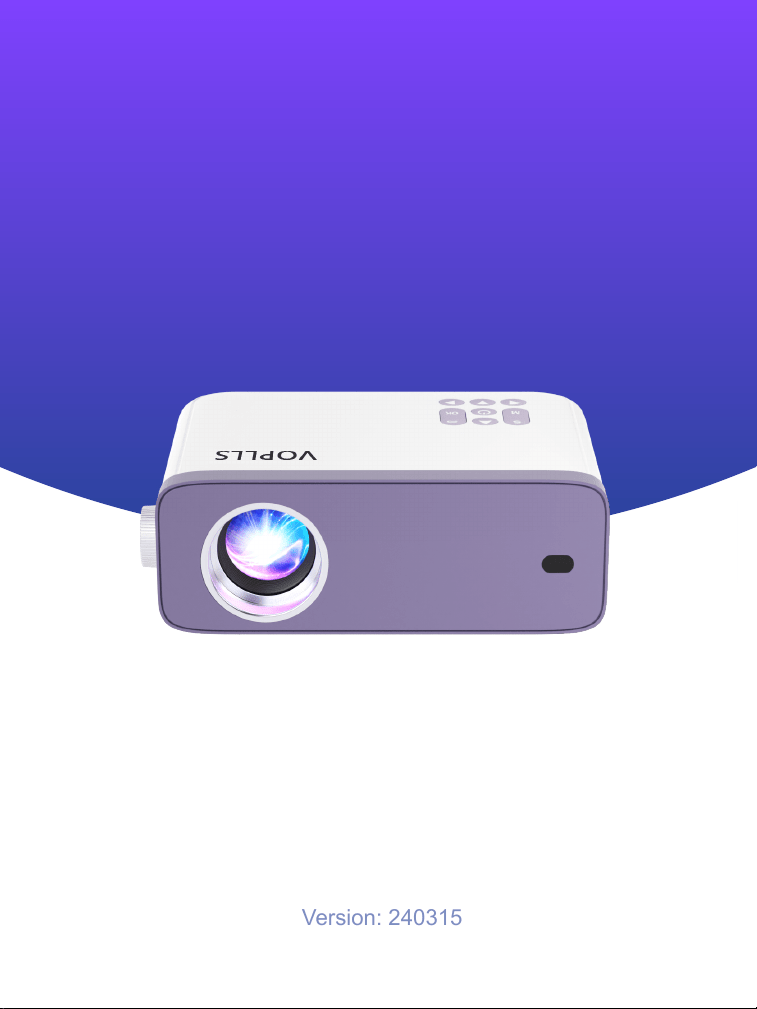
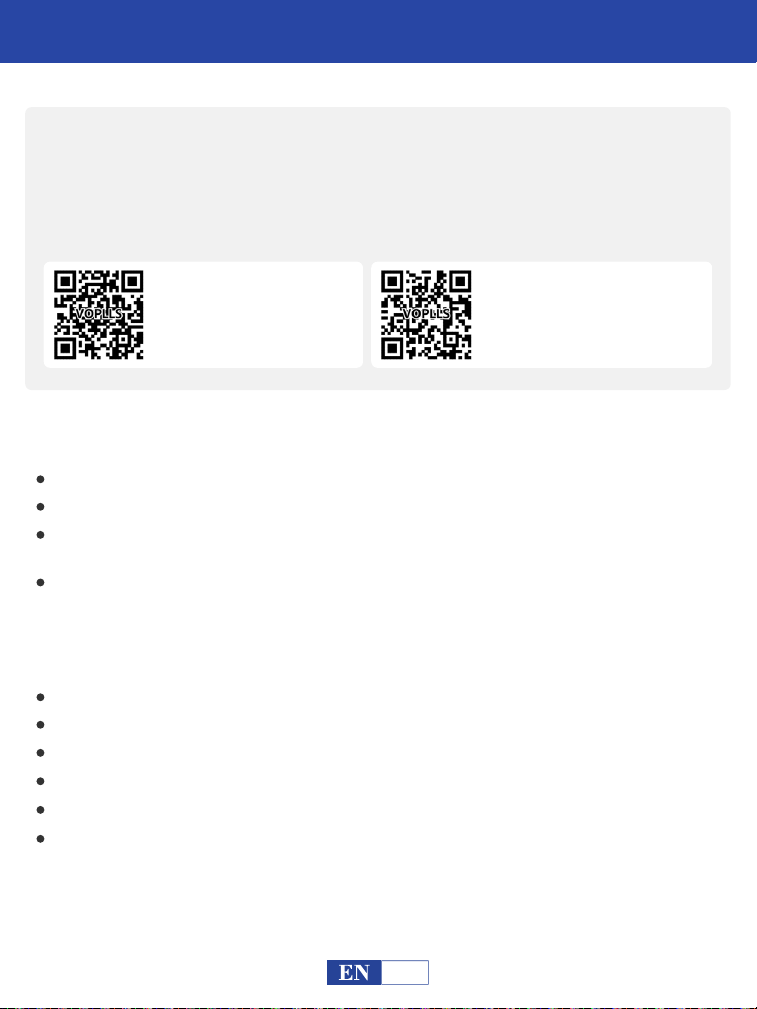
VOPLLS


Video Operation Guide
SUBSCRIBE
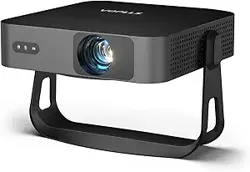
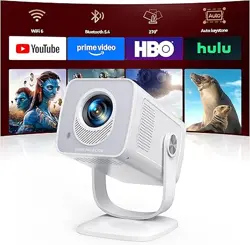
VS-KING PROJECTOR
VS-KING
Scan QR codes below or search for "VS-KING PROJECTOR" on YouTube to get videos


Catalog
Important Safety Considerations 02
Basic Configuration 04
Projector Overview 05
Remote Control 06
How to clean up the dust? 07
Projector Connections 08
Playing Movie 18
Playing Music 21
Playing Photo 23
Playing Text 25
Settings 27
Network Setting 27
Bluetooth Setting 29
Picture Setting 30
Sound Setting 31
Option Setting 31
Product Features 32
USB Support Fomat 17
Trouble Shooting 33
Connecting to the Mobile Device 08
For iOS System 08
For Android System 09
Connecting to the Computer 11
Connecting to Firestick 14
Connecting to the DVD Player 15
Connecting to the External Storage Device
16
01
Important Safety Considerations
Important Safety Considerations
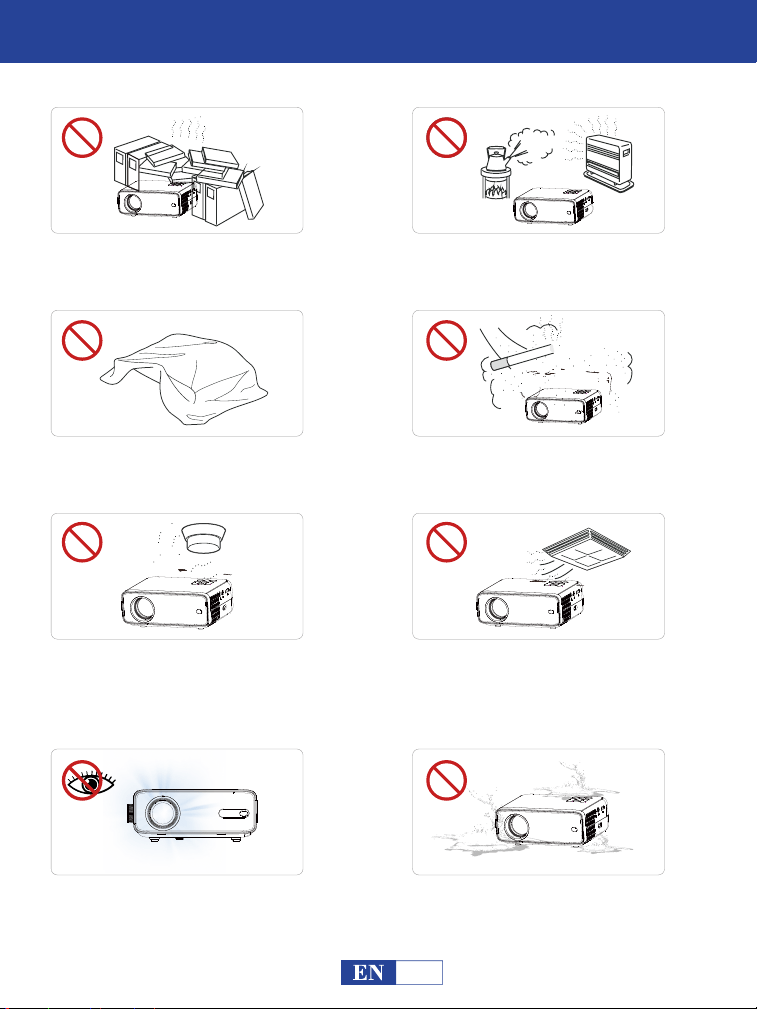
Do not install the projector in
hot and humid sites.
Do not block the ventilation
holes (intake or exhaust).
Do not install the projector in
dust and smoke sites.
Do not install the projector in sites
with improper ventilation.
Please keep the projector away
from water or any other liquid as it
is not waterproof.
Do not install the projector in sites
with direct blowing of warm and
cool air-condition wind. Otherwise
it may cause the project failure.
Please do not look into the lens
when the projector is working.
Otherwise it may hurt your eyes.
Do not install the projector near the
temperature and smoke transducer.
It may cause a sensor failure.
02
Installation
Please use the projector in a dark room for best watching experience.
Cleaning
Unplug the power cord from the projector.
Notes on Fire and Electric Shock
High Temperature Warning
Do not place any liquid on the projector.
Please use the projector with a soft brush. Do not use rigid accessories, such as a
crevice cleaning tool, to avoid damage to the projector.
Please clean the ventilation opening and the loudspeaker regularly with a cleaner. The
projector will be overheated with blocked dust, causing the failure.
Use an air brush or lens paper to clean the lens and be careful not to scratch or abrade
them.
Use a wet cloth to clean the cabinet regularly. Neutral detergent may be used for
serious smudge. Do not use strong detergent or solvent such as alcohol or diluent.
Use the power cord with caution to avoid unduly bending. Damaged power cord may
cause electric shock.
Please use the projector with caution to avoid dropping or shocking, which may
damage the projector.
Prevent foreign objects from falling into the projector, such as paper clips and paper
scraps, do not attempt to retrieve any such object. Do not insert any metal object, such
as an iron wire or a screwdriver, into the projector. Make sure to immediately turn off
the power and ask qualified professional maintenance personnel to remove any object
falling into the projector.
During and after the projection, the temperature near the outlet will rise, therefore
touching may cause burns. Do not peep at the lens, or it may cause severe eye injury.
Make sure of adequate ventilation and blocked outlet to avoid heat accumulation
within the projector.
03
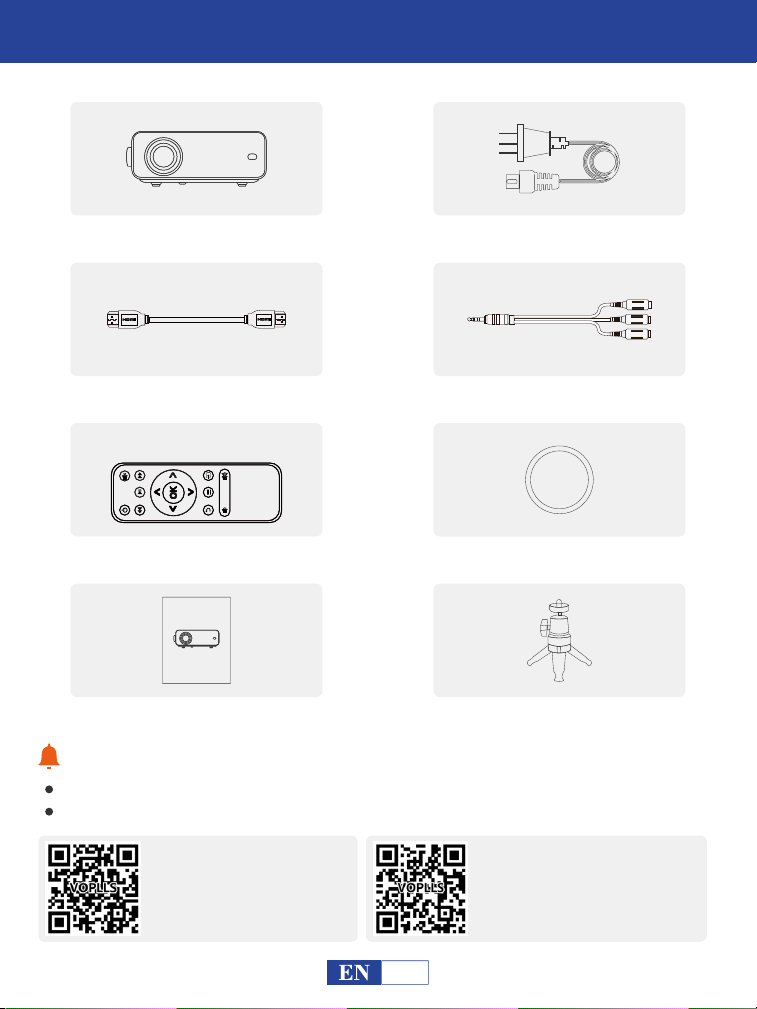
Basic Con�iguration
If there is any part missing, please contact VOPLLS support team.
Email address of VOPLLS support team:
Tips:
1 x HDMI Cord 1 x AV Signal Cord
1 x Remote Control
(battery not included)
1 x Mini Projector 1 x Power Cord
1x Lens Cap
1 x User Manual
User Manual
VOPLLS
04
1x Tripod
North America Marketplace:
Europe Marketplace:
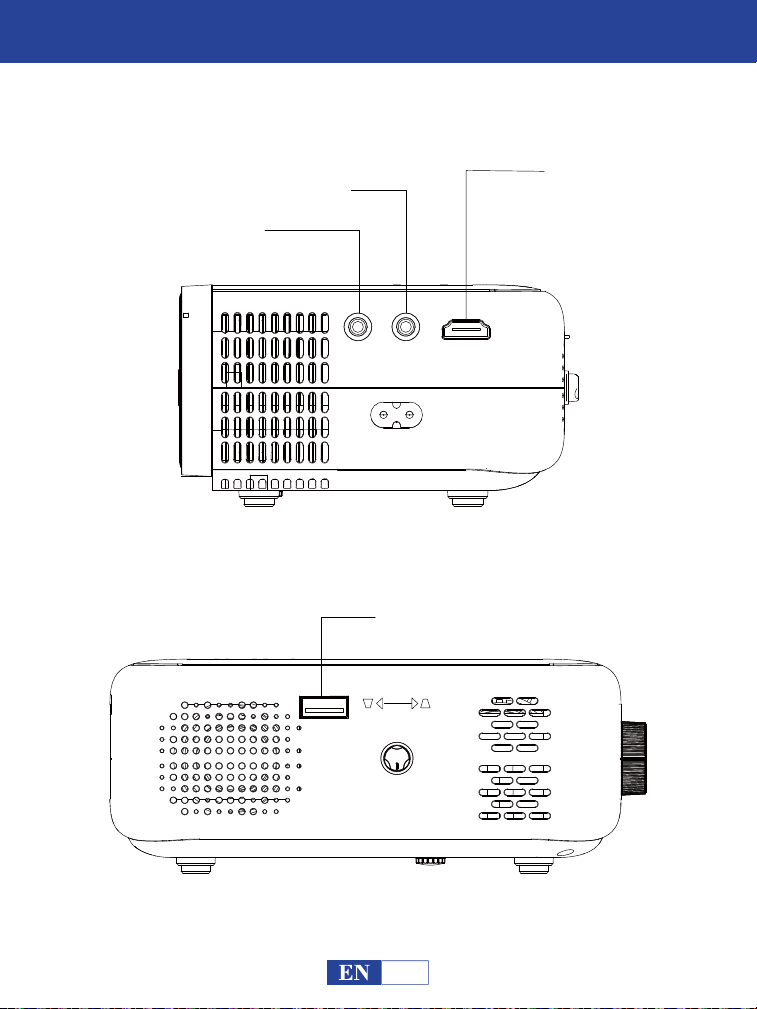
Projector Overview
3.5mm Audio
AV
HDMI
USB
KEYSTONE
/
/
05
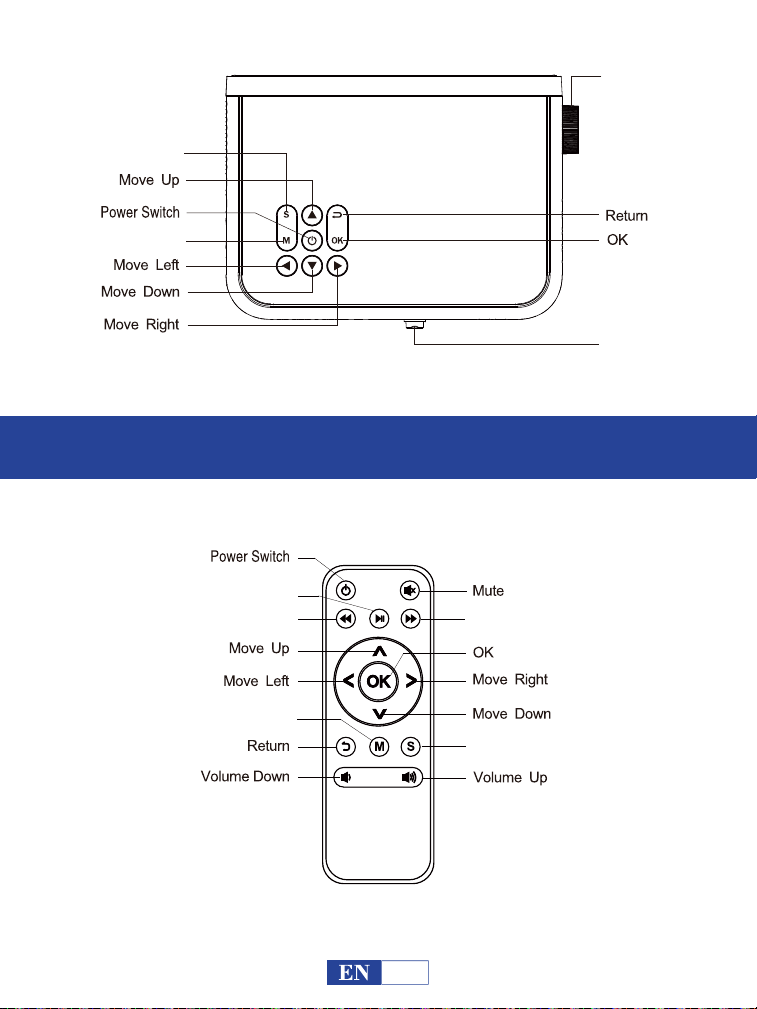
Remote Control
Fast Backward
Pause
Fast Forward
Menu
Signal source
Signal source
Menu
Focus
Keystone
06
VOPLLS
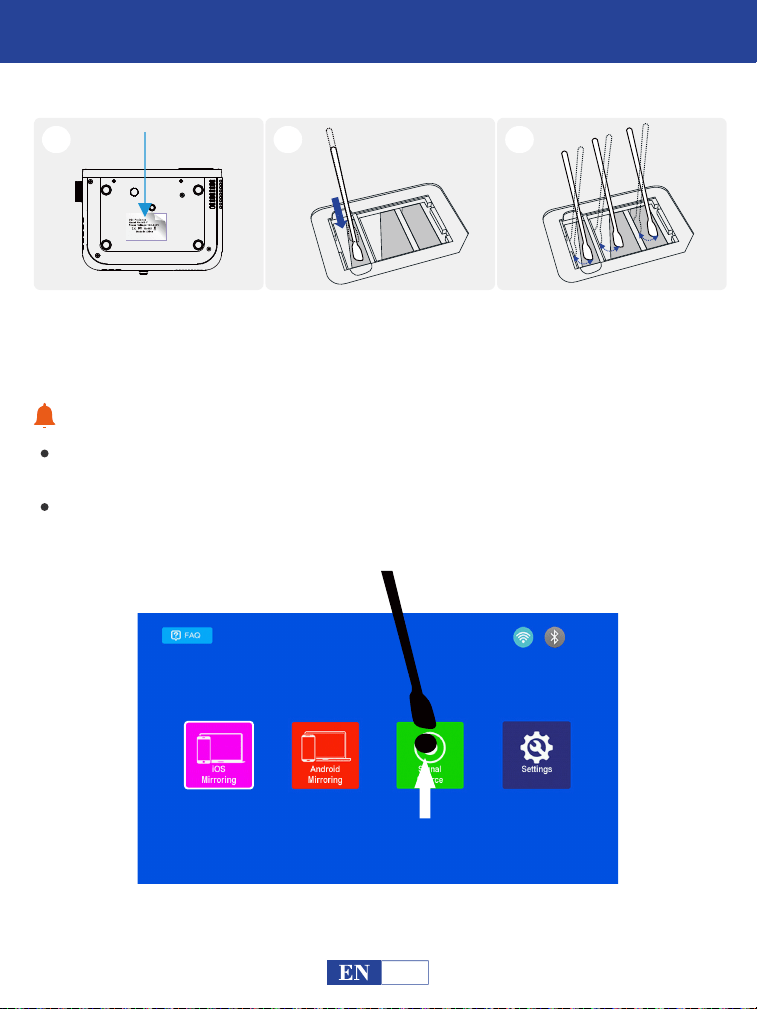
How to clean up the dust?
Tips:
1
Tear off the label and
open the lid.
2
Insert the cotton swab
deep inside.
3
Wiped all the 5 sides
(Adjust the “keystone” for
easy wiping).
If there are black spots on screen, please turn on the projector and move the swab
according to the position of the black spot on the screen.
Please wipe the lens regularly to solve or avoid the problem of black spots on the
screen.
07
08
Projector Connections
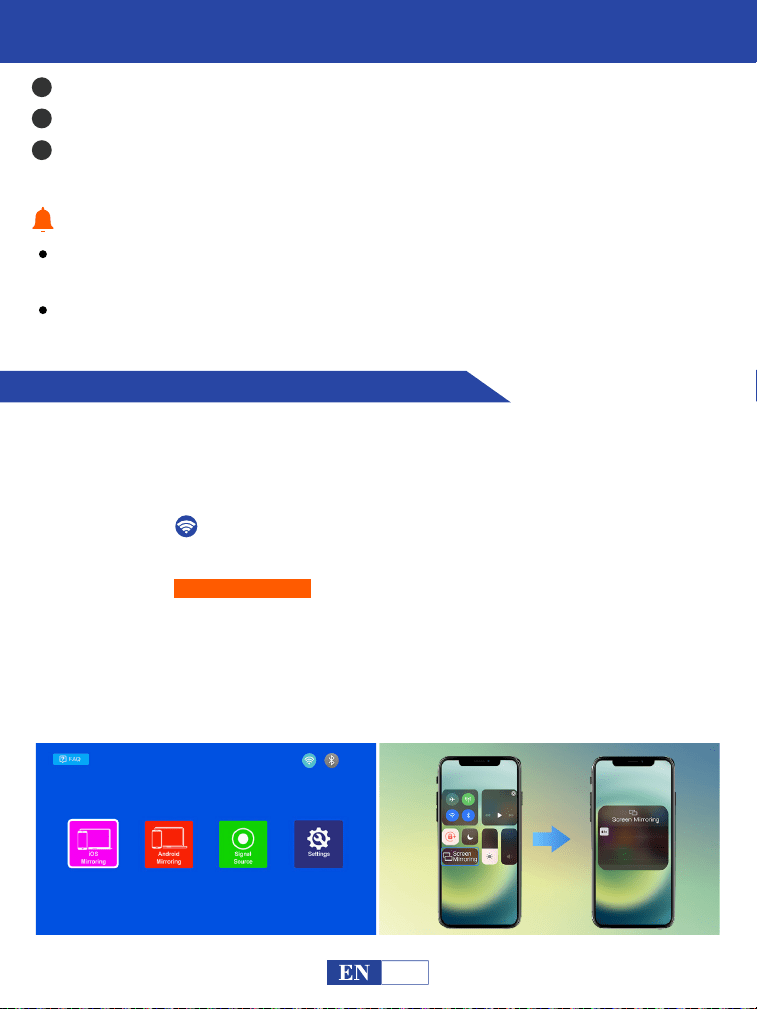
Connecting to the Mobile Device
Warm Tips:
All the devices are needed to connect to the same home WiFi.
1
2
3
Connect the power cord. The power button will turn red.
Short press the power button, then there will appear a brand video.
Adjust the “Focus” and “Keystone Correction” to get the best image perfor-
mance.
For iOS Device
Step 1:
Step 2:
Click “ ” on the home page to connect the projector to your
home WiFi.
Select “iOS Mirroring” on the home page.
Connect your iOS device to the same home WiFi as the projector.
Open the control center of your iOS device, click the “Screen Mirror-
ing” and select “V3-****” from the list.
Step 3:
Step 4:
Never look into the projector lens when the lamp is on. This can damage
your eyes and is especially dangerous for children.
Install 2 pieces of AAA batteries into the remote before using it.
V3-****
09
Note:
HUAWEI
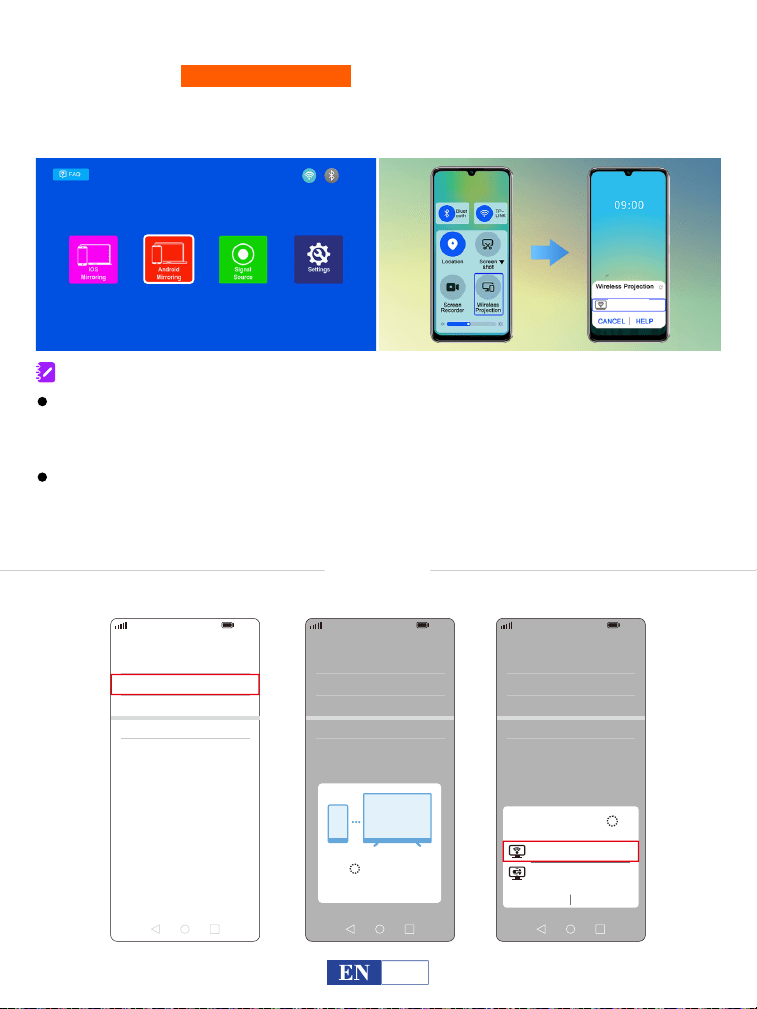
Select “Android Mirroring” on the home page.
Step 1:
Step 2:
Turn on your WiFi and Bluetooth function of your Android device.
Step 3: Open the “Multi-Screen” function and select “V3-****” from the list.
More connections - Wireless projection
For Android Device
5G
100%
21:05
>
>
>
>
>
Huawei Share
Wireless projection
Pirnting
On
VPN
Private DNS
Of
f
5G
100%
21:05
>
>
>
>
>
Huawei Share
Wireless projection
Pirnting
On
VPN
Private DNS
Of
f
Connecting...
CANCEL
5G
100%
21:05
>
>
>
>
>
Huawei Share
Wireless projection
Pirnting
On
VPN
Private DNS
Of
f
V3-****
Wireless Projection
Available devices
CANCEL HELP
V3-****
To activate this function, your Android device must support
“Multi-Screen/Wireless” display. Names of “Screen Mirroring” function may
differ from different devices.
Google phones and partial Motorola prohibit screen mirroring directly from
the projector due to mirroring protocol issues. You need to have a Google
Chromecast to connect it.
V3-****
10
SAMSUNG
Tips:
Swipe up the screen of your Samsung device, then click “Smart View”
and search for the device of the projector.
5G
100%
>
18:45
Monday, July 5
Devices Media
DeX
DeX
Smart View
Blue light
filter
Dark mode
B
Do not
disturb
5G
Hongbao
accelerator
NFC
5G
5G
100%
18:45
>
Smart View
Phone Other device
Select a device below to mirror your phone’s
screen or play content
Mirror screen
>
Other device Phone
→
→
V3-****
XIAOMI
Swipe up the screen of your Xiaomi device, then click “Connection & Sharing”
and search for the device of the projector.
5G
100%
18:45
>
Cast
Cast
Cast screen contents to an external
monitor
>
Cancel Help
Select device(1)
Demos
Casting documents,games,photos,and
videos
>
SPECIAL FEATURES
V3-****
Make sure your mobile device is closed to the projector when using
wireless connection. A distance within 1m/3.3ft is recommended.
Please kindly note projectors with mirrored are incompatible with Netflix
and Hulu due to copyright issues.

11
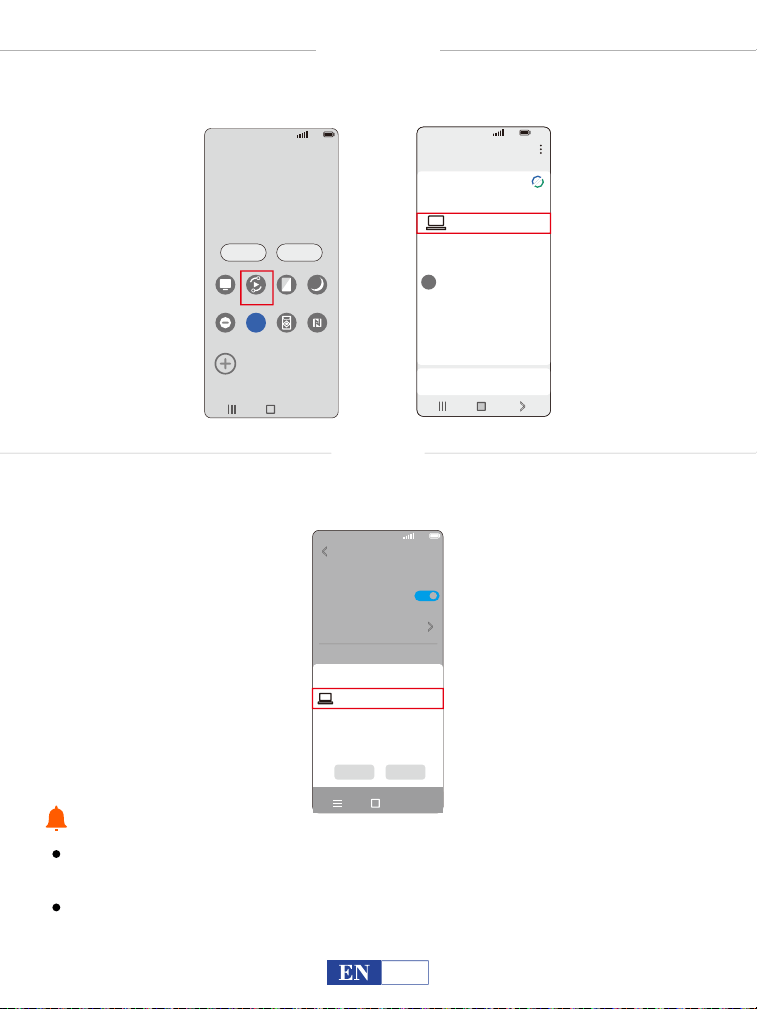
Connecting to the Computer
Click “ ” on the home page to connect the projector to your home
WiFi.
Select “iOS Mirroring” on the home page.
Step 1:
Step 2:
Step 3:
Connect your computer to the same home WiFi as the projector.
Wireless Connection for Mac OS
Display Resolution of your computer please choose “Default for display”.
Tips:
Step 4:
Open “System Preferences” on your computer - Choose “Displays” -
Click “AirPlay Display” - Connect “V3-****”.
V3-****
Select “Android Mirroring” on the home page.
Turn on your computer's WiFi function.
1. Access “System” - “Display” in the computer's “Settings”.
Option 1:
2. Find “Connect to a Wireless Display”.
3. Connect to “V3-****” and select “Duplicate these displays”
in“Multiple displays”.
Step 1:
Step 2:
Wireless Connection for Win10 or Above
12
1. Access “Settings” - “System” - “Projecting to this PC” - “Optional Features”.
2. Add a “Wireless Display” to your computer then follow the steps in
Option 1 to try connecting again.
When the “Connect to a Wireless Display” option does not appear in the
“Multiple Displays” option list and cannot be connected.
Option 2:
Please ensure your laptop has a wireless display function.
Since some computers with WIN10 and above do not support the
Miracast protocol, mirroring connections not be possible.
Please ensure you have selected “1920*1080 resolution” after you connect
the projector.
You can also press the Windows logo key + P key at the same time and
select “DUPLICATE”.
Tips:
Settings
Home
Projecting to this PC
System
Focus assist
Project your Windows phone or PC to this screen,and use its keyboard,
mouse,and other devices,too.
Some Windows and Android devices can project to this PC when you
say it's OK
This PC can be discovered for projection only when it’s pluged into a
power source
Add the "Wireless Display"optional feature to project to this PC:
Optional fegtures
Power & sleep
Battery
Storage
Tablet
Multitasking
Shared experiences
Find a setting
Always Off (Reemmended)
Ask to project to this PC
Everu time a connection is requested
Require PIN for pairing
Never
On
Projecting to this PC
13
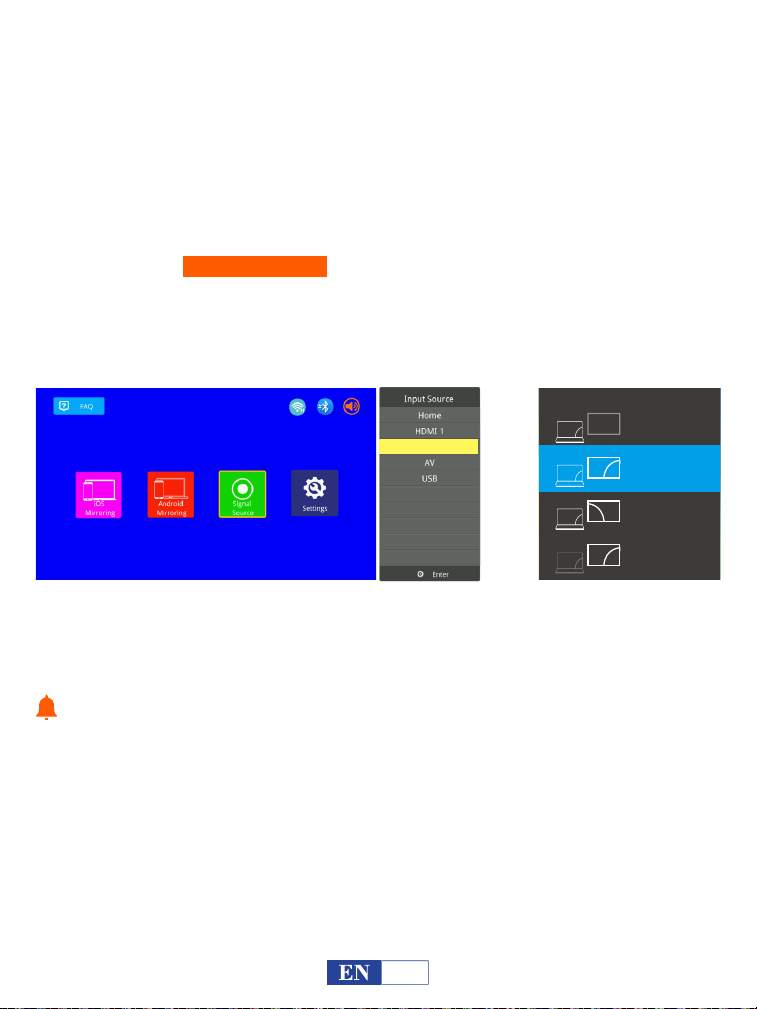
Turn on your computer and the projector.
Step 1:
Step 2:
Use included HDMI cord to connect your computer and projector.
Step 3:
Access “Signal Source” on the home page, and choose the HDMI 1
or HDMI 2 port which you plugged into,
For Windows7 and higher system, pressing the Windows logo key + P key at
the same time and select “DUPLICATE”.
Connect the projector to your computer by using the HDMI cord in the package.
Tips:
Wired Connection
SECOND SCOND
SCREEN ONLY
Project
PC SEREEN ONLY
DUPLICATE
EXTEND
HDMI 2
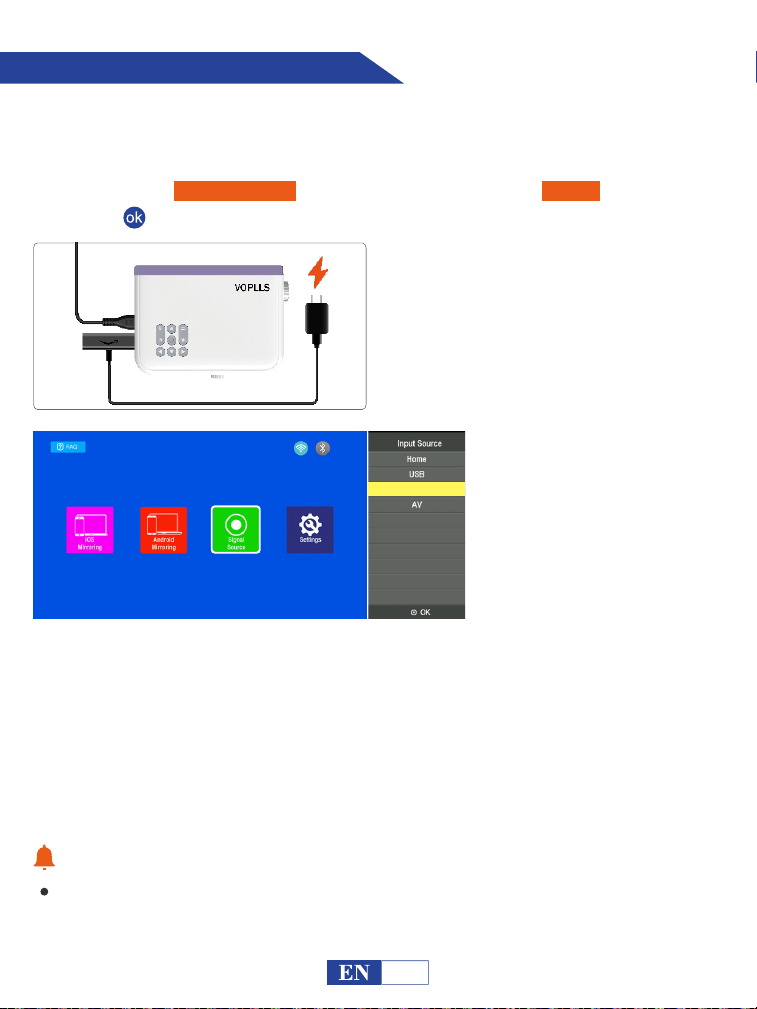
Connecting to Firestick
Insert Firestick;
Your Firestick may in sleep mode, please unplug your Firestick and charger cable of
Firestick, then plug back in to activate the Firestick.
Step 1:
Connect a charger cable for your Firestick;
Step 2:
Access “Signal Source” on the home page, and choose “HDMI”, then press
“ ” to confirm.
Step 3:
(not included)
What if projector doesn't recognize Firestick?
Enter "Setting" and find "Display & Sound". Then select "on" for "navigation sounds".
Select "Stereo (or PCM)" for "surround sound".
What if there is no sound?
Warm Tips:
Due to copyright issues, Netflix, Amazon prime, Disney and Hulu are not supported
to play directly by mirror screen with phone, it must be connected TV stick to play.
14
HDMI
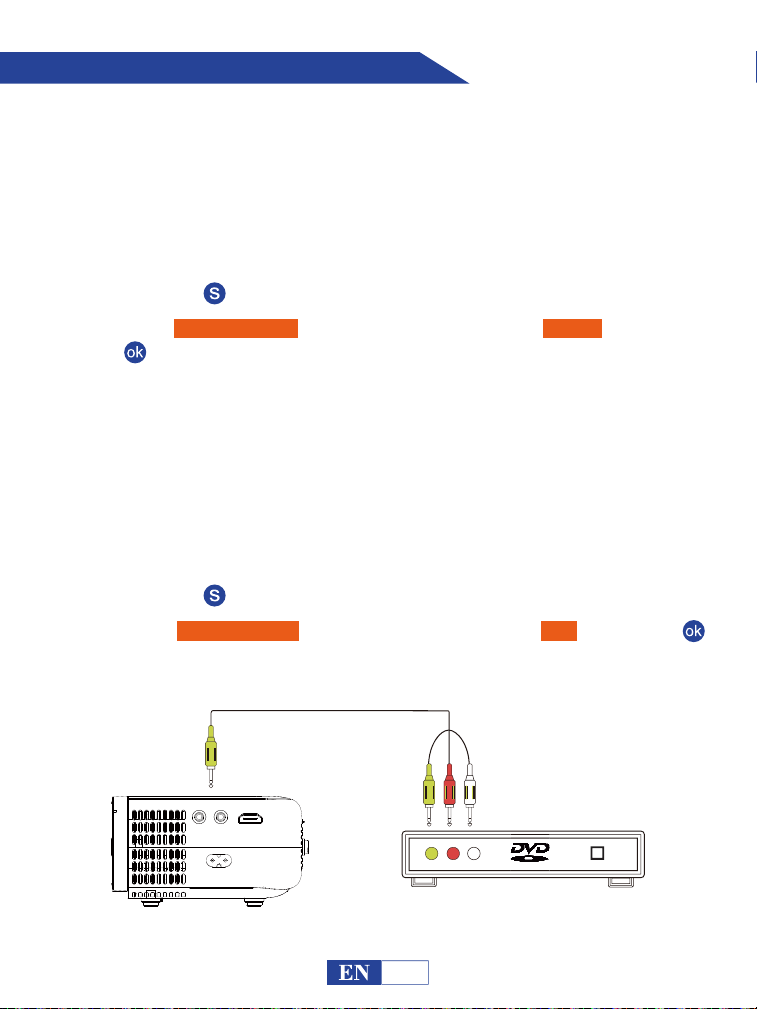
Connecting to the DVD Player
Turn on your DVD player and the projector;
Step 1:
Connect the HDMI cord to your DVD player's HDMI port;
Step 2:
Connect the other end to HDMI port on your projector;
Step 3:
Press the “ ” button to back to home page;
Step 4:
Step 5:
Access “Signal Source” on the home page, and choose “HDMI”, then press
“ ” to confirm.
Option 1: Connect the projector to your DVD player by using the HDMI
cord in the package.
Turn on your DVD player and the projector;
Step 1:
Connect the colorful Female connectors to your DVD player’s RCA cable;
Step 2:
Connect the yellow Male connector to the AV inport on the projector;
Step 3:
Press the “ ” button to enter back to home page;
Step 4:
Step 5:
Access “Signal Source” on the home page, and choose “AV”, then press “ ”
to confirm.
Option 2: Connect the projector to your DVD player by using the AV
cable in the package.
15
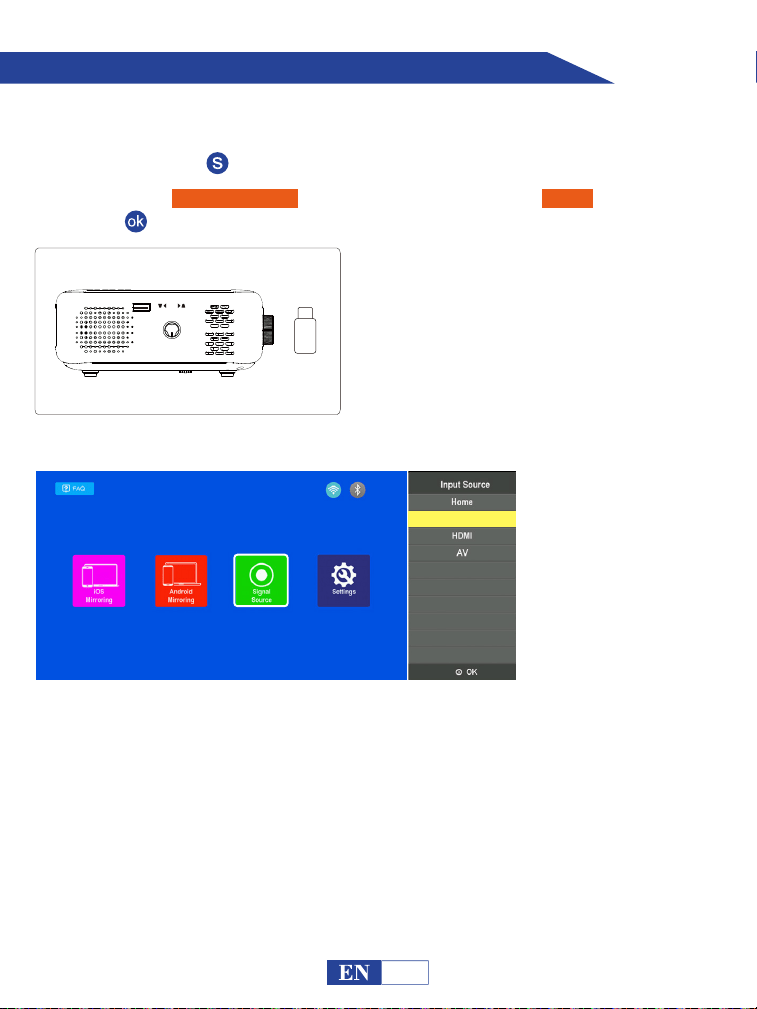
Connecting to the External Storage Device
Insert USB drive;
Step 1:
Press the “ ” button to back to home page;
Step 2:
Access “Signal Source” on the home page, and choose “USB”, then press
“ ” to confirm.
Step 3:
If USB stick is recognized successfully, the icon of the USB drive in the upper right corner
will light up. Please note that your USB drive and files need to meet the following formats.
(for example: If the format of your USB drive is NTFS, the memory capacity of USB drive
must be under 128G and the memory of video must be under 2T.)
HDMI AV
USB
KEYSTONE
//
16
USB
USB Support Fomat
Formats of USB Drive
NTFS
FAT32
128G
128G
2T
4G
FAT 128G 2G
Maximum memory capacity
of USB drive
Maximum memory of each video
Video:
AVI
FLV
H.264
FLV
MKV COPX H.264 MPEG-4DIVX MJPEG
MOV MOV
MP4 H.264 MPEG-4DIVX XIVD
MPG MPEG1
VOB VOB
Video formats
Music Format
Photo Format
Mp3,M4A (AAC)
JPEG,BMP,PNG
(Note: corresponding
format and encoder
are required when
play via USB)
Video encoder
17
Important Safety Considerations
Playing Movie
Select “Movie” by pressing the “ ” or “ ” or “ ” or “ ” buttons and
the selected frame will be highlighted. Then press the “ ” button to enter
the following interface;
Step 1:
Select the disk C or USB, then press the “ ” button to enter the disk;
Step 2:
1/1
C
Return
Movie Music
Photo Text
18
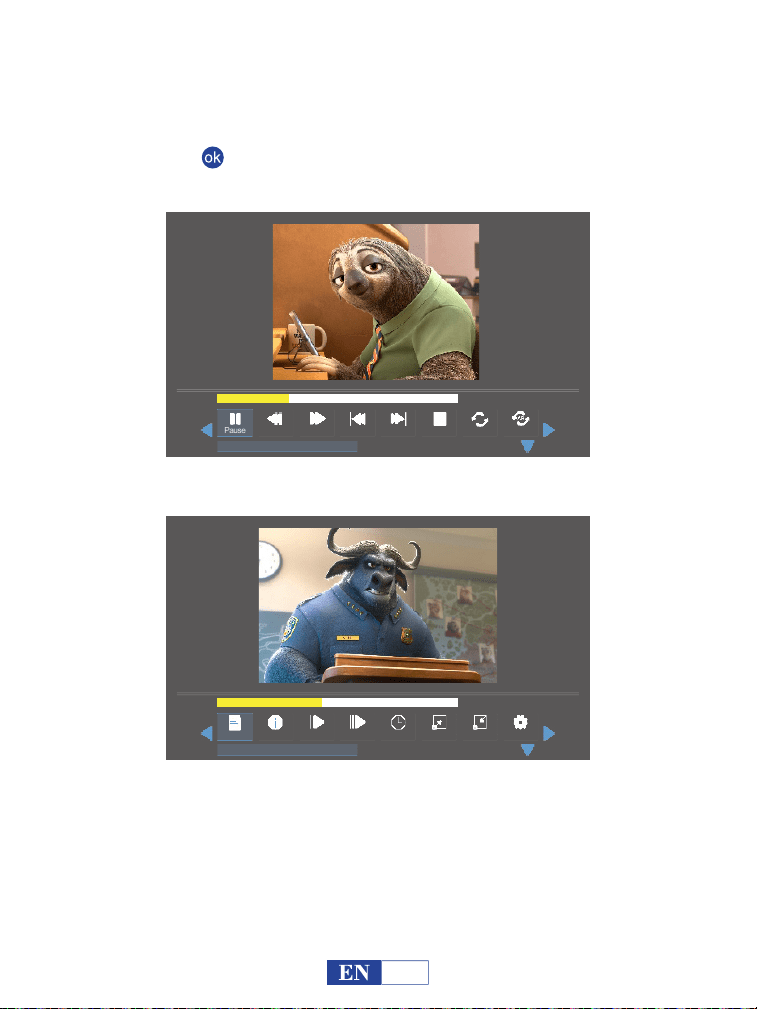
Select the Movie file or click the folder to enter the next directory till you find
the movie you would like to play in the directory;
Step 3:
Press the “ ” button on the projector or remote to select movie.
Step 4:
00:01:15 / 00:03:48
Prev StopPause
Repeal All
Set AFB FF Next
anime video.flv
00:01:35 / 00:03:48
StepPlaylist Green R..Info Slow Golotime
anime video.flv
Zoom Out
Zoom In
19

Play/Pause: Plays or pauses the current video.
Prev: Previous, goes back to the previous video.
Next: Goes to the next video.
Stop: Exits from the current video.
FF: Fast Forward, pushes the video to move forward quickly while playing it.
The forward speed ranges from 2X to 32X.
FB: Fast Backward, rewinds the video back quickly while playing it.
The rewinding speed ranges from 2X to 32X.
Repeat: Has the options of Repeat 1, Repeat All and Repeat NONE. Press the
“ ” button to switch among these options. Repeat All loops to play all the videos
in your playlist. Repeat NONE: plays the current video once, then exits from the
current video; Repeat 1 loops to play the current video all the time.
Set A/ Set B/ None: Selects “Set A” by pressing the “ ” button to set a time
point and select “Set B” by pressing “ ” button to set another time point when
playing the video, then it will loop to play the video fragment between these points.
Select None to return to normal playing mode.
Step: Steps forward the video frame by frame by pressing the “ ” button.
Zoom in: Magnify your video image from 2X to 8 X.
Zoom out: Shrink your video image from 1X to 1/8X.
Playlist: A list of video files that can be played from the current folder.
Info: Shows the information about the current video including resolution, size
and so on.
Slow: Plays the video in slow motion with a speed being range from 2X to 16X.
20
Important Safety Considerations
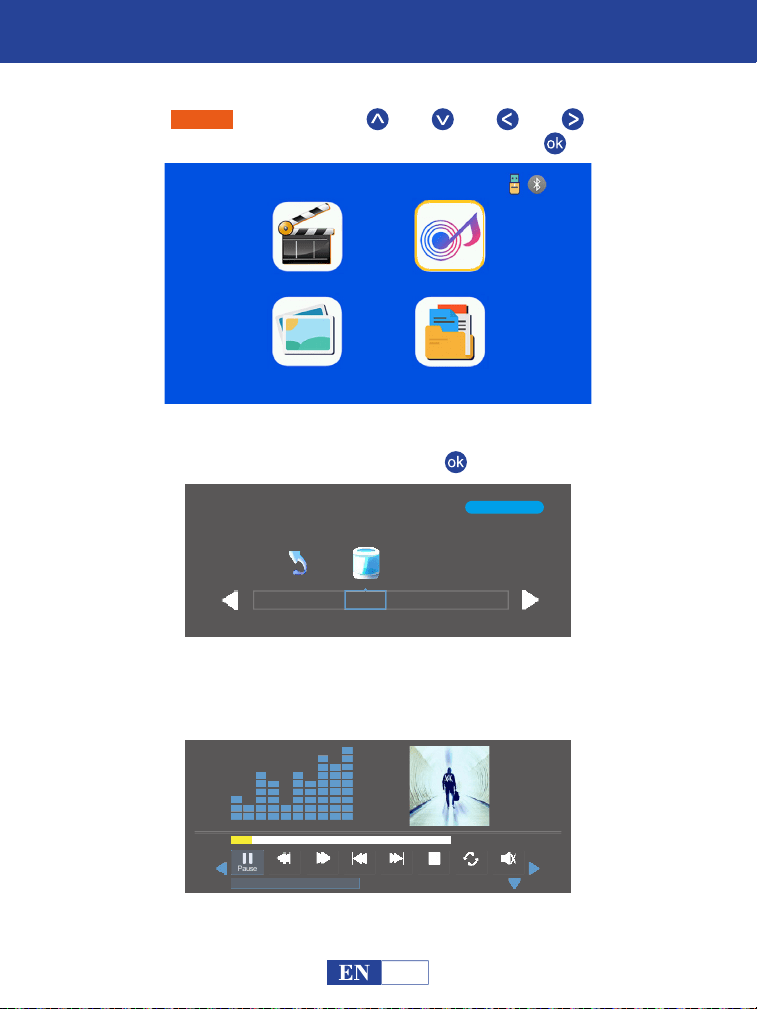
Playing Music
Select “Music” by pressing the “ ” or “ ” or “ ” or “ ” buttons and
the selected frame will be highlighted. Then press the “ ”;
Step 1:
Movie Music
Photo Text
1/1
C
Return
Select the disk C or USB, then press the “ ” button to enter the disk;
Step 2:
Select the music file or click the folder to enter the next directory till you find
the music you would like to play in the directory.
Step 3:
00:00:15 / 00:03:48
Prev StopPause
Repeal All
MuteFB FF Next
Alan Walker· Faded Mp3
21
Play/Pause: Plays or pauses the current video.
Prev: Previous, goes back to the previous video.
Next: Goes to the next video.
Stop: Exits from the current video.
FF: Fast Forward, pushes the video to move forward quickly while playing it.
The forward speed ranges from 2X to 32X.
FB: Fast Backward, rewinds the video back quickly while playing it.
The rewinding speed ranges from 2X to 32X.
Repeat: Has the options of Repeat 1, Repeat All and Repeat NONE. Press the
“ ” button to switch among these options. Repeat All loops to play all the videos
in your playlist. Repeat NONE: plays the current video once, then exits from the
current video; Repeat 1 loops to play the current video all the time.
Warm Tips:
It will show a bottom bar with different settings when playing the music. Press the
Down button or the Back button to hide it. Press the “ ” button to show it again.
Mute: Mutes or unmutes the current music.
Playlist: A list of music files that can be played from the current folder.
Info: Shows the information about the current music including Bit Rate, Artist,
Size, and so on.
00:00:15 / 00:03:48
Prev StopPause
Repeal All
MuteFB FF Next
Alan Walker· Faded Mp3
00:00:15 / 00:03:48
GotoTimePlaylist
Info Close P...
Auto
Alan Walker· Faded Mp3
22
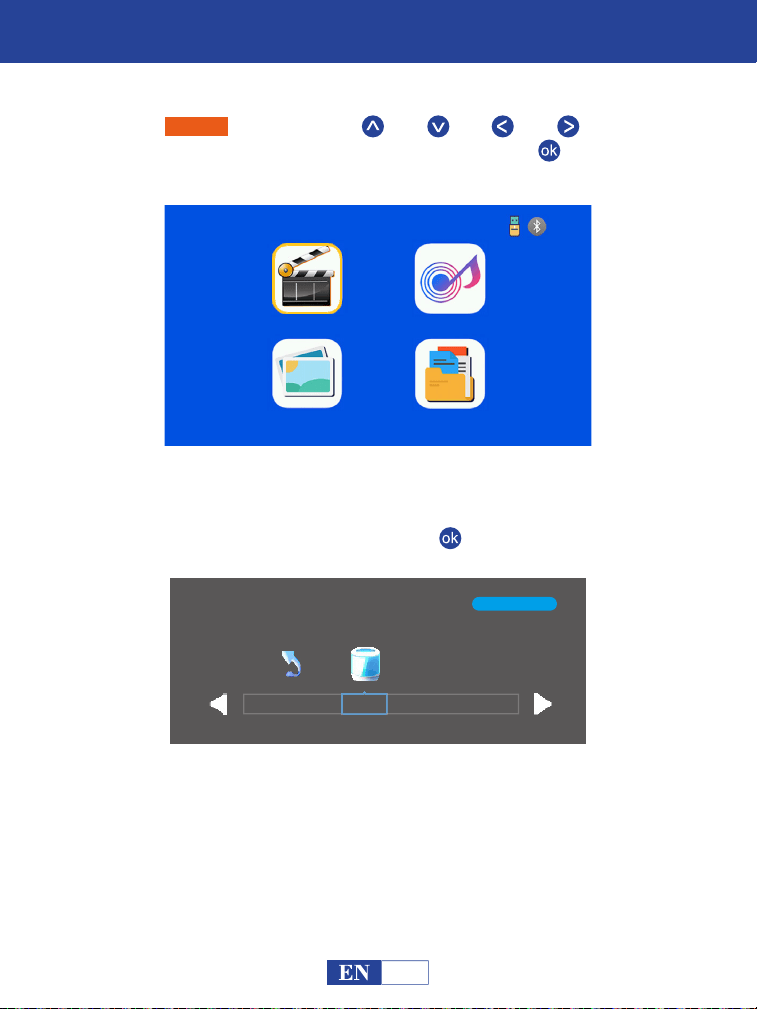
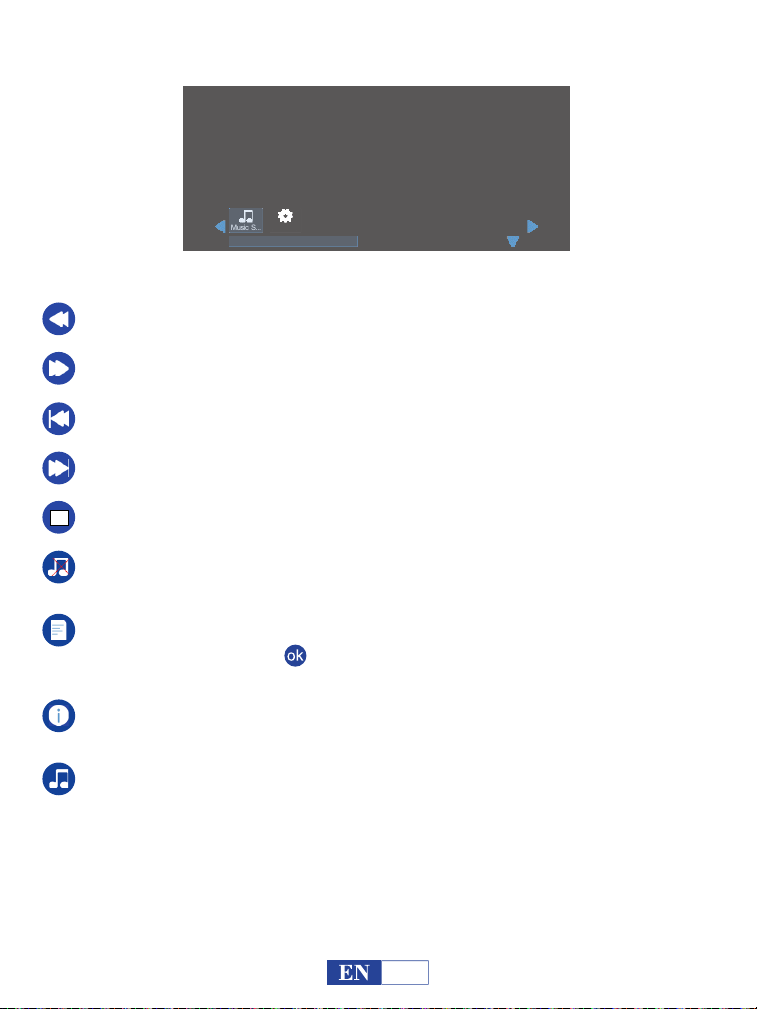
Important Safety Considerations
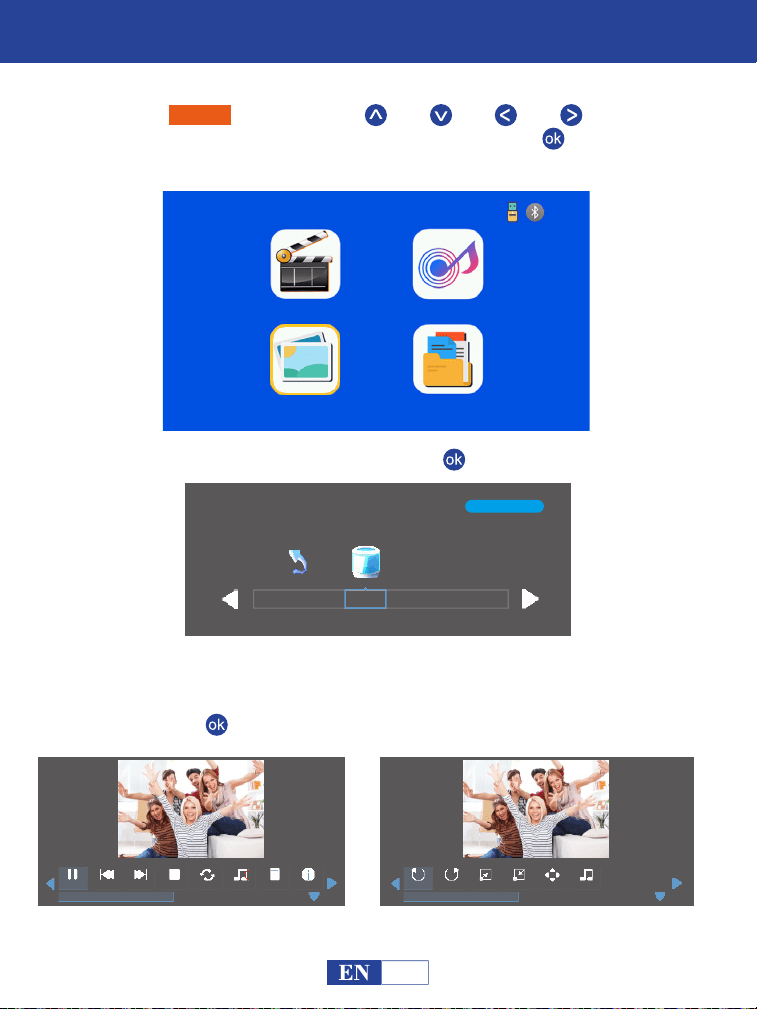
Playing Photo
Select “Photo” by pressing the “ ” or “ ” or “ ” or “ ” buttons and
the selected frame will be highlighted. Then press the “ ” button to enter
the following interface;
Step 1:
Movie Music
Photo Text
1/1
C
Return
Select the disk C or USB, then press the “ ” button to enter the disk;
Step 2:
Select the photo or click the folder to enter the next directory till you find the
photo you would like to play in the directory;
Step 3:
Press the “ ” button on the projector or remote to select photo.
Step 4:
Prev StopPause
Repeal All
Next
Stock-photo-tupian123.jpg
Music Off
Playlist Info
RotateRotate Zoom In
Stock-photo-tupian123.jpg
Music S...
Move
Zoom Out
23

Zoom in: Magnify your video image from 2X to 8 X.
Zoom out: Shrink your video image from 1X to 1/8X.
Music source: Tick some music file(s) for photo background.
Music Off: Turn on/off the music file(s) you ticked under the MUSIC Source for
text background.
Rotate: Rotate the photo clockwise by 90°, 180°, 270°, 360°.
Info: Shows the information about the current photo including resolution, size,
date and time.
Playlist: A list of photo files that can be played from the folder.
Warm Tips:
It will show a bottom bar with different settings when playing the music. Press the
Down button or the Back button to hide it. Press the “ ” button to show it again.
Play/Pause: Plays or pauses the current video.
Prev: Previous, goes back to the previous video.
Stop: Exits from the current video.
Next: Goes to the next video.
Repeat: Has the options of Repeat 1, Repeat All and Repeat NONE. Press the
“ ” button to switch among these options. Repeat All loops to play all the videos
in your playlist. Repeat NONE: plays the current video once, then exits from the
current video; Repeat 1 loops to play the current video all the time.
Rotate: Rotate the photo counterclockwise by 90°, 180°, 270°, 360°.
24

Important Safety Considerations
Playing Text
Select “Text” by pressing the “ ” or “ ” or “ ” or “ ” buttons and the
selected frame will be highlighted. Then press the “ ” button to enter the
following interface;
Step 1:
Press the “ ” or “ ” or “ ” or “ ” on the operation panel to select the
equipment for text storage.
Movie Music
Photo Text
1/1
C
Return
Select the disk C or USB, then press the “ ” button to enter the disk;
Step 2:
Step 3:
Prev StopPs Page Next
An evening in August.txt
Music Off
Playlist Info
An evening in August 1997
Li Ruiying learned the news that her son fell from the building and was injured, and she
was furious.But she was about to star t the live news broadcast, so she couldn't rush to her
son to accompany her right away.In the "News Network" that night, Li Ruiying's
performance was as usual, still calm and calm, her anxiety was well hidden, and she
couldn't see that her son just had an accident.After the live broadcast, Li Ruiying almost
flew to the hospital. Fortunately, her son was only slightly injured, otherwise she would
never have forgiven herself.
Next Page
25
Next Page: Next Page, goes to the next page of the current text.
Ps Page: Previous Page, goes back to the previous page of the current text.
Prev: Previous, goes back to the previous video.
Next: Goes to the next video.
Stop: Exits from the current video.
Info: Shows the information about the current photo including resolution, size,
date and time.
Playlist: A list of text files that can be played from the folder. If you did not tick
the texts by pressing the “ ” button in the sub menu, it will show all the texts that
can be played; otherwise, it will show your ticked text(s).
Music Off: Turn on/off the music file(s) you ticked under the MUSIC Source
for text background.
Music source: Tick some music file(s) for photo background.
An evening in August.txt
An evening in August 1997
Li Ruiying learned the news that her son fell from the building and was injured, and she
was furious.But she was about to star t the live news broadcast, so she couldn't rush to her
son to accompany her right away.In the "News Network" that night, Li Ruiying's
performance was as usual, still calm and calm, her anxiety was well hidden, and she
couldn't see that her son just had an accident.After the live broadcast, Li Ruiying almost
flew to the hospital. Fortunately, her son was only slightly injured, otherwise she would
never have forgiven herself.
Music S...
Auto
26
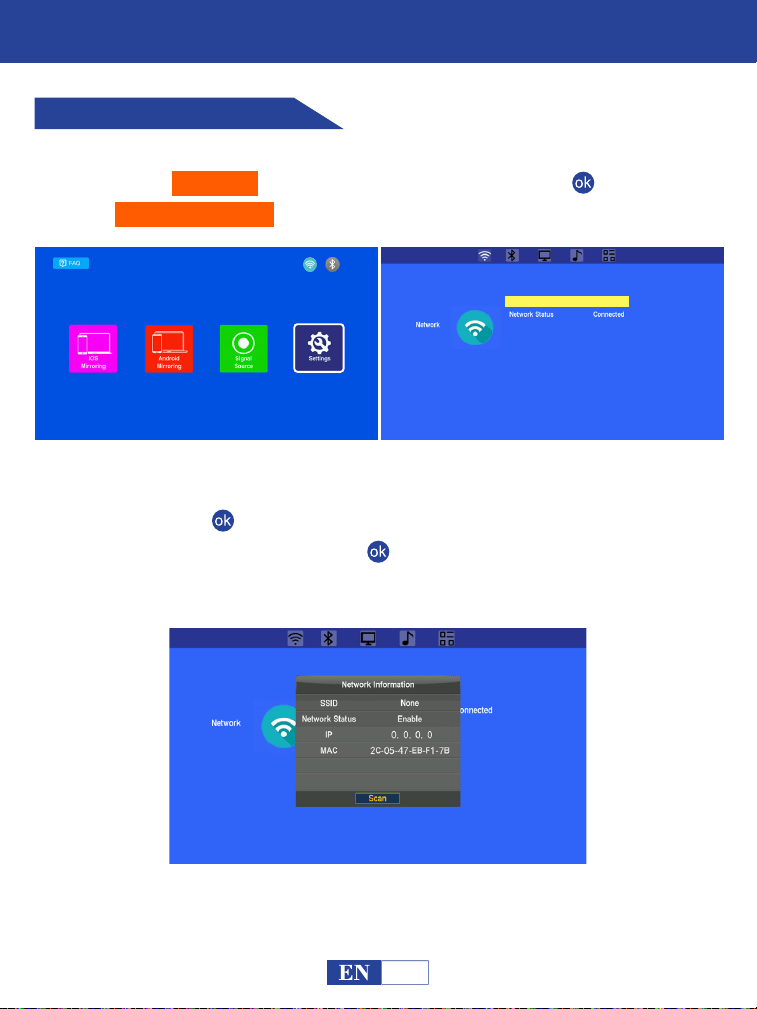
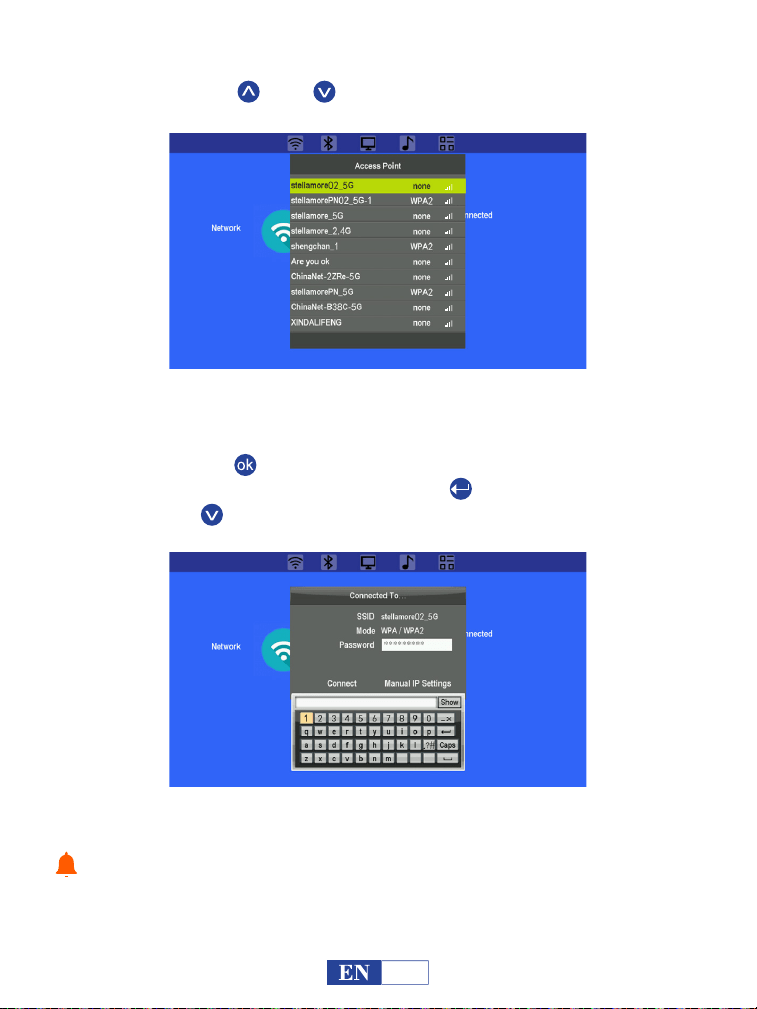
Network Setting
Select “Settings” on the home page, and then Press “ ” to access
“Network Settings”.
27
Press the “ ” to enter the Network Information page.
Select “Scan” and press the “ ” to enter the home WiFi list.
Important Safety Considerations
Settings
Step 1:
Step 2:
Network Settings
28
Press the “ ” or “ ” to select your home network.
Press the “ ” enter the password page. Enter password of
your home network and press the “ ” to confirm.
Press “ ” to select “Connect”.
Step 3:
Step 3:
Please turn on your mobile hotspot as your home network if there is no
network.
Tips:

Bluetooth Setting
29
Select “Settings” on the home page, and then Press “ ” enter setting
page, then press “ ” and “ ” to access “bluetooth Settings”.
Connect it to bluetooth speakers/earphones/soundbar. Please
presee “ ” to choose “Send”.
Use the projector as a bluetooth speaker for your phone/tablet.
Please presee “ ” to choose “Receive”.
Step 1:
Step 3:
Switch on your Bluetooth device, and make sure the Bluetooth is in
pairing mode.
The bluetooth doesn't have image/video transmission function.
Step 2:
Step 4:
Press the “ ” or “ ” to select the correct Bluetooth device from the
list, and press the “ ” to connect.
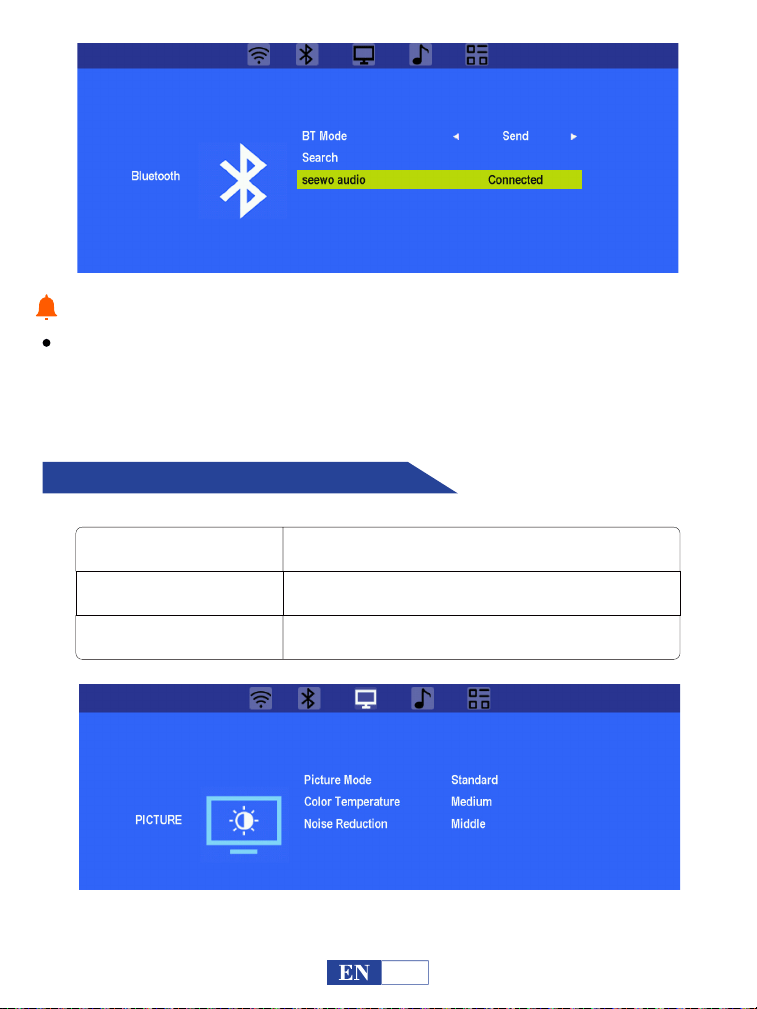
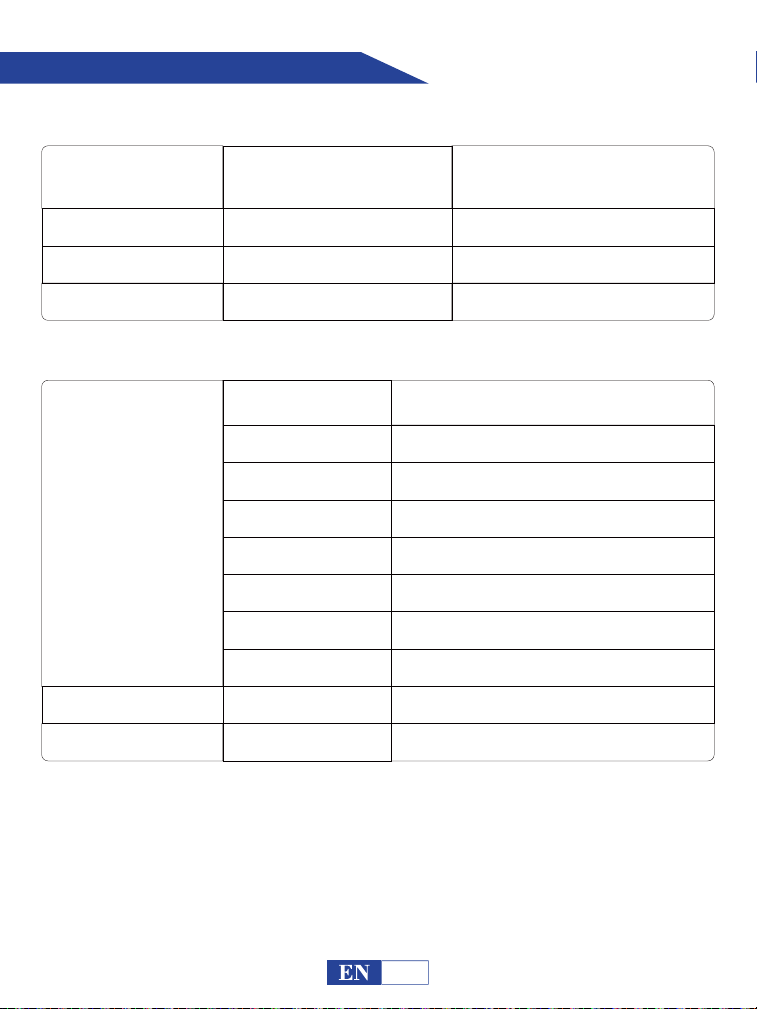
Picture Setting
30
Please make sure your bluetooth speakers/earphones/soundbar/-
phone/tablet is on the bluetooth setting package when use Bluetooth
Send/Receive function.
Tips:
Picture mode
Color temperature
Noise Reduction
Medium, Cool,Warm,User
Standard,Dynamic,Mild,User
Off, Low, Middle, High

Sound Setting
Option Setting
OSD Language
Projection Mode
USB Upgrade
Front, Rear, Ceiling Front and Ceiling Rear
English, Deutsch, France, Spanish, Italiano,
Greek, Czech, Finnish, Croatian, Slovak,
Japanese and Chinese for your choice
Projection Zoom 50-100%
Update the local software
Sound Mode
Auto Volume On, Off
Standard, Movie, Music, Sports, User
31

Projection Tech:
Power Supply:
Projector Consumption:
Lens:
Zoom:
Aspect Ratio:
Correction:
A Single Continuous Use Time:
Projection Size:
Projector Weight:
Noise and Light Leaking:
Dimension:
Ceiling Mount Size:
Audio Frequency:
Signal Ports:
LCD TFT Projection system
AC IN: 100V-240V 50/60HZ
50W
Multichip Composite Coating Optical Lens
100%-50%
4:3/16:9
±15 Degree
<24hour
30-210inch
0.64Kg
Low Noise, Low Light Leaking
173x126x67mm
M6
2W+2W
Video Input (1.OVp-p +/-5%)
HDMI Input (480i 480p 576i 720p 1080i 1080p)
Product Features
32
Trouble Shooting
1. Why is the display of the projector available but without audio?
The projector or the connected device (PC, TV, etc.) is muted.
Dolby sound is not supported, exit to play again.
Fire stick: Enter “Setting” and find “Display & Sound”. Then select “on” for “navigation
sounds”. Select “Stereo (or PCM)” for “surround sound”.
Try YouTube if your player is Netflix. The problem will happen when playing Netflix
because of copyright.
2. Why is the audio of the projector available but without display?
The video format is not supported by the projector.
Encryption applied to the videos or media player which holds the video.
If the lamp of the projector is off with only audio playing, the lamp is defective.
Please contact seller for a replacement.
Try another HDMI cord if you select the HDMI input source.
Try YouTube if your player is Netflix. The problem will happens when playing Netflix
because of copyright.
Problems listed below might occur during the operation of your projector. Please refer to the
possible factors which might cause the issue to do troubleshooting. Any questions during
use, please feel free to contact with VOPLLS customer service team correspondingly.
Email address of customer service:
33
North America Marketplace:
Europe Marketplace:

8. What if projector only displays the main screen of your computer?
Macbook: Enter settings of computer, select “Mirror Built-in Display” for Airplay Display.
Windows: Enter settings of computer, select “Duplicate these displays” for Display.
3. Why can't it connect to my phone?
Please keep staying in the correct connection channel when mirroring your device.(Evenif
you may need to skip to other interfaces to turn on the WiFi function, please turn backto
correct connection channel to connect.)
For iOS devices: Please ensure that your device and projector are connected to the
same home WiFi.
For Android devices: Please turn on WiFi and Bluetooth function of your device.
4. What kind of screws do I need for mounting this projector?
M6 screw
8. When we connect the phone/computer with the projector, can we
use the remote of projector to control?
No, because the projected content is from phone/computer, and the remote control
cannot control the phone/computer. So we cannot use the remote of projector to control.
6. How should I do if there is loud noise when using the projector?
Contact VOPLLS Team for assistance.
7. What if the sound comes from the mobile phone or computer
instead of projector?
Phone: Turn on Bluetooth on your phone.
Computer: Enter settings of computer, select “high Definition Audio Device” or “the
name of your HDMI adapter” for Audio.
34

9. How should I do if there is expanding dark spot or smoke when
using the projector?
Check if the fan noise increases or the fan stops working. Unplug the projector and
contact VOPLLS Team for assistance.
Make sure the outlet and projector power adapter are not wet or humid which will cause
sparks or smoke on outlet when power on the projector.
10. Why does the projector is shut off during playing?
Make sure the power plug is working and firmly fitted into the outlet.
If the LED indicator on the projector is light up, but the fan doesn’t work, please contact
VOPLLS Team for assistance.
Overheat on the projector will activate built-in power-off protection panel. Restart the
projector when it gets cooler.
11. Can this projector support 3D effect?
The projector supports 3D video source, and 3D viewing performance is achievable
with Red-Blue 3D Glasses; but please understand the experience will not be better
than in the theater and we do not recommend it if you have a higher expectation about
3D effect.
12. Why doesn't anything work when external USB flash device
connected?
“USB” input source must be selected when you use the USB disk;
Please make sure your USB drive meets following conditions: (for example: If the
format of your USB drive is NTFS, the memory capacity of USB drive must be under
128G and the memory of video must be under 2T.)
35
Press “ ” button to back to home page. Enter “Settings” and press “ ”4 times. Enter
“OSD Language”. There are Deutsch, France, Chinese, Italiano, Espanol and
Japanese for your choice.
Press “ ” button to back to home page and access to “Settings”, and press “ ”
button 4 times to choose “Projection Mode”, Press “ ” button to rotate.
Please contact VOPLLS for assistance when this occurs.
13. Why doesn’t the projector’s lamp light up or power on?
14. How can I change the language?
15. How can I do if the image is up side down?
36
Formats of USB Drive
NTFS
FAT32
128G
128G
2T
4G
FAT 128G 2G
Maximum memory capacity
of USB drive
Maximum memory of each video

Make sure the batteries are installed correctly and the power is enough.
Please make sure the IR receiver is not covered.
19. How can I do if the remote is unresponsive?
Adjust the focus and keystone ring by moving it leftward/rightward till it shows the best
images.
Place projector on a flat surface horizontally or vertically. An inclination of any angle may
result in blurry displays or uneven colors.
Darker environment suggested achieving the best projecting performance.
The eligible distance of 1.13m-7.2m/ 35inch-210inch between the projector and project-
ing screen/ wall.
Projecting wall or screen is clean white if possible.
16. How can I do if the image is blurry or out of shape?
Make sure the projector is placed on a flat surface with projector light in the middle of
the screen.
Make sure the projector screen is placed horizontally.
17. How can I do if the projection screen is not square or allied
horizontally?
Make sure the video source has a fine resolution.
Adjust the colors: enter Picture Mode/Color Temperature, then select different modes
and adjust the value accordingly.
18. How can I do if there is color distortion?
37

HDMI for all devices mentioned above, Certain DVD players require the AV code cord
connection.
Press “ ” button to back to home page. Enter “Settings” and access “Zoom”. Press
“ ” or “ ” to adjust the display size.
Tap the projector slightly to shake off the dust which may be caused during installing or
shipping.
Clean the lens with clean non-woven fabrics, please see the Cleaning Operation on
Page 7.
20. How should I do if there are small dots on display?
21. How to adjust display size from 100% to 50%?
22. What Kind of cable do I need when connecting TV BOX, TV,
Firestick and DVD Player to the projector?
USB drive: You cannot project PPT from a USB drive.
Phone or Computer: Yes, you can play PPT on your computer or mobile phone and
then project it through the projector.
23. Is it possible to project PPT?
38