

WALNUT BLASTER 30L CAPACITY
MODEL NO:
VSWB30
Thank you for purchasing a Sealey product. Manufactured to a high standard, this product will, if used according to these
instructions, and properly maintained, give you years of trouble free performance.
IMPORTANT: PLEASE READ THESE INSTRUCTIONS CAREFULLY. NOTE THE SAFE OPERATIONAL REQUIREMENTS, WARNINGS & CAUTIONS. USE
THE PRODUCT CORRECTLY AND WITH CARE FOR THE PURPOSE FOR WHICH IT IS INTENDED. FAILURE TO DO SO MAY CAUSE DAMAGE AND/OR
PERSONAL INJURY AND WILL INVALIDATE THE WARRANTY. KEEP THESE INSTRUCTIONS SAFE FOR FUTURE USE.
1. SAFETY
1.1. ELECTRICAL SAFETY
WARNING! It is the user’s responsibility to check the following:
9 Check all electrical equipment and blasters to ensure that they are safe before using. Inspect power supply leads, plugs and
all electrical connections for wear and damage. Sealey recommend that an RCD (Residual Current Device) is used with all electrical
products. It is advised the rated residual operating current does not exceed 30mA
9 Electrical safety information. It is important that the following information is read and understood:
9 Ensure that the insulation on all cables and on the blaster is safe before connecting it to the power supply.
9 Regularly inspect power supply cables and plugs for wear or damage and check all connections to ensure that they are secure.
Important: Ensure that the voltage rating on the blaster suits the power supply to be used and that the plug is tted with the
correct fuse.
8 DO NOT pull or carry the blaster by the power cable.
8 DO NOT pull the plug from the socket by the cable.
8 DO NOT use worn or damaged cables, plugs or connectors. Ensure that any faulty item is repaired or is replaced immediately by a
qualied electrician.
If the cable or plug is damaged during use, switch o the electricity supply and remove from use.
1.2. GENERAL SAFETY
9 Disconnect the blaster from the power supply before servicing, changing accessories, or performing any maintenance.
9 Use only genuine parts and accessories. Unauthorised parts and accessories may be dangerous and will invalidate your warranty.
9
Maintain the blaster in good condition. Use an authorised agent for servicing. Keep machine clean, but DO NOT use solvents.
9 Wear protective clothing and gloves.
8 DO NOT allow children or untrained persons to operate the blaster.
8 DO NOT place attachments close to your face (especially eyes, ears, etc). DO NOT point the hose end at other persons or animals.
8 DO NOT leave machine running unattended. Turn power supply OFF, and DO NOT leave the vicinity until motor has come to a
complete stop.
8 DO NOT operate the blaster while under the influence of drugs, alcohol or impairing medication, or if you are tired.
8 DO NOT use the blaster in the rain or in very damp conditions.
8 DO NOT use the blaster for a task it is not designed to perform.
9 When not in use, store the blaster in a safe, dry, childproof location.
9 Children shall NOT play with the blaster.
8 Cleaning and user maintenance on the blaster shall not be made by children without supervision.
9 The blaster shall be disconnected from its power source during service and when replacing parts.
9 Only to be use by a fully trained personnel.
2. INTRODUCTION
Designed for cleaning carbon deposits on intake ports, valves and intake manifold, to ensure engine eciency. Large 30L drum
capacity. Natural properties of walnut media provide a thorough clean of engine inlet components without causing damage. Allows for
walnut media to be sprayed and recovered simultaneously. Built-in lter to separate recovered walnut media and carbon deposits.
Back-mounted storage box for compact storage of adaptors and accessories. Built-in trolley handle and wheels for transportability.
Supplied with 23 adaptors to suit most vehicles applications and 5kg of walnut media.
Original Language Version
© Jack Sealey Limited
Read before rst
use
Wear eye
protection
Indoor use only
Wear protective
clothing
Wear protective
gloves
VSWB30 Issue 4 05/12/24
Wear a face
mask
Wear ear
protection
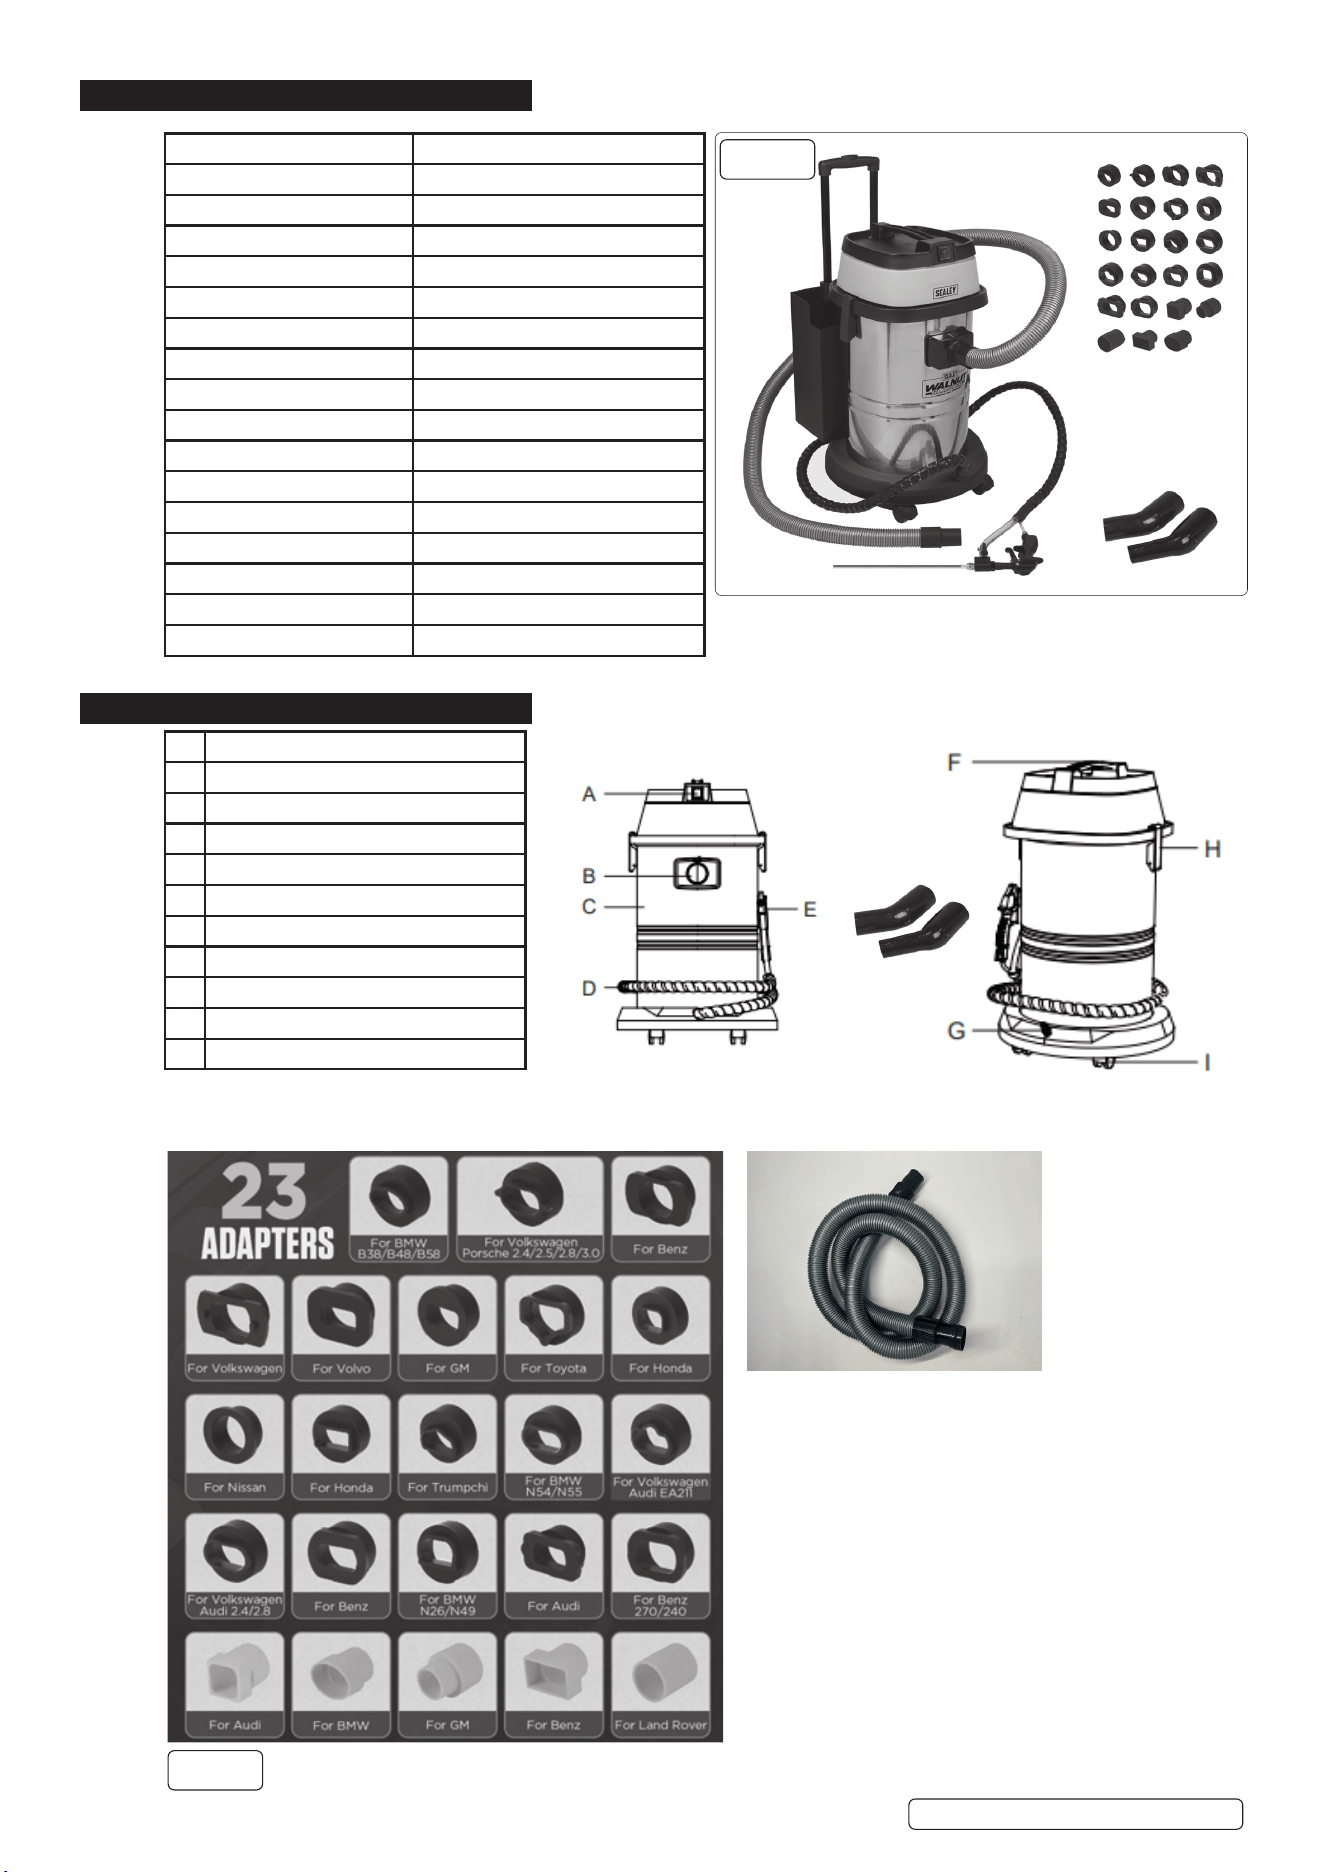
3. SPECIFICATION
4. CONTENTS
See also g.1 for contents.
J
A Power switch
B Particle recovery hose attachment
C Stainless steel drum
D Walnut blasting hose
E Walnut blasting gun
F Handle
G Air connector
H Machine head latch
I Castors
J Black hose bend adaptor
K Particle recovery hose
Original Language Version
© Jack Sealey Limited
VSWB30 Issue 4 05/12/24
Model No VSWB30
Air input: 7bar (102psi)
Airow: 300L/Min
Capacity: 30L
Dimensions: 435 x 520 x 760mm (W x D x H)
Filter Type: Dust Cartridge
Fuse Rating: 13A
Hose Length: 2500mm
Media: Walnut Powder (5kg supplied)
Media Size: Ø0.4-0.8mm (Walnut Powder)
Nett Weight: 26kg
Noise Power/Pressure: <70dB
Plug Type: 3-Pin BS
Power Supply Cable Length: 1.8m
Power: 1400W
Rated Voltage/ Frequency. 230V ~ 50HZ
Vacuum Suction: 0.02MPa
g.1
g.2
K
5. PREPARATION
5.1. Open the latches on both sides of the machine, remove the machine head cover, take out the filter cartridge. Then take out the walnut
media and add it into the stainless-steel drum (it is recommended to add 3-5kg walnut media). Then install the filter cartridge and the
machine head cover in turn.
5.2. Remove engine intake manifold assembly, following manufacturer’s instructions. Observe the carbon deposits in the cylinder head intake
valve ports and on the inlet valves.
NOTE: Ensure that the valves that are about to be cleaned are in the closed position.
6. OPERATION
6.1. Install particle recovery hose to the steel drum (B). Install elbow adaptor (J) on the end of the particle recovery hose.
6.2. Select adaptor appropriate to engine being worked on (Refer to g.2) and attach to elbow adaptor (J).
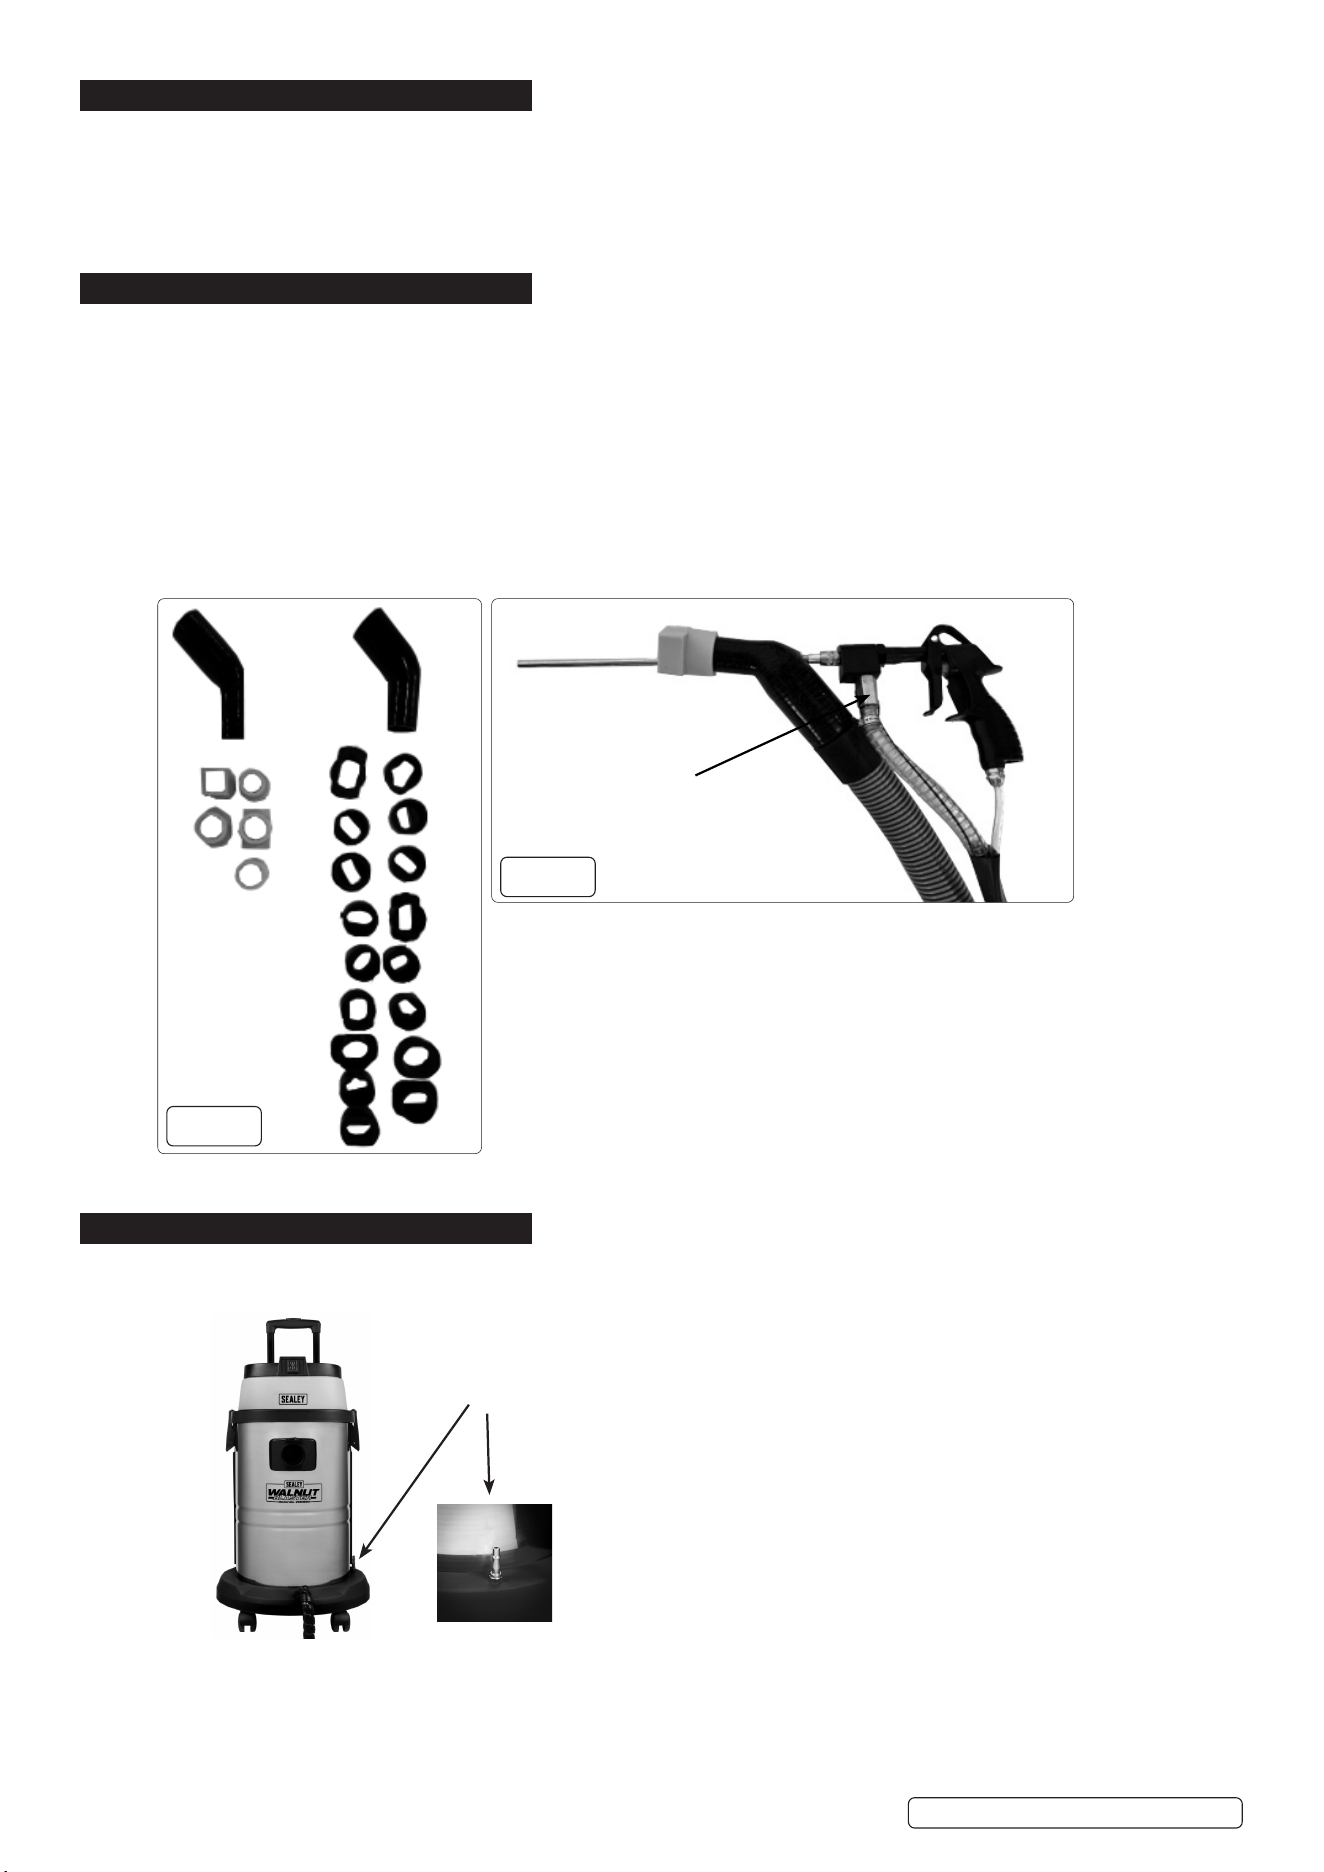
6.3. Attach walnut blasting gun to the elbow adaptor (the lance goes through the hole in the back of the elbow adaptor, refer to g.4).
6.4. Observe carbon deposit in engine to be worked on.
6.5. Connect external air source to (G), it will need to be used with a compressor with a minimum air output of 0.7mpa (7 bar/102psi).
6.6. Ensure to wear appropriate PPE.
6.7. Oer up the adaptor to the aperture of the intake manifold, intake or exhaust port to be worked on. Check all parts have been
assembled correctly and have no leaks.
6.8. Plug power cord into external power socket and turn on power switch (A).
6.9. Open the walnut shell abrasive outlet valve, operate trigger. Moving blasting gun backward, forward and in a circular motion to cover
all the valve/port being cleaned. 2 minutes should be sucient to remove all carbon deposits, check and repeat procedure if
necessary.
6.10. Ensure that all walnut media has been removed from engine and components before reinstalling.
7. BLOCKAGES
7.1. In the unlikely event of a blockage disconnect mains and the air supply. Remove hoses and clear debris wearing the appropriate PPE.
© Jack Sealey Limited
Original Language Version
VSWB30 Issue 4 05/12/24
g.3
g.4
Air supply
Connector
Walnut blasting valve
open position

8. MAINTENANCE
NOTE:To maintain the performance and appearance of the product, it is recommended that the following product care guidelines be
read carefully.
WARNING! disconnect from its power source during service and when replacing parts.
8.1. Be careful not to rub the product against rough surfaces or wear the product, especially the sheet metal housing.
8.2. Please regularly check the product parts that need to be tightened and connected. If found loose, please tighten it in time to ensure
the safe operation of the equipment.
8.3. To comply with the safe operating procedures and do not overload the equipment. The safety guards of the products should be
checked to ensure that they are not defective.
8.4. Check components regularly to ensure that no parts are defective including hoses. Replace any defective parts and avoid any contact
with corrosive liquids.
8.5. When not in use, unplug from power supply keep spare components inside the drum assembly and store the product in a dry place.
DO NOT store the product in hot, humid, or non-ventilated places.
8.6. CLEANING
8.7. NOTE: Wear appropriate PPE.
8.8. Remove the blaster head to access the lter.
8.9. NOTE: Remove fabric lter and remove the dust by hand-patting the lter.
8.10. Remove all dust on the lter. Clean with cold or lukewarm water without use of detergent and if necessary air-dry the lter for further
use.
8.11. To clean the exterior of the machine use a damp dry cloth.
Original Language Version
© Jack Sealey Limited
VSWB30 Issue 4 05/12/24
Sealey Group, Kempson Way, Suffolk Business Park, Bury St Edmunds, Suffolk. IP32 7AR
01284 757500 sales@sealey.co.uk www.sealey.co.uk
ENVIRONMENT PROTECTION
Recycle unwanted materials instead of disposing of them as waste. All tools, accessories and packaging should be sorted,
taken to a recycling centre and disposed of in a manner which is compatible with the environment. When the product
becomes completely unserviceable and requires disposal, drain any fluids (if applicable) into approved containers and
dispose of the product and fluids according to local regulations.
WEEE REGULATIONS
Dispose of this product at the end of its working life in compliance with the EU Directive on Waste Electrical and Electronic Equipment
(WEEE). When the product is no longer required, it must be disposed of in an environmentally protective way. Contact your local solid
waste authority for recycling information.
Note: It is our policy to continually improve products and as such we reserve the right to alter data, specifications and component parts without prior
notice. Please note that other versions of this product are available. If you require documentation for alternative versions, please email or call
our technical team on technical@sealey.co.uk or 01284 757505.
Important: No Liability is accepted for incorrect use of this product.
Warranty: Guarantee is 12 months from purchase date, proof of which is required for any claim.
REGISTER YOUR
PURCHASE HERE
