
AX10011
THIS INSTRUCTION BOOKLET CONTAINS IMPORTANT SAFETY INFORMATION.
PLEASE READ AND KEEP FOR FUTURE REFERENCE.
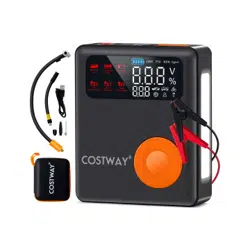
Multi-function Jump Starter and Air Pump
Multifunktions-Starthilfe und Luftpumpe
Démarreur de Saut Multifonction et Pompe à Air
Arrancador y Bomba de Aire Multifuncional
Avviatore di Multifunzione e Pompa d'Aria
Wielofunkcyjne urządzenie rozruchowe z pompką
DEU office: FDS GmbH, Neuer Höltigbaum 36, 22143 Hamburg, Deutschland
GBR office: FDS Corporation Limited,Unit 4, Blackacre Road, Great Blakenham,Ipswich, Ip6 0FL,United Kingdom
ITA office: Milano
FRA office: Saint Vigor d'Ymonville
POL office: GdańskAUS office: TruganinaUSA office: Fontana
Before You Start
Please read all instructions carefully.
Retain instructions for future reference.
Separate and count all parts and hardware.
Read through each step carefully and follow the proper order.
We recommend that, where possible, all items are assembled near to the area in
which they will be placed in use, to avoid moving the product unnecessarily once
assembled.
Always place the product on a flat, steady and stable surface.
Keep all small parts and packaging materials for this product away from babies
and children as they potentially pose a serious choking hazard.
EN
DE
Bitte lesen Sie alle Anweisungen sorgfältig durch.
Bewahren Sie die Anweisungen zum zukünftigen Verwendung auf.
Überprüfen Sie, ob alle Teile und Zubehörteile vorhanden sind.
Lesen Sie jeden Schritt sorgfältig durch und befolgen Sie die richtige Reihenfolge.
Wir empfehlen, alle Teile möglichst in der Nähe des Aufstellungsortes zu
montieren, um unnötige Bewegungen nach der Montage zu vermeiden.
Stellen Sie den Artikel immer auf eine ebene, feste und stabile Fläche.
Halten Sie alle kleinen Teile und Verpackungsmaterialien fern von Babys und
Kindern, ansonsten besteht Erstickungsgefahr.
Vor dem Beginnen
FR
Veuillez lire attentivement toutes les instructions.
Conservez les instructions pour vous y référer ultérieurement.
Vérifiez toutes les pièces et les accessoires.
Lisez attentivement chaque étape et suivez l'ordre correct.
Nous recommandons que, dans la mesure du possible, tous les produits soient
assemblés à proximité de la zone où ils seront utilisés, afin d'éviter tout
déplacement inutile du produit une fois assemblé.
Placez toujours le produit sur une surface plane et stable.
Conservez toutes les petites pièces de ce produit et les matériaux d'emballage
hors de portée des bébés et des enfants, car ils pourraient présenter un risque
d'étouffement.
Lea atentamente todas las instrucciones.
Conserve las instrucciones para futuras consultas.
Separe y cuente todas las piezas y los accesorios.
Lea detenidamente cada paso y siga el orden correcto.
Recomendamos que, siempre que sea posible, todos los elementos se monten
cerca de la zona en la que se van a utilizar, para evitar mover el producto
innecesariamente una vez montado.
Coloque siempre el producto sobre una superficie plana, estable y firme.
Mantenga todas las piezas pequeñas y los materiales de embalaje de este
producto lejos de los bebés y los niños, ya que pueden representar un grave
riesgo de asfixia.
ES
Avant de Commencer
Antes de Empezar
0202 03
Si prega di leggere attentamente tutte le istruzioni.
Conservare le istruzioni per riferimento futuro.
Separare e contare tutte le parti e gli accessori.
Leggere attentamente ogni passo e seguire l'ordine corretto.
Si consiglia, ove possibile, di assemblare tutti gli articoli vicino alla zona in cui
verranno posti in uso, per evitare di spostare inutilmente il prodotto una volta
assemblato.
Posizionare sempre il prodotto su una superficie piana, stabile.
Tenere tutte le piccole parti e i materiali di imballaggio di questo prodotto lontano
dalla portata di neonati e bambini, in quanto possono costituire un serio pericolo
di soffocamento.
Zapoznaj się z instrukcją.
Zachowaj instrukcję do wglądu.
Posortuj części i upewnij się, że zestaw jest kompletny.
Zapoznaj się ze sposobem montażu i postępuj zgodnie z instrukcją.
Zalecamy, aby montaż odbywał się możliwie najbliżej miejsca docelowego
położenia produktu, aby uniknąć niepotrzebnego przesuwania.
Upewnij się, że produkt znajdzie się na płaskiej i stabilnej po wierzchni.
Upewnij się, że materiały wykorzystane podczas pakowania produktu oraz jego
elementy znajdują się poza zasięgiem dzieci, gdyż stwarzają potencjalne ryzyko
zadławienia.
I T
PL
Prima di Iniziare
Zanim Zaczniesz
04 05
Extension air tube
Product manual
×1
×1
EN
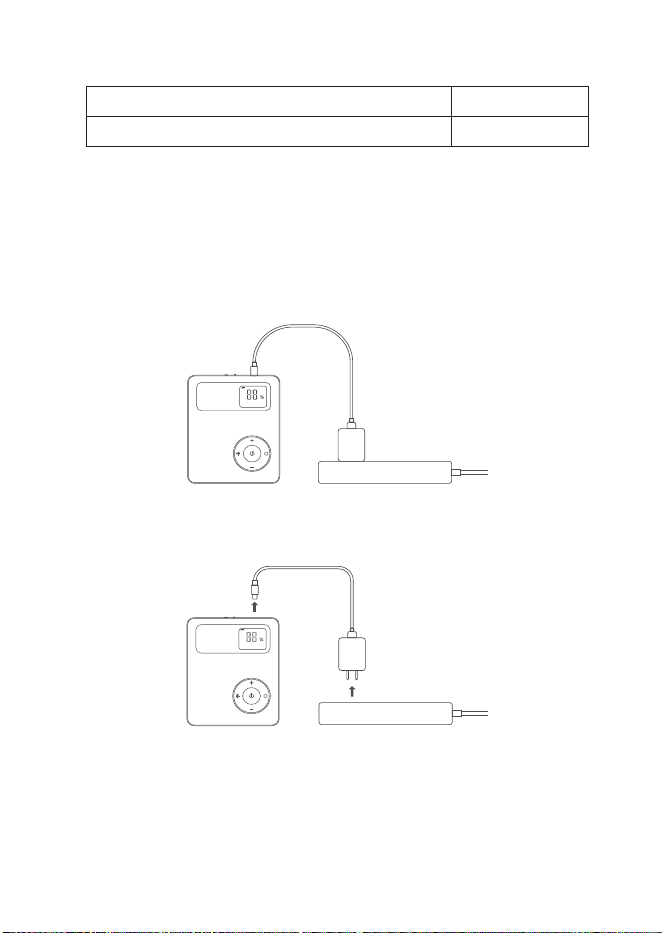
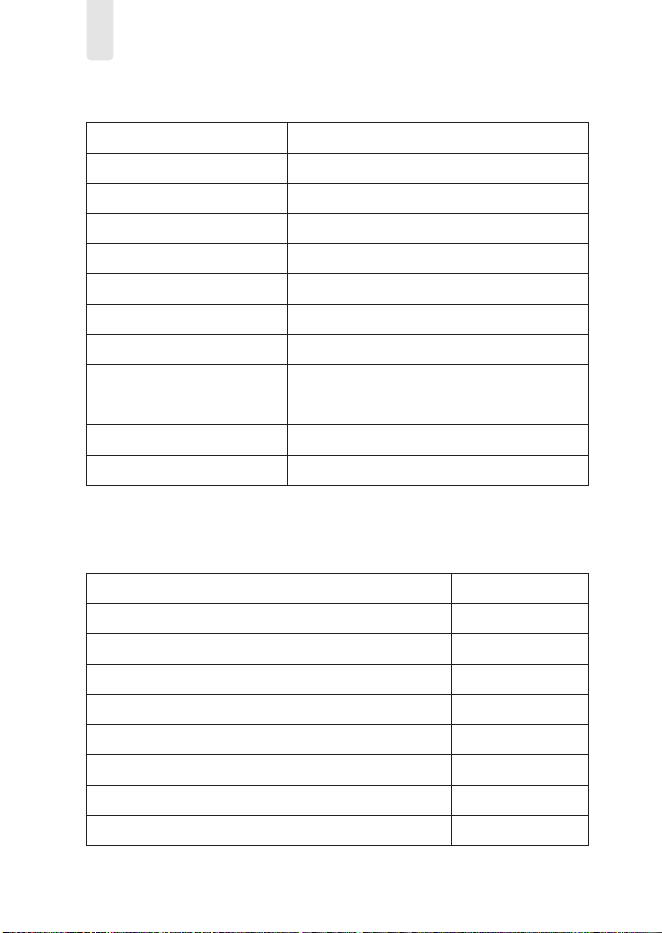
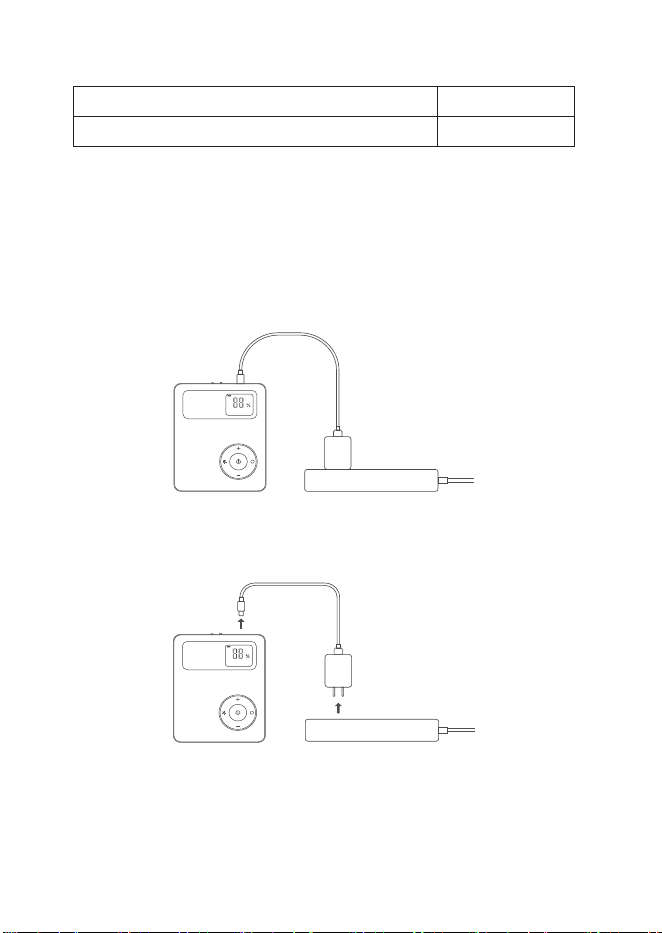
Tips
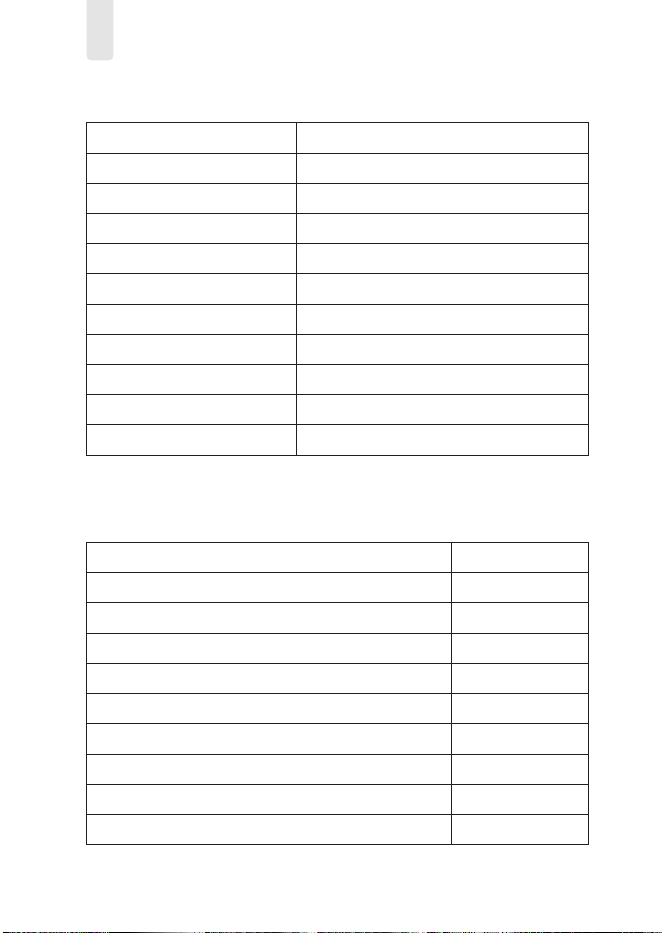
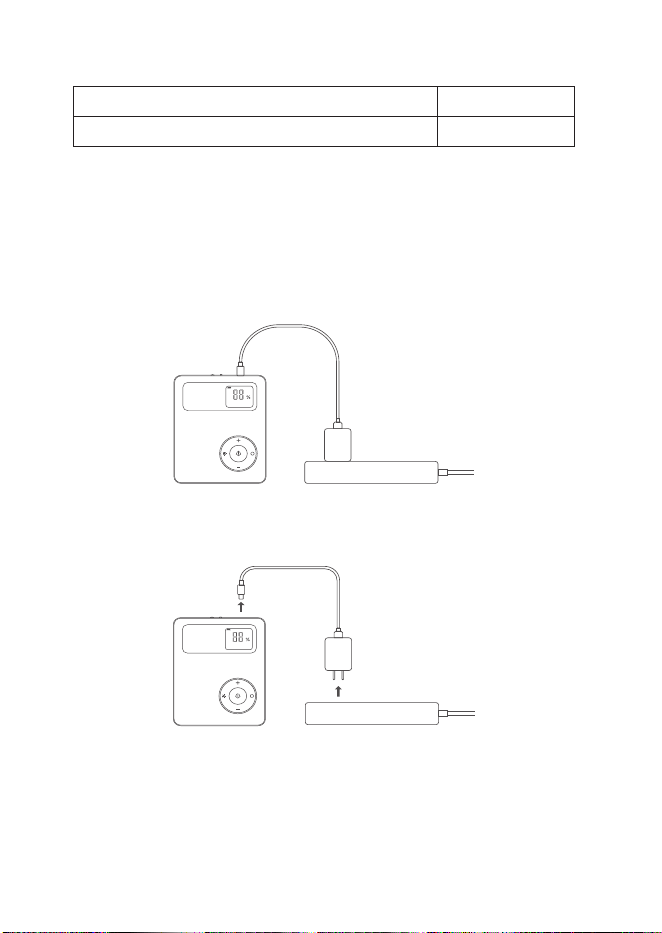
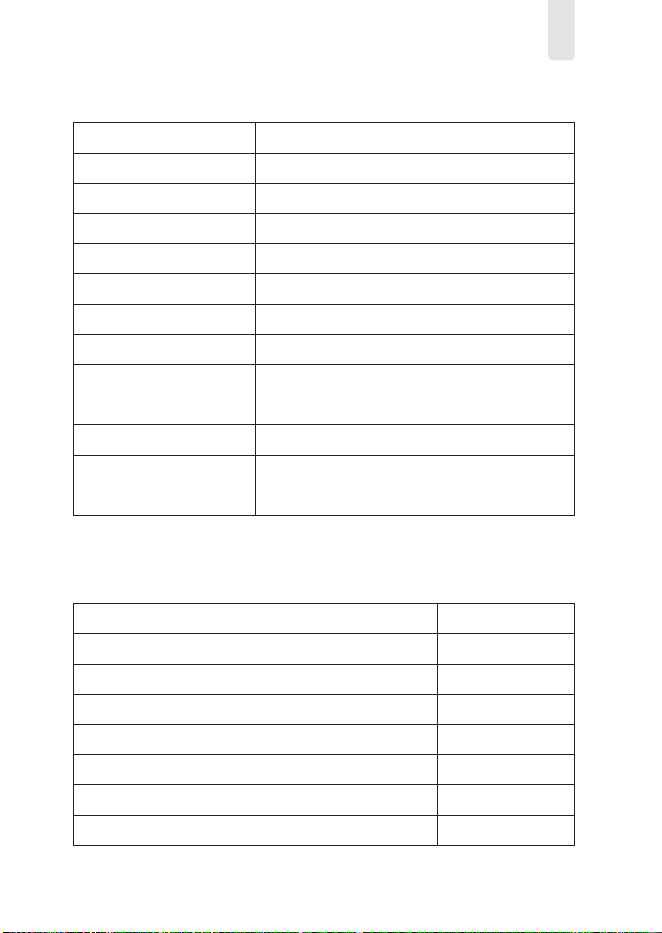
1.Plug the charger into the socket and connect the power cord to the
product for charging.
2.Disconnect the charger and power cord after the product is fully
charged.
Tip: For the best charging performance, use the included charging
cable to charge the product. Wall charger is not included.
charging
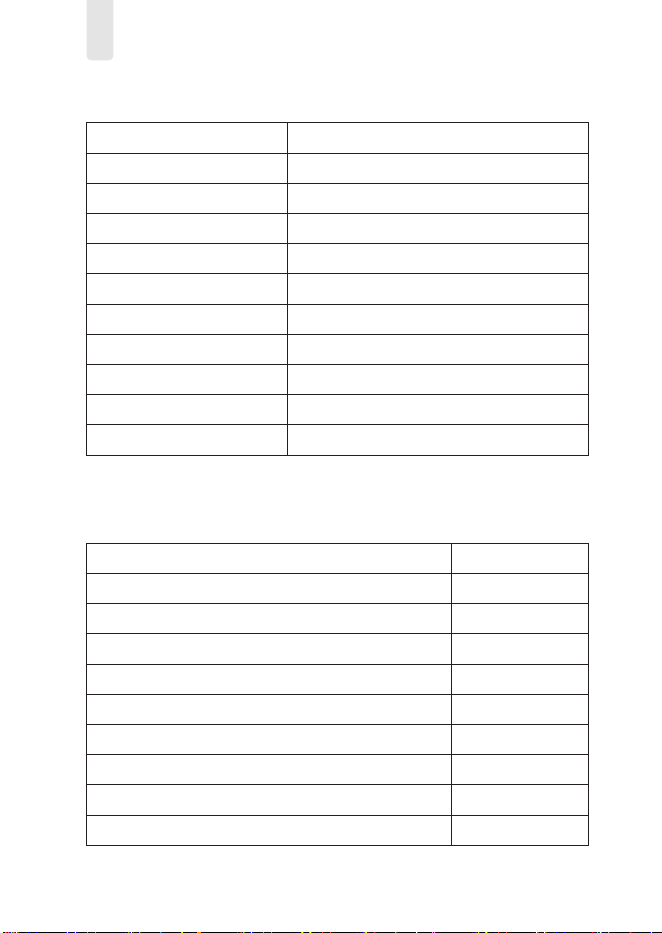
Product name
Model number
Capacity
Starting current
Peak current
Pressure range
USB output
Type-C Indicates the value
Operating temperature
Shell material
Full charge time
Multi-function jump starter & air pump
AX10011
13000mAh
1000A
2000A
Inflate: 0-150PSI
QC3.0 fast charge output 18W
5V/9V/12V
- 20°C ~ 60°C
ABS+PC
≈5 hours
Product information
Multi-function jump starter & air pump
Packing box
Sanding bag
Smart clamp
Charging cable
Long air nozzle
Breather nozzle
Ball needle
Car charger
Air pipe
×1
×1
×1
×1
×1
×1
×1
×1
×1
×1
The package includes
06 07
Extension air tube
Product manual
×1
×1
EN
Tips
1.Plug the charger into the socket and connect the power cord to the
product for charging.
2.Disconnect the charger and power cord after the product is fully
charged.
Tip: For the best charging performance, use the included charging
cable to charge the product. Wall charger is not included.
charging
Product name
Model number
Capacity
Starting current
Peak current
Pressure range
USB output
Type-C Indicates the value
Operating temperature
Shell material
Full charge time
Multi-function jump starter & air pump
AX10011
13000mAh
1000A
2000A
Inflate: 0-150PSI
QC3.0 fast charge output 18W
5V/9V/12V
- 20°C ~ 60°C
ABS+PC
≈5 hours
Product information
Multi-function jump starter & air pump
Packing box
Sanding bag
Smart clamp
Charging cable
Long air nozzle
Breather nozzle
Ball needle
Car charger
Air pipe
×1
×1
×1
×1
×1
×1
×1
×1
×1
×1
The package includes
06 07
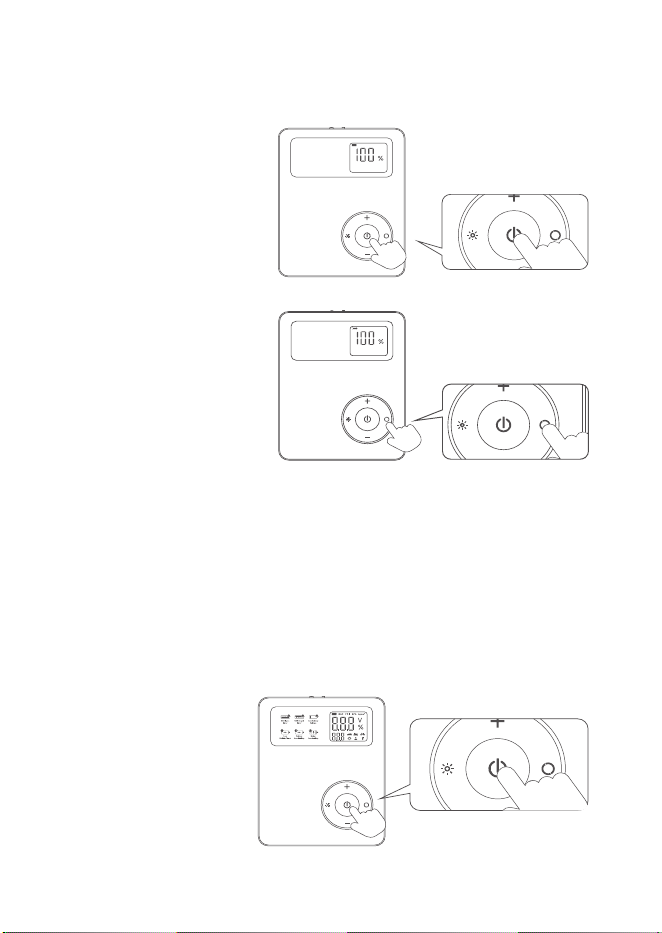
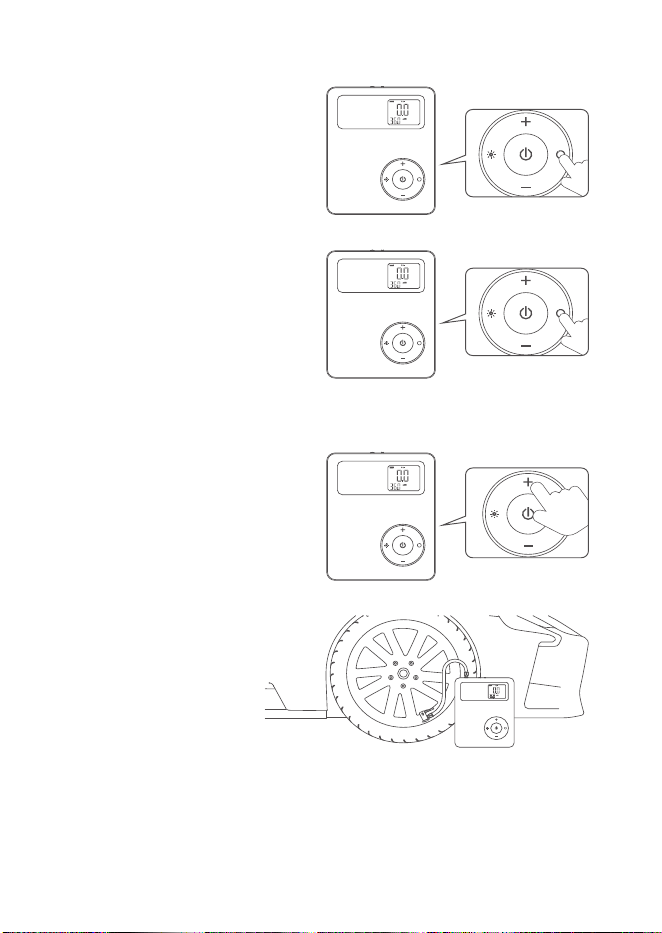
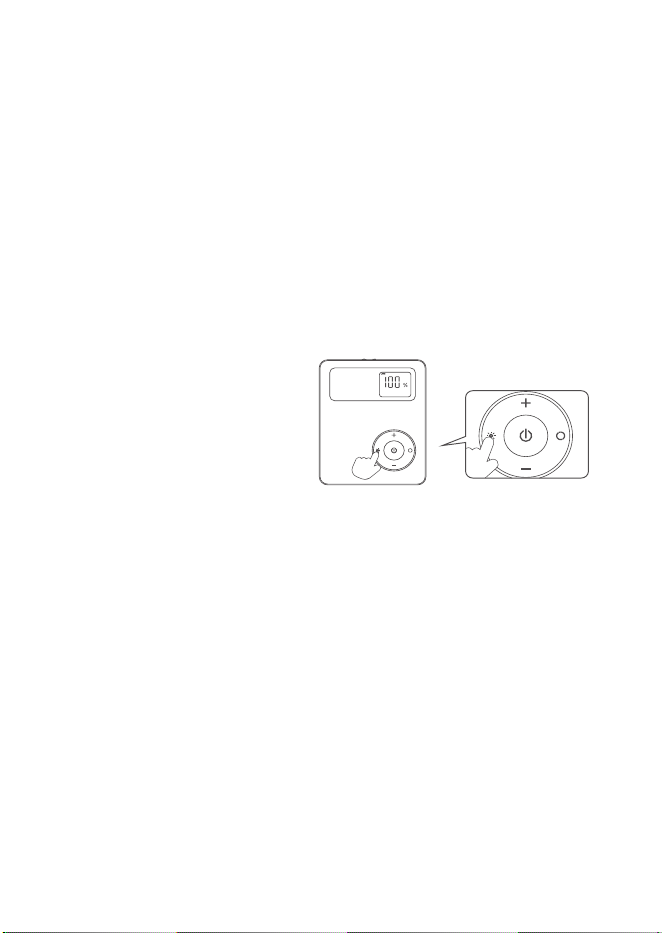
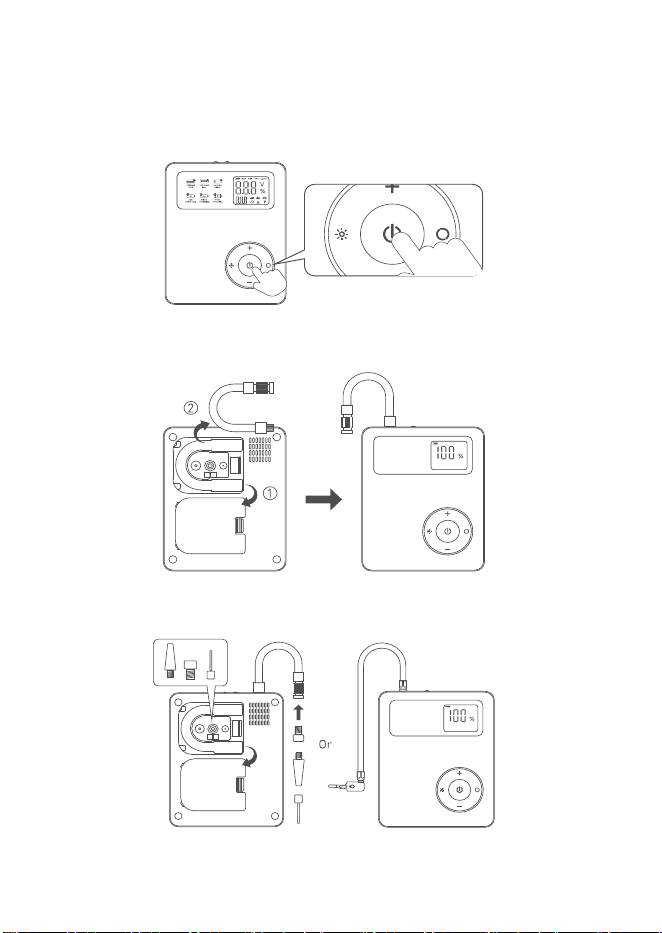
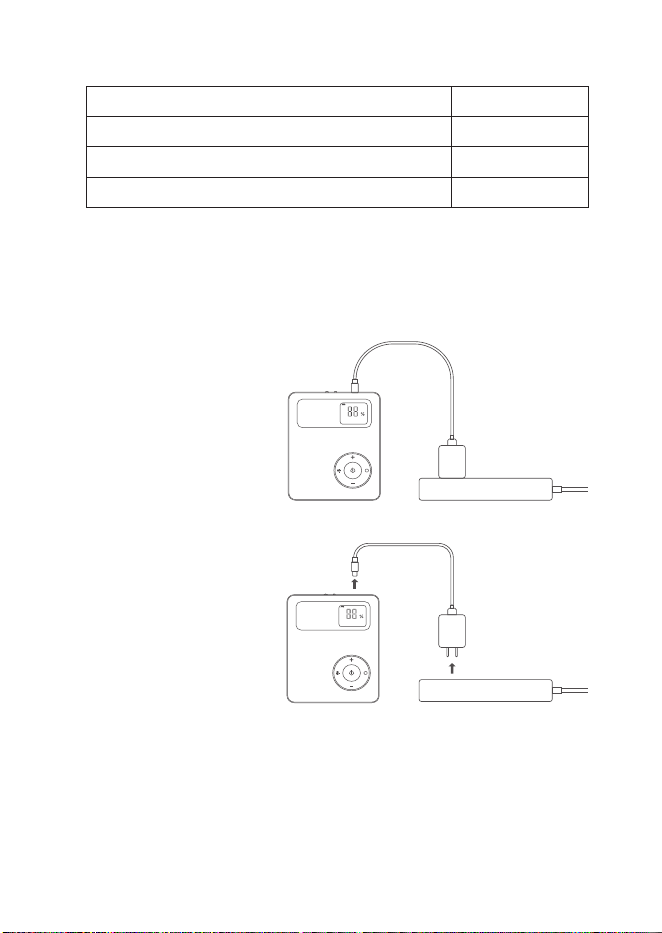
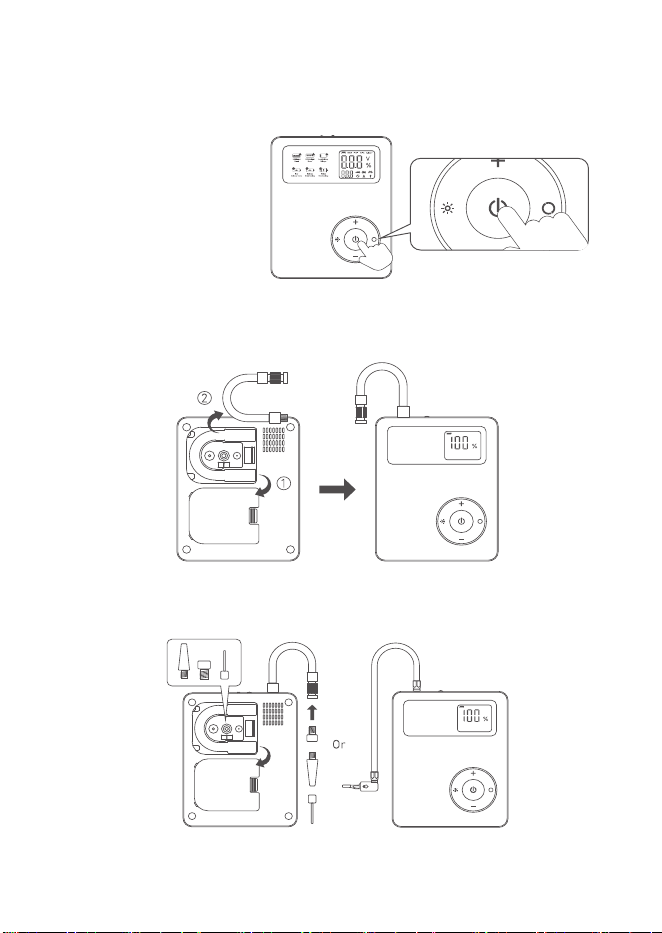
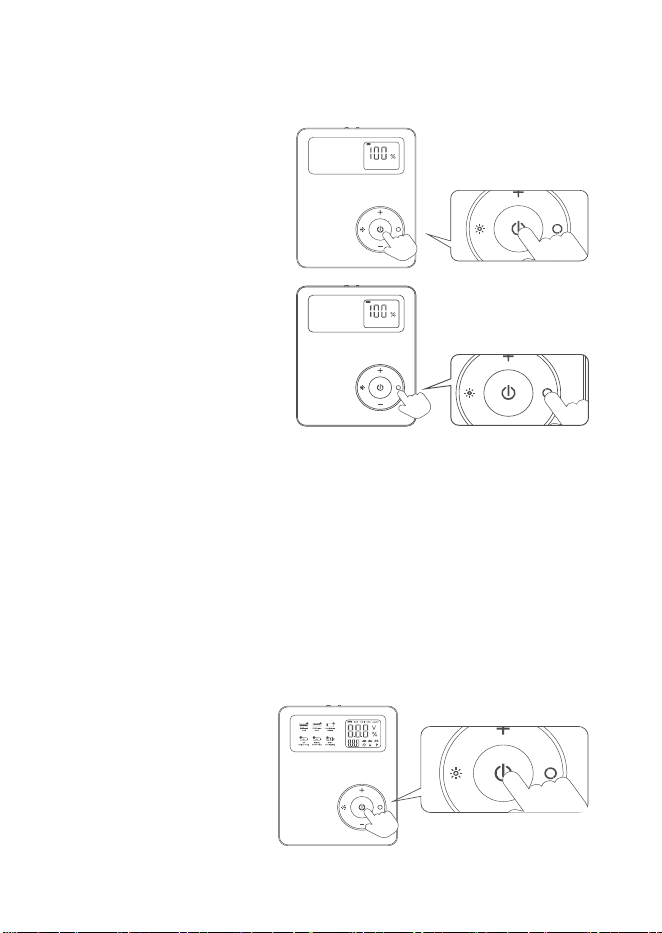
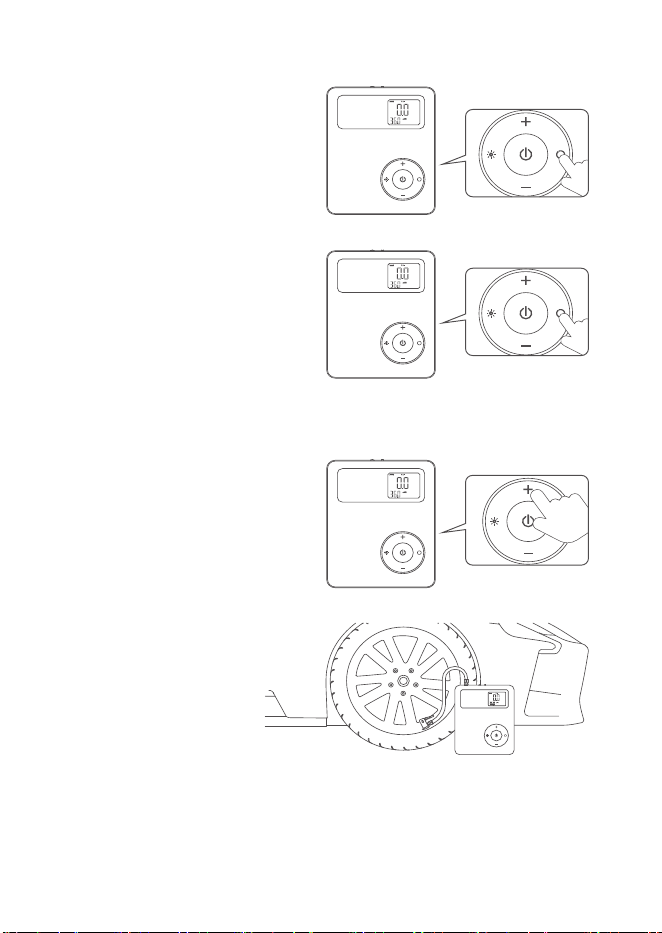
Check the battery level
Method 1:
After turning on, the
screen will display the
current battery level.
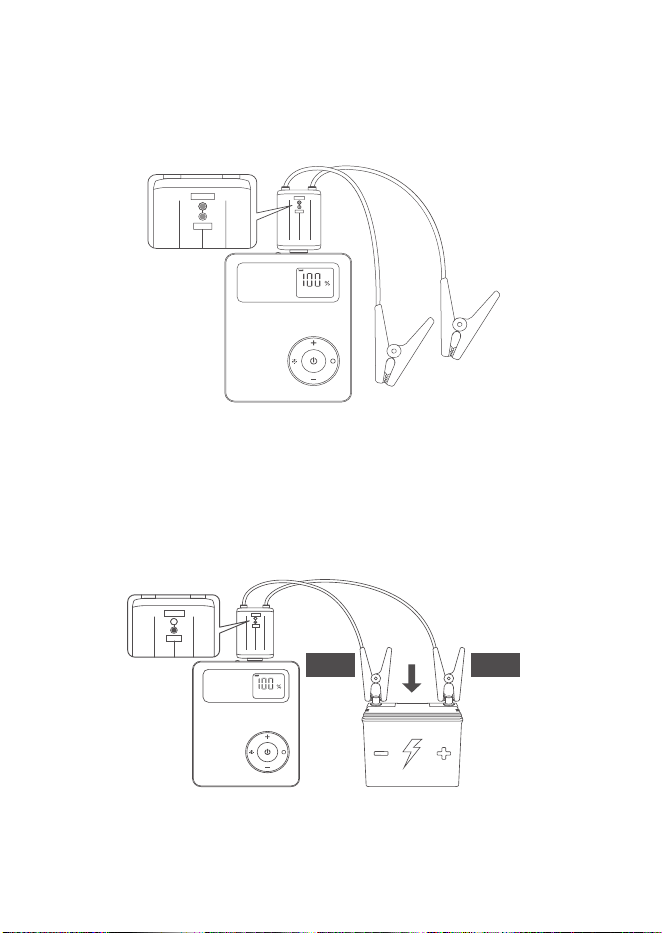
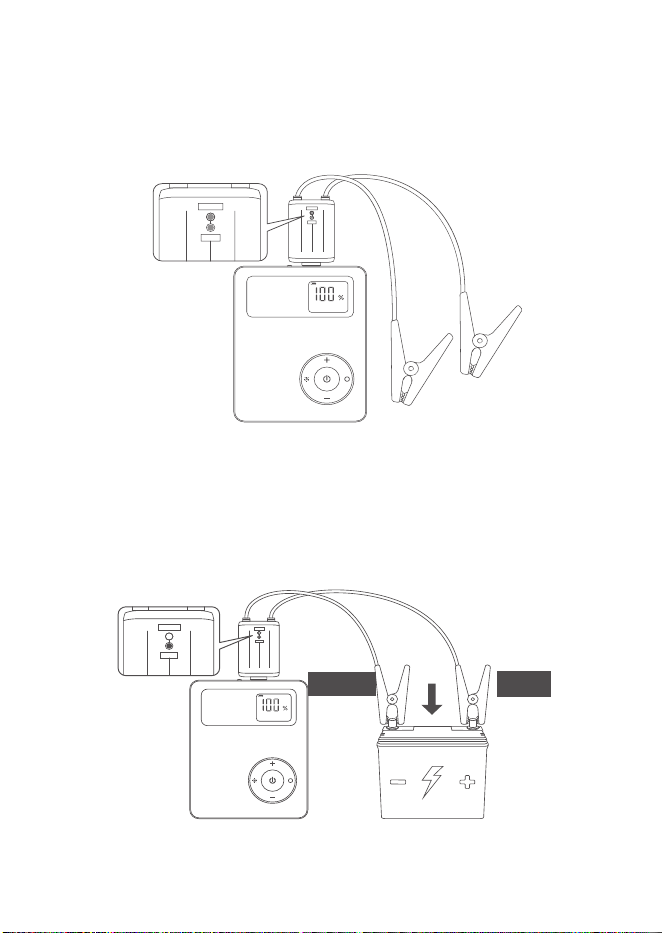
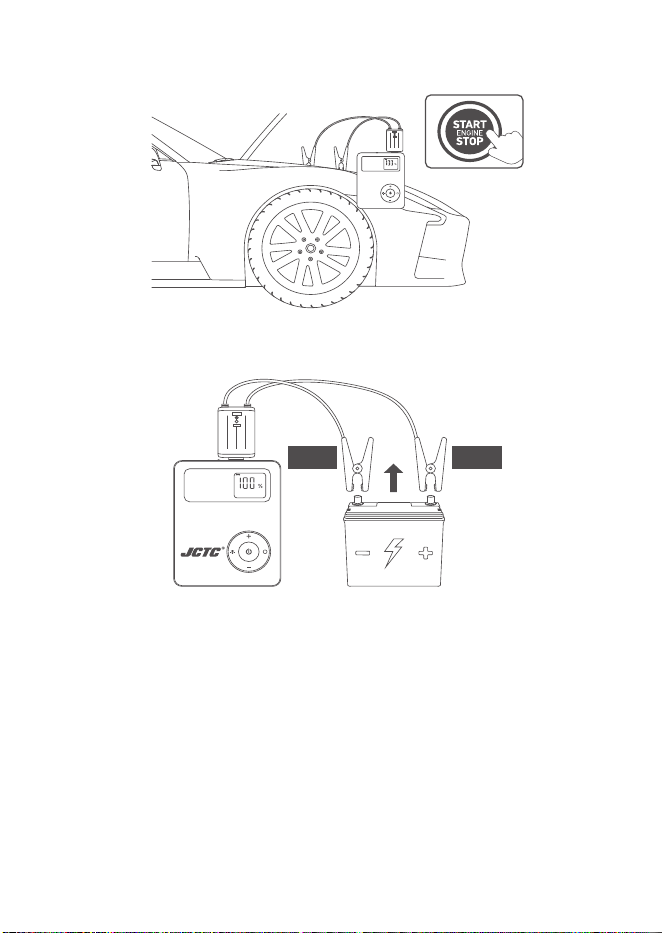
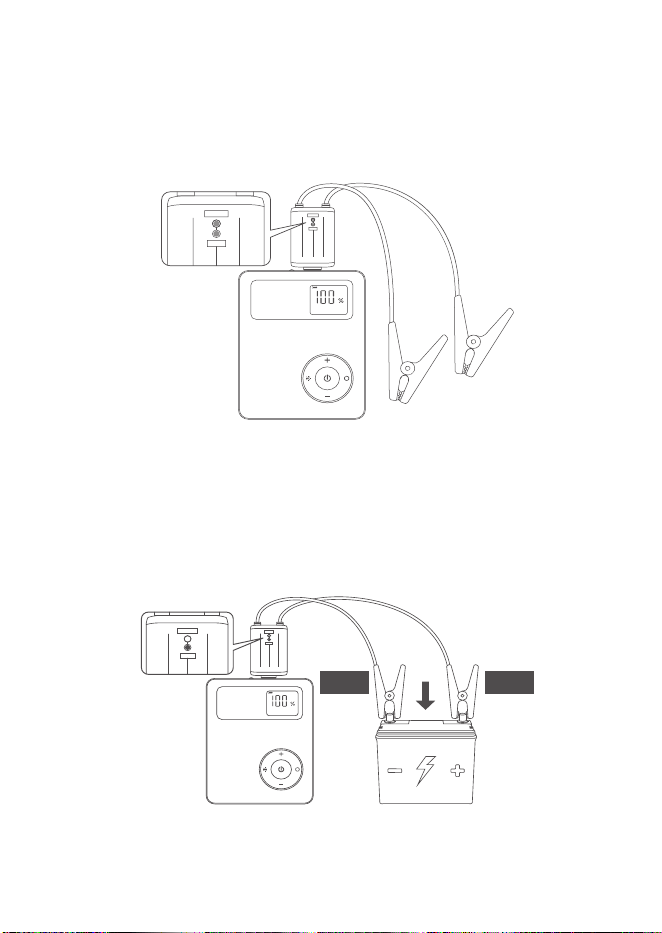
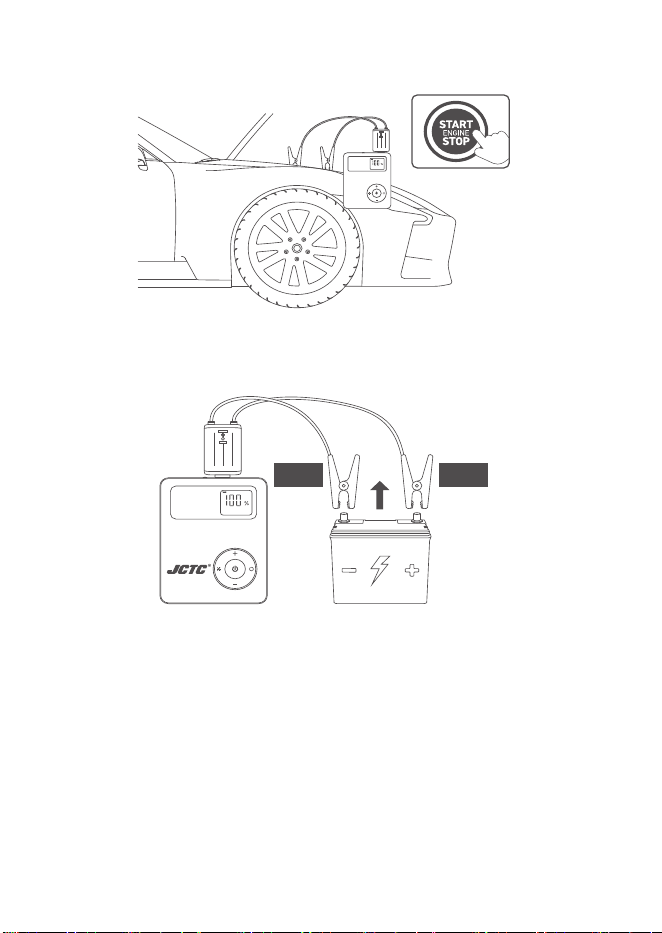
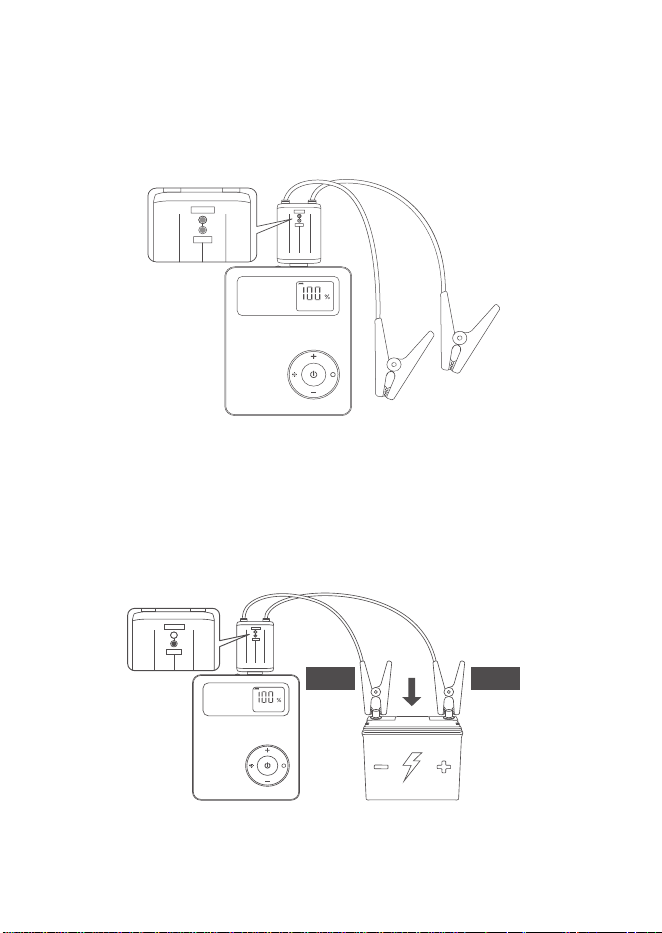
2.Ensure that the smart emergency starter cable is fully connected to
the 12V emergency start port.(The indicator light on the smart
emergency starter cable will flash, which is a normal phenomenon.
3.Firmly connect the positive and negative fixtures to the
corresponding battery terminals, as shown in the following figure.The
smart indicator will turn green.
(If the light continues to flash alternately red and green, make sure
the connection is correct.
Emergency start function
1.Press the power
button to power on.
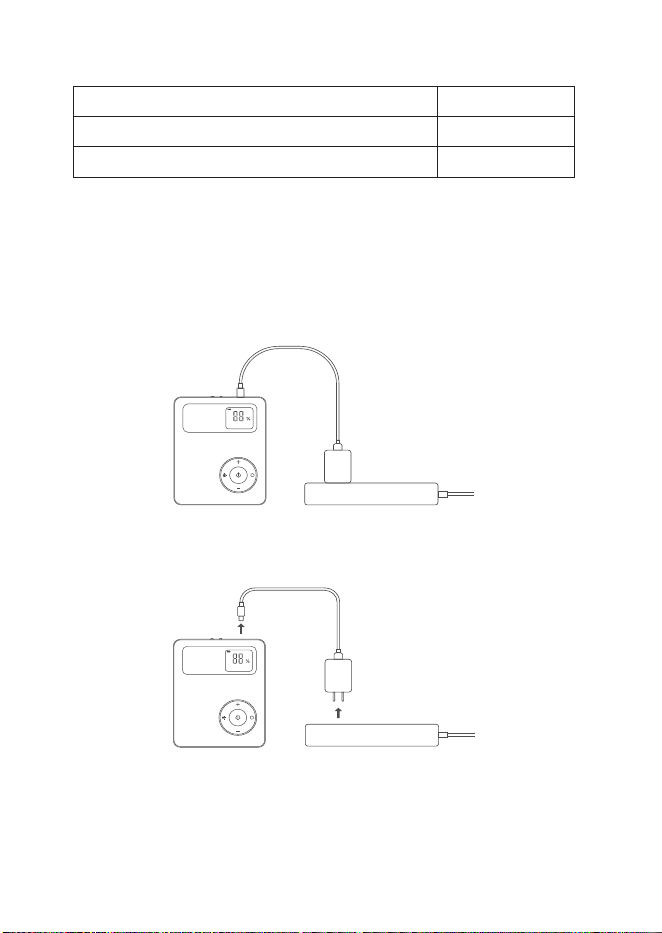
Method 2:
In charge setting
mode, press the
switch button to
display the current
remaining battery
percentage.
Note: If the battery level is below 20%, the quick start function will
not work properly. If the battery level falls below 20%, the display will
flash a "low battery" warning, Please charge your product
immediately. To maximize battery life, do not let the starter power
drop below 20%.
Black Red
08 09
Check the battery level
Method 1:
After turning on, the
screen will display the
current battery level.
2.Ensure that the smart emergency starter cable is fully connected to
the 12V emergency start port.(The indicator light on the smart
emergency starter cable will flash, which is a normal phenomenon.
3.Firmly connect the positive and negative fixtures to the
corresponding battery terminals, as shown in the following figure.The
smart indicator will turn green.
(If the light continues to flash alternately red and green, make sure
the connection is correct.
Emergency start function
1.Press the power
button to power on.
Method 2:
In charge setting
mode, press the
switch button to
display the current
remaining battery
percentage.
Note: If the battery level is below 20%, the quick start function will
not work properly. If the battery level falls below 20%, the display will
flash a "low battery" warning, Please charge your product
immediately. To maximize battery life, do not let the starter power
drop below 20%.
Black Red
08 09

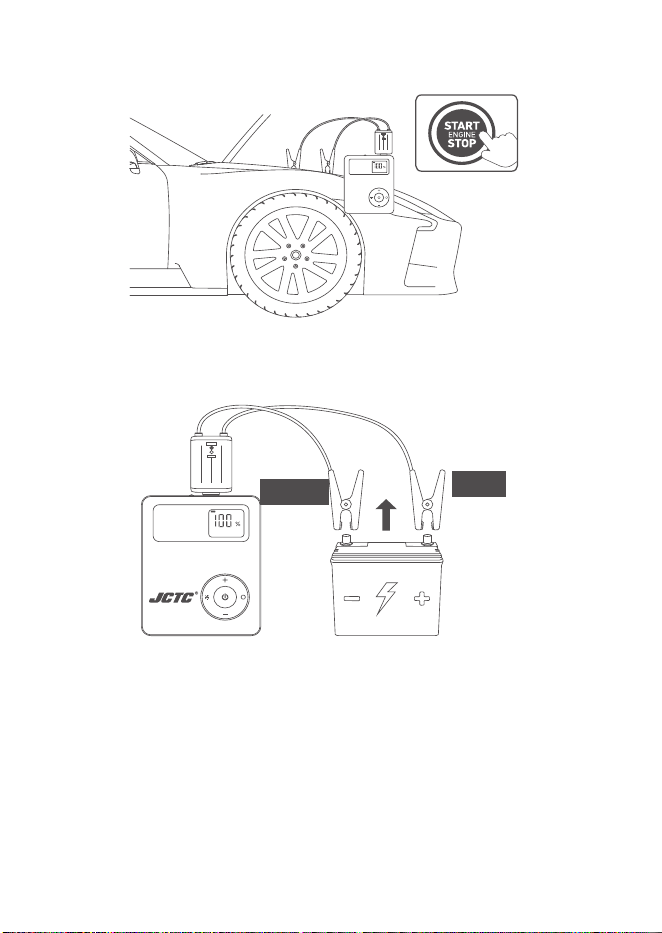
4.Start the vehicle.
5.Remove the smart cable clamp after successfully starting the car.
Tip 1: Turn off all electrical equipment in the vehicle before starting
the vehicle
Tip 2: If it cannot be started in an emergency, please stop and
remove the fixture and wait 60 seconds. Then try Step 4 again.
Black Red
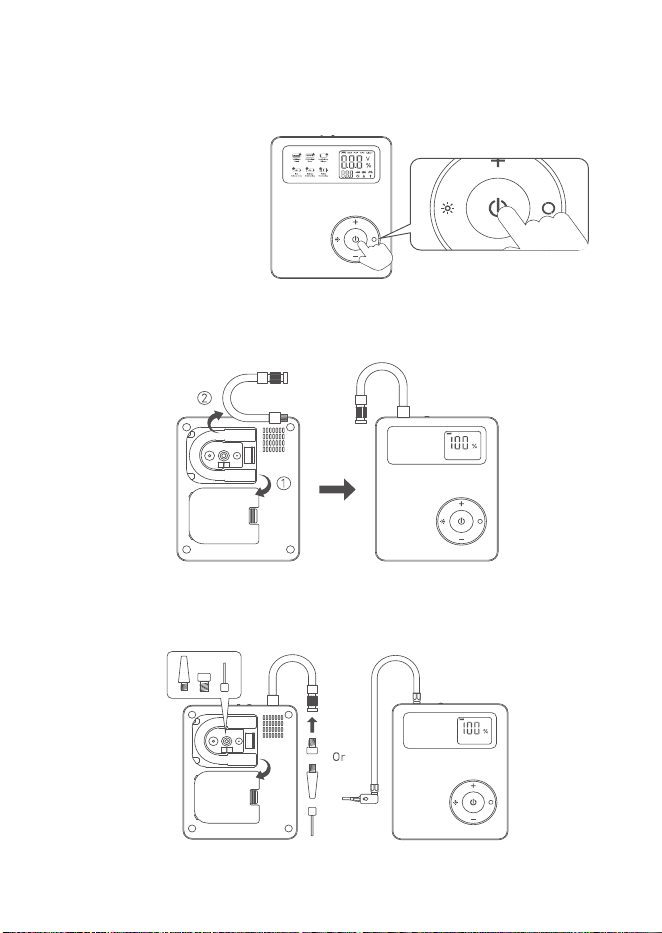
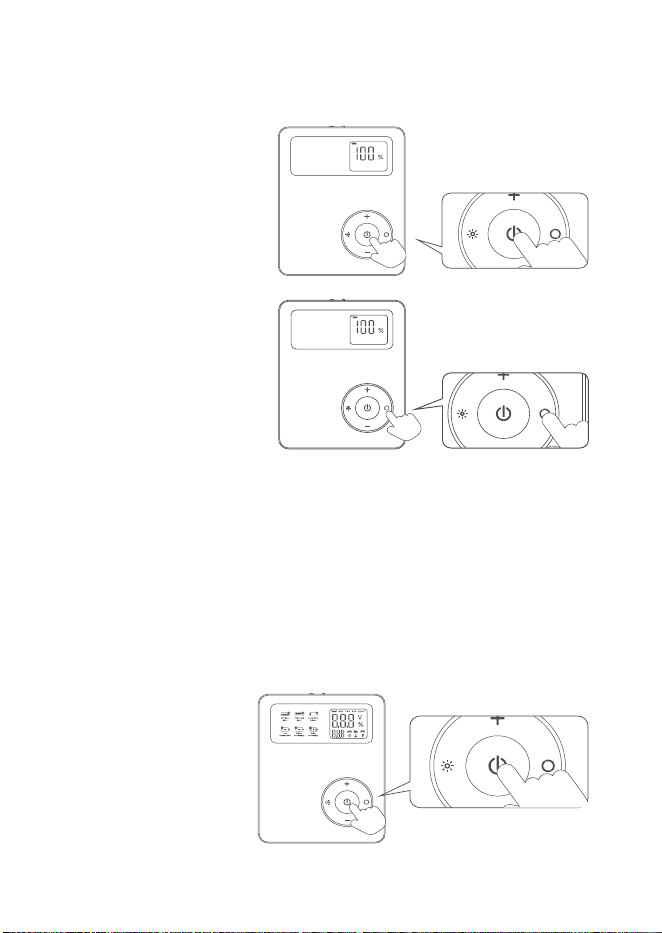
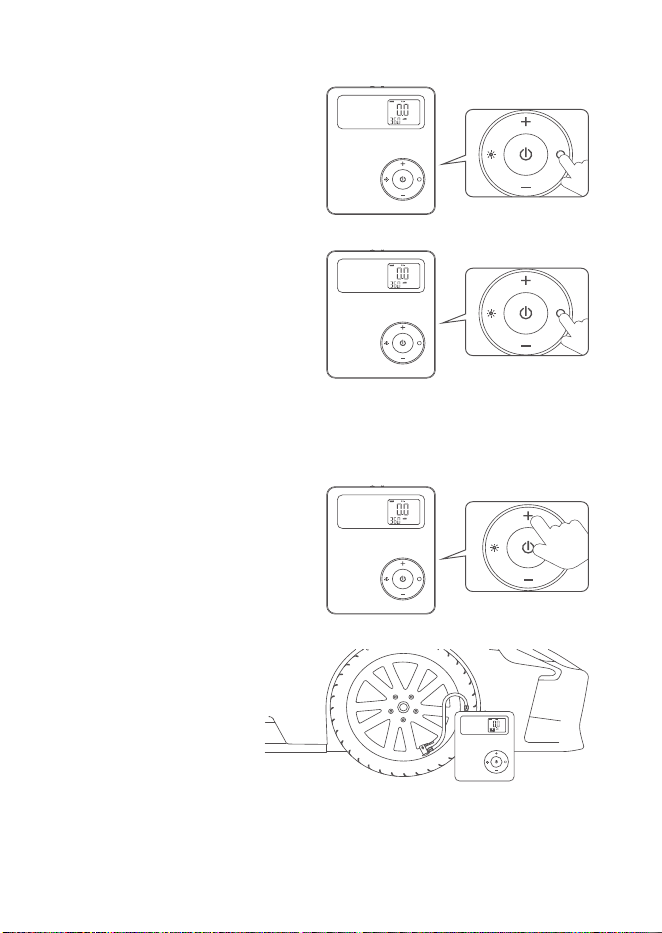
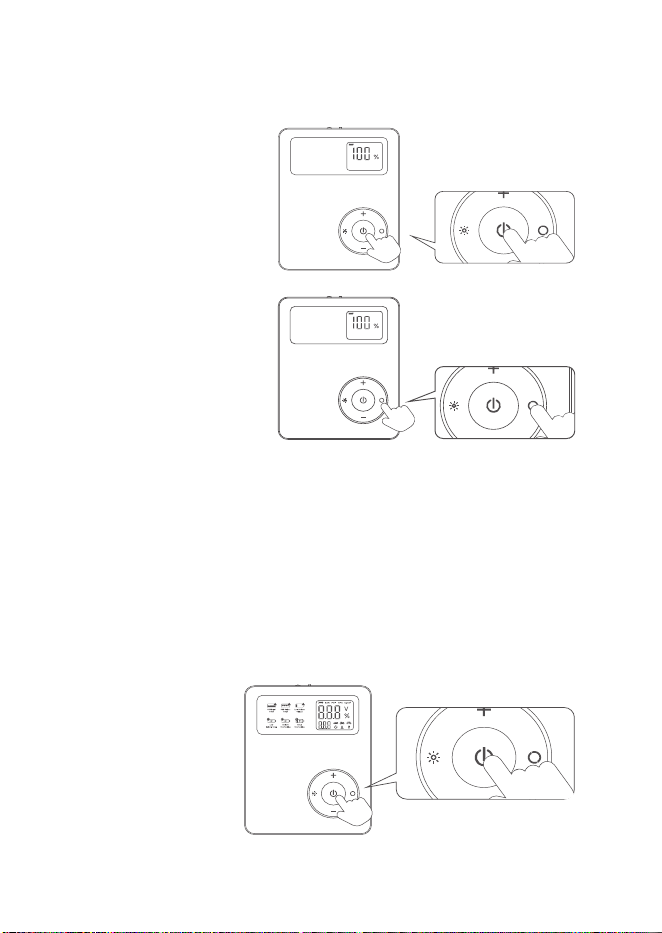
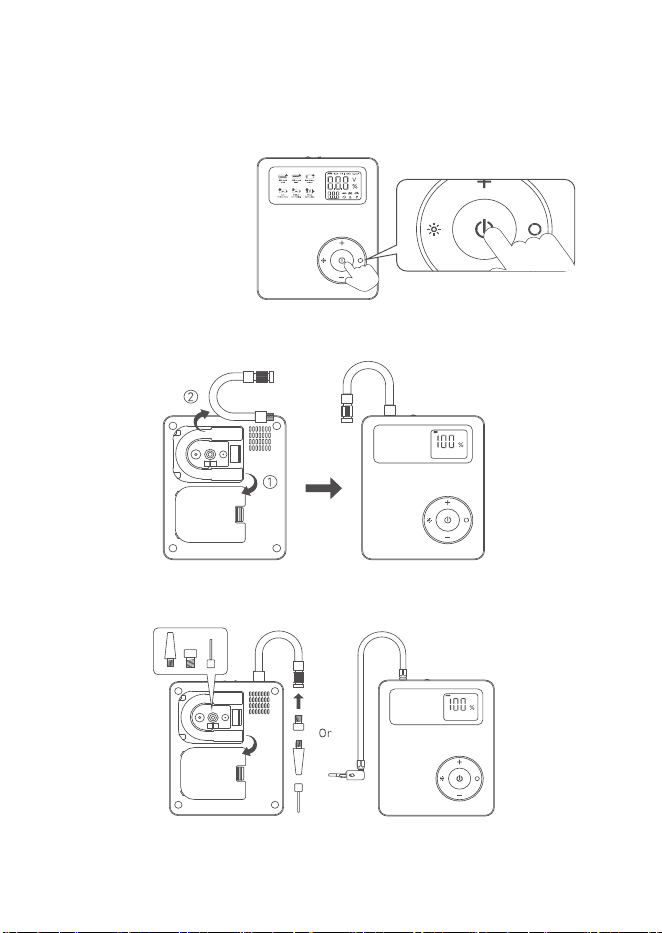
Inflation function description
1.Press and hold the power/start button for 3 seconds.
2.Take out the air hose and connect the gas pipe as shown in the
figure
3.Choose the right air nozzle to inflate your items
10 11

4.Start the vehicle.
5.Remove the smart cable clamp after successfully starting the car.
Tip 1: Turn off all electrical equipment in the vehicle before starting
the vehicle
Tip 2: If it cannot be started in an emergency, please stop and
remove the fixture and wait 60 seconds. Then try Step 4 again.
Black Red
Inflation function description
1.Press and hold the power/start button for 3 seconds.
2.Take out the air hose and connect the gas pipe as shown in the
figure
3.Choose the right air nozzle to inflate your items
10 11
Tip 1: If the tire pressure value of the object to be inflated is higher
than the preset value, the product will It doesn't work.
Tip 2:BAR, PSI, KPA, KG/CM² , are units, not pressure levels.
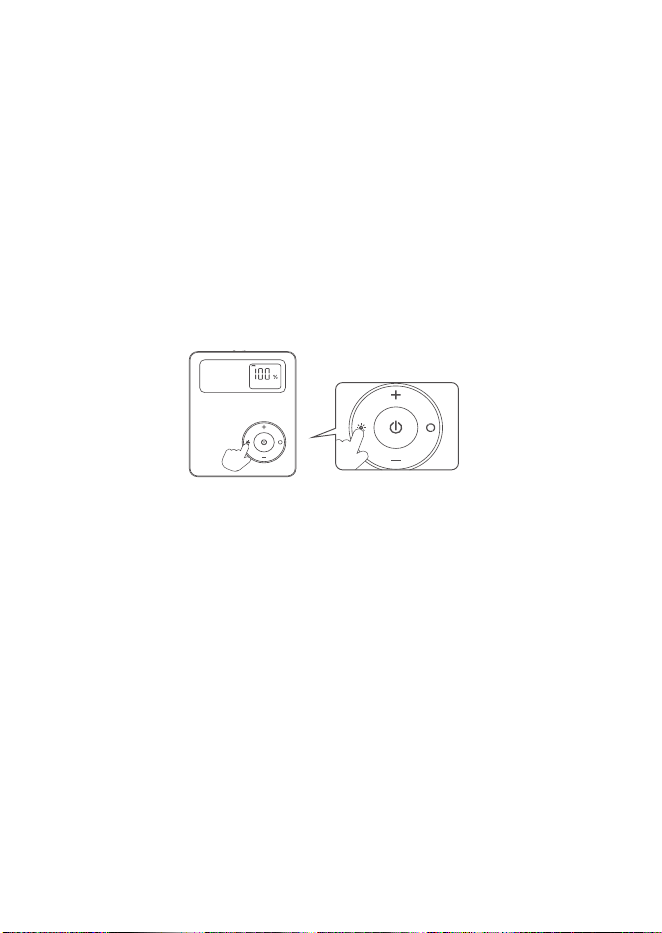
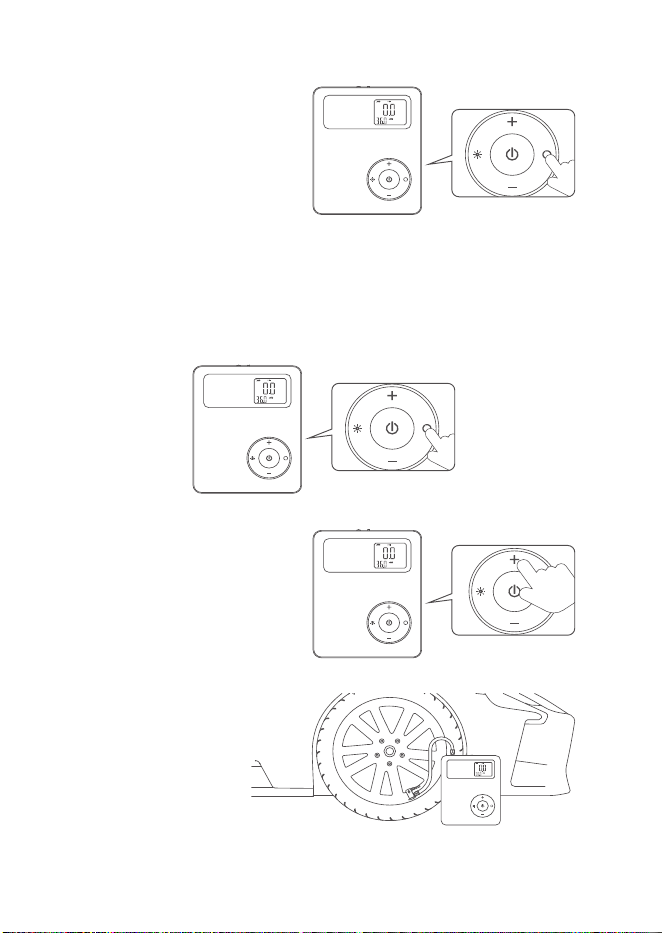
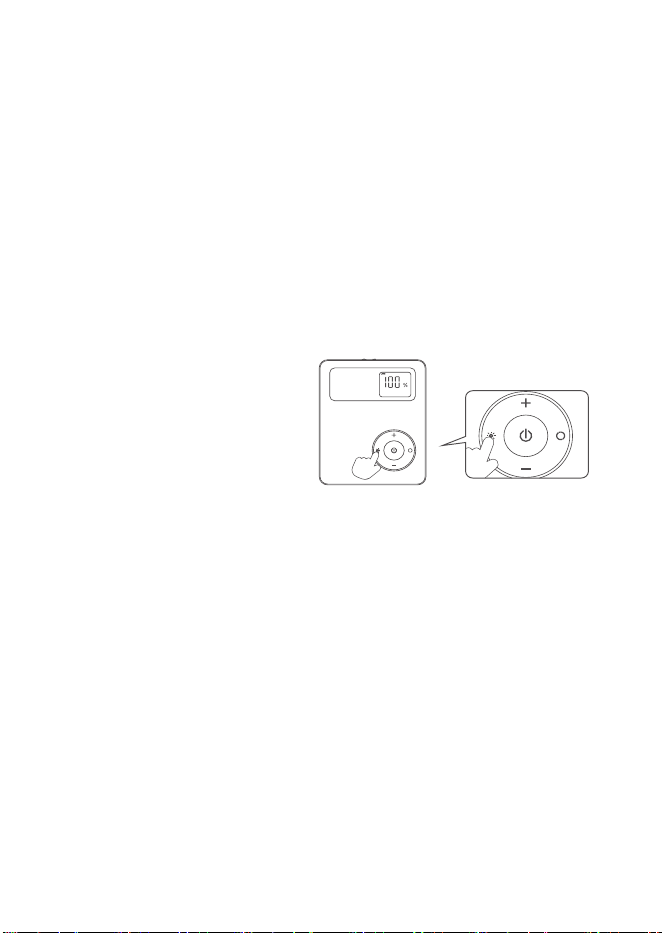
4.Press the switch button to
select the desired mode.
5.Press and hold the switch
button to switch between
devices. Press the button
until you reach the desired
order position. Release the
switch button and select it
when the desired device is on
the screen.
6.Use + and - to adjust the
pressure value
7.Press the
power/start button to
inflate, and the
product will turn off
automatically after the
inflation is complete.
Tip 3: Air compressors are not compatible with large capacity
objects. Such as air mattresses and air swimming pools.
Tip 4: Inflate the object only according to the recommended
pressure.
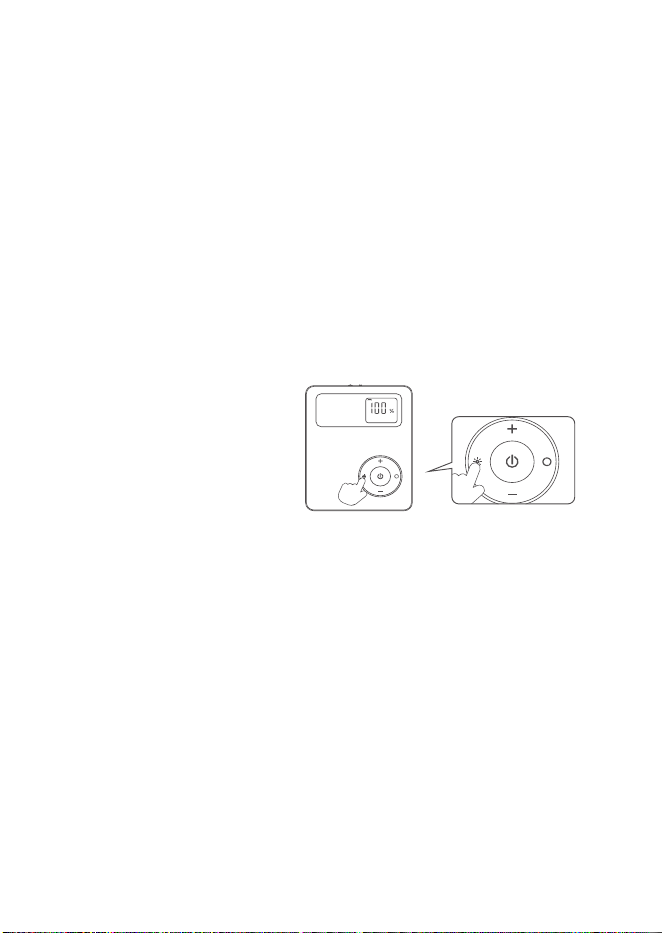
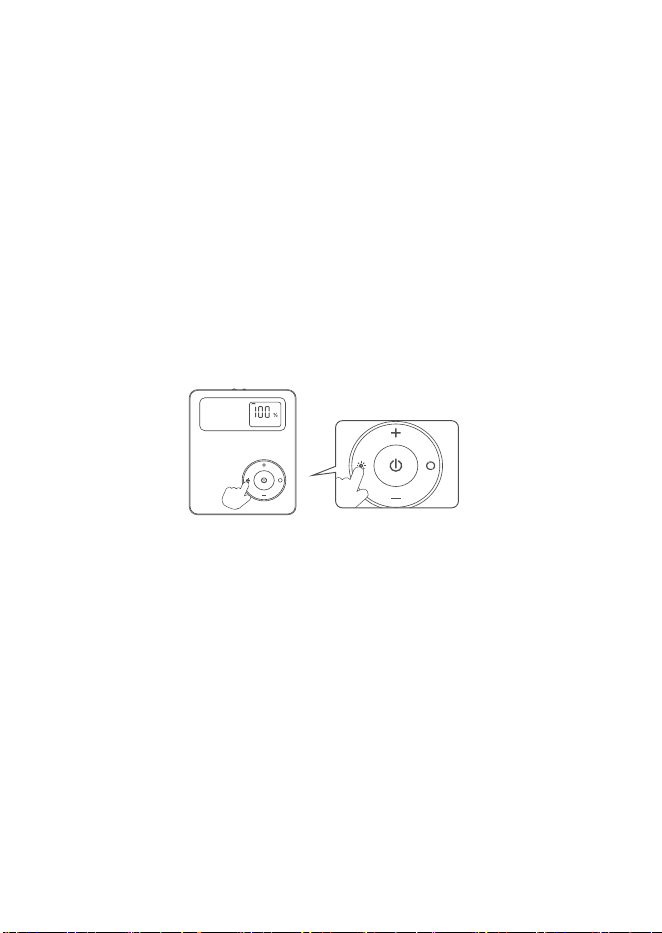
Lighting instruction
After starting up, press and switch successively.
Lighting -SOS- Warning flashing lights and side lights alternating red
and white-Lights off.
If the car cannot be started, please
check in order:
● The battery is low, you may need to charge the product more.
Please keep the battery charge above 60%, to ensure a successful
quick start.
● Rust or dirt on the battery terminals causes poor connection.
Clean the terminals and try again. It has activated its overheat
protection, please wait at least 1 minute to cool down and try again.
● The battery clamp is connected to the incorrect pole, please make
sure the clamp is connected to the correct terminal.
● There is a poor connection between the smart jump start clip and
the battery. Make sure the connection between the clip and battery is
secure.
12 13
Tip 1: If the tire pressure value of the object to be inflated is higher
than the preset value, the product will It doesn't work.
Tip 2:BAR, PSI, KPA, KG/CM² , are units, not pressure levels.
4.Press the switch button to
select the desired mode.
5.Press and hold the switch
button to switch between
devices. Press the button
until you reach the desired
order position. Release the
switch button and select it
when the desired device is on
the screen.
6.Use + and - to adjust the
pressure value
7.Press the
power/start button to
inflate, and the
product will turn off
automatically after the
inflation is complete.
Tip 3: Air compressors are not compatible with large capacity
objects. Such as air mattresses and air swimming pools.
Tip 4: Inflate the object only according to the recommended
pressure.
Lighting instruction
After starting up, press and switch successively.
Lighting -SOS- Warning flashing lights and side lights alternating red
and white-Lights off.
If the car cannot be started, please
check in order:
● The battery is low, you may need to charge the product more.
Please keep the battery charge above 60%, to ensure a successful
quick start.
● Rust or dirt on the battery terminals causes poor connection.
Clean the terminals and try again. It has activated its overheat
protection, please wait at least 1 minute to cool down and try again.
● The battery clamp is connected to the incorrect pole, please make
sure the clamp is connected to the correct terminal.
● There is a poor connection between the smart jump start clip and
the battery. Make sure the connection between the clip and battery is
secure.
12 13

If tire inflation fails, check possible
causes in order
● Battery level is insufficient.
● Inflatable tube not properly connected.
● The preset tire pressure value is lower than the current tire
pressure.
● The valve stem nozzle of the tire is blocked by ashes.
● User forgets to press start button after preset value.
● This product has activated its overheat protection due to
overheating of the motor or battery. Please cool down then try again.
Maintenance
For optimal battery performance, please charge the product when
the battery power is below 20%. In order to extend the service life of
the product, you should fully charge the product after use and
charge it when idle charge once every three months.
● The vehicle would not start due to reasons other than lack of
power.
● Please use the appropriate equipment to check your vehicle's
batt
ery or error codes.
Produktname
Modellnummer
Kapazität
Anlaufstrom
Spitzenstrom
Druckbereich
USB-Ausgang
Typ-C Zeigt den Wert an
Betriebstemperatur
Material der Hülle
Volle Ladezeit
Multifunktions-Starthilfe & Luftpumpe
AX10011
13000mAh
1000A
2000A
Druckstufe: 0-150PSI
QC3.0 Schnellladeausgang 18W
5V/9V/12V
- 20°C ~ 60°C
ABS+PC
≈5 Stunden
Produktinformation
Multifunktions-Starthilfe & Luftpumpe
Verpackungskiste
Schleifsack
Klammer
Ladekabel
Lange Luftdüse
Entlüftungsdüse
Kugel-Nadel
Autoladegerät
Luftrohr
×1
×1
×1
×1
×1
×1
×1
×1
×1
×1
Das Paket enthält
DE
14 15
Verlängerung Luftschlauch
Produkthandbuch
×1
×1
Tipps
1. Stecken Sie das Ladegerät in die Steckdose und schließen Sie
das Netzkabel zum Laden an das Gerät an.
2. Trennen Sie das Ladegerät und das Netzkabel, wenn das Gerät
vollständig aufgeladen ist.
Tipp: Verwenden Sie zum Aufladen des Geräts das mitgelieferte
Ladekabel, um die beste Ladeleistung zu erzielen. Ein
Wandladegerät ist nicht im Lieferumfang enthalten.
Aufladen
Überprüfung des Batteriestands
Methode 1:
Nach dem Einschalten wird
auf dem Bildschirm der
aktuelle Batteriestand
angezeigt.
Notstartfunktion
1. Drücken Sie die
Netztaste, um das
Gerät einzuschalten.
Methode 2:
Drücken Sie im
Ladungseinstellungsmodus
die Umschalttaste, um den
aktuellen Prozentsatz der
verbleibenden Batterie
anzuzeigen.
Hinweis: Wenn der Batteriestand unter 20 % liegt, funktioniert die
Schnellstartfunktion nicht richtig. Wenn der Batteriestand unter 20 %
fällt, erscheint auf dem Display die Warnung "Niedriger
Batteriestand". Bitte laden Sie Ihr Produkt sofort auf. Um die
Lebensdauer des Akkus zu verlängern, lassen Sie die Leistung des
Starters nicht unter 20 % sinken.
16 17
2. Vergewissern Sie sich, dass das intelligente Notstarterkabel
vollständig mit dem 12-V-Notstartanschluss verbunden ist. (Die
Anzeigeleuchte am intelligenten Notstarterkabel blinkt, was ein
normales Phänomen ist.
3. Schließen Sie die Plus- und Minusklemmen fest an die
entsprechenden Batteriepole an, wie in der folgenden Abbildung
gezeigt, und die Smart-Anzeige leuchtet grün. (Wenn die Leuchte
weiterhin abwechselnd rot und grün blinkt, stellen Sie sicher, dass
die Verbindung korrekt ist.
Schwarz Rot
4. Starten Sie das Fahrzeug.
5. Entfernen Sie die smart Kabelklemme nach erfolgreichem Starten
des Fahrzeugs.
Tipp 1: Schalten Sie alle elektrischen Geräte im Fahrzeug aus, bevor
Sie das Fahrzeug starten.
Tipp 2: Wenn sich das Fahrzeug in einem Notfall nicht starten lässt,
halten Sie bitte an, entfernen Sie die Halterung und warten Sie 60
Sekunden. Versuchen Sie dann Schritt 4 erneut.
Schwarz
Rot
18 19
Beschreibung der Inflationsfunktion
1. Halten Sie die
Power/Start-Taste 3
Sekunden lang
gedrückt.
2. Nehmen Sie den Luftschlauch heraus und schließen Sie die
Gasleitung wie in der Abbildung gezeigt an.
3. Wählen Sie die richtige Luftdüse, um Ihre Gegenstände zu
inflieren.
4. Drücken Sie den
Schaltknopf, um den
gewünschten Modus
auszuwählen.
5. Drücken und halten Sie die Umschalttaste, um zwischen den
Geräten zu wechseln. Drücken Sie die Taste, bis Sie die gewünschte
Bestellposition erreicht haben. Lassen Sie die Umschalttaste los und
wählen Sie sie aus, wenn das gewünschte Gerät auf dem Bildschirm
angezeigt wird.
6. Verwenden Sie + und -, um
den Druckwert einzustellen.
7. Drücken Sie die
Einschalt-/Starttaste, um das
Gerät einzuschalten.
Das Gerät schaltet
sich nach dem
Aufpumpen automatisch aus.
20 21
Tipp 1: Wenn der Reifendruck des aufzupumpenden Objekts höher
ist als der voreingestellte Wert, funktioniert das Produkt nicht.
Tipp 2: BAR, PSI, KPA, KG/CM² sind Einheiten, keine Druckwerte.
Tipp 3: Luftkompressoren sind nicht für Gegenstände mit großem
Fassungsvermögen geeignet. Wie z. B. Luftmatratzen und
Luftschwimmbecken.
Tipp 4: Inflate das Objekt nur entsprechend dem empfohlenen
Druck.
Lighting instruction
Nach dem Anfahren
nacheinander drücken und
schalten.
Beleuchtung - SOS -
Warnblinklichter und
Seitenleuchten abwechselnd
rot und weiß - Lichter off.
Wenn sich das Fahrzeug nicht starten lässt,
überprüfen Sie bitte die Reihenfolge:
● Der Akku ist schwach, möglicherweise müssen Sie das Produkt
stärker aufladen. Bitte halten Sie die Batterieladung über 60 %,
um einen erfolgreichen Schnellstart zu gewährleisten.
● Rost oder Schmutz an den Batteriepolen verursacht eine
schlechte Verbindung. Reinigen Sie die Pole und versuchen Sie
es
erneut.
● Der Überhitzungsschutz wurde aktiviert. Bitte warten Sie
mindestens 1 Minute, um sich abzukühlen, und versuchen Sie es
erneut.
● Die Batterieklemme ist an den falschen Pol angeschlossen,
Wenn der Reifen nicht aufgepumpt werden
kann, prüfen Sie die möglichen Ursachen in
folgender Reihenfolge
● Der Batteriestand ist unzureichend.
● Schlauch nicht richtig angeschlossen.
● Der voreingestellte Reifendruckwert ist niedriger als der aktuelle
Reifendruck .
● Die Ventilschaftdüse des Reifens ist durch Asche verstopft.
● Der Benutzer vergisst, den Startknopf nach dem voreingestellten
Wert zu drücken.
● Dieses Produkt hat seinen Überhitzungsschutz aufgrund einer
Überhitzung des Motors oder der Batterie aktiviert. Bitte kühlen
Sie sich ab und versuchen Sie es erneut.
Wartung
Für eine optimale Akkuleistung laden Sie das Produkt bitte auf, wenn
die Akkuleist
ung unter 20 % liegt. Um die Lebensdauer des Geräts
zu verlängern, sollten Sie es nach dem Gebrauch vollständig
aufladen und alle drei Monate aufladen, wenn es nicht geladen wird.
bitte stellen Sie sicher, dass die Klemme an den richtigen Pol
angeschlossen ist.
● Die Verbindung zwischen der Starthilfeklemme und der Batterie
ist schlecht.
● Stellen Sie sicher, dass die Verbindung zwischen der Klemme
und der Batterie sicher ist.
● Das Fahrzeug lässt sich nicht starten, weil die Batterie nicht
ausreichend geladen ist.
● Überprüfen Sie die Batterie oder die Fehlercodes Ihres
Fahrzeugs mit den entsprechenden Geräten.
22 23
Tube d'air
Tube d'air de rallonge
Manuel du produit
×1
×1
×1
FR
Conseils
1. Branchez le chargeur dans la prise de courant et connectez le
cordon d'alimentation au produit pour le charger.
2. Débranchez le chargeur et le cordon d'alimentation lorsque le
produit est complètement chargé.
Conseil : Pour une meilleure performance de charge, utilisez le
câble de charge inclus pour charger le produit. Le chargeur mural
n'est pas inclus.
Chargement
Nom du produit
Numéro de modèle
Capacité
Courant de démarrage
Courant maximal
Plage de pressions
Sortie USB
Type C Indique la valeur
Température de
fonctionnement
Matériau du boîtier
Temps de charge complet
Démarreur multifonction et pompe à air
AX10011
1,3000mAh
1,000A
2,000A
Tension : 0-150PSI
Sortie de charge rapide QC3.0 18W
5V/9V/12V
- 20°C ~ 60°C
ABS+PC
≈5 heures
Informations sur le produit
Démarreur multifonction et pompe à air
Boîte d'emballage
Sac de sable
Pince intelligente
Câble de charge
Longue buse d'air
Embout respiratoire
Aiguille à bille
Chargeur de voiture
×1
×1
×1
×1
×1
×1
×1
×1
×1
Le paquet comprend
24 25
Vérifier le niveau de la batterie
Méthode 1 :
Après la mise en
marche, l'écran affiche
le niveau actuel de la
batterie.
2. Assurez-vous que le câble de démarrage d'urgence intelligent est
entièrement connecté au port de démarrage d'urgence de 12 V. (Le
voyant du câble de démarrage d'urgence intelligent clignote, ce qui
est un phénomène normal.
3. Connectez fermement les bornes positives et négatives aux
bornes correspondantes de la batterie, comme indiqué dans la figure
ci-dessous. Le voyant intelligent devient vert.
(Si le voyant continue à clignoter alternativement en rouge et en
vert, assurez-vous que la connexion est correcte.)
Fonction de démarrage d'urgence
1. Appuyez sur le
bouton d'alimentation
pour allumer
l'appareil.
Méthode 2 :
En mode de réglage de
la charge, appuyez sur
le bouton de
basculement pour
afficher le pourcentage
de batterie
restant.
Remarque : Si le niveau de la batterie est inférieur à 20 %, la
fonction de démarrage rapide ne fonctionnera pas correctement. Si
le niveau de la batterie est inférieur à 20 %, l'écran affiche un
avertissement de « batterie faible ». Pour optimiser la durée de vie
de la batterie, ne laissez pas la puissance de démarrage descendre
en dessous de 20 %.
Noir Rouge
26 27
4.Démarrez le véhicule.
5. Retirez le collier du câble smart après avoir réussi à démarrer le
véhicule.
Conseil 1 : Éteignez tous les appareils électriques du véhicule avant
de le démarrer.
Conseil 2 : Si le véhicule ne peut pas être démarré en cas
d'urgence, arrêtez-vous, retirez la fixation et attendez 60 secondes.
Réessayez ensuite l'étape 4.
Noir Rouge
Description de la fonction d'inflation
1. Appuyez sur le bouton marche/démarrage pendant 3 secondes.
2. Tirez le tuyau d'air et raccordez la conduite de gaz comme indiqué
sur la figure.
3. Choisissez la buse d'air appropriée pour inflecter vos articles.
28 29
Relâchez la touche de commutation et sélectionnez-la lorsque
l'appareil souhaité apparaît à l'écran.
4. Appuyez sur le bouton de
commutation pour
sélectionner le mode
souhaité.
5. Appuyez sur le bouton de
commutation et maintenez-le
enfoncé pour passer d'un
appareil à l'autre. Appuyez sur
le bouton jusqu'à ce que la
position de commande
souhaitée soit atteinte.
6. Utilisez les touches + et -
pour régler la valeur de la
pression.
7. Appuyez sur le
bouton marche/marche
pour commencer le
gonflage, et le produit
s'éteindra
automatiquement
lorsque le gonflage
sera terminé.
Conseil 1 : Si la valeur de la pression du pneu de l'objet à gonfler est
supérieure à la valeur prédéfinie, le produit ne fonctionnera pas.
Conseil 2 : BAR, PSI, KPA, KG/CM² sont des unités et non des
niveaux de pression.
Conseil 3 : Les compresseurs d'air ne sont pas compatibles avec les
objets de grande capacité. Par exemple, les matelas pneumatiques
et les piscines à air.
Conseil 4 : Infla
tez l'objet uniquement en fonction de la pression
recommandée.
Instructions pour l'Allumage
Après la mise en service,
appuyez sur et mettez en
marche successivement.
Eclairage -SOS- Feux
clignotants d'avertissement et
feux latéraux alternant rouge
et blanc. Les feux latéraux
sont toujours blancs.
Si la voiture ne démarre pas, vérifiez
dans l'ordre :
● La batterie est faible, il se peut que vous deviez recharger le
produit. Maintenez la charge de la batterie au-dessus de 60 % pour
garantir un démarrage réussi.
● La rouille ou la saleté sur les bornes de la batterie entraînent une
mauvaise connexion. Nettoyez les bornes et réessayez. La
protection contre la surchauffe a été activée. Attendez au moins une
minute pour que la batterie refroidisse et réessayez.
30 31

Si le gonflage des pneus échoue,
vérifiez les causes possibles dans
l'ordre:
● Niveau de batterie insuffisant.
● La chambre de gonflage n'est pas correctement connectée.
● La valeur de pression des pneus prédéfinie est inférieure à la
pression actuelle des pneus. La buse de la tige de valve du pneu
est obstruée par des résidus de cendres.
● L'utilisateur oublie d'appuyer sur le bouton d'accueil après la
valeur prédéfinie.
● Ce produit a activé sa protection contre la surchauffe en raison
d'une surchauffe du moteur ou de la batterie. Veuillez vous calmer
et réessayer.
Maintenance
Pour des performances optimales de la batterie, chargez le produit
lorsque la charge de la batterie est inférieure à 20 %. Pour prolonger
la durée de vie du produit, vous devez le charger complètement
après utilisation et le charger une fois tous les trois mois lorsqu
'il est
inutilisé.
● La pince de la batterie est connectée au mauvais pôle,
assurez-vous que la pince est connectée à la bonne borne.
● Il y a une mauvaise connexion entre la pince du démarreur
intelligent et la batterie. Assurez-vous que la connexion entre la
pince et la batterie est correcte.
● Le véhicule ne démarre pas pour des raisons autres qu'un
manque de puissance.
● Utilisez l'équipement approprié pour vérifier la batterie de votre
véhicule ou les codes d'erreur.
Nombre del producto
Número de modelo
Capacidad
Corriente de arranque
Corriente de pico
Rango de presión
Salida USB
Tipo-C Indica el valor
Temperatura de
funcionamiento
Material de la carcasa
Tiempo de carga
completa
Arrancador multifunción y bomba de aire
AX10011
1,3000mAh
1,000A
2,000A
Tensión: 0-150PSI
Salida de carga rápida QC3.0 18W
5V/9V/12V
- 20°C ~ 60°C
ABS+PC
≈5 horas
Información sobre el producto
ES
Arrancador multifunción y bomba de aire
Caja de embalaje
Bolsa de arena
Pinza inteligente
Cable de carga
Boquilla de aire larga
Boquilla de respiración
Aguja de bola
×1
×1
×1
×1
×1
×1
×1
×1
El paquete incluye
32 33
Cargador de coche
Tubo de aire
Tubo de aire de extensión
Manual del producto
×1
×1
×1
×1
Consejos
1. Enchufe el cargador a
la toma de corriente y
conecte el cable de
alimentación al producto
para cargarlo.
2. Desconecte el
cargador y el cable de
alimentación cuando el
producto esté
completamente cargado.
Consejo: Para obtener el mejor rendimiento de carga, utilice el cable
de carga incluido para cargar el producto. El cargador de pared no
está incluido.
Cargar
Comprobar el nivel de la batería
Método 1:
Después de encender, la
pantalla mostrará el nivel
actual de la batería.
Función de arranque de emergencia
1. Pulse el botón de
encendido para
encender.
Método 2:
En el modo de ajuste de
carga, pulse el botón de
cambio para mostrar el
porcentaje de batería
restante actual.
Nota: Si el nivel de batería es inferior al 20%, la función de inicio
rápido no funcionará correctamente. Si el nivel de la batería es
inferior al 20%, la pantalla mostrará un aviso de "batería baja". Para
maximizar la duración de la batería, no deje que la potencia de
arranque caiga por debajo del 20%.
34 35
2. Asegúrese de que el cable de arranque de emergencia inteligente
está completamente conectado al puerto de arranque de
emergencia de 12 V. (La luz indicadora del cable de arranque de
emergencia inteligente parpadeará, lo cual es un fenómeno normal.
3. Conecte firmemente los bornes positivo y negativo a los
terminales correspondientes de la batería, como se muestra en la
siguiente figura. El indicador inteligente se pondrá verde.
(Si la luz continúa parpadeando alternativamente en rojo y verde,
asegúrese de que la conexión es correcta.
Negro Rojo
4. Arranque el vehículo
5. Retire la abrazadera del cable inteligente después de arrancar
con éxito el vehículo.
Consejo 1: Apague todos los equipos eléctricos del vehículo antes
de arrancarlo.
Consejo 2: Si no se puede arrancar en caso de emergencia,
deténgase, retire la fijación y espere 60 segundos. A continuación,
vuelva a intentar el paso 4.
Negro Rojo
36 37
Descripción de función de inflado
1. Mantenga pulsado el
botón de
encendido/arranque
durante 3 segundos.
2. Saque la manguera de aire y conecte la tubería de gas como se
muestra en la figura.
3. Elija la boquilla de aire adecuada para inflar sus artículos.
4. Pulse el botón interruptor
para seleccionar el modo
deseado.
5. Mantenga pulsado el botón de conmutación para cambiar de un
dispositivo a otro. Pulse el botón hasta alcanzar la posición de orden
deseada. Suelte el botón interruptor y selecciónelo cuando el
dispositivo deseado aparezca en la pantalla.
6. Utilice + y - para ajustar el
valor de presión.
7. Pulse el botón de
encendido/arranque para iniciar
el inflado, y el producto
se apagará
automáticamente una
vez finalizado el inflado.
38 39
Consejo 1: Si el valor de la presión de los neumáticos del objeto a
inflar es superior al valor preestablecido, el producto no funcionará.
Consejo 2: BAR, PSI, KPA, KG/CM², son unidades, no niveles de
presión.
Consejo 3: Los compresores de aire no son compatibles con objetos
de gran capacidad. Como colchones de aire y piscinas de aire.
Consejo 4: Inflate el objeto sólo de acuerdo con la presión
recomendada.
Instrucciones de encendido
Tras la puesta en marcha,
pulse y encienda
sucesivamente
Iluminación -SOS- Luces
parpadeantes de advertencia
flashing y luces laterales que
alternan rojo y blanco. Las
luces laterales son siempre
de color blanco.
Si el coche no puede arrancar, por favor,
compruebe en orden:
● La batería está baja, puede que necesite cargar más el
producto. Por favor, mantenga la carga de la batería por encima
del 60%, para asegurar un arranque rápido
con éxito.
● El óxido o la suciedad en los terminales de la batería provocan
una mala conexión. Limpie los terminales e inténtelo de nuevo. Se
ha activado su protección contra sobrecalentamiento, por favor
espere al menos 1 minuto para que se enfríe e inténtelo de nuevo.
Si falla el inflado de los neumáticos,
compruebe las posibles causas en orden:
● Nivel de batería insuficiente
● La cámara de inflado no está conectada correctamente.
● El valor de presión del neumático preestablecido es inferior a la
presión actual del neumático. La boquilla del vástago de la válvula
del neumático está bloqueada por restos de ceniza.
● El usuario olvida pulsar el botón de inicio después del valor
preestablecido.
● Este producto ha activado su protección contra
sobrecalentamiento debido al sobrecalen
tamiento del motor o de
la batería. Por favor, enfríe y vuelva a intentarlo.
Mantenimiento
Para un rendimiento óptimo de la batería, cargue el producto cuando
la carga de la batería sea inferior al 20%. Para prolongar la vida útil
del producto, debe cargarlo completamente después de usarlo y
cargarlo cuando esté inactivo una vez cada tres meses.
● La abrazadera de la batería está conectada al polo incorrecto,
por favor asegúrese de que la abrazadera está conectada al
terminal correcto.
● Hay una mala conexión entre la pinza de arranque inteligente y
la batería. Asegúrese de que la conexión entre la pinza y la
batería es correcta.
● El vehículo no arranca por motivos distintos a la falta de
corriente.
● Utilice el equipo adecuado para comprobar la batería de su
vehículo o los códigos
de error.
40 41
Tubo di prolunga per l'aria
Manuale del prodotto
×1
×1
IT
Consigli
1. Collegare il caricabatterie alla presa di corrente e collegare il cavo
di alimentazione al prodotto per la ricarica.
2. Scollegare il caricabatterie e il cavo di alimentazione dopo che il
prodotto è completamente carico.
Consiglio: Per ottenere le migliori prestazioni di ricarica, utilizzare il
cavo di ricarica incluso per caricare il prodotto. Il caricatore da
parete non è incluso.
Ricarica
Nome del prodotto
Numero di modello
Capacità
Corrente di avvio
Corrente di picco
Campo di pressione
Uscita USB
Tipo-C Indica il valore
Temperatura di esercizio
Materiale del guscio
Tempo di carica completa
Avviatore Multifunzione e Pompa d'Aria
AX10011
1,3000mAh
1,000A
2,000A
Inflato: 0-150PSI
Uscita di carica rapida QC3.0 18W
5V/9V/12V
- 20°C ~ 60°C
ABS+PC
≈5 ore
Informazioni sul prodotto
Avviatore multifunzione e pompa d'aria
Scatola di imballaggio
Sacchetto per la levigatura
Morsetto intelligente
Cavo di ricarica
Ugello aria lungo
Ugello di sfiato
Ago a sfera
Caricabatterie da auto
Tubo dell'aria
×1
×1
×1
×1
×1
×1
×1
×1
×1
×1
Il pacchetto comprende
42 43
Controllare il livello della batteria
Metodo 1:
Dopo l'accensione, lo
schermo visualizza il
livello attuale della
batteria.
2. Assicurarsi che il cavo di avviamento di emergenza intelligente sia
completamente collegato alla porta di avviamento di emergenza a 12
V. (La spia del cavo di avviamento di emergenza intelligente
lampeggia, il che è un fenomeno normale.
3. Collegare saldamente i dispositivi positivi e negativi ai terminali
corrispondenti della batteria, come mostrato nella figura seguente.
La spia intelligente diventerà verde.
(Se la luce continua a lampeggiare alternativamente in rosso e
verde, accertarsi che il collegamento sia corretto).
Metodo 2:
In modalità di
impostazione della carica,
premere il pulsante di
commutazione per
visualizzare l'attuale
percentuale di batteria
residua.
Nota: Se il livello della batteria è inferiore al
20%, la funzione di
avvio rapido non funziona correttamente. Se il livello della batteria
scende al di sotto del 20%, il display emette un avviso di "batteria
scarica", Si prega di caricare immediatamente il prodotto. Per
massimizzare la durata della batteria, non lasciare che la potenza di
avviamento scenda sotto il 20%.
Funzione di avviamento di emergenza
1. Premere il
pulsante di
accensione per
accendere il
dispositivo.
Nero Rosso
44 45

4. Avviare il veicolo.
5. Rimuovere il morsetto del cavo intelligente dopo l'avviamento
dell'auto.
Consiglio 1: Prima di avviare il veicolo, spegnere tutte le
apparecchiature elettriche presenti nel veicolo.
Consiglio 2: Se non è possibile avviare il veicolo in caso di
emergenza, si prega di fermarsi, rimuovere il dispositivo di fissaggio
e attendere 60 secondi. Poi riprovate il Passo 4.
Nero Rosso
Descrizione della funzione di
inflazione
1. Tenere premuto il
pulsante di
accensione/avvio per
3 secondi.
2. Estrarre il tubo dell'aria e collegare il tubo del gas come mostrato
in figura.
3. Scegliete l'ugello d'aria giusto per inflammare i vostri articoli.
46 47
Consiglio 1: Se il valore della pressione del pneumatico da gonfiare
è superiore al valore preimpostato, il prodotto non funziona.
4. Premere il pulsante di
commutazione per
selezionare la modalità
desiderata.
5. Tenere premuto il pulsante
di commutazione per passare
da un dispositivo all'altro.
Premere il pulsante fino a
raggiungere la posizione
d'ordine desiderata.
Rilasciare il pulsante di commutazione e selezionarlo quando sullo
schermo compare il dispositivo desiderato.
6. Utilizzare i tasti + e - per
regolare il valore della
pressione
7. Il prodotto si
spegnerà
automaticamente al
termine del
gonfiaggio.
Consiglio 2: BAR, PSI, KPA, KG/CM², sono unità di misura, non
livelli di pressione.
Consiglio 3: I compressori d'aria non sono compatibili con oggetti di
grande capacità. Come materassi ad aria e piscine ad aria.
Consiglio 4: Inforcare l'oggetto solo in base alla pressione
consigliata.
Istruzioni per l'illuminazione
Dopo l'avviamento, premere e commutare in successione
Illuminazione -SOS- Avvertimen
to flashing lights e luci laterali
alternate rosse e bianche off.
Se la macchina non può essere
avviata, si prega di controllare
nell'ordine:
● La batteria è scarica, potrebbe essere necessario caricare
maggiormente il prodotto. Si prega di mantenere la carica della
batteria al di sopra del 60%, per garantire un avvio rapido di
successo.
● La ruggine o la sporcizia sui terminali della batteria causano una
cattiva connessione. Pulire i terminali e riprovare.
● Ha attivato la protezione contro il surriscaldamento, si prega di
attendere almeno 1 minuto per il raffreddamento e riprovare.
48 49

In caso di mancato gonfiaggio degli
pneumatici, verificare le possibili
cause nell'ordine
● Il livello della batteria è insufficiente
● Tubo gonfiabile non collegato correttamente
● Il valore della pressione degli pneumatici preimpostata è inferiore
alla pressione attuale
● L'ugello dello stelo della valvola del pneumatico è bloccato dalla
cenere
● L'utente dimentica di premere il pulsante di avvio dopo il valore
preimpostato
● Il prodotto ha attivato la protezione da surriscaldamento a causa
del surriscaldamento del motore o della batteria, Si prega di
raffreddare e riprovare
Manutenzione
Per ottenere prestazioni ottimali della batteria, si prega di caricare il
prodotto quando la carica della batteria è inferiore al 20%. Per
prolungare la durata del prodotto, si consiglia di caricarlo
completamente dopo l'u
so e di ricaricarlo ogni tre mesi quando è
inattivo.
● Il morsetto della batteria è collegato al polo sbagliato; si prega di
verificare che il morsetto sia collegato al terminale corretto.
● Il collegamento tra la clip di avviamento intelligente e la batteria è
difettoso.
● Assicurarsi che il collegamento tra la clip e la batteria sia sicuro.
Il veicolo non si avvia per motivi diversi dalla mancanza di corrente.
● Si prega di utilizzare l'attrezzatura appropriata per controllare la
batteria del veicolo o i codici di errore.
Nazwa
Numer modelu
Pojemność
Natężenie początkowe
Natężenie szczytowe
Ciśnienie
Wyjście USB
Wyjśćie USB-C
Temperatura pracy
Materiał obudowy
Czas całkowitego ładowania
Wielofunkcyjne urządzenie
rozruchowe z pompką
AX10011
13000 mAh
1000 A
2000 A
Pompowanie: 0 - 150 PSI
QC 3.0, wyjście 18 W
5 V, 9 V, 12 V
-20°C ~ 60°C
ABS + PC
~ 5 godzin
Dane techniczne
Wielofunkcyjne urządzenie rozruchowe z pompką
Pudełko
Woreczek ochronny
Końcówka do pompowania kół
Kabel rozruchowy
Długa dysza
Szeroka dysza
Igła do pompowania piłek
Ładowarka samochodowa
×1
×1
×1
×1
×1
×1
×1
×1
×1
Zawartość opakowania
PL
50 51
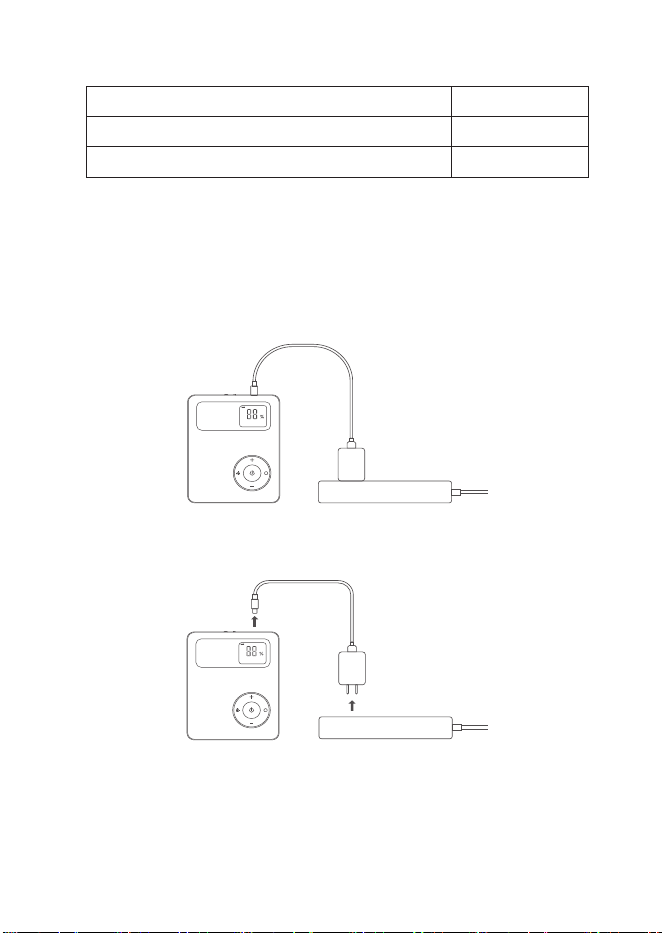
Wąż pompki
Przedłużka węża
Instrukcja obsługi
×1
×1
×1
Wskazówki
1.Podłącz ładowarkę do gniazdka, a następnie podłącz przewód do
urządzenia.
2.Po całkowitym naładowaniu urządzenia odłącz ładowarkę i
przewód.
Wskazówka: Aby uzyskać najlepszy efekt ładowania używaj
przewodu dołączonego do zestawu. Ładowarka nie wchodzi w skład
zestawu.
Ładowanie
Kontrola poziomu naładowania
Sposób 1:
Włącz urządzenie. Na
wyświetlaczu pojawi się
aktualny poziom
naładowania.
Funkcja rozruchu awaryjnego
Naciśnij przycisk
zasilania, aby
włączyć urządzenie.
Sposób 2:
W trybie ładowania
naciśnij przycisk wyboru
opcji, aby wyświetlić
aktualny poziom
naładowania.
Uwaga: Jeśli poziom naładowania spadnie poniżej 20%, funkcja
awaryjnego rozruchu samochodu nie będzie działać właściwie.
Poniżej poziomu 20% na wyświetlaczu pojawi się komunikat „low
battery” (akumulator wyczerpany). W takim przypadku niezwłocznie
naładuj urządzenie. Aby przedłużyć żywotność akumulatora nie
dopuszczaj do spadku poziomu naładowania poniżej 20%.
52 53
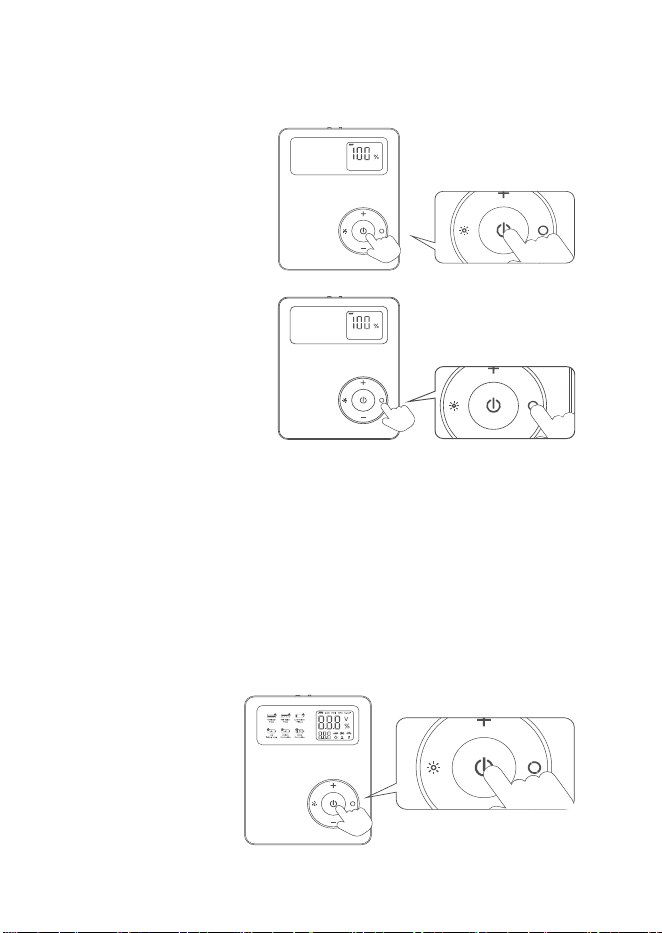
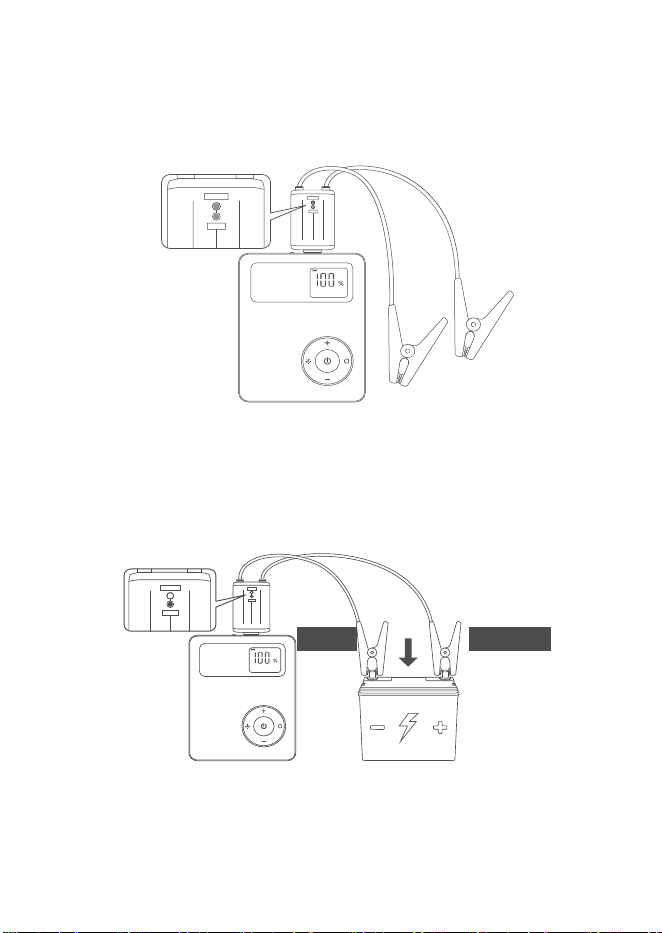
2.Podłącz inteligentny kabel rozruchowy do wyjścia rozruchu
awaryjnego 12V. Upewnij się, że wtyczka wepchnięta jest do końca.
Na kablu zapali się czerwona dioda.
3.Starannie połącz dodatnią i ujemną klemę z odpowiednimi stykami
akumulatora, jak pokazano na rysunku poniżej. Na kablu zapali się
zielona dioda. (Jeśli zielona i czerwona dioda migają naprzemiennie,
sprawdź, czy połączenie z akumulatorem jest prawidłowe.)
Czarna Czerwona
4.Zapal silnik.
Kiedy upewnisz się, że silnik działa, odepnij klemy od akumulatora.
Wskazówka 1: Przed zapaleniem silnika wyłącz wszystkie
elektryczne elementy wyposażenia samochodu.
Wskazówka 2: Jeśli silnik nie zapala, przerwij próbę, odepnij klemy,
odczekaj 60 sekund i spróbuj ponownie.
Czarna Czerwona
54 55
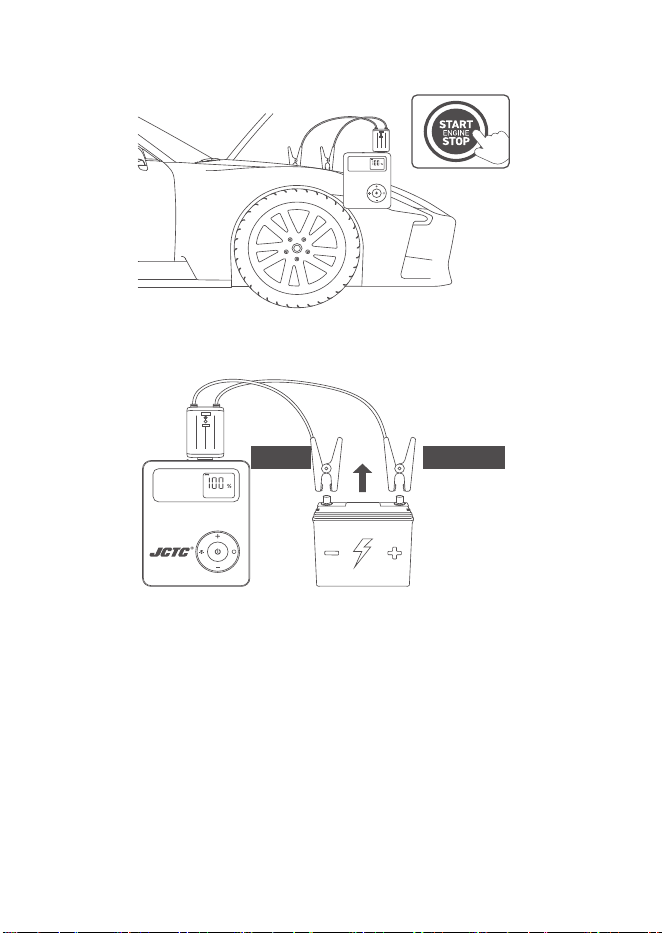

Funkcja pompowania
1.Naciśnij i przytrzymaj
przez 3 sekundy
przycisk zasilania.
2.Wyjmij wąż ze schowka i podłącz go do urządzenia, jak pokazano
na rysunku.
2.Wyjmij wąż ze schowka i podłącz go do urządzenia, jak pokazano
na rysunku.
Lub
4.Naciśnij przycisk wyboru
opcji, aby wybrać tryb
pompowania.
5.Naciśnij i przytrzymaj przycisk, aby przełączać pomiędzy
pompowanymi obiektami. Kiedy na wyświetlaczu pojawi się
odpowiednia funkcja, puść przycisk.
6.Użyj przycisków + i -, aby
ustawić docelowe ciśnienie.
7.Naciśnij przycisk zasilania,
aby rozpocząć pompowanie.
Urządzenie wyłączy się
automatycznie po
osiągnięciu docelowego
ciśnienia.
56 57
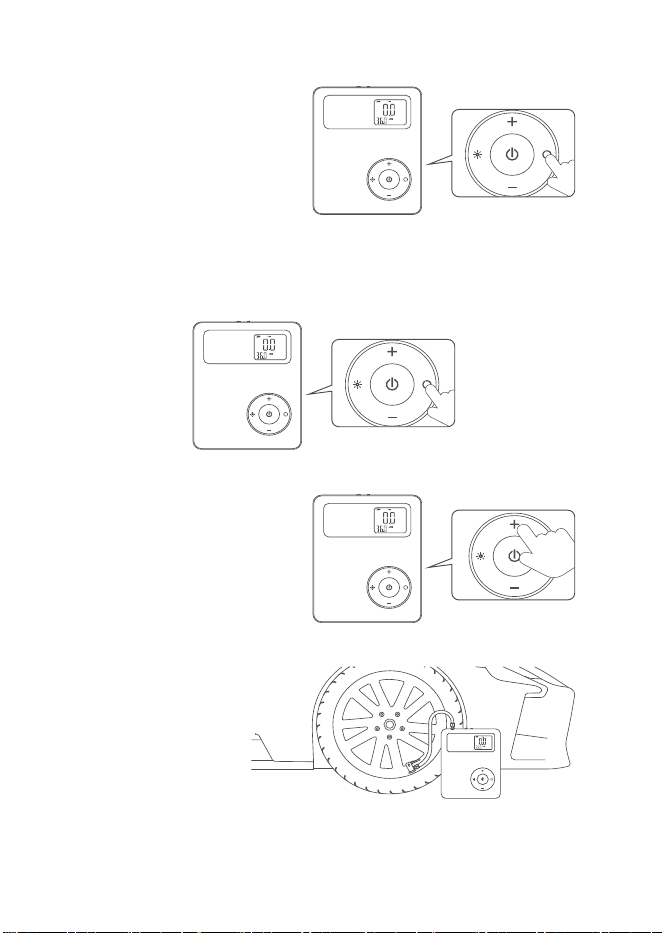

Wskazówka 1: Jeśli ciśnienie powietrza w pompowanym
przedmiocie jest wyższe niż zadana wartość, urządzenie nie włączy
się.
Wskazówka 2: BAR, PSI, KPA, KG/CM² to jednostki, nie wartości
ciśnienia.
Wskazówka 3: Urządzenie nie jest kompatybilne z obiektami o dużej
pojemności, takimi jak materace czy pompowane baseny.
Wskazówka 4: Pompuj obiekt tylko do wartości zalecanej przez
producenta.
Funkcja oświetlenia
Po włączeniu urządzenia naciskaj przycisk oświetlenia, aby wybrać
pożądaną opcję. Każde naciśnięcie zmienia opcję w sekwencji:
oświetlenie ciągłe - SOS - oświetlenie ostrzegawcze (migające
naprzemiennie czerwone i białe) - wyłączone.
Jeśli nie jesteś w stanie zapalić
silnika samochodu za pomocą
funkcji awaryjnego rozruchu,
sprawdź kolejno możliwe przyczyny:
● Poziom naładowania urządzenia jest zbyt niski i należy je
podładować. Funkcja awaryjnego rozruchu będzie działać
prawidłowo powyżej poziomu 60%.
Jeśli nie jesteś w stanie
napompować opon za pomocą funkcji
pompowania, sprawdź kolejno
możliwe przyczyny:
● Poziom naładowania urządzenia jest zbyt niski.
● Końcówka do pompowania nie jest prawidłowo podłączona do
zaworu.
● Docelowe ciśnienie ustawione na urządzeniu jest niższe niż
ciśnienie w oponie.
● Zawór opony jest zatkany brudem.
● Zapomniałeś nacisnąć przycisku zasilania po ustawieniu opcji.
● W urządzeniu zadziałała funkcja ochrony przed przegrzaniem.
● Wyłącz urządzenie, odczekaj przynajmniej 60 sekund i spróbuj
jeszcze raz.
● Rdza lub brud na stykach akumulatora mogą uniemożliwić
prawidłowe połączenie. Wyczyść styki i spróbuj jeszcze raz.
● W urządzeniu zadziałała funkcja ochrony przed przegrzaniem.
Odłącz urządzenie od akumulatora, odczekaj przynajmniej 60
sekund i spróbuj jeszcze raz.
● Klemy podłączone są do niewłaściwych styków. Sprawdź
prawidłowość połączenia.
● Połączenie między kablem rozruchowym a akumulatorem jest
niewłaściwe.
● Upewnij się, że klemy jest mocno siedzą na stykach
akumulatora.
● Samochód nie zapala z innych przyczyn niż rozładowany
akumulator.
● Przeprowadź diagnostykę samochodu.
58 59

In case a return is required, the item must be returned in original box. Without this
your return will not be accepted.
DO NOT discard the box / original packaging.
Take a photo of the box markings.
Take a photo of the damaged part (if applicable).
Send us an email with the images requested.
A photo of the markings (text) on the side of the box is required in case a part is
needed for replacement. This helps our staff identify your product number to
ensure you receive the correct parts.
A photo of the damage is always required to file a claim and get your replacement
or refund processed quickly. Please make sure you have the box even if it is
damaged.
Email us directly from marketplace where your item was purchased with the
attached images and a description of your claim.
Falls eine Rücksendung erforderlich ist, muss der Artikel in der
Originalverpackung zurückgeschickt werden. Andernfalls wird Ihre Rücksendung
nicht angenommen.
Werfen Sie den Karton / die Originalverpackung NICHT weg.
Machen Sie ein Foto von der Beschriftung des Kartons.
Machen Sie ein Foto des beschädigten Teils (falls zutreffend).
Schicken Sie uns eine E-Mail mit dem gewünschten Foto.
Für den Fall, dass ein Ersatzteil benötigt wird, benötigen wir ein Foto der
Beschriftung (Text) auf der Seite des Kartons. So können unsere Mitarbeiter Ihre
Artikelnummer identifizieren und sicherstellen, dass Sie die richtigen Teile
erhalten.
Ein Foto des beschädigten Teils ist immer erforderlich, um eine Reklamation
einzureichen und eine schnelle Bearbeitung Ihres Ersatzteils oder Ihrer
Rückerstattung zu gewährleisten. Bitte stellen Sie sicher, dass Sie den Karton
haben, auch wenn er beschädigt ist.
Schicken Sie uns eine E-Mail direkt vom Marktplatz, auf dem Sie den Artikel
gekauft haben, mit den angehängten Fotos und einer
Beschreibung Ihrer
Reklamation.
EN
DE
Return / Damage Claim Instructions
Rücksendung / Beschädigung Anweisungen
Konserwacja
Aby zadbać o sprawność akumulatora ładuj urządzenie, kiedy
poziom naładowania spadnie poniżej 20%. Jeśli nie planujesz
używać urządzenia przez dłuższy czas, naładuj je do 100%, a
następnie podładowuj co 3 miesiące. Dzięki temu przedłużysz
żywotność akumulatora.
60 61
Instructions De Retour / Réclamation De Dommages
Dans le cas où un retour est requis, l'article doit être retourné dans sa boîte
d'origine. Sans cela, votre retour ne sera pas accepté.
NE PAS jeter la boîte/l'emballage d'origine.
Prenez une photo des marquages de la boîte.
Prenez une photo des dommages (le cas échéant).
Envoyez-nous un e-mail avec les images demandées.
Une photo des marquages (texte) sur le côté de la boîte est requise au cas où une
pièce serait nécessaire pour le remplacement. Cela aide notre personnel à
identifier votre numéro de produit pour s'assurer que vous recevez les bonnes
pièces.
Une photo des dommages est toujours requise pour déposer une réclamation et
obtenir rapidement votre remplacement ou votre remboursement. Assurez-vous
d'avoir la boîte même si elle est endommagée.
Envoyez-nous un e-mail directement depuis le marché où votre article a été
acheté avec les images ci-jointes et une description de votre réclamation.
Instrucciones de Devolución / Reclamación de Daños
En caso de que se requiera una devolución, el artículo debe ser devuelto en la
caja original. Sin esto su devolución no será aceptada.
NO deseche la caja/embalaje original.
Tome una foto de las marcas de la caja.
Tome una foto de las piezas dañadas (si procede).
Envíenos un correo electrónico con las imágenes solicitadas.
Se requiere una foto de las marcas (texto) en el lado de la caja en caso de que se
necesite una pieza para reemplazarla. Esto ayuda a nuestro personal a identificar
su número de producto para asegurarse de que recibe las piezas correctas.
Una foto de los daños es siempre necesaria para presentar una reclamación y
conseguir que su reemplazo o reembolso sea procesado rápidamente. Por favor,
asegúrese de tener la caja aunque esté dañada.
Envíenos un correo electrónico directamente desde el mercado donde se compró
su artículo con las imágenes adjuntas y una descripción de su reclamación.
FR
ES
Nel caso in cui sia richiesto un reso, l'articolo deve essere restituito nella scatola
originale. Senza la scatola originale il tuo reso non sarà accettato.
NON scartare la scatola / confezione originale.
Fare una foto dei contrassegni sulla scatola.
Fare una foto di Danno (se è applicabile).
Inviarci una mail con le immagini richieste.
È necessaria una foto dei contrassegni (testo) sul lato della scatola nel caso in
cui la parte debba essere sostituita. Questo aiuta il nostro staff a identificare il
numero del tuo prodotto per assicurarti di ricevere le parti corrette.
Una foto del danno è sempre necessaria per presentare un reclamo e ottenere
rapidamente la sostituzione o il rimborso. Assicurati di avere la scatola anche se
è danneggiata.
Inviarci un'e-mail direttamente dal mercato in cui è stato acquistato il tuo articolo
con le immagini allegate e una descrizione del tuo reclamo.
Jeśli chcesz zwrócić produkt, musi znajdować się on w oryginalnym opakowaniu.
Towar zwrócony w nieoryginalnym opakowaniu nie zostanie przyjęty.
Nie wyrzucaj oryginalnego opakowania.
Zrób zdjęcie oznaczeń na opakowaniu.
Zrób zdjęcie uszkodzonej części (jeśli dotyczy).
Skontaktuj się z nami.
Jeśli jakakolwiek część wymaga wymiany, zrób zdjęcie oznaczeń kodu produktu,
który znajduje się na opakowaniu. Pozwoli nam to zidentyfikować produkt i
dostarczyć ci właściwą część.
Jeśli chcesz złożyć reklamację, zrób zdjęcie uszkodzonej części. Pozwoli nam to
zatwierdzić reklamację i zlecić zwrot środków na twoje konto. Do złożenia
reklamacji potrzebne będzie oryginalne opakowanie.
Skontaktuj się z nami telefonicznie, mailowo lub poprzez formularz kontaktowy.
Załącz zdjęcia produktu i opis roszczenia.
I T
PL
Istruzioni Per La Restituzione / Reclamo Per Danni
Zwroty i reklamacje
62 63

AX10011
THIS INSTRUCTION BOOKLET CONTAINS IMPORTANT SAFETY INFORMATION.
PLEASE READ AND KEEP FOR FUTURE REFERENCE.
Multi-function Jump Starter and Air Pump
Multifunktions-Starthilfe und Luftpumpe
Démarreur de Saut Multifonction et Pompe à Air
Arrancador y Bomba de Aire Multifuncional
Avviatore di Multifunzione e Pompa d'Aria
Wielofunkcyjne urządzenie rozruchowe z pompką
DEU office: FDS GmbH, Neuer Höltigbaum 36, 22143 Hamburg, Deutschland
GBR office: FDS Corporation Limited,Unit 4, Blackacre Road, Great Blakenham,Ipswich, Ip6 0FL,United Kingdom
ITA office: Milano
FRA office: Saint Vigor d'Ymonville
POL office: GdańskAUS office: TruganinaUSA office: Fontana
