

ST60L03
ST60L413
STC456
www.greenworkstools.com
EN OPERATOR MANUALSTRING TRIMMER
ES MANUAL DEL OPERADORCORTABORDES
P0802737-01 Rev B


1 Description.........................................4
1.1 Purpose.............................................................. 4
1.2 Overview........................................................... 4
1.3 Packing list........................................................ 4
2 Important safety instructions...........4
3 Symbols on the machine................... 5
4 Risk levels...........................................6
5 Service................................................ 6
6 Environmentally safe battery
disposal...............................................6
7 Proposition 65....................................6
8 Installation......................................... 7
8.1 Unpack the machine.......................................... 7
8.2 Attach the guard.................................................7
8.3 Assemble the shaft.............................................7
8.4 Attach the auxiliary handle................................7
8.5 Install the battery pack.......................................8
8.6 Remove the battery pack................................... 8
9 Operation........................................... 8
9.1 Start the machine............................................... 8
9.2 Stop the machine............................................... 8
9.3 Adjust the length of the cutting line.................. 8
9.4 Adjust the cutting diameter................................9
9.5 Line cut-off blade.............................................. 9
9.6 Attach machine to shoulder strap...................... 9
9.7 Operation tips.................................................... 9
9.8 Cutting tips ..................................................... 10
10 Maintenance.....................................10
10.1 General information.........................................10
10.2 Clean the machine........................................... 10
10.3 Replace excess line..........................................10
10.4 Install the cutting line...................................... 11
10.5 Replace the spool.............................................12
10.6 Remove the trimmer head................................12
10.7 Assemble the trimmer head............................. 12
11 Transportation and storage............13
11.1 Move the machine........................................... 13
11.2 Store the machine............................................ 13
12 Technical data..................................13
13 Troubleshooting...............................13
14 Limited warranty............................ 14
15 Replacement parts...........................15
3
English
EN
1 DESCRIPTION
1.1 PURPOSE
This machine is used to cut grass, light weeds, and other
similar vegetation at or around ground level. The cutting
plane must be approximately parallel to the ground surface.
You cannot use the machine to cut or chop hedges, shrubs,
bushes, flowers and compost.
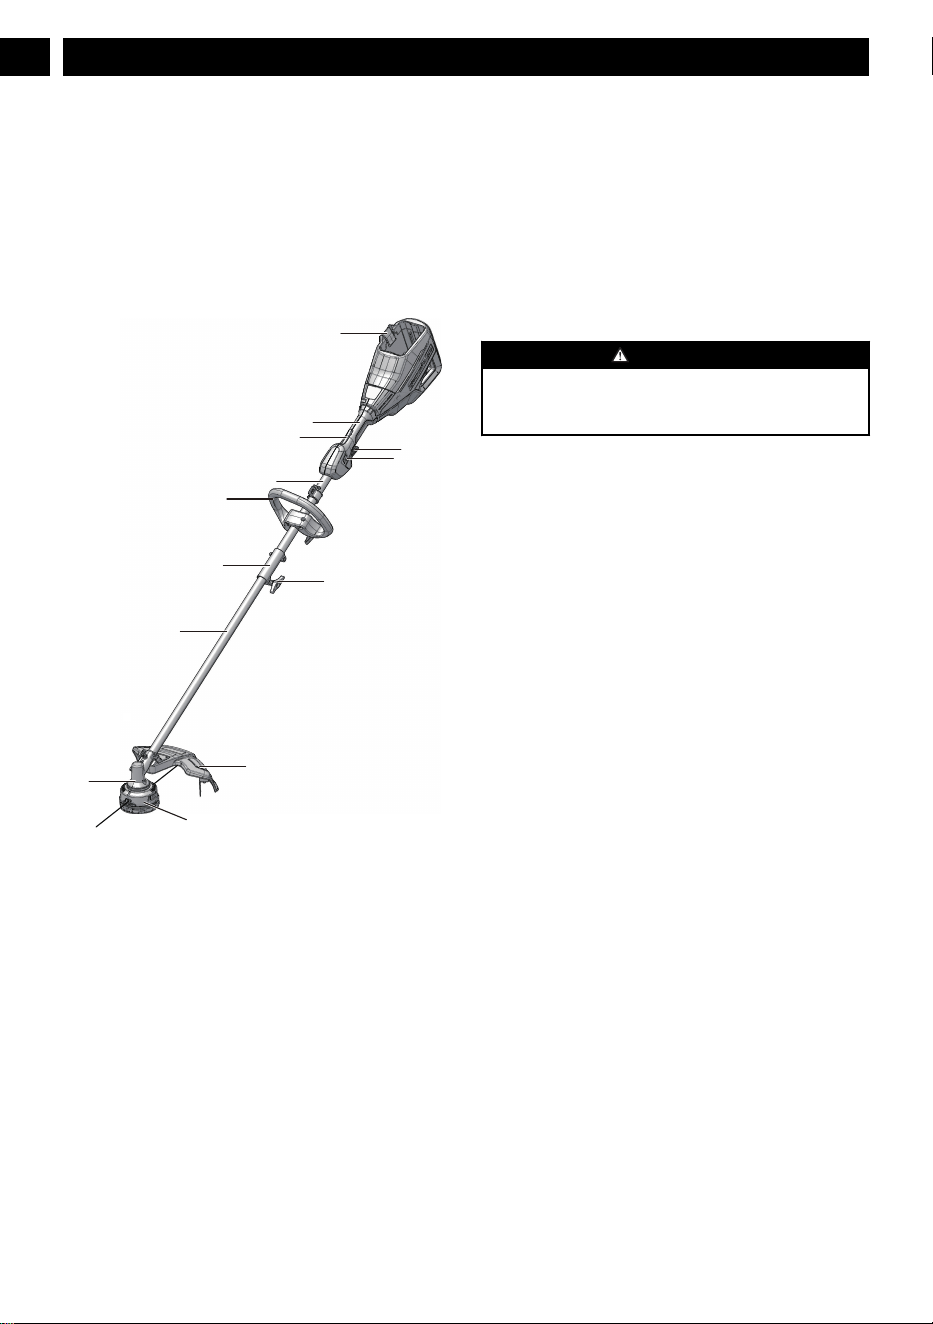
1.2 OVERVIEW
1
3
4
5
6
9
8
7
11
12
10
2
13
1
Battery release button
2
Rear handle
3
Lock-out button
4
Trigger
5
Speed switch
6
Upper shaft
7
Auxiliary handle
8
Coupler
9
Lower shaft
10
Gear box
11
Trimmer head
12
Guard
13
Knob
1.3 PACKING LIST
1
String trimmer bare
tool
2
Auxiliary handle
3
Guard
4
Allen key
5
Manual
6
Shoulder strap
2 IMPORTANT SAFETY
INSTRUCTIONS
READ ALL INSTRUCTIONS BEFORE USING (THIS
POWER TOOL)
WARNING
Read and understand all instructions before using this
product. Failure to follow all instructions listed below may
result in electric shock, fire, and/or serious personal injury.
• Use only identical manufacturer’s replacement parts and
accessories. Use of any other parts may create a hazard or
cause product damage.
• Always wear safety glasses with side shields marked to
comply with ANSI Z87.1. Everyday glasses have only
impact resistant lenses. They are NOT safety glasses.
Following this rule will reduce the risk of eye injury. Use
face mask if operating in dusty work spaces.
• Avoid Dangerous Environment – Don’t expose power
tools to damp or wet conditions. Water entering a power
tool will increase the risk of electric shock.
• Don’t use in rain.
• Keep all bystanders, children, and pets at least 50 ft.
away.
• Dress Properly – Do not wear loose clothing or jewelry.
They can be caught in moving parts. Use of rubber gloves
and substantial footwear is recommended when working
outdoors. Wear protective hair covering to contain long
hair.
• Use right Appliance. Do not use appliance for any job
except that for which it is intended.
• Avoid Unintentional Starting – Don’t carry appliance
with finger on switch. Be sure switch is off when battery
is plugged in.
• Don’t Force Appliance – It will do the job better and with
less likelihood of a risk of injury at the rate for which it
was designed.
• Don’t overreach – Keep proper footing and balance at all
times.
• Stay alert – Watch what you are doing. Use common
sense. Do not operate this unit when you are tired, ill or
under the influence of alcohol, drugs or medication.
• Always store idle power tools indoors – When not in use,
power tools should be stored indoors in a dry and high or
locked-up place, out of reach of children.
• Maintain Appliance With Care – Replace string head if
cracked, chipped, or damaged in any way. Be sure the
string head is properly installed and securely fastened.
Keep cutting edge sharp and clean for best performance
4
English
EN
and to reduce the risk of injury. Follow instructions for
lubricating and changing accessories. Inspect appliance
cord periodically, and if damaged, have it repaired by an
authorized service facility. Inspect extension cords
periodically and replace if damaged. Keep handles dry,
clean, and free from oil and grease. Failure to do so can
cause serious injury.
• Check damaged parts before using the appliance, a guard
or other part that is damaged should be carefully checked
to determine that it will operate properly and perform its
intended function. Check for alignment of moving parts,
binding of moving parts, breakage of parts, damaged
mountings, and any other condition that may affect its
operation. A guard or other part that is damaged should
be properly repaired or replaced by an authorized service
center unless indicated elsewhere in this manual.
• Remove or disconnect battery before servicing, cleaning
or removing material from the gardening appliance.
• Do not modify or attempt to repair the appliance or the
battery pack (as applicable) except as indicated in the
instructions for use and care. Use appliances only with
specifically designated battery packs. Use of any other
battery packs may create a risk of injury and fire. Use
only with Greenworks LB602, LB6025, LB603, LB604,
LB605, LB606 battery or other BAC series.
• Recharge only with the charger specified by the
manufacturer. A charger that is suitable for one type of
battery pack may create a risk of fire when used with
another battery pack. Use only with Greenworks
CAC801, CH60DP01, 60DPC10A, CH60R00 charger or
other CAC series.
• When battery pack is not in use, keep it away from other
metal objects, like paper clips, coins, keys, nails, screws
or other small metal objects, that can make a connection
from one terminal to another. Shorting the battery
terminals together may cause a fire.
• Under abusive conditions, liquid may be ejected from the
battery; avoid contact. If contact accidentally occurs,
flush with water. If liquid contacts eyes, additionally seek
medical help. Liquid ejected from the battery may cause
irritation or burns.
• Do not use a battery pack or appliance that is damaged or
modified. Damaged or modified batteries may exhibit
unpredictable behavior resulting in fire, explosion or risk
of injury.
• Do not expose a battery pack or appliance to fire or
excessive temperature. Exposure to fire or temperature
above 265 °F (130 °C) may cause an explosion.
• Do not dispose of the batteries in a fire. The cells may
explode. Check with local codes for possible special
disposal instructions.
• Do not open or mutilate the batteries. Released electrolyte
is corrosive and may cause damage to the eyes or skin. It
may be toxic if swallowed.
• Exercise care in handling batteries in order not to short
the battery with conducting materials such as rings,
bracelets, and keys. The battery or conductor may
overheat and cause burns.
• Follow all charging instructions and do not charge the
battery pack or appliance outside of the temperature range
specified in the instructions. Charging improperly or at
temperatures outside of the specified range may damage
the battery and increase the risk of fire.
• Have servicing performed by a qualified repair person
using only identical replacement parts. This will ensure
that the safety of the product is maintained.
• Keep guards in place and in working order.
• Keep hands and feet away from cutting area.
• Disconnect the battery pack from the appliance before
making any adjustments, changing accessories, or storing
appliance. Such preventive safety measures reduce the
risk of starting the appliance accidentally.
• Use only with the nylon cutting line of 0.095" / 0.080"
(2.4 mm / 2.0 mm) diameter. Do not use heavier lines
than recommended by the manufacturer and line
materials of other types – for example, metal wire, rope,
and the like.
SAVE THESE INSTRUCTIONS
3 SYMBOLS ON THE MACHINE
Some of the following symbols can be used on this machine.
Please study them and learn their definition. Proper
interpretation of these symbols will let you operate the tool
better and safer.
Symbol Explanation
V Voltage
A Current
Hz Frequency (cycles per second)
W Power
min Time
/min
Revolutions, strokes, surface speed, or-
bits etc., per minute
Direct current
Precautions that involve your safety.
Read and understand all instructions be-
fore you operate the machine, and follow
all warnings and safety instructions.
Always wear safety glasses with side
shields marked to comply with ANSI
Z87.1 when you operate this machine.
Do not expose the machine to rain or
moist conditions.
Keep all bystanders at least 15m away.
5
English
EN
Symbol Explanation
Do not install or use any type of blade on
the machine or displaying this symbol.
Thrown objects can ricochet and result in
personal injury or property damage.
4 RISK LEVELS
The following signal words and meanings are intended to
explain the levels of risk associated with this product.
SYM-
BOL
SIGNAL MEANING
DANGER Indicates an imminently haz-
ardous situation, which, if not
avoided, will result in death
or serious injury.
WARNING Indicates a potentially hazard-
ous situation, which, if not
avoided, could result in death
or serious injury.
CAUTION Indicates a potentially hazard-
ous situation, which, if not
avoided, may result in minor
or moderate injury.
CAUTION (Without Safety Alert Sym-
bol) Indicates a situation that
may result in property dam-
age.
5 SERVICE
Servicing requires extreme care and knowledge and must be
performed only by a qualified service technician. For service
we suggest you return the machine to your nearest
AUTHORIZED SERVICE CENTER for repair. Use only
identical manufacturer’s replacement parts and accessories.
6 ENVIRONMENTALLY SAFE
BATTERY DISPOSAL
The toxic and corrosive materials below are in the batteries
used in this machine: Lithium-Ion, a toxic material.
WARNING
Discard all toxic materials in a specified manner to prevent
contamination of the environment. Before discarding
damaged or worn out Li-ion battery, contact your local
waste disposal agency, or the local Environmental
Protection Agency for information and specific instructions.
Take the batteries to a local recycling and/or disposal center,
certified for lithium-ion disposal.
WARNING
If the battery pack cracks or breaks, with or without leaks,
do not recharge it and do not use. Discard it and replace
with a new battery pack. DO NOT TRY TO REPAIR IT! To
prevent injury and risk of fire, explosion, or electric shock,
and to avoid damage to the environment:
• Cover the terminals of the battery with heavy-duty
adhesive tape.
• DO NOT try to remove or destroy any of the battery
pack components.
• DO NOT try to open the battery pack.
• If a leak develops, the released electrolytes are
corrosive and toxic. DO NOT get the solution in the
eyes or on skin, and do not swallow it.
• DO NOT put these batteries in your regular household
trash.
• DO NOT incinerate.
• DO NOT put them where they will become part of any
waste landfill or municipal solid waste stream.
• Take them to a certified recycling or disposal center.
7 PROPOSITION 65
WARNING
This product contains a chemical known to the state of
California to cause cancer, birth defects or other
reproductive harm. Some dust created by power sanding,
sawing, grinding, drilling, and other construction activities
contains chemicals known to cause cancer, birth defects or
other reproductive harm. Some examples of these chemicals
are:
• Lead from lead-based paints;
• Crystalline silica from bricks and cement and other
masonry products;
• Arsenic and chromium from chemically treated lumber.
Your risk of exposure to these chemicals varies depending
on how often you do this type of work. To reduce your
exposure to these chemicals, work in a well-ventilated area,
and work with approved safety equipment, such as dust
masks that are specially designed to filter out microscopic
particles.
6
English
EN
8 INSTALLATION
8.1 UNPACK THE MACHINE
WARNING
Make sure that you correctly assemble the machine before
use.
WARNING
• If parts of the machine are damaged, do not use the
machine.
• If you do not have all the parts, do not operate the
machine.
• If the parts are damaged or missing, contact the service
center.
1. Open the package.
2. Read the documentation in the box.
3. Remove all the unassembled parts from the box.
4. Remove the machine from the box.
5. Discard the box and package in compliance with local
regulations.
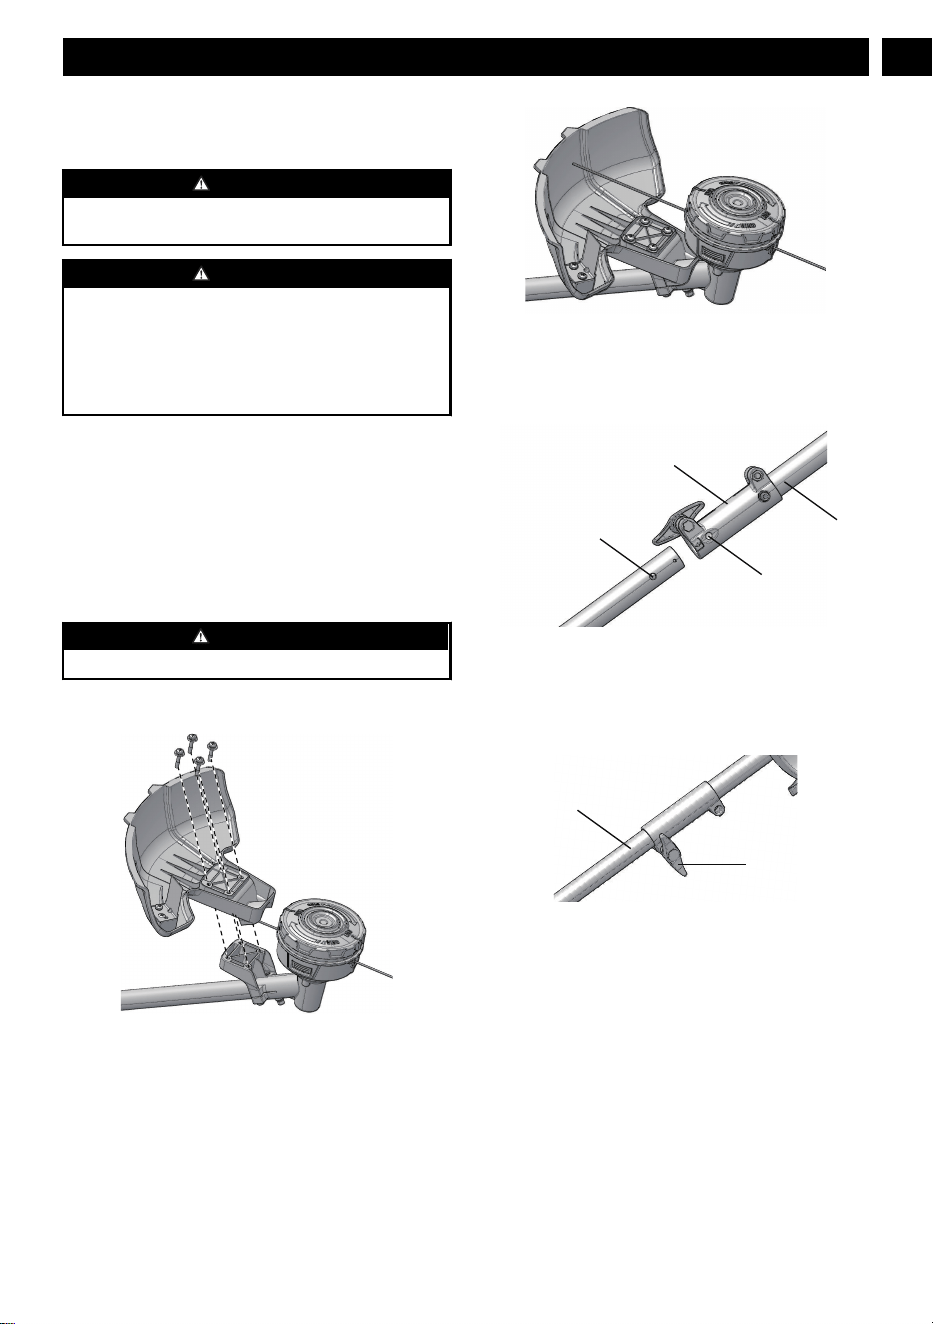
8.2 ATTACH THE GUARD
WARNING
Do not touch the cut-off blade.
1. Remove the screws from the trimmer head with a Phillips
head screwdriver (not included).
2. Put the guard onto the trimmer head.
3. Align the screw holes on the guard with the screw holes
on the trimmer head.
4. Tighten the screws.
8.3 ASSEMBLE THE SHAFT
1. Loosen the knob (13) on the coupler (8).
2. Push in the release button on the lower shaft (9).
6
8
Positioning hole
Release button
3. Align the release button with the positioning hole and
move the two shafts.
4. Turn the lower shaft until the button locks into the
positioning hole.
5. Tighten the knob.
9
13
8.4 ATTACH THE AUXILIARY
HANDLE
1. Remove the knob (16) from the handle.
2. Attach the auxiliary handle and lower clamp (15) on the
shaft.
3. Set the auxiliary handle in the comfortable position.
4. Put the bolt (14) through the holes.
5. Tighten the auxiliary handle with the knob.
7
English
EN
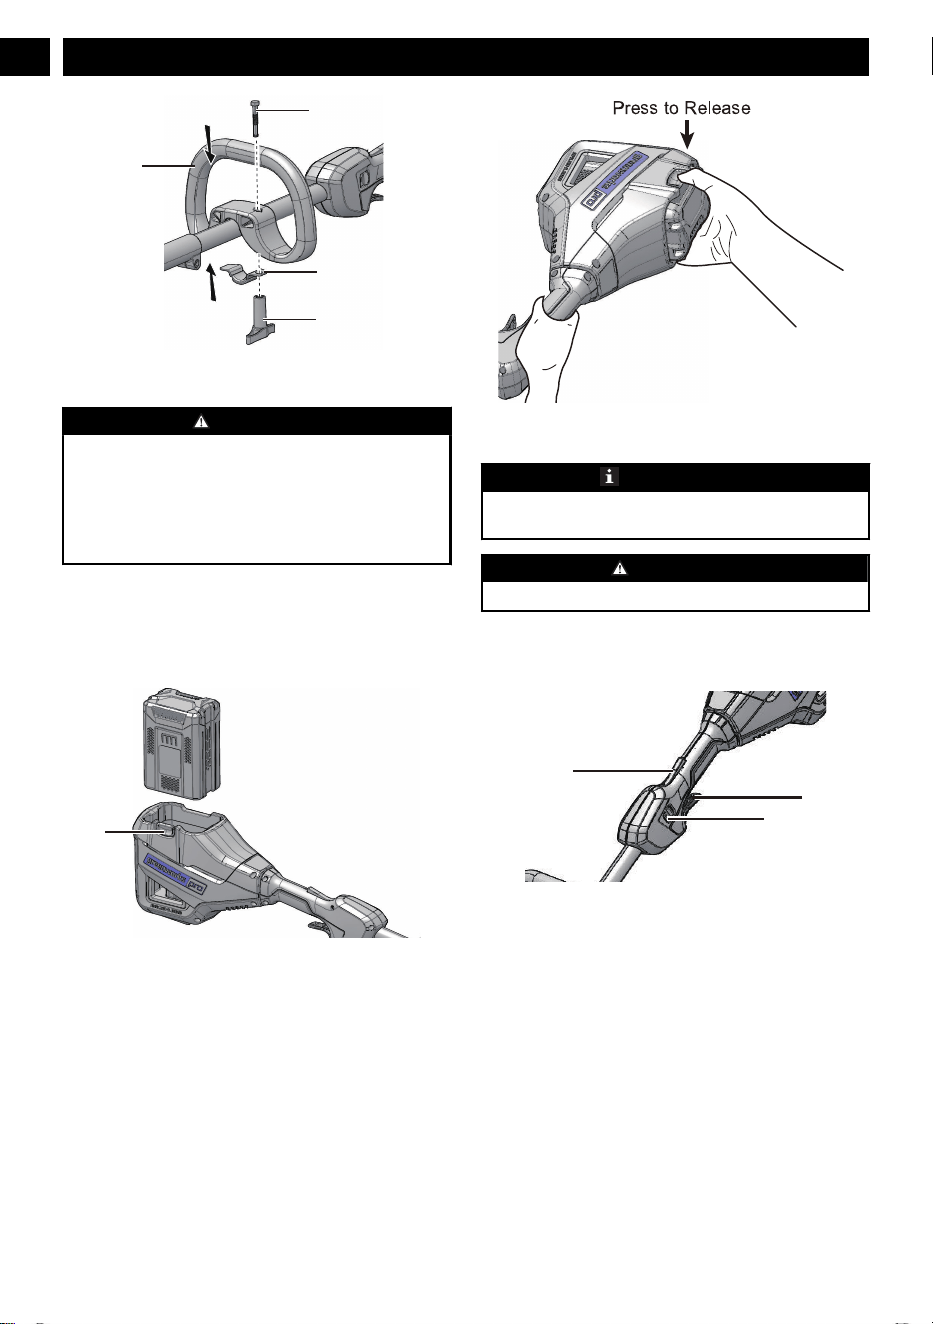
7
14
15
16
8.5 INSTALL THE BATTERY PACK
WARNING
• If the battery pack or charger is damaged, replace the
battery pack or the charger.
• Stop the machine and wait until the motor stops before
you install or remove the battery pack.
• Read and understand the instructions in the battery and
charger manual.
1. Align the lift ribs on the battery pack with the grooves in
the battery compartment.
2. Push the battery pack into the battery compartment until
the battery pack locks into place.
3. When you hear a click, the battery pack is installed.
1
8.6 REMOVE THE BATTERY PACK
1. Push and hold the battery release button (1).
2. Remove the battery pack from the machine.
9 OPERATION
IMPORTANT
Before you operate the machine, read and understand the
safety regulations and the operation instructions.
WARNING
Be careful when you operate the machine.
9.1 START THE MACHINE
1. Push the lock-out button (3) and pull the trigger (4).
3
4
5
2. Push the speed switch (5) to the desired operating speed.
Push the speed switch to position 1 for low speed or
position 2 for high speed.
9.2 STOP THE MACHINE
1. Release the trigger to stop the machine.
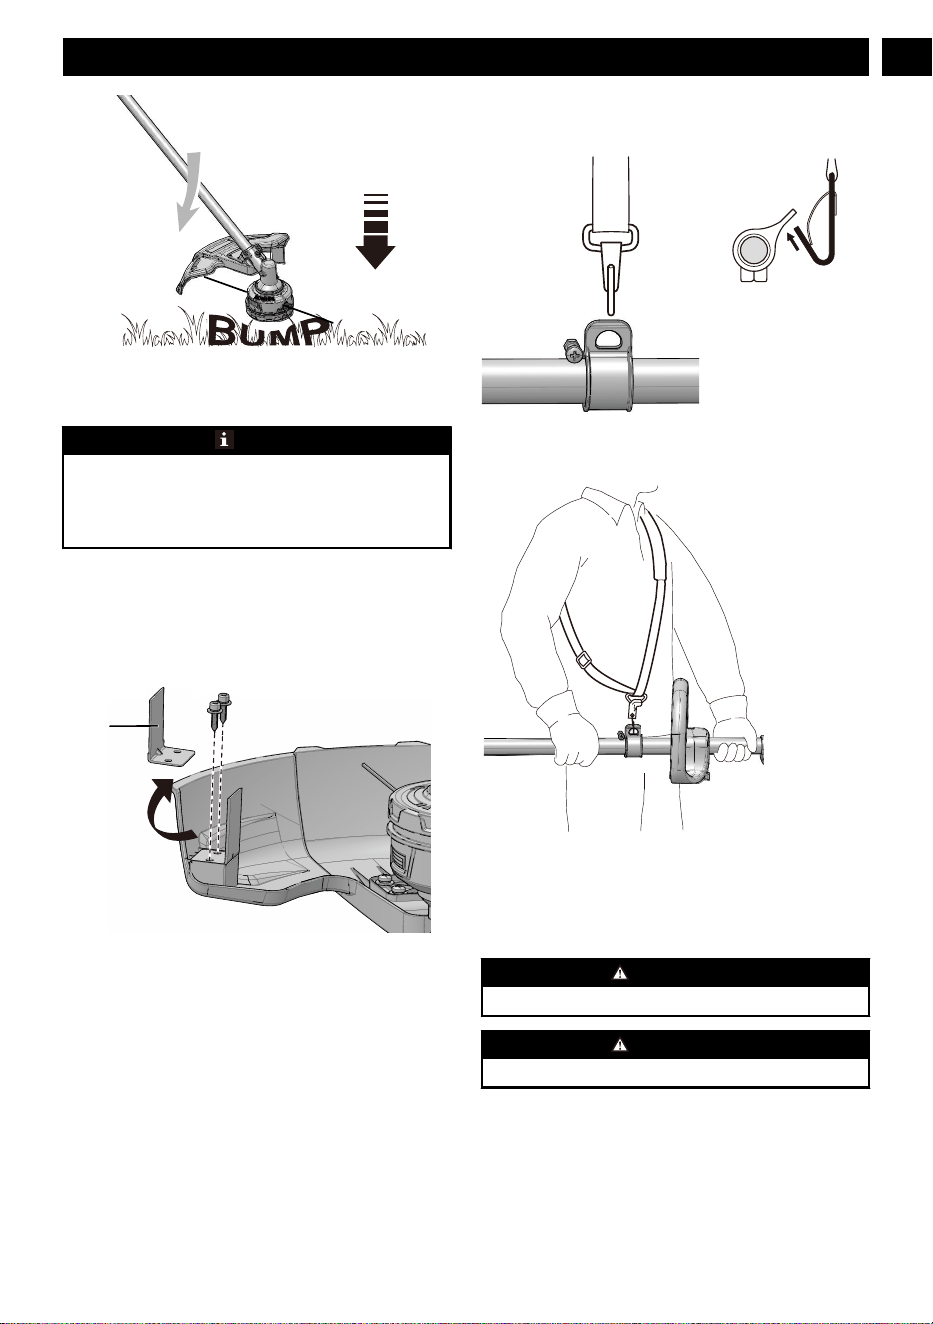
9.3 ADJUST THE LENGTH OF THE
CUTTING LINE
While you operate the machine, the cutting line gets worn
shorter. You can adjust the length of the cutting line.
1. While the trimmer is running, bump the trimmer head
against the ground.
2. Line is automatically released and the cut-off blade cuts
the excess length.
8
English
EN
9.4 ADJUST THE CUTTING
DIAMETER
NOTE
The machine is set at a 14 in. (35.6 cm) cutting diameter.
You can adjust to a 16 in. (40.6 cm) cutting diameter.
Set the cutting diameter to 14 in. (35.6 cm) for greater
runtime and 16 in. (40.6 cm)for a larger cutting area.
1. Remove the battery pack.
2. Remove the blade screws from the cut-off blade (17).
3. Turn the cut-off blade 180°.
4. Tighten the blade screws with the Allen key.
9.5 LINE CUT-OFF BLADE
This trimmer is equipped with a line cut-off blade (17) on the
guard. The line cut off blade continuously trims the line to
ensure a consistent and efficient cut diameter. Advance line
whenever you hear the motor running faster than normal, or
when trimming efficiency diminishes. This will maintain best
performance and keep line long enough to advance properly.
9.6 ATTACH MACHINE TO
SHOULDER STRAP
①
②
①
②
1. Attach the carabiner to the carrying ring on the drive
tube.
②
①
2. Put on the shoulder strap.
3. Adjust the length of the strap so that the carabiner is
about a hand’s width below your right hip.
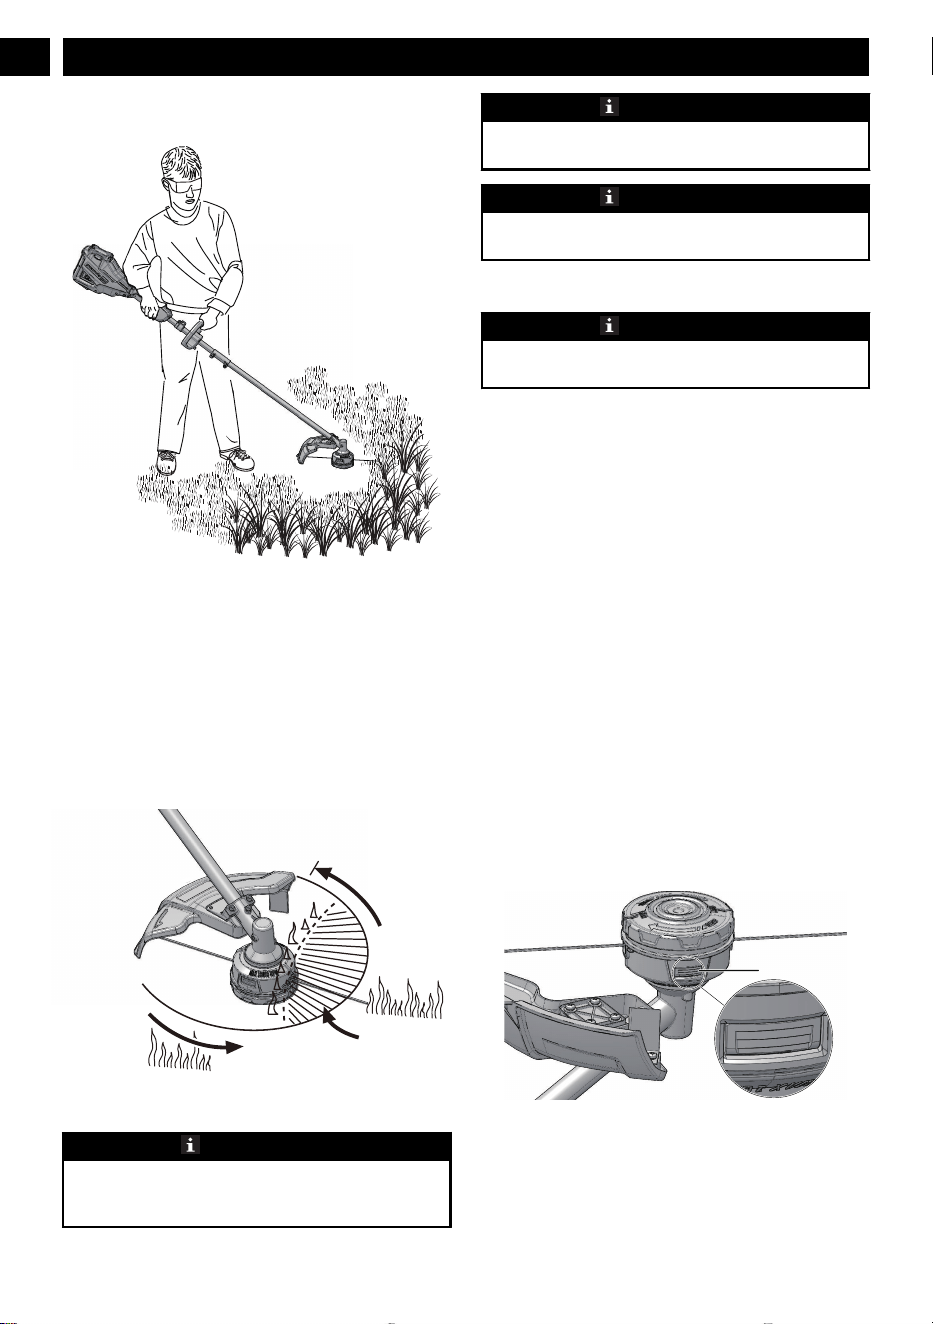
9.7 OPERATION TIPS
WARNING
Keep clearance between the body and the machine.
WARNING
Do not operate the machine without guard in place.
Do these tips when you use the machine
• Keep a firm hold with the two hands on the machine
while the string head is spinning.
• Cut tall grass from the top down.
If grass winds around the trimmer head:
9
English
EN
180°
17
• Remove the battery pack.
• Remove the grass.
9.8 CUTTING TIPS
• Tilt the machine toward the area to be cut. Use the tip of
the cutting line to cut grass.
• Move the machine from right to left to prevent thrown
debris from hitting the operator.
• Do not cut in the danger area.
• Do not force the trimmer head into uncut grass.
• Wire and picket fences cause cutting line wear and
breakage. Stone and brick walls, curbs, and wood can
wear the cutting line quickly.
Direction
of rotation
Best cutting area
Dangerous
cutting area
10 MAINTENANCE
IMPORTANT
Read and understand the safety regulations and the
maintenance instructions before you clean, repair or do the
maintenance work on the machine.
IMPORTANT
Make sure that all nuts, bolts and screws are tight. Examine
regularly that you install the handles tightly.
IMPORTANT
Use only the replacement parts and accessories of the initial
manufacturer.
10.1 GENERAL INFORMATION
IMPORTANT
Only your dealer or approved service center can perform
maintenance that is not given in this manual.
Before the maintenance operations:
• Stop the machine.
• Remove the battery pack.
• Cool the motor.
• Store the machine in cool and dry place.
• Use correct clothing, protective gloves and safety glasses.
10.2 CLEAN THE MACHINE
• Clean the machine after use with a moist cloth dipped in
neutral detergent.
• Do not use aggressive detergents or solvents to clean the
plastic parts or handles.
• Keep the trimmer head free of grass, leaves, or excessive
grease.
• Keep the air vents clean and free of debris to avoid
overheating and damage to the motor or the battery.
• Do not spray water onto the motor and electrical
components.
10.3 REPLACE EXCESS LINE
1. Push the tabs (a) on the sides of the trimmer head at the
same time.
a
2. Pull and remove the spool cover (b).
3. Remove any remaining line.
10
English
EN
a
b
c
d
e
4. Clean dirt and debris from all parts. Replace spool (d) if it
is worn or damaged.
5. Align the spool tabs (a) with the tab openings in the base
of the spool (e).
6. Push the spool cover until it clicks into position.
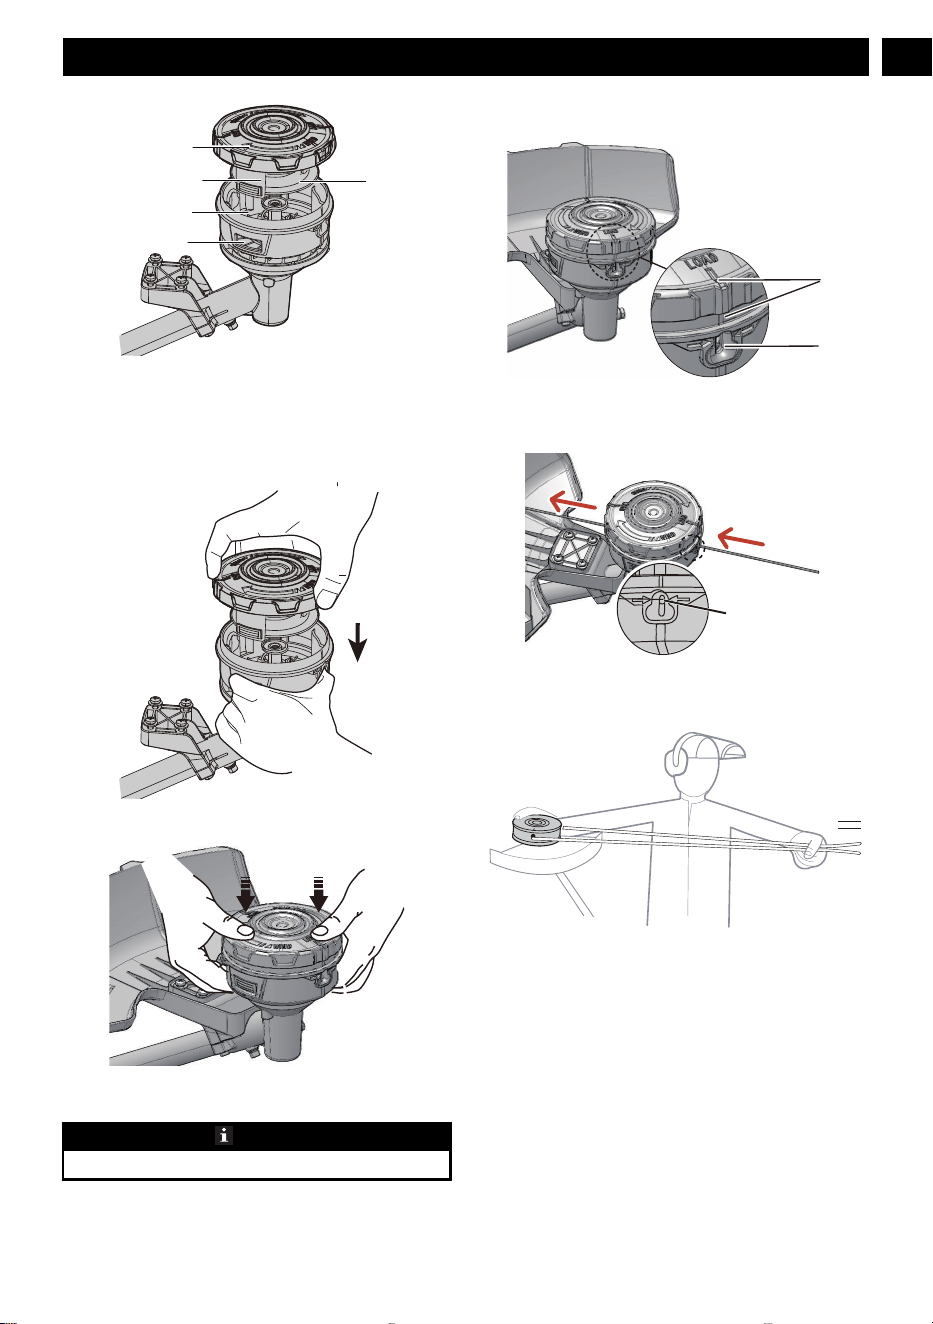
10.4 INSTALL THE CUTTING LINE
NOTE
Do not put more than 15 feet of cutting line in at a time.
1. Remove the remaining cutting line on the spool.
2. Line up the slots on the spool cover with the slots (a) on
the trimmer head.
a
b
3. Insert the line into the mounting hole, which is located
inside the eyelet (b). Push the cutting line until it exits the
opposite hole.
Mounting Hole
inside
the
E
yelet
4. Pull the cutting line through until there is an equal
quantity of cutting line on each side.
5. Rotate the spool cover clock-wise in the arrow direction
to wind the cutting line into the trimmer head. Keep
approximately 5 in of cutting line above out of each side
of the trimmer head.
11
English
EN
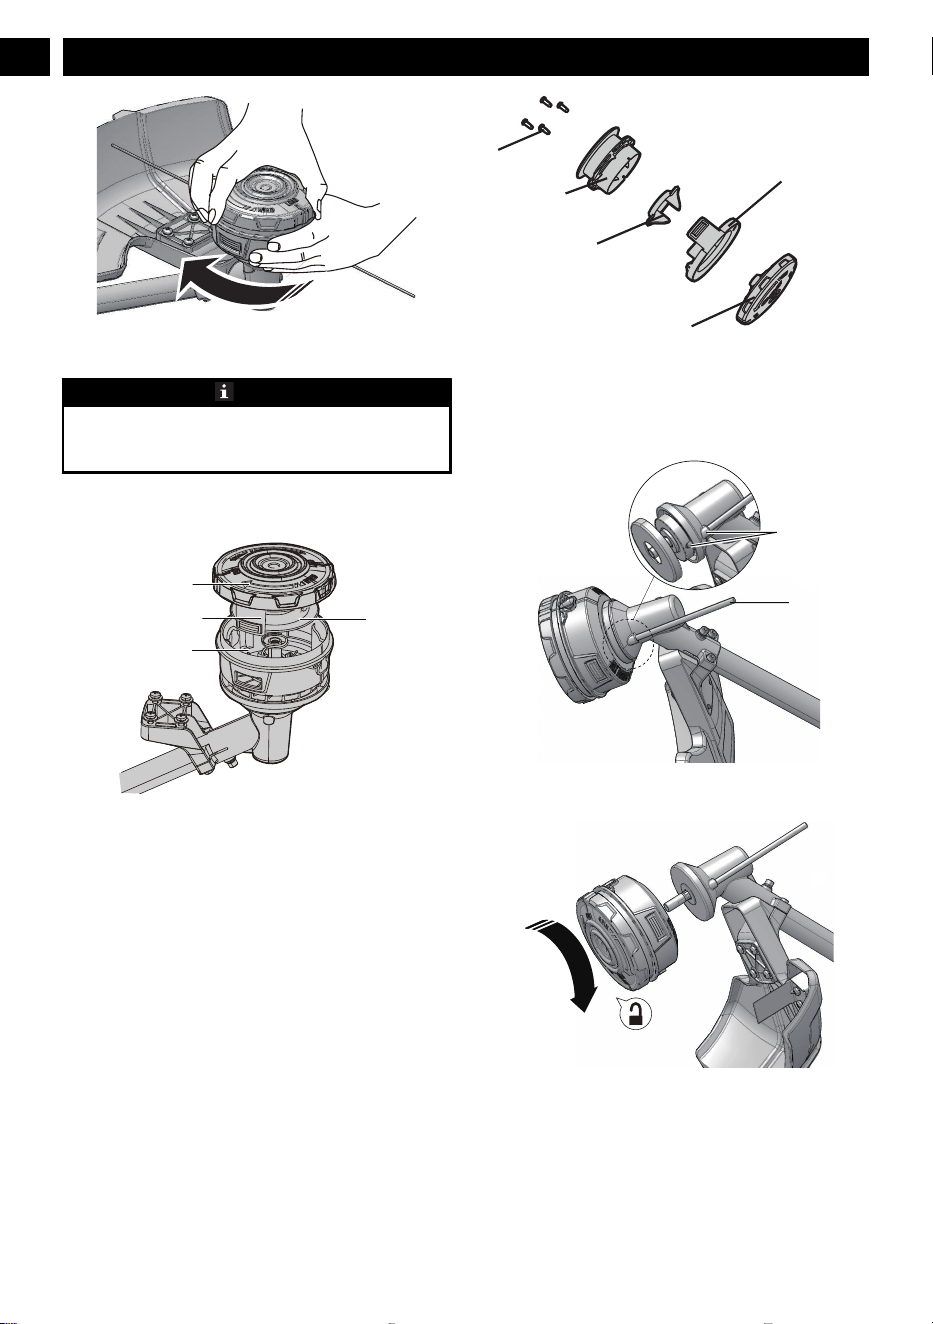
10.5 REPLACE THE SPOOL
NOTE
If any parts of the spool retainer assembly are damaged or
worn, replace the damaged part and reassemble them as
following showing
1. Disassemble the trimmer head . Pull and remove the
spool cover (b).
a
b
c
d
2. Clean dirt and debris from all parts. Replace spool (d) if it
is worn or damaged.
3. Loosen the screws (e). Remove the spool (d), slot cover
(f), location housing (g) from the spool assembly.
4. Replace with a new spool.
5. Insert the location housing and slot cover onto the spool
cover (b), and then put the spool onto the slot cover to the
desired position.
6. Tigthen with the screws.
e
d
f
b
g
10.6 REMOVE THE TRIMMER HEAD
1. Put the metal rod (a) in the specified angle transmission
hole (b) to fix the trimmer head.
a
b
2. Turn the trimmer head clockwise to loosen it. Do not
remove the spacer from the shaft.
10.7 ASSEMBLE THE TRIMMER HEAD
1. Put the metal rod in the specified angle transmission hole
to fix the trimmer head.
2. Assemble the new trimmer head.
3. Turn the trimmer head counterclockwise to tighten it.
12
English
EN

4. Remove the metal rod.
IMPORTANT
You must install the cut-off blade when you use the trimmer
head.
11 TRANSPORTATION AND
STORAGE
WARNING
Remove the battery pack from the machine before
transportation and storage.
11.1 MOVE THE MACHINE
When you move the machine, you must:
• Stop the machine.
• Remove the battery pack.
11.2 STORE THE MACHINE
• Remove the battery pack from the machine.
• Make sure that children cannot come near the machine.
• Keep the machine away from corrosive agents such as
garden chemicals and de-icing salts.
• Secure the machine during transportion to prevent
damage or injury. Clean and examine the machine for any
damage.
12 TECHNICAL DATA
Type Cordless, battery powered
Motor 60V Brushless
No load speed 6300/4700 RPM
Cutting line diameter 0.095" / 0.080" (2.4 mm /
2.0 mm)
Cutting path diameter 14 in. /16 in. (35.6 cm / 40.6
cm)
Feed Type Bump Feed
Weight (without battery
pack)
9.15Ibs (4.15kg)
Battery model LB602, LB6025, LB603,
LB604, LB605, LB606 and
other BAC series
Charger model CAC801, CH60DP01,
60DPC10A, CH60R00 and
other CAC series
The recommended ambient temperature range:
Item Temperature
String trimmer storage tem-
perature range
32°F (0°C) - 113°F (45°C)
String trimmer operation
temperature range
32°F (0°C) - 113°F (45°C)
Battery charging temperature
range
39°F (4°C) - 104°F (40°C)
Charger operation tempera-
ture range
39°F (4°C) - 104°F (40°C)
Battery storage temperature
range
32°F (0°C) - 113°F (45°C)
Battery discharging tempera-
ture range
32°F (0°C) - 113°F (45°C)
13 TROUBLESHOOTING
Problem Possible Cause Solution
The ma-
chine does
not start
when you
push the
trigger.
No electrical con-
tact between the
machine and the
battery pack.
1. Remove battery pack.
2. Check contact and in-
stall the battery pack
again.
The battery pack is
depleted.
Charge the battery pack.
The lock-out but-
ton and trigger are
not pushed at the
same time.
1. Pull the lock-out but-
ton and hold it.
2. Pull the trigger to start
the machine.
13
English
EN

Problem Possible Cause Solution
The ma-
chine stops
when you
cut.
The guard is not
attached to the ma-
chine.
Remove the battery pack
and attach the guard to
the machine.
Heavy cutting line
is used.
Use only with the nylon
cutting line of 0.095" /
0.080" (2.4 mm / 2.0
mm) diameter.
The grass winds
around the motor
shaft or the trim-
mer head.
1. Stop the machine.
2. Remove the battery
pack.
3. Remove the grass from
the motor shaft and trim-
mer head.
The motor is over-
loaded.
1. Remove the trimmer
head from the grass.
2. The motor will recover
to work as soon as the
load is removed.
3. When you cut, move
the trimmer head in and
out of the grass to be cut
and remove no more than
8" in pass.
The battery pack
or machine is too
hot.
1. Cool the battery pack
until its function returns
to normal.
2. Cool the machine for
approximately 10 mi-
nutes.
The battery pack is
disconnected from
the tool.
Install the battery pack
again.
The battery pack is
depleted.
Charge the battery pack.
The line
does not ad-
vance.
Lines are welded
to themselves.
Lubricate with silicone
spray.
Not enough line
on spool.
Install more line.
Lines are worn too
short.
Advance the cutting line.
Lines are tangled
on spool.
1. Remove the lines from
the spool.
2. Wind the lines.
Problem Possible Cause Solution
The line
keeps
breaking.
The machine is
used incorrectly.
1. Cut with the tip of the
line, avoid stones, walls
and other hard objects.
2. Advance the cutting
line regularly to keep full
cutting width.
The grass
winds
around the
trimmer
head and
motor hous-
ing.
Cut tall grass at
ground level.
1. Cut tall grass from the
top down.
2. Remove no more than
8" in each pass to prevent
wrapping.
The line
does not cut
well.
The cut-off blade
becomes dull.
Sharpen the cut-off blade
with a file or replace it.
Vibration
increases
obviously.
The line is worn
down at one side
and not advanced
in time.
Make sure that the line on
both sides is normal. Ad-
vance the line.
14 LIMITED WARRANTY
Greenworks hereby warranties this product, to the original
purchaser with proof of purchase, for a period of four (4)
years against defects in materials, parts or workmanship.
Greenworks, at its own discretion will repair or replace any
and all parts found to be defective, through normal use, free
of charge to the customer. This warranty is valid only for
units which have been used for personal use that have not
been hired or rented for industrial/commercial use, and that
have been maintained in accordance with the instructions in
the owners’ manual supplied with the product from new.
ITEMS NOT COVERED BY WARRANTY:
1. Any part that has become inoperative due to misuse,
commercial use, abuse, neglect, accident, improper
maintenance, or alteration; or
2. The unit, if it has not been operated and/or maintained in
accordance with the owner's manual; or
3. Normal wear, except as noted below;
4. Routine maintenance items such as lubricants, blade
sharpening;
14
English
EN
5. Normal deterioration of the exterior finish due to use or
exposure.
HELPLINE:
Warranty service is available by calling our toll-free helpline,
at 1-855-345-3934.
TRANSPORTATION CHARGES:
Transportation charges for the movement of any power
equipment unit or attachment are the responsibility of the
purchaser. It is the purchaser’s responsibility to pay
transportation charges for any part submitted for replacement
under this warranty unless such return is requested in writing
by Greenworks.
USA address:
Greenworks Tools
P.O. Box 1238
Mooresville, NC 28115
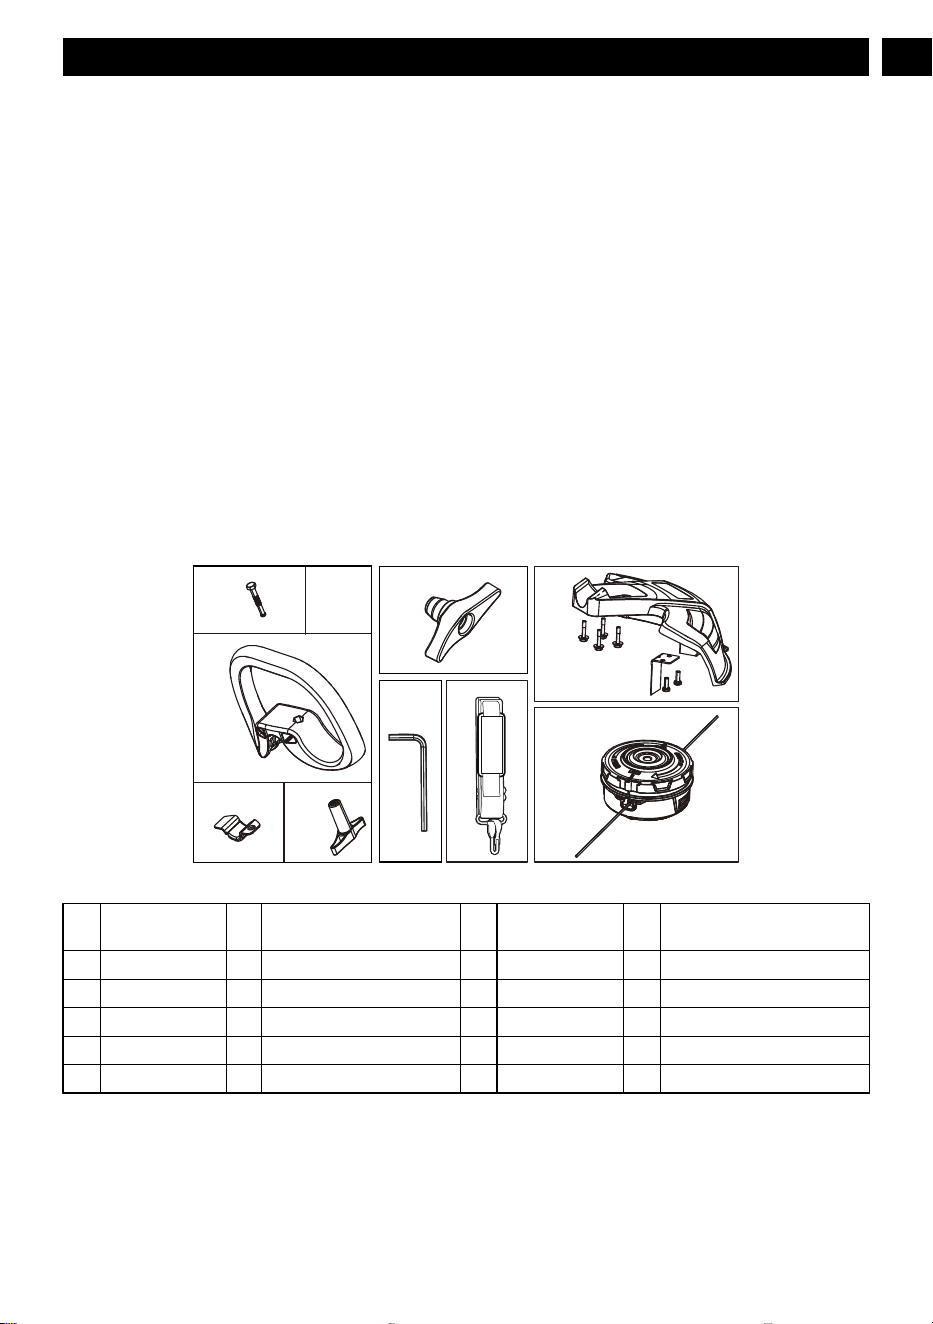
15 REPLACEMENT PARTS
2
3 4
5
6
1
1.1
1.2
1.3 1.4
No. Part No. Qt
y
Description No. Part No. Qty Description
1 R0201836-00 1 Auxiliary handle assembly 2 R0201784-00 1 Coupler knob
1.1 R0201826-00 1 Bolt 3 R0201770-00 1 Allen key
1.2 R0201827-00 1 Auxiliary handle 4 RB37902144 1 Shouler strap
1.3 R0201828-00 1 Lower clamp 5 R0201835-00 1 Guard assembly
1.4 R0201833-00 1 Knob 6 R0201834-00 1 Trimmer head assembly
15
English
EN
