Loading ...
Loading ...
Loading ...

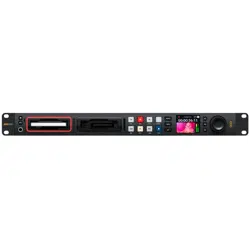
You can confirm the SDI or HDMI video signal by monitoring the built in LCD on the front panel.
TIP If you don’t see the video source on the LCD, it might be because you have
connected to the other source input. Press the ‘input’ button on the front panel to cycle
through the SDI or HDMI sources.
Audio is embedded in the SDI or HDMI signal so you don’t have to worry about connecting
audio. You can check the audio levels by observing the meters next to the video image
on the LCD.
Checking Audio
If your HyperDeck features a speaker and headphone port on the front panel, you can quickly
check your audio using the built in speaker or by plugging in headphones. To listen, press and
hold the speaker button and rotate the search dial to adjust the volume. A volume indicator will
appear on the LCD home screen.
Double press the speaker button to keep the speaker enabled. Double press again to disable.
Plugging in Media
All HyperDeck Studio models ship ready to record immediately without having to configure any
settings. All you need is a formatted SSD or SD card.
You can easily format media via the LCD menu settings. You can also format using a computer.
Refer to the ‘Formatting Media’ section in this manual for more information on how to format
your media. You can also find information about the types of media that are best for recording
video and a list of recommended drives and cards.
To plug in an SSD:
1 Hold a 9.5mm SSD with the connection pins facing the bottom and aligned with your
HyperDeck’s drive bay. Gently push the SSD into the drive bay until you feel it slot
into place.
2 Your HyperDeck Studio will verify the SSD. This is shown by an illuminated green
indicator surrounding the drive bay. When the green indicator stops, your HyperDeck
isready to record!
The drive indicator will illuminate green when reading the media and then turn off when your
HyperDeck is ready to record
7Getting Started
Loading ...
Loading ...
Loading ...