
HyperDeck
Dısk Recorders
HyperDeck Disk Recorders
July 2021
Installation and Operation Manual

English
Welcome
Thank you for purchasing your Blackmagic HyperDeck disk recorder!
When we designed the original Blackmagic HyperDeck disk recorders back in 2011,
wewanted to make it easier and more affordable to record and play back professional
video on removable 2.5” Solid State Disks.
Now we are excited to present our new range of HyperDeck disk recorders that let you
record HD and Ultra HD video using SD cards, SSDs and now USB flash disks. Youcan
even connect a Blackmagic MultiDock 10G and record or play back files on external
hard drives!
HyperDeck Studio Plus and Pro models feature familiar broadcast deck controls with a
search dial for jog, shuttle and scroll playback. The search dial’s clutch mechanism lets you
feel the playback so you can search through your clips without taking your eyes off the
monitor. They even include a front headphone connection and speaker so you can quickly
check your audio directly from your HyperDeck, plus many more features!
We hope you get years of use from your HyperDeck disk recorder and that it will serve
youwell with your productions!
Please check the support page at www.blackmagicdesign.com for the latest version of
this manual and updates to the HyperDeck software. Keeping your software up to date will
always ensure you get all the latest features. When downloading software, please register
with your information so we can keep you updated when new software is released. We are
constantly working on new features and improvements, so we would love to hear from you!
Grant Petty
CEO Blackmagic Design

Contents
Introducing HyperDeck Disk Recorders 5
Getting Started 6
Plugging in Power 6
Connecting Video and Audio 6
Checking Audio 7
Plugging in Media 7
Recording Video 9
Recording on multiple media 9
Playback 10
Playing Video with HyperDeck 10
Using the Search Dial 11
Using the Front Panel 13
Media Slot Indicators 13
Using the LCD Menu 14
Settings 15
Rear Panel 27
Using the Monitor Output 29
Storage Media 32
SD Card 32
SSD 34
EXT Disk 35
Formatting Media 37
Preparing Media on a Computer 37
Using your HyperDeck asa Webcam 38
Setting the Webcam Source 38
Setting up Open Broadcaster 39
Blackmagic HyperDeck Setup 41
Using HyperDeck Setup 41
LUTs Page 42
Updating the Internal Software 43
Teranex Mini Rack Shelf 44
RS-422 Control 45
Transferring Files over a Network 50
Connecting to an ATEM Switcher 52
Understanding Post
Production Workflows 53
Developer Information 54
Blackmagic HyperDeck Ethernet
Protocol 54
Protocol Commands 54
Protocol Details 58
Help 69
Regulatory Notices 70
Safety Information 71
Warranty 72
4Blackmagic HyperDeck Studio

Introducing HyperDeck Disk Recorders
Your Blackmagic HyperDeck disk recorder is part of a family of HD and 4K disk recorders
designed to fit your own production workflow. HyperDeck Studio HD Pro and HyperDeck
Studio 4K Pro are built to fit inside a single rack unit and are large enough to record and
play back files on both SD cards and 9.5mm SSDs.
HyperDeck Studio HD Mini and HyperDeck Studio HD Plus are smaller disk recorders
that can be used comfortably on your desktop or fitted in a rack unit via an optional
Teranex Mini Rack Shelf.
All models can also record to USB flash disks and support HD video up to 1080p60.
HyperDeckStudio 4K Pro supports Ultra HD video up to 2160p60.
Recording and playback functions generally operate the same way on all models, with extra
features on larger models giving you greater playback control and broader connection options.
This instruction manual provides all the information you need to get started with your
HyperDeck disk recorder and master all the controls and features!
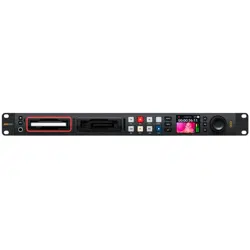
HyperDeck Studio HD Mini HyperDeck Studio HD Plus
HyperDeck Studio HD Pro and HyperDeck Studio 4K Pro
5Introducing HyperDeck Disk Recorders

Getting Started
Getting started with your HyperDeck Studio disk recorder is as easy as connecting power,
plugging in your video sources and destination equipment and inserting your SSDs or SD cards.
Plugging in Power
To power your HyperDeck, plug a standard IEC cable to your HyperDeck’s power input on
therear panel.
If your HyperDeck model has an additional IEC power input, you can connect to another power
source for redundancy. For example, connecting the second input to an uninterrupted power
supply, or UPS, will instantly take over if the primary source fails.
All models also include a 12V DC input, which lets you connect power from an external
12V battery.
HyperDeck Studio HD Mini can also be powered via an AC plug pack. If your power supply has a
locking ring, secure the connection to HyperDeck Studio HD Mini by tightening the connector
to the unit. This locks the power cable in place to prevent accidental disconnection.
Once powered, the LCD display will prompt you to select your language. Using the search dial,
scroll to the language you wish to use and press the flashing ‘set’ button. This will take you to
the home screen. For more information about the home screen and LCD menus, refer to the
‘using the front panel’ section.
Connecting Video and Audio
Plug your source video to the SDI or HDMI inputs, and your destination equipment to the SDI or
HDMI outputs. For example, a source could be a digital cinema camera and a destination could
be an HDMI television or SDI monitor.
All HyperDeck models support HD video up to 1080p60. HyperDeck Studio 4K Pro has 12G-SDI
connectors so you can input or output Ultra HD up to 2160p60 using a single BNC cable.
6Getting Started

You can confirm the SDI or HDMI video signal by monitoring the built in LCD on the front panel.
TIP If you don’t see the video source on the LCD, it might be because you have
connected to the other source input. Press the ‘input’ button on the front panel to cycle
through the SDI or HDMI sources.
Audio is embedded in the SDI or HDMI signal so you don’t have to worry about connecting
audio. You can check the audio levels by observing the meters next to the video image
on the LCD.
Checking Audio
If your HyperDeck features a speaker and headphone port on the front panel, you can quickly
check your audio using the built in speaker or by plugging in headphones. To listen, press and
hold the speaker button and rotate the search dial to adjust the volume. A volume indicator will
appear on the LCD home screen.
Double press the speaker button to keep the speaker enabled. Double press again to disable.
Plugging in Media
All HyperDeck Studio models ship ready to record immediately without having to configure any
settings. All you need is a formatted SSD or SD card.
You can easily format media via the LCD menu settings. You can also format using a computer.
Refer to the ‘Formatting Media’ section in this manual for more information on how to format
your media. You can also find information about the types of media that are best for recording
video and a list of recommended drives and cards.
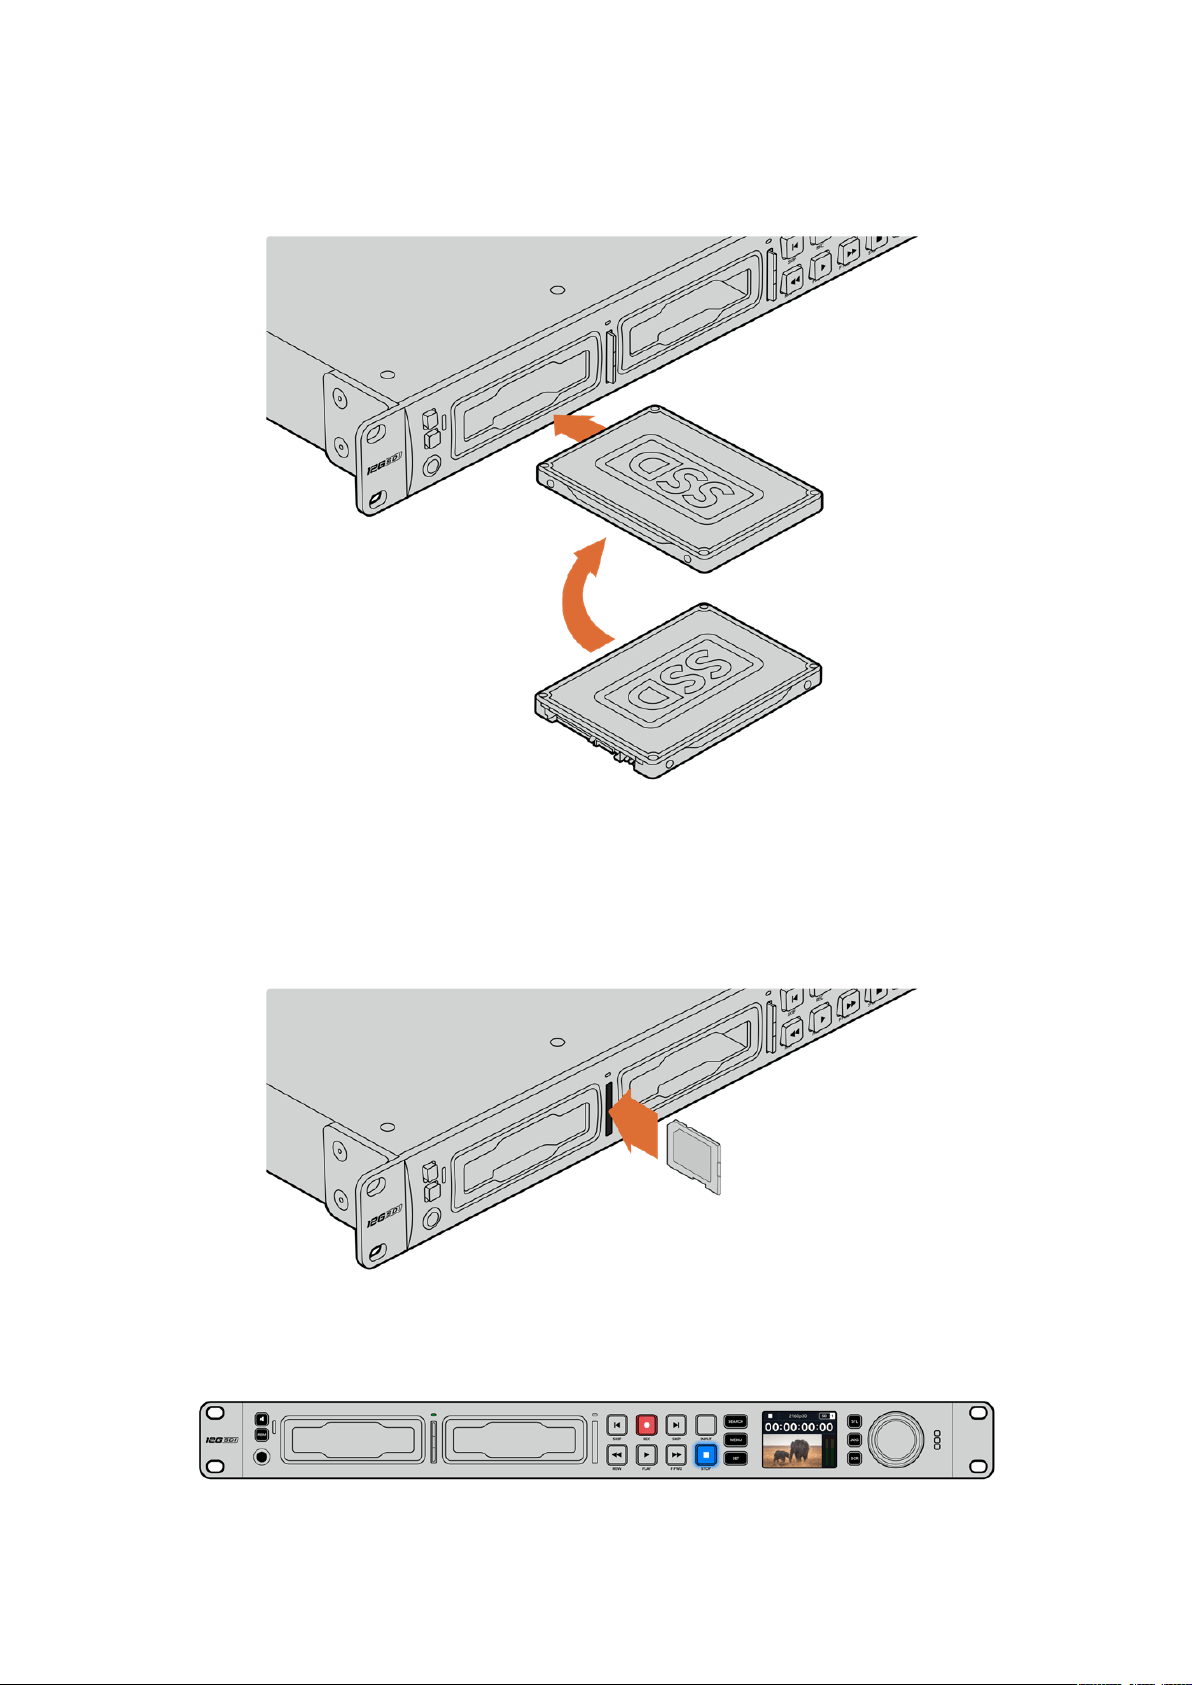
To plug in an SSD:
1 Hold a 9.5mm SSD with the connection pins facing the bottom and aligned with your
HyperDeck’s drive bay. Gently push the SSD into the drive bay until you feel it slot
into place.
2 Your HyperDeck Studio will verify the SSD. This is shown by an illuminated green
indicator surrounding the drive bay. When the green indicator stops, your HyperDeck
isready to record!
The drive indicator will illuminate green when reading the media and then turn off when your
HyperDeck is ready to record
7Getting Started
To remove the SSD, grip the outer edge and gently pull away from the unit. You will feel the
SSD disconnect from the slot.
Hold your SSD with the connection pins facing the bottom, alignedwith your HyperDeck
Studio’sdrive bay and gently pushtheSSD into the drive bay until you feel it slot into place
To plug in an SD card:
1 Hold the SD card with the gold connectors facing your HyperDeck Studio’s LCD and
align it with the media slot. Now gently push the card into the slot until you feel it lock
firmly into place.
2 Your HyperDeck Studio will verify the SD card. This is shown by an illuminated green
indicator above the SD card slot.
When the indicator turns off and the stop button is illuminated, your HyperDeck Studio is ready to record.
8Getting Started

TIP To remove the card, gently push until you feel it click, then release. The card will
eject a short distance, allowing you to hold the edge of the card and remove it from
the slot.
Your HyperDeck Studio is now ready for recording and playback!
Recording Video
After confirming that your video source is displayed on the LCD, you can start recording
straight away!
To start recording, press the record button. When recording to an SD card, the slot indicator will
illuminate red along with the record button, the play button will illuminate and a record icon will
appear in the LCD home screen. When recording to an SSD, the dynamic media indicator will
illuminate red.
While HyperDeck Studio is recording, the storage indicator on the LCD will alternate between displaying
the active slot and record time remaining on the media.
To finish the recording, press the stop button. Press the ‘play’ button to start playback
immediately.
TIP If you want to change the codec being used, you can change the codec setting
using the Blackmagic HyperDeck Setup utility. For more information, refer to the
‘Blackmagic HyperDeck Setup’ section later in this manual.
Recording on multiple media
When there is less than 3 minutes of record time remaining on your SD card or SSD, the
timecode counter on your HyperDeck Studio’s LCD will turn red and the ‘stop’ button will
flash slowly.
This also means there is no second disk with space that recording can continue onto. In this
case, you simply need to insert a disk with space so recording can continue. Once you insert a
blank disk into an empty slot or the ext disk input, the slow flashing will stop and the timecode
9Recording Video

will revert to white. This means HyperDeck can continue to record, because this second disk
has been checked ok and there is space to keep recording.
When more than one media is connected to HyperDeck Studio, the recording will spill from one
disk or drive to the next. This will be shown in the upper right corner of the home screen.
Swapping Disks During Recording
If you want to change the disk you are recording to at any time, and you have a second disk
thathas free space, then simply hold down the record button and the recording will move from
the current disk to the next disk. This is very useful when you want to get that disk out of the
HyperDeck without pausing recording. This can happen during live events when you need to
get an important recording out to another location, but you don’t want to miss anything or
stoprecording.
If the record button flashes during a recording, there may be problems with your media
resulting in dropped frames. This can occur when recording Ultra HD using slower media,
forexample, recording 2160p30 ProRes HQ uses a higher data rate compared to ProRes Proxy,
so your SD cards or SSDs need to be the fastest available. For a list of approved media, refer
the ‘storage media’ section in this manual.
Playback
The transport controls feature buttons commonly found on traditional broadcast decks including
‘record’, ‘rewind’, ‘play’, ‘fast fwd’ and ‘stop’. ‘Skip’ reverse and ‘skip’ forward buttons operate
like previous and next buttons so you can quickly navigate from clip to clip.
Playing Video with HyperDeck
1 Press the ‘play’ button once for instant playback and you’ll see your video on the LCD
and any displays connected to your HyperDeck’s video outputs.
2 To skip to the next clip, press the ‘next clip’ button on the control panel.
3 Press ‘previous clip’ once to go to the start of the current clip or press twice to skip
back to the start of the previous clip.
Press the play button on your HyperDeck’s control panel to play back a clip and press
theforward or reverse skip buttons to restart the current clip or skip to a different one
10Playback

TIP To play back video files on your HyperDeck, you will need to set the codec
tomatch. You can do this using the LCD menu. Refer to the ‘using the LCD menu’
and‘settings’ sections for more information.
Loop Playback
If you want playback to continue indefinitely, you can set your HyperDeck to loop by pressing
the play button again during playback. When loop playback is enabled, you will see the loop
icon appear on the LCD. There are two loop modes available.
Loop clip Loops the currently playing clip.
Loop all clips Loops all recorded clips on your media.
Dynamic LEDs
During playback, the bezel surrounding the drive bay illuminates green in a circular motion to
indicate the playback speed and direction
TIP If the play button flashes on HyperDecks that record on SSDs, this means the disk
is not fast enough and playback cannot keep up. We recommend you change to a
more compressed recording format such as H.264 or use a faster recommended SSD
or external disk for Ultra HD recording.
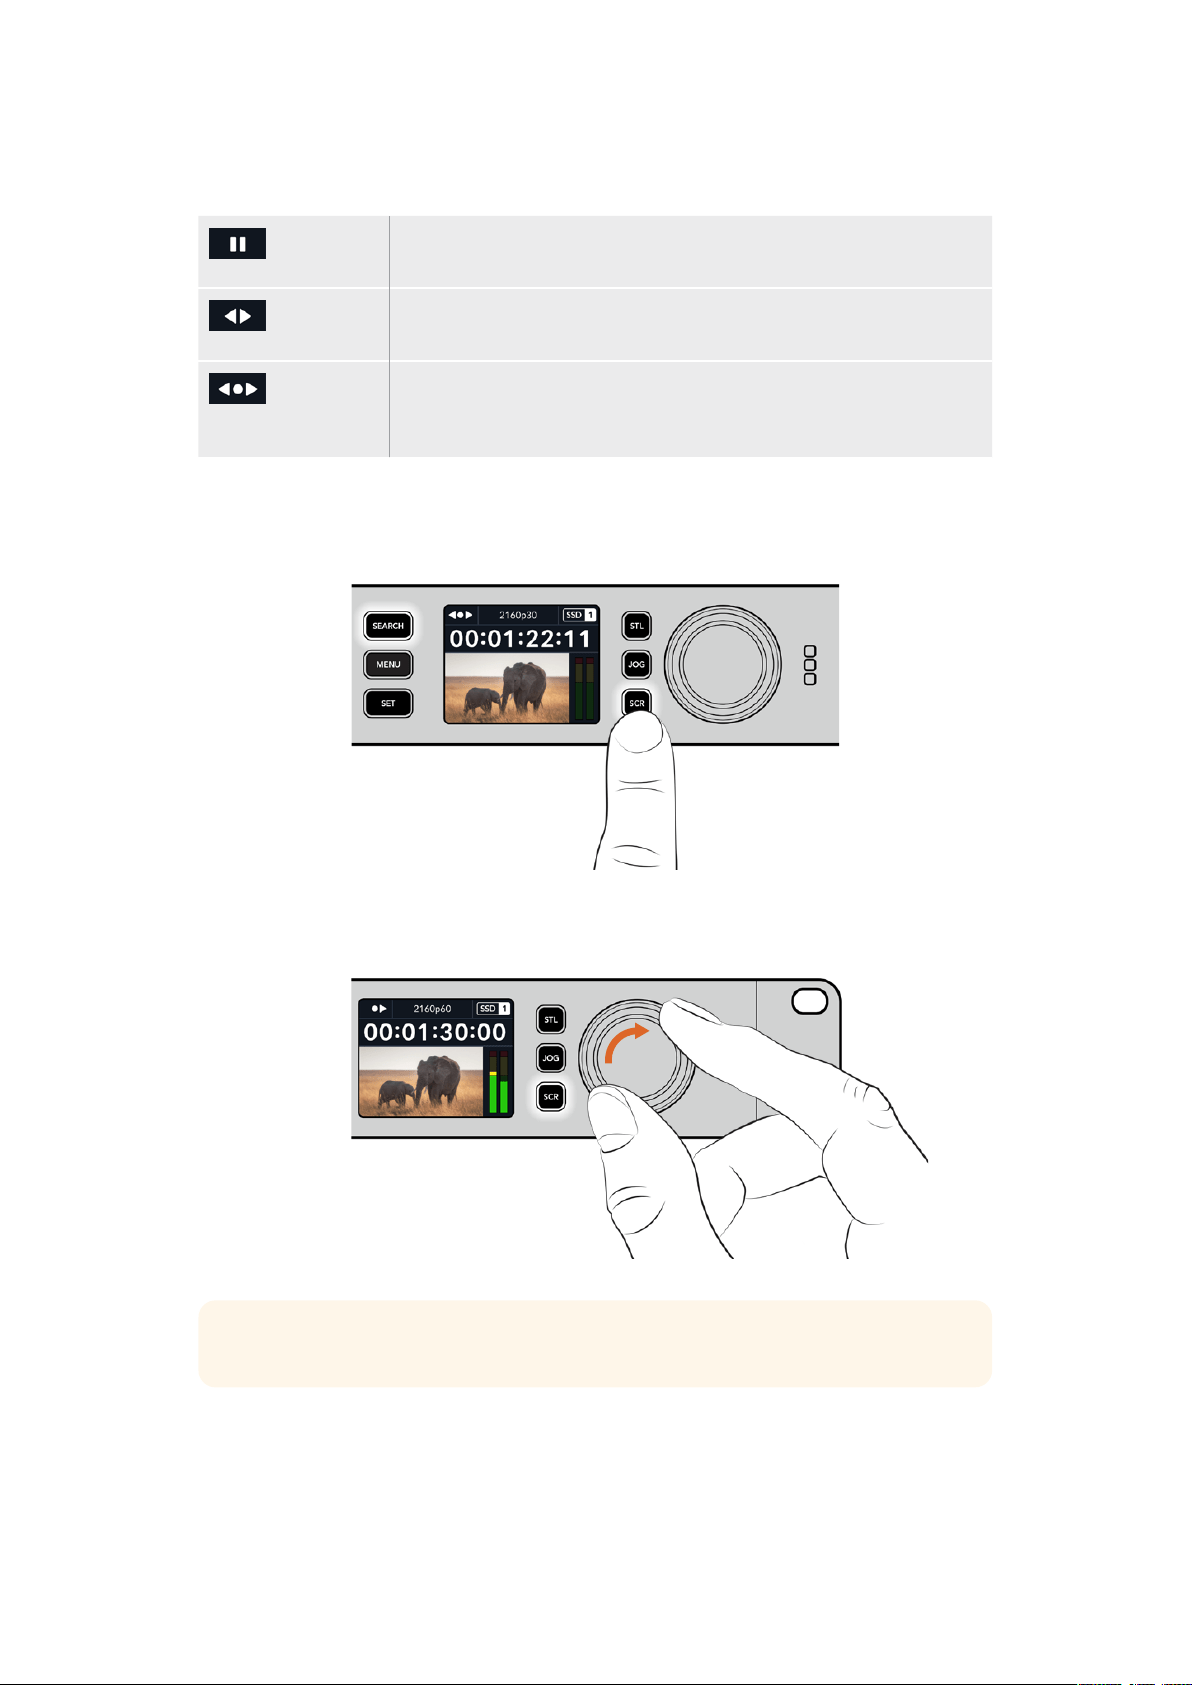
Using the Search Dial
Using the search dial during playback is a fast way to move through your clips and select
specific moments to play, or review them frame by frame. This can be important if you need
tolocate a specific moment in a clip, either by visually monitoring the clip as you turn the dial,
orby searching for a specific timecode point. It is also helpful for parking the playhead at a
specific cue point, ready for the clip to be rolled to air during a live broadcast.
Press the ‘search’ button to cycle through search dial modes
11Playback
Search dial modes include Jog, Shuttle and Scroll.
Jog Plays forwards or backwards through the clip frame by frame allowing
precise control.
Shuttle Plays forwards or backwards at a faster rate. The playback will vary based
on how far you turn the dial.
Scroll Even faster playback depending on how far you turn the dial. This mode
ishelpful to move quickly through a long clip when searching for a
specificmoment.
Larger models have dedicated search mode buttons and feature a search dial with a built in
clutch mechanism that provides tactile feedback during use. This allows you to feel your way
through the clip while watching it on a television or monitor.
Press the dedicated ‘JOG’, ‘STL’ and ‘SCR’ buttons
to select jog, shuttle and scroll search modes
TIP To resume normal playback, press the ‘play’ or ‘stop’ button.
12Playback

Using the Front Panel
When recording or playing video with HyperDeck, any information you need to know is
displayed on the unit itself via LED indicators for each media slot and the built in LCD.
HyperDeck Studio Home Screen
Media Slot Indicators
When you first power on HyperDeck, or any time you insert an SSD or SD card, the slot indicator
will illuminate green while checking the media and then switch off. If the disk has notbeen
formatted correctly, or fails to work, the slot will illuminate solid orange until the disk is removed.
In this case, check if the disk is formatted correctly and also that it works with a computer.
HyperDeck’s media slot indicators illuminate to let you know the status
ofthedisk,for example red when recording, and green during playback
Time Remaining and Media Indicator –
During recording, the icon will consistently
change between the time remaining on the disk
and the current drive in use. During playback,
the active media icon will be displayed.
Format Indicator – Shows the format of the
input or file for playback. It will also indicate
the input source when toggling the ‘input’
button on some HyperDeck Studio models
along with the current volume when adjusting
the speaker and headphone volumes via
the front panel button and search dial.
Status Indicator – Displays the
current status of the deck, including
the current playback mode.
Audio Meters – Displays
the audio levels of the source
or file during playback.
13Using the Front Panel

Using the LCD Menu
Press the ‘menu’ button on the front panel to open the menu settings.
Turn the search dial or press the skip buttons to navigate between the menu options and press
‘set’ to select a submenu.
Turn the search dial to move through the menu settings
With the menu item selected, press the ‘set’ button.
Adjust settings using the search dial or skip fwd and skip bwd buttons and confirm them by
pressing the ‘set’ button.
Press ‘menu’ to step back through the options and return to the home screen.
14Using the Front Panel
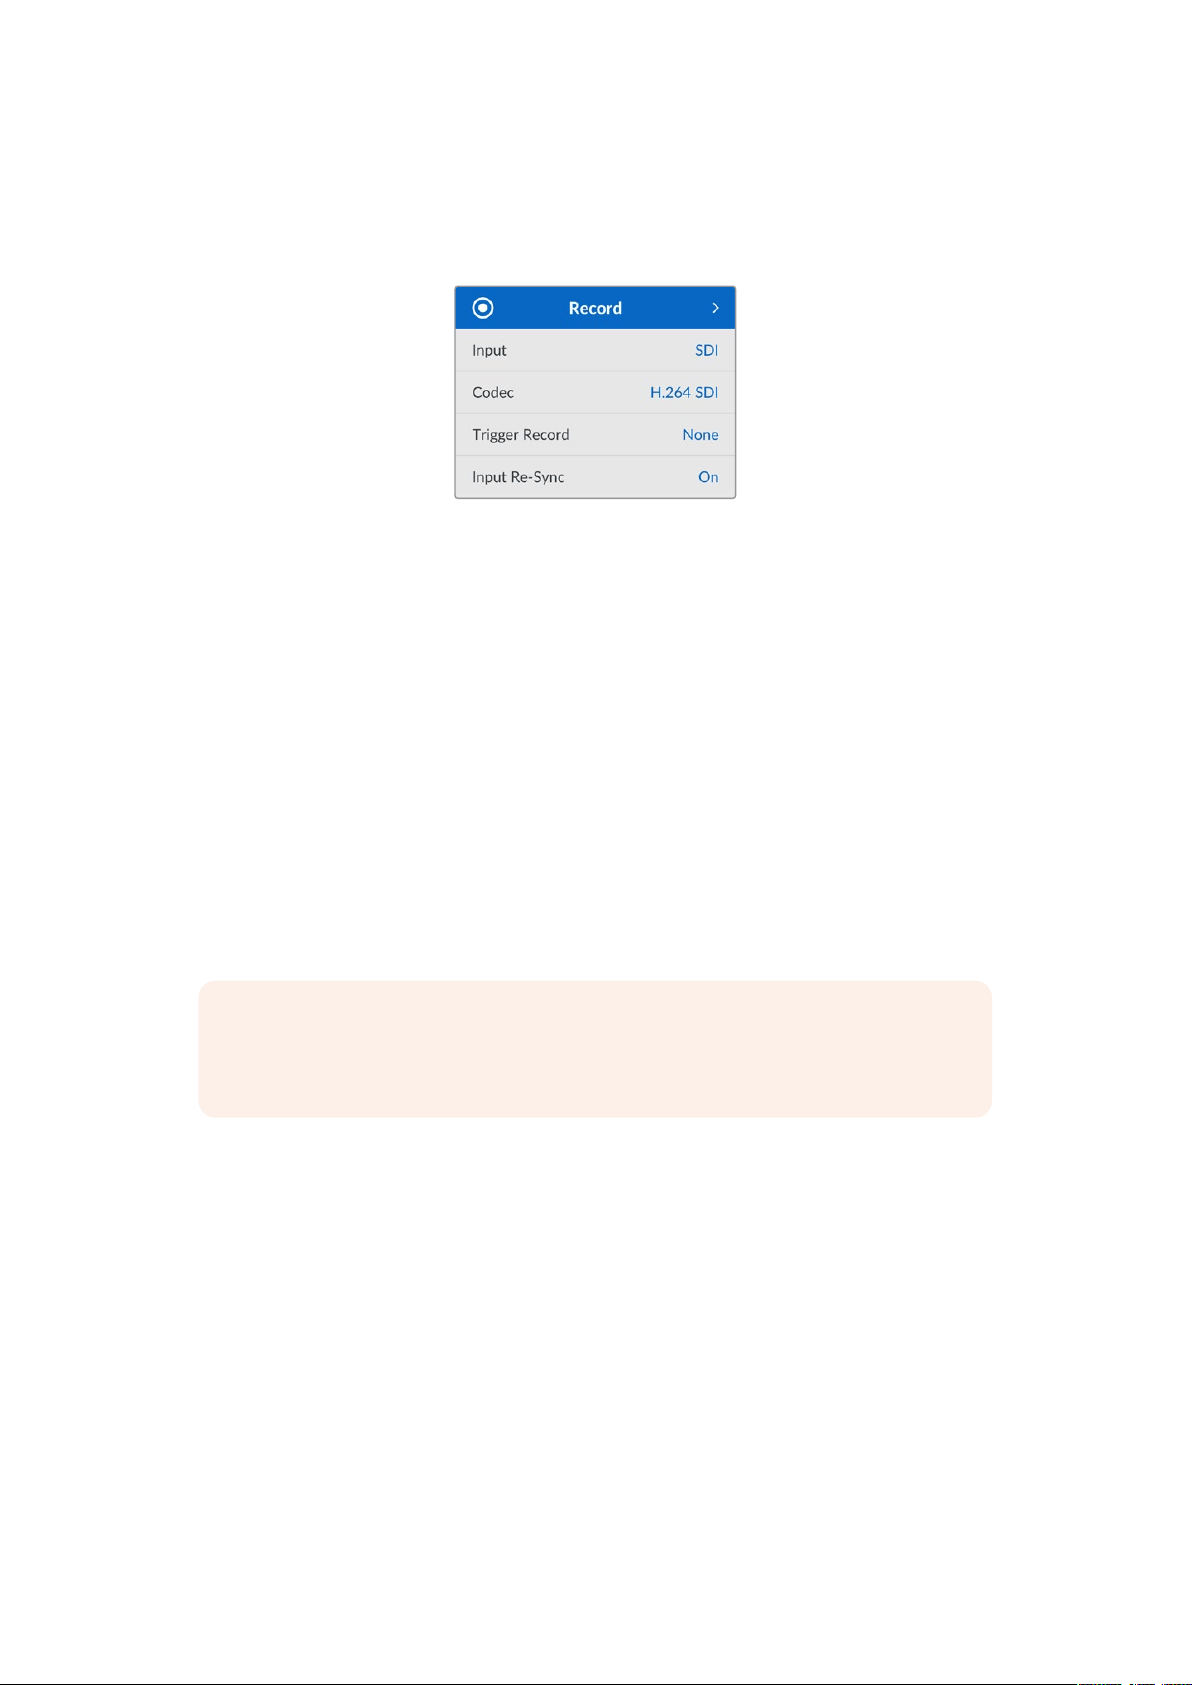
Settings
Record Menu
Input
Select your SDI or HDMI source using the input setting. You can also change your input source
using the ‘input’ button on the front panel.
Codec
All HyperDeck Studio models can record compressed video using H.264, Apple ProRes and
DNxHD codecs. HyperDeck Studio 4K Pro models can also use H.265 and DNxHR codecs
when recording 4K media.
Trigger Record
There are two trigger record modes available, video start/stop and timecode run.
Some cameras, such as the URSA Mini, send a signal over SDI to start and stop recording on
external recorders. Tapping on ‘video start/stop’ will trigger the HyperDeck to start or stop
recording when the record button is pressed on the camera.
Use the time ‘timecode run’ option to trigger the unit to start recording when it receives a valid
timecode signal via the inputs. When the signal stops, recording will also stop. Disable trigger
recording by tapping the ‘none’ option.
NOTE When recording from an HDMI or SDI camera, make sure the output is clean
with overlays turned off as any overlays that are present in your camera’s video output
will be recorded with your image.
Input Re-Sync
This setting will enable a re-sync on the video input and ensure video is locked to the external
reference before recording. The video output will remain locked to reference even when
switched to recording, as the input itself is being resynchronized. This feature is used for ISO
recording where you need multiple decks timecode locked but some sources are non-sync.
This feature is normally turned off so video inputs are recorded without frames being added
orremoved from the input video.
All broadcast decks can normally use a reference input to lock the video output during
playback. This means the output of the HyperDeck playback will be locked to the reference
input so it won’t need to be resynchronized when connected to a large broadcast system.
However, when the deck goes into record, the output will switch over to the input because
younormally want the input video recorded untouched with the same untouched video sent
toother downstream equipment that’s connected to the HyperDeck video outputs.
15Settings

However, HyperDeck Studio has a unique feature that helps with ISO recording. It will allow
youto completely reverse this process and resynchronize the video input to the reference
input. What this means is you can connect a non-sync source to the HyperDeck and it will
retime the video input to the video reference and then record it.
Non-sync sources could be computers, consumer cameras or any video equipment that is
unable to have a reference connected to it. It could even be an incoming video feed from
another studio or external broadcaster. Non-sync sources cause problems with ISO recording,
as you need the timecode on all recordings to match perfectly over time. A non-sync source
willrun faster or slower than your other sources and slip out of sync vs the timecode quite
quickly during the recording. This makes multi-cam editing a horrific process as the sources
won’t have matching timecode.
With input re-sync turned on, the HyperDeck video input will be analyzed and if it starts
fallingbehind a frame will be repeated, or if it starts running ahead of the reference, a frame
willbe removed. This is called resynchronization and the processing on the input is called a
frame re-sync. It means the timecode in the clips being recorded on all decks will have the
same events happening at the same timecode. It makes multi-cam editing possible.
Of course the downside is you are adding some frames to the input, or removing some
framesfrom the input before recording. This is why it’s best to leave this feature turned off
andto only use it when you absolutely cannot do anything to connect a reference to an ISO
source because it’s a computer or consumer device.
However, there is one situation where you can turn the input re-sync feature on and use it.
When input re-sync is turned on, the HyperDeck video output will remain reference locked
even when the deck is recording. What this means is you can connect the SDI output of the
HyperDeck to a camera to lock the camera to the reference via the program return feed.
Agood example is the Blackmagic Studio Camera 4K Pro and it can set its reference to the
external video. Then the camera feed will be reference locked from the HyperDeck and the
HyperDeck input re-sync won’t have to add or remove frames because the camera is not
running fast or slow.
The input re-sync only does something if the video input is not locked to the same reference
asthe HyperDeck. But in this case, the HyperDeck output is the reference source to the
camera and the HyperDeck is locked to its video reference input. If you have multiple
HyperDecks all locked together by looping the reference connections, then all cameras and
HyperDecks will be locked as a single group. Then if one of the HyperDecks in a group has
anon-sync source, such as a computer, then that one input will be resynchronized, but the
other sources won’t need anything.
The re-sync is automatic so you can just connect sources and it will work. The input re-sync
feature can be extremely powerful, however, it’s important to know when it’s going to do
something and what it will do. Try some experiments with multiple HyperDecks and multi-cam
editing software to see how it works! It’s a fantastic way to do program production that’s
very fast.
16Settings

Monitor Menu
The monitor menu is included on HyperDeck Studio models with the monitor out connection
onthe rear panel.
Clean Feed
Turning clean feed to on will remove the status text from appearing on displays connected to
the monitor out on the rear of HyperDeck Studio. For more information on the monitor out
display, including what information is displayed, refer to the monitor out section later in
this manual.
3D LUT
Display LUTs can be especially helpful when using the HyperDeck Studio as a field recorder.
They work by telling the unit what color and luminance output to display. This can be useful
forwhen you are using the ‘film’ dynamic range on your camera which has an intentionally
undersaturated, ‘flat’ appearance. By applying a display LUT, you can get an idea of what your
video will look like after it has been graded.
Display LUTs are selected via Blackmagic HyperDeck Setup can be applied on the SDI
monitor out.
To turn a 3D LUT on or off:
1 Press the ‘menu’ button and using the search dial, scroll to the ‘monitor’ menu.
2 Press the ‘set’ button.
3 Using the search dial, scroll down until ‘3D LUT’ is highlighted blue.
4 Toggle the set button to turn the LUT on or off.
For more information on selecting a LUT, refer to the Blackmagic HyperDeck Setup section
laterin this manual.
TIP For more information on the monitor out view, see the ‘monitor out’ section later in
the manual.
17Settings

Audio Menu
Recorded Audio Channels
HyperDeck Studio can record up to 16 channels of PCM audio at a time. To select the number
ofchannels to record, expand the recorded audio channels list and select 2, 4, 8 or 16 channels.
If the codec is set to H.264 or H.265, you can also select 2 channels of AAC audio so you can
upload recordings directly to YouTube. This setting also selects the number of channels to
appear via the monitor out connection.
Monitor Channels
When recording more than two channels, you can select which channels you want to see on
thefront panel LCD. This can be done via the monitor channels option. For HyperDeck Studio
models featuring a front panel speaker, this setting also sets which channels of audio will play
back through the speaker and headphones connection.
Audio Meters
The built in LCD displays audio meters for embedded audio channels. You can select to display
PPM or VU Meters. To change your meter type, expand the menu setting and select your
preferred audio meter display from the options.
Headphone Level
For models featuring a headphone port on the front panel you can adjust the headphone
volume via the headphone level setting.
Speaker Level
Adjust the speaker volume by turning the search dial. The default level is 50%.
TIP Headphone and speaker volume can also be adjusted directly via the front panel.
Press and hold the speaker button and turn the search dial to increase or decrease the
playback volume. The volume level will appear in the upper center of the front panel.
18Settings

Storage Menu
Format Media
SD Cards, SSDs and media connected via the rear ext disk connection can be formatted
directly on the unit or via a Mac or Windows computer.
Preparing Media on HyperDeck Studio:
1 Using the search dial and set button, select format media.
2 Select the media to format from the list and press set.
3 Choose the format and press set.
4 A confirmation window will appear detailing which card is to be formatted and the
selected format option, select format.
5 A formatting window will appear once completed, select Ok.
HFS+, is also known as Mac OS X Extended, and is the recommended format as it supports
‘journaling’. Data on journaled media is more likely to be recovered in the rare event that your
storage media becomes corrupted. HFS+ is natively supported by Mac. exFAT is supported
natively by Mac and Windows without needing any additional software but does not support
journaling.
To format media on a Mac or Windows computer, refer to the formatting media section in
this manual.
Setup Menu
19Settings
Name
When more than one HyperDeck Studio is on the network, you may wish to give them discrete
names. This can be done via Blackmagic HyperDeck Setup or Blackmagic HyperDeck Ethernet
Protocol using a terminal application.
Language
HyperDeck Studio supports 13 languages, including English, Chinese, Japanese, Korean,
Spanish, German, French, Russian, Italian, Portuguese, Turkish, Ukrainian and Polish.
To select the language:
1 Once the setup menu is highlighted, press set.
2 Scroll the search dial down to select language and press set.
3 Using the search dial to select the language and press set. Once selected you will
automatically return to the setup menu.
Date
To adjust the date, select the date field and press set. Using the search dial you can select the
day, month and year. This will populate the timestamp file suffix.
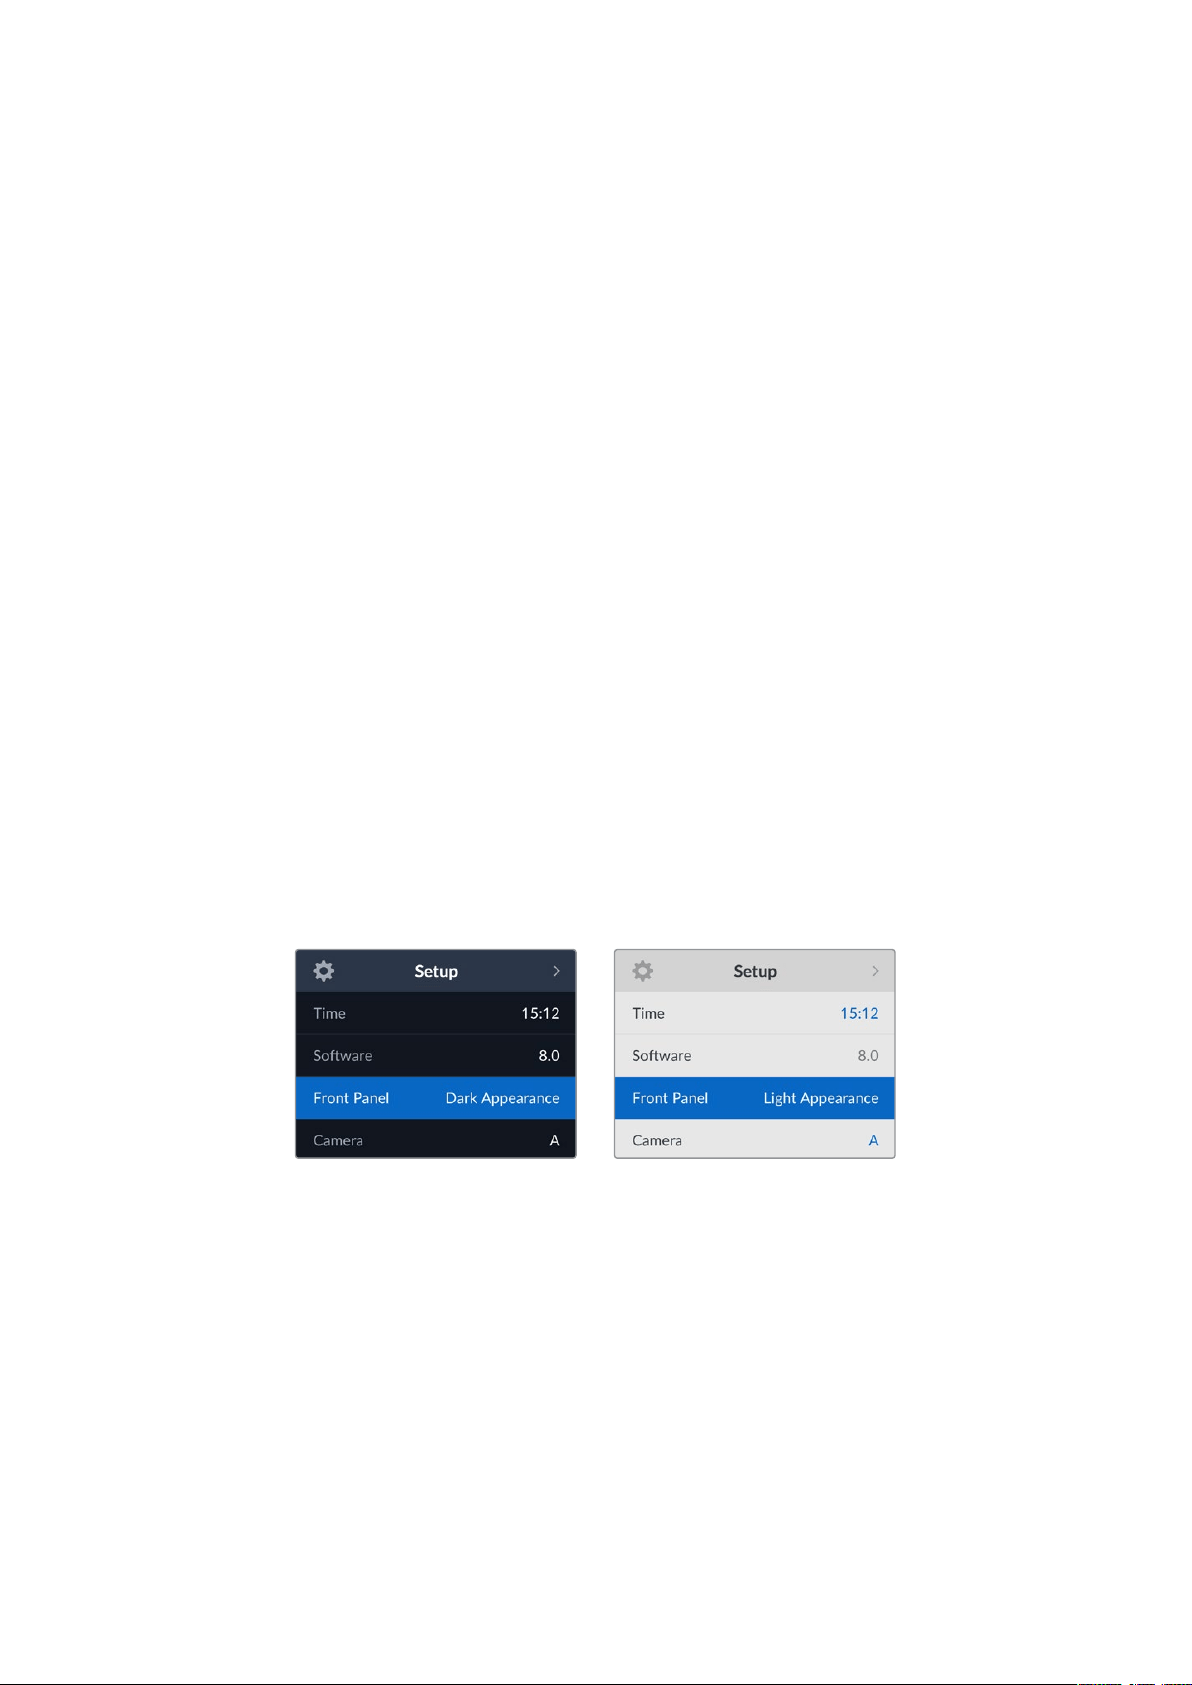
Time
To adjust the time, select time and press set. Use the search dial to adjust the hours and
minutes. HyperDeck Studio clock is a 24 hour clock.
Software
Displays the current software version.
Front Panel
Set your HyperDeck’s front panel to ‘light’ mode for a brightly illuminated LCD. Use ‘dark’
modefor dimly lit environments where a bright LCD may be distracting, for example multiple
HyperDeck units mounted in a rack in a production facility.
20Settings

Camera
This setting is helpful when using HyperDeck to record ISO files from multiple cameras
andthen editing them on a multicamera timeline in DaVinci Resolve.
Each individual camera identification letter will appear in the files’ metadata, allowing
DaVinciResolve to identify each angle easily when using the sync bin feature.
Assign you camera using characters A-Z or 1-9
Default Standard
Sometimes the HyperDeck Studio does not know what video standard you want to use.
Thissetting will let the HyperDeck know the video standard you want to use most of the time.
A good example is if you have turn on a HyperDeck Studio, it has no video input connected
andyou insert a disk with files on it with 2 different video standards. Which video standard
should the HyperDeck play? The default video standard will give it an indication which video
standard you prefer and it will switch to that format and play those files.
The default video standard is also useful when you first turn on a HyperDeck, and it has no
video input and no media disk inserted. In this case, the HyperDeck Studio does not know
which video standard to use for the monitoring output. The default video standard will guide
iton what to do.
However, the default video standard is only a guide. It won’t override anything. So if you had
amedia disk with only 1 type of video file on it and you press play, the HyperDeck Studio will
switch to that video standard and play. It will ignore the default video standard because it’s
obvious you just want to play the files on the disk.
It’s a similar situation with recording. If you press record, the HyperDeck will just record whatever
video standard is connected to the video input. Plus, once you have done the recording, the
HyperDeck Studio will playback the same video standard files on the disk, even if there are
other files on the disk that match the default video standard. It’s assumed you want to playback
the same video standard as you just recorded. If you unplug the media disk and plug it back in
again, only then will the default video standard be used to choose which type of files to
play back.
The default video standard is only a guide to help the HyperDeck Studio make decisions about
what to do when it’s not sure. It’s not an override that forces the deck to behave in any
specific way.
21Settings

Network Settings
Protocol
Blackmagic HyperDeck is shipped set to DHCP, so once connected, your network server will
automatically assign an IP address and no other network settings will need to be adjusted.
Ifyou need to set a manual address, you can connect via a static IP.
With ‘protocol’ selected press the flashing ‘set’ button to access the menu, scroll to ‘Static IP’
and press ‘set’.
IP Address, Subnet Mask and Gateway
Once Static IP is selected, you can enter your network details manually.
To change the IP address:
1 Use the search dial to highlight ‘IP address’ and press the flashing ‘set’ button on your
HyperDeck’s front panel.
2 Using the search dial, adjust the IP address, rotate the search dial to adjust your IP
address, pressing ‘set’ to confirm before adjusting the next set of values.
3 Press ‘set’ to confirm the change and move to the next value.
When you have finished entering your IP address, you can repeat these steps to adjust the
Subnet Mask and Gateway. Once finished, press the flashing ‘menu’ button to exit and return to
the home screen.
22Settings

Timecode Settings
Input
There are five timecode input options available when recording.
Video Input Selecting video input will take the embedded timecode from SDI and HDMI sources
with SMPTE RP 188 metadata. This will maintain sync between your SDI orHDMI
source and the file recorded on the HyperDeck Studio.
External Click this option when using the timecode in connection on the rear panel.
Internal Use this option to record time of day timecode via the built in timecode generator.
Last Clip
Regen
By selecting ‘last clip regen’ for your timecode input, each file will start one frame
after the last frame of the previous clip. For example, if your first clip ends on
10:28:30:10, the next clip timecode will start at 10:28:30:11.
Preset If you want to set a timecode manually, select the preset option. Recorded clips
will start at the timecode set via the preset later in the manual.
Drop Frame
For NTSC sources at frame rates of 29.97 or 59.94, you can select ‘drop frame’ or ‘non-drop
frame’ timecode. If the source is unknown, select ‘default’. This will maintain the standard of the
input, or default to drop frame if there is no valid timecode.
Preset
You can set your time code manually by pressing the set button and entering the start time
code using the search dial and set button. Make sure the ‘preset’ option is selected under the
input menu.
Output
Select your timecode options for your outputs.
Timeline To output a continuous timecode for all clips recorded on a card or drive,
selecttimeline.
Clip Selecting the clip option will output the time code of each individual clip.
SDI Output
23Settings

3G-SDI Output
Some broadcast equipment can only receive level A or level B 3G-SDI video.
To maintain compatibility with other broadcast equipment, select Level A for direct stream
3G-SDI or Level B for dual stream multiplexed 3G-SDI.
Genlock Settings
Reference Source
Select your reference source from the following three options.
Auto ‘Auto’ mode will default to external if there is a signal connected to the ‘ref in’
connection on the rear panel. If there is no reference connected, it will default to
theinput SDI or HDMI source.
Input Select ‘input’ if your SDI or HDMI source has embedded reference that you want to
syncto. Anexample of this would be where your analog deck may have a genlock
source directly connected.
External Select ‘external’ if you have an external reference device, for example the
Blackmagic Sync Generator, connected via the ‘ref in’ connector on the rear panel.
Reference Timing
Reference timing can be adjusted if you are archiving from analog tape decks and you need
frame synchronization. The reference adjustment is in samples so you can get an extremely
accurate timing adjustment down to the sample level.
To adjust the timing:
1 In the setup menu, use the search dial to highlight ‘reference timing lines’ and press
theflashing ‘set’ button.
2 Adjust the timeline lines value by turning the dial clockwise to increase or counter
clockwise to decrease.
3 To confirm your selection, press the flashing ‘set’ button.
4 To adjust the pixels, press the flashing ‘menu’ button to return to the setup menu and
repeat the steps for reference timing pixels.
External Reference Indicator –
A ‘ref’ indicator will be
displayed on the built in LCD
when your HyperDeck Studio
is successfully locked to an
external reference source.
24Settings

File Settings
Timestamp File Suffix
The timestamp added to the filename is set to ‘off’ by default. If you would like the date and
time recorded in your filename, press the set button and use the search dial to turn the
‘timestamp file suffix’ option to on.
HyperDeck_2105061438_0001
HyperDeck_2105061438_0001 Filename
HyperDeck_2105061438_0001 Year
HyperDeck_2105061438_0001 Month
HyperDeck_2105061438_0001 Day
HyperDeck_2105061438_0001 Hour
HyperDeck_2105061438_0001 Minute
HyperDeck_2105061438_0001 Clip Number
HDR Format Override
HyperDeck Studio 4K Pro will automatically detect embedded HDR metadata in a 4K video
signal or file and display it via the HDMI output. If the signal or file is tagged incorrectly, or your
display is not HDR compatible, you can override the HDR format.
To do this, set the ‘HDR format override’ setting to an SDR option, such as Rec.2020 SDR.
The available HDR playback and record settings are:
Auto
Auto is the default setting that will let HyperDeck automatically select the output format that
conforms to the clip’s HDR metadata.
Rec.709
For high definition video using standard dynamic range.
Rec.2020 SDR
This setting is used for Ultra HD video using standard dynamic range.
HLG
HLG stands for ‘hybrid log gamma’. This format allows HDR video to be played back on HDR
capable TVs and monitors, including those that support up to Rec.2020 SDR.
25Settings

The following settings support the Rec.2020 color gamut, plus PQ, or perceptual quantizer
published as SMPTE ST2084. PQ is the function of wide gamut HDR that allows for the display
of brighter images. Luminance values in candelas per meter squared, for example 1000 cd/m
2
indicate the maximum luminance per square meter supported by the corresponding format.
ST2084 (300)
300 cd/m
2
luminance.
ST2084 (500)
500 cd/m
2
luminance.
ST2084 (800)
800 cd/m
2
luminance.
ST2084 (1000)
1000 cd/m
2
luminance.
ST2084 (2000)
2000 cd/m
2
luminance.
ST2084 (4000)
4000 cd/m
2
luminance.
Remote
Remote
Select ‘remote’ to enable remote control via RS-422, this will let the HyperDeck be controlled
remotely by another device, for example, HyperDeck Extreme Control. When selected, the
dedicated remote button on some HyperDeck models will illuminate to indicate it is active.
Deselect remote to control the unit locally.
Deck Control
When remote is enabled, you can mirror the transport controls from one HyperDeck to multiple
additional HyperDeck units. Daisy chain your HyperDecks by connecting the remote out
connector from the master HyperDeck to the remote in connector on a second unit, then continue
the RS-422 chain for additional units. When all additional units have their remote setting enabled,
transport controls on the master unit will also control the additional units.
For example, when you press the ‘record’ button on the master HyperDeck, all the additional
HyperDecks connected will begin recording simultaneously.
It’s worth noting that while you cannot use HyperDeck Studio HD Mini as a controller, it can be
controlled by a HyperDeck Pro or Plus model.
Reset
Factory Reset
Highlight ‘Factory Reset’ in the setup menu to restore your HyperDeck to factory settings.
Onceyou press ‘set’, you will be prompted to confirm your selection.
26Settings

Rear Panel
1 Power
All HyperDecks feature an IEC power input for AC mains power. HyperDeck Studio 4K
Pro features two for redundancy. The DC input allows for external 12V battery power,
which can also be used for redundancy. Ensure any DC power source is compatible
with the input voltage and current rating marked below the DC in connector.
2 Ethernet
The Ethernet port lets you connect to your network for fast ftp transfers or to remotely
control the unit using the HyperDeck Ethernet Protocol. File transfers speeds are
supported via 1GbE on HD models and 10GbE on HyperDeck Studio 4K Pro. For more
details on transferring files via an FTP client, see the ‘transferring files over a network’
section later in this manual.
When connected to the same network shared with an ATEM switcher, you can also
control your HyperDeck using the ATEM switcher or an ATEM hardware panel.
3 Remote
Some HyperDeck Studio models feature two RS-422 DE-9 connectors for remote in
and out. HyperDeck Studio HD Mini supports remote in only.
4 Ext Disk
Connect a flash disk to the USB-C connector so you can record to external disks at up
to 5Gb/s on HyperDeck Studio HD models. HyperDeck Studio 4K Pro models feature a
USB 3.1 gen 2 connection for transfer speeds up to 10Gb/s. You can also connect to
multi port USB-C hubs or Blackmagic MultiDock 10G to connect one or multiple SSDs.
When your HyperDeck is connected to your computer via USB, you can use the
HyperDeck as your webcam source in software including Open Broadcaster and
Skype. For more information, see ‘Setting up Open Broadcaster’ later in this manual.
5 Monitor Out
The 3G-SDI monitor out connection provides a downscaled output with overlays so that
you can monitor on an external display. The overlays include drive icons, audio meters
and a time counter display as well as a display LUT. For more information on the
Monitor SDI settings, including how to output a clean signal, see the ‘settings’ section
earlier in this manual.
2 5 6 8 941
HyperDeck Studio HD Mini
includes a power connector
with a locking ring to prevent
accidental disconnection
HyperDeck Studio
HDMini and Plus models
featureBNC connectors
fortimecodeinand out
7
3
27Rear Panel

6 Ref
All HyperDeck models have their own built in sync generator that generates stabilized
black burst and tri-sync video reference signals. This means you can connect your
HyperDeck’s reference output to other video equipment’s reference input and lock
them to a master reference signal generated by your HyperDeck.
You can also connect a reference signal to the reference input and sync your
HyperDeck to an external master sync source.
For more information on selecting a reference source, including when looping multiple
HyperDeck disk recorders together, see ‘setup’ settings earlier in this manual.
7 Timecode
All HyperDecks also have their own time of day timecode generator. In a similar fashion
to reference, you can loop the timecode signal from a master HyperDeck to other
HyperDecks or video equipment so that each recording shares the same timecode.
Depending on the HyperDeck model you are using, the timecode connectors will be
either BNC or XLR. For more information on how to select your timecode options,
seethe ‘settings’ section earlier in this manual.
8 HDMI
Connect the HDMI output to HDMI televisions and monitors.
HyperDeck will auto detect SDR and HDR video standards when the signal is flagged
with the correct metadata. Youcan also override the HDR flag using the settings menu.
For more information, refer to the ‘settings’ section earlier in this manual.
9 SDI
HyperDeck Studio HD Mini models feature a single 3G SDI for signals up to 1080p60.
HyperDeck Studio HD Plus and HyperDeck Studio HD Pro models features 6G-SDI
allowing for signals from SD up to 2160p30. HyperDeck Studio 4K Pro features 12G-SDI
inputs and outputs allowing for resolutions up to 2160p60.
HyperDecks with two SDI outputs can be used to play back ProRes 4444 files for
simultaneous fill and key when connected to ATEM switchers.
28Rear Panel

Using the Monitor Output
The monitor output is a fast way to visually check your recording or playback video, with
overlays displaying important status information such as the codec being used, the video and
signal format, frame rate, timecode, file name, transport control status, storage media status,
and audio levels.
Below is a description of the information displayed.
Codec
Displays the codec selected via the LCD menu.
Format
Displays the current clip’s resolution and frame rate when in playback mode. If you are in record
mode, it will display the resolution and frame rate of the video connected to the currently
selected source.
Timecode
Displays the timecode present in your video clip during playback, or currently being recorded
via the video or timecode inputs. You can also select between displaying clip timecode or the
time counter for the timeline.
Source
Displays the currently selected SDI or HDMI source. If ‘no signal’ appears, it means a valid
signal is not detected.
Name
Shows the name of your HyperDeck disk recorder. For information on how to change the name,
see ‘Blackmagic HyperDeck Setup’ later in this manual.
29Using the Monitor Output

Status
As you play back or record a clip, this indicator will display the transport control status and
controls currently being used. These include:
HyperDeck is in standby mode. Indicates playback is set to ‘loop’
all recorded clips sharing the
currently selected video format.
Video is being played. Indicates playback is set to loop
asingle clip.
Video is being recorded.
Theindicator will illuminate
redduringrecording.
Indicates shuttle mode is
enabled,but in standby.
Displayed during fast forward
orrewind. The numbers indicate
the speed.
HyperDeck is in jog mode.
HyperDeck is in scroll mode.
Storage Media Status
These three indicators display the name and status of the SD card, SSDs and active USB drive
and vary slightly depending on the HyperDeck model.
HyperDeck
Studio HD Plus
SD Card slot 1 SD Card slot 2 Active external disk
HyperDeck
Studio Pro Models
Current SD or SSD
slot in use
Next SD or SSD
slot in order
Active external disk
On all HyperDeck models, the third indicator displays the USB drive. If you are using a USB hub,
or a dock such as Blackmagic MultiDock 10G, the active drive will be displayed.
Disk or Drive Indicator
The text above the progress bar indicates the SD card slot or SSD slot. If you are
recording, ‘current’ will appear to the left of the drive so you can easily identify which
disk is recording. ‘Next’ will appear above the progress bar to indicate the next disk or
drive to be recorded to.
30Using the Monitor Output

Media Bar
The media bar icon will be either blue, white or red depending on its current status
andwill display the used space on the card.
The blue drive icon indicates the active drive. This is the drive
that will be used for playback and recording.
A white drive icon indicates there is media present, but not
active. A solid white icon indicates the media is full.
The bar will illuminate red during recording.
Text underneath the media bar will display either the record time remaining or the
status of the slot.
Time remaining
When your SD card or SSD drive has space remaining, the duration available will be
displayed in hours:minutes:seconds based on the current source format and your
chosen codec and quality settings. If there is less than an hour left, minutes:seconds
remaining will be displayed.
Slot status
‘No card’ and ‘no drive’ will display if there is no media connected to that media slot.
Once an SD card, SSD or USB drive is full, the icon will display ‘card full’ or ‘drive full’ so
you know it’s time to swap out the storage media. If you have another SD card or SSD
inserted, the recording will automatically spill over and start recording onto it. If you
have an external disk connected, the recording will spill over once all the SD cards and
SSDs are full.
A locked drive will be shown with ‘locked’ under the progress bar.
31Using the Monitor Output
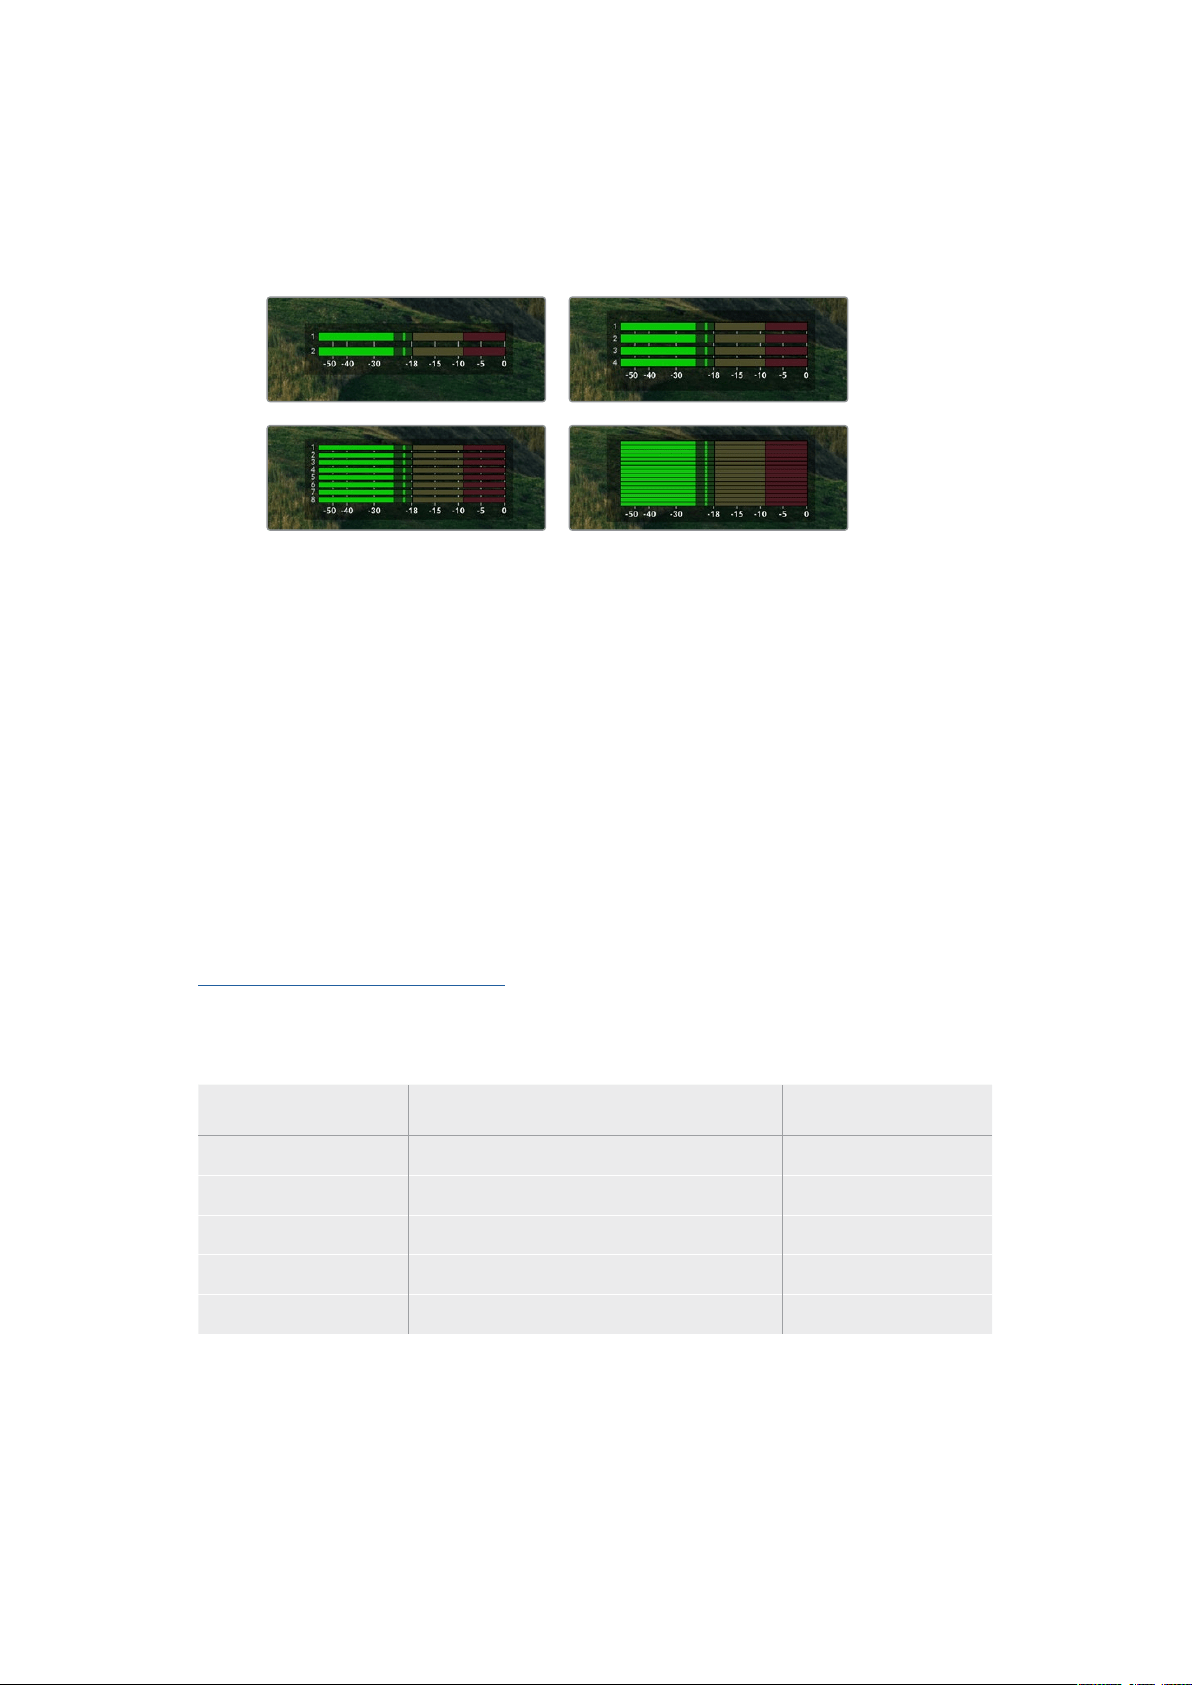
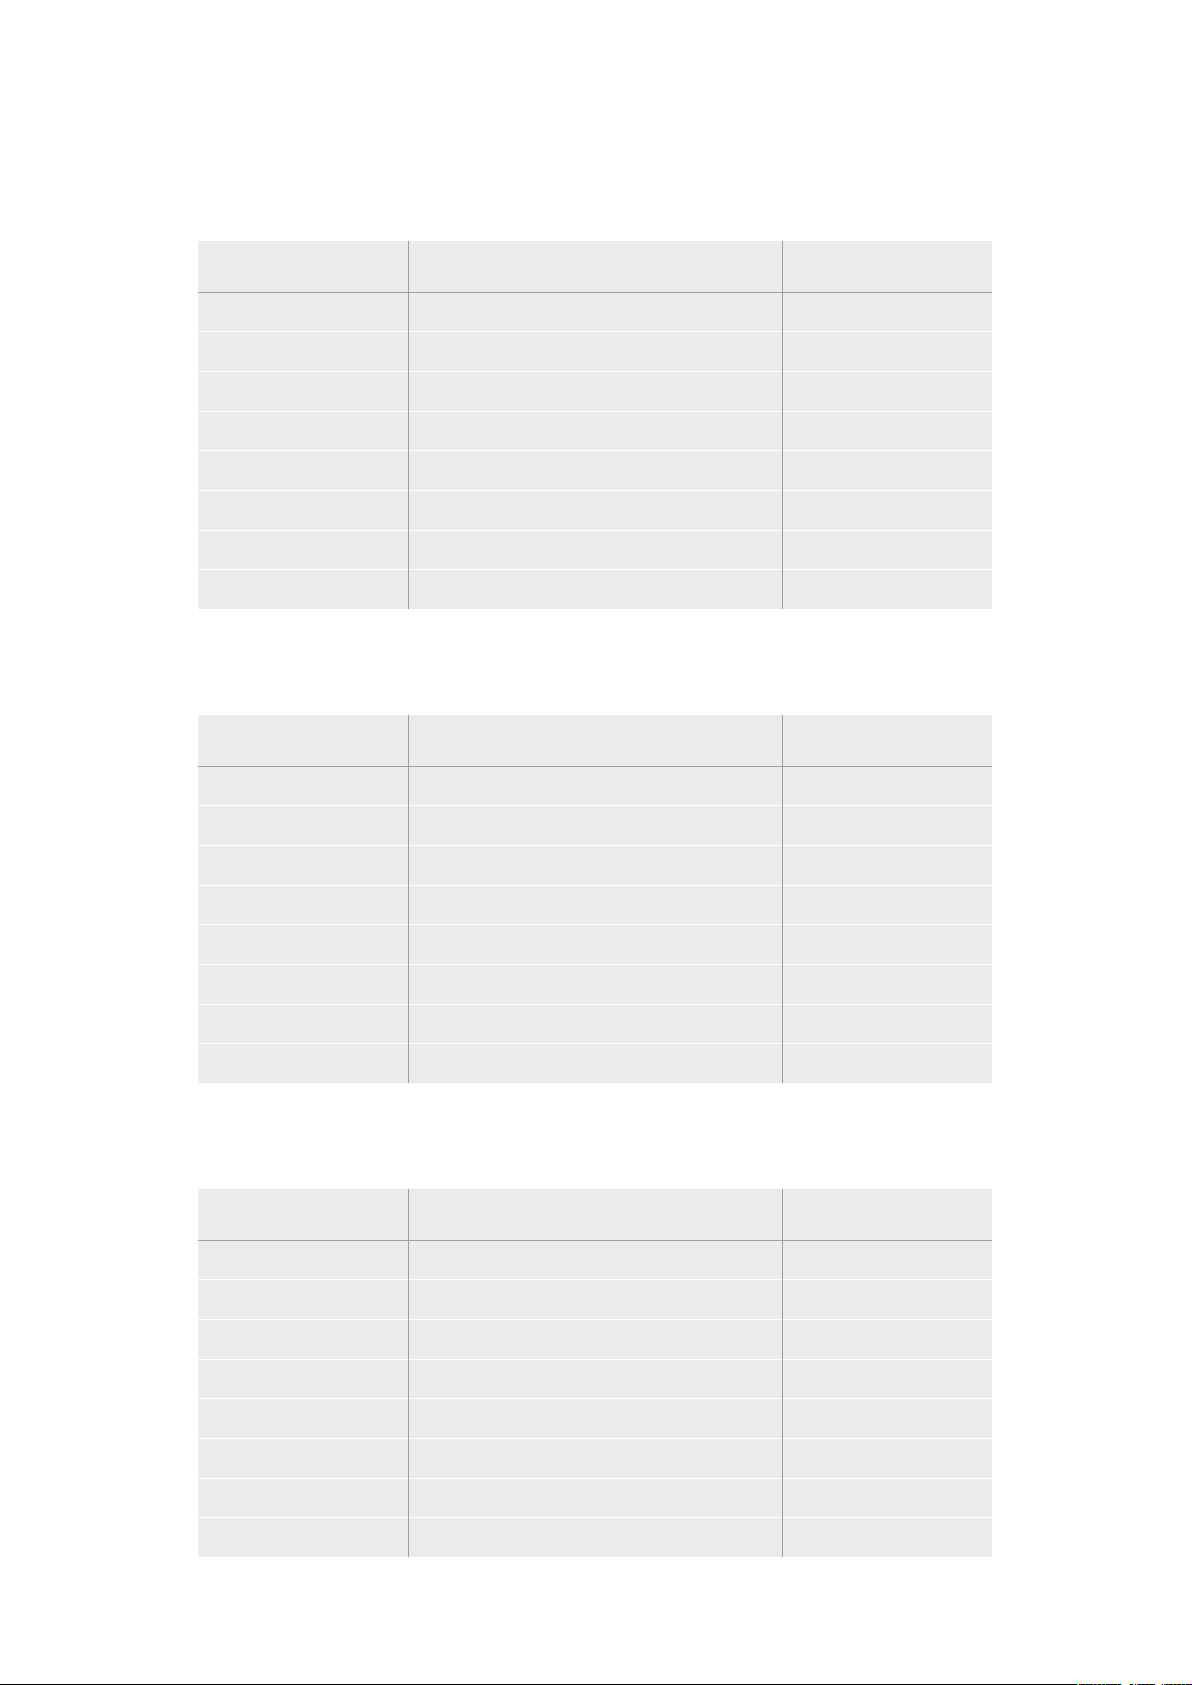
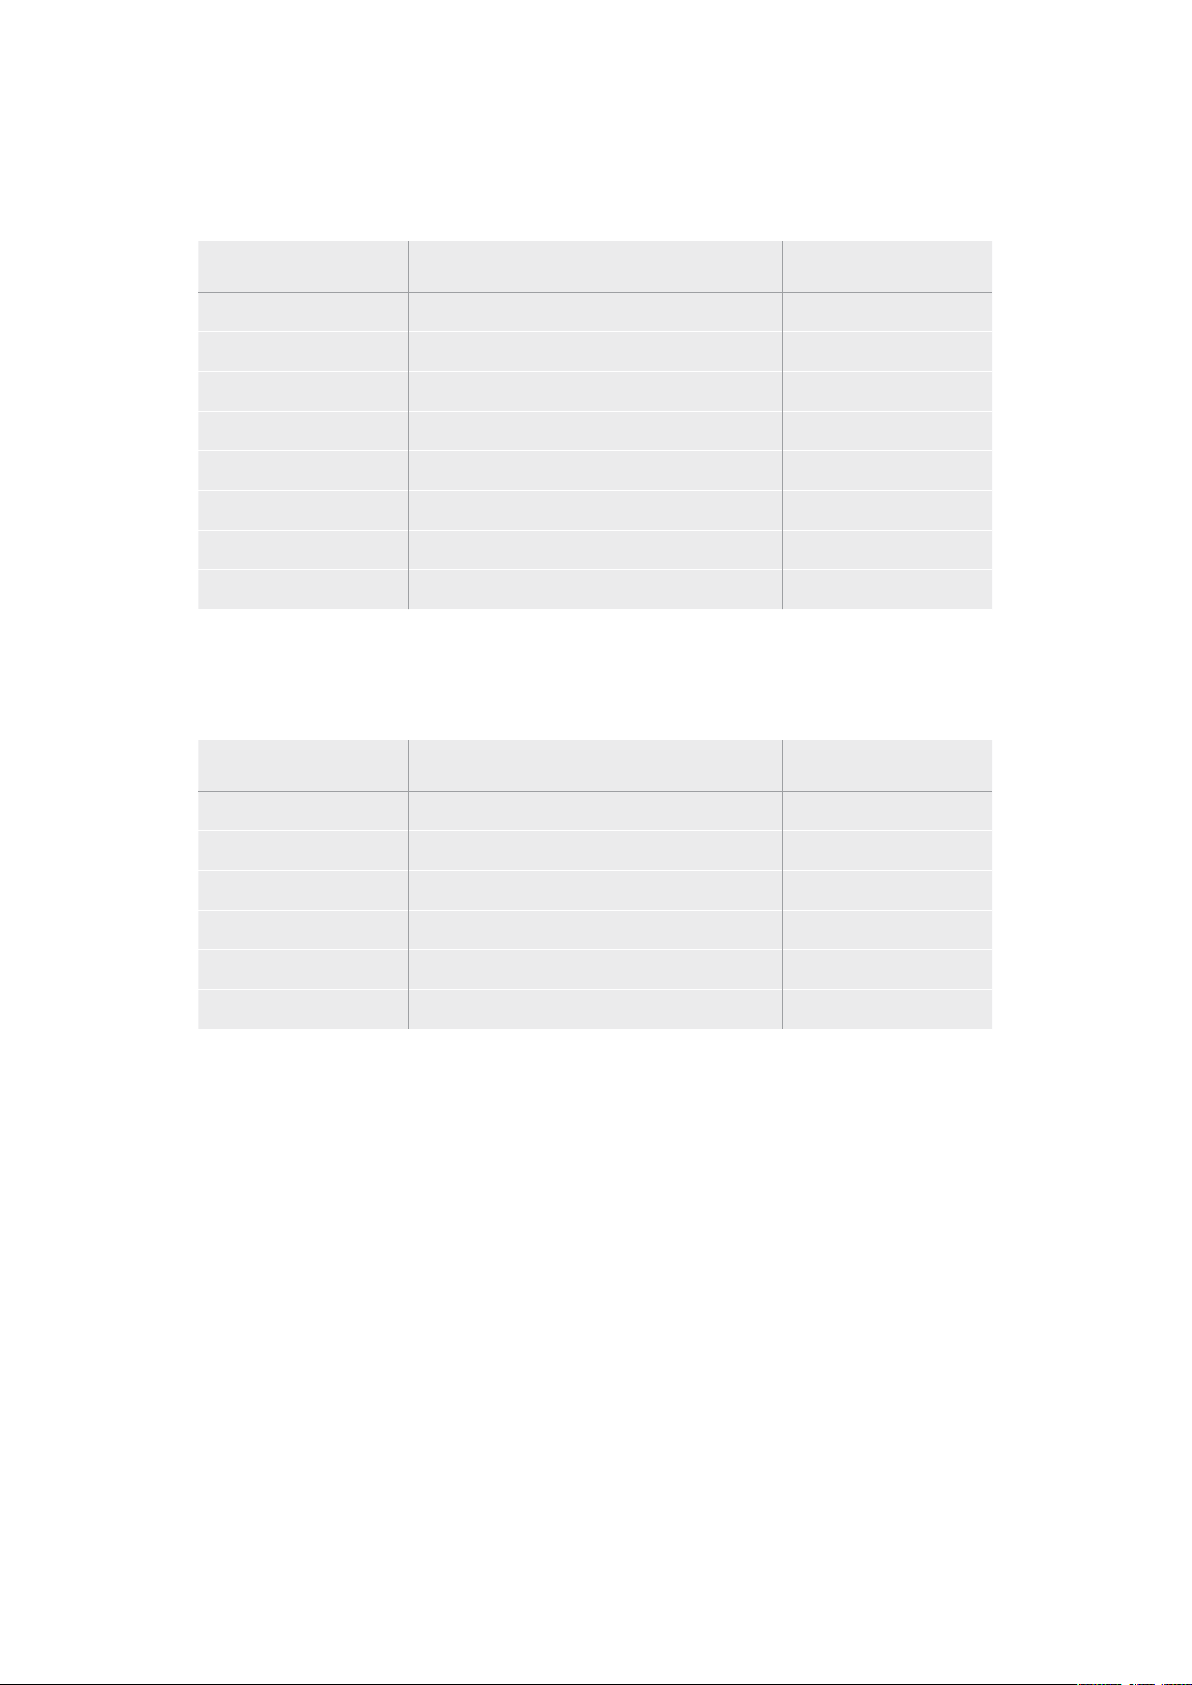
Audio Meters
On screen audio meters will display up to 16 channels of audio, depending on how
many channels you wish to record. These can be set to either PPM or VU meters via the
audio tab ofthe LCD menu.
To select your number of recorded audio channels, or to change to a different audio
meter, usethe audio tab of the LCD menu. For more information, refer to the ‘settings’
section earlier inthis manual.
Storage Media
SD Card
For high quality Ultra HD recording we recommend high speed UHS-II SD cards. These cards
need to be capable of write speeds above 220MB/s for recording up to Ultra HD 2160p60.
However, ifyou are recording at a lower bit rate with higher compression you might be able
touse slower cards. Generally, the faster the cards the better.
It’s worth regularly checking the latest version of this manual for more up to date information
and can always be downloaded from the Blackmagic Design website at
www.blackmagicdesign.com/support
What SD cards should I use with HyperDeck Studio 4K Pro?
The following SD Cards are recommended for recording 2160p up to 60 fps
Brand Model Capacity
Angelbird AV Pro MK2 V90 SDXC 128GB
Angelbird AV Pro MK2 V90 SDXC 256GB
ProGrade Digital SDXC UHS-II V90 300R 128GB
ProGrade Digital SDXC UHS-II V90 300R 256GB
Wise SD2-128U3 SDXC UHS-II 128GB
32Storage Media
What SD cards should I use with HyperDeck Studio HD Pro?
The following SD Cards are recommended for recording 2160p up to 30 fps
Brand Model Capacity
Angelbird AV Pro MK2 V90 SDXC 64GB
Angelbird AV Pro MK2 V90 SDXC 128GB
Angelbird AV Pro MK2 V90 SDXC 256GB
ProGrade Digital SDXC UHS-II V90 300R 64GB
ProGrade Digital SDXC UHS-II V90 300R 128GB
ProGrade Digital SDXC UHS-II V90 300R 256GB
Wise SD2-64U3 SDXC UHS-II 64GB
Wise SD2-128U3 SDXC UHS-II 128GB
What SD cards should I use with HyperDeck Studio HD Plus?
The following SD Cards are recommended for recording 2160p up to 30 fps
Brand Model Capacity
Angelbird AV Pro MK2 V90 SDXC 64GB
Angelbird AV Pro MK2 V90 SDXC 128GB
Angelbird AV Pro MK2 V90 SDXC 256GB
ProGrade Digital SDXC UHS-II V90 300R 64GB
ProGrade Digital SDXC UHS-II V90 300R 128GB
ProGrade Digital SDXC UHS-II V90 300R 256GB
Wise SD2-64U3 SDXC UHS-II 64GB
Wise SD2-128U3 SDXC UHS-II 128GB
What SD cards should I use with HyperDeck Studio HD Mini?
The following SD Cards are recommended for recording 1080p ProRes 422 HQ up to 60 fps
Brand Model Capacity
Angelbird AV Pro MK2 V90 SDXC 64GB
Angelbird AV Pro MK2 V90 SDXC 128GB
Angelbird AV Pro MK2 V90 SDXC 256GB
ProGrade Digital SDXC UHS-II V90 300R 64GB
ProGrade Digital SDXC UHS-II V90 300R 128GB
ProGrade Digital SDXC UHS-II V90 300R 256GB
Wise SD2-64U3 SDXC UHS-II 64GB
Wise SD2-128U3 SDXC UHS-II 128GB
33Storage Media

SSD
When working with high data rate video it’s important to carefully check the SSD you would
liketo use. This is because some SSDs can have up to 50% lower write speed than the
manufacturer’s claimed speed, so even though the disk specifications claim an SSD is fast
enough to handle video, in reality the disk is not fast enough for real time video recording.
Hidden data compression mostly affects recording and often these disks can still be used for
real time playback.
In our testing, we have found larger newer models of SSD and larger capacity SSDs are
generally faster. SSDs recommended for use include:
What SSDs should I use with HyperDeck Studio 4K Pro?
The following USB-C drives are recommended for recording 2160p up to 60 fps
Brand Model Capacity
Samsung 860 PRO 512GB
Samsung 860 PRO 1TB
Samsung 870 EVO (MZ-77E250BW) 250GB
Samsung 870 EVO (MZ-77E500BW) 500GB
Samsung 870 EVO (MZ-77E1T0BW) 1TB
Samsung 870 EVO (MZ-77E2T0BW) 2TB
What SSDs should I use with HyperDeck Studio HD Pro?
The following USB-C drives are recommended for recording 2160p up to 30 fps
Brand Model Capacity
Samsung 860 PRO 512GB
Samsung 860 PRO 1TB
Samsung 870 EVO (MZ-77E250BW) 250GB
Samsung 870 EVO (MZ-77E500BW) 500GB
Samsung 870 EVO (MZ-77E1T0BW) 1TB
Samsung 870 EVO (MZ-77E2T0BW) 2TB
34Storage Media

EXT Disk
All HyperDeck models can record directly to USB-C flash disks. These fast, high capacity
drivesallow you to record video for long periods. You can then connect the flash disk to your
computer and edit directly from them!
For even higher storage capacities, you can connect a USB-C dock or external hard drive.
Toconnect your Blackmagic MultiDock 10G or USB-C flash disk, connect a cable from your
USB-C connected device to the ‘ext disk’ port on the rear panel of your HyperDeck.
What USB-C drives should I use with HyperDeck Studio 4K Pro?
The following USB-C drives are recommended for recording 2160p up to 60 fps
Brand Model Capacity
Angelbird SSD2GO PKT MK2 512GB
Angelbird SSD2GO PKT MK2 2TB
DelKinDevices Juggler 1TB
DelKinDevices Juggler 2TB
LaCie Rugged SSD STHR2000800 2TB
LaCie Rugged SSD Pro STHZ1000800 1TB
Wise PTS-512 Portable SSD 512GB
Wise PTS-1024 Portable SSD 1TB
What USB-C drives should I use with HyperDeck Studio HD Pro?
The following USB-C drives are recommended for recording 2160p up to 30 fps
Brand Model Capacity
Angelbird SSD2GO PKT MK2 512GB
Angelbird SSD2GO PKT MK2 2TB
DelKinDevices Juggler 1TB
DelKinDevices Juggler 2TB
LaCie Rugged SSD STHR2000800 2TB
LaCie Rugged SSD Pro STHZ1000800 1TB
Wise PTS-512 Portable SSD 512GB
Wise PTS-1024 Portable SSD 1TB
35Storage Media
What USB-C drives should I use with HyperDeck Studio HD Plus?
The following USB-C drives are recommended for recording 2160p up to 30 fps
Brand Model Capacity
Angelbird SSD2GO PKT MK2 512GB
Angelbird SSD2GO PKT MK2 2TB
DelKinDevices Juggler 1TB
DelKinDevices Juggler 2TB
LaCie Rugged SSD STHR2000800 2TB
LaCie Rugged SSD Pro STHZ1000800 1TB
Wise PTS-512 Portable SSD 512GB
Wise PTS-1024 Portable SSD 1TB
What USB-C drives should I use with HyperDeck Studio HD Mini?
The following USB-C drives are recommended for recording 1080p ProRes 422 HQ
up to 60 fps
Brand Model Capacity
Angelbird SSD2GO PKT MK2 512GB
Angelbird SSD2GO PKT MK2 2TB
DelKinDevices Juggler 1TB
DelKinDevices Juggler 2TB
Wise PTS-512 Portable SSD 512GB
Wise PTS-1024 Portable SSD 1TB
36Storage Media
Formatting Media
Preparing Media on a Computer
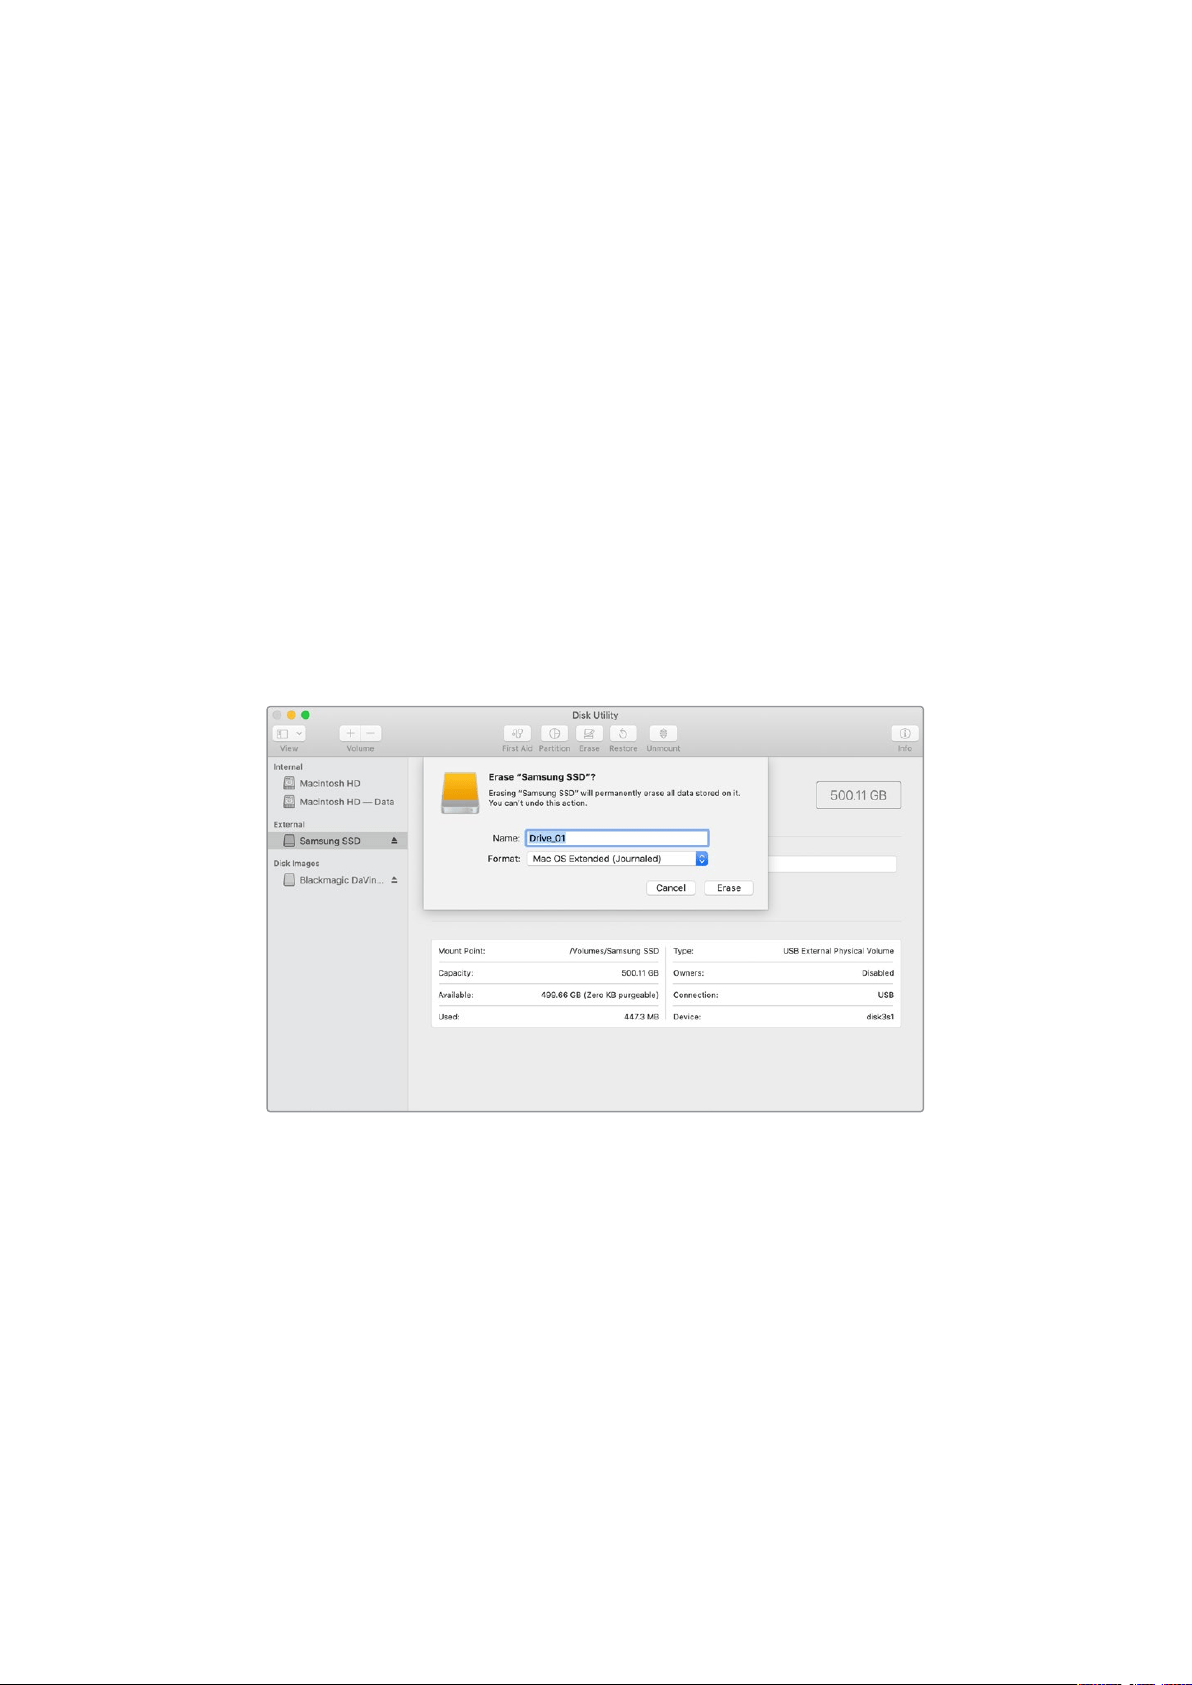
Formatting Media on a Mac Computer
The Disk Utility application included with Mac can format a drive in the HFS+ or exFAT formats.
Make sure you back up anything important from your disk as you will lose everything on it when
it is formatted.
1 Connect an SSD to your computer with an external dock or cable adapter and dismiss
any message offering to use your SSD for Time Machine backups. For CFast cards,
connect it to your computer via an external card reader.
2 Go to applications/utilities and launch Disk Utility.
3 Click on the disk icon of your SSD or CFast card and then click the erase tab.
4 Set the format to Mac OS Extended (Journaled) or exFAT.
5 Type a name for the new volume and then click erase. Your media will quickly be
formatted and made ready for use with HyperDeck.
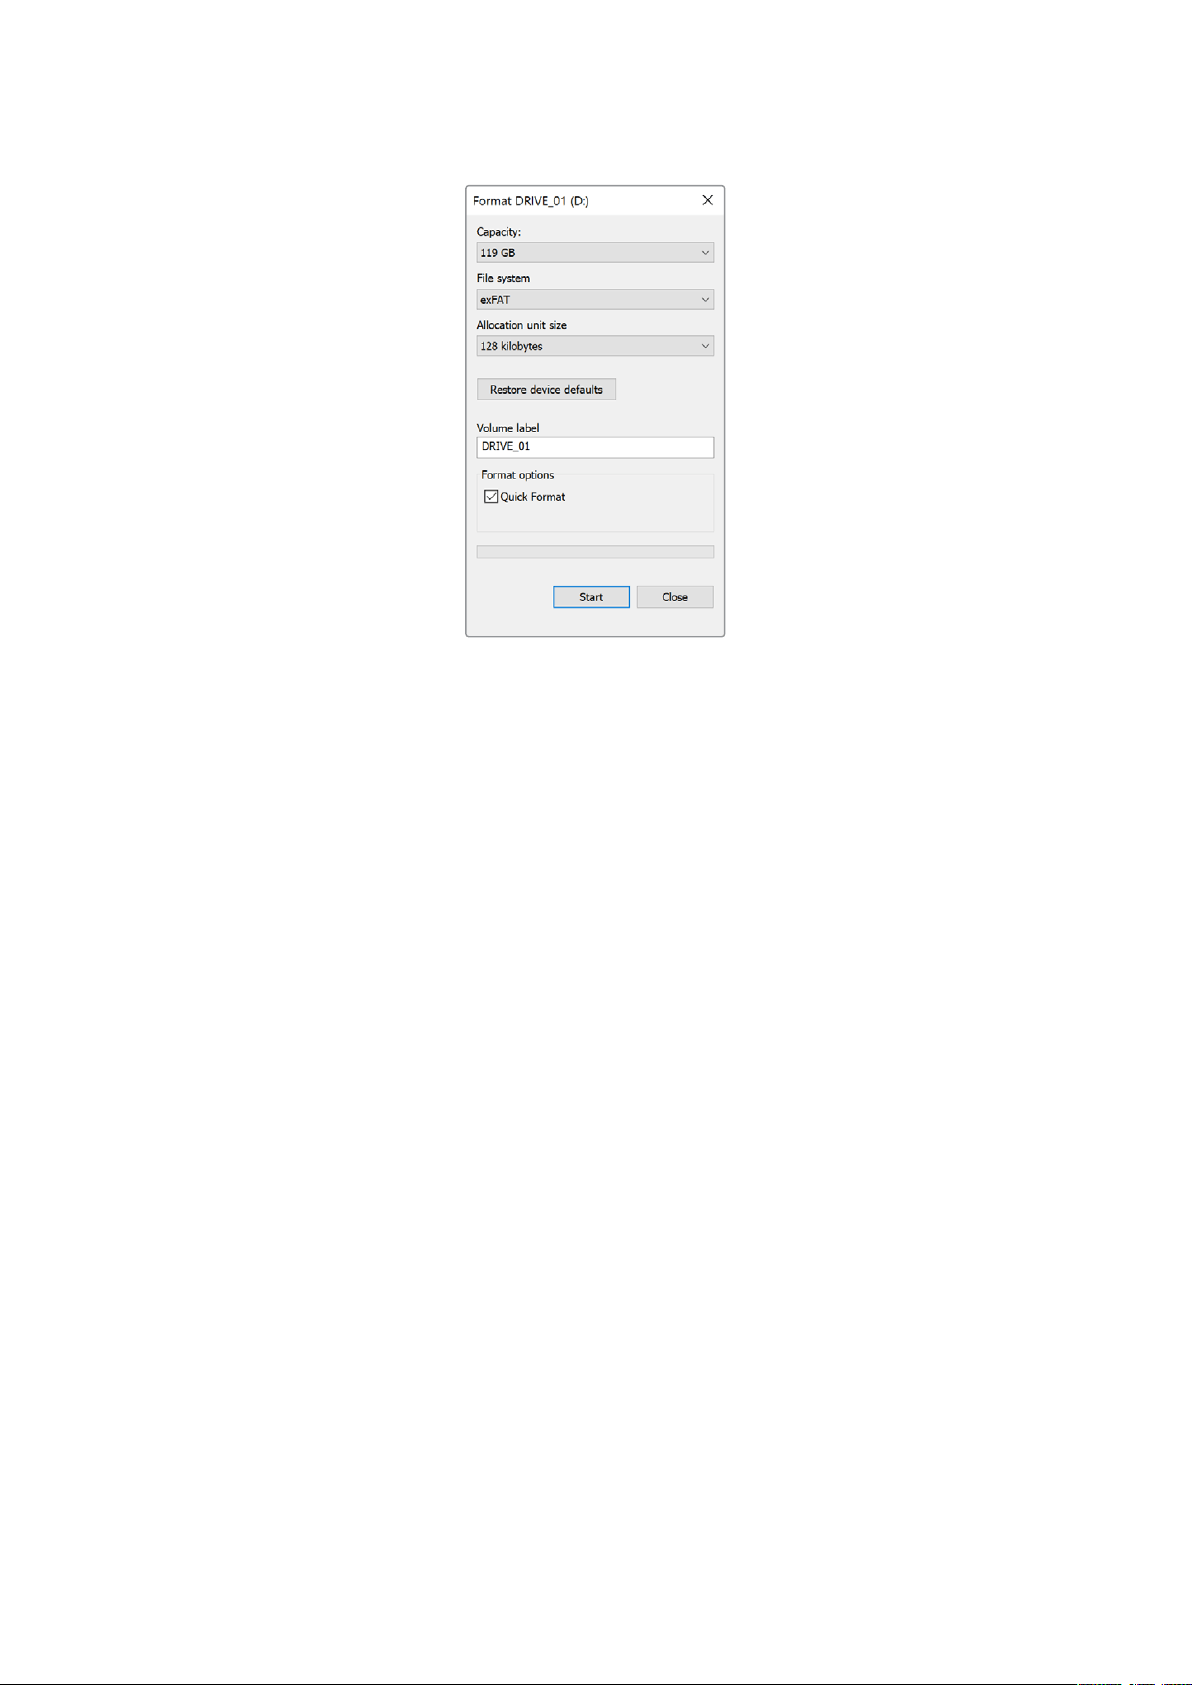
Formatting Media on a Windows computer
The format dialog box can format a drive in the exFAT format on a Windows PC. Make sure you
back up anything important from your SSD or SD card as you will lose everything on it when it
isformatted.
1 Connect an SSD to your computer with an external dock or cable adapter. For CFast
cards, connect it to your computer via an external CFast card reader.
2 Open the start menu or start screen and choose computer. Right-click on your SSD
orCFast card.
3 From the contextual menu, choose format.
4 Set the file system to exFAT and the allocation unit size to 128 kilobytes.
5 Type a volume label, select quick format and click Start.
6 Your media will quickly be formatted and made ready for use with HyperDeck.
37Formatting Media
Using your HyperDeck asa Webcam
When connected to a computer via USB, your HyperDeck disk recorder will be detected as
awebcam. This means you can broadcast the playback or recording from your HyperDeck
using streaming software such as Open Broadcaster.
Setting the Webcam Source
In most cases, your streaming software will automatically set HyperDeck as the webcam,
sowhen you launch your streaming software you will see the picture from your HyperDeck
Studio straight away. If your software doesn’t select it automatically, simply set the software
touse HyperDeck as the webcam and microphone.
Below is an example of how to set the webcam settings on Skype.
1 In Skype’s menu bar, open the ‘audio and video settings’.
2 Click on the ‘Camera’ menu and select your HyperDeck from the list. Youwill see the
video from HyperDeck appear in the preview window.
3 Now go to the ‘microphone’ menu and select your HyperDeck as the audio source.
With your Skype settings set correctly, perhaps try out a Skype call with a friend as a quick test
to check your webcam setup is working.
That’s all you need to do, your HyperDeck Studio is now ready to broadcast your video to the
world live!
38Using your HyperDeck asa Webcam

Setting up Open Broadcaster
Open Broadcaster is an open source application that works as a streaming platform between
your HyperDeck Studio and your favorite streaming software like YouTube, Twitch, Facebook
Live and others. Broadcaster compresses your video to a bit rate that is easily managed by your
streaming app.
Below is a demonstration of how to set up Open Broadcaster to stream the webcam output
from your HyperDeck Studio using YouTube Live as the streaming service.
Launch Open Broadcaster and click on the
plussymbol in the ‘sources’ box.
Select ‘Video Capture Device’.
Name the new source and click ‘OK’. In the device menu, select your HyperDeckStudio
model and click ‘OK’.
Now go to your YouTube account. Click on the
‘golive’ button then click ‘stream’.
In the YouTube ‘stream’ options, enter your
broadcast details and click ‘create stream’.
1
2
3
4
5
6
39Using your HyperDeck asa Webcam

YouTube will now generate a stream key that will
direct Open Broadcaster to your YouTube account.
Click the ‘copy’ button next to the stream key.
Copythe stream key that you will now paste
intoOpen Broadcaster.
Return to Open Broadcaster and open the
preferences by clicking on ‘OBS/preferences’
inthemenu bar. Select ‘stream’. Now paste in the
stream key you copied from YouTube and click ‘OK’.
You will now see the video from your HyperDeck
in the Open Broadcaster streaming previewwindow.
To connect Open Broadcaster’s broadcast
link to YouTube, click ‘start streaming’ in the bottom
right corner of the screen. This establishes the link
to YouTube from Open Broadcaster and from here
everything will now be set using YouTube Live.
Go back to YouTube Live and you will see the
webcam program output from your HyperDeck
in the background. Click ‘done’.
With Open Broadcaster now communicating
with YouTube Live, you are ready to begin your
broadcast. Now it’s time to perform your final
checks and make sure everything is good.
If you are all set, you can now begin
yourbroadcastby clicking ‘go live’.
You are now broadcasting live on YouTube with Open Broadcaster.
NOTE Due to the nature of internet streaming there can often be a delay, so it’s
important to watch the stream on YouTube and confirm your program has finished
before clicking ‘end stream’ to make sure you don’t accidentally cut the end of your
broadcast short.
7
8
9
10
11
12
40Using your HyperDeck asa Webcam

Blackmagic HyperDeck Setup
Using HyperDeck Setup
Blackmagic HyperDeck Setup is used to change settings and update the internal software in
your HyperDeck.
To use HyperDeck Setup:
1 Connect HyperDeck to your computer via USB or Ethernet.
2 Launch HyperDeck Setup. Your HyperDeck model will be named in the setup utility
home page.
3 Click on the circular ‘setup’ icon or the image of your HyperDeck to open the
setup page.
Setup Page
If you have more than one HyperDeck Studio, you may wish to give each unit a discrete name
to make them easy to identify. You can do this via the ‘name’ option.
41Blackmagic HyperDeck Setup

Network
Protocol
To use your HyperDeck Studio with ATEM switchers, or to control it remotely via
HyperDeck Ethernet Protocol, the HyperDeck Studio needs be on the same network
asyour other equipment using DHCP or by manually adding a fixed IP address.
DHCP
HyperDeck Studio disk recorders arrive set to DHCP by default. The
dynamic host configuration protocol, or DHCP, is a service on network
servers that automatically finds your HyperDeck Studio and assigns an
IP address. The DHCP is a great service that makes it easy to connect
equipment via Ethernet and ensure their IP addresses do not conflict with
each other. Most computers and network switchers support DHCP.
Static IP
When ‘static ip’ is selected, you can enter your network details manually.
When setting IP addresses manually so all units can communicate, they
must share the same subnet mask and gateway settings. In addition, the
first three fields of numbers in the panel’s IP address also need to match.
If there are other devices on the network that have the same identifying
number in their IP address, there will be a conflict and the units won’t
connect. If you encounter a conflict, simply change the identifying number
in the unit’s IP address.
LUTs Page
HyperDeck models with monitor out connections on the rear panel can display the input video
with 3D LUTs applied. 17 point, 33 point and 65 point .cube LUT files are supported.
This can be useful for when you are using the ‘film’ dynamic range on your camera which has
an intentionally undersaturated, ‘flat’ appearance. By applying a display LUT, you can get a
representation of what your video will look like after it has been graded.
The 3D LUT is only used on the monitor out display and not actually recorded into the video
itself, so you don’t need to worry that your recorded image will have the look
permanently applied.
If you want to apply the same LUT to your image in DaVinci Resolve, you can simply import the
exact same LUT .cube file used on your HyperDeck Studio into DaVinci Resolve and apply it to
your grade.
42Blackmagic HyperDeck Setup

To view a LUT
1 First you need to select your display LUT. Click on the ‘import’ button.
2 From the file window, navigate to the LUT you wish to import and press ‘open’.
3 Once your LUT is imported, toggle the ‘3D LUT’ option to ‘on’ and press the
‘save’ button.
The selected display LUT will appear on the monitor out display. You can now turn the LUT
onor off via the monitor settings in the LCD menu.
Updating the Internal Software
The setup utility lets you update your HyperDeck disk recorder’s internal software in addition
toconfiguring the streaming settings, network settings and streaming quality.
To update the internal software:
1 Download the newest Blackmagic HyperDeck Setup installer from
www.blackmagicdesign.com/support.
2 Run the Blackmagic HyperDeck Setup installer on your computer and follow the
onscreen instructions.
3 After installation is complete, connect your HyperDeck Studio to the computer via the
USB or Ethernet connector on the rear panel.
4 Launch Blackmagic HyperDeck Setup and follow any onscreen prompt to update the
internal software. If no prompt appears, the internal software is up to date and there is
nothing further you need to do.
43Updating the Internal Software

Download the latest setup utility for your Blackmagic HyperDeck Studio from
theBlackmagic Design support center at www.blackmagicdesign.com/support
Teranex Mini Rack Shelf
Teranex Mini Rack Shelf is a 1 RU shelf that lets you install Blackmagic HyperDeck Studio HD
Mini and HyperDeck Studio HD Plus models into a broadcast rack or road case. Blackmagic
HyperDeck Studio HD Mini is so small, you can install it next to other Blackmagic Design
equipment that shares a similar form factor, such as Teranex Mini converters, Blackmagic
MultiView 4 and Blackmagic Web Presenter. For example, installing a Blackmagic HyperDeck
Studio HD Mini together with ATEM Television Studio HD gives you the ability to switch eight
video inputs and record the program output on your HyperDeck Studio HD Mini. This modular
design lets you build your own custom video solutions that are portable and easy to use!
Teranex Mini Rack Shelf lets you rack mount your Blackmagic HyperDeck Studio HD Mini and HyperDeck
Studio HD Plus with other Blackmagic Design equipment that shares the same form factor.
To install your Blackmagic HyperDeck into a Teranex Mini Rack Shelf, remove the unit’s rubber
feet, if installed, and fasten the unit to the base of the shelf using the supplied screws.
The Teranex Mini Rack Shelf ships with two original blank panels which you can use to cover
gaps if you don’t need to install additional Blackmagic Design equipment.
For more information check the Blackmagic Design website at www.blackmagicdesign.com
44Teranex Mini Rack Shelf

RS-422 Control
What is RS-422 Control?
The RS-422 standard is a serial deck control broadcast standard and has been used by
broadcasters since the early 1980s and is found on many decks, linear editors, nonlinear editors
and broadcast automation products. All current HyperDeck models support this standard so
can be integrated into broadcast automation, remote control systems, editing systems and any
kind of custom control you might like to design yourself.
HyperDeck Studio also supports file based commands from the Advanced Media Protocol via
RS-422. This lets you control your HyperDeck with an external device using AMP commands
such as adding clips to a playlist, determining the filename of the next clip, looping a single clip
or timeline, or clearing a playlist.
Using an External RS-422 Controller
All current HyperDeck models feature an industry standard Sony™ compatible RS-422 deck
control port, which has the correct pin connections for a direct connection to any remote
controller with RS-422, for example HyperDeck Extreme Control.
You can use pre-manufactured 9 pin cables as long as each end of the cable is wired ‘pin for
pin’ where the same pin numbers on each end of the cable are connected together. If you
would like to make custom cables, please refer to the accompanying wiring diagram.
You can remotely control your HyperDeck from HyperDeck Extreme Control instead of locally
pushing buttons.
1 Connect a video signal to your HyperDeck’s video input.
2 Connect an RS-422 cable from your HyperDeck Extreme Control to your
HyperDeck Studio.
3 Enable remote control by pressing the remote button on the front control panel, or via
the LCD menu in HyperDeck Studio Mini, to allow remote deck control.
You can now remotely start and stop recording and playback of your HyperDeck as well as
performing other common jog and shuttle functions. The full list of supported RS-422
commands is in the following section named ‘supported RS-422 commands’.
5 4 3 2 1
9 8 7 6
Receive
(–)
Receive
(+)
Transmit
(–)
Transmit
(+)
Ground
Pins
2 7 8 3 1, 4, 6, 9
RS-422 remote pin connections
45RS-422 Control

Make sure your HyperDeck has remote set to ‘on’ in the LCD menu,
or via the front panel remote button, to enable RS-422 deck control
All HyperDeck models support remote control via the RS-422 port on the rear panel
Supported RS-422 Commands
Command Reply No Remote Notes
0 - System Control
0x00 0x11 DeviceTypeRequest
NTSC: 0xF0E0
PAL: 0xF1E0
24P: 0xF2E0
Enabled
1 - Slave Response
0x20 0x00 Stop Acknowledge Disabled
0x20 0x01 Play Acknowledge Disabled
0x20 0x02 Record Acknowledge Disabled
0x20 0x04 StandbyOff Acknowledge Disabled
0x20 0x05 StandbyOn Acknowledge Disabled
0x20 0x0F Eject Acknowledge Disabled
0x20 0x10 FastFwd Acknowledge Disabled
0x21 0x11 JogFwd1 Acknowledge Disabled
0x22 0x11 JogFwd2 Acknowledge Disabled
Treated as N=1;
Same as JogFwd1
0x21 0x12 VarFwd1 Acknowledge Disabled Uses ShuttleFwd1
0x22 0x12 VarFwd2 Acknowledge Disabled
Treated as N=1;
Same as VarFwd1
0x21 0x13 ShuttleFwd1 Acknowledge Disabled
0x22 0x13 ShuttleFwd2 Acknowledge Disabled
Treated as N=1;
Same as ShuttleFwd1
0x20 0x20 Rewind Acknowledge Disabled
0x21 0x21 JogRev1 Acknowledge Disabled
0x22 0x21 JogRev2 Acknowledge Disabled
Treated as N=1;
Same as JogRev1
0x21 0x22 VarRev1 Acknowledge Disabled Uses ShuttleRev1
46RS-422 Control

Command Reply No Remote Notes
0x22 0x22 VarRev2 Acknowledge Disabled
Treated as N=1;
Same as VarRev1
0x21 0x23 ShuttleRev1 Acknowledge Disabled
0x22 0x23 ShuttleRev2 Acknowledge Disabled
Treated as N=1;
Same as ShuttleRev1
0x20 0x30 Preroll Acknowledge Disabled
0x24 0x31 CueData Acknowledge Disabled
0x20 0x34 SyncPlay Acknowledge Disabled
0x20 0x40 Preview Acknowledge Disabled Status bits are set
0x20 0x41 Review Acknowledge Disabled Status bits are set
0x20 0x43 OutpointPreview Acknowledge Disabled
0x22 0x5C DMCSetFwd Acknowledge Disabled
0x22 0x5D DMCSetRev Acknowledge Disabled
0x20 0x60 FullEEOff Acknowledge Disabled
0x20 0x61 FullEEOn Acknowledge Disabled
0x20 0x63 SelectEEOn Acknowledge Disabled
4 - Preset/Select Control
0x40 0x10 InEntry Acknowledge Disabled
0x40 0x11 OutEntry Acknowledge Disabled
0x44 0x14 InDataPreset Acknowledge Disabled
0x44 0x15 OutDataPreset Acknowledge Disabled
0x40 0x18 InShift+ Acknowledge Disabled
0x40 0x19 InShift- Acknowledge Disabled
0x40 0x1A OutShift+ Acknowledge Disabled
0x40 0x1B OutShift- Acknowledge Disabled
0x40 0x20 InReset Acknowledge Disabled
0x40 0x21 OutReset Acknowledge Disabled
0x40 0x22 AInReset Acknowledge Disabled
0x40 0x23 AOutReset Acknowledge Disabled
0x44 0x31 PrerollPreset Acknowledge Disabled
0x40 0x40 AutoModeOff Acknowledge Disabled
ignored, Status bit
remembered
0x40 0x41 AutoModeOn Acknowledge Disabled
ignored, Status bit
remembered
0x41 0x37 InputCheck Acknowledge Disabled
47RS-422 Control

Command Reply No Remote Notes
6 - Sense Request
0x61 0x0A TimeCodeGenSense — —
0x61 0x0C CurrentTimeSense — —
0x60 0x10 InDataSense InData Enabled
0x60 0x11 OutDataSense OutData Enabled
0x60 0x12 AInDataSense AInData Enabled
0x60 0x13 AOutDataSense AOutData Enabled
0x61 0x20 StatusSense StatusData Enabled
0x60 0x2B RemainTimeSense RemainTimeData Enabled
0x60 0x2E SpeedSense SpeedData Enabled
0x60 0x31 PrerollTimeSense PreRollTimeData Enabled
0x60 0x36 TimerModeSense TimerModeData Enabled
0x60 0x3E RecordInhibitSense RecordInhibitStatus Enabled
7 - Sense Reply
0x78 0x00 Timer1Data — —
Current Time and
00:00:00:00
0x78 0x04 LTCUserBitsTimeData — —
Current Time and
00:00:00:00
0x78 0x06 VITCUserBitsTimeData — —
Current Time and
00:00:00:00
0x74 0x06 VITCTimeData — — Current Time
0x74 0x07 UserBitsVITCTimeData — — 00:00:00:00
0x74 0x08 GenTCData — — Current Time
0x78 0x08 GenTCUBData — —
Current Time and
00:00:00:00
0x74 0x09 GenUBData — — 00:00:00:00
0x74 0x10 InData — —
0x74 0x11 OutData — —
0x74 0x12 AInData — —
0x74 0x13 AOutData — —
0x74 0x14 CorrectedLTCTimeData — — Current Time
0x70 0x20 StatusData — —
Please see “Status Bits”
sheet: Limited to 9 bytes
of status, silently
truncated
0x76 0x2B RemainTimeData — —
0x71 0x2E SpeedData — —
0x74 0x31 PrerollTimeData — —
0x71 0x36 TimerModeData — — Returns 0 (TimeCode)
0x72 0x3E RecordInhibitStatus — —
48RS-422 Control

Command Reply No Remote Notes
A - Advanced Media Protocol
0xA1 0x01 AutoSkip Acknowledge Disabled
8-bit signed number of
clips to skip from current
clip
0xAX 0x15 ListNextID IDListing Enabled
when x = 0 single clip
request when x = 1, #
clips can be specified in
the send data
0x20 0x29 ClearPlaylist Acknowledge Disabled
0x41 0x42 SetPlaybackLoop Acknowledge Disabled
Bit 0 loop mode enable,
0=false 1=true
Bit 1 is single clip/timeline
0=single clip
1=timeline
0x41 0x44 SetStopMode Acknowledge Disabled
0 = Off
1 = Freeze on last frame
2 = Freeze on next clip
3 = Show black
0x4f 0x16 AppendPreset Acknowledge Disabled
2 Bytes for the length N
of the clip name
N Bytes for each character
of the clip name
4 Byte in point timecode
(format is FFSSMMHH)
4 Byte out point timecode
(format is FFSSMMHH)
Blackmagic Extensions
0x82 0x02 BMDSeekToTimelinePosition Acknowledge Disabled
16-bit little endian
fractional position
[0..65535]
0x81 0x03 BMDSeekRelativeClip Acknowledge Disabled
One-byte signed integer,
which is the number of
clips to skip (negative for
backwards).
RS-422 Developer Information
bit 7 bit 6 bit 5 bit 4 bit 3 bit 2 bit 1 bit 0
Byte 0
0 0 Cassette out 0 0 0 0 Local
Byte 1
Standby 0 Stop 0 Rewind Forward Record Play
Byte 2
Servo Lock 0 Shuttle Jog Var Direction Still 1
Byte 3
Auto Mode 0 0 0 Aout Set Ain Set Out Set In Set
Byte 4
Select EE Full EE Loop Playback 0 0 0 0 0
Byte 5
0 0 0 0 0 0 0 0
Byte 6
0 Lamp Still Lamp Fwd Lamp Rev 0 0 0 0
Byte 7
0 0 0 0 0 0 0 0
Byte 8
0 0 Near EOT EOT 0 0 0 0
Byte 9
0 0 0 0 0 0 0 0
49RS-422 Control

Variables
Cassette Out
Set if no SSD is present
Local
Set if Remote is disabled (local control)
Standby
Set if a disk is available
Direction
Clear if playback is forwarding, set if playback is reversing
Still
Set if playback is paused, or if in input preview mode
Auto Mode
Set if in Auto Mode
Select EE, Full EE
Set if in input preview mode
Lamp Still/Fwd/Rev
Set according to playback speed and direction
Near EOT
Set if total space left on available SSDs is less than 3 minutes
EOT
Set if total space left on available SSDs is less than 30 seconds
Others
Cue Complete (byte 2, bit 0)
Always 1: Cue requests are always instantaneous
HyperDeck Serial RS-422 Protocol
Protocol
Based on Sony 9-pin protocol
Interface
Baud rate 38.4 Kbps
1 start bit
8 data bits
1 stop bit
1 parity bit
Odd parity
Transferring Files over a Network
Your HyperDeck disk recorder supports file transfer via file transfer protocol, or ftp. This
powerful feature lets you copy files directly from your computer to your HyperDeck via a
network with the fast speeds a local network can provide. For example, you could be copying
new files to a remote HyperDeck unit based at another location for digital signage.
Connecting to HyperDeck Studio
With your computer and HyperDeck Studio on the same network, all you’ll need is an ftpclient
and your HyperDeck Studio’s IP address.
1 Download and install an FTP client on the computer you want to connect
your HyperDeck to. Werecommend Cyberduck, FileZilla or Transmit but most
FTPapplications will work. Cyberduck and FileZilla are free downloads.
50Transferring Files over a Network

2 Connect your HyperDeck Studio to your network using an Ethernet cable and noteits
IP address. To access the IP address, press the ‘menu’ button and rotate the search dial
to access the ‘network’ screen. You’ll see your HyperDeck Studio’s IP address at the
bottom of this screen.
You can find your HyperDeck Studio’s IP
address in the smart panel’s ‘network’ screen
3 Enter your HyperDeck’s IP address into your TCP application’s connection dialog.
Thenaming and position of this box can vary between applications, but it is usually
labeled ‘server’ or ‘host.’ If your FTP program includes an ‘anonymous login’ checkbox,
make sure this is checked.
When connecting to HyperDeck Studio, you don’t need to enter a username or
password. Simply enter your disk recorder’s IP address in your FTP application’s
‘server’ or ‘host’ field and check an ‘anonymous login’ checkbox if one is available.
Transferring Files
Once connected to your HyperDeck you can transfer files as you normally would with your
ftpprogram. Most ftp applications have a drag and drop interface but check your particular
application for the appropriate method.
You can transfer any file to and from your HyperDeck, but it’s worth noting that any files you
intend to play back from HyperDeck Studio will need to conform to your HyperDeck’s
supported codecs and resolutions. You can find a list of supported codecs in the ‘Blackmagic
HyperDeck Setup’ section of this manual.
TIP You can transfer files over a network while your HyperDeck is recording.
HyperDeck will automatically adjust transfer speeds to make sure recording is
notaffected.
51Transferring Files over a Network
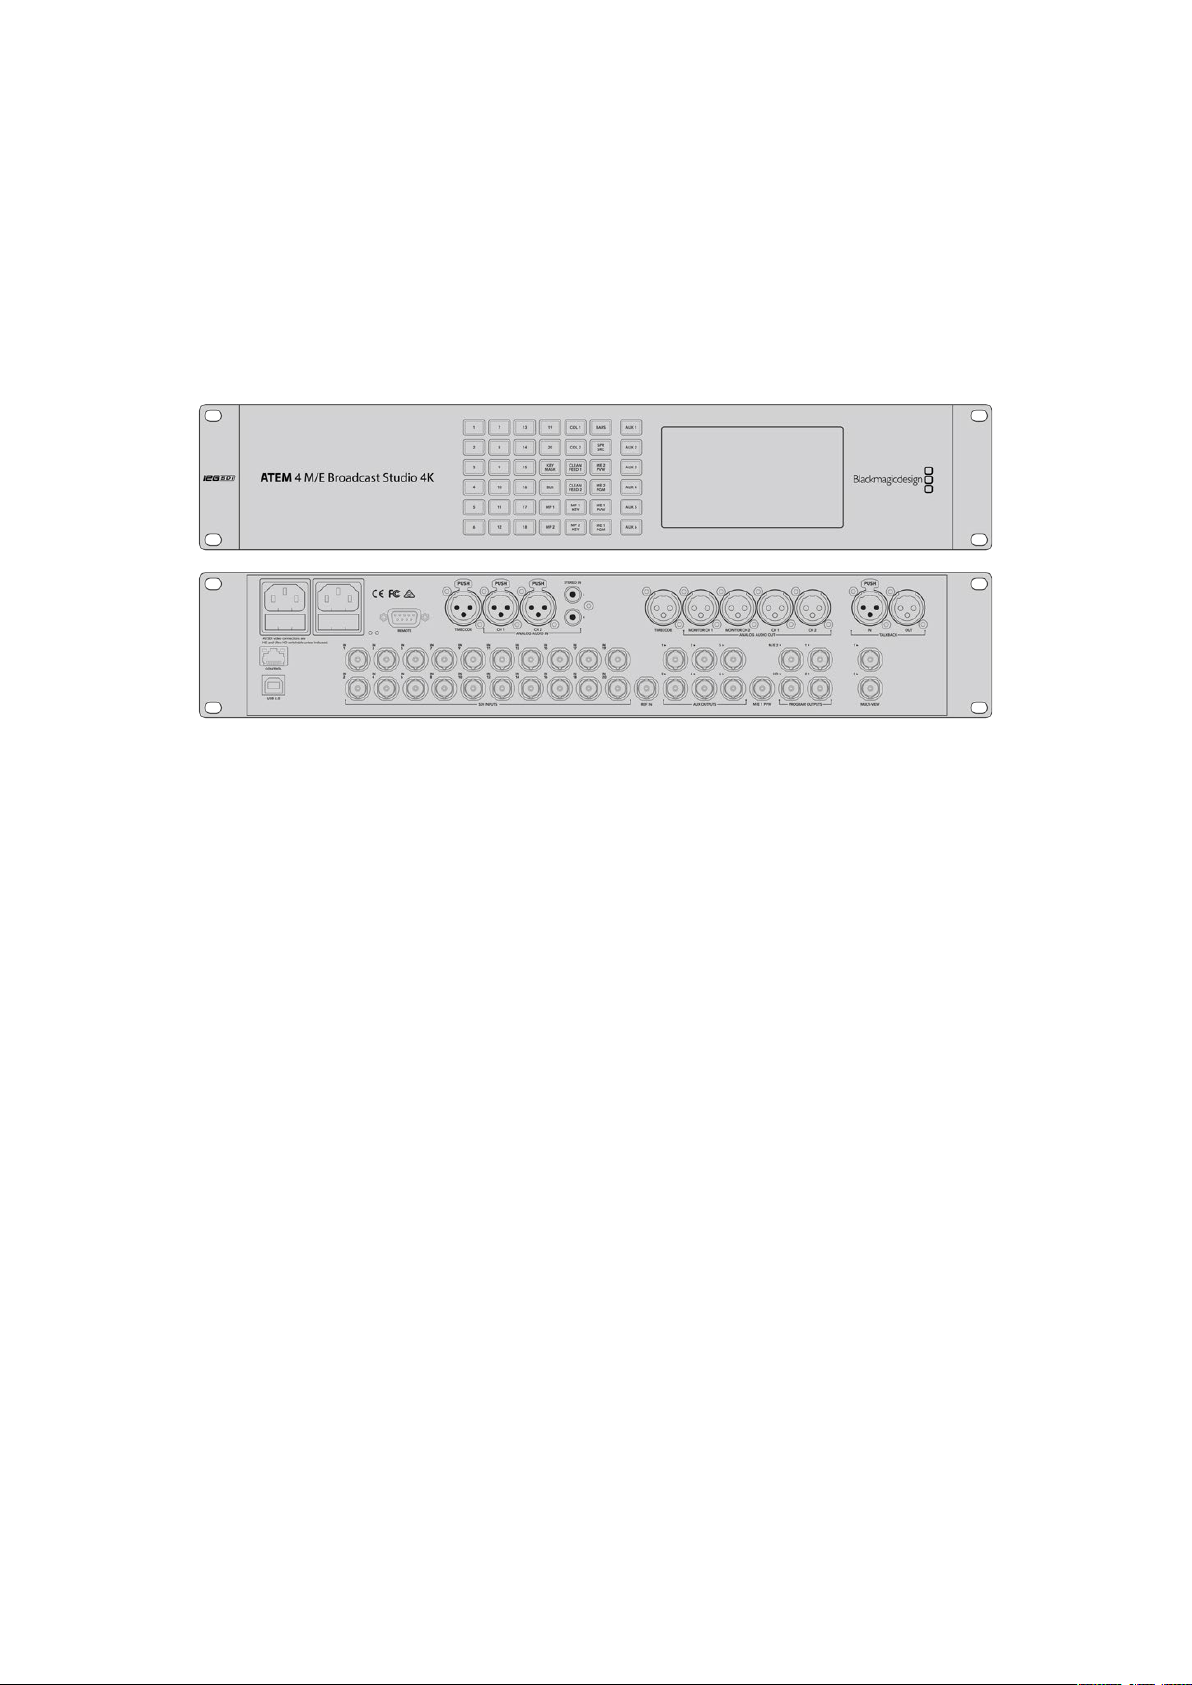
Connecting to an ATEM Switcher
If you’re using an ATEM switcher, you can plug in up to 4 Blackmagic HyperDeck disk recorders
and control them using the ATEM software or hardware panel. This is a very powerful feature
that effectively gives you an entire videotape department at your fingertips. You can also
trigger recording on your HyperDeck from an ATEM switcher, which is a great way of making an
archive copy of a live broadcast, or capturing B roll when live switching a production that will be
fine tuned later.
ATEM switchers, such as the ATEM 4 M/E Broadcast Studio 4K, canconnect with up to four
HyperDeck disk recorders
To connect HyperDecks to an ATEM switcher:
1 Connect your HyperDeck to the same network as your ATEM Switcher and note its
IP address.
Your HyperDeck’s IP address can be found via its front panel and LCD menu by
entering the ‘setup’, then ‘Ethernet’ menus from the main menu.
Alternatively, you can access your HyperDeck’s IP address on your Mac or PC via the
‘configure’ tab in Blackmagic HyperDeck Setup utility.
2 Connect one of your HyperDeck’s SDI or HDMI outputs to an SDI or HDMI source input
on your ATEM Switcher.
3 If you want to use your ATEM Switcher to trigger recording on your HyperDeck,
you’llalso need to connect a video source to your HyperDeck.
Simply connect an SDI or HDMI source to your HyperDeck as usual. To record your
ATEM switcher’s program output, connect one of your switcher’s auxiliary SDI outputs
to your HyperDeck’s SDI input.
4 Enable remote by pressing the remote button on HyperDeck’s front panel, or via the
LCD menu on HyperDeck Studio Mini, to allow remote control from the switcher.
5 Complete the connection process by entering your HyperDeck’s source and
IPaddress information into your ATEM software or ATEM broadcast panel. This is very
straightforward and laid out in your ATEM switcher manual.
52Connecting to an ATEM Switcher

Make sure your HyperDeck has remote set to ‘on’ in the LCD menu, or via the
controlpanel remote button, to enable Ethernet control with an ATEM switcher
Understanding Post
Production Workflows
Accessing Your Clips
To access your clips, simply plug the SD card or SSD into your computer via an SD card slot,
external reader, or SSD dock. You can either drag the files from the SSD or SD card directly to a
local hard drive, or you can work directly from the SSD or SD card. You can also connect SSDs
to your computer with a 2.5” eSATA to USB cable adapter, however this won’t be fast enough to
handle working directly from the SSD and is really only recommended as a portable solution for
getting your video files off the SSD and onto a laptop.
Mac OS
QuickTime is built into Mac OS. Apple ProRes, Avid DNxHD and DNxHR QuickTime movies
recorded by HyperDeck can be opened in almost any video software on Mac OS.
DNxHD and DNxHR MXF files recorded by HyperDeck can be opened with Avid Media
Composer and DaVinci Resolve for Mac. DNxHD codecs can be downloaded free from
http://www.avid.com/products/avid-dnxhr-and-dnxhd
MCC closed caption data files recorded by HyperDeck can be opened with MacCaption
software for Mac OS from http://www.telestream.net/captioning/overview.htm
Windows
Apple ProRes QuickTime movies recorded by HyperDeck require QuickTime to be installed on
your PC. Almost any video software on Windows that supports QuickTime can open movies
recorded by HyperDeck. QuickTime for Windows can be downloaded free from
http://www.apple.com/quicktime/download/.
DNxHD and DNxHR MXF files recorded by HyperDeck can be opened with Avid Media
Composer and DaVinci Resolve for Windows. DNxHD codecs can be downloaded free from
http://www.avid.com/products/avid-dnxhr-and-dnxhd
MCC closed caption data files recorded by HyperDeck can be opened with CaptionMaker
software for Windows from http://www.telestream.net/captioning/overview.htm
53Understanding Post Production Workflows

Developer Information
Blackmagic HyperDeck Ethernet Protocol
The Blackmagic HyperDeck Ethernet Protocol is a text based protocol accessed by connecting
to TCP port 9993 on HyperDeck Studio models that have a built in Ethernet connection. If you
are a software developer, you can use the protocol to construct devices that integrate with our
products. Here at Blackmagic Design our approach is to open up our protocols and we eagerly
look forward to seeing what you come up with!
Protocol Commands
Command Command Description
help or ? Provides help text on all commands and parameters
commands return commands in XML format
device info return device information
disk list query clip list on active disk
disk list: slot id: {n} query clip list on disk in slot {n}
quit disconnect ethernet control
ping check device is responding
preview: enable: {true/false} switch to preview or output
play play from current timecode
play: speed: {-5000 to 5000} play at specific speed
play: loop: {true/false} play in loops or stop-at-end
play: single clip: {true/false} play current clip or all clips
playrange query playrange setting
playrange set: clip id: {n} set play range to play clip {n} only
playrange set: clip id: {n} count: {m} set play range to {m} clips starting from clip {n}
playrange set: in: {inT} out: {outT}
set play range to play between:
- timecode {inT} andtimecode {outT}
playrange set: timeline in: {in} timeline out:
{out}
set play range in units of frames between:
- timeline position {in} and position {out} clear/reset play
rangesetting
playrange clear clear/reset play range setting
play on startup query unit play on startup state
play on startup: enable: {true/false} enable or disable play on startup
play on startup: single clip: {true/false} play single clip or all clips on startup
play option query play options
play option: stop mode:
{lastframe/nextframe/black}
set output frame when playback stops
record record from current input
record: name: {name} record named clip
record spill spill current recording to next slot
54Developer Information

Command Command Description
record: spill: slot id: {n}
spill current recording to specified slot
use current id to spill to same slot
stop stop playback or recording
clips count query number of clips on timeline
clips get query all timeline clips
clips get: clip id: {n} query a timeline clip info
clips get: clip id: {n} count: {m} query m clips starting from n
clips get: version: {1/2}
query clip info using specified output version:
version 1: is: name startT duration
version 2: id: startT duration inT outT name
clips add: name: {name} append a clip to timeline
clips add: clip id: {n} name: {name} insert clip before existing clip {n}
clips add: in: {inT} out: {outT} name: {name} append the {inT} to {outT} portion of clip
clips remove: clip id: {n}
remove clip {n} from the timeline
(invalidates clip ids following clip {n})
clips clear empty timeline clip list
transport info query current activity
slot info query active slot
slot info: slot id: {n} query slot {n}
slot select: slot id: {n} switch to specified slot
slot select: video format: {format} load clips of specified format
slot unblock unblock active slot
slot unblock: slot id: {n} unblock slot {n}
cache info query cache status
dynamic range query dynamic range settings
dynamic range: playback override:
{off/Rec709/Rec2020_SDR/HLG/
ST2084_300/ST2084_500/
ST2084_800/ST2084_1000/
ST2084_2000/ST2084_4000/ST2084
set playback dynamic range override
dynamic range: record override:
{off/Rec709/Rec2020_SDR/HLG/
ST2084_300/ST2084_500/
ST2084_800/ST2084_1000/
ST2084_2000/ST2084_4000/ST2048}
set record dynamic range override
notify query notification status
notify: remote: {true/false} set remote notifications
notify: transport: {true/false} set transport notifications
notify: slot: {true/false} set slot notifications
notify: configuration: {true/false} set configuration notifications
notify: dropped frames: {true/false} set dropped frames notifications
notify: display timecode: {true/false} set display timecode notifications
55Developer Information

Command Command Description
notify: timeline position: {true/false} set playback timeline position notifications
notify: playrange: {true/false} set playrange notifications
notify: cache: {true/false} set cache notifications
notify: dynamic range: {true/false} set dynamic range settings notifications
notify: slate: {true/false} set digital slate notifications
goto: clip id: {start/end} goto first clip or last clip
goto: clip id: {n} goto clip id {n}
goto: clip id: +{n} go forward {n} clips
goto: clip id: -{n} go backward {n} clips
goto: clip: {n} goto frame position {n} within current clip
goto: clip: +{n} go forward {n} frames within current clip
goto: clip: -{n} go backward {n} frames within current clip
goto: clip: {start/end} goto start or end of clip
goto: timeline: {n} goto frame position {n} within timeline
goto: timeline: +{n} o forward {n} frames within timeline
goto: timeline: -{n} go backward {n} frames within timeline
goto: timeline: {start/end} goto start or end of timeline
goto: timecode: {timecode} goto specified timecode
goto: timecode: +{timecode} go forward {timecode} duration
goto: timecode: -{timecode} go backward {timecode} duration
goto: slot id: {n} goto slot id {n}
jog: timecode: {timecode} jog to timecode
jog: timecode: +{timecode} jog forward {timecode} duration
jog: timecode: -{timecode} jog backward {timecode} duration
shuttle: speed: {-5000 to 5000} shuttle with speed
remote query unit remote control state
remote: enable: {true/false} enable or disable remote control
remote: override: {true/false} session override remote control
configuration query configuration settings
configuration: video input: SDI switch to SDI input
configuration: video input: HDMI switch to HDMI input
configuration: video input: component switch to component input
configuration: audio input: embedded capture embedded audio
configuration: audio input: XLR capture XLR audio
configuration: audio input: RCA capture RCA audio
configuration: file format: {format} switch to specific file format
configuration: audio codec: PCM switch to PCM audio
configuration: audio codec: AAC switch to AAC audio
56Developer Information

Command Command Description
configuration: timecode input:
{external/embedded/preset/clip}
change the timecode input
configuration: timecode output:
{clip/timeline/internal}
change the timecode output
configuration: timecode preference:
{default/dropframe/nondropframe}
whether or not to use drop frame timecodes when not
otherwise specified
configuration: timecode preset:
{timecode}
set the timecode preset
configuration: audio input channels: {n} set the number of audio channels recorded to {n}
configuration: record trigger:
{none/recordbit/timecoderun}
change the record trigger
configuration: record prefix: {name} set the record prefix name (supports UTF-8 name)
configuration: append timestamp:
{true/false}
append timestamp to recorded filename
configuration: xlr input id: {n} xlr type:
{line/mic}
configure xlr input type
multiple xlr inputs can be configured in a single command
configuration: genlock input resync:
{true/false}
enable or disable genlock input resync
uptime return time since last boot
format: prepare: {format} prepare a disk formatting operation to filesystem {format}
format: confirm: {token} perform a pre-prepared formatting operation using token
identify: enable: {true/false} identify the device
watchdog: period: {period in seconds} client connection timeout
reboot reboot device
slate clips slate clips information
slate project slate project information
slate project:↵
camera: {index}↵
set camera index e.g. A
Command Combinations
You can combine the parameters into a single command, for example:
play: speed: 200 loop: true single clip: true
Or for configuration:
configuration: video input: SDI audio input: XLR
Or to switch to the second disk, but only play NTSC clips:
slot select: slot id: 2 video format: NTSC
Using XML
While you can use the Terminal to talk to HyperDeck, if you are writing software, you can use
XML to confirm the existence of a specific command based on the firmware of the HyperDeck
you are communicating with. This helps your software user interface adjust to the capabilities of
the specific HyperDeck model and software version.
57Developer Information

Protocol Details
Connection
The HyperDeck Ethernet server listens on TCP port 9993.
Basic syntax
The HyperDeck protocol is a line oriented text protocol. Lines from the server will be separated by an ascii
CR LF sequence. Messages from the client may be separated by LF or CR LF.
New lines are represented in this document as a "↵" symbol.
Single line command syntax
Command parameters are usually optional. A command with no parameters is terminated with a new line:
{Command name}↵
If parameters are specified, the command name is followed by a colon, then pairs of parameter names and
values. Each parameter name is terminated with a colon character:
{Command name}: {Parameter}: {Value} {Parameter}: {Value} ...↵
Multiline command syntax
The HyperDeck protocol also supports an equivalent multiline syntax where each parameter-value pair is
entered on a new line. E.g.
{Command name}:↵
{P a r a m e t e r}: { Va lu e}↵
{P a r a m e t e r}: { Va lu e}↵
↵
Response syntax
Simple responses from the server consist of a three digit response code and descriptive text terminated by
a new line:
{Response code} {Response text}↵
If a response carries parameters, the response text is terminated with a colon, and parameter name and
value pairs follow on subsequent lines until a blank line is returned:
{Response code} {Response text}:↵
{P a r a m e t e r}: { Va lu e}↵
{P a r a m e t e r}: { Va lu e}↵
...
↵
Successful response codes
A simple acknowledgement of a command is indicated with a response code of 200:
200 ok↵
Other successful responses carry parameters and are indicated with response codes in the range of 201
to299.
58Developer Information

Failure response codes
Failure responses to commands are indicated with response codes in the range of 100 to 199:
100 syntax error
101 unsupported parameter
102 invalid value
103 unsupported
104 disk full
105 no disk
106 disk error
107 timeline empty
108 internal error
109 out of range
110 no input
111 remote control disabled
112 clip not found
120 connection rejected
150 invalid state
151 invalid codec
160 invalid format
161 invalid token
162 format not prepared
163 parameterized single line command not supported
Asynchronous response codes
The server may return asynchronous messages at any time. These responses are indicated with response
codes in the range of 500 to 599:
5xx {Response Text}:↵
{P a r a m e t e r}: { Va lu e}↵
{P a r a m e t e r}: { Va lu e}↵
↵
Connection response
On connection, an asynchronous message will be delivered:
500 connection info:↵
protocol version: {Version}↵
model: {Model Name}↵
↵
Connection rejection
Only one client may connect to the server at a time. If other clients attempt to connect concurrently,
they will receive an error and be disconnected:
120 connection rejected↵
59Developer Information

Timecode syntax
Timecodes are expressed as non-drop-frame timecode in the format:
HH:MM:SS:FF
Handling of deck "remote" state
The “remote” command may be used to enable or disable the remote control of the deck. Any attempt to
change the deck state over ethernet while remote access is disabled will generate an error:
111 remote control disabled↵
To enable or disable remote control:
remote: enable: {“true”, “false”} ↵
The current remote control state may be overridden allowing remote access over ethernet irrespective of
the current remote control state:
remote: override: {“true”, “false”} ↵
The override state is only valid for the currently connected ethernet client and only while the connection
remains open.
The “remote” command may be used to query the remote control state of the deck by specifying no
parameters:
remote↵
The deck will return the current remote control state:
210 remote info:↵
enabled: {“true”, “false”}↵
override: {“true”, “false”}↵
↵
Asynchronous remote control information change notification is disabled by default and may be
configured with the “notify” command. When enabled, changes in remote state will generate a “510 remote
info:”asynchronous message with the same parameters as the “210 remote info:” message.
Closing connection
The "quit" command instructs the server to cleanly shut down the connection:
quit↵
Checking connection status
The "ping" command has no function other than to determine if the server is responding:
ping↵
Getting help
The "help" or "?" commands return human readable help text describing all available commands and
parameters:
help↵
Or:
?↵
The server will respond with a list of all supported commands:
201 help:↵
{Help Te x t}↵
{Help Te x t}↵
↵
60Developer Information

Switching to preview mode
The "preview" command instructs the deck to switch between preview mode and output mode:
preview: enable: {"true", "false"}↵
Playback will be stopped when the deck is switched to preview mode. Capturing will be stopped when the
deck is switched to output mode.
Controlling device playback
The “play” command instructs the deck to start playing:
play↵
The play command accepts a number of parameters which may be used together in most combinations.
By default, the deck will play all remaining clips on the timeline then stop.
The “single clip” parameter may be used to override this behavior:
play: single clip: {“true”, “false”}↵
By default, the deck will play at normal (100%) speed. An alternate speed may be specified in percentage
between -1600 and 1600:
play: speed: {% normal speed}↵
By default, the deck will stop playing when it reaches to the end of the timeline. The “loop” parameter may
be used to override this behavior:
play: loop: {“true”, “false”}↵
The “playrange” command instructs the deck to play all the clips. To override this behavior: and select a
particular clip:
playrange set: clip id: {Clip ID}↵
To only play a certain timecode range:
playrange set: in: {in timecode} out: {out timecode}↵
To clear a set playrange and return to the default value:
playrange clear↵
The “play on startup command” instructs the deck on what action to take on startup. By default, the deck
will not play. Use the “enable” command to start playback after each power up.
play on startup: enable {“true”, “false”}↵
By default, the unit will play back all clips on startup. Use the “single clip” command to override.
play on startup: single clip: {“true”, “false”}↵
Stopping deck operation
The "stop" command instructs the deck to stop the current playback or capture:
stop↵
61Developer Information

Changing timeline position
The "goto" command instructs the deck to switch to playback mode and change its position within the
timeline.
To go to the start of a specific clip:
goto: clip id: {Clip ID}↵
To move forward/back {count} clips from the current clip on the current timeline:
goto: clip id: +/-{count}↵
Note that if the resultant clip id goes beyond the first or last clip on timeline, it will be clamp at the first or
last clip.
To go to the start or end of the current clip:
goto: clip: {“start”, “end”}↵
To go to the start of the first clip or the end of the last clip:
goto: timeline: {“start”, “end”}↵
To go to a specified timecode:
goto: timecode: {timecode}↵
To move forward or back a specified duration in timecode:
goto: timecode: {“+”, “-”}{duration in timecode}↵
To specify between slot 1 and slot 2:
goto: slot id: {Slot ID}↵
Note that only one parameter/value pair is allowed for each goto command.
Enumerating supported commands and parameters
The "commands" command returns the supported commands:
commands↵
The command list is returned in a computer readable XML format:
212 commands:
<commands>↵
<command name="…"><parameter name="…"/>…</command>↵
<command name="…"><parameter name="…"/>…</command>↵
…
</commands>↵
↵
More XML tokens and parameters may be added in later releases.
62Developer Information

Controlling asynchronous notifications
The “notify” command may be used to enable or disable asynchronous notifications from the server.
To enable or disable transport notifications:
notify: transport: {“true”, “false”}↵
To enable or disable slot notifications:
notify: slot: {“true”, “false”}↵
To enable or disable remote notifications:
notify: remote: {“true”, “false”}↵
To enable or disable configuration notifications:
notify: configuration: {“true”, “false”}↵
Multiple parameters may be specified. If no parameters are specified, the server returns the current state of
all notifications:
209 notify:↵
transport: {“true”, “false”}↵
slot: {“true”, “false”}↵
remote: {“true”, “false”}↵
configuration: {“true”, “false”}↵
dropped frames: {“true”, “false”}↵
display timecode: {“true”, “false”}↵
timeline position: {“true”, “false”}↵
playrange: {“true”, “false”}↵
cache: {“true”, “false”}↵
dynamic range: {“true”, “false”}↵
slate: {“true”, “false”}↵
↵
Retrieving device information
The "device info" command returns information about the connected deck device:
device info↵
The server will respond with:
204 device info:↵
protocol version: {Version}↵
model: {Model Name}↵
unique id: {unique alphanumeric identifier}↵
slot count: {number of storage slots}↵
software version: {software version}↵
↵
63Developer Information

Retrieving slot information
The "slot info" command returns information about a slot. Without parameters, the command returns
information for the currently selected slot:
slot info↵
If a slot id is specified, that slot will be queried:
slot info: slot id: {Slot ID}↵
The server will respond with slot specific information:
202 slot info:↵
slot id: {Slot ID}↵
status: {"empty", "mounting", "error", "mounted"}↵
volume name: {Volume name}↵
recording time: {recording time available in seconds}↵
video format: {disk's default video format}↵
blocked: {“true”, “false”}↵
↵
Asynchronous slot information change notification is disabled by default and may be configured with
the "notify" command. When enabled, changes in slot state will generate a "502 slot info:" asynchronous
message with the same parameters as the "202 slot info:" message.
Retrieving clip information
The “disk list” command returns the information for each playable clip on a given disk. Without parameters,
the command returns information for the current active disk:
disk list↵
If a slot id is specified, the disk in that slot will be queried:
disk list: slot id: {Slot ID}↵
The server responds with the list of all playable clips on the disk in the format of: Index, name, formats, and
duration in timecode:
206 disk list:↵
slot id: {Slot ID}↵
{clip index}: {name} {file format} {video format} {Duration
ti m ecode}↵
{clip index}: {name} {file format} {video format} {Duration
ti m ecode}↵
…
↵
Note that the clip index starts from 1.
Retrieving clip count
The "clips count" command returns the number of clips on the current timeline:
clips count ↵
The server responds with the number of clips:
214 clips count: ↵
clip count: {Count}↵
64Developer Information

Retrieving timeline information
The "clips get" command returns information for each available clip on the current timeline. Without
parameters, the command returns information for all clips on timeline:
clips get↵
The server responds with a list of clip IDs, names and timecodes:
205 clips info:↵
clip count: {Count}↵
{Clip ID}: {Name} {Start timecode} {Duration timecode}↵
{Clip ID}: {Name} {Start timecode} {Duration timecode}↵
…
↵
Retrieving transport information
The “transport info” command returns the state of the transport:
transport info ↵
The server responds with transport specific information:
208 transport info:
status: {“preview”, “stopped”, “play”, “forward”, “rewind”,
“j o g ”, “ s h u t t l e ”,” r e c o r d ” }↵
speed: {Play speed between -5000 and 5000 %}↵
slot id: {Slot ID or “none”}↵
clip id: {Clip ID or “none”}↵
single clip: {“true”, “false”}↵
display timecode: {timecode}↵
timecode: {timecode}↵
video format: {Video format}↵
loop: {“true”, “false”}↵
timeline: {n}↵
input video format: {Video format”}↵
dynamic range: {“off”, “Rec709”, “Rec2020_SDR”, “HLG”,
“ST2084_300”, “ST2084_500”, “ST2084_800”, “ST2084_1000”,
“ST2084_2000”, “ST2084_4000”, “ST2048” or “none”}↵
↵
The "timecode" value is the timecode within the current timeline for playback or the clip for record. The
"display timecode" is the timecode displayed on the front of the deck. The two timecodes will differ in some
deck modes.
Asynchronous transport information change notification is disabled by default and may be configured
with the "notify" command. When enabled, changes in transport state will generate a "508 transport info:"
asynchronous message with the same parameters as the "208 transport info:" message.
65Developer Information

Video Formats
The following video formats are currently supported on HyperDeck Studio:
NTSC, PAL, NTSCp, PALp
720p50, 720p5994, 720p60
1080p23976, 1080p24, 1080p25, 1080p2997, 1080p30
1080i50, 1080i5994, 1080i60
HyperDeck Studio Pro and Plus models support these 4k formats:
4Kp23976, 4Kp24, 4Kp25, 4Kp2997, 4Kp30
HyperDeck Studio 4K Pro adds support for the following 4k formats:
4Kp50, 4Kp5994, 4Kp60
Video format support may vary between models and software releases.
File Formats
All HyperDeck models currently support the following file formats:
H.264High_SDI
H.264High
H.264Medium
H.264Low
QuickTimeProResHQ
QuickTimeProRes
QuickTimeProResLT
QuickTimeProResProxy
QuickTimeDNxHD220x
DNxHD220x
QuickTimeDNxHD145
DNxHD145
QuickTimeDNxHD45
DNxHD45
HyperDeck Studio 4K Pro also supports the following file formats:
H.265High_SDI
H.265High
H.265Medium
H.265Low
QuickTimeDNxHR_HQX
DNxHR_HQX 4Kp60
QuickTimeDNxHR_SQ
DNxHR_SQ
QuickTimeDNxHR_LB
DNxHR_LB
Supported file formats may vary between models and software releases.
66Developer Information

Querying and updating configuration information
The "configuration" command may be used to query the current configuration of the deck:
configuration↵
The server returns the configuration of the deck:
211 configuration:↵
audio input: {“embedded”, “XLR”, “RCA”}↵
audio mapping: {n}↵
video input: {“SDI”, “HDMI”, “component”, “composite”}↵
file format: {format}↵
audio codec: {“PCM”, “AAC”}↵
timecode input: {“external”, “embedded”, “preset”, “clip”}↵
timecode output: {“clip”, “timeline”}↵
timecode preference: {“default”, “dropframe”, “nondropframe”}↵
timecode preset: {timecode}↵
audio input channels: {n}↵
record trigger: {“none”, “recordbit”, “timecoderun”}↵
record prefix: {name}↵
append timestamp: {“true”, “false”}↵
↵
One or more configuration parameters may be specified to change the configuration of the deck.
To change the current video input:
configuration: video input: {“SDI”, “HDMI”, “component”}↵
Valid video inputs may vary between models. To configure the current audio input:
configuration: audio input: {“embedded”, “XLR”, “RCA”}↵
Valid audio inputs may vary between models.
To configure the current file format:
configuration: file format: {File format}↵
Note that changes to the file format may require the deck to reset, which will cause the client connection to
be closed. In such case, response code 213 will be returned (instead of 200) before the client connection is
closed:
“213 deck rebooting”
Asynchronous configuration information change notification is disabled by default and may be configured
with the “notify” command. When enabled, changes in configuration will generate a “511 configuration:”
asynchronous message with the same parameters as the “211 configuration:” message.
Selecting active slot and video format
The "slot select" command instructs the deck to switch to a specified slot, or/and to select a specified
output video format.
To switch to a specified slot:
slot select: slot id: {slot ID}↵
To select the output video format:
slot select: video format: {video format}↵
Either or all slot select parameters may be specified. Note that selecting video format will result in a rescan
of the disk to reconstruct the timeline with all clips of the specified video format.
67Developer Information

Clearing the current timeline
The "clips clear" command instructs the deck to empty the current timeline:
clips clear↵
The server responds with
200 ok↵
Adding a clip to the current timeline
The "clips add:" command instructs the deck to add a clip to the current timeline:
clips add: name: {"clip name"}↵
The server responds with
200 ok↵
or in case of error
1xx {error description}↵
Configuring the watchdog
The “watchdog” command instructs the deck to monitor the connected client and terminate the connection
if the client is inactive for at least a specified period of time.
To configure the watchdog:
watchdog: period: {period in seconds}↵
To avoid disconnection, the client must send a command to the server at least every {period} seconds. Note
that if the period is set to 0 or less than 0, connection monitoring will be disabled.
68Developer Information

Help
Getting Help
The fastest way to obtain help is to go to the Blackmagic Design online support pages and
check the latest support material available for your Blackmagic HyperDeck disk recorder.
Blackmagic Design Online Support Pages
The latest manual, software and support notes can be found at the Blackmagic Design support
center at www.blackmagicdesign.com/support.
Blackmagic Design Forum
The Blackmagic Design forum on our website is a helpful resource you can visit for more
information and creative ideas. This can also be a faster way of getting help as there may
already be answers you can find from other experienced users and Blackmagic Design staff
which will keep you moving forward. You can visit the forum at
https://forum.blackmagicdesign.com
Contacting Blackmagic Design Support
If you can’t find the help you need in our support material or on the forum, please use the
“Sendus an email” button on the support page to email a support request. Alternatively,
click on the “Find your local support team” button on the support page and call your nearest
Blackmagic Design support office.
Checking the Software Version Currently Installed
To check which version of Blackmagic HyperDeck software is installed on your computer,
open the About Blackmagic HyperDeck Setup window.
On Mac OS, open Blackmagic HyperDeck Setup from the Applications folder.
Select About Blackmagic HyperDeck Setup from the application menu to reveal the
version number.
On Windows, open Blackmagic HyperDeck Setup utility from your Start menu or Start
Screen. Clickon the Help menu and select About Blackmagic HyperDeck Setup to
reveal the version number.
How to Get the Latest Software Updates
After checking the version of Blackmagic HyperDeck Setup software installed on your computer,
please visit the Blackmagic Design support center at www.blackmagicdesign.com/support to
check for the latest updates. While it is usually a good idea to run the latest updates, it is wise to
avoid updating any software if you are in the middle of an important project.
69Help

Regulatory Notices
Disposal of Waste of Electrical and Electronic Equipment Within the European Union.
The symbol on the product indicates that this equipment must not be disposed of with
other waste materials. In order to dispose of your waste equipment, it must be handed
over to a designated collection point for recycling. The separate collection and
recycling of your waste equipment at the time of disposal will help conserve natural
resources and ensure that it is recycled in a manner that protects human health and
theenvironment. For more information about where you can drop off your waste
equipment for recycling, please contact your local city recycling office or the dealer
from whom you purchased the product.
This equipment has been tested and found to comply with the limits for a Class A
digitaldevice, pursuant to Part 15 of the FCC rules. These limits are designed to provide
reasonable protection against harmful interference when the equipment is operated
inacommercial environment. This equipment generates, uses, and can radiate radio
frequency energy and, if not installed and used in accordance with the instructions,
maycause harmful interference to radio communications. Operation of this product in
aresidential area is likely to cause harmful interference, in which case the user will be
required to correct the interference at personal expense.
Operation is subject to the following two conditions:
1 This device may not cause harmful interference.
2 This device must accept any interference received, including interference that
may cause undesired operation.
R-R-BMD-20210202002
R-R-BMD-20210202003
R-R-BMD-20201201003
R-R-BMD-20210301001
ISED Canada Statement
This device complies with Canadianstandards for Class A digital apparatus.
Any modifications or use of this product outside its intended use could void
compliance to these standards.
Connection to HDMI interfaces must be made with high quality shielded
HDMI cables.
This equipment has been tested for compliance with the intended use in a
commercial environment. If the equipment is used in a domestic environment,
it may cause radio interference.
70Regulatory Notices
Safety Information
For protection against electric shock, the equipment must be connected to a mains socket
outlet with a protective earth connection. In case of doubt contact a qualifiedelectrician.
To reduce the risk of electric shock, do not expose this equipment to dripping orsplashing.
Product is suitable for use in tropical locations with an ambient temperature of up to 40
o
C.
Ensure that adequate ventilation is provided around the product and that it is not restricted.
When rack mounting, ensure that the ventilation is not restricted by adjacent equipment.
No operator serviceable parts inside product. Refer servicing to your local Blackmagic Design
service center.
Use only at altitudes not more than 2000m above sea level.
State of California statement
This product can expose you to chemicals such as trace amounts of polybrominated biphenyls
within plastic parts, which is known to the state of California to cause cancer and birth defects
or other reproductive harm.
For more information go to www.P65Warnings.ca.gov.
Warning for Authorized Service Personnel
Disconnect power from both power inlets before servicing!
71Safety Information

Warranty
12 Month Limited Warranty
Blackmagic Design warrants that this product will be free from defects in materials and workmanship
for a period of 12 months from the date of purchase. If a product proves to be defective during this
warranty period, Blackmagic Design, at its option, either will repair the defective product without
charge for parts and labor, or will provide a replacement in exchange for the defective product.
In order to obtain service under this warranty, you the Customer, must notify Blackmagic Design
of the defect before the expiration of the warranty period and make suitable arrangements for the
performance of service. The Customer shall be responsible for packaging and shipping the
defective product to a designated service center nominated by Blackmagic Design, withshipping
charges pre paid. Customer shall be responsible for paying all shipping charges, insurance, duties,
taxes, and any other charges for products returned to us for any reason.
This warranty shall not apply to any defect, failure or damage caused by improper use or improper
or inadequate maintenance and care. Blackmagic Design shall not be obligated to furnish service
under this warranty: a) to repair damage resulting from attempts by personnel other than
Blackmagic Design representatives to install, repair or service the product,
b) to repair damage resulting from improper use or connection to incompatible equipment,
c) to repair any damage or malfunction caused by the use of non Blackmagic Design parts or
supplies, or d) to service a product that has been modified or integrated with other products when
the effect of such a modification or integration increases the time or difficulty of servicing the
product. THIS WARRANTY IS GIVEN BY BLACKMAGIC DESIGN IN LIEU OF ANY OTHER
WARRANTIES, EXPRESS OR IMPLIED. BLACKMAGIC DESIGN AND ITS VENDORS DISCLAIM ANY
IMPLIED WARRANTIES OF MERCHANTABILITY OR FITNESS FOR A PARTICULAR PURPOSE.
BLACKMAGIC DESIGN’S RESPONSIBILITY TO REPAIR OR REPLACE DEFECTIVE PRODUCTS IS
THE WHOLE AND EXCLUSIVE REMEDY PROVIDED TO THE CUSTOMER FOR ANY INDIRECT,
SPECIAL, INCIDENTAL OR CONSEQUENTIAL DAMAGES IRRESPECTIVE OF WHETHER BLACKMAGIC
DESIGN OR THE VENDOR HAS ADVANCE NOTICE OF THE POSSIBILITY OF SUCH DAMAGES.
BLACKMAGIC DESIGN IS NOT LIABLE FOR ANY ILLEGAL USE OF EQUIPMENT BY CUSTOMER.
BLACKMAGIC IS NOT LIABLE FOR ANY DAMAGES RESULTING FROM USE OF THIS PRODUCT.
USER OPERATES THIS PRODUCT AT OWN RISK.
© Copyright 2021 Blackmagic Design. All rights reserved. ‘Blackmagic Design’, ‘DeckLink’, ‘HDLink’, ‘Workgroup Videohub’,
‘Multibridge Pro’, ‘Multibridge Extreme’, ‘Intensity’ and ‘Leading the creative video revolution’ are registered trademarks in the
US and other countries. All other company and product names may be trade marks of their respective companies with which
they are associated.
72Warranty
HyperDeckディスクレコーダー
HyperDeck
ディスクレコーダー
2021
年
7
月
インストール/オペレーションマニュアル

ようこそ
Blackmagic HyperDeckディスクレコーダーをお買い上げいただき誠にありがとうございます。
2011年に、Blackmagic HyperDeckディスクレコーダーのオリジナルモデルを設 計した際、2.5イ
ンチのリムーバブル
SSD
でプロ仕様のビデオの収録・再生を簡単かつ低価格に行える製品を開発
したいと考えました。
このたび、
HyperDeck
ディスクレコーダーの新しいラインナップをご紹介できることを大 変喜ばしく
思 って い ま す。新 機 種 は SDカードとSSDに加え、新たにUSBフラッシュディスクにHDおよびUltra HD
を収 録 で きます。Blackmagic MultiDock 10Gを接 続して、ファイルの収録・再生を外付けハードド
ライブで実行することも可能です!
HyperDeck
Studio
Plus
および
Pro
シリーズは、使い慣れた放 送デッキコントロールを搭載してお
り、サーチダイヤルでジョグ、シャトル、スクロール再生を操 作できます。サーチダイヤルのクラッチ
機構では、手元でフィードバックが得られるため、モニターから目を離すことなくクリップを検索で
きます。フロントパネルにヘッドフォン接続とスピーカーも搭載しているため、
HyperDeck
から直
接オーディオを確認できるだけでなく、他にも多数の機能に対応しています。
HyperDeckディスクレコーダーを末長くご使用いただき、制作の一翼を担えればと思っています。
弊 社のウェブサイト www.blackmagicdesign.com/jpのサポートページで、最新バージョンのマニュ
アルおよびHyperDeckソ フトウェ ア のアップ デ ート をご 確 認くだ さ い 。ソ フトウェ ア を アップ デ ートす
ることで、常に最新の機能をお使いいただけます。ソフトウェアをダウンロードする際にユーザー登 録
していただければ、新しいソフトウェアのリリース時にお知らせいたします。私たちは、常に新機能の
開発および製品の改善に努めていますので、ユーザーの皆様からご意見をいただければ幸いです。
Blackmagic Design CEO
グ ラント・ペ ティ

目次
HyperDeckディスクレコーダーについて 76
はじめに 77
電源の接続 77
ビデ オとオー ディオを接 続 77
オーディオの チェック 78
メディアの 接 続 78
ビデオの収録 80
複 数 のメディアへ の 収 録 80
再生 81
HyperDeck
でビデオを再生 81
サーチダイヤルの 使用 82
フロントパネル の使 用 84
メディア スロットの イン ジ ケー ター 84
LCD
メニューの 使 用 85
設定 86
リアパネル 98
モニター出力の使 用 100
ストレ ー ジメディア 103
SD
カード 103
SSD
105
外 付 け ディスク 106
メディア をフォーマット 108
コンピュー ター でメディア を 準 備 108
HyperDeck
をウェブカメラとして使 用する 109
ウェブカムソースの設定 109
Open
Broadcasterの セットアップ 110
Blackmagic
HyperDeckSetup 112
HyperDeck
Setupを使用する 112
「LUTs」ペ ー ジ 113
内部ソフトウェアのアップデート 114
Teranex
MiniRackShelf 115
RS
-422コントロール 116
ネットワークでファイルを転送 121
ATEM
スイッチ ャー に 接 続 123
ポストプロダクションワークフローについて 124
Developer
Information 125
Blackmagic
HyperDeck
EthernetProtocol 125
Protocol
Commands 125
Protocol
Details 129
ヘルプ 140
規制に関する警告 141
安全情報 142
保証 143
75
Blackmagic HyperDeck Studi
o

HyperDeck
ディスクレコーダーについて
Blackmagic
HyperDeck
デ ィ ス ク レ コ ー ダ ー は 、制 作 ワ ー ク フ ロ ー に お い て
HD
および
4K
収録に対応した
ディスクレコーダーシリーズの一部です。HyperDeck Studio HD ProおよびHyperDeck Studio 4K Pro
は、
1U
ラック内に収まるように設 計されており、
SD
カードおよび
9
.
5mm
SSD
で の 収 録・再 生 に 対 応し
ています。
HyperDeck Studio HD MiniおよびHyperDeck Studio HD Plusはコンパクトな ディスクレコ ー ダーで、
デスクトップでも邪魔にならずに使用でき、オプションの
Teranex
Mini
Rack
Shelf
を用いて、
1U
ラック
に設 置 することも可能 で す。
全モデルは、USBフラッシュディスクに 収 録 で き、1080p60までのHDビデオに 対応しています。HyperDeck
Studio 4K Proは、2160p60までのUltra HDビデオをサポートしています。
収録・再生機能の操作方法は、全モデルでほぼ共通していますが、大型モデルには追加の再生コントロ
ールとインターフェースが 搭載されています。
こ の イ ン ストラ ク シ ョ ン・マ ニュ ア ル は 、
HyperDeck
ディスクレコーダーを使い始める上で必要な情報す
べてを記載しているので、あらゆるコントロールや機能を使いこなせるようになります。
HyperDeckStudioHDMini HyperDeckStudioHDPlus
HyperDeck
StudioHDProおよびHyperDeckStudio4KPro
76
HyperDeckディスクレコーダーについて

はじめに
HyperDeck Studiディスクレコーダーは、電源を接続し、ビデオソースおよび送信先機器を接続し、
SSDまたはSDカードを挿入するだけで簡単に使用できます。
電源の接続
HyperDeck
へ 給 電 す る に は 、標 準 の
IEC
ケーブル を背 面 に あ る
HyperDeck
の電源入力に差し込みます。
追加の
IEC
電源入力を搭載している機種では、冗長性を得るために他の電源を接続できます。例えば、
2
つ目の入力を連続電力供給が可能な
UPS
に接続すると、メインの電源に問題が生じた場 合、瞬時に切
り替 わりま す。
全モデルで
12V DC入力も搭載しているため、外付け12Vバッテリーからも給 電できます。
HyperDeck
Studio
HD
Mini
は、
AC
プラグパックからも給 電できます。電源にロックリングが付いてい
る 場 合 は 、コ ネ ク タ ー を 締 め て 、HyperDeck Studio HD Miniの接続を固定します。これにより、電源ケ
ーブルが所定の位置にロックされるため、誤って接続が外れることを防ぎます。
電源を入れると、
LCD
ディスプレイに言語選択の画面が表示されます。サーチダイヤルで表示言語を選
択し、点滅している「
SET
」ボタンを押します。ホームスクリーンが表示されます。ホームスクリーンおよ
びLCDメニューの詳 細は「フロントパネルの 使 用」セクションを参 照してください 。
ビデオとオーディオを接続
SDI
/
HDMI
入力にソースビデオを接続し、送信先機器を
SDI
/
HDMI
出 力 に 接 続 し ま す 。例 え ば 、ソ ー ス は
デ ジ タ ル シ ネ マ カ メ ラ 、送 信 先 は HDMIテレビやSDIモニターなどを 使 用で きます。
HyperDeckの全モデルは1080p60までのHDビデオをサポートしています。HyperDeck Studio 4K Proは、
12G-SDIコネクターを搭 載してい るので、1本のBNCケーブルで 2160p60までのUltra HDの入力または出
力が 可能 で す。
77
はじめに

フロントパネルに内蔵されているLCDでモニタリングすることで、SDIまたはHDMIビデオ信 号をチェッ
クで きま す。
作業のこつ
LCD
にビデオソースが確認できない場合、他のソース入力に接続している可能性が
あ り ま す 。フ ロ ン ト パ ネ ル の「 INPUT」ボ タ ン を 押 して 、SDIまたはHDMIソースを 切り替えます。
オーディオは SDIまたはHDMI信号にエンベッドされているため、オーディオを接続する必要はありませ
ん 。オ ー デ ィ オ レ ベ ル は 、LCDのビデオの横に表示されるメーターで確認できます。
オーディオのチェック
フロントパネルにスピーカーとヘッドフォンポートを搭載した
HyperDeck
で は 、内 蔵 の ス ピ ー カ ー を 使
用して、またはヘッドフォンを接続してオーディオをチェックできます。オーディオを聞くには、スピーカ
ーボタンを長押しします。ボタンを押しながらサーチダイヤルを回すと、音量を調整できます。音量イン
ジケーターが LCDのホーム スクリーン に 表 示 され ます。
スピーカーボタンを
2
回押すと、スピーカーがオンの状態になります。再びボタンを
2
回 押すとオフにな
りま す。
メディアの 接 続
HyperDeck
Studio
シリーズは、すぐに収録できる状態で発 送されており、設定を変更する必要はありま
せん。必要な作業は、SSDまたはSDカ ードのフォーマットだけ で す。
メディアのフォ ーマットは 、LCDメニュー設 定を使 用して簡単に実 行できます。または、コンピューター
で もフォ ーマットで きます。メディアのフォーマット方 法 の 詳 細 は「メディアをフォーマット」セクション
を参照してください。ビデオの収 録に適したメディアの種 類、および推奨ドライブとカードのリストも同
セクションに記 載されています。
SSD
を 挿 入 す る:
1
9
.
5mm
SSD
の接続ピンを下に向け、
HyperDeck
のドライブベイと一 直 線に なるように持 ちま す。
SSDをドライブベイに差し込み、スロットにしっかりと収まるまでゆっくりと押します。
2
HyperDeck
Studio
が
SSD
を検証します。検証中は、ドライブベイの周囲の緑のインジケーターが点
灯します。緑のインジケーターが消えると、HyperDeckでの 収 録 準 備 が 完了したことを意 味します。
ドライブインジケーターは、メディアを読み込んでいる際は緑に点灯し、HyperDeckで収 録 の 準 備 が 完了すると消 えます。
78
はじめに

SSD
を取り外すには、
SSD
の 端 を 持 って ユ ニットか らゆ っくりと 引き 離 しま す。
SSD
が スロットか ら外 れ
ると、その感触が得られるはずです。
接続ピンを下に向け、HyperDeckStudioのドライブベイと一 直 線 になるように SSDを持ち、
スロットにしっかりと収まるまで ゆっくりと押します。
SD
カ ー ド を 挿 入 す る:
1
金のコネクターが
HyperDeck
Studio
の
LCD
の方を向くように
SD
カードを持ち、メディアスロット
と一 直 線になるようにしま す。カードをスロットに差し込 み 、固 定され るまで ゆっくりと押します。
2 HyperDeck StudioがSDカードを検証します。検証中は、SDカードスロットの上 部 の 緑 の インジ
ケーターが点 灯します。
インジケーターが消え、停止ボタンが点灯すると、HyperDeckStudioで収録する準備 が 完了したことを意 味します。
79
はじめに

作業のこつ カードを取り出すには、カチッと音がするまでスロットに押し込んで、リリースします。
カードがイジェクトされるので、カードの端を持ってスロットから取り出します。
HyperDeck Studioで収 録および 再生の準 備が 完了しました。
ビデオの収録
LCDにビデオソースが表示されたことを確認したら、収録を開始できます。
収録ボタンを押すと、収録が開始されます。
SD
カードに収録する場合、スロットインジケーターと収録
ボタンが赤に点灯します。また、再生ボタンが点灯して、LCDホーム スクリーンに 収 録 アイコン が 表 示さ
れます。SSDに 収 録 す る 場 合 は 、ダ イ ナ ミ ッ ク・メ デ ィ ア イ ン ジ ケ ー タ ー が 赤 に 点 灯 し ま す 。
HyperDeckStudioの収録中、LCD上のストレージインジケーター は 、
アクティブなスロットとメディアの収録可能時間を交互に表示します。
収録を停止するには、停止ボタンを押します。再生ボタンを押すと、再生を開始します。
作業のこつ 使用しているコーデックを変更したい場合、
HyperDeck Setup Utilityでコーデッ
クを変更できます。詳細は、このマニュアルの「
Blackmagic
HyperDeck
Setup
」セ ク シ ョ ン
を 参 照してください 。
複 数のメディアへの収 録
SD
カードや
SSD
の収録可能時間が残り
3
分を切った場合、
HyperDeck
Studio
の
LCD
の タイム コードカ
ウンターは赤くなり、停止ボタンがゆっくりと点滅します。
こ れ は 、収 録 を 継 続 で き る 空 き ス ペ ー ス の あ る
2
つ目のディスクが無いことも意味しています。この場合、
収録を継続するには、空きスペースがあるディスクを挿入してください。空いているスロットまたは外付
けディスク入力に、空きディスクを挿入すると、ゆっくりとした点滅が止まり、タイムコードの色が白に戻
り ま す 。こ れ は 、
2
つ目のディスクがチェックされた結果、収録を続けるために必要なスペースがあり、
HyperDeckで 収 録 が 継 続 で きることを意 味します。
80
ビデオの収録
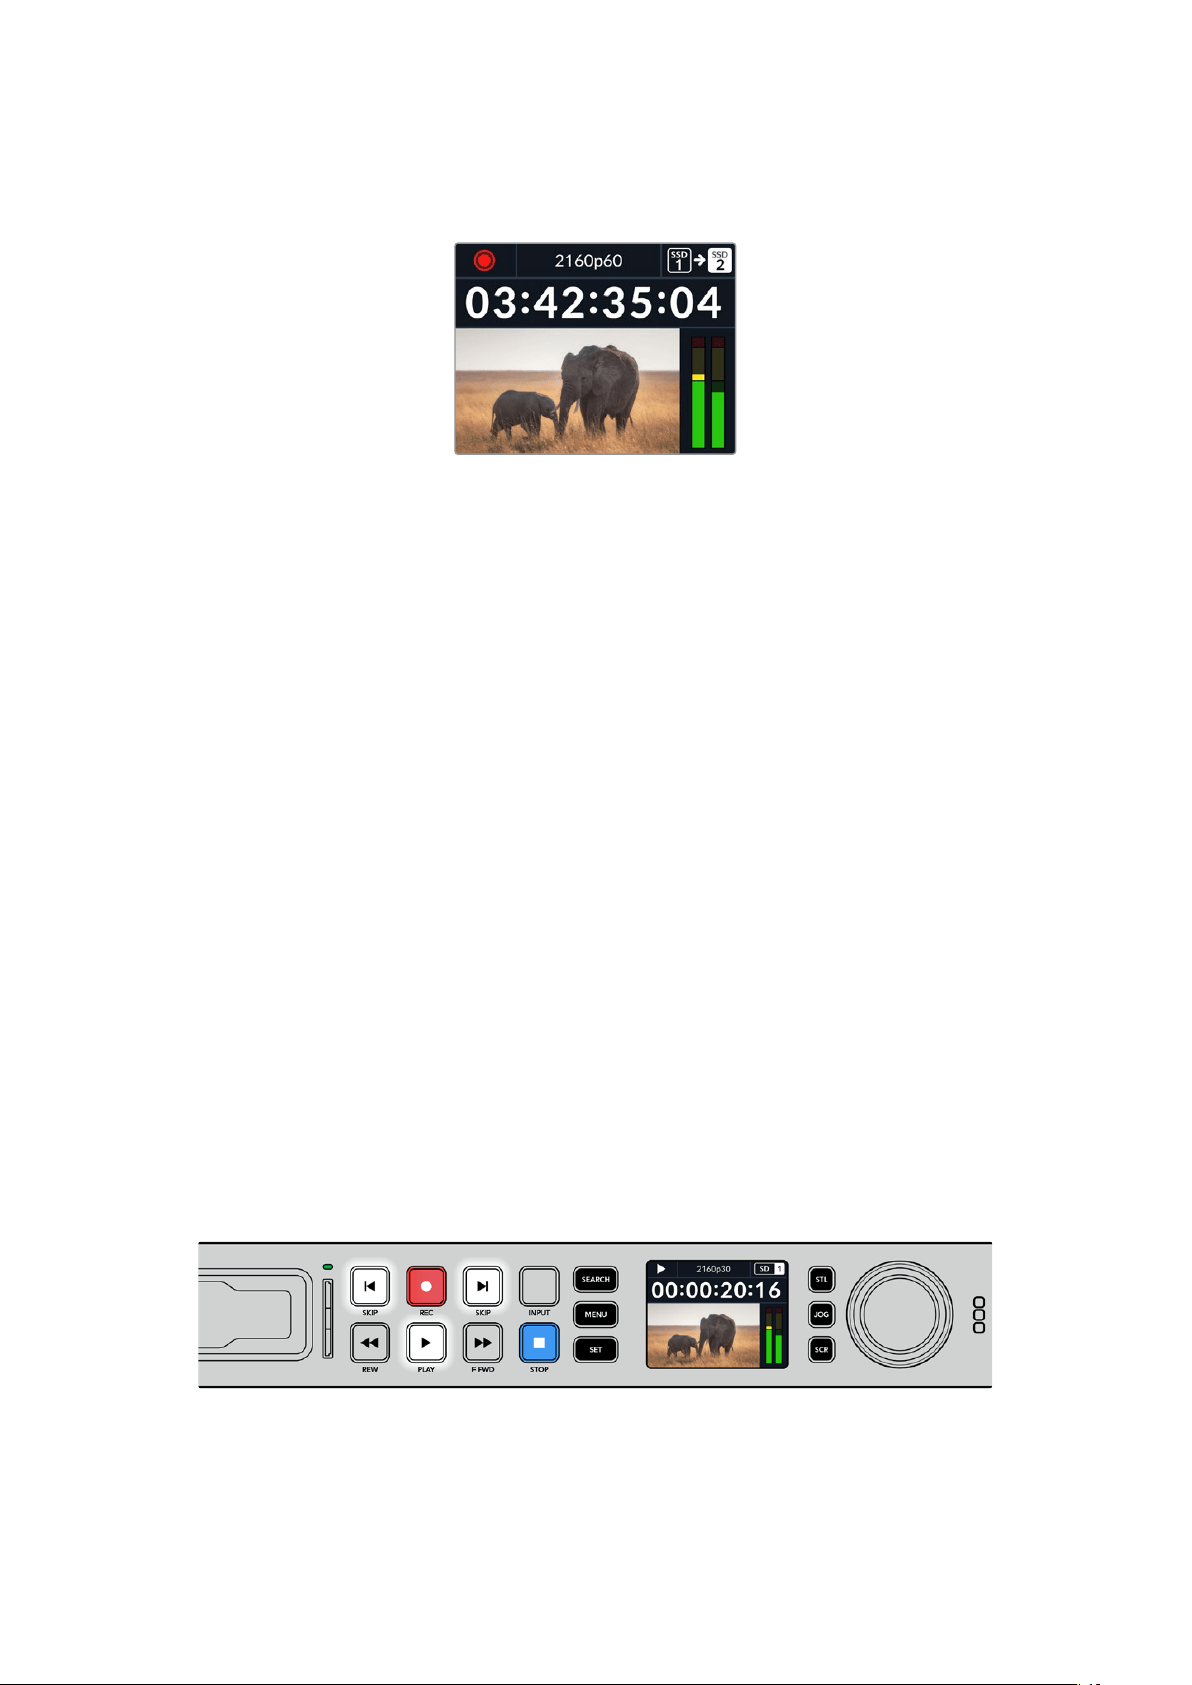
HyperDeck
Studio
に複数のメディアが接続されたら、収録が現在のディスクまたはドライブから次へと
引き継 が れます。これ は 、ホームスクリーンの 右上で 確 認 で きます。
収 録 中に メディアを 交 換 する
収録するディスクを変更したい場合で
2
つ目のディスクに空きスペースがあれば、収録ボタンを長押し
することにより、現在収録しているディスクから次のディスクに収録先が変わります。この機能は、収録
を停止せずに
HyperDeck
からディスクを取り出したい場 合に非常に便利です。例えば、ライブイベント
の最中に重要なコンテンツを別のロケーション用に取り出す必要がある時に、イベントすべてを収録し
たい場 合や、収録を停止したくない場 合などに役立ちます。
収録中に収録 ボタンが点滅する場合、メディアに問題 があり、コマ落ちが生じている可能性があります。
こ れ は 、低 速 の メ デ ィ ア で Ultra HDを 収 録 す る 際 に 起 こ る こ と が あ り ま す。例 え ば 、2160p30のProRes
HQ
で収録する場合、
ProRes
Proxy
より高いデータレートを使用するので、
SD
カードや
SSD
は最も高
速 の も の を 使 用 する 必 要 が ありま す。推 奨 メディアのリスト は 、このマ ニュ アル の「ストレ ー ジメディア」
を 参 照してください 。
再生
トランス ポートコントロールに 関しては 、従 来 型の 放 送 デッキ に搭 載 されてい るボタンをサ ポートしてい
ます。これには、収録、巻き戻し、再生、早送り、停止ボタンが含まれます。「
SKIP
( ス キ ッ プ )」ボ タ ン は 、
順 方 向 と 逆 方 向 そ れ ぞ れ の ボタ ン が あり 、前 の クリップ/ 次 の クリップ の 頭 出 し ボ タンと 同 様 に 機 能 す る
た め 、クリップ か らクリップ に す ば や く移 動 で き ま す。
HyperDeck
でビデオを再生
1
再生ボタンを押すとビデオが再生され、LCD、ま た は HyperDeckのビ デ オ 出 力 に 接 続した ディス
プレイでビデオを確認できます。
2 次 の クリップ に ス キップ す る に は 、コ ント ロ ール パ ネ ル の 次 クリップ 頭 出 し ボ タン を 押 し ま す。
3
前 クリップ 頭 出し ボ タ ン を 1回 押 す と 、現 在 の ク リ ップ の 頭 に 戻 り 、2回 押 すと 前 の クリップ の 頭 に
戻りま す。
HyperDeckのコントロールパネルの再生ボタンを押すとクリップが再生され、次クリップ頭出しボタンを押すと次の
クリップ に スキップし 、前 クリップ 頭 出しボタンを 押 すと現 在 の クリップ を再 スタートしま す。
81
再生

作業のこつ
HyperDeck
でビデオファイルを再生するには、マッチするコーデックに設定する必
要 が あ り ま す 。こ れ は 、
LCD
メ ニ ュ ー で 実 行 で き ま す 。 詳 細 は 、「
LCD
メ ニ ュ ー の 使 用 」お よ び
「設 定」セクションを参照してください。
ル ープ 再 生
半永久的に再生を継続したい場合は、再生中に再生ボタンをもう一度押すことで、
HyperDeck
を ル ープ
に設 定できます。ループ再生が 有効になっていると、LCDに ル ープ アイコ ン が 表 示 さ れ ま す。ル ープ に は
2つの モードが あります。
クリップル ープ
現 在 再 生して い る クリップ を ル ープ し ま す。
すべてをル ープ
メディア に 収 録 さ れて い る 全 クリップ を
ル ープ しま す。
ダイナミックLED
再生中、ドライブベイを囲む枠が緑に点灯し、ドライブベイの周囲を回るので、再生速度と方向を確認
できます。
作業のこつ
SSD
への収録機能を搭載した
HyperDeck
の再生ボタンが点滅している場合は、
ディスクの速度が十分でなく、再生が追いつかないことを意味します。H.264など圧縮率の高
い収録フォーマットに変更するか、
Ultra
HD
収録に対応できる高速の推奨
SSD
または外付け
ディスクを 使 用 することをお 勧 めしま す。
サーチダイヤルの使用
サーチダイヤルを再生中に使用することで、クリップ間をすばやく移動して、特定の箇所を再生するため
に 選 択 したり 、フレ ーム ごと にクリップ を チ ェック で きま す。クリップ で 特 定 の 箇 所 を 見 つ ける 必 要 が あ
る場 合に、この機 能は重要です。ダイヤルを回転させて視 覚的にクリップをモニタリングしたり、特定の
タイムコードを検索できます。特定の位置に再生ヘッドを配置し、生放送で該当のクリップを再生でき
るように 準 備 して おくと便 利 で す。
「SEARCH」ボタンを押して、サーチダイヤルのモードを切り替えます。
82
再生

サーチダイヤルのモードには、ジョグ(JOG)、シ ャ ト ル( STL)、ス ク ロ ー ル( SCR)が あ り ま す 。
ジョグ
クリップをフレームごとに前 方/ 後 方に再生できるため、精度の高いコントロ
ールが 可能 で す。
シャトル
より高速にクリップを前方/後方に再生します。ダイヤルを回した程度によっ
て 、再 生 速 度 が 変 わ り ま す 。
スクロール
ダイヤルを回転させた程度に基づき、さらに高速に再生します。このモード
は 、長 尺 の クリップ で 特 定 の 瞬 間 を 探 して い る 際 に 、クリップ 内 を す ば や く移
動 できるので 便 利 です。
大型のモデルはサーチモードボタンを搭載しており、クラッチ機構を内蔵したサーチダイヤルでは使用
中に触覚的なフィードバックが得られます。これにより、テレビやモニターを見ながら、手の感触でクリ
ップ内を移動することができます。
「JOG( ジ ョ グ ) 」 、「 STL( シ ャ ト ル ) 」 、「 SCR( ス ク ロ ー ル )」
ボ タ ン を 押 す と 、サ ー チ モ ー ド を 選 択 で き ま す 。
作業のこつ 通常の再生に戻るには、「PLAY」ま た は「 STOP」ボ タ ン を 押 し ま す。
83
再生

フロントパネルの 使 用
HyperDeckでビデオを収録・再生する際、必要な情報は本体のメディアスロットのLEDインジケーター
と内蔵LCDに 表 示されます。
HyperDeck
Studio
ホームスクリーン
メディアスロットの インジ ケー ター
HyperDeck
の 電 源 を 入 れ る か 、ま た は
SSD
/
SD
カードを挿入すると、メディアの確認中はインジケーター
が緑に点灯し、終わると消えます。挿入したディスクが適切にフォーマットされていない場合、または正し
く動作しない場 合は、ディスクを取り出すまでスロットがオレンジに点灯します。この場合、ディスクのフ
ォーマットが 正しく行われたか、またコンピューターで機能するか 確認してください。
HyperDeckのメディアスロットの インジケーター はディスクの 状 態 をライトで 表 示します。
例えば、収録中は赤、再生中は緑に点灯します。
録画可能 時間およびメディアインジケーター–
収 録 中 、ア イ コ ン は デ ィ ス ク へ の 録 画 可 能 時 間
と現在使用中のドライブを一定間隔で表示しま
す 。再 生 中 は 、使 用 中 の メ デ ィ ア の ア イ コ ン が 表
示されま す。
フォーマットインジケー ター –入力または再
生に使用するファイルのフォーマットを表示し
ます。
HyperDeckStudioの一部の機種では
「
INPUT」ボタンで 切り替えた入力ソースも表示
します。フロントパネル のボタンとサーチ ダイヤル
を用 いて、スピーカ ーとヘッドフォン の 音 量を 調 整
する際は、現在の音量が表示されます。
ステータスインジケーター –現在の再
生モードなど、デッキの現在のステータ
スを表 示します。
オーディオメーター–ソースま
たは再生に使 用するファイル の
オーディオレベルを表示します。
84
フロントパネルの使 用
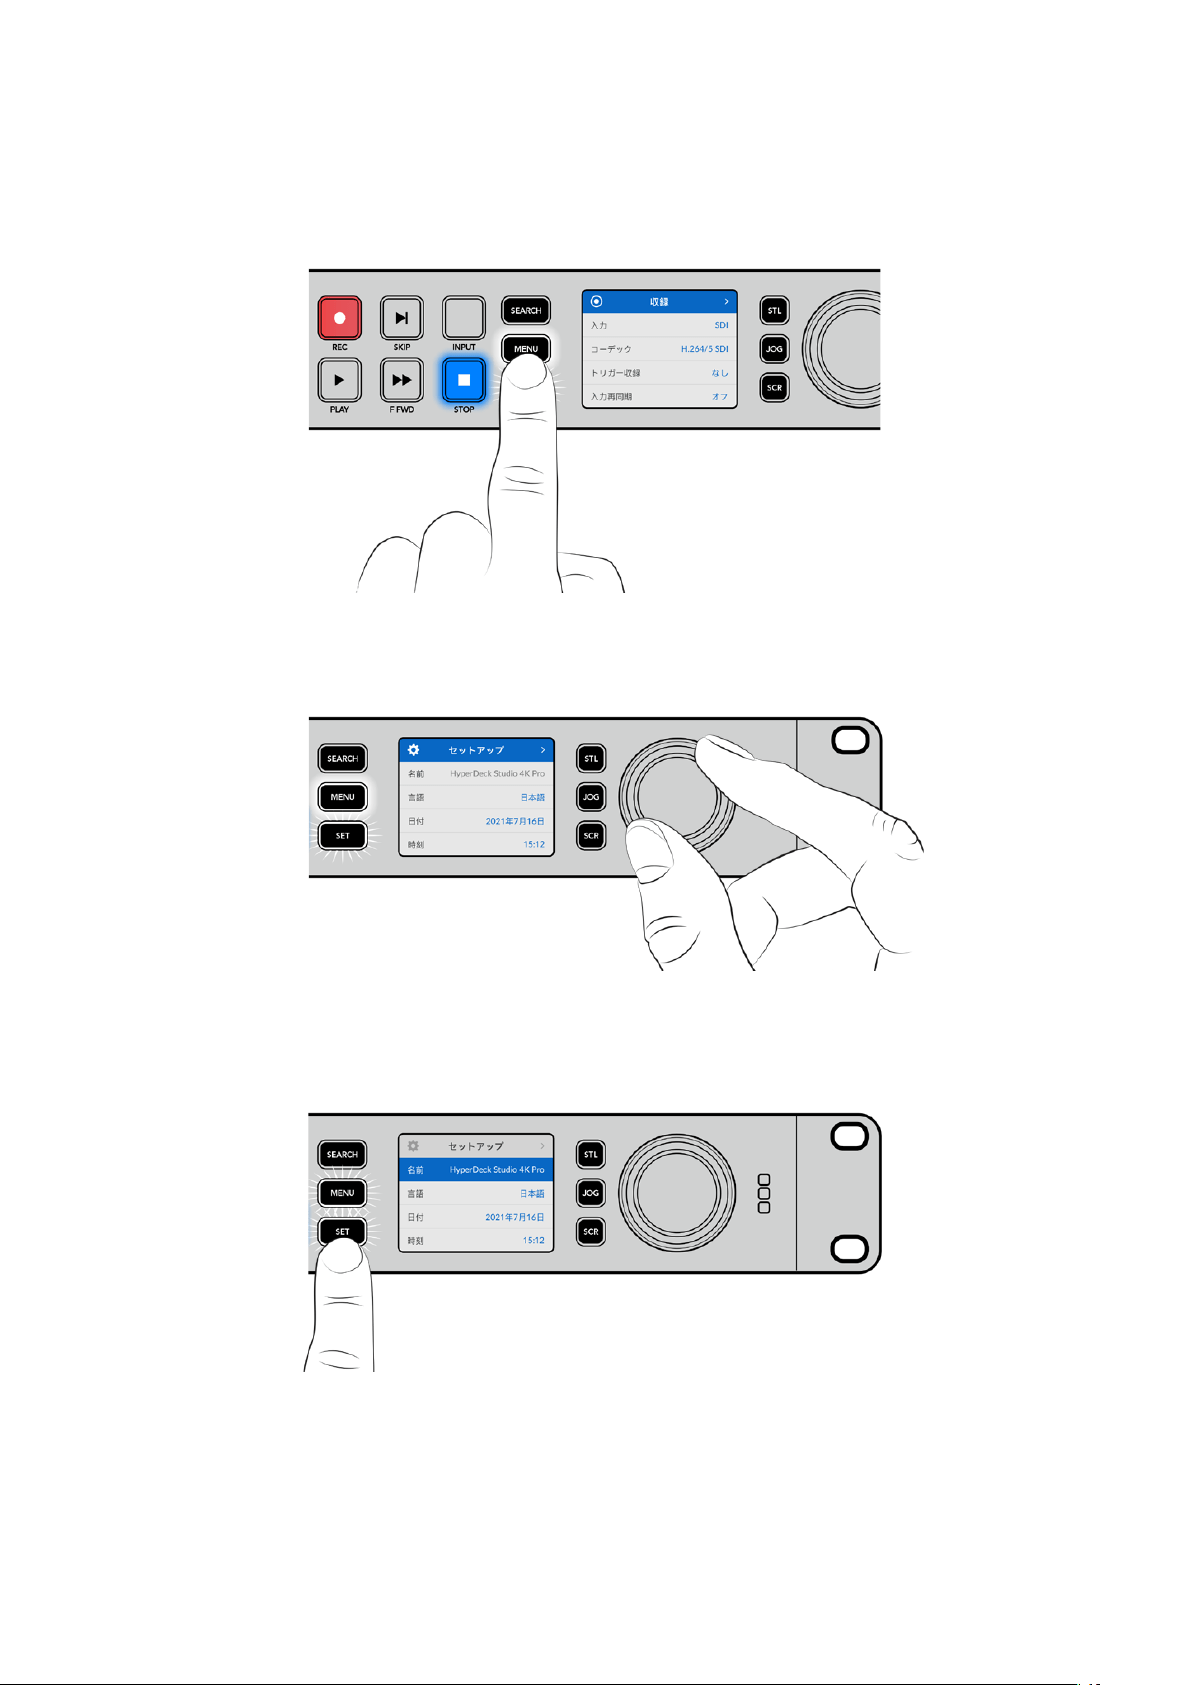
LCD
メニューの使 用
フ ロ ン ト パ ネ ル の「 MENU」ボ タ ン を 押 し て メ ニュ ー 設 定 を 開 き ま す 。
サーチダイヤルを回すか、「SKIP」ボタンを押して、メニューのオプション間を移動し、「SET」を 押 し て
サブメニューを 選 択しま す。
サーチダイヤルを回して、メニュー設定を移動
メ ニ ュ ー ア イ テ ム を 選 択 し た ら 、「 SET」ボ タ ン を 押 し ま す 。
サーチダイヤルか、順方向/逆方向の「SKIP」 ボ タ ン を 使 用 し て 設 定 を 調 整 し 、「 SET」ボ タ ン で 確 定 し ま す。
オプションを遡ってホームスクリーンに戻るには「MENU」ボ タ ン を 使 用 し ま す 。
85
フロントパネルの使 用

設定
収録メニュー
入力
「入 力 」設 定 で SDIまたはHDMIソースを選択します。また、フロントパネルの「INPUT」ボタンでも入力
ソースを変 更で きます。
コーデック
HyperDeck
Studio
の全モデルは、
H
.
264
、
Apple
ProRes
、
DNxHD
コーデックで圧縮ビデオを収 録しま
す。HyperDeck Studio 4K Proでは、4Kメディア を 収 録 する 際 に H.265およびDNxHRを使 用できます。
トリガー 収 録
「 ビ デ オ 開 始 / 停 止 」と「 タ イ ム コ ー ド ト リ ガ ー 」の 2種 類 のトリガー収 録 から選 択で きます。
URSA Miniなどの一部のカメラは、外部レコーダーの収 録開始/停止をコントロールする信号をSDI経由
で送信します。「ビデオ開始/停止」をタップすると、カメラの録画ボタンが押された際に、
HyperDeck
で 収 録 を開 始 / 停止します。
「タイムコードトリガー」で は 、入 力 を 介して 有 効 なタイムコード信 号 を 受 信 すると、
HyperDeck
で収録を
開始します。信号が止まると、収録も停止します。トリガー収 録を無 効にするには「なし」を選 択します。
メモ HDMIまたはSDIカメラから収録する場合、オーバーレイ機能がオフになっており、出力が
クリーンなことを確認してください。カメラのビデオ出力にオーバーレイが付いていると、イメー
ジと共にオーバーレイが収録されます。
入力再同期
ビデオ入力の再同期を有 効にし、収録を始める前にビデオが外部リファレンスにロックされるようにし
ます。収録に切り替えても、入力自体が再同期されるため、ビデオ出力はリファレンスにロックされたま
まになります。この機能は、複数のデッキのタイムコードをロックする必要があるにも関わらず、一部の
ソースが同期していない個別収録に使用します。デフォルトではオフになっており、ビデオ入力にフレー
ムが追加や除去されることなく収録されます。
通常、放 送デッキはリファレンス入力を使用して、再生中にビデオ出力をロックします。つまり、HyperDeck
の再生出力はリファレンス入力にロックされるため、大型の放送システムに接続された際に再同期する
必要はありません。
しかし、デッキで収録する際は、出力モードから入力モードに切り替わり、使用するリファレンスソースが
変 わ り ま す 。こ れ は 、多 く の 場 合 、
HyperDeck
のビデオ出力に接続した、その他のダウンストリーム機器
に送信されるビデオと同様に、手を加えずに入力ビデオを収録したいからです。
86
設定

HyperDeck Studioは、個別収録が簡単に実行できる独自の機能を搭載しています。この機能では、上記
の過程を逆転させ、ビデオ入力をリファレンス入力に再同期します。つまり、非同期のソースを
HyperDeck
に接続すると、ビデオ入 力をビデオリファレンスにリタイムして収 録します。
非同期ソースとは、コンピューターや民生用カメラなど、リファレンスを接続できないビデオ機器のこと
を意味します。別のスタジオや外部からの入力ビデオフィードも使用できます。個別収録において、非同
期ソースは、すべての収録ビデオで完璧にタイムコードを一致させる必要があるので問題となり得ます。
非同期ソースは他のソースと速度が異なり、収録を始めてからすぐに、タイムコードにずれが生じ始める
ことになります。つまり、ソースのタイムコードが一致しないため、マルチカム 編集で 困難 が生じます。
「入力再同期」をオンにすると、
HyperDeck
のビデオ入 力が遅 れている場 合、
1
フレームが 繰り返されま
す 。リ フ ァ レ ン ス よ り 早 過 ぎ る 場 合 は 、
1
フレームが除去されます。これは再同期と呼ばれ、入力に対する
処 理 はフレーム再 同 期と呼 ばれます。これ により、すべてのデッキで 収 録されるクリップは 、各ソースから
一 致したタイムコードで 収 録 され ます。これをマル チカム 編 集 の 作 業 に使 用で きます。
しかし、入 力にフレームを追 加または 除 去して収 録していることが マイナス面となります。そういった 理
由により、通常はこの機能をオフにしておき、コンピューターや民生用機 器など、リファレンスを接続で
きない個別収録ソースを使 用する場合にのみ有効にすることを推奨します。
「入力再同期」には別の使用方法もあります。同機能がオンになっている場合、
HyperDeck
のビデオ出
力は、収録中もリファレンスへのロックが維持されるので、HyperDeckのSDI出力をカメラに 接 続して、
プログラムリターンフィードを介してカメラをリファレンスにロックできます。例えば、
Blackmagic
Studio
Camera
4K
Pro
では、リファレンスを外部ビデオに設 定できます。カメラフィードは
HyperDeck
からのリ
ファレンスにロックされ、カメラの速度がマッチするため、HyperDeckの「入力再同期」機能は収録クリ
ップへ の フレ ーム の 追 加 や 除 去 を 行 い ま せ ん 。
ビデオ入 力が HyperDeckと同じリファレンスにロックされていない場合のみ、「入力再同期」はクリッ
プに対する処 理を実行します。このケースでは、HyperDeckの出 力 は カメラのリファレンスソースであ
り、
HyperDeck
はビデオリファレンス入力にロックされます。複数の
HyperDeck
のリファレンス 接 続 を ル
ープさせてロックしている場合、すべてのカメラと
HyperDeck
は一つのグループとしてロックされます。グ
ル ープ 内 の
HyperDeck
がコンピューターなどの非同期ソースを使用している場合、その入力は再同期さ
れますが、他のソースは影響を受けません。
ソースを接続するだけで再同期は自動で実行されます。「入力再同期」は非常にパワフルな機能です
が、機能の内容と実行されるタイミングを理解しておくことが重要です。複数の
HyperDeck
とマルチカ
ム 編 集ソフトウェア を 使 用して、色 々と試してみ ることをお 勧めします。高 速 にプ ログラムを 制 作 できる
優 れた 方 法で す。
87
設定

モニタリングメニュー
モニタリングメニューは、リアパネルにモニター出力を搭載した機 種のみで 使 用できます。
クリーンフィード
クリーンフィードをオンにすると、
HyperDeck
Studio
の背面のモニター出力に接続しているディスプレ
イのステータステキストが非表示になります。表示される情報などのモニター出力に関する情報は、
このマニュアルの「モニター出力の 使 用」セクションに後 述されています。
3D
LUT
ディスプ レ イ
LUT
は、
HyperDeck
Studio
をフィールドレコー ダーとして使 用している 際 に特に便 利で す。
ディスプ レ イ LUTは、ディスプレイに出力するカラーおよび輝度を指定します。これは、意図的に彩度の
低いフラットな 見た目にしてある”フィルム”ダイナミックレンジ を 使 用している際 に役 立ちます。ディスプ
レイLUTを適用することで、グレーディング後のビデオのルックを想定できます。
ディスプ レ イ
LUTはBlackmagic HyperDeck Setupで選択でき、SDIモニター 出力に 適 用で きます。
3D
LUT
のオン/オフを切り替える:
1
「MENU」ボタンを押し、サーチダイヤル を使 用して、「モニタリング」メニューに進 みます。
2 「SET」ボ タ ン を 押 し ま す 。
3 サ ー チ ダ イ ヤ ル を 使 用 し て 、「 3D LUT」が青でハイライトされるようにナビゲートします。
4 「SET」ボ タ ン を 押 し て 、LUTのオン/オフを切り替えます。
LUT
の選択方法に関しては、後述の「
Blackmagic
HyperDeck
Setup
」セクションを参照してください。
作業のこつ モニター出力に関する情 報は、このマニュアルの「モニター出力の使 用」セクショ
ンに 後 述されています。
88
設定

オーディオメニュー
収 録 オー ディオチャンネル
HyperDeck
Studio
は同時に最大
16
チャンネル の
PCM
オーディオを収 録できます。収 録するオーディオ
チャンネル 数 を設 定 するには「収 録 オー ディオチ ャンネル」に 進 み 、
2ch
、
4ch
、
8ch
、
16ch
から選択しま
す 。コ ー デ ッ ク が
H
.
264
または
H
.
265
に設 定されている場合、
2
チャンネル の
AAC
オーディオを選択で
き る た め 、直 接 YouTubeに ア ッ プ ロ ー ド で き ま す 。こ の 設 定 は 、モ ニ タ ー 出 力 に 表 示 さ れ る チ ャ ン ネ ル 数
も選 択します。
モニタリングチャンネル
2チャンネルを超える数のチャンネル数を収録している場合、フロントパネルに表示するチャンネルを
選択できます。これは「モニタリングチャンネル」のオプションで設定できます。フロントパネルを搭載
したHyperDeck Studioでは、この設定でスピーカーおよびヘッドフォン接続で再生するオーディオチャ
ンネルも設定できます。
オーディオメーター
内蔵LCDは、エンベッドされたオーディオチャンネルのオーディオメーターを表示します。メーターは、PPM
またはVUから選択できます。メーターの種 類を変更するには「オーディオメーター」のオプションからオ
ーディオメーターの表示方法を選択します。
ヘッドフォンレ ベ ル
フロントパ ネル にヘッドフォンを 搭 載した モ デルで は「 ヘッド フォンレ ベ ル」設 定 で ヘッドフォンの 音 量
を調 整 で きます。
スピーカーレベル
サーチダイヤルを回して、スピーカーの音量を調整します。デフォルトは50%で す。
作業のこつ ヘッドフォンとスピーカーの音 量は、フロントパネルから直 接調 整することもできます。
スピーカーボタンを押しながら、サーチダイヤルを回して、再生ボリュームを調整します。音量レ
ベルは、フロントパネルの中央上部に表示されます。
89
設定
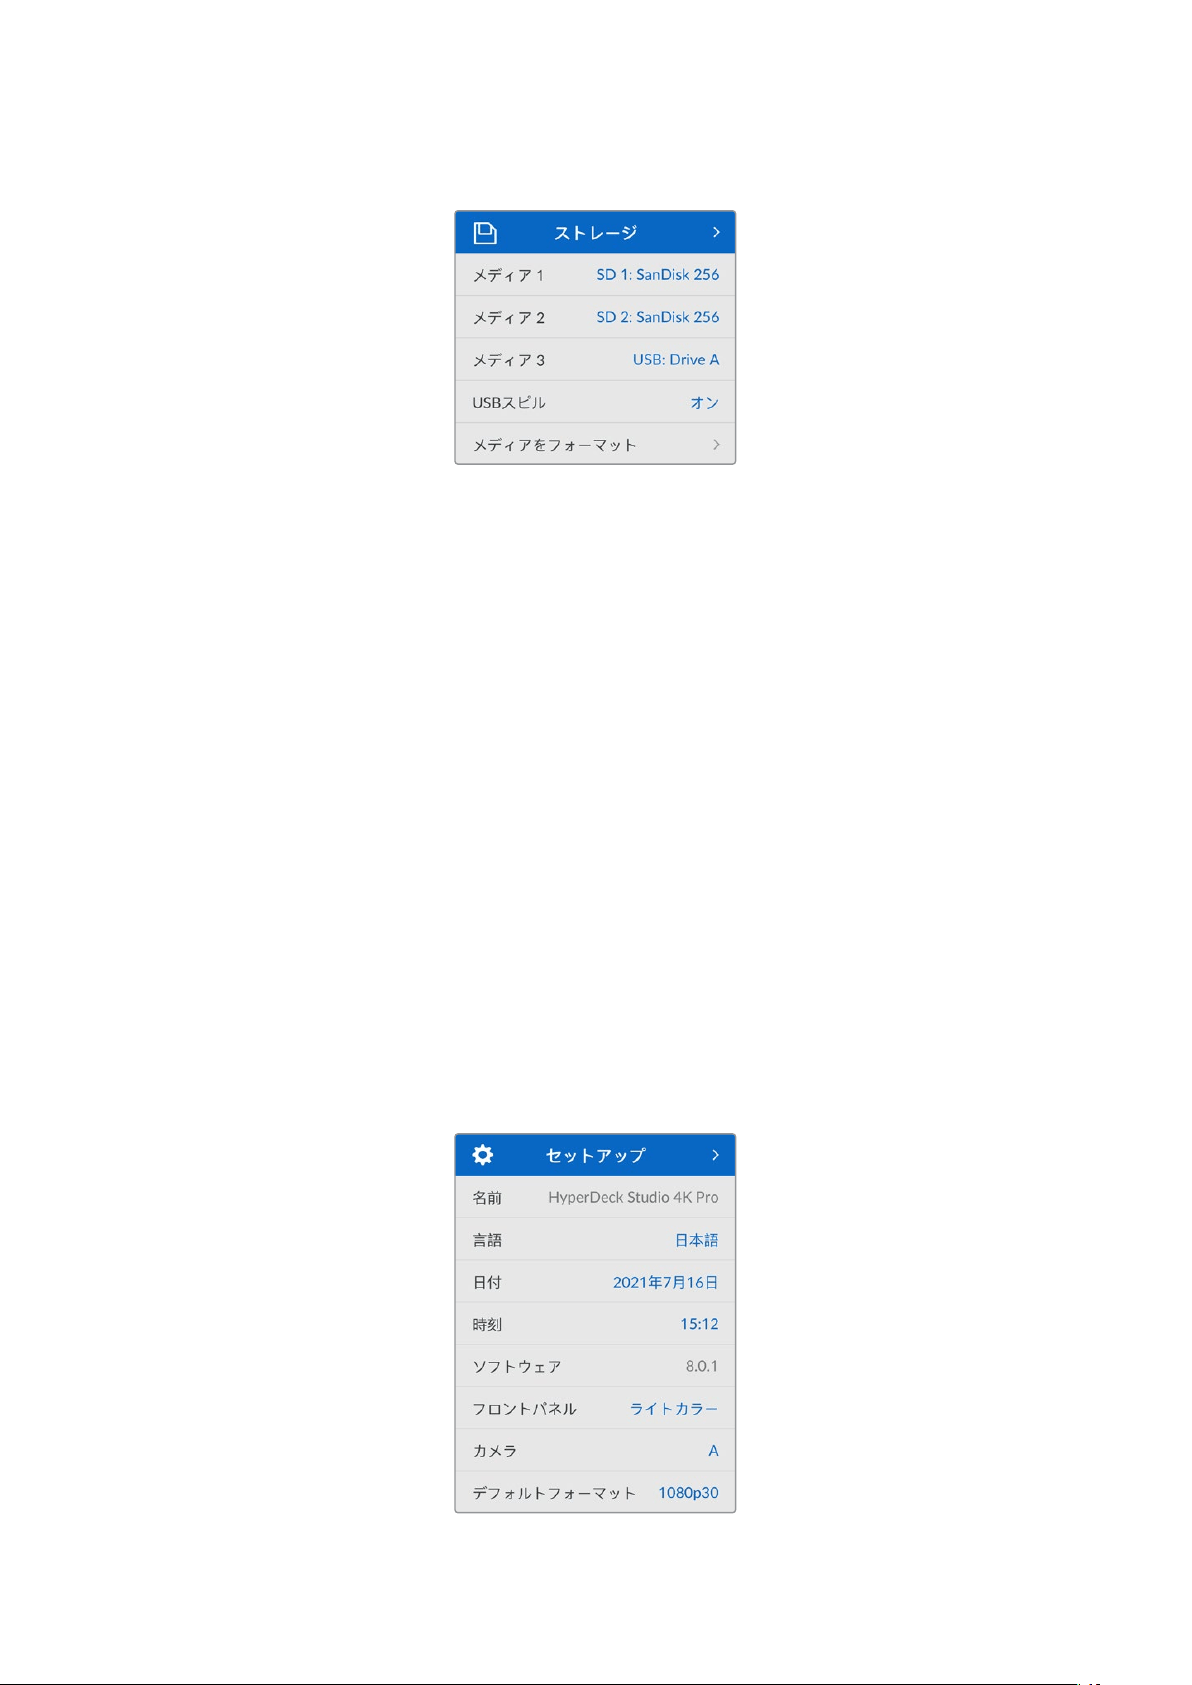
ストレージメニュー
メディアをフォーマット
リアパネルの
EXT
DISK
( 外 付 け デ ィ ス ク )コ ネ ク タ ー に
SD
カード、
SSD
、メディアを接続している場合、
直 接 ユ ニ ッ ト で 、あ る い は MacまたはWindowsコンピュー ターでフォーマットを 実 行 で きます。
HyperDeck
Studio
でメディア を 準 備 す る:
1
サ ー チ ダ イ ヤ ル と「 SET」ボタンを使用して「メディアをフォーマット」を選択します。
2 リストから初期化するメディアを選択して「SET」ボ タ ン を 押 し ま す 。
3 フォーマットを選択して「SET」ボ タ ン を 押 し ま す 。
4
初期化されるカードと、選 択したフォーマットを確 認するメッセージが表示されます。「フォーマ
ッ ト 」を 選 択 し て 確 定 し ま す 。
5
フォーマット中 であ ることを 示 すメッセー ジ が 表 示され 、完 了のメッセー ジ が 表 示さ れ たら「
OK
」
を選 択します。
HFS+ は「 Mac OS Extended」としても知られており、ジャーナリングをサポートしているため、使用が
推 奨されるフォーマットです。万が 一、ストレージメディアが 破 損した場 合、ジャーナリングされたメデ
ィアのデータは回復できる可能性があります。
HFS
+は
Mac
でネイティブサポートされています。
exFAT
は
Mac
および
Windows
によりネイティブサポートされており、ソフトウェアを別途購入する必要はあり
ませんが、ジャーナリングには対応していません。
Mac
または
Windows
で のメディアのフォ ーマット方 法 は 、「メディア をフォ ーマット」セクション を 参 照し
てください 。
セットアップメニュー
90
設定

名前
ネットワー クで 複 数の
HyperDeck
Studio
を使用している場合、個別の名前を付けると便利な場合が
あ り ま す 。こ れ は 、
Blackmagic
HyperDeck
Setup
、ま た は タ ー ミ ナ ル ア プ リ を 使 用 し て
Blackmagic
HyperDeck Ethernet Protocolで実 行 で きます。
言語
HyperDeck
Studio
は
13
ヶ国語をサポートしています。対応言語は、日本語、英語、中国語、韓国語、ス
ペイン語、ドイツ語、フランス語、ロシア語、イタリア語、ポルトガル語、トルコ語、ウクライナ語、ポーラ
ンド 語で す。
言 語 を 選 択 する:
1
「セットアップ」メニューがハイライトさ れたら「SET」を 押 し ま す 。
2 サーチダイヤルを回して、「言語」を選択したら「SET」を 押 し ま す 。
3
サーチダイヤルを使 用して、使用する言語を選 択したら「SET」を 押 し ま す 。言 語 が 選 択 さ れ る と 、
自 動 的 に「セットアップ」メニュー に 戻ります。
日付
日付を設定するには、「日付」設定を選択して「
SET
」ボ タ ン を 押 し ま す 。サ ー チ ダ イ ヤ ル を 使 用 し て 、日 、
月、年を選 択します。ここで 設 定した日付 が ファイル のタイムスタンプ・サフィックスとして使 用されま す。
時刻
時刻を設定するには、「時刻」設定を選択して「SET」ボタンを押します。サーチダイヤルを使 用して、
時 間と分を調 整します。HyperDeck Studioの時計は24時 制 です。
ソフトウェア
現在のソフトウェアバージョンを表示します。
フロントパネル
HyperDeck
のフロントパネルの表示モードを設 定できます。「ライトカラー」は、
LCD
が明るい背景で
表 示されます。薄 暗い 環 境 で は「ダークカラー」モ ードの 使 用を推 奨します。こういった 場 所 では 、明る
い
LCD
は気が散る原因となり得ます。例としては、プロダクション施設のラックに複数の
HyperDeck
を
マウントしている場合などです。
91
設定

カメラ
この設定は、
HyperDeck
で複数のカメラから個別収録ファイルを収録し、
DaVinci
Resolve
のマルチカ
ムタイムライン で 編 集 する 際 に 便 利 で す。
各カメラの識別文字がファイルのメタデータに記録されるため、同期ビン機能を使用する際に
DaVinci
Resolveが各アングルを簡単に識別できます。
カメラの 識 別 文 字には A〜Zまたは1〜9が 使 用 で きます。
デフォルトフォーマット
HyperDeck
Studio
が、使 用するビデオフォーマットを検出できない場 合に、この設 定を用いて、メイン
で 使 用 するビ デ オフォ ーマットを設 定します。
例えば、ビデオ入力を接続していない状態で
HyperDeck Studioをオンにし、2つの異なるビデオフォー
マットのファイルが 存在するディスクを挿入した場合、再生に使用するビデオフォーマットを
HyperDeck
で指定する必 要があります。「デフォルトフォーマット」では 、
HyperDeck
で 使 用 するビ デ オフォーマット
を設定でき、フォーマットを切り替えて、これらのファイルを再生します。
この機能は、HyperDeckにビデオ入 力やメディアディスクが 接 続されていない状 態で、HyperDeckを初
めてオンにする際にも便利です。この場合、
HyperDeck
Studio
はモニタリング出力に使用するビデオフ
ォーマットを検 出で きない の で、「デ フォルトフォーマット」の 情 報 を 使 用しま す。
しかし、この機能はガイドとして使用されるだけで、オーバーライドする訳ではありません。例えば、
一種 類のビデオファイルが収 録されたメディアディスクを再生する場 合、
HyperDeck
Studio
はそのビデ
オフォーマットに切り替えて再生を実 行します。「デフォルトフォーマット」の情 報は使 用されません。
これは収録でも同様です。収録ボタンを押すと、
HyperDeck
はビデオ入力に接続されたビデオフォーマ
ット を 使 用 し ま す。収 録 の 終 了 後 、HyperDeck Studioは 収 録 に使 用したのと同 一 のビ デオ フォーマット
で、そのファイルを再生します。これは、「デフォルトフォーマット」と一 致するビデオフォーマットのファ
イルがディスクに存在する場合でも同様です。デッキは、収録に使用したのと同じビデオフォーマットを
再生します。メディアディスクの接 続を外し、接 続し直した場 合のみ、「デフォルトフォーマット」の設 定に
基 づ き 、再 生 に 使 用 す る フ ァ イ ル の 種 類 が 選 択 さ れ ま す 。
この機能は、
HyperDeck
Studio
が使用するフォーマットを自動的に決めることができない場合にガイ
ドとして使用されるだけであり、デッキを特定の方法で動作させるようにオーバーライドする機能では
ありません。
92
設定
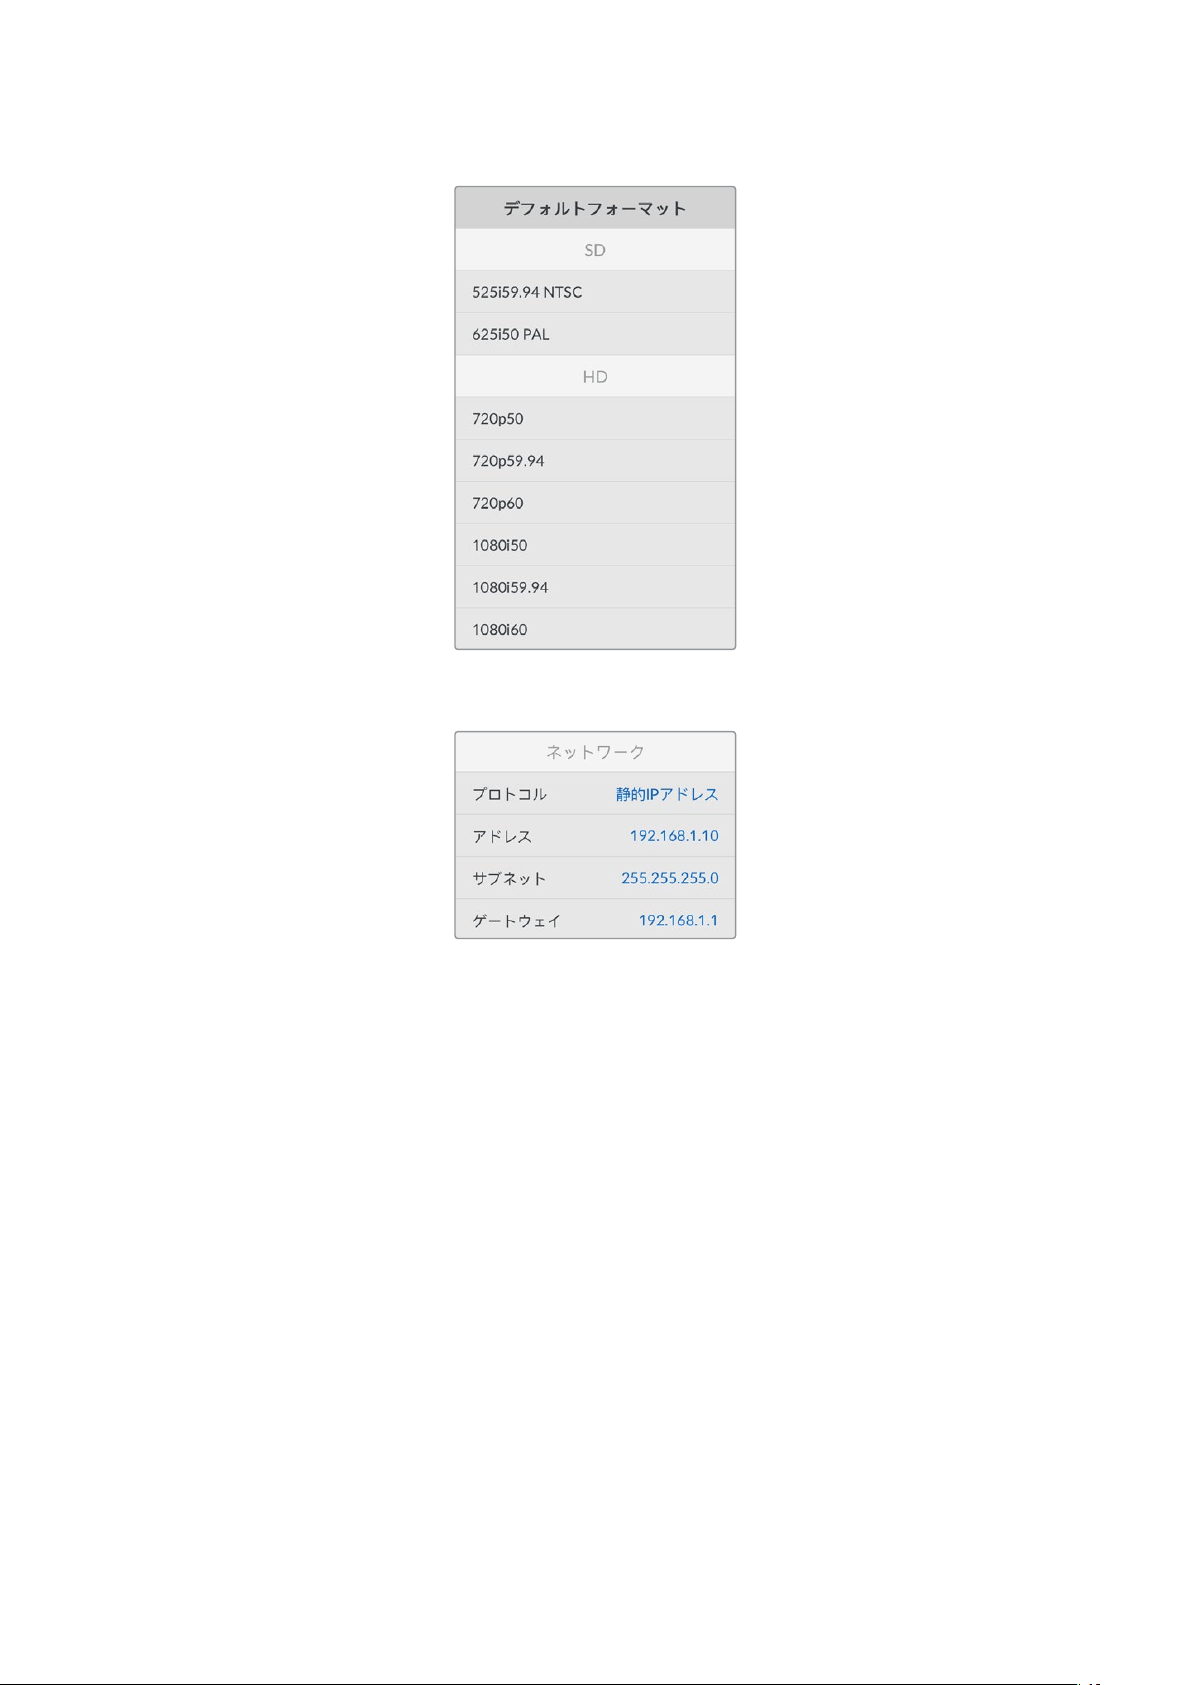
ネットワー ク 設 定
プロトコル
Blackmagic
HyperDeck
は デ フォルトで
DHCP
に設定されて出荷されます。そのため、ネットワークに接続す
るとネットワー クサーバー は 自 動 的 に IPアドレスを割り当てるので、その他のネットワーク設定を調整する必
要はありません。マニュアルでアドレスを設定する必要がある場合、静的IPアドレス 経 由で 接 続 で きます。
「 プ ロ ト コ ル 」を 選 択 し た 状 態 で 、点 滅 し て い る「 SET」 ボ タ ン を 押 し て メ ニ ュ ー に 進 み 、「 静 的 IPアドレ
ス 」を 選 択 し「 SET」ボ タ ン を 押 し ま す 。
IP
ア ド レ ス 、サ ブ ネ ッ ト マ ス ク 、ゲ ー ト ウ ェ イ
「静的IPアドレス」を選 択すると、ネットワークの詳細をマニュアルで入力できます。
IP
アドレスを変 更する:
1
サーチダイヤルを使用して「
IP
アドレス」をハイライトし、
HyperDeck
のフロントパネルで、点滅
し て い る「 SET」ボ タ ン を 押 し ま す。
2
サーチダイヤルを回 転させてIPア ド レ ス を 調 整 し 、「 SET」ボタンを押して確定し、次の数値に進みます。
3 「SET」ボタンを押して変更を確定し、次の数値に進みます。
IPアドレスの入 力が 終わったら、上記の手順を繰り返し、「サブネットマスク」と「ゲートウェイ」も調整 でき
ます。終了したら、点滅している「
MENU
」ボタンを押してメニューを出て、ホームスクリーンに戻ります。
93
設定
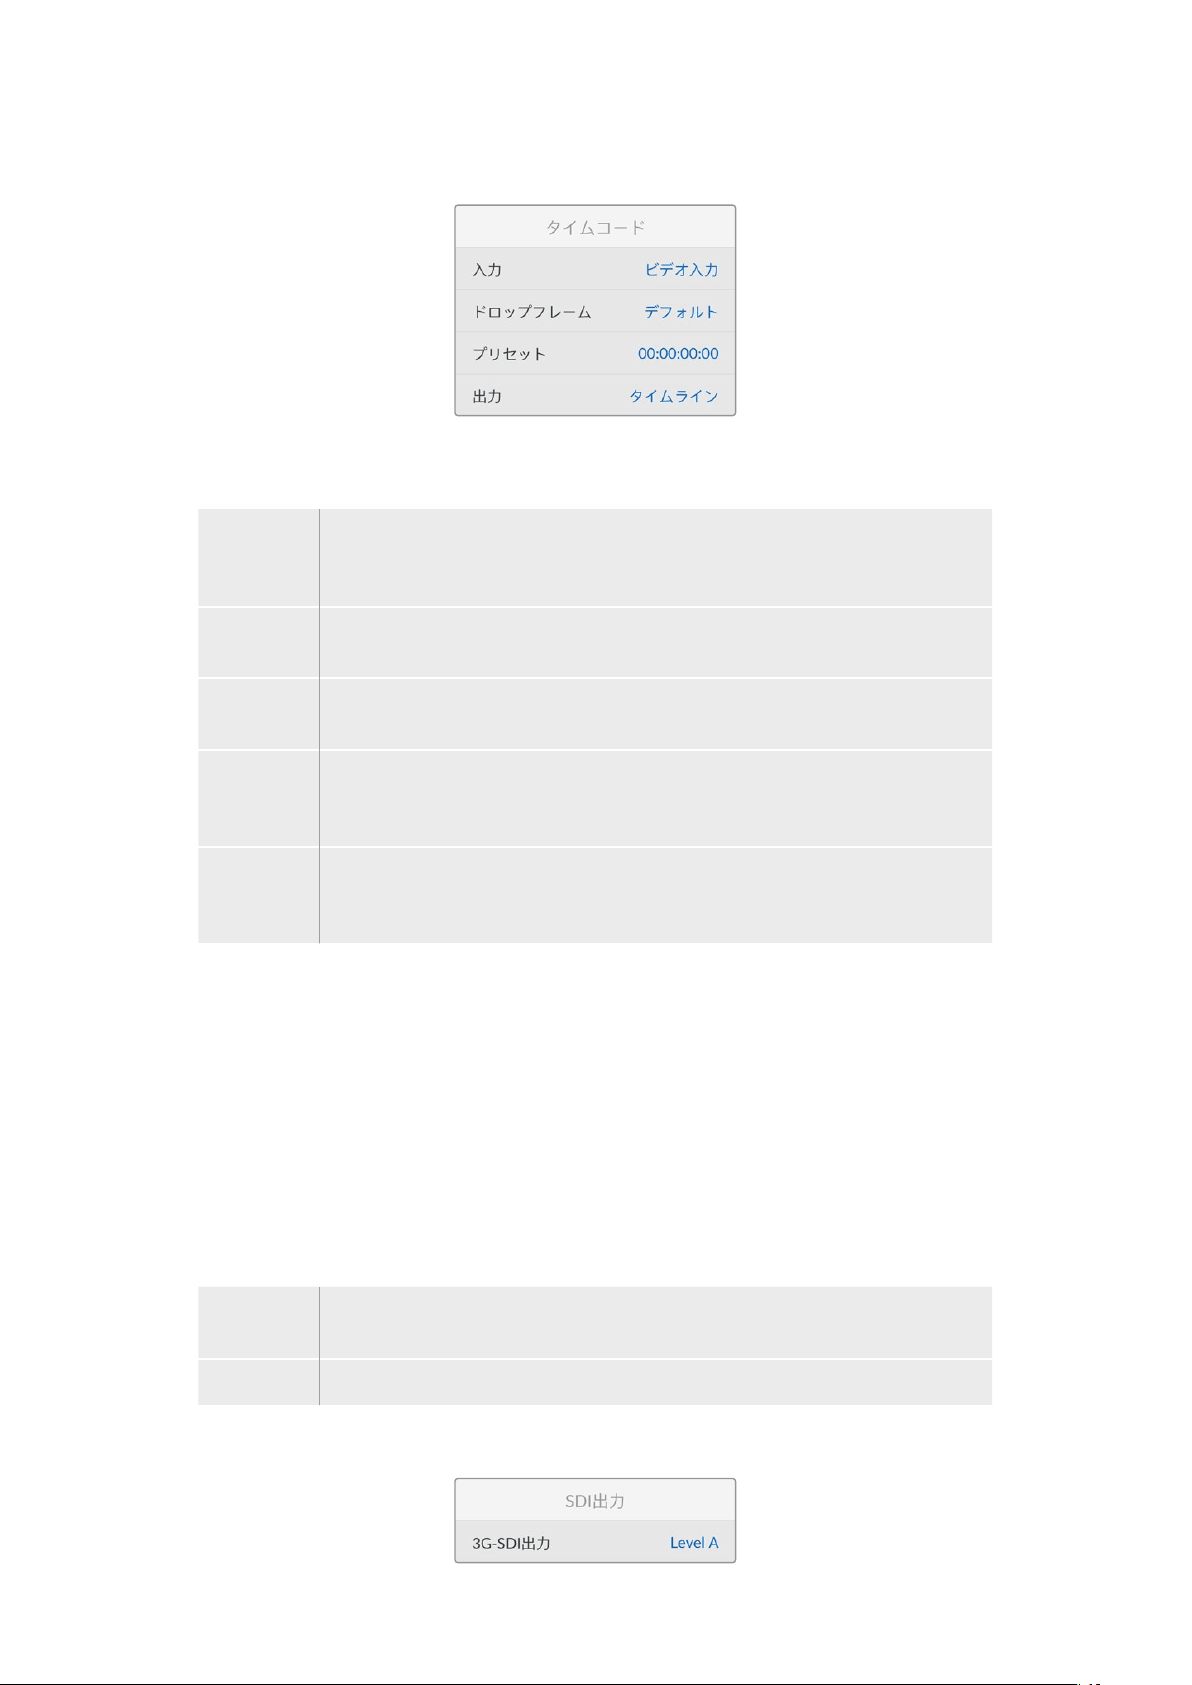
タイムコード 設 定
入力
収録中、5つ のタイム コード入 力オ プションを 使 用 で きます。
ビデオ入力
「 ビ デ オ 入 力 」を 選 択 す る と 、SMPTE RP 188メタデ ー タの 付 いた SDIおよびHDMIソース
のエンベデッドタイムコードを使用します。これにより、SDIまたはHDMIソースと、
HyperDeck Studioで収録されるファイルの同期が維持されます。
外部
リアパネルのコネクターに接続したタイムコードを使用する場合に、このオプションを選
択します。
内部
内 蔵 のタイム コードジェネレ ー ター を 介して、時 刻タイムコードを 収 録 する 場 合 に 、
このオプションを選択します。
前のクリップ
から生成
タイムコード入 力に「前のクリップから生 成 」を選 択すると、各ファイルは 、前のクリ
ップ の 最 終 フレ ーム の 1つ後のフレームから開始されます。例えば、最初のクリップが
10:28:30:10で 終 わ る 場 合 、次 の ク リ ップ は 10:28:30:11から開 始しま す。
プリセット
タイムコードをマニュアルで設 定したい場 合は「プリセット」オプションを選択しま
す 。プ リ セ ッ ト で 設 定 し た タ イ ム コ ー ド で 、収 録 し た ク リ ップ が 開 始 し ま す 。プ リ セ ッ ト
に関しては、このマニュアルに後述されています。
ドロップフレーム
29
.
97
および
59
.
94fps
の
NTSC
ソ ー ス で は「 ド ロ ップ フ レ ー ム 」ま た は「ノ ン ド ロ ップ フ レ ー ム 」を 選 択 で
きます。ソース が 不 明 な 場 合は「デ フォルト」を選 択します。これ により、入 力の 規 格 が 維 持 されます。
有効なタイムコードがない 場合はデフォルトのドロップフレームになります。
プリセット
タ イ ム コ ー ド を マ ニ ュ ア ル で 設 定 で き ま す 。「
SET
」 ボ タ ン を 押 し 、サ ー チ ダ イ ヤ ル と「
SET
」ボ タ ン で 開 始
タ イム コ ー ド を 入 力 し ま す 。入 力 メ ニュ ー の「 プ リ セ ッ ト 」が 選 択 さ れ て い る 必 要 が あ り ま す 。
出力
出力に使用するタイムコードのオプションを選択します。
タイムラ イン
カードまたはドライブに収録された全クリップを通して、継 続したタイムコードを出力す
る に は「 タ イ ム ラ イ ン 」を 選 択 し ま す 。
クリップ
「 クリップ」を 選 択 する と 、個 別 の クリップ ごとにタイム コ ード を 出 力しま す。
SDI出力
94
設定
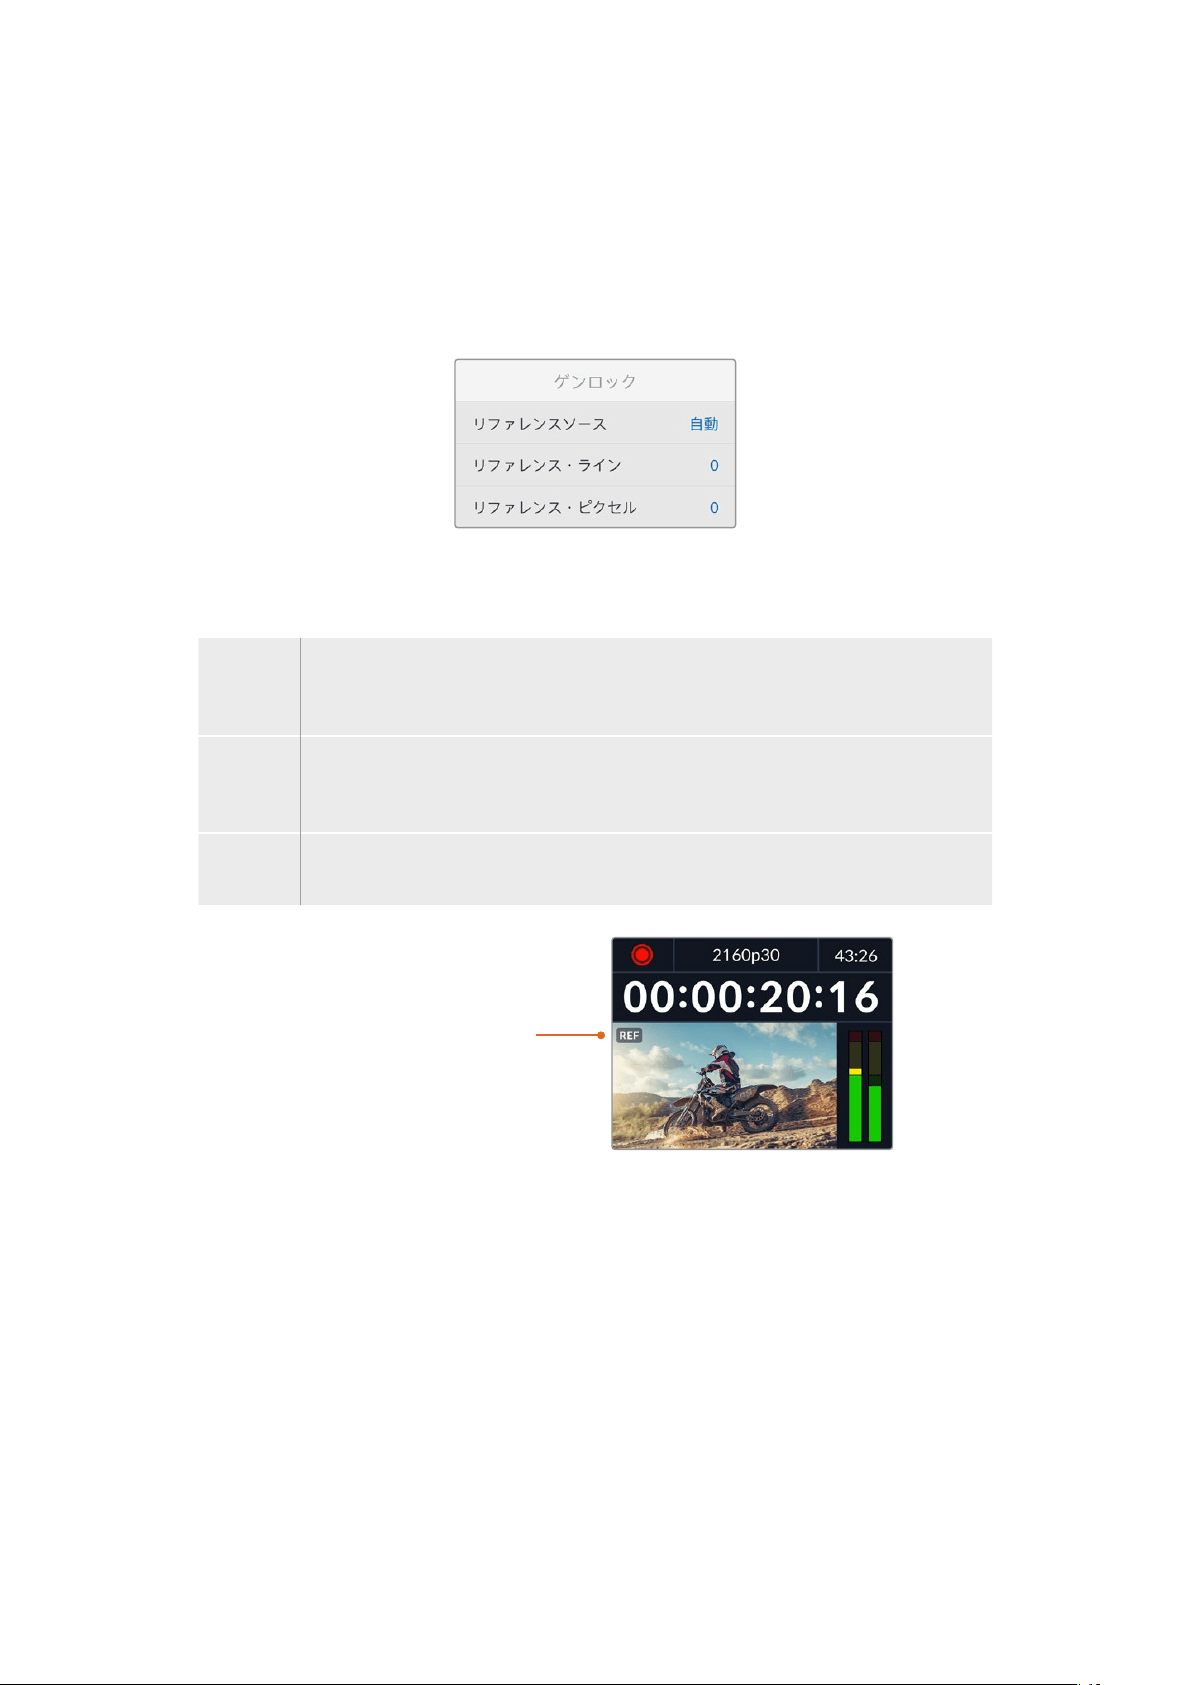
3G
-
SDI
出力
放 送 機 器 に よって は 、Level AまたはLevel Bの3G-SDIビデオしか受信できない場合があります。
他の放 送機器との互換性を維持するには、
Level A(3G専 用 の マ ッ ピ ン グ )ま た は Level B(多重化した
3G-SDIのデュアルストリーム)を選択します。
ゲンロック設 定
リファレンスソース
リファレンスソースを 以 下の 3つのオプションから選択できます。
自動
こ の モ ー ド で は 、リ ア パ ネ ル の 「 REF IN(リファレンス入力)」に信号が接続されている場
合、外部ソースをデフォルトで使用します。リファレンスが接続されていない場合、入力SDI
またはHDMIソースがデ フォルトとして使 用されます。
入力
SDIまたはHDMIソースにリファレンス がエ ンベッドされて おり、このリファレンス に同 期させ
たい場合は「入力」を選択します。例えば、アナログデッキに直接ゲンロックソースが接続
されている場合などです。
外部
Blackmagicのシンクジェネレーターなどの外部リファレンス機 器が、リアパネルの「REF
IN(リファレンス入力)」に接続されている場合に選択します。
外部リファレンスインジケーター –
HyperDeckStudioが外部リファレ
ンスソースにロックされると「
REF」
インジケーターが 内 蔵
LCDに表示
されます。
リファレンスタイミング
リファレンスタイミングは、アナログデッキからアーカイブしており、フレーム同期が必要な場 合に調 整
できます。リファレンスはサンプル単位で調整できるので、サンプルレベルで正確にタイミングを調整可
能 です。
タイミ ン グ を 調 整 す る:
1
「セットアップ」メニューで サー チ ダイヤル を 使 用して「リファレンスタイミング・ライン」を ハイラ
イトし、点滅している「SET」ボ タ ン を 押 し ま す 。
2
タイムラインのラインの値を調 整します。ダイヤルを時計回りに回すと増え、反時計回りでは減
りま す。
3 点滅している「SET」ボ タ ン を 押 し て 、選 択 を 確 定 し ま す 。
4
ピクセルを調整するには、点滅している「
MENU
」ボタンを押して「セットアップ」メニュー に 戻り、
「リファレンスタイミング・ピクセル」で上記の手順を繰り返します。
95
設定

ファイル設 定
タ イム ス タ ン プ・サ フィッ ク ス
ファイル名に追 加されるタイムスタンプは、デフォルトで は オフに設 定されています。ファイル 名に日付
と時刻を記録したい場合は、「
SET
」ボタンを押し、サーチダイヤルを使用して「タイムスタンプ・サフィ
ックス」のオプションをオンにします。
HyperDeck_2105061438_0001
HyperDeck_2105061438_0001
ファイル名
HyperDeck_2105061438_0001
年
HyperDeck_2105061438_0001
月
HyperDeck_2105061438_0001
日
HyperDeck_2105061438_0001
時
HyperDeck_2105061438_0001
分
HyperDeck_2105061438_0001
クリップ番 号
HDRフォーマットオーバーライド
HyperDeck Studio 4K Proは、4Kビ デ オ信 号 またはファイル に エンベッドさ れた HDRメタデータを自動
的に検出し、
HDMI
出力を介して表示します。信号またはファイルのタグが 適切ではない場 合や、ディス
プレイが HDRに対 応してい ない 場 合、HDRフォーマットをオーバーライド で きま す。
オ ー バ ー ラ イ ド す る に は 、「
HDR
フ ォ ー マ ット オ ー バ ー ラ イド 」設 定 を
Rec
.
2020
SDR
などの
SDR
オプシ
ョンに 設 定します。
HDR再生および収録設定は以下から選択できます:
自動
デフォルトの 設 定 です。
HyperDeck
が クリップ の
HDR
メタデ ー タと一 致 する 出 力フォーマットを自 動 的
に選 択します。
Rec
.
709
標 準 ダイナミックレンジ の HDビデオに使 用します。
Rec
.
2020
SDR
標 準 ダイナミックレンジ の Ultra HDビデオに使 用します。
HLG
HLGは 、「 Hybrid Log Gamma(ハイブリッドログガンマ)」の省略です。このフォーマットは、
HDR(Rec.2020 SDRまで)対応のテレビやモニターでHDRビ デオを再 生で きます。
96
設定
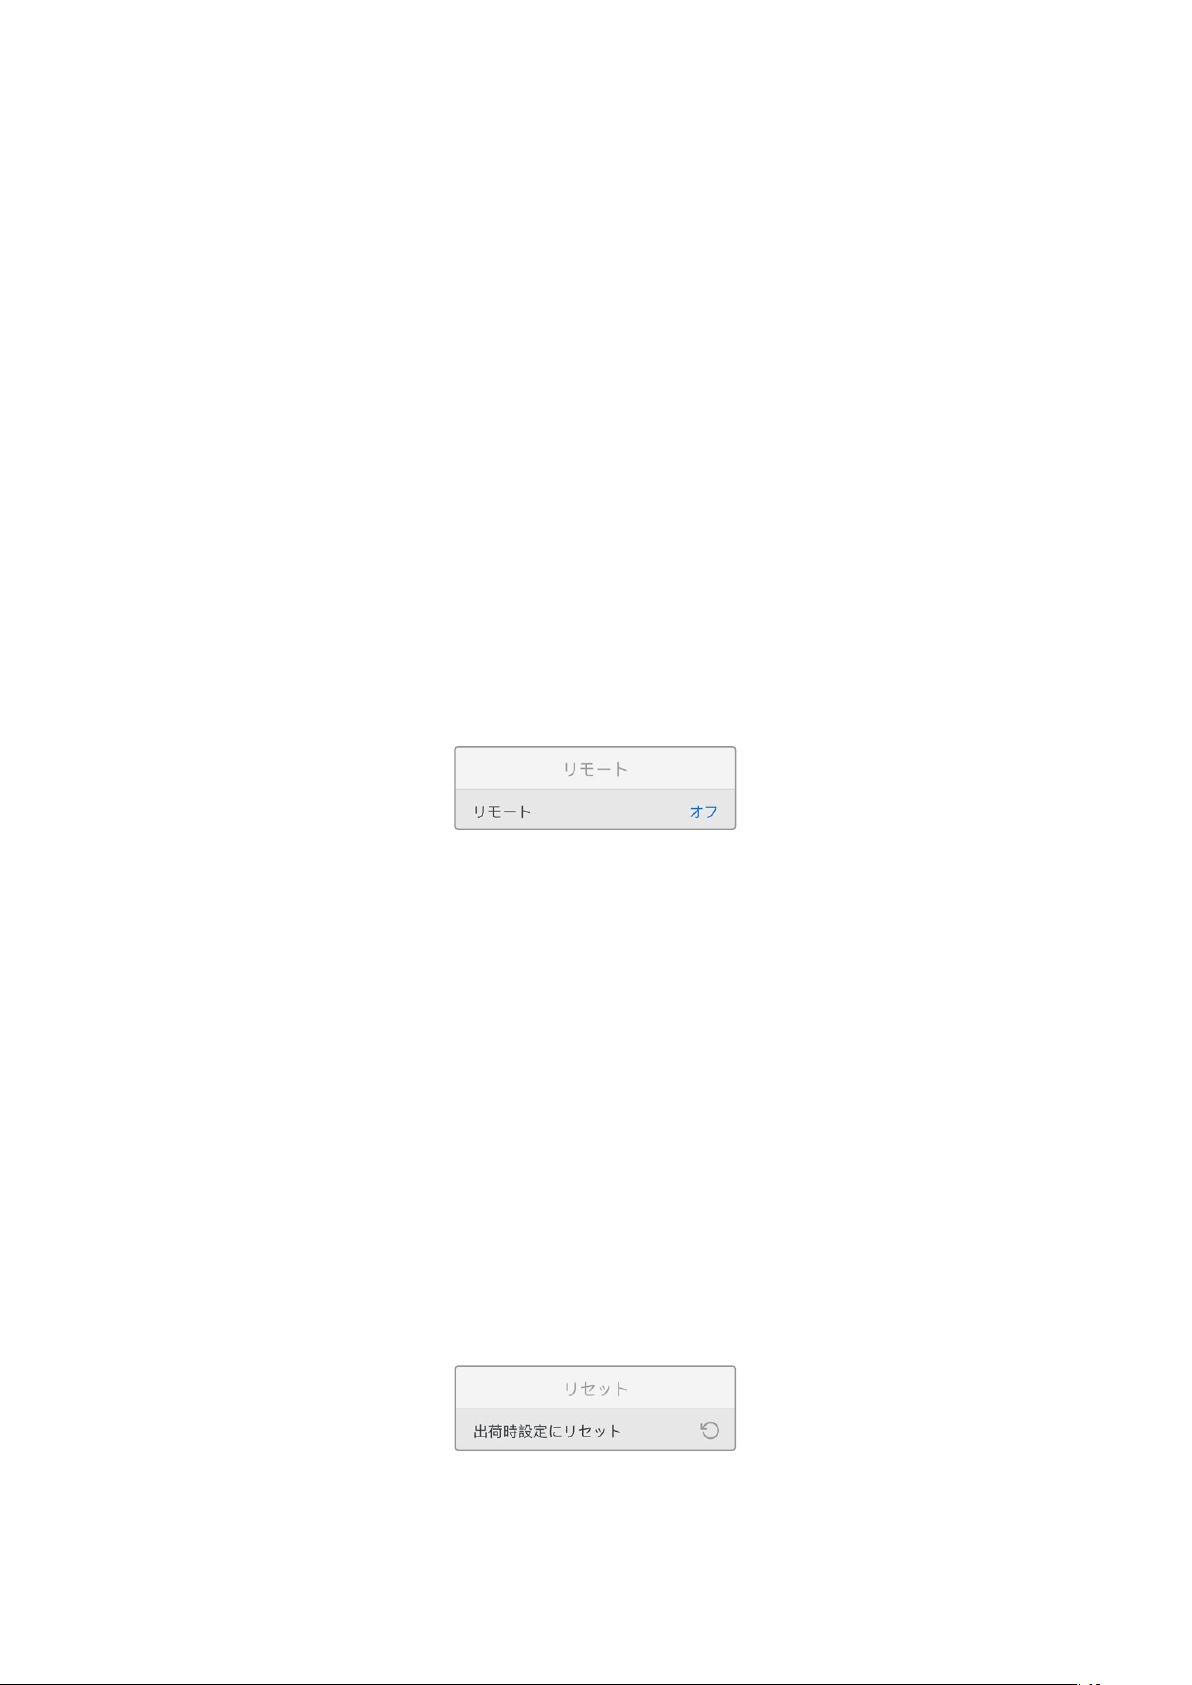
以下の設定は、
Rec
.
2020
色 域 、お よ び
SMPTE
ST2084
として 規 格 化 された
PQ
(
Perceptual
Quantizer
/
知 覚 量 子 化 )を サ ポ ー ト し て い ま す 。
PQ
は 、よ り 明 る い イ メ ー ジ を 表 示 可 能 に す る 、広 色 域
HDR
の機能
で す 。輝 度 値 は 、カ ン デ ラ 毎 平 方 メ ー ト ル(
cd
/
m
2
)で示されます。例えば、
1000
cd
/
m
2
は 、対 応 す る フ
ォーマットが平方メートルごとにサポートする輝 度の最 大値です。
ST2084
(
300
)
輝度 300 cd/m
2
ST2084
(
500
)
輝度 500 cd/m
2
ST2084
(
800
)
輝度 800 cd/m
2
ST2084
(
1000
)
輝度 1000 cd/m
2
ST2084
(
2000
)
輝度 2000 cd/m
2
ST2084
(
4000
)
輝度 4000 cd/m
2
リモート
リモート
RS-422を介したリモートコントロールを有効にするには「リモート」を選 択します。これにより、HyperDeck
Extreme
Control
などの他の機 器から
HyperDeck
を 操 作 で き ま す 。リ モ ー ト が 選 択 さ れ る と 、
HyperDeck
の一部のモデルに搭載されている「
REM
」ボタンが点灯してオンになっていることを示します。オフにす
る と 、ロ ー カ ル で ユ ニ ッ ト を 操 作 で き ま す 。
デッキコントロール
リモ ートが オン に なって い る 場 合 、
1
台の
HyperDeck
のトランスポートコントロールを操作することで、別
の複数の
HyperDeck
で同じ操作を実行できます。マスターとなる
HyperDeck
のリモート出力を
2
番目のユ
ニットのリモ ート入 力 に 接 続してデ イジ ー チェーンを構 築しま す。
RS
-
422
を 使 用 し て 、同 様 に ユ ニ ッ ト を
追加接続していきます。追加したユニットすべてのリモート設定がオンになると、マスターとなるユニット
で行ったトランスポートコントロールは、追加ユニットでも実行されます。
例 え ば 、マ ス タ ー と な る
HyperDeck
で収録ボタンを押すと、デイジーチェーンされた
HyperDeck
すべて
が 同 時 に 収 録 を開 始します。
HyperDeck Studio HD Miniはコントローラーとして使用することはできませんが、ProまたはPlusシリ
ーズからは 操 作 が 可能 です。
リセット
出 荷 時 設 定 にリセット
「セットアップ」メニューで「 出 荷 時 設 定 にリセット」をハイライトすると、
HyperDeck
を出荷時の設定に
戻 せ ま す 。「 SET」ボタンを押すと、操作を実行するか確認する画面が表示されます。
97
設定

リアパネル
1 電源
HyperDeck
の全モデルは
AC
主電源に接続できる
IEC
電源入力を搭載しています。
HyperDeck
Studio
4K
Pro
には
2
つ搭載されているため、電源の冗長性が得られます。
DC
入力には
12V
の外
付けバッテリー電源を接続できるので、冗長性を確保できます。接続する
DC
電源は、
DC
入力コ
ネクターの下に記載されている入力ボルテージと定格電流に必ず互換している必要があります。
2
ETHERNET
(イー サネット)
イーサネットポートで は 、ネットワー クに 接 続 し、高 速 の
FTP
を使 用してファイルの転 送や、
HyperDeck Ethernet Protocolを使 用してユニットをリモートコントロールできます。ファイル
の転送速度は、HDモデルで1GbE、HyperDeck Studio 4K Proでは10GbEです。FTPクライア
ントを使 用したファイルの転 送に関しては 、後 述の「ネットワークでファイルを転 送 」セクショ
ンを 参 照してください 。
ATEM
スイッチ ャー を 同じ ネットワ ー クに 接 続 して い る 場 合 、
ATEM
スイッチ ャー ま た は
ATEM
ハ
ードウェアパネルからHyperDeckを操 作 で きます。
3
REMOTE
(リモ ート)
HyperDeck
Studio
の一部のモデルは、
DE
-
9
を搭載した
2
つの
RS
-
422
をサ ポートしており、
リモ ートの入 出 力を接 続 で きます。
HyperDeck
Studio
HD
Mini
は 、リ モ ー ト 入 力 の み に 対 応
していま す。
4
EXT
DISK
(外付けディスク)
フラッシュディスクを
USB
-
C
コネクターに接 続すると、
HD
モデルでは最大
5Gb
/
s
で外付けディ
スクに収録できます。HyperDeck Studio 4K Proは、USB-C 3.1 Gen 2に 対 応しているので、
最大
10Gb
/
s
で転送できます。また、マルチポートの
USB
-
C
ハブや
Blackmagic
MultiDock
10G
を接続すると、1枚または複数のSSDを使 用 できます。
USBでHyperDeckをコンピューターに接続している場 合、Open BroadcasterやSkypeなどの
ソフトウェア で、HyperDeckを ウ ェ ブ カ ム ソ ー ス と し て 使 用 で き ま す 。詳 細 は 、後 述 の「 Open
Broadcasterのセットアップ」セクションを参照してください。
5
MONITOR
OUT
(モニター出力)
3G
-
SDI
モニター出力コネクターでは、オーバーレイ付きのダウンスケールした出力を送 信するた
め、外部ディスプレイでモニタリングできます。オーバーレイには、ドライブアイコン、オーディ
オ メ ー タ ー 、タ イ ム カ ウ ン タ ー 、デ ィ ス プ レ イ LUTが含まれます。クリーンフィードの出力方法な
ど、SDIのモニタリング設定に関しては、このマニュアルの「設定」セクションに前述されています。
2 5 6 8 941
HyperDeck Studio HD Mini
の電源コネクターは、ロックリン
グ を 搭 載 し て い る た め 、誤 っ て コ
ネクター が 外 れることを 防 止
HyperDeck Studio HD Mini
およびPlusモデルは、タイムコ
ード入出力用のBNCコネクタ
ーを搭載
7
3
98
リアパネル

6
REF
(リファレンス)
HyperDeck
の全モデルはシンクジェネレーターを内蔵しており、安定したブラックバーストお
よび3値シンク・ビデオリファレンスを生 成します。つまり、HyperDeckのリファレンス 出 力を 他
のビデオ機器のレファレンス入力に接続し、
HyperDeck
が 生 成 するマスターリファレンス信 号
にロックすることが 可 能 です。
リファレンス信 号 をリファレンス 入 力 に 接 続し、
HyperDeck
を外部マスター同期ソースに同期
させることもで きます。
複数の
HyperDeck
ディスクレコーダーをループさせている場合のリファレンスソースの選択方法
に関しては、前述の「設 定」セクションの「セットアップメニュー」を参照してください 。
7
TIMECODE
(タイム コード)
HyperDeck
の全モデルは時刻タイムコードのジェネレーターも搭載しています。これはリファレ
ンスと似ており、タイムコード信号をマスター
HyperDeck
から他の
HyperDeck
やビデオ機器に
ループできるため、それぞれに収録された映像には同じタイムコードが記録されます。
HyperDeck
のモデルによって、タイムコードコネクターは
BNC
または
XLR
のいずれかを搭載し
ています。タイムコードのオプションの選択方法に関しては、前述の「設定」セクションを参照
してください 。
8
HDMI
HDMI出力を使用すると、HDMIテレビやモニターに接続できます。
HyperDeck
は、適切なメタデータが信号にフラグ付けされている場合、
SDR
と
HDR
ビデオフォー
マ ット を 自 動 的 に 検 出 し ま す 。設 定 メ ニュ ー で HDRフラグ をオーバーライド することも可 能です。
詳細は、後 述の「設 定」セクションを参照してください。
9
SDI
HyperDeck
Studio
HD
Mini
は、
1080p60
までの単一の
3G
-
SDI
信号をサポートしています。
HyperDeck Studio HD PlusおよびHyperDeck Studio HD Proは、SDから2160p30までの
6G-SDI信 号に 対 応しています。HyperDeck Studio 4K Proは、2160p60までの解像度の12G-SDI
入出力をサポートしています。
2
つの
SDI
出力を搭載した
HyperDeck
では、
ATEM
スイッチャーに接続されている際に、フィル&
キー用にProRes 4444ファイル を再 生で きます。
99
リアパネル

モニター出力の使 用
モニター出力を使用すると、収録のチェックやビデオの再生をすばやく実行できます。オーバーレイに
は、使用されているコーデック、ビデオおよび信号のフォーマット、フレームレート、タイムコード、ファ
イル名、トランスポートコントロールステータス、ストレージメディアステータス、オーディオレベルなど
の重要な情報が表示されます。
以 下 は 、そ れ ぞ れ に 表 示 さ れ る 情 報 で す 。
コーデック
LCDメニューで選択されたコーデックを表示します。
フォーマット
再生モードで、現在のクリップの解像 度とフレームレートを表示します。収録モードでは 、現在 選 択され
ているソースのビデオの解像度とフレームレートが表示されます。
タイム コ ード
再生しているビデオクリップのタイムコードを表示します。あるいは、ビデオまたはタイムコード入力を介
して収 録されているタイムコードを表示します。表示は、クリップタイムコードまたはタイムラインのタイ
ムカウンターから選 択で きます。
ソース
現在選択されている
SDI
または
HDMI
入力ソースを表示します。「信号なし」と表示された場合、有効な信
号 が 検 出され な かったことを意 味します。
名前
HyperDeck
ディスクレコーダーの名前を表示します。名前の変更方法は、後述の「
Blackmagic
HyperDeck
Setup」を 参 照 し てく だ さ い 。
100
モニター出力の使用
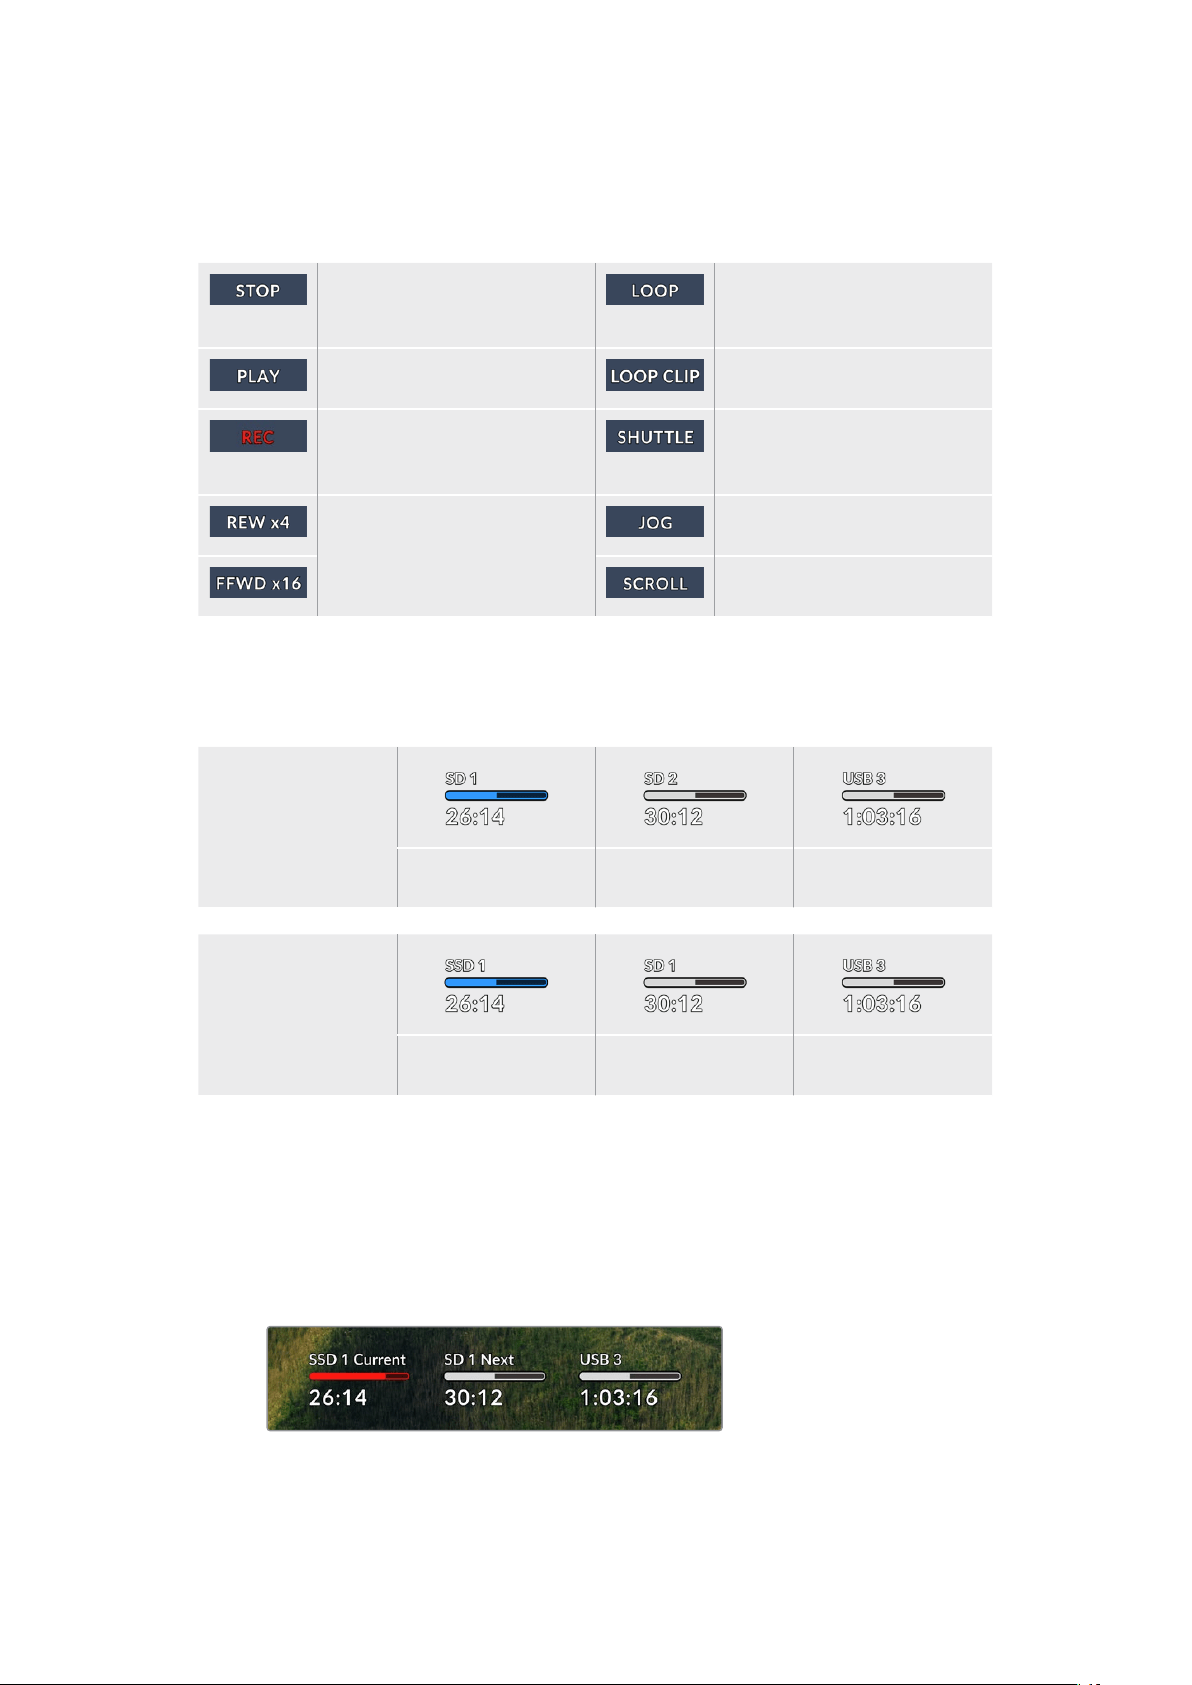
ステータス
クリップの再生や収録を行うと、このインジケーターにトランスポートコントロールのステータスと、現在
使用されているコントロールが表示されます。それぞれ以下を意味します:
HyperDeckが スタンバイ状 態で す。
現在 選択されているビデオフォー
マットで 収 録 さ れ た クリップ すべ て
が ル ープ 再 生 さ れ ま す。
ビデオが再生中です。 単一のクリップがループ再生され
ます。
ビデオを収録中です。収録が行わ
れているとインジケーターが赤に変
わります。
シャトル モ ード が オ ン に なって い ま
す が 、ス タ ン バ イ 状 態 で す 。
再生または巻き戻し中に表示され
ます。数値は 速 度を意 味します。
HyperDeckがジョグモードになっ
ています。
HyperDeckがスクロールモードに
なって い ま す。
ストレージメディアのステータス
以下の
3
つのインジケーターは、
SD
カード、
SSD
、ア ク テ ィ ブ な
USB
ドライブの名前とステータスを表示
します。表示方法は、HyperDeckの機 種により若 干 異 なります。
HyperDeck
Studio HD Plus
SDカードスロット 1 SDカードスロット 2
アクティブな
外 付 け ディスク
HyperDeck
Studio Proシリーズ
現在使用中のSD
またはSSDスロット
次に使用されるSD
またはSSDスロット
アクティブな
外 付 け ディスク
HyperDeck
の全モデルにおいて、
3
つ目のインジケーターには
USB
ドライブが 表 示されます。
USB
ハブ
や、Blackmagic MultiDock 10Gなどのドックを 使 用している 場 合、アクティブなドライブが 表 示され ます。
ディスク/ドライブインジケ ー ター
プログレス バー の上 には 、SDカードスロットまたはSSDス ロ ット の ラ ベ ル が 表 示 さ れ ま す。収 録
中は 、メディア名の左に「現在 」と表示されるので、収 録されているディスクを簡単に識 別できま
す。次に 収 録に使 用され るディスクやドライブにはプ ログレスバー の上 に「次 」と表 示されます。
101
モニター出力の使用
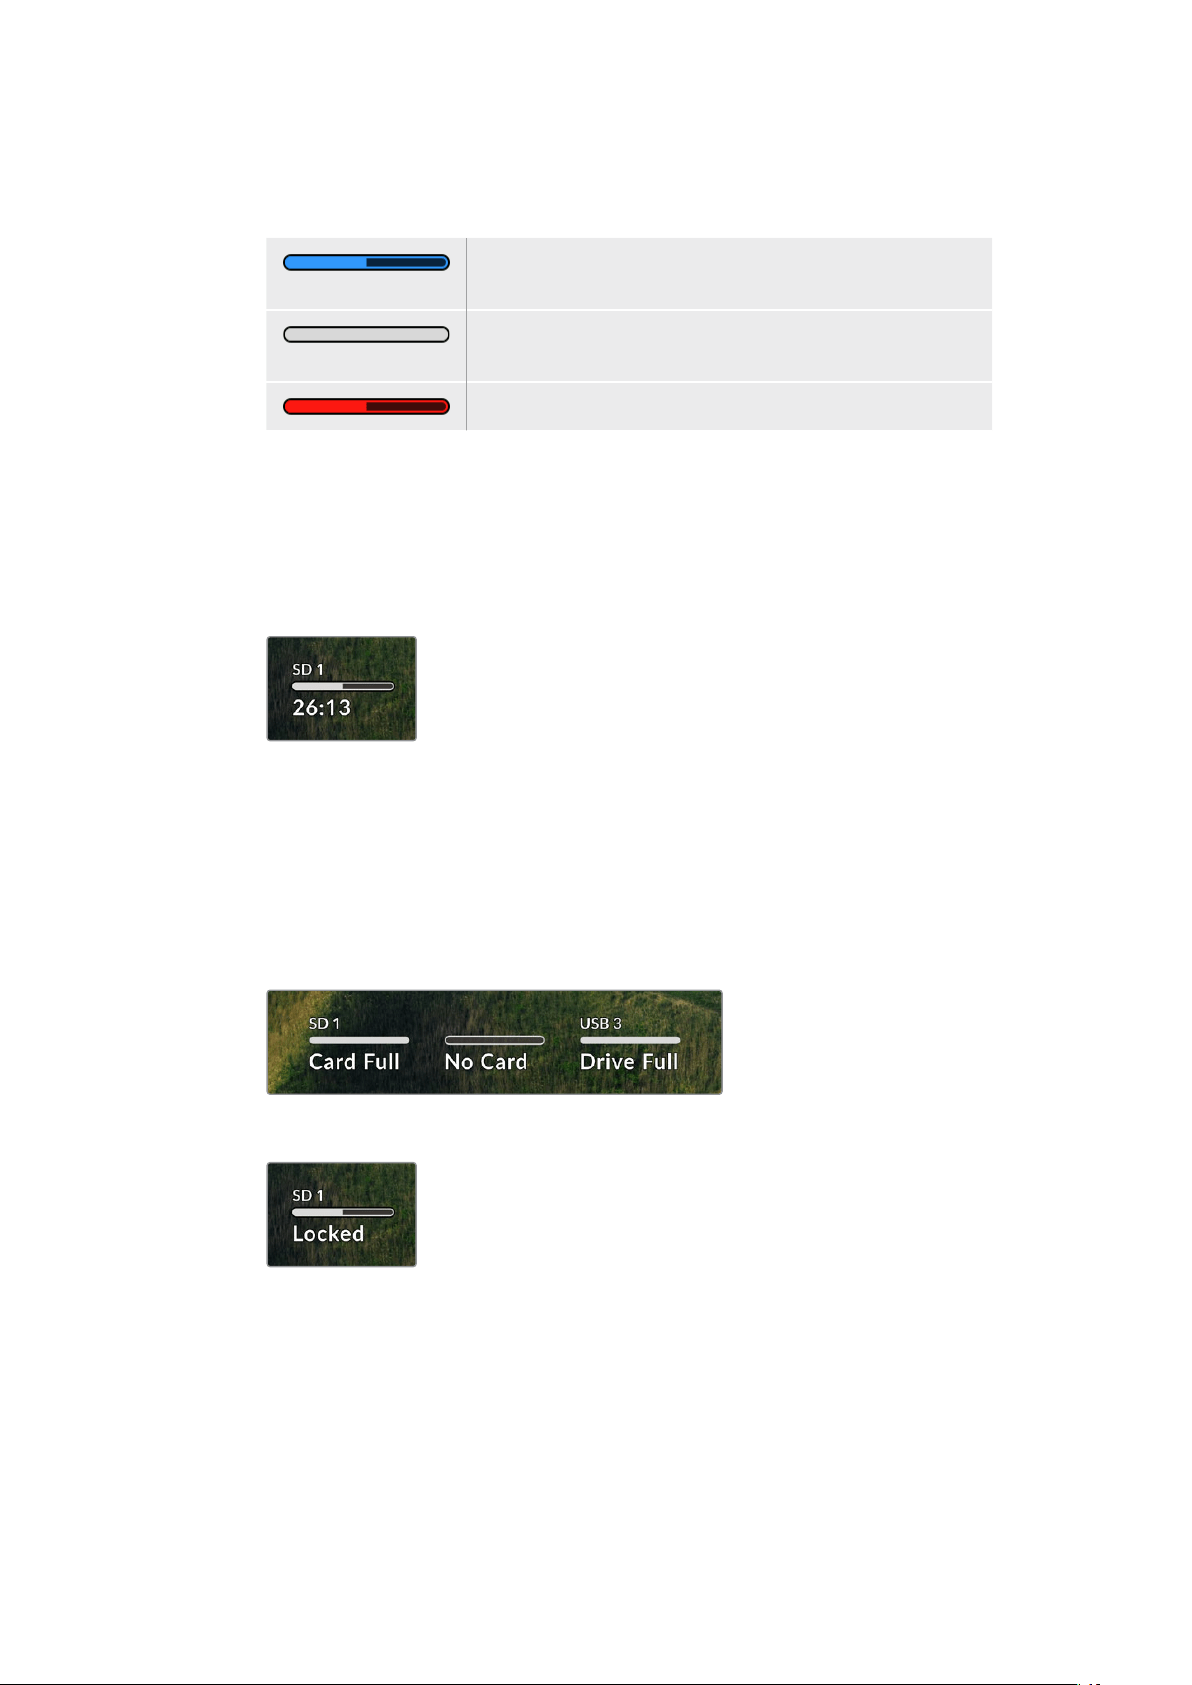
メディアバー
メディアバーアイコンは、現在の状況によって、青、白、赤で表示され、カードの残量を示します。
青のアイコンはアクティブなドライブであることを意味します。
このドライブが再生および収録に使用されます。
白のアイコンはメディアが 存 在 するが、アクティブではないことを意
味しま す。アイコン が 白 単 色 に なって い る 場 合 、メディア が フルで す。
収録が行われているとバーが赤に変わります。
メディアバーの下には、録画可能時間またはスロットのステータスが表示されます。
収録可能時間
SD
カードまたは
SSD
に容量が残っている場 合、現在のソースフォーマット、選択したコーデッ
クおよび品質設 定に基づく残り収録可能時間が、時間:分:秒で表示されます。残り収録可能
時間が1時間未満の場合は、分:秒のみが表示されます。
スロットステ ー タス
該当のメディアスロットにメディアが接続されていない場合は、「カードなし」または「ドライブ
な し 」と 表 示 さ れ ま す 。
SDカード、SSD、USBド ラ イ ブ が フ ル に な る と 、ア イ コ ン は「 フ ル 」と 表 示 す る の で 、ス ト レ ー ジ
メディアを交換する必要があることが把握できます。別の
SD
カードまたは
SSD
が挿入されてい
る場合、そのメディアに収録が自動的に継続されます。外付けディスクが接続されている場合、
すべてのSDカードおよびSSDがフルになると、そのディスクに収録が継 続します。
ロックされたドライブのプログレスバーの下には「ロック済み」と表示されます。
102
モニター出力の使用

オーディオメーター
オンスクリーンのオーディオメーターは、収録したいチャンネルの数に応じて、最大
16
チャンネ
ルのオーディオを表示します。LCDメニュー の「オー ディオ」メニューで、PPMまたはVUメータ
ーに設定できます。
収録されたオーディオチャンネルの数を選択したり、異なるオーディオメーターに変 更するに
は、
LCD
メニューのオーディオメニューを使 用します。詳 細は、後 述の「設 定 」セクションを参
照してください 。
ストレージメディア
SD
カード
高品質のUltra HD収録を行うには、高速のUHS-II SDカードを推 奨しま す。Ultra HD 2160p60までの
収録には、220MB/s以上の書き込み速度に対応しているカードを使用する必要があります。低ビット
レートで高い圧縮率を用いて収録する場合、低速のカードも使用可能ですが、一般的には、高速である
ほど良い品質が得られます。
定期的にこのマニュアルの最新バージョンを確認し、常に新しい情報を入手することをお勧めします。
マニュアル は
Blackmagic
Design
ウ ェ ブ サ イ ト( www.blackmagicdesign.com/jp/support)で ダ ウ ン
ロードで きます。
HyperDeckStudio4KProで使用が推奨されるSDカードは?
2160p
(
60fps
ま で )の 収 録 に は 、以 下 の
SD
カードを推 奨します。
メーカー モデル 容量
Angelbird AV Pro MK2 V90 SDXC 128GB
Angelbird AV Pro MK2 V90 SDXC 256GB
ProGrade Digital SDXC UHS-II V90 300R 128GB
ProGrade Digital SDXC UHS-II V90 300R 256GB
Wise SD2-128U3 SDXC UHS-II 128GB
103
ストレ ー ジメディア

HyperDeckStudioHDProで使用が推奨されるSDカードは?
2160p
(
30fps
ま で )の 収 録 に は 、以 下 の
SD
カードを推 奨します。
メーカー モデル 容量
Angelbird AV Pro MK2 V90 SDXC 64GB
Angelbird AV Pro MK2 V90 SDXC 128GB
Angelbird AV Pro MK2 V90 SDXC 256GB
ProGrade Digital SDXC UHS-II V90 300R 64GB
ProGrade Digital SDXC UHS-II V90 300R 128GB
ProGrade Digital SDXC UHS-II V90 300R 256GB
Wise SD2-64U3 SDXC UHS-II 64GB
Wise SD2-128U3 SDXC UHS-II 128GB
HyperDeckStudioHDPlusで使用が推奨されるSDカードは?
2160p
(
30fps
ま で )の 収 録 に は 、以 下 の
SD
カードを推 奨します。
メーカー モデル 容量
Angelbird AV Pro MK2 V90 SDXC 64GB
Angelbird AV Pro MK2 V90 SDXC 128GB
Angelbird AV Pro MK2 V90 SDXC 256GB
ProGrade Digital SDXC UHS-II V90 300R 64GB
ProGrade Digital SDXC UHS-II V90 300R 128GB
ProGrade Digital SDXC UHS-II V90 300R 256GB
Wise SD2-64U3 SDXC UHS-II 64GB
Wise SD2-128U3 SDXC UHS-II 128GB
HyperDeckStudioHDMiniで使用が推奨されるSDカードは?
1080p
ProRes
422
HQ
(
60fps
ま で )の 収 録 に は 、以 下 の
SD
カードを推 奨します。
メーカー モデル 容量
Angelbird AV Pro MK2 V90 SDXC 64GB
Angelbird AV Pro MK2 V90 SDXC 128GB
Angelbird AV Pro MK2 V90 SDXC 256GB
ProGrade Digital SDXC UHS-II V90 300R 64GB
ProGrade Digital SDXC UHS-II V90 300R 128GB
ProGrade Digital SDXC UHS-II V90 300R 256GB
Wise SD2-64U3 SDXC UHS-II 64GB
Wise SD2-128U3 SDXC UHS-II 128GB
104
ストレ ー ジメディア

SSD
高データレートビデオを扱う際 は、使 用するSSDを慎重に選ぶことが重要です。SSDの 中 に は 、製 造 業
者が公表する書き込み速度と比較して、実際の速度が半分程度しかない製品もあります。つまり、ディ
スクの仕様書に十分に映像を扱えるスピードが記載されていても、実際にリアルタイムのビデオ撮影で
は書き込み速度が追いつかないことがあります。
隠れたデータ圧縮は主に収録に影響し、リアルタイム再生は普通に実行できる場合もあります。
弊 社 に よ る テ ス トで は 、新 し く て サ イ ズ が 大 き い
SSD
や大容量の
SSD
が 概して 高 速 であるという結 果 が
出ています。以下のSSDの使用が推奨されます:
HyperDeckStudio4KProで使用が推奨されるSSDは?
2160p
(
60fps
ま で )の 収 録 に は 、以 下 の
SSD
を推 奨します。
メーカー モデル 容量
Samsung 860 PRO 512GB
Samsung 860 PRO 1TB
Samsung 870 EVO (MZ-77E250BW) 250GB
Samsung 870 EVO (MZ-77E500BW) 500GB
Samsung 870 EVO (MZ-77E1T0BW) 1TB
Samsung 870 EVO (MZ-77E2T0BW) 2TB
HyperDeckStudioHDProで使用が推奨されるSSDは?
2160p
(
30fps
ま で )の 収 録 に は 、以 下 の
SSD
を推 奨します。
メーカー モデル 容量
Samsung 860 PRO 512GB
Samsung 860 PRO 1TB
Samsung 870 EVO (MZ-77E250BW) 250GB
Samsung 870 EVO (MZ-77E500BW) 500GB
Samsung 870 EVO (MZ-77E1T0BW) 1TB
Samsung 870 EVO (MZ-77E2T0BW) 2TB
105
ストレ ー ジメディア
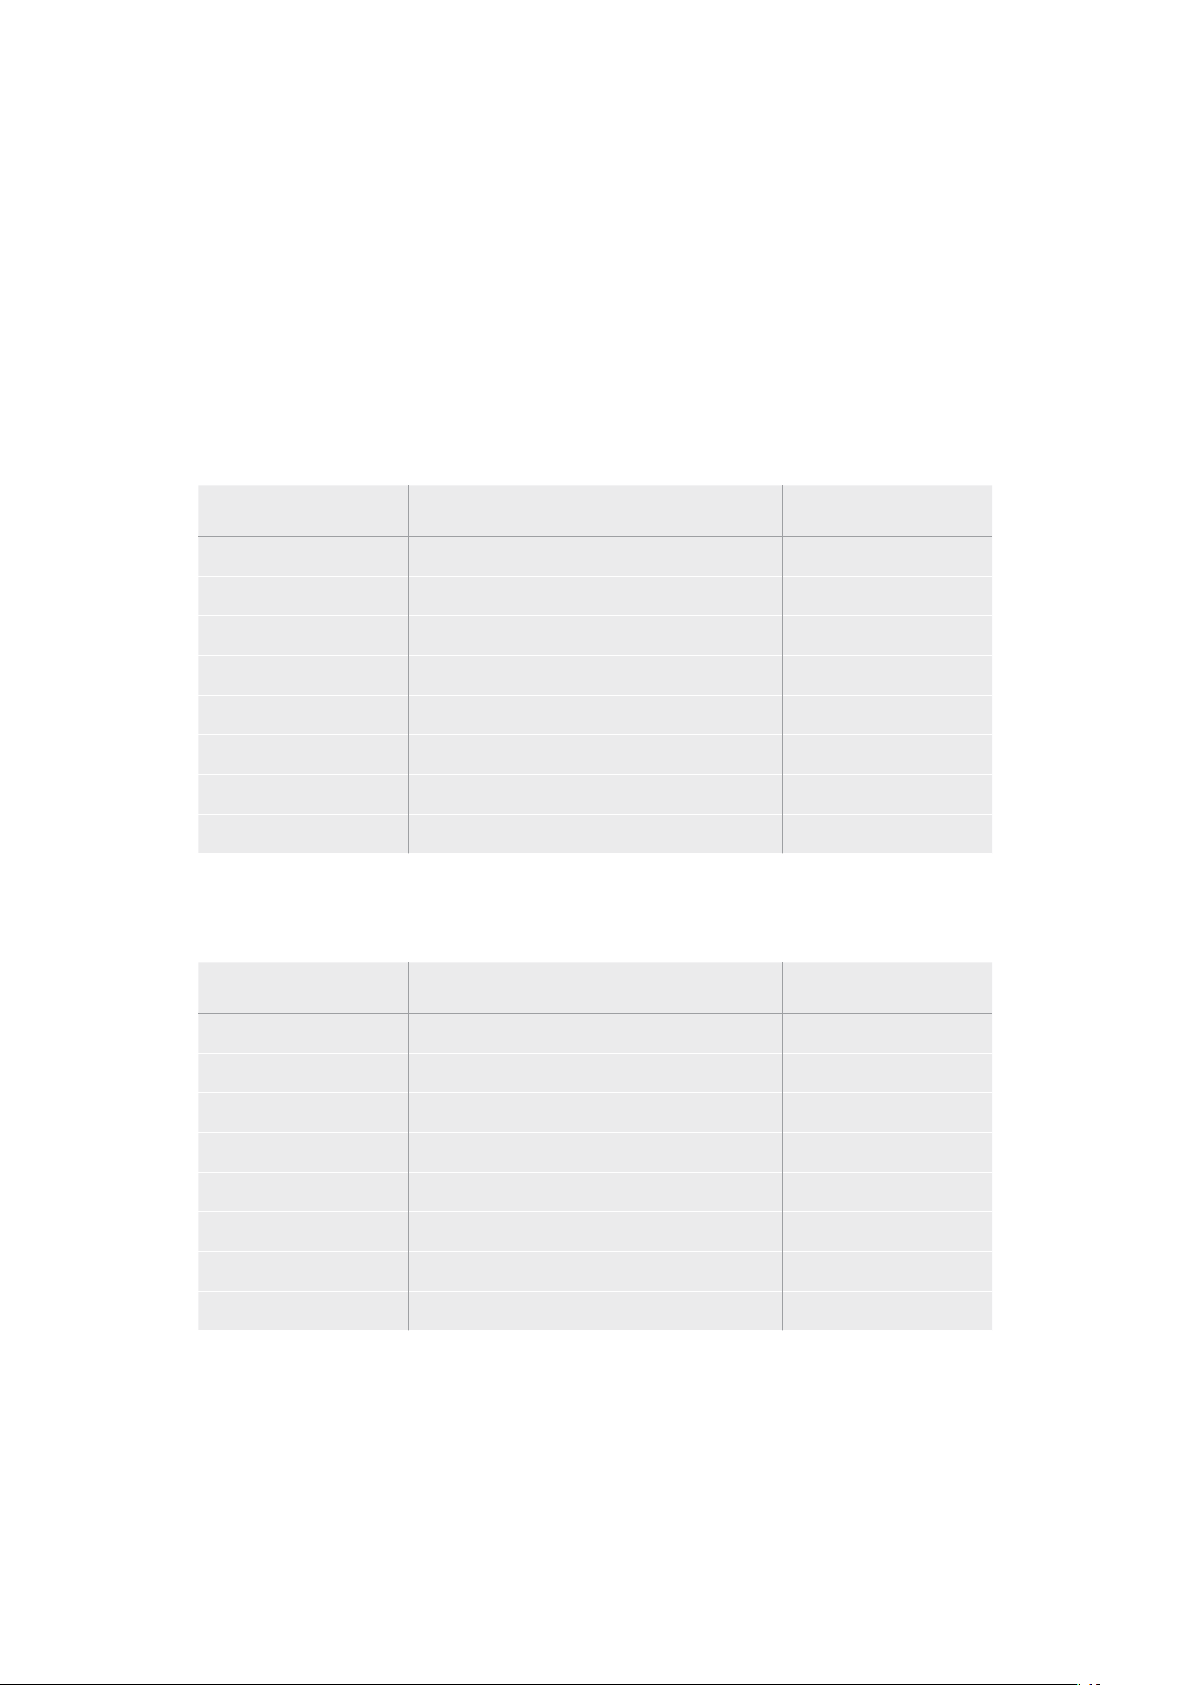
外付けディスク
HyperDeck
の 全 モ デ ル は 、直 接
USB
-
C
フラッシュディスクに収 録できます。これらのドライブは高速で
大容量なため、ビデオを長 時間 収 録できます。収 録に使 用したフラッシュディスクは 、コンピューターに
接 続して 直 接 編 集 を行えます。
さらに大きな容量が必要な場合は、
USB
-
C
ドックや外付けハードドライブを接続できます。
Blackmagic
MultiDock
10G
または
USB
-
C
フラッシュディスクに接続するには、機材に接 続した
USB
-
C
から の ケーブル
をHyperDeckの リ ア パ ネ ル の「 EXT DISK( 外 付 け デ ィ ス ク )」ポ ー ト に 接 続 し ま す 。
HyperDeckStudio4KProで使用が推奨されるUSB-Cドライブは?
2160p
(
60fps
ま で )の 収 録 に は 、以 下 の
USB
-
C
ドライブを推奨します。
メーカー モデル 容量
Angelbird SSD2GO PKT MK2 512GB
Angelbird SSD2GO PKT MK2 2TB
DelKinDevices Juggler 1TB
DelKinDevices Juggler 2TB
LaCie Rugged SSD STHR2000800 2TB
LaCie Rugged SSD Pro STHZ1000800 1TB
Wise PTS-512 Portable SSD 512GB
Wise PTS-1024 Portable SSD 1TB
HyperDeckStudioHDProで使用が推奨されるUSB-Cドライブは?
2160p
(
30fps
ま で )の 収 録 に は 、以 下 の
USB
-
C
ドライブを推奨します。
メーカー モデル 容量
Angelbird SSD2GO PKT MK2 512GB
Angelbird SSD2GO PKT MK2 2TB
DelKinDevices Juggler 1TB
DelKinDevices Juggler 2TB
LaCie Rugged SSD STHR2000800 2TB
LaCie Rugged SSD Pro STHZ1000800 1TB
Wise PTS-512 Portable SSD 512GB
Wise PTS-1024 Portable SSD 1TB
106
ストレ ー ジメディア

HyperDeckStudioHDPlusで使用が推奨されるUSB-Cドライブは?
2160p
(
30fps
ま で )の 収 録 に は 、以 下 の
USB
-
C
ドライブを推奨します。
メーカー モデル 容量
Angelbird SSD2GO PKT MK2 512GB
Angelbird SSD2GO PKT MK2 2TB
DelKinDevices Juggler 1TB
DelKinDevices Juggler 2TB
LaCie Rugged SSD STHR2000800 2TB
LaCie Rugged SSD Pro STHZ1000800 1TB
Wise PTS-512 Portable SSD 512GB
Wise PTS-1024 Portable SSD 1TB
HyperDeckStudioHDMiniで使用が推奨されるUSB-Cドライブは?
1080p
ProRes
422
HQ
(
60fps
ま で )の 収 録 に は 、以 下 の
USB
-
C
ドライブを推奨します。
メーカー モデル 容量
Angelbird SSD2GO PKT MK2 512GB
Angelbird SSD2GO PKT MK2 2TB
DelKinDevices Juggler 1TB
DelKinDevices Juggler 2TB
Wise PTS-512 Portable SSD 512GB
Wise PTS-1024 Portable SSD 1TB
107
ストレ ー ジメディア

メディアをフォーマット
コンピューターでメディアを準備
Mac
コンピューターでメディアをフォーマット
MacのDisk Utilityアプリケーションで、ドライブをHFS+またはexFATで フォ ーマットで きま す。
ディスクをフォーマットするとすべての情報が消去されるため、重 要な情報は必ずバックアップしてくだ
さい。
1
外付けドックまたはケーブルアダプターで、SSDをコンピューターに接続します。SSDをTime
Machine
バックアップに使用するというメッセージは拒否します。
CFast
カードは、外付けカード
リーダーを介してコンピューターに接続します。
2 Applications/Utilityへ行き、Disk Utilityを起 動します。
3
使用するSSDまたはCFastカ ー ド の デ ィ ス ク ア イ コ ン を ク リ ッ ク し 、「 Erase」タ ブ を ク リ ッ ク し ま す 。
4 「Format」を「 Mac OS Extended (Journaled) 」ま た は「 exFAT」に 設 定 し ま す 。
5
ボ リ ュ ー ム 名 を 入 力 し 、「
Erase
」を ク リ ッ ク し ま す 。メ デ ィア が フ ォ ー マ ット さ れ 、
HyperDeck
で
使 用で きる 状 態になります。
Windows
コンピューターでメディアをフォーマット
Windows
では、
Format
ダイアログボックスでドライブを
exFAT
でフォ ーマットで きま す。
SSD
や
SD
カー
ドをフォーマットするとすべての情報が消去されるため、重要な情報は必ずバックアップしてください。
1
外付けドックや ケーブルアダ プターを 使 用して、SSDとコンピュー ターを接 続します。CFastカード
は 、外 付 け CFastカードリーダーを介してコンピューターに接続します。
2
「Start」メ ニュ ー ま た は「 Start」画面を開き、コンピューターを選択します。使用するSSDまたは
CFastカードを右クリックします。
3 コ ン テ ク ス ト メ ニ ュ ー か ら「 Format」を 選 択 し ま す 。
4 フ ァ イ ル シ ス テ ム を「 exFAT」に 設 定 し 、ユ ニ ッ ト サ イ ズ 配 分 を 128キロバイトに設 定します。
5 ボ リ ュ ー ム ラ ベ ル を 入 力 し て 、「 Quick Format」 を 選 択 し 、「 Start」を ク リ ッ ク し ま す 。
6 メディア が フォ ーマットさ れ 、HyperDeckで 使 用で きる 状 態に なります。
108
メディアをフォ ー マット

HyperDeck
をウェブカメラとして使 用する
USB
経由でコンピューターに接 続すると、
HyperDeck
ディスクレコー ダー は ウェブカ ムとして 検 出さ れ
ま す 。つ ま り 、
HyperDeck
か ら の 再 生・収 録 クリップ を
Open
Broadcaster
などの 配 信ソフトウェアを 使
用して放送できます。
ウェブカムソースの設 定
多 く の 場 合 、配 信 ソ フ ト ウ ェ ア は 自 動 的 に
HyperDeck
をウェブカメラとして設 定するので、配信ソフトウェ
アを起 動すると
HyperDeck
Studio
からの映像がすぐに表示されます。ソフトウェアが
HyperDeck
を自動的
に 選 択 し な い 場 合 、ソ フ ト ウ ェ ア が HyperDeckをウェブ カメラとマイクとして 使 用 するように 設 定しま す。
以下は、Skypeで ウェブカメラを設 定する方 法 です。
1 Skypeの メ ニ ュ ー バ ー で 、「 Audio & Video Settings」を 開 き ま す 。
2
「Camera」メニューをクリックし、リストからHyperDeckを 選 択 し ま す 。プ レ ビ ュ ー ウ ィ ン ド ウ に
HyperDeckの映 像 が 表 示されます。
3 メ ニ ュ ー の「 Microphone」に 進 み 、Blackmagic Designをオーディオソースとして選 択します。
Skype
を適切に設定できたら、友人などに
Skype
で 通 話 し て 、ウ ェ ブ カ ム の セ ッ ト ア ッ プ が 機 能 す る か 確
認すると良いでしょう。
これで準 備は完 了で す。
HyperDeck Studioで世界へ向けてライブ配信する準備が整いました。
109
HyperDeckをウェブカメラとして使用する

Open
Broadcaster
の セットアップ
Open Broadcasterは、オープンソースのアプリケーションです。YouTube、Twitch、Facebook Liveなどの
お 気に入りの配 信ソフトウェアとHyperDeck Studioの間で配信プラットフォームとして機能します。Open
Broadcasterは 、配 信 ア プ リ が 管 理 し や す い ビ ッ ト レ ー ト に ビ デ オ を 圧 縮 し ま す 。
こ こ で は 、配 信 サ ー ビ ス と し て
YouTube
Live
を 使 用して、
HyperDeck
Studio
のウェブカム出力を配信 す
るように、Open Broadcasterを セットアップ する方 法 を説 明します。
Open
Broadcaster
を 起 動 し 、「
Sources
」ボ ッ ク ス の
プラスボタンを押します。
「
Video
Capture
Device
」を 選 択 し ま す 。
新しいソースに名前を付けて「
OK
」を ク リ ッ ク し ま す 。 「
Device
」メ ニュ ー で 使 用 し て い る
HyperDeck
Studio
の 機 種 を 選 択 し て「
OK
」を ク リ ッ ク し ま す 。
YouTube
の ア カ ウ ン ト へ 行 き ま す 。「
Go
live
」ボ タ ン
を 押 し て 、「
Stream
」を ク リ ッ ク し ま す 。
YouTube
の「
Stream
」オ プ シ ョ ン で 、配 信 の 詳 細 を 入
力 し 、「
Create
Stream
」を ク リ ッ ク し ま す 。
1
2
3
4
5
6
110
HyperDeckをウェブカメラとして使用する
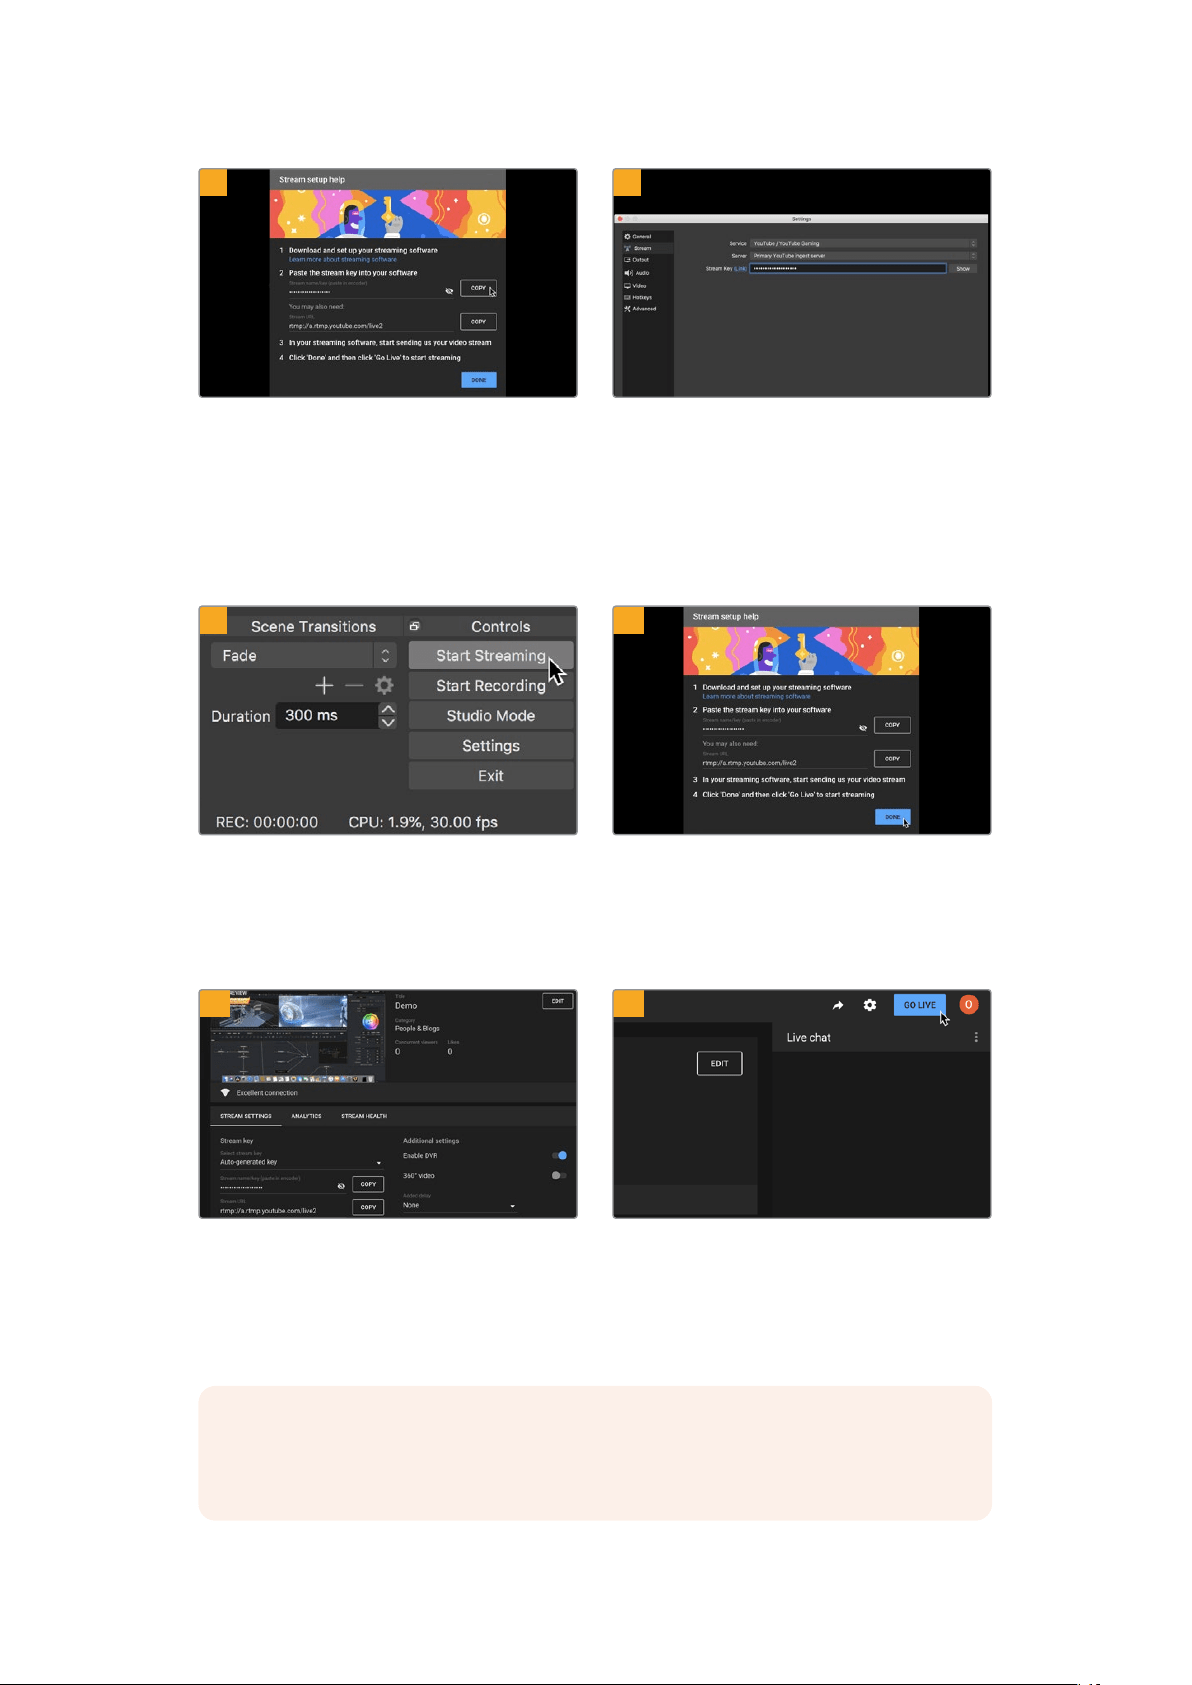
YouTube
は 、使 用 す る
YouTube
アカウントに
Open
Broadcaster
がアクセスできるようにするためのスト
リームキ ーを生 成します。
ストリームキーの横にある「
COPY
」ボ タ ン を ク リ ッ ク
します。コピーしたストリームキーは、次のステップで
Open
Broadcaster
にペーストします。
Open
Broadcaster
に 戻 り 、メ ニ ュ ー バ ー の「
OBS
/
Preferences
」を ク リ ッ ク し て 環 境 設 定 を 開 き ま す 。
「
Stream
」を 選 択 し ま す 。
YouTube
でコピーしたストリ
ー ム キ ー を「
Stream
Key
」に ペ ー ス ト し て「
OK
」を ク リ
ックします。
Open
Broadcaster
の配 信 プレビューウィンドウに
HyperDeck
の映 像 が 表 示されます。
Open
Broadcaster
の放 送リンクを
YouTube
に接続す
るには、スクリーン右下で「
Start
Streaming
」を ク リ
ッ ク し ま す 。こ れ で 、
Open
Broadcaster
から
YouTube
へのリンクが構築されました。ここからは、すべてが
YouTube
Live
を 使 って 設 定 さ れ ま す。
YouTube
Live
に戻ると、
HyperDeck
のウェブカム
プログラム出力がバックグラウンドに表示されます。
「
DONE
」を ク リ ッ ク し ま す 。
Open
Broadcaster
が
YouTube
Live
と通 信してい る 状
態になったので、放送を開始できます。すべてが適切
に設定されているか、最終チェックを行ってください。
準備が整ったら、「
GO
LIVE
」を ク リ ッ ク し て 放 送 を 開
始します。
Open Broadcasterを使ったYouTubeでのライブ配信が始まりました。
メモ インターネットの性 質上、配信に遅延が生じることが多々あります。放 送の最後の部分
を カ ッ ト し て し ま わ な い よ う 、「
End
Stream
」を ク リ ッ ク す る 前 に 、実 際 の
YouTube
の配信を
見て、プログラムが終了したことを確認することが 重要です。
7
8
9
10
11
12
111
HyperDeckをウェブカメラとして使用する

Blackmagic
HyperDeck
Setup
HyperDeck
Setup
を使用する
Blackmagic HyperDeck Setupでは、HyperDeckの設定変更や内部ソフトウェアのアップデートが行
えま す。
HyperDeck
Setup
を 使 用 する:
1
HyperDeckとコンピューターをUSBまたはイーサネットで接続します。
2
HyperDeck
Setup
を起 動します。
Setup
Utility
のホームページに、使用している
HyperDeck
の
モデルが 表 示されます。
3 丸 い セットアップ アイコンまた は HyperDeckの 画 像 を ク リ ッ ク し て「 Setup」ペ ー ジ を 開 き ま す 。
「Setup( セ ッ ト ア ッ プ )」ペ ー ジ
複数のHyperDeck Studioを使用している場合、各ユニットに個別の名前を付けることで簡単に識別で
き ま す 。こ れ は「 Name(名前)」オプションで実行できます。
112
BlackmagicHyperDeckSetup
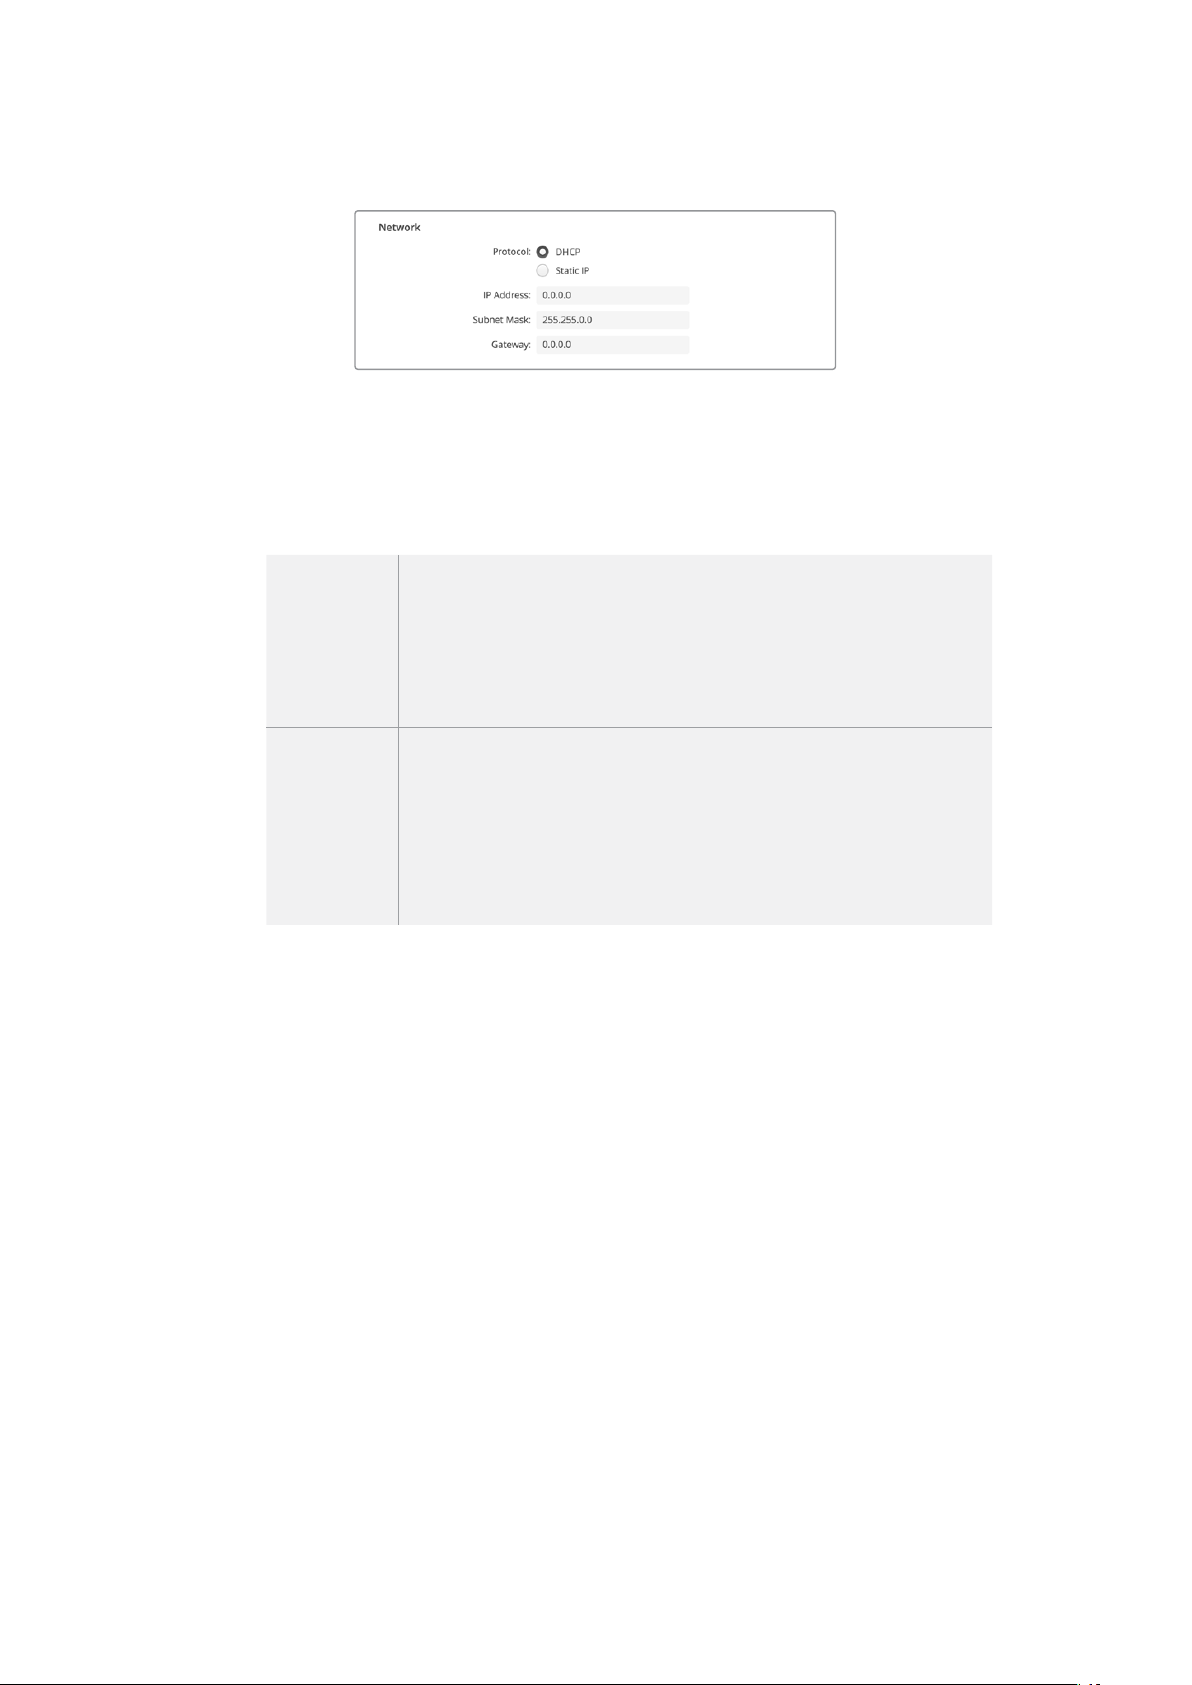
ネットワー ク
プロトコル
HyperDeck StudioをATEMスイッチャーと使 用したり、HyperDeck Ethernet Protocolを介し
てリモ ートコントロールする 場 合は 、
HyperDeck Studioを 他 の 機 器 と 同 じ ネットワ ー ク上 に 接
続する必要があります。これは、
DHCP
を 使 用 す る か 、固 定
IP
アドレスをマニュアルで 追 加して
実 行で きます。
DHCP
HyperDeck Studioの出 荷 時の デフォルト設 定は DHCPです。DHCP(ダイナミ
ック・ホスト・コンフィギュレーション・プロトコル)は、ネットワークサーバー
上のサービスで、HyperDeck Studioを自 動 的 に 検 出してIPアドレスを割り当
てます。DHCPは、イーサネット経由で機材を簡単に接続でき、IPアドレスの 競
合が生じないようにできる非常に優れたサービスです。コンピューターやネッ
トワークスイッチの多くは、DHCPをサポートしています。
静的
IPアドレス
ネットワークの詳細をマニュアルで入力する場合は「静的IPア ド レ ス 」を 選 択 し
ます。すべてのユニットの通信を可能にするためにIPア ド レ ス を 設 定 す る 際 、す
べ てのユ ニットが 同 一 の サブネットマスクとゲートウェイ設 定 を 共 有している
必 要 が あ り ま す 。さ ら に 、パ ネ ル の IPアドレスの最初の3つのフィールドの 数 値
が一致している必要があります。ネットワーク上に、IPアドレス が 同じ識 別 番
号のデバイスが存在する場合、競合が生じるためユニットは接続しません。
競合が生じた場合は、ユニットのIPアドレスの識別番号を変更してください。
「
LUTs
」ペ ー ジ
リアパネルにモニター出力コネクターを搭 載した
HyperDeck
は、
3D
LUT
を入 力ビデ オに適 用して表 示
できます。17ポイント、33ポイント、65ポイントのLUTファイル に対 応しています。
これ は 、意 図 的 に 彩 度 の 低 いフラットな 見 た 目にしてあ る” フィルム”ダイナミックレン ジ を 使 用してい る 際
に 役 立 ち ま す 。デ ィ ス プ レ イ LUTを適用することで、グレーディング後のビデオのルックを想定できます。
3D
LUT
はモニター出力ディスプレイに表示されるだけで、実際にビデオには収録されないので、収録さ
れたイメージが恒久的に適用されることを心配するは必要ありません。
DaVinci Resolveで同じLUTを イメー ジ に 適 用した い 場 合、HyperDeck Studioで 使用したのと同じLUT
.
cubeファイルをDaVinci Resolveに読み込むだけでグレードに適用できます。
113
BlackmagicHyperDeckSetup
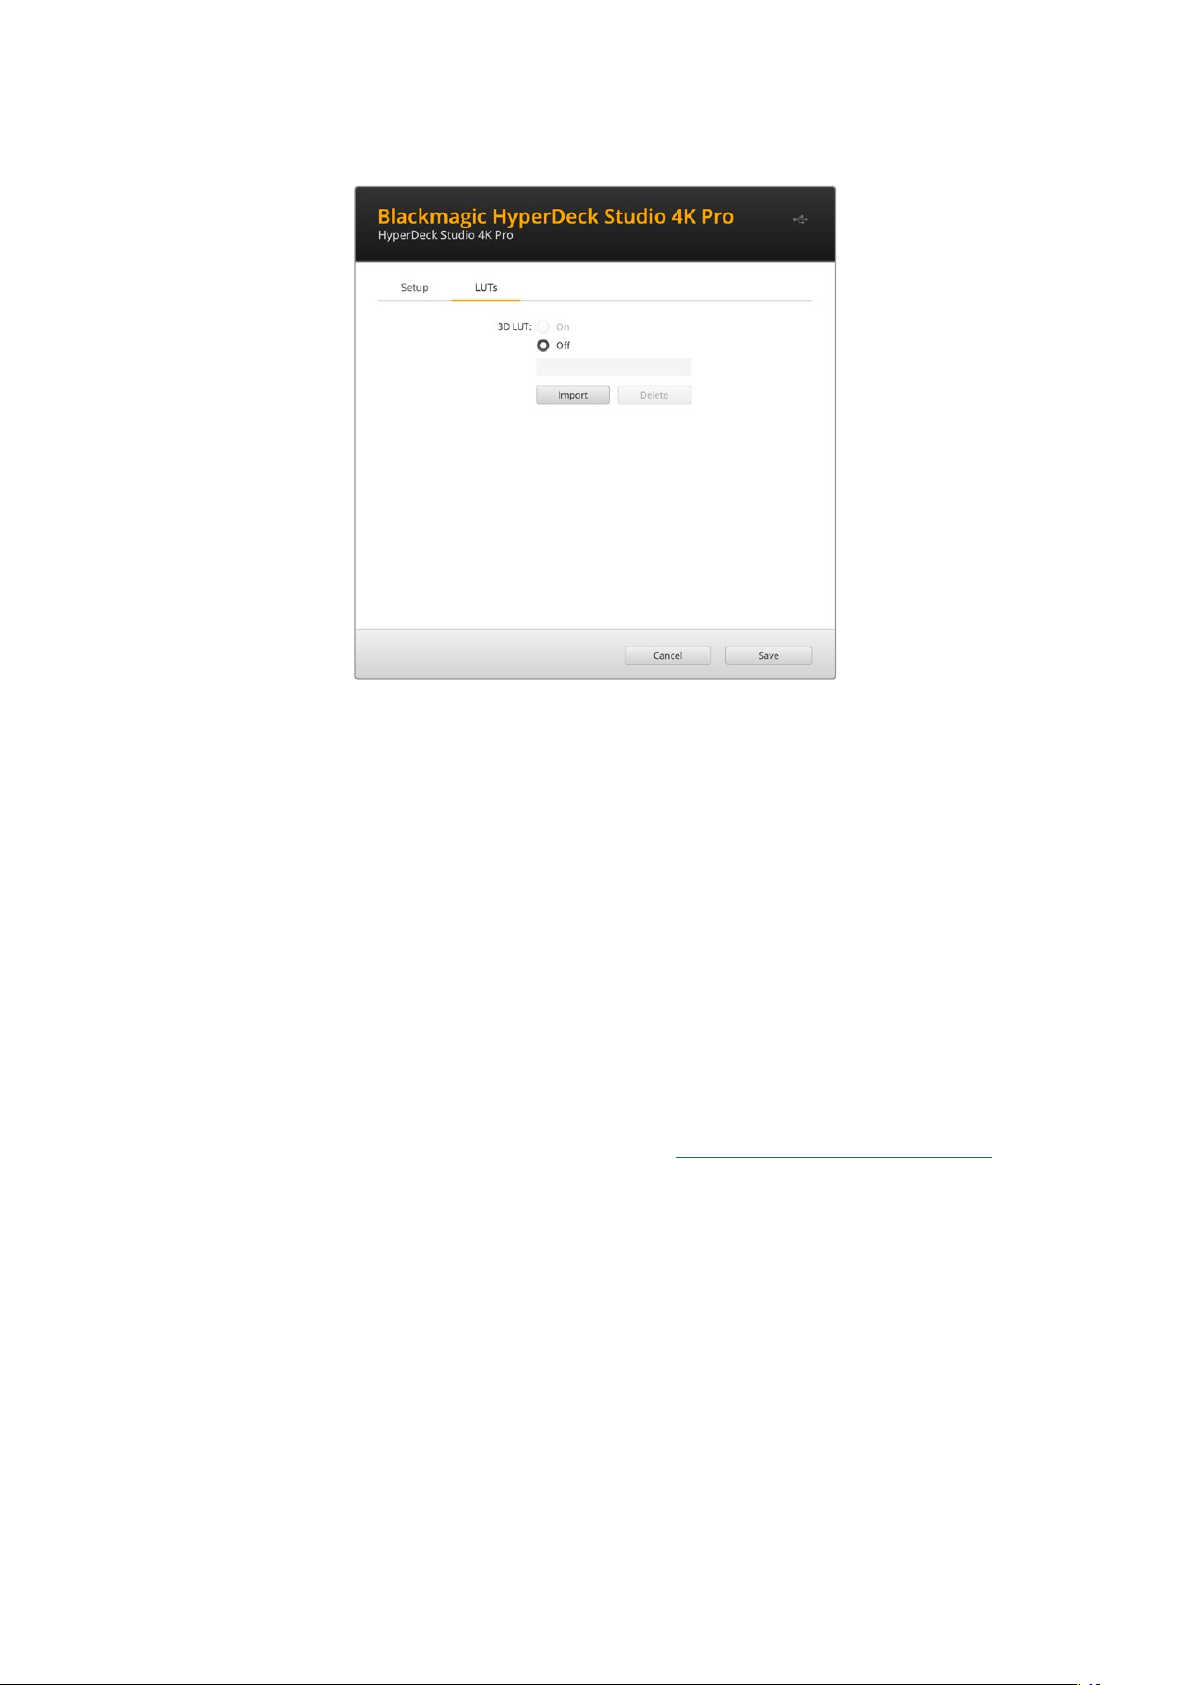
LUT
を 表 示 する に は 以 下 を 実 行しま す:
1
ディスプ レ イ LUTを 選 択 し ま す 。「 Import( 読 み 込 み )」ボ タ ン を ク リ ッ ク し ま す 。
2 フ ァ イ ル 選 択 の ウ ィ ン ド ウ で 、読 み 込 み た い LUTを 選 択 し 、「 Open( 開 く )」を 押 し ま す 。
3 LUTが読み込まれたら、「3D LUT」を「 On」 に し 、「 Save」ボタンを押して保存します。
選択した
LUT
が、モニター出力ディスプレイに表示されます。
LUT
のオン/オフは 、
LCD
メ ニュ ー の「 モ ニ タ
リ ン グ」設 定 で 切 り 替 え ら れ る よ う に な り ま し た 。
内 部ソフトウェアのアップデート
Setup Utilityでは、HyperDeckディスクレコーダーの内部ソフトウェアをアップデートでき、配信、ネット
ワーク、配信品質の設定も行えます。
内部ソフトウェアのアップデート:
1
最新のBlackmagic HyperDeck Setupインストーラーをwww.blackmagicdesign.com/jp/support
からダウンロードします。
2
Blackmagic
HyperDeck
Setup
インストーラーをコンピューターで起 動し、画面に表示される
指示に従います。
3 インストールが完了したら、HyperDeck Studioをリアパネル のUSB経由またはイーサネットコネ
クター経由でコンピューターに接 続します。
4
Blackmagic
HyperDeck
Setup
を起動し、スクリーンの指示に従って内部ソフトウェアをアッ
プデートします。内部ソフトウェアが最新で何もする必要がない場合、指示は表示されません。
114
内 部ソフトウェアのアップデ ート

BlackmagicDesignHyperDeckStudio用の最新のSetupUtilityは、BlackmagicDesign
サ ポ ー ト セ ン タ ー(
www.blackmagicdesign.com/jp/support)で ダ ウ ン ロ ー ド 可 能 。
Teranex
Mini
Rack
Shelf
Teranex
Mini
Rack
Shelf
は
1U
ラックの棚で、
Blackmagic
HyperDeck
Studio
HD
Mini
および
HyperDeck
Studio HD Plusを 放 送 用ラックやロードケースに設 置 できます。Blackmagic HyperDeck Studio HD Mini
は非常に小型なので、同じ形状の他のBlackmagic Design機 器( Teranex MiniコンバーターやBlackmagic
MultiView 4、Blackmagic Web Presenterな ど )と 一 緒 に マ ウ ン ト で き ま す 。例 え ば 、Blackmagic
HyperDeck Studio HD MiniをATEM Television Studio HDと共に設置することで、8つのビデオ入 力を
切り替えられ、
HyperDeck
Studio
HD
Mini
でプログラム出力を収録できます。モジュラー方式なので、
持ち運び可能で簡単に使えるビデオソリューションをカスタマイズできます。
TeranexMiniRackShelfは、BlackmagicHyperDeckStudioHDMiniおよびHyperDeckStudioHDPlusと、
同じ形状の他の
BlackmagicDesign機 器 と 並 べ て マウントで きま す。
Blackmagic HyperDeckをTeranex Mini Rack Shelfに設 置するには、HyperDeckのゴム製の脚を取り
外 し( 使 用 さ れ て い る 場 合 )、
Teranex Mini Rack Shelfの底部にユニットを同梱のネジで固定します。
Teranex Mini Rack Shelfに は 、オ リ ジ ナ ル の カ バ ー パ ネ ル が 2つ含まれており、Blackmagic Design機
器を
1台だけ使用している場合でもラックの隙間を埋められます。
詳細は、
Blackmagic Designウェブサイトwww.blackmagicdesign.com/jpを参 照してください 。
115
TeranexMiniRackShelf
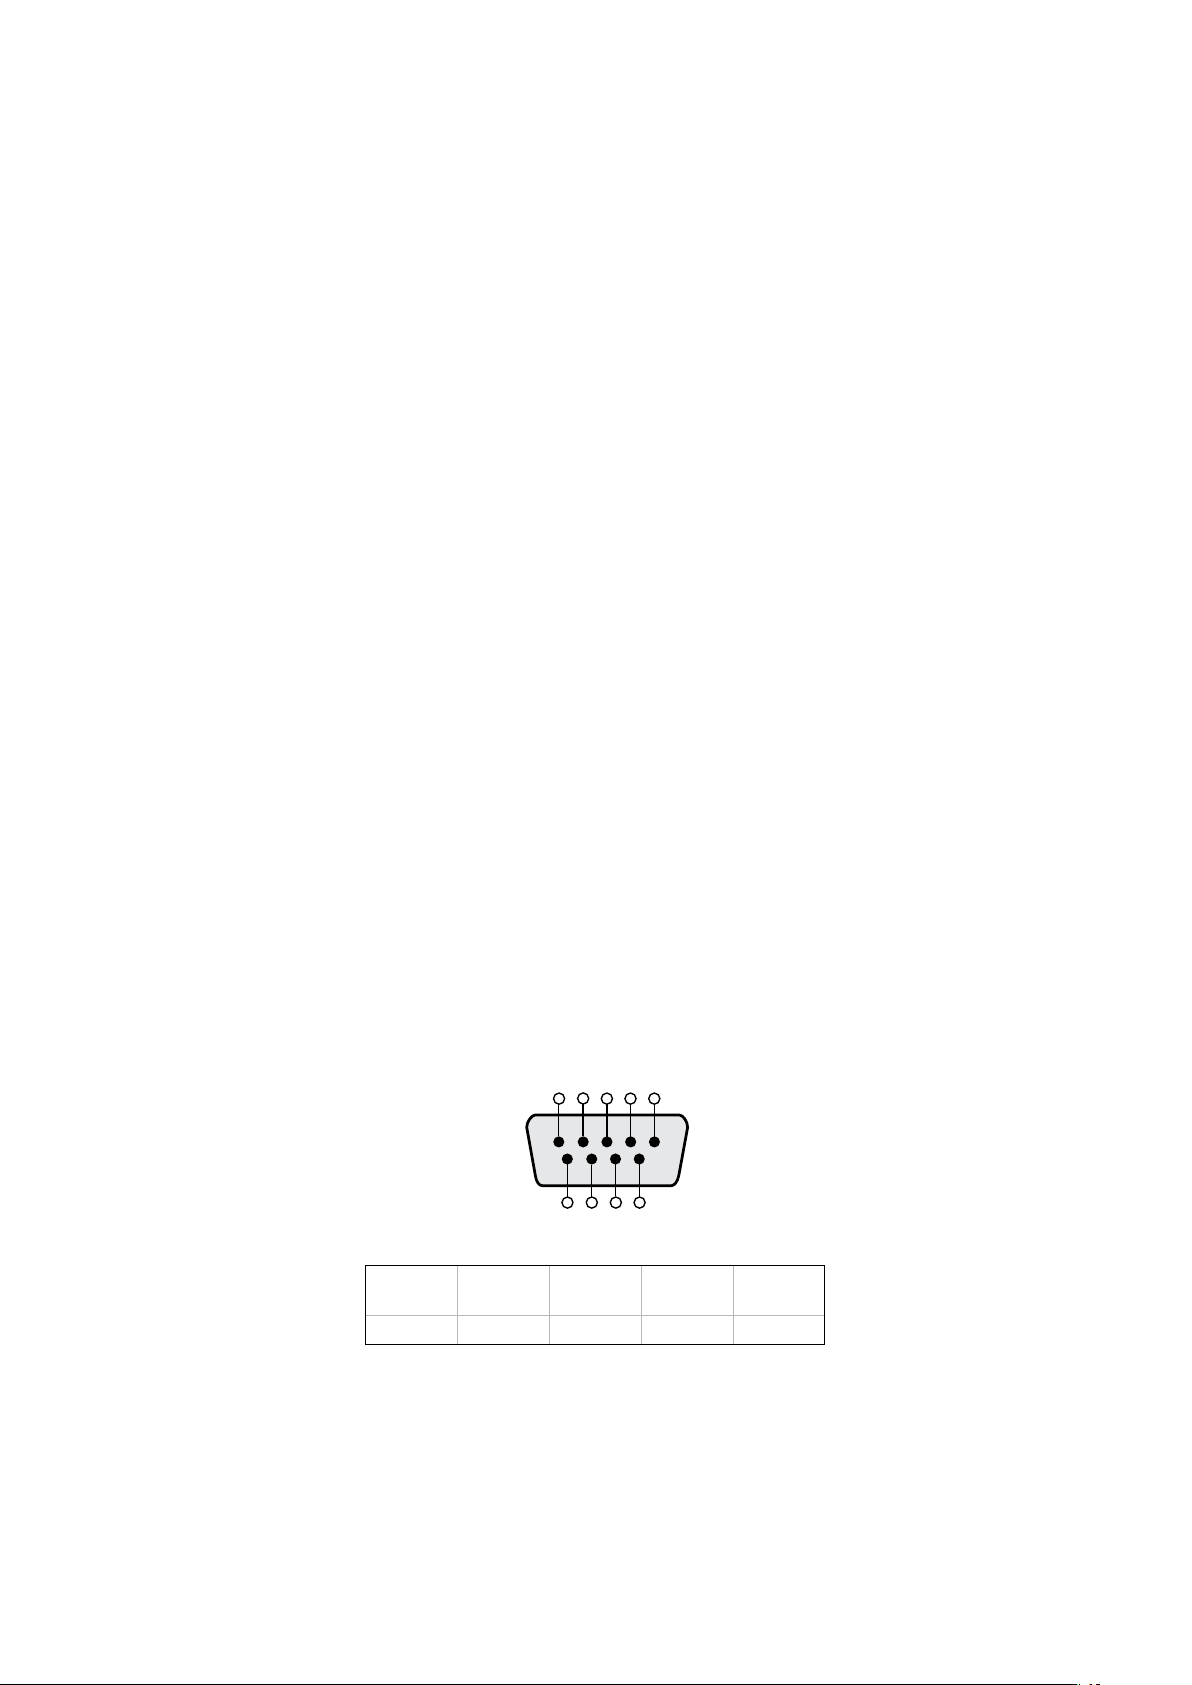
RS
-
422
コントロール
RS
-
422
とは?
RS- 422規格は、シリアルデッキコントロールの放送規格で、1980年 代 初 頭 か ら 多くの 放 送 局 で 採 用 さ
れています。数 多くのデッキ、リニアエディター、ノンリニアエディター、放 送オートメーション製品 など
で使用されています。
HyperDeck
の全 モデルは 、この規格 をサポートしているので、放送オートメーシ
ョン、リモートコントロールシステム、編集システム、自由にデザインしたあらゆる種類のカスタムコン
トロールに 組み込 めます。
HyperDeck Studioは、RS-422経由でAdvanced Media Protocol(AMP)か ら の フ ァ イ ル ベ ー ス の コ マ
ンドもサ ポートしています。これ により、外 部 機 器 を 使 用して
HyperDeck
を
AMP
コマンドでコントロール
できます。操作できる機能は、再生リストへのクリップの追加、次のクリップのファイル名の決定、単一の
クリップまたはタイムラインのル ープ、再生リストのクリアなどです。
外部RS-422コントローラーの使 用
現行のHyperDeckの全モデルは、業界標準のSony™互換RS-422デッキコントロールポートを搭載し
ており、
HyperDeck
Extreme
Control
な ど 、あ ら ゆ る
RS
-
422
リモートコントローラーに適切なピンで
接 続 で きま す。
市販の
9
ピ ンケーブル を 使 用 可 能 で す が 、ケーブル 両 端 で 同じピ ン 番 号 同 士 が それ ぞ れ 接 続 されてい る
必要があります。カスタムケーブルを作成する場合は、同梱される接続図を参照してください。
HyperDeckのボタンを直接押さなくても、HyperDeck Extreme Controlからリモートコントロールでき
ます。
1 HyperDeckのビデオ入力にビデオ信号を接続します。
2 HyperDeck Extreme ControlのRS-422ケーブル を HyperDeck Studioに接 続します。
3
フロントコントロールパネルのリモートボタンを押してリモートコントロールを有効化する
か、HyperDeck Studio MiniのLCDメニューでリモートデッキコントロールを有効にします。
これで、
HyperDeck
の収録や再生の開始/停止や、ジョグ/シャトル機能がリモートで操作できるように
な り ま し た 。サ ポ ー ト さ れ て い る RS-422コ マ ン ド の リ ス ト は 、次 の「 対 応 RS-422コ マ ン ド 」セ ク シ ョ ン を
参 照してください 。
5 4 3 2 1
9 8 7 6
受信
(–)
受信
(+)
送信
(–)
送信
(+)
グランド
ピン
2 7 8 3 1
、
4
、
6
、
9
RS-422リモートピン接 続
116
RS-422コントロール

HyperDeckのリモートをLCDメ ニ ュ ー で「 On」にするか、フロントパネルの
リモ ートボタンで 有 効 にして、
RS-422デッキコントロールを有効 化します。
HyperDeckの 全 モ デ ル は 、リ ア パ ネ ル の RS-422ポートを介したリモートコントロールに対応しています。
対応RS-422コマンド
Command Reply No Remote Notes
0 - System Control
0x00 0x11 DeviceTypeRequest
NTSC: 0xF0E0
PAL: 0xF1E0
24P: 0xF2E0
Enabled
1 - Slave Response
0x20 0x00 Stop Acknowledge Disabled
0x20 0x01 Play Acknowledge Disabled
0x20 0x02 Record Acknowledge Disabled
0x20 0x04 StandbyOff Acknowledge Disabled
0x20 0x05 StandbyOn Acknowledge Disabled
0x20 0x0F Eject Acknowledge Disabled
0x20 0x10 FastFwd Acknowledge Disabled
0x21 0x11 JogFwd1 Acknowledge Disabled
0x22 0x11 JogFwd2 Acknowledge Disabled
Treated as N=1;
Same as JogFwd1
0x21 0x12 VarFwd1 Acknowledge Disabled Uses ShuttleFwd1
0x22 0x12 VarFwd2 Acknowledge Disabled
Treated as N=1;
Same as VarFwd1
0x21 0x13 ShuttleFwd1 Acknowledge Disabled
0x22 0x13 ShuttleFwd2 Acknowledge Disabled
Treated as N=1;
Same as ShuttleFwd1
0x20 0x20 Rewind Acknowledge Disabled
0x21 0x21 JogRev1 Acknowledge Disabled
0x22 0x21 JogRev2 Acknowledge Disabled
Treated as N=1;
Same as JogRev1
0x21 0x22 VarRev1 Acknowledge Disabled Uses ShuttleRev1
117
RS-422コントロール

Command Reply No Remote Notes
0x22 0x22 VarRev2 Acknowledge Disabled
Treated as N=1;
Same as VarRev1
0x21 0x23 ShuttleRev1 Acknowledge Disabled
0x22 0x23 ShuttleRev2 Acknowledge Disabled
Treated as N=1;
Same as ShuttleRev1
0x20 0x30 Preroll Acknowledge Disabled
0x24 0x31 CueData Acknowledge Disabled
0x20 0x34 SyncPlay Acknowledge Disabled
0x20 0x40 Preview Acknowledge Disabled Status bits are set
0x20 0x41 Review Acknowledge Disabled Status bits are set
0x20 0x43 OutpointPreview Acknowledge Disabled
0x22 0x5C DMCSetFwd Acknowledge Disabled
0x22 0x5D DMCSetRev Acknowledge Disabled
0x20 0x60 FullEEOff Acknowledge Disabled
0x20 0x61 FullEEOn Acknowledge Disabled
0x20 0x63 SelectEEOn Acknowledge Disabled
4 - Preset/Select Control
0x40 0x10 InEntry Acknowledge Disabled
0x40 0x11 OutEntry Acknowledge Disabled
0x44 0x14 InDataPreset Acknowledge Disabled
0x44 0x15 OutDataPreset Acknowledge Disabled
0x40 0x18 InShift+ Acknowledge Disabled
0x40 0x19 InShift- Acknowledge Disabled
0x40 0x1A OutShift+ Acknowledge Disabled
0x40 0x1B OutShift- Acknowledge Disabled
0x40 0x20 InReset Acknowledge Disabled
0x40 0x21 OutReset Acknowledge Disabled
0x40 0x22 AInReset Acknowledge Disabled
0x40 0x23 AOutReset Acknowledge Disabled
0x44 0x31 PrerollPreset Acknowledge Disabled
0x40 0x40 AutoModeOff Acknowledge Disabled
ignored, Status bit
remembered
0x40 0x41 AutoModeOn Acknowledge Disabled
ignored, Status bit
remembered
0x41 0x37 InputCheck Acknowledge Disabled
118
RS-422コントロール

Command Reply No Remote Notes
6 - Sense Request
0x61 0x0A TimeCodeGenSense — —
0x61 0x0C CurrentTimeSense — —
0x60 0x10 InDataSense InData Enabled
0x60 0x11 OutDataSense OutData Enabled
0x60 0x12 AInDataSense AInData Enabled
0x60 0x13 AOutDataSense AOutData Enabled
0x61 0x20 StatusSense StatusData Enabled
0x60 0x2B RemainTimeSense RemainTimeData Enabled
0x60 0x2E SpeedSense SpeedData Enabled
0x60 0x31 PrerollTimeSense PreRollTimeData Enabled
0x60 0x36 TimerModeSense TimerModeData Enabled
0x60 0x3E RecordInhibitSense RecordInhibitStatus Enabled
7 - Sense Reply
0x78 0x00 Timer1Data — —
Current Time and
00:00:00:00
0x78 0x04 LTCUserBitsTimeData — —
Current Time and
00:00:00:00
0x78 0x06 VITCUserBitsTimeData — —
Current Time and
00:00:00:00
0x74 0x06 VITCTimeData — — Current Time
0x74 0x07 UserBitsVITCTimeData — — 00:00:00:00
0x74 0x08 GenTCData — — Current Time
0x78 0x08 GenTCUBData — —
Current Time and
00:00:00:00
0x74 0x09 GenUBData — — 00:00:00:00
0x74 0x10 InData — —
0x74 0x11 OutData — —
0x74 0x12 AInData — —
0x74 0x13 AOutData — —
0x74 0x14 CorrectedLTCTimeData — — Current Time
0x70 0x20 StatusData — —
Please see “Status Bits”
sheet: Limited to 9 bytes
of status, silently
truncated
0x76 0x2B RemainTimeData — —
0x71 0x2E SpeedData — —
0x74 0x31 PrerollTimeData — —
0x71 0x36 TimerModeData — — Returns 0 (TimeCode)
0x72 0x3E RecordInhibitStatus — —
119
RS-422コントロール

Command Reply No Remote Notes
A - Advanced Media Protocol
0xA1 0x01 AutoSkip Acknowledge Disabled
8-bit signed number of
clips to skip from current
clip
0xAX 0x15 ListNextID IDListing Enabled
when x = 0 single clip
request when x = 1, #
clips can be specified in
the send data
0x20 0x29 ClearPlaylist Acknowledge Disabled
0x41 0x42 SetPlaybackLoop Acknowledge Disabled
Bit 0 loop mode enable,
0=false 1=true
Bit 1 is single clip/timeline
0=single clip
1=timeline
0x41 0x44 SetStopMode Acknowledge Disabled
0 = Off
1 = Freeze on last frame
2 = Freeze on next clip
3 = Show black
0x4f 0x16 AppendPreset Acknowledge Disabled
2 Bytes for the length N
of the clip name
N Bytes for each character
of the clip name
4 Byte in point timecode
(format is FFSSMMHH)
4 Byte out point timecode
(format is FFSSMMHH)
Blackmagic Extensions
0x82 0x02 BMDSeekToTimelinePosition Acknowledge Disabled
16-bit little endian
fractional position
[0..65535]
0x81 0x03 BMDSeekRelativeClip Acknowledge Disabled
One-byte signed integer,
which is the number of
clips to skip (negative for
backwards).
RS-422デベロッパー 情 報
bit
7 bit
6 bit
5 bit
4 bit
3 bit
2 bit
1 bit
0
Byte
0
0 0 Cassette
out 0 0 0 0 Local
Byte
1
Standby 0 Stop 0 Rewind Forward Record Play
Byte
2
Servo
Lock 0 Shuttle Jog Var Direction Still 1
Byte
3
Auto
Mode 0 0 0 Aout
Set Ain
Set Out
Set In
Set
Byte
4
Select
EE Full
EE Loop
Playback 0 0 0 0 0
Byte
5
0 0 0 0 0 0 0 0
Byte
6
0 Lamp
Still Lamp
Fwd Lamp
Rev 0 0 0 0
Byte
7
0 0 0 0 0 0 0 0
Byte
8
0 0 Near
EOT EOT 0 0 0 0
Byte
9
0 0 0 0 0 0 0 0
120
RS-422コントロール

Variables
Cassette
Out
Set
if
no
SSD
is
present
Local
Set
if
Remote
is
disabled
(
local
control
)
Standby
Set
if
a
disk
is
available
Direction
Clear
if
playback
is
forwarding
,
set
if
playback
is
reversing
Still
Set
if
playback
is
paused
,
or
if
in
input
preview
mode
Auto
Mode
Set
if
in
Auto
Mode
Select
EE
,
Full
EE
Set
if
in
input
preview
mode
Lamp
Still
/
Fwd
/
Rev
Set
according
to
playback
speed
and
direction
Near
EOT
Set
if
total
space
left
on
available
SSDs
is
less
than
3
minutes
EOT
Set
if
total
space
left
on
available
SSDs
is
less
than
30
seconds
Others
Cue
Complete
(
byte
2
,
bit
0
)
Always
1
:
Cue
requests
are
always
instantaneous
HyperDeck
Serial
RS
-
422
Protocol
Protocol
Based
on
Sony
9
-
pin
protocol
Interface
Baud
rate 38
.
4
Kbps
1
start
bit
8
data
bits
1
stop
bit
1
parity
bit
Odd
parity
ネットワークでファイルを転 送
HyperDeck
ディスクレコー ダー は 、
FTP
(ファイル転送プロトコル)を介してファイルを転送できます。
この機能により、ネットワークを介してコンピューターからHyperDeckに 、ロ ー カ ル ネ ッ ト ワ ー ク の 速 度
でファイルを直接コピーできます。例えば、デジタルサイネージに使 用するために、別の場所に設 置され
ているHyperDeckに新しいファイルをコピーできます。
HyperDeckStudioの接続
コンピューターと
HyperDeck
Studio
を同じネットワークに接続した状態で転送を行うために必要なの
は、FTPクライアントとHyperDeck StudioのIPアドレスだけで す。
1
HyperDeckに接 続するコンピューターに、FTPクライアントをダウンロードし、インストールしま
す。推 奨 ア プ リ ケ ー シ ョ ン は 、
Cyberduck
、
FileZilla
、
Transmit
で す が 、ほ と ん ど の
FTP
クライアン
トが 使 用で きます。CyberduckとFileZillaは 無 償 です。
121
ネットワ ー クでファイル を 転 送

2
HyperDeck Studioをイーサ ネットケーブルで ネットワー クに 接 続して、HyperDeckのIPアドレスを
メモしま す。
IP
ア ド レ ス を 確 認 す る に は 、「
MENU
」ボタンを押して、サーチダイヤルを回転させて、
「ネットワーク」画面に進みます。画面の下にHyperDeck StudioのIPアドレス が 表 示されます。
ス マ ー ト パ ネ ル の「 Network」画 面 で HyperDeck
StudioのIPアドレスが 確 認 で きます。
3
HyperDeckのIPアドレスをTCPアプリケーションの接 続 ダイアログに入 力します。このダイアログ
ボックスの名前や位置はアプリケーションにより異なりますが、通常は「サーバー」や「ホスト」と
いう名称が使われています。使用する
FTP
プログラムに「匿名ログイン」のチェックボックスがあ
る 場 合 は 必ず チェックを 入 れてください 。
HyperDeckStudioの接続には、ユーザー名やパスワードは必要ありません。FTPア
プ リ ケ ー シ ョ ン の「 サ ー バ ー 」や「 ホ ス ト 」の フ ィ ー ル ド に
IPア ド レ ス を 入 力 し 、「 匿 名
ログイン」のチェックボックスがある場 合はチェックを入れるだけです。
ファイルの転 送
HyperDeck
を 接 続 し た ら 、通 常 の
FTP
プログラムでのファイル転 送と同様に作 業が 行えます。
FTP
アプリ
ケーションの多くは、インターフェースでドラッグ&ドロップが使えますが、使用しているアプリケーショ
ンに対して適切な方法を確認することを推奨します。
HyperDeck
であらゆるファイルの送受信が可能ですが、
HyperDeck
Studio
でファイル を再生するに
は、HyperDeckが対応しているコーデックと解 像度である必要があります。対応コーデックのリストは、
このマニュアルの「Blackmagic HyperDeck Setup」セ ク シ ョ ン に 記 載 さ れ て い ま す 。
作業のこつ
HyperDeck
で収録中でもネットワークでファイルの転送が可能です。収録に影響
を与えないように、HyperDeckは自動 的 に 転 送 速 度を調 整しま す。
122
ネットワ ー クでファイル を 転 送

ATEM
スイッチャー に 接 続
ATEM
スイッチ ャー を 使 用して い る 場 合 、
Blackmagic
HyperDeck
ディスクレコー ダー を
4
台まで接続し
て、
ATEM
Software
Control
またはハードウェアパネルからコントロールできます。これは非常にパワ
フルな機能で、ビデオ収録を手元で管理できます。ATEMスイッチャーからHyperDeckでトリガー 収 録
することも可能です。これは、生放 送のアーカイブ作成や、ライブスイッチングでの制作において後で微
調整するためにBロールのキャプチャーを行うのに優れた方法です。
ATEM4M/EBroadcastStudio4KなどのATEMスイッチ ャ ー は 最 大 4台のHyperDeckディスクレコーダーを接続できます。
ATEMスイッ チ ャー に HyperDeckを 接 続 する:
1 HyperDeckをATEMスイッチ ャーと 同 じ ネットワ ー クに 接 続 し 、IPアドレスをメモします。
HyperDeckのIPアドレスはフロントパネル の LCDメニューで確認できます。「Setup」に 進 み 、
メ イ ン メ ニ ュ ー か ら「 Ethernet(イーサネット)」メニューに行くとアドレスが表示されます。
別の 方 法としては 、
Mac
または
PC
の
Blackmagic
HyperDeck
Setup
Utility
の「
Configure
」タ ブ
でHyperDeckのIPアドレスを確 認できます。
2
HyperDeck
の
SDI
または
HDMI
出力を、
ATEM
スイッチ ャー の
SDI
または
HDMI
ソース入 力に接 続
します。
3
ATEMスイッ チ ャーで HyperDeckの 収 録 を ト リ ガ ー す る 場 合 、ビ デ オ ソ ー ス も HyperDeckに接続
する必要があります。
通常通りにSDIまたはHDMIソースをHyperDeckに接続するだけです。ATEMスイッチャー のプ
ログラム出 力を
HyperDeck
で 収 録 す る に は 、ス イ ッ チ ャ ー の
Aux
SDI
出力の
1
つを
HyperDeck
のSDI入 力に接 続します。
4
HyperDeck
の フ ロ ン ト パ ネ ル の「
RMT
」ボ タ ン を 押 し て リ モ ー ト を 有 効 に し ま す 。
HyperDeck
Studio Miniでは、スイッチャーからリモートコントロールをLCDメニューを使って有効にします。
5
HyperDeckのソースとIPアドレス情 報を ATEMソフトウェアまたは ATEMパネルに入力すれば接続作
業は完了です。手順は非常にシンプルで、
ATEM
スイッチャーのマニュアルでも説明されています。
123
ATEMスイッチャーに接続

HyperDeckのリモートをLCDメ ニ ュ ー で「 On」にするか、コントロールパネルのリモートボタンで
有効にして、イーサネットを介した
ATEMスイッチャーからのコントロールを有効化します。
ポ ストプ ロ ダクション ワ ー ク フロ ー に つ いて
クリップへ のアクセス
クリップ に アク セ スす る に は 、
SD
カードまたは
SSD
をコンピューターの
SD
カードスロット、外付けカー
ドリーダー、SSDドックのいず れかに 差し込 みます。SSDまたはSDカードのファイルは、ローカルハード
ドライブにドラッグして使用するか、
SSD
または
SD
カードから直 接 使 用 できます。
SSD
とコンピュータ
ーの接続には2.5インチのeSATA―USBケーブルアダプターも使用できますが、この方法はSSDからフ
ァ イ ル を 直 接 使 用 す る 場 合 に 速 度 が 十 分 で な い た め 、出 先 で SSDからファイル を取り出してラップトッ
プに移動する際のみに推奨されます。
MacOS
Quicktimeは、Mac OSに搭 載 されていま す。HyperDeckで収録したApple ProRes、Avid DNxHDおよ
びDNxHR QuickTimeムービーは 、Mac OSで使用するほぼすべてのビデオソフトウェアで開くことが
できます。
HyperDeckで収録したDNxHDおよびDNxHR MXFファイルは 、MacのAvid Media Composer
およびDaVinci Resolveで 開けます。DNxHDコーデックは以下より無 償で ダウンロードできます。
http://www.avid.com/jp/products/avid-dnxhr-and-dnxhd
HyperDeckで収録したMCCクローズドキャプションデ ータファイルは 、Mac OSのMacCaptionソフトウ
ェ ア( http://www.telestream.net/captioning/overview.htm)で 開 け ま す 。
Windows
HyperDeckで収録したApple ProRes QuickTimeムービーをPCで使 用するには、QuickTimeをインストール
する必要があります。
QuickTime
をサ ポートするほとんどの
Windows
ビデオソフトウェアで、
HyperDeck
で
収 録した ムービー を開けます。Windows用のQuickTimeは、http://www.apple.com/quicktime/download/
から無 料で ダウンロード できます。
HyperDeckで収録したDNxHDおよびDNxHR MXFファイルは 、WindowsのAvid Media Composer
およびDaVinci Resolveで 開けます。DNxHDコーデックは以下より無 償で ダウンロードできます。
http://www.avid.com/jp/products/avid-dnxhr-and-dnxhd
HyperDeck
で収録した
MCC
クローズドキャプションデ ータファイルは 、
Windows
の
CaptionMaker
ソフ
ト ウ ェ ア( http://www.telestream.net/captioning/overview.htm)で 開 け ま す 。
124
ポストプロダクションワークフローについて

Developer
Information
Blackmagic
HyperDeck
Ethernet
Protocol
The Blackmagic HyperDeck Ethernet Protocol is a text based protocol accessed by connecting
to TCP port 9993 on HyperDeck Studio models that have a built in Ethernet connection. If you
are a software developer, you can use the protocol to construct devices that integrate with our
products. Here at Blackmagic Design our approach is to open up our protocols and we eagerly
look forward to seeing what you come up with!
Protocol
Commands
Command Command Description
help or ? Provides help text on all commands and parameters
commands return commands in XML format
device info return device information
disk list query clip list on active disk
disk list: slot id: {n} query clip list on disk in slot {n}
quit disconnect ethernet control
ping check device is responding
preview: enable: {true/false} switch to preview or output
play play from current timecode
play: speed: {-5000 to 5000} play at specific speed
play: loop: {true/false} play in loops or stop-at-end
play: single clip: {true/false} play current clip or all clips
playrange query playrange setting
playrange set: clip id: {n} set play range to play clip {n} only
playrange set: clip id: {n} count: {m} set play range to {m} clips starting from clip {n}
playrange set: in: {inT} out: {outT}
set play range to play between:
- timecode {inT} andtimecode {outT}
playrange set: timeline in: {in} timeline out:
{out}
set play range in units of frames between:
- timeline position {in} and position {out} clear/reset play
rangesetting
playrange clear clear/reset play range setting
play on startup query unit play on startup state
play on startup: enable: {true/false} enable or disable play on startup
play on startup: single clip: {true/false} play single clip or all clips on startup
play option query play options
play option: stop mode:
{lastframe/nextframe/black}
set output frame when playback stops
record record from current input
record: name: {name} record named clip
record spill spill current recording to next slot
125
DeveloperInformation

Command Command Description
record: spill: slot id: {n}
spill current recording to specified slot
use current id to spill to same slot
stop stop playback or recording
clips count query number of clips on timeline
clips get query all timeline clips
clips get: clip id: {n} query a timeline clip info
clips get: clip id: {n} count: {m} query m clips starting from n
clips get: version: {1/2}
query clip info using specified output version:
version 1: is: name startT duration
version 2: id: startT duration inT outT name
clips add: name: {name} append a clip to timeline
clips add: clip id: {n} name: {name} insert clip before existing clip {n}
clips add: in: {inT} out: {outT} name: {name} append the {inT} to {outT} portion of clip
clips remove: clip id: {n}
remove clip {n} from the timeline
(invalidates clip ids following clip {n})
clips clear empty timeline clip list
transport info query current activity
slot info query active slot
slot info: slot id: {n} query slot {n}
slot select: slot id: {n} switch to specified slot
slot select: video format: {format} load clips of specified format
slot unblock unblock active slot
slot unblock: slot id: {n} unblock slot {n}
cache info query cache status
dynamic range query dynamic range settings
dynamic range: playback override:
{off/Rec709/Rec2020_SDR/HLG/
ST2084_300/ST2084_500/
ST2084_800/ST2084_1000/
ST2084_2000/ST2084_4000/ST2084
set playback dynamic range override
dynamic range: record override:
{off/Rec709/Rec2020_SDR/HLG/
ST2084_300/ST2084_500/
ST2084_800/ST2084_1000/
ST2084_2000/ST2084_4000/ST2048}
set record dynamic range override
notify query notification status
notify: remote: {true/false} set remote notifications
notify: transport: {true/false} set transport notifications
notify: slot: {true/false} set slot notifications
notify: configuration: {true/false} set configuration notifications
notify: dropped frames: {true/false} set dropped frames notifications
notify: display timecode: {true/false} set display timecode notifications
126
DeveloperInformation

Command Command Description
notify: timeline position: {true/false} set playback timeline position notifications
notify: playrange: {true/false} set playrange notifications
notify: cache: {true/false} set cache notifications
notify: dynamic range: {true/false} set dynamic range settings notifications
notify: slate: {true/false} set digital slate notifications
goto: clip id: {start/end} goto first clip or last clip
goto: clip id: {n} goto clip id {n}
goto: clip id: +{n} go forward {n} clips
goto: clip id: -{n} go backward {n} clips
goto: clip: {n} goto frame position {n} within current clip
goto: clip: +{n} go forward {n} frames within current clip
goto: clip: -{n} go backward {n} frames within current clip
goto: clip: {start/end} goto start or end of clip
goto: timeline: {n} goto frame position {n} within timeline
goto: timeline: +{n} o forward {n} frames within timeline
goto: timeline: -{n} go backward {n} frames within timeline
goto: timeline: {start/end} goto start or end of timeline
goto: timecode: {timecode} goto specified timecode
goto: timecode: +{timecode} go forward {timecode} duration
goto: timecode: -{timecode} go backward {timecode} duration
goto: slot id: {n} goto slot id {n}
jog: timecode: {timecode} jog to timecode
jog: timecode: +{timecode} jog forward {timecode} duration
jog: timecode: -{timecode} jog backward {timecode} duration
shuttle: speed: {-5000 to 5000} shuttle with speed
remote query unit remote control state
remote: enable: {true/false} enable or disable remote control
remote: override: {true/false} session override remote control
configuration query configuration settings
configuration: video input: SDI switch to SDI input
configuration: video input: HDMI switch to HDMI input
configuration: video input: component switch to component input
configuration: audio input: embedded capture embedded audio
configuration: audio input: XLR capture XLR audio
configuration: audio input: RCA capture RCA audio
configuration: file format: {format} switch to specific file format
configuration: audio codec: PCM switch to PCM audio
configuration: audio codec: AAC switch to AAC audio
127
DeveloperInformation

Command Command Description
configuration: timecode input:
{external/embedded/preset/clip}
change the timecode input
configuration: timecode output:
{clip/timeline/internal}
change the timecode output
configuration: timecode preference:
{default/dropframe/nondropframe}
whether or not to use drop frame timecodes when not
otherwise specified
configuration: timecode preset:
{timecode}
set the timecode preset
configuration: audio input channels: {n} set the number of audio channels recorded to {n}
configuration: record trigger:
{none/recordbit/timecoderun}
change the record trigger
configuration: record prefix: {name} set the record prefix name (supports UTF-8 name)
configuration: append timestamp:
{true/false}
append timestamp to recorded filename
configuration: xlr input id: {n} xlr type:
{line/mic}
configure xlr input type
multiple xlr inputs can be configured in a single command
configuration: genlock input resync:
{true/false}
enable or disable genlock input resync
uptime return time since last boot
format: prepare: {format} prepare a disk formatting operation to filesystem {format}
format: confirm: {token} perform a pre-prepared formatting operation using token
identify: enable: {true/false} identify the device
watchdog: period: {period in seconds} client connection timeout
reboot reboot device
slate clips slate clips information
slate project slate project information
slate project:↵
camera: {index}↵
set camera index e.g. A
Command Combinations
You can combine the parameters into a single command, for example:
play: speed: 200 loop: true single clip: true
Or for configuration:
configuration: video input: SDI audio input: XLR
Or to switch to the second disk, but only play NTSC clips:
slot select: slot id: 2 video format: NTSC
Using XML
While you can use the Terminal to talk to HyperDeck, if you are writing software, you can use
XML to confirm the existence of a specific command based on the firmware of the HyperDeck
you are communicating with. This helps your software user interface adjust to the capabilities of
the specific HyperDeck model and software version.
128
DeveloperInformation

Protocol
Details
Connection
The HyperDeck Ethernet server listens on TCP port 9993.
Basic syntax
The HyperDeck protocol is a line oriented text protocol. Lines from the server will be separated by an ascii
CR LF sequence. Messages from the client may be separated by LF or CR LF.
New lines are represented in this document as a "↵" symbol.
Single line command syntax
Command parameters are usually optional. A command with no parameters is terminated with a new line:
{Command name}↵
If parameters are specified, the command name is followed by a colon, then pairs of parameter names and
values. Each parameter name is terminated with a colon character:
{Command name}: {Parameter}: {Value} {Parameter}: {Value} ...↵
Multiline command syntax
The HyperDeck protocol also supports an equivalent multiline syntax where each parameter-value pair is
entered on a new line. E.g.
{Command name}:↵
{P a r a m e t e r}: { Va lu e}↵
{P a r a m e t e r}: { Va lu e}↵
↵
Response syntax
Simple responses from the server consist of a three digit response code and descriptive text terminated by
a new line:
{Response code} {Response text}↵
If a response carries parameters, the response text is terminated with a colon, and parameter name and
value pairs follow on subsequent lines until a blank line is returned:
{Response code} {Response text}:↵
{P a r a m e t e r}: { Va lu e}↵
{P a r a m e t e r}: { Va lu e}↵
...
↵
Successful response codes
A simple acknowledgement of a command is indicated with a response code of 200:
200 ok↵
Other successful responses carry parameters and are indicated with response codes in the range of 201
to299.
129
DeveloperInformation

Failure response codes
Failure responses to commands are indicated with response codes in the range of 100 to 199:
100 syntax error
101 unsupported parameter
102 invalid value
103 unsupported
104 disk full
105 no disk
106 disk error
107 timeline empty
108 internal error
109 out of range
110 no input
111 remote control disabled
112 clip not found
120 connection rejected
150 invalid state
151 invalid codec
160 invalid format
161 invalid token
162 format not prepared
163 parameterized single line command not supported
Asynchronous response codes
The server may return asynchronous messages at any time. These responses are indicated with response
codes in the range of 500 to 599:
5xx {Response Text}:↵
{P a r a m e t e r}: { Va lu e}↵
{P a r a m e t e r}: { Va lu e}↵
↵
Connection response
On connection, an asynchronous message will be delivered:
500 connection info:↵
protocol version: {Version}↵
model: {Model Name}↵
↵
Connection rejection
Only one client may connect to the server at a time. If other clients attempt to connect concurrently,
they will receive an error and be disconnected:
120 connection rejected↵
130
DeveloperInformation

Timecode syntax
Timecodes are expressed as non-drop-frame timecode in the format:
HH:MM:SS:FF
Handling of deck "remote" state
The “remote” command may be used to enable or disable the remote control of the deck. Any attempt to
change the deck state over ethernet while remote access is disabled will generate an error:
111 remote control disabled↵
To enable or disable remote control:
remote: enable: {“true”, “false”} ↵
The current remote control state may be overridden allowing remote access over ethernet irrespective of
the current remote control state:
remote: override: {“true”, “false”} ↵
The override state is only valid for the currently connected ethernet client and only while the connection
remains open.
The “remote” command may be used to query the remote control state of the deck by specifying no
parameters:
remote↵
The deck will return the current remote control state:
210 remote info:↵
enabled: {“true”, “false”}↵
override: {“true”, “false”}↵
↵
Asynchronous remote control information change notification is disabled by default and may be
configured with the “notify” command. When enabled, changes in remote state will generate a “510 remote
info:”asynchronous message with the same parameters as the “210 remote info:” message.
Closing connection
The "quit" command instructs the server to cleanly shut down the connection:
quit↵
Checking connection status
The "ping" command has no function other than to determine if the server is responding:
ping↵
Getting help
The "help" or "?" commands return human readable help text describing all available commands and
parameters:
help↵
Or:
?↵
The server will respond with a list of all supported commands:
201 help:↵
{Help Te x t}↵
{Help Te x t}↵
↵
131
DeveloperInformation

Switching to preview mode
The "preview" command instructs the deck to switch between preview mode and output mode:
preview: enable: {"true", "false"}↵
Playback will be stopped when the deck is switched to preview mode. Capturing will be stopped when the
deck is switched to output mode.
Controlling device playback
The “play” command instructs the deck to start playing:
play↵
The play command accepts a number of parameters which may be used together in most combinations.
By default, the deck will play all remaining clips on the timeline then stop.
The “single clip” parameter may be used to override this behavior:
play: single clip: {“true”, “false”}↵
By default, the deck will play at normal (100%) speed. An alternate speed may be specified in percentage
between -1600 and 1600:
play: speed: {% normal speed}↵
By default, the deck will stop playing when it reaches to the end of the timeline. The “loop” parameter may
be used to override this behavior:
play: loop: {“true”, “false”}↵
The “playrange” command instructs the deck to play all the clips. To override this behavior: and select a
particular clip:
playrange set: clip id: {Clip ID}↵
To only play a certain timecode range:
playrange set: in: {in timecode} out: {out timecode}↵
To clear a set playrange and return to the default value:
playrange clear↵
The “play on startup command” instructs the deck on what action to take on startup. By default, the deck
will not play. Use the “enable” command to start playback after each power up.
play on startup: enable {“true”, “false”}↵
By default, the unit will play back all clips on startup. Use the “single clip” command to override.
play on startup: single clip: {“true”, “false”}↵
Stopping deck operation
The "stop" command instructs the deck to stop the current playback or capture:
stop↵
132
DeveloperInformation

Changing timeline position
The "goto" command instructs the deck to switch to playback mode and change its position within the
timeline.
To go to the start of a specific clip:
goto: clip id: {Clip ID}↵
To move forward/back {count} clips from the current clip on the current timeline:
goto: clip id: +/-{count}↵
Note that if the resultant clip id goes beyond the first or last clip on timeline, it will be clamp at the first or
last clip.
To go to the start or end of the current clip:
goto: clip: {“start”, “end”}↵
To go to the start of the first clip or the end of the last clip:
goto: timeline: {“start”, “end”}↵
To go to a specified timecode:
goto: timecode: {timecode}↵
To move forward or back a specified duration in timecode:
goto: timecode: {“+”, “-”}{duration in timecode}↵
To specify between slot 1 and slot 2:
goto: slot id: {Slot ID}↵
Note that only one parameter/value pair is allowed for each goto command.
Enumerating supported commands and parameters
The "commands" command returns the supported commands:
commands↵
The command list is returned in a computer readable XML format:
212 commands:
<commands>↵
<command name="…"><parameter name="…"/>…</command>↵
<command name="…"><parameter name="…"/>…</command>↵
…
</commands>↵
↵
More XML tokens and parameters may be added in later releases.
133
DeveloperInformation

Controlling asynchronous notifications
The “notify” command may be used to enable or disable asynchronous notifications from the server.
To enable or disable transport notifications:
notify: transport: {“true”, “false”}↵
To enable or disable slot notifications:
notify: slot: {“true”, “false”}↵
To enable or disable remote notifications:
notify: remote: {“true”, “false”}↵
To enable or disable configuration notifications:
notify: configuration: {“true”, “false”}↵
Multiple parameters may be specified. If no parameters are specified, the server returns the current state of
all notifications:
209 notify:↵
transport: {“true”, “false”}↵
slot: {“true”, “false”}↵
remote: {“true”, “false”}↵
configuration: {“true”, “false”}↵
dropped frames: {“true”, “false”}↵
display timecode: {“true”, “false”}↵
timeline position: {“true”, “false”}↵
playrange: {“true”, “false”}↵
cache: {“true”, “false”}↵
dynamic range: {“true”, “false”}↵
slate: {“true”, “false”}↵
↵
Retrieving device information
The "device info" command returns information about the connected deck device:
device info↵
The server will respond with:
204 device info:↵
protocol version: {Version}↵
model: {Model Name}↵
unique id: {unique alphanumeric identifier}↵
slot count: {number of storage slots}↵
software version: {software version}↵
↵
134
DeveloperInformation

Retrieving slot information
The "slot info" command returns information about a slot. Without parameters, the command returns
information for the currently selected slot:
slot info↵
If a slot id is specified, that slot will be queried:
slot info: slot id: {Slot ID}↵
The server will respond with slot specific information:
202 slot info:↵
slot id: {Slot ID}↵
status: {"empty", "mounting", "error", "mounted"}↵
volume name: {Volume name}↵
recording time: {recording time available in seconds}↵
video format: {disk's default video format}↵
blocked: {“true”, “false”}↵
↵
Asynchronous slot information change notification is disabled by default and may be configured with
the "notify" command. When enabled, changes in slot state will generate a "502 slot info:" asynchronous
message with the same parameters as the "202 slot info:" message.
Retrieving clip information
The “disk list” command returns the information for each playable clip on a given disk. Without parameters,
the command returns information for the current active disk:
disk list↵
If a slot id is specified, the disk in that slot will be queried:
disk list: slot id: {Slot ID}↵
The server responds with the list of all playable clips on the disk in the format of: Index, name, formats, and
duration in timecode:
206 disk list:↵
slot id: {Slot ID}↵
{clip index}: {name} {file format} {video format} {Duration
ti m ecode}↵
{clip index}: {name} {file format} {video format} {Duration
ti m ecode}↵
…
↵
Note that the clip index starts from 1.
Retrieving clip count
The "clips count" command returns the number of clips on the current timeline:
clips count ↵
The server responds with the number of clips:
214 clips count: ↵
clip count: {Count}↵
135
DeveloperInformation

Retrieving timeline information
The "clips get" command returns information for each available clip on the current timeline. Without
parameters, the command returns information for all clips on timeline:
clips get↵
The server responds with a list of clip IDs, names and timecodes:
205 clips info:↵
clip count: {Count}↵
{Clip ID}: {Name} {Start timecode} {Duration timecode}↵
{Clip ID}: {Name} {Start timecode} {Duration timecode}↵
…
↵
Retrieving transport information
The “transport info” command returns the state of the transport:
transport info ↵
The server responds with transport specific information:
208 transport info:
status: {“preview”, “stopped”, “play”, “forward”, “rewind”,
“j o g ”, “ s h u t t l e ”,” r e c o r d ” }↵
speed: {Play speed between -5000 and 5000 %}↵
slot id: {Slot ID or “none”}↵
clip id: {Clip ID or “none”}↵
single clip: {“true”, “false”}↵
display timecode: {timecode}↵
timecode: {timecode}↵
video format: {Video format}↵
loop: {“true”, “false”}↵
timeline: {n}↵
input video format: {Video format”}↵
dynamic range: {“off”, “Rec709”, “Rec2020_SDR”, “HLG”,
“ST2084_300”, “ST2084_500”, “ST2084_800”, “ST2084_1000”,
“ST2084_2000”, “ST2084_4000”, “ST2048” or “none”}↵
↵
The "timecode" value is the timecode within the current timeline for playback or the clip for record. The
"display timecode" is the timecode displayed on the front of the deck. The two timecodes will differ in some
deck modes.
Asynchronous transport information change notification is disabled by default and may be configured
with the "notify" command. When enabled, changes in transport state will generate a "508 transport info:"
asynchronous message with the same parameters as the "208 transport info:" message.
136
DeveloperInformation

Video Formats
The following video formats are currently supported on HyperDeck Studio:
NTSC, PAL, NTSCp, PALp
720p50, 720p5994, 720p60
1080p23976, 1080p24, 1080p25, 1080p2997, 1080p30
1080i50, 1080i5994, 1080i60
HyperDeck Studio Pro and Plus models support these 4k formats:
4Kp23976, 4Kp24, 4Kp25, 4Kp2997, 4Kp30
HyperDeck Studio 4K Pro adds support for the following 4k formats:
4Kp50, 4Kp5994, 4Kp60
Video format support may vary between models and software releases.
File Formats
All HyperDeck models currently support the following file formats:
H.264High_SDI
H.264High
H.264Medium
H.264Low
QuickTimeProResHQ
QuickTimeProRes
QuickTimeProResLT
QuickTimeProResProxy
QuickTimeDNxHD220x
DNxHD220x
QuickTimeDNxHD145
DNxHD145
QuickTimeDNxHD45
DNxHD45
HyperDeck Studio 4K Pro also supports the following file formats:
H.265High_SDI
H.265High
H.265Medium
H.265Low
QuickTimeDNxHR_HQX
DNxHR_HQX 4Kp60
QuickTimeDNxHR_SQ
DNxHR_SQ
QuickTimeDNxHR_LB
DNxHR_LB
Supported file formats may vary between models and software releases.
137
DeveloperInformation

Querying and updating configuration information
The "configuration" command may be used to query the current configuration of the deck:
configuration↵
The server returns the configuration of the deck:
211 configuration:↵
audio input: {“embedded”, “XLR”, “RCA”}↵
audio mapping: {n}↵
video input: {“SDI”, “HDMI”, “component”, “composite”}↵
file format: {format}↵
audio codec: {“PCM”, “AAC”}↵
timecode input: {“external”, “embedded”, “preset”, “clip”}↵
timecode output: {“clip”, “timeline”}↵
timecode preference: {“default”, “dropframe”, “nondropframe”}↵
timecode preset: {timecode}↵
audio input channels: {n}↵
record trigger: {“none”, “recordbit”, “timecoderun”}↵
record prefix: {name}↵
append timestamp: {“true”, “false”}↵
↵
One or more configuration parameters may be specified to change the configuration of the deck.
To change the current video input:
configuration: video input: {“SDI”, “HDMI”, “component”}↵
Valid video inputs may vary between models. To configure the current audio input:
configuration: audio input: {“embedded”, “XLR”, “RCA”}↵
Valid audio inputs may vary between models.
To configure the current file format:
configuration: file format: {File format}↵
Note that changes to the file format may require the deck to reset, which will cause the client connection to
be closed. In such case, response code 213 will be returned (instead of 200) before the client connection is
closed:
“213 deck rebooting”
Asynchronous configuration information change notification is disabled by default and may be configured
with the “notify” command. When enabled, changes in configuration will generate a “511 configuration:”
asynchronous message with the same parameters as the “211 configuration:” message.
Selecting active slot and video format
The "slot select" command instructs the deck to switch to a specified slot, or/and to select a specified
output video format.
To switch to a specified slot:
slot select: slot id: {slot ID}↵
To select the output video format:
slot select: video format: {video format}↵
Either or all slot select parameters may be specified. Note that selecting video format will result in a rescan
of the disk to reconstruct the timeline with all clips of the specified video format.
138
DeveloperInformation

Clearing the current timeline
The "clips clear" command instructs the deck to empty the current timeline:
clips clear↵
The server responds with
200 ok↵
Adding a clip to the current timeline
The "clips add:" command instructs the deck to add a clip to the current timeline:
clips add: name: {"clip name"}↵
The server responds with
200 ok↵
or in case of error
1xx {error description}↵
Configuring the watchdog
The “watchdog” command instructs the deck to monitor the connected client and terminate the connection
if the client is inactive for at least a specified period of time.
To configure the watchdog:
watchdog: period: {period in seconds}↵
To avoid disconnection, the client must send a command to the server at least every {period} seconds. Note
that if the period is set to 0 or less than 0, connection monitoring will be disabled.
139
DeveloperInformation

ヘルプ
ヘルプライン
すぐに情報が必要な方は、Blackmagic Designオンラインサポートページで、Blackmagic HyperDeck
ディスクレコーダーの 最新 サポート情 報を確認できます。
BlackmagicDesignオンラインサポートページ
最 新のマニュアル、ソフトウェア、サポートノートは、www.blackmagicdesign.com/jp/support Blackmagic
サポートセンターで確認できます。
BlackmagicDesignフォーラム
弊 社ウェブサイトの
Blackmagic
Design
フ ォ ー ラ ム は 、様 々 な 情 報 や ク リ エ イ テ ィ ブ な ア イ デ ア を 共 有 で
き る 有 益 な リ ソ ー ス で す。経 験 豊 富 な ユ ー ザ ー や Blackmagic Designス タ ッ フ に よ っ て 、す で に 多 く の 問 題
の解決策が公開されているので、このフォーラムを参考にすることで、現在の問題をすばやく解決できる
こ と が あ り ま す 。ぜ ひ ご 利 用 く だ さ い 。Blackmagicフォーラムには 、
http://forum.blackmagicdesign.com
からアクセスで きます。
BlackmagicDesignサポートへの連絡
サポートページやフォーラムで必 要な情 報を得られ なかった場 合は 、サポートページの「メールを送 信」
ボ タ ン を 使 用 し て 、サ ポ ー ト の リ ク エ ス ト を メ ー ル 送 信 し て く だ さ い 。 あ る い は 、サ ポ ー ト ペ ー ジ の 「 お 住
まいの地域のサポートオフィス」をクリックして、お住まいの地域の
Blackmagic
Design
サ ポ ートオフィス
に電話でお問い合わせください。
現在インストールされているソフトウェアのバージョンを確認する
コンピューターにインストールされているBlackmagic HyperDeck Utilityソフトウェアのバージョンを確
認 す る に は 、「 About Blackmagic HyperDeck Setup」ウィンドウを開きます。
Mac
OS
では、アプリケーションフォルダーから「
Blackmagic
HyperDeck
Setup
」を 開 き ま す 。
ア プ リ ケ ー シ ョ ン メ ニ ュ ー か ら「 About Blackmagic HyperDeck Setup」を 選 択 し 、バ ー ジ ョ ン
を確 認します。
Windows
では、スタートメニューまたはスタート画面から「
Blackmagic
HyperDeck
Setup
」ユ ー
ティリティを開きます。ヘルプメニューをクリックして「About Blackmagic HyperDeck Setup」
を選択し、バージョンを確認します。
最 新 のソフトウェアを入手する
コンピューターにインストールされているBlackmagic HyperDeck Setupのバージョンを確 認した
後、Blackmagicサ ポ ー ト セ ン タ ー(
www.blackmagicdesign.com/jp/support
)で 最 新 の ソ フ ト ウ ェ ア
アップデートを確認してください。常に最新のソフトウェアを使 用することを推奨しますが、重 要なプロ
ジェクトの実行中は、ソフトウェアのアップデートは行わない方がよいでしょう。
140
ヘルプ
規制に関する警告
欧州連合内での電気機器および電子機器の廃棄処分
製品に記載されている記号は、当該の機器を他の廃棄物と共に処分してはならないことを示
していま す。機 器 を廃 棄 するには 、必ずリサイクルのために 指 定の回 収 場 所 に引き 渡してくださ
い。機器の廃 棄において個別回収とリサイクルが行われることで、天然資 源の保護につながり、
健康と環境を守る方法でリサイクルが確実に行われるようになります。廃棄する機器のリサイ
クルのための回収場所に関しては、お住まいの地方自治体のリサイクル部門、または製品を購
入した販売 業者にご連 絡ください。
この機器は、
FCC
規定の第
15
部 に 準 拠 し 、ク ラ ス
A
デジタル機器の制限に適合していることが確
認されています。これらの制限は、商用環境で機器を使用している場合に有害な干渉に対する
妥当な保護を提 供するためのものです。この機器は無線 周波エネルギーを生 成、使用、放出す
る可能性があります。また、指示に従ってインストールおよび使用しない場合、無線通信に有害
な干渉を引き起こす恐れがあります。住宅地域で当製品を使用すると有害な干渉を引き起こす
可能性があり、その場合はユーザーが自己責任で干渉に対処する必要があります。
動作は次の
2つを 条 件としま す:
1 本機は、有害な干渉を起こさない。
2
本機は希望しない動作を発生しかねない干渉を含む、いかなる受信干渉も受け入れる必要
がある。
R-R-BMD-20210202002
R
-R-BMD-20210202003
R
-R-BMD-20201201003
R
-R-BMD-20210301001
ISED
Canada
ステ ートメント
本 機 は 、カ ナ ダ の ク ラ ス Aデジタル機器の規格に準拠しています。
本機のいかなる改造、あるいは目的の用途以外での使用は、これらの規格への順守を無効
にすることが あります。
HDMI
インターフェースへの接続は、必ず高品質のシールド
HDMI
ケーブル を 使 用 する 必 要
があります。
本機は、商用環境で目的の用途に順守した使用においてテストを行なっています。非商業
環境で使用された場合、無線妨害を引き起こす可能性があります。
141
規制に関する警告
安全情報
感 電 を 避 け る た め 、必 ず 保 護 接 地 の あ る コ ン セ ン ト に 接 続 し てく だ さ い 。不 明 な 場 合 は 、資 格 の あ る 電
気 技 師 に 連 絡 してください 。
感電のリスクを減らすため、水が跳ねたり、滴るような場所には置かないでください。
この製品は、周囲温度が最高
40度までの熱帯地区での使用に対応しています。
通気 が妨げられないように、この製 品の周囲は通気に十 分なスペースを開けるようにしてください。
ラックマウントする場合は、隣接する機器により通気が妨げられないようにしてください。
この製品の内部には、ユーザーが保守できる部品はありません。サービスに関しては、お近くのBlackmagic
Designのサービスセンターにお問い合わせください。
海抜
2000m以上では使 用しないでください。
カリフォルニア州ステ ートメント
この製品のユーザーは、プラスチック部品内の微量の多臭素化ビフェニルなどの化学物質にさらされる
可能性があります。カリフォルニア州は、多臭素化ビフェニルは発がん性があり、先天異常や生殖機能へ
危害を及ぼす物質であると認識しています。
詳細は、以下のウェブサイトをご確認ください。
www.P65Warnings.ca.gov
正規サービススタッフへの注意
サービス前に、電源を電源インレットから外してください。
142
安全情報

保証
12
ヶ月限 定保 証
Blackmagic
Design
は、 お買い上げの日から
12
ヶ月間、 本製品の部品および仕上がりについて瑕疵がな
いことを保証します。この保証期間内に製品に瑕疵が見つかった場合、
Blackmagic
Design
は弊社の裁量
において部品代および人件費無料で該当製品の修理、あるいは製品の交換のいずれかで対応いたします。
この保証に基づいたサービスを受ける際、お客様は必ず保証期限終了前にBlackmagic Designに瑕疵を
通知し、保証サービスの手続きを行ってください。お客様の責任において不良品を梱包し、Blackmagic
Design
が指定するサポートセンターへ配 送料前 払で送 付いただきますようお願い致します。理由の如
何を問わず、Blackmagic Designへの製品返送のための配送料、保険、関税、税金、その他すべての費
用は お 客 様 の自己 負 担となります。
不適切な使用、または不十分なメンテナンスや取扱いによる不具合、故障、損傷に対しては、この保証は適
用されません。
Blackmagic
Design
は こ の 保 証 で 、以 下 に 関 し て サ ー ビ ス 提 供 義 務 を 負 わ な い も の と し ま
す。
a
)製品のインストールや修理、サービスを行う
Blackmagic
Design
販 売 代 理 人 以 外 の 者 に よって 生じ
た損傷の修理、
b
)不適切な使用や互換性のない機器への接続によって生じた損傷の修理、
c
)
Blackmagic
Designの部品や供給品ではない物を使用して生じたすべての損傷や故障の修理、d)改 造 や 他 製 品 と の
統合により時間増加や製品の機能低下が生じた場合のサービス。この保証は
Blackmagic
Design
が保
証するもので、明示または黙示を問わず他の保証すべてに代わるものです。Blackmagic Designとその
販売社は、商品性と特定目的に対する適合性のあらゆる黙示保証を拒否します。Blackmagic Design
の不良品の修理あるいは交換の責任が、特別に、間接的、偶発的、または結果的に生じる損害に対し
て、Blackmagic Designあるいは販売社がそのような損害の可能性についての事前通知を得ているか否
かに関わらず、お客様に提 供される完全唯一の救済手段となります。Blackmagic Designは お客 様による
機器のあらゆる不法使用に対して責任を負いません。
Blackmagic
Design
は本製品の使用により生じる
あらゆる損害に対して責任を負いません。使用者は自己の責任において本製品を使用するものとします。
© Copyright 2021 Blackmagic Design 著作権所有、無断複写・転載を禁じます。「Blackmagic Design」 、「 DeckLink」 、「 HDLink」、
「Workgroup Videohub」 、「 Multibridge Pro」 、「 Multibridge Extreme」 、「 Intensity」 、「 Leading the creative video revolution」は 、米 国 な
らびにその他諸国での登録商標です。その他の企業名ならびに製品名全てはそれぞれ関連する会社の登録商標である可能性があります。
143
保証

Enregistreurs à disque HyperDeck
Juillet 2021
Manuel d'installation et d’utilisation
Enregistreurs à
disque HyperDeck

Chère cliente, cher client,
Nous vous remercions d'avoir fait l'acquisition d'un enregistreur à disque Blackmagic
HyperDeck.
Lorsque nous avons conçu les premiers enregistreurs à disque HyperDeck en 2011,
nous voulions que l’enregistrement et la lecture de vidéo professionnelle sur disques
état solide amovibles soient à la fois plus faciles et plus abordables.
Aujourd’hui, nous sommes heureux de vous présenter notre nouvelle gamme d’enregistreurs
à disque HyperDeck qui vous permet d’enregistrer de la vidéo HD et Ultra HD à l’aide
de cartes SD, de SSD et aussi de disques flash USB. Vous pouvez même connecter un
Blackmagic MultiDock 10G et enregistrer ou lire des fichiers sur des disques durs externes.
Les modèles HyperDeck Studio Plus et Pro comprennent les commandes traditionnelles
d’enregistreurs broadcast avec une molette pour la lecture jog, shuttle et scroll. Grâce à
l’embrayage de la molette, vous pouvez rechercher des moments précis dans vos clips
sans quitter le moniteur des yeux. Ces modèles disposent même d’une connexion pour
casque et d’un haut-parleur à l’avant pour que vous puissiez vérifier rapidement votre
audio depuis votre HyperDeck et plus encore.
Nous espérons que vous profiterez de votre enregistreur à disque HyperDeck pendant
de nombreuses années et qu’il vous aidera avec toutes vos productions!
N’oubliez pas de consulter notre page d’assistance sur www.blackmagicdesign.com/fr pour
obtenir la dernière version de ce manuel et les mises à jour du logiciel de l’HyperDeck.
Nous vous recommandons de mettre le logiciel à jour régulièrement afin de travailler
avec les fonctions les plus récentes. Veuillez entrer vos coordonnées lorsque vous
téléchargerez le logiciel afin d'être informé des mises à jour. Nous travaillons constamment
sur de nouvelles fonctionnalités et nous efforçons d’améliorer nos services en permanence :
c’est pourquoi nous aimerions avoir votre avis !
Grant Petty,
PDG de Blackmagic Design

Sommaire
Présentation des enregistreurs
àdisqueHyperDeck 147
Mise en route 148
Brancher l'alimentation 148
Connecter une source vidéo et audio 148
Vérifer l’audio 149
Brancher un support 149
Enregistrer de la vidéo 151
Enregistrer sur des supports multiples 151
Lecture 152
Lire de la vidéo avec l'HyperDeck 152
Utiliser la molette 153
Utiliser le panneau avant 155
Voyants des logements 155
Utiliser les menus à l'écran 156
Paramètres 157
Face arrière 169
Utiliser la sortie de monitoring 171
Supports de stockage 174
Carte SD 174
SSD 176
Disque externe 177
Formater les supports 179
Préparer le support sur un ordinateur 179
Utiliser l’HyperDeck comme
unewebcam 180
Régler la source webcam 180
Configurer Open Broadcaster 181
Blackmagic HyperDeck Setup 183
Utiliser l’HyperDeck Setup 183
Page LUTs 184
Mise à jour du logiciel interne 185
Teranex Mini Rack Shelf 186
Contrôle RS-422 187
Transférer des fichiers sur un réseau 192
Connecter un mélangeur ATEM 194
Comprendre les workflows
depost-production 195
Information pour les développeurs 196
Blackmagic HyperDeck
Ethernet Protocol 196
Protocol Commands 196
Protocol Details 200
Assistance 211
Avertissements 212
Informations de sécurité 213
Garantie 214
146Blackmagic HyperDeck Studio

Présentation des enregistreurs
àdisqueHyperDeck
Votre enregistreur à disque Blackmagic HyperDeck fait partie de la famille des enregistreurs à
disque HD et 4K conçus pour s’adapter à votre workflow de production. L’HyperDeck Studio HD Pro
et l’HyperDeck Studio 4K Pro tiennent sur un seul rack et sont suffisamment grands pour enregistrer
et lire des fichiers à la fois sur des cartes SD et des SSD de 9,5mm.
L’HyperDeck Studio HD Mini et HyperDeck Studio HD Plus sont des enregistreurs à disque plus
petits qui peuvent être installés sur votre bureau ou sur un rack à l’aide d’un Teranex Mini Rack Shelf
en option.
Tous les modèles peuvent également enregistrer sur des disques flash USB et prennent en charge
la vidéo HD jusqu’à 1080p60. L’HyperDeckStudio 4K Pro prend en charge la vidéo Ultra HD
jusqu’à 2160p60.
Les fonctions d’enregistrement et de lecture sont généralement les mêmes sur tous les modèles,
mais les plus grands modèles sont dotés de fonctions supplémentaires vous donnant un contrôle
de lecture accru et davantage d’options de connexion.
Ce manuel d’utilisation contient toutes les informations dont vous avez besoin pour mettre en route
votre enregistreur à disque HyperDeck et maîtriser toutes ses commandes et fonctions.
HyperDeck Studio HD Mini HyperDeck Studio HD Plus
HyperDeck Studio HD Pro et HyperDeck Studio 4K Pro
147Présentation des enregistreurs àdisqueHyperDeck

Mise en route
Pour mettre en route l'enregistreur à disque HyperDeck Studio, connectez-le simplement à une
source d'alimentation, branchez vos sources vidéo et les appareils destinataires, puis insérez les
SSD ou cartes SD.
Brancher l'alimentation
Il suffit de brancher un câble CEI standard au connecteur d'alimentation de l'Hyperdeck situé sur la
face arrière.
Si votre modèle d’HyperDeck est doté d’une entrée d’alimentation IEC supplémentaire, vous pouvez
vous connecter à une autre source d'alimentation pour la redondance. Par exemple, si la deuxième
entrée est connectée à une alimentation ininterrompue, elle prendra immédiatement le relais si la
source primaire rencontre des difficultés.
Tous les modèles comprennent une entrée DC 12V, ce qui vous permet de connecter l’appareil à
une batterie externe 12V.
L’HyperDeck Studio HD Mini peut également être alimenté via un adaptateur AC. Si votre
alimentation est dotée d’une bague de blocage, sécurisez la connexion à l’HyperDeck Studio HD
Mini en serrant le connecteur à l’appareil. Cette action verrouille le câble d’alimentation afin d’éviter
qu’il soit retiré accidentellement.
Une fois l’appareil alimenté, un message sur l’écran LCD vous demandera de choisir une langue.
À l’aide de la molette, faites défiler jusqu’à la langue désirée et appuyez sur le bouton clignotant Set.
Cela vous amènera à l’écran d’accueil. Pour plus d’informations sur l’écran d’accueil et les menus
LCD, veuillez consulter la section «Utiliser le panneau avant».
Connecter une source vidéo et audio
Branchez la source vidéo à l'entrée SDI ou HDMI de l'appareil et reliez la sortie SDI ou HDMI au
connecteur de la destination. Par exemple, la source pourrait être une caméra numérique et la
destination, un téléviseur HDMI ou un moniteur SDI.
Tous les modèles HyperDeck prennent en charge la vidéo HD jusqu’à 1080p60. L'HyperDeck Studio
4K Pro dispose de connecteurs 12G-SDI. Vous pouvez donc recevoir et acheminer de l'Ultra HD
jusqu'à 2160p60 à l'aide d'un câble BNC standard.
148Mise en route

Vous pouvez confirmer le signal SDI ou HDMI en contrôlant l’écran sur le panneau avant.
CONSEIL Si vous ne voyez pas la source vidéo sur l’écran, cela peut être parce que vous
êtes connecté à l’autre entrée source. Appuyez sur le bouton Input situé sur le panneau
avant et passez les sources SDI et HDMI en revue.
Comme l’audio est embéddé en SDI ou HDMI, vous n’avez pas à vous soucier de connecter l’audio.
Vous pouvez vérifier les niveaux audio en obervant les vumètres à coté de l’image vidéo sur l’écran.
Vérifer l’audio
Si le panneau avant de votre HyperDeck comprend un haut-parleur ou un port pour casque, vous
pouvez rapidement vérifier l’audio à l’aide du haut-parleur intégré ou en branchant un casque. Pour
écouter, maintenez le bouton du haut-parleur enfoncé et tournez la molette pour ajuster le volume.
Un indicateur de volume apparaîtra sur l’écran d’accueil.
Appuyez deux fois sur le bouton du haut-parleur pour le garder activé. Appuyez deux fois sur ce
même bouton pour le désactiver.
Brancher un support
Tous les modèles HyperDeck Studio peuvent être utilisés sans configurer les paramètres. Vous
avez simplement besoin d’un disque SSD ou d'une carte SD formatés.
Il est facile de formater un support via les paramètres du menu sur l'écran LCD. Vous pouvez
également le formater sur un ordinateur. Pour en savoir plus sur le formatage de votre support,
veuillez consulter la section «Formater un support» de ce manuel. Vous y trouverez également
des informations sur les types de supports les plus adaptés à l'enregistrement vidéo et une liste
de disques et de cartes recommandés.
Brancher un SSD :
1 Positionnez le SSD de 9,5mm vers le bas et alignez-le avec le logement de l'Hyperdeck.
Insérez le disque dans le logement jusqu'à ce qu'il soit correctement enclenché.
2 L'HyperDeck Studio vérifie le SSD. La bordure du logement s'allume en vert. Le voyant
s’éteint quand votre HyperDeck est prêt à enregistrer.
Le voyant du disque s’allume en vert lors de la lecture du support et
s’éteint quand votre HyperDeck est prêt à enregistrer.
149Mise en route
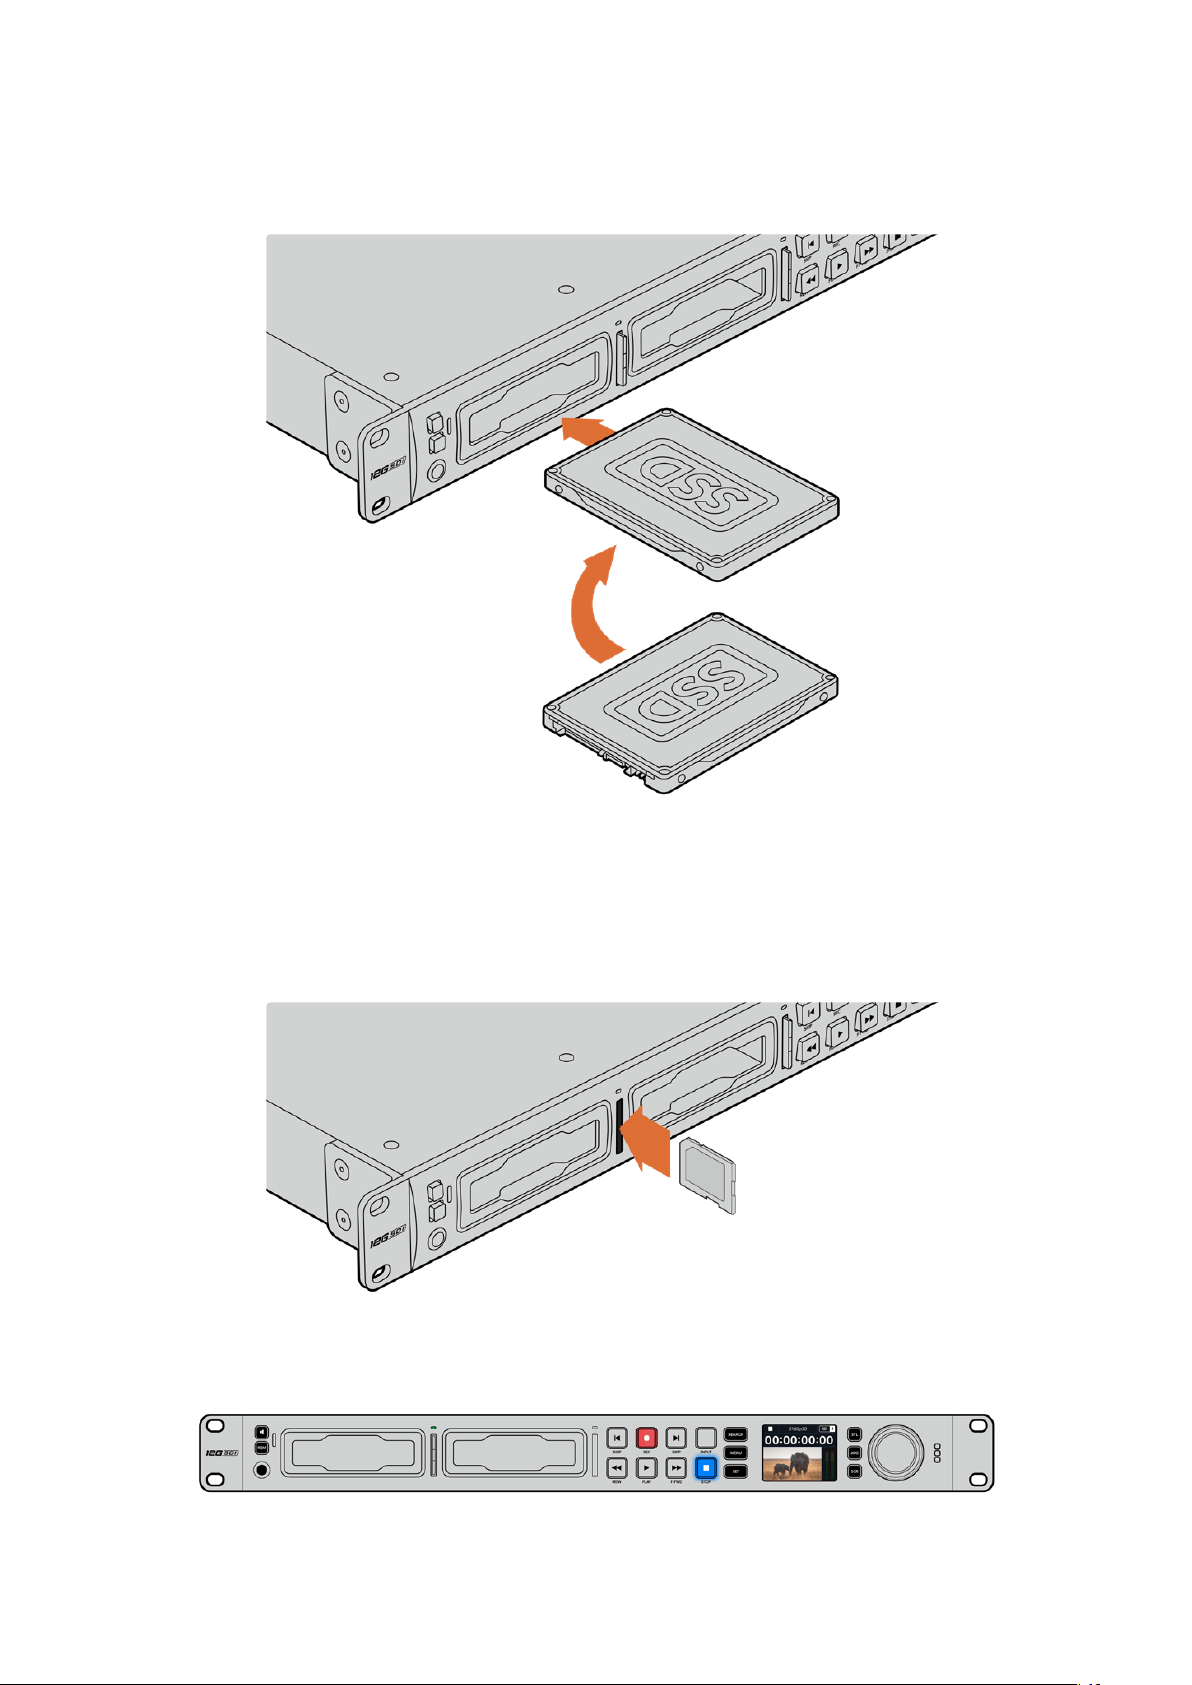
Pour retirer le SSD, saisissez-le par le bord et tirez délicatement pour le sortir. Vous sentirez le SSD
se déconnecter de son logement.
Positionnez le SSD vers le bas, alignez-le avec le logement de l'Hyperdeck Studio
puis insérez le disque jusqu'à ce qu'il soit correctement enclenché.
Brancher une carte SD :
1 Orientez les contacts dorés de la carte SD vers l'écran LCD de l'HyperDeck Studio et
alignez-la avec le logement du support. Poussez délicatement la carte dans le logement
jusqu'à ce qu'elle soit en place.
2 L'HyperDeck Studio vérifie la carte SD. Le voyant situé au-dessus du logement de la carte
SD s'allume en vert.
Lorsque le voyant s’éteint et que le bouton Stop s’allume, l'HyperDeck Studio est prêt à enregistrer.
150Mise en route

CONSEIL Pour retirer la carte, poussez-la délicatement jusqu'à ce qu'elle se décroche, puis
relâchez. Lorsque la carte est éjectée, saisissez-la par les bords et retirez-la du logement.
Votre HyperDeck Studio est désormais prêt à enregistrer et à lire!
Enregistrer de la vidéo
Une fois que votre source vidéo s’affiche sur l’écran LCD, vous pouvez commencer à enregistrer.
Appuyez sur le bouton d'enregistrement pour démarrer l'enregistrement. Lorsque vous enregistrez
sur une carte SD, le voyant du logement s’allume en rouge, comme le bouton d’enregistrement. Le
bouton de lecture s’allume et une icône d’enregistrement apparaît sur l’écran d’accueil. Lorsque
vous enregistrez sur un SSD, le voyant du support s’allume en rouge.
Lorsque l'HyperDeck Studio enregistre, l’indicateur de stockage sur l’écran LCD affiche en
alternance le logement actif et le temps d'enregistrement restant sur le support.
Appuyez sur le bouton d'arrêt pour terminer l'enregistrement. Appuyez sur le bouton de lecture pour
lire les clips.
CONSEIL Si vous voulez changer de codec, vous pouvez changer les paramètres de
codec à l’aide de l’utilitaire Blackmagic HyperDeck Setup. Pour plus d'informations,
consultez la section «Blackmagic HyperDeck Setup» de ce manuel.
Enregistrer sur des supports multiples
Lorsqu'il ne reste que 3 minutes de temps d'enregistrement sur la carte SD ou sur le disque SSD,
le timecode affiché sur l'écran LCD de l'HyperDeck Studio devient rouge et le bouton Stop clignote
lentement.
Cela signifie également qu'il n'y a pas de deuxième disque inséré sur lequel l'enregistrement peut
continuer. Dans ce cas, insérez simplement un disque vide afin de continuer l'enregistrement. Lorsque
vous insérez un nouveau disque dans un logement vide ou dans l’entrée pour disque externe, la
lumière clignotante s’éteint et le timecode redevient blanc. L’HyperDeck peut donc continuer à
enregistrer, car le second disque a été vérifié et il y a de l’espace pour poursuivre l’enregistrement.
151Enregistrer de la vidéo

Si plus d’un support est connecté à l’HyperDeck Studio, l’enregistrement se poursuit sur le
deuxième disque. Cela apparaîtra dans le coin supérieur droit de l’écran d’accueil.
Changer de disque durant l’enregistrement
Si vous souhaitez changer le disque sur lequel vous enregistrez, maintenez le bouton
d'enregistrement enfoncé et l'enregistrement se poursuivra automatiquement sur le disque vide
suivant. Cette fonction permet de retirer un disque de l'Hyperdeck sans arrêter l'enregistrement.
Vous pouvez être confronté à ce genre de situation lorsque vous réalisez des productions en direct
et qu’un des supports de l'HyperDeck doit être utilisé ailleurs. Grâce à ça, vous ne raterez rien !
Si le bouton d’enregistrement clignote durant un enregistrement, il se peut qu’il y ait des problèmes
avec votre support, ce qui peut entraîner une perte d’images. Cela peut se produire si vous
enregistrez en Ultra HD avec un support plus lent. Par exemple, l'enregistrement en 2160p30
ProRes HQ utilise un débit de données plus élevé que ProRes Proxy. Vos cartes SD ou vos SSD
doivent donc être les plus rapides possible. Pour voir la liste des supports approuvés, consultez
lasection « Supports de stockage » de ce manuel.
Lecture
Les commandes de transport comprennent les mêmes boutons que ceux des enregistreurs
broadcast traditionnels dont Enregistrement, Retour, Lecture, Avance rapide et Arrêt. Les deux
boutons Skip fonctionnent de la même façon que les boutons Previous et Next afin que vous
puissiez naviguer rapidement d’un clip à l’autre.
Lire de la vidéo avec l'HyperDeck
1 Appuyez une fois sur le bouton de lecture pour lire instantanément les vidéos sur l'écran
LCD et sur les écrans connectés aux sorties vidéo de l'HyperDeck.
2 Pour passer au clip suivant, utilisez la commande de transport Avance sur le panneau
de contrôle.
3 Appuyez une fois sur le bouton Retour pour retourner au début de la séquence en cours ou
appuyez deux fois pour revenir au début du clip précédent.
Appuyez sur le bouton Lecture du panneau de contrôle de l'HyperDeck pour lire un clip, et appuyez sur les
boutons Avance ou Retour pour recommencer la lecture du clip en cours ou pour passer à un autre clip.
152Lecture
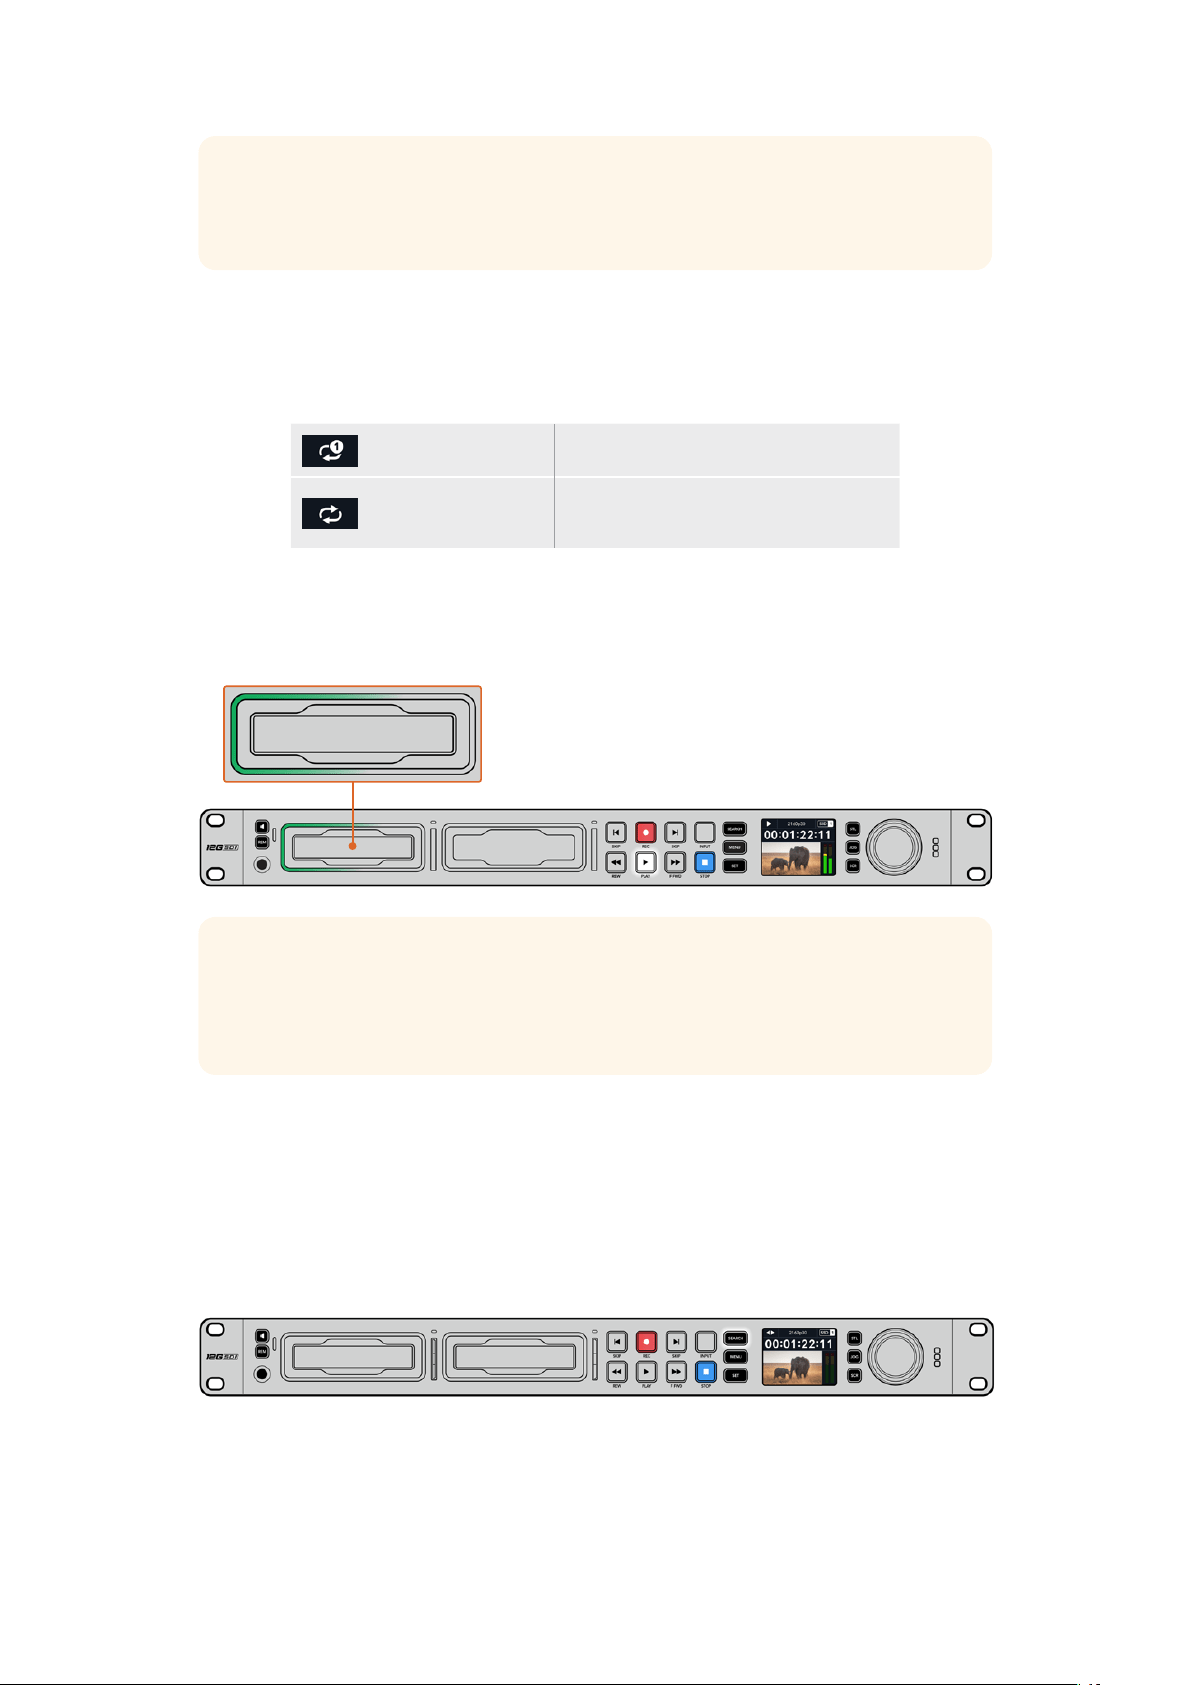
CONSEIL Pour lire des fichiers vidéo sur votre HyperDeck, vous devrez réglez le codec
pour qu’il corresponde. Vous pouvez le faire depuis le menu LCD. Pour plus d'informations,
consultez les sections «Utiliser le menu LCD» et «Paramètres» de ce manuel.
Lecture en boucle
Pour une lecture en boucle continue, appuyez à nouveau sur le bouton de lecture durant la lecture.
Une fois la lecture en boucle activée, vous verrez l’icône de lecture en boucle apparaître sur l’écran
LCD. Il y a deux modes de lecture en boucle disponibles.
Lire le clip en boucle Lit en boucle le clip en cours de lecture.
Lire tous les clips
en boucle
Lit en boucle tous les clips enregistrés
sur votre support.
LED dynamiques
Pendant la lecture, la bordure du logement s'allume en vert dans un mouvement circulaire pour
indiquer la vitesse et la direction de lecture.
CONSEIL Si le bouton de lecture clignote sur un HyperDeck qui enregistre sur un SSD,
cela indique que le disque n'est pas assez rapide pour assurer la lecture. Nous vous
recommandons alors d'utiliser un format d'enregistrement plus compressé tel que H.264,
ou d'utiliser un SSD ou un disque externe recommandé pour l’enregistrement en Ultra HD.
Utiliser la molette
Utiliser la molette pendant la lecture vous permet de parcourir rapidement vos clips et de
sélectionner des moments spécifiques à lire, ou de les revoir image par image. Cela peut être
important si vous devez localiser un moment précis dans un clip, soit en contrôlant visuellement
le clip lorsque vous tournez la molette, soit en recherchant un point de timecode spécifique. C’est
aussi utile pour positionner la tête de lecture sur un repère précis pour que le clip puisse être
diffusé pendant un événement en direct, par exemple.
Appuyez sur le bouton Search pour passer en revue les différents modes de recherche.
153Lecture
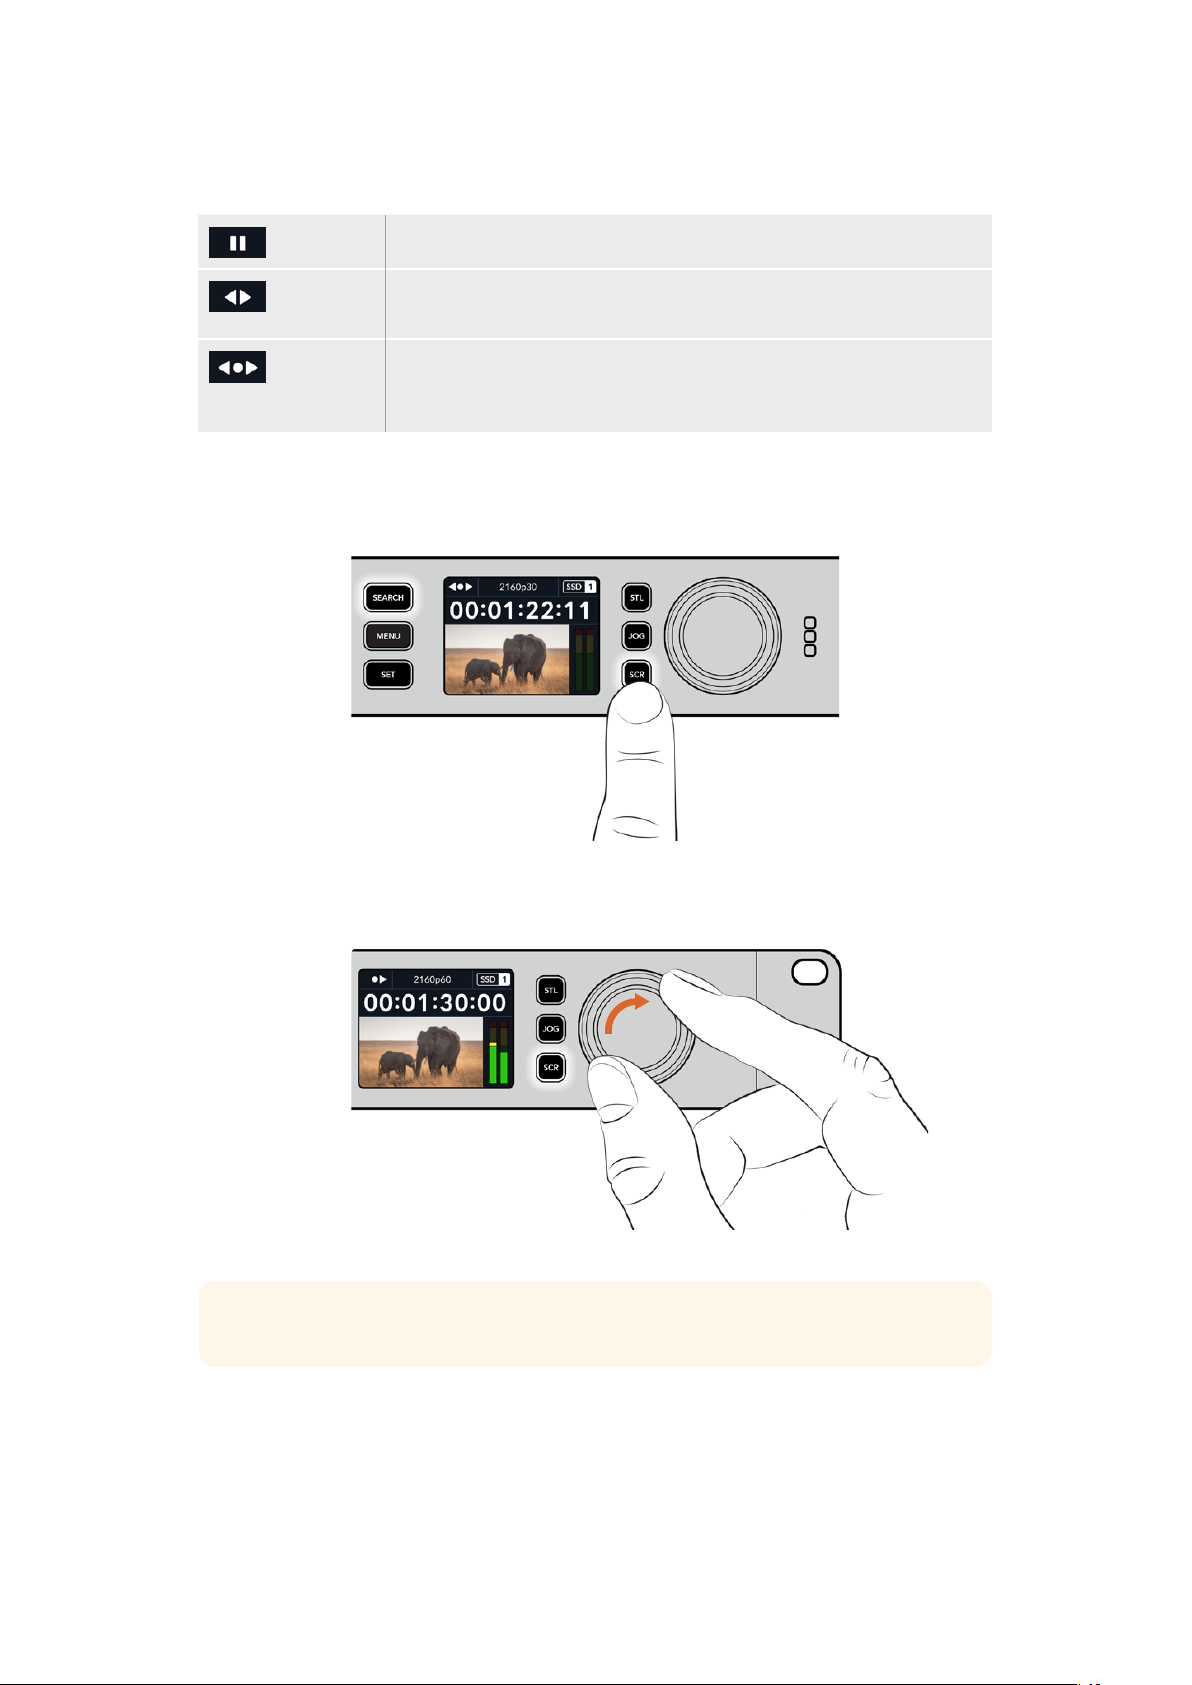
Les modes de recherche incluent Jog, Shuttle et Défilement.
Jog Lit le clip en avant ou en arrière image par image, permettant un contrôle précis.
Shuttle Lit en avant ou en arrière plus rapidement. La vitesse variera selon la façon
de tourner la molette.
Défilement Une lecture encore plus rapide selon la façon de tourner la molette.
Ce mode est pratique pour se déplacer rapidement dans un long clip
si vous êtes à la recherche d’un moment précis.
Les plus grands modèles ont des boutons de recherche dédiés et comprennent une molette avec
embrayage intégré. Cela vous permet de vous repérer plus facilement dans le clip pendant que vous
le visionnez sur un téléviseur ou un moniteur.
Appuyez sur les boutons JOG, STL ou SCR pour sélectionner
les modes Jog, Shuttle ou Défilement.
CONSEIL Pour revenir à une lecture normale, appuyez sur le bouton de lecture ou d’arrêt.
154Lecture
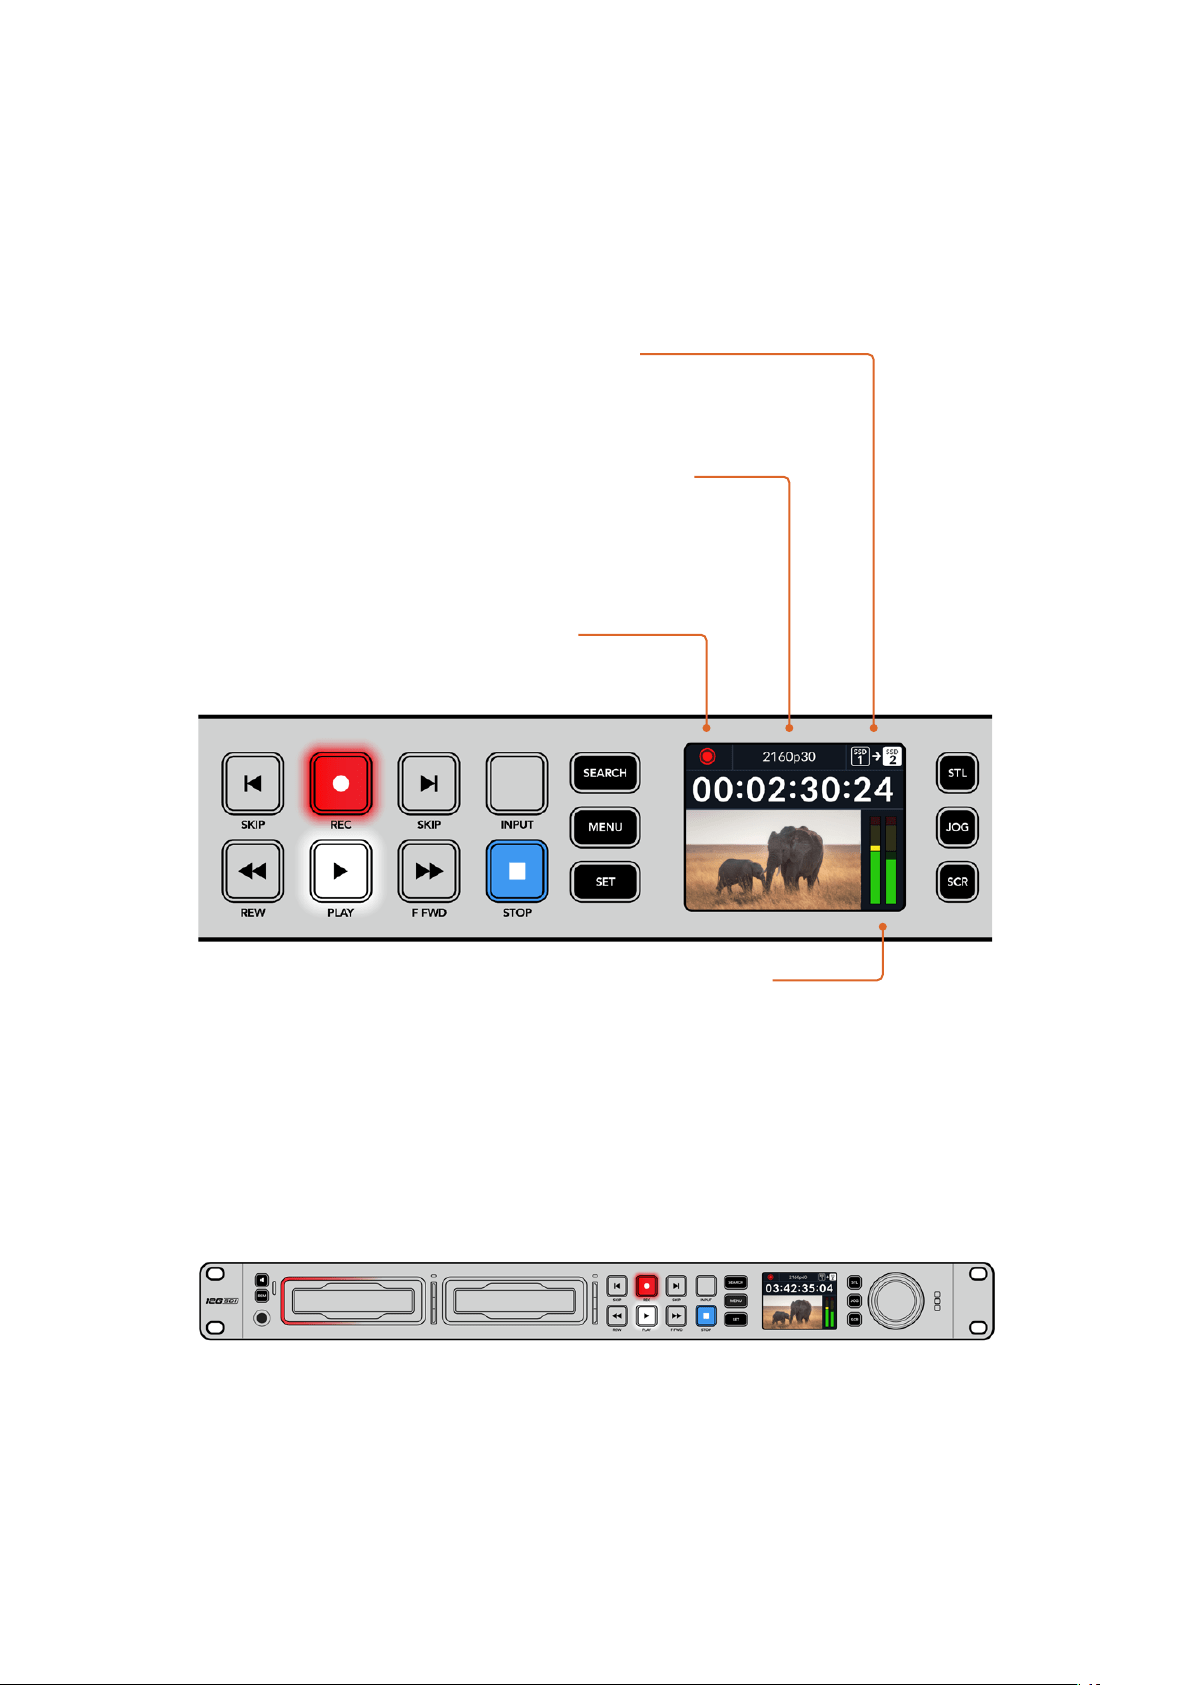
Utiliser le panneau avant
Lorsque vous enregistrez ou lisez de la vidéo avec l'HyperDeck, toutes les informations dont vous
avez besoin sont affichées sur l'appareil à l'aide de voyants LED ainsi que sur l'écran LCD.
Écran d’accueil de l’HyperDeck Studio
Temps restant et support – Durant
l’enregistrement, l’icône passera constamment
entre le temps restant sur le disque et le
disque en cours d’utilisation. Durant la lecture,
l’icône du support actif sera affichée.
Indicateur de format – Affiche le format de
l’entrée ou du fichier en lecture. Il indiquera
également la source d’entrée lors de la commutation
du bouton Input sur certains modèles d’HyperDeck,
mais aussi le volume lors de l’ajustement du
volume du haut-parleur et du casque via le
bouton du panneau avant et la molette.
Indicateur d’état – Affiche
l’état de l’enregistreur, dont le
mode de lecture en cours.
Indicateurs audio – Affichent
les niveaux audio de la source
ou du fichier durant la lecture.
Voyants des logements
Lorsque vous allumez l'HyperDeck, ou lorsque vous insérez un SSD ou une carte SD, le voyant du
logement s'allume en vert pendant la vérification du support, puis s'éteint. Si le disque n'a pas été
formaté correctement, ou s'il ne fonctionne pas, le logement s'allume en orange jusqu'à ce que le
disque soit retiré. Le cas échéant, vérifiez que le formatage a été correctement effectué et que le
disque fonctionne correctement sur un ordinateur.
Les voyants des logements de l'HyperDeck s'allument pour vous indiquer l'état
du disque, rouge pour l'enregistrement et vert pour la lecture.
155Utiliser le panneau avant
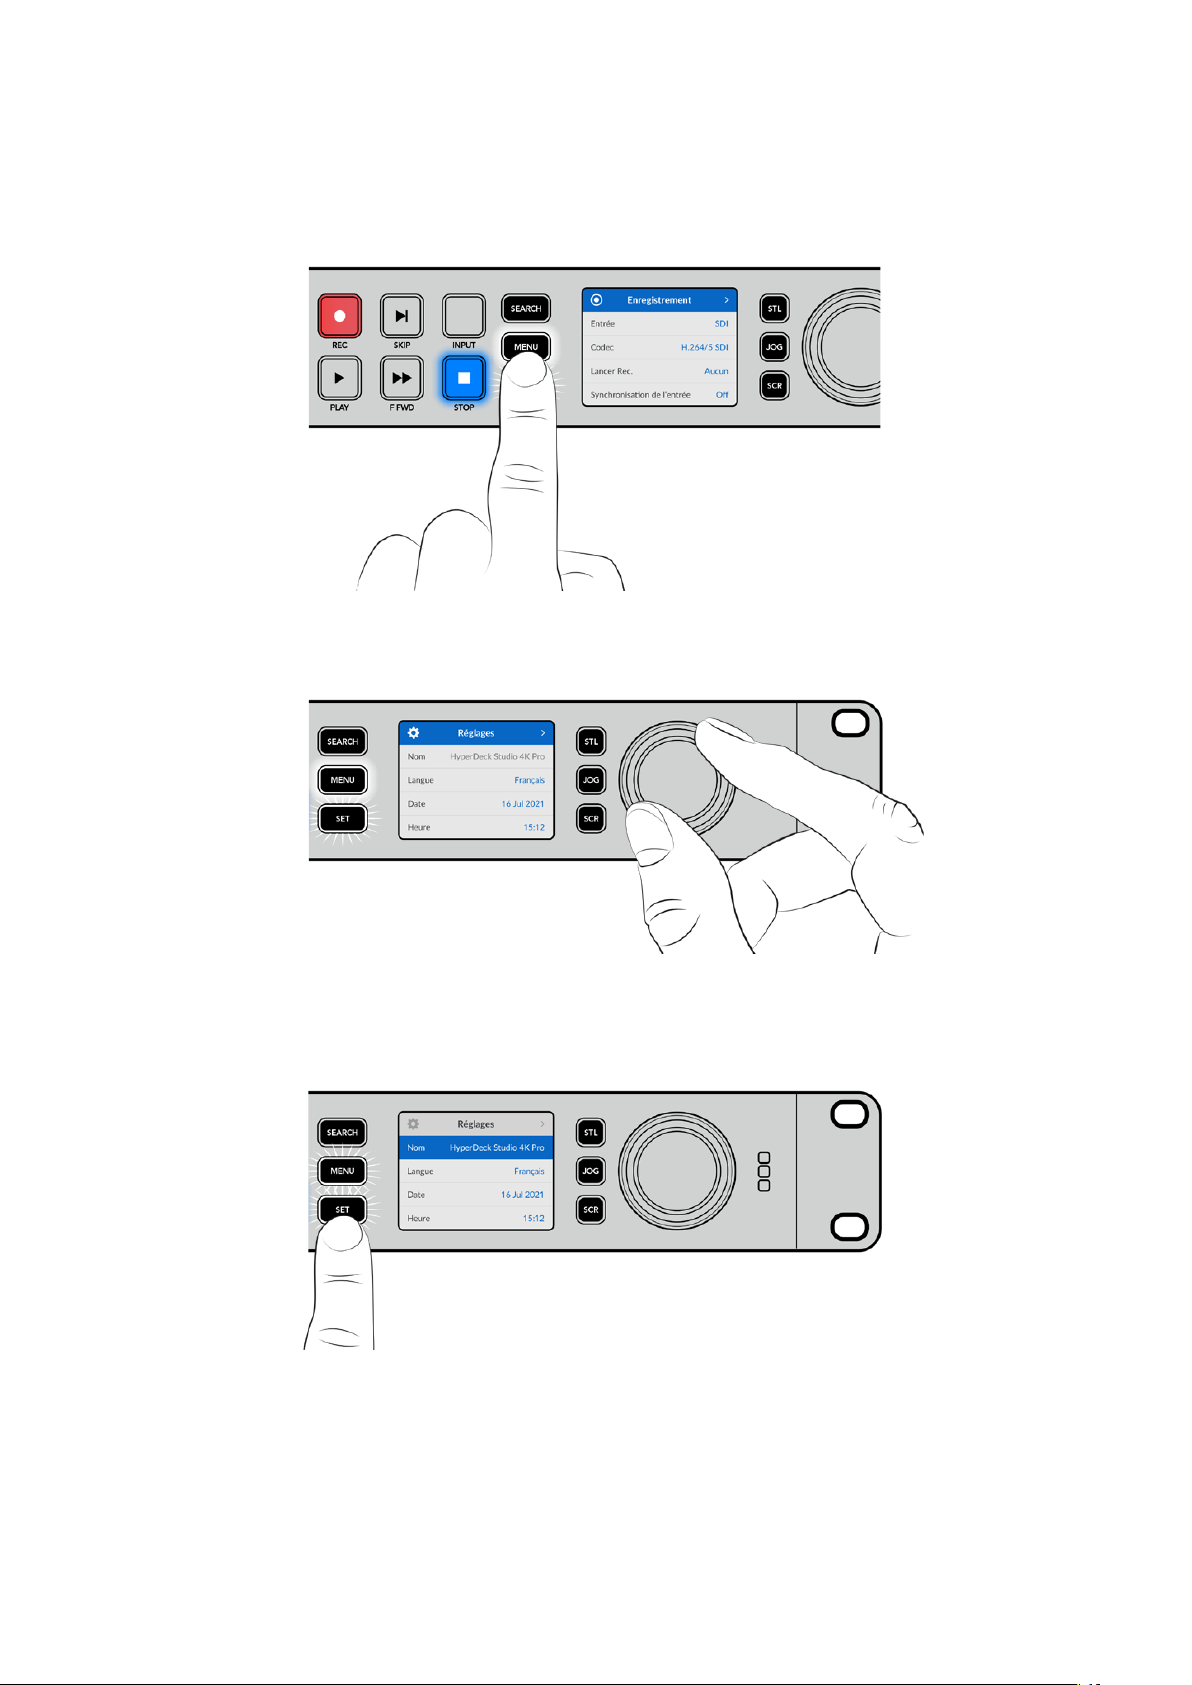
Utiliser les menus à l'écran
Appuyez sur le bouton Menu sur le panneau avant pour ouvrir le menu à l’écran.
Tournez la molette ou appuyez sur les boutons Skip pour passer en revue les différentes options.
Appuyez sur Set pour sélectionner un sous-menu.
Tournez la molette pour passer en revue les paramètres du menu.
Une fois l’élément de menu sélectionné, appuyez sur le bouton Set.
Ajustez les paramètres à l’aide de la molette ou des boutons Skip et confirmez en appuyant sur Set.
Appuyez sur le bouton Menu pour revenir à l’écran d'accueil.
156Utiliser le panneau avant

Paramètres
Menu Enregistrement
Entrée
Sélectionnez votre source SDI ou HDMI à l’aide du paramètre d’entrée. Vous pouvez également
changer la source d’entrée à l’aide du bouton Input sur le panneau avant.
Codec
Tous les modèles HyperDeck Studio peuvent enregistrer de la vidéo compressée à l'aide des
codecs H.264, Apple ProRes et DNxHD. Les modèles HyperDeck Studio 4K Pro peuvent aussi
utiliser les codecs H.265 et DNxHR lors d’un enregistrement en 4K.
Déclencher l'enregistrement
Il existe deux modes de déclenchement de l’enregistrement : Vidéo marche/arrêt, et Timecode.
Certaines caméras, comme la URSA Mini, envoient un signal via SDI pour démarrer ou arrêter
l’enregistrement sur les enregistreurs externes. Lorsque vous sélectionnez Vidéo marche/arrêt,
l’HyperDeck démarrera ou arrêtera l’enregistrement lorsque le bouton d’enregistrement sera pressé
sur la caméra.
Utilisez l’option Timecode pour que l’appareil déclenche l’enregistrement lorsqu’il reçoit un signal de
timecode valide via les entrées. L'enregistrement s’interrompt lorsque le signal s’arrête. Désactivez
le déclenchement de l’enregistrement en touchant l’option Aucun.
REMARQUE Lorsque vous enregistrez avec une caméra HDMI ou SDI, veillez à ce que
les informations à l'écran soient désactivées sur le signal de sortie, car les informations
présentes sur la vidéo provenant de la caméra sont enregistrées avec l'image.
Synchronisation de l’entrée
Ce paramètre permet une synchronisation de l’entrée vidéo et garantit que la vidéo est verrouillée
sur le signal de référence externe avant l’enregistrement. La sortie vidéo reste verrouillée sur le
signal de référence même lors de l’enregistrement, car l’entrée elle-même est synchronisée. Cette
fonction est utilisée pour les enregistrements indépendants quand vous avez besoin de verrouiller
le timecode de plusieurs enregistreurs mais que certaines sources ne sont pas synchronisées.
Elleest généralement désactivée pour que les entrées vidéo soient enregistrées sans ajout ou
suppression d’images depuis la source vidéo.
Tous les enregistreurs broadcast peuvent normalement utiliser une entrée de référence pour
verrouiller la sortie vidéo durant la lecture. La sortie de lecture de l’HyperDeck peut ainsi être
verrouillée sur l’entrée de référence afin qu’elle n’ait pas à être synchronisée une fois connectée
àun grand système de diffusion.
Cependant, quand l’enregistrement commence, la sortie bascule sur l'entrée. Il est, en effet,
préférable que la vidéo d'entrée soit enregistrée intacte avec cette même vidéo intacte envoyée
vers un autre équipement en aval connecté aux sorties vidéo HyperDeck.
157Paramètres

L’HyperDeck Studio dispose d’une fonctionnalité unique pour les enregistrements indépendants.
Elle permet d’inverser ce processus et de synchroniser l’entrée vidéo sur l’entrée de référence.
Vouspouvez donc connecter une source non-synchronisée sur l’HyperDeck et l’entrée vidéo sera
synchronisée sur le signal de référence vidéo avant d’être enregistrée.
Les sources non-synchronisées peuvent être des ordinateurs, des caméras grand public ou tout
autre équipement vidéo auquel il est impossible de connecter un signal de référence. Cela peut
même être un flux vidéo provenant d'un autre studio ou d’un diffuseur externe. Les sources non-
synchronisées peuvent causer des problèmes avec les enregistrement indépendants, car le
timecode de tous les enregistrements doit correspondre. Une source non-synchronisée sera plus
rapide ou plus lente que vos autres sources et se désynchronisera par rapport au timecode durant
l’enregistrement. Un montage multicaméra devient alors extrêmement difficile, car les sources ne
disposent pas du même timecode.
Avec la fonction Synchronisation de l’entrée activée, l’entrée vidéo de l’HyperDeck sera analysée
et si elle prend du retard, une image sera répétée. Au contraire, si elle prend de l’avance, une image
sera supprimée. C’est ce qu’on appelle la « synchronisation » et le traitement effectué sur l’entrée
estappelé « synchronisation d'image ». Grâce à cela, les plans enregistrés sur tous les enregistreurs
auront le même timecode, ce qui rend le montage multicaméra possible.
L’inconvénient est bien sûr l’ajout ou la suppression d’images sur l’entrée avant l’enregistrement.
C’est pourquoi il est préférable de désactiver cette fonction et de ne l’utiliser que lorsqu’il est
impossible de connecter un signal de référence à une source ISO parce qu’il s’agit d’un ordinateur
ou d'un appareil grand public.
Il y a toutefois une situation dans laquelle il est conseillé d’activer et d’utiliser la fonction
Synchronisation de l’entrée. Quand celle-ci est activée, la sortie vidéo de l’HyperDeck reste
verrouillée sur le signal de référence même pendant l’enregistrement. Vous pouvez ainsi connecter
la sortie SDI de l’HyperDeck à une caméra pour verrouiller la caméra au signal de référence via le
flux de retour programme. La Blackmagic Studio Camera 4K Pro avec sa capacité à régler son signal
de référence sur la vidéo externe en est un bon exemple. Le flux de la caméra est alors verrouillé
sur le signal de référence de l’HyperDeck. La synchronisation de l’entrée de l’HyperDeck n’a pas
besoin d’ajouter ou de supprimer d’images, car la caméra ne prend ni d’avance ni de retard.
La synchronisation de l’entrée n’intervient que si l’entrée vidéo n’est pas verrouillée sur le même
signal de référence que l’HyperDeck. Dans ce cas, la sortie de l’HyperDeck est la source de
référence pour la caméra et l’HyperDeck est verrouillé sur son entrée de référence vidéo. Si vous
avez verrouillé plusieurs HyperDeck en reliant les connexions de référence, les caméras et les
HyperDecks sont verrouillés en tant que groupe. Si l’un des HyperDecks du groupe a une source
non-synchronisée comme un ordinateur, seule son entrée sera synchronisée.
La synchronisation est automatique. Vous pouvez donc connecter des sources et tout fonctionnera
parfaitement. La fonction Synchronisation de l’entrée peut être très puissante. Cependant, il est
important de savoir ce qu’elle permet de faire et quand l’utiliser. Expérimentez avec plusieurs
HyperDecks et un logiciel de montage multicaméra pour découvrir par vous-même comment elle
fonctionne. C’est un moyen incroyable et très rapide de faire de la production.
158Paramètres
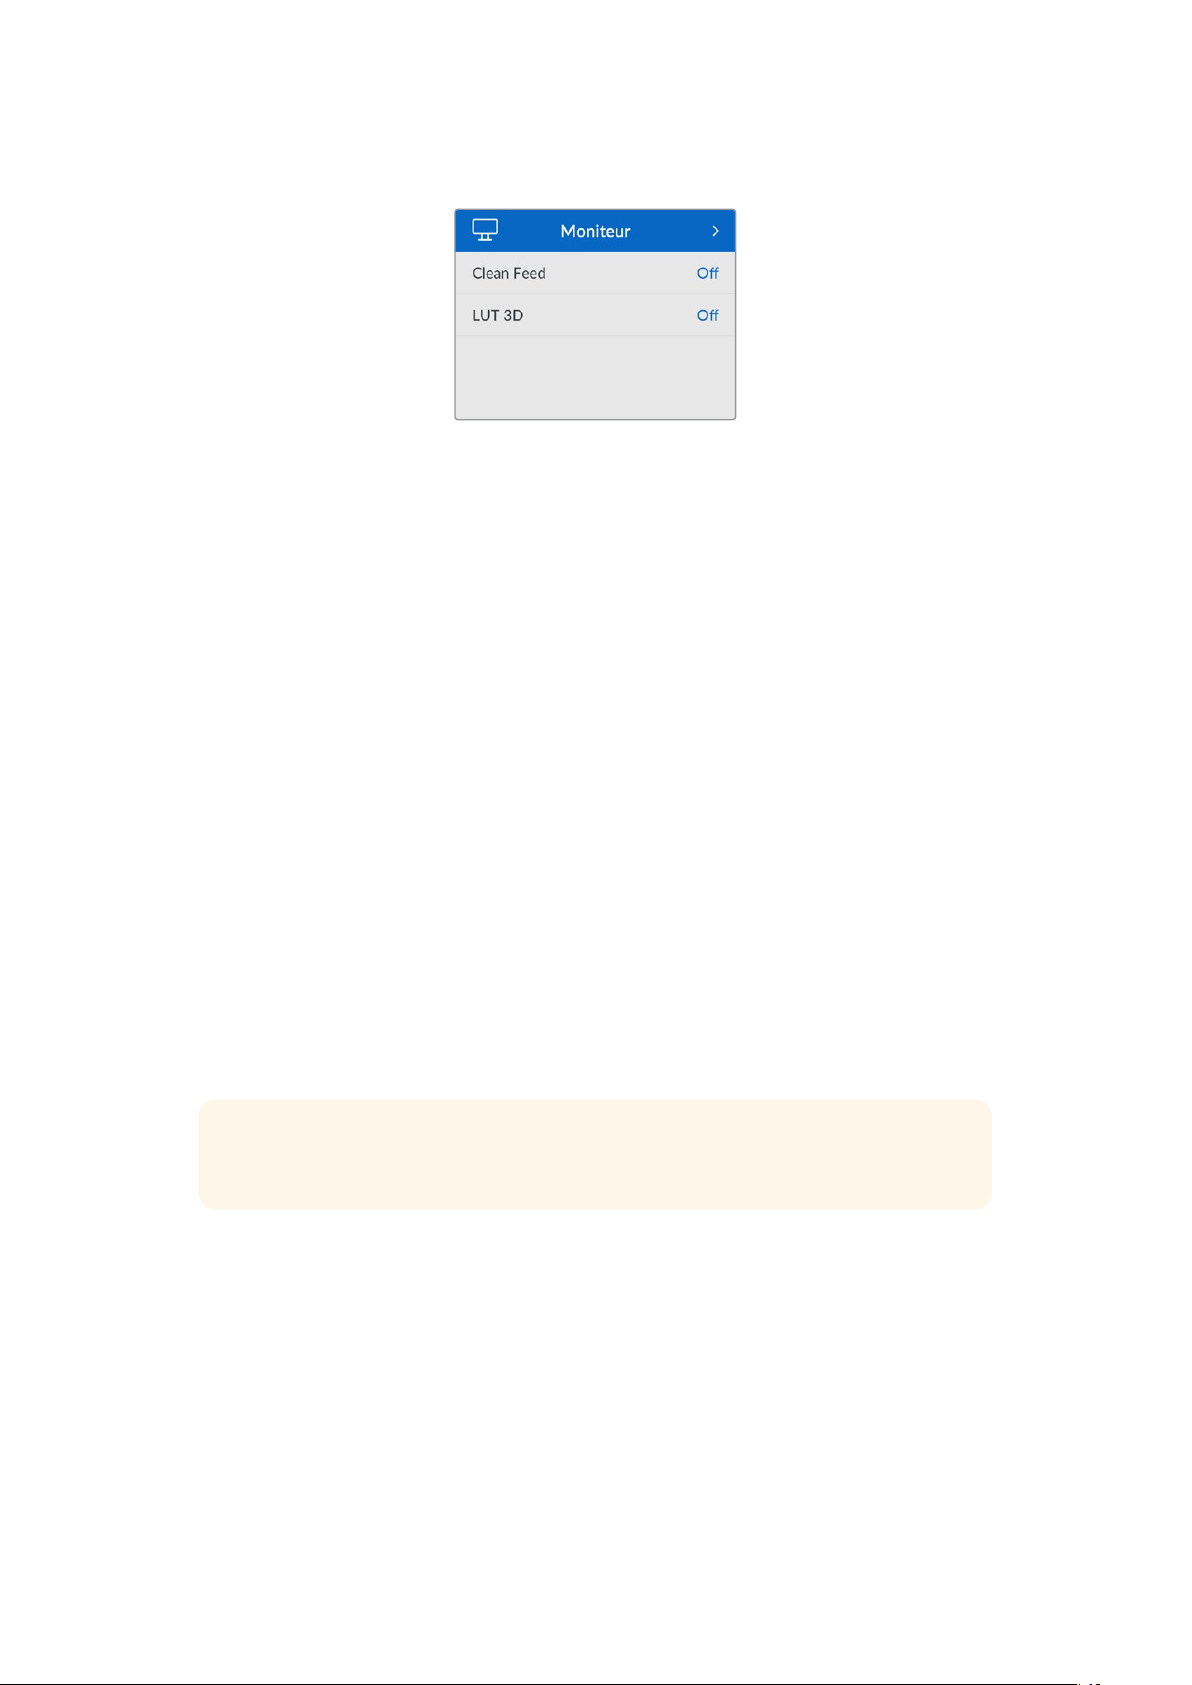
Menu Moniteur
Le menu Moniteur est inclus sur les modèles HyperDeck Studio avec la sortie moniteur située
sur la face arrière.
Clean Feed
Activer le clean feed supprimera les infos d’état sur les écrans connectés à la sortie moniteur
à l’arrière de l’HyperDeck Studio. Pour plus d’informations sur l’affichage de la sortie moniteur,
y compris les informations affichées, consultez la section «Sortie moniteur» de ce manuel.
LUT 3D
Il est très pratique d’afficher les LUTs lorsque vous utilisez l’HyperDeck Studio comme enregistreur
de terrain. Ces dernières communiquent à l’appareil quelles couleurs et quelle luminance afficher.
Cela peut s’avérer utile lorsque vous utilisez le mode Film, qui offre intentionnellement des images
peu contrastées. Le fait d'appliquer une LUT vous donnera une meilleure idée du rendu de la vidéo
après l'étalonnage.
Les LUTs sélectionnées via le Blackmagic HyperDeck Setup peuvent être appliquées à la sortie
moniteur SDI.
Pour activer ou désactiver une LUT 3D:
1 Appuyez sur le bouton Menu et à l’aide de la molette, faites défiler jusqu’au menu Moniteur.
2 Appuyez sur le bouton Set.
3 À l’aide de la molette, faites défiler jusqu’à ce que LUT 3D s’allume en bleu.
4 Appuyez sur le bouton Set pour activer ou désactiver la LUT.
Pour plus d'informations sur la façon de sélectionner une LUT, consultez la section «Blackmagic
HyperDeck Setup» de ce manuel.
CONSEIL Pour plus d’informations sur la sortie moniteur, consultez la section
«Sortiemoniteur» de ce manuel.
159Paramètres
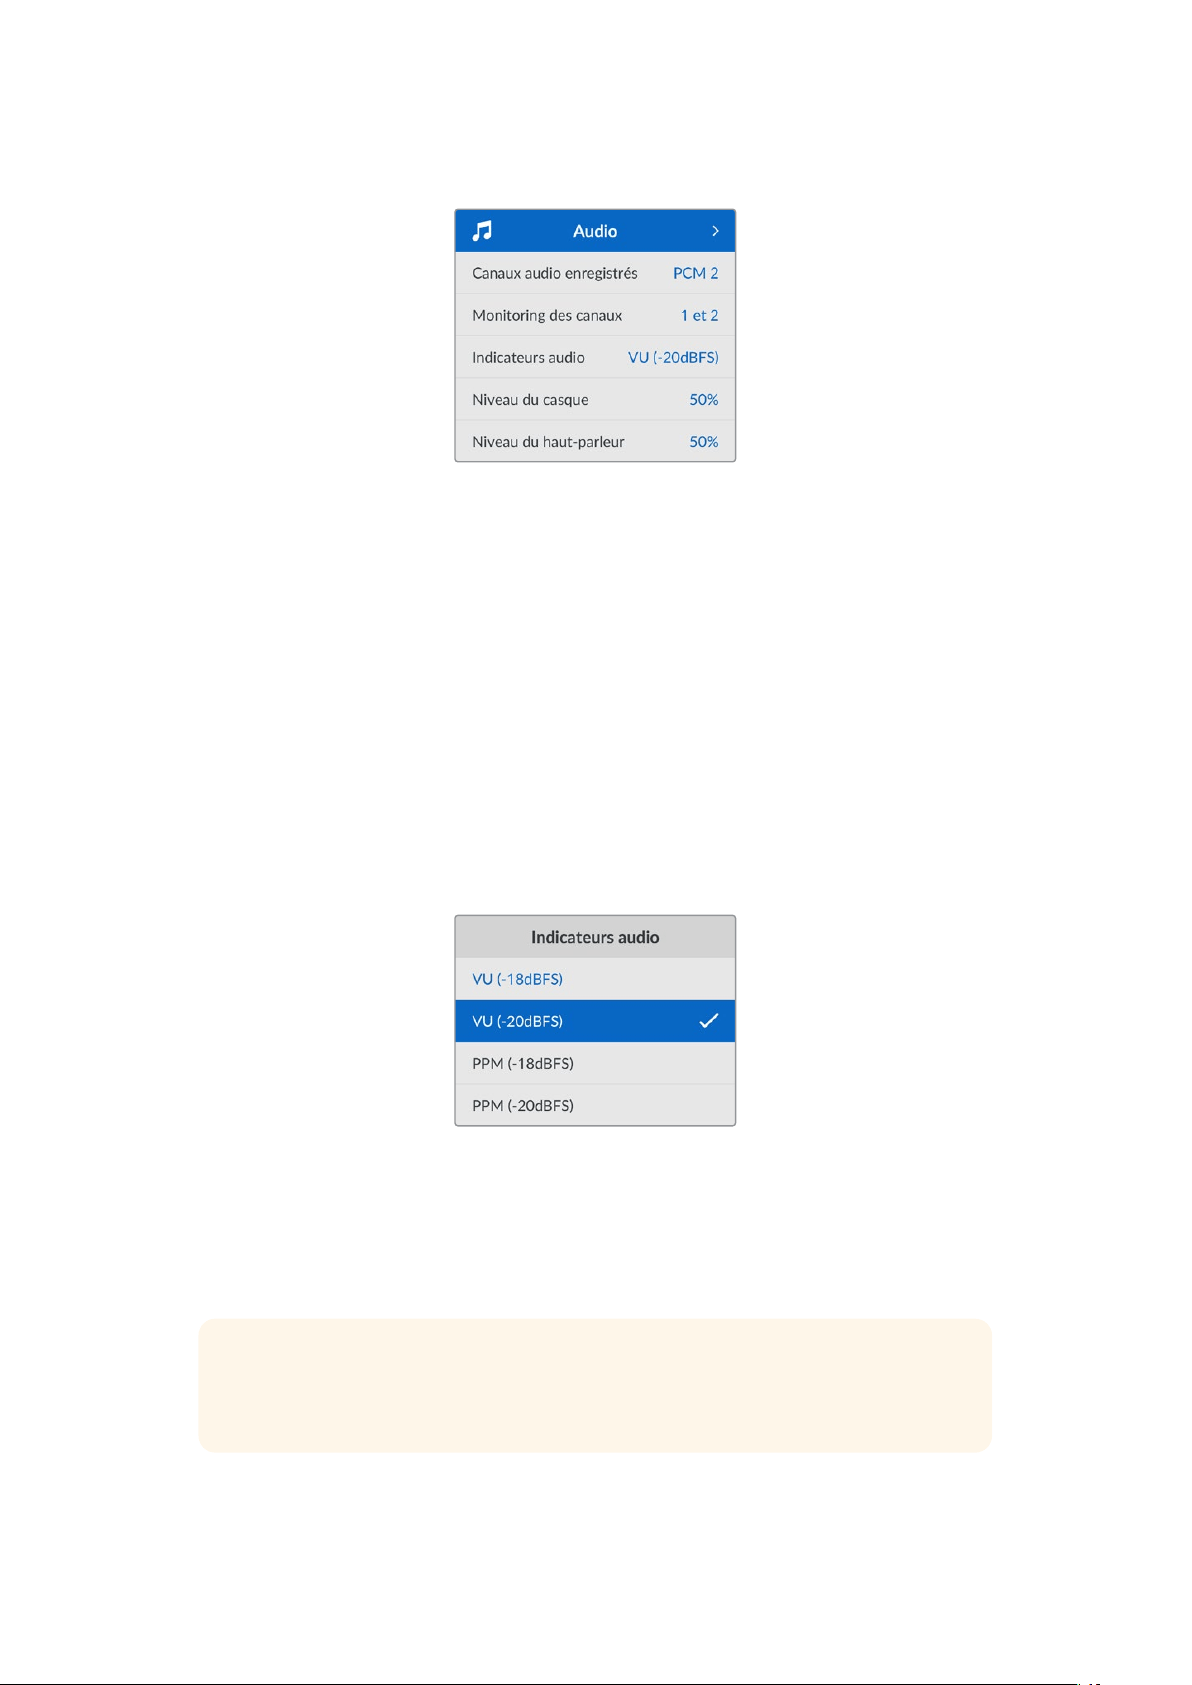
Menu Audio
Canaux audio enregistrés
L’HyperDeck Studio peut enregistrer simultanément jusqu’à 16 canaux audio PCM. Pour sélectionner
le nombre de canaux à enregistrer, agrandissez la liste des canaux audio enregistrés et sélectionnez
2, 4, 8 ou 16 canaux. Si le codec est réglé sur H.264 ou H.265, vous pouvez sélectionner 2 canaux
d’audio AAC afin de mettre vos enregistrements directement sur YouTube. Ce paramètre permet
aussi de sélectionner le nombre de canaux à afficher via la sortie moniteur.
Monitoring des canaux
Si vous enregistrez plus de deux canaux, vous pouvez sélectionner les canaux que vous voulez voir
sur l’écran LCD via l’option Monitoring des canaux. Avec les modèles HyperDeck Studio intégrant
un haut-parleur sur le panneau avant, ce paramètre permet également de sélectionner les canaux
audio qui seront diffusés via le haut-parleur et la connexion pour casque.
Indicateurs audio
Les indicateurs audio pour les canaux audio intégrés s’affichent sur l’écran LCD. Vous pouvez
choisir entre des indicateurs audio PPM et VU. Pour changer le type d'indicateur de niveau audio,
agrandissez le menu et sélectionnez votre option d’affichage préférée parmi toutes les options.
Niveau du casque
Avec les modèles disposant d’un port pour casque sur le panneau avant, vous pouvez ajuster
le volume du casque dans le paramètre Volume casque.
Niveau du haut-parleur
Ajustez le niveau du haut-parleur en tournant la molette. Le niveau par défaut est de 50%.
CONSEIL Le volume du casque et du haut-parleur peut être ajusté directement sur le panneau
avant. Maintenez le bouton du haut-parleur enfoncé et tournez la molette pour augmenter
ou diminuer le volume. Le volume apparaîtra en haut et au centre du panneau avant.
160Paramètres
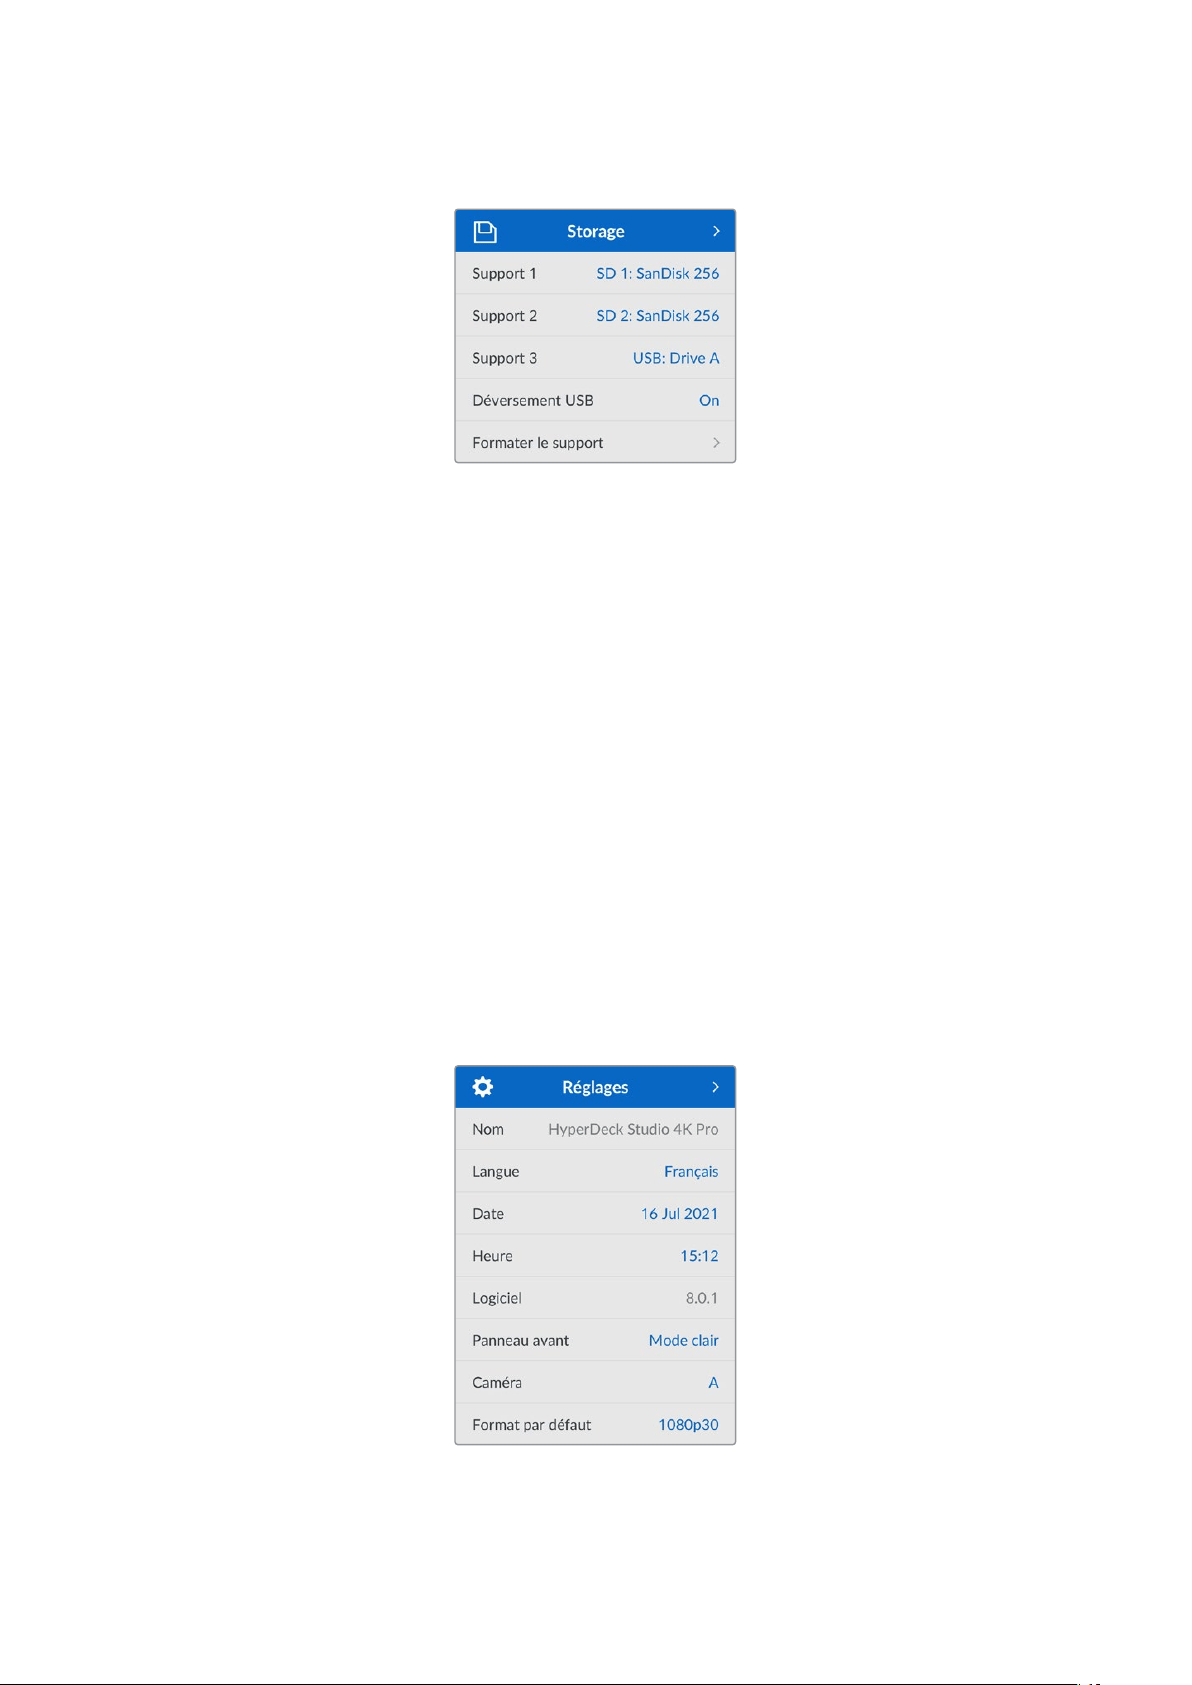
Menu Stockage
Formater le support
Les cartes SD, les SSD et les supports connectés via le port ext disk à l’arrière peuvent être
formatés directement sur l’appareil ou via un ordinateur Mac ou Windows.
Préparer les supports sur l’HyperDeck Studio:
1 À l’aide de la molette et du bouton Set, sélectionnez Formater le support.
2 Dans la liste, sélectionnez le support à formater et appuyez sur Set.
3 Choisissez le format et appuyez sur Set.
4 Un message de confirmation apparaîtra indiquant la carte qui sera formatée
et le format sélectionné.
5 Une fenêtre de formatage apparaîtra une fois le processus terminé. Sélectionnez Ok.
Nous conseillons d'utiliser le format HFS+, également connu sous le nom de Mac OS X Extended,
car il prend en charge la journalisation. Les données stockées sur un support journalisé ont plus
de chance d'être récupérées si le support est endommagé. Le format HFS+ est pris en charge
nativement par Mac. Le format exFAT est pris en charge nativement par Mac et Windows. Il n'est
donc pas nécessaire d'utiliser de logiciel tiers, mais la journalisation n’est pas prise en charge.
Pour formater un support sur un ordinateur Mac ou Windows, consultez la section «Formater un
support» de ce manuel.
Menu Réglages
161Paramètres

Nom
Lorsqu’il y a plusieurs HyperDeck Studio sur le réseau, il peut être utile de leur donner un nom. Pour
ce faire, utilisez le Blackmagic HyperDeck Setup ou le Blackmagic HyperDeck Ethernet Protocol et
un émulateur de terminal.
Langue
L’HyperDeck Studio prend en charge 13 langues dont l’anglais, le chinois, le japonais, le coréen,
l’espagnol, le français, le russe, l’italien, le portugais, le turc, le polonais et l’ukrainien.
Pour sélectionner la langue :
1 Une fois le menu Réglages sélectionné, appuyez sur Set.
2 À l’aide de la molette, faites défiler pour sélectionner la langue et appuyez sur Set.
3 Une fois celle-ci sélectionnée, vous retournerez automatiquement au menu Réglages.
Date
Pour ajuster la date, sélectionnez le champ de date et appuyez sur Set. Vous pouvez sélectionner
le jour, le mois et l’année à l’aide de la molette. Cela générera le suffixe horodaté.
Heure
Pour ajuster l’heure, sélectionnez Heure et appuyez sur Set. Ajustez les heures et les minutes
à l’aide de la molette. L'heure de l’HyperDeck Studio est configurée au format 24 heures.
Logiciel
Affiche la version actuelle du logiciel.
Panneau avant
Réglez le panneau avant de votre HyperDeck sur Apparence claire pour un écran très lumineux.
Le mode Apparence sombre convient aux environnements plus sombres et dans lesquels un écran
lumineux pourrait être une gêne. Par exemple, dans le cas de plusieurs HyperDeck montés sur rack
dans une société de production.
162Paramètres
Caméra
Ce paramètre est utile lorsque vous utilisez l’HyperDeck pour enregistrer des fichiers ISO depuis
plusieurs caméras et les montez sur une timeline multicaméra dans DaVinci Resolve.
La lettre d’identification de chaque caméra apparaîtra dans les métadonnées du fichier, permettant
ainsi à DaVinciResolve d’identifier facilement chaque angle avec la fonctionnalité Sync bin.
Assignez les caractères A-Z ou 1-9 à votre caméra
Norme par défaut
Parfois, l’HyperDeck Studio ne sait pas quelle norme vidéo vous voulez utiliser. Ce paramètre
indiquera à l’HyperDeck Studio la norme vidéo que vous souhaitez utiliser majoritairement.
Par exemple, si un HyperDeck Studio est allumé, qu’aucune entrée vidéo n’est connectée et que
vous insérez un disque contenant des fichiers avec 2 normes vidéo, quelle norme l’HyperDeck
doit-il lire ? La norme vidéo par défaut indique la norme vidéo que vous préférez. L’HyperDeck
sélectionne ainsi ce format et lit ces fichiers.
La norme vidéo par défaut est aussi utile quand vous allumez un HyperDeck pour la première fois
etqu’il n’a aucune entrée vidéo et qu’aucun disque n’a été inséré. Dans ce cas, l’HyperDeck Studio
ne sait pas quelle norme vidéo utiliser pour la sortie de monitoring. La norme vidéo par défaut lui
servira de guide.
En revanche, elle n’est qu’un simple guide. Elle ne prime sur rien. Ainsi, si vous avez un disque avec
un seul type de fichier vidéo et que vous lancez la lecture, l’HyperDeck Studio basculera sur cette
norme vidéo et la lira. Il ignorera la norme vidéo par défaut, car il est évident que vous souhaitez
uniquement lire les fichiers sur le disque.
L’enregistrement fonctionne de façon similaire. Si vous lancez l’enregistrement, l’HyperDeck
enregistrera la norme vidéo connectée à l’entrée vidéo. Une fois l’enregistrement terminé,
l’HyperDeck Studio lira les fichiers avec cette même norme vidéo même si le disque contient
d’autres fichiers qui correspondent à la norme vidéo par défaut. Il est entendu qu’on veut
généralement lire la norme vidéo qu’on vient d’enregistrer. Si vous débranchez et rebranchez le
disque, alors la norme vidéo par défaut sera utilisée pour choisir le type de fichier à lire.
La norme vidéo par défaut n’est qu’un guide pour aider l’HyperDeck Studio à prendre des décisions
en cas de doute. Elle ne force pas l’enregistreur à réagir de façon particulière.
163Paramètres

Paramètres du réseau
Protocole
Le Blackmagic HyperDeck est réglé sur DHCP. Une fois connecté, le serveur de votre réseau
assignera automatiquement une adresse IP et aucun autre paramètre réseau n’aura besoin d’être
ajusté. Si vous avez besoin d’une adresse manuelle, vous pouvez vous connecter via une
IP statique.
Une fois Protocole sélectionné, appuyez sur le bouton Set clignotant pour accéder au menu.
Puis, faites défiler jusqu’à IP statique et appuyez sur Set.
Adresse IP, masque de sous-réseau et passerelle
Une fois l’IP statique sélectionnée, vous pouvez saisir les informations du réseau manuellement.
Pour changer l’adresse IP:
1 Utilisez la molette pour mettre Adresse IP en surbrillance et appuyez sur le bouton
clignotant Set sur le panneau avant de votre HyperDeck.
2 À l’aide de la molette, ajustez l’adresse IP et appuyez sur Set pour confirmer avant d’ajuster
la série de valeurs suivante.
3 Appuyez sur Set pour confirmer le changement et passer à la valeur suivante.
Quand vous avez fini de saisir l’adresse IP, vous pouvez répéter ces étapes pour ajuster le masque
de sous-réseau et la passerelle. Une fois terminé, appuyez sur le bouton clignotant Menu pour
retourner à l’écran d’accueil.
164Paramètres

Paramètres du timecode
Entrée
Lors de l’enregistrement, vous disposez de cinq options pour l’entrée du timecode.
Entrée vidéo Sélectionne le timecode intégré aux sources SDI et HDMI intégrant des métadonnées
SMPTE RP 188. Grâce à cette opération, la source SDI ou HDMI et le fichier enregistré
sur l’HyperDeck Studio restent sychronisés.
Externe Choisissez cette option si vous utilisez l'entrée timecode sur la face arrière.
Interne Utilisez cette option pour enregistrer le timecode sous forme de code horaire via
le générateur de timecode intégré.
Regen
dernier clip
Lorsque vous sélectionnez Regen dernier clip pour l’entrée du timecode, chaque
fichier démarre une image après la dernière image du clip précédent. Par exemple,
si le premier clip se termine à 10:28:30:10, le timecode du clip suivant commencera
à 10:28:30:11.
Préréglage Pour régler un timecode manuellement, sélectionnez l’option Préréglage.
Les clips enregistrés commenceront au timecode réglé dans Préréglage.
Perte d'images
Pour les sources NTSC ayant une fréquence d’images de 29.97 ou de 59.94, vous pouvez choisir
entre un timecode avec ou sans perte d'images. Si la source est inconnue, sélectionnez Par défaut.
La norme de l’entrée sera conservée, ou elle se règlera par défaut sur Perte d'images s’il n’y pas de
timecode valide.
Préréglage
Vous pouvez régler votre timecode manuellement en appuyant sur Set et en saisissant le timecode
à l’aide de la molette et du bouton Set. Vérifiez que l’option Préréglage est correctement
sélectionnée dans le menu Entrée.
Sortie
Choisissez les options du timecode pour les sorties.
Timeline Pour acheminer un timecode continu pour tous les clips enregistrés sur une carte
ou sur un disque, sélectionnez Timeline.
Clip Sélectionnez Clip pour acheminer le timecode de chaque clip.
Sortie SDI
165Paramètres
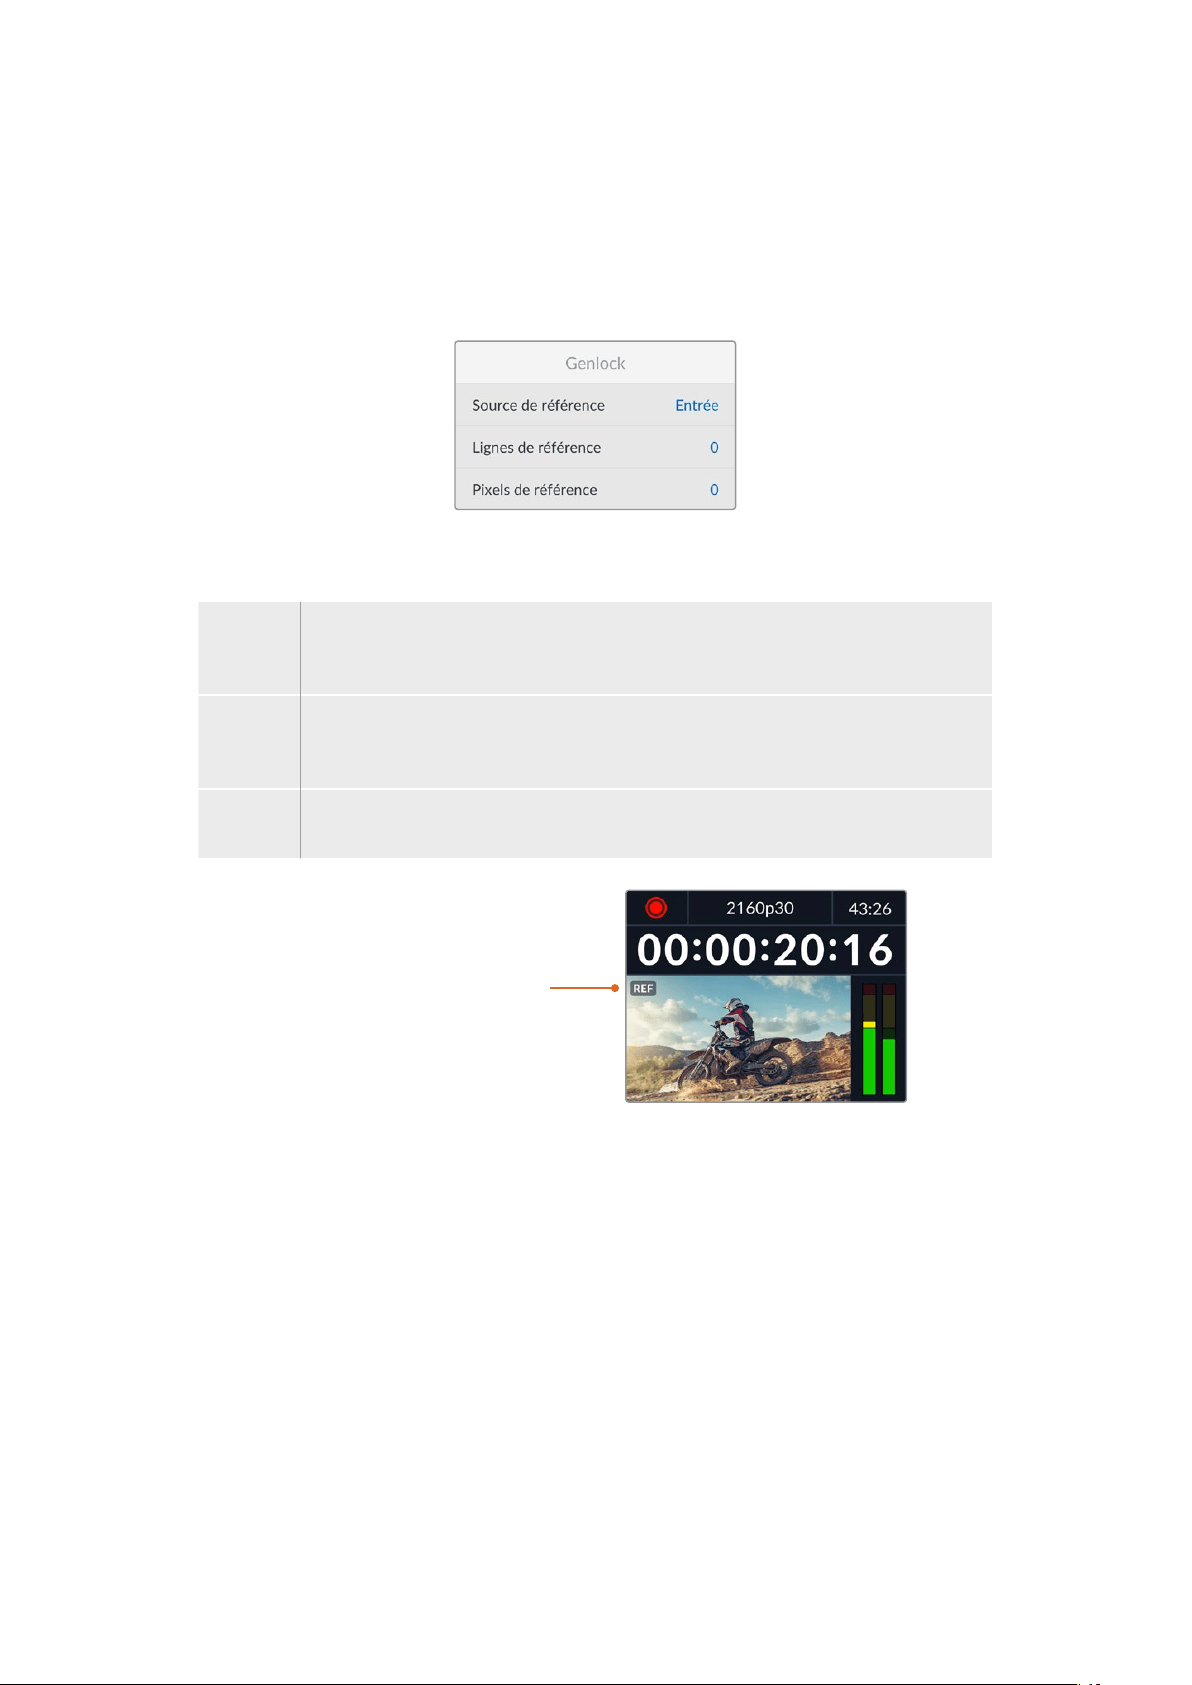
Sortie 3G-SDI
Certains équipements broadcast n’acceptent que la vidéo 3G-SDI de niveau A ou de niveau B.
Pour conserver une compatibilité avec d’autres équipements broadcast, sélectionnez Niveau A pour
un stream 3G-SDI direct, ou Niveau B pour un double stream multiplex 3G-SDI.
Paramètres Genlock
Source de référence
Choisissez votre source de référence parmi ces trois options.
Auto Le mode Auto sera par défaut sur externe s'il y a un signal connecté à la connexion Ref
in sur la face arrière. Si aucune référence n’est connectée, par défaut, la source d’entrée
sera SDI ou HDMI.
Entrée Sélectionnez Entrée si votre source intègre une référence à laquelle vous voulez vous
synchroniser. Par exemple, lorsque votre enregistreur analogique possède une source
de genlock directement connectée.
Externe Si vous utilisez un appareil de référence externe, par exemple un Blackmagic Sync
Generator, connecté via la connexion Ref In à l’arrière, sélectionnez Externe.
Indicateur de référence externe–
Un indicateur de référence s’affiche
sur l’écran LCD intégré quand votre
HyperDeck Studio est verrouillé sur
une source de référence externe.
Timing de référence
Le timing de référence peut être ajusté pour l’archivage depuis des enregistreurs à bande
analogiques si vous avez besoin de la synchronisation d’image. Le réglage de la référence est
effectué en unités d’échantillonnage afin d'obtenir un réglage extrêmement précis.
Pour ajuster le timing:
1 Dans le menu Réglages, utilisez la molette pour mettre Lignes de référence en surbrillance
et appuyez sur le bouton Set clignotant.
2 Ajustez le nombre de lignes en tournant la molette dans le sens des aiguilles d’une montre
pour augmenter et dans le sens inverse des aiguilles d’une montre pour diminuer.
3 Appuyez sur le bouton Set clignotant pour confirmer la sélection.
4 Pour ajuster les pixels, appuyez sur le bouton Menu clignotant pour retourner au menu
Réglages. Répétez les étapes pour les pixels de référence.
166Paramètres
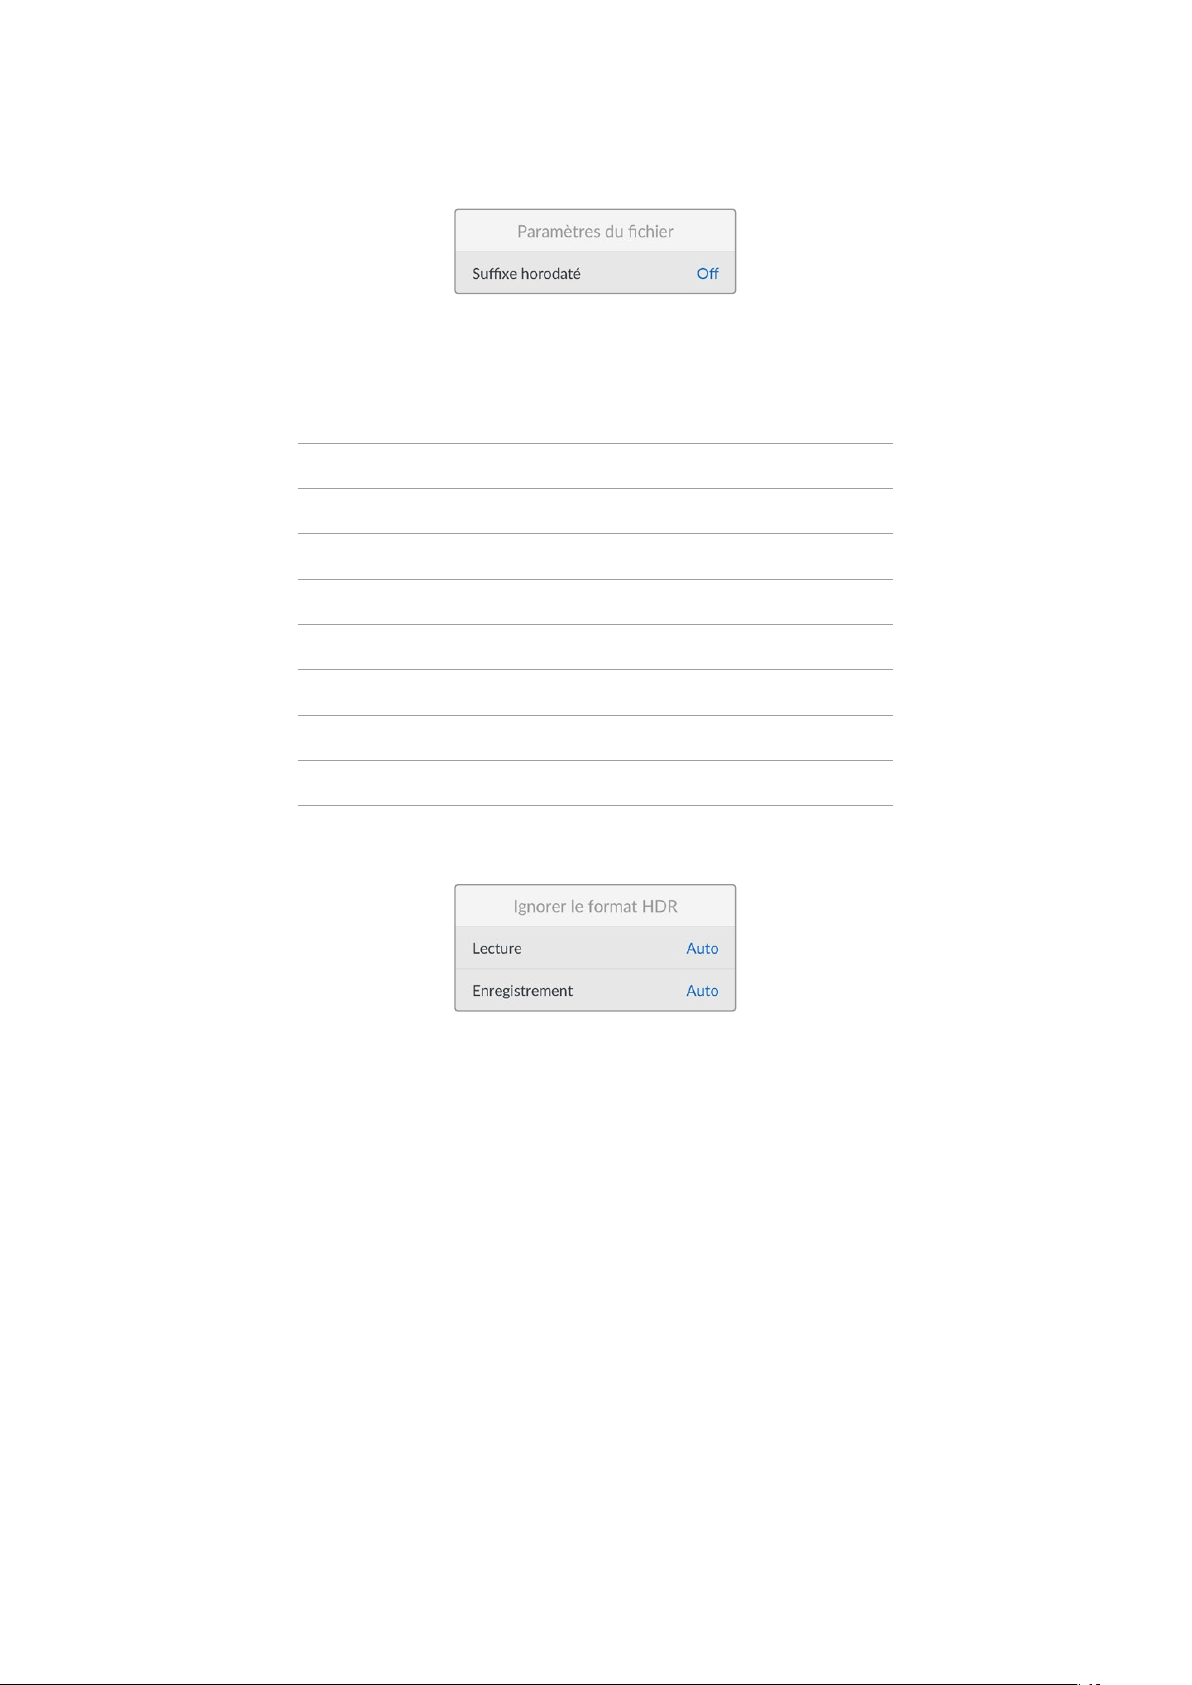
Paramètres du fichier
Suffixe horodaté
Par défaut, ce paramètre est désactivé. Si vous souhaitez utiliser la date et l’heure enregistrées dans
votre nom de fichier, activez cette option en appuyant sur le bouton Set et en sélectionnant On avec
la molette.
HyperDeck_2105061438_0001
HyperDeck_2105061438_0001 Nom de fichier
HyperDeck_2105061438_0001 Année
HyperDeck_2105061438_0001 Mois
HyperDeck_2105061438_0001 Jour
HyperDeck_2105061438_0001 Heure
HyperDeck_2105061438_0001 Minute
HyperDeck_2105061438_0001 Numéro de clip
Ignorer le format HDR
L’HyperDeck Studio 4K Pro détectera automatiquement les métadonnées HDR intégrées à un signal
ou fichier vidéo 4K et les affichera via la sortie HDMI. Si le signal ou le fichier est identifié de façon
incorrecte ou si votre affichage n’est pas compatible avec le HDR, vous pouvez ignorer le format HDR.
Pour ce faire, réglez le paramètre Ignorer le format HDR sur une option SDR telle que Rec.2020 SDR.
Les paramètres de lecture et d’enregistrement HDR sont:
Auto
C’est le paramètre réglé par défaut. L’HyperDeck sélectionne automatiquement le format de sortie
conforme aux métadonnées HDR du clip.
Rec.709
Ce paramètre est utilisé pour la vidéo haute définition utilisant une plage dynamique standard.
Rec.2020 SDR
Ce paramètre est utilisé pour la vidéo Ultra HD utilisant une plage dynamique standard.
HLG
HLG signifie ‘hybrid log gamma’. Ce format permet de lire de la vidéo sur les téléviseurs et les
moniteurs prenant en charge le HDR, y compris ceux compatibles avec le SDR Rec.2020.
167Paramètres

Les paramètres suivants prennent en charge le gamut Rec.2020, ainsi que le PQ (Perceptual
Quantizer) publié en tant que SMPTE ST2084. Le PQ est la fonction de HDR à gamut étendu qui
permet d’afficher des images plus claires. Les valeurs de luminance exprimées en candela par mètre
carré, par exemple 1000 cd/m
2
, indiquent la luminance maximale par mètre carré prise en charge par
le format correspondant.
ST2084 (300)
Luminance de 300cdm
2
.
ST2084 (500)
Luminance de 500 cd/m
2
.
ST2084 (800)
Luminance de 800 cd/m
2
.
ST2084 (1000)
Luminance de 1000 cd/m
2
.
ST2084 (2000)
Luminance de 2000 cd/m
2
.
ST2084 (4000)
Luminance de 4000 cd/m
2
.
Réglage à distance
Réglage à distance
Sélectionnez Réglage à distance pour activer le contrôle à distance via RS-422. Cela permettra à
l’HyperDeck d’être contrôlé à distance par un autre appareil comme l’HyperDeck Extreme Control,
par exemple. Lorsqu’il est sélectionné, le bouton Rem sur certains modèles HyperDeck s’allumera
pour indiquer qu’il est actif. Désélectionnez Rem pour contrôler l’appareil localement.
Contrôle à distance
Lorsque le contrôle à distance est activé, les commandes de transport d’un HyperDeck peuvent
êtrereflétées sur les HyperDeck supplémentaires. Reliez en chaîne vos HyperDecks en connectant
le connecteur de sortie à distance de l’HyperDeck master au connecteur d‘entrée à distance d’un
second Hyperdeck, puis continuez la chaîne RS-422 pour les enregistreurs supplémentaires. Lorsque
la fonction de contrôle à distance des enregistreurs supplémentaires est activée, les commandes de
transport de l’enregistreur principal contrôlent également les appareils supplémentaires.
Par exemple, quand vous appuyez sur Rec sur l’HyperDeck master, les autres HyperDecks
connectés enregistreront simultanément.
Il est important de noter que l’HyperDeck Studio HD Mini ne peut pas être utilisé comme contrôleur.
Il peut, en revanche, être contrôlé par un HyperDeck Pro ou Plus.
Réinitialisation
Réinitialisation d’usine
Mettez Réinitialisation d’usine en surbrillance dans le menu Réglages pour restaurer l’HyperDeck
sur les paramètres par défaut. Une fois que vous aurez appuyé sur Set, on vous demandera de
confirmer votre sélection.
168Paramètres

Face arrière
1 Alimentation
Tous les HyperDecks comprennent une entrée IEC pour une alimentation secteur AC.
L’HyperDeck Studio 4K Pro en intègre deux pour la redondance. L’entrée DC permet
d’utiliser une batterie 12V externe qui peut également servir de redondance. Vérifiez
que toute source d’alimentation DC est compatible avec la tension de l’entrée et les
caractéristiques indiquées sous le connecteur d’entrée DC.
2 Ethernet
Le port Ethernet permet de vous connecter au réseau pour des transferts FTP rapides
ou pour contrôler l’appareil à distance via l’HyperDeck Ethernet Protocol. Les vitesses
de transfert des fichiers sont supportées via 1GbE sur les modèles HD et 10GbE sur
l’HyperDeck Studio 4K Pro. Pour plus d’informations concernant le transfert des fichiers via
un client FTP, consultez la section «Transférer des fichiers sur un réseau» de ce manuel.
Lorsqu’il est connecté au même réseau qu’un mélangeur ATEM, votre HyperDeck peut
également être contrôlé à l’aide de ce dernier ou d’un panneau matériel ATEM.
3 Réglage à distance
Certains modèles HyperDeck Studio comprennent deux connecteurs DE-9 RS-422 pour
offrir une entrée et une sortie à distance. L’HyperDeck Studio HD Mini n’offre qu’une
entrée Remote.
4 Disque externe
Connectez un disque flash au connecteur USB-C pour enregistrer sur des disques externes
jusqu’à 5Gb/s sur les modèles HyperDeck Studio HD. Les modèles HyperDeck Studio 4K
Pro intègrent une connexion USB 3.1 gen 2 pour des vitesses de transfert jusqu’à 10Gb/s.
Vous pouvez également connecter l’appareil à des hubs USB-C multiports, ou à un
Blackmagic MultiDock 10G pour utiliser un ou plusieurs SSD.
Lorsque votre HyperDeck est connecté à un ordinateur via USB, vous pouvez l’utiliser en
tant que source webcam avec des logiciels comme Open Broadcaster et Skype. Pour plus
d'informations, consultez la section «Configurer Open Broadcaster» de ce manuel.
5 Sortie moniteur
La connexion 3G-SDI Monitor Out offre une sortie redimensionnée comportant des
informations à l’écran pour le monitoring sur un écran externe. Ces informations comprennent
des icônes pour les disques, des indicateurs audio, un compteur de temps et un affichage de
la LUT. Pour plus d'informations concernant les paramètres SDI du moniteur, dont la façon
d’acheminer un signal propre, consultez la section «Paramètres» de ce manuel.
2 5 6 8 941
L’HyperDeck Studio HD Mini
comprend un connecteur
d’alimentation sécurisé pour éviter
toute déconnexion accidentelle.
Les modèles HyperDeck Studio
HDMini et Plus intègrent des
connecteurs BNC pour l’entrée
et la sortie timecode.
7
3
169Face arrière

6 Ref
Tous les modèles HyperDeck intègrent une sortie de référence vidéo stabilisée qui
correspond aux normes de définition standard black burst et de haute définition tri-sync.
Vous pouvez également recevoir des signaux de référence provenant de sources externes,
telles qu’un générateur de synchro. Ainsi, plusieurs appareils dans votre studio peuvent
recevoir un signal de référence provenant de la même source, comme le Blackmagic Sync
Generator, pour synchroniser tous les équipements. Sélectionnez l’entrée ou la source de
référence externe via le menu Réglages.
Pour plus d'informations concernant la sélection de la source de référence, consultez la
section «Réglages» de ce manuel.
7 Timecode
Recevez le timecode externe via les entrées timecode ou reliez le timecode de
l’HyperDeck via la sortie timecode. Sur certains modèles, le timecode est connecté via les
connecteurs BNC. L’HyperDeck Studio 4K Pro comprend des connecteurs timecode XLR.
Pour plus d'informations concernant la sélection des options du timecode, consultez la
section «Paramètres» de ce manuel.
8 HDMI
Connectez la sortie HDMI à des télévisions et des moniteurs HDMI.
L’HyperDeck détectera automatiquement les normes vidéo SDR et HDR lorsque les
métadonnées correctes sont attribuées au signal. Vous pouvez également ignorer le format
HDR dans le menu Réglages. Pour plus d'informations, consultez la section «Paramètres»
de ce manuel.
9 SDI
Les modèles HyperDeck Studio HD Mini intègrent une connectique 3G-SDI pour les signaux
jusqu’à 1080p60. Les modèles HyperDeck Studio HD Plus et HyperDeck Studio HD Pro
offrent une connectique 6G-SDI pour les signaux de la SD jusqu’à 2160p30. L’HyperDeck
Studio 4K Pro comprend des entrées et des sorties 12G-SDI pour des résolutions
jusqu’à 2160p60.
Les HyperDecks dotés de deux sorties SDI peuvent être utilisés afin de lire des fichiers
ProRes 4444 pour acheminer simultanément des signaux fill et key lorsqu’ils sont connectés
à des mélangeurs ATEM.
170Face arrière

Utiliser la sortie de monitoring
La sortie de monitoring est une façon rapide de vérifier l’enregistrement ou la lecture de la vidéo,
car elle affiche des informations à l’écran importantes, telles que le codec, la vidéo, le format, la
fréquence d’images, le timecode, le nom de fichier, l’état des commandes de transport, l’état du
support de stockage et les niveaux audio.
Vous trouverez ci-dessous une description des informations affichées.
Codec
Affiche le codec sélectionné via le menu de l’écran LCD.
Format
En mode lecture, affiche la résolution et la fréquence d’images du clip en cours. Si vous êtes en
mode enregistrement, il affiche la résolution et la fréquence d’images de la vidéo connectée à la
source sélectionnée.
Timecode
Affiche le timecode du clip vidéo durant la lecture, ou du clip en cours d’enregistrement via les
entrées vidéo ou timecode. Vous pouvez aussi choisir d’afficher le timecode du clip ou le compteur
de temps de la timeline.
Original
Affiche la source SDI ou HDMI sélectionnée. Si la mention Aucun signal apparaît, aucun signal
valide n’est détecté.
Nom
Affiche le nom de l’enregistreur à disque HyperDeck. Pour des informations sur la façon de changer
de nom, consultez la section «Blackmagic HyperDeck Setup» de ce manuel.
171Utiliser la sortie de monitoring
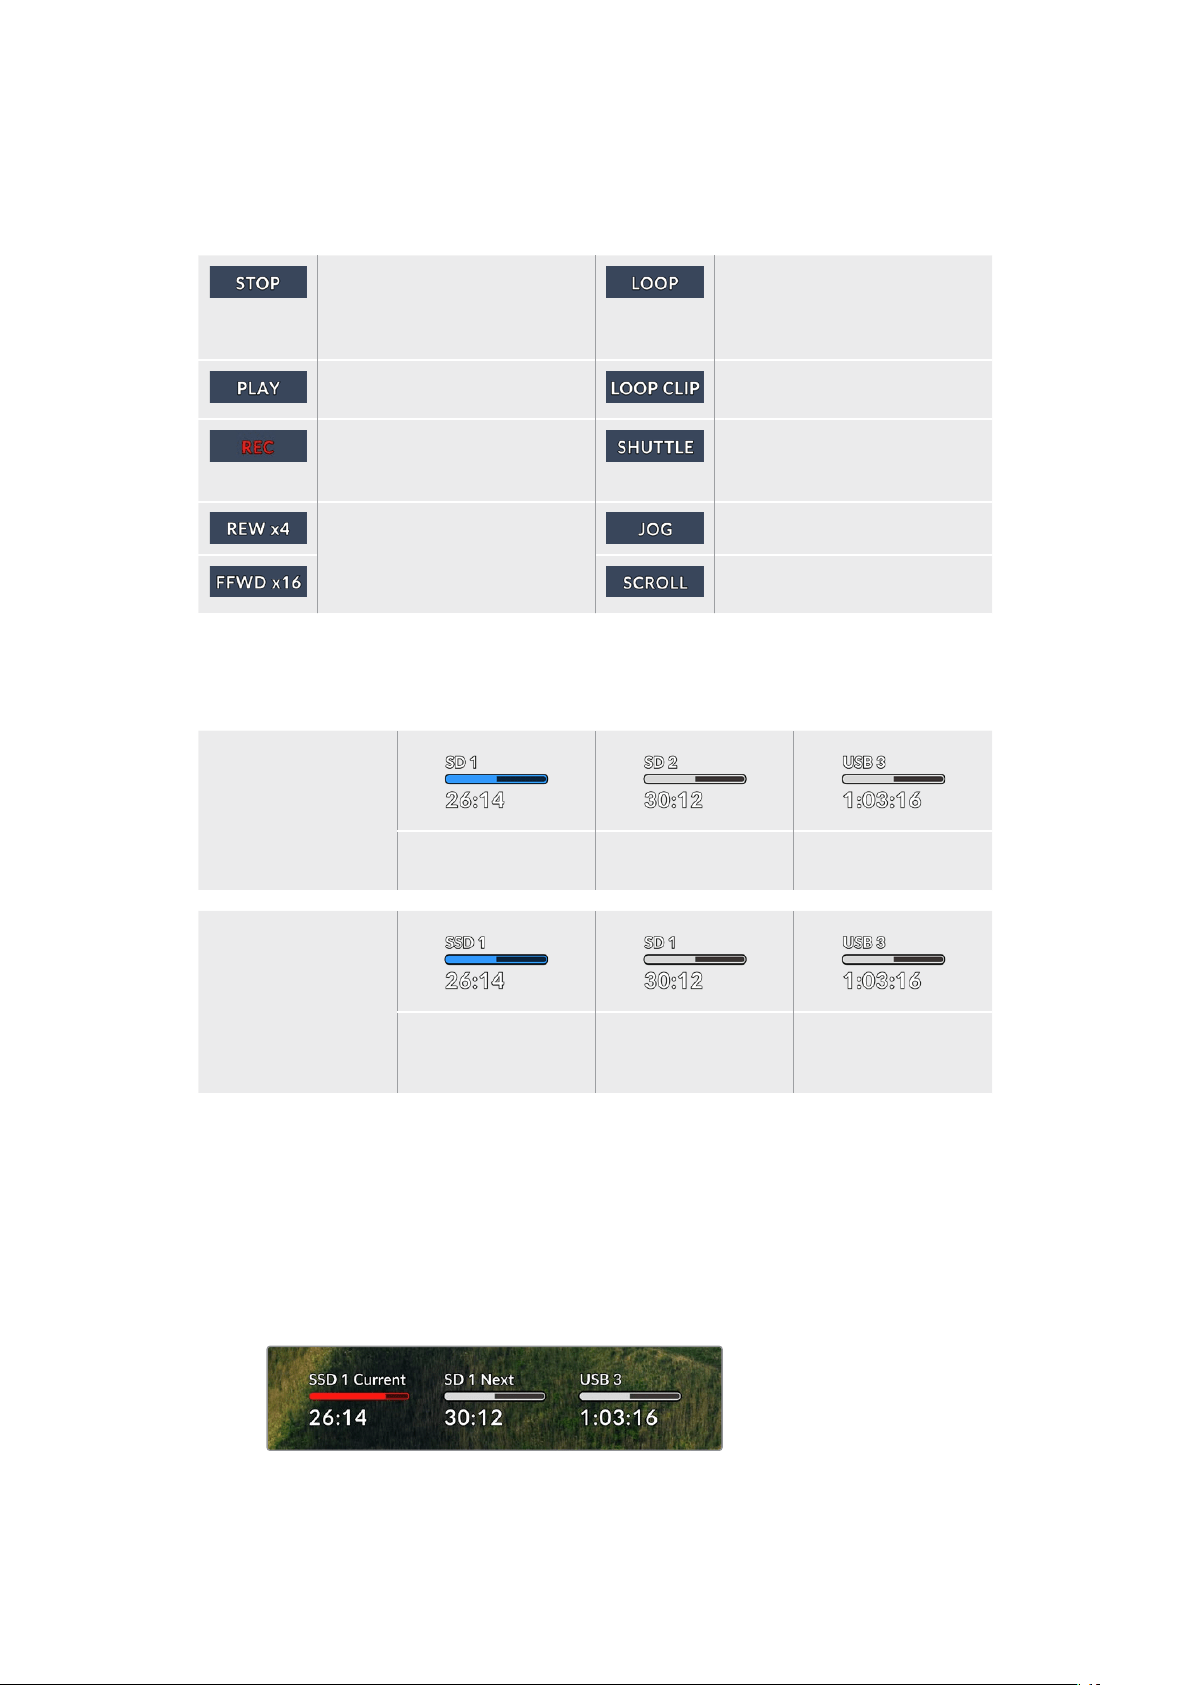
État
Lorsque vous lisez ou enregistrez un clip, cet indicateur affiche l’état des commandes de transport
ainsi que les commandes en utilisation. Ces options comprennent :
L’HyperDeck est en mode
de veille.
Indique une lecture en boucle
de tous les clips enregistrés
et partageant le format vidéo
sélectionné.
La vidéo est en lecture. Indique une lecture en boucle
d’un seul clip.
La vidéo est en enregistrement.
L’indicateur devient rouge durant
l’enregistrement.
Indique que le mode Shuttle
est activé, mais en veille.
Affichés durant l’avance ou
le retour rapide. Les numéros
indiquent la vitesse.
L’HyperDeck est en mode Jog.
L’HyperDeck est en mode
Défilement.
État des supports de stockage
Ces trois indicateurs affichent le nom et l’état de la carte SD, des SSD et du disque USB actif.
Ils varient légèrement selon le modèle de l’HyperDeck.
HyperDeck Studio
HD Plus
Logement pour
carte SD 1
Logement pour
carte SD 2
Disque externe actif
Modèles HyperDeck
Studio Pro
Carte SD ou SSD
en cours d’utilisation
Logement pour carte
SD ou SSD suivant
dans l’ordre
Disque externe actif
Sur tous les modèles HyperDeck, le 3e indicateur affiche le disque USB. Si vous utilisez un hub USB
ou une station d’accueil, telle que le Blackmagic MultiDock 10G, le disque actif sera affiché.
Indicateur du disque
Le texte au-dessus de la barre de progression indique le logement pour carte SD ou SSD.
Lors de l’enregistrement, la mention Actuel s’affichera à gauche du disque pour que vous
puissiez facilement identifier le disque en cours d’enregistrement. La mention Suivant
s’affichera au-dessus de la barre de progression pour indiquer le prochain disque sur
lequel l’enregistrement aura lieu.
172Utiliser la sortie de monitoring
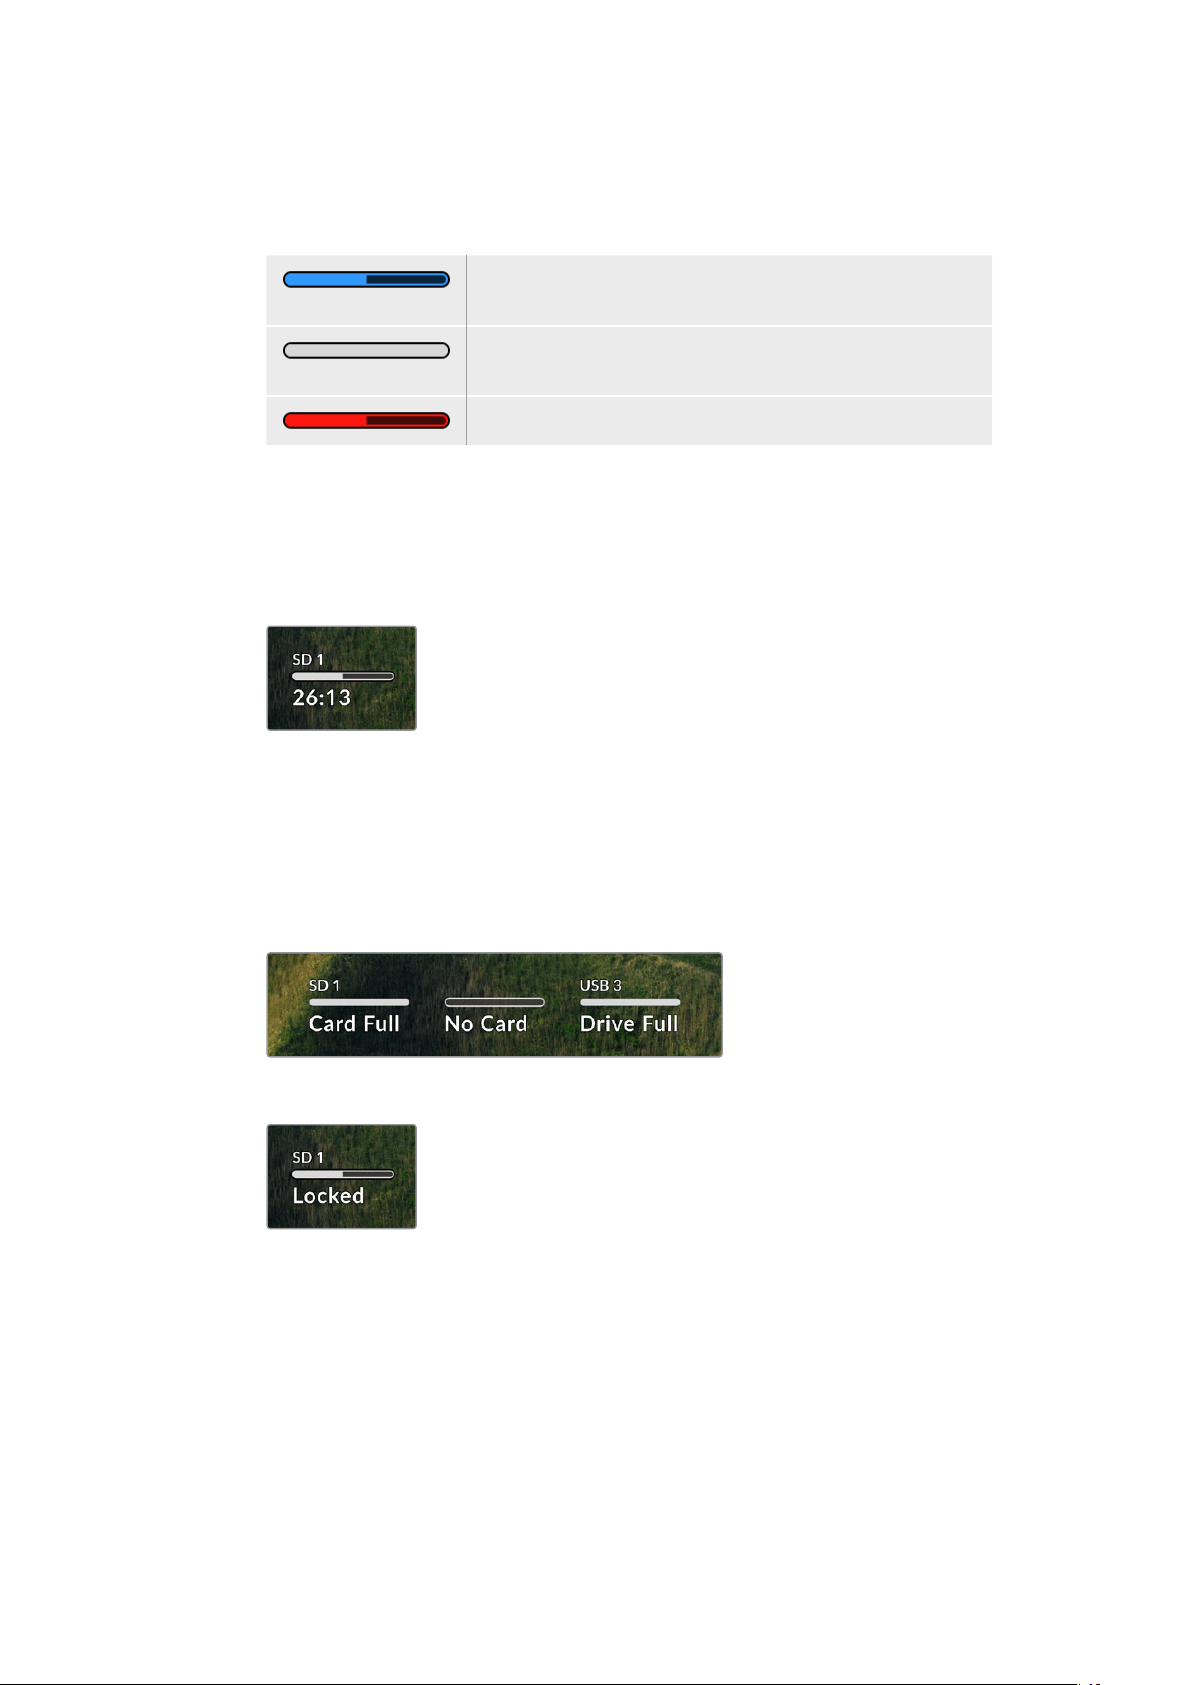
Barre du support
La barre du support s’affichera en bleu, en blanc ou en rouge selon son état. Elle affichera
également l’espace utilisé sur la carte.
La couleur bleue indique le disque actif. Ce dernier sera utilisé
pour la lecture et l’enregistrement.
La couleur blanche indique un support présent, mais inactif.
Une barre toute blanche indique un disque plein.
La barre devient rouge durant l’enregistrement.
Le texte sous la barre affiche le temps d’enregistrement restant ou l’état du logement.
Temps restant
Lorsqu’il reste de l’espace sur votre carte SD ou SSD, il s’affiche en heures:minutes:secondes
selon la source, le format, le codec et les paramètres de qualité sélectionnés. Lorsqu’il reste
moins d’une heure, seules les minutes et les secondes s’afficheront.
État du logement
Aucune et Aucun s’affichent lorsqu’aucun support n’est connecté au logement.
Lorsqu’une carte SD, un SSD ou un disque USB est plein, l’icône affiche Pleine ou Plein
pour vous indiquer qu’il est temps de changer le support de stockage. Si une autre carte SD
ou un SSD est inséré(e), l’enregistrement se poursuivra automatiquement sur ce support.
Si vous avez un disque externe connecté, l’enregistrement se poursuivra sur ce dernier
lorsque toutes les cartes SD et SSD seront pleins.
Lorsqu’un disque est verrouillé, la mention Verrouillé s’affiche sous la barre de progression.
173Utiliser la sortie de monitoring

Indicateurs audio
Les indicateurs audio afficheront jusqu’à 16 canaux audio à l’écran, selon le nombre de
canaux utilisés pour l’enregistrement. Ils peuvent être réglés sur PPM ou VU dans l’onglet
Audio du menu à l’écran.
Pour sélectionner le nombre de canaux audio, ou pour modifier le type d’indicateur, utilisez
l’onglet Audio du menu à l’écran. Pour plus d'informations, consultez la section «Paramètres»
de ce manuel.
Supports de stockage
Carte SD
Pour un enregistrement de haute qualité en Ultra HD, nous vous recommandons d'utiliser des
cartes SD haut débit UHS-II. Pour enregistrer de l'Ultra HD 2160p60, ces cartes doivent avoir un
débit d'écriture minimum de 220 Mb/s. Toutefois, si vous enregistrez à des débits plus bas et une
compression plus élevée, il est également possible d'utiliser des cartes moins rapides. Les cartes
les plus rapides sont en général plus performantes.
N'hésitez pas à vérifier les dernières versions du manuel pour obtenir les informations les plus récentes.
Il peut être téléchargé sur le site Internet de Blackmagic Design www.blackmagicdesign.com/fr/support.
Quelles cartes SD dois-je utiliser avec l’HyperDeck Studio 4K Pro ?
Les cartes SD suivantes sont recommandées pour enregistrer en 2160p jusqu’à 60 im/s.
Marque Modèle Capacité
Angelbird AV Pro MK2 V90 SDXC 128GB
Angelbird AV Pro MK2 V90 SDXC 256GB
ProGrade Digital SDXC UHS-II V90 300R 128GB
ProGrade Digital SDXC UHS-II V90 300R 256GB
Wise SD2-128U3 SDXC UHS-II 128GB
174Supports de stockage

Quelles cartes SD dois-je utiliser avec l’HyperDeck Studio HD Pro ?
Les cartes SD suivantes sont recommandées pour enregistrer en 2160p jusqu’à 30 im/s.
Marque Modèle Capacité
Angelbird AV Pro MK2 V90 SDXC 64GB
Angelbird AV Pro MK2 V90 SDXC 128GB
Angelbird AV Pro MK2 V90 SDXC 256GB
ProGrade Digital SDXC UHS-II V90 300R 64GB
ProGrade Digital SDXC UHS-II V90 300R 128GB
ProGrade Digital SDXC UHS-II V90 300R 256GB
Wise SD2-64U3 SDXC UHS-II 64GB
Wise SD2-128U3 SDXC UHS-II 128GB
Quelles cartes SD dois-je utiliser avec l’HyperDeck Studio HD Plus ?
Les cartes SD suivantes sont recommandées pour enregistrer en 2160p jusqu’à 30 im/s.
Marque Modèle Capacité
Angelbird AV Pro MK2 V90 SDXC 64GB
Angelbird AV Pro MK2 V90 SDXC 128GB
Angelbird AV Pro MK2 V90 SDXC 256GB
ProGrade Digital SDXC UHS-II V90 300R 64GB
ProGrade Digital SDXC UHS-II V90 300R 128GB
ProGrade Digital SDXC UHS-II V90 300R 256GB
Wise SD2-64U3 SDXC UHS-II 64GB
Wise SD2-128U3 SDXC UHS-II 128GB
Quelles cartes SD dois-je utiliser avec l’HyperDeck Studio HD Mini ?
Les cartes SD suivantes sont recommandées pour enregistrer en ProRes 422 HQ 1080p
jusqu’à to 60 im/s.
Marque Modèle Capacité
Angelbird AV Pro MK2 V90 SDXC 64GB
Angelbird AV Pro MK2 V90 SDXC 128GB
Angelbird AV Pro MK2 V90 SDXC 256GB
ProGrade Digital SDXC UHS-II V90 300R 64GB
ProGrade Digital SDXC UHS-II V90 300R 128GB
ProGrade Digital SDXC UHS-II V90 300R 256GB
Wise SD2-64U3 SDXC UHS-II 64GB
Wise SD2-128U3 SDXC UHS-II 128GB
175Supports de stockage

SSD
Lorsque vous travaillez avec de la vidéo dont le débit est élevé, il est important de bien choisir votre
SSD. Certains SSD ont une vitesse d'écriture jusqu'à 50 % moins élevée que celle indiquée par le
fabricant, par conséquent, bien que les spécifications du disque certifient qu'il est suffisamment
rapide pour prendre en charge de la vidéo, il se peut qu'il ne soit pas assez rapide pour enregistrer
de la vidéo en temps réel.
Les données de compression cachées concernent principalement l'enregistrement, ces disques
peuvent donc être utilisés pour la lecture en temps réel.
Lors de nos tests, nous avons remarqué que les modèles de SSD les plus récents et dont la capacité
de stockage est plus importante sont en général plus rapides. Les SSD recommandés comprennent
Quels SSD dois-je utiliser avec l’HyperDeck Studio 4K Pro ?
Les SSD suivants sont recommandés pour enregistrer en 2160p jusqu’à 60 im/s.
Marque Modèle Capacité
Samsung 860 PRO 512GB
Samsung 860 PRO 1TB
Samsung 870 EVO (MZ-77E250BW) 250GB
Samsung 870 EVO (MZ-77E500BW) 500GB
Samsung 870 EVO (MZ-77E1T0BW) 1TB
Samsung 870 EVO (MZ-77E2T0BW) 2TB
Quels SSD dois-je utiliser avec l’HyperDeck Studio HD Pro ?
Les SSD suivants sont recommandés pour enregistrer en 2160p jusqu’à 30 im/s.
Marque Modèle Capacité
Samsung 860 PRO 512GB
Samsung 860 PRO 1TB
Samsung 870 EVO (MZ-77E250BW) 250GB
Samsung 870 EVO (MZ-77E500BW) 500GB
Samsung 870 EVO (MZ-77E1T0BW) 1TB
Samsung 870 EVO (MZ-77E2T0BW) 2TB
176Supports de stockage

Disque externe
Tous les modèles HyperDeck peuvent enregistrer directement sur des disques flash USB-C. Grâce à
ces disques rapides et à leur capacité de stockage élevée, vous pouvez enregistrer sur de longues
périodes. Il suffit de connecter le disque flash à votre ordinateur et de monter directement sur celui-ci!
Pour des capacités de stockage encore plus élevées, vous pouvez également connecter une station
d’accueil USB-C ou un disque dur externe. Pour connecter le Blackmagic MultiDock 10G ou un
disque flash USB-C, reliez un câble de l’appareil USB-C connecté au port ext disk situé sur la face
arrière de l’HyperDeck.
Quels disques USB-C dois-je utiliser avec l’HyperDeck Studio 4K Pro ?
Les disques USB-C suivants sont recommandés pour enregistrer en 2160p jusqu’à 60 im/s.
Marque Modèle Capacité
Angelbird SSD2GO PKT MK2 512GB
Angelbird SSD2GO PKT MK2 2TB
DelKinDevices Juggler 1TB
DelKinDevices Juggler 2TB
LaCie Rugged SSD STHR2000800 2TB
LaCie Rugged SSD Pro STHZ1000800 1TB
Wise PTS-512 Portable SSD 512GB
Wise PTS-1024 Portable SSD 1TB
Quels disques USB-C dois-je utiliser avec l’HyperDeck Studio HD Pro ?
Les disques USB-C suivants sont recommandés pour enregistrer en 2160p jusqu’à 30 im/s.
Marque Modèle Capacité
Angelbird SSD2GO PKT MK2 512GB
Angelbird SSD2GO PKT MK2 2TB
DelKinDevices Juggler 1TB
DelKinDevices Juggler 2TB
LaCie Rugged SSD STHR2000800 2TB
LaCie Rugged SSD Pro STHZ1000800 1TB
Wise PTS-512 Portable SSD 512GB
Wise PTS-1024 Portable SSD 1TB
177Supports de stockage

Quels disques USB-C dois-je utiliser avec l’HyperDeck Studio HD Plus ?
Les disques USB-C suivants sont recommandés pour enregistrer en 2160p jusqu’à 30 im/s.
Marque Modèle Capacité
Angelbird SSD2GO PKT MK2 512GB
Angelbird SSD2GO PKT MK2 2TB
DelKinDevices Juggler 1TB
DelKinDevices Juggler 2TB
LaCie Rugged SSD STHR2000800 2TB
LaCie Rugged SSD Pro STHZ1000800 1TB
Wise PTS-512 Portable SSD 512GB
Wise PTS-1024 Portable SSD 1TB
Quels disques USB-C dois-je utiliser avec l’HyperDeck Studio HD Mini ?
Les disques USB-C suivants sont recommandés pour enregistrer en ProRes 422 HQ 1080p
jusqu’à 60 im/s.
Marque Modèle Capacité
Angelbird SSD2GO PKT MK2 512GB
Angelbird SSD2GO PKT MK2 2TB
DelKinDevices Juggler 1TB
DelKinDevices Juggler 2TB
Wise PTS-512 Portable SSD 512GB
Wise PTS-1024 Portable SSD 1TB
178Supports de stockage

Formater les supports
Préparer le support sur un ordinateur
Formater un support sur un ordinateur Mac
Utilisez l'utilitaire de disque de Mac pour formater un support au format HFS+ ou exFAT.
N'oubliez pas de sauvegarder les informations importantes contenues sur votre support car toutes
les données seront perdues lors du formatage.
1 Connectez un SSD à votre ordinateur à l'aide d'un dock externe ou d’un câble. Ignorez
les messages proposant d'utiliser le SSD pour sauvegarder vos données à l’aide de Time
Machine. Connectez les cartes CFast à votre ordinateur via un lecteur de cartes externe.
2 Allez dans le menu Applications/Utilitaires et lancez l'utilitaire de disque.
3 Cliquez sur l'icône représentant votre SSD ou carte CFast, puis cliquez sur l'onglet Effacer.
4 Choisissez le format Mac OS étendu (journalisé) ou exFAT.
5 Saisissez le nom du nouveau volume, puis cliquez sur Effacer. Le support est alors
rapidement formaté et est prêt à être utilisé avec l'HyperDeck.
Formater un support sur un ordinateur Windows
La boîte de dialogue Formater permet de formater un support en exFAT sur un ordinateur Windows.
N'oubliez pas de sauvegarder les informations importantes contenues sur votre support, car toutes
les données seront perdues lors du formatage.
1 Connectez un SSD à votre ordinateur à l'aide d'une baie d'accueil externe ou d'un
adaptateur de câble. Connectez les cartes CFast à votre ordinateur via un lecteur de cartes
CFast externe.
2 Ouvrez le menu Démarrer ou l’écran d’accueil et choisissez l'option Ordinateur. Faites un
clic droit sur votre SSD ou carte CFast.
3 Cliquez sur Formater à partir du menu contextuel.
4 Configurez le système de gestion des fichiers sur exFAT et la taille d'unité d'allocation
sur 128 Kb.
179Formater les supports
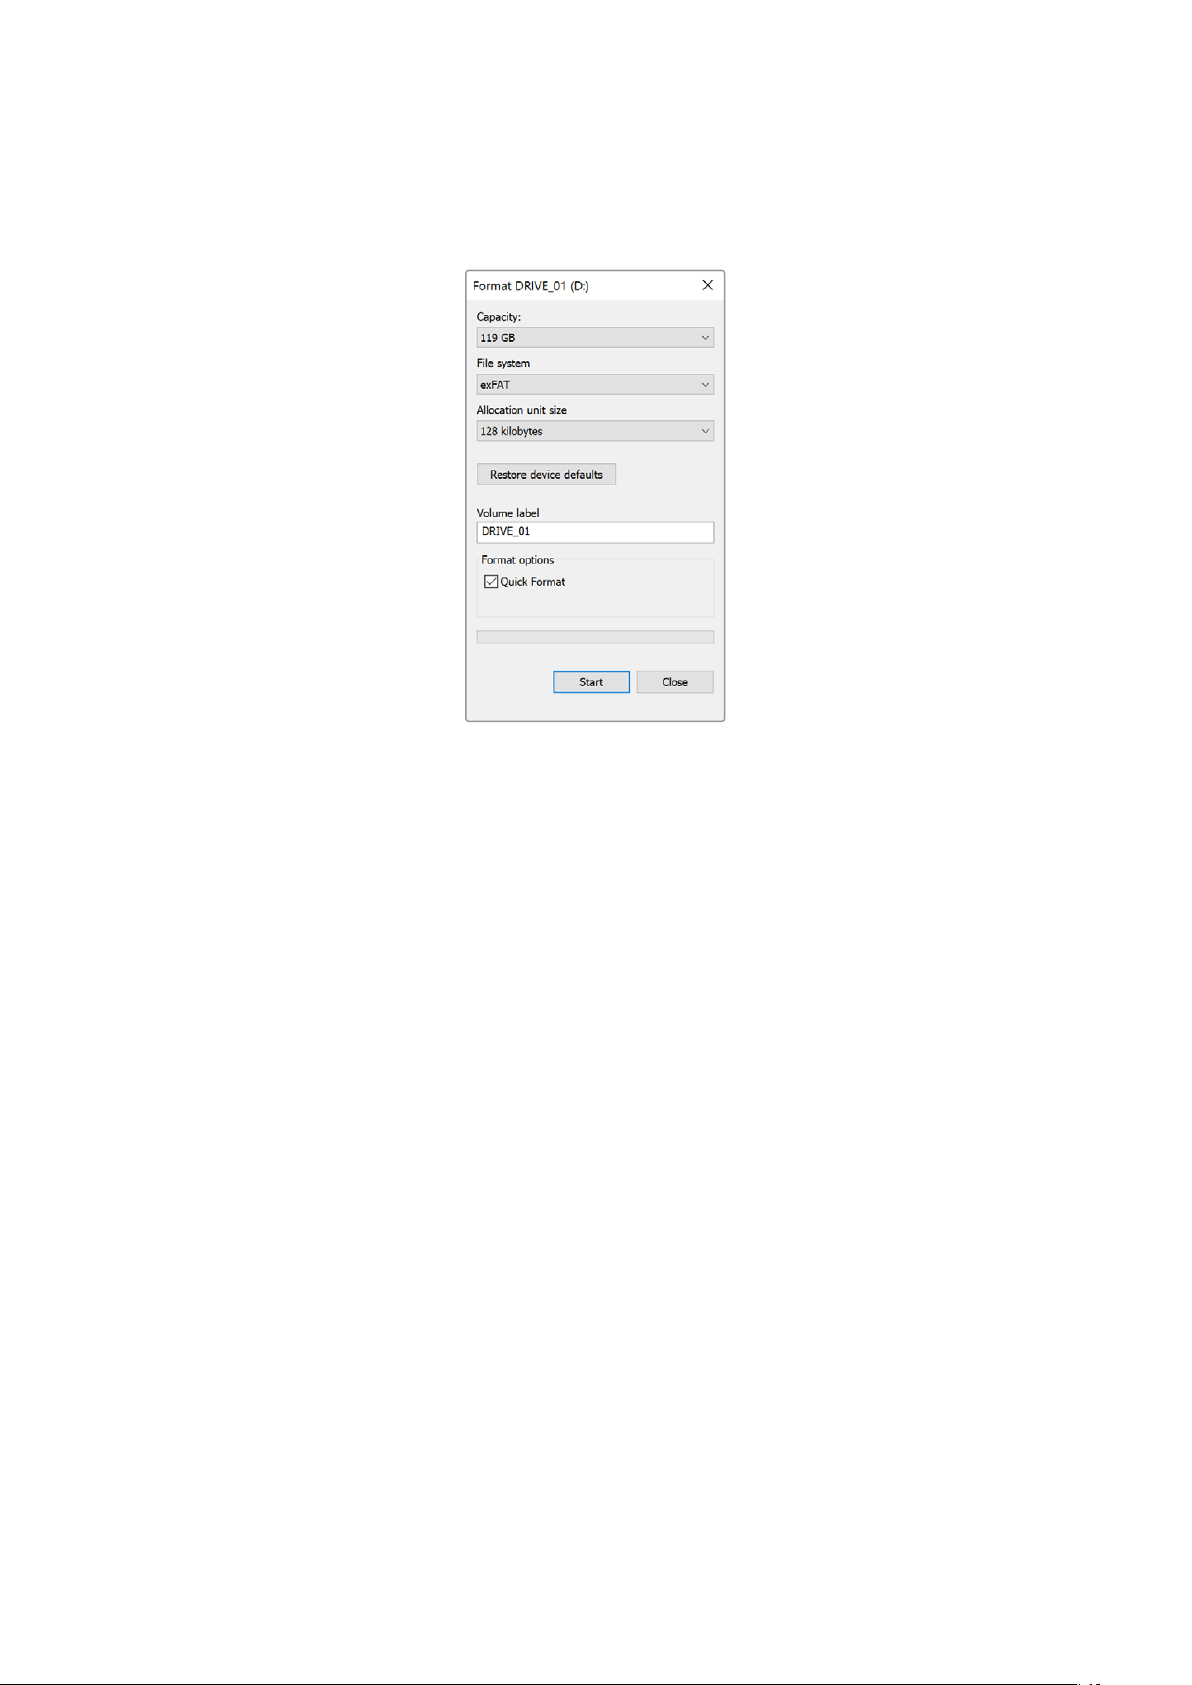
5 Saisissez un nom de volume, sélectionnez l’option Formatage rapide puis cliquez
sur Démarrer.
6 Le support est alors rapidement formaté et est prêt à être utilisé avec l'HyperDeck.
Utiliser l’HyperDeck comme unewebcam
Lorsqu’il est connecté à un ordinateur via USB, votre enregistreur à disque HyperDeck est détecté
comme une webcam. Vous pouvez donc diffuser la lecture ou l'enregistrement à partir de votre
HyperDeck à l'aide d'un logiciel de streaming tel qu'Open Broadcaster.
Régler la source webcam
Dans la plupart des cas, votre logiciel de streaming réglera automatiquement l’HyperDeck en tant
que webcam. Ainsi, lorsque vous lancerez votre logiciel de streaming, vous verrez directement
l’image de votre HyperDeck Studio. Si votre logiciel ne le sélectionne pas automatiquement,
il suffit de régler le logiciel afin qu’il utilise l’HyperDeck comme webcam et comme micro.
Vous trouverez ci-dessous un exemple pour régler les paramètres de la webcam sur Skype.
1 Dans la barre de menus de Skype, ouvrez les paramètres Audio et Vidéo.
2 Dans le menu Caméra, sélectionnez votre HyperDeck dans la liste. La vidéo de
l’HyperDeck apparaîtra dans la fenêtre de prévisualisation.
3 Dans le menu Micro, sélectionnez votre HyperDeck en tant que source audio.
Une fois les paramètres réglés, essayez peut-être d’appeler un ami via Skype afin de tester
votre webcam.
L’HyperDeck Studio est maintenant prêt à diffuser votre vidéo en direct.
180Utiliser l’HyperDeck comme unewebcam

Configurer Open Broadcaster
Open Broadcaster est une application open source qui fait office de plateforme de streaming entre
votre HyperDeck Studio et votre logiciel de streaming favori, tel que YouTube, Twitch ou encore
Facebook. Open Broadcaster compresse la vidéo en un débit binaire facilement gérable par votre
application de streaming.
Ci-dessous, vous trouverez les étapes pour configurer Open Broadcaster afin de diffuser la sortie
webcam de votre HyperDeck Studio à l’aide du service de streaming YouTube Live.
Ouvrez Open Broadcaster et cliquez sur le symbole
+ dans la boîte de dialogue Sources.
Sélectionnez Video Capture Device.
Nommez la nouvelle source et cliquez sur OK. Dans le menu Device, sélectionnez le modèle
de votre HyperDeck Studio et cliquez sur OK.
Allez sur votre compte YouTube. Cliquez sur le
bouton Go live, puis sur Stream.
Dans les options de flux de YouTube, saisissez
les informations de votre diffusion et cliquez sur
Create stream.
1
2
3
4
5
6
181Utiliser l’HyperDeck comme unewebcam

YouTube va générer une clé de stream qui va diriger
Open Broadcaster vers votre compte YouTube.
Cliquez sur le bouton Copy à côté de la clé de
stream. Copiez la clé de stream pour la coller
dans Open Broadcaster.
Retournez sur Open Broadcaster et ouvrez les
préférences en cliquant sur OBS/preferences dans
la barre de menu. Sélectionnez Stream. Collez la
clé de stream que vous avez copiée de YouTube
et cliquez sur OK.
La vidéo de l’HyperDeck apparaît dans la fenêtre de
prévisualisation du streaming d’Open Broadcaster.
Pour connecter le lien de diffusion d’Open
Broadcaster à YouTube, cliquez sur Start Streaming
en bas à droite de l’écran. Cela établit un lien
d’Open Broadcaster à YouTube. À partir de là,
tout sera réglé avec YouTube Live.
Retournez sur YouTube Live. Vous verrez la sortie
programme webcam depuis votre HyperDeck en
arrière-plan. Cliquez sur Done.
Maintenant qu’Open Broadcaster communique
avec YouTube Live, vous pouvez commencer
votre diffusion. Il est temps de faire les dernières
vérifications afin de vous assurer que tout fonctionne.
Lorsque vous êtes prêt, vous pouvez commencer
la diffusion en cliquant sur Go live.
Vous diffusez maintenant du contenu en direct sur YouTube avec Open Broadcaster.
REMARQUE En raison de la nature du streaming sur Internet, il se peut qu’il y ait un retard,
c’est pourquoi il est important de regarder la diffusion sur YouTube pour confirmer que
votre programme est terminé avant de cliquer sur End stream. Vous éviterez ainsi de
couper accidentellement la fin du programme.
7
8
9
10
11
12
182Utiliser l’HyperDeck comme unewebcam

Blackmagic HyperDeck Setup
Utiliser l’HyperDeck Setup
L'utilitaire Blackmagic HyperDeck Setup vous permet de modifier les paramètres et de mettre à jour
le logiciel interne de votre HyperDeck.
Pour utiliser l’HyperDeck Setup:
1 Connectez l'HyperDeck à votre ordinateur via USB or Ethernet.
2 Ouvrez l'HyperDeck Setup. Le nom de l’HyperDeck est indiqué sur la page d'accueil
du logiciel.
3 Pour ouvrir la page des réglages, cliquez sur l'icône Setup ou sur l'image de l’HyperDeck.
Page Setup (Réglages)
Si vous possédez plus d’un HyperDeck Studio, vous pouvez donner un nom à chaque appareil pour
faciliter leur identification dans l’option Name.
183Blackmagic HyperDeck Setup

Network (Réseau)
Protocol (Protocole)
Pour utiliser votre HyperDeck Studio avec les mélangeurs ATEM ou pour le contrôler à
distance via l’HyperDeck Ethernet Protocol, l’HyperDeck Studio doit être configuré sur le
même réseau que les autres équipements à l’aide du DHCP ou en ajoutant manuellement
une adresse IP fixe.
DHCP
Les enregistreurs à disque HyperDeck Studio sont réglés sur DHCP par
défaut. Le Dynamic Host Configuration Protocol, ou DHCP, est un service de
serveurs réseau qui attribue automatiquement une adresse IP à l’HyperDeck
Studio. Ce service facilite la connexion des équipements via Ethernet et
veille à ce que leur adresse IP ne soit pas en conflit l’une avec l’autre. La
plupart des ordinateurs et des commutateurs réseau supportent le DHCP.
Static IP (IP
statique)
Lorsque Static IP est sélectionné, vous pouvez saisir manuellement
les informations du réseau. Lorsque vous réglez des adresses IP
manuellement pour que tous les appareils puissent communiquer, ils
doivent partager les mêmes paramètres de masque de sous-réseau et de
passerelle. De plus, les trois premiers champs de l’adresse IP du panneau
doivent coïncider. Si d’autres appareils sur le réseau possèdent le même
numéro d’identification dans leur adresse IP, il y aura un conflit et les
appareils ne se connecteront pas. Le cas échéant, il suffit de modifier
le numéro d’identification dans l’adresse IP de l’appareil.
Page LUTs
Les modèles HyperDeck dotés de sorties Monitor à l’arrière peuvent afficher les entrées vidéo avec
des LUTs 3D. Les fichiers LUT .cube à 17, 33 et 65 points sont supportés.
Cela peut s’avérer utile lorsque vous utilisez le mode Film, qui offre intentionnellement des images
peu contrastées. Le fait d'appliquer une LUT vous donnera une meilleure représentation du rendu
de la vidéo après l'étalonnage.
La LUT 3D est uniquement affichée sur l’écran de monitoring et n’est pas enregistrée sur la vidéo.
Ainsi, le rendu de l’image enregistrée ne sera pas permanent.
Si vous souhaitez appliquer la même LUT à votre image dans DaVinci Resolve, il suffit d’importer le
fichier .cube utilisé par l’HyperDeck Studio dans DaVinci Resolve et de l’appliquer à l’étalonnage.
184Blackmagic HyperDeck Setup

Pour visualiser une LUT:
1 Sélectionnez la LUT. Cliquez sur le bouton Import.
2 Dans la fenêtre, allez sur la LUT que vous souhaitez importer et appuyez sur Open.
3 Une fois la LUT importée, faites basculer l’option 3D LUT sur On et appuyez sur le
bouton Save.
La LUT sélectionnée apparaîtra sur l’écran de monitoring. Vous pouvez activer et désactiver la LUT
via les paramètres du moniteur dans le menu à l’écran.
Mise à jour du logiciel interne
L’utilitaire HyperDeck Setup vous permet de mettre à jour le logiciel interne de votre enregistreur
à disque HyperDeck, mais également de configurer les paramètres de streaming, les paramètres
réseau et la qualité du streaming.
Mettre à jour le logiciel interne :
1 Téléchargez le nouveau programme d’installation Blackmagic HyperDeck Setup sur
www.blackmagicdesign.com/fr/support.
2 Ouvrez le Blackmagic HyperDeck Setup sur votre ordinateur et suivez les instructions
à l’écran.
3 Une fois l’installation terminée, connectez votre HyperDeck Studio à l’ordinateur via
le port USB ou Ethernet situé sur le panneau arrière.
4 Lancez le Blackmagic HyperDeck Setup et suivez les instructions affichées à l’écran
pour mettre à jour le logiciel interne. Si aucune information n'apparaît, le logiciel interne
est à jour.
185Mise à jour du logiciel interne

Téléchargez la dernière version de l’utilitaire pour le Blackmagic
HyperDeck Studio à partir de la page d'assistance Blackmagic
sur www.blackmagicdesign.com/fr/support.
Teranex Mini Rack Shelf
Le Teranex Mini Rack Shelf est un support d’une unité de rack qui vous permet d’installer les
modèles Blackmagic HyperDeck Studio HD Mini et HyperDeck Studio HD Plus dans un rack
broadcast ou une caisse de transport. Le Blackmagic HyperDeck Studio HD Mini est si petit qu’il
peut être installé aux côtés d'autres appareils Blackmagic Design de la même taille, tels que les
convertisseurs Teranex Mini, le Blackmagic MultiView 4 et le Blackmagic Web Presenter. Par
exemple, en installant un Blackmagic HyperDeck Studio HD Mini avec un ATEM Television Studio
HD, vous pourrez commuter huit entrées vidéo et enregistrer la sortie programme sur votre
HyperDeck Studio HD Mini. Ce design modulaire vous permet de créer des solutions personnalisées
qui sont portables et faciles à utiliser!
Le Blackmagic HyperDeck Studio HD Mini et l’HyperDeck Studio HD Plus peuvent être installés
sur un Teranex Mini Rack Shelf avec un autre appareil Blackmagic Design de la même taille.
Pour installer le Blackmagic HyperDeck sur un Teranex Mini Rack Shelf, retirez les pieds en
caoutchouc de l’appareil et vissez-le à la base du Teranex Mini Rack Shelf avec les vis fournies.
Le Teranex Mini Rack Shelf dispose de deux panneaux d'origine que vous pouvez utiliser pour
couvrir la partie du rack qui n'est pas utilisée par du matériel Blackmagic Design.
Pour plus d'informations, consultez le site Internet de Blackmagic Design :
www.blackmagicdesign.com/fr
186Teranex Mini Rack Shelf

Contrôle RS-422
Qu'est-ce que le contrôle RS-422 ?
La norme RS-422 est un contrôle de périphérique série utilisé par les diffuseurs depuis le début
des années 1980 pour les enregistreurs, les solutions de montage linéaires et non linéaires et les
produits broadcast automatisés. Les modèles HyperDeck prennent en charge cette norme afin
d'être intégrés à des systèmes broadcast automatisés, des systèmes de contrôle à distance,
des systèmes de montage ou tout autre contrôle personnalisé que vous souhaitez utiliser.
L’HyperDeck Studio prend également en charge les commandes de l’Advanced Media Protocol
via RS-422. Vous pouvez ainsi contrôler votre HyperDeck avec un appareil externe à l’aide des
commandes AMP, notamment ajouter des clips à une liste de lecture, déterminer le nom de fichier
du clip suivant, lire un clip ou une timeline en boucle et effacer une liste de lecture.
Utilisation d’un contrôleur RS-422 externe
Tous les modèles HyperDeck disposent d'un port RS-422 Sony™ comportant le nombre de broches
requises pour une connexion directe à tous types de contrôleurs à distance supportant le RS-422,
par exemple l’HyperDeck Extreme Control.
Vous pouvez utiliser des câbles à 9 broches standard dotés d’un nombre équivalent de broches
à chaque extrémité. Si vous souhaitez utiliser des câbles personnalisés, consultez le schéma
de câblage.
Si vous ne souhaitez pas utiliser les boutons du panneau avant, le contrôle à distance de
l’HyperDeck peut être effectué à l’aide de l’HyperDeck Extreme Control.
1 Connectez un signal vidéo à l'entrée vidéo de l'HyperDeck.
2 Branchez un câble RS-422 de l’HyperDeck Extreme Control à l’HyperDeck Studio.
3 Pour activer le contrôle à distance, appuyez sur le bouton Rem situé sur le panneau
de contrôle, ou utilisez le menu à l'écran de l'HyperDeck Studio Mini.
Vous pouvez désormais démarrer et arrêter la lecture et l'enregistrement à distance, mais vous
pouvez également continuer d’utiliser les fonctions de navigation standard. La liste complète des
commandes RS-422 prises en charge est affichée dans le tableau Commandes RS-422 prises
en charge.
5 4 3 2 1
9 8 7 6
Récepteur
(–)
Récepteur
(+)
Émetteur
(–)
Émetteur
(+)
Masse
2 7 8 3 1, 4, 6, 9
Broches de connexions pour le contrôle à distance RS-422
187Contrôle RS-422

Assurez-vous que le contrôle à distance de l'HyperDeck est réglé sur On
dans le menu à l'écran, ou utilisez le bouton Rem du panneau avant.
Tous les modèles HyperDeck supportent le contrôle à distance via le port RS-422 du panneau arrière.
Commandes RS-422 prises en charge
Command Reply No Remote Notes
0 - System Control
0x00 0x11 DeviceTypeRequest
NTSC: 0xF0E0
PAL: 0xF1E0
24P: 0xF2E0
Enabled
1 - Slave Response
0x20 0x00 Stop Acknowledge Disabled
0x20 0x01 Play Acknowledge Disabled
0x20 0x02 Record Acknowledge Disabled
0x20 0x04 StandbyOff Acknowledge Disabled
0x20 0x05 StandbyOn Acknowledge Disabled
0x20 0x0F Eject Acknowledge Disabled
0x20 0x10 FastFwd Acknowledge Disabled
0x21 0x11 JogFwd1 Acknowledge Disabled
0x22 0x11 JogFwd2 Acknowledge Disabled
Treated as N=1;
Same as JogFwd1
0x21 0x12 VarFwd1 Acknowledge Disabled Uses ShuttleFwd1
0x22 0x12 VarFwd2 Acknowledge Disabled
Treated as N=1;
Same as VarFwd1
0x21 0x13 ShuttleFwd1 Acknowledge Disabled
0x22 0x13 ShuttleFwd2 Acknowledge Disabled
Treated as N=1;
Same as ShuttleFwd1
0x20 0x20 Rewind Acknowledge Disabled
0x21 0x21 JogRev1 Acknowledge Disabled
0x22 0x21 JogRev2 Acknowledge Disabled
Treated as N=1;
Same as JogRev1
0x21 0x22 VarRev1 Acknowledge Disabled Uses ShuttleRev1
188Contrôle RS-422

Command Reply No Remote Notes
0x22 0x22 VarRev2 Acknowledge Disabled
Treated as N=1;
Same as VarRev1
0x21 0x23 ShuttleRev1 Acknowledge Disabled
0x22 0x23 ShuttleRev2 Acknowledge Disabled
Treated as N=1;
Same as ShuttleRev1
0x20 0x30 Preroll Acknowledge Disabled
0x24 0x31 CueData Acknowledge Disabled
0x20 0x34 SyncPlay Acknowledge Disabled
0x20 0x40 Preview Acknowledge Disabled Status bits are set
0x20 0x41 Review Acknowledge Disabled Status bits are set
0x20 0x43 OutpointPreview Acknowledge Disabled
0x22 0x5C DMCSetFwd Acknowledge Disabled
0x22 0x5D DMCSetRev Acknowledge Disabled
0x20 0x60 FullEEOff Acknowledge Disabled
0x20 0x61 FullEEOn Acknowledge Disabled
0x20 0x63 SelectEEOn Acknowledge Disabled
4 - Preset/Select Control
0x40 0x10 InEntry Acknowledge Disabled
0x40 0x11 OutEntry Acknowledge Disabled
0x44 0x14 InDataPreset Acknowledge Disabled
0x44 0x15 OutDataPreset Acknowledge Disabled
0x40 0x18 InShift+ Acknowledge Disabled
0x40 0x19 InShift- Acknowledge Disabled
0x40 0x1A OutShift+ Acknowledge Disabled
0x40 0x1B OutShift- Acknowledge Disabled
0x40 0x20 InReset Acknowledge Disabled
0x40 0x21 OutReset Acknowledge Disabled
0x40 0x22 AInReset Acknowledge Disabled
0x40 0x23 AOutReset Acknowledge Disabled
0x44 0x31 PrerollPreset Acknowledge Disabled
0x40 0x40 AutoModeOff Acknowledge Disabled
ignored, Status bit
remembered
0x40 0x41 AutoModeOn Acknowledge Disabled
ignored, Status bit
remembered
0x41 0x37 InputCheck Acknowledge Disabled
189Contrôle RS-422

Command Reply No Remote Notes
6 - Sense Request
0x61 0x0A TimeCodeGenSense — —
0x61 0x0C CurrentTimeSense — —
0x60 0x10 InDataSense InData Enabled
0x60 0x11 OutDataSense OutData Enabled
0x60 0x12 AInDataSense AInData Enabled
0x60 0x13 AOutDataSense AOutData Enabled
0x61 0x20 StatusSense StatusData Enabled
0x60 0x2B RemainTimeSense RemainTimeData Enabled
0x60 0x2E SpeedSense SpeedData Enabled
0x60 0x31 PrerollTimeSense PreRollTimeData Enabled
0x60 0x36 TimerModeSense TimerModeData Enabled
0x60 0x3E RecordInhibitSense RecordInhibitStatus Enabled
7 - Sense Reply
0x78 0x00 Timer1Data — —
Current Time and
00:00:00:00
0x78 0x04 LTCUserBitsTimeData — —
Current Time and
00:00:00:00
0x78 0x06 VITCUserBitsTimeData — —
Current Time and
00:00:00:00
0x74 0x06 VITCTimeData — — Current Time
0x74 0x07 UserBitsVITCTimeData — — 00:00:00:00
0x74 0x08 GenTCData — — Current Time
0x78 0x08 GenTCUBData — —
Current Time and
00:00:00:00
0x74 0x09 GenUBData — — 00:00:00:00
0x74 0x10 InData — —
0x74 0x11 OutData — —
0x74 0x12 AInData — —
0x74 0x13 AOutData — —
0x74 0x14 CorrectedLTCTimeData — — Current Time
0x70 0x20 StatusData — —
Please see “Status Bits”
sheet: Limited to 9 bytes
of status, silently
truncated
0x76 0x2B RemainTimeData — —
0x71 0x2E SpeedData — —
0x74 0x31 PrerollTimeData — —
0x71 0x36 TimerModeData — — Returns 0 (TimeCode)
0x72 0x3E RecordInhibitStatus — —
190Contrôle RS-422

Command Reply No Remote Notes
A - Advanced Media Protocol
0xA1 0x01 AutoSkip Acknowledge Disabled
8-bit signed number of
clips to skip from current
clip
0xAX 0x15 ListNextID IDListing Enabled
when x = 0 single clip
request when x = 1, #
clips can be specified in
the send data
0x20 0x29 ClearPlaylist Acknowledge Disabled
0x41 0x42 SetPlaybackLoop Acknowledge Disabled
Bit 0 loop mode enable,
0=false 1=true
Bit 1 is single clip/timeline
0=single clip
1=timeline
0x41 0x44 SetStopMode Acknowledge Disabled
0 = Off
1 = Freeze on last frame
2 = Freeze on next clip
3 = Show black
0x4f 0x16 AppendPreset Acknowledge Disabled
2 Bytes for the length N
of the clip name
N Bytes for each character
of the clip name
4 Byte in point timecode
(format is FFSSMMHH)
4 Byte out point timecode
(format is FFSSMMHH)
Blackmagic Extensions
0x82 0x02 BMDSeekToTimelinePosition Acknowledge Disabled
16-bit little endian
fractional position
[0..65535]
0x81 0x03 BMDSeekRelativeClip Acknowledge Disabled
One-byte signed integer,
which is the number of
clips to skip (negative for
backwards).
Informations pour les développeurs sur le RS-422
bit 7 bit 6 bit 5 bit 4 bit 3 bit 2 bit 1 bit 0
Byte 0
0 0 Cassette out 0 0 0 0 Local
Byte 1
Standby 0 Stop 0 Rewind Forward Record Play
Byte 2
Servo Lock 0 Shuttle Jog Var Direction Still 1
Byte 3
Auto Mode 0 0 0 Aout Set Ain Set Out Set In Set
Byte 4
Select EE Full EE Loop Playback 0 0 0 0 0
Byte 5
0 0 0 0 0 0 0 0
Byte 6
0 Lamp Still Lamp Fwd Lamp Rev 0 0 0 0
Byte 7
0 0 0 0 0 0 0 0
Byte 8
0 0 Near EOT EOT 0 0 0 0
Byte 9
0 0 0 0 0 0 0 0
191Contrôle RS-422

Variables
Cassette Out
Set if no SSD is present
Local
Set if Remote is disabled (local control)
Standby
Set if a disk is available
Direction
Clear if playback is forwarding, set if playback is reversing
Still
Set if playback is paused, or if in input preview mode
Auto Mode
Set if in Auto Mode
Select EE, Full EE
Set if in input preview mode
Lamp Still/Fwd/Rev
Set according to playback speed and direction
Near EOT
Set if total space left on available SSDs is less than 3 minutes
EOT
Set if total space left on available SSDs is less than 30 seconds
Others
Cue Complete (byte 2, bit 0)
Always 1: Cue requests are always instantaneous
HyperDeck Serial RS-422 Protocol
Protocol
Based on Sony 9-pin protocol
Interface
Baud rate 38.4 Kbps
1 start bit
8 data bits
1 stop bit
1 parity bit
Odd parity
Transférer des fichiers sur un réseau
Votre enregistreur à disque HyperDeck supporte le transfert des fichiers via le File Transfer Protocol,
ou FTP. Cette fonction permet de copier des fichiers directement de votre ordinateur à votre
HyperDeck via un réseau, à la vitesse fournie par le réseau local. Vous pouvez par exemple copier
de nouveaux fichiers sur un HyperDeck installé dans un endroit différent pour l’affichage numérique.
Connecter un HyperDeck Studio
Lorsque l’ordinateur et l’HyperDeck Studio sont sur le même réseau, vous aurez besoin d’un client
FTP et de l’adresse IP de l’HyperDeck Studio.
1 Téléchargez et installez un client FTP sur l’ordinateur auquel vous souhaitez connecter
l’HyperDeck. Nous recommandons Cyberduck, FileZilla ou Transmit, mais la plupart
des logiciels FTP fonctionneront également. Vous pouvez télécharger Cyberduck et
FileZilla gratuitement.
192Transférer des fichiers sur un réseau

2 Connectez l'HyperDeck Studio au réseau à l’aide d’un câble Ethernet et notez son adresse
IP. Pour accéder à l’adresse IP, appuyez sur le bouton Menu et tournez la molette jusqu’à ce
que vous arriviez sur l’écran Réseau. L’adresse IP de l’HyperDeck Studio se trouve au bas
de cet écran.
L’adresse IP de l’HyperDeck Studio se trouve
sur l’écran Network du Smart Panel.
3 Saisissez l’adresse IP de l’HyperDeck dans la boîte de connexion du logiciel FTP. Le nom
et la position de cette boîte varient selon les logiciels, mais en général, elle s’appelle Server
ou Host. Si votre logiciel FTP comprend une case de sélection intitulée Anonymous Login,
veillez à ce qu’elle soit cochée.
Lorsque vous connectez un HyperDeck Studio, vous n’avez pas besoin de
saisir de nom d'utilisateur ou de mot de passe. Il suffit de saisir l’adresse IP
de l’enregistreur à disque dans le champ Server ou Host du logiciel FTP
et de cocher la case Anonymous Login si elle est disponible.
Transférer des fichiers
Une fois l’HyperDeck connecté, vous pouvez transférer les fichiers comme sur n’importe quel
logiciel FTP. La plupart d’entre eux sont dotés d’une interface glisser-déposer, toutefois, vérifiez
quelle est la méthode appropriée pour le logiciel que vous utilisez.
Vous pouvez transférer n’importe quel fichier depuis et vers l’HyperDeck. Toutefois, notez que les
fichiers que vous souhaitez lire avec l’HyperDeck Studio doivent être conformes aux codecs et aux
résolutions pris en charge par l’HyperDeck. Vous trouverez une liste des codecs pris en charge
dans la section «Blackmagic HyperDeck Setup» de ce manuel.
CONSEIL Vous pouvez transférer des fichiers sur le réseau durant l’enregistrement avec
l’HyperDeck. L’HyperDeck ajuste automatiquement la vitesse de transfert afin de ne pas
affecter l’enregistrement.
193Transférer des fichiers sur un réseau

Connecter un mélangeur ATEM
Si vous utilisez un mélangeur ATEM, vous pouvez brancher jusqu'à 4 enregistreurs à disque
Blackmagic HyperDeck et les contrôler à l'aide du logiciel ou d’un panneau matériel ATEM. Grâce
à cette fonctionnalité, vous disposez d’un véritable studio d'enregistrement à portée de main. Vous
pouvez enclencher l'enregistrement sur l'HyperDeck à partir du mélangeur ATEM, ce qui est parfait
pour archiver les émissions en direct, ou pour capturer des plans de coupe lors de la production en
direct qui seront modifiés ultérieurement.
Les mélangeurs ATEM, par exemple l'ATEM 4 M/E Broadcast Studio 4K,
peuvent être reliés à quatre enregistreurs HyperDeck.
Connecter des HyperDecks à un mélangeur ATEM :
1 Connectez l'HyperDeck au même réseau que le mélangeur ATEM et notez son adresse IP.
L'adresse IP de l'HyperDeck se trouve dans le menu Setup > Ethernet.
Vous trouverez également l'adresse IP dans l'onglet Configure de l’utilitaire Blackmagic
HyperDeck Setup.
2 Branchez les sorties SDI ou HDMI de l’HyperDeck aux entrées SDI et HDMI du
mélangeur ATEM.
3 Si vous voulez utiliser le mélangeur ATEM pour enclencher l'enregistrement sur
l'HyperDeck, il faudra également connecter une source vidéo à l'HyperDeck.
Connectez simplement une source SDI ou HDMI à l'HyperDeck. Pour enregistrer la sortie
de programme de l'ATEM, branchez une sortie auxiliaire SDI du mélangeur à l'entrée SDI
de l'HyperDeck.
4 Pour activer le contrôle à distance à partir du mélangeur, appuyez sur le bouton Rem situé
sur le panneau de contrôle, ou si vous utilisez l'HyperDeck Studio Mini, vous pouvez y
accéder via le menu à l'écran.
5 Enfin, copiez la source et l'adresse IP de l'HyperDeck dans le logiciel ATEM ou sur l'ATEM
Broadcast Panel. Cette opération très simple est expliquée en détail dans le manuel ATEM.
194Connecter un mélangeur ATEM
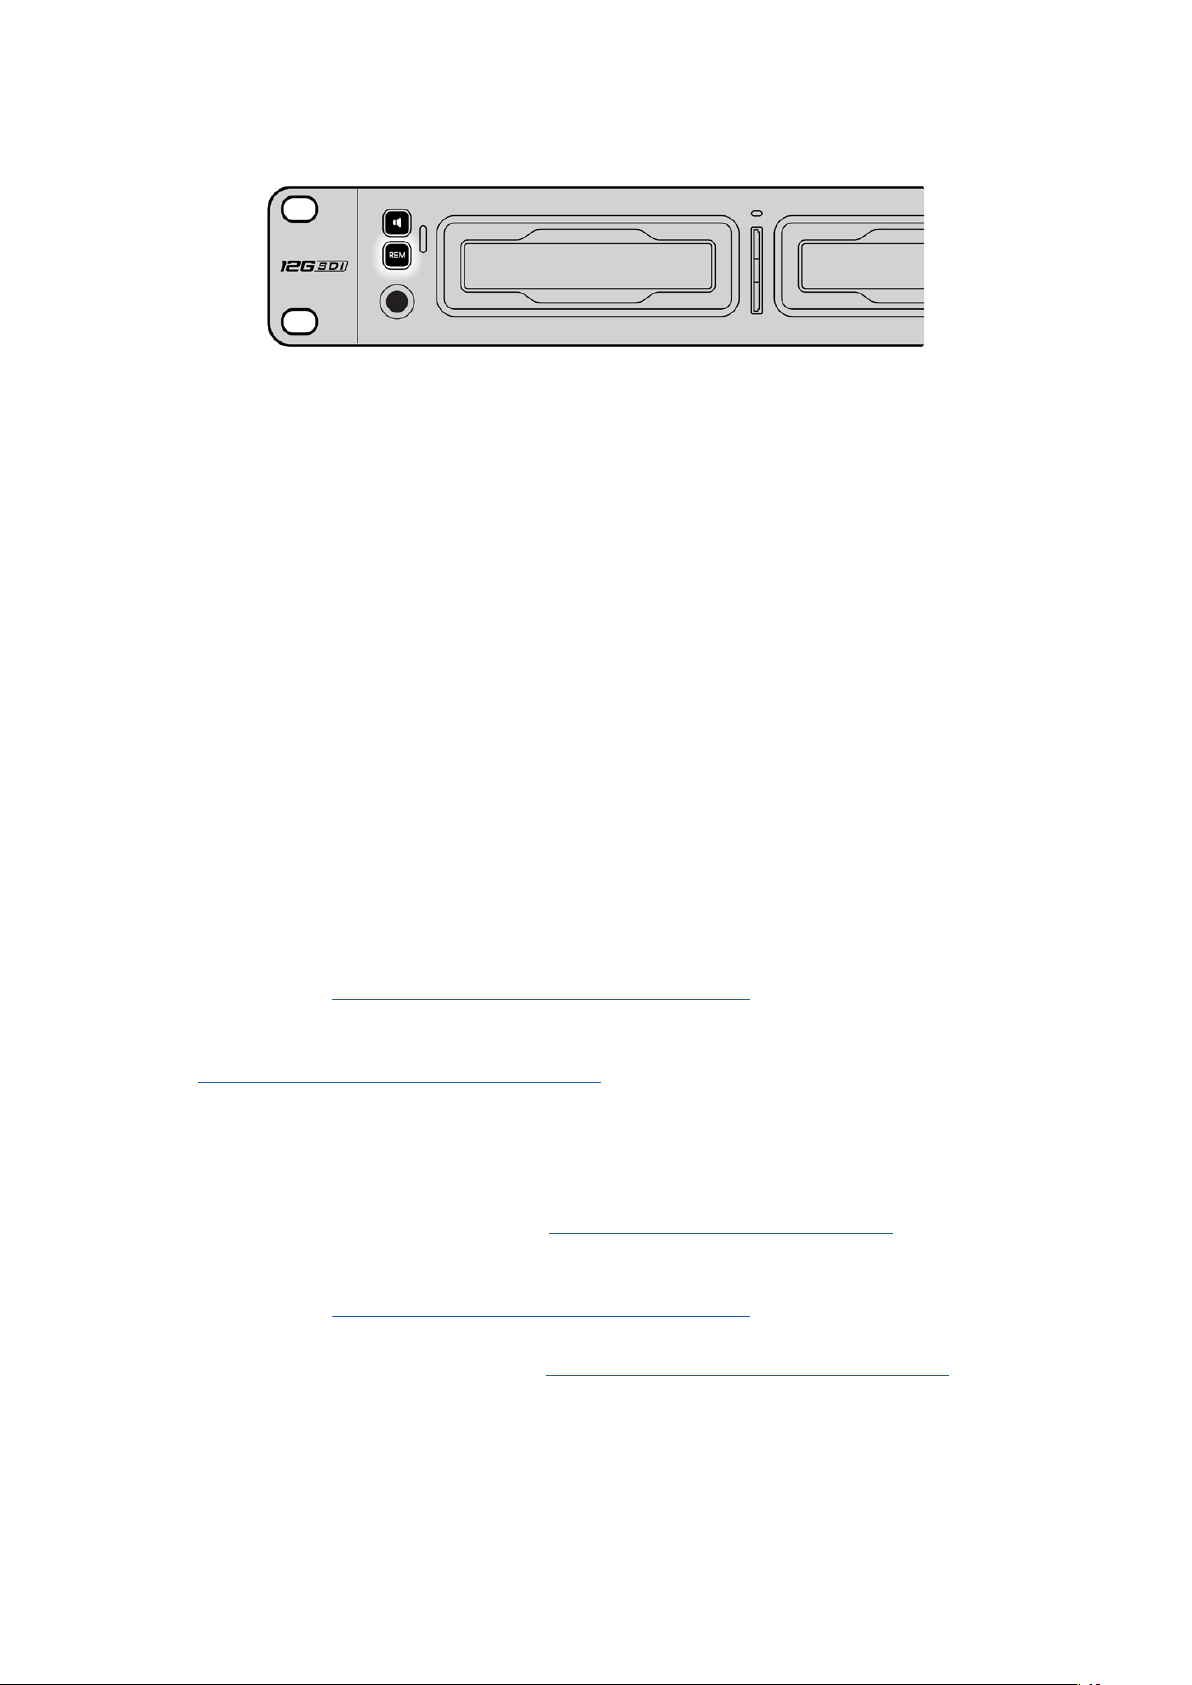
Assurez-vous que le contrôle à distance de l'HyperDeck est réglé sur On
dans le menu à l'écran, ou utilisez le bouton Rem du panneau de contrôle
pour disposer du contrôle Ethernet avec un mélangeur ATEM.
Comprendre les workflows
depost-production
Accéder aux clips
Pour accéder aux clips, insérez une carte SD ou un SSD dans le logement prévu à cet effet de votre
ordinateur, dans un lecteur pour carte SD ou dans un lecteur SSD. Vous pouvez faire glisser les
fichiers du SSD ou de la carte SD vers le disque dur local, ou travailler directement sur le SSD ou la
carte SD. Vous pouvez également connecter les SSD de 2,5" à votre ordinateur à l'aide d'un câble
eSATA vers USB, cependant, ce dispositif n’est pas assez rapide pour travailler directement sur le
disque. Cette connectique est uniquement recommandée comme solution portative, notamment
pour transférer les fichiers vidéo des SSD vers l'ordinateur.
Mac OS
QuickTime est intégré à Mac OS. Les fichiers .mov QuickTime Apple ProRes, Avid DNxHD et DNxHR
enregistrés avec l'HyperDeck peuvent être ouverts sur la plupart des logiciels vidéo sur Mac OS.
Les fichiers MXF DNxHD et DNxHR enregistrés par l’HyperDeck peuvent être ouverts avec Avid
Media Composer et DaVinci Resolve sous Mac. Les codecs DNxHD peuvent être téléchargés
gratuitement sur http://www.avid.com/products/avid-dnxhr-and-dnxhd
Les fichiers de sous-titrage codé au format MCC enregistrés par l’HyperDeck peuvent
être ouverts avec le logiciel MacCaption pour Mac OS, disponible sur le site
http://www.telestream.net/captioning/overview.htm
Windows
Les fichiers .mov QuickTime Apple ProRes enregistrés par l’HyperDeck nécessitent l'installation
de QuickTime sur votre PC. La plupart des logiciels vidéo sous Windows qui prennent en charge
QuickTime peuvent ouvrir les fichiers enregistrés par l’HyperDeck. QuickTime pour Windows
peut être téléchargé gratuitement sur le site http://www.apple.com/quicktime/download/
Les fichiers MXF DNxHD et DNxHR enregistrés par l'HyperDeck peuvent être ouverts avec Avid
Media Composer et DaVinci Resolve sous Windows. Les codecs DNxHD peuvent être téléchargés
gratuitement sur http://www.avid.com/products/avid-dnxhr-and-dnxhd
Les fichiers de sous-titrage codé MCC enregistrés par l'HyperDeck peuvent être ouverts avec le
logiciel CaptionMaker, disponible sur le site http://www.telestream.net/captioning/overview.htm
195Comprendre les workflows depost-production

Information pour les développeurs
Blackmagic HyperDeck Ethernet Protocol
Le port Ethernet intégré aux modèles HyperDeck Studio peut être connecté à l'ordinateur à l'aide
du protocole de transport TCP 9993. Si vous êtes développeur logiciel, vous pouvez utiliser ce
protocole pour élaborer du matériel qui puisse être utilisé avec nos produits. Notre approche chez
Blackmagic Design est de laisser nos protocoles ouverts et nous nous réjouissons de voir ce que
vous allez inventer !
Protocol Commands
Command Command Description
help or ? Provides help text on all commands and parameters
commands return commands in XML format
device info return device information
disk list query clip list on active disk
disk list: slot id: {n} query clip list on disk in slot {n}
quit disconnect ethernet control
ping check device is responding
preview: enable: {true/false} switch to preview or output
play play from current timecode
play: speed: {-5000 to 5000} play at specific speed
play: loop: {true/false} play in loops or stop-at-end
play: single clip: {true/false} play current clip or all clips
playrange query playrange setting
playrange set: clip id: {n} set play range to play clip {n} only
playrange set: clip id: {n} count: {m} set play range to {m} clips starting from clip {n}
playrange set: in: {inT} out: {outT}
set play range to play between:
- timecode {inT} andtimecode {outT}
playrange set: timeline in: {in} timeline out:
{out}
set play range in units of frames between:
- timeline position {in} and position {out} clear/reset play
rangesetting
playrange clear clear/reset play range setting
play on startup query unit play on startup state
play on startup: enable: {true/false} enable or disable play on startup
play on startup: single clip: {true/false} play single clip or all clips on startup
play option query play options
play option: stop mode:
{lastframe/nextframe/black}
set output frame when playback stops
record record from current input
record: name: {name} record named clip
record spill spill current recording to next slot
196Information pour les développeurs

Command Command Description
record: spill: slot id: {n}
spill current recording to specified slot
use current id to spill to same slot
stop stop playback or recording
clips count query number of clips on timeline
clips get query all timeline clips
clips get: clip id: {n} query a timeline clip info
clips get: clip id: {n} count: {m} query m clips starting from n
clips get: version: {1/2}
query clip info using specified output version:
version 1: is: name startT duration
version 2: id: startT duration inT outT name
clips add: name: {name} append a clip to timeline
clips add: clip id: {n} name: {name} insert clip before existing clip {n}
clips add: in: {inT} out: {outT} name: {name} append the {inT} to {outT} portion of clip
clips remove: clip id: {n}
remove clip {n} from the timeline
(invalidates clip ids following clip {n})
clips clear empty timeline clip list
transport info query current activity
slot info query active slot
slot info: slot id: {n} query slot {n}
slot select: slot id: {n} switch to specified slot
slot select: video format: {format} load clips of specified format
slot unblock unblock active slot
slot unblock: slot id: {n} unblock slot {n}
cache info query cache status
dynamic range query dynamic range settings
dynamic range: playback override:
{off/Rec709/Rec2020_SDR/HLG/
ST2084_300/ST2084_500/
ST2084_800/ST2084_1000/
ST2084_2000/ST2084_4000/ST2084
set playback dynamic range override
dynamic range: record override:
{off/Rec709/Rec2020_SDR/HLG/
ST2084_300/ST2084_500/
ST2084_800/ST2084_1000/
ST2084_2000/ST2084_4000/ST2048}
set record dynamic range override
notify query notification status
notify: remote: {true/false} set remote notifications
notify: transport: {true/false} set transport notifications
notify: slot: {true/false} set slot notifications
notify: configuration: {true/false} set configuration notifications
notify: dropped frames: {true/false} set dropped frames notifications
notify: display timecode: {true/false} set display timecode notifications
197Information pour les développeurs

Command Command Description
notify: timeline position: {true/false} set playback timeline position notifications
notify: playrange: {true/false} set playrange notifications
notify: cache: {true/false} set cache notifications
notify: dynamic range: {true/false} set dynamic range settings notifications
notify: slate: {true/false} set digital slate notifications
goto: clip id: {start/end} goto first clip or last clip
goto: clip id: {n} goto clip id {n}
goto: clip id: +{n} go forward {n} clips
goto: clip id: -{n} go backward {n} clips
goto: clip: {n} goto frame position {n} within current clip
goto: clip: +{n} go forward {n} frames within current clip
goto: clip: -{n} go backward {n} frames within current clip
goto: clip: {start/end} goto start or end of clip
goto: timeline: {n} goto frame position {n} within timeline
goto: timeline: +{n} o forward {n} frames within timeline
goto: timeline: -{n} go backward {n} frames within timeline
goto: timeline: {start/end} goto start or end of timeline
goto: timecode: {timecode} goto specified timecode
goto: timecode: +{timecode} go forward {timecode} duration
goto: timecode: -{timecode} go backward {timecode} duration
goto: slot id: {n} goto slot id {n}
jog: timecode: {timecode} jog to timecode
jog: timecode: +{timecode} jog forward {timecode} duration
jog: timecode: -{timecode} jog backward {timecode} duration
shuttle: speed: {-5000 to 5000} shuttle with speed
remote query unit remote control state
remote: enable: {true/false} enable or disable remote control
remote: override: {true/false} session override remote control
configuration query configuration settings
configuration: video input: SDI switch to SDI input
configuration: video input: HDMI switch to HDMI input
configuration: video input: component switch to component input
configuration: audio input: embedded capture embedded audio
configuration: audio input: XLR capture XLR audio
configuration: audio input: RCA capture RCA audio
configuration: file format: {format} switch to specific file format
configuration: audio codec: PCM switch to PCM audio
configuration: audio codec: AAC switch to AAC audio
198Information pour les développeurs

Command Command Description
configuration: timecode input:
{external/embedded/preset/clip}
change the timecode input
configuration: timecode output:
{clip/timeline/internal}
change the timecode output
configuration: timecode preference:
{default/dropframe/nondropframe}
whether or not to use drop frame timecodes when not
otherwise specified
configuration: timecode preset:
{timecode}
set the timecode preset
configuration: audio input channels: {n} set the number of audio channels recorded to {n}
configuration: record trigger:
{none/recordbit/timecoderun}
change the record trigger
configuration: record prefix: {name} set the record prefix name (supports UTF-8 name)
configuration: append timestamp:
{true/false}
append timestamp to recorded filename
configuration: xlr input id: {n} xlr type:
{line/mic}
configure xlr input type
multiple xlr inputs can be configured in a single command
configuration: genlock input resync:
{true/false}
enable or disable genlock input resync
uptime return time since last boot
format: prepare: {format} prepare a disk formatting operation to filesystem {format}
format: confirm: {token} perform a pre-prepared formatting operation using token
identify: enable: {true/false} identify the device
watchdog: period: {period in seconds} client connection timeout
reboot reboot device
slate clips slate clips information
slate project slate project information
slate project:↵
camera: {index}↵
set camera index e.g. A
Command Combinations
You can combine the parameters into a single command, for example:
play: speed: 200 loop: true single clip: true
Or for configuration:
configuration: video input: SDI audio input: XLR
Or to switch to the second disk, but only play NTSC clips:
slot select: slot id: 2 video format: NTSC
Using XML
While you can use the Terminal to talk to HyperDeck, if you are writing software, you can use XML
to confirm the existence of a specific command based on the firmware of the HyperDeck you are
communicating with. This helps your software user interface adjust to the capabilities of the specific
HyperDeck model and software version.
199Information pour les développeurs

Protocol Details
Connection
The HyperDeck Ethernet server listens on TCP port 9993.
Basic syntax
The HyperDeck protocol is a line oriented text protocol. Lines from the server will be separated by an ascii
CR LF sequence. Messages from the client may be separated by LF or CR LF.
New lines are represented in this document as a "↵" symbol.
Single line command syntax
Command parameters are usually optional. A command with no parameters is terminated with a new line:
{Command name}↵
If parameters are specified, the command name is followed by a colon, then pairs of parameter names and
values. Each parameter name is terminated with a colon character:
{Command name}: {Parameter}: {Value} {Parameter}: {Value} ...↵
Multiline command syntax
The HyperDeck protocol also supports an equivalent multiline syntax where each parameter-value pair is
entered on a new line. E.g.
{Command name}:↵
{P a r a m e t e r}: { Va lu e}↵
{P a r a m e t e r}: { Va lu e}↵
↵
Response syntax
Simple responses from the server consist of a three digit response code and descriptive text terminated by
a new line:
{Response code} {Response text}↵
If a response carries parameters, the response text is terminated with a colon, and parameter name and
value pairs follow on subsequent lines until a blank line is returned:
{Response code} {Response text}:↵
{P a r a m e t e r}: { Va lu e}↵
{P a r a m e t e r}: { Va lu e}↵
...
↵
Successful response codes
A simple acknowledgement of a command is indicated with a response code of 200:
200 ok↵
Other successful responses carry parameters and are indicated with response codes in the range of 201
to299.
200Information pour les développeurs

Failure response codes
Failure responses to commands are indicated with response codes in the range of 100 to 199:
100 syntax error
101 unsupported parameter
102 invalid value
103 unsupported
104 disk full
105 no disk
106 disk error
107 timeline empty
108 internal error
109 out of range
110 no input
111 remote control disabled
112 clip not found
120 connection rejected
150 invalid state
151 invalid codec
160 invalid format
161 invalid token
162 format not prepared
163 parameterized single line command not supported
Asynchronous response codes
The server may return asynchronous messages at any time. These responses are indicated with response
codes in the range of 500 to 599:
5xx {Response Text}:↵
{P a r a m e t e r}: { Va lu e}↵
{P a r a m e t e r}: { Va lu e}↵
↵
Connection response
On connection, an asynchronous message will be delivered:
500 connection info:↵
protocol version: {Version}↵
model: {Model Name}↵
↵
Connection rejection
Only one client may connect to the server at a time. If other clients attempt to connect concurrently,
they will receive an error and be disconnected:
120 connection rejected↵
201Information pour les développeurs

Timecode syntax
Timecodes are expressed as non-drop-frame timecode in the format:
HH:MM:SS:FF
Handling of deck "remote" state
The “remote” command may be used to enable or disable the remote control of the deck. Any attempt to
change the deck state over ethernet while remote access is disabled will generate an error:
111 remote control disabled↵
To enable or disable remote control:
remote: enable: {“true”, “false”} ↵
The current remote control state may be overridden allowing remote access over ethernet irrespective of
the current remote control state:
remote: override: {“true”, “false”} ↵
The override state is only valid for the currently connected ethernet client and only while the connection
remains open.
The “remote” command may be used to query the remote control state of the deck by specifying no
parameters:
remote↵
The deck will return the current remote control state:
210 remote info:↵
enabled: {“true”, “false”}↵
override: {“true”, “false”}↵
↵
Asynchronous remote control information change notification is disabled by default and may be
configured with the “notify” command. When enabled, changes in remote state will generate a “510 remote
info:”asynchronous message with the same parameters as the “210 remote info:” message.
Closing connection
The "quit" command instructs the server to cleanly shut down the connection:
quit↵
Checking connection status
The "ping" command has no function other than to determine if the server is responding:
ping↵
Getting help
The "help" or "?" commands return human readable help text describing all available commands and
parameters:
help↵
Or:
?↵
The server will respond with a list of all supported commands:
201 help:↵
{Help Te x t}↵
{Help Te x t}↵
↵
202Information pour les développeurs

Switching to preview mode
The "preview" command instructs the deck to switch between preview mode and output mode:
preview: enable: {"true", "false"}↵
Playback will be stopped when the deck is switched to preview mode. Capturing will be stopped when the
deck is switched to output mode.
Controlling device playback
The “play” command instructs the deck to start playing:
play↵
The play command accepts a number of parameters which may be used together in most combinations.
By default, the deck will play all remaining clips on the timeline then stop.
The “single clip” parameter may be used to override this behavior:
play: single clip: {“true”, “false”}↵
By default, the deck will play at normal (100%) speed. An alternate speed may be specified in percentage
between -1600 and 1600:
play: speed: {% normal speed}↵
By default, the deck will stop playing when it reaches to the end of the timeline. The “loop” parameter may
be used to override this behavior:
play: loop: {“true”, “false”}↵
The “playrange” command instructs the deck to play all the clips. To override this behavior: and select a
particular clip:
playrange set: clip id: {Clip ID}↵
To only play a certain timecode range:
playrange set: in: {in timecode} out: {out timecode}↵
To clear a set playrange and return to the default value:
playrange clear↵
The “play on startup command” instructs the deck on what action to take on startup. By default, the deck
will not play. Use the “enable” command to start playback after each power up.
play on startup: enable {“true”, “false”}↵
By default, the unit will play back all clips on startup. Use the “single clip” command to override.
play on startup: single clip: {“true”, “false”}↵
Stopping deck operation
The "stop" command instructs the deck to stop the current playback or capture:
stop↵
203Information pour les développeurs

Changing timeline position
The "goto" command instructs the deck to switch to playback mode and change its position within the
timeline.
To go to the start of a specific clip:
goto: clip id: {Clip ID}↵
To move forward/back {count} clips from the current clip on the current timeline:
goto: clip id: +/-{count}↵
Note that if the resultant clip id goes beyond the first or last clip on timeline, it will be clamp at the first or
last clip.
To go to the start or end of the current clip:
goto: clip: {“start”, “end”}↵
To go to the start of the first clip or the end of the last clip:
goto: timeline: {“start”, “end”}↵
To go to a specified timecode:
goto: timecode: {timecode}↵
To move forward or back a specified duration in timecode:
goto: timecode: {“+”, “-”}{duration in timecode}↵
To specify between slot 1 and slot 2:
goto: slot id: {Slot ID}↵
Note that only one parameter/value pair is allowed for each goto command.
Enumerating supported commands and parameters
The "commands" command returns the supported commands:
commands↵
The command list is returned in a computer readable XML format:
212 commands:
<commands>↵
<command name="…"><parameter name="…"/>…</command>↵
<command name="…"><parameter name="…"/>…</command>↵
…
</commands>↵
↵
More XML tokens and parameters may be added in later releases.
204Information pour les développeurs

Controlling asynchronous notifications
The “notify” command may be used to enable or disable asynchronous notifications from the server.
To enable or disable transport notifications:
notify: transport: {“true”, “false”}↵
To enable or disable slot notifications:
notify: slot: {“true”, “false”}↵
To enable or disable remote notifications:
notify: remote: {“true”, “false”}↵
To enable or disable configuration notifications:
notify: configuration: {“true”, “false”}↵
Multiple parameters may be specified. If no parameters are specified, the server returns the current state of
all notifications:
209 notify:↵
transport: {“true”, “false”}↵
slot: {“true”, “false”}↵
remote: {“true”, “false”}↵
configuration: {“true”, “false”}↵
dropped frames: {“true”, “false”}↵
display timecode: {“true”, “false”}↵
timeline position: {“true”, “false”}↵
playrange: {“true”, “false”}↵
cache: {“true”, “false”}↵
dynamic range: {“true”, “false”}↵
slate: {“true”, “false”}↵
↵
Retrieving device information
The "device info" command returns information about the connected deck device:
device info↵
The server will respond with:
204 device info:↵
protocol version: {Version}↵
model: {Model Name}↵
unique id: {unique alphanumeric identifier}↵
slot count: {number of storage slots}↵
software version: {software version}↵
↵
205Information pour les développeurs

Retrieving slot information
The "slot info" command returns information about a slot. Without parameters, the command returns
information for the currently selected slot:
slot info↵
If a slot id is specified, that slot will be queried:
slot info: slot id: {Slot ID}↵
The server will respond with slot specific information:
202 slot info:↵
slot id: {Slot ID}↵
status: {"empty", "mounting", "error", "mounted"}↵
volume name: {Volume name}↵
recording time: {recording time available in seconds}↵
video format: {disk's default video format}↵
blocked: {“true”, “false”}↵
↵
Asynchronous slot information change notification is disabled by default and may be configured with
the "notify" command. When enabled, changes in slot state will generate a "502 slot info:" asynchronous
message with the same parameters as the "202 slot info:" message.
Retrieving clip information
The “disk list” command returns the information for each playable clip on a given disk. Without parameters,
the command returns information for the current active disk:
disk list↵
If a slot id is specified, the disk in that slot will be queried:
disk list: slot id: {Slot ID}↵
The server responds with the list of all playable clips on the disk in the format of: Index, name, formats, and
duration in timecode:
206 disk list:↵
slot id: {Slot ID}↵
{clip index}: {name} {file format} {video format} {Duration
ti m ecode}↵
{clip index}: {name} {file format} {video format} {Duration
ti m ecode}↵
…
↵
Note that the clip index starts from 1.
Retrieving clip count
The "clips count" command returns the number of clips on the current timeline:
clips count ↵
The server responds with the number of clips:
214 clips count: ↵
clip count: {Count}↵
206Information pour les développeurs

Retrieving timeline information
The "clips get" command returns information for each available clip on the current timeline. Without
parameters, the command returns information for all clips on timeline:
clips get↵
The server responds with a list of clip IDs, names and timecodes:
205 clips info:↵
clip count: {Count}↵
{Clip ID}: {Name} {Start timecode} {Duration timecode}↵
{Clip ID}: {Name} {Start timecode} {Duration timecode}↵
…
↵
Retrieving transport information
The “transport info” command returns the state of the transport:
transport info ↵
The server responds with transport specific information:
208 transport info:
status: {“preview”, “stopped”, “play”, “forward”, “rewind”,
“j o g ”, “ s h u t t l e ”,” r e c o r d ” }↵
speed: {Play speed between -5000 and 5000 %}↵
slot id: {Slot ID or “none”}↵
clip id: {Clip ID or “none”}↵
single clip: {“true”, “false”}↵
display timecode: {timecode}↵
timecode: {timecode}↵
video format: {Video format}↵
loop: {“true”, “false”}↵
timeline: {n}↵
input video format: {Video format”}↵
dynamic range: {“off”, “Rec709”, “Rec2020_SDR”, “HLG”,
“ST2084_300”, “ST2084_500”, “ST2084_800”, “ST2084_1000”,
“ST2084_2000”, “ST2084_4000”, “ST2048” or “none”}↵
↵
The "timecode" value is the timecode within the current timeline for playback or the clip for record. The
"display timecode" is the timecode displayed on the front of the deck. The two timecodes will differ in some
deck modes.
Asynchronous transport information change notification is disabled by default and may be configured
with the "notify" command. When enabled, changes in transport state will generate a "508 transport info:"
asynchronous message with the same parameters as the "208 transport info:" message.
207Information pour les développeurs

Video Formats
The following video formats are currently supported on HyperDeck Studio:
NTSC, PAL, NTSCp, PALp
720p50, 720p5994, 720p60
1080p23976, 1080p24, 1080p25, 1080p2997, 1080p30
1080i50, 1080i5994, 1080i60
HyperDeck Studio Pro and Plus models support these 4k formats:
4Kp23976, 4Kp24, 4Kp25, 4Kp2997, 4Kp30
HyperDeck Studio 4K Pro adds support for the following 4k formats:
4Kp50, 4Kp5994, 4Kp60
Video format support may vary between models and software releases.
File Formats
All HyperDeck models currently support the following file formats:
H.264High_SDI
H.264High
H.264Medium
H.264Low
QuickTimeProResHQ
QuickTimeProRes
QuickTimeProResLT
QuickTimeProResProxy
QuickTimeDNxHD220x
DNxHD220x
QuickTimeDNxHD145
DNxHD145
QuickTimeDNxHD45
DNxHD45
HyperDeck Studio 4K Pro also supports the following file formats:
H.265High_SDI
H.265High
H.265Medium
H.265Low
QuickTimeDNxHR_HQX
DNxHR_HQX 4Kp60
QuickTimeDNxHR_SQ
DNxHR_SQ
QuickTimeDNxHR_LB
DNxHR_LB
Supported file formats may vary between models and software releases.
208Information pour les développeurs

Querying and updating configuration information
The "configuration" command may be used to query the current configuration of the deck:
configuration↵
The server returns the configuration of the deck:
211 configuration:↵
audio input: {“embedded”, “XLR”, “RCA”}↵
audio mapping: {n}↵
video input: {“SDI”, “HDMI”, “component”, “composite”}↵
file format: {format}↵
audio codec: {“PCM”, “AAC”}↵
timecode input: {“external”, “embedded”, “preset”, “clip”}↵
timecode output: {“clip”, “timeline”}↵
timecode preference: {“default”, “dropframe”, “nondropframe”}↵
timecode preset: {timecode}↵
audio input channels: {n}↵
record trigger: {“none”, “recordbit”, “timecoderun”}↵
record prefix: {name}↵
append timestamp: {“true”, “false”}↵
↵
One or more configuration parameters may be specified to change the configuration of the deck.
To change the current video input:
configuration: video input: {“SDI”, “HDMI”, “component”}↵
Valid video inputs may vary between models. To configure the current audio input:
configuration: audio input: {“embedded”, “XLR”, “RCA”}↵
Valid audio inputs may vary between models.
To configure the current file format:
configuration: file format: {File format}↵
Note that changes to the file format may require the deck to reset, which will cause the client connection to
be closed. In such case, response code 213 will be returned (instead of 200) before the client connection is
closed:
“213 deck rebooting”
Asynchronous configuration information change notification is disabled by default and may be configured
with the “notify” command. When enabled, changes in configuration will generate a “511 configuration:”
asynchronous message with the same parameters as the “211 configuration:” message.
Selecting active slot and video format
The "slot select" command instructs the deck to switch to a specified slot, or/and to select a specified
output video format.
To switch to a specified slot:
slot select: slot id: {slot ID}↵
To select the output video format:
slot select: video format: {video format}↵
Either or all slot select parameters may be specified. Note that selecting video format will result in a rescan
of the disk to reconstruct the timeline with all clips of the specified video format.
209Information pour les développeurs

Clearing the current timeline
The "clips clear" command instructs the deck to empty the current timeline:
clips clear↵
The server responds with
200 ok↵
Adding a clip to the current timeline
The "clips add:" command instructs the deck to add a clip to the current timeline:
clips add: name: {"clip name"}↵
The server responds with
200 ok↵
or in case of error
1xx {error description}↵
Configuring the watchdog
The “watchdog” command instructs the deck to monitor the connected client and terminate the connection
if the client is inactive for at least a specified period of time.
To configure the watchdog:
watchdog: period: {period in seconds}↵
To avoid disconnection, the client must send a command to the server at least every {period} seconds. Note
that if the period is set to 0 or less than 0, connection monitoring will be disabled.
210Information pour les développeurs

Assistance
Obtenir de l’assistance
Le moyen le plus rapide d'obtenir de l'aide est d'accéder aux pages d'assistance en ligne de
Blackmagic Design et de consulter les dernières informations de support concernant votre
enregistreur à disque HyperDeck de Blackmagic.
Pages d'assistance en ligne de Blackmagic Design
Les dernières versions du manuel, du logiciel et des notes d'assistance peuvent être consultées sur
la page d’assistance technique de Blackmagic Design : www.blackmagicdesign.com/fr/support.
Forum Blackmagic Design
Le forum Blackmagic Design est une source d'information utile qui offre des idées innovantes pour
vos productions. Cette plateforme d’aide vous permettra également d’obtenir des réponses rapides
à vos questions, car un grand nombre de sujets peuvent avoir déjà été abordés par d'autres
utilisateurs. Pour vous rendre sur le forum : http://forum.blackmagicdesign.com
Contacter le service d'assistance de Blackmagic Design
Si vous ne parvenez pas à trouver l'aide dont vous avez besoin dans les pages d’assistance ou sur
notre forum, veuillez utiliser l'option «Envoyez-nous un email», accessible sur la page d'assistance
pour envoyer une demande d'aide par email. Vous pouvez également cliquer sur le bouton
«Trouver un support technique» situé sur la page d'assistance et ainsi contacter le centre
d'assistance technique Blackmagic Design le plus proche de chez vous.
Vérification du logiciel actuel
Pour vérifier quelle version du logiciel Blackmagic HyperDeck est installée sur votre ordinateur,
ouvrez la fenêtre intitulée About Blackmagic HyperDeck Setup.
Sur Mac OS, ouvrez le logiciel Blackmagic HyperDeck Setup dans le dossier Applications.
Sélectionnez About Blackmagic HyperDeck Setup dans le menu d'application pour
connaître le numéro de version.
Sur Windows, ouvrez l’utilitaire Blackmagic HyperDeck Setup dans votre menu de
Démarrage ou sur l’écran de Démarrage. Cliquez sur le menu Aide et sélectionnez
About Blackmagic HyperDeck Setup pour connaître le numéro de version.
Comment obtenir les dernières mises à jour du logiciel
Après avoir vérifié quelle version du logiciel Blackmagic HyperDeck Setup est installée sur votre
ordinateur, veuillez vous rendre au centre de support technique Blackmagic Design à l’adresse
suivante : www.blackmagicdesign.com/fr/support pour vérifier les dernières mises à jour. Même s'il
est généralement conseillé d'exécuter les dernières mises à jour, il est prudent d’éviter d’effectuer
une mise à jour logicielle au milieu d'un projet important.
211Assistance

Avertissements
Élimination des déchets d'équipements électriques et électroniques au sein de
l'Union européenne.
Le symbole imprimé sur ce produit indique qu'il ne doit pas être jeté avec les autres
déchets. Cet appareil doit être déposé dans un point de collecte agréé pour être recyclé.
La collecte individuelle et le recyclage de votre équipement permettra de préserver les
ressources naturelles et garantit un recyclage approprié afin d'éviter la contamination de
l'environnement par des substances dangereuses pour la santé. Pour obtenir plus
d'informations sur les points de collecte pour recycler votre appareil, veuillez contacter
l'organisme responsable du recyclage dans votre région ou le revendeur du produit.
Cet équipement a été testé et déclaré conforme aux limites imposées aux appareils
numériques de classe A, en vertu du chapitre 15 des règles de la FCC. Ces limites ont
pour objectif d'assurer une protection suffisante contre les interférences nuisibles lorsque
l'équipement est utilisé dans un environnement commercial. Cet équipement génère,
utilise et peut dégager de l'énergie de radiofréquence et, s'il n'est pas installé et utilisé
conformément au manuel d'utilisation, peut provoquer un brouillage préjudiciable aux
communications radio. L'utilisation de cet équipement en zone résidentielle est susceptible
de provoquer des interférences nuisibles, auquel cas il sera demandé à l'utilisateur de
corriger ces interférences à ses frais.
L'utilisation de cet appareil est soumise aux deux conditions suivantes :
1 Cet appareil ne doit pas causer d'interférences nuisibles.
2 Cet appareil doit accepter toute interférence reçue, notamment celles pouvant
entraîner un dysfonctionnement.
R-R-BMD-20210202002
R-R-BMD-20210202003
R-R-BMD-20201201003
R-R-BMD-20210301001
Déclaration de ISDE Canada
Cet appareil est conforme aux normes canadiennes relatives aux appareils numériques
de Classe A.
Toute modification ou utilisation de ce produit en dehors de son utilisation prévue peut
annuler la conformité avec ces normes.
Les connexions aux interfaces HDMI doivent être effectuées avec des câbles HDMI
blindés d’excellente qualité.
Cet équipement a été testé pour être en conformité avec une utilisation prévue dans
un environnement commercial. Si cet équipement est utilisé dans un environnement
domestique, il peut provoquer des interférences radio.
212Avertissements
Informations de sécurité
Pour une protection contre les décharges électriques, cet appareil doit être connecté à une prise
secteur équipée d'un conducteur de protection. En cas de doute, veuillez contacter un
électricien qualifié.
Afin de réduire le risque de décharge électrique, ne pas éclabousser ou renverser de liquide sur
cet appareil.
Ce produit peut être utilisé dans un climat tropical lorsque la température ambiante n'excède
pas 40ºC.
Veillez à ce que l'espace autour du produit soit suffisant afin de ne pas compromettre la ventilation.
Lorsque vous installez l'appareil sur rack, veillez à ce que la ventilation ne soit pas compromise par
les autres équipements.
Les pièces de cet appareil ne sont pas réparables par l'opérateur. Toute opération d'entretien doit
être effectuée par un centre de service Blackmagic Design.
Cet appareil ne peut être utilisé qu'à une altitude inférieure à 2000 mètres.
Déclaration de l’État de Californie
Ce produit est susceptible de vous exposer à des produits chimiques, dont des traces de
polybromobiphényle dans les parties en plastique, reconnu par l’État de Californie comme étant
responsable de cancers, d’anomalies congénitales ou d’autres effets nocifs sur la reproduction.
Pour de plus amples informations, veuillez vous rendre sur www.P65Warnings.ca.gov.
Avertissement destiné aux techniciens agréés
Assurez-vous que le courant des deux prises est bien coupé avant toute opération
d'entretien.
213Informations de sécurité

Garantie
Garantie limitée à 12 mois
Par la présente, Blackmagic Design garantit que ce produit sera exempt de défauts matériels et de
fabrication pendant une durée d’un an à compter de la date d'achat. Si un produit s’avère défectueux
pendant la période de garantie, Blackmagic Design peut, à sa seule discrétion, réparer le produit
défectueux sans frais pour les pièces et la main-d’œuvre, ou le remplacer.
Pour se prévaloir du service offert en vertu de la présente garantie, il vous incombe d’informer
Blackmagic Design de l’existence du défaut avant expiration de la période de garantie, et de prendre
les mesures nécessaires pour l’exécution des dispositions de ce service. Le consommateur a la
responsabilité de s’occuper de l’emballage et de l'expédition du produit défectueux au centre de
service nommément désigné par Blackmagic Design, en frais de port prépayé. Il incombe au Consommateur
de payer tous les frais de transport, d’assurance, droits de douane et taxes et toutes autres charges
relatives aux produits qui nous auront été retournés et ce, quelle que soit la raison.
La présente garantie ne saurait en aucun cas s’appliquer à des défauts, pannes ou dommages causés
par une utilisation inappropriée ou un entretien inadéquat ou incorrect. Blackmagic Design n’a en aucun
cas l’obligation de fournir un service en vertu de la présente garantie : a) pour réparer les dommages
résultant de tentatives de réparations, d’installations ou tous services effectués par du personnel non
qualifié par Blackmagic Design, b) pour réparer tout dommage résultant d'une utilisation inadéquate
ou d'une connexion à du matériel incompatible, c) pour réparer tout dommage ou dysfonctionnement
causé par l’utilisation de pièces ou de fournitures n’appartenant pas à la marque de Blackmagic Design,
d) pour examiner un produit qui a été modifié ou intégré à d’autres produits quand l’impact d’une telle
modification ou intégration augmente les délais ou la difficulté d’examiner ce produit. CETTE GARANTIE
REMPLACE TOUTE GARANTIE EXPLICITE OU IMPLICITE. BLACKMAGIC DESIGN ET SES REVENDEURS
DÉCLINENT EXPRESSÉMENT TOUTE GARANTIE IMPLICITE DE COMMERCIALISATION OU D'ADAPTATION
QUEL QU’EN SOIT LE BUT. LA RESPONSABILITÉ DE BLACKMAGIC DESIGN POUR RÉPARER OU
REMPLACER UN PRODUIT S'AVÉRANT DÉFECTUEUX CONSTITUE LA TOTALITÉ ET LE SEUL RECOURS
EXCLUSIF PRÉVU ET FOURNI AU CONSOMMATEUR POUR TOUT DOMMAGE INDIRECT, SPÉCIFIQUE,
ACCIDENTEL OU CONSÉCUTIF, PEU IMPORTE QUE BLACKMAGIC DESIGN OU SES REVENDEURS
AIENT ÉTÉ INFORMÉS OU SE SOIENT RENDUS COMPTE AU PRÉALABLE DE L'ÉVENTUALITÉ DE CES
DOMMAGES. BLACKMAGIC DESIGN NE PEUT ÊTRE TENU POUR RESPONSABLE DE TOUTE UTILISATION
ILLICITE OU ABUSIVE DU MATÉRIEL PAR LE CONSOMMATEUR. BLACKMAGIC DESIGN N'EST PAS
RESPONSABLE DES DOMMAGES RÉSULTANT DE L'UTILISATION DE CE PRODUIT. LE CONSOMMATEUR
MANIPULE CE PRODUIT À SES SEULS RISQUES.
© Copyright 2021 de Blackmagic Design. Tous droits réservés. 'Blackmagic Design’, ‘DeckLink’, ‘HDLink’, ‘Workgroup Videohub’,
‘Multibridge Pro’, ‘Multibridge Extreme’, ‘Intensity’ et ‘Leading the creative video revolution’ sont des marques déposées aux USA
et dans d'autres pays. Tous les autres noms de société et de produits peuvent être des marques déposées de leurs sociétés
respectives auxquelles ils sont associés.
214Garantie

HyperDeck Dıgitalrekorder
Juli 2021
Installations - und Bedienungsanleitung
HyperDeck
Dıgitalrekorder

Willkommen!
Vielen Dank, dass Sie sich zum Kauf eines Blackmagic HyperDeck Digitalrekorders
entschieden haben.
Mit unseren ursprünglich im Jahr 2011 konzipierten Blackmagic HyperDeck Digitalrekordern
für 2,5“ Solid State Disks wollten wir die Aufzeichnung und Wiedergabe von professionellem
Video einfacher und erschwinglicher machen.
Jetzt freuen wir uns, Ihnen mit unserer neuen Produktserie HyperDeck Digitalrekorder
zu präsentieren, die HD- und Ultra-HD-Video auf SD-Karten, SSDs und USB-Laufwerke
aufzeichnen. Die Rekorder können Sie sogar mit einer Blackmagic MultiDock10G verbinden
und Videodateien auf externe Laufwerke aufzeichnen oder Inhalte von dort abspielen.
Die HyperDeck Studio Plus- und Pro-Modelle verfügen über vertraute MAZ-Bedienelemente
wie einen Suchlaufregler mit den Wiedergabemodi Jog, Shuttle und Scroll. Die Kupplung
des Suchlaufreglers bietet Ihnen bei der Wiedergabe eine taktile Navigation durch Ihre Clips,
sodass Sie dabei den Blick nicht vom Monitor abzuwenden brauchen. Die Rekorder sind an der
Front sogar mit einer Kopfhörerbuchse und Lautsprechern für schnelle Tonchecks direkt von
Ihrem HyperDeck ausgestattet, und bieten insgesamt noch viel mehr Features.
Wir hoffen, dass Ihr HyperDeck Ihnen über viele Jahre hinaus größtmöglichen Nutzen für Ihre
Produktionen bringt!
Bitte sehen Sie auf der Support-Seite unterwww.blackmagicdesign.com/de nach der
aktuellsten Version und Updates für die HyperDeck Software. Halten Sie Ihre Produktsoftware
stets auf dem aktuellsten Stand und sichern Sie sich so Zugang zu den neuesten Features.
Bitte registrieren Sie sich beim Herunterladen der Software mit Ihren Kontaktdaten, damit wir
Sie über neu veröffentlichte Versionen informieren können. Wir arbeiten ständig an neuen
Features und Verbesserungen und würden uns über eine Rückmeldung von Ihnen freuen.
Grant Petty
CEO Blackmagic Design

Inhaltsverzeichnis
Einführung HyperDeck Digitalrekorder 218
Erste Schritte 219
An den Strom anschließen 219
Anschließen von Video- und
Audiogeräten 219
Audio kontrollieren 220
Datenträger einführen 220
Aufzeichnen von Video 222
Aufzeichnen auf mehrere Datenträger 222
Wiedergabe 223
Video mit dem HyperDeck
wiedergeben 223
Mit dem Suchlaufregler arbeiten 224
Mit der Frontblende arbeiten 226
Medienschacht-Indikatoren 226
Die LCD-Menüs verwenden 227
Einstellungen 228
Rückseite 240
Mit der Monitorausgabe arbeiten 242
Datenträger 245
SD-Karten 245
SSDs 247
Externe Laufwerke 248
Datenträger formatieren 250
Datenträger auf einem
Computer vorbereiten 250
Ihren HyperDeck als Webcam
verwenden 251
Einrichten der Webcam-Quelle 251
Einrichten von Open Broadcaster 252
Blackmagic HyperDeck Setup 254
Mit HyperDeck Setup arbeiten 254
LUTs 255
Aktualisieren der Produktsoftware 256
Teranex Mini Rack Shelf 257
RS-422-Steuerung 258
Dateien per Netzwerk übertragen 263
Anschließen an einen ATEM Mischer 265
Postproduktions-Workflows verstehen 266
Informationen für Entwickler (Englisch) 267
Blackmagic HyperDeck
Ethernet Protocol 267
Protocol Commands 267
Protocol Details 271
Hilfe 282
Gesetzliche Vorschriften 283
Sicherheitshinweise 284
Garantie 285
217Blackmagic HyperDeck Studio

Einführung HyperDeck Digitalrekorder
Ihr Blackmagic HyperDeck Digitalrekorder gehört zu einer HD- und 4K-Rekorderfamilie, die für die
unterschiedlichsten Produktionsworkflows konzipiert ist. Die Modelle HyperDeck StudioHDPro
und HyperDeck Studio4KPro passen in ein Rack von Standardbreite. Sie sind groß genug zum
Aufzeichnen auf und Wiedergeben von Dateien auf bzw. von SD-Karten und 9,5mm-SSDs.
Die kleineren Digitalrekorder HyperDeck StudioHDMini und HyperDeck StudioHDPlus eignen
sich für den bequemen Tischeinsatz oder mit einer optionalen Teranex Mini Rack Shelf für
die Rackinstallation.
Alle Modelle können überdies auf USB-Laufwerke aufzeichnen und unterstützen HD-Video bis
zu 1080p/60. Der HyperDeck Studio4KPro unterstützt Ultra-HD-Video bis zu 2160p/60.
Insgesamt ist der Betrieb der Aufnahme- und Wiedergabefunktionen bei allen Modellen gleich.
Die größeren Modelle haben zusätzliche Features und geben Ihnen mehr Kontrolle über die
Wiedergabe und mehr Anschlüsse.
Diese Bedienungsanleitung enthält alle nötigen Informationen zur Inbetriebnahme Ihres
HyperDeck Digitalrekorders und führt Sie in seine Bedienelemente und Features ein.
HyperDeck Studio Mini HyperDeck Studio HD Plus
HyperDeck StudioHDPro und HyperDeck Studio4KPro
218Einführung HyperDeck Digitalrekorder

Erste Schritte
Die Inbetriebnahme Ihres HyperDeckStudio Rekorders ist einfach. Versorgen Sie Ihr Gerät mit
Strom, schließen Sie Ihre Videoquellen und Zielgeräte an und legen Sie SSDs oder SD-Karten ein.
An den Strom anschließen
Schließen Sie Ihren HyperDeck über die Strombuchse an der Rückseite mit einem Standard-IEC-
Kabel ans Stromnetz an.
Ein HyperDeck Modell mit einer zusätzlichen IEC-Strombuchse können Sie für Redundanz an eine
weitere Stromquelle anschließen. Beispiel: Ist die zweite Strombuchse mit einer unterbrechungsfreien
Stromversorgung (UVS) verbunden, springt diese bei Ausfall der primären Stromquelle sofort ein.
Alle Modelle sind mit einer 12V-DC-Buchse ausgestattet und können über ein externes 12V-Netzteil
mit Strom versorgt werden.
Der HyperDeck StudioHDMini lässt sich überdies über ein AC-Steckernetzteil versorgen. Wenn
Sie ein Netzteil mit Feststellring benutzen, sichern Sie die Kabelverbindung zum HyperDeck Studio
HD Mini durch Anziehen des Rings. Das so gesicherte Kabel kann sich nicht versehentlich lösen.
Sobald die Stromversorgung steht, schaltet sich das LCD ein und es erscheint der Bildschirm für die
Sprachauswahl. Scrollen Sie mit dem Suchlaufregler zur gewünschten Sprache und drücken Sie die
SET-Taste. Das bringt Sie zur Startseite. Näheres zur Startseite und zu den LCD-Menüs finden Sie im
Abschnitt „Mit der Frontblende arbeiten”.
Anschließen von Video- und Audiogeräten
Schließen Sie Ihre Videoeingabegeräte an die SDI- oder HDMI-Eingänge und die Zielgeräte an
die SDI- oder HDMI-Ausgänge Ihres HyperDecks an. Beispiel: Als Quelle könnte eine digitale
Filmkamera und als Zielgerät ein HDMI-Fernseher oder ein SDI-Bildschirm dienen.
Alle HyperDeck Modelle unterstützen HD-Video bis zu 1080p/60. Der HyperDeck Studio4KPro
besitzt 12G-SDI-Anschlüsse zur Ein- und Ausgabe von UltraHD bei bis zu 2160p/60 über ein
einziges BNC-Kabel.
219Erste Schritte

Das SDI- bzw. HDMI-Videosignal können Sie über die Monitoring-Anzeige des eingebauten LCDs
an der Frontblende bestätigen.
TIPP Wenn auf dem LCD keine Videoquelle angezeigt wird, ist Ihr Quellgerät vielleicht an
einen anderen Eingang angeschlossen. Durchlaufen Sie die SDI- bzw. HDMI-Quellen, indem
Sie bei entsprechend ausgestatteten Modellen die INPUT-Taste an der Frontblende drücken.
Audio ist in das SDI- bzw. HDMI-Signal eingebettet. Eine separate Tonquelle braucht nicht
angeschlossen zu werden. Die Kontrolle der Tonaussteuerung erfolgt über das LCD anhand
der Pegelmeter neben dem Videobild.
Audio kontrollieren
Bei HyperDeck Rekordern mit Lautsprecher und Kopfhörerbuchse an der Frontblende können
Sie den Ton im Nu über den Lautsprecher oder angeschlossene Kopfhörer prüfen. Um den Ton
abzuhören, halten Sie die Lautsprechertaste gedrückt und regeln Sie die Lautstärke durch Drehen
am Suchlaufregler. Auf der LCD-Startseite erscheint nun ein Lautstärke-Indikator.
Drücken Sie zweimal auf die Lautsprechertaste, damit die Lautsprecher eingeschaltet bleiben.
Zum Ausschalten drücken Sie die Taste erneut.
Datenträger einführen
Alle HyperDeckStudio Modelle werden einsatzbereit ausgeliefert und gestatten die sofortige
Aufzeichnung ohne vorherige Konfiguration. Sie benötigen lediglich eine formatierte SSD oder SD-Karte.
Datenträger lassen sich mühelos über die Menü-Einstellungen auf dem LCD formatieren. Dies
können Sie aber auch auf Ihrem Computer tun. Einzelheiten zur Formatierung von Medien finden
Sie im Abschnitt „Formatieren von Datenträgern“. Dieses Handbuch enthält auch Empfehlungen
über die zur Videoaufzeichnung bestgeeigneten Datenträgertypen sowie eine Liste mit
empfohlenen Laufwerken und Speicherkarten.
So führen Sie eine SSD ein:
1 Richten Sie eine 9,5mm-SSD mit den Kontakten nach unten auf den Laufwerksschacht
Ihres HyperDecks aus. Schieben Sie die SSD behutsam in den Laufwerksschacht,
bis sie einrastet.
2 Die SSD wird nun von Ihrem HyperDeckStudio geprüft. Der Vorgang wird mit einer grünen
Lichtumrandung um den Schacht herum angezeigt. Der HyperDeck ist aufnahmebereit,
sobald die grüne Lichtumrandung erlischt.
Die Schachtanzeige leuchtet grün, solange ein Datenträger gelesen wird,
und schaltet sich aus, wenn Ihr HyperDeck aufnahmebereit ist
220Erste Schritte

Um eine SSD zu entnehmen, ergreifen Sie sie an den äußeren Rändern und ziehen Sie sie behutsam
aus dem Schacht. Sie spüren, wie sich die SSD aus dem Schacht löst.
Richten Sie die SSD mit den Kontakten nach unten auf den Laufwerksschacht Ihres
HyperDeckStudios aus. Schieben Sie sie dann behutsam in den Schacht, bis sie einrastet
So führen Sie eine SD-Karte ein:
1 Halten Sie die SD-Karte mit den goldenen Kontakten hochkant zum LCD und richten Sie
sie auf den Kartenschacht Ihres HyperDecks aus. Schieben Sie die Karte vorsichtig in den
Schacht, bis sie in der richtigen Position einrastet.
2 Die SD-Karte wird nun von Ihrem HyperDeckStudio geprüft. Der Vorgang wird durch einen
grün leuchtenden Indikator über dem SD-Kartenschacht angezeigt.
Wenn der Indikator erlischt und die Stopptaste an der Frontblende aufleuchtet, ist Ihr HyperDeck aufnahmebereit
221Erste Schritte

TIPP Geben Sie der Karte zur Entnahme einen leichten Schubs, bis es klickt und sie
freigegeben wird. Die Karte wird ein Stück weit ausgeworfen. Sie kann nun am Rand
ergriffen und aus dem Schacht entnommen werden.
Ihr HyperDeckStudio ist jetzt bereit für Aufzeichnung und Wiedergabe.
Aufzeichnen von Video
Nachdem Sie sich vergewissert haben, dass Ihre Videoquelle auf dem LCD erscheint, können Sie
sofort Aufzeichnen.
Starten Sie die Aufzeichnung durch Drücken der REC-Taste. Beim Aufzeichnen auf eine SD-Karte
leuchten die Schachtanzeige und REC-Taste rot, die PLAY-Taste leuchtet auf und auf der LCD-
Startseite erscheint ein Aufnahme-Icon. Beim Aufzeichnen auf eine SSD leuchtet die um den
Schacht kreisende Lichtumrandung rot.
Während der HyperDeckStudio aufzeichnet, zeigt der Datenträger-Indikator auf dem LCD
abwechselnd den aktiven Schacht und die auf dem Medium verbleibende Aufzeichnungszeit an
Beenden Sie die Aufzeichnung durch Drücken der STOP-Taste. Um Video wiederzugeben, drücken
Sie die PLAY-Taste.
TIPP Den verwendeten Codec können Sie über die Codec-Einstellung im Blackmagic
HyperDeck Setup Dienstprogramm ändern. Näheres finden Sie im Abschnitt „Blackmagic
Hyperdeck Setup“ weiter hinten im Handbuch.
Aufzeichnen auf mehrere Datenträger
Sobald auf Ihrer SD-Karte oder SSD weniger als drei Minuten Aufzeichnungszeit verbleiben, wird der
Timecode auf dem LCD des HyperDeckStudios in Rot angezeigt. Gleichzeitig beginnt die STOP-
Taste langsam zu blinken.
Das Blinken bedeutet außerdem, dass kein zweites Medium zur Fortführung der Aufnahme vorhanden
ist. Führen Sie in diesem Fall einfach ein neues Medium ein, um die Aufnahme fortzusetzen. Sobald ein
leeres Medium in einen unbesetzten Schacht eingeführt oder ein externes Laufwerk angeschlossen
wird, hört das Blinken auf und der Timecode wird wieder in Weiß angezeigt. Der HyperDeck kann
222Aufzeichnen von Video

nun weiter aufnehmen, weil das neu eingeführte Medium als okay befunden wurde und über freien
Speicherplatz verfügt.
Wenn der HyperDeckStudio über mehr als ein Medium verfügt, wird nach Füllen eines Datenträgers
jeweils auf dem nächsten weiter aufgezeichnet. Dies zeigen die Symbole oben rechts auf der
Startseite an.
Wechseln von Datenträgern beim Aufzeichnen
Um die laufende Aufzeichnung zu beliebiger Zeit auf einem anderen Medium mit verfügbarem
Speicherplatz fortzusetzen, halten Sie die REC-Taste gedrückt. Die Aufzeichnung wechselt nun
vom aktuellen zum nächsten Medium. Das ist sehr hilfreich zur Entnahme eines Datenträgers aus
einem HyperDeck, ohne die Aufzeichnung zu pausieren. Bspw. bei Liveveranstaltungen, wenn ein
Datenträger mit einer wichtigen Aufnahme an einen anderen Ort gebracht werden soll, ohne die
Aufzeichnung zu stoppen und womöglich etwas zu verpassen.
Blinkt die REC-Taste bei der Aufzeichnung, liegt ggf. ein Problem mit dem Datenträger vor, das zum
Fallenlassen von Einzelbildern führt. Das kann bei Ultra-HD-Aufzeichnungen auf langsamere
Datenträger passieren. Beispielsweise wird beim Aufzeichnen mit 2160p/30 in ProRes HQ eine
vergleichsweise höhere Datenrate als mit ProRes Proxy verwendet. Deshalb sind dafür die
schnellsten erhältlichen SD-Karten oder SSDs erforderlich. Eine Liste mit getesteten Datenträgern
finden Sie im Abschnitt „Datenträger“ in diesem Handbuch.
Wiedergabe
Wie klassische MAZen verfügen HyperDecks über Transporttasten wie REC (Aufnahme), REW
(Rücklauf), PLAY (Wiedergabe), FFWD (Vorlauf) und STOP. SKIP-Tasten zum Vor- und Zurückspringen
fungieren wie schnellere Vor- und Rücklauftasten, um zügig von Clip zu Clip navigieren.
Video mit dem HyperDeck wiedergeben
1 Drücken Sie für sofortiges Abspielen einmal die PLAY-Taste. Ihr Video ist dann auf dem
LCD und allen an die Videoausgänge Ihres HyperDecks angeschlossenen Bildschirmen
zu sehen.
2 Um zum nächsten Clip zu springen, drücken Sie die rechte SKIP-Taste an der Frontblende.
3 Um an den Anfang des aktuellen Clips zu gelangen, drücken Sie die linke SKIP-
Taste einmal. Bei zweimaligem Drücken wird an den Anfang des vorherigen Clips
zurückgesprungen.
Drücken der PLAY-Taste an der Frontblende Ihres HyperDecks startet die
Wiedergabe eines Clips. Durch Drücken der rechten bzw. linken SKIP-Taste
gelangen Sie zum nächsten Clip bzw. zum Beginn des derzeitigen Clips
223Wiedergabe
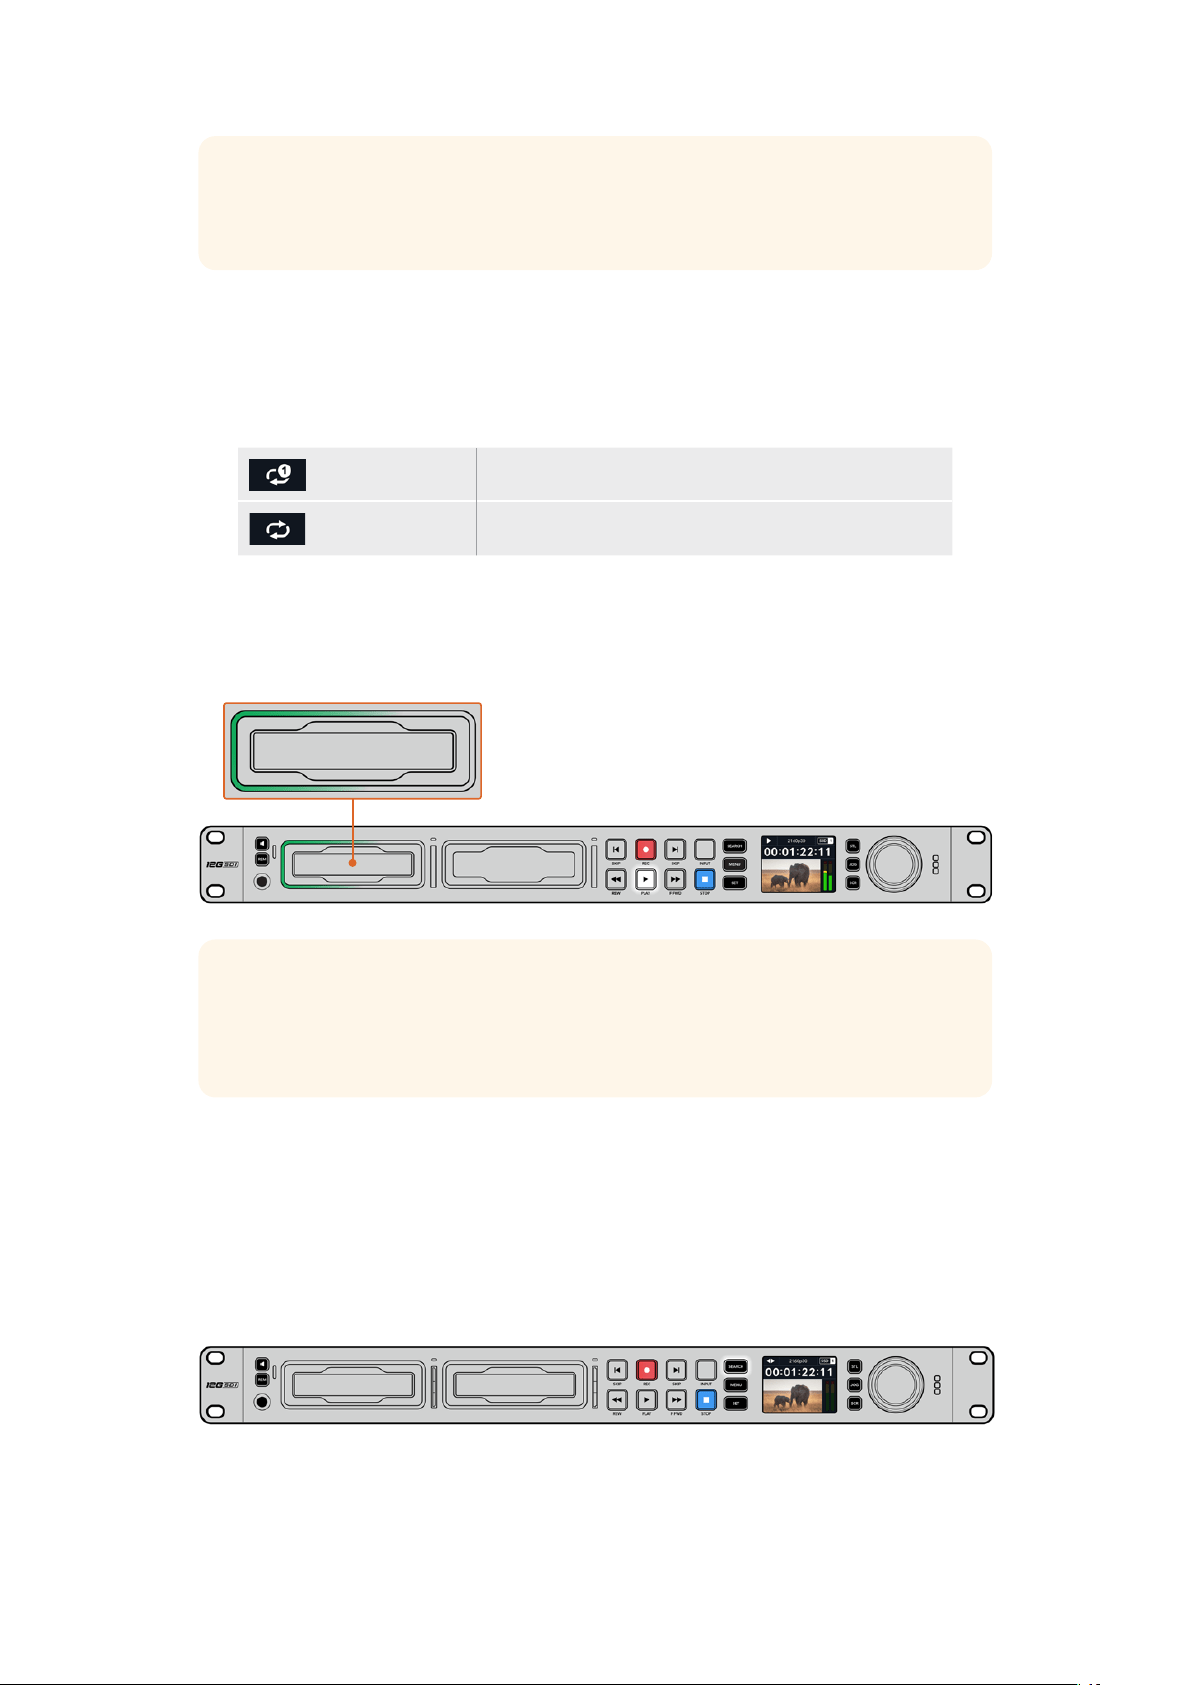
TIPP Um Videodateien auf Ihrem HyperDeck abzuspielen, müssen Sie den passenden
Codec vorgeben. Das geht über das LCD-Menü. Näheres finden Sie in den Abschnitten
„Die LCD-Menüs verwenden“ und „Einstellungen“ in diesem Handbuch.
Wiedergabe in Schleife
Für eine endlose Wiedergabe in Schleife aktivieren Sie auf Ihrem HyperDeck die Loop-Wiedergabe,
indem Sie während der Wiedergabe erneut die PLAY-Taste drücken. Bei aktivierter
Endloswiedergabe wird auf dem LCD ein Loop-Icon angezeigt. Es sind zwei Modi für die Loop-
Wiedergabe verfügbar.
Clip loopen Spielt den aktuellen Clip in Endlosschleife ab.
Alle Clips loopen Spielt alle Clips auf Ihren Datenträgern in Endlosschleife ab.
Dynamische LEDs
Während der Wiedergabe kreist die grüne Lichtumrandung im Tempo und in der Richtung der
Wiedergabe um den Laufwerksschacht.
TIPP Wenn während der Aufzeichnung auf SSDs die REC-Taste des HyperDecks blinkt, ist
der Datenträger zu langsam für eine fehlerfreie Wiedergabe. Wir empfehlen in diesem Fall,
ein stärker komprimiertes Aufzeichnungsformat wie H.264 zu verwenden oder auf eine für
UltraHD empfohlene schnellere SSD bzw. auf ein externes Laufwerk aufzuzeichnen.
Mit dem Suchlaufregler arbeiten
Der Suchlaufregler ermöglicht Ihnen, während der Wiedergabe schnell durch Ihre Clips zu
navigieren und bestimmte Stellen zur Wiedergabe auszuwählen oder diese frameweise zu sichten.
Manchmal ist es wichtig, zu einer bestimmten Stelle in einem Clip zu gelangen. Das geht, indem
Sie den Clip beim Drehen des Reglers visuell kontrollieren oder nach einem bestimmten Timecode
suchen. Das ist auch nützlich, um den Abspielkopf an einen bestimmten Cue-Punkt zu setzen, bspw.
um den Clip in eine Live-Sendung einzuspielen.
Drücken Sie die SEARCH-Taste, um die Suchmodi des Suchreglers zu durchlaufen
224Wiedergabe

Die Modi des Suchreglers sind Jog, Shuttle und Scrollen.
Jog Spielt Clips von einem Frame zum nächsten vor- oder rückwärts ab.
Shuttle Spielt mit höherer Geschwindigkeit vor- oder rückwärts ab. Die
Wiedergabe richtet sich danach, wie weit Sie den Suchregler drehen.
Scrollen Noch schnellere Wiedergabe, je nachdem wie weit Sie den Suchregler
drehen. Dieser Modus ist praktisch, um beim Suchen nach einer
bestimmten Stelle schnell durch einen langen Clip zu navigieren.
Die größeren Modelle sind mit dedizierten Suchmodustasten ausgestattet und die Suchregler mit
eingebauter Kupplung geben beim Gebrauch taktiles Feedback. So können Sie Ihren Clip „erfühlen“,
während Sie ihn auf einem Fernseher oder Bildschirm ansehen.
Drücken Sie die dedizierte JOG-, STL- oder SCR-Taste, um den
Jog-, Shuttle- bzw. Scroll-Suchmodus auszuwählen
TIPP Um zur normalen Wiedergabe zurückzukehren, drücken Sie die PLAY- oder STOP-Taste.
225Wiedergabe
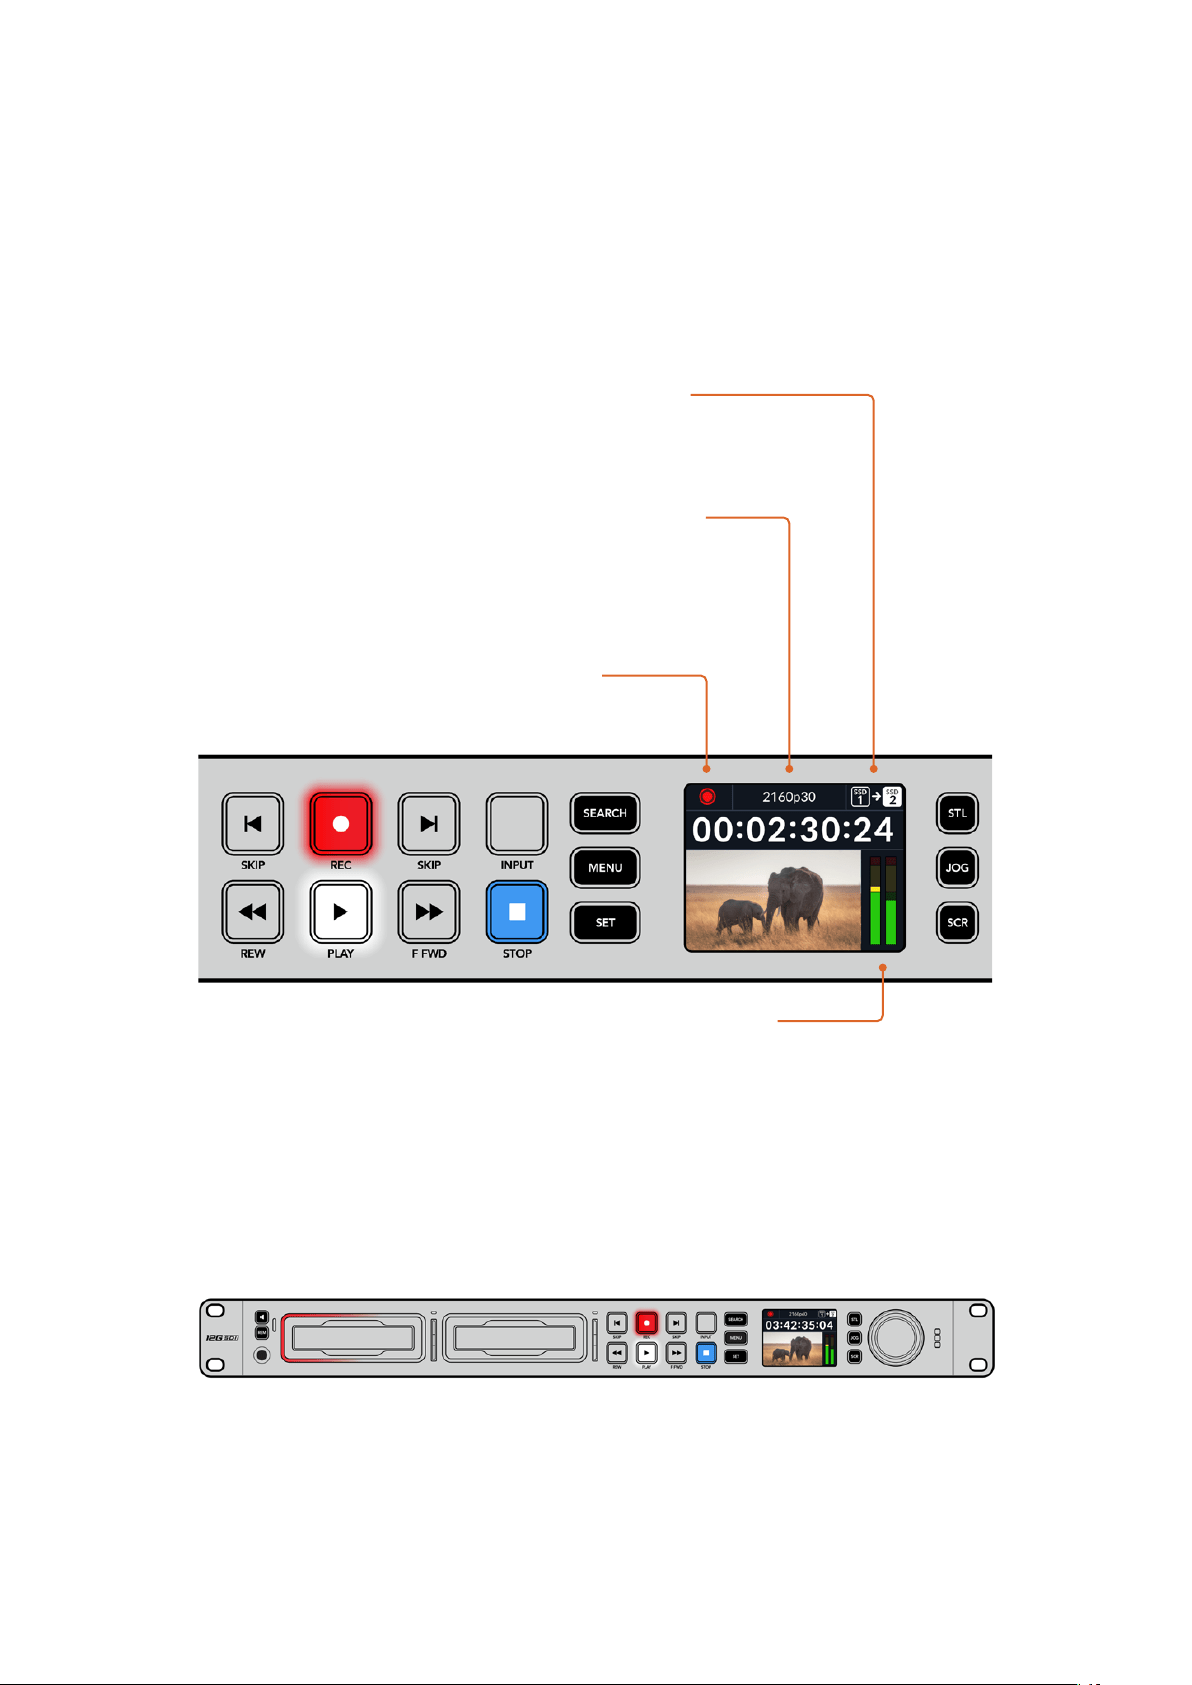
Mit der Frontblende arbeiten
Während der Aufzeichnung und Wiedergabe mit einem HyperDeck werden alle notwendigen
Informationen auf dem Gerät selbst angezeigt. Das geschieht über LED-Indikatoren für jeden
Medienschacht und das eingebaute LCD.
HyperDeckStudio Startseite
Medienschacht-Indikatoren
Wenn Sie Ihren HyperDeck erstmalig mit Strom versorgen oder immer dann, wenn Sie eine
SSD oder SD-Karte einlegen, leuchtet der Indikator des Medienschachts beim Verifizieren des
Datenträgers grün und erlischt anschließend. Bei fehlerhafter Formatierung oder Versagen des
Datenträgers leuchtet die Umrandung des Schachts kontinuierlich orange, bis das Medium entfernt
wird. Prüfen Sie in diesem Fall die korrekte Formatierung des Datenträgers und ob ein Computer sie
lesen kann.
Die Medienschacht-Indikatoren zeigen Ihnen den Status Ihres HyperDeck Datenträgers an.
Während der Aufzeichnung leuchten sie rot und während der Wiedergabe grün
Indikator für Datenträger und verbleibende Zeit –
Während der Aufzeichnung wechselt das Icon ständig
zwischen der auf dem Medium verbleibenden Zeit und dem
aktuell verwendeten Medium. Während der Wiedergabe
wird das Icon für den aktiven Datenträger angezeigt.
Format-Indikator – Zeigt das Format der Eingabe oder
Datei für die Wiedergabe an. Bei manchen HyperDeck
Studios erscheint hier beim Ein- und Ausschalten
der INPUT-Taste überdies die Eingabequelle und die
aktuelle Lautstärke beim Aussteuern der Lautsprecher-
und Kopfhörerpegel über die Lautsprechertaste
an der Frontblende und den Suchlaufregler.
Status-Indikator – Zeigt den aktuellen
Betriebsstatus des Decks an, einschließlich
des aktuellen Wiedergabemodus.
Audiopegelmeter – Zeigt die
Audiopegel der Quelle oder
Datei bei der Wiedergabe an.
226Mit der Frontblende arbeiten

Die LCD-Menüs verwenden
Drücken Sie die MENU-Taste an der Frontblende, um die Menüeinstellungen aufzurufen.
Drehen Sie den Suchlaufregler oder drücken Sie die SKIP-Taste, um durch die Menüoptionen zu
navigieren. Drücken Sie auf SET, um ein Untermenü zu wählen.
Drehen Sie den Suchregler, um durch die Menüeinstellungen zu navigieren
Drücken Sie nach Auswahl der Menüoption die SET-Taste.
Passen Sie Einstellungen mit dem Suchregler oder der linken und rechten SKIP-Taste an und
bestätigen Sie sie durch Drücken der SET-Taste.
Durch Drücken der MENU-Taste kehren Sie zu den Menüoptionen auf der Ebene darüber und
schließlich zur Startseite zurück.
227Mit der Frontblende arbeiten
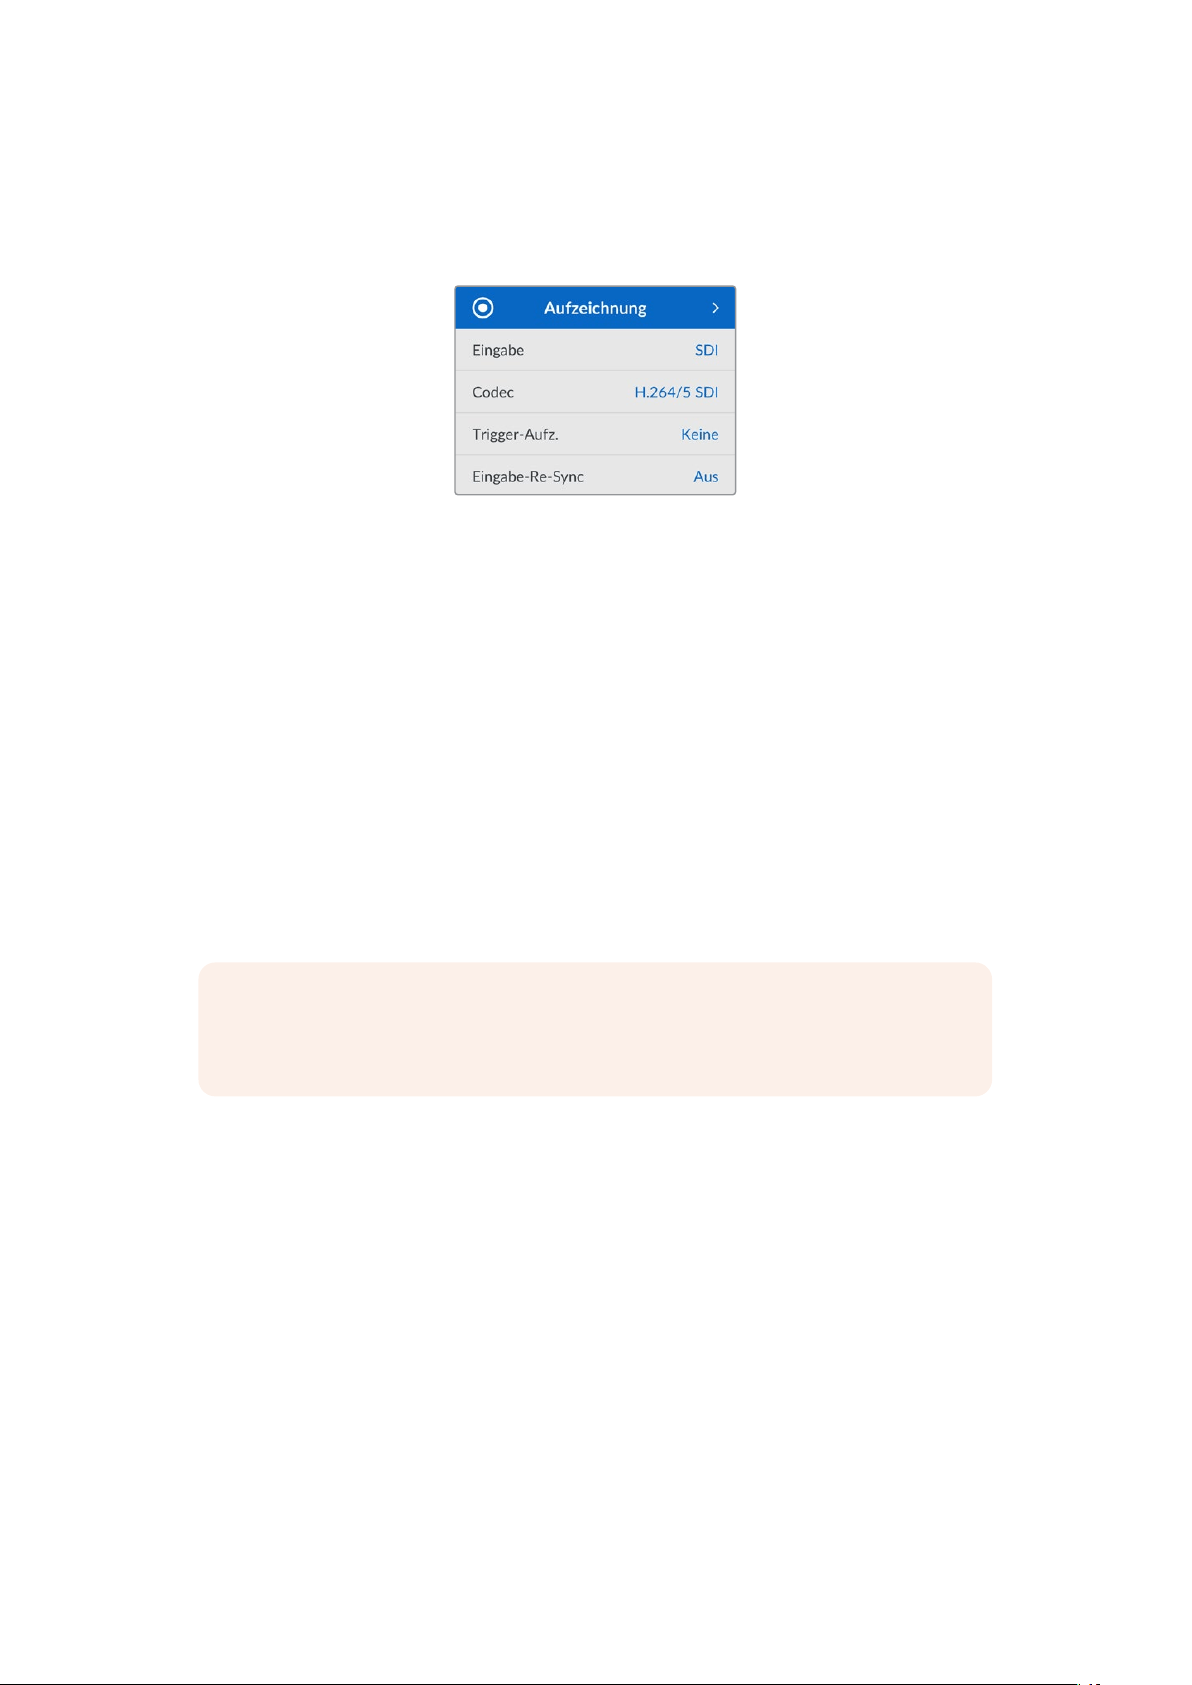
Einstellungen
Menü „Aufzeichnung“
Eingabe
Wählen Sie Ihre SDI- oder HDMI-Quelle über die Einstellung „Eingabe“ aus. Sie können Ihre
Eingabequelle bei den Pro-Modellen auch anhand der INPUT-Taste an der Frontblende ändern.
Codec
Alle HyperDeckStudio Modelle können komprimiertes Video in den Codecs H.264, Apple ProRes
und DNxHD aufzeichnen. HyperDeck Studio4KPro Modelle können überdies 4K-Material in H.265
und DNxHR aufzeichnen.
Trigger-Aufzeichnung
Es sind zwei Modi für die Trigger-Aufzeichnung verfügbar: „Video Start/Stop“ und „Timecode Run“.
Manche Kameras wie die URSA Mini senden zum Starten und Stoppen der Aufnahme auf externen
Rekordern ein Signal über SDI. Die Auswahl von „Video Start/Stop“ löst die Aufzeichnung auf einem
HyperDeck aus oder stoppt sie, sobald die Taste an der Kamera gedrückt wird.
Damit das Gerät mit der Aufzeichnung beginnt, sobald es über die Eingänge ein gültiges Timecode-
Signal empfängt, verwenden Sie die Option „Timecode Run“. Mit Beenden des Signals stoppt auch
die Aufzeichnung. Deaktivieren Sie die Trigger-Aufzeichnung durch Auswählen der Option „Keine“.
HINWEIS Vergewissern Sie sich beim Aufzeichnen von einer HDMI- oder SDI-Kamera, dass
die Ausgabe sauber und frei von Overlays ist. Andernfalls werden die in der Videoausgabe
Ihrer Kamera enthaltenen Einblendungen zusammen mit dem Bild aufgezeichnet.
Eingabe-Re-Sync
Diese Einstellung aktiviert die Resynchronisierung der Videoeingabe und sorgt dafür, dass das
Videosignal vor der Aufzeichnung mit dem externen Referenzsignal verkoppelt wird. Da die
Resynchronisierung am Eingang erfolgt, bleibt die Videoausgabe selbst dann mit der Referenzquelle
synchronisiert, wenn aufgezeichnet wird. Die Funktion dient für isolierte Aufzeichnungen mit nicht
synchronen Quellen, bei denen der Timecode auf mehreren Decks verkoppelt werden muss.
Standardmäßig ist die Funktion ausgeschaltet, damit Videoeingaben aufgezeichnet werden, ohne
dass Einzelbilder vom eingehenden Video hinzugefügt oder gelöscht werden.
Die meisten Broadcastdecks verkoppeln Videoausgaben während der Wiedergabe normalerweise
anhand einer Referenzquelle. Bei der Wiedergabe wird die Ausgabe auf dem HyperDeck mit der
Referenzquelle verkoppelt. Bei der Einbindung in ein großes Broadcastsystem bedarf es also keiner
Resynchronisierung.
Wenn das Deck in den Aufzeichnungsmodus wechselt, wird auch die Ausgabe auf den Eingang
geschaltet, weil man das Video meist als Clean-Feed aufzeichnen und an andere nachgeschaltete,
an die HyperDeck Ausgänge angeschlossenen Geräte übermitteln möchte.
228Einstellungen

HyperDeck Studios verfügen jedoch über eine spezielle, für isolierte Aufzeichnungen konzipierte
Funktion. Sie ermöglicht es Ihnen, diesen Vorgang komplett umzukehren und die Videoeingabe mit
der Referenzquelle zu synchronisieren. Um eine nicht synchrone Quelle aufzuzeichnen, können Sie
sie einfach an den HyperDeck anschließen und die Videoeingabe wird automatisch mit dem
Videoreferenzsignal synchronisiert.
Nicht synchrone Quellen können bspw. Computer, Consumer-Kameras oder sämtliche Videogeräte
sein, an die sich keine Referenzquelle anschließen lässt. Das könnten sogar aus einem anderen
Studio oder einer externen Sendeanstalt eingehende Videofeeds sein. Nicht synchrone Quellen
sind für isolierte Aufzeichnungen problematisch, weil der Timecode aller Aufzeichnungen über die
gesamte Dauer perfekt aufeinander abgestimmt sein muss. Eine nicht synchrone Quelle läuft
schneller oder langsamer als andere Quellen und kann während der Aufzeichnung leicht aus der
Zeit laufen. Quellen mit unterschiedlichem Timecode erschweren den Multicam-Schnitt extrem.
Ist „Eingabe-Re-Sync“ eingeschaltet, wird die Videoquelle auf dem HyperDeck analysiert. Fällt sie
zurück, wird ein Frame wiederholt. Läuft sie schneller als das Referenzsignal, wird ein Frame gelöscht.
Dieser Vorgang nennt sich Resynchronisierung. Die Verarbeitung an den Eingängen bezeichnet man
als Frame-Resynchronisierung. Sie gewährleistet, dass sich in allen auf verschiedenen Decks
aufgezeichneten Clips an der gleichen Timecode-Stelle das Gleiche abspielt. Dadurch ist der
Multicam-Schnitt möglich.
Fügt man vor der Aufzeichnung Frames in die Eingabe hinzu oder löscht sie, kann dies allerdings
nachteilig sein. Aus diesem Grund ist es sinnvoll, die Funktion ausgeschaltet zu lassen und sie nur
dann zu aktivieren, wenn sich wirklich keine Referenzquelle an ihr Gerät wie bspw. ein Computer
oder ein Consumer-Gerät anschließen lässt.
In einer bestimmten Situation ist es jedoch ratsam, die Funktion „Eingabe-Re-Sync“ zu verwenden.
Wenn „Eingabe-Re-Sync“ aktiviert ist, bleibt die Videoausgabe des HyperDeck mit der
Referenzquelle verkoppelt, während auf dem Deck aufgezeichnet wird. Dies bedeutet, dass Sie
eineKamera an den SDI-Ausgang des HyperDeck anschließen können, um die Kamera über den
rückgeführten Programmfeed mit dem Referenzsignal zu koppeln. Ein gutes Beispiel ist die
Blackmagic Studio Camera 4K Pro, deren Referenzsignal sich auf externes Video einstellen lässt.
Der HyperDeck synchronisiert den Kamerafeed dann mit dem Referenzsignal. Bei der
Resynchronisierung der HyperDeck Eingabe müssen keine Frames hinzugefügt oder gelöscht
werden, weil die Kamera nicht schneller oder langsamer läuft.
Die Eingabe-Resynchronisierung setzt nur dann ein, wenn die Videoeingabe nicht mit derselben
Referenzquelle verkoppelt ist wie der HyperDeck. In dem zuvor beschriebenen Beispiel dient
jedoch die Ausgabe des HyperDecks als Referenzquelle für die Kamera und der HyperDeck wird
über den Videoreferenzeingang synchronisiert. Wenn Sie mehrere miteinander verkoppelte
HyperDecks verwenden, die über Ihre Referenz-Anschlüsse in Reihe geschaltet sind, werden alle
Kameras und HyperDecks als eine Gruppe synchronisiert. Ist an einen HyperDeck aus der Gruppe
eine nicht synchrone Quelle wie ein Computer angeschlossen, wird nur diese eine Eingabe
resynchronisiert. Die anderen Quellen bleiben jedoch unverändert.
Die Resynchronisierung erfolgt automatisch, sodass Sie lediglich Ihre Quelle verbinden müssen.
Wenn man weiß, wie die Eingabe-Resynchronisierung funktioniert und wann sie aktiv ist, kann sie
sehr wirkungsvoll eingesetzt werden. Mit mehreren HyperDecks und Multicam-Schnittsoftware
können Sie verschiedene Sachen ausprobieren. Sie werden sehen, dass Ihre Sendung so schnell
produziert ist.
229Einstellungen

Menü „Monitor“
Bei HyperDeckStudio Modellen ist das „Monitor“-Menü Teil der über den „MONITOR OUT“-
Anschluss an der Rückseite ausgegebenen Signale.
Clean-Feed
Aktivieren von „Clean-Feed“ verhindert die Ausgabe von Statustext auf Bildschirmen, die an
den „MONITOR OUT“-Anschluss an der Rückseite von HyperDeckStudios angeschlossen sind.
Einzelheiten zur Monitoring-Ausgabe an angeschlossene Bildschirme, einschl. welche Informationen
angezeigt werden, siehe „Monitorausgabe“ weiter hinten in diesem Handbuch.
3D-LUT
Display-LUTs können besonders hilfreich sein, wenn man den HyperDeckStudio als Field Recorder
nutzt. LUTs teilen dem Gerät mit, welche Farb- und Luminanzwerte ausgegeben werden sollen.
Hilfreich ist das bspw. bei Verwendung des Dynamikumfangs „Film“ auf Ihrer Kamera, der Bilder
normalerweise gewollt untersättigt und kontrastarm darstellt. Durch Anwenden einer Display-LUT
verschaffen Sie sich einen Eindruck über das Aussehen Ihres Videos nach der Farbkorrektur.
LUTs für die Anzeige können über Blackmagic HyperDeck Setup ausgewählt und über den SDI-
Monitorausgang angewendet werden.
So schaltet man eine 3D-LUT ein oder aus:
1 Drücken Sie die MENU-Taste und scrollen Sie mit dem Suchlaufregler zum „Monitor“-Menü.
2 Drücken Sie die SET-Taste.
3 Scrollen Sie mit dem Suchregler nach unten, bis „3D-LUT“ blau markiert ist.
4 Schalten Sie die LUT mit der SET-Taste ein bzw. aus.
Einzelheiten zur Auswahl einer LUT finden Sie im Abschnitt „Blackmagic Hyperdeck Setup“ weiter
hinten im Handbuch.
TIPP Näheres zur Signalausgabe für das Monitoring siehe „Monitorausgabe“ weiter hinten
im Handbuch.
230Einstellungen

Menü „Audio“
Aufgezeichnete Audiokanäle
Der HyperDeckStudio kann bis zu 16Kanäle PCM-Audio gleichzeitig aufzeichnen. Um die Anzahl
der aufzuzeichnenden Audiokanäle vorzugeben, gehen Sie ins Untermenü. Wählen Sie aus der
Liste mit den Audiokanälen 2, 4, 8 oder 16Kanäle. Wenn als Codec H.264 oder H.265 ausgewählt
ist, können Sie auch 2Kanäle AAC-Audio vorgeben. Diese Aufnahmen können Sie dann direkt auf
YouTube hochladen. Über diese Einstellung gibt man auch die Anzahl der Kanäle vor, die über den
„MONITOR OUT“-Anschluss ausgegeben werden.
Monitoring-Kanäle
Wenn mehr als zwei Kanäle aufgezeichnet werden, können Sie vorgeben, welche Kanäle auf dem
Frontblenden-LCD angezeigt werden sollen. Dies erfolgt über die Option „Monitoring-Kanäle“. Bei
HyperDeckStudio Modellen mit einem Lautsprecher an der Frontblende wählt man über diese Option
auch die Kanäle aus, die über den Lautsprecher und die Kopfhörerbuchse ausgegeben werden sollen.
Audiopegelmeter
Das eingebaute LCD zeigt Audiopegelmeter für eingebettete Audiokanäle an. Man hat die Wahl
zwischen der Anzeige als PPM- oder VU-Meter. Um den Pegelmetertyp zu ändern, gehen Sie ins
Untermenü und wählen Sie dort den gewünschten Typ aus.
Kopfhörerpegel
Bei Modellen mit einer Kopfhörerbuchse an der Frontblende können Sie die Lautstärke
angeschlossener Kopfhörer über die Einstellung „Kopfhörerpegel“ regulieren.
Lautsprecherpegel
Regulieren Sie die Lautsprecherpegel durch Drehen des Suchlaufreglers. Die Standardeinstellung
ist 50%.
TIPP Die Lautstärke von Kopfhörern und Lautsprecher lassen sich auch direkt über die
Frontblende regulieren. Halten Sie die Lautsprechertaste gedrückt und drehen Sie am
Suchregler, um den Wiedergabepegel lauter oder leiser zu stellen. Die Lautstärke wird
mittig am oberen Rand des LCDs an der Frontblende angezeigt.
231Einstellungen
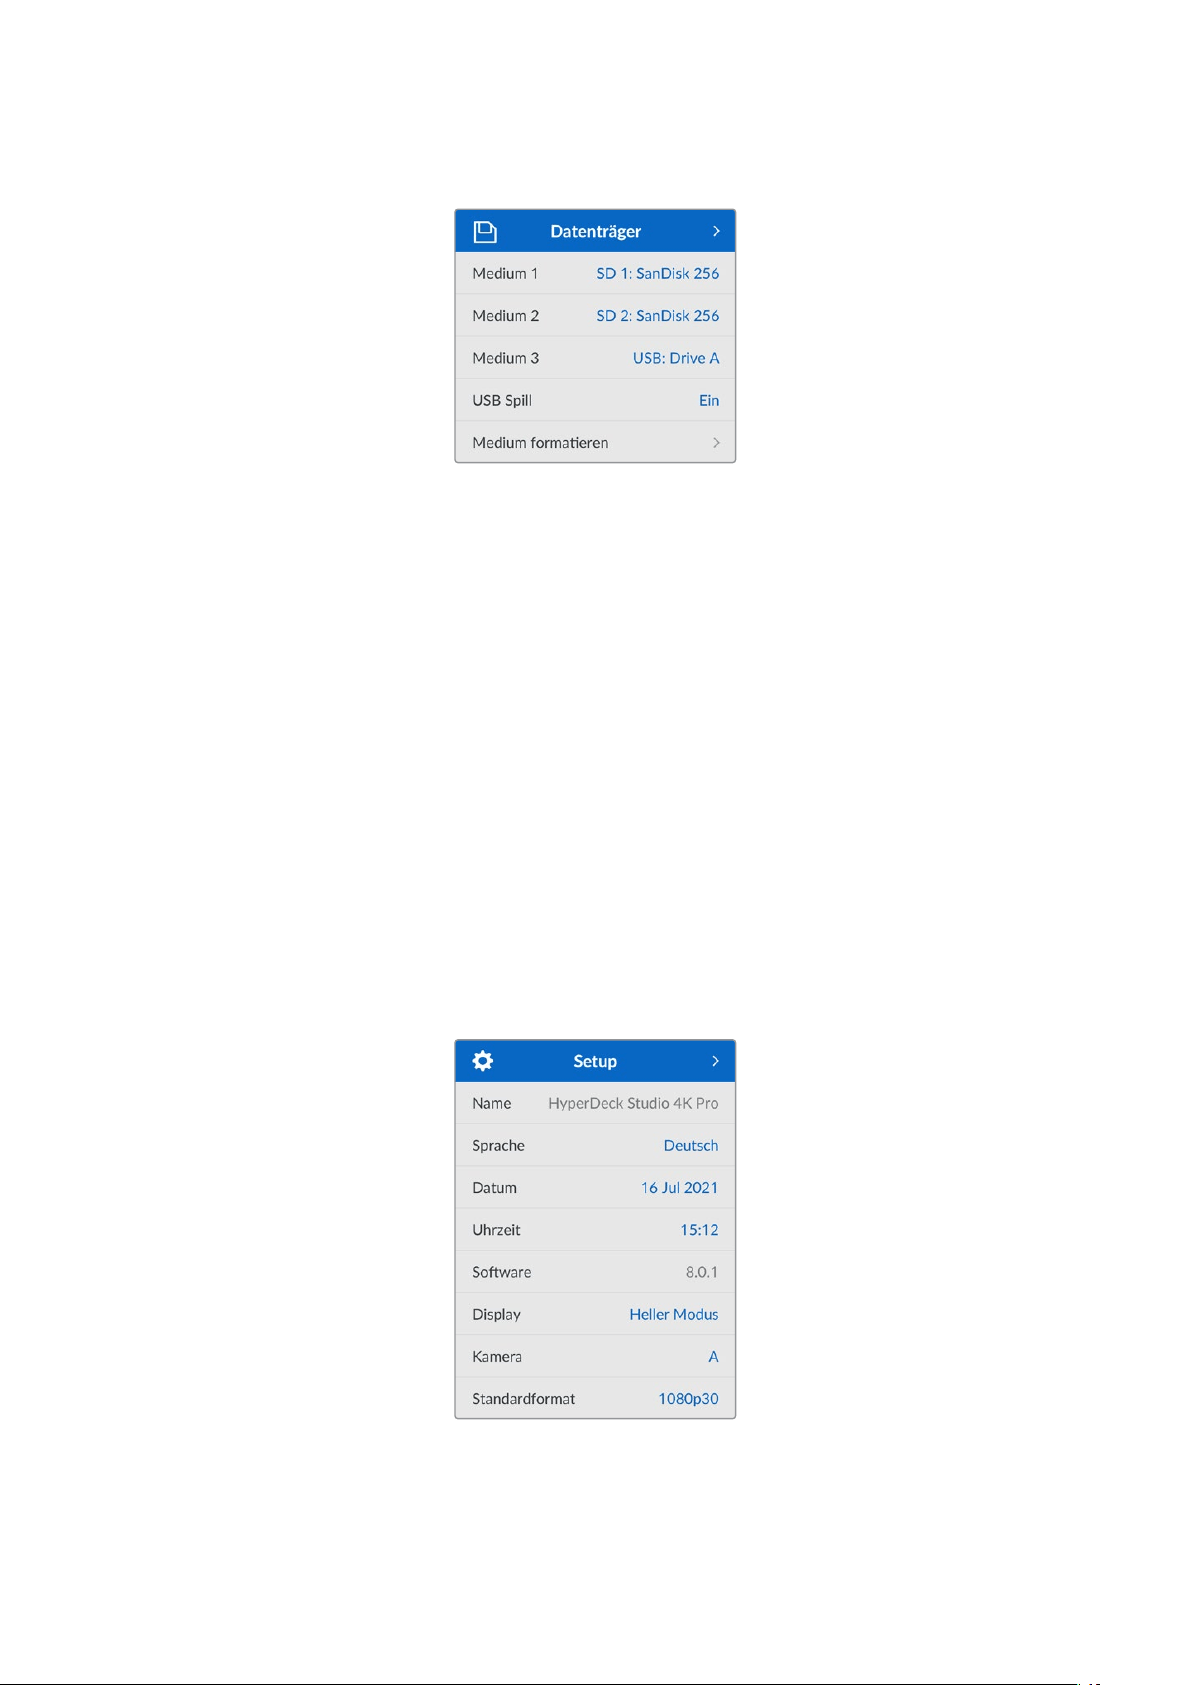
Menü „Datenträger“
Medium formatieren
SD-Karten, SSDs und an den rückwärtigen „EXT DISK“-Port angeschlossene Laufwerke können
direkt mit dem Rekorder oder mit einem Mac- oder Windows-Computer formatiert werden.
So bereiten Sie Datenträger auf dem HyperDeckStudio vor:
1 Wählen Sie unter Einsatz von Suchlaufregler und SET-Taste die Option „Medium formatieren“.
2 Wählen Sie den zu formatierenden Datenträger aus der Liste und drücken Sie auf SET.
3 Wählen Sie das Format und drücken Sie auf SET.
4 Der nun erscheinende Bildschirm zeigt, welcher Datenträger in welchem Format formatiert
wird. Wählen Sie „Formatieren“.
5 Nach abgeschlossenem Vorgang erscheint eine Bestätigungsmeldung. Wählen Sie OK.
HFS+ wird auch als „Mac OS X Extended“ bezeichnet und ist das empfohlene Format, da es
„Journaling“ unterstützt. Auf Datenträgern mit Journaling gespeicherte Daten lassen sich im seltenen
Fall einer Beschädigung Ihres Datenträgers mit höherer Wahrscheinlichkeit wiederherstellen. HFS+
wird nativ von Mac unterstützt. ExFAT wird von Mac und Windows nativ ohne Verwendung zusätzlicher
Software unterstützt. Es unterstützt jedoch kein Journaling.
Einzelheiten zur Datenträgerformatierung finden Sie am Abschnitt „Formatieren von Datenträgern“.
Menü „Setup“
232Einstellungen
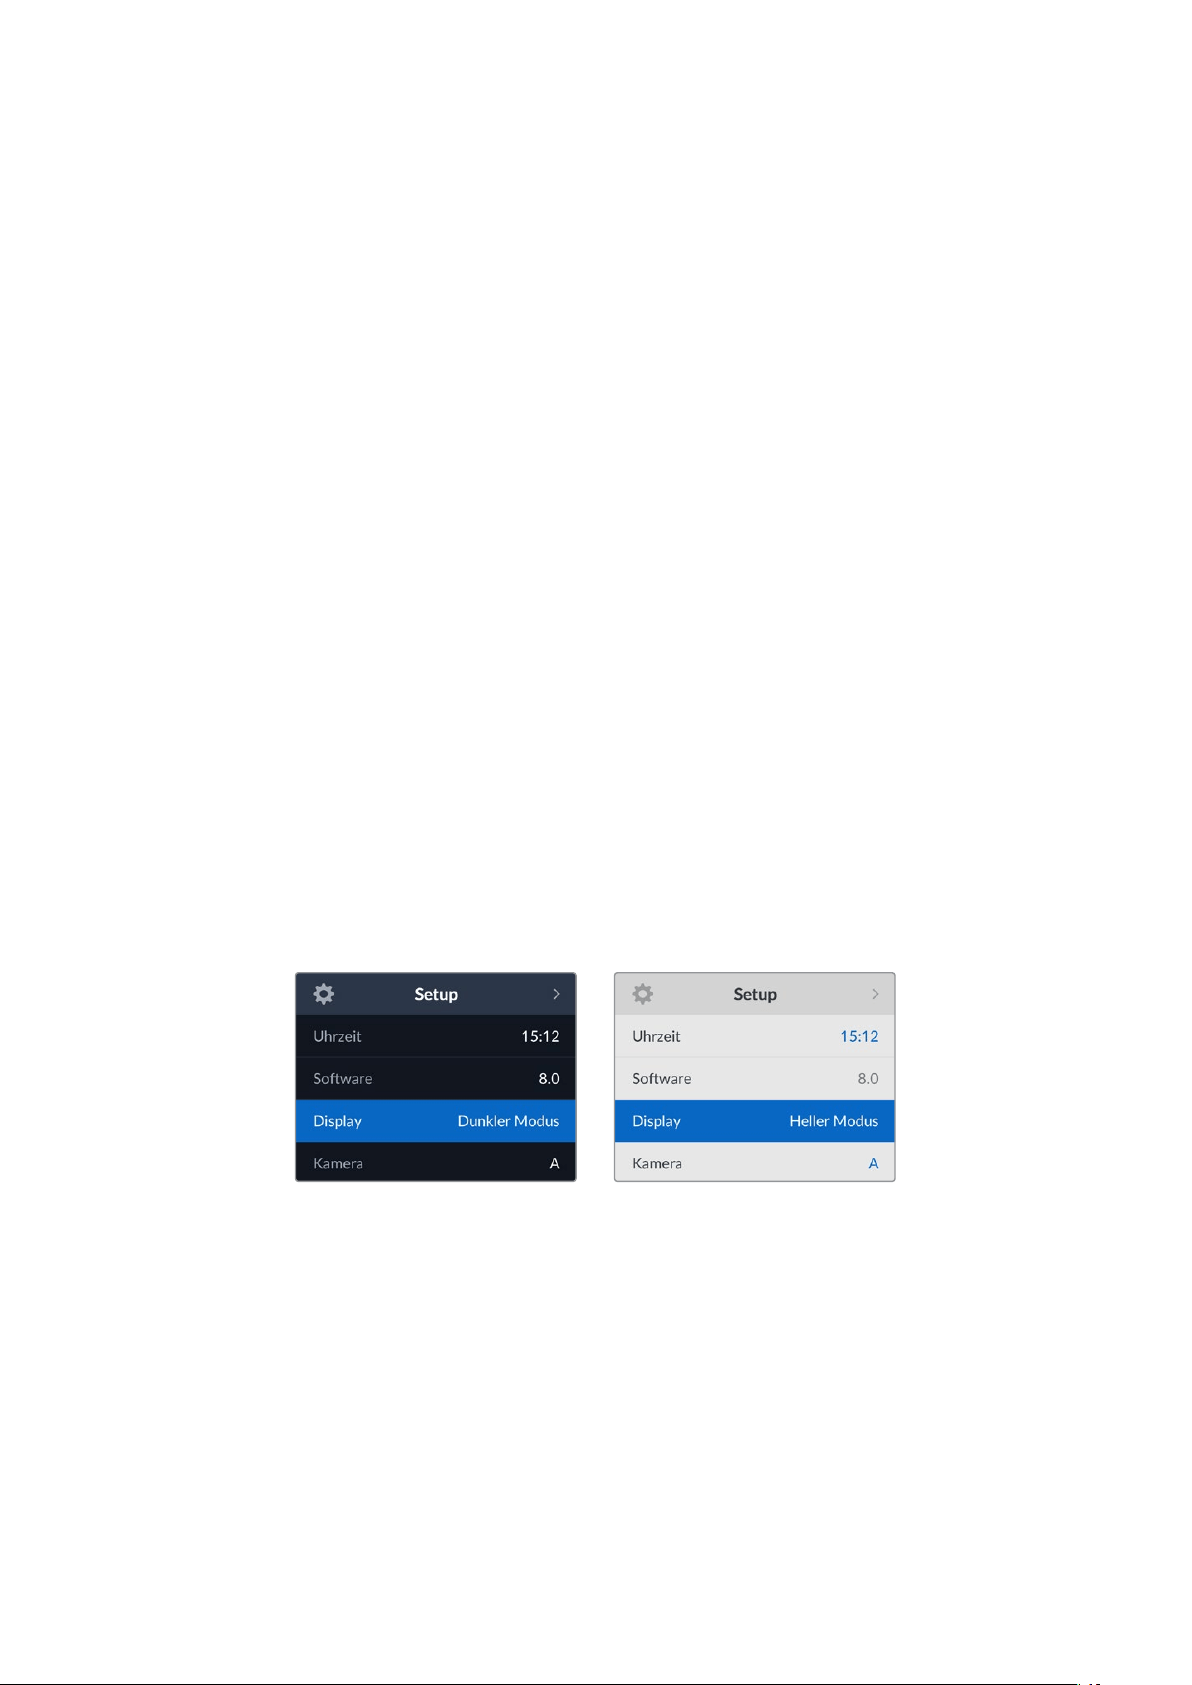
Name
Wenn mehr als HyperDeckStudio in ein Netzwerk eingebunden ist, empfiehlt sich es sich, die
Rekorder individuell zu benennen. Das geht über Blackmagic HyperDeck Setup oder Blackmagic
HyperDeck Ethernet Protocol mithilfe eines Terminalprogramms.
Sprache
HyperDeckStudios unterstützen 13verbreitete Sprachen. Neben Deutsch und Englisch sind das
Chinesisch, Französisch, Italienisch, Japanisch, Koreanisch, Polnisch, Portugiesisch, Russisch,
Spanisch, Türkisch und Ukrainisch.
So stellen Sie die Sprache ein:
1 Wählen Sie das „Setup“-Menü und drücken Sie auf SET.
2 Scrollen Sie mit dem Suchlaufregler zur gewünschten Sprache und drücken Sie auf SET.
3 Scrollen Sie mit dem Suchlaufregler zur gewünschten Sprache und drücken Sie auf SET.
Nach Auswahl der Sprache gelangen Sie automatisch wieder ins „Setup“-Menü.
Datum
Um das Datum vorzugeben, wählen Sie die Option „Datum“ und drücken Sie auf SET. Anhand des
Suchlaufreglers können Sie nun den Tag, Monat und die Uhrzeit vorgeben. Aus diesen Angaben
wird der Dateisuffix für den Zeitstempel gebildet.
Uhrzeit
Um die Uhrzeit vorzugeben, wählen Sie diese und drücken Sie auf SET. Geben Sie die Stunden und
Minuten anhand des Suchreglers vor. Der HyperDeckStudio verwendet das 24-Stunden-Format.
Software
Zeigt die aktuelle Version der Produktsoftware an.
Display
Damit das LCD an der Frontblende hell leuchtet, geben Sie „Heller Modus“ vor. In Umgebungen mit
wenig Licht, in denen ein helles LCD stören mag, geben Sie „Dunkler Modus“ vor. Bspw. an einer
Produktionsstätte mit mehreren rackinstallierten HyperDeckRekordern.
233Einstellungen

Kamera
Diese praktische Einstellung ermöglicht es, die Feeds von mehreren Kameras getrennt als ISO-Dateien
aufzuzeichnen. In DaVinciResolve kann man diese Dateien in einer Multicam-Timeline nachbearbeiten.
Der Kennbuchstabe einzelner Kameras wird in den Metadaten der Datei festgehalten, anhand dessen
DaVinci Resolve bei Einsatz der „Sync Bin“-Funktion unterschiedliche Kamerawinkel problemlos erkennt.
Ordnen Sie Kameras Buchstaben
von A–Z oder Ziffern von 1–9 zu
Standardformat
Es kann vorkommen, dass der HyperDeck Studio die gewünschte Videonorm nicht sofort erkennt.
Diese Einstellung gibt dem HyperDeck die Videonorm vor, die Sie als Standard verwenden möchten.
Beispiel: Sie schalten einen HyperDeck Studio ein, an den keine Videoquelle angeschlossen ist,
undverbinden dann einen Datenträger mit mehreren Dateien, auf dem sich Dateien mit
unterschiedlichen Videonormen befinden. In welchem Videoformat soll der HyperDeck diese nun
abspielen? Das Standard-Videoformat gibt Aufschluss darüber, welche Videonorm Sie bevorzugen,
und spielt die Dateien in diesem Format ab.
Das Standard-Videoformat ist auch beim ersten Einschalten eines HyperDeck nützlich, wenn keine
Videoquellen oder Datenträger verbunden sind. In diesem Fall ist nämlich nicht klar, welches
Videoformat der HyperDeck für die Monitorausgabe verwenden soll. Das Standardformat liefert
Hinweise, was zu tun ist.
Dennoch ist das Standardformat nur ein Leitwert. Es überschreibt keine Parameter. Haben Sie einen
Datenträger mit nur einer Art von Videodateien und drücken die Wiedergabetaste, wechselt der
HyperDeck Studio zu diesem Videoformat und spielt die Dateien ab. Das Standard-Videoformat wird
ignoriert, weil offensichtlich ist, dass Sie nur die Dateien von diesem Datenträger abspielen wollen.
Mit der Aufzeichnung verhält es sich ähnlich. Drücken Sie die Aufnahmetaste, wird im Videoformat
derangeschlossenen Videoquelle aufgezeichnet. Nach abgeschlossener Aufzeichnung spielt der
HyperDeck Studio die Dateien auf dem Datenträger in derselben Videonorm ab. Dies gilt auch, wenn
andere Dateien auf dem Datenträger dem Standard-Videoformat entsprechen. Es wird angenommen,
dass Sie Dateien im gleichen Videoformat abspielen wollen, in dem sie aufgezeichnet wurden. Erst
wenn Sie den Datenträger trennen und wieder verbinden, dient das Standard-Videoformat zur
Auswahl von Dateien in einer bestimmten Videonorm.
Das Standard-Videoformat bietet lediglich einen Leitwert, auf den der HyperDeck Studio in
Ermangelung eindeutiger Präferenzen zurückgreifen kann. Es werden keine Parameter
überschrieben oder das Verhalten des Decks auf eine bestimmte Weise erzwungen.
234Einstellungen

Menü „Netzwerkeinstellungen“
Protokoll
Blackmagic HyperDecks werden auf DHCP voreingestellt ausgeliefert. Wird Ihr Rekorder in ein
Netzwerk eingebunden, bekommt er vom Netzwerkserver automatisch eine IP-Adresse zugewiesen.
Es müssen keine weiteren Netzwerkeinstellungen angepasst werden. Wenn Sie eine Adresse
manuell einrichten müssen, können Sie die Verbindung über ein statisches IP erstellen.
Um auf das Menü zuzugreifen, markieren Sie „Protokoll“ und drücken Sie die blinkende SET-Taste.
Scrollen Sie zu „Statische IP“ und drücken Sie SET.
IP-Adresse, Subnetzmaske und Gateway
Nach Auswahl von „Statische IP“ können Sie Ihre Netzwerkinformationen manuell eingeben.
So ändern Sie die IP-Adresse:
1 Navigieren Sie mit dem Suchlaufregler zur Option „IP-Adresse“ und drücken Sie an der
Frontblende Ihres HyperDecks die blinkende SET-Taste.
2 Drehen Sie den Suchregler, um die IP-Adresse anzupassen und drücken Sie zur
Bestätigung auf SET, ehe Sie den nächsten Zahlenblock anpassen.
3 Drücken Sie zur Bestätigung der Änderung auf SET und machen Sie mit dem nächsten
Zahlenblock weiter.
Wenn die Eingabe Ihrer IP-Adresse abgeschlossen ist, wiederholen Sie diese Schritte, um die
Subnetzmaske und das Gateway anzupassen. Wenn Sie fertig sind, drücken Sie die blinkende
MENU-Taste, um zur Startseite zurückzukehren.
235Einstellungen
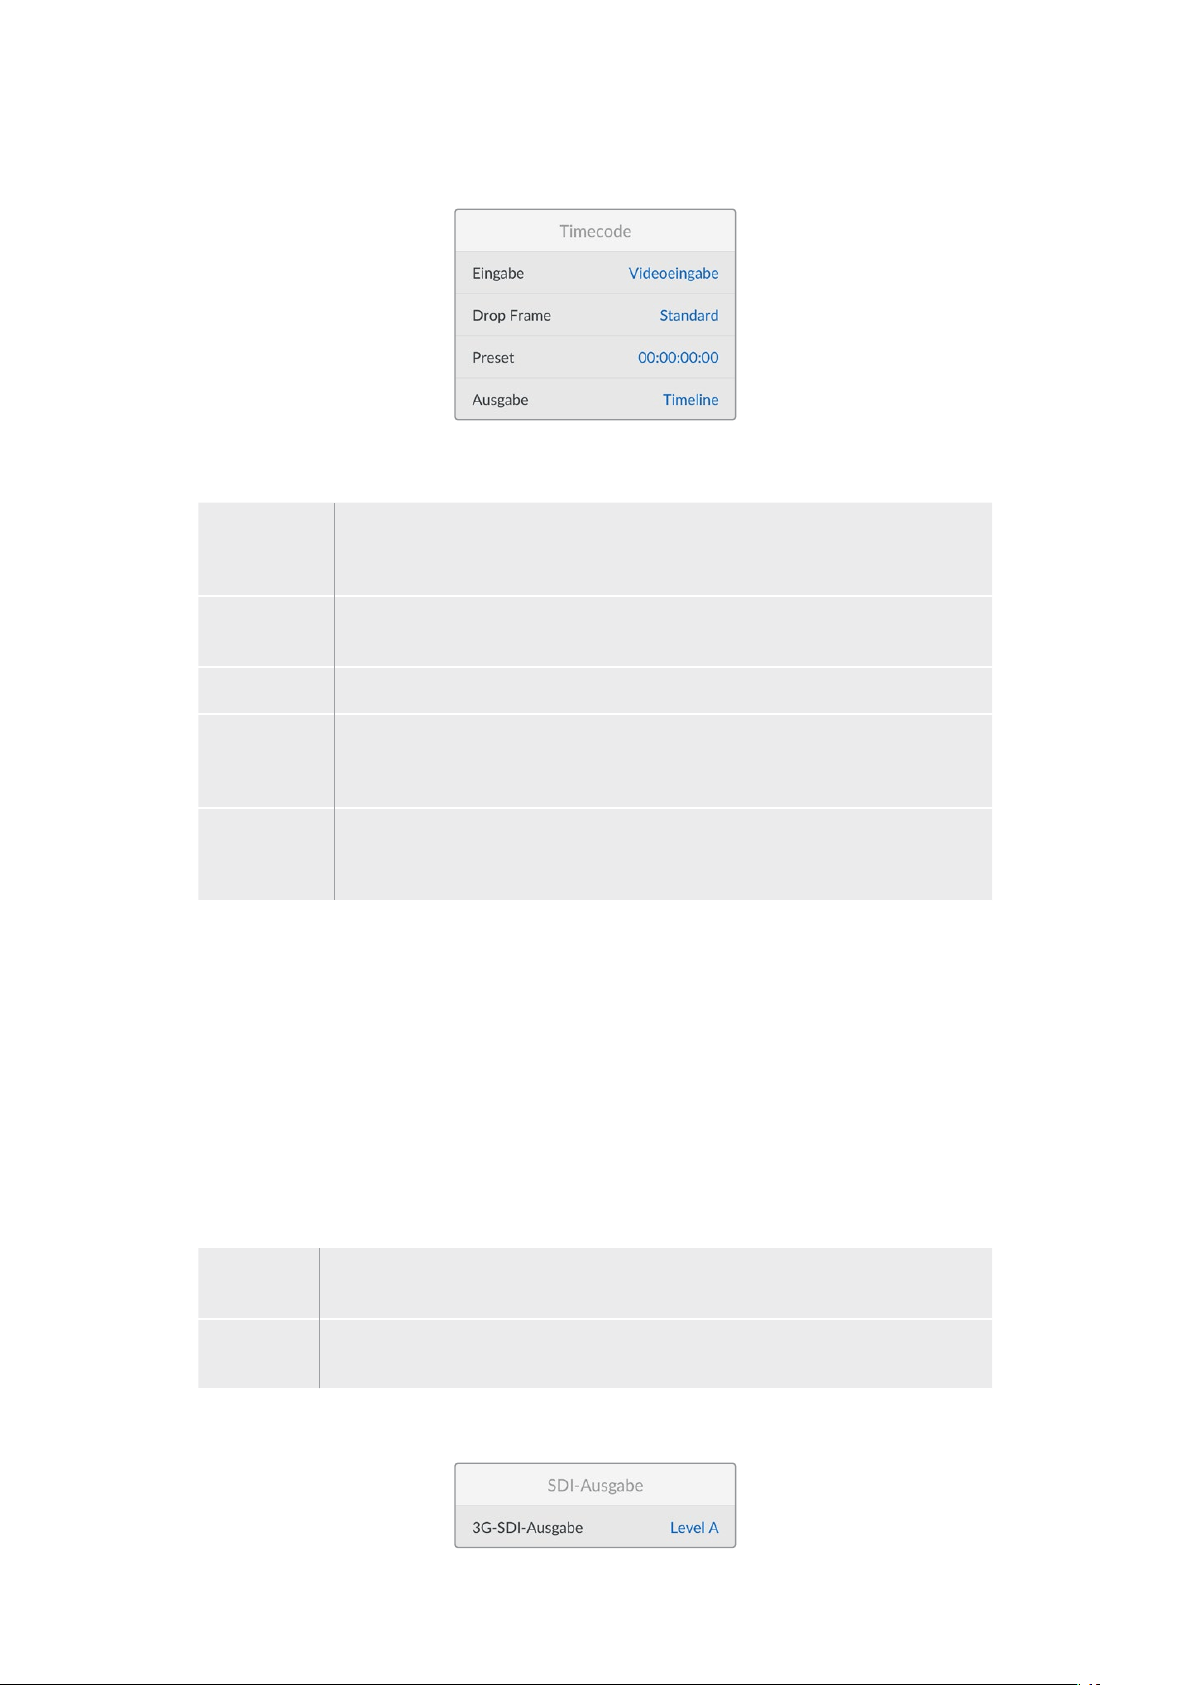
Menü „Timecode“
Eingabe
Es stehen fünf Timecode-Eingabeoptionen für die Aufzeichnung zur Verfügung.
Videoeingabe Diese Option übernimmt den in die SDI- und HDMI-Signale eingebetteten
Timecode mit SMPTE RP-188 Metadaten. Das sorgt für die Synchronisierung Ihrer
SDI- oder HDMI-Quellen mit der auf dem HyperDeckStudio aufgezeichneten Datei.
Extern Aktivieren Sie diese Option, wenn der „TIMECODE IN“-Anschluss an der Rückseite
benutzt wird.
Intern Verwenden Sie diese Option für Uhrzeit-Timecode vom internen Timecode-Generator.
Ende letzter
Clip
Mit dieser Auswahl für die Timecode-Eingabe beginnt jede Aufzeichnung einen
Frame nach dem letzten Frame des vorherigen Clips. Endet Ihr erster Clip bspw.
bei 10:28:30:10, beginnt der Timecode des nächsten Clips bei 10:28:30:11.
Preset Wählen Sie die „Preset“-Option, um Timecode manuell vorzugeben. Die
Clipaufzeichnung beginnt mit dem unter „Preset“ vorgegebenen Timecode,
wie nachstehend erklärt.
Voreinstellung
Für NTSC-Quellen mit Bildwechselfrequenzen von 29,97 oder 59,94 können Sie für Timecode die
Option „Frames auslassen“ oder „Keine Frames auslassen“ wählen. Ist die Quelle unbekannt, tippen
Sie auf „Standard“. Damit wird die Norm der Eingabe beibehalten oder es werden standardmäßig
Frames ausgelassen, wenn kein gültiger Timecode erkannt wird.
Preset
Sie können den Timecode manuell vorgeben, indem Sie die SET-Taste drücken und den Start-
Timecode per Suchlaufregler und SET-Taste vorgeben. Vergewissern Sie sich, dass unter „Eingabe“
die Option „Preset“ vorgegeben ist.
Timecode-Ausgabe
Wählen Sie die Timecode-Optionen für Ihre Ausgaben.
Timeline Um alle auf einen Datenträger aufgezeichneten Clips mit fortlaufendem Timecode
auszugeben, wählen Sie die Option „Timeline“.
Clip Ist die Option „Clip“ aktiviert, wird ein Timecode für jeden einzelnen Clip
ausgegeben.
Menü „SDI-Ausgabe“
236Einstellungen
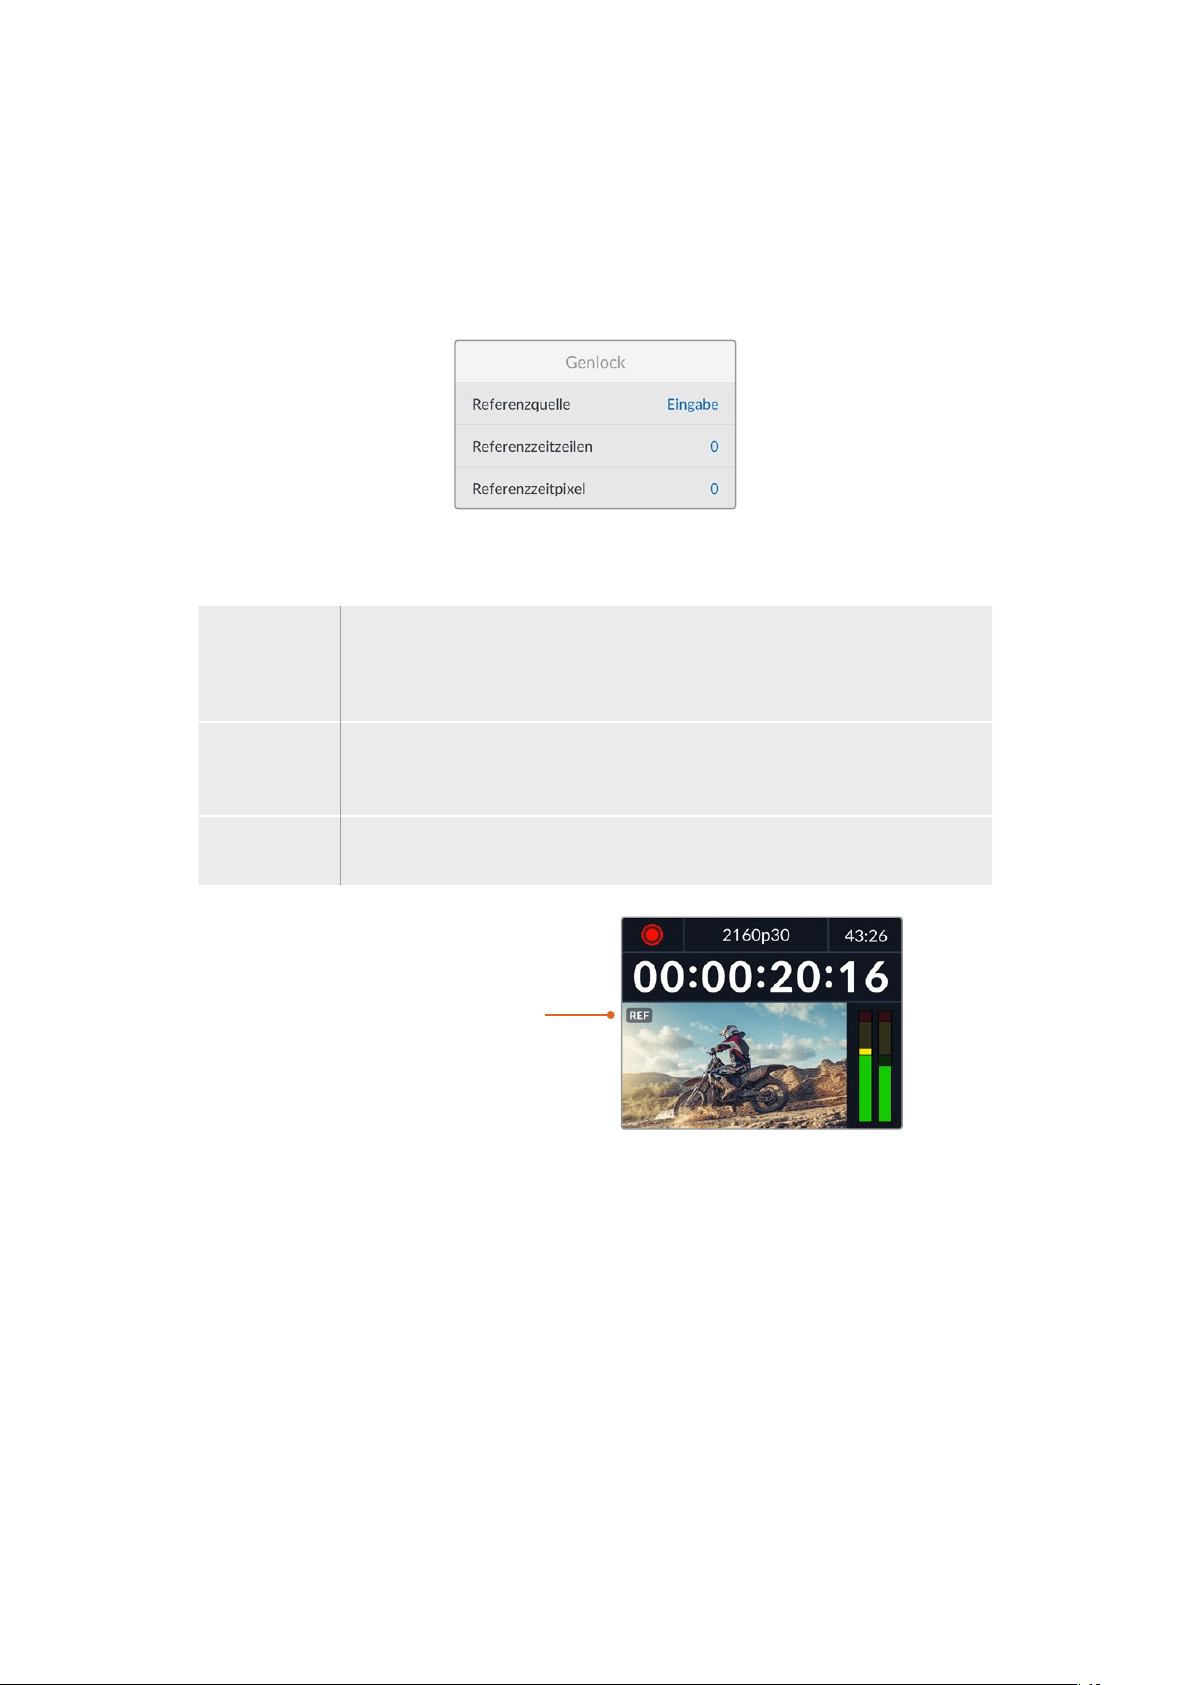
3G-SDI-Ausgabe
Manche Broadcast-Geräte können nur Level A oder Level B 3G-SDI-Videosignale empfangen.
Um die Kompatibilität mit anderen Broadcast-Geräten zu wahren, wählen Sie „LevelA“ für direkte
3D-SDI-Streams oder „LevelB“ für Dual Stream Multiplex 3D-SDI.
Menü „Genlock“
Referenzquelle
Wählen Sie als Referenzquelle eine der drei folgenden Optionen.
Automatischer
Modus
Der Modus „Automatisch“ wechselt standardmäßig zu „Extern“, wenn an den
„REF IN“-Anschluss an der Rückseite eine Signalquelle angeschlossen ist. Ist
keine Referenzquelle angeschlossen, wird zum eingehenden SDI- oder HDMI-
Signal gewechselt.
Eingabe Wählen Sie „Eingabe“, wenn in Ihre SDI- oder HDMI-Quelle Referenzsignale
eingebettet sind, die Sie zum Synchronisieren verwenden wollen. Ein Beispiel dafür
wäre eine bandbasierte MAZ mit einer direkt daran angeschlossenen Genlock-Quelle.
Extern Ist eine externe Referenzquelle wie der Blackmagic Sync Generator an den
„REF IN“-Anschluss an der Rückseite angeschlossen, wählen Sie „Extern“.
Indikator für externe
Referenzsignale – Auf dem
internen LCD erscheint das Kürzel
REF, wenn Ihr HyperDeck Studio
erfolgreich mit einer externen
Referenzquelle verkoppelt ist.
Referenzzeit
Die Referenzzeit lässt sich anpassen, wenn framegenau synchronisiert werden soll, bspw. beim
Archivieren von analogen MAZen. Die Referenzanpassung erfolgt in Samples, was äußerst präzise
Zeitangleichungen bis auf Sample-Ebene ermöglicht.
So passen Sie die Zeit an:
1 Navigieren Sie mit dem Suchlaufregler vom Setup-Menü zur die Option „Referenzzeitzeilen“
und drücken Sie die blinkende SET-Taste.
2 Passen Sie die Timeline-Zeitwerte mit dem Suchregler an. Drehen im Uhrzeigersinn erhöht
die Werte, drehen gegen den Uhrzeigersinn senkt sie.
3 Bestätigen Sie Ihre Auswahl durch Drücken der blinkenden SET-Taste.
4 Um die Referenzzeitpixel anzupassen, navigieren Sie durch Drücken der blinkenden
MENU-Taste zurück ins Setup-Menü. Gehen Sie für die Pixel genauso vor wie bei den
Referenzzeitzeilen.
237Einstellungen

Menü „Dateieinstellungen“
Zeitstempel-Dateisuffix
Das Hinzufügen des Zeitstempels zum Dateinamen ist standardmäßig ausgeschaltet. Aktiveren Sie
diese Option, wenn Sie das Datum und die Uhrzeit mit Ihrem Dateinamen speichern möchten. Drücken
Sie die SET-Taste und aktivieren Sie mit dem Suchlaufregler die Option „Zeitstempel-Dateisuffix“.
HyperDeck_2105061438_0001
HyperDeck_2105061438_0001 Dateiname
HyperDeck_2105061438_0001 Jahr
HyperDeck_2105061438_0001 Monat
HyperDeck_2105061438_0001 Tag
HyperDeck_2105061438_0001 Stunde
HyperDeck_2105061438_0001 Minute
HyperDeck_2105061438_0001 Clipnummer
Menü „HDR-Format ignorieren für“
Der HyperDeck Studio4KPro erkennt in ein 4K-Videosignal oder in eine Datei eingebettete
HDR-Metadaten automatisch und zeigt diese über die HDMI-Ausgabe an. Wenn das Signal oder
die Datei nicht korrekt getaggt ist, oder Ihr Bildschirm nicht HDR-kompatibel ist, kann das HDR-
Format deaktiviert werden.
Geben Sie hierfür unter der Einstellung „HDR-Format ignorieren für“ eine der SDR-Optionen wie
„Rec.2020SDR“ vor.
Für die Wiedergabe und Aufzeichnung von HDR gibt es folgende Einstellungen:
Automatisch
Der automatische Modus ist die Standardeinstellung. Damit wählt der HyperDeck automatisch das
den HDR-Metadaten des Clips entsprechende Ausgabeformat.
Rec.709
Für High-Definition-Video unter Einsatz des Farb- und Dynamikumfangs Standard Dynamic Range (SDR).
Rec.2020SDR
Dient für Ultra-HD-Video unter Einsatz des Farb- und Dynamikumfangs Standard Dynamic Range (SDR).
HLG
HLG steht für Hybrid Log Gamma. Mit diesem Format kann HDR-Video auf HDR-fähigen Fernsehern und
Monitoren wiedergegeben werden, inklusive solcher, die Farbräume bis Rec.2020SDR unterstützen.
238Einstellungen
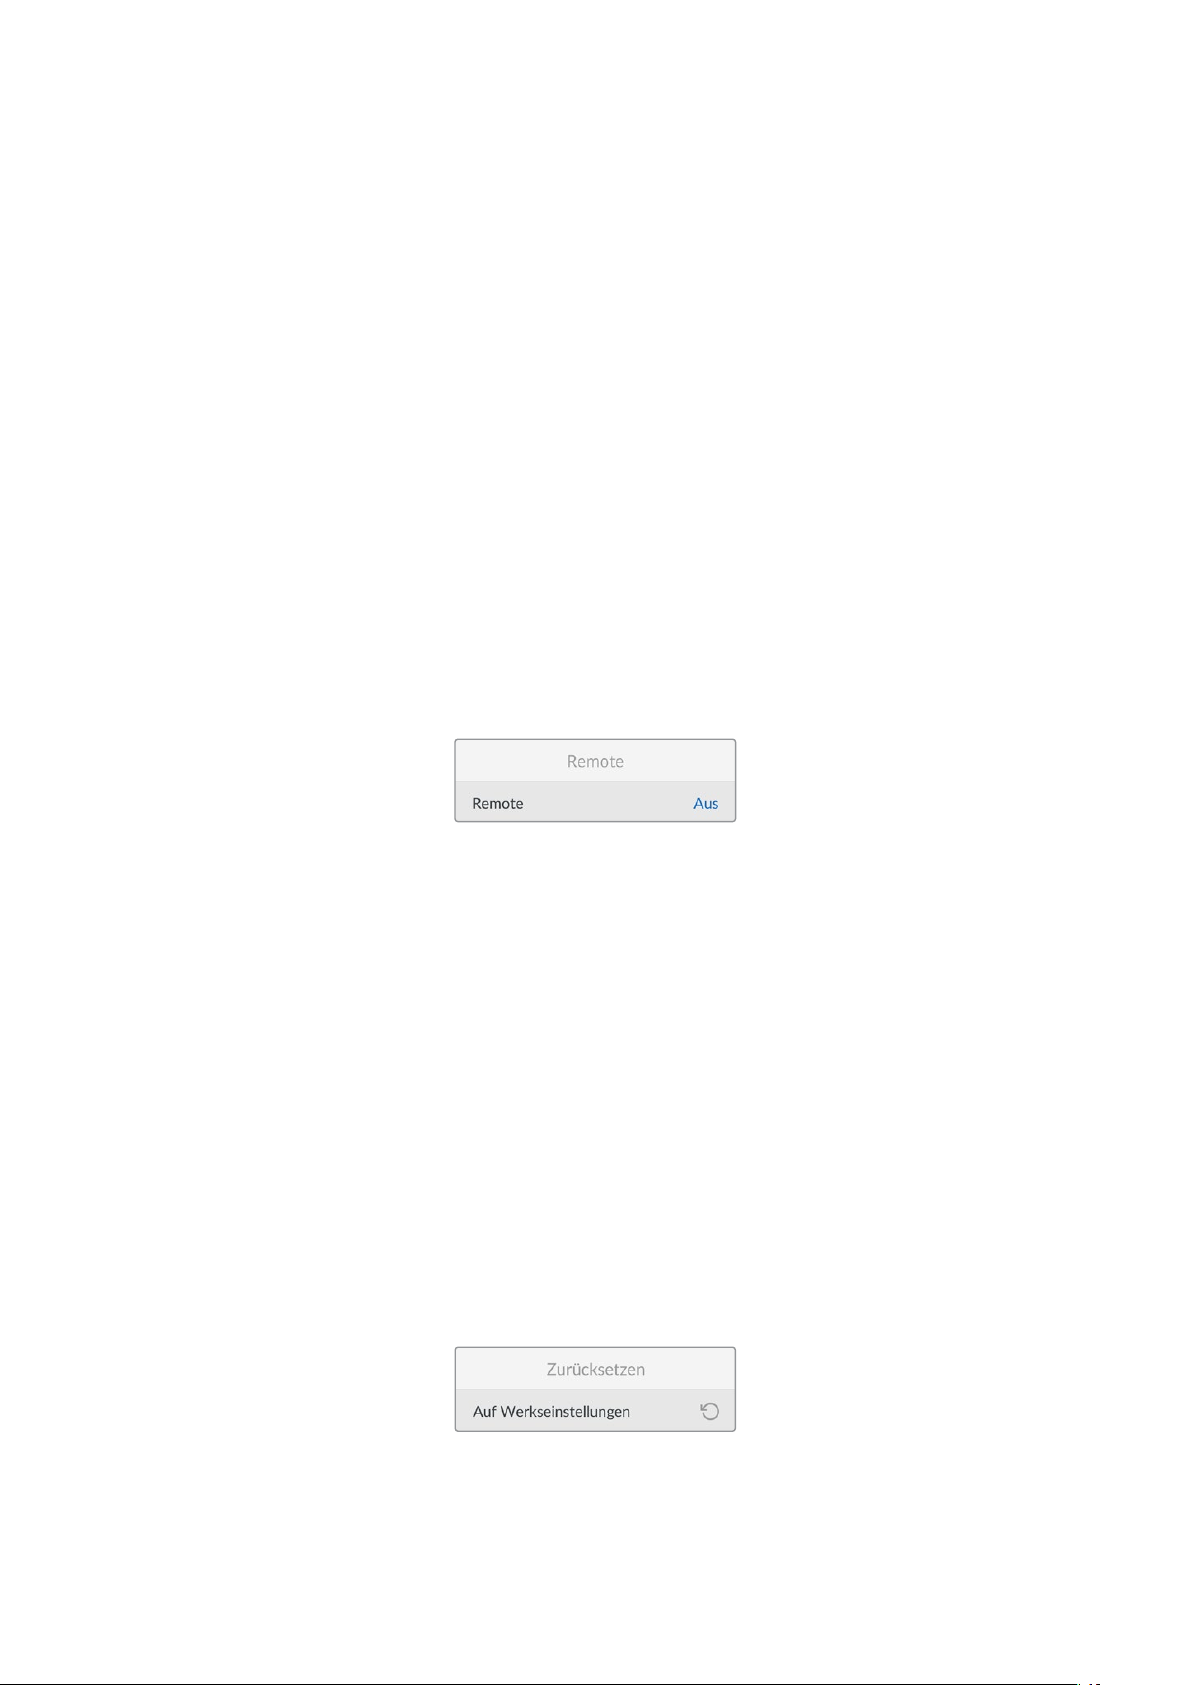
Die nachstehenden Einstellungen unterstützen den Rec.2020-Farbraum sowie PQ, also den unter
SMPTE ST2084 veröffentlichten Perceptual Quantizer zur Wahrungsoptimierung. PQ ist die Funktion
für HDR mit erweitertem Farbraum zur Darstellung leuchtkräftigerer Bilder. Die in Candela pro
Quadratmeter angegebenen Leuchtdichtewerte, bspw. 1000cd/m
2
, geben die maximale
Leuchtdichte pro Quadratmeter an, die das jeweilige Format unterstützt.
ST2084300
300cd/m
2
Luminanz
ST2084500
500cd/m
2
Luminanz
ST2084800
800cd/m
2
Luminanz
ST20841000
1000cd/m
2
Luminanz
ST20842000
2000cd/m
2
Luminanz
ST20844000
4000cd/m
2
Luminanz
Remote
Menü „Remote“
Mit „Remote“ wird die Fernsteuerung über RS-422 aktiviert. Dann kann das HyperDeck aus der
Ferne von einem anderen Gerät, bspw. einer HyperDeck Extreme Control, gesteuert werden. Ist
diese Option aktiviert, leuchtet die bei manchen HyperDeck Modellen vorhandene dedizierte
REM-Taste rot und zeigt die aktive Fernsteuerung an. Um den Rekorder lokal zu steuern,
deaktivieren Sie „Remote“.
Lokale Steuerung
Wenn „Remote“ aktiviert ist, können Sie die Transportsteuerung eines HyperDecks auf mehreren
weiteren HyperDeck Geräten spiegeln. Schalten Sie Ihre HyperDecks in Reihe, indem Sie den
REMOTE-OUT-Anschluss des Master HyperDecks mit dem REMOTE-IN-Anschluss eines zweiten
Geräts verbinden und das Gleiche mit weiteren Geräten in der RS-422-Kette tun. Ist auf allen
weiteren Geräten der Remote-Modus aktiviert, steuern Sie über die Transportsteuerung des
Master-Geräts auch alle anderen Geräte.
Drücken Sie bspw. auf dem Master HyperDeck die REC-Taste, startet die Aufzeichnung gleichzeitig
auf allen anderen angeschlossenen HyperDecks.
Bitte beachten: Der HyperDeck Studio HD Mini ist zwar nicht als Steuergerät einsetzbar, lässt sich
aber von einem HyperDeck Pro- oder Plus-Modell steuern.
Menü „Zurücksetzen“
Auf Werkseinstellungen
Um Ihren HyperDeck auf seine Werkseinstellungen zurückzusetzen, markieren Sie im „Setup“-Menü
die Option „Auf Werkseinstellungen“. Sobald Sie auf SET drücken, werden Sie aufgefordert, Ihre
Auswahl zu bestätigen.
239Einstellungen

Rückseite
1 Stromanschluss
Alle HyperDecks sind mit einer IEC-Strombuchse für AC-Netzstrom ausgestattet. Der
HyperDeck Studio4KPro verfügt für Redundanz über zwei Strombuchsen. Die DC-
Strombuchse für ein externes 12V-Netzteil kann auch für Redundanz eingesetzt werden.
Stellen Sie sicher, dass DC-Stromquellen mit der an der DC-Buchse angegebenen
Eingangsspannung und -stärke kompatibel sind.
2 ETHERNET
Der ETHERNET-Anschluss dient zum Einbinden Ihres Rekorders in Ihr Netzwerk, für
schnelle FTP-Übertragungen und zum Fernsteuern des Rekorders per HyperDeck Ethernet
Protocol. Die Geschwindigkeit von Dateiübertragungen wird bei HD-Modellen via 1 GbE
unterstützt und beim HyperDeck Studio 4K Pro via 10 GbE. Einzelheiten zur Übertragung
von Dateien über einen FTP-Client siehe Abschnitt „Dateien über ein Netzwerk senden“
weiter hinten im Handbuch.
Wenn Ihr HyperDeck in ein Netzwerk mit einem ATEM Mischer eingebunden ist, können
Sie den Rekorder auch unter Einsatz des ATEM Mischers oder eines ATEM Hardware-
Bedienpults steuern.
3 REMOTE
Manche HyperDeck Studio Modelle sind mit zwei RS-422 DE-9 Buchsen (REMOTE IN,
REMOTE OUT) ausgestattet. Der HyperDeck StudioHDMini mit einer „REMOTE IN“-Buchse
unterstützt nur eingehende Fernsteuersignale.
4 EXT DISK
Der USB-C-Verbinder an der Rückseite dient zum Anschließen eines externen Laufwerks,
um mit Datengeschwindigkeiten bis zu 5Gbit/s aufzuzeichnen. HyperDeck Studio4KPro
Modelle verfügen über einen 3,1-USB-Port der Generation2 für Übertragungen mit
Geschwindigkeiten bis zu 10Gbit/s. Sie können HyperDecks auch an USB-C-Hubs mit
mehreren Ports oder zum Gebrauch einer oder mehrerer SSDs an eine Blackmagic
MultiDock10G anschließen.
Wenn Ihr HyperDeck per USB mit Ihrem Computer verbunden ist, können Sie den Rekorder
bei Verwendung von Softwares wie Open Broadcaster oder Skype als Ihre Webcam-Quelle
einsetzen. Weitere Informationen finden Sie im Abschnitt „Open Broadcaster einrichten“
weiter hinten im Handbuch.
5 MONITOR OUT
Der 3G-SDI-Monitorausgang ermöglicht eine herabskalierte Ausgabe mit Overlays zum
Monitoring auf einem externen Bildschirm. Die Overlays enthalten u.a. Laufwerk-Icons,
Audiopegelmeter, einen Zeitzähler und eine Display-LUT. Näheres zu den SDI-Einstellungen
fürs Monitoring, bspw. wie man ein sauberes Signal ausgibt, finden Sie unter „Einstellungen“
zu Beginn des Handbuchs.
2 5 6 8 941
Der Feststellring an der Strombuchse
des HyperDeck StudioHDMini
verhindert ein versehentliches
Lockern des Kabels
HyperDeck Studio HDMini-
und Plus-Modelle haben
BNC-Buchsen zur Timecode-
Ein- und Ausgabe
7
3
240Rückseite

6 REF
Alle HyperDeck Modelle sind mit einem internen Taktgenerator zur Ausgabe von
stabilisierten Black-Burst- und Tri-Level-Sync-Videoreferenzsignalen ausgestattet. Dies
ermöglicht es, Ihren als Master dienenden HyperDeck über seinen REF-Ausgang mit dem
Referenzeingang anderer Videogeräte zu verbinden und diese zum Synchronisieren mit
dem von diesem HyperDeck generierten Referenzsignal zu verkoppeln.
Sie können ein Referenzsignal auch über den REF-Eingang einspeisen und Ihren
HyperDeck über eine externe Master-Taktquelle synchronisieren.
Näheres zur Auswahl einer Referenzquelle, bspw. beim Durchschleifen mehrerer
HyperDeck Rekorder, finden Sie im Abschnitt „Einstellungen“ unter „Menü ,Setup‘“
zu Beginn des Handbuchs.
7 TIMECODE
Alle HyperDecks verfügen auch über einen internen Uhrzeit-Timecode-Generator. Auf
ähnliche Weise wie mit dem Referenzsignal können Sie also auch ein Timecode-Signal von
einem als Master fungierenden HyperDeck zu weiteren HyperDecks oder Videogeräten
durschleifen, damit alle den gleichen Timecode verwenden.
Je nach HyperDeck Modell sind die Timecode-Anschlüsse als BNC- oder XLR-Buchsen
ausgeführt. Näheres zur Auswahl von Timecode-Optionen finden Sie im Abschnitt
„Einstellungen“ weiter vorne im Handbuch.
8 HDMI
„HDMI OUT“ dient zum Anschließen von HDMI-Fernsehern und Bildschirmen.
Der HyperDeck erkennt die SDR- oder HDR-Videonorm automatisch, sofern das Signal
mit den korrekten Metadaten getaggt ist. Sie können die HDR-Tags jedoch über das Menü
„Einstellungen“ deaktivieren. Näheres finden Sie im Abschnitt „Einstellungen“ weiter hinten
im Handbuch.
9 SDI
Bei HyperDeck StudioHDMini Modellen ist je ein 3G-SDI-Ein- und -Ausgang für Signale
bis zu 1080p/60 vorhanden. Bei HyperDeck StudioHDPlus und HyperDeck StudioHDPro
Modellen sind die Ein- und Ausgänge in 6G-SDI für SD bis zu 2160p/30 ausgeführt. Der
HyperDeck Studio4KPro verfügt über 12G-SDI-Ein- und -Ausgänge für Auflösungen bis
zu 2160p/60.
HyperDecks mit zwei SDI-Ausgängen können zur Wiedergabe von ProRes-4444-Dateien
und Ausgabe simultaner Füll- und Keysignale an angeschlossene ATEM Mischer
eingesetzt werden.
241Rückseite
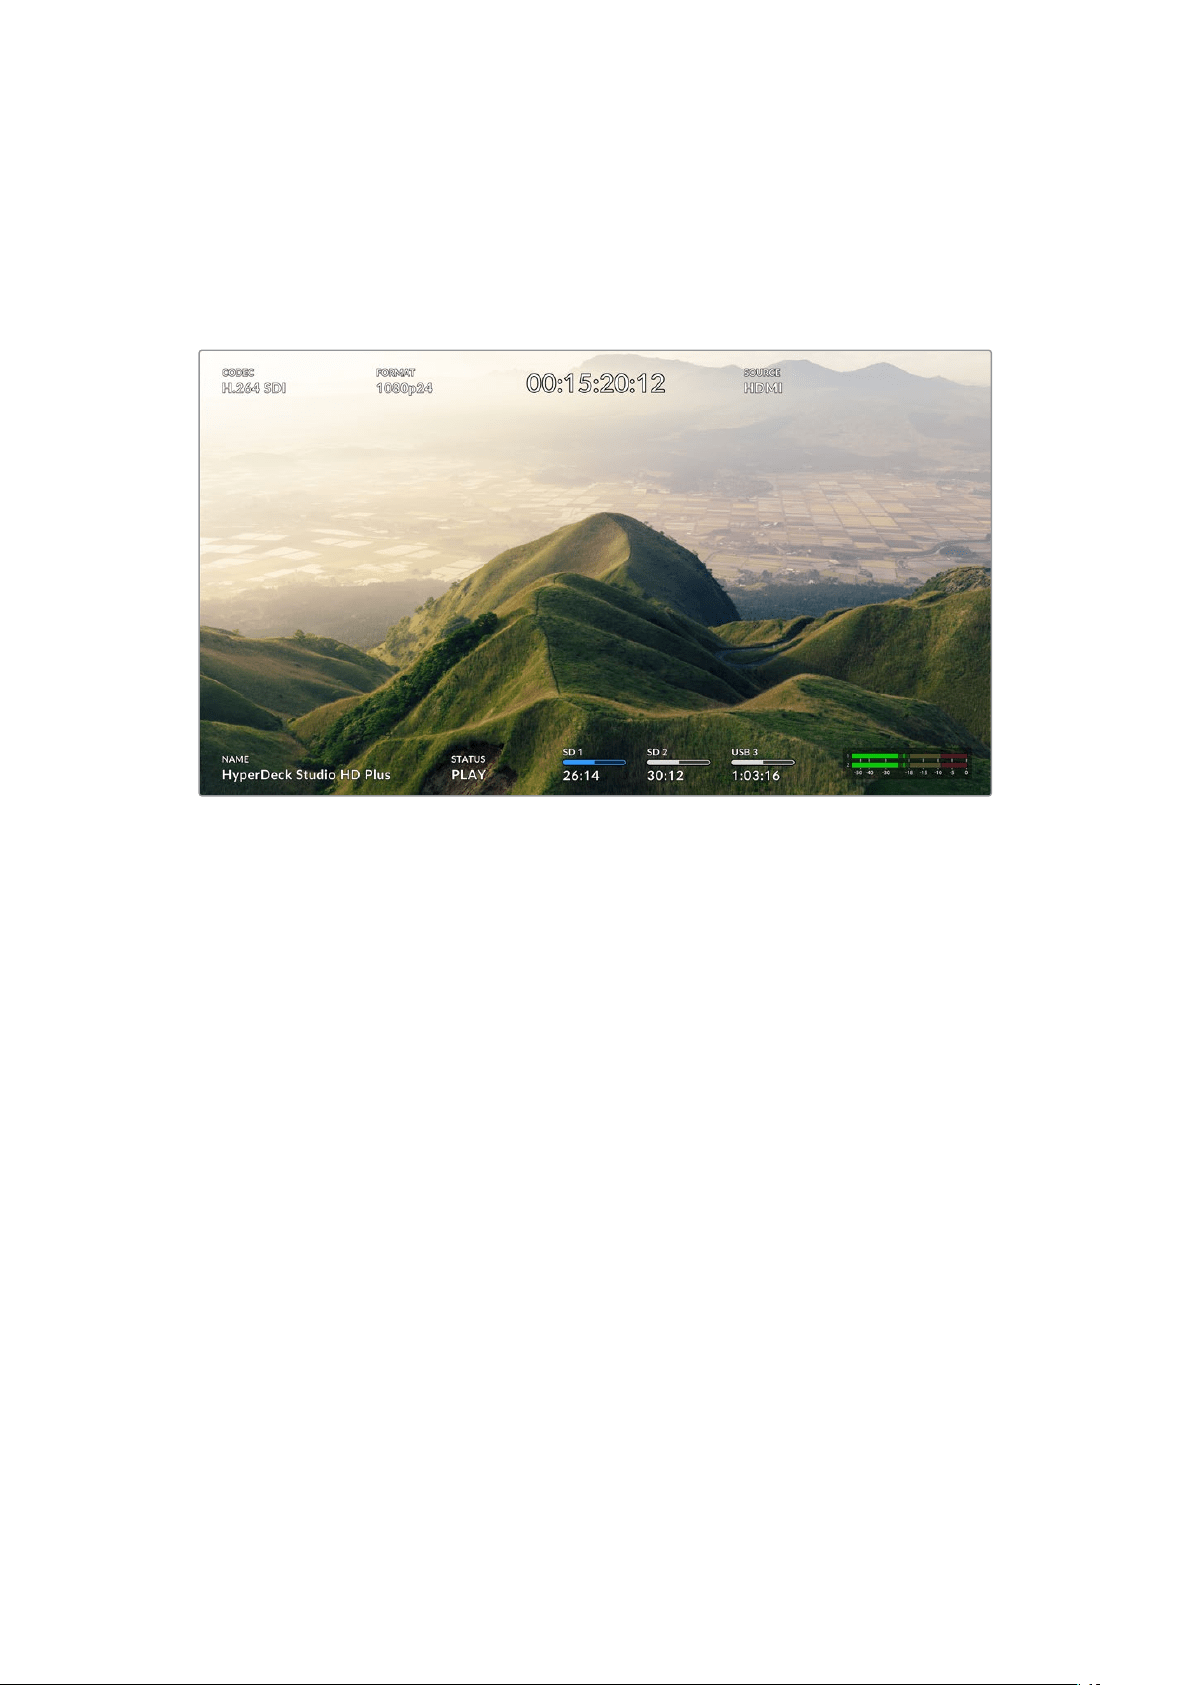
Mit der Monitorausgabe arbeiten
Anhand der Monitorausgabe können Sie die Aufzeichnung oder Wiedergabe von Video anhand von
Overlays mit wichtigen Statusinfos im Nu visuell prüfen. Angezeigt werden der verwendete Codec,
Video- und Signalformat, Framerate, Timecode, Dateiname, Transportsteuerstatus,
Datenträgerstatus und Audiopegel.
Es folgt eine Beschreibung der angezeigten Informationen.
CODEC
Zeigt den im LCD-Menü ausgewählten Codec an.
FORMAT
Zeigt die im Wiedergabemodus verwendete Auflösung und Framerate des aktuellen Clips an. Im
Aufzeichnungsmodus wird unter FORMAT die Auflösung und Framerate der aktuell ausgewählten
Quelle angezeigt.
Timecode
Numerische Anzeige des Timecodes, der bei der Wiedergabe in Ihrem Videoclip enthalten ist oder
aktuell über die Video- oder Timecode-Eingänge aufgezeichnet wird. Sie können sich hier
wahlweise den Clip-Timecode oder den Zeitzähler der Timeline anzeigen lassen.
QUELLE
Zeigt die ausgewählte SDI- oder HDMI-Eingabequelle an. „Kein Signal“ bedeutet, dass kein gültiges
Signal erkannt wurde.
NAME
Zeigt den Namen Ihres HyperDeck Rekorders an. Näheres zum Ändern des Namens finden Sie im
Abschnitt „Blackmagic Hyperdeck Setup“ weiter hinten im Handbuch.
242Mit der Monitorausgabe arbeiten
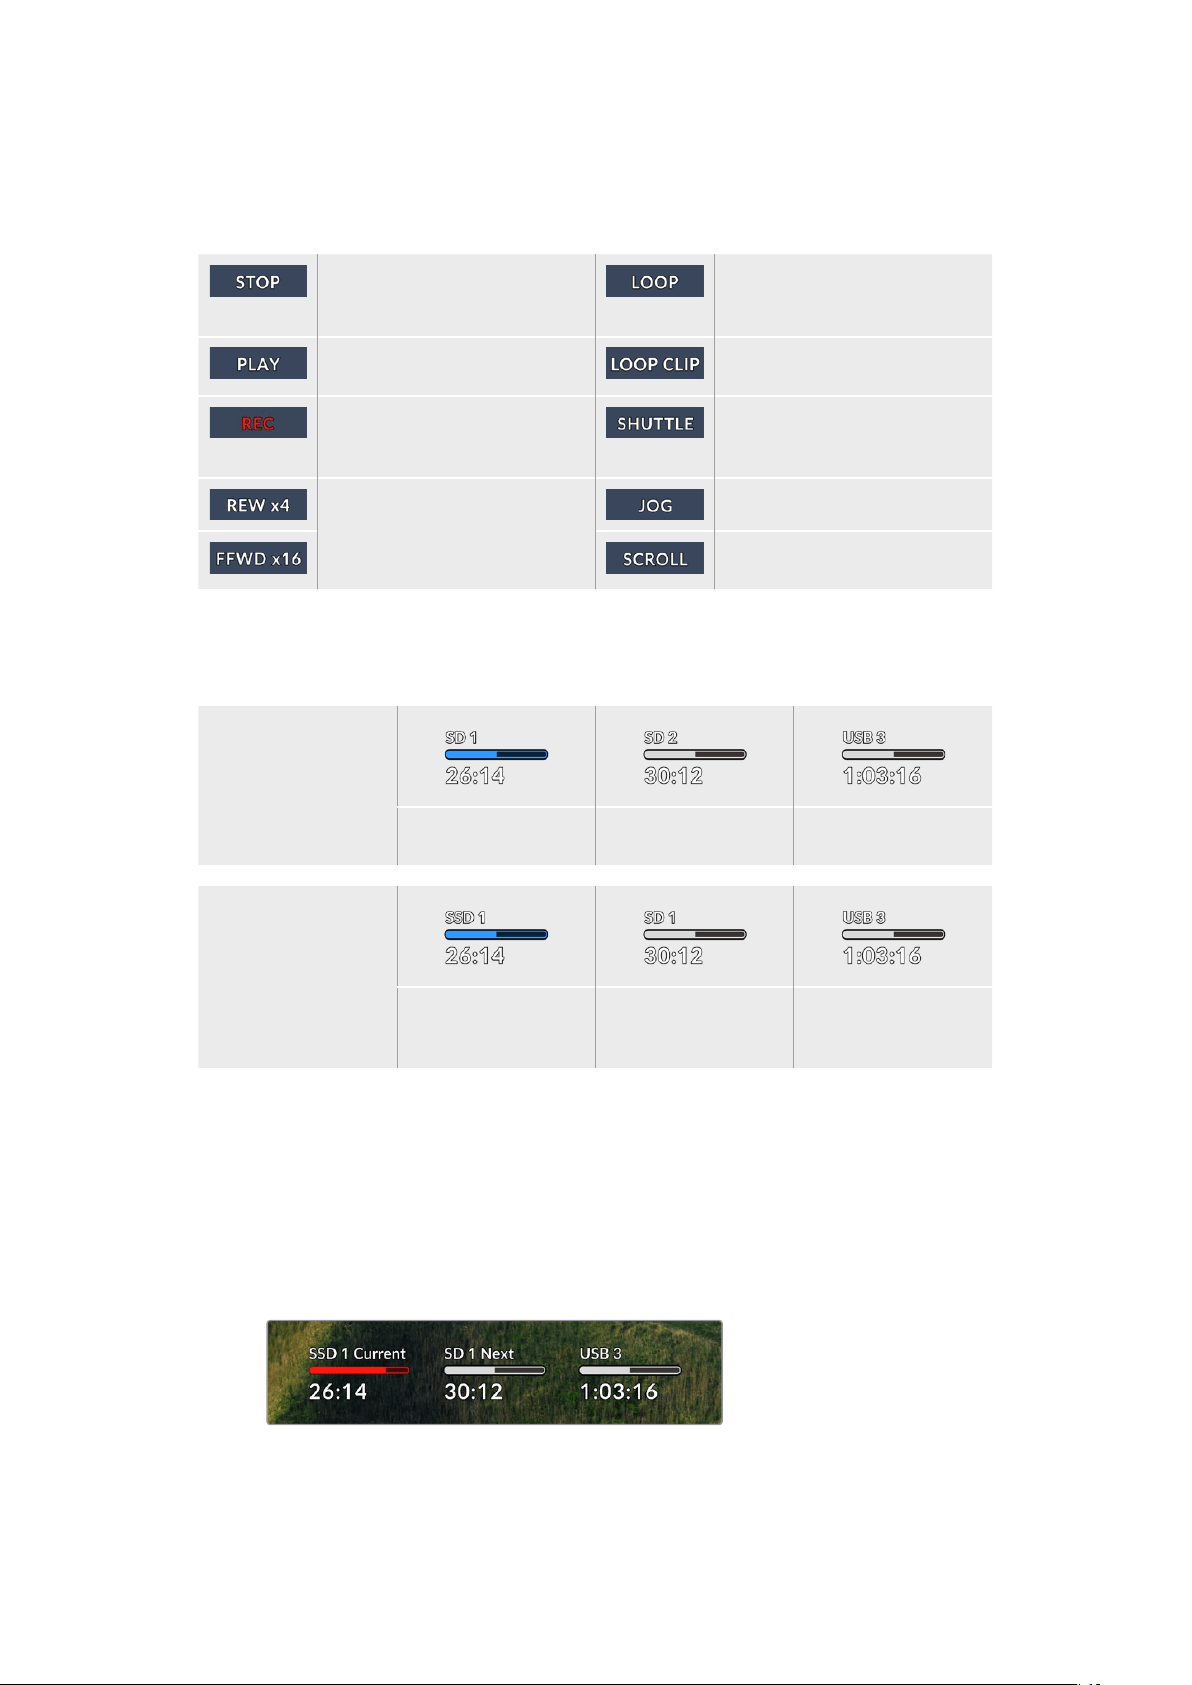
STATUS
Bei der Aufzeichnung und Wiedergabe eines Clips werden hier der Transportsteuerstatus und die
aktuell eingesetzten Befehle angezeigt. Diese umfassen:
Der HyperDeck befindet sich
im Standby-Modus.
Alle Clips mit dem aktuell
ausgewählten Videoformat
werden in Schleife abgespielt.
Die Videowiedergabe läuft. Ein einzelner Clip wird in
Endlosschleife abgespielt.
Die Videoaufzeichnung läuft.
Die Anzeige leuchtet beim
Aufzeichnen rot.
Der Shuttle-Modus ist zwar
aktiviert, aber nur in Bereitschaft.
Wird beim schnellen Vor- oder
Zurückspulen angezeigt.
Die Zahlen stehen für die
Geschwindigkeit.
Der HyperDeck ist im Jog-Modus.
Der HyperDeck ist im Scroll-
Modus.
Datenträgerstatus
Drei Indikatoren zeigen den Namen und Status von SD-Karten, SSDs und aktiven USB-Laufwerken
an. Sie unterscheiden sich je nach HyperDeck Modell leicht.
HyperDeck
Studio HD Plus
SD-Kartenschacht1 SD-Kartenschacht2 Aktives externes
Laufwerk
HyperDeck
Studio Pro Modelle
Aktueller SD- oder
SSD-Schacht in
Gebrauch
Nächster SD- oder
SSD-Schacht in
Folge
Aktives externes
Laufwerk
Der dritte Indikator zeigt bei allen HyperDeck Modellen das USB-Laufwerk an. Bei Einsatz eines
USB-Hubs oder einer Dockingstation wie einer Blackmagic MultiDock10G wird hier das aktive
Laufwerk angezeigt.
Datenträger-Indikator
Der Text über dem Fortschrittsbalken gibt den jeweiligen SD- oder SSD-Schacht an.
Beim Aufzeichnen erscheint „Aktueller“ rechts neben dem Schacht, über den aktuell
aufgezeichnet wird. So ist er leicht erkennbar. „Nächster“ über dem Fortschrittsbalken
gibt den Datenträger an, auf den als nächsten aufgezeichnet wird.
243Mit der Monitorausgabe arbeiten

Datenträgerbalken
Je nach aktuellem Status werden die Balken entweder in blau, weiß oder rot angezeigt.
Sie stellen auch den Füllstand des Datenträgers dar.
Der blaue Balken zeigt den aktiven Datenträger an, der für die
Wiedergabe und Aufzeichnung benutzt wird.
Ein weißer Balken bedeutet, dass zwar ein Datenträger vorhanden
aber nicht aktiv ist. Ist er durchgängig weiß, ist der Datenträger voll.
Der Balken leuchtet beim Aufzeichnen rot.
Der Text unter dem Datenträgerbalken zeigt den verbleibenden Speicherplatz oder den
Status des Schachts an.
Verbleibende Zeit
Weist Ihre CFast-Karte oder SSD freien Speicherplatz auf, wird dieser beruhend auf dem derzeit
ausgewählten Quellformat, Codec und Qualitätseinstellungen in Stunden:Minuten:Sekunden
angezeigt. Verbleibt weniger als eine Stunde, wird die Zeit in Minuten:Stunden angezeigt.
Schachtstatus
Ist kein Datenträger vorhanden, wird „Keine Karte“ oder „Kein Laufwerk“ angezeigt.
Ist eine CFast-Karte, SSD oder ein externes Laufwerk voll, wird hier „Karte voll“ bzw. „Laufw.
voll“ angezeigt. So wissen Sie, wenn es Zeit ist, den Datenträger auszutauschen. Wenn eine
weitere CFast-Karte oder SSD eingeschoben ist, läuft die Aufzeichnung automatisch auf
dieser weiter. Ist ein externes Laufwerk angeschlossen, läuft die Aufzeichnung darauf
weiter, sobald alle SD-Karten und SSDs voll sind.
Ein gesperrtes Laufwerk wird unter dem Fortschrittsbalken als „Gesperrt“ angezeigt.
244Mit der Monitorausgabe arbeiten
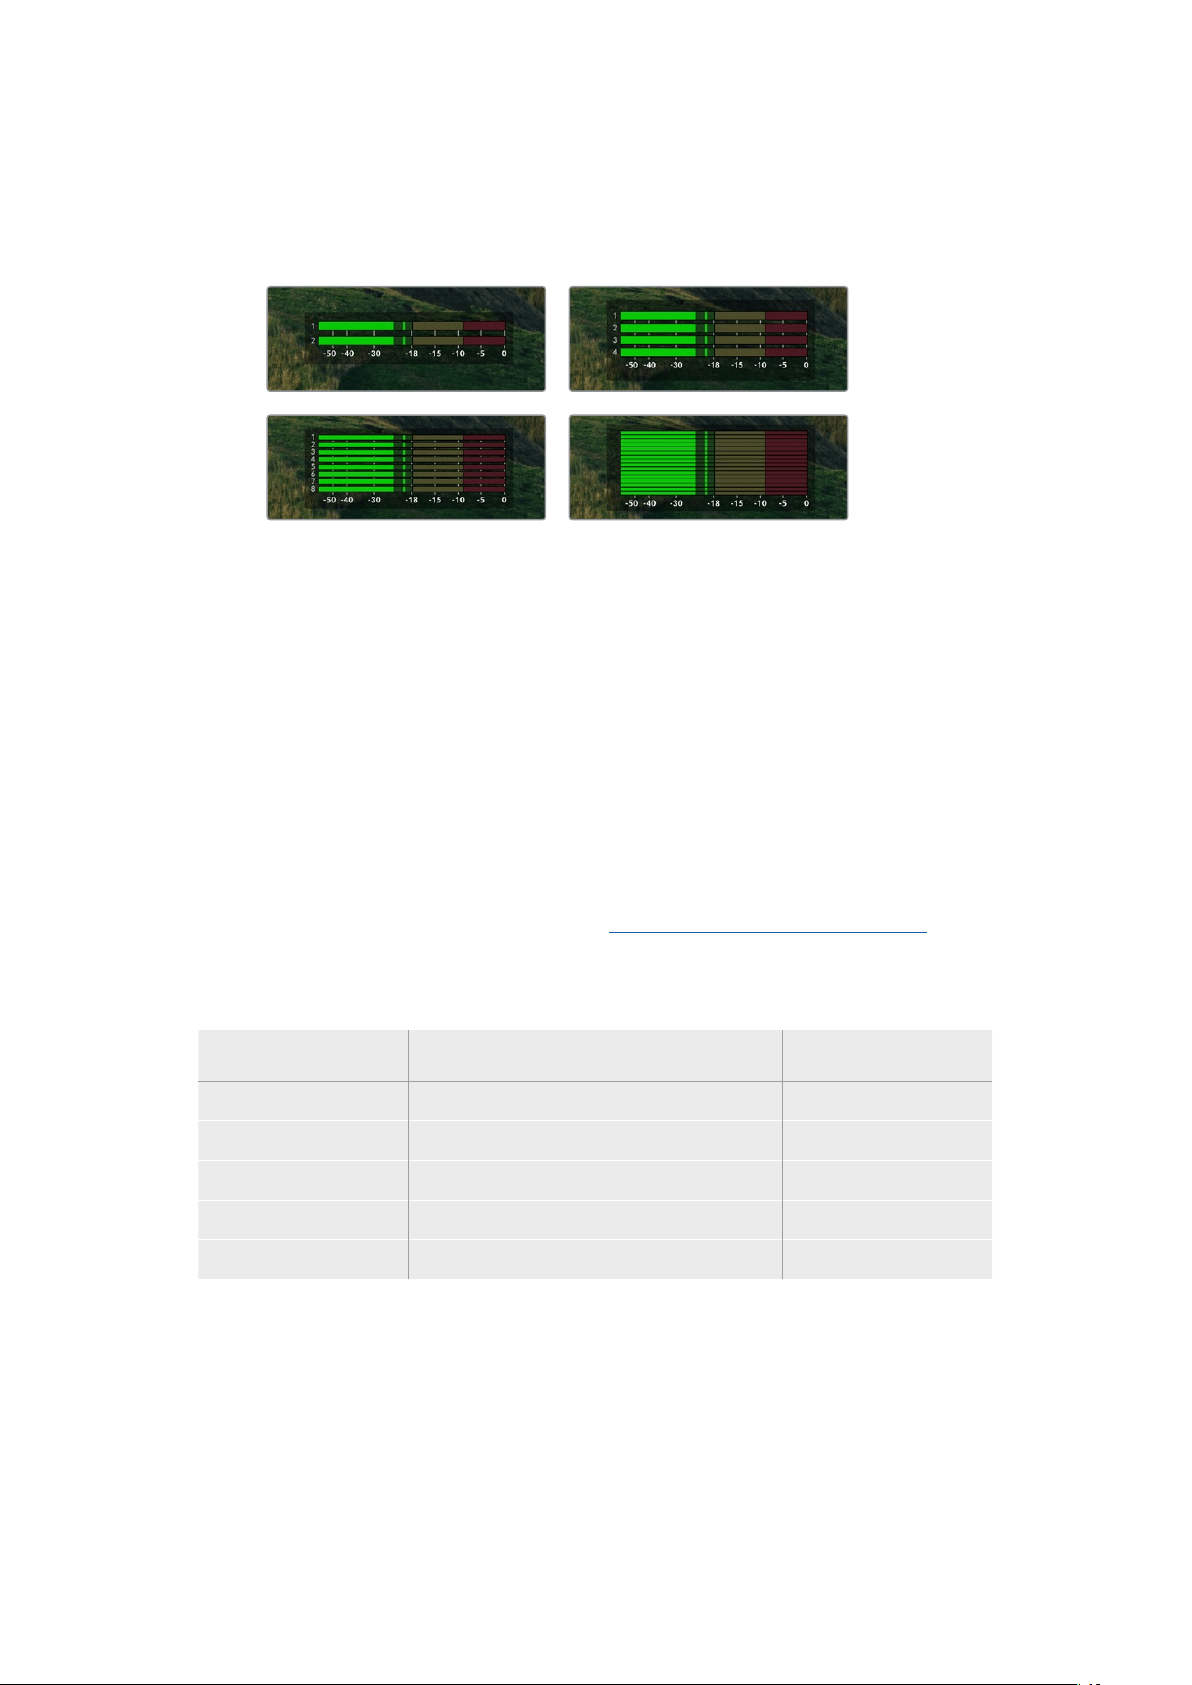
Audiopegelmeter
Es werden Onscreen-Audiopegelmeter für bis zu 16Audiokanäle angezeigt. Die Anzahl richtet
sich danach, wie viele Kanäle Sie für die Aufnahme vorgegeben haben. Die Pegelanzeige
können Sie über den Audio-Tab im LCD-Menü auf PPM- oder VU-Meter einstellen.
Um die Anzahl der aufgezeichneten Audiokanäle vorzugeben oder um die Pegelmeteranzeige
zu ändern, gehen Sie im LCD-Menü zum Audio-Tab. Näheres finden Sie im Abschnitt
„Einstellungen“ weiter hinten im Handbuch.
Datenträger
SD-Karten
Für hochwertige Ultra-HD-Aufnahmen empfehlen wir Hochleistungs-SD-Karten des Typs UHS-II.
Umin Ultra-HD-Formaten bis zu 2160p/60 aufzunehmen, müssen die Karten Schreibgeschwindigkeiten
über 220MB/s meistern. Wenn Sie bei niedrigeren Bit-Raten mit geringerer Kompression aufnehmen,
reichen ggf. auch langsamere Karten. Allgemein gilt: Je schneller die Karte, desto besser.
Sehen Sie in der aktuellsten Ausgabe dieses Handbuchs regelmäßig nach den neuesten Infos. Sie steht
jederzeit zum Download auf unserer Firmenwebsite www.blackmagicdesign.com/de/support bereit.
Welche SD-Karten sollte ich mit dem HyperDeck Studio 4K Pro verwenden?
Für Aufzeichnungen in 2160p mit bis zu 60 fps werden folgende SD-Karten empfohlen:
Marke Modell Kapazität
Angelbird AV Pro MK2 V90 SDXC 128GB
Angelbird AV Pro MK2 V90 SDXC 256GB
ProGrade Digital SDXC UHS-II V90 300R 128GB
ProGrade Digital SDXC UHS-II V90 300R 256GB
Wise SD2-128U3 SDXC UHS-II 128GB
245Datenträger
Welche SD-Karten sollte ich mit dem HyperDeck Studio HD Pro verwenden?
Für Aufzeichnungen in 2160p mit bis zu 30 fps werden folgende SD-Karten empfohlen:
Marke Modell Kapazität
Angelbird AV Pro MK2 V90 SDXC 64GB
Angelbird AV Pro MK2 V90 SDXC 128GB
Angelbird AV Pro MK2 V90 SDXC 256GB
ProGrade Digital SDXC UHS-II V90 300R 64GB
ProGrade Digital SDXC UHS-II V90 300R 128GB
ProGrade Digital SDXC UHS-II V90 300R 256GB
Wise SD2-64U3 SDXC UHS-II 64GB
Wise SD2-128U3 SDXC UHS-II 128GB
Welche SD-Karten sollte ich mit dem HyperDeck Studio HD Plus verwenden?
Für Aufzeichnungen in 2160p mit bis zu 30 fps werden folgende SD-Karten empfohlen:
Marke Modell Kapazität
Angelbird AV Pro MK2 V90 SDXC 64GB
Angelbird AV Pro MK2 V90 SDXC 128GB
Angelbird AV Pro MK2 V90 SDXC 256GB
ProGrade Digital SDXC UHS-II V90 300R 64GB
ProGrade Digital SDXC UHS-II V90 300R 128GB
ProGrade Digital SDXC UHS-II V90 300R 256GB
Wise SD2-64U3 SDXC UHS-II 64GB
Wise SD2-128U3 SDXC UHS-II 128GB
Welche SD-Karten sollte ich mit dem HyperDeck Studio HD Mini verwenden?
Für Aufzeichnungen in 1080p ProRes 422 HQ mit bis zu 60 fps werden folgende SD-Karten
empfohlen:
Marke Modell Kapazität
Angelbird AV Pro MK2 V90 SDXC 64GB
Angelbird AV Pro MK2 V90 SDXC 128GB
Angelbird AV Pro MK2 V90 SDXC 256GB
ProGrade Digital SDXC UHS-II V90 300R 64GB
ProGrade Digital SDXC UHS-II V90 300R 128GB
ProGrade Digital SDXC UHS-II V90 300R 256GB
Wise SD2-64U3 SDXC UHS-II 64GB
Wise SD2-128U3 SDXC UHS-II 128GB
246Datenträger

SSDs
Beim Verarbeiten von Videomaterial mit hohem Datenvolumen will die Wahl der verwendeten SSD
wohl überlegt sein. Das ist deshalb wichtig, weil manche SSDs ggf. eine bis zu 50 % niedrigere
Schreibgeschwindigkeit aufweisen als vom Hersteller behauptet. Es kann also sein, dass die SSD
entgegen der für diesen Festkörperspeicher angegebenen technischen Daten nicht schnell genug
für die Echtzeitverarbeitung von Video ist.
Eine unerwünschte Datenkompression beeinträchtigt vor allem die Aufzeichnung. In der Regel
lassen sich diese SSDs dennoch für die Echtzeit-Wiedergabe verwenden.
Von Blackmagic ausgeführte Tests haben ergeben, dass neuere, größere SSD-Modelle und SSDs
mit höheren Kapazitäten in der Regel schneller sind. Empfohlen werden u. a. folgende SSDs:
Welche SSDs sollte ich mit dem HyperDeck Studio 4K Pro verwenden?
Für Aufzeichnungen in 2160p mit bis zu 60 fps werden folgende SSDs empfohlen:
Marke Modell Kapazität
Samsung 860 PRO 512GB
Samsung 860 PRO 1TB
Samsung 870 EVO (MZ-77E250BW) 250GB
Samsung 870 EVO (MZ-77E500BW) 500GB
Samsung 870 EVO (MZ-77E1T0BW) 1TB
Samsung 870 EVO (MZ-77E2T0BW) 2TB
Welche SSDs sollte ich mit dem HyperDeck Studio HD Pro verwenden?
Für Aufzeichnungen in 2160p mit bis zu 30 fps werden folgende SSDs empfohlen:
Marke Modell Kapazität
Samsung 860 PRO 512GB
Samsung 860 PRO 1TB
Samsung 870 EVO (MZ-77E250BW) 250GB
Samsung 870 EVO (MZ-77E500BW) 500GB
Samsung 870 EVO (MZ-77E1T0BW) 1TB
Samsung 870 EVO (MZ-77E2T0BW) 2TB
247Datenträger

Externe Laufwerke
Alle HyperDeck Modelle können direkt auf USB-C-Laufwerke aufzeichnen. Diese schnellen
leistungsfähigen Laufwerke ermöglichen Ihnen Langzeit-Videoaufzeichnungen. Anschließend
können Sie die Laufwerke an Ihren Computer anschließen und direkt darauf schneiden.
Noch mehr Speicherkapazität bieten Ihnen USB-C-Dockingstationen oder externe Festplatten.
Verbinden Sie Ihre Blackmagic MultiDock10G oder Ihr USB-C-Laufwerk über ein Kabel mit dem
„EXT DISK“-Port an der Rückseite Ihres HyperDecks.
Welche USB-C-Laufwerke sollte ich mit dem HyperDeck Studio 4K Pro
verwenden?
Für Aufzeichnungen in 2160p mit bis zu 60 fps werden folgende USB-C-Laufwerke empfohlen:
Marke Modell Kapazität
Angelbird SSD2GO PKT MK2 512GB
Angelbird SSD2GO PKT MK2 2TB
DelKinDevices Juggler 1TB
DelKinDevices Juggler 2TB
LaCie Rugged SSD STHR2000800 2TB
LaCie Rugged SSD Pro STHZ1000800 1TB
Wise PTS-512 Portable SSD 512GB
Wise PTS-1024 Portable SSD 1TB
Welche USB-C-Laufwerke sollte ich mit dem HyperDeck Studio HD Pro
verwenden?
Für Aufzeichnungen in 2160p mit bis zu 30 fps werden folgende USB-C-Laufwerke empfohlen:
Marke Modell Kapazität
Angelbird SSD2GO PKT MK2 512GB
Angelbird SSD2GO PKT MK2 2TB
DelKinDevices Juggler 1TB
DelKinDevices Juggler 2TB
LaCie Rugged SSD STHR2000800 2TB
LaCie Rugged SSD Pro STHZ1000800 1TB
Wise PTS-512 Portable SSD 512GB
Wise PTS-1024 Portable SSD 1TB
248Datenträger

Welche USB-C-Laufwerke sollte ich mit dem HyperDeck Studio HD Plus
verwenden?
Für Aufzeichnungen in 2160p mit bis zu 30 fps werden folgende USB-C-Laufwerke empfohlen:
Marke Modell Kapazität
Angelbird SSD2GO PKT MK2 512GB
Angelbird SSD2GO PKT MK2 2TB
DelKinDevices Juggler 1TB
DelKinDevices Juggler 2TB
LaCie Rugged SSD STHR2000800 2TB
LaCie Rugged SSD Pro STHZ1000800 1TB
Wise PTS-512 Portable SSD 512GB
Wise PTS-1024 Portable SSD 1TB
Welche USB-C-Laufwerke sollte ich mit dem HyperDeck Studio HD Mini
verwenden?
Für Aufzeichnungen in 1080p ProRes 422 HQ mit bis zu 60 fps werden folgende USB-C-
Laufwerke empfohlen:
Marke Modell Kapazität
Angelbird SSD2GO PKT MK2 512GB
Angelbird SSD2GO PKT MK2 2TB
DelKinDevices Juggler 1TB
DelKinDevices Juggler 2TB
Wise PTS-512 Portable SSD 512GB
Wise PTS-1024 Portable SSD 1TB
249Datenträger

Datenträger formatieren
Datenträger auf einem Computer vorbereiten
Datenträger auf einem Mac-Computer formatieren
Mithilfe des im Betriebssystem Ihres Macs enthaltenen Festplattendienstprogramms lässt sich Ihr
Datenträger in HFS+ oder exFAT formatieren.
Fertigen Sie unbedingt Sicherungskopien von allen wichtigen Daten auf Ihrem Speichermedium an,
da beim Formatieren alle Inhalte gelöscht werden.
1 Schließen Sie eine SSD über eine externe Dockingstation oder einen Kabeladapter an
Ihren Computer an. Ignorieren Sie jegliche Meldungen, die den Gebrauch Ihrer SSD
für Time Machine Backups anbieten. Schließen Sie eine CFast-Karte über ein externes
Kartenlesegerät an Ihren Computer an.
2 Gehen Sie zu „Programme“ > „Dienstprogramme“ und starten Sie das
Festplattendienstprogramm.
3 Klicken Sie auf das Laufwerksymbol Ihrer SSD oder CFast-Karte und dann auf „Löschen“.
4 Geben Sie als Format „Mac OS Extended (Journaled)“ oder „exFAT“ vor.
5 Geben Sie einen Namen für das neue Volumen ein und klicken Sie auf „Löschen“. Ihr
Datenträger wird schnell formatiert und ist dann mit einem HyperDeck einsatzbereit.
Datenträger auf einem Windows-Computer formatieren
Auf einem Windows-PC erfolgt die Formatierung eines Laufwerks in exFAT über das Dialogfeld
„Formatieren“. Fertigen Sie auf jeden Fall Sicherungskopien von allen wichtigen Daten auf Ihrer
SSD oder SD-Karte an, da während der Formatierung alle Inhalte gelöscht werden.
1 Schließen Sie eine SSD über eine externe Dockingstation oder einen Kabeladapter an Ihren
Computer an. Schließen Sie eine CFast-Karte über ein externes CFast-Kartenlesegerät an
Ihren Computer an.
2 Öffnen Sie das Startmenü oder den Startbildschirm und wählen Sie „Dieser PC“ aus.
Rechtsklicken Sie auf Ihre SSD oder CFast-Karte.
3 Wählen Sie im Kontextmenü „Formatieren“ aus.
250Datenträger formatieren

4 Stellen Sie das Dateisystem auf „exFAT“ und die Größe der Zuordnungseinheiten auf
„128Kilobytes“ ein.
5 Geben Sie eine Volumebezeichnung ein, setzen Sie ein Häkchen bei „Schnellformatierung“
und klicken Sie auf „Starten“.
6 Ihr Datenträger wird schnell formatiert und ist dann mit einem HyperDeck einsatzbereit.
Ihren HyperDeck als Webcam verwenden
Ihr per USB an einen Computer angeschlossener HyperDeck Rekorder wird als Webcam gelesen.
Das befähigt Sie, die Wiedergabe oder Aufzeichnung von Ihrem HyperDeck mit einer
Streamingsoftware wie Open Broadcaster über das Internet zu übertragen.
Einrichten der Webcam-Quelle
Meistens gibt Ihre Streamingsoftware den HyperDeck automatisch als Webcam vor. Dann erscheint
beim Öffnen Ihrer Streamingsoftware sofort der Bildschirminhalt Ihres HyperDeck Studios. Wählt Ihre
Software den HyperDeck nicht automatisch, geben Sie der Software einfach manuell vor, den
HyperDeck als Webcam und Mikrofon zu benutzen.
Es folgt ein Beispiel zur Einrichtung der Webcam-Einstellungen in Skype.
1 Öffnen Sie in der Skype-Menüleiste unter Einstellungen „Audio und Video“.
2 Klicken Sie auf das Kamera-Drop-down-Menü unter „Kamera“ und wählen Sie Ihren
HyperDeck aus der Liste aus. Nun ist das Video aus dem HyperDeck im Vorschaufenster
zu sehen.
3 Wählen Sie dann im Mikrofon-Drop-down-Menü „HyperDeck“ als Ihre Audioquelle.
Wenn Sie in Skype alles richtig eingestellt haben, rufen Sie vielleicht kurz einen Freund per Skype
an, um Ihr Webcam-Setup zu testen.
Das war schon alles. Jetzt ist Ihr HyperDeck Studio startklar für die weltweite Liveausstrahlung
Ihres Videos!
251Ihren HyperDeck als Webcam verwenden

Einrichten von Open Broadcaster
Open Broadcaster ist eine quelloffene Anwendung, die als Streaming-Plattform zwischen Ihrem
HyperDeck Studio und Ihrer bevorzugten Streaming-Software fungiert. Das könnten bspw. YouTube,
Twitch, Facebook Live oder andere sein. Open Broadcaster komprimiert Ihr Video auf eine Bitrate,
die Ihre Streaming-Anwendung problemlos bewältigt.
Das folgende Demo zeigt, wie Sie Open Broadcaster zum Streamen der Webcam-Ausgabe Ihres
HyperDeck Studios mit YouTube Live als Streaming-Dienst einrichten.
Öffnen Sie Open Broadcaster und klicken Sie auf
das Pluszeichen unten im „Quellen“-Fenster.
Wählen Sie „Videoerfassungsgerät“.
Benennen Sie die neue Quelle und klicken Sie
auf „OK“.
Wählen Sie im Geräte-Menü aus der Liste Ihr Web
HyperDeck Studio Modell und klicken Sie auf „OK“.
Gehen Sie jetzt zu Ihrem YouTube-Konto. Klicken
Sie auf „Livestream starten“ und dann auf „Weiter“.
Geben Sie in den YouTube „Streamoptionen“ Ihre
Sendedaten ein und klicken Sie auf „Stream erstellen“.
1
2
3
4
5
6
252Ihren HyperDeck als Webcam verwenden

YouTube generiert nun einen Streamschlüssel
bzw. -namen und leitet Open Broadcaster an Ihr
YouTube-Konto weiter.
Klicken Sie auf den „Kopieren“-Button neben dem
Streamschlüssel. Kopieren Sie den Streamschlüssel,
den Sie als nächstes in Open Broadcaster einfügen.
Gehen Sie zurück zu Open Broadcaster und öffnen
Sie die Einstellungen, indem Sie in der Menüleiste
auf „OBS/Einstellungen“ klicken. Wählen Sie
„Stream“. Fügen Sie jetzt den Streamschlüssel für Ihr
HyperDeck in Open Broadcaster in das Streaming-
Vorschaufenster ein.
Um die Übertragung in Open Broadcaster mit YouTube
zu verknüpfen, klicken Sie unten rechts am Bildschirm
auf „Jetzt streamen“. Dies stellt die Verbindung von
Open Broadcaster zu YouTube her. Von hier an richten
Sie alles Weitere in YouTube Live ein.
Zurück in YouTube Live ist die Webcam-
Programmausgabe Ihres HyperDecks im Hintergrund
zu sehen. Klicken Sie zur Bestätigung auf „Fertig“.
Open Broadcaster kommuniziert nun mit YouTube Live
und alles ist startklar für die Übertragung Ihres Streams.
Prüfen Sie sicherheitshalber alles noch einmal.
Wenn alles stimmt, beginnen Sie per Klick auf
„Live schalten“ mit der Ausstrahlung.
Jetzt wird Ihre Sendung mit Open Broadcaster live auf YouTube ausgestrahlt.
HINWEIS Häufige Verzögerungen liegen in der Natur von Internetübertragungen. Sehen
Sie sich den Stream also unbedingt auf YouTube an, um sicherzugehen, dass Ihre Sendung
zu Ende ist. Klicken Sie erst dann auf „Stream beenden“. Andernfalls riskieren Sie, Ihre
Sendung frühzeitig zu abzubrechen.
7
8
9
10
11
12
253Ihren HyperDeck als Webcam verwenden
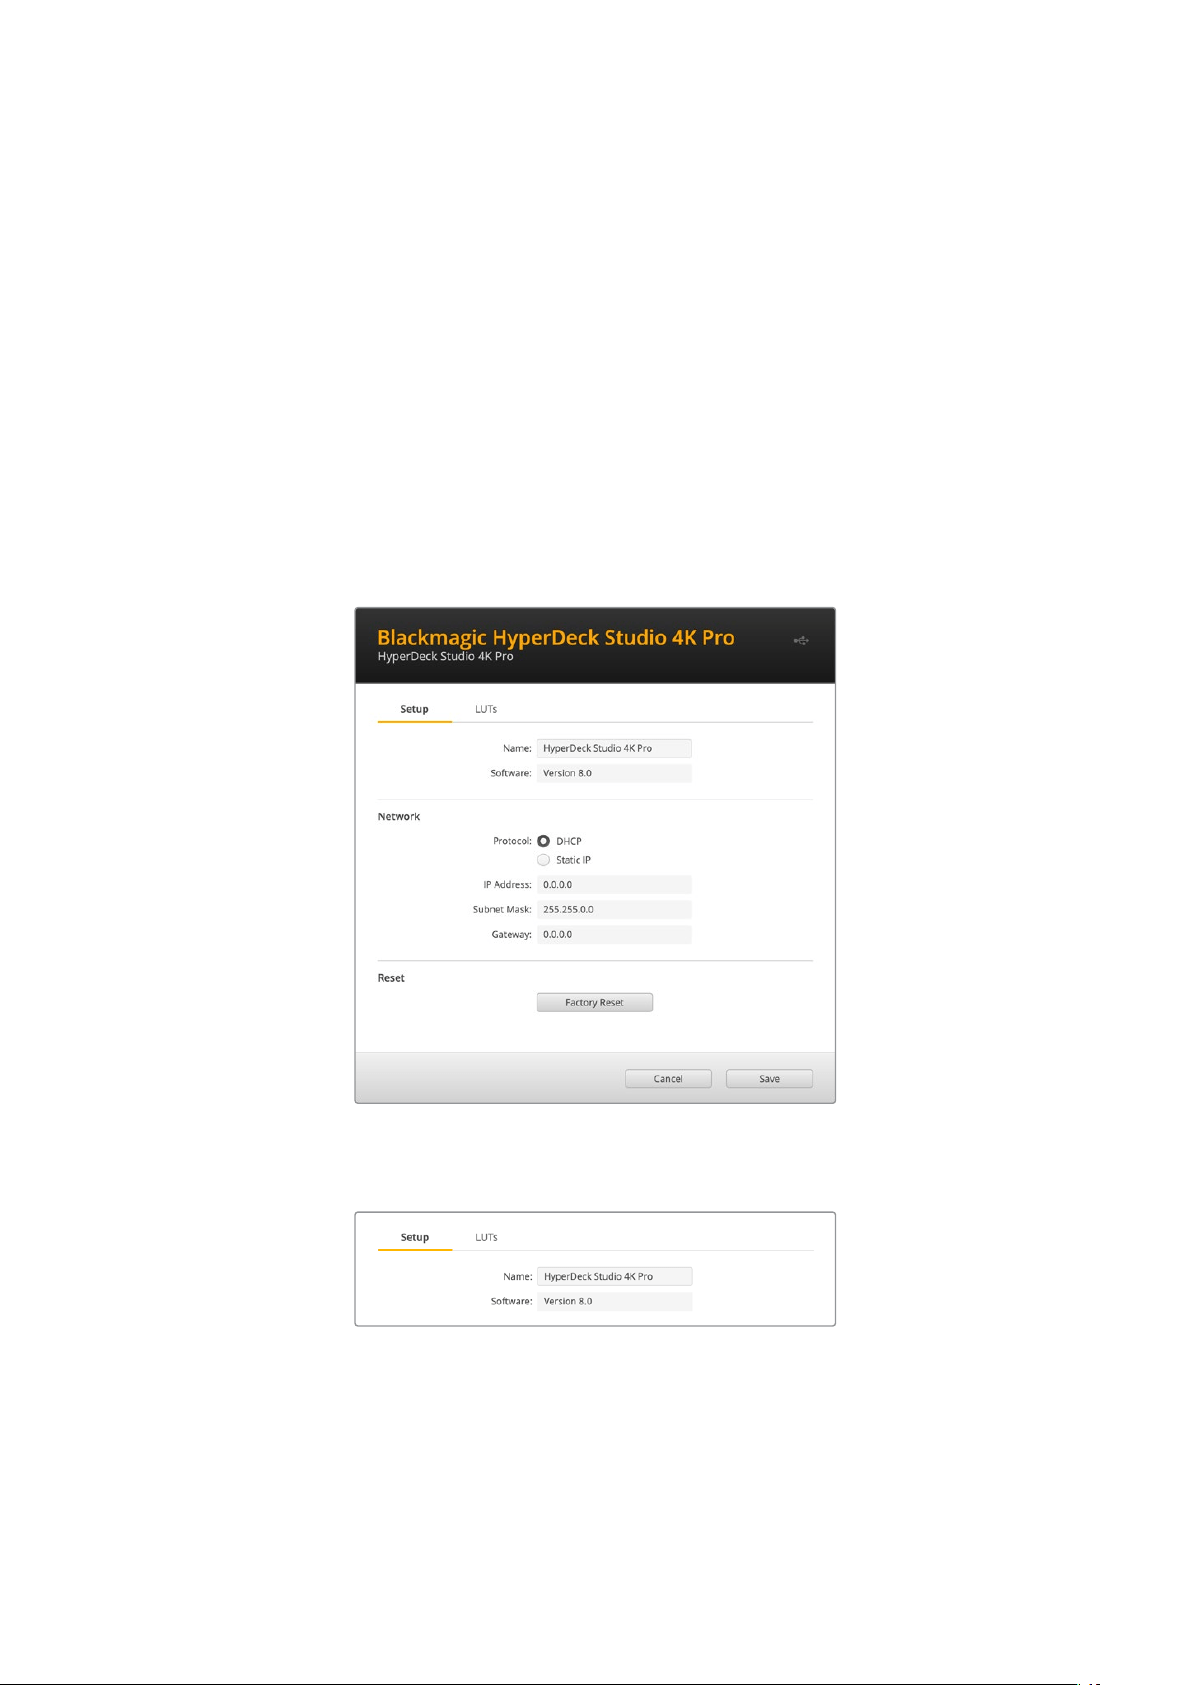
Blackmagic HyperDeck Setup
Mit HyperDeck Setup arbeiten
Mit Blackmagic HyperDeck Setup werden Einstellungen geändert und die Produktsoftware Ihres
HyperDeck Rekorders aktualisiert.
So arbeiten Sie mit HyperDeck Setup:
1 Schließen Sie den HyperDeck per USB oder Ethernet an Ihren Computer an.
2 Starten Sie die HyperDeck Setup Software. Der Name Ihres HyperDeck Modells erscheint
auf der Startseite des Setup-Dienstprogramms.
3 Klicken Sie auf das runde Setup-Symbol oder auf das Bild Ihres HyperDecks, um die
Einstellungen einzublenden.
Setup
Beim Gebrauch von mehr als einem HyperDeck Studio ist es ratsam, jedem Gerät zur leichteren
Identifizierung einen eindeutigen Namen zu geben. Dies erfolgt mit der Option „Name“.
254Blackmagic HyperDeck Setup

Network
Protocol
Um Ihren HyperDeck Studio mit ATEM Mischern zu verwenden oder über das HyperDeck
Ethernet Protocol fernzusteuern, muss er mithilfe des DHCP oder durch manuelles Hinzufügen
einer statischen IP-Adresse im selben Netzwerk wie Ihre anderen Geräte erscheinen.
DHCP
HyperDeck Studio Rekorder sind standardmäßig auf DHCP eingestellt.
Das Dynamic Host Configuration Protocol, kurz DHCP, ist ein auf
Netzwerkservern verwendeter Dienst, der Ihren HyperDeck Studio
automatisch auffindet und ihm eine IP-Adresse zuordnet. Das DHCP ist ein
großartiger Dienst. Er vereinfacht die Einbindung von Geräten per Ethernet
und sorgt dafür, dass deren IP-Adressen nicht miteinander in Konflikt
geraten. Die meisten Computer und Netzwerkrouter unterstützen DHCP.
StaticIP
Wenn „StaticIP“ (Statisches IP) eingeschaltet ist, können Sie Ihre
Netzwerkdaten manuell eingeben. Achten Sie beim manuellen Einrichten
von IP-Adressen zur Kommunikation zwischen allen Geräten darauf, dass
sie die gleiche Subnetzmaske und die gleichen Gateway-Einstellungen
haben. Die ersten drei Zahlenblöcke der IP-Adresse des Mischers und
des Bedienpults müssen ebenfalls identisch sein. Wenn andere Geräte im
Netzwerk die gleiche Identifikationsnummer haben, verursacht das Probleme
beim Verbinden der Geräte. Ändern Sie bei Auftreten eines solchen Konflikts
einfach die identifizierende Nummer in der IP-Adresse des Geräts.
LUTs
HyperDeck Modelle mit Monitorausgängen an der Rückseite können die Videoeingabe mit
geladenen 3D-LUTs anzeigen. Es werden 17-, 33- und 65-Punkt-LUT-Dateien im .cube-Format
unterstützt.
Hilfreich ist das bspw. bei Verwendung des Dynamikumfangs „Film“ auf Ihrer Kamera, der Bilder
normalerweise gewollt ungesättigt und kontrastarm darstellt. Durch Anwenden einer Display-LUT
verschaffen Sie sich einen Eindruck über das Aussehen Ihres Videos nach der Farbkorrektur.
Eine 3D-LUT wird lediglich auf dem Display angezeigt, aber nicht mit dem Video aufgezeichnet.
Es besteht also keine Gefahr, dass ein Look dauerhaft auf Ihr Bild angewendet wird.
Wenn Sie die gleiche LUT auf ein Bild in DaVinci Resolve anwenden möchten, können Sie einfach
die LUT-.cube-Datei vom HyperDeck Studio in DaVinci Resolve importieren und sie dort für die
Farbkorrektur verwenden.
255Blackmagic HyperDeck Setup
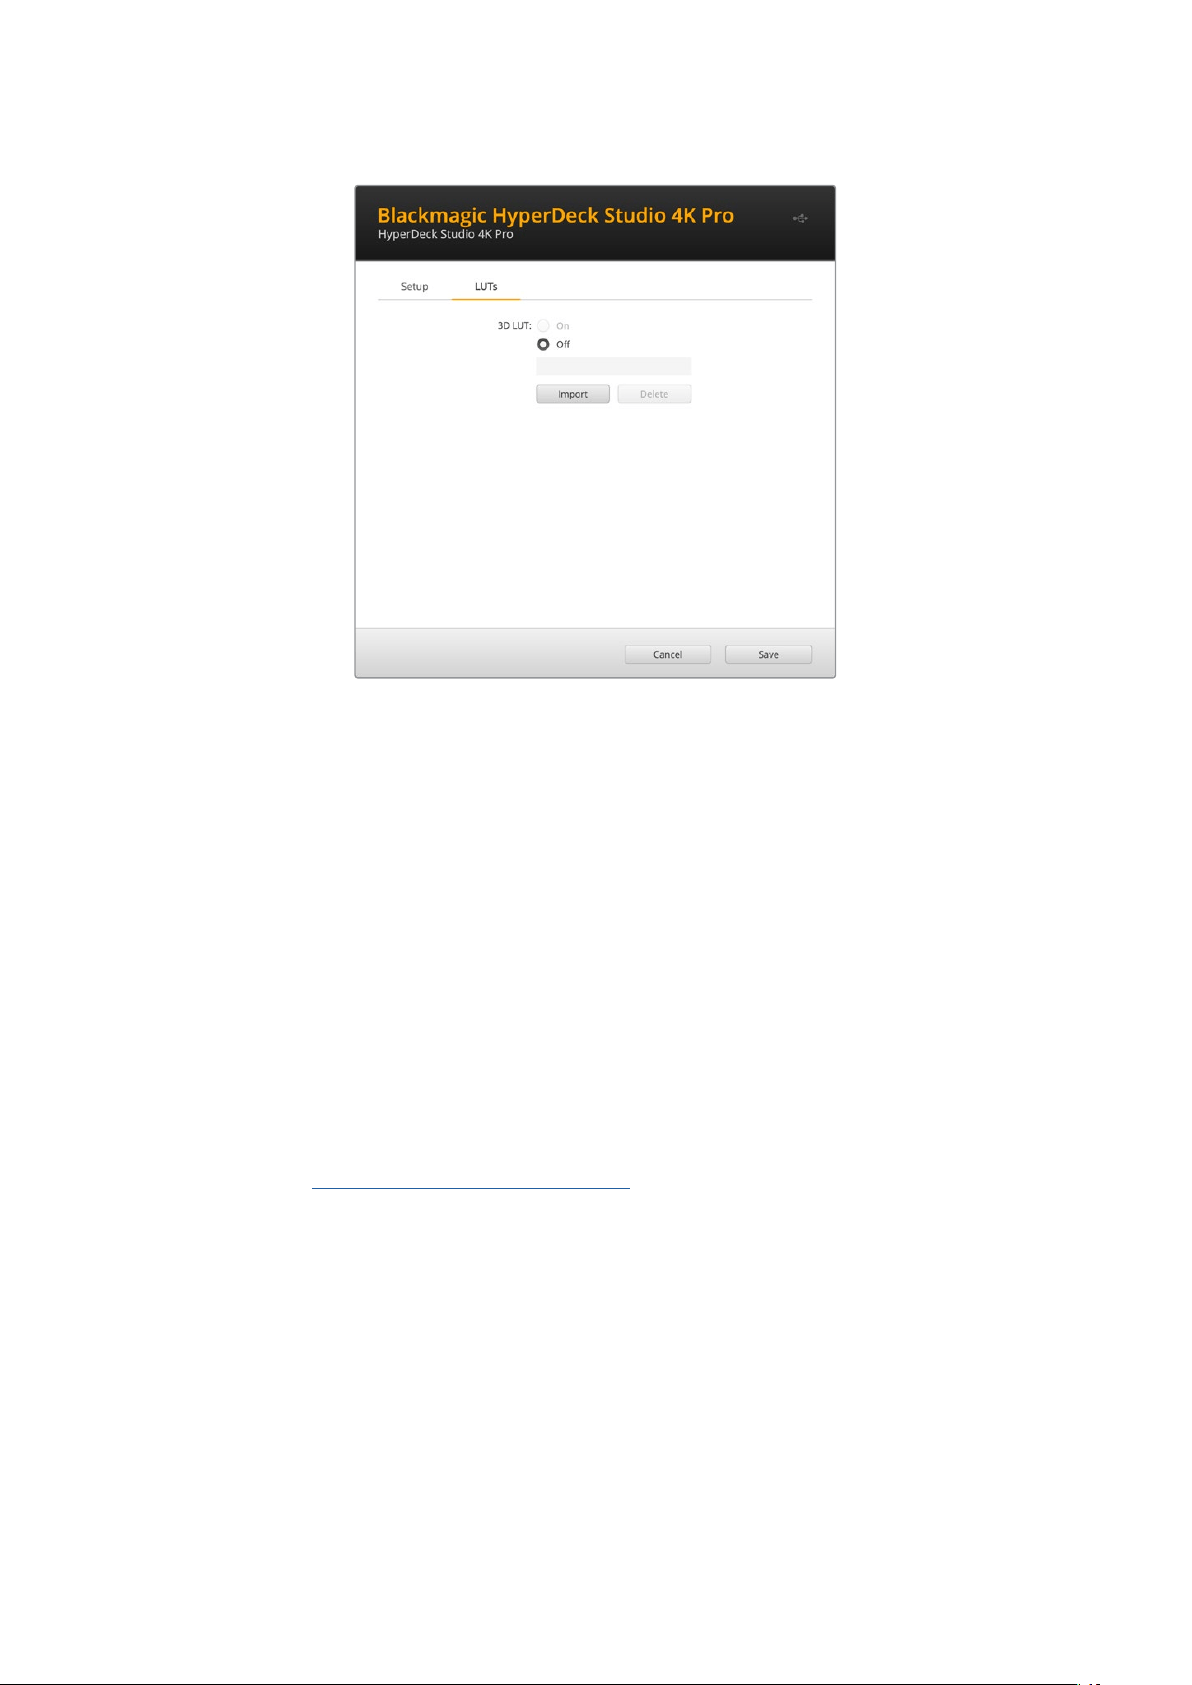
So sichten Sie eine LUT:
1 Sie müssen zuerst Ihre Display-LUT auswählen. Klicken Sie auf den Button „Import“.
2 Navigieren Sie im Dateifenster zu Ihrer zu importierenden LUT und klicken Sie auf „Open“.
3 Wenn der Import Ihrer LUT fertig ist, aktivieren Sie die Option „3D LUT“ und klicken
auf „Save“.
Die ausgewählte Display-LUT wird auf dem Display für die Monitoring-Ausgabe angezeigt. Sie
können die LUT nun über die Monitoring-Einstellungen im LCD-Menü ein- oder ausschalten.
Aktualisieren der Produktsoftware
Anhand des Setup-Dienstprogramms können Sie die Produktsoftware Ihres HyperDeck Rekorders
aktualisieren. Des Weiteren dient es zur Konfiguration der Streaming- und Netzwerkeinstellungen
sowie der Streaming-Qualität.
So aktualisieren Sie die Produktsoftware:
1 Laden Sie die neueste Version des Installationsprogramms Blackmagic HyperDeck Setup
unterwww.blackmagicdesign.com/de/support herunter.
2 Führen Sie das Installationsprogramm Blackmagic HyperDeck Setup auf Ihrem Computer
aus und folgen Sie den Anweisungen auf dem Bildschirm.
3 Verbinden Sie Ihren HyperDeck Studio nach abgeschlossener Installation über den USB-
oder Ethernet-Anschluss an der Rückseite mit dem Computer.
4 Starten Sie Blackmagic HyperDeck Setup und folgen Sie etwaigen Aufforderungen auf
Ihrem Bildschirm, die Produktsoftware zu aktualisieren. Erscheint keine Aufforderung,
so ist Ihre Produktsoftware auf dem neuesten Stand. Es sind keine weiteren Aktionen
Ihrerseits notwendig.
256Aktualisieren der Produktsoftware

Die neueste Version des Setup-Dienstprogramms für Ihren
Blackmagic HyperDeck Studio erhalten Sie im Blackmagic Design
Support-Center unterwww.blackmagicdesign.com/de/support
Teranex Mini Rack Shelf
Das Teranex Mini Rack Shelf ist eine 1-HE-Rackwanne zur Installation von Blackmagic HyperDeck
Studio HDMini und HyperDeck Studio HDPlus Modellen in einem Broadcast-Rack oder Road-Case.
Der HyperDeck Studio HDMini ist so klein, dass er zusammen mit anderen Blackmagic Design
Geräten mit ähnlichen Abmessungen wie bspw. Teranex Mini Convertern, Blackmagic MultiView4
oder Blackmagic WebPresentern im Rack installiert werden kann. Zum Beispiel bietet Ihnen der
Blackmagic HyperDeck Studio HDMini in Verbindung mit einem ATEM Television StudioHD die
Möglichkeit, acht Videoeingaben zu mischen, während die Programmausgabe auf dem HyperDeck
Studio HDMini aufgezeichnet wird. Dank dieses Modulardesigns können Sie sich eigene portable
Videolösungen zusammenstellen, die noch dazu bedienfreundlich sind.
Mit dem Teranex Mini Rack Shelf können Sie Ihren Blackmagic HyperDeck Studio HDMini und HyperDeck
Studio HDPlus zusammen mit weiteren Blackmagic Design Geräten derselben Größe in einem Rack montieren
Entfernen Sie zur Installation des Blackmagic HyperDeck in einem Teranex Mini Rack Shelf die
Gummifüße –falls vorhanden– und schrauben Sie das Gerät mit den mitgelieferten Schrauben am
Boden der Rackwanne fest.
Die Teranex Mini Rack Shelf wird mit zwei Standard-Zierblenden geliefert. Wenn Sie nicht alle Plätze
in der Rackwanne mit weiteren Blackmagic Design Geräten besetzen, verdecken Sie die
verbleibenden Lücken einfach mit den Zierblenden.
Weitere Einzelheiten finden Sie auf der Blackmagic Design Website unter
https://www.blackmagicdesign.com/de
257Teranex Mini Rack Shelf

RS-422-Steuerung
Was ist RS-422-Steuerung?
Der Broadcaststandard RS-422 dient zur seriellen Decksteuerung und wird von Broadcastern seit
den frühen 1980er Jahren verwendet. Er wird auf vielen MAZen sowie linearen Schnittsystemen und
nichtlinearen automatisierten Schnitt- und Broadcastsystemen eingesetzt. Alle aktuellen HyperDeck
Modelle unterstützen diesen Standard, d.h. er lässt sich in automatisierte Sendeanlagen, ferngesteuerte
Systeme und Schnittsysteme sowie in beliebige selbstgebaute Steuerlösungen integrieren.
Der HyperDeck Studio unterstützt auch mit dem Advanced Media Protocol via RS-422 übermittelte
dateibasierte Befehle. Sie können Ihren HyperDeck somit über ein externes Gerät mit AMP-Befehlen
steuern. U.a. können Sie Clips zu einer Playlist hinzufügen, einen Dateinamen für den nächsten Clip
vorgeben, einen einzelnen Clip oder eine Timeline loopen oder eine Playlist entfernen.
Eine externe RS-422-Steuerung verwenden
Alle derzeitigen HyperDeck Modelle sind mit einem branchenüblichen Sony™-kompatiblen RS-422-
Decksteuerungsport ausgestattet. Dieser verfügt über Verbindungsstifte, die einen direkten Anschluss
an beliebige Fernsteuergeräte mit RS-422 wie einer HyperDeck Extreme Control ermöglichen.
Sie können vorgefertigte 9-polige Kabel verwenden, sofern beide Kabelenden Stift für Stift
verdrahtet sind und die Stiftnummern an beiden Enden einander entsprechen. Orientieren Sie sich
für den Bau eigener Kabel am nachstehenden Anschlussplan.
Sie können Ihren HyperDeck über eine HyperDeck Extreme Control fernbedienen, anstatt über die
Tasten am lokalen Gerät.
1 Legen Sie ein Videosignal an den Videoeingang Ihres HyperDecks an.
2 Verbinden Sie Ihre HyperDeck Extreme Control über ein RS-422-Kabel mit Ihrem
HyperDeck Studio.
3 Aktivieren Sie die Fernsteuerung, indem Sie die REM-Taste an der Frontblende drücken.
Am HyperDeck Studio Mini kann die Fernsteuerung über das LCD-Menü aktiviert werden.
Diverse Funktionen auf Ihrem HyperDeck wie Aufnahmestart/-stopp und Wiedergabe sowie
gebräuchliche Jog/Shuttle-Funktionen können jetzt ferngesteuert werden. Eine vollständige Liste
mit RS-422-Befehlen finden Sie im Abschnitt „Unterstützte RS-422-Befehle”.
5 4 3 2 1
9 8 7 6
Receive
(–)
Receive
(+)
Transmit
(–)
Transmit
(+)
Ground
Pins
2 7 8 3 1, 4, 6, 9
RS-422-Stiftverbinder zur Fernsteuerung
258RS-422-Steuerung

Vergewissern Sie sich, dass die Fernsteuerung Ihres HyperDeck im LCD-Menü oder über die
REM-Taste an der Frontblende aktiviert ist, um die RS-422-Decksteuerung zu ermöglichen
Alle HyperDeck Modelle unterstützen die Fernsteuerung über den RS-422-Port an der Rückseite
Unterstützte RS-422-Befehle (Englisch)
Command Reply No Remote Notes
0 - System Control
0x00 0x11 DeviceTypeRequest
NTSC: 0xF0E0
PAL: 0xF1E0
24P: 0xF2E0
Enabled
1 - Slave Response
0x20 0x00 Stop Acknowledge Disabled
0x20 0x01 Play Acknowledge Disabled
0x20 0x02 Record Acknowledge Disabled
0x20 0x04 StandbyOff Acknowledge Disabled
0x20 0x05 StandbyOn Acknowledge Disabled
0x20 0x0F Eject Acknowledge Disabled
0x20 0x10 FastFwd Acknowledge Disabled
0x21 0x11 JogFwd1 Acknowledge Disabled
0x22 0x11 JogFwd2 Acknowledge Disabled
Treated as N=1;
Same as JogFwd1
0x21 0x12 VarFwd1 Acknowledge Disabled Uses ShuttleFwd1
0x22 0x12 VarFwd2 Acknowledge Disabled
Treated as N=1;
Same as VarFwd1
0x21 0x13 ShuttleFwd1 Acknowledge Disabled
0x22 0x13 ShuttleFwd2 Acknowledge Disabled
Treated as N=1;
Same as ShuttleFwd1
0x20 0x20 Rewind Acknowledge Disabled
0x21 0x21 JogRev1 Acknowledge Disabled
0x22 0x21 JogRev2 Acknowledge Disabled
Treated as N=1;
Same as JogRev1
0x21 0x22 VarRev1 Acknowledge Disabled Uses ShuttleRev1
259RS-422-Steuerung

Command Reply No Remote Notes
0x22 0x22 VarRev2 Acknowledge Disabled
Treated as N=1;
Same as VarRev1
0x21 0x23 ShuttleRev1 Acknowledge Disabled
0x22 0x23 ShuttleRev2 Acknowledge Disabled
Treated as N=1;
Same as ShuttleRev1
0x20 0x30 Preroll Acknowledge Disabled
0x24 0x31 CueData Acknowledge Disabled
0x20 0x34 SyncPlay Acknowledge Disabled
0x20 0x40 Preview Acknowledge Disabled Status bits are set
0x20 0x41 Review Acknowledge Disabled Status bits are set
0x20 0x43 OutpointPreview Acknowledge Disabled
0x22 0x5C DMCSetFwd Acknowledge Disabled
0x22 0x5D DMCSetRev Acknowledge Disabled
0x20 0x60 FullEEOff Acknowledge Disabled
0x20 0x61 FullEEOn Acknowledge Disabled
0x20 0x63 SelectEEOn Acknowledge Disabled
4 - Preset/Select Control
0x40 0x10 InEntry Acknowledge Disabled
0x40 0x11 OutEntry Acknowledge Disabled
0x44 0x14 InDataPreset Acknowledge Disabled
0x44 0x15 OutDataPreset Acknowledge Disabled
0x40 0x18 InShift+ Acknowledge Disabled
0x40 0x19 InShift- Acknowledge Disabled
0x40 0x1A OutShift+ Acknowledge Disabled
0x40 0x1B OutShift- Acknowledge Disabled
0x40 0x20 InReset Acknowledge Disabled
0x40 0x21 OutReset Acknowledge Disabled
0x40 0x22 AInReset Acknowledge Disabled
0x40 0x23 AOutReset Acknowledge Disabled
0x44 0x31 PrerollPreset Acknowledge Disabled
0x40 0x40 AutoModeOff Acknowledge Disabled
ignored, Status bit
remembered
0x40 0x41 AutoModeOn Acknowledge Disabled
ignored, Status bit
remembered
0x41 0x37 InputCheck Acknowledge Disabled
260RS-422-Steuerung

Command Reply No Remote Notes
6 - Sense Request
0x61 0x0A TimeCodeGenSense — —
0x61 0x0C CurrentTimeSense — —
0x60 0x10 InDataSense InData Enabled
0x60 0x11 OutDataSense OutData Enabled
0x60 0x12 AInDataSense AInData Enabled
0x60 0x13 AOutDataSense AOutData Enabled
0x61 0x20 StatusSense StatusData Enabled
0x60 0x2B RemainTimeSense RemainTimeData Enabled
0x60 0x2E SpeedSense SpeedData Enabled
0x60 0x31 PrerollTimeSense PreRollTimeData Enabled
0x60 0x36 TimerModeSense TimerModeData Enabled
0x60 0x3E RecordInhibitSense RecordInhibitStatus Enabled
7 - Sense Reply
0x78 0x00 Timer1Data — —
Current Time and
00:00:00:00
0x78 0x04 LTCUserBitsTimeData — —
Current Time and
00:00:00:00
0x78 0x06 VITCUserBitsTimeData — —
Current Time and
00:00:00:00
0x74 0x06 VITCTimeData — — Current Time
0x74 0x07 UserBitsVITCTimeData — — 00:00:00:00
0x74 0x08 GenTCData — — Current Time
0x78 0x08 GenTCUBData — —
Current Time and
00:00:00:00
0x74 0x09 GenUBData — — 00:00:00:00
0x74 0x10 InData — —
0x74 0x11 OutData — —
0x74 0x12 AInData — —
0x74 0x13 AOutData — —
0x74 0x14 CorrectedLTCTimeData — — Current Time
0x70 0x20 StatusData — —
Please see “Status Bits”
sheet: Limited to 9 bytes
of status, silently
truncated
0x76 0x2B RemainTimeData — —
0x71 0x2E SpeedData — —
0x74 0x31 PrerollTimeData — —
0x71 0x36 TimerModeData — — Returns 0 (TimeCode)
0x72 0x3E RecordInhibitStatus — —
261RS-422-Steuerung

Command Reply No Remote Notes
A - Advanced Media Protocol
0xA1 0x01 AutoSkip Acknowledge Disabled
8-bit signed number of
clips to skip from current
clip
0xAX 0x15 ListNextID IDListing Enabled
when x = 0 single clip
request when x = 1, #
clips can be specified in
the send data
0x20 0x29 ClearPlaylist Acknowledge Disabled
0x41 0x42 SetPlaybackLoop Acknowledge Disabled
Bit 0 loop mode enable,
0=false 1=true
Bit 1 is single clip/timeline
0=single clip
1=timeline
0x41 0x44 SetStopMode Acknowledge Disabled
0 = Off
1 = Freeze on last frame
2 = Freeze on next clip
3 = Show black
0x4f 0x16 AppendPreset Acknowledge Disabled
2 Bytes for the length N
of the clip name
N Bytes for each character
of the clip name
4 Byte in point timecode
(format is FFSSMMHH)
4 Byte out point timecode
(format is FFSSMMHH)
Blackmagic Extensions
0x82 0x02 BMDSeekToTimelinePosition Acknowledge Disabled
16-bit little endian
fractional position
[0..65535]
0x81 0x03 BMDSeekRelativeClip Acknowledge Disabled
One-byte signed integer,
which is the number of
clips to skip (negative for
backwards).
RS-422 Informationen für Entwickler (Englisch)
bit 7 bit 6 bit 5 bit 4 bit 3 bit 2 bit 1 bit 0
Byte 0
0 0 Cassette out 0 0 0 0 Local
Byte 1
Standby 0 Stop 0 Rewind Forward Record Play
Byte 2
Servo Lock 0 Shuttle Jog Var Direction Still 1
Byte 3
Auto Mode 0 0 0 Aout Set Ain Set Out Set In Set
Byte 4
Select EE Full EE Loop Playback 0 0 0 0 0
Byte 5
0 0 0 0 0 0 0 0
Byte 6
0 Lamp Still Lamp Fwd Lamp Rev 0 0 0 0
Byte 7
0 0 0 0 0 0 0 0
Byte 8
0 0 Near EOT EOT 0 0 0 0
Byte 9
0 0 0 0 0 0 0 0
262RS-422-Steuerung

Variables
Cassette Out
Set if no SSD is present
Local
Set if Remote is disabled (local control)
Standby
Set if a disk is available
Direction
Clear if playback is forwarding, set if playback is reversing
Still
Set if playback is paused, or if in input preview mode
Auto Mode
Set if in Auto Mode
Select EE, Full EE
Set if in input preview mode
Lamp Still/Fwd/Rev
Set according to playback speed and direction
Near EOT
Set if total space left on available SSDs is less than 3 minutes
EOT
Set if total space left on available SSDs is less than 30 seconds
Others
Cue Complete (byte 2, bit 0)
Always 1: Cue requests are always instantaneous
HyperDeck Serial RS-422 Protocol
Protocol
Based on Sony 9-pin protocol
Interface
Baud rate 38.4 Kbps
1 start bit
8 data bits
1 stop bit
1 parity bit
Odd parity
Dateien per Netzwerk übertragen
Ihr HyperDeck Rekorder unterstützt die Übertragung von Dateien über das Dateiübertragungsprotokoll
FTP. Mit dieser leistungsstarken Funktion können Sie Dateien mit den schnellen Geschwindigkeiten
eines lokalen Netzwerks direkt von Ihrem Computer auf Ihren HyperDeck kopieren. Kopieren Sie
bspw. neue Dateien für Digital Signage auf einen ferngesteuerten HyperDeck Rekorder an einem
anderen Standort.
Eine Verbindung mit einem HyperDeck Studio auauen
Wenn Ihr Computer und HyperDeck Studio an dasselbe Netzwerk angeschlossen sind, brauchen
Sie lediglich einen FTP-Client und die IP-Adresse Ihres HyperDeck Studios, um beide Geräte
miteinander zu verbinden.
1 Laden Sie einen FTP-Client herunter und installieren Sie ihn auf dem Computer, den Sie mit
Ihrem HyperDeck verbinden möchten. Wir empfehlen die Programme Cyberduck, FileZilla
oder Transmit. Es funktioniert aber mit fast allen FTP-Anwendungen. Cyberduck und
FileZilla sind als kostenlose Downloads erhältlich.
263Dateien per Netzwerk übertragen

2 Schließen Sie Ihren HyperDeck Studio mit einem Ethernet-Kabel an Ihr Netzwerk an und
notieren Sie sich die IP-Adresse. Um auf die IP-Adresse zuzugreifen, drücken Sie den
MENU-Button und drehen Sie am Suchlaufregler, bis das LCD-Menü „Netzwerk“ erscheint.
Dort wird die IP-Adresse für Ihren HyperDeck Studio am unteren Rand eingeblendet.
Die IP-Adresse für Ihren HyperDeck Studio Mini
erscheint im LCD-Menü unter „Netzwerk“
3 Geben Sie die IP-Adresse Ihres HyperDecks im TCP-Verbindungsdialogfenster ein. Name
und Position dieses Textfelds variieren von Anwendung zu Anwendung. Für gewöhnlich
trägt es jedoch die Bezeichnung „Server“ oder „Host“. Enthält Ihr FTP-Programm ein
Kontrollkästchen wie „Anonymous Login“, aktivieren Sie dieses unbedingt.
Der Verbindungsaufbau zu Ihrem HyperDeck Studio erfolgt ohne Eingabe eines
Benutzernamens und Passworts. Geben Sie im FTP-Programmdialog einfach die
IP-Adresse Ihres Rekorders in das Feld „Server“ bzw. „Host“ ein und aktivieren
Sie das Kontrollkästchen, falls vorhanden, für einen anonymen Login
Dateien übertragen
Haben Sie Ihren Computer an den HyperDeck angeschlossen, können Sie die Dateiübertragung
ganz normal wie mit einem FTP-Programm vornehmen. Ein Großteil der FTP-Anwendungen verfügt
über eine Bedienoberfläche mit Drag-and-drop-Optionen. Sie sollten jedoch überprüfen, welche
Methode für Ihre Anwendung verfügbar ist.
Sie können den Datenaustausch mit Ihrem HyperDeck in beliebigen Formaten vornehmen. Beachten
Sie jedoch, dass Dateien, die Sie von Ihrem HyperDeck Studio wiedergeben möchten, mit den von
Ihrem HyperDeck unterstützen Codecs und Auflösungen kompatibel sein müssen. Eine Liste mit
unterstützten Codecs finden Sie im Abschnitt „Blackmagic HyperDeck Setup“ in diesem Handbuch.
TIPP Sie können Dateien über ein Netzwerk übertragen, während Ihr HyperDeck
aufzeichnet. Der HyperDeck passt Übertragungsgeschwindigkeiten automatisch an,
um die Aufzeichnung nicht zu beeinträchtigen.
264Dateien per Netzwerk übertragen

Anschließen an einen ATEM Mischer
Wenn Sie einen ATEM Mischer verwenden, lassen sich bis zu vier Blackmagic HyperDeck Rekorder
anschließen und über ein ATEM Hardware-Bedienpanel oder ATEM Software Control steuern. Diese
sagenhaft starke Feature stellt Ihnen faktisch eine ganze Videobandabteilung zur Verfügung. Über
den ATEM Mischer können Sie zudem die Aufzeichnung auf Ihrem HyperDeck auslösen. Das bietet
die großartige Möglichkeit, Archivkopien von Livesendungen anzufertigen oder B-Roll-Material von
live gemischten Produktionen zu erfassen, um diese später zu bearbeiten.
ATEM Mischer, wie der ATEM4M/E Broadcast Studio4K, können mit
bis zu vier HyperDeck Rekordern verbunden werden
Anschließen von HyperDecks an Ihren ATEM Mischer:
1 Binden Sie Ihren HyperDeck in dasselbe Netzwerk ein, mit dem auch Ihr ATEM Mischer
verbunden ist und notieren Sie sich die IP-Adresse.
Die IP-Adresse Ihres HyperDecks können Sie auf dem LCD an der Frontblende nachsehen,
indem Sie zu den Menüseiten „Setup“ und „Ethernet“ navigieren.
Alternativ können Sie die IP-Adresse Ihres HyperDecks auf Ihrem Mac oder PC im
Blackmagic HyperDeck Setup Dienstprogramm unter dem Tab „Configure“ nachsehen.
2 Verbinden Sie einen SDI- oder HDMI-Ausgang Ihres HyperDecks mit einem der SDI- oder
HDMI-Eingänge Ihres ATEM Mischers.
3 Wenn Sie die Aufnahme auf Ihrem HyperDeck über den ATEM Mischer auslösen möchten,
muss zusätzlich eine Videoquelle an Ihren HyperDeck angeschlossen werden.
Schließen Sie einfach wie gewohnt eine SDI- oder HDMI-Quelle an Ihren HyperDeck an.
Um die Programmausgabe Ihres ATEM Mischers mit Ihrem HyperDeck aufzuzeichnen,
verbinden Sie einen der Aux-SDI-Ausgänge Ihres Mischers mit dem SDI-Eingang Ihres
HyperDecks.
4 Aktivieren Sie die Fernsteuerung, indem Sie die REM-Taste an der Frontblende des
HyperDecks drücken oder sie über das LCD-Menü des HyperDeck Studio Minis
einschalten. Das gestattet die Fernsteuerung über den Mischer.
5 Stellen Sie die Verbindung her, indem Sie die Videoquelle und die IP-Adresse Ihres
HyperDecks in die ATEM Software bzw. auf dem ATEM Broadcast-Bedienpult eingeben.
Dieser Vorgang ist unkompliziert und im Handbuch Ihres ATEM Mischers beschrieben.
265Anschließen an einen ATEM Mischer

Vergewissern Sie sich, dass die Fernsteuerung im LCD-Menü oder über die REM-Taste an der
Frontblende aktiviert ist, um die Ethernet-Steuerung über einen ATEM Mischer zu ermöglichen
Postproduktions-Workflows verstehen
Auf Ihre Clips zugreifen
Um auf Ihre Clips zuzugreifen, verbinden Sie die SD-Karte oder SSD per SD-Kartenschacht,
externem Lesegerät oder SSD-Dock mit Ihrem Computer. Sie können Dateien entweder von Ihrer
SSD oder SD-Karte auf eine Festplatte ziehen oder direkt auf der SSD bzw. SD-Karte arbeiten.
SSDs lassen sich zudem über einen Kabeladapter des Typs 2,5"-eSATA nach USB anschließen.
Das ist jedoch nicht schnell genug, um direkt auf Ihrer SSD zu arbeiten. Dieses Setup empfiehlt
sich lediglich als tragbare Lösung, um Ihre Videodateien von der SSD auf Ihren Laptop zu spielen.
macOS
QuickTime ist in das macOS-Betriebssystem integriert. Mit einem HyperDeck in Apple ProRes,
Avid DNxHD und DNxHR in QuickTime aufgezeichnetes Video lässt sich mit nahezu jeder
Videoanwendung unter macOS öffnen.
Mit einem HyperDeck in DNxHD und DNxHR aufgezeichnete MXF-Dateien lassen sich in DaVinci
Resolve für Mac und in Avid Media Composer öffnen. DNxHD-Codecs stehen zum kostenlosen
Download unter http://www.avid.com/products/avid-dnxhr-and-dnxhd bereit.
Mit dem HyperDeck aufgezeichnete MCC-Dateien für geschlossene Untertitel lassen sich mit der Software
MacCaption für macOS öffnen, die Sie unter http://www.telestream.net/captioning/overview.htm finden.
Windows
Um Video zu öffnen, das mit einem HyperDeck in Apple ProRes in QuickTime aufgezeichnet
wurde, muss QuickTime auf Ihrem PC installiert sein. Nahezu jede Videosoftware auf Windows,
die QuickTime unterstützt, kann mit dem HyperDeck aufgezeichnetes Video öffnen. QuickTime für
Windows kann kostenlos unter http://www.apple.com/quicktime/download/ heruntergeladen werden.
Mit einem HyperDeck in DNxHD und DNxHR aufgezeichnete MXF-Dateien lassen sich in DaVinci
Resolve für Windows oder Avid Media Composer oder öffnen. DNxHD-Codecs stehen zum
kostenlosen Download unter http://www.avid.com/products/avid-dnxhr-and-dnxhd bereit.
Mit einem HyperDeck aufgezeichnete MCC-Dateien für geschlossene Untertitel lassen
sich mit der Software CaptionMaker für Windows öffnen, die Sie unter
http://www.telestream.net/captioning/overview.htm finden.
266Postproduktions-Workflows verstehen

Informationen für Entwickler (Englisch)
Blackmagic HyperDeck Ethernet Protocol
Das Blackmagic HyperDeck Ethernet Protocol ist ein textbasiertes Protokoll. Bei HyperDeck Studio
Modellen mit internem Ethernet-Anschluss erfolgt der Zugriff über die Verbindung mit dem TCP-
Port-9993 der Rekorder. Als Software-Entwickler können Sie das Protokoll verwenden, um Geräte
zu entwickeln, die mit unseren Produkten integrierbar sind. Hier bei Blackmagic Design legen wir
unsere Protokolle offen und freuen uns auf Ihre Ideen!
Protocol Commands
Command Command Description
help or ? Provides help text on all commands and parameters
commands return commands in XML format
device info return device information
disk list query clip list on active disk
disk list: slot id: {n} query clip list on disk in slot {n}
quit disconnect ethernet control
ping check device is responding
preview: enable: {true/false} switch to preview or output
play play from current timecode
play: speed: {-5000 to 5000} play at specific speed
play: loop: {true/false} play in loops or stop-at-end
play: single clip: {true/false} play current clip or all clips
playrange query playrange setting
playrange set: clip id: {n} set play range to play clip {n} only
playrange set: clip id: {n} count: {m} set play range to {m} clips starting from clip {n}
playrange set: in: {inT} out: {outT}
set play range to play between:
- timecode {inT} andtimecode {outT}
playrange set: timeline in: {in} timeline out:
{out}
set play range in units of frames between:
- timeline position {in} and position {out} clear/reset play
rangesetting
playrange clear clear/reset play range setting
play on startup query unit play on startup state
play on startup: enable: {true/false} enable or disable play on startup
play on startup: single clip: {true/false} play single clip or all clips on startup
play option query play options
play option: stop mode:
{lastframe/nextframe/black}
set output frame when playback stops
record record from current input
record: name: {name} record named clip
record spill spill current recording to next slot
267Informationen für Entwickler (Englisch)

Command Command Description
record: spill: slot id: {n}
spill current recording to specified slot
use current id to spill to same slot
stop stop playback or recording
clips count query number of clips on timeline
clips get query all timeline clips
clips get: clip id: {n} query a timeline clip info
clips get: clip id: {n} count: {m} query m clips starting from n
clips get: version: {1/2}
query clip info using specified output version:
version 1: is: name startT duration
version 2: id: startT duration inT outT name
clips add: name: {name} append a clip to timeline
clips add: clip id: {n} name: {name} insert clip before existing clip {n}
clips add: in: {inT} out: {outT} name: {name} append the {inT} to {outT} portion of clip
clips remove: clip id: {n}
remove clip {n} from the timeline
(invalidates clip ids following clip {n})
clips clear empty timeline clip list
transport info query current activity
slot info query active slot
slot info: slot id: {n} query slot {n}
slot select: slot id: {n} switch to specified slot
slot select: video format: {format} load clips of specified format
slot unblock unblock active slot
slot unblock: slot id: {n} unblock slot {n}
cache info query cache status
dynamic range query dynamic range settings
dynamic range: playback override:
{off/Rec709/Rec2020_SDR/HLG/
ST2084_300/ST2084_500/
ST2084_800/ST2084_1000/
ST2084_2000/ST2084_4000/ST2084
set playback dynamic range override
dynamic range: record override:
{off/Rec709/Rec2020_SDR/HLG/
ST2084_300/ST2084_500/
ST2084_800/ST2084_1000/
ST2084_2000/ST2084_4000/ST2048}
set record dynamic range override
notify query notification status
notify: remote: {true/false} set remote notifications
notify: transport: {true/false} set transport notifications
notify: slot: {true/false} set slot notifications
notify: configuration: {true/false} set configuration notifications
notify: dropped frames: {true/false} set dropped frames notifications
notify: display timecode: {true/false} set display timecode notifications
268Informationen für Entwickler (Englisch)

Command Command Description
notify: timeline position: {true/false} set playback timeline position notifications
notify: playrange: {true/false} set playrange notifications
notify: cache: {true/false} set cache notifications
notify: dynamic range: {true/false} set dynamic range settings notifications
notify: slate: {true/false} set digital slate notifications
goto: clip id: {start/end} goto first clip or last clip
goto: clip id: {n} goto clip id {n}
goto: clip id: +{n} go forward {n} clips
goto: clip id: -{n} go backward {n} clips
goto: clip: {n} goto frame position {n} within current clip
goto: clip: +{n} go forward {n} frames within current clip
goto: clip: -{n} go backward {n} frames within current clip
goto: clip: {start/end} goto start or end of clip
goto: timeline: {n} goto frame position {n} within timeline
goto: timeline: +{n} o forward {n} frames within timeline
goto: timeline: -{n} go backward {n} frames within timeline
goto: timeline: {start/end} goto start or end of timeline
goto: timecode: {timecode} goto specified timecode
goto: timecode: +{timecode} go forward {timecode} duration
goto: timecode: -{timecode} go backward {timecode} duration
goto: slot id: {n} goto slot id {n}
jog: timecode: {timecode} jog to timecode
jog: timecode: +{timecode} jog forward {timecode} duration
jog: timecode: -{timecode} jog backward {timecode} duration
shuttle: speed: {-5000 to 5000} shuttle with speed
remote query unit remote control state
remote: enable: {true/false} enable or disable remote control
remote: override: {true/false} session override remote control
configuration query configuration settings
configuration: video input: SDI switch to SDI input
configuration: video input: HDMI switch to HDMI input
configuration: video input: component switch to component input
configuration: audio input: embedded capture embedded audio
configuration: audio input: XLR capture XLR audio
configuration: audio input: RCA capture RCA audio
configuration: file format: {format} switch to specific file format
configuration: audio codec: PCM switch to PCM audio
configuration: audio codec: AAC switch to AAC audio
269Informationen für Entwickler (Englisch)

Command Command Description
configuration: timecode input:
{external/embedded/preset/clip}
change the timecode input
configuration: timecode output:
{clip/timeline/internal}
change the timecode output
configuration: timecode preference:
{default/dropframe/nondropframe}
whether or not to use drop frame timecodes when not
otherwise specified
configuration: timecode preset:
{timecode}
set the timecode preset
configuration: audio input channels: {n} set the number of audio channels recorded to {n}
configuration: record trigger:
{none/recordbit/timecoderun}
change the record trigger
configuration: record prefix: {name} set the record prefix name (supports UTF-8 name)
configuration: append timestamp:
{true/false}
append timestamp to recorded filename
configuration: xlr input id: {n} xlr type:
{line/mic}
configure xlr input type
multiple xlr inputs can be configured in a single command
configuration: genlock input resync:
{true/false}
enable or disable genlock input resync
uptime return time since last boot
format: prepare: {format} prepare a disk formatting operation to filesystem {format}
format: confirm: {token} perform a pre-prepared formatting operation using token
identify: enable: {true/false} identify the device
watchdog: period: {period in seconds} client connection timeout
reboot reboot device
slate clips slate clips information
slate project slate project information
slate project:↵
camera: {index}↵
set camera index e.g. A
Command Combinations
You can combine the parameters into a single command, for example:
play: speed: 200 loop: true single clip: true
Or for configuration:
configuration: video input: SDI audio input: XLR
Or to switch to the second disk, but only play NTSC clips:
slot select: slot id: 2 video format: NTSC
Using XML
While you can use the Terminal to talk to HyperDeck, if you are writing software, you can use XML
to confirm the existence of a specific command based on the firmware of the HyperDeck you are
communicating with. This helps your software user interface adjust to the capabilities of the specific
HyperDeck model and software version.
270Informationen für Entwickler (Englisch)

Protocol Details
Connection
The HyperDeck Ethernet server listens on TCP port 9993.
Basic syntax
The HyperDeck protocol is a line oriented text protocol. Lines from the server will be separated by an ascii
CR LF sequence. Messages from the client may be separated by LF or CR LF.
New lines are represented in this document as a "↵" symbol.
Single line command syntax
Command parameters are usually optional. A command with no parameters is terminated with a new line:
{Command name}↵
If parameters are specified, the command name is followed by a colon, then pairs of parameter names and
values. Each parameter name is terminated with a colon character:
{Command name}: {Parameter}: {Value} {Parameter}: {Value} ...↵
Multiline command syntax
The HyperDeck protocol also supports an equivalent multiline syntax where each parameter-value pair is
entered on a new line. E.g.
{Command name}:↵
{P a r a m e t e r}: { Va lu e}↵
{P a r a m e t e r}: { Va lu e}↵
↵
Response syntax
Simple responses from the server consist of a three digit response code and descriptive text terminated by
a new line:
{Response code} {Response text}↵
If a response carries parameters, the response text is terminated with a colon, and parameter name and
value pairs follow on subsequent lines until a blank line is returned:
{Response code} {Response text}:↵
{P a r a m e t e r}: { Va lu e}↵
{P a r a m e t e r}: { Va lu e}↵
...
↵
Successful response codes
A simple acknowledgement of a command is indicated with a response code of 200:
200 ok↵
Other successful responses carry parameters and are indicated with response codes in the range of 201
to299.
271Informationen für Entwickler (Englisch)

Failure response codes
Failure responses to commands are indicated with response codes in the range of 100 to 199:
100 syntax error
101 unsupported parameter
102 invalid value
103 unsupported
104 disk full
105 no disk
106 disk error
107 timeline empty
108 internal error
109 out of range
110 no input
111 remote control disabled
112 clip not found
120 connection rejected
150 invalid state
151 invalid codec
160 invalid format
161 invalid token
162 format not prepared
163 parameterized single line command not supported
Asynchronous response codes
The server may return asynchronous messages at any time. These responses are indicated with response
codes in the range of 500 to 599:
5xx {Response Text}:↵
{P a r a m e t e r}: { Va lu e}↵
{P a r a m e t e r}: { Va lu e}↵
↵
Connection response
On connection, an asynchronous message will be delivered:
500 connection info:↵
protocol version: {Version}↵
model: {Model Name}↵
↵
Connection rejection
Only one client may connect to the server at a time. If other clients attempt to connect concurrently,
they will receive an error and be disconnected:
120 connection rejected↵
272Informationen für Entwickler (Englisch)

Timecode syntax
Timecodes are expressed as non-drop-frame timecode in the format:
HH:MM:SS:FF
Handling of deck "remote" state
The “remote” command may be used to enable or disable the remote control of the deck. Any attempt to
change the deck state over ethernet while remote access is disabled will generate an error:
111 remote control disabled↵
To enable or disable remote control:
remote: enable: {“true”, “false”} ↵
The current remote control state may be overridden allowing remote access over ethernet irrespective of
the current remote control state:
remote: override: {“true”, “false”} ↵
The override state is only valid for the currently connected ethernet client and only while the connection
remains open.
The “remote” command may be used to query the remote control state of the deck by specifying no
parameters:
remote↵
The deck will return the current remote control state:
210 remote info:↵
enabled: {“true”, “false”}↵
override: {“true”, “false”}↵
↵
Asynchronous remote control information change notification is disabled by default and may be
configured with the “notify” command. When enabled, changes in remote state will generate a “510 remote
info:”asynchronous message with the same parameters as the “210 remote info:” message.
Closing connection
The "quit" command instructs the server to cleanly shut down the connection:
quit↵
Checking connection status
The "ping" command has no function other than to determine if the server is responding:
ping↵
Getting help
The "help" or "?" commands return human readable help text describing all available commands and
parameters:
help↵
Or:
?↵
The server will respond with a list of all supported commands:
201 help:↵
{Help Te x t}↵
{Help Te x t}↵
↵
273Informationen für Entwickler (Englisch)

Switching to preview mode
The "preview" command instructs the deck to switch between preview mode and output mode:
preview: enable: {"true", "false"}↵
Playback will be stopped when the deck is switched to preview mode. Capturing will be stopped when the
deck is switched to output mode.
Controlling device playback
The “play” command instructs the deck to start playing:
play↵
The play command accepts a number of parameters which may be used together in most combinations.
By default, the deck will play all remaining clips on the timeline then stop.
The “single clip” parameter may be used to override this behavior:
play: single clip: {“true”, “false”}↵
By default, the deck will play at normal (100%) speed. An alternate speed may be specified in percentage
between -1600 and 1600:
play: speed: {% normal speed}↵
By default, the deck will stop playing when it reaches to the end of the timeline. The “loop” parameter may
be used to override this behavior:
play: loop: {“true”, “false”}↵
The “playrange” command instructs the deck to play all the clips. To override this behavior: and select a
particular clip:
playrange set: clip id: {Clip ID}↵
To only play a certain timecode range:
playrange set: in: {in timecode} out: {out timecode}↵
To clear a set playrange and return to the default value:
playrange clear↵
The “play on startup command” instructs the deck on what action to take on startup. By default, the deck
will not play. Use the “enable” command to start playback after each power up.
play on startup: enable {“true”, “false”}↵
By default, the unit will play back all clips on startup. Use the “single clip” command to override.
play on startup: single clip: {“true”, “false”}↵
Stopping deck operation
The "stop" command instructs the deck to stop the current playback or capture:
stop↵
274Informationen für Entwickler (Englisch)

Changing timeline position
The "goto" command instructs the deck to switch to playback mode and change its position within the
timeline.
To go to the start of a specific clip:
goto: clip id: {Clip ID}↵
To move forward/back {count} clips from the current clip on the current timeline:
goto: clip id: +/-{count}↵
Note that if the resultant clip id goes beyond the first or last clip on timeline, it will be clamp at the first or
last clip.
To go to the start or end of the current clip:
goto: clip: {“start”, “end”}↵
To go to the start of the first clip or the end of the last clip:
goto: timeline: {“start”, “end”}↵
To go to a specified timecode:
goto: timecode: {timecode}↵
To move forward or back a specified duration in timecode:
goto: timecode: {“+”, “-”}{duration in timecode}↵
To specify between slot 1 and slot 2:
goto: slot id: {Slot ID}↵
Note that only one parameter/value pair is allowed for each goto command.
Enumerating supported commands and parameters
The "commands" command returns the supported commands:
commands↵
The command list is returned in a computer readable XML format:
212 commands:
<commands>↵
<command name="…"><parameter name="…"/>…</command>↵
<command name="…"><parameter name="…"/>…</command>↵
…
</commands>↵
↵
More XML tokens and parameters may be added in later releases.
275Informationen für Entwickler (Englisch)

Controlling asynchronous notifications
The “notify” command may be used to enable or disable asynchronous notifications from the server.
To enable or disable transport notifications:
notify: transport: {“true”, “false”}↵
To enable or disable slot notifications:
notify: slot: {“true”, “false”}↵
To enable or disable remote notifications:
notify: remote: {“true”, “false”}↵
To enable or disable configuration notifications:
notify: configuration: {“true”, “false”}↵
Multiple parameters may be specified. If no parameters are specified, the server returns the current state of
all notifications:
209 notify:↵
transport: {“true”, “false”}↵
slot: {“true”, “false”}↵
remote: {“true”, “false”}↵
configuration: {“true”, “false”}↵
dropped frames: {“true”, “false”}↵
display timecode: {“true”, “false”}↵
timeline position: {“true”, “false”}↵
playrange: {“true”, “false”}↵
cache: {“true”, “false”}↵
dynamic range: {“true”, “false”}↵
slate: {“true”, “false”}↵
↵
Retrieving device information
The "device info" command returns information about the connected deck device:
device info↵
The server will respond with:
204 device info:↵
protocol version: {Version}↵
model: {Model Name}↵
unique id: {unique alphanumeric identifier}↵
slot count: {number of storage slots}↵
software version: {software version}↵
↵
276Informationen für Entwickler (Englisch)

Retrieving slot information
The "slot info" command returns information about a slot. Without parameters, the command returns
information for the currently selected slot:
slot info↵
If a slot id is specified, that slot will be queried:
slot info: slot id: {Slot ID}↵
The server will respond with slot specific information:
202 slot info:↵
slot id: {Slot ID}↵
status: {"empty", "mounting", "error", "mounted"}↵
volume name: {Volume name}↵
recording time: {recording time available in seconds}↵
video format: {disk's default video format}↵
blocked: {“true”, “false”}↵
↵
Asynchronous slot information change notification is disabled by default and may be configured with
the "notify" command. When enabled, changes in slot state will generate a "502 slot info:" asynchronous
message with the same parameters as the "202 slot info:" message.
Retrieving clip information
The “disk list” command returns the information for each playable clip on a given disk. Without parameters,
the command returns information for the current active disk:
disk list↵
If a slot id is specified, the disk in that slot will be queried:
disk list: slot id: {Slot ID}↵
The server responds with the list of all playable clips on the disk in the format of: Index, name, formats, and
duration in timecode:
206 disk list:↵
slot id: {Slot ID}↵
{clip index}: {name} {file format} {video format} {Duration
ti m ecode}↵
{clip index}: {name} {file format} {video format} {Duration
ti m ecode}↵
…
↵
Note that the clip index starts from 1.
Retrieving clip count
The "clips count" command returns the number of clips on the current timeline:
clips count ↵
The server responds with the number of clips:
214 clips count: ↵
clip count: {Count}↵
277Informationen für Entwickler (Englisch)

Retrieving timeline information
The "clips get" command returns information for each available clip on the current timeline. Without
parameters, the command returns information for all clips on timeline:
clips get↵
The server responds with a list of clip IDs, names and timecodes:
205 clips info:↵
clip count: {Count}↵
{Clip ID}: {Name} {Start timecode} {Duration timecode}↵
{Clip ID}: {Name} {Start timecode} {Duration timecode}↵
…
↵
Retrieving transport information
The “transport info” command returns the state of the transport:
transport info ↵
The server responds with transport specific information:
208 transport info:
status: {“preview”, “stopped”, “play”, “forward”, “rewind”,
“j o g ”, “ s h u t t l e ”,” r e c o r d ” }↵
speed: {Play speed between -5000 and 5000 %}↵
slot id: {Slot ID or “none”}↵
clip id: {Clip ID or “none”}↵
single clip: {“true”, “false”}↵
display timecode: {timecode}↵
timecode: {timecode}↵
video format: {Video format}↵
loop: {“true”, “false”}↵
timeline: {n}↵
input video format: {Video format”}↵
dynamic range: {“off”, “Rec709”, “Rec2020_SDR”, “HLG”,
“ST2084_300”, “ST2084_500”, “ST2084_800”, “ST2084_1000”,
“ST2084_2000”, “ST2084_4000”, “ST2048” or “none”}↵
↵
The "timecode" value is the timecode within the current timeline for playback or the clip for record. The
"display timecode" is the timecode displayed on the front of the deck. The two timecodes will differ in some
deck modes.
Asynchronous transport information change notification is disabled by default and may be configured
with the "notify" command. When enabled, changes in transport state will generate a "508 transport info:"
asynchronous message with the same parameters as the "208 transport info:" message.
278Informationen für Entwickler (Englisch)

Video Formats
The following video formats are currently supported on HyperDeck Studio:
NTSC, PAL, NTSCp, PALp
720p50, 720p5994, 720p60
1080p23976, 1080p24, 1080p25, 1080p2997, 1080p30
1080i50, 1080i5994, 1080i60
HyperDeck Studio Pro and Plus models support these 4k formats:
4Kp23976, 4Kp24, 4Kp25, 4Kp2997, 4Kp30
HyperDeck Studio 4K Pro adds support for the following 4k formats:
4Kp50, 4Kp5994, 4Kp60
Video format support may vary between models and software releases.
File Formats
All HyperDeck models currently support the following file formats:
H.264High_SDI
H.264High
H.264Medium
H.264Low
QuickTimeProResHQ
QuickTimeProRes
QuickTimeProResLT
QuickTimeProResProxy
QuickTimeDNxHD220x
DNxHD220x
QuickTimeDNxHD145
DNxHD145
QuickTimeDNxHD45
DNxHD45
HyperDeck Studio 4K Pro also supports the following file formats:
H.265High_SDI
H.265High
H.265Medium
H.265Low
QuickTimeDNxHR_HQX
DNxHR_HQX 4Kp60
QuickTimeDNxHR_SQ
DNxHR_SQ
QuickTimeDNxHR_LB
DNxHR_LB
Supported file formats may vary between models and software releases.
279Informationen für Entwickler (Englisch)

Querying and updating configuration information
The "configuration" command may be used to query the current configuration of the deck:
configuration↵
The server returns the configuration of the deck:
211 configuration:↵
audio input: {“embedded”, “XLR”, “RCA”}↵
audio mapping: {n}↵
video input: {“SDI”, “HDMI”, “component”, “composite”}↵
file format: {format}↵
audio codec: {“PCM”, “AAC”}↵
timecode input: {“external”, “embedded”, “preset”, “clip”}↵
timecode output: {“clip”, “timeline”}↵
timecode preference: {“default”, “dropframe”, “nondropframe”}↵
timecode preset: {timecode}↵
audio input channels: {n}↵
record trigger: {“none”, “recordbit”, “timecoderun”}↵
record prefix: {name}↵
append timestamp: {“true”, “false”}↵
↵
One or more configuration parameters may be specified to change the configuration of the deck.
To change the current video input:
configuration: video input: {“SDI”, “HDMI”, “component”}↵
Valid video inputs may vary between models. To configure the current audio input:
configuration: audio input: {“embedded”, “XLR”, “RCA”}↵
Valid audio inputs may vary between models.
To configure the current file format:
configuration: file format: {File format}↵
Note that changes to the file format may require the deck to reset, which will cause the client connection to
be closed. In such case, response code 213 will be returned (instead of 200) before the client connection is
closed:
“213 deck rebooting”
Asynchronous configuration information change notification is disabled by default and may be configured
with the “notify” command. When enabled, changes in configuration will generate a “511 configuration:”
asynchronous message with the same parameters as the “211 configuration:” message.
Selecting active slot and video format
The "slot select" command instructs the deck to switch to a specified slot, or/and to select a specified
output video format.
To switch to a specified slot:
slot select: slot id: {slot ID}↵
To select the output video format:
slot select: video format: {video format}↵
Either or all slot select parameters may be specified. Note that selecting video format will result in a rescan
of the disk to reconstruct the timeline with all clips of the specified video format.
280Informationen für Entwickler (Englisch)

Clearing the current timeline
The "clips clear" command instructs the deck to empty the current timeline:
clips clear↵
The server responds with
200 ok↵
Adding a clip to the current timeline
The "clips add:" command instructs the deck to add a clip to the current timeline:
clips add: name: {"clip name"}↵
The server responds with
200 ok↵
or in case of error
1xx {error description}↵
Configuring the watchdog
The “watchdog” command instructs the deck to monitor the connected client and terminate the connection
if the client is inactive for at least a specified period of time.
To configure the watchdog:
watchdog: period: {period in seconds}↵
To avoid disconnection, the client must send a command to the server at least every {period} seconds. Note
that if the period is set to 0 or less than 0, connection monitoring will be disabled.
281Informationen für Entwickler (Englisch)

Hilfe
So erhalten Sie Hilfe
Am schnellsten erhalten Sie Hilfe über die Online-Support-Seiten auf der Blackmagic Design
Website. Suchen Sie dort auch nach dem aktuellsten Support-Material für Ihren Blackmagic
HyperDeck Rekorder.
Blackmagic Design Online-Support-Seiten
Die aktuellsten Versionen der Bedienungsanleitung, Produktsoftware und Support-Hinweise
finden Sie im Blackmagic Support Center unter www.blackmagicdesign.com/de/support.
Blackmagic Design Forum
Das Blackmagic Design Forum auf unserer Website ist eine praktische Ressource für weitere
Informationen und kreative Ideen. Manchmal finden Sie dort schneller Lösungen, da möglicherweise
bereits hilfreiche Antworten auf ähnliche Fragen von anderen erfahrenen Anwendern und
Blackmagic Design Mitarbeitern vorliegen. Das Forum finden Sie unter
http://forum.blackmagicdesign.com.
Kontaktaufnahme mit dem Blackmagic Design Support
Wenn unser Support-Material oder das Forum Ihnen nicht wie gewünscht hilft, gehen Sie bitte
auf unsere Support-Seite und schicken Sie uns Ihre Anfrage über den Button „Senden Sie uns
eine E-Mail“. Oder klicken Sie auf „Finden Sie Ihr lokales Support-Team“ und rufen Sie Ihre
nächstgelegene Blackmagic Design Support Stelle an.
Die derzeit installierte Softwareversion prüfen
Um herauszufinden, welche Version der Blackmagic HyperDeck Software momentan auf Ihrem
Computer installiert ist, öffnen Sie das Fenster „About Blackmagic HyperDeck Setup“.
Öffnen Sie Blackmagic HyperDeck Setup auf macOS über den Ordner „Programme“.
Wählen Sie im Anwendungsmenü „About Blackmagic HyperDeck Setup“, um die
Versionsnummer anzuzeigen.
Öffnen Sie Blackmagic HyperDeck Setup auf Windows über das Startmenü oder den
Startbildschirm. Klicken Sie auf das Menü „Help“ (Hilfe) und wählen Sie „About Blackmagic
HyperDeck Setup“ aus, um die Versionsnummer anzuzeigen.
Die aktuellsten Software-Updates erhalten
Prüfen Sie zunächst die Nummer der auf Ihrem Computer installierten Blackmagic HyperDeck
Setup Version. Sehen Sie dann im Blackmagic Design Support Center unter
www.blackmagicdesign.com/de/support/ nach neueren Aktualisierungen. In der Regel empfiehlt
es sich, die neuesten Updates zu laden. Vermeiden Sie Software-Updates jedoch, während
Sie an einem wichtigen Projekt arbeiten.
282Hilfe
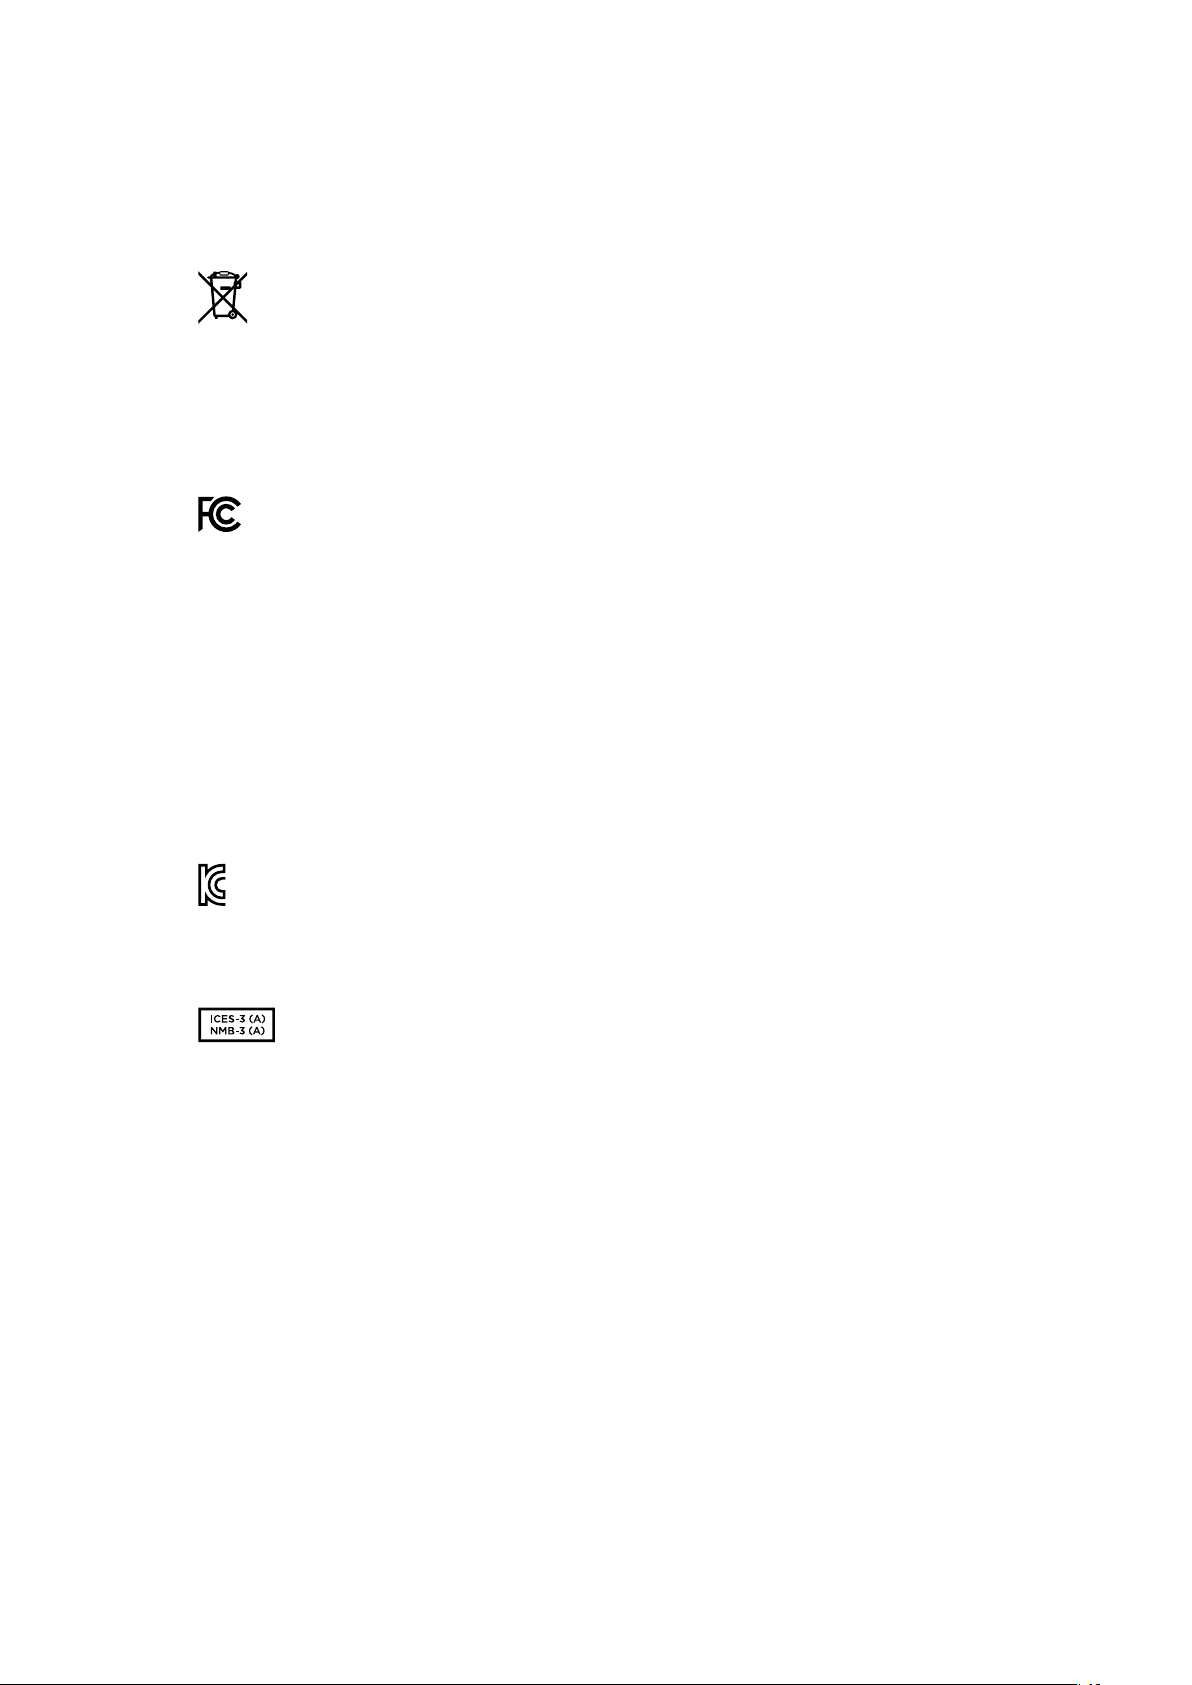
Gesetzliche Vorschriften
Entsorgung von elektrischen und elektronischen Geräten innerhalb der Europäischen Union.
Das auf dem Produkt abgebildete Symbol weist darauf hin, dass dieses Gerät nicht
zusammen mit anderen Abfallstoffen entsorgt werden darf. Altgeräte müssen daher
zur Wiederverwertung an eine dafür vorgesehene Sammelstelle übergeben werden.
Mülltrennung und Wiederverwertung von Altgeräten tragen zum nachhaltigen Umgang
mit natürlichen Ressourcen bei. Gleichzeitig wird sichergestellt, dass die Wiederverwertung
nicht zulasten der menschlichen Gesundheit und der Umwelt geht. Weitere Informationen
zur Entsorgung von Altgeräten sowie zu den Standorten der zuständigen Sammelstellen
erhalten Sie von Ihren örtlichen Müllentsorgungsbetrieben sowie vom Händler, bei dem
Sie dieses Produkt erworben haben.
Dieses Gerät wurde geprüft und entspricht den Grenzwerten für Digitalgeräte der Klasse A
gemäß Abschnitt 15 der FCC-Bestimmungen für Funkentstörung. Diese Grenzwerte dienen
dem angemessenen Schutz gegen schädliche Störungen bei Betrieb des Geräts in einer
gewerblichen Umgebung. Geräte dieser Art erzeugen und verwenden Hochfrequenzen
und können diese auch ausstrahlen. Bei Nichteinhaltung der Installations- und
Gebrauchsvorschriften können sie zu Störungen beim Rundfunkempfang führen.
Der Betrieb solcher Geräte im Wohnbereich führt mit großer Wahrscheinlichkeit zu
Funkstörungen. In diesem Fall kann vom Betreiber verlangt werden, selbst für die
Beseitigung solcher Störungen aufzukommen.
Der Betrieb unterliegt den folgenden zwei Bedingungen:
1 Dieses Gerät darf keine schädigenden Störungen hervorrufen und
2 Das Gerät muss unanfällig gegenüber beliebigen empfangenen Störungen sein,
einschließlich solcher, die einen unerwünschten Betrieb verursachen.
R-R-BMD-20210202002
R-R-BMD-20210202003
R-R-BMD-20201201003
R-R-BMD-20210301001
ISED-Zertifizierung für den kanadischen Markt
Dieses Gerät erfüllt die kanadischen Vorschriften für digitale Geräte der KlasseA.
Jedwede an diesem Produkt vorgenommene Änderung oder unsachgemäße
Verwendung kann die Konformitätserklärung zum Erlöschen bringen.
Verbindungen zu HDMI-Schnittstellen müssen über hochwertige abgeschirmte
HDMI-Kabel hergestellt werden.
Die Ausstattung wurde unter Einhaltung der beabsichtigten Nutzung in einer
gewerblichen Umgebung getestet. Bei Einsatz des Geräts in einer häuslichen
Umgebung verursacht es möglicherweise Funkstörungen.
283Gesetzliche Vorschriften

Sicherheitshinweise
Zum Schutz vor Stromschlag muss das Gerät an ein vorschriftsmäßig geerdetes Stromnetz
angeschlossen werden. Kontaktieren Sie im Zweifelsfall einen Elektrofachmann.
Um das Risiko eines Stromschlages zu verringern, setzen Sie das Gerät weder Tropfen noch
Spritzern aus.
Das Gerät eignet sich für den Einsatz in tropischen Gebieten mit Umgebungstemperaturen
von bis zu 40ºC.
Achten Sie auf eine ausreichende Luftzufuhr um das Gerät herum, sodass die Belüftung nicht
eingeschränkt wird.
Achten Sie bei der Installation im Rack, dass die Luftzufuhr nicht durch andere Geräte
eingeschränkt wird.
Es befinden sich keine durch den Anwender zu wartenden Teile im Inneren des Gehäuses.
Wenden Sie sich für die Wartung an ein Blackmagic Design Service-Center in Ihrer Nähe.
Nicht in Höhen von über 2000m über dem Meeresspiegel einsetzen.
California Proposition65
Plastikteile dieses Produkts können Spuren von polybromierten Biphenylen enthalten. Im US-
amerikanischen Bundesstaat Kalifornien werden diese Chemikalien mit Krebs, Geburtsfehlern
und anderen Schäden der Fortpflanzungsfähigkeit in Verbindung gebracht.
Weitere Informationen finden Sie unterwww.P65Warnings.ca.gov.
Warnhinweise für autorisiertes Wartungspersonal
Vergewissern Sie sich, dass die Verbindung zum Stromnetz vor Beginn der
Wartung getrennt wurde.
284Sicherheitshinweise

Garantie
12 Monate eingeschränkte Garantie
Für dieses Produkt gewährt die Firma Blackmagic Design eine Garantie auf Material- und Verarbeitungsfehler
von 12 Monaten ab Kaufdatum. Sollte sich ein Produkt innerhalb dieser Garantiezeit als fehlerhaft
erweisen, wird die Firma Blackmagic Design nach ihrem Ermessen das defekte Produkt entweder ohne
Kostenerhebung für Teile und Arbeitszeit reparieren oder Ihnen das defekte Produkt ersetzen.
Zur Inanspruchnahme der Garantieleistungen müssen Sie als Kunde Blackmagic Design über den
Defekt innerhalb der Garantiezeit in Kenntnis setzen und die entsprechenden Vorkehrungen für die
Leistungserbringung treffen. Es obliegt dem Kunden, für die Verpackung und den bezahlten Versand
des defekten Produkts an ein spezielles von Blackmagic Design benanntes Service Center zu sorgen
und hierfür aufzukommen. Sämtliche Versandkosten, Versicherungen, Zölle, Steuern und sonstige
Abgaben im Zusammenhang mit der Rücksendung von Waren an uns, ungeachtet des Grundes, sind
vom Kunden zu tragen.
Diese Garantie gilt nicht für Mängel, Fehler oder Schäden, die durch unsachgemäße Handhabung oder
unsachgemäße oder unzureichende Wartung und Pflege verursacht wurden. Blackmagic Design ist
im Rahmen dieser Garantie nicht verpflichtet, die folgenden Serviceleistungen zu erbringen: a) Behebung
von Schäden infolge von Versuchen Dritter, die Installation, Reparatur oder Wartung des Produkts
vorzunehmen, b) Behebung von Schäden aufgrund von unsachgemäßer Handhabung oder Anschluss
an nicht kompatible Geräte, c) Behebung von Schäden oder Störungen, die durch die Verwendung
von nicht Blackmagic-Design-Ersatzteilen oder -Verbrauchsmaterialien entstanden sind, d) Service für
ein Produkt, das verändert oder in andere Produkte integriert wurde, sofern eine solche Änderung
oder Integration zu einer Erhöhung des Zeitaufwands oder zu Schwierigkeiten bei der Wartung des
Produkts führt. ÜBER DIE IN DIESER GARANTIEERKLÄRUNG AUSDRÜCKLICH AUFGEFÜHRTEN
ANSPRÜCHE HINAUS ÜBERNIMMT BLACKMAGIC DESIGN KEINE WEITEREN GARANTIEN, WEDER
AUSDRÜCKLICH NOCH STILLSCHWEIGEND. DIE FIRMA BLACKMAGIC DESIGN UND IHRE HÄNDLER
LEHNEN JEGLICHE STILLSCHWEIGENDEN GARANTIEN IN BEZUG AUF AUSSAGEN ZUR
MARKTGÄNGIGKEIT UND GEBRAUCHSTAUGLICHKEIT FÜR EINEN BESTIMMTEN ZWECK AB. DIE
VERANTWORTUNG VON BLACKMAGIC DESIGN, FEHLERHAFTE PRODUKTE ZU REPARIEREN ODER
ZU ERSETZEN, IST DIE EINZIGE UND AUSSCHLIESSLICHE ABHILFE, DIE GEGENÜBER DEM KUNDEN
FÜR ALLE INDIREKTEN, SPEZIELLEN, NEBEN- ODER FOLGESCHÄDEN ZUR VERFÜGUNG GESTELLT
WIRD, UNABHÄNGIG DAVON, OB BLACKMAGIC DESIGN ODER DER HÄNDLER VON DER MÖGLICHKEIT
SOLCHER SCHÄDEN ZUVOR IN KENNTNIS GESETZT WURDE. BLACKMAGIC DESIGN IST NICHT
HAFTBAR FÜR JEGLICHE WIDERRECHTLICHE VERWENDUNG DER GERÄTE DURCH DEN KUNDEN.
BLACKMAGIC HAFTET NICHT FÜR SCHÄDEN, DIE SICH AUS DER VERWENDUNG DES PRODUKTS
ERGEBEN. NUTZUNG DES PRODUKTS AUF EIGENE GEFAHR.
© Copyright 2021 Blackmagic Design. Alle Rechte vorbehalten. „Blackmagic Design“, „DeckLink“, „HDLink“, „Workgroup Videohub“,
„Multibridge Pro“, „Multibridge Extreme“, „Intensity“ und „Leading the creative video revolution“ sind eingetragene Warenzeichen
in den USA und anderen Ländern. Alle anderen Unternehmens- und Produktnamen sind möglicherweise Warenzeichen der
jeweiligen Firmen, mit denen sie verbunden sind.
285Garantie

Grabadores HyperDeck
Julio 2021
Manual de instalación y funcionamiento
Grabadores
HyperDeck

Bienvenido
Gracias por haber adquirido este producto.
Cuando diseñamos los equipos HyperDeck originales en 2011, nuestro objetivo era facilitar
la grabación y reproducción de material audiovisual en unidades de estado sólido extraíbles
de 2.5 pulgadas.
Ahora, nos complace presentar la nueva línea HyperDeck, que permite grabar en HD y UHD
mediante tarjetas SD y unidades SSD o USB. Además, es posible conectar discos duros
externos a través de un dispositivo Blackmagic MultiDock10G.
Los modelos HyperDeck Studio Plus y Pro incluyen controles familiares y un mando giratorio
con un mecanismo de embrague que permite reproducir las imágenes y realizar búsquedas
sin quitar la vista del monitor. Además, disponen de una conexión frontal para auriculares y
un altavoz que brinda la posibilidad de supervisar la calidad del audio directamente desde
el equipo, entre otras prestaciones.
Esperamos que puedas aprovechar el grabador durante mucho tiempo y que te facilite la
realización de producciones audiovisuales.
En nuestra página de soporte técnico, encontrarás la versión más reciente de este manual, así
como material de apoyo adicional para estos productos. Recuerda actualizarlos con frecuencia,
a fin de asegurarte que cuentas con las últimas prestaciones disponibles. Por último, no olvides
registrarte al descargar las actualizaciones para que podamos mantenerte informado sobre
nuevos lanzamientos. Trabajamos constantemente para desarrollar herramientas innovadoras
y superarnos, de modo que nos encantaría conocer tu opinión.
Grant Petty
Director ejecutivo de Blackmagic Design

Índice
Grabadores HyperDeck 289
Primeros pasos 290
Conexión del cable de alimentación 290
Conexión de fuentes audiovisuales 290
Comprobación del audio 291
Conexión de soportes de grabación 291
Grabación 293
Grabación en múltiples soportes 293
Reproducción 294
Reproducción en los modelos
HyperDeck 294
Mando de búsqueda 295
Uso del panel frontal 297
Indicadores luminosos 297
Uso de los menús en pantalla 298
Ajustes 299
Panel trasero 311
Uso de la salida de monitorización 313
Soportes de grabación 316
Tarjeta SD 316
SSD 318
Discos externos 319
Formatear soportes de
almacenamiento 321
Preparación de soportes en
equipos informáticos 321
Uso del grabador como una
cámara web 322
Configuración del dispositivo
como fuente 322
Configuración de Open Broadcaster 323
Configuración del dispositivo 325
Uso del programa HyperDeck Setup 325
Tablas de conversión (LUT) 326
Actualización del dispositivo 327
Estante para bastidores 328
Control mediante el puerto RS-422 329
Transferencia de archivos a través
deuna red 334
Conexión a un mezclador ATEM 336
Dinámicas de trabajo en
posproducción 337
Información para desarrolladores 338
Protocolo de Ethernet para el
modelo Blackmagic HyperDeck 338
Protocol Commands 338
Protocol Details 342
Ayuda 353
Normativas 354
Seguridad 355
Garantía 356
288Blackmagic HyperDeck Studio

Grabadores HyperDeck
Estos productos forman parte de una familia de grabadores HD y 4K que han sido diseñados
para adaptarse a las necesidades de cada producción. Los modelos HyperDeck Studio HD Pro
y HyperDeck Studio 4K caben en una unidad de bastidor y permiten grabar archivos en tarjetas
SD o unidades SSD de 9.5mm.
Por su parte, las versiones HyperDeck Studio HD Mini y HyperDeck Studio HD Plus son más
compactas y pueden colocarse fácilmente sobre cualquier escritorio o instalarse en un bastidor
mediante el estante opcional Teranex Mini Rack Shelf.
Todos los modelos permiten grabar en discos USB y admiten imágenes con una resolución máxima
de 1080p60, o 2160p60 en el caso de la versión HyperDeckStudio 4K Pro.
Las funciones de grabación y reproducción son iguales en todos los modelos, mientras que las
versiones de mayor tamaño ofrecen prestaciones suplementarias que brindan más control y
opciones de conexión adicionales.
Este manual de instrucciones contiene toda la información necesaria para comenzar a utilizar
estos dispositivos.
HyperDeck Studio HD Mini Modelo HyperDeck Studio HD Plus
HyperDeck Studio HD Pro y HyperDeck Studio 4K Pro
289Grabadores HyperDeck

Primeros pasos
Para comenzar a utilizar el grabador, basta con enchufarlo a una red de suministro eléctrico,
conectar las fuentes y los equipos de destino e insertar una tarjeta SD o unidad SSD.
Conexión del cable de alimentación
Conecte un cable IEC convencional a la entrada de alimentación situada en el panel trasero
del dispositivo.
Si el grabador incluye una entrada IEC adicional, es posible conectar un sistema de alimentación
ininterrumpida (o UPS) a modo de respaldo, en caso de que la fuente principal falle.
Además, todos los modelos cuentan con una entrada para corriente continua de 12V que permite
conectar baterías externas.
A su vez, la versión HyperDeck Studio HD Mini puede alimentarse mediante un adaptador para
corriente alterna. Si la fuente de alimentación cuenta con un aro de seguridad, apriete el conector
para evitar que se desconecte accidentalmente.
Una vez conectado el dispositivo, los idiomas disponibles para la interfaz se mostrarán en la
pantalla. Gire el mando de búsqueda para seleccionar uno de ellos y presione el botón SET. A
continuación, se mostrará la pantalla de inicio. Consulte el apartado Uso del panel frontal para
obtener información adicional.
Conexión de fuentes audiovisuales
Conecte las fuentes a las entradas SDI o HDMI del dispositivo (por ejemplo, una cámara
cinematográfica digital) y los equipos de destino a las salidas correspondientes (por ejemplo,
un televisor HDMI o un monitor SDI).
Todos los modelos admiten una resolución de 1080p60. Por su parte, la versión HyperDeck 4K Pro
incluye conectores SDI 12G que permiten recibir o transmitir señales UHD con una resolución
máxima de 2160p60 mediante un solo cable BNC.
290Primeros pasos

La señal SDI o HDMI puede verse en la pantalla integrada.
SUGERENCIA: Si la imagen no se ve en la pantalla, es posible que se haya conectado la
fuente a otra entrada. Presione el botón INPUT en el panel frontal para alternar entre las
distintas señales SDI o HDMI disponibles.
Dado que las señales SDI y HDMI incluyen el sonido además de las imágenes, no es necesario
conectar fuentes de audio. El volumen puede comprobarse observando los indicadores junto a
la imagen en la pantalla.
Comprobación del audio
Si el dispositivo incluye un altavoz y una conexión para auriculares en el panel frontal, es posible
emplearlos para verificar el audio. Para escuchar, mantenga presionado el botón con el símbolo
del altavoz y gire el mando de búsqueda a fin de ajustar el volumen. El indicador correspondiente
aparecerá en la pantalla.
Presione dos veces el botón con el símbolo del altavoz a fin de mantenerlo encendido. Oprímalo
nuevamente para apagarlo.
Conexión de soportes de grabación
Todos los modelos HyperDeck Studio pueden grabar contenidos en forma inmediata sin necesidad
de realizar ningún tipo de ajuste o configuración. Para ello, solo es necesario una tarjeta SD o una
unidad SSD formateadas.
Los soportes de grabación pueden formatearse fácilmente mediante las opciones del menú en
pantalla. Cabe destacar que además este procedimiento puede realizarse en cualquier equipo
informático. Consulte el apartado Formatear soportes de grabación para obtener información sobre
las unidades más adecuadas. Además, se proporciona una lista de modelos recomendados.
Para insertar una unidad SSD:
1 Sostenga la unidad de 9.5 mm con los contactos hacia abajo. Insértela en el
compartimiento del dispositivo y empújela con cuidado hasta que calce en su lugar.
2 A continuación, el dispositivo verificará la unidad. El indicador que rodea el compartimiento
respectivo se encenderá de color verde mientras este procedimiento se lleva a cabo.
Al apagarse, la unidad estará lista para la grabar.
El indicador que rodea el compartimiento se encenderá de color verde mientras
el dispositivo lee la unidad y se apagará cuando esté listo para grabar.
291Primeros pasos

Para quitar la unidad SSD, tire del borde externo suavemente hacia afuera hasta desconectarla.
Sostenga la unidad SSD con los contactos hacia abajo, insértela en el
compartimiento y empújela con cuidado hasta que calce en su lugar.
Para insertar una tarjeta SD:
1 Sostenga la unidad con los contactos dorados orientados hacia la pantalla, de forma que
coincida con una de las ranuras correspondientes en el dispositivo. Luego, empuje la tarjeta
con suavidad hasta que calce firmemente en su lugar.
2 A continuación, el dispositivo verificará la tarjeta. El indicador sobre la ranura respectiva
se encenderá de color verde mientras este procedimiento se lleva a cabo.
Cuando el indicador se apaga y el botón de detención se enciende en
el panel de control, el dispositivo está listo para grabar.
292Primeros pasos
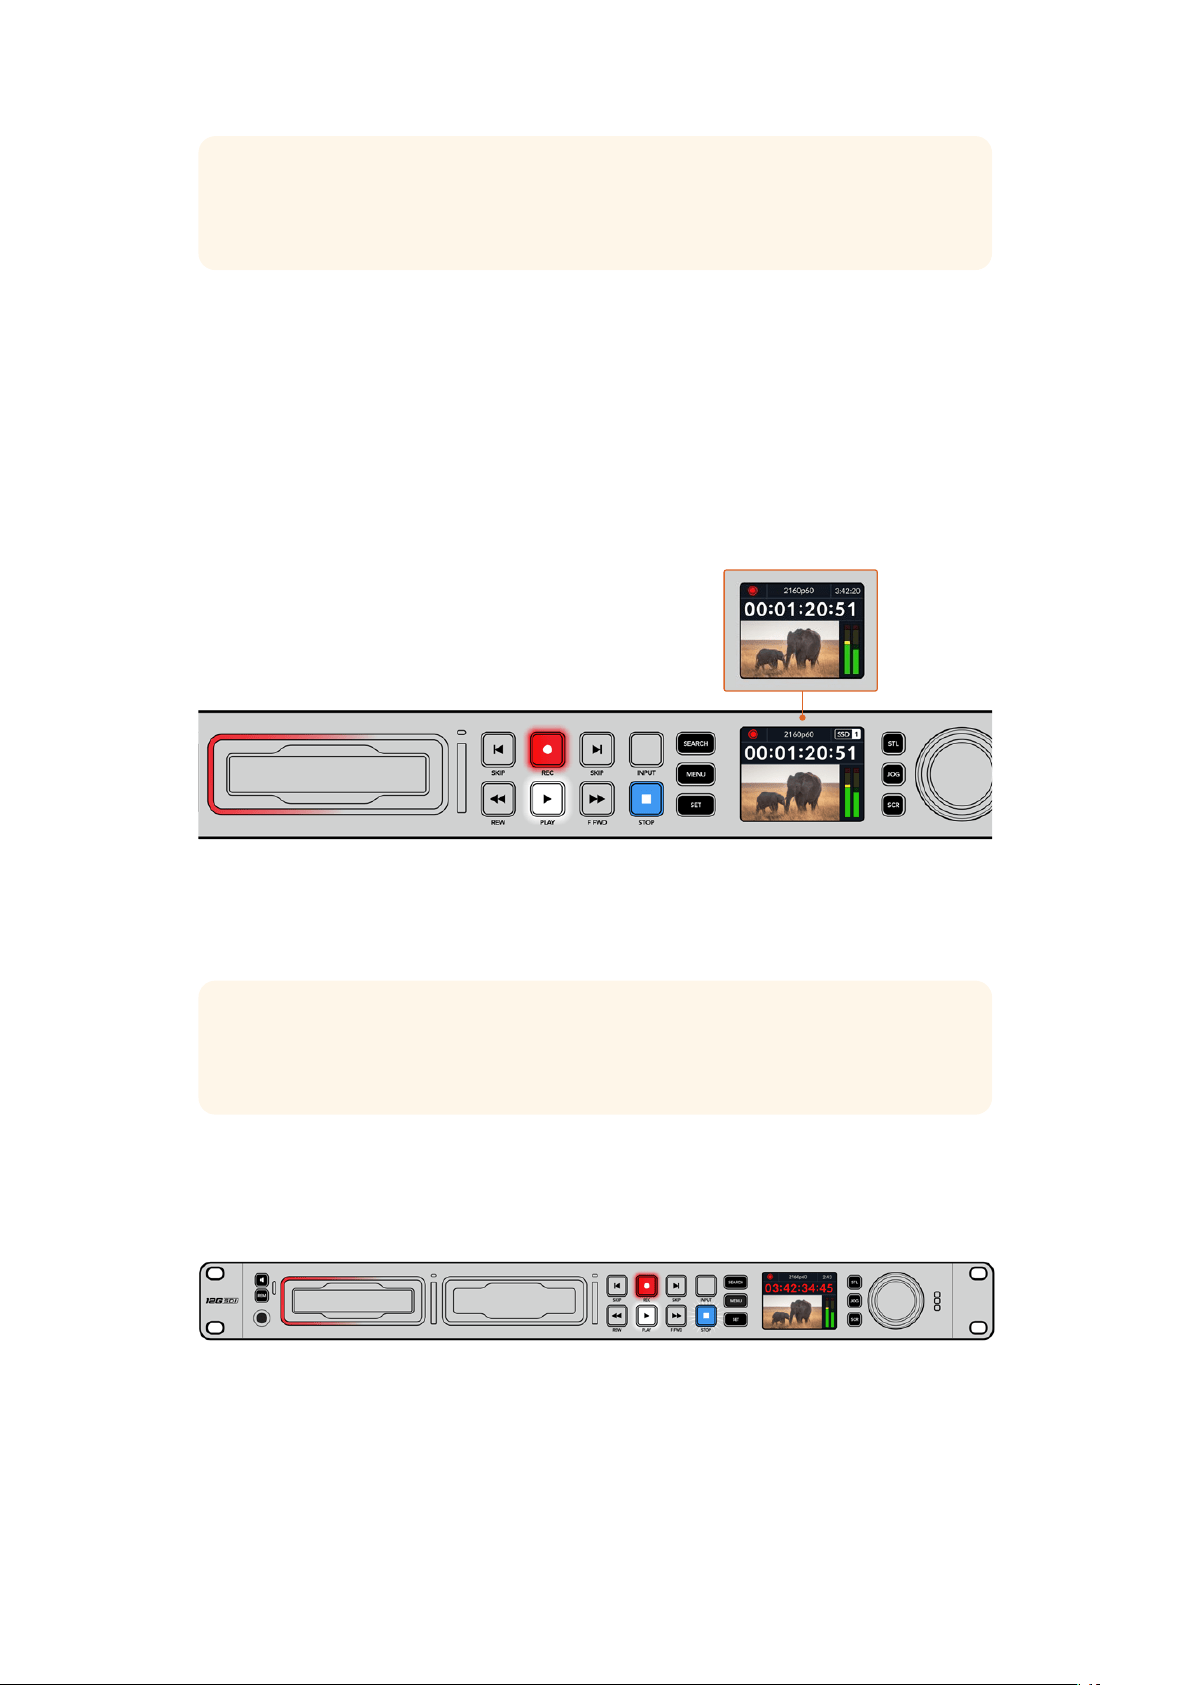
SUGERENCIA: Para quitar la tarjeta del dispositivo, empújela con suavidad y luego
suéltela. A continuación, notará que parte de la unidad sobresale de la ranura. Esto
le permitirá tomarla del borde y extraerla.
El dispositivo ya está listo para grabar.
Grabación
Después de confirmar la fuente en la pantalla, puede comenzar a grabar inmediatamente.
Presione el botón de grabación para comenzar a grabar. Al hacerlo en una tarjeta SD, el indicador
sobre la ranura se encenderá de rojo junto con el botón de grabación. El botón de reproducción
también se iluminará, y aparecerá un ícono en la pantalla. Al usar una unidad SSD, el indicador
dinámico se encenderá de rojo.
Mientras el dispositivo está grabando, el indicador de almacenamiento en la pantalla
mostrará alternadamente el soporte activo y el tiempo de grabación disponible.
Presione el botón de detención para finalizar la grabación. Presione el botón de reproducción para
ver la secuencia inmediatamente.
SUGERENCIA: Es posible cambiar el códec utilizado mediante el programa utilitario
Blackmagic HyperDeck Setup. Consulte el apartado correspondiente para obtener más
información al respecto.
Grabación en múltiples soportes
Cuando hay menos de tres minutos disponibles en la tarjeta SD o la unidad SSD, el código de tiempo
en la pantalla se destacará en rojo, y el botón de detención comenzará a parpadear lentamente.
Esto también indica que no se ha insertado una unidad para continuar la grabación, en cuyo caso
solo es necesario insertar otro soporte de almacenamiento en el compartimiento adicional. Al
insertar una unidad vacía en uno de los compartimientos disponibles o conectar un disco externo
al dispositivo, el botón de detención dejará de parpadear, y el código de tiempo volverá a mostrarse
en blanco. Esto significa que el equipo está listo para continuar la grabación en dicha unidad.
293Grabación

Al conectar más de un soporte al dispositivo, la grabación continuará en la unidad disponible.
Esto se indica en la esquina superior derecha de la pantalla.
Cambio de soportes durante la grabación
Para cambiar el soporte de grabación activo, mantenga presionado el botón de grabación en
cualquier momento. El registro de imágenes continuará inmediatamente en la segunda unidad.
Esto resulta de suma utilidad cuando es necesario retirar una de ellas sin detener la grabación,
por ejemplo, durante eventos en directo en los que resulta preciso trasladar el dispositivo a otro
lugar sin interrumpir el registro de imágenes.
Si el botón de grabación parpadea, es posible que exista un problema con la unidad de
almacenamiento, lo cual podría ocasionar que se omitan fotogramas. Al grabar en UHD, por ejemplo,
ProRes HQ 2160p30, esta definición requiere una mayor velocidad de transferencia de datos, por lo
cual es preciso contar con tarjetas SD o unidades SSD más rápidas. Consulte el apartado Unidades
de almacenamiento para obtener más información al respecto.
Reproducción
Los controles de reproducción son similares a los que habitualmente se encuentran en cualquier
grabador profesional. Los botones de avance y retroceso funcionan de la misma manera que
aquellos para avanzar a la secuencia siguiente o retroceder a la anterior.
Reproducción en los modelos HyperDeck
1 Presione el botón de reproducción para ver las imágenes en la pantalla del dispositivo
o cualquier monitor conectado a una de sus salidas.
2 Para pasar al siguiente clip, presione el botón de avance en el panel de control.
3 Presione el botón de retroceso una vez para reproducir el clip actual desde el inicio, o dos
veces para retroceder hasta el comienzo del clip anterior.
Presione el botón de reproducción en el panel de control para reproducir un clip, o los botones
de avance y retroceso para volver al comienzo del mismo o adelantar hasta el siguiente.
294Reproducción
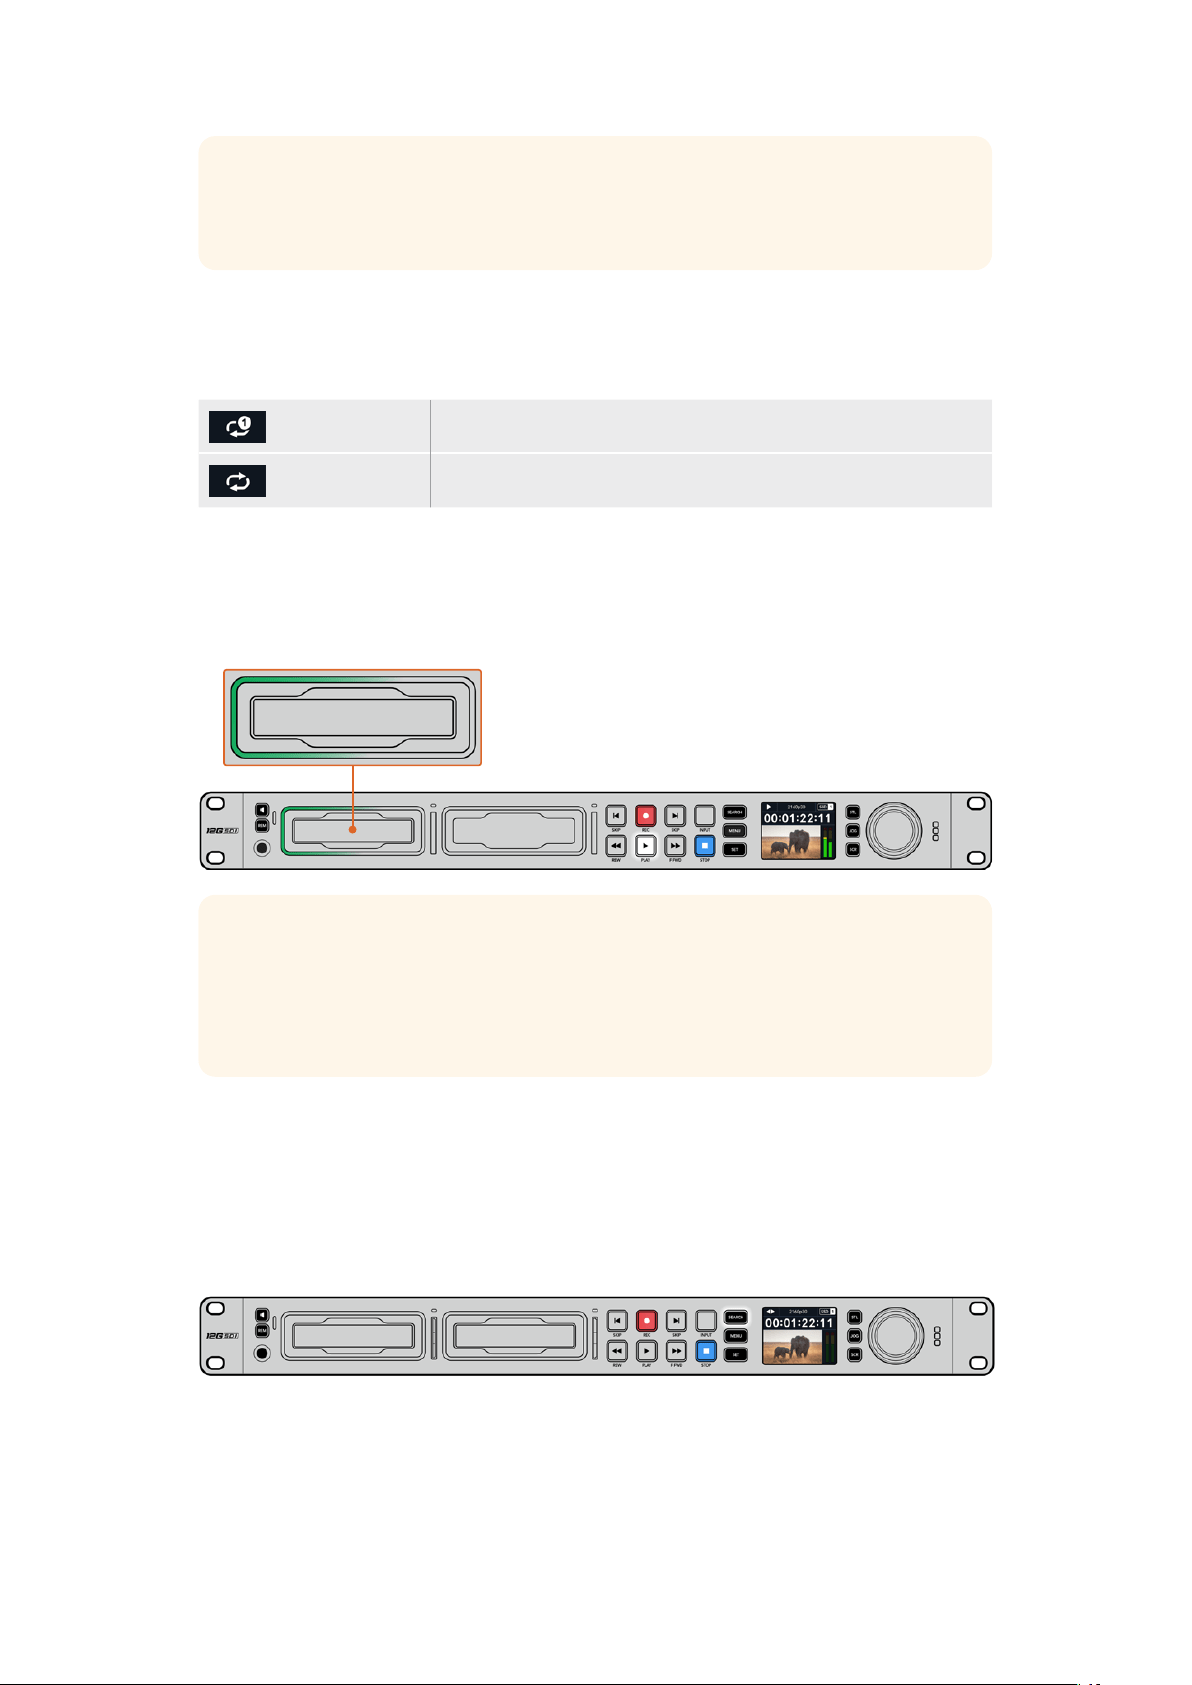
SUGERENCIA: Para reproducir una secuencia en el dispositivo, es necesario configurar el
códec mediante el menú en pantalla a fin de que coincida. Consulte el apartado Uso de los
menús para obtener más información al respecto.
Reproducción continua
Presione el botón de reproducción al reproducir una secuencia para activar esta función. Verá el
ícono correspondiente en la pantalla del dispositivo. Existen dos modos disponibles.
Repetir clip Reproduce nuevamente el clip actual.
Repetir todos Reproduce nuevamente todos los clips en el soporte de grabación.
Indicadores dinámicos
Al reproducir una secuencia, los ledes del indicador luminoso en torno a cada compartimiento para
soportes de grabación se encienden de verde alternadamente simulando un movimiento circular,
según la dirección y la velocidad de la reproducción.
SUGERENCIA: El botón de reproducción se enciende en forma intermitente cuando la
unidad de almacenamiento carece de la velocidad suficiente para reproducir las imágenes.
En este caso, recomendamos utilizar un formato de grabación comprimido, por ejemplo
H.264, o cambiar la unidad por otra más rápida para poder grabar contenidos en
definición UHD.
Mando de búsqueda
El mando de búsqueda permite encontrar fácilmente una parte específica de un clip y reproducirla o
ver las imágenes fotograma por fotograma. Esto resulta importante si es necesario encontrar una
sección particular de la secuencia mirando las imágenes al girar el mando o buscando un código de
tiempo determinado. También es útil cuando es preciso colocar el cabezal de reproducción en un
punto específico del clip para emitirlo al aire durante una producción en directo.
Presione el botón SEARCH para acceder a los distintos modos de búsqueda.
295Reproducción
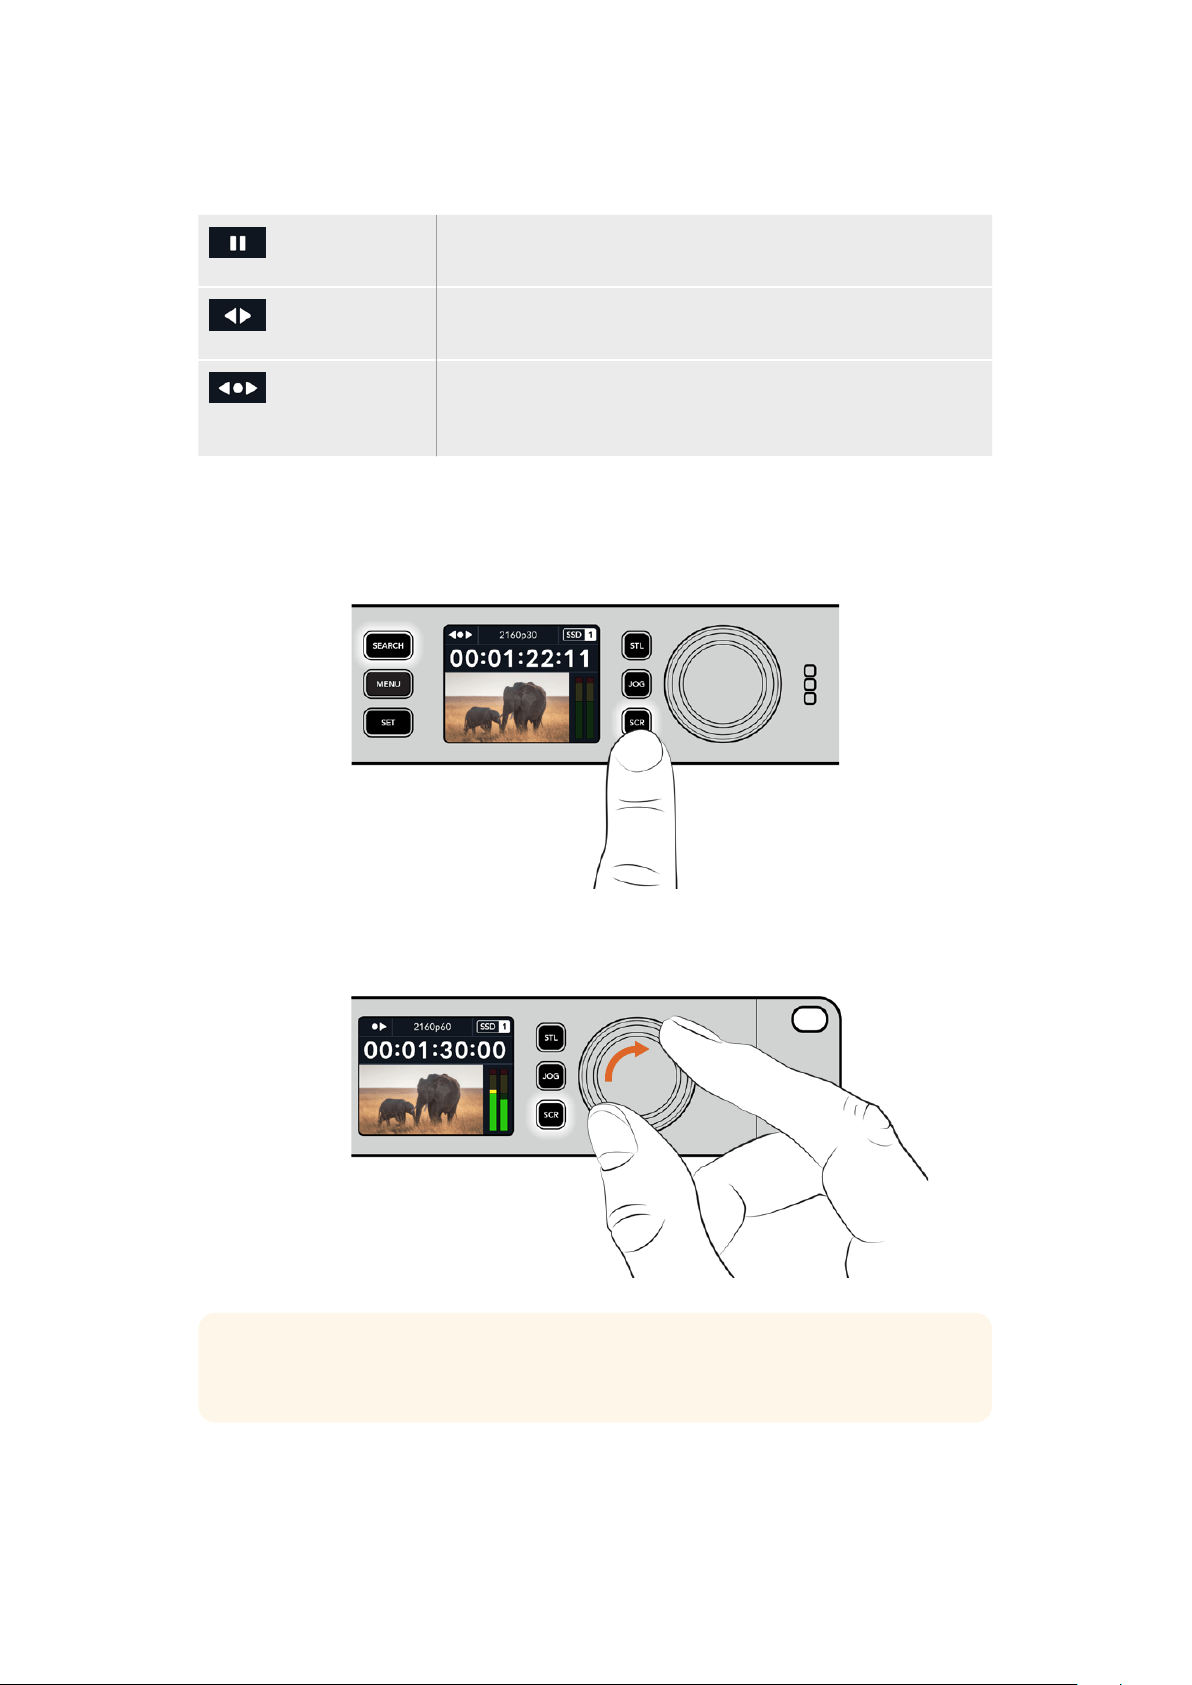
Los modos de búsqueda disponibles son los siguientes:
Desplazamiento El modo jog permite reproducir la secuencia fotograma por
fotograma para brindar mayor precisión.
Avance y
retroceso
El modo shuttle permite avanzar o retroceder las imágenes a una
mayor velocidad, según cuánto se gira el mando de búsqueda.
Avance y
retroceso rápido
El modo scroll permite avanzar o retroceder las imágenes aún
más rápido y resulta útil para buscar una parte específica de una
secuencia de larga duración.
Los modelos de mayor tamaño incluyen botones específicos para los distintos modos y un mando
de búsqueda con un mecanismo de embrague que proporciona una respuesta táctil al utilizarlo.
Esto permite encontrar una parte determinada de una secuencia girándolo y mirando las imágenes
en un monitor o televisor.
Presione los botones JOG, STL o SCR para acceder
a los distintos modos de búsqueda.
SUGERENCIA: Para reproducir la secuencia de manera habitual, presione el botón de
reproducción o detención.
296Reproducción
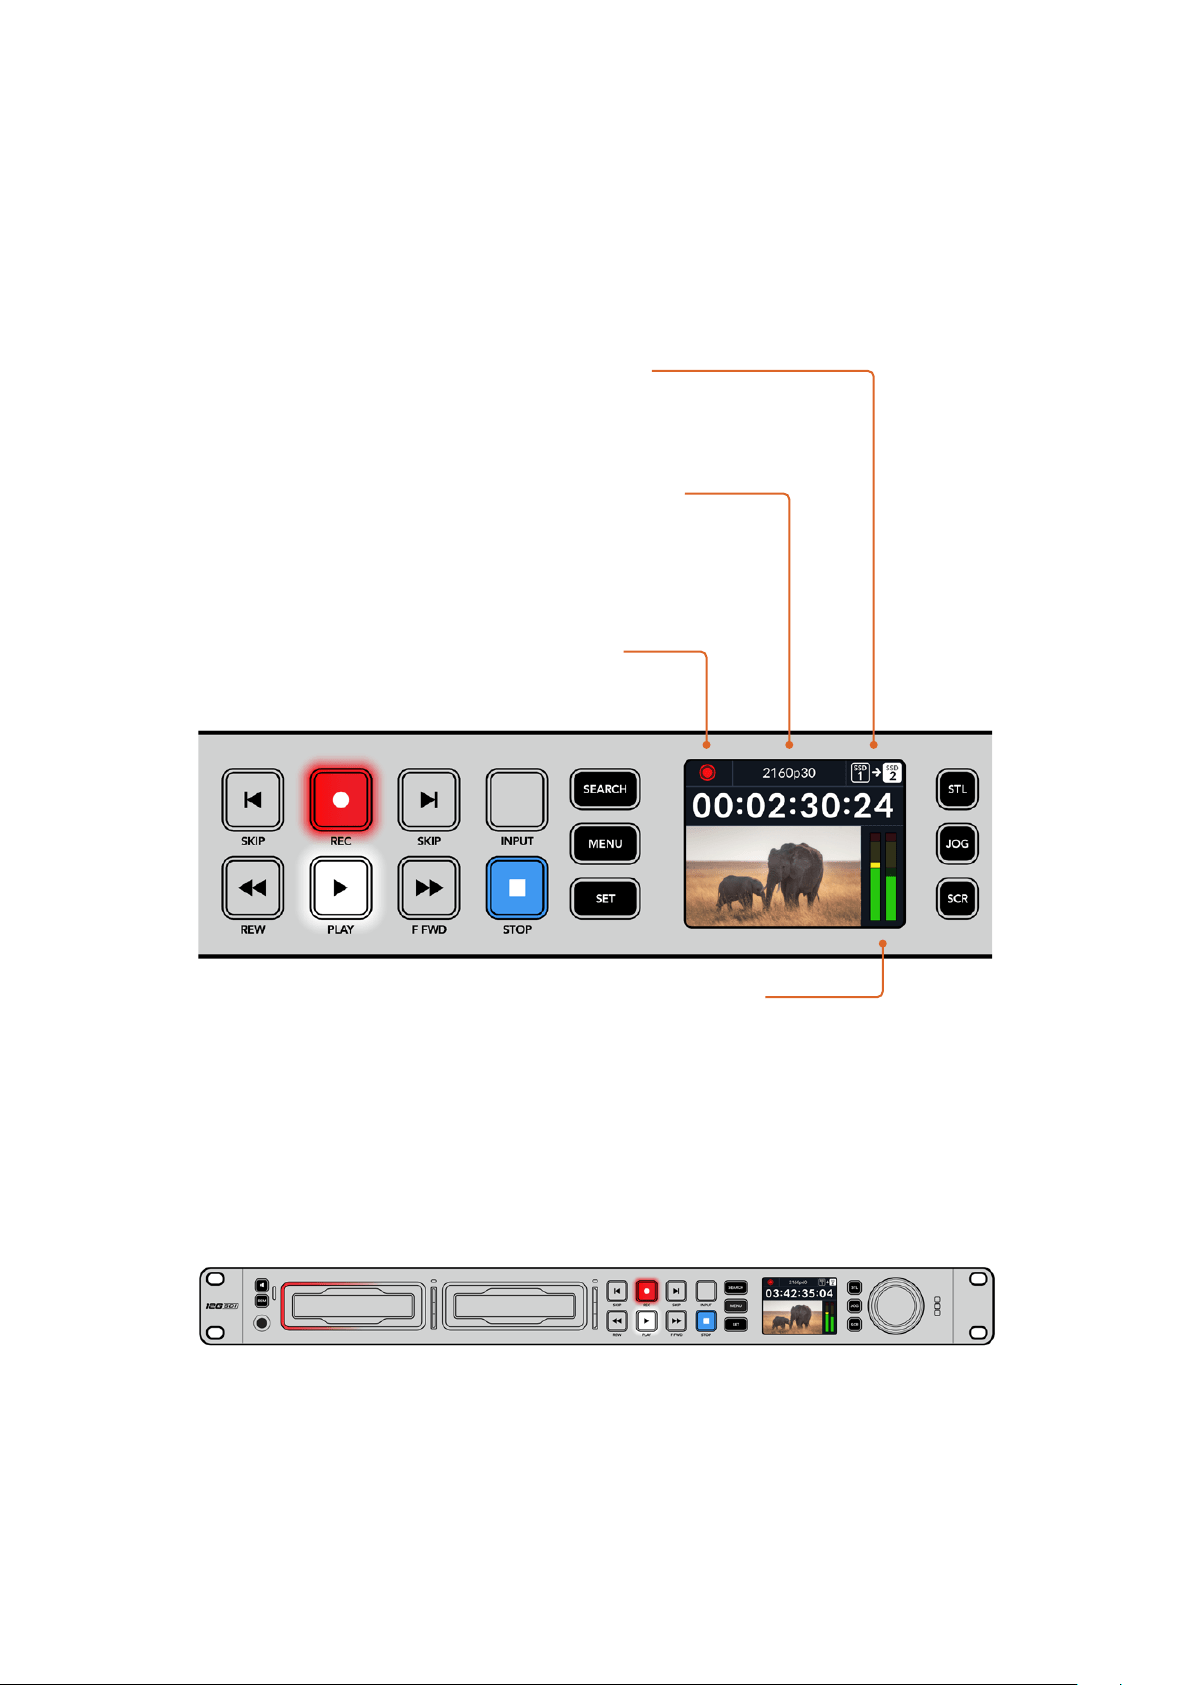
Uso del panel frontal
Al grabar o reproducir clips con los distintos modelos HyperDeck, la pantalla frontal y los
indicadores luminosos brindan toda la información necesaria.
Pantalla principal
Indicadores luminosos
Al encender el grabador por primera vez o al insertar una tarjeta SD o unidad SSD, el indicador
luminoso se enciende de color verde mientras el dispositivo verifica el soporte de grabación y
luego se apaga. Si la unidad no se ha formateado correctamente o no funciona como debería, este
permanecerá encendido en naranja hasta que la unidad se extraiga del dispositivo. Compruebe que
el soporte de grabación haya sido formateado correctamente y verifique su funcionamiento en un
equipo informático.
Los indicadores luminosos del dispositivo se encienden de rojo durante
la grabación o de verde al reproducir secuencias.
Tiempo restante y unidad activa –
Durante la grabación, se indica de
forma alternada el tiempo de grabación
restante y la unidad activa. Durante la
reproducción, se muestra la unidad activa.
Formato – Indica el formato de la fuente
o el archivo reproducido. Asimismo,
muestra la fuente al presionar el botón
INPUT en algunos modelos HyperDeck
Studio, junto con el volumen del altavoz
y los auriculares al ajustarlo mediante
el mando giratorio de búsqueda.
Estado – Muestra el estado del
grabador y el modo de reproducción.
Nivel del audio – Indica
el volumen de la fuente o de
la secuencia reproducida.
297Uso del panel frontal

Uso de los menús en pantalla
Presione el botón MENU en el panel frontal para acceder al menú de ajustes.
Gire el mando de búsqueda o presione los botones de avance y retroceso para acceder a las
distintas opciones, y oprima SET a fin de seleccionarlas.
Gire el mando de búsqueda para acceder a las distintas opciones en cada menú.
Al seleccionar una opción, presione el botón SET.
Ajuste la configuración mediante el mando de búsqueda o los botones de avance y retroceso.
Confirme los cambios presionando el botón SET.
Presione el botón MENU para salir y regresar a la pantalla principal.
298Uso del panel frontal

Ajustes
Menú Grabación
Fuente
Esta opción permite seleccionar la fuente SDI o HDMI. También es posible cambiarla presionando
el botón INPUT en el panel frontal.
Códec
Todos los modelos HyperDeck Studio permiten grabar con compresión en formato H.264, ProRes
y DNxHD. A su vez, la versión HyperDeck Studio 4K Pro admite códecs H.265 y DNxHR al
grabar en 4K.
Inicio automático
Hay dos modos disponibles para iniciar la grabación automáticamente: Cámara y CT
(código de tiempo).
Algunas cámaras, tales como el modelo URSA Mini, transmiten una señal a través de la conexión
SDI para comenzar o detener la grabación en equipos externos. Mediante la opción Cámara, el
dispositivo comienza o detiene la grabación cuando se presiona el botón correspondiente en
la cámara.
Por su parte, la opción CT permite que el dispositivo inicie la grabación al recibir un código de
tiempo válido a través de una entrada. Cuando este se detiene, la grabación finaliza. Seleccione
la opción No para desactivar esta función.
NOTA: Al grabar imágenes captadas por cámaras HDMI o SDI, compruebe que la señal no
contenga ningún tipo de información superpuesta, ya que de lo contrario esta quedará
registrada en el material grabado.
Resincronización
Esta opción permite garantizar que la fuente está sincronizada con la señal de referencia externa
antes de comenzar a grabar. La salida permanecerá sincronizada incluso al grabar, ya que la entrada
se resincroniza automáticamente. Esta función se emplea para realizar grabaciones independientes
en las que se requieren múltiples códigos de tiempo sincronizados, pero algunas fuentes no están
sincronizadas. Esta opción se encuentra normalmente desactivada, de manera que la señal se
graba sin fotogramas añadidos o eliminados.
Normalmente, todos los grabadores profesionales usan una fuente de referencia para sincronizar
la señal durante la reproducción. Es decir, la señal transmitida por el grabador HyperDeck se
sincronizará con la señal de referencia, de modo que no será necesario hacerlo nuevamente al
conectar el dispositivo a un sistema profesional más complejo.
Sin embargo, cuando el dispositivo está grabando la señal recibida, la transmite sin modificarla
directamente a otro equipo conectado al grabador.
299Ajustes

El modelo HyperDeck Studio cuenta con una función única que facilita la grabación de señales
individuales. Esto permite revertir por completo el proceso y volver a sincronizar la fuente con
la señal de referencia, a fin de poder conectar fuentes no sincronizadas al dispositivo, el cual
resincronizará la señal y la hará coincidir con la de referencia para comenzar a grabar.
Las fuentes no sincronizadas pueden ser equipos informáticos, cámaras de consumo masivo o
cualquier otro dispositivo que no admita una señal de referencia conectada. Incluso podría tratarse
de una señal proveniente de otro estudio o una teledifusora externa. Las fuentes no sincronizadas
pueden causar problemas con la grabación de señales individuales, ya que el código de tiempo
debe coincidir para todas, y en ocasiones en aquellas que no están sincronizadas, el código de
tiempo puede adelantarse o atrasarse durante la grabación. Si los códigos de tiempo de todas las
fuentes en un proyecto multicámara no coinciden, el proceso de edición será más complicado.
Con la opción de resincronización activada, la señal recibida por el grabador HyperDeck será
analizada con el propósito de que, si el código de tiempo se atrasa, se repetirá un fotograma,
mientras que si se adelanta, este se eliminará. Este proceso se denomina resincronización, y el que
sucede en la señal recibida es llamado resincronización de fotogramas. Esto significa que el código
de tiempo en los clips grabados en todos los dispositivos estará sincronizado, lo cual hace posible
la edición de proyectos multicámara.
La desventaja de este proceso es que se agregan o se eliminan algunos fotogramas. Es por esto
que se recomienda mantener esta función desactivada y usarla únicamente cuando no sea posible
conectar una señal de referencia a las fuentes aisladas.
No obstante, hay una situación en la que es posible mantener la opción de reesincronización.
Cuando esta función está activada, la señal transmitida por el dispositivo HyperDeck permanecerá
sincronizada con la señal de referencia durante la grabación. Es decir, se puede conectar la salida
SDI del grabador a una cámara con el propósito de sincronizarla a la señal de referencia a través de
la señal de retorno del programa. Por ejemplo, al conectar el modelo Blackmagic Studio Camera 4K
Pro, puede seleccionarse la fuente externa como su señal de referencia. De esta manera, la señal
de la cámara estará sincronizada con la de referencia a través del grabador, por lo que no será
necesario agregar o eliminar fotogramas a la señal recibida.
En el caso resincronización, únicamente funciona si la fuente no está sincronizada a la misma señal
de referencia del grabador. Pero en este caso, la señal transmitida por el grabador es la fuente de
referencia para la cámara, ambos dispositivos están sincronizados. Si se cuenta con varias unidades
HyperDeck sincronizadas, las cámaras conectadas se sincronizarán como un grupo. En caso de que
uno de los grabadores cuente con una fuente no sincronizada conectada, como un equipo
informático, entonces solo esa entrada se resincronizará.
La resincronización es automática, por lo que basta con conectar fuentes para que funcione.
La función de resincronización es muy útil, pero es importante conocer sus características.
Recomendamos realizar distintas pruebas a fin de familiarizarse con su funcionamiento. Es fantástica
para realizar producciones rápidamente.
300Ajustes

Menú Supervisión
El menú Supervisión está disponible en los modelos que incluyen una salida de monitorización en la
parte trasera.
Información superpuesta
Esta opción evita que aparezca información superpuesta a la imagen que se visualiza en el monitor
conectado al grabador. Consulte el apartado correspondiente más adelante para obtener
información adicional al respecto.
LUT 3D
Las tablas de conversión pueden resultar de suma utilidad al emplear el dispositivo para grabar
en exteriores. Estas indican a la unidad el color y la luminancia que debe aplicar a las imágenes,
lo cual resulta beneficioso al filmar en formato RAW o con rango dinámico de película (Film), ya que
en estos casos el material grabado presenta un contraste bajo. Al aplicar una tabla de conversión,
se obtiene una idea de cómo lucirán las secuencias una vez etalonadas.
Las tablas de conversión seleccionadas mediante el programa Blackmagic HyperDeck Setup
pueden aplicarse a la imagen visualizada en el monitor SDI conectado al grabador.
Para activar o desactivar una tabla de conversión:
1 Presione el botón MENU y acceda al menú Supervisión girando el mando de búsqueda.
2 Presione el botón SET.
3 Gire el mando de búsqueda hasta ver la opción 3DLUT destacada en azul.
4 Presione el botón SET para activar o desactivar la tabla.
Consulte el apartado Blackmagic HyperDeck Setup para obtener más información al respecto.
SUGERENCIA: Consulte el apartado Monitorización para obtener más información sobre
esta función.
301Ajustes

Menú Audio
Canales grabados
Los modelos HyperDeck Studio permiten grabar hasta 16 canales de audio PCM simultáneamente.
Para ello, seleccione una de las opciones disponibles en este menú. Al usar el códec H.264 o
H.265, también es posible elegir dos canales de audio AAC, a fin de compartir la grabación
directamente por YouTube. Este ajuste también brinda la oportunidad de escoger la cantidad de
canales que se transmiten a través de la salida de monitorización.
Canales monitorizados
Al grabar más de dos canales, es posible elegir cuáles se muestran en la pantalla del panel frontal
mediante este menú. En los modelos que cuentan con un altavoz frontal, este ajuste también
permite seleccionar los canales de audio que se escuchan a través del mismo y de los auriculares.
Modo de medición
La pantalla del dispositivo muestra la intensidad del audio integrado. Estos funcionan en la
modalidad vúmetro (VU) o picómetro (PPM). Para cambiar el sistema de medición, acceda al menú
Modo de medición y seleccione la opción preferida.
Volumen de los auriculares
En los modelos que incluyen una conexión para auriculares en el panel frontal, es posible ajustar su
volumen mediante este menú.
Volumen del altavoz
Ajuste el volumen del altavoz girando el mando de búsqueda. El valor predeterminado es 50%.
SUGERENCIA: El volumen del altavoz y los auriculares también puede ajustarse desde el
panel frontal del dispositivo. Mantenga presionado el botón con el símbolo del altavoz y
gire el mando de búsqueda para aumentar o disminuir la intensidad durante la
reproducción. El nivel se indicará en la parte superior central del panel.
302Ajustes

Menú Almacenamiento
Formatear unidad
Las tarjetas SD, unidades SSD y los discos externos conectados a través del puerto en la parte trasera
del grabador pueden formatearse directamente en la unidad o mediante equipos Mac y Windows.
Preparación de unidades:
1 Gire el mando de búsqueda para seleccionar el menú Formatear unidad.
2 Elija la unidad deseada y presione el botón SET.
3 Escoja un formato y presione el botón SET.
4 Aparecerá un mensaje de confirmación con el nombre de la unidad y el formato seleccionado.
5 Una vez completado el procedimiento, seleccione Aceptar.
El formato HFS+ (también conocido como Mac OS X Extended) es el más recomendado, ya que
permite registrar la transferencia de los datos a medida que esta se lleva a cabo. De este modo,
es más probable que la información pueda recuperarse en caso de un mal funcionamiento de la
unidad. Por su parte, el formato exFAT puede emplearse en sistemas operativos macOS y Windows
sin necesidad de adquirir programas adicionales, pero no brinda la posibilidad de registrar la
transferencia de datos.
Consulte el apartado correspondiente para obtener más información al respecto.
Menú Ajustes
303Ajustes

Nombre
Al contar con varias unidades HyperDeck Studio en una red, es posible asignarles distintos nombres
mediante el programa Blackmagic HyperDeck Setup o el protocolo de Ethernet para estos
grabadores, a través de una terminal. El nombre asignado aparecerá junto a la opción Nombre.
Idioma
La interfaz está disponible en español, alemán, chino, coreano, francés, inglés, italiano, japonés,
polaco, portugués, ruso, turco y ucraniano.
Para seleccionar el idioma:
1 Seleccione el menú Ajustes y presione SET.
2 Gire el mando de búsqueda para seleccionar la opción Idioma y presione SET.
3 Gire el mando de búsqueda para seleccionar el idioma y presione SET. A continuación,
la pantalla mostrará nuevamente el menú Setup.
Fecha
Para ajustar la fecha, seleccione la opción Fecha y presione SET. Gire el mando de búsqueda para
modificar el día, el mes y el año. Estos se usarán para la marca de tiempo que se agrega como sufijo
al nombre de los archivos.
Hora
Para ajustar la hora, seleccione la opción Hora y presione SET. Gire el mando de búsqueda para
modificar la hora y los minutos. Nótese que estos dispositivos utilizan el formato de 24 horas.
Software
Esta opción muestra la versión del sistema operativo instalado en el dispositivo.
Estilo
Seleccione la opción Claro a fin de activar este modo para la pantalla LCD. El modo oscuro resulta
apropiado en ambientes donde el brillo de la pantalla puede distraer, por ejemplo, cuando hay
varias unidades instaladas en un bastidor.
304Ajustes
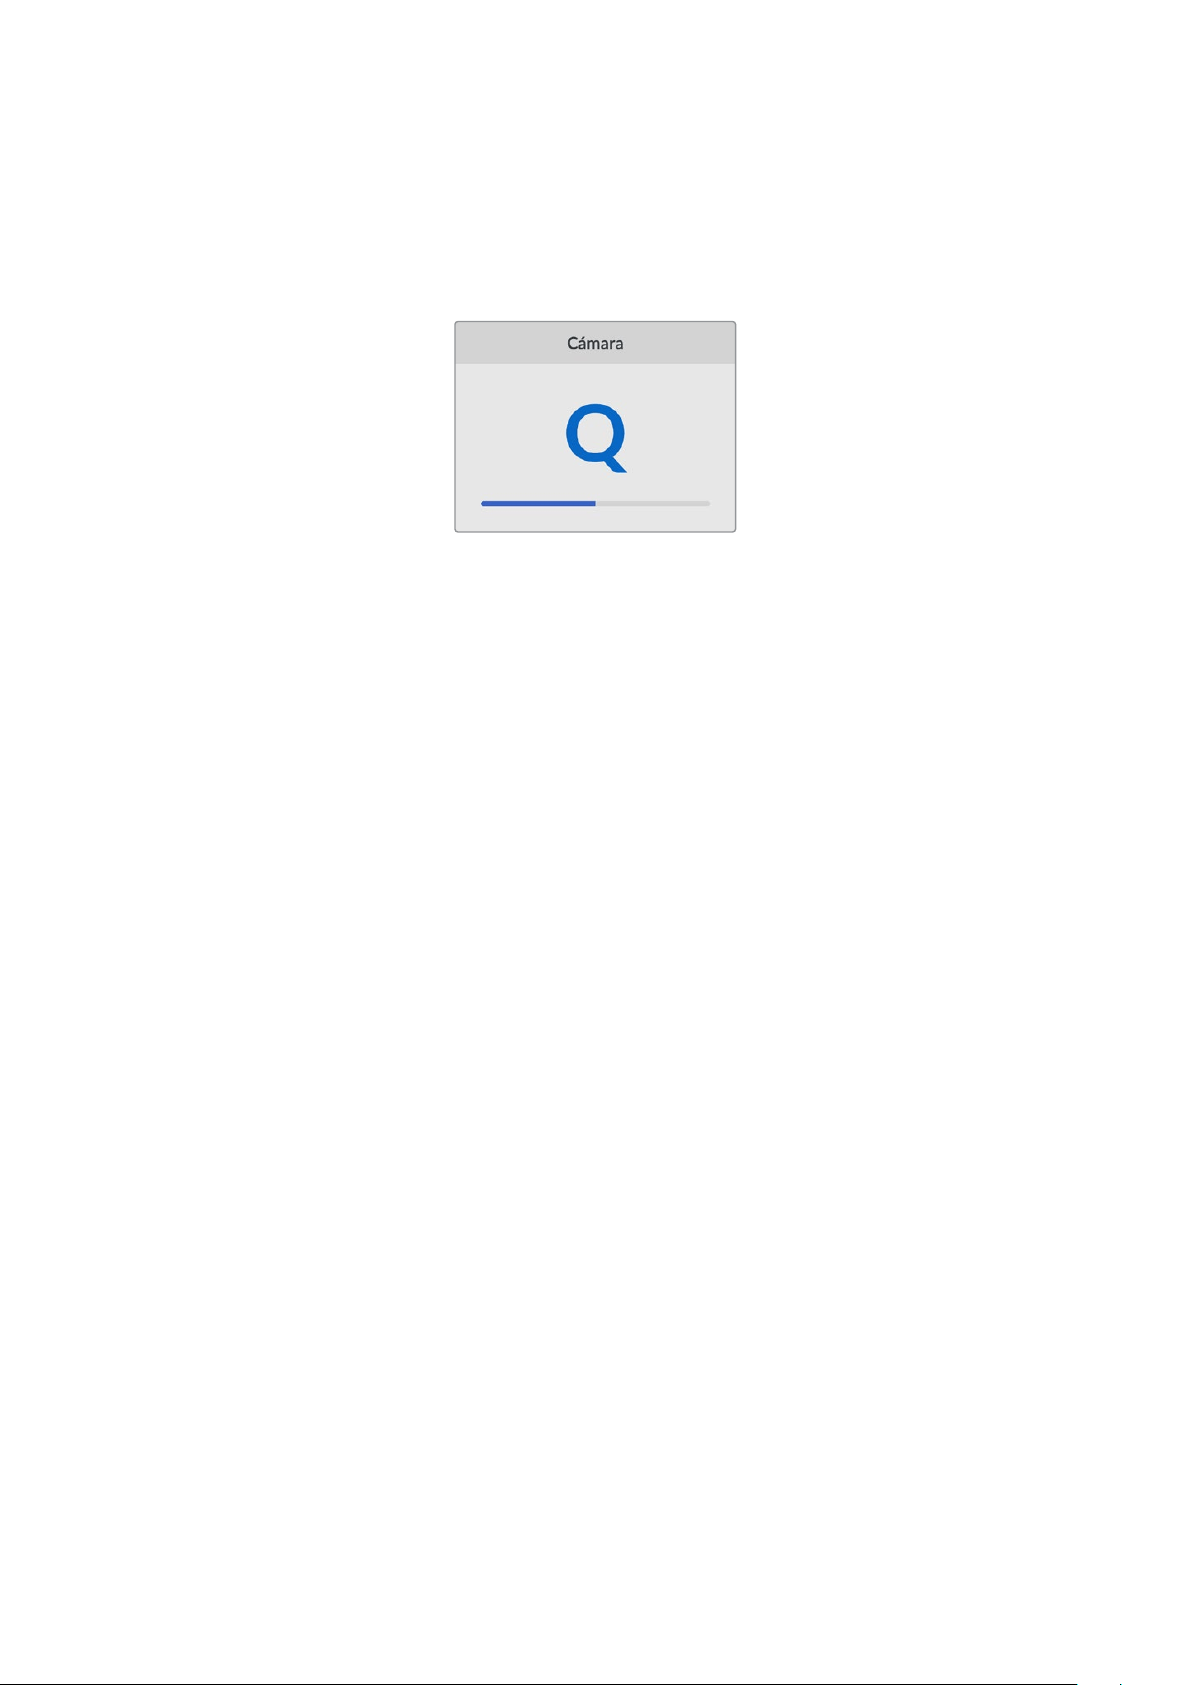
Cámara
Este ajuste es útil al emplear el dispositivo para grabar imágenes aisladas provenientes de distintas
cámaras y editarlas conjuntamente en DaVinci Resolve.
La letra correspondiente a cada unidad aparecerá en los metadatos de los archivos, permitiendo así
que el programa identifique los ángulos correctamente al utilizar la bandeja de sincronización.
Asigne una letra o un número (1-9) a la cámara.
Formato predeterminado
En ocasiones, el modelo HyperDeck Studio no detecta automáticamente el formato que se desea
utilizar, por lo que esta función permite seleccionar el formato que se empleará la mayor parte
del tiempo.
Por ejemplo, si se cuenta con un modelo HyperDeck Studio sin un equipo conectado a la entrada y
se inserta un disco con archivos de dos formatos distintos, ¿qué formato debe reproducir el
grabador? El formato predeterminado permite que el dispositivo conozca las prioridades del usuario.
Asimismo, esta opción es útil cuando se enciende por primera vez un grabador HyperDeck y no hay
otros equipos conectados o un disco insertado. En este caso, el dispositivo no reconoce cual es el
formato adecuado para la transmisión de la señal, por lo que esta función sirve de guía.
Cabe destacar que esta función no cancela otros ajustes. Por lo que, si se cuenta con un soporte de
almacenamiento que contiene archivos con un único formato y se presiona el botón de
reproducción, el grabador HyperDeck Studio los reproducirá, ignorando el formato predeterminado.
Al grabar, sucede algo similar. Cuando se presiona el botón de grabación, el dispositivo realizará la
acción según el formato del equipo conectado al mismo. Cabe destacar que, una vez finalizada la
grabación, el dispositivo HyperDeck Studio reproducirá las imágenes con el mismo formato de
almacenamiento, independientemente de si hay otros archivos en el soporte donde se han
guardado. En otras palabras, se reproducirá el material con el mismo formato que el de grabación.
Solo si se retira y vuelve a introducir el soporte de almacenamiento, el grabador empleará el formato
predeterminado.
La opción para predeterminar el formato es únicamente una guía para el grabador, a fin de facilitar
su automatización en términos de reproducción, y no anula otros ajustes.
305Ajustes

Ajustes de red
Protocolo
Los grabadores HyperDeck utilizan el protocolo DHCP de forma predeterminada, por lo cual,
al conectarlos, el servidor de la red les asignará una dirección IP automáticamente, y no será
necesario configurar otros ajustes. Para introducir una dirección particular,
seleccione Protocolo, presione el botón SET, elija la opción IP estática y oprima SET nuevamente.
Dirección IP, máscara de subred y puerta de enlace
Al seleccionar la opción IP estática, es posible introducir los datos de la red.
Para cambiar la dirección IP:
1 Gire el mando de búsqueda para seleccionar la opción Dirección IP y presione el botón
SET en el panel frontal del dispositivo.
2 Gire el mando de búsqueda para ajustar cada valor y presione el botón SET para confirmar
antes de continuar con el siguiente.
3 Presione SET para confirmar los cambios.
Una vez introducida la dirección IP, siga los mismos pasos para configurar la máscara de subred y
la puerta de enlace. Al finalizar, presione el botón MENU para salir y regresar a la pantalla principal.
306Ajustes

Ajustes para el código de tiempo
Fuente
Existen cinco opciones disponibles al grabar.
Señal Al seleccionar esta opción, se utiliza el código de tiempo de la señal SDI o HDMI
con los metadatos SMPTE RP 188. Esto permite mantener la sincronización entre
la fuente y el material grabado con el dispositivo.
Externo Seleccione esta opción al emplear la conexión para el código de tiempo en el
panel trasero.
Interno Seleccione esta opción para grabar el código de tiempo (hora del día) generado
internamente.
Continuo Al seleccionar esta opción, la grabación de cada secuencia se inicia un fotograma
después de la anterior. Por ejemplo, si el primer clip finaliza en 10:28:30:10, el
siguiente comenzará en 10:28:30:11.
Personalizado Seleccione esta opción a fin de indicar un código de tiempo particular para la
grabación.
Preferencia
Seleccione cualquiera de los modos disponibles en esta opción para fuentes NTSC con
una frecuencia de imagen de 29.97 o 59.94 f/s. Si la fuente es desconocida, elija la opción
Predeterminado. Esto permitirá que se mantenga el formato. Si no se detecta un código de
tiempo válido, la opción seleccionada por defecto será Omitir fotogramas.
Personalizado
Es posible indicar un código de tiempo particular presionando el botón SET y girando el mando
de búsqueda para introducir el valor inicial. Para ello, seleccione la opción Predeterminado en el
menú Fuente.
Mostrar
Seleccione las opciones para las señales transmitidas.
Línea de tiempo Seleccione esta opción a fin de ver un código de tiempo continuo para todos los
clips grabados.
Clip Seleccione esta opción para ver el código de tiempo de cada clip.
Salida SDI
307Ajustes
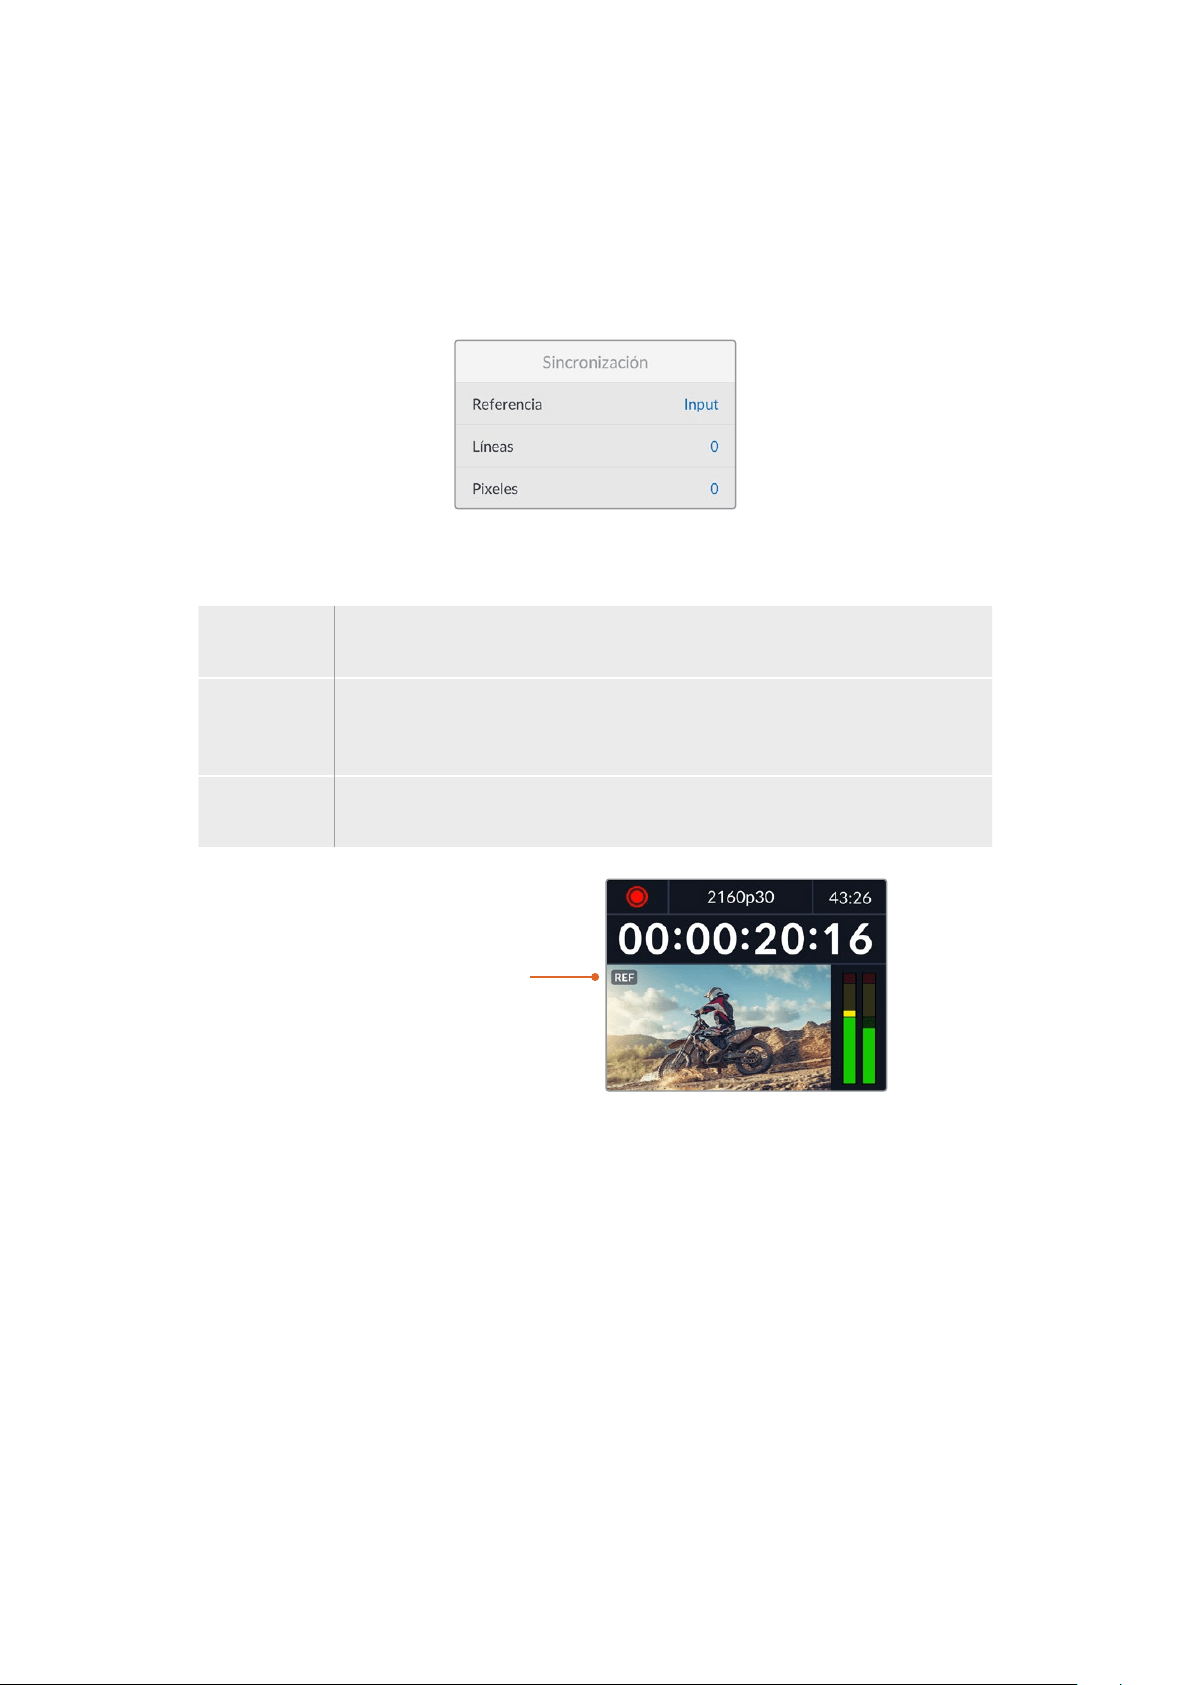
Salida SDI 3G
Algunos equipos solo son capaces de recibir señales SDI3G nivel A o B.
A fin de mantener la compatibilidad con otros equipos, seleccione la opción NivelA para
transmisiones directas o NivelB en el caso de señales multiplexadas.
Sincronización
Referencia
Seleccione el tipo de fuente que utilizará como referencia.
Automático Por defecto, este modo utilizará una señal externa conectada a la entrada REFIN
en el panel trasero, o en caso contrario, la fuente SDI o HDMI.
Fuente Seleccione esta opción si la fuente incluye una señal de referencia que desea
utilizar para la sincronización, por ejemplo, un grabador analógico con un
generador de sincronismos conectado al mismo.
Externa Seleccione esta opción si hay un dispositivo de referencia (por ejemplo,
Blackmagic Sync Generator) conectado a la entrada REF IN del grabador.
Referencia externa – Cuando
el dispositivo esté sincronizado
con una fuente de referencia
externa, el indicador REF
aparecerá en la pantalla.
Líneas
Esta opción permite realizar ajustes al conectar videograbadores analógicos si es preciso sincronizar
los fotogramas y se implementa mediante muestras, de manera que es posible lograr una
configuración exacta a este nivel.
Para ajustar la sincronización:
1 En el menú Sincronización, seleccione la opción Líneas y presione el botón SET.
2 Ajuste el valor girando el mando de búsqueda hacia la derecha o la izquierda para
aumentarlo o disminuirlo, respectivamente.
3 Presione SET para confirmar.
4 Para ajustar los pixeles, presione el botón MENU para regresar al menú de ajustes,
seleccione la opción Pixeles y repita los pasos descritos para modificar el número
de líneas.
308Ajustes

Archivos
Sufijo con fecha
Por defecto, esta opción se encuentra desactivada. Para añadir la fecha y la hora al nombre del
archivo grabado, presione el botón SET y gire el mando de búsqueda a fin de activarla.
HyperDeck_2105061438_0001
HyperDeck_2105061438_0001 Nombre
HyperDeck_2105061438_0001 Año
HyperDeck_2105061438_0001 Mes
HyperDeck_2105061438_0001 Día
HyperDeck_2105061438_0001 Hora
HyperDeck_2105061438_0001 Minuto
HyperDeck_2105061438_0001 Número de clip
Rango dinámico
El modelo HyperDeck Studio 4K detecta automáticamente metadatos HDR en señales 4K y aplica
el respectivo rango dinámico a la imagen transmitida a través de la salida HDMI. Sin embargo, es
posible seleccionar otro distinto en caso de que los archivos o las imágenes hayan sido etiquetados
incorrectamente, o si el monitor conectado no admite este tipo de contenidos.
Para ello, seleccione una de las opciones disponibles en el menú Rango dinámico.
Las opciones para la reproducción son las siguientes:
Automático
El dispositivo seleccionará automáticamente el formato según los metadatos del clip.
Rec. 709
Seleccione esta opción para imágenes HD con un rango dinámico convencional.
Rec. 2020 SDR
Seleccione esta opción para imágenes UHD con un rango dinámico convencional.
HLG
Esta opción permite reproducir imágenes de alto rango dinámico en monitores y televisores
compatibles, incluidos aquellos que admiten el formato Rec. 2020 SDR.
309Ajustes
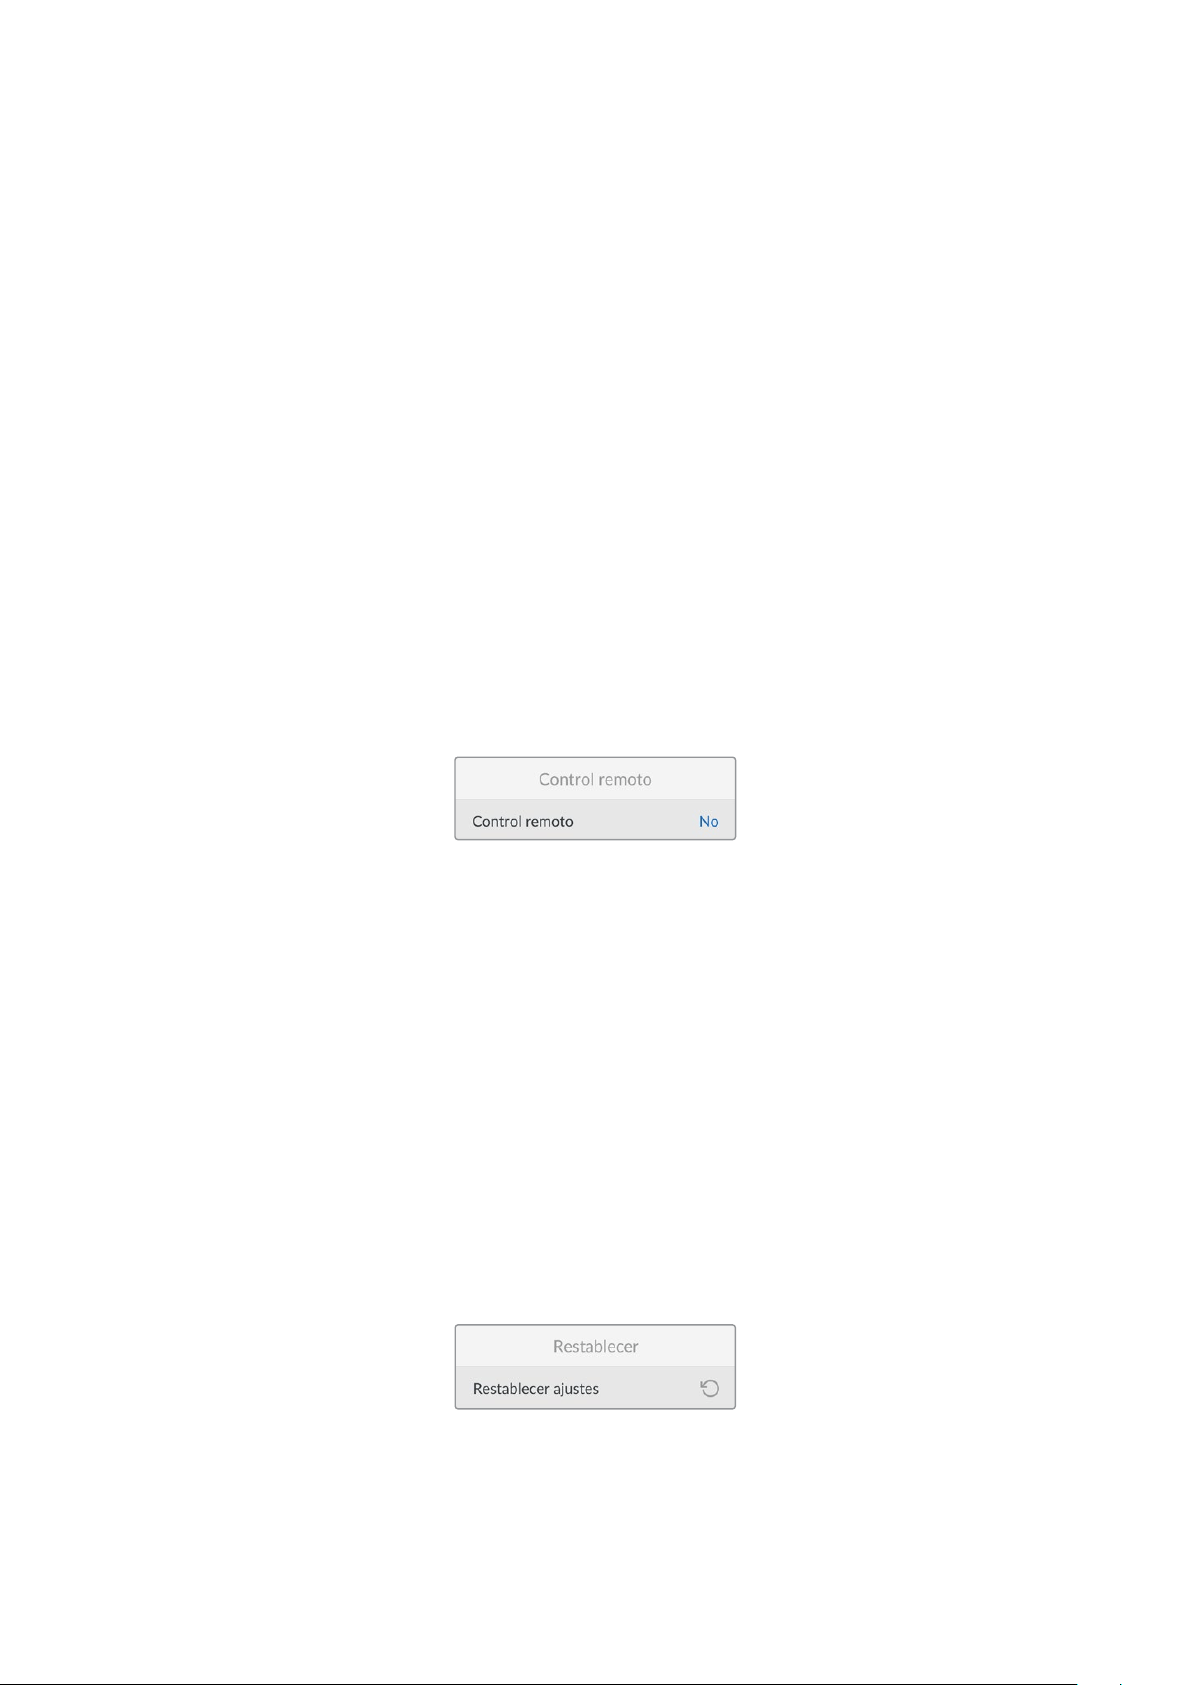
Los siguientes ajustes son adecuados para el espectro cromático Rec. 2020 y el cuantificador
perceptual (PQ), según la norma SMPTE ST2084. Este último es la función del espectro de alto
rango dinámico que permite visualizar imágenes más brillantes. Los valores de luminancia
expresados en candelas por metro cuadrado, por ejemplo, 1000 cd/m
2
, indican la luminancia
máxima por metro cuadrado que admite el formato correspondiente.
ST2084 (300)
300 cd/m
2
ST2084 (500)
500 cd/m
2
ST2084 (800)
800 cd/m
2
ST2084 (1000)
1000 cd/m
2
ST2084 (2000)
2000 cd/m
2
ST2084 (4000)
4000 cd/m
2
Control remoto
Control remoto
Seleccione esta opción para controlar el grabador a distancia mediante el puerto RS-422 desde
otros equipos, por ejemplo dispositivos HyperDeck Extreme Control. Al activarla, el botón REM
se encenderá en los modelos que incluyen esta función. Desactívela para controlar el grabador
localmente.
Control de grabadores
Cuando se controla a distancia un grabador, es posible reflejar las acciones que se realizan en una
unidad en otras conectadas. De esta manera, es posible conectar unidades HyperDeck en serie al
equipo principal a través del puerto RS-422. Una vez que las unidades adicionales tienen la función
de control a distancia activada, las acciones realizadas en el equipo principal se reflejarán
en el resto.
Al presionar el botón de grabación, todos los dispositivos conectados comenzarán a grabar
simultáneamente.
Cabe señalar que el modelo HyperDeck Studio HD Mini no permite controlar otros grabadores.
Sin embargo, es posible controlarlo desde otras unidades.
Restablecer
Restablecer ajustes
Seleccione esta opción para restablecer los ajustes de fábrica. Al presionar el botón SET,
el dispositivo le solicitará que confirme la opción seleccionada.
310Ajustes

Panel trasero
1 Alimentación
Todos los modelos HyperDeck incluyen una entrada IEC para conectarlos a la red de
suministro eléctrico. La versión HyperDeck Studio 4K cuenta con dos de estas conexiones
a fin de ofrecer un sistema de alimentación redundante. A su vez, la entrada para corriente
continua permite utilizar baterías externas de 12V. Compruebe que la fuente conectada
sea compatible, según el voltaje y la intensidad de la corriente indicados junto al
conector DC IN.
2 Ethernet
El puerto Ethernet permite utilizar este tipo de redes para transferir archivos mediante
un cliente FTP o controlar la unidad a distancia a través del protocolo para dispositivos
HyperDeck. Es posible transferir archivos mediante las conexiones de 1 Gb en los modelos
HD o de 10 Gb en el caso de la versión HyperDeck Studio 4K Pro. Consulte el apartado
Transferencia de archivos a través de una red para obtener más información al respecto.
Es posible controlar los grabadores desde mezcladores y paneles ATEM si los dispositivos
están conectados a una misma red.
3 Control remoto
Algunos modelos incluyen dos conectores RS-422 DE-9 (entrada y salida). La versión
HyperDeck Studio HD Mini solo cuenta con una entrada de este tipo.
4 Discos externos
Conecte un disco externo a este puerto USB-C para grabar a una velocidad máxima de
5Gb/s en los modelos HyperDeck Studio HD. La versión HyperDeck Studio 4K Pro incluye
una conexión USB 3.1 de segunda generación que permite lograr una velocidad de
transferencia de 10 Gb/s. Asimismo, es posible conectar un adaptador con varios puertos
USB o un dispositivo MultiDock10G, a fin de emplear varias unidades SSD.
Al conectar el grabador a un equipo informático a través del puerto USB, es posible
seleccionarlo como fuente en Open Broadcaster y Skype, entre otros programas similares.
Consulte el apartado Configuración en Open Broadcaster’ para obtener más información
al respecto.
5 Salida de monitorización
Esta salida SDI3G permite transmitir una imagen a menor resolución con elementos
superpuestos a un monitor externo. Estos incluyen indicadores para el volumen y los
soportes de grabación, así como el código de tiempo. Consulte el apartado Ajustes
para obtener más información al respecto.
2 5 6 8 941
El modelo HyperDeck Studio HD
Mini incluye un conector con un aro
de seguridad que impide que se
desconecte accidentalmente.
Los modelos HyperDeck
Studio HDMini y Plus incluyen
conectores BNC para la entrada
y la salida del código de tiempo.
7
3
311Panel trasero

6 Referencia
Todos los modelos HyperDeck incluyen un generador de sincronismos que produce señales
Black Burst o Tri-level Sync estables. Esto permite conectar la salida de una unidad a la
entrada de otra y sincronizarlas con una señal de referencia.
Asimismo, es posible conectar una referencia externa a la entrada correspondiente
del grabador.
Consulte el apartado Ajustes para obtener más información al respecto.
7 Código de tiempo
Todos los modelos HyperDeck incluyen un generador de códigos de tiempo (hora del día).
Al igual que con las señales de referencia, este se puede transmitir de una unidad a otra,
a fin de que coincida en todas las grabaciones.
Los conectores para el código de tiempo pueden ser BNC o XLR, según el modelo del
grabador. Consulte el apartado Ajustes para obtener más información al respecto.
8 HDMI
Esta salida permite conectar monitores y televisores HDMI.
La unidad detectará automáticamente el rango dinámico si este parámetro se ha indicado
en los metadatos. Además, es posible seleccionar un rango dinámico distinto mediante el
menú de ajustes. Consulte dicho apartado para obtener más información al respecto.
9 SDI
El modelo HyperDeck Studio HD Mini dispone de una conexión SDI3G que admite
una resolución máxima de 1080p a 60f/s. Las versiones HyperDeck Studio HD Plus y
HyperDeck Studio HD Pro incluyen conexiones SDI6G que admiten una resolución máxima
de 2160p a 30f/s. Por su parte, el modelo HyperDeck Studio 4K Pro cuenta con entradas y
salidas SDI12G que admiten una resolución máxima de 2160p a 60f/s.
Los modelos que disponen de dos salidas SDI permiten reproducir archivos ProRes4444
que incluyen el canal alfa y la imagen principal al conectarlos a mezcladores ATEM.
312Panel trasero

Uso de la salida de monitorización
Esta salida permite comprobar visualmente las imágenes grabadas o reproducidas con información
superpuesta a las mismas que incluye el códec, el formato de la señal, la frecuencia de imagen, el
código de tiempo, el nombre del archivo, el estado de la reproducción y de los soportes de
grabación, y la intensidad del audio.
A continuación, se describen estos datos.
Códec
Indica el códec seleccionado
Formato
Muestra la resolución y la frecuencia de imagen del clip durante la reproducción o de la fuente en el
modo de grabación.
Código de tiempo
Indica el código de tiempo del clip durante la grabación o la reproducción. También es posible ver
un contador para la línea de tiempo.
Fuente
Esta opción brinda información sobre la fuente SDI o HDMI seleccionada. Si el mensaje Sin señal
aparece junto al mismo, significa que no se ha detectado una señal válida.
Nombre
Indica el nombre de la unidad. Consulte el apartado Blackmagic HyperDeck Setup para saber cómo
cambiarlo.
313Uso de la salida de monitorización
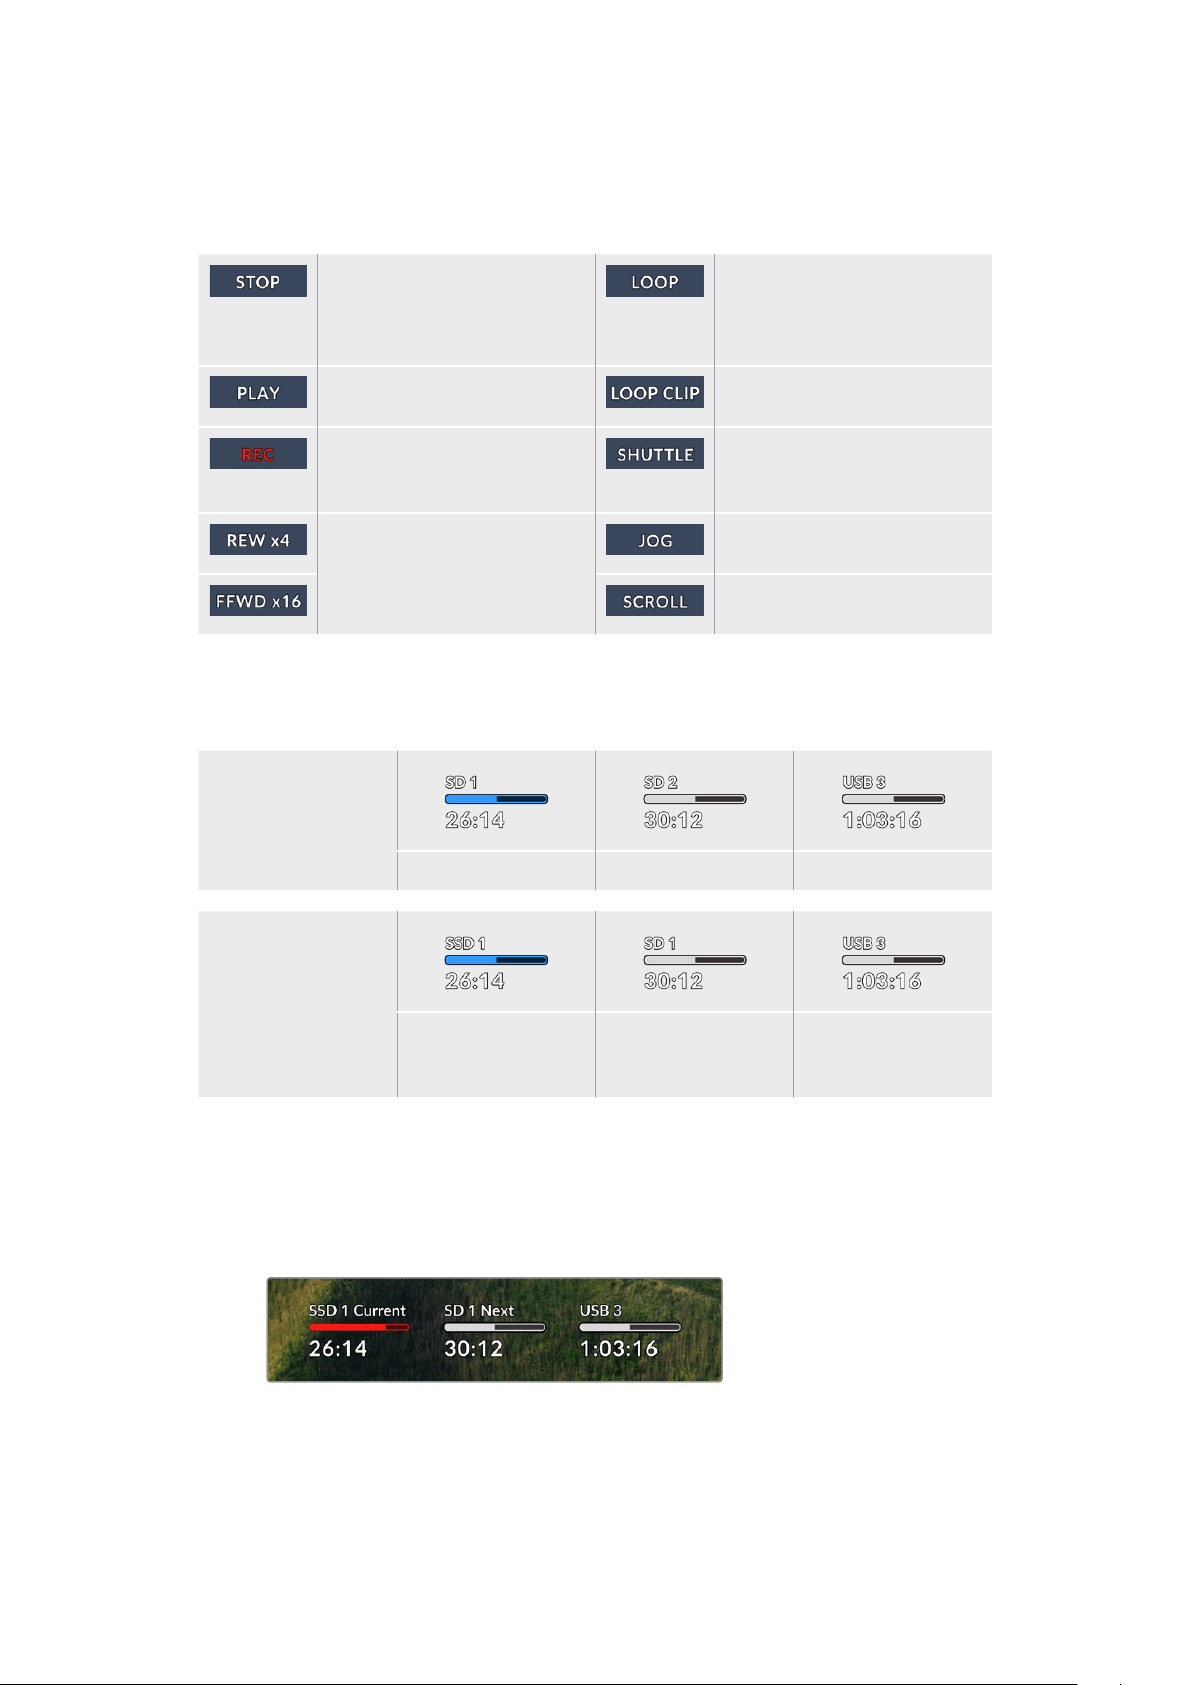
Estado
Este indicador muestra el estado de la grabación o la reproducción y los controles utilizados, según
se describe a continuación.
La unidad se encuentra en modo
de espera.
Indica que se reproducen de
forma continua todos los clips
cuyo formato coincida con el
seleccionado.
La unidad se encuentra en modo
de reproducción.
Indica que el clip se reproduce
de forma continua.
La unidad se encuentra en modo
de grabación. El indicador se
enciende de rojo.
Indica que se ha activado el
modo de avance y retroceso.
Aparecen al avanzar o retroceder
las imágenes. El número indica la
velocidad.
Indica que se ha activado el
modo de búsqueda.
Indica que se ha activado el
modo de desplazamiento.
Soportes de grabación
Estos tres indicadores muestran el nombre y el estado de los soportes de grabación y varían
ligeramente según el modelo.
Modelo HyperDeck
Studio HD Plus
Tarjeta SD 1 Tarjeta SD 2 Disco externo activo
Modelos HyperDeck
Studio Pro
Tarjeta SD o unidad
SSD en uso
Tarjeta SD o unidad
SSD que se usará a
continuación
Disco externo activo
En todos los modelos HyperDeck, el tercer indicador corresponde a la unidad USB. En caso de
haber varias conectadas, indica la unidad activa.
Indicadores de disco o unidad
El texto arriba de la barra de progreso permite identificar claramente la unidad utilizada
para la grabación y la que se usará a continuación, una vez que se llene.
314Uso de la salida de monitorización

Barra
Esta barra indica el espacio disponible en la unidad.
Azul: Indica que la unidad está activa. La unidad activa se emplea
para grabar y reproducir secuencias.
Blanco: Indica que hay una unidad insertada, pero no está activa.
Si la barra está llena, significa que no hay espacio disponible.
Rojo: Indica que la unidad está grabando.
El texto debajo de la barra indica si hay una tarjeta insertada en el compartimiento o una
unidad conectada al dispositivo. Además, se muestra la capacidad restante del soporte
de grabación.
Tiempo restante
Cuando el soporte de grabación aún tiene capacidad, esta se indica en horas, minutos y
segundos, conforme al formato de la fuente, y la calidad y el códec seleccionados. Si hay
menos de una hora restante, solo se indican los minutos y los segundos.
Compartimiento
Si no hay una tarjeta insertada en el compartimiento o una unidad conectada al dispositivo,
el indicador dirá Ninguna.
Cuando la unidad de almacenamiento esté llena, el indicador dirá Llena, a fin de advertir
al usuario que es preciso remplazarla. Si hay una segunda tarjeta o unidad insertada en
el dispositivo, la grabación continuará automáticamente en la misma o en el disco externo
conectado, en caso de que esta última no tenga más capacidad.
En ocasiones, aparece el ícono de un candado y la palabra Protegida debajo de la barra.
315Uso de la salida de monitorización

Indicadores de volumen
Estos indicadores muestran hasta 16 canales de audio, según los que se desean grabar.
Mediante el menú de ajustes, es posible configurar el modo de medición (VU o PPM).
La pestaña Audio permite cambiar la cantidad de canales grabados o el modo de medición.
Consulte el apartado Ajustes para obtener más información al respecto.
Soportes de grabación
Tarjeta SD
Recomendamos el uso de tarjetas UHS-II a fin de grabar en UHD. Estas ofrecen una velocidad de
escritura de 220 MB/s y, por lo tanto, resultan adecuadas para almacenar secuencias en formato
2160p60. Por el contrario, para grabar con mayor compresión o a una velocidad de bits más baja,
es posible emplear tarjetas más lentas. Generalmente, los modelos más rápidos ofrecen un
mejorrendimiento.
No obstante, es aconsejable consultar la versión más reciente de este manual en nuestra página
de soporte técnico para obtener información actualizada al respecto.
¿Qué tarjetas SD pueden usarse con el modelo HyperDeck Studio 4K Pro?
Recomendamos las siguientes para grabar en resolución 2160p a una frecuencia máxima de 60 f/s.
Marca Modelo Capacidad
Angelbird AV Pro MK2 V90 SDXC 128GB
Angelbird AV Pro MK2 V90 SDXC 256GB
ProGrade Digital SDXC UHS-II V90 300R 128GB
ProGrade Digital SDXC UHS-II V90 300R 256GB
Wise SD2-128U3 SDXC UHS-II 128GB
316Soportes de grabación

¿Qué tarjetas SD pueden usarse con el modelo HyperDeck Studio HD Pro?
Recomendamos las siguientes para grabar en resolución 2160p a una frecuencia máxima de 30 f/s.
Marca Modelo Capacidad
Angelbird AV Pro MK2 V90 SDXC 64GB
Angelbird AV Pro MK2 V90 SDXC 128GB
Angelbird AV Pro MK2 V90 SDXC 256GB
ProGrade Digital SDXC UHS-II V90 300R 64GB
ProGrade Digital SDXC UHS-II V90 300R 128GB
ProGrade Digital SDXC UHS-II V90 300R 256GB
Wise SD2-64U3 SDXC UHS-II 64GB
Wise SD2-128U3 SDXC UHS-II 128GB
¿Qué tarjetas SD pueden usarse con el modelo HyperDeck Studio HD Plus?
Recomendamos las siguientes para grabar en resolución 2160p a una frecuencia máxima de 30 f/s.
Marca Modelo Capacidad
Angelbird AV Pro MK2 V90 SDXC 64GB
Angelbird AV Pro MK2 V90 SDXC 128GB
Angelbird AV Pro MK2 V90 SDXC 256GB
ProGrade Digital SDXC UHS-II V90 300R 64GB
ProGrade Digital SDXC UHS-II V90 300R 128GB
ProGrade Digital SDXC UHS-II V90 300R 256GB
Wise SD2-64U3 SDXC UHS-II 64GB
Wise SD2-128U3 SDXC UHS-II 128GB
¿Qué tarjetas SD pueden usarse con el modelo HyperDeck Studio HD Mini?
Recomendamos las siguientes para grabar en formato ProRes 422 HQ a una resolución de
1080p y una frecuencia máxima de 60 f/s.
Marca Modelo Capacidad
Angelbird AV Pro MK2 V90 SDXC 64GB
Angelbird AV Pro MK2 V90 SDXC 128GB
Angelbird AV Pro MK2 V90 SDXC 256GB
ProGrade Digital SDXC UHS-II V90 300R 64GB
ProGrade Digital SDXC UHS-II V90 300R 128GB
ProGrade Digital SDXC UHS-II V90 300R 256GB
Wise SD2-64U3 SDXC UHS-II 64GB
Wise SD2-128U3 SDXC UHS-II 128GB
317Soportes de grabación

SSD
Al trabajar con imágenes que requieren transferir datos con una gran rapidez, es importante verificar
cuidadosamente la unidad SSD empleada. Esto se debe a que algunas pueden tener una velocidad
de escritura hasta un 50 % menor que la atribuida por el fabricante, por lo cual, a pesar de que las
especificaciones técnicas indiquen que son capaces de procesar la información, en realidad
carecen de la velocidad necesaria para efectuar la grabación en tiempo real.
No obstante, dado que la compresión de datos ocultos solo afecta a la grabación, dichas unidades
permiten reproducir contenidos en tiempo real.
Según las pruebas realizadas, podemos afirmar que los modelos más nuevos y de mayor capacidad
son, por lo general, más rápidos. Las unidades SSD recomendadas incluyen las siguientes:
¿Qué unidades SSD pueden usarse con el modelo HyperDeck Studio 4K Pro?
Recomendamos las siguientes para grabar en resolución 2160p a una frecuencia máxima de 60 f/s.
Marca Modelo Capacidad
Samsung 860 PRO 512GB
Samsung 860 PRO 1TB
Samsung 870 EVO (MZ-77E250BW) 250GB
Samsung 870 EVO (MZ-77E500BW) 500GB
Samsung 870 EVO (MZ-77E1T0BW) 1TB
Samsung 870 EVO (MZ-77E2T0BW) 2TB
¿Qué unidades SSD pueden usarse con el modelo HyperDeck Studio HD Pro?
Recomendamos las siguientes para grabar en resolución 2160p a una frecuencia máxima de 30 f/s.
Marca Modelo Capacidad
Samsung 860 PRO 512GB
Samsung 860 PRO 1TB
Samsung 870 EVO (MZ-77E250BW) 250GB
Samsung 870 EVO (MZ-77E500BW) 500GB
Samsung 870 EVO (MZ-77E1T0BW) 1TB
Samsung 870 EVO (MZ-77E2T0BW) 2TB
318Soportes de grabación

Discos externos
Todos los modelos HyperDeck permiten guardar el material digitalizado directamente en discos
USB-C. Estas unidades de gran capacidad son rápidas y brindan la posibilidad de grabar durante
períodos prolongados. Además, facilitan la edición de los contenidos al instante conectándolas
a un equipo informático.
También es posible emplear varias unidades simultáneamente para aumentar la capacidad de
almacenamiento. A tales efectos, conecte un dispositivo Blackmagic MultiDock10G al puerto
EXTDISK en la parte trasera de la unidad mediante un cable USB-C.
¿Qué unidades USB-C pueden usarse con el modelo HyperDeck Studio 4K Pro?
Recomendamos las siguientes para grabar en resolución 2160p a una frecuencia máxima de 60 f/s.
Marca Modelo Capacidad
Angelbird SSD2GO PKT MK2 512GB
Angelbird SSD2GO PKT MK2 2TB
DelKinDevices Juggler 1TB
DelKinDevices Juggler 2TB
LaCie Rugged SSD STHR2000800 2TB
LaCie Rugged SSD Pro STHZ1000800 1TB
Wise PTS-512 Portable SSD 512GB
Wise PTS-1024 Portable SSD 1TB
¿Qué unidades USB-C pueden usarse con el modelo HyperDeck Studio HD Pro?
Recomendamos las siguientes para grabar en resolución 2160p a una frecuencia máxima de 30 f/s.
Marca Modelo Capacidad
Angelbird SSD2GO PKT MK2 512GB
Angelbird SSD2GO PKT MK2 2TB
DelKinDevices Juggler 1TB
DelKinDevices Juggler 2TB
LaCie Rugged SSD STHR2000800 2TB
LaCie Rugged SSD Pro STHZ1000800 1TB
Wise PTS-512 Portable SSD 512GB
Wise PTS-1024 Portable SSD 1TB
319Soportes de grabación

¿Qué unidades USB-C pueden usarse con el modelo HyperDeck Studio HD Plus?
Recomendamos las siguientes para grabar en resolución 2160p a una frecuencia máxima de 30 f/s.
Marca Modelo Capacidad
Angelbird SSD2GO PKT MK2 512GB
Angelbird SSD2GO PKT MK2 2TB
DelKinDevices Juggler 1TB
DelKinDevices Juggler 2TB
LaCie Rugged SSD STHR2000800 2TB
LaCie Rugged SSD Pro STHZ1000800 1TB
Wise PTS-512 Portable SSD 512GB
Wise PTS-1024 Portable SSD 1TB
¿Qué unidades USB-C pueden usarse con el modelo HyperDeck Studio HD Mini?
Recomendamos las siguientes para grabar en formato ProRes 422 HQ a una resolución de
1080p y una frecuencia máxima de 60 f/s.
Marca Modelo Capacidad
Angelbird SSD2GO PKT MK2 512GB
Angelbird SSD2GO PKT MK2 2TB
DelKinDevices Juggler 1TB
DelKinDevices Juggler 2TB
Wise PTS-512 Portable SSD 512GB
Wise PTS-1024 Portable SSD 1TB
320Soportes de grabación
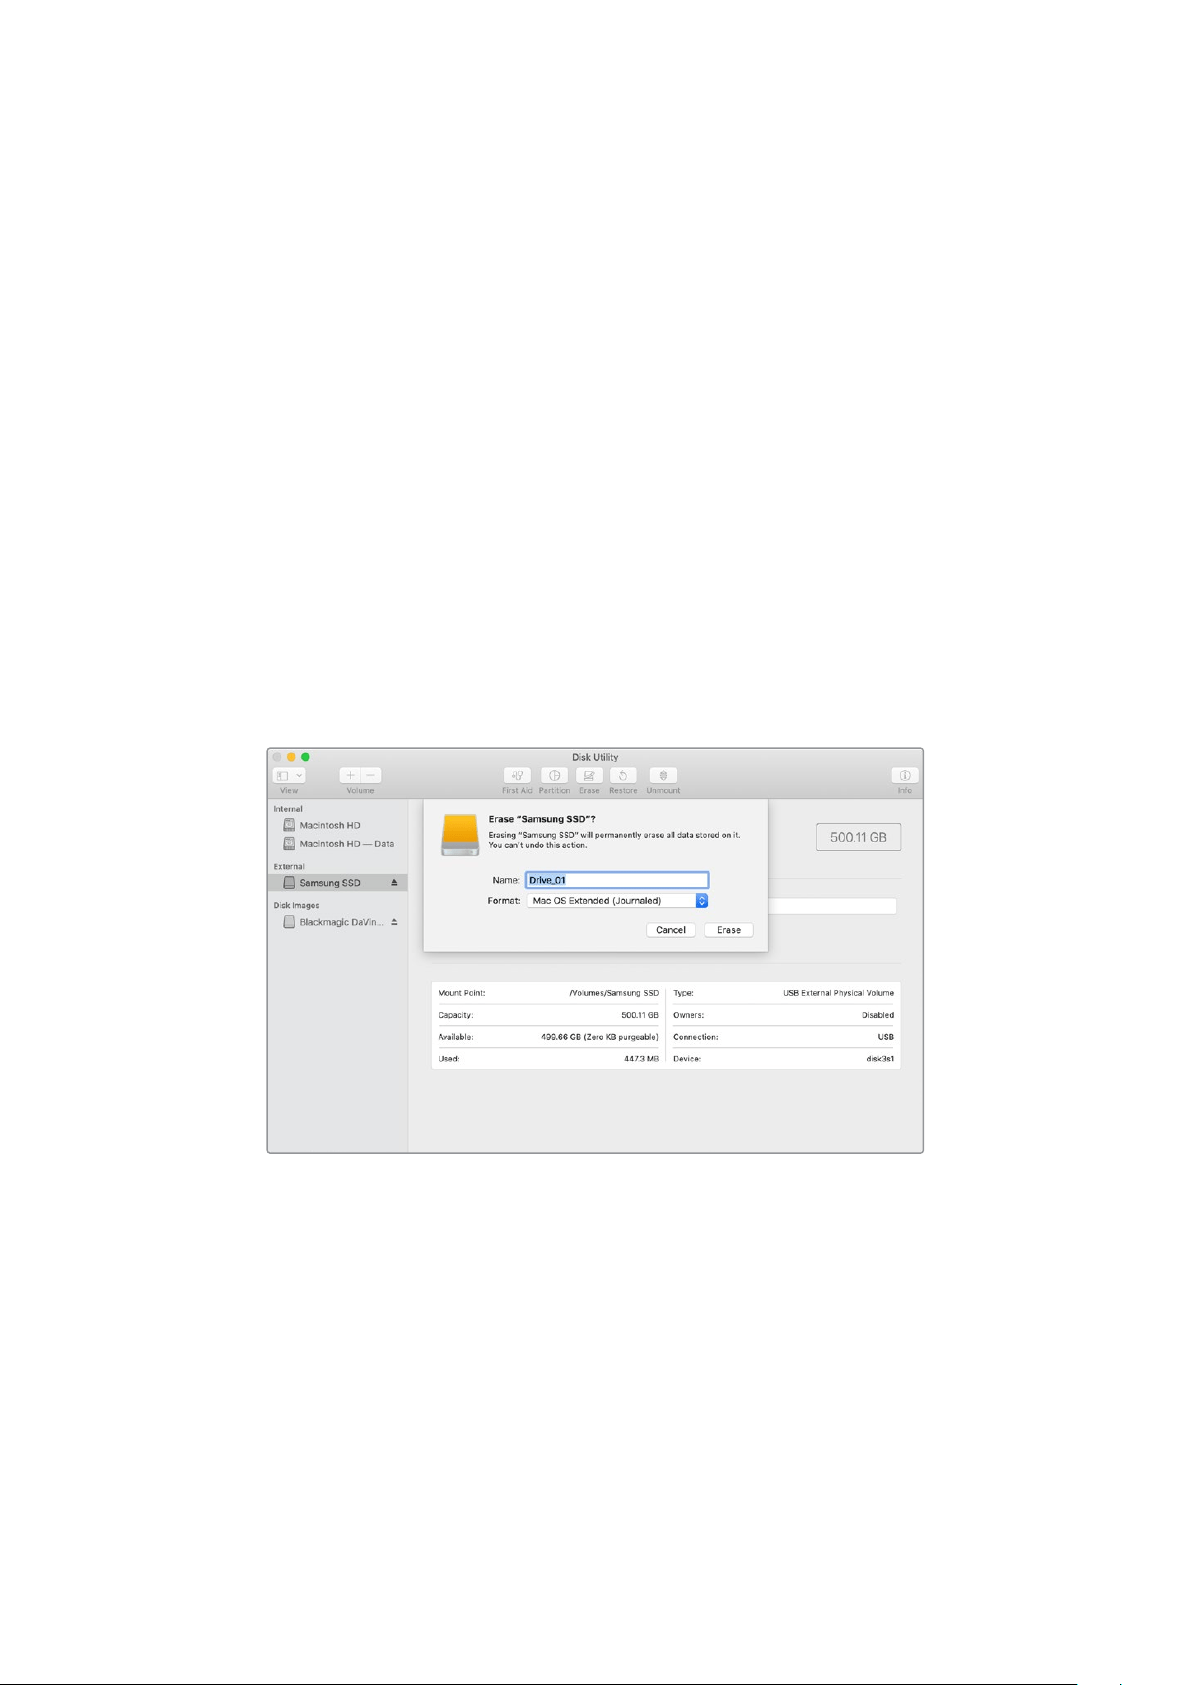
Formatear soportes de almacenamiento
Preparación de soportes en equipos informáticos
Preparación de soportes en Mac
La aplicación Utilidad de Discos, incluida en el sistema operativo macOS, permite formatear
unidades de almacenamiento mediante el sistema HFS+ o exFAT.
Asegúrese de respaldar cualquier información importante que contenga el soporte de grabación,
puesto que, al iniciar este procedimiento, se borrarán todos los datos.
1 Conecte la unidad al equipo informático mediante un cable o una base externa e ignore
cualquier mensaje relativo a su uso para copias de seguridad con Time Machine. En el
caso de las tarjetas CFast, utilice un lector externo para este tipo de soportes.
2 Haga clic en Aplicaciones y luego seleccione Utilidades. A continuación, ejecute la
aplicación Utilidad de Discos.
3 Haga clic en el ícono de la unidad y luego en la pestaña Borrar.
4 Seleccione la opción Mac OS Extended (con registro) o exFAT.
5 Ingrese un nombre para la unidad y luego haga clic en Borrar. Se dará formato a la unidad
rápidamente y quedará lista para usarla.
Preparación de soportes en Windows
El cuadro de diálogo Formato en el sistema operativo Windows permite formatear unidades
de almacenamiento mediante el sistema exFAT. Asegúrese de respaldar cualquier información
importante que contenga el soporte de grabación, puesto que, al iniciar este procedimiento,
se borrarán todos los datos.
1 Conecte la unidad al equipo informático mediante un cable o un dispositivo externo.
En el caso de las tarjetas CFast, utilice un lector externo para este tipo de soportes.
2 Abra el menú Inicio o la Pantalla de Inicio y seleccione la opción PC. Haga clic con
el botón derecho en el ícono de la unidad.
3 En el menú contextual, seleccione la opción Formato.
321Formatear soportes de almacenamiento
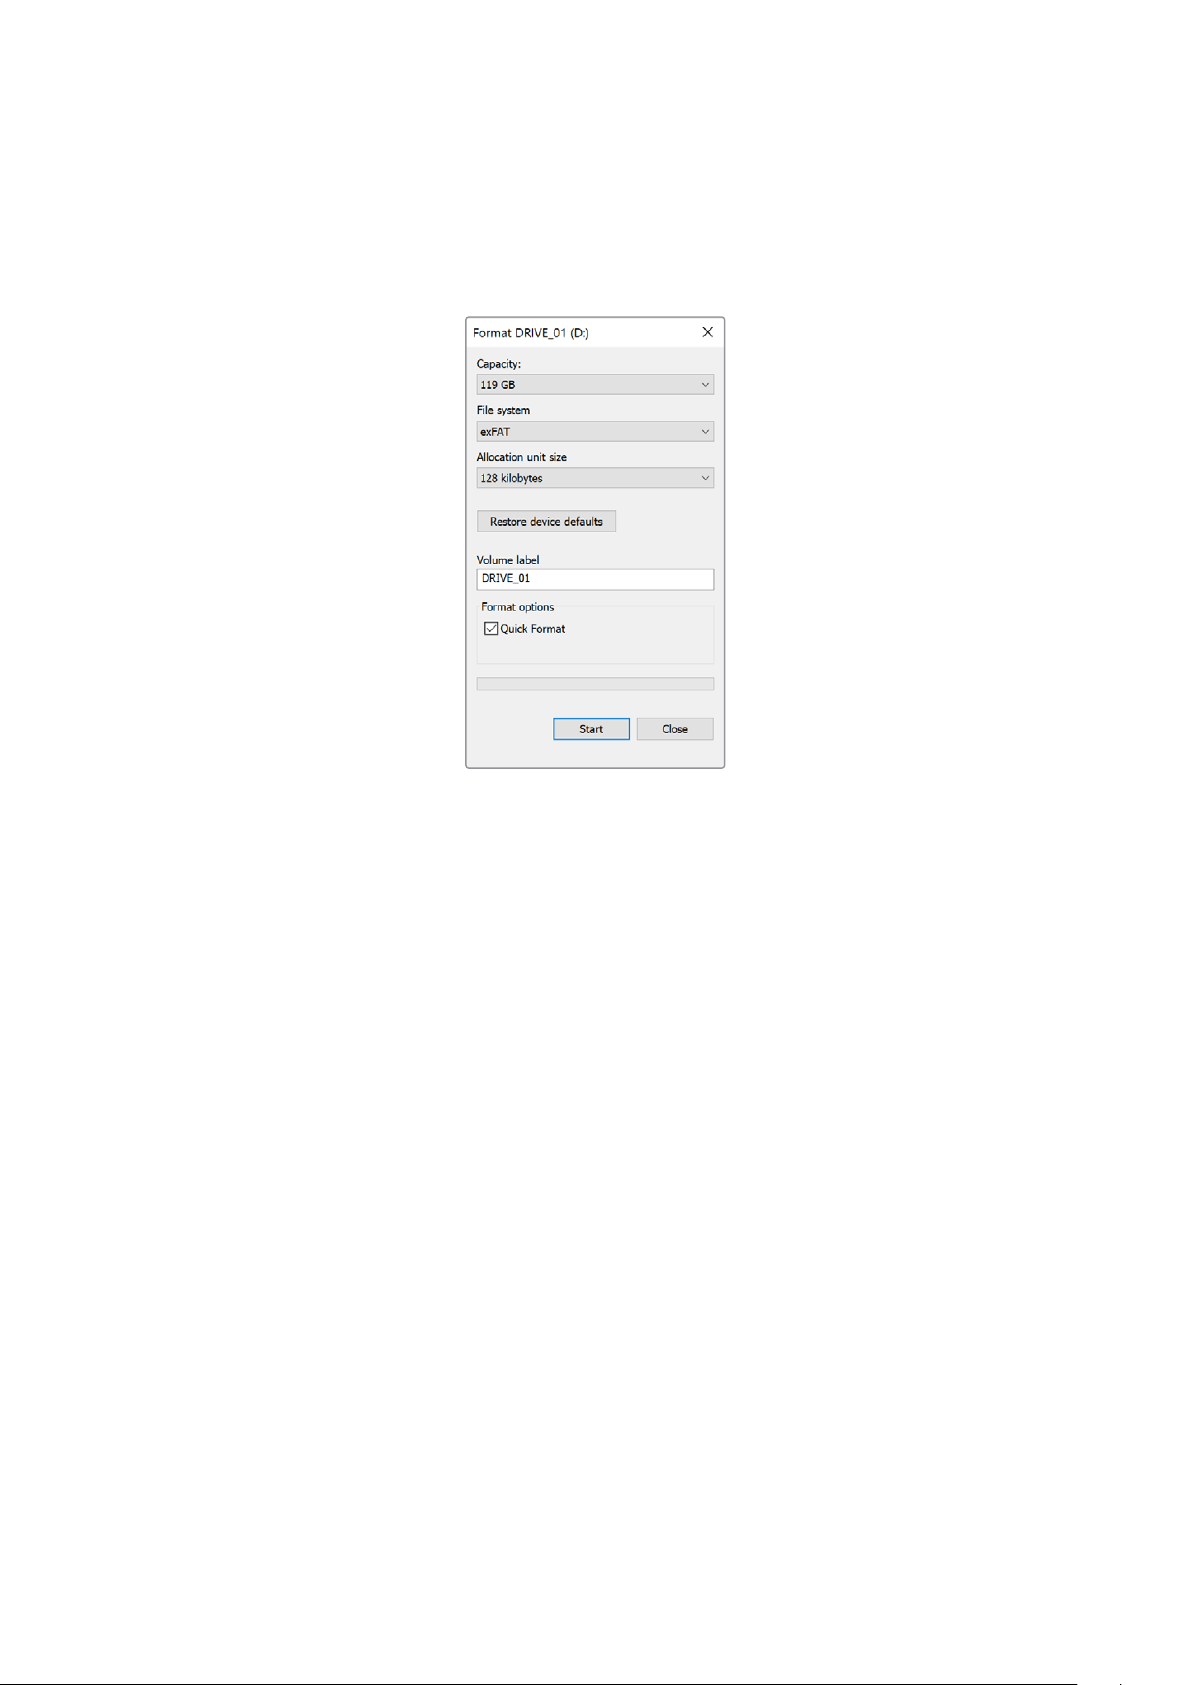
4 Elija la opción exFAT para el sistema de archivos y 128 kilobytes para el tamaño de la
unidad de asignación.
5 Ingrese un nombre para la unidad, marque la casilla Formato rápido y haga clic en Iniciar.
6 Se dará formato a la unidad rápidamente y quedará lista para usarla en el dispositivo.
Uso del grabador como una cámara web
Al conectar el dispositivo a un equipo informático mediante el puerto USB, este lo detectará como
una cámara web, lo cual permite transmitir el material grabado o reproducido a través de programas
como Open Broadcaster.
Configuración del dispositivo como fuente
En la mayoría de los casos, el programa empleado para la transmisión detectará automáticamente
al dispositivo como una fuente, por lo que la imagen transmitida por el mismo aparecerá
inmediatamente en la pantalla. De lo contrario, simplemente es necesario configurarlo como tal en
el programa.
A continuación, se proporciona un ejemplo de cómo hacerlo en Skype.
1 En la barra de menú de Skype, seleccione Configuración de audio y video.
2 Haga clic en el menú desplegable Cámara y seleccione el dispositivo en la lista que
aparece. La señal transmitida por este aparecerá en la ventana de vista previa.
3 En el menú desplegable Micrófono, seleccione el dispositivo como fuente de audio.
Una vez configurado el programa, recomendamos realizar una llamada de prueba con una persona
conocida, a fin de verificar que todo funcione correctamente.
Esto es todo lo necesario para poder transmitir en directo.
322Uso del grabador como una cámara web

Configuración de Open Broadcaster
Open Broadcaster es un programa de código abierto que facilita la transmisión de señales desde
el dispositivo mediante diversas plataformas, tales como YouTube, Twitch, Facebook Live o Vimeo
Live. El programa comprime el material para lograr una velocidad de transmisión adecuada para la
plataforma elegida.
A continuación, se incluye un ejemplo que muestra cómo configurar Open Broadcaster para
transmitir la señal desde el dispositivo mediante YouTube.
Ejecute Open Broadcaster y haga clic en el símbolo
+, en el recuadro Sources.
Seleccione la opción Video Capture Device.
Asigne un nombre a la fuente y haga clic en OK. En el menú de dispositivos, seleccione HyperDeck
Studio y haga clic en OK.
A continuación, acceda a su cuenta de YouTube.
Haga clic en el botón Emitir en directo y a
continuación en Emitir.
En las opciones de transmisión, introduzca la
información correspondiente y haga clic en Crear
transmisión.
1
2
3
4
5
6
323Uso del grabador como una cámara web

Como resultado, YouTube genera un nombre y
una clave para la transmisión que vincula Open
Broadcaster con su cuenta de YouTube.
Haga clic en el botón COPIAR junto a la clave
de transmisión y péguela en Open Broadcaster.
En Open Broadcaster, haga clic en el menú OBS/
Preferences en la barra superior para acceder
a las preferencias del programa. Seleccione la
opción Stream. A continuación, pegue la clave
de transmisión en la ventana de vista previa.
Para vincular el enlace de transmisión de Open
Broadcaster con YouTube, haga clic en la opción
Start Streaming, situada en la esquina superior
derecha de la pantalla. Una vez que se establece
la conexión entre ambas aplicaciones, el resto se
configura desde YouTube Live.
La señal transmitida mediante la salida USB del
dispositivo se verá en YouTube Live. Haga clic
en Listo.
Una vez que Open Broadcaster y YouTube
Live están comunicados, es posible iniciar
la transmisión. Asegúrese de que todo esté
funcionando correctamente.
Si está todo listo, haga clic en la opción TRANSMITIR
EN VIVO.
Ya está transmitiendo en directo por YouTube mediante el programa Open Broadcaster.
NOTA: Debido a que se trata de una transmisión por Internet, es posible que haya cierta
demora. Por lo tanto, es importante mirarla por YouTube y confirmar que haya finalizado
antes de hacer clic en End Stream para evitar interrumpir accidentalmente la señal.
7
8
9
10
11
12
324Uso del grabador como una cámara web

Configuración del dispositivo
Uso del programa HyperDeck Setup
El programa HyperDeck Setup permite configurar el dispositivo y actualizar su sistema
operativo interno.
Para emplear el programa HyperDeck Setup:
1 Conecte el dispositivo a un equipo informático mediante el puerto USB o Ethernet.
2 Ejecute el programa HyperDeck Setup. El modelo del dispositivo aparecerá en la ventana
principal.
3 Haga clic en el ícono circular o en la imagen del dispositivo para acceder a la ventana
de configuración.
Ventana de configuración
Si cuenta con más de una unidad HyperDeck Studio, recomendamos cambiarle el nombre a fin de
idetificarlas fácilmente. Es posible realizar esto mediante la opción Name.
325Configuración del dispositivo

Red
Protocolo
Para emplear el modelo HyperDeck Studio junto con mezcladores ATEM, o a fin de
controlarlo remotamente a través del protocolo de Ethernet para HyperDeck, la unidad
debe estar conectada a la misma red que el resto de los equipos, bien usando el protocolo
DHCP o añadiendo de forma manual una dirección IP fija.
DHCP
La configuración predeterminada del modelo HyperDeck Studio es la
del protocolo DHCP, que permite a los servidores de red reconocer
automáticamente al grabador y asignarle una dirección IP. Es un servicio
estupendo que facilita la conexión de equipos mediante la tecnología
Ethernet y a la vez garantiza que dichas direcciones sean compatibles
entre ellas. La mayoría de los equipos informáticos y conmutadores de red
aceptan el protocolo DHCP.
Dirección IP
estática
Cuando la opción Static IP está seleccionada, es posible introducir
manualmente los datos de la red. Para configurar una dirección IP
manualmente y que todos los equipos puedan comunicarse entre sí,
es necesario que compartan los mismos ajustes de máscara de subred
y puerta de enlace. Además, también deben coincidir los primeros
tres campos de la dirección IP del panel. En caso de que haya otros
dispositivos en la red con el mismo número de identificación en la
direcciónIP, se producirá un conflicto y las unidades no se conectarán. Si
esto sucede, basta con cambiar dicho valor en la unidad correspondiente.
Tablas de conversión (LUT)
Las conexiones para la monitorización en la parte trasera de los modelos HyperDeck permiten
mostrar las imágenes con tablas de conversión tridimensionales (.cube) aplicadas, ya sean de 17, 33
o 65 puntos.
Esto resulta beneficioso al filmar en formato RAW o con rango dinámico de Film, ya que en estos
casos el material grabado presenta un contraste bajo. Al aplicar una LUT, se obtiene una idea de
cómo lucirán las secuencias una vez etalonadas.
Cabe destacar que el contenido grabado no se ve afectado por este tipo de modificaciones.
Si se desea aplicar la misma tabla a la imagen en DaVinci Resolve, basta con importar el archivo .
cube correspondiente desde el programa para emplearlo durante el etalonaje.
326Configuración del dispositivo
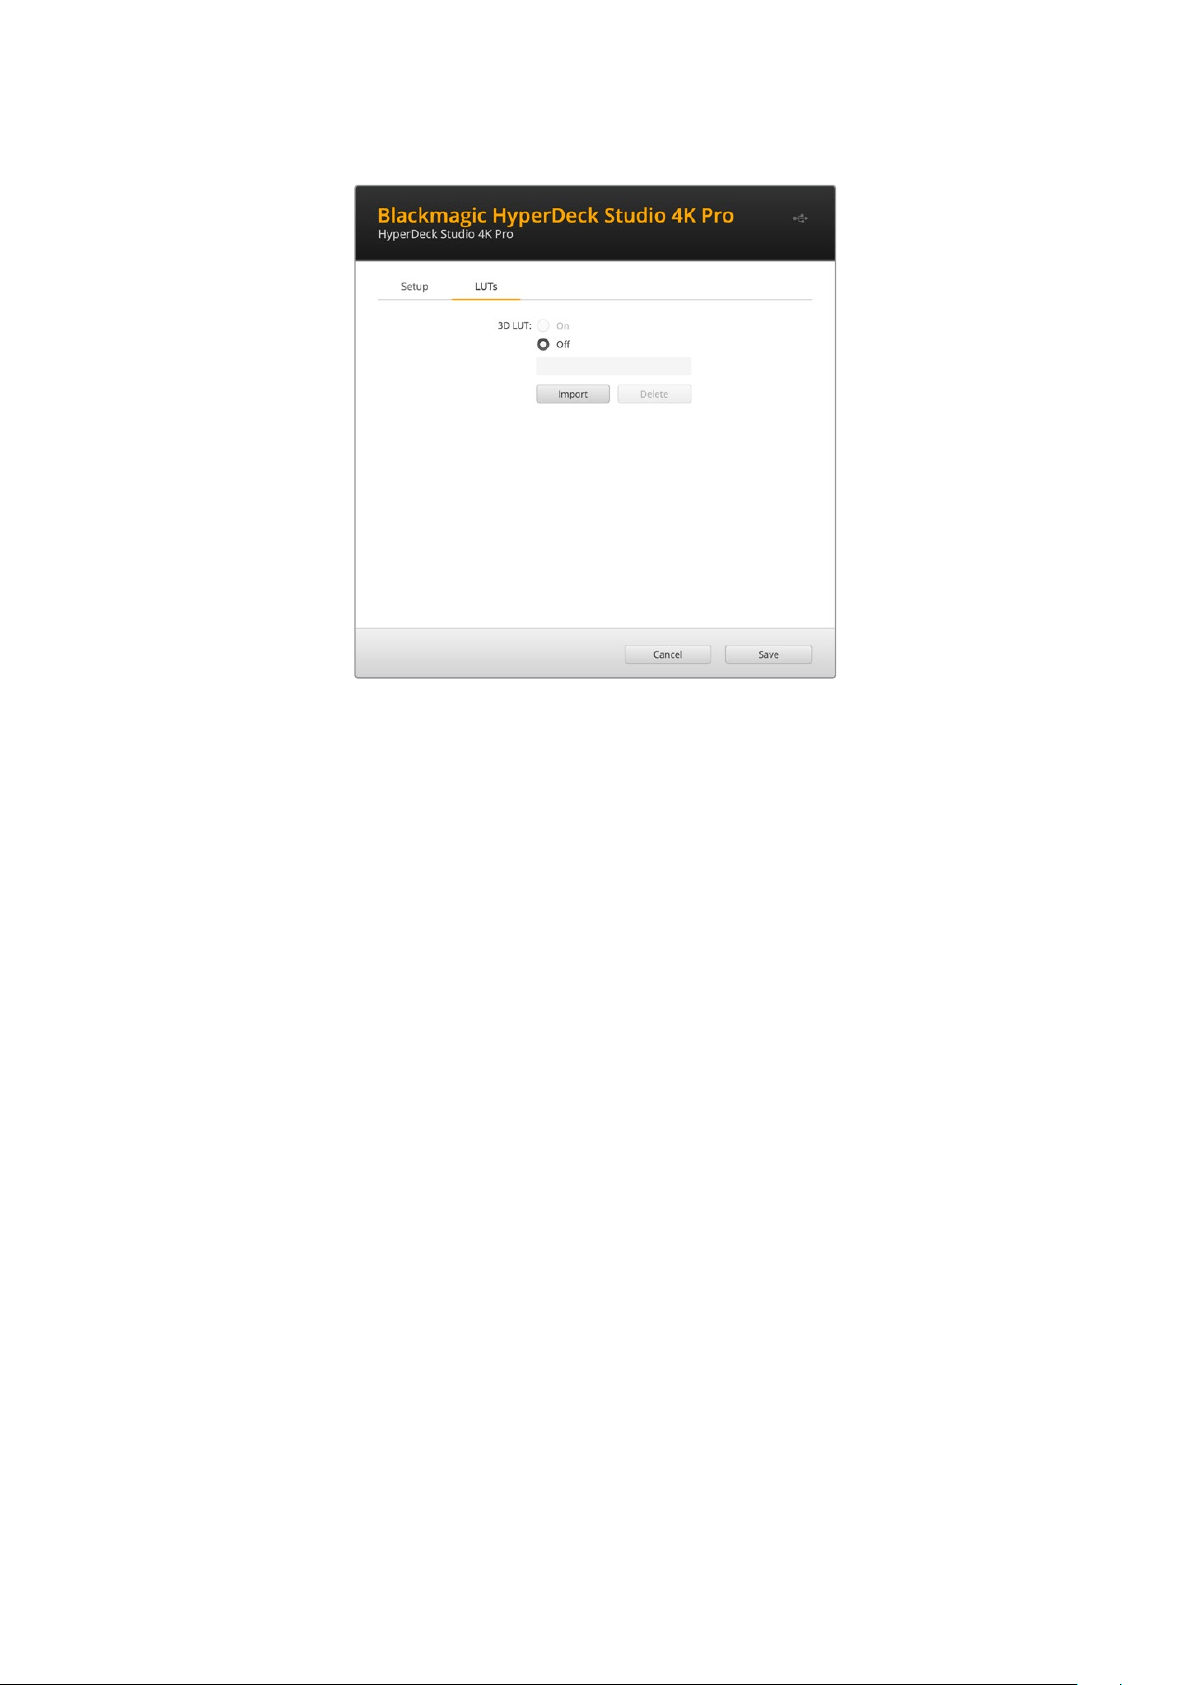
Para ver una LUT:
1 En primer lugar, se debe seleccionar la tabla de conversión. Haga clic en el botón Import
para importarla.
2 Se abrirá una ventana con archivos. Seleccione la tabla de conversión deseada y haga clic
en el botón Open para abrirla.
3 Una vez que la tabla de conversión ha sido importada, active la opción 3D LUT y presione
el botón Save para guardarla.
La tabla de conversión seleccionada se mostrará en la pantalla. Ahora, es posible activarla y
desactivarla mediante los ajustes correspondientes en el menú LCD.
Actualización del dispositivo
El programa utilitario permite actualizar el sistema operativo interno de los grabadores HyperDeck,
además de ofrecer la posibilidad de configurar los ajustes de red o las transmisiones en directo,
inclusive la calidad de las mismas.
Para actualizar el sistema operativo interno:
1 Descargue la última versión del instalador desde nuestra página de soporte técnico.
2 Abra el asistente de instalación en su equipo informático y siga las instrucciones.
3 Una vez que la instalación se ha completado, conecte el grabador al equipo informático
mediante el puerto USB o Ethernet situado en la parte trasera.
4 Ejecute el programa HyperDeck Setup y siga las instrucciones que aparecen en la pantalla
para actualizar el sistema operativo interno. Si no aparece ningún aviso, el procedimiento
ha finalizado con éxito.
327Actualización del dispositivo

Descargue la última versión del programa en
nuestra página de soporte técnico.
Estante para bastidores
El estante para bastidores Teranex Mini Rack Shelf mide 1U y permite instalar los modelos
Blackmagic HyperDeck Studio HD Mini y HyperDeck Studio HD Plus en un bastidor o una caja
de transporte. Gracias al tamaño compacto de la versión HyperDeck Studio HD Mini, es posible
colocarlo junto a otros productos de dimensiones similares, tales como el MultiView 4, el Blackmagic
Web Presenter o los conversores Teranex Mini. Por ejemplo, instalando una unidad Blackmagic
HyperDeck Studio HD Mini junto a un mezclador ATEM Television Studio HD, existe la posibilidad de
alternar entre ocho fuentes y grabar la señal del programa. Este diseño modular facilita la creación
de soluciones personalizadas portátiles y fáciles de usar.
El estante para la línea de conversores Teranex Mini permite instalar en un
bastidor múltiples dispositivos de dimensiones similares.
Para instalar el dispositivo en el estante, basta con quitar los soportes de goma y sujetarlo a la base
con los tornillos proporcionados.
Cabe destacar además que el estante incluye dos paneles vacíos que permiten cubrir los espacios
no utilizados.
Visite nuestro sitio web para obtener más información al respecto.
328Estante para bastidores

Control mediante el puerto RS-422
¿Qué es el protocolo RS-422?
El estándar RS-422 es un protocolo para controlar dispositivos por medio de un puerto serial,
utilizado por una gran cantidad de emisoras desde principios de los años 80, que se emplea en
varios productos con el objetivo de automatizar la difusión de contenidos. Dado que los modelos
de la línea HyperDeck son compatibles con dicho protocolo, pueden integrarse a cualquier sistema
de edición, automatización o control remoto, así como otras soluciones diseñadas por el usuario.
Los modelos HyperDeck Studio son compatibles además con comandos de archivo del protocolo
Advanced Media a través del puerto RS-422. Esto permite controlar el grabador con un dispositivo
externo mediante comandos AMP, por ejemplo, para añadir clips a una lista de reproducción,
determinar el nombre del archivo de la siguiente secuencia, reproducir un clip o una línea de tiempo
de forma continua o eliminar una lista de reproducción.
Uso de un controlador RS-422 externo
Todos los modelos HyperDeck disponen de un puerto RS-422, compatible con dispositivos Sony®,
cuya configuración permite conectar directamente cualquier controlador remoto que funcione por
medio de este protocolo, como el HyperDeck Extreme Control.
A estos efectos, es posible utilizar cables de 9 pines prefabricados, siempre que cada una de las
conexiones coincida exactamente con la configuración numerada del puerto. Si desea fabricar
cables personalizados, consulte el diagrama de conexiones provisto.
Al conectar un controlador externo al dispositivo, es posible controlarlo a distancia sin necesidad
de presionar sus botones.
1 Conecte una fuente a una de las entradas SDI o HDMI del dispositivo.
2 Conecte el controlador HyperDeck Extreme Control al dispositivo mediante un
cable RS-422.
3 Active la función de control remoto presionando el botón REM en el panel frontal del
dispositivo, o desde el menú en pantalla en el modelo HyperDeck Studio Mini.
Estos comandos permiten controlar el dispositivo en forma remota para comenzar o detener la
grabación, reproducir secuencias y avanzar o retroceder las imágenes. En la sección «Comandos
compatibles con el estándar RS-422» se incluye una lista completa al respecto.
5 4 3 2 1
9 8 7 6
Recepción
(–)
Recepción (+) Transmisión
(–)
Transmisión
(+)
Conexión
a tierra
2 7 8 3 1, 4, 6, 9
Pines en la conexión RS-422
329Control mediante el puerto RS-422

Active la función de control remoto presionando el botón REM en el panel frontal del
dispositivo, o desde el menú en pantalla, para activar el protocolo de control RS-422.
Todos los modelos HyperDeck pueden ser controlados remotamente a través
del puerto RS-422, situado en el panel trasero de los dispositivos.
Comandos compatibles con el protocolo RS-422
Command Reply No Remote Notes
0 - System Control
0x00 0x11 DeviceTypeRequest
NTSC: 0xF0E0
PAL: 0xF1E0
24P: 0xF2E0
Enabled
1 - Slave Response
0x20 0x00 Stop Acknowledge Disabled
0x20 0x01 Play Acknowledge Disabled
0x20 0x02 Record Acknowledge Disabled
0x20 0x04 StandbyOff Acknowledge Disabled
0x20 0x05 StandbyOn Acknowledge Disabled
0x20 0x0F Eject Acknowledge Disabled
0x20 0x10 FastFwd Acknowledge Disabled
0x21 0x11 JogFwd1 Acknowledge Disabled
0x22 0x11 JogFwd2 Acknowledge Disabled
Treated as N=1;
Same as JogFwd1
0x21 0x12 VarFwd1 Acknowledge Disabled Uses ShuttleFwd1
0x22 0x12 VarFwd2 Acknowledge Disabled
Treated as N=1;
Same as VarFwd1
0x21 0x13 ShuttleFwd1 Acknowledge Disabled
0x22 0x13 ShuttleFwd2 Acknowledge Disabled
Treated as N=1;
Same as ShuttleFwd1
0x20 0x20 Rewind Acknowledge Disabled
0x21 0x21 JogRev1 Acknowledge Disabled
0x22 0x21 JogRev2 Acknowledge Disabled
Treated as N=1;
Same as JogRev1
0x21 0x22 VarRev1 Acknowledge Disabled Uses ShuttleRev1
330Control mediante el puerto RS-422

Command Reply No Remote Notes
0x22 0x22 VarRev2 Acknowledge Disabled
Treated as N=1;
Same as VarRev1
0x21 0x23 ShuttleRev1 Acknowledge Disabled
0x22 0x23 ShuttleRev2 Acknowledge Disabled
Treated as N=1;
Same as ShuttleRev1
0x20 0x30 Preroll Acknowledge Disabled
0x24 0x31 CueData Acknowledge Disabled
0x20 0x34 SyncPlay Acknowledge Disabled
0x20 0x40 Preview Acknowledge Disabled Status bits are set
0x20 0x41 Review Acknowledge Disabled Status bits are set
0x20 0x43 OutpointPreview Acknowledge Disabled
0x22 0x5C DMCSetFwd Acknowledge Disabled
0x22 0x5D DMCSetRev Acknowledge Disabled
0x20 0x60 FullEEOff Acknowledge Disabled
0x20 0x61 FullEEOn Acknowledge Disabled
0x20 0x63 SelectEEOn Acknowledge Disabled
4 - Preset/Select Control
0x40 0x10 InEntry Acknowledge Disabled
0x40 0x11 OutEntry Acknowledge Disabled
0x44 0x14 InDataPreset Acknowledge Disabled
0x44 0x15 OutDataPreset Acknowledge Disabled
0x40 0x18 InShift+ Acknowledge Disabled
0x40 0x19 InShift- Acknowledge Disabled
0x40 0x1A OutShift+ Acknowledge Disabled
0x40 0x1B OutShift- Acknowledge Disabled
0x40 0x20 InReset Acknowledge Disabled
0x40 0x21 OutReset Acknowledge Disabled
0x40 0x22 AInReset Acknowledge Disabled
0x40 0x23 AOutReset Acknowledge Disabled
0x44 0x31 PrerollPreset Acknowledge Disabled
0x40 0x40 AutoModeOff Acknowledge Disabled
ignored, Status bit
remembered
0x40 0x41 AutoModeOn Acknowledge Disabled
ignored, Status bit
remembered
0x41 0x37 InputCheck Acknowledge Disabled
331Control mediante el puerto RS-422

Command Reply No Remote Notes
6 - Sense Request
0x61 0x0A TimeCodeGenSense — —
0x61 0x0C CurrentTimeSense — —
0x60 0x10 InDataSense InData Enabled
0x60 0x11 OutDataSense OutData Enabled
0x60 0x12 AInDataSense AInData Enabled
0x60 0x13 AOutDataSense AOutData Enabled
0x61 0x20 StatusSense StatusData Enabled
0x60 0x2B RemainTimeSense RemainTimeData Enabled
0x60 0x2E SpeedSense SpeedData Enabled
0x60 0x31 PrerollTimeSense PreRollTimeData Enabled
0x60 0x36 TimerModeSense TimerModeData Enabled
0x60 0x3E RecordInhibitSense RecordInhibitStatus Enabled
7 - Sense Reply
0x78 0x00 Timer1Data — —
Current Time and
00:00:00:00
0x78 0x04 LTCUserBitsTimeData — —
Current Time and
00:00:00:00
0x78 0x06 VITCUserBitsTimeData — —
Current Time and
00:00:00:00
0x74 0x06 VITCTimeData — — Current Time
0x74 0x07 UserBitsVITCTimeData — — 00:00:00:00
0x74 0x08 GenTCData — — Current Time
0x78 0x08 GenTCUBData — —
Current Time and
00:00:00:00
0x74 0x09 GenUBData — — 00:00:00:00
0x74 0x10 InData — —
0x74 0x11 OutData — —
0x74 0x12 AInData — —
0x74 0x13 AOutData — —
0x74 0x14 CorrectedLTCTimeData — — Current Time
0x70 0x20 StatusData — —
Please see “Status Bits”
sheet: Limited to 9 bytes
of status, silently
truncated
0x76 0x2B RemainTimeData — —
0x71 0x2E SpeedData — —
0x74 0x31 PrerollTimeData — —
0x71 0x36 TimerModeData — — Returns 0 (TimeCode)
0x72 0x3E RecordInhibitStatus — —
332Control mediante el puerto RS-422

Command Reply No Remote Notes
A - Advanced Media Protocol
0xA1 0x01 AutoSkip Acknowledge Disabled
8-bit signed number of
clips to skip from current
clip
0xAX 0x15 ListNextID IDListing Enabled
when x = 0 single clip
request when x = 1, #
clips can be specified in
the send data
0x20 0x29 ClearPlaylist Acknowledge Disabled
0x41 0x42 SetPlaybackLoop Acknowledge Disabled
Bit 0 loop mode enable,
0=false 1=true
Bit 1 is single clip/timeline
0=single clip
1=timeline
0x41 0x44 SetStopMode Acknowledge Disabled
0 = Off
1 = Freeze on last frame
2 = Freeze on next clip
3 = Show black
0x4f 0x16 AppendPreset Acknowledge Disabled
2 Bytes for the length N
of the clip name
N Bytes for each character
of the clip name
4 Byte in point timecode
(format is FFSSMMHH)
4 Byte out point timecode
(format is FFSSMMHH)
Blackmagic Extensions
0x82 0x02 BMDSeekToTimelinePosition Acknowledge Disabled
16-bit little endian
fractional position
[0..65535]
0x81 0x03 BMDSeekRelativeClip Acknowledge Disabled
One-byte signed integer,
which is the number of
clips to skip (negative for
backwards).
Información para desarrolladores (RS-422)
bit 7 bit 6 bit 5 bit 4 bit 3 bit 2 bit 1 bit 0
Byte 0
0 0 Cassette out 0 0 0 0 Local
Byte 1
Standby 0 Stop 0 Rewind Forward Record Play
Byte 2
Servo Lock 0 Shuttle Jog Var Direction Still 1
Byte 3
Auto Mode 0 0 0 Aout Set Ain Set Out Set In Set
Byte 4
Select EE Full EE Loop Playback 0 0 0 0 0
Byte 5
0 0 0 0 0 0 0 0
Byte 6
0 Lamp Still Lamp Fwd Lamp Rev 0 0 0 0
Byte 7
0 0 0 0 0 0 0 0
Byte 8
0 0 Near EOT EOT 0 0 0 0
Byte 9
0 0 0 0 0 0 0 0
333Control mediante el puerto RS-422

Variables
Cassette Out
Set if no SSD is present
Local
Set if Remote is disabled (local control)
Standby
Set if a disk is available
Direction
Clear if playback is forwarding, set if playback is reversing
Still
Set if playback is paused, or if in input preview mode
Auto Mode
Set if in Auto Mode
Select EE, Full EE
Set if in input preview mode
Lamp Still/Fwd/Rev
Set according to playback speed and direction
Near EOT
Set if total space left on available SSDs is less than 3 minutes
EOT
Set if total space left on available SSDs is less than 30 seconds
Others
Cue Complete (byte 2, bit 0)
Always 1: Cue requests are always instantaneous
HyperDeck Serial RS-422 Protocol
Protocol
Based on Sony 9-pin protocol
Interface
Baud rate 38.4 Kbps
1 start bit
8 data bits
1 stop bit
1 parity bit
Odd parity
Transferencia de archivos a través
deuna red
El modelo HyperDeck permite transferir archivos mediante el protocolo FTP. De este modo, es
posible copiarlos directamente de un equipo informático al dispositivo, a través de una red local de
gran velocidad. Por ejemplo, con el propósito de crear carteles digitales, es posible copiar archivos
nuevos de manera remota a otra unidad HyperDeck situada en una ubicación distinta.
Conexión a un grabador HyperDeck Studio
Si el dispositivo y el equipo informático se encuentran conectados a la misma red, solo es necesario
saber la dirección IP del grabador y contar con un cliente FTP.
1 Descargue e instale un cliente FTP en el equipo informático al cual desea conectar el
grabador. En tal sentido, recomendamos programas tales como Cyberduck, FileZilla o
Transmit, aunque es posible utilizar prácticamente cualquier aplicación FTP. Cabe
destacar que Cyberduck y FileZilla son programas gratuitos.
334Transferencia de archivos a través deuna red
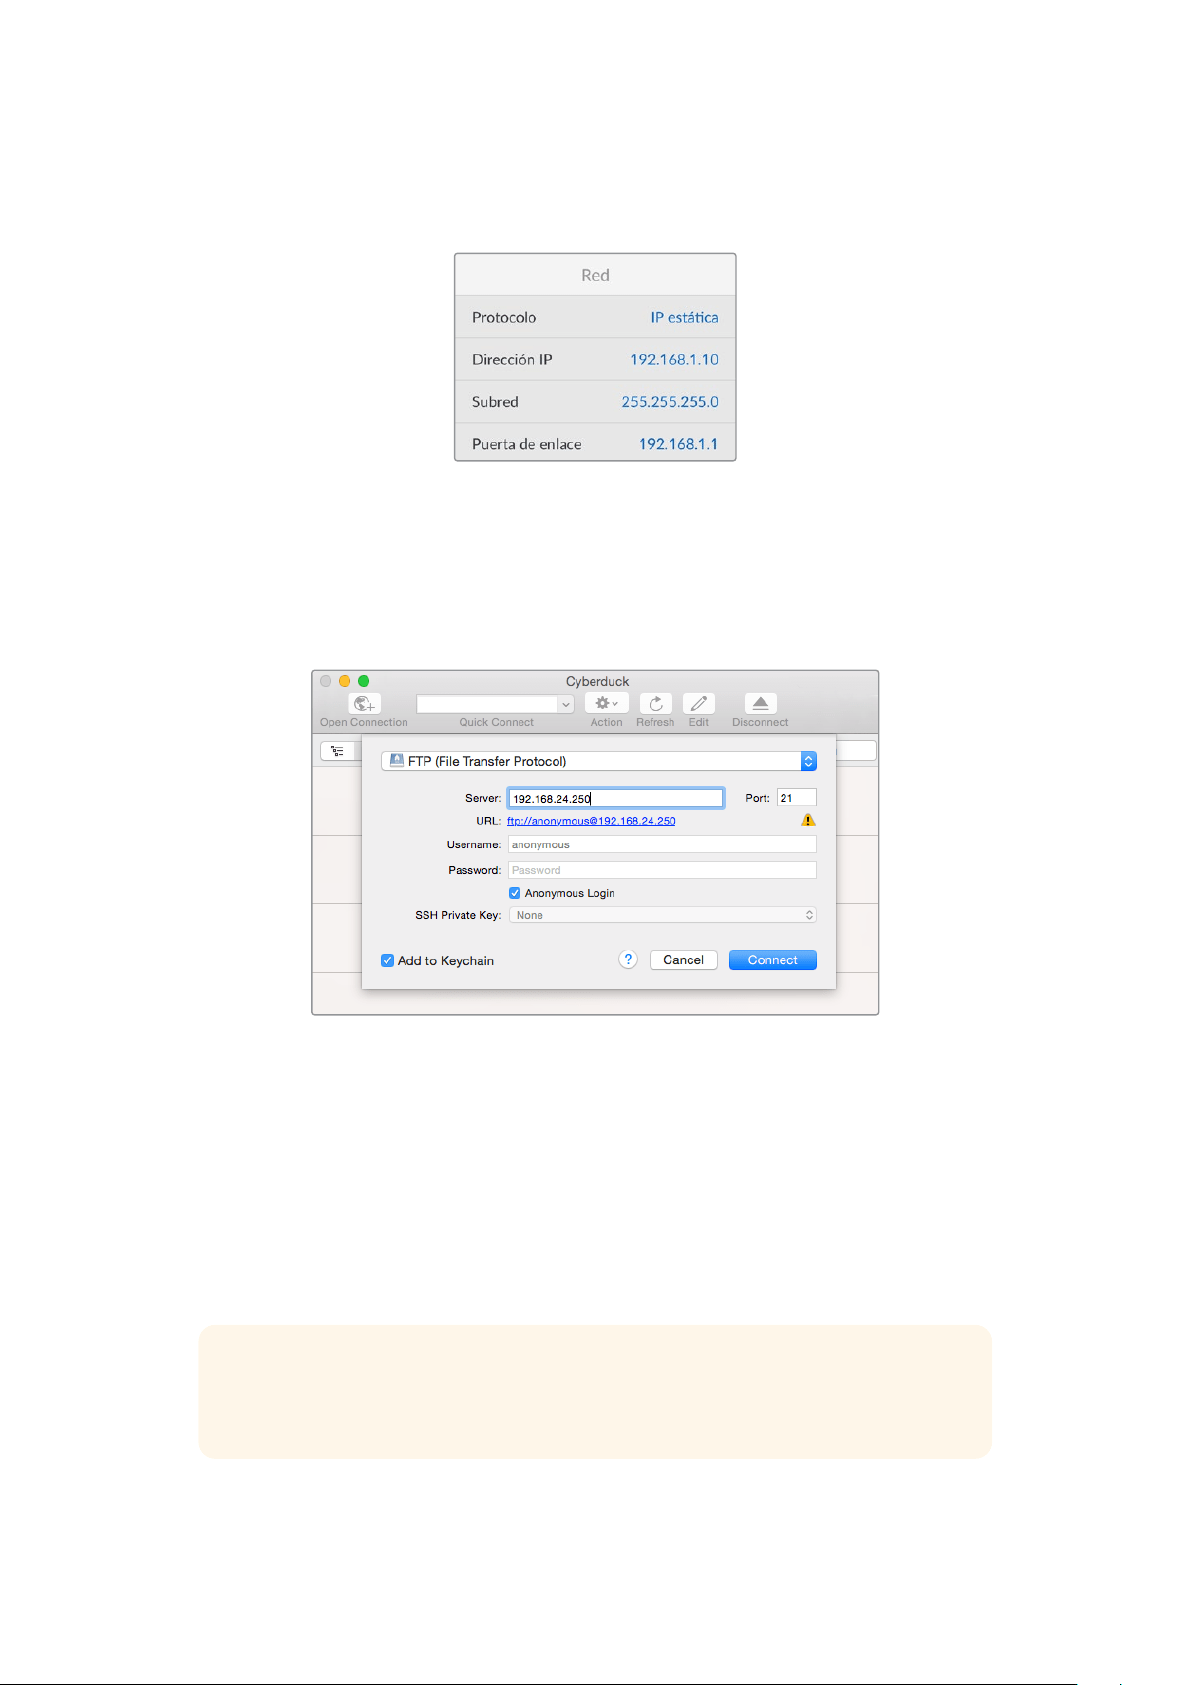
2 Conecte el grabador a la red mediante un cable Ethernet y tome nota de su dirección
IP. Para ello, presione el botón MENU y mueva el mando giratorio para acceder al menú
Network. La dirección IP del dispositivo aparecerá en la parte inferior de la pantalla.
La dirección IP del dispositivo aparece en la parte
inferior de la pantalla en el menú Network.
3 Introduzca la dirección IP del grabador en el cuadro de diálogo del cliente TCP. El
nombre y la posición de esta ventana pueden variar según la aplicación utilizada, aunque
generalmente se denomina «servidor» o «host». Compruebe que la casilla Anonymous
Login esté marcada, si el programa incluye esta opción.
Al conectar una unidad HyperDeck, no es necesario introducir un nombre de
usuario ni una clave. Basta con ingresar la dirección IP del dispositivo en el cliente
TCP y marcar la casilla Anonymous login, si dicha opción está disponible.
Transferencia de archivos
Una vez conectado el grabador, es posible transferir archivos mediante el cliente FTP. Muchos
programas de este tipo cuentan con una interfaz que permite arrastrar y soltar elementos. Verifique
el método de transferencia que la aplicación utiliza.
Aunque es posible transferir cualquier tipo de archivos al grabador, nótese que aquellos que vayan
a reproducirse desde el dispositivo deben ser compatibles con los códecs y resoluciones que este
admite. Consulte la lista de códecs compatibles en el apartado correspondiente.
SUGERENCIA: Es posible transferir archivos mediante la red mientras la unidad está
grabando. El dispositivo ajustará automáticamente la velocidad de transferencia para que
la grabación no se vea afectada.
335Transferencia de archivos a través deuna red

Conexión a un mezclador ATEM
Los mezcladores ATEM admiten la conexión de hasta cuatro grabadores HyperDeck, que pueden
manejarse desde el programa ATEM Software o un dispositivo de control. Esta aplicación
informática es sumamente efectiva y pone infinitas herramientas de grabación al alcance del
usuario. Asimismo, es posible iniciar la grabación en un HyperDeck desde un mezclador, lo
que permite crear una copia de archivo de la transmisión en directo, así como capturar planos
complementarios durante una producción en directo que serán ajustados posteriormente.
Es posible conectar hasta cuatro grabadores HyperDeck a un mezclador
ATEM, tal como el modelo ATEM 2 M/E Broadcast Studio 4K.
Cómo conectar un grabador HyperDeck a un mezclador ATEM:
1 Conecte el grabador a la misma red que el mezclador y registre su dirección IP.
La dirección IP puede encontrarse en el panel frontal del dispositivo o al acceder
a la opción Setup y luego Ethernet en el menú en pantalla.
De manera alternativa, es posible acceder a la dirección IP desde un equipo Mac o
Windows, mediante la pestaña Configure en del programa Blackmagic HyperDeck
Setup Utility.
2 Conecte la salida SDI o HDMI del grabador a una de las entradas correspondientes
en el mezclador.
3 Para iniciar la grabación en el HyperDeck desde el mezclador, es necesario conectar una
fuente al grabador.
Simplemente conecte una fuente SDI o HDMI al dispositivo de manera habitual. Para grabar
la señal principal transmitida por mezclador, conecte una de sus salidas SDI auxiliares a la
entrada SDI del grabador.
4 Presione el botón REM en el panel frontal del dispositivo, o en el menú en pantalla del
modelo HyperDeck Studio Mini, para activar la función de control remoto desde el mezclador.
5 Complete el proceso ingresando la información sobre la fuente y la dirección IP en el
programa ATEM Software Control o en el panel de control. Este procedimiento sencillo
se explica en el manual correspondiente a los mezcladores ATEM.
336Conexión a un mezclador ATEM

Active la función de control remoto mediante el menú en pantalla o el panel de control
para manejar el grabador desde un mezclador ATEM, a través de una red Ethernet.
Dinámicas de trabajo en posproducción
Acceso al material grabado
Para acceder a los archivos grabados, conecte el soporte de almacenamiento a un equipo
informático. A continuación, puede copiar el material a la unidad local o trabajar directamente sin
transferirlo. A efectos de conectar la unidad de almacenamiento al equipo informático, es posible
utilizar un cable adaptador para puertos USB. Sin embargo, este tipo de conexión no es lo
suficientemente rápida como para permitir el procesamiento de los archivos directamente desde
la unidad. Por consiguiente, solo se recomienda como una solución portátil, a fin de copiar el
material almacenado en la misma.
macOS
QuickTime forma parte del sistema operativo macOS. Los archivos en formato ProRes, DNxHD,
DNxHR o QuickTime grabados con un modelo HyperDeck pueden abrirse prácticamente con
cualquier programa de edición en macOS.
Por su parte, los archivos DNxHD y DNxHR (MXF) son compatibles con las versiones de Media
Composer y DaVinci Resolve para Mac. Los códecs DNxHD pueden descargarse gratuitamente
desde http://www.avid.com/products/avid-dnxhr-and-dnxhd.
Los archivos MCC que contienen subtítulos pueden abrirse con el programa MacCaption para
macOS, que puede obtenerse en el sitio http://www.telestream.net/captioning/overview.htm.
Windows
Para abrir archivos ProRes o QuickTime grabados con un dispositivo HyperDeck, es necesario instalar
QuickTime en el equipo informático. Cualquier programa de video para Windows compatible con
estos formatos permite ver las secuencias grabadas con el dispositivo. La versión de QuickTime para
Windows puede descargarse en forma gratuita del sitio http://www.apple.com/quicktime/download/.
Por su parte, los archivos DNxHD y DNxHR (MXF) son compatibles con las versiones de Media
Composer y DaVinci Resolve para Windows. Los códecs DNxHD pueden descargarse gratuitamente
desde http://www.avid.com/products/avid-dnxhr-and-dnxhd.
Los archivos MCC que contienen subtítulos pueden abrirse con el programa CaptionMaker para
Windows, que puede obtenerse en el sitio http://www.telestream.net/captioning/overview.htm
337Dinámicas de trabajo en posproducción

Información para desarrolladores
Protocolo de Ethernet para el modelo Blackmagic HyperDeck
Este protocolo está basado en texto y se accede al mismo mediante el puerto TCP 9993 en
los modelos HyperDeck Studio con conexión Ethernet. El protocolo de control integrado para
dispositivos de video facilita la integración de nuestros productos con otros dispositivos. Nuestra
filosofía en Blackmagic Design es mantener los protocolos abiertos para facilitar la colaboración
entre usuarios durante los procesos creativos.
Protocol Commands
Command Command Description
help or ? Provides help text on all commands and parameters
commands return commands in XML format
device info return device information
disk list query clip list on active disk
disk list: slot id: {n} query clip list on disk in slot {n}
quit disconnect ethernet control
ping check device is responding
preview: enable: {true/false} switch to preview or output
play play from current timecode
play: speed: {-5000 to 5000} play at specific speed
play: loop: {true/false} play in loops or stop-at-end
play: single clip: {true/false} play current clip or all clips
playrange query playrange setting
playrange set: clip id: {n} set play range to play clip {n} only
playrange set: clip id: {n} count: {m} set play range to {m} clips starting from clip {n}
playrange set: in: {inT} out: {outT}
set play range to play between:
- timecode {inT} andtimecode {outT}
playrange set: timeline in: {in} timeline out:
{out}
set play range in units of frames between:
- timeline position {in} and position {out} clear/reset play
rangesetting
playrange clear clear/reset play range setting
play on startup query unit play on startup state
play on startup: enable: {true/false} enable or disable play on startup
play on startup: single clip: {true/false} play single clip or all clips on startup
play option query play options
play option: stop mode:
{lastframe/nextframe/black}
set output frame when playback stops
record record from current input
record: name: {name} record named clip
record spill spill current recording to next slot
338Información para desarrolladores

Command Command Description
record: spill: slot id: {n}
spill current recording to specified slot
use current id to spill to same slot
stop stop playback or recording
clips count query number of clips on timeline
clips get query all timeline clips
clips get: clip id: {n} query a timeline clip info
clips get: clip id: {n} count: {m} query m clips starting from n
clips get: version: {1/2}
query clip info using specified output version:
version 1: is: name startT duration
version 2: id: startT duration inT outT name
clips add: name: {name} append a clip to timeline
clips add: clip id: {n} name: {name} insert clip before existing clip {n}
clips add: in: {inT} out: {outT} name: {name} append the {inT} to {outT} portion of clip
clips remove: clip id: {n}
remove clip {n} from the timeline
(invalidates clip ids following clip {n})
clips clear empty timeline clip list
transport info query current activity
slot info query active slot
slot info: slot id: {n} query slot {n}
slot select: slot id: {n} switch to specified slot
slot select: video format: {format} load clips of specified format
slot unblock unblock active slot
slot unblock: slot id: {n} unblock slot {n}
cache info query cache status
dynamic range query dynamic range settings
dynamic range: playback override:
{off/Rec709/Rec2020_SDR/HLG/
ST2084_300/ST2084_500/
ST2084_800/ST2084_1000/
ST2084_2000/ST2084_4000/ST2084
set playback dynamic range override
dynamic range: record override:
{off/Rec709/Rec2020_SDR/HLG/
ST2084_300/ST2084_500/
ST2084_800/ST2084_1000/
ST2084_2000/ST2084_4000/ST2048}
set record dynamic range override
notify query notification status
notify: remote: {true/false} set remote notifications
notify: transport: {true/false} set transport notifications
notify: slot: {true/false} set slot notifications
notify: configuration: {true/false} set configuration notifications
notify: dropped frames: {true/false} set dropped frames notifications
notify: display timecode: {true/false} set display timecode notifications
339Información para desarrolladores

Command Command Description
notify: timeline position: {true/false} set playback timeline position notifications
notify: playrange: {true/false} set playrange notifications
notify: cache: {true/false} set cache notifications
notify: dynamic range: {true/false} set dynamic range settings notifications
notify: slate: {true/false} set digital slate notifications
goto: clip id: {start/end} goto first clip or last clip
goto: clip id: {n} goto clip id {n}
goto: clip id: +{n} go forward {n} clips
goto: clip id: -{n} go backward {n} clips
goto: clip: {n} goto frame position {n} within current clip
goto: clip: +{n} go forward {n} frames within current clip
goto: clip: -{n} go backward {n} frames within current clip
goto: clip: {start/end} goto start or end of clip
goto: timeline: {n} goto frame position {n} within timeline
goto: timeline: +{n} o forward {n} frames within timeline
goto: timeline: -{n} go backward {n} frames within timeline
goto: timeline: {start/end} goto start or end of timeline
goto: timecode: {timecode} goto specified timecode
goto: timecode: +{timecode} go forward {timecode} duration
goto: timecode: -{timecode} go backward {timecode} duration
goto: slot id: {n} goto slot id {n}
jog: timecode: {timecode} jog to timecode
jog: timecode: +{timecode} jog forward {timecode} duration
jog: timecode: -{timecode} jog backward {timecode} duration
shuttle: speed: {-5000 to 5000} shuttle with speed
remote query unit remote control state
remote: enable: {true/false} enable or disable remote control
remote: override: {true/false} session override remote control
configuration query configuration settings
configuration: video input: SDI switch to SDI input
configuration: video input: HDMI switch to HDMI input
configuration: video input: component switch to component input
configuration: audio input: embedded capture embedded audio
configuration: audio input: XLR capture XLR audio
configuration: audio input: RCA capture RCA audio
configuration: file format: {format} switch to specific file format
configuration: audio codec: PCM switch to PCM audio
configuration: audio codec: AAC switch to AAC audio
340Información para desarrolladores

Command Command Description
configuration: timecode input:
{external/embedded/preset/clip}
change the timecode input
configuration: timecode output:
{clip/timeline/internal}
change the timecode output
configuration: timecode preference:
{default/dropframe/nondropframe}
whether or not to use drop frame timecodes when not
otherwise specified
configuration: timecode preset:
{timecode}
set the timecode preset
configuration: audio input channels: {n} set the number of audio channels recorded to {n}
configuration: record trigger:
{none/recordbit/timecoderun}
change the record trigger
configuration: record prefix: {name} set the record prefix name (supports UTF-8 name)
configuration: append timestamp:
{true/false}
append timestamp to recorded filename
configuration: xlr input id: {n} xlr type:
{line/mic}
configure xlr input type
multiple xlr inputs can be configured in a single command
configuration: genlock input resync:
{true/false}
enable or disable genlock input resync
uptime return time since last boot
format: prepare: {format} prepare a disk formatting operation to filesystem {format}
format: confirm: {token} perform a pre-prepared formatting operation using token
identify: enable: {true/false} identify the device
watchdog: period: {period in seconds} client connection timeout
reboot reboot device
slate clips slate clips information
slate project slate project information
slate project:↵
camera: {index}↵
set camera index e.g. A
Command Combinations
You can combine the parameters into a single command, for example:
play: speed: 200 loop: true single clip: true
Or for configuration:
configuration: video input: SDI audio input: XLR
Or to switch to the second disk, but only play NTSC clips:
slot select: slot id: 2 video format: NTSC
Using XML
While you can use the Terminal to talk to HyperDeck, if you are writing software, you can use XML
to confirm the existence of a specific command based on the firmware of the HyperDeck you are
communicating with. This helps your software user interface adjust to the capabilities of the specific
HyperDeck model and software version.
341Información para desarrolladores

Protocol Details
Connection
The HyperDeck Ethernet server listens on TCP port 9993.
Basic syntax
The HyperDeck protocol is a line oriented text protocol. Lines from the server will be separated by an ascii
CR LF sequence. Messages from the client may be separated by LF or CR LF.
New lines are represented in this document as a "↵" symbol.
Single line command syntax
Command parameters are usually optional. A command with no parameters is terminated with a new line:
{Command name}↵
If parameters are specified, the command name is followed by a colon, then pairs of parameter names and
values. Each parameter name is terminated with a colon character:
{Command name}: {Parameter}: {Value} {Parameter}: {Value} ...↵
Multiline command syntax
The HyperDeck protocol also supports an equivalent multiline syntax where each parameter-value pair is
entered on a new line. E.g.
{Command name}:↵
{P a r a m e t e r}: { Va lu e}↵
{P a r a m e t e r}: { Va lu e}↵
↵
Response syntax
Simple responses from the server consist of a three digit response code and descriptive text terminated by
a new line:
{Response code} {Response text}↵
If a response carries parameters, the response text is terminated with a colon, and parameter name and
value pairs follow on subsequent lines until a blank line is returned:
{Response code} {Response text}:↵
{P a r a m e t e r}: { Va lu e}↵
{P a r a m e t e r}: { Va lu e}↵
...
↵
Successful response codes
A simple acknowledgement of a command is indicated with a response code of 200:
200 ok↵
Other successful responses carry parameters and are indicated with response codes in the range of 201
to299.
342Información para desarrolladores

Failure response codes
Failure responses to commands are indicated with response codes in the range of 100 to 199:
100 syntax error
101 unsupported parameter
102 invalid value
103 unsupported
104 disk full
105 no disk
106 disk error
107 timeline empty
108 internal error
109 out of range
110 no input
111 remote control disabled
112 clip not found
120 connection rejected
150 invalid state
151 invalid codec
160 invalid format
161 invalid token
162 format not prepared
163 parameterized single line command not supported
Asynchronous response codes
The server may return asynchronous messages at any time. These responses are indicated with response
codes in the range of 500 to 599:
5xx {Response Text}:↵
{P a r a m e t e r}: { Va lu e}↵
{P a r a m e t e r}: { Va lu e}↵
↵
Connection response
On connection, an asynchronous message will be delivered:
500 connection info:↵
protocol version: {Version}↵
model: {Model Name}↵
↵
Connection rejection
Only one client may connect to the server at a time. If other clients attempt to connect concurrently,
they will receive an error and be disconnected:
120 connection rejected↵
343Información para desarrolladores

Timecode syntax
Timecodes are expressed as non-drop-frame timecode in the format:
HH:MM:SS:FF
Handling of deck "remote" state
The “remote” command may be used to enable or disable the remote control of the deck. Any attempt to
change the deck state over ethernet while remote access is disabled will generate an error:
111 remote control disabled↵
To enable or disable remote control:
remote: enable: {“true”, “false”} ↵
The current remote control state may be overridden allowing remote access over ethernet irrespective of
the current remote control state:
remote: override: {“true”, “false”} ↵
The override state is only valid for the currently connected ethernet client and only while the connection
remains open.
The “remote” command may be used to query the remote control state of the deck by specifying no
parameters:
remote↵
The deck will return the current remote control state:
210 remote info:↵
enabled: {“true”, “false”}↵
override: {“true”, “false”}↵
↵
Asynchronous remote control information change notification is disabled by default and may be
configured with the “notify” command. When enabled, changes in remote state will generate a “510 remote
info:”asynchronous message with the same parameters as the “210 remote info:” message.
Closing connection
The "quit" command instructs the server to cleanly shut down the connection:
quit↵
Checking connection status
The "ping" command has no function other than to determine if the server is responding:
ping↵
Getting help
The "help" or "?" commands return human readable help text describing all available commands and
parameters:
help↵
Or:
?↵
The server will respond with a list of all supported commands:
201 help:↵
{Help Te x t}↵
{Help Te x t}↵
↵
344Información para desarrolladores

Switching to preview mode
The "preview" command instructs the deck to switch between preview mode and output mode:
preview: enable: {"true", "false"}↵
Playback will be stopped when the deck is switched to preview mode. Capturing will be stopped when the
deck is switched to output mode.
Controlling device playback
The “play” command instructs the deck to start playing:
play↵
The play command accepts a number of parameters which may be used together in most combinations.
By default, the deck will play all remaining clips on the timeline then stop.
The “single clip” parameter may be used to override this behavior:
play: single clip: {“true”, “false”}↵
By default, the deck will play at normal (100%) speed. An alternate speed may be specified in percentage
between -1600 and 1600:
play: speed: {% normal speed}↵
By default, the deck will stop playing when it reaches to the end of the timeline. The “loop” parameter may
be used to override this behavior:
play: loop: {“true”, “false”}↵
The “playrange” command instructs the deck to play all the clips. To override this behavior: and select a
particular clip:
playrange set: clip id: {Clip ID}↵
To only play a certain timecode range:
playrange set: in: {in timecode} out: {out timecode}↵
To clear a set playrange and return to the default value:
playrange clear↵
The “play on startup command” instructs the deck on what action to take on startup. By default, the deck
will not play. Use the “enable” command to start playback after each power up.
play on startup: enable {“true”, “false”}↵
By default, the unit will play back all clips on startup. Use the “single clip” command to override.
play on startup: single clip: {“true”, “false”}↵
Stopping deck operation
The "stop" command instructs the deck to stop the current playback or capture:
stop↵
345Información para desarrolladores

Changing timeline position
The "goto" command instructs the deck to switch to playback mode and change its position within the
timeline.
To go to the start of a specific clip:
goto: clip id: {Clip ID}↵
To move forward/back {count} clips from the current clip on the current timeline:
goto: clip id: +/-{count}↵
Note that if the resultant clip id goes beyond the first or last clip on timeline, it will be clamp at the first or
last clip.
To go to the start or end of the current clip:
goto: clip: {“start”, “end”}↵
To go to the start of the first clip or the end of the last clip:
goto: timeline: {“start”, “end”}↵
To go to a specified timecode:
goto: timecode: {timecode}↵
To move forward or back a specified duration in timecode:
goto: timecode: {“+”, “-”}{duration in timecode}↵
To specify between slot 1 and slot 2:
goto: slot id: {Slot ID}↵
Note that only one parameter/value pair is allowed for each goto command.
Enumerating supported commands and parameters
The "commands" command returns the supported commands:
commands↵
The command list is returned in a computer readable XML format:
212 commands:
<commands>↵
<command name="…"><parameter name="…"/>…</command>↵
<command name="…"><parameter name="…"/>…</command>↵
…
</commands>↵
↵
More XML tokens and parameters may be added in later releases.
346Información para desarrolladores

Controlling asynchronous notifications
The “notify” command may be used to enable or disable asynchronous notifications from the server.
To enable or disable transport notifications:
notify: transport: {“true”, “false”}↵
To enable or disable slot notifications:
notify: slot: {“true”, “false”}↵
To enable or disable remote notifications:
notify: remote: {“true”, “false”}↵
To enable or disable configuration notifications:
notify: configuration: {“true”, “false”}↵
Multiple parameters may be specified. If no parameters are specified, the server returns the current state of
all notifications:
209 notify:↵
transport: {“true”, “false”}↵
slot: {“true”, “false”}↵
remote: {“true”, “false”}↵
configuration: {“true”, “false”}↵
dropped frames: {“true”, “false”}↵
display timecode: {“true”, “false”}↵
timeline position: {“true”, “false”}↵
playrange: {“true”, “false”}↵
cache: {“true”, “false”}↵
dynamic range: {“true”, “false”}↵
slate: {“true”, “false”}↵
↵
Retrieving device information
The "device info" command returns information about the connected deck device:
device info↵
The server will respond with:
204 device info:↵
protocol version: {Version}↵
model: {Model Name}↵
unique id: {unique alphanumeric identifier}↵
slot count: {number of storage slots}↵
software version: {software version}↵
↵
347Información para desarrolladores

Retrieving slot information
The "slot info" command returns information about a slot. Without parameters, the command returns
information for the currently selected slot:
slot info↵
If a slot id is specified, that slot will be queried:
slot info: slot id: {Slot ID}↵
The server will respond with slot specific information:
202 slot info:↵
slot id: {Slot ID}↵
status: {"empty", "mounting", "error", "mounted"}↵
volume name: {Volume name}↵
recording time: {recording time available in seconds}↵
video format: {disk's default video format}↵
blocked: {“true”, “false”}↵
↵
Asynchronous slot information change notification is disabled by default and may be configured with
the "notify" command. When enabled, changes in slot state will generate a "502 slot info:" asynchronous
message with the same parameters as the "202 slot info:" message.
Retrieving clip information
The “disk list” command returns the information for each playable clip on a given disk. Without parameters,
the command returns information for the current active disk:
disk list↵
If a slot id is specified, the disk in that slot will be queried:
disk list: slot id: {Slot ID}↵
The server responds with the list of all playable clips on the disk in the format of: Index, name, formats, and
duration in timecode:
206 disk list:↵
slot id: {Slot ID}↵
{clip index}: {name} {file format} {video format} {Duration
ti m ecode}↵
{clip index}: {name} {file format} {video format} {Duration
ti m ecode}↵
…
↵
Note that the clip index starts from 1.
Retrieving clip count
The "clips count" command returns the number of clips on the current timeline:
clips count ↵
The server responds with the number of clips:
214 clips count: ↵
clip count: {Count}↵
348Información para desarrolladores

Retrieving timeline information
The "clips get" command returns information for each available clip on the current timeline. Without
parameters, the command returns information for all clips on timeline:
clips get↵
The server responds with a list of clip IDs, names and timecodes:
205 clips info:↵
clip count: {Count}↵
{Clip ID}: {Name} {Start timecode} {Duration timecode}↵
{Clip ID}: {Name} {Start timecode} {Duration timecode}↵
…
↵
Retrieving transport information
The “transport info” command returns the state of the transport:
transport info ↵
The server responds with transport specific information:
208 transport info:
status: {“preview”, “stopped”, “play”, “forward”, “rewind”,
“j o g ”, “ s h u t t l e ”,” r e c o r d ” }↵
speed: {Play speed between -5000 and 5000 %}↵
slot id: {Slot ID or “none”}↵
clip id: {Clip ID or “none”}↵
single clip: {“true”, “false”}↵
display timecode: {timecode}↵
timecode: {timecode}↵
video format: {Video format}↵
loop: {“true”, “false”}↵
timeline: {n}↵
input video format: {Video format”}↵
dynamic range: {“off”, “Rec709”, “Rec2020_SDR”, “HLG”,
“ST2084_300”, “ST2084_500”, “ST2084_800”, “ST2084_1000”,
“ST2084_2000”, “ST2084_4000”, “ST2048” or “none”}↵
↵
The "timecode" value is the timecode within the current timeline for playback or the clip for record. The
"display timecode" is the timecode displayed on the front of the deck. The two timecodes will differ in some
deck modes.
Asynchronous transport information change notification is disabled by default and may be configured
with the "notify" command. When enabled, changes in transport state will generate a "508 transport info:"
asynchronous message with the same parameters as the "208 transport info:" message.
349Información para desarrolladores

Video Formats
The following video formats are currently supported on HyperDeck Studio:
NTSC, PAL, NTSCp, PALp
720p50, 720p5994, 720p60
1080p23976, 1080p24, 1080p25, 1080p2997, 1080p30
1080i50, 1080i5994, 1080i60
HyperDeck Studio Pro and Plus models support these 4k formats:
4Kp23976, 4Kp24, 4Kp25, 4Kp2997, 4Kp30
HyperDeck Studio 4K Pro adds support for the following 4k formats:
4Kp50, 4Kp5994, 4Kp60
Video format support may vary between models and software releases.
File Formats
All HyperDeck models currently support the following file formats:
H.264High_SDI
H.264High
H.264Medium
H.264Low
QuickTimeProResHQ
QuickTimeProRes
QuickTimeProResLT
QuickTimeProResProxy
QuickTimeDNxHD220x
DNxHD220x
QuickTimeDNxHD145
DNxHD145
QuickTimeDNxHD45
DNxHD45
HyperDeck Studio 4K Pro also supports the following file formats:
H.265High_SDI
H.265High
H.265Medium
H.265Low
QuickTimeDNxHR_HQX
DNxHR_HQX 4Kp60
QuickTimeDNxHR_SQ
DNxHR_SQ
QuickTimeDNxHR_LB
DNxHR_LB
Supported file formats may vary between models and software releases.
350Información para desarrolladores

Querying and updating configuration information
The "configuration" command may be used to query the current configuration of the deck:
configuration↵
The server returns the configuration of the deck:
211 configuration:↵
audio input: {“embedded”, “XLR”, “RCA”}↵
audio mapping: {n}↵
video input: {“SDI”, “HDMI”, “component”, “composite”}↵
file format: {format}↵
audio codec: {“PCM”, “AAC”}↵
timecode input: {“external”, “embedded”, “preset”, “clip”}↵
timecode output: {“clip”, “timeline”}↵
timecode preference: {“default”, “dropframe”, “nondropframe”}↵
timecode preset: {timecode}↵
audio input channels: {n}↵
record trigger: {“none”, “recordbit”, “timecoderun”}↵
record prefix: {name}↵
append timestamp: {“true”, “false”}↵
↵
One or more configuration parameters may be specified to change the configuration of the deck.
To change the current video input:
configuration: video input: {“SDI”, “HDMI”, “component”}↵
Valid video inputs may vary between models. To configure the current audio input:
configuration: audio input: {“embedded”, “XLR”, “RCA”}↵
Valid audio inputs may vary between models.
To configure the current file format:
configuration: file format: {File format}↵
Note that changes to the file format may require the deck to reset, which will cause the client connection to
be closed. In such case, response code 213 will be returned (instead of 200) before the client connection is
closed:
“213 deck rebooting”
Asynchronous configuration information change notification is disabled by default and may be configured
with the “notify” command. When enabled, changes in configuration will generate a “511 configuration:”
asynchronous message with the same parameters as the “211 configuration:” message.
Selecting active slot and video format
The "slot select" command instructs the deck to switch to a specified slot, or/and to select a specified
output video format.
To switch to a specified slot:
slot select: slot id: {slot ID}↵
To select the output video format:
slot select: video format: {video format}↵
Either or all slot select parameters may be specified. Note that selecting video format will result in a rescan
of the disk to reconstruct the timeline with all clips of the specified video format.
351Información para desarrolladores

Clearing the current timeline
The "clips clear" command instructs the deck to empty the current timeline:
clips clear↵
The server responds with
200 ok↵
Adding a clip to the current timeline
The "clips add:" command instructs the deck to add a clip to the current timeline:
clips add: name: {"clip name"}↵
The server responds with
200 ok↵
or in case of error
1xx {error description}↵
Configuring the watchdog
The “watchdog” command instructs the deck to monitor the connected client and terminate the connection
if the client is inactive for at least a specified period of time.
To configure the watchdog:
watchdog: period: {period in seconds}↵
To avoid disconnection, the client must send a command to the server at least every {period} seconds. Note
that if the period is set to 0 or less than 0, connection monitoring will be disabled.
352Información para desarrolladores

Ayuda
Cómo obtener ayuda
Visite nuestra página de soporte técnico para obtener ayuda rápidamente y acceder al material
de apoyo más reciente para los productos descritos en este manual.
Página de soporte técnico
Las versiones más recientes de este manual, los distintos programas mencionados y el material
de apoyo se encuentran disponibles en nuestra página de soporte técnico.
Foro
El foro de Blackmagic Design permite compartir ideas creativas y constituye un recurso útil para
obtener más información sobre nuestros productos. Por otra parte, brinda la posibilidad de
encontrar rápidamente respuestas suministradas por usuarios experimentados o por el personal
de Blackmagic Design. Para acceder al foro, visite la página https://forum.blackmagicdesign.com.
Cómo ponerse en contacto con Blackmagic Design
Si no encuentra la ayuda que necesita, solicite asistencia mediante el botón Enviar correo
electrónico, situado en la parte inferior de nuestra página de soporte técnico. De manera alternativa,
haga clic en el botón Soporte técnico local para acceder al número telefónico del centro de atención
más cercano.
Cómo comprobar la versión del software instalado
Para comprobar la versión del programa instalada en su equipo informático, acceda al menú About
Blackmagic HyperDeck Setup.
En macOS, ejecute el programa desde la carpeta de aplicaciones. Seleccione el menú
About HyperDeck Setup en la barra superior de la ventana para ver el número de versión.
En Windows, ejecute el programa Blackmagic HyperDeck Setup haciendo clic en el ícono
situado en el menú Inicio. En el menú Help, seleccione la opción About Blackmagic
HyperDeck Setup para ver el número de versión.
Cómo obtener las actualizaciones más recientes
Después de verificar la versión del programa instalado, visite nuestra página de soporte técnico
para comprobar si hay actualizaciones disponibles. Aunque generalmente es recomendable instalar
las versiones más recientes, evite realizar modificaciones al sistema operativo interno del dispositivo
si se encuentra en medio de un proyecto importante.
353Ayuda

Normativas
Tratamiento de residuos de equipos eléctricos y electrónicos en la Unión Europea:
Este símbolo en el producto indica que el dispositivo no debe desecharse con otros
residuos domésticos. Por lo tanto, es su responsabilidad entregarlo a un centro de
recolección para su posterior reciclado. Esto ayuda a preservar los recursos naturales
y garantiza que dicho procedimiento se realice protegiendo la salud y el medioambiente.
Para obtener más información en este sentido, comuníquese con el centro de reciclaje
más cercano o el distribuidor donde adquirió el producto.
Según las pruebas realizadas, este equipo cumple con los límites indicados para
dispositivos digitales Clase A, en conformidad con la sección 15 de las normas establecidas
por la Comisión Federal de Comunicaciones. Esto permite proporcionar una protección
razonable contra interferencias nocivas al operar el dispositivo en un entorno comercial.
Este equipo usa, genera y puede irradiar energía de radiofrecuencia, y si no se instala o
utiliza de acuerdo con el manual de instrucciones, podría ocasionar interferencias nocivas
para las comunicaciones radiales. El funcionamiento de este equipo en una zona
residencial podría ocasionar interferencias nocivas, en cuyo caso el usuario deberá
solucionar dicho inconveniente por cuenta propia.
El funcionamiento de este equipo está sujeto a las siguientes condiciones:
1 Este dispositivo no puede causar interferencias nocivas y,
2 El dispositivo debe admitir cualquier interferencia recibida, incluidas aquellas que
pudieran provocar un funcionamiento incorrecto del mismo.
R-R-BMD-20210202002
R-R-BMD-20210202003
R-R-BMD-20201201003
R-R-BMD-20210301001
Declaración ISED (Canadá)
Este dispositivo cumple con las normas del gobierno de Canadá relativas a equipos
digitales clase A.
Cualquier modificación o uso indebido del mismo podría acarrear un incumplimiento
de dichas normas.
Las conexiones a interfaces HDMI deberán realizarse mediante cables blindados.
Este equipo cumple con las normas descritas anteriormente al emplearse en entornos
comerciales. Nótese que podría ocasionar interferencia radial al utilizarlo en ambientes
domésticos.
354Normativas

Seguridad
Para evitar el riesgo de descarga eléctrica, este equipo debe enchufarse a una toma de corriente
que disponga de un cable a tierra. Ante cualquier duda, póngase en contacto con un electricista
capacitado.
A fin de reducir el riesgo de descarga eléctrica, evite exponer el equipo a goteras o salpicaduras.
Este equipo puede utilizarse en climas tropicales, a una temperatura ambiente máxima de 40ºC.
Compruebe que haya suficiente ventilación en torno a la unidad.
Al instalar el equipo en un bastidor, verifique que el dispositivo contiguo no impida la ventilación.
La reparación de los componentes internos del equipo no debe ser llevada a cabo por el usuario.
Comuníquese con nuestro centro de atención más cercano para obtener información al respecto.
Evite utilizar el equipo a una altura mayor de 2000metros.
Declaración del Estado de California
Las partes plásticas de este producto pueden contener trazas de compuestos químicos, tales
como polibromobifenilos (PBB), que el Estado de California reconoce como causantes de cáncer,
anomalías congénitas o daños reproductivos.
Consulte el sitio www.P65Warnings.ca.gov para obtener más información al respecto.
Advertencias para el personal técnico autorizado
Desconecte la alimentación de ambas tomas de entrada antes de reparar
el dispositivo.
355Seguridad

Garantía
12 meses de garantía limitada
Blackmagic Design ofrece una garantía de 12 meses a partir de la fecha de compra de este producto
por defectos relativos a los materiales o la fabricación. Si el producto resulta defectuoso durante el
período de validez de la garantía, Blackmagic Design podrá optar por reemplazarlo o repararlo sin
cargo alguno por concepto de piezas y/o mano de obra.
Para acceder al servicio proporcionado de acuerdo con los términos de esta garantía, el Cliente deberá
dar aviso del defecto a Blackmagic Design antes del vencimiento del período de garantía y encargarse
de los arreglos necesarios para la prestación del mismo. El Cliente será responsable del empaque y
el envío del producto defectuoso al centro de servicio técnico designado por Blackmagic Design,
y deberá abonar las tarifas postales por adelantado. El Cliente será responsable de todos los gastos
de envío, seguros, aranceles, impuestos y cualquier otro importe que surja con relación a la devolución
de productos por cualquier motivo.
Esta garantía carecerá de validez ante defectos o daños causados por un uso indebido del producto
o por falta de cuidado y mantenimiento. Blackmagic Design no tendrá obligación de prestar el servicio
estipulado en esta garantía para (a) reparar daños provocados por intentos de personal ajeno a
Blackmagic Design de instalar el producto, repararlo o realizar un mantenimiento del mismo; (b) reparar
daños resultantes del uso de equipos incompatibles o conexiones a los mismos; (c) reparar cualquier
daño o mal funcionamiento provocado por el uso de piezas o repuestos no suministrados por
Blackmagic Design; o (d) brindar servicio técnico a un producto que haya sido modificado o integrado
con otros productos, cuando dicha modificación o integración tenga como resultado un aumento de
la dificultad o el tiempo necesario para reparar el producto. ESTA GARANTÍA OFRECIDA POR
BLACKMAGIC DESIGN REEMPLAZA CUALQUIER OTRA GARANTÍA, EXPRESA O IMPLÍCITA. POR
MEDIO DE LA PRESENTE, BLACKMAGIC DESIGN Y SUS DISTRIBUIDORES RECHAZAN CUALQUIER
GARANTÍA IMPLÍCITA DE COMERCIALIZACIÓN O IDONEIDAD PARA UN PROPÓSITO PARTICULAR.
LA RESPONSABILIDAD DE BLACKMAGIC DESIGN EN CUANTO A LA REPARACIÓN O SUSTITUCIÓN
DE PRODUCTOS DEFECTUOSOS CONSTITUYE UNA COMPENSACIÓN COMPLETA Y EXCLUSIVA
PROPORCIONADA AL CLIENTE POR CUALQUIER DAÑO INDIRECTO, ESPECIAL, FORTUITO O
EMERGENTE, AL MARGEN DE QUE BLACKMAGIC DESIGN O SUS DISTRIBUIDORES HAYAN SIDO
ADVERTIDOS CON ANTERIORIDAD SOBRE LA POSIBILIDAD DE TALES DAÑOS. BLACKMAGIC DESIGN
NO SE HACE RESPONSABLE POR EL USO ILEGAL DE EQUIPOS POR PARTE DEL CLIENTE. BLACKMAGIC
DESIGN NO SE HACE RESPONSABLE POR DAÑOS CAUSADOS POR EL USO DE ESTE PRODUCTO.
EL USUARIO UTILIZA EL PRODUCTO BAJO SU PROPIA RESPONSABILIDAD.
© Copyright 2021 Blackmagic Design. Todos los derechos reservados. Blackmagic Design, DeckLink, HDLink, Videohub Workgroup,
Multibridge Pro, Multibridge Extreme, Intensity y «Leading the creative video revolution» son marcas registradas en Estados
Unidos y otros países. Todos los demás nombres de compañías y productos pueden ser marcas comerciales de las respectivas
empresas a las que estén asociados.
356Garantía

HyperDeck硬盘录机系列
HyperDeck
硬盘录机系列硬盘录机系列
2021年7月
安装操作手册

欢迎辞
感谢您购买Blackmagic HyperDeck硬盘录机!
早在
2011
年设计第一版
Blackmagic
HyperDeck
硬盘录机的时候,我们的目标就是操作更轻松、
价 格 更 亲 民 ,并 且 能 在 2.5英寸移动固态硬盘上实现专业级视频记录和播放功能。
如今,我们非常高兴地向您呈现新一系列HyperDeck硬 盘 录 机 ,这 些 型 号 可 以 在 SD卡、SSD,
以及USB硬盘上记录HD和Ultra HD视频。您甚至可以将其连接到Blackmagic MultiDock 10G,
在外部硬盘上记录或播放文件!
HyperDeck Studio Plus及Pro型号搭载了熟悉的广播式录机控制,设有快速、慢速和极速搜索
片段的旋钮操控。搜索旋钮采用离合机制质感非凡,因此搜索片段时您的目光无需离开监视器就
可以感受到其播放效果。其前面板还设有耳机插孔和扬声器,方便您从
HyperDeck
直接检查音
频 ,此 外 还 包 含 更 多 功 能 !
我们希望
HyperDeck硬盘录机可以供您多年使用,它定能为您的制作提供优质服务!
请登陆公司网站www.blackmagicdesign.com/cn的支持页面获取最新版操作手册以及
HyperDeck
软件更新。请注意定期更新您的软件以便获得最新功能。下载软件时,请注册您的相
关信息,以便我们发布新软件时能及时通知您。我们将不断致力于产品的功能开发和性能改进,
诚挚期待 您的意见和建议!
Grant Petty
Blackmagic
Design首席执行官

目录
HyperDeck硬盘录机系列简介 360
开始使用 361
连接电源 361
连接视频和音频 361
检查音频 362
连接媒体 362
记录视频 364
在多个存储介质上记录 364
播放 365
使用HyperDeck播放视频 365
使用搜索旋钮 366
使用前面板 368
存储介质插槽提示 368
使用LCD菜单 369
设置 370
后面板 382
使用监看输出 384
存储介质 387
SD
卡 387
SSD
389
外接硬盘 390
格式化存储介质 392
在计算机上准备存储介质 392
将HyperDeck作为网络摄像头使用 393
设置网络摄像头信号源 393
设置OpenBroadcaster394
Blackmagic
HyperDeckSetup396
使用HyperDeckSetup396
LUT
选项卡 397
更新内部软件 398
Teranex
MiniRackShelf399
RS
-422控制 400
通过网络传输文件 405
连接到ATEM切换台 407
了解后期制作工作流程 408
开发人员信息 409
Blackmagic
HyperDeck
EthernetProtocol以太网协议 409
Protocol
Commands409
Protocol
Details413
帮助 424
监管声明 425
安全信息 426
保修 427
359
BlackmagicHyperDeckStudio
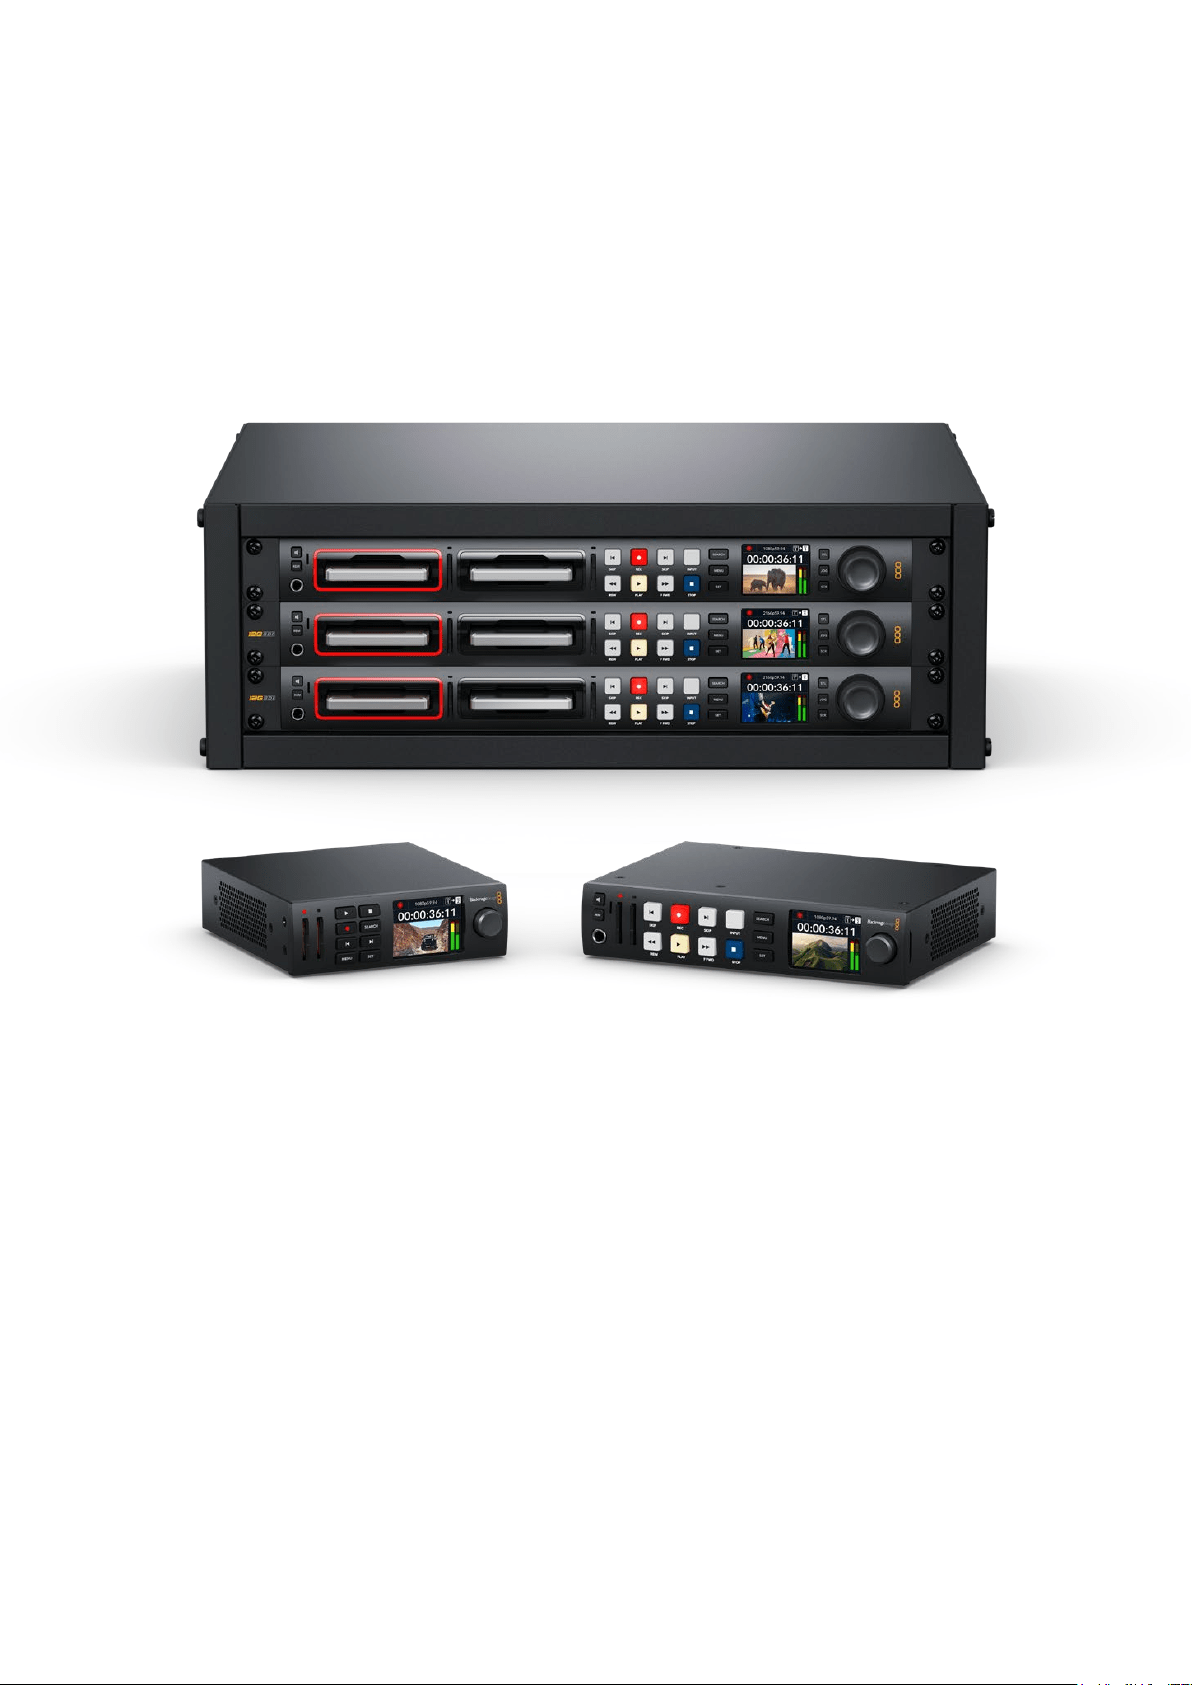
HyperDeck硬盘录机系列简介
Blackmagic HyperDeck硬盘录机是HD和4K硬盘录机系列的一部分,其设计适合您自己的制作流
程。HyperDeck Studio HD Pro和HyperDeck Studio 4K Pro型号采用1RU机 架 设 计 ,足 够 在 SD卡和
9.5mm SSD上记录并播放 文件。
HyperDeck Studio HD Mini和HyperDeck Studio HD Plus型 号 是 更 小 型 的 录 机 ,可 灵 活 地 摆 放 在 工
作台上或选购
Teranex Mini Rack Shelf安装于机架内。
所有型号还可以外录至
USB硬 盘 ,并 支 持 上 至 1080p60的HD视 频 。而 HyperDeck Studio 4K Pro则支
持上至
2160p60的Ultra HD视频。
通常在所有型号上,记录和播放功能运行方式都是一样的,只是更大的型号上搭载了额外性能可让您具有
更多播放控制并提供了更多的接口选项。
本操作手册提供了
HyperDeck硬盘录机入门以及掌控所有控制和功能所需的一切信息!
HyperDeck
Studio
HD
Mini HyperDeck
Studio
HD
Plus
HyperDeck
Studio
HD
Pro
和
HyperDeck
Studio
4K
Pro
360
HyperDeck硬盘录机系列简介
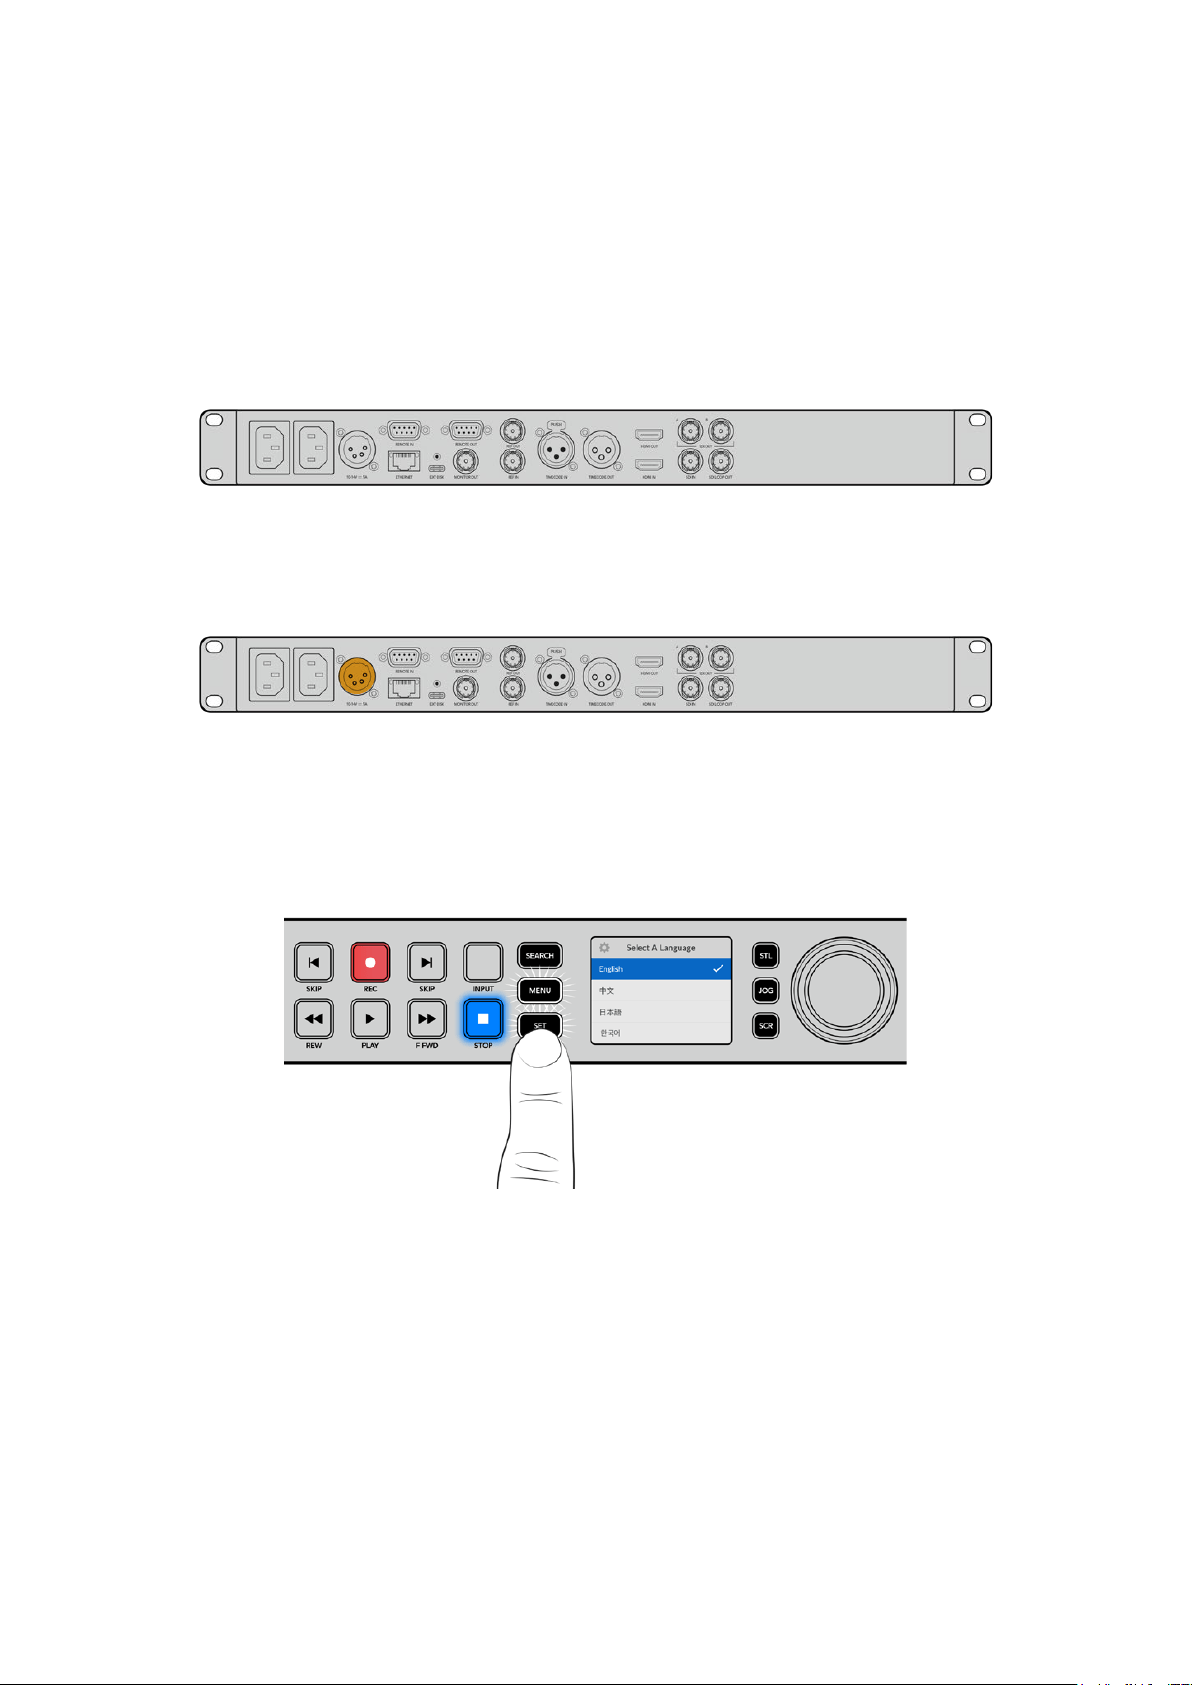
开始使用
HyperDeck Studio硬盘录机使用前的准备工作非常简单,只需连接电源,连接视频源和目标设备,并插
入
SSD硬盘或SD卡即可。
连接电源
要启动HyperDeck,请 将 标 准 IEC线缆连接到HyperDeck后面板上的电源输入口即可。
如果您的HyperDeck型号设有额外IEC电源输入,可连接另一个电源以备冗余用途。例如,将第二个输入
连接至不间断电源,或UPS,那 么 当 主 电 源 中 断 时 ,它 可 立 即 启 用 。
所有型号还设有一个
12V DC输 入 ,可 让 连 接 外 部 12伏电池获得电源。
HyperDeck
Studio
HD
Mini
还可以通过
AC
插座连接电源。如果您的电源供应设有锁定环,可通过拧紧连
接至设备的接口来确保与
HyperDeck
Studio
HD
Mini
的连接。该步骤可以将线缆锁紧,防止意外拔开。
一旦连接电源后,
LCD
显示屏会弹出提示让您选择语言。通过搜索旋钮,滚动到您想要使用的语言上,
然后按闪烁的“
SET
”按钮。此步骤将带您回到屏幕主页面。更多关于主页面和
LCD
菜单的详细内容,
请参阅“使用前面板”部分的内容。
连接视频和音频
将源视频连接到
SDI
或
HDMI
输 入 上 ,再 连 接 到 目 标 设 备 的
SDI
或
HDMI
输出上。例如,源视频可以是数字
电 影 摄 影 机 ,目 标 设 备 可 以 是 HDMI电视机或SDI监视器。
所有
HyperDeck型号支持上至1080p60的HD视频。HyperDeck Studio 4K Pro具备12G-SDI接口,
可通过单根
BNC线缆输入或输出高达2160p60的Ultra HD影像。
361
开始使用

通过观察前面板内置的LCD屏 幕 ,您 可 以 确 认 是 SDI还是HDMI视频信号。
提示 如果在LCD屏上没有看到视频源,那可能是因为您连接了其他的源输入。按前面板上
的“INPUT”按钮可逐个选择SDI或HDMI信号源。
音频已嵌入SDI或HDMI信号中,因此不用再考虑连接音频的问题。观察LCD屏上视频图像旁的音频表,
可查看 音 频电平。
检查音频
如果您的HyperDeck的前面板上设有扬声器和耳机插孔,那么可以通过内置扬声器或连接耳机来快速检查
音频。要听取音频,您可以长按扬声器按钮同时旋转搜索旋钮来调整音量。LCD主页面上将出现音量提示。
按两次扬声器按钮可启用扬声器。再按两次该按钮可禁用该功能。
连接媒体
所有HyperDeck Studio型号拆封后便可立即开始记录,无需进行任何配置或设置。您需要准备的只有
一个经过格式化的SSD硬盘或SD卡。
您可以通过
LCD
屏幕中的菜单设置,轻松地对存储介质进行格式化。您也可使用计算机进行格式化。更多
关于如何格式化存储介质的信息,请参考本手册中“格式化存储介质”部分的内容。此外,还有关于适用于视
频记录的存储介质以及推荐使用的影片和存储卡列表等内容。
插入
SSD步骤 如 下:
1
手持一块9.5mm规格SSD,将引脚接触点朝下并对准HyperDeck的硬盘插槽。将SSD轻轻推
入硬盘插槽内,直至完全插入到位。
2
您的HyperDeck Studio将验证插入的SSD。硬盘插槽周围将亮起绿灯提示。当绿灯熄
灭,HyperDeck就可以开始 记录了!
当
HyperDeck
读取存储介质时,插槽上会亮起绿色提示灯,绿灯熄灭后就可以开始记录了
362
开始使用
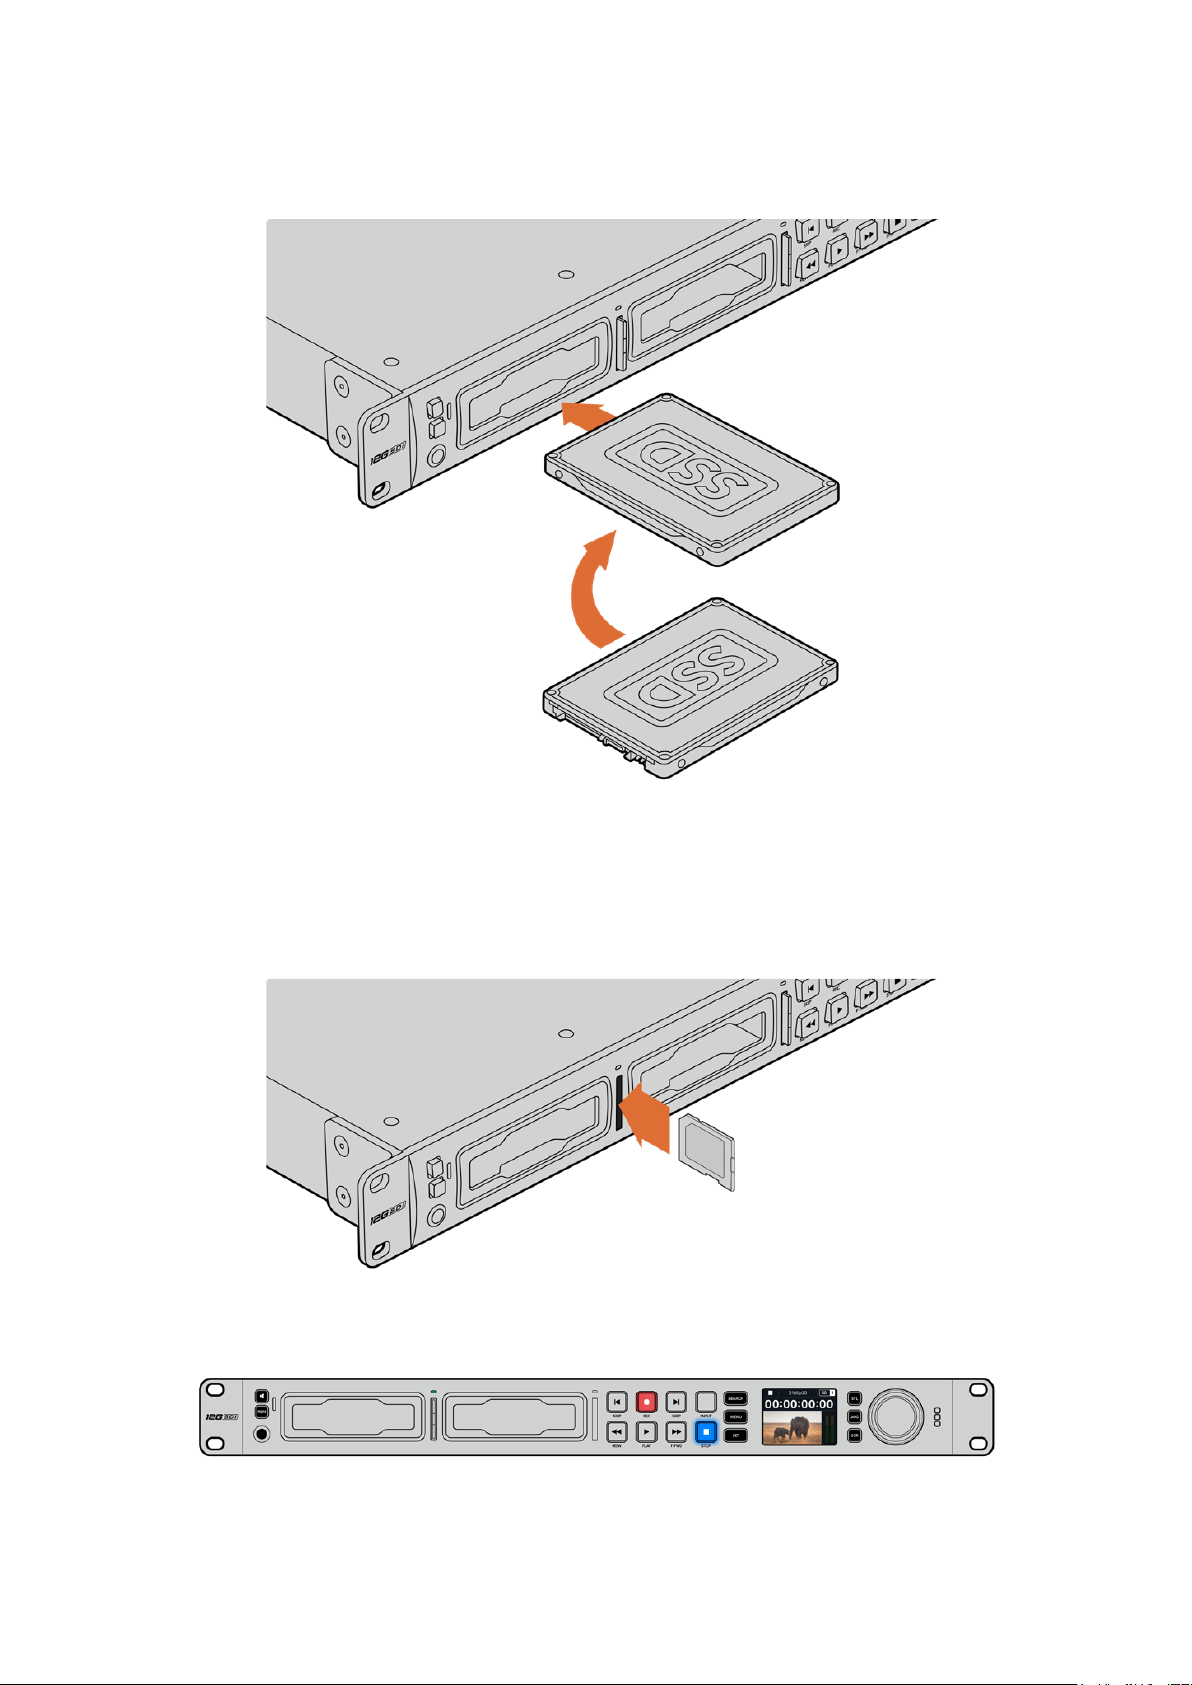
要移除SSD,抓 住 其 外 部 边 缘 ,轻 轻 拉 出 设 备 。您 会 感 觉 到 SSD从插槽中断开连接。
手持
SSD
硬盘,将引脚接触点朝下并对准
HyperDeck
Studio
的硬盘插槽,
将
SSD
轻轻推入硬盘插槽内,直至完全插入到位。
插入SD卡步 骤 如下:
1
手持
SD
卡,将卡的金色接触点面向
HyperDeck
Studio
的
LCD
屏 幕 ,并 对 准
SD
卡 槽 。下 面 ,将
存储卡轻轻推入卡槽,直至您认为插入到位。
2
您的HyperDeck Studio将验证插入的SD卡。SD卡槽上方的绿灯将会亮起。
当提示灯熄灭,
STOP
按钮提示灯亮起时,表示
HyperDeck
Studio
已准备就绪并可以开始记录。
363
开始使用

提示 要取出存储卡,请轻轻按下存储卡,待听到固定销解锁的声音时放开。存储卡会弹出一小
截 ,便 于 您 将 其 从 卡 槽 中 取 出 。
您的
HyperDeck Studio就 准 备 就 绪 ,可 以 开 始 记 录 和 播 放 了 !
记录视频
当在LCD上确认视频源显示后,就可以立即开始记录!
要开始记录,请按记录按钮。当记录到SD卡 时 ,插 槽 提 示 灯 和 “ REC”记录按钮将亮起红色,“PLAY”播放
按 钮 会 亮 起 ,并 且 LCD主页面上会出现记录图标。当连接了SSD时,动态存储介质的指示灯会亮起红色。
当
HyperDeck
Studio
记录时,
LCD
屏上的存储介质提示将在所使用卡槽和媒体所剩余记录时间这两者间交替显示
要结束记录,请按停止按钮。按下“PLAY” 播放按钮可立即开始片段播放。
提示
如果您想要更改所使用的编解码器,可通过
Blackmagic
HyperDeck
Setup
实用程序更
改 编 解 码 设 置 。更 多 信 息 请 参 考 本 手 册 中 “ Blackmagic HyperDeck设置”部分的内容。
在多个存储介质上记录
当
SD
卡或
SSD
的剩余记录时间少于
3
分钟时,
HyperDeck
Studio
LCD
屏幕上的时间码计数器会变红,
停止按钮也会缓慢闪烁。
这意味着设备并没有另一块硬盘可供记录。遇到该类情况时,只需插入拥有足够记录空间的硬盘即可继续
记录。当您在空白卡槽插入一张空白硬盘或连接外部硬盘输入后,缓慢闪烁将停止,时间码将变成白色。这
意味着,HyperDeck可以继续记录,因为已检测到第二块硬盘,并且该硬盘上拥有足够空间继续记录。
364
记录视频

当HyperDeck Studio连接一个以上的存储介质时,记录将从一个硬盘跳至下一个硬盘,并且主页面的
右上角会显示相应信息。
记录时更换硬盘
如果您在任何时候想要更改用于记录的硬盘,并且已准备了第二块具有足够空间的硬盘,那么只需长按记
录按钮就可将记录活动从当前硬盘转移到下一块硬盘上。当您想要取出HyperDeck正在记录的硬盘并不
间断记录工作时,这一功能非常有用。当您从事现场活动制作时,可能会需要将一段重要的录像用于另一
地点,但同时又不想错过任何内容或中断记录,此时就可以使用这一功能。
如果记录过程中记录按钮开始闪烁,这可能是因为存储介质出现问题而导致了丢帧。当使用较慢的存储介
质记录Ultra HD文件时可能会发生这种情况,例如,使用比ProRes Proxy更高数据速率记录2160p30
ProRes HQ时,SD卡或SSD需要是最快的那种。更多测试批准存储介质列表的信息,请阅读本手册中
“存储介质”部分的内容。
播放
播放控制所设的按钮与传统广播级录机一样,包括“
REC
” 记 录 、“
REW
” 倒 回 、“
PLAY
” 播 放 、“
F
FWD
”快
进和“STOP”停止。“向后跳转”和“向前跳转”按钮相当于“上一个”和“下一个”按钮,方便您快速在片段之
间浏览。
使用
HyperDeck
播放视频
1
按播放按钮一次开始即时播放,您可通过LCD屏幕、或任何经输出接口连接的显示器上查看到
视频。
2
要跳转到下一个片段,请按控制面板中的“下一个片段”按钮。
3
按“上一个片段”按钮一次会回到当前素材片段的开头,按两次则跳转到上一段素材片段的开头。
按下
HyperDeck
控制面板上的播放按钮即可播放片段,按快进或快退按钮
可以重新播放当前片段,或者跳转到另一个片段。
365
播放

提示
要在HyperDeck上播放视频文件,需要设置相匹配的编解码。您可以使用LCD屏幕菜单
来 操 作 。详 情 请 参 考 “ 使 用 LCD菜单”和“设置”部分的内容。
循环播放
如果您想要继续不断地播放,可以将HyperDeck设为循环模式,只要在播放时再次按“PLAY”按钮即可。
当 启 用 循 环 播 放 后 ,可 以 在 LCD上看到循环图标。一共有两种循环模式。
循环片段 循环播放当前片段。
循环所有片段 循环播放存储介质上所有记录片段。
动态LED
播放时,硬盘槽外围会亮起绿色环形动态灯,提示播放速度和方向。
提示
如果使用
SSD
记录的
HyperDeck
上的播放按钮闪烁,这表示硬盘读写速度不够快,播放
跟不上速度。我们建议您改成
H
.
264
等更高压缩的记录格式或使用所推荐的更快速
SSD
或外部
硬盘来记录Ultra HD文件。
使用搜索旋钮
播放时使用搜索旋钮是一种在片段间快速移动的方式,可选择播放片段的某个具体部分,或逐帧查看。这
一功能非常重要,如果您需要在片段中定位某个位置,可以一边转动旋钮一边肉眼查看片段,或者以某个
时间码点进行搜索。或者要将播放头移动到某个特定切入点,从而在现场直播中为直播某个片段就绪。
按“
SEARCH
”按钮可在各种搜索模式间切换
366
播放
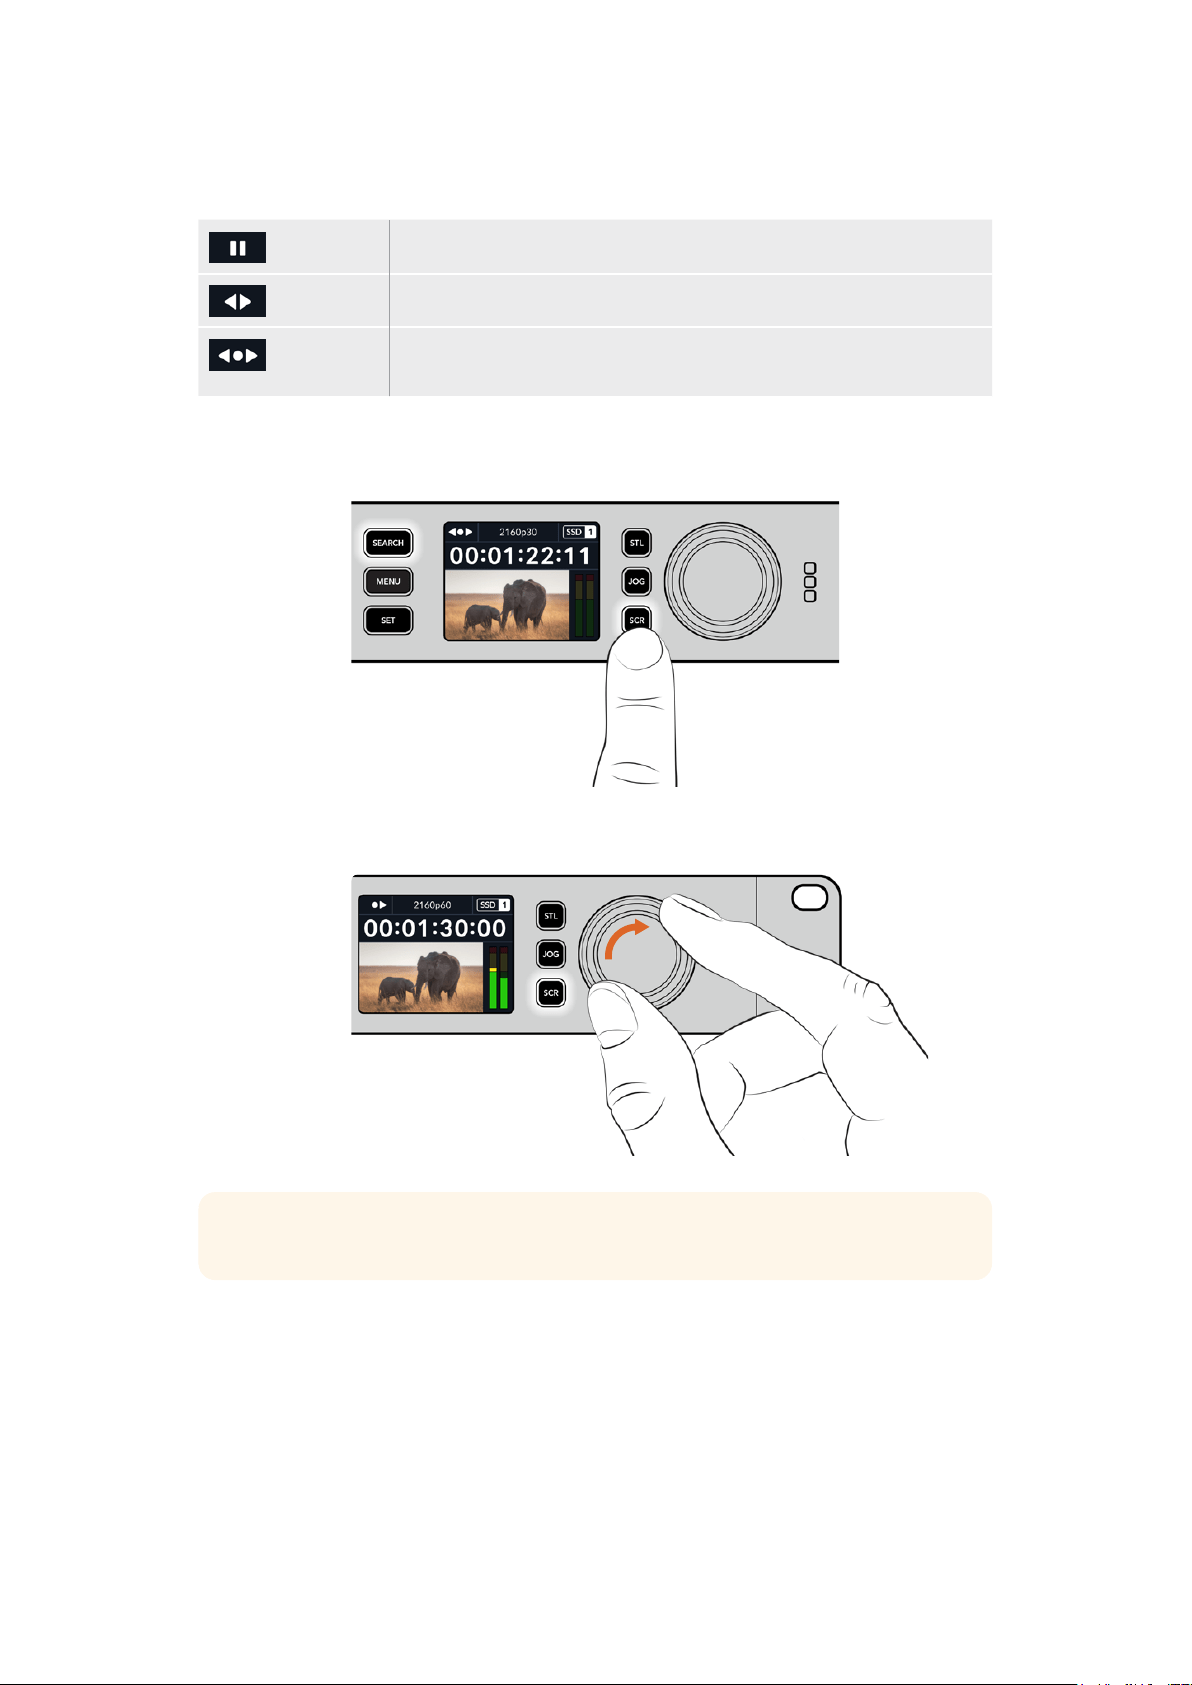
搜索旋钮模式包括慢速搜索、快速搜索和极速搜索三种。
慢速 通过片段逐帧向前或向后播放,从而实现精准控制。
快速 以更快的速率向前或向后播放。根据您转动旋钮的情况来决定播放。
极速 比上两种更快的播放模式,取决于您转动旋钮的情况。当搜索某个特定画面,
需要快速在一段很长的片段中移动时,这一模式很有帮助。
更大的型号还设有专门的搜索模式按钮,还配有内置离合机制的搜索旋钮在使用时为您提供了具有触感
的反馈。这让您可以通过手感在片段里搜索,同时还可以在电视机或监视器上观看。
按下专设的“
JOG
” 、“
STL
”和“
SCR
”按钮来选择慢速、快速和极速搜索模式
提示 要回到正常播放,按“PLAY”或“STOP”按钮。
367
播放

使用前面板
当使用HyperDeck记录或播放视频时,您所需的任何信息都会通过存储介质插槽的LED指 示 灯 ,以 及 内
置LCD屏幕显示出来。
HyperDeck Studio主页面
剩余时间和存储介质提示–记录时,
该图标会一直在硬盘剩余时间和当前
所使用硬盘这两种提示间切换。播放
时,将显示正在使用的存储介质图标。
格式提示–显示了输入或播放文件
的格式。在有些
HyperDeck
Studio
型号上按下“
INPUT
” 按 钮 时 ,它 还 会
提示相应的输入信号源,并且会在您
使用前面板按钮和搜索旋钮调整扬
声器和耳机音量时显示当前音量。
状态提示–显示当前录机状
态 ,包 括 当 前 播 放 模 式 。
音频表–显示了播放时信
号源或文件的音频电平。
存储介质插槽提示
当您开启HyperDeck,或 者 插 入 SSD硬盘或SD卡时,插槽上的提示灯将在检查存储介质时亮起绿灯,然
后熄灭。如果插入的硬盘未被正确格式化或无法正常工作,相应的插槽提示灯将亮起橙色,直至您取出硬
盘。在这种情况下,请检查硬盘是否被正确格式化,以及是否适用于计算机。
HyperDeck
存储介质插槽的指示灯通过亮起来通知您硬盘的状态,比如记录时为红色,播放时为绿色。
368
使用前面板
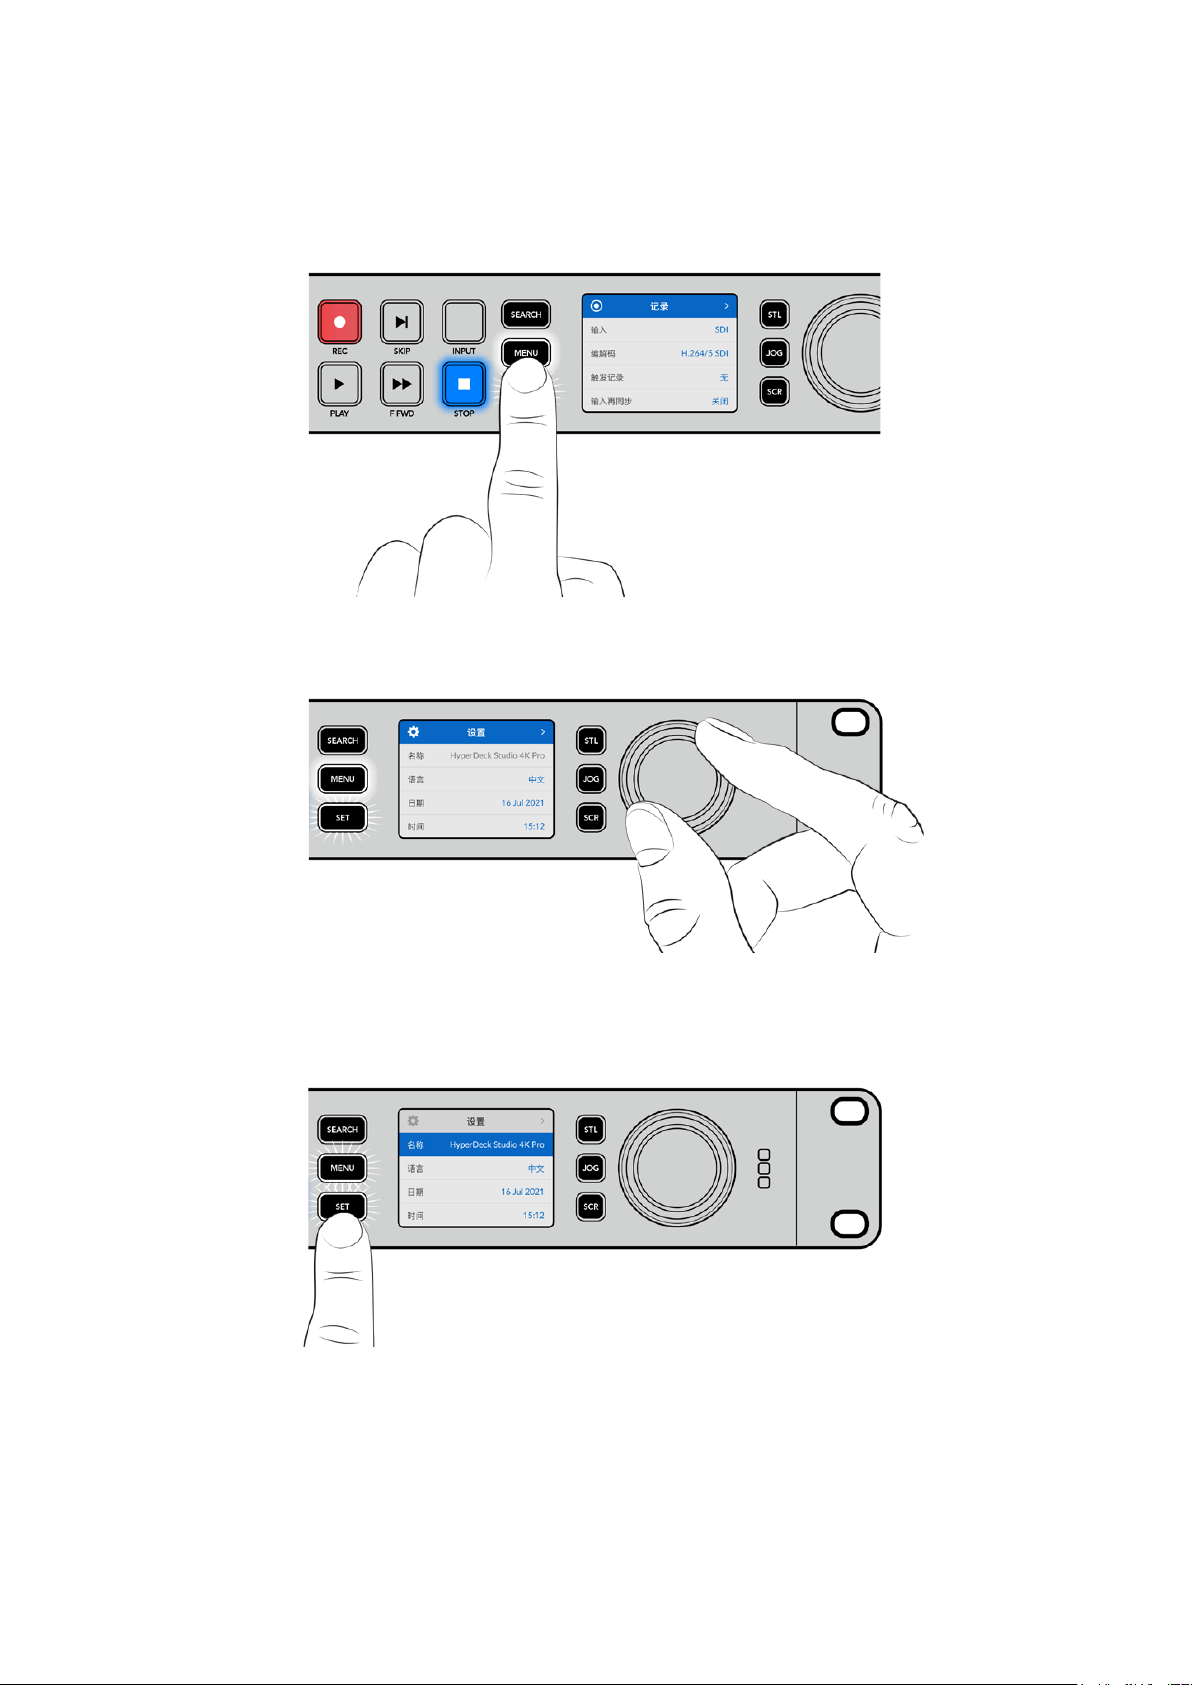
使用
LCD
菜单
按下前面板上的“MENU”(菜单)按钮,打开菜单设置。
转动搜索旋钮或按下“
SKIP” 按 钮 可 在 菜 单 选 项 间 导 航 ,按 “ SET”选择子菜单。
转动搜索旋钮在菜单设置间移动
菜单条目选中后,按“SET”按钮。
使用搜索旋钮或向前和向后跳转按钮调整设置,按下“
SET”按钮确认设置。
按“
MENU”退出选项并返回主页面。
369
使用前面板

设置
记录菜单
输入
使用输入设置选择您的
SDI或HDMI信号源。您还可以通过前面板上的“INPUT”按钮更改您的输入源。
编解码
所有
HyperDeck
Studio
型号都可使用
H
.
264
、
Apple
ProRes
和
DNxID
编解码记录压缩视频。当记录
4K
媒体时,HyperDeck Studio 4K Pro型号还可以使用H.265和DNxHR编解码。
触发记录
共有两种触发记录模式,“视频开始/停止”和“时间码运行”。
URSA Mini等 有 些 摄 影 机 ,通 过 SDI发送信号来开始和停止在外接录机上的记录。当在摄影机上按记录
按钮时,点按“视频开始/停止”将触发HyperDeck开始或停止记录。
使用“时间码运行”选项,设备通过输入接口收到有效时间码信号时触发开始记录。当信号停止时,记录也
停止。点按“无”选项可以禁用触发记录功能。
备注 从
HDMI
或
SDI
摄影机记录时,请确保设备输出的是无叠加信息的纯画面,因为任何显示
在摄影机视频输出画面上的叠加信息都将被一同记录下来。
输入再同步
该设置可启用视频输入上的再同步功能,以确保记录开始前视频已锁定到外部同步信号源。切换到记录
时,视频输出将依然保持与同步源的锁定状态,输入会进行再同步。这一功能可以在您需要锁定多部录机
时间码,但部分信号源为非同步信号的时候用于
ISO
记录。该功能一般处于关闭状态,以便可以不在视频
输入上添加或移除帧的情况下进行记录。
所有广播级录机通常都会在播放时使用一路同步输入来锁定视频输出。这表示
HyperDeck
的播放输出会
锁定到同步输入上,这样就不需要在连接到大型播出系统时进行再同步了。
但是,当录机开始记录后,输出将切换到输入上,因为用户大多希望输入视频被原封不动地记录下来,
再原封不动地发送到其他连接HyperDeck视频输出的下游设备上。
370
设置

HyperDeck
Studio
设有一项独特的功能,可以辅助
ISO
记录。该功能可以将这一过程完全反过来,将视
频输入和同步输入信号进行再同步。这意味着您可以将非同步信号连接到
HyperDeck
,设 备 会 将 这 一 视
频输入信号和视频同步信号进行同步,然后开始记录。
非同步信号源可以来自计算机、消费级摄像机或者任何无法连接同步信号的视频设备。它可以是来自另一
个演播室或外部播出机构的视频输入信号。非同步信号源会导致
ISO
记录出现问题,因为所有记录上的时
间码都需要全程精准匹配。记录时,非同步信号的运行会快于或慢于其他信号源,并且很快就会和时间码
失去同步。一旦信号源的时间码不一致,多机位剪辑就会变得非常棘手。
开启输入再同步功能后,
HyperDeck
将会对视频输入进行分析,并且会在信号较慢时重复一帧,或者在
信号较快时移除一帧。这一过程叫做“再同步”,而设备对于输入信号的处理方式叫做“帧再同步”。它表示
记录到所有录机上的片段时间码都会在相同的时间码显示相同的画面内容,从而为多机位剪辑提供便利。
这样处理的缺点是,记录前输入上会添加或移除一些帧。因此,建议您平时将这一功能保持在关闭状态,
只在使用计算机信号或消费级设备等完全无法将同步信号源连接到ISO信号源上的情况下再使用。
但是,在一种情况下,您可以开启并使用输入再同步功能。输入再同步功能开启后,HyperDeck视频输出
将会保持同步锁定状态,即使录机在记录时也是如此。这样一来,您就可以将HyperDeck的SDI输出连接
到摄影机上,通过节目返送信号将摄影机信号锁定到同步信号。Blackmagic Studio Camera 4K Pro就
是一个很好的例子,它可以将同步信号设置为外部视频。然后,
HyperDeck
会将摄影机信号同步锁定,并
且HyperDeck的输入再同步功能将不会添加或移除帧,因为摄影机运行没有出现较快或较慢的情况。
只有在视频输入未锁定到和HyperDeck相同的同步信号上时,输入再同步功能才会有所动作。但是,在这
一 情 况下,HyperDeck输出会作为摄影机的同步信号源,并且HyperDeck被锁定到它的视频同步输入上。
如果您使用多台HyperDeck,并且都通过环通连接同步接口锁定到一起,那么所有摄影机和HyperDeck
就会作为一个群组进行锁定。 此时,如果群组中的一台HyperDeck含有一路非同步信号,比如计算机信
号,那么这路输入将会进行再同步,但其他信号源不会进行任何处理。
再同步功能会自动进行,您只需要连接信号源即可。输入再同步功能非常强大,因此请务必明确它会在什
么时候启用,以及会进行哪些处理。不妨使用多台
HyperDeck
和多机位剪辑软件进行尝试,从而加深对
这一功能的了解。它是进行节目制作的快捷途径。
371
设置

监看菜单
HyperDeck Studio型号包括监看菜单,其后面板上设有监看输出端口。
纯画面
启用纯画面将移除所有状态信息,在连接到HyperDeck Studio后面板监看输出上的屏幕上只显示图像。
更多关于监看输出显示的信息,包括哪些信息显示等内容,参考本手册后面关于监看输出部分的内容。
3D LUT
将
HyperDeck
Studio
作 为 现 场 录 机 时 ,显 示
LUT
非常实用。它们能告诉设备向显示器输出什么色彩和亮
度 。当 您 在 摄 影 机 上 使 用 “ Film”动态范围,通常会呈现出低饱和度的平淡画面,此时该功能就十分实用。
通过应用显示LUT,您可以对视频调色后的画面有个大致的把握。
通过
Blackmagic HyperDeck Setup软件选中显示LUT可应用到SDI监看输出上。
启用或禁用
3D LUT:
1
按“MENU”按钮,使用搜索旋钮找到“监看”菜单。
2
按“SET”按钮。
3
转 动 搜 索 旋 钮 ,直 到 “ 3D LUT”选项以蓝色高光显示。
4
按SET按钮可在开启LUT或禁用间切换。
更多关于选择
LUT的 信 息 ,请 参 考 本 手 册 中 “ Blackmagic HyperDeck设置”部分的内容。
提示 更多关于监看输出画面的信息,请参考本手册“监看输出”部分的内容。
372
设置

音频菜单
录音通道
HyperDeck
Studio
可一次记录多达
16
声道的
PCM
音频。要选择记录通道的数量,请扩展录音频通道列
表 ,选 择
2
、
4
、
8
或
16
声 道 。如 果 编 解 码 被 设 为
H
.
264
或
H
.
265
,那 么 您 可 以 选 择
2
声道
AAC
音 频 ,从 而 直
接将记录内容上传到YouTube。此设置还可以选择通过监看输出连接所显示的声道数量。
监看通道
当 记 录 两 条 以 上 音 频 通 道 时 ,可 以 在 前 面 板
LCD
上选择监看哪个通道。该操作可通过监看通道选项完成。对
于带有前面板扬声器的
HyperDeck
Studio
型号,该设置还可以设定扬声器和耳机接口播放哪个音频通道。
音频表类型
其内置LCD显示了嵌入式音频声道音频表。您可选择显示PPM或VU音频表。要更改音频表类型,扩展菜
单设置,并从选项中选择您想要的音频表显示。
耳麦电平
对于前面板设有耳机插孔的型号,您可以通过耳机电平设置调整耳机音量。
扬声器电平
转动搜索旋钮可调整扬声器音量。默认电平是
50%。
提示 耳机和扬声器电平还可以通过前面板直接调整。长按扬声器按钮同时转动搜索旋钮可升
高或降低播放音量。音量电平会显示在前面板的中上侧。
373
设置
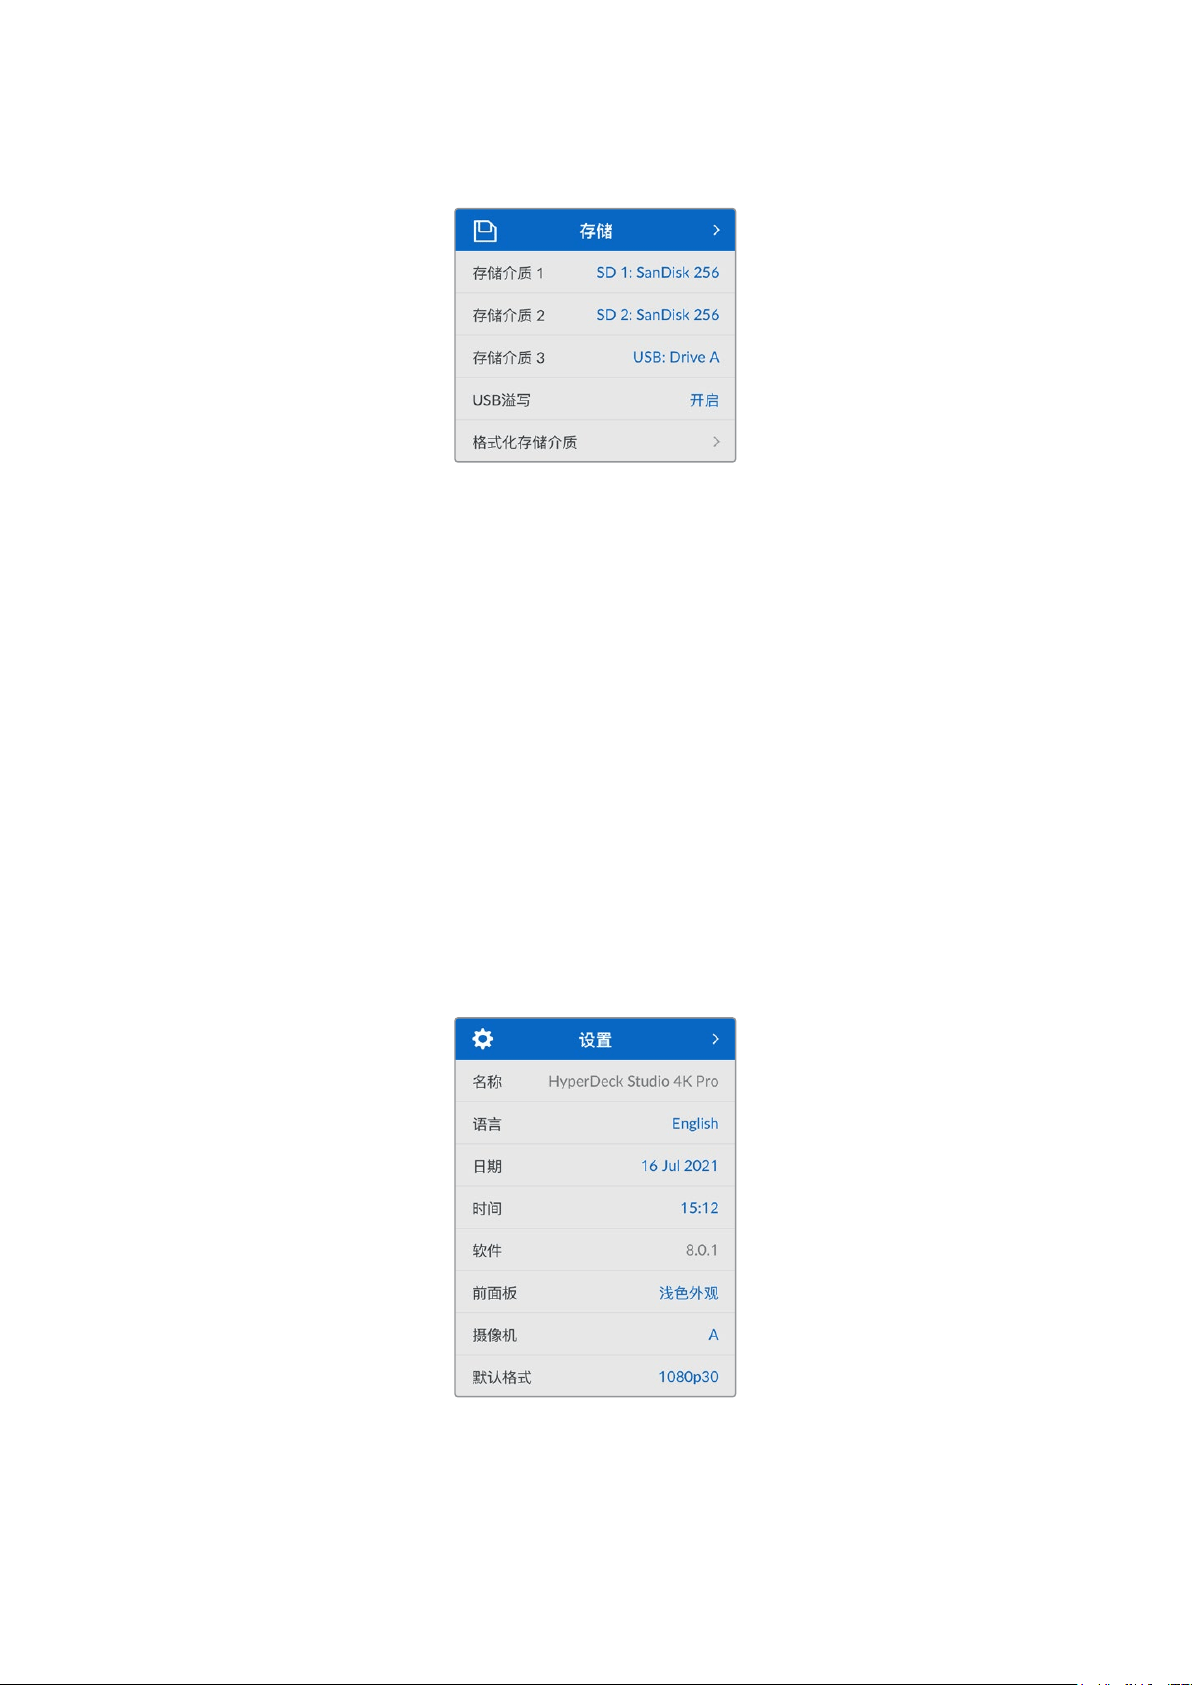
存储菜单
格式化存储介质
通过“EXT DISK”接口连接的SD卡、SSD及存储介质可直接在设备上或通过Mac或Windows计算机格式化。
为HyperDeck Studio准备存储介质:
1
使用搜索旋钮和“SET” 按 钮 ,选 择 “ 格 式 化 存 储 介 质 ” 。
2
从列表中选择要格式化的存储介质,并按“SET”按钮。
3
选定格式后,按“SET”按钮。
4
随后会出现确认窗口,显示即将被格式化的存储介质以及选定的格式化选项,选择“格式化”。
5
格式化完毕后会出现一个提示窗口,选择“确定”。
HFS
+也被称为
Mac
OS
X
扩展格式,因为它支持“日志功能”,所以被广为推荐。一旦发生存储介质损坏的
情况,具有日志功能的存储介质更易恢复数据。HFS+受Mac系统的原生支持。exFAT则受Mac和Windows
系统的支持,无需使用额外软件,但不支持日志功能。
要在
Mac或Windows计算机上格式化存储介质,请参考本手册中“格式化存储介质”部分的内容。
设置菜单
374
设置

名称
当网络上出现超过一台以上的
HyperDeck
Studio
时,您可以分别对其命名。该操作可通过
Blackmagic
HyperDeck Setup或Blackmagic HyperDeck Ethernet Protocol终端程序操作完成。
语言
HyperDeck Studio支持13种语言界面,包括英语、中文、日语、韩语、西班牙语、德语、法语、俄语、意大
利语、葡萄牙语、土耳其语、乌克兰语以及波兰语。
选 择 语言步 骤 如下:
1
当 设 置 菜 单 高 光 显 示 时 ,按 SET。
2
向下滚动搜索旋钮选择语言并按SET。
3
使用搜索旋钮选择语言并按SET。选 完 后 ,将 自 动 返 回 到 设 置 菜 单 。
日期
要调整日期,请选择日期一栏并选择SET。使用搜索旋钮选择日月年。该信息将作为时间戳文件后缀出现。
时间
要调整时间,请选择时间,并按SET。使用搜索旋钮调整小时和分钟。HyperDeck Studio是24小时制时钟。
软件
显示当前安装的软件版本。
前面板
将
HyperDeck
前面板设为“浅色”模式,可获得明亮的
LCD
显示。而“深色”模式适合光线昏暗的环境,这
样的环境里明亮的液晶显示屏可能会分散注意力,例如制作间内多台HyperDeck设备安装在机架上。
375
设置

摄影机
当使用
HyperDeck记录多台摄影机的ISO单 独 文 件 ,然 后 要 将 其 在 DaVinci Resolve中作为多机位时间
线剪辑时,该设置就非常有用。
每台单独的摄影机的识别性字符都将显示在文件的元数据中,从而
DaVinci
Resolve
在使用同步媒体夹
功能时可以轻松识别每个角度。
通过
A
-
Z
或者
1
-
9
来指派摄影机
默认格式
有时,
HyperDeck Studio无 法 判 断 您 想 要 使 用 什 么 视 频 格 式 。这 一 设 置 可 以 让 HyperDeck明确大多数
情况下您想要使用的视频格式。
一个很好的例子就是,如果您开启了
HyperDeck Studio,设备上并未连接视频输入,此时您插入一块硬
盘,硬盘中含有两种不同视频格式的文件,那么
HyperDeck
会播放哪种视频格式? 默认视频格式功能会
提示设备您所偏好的视频格式,让设备切换到这一格式来播放这些文件。
另 外 ,当 您 首 次 开 启
HyperDeck
,并且没有连接任何视频输入,也没有插入任何存储介质时,默认视频格
式功能也会很有帮助。在这类情况下,
HyperDeck
Studio
无法判断应该使用哪类视频格式进行监看输
出。此时,默认视频格式会引导设备进行操作。
但是,默认视频格式只是作为指引,它不会覆盖任何内容。因此,如果您的存储介质中只含有一类视频文
件 ,当 您 按 下 播 放 键 时 ,
HyperDeck
Studio
会切换到对应的视频格式进行播放。此时默认视频格式功
能会被忽略,因为很明显此时只需要播放存储介质上的文件即可。
记录期间的情况也会类似。当您按下记录键后,HyperDeck只会以连接到视频输入上的视频格式进行
记录。此外,当您记录完成后,HyperDeck Studio会以相同视频格式播放存储介质上的文件,即使存储
介质上存在其他匹配默认视频格式的文件。因为设备会认为您想要使用和刚才所记录文件相同的视频格
式来进行播放。只有在您将存储介质拔出后再次插入设备的时候,设备才会启用默认视频格式让您选择
使用哪类文件播放。
默 认 视 频 格 式 只 是 作 为 指 引 ,在 HyperDeck Studio不确定如何操作的情况下帮助其进行判断。该功能不
属于覆盖命令,因此不会强制录机以任何特定方式运行。
376
设置

网络设置
协议
Blackmagic
HyperDeck
出厂设置为
DHCP
,因此连接后,您的网服务器会自动指派一个
IP
地 址 ,无 需
调整其他网络设置。如果需要手动设置地址,可通过静态IP连接。
选 中 “ 协 议 ” 后 ,按 下 闪 烁 “
SET”按钮,滚动到菜单中的“静态IP”然后按“SET”。
IP地址、子网掩码及网关
选中静态
IP后 ,您 可 以 手 动 键 入 网 络 信 息 。
要更改
IP地址:
1
通过搜索旋钮将“IP地址”高光选中,在HyperDeck前面板按下闪烁的“SET”按钮。
2
通 过 搜 索 旋 钮 ,调 整
IP
地 址 、转 动 搜 索 旋 钮 可 调 整
IP
地址,在调整下一个值前按“
SET
”进行确认。
3
按下“SET”以确认更改,并跳至下个值。
输入完IP地址后,重复这些步骤调整子网掩码和网关。完成后,按闪烁的“MENU”按钮退出并返回主页面。
377
设置

时间码设置
输入
记录时共有五个时间码输入选项。
视频输入
选 择 “ 视 频 输 入” 将 从 带 有
SMPTE RP 188元数据的SDI和HDMI信号源提取其嵌入式时间
码。该操作将保存SDI或HDMI信号源和HyperDeck Studio所 记 录 文件 之 间 的 同 步。
外部 当 使 用 后 面 板 所 连 接 的 时 间 码 时 ,点 击 此 选 项 。
内部 使用此选项可记录通过内置时间码发生器所产生的当日时间码。
从上个片段生成 为时间码输入选择“从上个片段生成”选项时,每个文件将从上一个片段尾帧的下一帧开始。
例 如 ,如 果 首 个 片 段 以
10:28:30:10结 束 ,那 么 下 一 个 片 段 时 间 码 将 从 10:28:30:11开始。
预设 如果想要手动设置时间码,选择预设选项。所记录片段将从本手册后面介绍的预设选项
所设置的时间码开始。
丢帧
对于
29
.
97
或
59
.
94
帧率
NTSC
信号源,您可以选择“丢帧”或“无丢帧”时间码。如果是未知信号源,选择
“默认”。这样将保持输入格式,或如果没有有效时间码默认为丢帧。
预设
您可以手动设置时间码,按
SET
按 钮 ,并 通 过 搜 索 旋 钮 和
SET
按钮来输入开始时间码。请确保输入菜单中
的“预设”选项被勾选。
输出
为您的输出选择时间码选项。
时间线 要为记录在存储卡或硬盘上的所有片段输出连续时间码,请选择时间线。
片段 选择片段选项可输出每个单独片段的时间码。
SDI输出
378
设置
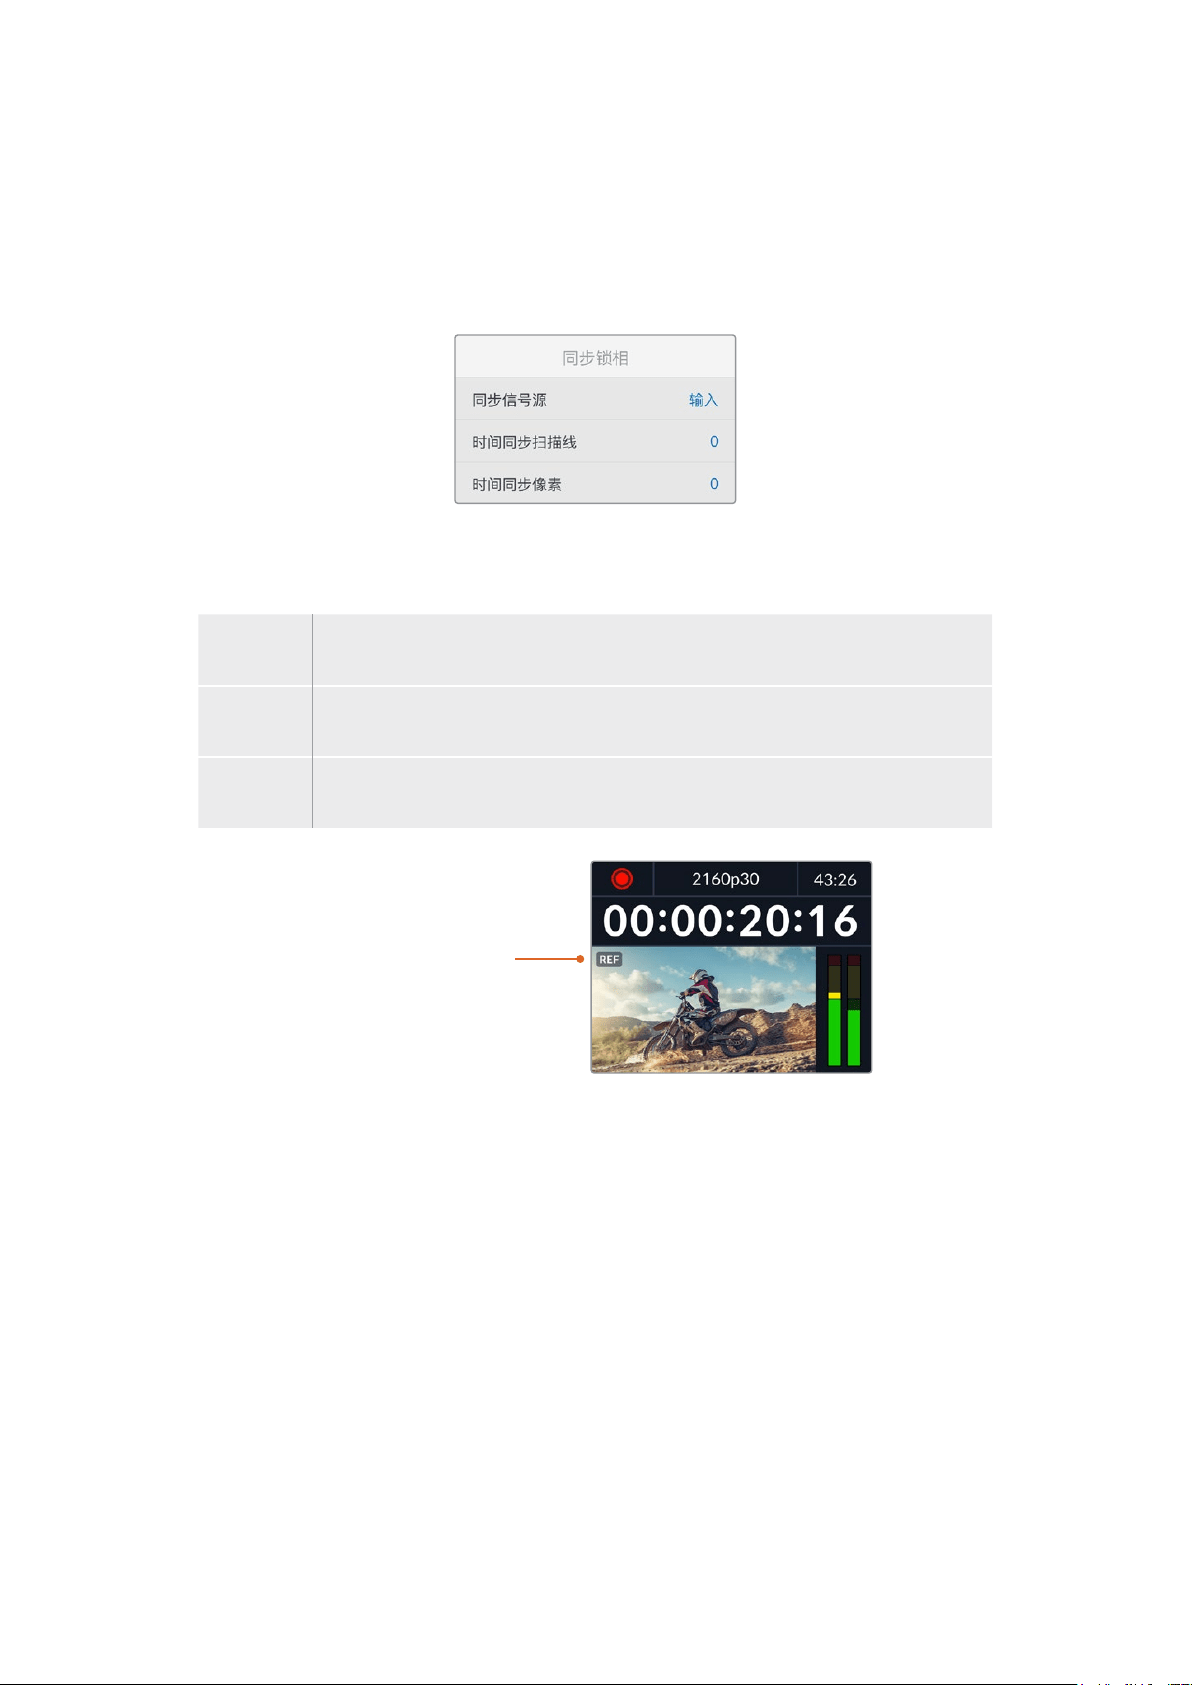
3G-SDI输出
有些广播设备只接收
A级或B级的3G-SDI视频信号。
要保持与其他播出设备的兼容性,请为直接推流
3G
-
SDI
选择
A
级,为双通道多路复用
3G
-
SDI
选择
B
级。
同步锁相设置
同步信号源
从以下三个选项中选择同步信号源。
自动
如果有信号连接到后面板的“
REF IN”接口时,“自动”模式默认为外部。如果没有连接同步信号,
默认为输入
SDI或HDMI源。
输入
如果您想要与
SDI或HDMI信号源中嵌入的同步信号进行同步,请选择“输入”。举例来说,您的模
拟录机可能直接连有同步锁相信号源。
外部
如果
Blackmagic Sync Generator等外部同步设备连接至设备后面板上的“REF IN”接口,
请选择“外部”。
外部同步提示–当
HyperDeck
Studio
成功锁定到外部同
步 信 号 源 时 ,其 内 置
LCD
屏
幕上会显示“
REF
”字样。
同步时间校准
如果您从模拟磁带录机进行存档,需要帧同步,那么可以调整同步时间校准。这一同步调整基于采样,因
此您可以获得精确到采样级别的准确同步调整。
调整时间校准设置:
1
在设置菜单中,使用搜索旋钮将“时间同步扫描线”高光,并按下闪烁的“SET”按钮。
2
顺时针转动旋钮可提高时间同步扫描线数值,逆时针转动可降低其数值。
3
要 确 认 您 的 选 择 ,按 闪 烁 的 “ SET”按钮。
4
要调整像素,请按闪烁的“
MENU
”按钮回到设置菜单,重复以上类似步骤设置同步时间线像素。
379
设置

文件设置
时间戳文件后缀
默认设置下,时间戳添加至文件名是关闭状态。如果您想要将日期和时间记录到文件名中,按SET按钮,
并转动搜索旋钮将“时间戳文件后缀”选项切换至“开启”状态。
HyperDeck_2105061438_0001
HyperDeck
_2105061438_0001
文件名
HyperDeck_2105061438_0001
年
HyperDeck_2105061438_0001
月
HyperDeck_2105061438_0001
星期
HyperDeck_2105061438_0001
时
HyperDeck_2105061438_0001
分
HyperDeck_2105061438_0001
片段编号
HDR格式覆盖
HyperDeck Studio 4K Pro会自动检测4K视频信号或文件中的嵌入式HDR元数据并通过HDMI输出将
其显示。如果该信号或文件标签不正确,或者您的显示不兼容
HDR,那 么 可 以 覆 盖 HDR格式。
要 完 成 以 上 操 作 ,将 “
HDR格式覆盖”设置为某个SDR选 项 ,例 如 Rec.2020 SDR。
可用的
HDR播放 和记 录 设 置有:
自动
自动选项是默认设置,可让
HyperDeck自动选择符合片段HDR元数据的输出格式。
Rec.709
用于采用标准动态范围的高清视频。
Rec.2020 SDR
该设置是用于采用标准动态范围的超高清视频。
HLG
HLG
是“混合对数伽玛”的缩写。该格式可使得兼容
HDR
的电视和监视器播放
HDR
视频,支持上至
Rec
.
2020
SDR的格式。
380
设置

以下设置支持Rec.2020色域以及PQ( 即 感 知 量 化 ,定 义 为 SMPTE ST2084标 准 )。PQ是广色域HDR
的功能,可显示更明亮的图像。亮度值单位是坎德拉每米平方,例如
1000
cd
/
m
2
代表了每平方米 所支持
格式的最大亮度。
ST2084(300)
300 cd/m
2
亮度。
ST2084(500)
500 cd/m
2
亮度。
ST2084(800)
800 cd/m
2
亮度。
ST2084(1000)
1000 cd/m
2
亮度。
ST2084(2000)
2000 cd/m
2
亮度。
ST2084(4000)
4000 cd/m
2
亮度。
远程
远程
选择“远程”可通过
RS-422启 用 远 程 控 制 ,从 而 HyperDeck可通过HyperDeck Extreme Control等其
他设备被远程控制。选中时,有些HyperDeck型号设有专门的远程按钮,该按钮会亮起提示该功能被开
启。取消远程控制可回到本机控制。
录机控制
启用远程功能时,您可以将一台HyperDeck上的播放控制映射到多台其他HyperDeck设 备 上 。从 主
HyperDeck
设备的远程输出接口连接到第二台设备的远程输入接口,菊链连接多台设备,然后继续操
作 ,完 成 其 他 设 备 的
RS
-
422
菊链连接。所有其他设备都启用远程设置后,主设备上的播放控制就可以控
制 其 他 设 备了。
例 如 ,当 您 按 下 主
HyperDeck上的REC记录按钮时,所有连接的其他HyperDeck都将同时开始记录。
需要注意的是,
HyperDeck Studio HD Mini不能作为控制器使用,HyperDeck Pro或Plus型号可以。
重置
恢复出厂设置
在设置菜单中高光“恢复出厂设置”可将
HyperDeck
恢 复 到 出 厂 时 的 设 置 。按 下 “
SET
” 时 ,您 将 看 到 出 现
确认信息。
381
设置
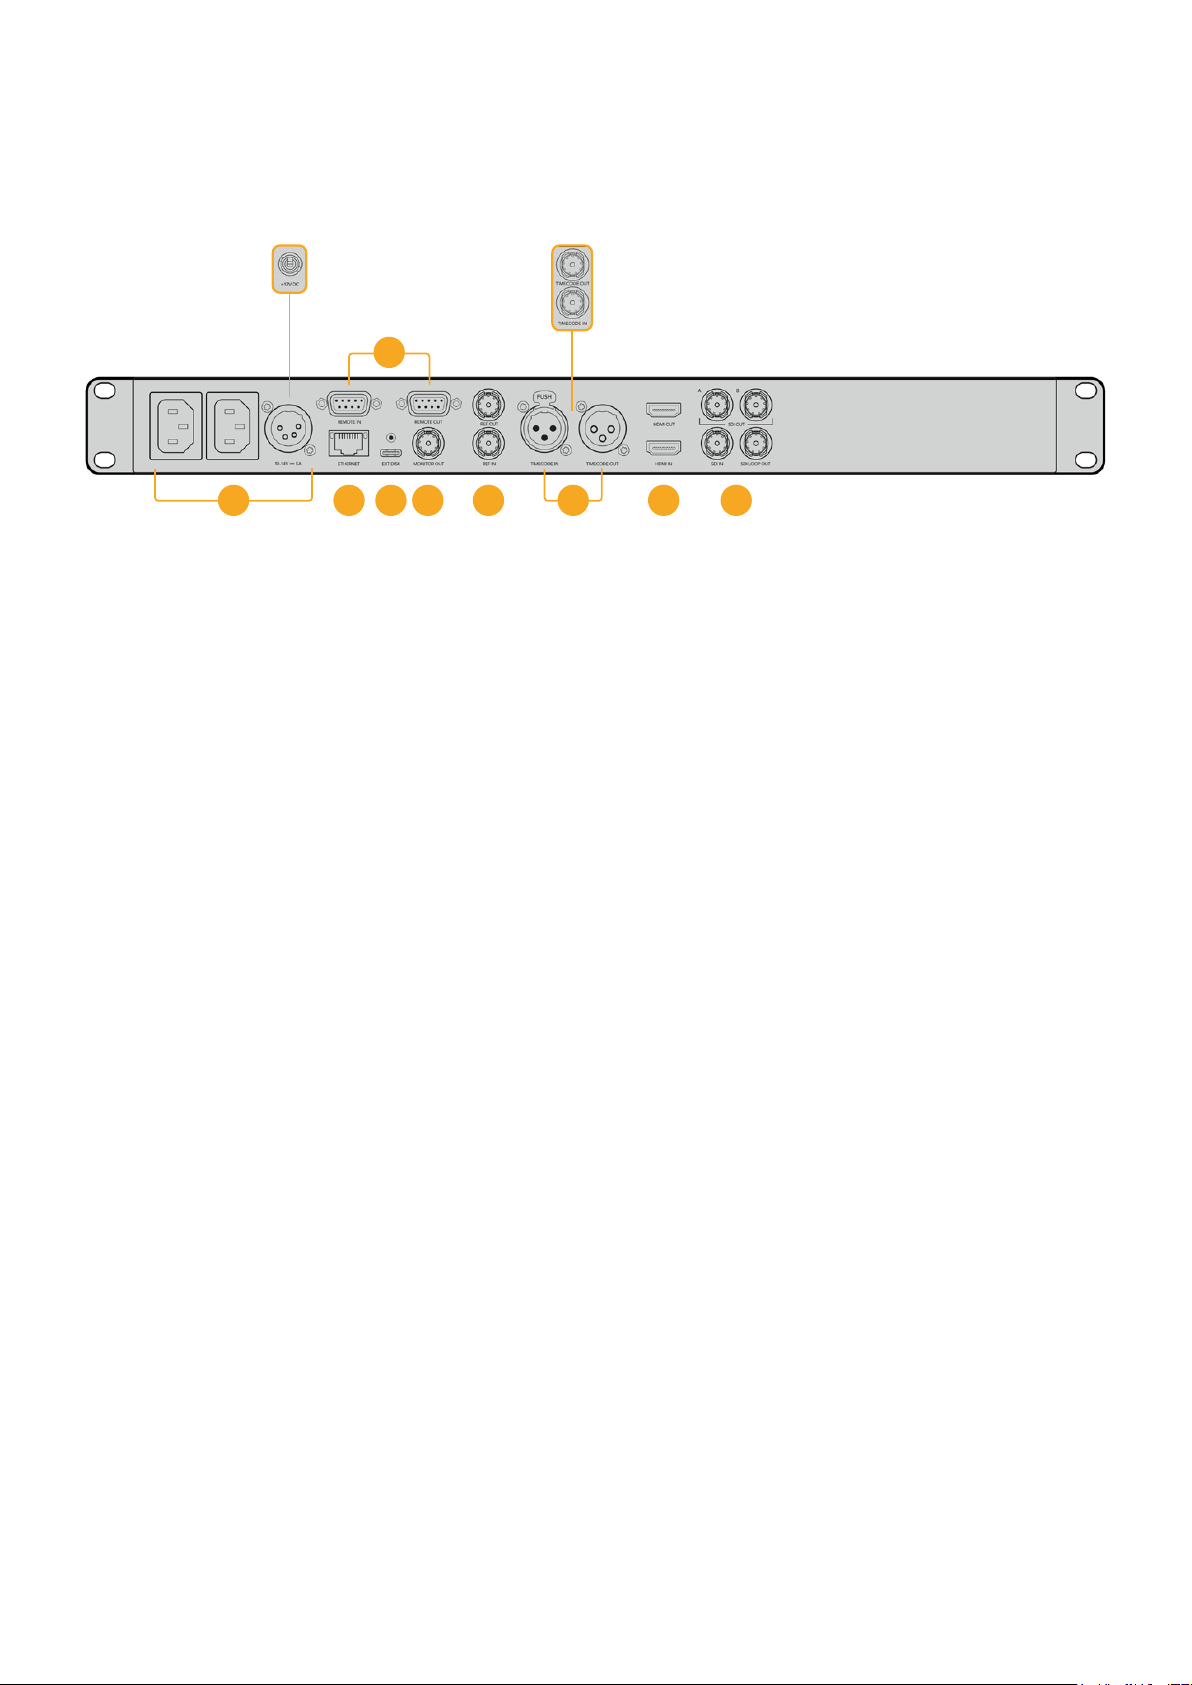
后面板
1
电源
所有
HyperDeck都设有IEC电源输入作为AC主要电源供应。HyperDeck Studio 4K Pro设有
两个电源作为冗余方案。DC输入可连接外部12伏电池电源,还可以作为冗余电源使用。请务必确
保DC电源符合本设备的“DC IN”( DC输入)接口下面标注的输入电压和电流要求。
2
以太网
您可以使用这一以太网端口直接连接网络,实现快速FTP传 输 ,或 通 过 HyperDeck Ethernet
Protocol协议来远程控制设备。HD型号支持1GbE文件传输速度,HyperDeck Studio 4K Pro
型号支持
10GbE
文件传输速度。更多关于通过
FTP
客户端传输文件的信息,请阅读本手册之后
在“通过网络传输文件”部分的介绍。
连接到
ATEM
切换台所在的同一个网络下时,您还可以使用
ATEM
切换台或
ATEM
硬件控制面板
来控制HyperDeck。
3
远程
有些
HyperDeck Studio型号设有两个RS-422 DE-9端口用于远程输入和输出。HyperDeck
Studio HD Mini上只有远程输入。
4
外接硬盘
将硬盘连接至
USB
-
C
接 口 ,在
HyperDeck
Studio
HD
型 号 上 ,您 可 以 高 达
5Gb
/
s
的速度记录至
外接硬盘。HyperDeck Studio 4K Pro型号设有1个USB 3.1第 二 代 接 口 ,传 输 速 度 高 达 10Gb/s。
您还可以连接多端口USB-C集线器或Blackmagic MultiDock 10G,从 而 连 接 一 个 或 多 个 SSD。
当
HyperDeck
通过
USB
连接到您的计算机时,在
Open
Broadcaster
和
Skype
等软件上可以将
HyperDeck作为网络摄像头信号使用。详情请参考本手册“设置Open Broadcaster”部分的内容。
5
监看输出
3G-SDI监看输出接口提供了带有叠加显示的向下调整,因此您可以在外接显示器上进行监看。
叠加显示包括硬盘图标、音频表、计数器显示以及
LUT
显 示 。更 多 关 于 监 看
SDI
设 置 的 信 息 ,包 括
如何输出纯净信号等内容,请参考本手册前面关于“设置”部分的内容。
2 5 6 8 941
HyperDeck
Studio
HD
Mini
设有一个带锁定环的电源接口,
以防意外断开
HyperDeck
Studio
HD
Mini
和
Plus
型号设有
BNC
接口用于
时间码输入和输出
7
3
382
后面板

6
同步
所有
HyperDeck
型号都自带同步信号发生器,可生成稳定的黑场或三电平视频同步信号,以便
将HyperDeck的同步输出连接到其他视频设备的同步输入上,并将它们锁定到由HyperDeck
生成的主同步信号上。
此外,您还可以将一路同步信号连接到这一同步输入上,并且将
HyperDeck
和外接主同步源进
行 同 步。
更多关于选择同步信号源,包括环通连接多台HyperDeck硬盘录机时选择同步信号源的信息,
请阅读本手册之前在设置部分的介绍。
7
时间码
所有HyperDeck都具备自己的TOD时间码发生器。类似于同步信号,您可以将来自主HyperDeck
的时间码信号环通连接到其他多台HyperDeck或视频设备上,让所有记录都共享相同的时间码。
根据您所使用的HyperDeck型 号 ,时 间 码 接 口 可 能 是 BNC或XLR规格。更多关于如何选择时间
码选项的信息,请阅读本手册之前在设置部分的介绍。
8
HDMI
将HDMI输出口连接到HDMI电视机和监视器。
HyperDeck
将自动检测
SDR
和
HDR
视频格式,当信号标有正确元数据时适用。您还可以通过设
置菜单覆盖HDR Flag。更多内容,请参阅本手册前面“设置”部分的内容。
9
SDI
HyperDeck Studio HD Mini型号设有单个3G SDI,支 持 上 至 1080p60的信号。HyperDeck
Studio
HD
Plus
和
HyperDeck
Studio
HD
Pro
型号设有
6G
-
SDI
,支 持 从
SD
上至
2160p30
的信号。HyperDeck Studio 4K Pro设有12G-SDI输入和输出,支持上至2160p60的分辨率。
HyperDeck
设有两个
SDI
输 出 ,当 连 接 至
ATEM
切换台时,可用于播放
ProRes
4444
文件同时
作为填充和抠像使用。
383
后面板
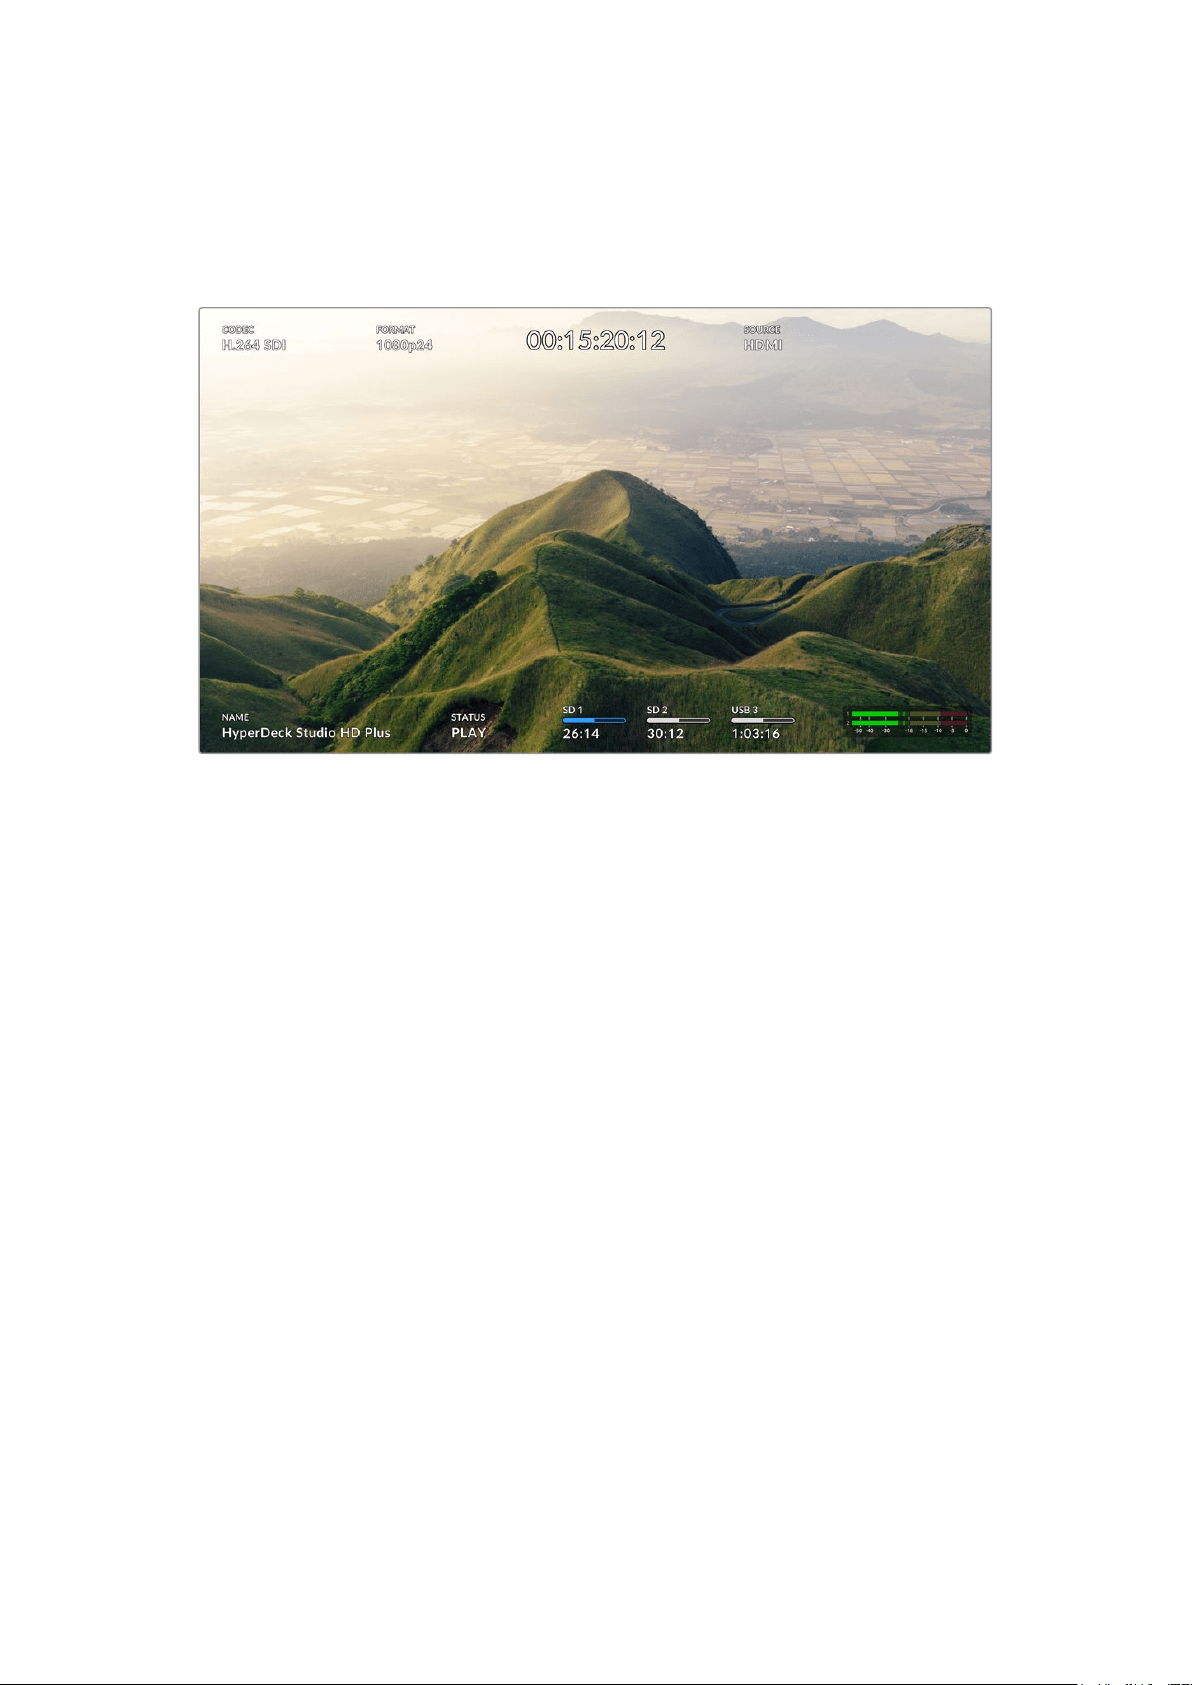
使用监看输出
监看输出是查看记录或播放视频的快捷途径,并且叠加显示了重要的状态信息,比如所使用的编解码、视
频和信号格式、帧率、时间码、文件名、播放控制状态、存储介质状态和音频电平等。
以下逐一介绍了显示信息。
编解码
通过
LCD菜单显示了所选的编解码。
格式
播放模式下,显示了当前片段分辨率和帧率。如果在记录模式时,将显示连接到当前所选信号源视频的分
辨率和帧率。
时间码
播放时显示您视频片段中呈现的时间码,或者是当前通过视频或时间码输入所记录的。您还可以在显示片
段时间码或时间线计数器之间进行选择。
信号源
显示当前所选的
SDI或HDMI信号源。如果显示“无信号”,意味着未检测到信号。
名称
显示了HyperDeck硬盘录机名称。更多关于如何更改摄影机名称的信息,请参考本手册后面关
于“Blackmagic HyperDeck Setup”部分的介绍。
384
使用监看输出

状态
播放或记录片段时,该提示将显示播放控制状态和当前所使用的控制信息。具体包括:
HyperDeck处于待机模式。
提示了播放已设为“循环”所有共享当
前所选视频格式的记录片段。
视频正在播放。 提示了播放设为循环单个片段。
视频正在记录。
记录时该提示会亮起红色。
提示了快速搜索模式已开启,
但位于待机中。
快进或倒回时显示。
该数字提示了速度。
HyperDeck位于慢速搜索模式。
HyperDeck位于极速搜索模式。
存储介质状态
这三个提示显示了
SD
卡、
SSD
以及使用
USB
硬盘的名称及状态,不同
HyperDeck
型号信息也略有不同。
HyperDeck
Studio HD Plus
SD卡插槽1 SD卡插槽2
所使用的外接存储盘
HyperDeck
Studio Pro型号
当前所使用的
SD或SSD插槽
下一个将被使用的
SD或SSD插槽
所使用的外接存储盘
在所有
HyperDeck
型号上,第三个提示都显示了
USB
硬 盘 。如 果 您 使 用 的 是
USB
集线器或者
Blackmagic
MultiDock 10G等外接硬盘坞,那么所使用的硬盘将被显示。
硬盘或驱动提示
进度栏上方的文字提示了
SD
卡插槽或
SSD
插槽。如果您正在记录,所记录硬盘左侧将显示“当
前”,从而让您轻松识别哪个硬盘正在记录中。进度栏上方显示“下一个”提示了下一个将要记录
的硬盘或驱动。
385
使用监看输出

存储条
根据当前状态,存储条图标有红白蓝三种颜色显示,还将显示卡上所使用的空间。
蓝色硬盘图标代表正在使用的存储盘。该硬盘将被用于播放和记录。
白色硬盘图标表示存储介质已连接,但尚未被使用。实心的白色图标表示
存储介质已满。
红色的图标表示记录中。
存储条下面的文字显示了剩余记录时间或者插槽状态。
剩余时间
当您的
SD
卡或
SSD
硬盘有剩余空间时,根据当前的源格式和已选的编解码及画质设置,可用的
记录时长会以“时:分:秒”的格式显示。如果剩余时间少于一小时,就会显示分:秒。
插槽状态
如果插槽没有连接任何存储介质,将显示“无存储卡”和“无存储盘”。
当
SD
卡、
SSD
或
USB
硬盘已满时,该图标会显示“存储卡已满”或“存储盘已满”,提示您需要替换
存储介质。如果插入另一张SD卡或SSD,系统会自动开始在这张SD或SSD上记录。如果您连接
了 外 部 存 储 盘 ,当 所 有 SD卡和SSD存满时,会在外部存储盘上开始记录。
锁定的存储盘会在进度条下方显示“已锁定”。
386
使用监看输出

音频表
屏幕上的音频表将显示多达16个音频声道,具体取决于您想要记录的通道数量。您可以通过LCD
菜单中音频选项卡选择PPM表或VU表。
要选择所记录音频通道的数量,或者更改不同的音频表,请使用LCD菜 单 的 音 频 选 项 卡 。更 多 内
容,请参阅本手册前面“设置”部分的内容。
存储介质
SD
卡
为获得高质量Ultra HD记 录 ,我 们 建 议 使 用 高 速 UHS-II型SD卡 。这 些 卡 需 要 具 备 超 过 220MB/s的写入
速度,可记录高达
Ultra
HD
2160p60
的影像。但是,如果您以低比特率记录更高压缩格式,那么或许能
使用更低速的存储卡。通常来讲,卡的速度越快越好。
请定期关注本操作手册是否已有更新版本,以便获得最新信息。请到Blackmagic Design网站
www.blackmagicdesign.com/cn/support进行下载。
HyperDeckStudio4KPro应使用哪些SD卡?
建议您使用以下几款SD卡记录最高60fps的2160p影像:
品牌 型号 容量
Angelbird AV Pro MK2 V90 SDXC 128GB
Angelbird AV Pro MK2 V90 SDXC 256GB
ProGrade Digital SDXC UHS-II V90 300R 128GB
ProGrade Digital SDXC UHS-II V90 300R 256GB
Wise SD2-128U3 SDXC UHS-II 128GB
387
存储介质

HyperDeckStudioHDPro应使用哪些SD卡?
建议您使用以下几款SD卡记录最高30fps的2160p影像:
品牌 型号 容量
Angelbird AV Pro MK2 V90 SDXC 64GB
Angelbird AV Pro MK2 V90 SDXC 128GB
Angelbird AV Pro MK2 V90 SDXC 256GB
ProGrade Digital SDXC UHS-II V90 300R 64GB
ProGrade Digital SDXC UHS-II V90 300R 128GB
ProGrade Digital SDXC UHS-II V90 300R 256GB
Wise SD2-64U3 SDXC UHS-II 64GB
Wise SD2-128U3 SDXC UHS-II 128GB
HyperDeckStudioHDPlus应使用哪些SD卡?
建议您使用以下几款SD卡记录最高30fps的2160p影像:
品牌 型号 容量
Angelbird AV Pro MK2 V90 SDXC 64GB
Angelbird AV Pro MK2 V90 SDXC 128GB
Angelbird AV Pro MK2 V90 SDXC 256GB
ProGrade Digital SDXC UHS-II V90 300R 64GB
ProGrade Digital SDXC UHS-II V90 300R 128GB
ProGrade Digital SDXC UHS-II V90 300R 256GB
Wise SD2-64U3 SDXC UHS-II 64GB
Wise SD2-128U3 SDXC UHS-II 128GB
HyperDeckStudioHDMini应使用哪些SD卡?
建议您使用以下几款SD卡记录最高60fps的1080p ProRes 422 HQ影像:
品牌 型号 容量
Angelbird AV Pro MK2 V90 SDXC 64GB
Angelbird AV Pro MK2 V90 SDXC 128GB
Angelbird AV Pro MK2 V90 SDXC 256GB
ProGrade Digital SDXC UHS-II V90 300R 64GB
ProGrade Digital SDXC UHS-II V90 300R 128GB
ProGrade Digital SDXC UHS-II V90 300R 256GB
Wise SD2-64U3 SDXC UHS-II 64GB
Wise SD2-128U3 SDXC UHS-II 128GB
388
存储介质
SSD
如果您的摄制工作涉及到数据速率较高的视频,请谨慎挑选您使用的
SSD
硬 盘 。因 为 有 些
SSD
硬盘的录
入速度可比其生产商所描述的速度低50%之多,因此即使硬盘规格标明该SSD硬盘的速度足以处理视
频文件,实际上并无法胜任实时视频录制。
隐藏数据压缩大多会影响记录,而这类硬盘却依然可以用于实时播放。
我们通过测试后发现型号更新、尺寸更大的
SSD
和容量更大的
SSD
硬盘通常具备更快的读写速度。推荐
使用的SSD将在下文给出。
HyperDeckStudio4KPro应使用哪些SSD?
建议您使用以下几款SSD记录最高60fps的2160p影像:
品牌 型号 容量
Samsung 860 PRO 512GB
Samsung 860 PRO 1TB
Samsung 870 EVO (MZ-77E250BW) 250GB
Samsung 870 EVO (MZ-77E500BW) 500GB
Samsung 870 EVO (MZ-77E1T0BW) 1TB
Samsung 870 EVO (MZ-77E2T0BW) 2TB
HyperDeckStudioHDPro应使用哪些SSD?
建议您使用以下几款SSD记录最高30fps的2160p影像:
品牌 型号 容量
Samsung 860 PRO 512GB
Samsung 860 PRO 1TB
Samsung 870 EVO (MZ-77E250BW) 250GB
Samsung 870 EVO (MZ-77E500BW) 500GB
Samsung 870 EVO (MZ-77E1T0BW) 1TB
Samsung 870 EVO (MZ-77E2T0BW) 2TB
389
存储介质

外接硬盘
所有HyperDeck型号都可以直接记录到USB-C硬盘上。这类存储盘速度快,容量大,可进行长时间视频
记录。您可以将硬盘连接到计算机,直接在硬盘上进行剪辑!
如 要 获 得 更 大 的 存 储 空 间 ,可 以 连 接
USB-C硬盘坞或外置硬盘。如要连接Blackmagic MultiDock 10G
或USB-C硬 盘 ,用 线 缆 将 USB-C设备连接到HyperDeck后方的“EXT DISK”端口。
HyperDeckStudio4KPro应使用哪些USB-C硬盘?
建议您使用以下几款USB-C硬盘记录最高60fps的2160p影像:
品牌 型号 容量
Angelbird SSD2GO PKT MK2 512GB
Angelbird SSD2GO PKT MK2 2TB
DelKinDevices Juggler 1TB
DelKinDevices Juggler 2TB
LaCie Rugged SSD STHR2000800 2TB
LaCie Rugged SSD Pro STHZ1000800 1TB
Wise PTS-512 Portable SSD 512GB
Wise PTS-1024 Portable SSD 1TB
HyperDeckStudioHDPro应使用哪些USB-C硬盘?
建议您使用以下几款USB-C硬盘记录最高30fps的2160p影像:
品牌 型号 容量
Angelbird SSD2GO PKT MK2 512GB
Angelbird SSD2GO PKT MK2 2TB
DelKinDevices Juggler 1TB
DelKinDevices Juggler 2TB
LaCie Rugged SSD STHR2000800 2TB
LaCie Rugged SSD Pro STHZ1000800 1TB
Wise PTS-512 Portable SSD 512GB
Wise PTS-1024 Portable SSD 1TB
390
存储介质

HyperDeckStudioHDPlus应使用哪些USB-C硬盘?
建议您使用以下几款USB-C硬盘记录最高30fps的2160p影像:
品牌 型号 容量
Angelbird SSD2GO PKT MK2 512GB
Angelbird SSD2GO PKT MK2 2TB
DelKinDevices Juggler 1TB
DelKinDevices Juggler 2TB
LaCie Rugged SSD STHR2000800 2TB
LaCie Rugged SSD Pro STHZ1000800 1TB
Wise PTS-512 Portable SSD 512GB
Wise PTS-1024 Portable SSD 1TB
HyperDeckStudioHDMini应使用哪些USB-C硬盘?
建议您使用以下几款USB-C硬盘记录最高60fps的1080p ProRes 422 HQ影像:
品牌 型号 容量
Angelbird SSD2GO PKT MK2 512GB
Angelbird SSD2GO PKT MK2 2TB
DelKinDevices Juggler 1TB
DelKinDevices Juggler 2TB
Wise PTS-512 Portable SSD 512GB
Wise PTS-1024 Portable SSD 1TB
391
存储介质

格式化存储介质
在计算机上准备存储介质
在Mac计算机上格式化存储介质
Mac系统自带的“磁盘工具”应用程序可以将硬盘格式化为HFS+或exFAT格式。
由于格式化后硬盘内所有文件都会被清除,因此请务必在格式化前备份硬盘上的所有重要文件。
1
通过外部连接器或数据线将SSD连 接 至 电 脑 ,忽 略 任 何 关 于 使 用 SSD作为Time Machine备份
选择的信息。CFast卡可通过外部读卡器连接到您的计算机。
2
进入“应用程序/实用工具”界面,运行“磁盘工具”程序。
3
点击SSD或CFast卡图标,再点击“抹掉”选项卡。
4
将格式设置为“Mac OS扩 展( 日 志 式 )” 或 “ exFAT”。
5
输入新增分区的名字,点击“抹掉”。您的存储介质会迅速格式化,以备HyperDeck使用。
在Windows计算机上格式化存储介质
使用
Windows
PC
的格式化对话框可将硬盘格式化为
exFAT
。由 于 格 式 化 后
SSD
硬盘或
SD
卡内所有文
件都会被清除,因此请务必在格式化前备份硬盘上的所有重要文件。
1
通过外接硬盘座或数据线将SSD连接至计算机。CFast卡可通过外部读卡器连接到您的计算机。
2
打开“开始菜单”或“开始画面”,选择“我的电脑”。右键点击SSD或CFast卡。
3
从快 捷 菜 单 中 选 择 “ 格 式化 ”。
4
将文件系统设置为“exFAT”,将分配单元大小设置成128kb。
5
输入卷标,选择“快速格式化”,点击“开始”。
6
您 的 存 储 介 质 会 迅 速 格 式 化 ,以 备 HyperDeck使用。
392
格式化存储介质

将HyperDeck作为网络摄像头使用
通过
USB
连接计算机时,您的
HyperDeck
硬盘录机会被识别为网络摄像头。这表示您可以使用
Open
Broadcaster等流媒体软件播出来自HyperDeck的播放内容或记录影像。
设置网络摄像头信号源
大部分情况下,流媒体软件会自动将
HyperDeck
设置为网络摄像头,因此当您运行流媒体软件时,就能立
即从HyperDeck Studio上看到图像。如果您的软件没有自动选择HyperDeck,只 要 将 软 件 设 置 为 使 用
HyperDeck作为网络摄像头和麦克风即可。
以下举例说明如何在
Skype上设定网络摄像头设置。
1
在Skype菜 单 栏 中 ,打 开 “ 音 频 和 视 频 设 置 ” 。
2
点击“摄像头”菜单,从列表中选择“HyperDeck” 。预 览 窗 口 会 显 示 来 自 HyperDeck的视频画面。
3
打开“麦克风”菜单,选择“HyperDeck”作为音频源。
正确设置
Skype后,不妨尝试与朋友进行Skype视频通话来快速测试并检查网络摄像头是否工作。
完成以上操作步骤后,
HyperDeck Studio应已准备就绪,可以向全世界直播您的视频了!
393
将HyperDeck作为网络摄像头使用
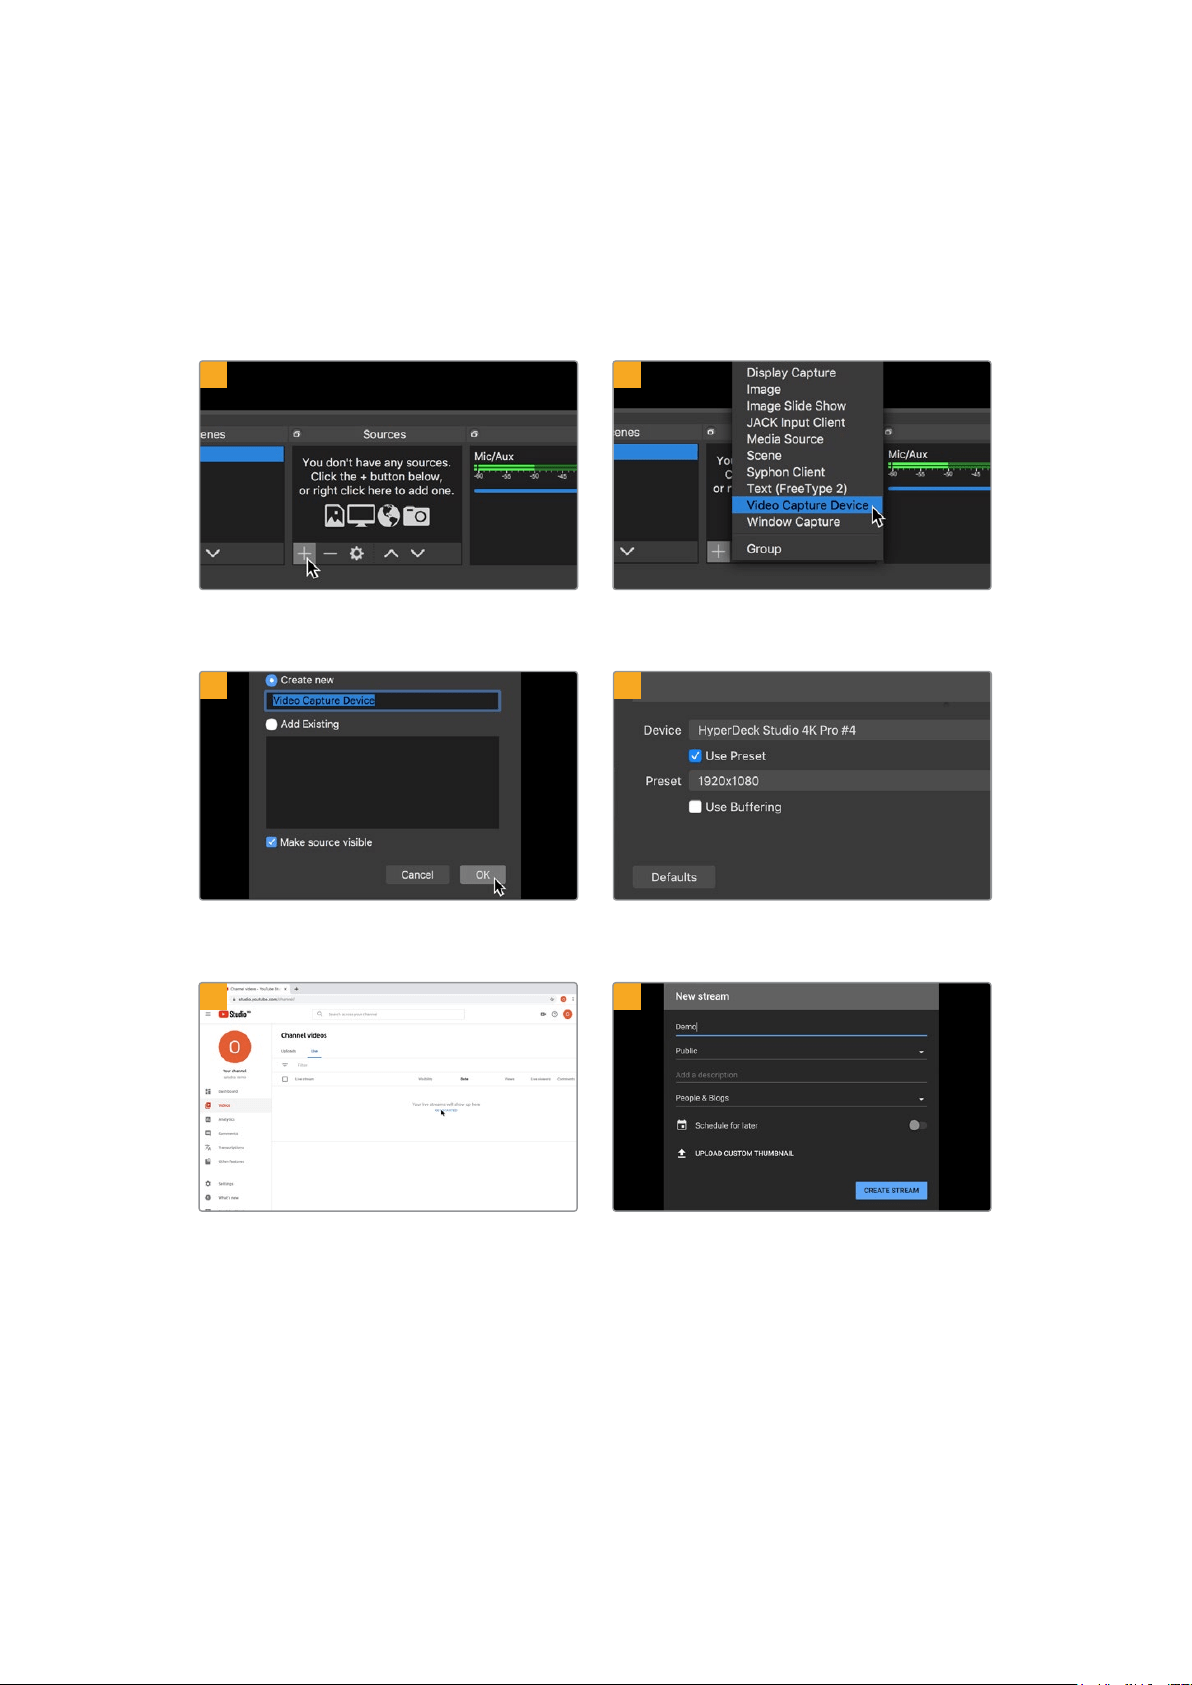
设置
Open
Broadcaster
Open Broadcaster是一个开源程序,是HyperDeck Studio与YouTube、Twitch、Facebook Live等常
用流媒体软件之间的流媒体平台。Open Broadcaster会把视频压缩到流媒体程序易于管理的比特率。
以下示例演示了如何设置Open Broadcaster,从 而 使 用 YouTube Live流媒体程序直播来自HyperDeck
Studio的网络摄像头输出内容。
打开Open Broadcaster,点 击 “ Sources”窗口中的加号
图标。
选择“Video Capture Device”。
为新信号源命名并点击“
Ok”。 在设备菜单中,选择“HyperDeck Studio”型号并点
击“
OK”。
打开您的
YouTube账号。点击“开始直播”按钮,然后点击
“ 直 播 ”。
在YouTube“Stream”(直播)选项中,键入您的播出内容
信 息 ,点 击 “
create stream”( 创 建 直 播 )。
1
2
3
4
5
6
394
将HyperDeck作为网络摄像头使用
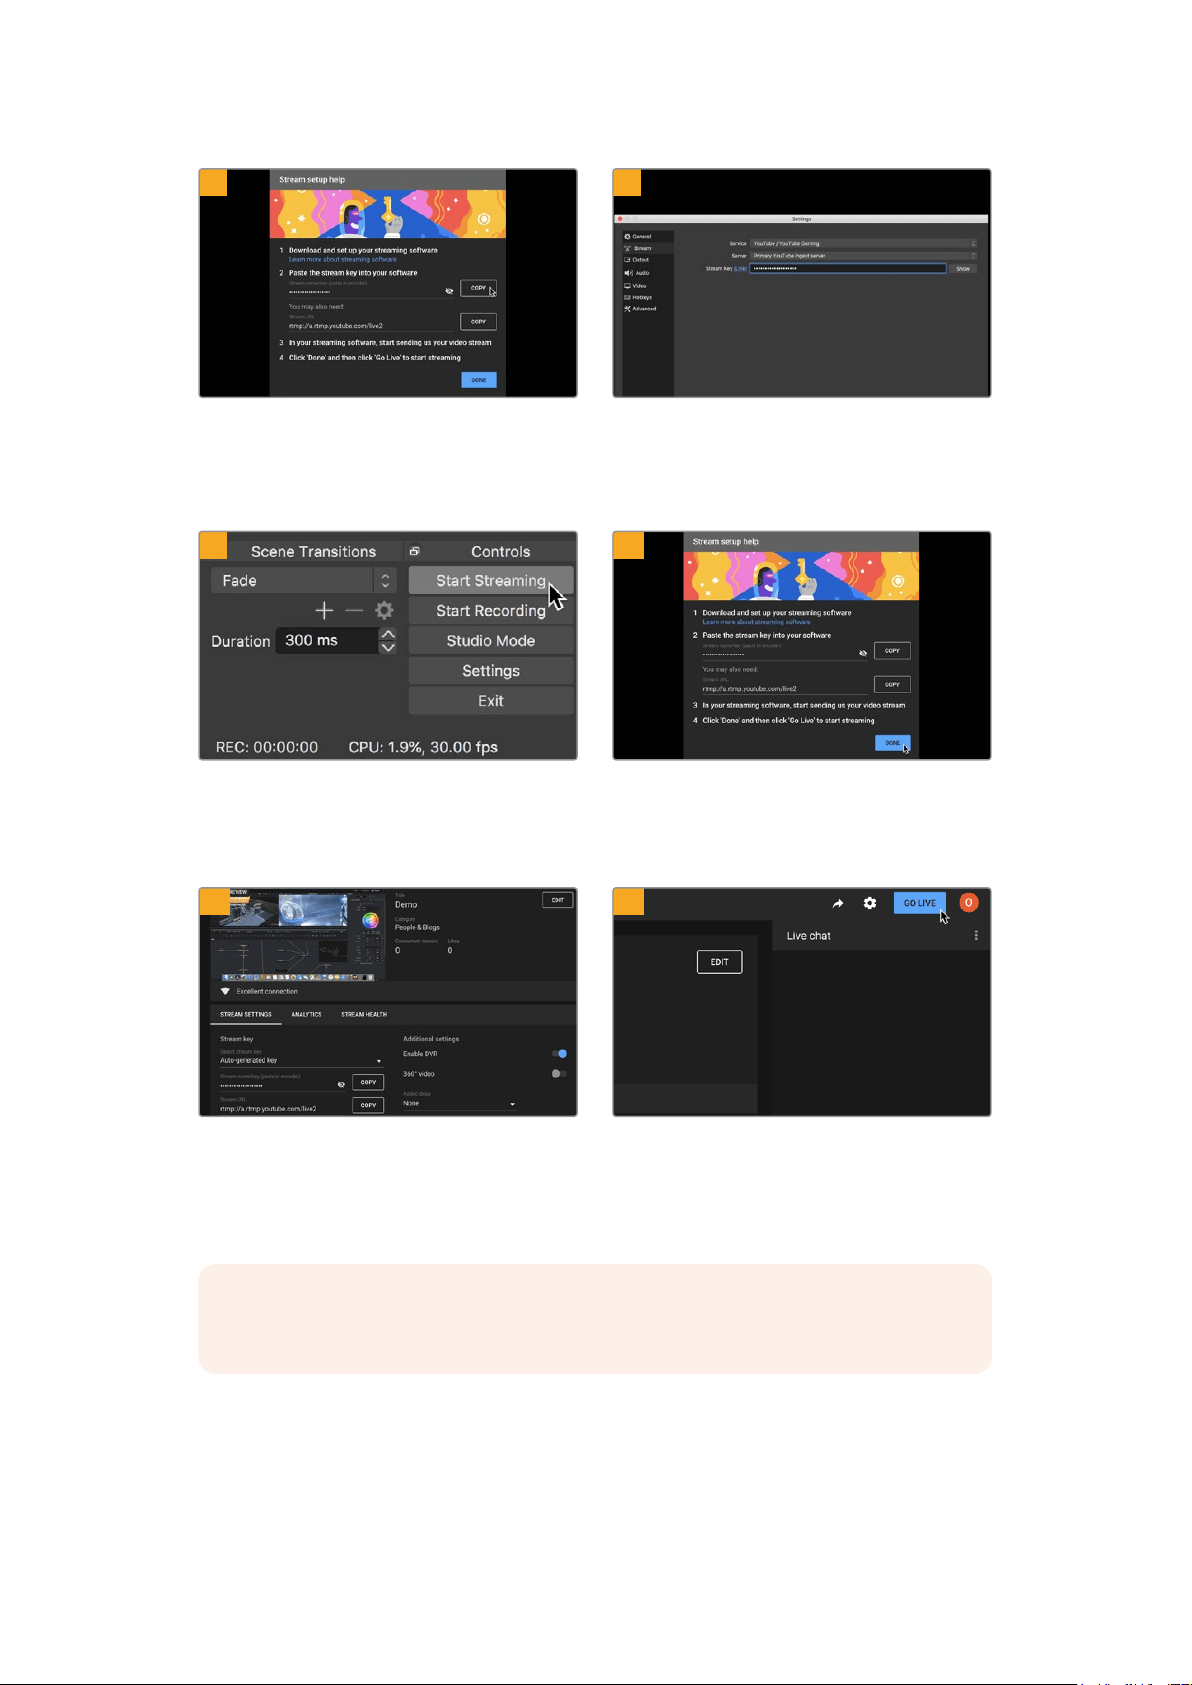
YouTube会 生 成 视 频 流 密 钥 ,以 便 将 Open Broadcaster
导向您的YouTube账 户。
点击视频流密钥一侧的“复制”按钮。复制将要粘贴到
Open Broadcaster的视频流密钥。
回到
Open Broadcaster,在菜单栏中点击“OBS/
preferences” 打 开 偏 好 设 置 。选 择 “ Stream”。
将
HyperDeck的视频流密钥粘贴到Open Broadcaster
的流媒体预览窗口中。
要把
Open Broadcaster的播出链接与YouTube相连,
请在屏幕右下角点击“
Start Streaming”。该步骤可以建
立从
Open Broadcaster到YouTube的 链 接 ,此 后 一 切 设
置都可在
YouTube Live中完成。
回到YouTube Live,您 会 看 到 背 景 中 显 示 来 自
HyperDeck的网络摄像头节目输出画面。点击“DONE”
( 完 成 )。
Open Broadcaster现在可以和YouTube Live进行通信
了,您就可以开始播出。请最后检查一遍,确保运行正常。
检 查 并 确 认 后 ,点 击 “ Go Live” 就 可 以 开 始 直 播 了。
现 在 ,您 就 已 经 开 始 使 用 Open Broadcaster通过YouTube平 台 进 行 直 播 了。
备注
由于网络流媒体本身经常延迟的特点,非常重要的是要观看YouTube上的流媒体并确认
节目已结束,然后在点击“结束流媒体”,从而确保不会意外切断播出内容。
7
8
9
10
11
12
395
将HyperDeck作为网络摄像头使用

Blackmagic HyperDeck Setup
使用
HyperDeck
Setup
Blackmagic HyperDeck Setup实用程序可用于更改HyperDeck的各项设置并更 新其内部软件。
使用
HyperDeck Setup:
1
将HyperDeck通过USB或以太网连接到您的计算机。
2
运行HyperDeck Setup。您可在该实用程序的主页上为您的HyperDeck型号命名。
3
点击圆形的设置图标或HyperDeck图像打开设置页面。
设置选项卡
如果您拥有多台
HyperDeck
Studio
,建议为每台设备单独命名,以便加以区分。具体可通过“
Name
”
( 命 名 )选 项 栏 进 行 设 置 。
396
BlackmagicHyperDeckSetup
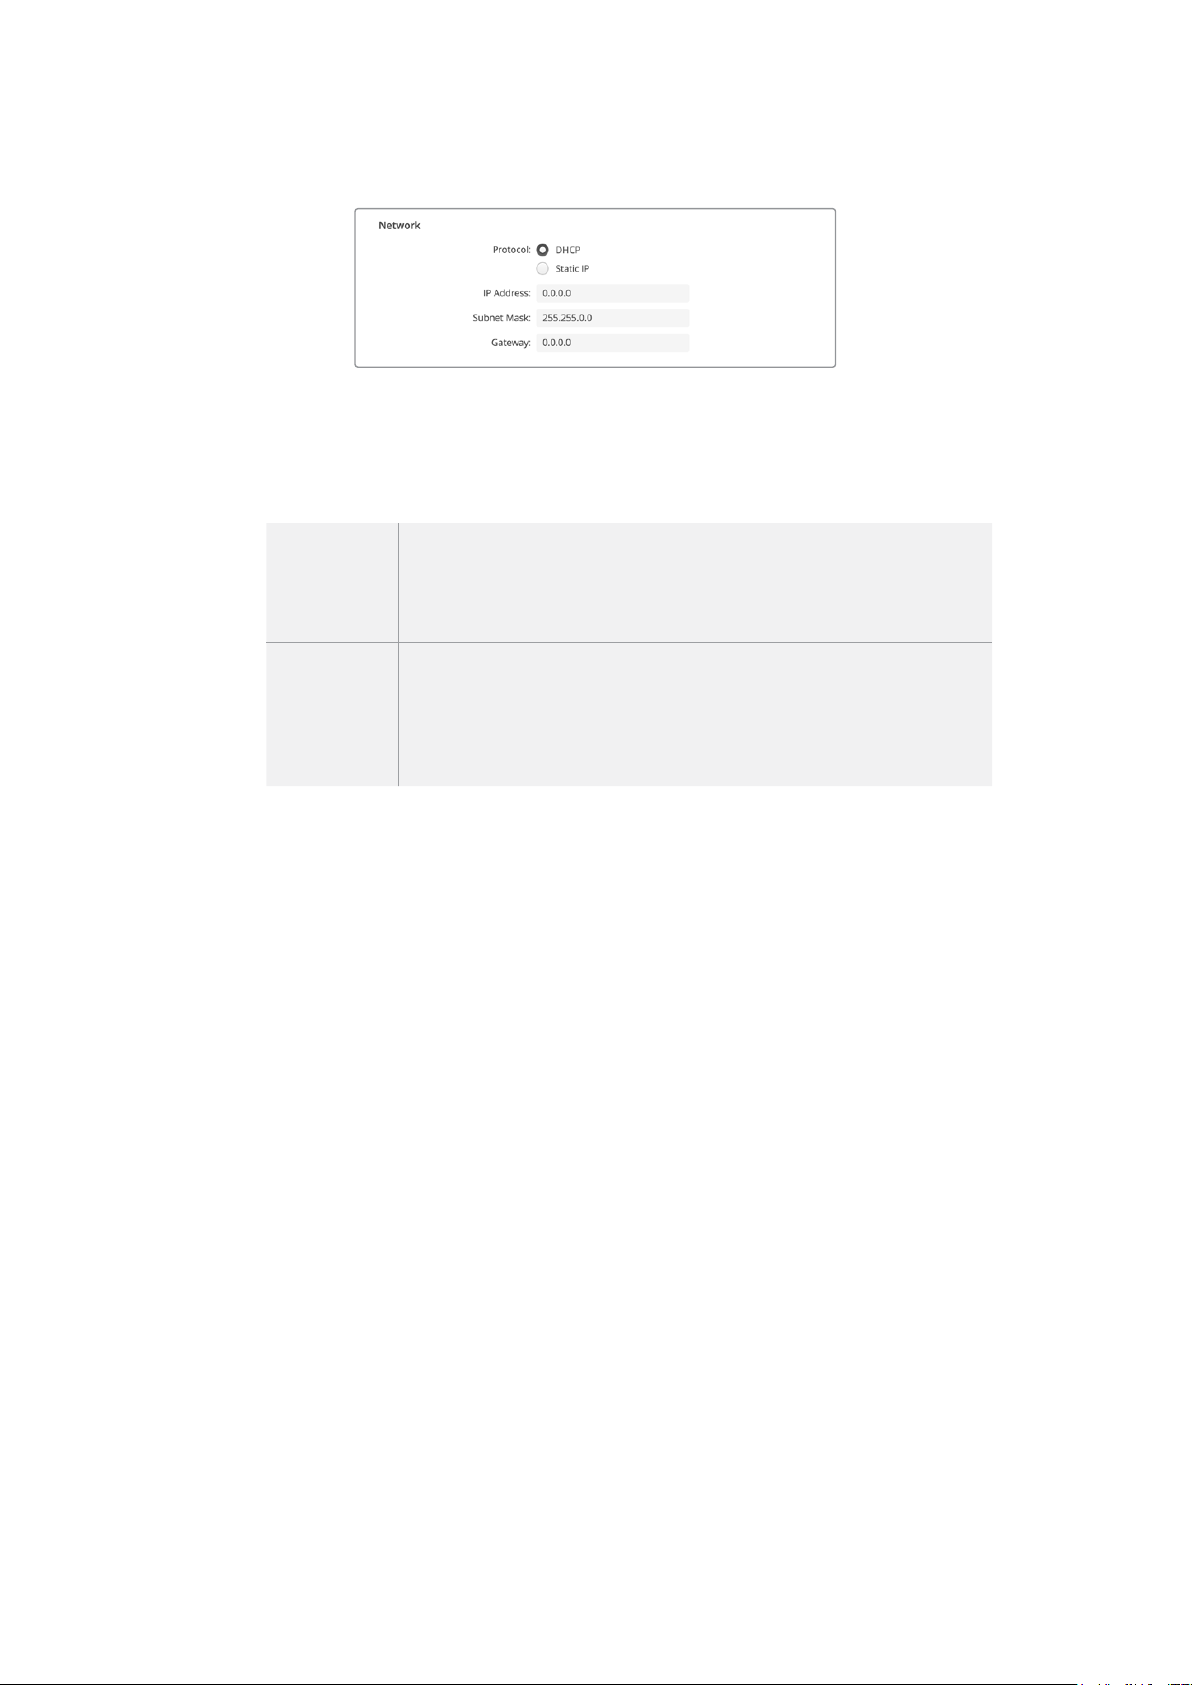
网络
协议
如果要将
HyperDeck
Studio
和
ATEM
切换台结合使用,或者通过
HyperDeck
Ethernet
Protocol
以太网协议对
HyperDeck
Studio
进 行 远 程 控 制 ,那 么
HyperDeck
Studio
就需要和其他使用
DHCP的设备位于同一网络下,或者您也可以手动添加固定的IP地址。
DHCP
HyperDeck
Studio硬盘录机默认使用DHCP设置。动态主机配置协议也叫
DHCP,这个网络服务器可以自动寻找您的HyperDeck Studio并为其指派一个IP地
址。DHCP方便易用,可通过以太网连接设备,并确保设备的IP地址相互不冲突。
大部分计算机和网络交换机支持DHCP。
静态
IP
即“Static IP”,选中该选项后,您可以手动输入具体的网络信息。当您进行手动设置
IP地址以便让所有设备都能建立通信时,这些设备必须共享同一个子网掩码和网关
设 置 。此 外 ,控 制 面 板 IP地址的前三段数值也必须匹配。如果网络上其他设备的IP地
址具有相同的第四段数值,那么会有冲突,设备不会连接。如果遇到冲突,只要将该
设备IP地址的第四段识别数值进行修改即可。
LUT
选项卡
HyperDeck
型号后面板设有监看输出接口,能显示套用了
3D
LUT
的输入视频。
17
点、
33
点和
65
点精度
的.cube LUT文件均受到支持。
当您在摄影机上使用“
Film
”动态范围,通常会呈现出低饱和度的平淡画面,此时该功能就十分实用。通过
应用显示LUT,您可以对视频调色后的画面有个大致的把握。
3D LUT仅应用于监看输出显示器,并不会被记录到视频本身,因此您不用担心记录画面会永久应用这一
风格。
但 是 ,如 果 您 想 让
DaVinci
Resolve
中的画面应用相同的
LUT
,只 需 将 您 在
HyperDeck
Studio
中所使用
的同一个LUT .cube文件导入DaVinci Resolve,并且为您的调色套用这一文件即可。
397
BlackmagicHyperDeckSetup
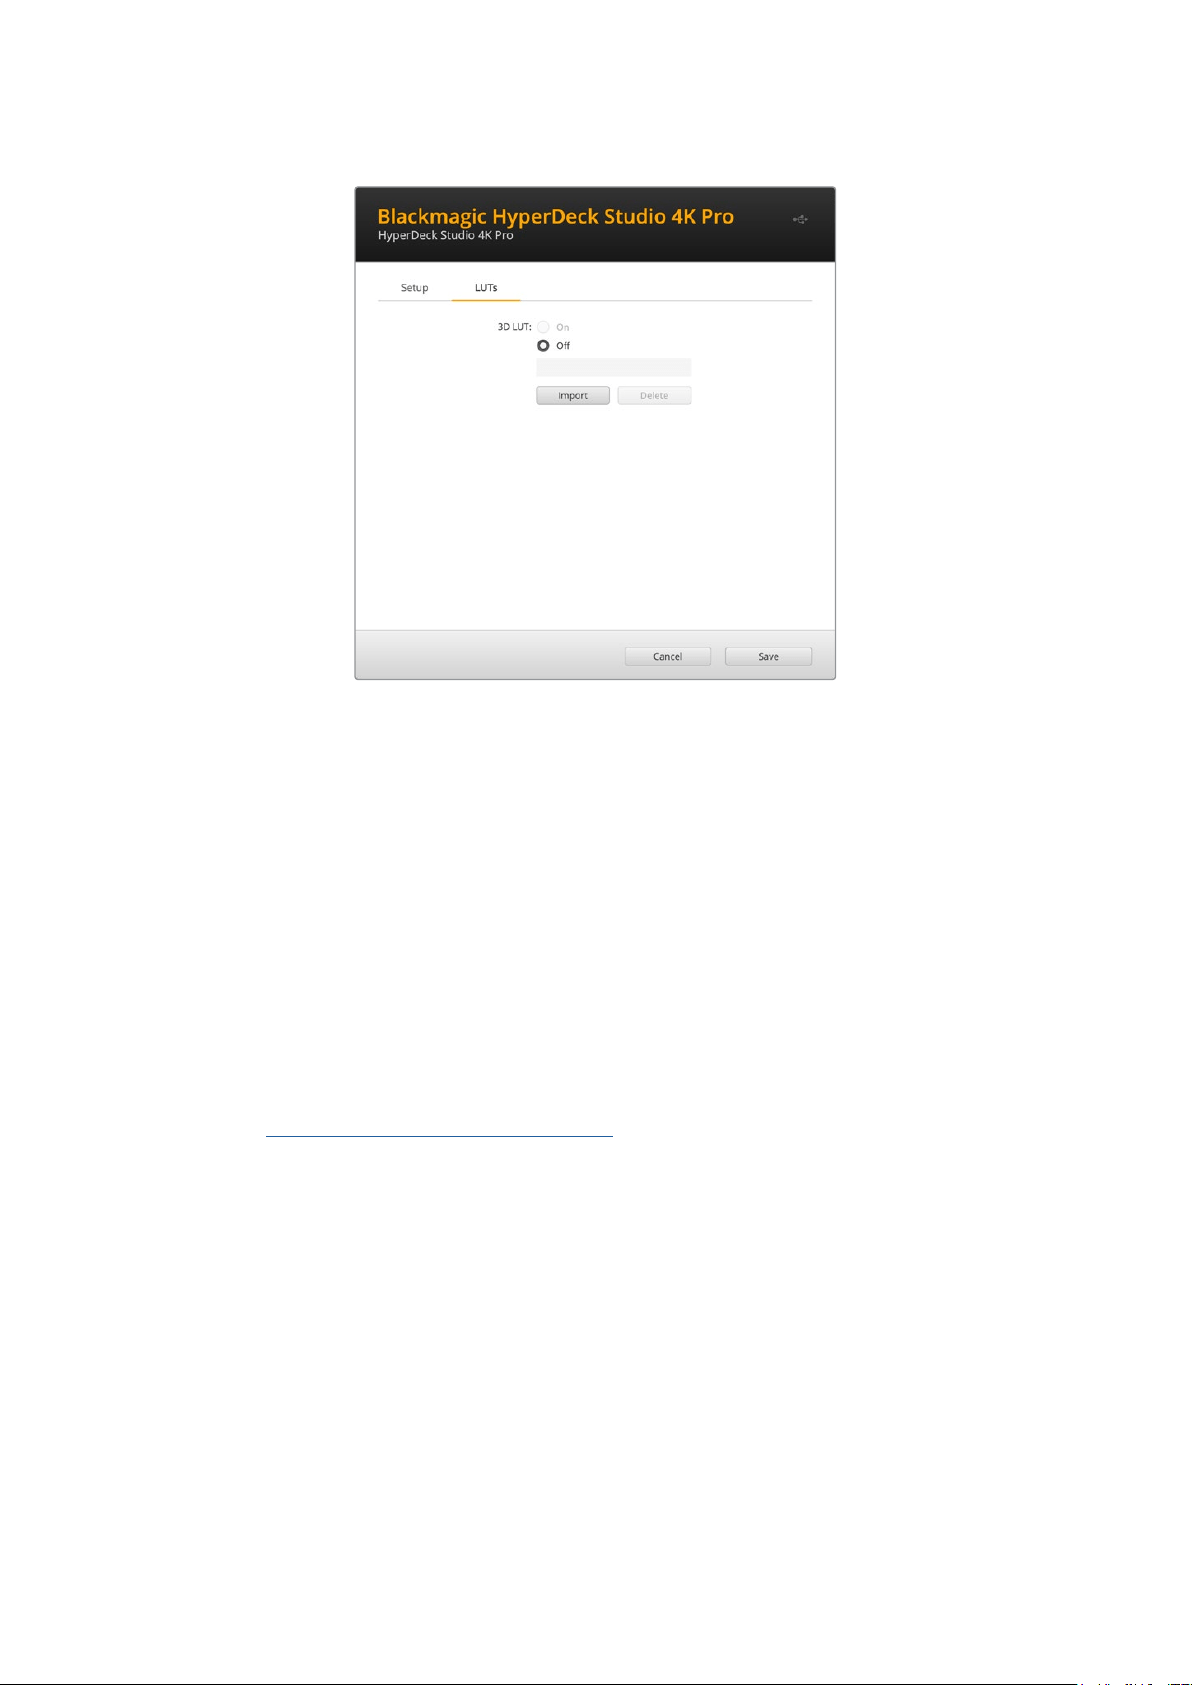
查看LUT
1
首 先 ,您 需 要 选 择 显 示 LUT。点 击 “ Import”( 导 入 )按 钮 。
2
从文件窗口导航到您 想要导入的LUT,然 后 点 击 “ Open”( 打 开 )。
3
导入LUT后 ,将 “ 3D LUT”选项切换到“On”( 开 启 )状 态 ,然 后 点 击 “ Save”按钮保存。
所选的显示
LUT
会出现在监看输出显示器上。现在,您可以通过
LCD
菜单中的监看设置来开启或关闭
LUT
。
更新内部软件
这一实用程序可用来更新
HyperDeck
硬盘录机的内部软件并配置流媒体设置、网络设置以及流媒体质量。
更 新内 部 软件步 骤 如下:
1
最新版Blackmagic HyperDeck Setup安装程序下载链接:
www.blackmagicdesign.com/cn/support
2
运行Blackmagic HyperDeck Setup安装程序,根据屏幕提示完成安装。
3
安 装 完 成 后 ,将 HyperDeck Studio通过后面板的USB或以太网端口连接到计算机。
4
运行
Blackmagic
HyperDeck
Setup
程序,并根据屏幕提示更新内部软件。如果系统未弹出任
何提示信息,即表示当前内部软件已是最新版本,无需升级。
398
更新内部软件
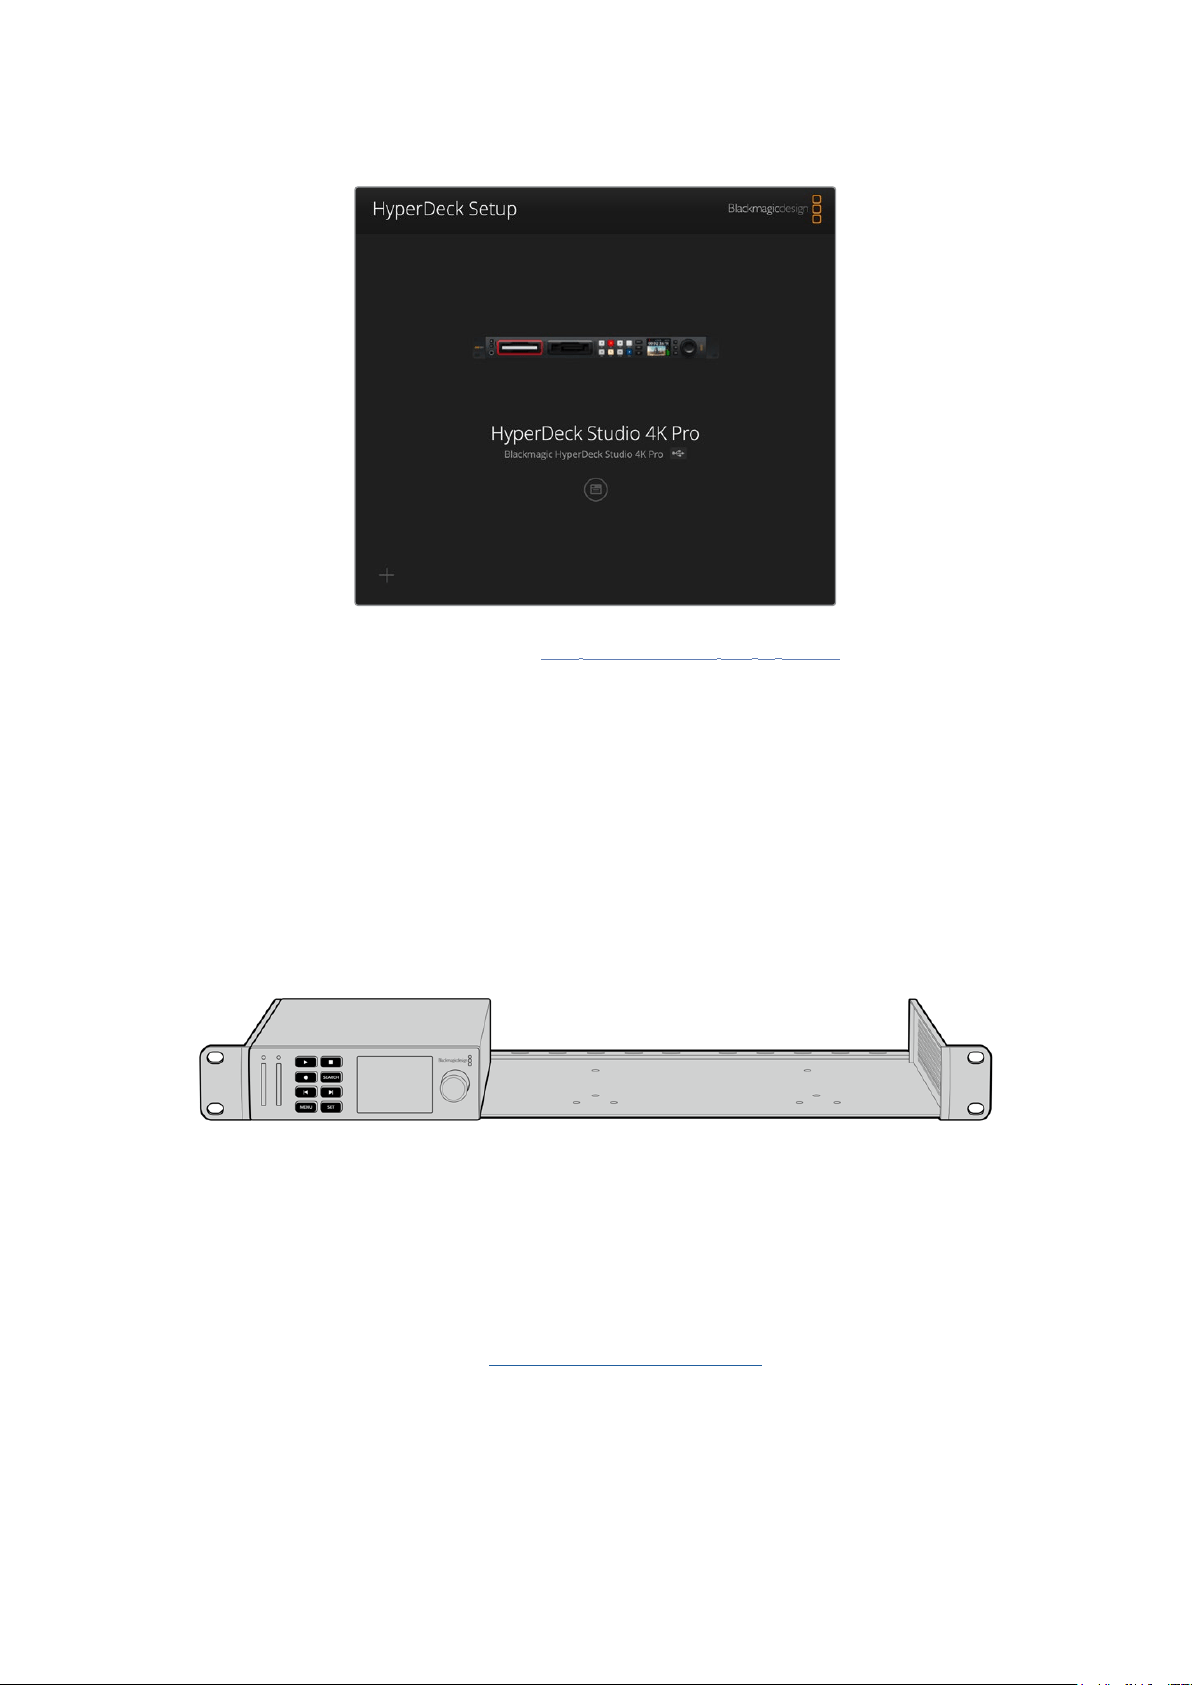
请到
Blackmagic
Design
的支 持中心下载 最新版
Blackmagic
HyperDeck
Studio
设 置 实 用 程 序 ,网 址 :
www
.
blackmagicdesign
.
com
/
cn
/
support
。
Teranex Mini Rack Shelf
Teranex Mini Rack Shelf是一款采用1RU设计的机架,可用来将您Blackmagic HyperDeck Studio
HD Mini和HyperDeck Studio HD Plus型号安装到广播级机架或航空箱中。Blackmagic HyperDeck
Studio HD Mini设 计 非 常 小 巧 ,可 与 Teranex Mini Converter系列、Blackmagic MultiView 4以及
Blackmagic Web Presenter等其他大小相近的Blackmagic Design设 备 并 排 安 装 。例 如 ,将 Blackmagic
HyperDeck Studio HD Mini和ATEM Television Studio HD一 起 安 装 ,就 可 以 切 换 8路 视 频 输 入 ,并
能记录
HyperDeck Studio HD Mini的节目输出信号。这种模块化设计能方便您组建自定义视频解决方
案 ,不 仅 便 携 还 容 易 使 用 !
Teranex
Mini
Rack
Shelf
可实现
Blackmagic
HyperDeck
Studio
HD
Mini
、
HyperDeck
Studio
HD
Plus
型号和其他大小相同的
Blackmagic
Design
设备的机架安装方案。
要将Blackmagic HyperDeck安装到Teranex Mini Rack Shelf机 架 上 ,只 需 移 除 设 备 上 的 橡 胶 垫( 如
有安装),再使用内附的螺丝将设备牢牢固定在机架底部即可。
Teranex Mini Rack Shelf附带两块标配空白面板,可在您不想安装多台Blackmagic Design设备时用
来填补机架的空隙。
详情请访问
Blackmagic Design网站www.blackmagicdesign.com/cn。
399
TeranexMiniRackShelf

RS-422控制
什么是
RS
-
422
控制?
RS-422标准是串行录机控制广播级标准,自20世纪80年代早期开始便为众多播出机构用于各类录机、
线性编辑工具、非编工具以及播出自动化产品。所有当前
HyperDeck
型号均支持这一标准,因此可集成到
播出自动化遥控系统、剪辑系统以及任何自行设计的定制控制方案当中。
HyperDeck Studio还可以通过RS-422支持来自Advanced Media Protocol的 文 件 命 令 。您 可 以 使 用
AMP命令通过外部设备控制HyperDeck,比如为播放列表添加素材片段,决定下一个片段的文件名,循环
播放单个片段或时间线,或者清空播放列表。
使用外部RS-422控制器
所有当前
HyperDeck
型号均配备工业标准的索尼™兼容
RS
-
422
录机控制端口,该端口配有正确的引脚
连接,可直接连接到任何RS-422远 程 控 制 ,比 如 HyperDeck Extreme Control。
您可以使用预加工的
9
针线缆,只要确保线缆两端均采用“引脚到引脚”的连线,且两端相同号码的引脚连
接在一起即可。如果您想要定制线缆,请参考附带的引脚配线图。
您可以从
HyperDeck Extreme Control来远程控制HyperDeck,这样就无需亲自过去按按钮。
1
将视频信号连接到HyperDeck的视频输入上。
2
使用RS-422线缆连接HyperDeck Extreme Control和HyperDeck Studio。
3
按HyperDeck Studio Mini前方控制面板上的远程控制按钮启用该功能,或通过LCD屏幕菜
单启用该远程录机控制功能。
现在,您就可以远程控制开始或停止HyperDeck的记录和播放功能,并进行其他常用的快速搜索操作了。
本章节后续名为“支持的RS-422命令”的表格列出了所有支持的RS-422命 令。
5 4 3 2 1
9 8 7 6
接收
(–)
接收
(+)
发射
(–)
发射
(+)
接地
引脚
2 7 8 3 1,4,6,9
RS
-
422
远程控制引脚接口
400
RS-422控制

请确保通过
LCD
屏幕菜单将
HyperDeck
的远程功能设置为“开启”状态,
或通过前面板上的远程控制按钮来启用
RS
-
422
录机控制
所有
HyperDeck
型号均可通过设备后面板的
RS
-
422
端口支持远程控制
支持的RS-422命令
Command Reply No Remote Notes
0 - System Control
0x00 0x11 DeviceTypeRequest
NTSC: 0xF0E0
PAL: 0xF1E0
24P: 0xF2E0
Enabled
1 - Slave Response
0x20 0x00 Stop Acknowledge Disabled
0x20 0x01 Play Acknowledge Disabled
0x20 0x02 Record Acknowledge Disabled
0x20 0x04 StandbyOff Acknowledge Disabled
0x20 0x05 StandbyOn Acknowledge Disabled
0x20 0x0F Eject Acknowledge Disabled
0x20 0x10 FastFwd Acknowledge Disabled
0x21 0x11 JogFwd1 Acknowledge Disabled
0x22 0x11 JogFwd2 Acknowledge Disabled
Treated as N=1;
Same as JogFwd1
0x21 0x12 VarFwd1 Acknowledge Disabled Uses ShuttleFwd1
0x22 0x12 VarFwd2 Acknowledge Disabled
Treated as N=1;
Same as VarFwd1
0x21 0x13 ShuttleFwd1 Acknowledge Disabled
0x22 0x13 ShuttleFwd2 Acknowledge Disabled
Treated as N=1;
Same as ShuttleFwd1
0x20 0x20 Rewind Acknowledge Disabled
0x21 0x21 JogRev1 Acknowledge Disabled
0x22 0x21 JogRev2 Acknowledge Disabled
Treated as N=1;
Same as JogRev1
0x21 0x22 VarRev1 Acknowledge Disabled Uses ShuttleRev1
401
RS-422控制

Command Reply No Remote Notes
0x22 0x22 VarRev2 Acknowledge Disabled
Treated as N=1;
Same as VarRev1
0x21 0x23 ShuttleRev1 Acknowledge Disabled
0x22 0x23 ShuttleRev2 Acknowledge Disabled
Treated as N=1;
Same as ShuttleRev1
0x20 0x30 Preroll Acknowledge Disabled
0x24 0x31 CueData Acknowledge Disabled
0x20 0x34 SyncPlay Acknowledge Disabled
0x20 0x40 Preview Acknowledge Disabled Status bits are set
0x20 0x41 Review Acknowledge Disabled Status bits are set
0x20 0x43 OutpointPreview Acknowledge Disabled
0x22 0x5C DMCSetFwd Acknowledge Disabled
0x22 0x5D DMCSetRev Acknowledge Disabled
0x20 0x60 FullEEOff Acknowledge Disabled
0x20 0x61 FullEEOn Acknowledge Disabled
0x20 0x63 SelectEEOn Acknowledge Disabled
4 - Preset/Select Control
0x40 0x10 InEntry Acknowledge Disabled
0x40 0x11 OutEntry Acknowledge Disabled
0x44 0x14 InDataPreset Acknowledge Disabled
0x44 0x15 OutDataPreset Acknowledge Disabled
0x40 0x18 InShift+ Acknowledge Disabled
0x40 0x19 InShift- Acknowledge Disabled
0x40 0x1A OutShift+ Acknowledge Disabled
0x40 0x1B OutShift- Acknowledge Disabled
0x40 0x20 InReset Acknowledge Disabled
0x40 0x21 OutReset Acknowledge Disabled
0x40 0x22 AInReset Acknowledge Disabled
0x40 0x23 AOutReset Acknowledge Disabled
0x44 0x31 PrerollPreset Acknowledge Disabled
0x40 0x40 AutoModeOff Acknowledge Disabled
ignored, Status bit
remembered
0x40 0x41 AutoModeOn Acknowledge Disabled
ignored, Status bit
remembered
0x41 0x37 InputCheck Acknowledge Disabled
402
RS-422控制

Command Reply No Remote Notes
6 - Sense Request
0x61 0x0A TimeCodeGenSense — —
0x61 0x0C CurrentTimeSense — —
0x60 0x10 InDataSense InData Enabled
0x60 0x11 OutDataSense OutData Enabled
0x60 0x12 AInDataSense AInData Enabled
0x60 0x13 AOutDataSense AOutData Enabled
0x61 0x20 StatusSense StatusData Enabled
0x60 0x2B RemainTimeSense RemainTimeData Enabled
0x60 0x2E SpeedSense SpeedData Enabled
0x60 0x31 PrerollTimeSense PreRollTimeData Enabled
0x60 0x36 TimerModeSense TimerModeData Enabled
0x60 0x3E RecordInhibitSense RecordInhibitStatus Enabled
7 - Sense Reply
0x78 0x00 Timer1Data — —
Current Time and
00:00:00:00
0x78 0x04 LTCUserBitsTimeData — —
Current Time and
00:00:00:00
0x78 0x06 VITCUserBitsTimeData — —
Current Time and
00:00:00:00
0x74 0x06 VITCTimeData — — Current Time
0x74 0x07 UserBitsVITCTimeData — — 00:00:00:00
0x74 0x08 GenTCData — — Current Time
0x78 0x08 GenTCUBData — —
Current Time and
00:00:00:00
0x74 0x09 GenUBData — — 00:00:00:00
0x74 0x10 InData — —
0x74 0x11 OutData — —
0x74 0x12 AInData — —
0x74 0x13 AOutData — —
0x74 0x14 CorrectedLTCTimeData — — Current Time
0x70 0x20 StatusData — —
Please see “Status Bits”
sheet: Limited to 9 bytes
of status, silently
truncated
0x76 0x2B RemainTimeData — —
0x71 0x2E SpeedData — —
0x74 0x31 PrerollTimeData — —
0x71 0x36 TimerModeData — — Returns 0 (TimeCode)
0x72 0x3E RecordInhibitStatus — —
403
RS-422控制

Command Reply No Remote Notes
A - Advanced Media Protocol
0xA1 0x01 AutoSkip Acknowledge Disabled
8-bit signed number of
clips to skip from current
clip
0xAX 0x15 ListNextID IDListing Enabled
when x = 0 single clip
request when x = 1, #
clips can be specified in
the send data
0x20 0x29 ClearPlaylist Acknowledge Disabled
0x41 0x42 SetPlaybackLoop Acknowledge Disabled
Bit 0 loop mode enable,
0=false 1=true
Bit 1 is single clip/timeline
0=single clip
1=timeline
0x41 0x44 SetStopMode Acknowledge Disabled
0 = Off
1 = Freeze on last frame
2 = Freeze on next clip
3 = Show black
0x4f 0x16 AppendPreset Acknowledge Disabled
2 Bytes for the length N
of the clip name
N Bytes for each character
of the clip name
4 Byte in point timecode
(format is FFSSMMHH)
4 Byte out point timecode
(format is FFSSMMHH)
Blackmagic Extensions
0x82 0x02 BMDSeekToTimelinePosition Acknowledge Disabled
16-bit little endian
fractional position
[0..65535]
0x81 0x03 BMDSeekRelativeClip Acknowledge Disabled
One-byte signed integer,
which is the number of
clips to skip (negative for
backwards).
RS-422开发人员信息
bit 7 bit 6 bit 5 bit 4 bit 3 bit 2 bit 1 bit 0
Byte
0 0 0 Cassetteout 0 0 0 0 Local
Byte
1 Standby 0 Stop 0 Rewind Forward Record Play
Byte
2 ServoLock 0 Shuttle Jog Var Direction Still 1
Byte
3 AutoMode 0 0 0 AoutSet AinSet OutSet InSet
Byte
4 SelectEE FullEE LoopPlayback 0 0 0 0 0
Byte
5 0 0 0 0 0 0 0 0
Byte
6 0 LampStill LampFwd LampRev 0 0 0 0
Byte
7 0 0 0 0 0 0 0 0
Byte
8 0 0 NearEOT EOT 0 0 0 0
Byte
9 0 0 0 0 0 0 0 0
404
RS-422控制

Variables
Cassette
Out
SetifnoSSDispresent
Local
SetifRemoteisdisabled(localcontrol)
Standby
Setifadiskisavailable
Direction
Clearifplaybackisforwarding,setifplaybackisreversing
Still
Setifplaybackispaused,orifininputpreviewmode
Auto Mode
SetifinAutoMode
Select EE, Full EE
Setifininputpreviewmode
Lamp Still/Fwd/Rev
Setaccordingtoplaybackspeedanddirection
Near EOT
SetiftotalspaceleftonavailableSSDsislessthan3minutes
EOT
SetiftotalspaceleftonavailableSSDsislessthan30seconds
Others
Cue
Complete (byte 2, bit 0)
Always
1:Cuerequestsarealwaysinstantaneous
HyperDeck Serial RS-422 Protocol
Protocol
BasedonSony9-pinprotocol
Interface
Baudrate 38.4Kbps
1
startbit
8
databits
1
stopbit
1
paritybit
Odd
parity
通过网络传输文件
HyperDeck硬盘录机支持通过文件传输协议,即“FTP”来传输文件。这个强大功能可让您通过本地网
络可提供的快速网络,直接从电脑上复制文件到
HyperDeck
。例 如 ,您 可 以 将 新 文 件 复 制 到 位 于 异 地 的
HyperDeck远程设备上,用于数字标牌。
连接HyperDeckStudio
由于计算机和
HyperDeck
Studio
位于一个网络里,您只需要一个
FTP
客户端和
HyperDeck
Studio
的
IP地址即可。
1
在用来连接HyperDeck的计算 机上下载 安装 FTP客 户 端 。我 们 推 荐 Cyberduck、FileZilla或
Transmit,但 大 多 数 FTP应用程序都可以使用。Cyberduck与FileZilla均可免费下载。
405
通过网络传输文件
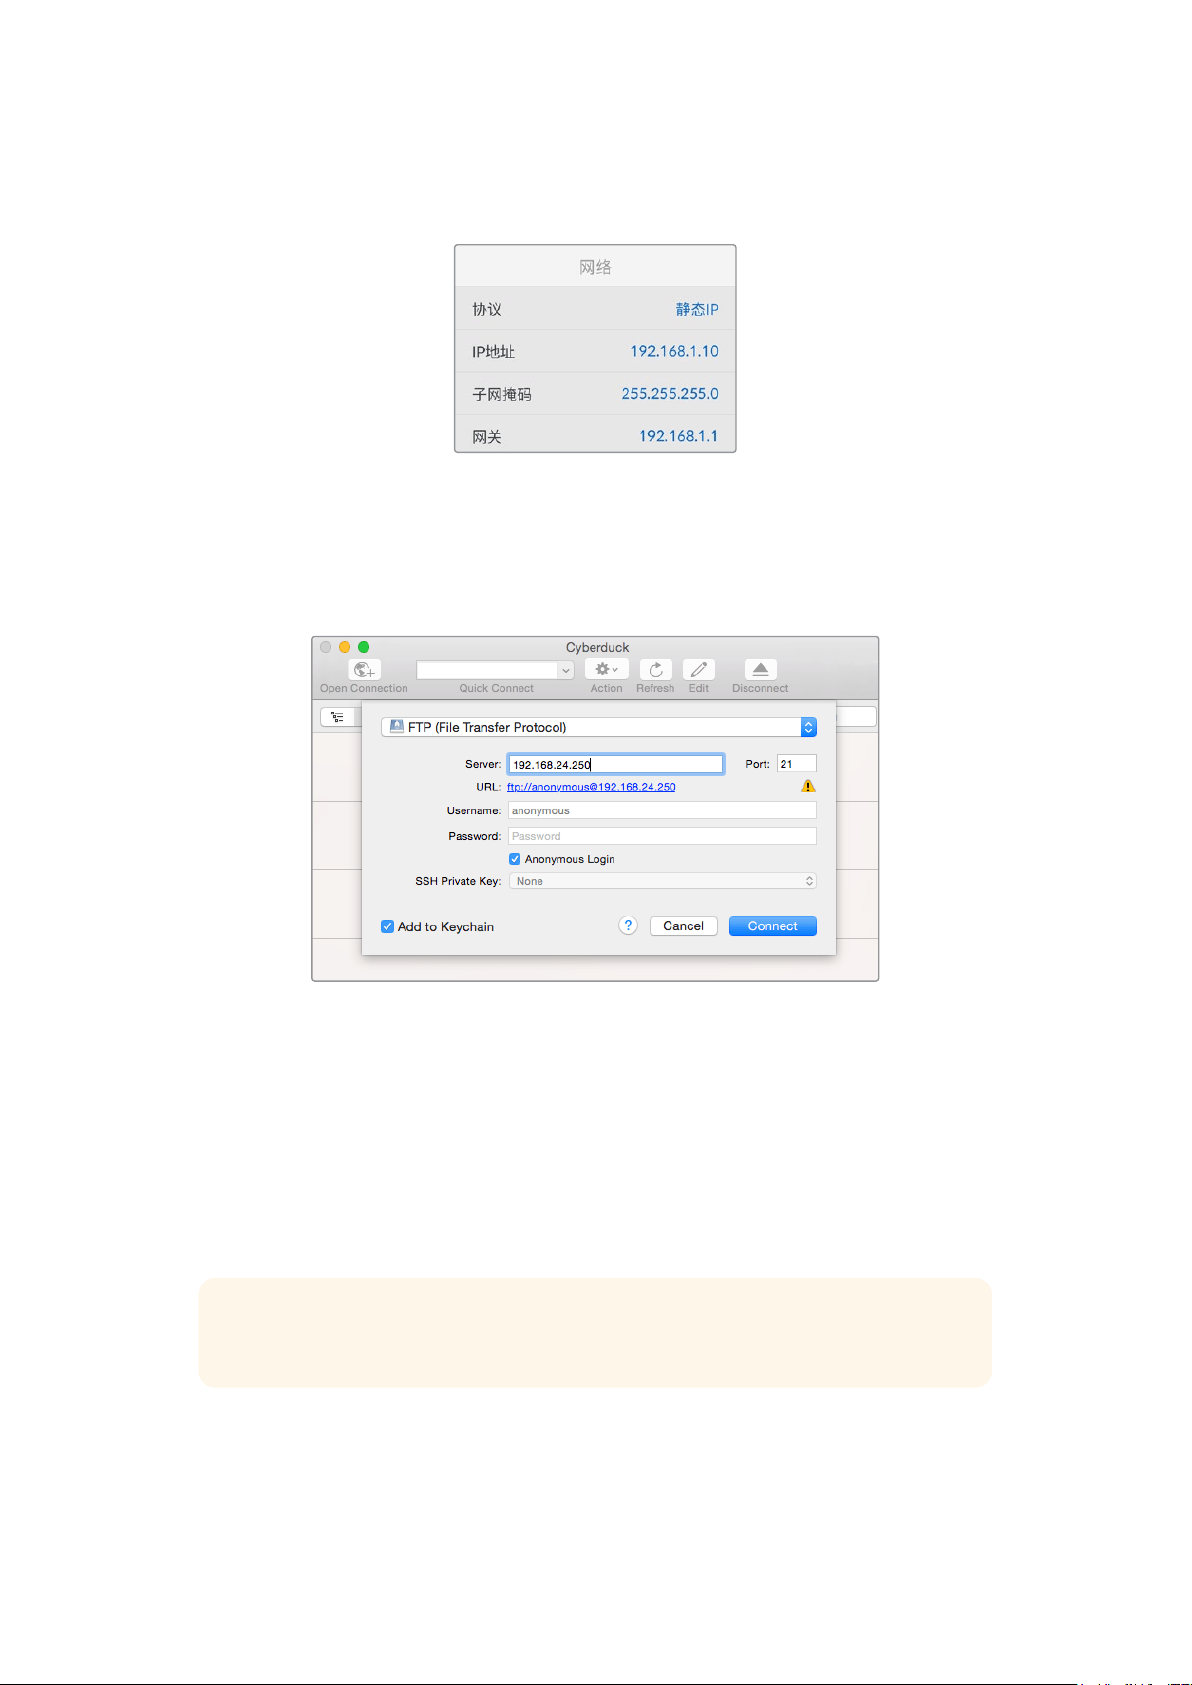
2
通过以太网线将HyperDeck Studio连 接 到 网 络 ,并 记 下 它 的 IP地 址 。要 查 询 IP地 址 ,按 “ 菜 单 ”
按钮,旋转旋钮进入“网络”设置即可。屏幕下方会显示HyperDeck Studio的IP地址。
HyperDeck
Studio
的
IP
地址可以在智能
面板的“网络”屏幕菜单中找到。
3
将HyperDeck的IP地址输入TCP应用程序的连接对话框。对话框的名字和位置会根据应用程
序的不同而发生变化,但通常会标为“服务器”或“主机”。如果您的
FTP
程序包含“匿名登录”复选
框 ,请 务 必 勾 选 该 复 选 框 。
连接
HyperDeck
Studio
时,不需要输入用户名或密码。只需在
FTP
应用程序的“服务器”或
“主机”一栏输入硬盘录机的
IP
地址,如有“匿名登录”复选框的话同时勾选该复选框。
传输文件
连接HyperDeck后 ,您 可 以 像 使 用 FTP程序一样传输文件。大多数FTP应用程序都具备拖放界面,具体
方式请查看您使用的应用程序。
您的
HyperDeck可 以 发 送 和 接 收 任 何 文 件 ,但 请 注 意 ,如 果 您 需 要 在 HyperDeck Studio上播放任何文
件 ,该 文 件 必 须 符 合
HyperDeck
所支持的编解码器和分辨率。您可以在本手册“
Blackmagic
HyperDeck
Setup”部分看到所支持编解码器的列表。
提示
您可以在HyperDeck录制的同时通过网络传输文件。HyperDeck会自动调整传输速度,
确保记录不受影响。
406
通过网络传输文件

连接到ATEM切换台
如果您使用
ATEM
切换台,还可以连接多达
4
台
Blackmagic
HyperDeck
硬 盘 录 机 ,并 通 过
ATEM
软件或
硬件控制面板进行控制。这是非常强大的功能,相当于提供了一整个录像部门由您掌控。您还可以从ATEM
切换台上触发
HyperDeck
的记录功能,这是制作直播节目存档备份的好办法,也是在进行现场切换时采
集B卷用于事后加工的极佳途径。
ATEM
4
M
/
E
Broadcast
Studio
4K
等切换台可连接多达四台
HyperDeck
硬盘录机
将HyperDeck连接到ATEM切换台:
1
将您的HyperDeck连接到和ATEM切换台相同的网络下,并记下其IP地址。
HyperDeck
的
IP
地址可通过前面板和
LCD
屏幕菜单找到,只要从主菜单进入“设置”和“以太网”
菜单即可。
或 者 ,您 可 以 通 过 Blackmagic HyperDeck Setup实用程序的“配置”选项卡从Mac或PC上获
取HyperDeck的IP地址。
2
将HyperDeck其中一个SDI或HDMI输出接口连接到ATEM切换台的SDI或HDMI源输入上。
3
如果您想用ATEM切换台来触发HyperDeck的记录功能,就还需要将一路视频源连接到
HyperDeck上。
只需按正常步骤将一路SDI或HDMI信号源连接到HyperDeck上 即 可 。如 果 要 记 录 ATEM切换
台节目输出上的内容, 请将切换台其中一路辅助SDI输出连接到HyperDeck的SDI输入上。
4
按下HyperDeck前面板的远程按钮启用远程功能,或通过HyperDeck Studio Mini的LCD菜
单启用该功能,以便从切换台遥控设备。
5
将
HyperDeck
的源和
IP
地址信息输入到
ATEM
软件或硬件控制面板上,完成连接步骤。
ATEM
切换台操作手册中对此有清楚介绍。
407
连接到ATEM切换台

请确保通过
LCD
屏幕菜单将
HyperDeck
的远程功能设置为“开启”状态,或通过控制
面板上的远程控制按钮来启用通过
ATEM
切换台实现以太网控制的功能
了解后期制作工作流程
如何获取录制的片段
要获取片段,请将使用
SD
卡 槽 、外 部 读 卡 器 或
SSD
硬盘座将
SD
卡或
SSD
硬盘插入计算机。您可直接将
SSD
或
SD
卡上的文件拖放到本地硬盘上,也可直接从
SSD
或
SD
卡上进行操作。您还可以使用
2
.
5
英寸
eSATA转USB适配线缆将SSD连接到计算机上,但是此类连接方式的传输速度不足以直接在SSD上工
作,因此仅可作为将视频文件从SSD转到笔记本电脑上的便携方案。
MacOS
Mac OS系统自带QuickTime。使 用 HyperDeck记录的Apple ProRes、Avid DNxHD和DNxHR
QuickTime电影文件几乎可在Mac OS的 任 何视 频软件中 打开。
HyperDeck所记录的DNxHD和DNxHR MXF文件可在Mac版Avid Media Composer和DaVinci Resolve
中打开。DNxHD编解码器免费下载链接:http://www.avid.com/products/avid-dnxhr-and-dnxhd
HyperDeck所记录的MCC隐藏式字幕数据文件可在Mac OS计算机上使用MacCaption软 件 打 开 ,下 载
链接:http://www.telestream.net/captioning/overview.htm
Windows
HyperDeck所记录的Apple ProRes QuickTime电影文件需要在安装了QuickTime的PC上方可打开。
几乎所有支持QuickTime的Windows版视频软件都能打开HyperDeck所 记录的电影文件。Windows版
QuickTime可到以下网址免费下载:http:// www.apple.com/quicktime/download/。
HyperDeck
所记录的
DNxHD
和
DNxHR
MXF
文件可在
Windows
版
Avid
Media
Composer
和
DaVinci
Resolve中打开。
DNxHD编解码器免费下载链接:http://www.avid.com/products/avid-dnxhr-and-dnxhd
HyperDeck
所记录的
MCC
隐藏式字幕数据文件可在
Windows
计算机上使用
CaptionMaker
软件 打开,
下载链接:http://www.telestream.net/captioning/overview.htm
408
了解后期制作工作流程

开发人员信息
Blackmagic
HyperDeck
Ethernet
Protocol
以太网协议
Blackmagic HyperDeck Ethernet Protocol是一项基于文本的协议,HyperDeck Studio自带以太网
接 口 ,连 接 该 型 号 的 TCP端口9993即可使用这一协议。如果您是软件开发人员,可使用这一协议将各类设
备和我们的产品进行整合。Blackmagic Design对广大用户公开各类协议,并期待您的创意!
Protocol
Commands
Command Command Description
help or ? Provides help text on all commands and parameters
commands return commands in XML format
device info return device information
disk list query clip list on active disk
disk list: slot id: {n} query clip list on disk in slot {n}
quit disconnect ethernet control
ping check device is responding
preview: enable: {true/false} switch to preview or output
play play from current timecode
play: speed: {-5000 to 5000} play at specific speed
play: loop: {true/false} play in loops or stop-at-end
play: single clip: {true/false} play current clip or all clips
playrange query playrange setting
playrange set: clip id: {n} set play range to play clip {n} only
playrange set: clip id: {n} count: {m} set play range to {m} clips starting from clip {n}
playrange set: in: {inT} out: {outT}
set play range to play between:
- timecode {inT} andtimecode {outT}
playrange set: timeline in: {in} timeline out:
{out}
set play range in units of frames between:
- timeline position {in} and position {out} clear/reset play
rangesetting
playrange clear clear/reset play range setting
play on startup query unit play on startup state
play on startup: enable: {true/false} enable or disable play on startup
play on startup: single clip: {true/false} play single clip or all clips on startup
play option query play options
play option: stop mode:
{lastframe/nextframe/black}
set output frame when playback stops
record record from current input
record: name: {name} record named clip
record spill spill current recording to next slot
409
开发人员信息

Command Command Description
record: spill: slot id: {n}
spill current recording to specified slot
use current id to spill to same slot
stop stop playback or recording
clips count query number of clips on timeline
clips get query all timeline clips
clips get: clip id: {n} query a timeline clip info
clips get: clip id: {n} count: {m} query m clips starting from n
clips get: version: {1/2}
query clip info using specified output version:
version 1: is: name startT duration
version 2: id: startT duration inT outT name
clips add: name: {name} append a clip to timeline
clips add: clip id: {n} name: {name} insert clip before existing clip {n}
clips add: in: {inT} out: {outT} name: {name} append the {inT} to {outT} portion of clip
clips remove: clip id: {n}
remove clip {n} from the timeline
(invalidates clip ids following clip {n})
clips clear empty timeline clip list
transport info query current activity
slot info query active slot
slot info: slot id: {n} query slot {n}
slot select: slot id: {n} switch to specified slot
slot select: video format: {format} load clips of specified format
slot unblock unblock active slot
slot unblock: slot id: {n} unblock slot {n}
cache info query cache status
dynamic range query dynamic range settings
dynamic range: playback override:
{off/Rec709/Rec2020_SDR/HLG/
ST2084_300/ST2084_500/
ST2084_800/ST2084_1000/
ST2084_2000/ST2084_4000/ST2084
set playback dynamic range override
dynamic range: record override:
{off/Rec709/Rec2020_SDR/HLG/
ST2084_300/ST2084_500/
ST2084_800/ST2084_1000/
ST2084_2000/ST2084_4000/ST2048}
set record dynamic range override
notify query notification status
notify: remote: {true/false} set remote notifications
notify: transport: {true/false} set transport notifications
notify: slot: {true/false} set slot notifications
notify: configuration: {true/false} set configuration notifications
notify: dropped frames: {true/false} set dropped frames notifications
notify: display timecode: {true/false} set display timecode notifications
410
开发人员信息

Command Command Description
notify: timeline position: {true/false} set playback timeline position notifications
notify: playrange: {true/false} set playrange notifications
notify: cache: {true/false} set cache notifications
notify: dynamic range: {true/false} set dynamic range settings notifications
notify: slate: {true/false} set digital slate notifications
goto: clip id: {start/end} goto first clip or last clip
goto: clip id: {n} goto clip id {n}
goto: clip id: +{n} go forward {n} clips
goto: clip id: -{n} go backward {n} clips
goto: clip: {n} goto frame position {n} within current clip
goto: clip: +{n} go forward {n} frames within current clip
goto: clip: -{n} go backward {n} frames within current clip
goto: clip: {start/end} goto start or end of clip
goto: timeline: {n} goto frame position {n} within timeline
goto: timeline: +{n} o forward {n} frames within timeline
goto: timeline: -{n} go backward {n} frames within timeline
goto: timeline: {start/end} goto start or end of timeline
goto: timecode: {timecode} goto specified timecode
goto: timecode: +{timecode} go forward {timecode} duration
goto: timecode: -{timecode} go backward {timecode} duration
goto: slot id: {n} goto slot id {n}
jog: timecode: {timecode} jog to timecode
jog: timecode: +{timecode} jog forward {timecode} duration
jog: timecode: -{timecode} jog backward {timecode} duration
shuttle: speed: {-5000 to 5000} shuttle with speed
remote query unit remote control state
remote: enable: {true/false} enable or disable remote control
remote: override: {true/false} session override remote control
configuration query configuration settings
configuration: video input: SDI switch to SDI input
configuration: video input: HDMI switch to HDMI input
configuration: video input: component switch to component input
configuration: audio input: embedded capture embedded audio
configuration: audio input: XLR capture XLR audio
configuration: audio input: RCA capture RCA audio
configuration: file format: {format} switch to specific file format
configuration: audio codec: PCM switch to PCM audio
configuration: audio codec: AAC switch to AAC audio
411
开发人员信息

Command Command Description
configuration: timecode input:
{external/embedded/preset/clip}
change the timecode input
configuration: timecode output:
{clip/timeline/internal}
change the timecode output
configuration: timecode preference:
{default/dropframe/nondropframe}
whether or not to use drop frame timecodes when not
otherwise specified
configuration: timecode preset:
{timecode}
set the timecode preset
configuration: audio input channels: {n} set the number of audio channels recorded to {n}
configuration: record trigger:
{none/recordbit/timecoderun}
change the record trigger
configuration: record prefix: {name} set the record prefix name (supports UTF-8 name)
configuration: append timestamp:
{true/false}
append timestamp to recorded filename
configuration: xlr input id: {n} xlr type:
{line/mic}
configure xlr input type
multiple xlr inputs can be configured in a single command
configuration: genlock input resync:
{true/false}
enable or disable genlock input resync
uptime return time since last boot
format: prepare: {format} prepare a disk formatting operation to filesystem {format}
format: confirm: {token} perform a pre-prepared formatting operation using token
identify: enable: {true/false} identify the device
watchdog: period: {period in seconds} client connection timeout
reboot reboot device
slate clips slate clips information
slate project slate project information
slate project:↵
camera: {index}↵
set camera index e.g. A
Command Combinations
You can combine the parameters into a single command, for example:
play: speed: 200 loop: true single clip: true
Or for configuration:
configuration: video input: SDI audio input: XLR
Or to switch to the second disk, but only play NTSC clips:
slot select: slot id: 2 video format: NTSC
Using XML
While you can use the Terminal to talk to HyperDeck, if you are writing software, you can use
XML
to
confirm
the
existence
of
a
specific
command
based
on
the
firmware
of
the
HyperDeck
you are communicating with. This helps your software user interface adjust to the capabilities
of the specific HyperDeck model and software version.
412
开发人员信息

Protocol
Details
Connection
The HyperDeck Ethernet server listens on TCP port 9993.
Basic syntax
The HyperDeck protocol is a line oriented text protocol. Lines from the server will be separated by an ascii
CR LF sequence. Messages from the client may be separated by LF or CR LF.
New lines are represented in this document as a "↵" symbol.
Single line command syntax
Command parameters are usually optional. A command with no parameters is terminated with a new line:
{Command name}↵
If parameters are specified, the command name is followed by a colon, then pairs of parameter names and
values. Each parameter name is terminated with a colon character:
{Command name}: {Parameter}: {Value} {Parameter}: {Value} ...↵
Multiline command syntax
The HyperDeck protocol also supports an equivalent multiline syntax where each parameter-value pair is
entered on a new line. E.g.
{Command name}:↵
{P a r a m e t e r}: { Va lu e}↵
{P a r a m e t e r}: { Va lu e}↵
↵
Response syntax
Simple responses from the server consist of a three digit response code and descriptive text terminated by
a new line:
{Response code} {Response text}↵
If a response carries parameters, the response text is terminated with a colon, and parameter name and
value pairs follow on subsequent lines until a blank line is returned:
{Response code} {Response text}:↵
{P a r a m e t e r}: { Va lu e}↵
{P a r a m e t e r}: { Va lu e}↵
...
↵
Successful response codes
A simple acknowledgement of a command is indicated with a response code of 200:
200 ok↵
Other successful responses carry parameters and are indicated with response codes in the range of 201
to299.
413
开发人员信息

Failure response codes
Failure responses to commands are indicated with response codes in the range of 100 to 199:
100 syntax error
101 unsupported parameter
102 invalid value
103 unsupported
104 disk full
105 no disk
106 disk error
107 timeline empty
108 internal error
109 out of range
110 no input
111 remote control disabled
112 clip not found
120 connection rejected
150 invalid state
151 invalid codec
160 invalid format
161 invalid token
162 format not prepared
163 parameterized single line command not supported
Asynchronous response codes
The server may return asynchronous messages at any time. These responses are indicated with response
codes in the range of 500 to 599:
5xx {Response Text}:↵
{P a r a m e t e r}: { Va lu e}↵
{P a r a m e t e r}: { Va lu e}↵
↵
Connection response
On connection, an asynchronous message will be delivered:
500 connection info:↵
protocol version: {Version}↵
model: {Model Name}↵
↵
Connection rejection
Only one client may connect to the server at a time. If other clients attempt to connect concurrently,
they will receive an error and be disconnected:
120 connection rejected↵
414
开发人员信息

Timecode syntax
Timecodes are expressed as non-drop-frame timecode in the format:
HH:MM:SS:FF
Handling of deck "remote" state
The “remote” command may be used to enable or disable the remote control of the deck. Any attempt to
change the deck state over ethernet while remote access is disabled will generate an error:
111 remote control disabled↵
To enable or disable remote control:
remote: enable: {“true”, “false”} ↵
The current remote control state may be overridden allowing remote access over ethernet irrespective of
the current remote control state:
remote: override: {“true”, “false”} ↵
The override state is only valid for the currently connected ethernet client and only while the connection
remains open.
The “remote” command may be used to query the remote control state of the deck by specifying no
parameters:
remote↵
The deck will return the current remote control state:
210 remote info:↵
enabled: {“true”, “false”}↵
override: {“true”, “false”}↵
↵
Asynchronous remote control information change notification is disabled by default and may be
configured with the “notify” command. When enabled, changes in remote state will generate a “510 remote
info:”asynchronous message with the same parameters as the “210 remote info:” message.
Closing connection
The "quit" command instructs the server to cleanly shut down the connection:
quit↵
Checking connection status
The "ping" command has no function other than to determine if the server is responding:
ping↵
Getting help
The "help" or "?" commands return human readable help text describing all available commands and
parameters:
help↵
Or:
?↵
The server will respond with a list of all supported commands:
201 help:↵
{Help Te x t}↵
{Help Te x t}↵
↵
415
开发人员信息

Switching to preview mode
The "preview" command instructs the deck to switch between preview mode and output mode:
preview: enable: {"true", "false"}↵
Playback will be stopped when the deck is switched to preview mode. Capturing will be stopped when the
deck is switched to output mode.
Controlling device playback
The “play” command instructs the deck to start playing:
play↵
The play command accepts a number of parameters which may be used together in most combinations.
By default, the deck will play all remaining clips on the timeline then stop.
The “single clip” parameter may be used to override this behavior:
play: single clip: {“true”, “false”}↵
By default, the deck will play at normal (100%) speed. An alternate speed may be specified in percentage
between -1600 and 1600:
play: speed: {% normal speed}↵
By default, the deck will stop playing when it reaches to the end of the timeline. The “loop” parameter may
be used to override this behavior:
play: loop: {“true”, “false”}↵
The “playrange” command instructs the deck to play all the clips. To override this behavior: and select a
particular clip:
playrange set: clip id: {Clip ID}↵
To only play a certain timecode range:
playrange set: in: {in timecode} out: {out timecode}↵
To clear a set playrange and return to the default value:
playrange clear↵
The “play on startup command” instructs the deck on what action to take on startup. By default, the deck
will not play. Use the “enable” command to start playback after each power up.
play on startup: enable {“true”, “false”}↵
By default, the unit will play back all clips on startup. Use the “single clip” command to override.
play on startup: single clip: {“true”, “false”}↵
Stopping deck operation
The "stop" command instructs the deck to stop the current playback or capture:
stop↵
416
开发人员信息

Changing timeline position
The "goto" command instructs the deck to switch to playback mode and change its position within the
timeline.
To go to the start of a specific clip:
goto: clip id: {Clip ID}↵
To move forward/back {count} clips from the current clip on the current timeline:
goto: clip id: +/-{count}↵
Note that if the resultant clip id goes beyond the first or last clip on timeline, it will be clamp at the first or
last clip.
To go to the start or end of the current clip:
goto: clip: {“start”, “end”}↵
To go to the start of the first clip or the end of the last clip:
goto: timeline: {“start”, “end”}↵
To go to a specified timecode:
goto: timecode: {timecode}↵
To move forward or back a specified duration in timecode:
goto: timecode: {“+”, “-”}{duration in timecode}↵
To specify between slot 1 and slot 2:
goto: slot id: {Slot ID}↵
Note that only one parameter/value pair is allowed for each goto command.
Enumerating supported commands and parameters
The "commands" command returns the supported commands:
commands↵
The command list is returned in a computer readable XML format:
212 commands:
<commands>↵
<command name="…"><parameter name="…"/>…</command>↵
<command name="…"><parameter name="…"/>…</command>↵
…
</commands>↵
↵
More XML tokens and parameters may be added in later releases.
417
开发人员信息

Controlling asynchronous notifications
The “notify” command may be used to enable or disable asynchronous notifications from the server.
To enable or disable transport notifications:
notify: transport: {“true”, “false”}↵
To enable or disable slot notifications:
notify: slot: {“true”, “false”}↵
To enable or disable remote notifications:
notify: remote: {“true”, “false”}↵
To enable or disable configuration notifications:
notify: configuration: {“true”, “false”}↵
Multiple parameters may be specified. If no parameters are specified, the server returns the current state of
all notifications:
209 notify:↵
transport: {“true”, “false”}↵
slot: {“true”, “false”}↵
remote: {“true”, “false”}↵
configuration: {“true”, “false”}↵
dropped frames: {“true”, “false”}↵
display timecode: {“true”, “false”}↵
timeline position: {“true”, “false”}↵
playrange: {“true”, “false”}↵
cache: {“true”, “false”}↵
dynamic range: {“true”, “false”}↵
slate: {“true”, “false”}↵
↵
Retrieving device information
The "device info" command returns information about the connected deck device:
device info↵
The server will respond with:
204 device info:↵
protocol version: {Version}↵
model: {Model Name}↵
unique id: {unique alphanumeric identifier}↵
slot count: {number of storage slots}↵
software version: {software version}↵
↵
418
开发人员信息

Retrieving slot information
The "slot info" command returns information about a slot. Without parameters, the command returns
information for the currently selected slot:
slot info↵
If a slot id is specified, that slot will be queried:
slot info: slot id: {Slot ID}↵
The server will respond with slot specific information:
202 slot info:↵
slot id: {Slot ID}↵
status: {"empty", "mounting", "error", "mounted"}↵
volume name: {Volume name}↵
recording time: {recording time available in seconds}↵
video format: {disk's default video format}↵
blocked: {“true”, “false”}↵
↵
Asynchronous slot information change notification is disabled by default and may be configured with
the "notify" command. When enabled, changes in slot state will generate a "502 slot info:" asynchronous
message with the same parameters as the "202 slot info:" message.
Retrieving clip information
The “disk list” command returns the information for each playable clip on a given disk. Without parameters,
the command returns information for the current active disk:
disk list↵
If a slot id is specified, the disk in that slot will be queried:
disk list: slot id: {Slot ID}↵
The server responds with the list of all playable clips on the disk in the format of: Index, name, formats, and
duration in timecode:
206 disk list:↵
slot id: {Slot ID}↵
{clip index}: {name} {file format} {video format} {Duration
ti m ecode}↵
{clip index}: {name} {file format} {video format} {Duration
ti m ecode}↵
…
↵
Note that the clip index starts from 1.
Retrieving clip count
The "clips count" command returns the number of clips on the current timeline:
clips count ↵
The server responds with the number of clips:
214 clips count: ↵
clip count: {Count}↵
419
开发人员信息

Retrieving timeline information
The "clips get" command returns information for each available clip on the current timeline. Without
parameters, the command returns information for all clips on timeline:
clips get↵
The server responds with a list of clip IDs, names and timecodes:
205 clips info:↵
clip count: {Count}↵
{Clip ID}: {Name} {Start timecode} {Duration timecode}↵
{Clip ID}: {Name} {Start timecode} {Duration timecode}↵
…
↵
Retrieving transport information
The “transport info” command returns the state of the transport:
transport info ↵
The server responds with transport specific information:
208 transport info:
status: {“preview”, “stopped”, “play”, “forward”, “rewind”,
“j o g ”, “ s h u t t l e ”,” r e c o r d ” }↵
speed: {Play speed between -5000 and 5000 %}↵
slot id: {Slot ID or “none”}↵
clip id: {Clip ID or “none”}↵
single clip: {“true”, “false”}↵
display timecode: {timecode}↵
timecode: {timecode}↵
video format: {Video format}↵
loop: {“true”, “false”}↵
timeline: {n}↵
input video format: {Video format”}↵
dynamic range: {“off”, “Rec709”, “Rec2020_SDR”, “HLG”,
“ST2084_300”, “ST2084_500”, “ST2084_800”, “ST2084_1000”,
“ST2084_2000”, “ST2084_4000”, “ST2048” or “none”}↵
↵
The "timecode" value is the timecode within the current timeline for playback or the clip for record. The
"display timecode" is the timecode displayed on the front of the deck. The two timecodes will differ in some
deck modes.
Asynchronous transport information change notification is disabled by default and may be configured
with the "notify" command. When enabled, changes in transport state will generate a "508 transport info:"
asynchronous message with the same parameters as the "208 transport info:" message.
420
开发人员信息

Video Formats
The following video formats are currently supported on HyperDeck Studio:
NTSC, PAL, NTSCp, PALp
720p50, 720p5994, 720p60
1080p23976, 1080p24, 1080p25, 1080p2997, 1080p30
1080i50, 1080i5994, 1080i60
HyperDeck Studio Pro and Plus models support these 4k formats:
4Kp23976, 4Kp24, 4Kp25, 4Kp2997, 4Kp30
HyperDeck Studio 4K Pro adds support for the following 4k formats:
4Kp50, 4Kp5994, 4Kp60
Video format support may vary between models and software releases.
File Formats
All HyperDeck models currently support the following file formats:
H.264High_SDI
H.264High
H.264Medium
H.264Low
QuickTimeProResHQ
QuickTimeProRes
QuickTimeProResLT
QuickTimeProResProxy
QuickTimeDNxHD220x
DNxHD220x
QuickTimeDNxHD145
DNxHD145
QuickTimeDNxHD45
DNxHD45
HyperDeck Studio 4K Pro also supports the following file formats:
H.265High_SDI
H.265High
H.265Medium
H.265Low
QuickTimeDNxHR_HQX
DNxHR_HQX 4Kp60
QuickTimeDNxHR_SQ
DNxHR_SQ
QuickTimeDNxHR_LB
DNxHR_LB
Supported file formats may vary between models and software releases.
421
开发人员信息

Querying and updating configuration information
The "configuration" command may be used to query the current configuration of the deck:
configuration↵
The server returns the configuration of the deck:
211 configuration:↵
audio input: {“embedded”, “XLR”, “RCA”}↵
audio mapping: {n}↵
video input: {“SDI”, “HDMI”, “component”, “composite”}↵
file format: {format}↵
audio codec: {“PCM”, “AAC”}↵
timecode input: {“external”, “embedded”, “preset”, “clip”}↵
timecode output: {“clip”, “timeline”}↵
timecode preference: {“default”, “dropframe”, “nondropframe”}↵
timecode preset: {timecode}↵
audio input channels: {n}↵
record trigger: {“none”, “recordbit”, “timecoderun”}↵
record prefix: {name}↵
append timestamp: {“true”, “false”}↵
↵
One or more configuration parameters may be specified to change the configuration of the deck.
To change the current video input:
configuration: video input: {“SDI”, “HDMI”, “component”}↵
Valid video inputs may vary between models. To configure the current audio input:
configuration: audio input: {“embedded”, “XLR”, “RCA”}↵
Valid audio inputs may vary between models.
To configure the current file format:
configuration: file format: {File format}↵
Note that changes to the file format may require the deck to reset, which will cause the client connection to
be closed. In such case, response code 213 will be returned (instead of 200) before the client connection is
closed:
“213 deck rebooting”
Asynchronous configuration information change notification is disabled by default and may be configured
with the “notify” command. When enabled, changes in configuration will generate a “511 configuration:”
asynchronous message with the same parameters as the “211 configuration:” message.
Selecting active slot and video format
The "slot select" command instructs the deck to switch to a specified slot, or/and to select a specified
output video format.
To switch to a specified slot:
slot select: slot id: {slot ID}↵
To select the output video format:
slot select: video format: {video format}↵
Either or all slot select parameters may be specified. Note that selecting video format will result in a rescan
of the disk to reconstruct the timeline with all clips of the specified video format.
422
开发人员信息

Clearing the current timeline
The "clips clear" command instructs the deck to empty the current timeline:
clips clear↵
The server responds with
200 ok↵
Adding a clip to the current timeline
The "clips add:" command instructs the deck to add a clip to the current timeline:
clips add: name: {"clip name"}↵
The server responds with
200 ok↵
or in case of error
1xx {error description}↵
Configuring the watchdog
The “watchdog” command instructs the deck to monitor the connected client and terminate the connection
if the client is inactive for at least a specified period of time.
To configure the watchdog:
watchdog: period: {period in seconds}↵
To avoid disconnection, the client must send a command to the server at least every {period} seconds. Note
that if the period is set to 0 or less than 0, connection monitoring will be disabled.
423
开发人员信息

帮助
获得帮助
获得帮助最快捷的途径是登陆Blackmagic Design在线支持页面并浏览有关Blackmagic HyperDeck
硬盘录机的最新支持信息和材料。
BlackmagicDesign在线支持页面
请登陆Blackmagic Design支持中心www.blackmagicdesign.com/cn/support获得最新版操作手
册 、软 件 以 及 技 术 答 疑 文 章 。
BlackmagicDesign论坛
您可以登陆我们的网站访问Blackmagic Design论坛,获得更多信息和有用的创意资源。访问论坛也是
获取帮助的一个捷径,因为论坛中不乏经验丰富的用户和Blackmagic Design的员工,他们都能为您答
疑 解 惑 。论 坛 网 址 :http://forum.blackmagicdesign.com
联系BlackmagicDesign支持中心
如果我们提供的支持信息和论坛均无法解答您的疑问,请到支持页面下点击“给我们发送电子邮件”按钮
即可发送技术支持请求。或者,您也可以点击支持页面下的“查找您所在地区的支持团队”按钮,致电您所
在地区的Blackmagic Design支持中心获得帮助。
查看当前安装的软件版本
要检查您的电脑当前安装的
Blackmagic
HyperDeck
软 件 版 本 ,请 打 开
About
Blackmagic
HyperDeck
Setup窗口查看。
在
Mac OS系统下,请到“应用程序”文件夹下打开Blackmagic HyperDeck Setup。到 程 序 菜
单中点击“
About Blackmagic HyperDeck Setup”即可查看版本号。
在
Windows
系统下,请到开始菜单或开始界面打开
Blackmagic
HyperDeck
Setup
实用程序。
点击“Help”( 帮 助 )菜 单 并 选 择 “ About Blackmagic HyperDeck Setup”即可查看版本号。
如何获得软件更新
检查完电脑上安装的Blackmagic HyperDeck Setup软 件 版 本 号 之 后 ,请 登 录 网 址
www.blackmagicdesign.com/cn/support,访 问 Blackmagic Design支持中心查看最新版本。请及
时将软件升级到最新版本,但切勿在重要项目制作过程中升级软件。
424
帮助
监管声明
在欧盟范围内处置电子垃圾和电子设备的注意事项。
根据产品所附的提示标志,本设备不得与其它废弃材料共同处置。处置废弃设备时,必须交给
指定收集点进行回收。对废弃设备进行单独收集并回收能够节省自然资源,且回收方式不会损
害环境和人体健康。获取更多关于废弃设备回收点的信息,请联系您所在城市的回收站,或当时
购买设备的经销商。
本设备经过测试,符合FCC规则的第15部分对A类数字设备的限制。这些限制旨在为运行于商业
环境中的设备提供合理保护,使其免受有害干扰的影响。本设备可生成、使用且辐射射频能量,如
果未按照安装手册来安装和使用本设备,则可能导致对无线电通信的有害干扰。在住宅区运行本
产品可能会产生有害干扰,在这种情况下将由用户自行承担消除干扰的费用。
必须满足以下条件后方可操作:
1
设备不会造成有害干扰。
2
设备必须能够承受任何干扰,包括可能导致意外操作的干扰。
R-R-BMD-20210202002
R-R-BMD-20210202003
R-R-BMD-20201201003
R-R-BMD-20210301001
加拿大ISED认证声明
本设备符合加拿大
A类数码产品的相关标准。
任何对本产品的改装或预期用途之外的使用均可能导致相关标准认证无效。
必须使用有高品质屏蔽的
HDMI电缆连接HDMI接口。
本设备经检测符合商业环境使用要求。在家用环境中,本设备可能会造成无线电干扰。
425
监管声明

安全信息
为避免触电,设备必须连接在配有保护地线的电源插座。如有疑问,请与具有相关资质的电工进行确认。
为了降低触电风险,请勿将设备放在会滴水或溅水的地方。
本产品适合在环境温度低于
40
º
C的热带地区使用。
确保设备四周留有足够的空间,不受阻碍。
安装在机架上时,确保相邻设备不会影响通风。
设备内部没有操作人员可维护的零件。维修服务请联系当地
Blackmagic Design服务中心。
请在海拔高度
2000米以下的地区使用。
加利福尼亚安全声明
该产品可能会让您暴露在塑料部件中所含的微量多溴化联苯等化学物质下,此类物质已被加州政府认定
为 可 能 导 致 癌 症 、先 天 畸 形 或 其 他 遗 传 危 害 的 物 质 。
详情请访问网址
www.P65Warnings.ca.gov。
授权维修人员警告
请确保电源从插座拔出后方可进行维护。
426
安全信息

保修
12
个月有限保修
Blackmagic
Design
保证本产品自购买之日起
12
个月内不会有材料和工艺上的缺陷。若本产品在保修期
内出现质量问题,Blackmagic Design可选择为产品提供免费修理或更换零部件,或者更换缺陷产品。
为确保消费者有权享受本保修条款中的服务,如遇产品质量问题请务必在保修期内联系Blackmagic
Design并妥善安排保修事宜。消费者应将缺陷产品包装并运送到Blackmagic Design的指定服务中心
进行维修,运费由消费者承担并预先支付。若消费者因任何原因退货,所有运费、保险费、关税等各项税
务以及其他费用均由消费者承担。
本保修条款不适用于任何因使用、维护不当或保养不周造成的缺陷、故障或损坏。根据本保修服
务,
Blackmagic
Design
的保修服务范围不包括以下内容:
1
. 对由非
Blackmagic
Design
专门人员进
行的安装、维修或保养所造成的损坏进行维修,2. 对因使用不当或连接到不兼容设备所造成的损坏进
行维修,3. 对因使用了非Blackmagic Design生产的零部件所导致的损坏或故障进行维修,及 4. 对经
过改装或和其他产品进行组装的产品进行保养维修(因为产品经改装或组装后会增加保养维修所需时
间或保养难度)。本保修条款由BLACKMAGIC DESIGN提供,它可取代所有其他明示或隐含的保修。
BLACKMAGIC DESIGN及其供应商对任何有关适销性及就特定用途的适用性等隐含保证不作任何担
保。BLACKMAGIC DESIGN负责为消费者提供缺陷产品的维修或更换服务是完整和排他性补救措施,
不论
BLACKMAGIC
DESIGN
或其供应商是否事先获悉发生间接、特殊、偶然或必然损坏等损坏的可
能性。若消费者对本设备进行非法使用,
BLACKMAGIC
DESIGN
概不负责。对因使用本产品造成的损
失,BLACKMAGIC DESIGN概不负责。本产品的操作风险由用户自行承担。
©
Copyright
2021
Blackmagic
Design
。保 留 一 切 权 利 。“
Blackmagic
Design
” 、“
DeckLink
” 、“
HDLink
” 、“
Workgroup
Videohub” 、“ Multibridge Pro” 、“ Multibridge Extreme” 、“ Intensity”以及“ Leading the creative video revolution”均为美
国及其他国家的注册商标。所有其他公司名称及产品名称可能是其他所有者的注册商标。
427
保修

HyperDeck 디스크 레코더
2021
년
7
월
설치 및 사용 설명서
HyperDeck
디스크 레코더

환영합니다
Blackmagic HyperDeck 디스크 레코더를 구매해 주셔서 감사합니다.
저희는
2011년에 Blackmagic HyperDeck 디스크 레코더를 처음 개발할 당시 누구나 경제적인
가격으로 전문 비디오를 분리형
2.5" SSD에 녹화 및 재생할 수 있는 제품을 만들고자 했습니다.
이제 여러분들께
SD/SSD/USB 플래시 디스크를 사용해 HD 및 UHD 영상을 녹화할 수 있는
새로운
Blackmagic HyperDeck 디스크 레코더 제품군을 선보이게 되어 기쁘게 생각합니다.
Blackmagic MultiDock 10G를 연결하여 외장 하드 드라이브에 영상을 녹화하거나 녹화된 파일을
재생할 수도 있습니다.
HyperDeck Studio Plus 및 Pro 모델은 친숙한 방송용 데크 컨트롤과 조그/셔틀/스크롤 재생이
가능한 검색 다이얼을 탑재했습니다. 검색 다이얼의 클러치 방식을 통해 재생 모드를 구별할 수 있기
때문에 모니터에서 눈을 떼지 않고 클립을 검색할 수 있습니다. 전면에 헤드폰 연결 단자와 스피커를
탑재해
HyperDeck에서 직접 오디오를 확인할 수 있으며 이외에도 수많은 기능을 제공합니다.
앞으로 다년간
Blackmagic HyperDeck 디스크 레코더를 사용하며 이 제품이 여러분의 프로덕션에
큰 도움이 되기를 바랍니다.
또한 자사 웹사이트
www.blackmagicdesign.com/kr 고객지원 페이지에서 최신 버전의 사용
설명서와
HyperDeck 관련 업데이트를 확인하시기 바랍니다. 최신 버전의 소프트웨어로
업데이트해야 모든 신규 기능을 사용하실 수 있습니다. 소프트웨어를 다운로드할 때 사용자
정보를 등록하시면 새로운 소프트웨어가 출시될 때마다 업데이트 소식을 받아보실 수 있습니다.
저희는 새로운 기능과 제품 향상을 위해서 끊임없이 노력하고 있으며, 항상 고객 여러분의 의견을
기다립니다.
Blackmagic Design의 CEO
그랜트 패티

목차
HyperDeck 디스크 레코더 소개 431
시작하기 432
전원 연결하기 432
비디오 및 오디오 연결하기 432
오디오 확인하기 433
미디어 연결하기 433
비디오 녹화하기 435
여러 개의 미디어에 녹화하기 435
재생 436
HyperDeck
으로 비디오 재생하기 436
검색 다이얼 사용하기 437
전면 패널 사용하기 439
미디어 슬롯 표시 장치 439
LCD
메뉴 사용하기 440
설정 441
뒷면 패널 453
모니터링 출력 사용하기 455
저장 미디어 458
SD
카드 458
SSD
460
외장 디스크 461
미디어 포맷하기 463
컴퓨터에서 미디어 준비하기 463
HyperDeck
을 웹캠으로 사용하기 464
웹캠 소스 설정하기 464
Open
Broadcaster 설정하기 465
Blackmagic
HyperDeck Setup 467
HyperDeck
Setup 사용하기 467
LUT
페이지 468
내부 소프트웨어 업데이트 469
Teranex
Mini Rack Shelf 470
RS
-422 컨트롤 471
네트워크를 통해 파일 전송하기 476
ATEM
스위처에 연결하기 478
후반 제작 워크플로 이해하기 479
Developer
Information 480
Blackmagic
HyperDeck 이더넷 프로토콜 480
프로토콜 명령어 480
Protocol
Details 484
도움말 495
규제 사항 496
안전 정보 497
보증 498
430
Blackmagic HyperDeck Studio

HyperDeck 디스크 레코더 소개
Blackmagic HyperDeck 디스크 레코더는 HD 및 4K 디스크 레코더 제품군의 일부이며, 자신만의
워크플로에 활용할 수 있도록 설계되었습니다.
HyperDeck Studio HD Pro와 HyperDeck Studio 4K
Pro는 1RU 장비랙에 설치할 수 있는 크기로 제작되었으며, SD 카드 및 9.5mm SSD를 사용해 영상을
녹화 및 재생하기에 충분한 크기입니다.
HyperDeck Studio HD Mini와 HyperDeck Studio HD Plus는 소형 디스크 레코더로, 책상에 간편하게
설치하거나
Teranex Mini Rack Shelf 옵션을 추가해 장비랙에 설치할 수 있습니다.
모든 모델은
USB 플래시 디스크 녹화 기능을 지원하며, 최대 1080p60의 HD 비디오를 지원합니다.
HyperDeck Studio 4K Pro는 최대 2160p60의 UHD 비디오를 지원합니다.
녹화 및 재생 기능은 대부분의 모델에서 동일한 방식으로 작동되며, 크기가 큰 모델의 경우에는 더 나은
재생 컨트롤과 폭넓은 연결 단자 옵션 등의 추가 기능을 제공합니다.
본 사용 설명서에는
HyperDeck 디스크 레코더의 사용 준비와 모든 컨트롤 및 기능 파악에 필요한 모든
정보가 포함되어 있습니다.
HyperDeck Studio HD Mini HyperDeck Studio HD Plus
HyperDeck
Studio HD Pro와 HyperDeck Studio 4K Pro
431
HyperDeck 디스크 레코더 소개

시작하기
전원을 연결한 뒤, 비디오 소스와 출력하고자 하는 장비를 연결하고 SSD 또는 SD 카드를 삽입하기만
하면
HyperDeck Studio 디스크 레코더의 사용 준비가 완료됩니다.
전원 연결하기
HyperDeck에 전원을 연결하려면, 표준 IEC 케이블을 HyperDeck 뒷면의 전원 입력에 연결하세요.
HyperDeck 모델에는 IEC 전원 입력이 추가로 탑재되어 있어 다른 전원 공급 장치를 연결해 리던던시
용도로 사용할 수 있습니다. 예를 들어, 두 번째 전원 입력을 무정전 전원 공급 장치(
UPS)에 연결하면
주전원에 문제 발생 시 바로 두 번째 전원으로 변경됩니다.
모든 모델에는
12V DC 입력도 포함되어 있어 외장 12V 배터리 전원을 연결할 수 있습니다.
HyperDeck Studio HD Mini는 AC 플러그팩을 통한 전원 연결도 가능합니다. 전원 장치에 잠금링이
있는 경우, 잠금링을 완전히 조여 커넥터가
HyperDeck Studio HD Mini에서 분리되지 않도록 하세요.
그래야 실수로 전원 연결이 분리되는 일을 방지할 수 있습니다.
전원이 공급되면
LCD 화면에 언어 선택 화면이 나타납니다. 검색 다이얼을 사용해 원하는 언어를 고른
다음 깜빡이는
SET 버튼을 누르세요. 그러면 시작 화면이 나타납니다. 시작 화면 및 LCD 메뉴에 관한
자세한 정보는 [전면 패널 사용하기] 부분을 참고하세요.
비디오 및 오디오 연결하기
SDI 또는 HDMI 입력에는 소스 비디오를, SDI 또는 HDMI 출력에는 수신 장비를 연결하세요. 예를 들어,
디지털 시네마 카메라를 소스 영상으로 사용하고
HDMI TV 또는 SDI 모니터를 목적지로 설정할 수
있습니다.
모든
HyperDeck 모델은 최대 1080p60의 HD 영상을 지원합니다. HyperDeck Studio 4K Pro에는
12G-SDI 커넥터가 탑재되어 있어 단일 BNC 케이블 연결로 최대 2160p60의 UHD를 입/출력할 수
있습니다.
432
시작하기
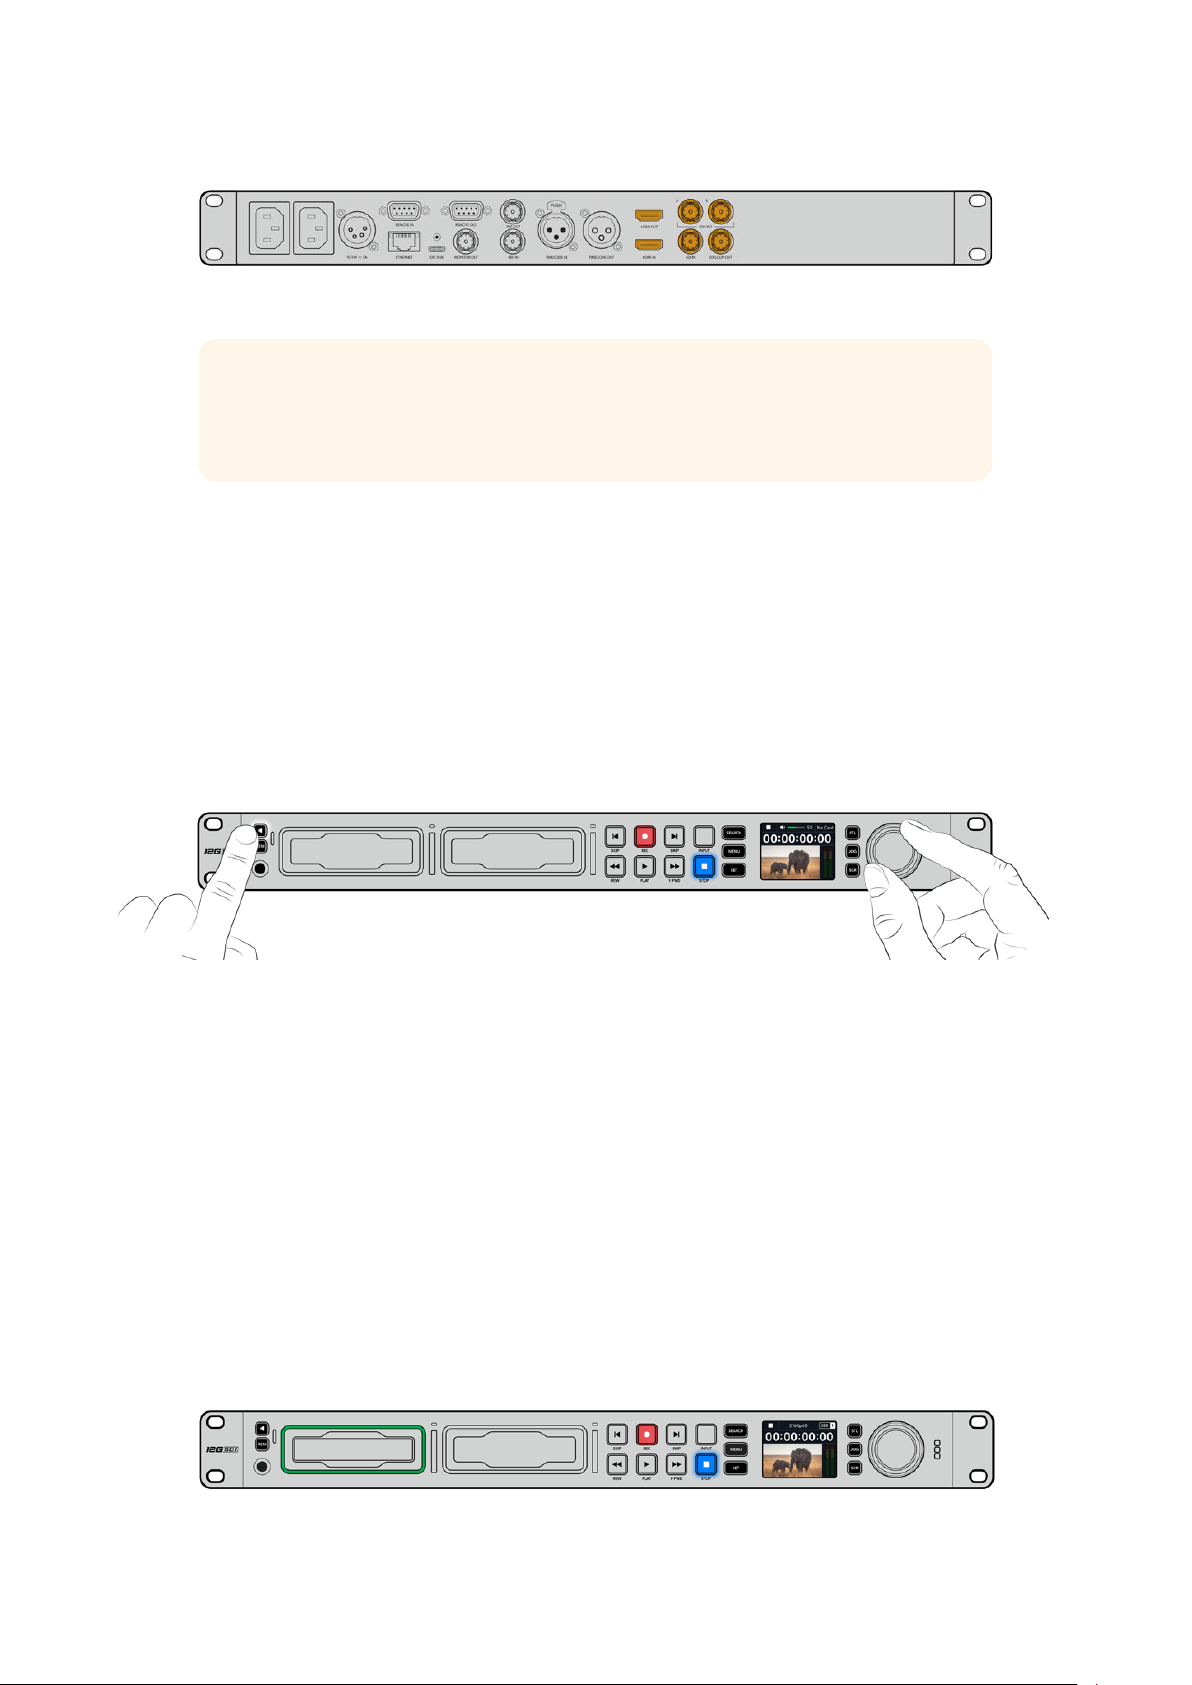
전면 패널의 LCD로 모니터링하면 SDI 또는 HDMI 비디오 신호를 확인할 수 있습니다.
정보 LCD에 비디오 소스 영상이 나타나지 않을 경우, 현재 다른 소스 입력이 연결되었을
가능성이 있습니다. 전면 패널의
INPUT 버튼을 눌러 SDI 또는 HDMI 소스 중 원하는 신호를
선택하세요.
SDI 또는 HDMI 신호에는 오디오가 임베드되어 있으므로 오디오 소스를 따로 연결하지 않아도 됩니다.
LCD의 비디오 이미지 옆에 나타나는 미터를 통해 오디오 레벨을 확인할 수 있습니다.
오디오 확인하기
현재 사용 중인 HyperDeck의 전면 패널에 스피커 및 헤드폰 포트가 탑재되어 있는 경우, 내장 스피커
또는 연결된 헤드폰을 통해 오디오를 신속하게 확인할 수 있습니다. 오디오를 확인하려면 스피커 버튼을
누른 상태에서 검색 다이얼을 돌려 볼륨을 조절하세요. 볼륨 정보 표시가
LCD 시작 화면에 나타납니다.
스피커 버튼을 두 번 누르면 스피커가 활성화된 상태로 유지됩니다. 버튼을 다시 두 번 누르면
비활성화됩니다.
미디어 연결하기
모든 HyperDeck Studio 모델은 설정 변경 없이 바로 녹화할 수 있는 상태로 출고됩니다. 포맷된 SSD
또는
SD 카드만 있으면 바로 녹화를 시작할 수 있습니다.
LCD의 메뉴 설정을 통해 미디어를 쉽게 포맷할 수 있습니다. 컴퓨터에서 미디어를 포맷할 수도 있습니다.
미디어 포맷에 관한 자세한 정보는 본 설명서의 [미디어 포맷하기] 부분을 참고하세요. 영상 녹화에 가장
적합한 미디어 유형과 권장 드라이브 및 카드 목록에 대한 정보도 확인할 수 있습니다.
SSD 카드 장착하기
1
9
.5mm SSD의 연결핀이 아래쪽을 향하도록 잡고 HyperDeck의 드라이브 베이에 잘 맞추세요.
제대로 장착될 때까지
SSD를 드라이브 베이에 부드럽게 밀어 넣으세요.
2
이제 HyperDeck Studio에서 SSD를 인식합니다. 드라이브 베이 테두리에 녹색 불이 들어와
인식 여부를 확인할 수 있습니다.
HyperDeck의 녹화 준비가 완료되면 녹색 불이 꺼집니다.
미디어를 인식하는 중엔 드라이브 테두리에 녹색 불이 들어오며, HyperDeck의 사용 준비가 완료되면 불이 꺼집니다.
433
시작하기
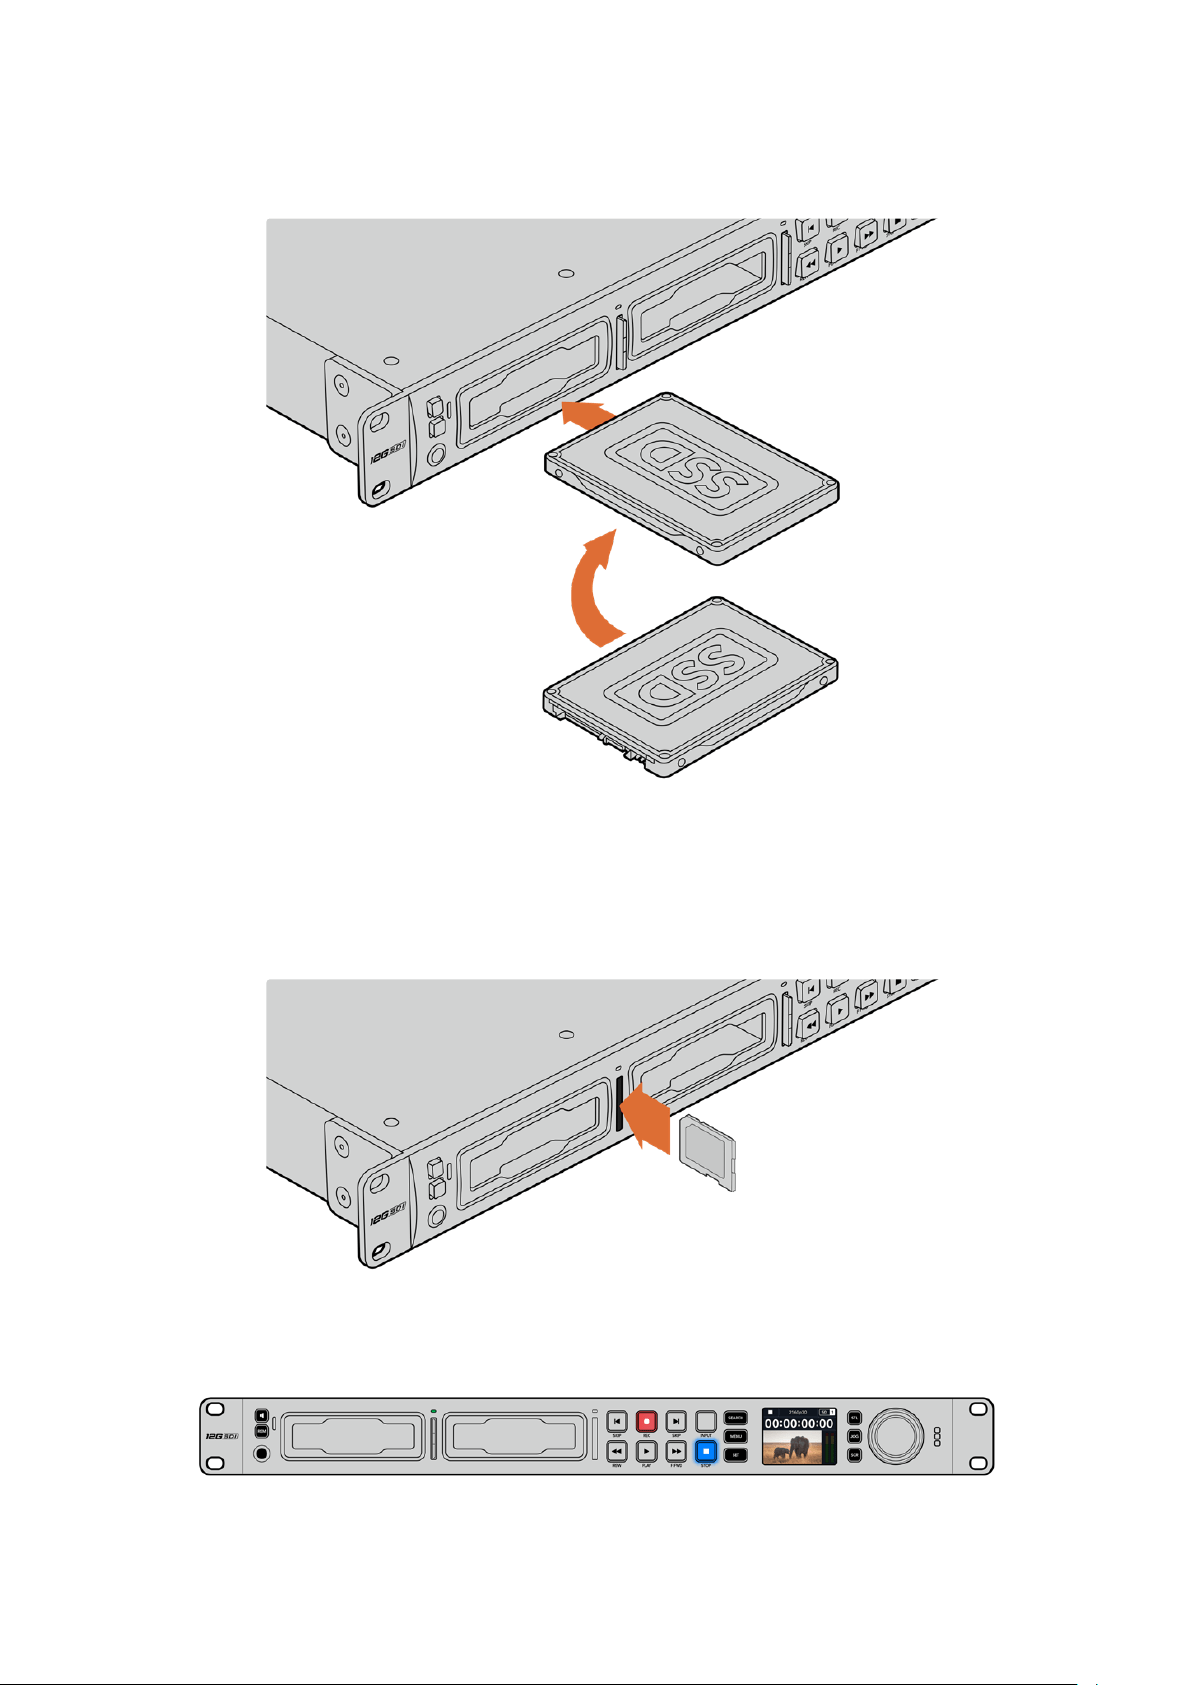
SSD를 제거하려면, 끝부분을 잡고 부드럽게 꺼내세요. 그러면 SSD가 슬롯에서 분리됩니다.
SSD의 연결핀이 아래쪽을 향하도록 잡고 HyperDeck Studio의 드라이브 베이에 잘 맞춘 뒤,
제대로 장착될 때까지
SSD를 드라이브 베이에 부드럽게 밀어 넣으세요.
SD 카드 장착하기
1
SD
카드의 금색 접촉부가 HyperDeck의 LCD 화면 방향으로 향하도록 잡고 미디어 슬롯에 잘
맞추세요. 이제 카드를 슬롯에 집어넣고 완전히 장착될 때까지 부드럽게 밀어 넣으세요.
2
이제 HyperDeck Studio에서 SD 카드를 인식합니다. SD 카드 슬롯 위의 녹색 표시등에 불이
들어와 인식 여부를 확인할 수 있습니다.
표시 장치에 불이 꺼지고 정지 버튼에 불이 들어오면 HyperDeck Studio의 녹화 준비가 완료되었음을 의미합니다.
434
시작하기

정보 다시 한 번 눌러 딸깍 소리가 나면 슬롯에서 카드가 분리됩니다. 조금 튀어나온 카드
끝부분을 잡고 슬롯에서 빼내세요.
이제
HyperDeck Studio의 녹화 및 재생 준비가 완료되었습니다!
비디오 녹화하기
비디오 소스가 LCD에 나타나는 걸 확인하고 나면 녹화를 바로 시작할 수 있습니다.
녹화를 시작하려면 녹화 버튼을 누르세요.
SD 카드에 녹화할 경우, 슬롯 표시 장치와 녹화 및 재생 버튼에
빨간 불이 들어오며,
LCD 시작 화면에도 녹화 아이콘이 나타납니다. SSD에 녹화할 경우엔 미디어 상태
표시
LED에 빨간 불이 들어옵니다.
HyperDeck Studio에서 녹화가 진행되는 동안 LCD의 슬롯 표시 장치에 활성화된
슬롯과 해당 미디어의 잔여 녹화 시간이 번갈아 표시됩니다.
녹화를 마치려면 STOP 버튼을 누르세요. PLAY 버튼을 누르면 재생이 시작됩니다.
정보 사용 중인 코덱을 변경하려면 Blackmagic HyperDeck Setup 유틸리티를 사용해 코덱
설정을 변경하세요. 자세한 정보는 본 설명서의 뒷편의 [
Blackmagic Hyperdeck Setup]
부분을 참고하세요.
여러 개의 미디어에 녹화하기
SD 카드나 SSD의 잔여 녹화 시간이 3분 미만일 경우, HyperDeck Studio의 LCD에 있는 타임코드
카운터가 빨간색으로 변하며 정지 버튼이 천천히 깜빡입니다.
이는 녹화를 이어갈 여유 공간이 있는 두 번째 디스크가 없다는 것을 의미하기도 합니다. 이런 경우에는
녹화가 지속될 수 있도록 저장 공간이 있는 디스크를 삽입하기만 하면 됩니다. 빈 디스크를 슬롯에
삽입하거나,
EXT DISK 입력에 연결하면 천천히 깜빡이던 불빛이 사라지고 타임코드가 흰색으로
바뀝니다. 이는 두 번째 디스크에 이상이 없고 녹화를 이어갈 여유 공간이 있어
HyperDeck에서 녹화를
이어갈 수 있다는 것을 의미합니다.
435
비디오 녹화하기
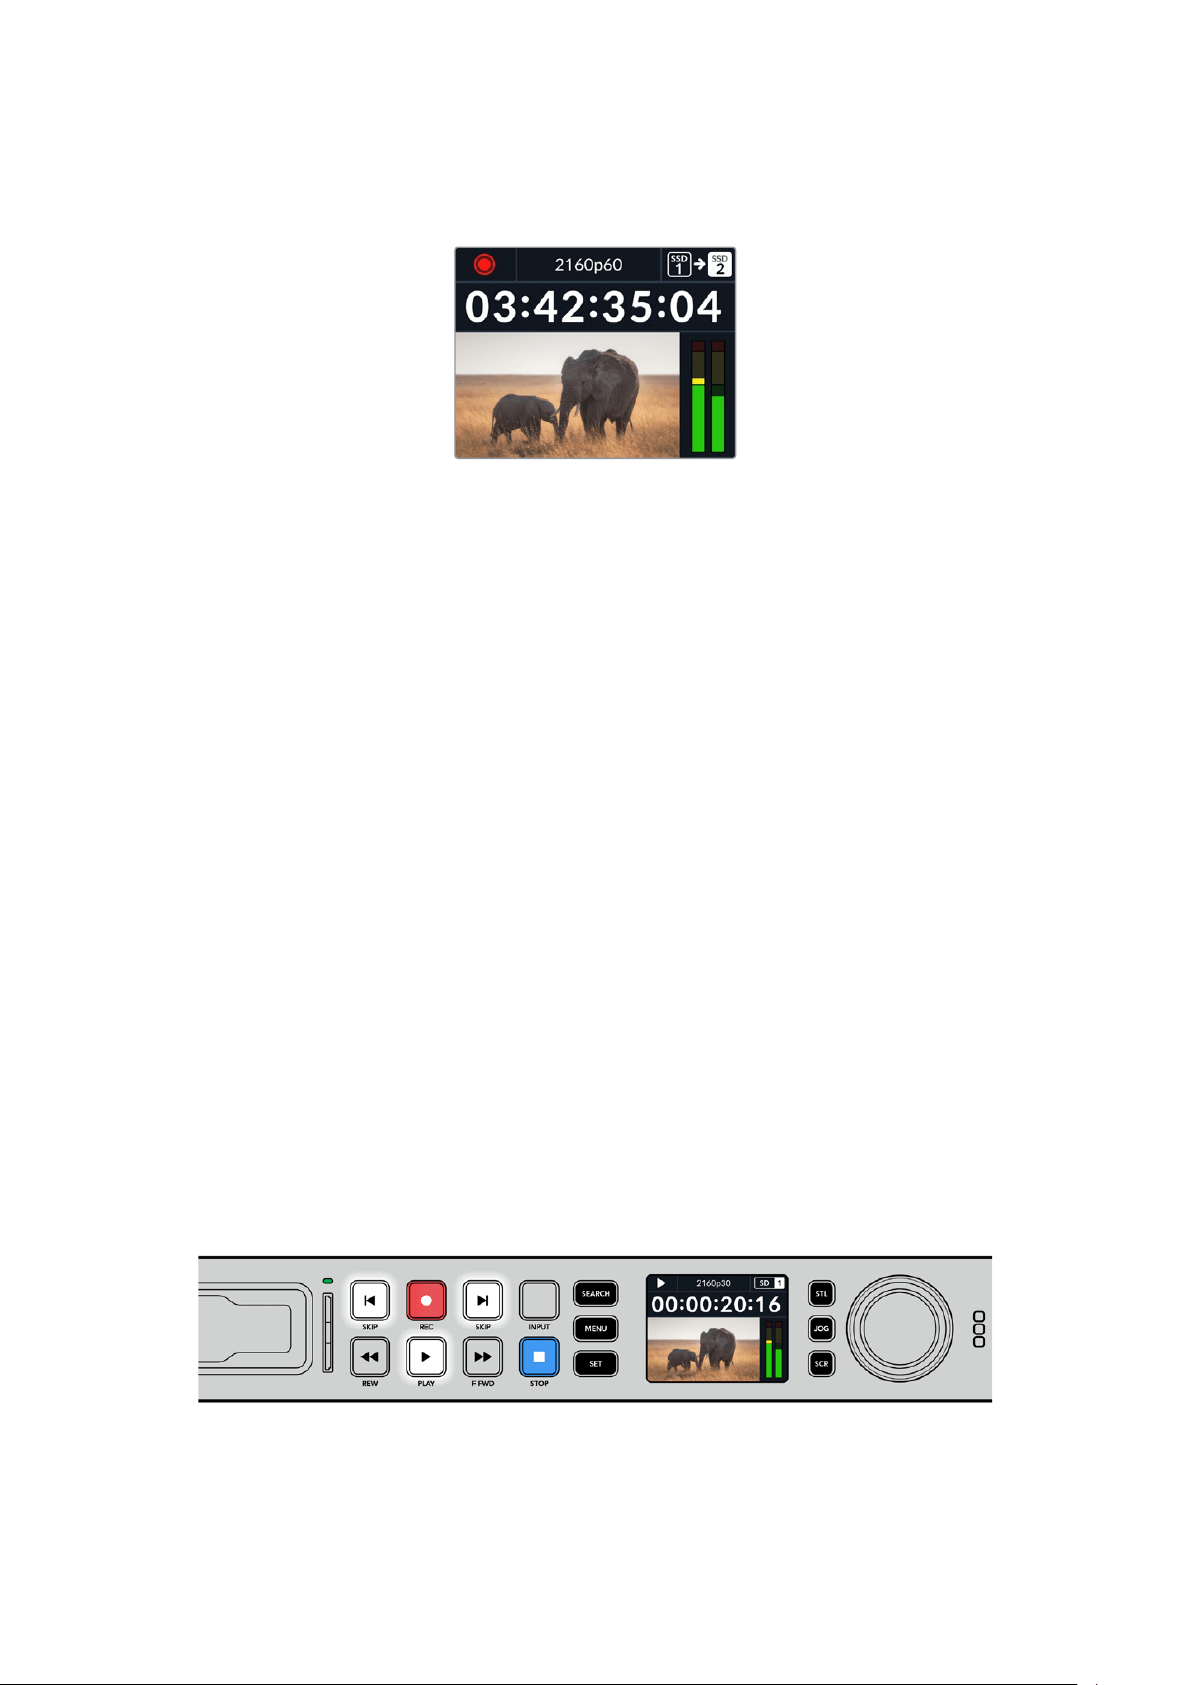
HyperDeck Studio에 두 개 이상의 미디어가 연결된 경우, 한 미디어가 가득 차면 다음 디스크나
드라이브로 녹화가 이어집니다. 해당 정보는 시작 화면의 우측 상단에 표시됩니다.
녹화 중 디스크 교체하기
저장 공간이 남아있는 두 번째 디스크가 준비된 상태에서 녹화 디스크를 교체하려는 경우, 녹화 버튼을
길게 누르면 현재 녹화 중인 디스크에서 다음 디스크로 녹화가 이어집니다. 이 기능은 녹화를 중단하지
않고
HyperDeck에서 디스크를 꺼낼 수 있는 유용한 기능입니다. 예를 들면, 라이브 이벤트에서 중요한
녹화 파일을 다른 장소로 보내야 하지만, 일부 장면을 놓치거나 녹화를 중단하고 싶지 않을 경우에 사용할
수 있습니다.
녹화 버튼이 깜빡이면 이는 현재 미디어에 문제가 발생하여 드롭 프레임 현상이 생길 가능성이 있다는
것을 의미합니다. 속도가 느린 미디어를 사용해
UHD 영상을 녹화하는 경우에 이런 일이 생길 수
있습니다. 예를 들어,
2160p30 ProRes HQ 영상 녹화 시 ProRes Proxy보다 높은 데이터율이 사용되기
때문에 가장 빠른 속도의
SD 카드나 SSD를 사용하는 것이 좋습니다. 검증된 미디어 목록은 본 설명서의
[저장 미디어] 부분을 참고하세요.
재생
트랜스포트 컨트롤에는 기존 방송용 데크에서 사용하는 녹화/되감기/재생/빨리 감기/정지 버튼을
탑재했습니다.
SKIP 버튼은 건너뛰기와 뒤로 가기 기능으로, 이전/다음 버튼과 유사하며 클립 간을
신속하게 이동할 수 있습니다.
HyperDeck
으로 비디오 재생하기
1
재생 버튼을 한 번 누르면 클립이 바로 재생되어 내장 LCD와 HyperDeck 출력에 연결된 모든
디스플레이에서 영상을 확인할 수 있습니다.
2
다음 클립으로 넘어가려면 제어 패널에 있는 건너뛰기 버튼을 누르세요.
3
이전 클립 버튼을 누르면 현재 재생 중인 클립의 시작 부분으로 넘어가며, 이 버튼을 두 번
누르면 이전 클립의 시작 부분으로 되돌아갑니다.
HyperDeck 제어 패널에서 재생 버튼을 누르면 클립이 재생되고, 건너뛰기 또는 뒤로
가기 버튼을 누르면 현재 클립이 다시 시작되거나 다른 클립으로 넘어갑니다.
436
재생
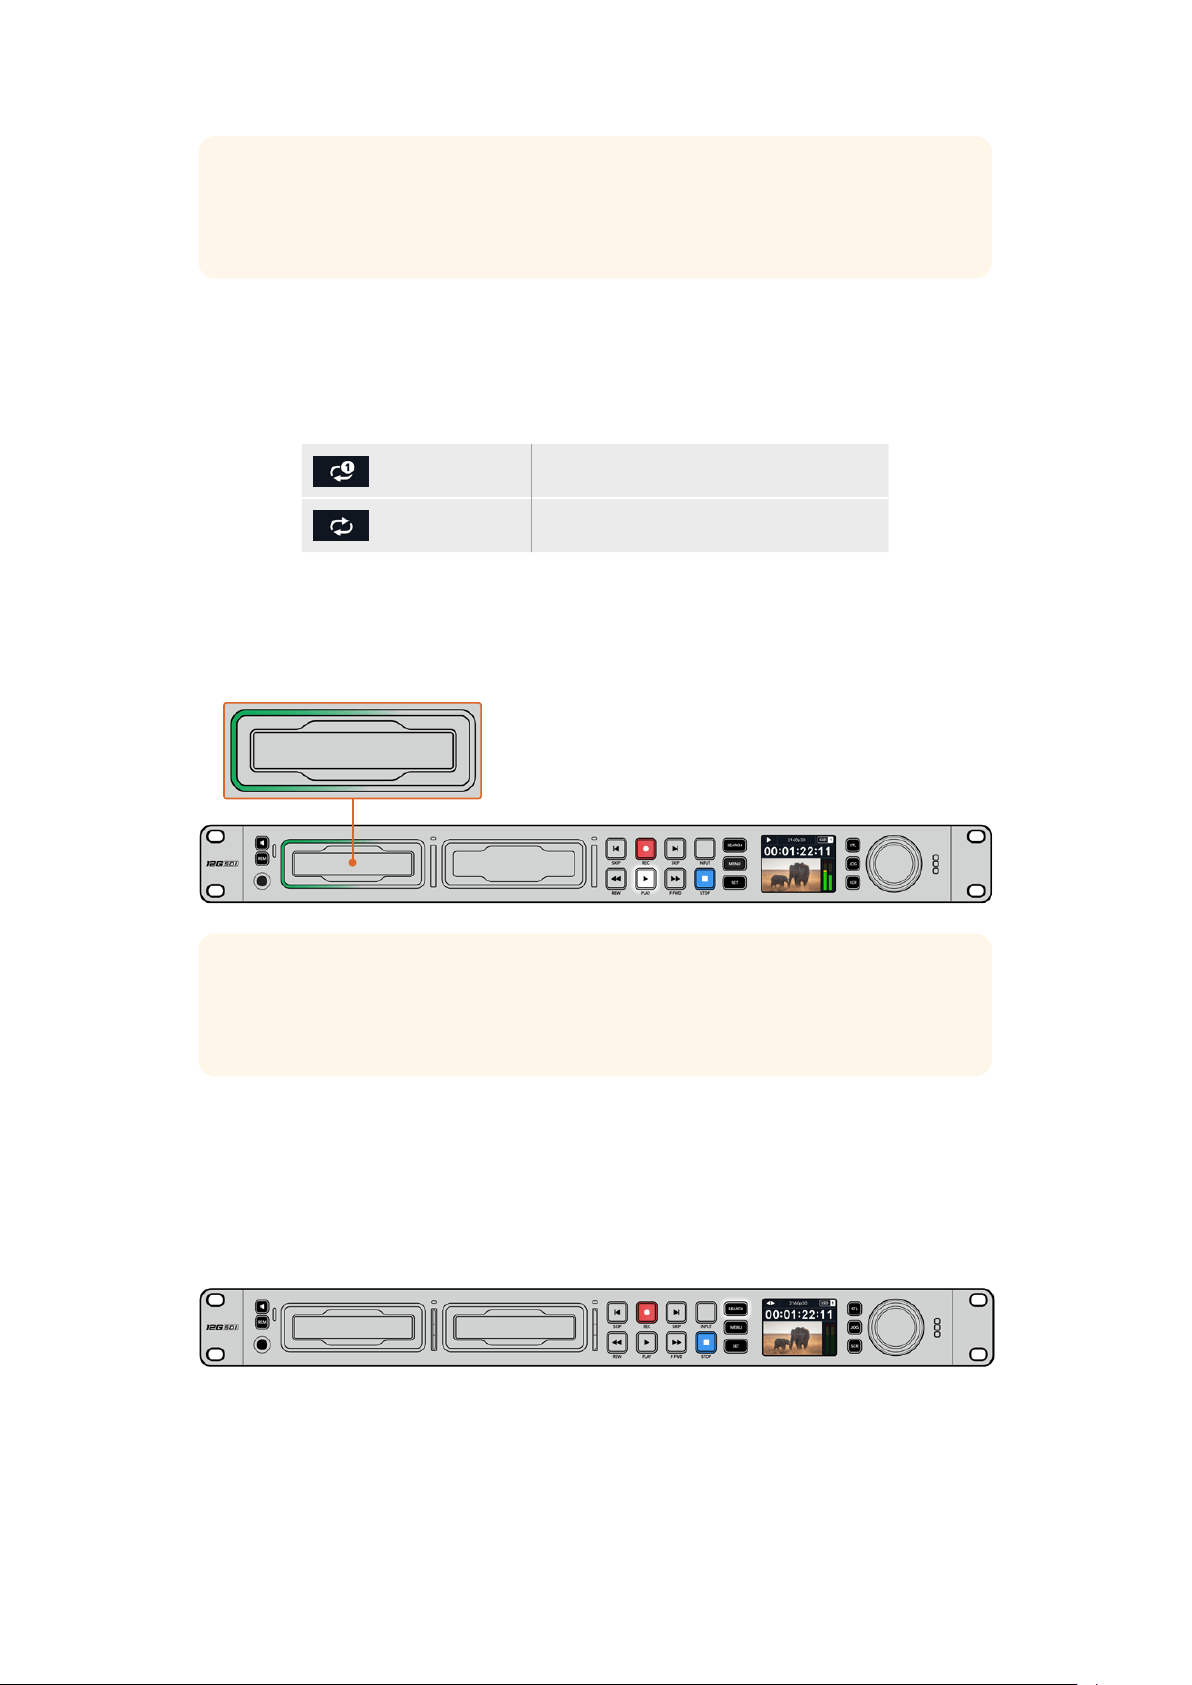
정보 HyperDeck에서 비디오 파일을 재생하려면, 파일에 맞는 코덱을 설정해야 합니다. 이
설정은
LCD 메뉴에서 할 수 있습니다. 더 자세한 정보는 본 설명서의 [LCD 메뉴 사용하기]
부분을 참고하세요.
루프 재생
HyperDeck에서 파일을 무한 반복 재생하려면, 영상 재생 중에 재생 버튼을 한 번 더 누르세요. 루프
재생 기능이 활성화되면
LCD에 루프 아이콘이 나타나는 것을 확인할 수 있습니다. 루프는 두 가지 모드로
지원됩니다.
클립 루프
현재 재생 중인 클립을 반복 재생합니다.
전체 클립 루프
미디어에 녹화된 모든 클립을 반복 재생합니다.
역동적인 LED 표시 장치
파일 재생 중 드라이브 베이 주변의 베젤에 녹색 불이 원을 그리며 들어와 재생 속도 및 재생 방향을
알려줍니다.
정보 HyperDeck에서 SSD에 녹화 시 재생 버튼이 깜빡거린다면 이는 디스크 속도가 녹화를
지속할 수 없을 정도로 느리다는 것을 의미합니다.
H.264 등의 압축 녹화 포맷으로 변경하거나,
속도가 빠른 권장
SSD 또는 외장 디스크를 사용해 UHD 녹화를 진행하는 것이 좋습니다.
검색 다이얼 사용하기
영상 재생 중 검색 다이얼을 사용하면 클립 간을 신속하게 이동할 수 있으며, 특정 부분을 골라 재생하거나
프레임 단위로 검토할 수 있습니다. 이는 클립의 특정 부분을 찾을 때 중요한 기능으로, 다이얼을 돌려
클립을 시각적으로 모니터링하거나 특정 타임코드 포인트를 검색할 수 있습니다. 또한 플레이헤드를 특정
큐 지점으로 이동시켜 생방송 도중 내보낼 클립을 준비시킬 때 유용한 기능입니다.
SEARCH 버튼을 눌러 검색 다이얼 모드를 고르세요.
437
재생

검색 다이얼 모드에는 조그(JOG), 셔틀(STL), 스크롤(SCR)이 있습니다.
조그
클립 전체를 정방향 또는 역방향으로 재생해 프레임 단위로 정확하게 컨트롤할
수 있습니다.
셔틀
클립을 앞/뒤로 빠르게 재생합니다. 다이얼을 돌리는 정도에 따라 재생 속도가
달라집니다.
스크롤
다이얼을 돌리는 정도에 따라 더욱 빠르게 재생됩니다. 길이가 긴 클립에서 특정
장면을 신속하게 검색할 때 유용한 기능입니다.
크기가 큰 모델에는 전용 검색 모드 버튼이 탑재되어 있으며, 검색 다이얼에 클러치 방식의 기능이
내장되어 있어 사용 중 촉감으로 피드백을 전달받을 수 있습니다. 이를 통해
TV나 모니터로 영상을
확인하며 클립의 어느 부분을 검색 중인지 체감할 수 있습니다.
JOG, STL, SCR 버튼을 눌러 조그/셔틀/스크롤 검색 모드를 선택하세요.
정보 일반 재생 모드로 돌아가려면 PLAY 또는 STOP 버튼을 누르세요.
438
재생
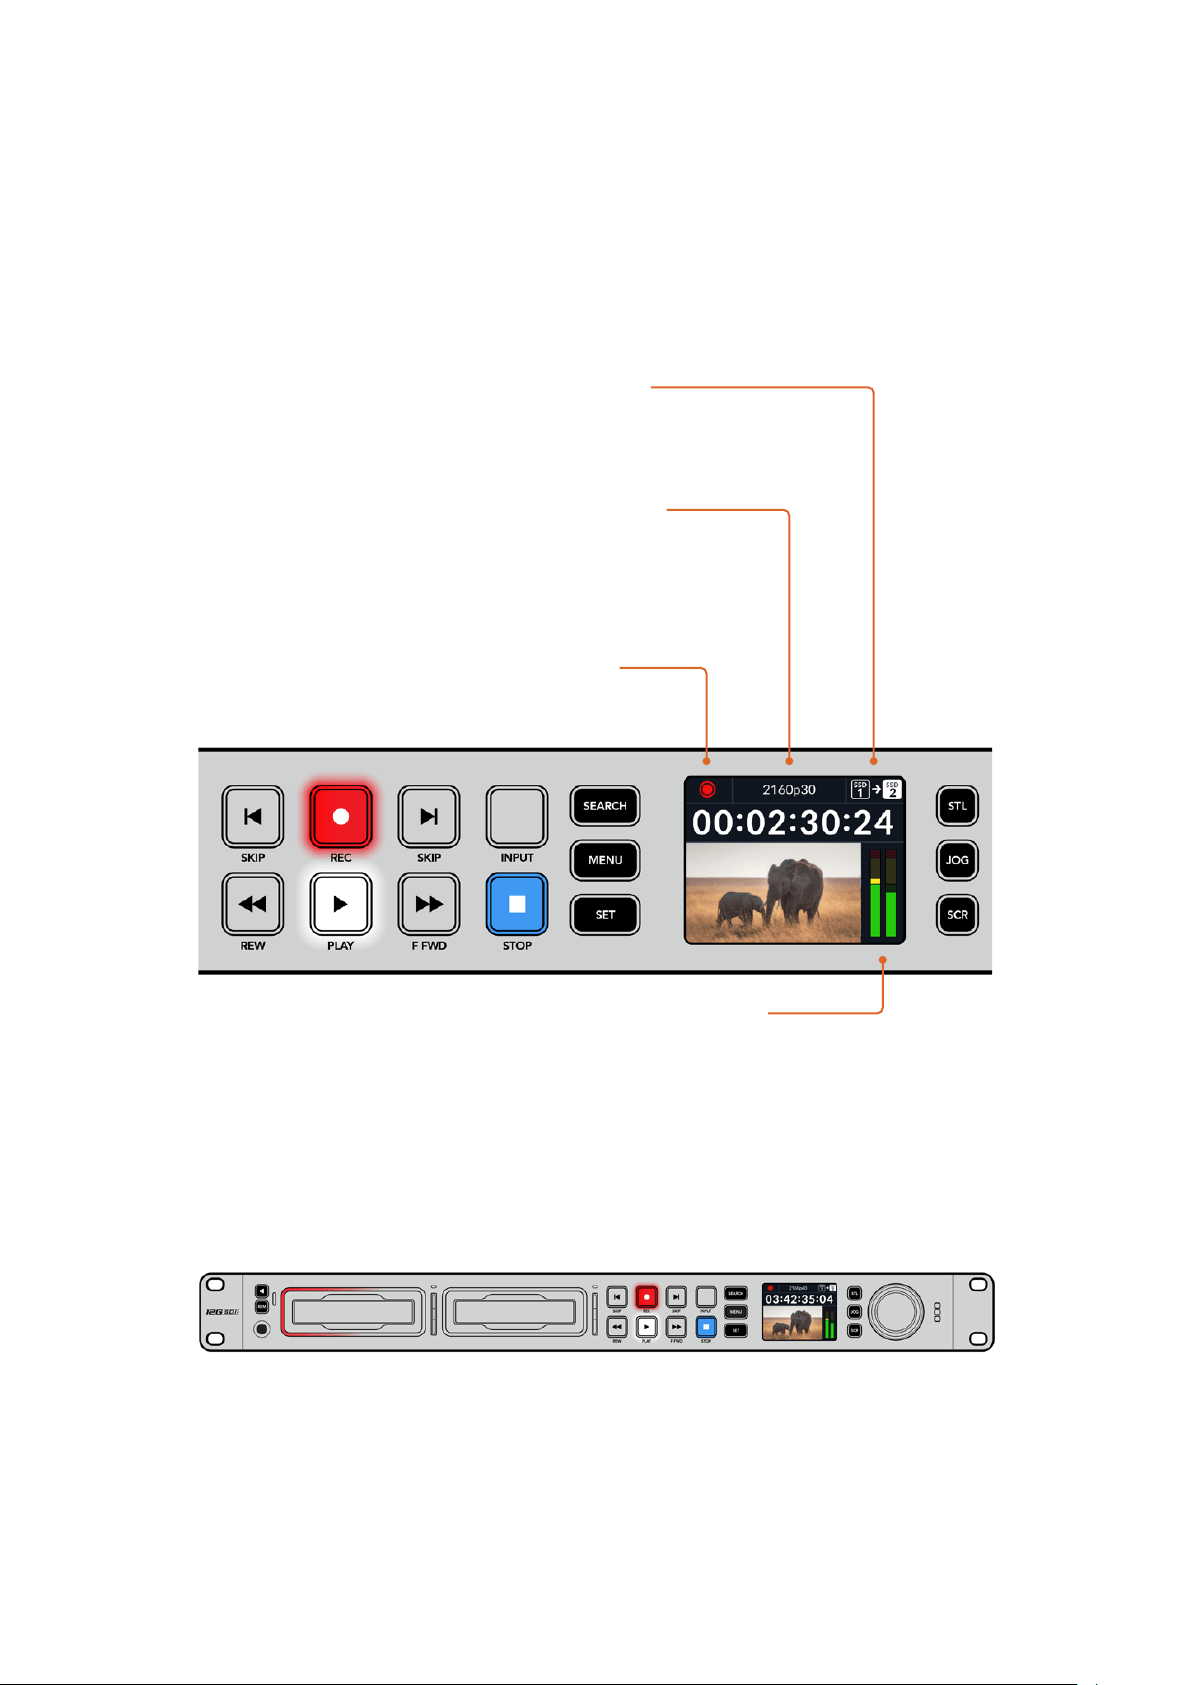
전면 패널 사용하기
HyperDeck로 녹화하거나 재생할 경우, 필요한 모든 정보가 각 미디어 슬롯의 LED 표시 장치와 내장
LCD를 통해 표시됩니다.
HyperDeck Studio 시작 화면
미디어 슬롯 표시 장치
HyperDeck의 전원을 켜거나 SSD 또는 SD 카드를 삽입하면 미디어를 확인하는 동안 슬롯 표시 장치에
녹색 불이 들어온 뒤 곧 사라집니다. 디스크 포맷이 잘못된 경우나 사용이 불가능한 경우 디스크를 제거할
때까지 슬롯 주변에 주황색 불이 들어옵니다. 이런 경우 디스크가 제대로 포맷되었는지 그리고 해당
컴퓨터에서 사용할 수 있는지 확인하시기 바랍니다.
HyperDeck의 미디어 슬롯 표시 장치에 불이 들어와 디스크 상태를 확인할 수 있습니다.
예를 들어 녹화 시에는 빨간색 불이, 재생 시에는 녹색 불이 들어옵니다.
잔여 시간 미및 미디어 표시 - 녹화 중에는
디스크 및 현재 사용 중인 드라이브의 잔여
시간이 서로 번갈아 표시됩니다. 재생 중에는
사용 중인 미디어의 아이콘이 나타납니다.
포맷 표시 - 재생 중인 입력 또는 파일 포맷이
나타납니다. 일부
HyperDeck Studio
모델에서는
INPUT 버튼을 토글링하면 전면 패널
버튼 및 검색 다이얼로 조절하는 스피커 및 헤드폰
볼륨 세기와 함께 해당 입력 소스가 나타납니다.
상태 표시 - 재생 모드와 함께 데크의
현재 상태가 나타납니다.
오디오 미터 - 재생 중에 해당
소스의 오디오 레벨이 나타납니다.
439
전면 패널 사용하기

LCD
메뉴 사용하기
전면 패널에 있는 MENU 버튼을 누르면 메뉴 설정이 나타납니다.
검색 다이얼을 돌리거나 뒤로 가기/건너뛰기
SKIP 버튼을 눌러 메뉴 옵션을 검색한 다음 SET 버튼을 눌러
하위 메뉴를 선택하세요.
검색 다이얼을 돌려 메뉴 설정을 검색할 수 있습니다.
메뉴 항목을 선택한 다음 SET 버튼을 누르세요.
검색 다이얼을 사용하거나 뒤로 가기/건너뛰기
SKIP 버튼을 눌러 설정을 조절한 다음 SET 버튼을 눌러
마무리하세요.
MENU 버튼을 누르면 이전 메뉴 항목으로 이동해 시작 화면으로 되돌아 갑니다.
440
전면 패널 사용하기

설정
녹화 메뉴
입력
입력 설정을 사용해 SDI 또는 HDMI 소스를 선택하세요. 전면 패널의 INPUT 버튼을 사용해 입력 소스를
변경할 수도 있습니다.
코덱
모든 HyperDeck Studio 모델은 H.264, Apple ProRes 및 DNxHD 코덱을 사용해 압축 비디오로
녹화합니다.
HyperDeck Studio 4K Pro에서는 4K 미디어 녹화 시 H.265 및 DNxHR 코덱을 사용할
수도 있습니다.
트리거 녹화
‘비디오 시작/정지’와 ‘타임코드 런’의 두 가지 모드 중 선택할 수 있습니다.
URSA Mini 같은 일부 카메라는 외부 녹화 장비에 녹화를 시작하거나 정지할 때 SDI를 통해 명령을
전송합니다. ‘비디오 시작/정지’ 모드를 선택하면 촬영 중인 카메라에서 녹화 버튼이 눌러지는 시점에
HyperDeck에서 녹화가 시작/정지됩니다.
‘타임코드 런’ 모드는 유효한 타임코드 신호가 입력되는 시점에 녹화가 시작하도록 합니다. 타임코드 신호
입력이 멈추면 녹화도 자동으로 멈춥니다. ‘장치 없음’을 선택하여 트리거를 비활성화하세요.
참고 HDMI 및 SDI 카메라를 녹화할 경우, 출력에 나타나는 오버레이도 영상과 함께
녹화되므로 오버레이 기능을 끈 상태에서 클린 피드만 출력되는지 확인하세요.
입력 재동기화
‘입력 재동기화’ 기능은 비디오 입력의 재동기화를 활성화하고 녹화 전에 비디오가 외부 레퍼런스에
잠기도록 합니다. 입력 자체가 재동기화 되므로, 비디오 출력은 녹화로 전환되어도 레퍼런스에 잠긴
상태를 유지합니다. 이 기능은 여러 데크의 타임코드를 잠가야 하지만 일부 소스는 동기화되지 않는
ISO
개별 녹화에 사용합니다. 이 기능은 일반적으로 꺼져 있으므로 입력 비디오에 프레임을 별도로 추가/
제거하지 않고 비디오 입력이 녹화됩니다.
모든 방송 데크는 일반적으로 재생 중 레퍼런스 입력을 사용하여 비디오 출력을 잠급니다. 이는
HyperDeck 재생 출력이 레퍼런스 입력에 잠기므로 대형 방송 시스템에 연결할 때 다시 동기화할 필요가
없습니다.
그러나 데크에서 녹화 시에는 출력이 입력으로 전환되는데, 이는 일반적으로 녹화 중 변경되지 않은 입력
비디오를
HypderDeck 비디오 출력과 연결된 다른 다운스트림 장비로 전송하고 싶은 경우가 대부분이기
때문입니다.
441
설정

하지만 HyperDeck Studio에는 ISO 개별 녹화에 도움이 되는 독특한 기능이 있습니다. 이를 통해 위의
과정을 완전히 반대로 하여 비디오 입력을 레퍼런스 입력으로 재동기화할 수 있습니다. 즉, 동기화되지
않은 소스를
HyperDeck에 연결할 수 있는데, 이 경우 HyperDeck Studio에서 이 소스를 비디오
레퍼런스에 동기화한 다음 녹화합니다.
동기화되지 않은 소스는 컴퓨터, 소비자용 카메라 또는 레퍼런스에 연결할 수 없는 모든 비디오 장비를
예로 들 수 있습니다. 또는 다른 스튜디오나 외부 방송국에서 들어오는 비디오 피드일 수도 있습니다.
동기화되지 않은 소스는
ISO 개별 녹화 시 문제를 야기하는데, 이는 모든 녹화 영상에서 시각이 완벽하게
일치하도록 하나의 타임코드가 필요하기 때문입니다. 동기화되지 않은 소스는 다른 소스보다 빠르거나
느리게 실행되며 녹화 중에 기준 타임코드에서 크게 벗어나게 됩니다. 이 경우, 여러 소스들에 매칭되는
타임코드가 없기 때문에 멀티캠 편집 작업이 매우 힘들어집니다.
입력 재동기화 기능이 켜지면,
HyperDeck 비디오 입력이 분석되며, 비디오 입력이 뒤처지기 시작하면
프레임이 반복되며 레퍼런스보다 앞서가기 시작하면 프레임이 제거됩니다. 이를 ‘재동기화’라고 하며
입력에 대한 이 과정을 ‘프레임 재동기화’라고 합니다. 이는 모든 데크에 녹화되는 클립들의 타임코드가
동일한 시각에 동일한 이벤트를 보여주는 것을 의미합니다. 이를 통해 멀티캠 편집 작업이 가능해집니다.
물론 단점은 녹화 전, 입력에 일부 프레임이 추가하거나 입력의 일부 프레임이 제거된다는 것입니다.
이것이 바로 이 기능을 보통 ‘
OFF’ 상태로 두고 ISO 개별 녹화 소스가 컴퓨터나 일반 소비자용 기기에서
해당 소스에 레퍼런스를 연결할 수 없는 경우에만 사용하는 것이 가장 좋은 이유입니다.
하지만 입력 재동기화 기능을 켜고 사용할 수 있는 한 가지 상황이 있습니다. 입력 재동기화 기능이
켜져 있으면
HyperDeck 비디오 출력은 데크가 녹화 중일 때도 레퍼런스 잠금 상태를 유지합니다. 즉,
HyperDeck의 SDI 출력을 카메라에 연결하여 프로그램 리턴 피드를 통해 카메라를 레퍼런스에 잠글 수
있습니다. 좋은 예가 바로
Blackmagic Studio Camera 4K Pro인데, 이 카메라 모델은 외부 비디오를
레퍼런스로서 설정할 수 있습니다. 그러면 카메라 피드는
HyperDeck의 레퍼런스에 동기화되며 카메라
영상이 빠르거나 느리게 실행되지 않기 때문에
HyperDeck 입력 재동기화가 프레임을 추가하거나 제거할
필요가 없습니다.
‘입력 재동기화’ 기능은, 비디오 입력이
HypderDeck과 동일한 레퍼런스에 동기화되지 않을 때만
사용합니다. 하지만 위의 경우,
HyperDeck 출력이 카메라의 레퍼런스 소스이며, HyperDeck은
비디오 레퍼런스 입력에 잠기게 됩니다. 만약 레퍼런스 루프 연결을 사용하여 여러
HypderDeck을 모두
잠그면, 모든 카메라와 모든
HyperDeck이 하나의 그룹으로 잠기게 됩니다. 만약 이 그룹에서 한 대의.
HyperDeck이 컴퓨터와 같이 비동기화된 소스를 가질 시, 이 입력 소스는 재동기화되지만 다른 소스들은
그대로 있게 됩니다.
재동기화 기능은 자동으로 실행되므로, 간단히 소스들을 연결하기만 하면 작동됩니다. 입력 재동기화
기능은 매우 강력한 기능이지만, 언제 그리고 어느 목적으로 사용할 지 분명히 결정한 뒤 사용해야 합니다.
여러 대의
HyperDeck과 멀티캠 편집 소프트웨어로 테스트를 하여 어떻게 작동되는지 확인해 보세요.
재동기화 기능은 매우 빠른 프로그램 프로덕션을 가능케 하는 훌륭한 기능입니다.
442
설정

모니터 메뉴
모니터 메뉴는 뒷면 패널에 모니터 연결 단자가 탑재된 HyperDeck Studio 모델에 포함되어 있습니다.
클린 피드
클린 피드로 전환하면 HyperDeck Studio의 뒷면에 있는 모니터 출력 단자에 연결된 디스플레이에서
상태 정보 텍스트가 사라집니다. 표시되는 정보를 포함한 모니터 출력 디스플레이에 관한 자세한 정보는
본 설명서의 [모니터 출력] 부분을 참고하세요.
3D LUT
HyperDeck
Studio를 필드 레코더로 사용하는 경우에는 디스플레이 LUT 기능이 매우 유용합니다.
HyperDeck에게 어떤 색과 휘도가 화면으로 출력되고 있는지 알려주기 때문입니다. 카메라에서 필름
다이나믹 레인지를 사용하는 경우에는 의도적으로 채도를 낮춰 명암 대비를 낮추기 때문에 이 기능을
유용하게 사용할 수 있습니다. 디스플레이
LUT를 적용하면 색보정 작업 후 영상룩에 대한 아이디어를
얻을 수 있습니다.
Blackmagic HyperDeck Setup 유틸리티를 통해 선택한 디스플레이 LUT를 SDI 모니터 출력에 적용할
수 있습니다.
3D LUT 켜고 끄기
1
MENU
버튼을 누르고 검색 다이얼을 사용해 ‘모니터링’ 메뉴를 검색하세요.
2
SET
버튼을 누르세요.
3
검색 다이얼을 사용해 ‘3D LUT’가 파란색으로 하이라이트될 때까지 아래로 스크롤하세요.
4
SET
버튼을 눌러 LUT를 켜고 끌 수 있습니다.
LUT 선택에 관한 자세한 정보는 본 설명서의 뒷편의 [Blackmagic HyperDeck Setup] 부분을
참고하세요.
정보 모니터 출력 뷰에 관한 자세한 정보는 본 설명서의 [모니터 출력] 부분을 참고하세요.
443
설정

오디오 메뉴
녹음된 오디오 채널
HyperDeck Studio를 사용하여 한 번에 최대 16개의 PCM 오디오 채널을 녹음할 수 있습니다. 녹화할
채널 수를 선택하기 위해서는 녹음된 오디오 채널 목록을 확장하여
2/4/8/16 채널 중에서 선택하세요.
코덱이
H.264 또는 H.265로 설정된 경우, 2채널의 AAC 오디오를 선택하면 유튜브에 바로 업로드할 수
있습니다. 이 설정에서는 또한 모니터 출력 연결에 표시할 채널 수를 선택할 수도 있습니다.
모니터 채널
두 개 이상의 채널 녹화 시, 전면 패널 LCD에서 확인할 채널을 선택할 수 있습니다. 이는 모니터 채널
옵션을 통해 선택할 수 있습니다. 전면 패널 스피커가 장착된
HyperDeck Studio 모델에서 이 설정을
사용하면 스피커와 헤드폰 연결을 통해 어떤 오디오를 재생할지도 선택할 수 있습니다.
오디오 미터
내장 LCD는 임베디드 오디오 채널을 위한 오디오 미터를 표시합니다. 미터 방식에는 PPM과 VU 방식이
있습니다. 미터 유형을 변경하려면, 현재 미터 설정으로 들어가 지원되는 옵션 중에서 원하는 오디오 미터
디스플레이를 선택하세요.
헤드폰 레벨
전면 패널에 헤드폰 포트가 장착된 제품 모델 사용 시, 헤드폰 볼륨 설정에서 해당 볼륨을 조절할 수
있습니다.
스피커 레벨
검색 다이얼을 돌려 스피커 볼륨을 조절하세요. 기본 설정값은 50%로 설정되어 있습니다.
정보 헤드폰 볼륨과 스피커 볼륨은 전면 패널에서 바로 조절할 수도 있습니다. 스피커 버튼을
누른 상태에서 검색 다이얼을 돌리면 재생 볼륨을 증가 또는 감소시킬 수 있습니다. 볼륨 레벨은
전면 패널 상단 중앙에 나타납니다.
444
설정
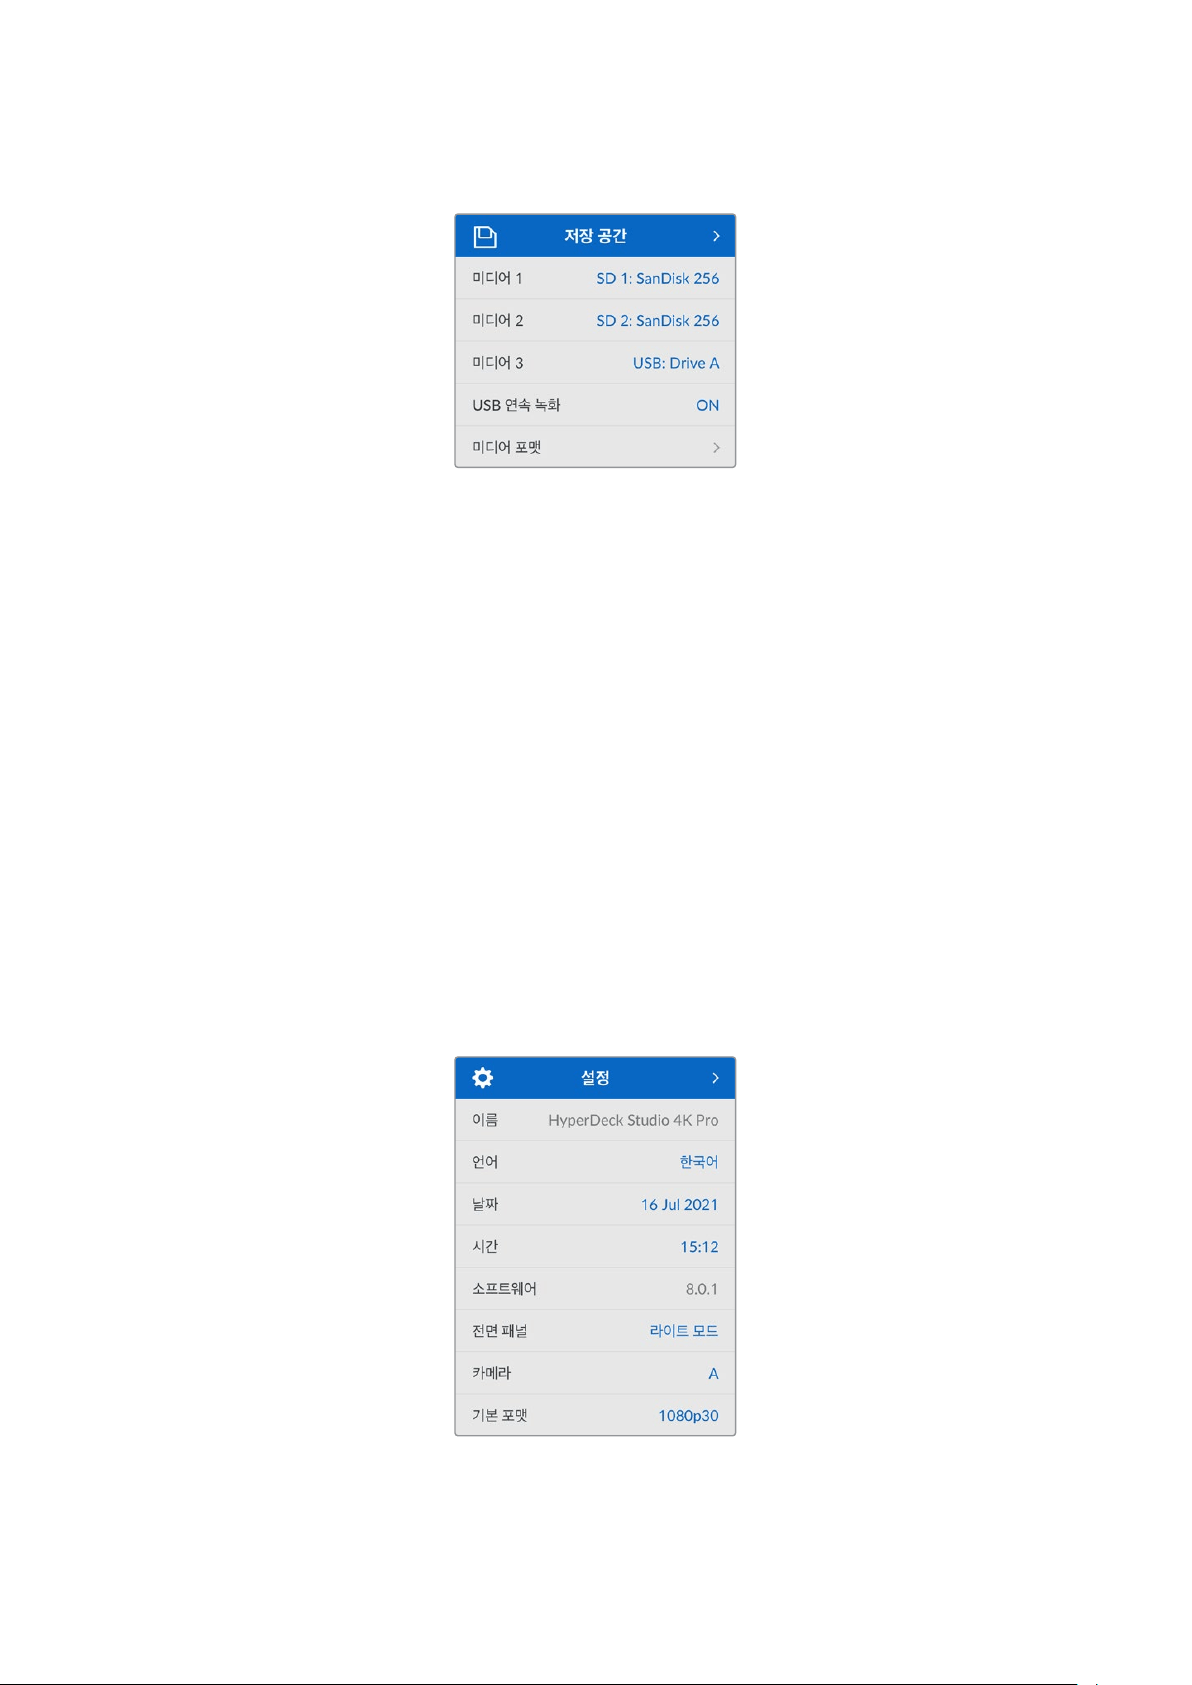
저장 공간 메뉴
미디어 포맷
SD 카드, SSD 그리고 뒷면 EXT Disk 단자에 연결된 미디어는 장치에서 바로 포맷하거나, Mac/
Windows 컴퓨터에서 포맷할 수 있습니다.
HyperDeck Studio에서 미디어 사용 준비하기
1
검색 다이얼과 SET 버튼으로 포맷할 미디어를 선택하세요.
2
해당 목록에서 포맷하려는 미디어를 선택하고 SET 버튼을 누르세요.
3
포맷을 선택하고 SET 버튼을 누르세요.
4
포맷하려는 카드와 선택된 포맷 옵션을 보여주는 확인 창이 나타납니다.
5
작업 완료 후, 포맷 창이 나타나면 ‘확인’을 선택하세요.
Mac OS X 확장 포맷으로도 알려진 HFS+는 저널링을 지원하여 사용이 권장됩니다. 사용하는 저장
미디어에 문제가 생길 경우, 저널링이 적용된 미디어 카드의 데이터는 복원될 가능성이 훨씬 높습니다.
HFS+는 Mac에서 기본 지원됩니다. exFAT는 Mac과 Windows에서 기본 지원되므로 추가 소프트웨어가
필요하지 않으나, 저널링을 지원하지는 않습니다.
Mac/Windows 컴퓨터에서 미디어를 포맷하려면 본 설명서의 [미디어 포맷하기] 부분을 참고하세요.
설정 메뉴
445
설정
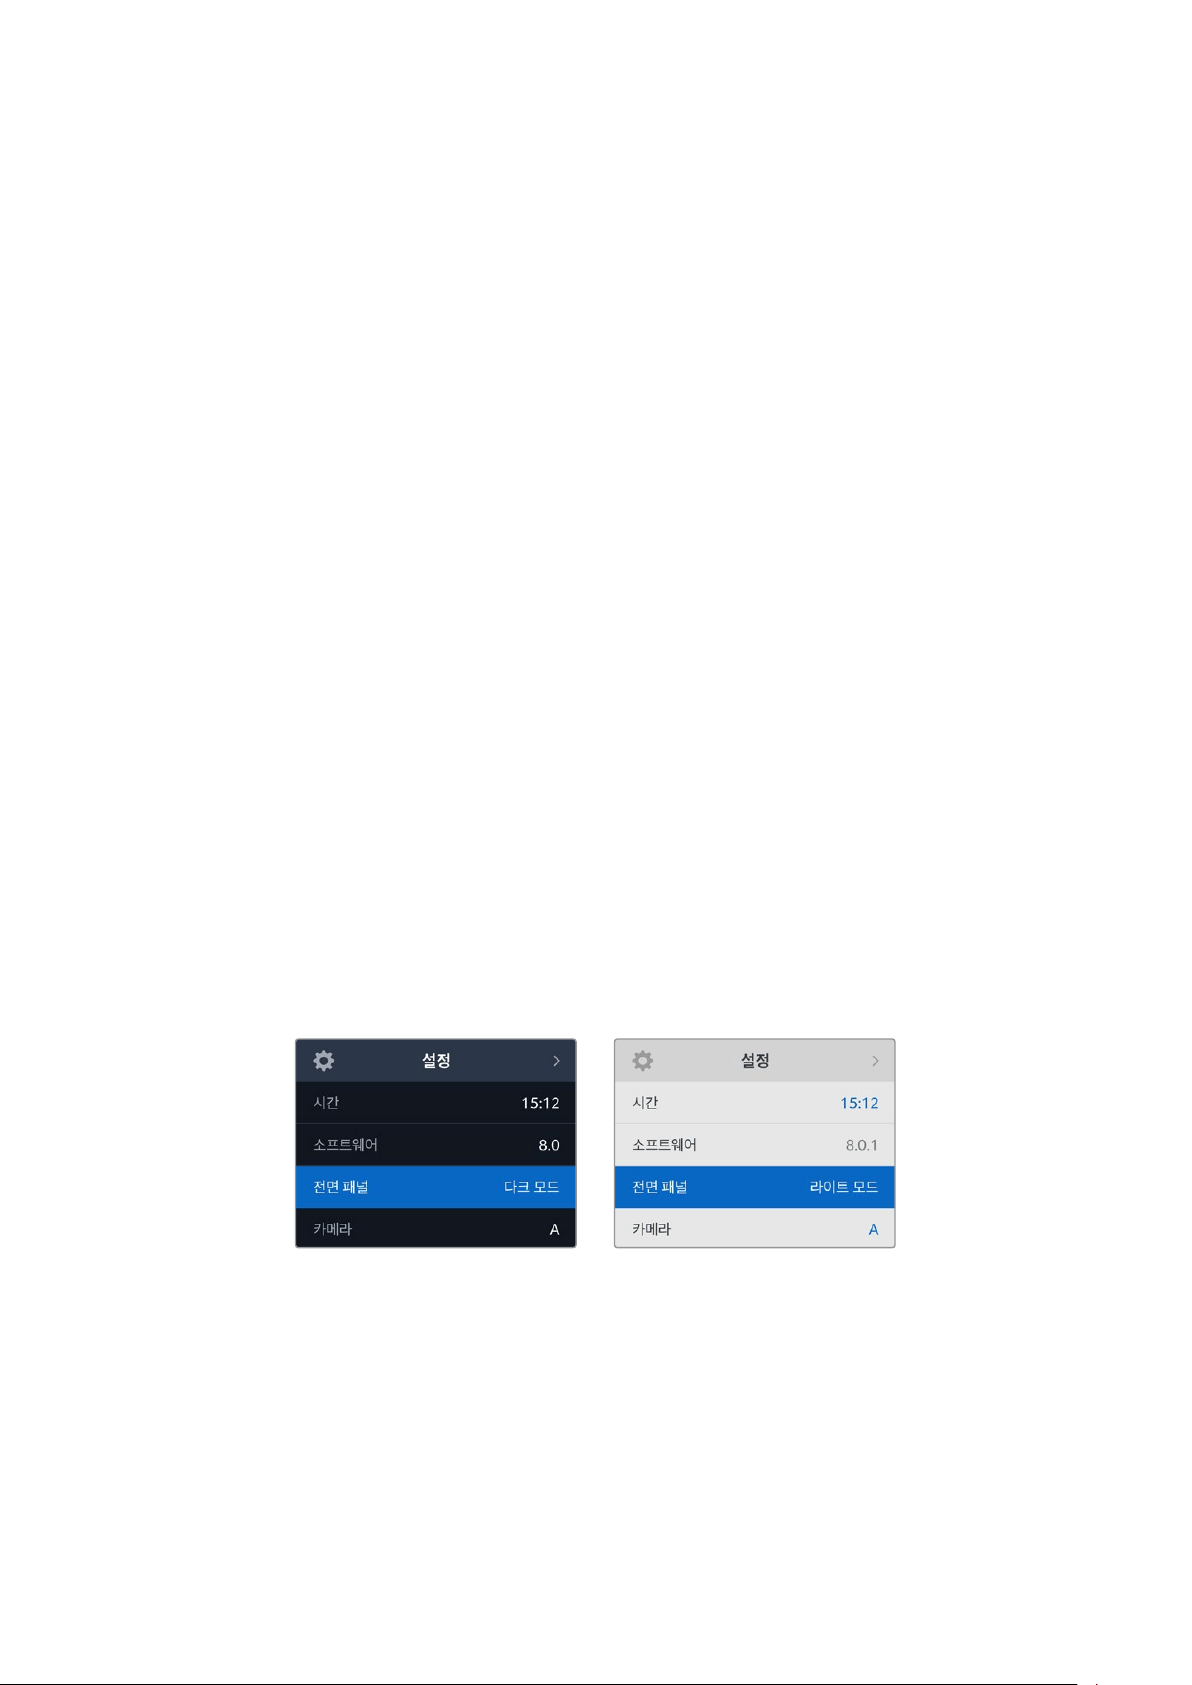
이름
한 대 이상의 HyperDeck Studio가 네트워크에 연결된 경우, 장비를 구분할 수 있도록 이름을 설정할 수
있습니다. 이는
Blackmagic HyperDeck Setup 또는 Blackmagic HyperDeck 이더넷 프로토콜을 통한
터미널 응용 프로그램 사용으로 설정할 수 있습니다.
언어
HyperDeck Studio는 한국어, 영어, 중국어, 일본어, 스페인어, 독일어, 불어, 러시아어, 이탈리아어,
포르투갈어, 터키어, 우크라이나어, 폴란드어를 포함해 총
13개 언어를 지원합니다.
언어 설정 방법
1
‘설정’ 메뉴가 하이라이트되면 SET 버튼을 누르세요.
2
검색 다이얼로 스크롤하여 ‘언어’를 선택한 뒤, SET 버튼을 누르세요.
3
검색 다이얼로 원하는 언어를 선택한 뒤, SET 버튼을 누르세요. 언어가 선택되면 자동으로 설정
메뉴로 되돌아갑니다.
날짜
날짜 입력란을 선택하고 SET 버튼을 누르세요. 검색 다이얼을 사용하여 년/월/일을 선택하세요.
타임스탬프 파일 접미사에 해당 날짜가 적용됩니다.
시간
시간을 설정하려면 ‘시간’을 선택하고 SET 버튼을 누르세요. 검색 다이얼을 사용하여 시간과 분을
조절하세요.
HyperDeck Studio에서 시간은 24시간 형식으로 설정됩니다.
소프트웨어
현재 소프트웨어의 버전을 표시합니다.
전면 패널
HyperDeck의 전면 패널을 ‘라이트’ 모드로 설정하면 LCD 밝기가 높아집니다. 여러 대의 HyperDeck
장비가 설치된 프로덕션 시설같이 밝은
LCD 화면이 거슬리는 어두운 환경에서 작업할 경우에는 ‘다크’
모드로 설정해 사용할 수 있습니다.
446
설정
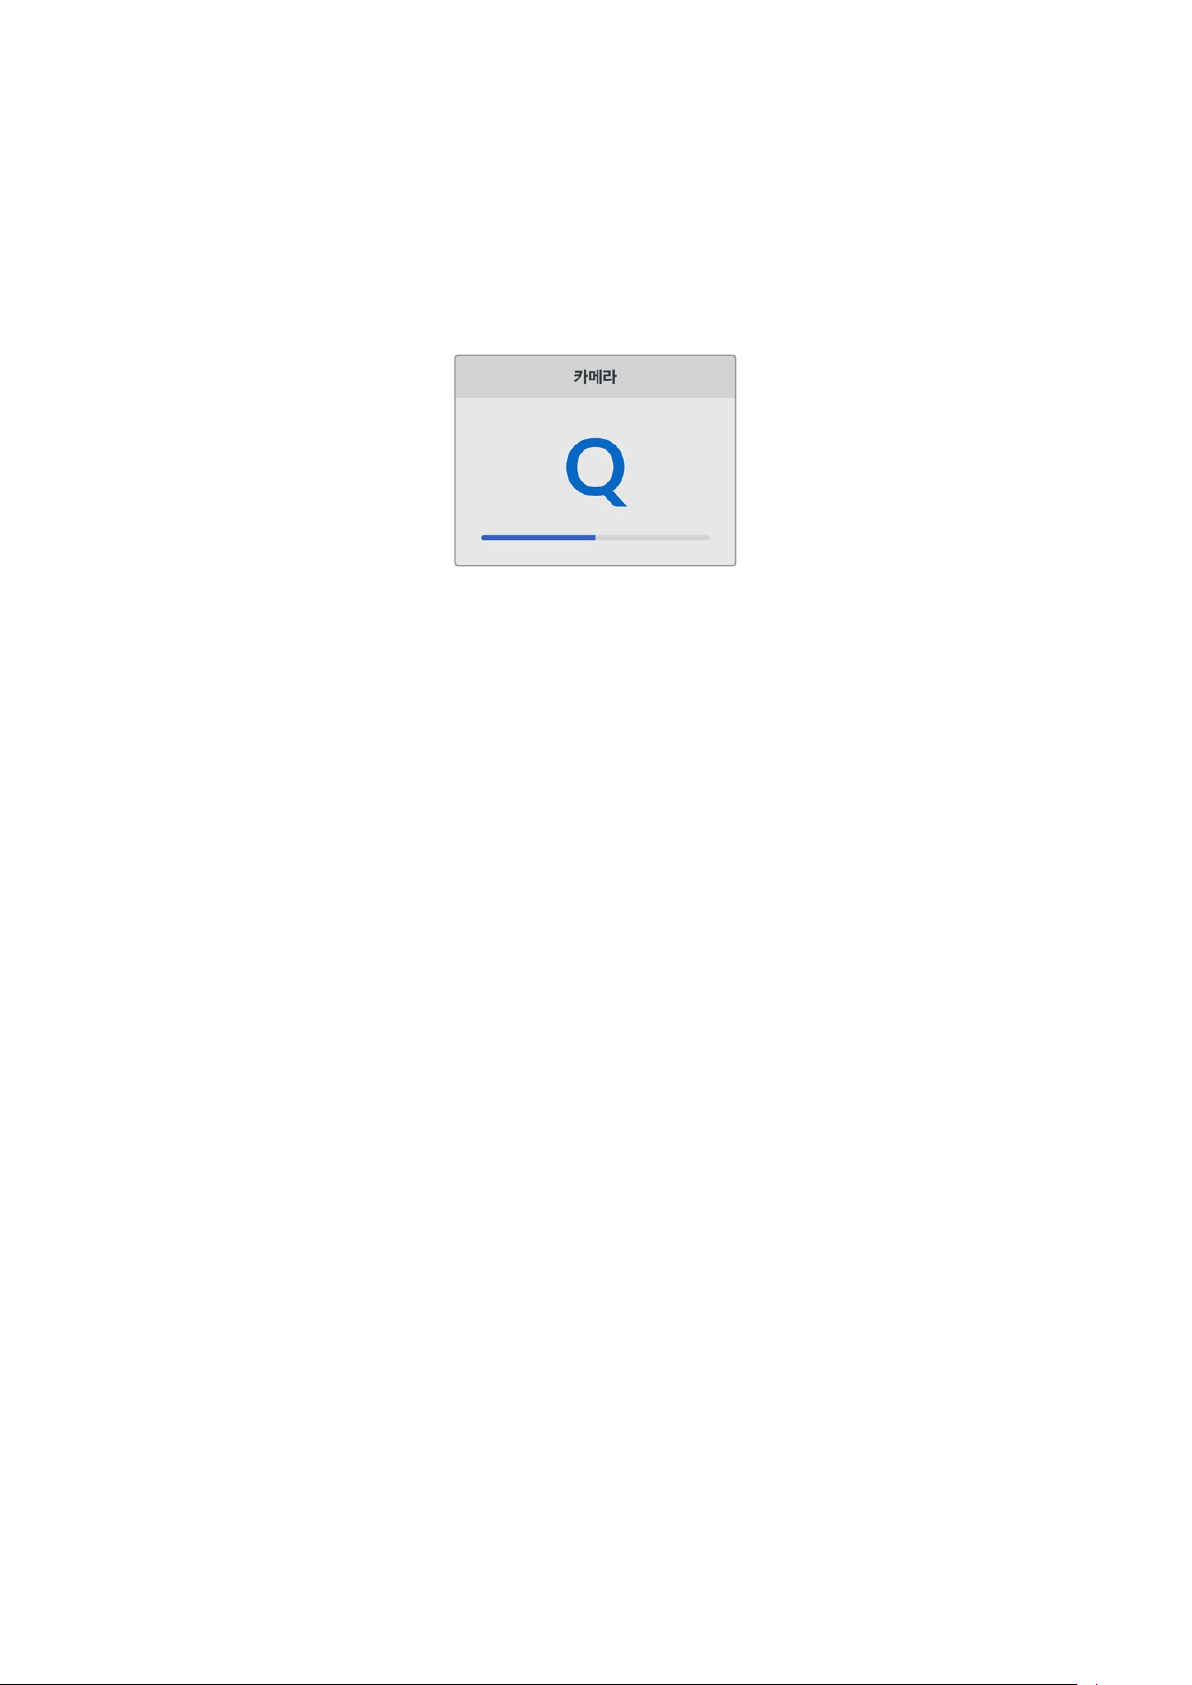
카메라
이 설정은 HyperDeck를 사용해 여러 대의 카메라로부터 개별 카메라 파일을 녹화하여 DaVinci Resolve
의 멀티카메라 타임라인으로 편집할 경우에 유용한 기능입니다.
파일 메타데이터에 개별 카메라 식별 글자가 나타나
DaVinci Resolve에서 동기화 빈 기능을 사용해
각각의 카메라 앵글을 쉽게 확인할 수 있습니다.
A~Z 또는 1~9를 사용해 카메라를 지정하세요.
기본 비디오 표준
HyperDeck Studio는 때때로 사용자가 사용하길 원하는 비디오 표준이 무엇인지 알지 못합니다.
이 설정을 통해
HyperDeck이 사용자가 가장 선호하는 비디오 표준을 알 수 있습니다.
한 가지 좋은 예는,
HyperDeck Studio를 켰을 때 연결된 비디오 입력이 없고 삽입된 디스크에 저장된
파일들이
2개의 서로 다른 비디오 표준을 가지는 경우입니다. 이런 경우엔 HyperDeck에서 어느 비디오
표준을 사용하여 재생할까요?
HyperDeck은 사용자가 선호하는 비디오 표준을 ‘기본 비디오 표준’
설정을 통해 파악하고 해당 포맷으로 전환하여 파일들을 재생합니다.
‘기본 비디오 표준’은, 처음으로
HyperDeck를 켰을 때 연결된 비디오 및 삽입된 미디어 디스크가 없을
시에도 유용하게 사용됩니다. 이 경우,
HyperDeck Studio는 모니터링 출력에 어느 비디오 표준을
사용할지 알지 못합니다. 이때 ‘기본 비디오 표준’ 설정이 가이드가 되어 무엇을 할지
Hyperdeck에게
알려줍니다.
하지만, 기본 비디오 표준은 단순히 가이드입니다. 다른 어떤 설정도 덮어쓰지 않습니다. 따라서,
1개의
파일이 담긴 미디어 디스크를 재생하면
HyperDeck Studio는 이 파일의 비디오 표준으로 전환하여
재생을 실행합니다. 이 경우는 사용자가 단순히 디스크에 저장된 파일을 재생하려는 의도가 명확하기
때문에 ‘기본 비디오 표준’ 설정을 무시하게 됩니다.
녹화할 때도 비슷한 상황이 적용됩니다. 녹화 버튼을 누르면,
HyperDeck은 비디오 입력 단자에 연결된
비디오 표준과 상관없이 그대로 녹화합니다. 또한, 녹화를 마친 뒤, ‘기본 비디오 표준’과 일치하는
다른 파일이 디스크에 있더라도
HyperDeck은 디스크에 방금 녹화한 비디오 표준 파일을 재생합니다.
왜냐하면 사용자가 방금 녹화한 비디오 표준과 동일한 비디오 표준으로 재생을 원하는 것으로 가정하기
때문입니다. 만약 미디어 디스크를 빼낸 후 다시 삽입하면 이때 ‘기본 비디오 표준’을 사용하여 재생할
파일을 고르게 됩니다.
‘기본 비디오 표준’ 설정은
HyperDeck Studio가 어떤 결정을 내려야 할지 불명확할 때 오로지
가이드로써 사용됩니다. 하지만
HyperDeck을 특정 방향으로 실행시키도록 우선하는 기능은 아닙니다.
447
설정

네트워크 설정
프로토콜
Blackmagic HyperDeck은 DHCP로 기본 설정되어 있으므로, 장치를 연결하면 사용하는 네트워크
서버가 자동으로
IP 주소를 지정하여 다른 네트워크 설정을 변경하지 않아도 됩니다. 수동으로 IP 주소를
입력해야 하는 경우, 고정
IP 주소를 통해 연결하세요.
‘프로토콜’을 선택한 상태에서 깜빡이는
SET 버튼을 눌러 메뉴에 접속한 뒤, ‘고정 IP’로 스크롤해 SET
버튼을 누르세요.
IP Address, 서브넷 마스크, 게이트웨이
고정 IP를 선택한 후 네트워크 세부사항을 직접 입력할 수 있습니다.
IP 주소 변경하기
1
검색 다이얼을 사용하여 'IP 주소'로 맞춘 뒤, HyperDeck의 전면 패널에서 깜박이는 SET
버튼을 누르세요.
2
검색 다이얼을 사용하여 IP 주소를 조정한 다음 '설정'을 눌러 확인한 후, 다음 설정 단계로
넘어갑니다.
3
SET
버튼을 눌러 변경 사항을 확인하고 다음 값으로 이동하세요.
IP 주소 입력이 끝나면 위 단계를 반복하여 서브넷 마스크 및 게이트웨이를 조정할 수 있습니다. 완료되면
깜박이는
MENU 버튼을 눌러 종료하고 시작 화면으로 돌아갑니다.
448
설정
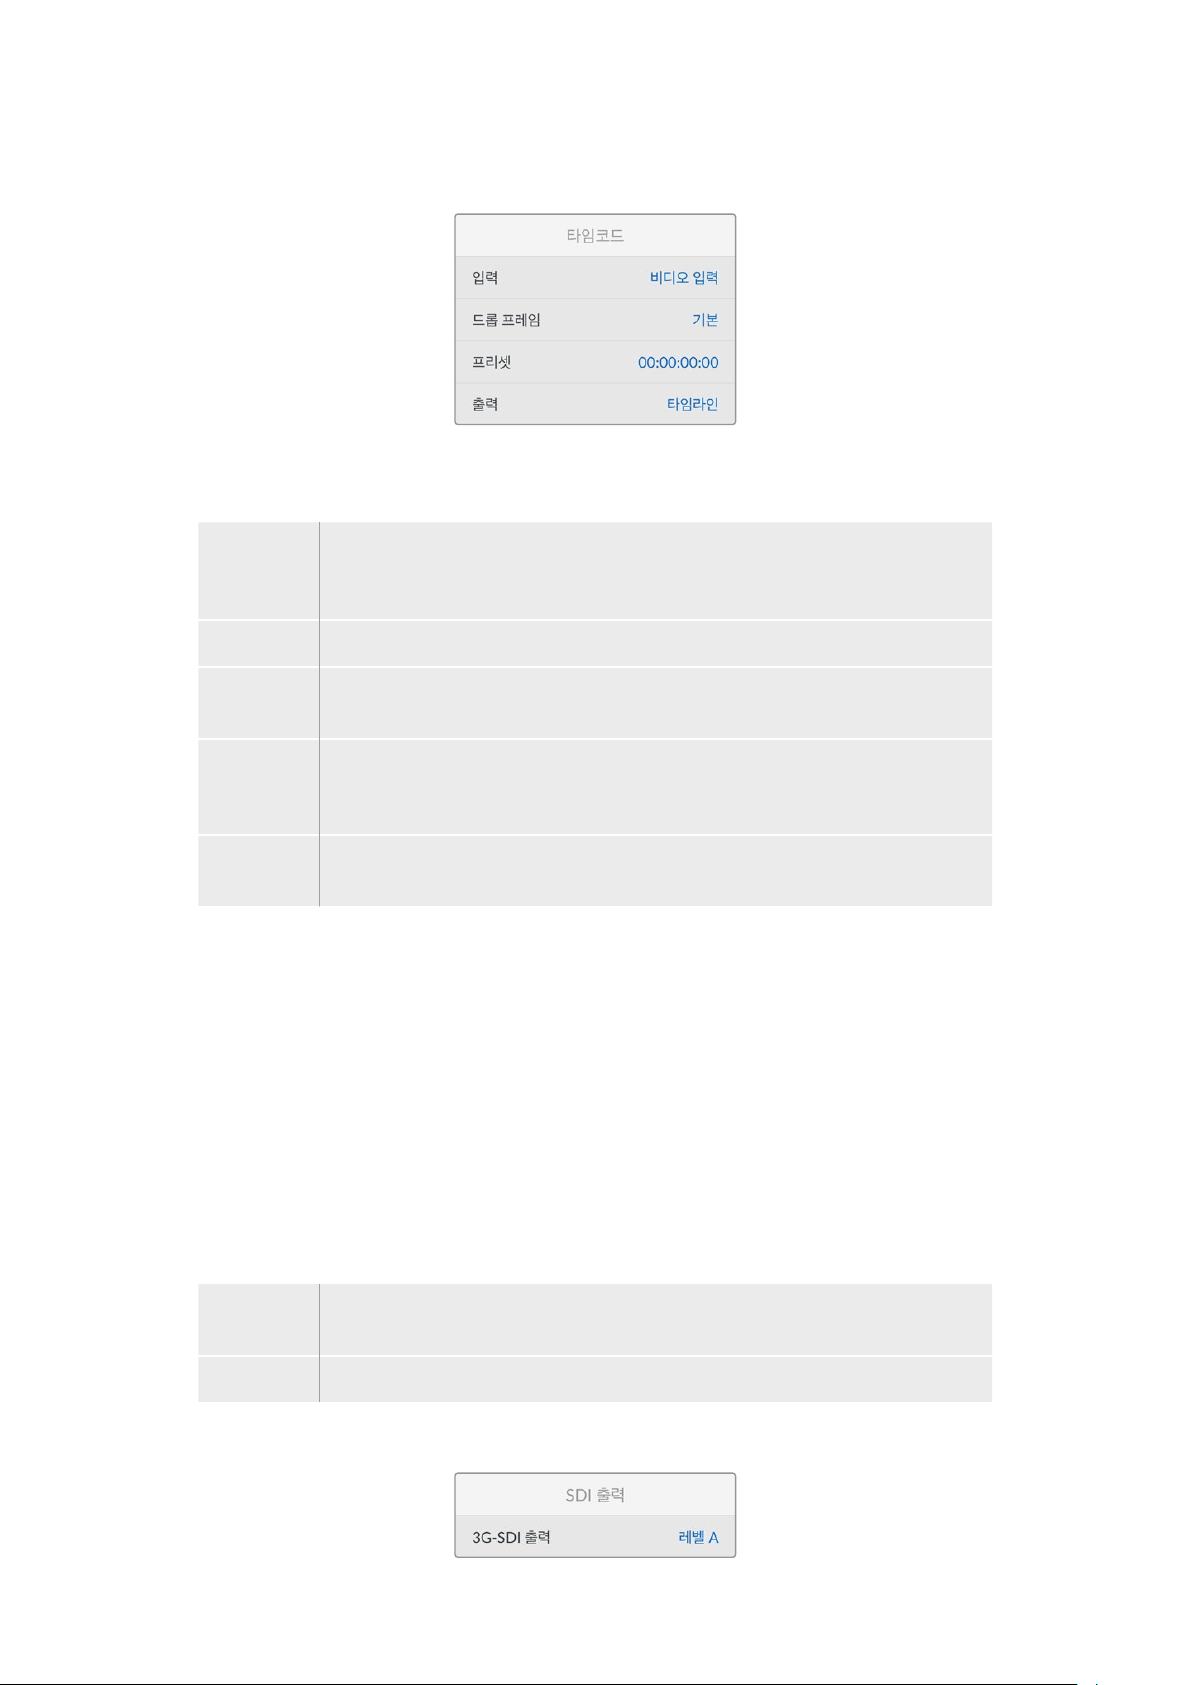
타임코드 설정하기
입력
녹화 시 총 5개의 타임코드 입력 옵션에서 선택할 수 있습니다.
비디오 입력
비디오 입력을 선택하면 SMPTE RP 188 메타데이터가 있는 SDI나 HDMI 소스에
임베디드된 타임코드를 가져와 사용합니다. 그러면 SDI 또는 HDMI 소스와 HyperDeck
Studio 녹화 파일 간에 동기화가 유지됩니다.
외부 장치
뒷면 패널 단자의 연결에서 타임코드를 가져와 사용할 시 이 옵션을 선택하세요.
내부 장치
내장 타임임코드 생성기를 통해 현재 시간 타임코드를 사용해 녹화 시 이 옵션을
선택하세요.
마지막 클립
이어가기
이 옵션을 선택 시, 이전 클립의 마지막 프레임 바로 다음에 파일이 이어집니다. 예를
들어, 첫 번째 클립이 10:28:30:10에 끝난다면 다음 클립의 타임코드는 10:28:30:11에서
시작합니다.
프리셋
타임코드를 수동으로 설정하려면 프리셋 항목을 선택하세요. 프리셋을 통해 설정된
타임 코드에서 녹화 클립이 시작합니다.
드롭 프레임
29.97 혹은 59.94 프레임 레이트의 NTSC 소스로부터 타임코드를 전송받는 경우 ‘드롭 프레임’ 또는
‘논드롭 프레임’ 타임코드를 선택할 수 있습니다. 소스가 불명확할 시 ‘기본값’을 선택하세요. 이 경우,
입력 소스의 표준을 그대로 사용하거나, 유효한 타임코드 입력이 없는 경우에는 드롭 프레임 방식으로
처리합니다.
프리셋
타임코드를 수동으로 설정하려면 SET 버튼을 누르고 검색다이얼과 SET 버튼을 사용하여 시작 시간을
입력하세요. 입력 매뉴의 하위 항목에 있는 ‘프리셋’을 선택해야 합니다.
출력
출력을 위한 타임코드 옵션은 다음과 같습니다.
타임라인
카드 또는 드라이브에 녹화된 모든 클립에 대해 연속 타임 코드를 출력하려면 ‘타임라인’을
선택하세요.
클립
‘클립’을 선택하면 각 개별 클립의 타임코드가 출력됩니다.
SDI 출력
449
설정

3G-SDI 출력
일부 방송 장비는 3G-SDI 영상 수신 시 ‘레벨 A’ 또는 ‘레벨 B’ 방식만 수신 가능합니다.
다른 방송 장비와의 호환성을 유지하기 위해 직접 스트리밍하는
3G-SDI의 경우에는 ‘레벨 A’를 선택하고
듀얼 스트림 멀티플렉스
3G-SDI의 경우에는 ‘레벨 B’를 선택하세요.
젠록 설정
레퍼런스 소스
다음 세 가지 옵션 중 하나를 선택하세요.
자동
뒷면 패널의 REF IN 단자에 연결된 신호가 있는 경우, '자동' 모드 선택 시 외부 신호로 기본
설정됩니다. 연결된 레퍼런스가 없으면 입력 SDI 또는 HDMI 소스로 기본 설정됩니다.
입력
SDI 또는 HDMI 소스에 동기화 하려는 레퍼런스가 임베디드되어 있는 경우, ‘입력’을
선택하세요. 예를 들어, 사용자의 아날로그 데크에 젠록 소스가 연결되어 있는 경우 이 옵션을
선택할 수 있습니다.
외부 장치
뒷면 패널의 REF IN 단자에 Blackmagic Sync Generator와 같은 외부 레퍼런스 장치가
연결된 경우 '외부'를 선택하세요 .
외부 레퍼런스 표시 – HyperDeck
Studio가 외부 레퍼런스 소스에
성공적으로 잠겼을 때 내장
LCD
에 ‘REF’가 표시됩니다.
레퍼런스 타이밍
아날로그 테이프 데크에서 아카이빙을 위한 프레임 동기화가 필요한 경우 레퍼런스 타이밍을 조정할 수
있습니다. 레퍼런스 조정이 샘플 단위로 이루어지므로, 샘플 레벨까지 정확하게 일치시킬 수 있습니다.
타이밍 설정하기:
1
‘설정’ 메뉴에서 검색 다이얼을 사용하여 '레퍼런스 타이밍'을 맞추고 깜박이는 SET 버튼을
누르세요.
2
검색 다이얼을 시계 방향 또는 반대 방향으로 돌려 타임라인 라인 값을 조정하세요.
3
SET
버튼을 눌러 선택을 완료하세요.
4
픽셀을 조정하려면 깜박이는 MENU 버튼을 눌러 ‘설정’ 메뉴로 돌아가, 레퍼런스 타이밍 픽셀
과정을 반복하세요.
450
설정

파일 설정
타임스탬프 파일 접미사
파일명에 타임스탬프가 추가되는 기능은 ‘OFF’로 기본 설정되어 있습니다. 파일명에 날짜와 시간을
기록하려면
SET 버튼을 누르고 검색 다이얼을 사용하여 '타임 스탬프 파일 접미사' 옵션을 켜세요.
HyperDeck_2105061438_0001
HyperDeck_2105061438_0001
파일명
HyperDeck_2105061438_0001
연도
HyperDeck_2105061438_0001
월
HyperDeck_2105061438_0001
일
HyperDeck_2105061438_0001
시
HyperDeck_2105061438_0001
분
HyperDeck_2105061438_0001
클립 번호
HDR 포맷 재설정하기
HyperDeck Studio 4K Pro는 4K 비디오 신호 또는 파일에 포함된 HDR 메타데이터를 자동으로
감지하여
HDMI 출력을 통해 표시합니다. 만약 신호 또는 파일에 태그가 잘못 지정되었거나 사용자의
디스플레이가
HDR과 호환되지 않는 경우, HDR 포맷을 재설정할 수 있습니다.
이를 위해 '
HDR 포맷 재설정’ 항목을 ‘Rec.2020 SDR’과 같은 SDR 옵션으로 설정하세요.
사용 가능한
HDR 재생 및 녹화 설정은 다음과 같습니다.
자동
‘자동’은 HyperDeck이 클립의 HDR 메타데이터에 맞춘 출력 형식을 자동으로 선택하도록 하는 기본
설정입니다.
Rec.709
표준 다이나믹 레인지를 사용하는 고화질 비디오를 위한 설정입니다.
Rec.2020 SDR
표준 다이나믹 레인지를 사용하는 UHD 비디오를 위한 설정입니다.
HLG
HLG
는 '하이브리드 로그 감마'를 의미합니다. 이 형식은 최대 Rec. 2020 SDR을 지원하는 HDR 케이블
TV 및 모니터에서 HDR 비디오를 재생할 수 있습니다.
451
설정
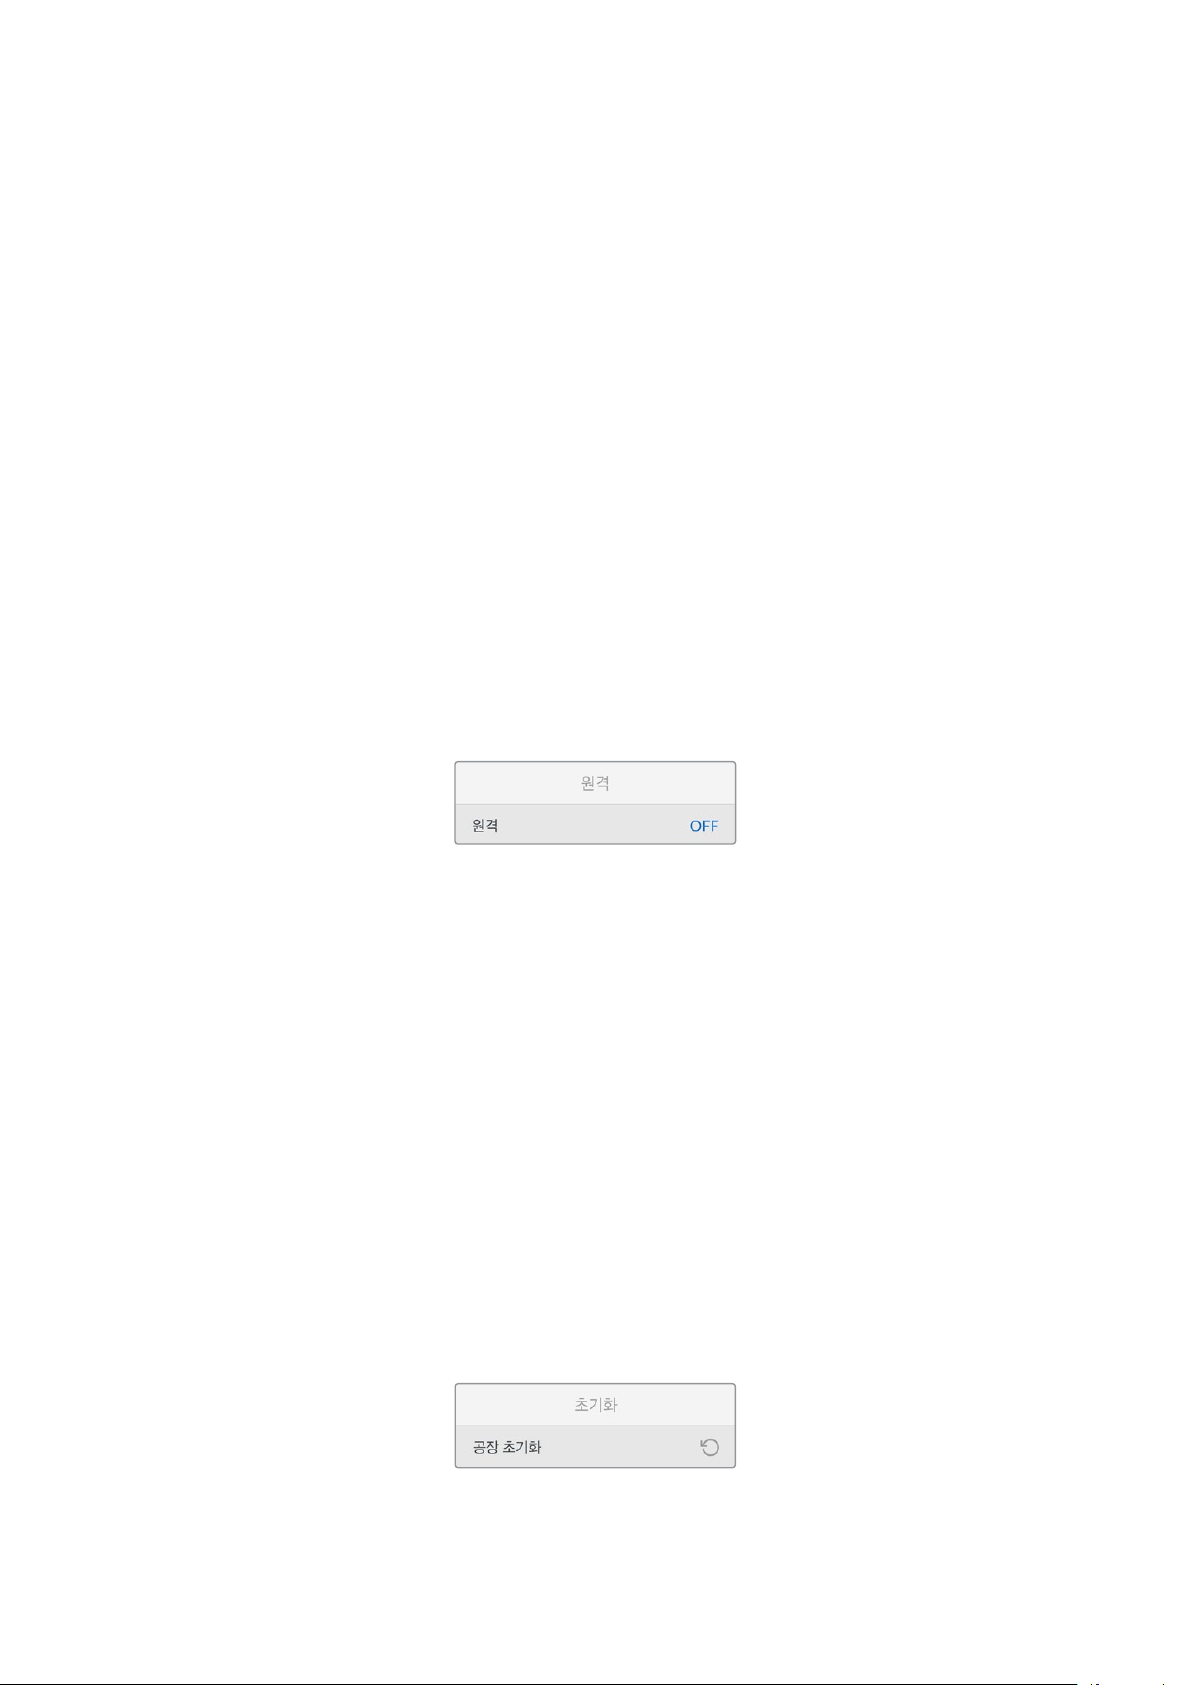
다음 설정은 Rec.2020 색 영역과 SMPTE ST2084 등의 PQ를 지원합니다. PQ는 더 밝은 이미지를
표시할 수 있는 넓은 영역의 HDR 기능입니다. 밝기는 제곱미터 당 칸델라 단위로 나타내며, 예를 들어
1000cd/m
2
는 해당 형식에서 지원하는 제곱미터 당 최대 휘도를 나타냅니다.
ST2084 (300)
300 cd/m
2
밝기
ST2084 (500)
500 cd/m
2
밝기
ST2084 (800)
800 cd/m
2
밝기
ST2084 (1000)
1000 cd/m
2
밝기
ST2084 (2000)
2000 cd/m
2
밝기
ST2084 (4000)
4000 cd/m
2
밝기
원격
원격
‘원격’을 선택하여 RS-422를 통한 원격 제어를 활성화하면 HyperDeck을 HyperDeck Extreme Control
등의 다른 장치에서 원격으로 제어할 수 있습니다. ‘원격’을 선택하면 일부 HyperDeck 모델의 경우
전용 원격 버튼에 불이 들어와 활성화 되었음을 나타냅니다. 장치를 직접 제어하려면 원격 제어 선택을
취소하세요.
데크 컨트롤 기능
원격 기능이 활성화되면 하나의 HyperDeck에서 실행한 트랜스포트 제어를 여러 개의 추가 HyperDeck
으로 미러링할 수 있습니다. 마스터 HyperDeck의 원격 출력 커넥터를 두 번째 Hyperdeck의 원격 입력
커넥터에 연결하여 데이지 체인 방식으로 연결한 다음 다른 추가 Hyperdeck도 RS-422 체인 방식으로
계속 연결하세요. 모든 추가 HyperDeck에서 원격 설정을 활성화하면 마스터 Hyperdeck의 트랜스포트
컨트롤을 통해 추가 기기도 제어 가능합니다.
예를 들어, 마스터
HyperDeck에서 '녹화' 버튼을 누르면 연결된 모든 추가 HyperDeck이 동시에 녹화를
시작합니다.
참고로
HyperDeck Studio HD Mini를 컨트롤러로 사용할 수는 없지만, HyperDeck Pro 또는 Plus
모델에서는 이를 제어할 수 있습니다.
초기화
공장 초기화
‘설정’ 메뉴에서 '공장 초기화'로 맞춘 후 HyperDeck을 공장 초기 설정으로 초기화하세요. SET 버튼을
누르면 선택을 확인하는 메시지가 뜹니다.
452
설정

뒷면 패널
1 전원
모든 HyperDeck에는 AC 주 전원을 위한 IEC 전원 입력 단자가 있습니다. HyperDeck Studio
4K Pro는 리던던시를 위한 2개의 단자를 제공합니다. DC 입력 단자에 외부 12V 배터리 전원을
연결하여 리던던시로 사용할 수도 있습니다.
DC 전원을 연결할 때는 해당 전원이 DC IN에
표시된 전압 및 정격 전류의 허용 범위 내에 속하는지 반드시 확인하세요.
2 이더넷
HyperDeck 이더넷 프로토콜을 사용한 고속 FTP 데이터 전송 혹은 원격 제어 시 네트워크
접속에 필요한 이더넷 포트입니다.
HD 모델은 1GbE, HyperDeck Studio 4K Pro 모델은 10GbE
의 파일 전송 속도를 지원합니다. FTP 클라이언트를 통한 파일 전송의 자세한 내용은 본 설명서
뒤편의 [네트워크를 통해 파일 전송하기] 부분을 참고하세요.
ATEM 스위처와 네트워크를 공유하여 접속한 경우, ATEM 스위처 또는 ATEM 하드웨어 패널을
사용하여
HyperDeck에 접속할 수도 있습니다.
3 원격 제어
일부 HyperDeck Studio 모델은 원격 입/출력을 위해 2개의 RS-422 DE-9 단자가 있습니다.
HyperDeck Studio HD Mini는 원격 입력 단자만 지원합니다.
4 외장 디스크
HyperDeck Studio HD 모델은 후면 패널의 USB-C 단자에 플래시 디스크를 연결하여 최대
10Gb/s의 속도로 녹화할 수 있습니다. HyperDeck Studio 4K Pro 모델은 2세대 USB 3.1 연결
단자가 있어 최대
10Gb/s의 속도로 전송이 가능합니다. 다포트 USB-C 허브를 사용하거나, 한개
또는 여러 개의
SSD 카드를 Blackmagic MultiDock 10G에 꽂아 사용할 수도 있습니다.
HyperDeck의 USB 단자를 통해 컴퓨터에 연결하면 Open Broadcaster 및 Skype를 포함한
소프트웨어에서
HyperDeck을 웹캠 소스로 사용할 수 있습니다. 더 자세한 정보는 본 사용
설명서 뒤편의 [
Open Broadcaster 설정하기] 부분을 참고하세요.
5 모니터 출력
3G-SDI 모니터 출력을 통해 다운스케일된 영상이 오버레이와 함께 출력되므로 외부
디스플레이를 사용하여 모니터링할 수 있습니다. 오버레이에는 드라이브 아이콘, 오디오 미터 및
시간 카운터 디스플레이와 디스플레이
LUT가 표시됩니다. 클린 신호 출력 방법 등의 SDI 모니터
설정에 관한 자세한 정보는 본 사용 설명서 뒤편의 [설정] 부분을 참고하세요.
2 5 6 8 941
HyperDeck Studio HD Mini에는
실수로 전원 연결이 분리되는
일을 방지하기 위한 잠금링이
전원 커넥터와 함께 제공됩니다.
HyperDeck Studio HD Mini
와 Plus 모델은 타임코드 입/
출력을 위한 BNC 커넥터가
탑재되어 있습니다.
7
3
453
뒷면 패널

6 레퍼런스
모든 HyperDeck 모델은 안정화된 SD 블랙 버스트 및 HD Tri-Sync 레퍼런스 신호를 출력할 수
있습니다. 또한 동기 신호 발생기 같은 외부 소스로부터 레퍼런스 신호를 수신할 수도 있습니다.
따라서
Blackmagic Sync Generator 등을 사용하여 하나의 레퍼런스 신호를 여러 대의 장비로
전송하여 모든 장비의 신호를 동기화시키는 젠록 기능을 구현할 수 있습니다. 설정 메뉴에서
비디오 입력과 외부 레퍼런스 소스 중 선택하세요.
레퍼런스 소스 선택에 관한 자세한 사항은 본 사용 설명서 앞편의 [설정] 부분을 참고하세요.
7 타임코드
타임코드 입력 단자를 통해 외부 타임코드를 수신하거나 HyperDeck에서 타임코드 출력 단자를
통해 타임코드를 루프할 수 있습니다. 일부 모델에서 타임코드는
BNC 커넥터를 통해 연결되며
HyperDeck Studio 4K Pro는 XLR 타임코드 단자를 사용합니다. 타임코드 설정에 관한 자세한
사항은 본 사용 설명서 앞부분의 [설정] 부분을 참고하세요.
8 HDMI
HDMI 출력을 HDMI TV 및 모니터에 연결하세요.
HyperDeck는 신호가 올바른 메타데이터로 태그된 경우 SDR 및 HDR 비디오 표준을 자동으로
감지합니다. ‘설정’ 메뉴에서
HDR 플래그를 재설정할 수도 있습니다. 자세한 정보는 본 설명서
앞쪽의 [설정하기] 부분을 참고하세요.
9 SDI
HyperDeck Studio HD Mini 모델은 최대 1080p60 신호를 지원하는 단일 3G SDI 단자를
탑재했습니다.
HyperDeck Studio HD Plus 및 HyperDeck Studio HD Pro 모델은 최대
2160p30의 SD 신호를 지원하는 6G-SDI 단자를 탑재했습니다. HyperDeck Studio 4K Pro는
최대
2160p60의 해상도의 12G-SDI 입력 및 출력 단자를 탑재했습니다.
HyperDeck의 2개의 SDI 출력 단자를 ATEM 스위처에 연결하면 필/키를 동시 출력하는
ProRes 4444 파일을 재생할 수 있습니다.
454
뒷면 패널

모니터링 출력 사용하기
모니터 출력은 사용중인 코덱, 비디오 및 신호 형식, 프레임 속도, 시간 코드, 파일 이름, 트랜스포트 제어
상태, 저장 매체 상태, 오디오 레벨과 같은 중요한 상태 정보를 표시하는 오버레이를 통해 녹화 또는 재생
비디오를 시각적으로 확인하는 빠른 방법입니다.
다음은 표시되는 정보입니다.
코덱
LCD 메뉴에 선택된 코덱이 나타납니다.
포맷
재생 모드에서 현재 클립의 해상도와 프레임 속도를 표시합니다. 녹화 모드인 경우 현재 선택된 소스에
연결된 비디오의 해상도와 프레임 속도가 표시됩니다.
타임코드
재생 중인 비디오 클립의 타임코드를 표시하거나 또는 비디오 또는 타임코드 입력을 통해 현재 녹화
중인 클립의 타임코드를 표시합니다. 클립 타임 코드와 타임라인의 타임코드 측정기 중에서 선택할 수
있습니다.
소스
현재 선택된 SDI 또는 HDMI 소스를 표시합니다. 유효한 신호가 감지되지 않을 경우에는 ‘입력 신호 없음’
이 표시됩니다.
이름
HyperDeck 디스크 레코더명이 나타납니다. 이름 변경에 관한 자세한 정보는 [Blackmagic HyperDeck
Setup] 부분을 참고하세요.
455
모니터링 출력 사용하기
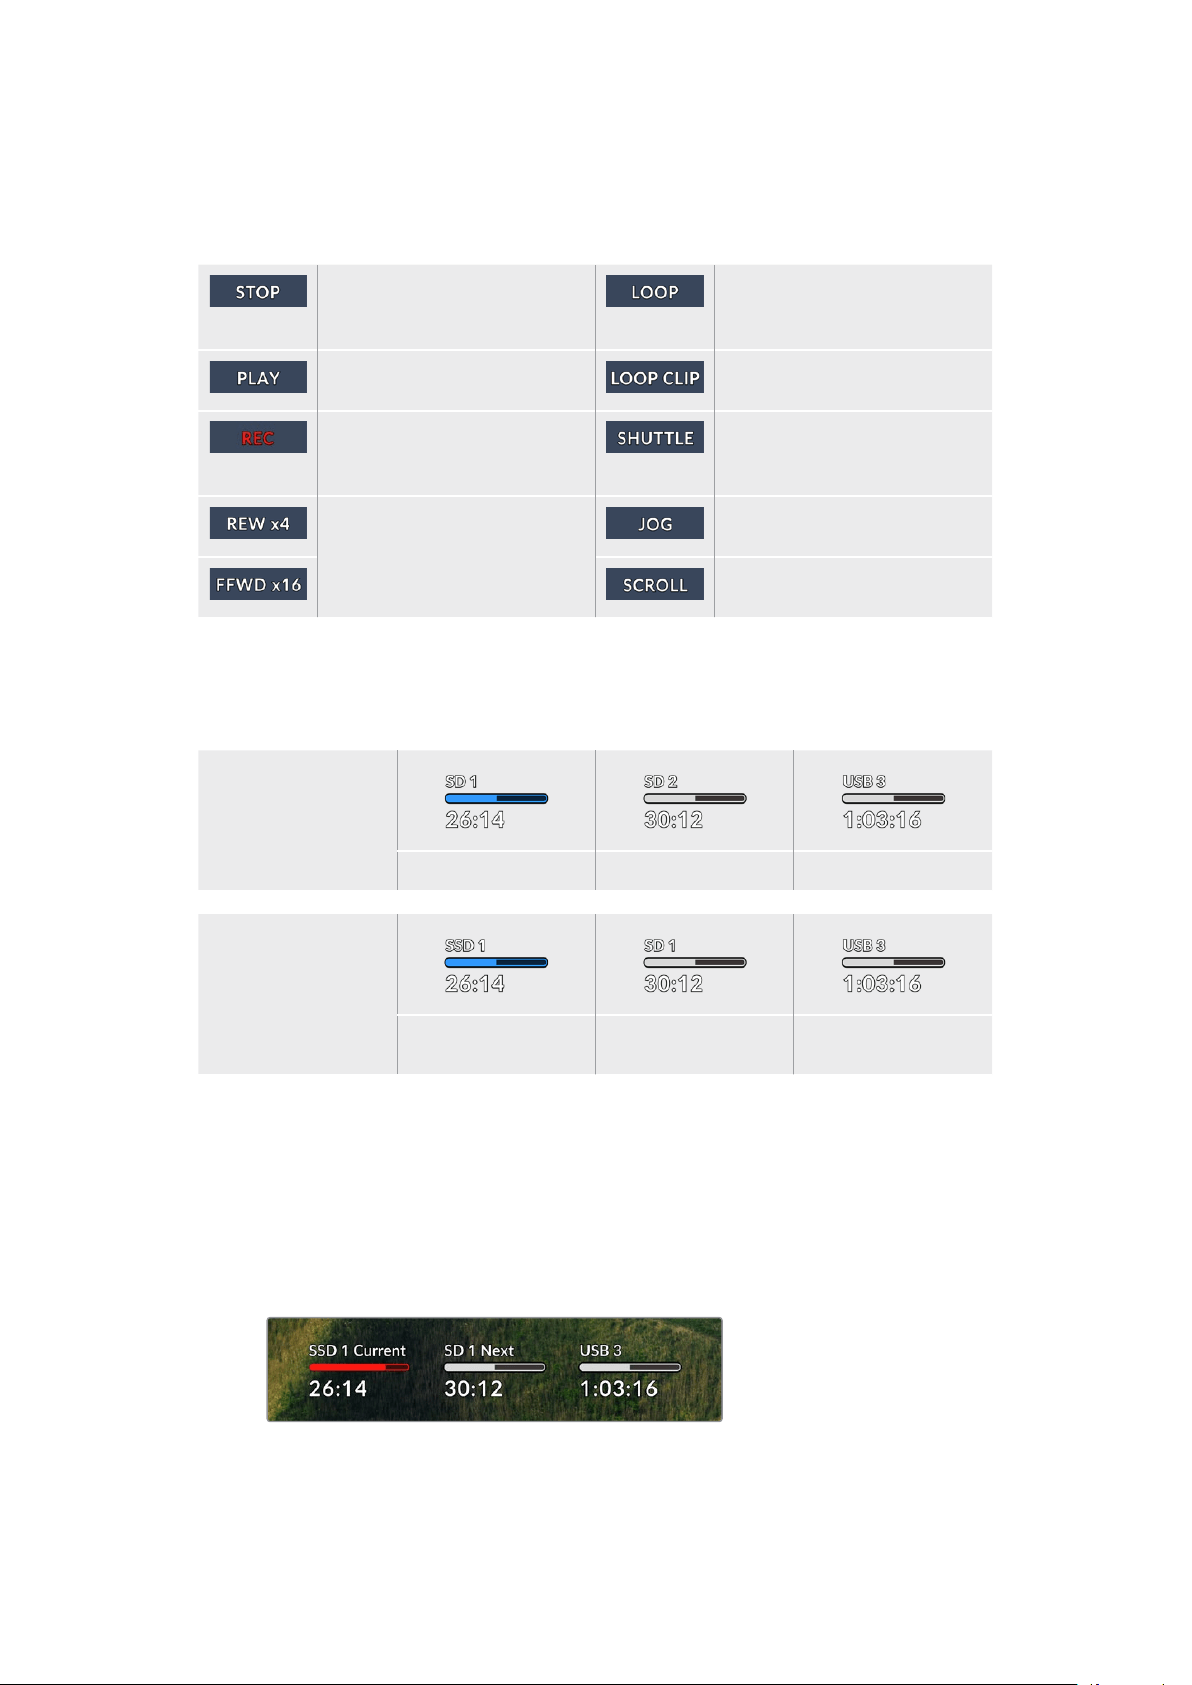
상태
클립을 재생 또는 녹화하는 동안 상태 표시에는 트랜스포트 컨트롤 상태와 현재 사용 중인 컨트롤이
나타납니다. 디스플레이 옵션은 다음과 같습니다.
HyperDeck이 대기 상태에
있습니다.
현재 선택된 비디오 포맷의 녹화
클립 전체가 루프 재생으로 설정되어
있습니다.
비디오가 현재 재생 중입니다. 단일 클립의 재생이 루프로 설정되어
있습니다.
비디오가 현재 녹화 중입니다.
녹화 중에는 해당 표시에 빨간불이
들어옵니다.
셔틀 모드가 활성화되어 있지만,
사용 대기 중입니다.
빨리감기 또는 되감기 중에
나타납니다. 표기된 숫자는 속도를
나타냅니다.
HyperDeck가 조그 모드로
설정되어 있습니다.
HyperDeck가 스크롤 모드로
설정되어 있습니다.
저장 미디어 상태
다음 세 개의 상태 표시는 SD 카드, SSD, USB 드라이브의 이름 및 상태를 나타내며, 사용하는
HyperDeck 모델에 따라 약간의 차이가 있습니다.
HyperDeck
Studio HD Plus
SD 카드 슬롯 1 SD 카드 슬롯 2
액티브 외장 디스크
HyperDeck
Studio Pro 모델
현재 사용 중인
SD/SSD 슬롯
다음 사용할
SD/SSD 슬롯
외장 디스크 활성화
모든 HyperDeck 모델의 경우, 세 번째 상태 표시에는 USB 드라이브가 나타납니다. USB 허브 또는
Blackmagic MultiDock 10G 같은 도크를 사용하는 경우, 해당 드라이브가 나타납니다.
디스크/드라이브 상태 표시
텍스트 위에 표시되는 상태 표시바는 SD 카드 또는 SSD 슬롯을 나타냅니다. 녹화 중,
드라이브명 우측에 ‘사용 중’이라는 표시가 나타나 현재 녹화 중인 디스크를 확인할 수 있습니다.
다음에 녹화될 디스크 또는 드라이이브에는 상태 표시바 위에 ‘다음’이라고 나타납니다.
456
모니터링 출력 사용하기

미디어 바
미디어 바는 현재 미디어의 상태에 따라 파란색, 흰색, 또는 빨간색으로 나타나며, 카드 사용
공간이 나타납니다.
파란색 드라이브 아이콘은 현재 활성화된 드라이브입니다. 이
드라이브는 재생과 녹화에 사용됩니다.
흰색 드라이브 아이콘은 현재 미디어가 있지만, 사용 중이지 않은
상태를 나타냅니다. 전체가 흰색으로 표시되는 경우, 해당 미디어가 꽉
찼다는 뜻입니다.
녹화 중에는 해당 표시에 빨간 불이 들어옵니다.
미디어 바 아래 텍스트는 녹화 잔여 시간 또는 슬롯 상태를 표시합니다.
잔여 시간
SD 카드 또는 SSD 드라이브에 저장 공간이 남은 경우, 현재 소스 포맷과 코덱 및 화질 설정에
기반하여 시:분:초 형식으로 잔여 시간이 표시됩니다. 잔여 시간이 한 시간 미만일 경우에는 분:초
형식으로 표시됩니다.
슬롯 상태
미디어 슬롯에 연결된 미디어가 없을 때는 ‘카드 없음’과 ‘매체 없음’이 표시됩니다.
SD 카드 및 SSD, USB 드라이브가 가득 찬 경우에는 아이콘에 ‘가득 참’이 표시되므로 저장
미디어 교체 시기를 쉽게 알 수 있습니다.
SD 카드 또는 SSD가 하나 더 꽂혀 있는 경우에는
자동으로 두 번째 미디어에 녹화가 이어집니다. 외장 디스크가 연결된 경우, 모든
SD 카드 및
SSD가 가득 차면 외장 디스크에 녹화가 이어집니다.
드라이브가 잠금 상태일 때는 상태 표시바 아래에 ‘잠금 모드’가 표시됩니다.
457
모니터링 출력 사용하기
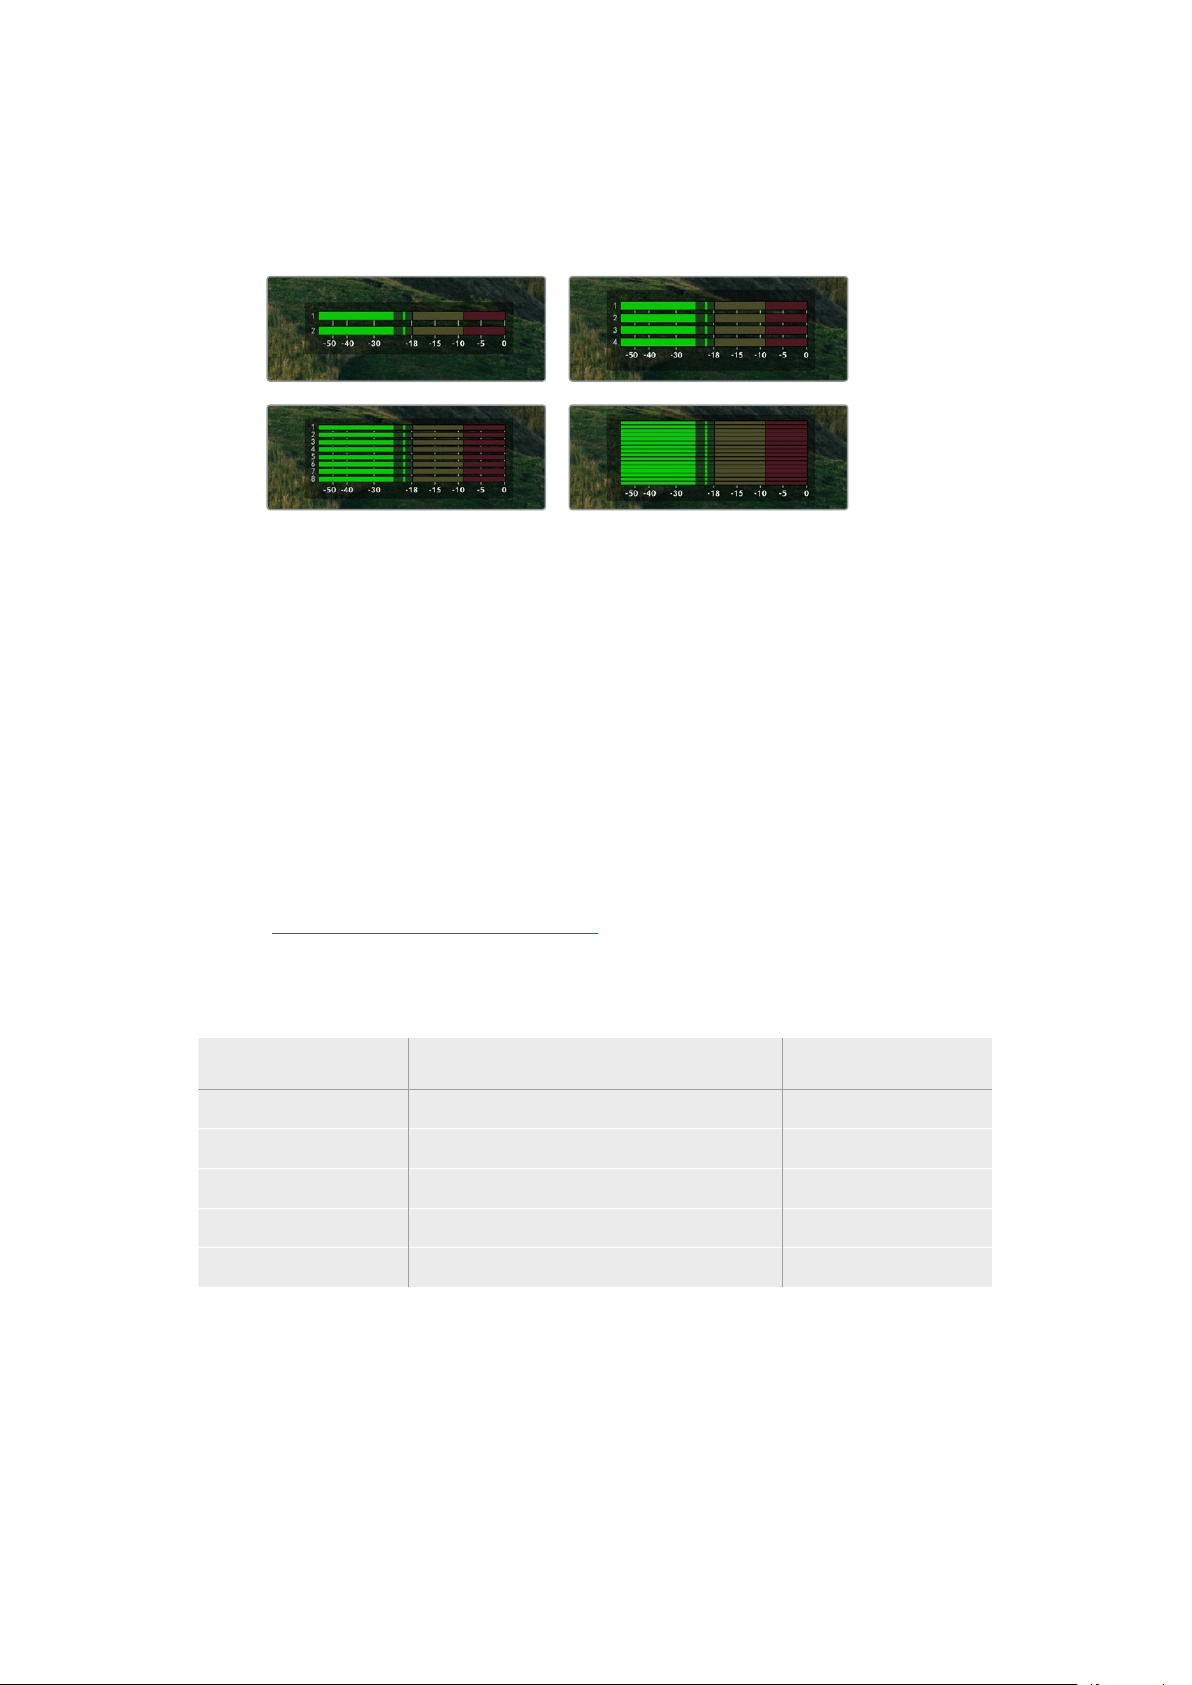
오디오 미터
온스크린 오디오 미터는 녹화하려는 채널 수에 따라 최대 16개의 오디오 채널을 표시합니다.
LCD 메뉴의 ‘오디오’ 탭에서 ‘PPM’ 혹은 ‘VU’ 미터로 설정할 수 있습니다.
녹화하려는 오디오 채널 수를 선택하거나, 다른 오디오 미터로 변경하려면 LCD 메뉴의 오디오
탭을 사용하세요. 더욱 자세한 정보는 본 설명서 앞부분의 [설정]을 참고하세요.
저장 미디어
SD
카드
고화질의 UHD로 녹화할 경우, 초고속 UHS-II SD 카드를 사용할 것을 권장합니다. 최대 2160p60
의 UHD 녹화를 위해서는 220MB/s 이상의 쓰기 속도를 제공하는 카드를 사용해야 합니다. 하지만,
낮은 비트 전송률의 고압축 영상으로 녹화할 경우에는 이렇게 빠른 카드를 사용할 필요가 없습니다.
일반적으로 카드 속도는 빠를수록 좋습니다.
최신 버전의 설명서를 통해 주기적으로 최신 정보를 확인하는 것이 좋으며, 설명서는
Blackmagic Design
웹사이트
www.blackmagicdesign.com/kr/support에서 다운로드할 수 있습니다.
HyperDeck Studio 4K Pro에는 어떤 SD 카드를 사용해야 하나요?
다음은 최대 60 fps의 2160p 녹화에 권장되는 SD 카드 목록입니다.
제조사 모델 용량
Angelbird AV Pro MK2 V90 SDXC 128GB
Angelbird AV Pro MK2 V90 SDXC 256GB
ProGrade Digital SDXC UHS-II V90 300R 128GB
ProGrade Digital SDXC UHS-II V90 300R 256GB
Wise SD2-128U3 SDXC UHS-II 128GB
458
저장 미디어

HyperDeck Studio HD Pro에는 어떤 SD 카드를 사용해야 하나요?
다음은 최대 30fps의 2160p 녹화에 권장되는 SD 카드 목록입니다.
제조사 모델 용량
Angelbird AV Pro MK2 V90 SDXC 64GB
Angelbird AV Pro MK2 V90 SDXC 128GB
Angelbird AV Pro MK2 V90 SDXC 256GB
ProGrade Digital SDXC UHS-II V90 300R 64GB
ProGrade Digital SDXC UHS-II V90 300R 128GB
ProGrade Digital SDXC UHS-II V90 300R 256GB
Wise SD2-64U3 SDXC UHS-II 64GB
Wise SD2-128U3 SDXC UHS-II 128GB
HyperDeck Studio HD Plus에는 어떤 SD 카드를 사용해야 하나요?
다음은 최대 30fps의 2160p 녹화에 권장되는 SD 카드 목록입니다.
제조사 모델 용량
Angelbird AV Pro MK2 V90 SDXC 64GB
Angelbird AV Pro MK2 V90 SDXC 128GB
Angelbird AV Pro MK2 V90 SDXC 256GB
ProGrade Digital SDXC UHS-II V90 300R 64GB
ProGrade Digital SDXC UHS-II V90 300R 128GB
ProGrade Digital SDXC UHS-II V90 300R 256GB
Wise SD2-64U3 SDXC UHS-II 64GB
Wise SD2-128U3 SDXC UHS-II 128GB
HyperDeck Studio HD Mini에는 어떤 SD 카드를 사용해야 하나요?
다음은 최대 60fps의 1080p ProRes 422 HQ 녹화에 권장되는 SD 카드 목록입니다.
제조사 모델 용량
Angelbird AV Pro MK2 V90 SDXC 64GB
Angelbird AV Pro MK2 V90 SDXC 128GB
Angelbird AV Pro MK2 V90 SDXC 256GB
ProGrade Digital SDXC UHS-II V90 300R 64GB
ProGrade Digital SDXC UHS-II V90 300R 128GB
ProGrade Digital SDXC UHS-II V90 300R 256GB
Wise SD2-64U3 SDXC UHS-II 64GB
Wise SD2-128U3 SDXC UHS-II 128GB
459
저장 미디어
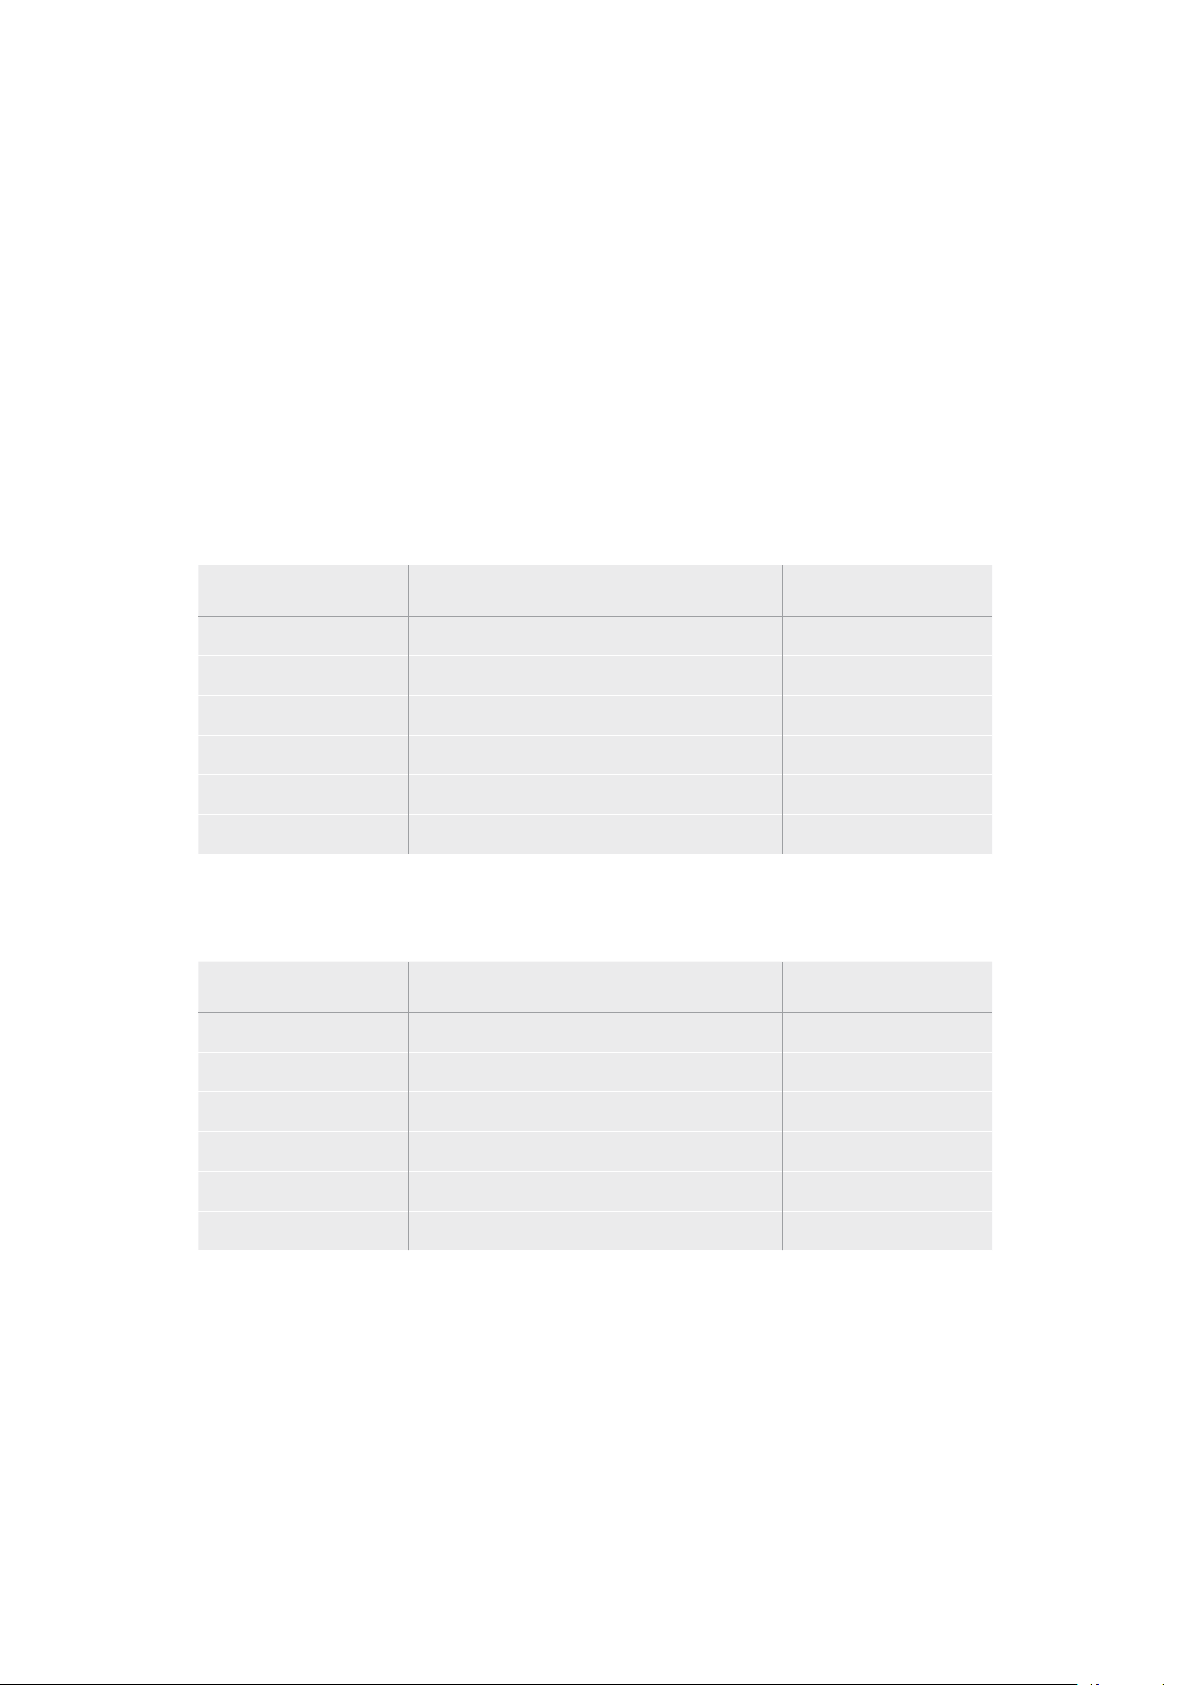
SSD
데이터율이 높은 영상을 작업할 경우 사용하려는 SSD의 종류를 신중히 결정해야 합니다. 왜냐하면 일부
SSD의 실제 속도는 제조사가 주장하는 쓰기 속도보다 최대 50%까지 느릴 수 있기 때문입니다. SSD
사양에는 특정 비디오를 다룰 수 있다고 나와 있지만, 실제 실시간 비디오 촬영 시 충분한 속도를 지원하지
못하는 경우가 있습니다.
명시되지 않은 데이터 압축 방식은 대부분 녹화에 영향을 끼치지만, 이런 종류의 디스크는 여전히 실시간
재생에 사용 가능합니다.
테스트 결과 일반적으로 용량이 크고 새로운
SSD 모델일수록 속도가 빠른 것으로 나타났습니다. 사용이
권장되는
SSD는 다음과 같습니다.
HyperDeck Studio 4K Pro에는 어떤 SSD를 사용해야 하나요?
다음은 최대 60 fps의 2160p 녹화에 권장되는 SSD 목록입니다.
제조사 모델 용량
Samsung 860 PRO 512GB
Samsung 860 PRO 1TB
Samsung 870 EVO (MZ-77E250BW) 250GB
Samsung 870 EVO (MZ-77E500BW) 500GB
Samsung 870 EVO (MZ-77E1T0BW) 1TB
Samsung 870 EVO (MZ-77E2T0BW) 2TB
HyperDeck Studio HD Pro에는 어떤 SSD를 사용해야 하나요?
다음은 최대 30fps의 2160p 녹화에 권장되는 SSD 목록입니다.
제조사 모델 용량
Samsung 860 PRO 512GB
Samsung 860 PRO 1TB
Samsung 870 EVO (MZ-77E250BW) 250GB
Samsung 870 EVO (MZ-77E500BW) 500GB
Samsung 870 EVO (MZ-77E1T0BW) 1TB
Samsung 870 EVO (MZ-77E2T0BW) 2TB
460
저장 미디어

외장 디스크
HyperDeck 전체 모델은 USB-C 플래시 디스크에 바로 녹화할 수 있습니다. 이 디스크는 속도가 빠르고
용량이 커서 장시간 녹화에 사용할 수 있습니다. 녹화가 끝나면 플래시 디스크를 컴퓨터에 연결하여 바로
편집 작업을 시작할 수 있습니다.
더 큰 저장 공간을 사용하고 싶다면
USB-C 도크 장비나 외장 하드 드라이브를 연결할 수 있습니다.
Blackmagic MultiDock 10G 또는 USB-C 플래시 디스크를 연결하려면 해당 USB-C 장비와
HyperDeck 후면의 ‘EXT Disk’ 단자를 케이블로 연결하세요.
HyperDeck Studio 4K Pro로 녹화 시, 어떤 USB-C 드라이브를 사용해야 하나요?
다음은 최대 60 fps의 2160p 녹화에 권장되는 USB-C 드라이브 목록입니다.
제조사 모델 용량
Angelbird SSD2GO PKT MK2 512GB
Angelbird SSD2GO PKT MK2 2TB
DelKinDevices Juggler 1TB
DelKinDevices Juggler 2TB
LaCie Rugged SSD STHR2000800 2TB
LaCie Rugged SSD Pro STHZ1000800 1TB
Wise PTS-512 Portable SSD 512GB
Wise PTS-1024 Portable SSD 1TB
HyperDeck Studio HD Pro로 녹화 시, 어떤 USB-C 드라이브를 사용해야 하나요?
다음은 최대 30fps의 2160p 녹화에 권장되는 USB-C 드라이브 목록입니다.
제조사 모델 용량
Angelbird SSD2GO PKT MK2 512GB
Angelbird SSD2GO PKT MK2 2TB
DelKinDevices Juggler 1TB
DelKinDevices Juggler 2TB
LaCie Rugged SSD STHR2000800 2TB
LaCie Rugged SSD Pro STHZ1000800 1TB
Wise PTS-512 Portable SSD 512GB
Wise PTS-1024 Portable SSD 1TB
461
저장 미디어

HyperDeck Studio HD Plus에는 어떤 USB-C 드라이브를 사용해야 하나요?
다음은 최대 30fps의 2160p 녹화에 권장되는 USB-C 드라이브 목록입니다.
제조사 모델 용량
Angelbird SSD2GO PKT MK2 512GB
Angelbird SSD2GO PKT MK2 2TB
DelKinDevices Juggler 1TB
DelKinDevices Juggler 2TB
LaCie Rugged SSD STHR2000800 2TB
LaCie Rugged SSD Pro STHZ1000800 1TB
Wise PTS-512 Portable SSD 512GB
Wise PTS-1024 Portable SSD 1TB
HyperDeck Studio HD Mini로 녹화 시, 어떤 USB-C 드라이브를 사용해야 하나요?
다음은 최대 60fps의 1080p ProRes 422 HQ 녹화에 권장되는 USB-C 드라이브 목록입니다.
제조사 모델 용량
Angelbird SSD2GO PKT MK2 512GB
Angelbird SSD2GO PKT MK2 2TB
DelKinDevices Juggler 1TB
DelKinDevices Juggler 2TB
Wise PTS-512 Portable SSD 512GB
Wise PTS-1024 Portable SSD 1TB
462
저장 미디어

미디어 포맷하기
컴퓨터에서 미디어 준비하기
Mac 컴퓨터를 이용하여 미디어 포맷하기
Mac에 있는 디스크 유틸리티 앱을 사용하여 드라이브를 HFS+ 또는 exFAT 형식으로 포맷할 수
있습니다.
포맷이 진행되면 디스크의 모든 정보가 삭제되므로 중요한 정보는 포맷 전에 반드시 백업해 두어야
합니다.
1
외장 도크 또는 케이블 어댑터를 사용해 SSD를 컴퓨터에 연결하세요. SSD를 사용하여
타임머신 백업을 하도록 요청하는 메시지는 모두 거절하세요.
CFast 카드의 경우, 외장 카드
리더기를 통해 컴퓨터에 연결하세요.
2
응용 프로그램 > 유틸리티로 이동해 디스크 유틸리티를 실행하세요.
3
사용 중인 SSD 또는 CFast 디스크 아이콘을 클릭한 뒤, ‘지우기’ 탭을 클릭하세요.
4
포맷을 ‘Mac OS 확장(저널링)’ 또는 ‘exFAT’로 설정하세요.
5
새로운 볼륨의 이름을 입력하고 ‘지우기’를 클릭하세요. 미디어가 신속하게 포맷되면
사용 준비가 완료됩니다.
Windows 컴퓨터에서 미디어 포맷하기
Windows 컴퓨터의 포맷 대화 상자에서 드라이브를 'exFAT'로 포맷할 수 있습니다. 포맷이 진행되면
SSD 또는 CFast 카드의 모든 정보가 삭제되므로 중요한 정보는 포맷하기 전에 반드시 백업해 두어야
합니다.
1
외장 도크 또는 케이블 어댑터를 사용하여 SSD를 컴퓨터에 연결하세요. CFast 카드의 경우,
외장
CFast 카드 리더기를 통해 컴퓨터에 연결히세요.
2
‘시작’ 메뉴 또는 ‘시작’ 화면을 열고 ‘내컴퓨터’를 선택하세요. SSD 또는 CFast 카드에서 마우스
오른쪽 버튼을 클릭하세요.
3
나타나는 메뉴에서 ‘포맷’을 선택하세요.
463
미디어 포맷하기
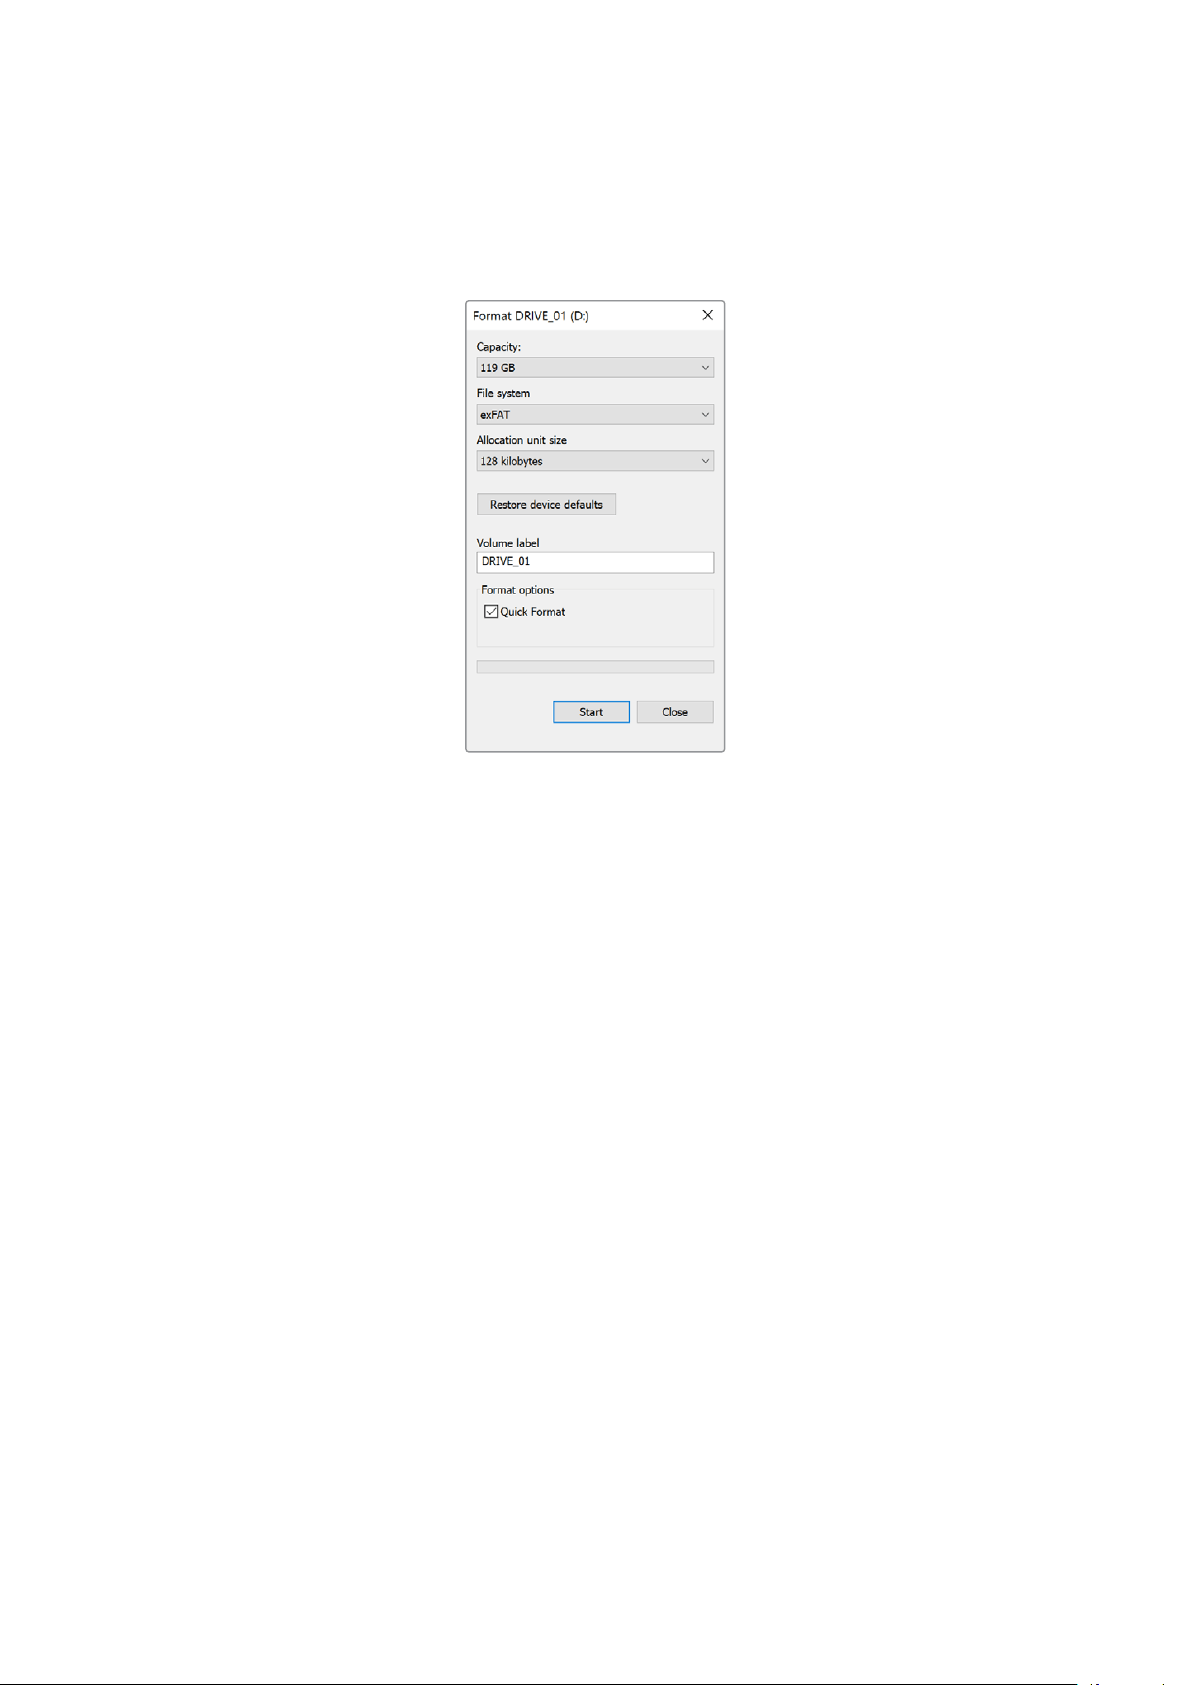
4
파일 시스템을 ‘exFAT’으로 설정한 뒤, 할당 단위의 크기를 128 킬로바이트로 설정합니다.
5
볼륨 이름을 입력하고 ‘빠른 포맷’을 선택한 뒤, ‘시작’을 클릭하세요.
6
미디어가 신속하게 포맷되면 사용 준비가 완료됩니다.
HyperDeck을 웹캠으로 사용하기
HyperDeck 디스크 레코더를 USB로 컴퓨터에 연결하면 웹캠으로 인식됩니다. 그러므로 Open
Broadcaster와 같은 스트리밍 소프트웨어를 사용해 HyperDeck에서 재생 또는 녹화를 수행할 수
있습니다.
웹캠 소스 설정하기
대부분의 경우에는 스트리밍 소프트웨어가 HyperDeck를 웹캠으로 자동 인식하므로, 스트리밍
소프트웨어 실행하면
HyperDeck의 출력 영상이 바로 화면에 나타납니다. 사용 중인 소프트웨어에서
자동으로 이를 설정하지 못할 경우, 해당 소프트웨어 설정 화면의 웹캠과 마이크 항목에서
HyperDeck를
선택하세요.
아래 예는
Skype에서 웹캠을 설정하는 방법을 설명합니다.
1
Skype
의 메뉴바에서 ‘오디오 및 비디오 설정’ 화면으로 들어가세요.
2
‘카메라’ 메뉴를 클릭한 다음, 목록에서 현재 사용 중인 HyperDeck를 선택하세요.
그러면 미리보기 창에
HyperDeck의 영상이 나타납니다.
3
이제 '마이크' 메뉴에서 소스를 ‘마이크’로 선택하세요.
Skype 환경 설정을 마치면 친구에게 Skype로 전화를 걸어 웹캠 설정이 제대로 작동하는지 간단히
테스트해 보세요.
이로써
HyperDeck Studio를 사용하여 전 세계에 영상을 생중계할 준비가 모두 끝났습니다.
464
HyperDeck을 웹캠으로 사용하기

Open
Broadcaster
설정하기
Open Broadcaster는 HyperDeck Studio와 유튜브, 트위치, 페이스북 라이브 같은 인기 스트리밍
소프트웨어 사이의 매개체로 활용할 수 있는 개방형 스트리밍 플랫폼입니다. 이 플랫폼은 스트리밍
소프트웨어가 쉽게 처리할 수 있는 포맷으로 영상을 압축합니다.
다음은
HyperDeck Studio에서 유튜브 라이브로 웹캠 출력을 스트리밍할 수 있도록 Open
Broadcaster를 설정하는 방법에 대해 소개합니다.
Open Broadcaster를 실행한 다음, ‘Source’ 박스에서
‘+’ 를 클릭하세요.
‘Video Capture Device’를 선택하세요.
새로운 소스의 이름을 지정한 다음, ‘OK’ 버튼을
클릭하세요.
Device 메뉴에서 사용 중인 HyperDeck Studio 모델을
선택한 뒤 ‘OK’를 클릭하세요.
사용자의 유튜브 계정으로 들어가세요. ‘실시간 스트리밍
시작’ 버튼을 클릭한 다음, ‘스트림’을 클릭하세요.
유튜브의 ‘스트림’ 옵션에서 자신의 방송 정보를 입력한 후,
‘스트림 만들기’를 클릭하세요.
1
2
3
4
5
6
465
HyperDeck을 웹캠으로 사용하기
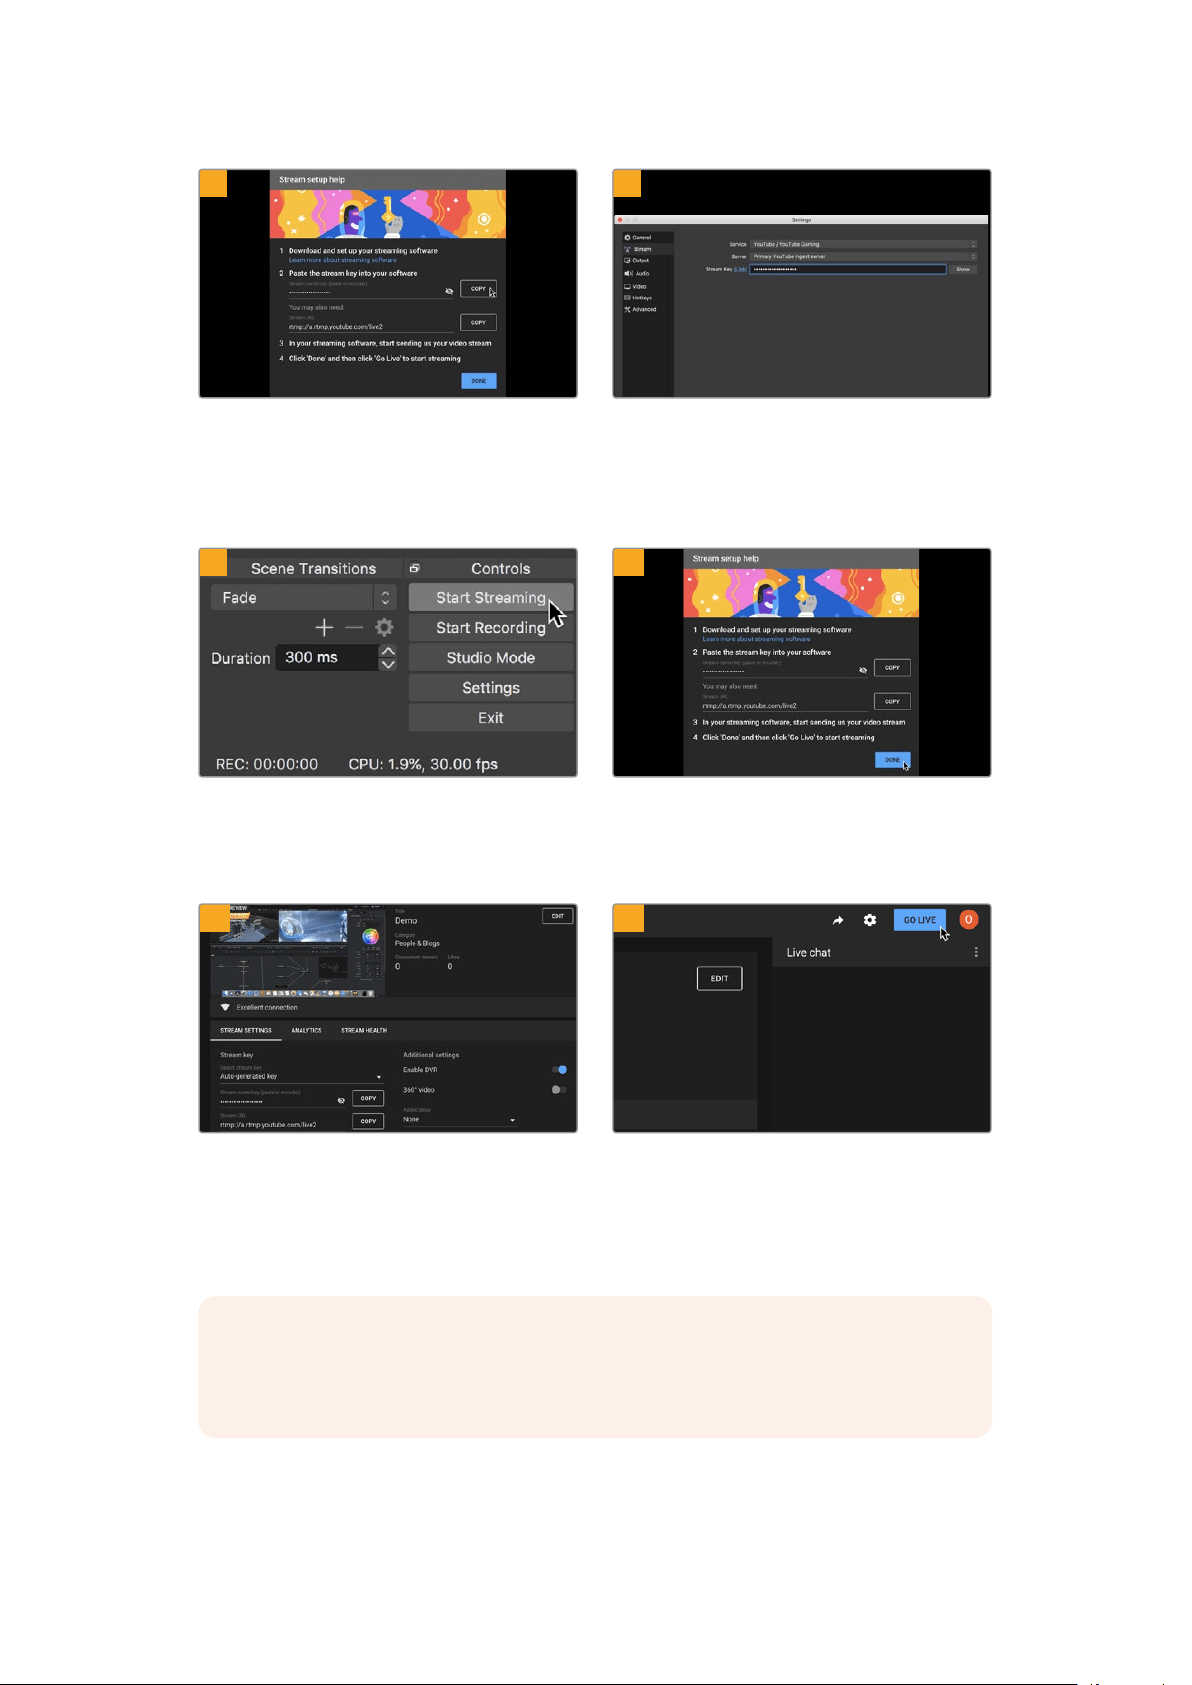
이제 유튜브에서 Open Broadcaster를 자신의 유튜브
계정으로 전송하는 스트림 키어가 생성됩니다.
스트림 키 옆의 ‘복사’ 버튼을 클릭하세요. Open
Broadcaster에 붙여넣기 할 스트림 키를 복사하세요.
Open Broadcaster로 다시 돌아와 메뉴바에서 ‘OBS >
환경설정’을 클릭하세요. ‘Stream’을 선택하세요. 유튜브에서
복사했던 스트림 키를 붙여넣기한 뒤, ‘OK’를 클릭하세요.
이제 HyperDeck에서 출력되는 영상을 Open Broadcaster의
미리보기 창에서 확인할 수 있습니다.
화면 우측 하단에서 ‘Start Streaming’을 클릭하여 Open
Broadcaster의 방송 링크를 유튜브에 연결하세요. Open
Broadcaster에서 유튜브로 연결이 생성되며, 연결과 함께
유튜브 라이브에서 모든 사항을 설정할 수 있습니다.
유튜브 라이브로 돌아가 보면 HyperDeck의 웹캠 프로그램
출력이 배경 영상으로 들어오고 있는 것을 확인할 수
있습니다. ‘완료’를 클릭하세요.
Open Broadcaster가 유튜브 라이브와 완벽히
연결되었으므로, 이제 방송 시작 준비가 완료되었습니다.
방송 전에 모든 준비가 완료되었는지 최종 점검하세요.
점검이 끝나면 ‘시작’을 클릭하여 방송을 시작하세요.
이제 Open Broadcaster에서 유튜브로 방송이 실시간 스트리밍됩니다.
참고 인터넷 스트리밍의 특성상 지연이 자주 발생할 수 있으므로 방송이 채 끝나기 전에 실수로
종료 버튼을 누르지 않도록 주의해야 합니다. 따라서 유튜브에서 스트리밍 영상을 지켜보며
방송이 종료된 것을 반드시 확인한 후에 ‘스트림 종료’를 클릭하세요.
7
8
9
10
11
12
466
HyperDeck을 웹캠으로 사용하기

Blackmagic HyperDeck Setup
HyperDeck
Setup
사용하기
Blackmagic HyperDeck Setup은 HyperDeck 설정을 변경하고 내부 소프트웨어를 업데이트하는 데
사용됩니다.
HyperDeck 셋업:
1
USB
또는 이더넷을 사용해 HyperDeck와 컴퓨터를 연결하세요.
2
HyperDeck
Setup을 실행하세요. 연결된 HyperDeck 모델명이 Setup 유틸리티 초기 화면에
나타납니다.
3
동그라미 ‘셋업’ 아이콘이나 HyperDeck 이미지를 클릭해 설정 페이지로 들어갑니다.
셋업 페이지
한 대 이상의 HyperDeck Studio를 운용할 경우, 쉽게 확인할 수 있도록 기기명을 다르게 설정할 수도
있습니다. ‘이름(
Name)’ 옵션에서 이를 설정할 수 있습니다.
467
Blackmagic HyperDeck Setup
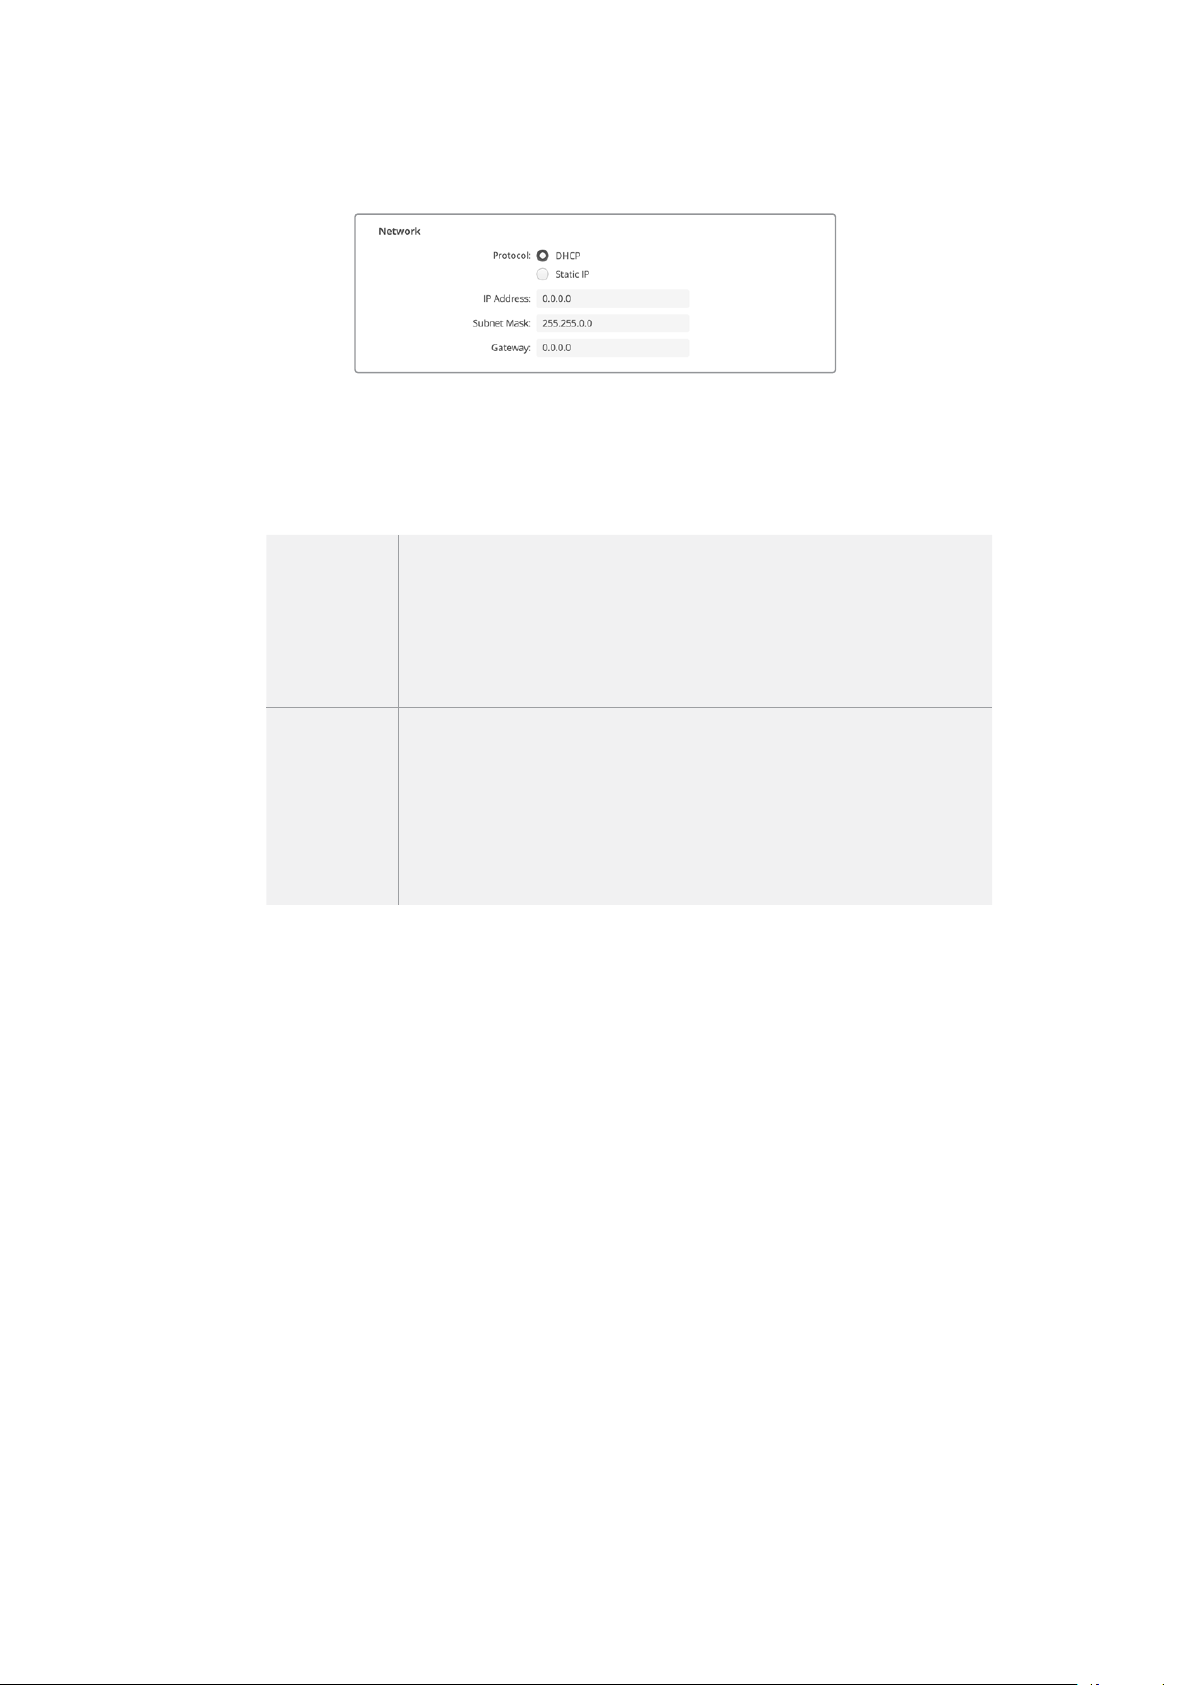
네트워크
프로토콜
HyperDeck Studio와 ATEM 스위처를 함께 사용하거나, HyperDeck 이더넷 프로토콜을 통해
원격으로 제어하려는 경우,
DHCP를 사용하거나, 수동으로 고정 IP 주소를 추가하는 방식으로
HyperDeck Studio를 다른 장비에서 사용하는 네트워크에 연결해야 합니다.
DHCP
HyperDeck Studio 디스크 레코더는 DHCP로 기본 설정되어 있습니다. DHCP
(동적 호스트 구성 프로토콜)는 자동으로 사용자의 HyperDeck Studio를 찾아
IP 주소를 지정하는 네트워크 서버 및 라우터의 서비스를 의미합니다. DHCP
는 이더넷을 통해 장비를 쉽게 연결하도록 돕고 다른 IP 주소와 충돌하지 않도록
하는 중요한 서비스입니다. 대부분의 컴퓨터와 네트워크 스위처는 DHCP를
지원합니다.
고정 IP
‘고정 IP(Static IP)’를 선택하면 네트워크 정보를 수동으로 입력할 수 있습니다.
모든 유닛이 통신할 수 있도록 고정 IP 주소를 수동으로 설정할 경우, 동일한
서브넷 마스크 및 게이트웨이 설정을 공유하도록 해야 합니다. 또한 패널의
IP 주소를 구성하는 4개 필드 중 첫 3개 필드가 동일해야 합니다. 만약 해당
네트워크에 이미 같은 IP를 보유한 장비가 있다면, 이 설정은 충돌을 일으켜
네트워크에 제대로 연결되지 않습니다. 충돌 발생 시 IP 주소의 마지막 필드를
변경하면 문제가 해결됩니다.
LUT
페이지
뒷면 패널에 모니터 출력 단자를 가진 HyperDeck 모델은 3D LUT가 적용된 입력 영상을 화면에
디스플레이할 수 있습니다.
17/33/65 포인트의 .cube LUT 파일이 지원됩니다.
카메라의 필름 다이나믹 레인지를 사용하는 경우, 의도적으로 채도를 낮춰 명암 대비가 낮기 때문에 이
기능을 유용하게 사용할 수 있습니다. 화면에
LUT를 적용하면 색보정 작업 후 영상룩이 어떤 모습일지에
대한 아이디어를 얻을 수 있습니다.
3D LUT는 모니터 출력 디스플레이에만 사용될 뿐 실제 영상에는 녹화되지 않기 때문에 LUT가녹화
영상에 영구적으로 남을 가능성에 대해 염려할 필요가 없습니다.
하지만
DaVinci Resolve에서 동일한 LUT를 이미지에 적용하려면 HyperDeck Studio에서 사용한 LUT
의 .cube 파일을 DaVinci Resolve로 불러와 색보정 작업에 적용할 수 있습니다.
468
Blackmagic HyperDeck Setup

LUT 확인하기
1
먼저, 사용하는 LUT 디스플레이를 선택하세요. ‘Import’ 버튼을 클릭하세요.
2
파일 창에서 불러오기하려는 LUT로 이동하고 ‘Open’을 누르세요.
3
LUT
를 불러오면 3D LUT 옵션을 ‘ON’으로 설정하고 ‘Save’ 버튼을 누르세요.
선택된
LUT 디스플레이가 모니터 출력 화면에 나타납니다. 이제 LCD 메뉴의 모니터 설정에서 LUT를
ON/OFF할 수 있습니다.
내부 소프트웨어 업데이트
셋업 유틸리티를 통해 HyperDeck 디스크 레코더의 내부 소프트웨어를 업데이트하고, 스트리밍 설정 및
네트워크 설정, 스트리밍 품질을 변경할 수 있습니다.
내부 소프트웨어 업데이트하기
1
www
.blackmagicdesign.com/kr/support에서 최신 HyperDeck Setup 설치 프로그램을
다운로드하세요.
2
컴퓨터에 설치된 Blackmagic HyperDeck Setup 설치 프로그램을 실행하고 화면에 나타나는
지시 사항을 따르세요.
3
설치가 완료되면 HyperDeck Studio 뒷면 패널에 있는 이더넷 단자 또는 USB를 통해 컴퓨터에
연결하세요.
4
Blackmagic
HyperDeck Setup을 실행한 뒤, 화면에 나타나는 지시 사항에 따라 내부
소프트웨어 업데이트를 진행하세요. 내부 소프트웨어가 최신 버전일 경우 아무런 메시지가
나타나지 않으며 더 이상의 추가 작업이 필요하지 않습니다.
469
내부 소프트웨어 업데이트

Blackmagic Design 고객 지원 센터(www.blackmagicdesign.com/kr/support)에서
Blackmagic HyperDeck Studio를 위한 최신 버전의 셋업 유틸리티를 다운로드하세요.
Teranex Mini Rack Shelf
Teranex Mini Rack Shelf는 1RU의 장비랙 크기로 HyperDeck Studio HD Mini와 HyperDeck
Studio HD Plus 모델을 방송 장비랙 또는 로드케이스에 설치할 수 있습니다. 소형 제품의 Blackmagic
HyperDeck Studio HD Mini는 Teranex Mini 컨버터 및 Blackmagic MultiView 4, Blackmagic Web
Presenter 같은 비슷한 크기의 다른 Blackmagic Design 장비와 함께 설치할 수 있습니다. 예를 들어,
Blackmagic HyperDeck Studio HD Mini를 ATEM Television Studio HD와 함께 설치하면 8개의
비디오 입력을 전환하고
HyperDeck Studio HD Mini를 통해 프로그램 출력을 녹화할 수 있습니다.
이러한 제품 모듈 디자인 덕분에 휴대성이 높고 사용이 간편한 커스텀 비디오 솔루션을 구축할 수
있습니다.
Teranex Mini Rack Shelf를 사용하면 Blackmagic HyperDeck Studio HD Mini 및 HyperDeck
Studio HD Plus를 같은 디자인을 가진 다른 Blackmagic Design 제품과 함께 설치할 수 있습니다.
제품의 고무 바닥을 제거하고 Teranex Mini Rack Shelf에 장착하여 제품과 함께 제공된 나사로 바닥면을
고정하면
Blackmagic HyperDeck을 손쉽게 설치할 수 있습니다.
Teranex Mini Rack Shelf는 설치랙에 제품을 추가로 설치하지 않을 때 빈 공간을 채울 수 있는 두 개의
검은색 패널과 함께 제공됩니다.
Blackmagic Design 웹사이트 www.blackmagicdesign.com/kr에서 더욱 자세한 정보를 확인하실 수
있습니다.
470
Teranex Mini Rack Shelf

RS-422 컨트롤
RS
-
422
컨트롤이란?
RS-422 표준은 1980년대 초반부터 데크 컨트롤 직렬 전송을 위한 방송 표준으로 사용해 왔으며
대부분의 데크 및 선형/비선형 편집 시스템, 방송 자동화 운영 장치에서 사용되고 있습니다. 현재 모든
HyperDeck 모델에서 이 표준을 지원하므로 방송 자동화와 원격 제어 시스템, 편집 시스템, 원하는 모든
종류의 커스텀 컨트롤에 통합시킬 수 있습니다.
HyperDeck Studio는 RS-422를 통해 첨단 미디어 프로토콜(Advanced Media Protocol, AMP)의
파일 기반 명령어 또한 지원합니다. 재생 목록에 클립 추가, 다음 클립의 파일명 설정, 특정 클립 또는
타임라인 반복 재생, 재생 목록 제거 등의
AMP 명령어를 사용하여 외부 장치에서 HyperDeck을 제어할
수 있습니다.
외부 RS-422 컨트롤러 사용하기
현재 모든 HyperDeck 모델에는 Sony™와 호환하는 산업 표준 RS-422 데크 컨트롤 포트가 탑재되어
있습니다. 이 포트에는 표준 규격 핀 연결부가 있어
HyperDeck Extreme Control같은 RS-422를 가진
모든 원격 컨트롤러에 바로 연결할 수 있습니다.
케이블 양쪽 끝의 핀 번호가 서로 일치하도록 제작된
9핀 케이블이라면 모두 사용 가능합니다. 커스텀
케이블을 제작하고자 할 경우 첨부된 배선도를 참조하세요.
직접 버튼을 누르지 않고
HyperDeck Extreme Control에서 HyperDeck을 원격 제어할 수 있습니다.
1
HyperDeck
의 비디오 입력에 비디오 신호를 연결하세요.
2
RS
-422 케이블로 HyperDeck Extreme Control과 HyperDeck Studio를 연결하세요.
3
전면 패널의 REM 버튼을 누르거나 HyperDeck Studio Mini의 LCD 메뉴를 통해 원격 제어
기능을 활성화시키면 원격 데크 제어 기능을 사용할 수 있습니다.
이제
HyperDeck에서 기타 일반 조그/셔틀 기능 뿐만 아니라, 녹화 및 재생 시작/정지를 원격으로 제어할
수도 있습니다. 지원되는
RS-422 명령어의 전체 목록은 [지원되는 RS-422 명령어] 부분에 자세히 나와
있습니다.
5 4 3 2 1
9 8 7 6
수신
(–)
수신
(+)
송신
(–)
송신
(+)
접지핀
2 7 8 3 1, 4, 6, 9
RS-422 원격 핀 연결
471
RS-422 컨트롤

HyperDeck의 LCD 메뉴에 있는 원격 설정을 ‘ON’으로 설정하거나,
제어 패널의
REM 버튼을 눌러 RS-422 데크 제어 기능을 활성화하세요.
모든 HyperDeck 모델은 뒷면 패널의 RS-422 포트를 통해 원격 제어 기능을 지원합니다.
지원되는 RS-422 명령어
Command Reply No Remote Notes
0 - System Control
0x00 0x11 DeviceTypeRequest
NTSC: 0xF0E0
PAL: 0xF1E0
24P: 0xF2E0
Enabled
1 - Slave Response
0x20 0x00 Stop Acknowledge Disabled
0x20 0x01 Play Acknowledge Disabled
0x20 0x02 Record Acknowledge Disabled
0x20 0x04 StandbyOff Acknowledge Disabled
0x20 0x05 StandbyOn Acknowledge Disabled
0x20 0x0F Eject Acknowledge Disabled
0x20 0x10 FastFwd Acknowledge Disabled
0x21 0x11 JogFwd1 Acknowledge Disabled
0x22 0x11 JogFwd2 Acknowledge Disabled
Treated as N=1;
Same as JogFwd1
0x21 0x12 VarFwd1 Acknowledge Disabled Uses ShuttleFwd1
0x22 0x12 VarFwd2 Acknowledge Disabled
Treated as N=1;
Same as VarFwd1
0x21 0x13 ShuttleFwd1 Acknowledge Disabled
0x22 0x13 ShuttleFwd2 Acknowledge Disabled
Treated as N=1;
Same as ShuttleFwd1
0x20 0x20 Rewind Acknowledge Disabled
0x21 0x21 JogRev1 Acknowledge Disabled
0x22 0x21 JogRev2 Acknowledge Disabled
Treated as N=1;
Same as JogRev1
0x21 0x22 VarRev1 Acknowledge Disabled Uses ShuttleRev1
472
RS-422 컨트롤

Command Reply No Remote Notes
0x22 0x22 VarRev2 Acknowledge Disabled
Treated as N=1;
Same as VarRev1
0x21 0x23 ShuttleRev1 Acknowledge Disabled
0x22 0x23 ShuttleRev2 Acknowledge Disabled
Treated as N=1;
Same as ShuttleRev1
0x20 0x30 Preroll Acknowledge Disabled
0x24 0x31 CueData Acknowledge Disabled
0x20 0x34 SyncPlay Acknowledge Disabled
0x20 0x40 Preview Acknowledge Disabled Status bits are set
0x20 0x41 Review Acknowledge Disabled Status bits are set
0x20 0x43 OutpointPreview Acknowledge Disabled
0x22 0x5C DMCSetFwd Acknowledge Disabled
0x22 0x5D DMCSetRev Acknowledge Disabled
0x20 0x60 FullEEOff Acknowledge Disabled
0x20 0x61 FullEEOn Acknowledge Disabled
0x20 0x63 SelectEEOn Acknowledge Disabled
4 - Preset/Select Control
0x40 0x10 InEntry Acknowledge Disabled
0x40 0x11 OutEntry Acknowledge Disabled
0x44 0x14 InDataPreset Acknowledge Disabled
0x44 0x15 OutDataPreset Acknowledge Disabled
0x40 0x18 InShift+ Acknowledge Disabled
0x40 0x19 InShift- Acknowledge Disabled
0x40 0x1A OutShift+ Acknowledge Disabled
0x40 0x1B OutShift- Acknowledge Disabled
0x40 0x20 InReset Acknowledge Disabled
0x40 0x21 OutReset Acknowledge Disabled
0x40 0x22 AInReset Acknowledge Disabled
0x40 0x23 AOutReset Acknowledge Disabled
0x44 0x31 PrerollPreset Acknowledge Disabled
0x40 0x40 AutoModeOff Acknowledge Disabled
ignored, Status bit
remembered
0x40 0x41 AutoModeOn Acknowledge Disabled
ignored, Status bit
remembered
0x41 0x37 InputCheck Acknowledge Disabled
473
RS-422 컨트롤

Command Reply No Remote Notes
6 - Sense Request
0x61 0x0A TimeCodeGenSense — —
0x61 0x0C CurrentTimeSense — —
0x60 0x10 InDataSense InData Enabled
0x60 0x11 OutDataSense OutData Enabled
0x60 0x12 AInDataSense AInData Enabled
0x60 0x13 AOutDataSense AOutData Enabled
0x61 0x20 StatusSense StatusData Enabled
0x60 0x2B RemainTimeSense RemainTimeData Enabled
0x60 0x2E SpeedSense SpeedData Enabled
0x60 0x31 PrerollTimeSense PreRollTimeData Enabled
0x60 0x36 TimerModeSense TimerModeData Enabled
0x60 0x3E RecordInhibitSense RecordInhibitStatus Enabled
7 - Sense Reply
0x78 0x00 Timer1Data — —
Current Time and
00:00:00:00
0x78 0x04 LTCUserBitsTimeData — —
Current Time and
00:00:00:00
0x78 0x06 VITCUserBitsTimeData — —
Current Time and
00:00:00:00
0x74 0x06 VITCTimeData — — Current Time
0x74 0x07 UserBitsVITCTimeData — — 00:00:00:00
0x74 0x08 GenTCData — — Current Time
0x78 0x08 GenTCUBData — —
Current Time and
00:00:00:00
0x74 0x09 GenUBData — — 00:00:00:00
0x74 0x10 InData — —
0x74 0x11 OutData — —
0x74 0x12 AInData — —
0x74 0x13 AOutData — —
0x74 0x14 CorrectedLTCTimeData — — Current Time
0x70 0x20 StatusData — —
Please see “Status Bits”
sheet: Limited to 9 bytes
of status, silently
truncated
0x76 0x2B RemainTimeData — —
0x71 0x2E SpeedData — —
0x74 0x31 PrerollTimeData — —
0x71 0x36 TimerModeData — — Returns 0 (TimeCode)
0x72 0x3E RecordInhibitStatus — —
474
RS-422 컨트롤

Command Reply No Remote Notes
A - Advanced Media Protocol
0xA1 0x01 AutoSkip Acknowledge Disabled
8-bit signed number of
clips to skip from current
clip
0xAX 0x15 ListNextID IDListing Enabled
when x = 0 single clip
request when x = 1, #
clips can be specified in
the send data
0x20 0x29 ClearPlaylist Acknowledge Disabled
0x41 0x42 SetPlaybackLoop Acknowledge Disabled
Bit 0 loop mode enable,
0=false 1=true
Bit 1 is single clip/timeline
0=single clip
1=timeline
0x41 0x44 SetStopMode Acknowledge Disabled
0 = Off
1 = Freeze on last frame
2 = Freeze on next clip
3 = Show black
0x4f 0x16 AppendPreset Acknowledge Disabled
2 Bytes for the length N
of the clip name
N Bytes for each character
of the clip name
4 Byte in point timecode
(format is FFSSMMHH)
4 Byte out point timecode
(format is FFSSMMHH)
Blackmagic Extensions
0x82 0x02 BMDSeekToTimelinePosition Acknowledge Disabled
16-bit little endian
fractional position
[0..65535]
0x81 0x03 BMDSeekRelativeClip Acknowledge Disabled
One-byte signed integer,
which is the number of
clips to skip (negative for
backwards).
RS-422 개발자 정보
bit 7 bit 6 bit 5 bit 4 bit 3 bit 2 bit 1 bit 0
Byte 0
0 0 Cassette out 0 0 0 0 Local
Byte 1
Standby 0 Stop 0 Rewind Forward Record Play
Byte 2
Servo Lock 0 Shuttle Jog Var Direction Still 1
Byte 3
Auto Mode 0 0 0 Aout Set Ain Set Out Set In Set
Byte 4
Select EE Full EE Loop Playback 0 0 0 0 0
Byte 5
0 0 0 0 0 0 0 0
Byte 6
0 Lamp Still Lamp Fwd Lamp Rev 0 0 0 0
Byte 7
0 0 0 0 0 0 0 0
Byte 8
0 0 Near EOT EOT 0 0 0 0
Byte 9
0 0 0 0 0 0 0 0
475
RS-422 컨트롤

Variables
Cassette Out
Set if no SSD is present
Local
Set if Remote is disabled (local control)
Standby
Set if a disk is available
Direction
Clear if playback is forwarding, set if playback is reversing
Still
Set if playback is paused, or if in input preview mode
Auto Mode
Set if in Auto Mode
Select EE, Full EE
Set if in input preview mode
Lamp Still/Fwd/Rev
Set according to playback speed and direction
Near EOT
Set if total space left on available SSDs is less than 3 minutes
EOT
Set if total space left on available SSDs is less than 30 seconds
Others
Cue Complete (byte 2, bit 0)
Always 1: Cue requests are always instantaneous
HyperDeck Serial RS-422 Protocol
Protocol
Based on Sony 9-pin protocol
Interface
Baud rate 38.4 Kbps
1 start bit
8 data bits
1 stop bit
1 parity bit
Odd parity
네트워크를 통해 파일 전송하기
HyperDeck 디스크 레코더는 파일 전송 프로토콜(FTP)을 통한 파일 전송을 지원합니다. 이는
네트워크를 통해 컴퓨터에서 바로
HyperDeck 장비에 파일을 전송하는 강력한 기능으로, 인터넷 공급
업체에서 제공하는 최고의 속도로 전송할 수 있습니다. 예를 들어, 새로운 파일을 디지털 사이니지 구동을
위해 다른 곳에 위치한 원격
HyperDeck 장비에 복사할 수 있습니다.
HyperDeck Studio에 연결하기
컴퓨터와 HyperDeck Studio가 동일한 네트워크상에 있는 경우, FTP 클라이언트와 HyperDeck Studio
의 IP 주소만 있으면 연결 가능합니다.
1
HyperDeck
에 연결하려는 컴퓨터에 FTP 클라이언트를 다운로드하여 설치하세요. Cyberduck,
FileZilla, Transmit 등의 사용을 추천하지만, 대부분의 FTP 클라이언트 소프트웨어와
호환됩니다.
Cyberduck과 FileZilla는 무료로 다운로드할 수 있습니다.
476
네트워크를 통해 파일 전송하기
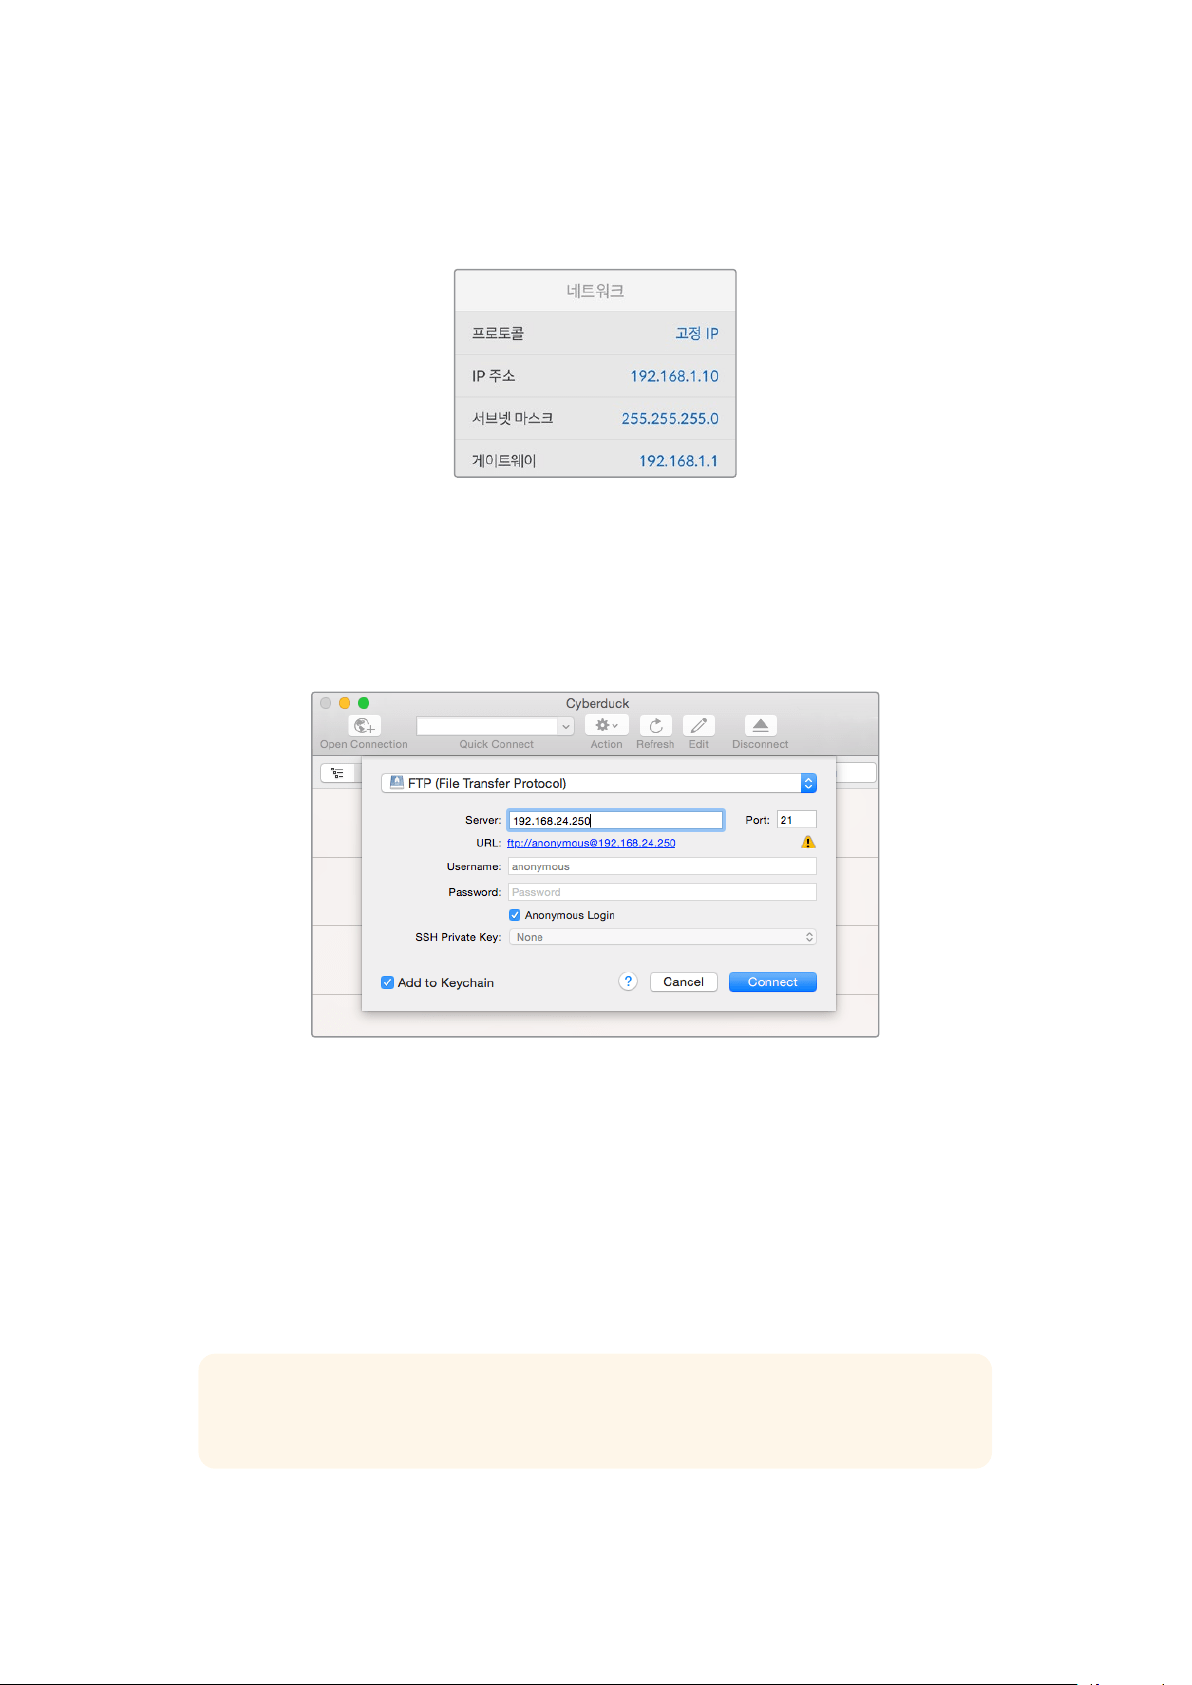
2
이더넷 케이블을 사용해 HyperDeck Studio를 네트워크에 연결한 뒤, IP 주소를 적어두세요.
MENU 버튼을 누른 다음 검색 다이얼을 돌려 ‘네트워크’ 화면에 들어가면 IP 주소를 확인할 수
있습니다.
HyperDeck Studio의 IP 주소는 스크린 하단에 나타납니다.
HyperDeck Studio의 IP 주소는
‘네트워크’ 화면에서 확인할 수 있습니다.
3
FTP
프로그램에 있는 연결 대화 상자에 HyperDeck Studio의 IP 주소를 입력하세요. 대화
상자의 이름 및 위치가 프로그램마다 다를 수 있지만 일반적으로 ‘
Server’ 또는 ‘Host’라고
표기되어 있습니다.
FTP 프로그램에 ‘Anonymous Login’ 확인란이 있는 경우에는 해당
확인란을 선택하세요.
HyperDeck Studio에 연결할 경우, 사용자 이름이나 비밀번호를 입력할 필요가 없습니다.
간단히 디스크 레코더의
IP 주소를 FTP 프로그램의 ‘Server’ 또는 ‘Host’ 필드에 입력하세요.
FTP 프로그램에 ‘Anonymous Login’ 확인란이 있는 경우에는 해당 확인란을 선택하세요.
파일 전송하기
HyperDeck에 연결하고 나면 FTP 프로그램과 같은 방식으로 파일을 전송할 수 있습니다. 대부분의 FTP
프로그램에서 드래그 & 드롭 기능을 지원하지만 현재 사용 중인 프로그램에 맞는 사용법을 확인하세요.
HyperDeck와 모든 파일을 주고받을 수 있지만 HyperDeck에서 지원하는 코덱 및 해상도의 파일만
HyperDeck Studio에서 재생할 수 있습니다. 지원 코덱 목록은 본 설명서의 [Blackmagic HyperDeck
Setup]에서 확인할 수 있습니다.
정보 HyperDeck에서 녹화가 진행되는 동안 네트워크를 통해 파일을 전송할 수 있습니다.
HyperDeck에서 자동으로 전송 속도를 조절하기 때문에 녹화에는 영향을 끼치지 않습니다.
477
네트워크를 통해 파일 전송하기

ATEM 스위처에 연결하기
ATEM 스위처를 사용할 경우 최대 4대의 Blackmagic HyperDeck 디스크 레코더를 연결하여 ATEM
소프트웨어 또는 하드웨어 패널로 제어할 수 있습니다. 손끝으로 전체 녹화 과정을 제어할 수 있는
강력하고 효과적인 기능입니다.
ATEM 스위처에서 HyperDeck 녹화를 실행할 수도 있어 생방송을
아카이브로 녹화하거나 라이브 프로덕션 장면 전환에서 나중에 조절할
B롤 영상을 캡처하기에 아주
편리한 기능입니다.
ATEM 4 M/E Broadcast Studio 4K와 같은 ATEM 스위처에는
최대 네 대의
HyperDeck 디스크 레코더를 연결할 수 있습니다.
ATEM 스위처에 HyperDeck 연결하기
1
HyperDeck
을 ATEM 스위처와 같은 네트워크에 연결하고 IP 주소를 적어두세요.
HyperDeck의 IP 주소는 전면 패널 LCD 메뉴에서 ‘설정’으로 이동한 뒤, 메인 메뉴의 ‘이더넷’
으로 들어가 확인할 수 있습니다.
Mac 또는 PC에서는 Blackmagic HyperDeck Setup 유틸리티의 ‘Configure’ 탭에서
HyperDeck의 IP 주소를 확인할 수 있습니다.
2
HyperDeck
의 SDI 또는 HDMI 출력을 ATEM 스위처의 SDI 또는 HDMI 소스 입력에
연결하세요.
3
ATEM
스위처를 사용해 HyperDeck에서 트리거 녹화를 사용하고자 할 경우 비디오 소스 또한
HyperDeck에 연결해야 합니다.
간단히 SDI 또는 HDMI 소스를 HyperDeck에 연결하세요. ATEM 스위처의 프로그램 출력을
녹화하려면 스위처의 보조
SDI 출력 중 하나를 HyperDeck의 SDI 입력에 연결하세요.
4
HyperDeck
전면 패널에서 REM 버튼을 누르거나 HyperDeck Studio Mini의 LCD 메뉴를
통해 원격 기능을 활성화하면 스위처에서 원격 제어 기능을 사용할 수 있습니다.
5
HyperDeck
의 소스 및 IP 주소 정보를 ATEM 소프트웨어 및 ATEM 방송 패널에 입력해 연결
작업을 완료합니다. 이 과정은 아주 간단하며
ATEM 스위처 사용 설명서에 소개되어 있습니다.
478
ATEM 스위처에 연결하기

HyperDeck의 LCD 메뉴에 있는 원격 설정을 ‘ON’으로 설정하거나, 제어 패널의
REM 버튼을 눌러 ATEM 스위처를 통한 이더넷 제어 기능을 활성화하세요.
후반 제작 워크플로 이해하기
클립 사용하기
SD 카드 슬롯, 외부 리더기, 또는 SSD 도크를 통해 SD 카드나 SSD를 컴퓨터에 연결하기만 하면 클립을
쉽게 사용할 수 있습니다.
SSD 또는 SD 카드에서 컴퓨터 하드 드라이브로 파일을 바로 드래그하여
사용하거나
SSD 또는 SD 카드에서 직접 작업할 수 있습니다. 2.5인치 eSATA 대 USB 케이블 어댑터를
사용해
SSD를 컴퓨터에 연결할 수도 있지만, SSD에서 직접 작업할 정도로 빠른 속도는 아니기 때문에
SSD에서 비디오 파일을 노트북으로 옮기기 위한 하나의 방법으로 사용하시길 권장합니다.
Mac OS
QuickTime은 MacOS에 설치되어 있습니다. HyperDeck에서 녹화된 Apple ProRes, Avid DNxHD,
DNxHR QuickTime 영상은 MacOS에서 사용하는 거의 모든 비디오 소프트웨어에서 사용할 수
있습니다.
HyperDeck에서 녹화된 DNxHD 및 DNxHR MXF 파일은 Mac용 Avid Media Composer 및 DaVinci Resolve
에서 사용할 수 있습니다. DNxHD 코덱은 다음의 링크 http://www.avid.com/products/avid-dnxhr-and-dnxhd
에서 무료로 다운로드 할 수 있습니다.
HyperDeck에서 녹화된 MCC 폐쇄 자막 데이터 파일은 http://www.telestream.net/captioning/overview.htm
에서 MacOS용 MacCaption 소프트웨어를 다운로드해 사용할 수 있습니다.
Windows
HyperDeck에서 녹화된 Apple ProRes QuickTime 영상은 QuickTime을 컴퓨터에 설치해 사용할 수 있
습니다.
HyperDeck에서 녹화된 비디오는 QuickTime을 지원하는 거의 모든 Windows의 비디오 소프트
웨어에서 사용할 수 있습니다.
Windows용 QuickTime은 http://www.apple.com/quicktime/download/
에서 무료로 다운로드할 수 있습니다.
HyperDeck에서 녹화된 DNxHD 및 DNxHR MXF 파일은 Windows용 Avid Media
Composer 및 DaVinci Resolve에서 사용할 수 있습니다. DNxHD 코덱은 다음의 링크
http://www.avid.com/products/avid-dnxhr-and-dnxhd에서 무료로 다운로드 할 수 있습니다.
HyperDeck에서 녹화된 MCC 폐쇄 자막 데이터 파일은 http://www.telestream.net/captioning/overview.htm
에서 Windows용 CaptionMaker 소프트웨어를 다운로드해 사용할 수 있습니다.
479
후반 제작 워크플로 이해하기

Developer Information
Blackmagic
HyperDeck
이더넷 프로토콜
Blackmagic HyperDeck 이더넷 프로토콜은 이더넷 연결이 내장된 HyperDeck Studio 모델에서 TCP
포트
9993에 연결하여 액세스하는 텍스트 기반 프로토콜입니다. 소프트웨어 개발자들은 프로토콜을
사용하여 장비들을
Blackmagic Design 제품과 통합시킬 수 있습니다. 저희 Blackmagic Design은
자사의 프로토콜을 공개하여 고객들이 새로운 방안을 고안해 낼 수 있기를 기대하고 있습니다!
프로토콜 명령어
Command Command Description
help or ? Provides help text on all commands and parameters
commands return commands in XML format
device info return device information
disk list query clip list on active disk
disk list: slot id: {n} query clip list on disk in slot {n}
quit disconnect ethernet control
ping check device is responding
preview: enable: {true/false} switch to preview or output
play play from current timecode
play: speed: {-5000 to 5000} play at specific speed
play: loop: {true/false} play in loops or stop-at-end
play: single clip: {true/false} play current clip or all clips
playrange query playrange setting
playrange set: clip id: {n} set play range to play clip {n} only
playrange set: clip id: {n} count: {m} set play range to {m} clips starting from clip {n}
playrange set: in: {inT} out: {outT}
set play range to play between:
- timecode {inT} andtimecode {outT}
playrange set: timeline in: {in} timeline out:
{out}
set play range in units of frames between:
- timeline position {in} and position {out} clear/reset play
rangesetting
playrange clear clear/reset play range setting
play on startup query unit play on startup state
play on startup: enable: {true/false} enable or disable play on startup
play on startup: single clip: {true/false} play single clip or all clips on startup
play option query play options
play option: stop mode:
{lastframe/nextframe/black}
set output frame when playback stops
record record from current input
record: name: {name} record named clip
record spill spill current recording to next slot
480
Developer Information

Command Command Description
record: spill: slot id: {n}
spill current recording to specified slot
use current id to spill to same slot
stop stop playback or recording
clips count query number of clips on timeline
clips get query all timeline clips
clips get: clip id: {n} query a timeline clip info
clips get: clip id: {n} count: {m} query m clips starting from n
clips get: version: {1/2}
query clip info using specified output version:
version 1: is: name startT duration
version 2: id: startT duration inT outT name
clips add: name: {name} append a clip to timeline
clips add: clip id: {n} name: {name} insert clip before existing clip {n}
clips add: in: {inT} out: {outT} name: {name} append the {inT} to {outT} portion of clip
clips remove: clip id: {n}
remove clip {n} from the timeline
(invalidates clip ids following clip {n})
clips clear empty timeline clip list
transport info query current activity
slot info query active slot
slot info: slot id: {n} query slot {n}
slot select: slot id: {n} switch to specified slot
slot select: video format: {format} load clips of specified format
slot unblock unblock active slot
slot unblock: slot id: {n} unblock slot {n}
cache info query cache status
dynamic range query dynamic range settings
dynamic range: playback override:
{off/Rec709/Rec2020_SDR/HLG/
ST2084_300/ST2084_500/
ST2084_800/ST2084_1000/
ST2084_2000/ST2084_4000/ST2084
set playback dynamic range override
dynamic range: record override:
{off/Rec709/Rec2020_SDR/HLG/
ST2084_300/ST2084_500/
ST2084_800/ST2084_1000/
ST2084_2000/ST2084_4000/ST2048}
set record dynamic range override
notify query notification status
notify: remote: {true/false} set remote notifications
notify: transport: {true/false} set transport notifications
notify: slot: {true/false} set slot notifications
notify: configuration: {true/false} set configuration notifications
notify: dropped frames: {true/false} set dropped frames notifications
notify: display timecode: {true/false} set display timecode notifications
481
Developer Information

Command Command Description
notify: timeline position: {true/false} set playback timeline position notifications
notify: playrange: {true/false} set playrange notifications
notify: cache: {true/false} set cache notifications
notify: dynamic range: {true/false} set dynamic range settings notifications
notify: slate: {true/false} set digital slate notifications
goto: clip id: {start/end} goto first clip or last clip
goto: clip id: {n} goto clip id {n}
goto: clip id: +{n} go forward {n} clips
goto: clip id: -{n} go backward {n} clips
goto: clip: {n} goto frame position {n} within current clip
goto: clip: +{n} go forward {n} frames within current clip
goto: clip: -{n} go backward {n} frames within current clip
goto: clip: {start/end} goto start or end of clip
goto: timeline: {n} goto frame position {n} within timeline
goto: timeline: +{n} o forward {n} frames within timeline
goto: timeline: -{n} go backward {n} frames within timeline
goto: timeline: {start/end} goto start or end of timeline
goto: timecode: {timecode} goto specified timecode
goto: timecode: +{timecode} go forward {timecode} duration
goto: timecode: -{timecode} go backward {timecode} duration
goto: slot id: {n} goto slot id {n}
jog: timecode: {timecode} jog to timecode
jog: timecode: +{timecode} jog forward {timecode} duration
jog: timecode: -{timecode} jog backward {timecode} duration
shuttle: speed: {-5000 to 5000} shuttle with speed
remote query unit remote control state
remote: enable: {true/false} enable or disable remote control
remote: override: {true/false} session override remote control
configuration query configuration settings
configuration: video input: SDI switch to SDI input
configuration: video input: HDMI switch to HDMI input
configuration: video input: component switch to component input
configuration: audio input: embedded capture embedded audio
configuration: audio input: XLR capture XLR audio
configuration: audio input: RCA capture RCA audio
configuration: file format: {format} switch to specific file format
configuration: audio codec: PCM switch to PCM audio
configuration: audio codec: AAC switch to AAC audio
482
Developer Information

Command Command Description
configuration: timecode input:
{external/embedded/preset/clip}
change the timecode input
configuration: timecode output:
{clip/timeline/internal}
change the timecode output
configuration: timecode preference:
{default/dropframe/nondropframe}
whether or not to use drop frame timecodes when not
otherwise specified
configuration: timecode preset:
{timecode}
set the timecode preset
configuration: audio input channels: {n} set the number of audio channels recorded to {n}
configuration: record trigger:
{none/recordbit/timecoderun}
change the record trigger
configuration: record prefix: {name} set the record prefix name (supports UTF-8 name)
configuration: append timestamp:
{true/false}
append timestamp to recorded filename
configuration: xlr input id: {n} xlr type:
{line/mic}
configure xlr input type
multiple xlr inputs can be configured in a single command
configuration: genlock input resync:
{true/false}
enable or disable genlock input resync
uptime return time since last boot
format: prepare: {format} prepare a disk formatting operation to filesystem {format}
format: confirm: {token} perform a pre-prepared formatting operation using token
identify: enable: {true/false} identify the device
watchdog: period: {period in seconds} client connection timeout
reboot reboot device
slate clips slate clips information
slate project slate project information
slate project:↵
camera: {index}↵
set camera index e.g. A
Command Combinations
You
can combine the parameters into a single command, for example:
play: speed: 200 loop: true single clip: true
Or for configuration:
configuration: video input: SDI audio input: XLR
Or to switch to the second disk, but only play NTSC clips:
slot select: slot id: 2 video format: NTSC
Using XML
While
you can use the Terminal to talk to HyperDeck, if you are writing software, you can use
XML to confirm the existence of a specific command based on the firmware of the HyperDeck
you are communicating with. This helps your software user interface adjust to the capabilities
of the specific HyperDeck model and software version.
483
Developer Information

Protocol
Details
Connection
The HyperDeck Ethernet server listens on TCP port 9993.
Basic syntax
The HyperDeck protocol is a line oriented text protocol. Lines from the server will be separated by an ascii
CR LF sequence. Messages from the client may be separated by LF or CR LF.
New lines are represented in this document as a "↵" symbol.
Single line command syntax
Command parameters are usually optional. A command with no parameters is terminated with a new line:
{Command name}↵
If parameters are specified, the command name is followed by a colon, then pairs of parameter names and
values. Each parameter name is terminated with a colon character:
{Command name}: {Parameter}: {Value} {Parameter}: {Value} ...↵
Multiline command syntax
The HyperDeck protocol also supports an equivalent multiline syntax where each parameter-value pair is
entered on a new line. E.g.
{Command name}:↵
{P a r a m e t e r}: { Va lu e}↵
{P a r a m e t e r}: { Va lu e}↵
↵
Response syntax
Simple responses from the server consist of a three digit response code and descriptive text terminated by
a new line:
{Response code} {Response text}↵
If a response carries parameters, the response text is terminated with a colon, and parameter name and
value pairs follow on subsequent lines until a blank line is returned:
{Response code} {Response text}:↵
{P a r a m e t e r}: { Va lu e}↵
{P a r a m e t e r}: { Va lu e}↵
...
↵
Successful response codes
A simple acknowledgement of a command is indicated with a response code of 200:
200 ok↵
Other successful responses carry parameters and are indicated with response codes in the range of 201
to299.
484
Developer Information

Failure response codes
Failure responses to commands are indicated with response codes in the range of 100 to 199:
100 syntax error
101 unsupported parameter
102 invalid value
103 unsupported
104 disk full
105 no disk
106 disk error
107 timeline empty
108 internal error
109 out of range
110 no input
111 remote control disabled
112 clip not found
120 connection rejected
150 invalid state
151 invalid codec
160 invalid format
161 invalid token
162 format not prepared
163 parameterized single line command not supported
Asynchronous response codes
The server may return asynchronous messages at any time. These responses are indicated with response
codes in the range of 500 to 599:
5xx {Response Text}:↵
{P a r a m e t e r}: { Va lu e}↵
{P a r a m e t e r}: { Va lu e}↵
↵
Connection response
On connection, an asynchronous message will be delivered:
500 connection info:↵
protocol version: {Version}↵
model: {Model Name}↵
↵
Connection rejection
Only one client may connect to the server at a time. If other clients attempt to connect concurrently,
they will receive an error and be disconnected:
120 connection rejected↵
485
Developer Information

Timecode syntax
Timecodes are expressed as non-drop-frame timecode in the format:
HH:MM:SS:FF
Handling of deck "remote" state
The “remote” command may be used to enable or disable the remote control of the deck. Any attempt to
change the deck state over ethernet while remote access is disabled will generate an error:
111 remote control disabled↵
To enable or disable remote control:
remote: enable: {“true”, “false”} ↵
The current remote control state may be overridden allowing remote access over ethernet irrespective of
the current remote control state:
remote: override: {“true”, “false”} ↵
The override state is only valid for the currently connected ethernet client and only while the connection
remains open.
The “remote” command may be used to query the remote control state of the deck by specifying no
parameters:
remote↵
The deck will return the current remote control state:
210 remote info:↵
enabled: {“true”, “false”}↵
override: {“true”, “false”}↵
↵
Asynchronous remote control information change notification is disabled by default and may be
configured with the “notify” command. When enabled, changes in remote state will generate a “510 remote
info:”asynchronous message with the same parameters as the “210 remote info:” message.
Closing connection
The "quit" command instructs the server to cleanly shut down the connection:
quit↵
Checking connection status
The "ping" command has no function other than to determine if the server is responding:
ping↵
Getting help
The "help" or "?" commands return human readable help text describing all available commands and
parameters:
help↵
Or:
?↵
The server will respond with a list of all supported commands:
201 help:↵
{Help Te x t}↵
{Help Te x t}↵
↵
486
Developer Information

Switching to preview mode
The "preview" command instructs the deck to switch between preview mode and output mode:
preview: enable: {"true", "false"}↵
Playback will be stopped when the deck is switched to preview mode. Capturing will be stopped when the
deck is switched to output mode.
Controlling device playback
The “play” command instructs the deck to start playing:
play↵
The play command accepts a number of parameters which may be used together in most combinations.
By default, the deck will play all remaining clips on the timeline then stop.
The “single clip” parameter may be used to override this behavior:
play: single clip: {“true”, “false”}↵
By default, the deck will play at normal (100%) speed. An alternate speed may be specified in percentage
between -1600 and 1600:
play: speed: {% normal speed}↵
By default, the deck will stop playing when it reaches to the end of the timeline. The “loop” parameter may
be used to override this behavior:
play: loop: {“true”, “false”}↵
The “playrange” command instructs the deck to play all the clips. To override this behavior: and select a
particular clip:
playrange set: clip id: {Clip ID}↵
To only play a certain timecode range:
playrange set: in: {in timecode} out: {out timecode}↵
To clear a set playrange and return to the default value:
playrange clear↵
The “play on startup command” instructs the deck on what action to take on startup. By default, the deck
will not play. Use the “enable” command to start playback after each power up.
play on startup: enable {“true”, “false”}↵
By default, the unit will play back all clips on startup. Use the “single clip” command to override.
play on startup: single clip: {“true”, “false”}↵
Stopping deck operation
The "stop" command instructs the deck to stop the current playback or capture:
stop↵
487
Developer Information

Changing timeline position
The "goto" command instructs the deck to switch to playback mode and change its position within the
timeline.
To go to the start of a specific clip:
goto: clip id: {Clip ID}↵
To move forward/back {count} clips from the current clip on the current timeline:
goto: clip id: +/-{count}↵
Note that if the resultant clip id goes beyond the first or last clip on timeline, it will be clamp at the first or
last clip.
To go to the start or end of the current clip:
goto: clip: {“start”, “end”}↵
To go to the start of the first clip or the end of the last clip:
goto: timeline: {“start”, “end”}↵
To go to a specified timecode:
goto: timecode: {timecode}↵
To move forward or back a specified duration in timecode:
goto: timecode: {“+”, “-”}{duration in timecode}↵
To specify between slot 1 and slot 2:
goto: slot id: {Slot ID}↵
Note that only one parameter/value pair is allowed for each goto command.
Enumerating supported commands and parameters
The "commands" command returns the supported commands:
commands↵
The command list is returned in a computer readable XML format:
212 commands:
<commands>↵
<command name="…"><parameter name="…"/>…</command>↵
<command name="…"><parameter name="…"/>…</command>↵
…
</commands>↵
↵
More XML tokens and parameters may be added in later releases.
488
Developer Information

Controlling asynchronous notifications
The “notify” command may be used to enable or disable asynchronous notifications from the server.
To enable or disable transport notifications:
notify: transport: {“true”, “false”}↵
To enable or disable slot notifications:
notify: slot: {“true”, “false”}↵
To enable or disable remote notifications:
notify: remote: {“true”, “false”}↵
To enable or disable configuration notifications:
notify: configuration: {“true”, “false”}↵
Multiple parameters may be specified. If no parameters are specified, the server returns the current state of
all notifications:
209 notify:↵
transport: {“true”, “false”}↵
slot: {“true”, “false”}↵
remote: {“true”, “false”}↵
configuration: {“true”, “false”}↵
dropped frames: {“true”, “false”}↵
display timecode: {“true”, “false”}↵
timeline position: {“true”, “false”}↵
playrange: {“true”, “false”}↵
cache: {“true”, “false”}↵
dynamic range: {“true”, “false”}↵
slate: {“true”, “false”}↵
↵
Retrieving device information
The "device info" command returns information about the connected deck device:
device info↵
The server will respond with:
204 device info:↵
protocol version: {Version}↵
model: {Model Name}↵
unique id: {unique alphanumeric identifier}↵
slot count: {number of storage slots}↵
software version: {software version}↵
↵
489
Developer Information

Retrieving slot information
The "slot info" command returns information about a slot. Without parameters, the command returns
information for the currently selected slot:
slot info↵
If a slot id is specified, that slot will be queried:
slot info: slot id: {Slot ID}↵
The server will respond with slot specific information:
202 slot info:↵
slot id: {Slot ID}↵
status: {"empty", "mounting", "error", "mounted"}↵
volume name: {Volume name}↵
recording time: {recording time available in seconds}↵
video format: {disk's default video format}↵
blocked: {“true”, “false”}↵
↵
Asynchronous slot information change notification is disabled by default and may be configured with
the "notify" command. When enabled, changes in slot state will generate a "502 slot info:" asynchronous
message with the same parameters as the "202 slot info:" message.
Retrieving clip information
The “disk list” command returns the information for each playable clip on a given disk. Without parameters,
the command returns information for the current active disk:
disk list↵
If a slot id is specified, the disk in that slot will be queried:
disk list: slot id: {Slot ID}↵
The server responds with the list of all playable clips on the disk in the format of: Index, name, formats, and
duration in timecode:
206 disk list:↵
slot id: {Slot ID}↵
{clip index}: {name} {file format} {video format} {Duration
ti m ecode}↵
{clip index}: {name} {file format} {video format} {Duration
ti m ecode}↵
…
↵
Note that the clip index starts from 1.
Retrieving clip count
The "clips count" command returns the number of clips on the current timeline:
clips count ↵
The server responds with the number of clips:
214 clips count: ↵
clip count: {Count}↵
490
Developer Information

Retrieving timeline information
The "clips get" command returns information for each available clip on the current timeline. Without
parameters, the command returns information for all clips on timeline:
clips get↵
The server responds with a list of clip IDs, names and timecodes:
205 clips info:↵
clip count: {Count}↵
{Clip ID}: {Name} {Start timecode} {Duration timecode}↵
{Clip ID}: {Name} {Start timecode} {Duration timecode}↵
…
↵
Retrieving transport information
The “transport info” command returns the state of the transport:
transport info ↵
The server responds with transport specific information:
208 transport info:
status: {“preview”, “stopped”, “play”, “forward”, “rewind”,
“j o g ”, “ s h u t t l e ”,” r e c o r d ” }↵
speed: {Play speed between -5000 and 5000 %}↵
slot id: {Slot ID or “none”}↵
clip id: {Clip ID or “none”}↵
single clip: {“true”, “false”}↵
display timecode: {timecode}↵
timecode: {timecode}↵
video format: {Video format}↵
loop: {“true”, “false”}↵
timeline: {n}↵
input video format: {Video format”}↵
dynamic range: {“off”, “Rec709”, “Rec2020_SDR”, “HLG”,
“ST2084_300”, “ST2084_500”, “ST2084_800”, “ST2084_1000”,
“ST2084_2000”, “ST2084_4000”, “ST2048” or “none”}↵
↵
The "timecode" value is the timecode within the current timeline for playback or the clip for record. The
"display timecode" is the timecode displayed on the front of the deck. The two timecodes will differ in some
deck modes.
Asynchronous transport information change notification is disabled by default and may be configured
with the "notify" command. When enabled, changes in transport state will generate a "508 transport info:"
asynchronous message with the same parameters as the "208 transport info:" message.
491
Developer Information

Video Formats
The following video formats are currently supported on HyperDeck Studio:
NTSC, PAL, NTSCp, PALp
720p50, 720p5994, 720p60
1080p23976, 1080p24, 1080p25, 1080p2997, 1080p30
1080i50, 1080i5994, 1080i60
HyperDeck Studio Pro and Plus models support these 4k formats:
4Kp23976, 4Kp24, 4Kp25, 4Kp2997, 4Kp30
HyperDeck Studio 4K Pro adds support for the following 4k formats:
4Kp50, 4Kp5994, 4Kp60
Video format support may vary between models and software releases.
File Formats
All HyperDeck models currently support the following file formats:
H.264High_SDI
H.264High
H.264Medium
H.264Low
QuickTimeProResHQ
QuickTimeProRes
QuickTimeProResLT
QuickTimeProResProxy
QuickTimeDNxHD220x
DNxHD220x
QuickTimeDNxHD145
DNxHD145
QuickTimeDNxHD45
DNxHD45
HyperDeck Studio 4K Pro also supports the following file formats:
H.265High_SDI
H.265High
H.265Medium
H.265Low
QuickTimeDNxHR_HQX
DNxHR_HQX 4Kp60
QuickTimeDNxHR_SQ
DNxHR_SQ
QuickTimeDNxHR_LB
DNxHR_LB
Supported file formats may vary between models and software releases.
492
Developer Information

Querying and updating configuration information
The "configuration" command may be used to query the current configuration of the deck:
configuration↵
The server returns the configuration of the deck:
211 configuration:↵
audio input: {“embedded”, “XLR”, “RCA”}↵
audio mapping: {n}↵
video input: {“SDI”, “HDMI”, “component”, “composite”}↵
file format: {format}↵
audio codec: {“PCM”, “AAC”}↵
timecode input: {“external”, “embedded”, “preset”, “clip”}↵
timecode output: {“clip”, “timeline”}↵
timecode preference: {“default”, “dropframe”, “nondropframe”}↵
timecode preset: {timecode}↵
audio input channels: {n}↵
record trigger: {“none”, “recordbit”, “timecoderun”}↵
record prefix: {name}↵
append timestamp: {“true”, “false”}↵
↵
One or more configuration parameters may be specified to change the configuration of the deck.
To change the current video input:
configuration: video input: {“SDI”, “HDMI”, “component”}↵
Valid video inputs may vary between models. To configure the current audio input:
configuration: audio input: {“embedded”, “XLR”, “RCA”}↵
Valid audio inputs may vary between models.
To configure the current file format:
configuration: file format: {File format}↵
Note that changes to the file format may require the deck to reset, which will cause the client connection to
be closed. In such case, response code 213 will be returned (instead of 200) before the client connection is
closed:
“213 deck rebooting”
Asynchronous configuration information change notification is disabled by default and may be configured
with the “notify” command. When enabled, changes in configuration will generate a “511 configuration:”
asynchronous message with the same parameters as the “211 configuration:” message.
Selecting active slot and video format
The "slot select" command instructs the deck to switch to a specified slot, or/and to select a specified
output video format.
To switch to a specified slot:
slot select: slot id: {slot ID}↵
To select the output video format:
slot select: video format: {video format}↵
Either or all slot select parameters may be specified. Note that selecting video format will result in a rescan
of the disk to reconstruct the timeline with all clips of the specified video format.
493
Developer Information

Clearing the current timeline
The "clips clear" command instructs the deck to empty the current timeline:
clips clear↵
The server responds with
200 ok↵
Adding a clip to the current timeline
The "clips add:" command instructs the deck to add a clip to the current timeline:
clips add: name: {"clip name"}↵
The server responds with
200 ok↵
or in case of error
1xx {error description}↵
Configuring the watchdog
The “watchdog” command instructs the deck to monitor the connected client and terminate the connection
if the client is inactive for at least a specified period of time.
To configure the watchdog:
watchdog: period: {period in seconds}↵
To avoid disconnection, the client must send a command to the server at least every {period} seconds. Note
that if the period is set to 0 or less than 0, connection monitoring will be disabled.
494
Developer Information

도움말
지원 받기
가장 빠르게 지원 받을 수 있는 방법은 Blackmagic Design 온라인 고객지원 페이지에 접속하여
Blackmagic HyperDeck 디스크 레코더 관련 최신 지원 정보를 이용하는 것입니다.
Blackmagic Design 온라인 고객 지원 페이지
Blackmagic 고객 지원 센터(www.blackmagicdesign.com/kr/support)에서 최신 사용 설명서와
소프트웨어, 지원 정보를 확인할 수 있습니다.
Blackmagic Design 포럼
저희 웹사이트에 있는 Blackmagic Design 포럼은 유용한 정보를 제공하는 곳으로 방문을 통해 자세한
정보와 창의적인 아이디어를 얻을 수 있습니다. 또한 숙련된 사용자나
Blackmagic Design 직원들이
기존에 제공한 해결책을 통해 원하는 해답을 얻을 수도 있어 빠르게 문제 해결을 통해 제품 사용을 이어갈
수 있습니다.
http://forum.blackmagicdesign.com/kr에서 포럼을 방문할 수 있습니다
Blackmagic Design 고객 지원에 문의하기
고객 지원 페이지에서 원하는 정보를 얻지 못한 경우에는 ‘이메일 보내기’ 버튼을 클릭하여 지원 요청
이메일을 보내주세요. 다른 방법으로는, 고객지원 페이지의 [지역별 고객 지원팀 찾기] 버튼을 클릭하여
가장 가까운
Blackmagic Design 고객지원 사무실에 문의하세요.
현재 설치된 소프트웨어 버전 확인하기
컴퓨터에 설치된 Blackmagic HyperDeck 소프트웨어 버전을 확인하려면 ‘About Blackmagic
HyperDeck Setup’ 창을 엽니다.
Mac OS에서는 응용 프로그램 폴더에서 Blackmagic HyperDeck Setup을 엽니다.
응용 프로그램 메뉴에서 ‘
About Blackmagic HyperDeck Setup’을 선택하면 버전 번호가
나타납니다.
Windows에서는 시작 메뉴 또는 시작 스크린에서 Blackmagic HyperDeck Setup 유틸리티를
실행합니다. ‘도움말’ 메뉴를 클릭한 뒤 ‘
About Blackmagic HyperDeck Setup’를 선택하고
버전을 확인하십시오.
최신 버전 소프트웨어로 업데이트하기
컴퓨터에 설치된 Blackmagic HyperDeck Setup 소프트웨어 버전을 확인한 뒤, Blackmagic 고객
지원 센터(
www.blackmagicdesign.com/kr/support)에 방문하여 최신 업데이트를 확인하세요. 최신
버전으로 업데이트하는 것을 권장하지만, 중요한 프로젝트를 실행하는 도중에는 소프트웨어 업데이트를
하지 않는 것이 좋습니다.
495
도움말

규제 사항
유럽 연합 국가 내의 전기전자제품 폐기물 처리기준
제품에 부착된 기호는 해당 제품을 다른 폐기물과는 별도로 처리되어야 함을 나타냅니다.
제품을 폐기하려면 반드시 재활용 지정 수거 장소에 폐기해야 합니다. 폐기물 제품을 분리수거
및 재활용으로 처리하는 것은 자연 자원을 보전하고 인간의 건강과 환경을 보호할 수 있도록
폐기물을 재활용할 수 있는 방법입니다. 재활용을 위한 제품 폐기물 장소에 관한 자세한 정보는
해당 지역 시청의 재활용 센터 혹은 해당 제품을 구입한 상점으로 문의하십시오.
본 제품은 테스트 결과
FCC 규정 제15항에 따라 A급 디지털 기기 제한 사항을 준수하는 것으로
확인되었습니다. 해당 제한 사항은 본 제품을 상업적 환경에서 사용할 시 발생할 수 있는 유해
혼선으로부터 적절한 보호를 제공하기 위함입니다. 이 제품은 무선 주파수를 생성 및 사용,
방출할 수 있습니다. 따라서 설명서의 안내에 따라 제품을 설치 및 사용하지 않을 시, 무선 통신을
방해하는 전파 혼선을 일으킬 수 있습니다. 해당 제품을 주거 지역에서 사용할 경우, 유해 전파
혼선이 발생할 가능성이 있으며 이 경우, 사용자는 자체 비용으로 전파 혼선 문제를 해결해야
합니다.
제품 작동은 다음 두 가지 조건을 전제로 합니다.
1
본 기기는 유해 혼신을 일으키지 않습니다.
2
본 기기는 원치 않는 동작을 유발할 수 있는 혼신을 포함한 수신 되는 모든 혼신을 수용해야
합니다.
R-R-BMD-20210202002
R
-R-BMD-20210202003
R
-R-BMD-20201201003
R
-R-BMD-20210301001
ISED
캐나다 성명
본 기기는 캐나다 표준 A급 디지털 장치 규정을 준수합니다.
정해진 사용 목적 이외의 다른 목적의 사용 또는 제품 변경은 표준 규정 위반으로 간주할 수
있습니다.
HDMI 인터페이스 연결 시에는 반드시 고품질의 쉴드 HDMI 케이블을 사용해야 합니다.
이 기기는 업무용 환경에서 사용할 목적으로 적합성 평가를 받은 기기로, 가정용 환경에서
사용하는 경우 전파간섭의 우려가 있습니다.
496
규제 사항

안전 정보
감전 예방을 위하여 본 제품은 반드시 보호 접지가 되어있는 메인 콘센트에 연결해야 합니다. 확실하지
않을 경우, 자격증이 있는 전기공에 연락하십시오.
감전 사고 위험을 줄이기 위해서 본 제품을 물이 튀거나 젖는 곳에 두지 마십시오.
본 제품은 주위 온도가 최대
40ºC인 열대 지역에서 사용하기 적합합니다.
공기가 잘 통할 수 있도록 제품을 통풍이 잘되는 곳에 둡니다.
장비랙에 제품을 설치할 시, 주변 장비가 제품 통풍에 방해가 되지 않도록 주의하세요.
제품 내부에는 사용자가 수리 가능한 부품이 없습니다. 제품 수리는 해당 지역
Blackmagic Design
서비스 센터에 문의하세요.
최대 작동 고도는 해수면 기준
2000m입니다.
캘리포니아주 성명
본 제품을 사용하는 사용자는 제품의 플라스틱 내 폴리브롬화 비페닐에 노출될 수 있으며
캘리포니아주에서는 해당 물질이 암, 선천적 결손증, 기타 생식기능의 손상을 유발하는 것으로 알려져
있습니다.
더욱 자세한 정보는
www.P65Warnings.ca.gov를 확인하세요.
공인 서비스 직원을 위한 경고
정비를 진행하기 전에 두 개의 전원 코드를 뽑으세요.
497
안전 정보

보증
12
개월 한정 보증
Blackmagic Design은 본 제품의 부품 및 제조에 어떠한 결함도 없음을 제품 구매일로부터 12개월 동안
보증합니다. 보증 기간 내에 결함이 발견될 경우,
Blackmagic Design은 당사의 결정에 따라 무상 수리 또는
새로운 제품으로 교환해드립니다.
구매 고객은 반드시 보증 기간이 만료되기 전에 결함 사실을
Blackmagic Design에 통지해야 적절한 보증
서비스를 제공받을 수 있습니다. 구매 고객은 지정된
Blackmagic Design 서비스 센터로 결함 제품을 포장
및 운송할 책임이 있으며, 운송 비용은 선불로 지급되어야 합니다. 구매 고객은 또한 이유를 불문하고 제품
반송에 대한 운송료, 보험, 관세, 세금, 기타 비용을 부담해야 합니다.
이 보증은 부적절한 사용, 관리 및 취급으로 인한 파손, 고장, 결함에는 적용되지 않습니다.
Blackmagic
Design
은 다음과 같은 경우에 보증 서비스를 제공할 의무가 없습니다.
a
)
Blackmagic
Design
판매 대리인이
아닌 개인에 의해 발생한 제품 손상. b) 부적절한 사용 및 호환하지 않는 장비와의 연결로 인한 제품 손상.
c) Blackmagic Design사의 부품 및 공급품이 아닌 것을 사용하여 발생한 손상 및 고장. d) 제품 을 개조하거나
다른 제품과 통합하여 제품 작동 시간 증가 및 기능 저하가 발생한 경우. Blackmagic Design에서 제공하는
제품 보증은 다른 모든 명시적 또는 묵시적 보증을 대신합니다.
Blackmagic
Design
과 관련 판매 회사는 상품성
및 특정 목적의 적합성과 관련된 모든 묵시적 보증을 부인합니다. 구매 고객에게 제공되는 BLACKMAGIC
DESIGN의 결함 제품 수리 및 교환 관련 책임은 유일한 배상 수단입니다. BLACKMAGIC DESIGN은 자사
또는 판매 회사에서 관련 위험의 가능성에 대한 사전 통보의 여부와 관계없이 모든 간접적, 특별, 우발적,
결과적 손해에 대해 책임지지 않습니다.
Blackmagic Design은 장비의 불법적 사용과 관련하여 어떤 법적
책임도 지지 않습니다.
Blackmagic Design은 본 제품의 사용으로 인해 발생하는 손해에 대해서는 어떤
법적 책임도 지지 않습니다. 제품 사용으로 인해 발생할 수 있는 위험에 대한 책임은 본인에게 있습니다.
©
Copyright
2021
Blackmagic
Design
. 모든 저작권은
Blackmagic
Design
에게 있습니다. ‘
Blackmagic
Design
’, ‘
DeckLink
’,
‘HDLink’, ‘ Workgroup Videohub’, ‘Multibridge Pro’, ‘Multibridge Extreme’, ‘Intensity’, ‘ Leading the creative video
revolution’은 모두 미국 및 기타 국가에 등록된 상표입니다. 모든 다른 회사명 및 제품 이름은 관련 회사의 등록 상표일 수 있습니다.
498
보증

Дисковые рекордеры HyperDeck
Дисковые рекордеры
HyperDeck
Июль 2021 г.
Руководство по установке и эксплуатации

Уважаемый пользователь!
Благодарим вас за покупку устройства Blackmagic HyperDeck.
Когда мы разрабатывали первые дисковые рекордеры Blackmagic HyperDeck, то стремились
создать доступное для каждого решение, которое позволяет записывать ивоспроизводить
самое качественное видео с помощью портативных SSD-накопителей размером 2,5дюйма.
Сейчас эта линейка пополнилась новыми моделями HyperDeck, допускающими сохранение
материала в форматахHD и UltraHD на SD-карты, SSD-носители и флеш-дискиUSB.
Кустройствам можно даже подключить станцию Blackmagic MultiDock10G, что позволит
записывать и воспроизводить файлы с помощью внешних жестких дисков.
Модели HyperDeck Studio Plus иPro имеют привычные органы управления вещательной
декой, в том числе круглую ручку поиска для выполнения протяжки, перемотки и прокрутки.
Оснащенная механизмом фиксации, она позволяет при воспроизведении клипов интуитивно
находить нужные фрагменты, не отрывая глаз от монитора. На передней панели также есть
гнездо для подключения наушников и динамик, с помощью которых можно быстро проверять
фонограмму непосредственно на рекордере.
Надеемся, что HyperDeck послужит вам много лет и станет важным компонентом
производственной инфраструктуры.
Последнюю версию руководства и обновления ПО для HyperDeck можно найти в разделе
поддержки на веб-сайте www.blackmagicdesign.com/ru. Использование актуальной версии
ПО гарантирует доступ ко всем имеющимся функциям. Чтобы узнавать о выходе обновлений,
зарегистрируйтесь при загрузке ПО. Мы постоянно работаем над совершенствованием наших
продуктов, поэтому ваши отзывы помогут
нам сделать их еще лучше.
Грант Петти
Генеральный директор Blackmagic Design

Содержание
Обзор дисковых
рекордеровHyperDeck 502
Подготовка к работе 503
Подключение питания 503
Подключение источника
видео- и аудиосигнала 503
Проверка звука 504
Подключение накопителей 504
Запись видео 506
Запись на несколько накопителей 506
Воспроизведение 507
Воспроизведение видео на
HyperDeck 507
Круглая ручка поиска 508
Работа с передней панелью 510
Индикаторы слотов 510
Работа с меню на ЖК-дисплее 511
Настройки 512
Задняя панель 524
Применение выхода для
мониторинга 526
Работа с накопителями 529
SD-карта 529
SSD 531
Внешний диск 532
Форматирование накопителя 534
Подготовка накопителя на
компьютере 534
Использование HyperDeck
вкачествевеб-камеры 535
Выбор источника в качестве
веб-камеры 535
Настройка приложения Open
Broadcaster 536
Blackmagic HyperDeck Setup 538
Работа с утилитой HyperDeck Setup 538
Вкладка LUTs 539
Обновление встроенного
программного обеспечения 540
Teranex Mini Rack Shelf 541
Управление по протоколу RS-422 542
Передача файлов по сети 547
Работа с видеомикшером АТЕМ 549
Процедура постобработки 550
Информация для разработчиков 551
Blackmagic HyperDeck
Ethernet Protocol 551
Protocol Commands 551
Protocol Details 555
Помощь 566
Соблюдение нормативных
требований 567
Правила безопасности 568
Гарантия 569
501Blackmagic HyperDeck Studio

Обзор дисковых
рекордеровHyperDeck
Новые модели Blackmagic HyperDeck, входящие в линейку HD- и 4K-рекордеров, легко
подходят для самых разных производственных систем. HyperDeck Studio HDPro и
HyperDeckStudio 4KPro умещаются на одно место в стойке, а также позволяют записывать
и воспроизводить файлы с помощью SD-карт и SSD-накопителей размером 9,5мм.
Компактные рекордеры HyperDeck Studio HDMini и HyperDeck Studio HDPlus можно легко
разместить как на рабочем столе, так и на полке Teranex Mini RackShelf.
Все модели способны вести запись на флеш-дискиUSB и поддерживают HD-видео
до1080p/60, а HyperDeck Studio 4KPro обеспечивает обработку UltraHD в форматах вплоть
до2160p/60.
На всех рекордерах контроль записи и воспроизведения выполняется похожим образом.
Крупные модели имеют дополнительные органы управления и более широкий набор
соединительных разъемов.
Это руководство содержит всю информацию, необходимую для работы с рекордером HyperDeck.
HyperDeck Studio HD Mini HyperDeck Studio HD Plus
HyperDeck Studio HD Pro и HyperDeck Studio 4K Pro
502Обзор дисковых рекордеровHyperDeck

Подготовка к работе
Чтобы начать работу с рекордером HyperDeck Studio, достаточно подключить питание,
подсоединить источники видео и оборудование для получения сигнала, а также установить
SSD-диски или SD-карты.
Подключение питания
Для подачи электроэнергии подключите силовой кабель по стандарту IEC к гнезду на задней
панели рекордера HyperDeck.
Если на вашей модели есть дополнительный силовой вход, его можно подключить к
источнику резервного питания. При сбое на основном источнике энергоснабжения
устройство автоматически начнет использовать резервный.
Кроме того, на всех моделях имеется вход 12В постоянного тока, который позволяет
подключать питание от внешней батареи12В.
К устройству HyperDeck Studio HDMini также можно подсоединить блок питания переменного
тока. При наличии фиксирующего кольца используйте его, чтобы затянуть разъем как можно
плотнее к рекордеру. Это позволит предотвратить случайное отсоединение кабеля.
После подачи питания на ЖК-дисплее будет отображаться таблица со списком доступных
языков. Выберите нужный язык с помощью круглой ручки и нажмите мигающую кнопкуSET.
Откроется начальная страница. Подробнее о начальной странице и меню на ЖК-дисплее
см.раздел «Работа с передней панелью».
Подключение источника видео- и аудиосигнала
Подключите источник сигнала к SDI- или HDMI-входу рекордера, а оборудование для
получения материала— к SDI- или HDMI-выходу. Источником, к примеру, может быть
цифровая кинокамера, а приемником— HDMI-телевизор или SDI-монитор.
Все модели HyperDeck поддерживают HD-видео до 1080p/60. HyperDeck Studio 4KPro имеет
интерфейс 12G-SDI, который позволяет по одному BNC-кабелю принимать и выводить
UltraHD в форматах вплоть до 2160p/60.
503Подготовка к работе

Источник SDI- или HDMI-сигнала можно увидеть на встроенном ЖК-дисплее передней панели.
СОВЕТ. Если видеоисточник на экране не отображается, возможно он подключен к
другому входу. На передней панели нажмите кнопку INPUT, чтобы просмотреть
SDI- или HDMI-источники.
Поскольку аудиодорожка встроена в SDI- и HDMI-сигналы, источник звука подключать не
требуется. Уровни каналов можно отслеживать по индикаторам, расположенным на ЖК-
дисплее рядом с видеоизображением.
Проверка звука
Если на передней панели рекордера HyperDeck есть динамик и гнездо для наушников, с их
помощью можно быстро прослушать имеющуюся фонограмму. Для этого нажмите кнопку
динамика и, удерживая ее, регулируйте громкость поворотом круглой ручки. На начальной
странице ЖК-дисплея появится соответствующий индикатор.
Нажмите кнопку динамика дважды, чтобы он оставался включенным. Для его выключения
проделайте ту же операцию.
Подключение накопителей
Модели HyperDeck Studio поставляются готовыми к работе и не требуют дополнительной
установки настроек. Все, что нужно,— это отформатированный SSD-диск или SD-карта.
Носители легко отформатировать с помощью меню на ЖК-дисплее. Также это можно сделать
на компьютере. Подробнее см.раздел «Форматирование накопителей». Там же приводится
информация о типах носителей, наиболее подходящих для записи видео, а также список
рекомендуемых дисков икарт.
Порядок установки SSD-диска
1 Возьмите SSD-диск (9,5мм) так, чтобы его контакты были обращены вниз. Осторожно
вставьте диск в отсек до упора.
2 HyperDeck Studio выполнит проверку SSD-накопителя. В это время индикатор отсека
будет гореть зеленым цветом. Выключение подсветки говорит о том, что рекордер
готов к записи.
При проверке накопителя индикатор отсека будет гореть зеленым цветом.
Выключение подсветки означает, что рекордер готов к записи
504Подготовка к работе

Чтобы извлечь SSD-диск, возьмите его за края и осторожно вытяните из отсека.
Возьмите SSD-диск так, чтобы его контакты были обращены вниз
и осторожно вставьте в отсек рекордера до упора
Порядок установки SD-карты
1 Возьмите SD-карту так, чтобы позолоченные контакты были обращены к ЖК-дисплею
рекордера, и установите ее в SD-слот. Осторожно надавите на карту, чтобы она
вошла в слот до конца.
2 HyperDeck Studio выполнит проверку SD-карты. В это время индикатор SD-слота
будет гореть зеленым цветом.
Когда индикатор выключится и загорится кнопка остановки,
это будет означать, что рекордер готов к записи
505Подготовка к работе

СОВЕТ. Чтобы вынуть карту, осторожно надавите на нее до щелчка и отпустите.
Край карты выйдет из слота, после чего накопитель можно полностью извлечь.
Рекордер HyperDeck Studio готов к записи и воспроизведению.
Запись видео
Прежде всего убедитесь, что на ЖК-дисплее отображается видео с нужного источника.
После этого можно сразу приступать к записи контента.
Для начала записи нажмите соответствующую кнопку. При сохранении на SD-карту индикатор
слота и кнопка записи будут гореть красным цветом, а кнопка воспроизведения— белым.
Кроме того, на начальной странице ЖК-дисплея также появится значок записи. Во время
сохранения на SSD-диск индикатор его слота также будет гореть красным цветом.
Когда идет запись, на ЖК-дисплее попеременно отображается
номер активного слота и оставшееся время записи
Чтобы прекратить запись, нажмите кнопку STOP. Для воспроизведения нажмите кнопкуPLAY.
СОВЕТ. Чтобы выбрать иной кодек, используйте утилиту Blackmagic HyperDeck
Setup. Подробнее см.раздел «Утилита Blackmagic HyperDeck Setup».
Запись на несколько накопителей
Когда носитель почти полностью заполнен и остается менее трех минут записи на SD-карту
или SSD-диск, счетчик тайм-кода на ЖК-дисплее начинает гореть красным цветом, а кнопка
остановки мигает с большими интервалами.
Это также говорит о том, что на рекордере нет другого накопителя со свободным местом.
Чтобы продолжить запись, необходимо вставить новый носитель. После установки диска в
неиспользуемый слот или подключения его ко входу EXTDISK кнопка перестанет мигать,
а счетчик тайм-кода снова станет белым. Это означает, что рекордер проверил диск на
наличие свободного места и запись будет продолжена.
506Запись видео

Когда к модели HyperDeck Studio подключено несколько накопителей, при заполнении
одного из них сохранение автоматически выполняется на другом. Это будет показано в
правом верхнем углу начальной страницы.
Замена дисков во время записи
Если необходимо заменить диск во время работы, нажмите и удерживайте кнопку записи.
В этом случае сохранение продолжится на следующем диске, который должен иметь
достаточно свободного места. При извлечении носителя запись не останавливается, поэтому
создаваемые программы не будут иметь пауз и пропущенных фрагментов. Подобная функция
позволяет получать целостный материал даже в тех случаях, когда оператору необходимо
перейти на новое место, например при освещении массовых мероприятий.
Если во время сохранения мигает кнопка записи, значит есть нарушения в функционировании
накопителя, что иногда приводит к пропуску кадров. Это может происходить при записи
контента в Ultra HD на недостаточно быстрые носители. К примеру, в отличие от формата
ProRes Proxy для сохранения в 2160p/30 ProRes HQ требуется более высокая скорость
передачи данных, поэтому для него нужно использовать самые скоростные SD-карты и
SSD-диски. Список рекомендуемых носителей приведен в разделе «Работа с накопителями».
Воспроизведение
На рекордере предусмотрены такие же органы управления воспроизведением, как на
обычных вещательных деках: REC, REW, PLAY, FFWD иSTOP. Кнопки SKIP предназначены
для быстрого перехода к предыдущему или следующему клипу.
Воспроизведение видео на HyperDeck
1 Нажмите кнопку воспроизведения один раз для вывода видео на монитор,
подключенный к выходу на HyperDeck.
2 Чтобы перейти к следующему клипу, нажмите соответствующую кнопку на панели
управления.
3 Для перехода к началу текущего клипа нажмите кнопку перехода к предыдущему
клипу один раз, для перехода к началу предыдущего клипа— два раза.
HyperDeck имеет кнопки для воспроизведения, возврата к началу
текущего клипа и перехода к другим клипам
507Воспроизведение

СОВЕТ. Для обеспечения правильного воспроизведения видеофайлов на рекордере
требуется выбрать надлежащий кодек. Это можно сделать с помощью меню на
ЖК-дисплее. Подробнее см.разделы «Работа с меню на ЖК-дисплее» и «Настройки».
Циклическое воспроизведение
Для переключения воспроизведения в циклический режим при просмотре контента на
рекордере следует еще раз нажать кнопку воспроизведения. При этом на ЖК-дисплее
появится соответствующий значок. Предусмотрены два циклических режима.
Клип циклом Повторное воспроизведение текущего клипа.
Все клипы циклом Повторное воспроизведение всех клипов на носителе.
Динамическая подсветка
Во время воспроизведения окантовка отсека горит зеленым цветом. При этом подсветка
движется по кругу, показывая скорость и направление воспроизведения.
СОВЕТ. При использовании SSD-диска мигающая кнопка воспроизведения
указывает на недостаточную скорость накопителя. В этом случае рекомендуем для
записи использовать сжатый формат H.264 либо более скоростной SSD-диск или
внешний носитель для сохранения вUltraHD.
Круглая ручка поиска
Во время воспроизведения ручка поиска позволяет быстро переходить от одного клипа к
другому, а также выбирать отдельные фрагменты и выполнять покадровый просмотр. Это
дает возможность оперативно находить нужный участок визуально или по значению тайм-
кода и устанавливать точку начала проигрывания клипа для вывода его в эфир при
потоковом вещании.
Переключение режимов поиска выполняется нажатием круглой ручки
508Воспроизведение

На данном устройстве доступны режимы протяжки, перемотки и прокрутки.
Протяжка Воспроизведение клипа вперед или назад на покадровом уровне.
Перемотка Более быстрое воспроизведение вперед или назад.
Скорость зависит от амплитуды поворота ручки.
Прокрутка Еще более скоростное воспроизведение, зависящее от амплитуды
поворота ручки. Данный режим применяют для быстрого
перемещения по длинному клипу при поиске конкретного фрагмента.
На более крупных моделях для переключения режимов предусмотрены специальные
кнопки, а круглая ручка имеет встроенный механизм фиксации. Он позволяет намного
точнее перемещаться по клипу при мониторинге видео на телевизоре или дисплее.
Для выбора режимов протяжки, перемотки и прокрутки
используют соответственно кнопки JOG, STL иSCR
СОВЕТ. Чтобы вернуться в обычный режим воспроизведения, нажмите кнопку PLAY
или STOP.
509Воспроизведение

Работа с передней панелью
Благодаря светодиодным индикаторам слота и встроенному ЖК-дисплею при записи и
воспроизведении материала с помощью HyperDeck всю необходимую информацию можно
увидеть на самой деке.
Начальная страница на HyperDeck Studio
Оставшееся время и индикатор накопителя.
При записи здесь попеременно появляется
оставшееся время и используемый в данный
момент накопитель. При воспроизведении
отображается значок активного носителя.
Индикатор формата. Показывает формат входящего
сигнала или воспроизводимого файла. На некоторых
моделях HyperDeck Studio при нажатии кнопки INPUT
здесь также отображается источник сигнала, а при
регулировке громкости динамика и наушников с
помощью кнопки на передней панели и круглой
ручки появляется обозначение уровня звука.
Индикатор состояния. Показывает
текущее состояние деки, в том
числе режим воспроизведения.
Индикация звука. Показывает
уровень аудиосигнала источника
или воспроизводимого файла.
Индикаторы слотов
При включении HyperDeck и при каждой установке накопителя индикатор слота загорается
зеленым цветом, а после проверки SSD-диска или SD-карты гаснет. Если носитель
неправильно отформатирован или не работает, этот индикатор будет гореть оранжевым
цветом до извлечения носителя из слота. Убедитесь в том, что накопитель правильно
отформатирован и поддерживает работу с компьютером.
При записи индикатор слота горит красным, во время воспроизведения— зеленым
510Работа с передней панелью

Работа с меню на ЖК-дисплее
Чтобы открыть настройки меню, нажмите кнопку MENU на передней панели.
Для навигации по опциям меню используйте круглую ручку поиска или кнопки SKIP,
а для выбора подменю нажмитеSET.
Перемещаться по настройкам можно с помощью круглой ручки
Для использования выбранной опции нажмите кнопкуSET.
Регулировку настроек выполняют с помощью круглой ручки или кнопок SKIP, а для
подтверждения следует нажать кнопкуSET.
Чтобы вернуться на один шаг назад вплоть до начальной страницы, используют кнопкуMENU.
511Работа с передней панелью
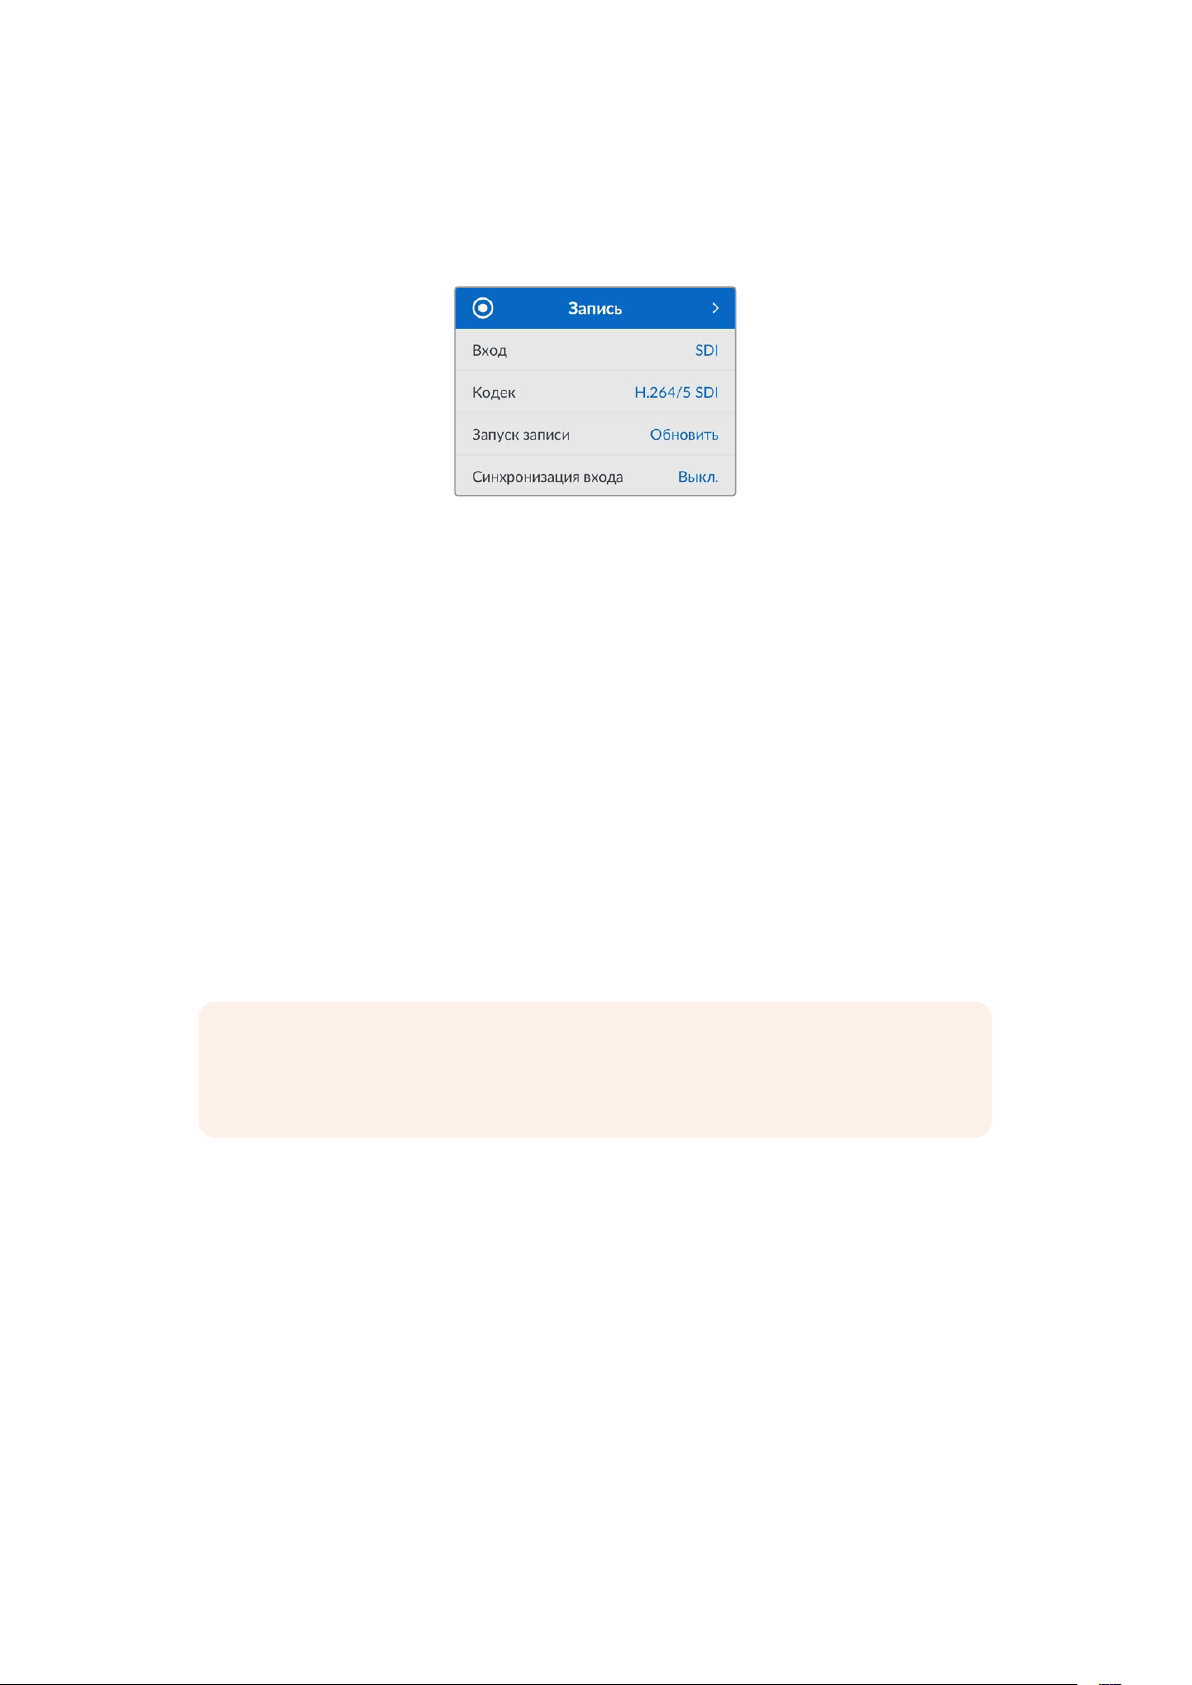
Настройки
Меню «Запись»
Вход
Данную настройку используют для выбора SDI- или HDMI-источника. Эту же операцию можно
выполнить нажатием кнопки INPUT на передней панели.
Кодек
Все модели HyperDeck Studio позволяют записывать видео с компрессией, для чего
используются кодеки H.264, Apple ProRes иDNxHD. При сохранении 4K-материала на
рекордерах HyperDeck Studio 4KPro можно также применять кодеки H.265 иDNxHR.
Запуск записи
Для этой настройки доступны две опции: «Начало/остановка видео» и «По тайм-коду».
Некоторые камеры (например, URSA Mini) используют SDI-интерфейс для передачи сигнала о
запуске и остановке записи на внешних рекордерах. При выборе данной опции сохранение
на HyperDeck будет начинаться и прекращаться при соответствующем нажатии кнопки записи
на камере.
При выборе второй опции запись на рекордере будет начинаться при поступлении на вход
действительного тайм-кода. В отсутствие сигнала сохранение остановится. Для отключения
данной настройки нужно выбрать «Нет».
ПРИМЕЧАНИЕ. При записи с HDMI- или SDI-камеры убедитесь в том, что
используется чистый сигнал, так как в противном случае вместе с изображением
будут записаны выводимые параметры.
Синхронизация входа
Эта настройка позволит синхронизировать видео с внешним опорным сигналом перед
началом записи. Благодаря этому выводимое изображение будет привязано к
подключенному источнику даже во время сохранения материала. Данная функция
используется для раздельной записи потоков, когда необходимо выполнить синхронизацию
нескольких рекордеров по тайм-коду. Обычно она отключена, поэтому файлы записываются
без добавления или удаления кадров из поступающего видео.
Как правило, все рекордеры могут использовать синхровход для согласования выводимого
видео во время воспроизведения. Это позволяет выполнить привязку изображения,
передаваемого с HyperDeck, ко входному опорному сигналу, поэтому его не нужно повторно
синхронизировать при подключении к профессиональной системе вещания.
Однако при переходе рекордера в режим записи выводимое изображение синхронизируется
с сигналом на входе, так как обычно входящее видео записывается без изменений и
направляется в таком же виде на оборудование, подключенное к видеовыходам HyperDeck.
512Настройки

Рекордеры HyperDeck Studio обладают уникальным функционалом, который значительно
упрощает запись отдельных потоков. Он позволяет полностью поменять этот процесс и
повторно привязать входящее изображение к опорному сигналу. Таким образом, можно
подключить несинхронизированный источник к HyperDeck, и рекордер сначала
синхронизирует видео с опорным сигналом, а затем выполнит запись изображения.
Несинхронизированными источниками могут быть компьютеры, бытовые камеры и любое
другое оборудование, к которому невозможно подключить устройство синхронизации.
Имтакже может являться входящий видеопоток другой студии или вещательной компании.
Такие источники затрудняют запись отдельных файлов, так как для идеального согласования
каждый из потоков должен иметь свой тайм-код. Сигналы, поступающие с подобных
источников, во время записи очень быстро становятся рассинхронизированными. Из-за этого
монтаж многокамерного материала часто превращается в сложный и трудоемкий процесс.
При включенной настройке синхронизация изображения в случае его отставания или
опережения будет выполняться за счет добавления или удаления отдельных кадров. Данный
процесс обработки входящих данных называется повторной синхронизацией. Таким образом,
тайм-код в клипах, записываемых на всех рекордерах, будет идеально совпадать, что
значительно упрощает монтаж многокамерного материала.
Недостатком данной функции является необходимость добавления или удаления некоторых
кадров перед началом записи. Именно поэтому ее лучше использовать только тогда, когда
кбытовому оборудованию невозможно подключить дополнительное устройство
синхронизации.
Тем не менее в некоторых случаях функция повторной синхронизации входных данных очень
удобна. Когда она включена, видеовыход на HyperDeck будет привязан к опорному сигналу
даже в режиме записи. Таким образом, камеру можно подключить к SDI-выходу рекордера
для того, чтобы синхронизировать сигнал через обратный программный поток. Например,
модель Blackmagic Studio 4K Pro может служить источником опорного сигнала для внешнего
источника видео. В этом случае сигнал с камеры будет использоваться рекордером в
качестве опорного, и необходимость в повторной синхронизации, а также в добавлении и
удалении отдельных кадров не возникнет.
Это происходит только тогда, когда видеовход и рекордер не привязаны к одному и тому же
опорному сигналу. Однако в этом случае выход на HyperDeck является источником опорного
сигнала для камеры, и рекордер синхронизируется с собственным видеовходом. В случае
соединения нескольких рекордеров через интерфейс опорного сигнала, все устройства
будут синхронизированы между собой. Таким образом, если один из рекордеров в цепи
будет подключен к несинхронизированному источнику (например, компьютеру), повторная
синхронизация будет выполнена только для соответствующего видеовхода.
Синхронизация выполняется автоматически, требуется всего лишь подключить источники.
Данная функция очень мощная, но следует хорошо понимать, когда ее нужно применять
икак она работает. Чтобы лучше в этом разобраться, попробуйте поэкспериментировать с
несколькими рекордерами HyperDeck и приложением для монтажа многокамерного контента.
С таким инструментом производство программ становится гораздо быстрее.
513Настройки

Меню «Мониторинг»
Данное меню предусмотрено на моделях HyperDeck Studio, у которых на задней панели есть
разъем MONITOROUT.
Чистый сигнал
При активировании данной настройки служебная информация не будет выводиться на
дисплеи, подключенные к разъему MONITOROUT модели HyperDeckStudio. Подробнее о
функции выхода для мониторинга см.раздел «Выход для мониторинга» ниже.
3D LUT
LUT-таблицы особенно полезны в тех случаях, когда запись на рекордер HyperDeckStudio
ведут в мобильных условиях. При использовании динамического режима «Фильм» получают
малоконтрастное изображение. Таблицы определяют значения цвета и яркости при выводе
видео на дисплей, поэтому с их помощью можно увидеть, как будет выглядеть материал
после грейдинга.
LUT-таблицы выбирают с помощью утилиты Blackmagic HyperDeck Setup, а контент с их
параметрами можно выводить через SDI-выход MONITOROUT.
Порядок включения и выключения 3D LUT-таблицы
1 Нажмите кнопку MENU и с помощью круглой ручки перейдите к меню «Мониторинг».
2 Нажмите кнопку SET.
3 С помощью круглой ручки перейдите к настройке 3DLUT.
4 Для включения и выключения LUT-таблицы используйте кнопкуSET.
Подробнее о выборе LUT-таблицы см.раздел «Утилита Blackmagic HyperDeck Setup» ниже.
СОВЕТ. Подробнее о выводе изображения на отдельный дисплей см.раздел
«Выход для мониторинга» ниже.
514Настройки
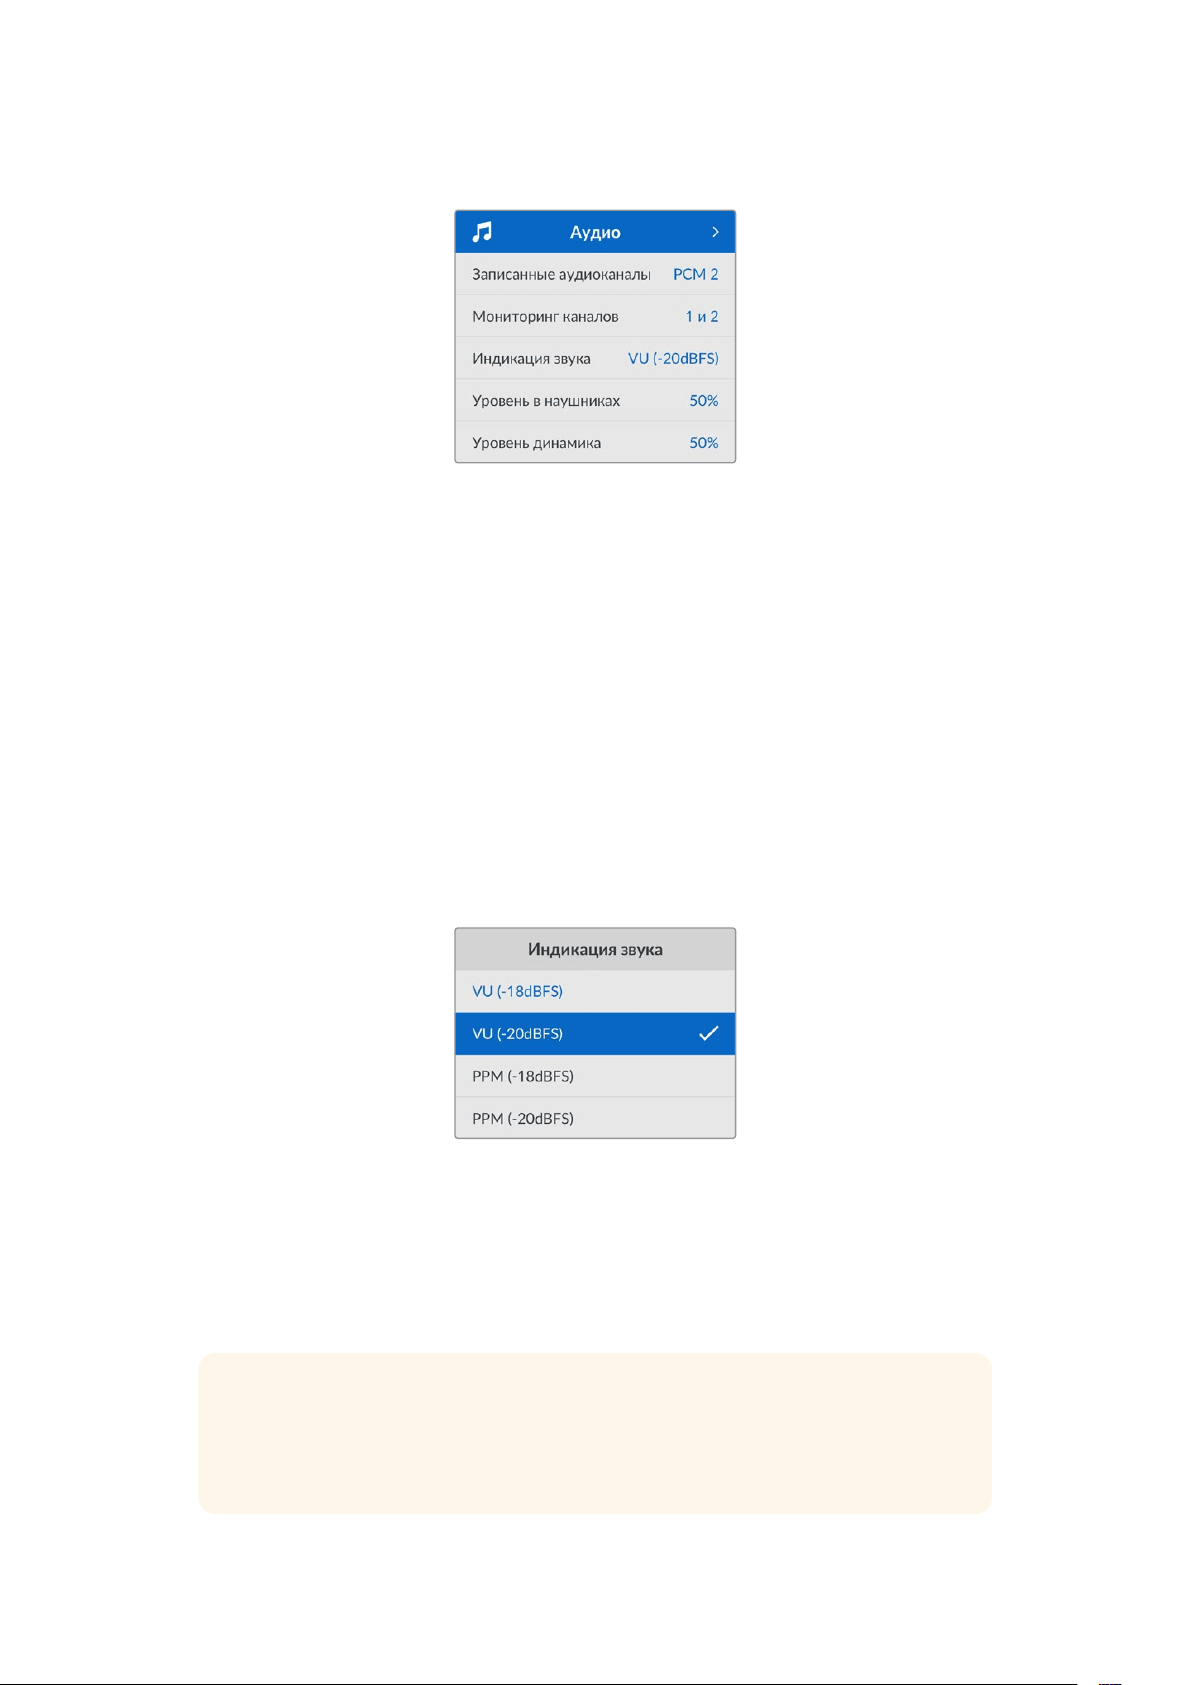
Меню «Аудио»
Записанные аудиоканалы
HyperDeck Studio позволяет одновременно записывать до 16каналов звукаPCM. Чтобы задать
количество каналов записи, откройте список данной настройки и выберите значение2, 4, 8
или16. Если используется кодек H.264 или H.265, можно также выбрать два канала AAC-аудио,
что позволит напрямую выгружать записанный материал на платформуYouTube. Кроме того,
эта настройка определяет количество каналов, выводимых через выход для мониторинга.
Мониторинг каналов
При записи более двух каналов можно выбирать, какие из них будут отображаться на
ЖК-дисплее передней панели. Для этого используют настройку «Мониторинг каналов».
На моделях HyperDeck Studio, имеющих на передней панели динамик и гнездо для
наушников, каналы для них также задают в данной секции.
Индикация звука
На аппаратный ЖК-дисплей также выводятся индикаторы встроенных аудиоканалов.
Громкость можно отображать с помощью шкалы PPM илиVU. Чтобы поменять ее тип,
откройте данную настройку и выберите желаемый параметр.
Уровень в наушниках
На моделях, имеющих на передней панели гнездо для наушников, данную настройку
используют для регулировки их громкости.
Уровень динамика
Громкость динамика регулируют с помощью круглой ручки. По умолчанию используется
значение50%.
СОВЕТ. Громкость наушников и динамика также можно корректировать с помощью
органов управления, расположенных непосредственно на передней панели. Нажмите
кнопку динамика и, удерживая ее, регулируйте уровень поворотом круглой ручки.
Громкость будет отображаться в верхней центральной части передней панели.
515Настройки
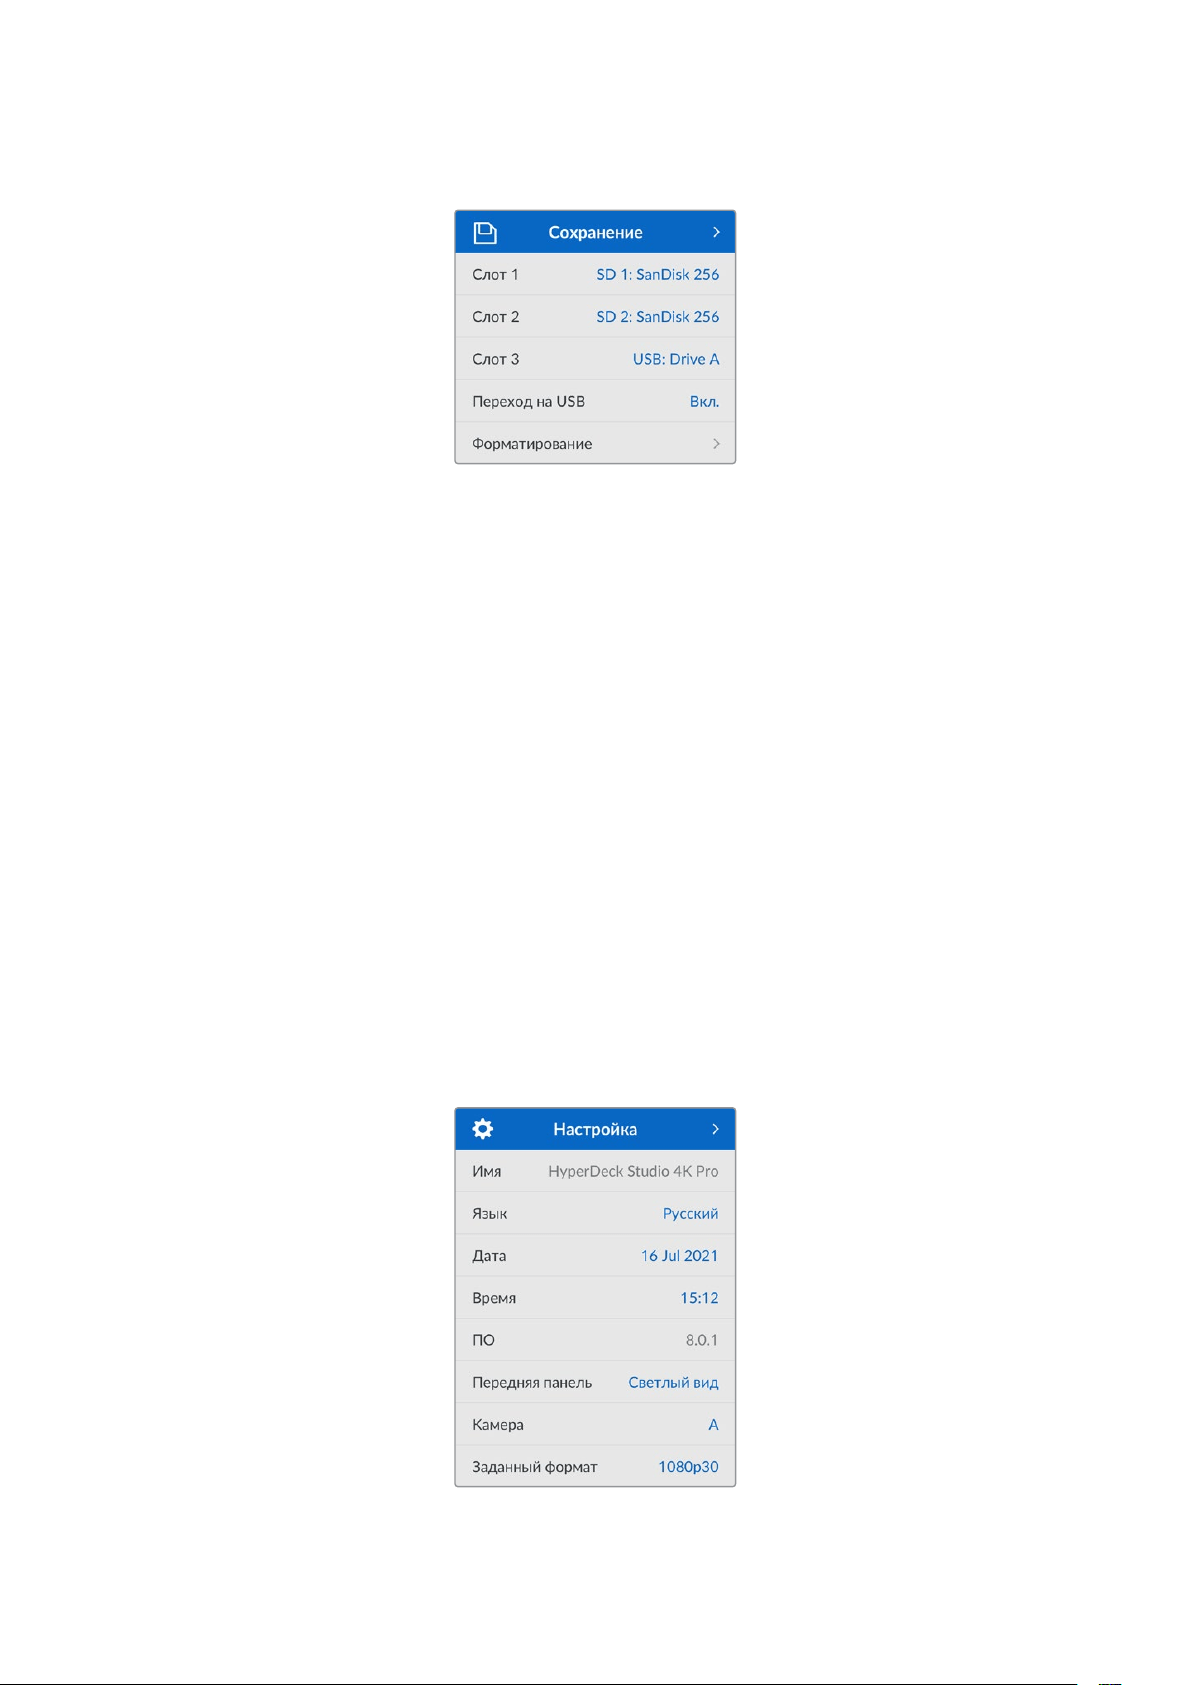
Меню «Сохранение»
Форматирование
SD-карты, SSD-диски и накопители, подключенные к заднему разъему EXTDISK, можно
отформатировать на рекордере или на компьютере с операционной системой Mac илиWindows.
Подготовка накопителя на HyperDeck Studio
1 Перейдите к настройке «Форматирование» поворотом круглой ручки и выберите ее
с помощью кнопкиSET.
2 Из списка выберите накопитель для форматирования и нажмитеSET.
3 Укажите желаемый формат и нажмитеSET.
4 Появится подтверждение, содержащее имя карты и заданный формат. Выберите
«Форматировать».
5 После завершения процедуры появится окно форматирования. Выберите«ОК».
Формат HFS+, также известный как Mac OSX Extended, является предпочтительным, так как он
поддерживает протоколирование. В этом случае при повреждении носителя содержащиеся
на нем данные будет проще восстановить. Формат HFS+ совместим с операционной системой
Mac, а exFAT можно использовать на платформах Mac и Windows без дополнительного
программного обеспечения, однако он не предусматривает протоколирования.
Инструкции по форматированию накопителей в ОС Mac и Windows приведены в разделе
«Форматирование накопителей».
Меню «Настройка»
516Настройки

Имя
Когда к сети подключено несколько рекордеров HyperDeck Studio, им следует присвоить
отдельные имена. Это можно использовать утилиту Blackmagic HyperDeck Setup или
Blackmagic HyperDeck EthernetProtocol.
Язык
HyperDeck Studio имеет пользовательский интерфейс на 13основных языках, включая
английский, китайский, японский, корейский, испанский, немецкий, французский, русский,
итальянский, португальский, турецкий, украинский и польский.
Выбор языка
1 Выберите меню «Настройка» и нажмитеSET.
2 Перейдите к опции «Язык» поворотом круглой ручки и нажмитеSET.
3 Выберите нужный язык с помощью круглой ручки и нажмитеSET. На экране снова
появится основное меню «Настройка».
Дата
Чтобы изменить дату, выберите соответствующий параметр и нажмитеSET. С помощью
круглой ручки установите день, месяц и год. Эти данные будут добавлены к имени файла в
виде временных меток.
Время
Чтобы изменить время, выберите соответствующий параметр и нажмитеSET. С помощью круглой
ручки установите часы и минуты. На моделях HyperDeck Studio используется 24-часовой формат.
ПО
Отображает текущую версию программного обеспечения.
Передняя панель
Чтобы ЖК-дисплей на передней панели имел высокую яркость, выберите режим
«Светлыйвид». Для помещений со слабым освещением, например производственных студий,
в которых применяют несколько рекордеров, лучше подходит «Темныйвид», поскольку яркие
экраны могут отвлекать.
517Настройки

Камера
Данную настройку используют при записи многоракурсного контента в виде отдельных файлов,
которые затем редактируют на специальной временной шкале в приложении DaVinciResolve.
В метаданных файлов каждая из камер будет иметь свое обозначение, что позволит легко
определить все доступные ракурсы с помощью синхроящика.
Для наименования камер можно
использовать знаки A-Z или 1-9
Заданный формат
Иногда HyperDeck Studio не в состоянии определить, какой видеоформат следует
использовать. Данная настройка поможет рекордеру выбрать формат, применяемый
чаще всего.
В качестве примера возьмем ситуацию, когда при включении HyperDeck Studio к нему не
подключен источник видео, а на вставленном диске записаны файлы двух форматов. Какой
из них следует рекордеру воспроизвести? В данном случае устройство будет использовать
формат, заданный по умолчанию.
Эта функция также применяется, когда при включении рекордера к нему не подсоединен
источник видео и не вставлен диск. В данном случае для вывода сигнала мониторинга
HyperDeck Studio использует формат по умолчанию.
Заданный по умолчанию формат тем не менее является всего лишь рекомендуемым, а не
обязательным. Если на диске содержатся файлы только одного типа, при воспроизведении
HyperDeck Studio переключится на их формат. Рекордер не будет использовать формат по
умолчанию, так как в данном случае выбор очевиден.
То же происходит и во время сохранения контента. Используемый при записи формат
соответствует формату поступающего видеосигнала. Он будет применяться рекордером при
воспроизведении этого материала, даже если на диске есть другие файлы, которые имеют
формат, заданный по умолчанию. Предполагается, что при записи и воспроизведении
форматы должны быть одинаковыми. Если диск извлечь, а затем снова вставить, только тогда
для проигрывания HyperDeck Studio переключится на формат по умолчанию.
Заданный по умолчанию формат является всего лишь рекомендуемым, а не обязательным,
ипредназначен только для тех случаев, когда автоматический выбор затруднен.
518Настройки

Сетевые параметры
Протокол
В поставляемых рекордерах Blackmagic HyperDeck по умолчанию используется
протоколDHCP. При подключении устройства к сети сервер автоматически присвоит ему
IP-адрес. Выполнять дополнительную настройку не потребуется. Чтобы внести адрес
вручную, следует выбрать «Статический IP-адрес».
Выделите настройку «Протокол» и нажмите мигающую кнопкуSET. Перейдите к параметру
«Статический IP-адрес» и нажмитеSET.
IP-адрес, маска подсети и шлюз
Когда выбран «Статический IP-адрес», сетевые настройки можно задавать вручную.
Порядок изменения IP-адреса
1 Выделите настройку «IP-адрес» с помощью круглой ручки и нажмите мигающую
кнопкуSET на передней панели рекордера.
2 Внесите изменения в IP-адрес поворотом круглой ручки. Для подтверждения
значения одного сегмента и перехода к следующему нажмите кнопкуSET.
3 Чтобы подтвердить изменение и перейти к следующему значению, нажмитеSET.
После ввода IP-адреса выполните те же операции для настройки маски подсети и шлюза.
После завершения установки параметров нажмите мигающую кнопкуMENU, чтобы
вернуться к начальной странице.
519Настройки
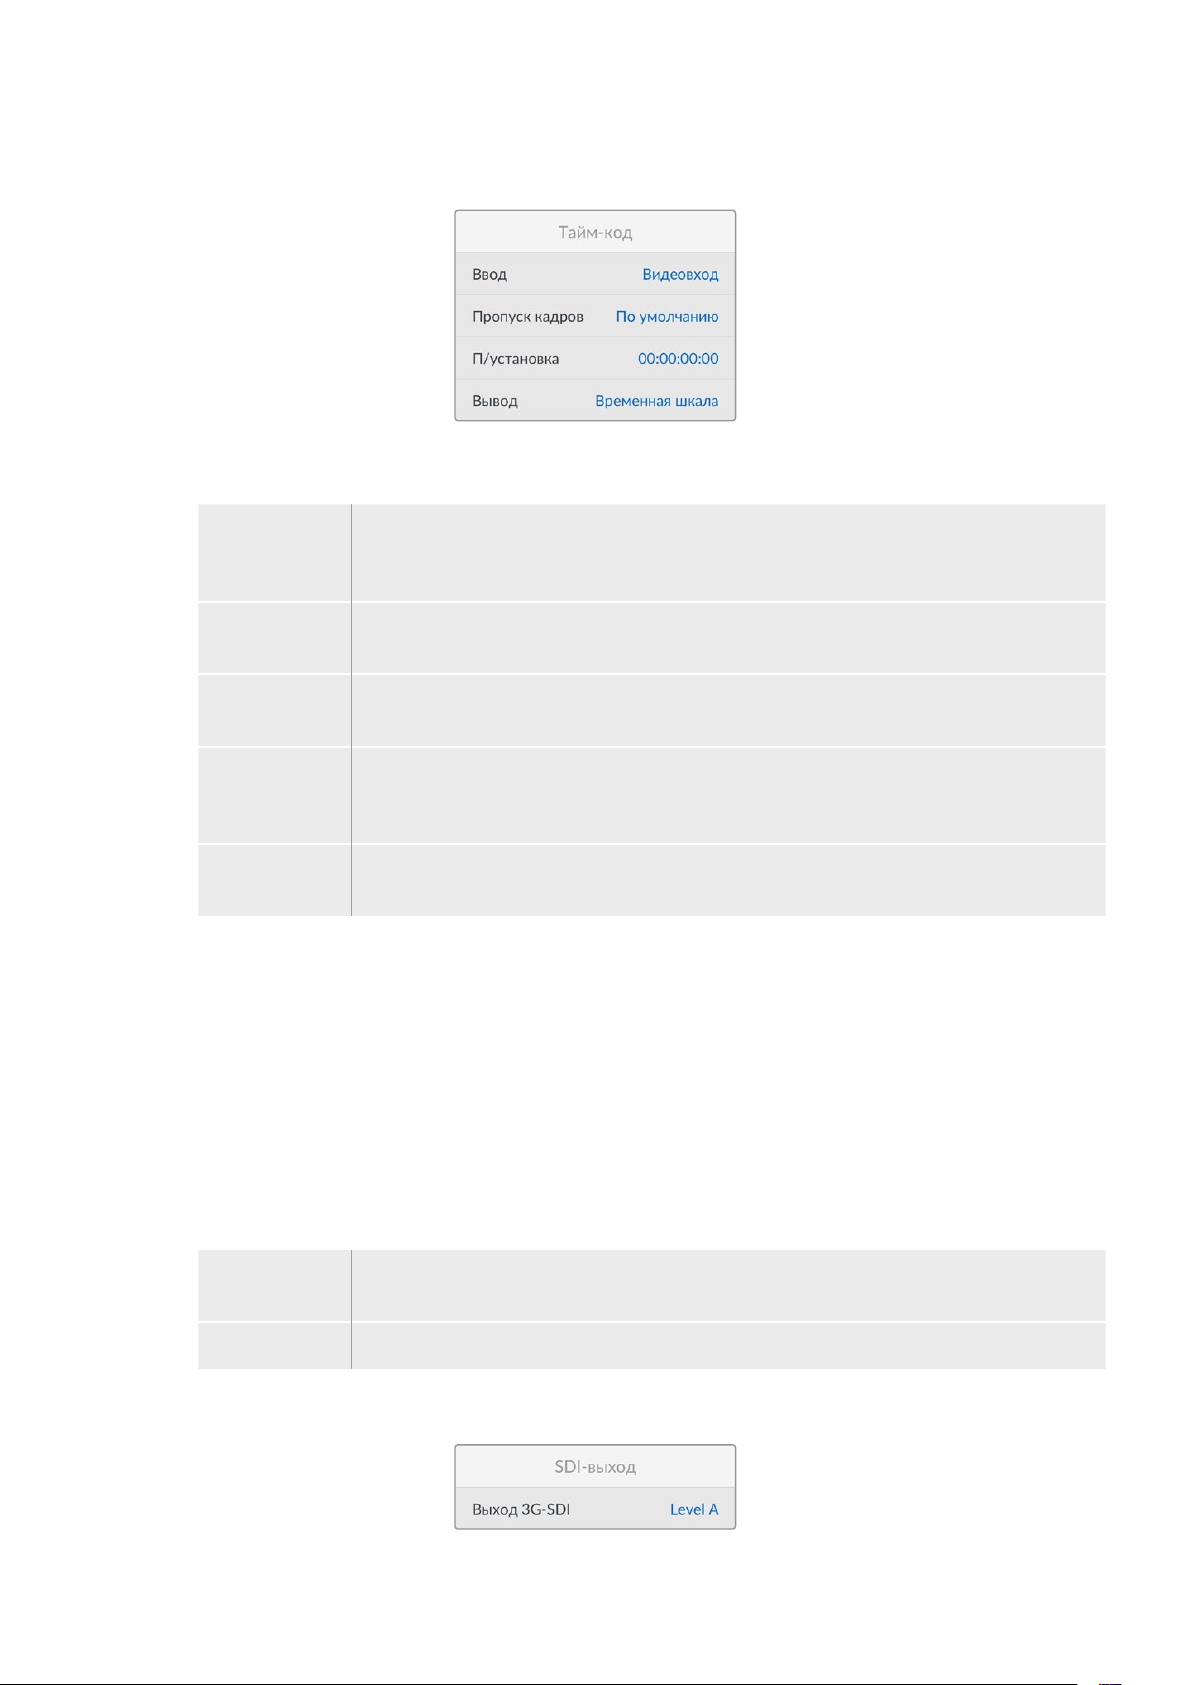
Настройки тайм-кода
Ввод
При записи доступны пять опций использования тайм-кода.
Видеовход Эта опция позволяет использовать встроенный тайм-код из SDI- и HDMI-источников
с метаданными SMPTE RP188. Она обеспечивает синхронизацию SDI- или HDMI-сигнала
с файлом, сохраняемым на HyperDeckStudio.
Внешний Данную опцию выбирают в тех случаях, когда тайм-код поступает через разъем на
задней панели.
Внутренний Эту опцию используют для записи времени суток, получаемого от встроенного
генератора тайм-кода.
Возобновление При выборе этой опции тайм-код каждого последующего файла будет продолжаться
с того значения, на котором закончился предыдущий клип. Например, если первый клип
остановился на 10:28:30:10, то второй начнется с 10:28:30:11.
Предустановка Для ввода тайм-кода вручную выберите опцию «П/установка». Запись контента
начнется по тайм-коду, который установлен в упомянутой ниже секции «П/установка».
Пропуск кадров
При работе с видео в NTSC на частоте 29,97 или 59,94fps можно использовать опцию
«Спропуском кадров» или «Без пропуска кадров». Если параметры источника неизвестны,
выберите «По умолчанию». В этом случае сохраняется формат входящего сигнала, а при
отсутствии действительного тайм-кода выполняется пропуск кадров.
Предустановка
Чтобы ввести тайм-код вручную, нажмите кнопкуSET, установите значение с помощью круглой
ручки и снова нажмитеSET. Убедитесь, что в меню «Ввод» выбрана опция «П/установка».
Вывод
Эта настройка задает вывод тайм-кода.
Временная
шкала
Данная настройка позволяет выводить непрерывный тайм-код для всех клипов,
записываемых на карту или диск.
Клип При выборе этой опции выводится тайм-код каждого отдельного клипа.
SDI-выход
520Настройки
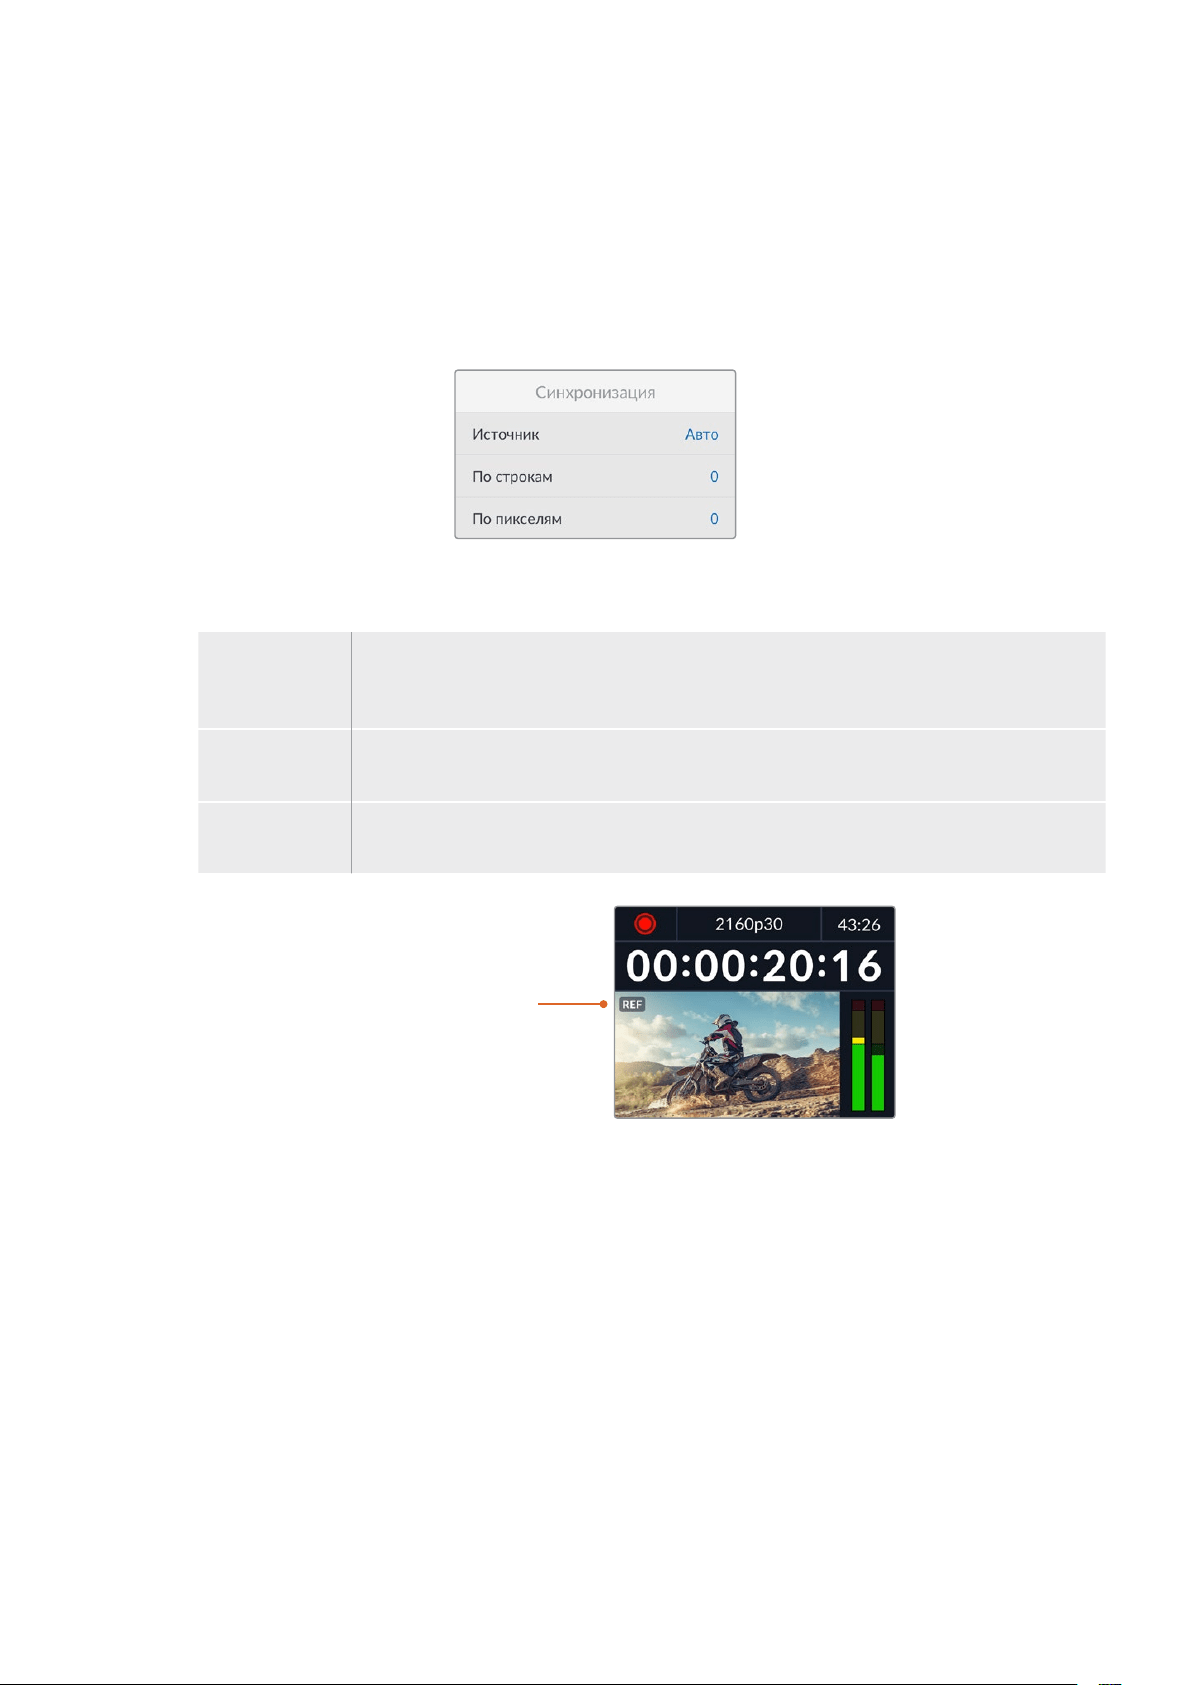
Выход 3G-SDI
При использовании интерфейса 3G-SDI некоторое вещательное оборудование поддерживает
только один уровень— LevelA или LevelB.
Чтобы обеспечить совместимость с разной техникой, для прямого стриминга через выход
3G-SDI выбирайте LevelA, а для мультиплексной двухпотоковой трансляции— LevelB.
Настройки синхронизации
Источник
Эта настройка имеет три опции.
Авто В этом режиме по умолчанию используется внешний источник синхронизации, если
он подключен к разъему REFIN на задней панели. При его отсутствии синхронизация
выполняется по сигналу устройства, подсоединенного ко входу SDI илиHDMI.
Вход Данная настройка позволяет выполнить синхронизацию по SDI- или HDMI-источнику.
Им может быть аналоговая дека с подключенным синхрогенератором.
Внешний Эта опция позволяет использовать внешнее устройство синхронизации (например,
Blackmagic Sync Generator), подключенное через разъем REFIN на задней панели.
Индикатор внешнего
синхросигнала.
Когда рекордер HyperDeck
Studio подключен ко внешнему
источнику синхросигнала,
на встроенном ЖК-дисплее
отображается REF.
Корректировка синхронизации
При архивировании материала, записанного на аналоговую ленточную деку, может
понадобиться корректировка синхронизации кадров. Подобная операция выполняется на
уровне составных элементов изображения, что обеспечивает точную синхронизацию
входящих и исходящих сигналов.
Порядок корректировки синхронизации
1 Войдите в меню настройки, выберите опцию «По строкам» с помощью круглой ручки
и нажмите мигающую кнопкуSET.
2 Для увеличения значения поверните круглую ручку по часовой стрелке, для
уменьшения— против часовой стрелки.
3 Чтобы подтвердить выбор, нажмите мигающую кнопкуSET.
4 Для корректировки синхронизации на уровне пикселей нажмите мигающую
кнопкуMENU. Вернувшись в меню настройки, выберите опцию «По пикселям» и
повторите упомянутые выше шаги.
521Настройки

Настройки файла
Индекс с метками
По умолчанию для индекса с метками времени выбран параметр «Выкл.». Чтобы данная
информация добавлялась в имя файла, нажмите кнопкуSET и с помощью круглой ручки
выберите опцию «Вкл.».
HyperDeck_2105061438_0001
HyperDeck_2105061438_0001 Имя файла
HyperDeck_2105061438_0001 Год
HyperDeck_2105061438_0001 Месяц
HyperDeck_2105061438_0001 День
HyperDeck_2105061438_0001 Часы
HyperDeck_2105061438_0001 Минуты
HyperDeck_2105061438_0001 Номер клипа
Игнорировать HDR-формат
HyperDeck Studio 4K Pro автоматически обнаруживает встроенные в 4K-видеосигнал (или
файл) HDR-метаданные и выводит их на дисплей через HDMI-выход. Если теги используются
неправильно или дисплей несовместим с форматомHDR, можно задать другую настройку.
Для этого следует выбрать режим SDR, например опцию Rec.2020 SDR.
Ниже приведены доступные опции для воспроизведения и записи вHDR.
Авто
Настройка по умолчанию, которая служит для автоматического выбора стандарта на
HyperDeck в соответствии с метаданными клипа.
Rec.709
Применяется для HD-видео в режиме SDR.
Rec.2020 SDR
Используется для Ultra HD-видео в режиме SDR.
HLG
Воспроизведение HDR-видео на телевизорах и мониторах с поддержкой HDR-форматов
вплоть до Rec.2020 SDR.
522Настройки

Перечисленные ниже настройки поддерживают цветопередачу по стандартам Rec.2020 иPQ
(SMPTEST2084). Последний является разновидностью HDR и позволяет выводить более
яркие изображения. Яркость измеряется в канделах на квадратный метр, где 1000кд/м
2
означает максимальное значение для соответствующего формата.
ST2084 (300)
Яркость 300 кд/м
2
.
ST2084 (500)
Яркость 500 кд/м
2
.
ST2084 (800)
Яркость 800 кд/м
2
.
ST2084 (1000)
Яркость 1000 кд/м
2
.
ST2084 (2000)
Яркость 2000 кд/м
2
.
ST2084 (4000)
Яркость 4000 кд/м
2
.
Дистанционное управление
ДУ
Чтобы включить дистанционное управление по протоколу RS-422, необходимо активировать
параметр«ДУ». Это позволит контролировать рекордер с помощью другого устройства,
например блока HyperDeck ExtremeControl. При выборе данного режима на некоторых
моделях HyperDeck загорается специальная кнопка. Чтобы перейти к обычному способу
управления, функцию «ДУ» следует выключить.
Управление декой
Если функция «ДУ» включена, управление одной моделью HyperDeck можно дублировать
надругих рекордерах. Для этого соедините их последовательно, то есть подключите выход
REMOTE OUT ведущего рекордера HyperDeck ко входу REMOTE IN второго устройства, его
подключите к следующему, и т. д. Когда на всех дополнительных устройствах включена
настройка «ДУ», их легко контролировать с помощью основного рекордера.
Например, при активировании записи на ведущей модели она одновременно начнется на
всех подключенных рекордерах.
Следует отметить, что модель HyperDeck Studio HD Mini нельзя использовать в качестве
ведущей, но ею можно управлять с помощью рекордеров линейки HyperDeck Pro и Plus.
Сброс
Сброс до заводских настроек
Чтобы восстановить первоначальные параметры, выберите «Сброс до заводских настроек».
После нажатия кнопкиSET появится сообщение с просьбой подтвердить действие.
523Настройки
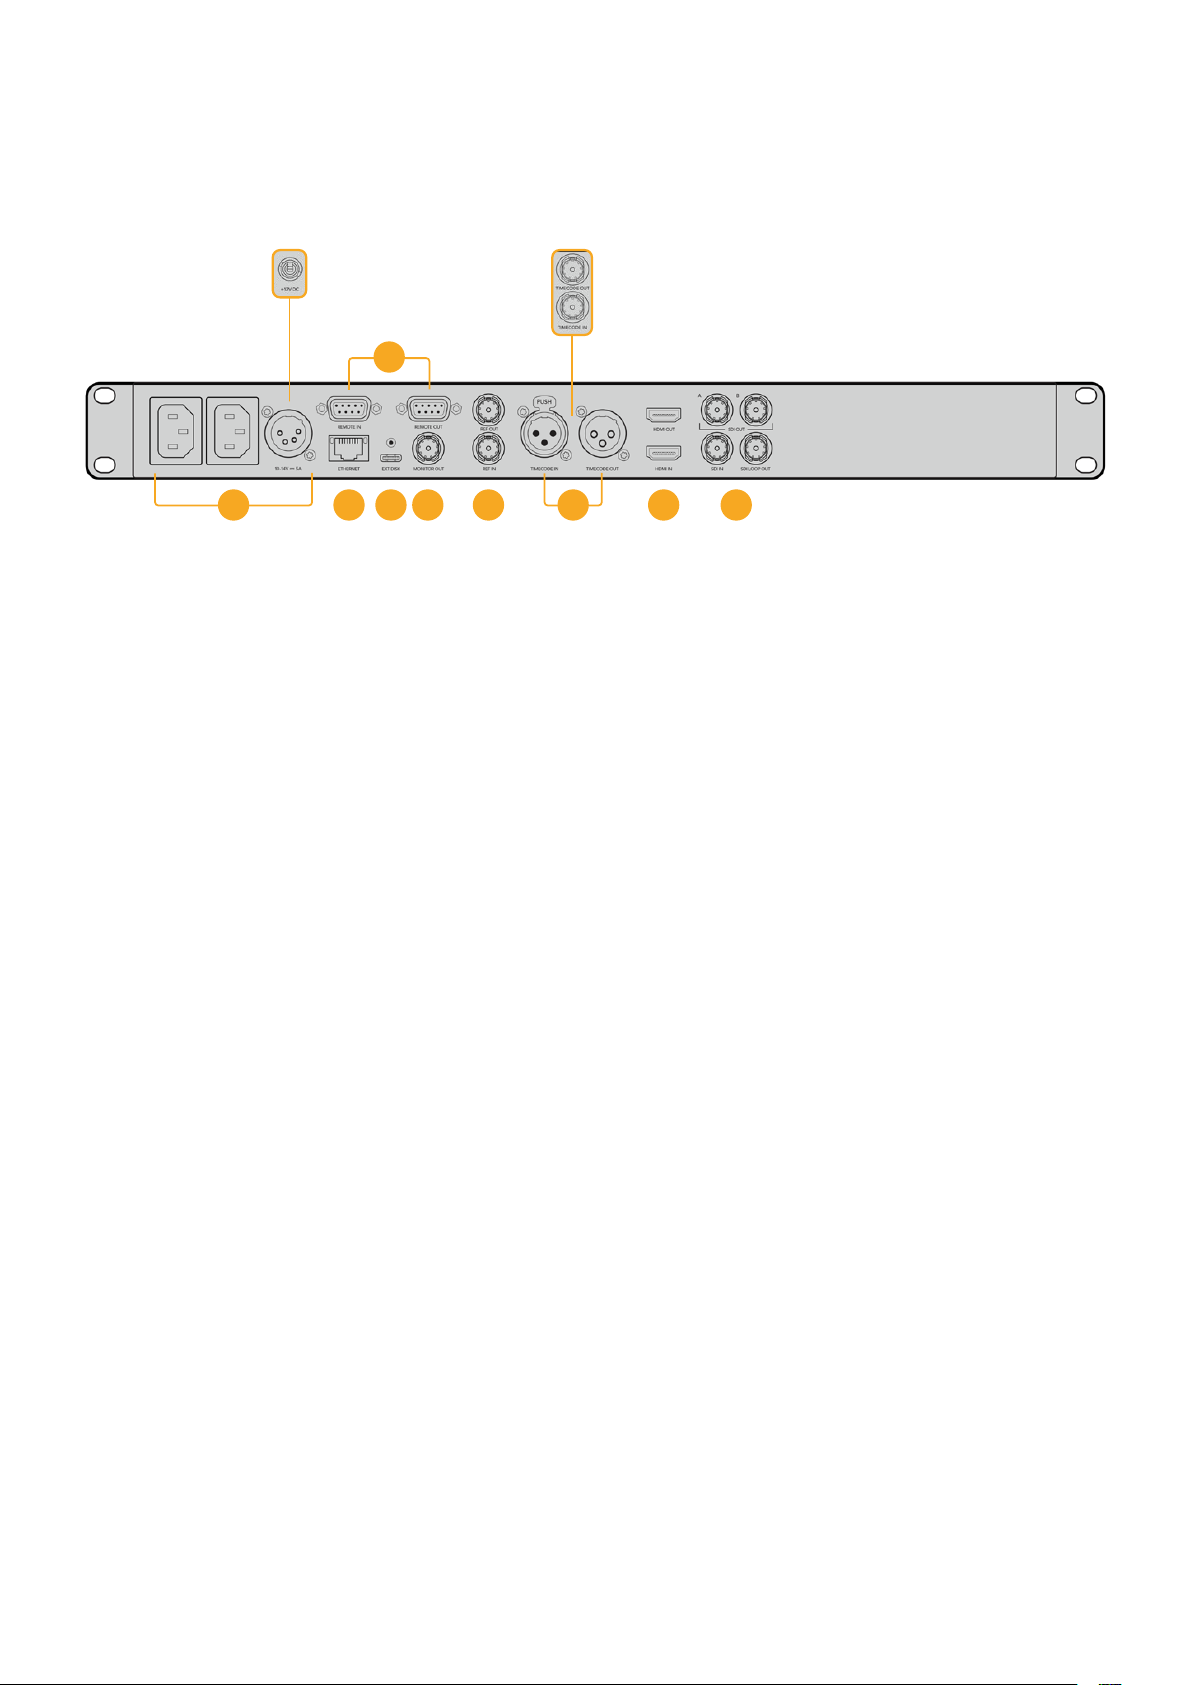
Задняя панель
1 Питание
На всех моделях HyperDeck есть силовой вход по стандарту IEC для энергоснабжения
от сети переменного тока. HyperDeck Studio 4KPro имеет дополнительное гнездо для
обеспечения резервным питанием. Для этой цели можно также использовать вход
для подключения внешней батареи 12В постоянного тока. При использовании
источника второго типа убедитесь в том, что его напряжение и номинальный ток
соответствуют допустимым характеристикам, указанным под разъемом DCIN.
2 Ethernet
Порт Ethernet позволяет подключаться к локальной сети для быстрой передачи
данных по FTP и управлять рекордером в дистанционном режиме с помощью
протокола HyperDeck Ethernet. На HD-моделях скорость переноса файлов достигает
1Гбит/с, а на HyperDeck Studio 4K Pro — 10 Гбит/с. Подробнее см. раздел «Передача
файлов по сети», приведенный ниже.
Рекордером HyperDeck также можно управлять с помощью микшера ATEM или
пульта ATEM, если они подключены к единой сети.
3 Дистанционное управление
На некоторых моделях HyperDeckStudio есть два разъема RS-422 DE-9 для приема
и передачи сигналов дистанционного управления. HyperDeck Studio HD Mini имеет
только порт REMOTEIN.
4 Внешний диск
На моделях HyperDeck StudioHD через разъем USB-C можно вести запись на
внешний диск со скоростью до 5Гбит/с. Рекордеры HyperDeck Studio 4KPro имеют
порт USB3.1 Gen2, который позволяет передавать до 10Гбит в секунду. Допускается
также подключение к концентраторам USB-C и к станции MultiDock10G для
сохранения материала на один или несколько твердотельных накопителей.
Когда рекордер HyperDeck подключен к компьютеру через USB, его можно
использовать в качестве веб-камеры в таких приложениях, как Open Broadcaster
иSkype. Подробнее см.раздел «Настройка приложения Open Broadcaster» ниже.
2 5 6 8 941
На силовом разъеме модели
HyperDeck Studio HDMini есть
фиксирующее кольцо для
предотвращения случайного
отсоединения
На моделях HyperDeck
Studio HDMini и Plus
предусмотрены разъемы
BNC для приема и передачи
тайм-кода
7
3
524Задняя панель

5 Выход для мониторинга
Этот выход 3G-SDI позволяет выполнять понижающую конверсию изображения и
выводить его на внешний дисплей вместе со служебной информацией. Она включает
в себя обозначения дисков, индикаторы звука, счетчик времени и LUT-таблицу.
Подробнее о мониторинге и выводе чистого сигнала см.раздел «Настройки»,
приведенный выше.
6 Синхроразъемы
Все модели HyperDeck имеют встроенный синхрогенератор для передачи
стабилизированного видеосигнала по стандартам Black Burst (SD) и Tri-Sync (HD).
Для синхронизации оборудования подключите выход REF OUT основного рекордера
HyperDeck ко входу REF IN другого устройства.
HyperDeck можно также синхронизировать по внешнему источнику опорного
сигнала, подключив его ко входу REF IN рекордера.
Подробнее о выборе источника синхронизации и последовательном соединении
нескольких рекордеров см. раздел «Настройки» выше.
7 Тайм-код
На моделях HyperDeck также есть собственный генератор тайм-кода времени суток.
Как и в случае с синхронизацией, сигнал тайм-кода можно передавать с основного
рекордера HyperDeck на другие видеозаписывающие устройства, чтобы
сохраняемый материал имел одинаковый тайм-код.
Для приема и передачи сигнала тайм-кода модели HyperDeck оснащены разъемами
BNC или XLR. Подробнее о выборе доступных опций см. раздел «Настройки» ниже.
8 HDMI
Выход HDMI предназначен для подключения устройства ктелевизору или монитору.
Если сигнал поступает с корректными метаданными, рекордер может автоматически
распознать динамический диапазон видео (SDR илиHDR). Формат HDR также легко
переопределить с помощью меню настроек. Подробнее см.раздел «Настройки» выше.
9 SDI
Модели HyperDeck Studio HD Mini имеют один 3G-SDI-разъем для сигналов разных
форматов вплоть до1080p/60. На HyperDeck Studio HDPlus и HyperDeck Studio HDPro
предусмотрен интерфейс 6G-SDI, позволяющий работать с потоками в диапазоне от
SD до2160p/30. На рекордере HyperDeck Studio 4KPro есть входы и выходы 12G-SDI
для приема и передачи видео с разрешением до2160p/60.
Модели HyperDeck, оснащенные двумя SDI-выходами, можно использовать для
воспроизведения файлов ProRes4444 с заполняющим и вырезающим изображением,
поступающим с микшеровATEM.
525Задняя панель

Применение выхода для мониторинга
Данный интерфейс позволяет быстро выполнять визуальную проверку записываемого
или воспроизводимого материала. Вместе с видео на экран выводится такая служебная
информация, как используемый кодек, формат сигнала, кадровая частота, тайм-код, имя
файла, состояние управления, статус накопителей и уровни звука.
Подробное описание отображаемой информации приведено ниже.
Кодек
Показывает кодек, выбранный в меню на ЖК-дисплее.
Формат
В режиме воспроизведения показывает разрешение и кадровую частоту текущего клипа.
При записи отображаются те же параметры видео, поступающего с выбранного источника.
Тайм-код
Показывает тайм-код, присутствующий в воспроизводимом клипе или в записываемом
видеопотоке, либо поступающий через вход TIMECODEIN. Также можно выводить тайм-код
для отдельных клипов или счетчик для всей временной шкалы.
Источник
Отображает выбранный SDI- или HDMI-источник. В случае отсутствия корректного сигнала
на дисплей выводится соответствующее сообщение.
Имя
Показывает имя рекордера HyperDeck. Информация о том, как поменять имя, приведена
в разделе «Утилита Blackmagic HyperDeck Setup» ниже.
526Применение выхода для мониторинга
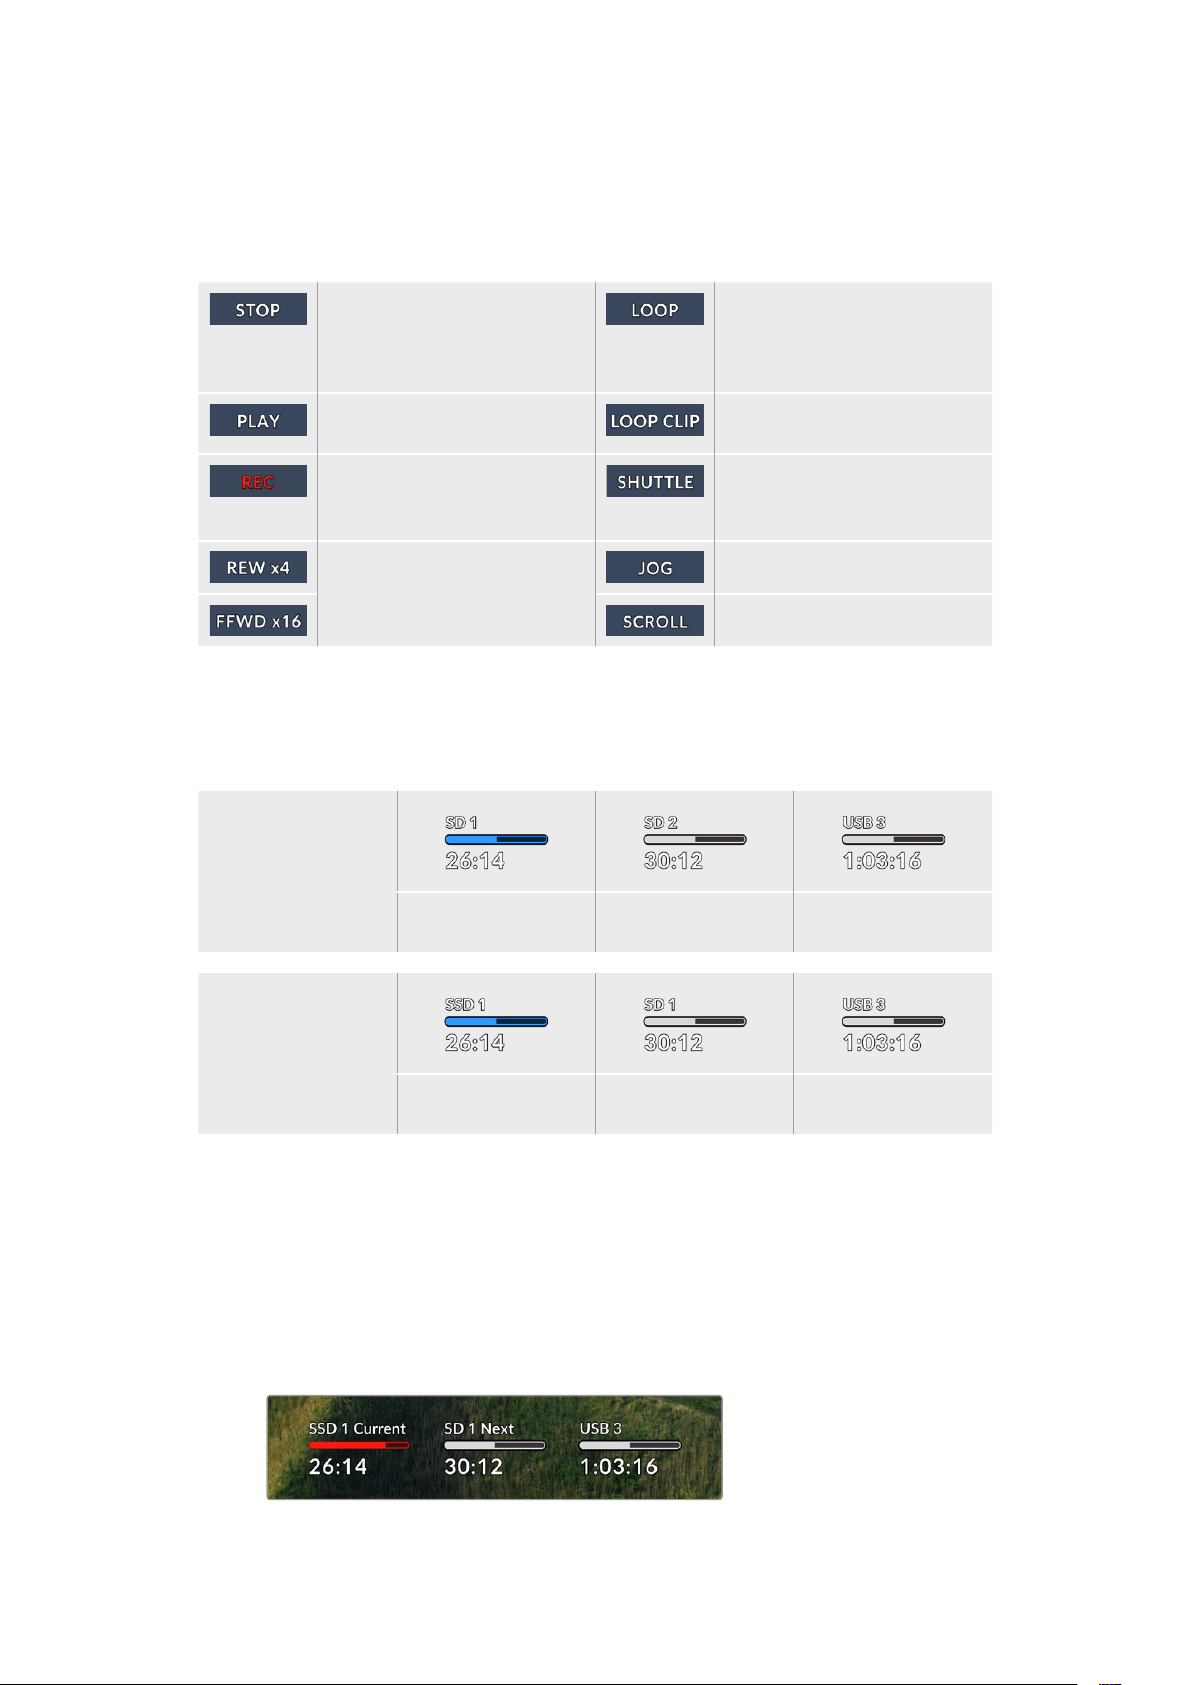
Состояние
При воспроизведении или записи материала данный индикатор показывает состояние
управления потоком и используемые для этого функции. Возможные варианты
приведены ниже.
HyperDeck находится в режиме
ожидания.
Выполняется циклическое
воспроизведение всех
записанных клипов
выбранного формата.
Выполняется воспроизведение
видео.
Выполняется циклическое
воспроизведение клипа.
Выполняется запись видео. Во
время сохранения индикатор
горит красным цветом.
Включена перемотка в
режиме ожидания.
Выполняется перемотка вперед
или назад. Число показывает
скорость.
Включен режим протяжки.
Включен режим прокрутки.
Состояние накопителей
Эти три индикатора показывают имя и состояние SD-карт и SSD-дисков, а также статус
внешних USB-накопителей. Отображаемая информация немного различается в зависимости
от модели HyperDeck.
HyperDeck
Studio HD Plus
Слот 1 для SD-карт Слот 2 для SD-карт Активный внешний
диск
Модели HyperDeck
Studio Pro
Текущий SD- или SSD-
слот задействован
Следующий SD- или
SSD-слот готов
Активный внешний
диск
На всех моделях HyperDeck третий индикатор показывает состояние USB-накопителя. При
использовании USB-разветвителя или станции Blackmagic MultiDock10G здесь отображается
активный диск.
Индикаторы состояния карт и дисков
Данные индикаторы показывают задействованные слоты (SD илиSSD). Во время
записи видео слева от используемого диска появляется надпись «Текущий», а над
накопителем, который будет сохранять материал дальше, отображается слово
«Следующий».
527Применение выхода для мониторинга
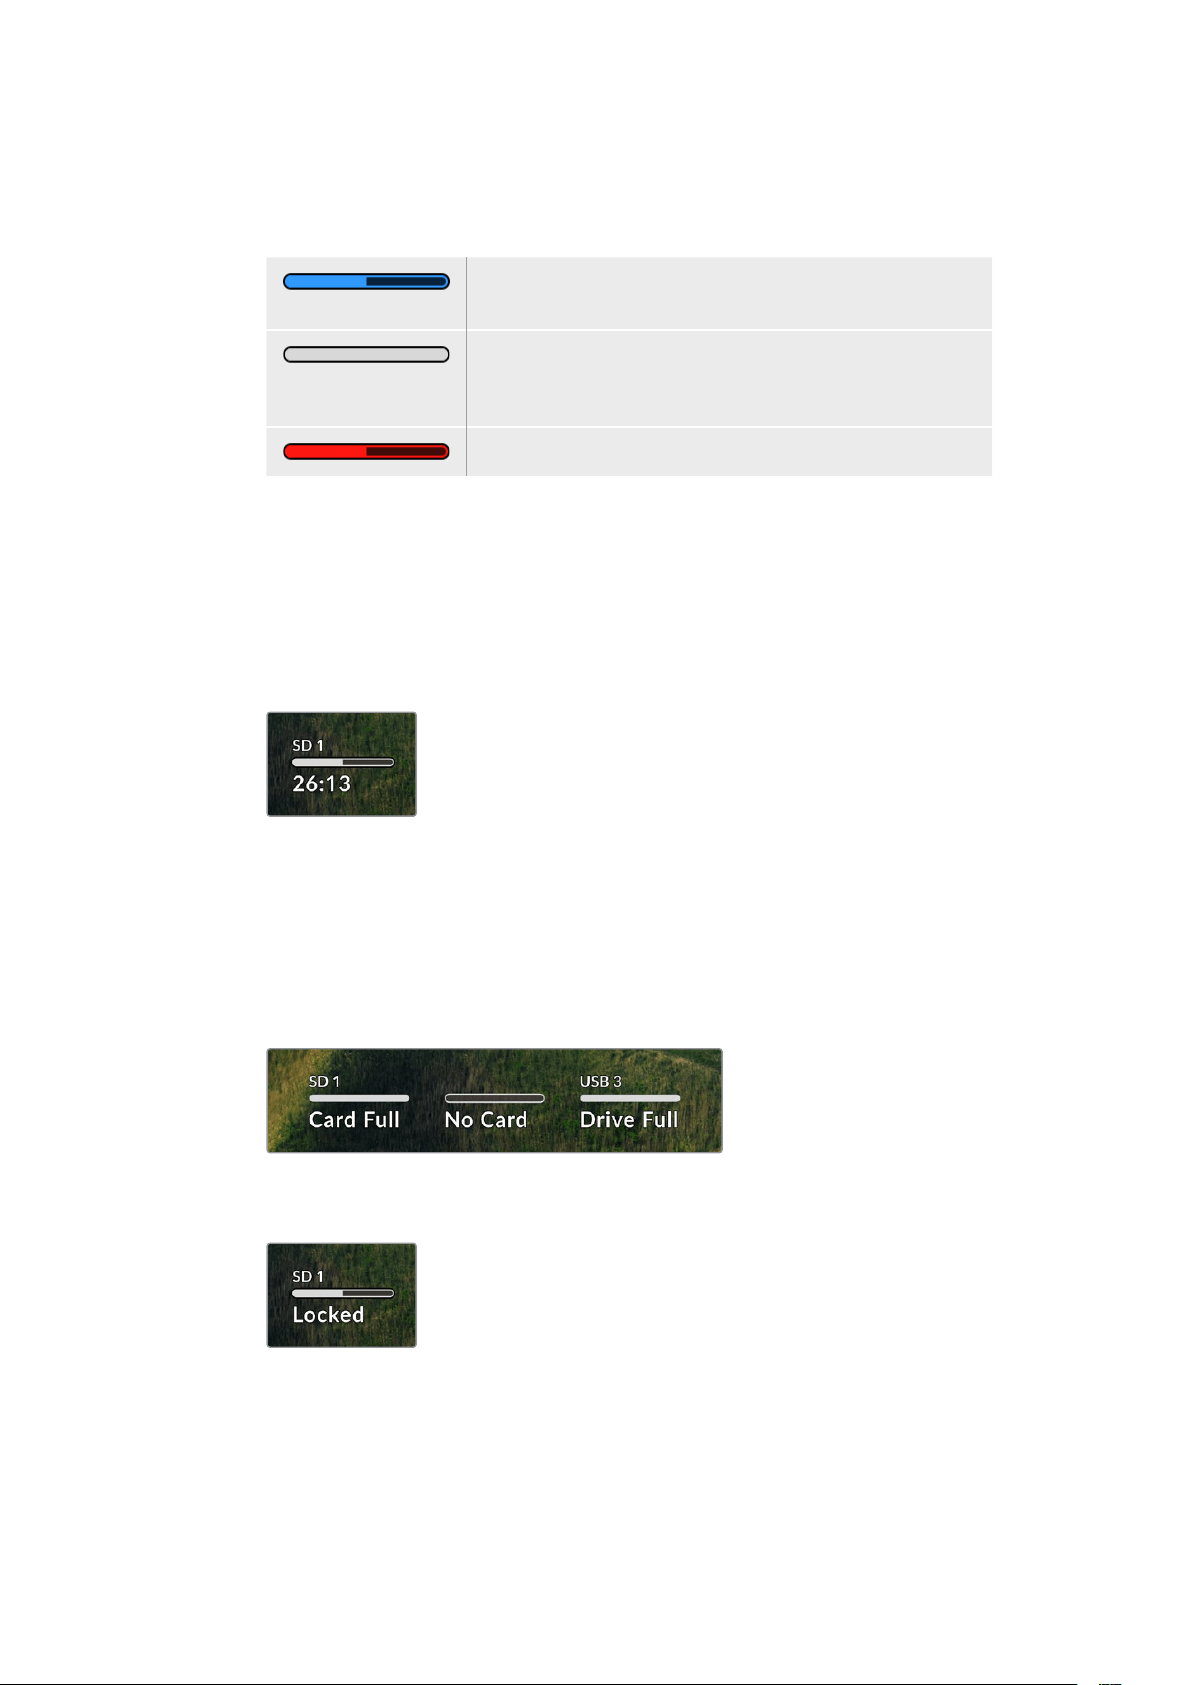
Полоса состояния накопителя
В зависимости от состояния накопителя полоса может иметь синий, белый или
красный цвет, а степень заливки визуально показывает уровень заполнения.
Синяя полоса обозначает активный накопитель, то есть
используемый для воспроизведения и записи.
Белый цвет указывает на наличие носителя, но он является
неактивным. Полностью заполненная полоса обозначает
отсутствие свободного места на накопителе.
Во время сохранения полоса горит красным цветом.
Под полосой состояния отображается оставшееся время, в течение которого можно
вести запись на накопитель, или статус слота.
Оставшееся время
Если на SD-карте или SSD-диске есть свободное место, оставшееся время записи
отображается в часах, минутах и секундах на основе текущего формата, выбранного
кодека и настроек качества. Когда доступная продолжительность составляет менее
часа, она будет показана в минутах и секундах.
Статус слота
При отсутствии карты или диска отображается соответствующее сообщение.
Если SD-карта, SSD-диск или USB-накопитель заполнены, появляется надпись «Карта
полная» или «Диск полный». В этом случае нужно поменять носитель. При установке
нового SD- или SSD-накопителя запись будет автоматически продолжена на нем.
Когда подключен внешний диск, сохранение на нем начинается после заполнения
всех SD-карт и SSD-дисков.
Если накопитель недоступен для сохранения, под индикатором состояния
отображается сообщение «Защита».
528Применение выхода для мониторинга

Индикация звука
На экране устройства может отображаться до 16аудиоканалов. Для выбора одной из
двух доступных шкал (PPM или VU) используют вкладку «Звук» в меню на ЖК-дисплее.
Чтобы выбрать число записываемых аудиоканалов или поменять шкалу индикаторов,
перейдите на вкладку «Звук» в меню на ЖК-дисплее. Подробнее см.раздел
«Настройки» выше.
Работа с накопителями
SD-карта
Для UltraHD-видео высокого качества рекомендуется использовать скоростные SD-карты
класса UHS-II. Эти носители способны работать на скорости свыше 220МБ/с при сохранении
UltraHD-видео в форматах вплоть до2160p/60. При записи с более низким битрейтом и
высоким сжатием можно работать с другими носителями, однако скоростные накопители
обычно обеспечивают наилучший результат.
Эта информация регулярно обновляется, поэтому мы рекомендуем обращаться к самой
последней версии данного руководства, которую можно загрузить на сайте Blackmagic Design
по адресу www.blackmagicdesign.com/ru/support.
Выбор SD-карт при работе с HyperDeck Studio 4K Pro
Рекомендуемые SD-карты для записи в формате 2160p с частотой до 60 кадров/с
Производитель Модель Емкость
Angelbird AV Pro MK2 V90 SDXC 128 ГБ
Angelbird AV Pro MK2 V90 SDXC 256 ГБ
ProGrade Digital SDXC UHS-II V90 300R 128 ГБ
ProGrade Digital SDXC UHS-II V90 300R 256 ГБ
Wise SD2-128U3 SDXC UHS-II 128 ГБ
529Работа с накопителями

Выбор SD-карт при работе с HyperDeck Studio HD Pro
Рекомендуемые SD-карты для записи в формате 2160p с частотой до 30 кадров/с
Производитель Модель Емкость
Angelbird AV Pro MK2 V90 SDXC 64 ГБ
Angelbird AV Pro MK2 V90 SDXC 128 ГБ
Angelbird AV Pro MK2 V90 SDXC 256 ГБ
ProGrade Digital SDXC UHS-II V90 300R 64 ГБ
ProGrade Digital SDXC UHS-II V90 300R 128 ГБ
ProGrade Digital SDXC UHS-II V90 300R 256 ГБ
Wise SD2-64U3 SDXC UHS-II 64 ГБ
Wise SD2-128U3 SDXC UHS-II 128 ГБ
Выбор SD-карт при работе с HyperDeck Studio HD Plus
Рекомендуемые SD-карты для записи в формате 2160p с частотой до 30 кадров/с
Производитель Модель Емкость
Angelbird AV Pro MK2 V90 SDXC 64 ГБ
Angelbird AV Pro MK2 V90 SDXC 128 ГБ
Angelbird AV Pro MK2 V90 SDXC 256 ГБ
ProGrade Digital SDXC UHS-II V90 300R 64 ГБ
ProGrade Digital SDXC UHS-II V90 300R 128 ГБ
ProGrade Digital SDXC UHS-II V90 300R 256 ГБ
Wise SD2-64U3 SDXC UHS-II 64 ГБ
Wise SD2-128U3 SDXC UHS-II 128 ГБ
Выбор SD-карт при работе с HyperDeck Studio HD Mini
Рекомендуемые SD-карты для записи в формате 1080p ProRes 422 HQ с частотой до
60 кадров/с
Производитель Модель Емкость
Angelbird AV Pro MK2 V90 SDXC 64 ГБ
Angelbird AV Pro MK2 V90 SDXC 128 ГБ
Angelbird AV Pro MK2 V90 SDXC 256 ГБ
ProGrade Digital SDXC UHS-II V90 300R 64 ГБ
ProGrade Digital SDXC UHS-II V90 300R 128 ГБ
ProGrade Digital SDXC UHS-II V90 300R 256 ГБ
Wise SD2-64U3 SDXC UHS-II 64 ГБ
Wise SD2-128U3 SDXC UHS-II 128 ГБ
530Работа с накопителями

SSD
При работе с видео, которое требует передачи большого объема данных, важно правильно
подобрать SSD-диск. На некоторых дисках скорость записи меньше заявленной
производителем, при этом отклонение может достигать 50%. Даже если в технических
характеристиках указано, что накопитель подходит для работы с видео, на практике он может
не поддерживать запись в реальном времени.
Так как сжатие данных происходит в основном во время записи, такой SSD-диск можно все
равно использовать для воспроизведения.
Как правило, современные твердотельные накопители имеют более высокое быстродействие
и емкость. Рекомендуемые SSD-диски приведены ниже.
Выбор SDD-дисков при работе с HyperDeck Studio 4K Pro
Рекомендуемые SDD-диски для записи в формате 2160p с частотой до 60 кадров/с
Производитель Модель Емкость
Samsung 860 PRO 512 ГБ
Samsung 860 PRO 1 ТБ
Samsung 870 EVO (MZ-77E250BW) 250 ГБ
Samsung 870 EVO (MZ-77E500BW) 500 ГБ
Samsung 870 EVO (MZ-77E1T0BW) 1 ТБ
Samsung 870 EVO (MZ-77E2T0BW) 2 ТБ
Выбор SDD-дисков при работе с HyperDeck Studio HD Pro
Рекомендуемые SDD-диски для записи в формате 2160p с частотой до 30 кадров/с
Производитель Модель Емкость
Samsung 860 PRO 512 ГБ
Samsung 860 PRO 1 ТБ
Samsung 870 EVO (MZ-77E250BW) 250 ГБ
Samsung 870 EVO (MZ-77E500BW) 500 ГБ
Samsung 870 EVO (MZ-77E1T0BW) 1 ТБ
Samsung 870 EVO (MZ-77E2T0BW) 2 ТБ
531Работа с накопителями

Внешний диск
Все модели HyperDeck позволяют вести запись непосредственно на флеш-диски USB-C.
Эти носители имеют большую емкость и обеспечивают запись в течение долгого времени.
Затем их можно подключить к компьютеру и сразу приступить к монтажу.
Чтобы получить еще больше места для хранения видео, можно подключить док-станцию с
портом USB-C или внешний жесткий диск. Для подключения станции Blackmagic MultiDock10G
или флеш-диска USB-C используют кабель USB-C, который соединяют с разъемом EXTDISK
на задней панели рекордера HyperDeck.
Выбор дисков USB-C при работе с HyperDeck Studio 4K Pro
Рекомендуемые диски USB-C для записи в формате 2160p с частотой до 60 кадров/с
Производитель Модель Емкость
Angelbird SSD2GO PKT MK2 512 ГБ
Angelbird SSD2GO PKT MK2 2 ТБ
DelKinDevices Juggler 1 ТБ
DelKinDevices Juggler 2 ТБ
LaCie Rugged SSD STHR2000800 2 ТБ
LaCie Rugged SSD Pro STHZ1000800 1 ТБ
Wise PTS-512 Portable SSD 512 ГБ
Wise PTS-1024 Portable SSD 1 ТБ
Выбор дисков USB-C при работе с HyperDeck Studio HD Pro
Рекомендуемые диски USB-C для записи в формате 2160p с частотой до 30 кадров/с
Производитель Модель Емкость
Angelbird SSD2GO PKT MK2 512 ГБ
Angelbird SSD2GO PKT MK2 2 ТБ
DelKinDevices Juggler 1 ТБ
DelKinDevices Juggler 2 ТБ
LaCie Rugged SSD STHR2000800 2 ТБ
LaCie Rugged SSD Pro STHZ1000800 1 ТБ
Wise PTS-512 Portable SSD 512 ГБ
Wise PTS-1024 Portable SSD 1 ТБ
532Работа с накопителями

Выбор дисков USB-C при работе с HyperDeck Studio HD Plus
Рекомендуемые диски USB-C для записи в формате 2160p с частотой до 30 кадров/с
Производитель Модель Емкость
Angelbird SSD2GO PKT MK2 512 ГБ
Angelbird SSD2GO PKT MK2 2 ТБ
DelKinDevices Juggler 1 ТБ
DelKinDevices Juggler 2 ТБ
LaCie Rugged SSD STHR2000800 2 ТБ
LaCie Rugged SSD Pro STHZ1000800 1 ТБ
Wise PTS-512 Portable SSD 512 ГБ
Wise PTS-1024 Portable SSD 1 ТБ
Выбор дисков USB-C при работе с HyperDeck Studio HD Mini
Рекомендуемые диски USB-C для записи в формате 1080p ProRes 422 HQ с частотой
до 60 кадров/с
Производитель Модель Емкость
Angelbird SSD2GO PKT MK2 512 ГБ
Angelbird SSD2GO PKT MK2 2 ТБ
DelKinDevices Juggler 1 ТБ
DelKinDevices Juggler 2 ТБ
Wise PTS-512 Portable SSD 512 ГБ
Wise PTS-1024 Portable SSD 1 ТБ
533Работа с накопителями

Форматирование накопителя
Подготовка накопителя на компьютере
Форматирование накопителя на Mac
Для форматирования диска под систему HFS+ или exFAT воспользуйтесь дисковой утилитой,
которая входит в пакет Mac.
Выполните резервное копирование всех важных данных, потому что при форматировании
носителя они будут удалены.
1 Подключите SSD-диск к компьютеру при помощи внешней док-станции или
переходного кабеля и пропустите сообщение, предлагающее использовать диск для
создания резервной копии Time Machine. При работе сCFast подключите накопитель
к компьютеру через внешний картридер.
2 Выберите «Программы» > «Утилиты» и запустите приложение «Дисковая утилита».
3 Щелкните кнопкой мыши по значкуSSD илиCFast и выберите вкладку «Стереть».
4 Выберите формат Mac OS Extended (журналируемый) илиexFAT.
5 Введите название нового тома и выберите «Стереть». По окончании форматирования
носитель будет готов к использованию на HyperDeck.
Форматирование накопителя на Windows
На компьютере под управлением Windows форматирование диска под систему exFAT
выполняется с помощью диалогового окна «Форматировать». Выполните резервное
копирование всех важных данных, потому что при форматировании SSD-диска или SD-карты
они будут удалены.
1 Подключите SSD к компьютеру с помощью внешней док-станции или переходного
кабеля. При работе с CFast подключите накопитель к компьютеру через внешний
картридер.
2 Откройте меню или экран «Пуск» и выберите «Компьютер». Щелкните правой кнопкой
мыши по SSD-диску или картеCFast.
3 В контекстном меню выберите «Форматировать».
534Форматирование накопителя
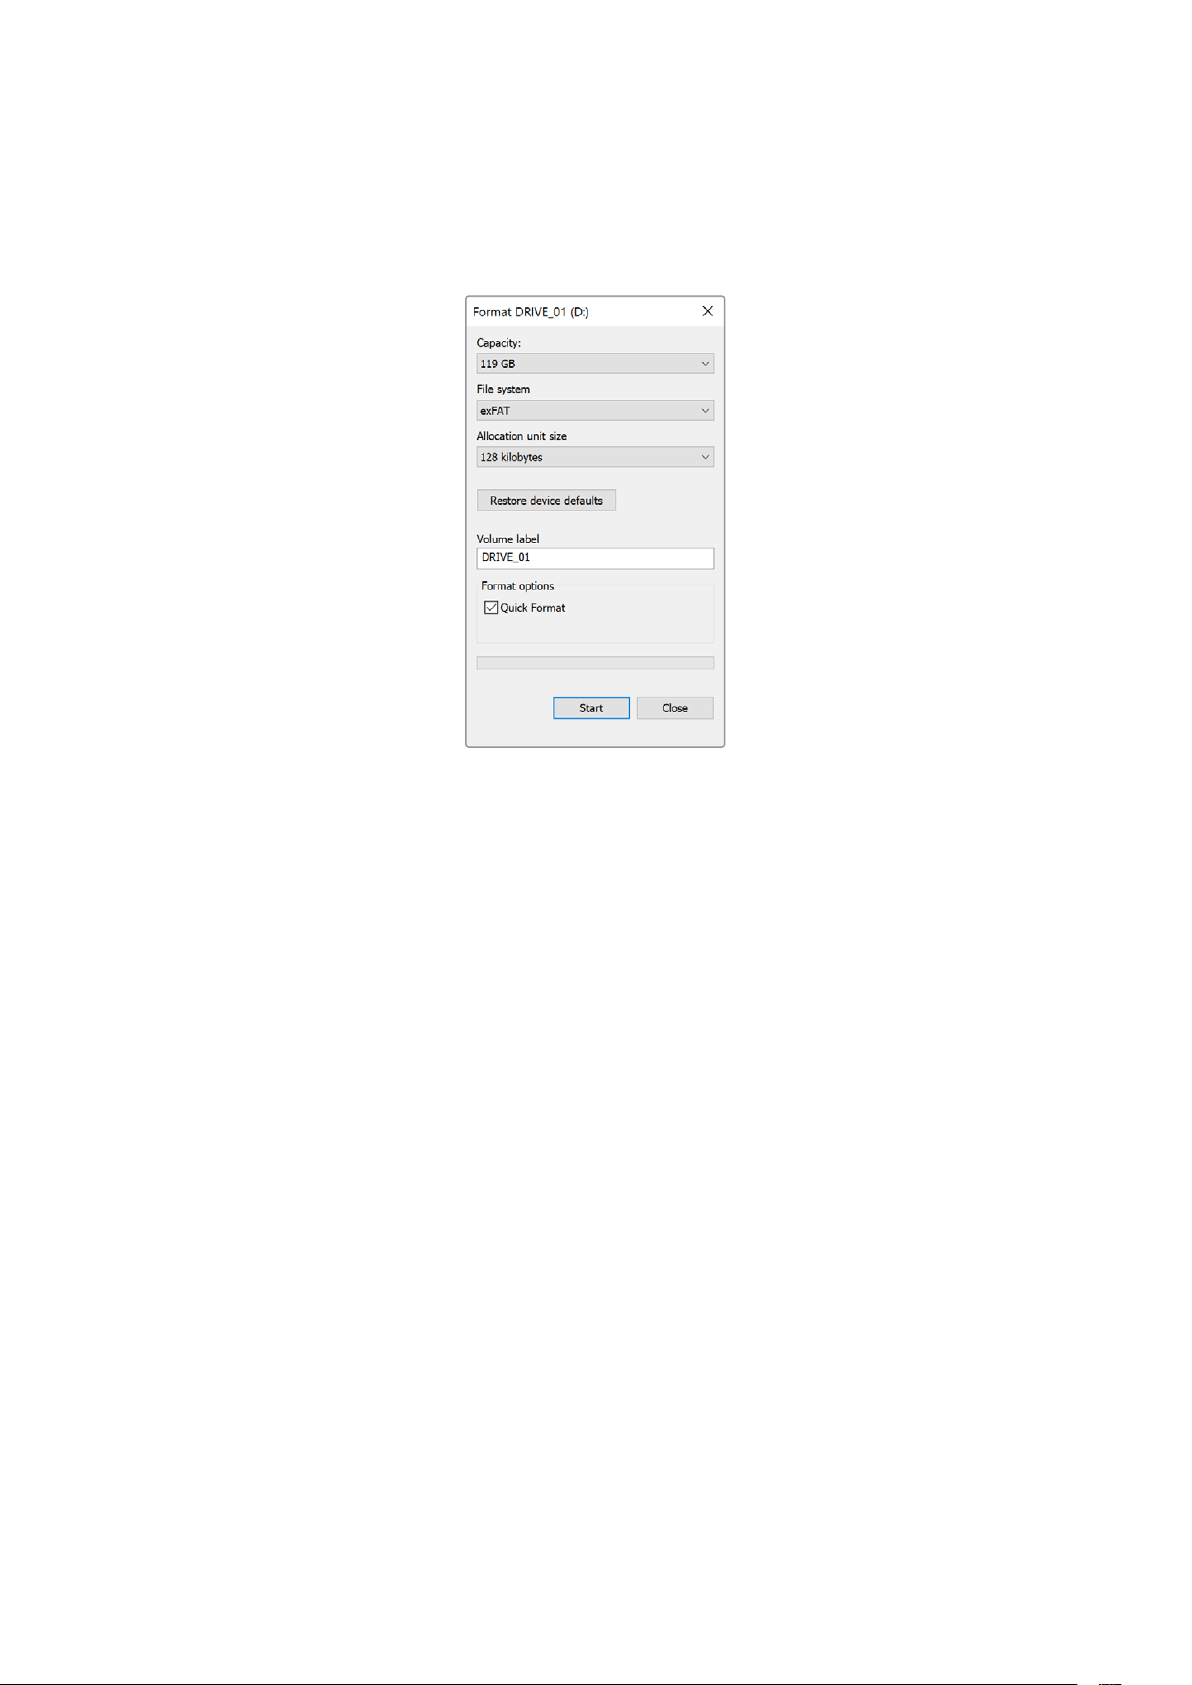
4 Выберите файловую систему exFAT и установите размер кластера, равный 128 Кб.
5 Укажите метку тома, выберите «Быстрое форматирование» и нажмите «Начать».
6 По окончании форматирования носитель будет готов к использованию на HyperDeck.
Использование HyperDeck
вкачествевеб-камеры
При подключении к компьютеру черезUSB рекордер HyperDeck распознается как веб-
камера. Это позволяет вести стриминг записанного материала с рекордера с помощью
приложения для потоковой трансляции, например Open Broadcaster.
Выбор источника в качестве веб-камеры
В большинстве случаев приложение для потоковой трансляции автоматически использует
рекордер как подключенную веб-камеру, поэтому при его запуске сразу будет показано
видео с HyperDeckStudio. Если ПО не распознает HyperDeck, нужно настроить
использование рекордера как веб-камеры и микрофона.
Ниже описан порядок настройки при работе с приложением Skype.
1 В меню Skype выберите «Настройки звука и видео».
2 Откройте раскрывающееся меню «Камера» и в списке выберите HyperDeck. В окне
просмотра будет отображаться видео, поступающее с рекордера HyperDeck.
3 Перейдите к меню «Микрофон» и выберите HyperDeck в качестве источника звука.
После установки настроек рекомендуется проверить работу приложения Skype в
тестовом режиме.
Это все, что нужно сделать для трансляции материала с помощью рекордера HyperDeck
Studio на любую аудиторию.
535Использование HyperDeck вкачествевеб-камеры
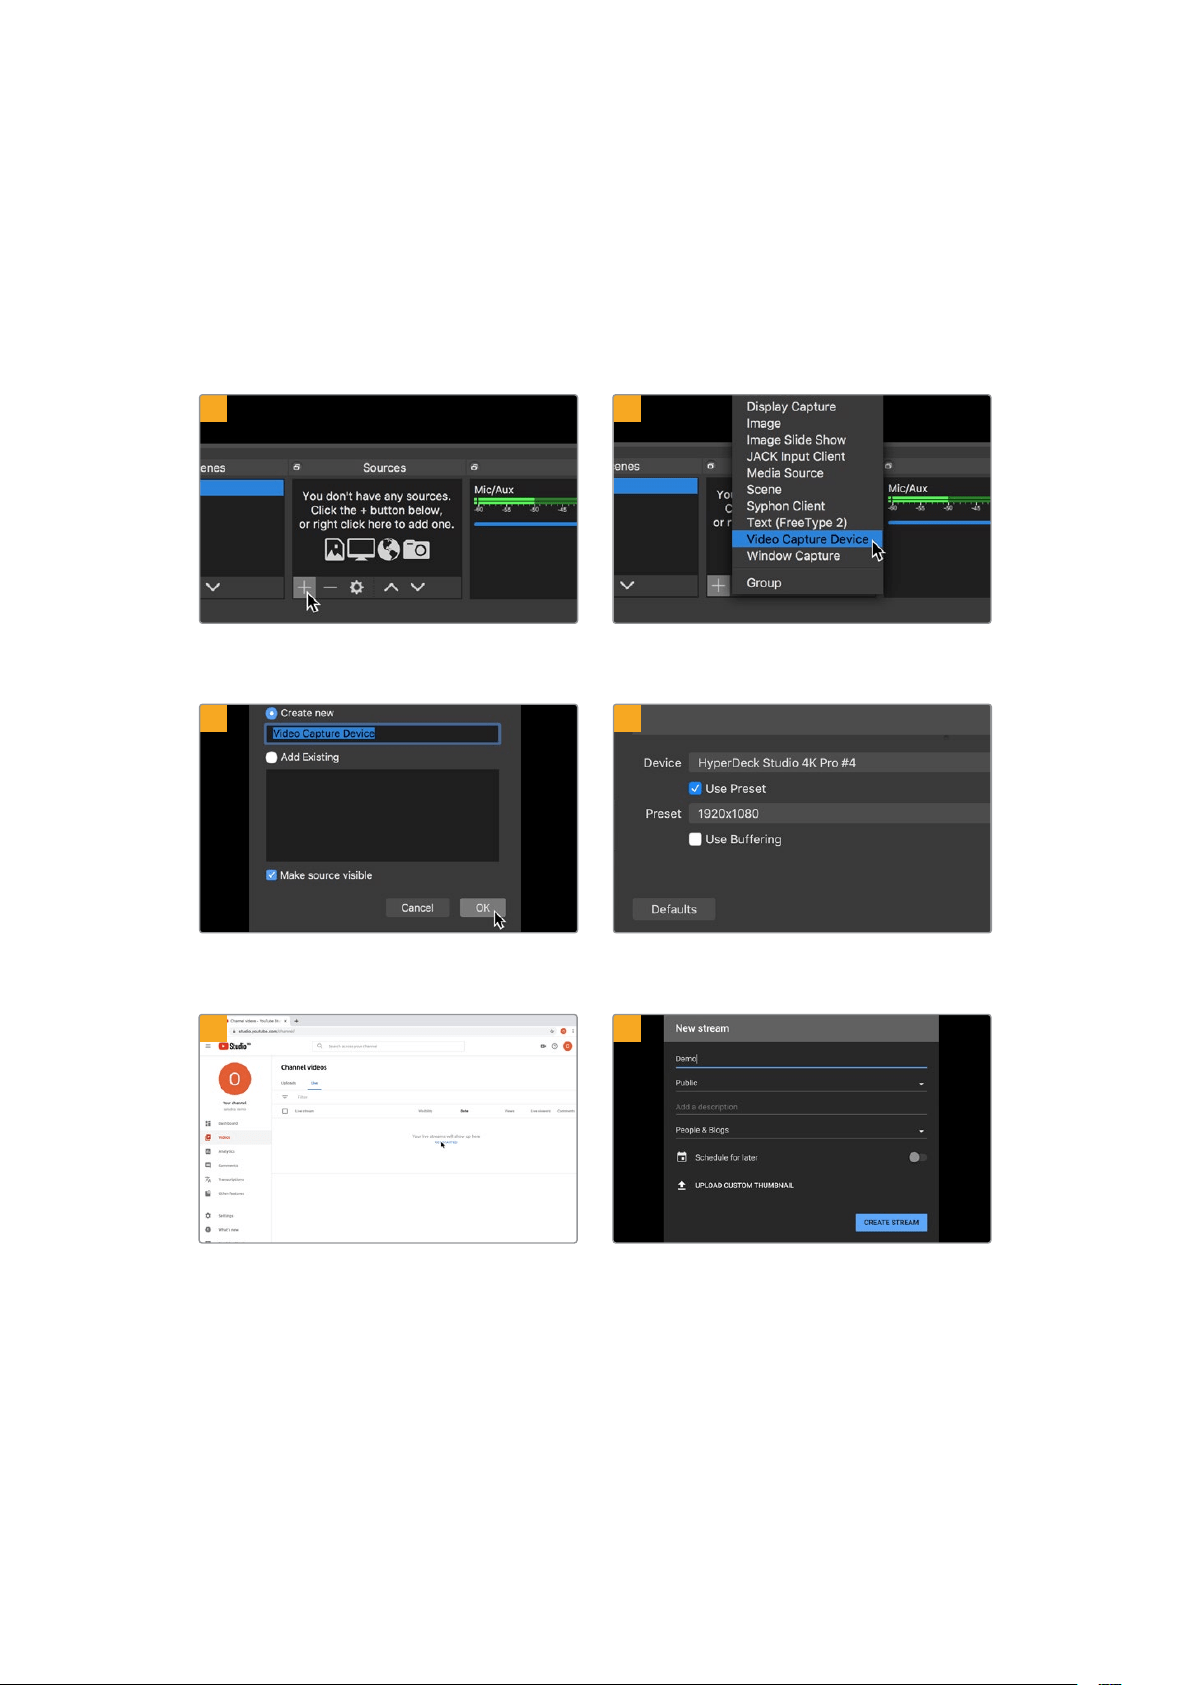
Настройка приложения Open Broadcaster
Open Broadcaster — открытое приложение, которое позволяет использовать рекордер
HyperDeck Studio для показа материала на таких платформах, как YouTube, Twitch и
FacebookLive. Оно сжимает видео путем уменьшения скорости цифрового потока, чтобы
обеспечить его онлайн-трансляцию.
Ниже описан порядок настройки приложения Open Broadcaster для трансляции на YouTube
Live, когда программный сигнал поступает с HyperDeckStudio.
Запустите приложение Open Broadcaster и
щелкните значок плюса в окне «Источники».
Выберите «Устройство захвата видео».
Укажите имя нового источника и нажмите «ОК». В меню «Устройство» выберите устройство
HyperDeckStudio и нажмите «ОК».
Откройте свой профиль на YouTube. Нажмите
кнопку «Начать трансляцию», а затем щелкните
«Трансляции».
Введите данные трансляции и нажмите
«СОЗДАТЬ ТРАНСЛЯЦИЮ».
1
2
3
4
5
6
536Использование HyperDeck вкачествевеб-камеры

Сервис YouTube сгенерирует ключ трансляции,
который подсоединит приложение Open
Broadcaster к соответствующему аккаунту
на платформе YouTube.
Нажмите кнопку «КОПИРОВАТЬ» рядом с
ключом трансляции. Скопируйте ключ,
который нужно вставить в Open Broadcaster.
Вернитесь к приложению Open Broadcaster
и откройте настройки, щелкнув меню OBS >
«Настройки». Выберите «Вещание». Вставьте
ключ трансляции, скопированный из YouTube,
и нажмите «ОК».
В окне просмотра приложения Open Broadcaster
будет выводиться изображение, поступающее
с рекордера HyperDeck.
Чтобы установить канал связи между Open
Broadcaster и YouTube, выберите «Запустить
трансляцию» в правом нижнем углу экрана.
Изображение будет поступать из Open
Broadcaster на платформу YouTube Live,
которая с этого момента используется для
установки всех настроек.
Перейдите на YouTube Live. В качестве
фона должно использоваться изображение,
поступающее с программного выхода устройства
HyperDeck. Нажмите «Готово».
После того как между Open Broadcaster и
YouTube Live установлен канал передачи
изображения, все готово к трансляции.
Перед ее началом рекомендуется выполнить
окончательную проверку, чтобы протестировать
работу оборудования.
Если все в порядке, нажмите кнопку «НАЧАТЬ
ТРАНСЛЯЦИЮ».
После выполнения всех описанных выше действий приложение Open Broadcaster обеспечит
трансляцию на YouTube.
7
8
9
10
11
12
537Использование HyperDeck вкачествевеб-камеры

ПРИМЕЧАНИЕ. Из-за специфики потоковой трансляции часто возникает задержка
с передачей изображения. Перед нажатием кнопки «Остановить трансляцию»
необходимо убедиться в том, что показ программы на YouTube действительно
завершен, потому что в противном случае она будет прекращена раньше времени.
Blackmagic HyperDeck Setup
Работа с утилитой HyperDeck Setup
Утилита Blackmagic HyperDeck Setup позволяет изменять настройки и обновлять
прошивку HyperDeck.
Порядок запуска утилиты HyperDeck Setup
1 Подключите HyperDeck к компьютеру через портUSB или Ethernet.
2 Запустите HyperDeck Setup. Название подключенной модели будет отображаться
на начальной странице утилиты.
3 Чтобы открыть страницу настроек, щелкните мышью по круглому значку Setup или
по изображению HyperDeck.
Вкладка Setup
При наличии нескольких рекордеров HyperDeck Studio, с ними будет легче работать по
присвоенным идентификаторам. Указать имя устройства можно в поле Name.
538Blackmagic HyperDeck Setup
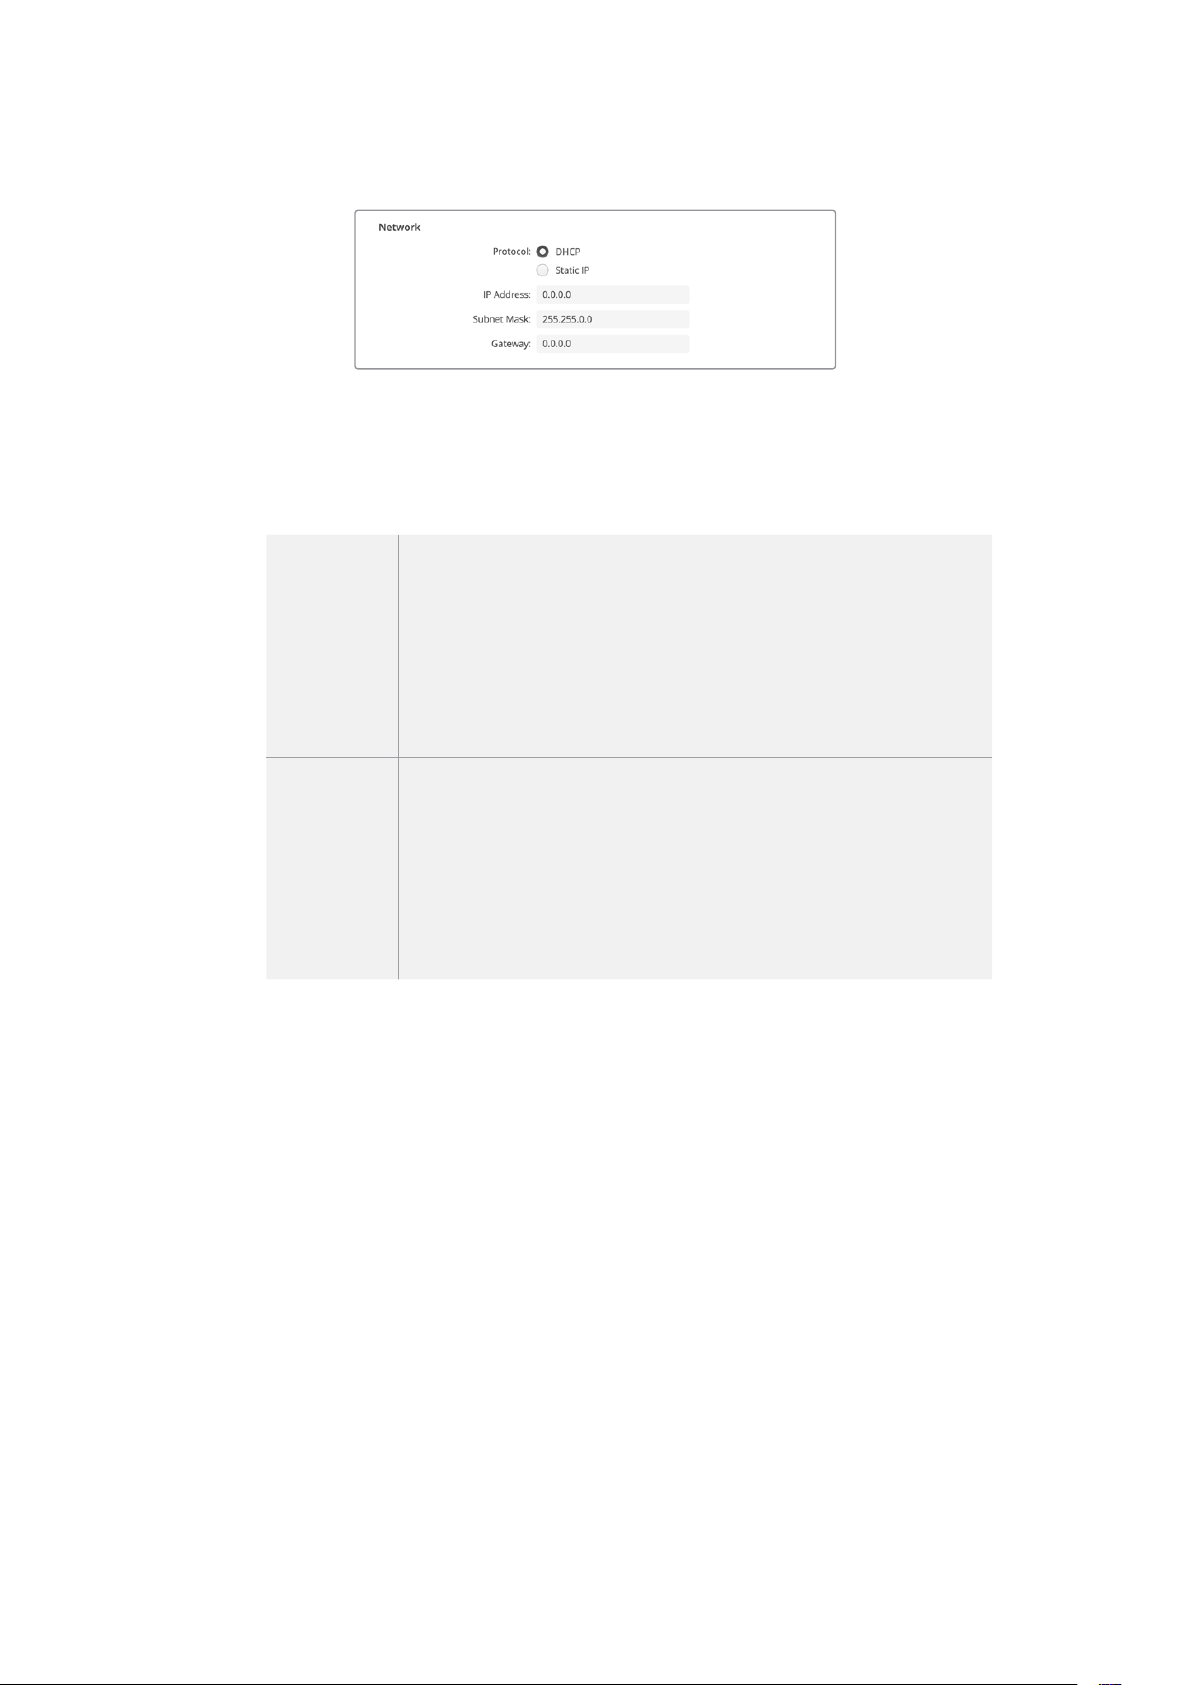
Сеть
Протокол
Для использования HyperDeck Studio с видеомикшерамиATEM или его
дистанционного управления через HyperDeck Ethernet Protocol, рекордер нужно
подключить к локальной сети с применением протоколаDHCP или фиксированного
IP-адреса.
DHCP
Рекордеры HyperDeck Studio по умолчанию используют
протоколDHCP. DHCP— это протокол динамической настройки
узла, используемый сетевыми серверами для автоматического
обнаружения устройства HyperDeck Studio и присвоения ему
IP-адреса. Данная функция, которой оснащено большинство
компьютеров и сетевых маршрутизаторов, значительно облегчает
подключение оборудования через Ethernet и не допускает
конфликтов IP-адресов.
Статический
IP-адрес
При выборе настройки Static IP, сетевые параметры можно указать
вручную. Чтобы между устройствами существовал канал связи, они
должны иметь одинаковые настройки маски подсети и шлюза. Еще
одно условие — совпадение первых трех компонентов в IP-адресах
панели и микшера. Если идентифицирующий компонент IP-адреса
уже используется другим устройством компьютерной сети, из-за
конфликта настроек подключение не будет выполнено. В этом случае
необходимо изменить последнее поле в IP-адресе.
Вкладка LUTs
Модели HyperDeck c выходами для мониторинга на задней панели позволяют выводить на
дисплей поступающее видео с применением 3D LUT-таблиц на основе17, 33 и65
координатных точек, конвертированных в файлы с расширением.cube.
Это удобно при съемке в режиме «Фильм», когда изображение изначально не такое
контрастное. Применив LUT-таблицу можно увидеть, как будет выглядеть материал после
грейдинга.
3D LUT применяется только к выводимому на дисплей изображению и не влияет на запись
материала.
Если на этапе постпроизводства необходимо воссоздать такую же цветовую схему, эту
таблицу в виде файла.cube можно импортировать из HyperDeck Studio в DaVinciResolve.
539Blackmagic HyperDeck Setup

Применение LUT-таблицы
1 Сначала следует выбрать нужную LUT-таблицу. Нажмите кнопку Import.
2 В диалоговом окне укажите нужную LUT-таблицу для импорта и нажмите Open.
3 После того как LUT-таблица загружена, выберите опцию On и нажмите Save.
Заданная LUT-таблица появится на дисплее. Теперь ее можно включать и отключать с
помощью настроек мониторинга в экранном меню.
Обновление встроенного
программного обеспечения
Обновить встроенное ПО устройства HyperDeck, а также изменить настройки трансляции,
сетевые параметры и качество записи можно с помощью утилиты HyperDeck Setup.
Порядок обновления встроенного ПО
1 Загрузите последнюю версию Blackmagic HyperDeck Setup в разделе поддержки по
адресу www.blackmagicdesign.com/ru/support.
2 Запустите установщик Blackmagic HyperDeck Setup и следуйте инструкциям
на экране.
3 После установки подключите HyperDeck Studio к компьютеру через портUSB или
разъем Ethernet на задней панели устройства.
4 Для обновления программного обеспечения запустите Blackmagic HyperDeck Setup
и следуйте инструкциям на экране. Если они не появятся, используемая версия
является актуальной.
540Обновление встроенного программного обеспечения

Последнюю версию утилиты для Blackmagic HyperDeck Studio
можно найти в разделе поддержки на нашем веб-сайте по
адресу www.blackmagicdesign.com/ru/support.
Teranex Mini Rack Shelf
Для установки устройств Blackmagic HyperDeck Studio HDMini и HyperDeck Studio HDPlus в
стойку или транспортировочный ящик можно использовать Teranex Mini Rack Shelf размером
1RU. Модель HyperDeck Studio HDMini настолько мала, что ее легко разместить на полке
вместе с другой техникой Blackmagic Design, которая имеет аналогичный форм-фактор
(например, конвертеры Teranex Mini, MultiView4 или Web Presenter). Применение HyperDeck
Studio HDMini вместе с ATEM Television StudioHD дает возможность работать с восемью
источниками видео и записывать программный сигнал на HyperDeck Studio HDMini. Такой
модульный дизайн позволяет создавать портативные и простые в использовании решения
под индивидуальные требования.
Дополнительная полка Teranex Mini Rack Shelf позволяет установить устройства HyperDeck Studio HDMini
и HyperDeck Studio HDPlus в стойку с другим оборудованием Blackmagic Design такого же форм-фактора.
Для размещения решения HyperDeck на полке Teranex Mini Rack Shelf достаточно снять
резиновые вставки в основании корпуса и закрепить его с помощью прилагаемых винтов.
В комплект поставки Teranex Mini Rack Shelf входят две глухие панели для заполнения
свободного места, если дополнительное оборудование не требуется.
Подробнее см. веб-сайт компании Blackmagic Design www.blackmagicdesign.com/ru.
541Teranex Mini Rack Shelf
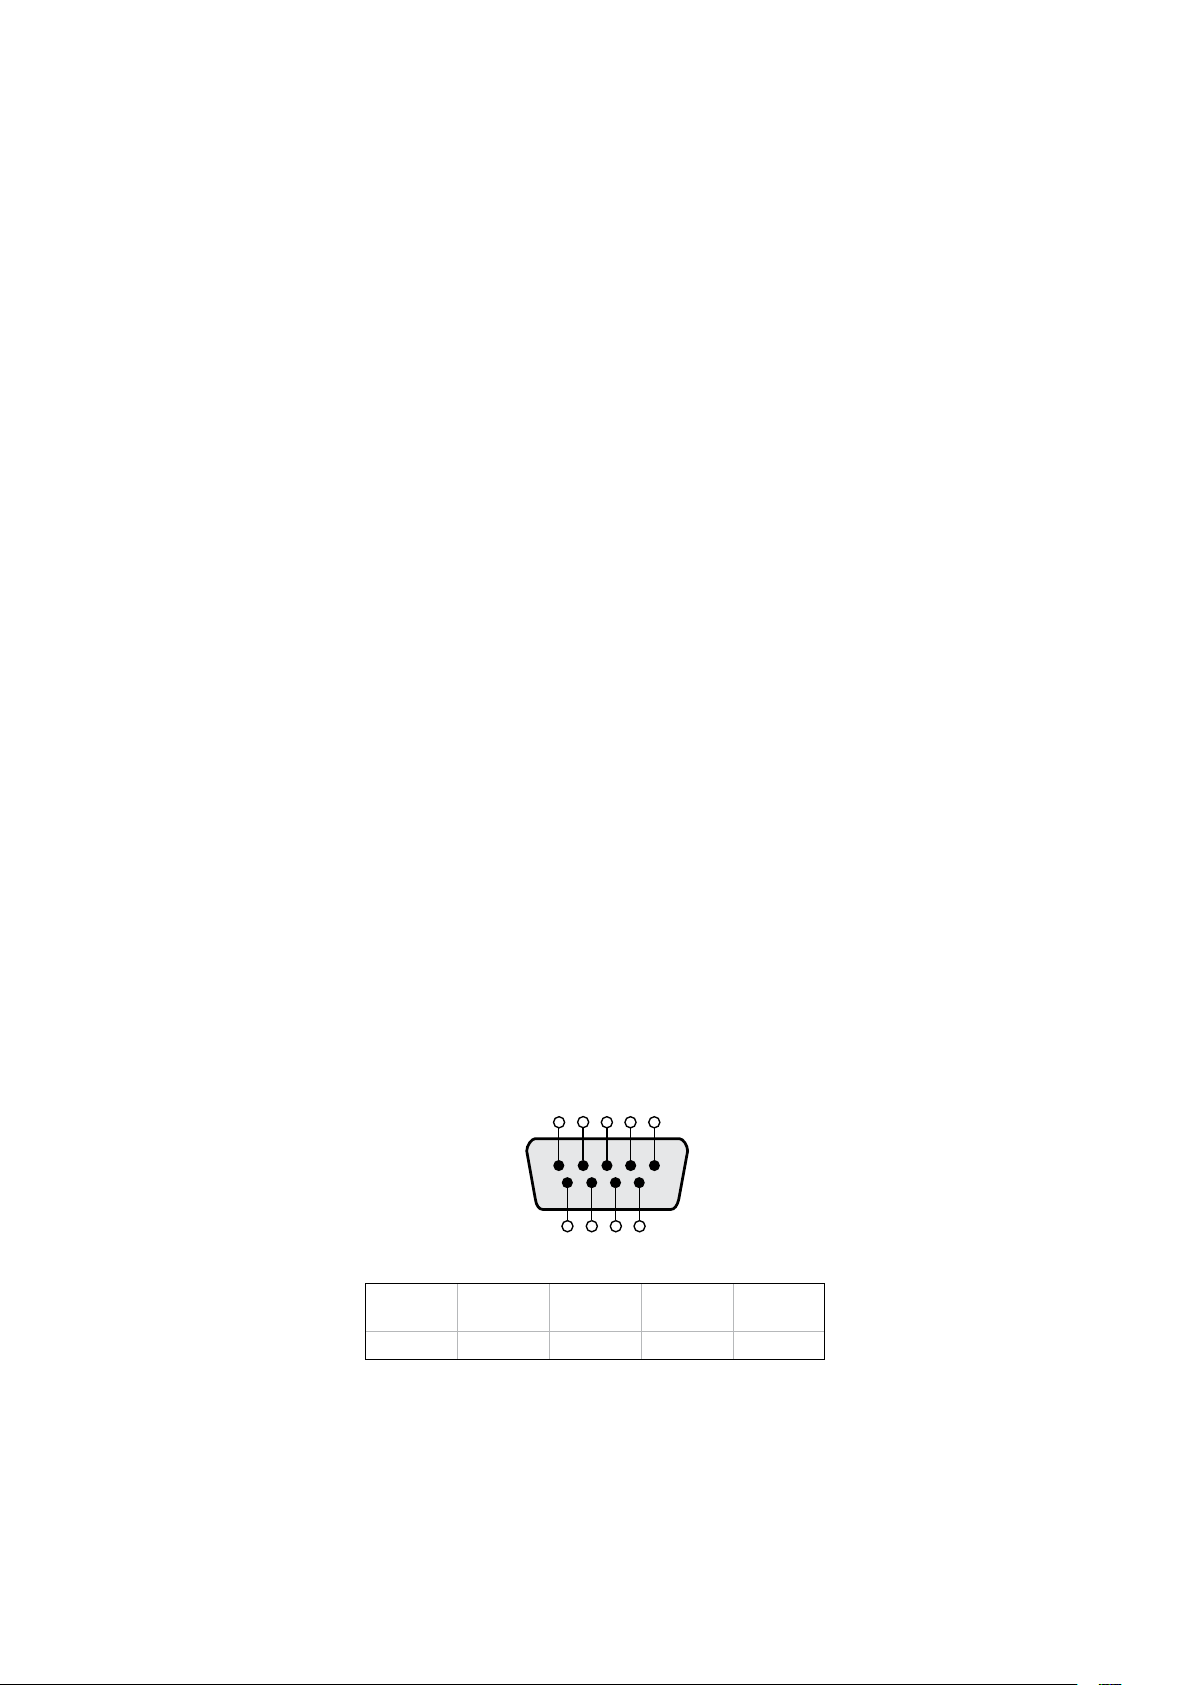
Управление по протоколу RS-422
Протокол RS-422
Протокол RS-422 является вещательным стандартом для управления через
последовательный порт. Он применяется с начала 1980-х гг. и используется на многих деках,
в приложениях линейного и нелинейного монтажа. Все текущие модели HyperDeck
поддерживают этот стандарт, поэтому их можно интегрировать в системы автоматизации
вещания, редактирования видео, дистанционного контроля и собственные решения.
HyperDeck Studio также поддерживает команды в виде файлов, которые передаются по
протоколу Advanced Media Protocol через порт RS-422. Они позволяют с внешнего устройства
управлять рекордерами HyperDeck через такие команды, как добавление клипов к списку
вывода, определение имени следующего клипа, циклическое воспроизведение отдельного
клипа или участка на монтажной линейке, а также очистка списка воспроизведения.
Использование внешнего контроллера RS-422
Все модели HyperDeck оснащены портом RS-422, который совместим с оборудованием Sony™
и позволяет напрямую подключаться к любому дистанционному контроллеру с поддержкой
RS-422, например, к блоку HyperDeck ExtremeControl.
Можно использовать готовый 9-контактный кабель, если оба его конца полностью
идентичны, т. е. выводы с одинаковым номером соединены друг с другом. Для создания
собственного кабеля см. схему распайки на рисунке.
Блок HyperDeck Extreme Control позволяет управлять работой HyperDeck в
дистанционном режиме.
1 Соедините источник сигнала с видеовходом рекордера.
2 Соедините HyperDeck Extreme Control и HyperDeck Studio через порт RS-422.
3 Активируйте удаленное управление с помощью кнопки REM на передней панели или
через экранное меню (на HyperDeck StudioMini).
Теперь управлять запуском/остановкой записи, воспроизведением и другими функциями
HyperDeck можно в удаленном режиме. Полный перечень команд, поддерживаемых
протоколом RS-422, см. в таблице ниже.
5 4 3 2 1
9 8 7 6
Прием
(–)
Прием
(+)
Передача
(–)
Передача
(+)
Контакты
заземления
2 7 8 3 1, 4, 6, 9
Схема распайки для дистанционного
управления по протоколу RS-422
542Управление по протоколу RS-422

Убедитесь, что для настройки дистанционного управления в экранном меню
выбран параметр «Вкл.» или нажата кнопка REM на передней панели рекордера
Все модели HyperDeck поддерживают удаленное управление
декой через порт RS-422 на задней панели
Перечень поддерживаемых команд по протоколу RS-422
Command Reply No Remote Notes
0 - System Control
0x00 0x11 DeviceTypeRequest
NTSC: 0xF0E0
PAL: 0xF1E0
24P: 0xF2E0
Enabled
1 - Slave Response
0x20 0x00 Stop Acknowledge Disabled
0x20 0x01 Play Acknowledge Disabled
0x20 0x02 Record Acknowledge Disabled
0x20 0x04 StandbyOff Acknowledge Disabled
0x20 0x05 StandbyOn Acknowledge Disabled
0x20 0x0F Eject Acknowledge Disabled
0x20 0x10 FastFwd Acknowledge Disabled
0x21 0x11 JogFwd1 Acknowledge Disabled
0x22 0x11 JogFwd2 Acknowledge Disabled
Treated as N=1;
Same as JogFwd1
0x21 0x12 VarFwd1 Acknowledge Disabled Uses ShuttleFwd1
0x22 0x12 VarFwd2 Acknowledge Disabled
Treated as N=1;
Same as VarFwd1
0x21 0x13 ShuttleFwd1 Acknowledge Disabled
0x22 0x13 ShuttleFwd2 Acknowledge Disabled
Treated as N=1;
Same as ShuttleFwd1
0x20 0x20 Rewind Acknowledge Disabled
0x21 0x21 JogRev1 Acknowledge Disabled
0x22 0x21 JogRev2 Acknowledge Disabled
Treated as N=1;
Same as JogRev1
0x21 0x22 VarRev1 Acknowledge Disabled Uses ShuttleRev1
543Управление по протоколу RS-422

Command Reply No Remote Notes
0x22 0x22 VarRev2 Acknowledge Disabled
Treated as N=1;
Same as VarRev1
0x21 0x23 ShuttleRev1 Acknowledge Disabled
0x22 0x23 ShuttleRev2 Acknowledge Disabled
Treated as N=1;
Same as ShuttleRev1
0x20 0x30 Preroll Acknowledge Disabled
0x24 0x31 CueData Acknowledge Disabled
0x20 0x34 SyncPlay Acknowledge Disabled
0x20 0x40 Preview Acknowledge Disabled Status bits are set
0x20 0x41 Review Acknowledge Disabled Status bits are set
0x20 0x43 OutpointPreview Acknowledge Disabled
0x22 0x5C DMCSetFwd Acknowledge Disabled
0x22 0x5D DMCSetRev Acknowledge Disabled
0x20 0x60 FullEEOff Acknowledge Disabled
0x20 0x61 FullEEOn Acknowledge Disabled
0x20 0x63 SelectEEOn Acknowledge Disabled
4 - Preset/Select Control
0x40 0x10 InEntry Acknowledge Disabled
0x40 0x11 OutEntry Acknowledge Disabled
0x44 0x14 InDataPreset Acknowledge Disabled
0x44 0x15 OutDataPreset Acknowledge Disabled
0x40 0x18 InShift+ Acknowledge Disabled
0x40 0x19 InShift- Acknowledge Disabled
0x40 0x1A OutShift+ Acknowledge Disabled
0x40 0x1B OutShift- Acknowledge Disabled
0x40 0x20 InReset Acknowledge Disabled
0x40 0x21 OutReset Acknowledge Disabled
0x40 0x22 AInReset Acknowledge Disabled
0x40 0x23 AOutReset Acknowledge Disabled
0x44 0x31 PrerollPreset Acknowledge Disabled
0x40 0x40 AutoModeOff Acknowledge Disabled
ignored, Status bit
remembered
0x40 0x41 AutoModeOn Acknowledge Disabled
ignored, Status bit
remembered
0x41 0x37 InputCheck Acknowledge Disabled
544Управление по протоколу RS-422

Command Reply No Remote Notes
6 - Sense Request
0x61 0x0A TimeCodeGenSense — —
0x61 0x0C CurrentTimeSense — —
0x60 0x10 InDataSense InData Enabled
0x60 0x11 OutDataSense OutData Enabled
0x60 0x12 AInDataSense AInData Enabled
0x60 0x13 AOutDataSense AOutData Enabled
0x61 0x20 StatusSense StatusData Enabled
0x60 0x2B RemainTimeSense RemainTimeData Enabled
0x60 0x2E SpeedSense SpeedData Enabled
0x60 0x31 PrerollTimeSense PreRollTimeData Enabled
0x60 0x36 TimerModeSense TimerModeData Enabled
0x60 0x3E RecordInhibitSense RecordInhibitStatus Enabled
7 - Sense Reply
0x78 0x00 Timer1Data — —
Current Time and
00:00:00:00
0x78 0x04 LTCUserBitsTimeData — —
Current Time and
00:00:00:00
0x78 0x06 VITCUserBitsTimeData — —
Current Time and
00:00:00:00
0x74 0x06 VITCTimeData — — Current Time
0x74 0x07 UserBitsVITCTimeData — — 00:00:00:00
0x74 0x08 GenTCData — — Current Time
0x78 0x08 GenTCUBData — —
Current Time and
00:00:00:00
0x74 0x09 GenUBData — — 00:00:00:00
0x74 0x10 InData — —
0x74 0x11 OutData — —
0x74 0x12 AInData — —
0x74 0x13 AOutData — —
0x74 0x14 CorrectedLTCTimeData — — Current Time
0x70 0x20 StatusData — —
Please see “Status Bits”
sheet: Limited to 9 bytes
of status, silently
truncated
0x76 0x2B RemainTimeData — —
0x71 0x2E SpeedData — —
0x74 0x31 PrerollTimeData — —
0x71 0x36 TimerModeData — — Returns 0 (TimeCode)
0x72 0x3E RecordInhibitStatus — —
545Управление по протоколу RS-422
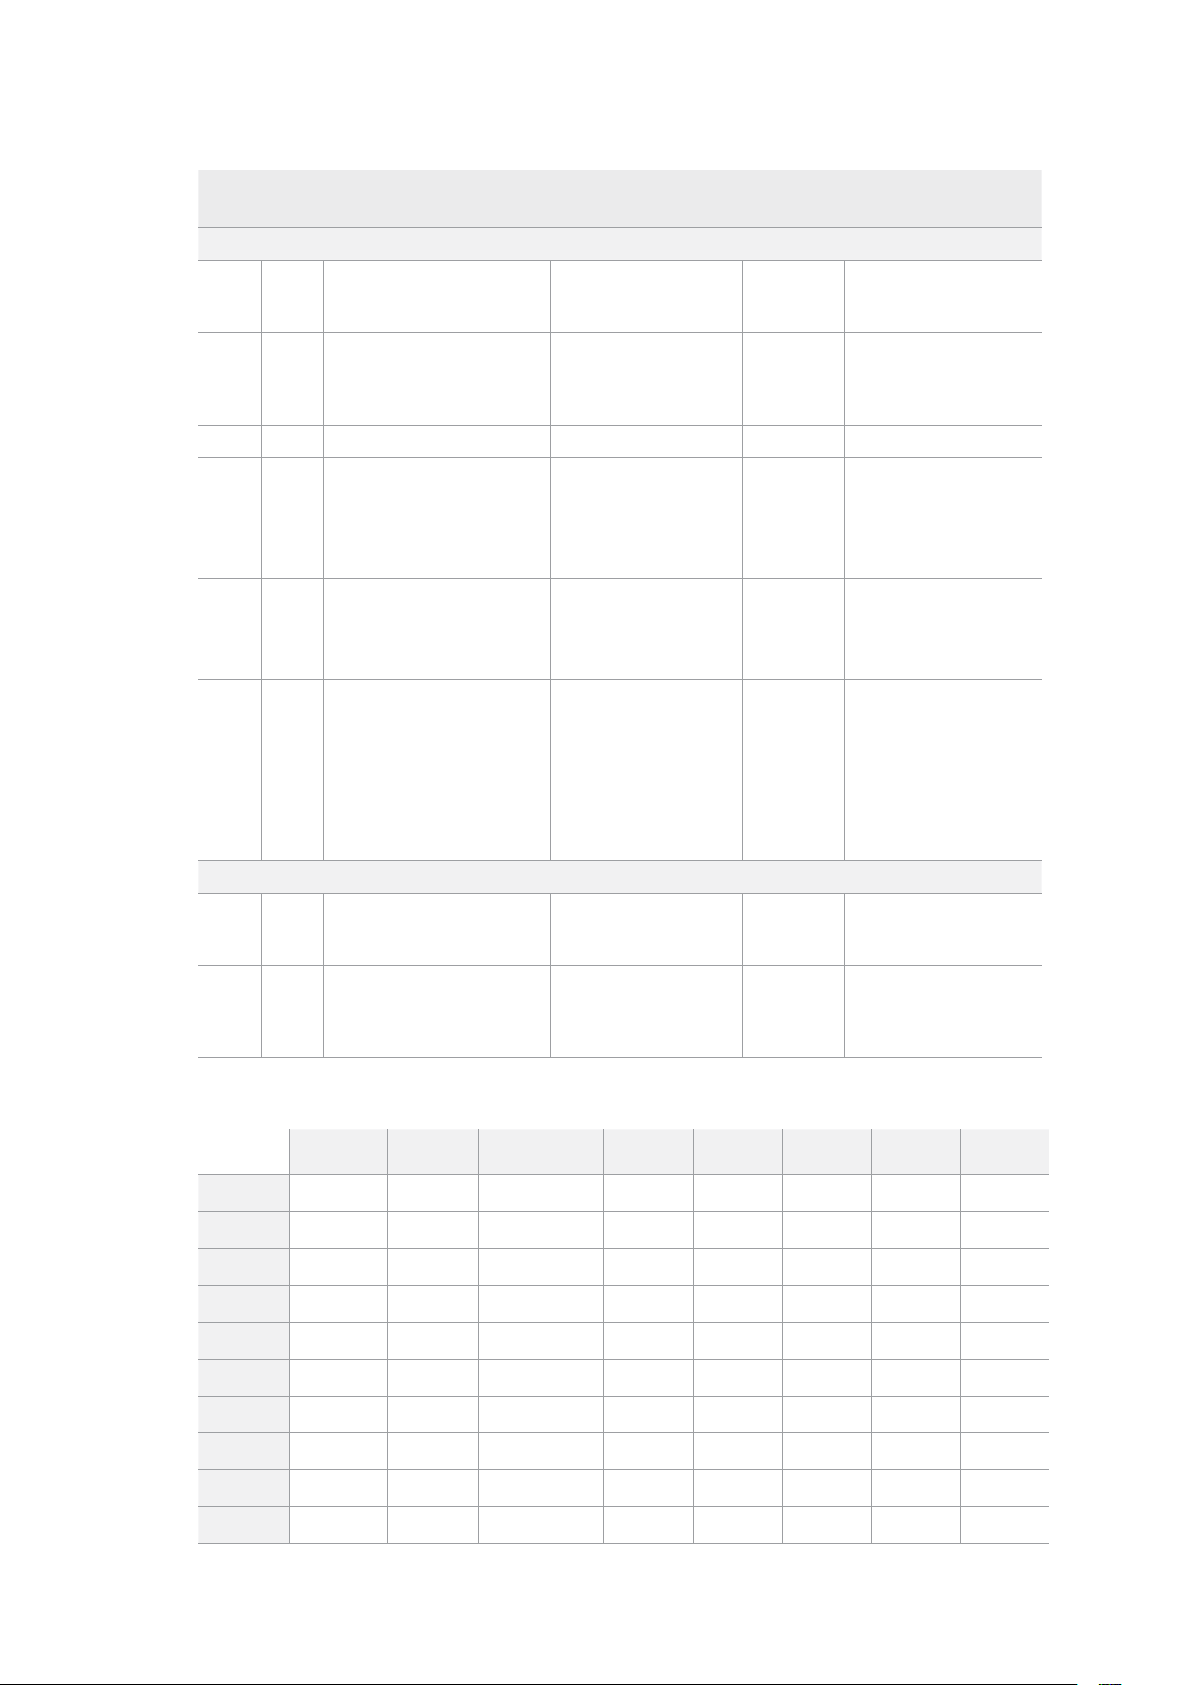
Command Reply No Remote Notes
A - Advanced Media Protocol
0xA1 0x01 AutoSkip Acknowledge Disabled
8-bit signed number of
clips to skip from current
clip
0xAX 0x15 ListNextID IDListing Enabled
when x = 0 single clip
request when x = 1, #
clips can be specified in
the send data
0x20 0x29 ClearPlaylist Acknowledge Disabled
0x41 0x42 SetPlaybackLoop Acknowledge Disabled
Bit 0 loop mode enable,
0=false 1=true
Bit 1 is single clip/timeline
0=single clip
1=timeline
0x41 0x44 SetStopMode Acknowledge Disabled
0 = Off
1 = Freeze on last frame
2 = Freeze on next clip
3 = Show black
0x4f 0x16 AppendPreset Acknowledge Disabled
2 Bytes for the length N
of the clip name
N Bytes for each character
of the clip name
4 Byte in point timecode
(format is FFSSMMHH)
4 Byte out point timecode
(format is FFSSMMHH)
Blackmagic Extensions
0x82 0x02 BMDSeekToTimelinePosition Acknowledge Disabled
16-bit little endian
fractional position
[0..65535]
0x81 0x03 BMDSeekRelativeClip Acknowledge Disabled
One-byte signed integer,
which is the number of
clips to skip (negative for
backwards).
Информация о протоколе RS-422 для разработчиков
bit 7 bit 6 bit 5 bit 4 bit 3 bit 2 bit 1 bit 0
Byte 0
0 0 Cassette out 0 0 0 0 Local
Byte 1
Standby 0 Stop 0 Rewind Forward Record Play
Byte 2
Servo Lock 0 Shuttle Jog Var Direction Still 1
Byte 3
Auto Mode 0 0 0 Aout Set Ain Set Out Set In Set
Byte 4
Select EE Full EE Loop Playback 0 0 0 0 0
Byte 5
0 0 0 0 0 0 0 0
Byte 6
0 Lamp Still Lamp Fwd Lamp Rev 0 0 0 0
Byte 7
0 0 0 0 0 0 0 0
Byte 8
0 0 Near EOT EOT 0 0 0 0
Byte 9
0 0 0 0 0 0 0 0
546Управление по протоколу RS-422
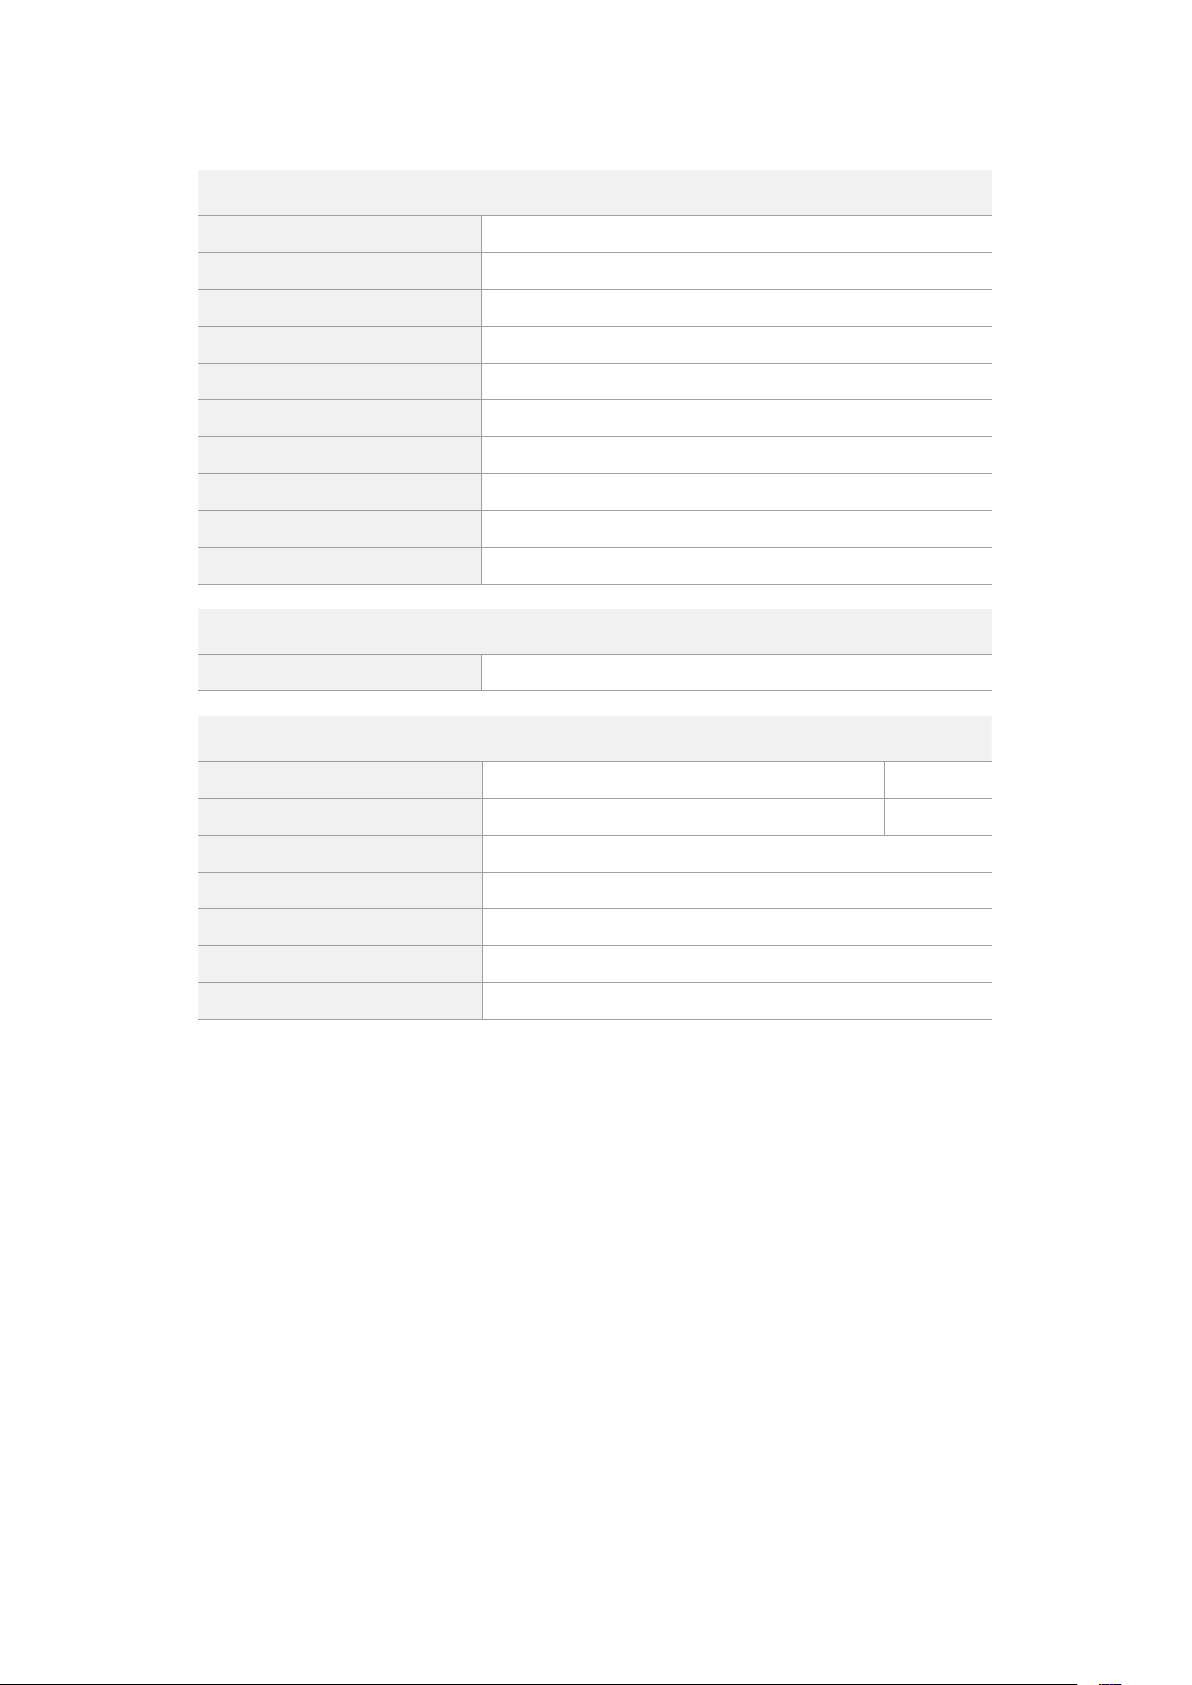
Variables
Cassette Out
Set if no SSD is present
Local
Set if Remote is disabled (local control)
Standby
Set if a disk is available
Direction
Clear if playback is forwarding, set if playback is reversing
Still
Set if playback is paused, or if in input preview mode
Auto Mode
Set if in Auto Mode
Select EE, Full EE
Set if in input preview mode
Lamp Still/Fwd/Rev
Set according to playback speed and direction
Near EOT
Set if total space left on available SSDs is less than 3 minutes
EOT
Set if total space left on available SSDs is less than 30 seconds
Others
Cue Complete (byte 2, bit 0)
Always 1: Cue requests are always instantaneous
HyperDeck Serial RS-422 Protocol
Protocol
Based on Sony 9-pin protocol
Interface
Baud rate 38.4 Kbps
1 start bit
8 data bits
1 stop bit
1 parity bit
Odd parity
Передача файлов по сети
Рекордеры HyperDeck поддерживают передачу файлов по FTP-протоколу. Это позволяет
быстро копировать материалы с компьютера непосредственно на рекордер по локальной
сети. Например, можно в удаленном режиме перенести файлы на рекордер HyperDeck,
который используется для вывода изображения на цифровые рекламно-
информационные панели.
Подключение к HyperDeck Studio
Для обмена файлами между компьютером и HyperDeck Studio в одной локальной сети
потребуются приложение для работы с FTP-протоколом и IP-адрес рекордера.
1 Загрузите и установите приложение для работы с FTP-протоколом на компьютер,
который будет подключен к рекордеру. Рекомендуется использовать Cyberduck,
FileZilla или Transmit, однако подойдут и другие аналогичные программы. Cyberduck
и FileZilla предлагаются бесплатно.
547Передача файлов по сети
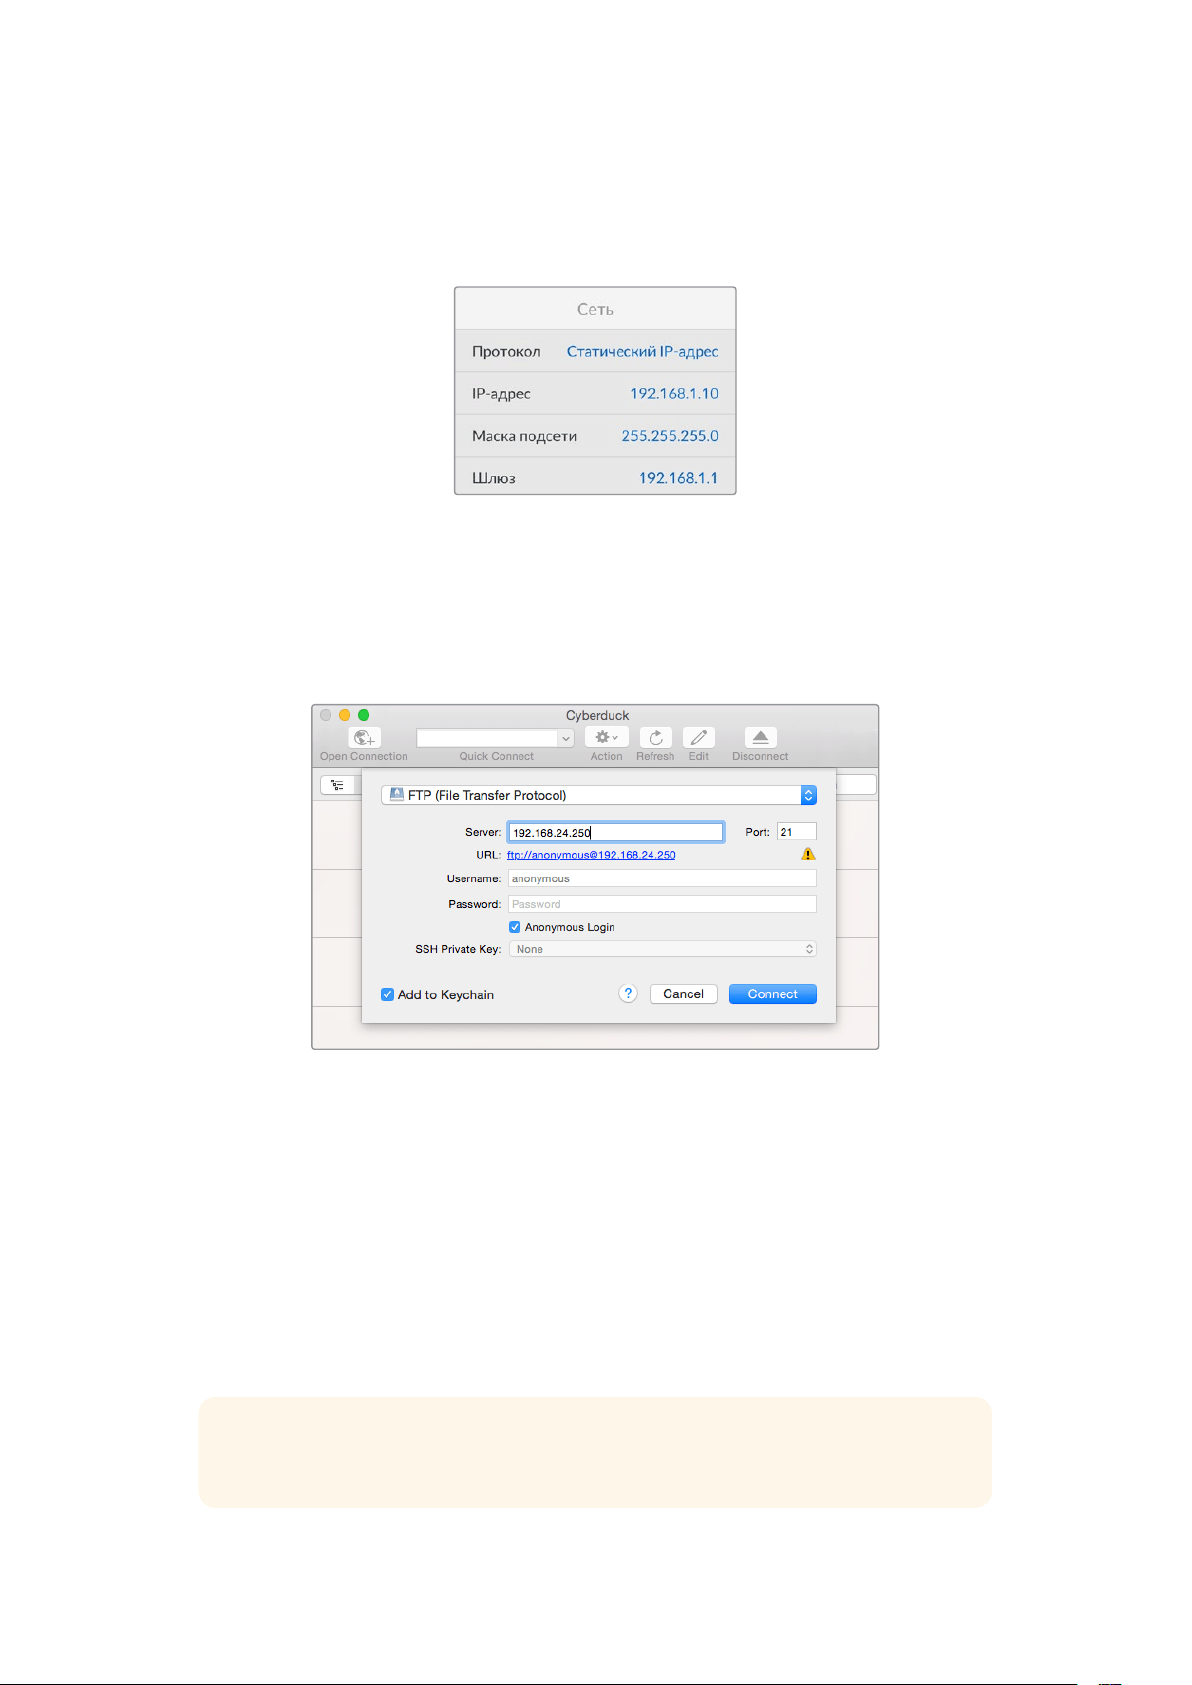
2 С помощью кабеля Ethernet подключите HyperDeck Studio к локальной сети и
посмотрите IP-адрес рекордера. Для этого нажмите кнопку MENU и поверните
круглую ручку, чтобы перейти к экрану «Сеть». Адрес будет отображаться
внизу экрана.
IP-адрес рекордера HyperDeck Studio
отображается в секции «Сеть»
3 Введите IP-адрес рекордера HyperDeck Studio в диалоговом окне приложения для
работы с FTP-протоколом. В зависимости от программы имя и положение поля могут
меняться, но обычно оно называется Server илиHost. Если есть опция Anonymous
Login, поставьте для нее флажок.
При подключении к HyperDeck Studio вводить имя пользователя
или пароль не нужно. Достаточно указать IP-адрес рекордера и
поставить флажок для опции Anonymous Login при ее наличии
Передача файлов
После установки соединения с HyperDeck Studio можно выполнять передачу файлов поFTP.
В большинстве приложений для работы с таким протоколом используется простое
перетаскивание.
HyperDeck Studio позволяет импортировать и экспортировать любые файлы, однако их
воспроизведение возможно только в том случае, если рекордер поддерживает
используемые кодек и разрешение. Перечень кодеков содержится в разделе о работе с
утилитой Blackmagic HyperDeck Setup.
СОВЕТ. Передавать файлы по сети можно в то время, когда HyperDeck ведет запись.
В этом случае скорость обмена данными корректируется автоматически.
548Передача файлов по сети

Работа с видеомикшером АТЕМ
Программная панель ATEM Software Control и аппаратная консоль ATEM позволяют
подключать к видеомикшеру до четырех рекордеров HyperDeck и управлять ими. В этом
случае их удобно использовать как библиотеку мультимедиа и для записи материала.
Видеомикшер АТЕМ дает возможность удаленно запускать и останавливать запись на
HyperDeck для создания архивной копии во время эфирной трансляции или сохранения
дополнительных ракурсов съемки.
Такие видеомикшеры, как ATEM 4 M/E Broadcast Studio4K,
позволяют подключать до четырех рекордеров HyperDeck
Подключение HyperDeck к видеомикшеру АТЕМ
1 Подключите HyperDeck к той же локальной сети, в которой находится видеомикшер
АТЕМ, и запомните IP-адрес.
Чтобы узнать IP-адрес рекордера, перейдите к меню «Настройка» на ЖК-дисплее,
затем выберите Ethernet.
Также IP-адрес рекордера можно посмотреть на вкладке Configure утилиты
Blackmagic HyperDeck Setup.
2 Соедините SDI- или HDMI-выход рекордера с соответствующим входом
видеомикшера.
3 Чтобы управлять запуском и остановкой записи на рекордере, необходимо также
подключить SDI- или HDMI-источник сигнала к HyperDeck.
Для записи программного сигнала на выходе АТЕМ соедините любой из
вспомогательных (AUX) SDI-выходов видеомикшера с SDI-входом на HyperDeck.
4 Активируйте удаленное управление с помощью кнопкиREM на передней панели или
через экранное меню (на HyperDeck Studio Mini).
5 Введите на программной или вещательной панели АТЕМ информацию об источнике
сигнала и его IP-адрес. Это самый простой способ, описанный в руководстве по
работе с АТЕМ.
549Работа с видеомикшером АТЕМ
Для управления декой по сети Ethernet с видеомикшера ATEM выберите опцию«Вкл.»
во вкладке«ДУ» на ЖК-дисплее или нажмите кнопкуREM на передней панели
Процедура постобработки
Работа с клипами
Чтобы работать с клипами, установите SD-карту или SSD-диск в слот компьютера, внешнего
устройства для чтения карт или док-станции. Файлы можно копировать на жесткий диск
простым перетаскиванием или открывать непосредственно на носителе. Твердотельный
накопитель размером 2,5дюйма допускает подключение к компьютеру через переходный
кабель eSATA-USB, однако портUSB не обладает достаточной скоростью для обработки
видео непосредственно на диске. Его рекомендуется использовать только для копирования
файлов с SSD наПК.
Mac OS
Операционная система Mac OS поддерживает QuickTime. Файлы Apple ProRes, Avid DNxHD и
DNxHR QuickTime, записанные с помощью HyperDeck, можно открыть практически в любом
приложении для обработки видео на платформе MacOS.
Файлы DNxHD и DNxHR MXF, записанные с помощью HyperDeck, совместимы с
приложениями Avid Media Composer и DaVinci Resolve для Mac. Кодеки DNxHD доступны для
бесплатной загрузки на странице http://www.avid.com/products/avid-dnxhr-and-dnxhd.
Файлы MCC, содержащие скрытые субтитры и записанные с помощью HyperDeck, можно
открыть в приложении MacCaption для MacOS (http://www.telestream.net/captioning/overview.htm).
Windows
Чтобы работать с файлами Apple ProRes и видео QuickTime, записанными с помощью
HyperDeck, компьютер должен поддерживать QuickTime. Файлы, записанные на HyperDeck,
можно открыть практически во всех приложениях для обработки видео в Windows, если они
совместимы с форматом QuickTime. Чтобы загрузить QuickTime для Windows, перейдите по
ссылке http://www.apple.com/quicktime/download/.
Файлы DNxHD и DNxHRMXF, записанные с помощью HyperDeck, совместимы с
приложениями Avid Media Composer и DaVinci Resolve для Windows. Кодеки DNxHD доступны
для бесплатной загрузки на странице http://www.avid.com/products/avid-dnxhr-and-dnxhd.
Файлы MCC, содержащие скрытые субтитры и записанные с помощью HyperDeck, можно открыть
в приложении CaptionMaker для Windows (http://www.telestream.net/captioning/overview.htm).
550Процедура постобработки

Информация для разработчиков
Blackmagic HyperDeck Ethernet Protocol
Blackmagic HyperDeck Ethernet Protocol — текстовый протокол, доступ к которому
осуществляется через TCP-порт 9993 на рекордерах HyperDeck Studio со встроенным
портом Ethernet. Разработчики программного обеспечения могут использовать встроенный
протокол управления для создания решений, интегрированных с нашими продуктами. С этой
целью компания Blackmagic Design публикует протоколы в открытом доступе.
Protocol Commands
Command Command Description
help or ? Provides help text on all commands and parameters
commands return commands in XML format
device info return device information
disk list query clip list on active disk
disk list: slot id: {n} query clip list on disk in slot {n}
quit disconnect ethernet control
ping check device is responding
preview: enable: {true/false} switch to preview or output
play play from current timecode
play: speed: {-5000 to 5000} play at specific speed
play: loop: {true/false} play in loops or stop-at-end
play: single clip: {true/false} play current clip or all clips
playrange query playrange setting
playrange set: clip id: {n} set play range to play clip {n} only
playrange set: clip id: {n} count: {m} set play range to {m} clips starting from clip {n}
playrange set: in: {inT} out: {outT}
set play range to play between:
- timecode {inT} andtimecode {outT}
playrange set: timeline in: {in} timeline out:
{out}
set play range in units of frames between:
- timeline position {in} and position {out} clear/reset play
rangesetting
playrange clear clear/reset play range setting
play on startup query unit play on startup state
play on startup: enable: {true/false} enable or disable play on startup
play on startup: single clip: {true/false} play single clip or all clips on startup
play option query play options
play option: stop mode:
{lastframe/nextframe/black}
set output frame when playback stops
record record from current input
record: name: {name} record named clip
record spill spill current recording to next slot
551Информация для разработчиков

Command Command Description
record: spill: slot id: {n}
spill current recording to specified slot
use current id to spill to same slot
stop stop playback or recording
clips count query number of clips on timeline
clips get query all timeline clips
clips get: clip id: {n} query a timeline clip info
clips get: clip id: {n} count: {m} query m clips starting from n
clips get: version: {1/2}
query clip info using specified output version:
version 1: is: name startT duration
version 2: id: startT duration inT outT name
clips add: name: {name} append a clip to timeline
clips add: clip id: {n} name: {name} insert clip before existing clip {n}
clips add: in: {inT} out: {outT} name: {name} append the {inT} to {outT} portion of clip
clips remove: clip id: {n}
remove clip {n} from the timeline
(invalidates clip ids following clip {n})
clips clear empty timeline clip list
transport info query current activity
slot info query active slot
slot info: slot id: {n} query slot {n}
slot select: slot id: {n} switch to specified slot
slot select: video format: {format} load clips of specified format
slot unblock unblock active slot
slot unblock: slot id: {n} unblock slot {n}
cache info query cache status
dynamic range query dynamic range settings
dynamic range: playback override:
{off/Rec709/Rec2020_SDR/HLG/
ST2084_300/ST2084_500/
ST2084_800/ST2084_1000/
ST2084_2000/ST2084_4000/ST2084
set playback dynamic range override
dynamic range: record override:
{off/Rec709/Rec2020_SDR/HLG/
ST2084_300/ST2084_500/
ST2084_800/ST2084_1000/
ST2084_2000/ST2084_4000/ST2048}
set record dynamic range override
notify query notification status
notify: remote: {true/false} set remote notifications
notify: transport: {true/false} set transport notifications
notify: slot: {true/false} set slot notifications
notify: configuration: {true/false} set configuration notifications
notify: dropped frames: {true/false} set dropped frames notifications
notify: display timecode: {true/false} set display timecode notifications
552Информация для разработчиков

Command Command Description
notify: timeline position: {true/false} set playback timeline position notifications
notify: playrange: {true/false} set playrange notifications
notify: cache: {true/false} set cache notifications
notify: dynamic range: {true/false} set dynamic range settings notifications
notify: slate: {true/false} set digital slate notifications
goto: clip id: {start/end} goto first clip or last clip
goto: clip id: {n} goto clip id {n}
goto: clip id: +{n} go forward {n} clips
goto: clip id: -{n} go backward {n} clips
goto: clip: {n} goto frame position {n} within current clip
goto: clip: +{n} go forward {n} frames within current clip
goto: clip: -{n} go backward {n} frames within current clip
goto: clip: {start/end} goto start or end of clip
goto: timeline: {n} goto frame position {n} within timeline
goto: timeline: +{n} o forward {n} frames within timeline
goto: timeline: -{n} go backward {n} frames within timeline
goto: timeline: {start/end} goto start or end of timeline
goto: timecode: {timecode} goto specified timecode
goto: timecode: +{timecode} go forward {timecode} duration
goto: timecode: -{timecode} go backward {timecode} duration
goto: slot id: {n} goto slot id {n}
jog: timecode: {timecode} jog to timecode
jog: timecode: +{timecode} jog forward {timecode} duration
jog: timecode: -{timecode} jog backward {timecode} duration
shuttle: speed: {-5000 to 5000} shuttle with speed
remote query unit remote control state
remote: enable: {true/false} enable or disable remote control
remote: override: {true/false} session override remote control
configuration query configuration settings
configuration: video input: SDI switch to SDI input
configuration: video input: HDMI switch to HDMI input
configuration: video input: component switch to component input
configuration: audio input: embedded capture embedded audio
configuration: audio input: XLR capture XLR audio
configuration: audio input: RCA capture RCA audio
configuration: file format: {format} switch to specific file format
configuration: audio codec: PCM switch to PCM audio
configuration: audio codec: AAC switch to AAC audio
553Информация для разработчиков

Command Command Description
configuration: timecode input:
{external/embedded/preset/clip}
change the timecode input
configuration: timecode output:
{clip/timeline/internal}
change the timecode output
configuration: timecode preference:
{default/dropframe/nondropframe}
whether or not to use drop frame timecodes when not
otherwise specified
configuration: timecode preset:
{timecode}
set the timecode preset
configuration: audio input channels: {n} set the number of audio channels recorded to {n}
configuration: record trigger:
{none/recordbit/timecoderun}
change the record trigger
configuration: record prefix: {name} set the record prefix name (supports UTF-8 name)
configuration: append timestamp:
{true/false}
append timestamp to recorded filename
configuration: xlr input id: {n} xlr type:
{line/mic}
configure xlr input type
multiple xlr inputs can be configured in a single command
configuration: genlock input resync:
{true/false}
enable or disable genlock input resync
uptime return time since last boot
format: prepare: {format} prepare a disk formatting operation to filesystem {format}
format: confirm: {token} perform a pre-prepared formatting operation using token
identify: enable: {true/false} identify the device
watchdog: period: {period in seconds} client connection timeout
reboot reboot device
slate clips slate clips information
slate project slate project information
slate project:↵
camera: {index}↵
set camera index e.g. A
Command Combinations
You can combine the parameters into a single command, for example:
play: speed: 200 loop: true single clip: true
Or for configuration:
configuration: video input: SDI audio input: XLR
Or to switch to the second disk, but only play NTSC clips:
slot select: slot id: 2 video format: NTSC
Using XML
While you can use the Terminal to talk to HyperDeck, if you are writing software, you can use XML
to confirm the existence of a specific command based on the firmware of the HyperDeck you are
communicating with. This helps your software user interface adjust to the capabilities of the specific
HyperDeck model and software version.
554Информация для разработчиков

Protocol Details
Connection
The HyperDeck Ethernet server listens on TCP port 9993.
Basic syntax
The HyperDeck protocol is a line oriented text protocol. Lines from the server will be separated by an ascii
CR LF sequence. Messages from the client may be separated by LF or CR LF.
New lines are represented in this document as a "↵" symbol.
Single line command syntax
Command parameters are usually optional. A command with no parameters is terminated with a new line:
{Command name}↵
If parameters are specified, the command name is followed by a colon, then pairs of parameter names and
values. Each parameter name is terminated with a colon character:
{Command name}: {Parameter}: {Value} {Parameter}: {Value} ...↵
Multiline command syntax
The HyperDeck protocol also supports an equivalent multiline syntax where each parameter-value pair is
entered on a new line. E.g.
{Command name}:↵
{P a r a m e t e r}: { Va lu e}↵
{P a r a m e t e r}: { Va lu e}↵
↵
Response syntax
Simple responses from the server consist of a three digit response code and descriptive text terminated by
a new line:
{Response code} {Response text}↵
If a response carries parameters, the response text is terminated with a colon, and parameter name and
value pairs follow on subsequent lines until a blank line is returned:
{Response code} {Response text}:↵
{P a r a m e t e r}: { Va lu e}↵
{P a r a m e t e r}: { Va lu e}↵
...
↵
Successful response codes
A simple acknowledgement of a command is indicated with a response code of 200:
200 ok↵
Other successful responses carry parameters and are indicated with response codes in the range of 201
to299.
555Информация для разработчиков

Failure response codes
Failure responses to commands are indicated with response codes in the range of 100 to 199:
100 syntax error
101 unsupported parameter
102 invalid value
103 unsupported
104 disk full
105 no disk
106 disk error
107 timeline empty
108 internal error
109 out of range
110 no input
111 remote control disabled
112 clip not found
120 connection rejected
150 invalid state
151 invalid codec
160 invalid format
161 invalid token
162 format not prepared
163 parameterized single line command not supported
Asynchronous response codes
The server may return asynchronous messages at any time. These responses are indicated with response
codes in the range of 500 to 599:
5xx {Response Text}:↵
{P a r a m e t e r}: { Va lu e}↵
{P a r a m e t e r}: { Va lu e}↵
↵
Connection response
On connection, an asynchronous message will be delivered:
500 connection info:↵
protocol version: {Version}↵
model: {Model Name}↵
↵
Connection rejection
Only one client may connect to the server at a time. If other clients attempt to connect concurrently,
they will receive an error and be disconnected:
120 connection rejected↵
556Информация для разработчиков

Timecode syntax
Timecodes are expressed as non-drop-frame timecode in the format:
HH:MM:SS:FF
Handling of deck "remote" state
The “remote” command may be used to enable or disable the remote control of the deck. Any attempt to
change the deck state over ethernet while remote access is disabled will generate an error:
111 remote control disabled↵
To enable or disable remote control:
remote: enable: {“true”, “false”} ↵
The current remote control state may be overridden allowing remote access over ethernet irrespective of
the current remote control state:
remote: override: {“true”, “false”} ↵
The override state is only valid for the currently connected ethernet client and only while the connection
remains open.
The “remote” command may be used to query the remote control state of the deck by specifying no
parameters:
remote↵
The deck will return the current remote control state:
210 remote info:↵
enabled: {“true”, “false”}↵
override: {“true”, “false”}↵
↵
Asynchronous remote control information change notification is disabled by default and may be
configured with the “notify” command. When enabled, changes in remote state will generate a “510 remote
info:”asynchronous message with the same parameters as the “210 remote info:” message.
Closing connection
The "quit" command instructs the server to cleanly shut down the connection:
quit↵
Checking connection status
The "ping" command has no function other than to determine if the server is responding:
ping↵
Getting help
The "help" or "?" commands return human readable help text describing all available commands and
parameters:
help↵
Or:
?↵
The server will respond with a list of all supported commands:
201 help:↵
{Help Te x t}↵
{Help Te x t}↵
↵
557Информация для разработчиков

Switching to preview mode
The "preview" command instructs the deck to switch between preview mode and output mode:
preview: enable: {"true", "false"}↵
Playback will be stopped when the deck is switched to preview mode. Capturing will be stopped when the
deck is switched to output mode.
Controlling device playback
The “play” command instructs the deck to start playing:
play↵
The play command accepts a number of parameters which may be used together in most combinations.
By default, the deck will play all remaining clips on the timeline then stop.
The “single clip” parameter may be used to override this behavior:
play: single clip: {“true”, “false”}↵
By default, the deck will play at normal (100%) speed. An alternate speed may be specified in percentage
between -1600 and 1600:
play: speed: {% normal speed}↵
By default, the deck will stop playing when it reaches to the end of the timeline. The “loop” parameter may
be used to override this behavior:
play: loop: {“true”, “false”}↵
The “playrange” command instructs the deck to play all the clips. To override this behavior: and select a
particular clip:
playrange set: clip id: {Clip ID}↵
To only play a certain timecode range:
playrange set: in: {in timecode} out: {out timecode}↵
To clear a set playrange and return to the default value:
playrange clear↵
The “play on startup command” instructs the deck on what action to take on startup. By default, the deck
will not play. Use the “enable” command to start playback after each power up.
play on startup: enable {“true”, “false”}↵
By default, the unit will play back all clips on startup. Use the “single clip” command to override.
play on startup: single clip: {“true”, “false”}↵
Stopping deck operation
The "stop" command instructs the deck to stop the current playback or capture:
stop↵
558Информация для разработчиков

Changing timeline position
The "goto" command instructs the deck to switch to playback mode and change its position within the
timeline.
To go to the start of a specific clip:
goto: clip id: {Clip ID}↵
To move forward/back {count} clips from the current clip on the current timeline:
goto: clip id: +/-{count}↵
Note that if the resultant clip id goes beyond the first or last clip on timeline, it will be clamp at the first or
last clip.
To go to the start or end of the current clip:
goto: clip: {“start”, “end”}↵
To go to the start of the first clip or the end of the last clip:
goto: timeline: {“start”, “end”}↵
To go to a specified timecode:
goto: timecode: {timecode}↵
To move forward or back a specified duration in timecode:
goto: timecode: {“+”, “-”}{duration in timecode}↵
To specify between slot 1 and slot 2:
goto: slot id: {Slot ID}↵
Note that only one parameter/value pair is allowed for each goto command.
Enumerating supported commands and parameters
The "commands" command returns the supported commands:
commands↵
The command list is returned in a computer readable XML format:
212 commands:
<commands>↵
<command name="…"><parameter name="…"/>…</command>↵
<command name="…"><parameter name="…"/>…</command>↵
…
</commands>↵
↵
More XML tokens and parameters may be added in later releases.
559Информация для разработчиков

Controlling asynchronous notifications
The “notify” command may be used to enable or disable asynchronous notifications from the server.
To enable or disable transport notifications:
notify: transport: {“true”, “false”}↵
To enable or disable slot notifications:
notify: slot: {“true”, “false”}↵
To enable or disable remote notifications:
notify: remote: {“true”, “false”}↵
To enable or disable configuration notifications:
notify: configuration: {“true”, “false”}↵
Multiple parameters may be specified. If no parameters are specified, the server returns the current state of
all notifications:
209 notify:↵
transport: {“true”, “false”}↵
slot: {“true”, “false”}↵
remote: {“true”, “false”}↵
configuration: {“true”, “false”}↵
dropped frames: {“true”, “false”}↵
display timecode: {“true”, “false”}↵
timeline position: {“true”, “false”}↵
playrange: {“true”, “false”}↵
cache: {“true”, “false”}↵
dynamic range: {“true”, “false”}↵
slate: {“true”, “false”}↵
↵
Retrieving device information
The "device info" command returns information about the connected deck device:
device info↵
The server will respond with:
204 device info:↵
protocol version: {Version}↵
model: {Model Name}↵
unique id: {unique alphanumeric identifier}↵
slot count: {number of storage slots}↵
software version: {software version}↵
↵
560Информация для разработчиков

Retrieving slot information
The "slot info" command returns information about a slot. Without parameters, the command returns
information for the currently selected slot:
slot info↵
If a slot id is specified, that slot will be queried:
slot info: slot id: {Slot ID}↵
The server will respond with slot specific information:
202 slot info:↵
slot id: {Slot ID}↵
status: {"empty", "mounting", "error", "mounted"}↵
volume name: {Volume name}↵
recording time: {recording time available in seconds}↵
video format: {disk's default video format}↵
blocked: {“true”, “false”}↵
↵
Asynchronous slot information change notification is disabled by default and may be configured with
the "notify" command. When enabled, changes in slot state will generate a "502 slot info:" asynchronous
message with the same parameters as the "202 slot info:" message.
Retrieving clip information
The “disk list” command returns the information for each playable clip on a given disk. Without parameters,
the command returns information for the current active disk:
disk list↵
If a slot id is specified, the disk in that slot will be queried:
disk list: slot id: {Slot ID}↵
The server responds with the list of all playable clips on the disk in the format of: Index, name, formats, and
duration in timecode:
206 disk list:↵
slot id: {Slot ID}↵
{clip index}: {name} {file format} {video format} {Duration
ti m ecode}↵
{clip index}: {name} {file format} {video format} {Duration
ti m ecode}↵
…
↵
Note that the clip index starts from 1.
Retrieving clip count
The "clips count" command returns the number of clips on the current timeline:
clips count ↵
The server responds with the number of clips:
214 clips count: ↵
clip count: {Count}↵
561Информация для разработчиков

Retrieving timeline information
The "clips get" command returns information for each available clip on the current timeline. Without
parameters, the command returns information for all clips on timeline:
clips get↵
The server responds with a list of clip IDs, names and timecodes:
205 clips info:↵
clip count: {Count}↵
{Clip ID}: {Name} {Start timecode} {Duration timecode}↵
{Clip ID}: {Name} {Start timecode} {Duration timecode}↵
…
↵
Retrieving transport information
The “transport info” command returns the state of the transport:
transport info ↵
The server responds with transport specific information:
208 transport info:
status: {“preview”, “stopped”, “play”, “forward”, “rewind”,
“j o g ”, “ s h u t t l e ”,” r e c o r d ” }↵
speed: {Play speed between -5000 and 5000 %}↵
slot id: {Slot ID or “none”}↵
clip id: {Clip ID or “none”}↵
single clip: {“true”, “false”}↵
display timecode: {timecode}↵
timecode: {timecode}↵
video format: {Video format}↵
loop: {“true”, “false”}↵
timeline: {n}↵
input video format: {Video format”}↵
dynamic range: {“off”, “Rec709”, “Rec2020_SDR”, “HLG”,
“ST2084_300”, “ST2084_500”, “ST2084_800”, “ST2084_1000”,
“ST2084_2000”, “ST2084_4000”, “ST2048” or “none”}↵
↵
The "timecode" value is the timecode within the current timeline for playback or the clip for record. The
"display timecode" is the timecode displayed on the front of the deck. The two timecodes will differ in some
deck modes.
Asynchronous transport information change notification is disabled by default and may be configured
with the "notify" command. When enabled, changes in transport state will generate a "508 transport info:"
asynchronous message with the same parameters as the "208 transport info:" message.
562Информация для разработчиков

Video Formats
The following video formats are currently supported on HyperDeck Studio:
NTSC, PAL, NTSCp, PALp
720p50, 720p5994, 720p60
1080p23976, 1080p24, 1080p25, 1080p2997, 1080p30
1080i50, 1080i5994, 1080i60
HyperDeck Studio Pro and Plus models support these 4k formats:
4Kp23976, 4Kp24, 4Kp25, 4Kp2997, 4Kp30
HyperDeck Studio 4K Pro adds support for the following 4k formats:
4Kp50, 4Kp5994, 4Kp60
Video format support may vary between models and software releases.
File Formats
All HyperDeck models currently support the following file formats:
H.264High_SDI
H.264High
H.264Medium
H.264Low
QuickTimeProResHQ
QuickTimeProRes
QuickTimeProResLT
QuickTimeProResProxy
QuickTimeDNxHD220x
DNxHD220x
QuickTimeDNxHD145
DNxHD145
QuickTimeDNxHD45
DNxHD45
HyperDeck Studio 4K Pro also supports the following file formats:
H.265High_SDI
H.265High
H.265Medium
H.265Low
QuickTimeDNxHR_HQX
DNxHR_HQX 4Kp60
QuickTimeDNxHR_SQ
DNxHR_SQ
QuickTimeDNxHR_LB
DNxHR_LB
Supported file formats may vary between models and software releases.
563Информация для разработчиков

Querying and updating configuration information
The "configuration" command may be used to query the current configuration of the deck:
configuration↵
The server returns the configuration of the deck:
211 configuration:↵
audio input: {“embedded”, “XLR”, “RCA”}↵
audio mapping: {n}↵
video input: {“SDI”, “HDMI”, “component”, “composite”}↵
file format: {format}↵
audio codec: {“PCM”, “AAC”}↵
timecode input: {“external”, “embedded”, “preset”, “clip”}↵
timecode output: {“clip”, “timeline”}↵
timecode preference: {“default”, “dropframe”, “nondropframe”}↵
timecode preset: {timecode}↵
audio input channels: {n}↵
record trigger: {“none”, “recordbit”, “timecoderun”}↵
record prefix: {name}↵
append timestamp: {“true”, “false”}↵
↵
One or more configuration parameters may be specified to change the configuration of the deck.
To change the current video input:
configuration: video input: {“SDI”, “HDMI”, “component”}↵
Valid video inputs may vary between models. To configure the current audio input:
configuration: audio input: {“embedded”, “XLR”, “RCA”}↵
Valid audio inputs may vary between models.
To configure the current file format:
configuration: file format: {File format}↵
Note that changes to the file format may require the deck to reset, which will cause the client connection to
be closed. In such case, response code 213 will be returned (instead of 200) before the client connection is
closed:
“213 deck rebooting”
Asynchronous configuration information change notification is disabled by default and may be configured
with the “notify” command. When enabled, changes in configuration will generate a “511 configuration:”
asynchronous message with the same parameters as the “211 configuration:” message.
Selecting active slot and video format
The "slot select" command instructs the deck to switch to a specified slot, or/and to select a specified
output video format.
To switch to a specified slot:
slot select: slot id: {slot ID}↵
To select the output video format:
slot select: video format: {video format}↵
Either or all slot select parameters may be specified. Note that selecting video format will result in a rescan
of the disk to reconstruct the timeline with all clips of the specified video format.
564Информация для разработчиков

Clearing the current timeline
The "clips clear" command instructs the deck to empty the current timeline:
clips clear↵
The server responds with
200 ok↵
Adding a clip to the current timeline
The "clips add:" command instructs the deck to add a clip to the current timeline:
clips add: name: {"clip name"}↵
The server responds with
200 ok↵
or in case of error
1xx {error description}↵
Configuring the watchdog
The “watchdog” command instructs the deck to monitor the connected client and terminate the connection
if the client is inactive for at least a specified period of time.
To configure the watchdog:
watchdog: period: {period in seconds}↵
To avoid disconnection, the client must send a command to the server at least every {period} seconds. Note
that if the period is set to 0 or less than 0, connection monitoring will be disabled.
565Информация для разработчиков

Помощь
Как получить помощь
Самый быстрый способ получить помощь— обратиться к страницам поддержки на сайте
Blackmagic Design и проверить наличие последних справочных материалов по рекордерам
HyperDeck.
Страницы поддержки на сайте Blackmagic Design
Последние версии руководства по эксплуатации, программного обеспечения и
дополнительную информацию можно найти в центре поддержки Blackmagic Design
на странице www.blackmagicdesign.com/ru/support.
Форум Blackmagic Design
Посетите форум сообщества Blackmagic Design на нашем веб-сайте, чтобы получить
дополнительную информацию и узнать об интересных творческих идеях. На нем можно
поделиться своими идеями, а также получить помощь от персонала поддержки и других
пользователей. Адрес форума https://forum.blackmagicdesign.com.
Обращение в Службу поддержки Blackmagic Design
Если с помощью доступных справочных материалов решить проблему не удалось,
воспользуйтесь формой «Отправить нам сообщение» на странице поддержки. Можно также
позвонить в ближайшее представительство Blackmagic Design, телефон которого вы найдете
на нашем веб-сайте.
Проверка используемой версии программного обеспечения
Чтобы узнать версию утилиты Blackmagic HyperDeck Setup, установленной на вашем
компьютере, откройте окно About Blackmagic HyperDeck Setup.
На компьютере с операционной системой Mac OS откройте Blackmagic HyperDeck
Setup в папке «Программы». В меню выберите About Blackmagic HyperDeck Setup,
чтобы узнать номер версии.
На компьютере с операционной системой Windows откройте Blackmagic HyperDeck
Setup в меню «Пуск» или щелкните значок утилиты на начальном экране. В меню
«Справка» выберите About Blackmagic HyperDeck Setup, чтобы узнать номер версии.
Загрузка последних версий программного обеспечения
Узнав установленную версию Blackmagic HyperDeck Setup, перейдите в центр поддержки
Blackmagic на странице www.blackmagicdesign.com/ru/support, чтобы проверить наличие
обновлений. Рекомендуется всегда использовать последнюю версию программного
обеспечения, однако обновление лучше всего выполнять после завершения
текущего проекта.
566Помощь

Соблюдение нормативных требований
Утилизация электрооборудования и электронной аппаратуры в Европейском Союзе
Изделие содержит маркировку, в соответствии с которой его запрещается
утилизировать вместе с бытовыми отходами. Непригодное для эксплуатации
оборудование необходимо передать в пункт вторичной переработки. Раздельный
сбор отходов и их повторное использование позволяют беречь природные ресурсы,
охранять окружающую среду и защищать здоровье человека. Чтобы получить
подробную информацию о порядке утилизации, обратитесь в местные
муниципальные органы или к дилеру, у которого вы приобрели это изделие.
Данное оборудование протестировано по требованиям для цифровых устройств
класса A (раздел 15 спецификаций FCC) и признано соответствующим всем
предъявляемым критериям. Соблюдение упомянутых нормативов обеспечивает
достаточную защиту от вредного излучения при работе оборудования в нежилых
помещениях. Так как это изделие генерирует и излучает радиоволны, при
неправильной установке оно может становиться источником радиопомех. Если
оборудование эксплуатируется в жилых помещениях, высока вероятность
возникновения помех, влияние которых в этом случае пользователь должен
устранить самостоятельно.
До эксплуатации допускаются устройства, соответствующие двум главным
требованиям.
1 Оборудование не должно быть источником вредных помех.
2 Оборудование должно быть устойчивым к помехам, включая те, которые могут
вызвать сбой в работе.
R-R-BMD-20210202002
R-R-BMD-20210202003
R-R-BMD-20201201003
R-R-BMD-20210301001
Соответствие требованиям ISED (Канада)
Данное оборудование соответствует канадским стандартам для цифровых
устройств классаA.
Любая модификация или использование изделия не по назначению могут
повлечь за собой аннулирование заявления о соответствии этим стандартам.
Подключение к HDMI-интерфейсу должно выполняться с помощью
качественного экранированного кабеля.
Данное оборудование протестировано по требованиям, предъявляемым к
устройствам при работе в нежилых помещениях. При использовании в бытовых
условиях оно может становиться источником помех для радиосигнала.
567Соблюдение нормативных требований
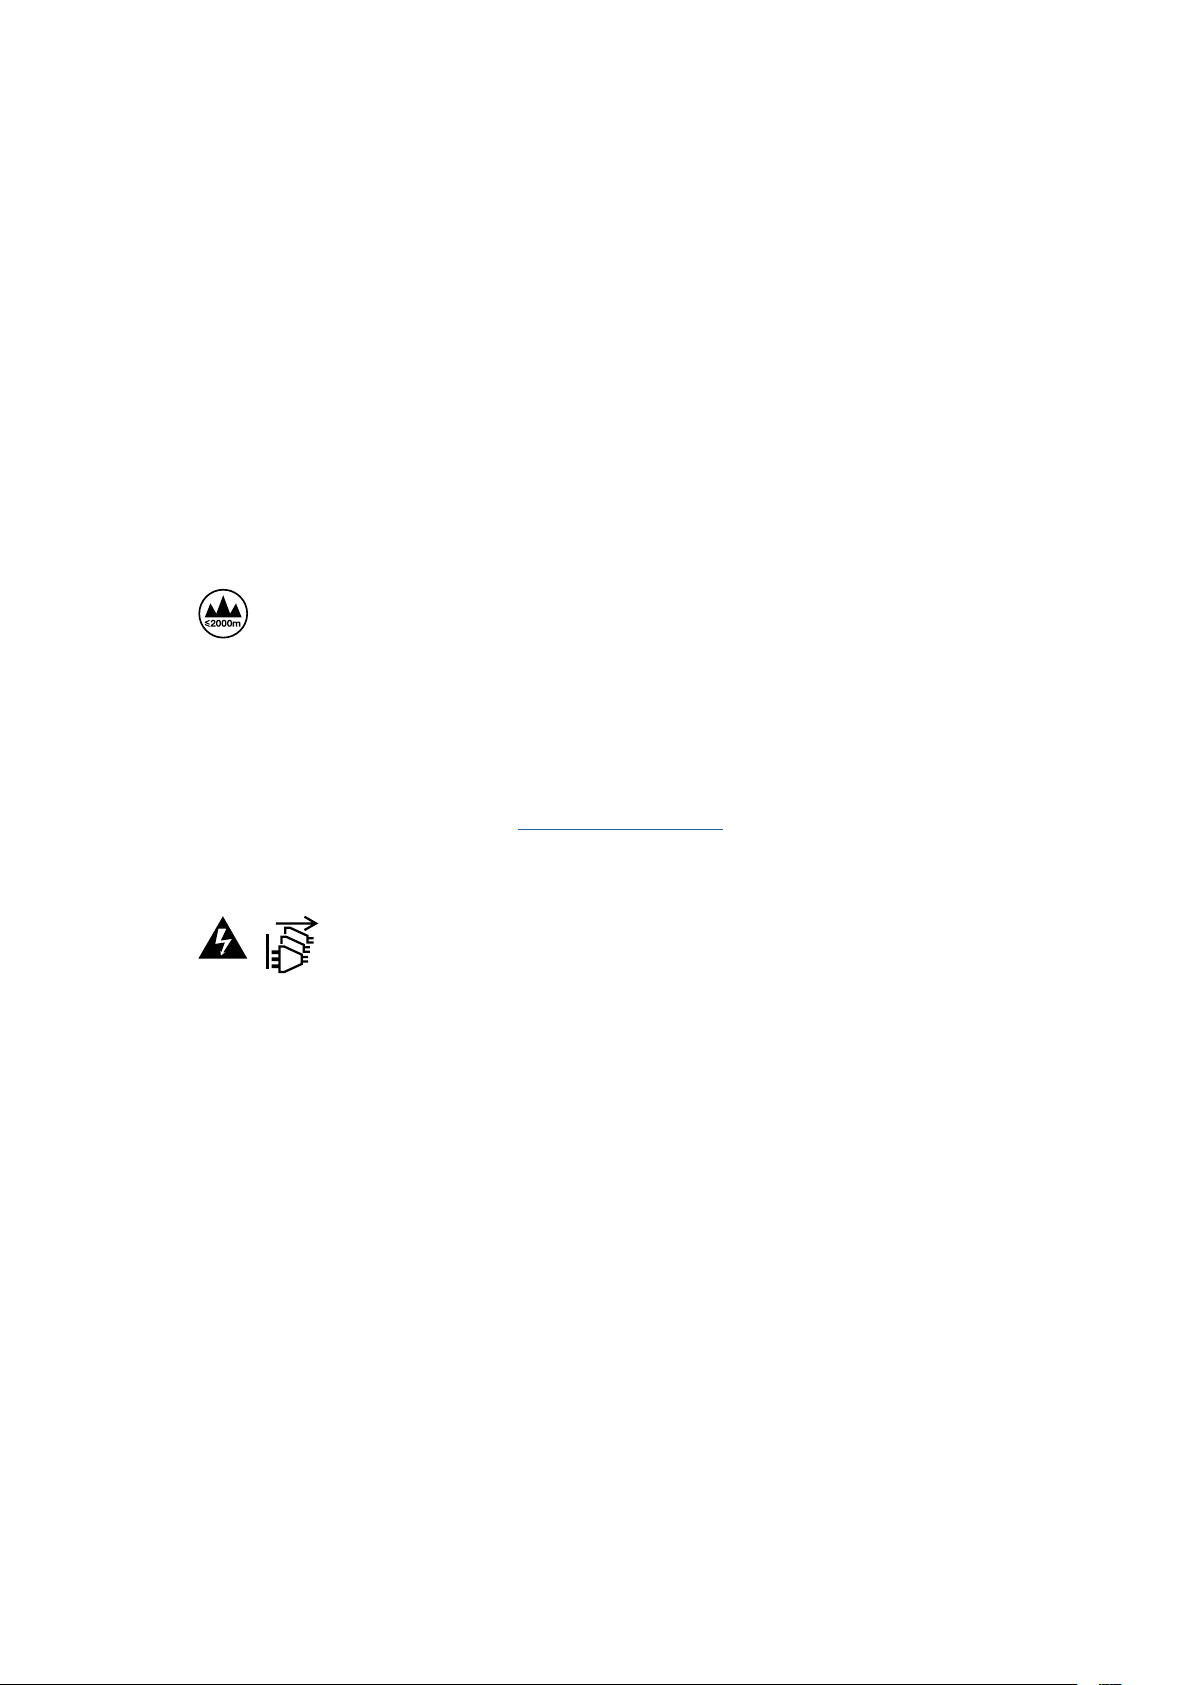
Правила безопасности
Во избежание удара электрическим током розетка для подключения устройства к сети
должна иметь заземляющий контакт. При необходимости обратитесь за помощью к
квалифицированному электрику.
Чтобы минимизировать опасность поражения электрическим током, изделие необходимо
защищать от попадания брызг и капель воды.
Допускается его эксплуатация в условиях тропического климата с температурой
окружающей среды до 40ºC.
Для работы устройства необходимо обеспечить достаточную вентиляцию.
При установке в стойку убедитесь в том, что не нарушен приток воздуха.
Внутри корпуса не содержатся детали, подлежащие обслуживанию. Для выполнения
ремонтных работ обратитесь в местный сервисный центр Blackmagic Design.
Допускается эксплуатация в местах не выше 2000метров над уровнем моря.
Уведомление для жителей штата Калифорния
При работе с этим оборудованием существует возможность контакта с содержащимися в
пластмассе микропримесями многобромистого бифенила, который в штате Калифорния
признан канцерогеном и увеличивает риск врожденных дефектов и пороков
репродуктивной системы.
Подробнее см.информацию на сайте www.P65Warnings.ca.gov.
Предупреждение для технического персонала
Перед обслуживанием отключите питание на обоих силовых разъемах.
568Правила безопасности

Гарантия
Ограниченная гарантия сроком 12 месяцев
Компания Blackmagic Design гарантирует отсутствие в данном изделии дефектов материала и
производственного брака в течение 12 месяцев с даты продажи. Если во время гарантийного
срока будут выявлены дефекты, Blackmagic Design по своему усмотрению выполнит ремонт
неисправного изделия без оплаты стоимости запчастей и трудозатрат или заменит такое
изделие новым.
Чтобы воспользоваться настоящей гарантией, потребитель обязан уведомить компанию
Blackmagic Design о дефекте до окончания гарантийного срока и обеспечить условия для
предоставления необходимых услуг. Потребитель несет ответственность за упаковку и доставку
неисправного изделия в соответствующий сервисный центр Blackmagic Design с оплатой почтовых
расходов. Потребитель обязан оплатить все расходы по доставке и страхованию, пошлины,
налоги и иные сборы в связи с возвратом изделия вне зависимости от причины.
Настоящая гарантия не распространяется на дефекты, отказы и повреждения, возникшие из-за
ненадлежащего использования, неправильного ухода или обслуживания. Компания
Blackmagic Design не обязана предоставлять услуги по настоящей гарантии: а) для устранения
повреждений, возникших в результате действий по установке, ремонту или обслуживанию
изделия лицами, которые не являются персоналом Blackmagic Design; б) для устранения
повреждений, возникших в результате ненадлежащего использования или подключения к
несовместимому оборудованию; в) для устранения повреждений или дефектов, вызванных
использованием запчастей или материалов других производителей; г) если изделие было
модифицировано или интегрировано с другим оборудованием, когда такая модификация или
интеграция увеличивает время или повышает сложность обслуживания изделия. НАСТОЯЩАЯ
ГАРАНТИЯ ПРЕДОСТАВЛЯЕТСЯ КОМПАНИЕЙ BLACKMAGIC DESIGN ВМЕСТО ЛЮБЫХ ДРУГИХ
ПРЯМО ВЫРАЖЕННЫХ ИЛИ ПОДРАЗУМЕВАЕМЫХ ГАРАНТИЙ. КОМПАНИЯ BLACKMAGIC DESIGN
И ЕЕ ДИЛЕРЫ ОТКАЗЫВАЮТСЯ ОТ ЛЮБЫХ ПОДРАЗУМЕВАЕМЫХ ГАРАНТИЙ КОММЕРЧЕСКОЙ
ЦЕННОСТИ ИЛИ ПРИГОДНОСТИ ДЛЯ КАКОЙ-ЛИБО ОПРЕДЕЛЕННОЙ ЦЕЛИ. ОТВЕТСТВЕННОСТЬ
BLACKMAGIC DESIGN ПО РЕМОНТУ ИЛИ ЗАМЕНЕ НЕИСПРАВНЫХ ИЗДЕЛИЙ ЯВЛЯЕТСЯ ПОЛНЫМ
И ИСКЛЮЧИТЕЛЬНЫМ СРЕДСТВОМ ВОЗМЕЩЕНИЯ, ПРЕДОСТАВЛЯЕМЫМ ПОТРЕБИТЕЛЮ В
СВЯЗИ С КОСВЕННЫМИ, ФАКТИЧЕСКИМИ, СОПУТСТВУЮЩИМИ ИЛИ ПОСЛЕДУЮЩИМИ
УБЫТКАМИ, ВНЕ ЗАВИСИМОСТИ ОТ ТОГО, БЫЛА ИЛИ НЕТ КОМПАНИЯ BLACKMAGIC DESIGN
(ЛИБО ЕЕ ДИЛЕР) ПРЕДВАРИТЕЛЬНО ИЗВЕЩЕНА О ВОЗМОЖНОСТИ ТАКИХ УБЫТКОВ.
BLACKMAGIC DESIGN НЕ НЕСЕТ ОТВЕТСТВЕННОСТИ ЗА ПРОТИВОПРАВНОЕ ИСПОЛЬЗОВАНИЕ
ОБОРУДОВАНИЯ СО СТОРОНЫ ПОТРЕБИТЕЛЯ. BLACKMAGIC DESIGN НЕ НЕСЕТ ОТВЕТСТВЕННОСТИ
ЗА УБЫТКИ, ВОЗНИКАЮЩИЕ ВСЛЕДСТВИЕ ИСПОЛЬЗОВАНИЯ ЭТОГО ИЗДЕЛИЯ. ПОТРЕБИТЕЛЬ
ПРИНИМАЕТ НА СЕБЯ РИСКИ, СВЯЗАННЫЕ С ЕГО ЭКСПЛУАТАЦИЕЙ.
© Copyright 2021 Blackmagic Design. Все права защищены. Blackmagic Design, DeckLink, HDLink, Workgroup Videohub,
Multibridge Pro, Multibridge Extreme, Intensity и "Leading the creative video revolution" зарегистрированы как товарные
знаки в США и других странах. Названия других компаний и наименования продуктов могут являться товарными знаками
соответствующих правообладателей.
569Гарантия

Registratori su disco HyperDeck
Luglio 2021
Manuale di istruzioni
Registratori su
disco HyperDeck

Gentile utente,
Grazie per aver acquistato un registratore su disco Blackmagic HyperDeck!
Nel 2011 abbiamo progettato i primi HyperDeck per semplificare e abbattere i costi della
registrazione e della riproduzione di video professionali con unità a stato solido da 2,5".
Ora siamo felici di presentare la nuova linea di registratori su disco HyperDeck per
registrare video HD e Ultra HD su schede SD, dischi SSD e flash disk USB. Connettendo
Blackmagic MultiDock 10G è anche possibile registrare e riprodurre file su hard
drive esterni.
I modelli HyperDeck Studio Plus e Pro dispongono dei classici controlli dei deck broadcast,
con manopola jog / shuttle / scroll. Grazie al meccanismo di frizione, la manopola offre un
riscontro tattile durante la ricerca delle clip per evitare di distogliere lo sguardo dal monitor.
Tra le numerose altre caratteristiche, il pannello frontale include una connessione cuffie e
uno speaker per monitorare l’audio direttamente dal dispositivo.
Ci auguriamo che HyperDeck diventi lo strumento immancabile delle tue produzioni per
anni a venire.
La versione più recente del manuale e gli aggiornamenti del software HyperDeck
sono disponibili alla pagina www.blackmagicdesign.com/it. Consigliamo di aggiornare
regolarmente il dispositivo per disporre delle ultime funzioni. Quando scarichi il software,
registra i tuoi dati personali se desideri ricevere una notifica quando rilasciamo gli
aggiornamenti. Siamo sempre a lavoro per continuare a sviluppare funzioni nuove e
miglioramenti e ci piacerebbe ricevere il tuo feedback!
Grant Petty
CEO Blackmagic Design

Indice
Registratori su disco HyperDeck 573
Operazioni preliminari 574
Collegare l'alimentazione 574
Collegare video e audio 574
Monitorare l’audio 575
Collegare i supporti di memoria 575
Registrare 577
Registrare su molteplici supporti 577
Riprodurre 578
Riprodurre video con HyperDeck 578
Usare la manopola 579
Usare il pannello frontale 581
Spie degli slot 581
Usare il menù LCD 582
Impostazioni 583
Lato posteriore 595
Uscita Monitor Out 597
Archiviazione 600
SD 600
SSD 602
Drive esterno 603
Formattare i supporti di memoria 605
Preparare i supporti di memoria
sul computer 605
Utlizzare HyperDeck come webcam 606
Configurare HyperDeck come webcam 606
Configurare Open Broadcaster 607
Blackmagic HyperDeck Setup 609
Utilizzare HyperDeck Setup 609
Tab LUTs 610
Aggiornare il software interno 611
Teranex Mini Rack Shelf 612
Controllo RS-422 613
Trasferire i file in rete 618
Collegare uno switcher ATEM 620
Come impostare un workflow
dipostproduzione 621
Informazioni per gli sviluppatori
(English) 622
Blackmagic HyperDeck
Ethernet Protocol 622
Protocol Commands 622
Protocol Details 626
Assistenza 637
Normative 638
Sicurezza 639
Garanzia 640
572Blackmagic HyperDeck Studio

Registratori su disco HyperDeck
Il tuo HyperDeck fa parte della linea di registratori su disco HD e 4K sviluppata per adattarsi
ai diversi flussi di lavoro di produzione. HyperDeck Studio HD Pro e HyperDeck Studio 4K Pro
occupano solo una unità rack e ospitano slot per schede SD e dischi SSD 9,5mm per riprodurre
e registrare.
Di dimensioni minori, HyperDeck Studio HD Mini e HyperDeck Studio HD Plus si possono
installare sulla scrivania o in una unità rack sulla mensola Teranex Mini Rack Shelf.
Tutti i modelli consentono di registrare sui flash disk USB e supportano video HD fino
al 1080p60. HyperDeck Studio 4K Pro supporta video Ultra HD fino al 2160p60.
Registrazione e riproduzione funzionano perlopiù nello stesso modo su tutti i modelli,
ma quelli più grandi offrono un controllo superiore e connessioni aggiuntive.
Questo manuale illustra come installare e utilizzare i controlli e le funzioni di HyperDeck.
HyperDeck Studio HD Mini HyperDeck Studio HD Plus
HyperDeck Studio HD Pro e HyperDeck Studio 4K Pro
573Registratori su disco HyperDeck

Operazioni preliminari
Prima collega l’alimentazione, le sorgenti video e i dispositivi di destinazione, e poi inserisci
le schede SD o gli SSD.
Collegare l'alimentazione
Per alimentare HyperDeck, inserisci un cavo IEC standard nell’ingresso di alimentazione posteriore.
Se il tuo modello ha due ingressi di alimentazione IEC, puoi collegare una seconda fonte di
riserva - per esempio un gruppo statico di continuità (UPS), che subentra all’istante se la fonte
primaria smette di fornire corrente.
Tutti i modelli includono un ingresso DC 12V per collegare una batteria esterna.
HyperDeck Studio HD Mini si può alimentare anche con un adattatore AC. Se l’adattatore
dispone di un anello di blocco, avvitalo sul connettore per evitare che il cavo si scolleghi
accidentalmente.
All’accensione, il display LCD richiede di selezionare una lingua. Scorri tra le opzioni disponibili
con la manopola e premi il pulsante SET lampeggiante. A questo punto si apre la schermata
principale. Tutte le informazioni sulla schermata principale e sui menù LCD si trovano nella
sezione “Usare il pannello frontale”.
Collegare video e audio
Collega una sorgente video all’ingresso SDI o HDMI - ad esempio una cinepresa digitale -
e un dispositivo di destinazione all’uscita SDI o HDMI - ad esempio un televisore HDMI o un
monitor SDI.
Tutti gli HyperDeck supportano video HD fino al 1080p60. HyperDeck Studio 4K Pro è munito
di connettori 12G-SDI in entrata e in uscita per collegare video Ultra HD fino al 2160p60 con
un cavo BNC.
574Operazioni preliminari

Osserva l’LCD per confermare la validità del segnale video SDI o HDMI collegato.
SUGGERIMENTO Se l’LCD non mostra la sorgente video è probabile che sia
erroneamente collegata all’altro ingresso. Premi il pulsante INPUT per scorrere tra
le sorgenti SDI e HDMI.
Non è necessario collegare l’audio perché è già integrato nel segnale SDI o HDMI. Osserva gli
indicatori di livello a destra dell’immagine sull’LCD per monitorare l’audio.
Monitorare l’audio
Se il tuo HyperDeck dispone di speaker e presa cuffie frontali puoi sfruttarli per monitorare
l’audio. Tieni premuto il pulsante dell’altoparlante e ruota la manopola per regolare il volume.
L’indicatore del volume sarà visibile nella schermata principale dell’LCD.
Premi due volte il pulsante dell’altoparlante per accendere lo speaker. Ripremilo due volte
per spegnerlo.
Collegare i supporti di memoria
Tutti i modelli HyperDeck Studio sono già pronti per registrare senza richiedere configurazione
preliminare. Basta inserire una scheda SD o un SSD formattati.
Puoi formattare i supporti nell’apposito menù LCD o su un computer. Leggi la sezione
“Formattare i supporti di memoria” per i dettagli sulla formattazione, i supporti migliori
per registrare il video, e la lista delle schede e dei drive consigliati.
Inserire un disco SSD
1 Posiziona il disco SSD 9,5mm nello slot con i contatti rivolti verso il basso. Spingi
delicatamente il disco nello slot fino a bloccarlo in posizione.
2 HyperDeck Studio verificherà il disco. La spia dello slot è illuminata di verde in fase
di verifica e si spegne quando HyperDeck è pronto per registrare.
La spia dello slot è illuminata di verde durante verifica del disco e si
spegne quando HyperDeck è pronto per registrare
575Operazioni preliminari

Per rimuovere un SSD, afferra la parte esterna del disco e tira delicatamente. Sentirai il disco
disconnettersi dallo slot.
Posizione il disco nello slot con i contatti rivolti verso il basso e
spingi delicatamente fino a bloccarlo in posizione
Inserire una scheda SD
1 Posiziona la scheda nello slot con i contatti rivolti verso l’LCD. Spingi delicatamente
la scheda nello slot fino a bloccarla in posizione.
2 HyperDeck Studio verificherà la scheda. La spia dello slot è illuminata di verde durante
la verifica.
Quando la spia si spegne e il pulsante STOP si illumina, HyperDeck Studio è pronto per registrare
576Operazioni preliminari
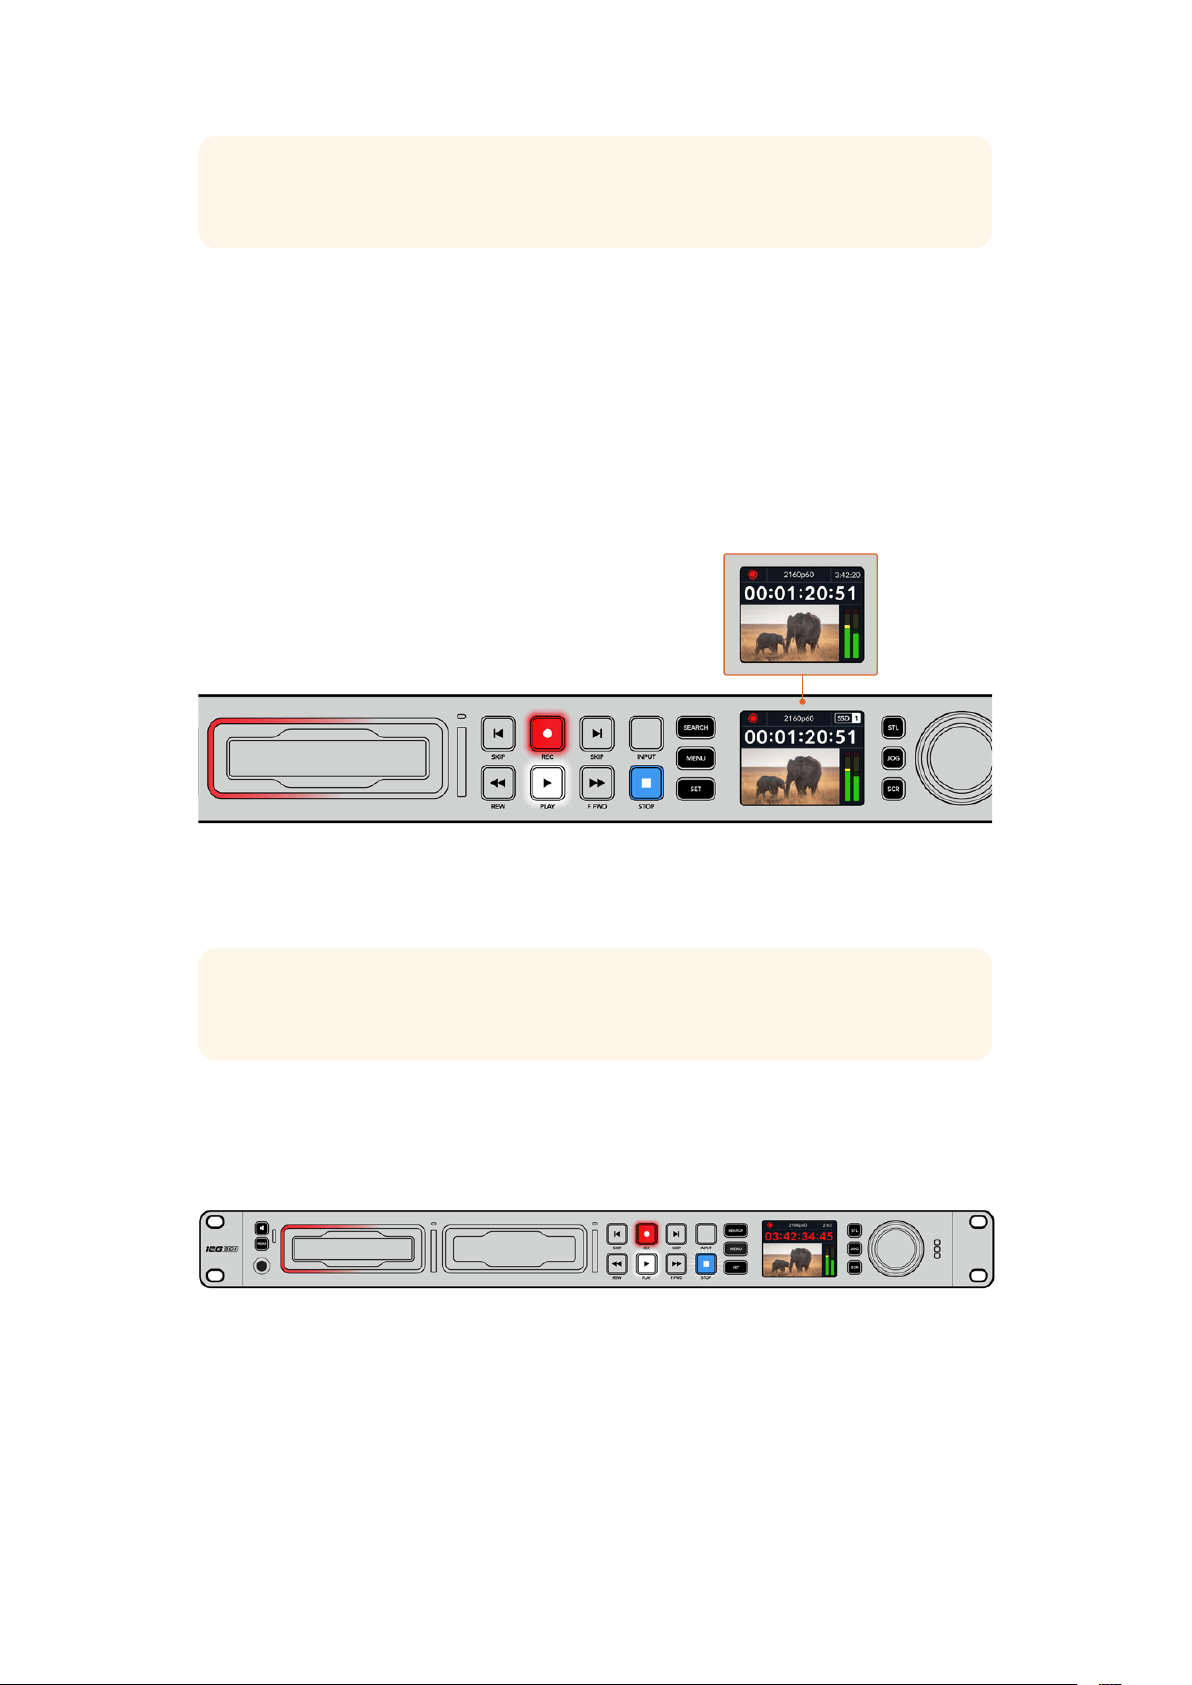
SUGGERIMENTO Per rimuovere la scheda dallo slot, premila delicatamente fino a
sentire un clic. Afferra la parte sporgente della scheda per estrarla.
HyperDeck Studio è pronto per registrare e riprodurre.
Registrare
Dopo aver verificato la sorgente video sull’LCD, puoi avviare la registrazione.
Premi il pulsante REC. Se registri su una scheda SD, la spia dello slot e il pulsante REC si
illuminano di rosso, il pulsante PLAY si illumina di bianco, e la schermata principale mostra
l’icona di registrazione. Se registri su un disco SSD, la spia dinamica dello slot si
illumina di rosso.
Durante la registrazione l’icona di archiviazione mostra alternatamente lo
slot attivo e il tempo di registrazione residuo sul supporto
Premi STOP per interrompere la registrazione, PLAY per riprodurla all’istante.
SUGGERIMENTO Apri l’utility Blackmagic HyperDeck Setup per cambiare il codec in
uso. Consulta la sezione “Blackmagic HyperDeck Setup” per approfondire.
Registrare su molteplici supporti
Quando il tempo di registrazione residuo sulla scheda o sul disco è inferiore a 3 secondi, il
timecode sull’LCD diventa rosso e il pulsante STOP lampeggia lentamente.
Questo indica anche l’assenza di un secondo supporto su cui poter continuare a registrare. In
questo caso basta inserirne uno con spazio a sufficienza. Inserendo un disco vuoto in uno slot
o collegandone uno all’ingresso EXT DISK, il pulsante STOP smette di lampeggiare e il
timecode sull’LCD ritorna bianco. Questo indica che HyperDeck ha verificato il nuovo disco e lo
userà per continuare a registrare.
577Registrare

Quando HyperDeck Studio è collegato a più di un supporto, la registrazione continua dal primo
disco o drive a quello successivo. Due icone in alto a destra della schermata principale
confermano questa configurazione.
Sostituire i supporti durante la registrazione
Il supporto attivo durante la registrazione si può cambiare in qualsiasi momento. Se hai inserito
un secondo supporto con spazio a sufficienza, tieni premuto il pulsante REC per continuare a
registrare su quest’ultimo. Così facendo eviterai di mettere in pausa la registrazione per
rimuovere un supporto - per esempio se lo richiedono in un’altra location durante una
produzione dal vivo.
Se il pulsante REC lampeggia durante la registrazione, è probabile che ci siano dei problemi e
che si stiano perdendo dei fotogrammi. Questo potrebbe verificarsi se registri in Ultra HD su
supporti lenti. Ad esempio per il 2160p30 ProRes HQ - che richiede un data rate più alto
rispetto al ProRes Proxy - serve una SD o un SSD il più veloce possibile. Consulta la lista dei
supporti approvati nella sezione “Archiviazione” del manuale.
Riprodurre
I controlli di trasporto sono gli stessi dei classici deck broadcast, tra cui REC, REW, PLAY, F FWD
e STOP. I pulsanti SKIP avanti e indietro servono per navigare velocemente le clip.
Riprodurre video con HyperDeck
1 Premi PLAY per riprodurre il video e vederlo sull’LCD e sugli eventuali display collegati
alle uscite di HyperDeck.
2 Premi SKIP avanti per passare alla clip successiva.
3 Premi SKIP indietro una volta per andare all’inizio della clip corrente, due volte per
andare all’inizio della clip precedente.
Premi PLAY per riprodurre una clip; premi SKIP avanti o indietro per
cambiare clip o tornare all’inizio della clip corrente
578Riprodurre

SUGGERIMENTO Per riprodurre i file video con HyperDeck è necessario impostare il
codec esatto nel menù LCD. Leggi la sezione “Usare il menù LCD” per tutti i dettagli.
Riproduzione continua
Premi nuovamente PLAY durante la riproduzione per attivare la riproduzione continua (Loop).
L’LCD mostrerà un’icona diversa a seconda della modalità selezionata.
Loop una clip Riproduzione continua della clip corrente.
Loop tutte le clip Riproduzione continua di tutte le clip.
LED dinamico
Durante la riproduzione la spia intorno allo slot è illuminata di verde e il suo movimento circolare
ne segnala la direzione e la velocità.
SUGGERIMENTO Se il pulsante PLAY lampeggia mentre HyperDeck registra su
SSD vuol dire che il supporto non è veloce a sufficienza e la riproduzione ne risente.
Consigliamo di scegliere un formato più compresso - ad esempio l’H.264 - o di usare
un SSD o un disco esterno più veloce tra quelli consigliati per registrare in Ultra HD.
Usare la manopola
La manopola consente di navigare velocemente le clip e di selezionare momenti specifici da
riprodurre o di rivederli fotogramma per fotogramma. Ruotala per individuare un punto preciso
di una clip osservando le immagini o cercandone il timecode. È anche utile anche per
posizionare la playhead nel punto esatto da mandare in onda durante una trasmissione.
Premi SEARCH per cambiare la modalità della manopola
579Riprodurre
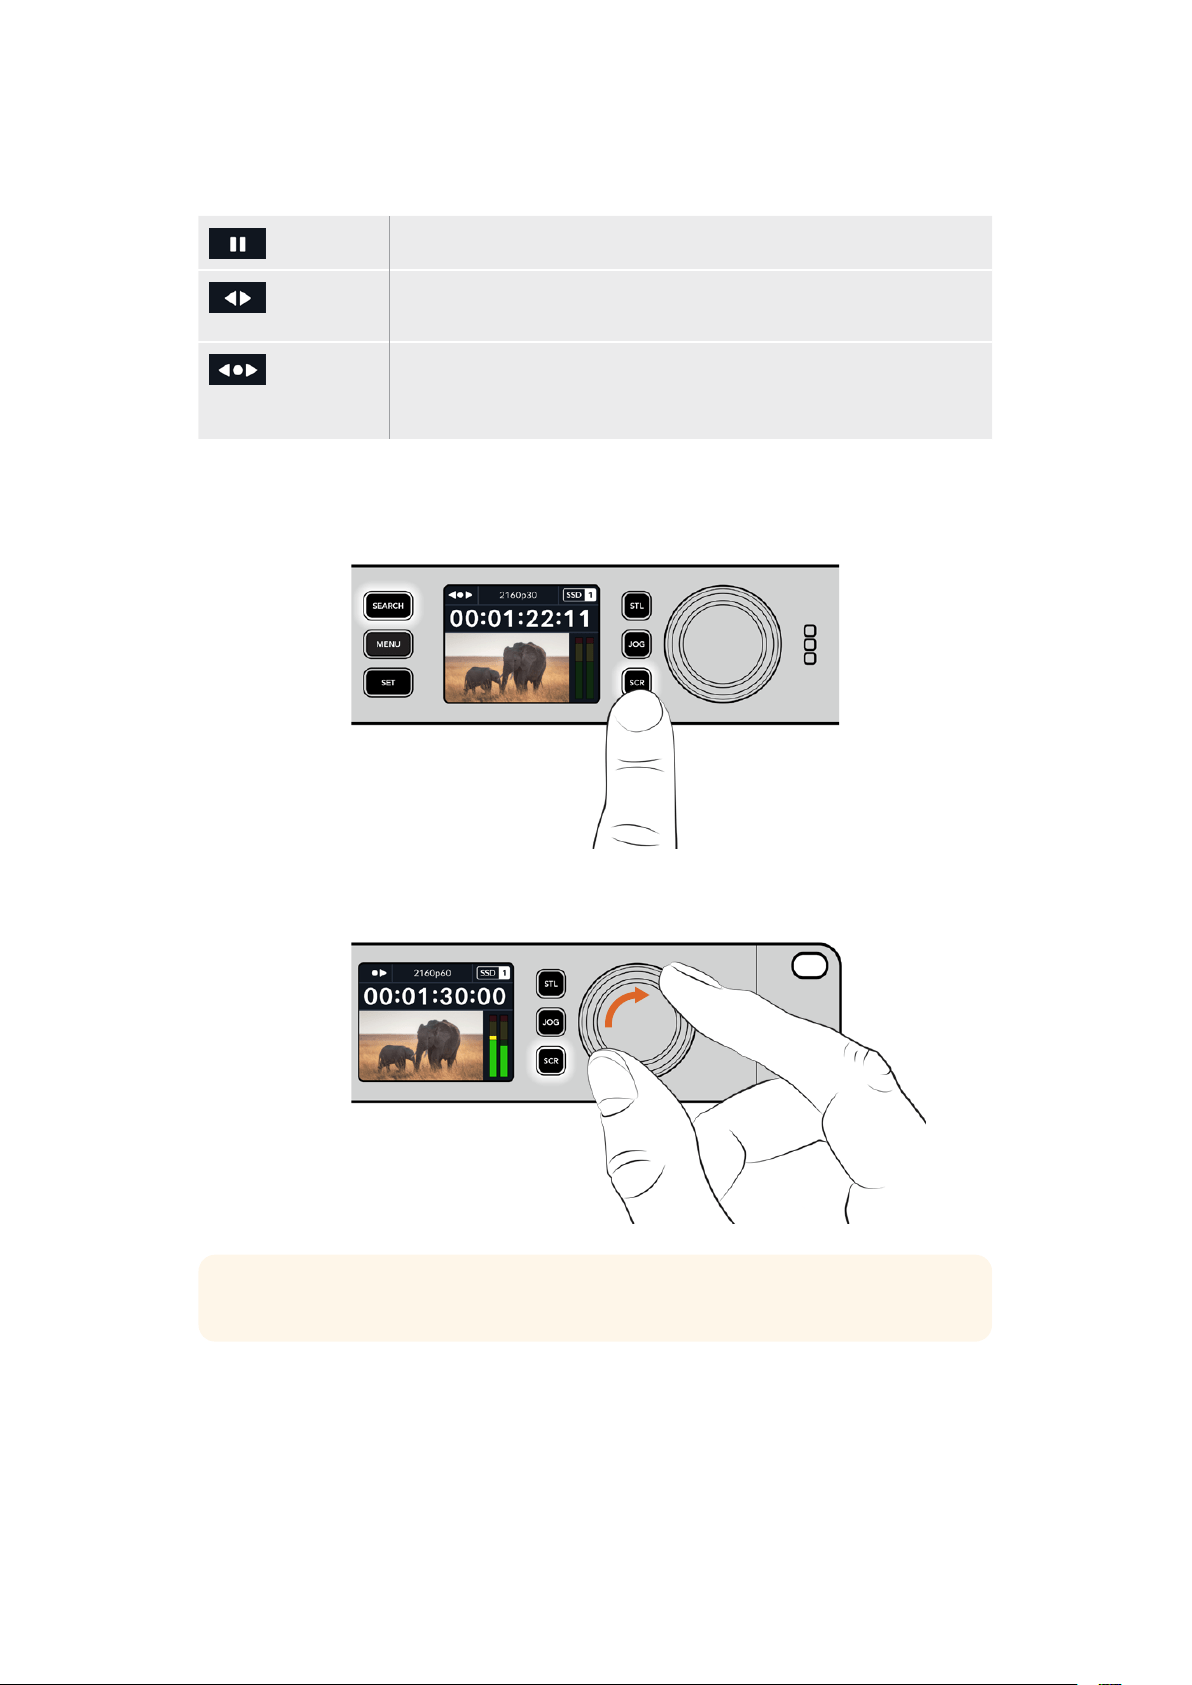
Le modalità della manopola sono jog, shuttle e scroll.
Jog Riproduci in avanti e indietro fotogramma per fotogramma con precisione.
Shuttle Riproduci in avanti e indietro a una velocità maggiore. La riproduzione
varia a seconda di quanto ruoti la manopola.
Scroll Riproduci a una velocità ancora maggiore a seconda di quanto ruoti la
manopola. È ideale per scorrere velocemente una clip lunga alla ricerca
di un momento preciso.
I modelli HyperDeck più grandi dispongono di appositi pulsanti per selezionare la modalità
della manopola, il cui sistema di frizione fornisce una risposta tattile ideale mentre navighi il
materiale seguendo le operazioni su un televisore o un monitor.
Premi JOG, STL o SCR per selezionare la modalità
jog, shuttle o scroll della manopola
SUGGERIMENTO Premi PLAY o STOP per tornare alla riproduzione normale.
580Riprodurre

Usare il pannello frontale
Quando registri o riproduci video con HyperDeck, le informazioni utili vengono fornite dalle
spie LED degli slot e dall’LCD.
Schermata principale dell’LCD
Tempo residuo e supporto di memoria –
Durante la registrazione, mostra l’icona del
tempo residuo sul supporto alternata a quella
del supporto in uso. Durate la riproduzione
mostra l’icona del supporto attivo.
Formato – Il formato dell’ingresso o del
file in fase di riproduzione. Mostra anche la
sorgente di ingresso premendo il pulsante
INPUT (su alcuni modelli HyperDeck
Studio), e il volume mentre regoli lo
speaker e le cuffie dal pannello frontale.
Stato – Lo stato del deck e la
modalità di riproduzione.
Livelli audio – I livelli audio
della sorgente o del file
durante la riproduzione.
Spie degli slot
Quando accendi HyperDeck e quando inserisci un SSD o una SD, la spia dello slot si illumina
di verde durante la verifica del supporto e poi si spegne. Se il supporto non è formattato
correttamente, o non funziona, lo slot si illumina di arancione. In questo caso controlla che il
disco sia formattato correttamente e funzioni su un computer.
Le spie degli slot di HyperDeck si illuminano per segnalare lo stato del disco
- per es. rosso per la registrazione e verde per la riproduzione
581Usare il pannello frontale

Usare il menù LCD
Premi MENU per aprire il menù impostazioni.
Ruota la manopola o premi SKIP avanti e indietro per scorrere tra le impostazioni del menù;
premi SET per confermare un sottomenù.
Ruota la manopola per scorrere tra le impostazioni del menù
Premi SET per confermare l’opzione selezionata.
Ruota la manopola e premi SKIP avanti e indietro per modificare le impostazioni e premi SET
per confermare.
Premi MENU per tornare indietro dalle impostazioni fino alla schermata principale.
582Usare il pannello frontale

Impostazioni
Registrazione
Ingresso
Seleziona una sorgente SDI o HDMI. Puoi anche farlo premendo il pulsante INPUT.
Codec
Gli HyperDeck Studio registrano video compresso con i codec H.264, Apple ProRes e DNxHD.
HyperDeck Studio 4K Pro è compatibile anche con i codec H.265 e DNxHR per registrare in 4K.
REC auto
L’impostazione di innesco della registrazione offre due opzioni: Video Start/Stop e Timecode.
Alcune camere, per esempio URSA Mini, sono in grado di avviare e interrompere la registrazione
sui registratori esterni tramite un segnale SDI. Seleziona Video Start/Stop per far sì che
HyperDeck avvii e interrompa la registrazione quando viene premuto Rec sulla camera.
Seleziona Timecode per far sì che HyperDeck avvii la registrazione quando riceve un segnale
di timecode valido dagli ingressi. Se il segnale si disconnette, la registrazione si interrompe.
Scegli Off per disabilitare la funzione di innesco della registrazione.
NOTA Se utilizzi una camera HDMI o SDI, disabilita gli overlay sull’uscita della camera
se non vuoi che vengano registrati con l’immagine.
Re-sync ingresso
Abilita l’impostazione di risincronizzazione dell’ingresso video per agganciare il video al
riferimento esterno prima della registrazione. L’uscita video rimarrà agganciata al riferimento
anche in fase di registrazione mentre l’ingresso stesso viene risincronizzato. Questa
impostazione è utile per le registrazioni ISO in cui è importante che i deck attivi abbiano
lostesso timecode, ma alcune sorgenti sono prive di sync. Di solito va tenuta disabilitata
perfarsì che gli ingressi video vengano registrati senza aggiunta o perdita di fotogrammi.
Tutti i deck broadcast consentono l’utilizzo di un ingresso di riferimento per sincronizzare
l’uscita video durante il playback. L’uscita riprodotta da HyperDeck sarà quindi sincronizzata
all’ingresso di riferimento e non bisognerà risincronizzarla in caso di connessione a un grande
sistema broadcast.
Durante la registrazione invece, l’ingresso prende di nuovo la priorità perché è importante che
venga registrato e inviato “intatto” ai dispostivi a valle collegati alle uscite video di HyperDeck.
583Impostazioni

HyperDeck Studio offre una funzione che agevola la registrazione ISO perché inverte questo
processo risincronizzando l’ingresso video all’ingresso di riferimento. In termini pratici, consente
di collegare HyperDeck a sorgenti prive di sync e di risincronizzare l’ingresso video al video di
riferimento prima di registrarlo.
I computer, le camere di consumo e qualsiasi dispositivo video sono esempi di sorgenti prive di
sync a cui non si può collegare un riferimento. Potrebbe trattarsi anche di un segnale video in
entrata da un altro studio o broadcaster esterno. Le sorgenti prive di sync non sono adatte alla
registrazione ISO in quanto il timecode di tutti i deck deve combaciare sempre alla perfezione.
Risulterebbero più veloci o più lente delle altre sorgenti, scivolando fuori sync rispetto al
timecode durante la registrazione. Questo complicherebbe il montaggio multicamera perché le
sorgenti avrebbero timecode differenti.
Abilitando l’impostazione di re-sync dell’ingresso, l’ingresso video di HyperDeck viene
analizzato in modo tale da poter ripetere o rimuovere un fotogramma se il video è in ritardo o in
anticipo rispetto al riferimento. L’operazione si chiama risincronizzazione, e l’elaborazione
sull’ingresso si chiama re-sync di frame. Questo sistema fa sì che gli eventi nelle clip registrate
da ciascun deck abbiano luogo nel medesimo punto del timecode, facilitando il montaggio
multicamera.
Il lato negativo è proprio l’aggiunta o la rimozione di alcuni fotogrammi dall’ingresso prima della
registrazione. Per questo motivo consigliamo di disabilitare questa impostazione e di usarla
solo quando è impossibile collegare un riferimento a una sorgente ISO, ad esempio un
computer o un dispositivo di consumo.
L’impostazione di re-sync dell’ingresso torna utile per mantenere l’uscita video di HyperDeck
agganciata a un riferimento durante la registrazione. Dunque puoi collegare l’uscita SDI di
HyperDeck a una camera e agganciare quest’ultima al riferimento sfruttando il segnale di
ritorno di programma. Ad esempio Studio Camera 4K Pro è in grado di usare il video esterno
come riferimento. HyperDeck sincronizzerà il segnale della camera al riferimento e la funzione
di re-sync non dovrà aggiungere o rimuovere fotogrammi perché la camera non sarà né in
ritardo né in anticipo.
La funzione di re-sync dell’ingresso interviene solo se l’ingresso video non è sincronizzato allo
stesso riferimento di HyperDeck. In questo caso, l’uscita di HyperDeck sarà la sorgente di
riferimento della camera, e HyperDeck sarà agganciato al suo ingresso video di riferimento.
Collegando a cascata diversi HyperDeck per sincronizzarli mediante le connessioni di
riferimento, tutte le camere e gli HyperDeck saranno sincronizzati in gruppo. Se uno degli
HyperDeck ha una sorgente priva di sync, ad esempio un computer, la risincronizzazione avrà
luogo solo su quell’ingresso e non sugli altri.
La risincronizzazione è automatica e funziona con qualsiasi sorgente collegata. È una funzione
estremamente efficiente, ma è importante capire quando usarla e cosa comporta. Prova a
testarla utilizzando diversi HyperDeck e un software per montaggio multicamera. Se usata con
consapevolezza, questa funzione velocizza notevolmente la produzione.
584Impostazioni
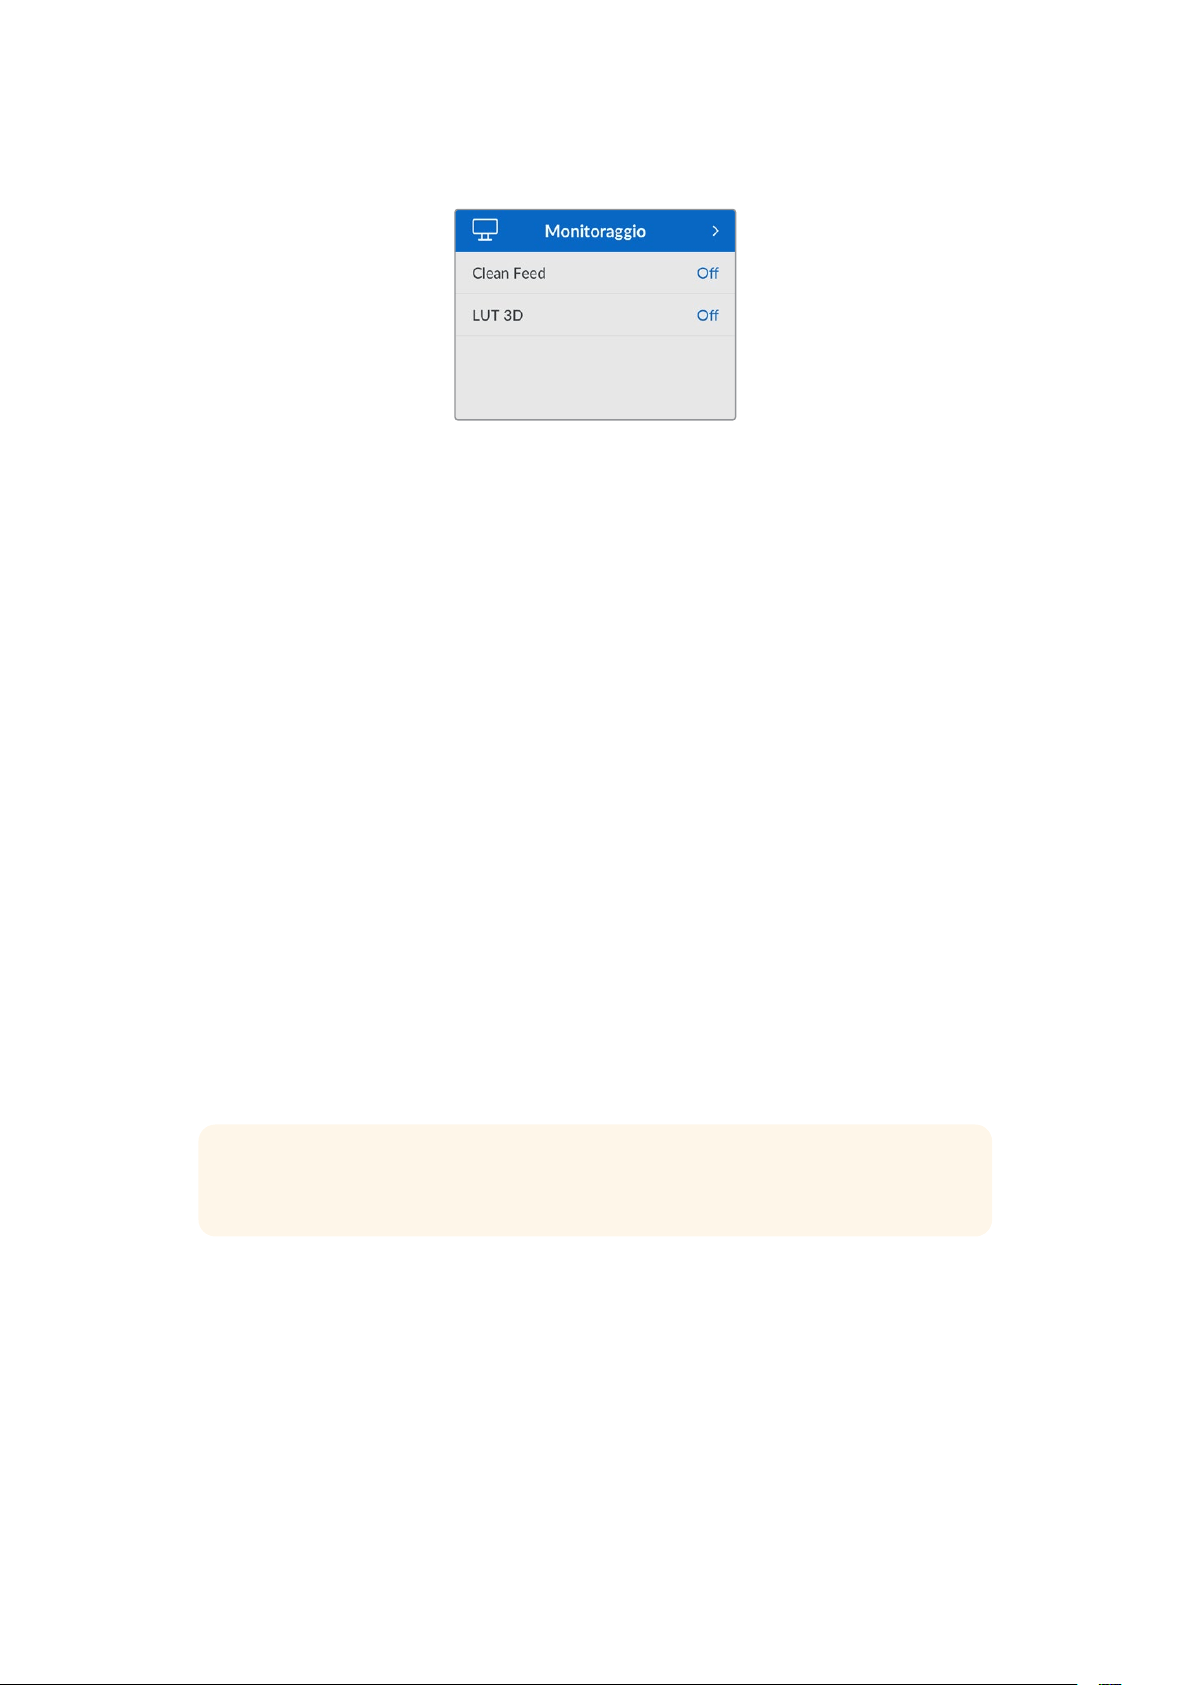
Monitoraggio
Questo menù è disponibile per gli HyperDeck Studio provvisti di connessione Monitor Out
sul retro.
Clean feed
Abilita questa impostazione per nascondere le informazioni di stato dai display collegati
all’uscita Monitor Out. Consulta la sezione “Uscita Monitor Out” per tutti i dettagli sulla
schermata di monitoraggio e le informazioni di stato disponibili.
LUT 3D
Le LUT potrebbero ritornare particolarmente utili se usi HyperDeck Studio come registratore
sul campo perché indicano al deck il colore e la luminanza con cui visualizzare il video. Fanno
comodo anche per le immagini girate in gamma dinamica Film, di proposito piatte e a bassa
saturazione. Applicando una LUT puoi farti un’idea di come sarà il video dopo la
correzione colore.
All’uscita SDI Monitor Out puoi applicare le LUT selezionate nell’utilità Blackmagic
HyperDeck Setup.
Abilitare / disabilitare una LUT 3D
1 Premi MENU e ruota la manopola fino al menù Monitoraggio.
2 Premi SET.
3 Ruota la manopola fino all’impostazione LUT 3D.
4 Premi SET per abilitare o disabilitare la LUT.
Consulta la sezione “Blackmagic HyperDeck Setup” per scoprire come selezionare una LUT
nell’utility.
SUGGERIMENTO Consulta la sezione “Uscita Monitor Out” per tutti i dettagli sulla
schermata di monitoraggio.
585Impostazioni
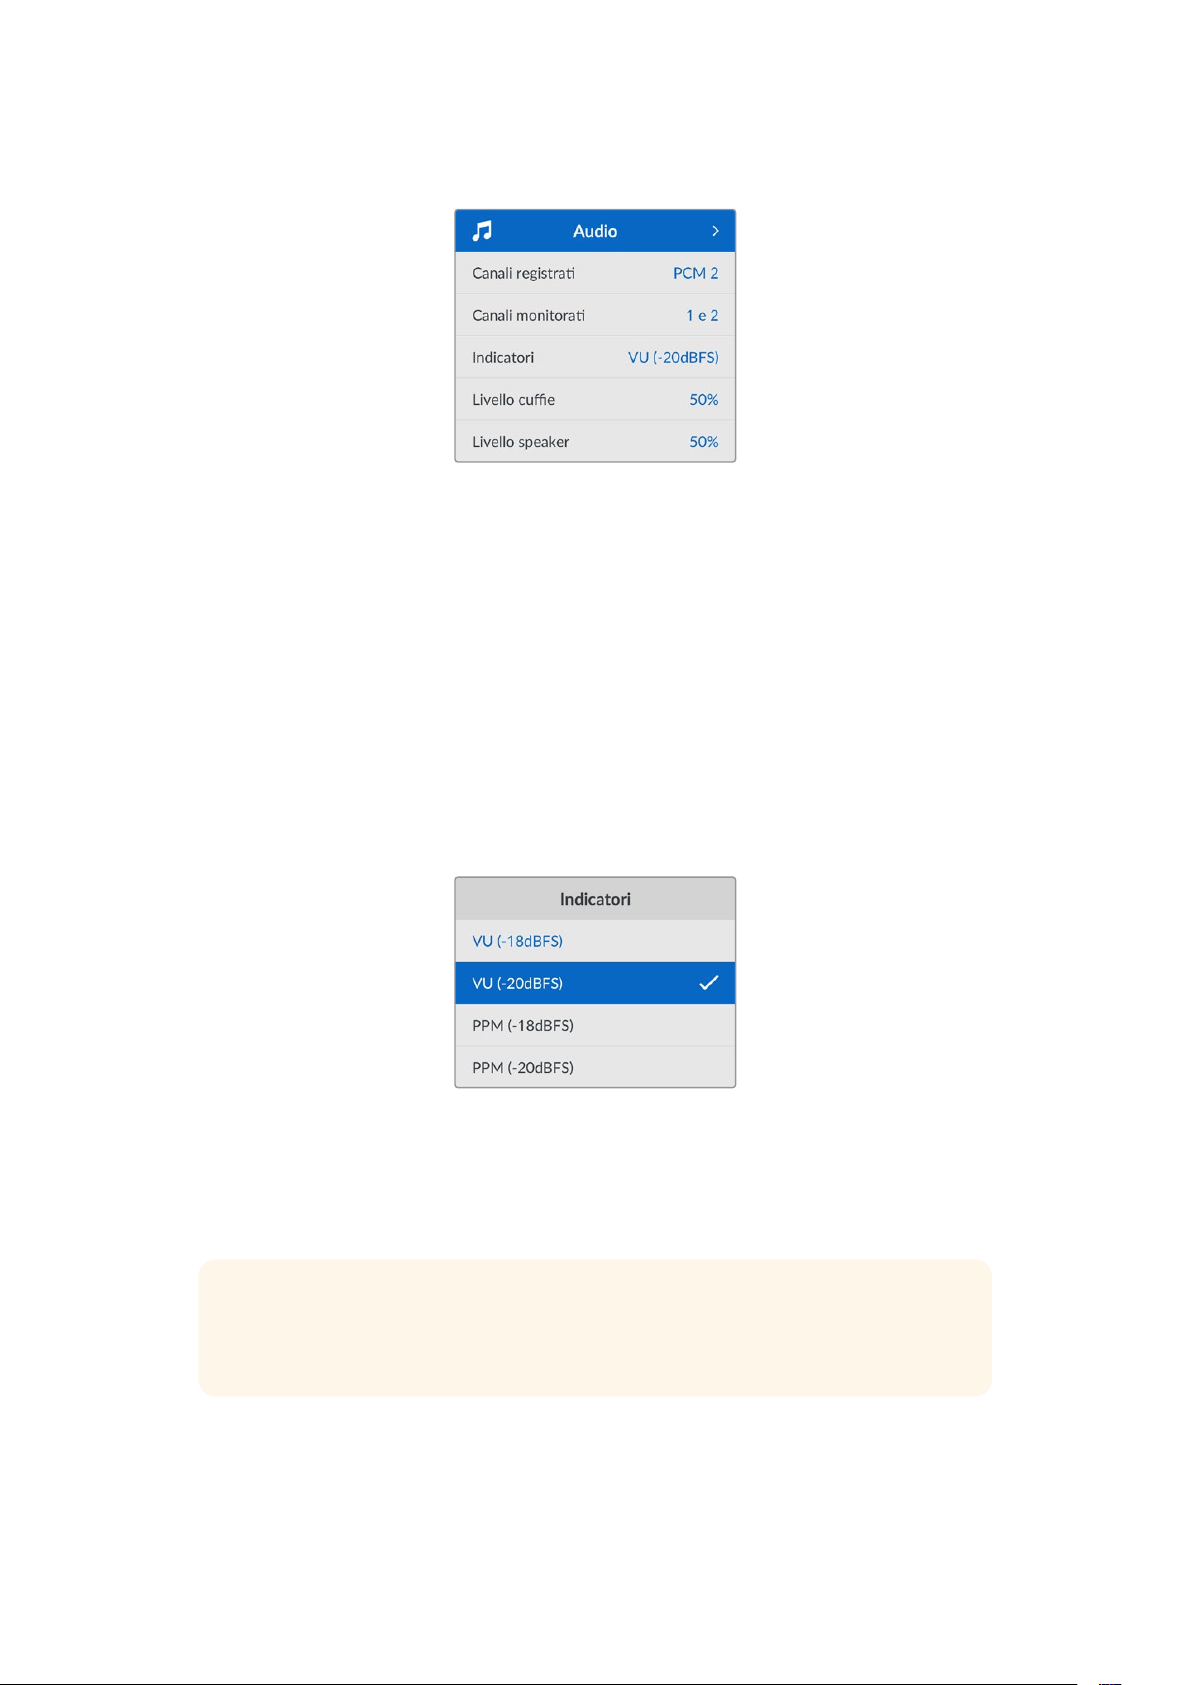
Audio
Canali registrati
HyperDeck Studio può registrare fino a 16 canali di audio PCM alla volta. Apri questa
impostazione e seleziona 2, 4, 8 o 16 canali dalla lista. Se il codec è H.264 o H.265 puoi anche
selezionare due canali di audio AAC per caricare le registrazioni direttamente su YouTube. Dalla
tua selezione dipenderà il numero di canali visibili sul display connesso all’uscita Monitor Out.
Canali monitorati
Se registri più di due canali audio, apri questa impostazione e seleziona quali canali vedere
sull’LCD frontale. Per gli HyperDeck Studio dotati di speaker frontale, questa selezione
definisce anche quali canali audio verranno riprodotti dallo speaker e attraverso la
connessione cuffie.
Indicatori
Sono gli indicatori di livello visibili sull’LCD per i canali dell’audio integrato. Scegli tra VU e PPM
aprendo questa impostazione e selezionando l’opzione che preferisci.
Livello cuffie
Regola il volume delle cuffie sui modelli dotati di connessone cuffie frontale.
Livello speaker
Regola il volume dello speaker ruotando la manopola. Il volume di default è 50%.
SUGGERIMENTO Il volume di cuffie e speaker si può regolare anche tenendo
premuto il pulsante dell’altoparlante e ruotando la manopola. Il livello del volume
sarà visibile in alto al centro dell’LCD.
586Impostazioni

Archiviazione
Formattare i supporti di memoria
Le schede SD, i dischi SSD e i supporti collegati alla connessione EXT DISK si possono
formattare sul deck stesso o su un computer Mac o Windows.
Preparare i supporti su HyperDeck Studio
1 Ruota la manopola fino all’impostazione Formatta e premi SET.
2 Seleziona il supporto da formattare dalla lista e premi SET.
3 Seleziona il formato e premi SET.
4 Nel messaggio che conferma il supporto e il formato selezionati, conferma
con Formatta.
5 Seleziona OK nel messaggio di formattazione effettuata.
HFS+ (o Mac OS X Extended) è il formato consigliato perché supporta il journaling, che
permette con più probabilità di recuperare i dati in caso di danneggiamento del supporto di
memoria. HFS+ è supportato nativamente da Mac; exFAT è supportato nativamente da Mac e
Windows senza richiedere altri software, ma non ammette il journaling.
Leggi la sezione “Formattare i supporti di memoria” per le informazioni sulla formattazione su
Mac e Windows.
Configurazione
587Impostazioni

Nome
Se in rete ci sono molteplici HyperDeck Studio, è preferibile assegnare un nome a ciascuno.
Puoi farlo nell’utility Blackmagic HyperDeck Setup o mediante Blackmagic HyperDeck Ethernet
Protocol usando un’applicazione terminale.
Lingua
HyperDeck Studio si può usare in 13 lingue: inglese, cinese, giapponese, coreano, spagnolo,
tedesco, francese, russo, italiano, portoghese, turco, ucraino e polacco.
Cambiare la lingua
1 Seleziona il menù Configurazione e premi SET.
2 Ruota la manopola fino all’impostazione Lingua e premi SET.
3 Ruota la manopola fino alla lingua desiderata e premi SET. A selezione effettuata,
la schermata ritorna al menù Configurazione.
Data
Seleziona questa impostazione e premi SET. Ruota la manopola per impostare giorno, mese e
anno. Questi dati finiranno nel suffisso timestamp.
Ora
Seleziona questa impostazione e premi SET. Ruota la manopola per impostare ora e minuti.
L’orologio è nel formato 24 ore.
Software
Mostra la versione attuale del software.
Schermo
Seleziona l’opzione Chiaro per vedere l’LCD ben illuminato; seleziona l’opzione Scuro per
ridurre la luminosità dell’LCD - per esempio se sul rack ci sono tanti HyperDeck uno sopra
all’altro.
588Impostazioni

Camera
Questa impostazione è utile se usi HyperDeck per registrare un file (ISO) da ciascuna camera
da montare poi nella timeline multicamera di DaVinci Resolve.
Le lettere identificative vanno a finire nei metadati del file, consentendo a DaVinciResolve di
identificare le inquadrature grazie al Sync Bin.
Assegna alla camera una lettera
(dalla A alla Zeta) o un numero (da 1 a 9)
Standard di default
Questa impostazione è utile quando HyperDeck non è in grado di determinare quale standard
video usare.
Per esempio se al deck non è collegato nessun ingresso video e inserisci un disco con dei file
di standard video differenti, quale standard verrà usato? Abilitando l’impostazione dello
standard video di default, il deck adotterà lo standard migliore per riprodurre i file.
Questa impostazione è utile anche alla prima accensione di HyperDeck, in assenza di video
inentrata e di un supporto di memoria. In questo caso il deck non è in grado di determinare lo
standard video da usare per l’uscita di monitoraggio e si basa sul suggerimento fornito da
questa impostazione.
Lo standard di default è solo una guida e non altera il funzionamento consueto del deck.
Ad esempio se inserisci un supporto di memoria con un solo tipo di file video e premi Play,
HyperDeck Studio riproduce quello standard video, tralasciando lo standard di default.
Lo stesso si verifica per la registrazione. Se premi Rec, HyperDeck registra lo standard video
dell’ingresso video collegato. Terminata la registrazione, il deck riproduce i file in questo stesso
standard video anche se sul supporto di memoria ci sono file di standard video differenti che
combaciano con quello di default. Questo perché di solito i file si rivedono nello stesso
standard video con cui sono stati registrati. Se estrai e reinserisci il supporto di memoria,
allorail deck adotterà uno standard video di default per riprodurre i file.
Lo standard video di default è solo una guida che suggerisce ad HyperDeck Studio la selezione
più adatta nelle circostanze menzionate e non ne altera il funzionamento regolare.
589Impostazioni
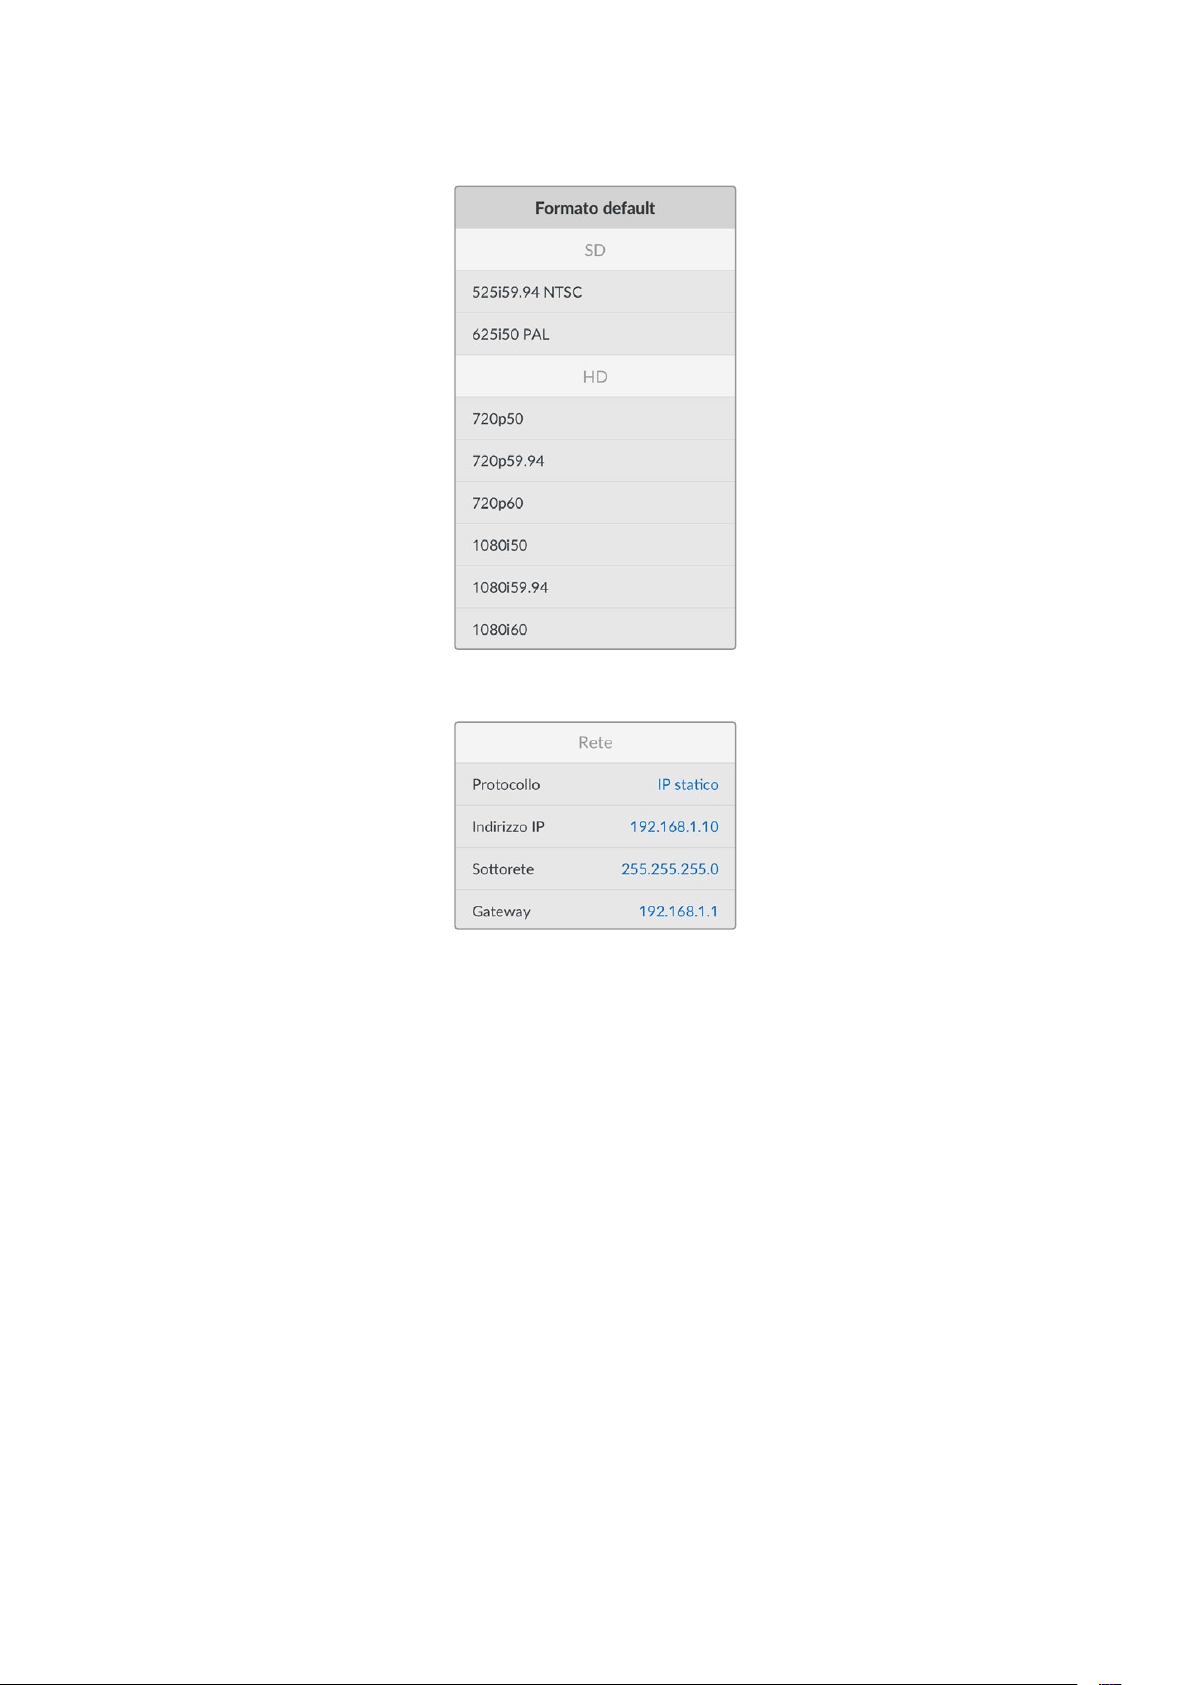
Rete
Protocollo
HyperDeck è impostato su DHCP di default: una volta connesso, il server di rete gli assegna
automaticamente un indirizzo IP e non c’è bisogno di configurare nessun’altra impostazione.
Per impostare manualmente l’indirizzo è necessario un IP statico.
Seleziona l’impostazione Protocollo e premi SET, seleziona IP statico dalla lista e premi SET.
Indirizzo IP, maschera di sottorete e gateway
Dopo aver selezionato l’opzione IP statico, puoi inserire i valori manualmente.
Cambiare indirizzo IP
1 Ruota la manopola fino all’impostazione Indirizzo IP e premi SET.
2 Ruota la manopola per cambiare i campi dell’indirizzo IP.
3 Premi SET per confermare un campo e passare al successivo.
Segui lo stesso procedimento per modificare la maschera di sottorete e il gateway. Premi
MENU per tornare alla schermata principale.
590Impostazioni

Timecode
Ingresso
Le opzioni per timecode in entrata durante la registrazione sono cinque.
Ingresso
video
Usa il timecode integrato nelle sorgenti SDI e HDMI con metadati SMPTE RP 188.
Mantiene la sincronizzazione tra la sorgente SDI o HDMI e il file registrato dal deck.
Esterno Usa il timecode della connessione Timecode del deck.
Interno Registra l’ora del giorno attraverso il generatore interno di timecode.
Ultima clip Fai partire ciascun file un fotogramma dopo l’ultimo fotogramma della clip
precedente. Per esempio se la prima clip finisce a 10:28:30:10, il timecode della clip
successiva inizia a 10:28:30:11.
Predefinito Imposta il timecode manualmente. Le clip registrate partono dal timecode definito
nell’impostazione Predefinito.
Drop frame
Seleziona Drop frame o Senza drop frame per le sorgenti NTSC con frame rate di 29.97 o
59.94. Seleziona Default se la sorgente è sconosciuta. Questa opzione mantiene lo standard
dell’ingresso, o passa al drop frame in assenza di un timecode valido.
Predefinito
Ruota la manopola per impostare il tempo di inizio e premi SET per confermare. Seleziona
questa opzione nell’impostazione Ingresso per usare il timecode predefinito.
Uscita
Scegli come usare il timecode per le uscite.
Timeline Trasmetti un timecode continuo per tutte le clip registrate su una scheda
o su un drive.
Clip Trasmetti il timecode di ciascuna clip.
Uscita SDI
591Impostazioni
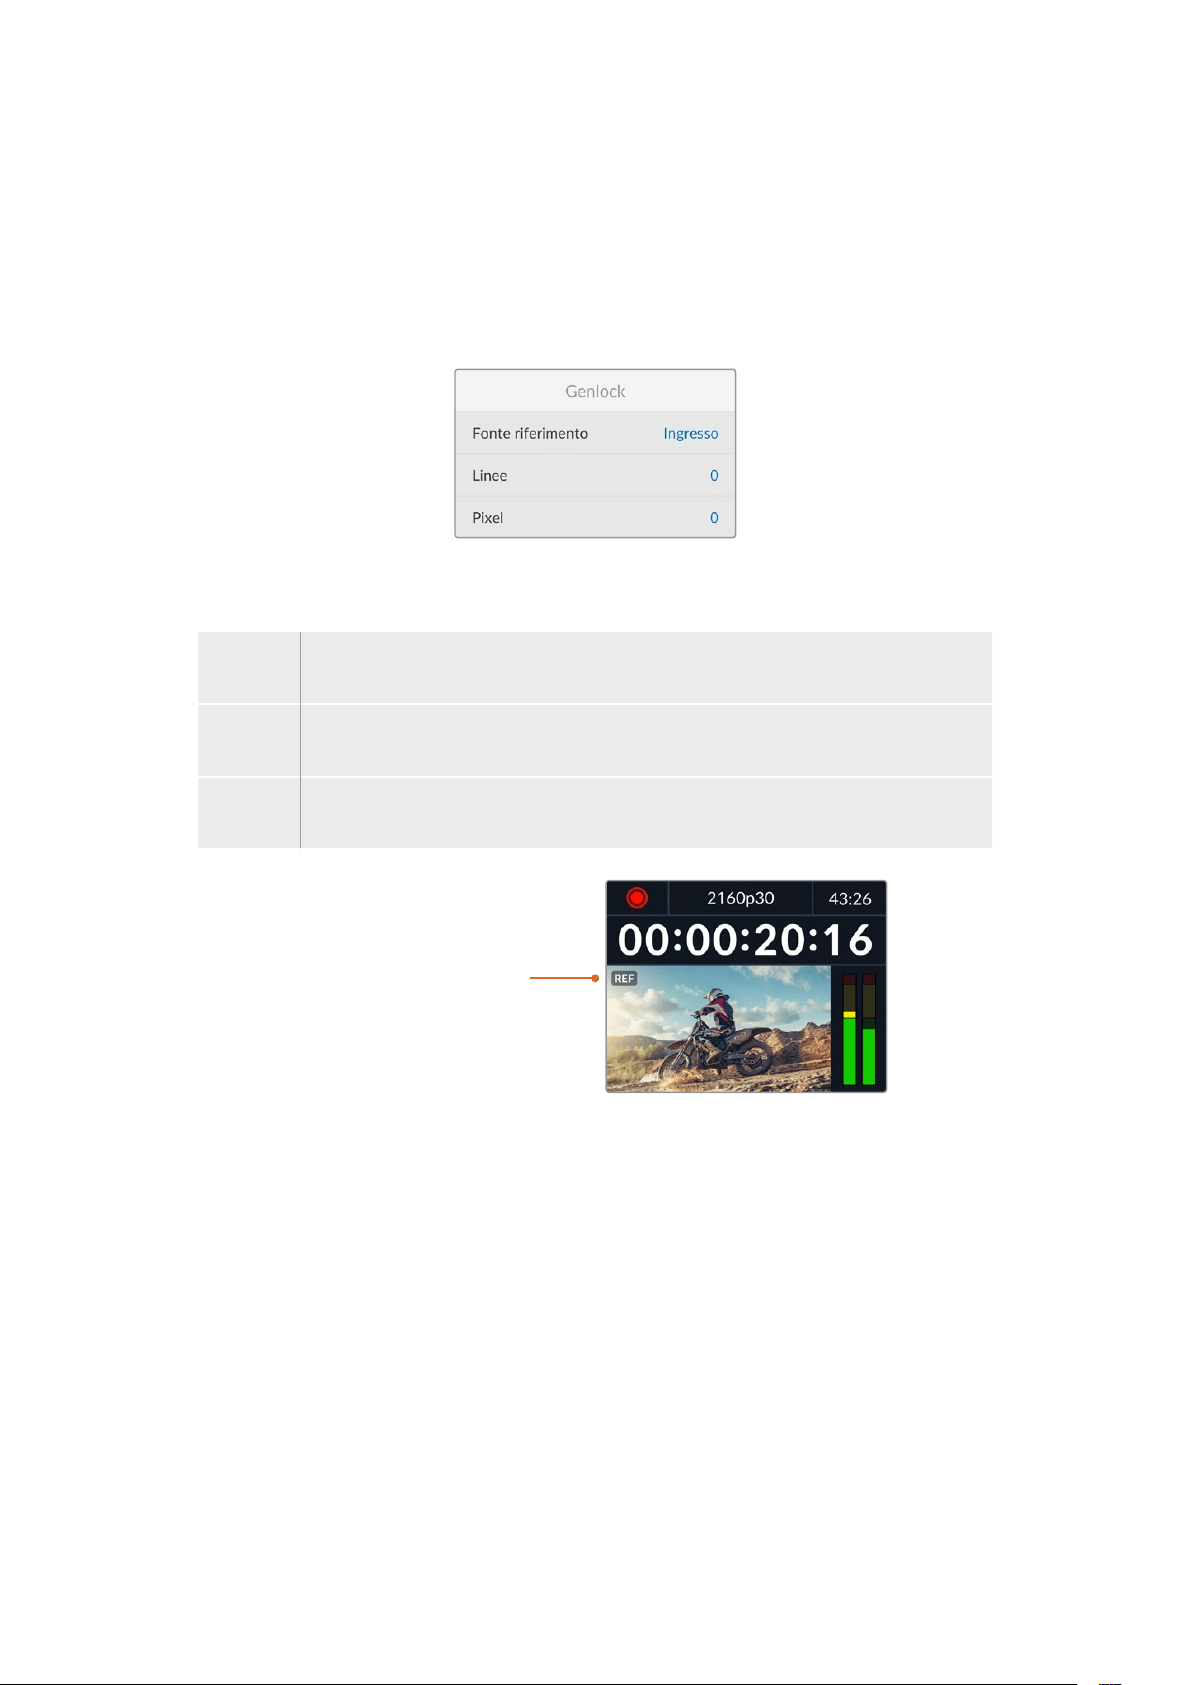
3G-SDI
Alcuni dispositivi broadcast sono in grado di ricevere video 3G-SDI solo di livello A o solo di
livello B.
Seleziona Livello A per un flusso 3G-SDI diretto; Livello B per un flusso 3G-SDI dual stream
multiplexato.
Genlock
Fonte riferimento
Seleziona una delle seguenti tre opzioni.
Auto Adotta di default il segnale della fonte esterna collegata all’ingresso Ref In. In assenza
di una fonte esterna, adotta di default il segnale della sorgente SDI o HDMI.
Ingresso Sincronizza HyperDeck al segnale di riferimento integrato nella fonte SDI o HDMI
(per esempio un deck analogico connesso direttamente a una sorgente genlockata).
Esterna Seleziona questa opzione se all’ingresso Ref In è collegato un dispositivo di
riferimento esterno, per esempio Blackmagic Sync Generator.
Indicatore riferimento
esterno – Quando HyperDeck
Studio è sincronizzato a una
fonte di riferimento esterna
compare l’indicazione REF
a sinistra dell’LCD.
Riferimento temporale
Regola queste impostazioni per archiviare materiale da deck a nastro analogici con
sincronizzazione di frame. La regolazione del riferimento temporale è altamente accurata
perché viene effettuata a livello del campione.
Regolare il riferimento temporale
1 Apri il menù Configurazione, seleziona l’impostazione Genlock > Linee e premi SET.
2 Ruota la manopola per regolare il numero delle linee.
3 Premi SET per confermare il numero.
4 Segui lo stesso percorso e seleziona l’impostazione Pixel per regolare il numero di pixel.
592Impostazioni
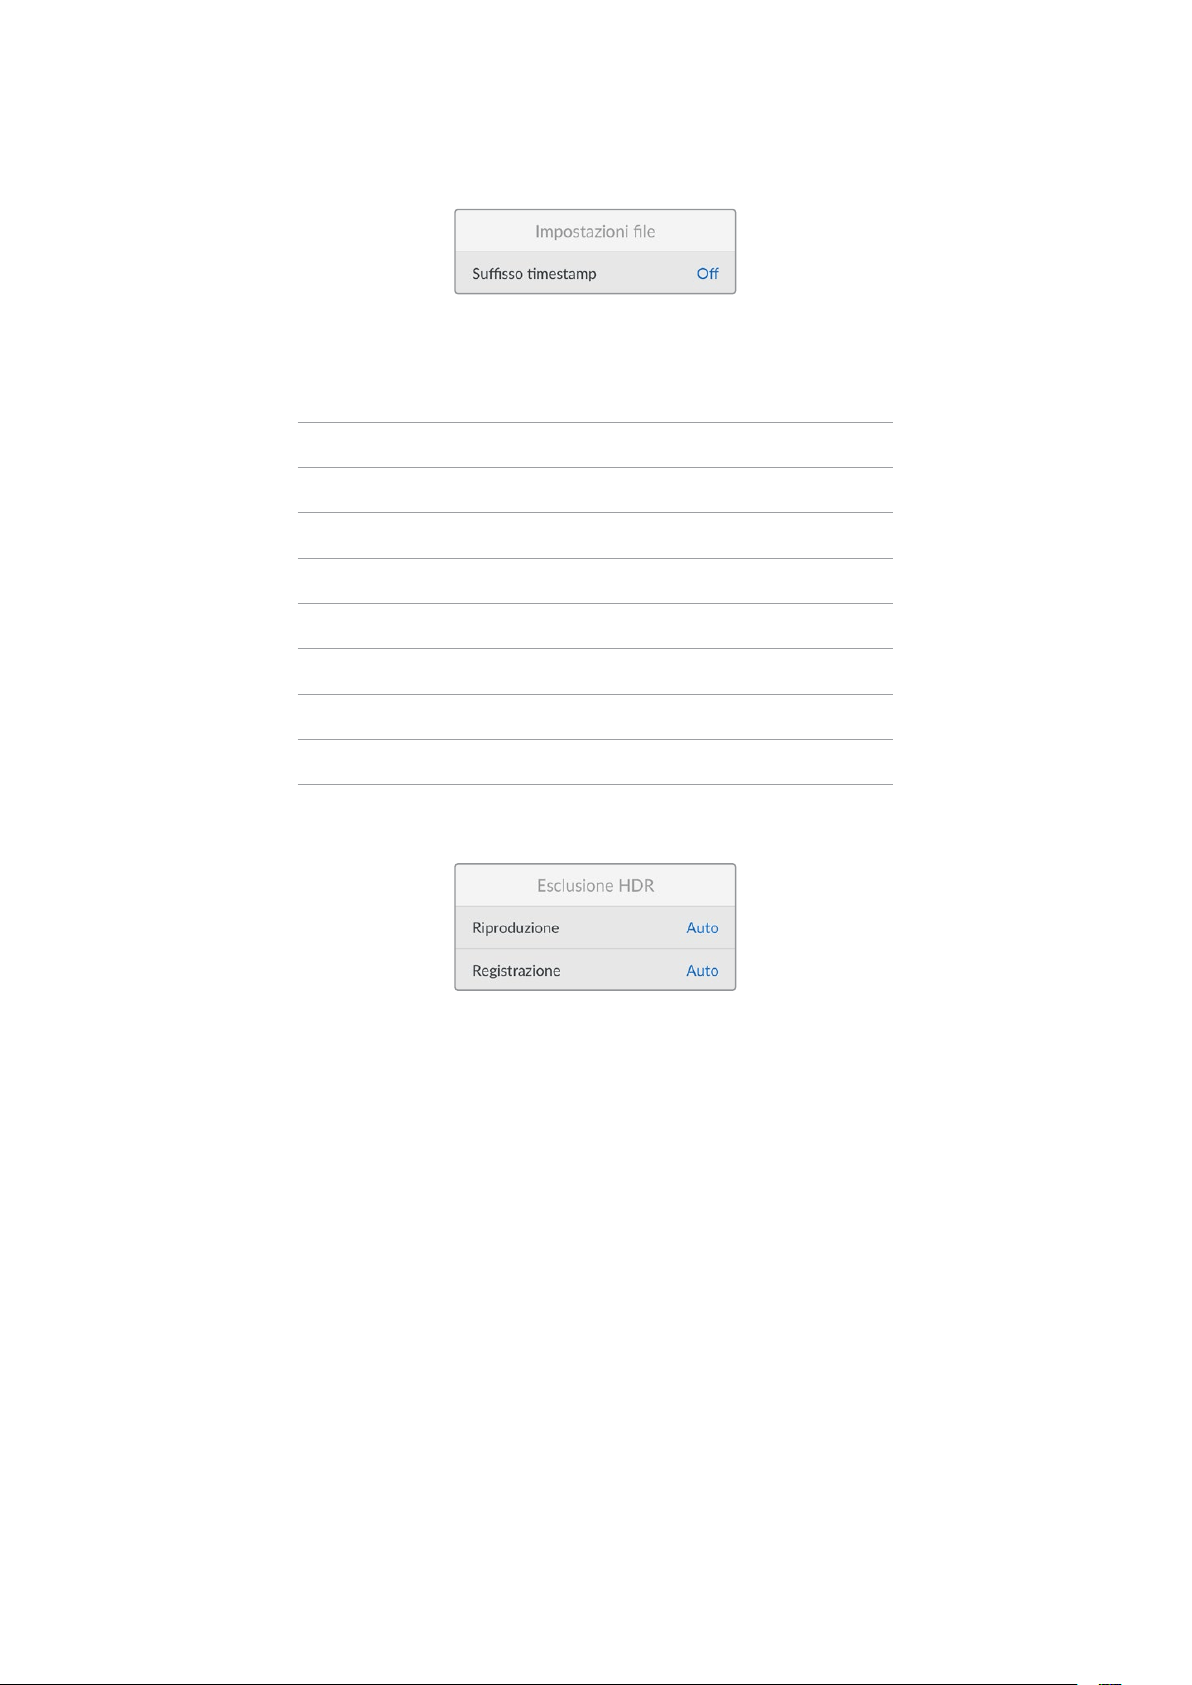
Impostazioni file
Suffisso timestamp
Il suffisso timestamp non viene aggiunto al nome del file di default. Attiva questa impostazione
per aggiungere al nome del file la data e l’ora registrati.
HyperDeck_2105061438_0001
HyperDeck_2105061438_0001 Nome file
HyperDeck_2105061438_0001 Anno
HyperDeck_2105061438_0001 Mese
HyperDeck_2105061438_0001 Giorno
HyperDeck_2105061438_0001 Ore
HyperDeck_2105061438_0001 Minuti
HyperDeck_2105061438_0001 Clip
Esclusione HDR
HyperDeck Studio 4K Pro rileva automaticamente i metadati HDR integrati in un segnale video
4K o in un file e li mostra attraverso l’uscita HDMI. Se il segnale o il file non sono taggati
correttamente, o se il display non supporta l’HDR, puoi escludere le informazioni HDR.
Apri il menù Esclusione HDR e seleziona un’opzione SDR, ad esempio Rec.2020.
Le opzioni per la riproduzione e la registrazione HDR sono:
Auto
Opzione di default: HyperDeck seleziona automaticamente il formato in uscita conforme ai
metadati HDR della clip.
Rec.709
Per il video ad alta definizione a gamma dinamica standard.
Rec.2020 SDR
Per il video Ultra HD a gamma dinamica standard.
HLG
Hybrid Log Gamma permette di riprodurre il video HDR su TV e monitor compatibili con l’HDR,
e con i formati fino al Rec.2020 SDR.
593Impostazioni

Le opzioni seguenti supportano il gamut di colore Rec.2020 e PQ (quantizzatore percettivo)
SMPTE ST2084. PQ è la funzione dell’HDR ad ampio gamut che consente di visualizzare immagini
altamente luminose. I valori di luminanza in candela per metro quadrato, per esempio 1000 cd/m
2
,
indicano la luminosità massima per metro quadrato supportata dal formato corrispondente.
ST2084 (300)
Luminanza di 300 cd/m
2
ST2084 (500)
Luminanza di 500 cd/m
2
ST2084 (800)
Luminanza di 800 cd/m
2
ST2084 (1000)
Luminanza di 1000 cd/m
2
ST2084 (2000)
Luminanza di 2000 cd/m
2
ST2084 (4000)
Luminanza di 4000 cd/m
2
Remoto
Remoto
Attiva il controllo remoto RS-422 per controllare HyperDeck da un altro dispositivo, ad esempio
HyperDeck Extreme Control (sui modelli HyperDeck che ne sono dotati si illuminerà il pulsante
Remote). Disattivalo per controllare HyperDeck dal dispositivo stesso.
Controllo deck
Abilita questa impostazione per specchiare i comandi dei controlli di trasporto da un HyperDeck
agli altri. Collega il connettore Remote Out dell’HyperDeck principale al connettore Remote In
del secondo HyperDeck e così via con il resto delle unità per creare una configurazione a
cascata tramite RS-422. Abilita l’impostazione di controllo remoto su tutte le unità per far sì che
icomandi impartiti dal deck principale funzionino anche sui deck secondari.
Premendo il pulsante REC sul deck principale, inizieranno a registrare tutti i deck collegati
a cascata.
HyperDeck Studio HD Mini non funziona come controller, ma si può controllare da un
HyperDeck Pro o Plus.
Reset
Impostazioni di fabbrica
Ripristina le impostazioni di fabbrica. Un messaggio ti chiederà di procedere o annullare
l’operazione.
594Impostazioni

Lato posteriore
1 Alimentazione
Tutti gli HyperDeck offrono un ingresso IEC AC; HyperDeck Studio 4K Pro ne offre due.
L’ingresso DC permette di collegare batterie 12V esterne, ideali come fonte di riserva.
Assicurati che la fonte DC sia compatibile con la tensione di ingresso e la corrente
nominale indicata sotto il connettore DC.
2 Ethernet
Connetti il deck alla rete per trasferire i file con FTP ad alta velocità o per controllarlo
remotamente mediante HyperDeck Ethernet Protocol. La porta è 1GbE sui modelli HD
e 10GbE su HyperDeck Studio 4K Pro. Tutti i dettagli sul trasferimento file con un client
FTP si trovano nella sezione “Trasferire file in rete”.
Se HyperDeck è connesso alla stessa rete di uno switcher ATEM, si può controllare
da quest’ultimo o da un pannello ATEM.
3 Remoto
Alcuni modelli HyperDeck Studio hanno due connettori RS-422 DE-9: uno di ingresso
e uno di uscita. HyperDeck Studio HD Mini ne ha solo uno di ingresso.
4 Disco esterno
Collega un flash disk esterno al connettore USB-C per registrare alla velocità massima
di 5Gb/s sui modelli HyperDeck Studio HD. La connessione USB 3.1 Gen 2 dei modelli
HyperDeck Studio 4K Pro consente velocità di trasferimento fino 10Gb/s. Puoi anche
collegare hub USB-C, o Blackmagic MultiDock 10G per usare uno o più SSD.
Quando HyperDeck è collegato al computer tramite USB, puoi sfruttare il deck come
sorgente webcam nei software come Open Broadcaster e Skype. Consulta la sezione
“Configurare Open Broadcaster” per tutti i dettagli.
5 Monitoraggio esterno
Collega un display esterno al connettore 3G-SDI Monitor Out per monitorare le
immagini con gli overlay su un’uscita convertita in risoluzione minore. Tra gli overlay ci
sono anche le icone dei drive, i livelli audio, il timecode e la LUT 3D. Leggi la sezione
“Impostazioni” per tutti i dettagli sulle impostazioni di monitoraggio SDI e sul
clean feed.
2 5 6 8 941
HyperDeck Studio HD Mini
offre un connettore con anello
di blocco per evitare che il
cavo si scolleghi
HyperDeck Studio HD Mini
e Plus offrono connettori
BNC per il timecode in
entrata e in uscita
7
3
595Lato posteriore

6 Riferimento
Tutti i modelli HyperDeck sono provvisti di un generatore interno di sync che genera
segnali di riferimento video stabilizzati black burst e tri-sync. Puoi collegare l’uscita
di riferimento di HyperDeck all’ingresso di riferimento di altri dispositivi video per
sincronizzarli al segnale di riferimento generato dall’HyperDeck principale, oppure
collegare un segnale di riferimento all’ingresso di riferimento per sincronizzare
HyperDeck a una sorgente esterna di sync principale.
Consulta la sezione “Configurazione” per tutti i dettagli su come selezionare la
sorgente di riferimento e collegare a cascata gli HyperDeck.
7 Timecode
Tutti gli HyperDeck sono provvisti di un generatore interno di timecode ora del giorno.
Come il segnale di riferimento, anche il segnale di timecode si può collegare a cascata
a un HyperDeck principale o a un dispositivo video per far sì che le registrazioni
abbiano lo stesso timecode.
I connettori di timecode sono BNC o XLR a seconda del modello. Consulta la sezione
“Impostazioni” per tutti i dettagli sulle opzioni del timecode.
8 HDMI
Collega televisori e monitor HDMI.
HyperDeck rileva automaticamente gli standard video SDR e HDR quando il segnale è
taggato con i metadati esatti. I metadati HDR si possono anche escludere. Consulta la
sezione “Impostazioni” per tutti i dettagli.
9 SDI
I modelli HyperDeck Studio HD Mini offrono una connessione 3G-SDI per segnali fino
al 1080p60. HyperDeck Studio HD Plus e HyperDeck Studio HD Pro offrono una
connessione 6G-SDI per segnali dall’SD al 2160p30. HyperDeck Studio 4K Pro offre
ingressi e uscite 12G-SDI compatibili con risoluzioni fino al 2160p60.
Se collegati agli switcher ATEM, gli HyperDeck con due uscite SDI consentono di
riprodurre file ProRes 4444 con riempimento e chiave.
596Lato posteriore

Uscita Monitor Out
L’uscita di monitoraggio esterno è utile per controllare il video registrato o riprodotto usando gli
overlay delle informazioni importanti tra cui: codec, formato del video e del segnale, frame rate,
timecode, nome del file, stato dei comandi di trasporto, stato dei supporti di memoria e
livelli audio.
Le informazioni in sovraimpressione sono elencate di seguito.
Codec
Il codec selezionato nel menù LCD.
Formato
La risoluzione e il frame rate della clip corrente in modalità riproduzione; la risoluzione e il frame
rate del video sorgente in modalità registrazione.
Timecode
Il timecode della clip video durante la riproduzione; il timecode registrato attraverso gli ingressi
video o timecode. Puoi anche scegliere se visualizzare il timecode della clip o della timeline.
Fonte
La fonte SDI o HDMI selezionata. Nessun segnale compare in assenza di un segnale valido.
Nome
Il nome assegnato al dispositivo. Consulta la sezione “Blackmagic HyperDeck Setup” per tutti
i dettagli.
597Uscita Monitor Out
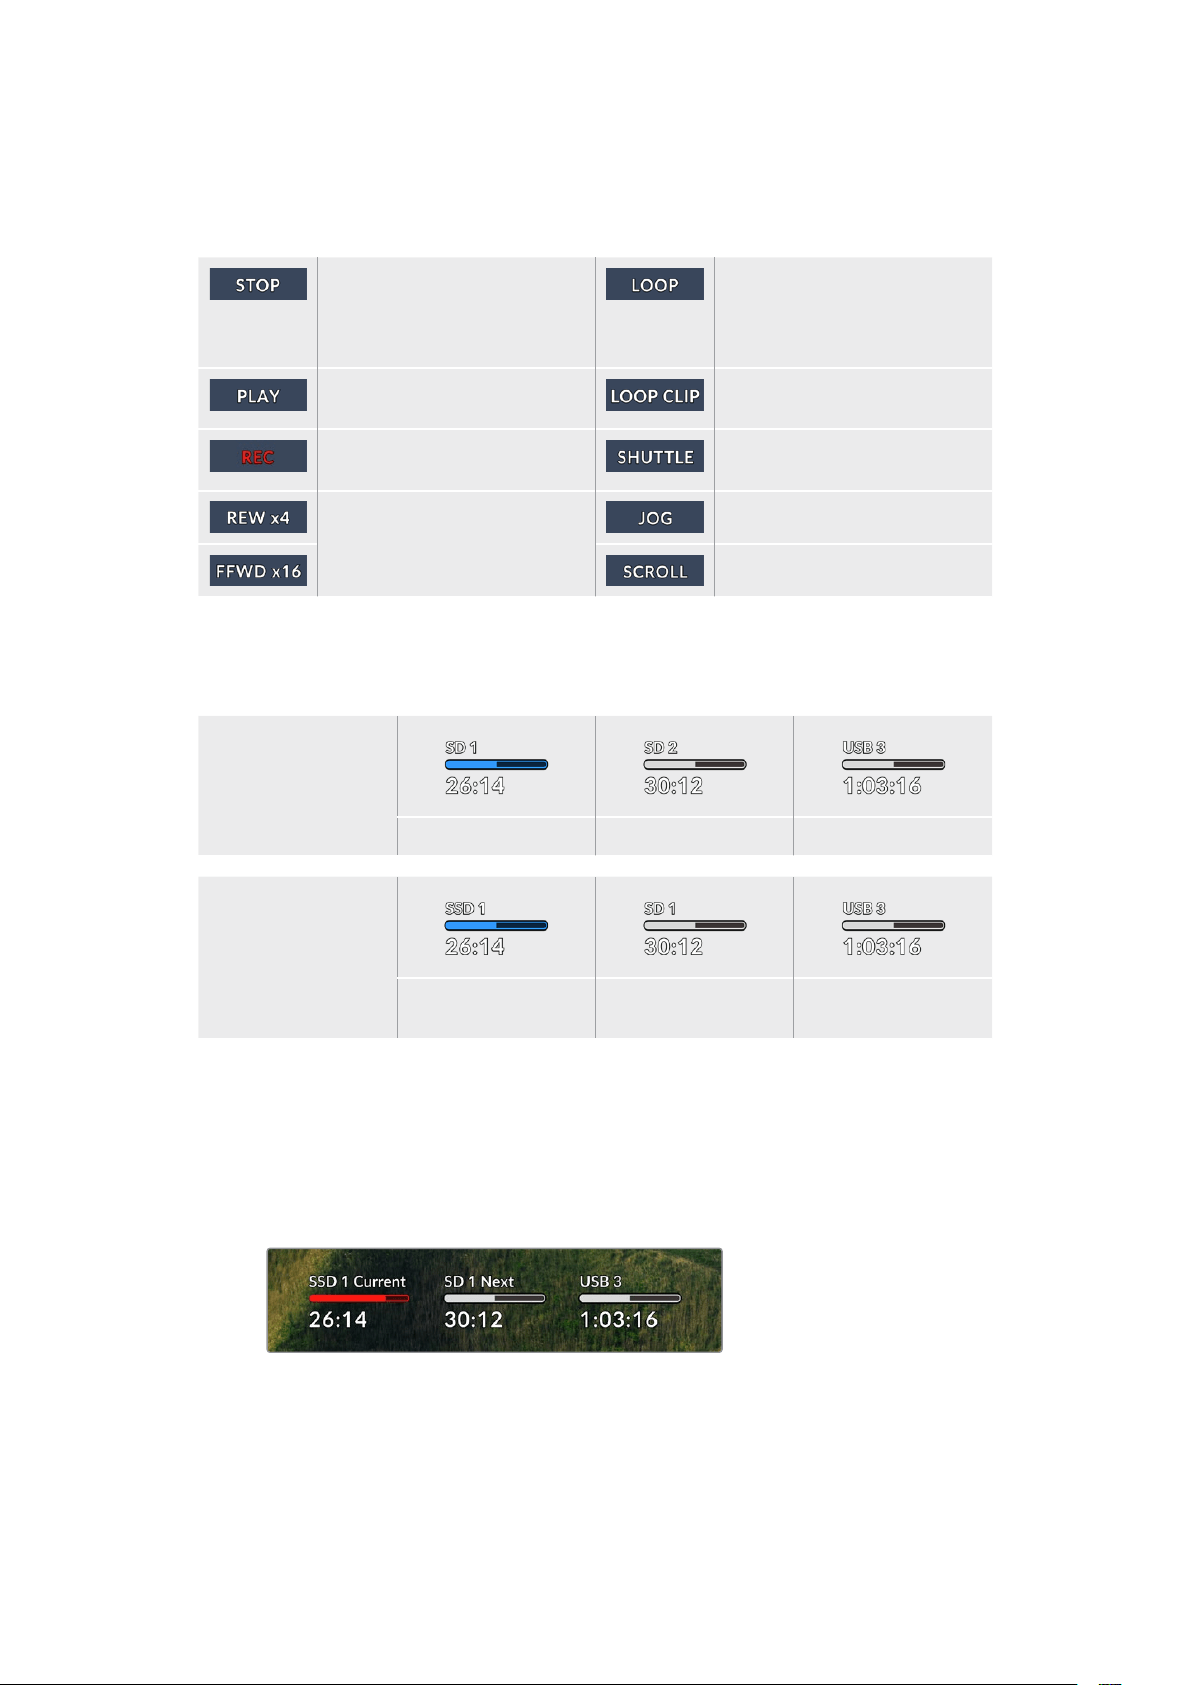
Stato
Il comando di trasporto attivo durante la riproduzione o la registrazione. I comandi di trasporto
sono elencati di seguito.
Modalità standby. Riproduzione continua di tutte
le clip registrate che hanno
il formato video attualmente
selezionato.
Riproduzione video in corso. Riproduzione continua di una
sola clip.
Quando la registrazione video è
in corso si illumina di rosso.
Modalità Shuttle, ma in standby.
Avanti o indietro veloce. I numeri
indicano la velocità.
Modalità Jog.
Modalità Scroll.
Supporti di memoria
Questi tre indicatori mostrano il nome e lo stato della scheda SD, del disco SSD e del drive USB
attivo. Sono leggermente diversi a seconda del modello di HyperDeck.
HyperDeck
Studio HD Plus
Slot scheda SD 1 Slot scheda SD 2 Disco esterno attivo
Modelli HyperDeck
Studio Pro
Slot SD o SSD in uso Slot SD o SSD
successivi
Disco esterno attivo
Il terzo indicatore si riferisce sempre al drive USB. In caso di hub USB, o di dock come
Blackmagic MultiDock 10G, visualizza il drive attivo.
Disco o drive
Il testo sopra la barra di progresso indica lo slot SD o SSD. Durante la registrazione,
la scritta Attivo segnala il supporto in uso; la scritta Successivo segnala il prossimo
supporto su cui registrare.
598Uscita Monitor Out

Barra di progresso
La barra è blu, bianca o rossa in base allo stato del supporto di memoria, e indica lo
spazio utilizzato.
Il supporto di memoria attivo per la riproduzione e la registrazione.
Supporto di memoria presente ma non attivo. Il supporto è pieno
se la barra è del tutto bianca.
Registrazione in corso.
Sotto la barra di progresso compaiono il tempo di registrazione residuo o lo stato
dello slot.
Tempo residuo
Lo spazio residuo sulla scheda SD o sul disco SSD è indicato in ore:minuti:secondi e
dipende dal formato della fonte e dal codec e dall’impostazione di qualità selezionati.
Quando rimane meno di un’ora, il tempo compare in minuti:secondi.
Stato dello slot
No scheda e No drive indicano che nello slot non è inserita una scheda o un drive.
Scheda piena e Drive pieno indicano che la scheda SD, il disco SSD o il drive USB
sono pieni e vanno sostituiti. Se però avevi già inserito un’altra SD o un altro SSD, la
registrazione continuerà su quel supporto automaticamente. Se hai collegato un disco
esterno, la registrazione continuerà su quest’ultimo quando tutte le SD e gli SSD
sono pieni.
Protetto e Protetta indicano che il supporto è protetto.
599Uscita Monitor Out

Livelli audio
Gli indicatori di livello audio mostrano fino a 16 canali audio - a seconda di quanti
desideri registrarne - e si possono impostare su PPM o VU dal menù LCD.
Apri il menù Audio per selezionare il numero di canali da registrare e cambiare il tipo
di indicatori. Consulta la sezione “Impostazioni” per tutti i dettagli.
Archiviazione
SD
Per registrare in Ultra HD ad alta qualità consigliamo le veloci schede SD UHS II. Queste
schede raggiungono velocità di scrittura superiori a 220MB/s per registrare fino all’Ultra HD
2160p60. Per registrare a bit rate più bassi con una compressione maggiore sono sufficienti
schede più lente. In generale sono sempre preferibili le schede più veloci.
Consigliamo di visitare regolarmente la pagina www.blackmagicdesign.com/it/support per
scaricare l’ultima versione del manuale con le informazioni aggiornate.
Quali schede SD sono adatte per HyperDeck Studio 4K Pro?
Consigliamo le seguenti schede SD per registrare a 2160p fino a 60 fps
Marca Modello Capacità
Angelbird AV Pro MK2 V90 SDXC 128GB
Angelbird AV Pro MK2 V90 SDXC 256GB
ProGrade Digital SDXC UHS-II V90 300R 128GB
ProGrade Digital SDXC UHS-II V90 300R 256GB
Wise SD2-128U3 SDXC UHS-II 128GB
600Archiviazione

Quali schede SD sono adatte per HyperDeck Studio HD Pro?
Consigliamo le seguenti schede SD per registrare a 2160p fino a 30 fps
Marca Modello Capacità
Angelbird AV Pro MK2 V90 SDXC 64GB
Angelbird AV Pro MK2 V90 SDXC 128GB
Angelbird AV Pro MK2 V90 SDXC 256GB
ProGrade Digital SDXC UHS-II V90 300R 64GB
ProGrade Digital SDXC UHS-II V90 300R 128GB
ProGrade Digital SDXC UHS-II V90 300R 256GB
Wise SD2-64U3 SDXC UHS-II 64GB
Wise SD2-128U3 SDXC UHS-II 128GB
Quali schede SD sono adatte per HyperDeck Studio HD Plus?
Consigliamo le seguenti schede SD per registrare a 2160p fino a 30 fps
Marca Modello Capacità
Angelbird AV Pro MK2 V90 SDXC 64GB
Angelbird AV Pro MK2 V90 SDXC 128GB
Angelbird AV Pro MK2 V90 SDXC 256GB
ProGrade Digital SDXC UHS-II V90 300R 64GB
ProGrade Digital SDXC UHS-II V90 300R 128GB
ProGrade Digital SDXC UHS-II V90 300R 256GB
Wise SD2-64U3 SDXC UHS-II 64GB
Wise SD2-128U3 SDXC UHS-II 128GB
Quali schede SD sono adatte per HyperDeck Studio HD Mini?
Consigliamo le seguenti schede SD per registrare a 1080p in ProRes 422 HQ fino a 60 fps
Marca Modello Capacità
Angelbird AV Pro MK2 V90 SDXC 64GB
Angelbird AV Pro MK2 V90 SDXC 128GB
Angelbird AV Pro MK2 V90 SDXC 256GB
ProGrade Digital SDXC UHS-II V90 300R 64GB
ProGrade Digital SDXC UHS-II V90 300R 128GB
ProGrade Digital SDXC UHS-II V90 300R 256GB
Wise SD2-64U3 SDXC UHS-II 64GB
Wise SD2-128U3 SDXC UHS-II 128GB
601Archiviazione

SSD
Per lavorare con video ad alto data rate è importante controllare le specifiche del disco SSD.
Alcuni SSD hanno velocità di scrittura fino a 50% minore di quella indicata dal produttore.
Anche quando le specifiche del disco indicano che la velocità è sufficiente per il video, in realtà
l’SSD non è abbastanza veloce per registrare video in tempo reale.
La compressione dati nascosta compromette perlopiù la registrazione, quindi spesso questi
SSD sono adatti alla riproduzione.
In fase di test abbiamo riscontrato che gli ultimi modelli di SSD e quelli ad alta capacità sono
solitamente più veloci. Gli SSD consigliati sono:
Quali SSD sono adatti per HyperDeck Studio 4K Pro?
Consigliamo i seguenti SSD per registrare a 2160p fino a 60 fps
Marca Modello Capacità
Samsung 860 PRO 512GB
Samsung 860 PRO 1TB
Samsung 870 EVO (MZ-77E250BW) 250GB
Samsung 870 EVO (MZ-77E500BW) 500GB
Samsung 870 EVO (MZ-77E1T0BW) 1TB
Samsung 870 EVO (MZ-77E2T0BW) 2TB
Quali SSD sono adatti per HyperDeck Studio HD Pro?
Consigliamo i seguenti SSD per registrare a 2160p fino a 30 fps
Marca Modello Capacità
Samsung 860 PRO 512GB
Samsung 860 PRO 1TB
Samsung 870 EVO (MZ-77E250BW) 250GB
Samsung 870 EVO (MZ-77E500BW) 500GB
Samsung 870 EVO (MZ-77E1T0BW) 1TB
Samsung 870 EVO (MZ-77E2T0BW) 2TB
602Archiviazione
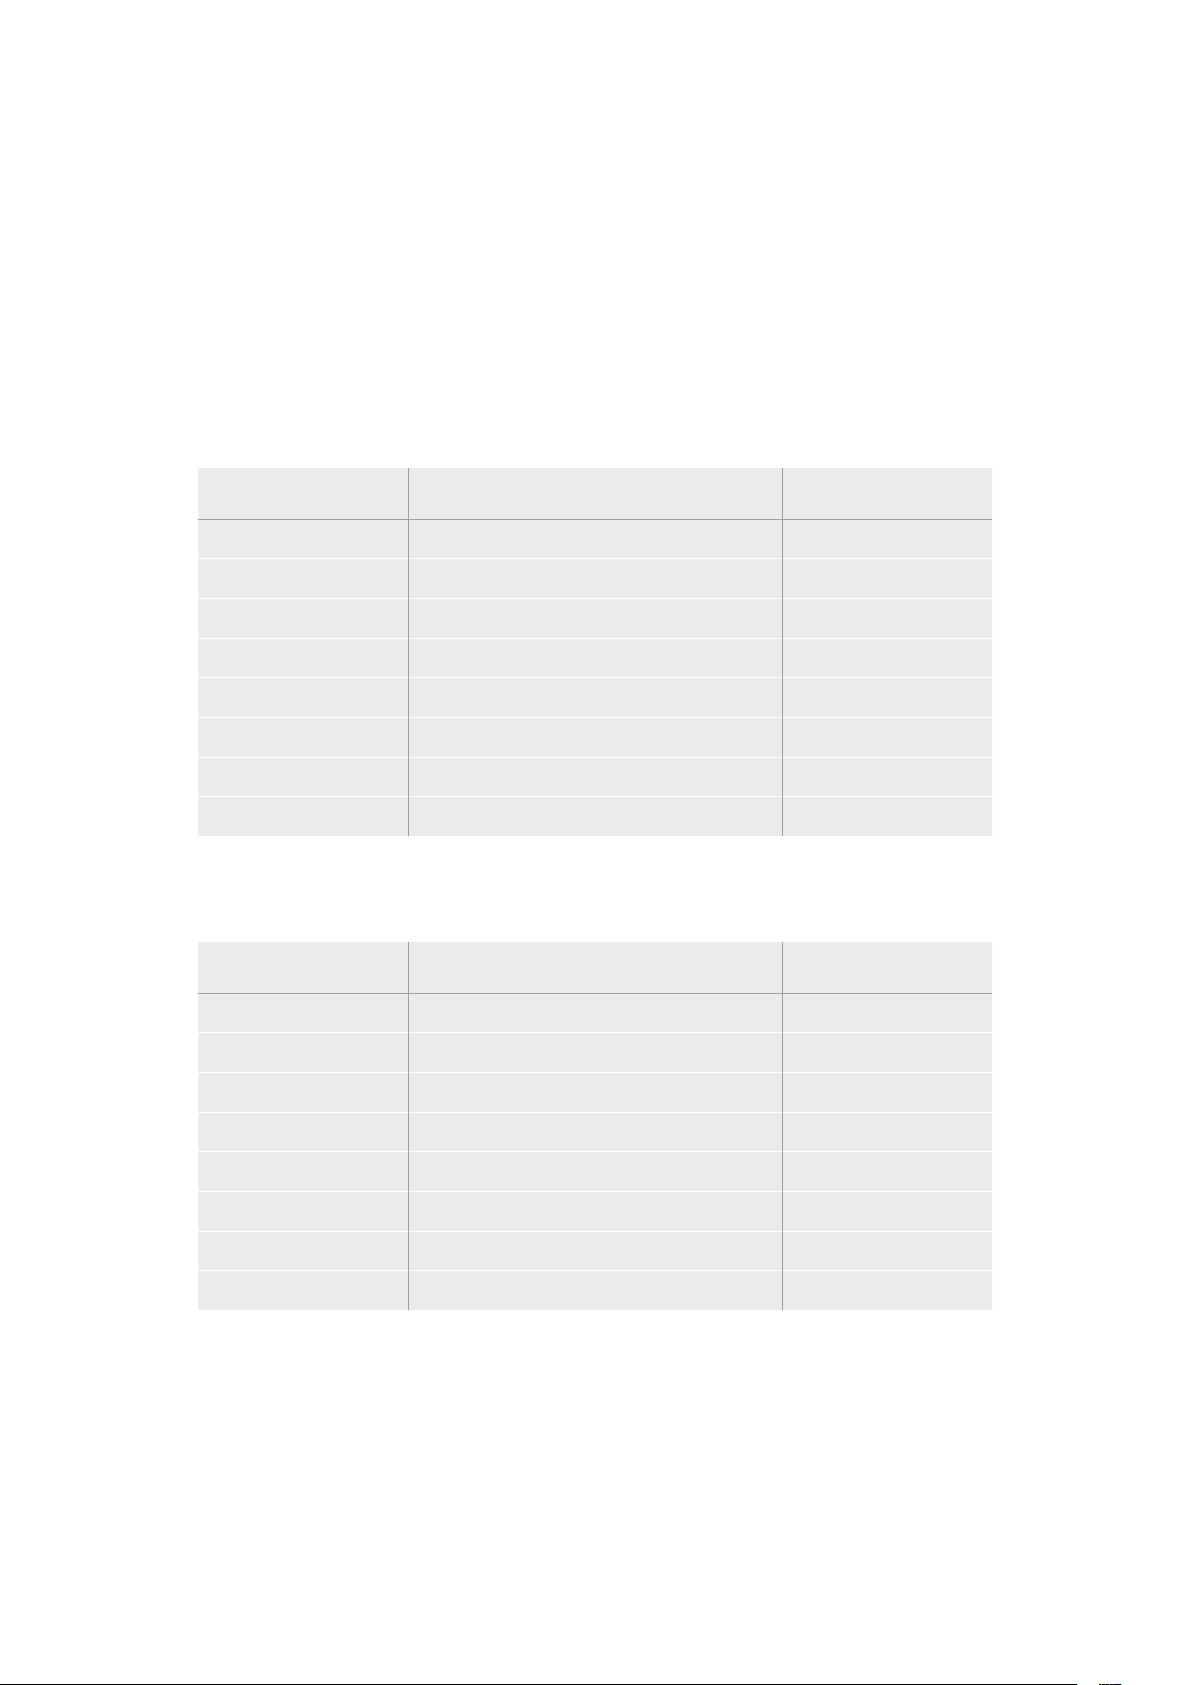
Drive esterno
Tutti i modelli HyperDeck sono in grado di registrare su flash disk USB-C, drive veloci e ad alta
capacità che consentono registrazioni di lunga durata. Collegali al computer per montare il
materiale dal drive stesso.
Per una capacità di archiviazione ancora superiore puoi anche collegare un dock USB-C o un
hard drive esterno. Per usare Blackmagic MultiDock 10G o un flash disk USB-C, collega un cavo
USB-C dal dispositivo alla porta Ext Disk di HyperDeck.
Quali drive USB sono adatti per HyperDeck Studio 4K Pro?
Consigliamo i seguenti drive USB-C per registrare a 2160p fino a 60 fps
Marca Modello Capacità
Angelbird SSD2GO PKT MK2 512GB
Angelbird SSD2GO PKT MK2 2TB
DelKinDevices Juggler 1TB
DelKinDevices Juggler 2TB
LaCie Rugged SSD STHR2000800 2TB
LaCie Rugged SSD Pro STHZ1000800 1TB
Wise PTS-512 Portable SSD 512GB
Wise PTS-1024 Portable SSD 1TB
Quali drive USB sono adatti per HyperDeck Studio HD Pro?
Consigliamo i seguenti drive USB-C per registrare a 2160p fino a 30 fps
Marca Modello Capacità
Angelbird SSD2GO PKT MK2 512GB
Angelbird SSD2GO PKT MK2 2TB
DelKinDevices Juggler 1TB
DelKinDevices Juggler 2TB
LaCie Rugged SSD STHR2000800 2TB
LaCie Rugged SSD Pro STHZ1000800 1TB
Wise PTS-512 Portable SSD 512GB
Wise PTS-1024 Portable SSD 1TB
603Archiviazione
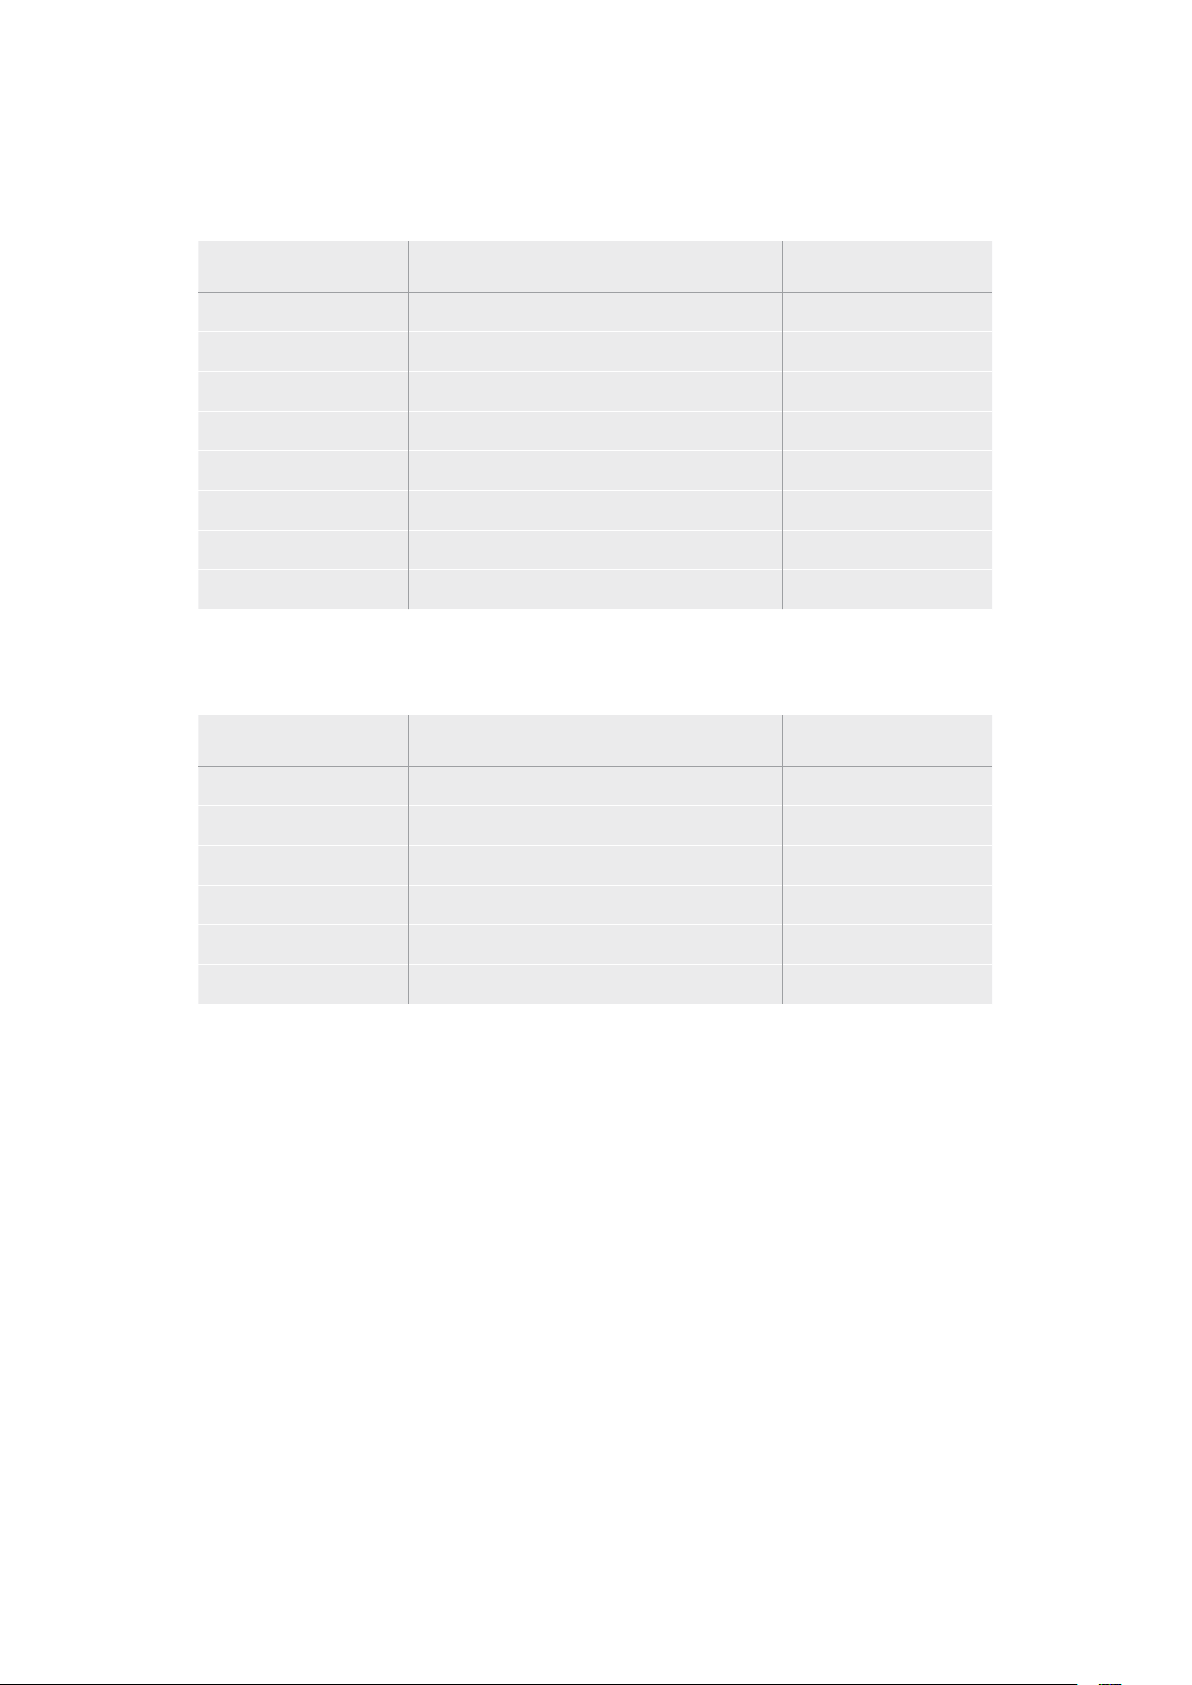
Quali drive USB-C sono adatti per HyperDeck Studio HD Plus?
Consigliamo i seguenti drive USB-C per registrare a 2160p fino a 30 fps
Marca Modello Capacità
Angelbird SSD2GO PKT MK2 512GB
Angelbird SSD2GO PKT MK2 2TB
DelKinDevices Juggler 1TB
DelKinDevices Juggler 2TB
LaCie Rugged SSD STHR2000800 2TB
LaCie Rugged SSD Pro STHZ1000800 1TB
Wise PTS-512 Portable SSD 512GB
Wise PTS-1024 Portable SSD 1TB
Quali drive USB-C sono adatti per HyperDeck Studio HD Mini?
Consigliamo i seguenti drive USB-C per registrare a 1080p in ProRes 422 HQ fino a 60 fps
Marca Modello Capacità
Angelbird SSD2GO PKT MK2 512GB
Angelbird SSD2GO PKT MK2 2TB
DelKinDevices Juggler 1TB
DelKinDevices Juggler 2TB
Wise PTS-512 Portable SSD 512GB
Wise PTS-1024 Portable SSD 1TB
604Archiviazione

Formattare i supporti di memoria
Preparare i supporti di memoria sul computer
Formattare su Mac
Per formattare in HFS+ o exFAT su un Mac, utilizza Utility disco.
È consigliabile eseguire un backup del supporto di memoria perché la formattazione elimina
i dati permanentemente.
1 Nel caso di un SSD, collegalo al computer tramite un dock esterno o un cavo
adattatore. Ignora il messaggio che suggerisce di usare l’SSD per il backup della Time
Machine. Nel caso di una scheda CFast, inseriscila in un lettore esterno collegato
al computer.
2 Vai su Applicazioni > Utility Disco.
3 Clicca sull’icona del disco dell’SSD o della CFast e clicca sulla tab Inizializza.
4 Seleziona il formato Mac OS Extended (Journaled) o exFAT.
5 Inserisci un Nome per il nuovo volume e poi clicca Elimina. La formattazione durerà
pochi istanti e il supporto di archiviazione sarà pronto all'uso.
Formattare su Windows
Usa la finestra di dialogo Formatta su Windows per formattare un drive in exFAT. È consigliabile
eseguire un backup dell’SSD o della scheda SD perché la formattazione elimina i dati
permanentemente.
1 Nel caso di un SSD, collegalo al computer tramite un dock esterno o un cavo
adattatore. Nel caso di una scheda CFast, inseriscila in un lettore esterno collegato
al computer.
2 Seleziona Computer dal menù Start o dalla schermata iniziale. Fai clic destro sull’SSD
o sulla CFast.
3 Seleziona Inizializza dal menù contestuale.
4 Imposta file system su exFAT e dimensioni unità di allocazione su 128 kb.
605Formattare i supporti di memoria
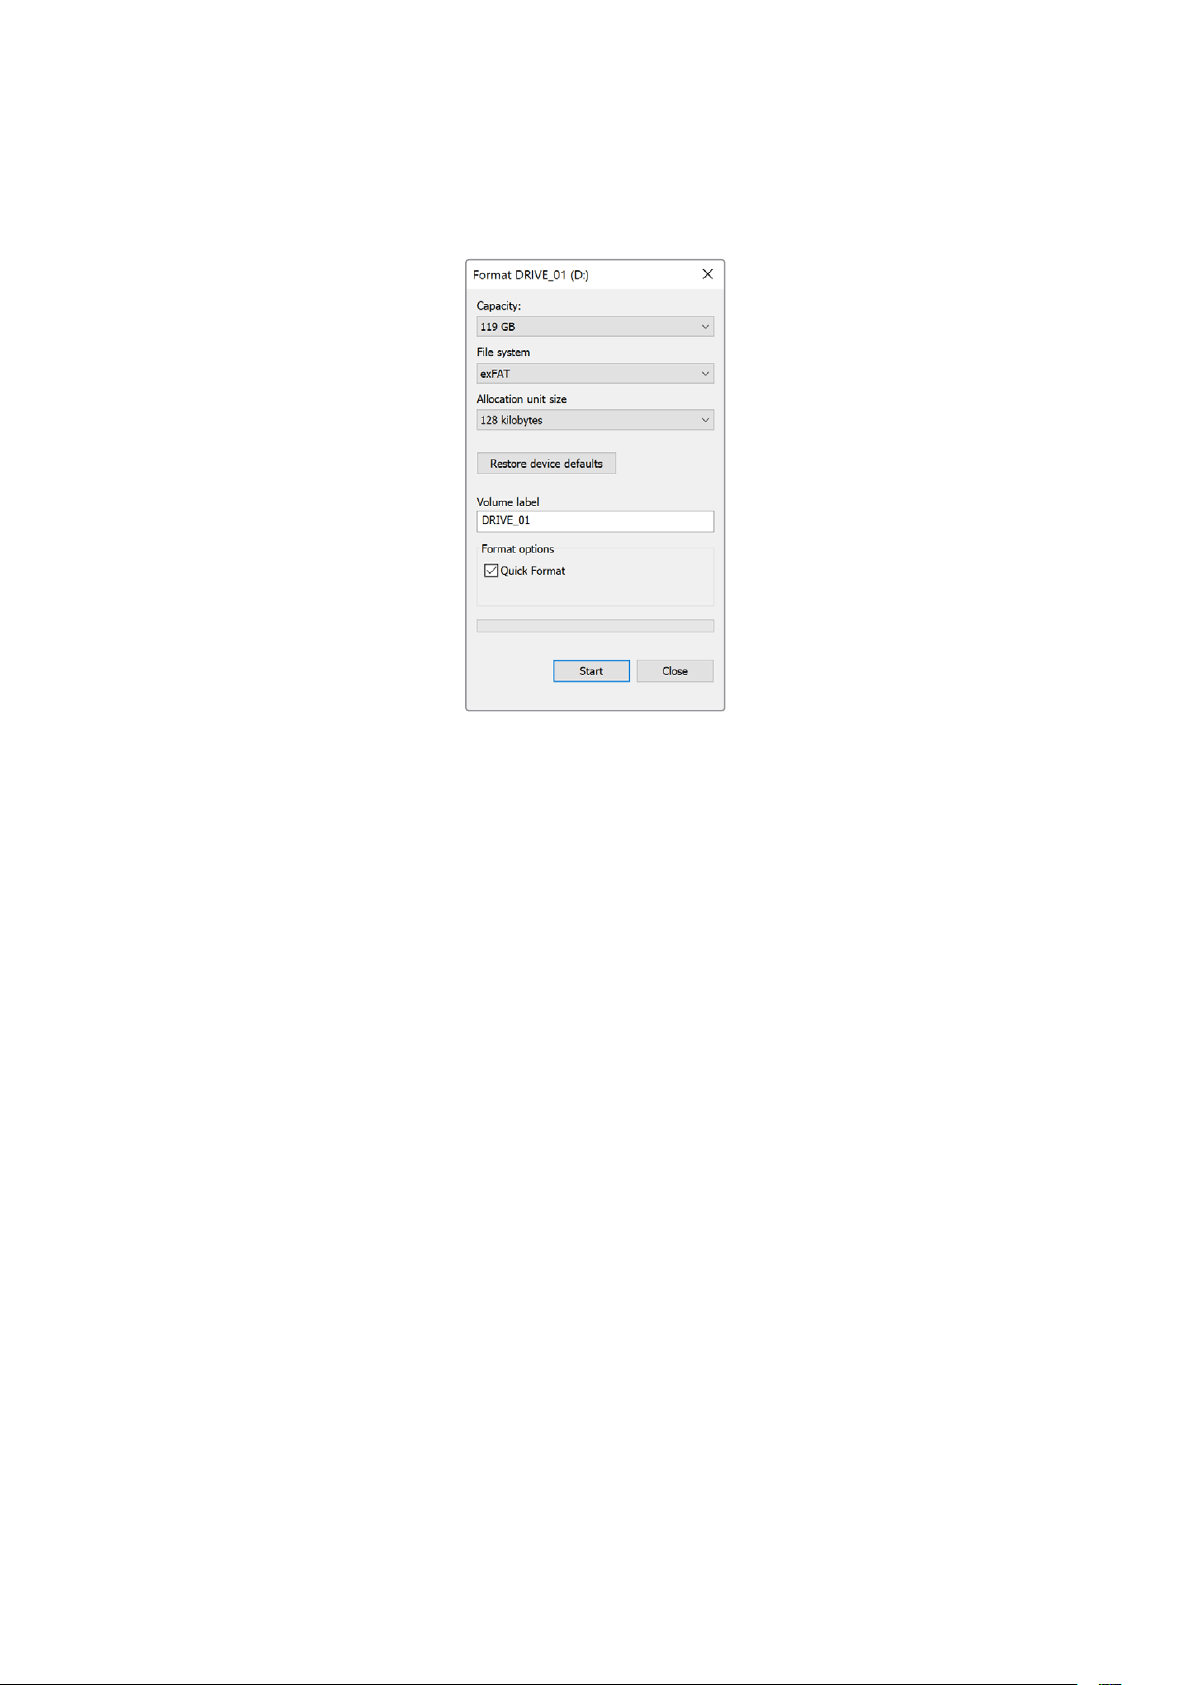
5 Assegna un nome al volume, seleziona Formattazione veloce e clicca Esegui.
6 La formattazione durerà pochi istanti e il supporto di archiviazione sarà pronto all'uso.
Utlizzare HyperDeck come webcam
Collegandolo a un computer tramite USB, HyperDeck viene rilevato come una webcam.
In questo modo potrai trasmettere quanto viene riprodotto o registrato su HyperDeck con
i software di streaming come Open Broadcaster.
Configurare HyperDeck come webcam
Nella maggior parte dei casi, il software di streaming rileva HyperDeck come webcam all’istante
e ne mostra l’icona. In caso contrario, sarà necessario indicare al software di usare HyperDeck
come webcam e microfono.
Su Skype:
1 Nella barra del menù di Skype, apri Audio e video.
2 Nel menù a discesa Videocamera, seleziona HyperDeck. L’anteprima mostrerà il video
proveniente da HyperDeck.
3 Nel menù Microfono seleziona HyperDeck come sorgente audio.
Dopo aver cambiato le impostazioni di Skype, prova ad effettuare una videochiamata per
testare la configurazione della webcam.
Ora HyperDeck Studio è pronto per trasmettere contenuti video in tutto il mondo.
606Utlizzare HyperDeck come webcam

Configurare Open Broadcaster
Open Broadcaster è un’applicazione open source che funge da piattaforma di streaming tra
HyperDeck Studio e i software come YouTube, Twitch e Facebook Live. Open Broadcaster
comprime il video in un bit rate facilmente gestibile dall’applicazione di streaming.
L’esempio qui sotto spiega come impostare Open Broadcaster per trasmettere in streaming
il flusso video di HyperDeck Studio usando come piattaforma YouTube Live.
Lancia Open Broadcaster e clicca il simbolo + nella
sezione Origini.
Seleziona Dispositivo di cattura dalla lista.
Assegna un nome al dispositivo di cattura
e conferma con OK.
Alla voce Dispositivo seleziona il tuo modello
di HyperDeckStudio e conferma con OK.
Accedi al tuo account di YouTube. Seleziona Dal
vivo e clicca Inizia.
Nella sezione Stream, inserisci i dettagli della
trasmissione e clicca Crea stream.
1
2
3
4
5
6
607Utlizzare HyperDeck come webcam
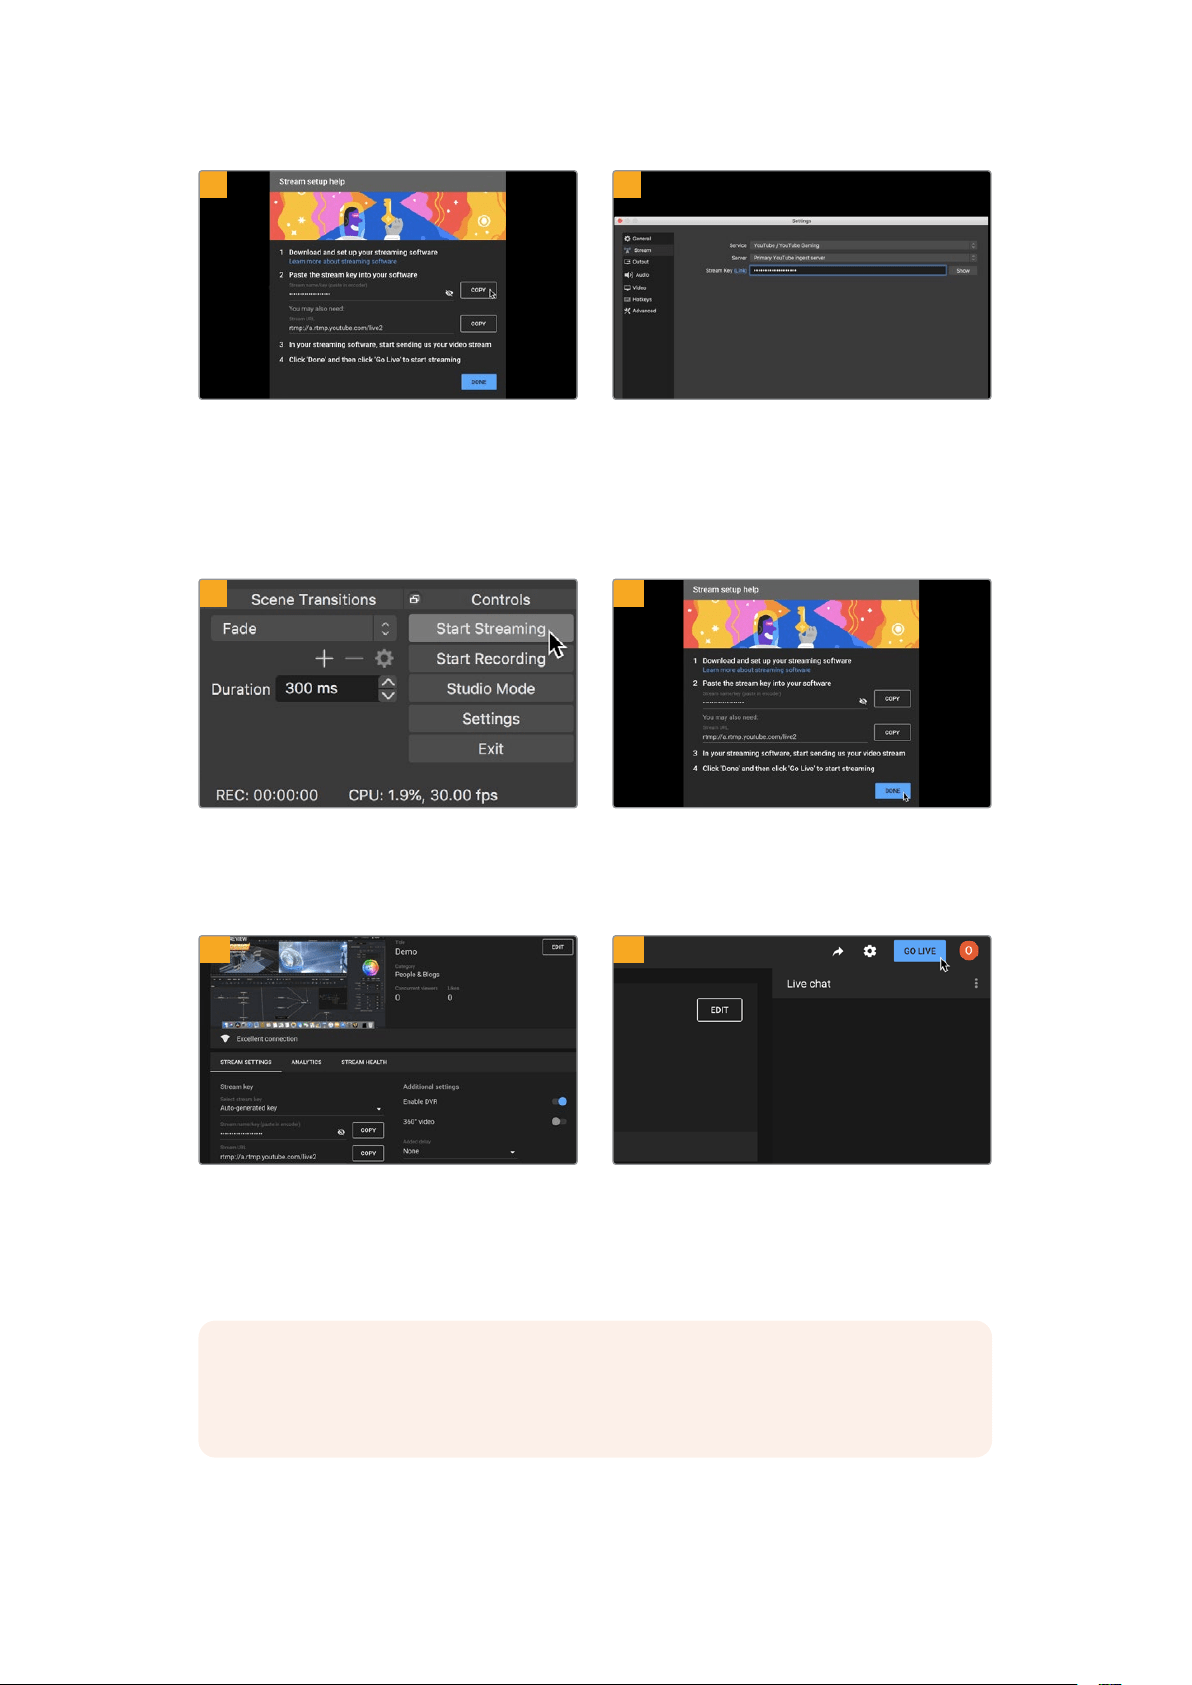
YouTube genererà un codice di streaming che
reindirizza Open Broadcaster al tuo account di
YouTube.
Clicca Copia per copiare il codice di streaming
che dovrai incollare su Open Broadcaster.
Su Open Broadcaster, apri le preferenze cliccando
OBS/Impostazioni nella barra del menù e seleziona
Stream. Incolla il codice di streaming copiato da
YouTube e procedi con OK.
Il flusso video di HyperDeck Studio apparirà nella
finestra di anteprima di Open Broadcaster.
Per connettere Open Broadcaster a YouTube, clicca
Avvia trasmissione in basso a destra. Da questo
momento in poi, Open Broadcaster comunicherà
unicamente con YouTube Live.
Torna su YouTube Live. Sullo sfondo vedrai il
programma dell’uscita webcam di HyperDeck.
Clicca Fine.
A questo punto puoi iniziare a trasmettere. Fai
gli ultimi controlli per assicurarti che tutto sia
configurato correttamente.
Clicca Trasmetti dal vivo per avviare la diretta
streaming.
Ora sei in onda su YouTube con Open Broadcaster.
NOTA È probabile che durante la trasmissione in streaming ci sia un ritardo. Seguila
su YouTube per assicurarti che sia giunta effettivamente al termine prima di chiuderla
cliccando su Termina streaming.
7
8
9
10
11
12
608Utlizzare HyperDeck come webcam

Blackmagic HyperDeck Setup
Utilizzare HyperDeck Setup
Blackmagic HyperDeck Setup consente di modificare le impostazioni e di aggiornare il software
interno di HyperDeck.
Per usare HyperDeck Setup:
1 Collega HyperDeck al computer tramite USB o ethernet.
2 Lancia HyperDeck Setup. Il nome del modello HyperDeck compare nella home.
3 Clicca sull’icona circolare al centro della pagina o sull’immagine di HyperDeck per
aprire le impostazioni.
Tab Setup
Se lavori con più dispositivi HyperDeck Studio, assegna un nome a ciascuno per identificarli
con facilità. Scrivi il nome nel campo Name.
609Blackmagic HyperDeck Setup
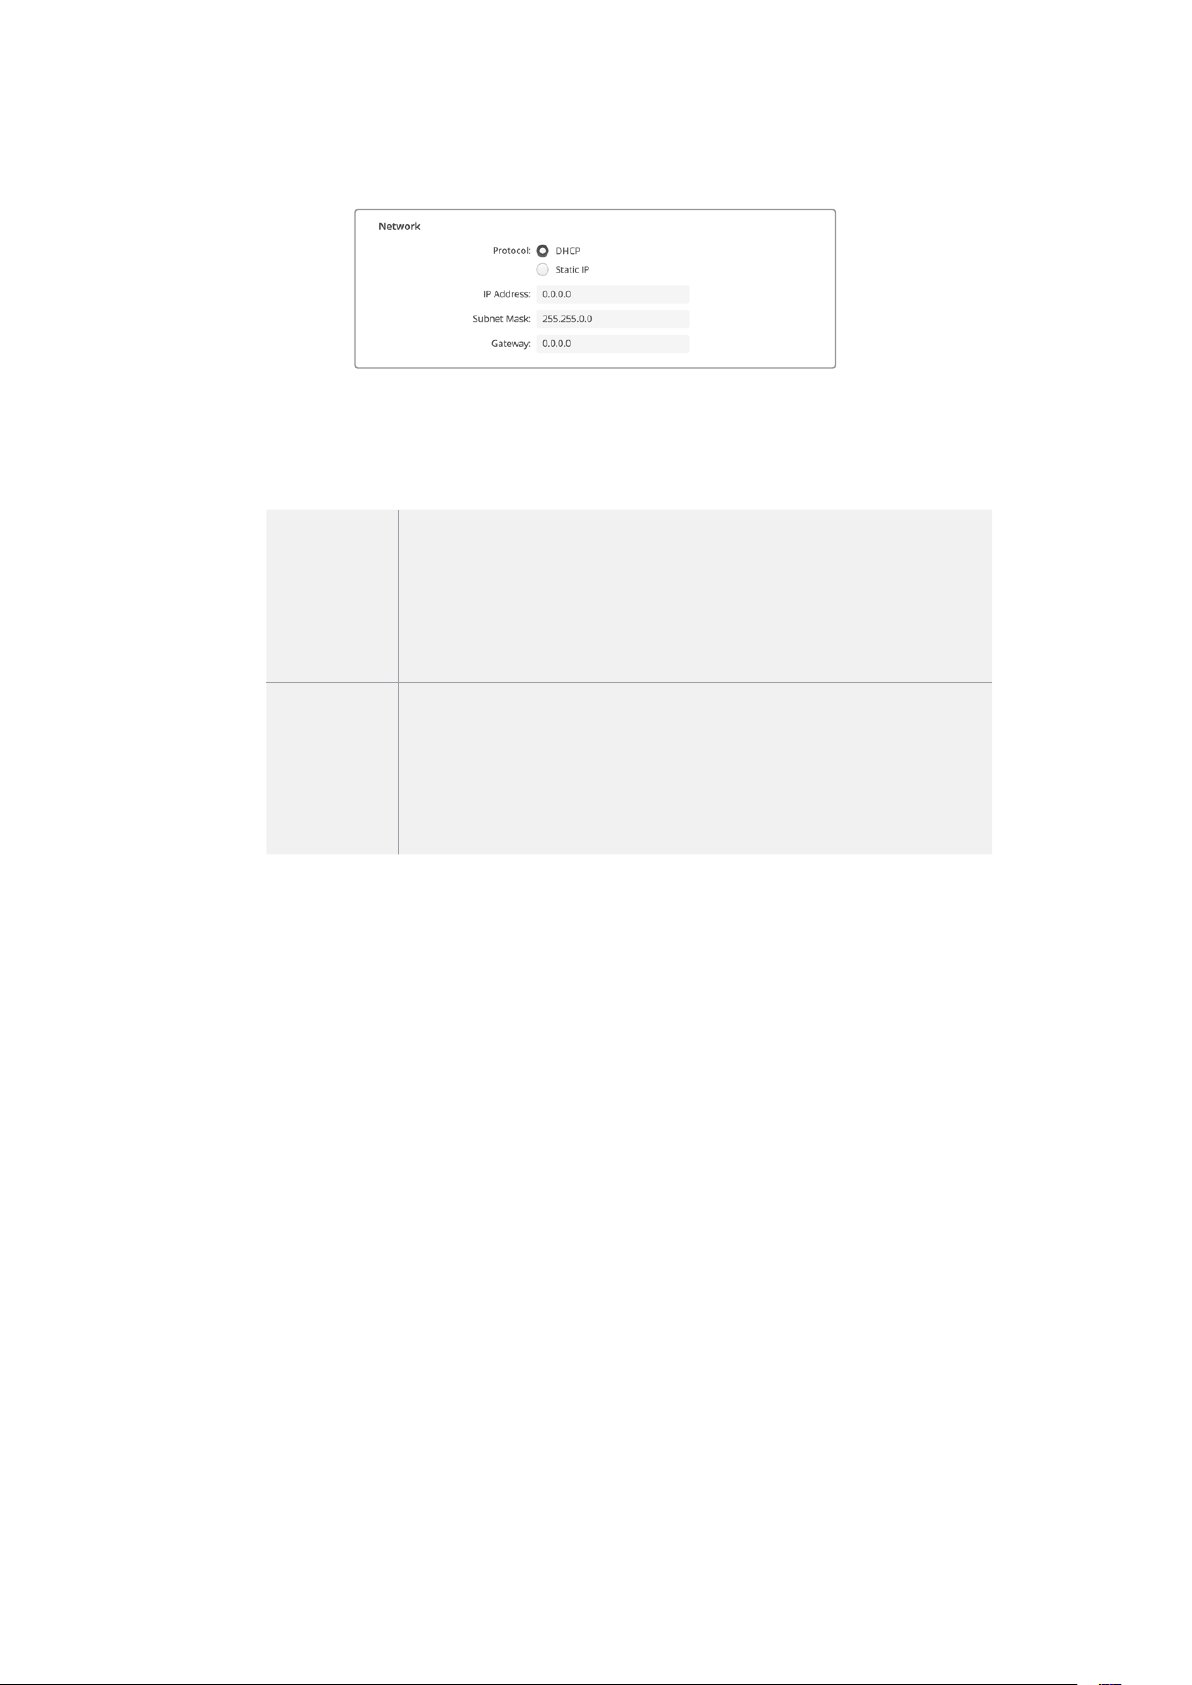
Network
Protocol
Per utilizzare HyperDeck Studio con gli switcher ATEM o controllarlo in remoto
mediante HyperDeck Ethernet Protocol, i dispositivi devono essere collegati alla stessa
rete tramite DHCP o configurando manualmente un indirizzo IP fisso.
DHCP
HyperDeck Studio è impostato su DHCP di default. Il protocollo di
configurazione IP dinamica (DHCP) è un servizio sui server di rete che
trova e assegna automaticamente a HyperDeck Studio un indirizzo IP.
Questo servizio facilita la connessione dei dispositivi tramite ethernet,
evitando che gli indirizzi IP entrino in conflitto tra loro. La maggior parte
dei computer e delle reti è compatibile con il DHCP.
Static IP
Selezionalo per inserire manualmente le impostazioni di rete. Per poter
comunicare, tutte le unità devono avere la stessa maschera di sottorete
e gatweay, e gli stessi primi 3 campi dell’indirizzo IP. Se sulla rete ci sono
altri dispositivi che hanno un indirizzo IP identico, le unità non saranno in
grado di comunicare. In questo caso è necessario cambiare l’ultimo campo
dell’indirizzo IP dell’unità.
Tab LUTs
I modelli HyperDeck dotati di connessioni di monitoraggio permettono di visualizzare il video
in entrata con le LUT 3D a 17, 33 o 65 punti nel formato .cube.
Per esempio le LUT sono ideali per le immagini girate in gamma dinamica Film, piatte e a bassa
saturazione. Applicando una LUT è possibile vederle con il look che si desidera ottenere dopo
la correzione colore.
Le LUT 3D sono utili solo ai fini del monitoraggio, quindi non vengono registrate nel video.
Se desideri applicare la stessa LUT 3D alle immagini in fase di post, basta importare su
DaVinciResolve il file .cube utilizzato su HyperDeck Studio e usarla nella correzione.
610Blackmagic HyperDeck Setup

Per visualizzare una LUT
1 Vai sulla tab LUTs e clicca su Import.
2 Nella finestra dei file vai alla LUT che desideri importare e premi Open.
3 Dopo aver importato la LUT, seleziona On alla voce 3D LUT e salva con Save.
La LUT selezionata apparirà sul display di monitoraggio. Ora puoi abilitare e disabilitare la LUT
dalle impostazioni di monitoraggio del menù LCD.
Aggiornare il software interno
L’utilità consente di aggiornare il software interno di HyperDeck e configurare le impostazioni
di streaming, le impostazioni di rete e la qualità dello streaming.
Per aggiornare il software interno:
1 Scarica l’installer Blackmagic HyperDeck Setup più recente da
www.blackmagicdesign.com/it/support
2 Apri l’installer e segui i passi indicati per installare il software sul computer.
3 A installazione completata, collega HyperDeck Studio al computer tramite le
connessioni USB o ethernet sul retro del dispositivo.
4 Lancia Blackmagic HyperDeck Setup e se un messaggio suggerisce di aggiornare
il software interno, segui le istruzioni. Se non compare nessuna finestra, il software
interno è già aggiornato.
611Aggiornare il software interno

La versione più recente dell’utility è disponibile per il download alla pagina
Supporto di Blackmagic Design su www.blackmagicdesign.com/it/support
Teranex Mini Rack Shelf
Teranex Mini Rack Shelf è una mensola di una unità rack ideale per inserire Blackmagic
HyperDeck Studio HD Mini e HyperDeck Studio HD Plus nel rack o in un flight case. HyperDeck
Studio HD Mini ha le stesse dimensioni compatte di altri dispositivi Blackmagic Design, tra cui i
convertitori Teranex Mini, MultiView 4 e Web Presenter. Per esempio, affiancando HyperDeck
Studio HD Mini ad ATEM Television Studio HD hai la possibilità di commutare otto ingressi video
e di registrare l’uscita di programma su HyperDeck Studio HD Mini. Questo design modulare
consente di creare soluzioni video su misura portatili e facili da usare.
Teranex Mini Rack Shelf consente di affiancare HyperDeck Studio HD Mini e HyperDeck
Studio HD Plus ad altri dispositivi Blackmagic Design dalle stesse dimensioni
Per installare Blackmagic HyperDeck sulla mensola Teranex Mini Rack Shelf basta rimuovere
i piedini in gomma (se presenti) e ancorare il dispositivo alla base utilizzando le viti incluse.
Teranex Mini Rack Shelf ha in dotazione due pannelli di copertura per mascherare gli spazi
non utilizzati.
Per maggiori informazioni, visita il sito di Blackmagic Design www.blackmagicdesign.com/it
612Teranex Mini Rack Shelf

Controllo RS-422
Cos'è il protocollo RS-422?
Il protocollo RS-422, lo standard broadcast per il controllo seriale utilizzato dalle emittenti
sin dai primi anni ottanta, è disponibile su deck, prodotti di automazione, e programmi di
montaggio lineari e non lineari. Tutti i modelli esistenti di HyperDeck supportano questo
standard, garantendone la perfetta integrazione alle soluzioni di automazione broadcast,
di controllo remoto, di montaggio, e di controllo su misura.
HyperDeck Studio è anche compatibile con i comandi Advanced Media Protocol (AMP) tramite
RS-422 e consente il controllo remoto da un dispositivo esterno. Per esempio si possono
impartire comandi per aggiungere una clip a una playlist, stabilire il nome del file della clip
successiva, azionare la riproduzione continua di una clip o dell’intera timeline, o cancellare
una playlist.
Utilizzare un dispositivo di controllo esterno RS-422
Tutti i modelli HyperDeck ospitano una porta di controllo deck remoto RS-422 standard
compatibile con Sony™ che consente la connessione diretta a qualsiasi dispositivo di controllo
di tipo RS-422 come HyperDeck Extreme Control.
È possibile utilizzare i cavi a 9 pin in commercio, purché i pin alle due estremità siano configurati
allo stesso modo. Se preferisci utilizzare cavi su misura, consulta l’illustrazione della piedinatura
di seguito.
HyperDeck si può gestire da HyperDeck Extreme Control invece che dai pulsanti del
pannello stesso.
1 Connetti un segnale video all’ingresso di HyperDeck.
2 Collega HyperDeck Studio ad HyperDeck Extreme Control con un cavo RS-422.
3 Premi Rem sul pannello frontale o seleziona Remoto dal menù del display LCD di
HyperDeck Studio Mini per attivare il controllo remoto.
Ora a distanza puoi avviare e interrompere la registrazione e la riproduzione delle clip, e
controllare altre funzioni di HyperDeck, ad esempio jog e shuttle. La sezione successiva
“Comandi RS-422 compatibili” contiene l'elenco completo dei comandi RS-422 compatibili.
5 4 3 2 1
9 8 7 6
Receive
(–)
Receive
(+)
Transmit
(–)
Transmit
(+)
Ground
Pins
2 7 8 3 1, 4, 6, 9
Piedinatura della connessione RS-422
613Controllo RS-422

Abilita il controllo deck remoto tramite RS-422 selezionando Remoto
nel menù del display LCD o premendo il pulsante Rem
Tutti i modelli HyperDeck supportano il controllo remoto tramite la porta RS-422 sul retro
Comandi RS-422 compatibili
Command Reply No Remote Notes
0 - System Control
0x00 0x11 DeviceTypeRequest
NTSC: 0xF0E0
PAL: 0xF1E0
24P: 0xF2E0
Enabled
1 - Slave Response
0x20 0x00 Stop Acknowledge Disabled
0x20 0x01 Play Acknowledge Disabled
0x20 0x02 Record Acknowledge Disabled
0x20 0x04 StandbyOff Acknowledge Disabled
0x20 0x05 StandbyOn Acknowledge Disabled
0x20 0x0F Eject Acknowledge Disabled
0x20 0x10 FastFwd Acknowledge Disabled
0x21 0x11 JogFwd1 Acknowledge Disabled
0x22 0x11 JogFwd2 Acknowledge Disabled
Treated as N=1;
Same as JogFwd1
0x21 0x12 VarFwd1 Acknowledge Disabled Uses ShuttleFwd1
0x22 0x12 VarFwd2 Acknowledge Disabled
Treated as N=1;
Same as VarFwd1
0x21 0x13 ShuttleFwd1 Acknowledge Disabled
0x22 0x13 ShuttleFwd2 Acknowledge Disabled
Treated as N=1;
Same as ShuttleFwd1
0x20 0x20 Rewind Acknowledge Disabled
0x21 0x21 JogRev1 Acknowledge Disabled
0x22 0x21 JogRev2 Acknowledge Disabled
Treated as N=1;
Same as JogRev1
0x21 0x22 VarRev1 Acknowledge Disabled Uses ShuttleRev1
614Controllo RS-422

Command Reply No Remote Notes
0x22 0x22 VarRev2 Acknowledge Disabled
Treated as N=1;
Same as VarRev1
0x21 0x23 ShuttleRev1 Acknowledge Disabled
0x22 0x23 ShuttleRev2 Acknowledge Disabled
Treated as N=1;
Same as ShuttleRev1
0x20 0x30 Preroll Acknowledge Disabled
0x24 0x31 CueData Acknowledge Disabled
0x20 0x34 SyncPlay Acknowledge Disabled
0x20 0x40 Preview Acknowledge Disabled Status bits are set
0x20 0x41 Review Acknowledge Disabled Status bits are set
0x20 0x43 OutpointPreview Acknowledge Disabled
0x22 0x5C DMCSetFwd Acknowledge Disabled
0x22 0x5D DMCSetRev Acknowledge Disabled
0x20 0x60 FullEEOff Acknowledge Disabled
0x20 0x61 FullEEOn Acknowledge Disabled
0x20 0x63 SelectEEOn Acknowledge Disabled
4 - Preset/Select Control
0x40 0x10 InEntry Acknowledge Disabled
0x40 0x11 OutEntry Acknowledge Disabled
0x44 0x14 InDataPreset Acknowledge Disabled
0x44 0x15 OutDataPreset Acknowledge Disabled
0x40 0x18 InShift+ Acknowledge Disabled
0x40 0x19 InShift- Acknowledge Disabled
0x40 0x1A OutShift+ Acknowledge Disabled
0x40 0x1B OutShift- Acknowledge Disabled
0x40 0x20 InReset Acknowledge Disabled
0x40 0x21 OutReset Acknowledge Disabled
0x40 0x22 AInReset Acknowledge Disabled
0x40 0x23 AOutReset Acknowledge Disabled
0x44 0x31 PrerollPreset Acknowledge Disabled
0x40 0x40 AutoModeOff Acknowledge Disabled
ignored, Status bit
remembered
0x40 0x41 AutoModeOn Acknowledge Disabled
ignored, Status bit
remembered
0x41 0x37 InputCheck Acknowledge Disabled
615Controllo RS-422

Command Reply No Remote Notes
6 - Sense Request
0x61 0x0A TimeCodeGenSense — —
0x61 0x0C CurrentTimeSense — —
0x60 0x10 InDataSense InData Enabled
0x60 0x11 OutDataSense OutData Enabled
0x60 0x12 AInDataSense AInData Enabled
0x60 0x13 AOutDataSense AOutData Enabled
0x61 0x20 StatusSense StatusData Enabled
0x60 0x2B RemainTimeSense RemainTimeData Enabled
0x60 0x2E SpeedSense SpeedData Enabled
0x60 0x31 PrerollTimeSense PreRollTimeData Enabled
0x60 0x36 TimerModeSense TimerModeData Enabled
0x60 0x3E RecordInhibitSense RecordInhibitStatus Enabled
7 - Sense Reply
0x78 0x00 Timer1Data — —
Current Time and
00:00:00:00
0x78 0x04 LTCUserBitsTimeData — —
Current Time and
00:00:00:00
0x78 0x06 VITCUserBitsTimeData — —
Current Time and
00:00:00:00
0x74 0x06 VITCTimeData — — Current Time
0x74 0x07 UserBitsVITCTimeData — — 00:00:00:00
0x74 0x08 GenTCData — — Current Time
0x78 0x08 GenTCUBData — —
Current Time and
00:00:00:00
0x74 0x09 GenUBData — — 00:00:00:00
0x74 0x10 InData — —
0x74 0x11 OutData — —
0x74 0x12 AInData — —
0x74 0x13 AOutData — —
0x74 0x14 CorrectedLTCTimeData — — Current Time
0x70 0x20 StatusData — —
Please see “Status Bits”
sheet: Limited to 9 bytes
of status, silently
truncated
0x76 0x2B RemainTimeData — —
0x71 0x2E SpeedData — —
0x74 0x31 PrerollTimeData — —
0x71 0x36 TimerModeData — — Returns 0 (TimeCode)
0x72 0x3E RecordInhibitStatus — —
616Controllo RS-422

Command Reply No Remote Notes
A - Advanced Media Protocol
0xA1 0x01 AutoSkip Acknowledge Disabled
8-bit signed number of
clips to skip from current
clip
0xAX 0x15 ListNextID IDListing Enabled
when x = 0 single clip
request when x = 1, #
clips can be specified in
the send data
0x20 0x29 ClearPlaylist Acknowledge Disabled
0x41 0x42 SetPlaybackLoop Acknowledge Disabled
Bit 0 loop mode enable,
0=false 1=true
Bit 1 is single clip/timeline
0=single clip
1=timeline
0x41 0x44 SetStopMode Acknowledge Disabled
0 = Off
1 = Freeze on last frame
2 = Freeze on next clip
3 = Show black
0x4f 0x16 AppendPreset Acknowledge Disabled
2 Bytes for the length N
of the clip name
N Bytes for each character
of the clip name
4 Byte in point timecode
(format is FFSSMMHH)
4 Byte out point timecode
(format is FFSSMMHH)
Blackmagic Extensions
0x82 0x02 BMDSeekToTimelinePosition Acknowledge Disabled
16-bit little endian
fractional position
[0..65535]
0x81 0x03 BMDSeekRelativeClip Acknowledge Disabled
One-byte signed integer,
which is the number of
clips to skip (negative for
backwards).
RS-422 - Informazioni per sviluppatori
bit 7 bit 6 bit 5 bit 4 bit 3 bit 2 bit 1 bit 0
Byte 0
0 0 Cassette out 0 0 0 0 Local
Byte 1
Standby 0 Stop 0 Rewind Forward Record Play
Byte 2
Servo Lock 0 Shuttle Jog Var Direction Still 1
Byte 3
Auto Mode 0 0 0 Aout Set Ain Set Out Set In Set
Byte 4
Select EE Full EE Loop Playback 0 0 0 0 0
Byte 5
0 0 0 0 0 0 0 0
Byte 6
0 Lamp Still Lamp Fwd Lamp Rev 0 0 0 0
Byte 7
0 0 0 0 0 0 0 0
Byte 8
0 0 Near EOT EOT 0 0 0 0
Byte 9
0 0 0 0 0 0 0 0
617Controllo RS-422

Variables
Cassette Out
Set if no SSD is present
Local
Set if Remote is disabled (local control)
Standby
Set if a disk is available
Direction
Clear if playback is forwarding, set if playback is reversing
Still
Set if playback is paused, or if in input preview mode
Auto Mode
Set if in Auto Mode
Select EE, Full EE
Set if in input preview mode
Lamp Still/Fwd/Rev
Set according to playback speed and direction
Near EOT
Set if total space left on available SSDs is less than 3 minutes
EOT
Set if total space left on available SSDs is less than 30 seconds
Others
Cue Complete (byte 2, bit 0)
Always 1: Cue requests are always instantaneous
HyperDeck Serial RS-422 Protocol
Protocol
Based on Sony 9-pin protocol
Interface
Baud rate 38.4 Kbps
1 start bit
8 data bits
1 stop bit
1 parity bit
Odd parity
Trasferire i file in rete
HyperDeck Extreme consente il trasferimento dei file mediante FTP (protocollo di trasferimento
file). Grazie a questa funzione è possibile copiare file dal computer direttamente su HyperDeck
all’interno di una rete, alla velocità offerta dalla rete locale. Ad esempio puoi copiare dei file su
un HyperDeck installato a distanza per un’insegna digitale.
Connettere HyperDeck Studio
Quando il computer e HyperDeck Studio sono sulla stessa rete, servono solo un client FTP
e l’indirizzo IP di HyperDeck Studio.
1 Scarica e installa un client FTP sul computer a cui vuoi connettere HyperDeck.
Consigliamo Cyberduck, FileZilla o Transmit, ma la maggior parte delle applicazioni
FTP sono comunque compatibili. Cyberduck e FileZilla sono gratuiti.
618Trasferire i file in rete

2 Connetti HyperDeck Studio alla rete tramite un cavo ethernet e appuntati l’indirizzo
IP. Per accedere all’indirizzo IP, premi il pulsante MENU e ruota la manopola fino
all’impostazione Rete. L’indirizzo IP appare in basso.
L’indirizzo IP di HyperDeck Studio si trova
nel menù Rete del display frontale
3 Inserisci l’indirizzo IP nella finestra di dialogo dell’applicazione FTP. Il nome e la
posizione del campo in cui inserire l’indirizzo IP variano a seconda dell’applicazione.
Di solito è Server o Host. Se la finestra include la casella Anonymous Login, spuntala.
Per connettere HyperDeck Studio non servono nome utente o password. Inserisci l’indirizzo
IP del deck nel campo Server o Host e, se disponibile, spunta la casella Anonymous Login
Trasferire i file
Quando HyperDeck è connesse puoi trasferire i file normalmente con l’applicazione FTP. Gran
parte delle applicazioni FTP offre un’interfaccia di tipo trascina e rilascia.
Puoi trasferire qualsiasi file da e su HyperDeck, ma ricorda che i file che intendi riprodurre da
HyperDeck Studio devono essere compatibili con le risoluzioni e con i codec da esso
supportati. Per la lista dei codec supportati, consulta la sezione dedicata ai codec.
SUGGERIMENTO Puoi trasferire file in rete mentre HyperDeck registra. Il registratore
regola automaticamente la velocità di trasferimento per evitare che la registrazione
ne risenta.
619Trasferire i file in rete
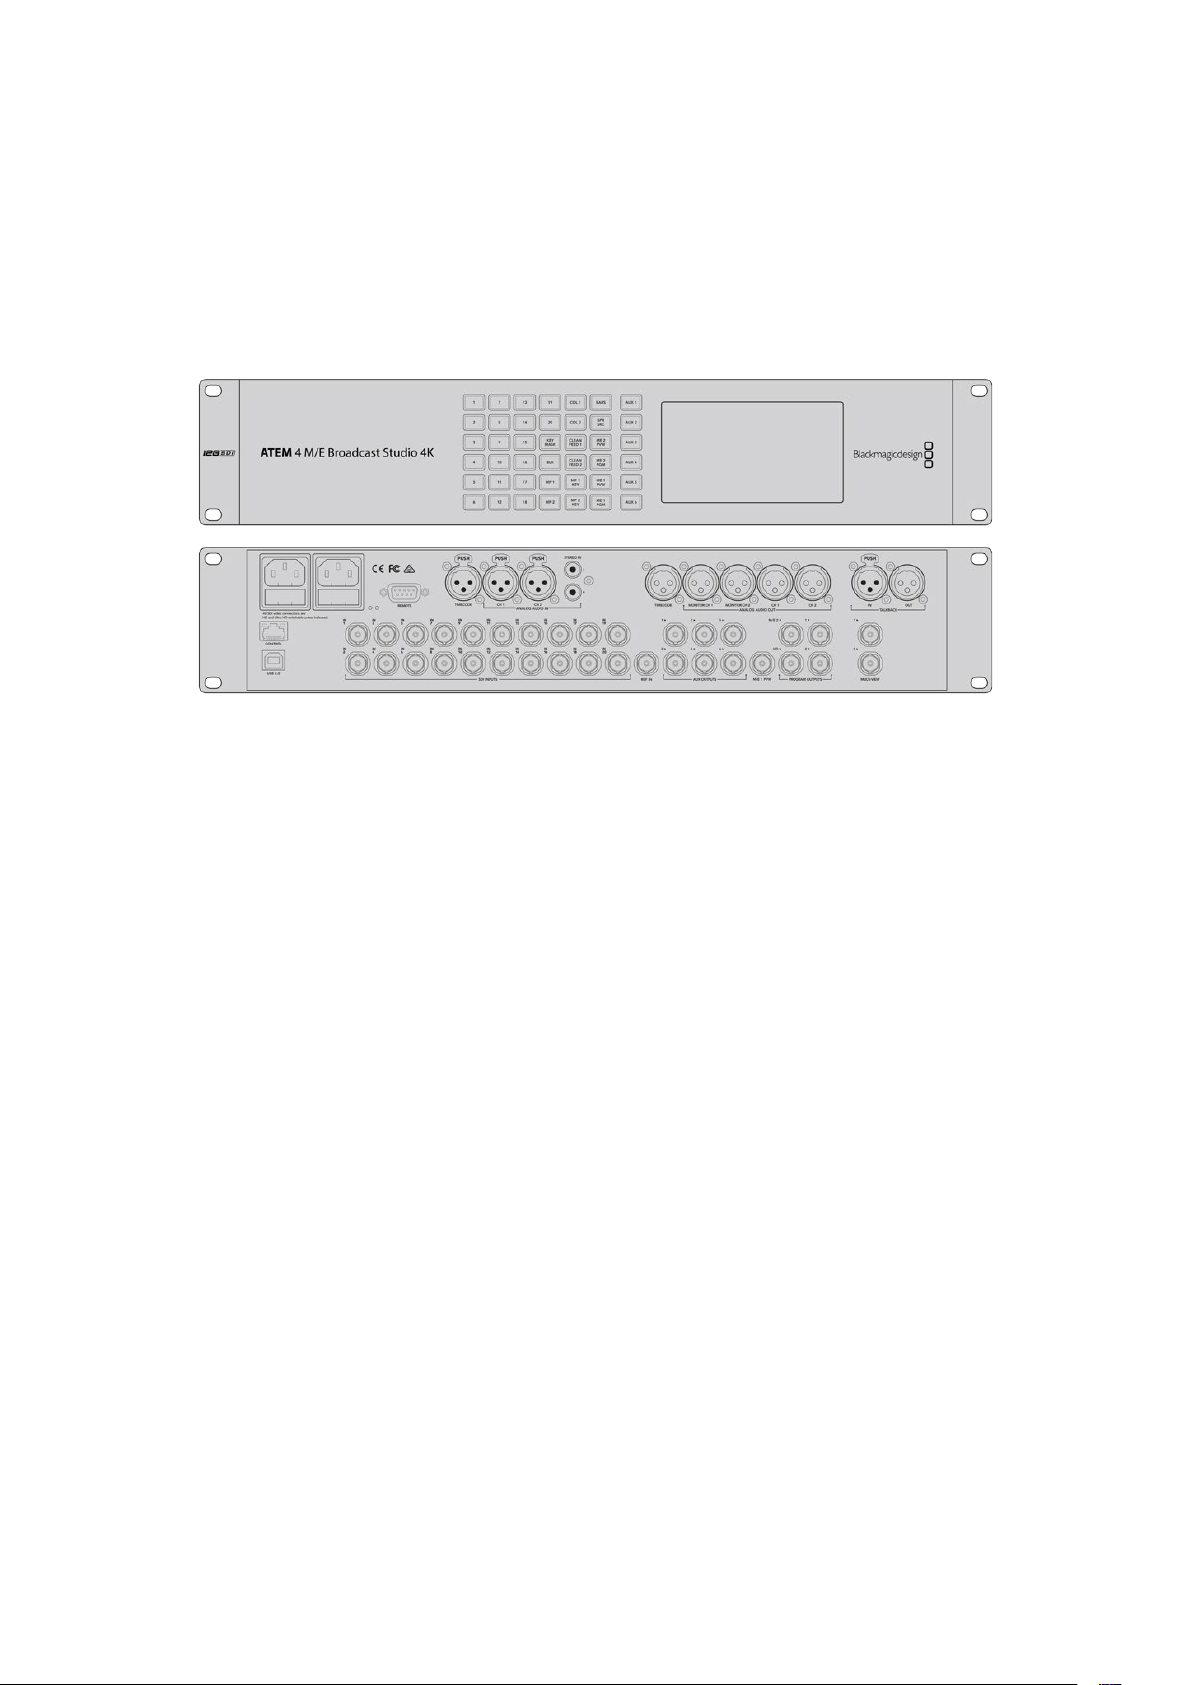
Collegare uno switcher ATEM
Se usi uno switcher ATEM, puoi collegare fino a 4 HyperDeck e gestirli dal software o da un
pannello ATEM. Sarà come avere un intero studio di registrazione a portata di mano. Dallo
switcher ATEM puoi anche innescare la registrazione su HyperDeck, un’ottima soluzione per
archiviare le trasmissioni o per catturare le riprese secondarie durante le produzioni live da
utilizzare in post.
Collega fino a 4 HyperDeck agli switcher ATEM, per esempio ATEM 4 M/E Broadcast Studio 4K
Per collegare HyperDeck a uno switcher ATEM:
1 Collega HyperDeck alla stessa rete dello switcher ATEM e appuntati l’indirizzo IP.
L'indirizzo IP di HyperDeck si trova nel menù LCD frontale Configurazione > Rete.
Oppure apri la tab Configure dell’utilità BlackMagic HyperDeck Setup su un computer
Mac o Windows.
2 Collega l’uscita SDI o HDMI di HyperDeck a un ingresso SDI o HDMI dello
switcher ATEM.
3 Se intendi usare lo switcher per innescare la registrazione su HyperDeck, è necessario
collegare una fonte video ad HyperDeck.
Collega la fonte SDI o HDMI ad HyperDeck come di consueto. Se intendi registrare
l’uscita di programma dello switcher, collega una delle uscite ausiliarie SDI dello
switcher all’ingresso SDI di HyperDeck.
4 Premi Rem sul pannello frontale di HyperDeck o seleziona Remoto nel menù LCD
di HyperDeck Studio Mini per attivare il controllo remoto dallo switcher.
5 Infine inserisci la fonte e l'indirizzo IP nel software o sul pannello ATEM. Questa
semplice operazione è illustrata nel manuale di istruzioni dello switcher ATEM.
620Collegare uno switcher ATEM
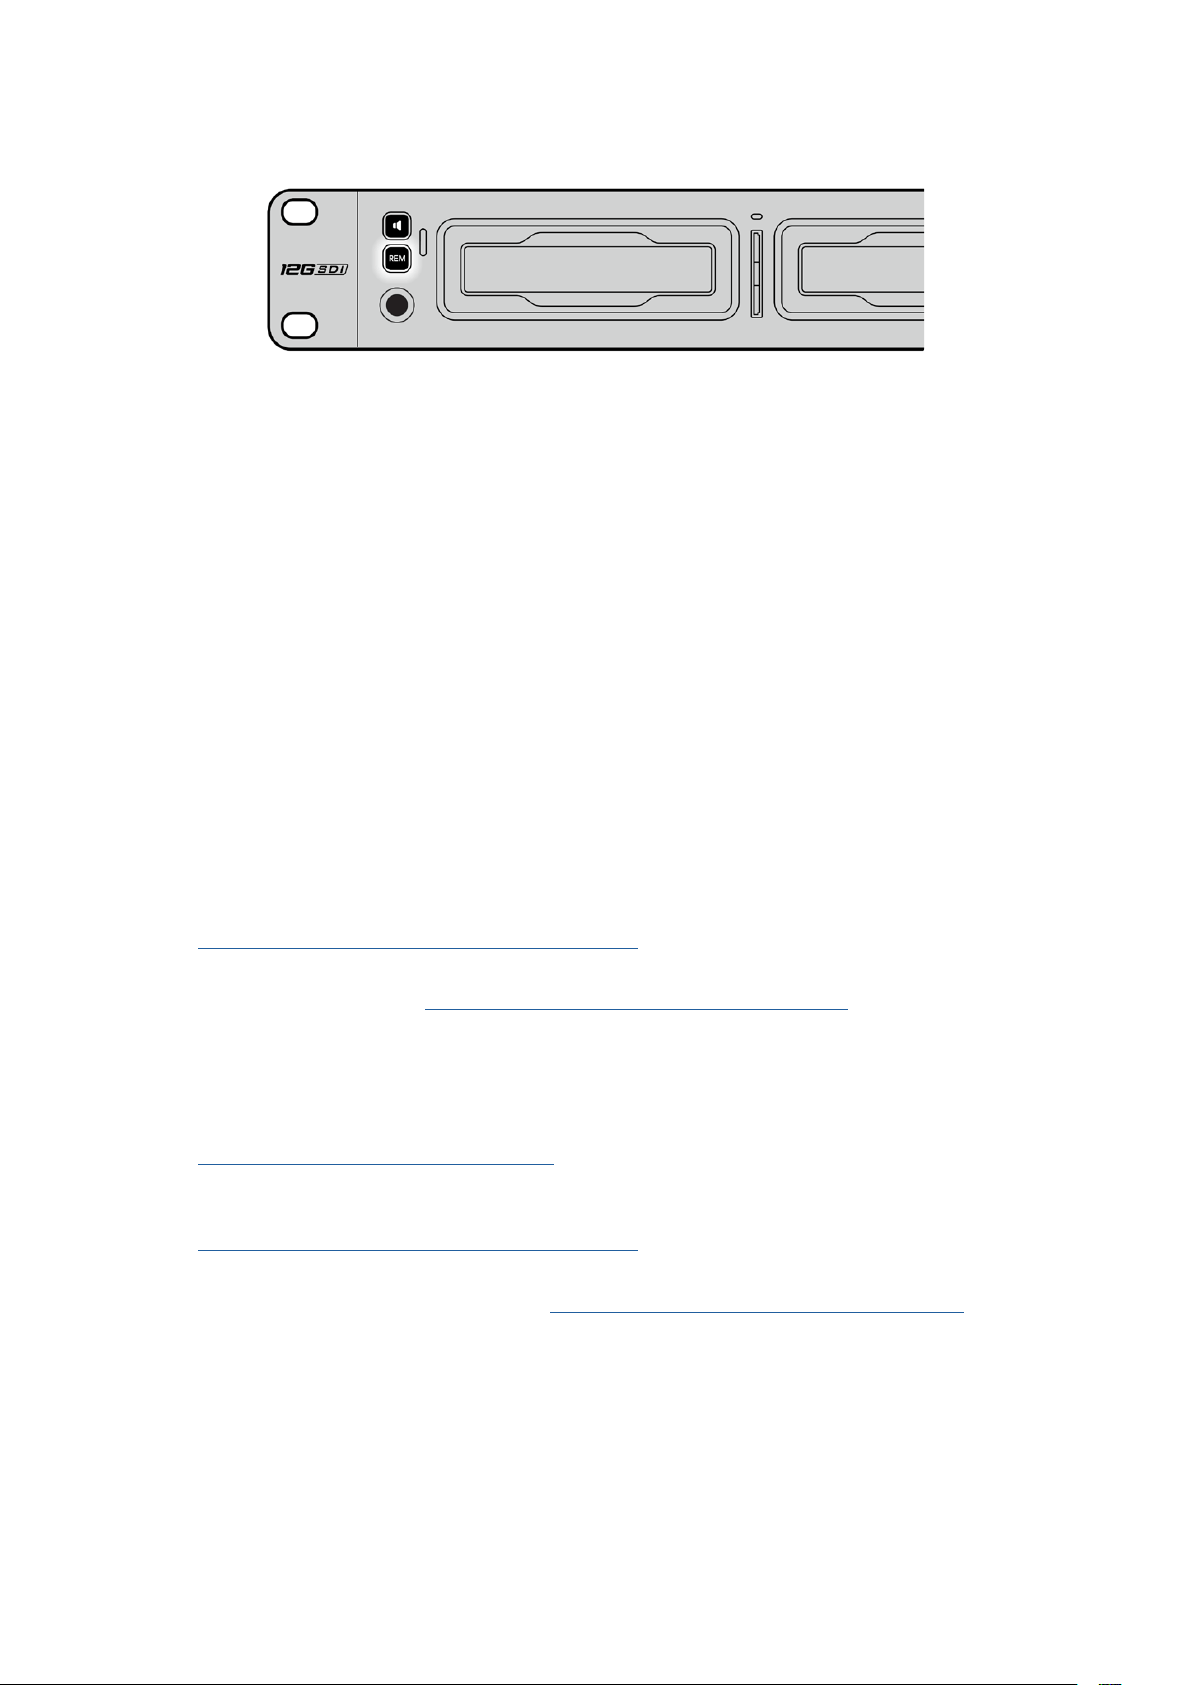
Seleziona Remoto nel menù LCD o premi Rem su HyperDeck per
controllarlo da uno switcher ATEM tramite ethernet
Come impostare un workflow
dipostproduzione
Accedere alle clip
Per accedere alle clip inserisci nel computer la scheda SD o l’SSD direttamente nello slot, in
un lettore esterno o in un dock per SSD. Trascina i file dai supporti di memoria su un hard drive
oppure lavoraci direttamente. Puoi anche connettere gli SSD al computer tramite un adattatore
da eSATA a USB di 2.5". Quest’ultima è un’ottima soluzione portatile per trasferire velocemente
i file dall’SSD al laptop, ma non offre una velocità sufficiente per lavorare direttamente sull’SSD.
Mac OS
QuickTime è integrato a Mac OS. I file Apple ProRes, Avid DNxHD e DNxHR QuickTime
registrati da HyperDeck si aprono su qualsiasi software video su Mac OS.
I file DNxHD e DNxHR MXF registrati da HyperDeck si aprono con Avid Media Composer
e DaVinci Resolve per Mac. I codec DNxHD si possono scaricare gratuitamente da
http://www.avid.com/products/avid-dnxhr-and-dnxhd
I dati dei sottotitoli chiusi .MCC registrati da HyperDeck si aprono con il programma MacCaption
per Mac OS, scaricabile da http://www.telestream.net/captioning/overview.htm
Windows
I file Apple ProRes QuickTime registrati da HyperDeck richiedono l’installazione di QuickTime
sul PC. Quasi tutti i software video su Windows che supportano QuickTime aprono i file
registrati da HyperDeck. QuickTime per Windows si può scaricare gratuitamente da
http://www.apple.com/quicktime/download
I file DNxHD e DNxHR MXF registrati da HyperDeck si aprono con Avid Media Composer
e DaVinci Resolve per Windows. I codec DNxHD si possono scaricare gratuitamente da
http://www.avid.com/products/avid-dnxhr-and-dnxhd
I dati dei sottotitoli chiusi .MCC registrati da HyperDeck si aprono con il programma
CaptionMaker per Windows, scaricabile da http://www.telestream.net/captioning/overview.htm
621Come impostare un workflow dipostproduzione

Informazioni per gli sviluppatori (English)
Blackmagic HyperDeck Ethernet Protocol
Per accedere al protocollo di testo Blackmagic HyperDeck Ethernet Protocol collegati alla porta
TCP 9993 sui modelli HyperDeck Studio con connessione ethernet integrata. Il protocollo
consente di costruire dispositivi integrabili ai nostri prodotti. A Blackmagic Design crediamo
fermamente nei protocolli aperti e non vediamo l’ora di scoprire cosa realizzerai.
Protocol Commands
Command Command Description
help or ? Provides help text on all commands and parameters
commands return commands in XML format
device info return device information
disk list query clip list on active disk
disk list: slot id: {n} query clip list on disk in slot {n}
quit disconnect ethernet control
ping check device is responding
preview: enable: {true/false} switch to preview or output
play play from current timecode
play: speed: {-5000 to 5000} play at specific speed
play: loop: {true/false} play in loops or stop-at-end
play: single clip: {true/false} play current clip or all clips
playrange query playrange setting
playrange set: clip id: {n} set play range to play clip {n} only
playrange set: clip id: {n} count: {m} set play range to {m} clips starting from clip {n}
playrange set: in: {inT} out: {outT}
set play range to play between:
- timecode {inT} andtimecode {outT}
playrange set: timeline in: {in} timeline out:
{out}
set play range in units of frames between:
- timeline position {in} and position {out} clear/reset play
rangesetting
playrange clear clear/reset play range setting
play on startup query unit play on startup state
play on startup: enable: {true/false} enable or disable play on startup
play on startup: single clip: {true/false} play single clip or all clips on startup
play option query play options
play option: stop mode:
{lastframe/nextframe/black}
set output frame when playback stops
record record from current input
record: name: {name} record named clip
record spill spill current recording to next slot
622Informazioni per gli sviluppatori (English)

Command Command Description
record: spill: slot id: {n}
spill current recording to specified slot
use current id to spill to same slot
stop stop playback or recording
clips count query number of clips on timeline
clips get query all timeline clips
clips get: clip id: {n} query a timeline clip info
clips get: clip id: {n} count: {m} query m clips starting from n
clips get: version: {1/2}
query clip info using specified output version:
version 1: is: name startT duration
version 2: id: startT duration inT outT name
clips add: name: {name} append a clip to timeline
clips add: clip id: {n} name: {name} insert clip before existing clip {n}
clips add: in: {inT} out: {outT} name: {name} append the {inT} to {outT} portion of clip
clips remove: clip id: {n}
remove clip {n} from the timeline
(invalidates clip ids following clip {n})
clips clear empty timeline clip list
transport info query current activity
slot info query active slot
slot info: slot id: {n} query slot {n}
slot select: slot id: {n} switch to specified slot
slot select: video format: {format} load clips of specified format
slot unblock unblock active slot
slot unblock: slot id: {n} unblock slot {n}
cache info query cache status
dynamic range query dynamic range settings
dynamic range: playback override:
{off/Rec709/Rec2020_SDR/HLG/
ST2084_300/ST2084_500/
ST2084_800/ST2084_1000/
ST2084_2000/ST2084_4000/ST2084
set playback dynamic range override
dynamic range: record override:
{off/Rec709/Rec2020_SDR/HLG/
ST2084_300/ST2084_500/
ST2084_800/ST2084_1000/
ST2084_2000/ST2084_4000/ST2048}
set record dynamic range override
notify query notification status
notify: remote: {true/false} set remote notifications
notify: transport: {true/false} set transport notifications
notify: slot: {true/false} set slot notifications
notify: configuration: {true/false} set configuration notifications
notify: dropped frames: {true/false} set dropped frames notifications
notify: display timecode: {true/false} set display timecode notifications
623Informazioni per gli sviluppatori (English)

Command Command Description
notify: timeline position: {true/false} set playback timeline position notifications
notify: playrange: {true/false} set playrange notifications
notify: cache: {true/false} set cache notifications
notify: dynamic range: {true/false} set dynamic range settings notifications
notify: slate: {true/false} set digital slate notifications
goto: clip id: {start/end} goto first clip or last clip
goto: clip id: {n} goto clip id {n}
goto: clip id: +{n} go forward {n} clips
goto: clip id: -{n} go backward {n} clips
goto: clip: {n} goto frame position {n} within current clip
goto: clip: +{n} go forward {n} frames within current clip
goto: clip: -{n} go backward {n} frames within current clip
goto: clip: {start/end} goto start or end of clip
goto: timeline: {n} goto frame position {n} within timeline
goto: timeline: +{n} o forward {n} frames within timeline
goto: timeline: -{n} go backward {n} frames within timeline
goto: timeline: {start/end} goto start or end of timeline
goto: timecode: {timecode} goto specified timecode
goto: timecode: +{timecode} go forward {timecode} duration
goto: timecode: -{timecode} go backward {timecode} duration
goto: slot id: {n} goto slot id {n}
jog: timecode: {timecode} jog to timecode
jog: timecode: +{timecode} jog forward {timecode} duration
jog: timecode: -{timecode} jog backward {timecode} duration
shuttle: speed: {-5000 to 5000} shuttle with speed
remote query unit remote control state
remote: enable: {true/false} enable or disable remote control
remote: override: {true/false} session override remote control
configuration query configuration settings
configuration: video input: SDI switch to SDI input
configuration: video input: HDMI switch to HDMI input
configuration: video input: component switch to component input
configuration: audio input: embedded capture embedded audio
configuration: audio input: XLR capture XLR audio
configuration: audio input: RCA capture RCA audio
configuration: file format: {format} switch to specific file format
configuration: audio codec: PCM switch to PCM audio
configuration: audio codec: AAC switch to AAC audio
624Informazioni per gli sviluppatori (English)

Command Command Description
configuration: timecode input:
{external/embedded/preset/clip}
change the timecode input
configuration: timecode output:
{clip/timeline/internal}
change the timecode output
configuration: timecode preference:
{default/dropframe/nondropframe}
whether or not to use drop frame timecodes when not
otherwise specified
configuration: timecode preset:
{timecode}
set the timecode preset
configuration: audio input channels: {n} set the number of audio channels recorded to {n}
configuration: record trigger:
{none/recordbit/timecoderun}
change the record trigger
configuration: record prefix: {name} set the record prefix name (supports UTF-8 name)
configuration: append timestamp:
{true/false}
append timestamp to recorded filename
configuration: xlr input id: {n} xlr type:
{line/mic}
configure xlr input type
multiple xlr inputs can be configured in a single command
configuration: genlock input resync:
{true/false}
enable or disable genlock input resync
uptime return time since last boot
format: prepare: {format} prepare a disk formatting operation to filesystem {format}
format: confirm: {token} perform a pre-prepared formatting operation using token
identify: enable: {true/false} identify the device
watchdog: period: {period in seconds} client connection timeout
reboot reboot device
slate clips slate clips information
slate project slate project information
slate project:↵
camera: {index}↵
set camera index e.g. A
Command Combinations
You can combine the parameters into a single command, for example:
play: speed: 200 loop: true single clip: true
Or for configuration:
configuration: video input: SDI audio input: XLR
Or to switch to the second disk, but only play NTSC clips:
slot select: slot id: 2 video format: NTSC
Using XML
While you can use the Terminal to talk to HyperDeck, if you are writing software, you can use
XML to confirm the existence of a specific command based on the firmware of the HyperDeck
you are communicating with. This helps your software user interface adjust to the capabilities of
the specific HyperDeck model and software version.
625Informazioni per gli sviluppatori (English)

Protocol Details
Connection
The HyperDeck Ethernet server listens on TCP port 9993.
Basic syntax
The HyperDeck protocol is a line oriented text protocol. Lines from the server will be separated by an ascii
CR LF sequence. Messages from the client may be separated by LF or CR LF.
New lines are represented in this document as a "↵" symbol.
Single line command syntax
Command parameters are usually optional. A command with no parameters is terminated with a new line:
{Command name}↵
If parameters are specified, the command name is followed by a colon, then pairs of parameter names and
values. Each parameter name is terminated with a colon character:
{Command name}: {Parameter}: {Value} {Parameter}: {Value} ...↵
Multiline command syntax
The HyperDeck protocol also supports an equivalent multiline syntax where each parameter-value pair is
entered on a new line. E.g.
{Command name}:↵
{P a r a m e t e r}: { Va lu e}↵
{P a r a m e t e r}: { Va lu e}↵
↵
Response syntax
Simple responses from the server consist of a three digit response code and descriptive text terminated by
a new line:
{Response code} {Response text}↵
If a response carries parameters, the response text is terminated with a colon, and parameter name and
value pairs follow on subsequent lines until a blank line is returned:
{Response code} {Response text}:↵
{P a r a m e t e r}: { Va lu e}↵
{P a r a m e t e r}: { Va lu e}↵
...
↵
Successful response codes
A simple acknowledgement of a command is indicated with a response code of 200:
200 ok↵
Other successful responses carry parameters and are indicated with response codes in the range of 201
to299.
626Informazioni per gli sviluppatori (English)

Failure response codes
Failure responses to commands are indicated with response codes in the range of 100 to 199:
100 syntax error
101 unsupported parameter
102 invalid value
103 unsupported
104 disk full
105 no disk
106 disk error
107 timeline empty
108 internal error
109 out of range
110 no input
111 remote control disabled
112 clip not found
120 connection rejected
150 invalid state
151 invalid codec
160 invalid format
161 invalid token
162 format not prepared
163 parameterized single line command not supported
Asynchronous response codes
The server may return asynchronous messages at any time. These responses are indicated with response
codes in the range of 500 to 599:
5xx {Response Text}:↵
{P a r a m e t e r}: { Va lu e}↵
{P a r a m e t e r}: { Va lu e}↵
↵
Connection response
On connection, an asynchronous message will be delivered:
500 connection info:↵
protocol version: {Version}↵
model: {Model Name}↵
↵
Connection rejection
Only one client may connect to the server at a time. If other clients attempt to connect concurrently,
they will receive an error and be disconnected:
120 connection rejected↵
627Informazioni per gli sviluppatori (English)

Timecode syntax
Timecodes are expressed as non-drop-frame timecode in the format:
HH:MM:SS:FF
Handling of deck "remote" state
The “remote” command may be used to enable or disable the remote control of the deck. Any attempt to
change the deck state over ethernet while remote access is disabled will generate an error:
111 remote control disabled↵
To enable or disable remote control:
remote: enable: {“true”, “false”} ↵
The current remote control state may be overridden allowing remote access over ethernet irrespective of
the current remote control state:
remote: override: {“true”, “false”} ↵
The override state is only valid for the currently connected ethernet client and only while the connection
remains open.
The “remote” command may be used to query the remote control state of the deck by specifying no
parameters:
remote↵
The deck will return the current remote control state:
210 remote info:↵
enabled: {“true”, “false”}↵
override: {“true”, “false”}↵
↵
Asynchronous remote control information change notification is disabled by default and may be
configured with the “notify” command. When enabled, changes in remote state will generate a “510 remote
info:”asynchronous message with the same parameters as the “210 remote info:” message.
Closing connection
The "quit" command instructs the server to cleanly shut down the connection:
quit↵
Checking connection status
The "ping" command has no function other than to determine if the server is responding:
ping↵
Getting help
The "help" or "?" commands return human readable help text describing all available commands and
parameters:
help↵
Or:
?↵
The server will respond with a list of all supported commands:
201 help:↵
{Help Te x t}↵
{Help Te x t}↵
↵
628Informazioni per gli sviluppatori (English)

Switching to preview mode
The "preview" command instructs the deck to switch between preview mode and output mode:
preview: enable: {"true", "false"}↵
Playback will be stopped when the deck is switched to preview mode. Capturing will be stopped when the
deck is switched to output mode.
Controlling device playback
The “play” command instructs the deck to start playing:
play↵
The play command accepts a number of parameters which may be used together in most combinations.
By default, the deck will play all remaining clips on the timeline then stop.
The “single clip” parameter may be used to override this behavior:
play: single clip: {“true”, “false”}↵
By default, the deck will play at normal (100%) speed. An alternate speed may be specified in percentage
between -1600 and 1600:
play: speed: {% normal speed}↵
By default, the deck will stop playing when it reaches to the end of the timeline. The “loop” parameter may
be used to override this behavior:
play: loop: {“true”, “false”}↵
The “playrange” command instructs the deck to play all the clips. To override this behavior: and select a
particular clip:
playrange set: clip id: {Clip ID}↵
To only play a certain timecode range:
playrange set: in: {in timecode} out: {out timecode}↵
To clear a set playrange and return to the default value:
playrange clear↵
The “play on startup command” instructs the deck on what action to take on startup. By default, the deck
will not play. Use the “enable” command to start playback after each power up.
play on startup: enable {“true”, “false”}↵
By default, the unit will play back all clips on startup. Use the “single clip” command to override.
play on startup: single clip: {“true”, “false”}↵
Stopping deck operation
The "stop" command instructs the deck to stop the current playback or capture:
stop↵
629Informazioni per gli sviluppatori (English)

Changing timeline position
The "goto" command instructs the deck to switch to playback mode and change its position within the
timeline.
To go to the start of a specific clip:
goto: clip id: {Clip ID}↵
To move forward/back {count} clips from the current clip on the current timeline:
goto: clip id: +/-{count}↵
Note that if the resultant clip id goes beyond the first or last clip on timeline, it will be clamp at the first or
last clip.
To go to the start or end of the current clip:
goto: clip: {“start”, “end”}↵
To go to the start of the first clip or the end of the last clip:
goto: timeline: {“start”, “end”}↵
To go to a specified timecode:
goto: timecode: {timecode}↵
To move forward or back a specified duration in timecode:
goto: timecode: {“+”, “-”}{duration in timecode}↵
To specify between slot 1 and slot 2:
goto: slot id: {Slot ID}↵
Note that only one parameter/value pair is allowed for each goto command.
Enumerating supported commands and parameters
The "commands" command returns the supported commands:
commands↵
The command list is returned in a computer readable XML format:
212 commands:
<commands>↵
<command name="…"><parameter name="…"/>…</command>↵
<command name="…"><parameter name="…"/>…</command>↵
…
</commands>↵
↵
More XML tokens and parameters may be added in later releases.
630Informazioni per gli sviluppatori (English)

Controlling asynchronous notifications
The “notify” command may be used to enable or disable asynchronous notifications from the server.
To enable or disable transport notifications:
notify: transport: {“true”, “false”}↵
To enable or disable slot notifications:
notify: slot: {“true”, “false”}↵
To enable or disable remote notifications:
notify: remote: {“true”, “false”}↵
To enable or disable configuration notifications:
notify: configuration: {“true”, “false”}↵
Multiple parameters may be specified. If no parameters are specified, the server returns the current state of
all notifications:
209 notify:↵
transport: {“true”, “false”}↵
slot: {“true”, “false”}↵
remote: {“true”, “false”}↵
configuration: {“true”, “false”}↵
dropped frames: {“true”, “false”}↵
display timecode: {“true”, “false”}↵
timeline position: {“true”, “false”}↵
playrange: {“true”, “false”}↵
cache: {“true”, “false”}↵
dynamic range: {“true”, “false”}↵
slate: {“true”, “false”}↵
↵
Retrieving device information
The "device info" command returns information about the connected deck device:
device info↵
The server will respond with:
204 device info:↵
protocol version: {Version}↵
model: {Model Name}↵
unique id: {unique alphanumeric identifier}↵
slot count: {number of storage slots}↵
software version: {software version}↵
↵
631Informazioni per gli sviluppatori (English)

Retrieving slot information
The "slot info" command returns information about a slot. Without parameters, the command returns
information for the currently selected slot:
slot info↵
If a slot id is specified, that slot will be queried:
slot info: slot id: {Slot ID}↵
The server will respond with slot specific information:
202 slot info:↵
slot id: {Slot ID}↵
status: {"empty", "mounting", "error", "mounted"}↵
volume name: {Volume name}↵
recording time: {recording time available in seconds}↵
video format: {disk's default video format}↵
blocked: {“true”, “false”}↵
↵
Asynchronous slot information change notification is disabled by default and may be configured with
the "notify" command. When enabled, changes in slot state will generate a "502 slot info:" asynchronous
message with the same parameters as the "202 slot info:" message.
Retrieving clip information
The “disk list” command returns the information for each playable clip on a given disk. Without parameters,
the command returns information for the current active disk:
disk list↵
If a slot id is specified, the disk in that slot will be queried:
disk list: slot id: {Slot ID}↵
The server responds with the list of all playable clips on the disk in the format of: Index, name, formats, and
duration in timecode:
206 disk list:↵
slot id: {Slot ID}↵
{clip index}: {name} {file format} {video format} {Duration
ti m ecode}↵
{clip index}: {name} {file format} {video format} {Duration
ti m ecode}↵
…
↵
Note that the clip index starts from 1.
Retrieving clip count
The "clips count" command returns the number of clips on the current timeline:
clips count ↵
The server responds with the number of clips:
214 clips count: ↵
clip count: {Count}↵
632Informazioni per gli sviluppatori (English)

Retrieving timeline information
The "clips get" command returns information for each available clip on the current timeline. Without
parameters, the command returns information for all clips on timeline:
clips get↵
The server responds with a list of clip IDs, names and timecodes:
205 clips info:↵
clip count: {Count}↵
{Clip ID}: {Name} {Start timecode} {Duration timecode}↵
{Clip ID}: {Name} {Start timecode} {Duration timecode}↵
…
↵
Retrieving transport information
The “transport info” command returns the state of the transport:
transport info ↵
The server responds with transport specific information:
208 transport info:
status: {“preview”, “stopped”, “play”, “forward”, “rewind”,
“j o g ”, “ s h u t t l e ”,” r e c o r d ” }↵
speed: {Play speed between -5000 and 5000 %}↵
slot id: {Slot ID or “none”}↵
clip id: {Clip ID or “none”}↵
single clip: {“true”, “false”}↵
display timecode: {timecode}↵
timecode: {timecode}↵
video format: {Video format}↵
loop: {“true”, “false”}↵
timeline: {n}↵
input video format: {Video format”}↵
dynamic range: {“off”, “Rec709”, “Rec2020_SDR”, “HLG”,
“ST2084_300”, “ST2084_500”, “ST2084_800”, “ST2084_1000”,
“ST2084_2000”, “ST2084_4000”, “ST2048” or “none”}↵
↵
The "timecode" value is the timecode within the current timeline for playback or the clip for record. The
"display timecode" is the timecode displayed on the front of the deck. The two timecodes will differ in some
deck modes.
Asynchronous transport information change notification is disabled by default and may be configured
with the "notify" command. When enabled, changes in transport state will generate a "508 transport info:"
asynchronous message with the same parameters as the "208 transport info:" message.
633Informazioni per gli sviluppatori (English)

Video Formats
The following video formats are currently supported on HyperDeck Studio:
NTSC, PAL, NTSCp, PALp
720p50, 720p5994, 720p60
1080p23976, 1080p24, 1080p25, 1080p2997, 1080p30
1080i50, 1080i5994, 1080i60
HyperDeck Studio Pro and Plus models support these 4k formats:
4Kp23976, 4Kp24, 4Kp25, 4Kp2997, 4Kp30
HyperDeck Studio 4K Pro adds support for the following 4k formats:
4Kp50, 4Kp5994, 4Kp60
Video format support may vary between models and software releases.
File Formats
All HyperDeck models currently support the following file formats:
H.264High_SDI
H.264High
H.264Medium
H.264Low
QuickTimeProResHQ
QuickTimeProRes
QuickTimeProResLT
QuickTimeProResProxy
QuickTimeDNxHD220x
DNxHD220x
QuickTimeDNxHD145
DNxHD145
QuickTimeDNxHD45
DNxHD45
HyperDeck Studio 4K Pro also supports the following file formats:
H.265High_SDI
H.265High
H.265Medium
H.265Low
QuickTimeDNxHR_HQX
DNxHR_HQX 4Kp60
QuickTimeDNxHR_SQ
DNxHR_SQ
QuickTimeDNxHR_LB
DNxHR_LB
Supported file formats may vary between models and software releases.
634Informazioni per gli sviluppatori (English)

Querying and updating configuration information
The "configuration" command may be used to query the current configuration of the deck:
configuration↵
The server returns the configuration of the deck:
211 configuration:↵
audio input: {“embedded”, “XLR”, “RCA”}↵
audio mapping: {n}↵
video input: {“SDI”, “HDMI”, “component”, “composite”}↵
file format: {format}↵
audio codec: {“PCM”, “AAC”}↵
timecode input: {“external”, “embedded”, “preset”, “clip”}↵
timecode output: {“clip”, “timeline”}↵
timecode preference: {“default”, “dropframe”, “nondropframe”}↵
timecode preset: {timecode}↵
audio input channels: {n}↵
record trigger: {“none”, “recordbit”, “timecoderun”}↵
record prefix: {name}↵
append timestamp: {“true”, “false”}↵
↵
One or more configuration parameters may be specified to change the configuration of the deck.
To change the current video input:
configuration: video input: {“SDI”, “HDMI”, “component”}↵
Valid video inputs may vary between models. To configure the current audio input:
configuration: audio input: {“embedded”, “XLR”, “RCA”}↵
Valid audio inputs may vary between models.
To configure the current file format:
configuration: file format: {File format}↵
Note that changes to the file format may require the deck to reset, which will cause the client connection to
be closed. In such case, response code 213 will be returned (instead of 200) before the client connection is
closed:
“213 deck rebooting”
Asynchronous configuration information change notification is disabled by default and may be configured
with the “notify” command. When enabled, changes in configuration will generate a “511 configuration:”
asynchronous message with the same parameters as the “211 configuration:” message.
Selecting active slot and video format
The "slot select" command instructs the deck to switch to a specified slot, or/and to select a specified
output video format.
To switch to a specified slot:
slot select: slot id: {slot ID}↵
To select the output video format:
slot select: video format: {video format}↵
Either or all slot select parameters may be specified. Note that selecting video format will result in a rescan
of the disk to reconstruct the timeline with all clips of the specified video format.
635Informazioni per gli sviluppatori (English)

Clearing the current timeline
The "clips clear" command instructs the deck to empty the current timeline:
clips clear↵
The server responds with
200 ok↵
Adding a clip to the current timeline
The "clips add:" command instructs the deck to add a clip to the current timeline:
clips add: name: {"clip name"}↵
The server responds with
200 ok↵
or in case of error
1xx {error description}↵
Configuring the watchdog
The “watchdog” command instructs the deck to monitor the connected client and terminate the connection
if the client is inactive for at least a specified period of time.
To configure the watchdog:
watchdog: period: {period in seconds}↵
To avoid disconnection, the client must send a command to the server at least every {period} seconds. Note
that if the period is set to 0 or less than 0, connection monitoring will be disabled.
636Informazioni per gli sviluppatori (English)

Assistenza
Assistenza clienti
Il modo più veloce di ottenere assistenza per HyperDeck è consultare il materiale di supporto
più recente disponibile alla pagina Supporto di Blackmagic Design.
Supporto online Blackmagic Design
Il manuale, il software e le note di supporto più recenti sono disponibili alla pagina
www.blackmagicdesign.com/it/support
Blackmagic Forum
Il Blackmagic Forum sul nostro sito è un'ottima risorsa per ottenere informazioni utili e
condividere idee creative. Qui trovi le risposte alle domande più frequenti, oltre ai consigli
forniti da utenti esperti e dal team Blackmagic Design. Visita il Forum alla pagina
https://forum.blackmagicdesign.com
Contattare Blackmagic Design
Se il materiale di supporto disponibile e il Blackmagic Forum non rispondono alle tue domande,
clicca su Invia una email, o su Trova un team di supporto per contattare direttamente il team
di Blackmagic Design più vicino a te.
Verificare la versione del software
La versione del software Blackmagic HyperDeck installata sul tuo computer è indicata nella
finestra About Blackmagic HyperDeck Setup.
Su Mac OS, apri la cartella Applicazioni e seleziona Blackmagic HyperDeck Setup.
Il numero della versione attualmente in uso è indicato nel menù About Blackmagic
HyperDeck Setup.
Su Windows, seleziona Blackmagic HyperDeck Setup dal menù Start. Clicca su
Help e seleziona About Blackmagic HyperDeck Setup per controllare il numero
della versione.
Scaricare gli ultimi aggiornamenti software
Dopo aver controllato quale versione del software HyperDeck è installata sul tuo computer,
visita il Centro assistenza di Blackmagic Design su www.blackmagicdesign.com/it/support
per scaricare gli aggiornamenti più recenti. È consigliabile non aggiornare il software se stai
già lavorando a un progetto importante.
637Assistenza

Normative
Smaltimento di apparecchiature elettriche ed elettroniche nell'Unione Europea
Questo simbolo indica che il dispositivo non deve essere scartato insieme agli altri
rifiuti, ma consegnato a uno degli appositi centri di raccolta e riciclaggio. La raccolta e
lo smaltimento differenziato corretto di questo tipo di apparecchiatura evita lo spreco di
risorse e contribuisce alla sostenibilità ambientale e umana. Per tutte le informazioni sui
centri di raccolta e riciclaggio, contatta gli uffici del tuo comune di residenza o il punto
vendita presso cui hai acquistato il prodotto.
Questo dispositivo è stato testato e dichiarato conforme ai limiti relativi ai dispositivi
digitali di Classe A, ai sensi dell'articolo 15 del regolamento FCC. Tali limiti sono stati
stabiliti con lo scopo di fornire protezione ragionevole da interferenze dannose in
ambienti commerciali. Questo dispositivo genera, usa e può irradiare energia a
radiofrequenza e, se non è installato o usato in conformità alle istruzioni, può causare
interferenze dannose che compromettono le comunicazioni radio. Operare questo
dispositivo in ambienti residenziali può causare interferenze dannose, nella cui
evenienza l'utente dovrà porvi rimedio a proprie spese.
Il funzionamento è soggetto alle due condizioni seguenti:
1 Questo dispositivo non deve causare interferenze dannose.
2 Questo dispositivo deve accettare eventuali interferenze ricevute, incluse le
interferenze che possono causare un funzionamento indesiderato.
R-R-BMD-20210202002
R-R-BMD-20210202003
R-R-BMD-20201201003
R-R-BMD-20210301001
Dichiarazione ISED (Canada)
Questo dispositivo è conforme agli standard canadesi sui dispositivi digitali
di Classe A.
Qualsiasi modifica o utilizzo del dispositivo al di fuori di quello previsto potrebbero
invalidare la conformità a tali standard.
Consigliamo di connettere le interfacce HDMI usando cavi schermati HDMI di
alta qualità.
Questo dispositivo è stato testato per l’uso in ambienti commerciali. Se utilizzato in
ambienti domestici, può causare interferenze radio.
638Normative

Sicurezza
Per evitare scosse elettriche, connettere il dispositivo a una presa di corrente con messa
a terra. Per qualsiasi dubbio, contattare un elettricista qualificato.
Per ridurre il rischio di scosse elettriche, evitare di esporre il dispositivo a gocce o spruzzi.
Questo dispositivo è adatto all'uso nei luoghi tropicali con una temperatura ambiente non
superiore ai 40ºC.
Lasciare uno spazio adeguato intorno al dispositivo per consentire sufficiente ventilazione.
Se installato su rack, assicurarsi che i dispositivi adiacenti non ostacolino la ventilazione.
Le parti all'interno del dispositivo non sono riparabili dall'utente. Contattare un centro
assistenza Blackmagic Design per le operazioni di manutenzione.
Usare il dispositivo a un'altitudine non superiore a 2000 m sopra il livello del mare.
Dichiarazione dello Stato della California
Questo dispositivo può esporre l’utente a sostanze chimiche, per esempio tracce di bifenili
polibromurati nelle parti in plastica, che nello Stato della California sono considerati causa di
cancro e difetti alla nascita o altri danni riproduttivi.
Per maggiori informazioni, visitare la pagina www.P65Warnings.ca.gov
Avvertenze per il personale autorizzato
Scollegare l’alimentazione da entrambe le prese prima di effettuare la
manutenzione!
639Sicurezza

Garanzia
Garanzia limitata di 12 mesi
Blackmagic Design garantisce che questo prodotto è fornito privo di difetti nei materiali e nella
manifattura per un periodo di 12 mesi a partire dalla data d'acquisto. Durante il periodo di garanzia
Blackmagic Design riparerà o, a sua scelta, sostituirà tutti i componenti che risultino difettosi
esonerando il/la Cliente da costi aggiuntivi, purché i componenti vengano restituiti dal/la Cliente.
Per ottenere l'assistenza coperta dalla presente garanzia, il/la Cliente deve notificare
Blackmagic Design del difetto entro il periodo di garanzia e organizzare il servizio di riparazione.
Il/la Cliente è responsabile del costo di imballaggio e di spedizione del prodotto al centro di
assistenza indicato da Blackmagic Design, con spese di spedizione prepagate. I costi di spedizione,
l’assicurazione, le tasse, la dogana e altre spese pertinenti alla resa del prodotto a Blackmagic Design
sono a carico del/la cliente.
Questa garanzia perde di validità per difetti, malfunzionamento o danni causati da utilizzo improprio
o da manutenzione e cura inadeguate del prodotto. Blackmagic Design non ha obbligo di fornire
assistenza sotto questa garanzia: a) per riparare danni causati da tentativi di installazione, riparazione
o manutenzione da parte di personale che non sia autorizzato da Blackmagic Design, b) per riparare
danni causati da uso improprio o connessione ad attrezzatura incompatibile, c) per riparare danni
o malfunzionamenti causati dall’uso di parti o ricambi non originali Blackmagic Design, o d) per
fare manutenzione se il prodotto è stato modificato o integrato ad altri prodotti con il risultato di
allungare i tempi della manutenzione o di renderla più difficoltosa. LA PRESENTE GARANZIA DI
BLACKMAGIC DESIGN SOSTITUISCE QUALSIASI ALTRA GARANZIA, ESPLICITA O IMPLICITA.
BLACKMAGIC DESIGN E I SUOI FORNITORI ESCLUDONO QUALSIASI ALTRA GARANZIA IMPLICITA
DI COMMERCIABILITÀ O DI IDONEITÀ AD UN USO SPECIFICO. L'INTERA RESPONSABILITÀ DI
BLACKMAGIC DESIGN E L'UNICO ESCLUSIVO RICORSO DELL'UTENTE PER QUALSIASI DANNO
ARRECATO DI NATURA INDIRETTA, SPECIFICA, ACCIDENTALE O CONSEQUENZIALE, ANCHE
QUALORA BLACKMAGIC DESIGN FOSSE STATA AVVERTITA DELLA POSSIBILITÀ DI TALI DANNI,
È LA RIPARAZIONE O LA SOSTITUZIONE DEI PRODOTTI DIFETTOSI. BLACKMAGIC DESIGN NON
SI ASSUME ALCUNA RESPONSABILITÀ PER QUALSIASI USO ILLEGALE DEL DISPOSITIVO DA
PARTE DEL/LA CLIENTE. BLACKMAGIC DESIGN NON SI ASSUME ALCUNA RESPONSABILITÀ
PER DANNI DERIVANTI DALL'USO DI QUESTO PRODOTTO. IL/LA CLIENTE UTILIZZA QUESTO
PRODOTTO A PROPRIO RISCHIO.
© Copyright 2021 Blackmagic Design. Tutti i diritti riservati. Blackmagic Design, DeckLink, HDLink, Workgroup Videohub, Multibridge
Pro, Multibridge Extreme, Intensity and Leading the creative video revolution sono marchi registrati negli Stati Uniti e in altri Paesi.
Altri nomi di prodotti e aziende qui contenuti potrebbero essere marchi dei rispettivi proprietari.
640Garanzia

Gravadores de Disco HyperDeck
Julho 2021
Manual de Instalação e Operação
Gravadores de
Disco HyperDeck

Prezado Cliente,
Obrigado por adquirir um gravador de disco Blackmagic HyperDeck!
Quando criamos os gravadores de disco Blackmagic HyperDeck originais em 2011, queríamos
tornar mais fácil e acessível a gravação e reprodução de vídeos profissionais em unidades de
estado sólido removíveis de 2,5".
Hoje, estamos animados em apresentar a nossa nova linha de gravadores de disco HyperDeck,
que permitem gravar vídeos HD e Ultra HD usando SSDs, cartões SD, e agora unidades flash
USB. Você pode inclusive conectar uma Blackmagic MultiDock 10G e gravar ou reproduzir
arquivos em discos rígidos externos.
Os modelos HyperDeck Studio Plus e Pro possuem controles de deck broadcast familiares,
com um seletor de busca para reprodução nos modos jog, shuttle e scroll. A engrenagem do
seletor oferece feedback durante a reprodução, assim você pode navegar pelos clipes sem
tirar os olhos do monitor. Os novos modelos também possuem entrada de fone de ouvido
e alto-falante no painel frontal para que você possa verificar o áudio diretamente do seu
HyperDeck, além de vários outros recursos.
Esperamos que você obtenha anos de uso do seu gravador de disco HyperDeck e que ele
contribua com as suas produções.
Consulte a página de suporte em www.blackmagicdesign.com/br para obter a versão mais
recente deste manual e das atualizações do software HyperDeck. Para garantir que você
receba todos os recursos mais recentes, mantenha o seu programa atualizado. Ao baixar
o software, registre suas informações para que possamos mantê-lo atualizado quando
novos programas forem lançados. Estamos sempre trabalhando com novos recursos e
aprimoramentos, então adoraríamos ouvir a sua opinião.
Grant Petty
Diretor Executivo da Blackmagic Design

Índice
Apresentando os Gravadores
deDiscoHyperDeck 644
Primeiros Passos 645
Conexão de alimentação 645
Conexão de vídeo e áudio 645
Verificar áudio 646
Conexão de mídias 646
Gravação de Vídeo 648
Gravação em múltiplas mídias 648
Reprodução 649
Reprodução de vídeos com o
HyperDeck 649
Usar o seletor de busca 650
Usar o Painel Frontal 652
Indicadores dos
compartimentos de mídia 652
Usar o menu LCD 653
Configurações 654
Painel Traseiro 666
Usar a Saída de Monitoramento 668
Mídias de Armazenamento 671
Cartão SD 671
SSD 673
Unidades externas 674
Formatar Mídias 676
Preparar mídias em um computador 676
Usar o HyperDeck como uma Webcam 677
Configurar a fonte webcam 677
Configurar Open Broadcaster 678
Blackmagic HyperDeck Setup 680
Usar HyperDeck Setup 680
Página LUTs 681
Atualizar o Software Interno 682
Teranex Mini Rack Shelf 683
Controle RS-422 684
Transferir Arquivos via Rede 689
Conectar a um Switcher ATEM 691
Noções Básicas sobre Fluxos de
Trabalho de Pós-Produção 692
Developer Information 693
Blackmagic HyperDeck
Ethernet Protocol 693
Protocol Commands 693
Protocol Details 697
Ajuda 708
Informações Regulatórias 709
Informações de Segurança 710
Garantia 711
643Blackmagic HyperDeck Studio

Apresentando os Gravadores
deDiscoHyperDeck
Seu gravador de disco Blackmagic HyperDeck faz parte de uma família de gravadores de
disco HD e 4K, desenvolvidos para atender ao seu fluxo de trabalho de produção existente.
O HyperDeck Studio HD Pro e o HyperDeck Studio 4K Pro foram projetados para caber dentro
de uma única unidade de rack, porém são grandes o suficiente para gravar e reproduzir
arquivos tanto em cartões SD quanto em SSDs de 9,5 mm.
O HyperDeck Studio HD Mini e o HyperDeck Studio HD Plus são gravadores de disco menores,
que podem ser usados confortavelmente em sua área de trabalho ou instalados em uma
unidade de rack com uma Teranex Mini Rack Shelf opcional.
Além disso, todos os modelos gravam em unidades flash USB e suportam vídeo HD de até
1080p60. O HyperDeck Studio 4K Pro suporta vídeo Ultra HD de até 2160p60.
De modo geral, as funções de gravação e reprodução operam da mesma forma em todos os
modelos, com recursos adicionais em modelos maiores, proporcionando maior controle de
reprodução e opções de conexão mais amplas.
Este manual de instruções fornece todas as informações necessárias para você começar a usar
o seu gravador de disco HyperDeck e dominar todos os controles e recursos.
HyperDeck Studio HD Mini HyperDeck Studio HD Plus
HyperDeck Studio HD Pro e HyperDeck Studio 4K Pro
644Apresentando os Gravadores deDiscoHyperDeck

Primeiros Passos
Começar a usar o seu gravador de disco HyperDeck Studio é tão simples quanto conectar a
alimentação, as fontes de vídeo, o equipamento de destino e inserir os SSDs ou os cartões SD.
Conexão de alimentação
Basta conectar um cabo IEC padrão à entrada de alimentação do seu HyperDeck na parte
traseira do painel.
Caso o seu HyperDeck possua uma entrada de alimentação IEC adicional, você pode conectar
outra fonte de alimentação para redundância. Por exemplo, quando conectada a um no-break, a
segunda entrada assumirá o comando instantaneamente caso ocorra uma falha na fonte primária.
Todos os modelos ainda incluem uma entrada DC de 12 V, que permite conectar energia a
partir de uma bateria de 12 V externa.
O HyperDeck Studio HD Mini também pode ser alimentado através de um kit de alimentação
AC. Caso sua fonte de alimentação possua um anel de travamento, prenda a conexão ao
HyperDeck Studio HD Mini ajustando o conector na unidade. Isso mantém o cabo de
alimentação no lugar para prevenir desconexões acidentais.
Uma vez alimentada, a tela LCD solicitará que você selecione o seu idioma. Com o seletor de
busca, role até o idioma que deseja utilizar e pressione o botão “Set” piscante. Isso irá levá-lo
de volta à tela inicial. Para obter mais informações sobre a tela inicial e os menus LCD, consulte
a seção ‘Usar o Painel Frontal’.
Conexão de vídeo e áudio
Conecte sua fonte de vídeo às entradas SDI ou HDMI, e seu equipamento de destino às saídas
SDI ou HDMI. Por exemplo, uma fonte pode ser uma câmera cinematográfica digital e o destino
pode ser uma televisão HDMI ou um monitor SDI.
Todos os modelos HyperDeck suportam vídeo HD até 1080p60. O HyperDeck Studio 4K Pro
possui conectores 12G-SDI para que você possa enviar ou receber Ultra HD de até 2160p60
usando um único cabo BNC.
645Primeiros Passos
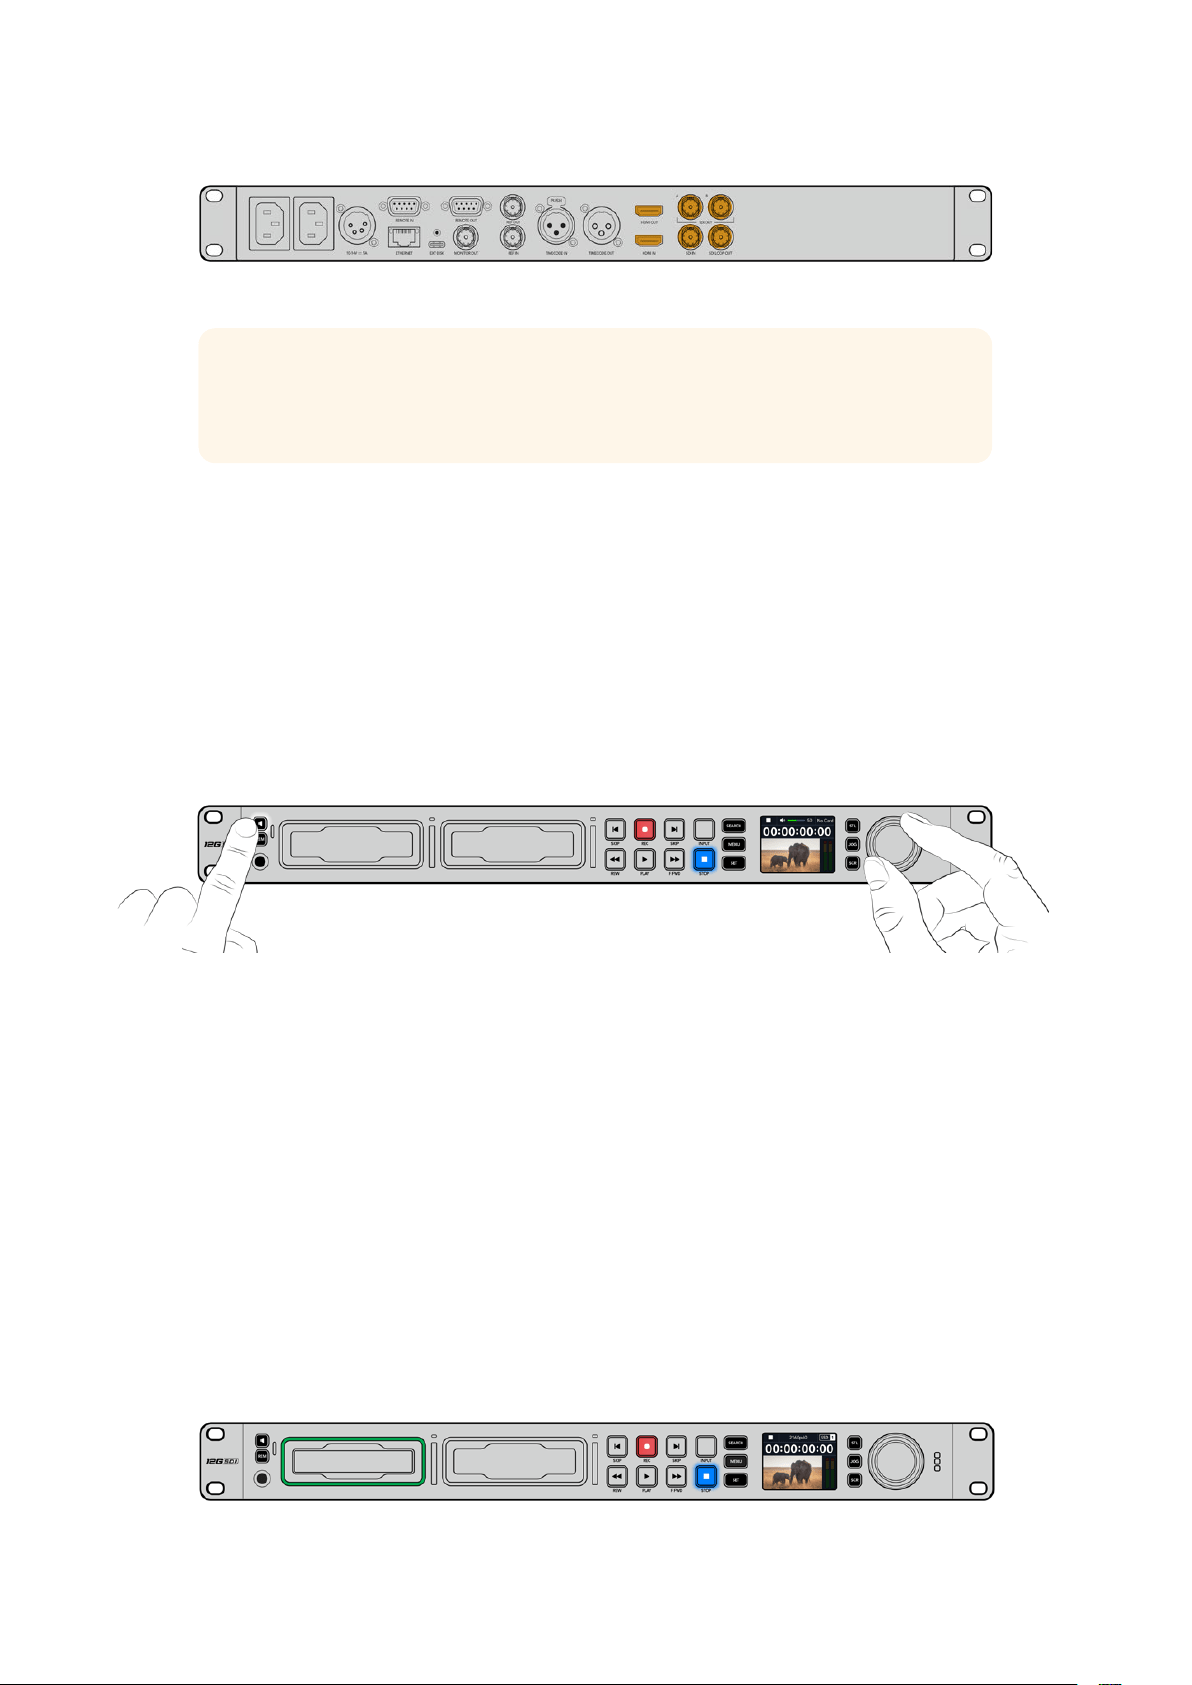
Você pode confirmar o sinal de vídeo SDI ou HDMI monitorando o LCD integrado ao painel frontal.
DICA Caso não esteja visualizando a fonte de vídeo no LCD, pode ser que você tenha
conectado à outra entrada de fonte. Pressione o botão “Input” no painel frontal para
alternar entre as fontes SDI e HDMI.
Como o áudio é embutido no sinal SDI ou HDMI, você não precisa se preocupar com a
conexão de áudio. Você pode verificar os níveis de áudio observando os medidores ao lado
da imagem de vídeo no LCD.
Verificar áudio
Caso o seu HyperDeck possua um alto-falante e um conector de fone de ouvido no painel
frontal, você pode verificar o áudio rapidamente usando o alto-falante integrado ou
conectando fones de ouvido. Para ouvir, pressione e segure o botão de alto-falante e gire
o seletor para ajustar o volume. Um indicador de volume será exibido na tela inicial do LCD.
Pressione o botão de alto-falante duas vezes para manter o alto-falante habilitado. Pressione
duas vezes novamente para desabilitá-lo.
Conexão de mídias
Todos os modelos HyperDeck Studio são comercializados prontos para gravar imediatamente
sem precisar ajustar nenhuma configuração. Tudo que você precisa é um SSD ou cartão SD.
Você pode formatar mídias facilmente através das configurações do menu LCD. Você também
pode formatar usando um computador. Consulte a seção ‘Formatar Mídias’ neste manual para
obter mais informações sobre como formatar suas mídias. Você também pode encontrar
informações sobre os tipos de mídia mais indicados para gravar vídeos e uma lista de unidades
e cartões recomendados.
Como plugar um SSD:
1 Segure um SSD de 9,5 mm com os pinos de conexão voltados para baixo e alinhados
com o compartimento da unidade do seu HyperDeck. Insira o SSD no compartimento
da unidade cuidadosamente até que ele se encaixe no lugar.
2 O HyperDeck Studio verificará o SSD. Uma luz verde acenderá ao redor do
compartimento da unidade. Quando o indicador verde apagar, o HyperDeck estará
pronto para gravar.
O indicador da unidade acenderá em verde durante a leitura da mídia e
apagará quando o seu HyperDeck estiver pronto para gravar.
646Primeiros Passos

Para remover o SSD, segure a borda externa e puxe cuidadosamente. Você sentirá que o SSD
desencaixou do compartimento.
Segure o SSD com os pinos de conexão voltados para baixo, alinhados
com o compartimento da unidade do HyperDeck Studio e insira o SSD no
compartimento da unidade até sentir que ele se encaixou no lugar.
Como plugar um cartão SD:
1 Segure o cartão SD com os conectores dourados voltados para o LCD do HyperDeck
Studio e alinhe-o com o compartimento de mídia. Agora, insira o cartão no
compartimento até que ele se encaixe firmemente no lugar.
2 O HyperDeck Studio verificará o cartão SD. Uma luz verde acenderá acima do
compartimento do cartão SD.
Quando o indicador apagar e o botão “Stop” acender, o HyperDeck Studio está pronto para gravar.
647Primeiros Passos

DICA Para remover o cartão, empurre-o devagar até sentir um clique e a liberação do
cartão. Ele será ejetado parcialmente, permitindo que você o segure pelas bordas e o
remova do compartimento.
Seu HyperDeck Studio está pronto para gravar e reproduzir!
Gravação de Vídeo
Depois de confirmar que sua fonte de vídeo está sendo exibida no LCD, você pode começar
a gravar imediatamente.
Para iniciar a gravação, pressione o botão “Rec”. Ao gravar em um cartão SD, o indicador do
compartimento acenderá em vermelho junto com o botão de gravação, o botão de reprodução
acenderá e um ícone de gravação aparecerá na tela inicial do LCD. Ao gravar em um SSD,
oindicador de mídia dinâmico acenderá em vermelho.
Conforme seu HyperDeck Studio grava, o indicador do compartimento no LCD do painel de controle
alternará entre a exibição do compartimento ativo e o tempo de gravação restante na mídia.
Pressione o botão “Stop” para finalizar a gravação. Pressione o botão “Play” para iniciar a
reprodução imediatamente.
DICA Caso queira alterar o codec, você pode ajustar a configuração de codec no
utilitário Blackmagic HyperDeck Setup. Para mais informações, consulte a seção
‘Blackmagic HyperDeck Setup’ mais adiante neste manual.
Gravação em múltiplas mídias
Quando o tempo de gravação do SSD ou do cartão SD for inferior a três minutos, o contador
do código de tempo no LCD do seu HyperDeck Studio ficará vermelho e o botão “Stop”
piscará lentamente.
Isso também indica que não há um segundo disco com espaço para continuar a gravação.
Nesse caso, basta inserir um disco com espaço para que a gravação possa continuar. Após
inserir um disco em branco em um compartimento vazio ou na entrada de disco externa,
obotão irá parar de piscar lentamente e o código de tempo ficará branco. Isso significa que o
648Gravação de Vídeo

HyperDeck pode continuar a gravar, já que o segundo disco foi verificado e há espaço para
continuar a gravação.
Se houver mais de uma mídia conectada ao HyperDeck Studio, a gravação passará de um
disco ou drive para o próximo. O HyperDeck Studio exibirá um ícone no canto superior direito
da tela inicial.
Trocar discos durante a gravação
Caso queira trocar o disco que estiver usando para a gravação a qualquer momento, e tiver
um segundo disco com espaço livre, mantenha pressionado o botão “Rec” para que a gravação
passe do disco atual para o próximo disco. Isso é útil caso você queira retirar o disco do
HyperDeck sem precisar pausar a gravação. Por exemplo, em eventos ao vivo quando você
precise enviar uma gravação importante a outro local, mas não quer perder nenhum momento
ou interromper a gravação.
Se o botão de gravação piscar durante a gravação, pode haver problemas com a mídia, o que
resultará em quadros descartados. Isso pode ocorrer ao gravar Ultra HD usando mídias mais
lentas, por exemplo, a gravação de ProRes HQ 2160p30 utiliza uma taxa de dados mais alta em
comparação ao ProRes Proxy, portanto seus cartões SD ou SSDs precisam ser os mais rápidos
disponíveis. Para uma lista de mídias aprovadas, consulte a seção ‘Mídias de Armazenamento’
neste manual.
Reprodução
Os botões de controle de transporte no painel frontal incluem funções básicas de decks
broadcast tradicionais, incluindo gravação, retrocesso, reprodução, avanço rápido e stop.
Os botões “Skip” funcionam como botões “Anterior” e “Próximo”, assim você pode navegar
rapidamente de clipe para clipe.
Reprodução de vídeos com o HyperDeck
1 Pressione o botão “Reproduzir” para a reprodução instantânea do vídeo no LCD e em
qualquer tela conectada às saídas de vídeo do HyperDeck.
2 Para pular para o próximo clipe, pressione o botão “Skip” no painel de controle.
3 Pressione o botão “Skip” uma vez para ir ao início do clipe atual ou pressione duas
vezes para voltar ao início do clipe anterior.
Pressione o botão “Reproduzir” no painel de controle do HyperDeck para reproduzir um clipe
e pressione os botões “Skip” para reiniciar o clipe atual ou pular para um clipe diferente.
649Reprodução
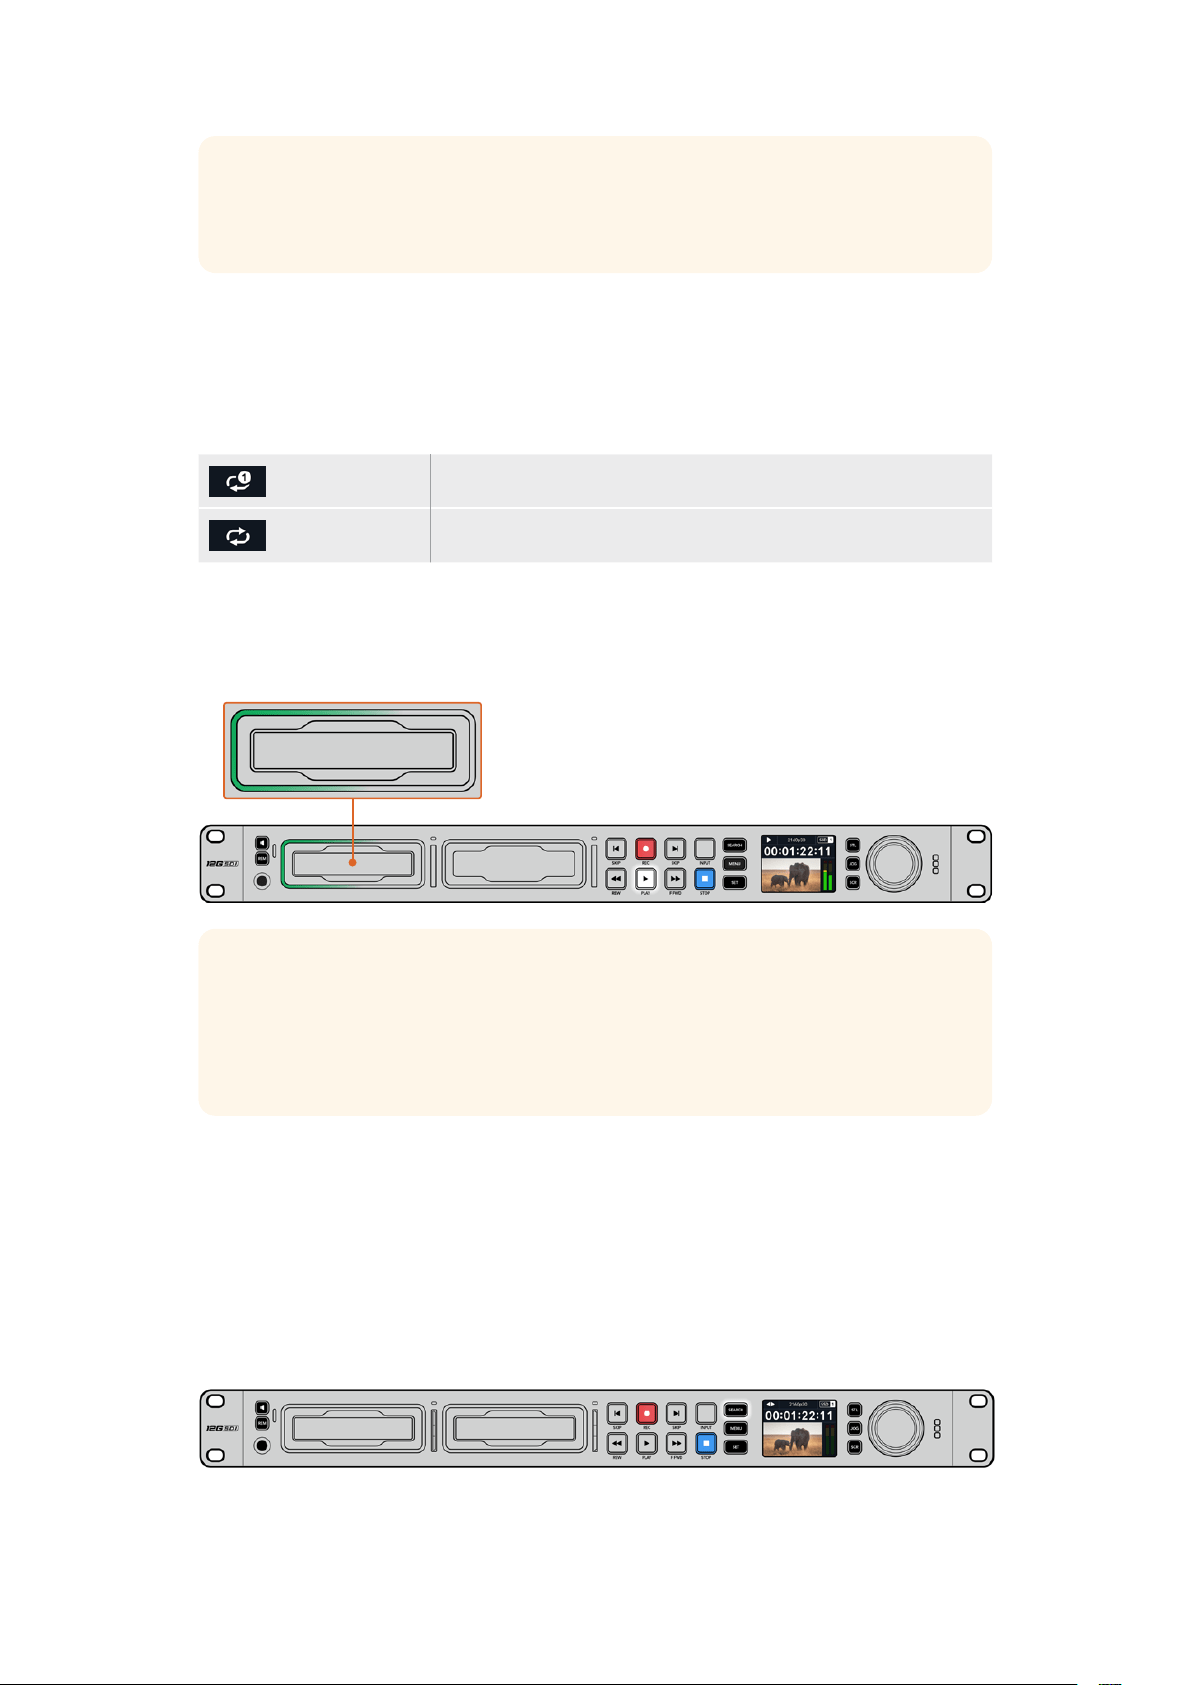
DICA Para reproduzir arquivos de vídeo no seu HyperDeck, você precisará
corresponder o codec. Isso pode ser feito no menu LCD. Consulte as seções ‘Usar o
Menu LCD’ e ‘Configurações’ para mais informações.
Reprodução em loop
Caso queira que a reprodução continue indefinidamente, você pode definir o seu HyperDeck
para reprodução em loop pressionando o botão “Play” novamente durante a reprodução.
Quando a reprodução em loop estiver ativada, o ícone de loop será exibido no LCD. Existem
dois modos de loop disponíveis:
Repetir Reproduz o clipe atual continuamente.
Repetir todos Reproduz continuamente todos os clipes gravados na sua mídia.
LEDs Dinâmicos
Durante a reprodução, o contorno do compartimento de drive acende em verde e utiliza
movimentos circulares para indicar a velocidade e a direção da reprodução.
DICA Se o botão de reprodução piscar em HyperDecks que gravam em SSDs, isso
significa que o disco não é rápido o suficiente e a reprodução não pode acompanhar.
Recomendamos que você mude para um formato de gravação mais compactado,
como H.264, ou utilize um SSD ou disco externo recomendado mais rápido para
gravação Ultra HD.
Usar o seletor de busca
Usar o seletor de pesquisa durante a reprodução é uma maneira rápida de navegar pelos seus
clipes e selecionar momentos específicos para reproduzi-los, ou revisá-los quadro a quadro.
Isso pode ser importante caso você precise localizar um momento específico em um clipe, seja
monitorando o clipe visualmente à medida que você gira o seletor ou buscando um ponto de
código de tempo específico. Também é útil para posicionar o cursor de reprodução em um
ponto de indicação específico, pronto para colocar o clipe no ar durante uma
transmissão ao vivo.
Pressione o botão “Search” para alternar entre os modos de busca.
650Reprodução

Os modos de busca do seletor são: jog, shuttle e scroll.
Jog Reproduz o clipe quadro por quadro, para frente ou para trás,
oferecendo controle preciso.
Shuttle Reproduz para frente ou para trás a uma velocidade mais rápida.
A reprodução varia de acordo com o giro do seletor.
Scroll Reprodução ainda mais rápida dependendo de como você gira o seletor.
Este modo é útil para navegar rapidamente por um clipe longo em busca
de um momento específico.
Os modelos maiores possuem botões de modo de busca dedicados e incluem um seletor com
engrenagem mecânica integrada que fornece feedback tátil durante o uso. Isso permite que
você sinta o clipe sendo reproduzido enquanto o assiste em uma TV ou monitor.
Pressione os botões “JOG”, “STL” e “SCR” para selecionar
os modos de busca jog, shuttle e scroll.
DICA Para retornar à reprodução normal, pressione o botão “Play” ou “Stop”.
651Reprodução
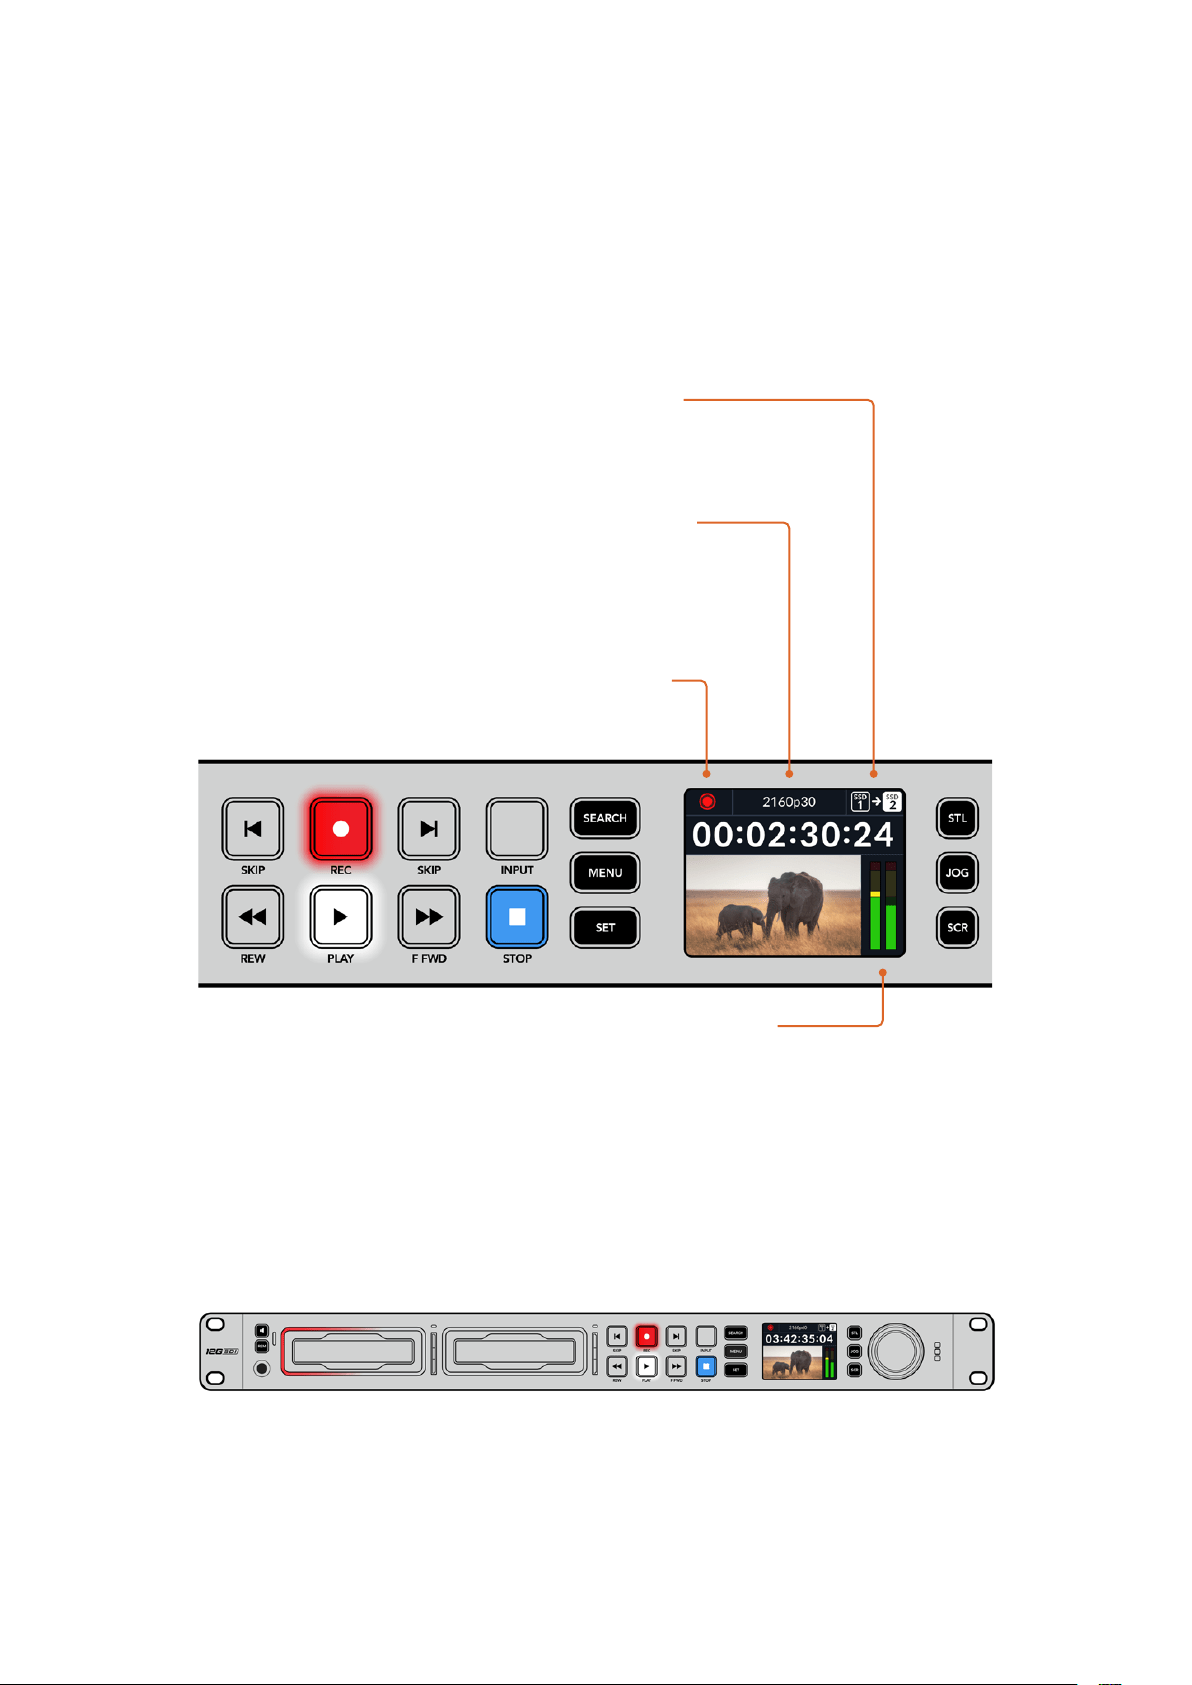
Usar o Painel Frontal
Ao gravar ou reproduzir vídeos com o HyperDeck, todas as informações essenciais são
exibidas na própria unidade através de indicadores LED para cada compartimento de mídia
e do LCD integrado.
Tela Inicial do HyperDeck Studio
Indicadores dos compartimentos de mídia
Quando você ligar o HyperDeck pela primeira vez, ou sempre que inserir um SSD ou cartão
SD, o indicador do compartimento acenderá em verde enquanto verifica a mídia e, em seguida,
desligará. Se o disco não tiver sido formatado corretamente ou não funcionar, o compartimento
acenderá em laranja até que o disco seja removido. Nesse caso, verifique se o disco está
formatado corretamente e se ele funciona com um computador.
Os indicadores dos compartimentos de mídia do HyperDeck acendem para informar o status
do disco. Por exemplo: vermelho durante a gravação e verde durante a reprodução.
Indicador de Tempo Restante e Mídias –
Durante a gravação, o ícone alternará
consistentemente entre o tempo restante
no disco e o drive atual em uso. Durante a
reprodução, o ícone de mídia ativa será exibido.
Indicador de Formato – Exibe o formato da
entrada ou arquivo para reprodução. Ele também
indicará a fonte de entrada ao pressionar o botão
“Input” em alguns modelos HyperDeck Studio,
assim como o volume atual ao ajustar os volumes
do alto-falante e do fone de ouvido utilizando
o botão no painel frontal e o seletor de busca.
Indicador de Status – Exibe o status do
deck, incluindo o modo de reprodução atual.
Medidores de Áudio – Exibem
os níveis de áudio da fonte ou
arquivo durante a reprodução.
652Usar o Painel Frontal

Usar o menu LCD
Pressione o botão “Menu” no painel frontal para acessar o menu de configurações.
Gire o seletor de busca ou pressione os botões “Skip” para navegar entre as opções do menu
e pressione “Set” para selecionar um submenu.
Gire o seletor de busca para navegar pelo menu de configurações.
Após selecionar um item do menu, pressione o botão “Set”.
Ajuste as configurações usando o seletor de busca ou os botões “Skip” e confirme-as
pressionando o botão “Set”.
Pressione “Menu” para retornar pelas opções até a tela inicial.
653Usar o Painel Frontal

Configurações
Menu Gravação
Entrada
Selecione sua fonte SDI ou HDMI usando a configuração “Entrada”. Você também pode alterar
sua fonte de entrada usando o botão “Input” no painel frontal.
Codec
Todos os modelos HyperDeck Studio podem gravar vídeos compactados usando codecs
H.264, Apple ProRes e DNxHD. Os modelos HyperDeck Studio 4K Pro também podem usar
codecs H.265 e DNxHR ao gravar mídias 4K.
Disparo de Gravação
Há dois modos de disparo de gravação disponíveis, “Iniciar/Parar Vídeo” e “Timecode de
Execução”.
Algumas câmeras, como a URSA Mini, enviam um sinal via SDI para iniciar e cessar a gravação
em gravadores externos. A configuração “Iniciar/Parar Vídeo” acionará o HyperDeck para que
inicie ou pare a gravação quando você pressionar o botão de gravação na câmera.
Utilize a opção “Timecode de Execução” para acionar a unidade e iniciar a gravação quando
ela receber um sinal de código de tempo válido através das entradas. Quando o sinal parar,
agravação também cessará. Desabilite o disparo de gravação tocando na opção “Nenhum”.
OBSERVAÇÃO Ao gravar com uma câmera HDMI ou SDI, certifique-se de que a
saída esteja limpa e com as sobreposições desativadas, pois qualquer sobreposição
presente na saída de vídeo da sua câmera será gravada com a sua imagem.
Ressincronização
Esta configuração habilitará a ressincronização da entrada de vídeo e irá assegurar que o vídeo
esteja casado com uma referência externa antes de gravar. A saída de vídeo permanecerá
casada à referência mesmo quando alternada para a gravação, já que a própria entrada está
sendo ressincronizada. Este recurso é utilizado para gravação ISO, quando você precisa de
vários decks com código de tempo casado, mas algumas fontes não são sincronizadas. Este
recurso é normalmente desabilitado para que as entradas de vídeo sejam gravadas sem que
quadros sejam adicionados ou removidos da entrada de vídeo.
Geralmente, todos os decks profissionais podem usar uma entrada de referência para casar a
saída de vídeo durante a reprodução. Isso significa que a saída de reprodução do HyperDeck
será casada à entrada de referência para que não seja necessário ressincronizá-la quando for
conectada a um sistema de transmissão maior.
654Configurações

No entanto, quando o deck entra em modo de gravação, a saída será alternada para a entrada,
já que normalmente você quer que a gravação da entrada de vídeo inalterada seja enviada
com o mesmo vídeo inalterado a outros equipamentos receptores que estejam conectados às
saídas de vídeo do HyperDeck.
Contudo, o HyperDeck Studio possui um recurso original que facilita as gravações isoladas.
Elepermitirá reverter este processo completamente e ressincronizar a entrada de vídeo à
entrada de referência. Desse modo, você pode conectar uma fonte não sincronizada ao
HyperDeck e ele reprogramará a entrada de vídeo com a entrada de referência e gravar
em seguida.
As fontes não sincronizadas podem ser computadores, câmeras domésticas ou qualquer
equipamento de vídeo incapaz de incluir uma conexão de referência. Inclusive, elas podem
atéser uma alimentação de vídeo chegando de outro estúdio ou emissora externa. As fontes
não sincronizadas causam problemas com gravações ISO, pois você precisa do código de
tempo em todas as gravações para que todas se correspondam perfeitamente ao longo do
tempo. Uma fonte não sincronizada será executada mais rapidamente ou mais lentamente que
as suas outras fontes e perderá a sincronia com o código de tempo muito rapidamente durante
a gravação. Isso complica o processo de edição multicâmera porque as fontes não terão um
código de tempo compatível.
Com a ressincronização habilitada, a entrada de vídeo do HyperDeck será analisada e se
começar a ficar para trás, um quadro será repetido, ou se começar a ficar adiantada, um quadro
será removido. Isso é chamado de ressincronização e o processamento na entrada é chamado
de ressincronismo de quadros. Isso quer dizer que o código de tempo nos clipes sendo
gravados em todos os decks conterá os mesmos eventos ocorrendo no mesmo código de
tempo. Isso torna a edição multicâmera possível.
Obviamente, em contrapartida, você estará adicionando alguns quadros à entrada, ou
removendo quadros da entrada antes da gravação. É por essa razão que é melhor deixar este
recurso desabilitado e apenas utilizá-lo quando não for possível fazer absolutamente nada para
conectar uma referência a uma fonte ISO, porque ela é um computador ou dispositivo
doméstico.
Contudo, há uma situação em que você pode habilitar e utilizar o recurso de ressincronização
de entradas. Quando a ressincronização estiver habilitada, a saída de vídeo do HyperDeck
permanecerá com a referência casada mesmo quando o deck estiver gravando. Isso quer dizer
que você pode conectar a saída SDI do HyperDeck a uma câmera para casar a câmera com a
referência através da alimentação de retorno do programa. Um bom exemplo é a Blackmagic
Studio Camera 4K Pro, que pode definir sua referência como vídeo externo. Depois, a
alimentação de câmera será casada com a referência do HyperDeck e a ressincronização de
entradas do HyperDeck não terá que adicionar ou remover quadros porque a câmera não
estará atrasada ou adiantada.
A ressincronização de entrada apenas executará uma ação se a entrada de vídeo não estiver
casada com a mesma referência que o HyperDeck. Mas, neste caso, a saída do HyperDeck
éafonte de referência para a câmera e o HyperDeck está casado com a sua entrada de vídeo
de referência. Caso possua vários HyperDecks interligados com as conexões de referência
emloop, então todas as câmeras e HyperDecks estarão interligados como um único grupo.
Assim,se um dos HyperDecks em um grupo possuir uma fonte não sincronizada, como um
computador, essa entrada será ressincronizada, mas nada será necessário para as
outras fontes.
A ressincronização é automática, portanto basta conectar as fontes e ela funcionará. O recurso
de ressincronização pode ser extremamente eficaz, mas é importante saber quando e como
ele será executado. Faça testes com alguns HyperDecks e programas de edição multicâmera
para ver como ele funciona. É uma maneira incrível e muito rápida de produzir programas.
655Configurações
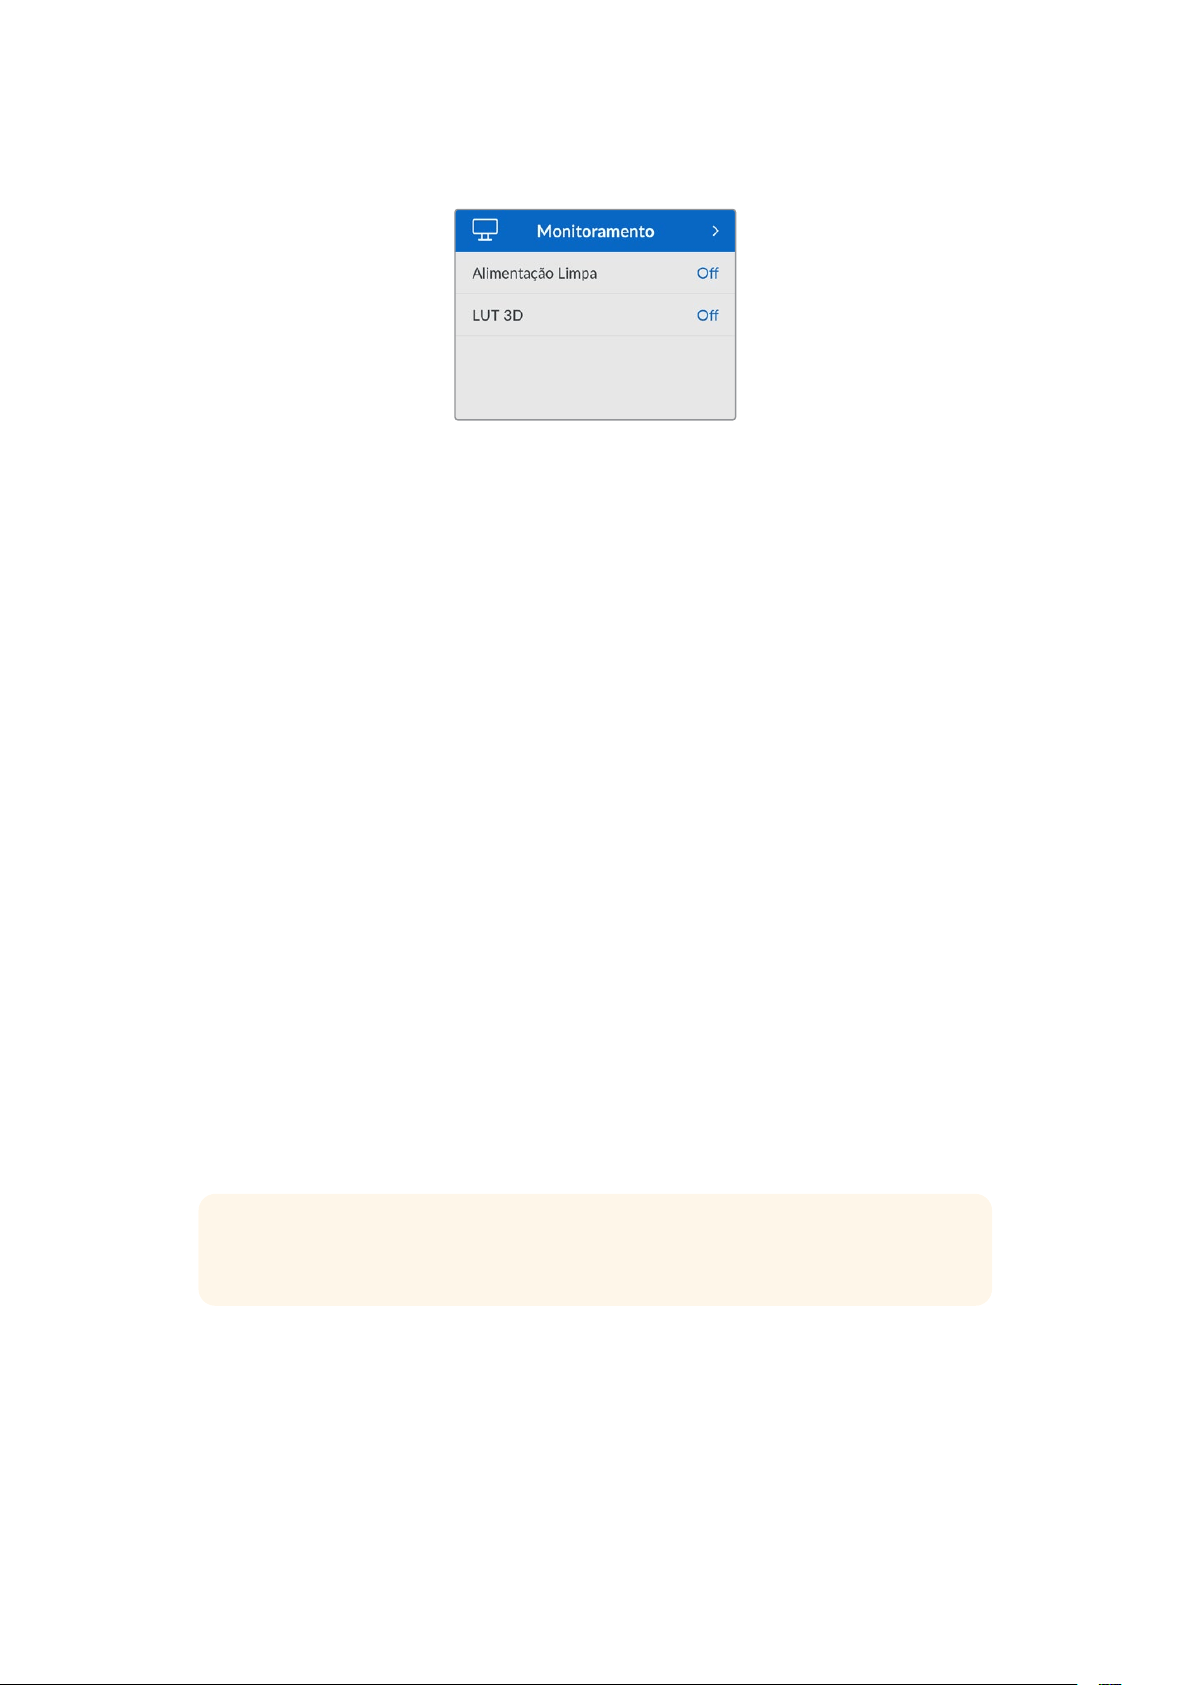
Menu Monitoramento
O menu “Monitoramento” está incluído nos modelos HyperDeck Studio com a conexão de
monitoramento no painel traseiro.
Alimentação Limpa
Ao ativar “Alimentação Limpa”, o texto de status não será exibido em telas conectadas à saída
de monitoramento na parte traseira do HyperDeck Studio. Para obter mais informações sobre
a exibição da saída de monitoramento, incluindo quais informações são exibidas, consulte a
seção ‘Usar a Saída de Monitoramento’.
LUT 3D
As LUTs podem ser especialmente úteis ao usar o HyperDeck Studio como um gravador de
campo. Elas informam ao dispositivo qual cor e luminância exibir. Isto pode ser útil ao usar a
faixa dinâmica da câmera no modo Filme, que tem um aspecto intencionalmente “lavado” e
dessaturado. Ao aplicar uma LUT de exibição, você pode ter noção de como será a aparência
do seu vídeo após o tratamento de cores.
As LUTs de exibição são selecionadas através do Blackmagic HyperDeck Setup e podem ser
aplicadas à saída de monitoramento SDI.
Como habilitar ou desabilitar uma LUT 3D:
1 Pressione o botão “Menu” e navegue até o menu “Monitoramento” utilizando o
seletor de busca.
2 Pressione o botão “Set”.
3 Utilizando o seletor de busca, navegue até que a opção “LUT 3D” esteja
destacada em azul.
4 Pressione o botão “Set” para habilitar ou desabilitar a LUT.
Para mais informações sobre como selecionar uma LUT, consulte a seção ‘Blackmagic
HyperDeck Setup’ neste manual.
DICA Para mais informações sobre a exibição da saída de monitoramento, consulte a
seção ‘Usar a Saída de Monitoramento’.
656Configurações

Menu Áudio
Canais de Áudio Gravados
O HyperDeck Studio pode gravar até 16 canais de áudio PCM de cada vez. Para selecionar o
número de canais a ser gravado, amplie a lista “Canais de Áudio Gravados” e selecione 2, 4, 8
ou 16 canais. Se o codec estiver definido como H.264 ou H.265, você também pode selecionar
dois canais de áudio AAC para que as gravações possam ser carregadas diretamente no
YouTube. Esta configuração também seleciona o número de canais a ser exibido através da
saída de monitoramento.
Canais de Monitoramento
Ao gravar mais de dois canais, você pode selecionar quais canais deseja visualizar no LCD do
painel frontal. Isso pode ser feito através da opção “Canais de Monitoramento”. Nos modelos
HyperDeck Studio que possuem um alto-falante no painel frontal, esta configuração também
define quais canais de áudio serão reproduzidos através do alto-falante e fone de ouvido.
Medidores de Áudio
O LCD integrado exibe medidores para os canais de áudio integrados. Você pode optar por
exibir medidores PPM ou VU. Para alterar o tipo de medidor, amplie a lista “Medidores de
Áudio” e selecione uma exibição de medidores de áudio.
Nível do Fone de Ouvido
Nos modelos que possuem um conector para fones de ouvido no painel frontal, você pode
ajustar o volume através da configuração “Nível do Fone de Ouvido”.
Nível do Alto-Falante
Ajuste o volume do alto-falante ao girar o seletor de busca. O nível padrão é 50%.
DICA Os volumes do fone de ouvido e alto-falante também podem ser ajustados
através do painel frontal. Pressione e segure o botão do alto-falante e gire o seletor
de busca para aumentar ou diminuir o volume de reprodução. O nível do volume será
exibido na parte superior central do painel.
657Configurações

Menu Armazenamento
Formatar Mídia
Mídias, SSDs e cartões SD conectados à porta rotulada “Ext Disk” na parte traseira podem
ser formatados diretamente no HyperDeck ou através de um computador Mac ou Windows.
Como preparar mídias no HyperDeck Studio:
1 Usando o seletor de busca e o botão “Set”, selecione “Formatar Mídia”.
2 Selecione a mídia a ser formatada na lista e pressione “Set”.
3 Escolha o formato e pressione “Set”.
4 Uma janela de confirmação será exibida, detalhando qual cartão será formatado
e o formato selecionado. Selecione “Formatar”.
5 Uma vez concluída, uma janela de formatação será exibida. Selecione “Ok”.
O HFS+, também conhecido como Mac OS X Expandido, é o formato recomendado, pois
é compatível com “journaling”. Os dados em mídias com o recurso “journaling” têm uma
probabilidade maior de recuperação na rara eventualidade da sua mídia de armazenamento
se corromper. O HFS+ é nativamente suportado pelo Mac. Já o exFAT é suportado nativamente
pelo Mac e Windows sem a necessidade de adquirir outro software adicional. No entanto, o
formato exFAT não é compatível com “journaling”.
Para formatar mídias em um computador Mac ou Windows, consulte a seção ‘Formatar Mídias’
neste manual.
Menu Configurações
658Configurações

Nome
Quando mais de um HyperDeck Studio estiver na rede, é recomendável nomear os
gravadores. Isso pode ser feito através do Blackmagic HyperDeck Setup ou do Blackmagic
HyperDeck Ethernet Protocol usando um aplicativo terminal.
Idioma
O HyperDeck Studio suporta 13 idiomas, incluindo inglês, chinês, japonês, coreano, espanhol,
alemão, francês, russo, italiano, português, turco, ucraniano e polonês.
Como selecionar o idioma:
1 Após destacar o menu “Configurações”, pressione “Set”.
2 Gire o seletor de busca para escolher “Idioma” e pressione “Set”.
3 Usando o seletor de busca, escolha o idioma e pressione “Set”. Após a seleção,
você retornará ao menu de configurações automaticamente.
Data
Para ajustar a data, selecione o campo “Data” e pressione “Set”. Com o seletor de busca,
você pode selecionar dia, mês e ano. Essas informações serão usadas para registrar data
e hora no nomes dos arquivos.
Hora
Para ajustar a hora, selecione “Hora” e pressione “Set". Use o seletor de busca para ajustar
as horas e os minutos. O relógio do HyperDeck Studio utiliza o padrão 24 horas.
Software
Exibe a versão do software instalado.
Painel Frontal
Configure o painel frontal do seu HyperDeck no modo “Aparência Clara” para obter um LCD
de alta luminosidade. Utilize o modo “Aparência Escura” em ambientes com pouca iluminação,
onde um LCD brilhante pode causar distrações, por exemplo, em uma instalação de produção
com múltiplos HyperDecks montados em um rack.
659Configurações
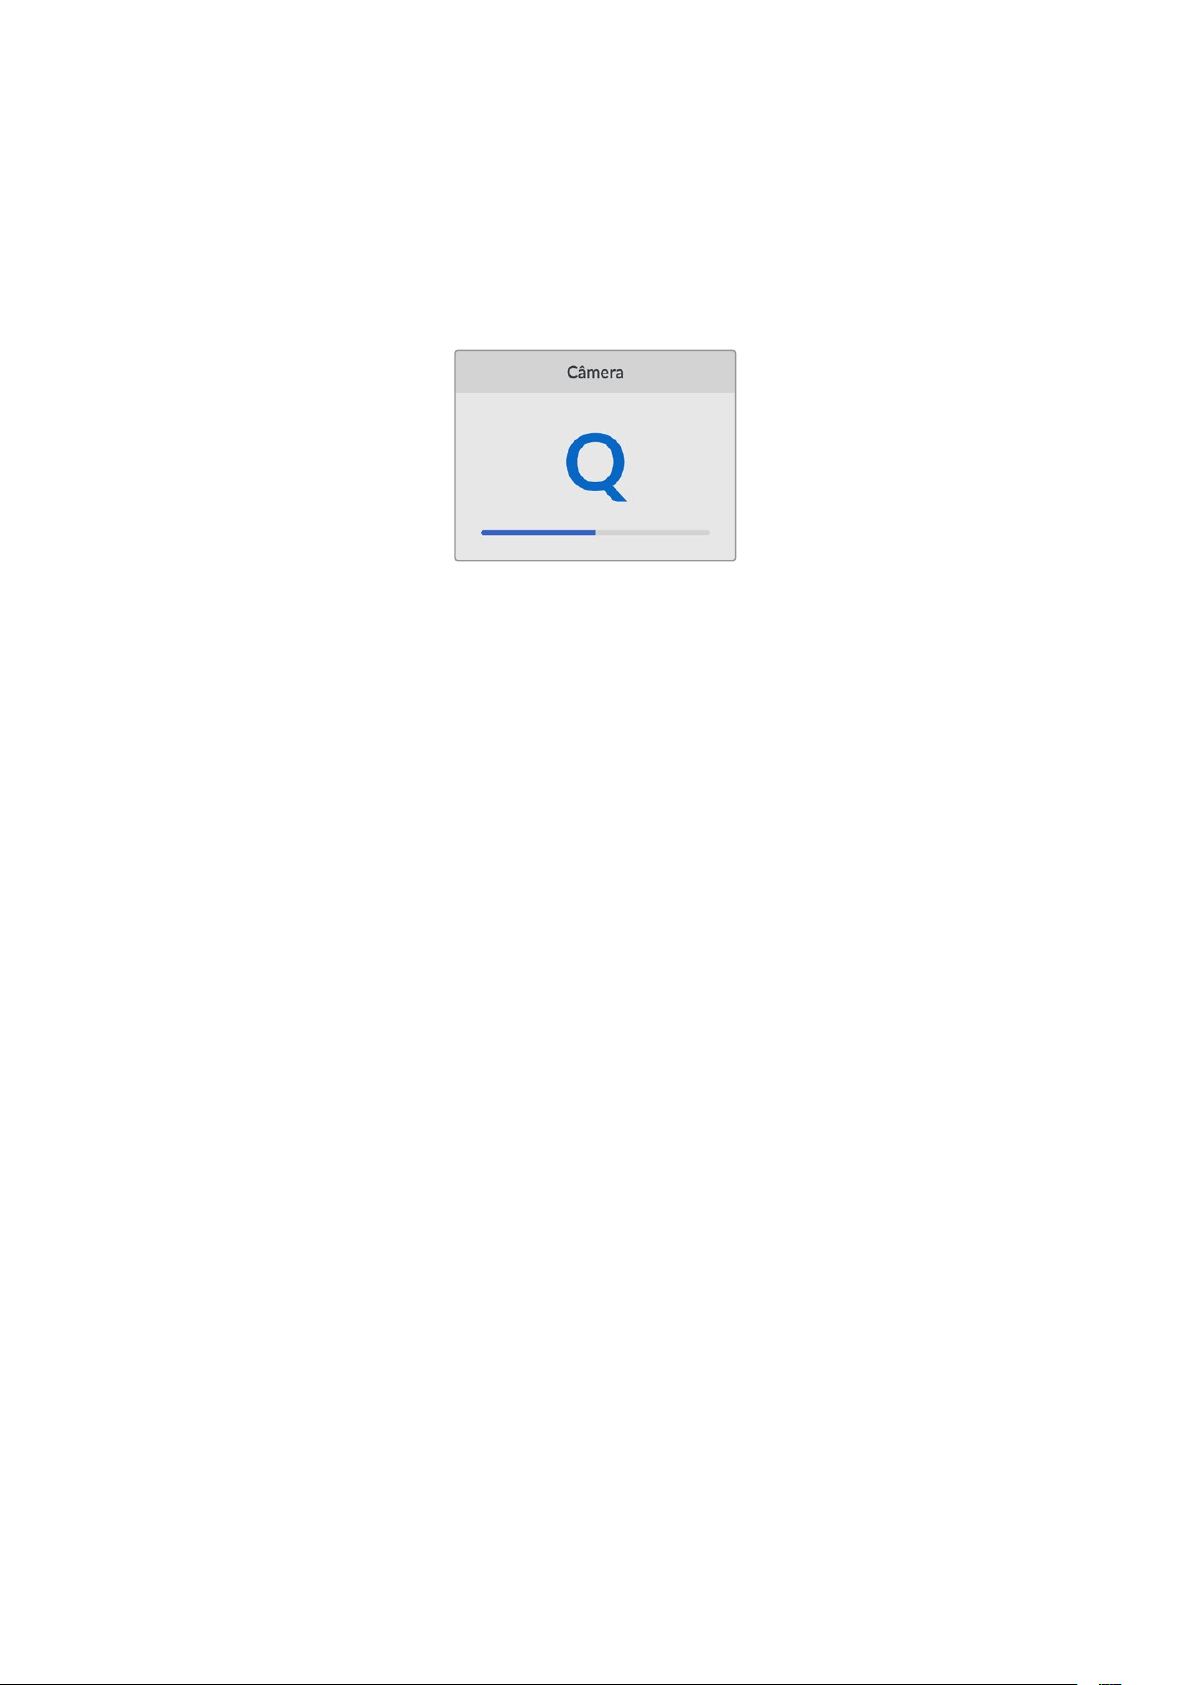
Câmera
Esta configuração é útil ao usar o HyperDeck para gravar arquivos ISO de várias câmeras e,
em seguida, editá-los em uma linha de tempo multicâmera no DaVinci Resolve.
Cada letra de identificação de câmera aparecerá nos metadados dos arquivos, permitindo
que o DaVinci Resolve identifique cada ângulo facilmente ao usar o recurso de compartimento
sincronizado.
Identifique sua câmera usando
caracteres de A a Z; ou 1 a 9.
Padrão Principal
Em alguns casos, o HyperDeck Studio não consegue identificar qual é o padrão de vídeo
quevocê deseja usar. Este recurso indicará ao HyperDeck qual é o padrão de vídeo que
você mais usa.
Um bom exemplo é quando você habilita um HyperDeck Studio sem uma entrada de vídeo
conectada e insere um disco com arquivos em dois padrões de vídeo diferentes. Qual padrão
de vídeo o HyperDeck deve reproduzir? O recurso de padrão principal indicará o padrão de
vídeo de sua preferência, alternará para esse formato e reproduzirá os arquivos.
O padrão principal também é útil quando você inicializa um HyperDeck pela primeira vez e não
há uma entrada de vídeo ou um disco de mídias inserido. Neste caso, o HyperDeck Studio não
consegue identificar qual padrão de vídeo usar para a saída de monitoramento. O padrão
principal de vídeo indicará o que fazer.
Contudo, o recurso do padrão de vídeo principal é apenas um guia. Ele não substituirá nada.
Por isso, se você tiver um disco de mídia com somente um tipo de arquivo de vídeo e acionar a
reprodução, o HyperDeck Studio alternará para esse padrão de vídeo e reproduzirá. O padrão
principal de vídeo será ignorado, já que é óbvio que você deseja apenas reproduzir os
arquivos do disco.
É uma situação semelhante com a gravação. Se você acionar a gravação, o HyperDeck
simplesmente gravará qualquer padrão de vídeo que esteja conectado à entrada de vídeo.
Depois que você concluir a gravação, o HyperDeck Studio reproduzirá os arquivos no mesmo
padrão de vídeo do disco, mesmo se existirem outros arquivos no disco que correspondam ao
padrão principal. É presumido que você deseja reproduzir o mesmo padrão de vídeo que
acabou de gravar. Se você desconectar o disco de mídia e plugá-lo novamente, somente então
o padrão principal será utilizado para selecionar quais tipos de arquivo você deseja reproduzir.
O recurso de padrão principal é apenas um guia para ajudar o HyperDeck Studio a tomar
decisões sobre o que fazer quando ele não tiver certeza. Ele não é uma substituição que força
o deck a se comportar de uma maneira específica.
660Configurações

Configurações de Rede
Protocolo
O Blackmagic HyperDeck vem configurado de fábrica como DHCP, portanto, uma vez
conectado, o servidor de rede atribuirá um endereço IP automaticamente e nenhuma outra
configuração de rede precisará ser ajustada. Caso precise definir um endereço manualmente,
você pode conectar usando um IP estático.
Com “Protocolo” selecionado, pressione o botão “Set” piscante para acessar o menu, navegue
até “IP Estático” e pressione “Set”.
Endereço IP, Máscara de Sub-rede e Gateway
Após selecionar “IP Estático”, você pode inserir as informações da sua rede manualmente.
Como alterar o endereço IP:
1 Use o seletor de busca para destacar “Endereço IP” e pressione o botão “Set” piscante
no painel frontal do HyperDeck.
2 Usando o seletor de busca, ajuste o seu endereço IP, pressionando “Set” para
confirmar antes de ajustar o próximo valor.
3 Pressione “Set” para confirmar a alteração e passar para o próximo valor.
Após inserir seu endereço IP, você pode repetir esses passos para ajustar a Máscara de Sub-rede
e o Gateway. Quando concluir, pressione o botão “Menu” piscante para sair e retornar à tela inicial.
661Configurações

Configurações de Timecode
Entrada
Há cinco opções de entrada de código de tempo disponíveis durante a gravação.
Entrada de
Vídeo
A seleção da entrada de vídeo obterá o código de tempo embutido de fontes SDI e
HDMI com metadados SMPTE RP 188. Isso manterá a sincronização entre sua fonte
SDI ou HDMI e o arquivo gravado no HyperDeck Studio.
Externa Clique nesta opção ao usar o código de tempo conectado ao painel traseiro.
Interna Use esta opção para gravar timecode de hora do dia através do gerador de
timecode integrado.
Regen.
Último Clipe
Selecionando a opção “Regen. Último Clipe” para sua entrada de código de tempo,
cada arquivo iniciará um quadro após o último quadro do clipe anterior. Por exemplo,
se o primeiro clipe terminar em 10:28:30:10, o código de tempo do próximo clipe
começará em 10:28:30:11.
Predefinição Caso deseje definir um código de tempo manualmente, selecione a opção
“Predefinição”. Os clipes gravados começarão no código de tempo definido
através da configuração “Predefinição”, descrita abaixo.
Descarte de Quadros
Para fontes NTSC com taxas de quadros de 29.97 ou 59.94, você pode optar por “Descartar
Quadros” ou “Não Descartar Quadros” na gravação. Caso a fonte seja desconhecida, selecione
“Padrão”. Isso manterá o padrão da entrada ou gravará com descarte de quadros se não
houver nenhum código de tempo válido.
Predefinição
Você pode definir seu código de tempo manualmente ao pressionar o botão “Set” e inserir o
código de tempo de início usando o seletor de busca e o botão “Set”. Certifique-se de que a
opção “Predefinição” esteja selecionada no menu “Entrada”.
Saída
Selecione as opções de código de tempo para as saídas.
Linha de
Tempo
Para enviar um código de tempo contínuo a todos os clipes gravados em um cartão
ou drive, selecione “Linha de Tempo”.
Clipe Selecionar a opção “Clipe” enviará o código de tempo de cada clipe individual.
Saída SDI
662Configurações

Saída 3G-SDI
Esta opção oferece compatibilidade com equipamentos profissionais que aceitam somente
vídeos 3G-SDI de nível A ou nível B.
Para manter a compatibilidade com outros equipamentos profissionais, selecione “Nível” A para
3G-SDI de fluxo direto ou “Nível B” para 3G-SDI multiplexada de fluxo duplo.
Configurações de Genlock
Fonte de Referência
Selecione sua fonte de referência entre as três opções a seguir:
Auto O modo automático definirá “Externa” como padrão se houver um sinal conectado
à porta “Ref In” no painel traseiro. Se não houver uma referência conectada, será
definida como padrão a fonte SDI ou HDMI de entrada.
Entrada Selecione “Entrada” caso sua fonte SDI ou HDMI inclua a referência com a qual você
deseja sincronizar. Por exemplo, um deck analógico pode ter uma fonte genlock
conectada diretamente.
Externa Se você tiver um dispositivo de referência externo, por exemplo, o Blackmagic Sync
Generator, conectado à porta “Ref In” na parte traseira, selecione “Externa”.
Indicador de Referência
Externa – O símbolo “REF”
será exibido no LCD integrado
quando o seu HyperDeck
Studio estiver casado com uma
fonte de referência externa.
Sincronização de Referência
A sincronização de referência pode ser ajustada se você estiver arquivando a partir de decks
de fita analógicos e precisar de sincronização de quadros. O ajuste de referência está em
amostras para que você possa obter um ajuste de tempo extremamente preciso ao nível
de amostra.
Como ajustar a referência:
1 No menu “Configurações”, use o seletor de busca para destacar “Linhas de Referência”
e pressione o botão “Set” piscante.
2 Ajuste o valor das linhas de referência girando o seletor no sentido horário para
aumentar ou no sentido anti-horário para diminuir.
3 Pressione o botão “Set” piscante para confirmar sua seleção.
4 Para ajustar os pixels, pressione o botão “Menu” piscante para retornar ao menu de
configurações e repita os passos em “Pixels de Referência”.
663Configurações

Configurações de Arquivo
Sufixo com Timestamp
O carimbo de data/hora adicionado ao nome do arquivo é desativado por padrão. Caso queira
registrar a data e a hora no nome do arquivo, pressione “Set” e use o seletor de busca para
ativar a opção “Sufixo com Timestamp”.
HyperDeck_2105061438_0001
HyperDeck_2105061438_0001 Nome do Arquivo
HyperDeck_2105061438_0001 Ano
HyperDeck_2105061438_0001 Mês
HyperDeck_2105061438_0001 Dia
HyperDeck_2105061438_0001 Horas
HyperDeck_2105061438_0001 Minutos
HyperDeck_2105061438_0001 Número do Clipe
Substituição de Formato HDR
O HyperDeck Studio 4K Pro automaticamente detectará metadados HDR integrados em um sinal
ou arquivo de vídeo 4K e os exibirá através da saída HDMI. Caso o sinal ou arquivo esteja rotulado
incorretamente, ou o seu display não seja compatível com HDR, você pode substituir o formato HDR.
Basta configurar “Substituição de Formato HDR” com uma opção SDR, como Rec.2020 SDR.
As configurações de reprodução e gravação HDR disponíveis são:
Auto
Esta é a configuração padrão que permitirá que o HyperDeck selecione automaticamente
o formato de saída em conformidade com os metadados HDR do clipe.
Rec.709
Para vídeos de alta definição com faixa dinâmica padrão.
Rec.2020 SDR
Esta configuração é usada para vídeos Ultra HD com faixa dinâmica padrão.
HLG
HLG significa “Hybrid Log Gamma”. Esse formato permite que o vídeo HDR seja reproduzido
em TVs e monitores compatíveis com HDR, incluindo aqueles que suportam até Rec.2020 SDR.
664Configurações

As configurações abaixo suportam a gama de cores Rec.2020, além de PQ, ou quantizador
perceptual, publicado como SMPTE ST2084. PQ é a função do HDR de gama ampla que
permite a exibição de imagens mais brilhantes. Os valores de luminância em candelas por
metro quadrado, por exemplo, 1000 cd/m
2
indicam a luminância máxima por metro quadrado
suportada pelo formato correspondente.
ST2084 (300)
300 cd/m² de luminância.
ST2084 (500)
500 cd/m² de luminância.
ST2084 (800)
800 cd/m² de luminância.
ST2084 (1000)
1000 cd/m² de luminância.
ST2084 (2000)
2000 cd/m² de luminância.
ST2084 (4000)
4000 cd/m² de luminância.
Remoto
Remoto
Selecione “Remoto” para habilitar o controle remoto via RS-422. Isso permitirá que o
HyperDeck seja controlado remotamente por outro dispositivo, como o HyperDeck Extreme
Control. Quando selecionado, o botão “Remote” dedicado, incluído em alguns modelos
HyperDeck, acenderá para indicar que o recurso está ativo. Basta desativar “Remoto” para
controlar a unidade localmente.
Controle de Deck
Quando o recurso remoto é habilitado, você pode espelhar os controles de transporte de um
HyperDeck para várias unidades HyperDeck adicionais. Monte seus HyperDecks em cascata
ao plugar o conector de saída remota do HyperDeck principal ao conector de entrada remota
da segunda unidade, e continue a cadeia RS-422 para as unidades adicionais. Quando todas
as unidades adicionais tiverem a configuração remota habilitada, os controles de transporte da
unidade principal também controlarão as unidades adicionais.
Por exemplo, ao pressionar o botão de gravação na unidade HyperDeck principal, todos os
HyperDecks adicionais conectados iniciarão a gravação simultaneamente.
É interessante ressaltar que embora você não possa usar o HyperDeck Studio HD Mini como
um controlador, ele pode ser controlado por um modelo HyperDeck Pro ou Plus.
Redefinir
Padrão de Fábrica
Destaque “Padrão de Fábrica” no menu de configurações para redefinir seu HyperDeck para
as configurações de fábrica. Quando você pressionar “Set”, será solicitado que você confirme
sua seleção.
665Configurações

Painel Traseiro
1 Alimentação
Todos os HyperDecks possuem uma entrada de alimentação IEC para tomadas AC.
O HyperDeck Studio 4K Pro possui duas para redundância. A entrada DC permite
utilizar baterias externas de 12 V, que também podem ser usadas para redundância.
Certifique-se de que qualquer fonte de alimentação DC seja compatível com a
voltagem de entrada e a classificação atual indicada embaixo do conector “DC IN”.
2 Ethernet
A conexão Ethernet permite que você se conecte à sua rede para transferências FTP
rápidas ou para controlar a unidade remotamente através do HyperDeck Ethernet
Protocol. As velocidades de transferência de arquivos são suportadas através de 1GbE
nos modelos HD e 10GbE no HyperDeck Studio 4K Pro. Para mais detalhes sobre a
transferência de arquivos através de um cliente de FTP, consulte a seção ‘Transferir
Arquivos via Rede’ mais adiante neste manual.
Quando conectado à mesma rede compartilhada com um switcher ATEM, você também
pode controlar seu HyperDeck usando o switcher ATEM ou um painel ATEM físico.
3 Remoto
Alguns modelos HyperDeck Studio incluem dois conectores DE-9 RS-422 para entrada
e saída remota. O HyperDeck Studio HD Mini suporta apenas entrada remota.
4 Disco Externo
Conecte uma unidade flash no conector USB-C para gravar em unidades externas de
até 5 Gb/s nos modelos HyperDeck Studio HD. Os modelos HyperDeck Studio 4K Pro
possuem uma conexão USB 3.1 de segunda geração para transferências de até 10
Gb/s. Você também pode utilizar hubs USB-C multiporta ou uma Blackmagic MultiDock
10G para conectar um ou vários SSDs.
Quando o HyperDeck estiver conectado ao seu computador via USB, você pode usar
o HyperDeck como fonte de webcam em aplicativos como Open Broadcaster e Skype.
Para mais informações, consulte a seção ‘Configurar Open Broadcaster’ neste manual.
5 Saída de Monitoramento
A saída de monitoramento 3G-SDI fornece uma saída reduzida com sobreposições
para que você possa fazer o monitoramento em um monitor externo. As sobreposições
incluem ícones de drives, medidores de áudio e um contador de tempo, além de uma
LUT de exibição. Para mais informações sobre configurações de monitoramento SDI,
incluindo a saída de um sinal limpo, consulte a seção ‘Configurações’ anteriormente
neste manual.
2 5 6 8 941
O HyperDeck Studio HD Mini
inclui um conector de alimentação
com trava para prevenir
desconexões acidentais
Os modelos HyperDeck
Studio HD Mini e Plus incluem
conectores BNC para entrada
e saída de timecode
7
3
666Painel Traseiro

6 Referência
Todos os modelos HyperDeck possuem um gerador interno de sincronismo que
oferece sinais de referência de vídeo Black Burst e Tri-Sync. Isso significa que você
pode conectar a saída de sincronização do seu HyperDeck à entrada de sincronização
de outros equipamentos de vídeo e casá-las a um sinal de referência máster gerado
pelo HyperDeck.
Você também pode conectar um sinal de referência à entrada de sincronização e
sincronizar o seu HyperDeck a uma fonte de sincronização máster externa.
Consulte a seção ‘Configurações’ neste manual para mais informações sobre como
selecionar uma fonte de sincronização, incluindo como fazer o loop de múltiplos
gravadores de disco HyperDeck.
7 Timecode
Todos os HyperDecks incluem um gerador de timecode de hora do dia integrado.
Quase da mesma maneira que a referência, a partir de um HyperDeck máster, você
pode fazer o loop do sinal de timecode para outros HyperDecks ou equipamentos
de vídeo, assim todas as gravações terão o mesmo código de tempo.
Dependendo do modelo HyperDeck que você estiver usando, os conectores de
timecode serão BNC ou XLR. Para obter mais informações sobre como selecionar
suas opções de timecode, consulte a seção ‘Configurações’ deste manual.
8 HDMI
Conecte a saída HDMI a televisores e monitores HDMI.
O HyperDeck detectará padrões de vídeo SDR e HDR automaticamente quando
o sinal for identificado com os metadados corretos. Você também pode substituir a
sinalização HDR utilizando o menu de configurações. Para mais informações, consulte
a seção ‘Configurações’ neste manual.
9 SDI
Os modelos HyperDeck Studio HD Mini possuem um único conector 3G-SDI para
sinais de até 1080p60. Os modelos HyperDeck Studio HD Plus e HyperDeck Studio
HD Pro incluem 6G-SDI para sinais desde SD até 2160p30. O HyperDeck Studio 4K Pro
possui entradas e saídas 12G-SDI que suportam resoluções de até 2160p60.
Os HyperDecks com duas saídas SDI permitem reproduzir arquivos ProRes 4444 e
obter saída de preenchimento e chave simultaneamente quando conectados a
switchers ATEM.
667Painel Traseiro
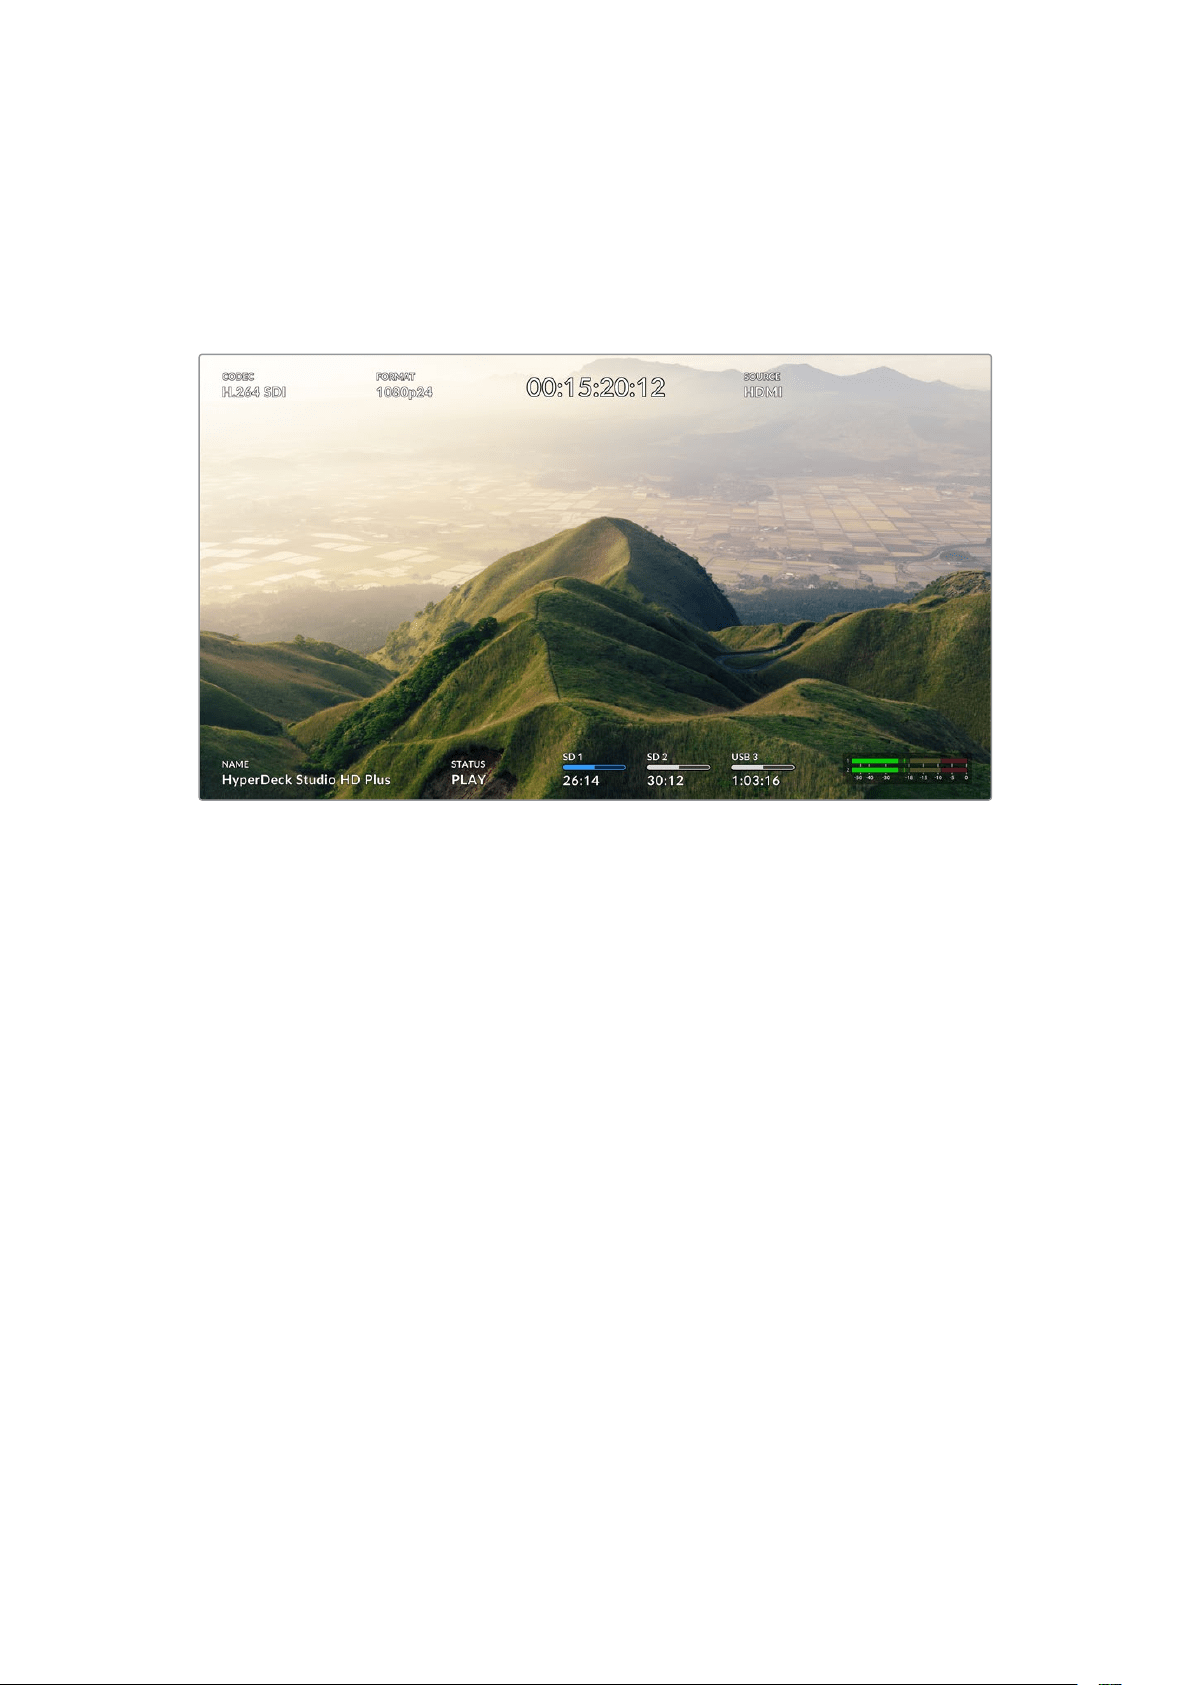
Usar a Saída de Monitoramento
A saída de monitoramento é uma maneira rápida de verificar o vídeo de gravação ou
reprodução, com sobreposições exibindo informações de status importantes, como codec,
formato de vídeo e sinal, taxa de quadros, código de tempo, nome do arquivo, status do
controle de transporte, status de mídias de armazenamento e níveis de áudio.
Segue abaixo uma descrição das informações exibidas:
Codec
Exibe o codec selecionado através do menu LCD.
Formato
Quando no modo de reprodução, o ícone “Formato” exibirá a resolução e a taxa de quadro
do clipe atual. Se você estiver no modo de gravação, o ícone exibirá a resolução e a taxa de
quadro do vídeo conectado à fonte selecionada.
Timecode
Exibe o timecode presente no seu clipe de vídeo durante a reprodução ou o timecode que
está sendo gravado através das entradas de vídeo ou timecode. Você também pode optar
por exibir o timecode do clipe ou o contador da linha de tempo.
Fonte
Exibe a fonte SDI ou HDMI conectada. Caso a mensagem “Nenhum Sinal” seja exibida,
significa que um sinal válido não foi detectado.
Nome
Exibe o nome do seu gravador de disco HyperDeck. Para mais informações sobre como
alterar o nome, consulte a seção ‘Blackmagic HyperDeck Setup’ neste manual.
668Usar a Saída de Monitoramento

Status
À medida que você reproduz ou grava um clipe, este indicador exibe o status do controle de
transporte e dos comandos que estão sendo utilizados. Estes incluem:
O HyperDeck está no modo de
espera.
Indica que a reprodução está
configurada para fazer o loop
de todos os clipes gravados que
compartilhem o mesmo formato de
vídeo selecionado no momento.
O vídeo está sendo reproduzido. Indica que a reprodução está
configurada para fazer o loop de
um único clipe.
O vídeo está sendo gravado.
O indicador acenderá em
vermelho durante a gravação.
Indica que o modo shuttle está
habilitado, mas em modo de
espera.
Exibido durante avanço ou
retrocesso rápido. O número
indica a velocidade.
O HyperDeck está em modo jog.
O HyperDeck está em modo
scroll.
Status de Mídias de Armazenamento
Esses três indicadores exibem o nome e o status do cartão SD, SSD e drive USB ativos; e
podem variar um pouco dependendo do modelo HyperDeck.
HyperDeck
Studio HD Plus
Slot de cartão SD 1 Slot de cartão SD 2 Disco externo ativo
Modelos HyperDeck
Studio Pro
Slot SD ou SSD
em uso
Próximo slot SD ou SSD
na ordem
Disco externo ativo
Em todos os modelos HyperDeck, o terceiro indicador exibe a unidade USB. Se você estiver
usando um hub USB, ou uma doca com a Blackmagic MultiDock 10G, o drive ativo será exibido.
Indicador de Disco ou Drive
O texto acima da barra indica o compartimento de SSD ou cartão SD. Se você estiver
gravando, “Atual” aparecerá à esquerda do drive para que você possa identificar
facilmente qual disco está gravando. “Próx.” aparecerá acima da barra de progresso
para indicar o próximo disco ou drive a ser gravado.
669Usar a Saída de Monitoramento

Barra de Mídia
O ícone da barra será azul, branco ou vermelho, dependendo do status atual, e exibirá
o espaço utilizado no cartão.
O ícone azul indica a unidade ativa. Este é o drive que será usado
para reprodução e gravação.
Um ícone de drive branco indica que há mídia presente, mas
inativa. Um ícone branco constante indica que a mídia está cheia.
A barra ficará vermelha durante as gravações.
O texto abaixo da barra de mídia exibirá o tempo de gravação restante ou o status do
compartimento.
Tempo Restante
Quando o seu SSD ou cartão SD tiver espaço restante, a duração disponível será
exibida em horas:minutos:segundos com base no formato de origem atual e nas
configurações de codec e qualidade selecionadas. Se restar menos de uma hora,
apenas os minutos e segundos serão exibidos.
Status do Compartimento
As mensagens “Nenhum Cartão” ou “Nenhum Drive” serão exibidas caso nenhuma
mídia esteja conectada a esses compartimentos.
Uma vez que um SSD, cartão SD ou drive USB estiver cheio, o ícone exibirá “Cartão
Cheio” ou “Drive Cheio” para indicar que é hora de trocar a mídia de armazenamento.
Caso um segundo SSD ou cartão SD esteja inserido, a gravação continuará
automaticamente nesta segunda mídia. Caso haja um disco externo conectado,
agravação continuará nele quando todos os SSDs e cartões SD estiverem cheios.
Um drive bloqueado será exibido com “Bloqueado” na barra de progresso.
670Usar a Saída de Monitoramento

Medidores de Áudio
Os medidores de áudio na tela exibirão até 16 canais de áudio, dependendo de
quantos canais você deseja gravar. Você pode escolher entre medidores PPM ou
VU através da aba “Áudio” no menu LCD.
Para selecionar o número de canais de áudio gravados ou alterar para um medidor
de áudio diferente, use a aba “Áudio” no menu LCD. Para mais informações, consulte
a seção ‘Configurações’ neste manual.
Mídias de Armazenamento
Cartão SD
Para gravações Ultra HD de alta qualidade, recomendamos cartões SD UHS-II de alta
velocidade. Esses cartões precisam ser capazes de obter velocidades de gravação acima de
220 MB/s para gravações de até Ultra HD 2160p60. No entanto, caso esteja gravando a uma
taxa de bits mais baixa com compactação mais elevada, você deve conseguir usar cartões
mais lentos. Geralmente, quanto mais rápidos forem os cartões, melhores eles serão.
É recomendável verificar regularmente a última versão deste manual, que pode ser sempre
baixado no site da Blackmagic Design em www.blackmagicdesign.com/br/support para
informações mais atualizadas.
Quais cartões SD devo usar com o HyperDeck Studio 4K Pro?
Os seguintes cartões SD são recomendados para gravar 2160p em até 60 fps:
Marca Modelo Capacidade
Angelbird AV Pro MK2 V90 SDXC 128GB
Angelbird AV Pro MK2 V90 SDXC 256GB
ProGrade Digital SDXC UHS-II V90 300R 128GB
ProGrade Digital SDXC UHS-II V90 300R 256GB
Wise SD2-128U3 SDXC UHS-II 128GB
671Mídias de Armazenamento

Quais cartões SD devo usar com o HyperDeck Studio HD Pro?
Os seguintes cartões SD são recomendados para gravar 2160p em até 30 fps:
Marca Modelo Capacidade
Angelbird AV Pro MK2 V90 SDXC 64GB
Angelbird AV Pro MK2 V90 SDXC 128GB
Angelbird AV Pro MK2 V90 SDXC 256GB
ProGrade Digital SDXC UHS-II V90 300R 64GB
ProGrade Digital SDXC UHS-II V90 300R 128GB
ProGrade Digital SDXC UHS-II V90 300R 256GB
Wise SD2-64U3 SDXC UHS-II 64GB
Wise SD2-128U3 SDXC UHS-II 128GB
Quais cartões SD devo usar com o HyperDeck Studio HD Plus?
Os seguintes cartões SD são recomendados para gravar 2160p em até 30 fps:
Marca Modelo Capacidade
Angelbird AV Pro MK2 V90 SDXC 64GB
Angelbird AV Pro MK2 V90 SDXC 128GB
Angelbird AV Pro MK2 V90 SDXC 256GB
ProGrade Digital SDXC UHS-II V90 300R 64GB
ProGrade Digital SDXC UHS-II V90 300R 128GB
ProGrade Digital SDXC UHS-II V90 300R 256GB
Wise SD2-64U3 SDXC UHS-II 64GB
Wise SD2-128U3 SDXC UHS-II 128GB
Quais cartões SD devo usar com o HyperDeck Studio HD Mini?
Os seguintes cartões SD são recomendados para gravar 1080p ProRes 422 HQ em até 60 fps:
Marca Modelo Capacidade
Angelbird AV Pro MK2 V90 SDXC 64GB
Angelbird AV Pro MK2 V90 SDXC 128GB
Angelbird AV Pro MK2 V90 SDXC 256GB
ProGrade Digital SDXC UHS-II V90 300R 64GB
ProGrade Digital SDXC UHS-II V90 300R 128GB
ProGrade Digital SDXC UHS-II V90 300R 256GB
Wise SD2-64U3 SDXC UHS-II 64GB
Wise SD2-128U3 SDXC UHS-II 128GB
672Mídias de Armazenamento
SSD
Ao trabalhar com vídeos de alta taxa de dados, é importante verificar com atenção o SSD que
você gostaria de usar. Isso porque alguns SSDs podem ter uma velocidade de gravação até 50%
menor do que a velocidade alegada pelo fabricante, ou seja, mesmo que as especificações
afirmem que o SSD seja rápido o suficiente para manusear vídeos, na verdade, ele não é rápido
o suficiente para gravar vídeos em tempo real.
A compressão de dados ocultos afeta principalmente a gravação e, muitas vezes, esses discos
ainda podem ser usados para reproduzir em tempo real.
Segundo os testes que realizamos, os modelos de SSDs mais novos e de maior capacidade,
normalmente, são mais rápidos. Os SSDs recomendados para uso incluem:
Quais SSDs devo usar com o HyperDeck Studio 4K Pro?
Os seguintes SSDs são recomendados para gravar 2160p em até 60 fps:
Marca Modelo Capacidade
Samsung 860 PRO 512GB
Samsung 860 PRO 1TB
Samsung 870 EVO (MZ-77E250BW) 250GB
Samsung 870 EVO (MZ-77E500BW) 500GB
Samsung 870 EVO (MZ-77E1T0BW) 1TB
Samsung 870 EVO (MZ-77E2T0BW) 2TB
Quais SSDs devo usar com o HyperDeck Studio HD Pro?
Os seguintes SSDs são recomendados para gravar 2160p em até 30 fps:
Marca Modelo Capacidade
Samsung 860 PRO 512GB
Samsung 860 PRO 1TB
Samsung 870 EVO (MZ-77E250BW) 250GB
Samsung 870 EVO (MZ-77E500BW) 500GB
Samsung 870 EVO (MZ-77E1T0BW) 1TB
Samsung 870 EVO (MZ-77E2T0BW) 2TB
673Mídias de Armazenamento
Unidades externas
Todos os modelos HyperDeck podem gravar diretamente em unidades flash USB-C. Essas
unidades rápidas e de capacidade superior possibilitam a gravação de vídeos por períodos
prolongados. Depois, você pode conectar a unidade flash ao seu computador e editar
diretamente dela.
Para capacidades de armazenamento ainda mais elevadas, você pode conectar uma doca ou
um disco rígido externo USB-C. Para conectar seu Blackmagic MultiDock 10G ou unidade flash
USB-C, conecte um cabo do seu dispositivo USB-C à porta “EXT DISK” na parte traseira
do HyperDec.
Quais unidades USB-C devo usar com o HyperDeck Studio 4K Pro?
As seguintes unidades USB-C são recomendadas para gravar 2160p em até 60 fps:
Marca Modelo Capacidade
Angelbird SSD2GO PKT MK2 512GB
Angelbird SSD2GO PKT MK2 2TB
DelKinDevices Juggler 1TB
DelKinDevices Juggler 2TB
LaCie Rugged SSD STHR2000800 2TB
LaCie Rugged SSD Pro STHZ1000800 1TB
Wise PTS-512 Portable SSD 512GB
Wise PTS-1024 Portable SSD 1TB
Quais unidades USB-C devo usar com o HyperDeck Studio HD Pro?
As seguintes unidades USB-C são recomendadas para gravar 2160p em até 30 fps:
Marca Modelo Capacidade
Angelbird SSD2GO PKT MK2 512GB
Angelbird SSD2GO PKT MK2 2TB
DelKinDevices Juggler 1TB
DelKinDevices Juggler 2TB
LaCie Rugged SSD STHR2000800 2TB
LaCie Rugged SSD Pro STHZ1000800 1TB
Wise PTS-512 Portable SSD 512GB
Wise PTS-1024 Portable SSD 1TB
674Mídias de Armazenamento

Quais unidades USB-C devo usar com o HyperDeck Studio HD Plus?
As seguintes unidades USB-C são recomendadas para gravar 2160p em até 30 fps:
Marca Modelo Capacidade
Angelbird SSD2GO PKT MK2 512GB
Angelbird SSD2GO PKT MK2 2TB
DelKinDevices Juggler 1TB
DelKinDevices Juggler 2TB
LaCie Rugged SSD STHR2000800 2TB
LaCie Rugged SSD Pro STHZ1000800 1TB
Wise PTS-512 Portable SSD 512GB
Wise PTS-1024 Portable SSD 1TB
Quais unidades USB-C devo usar com o HyperDeck Studio HD Mini?
As seguintes unidades USB-C são recomendadas para gravar 1080p ProRes 422 HQ em até 60 fps:
Marca Modelo Capacidade
Angelbird SSD2GO PKT MK2 512GB
Angelbird SSD2GO PKT MK2 2TB
DelKinDevices Juggler 1TB
DelKinDevices Juggler 2TB
Wise PTS-512 Portable SSD 512GB
Wise PTS-1024 Portable SSD 1TB
675Mídias de Armazenamento

Formatar Mídias
Preparar mídias em um computador
Como formatar mídias em um computador Mac:
O Utilitário de Disco incluído no Mac pode formatar um drive nos formatos HFS+ ou exFAT.
Lembre-se de fazer o backup de gravações importantes no seu disco, pois todos os dados
serão perdidos após a formatação.
1 Conecte um SSD ao seu computador através de uma doca externa ou adaptador
de cabo e ignore qualquer mensagem relativa à utilização do SSD para backups com
Time Machine. Para cartões CFast, faça a conexão com o seu computador usando um
leitor externo.
2 Vá até “Aplicativos/Utilitários” e inicie o Utilitário de Disco.
3 Selecione o seu SSD ou cartão CFast e clique em “Apagar”.
4 Configure o formato como “Mac OS Expandido (Journaling)” ou “exFAT”.
5 Digite um nome para o novo volume e clique em “Apagar”. A sua mídia de armazenamento
será formatada rapidamente e disponibilizada para uso com o HyperDeck.
Como formatar mídias em um computador Windows:
A caixa de diálogo “Formatar” pode formatar um drive no formato exFAT em um PC Windows.
Lembre-se de fazer o backup de gravações importantes do seu SSD ou cartão SD, pois todos
os dados serão perdidos após a formatação.
1 Conecte o SSD ao seu computador com uma doca externa ou cabo adaptador. Para
cartões CFast, faça a conexão com o seu computador usando um leitor externo.
2 Abra o menu “Iniciar” ou a tela “Iniciar” e selecione “Computador”. Dê um clique com
o botão direito no seu SSD ou cartão CFast .
3 No menu contextual, selecione “Formatar”.
4 Defina o sistema de arquivo como “exFAT” e o tamanho da unidade de alocação para
128 kilobytes.
676Formatar Mídias
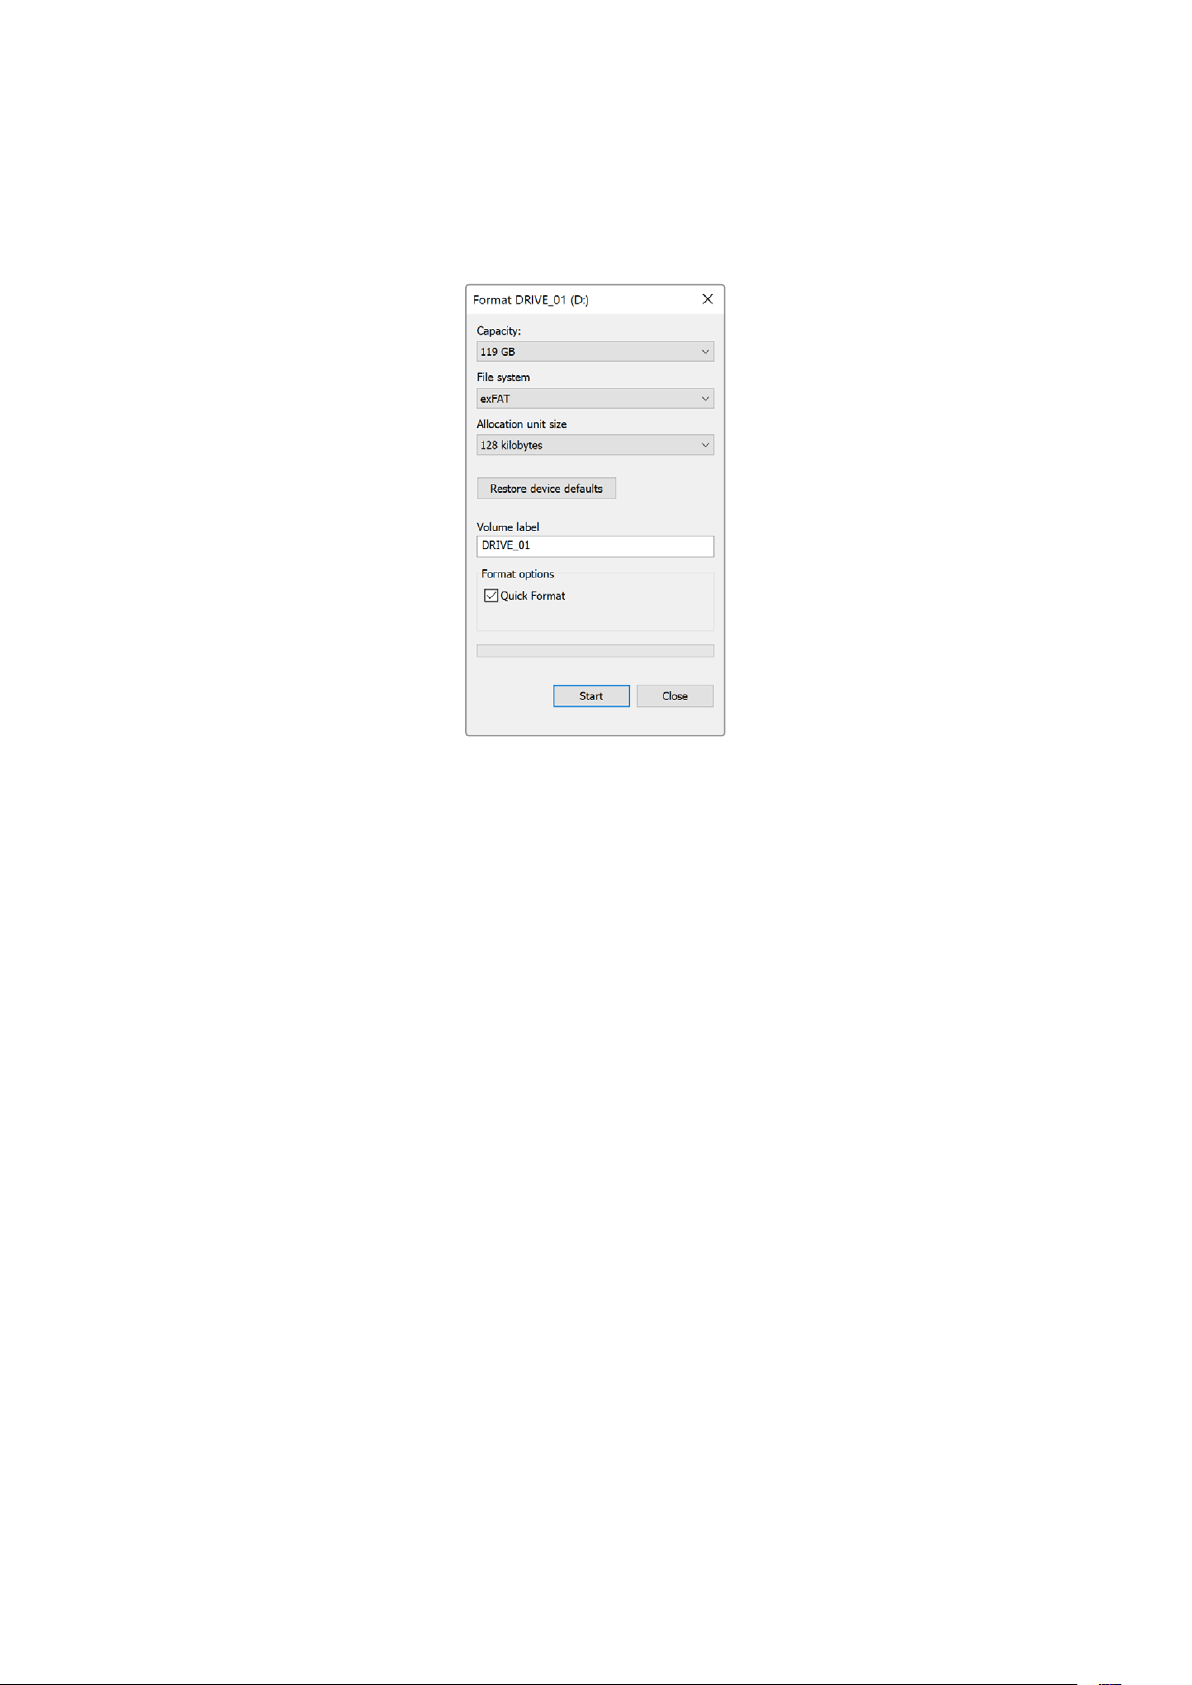
5 Digite um rótulo do volume, selecione “Formatação Rápida” e clique em “Iniciar”.
6 A sua mídia de armazenamento será formatada rapidamente e disponibilizada para uso
com o HyperDeck.
Usar o HyperDeck como uma Webcam
Quando conectado a um computador por USB, o seu gravador de disco HyperDeck será
detectado como uma webcam. Isso significa que você pode transmitir a reprodução ou
gravação do seu HyperDeck usando aplicativos de streaming como o Open Broadcaster.
Configurar a fonte webcam
Na maioria das vezes, o seu aplicativo de software definirá o HyperDeck Studio como uma
webcam automaticamente, assim, ao iniciar o seu aplicativo de streaming você visualizará a
imagem do seu HyperDeck Studio na hora. Caso o seu aplicativo não selecione o HyperDeck
automaticamente, basta configurar o software para usar o HyperDeck como a webcam e
o microfone.
Um exemplo de como definir as configurações de webcam no Skype pode ser
conferido abaixo.
1 Na barra de menu do Skype, abra as “Configurações de Vídeo e Áudio”.
2 Clique no menu “Câmera” e selecione o seu HyperDeck na lista. Você verá o vídeo
do HyperDeck aparecer na janela de pré-visualização.
3 Vá até o menu “Microfone” e selecione seu HyperDeck como sua fonte de áudio.
Com as suas configurações de Skype definidas corretamente, é recomendável testar uma
chamada Skype com um amigo para conferir rapidamente se a sua configuração de webcam
está funcionando.
Isso é tudo que você precisa fazer. Agora, o HyperDeck Studio está preparado para transmitir
o seu vídeo ao vivo ao mundo.
677Usar o HyperDeck como uma Webcam
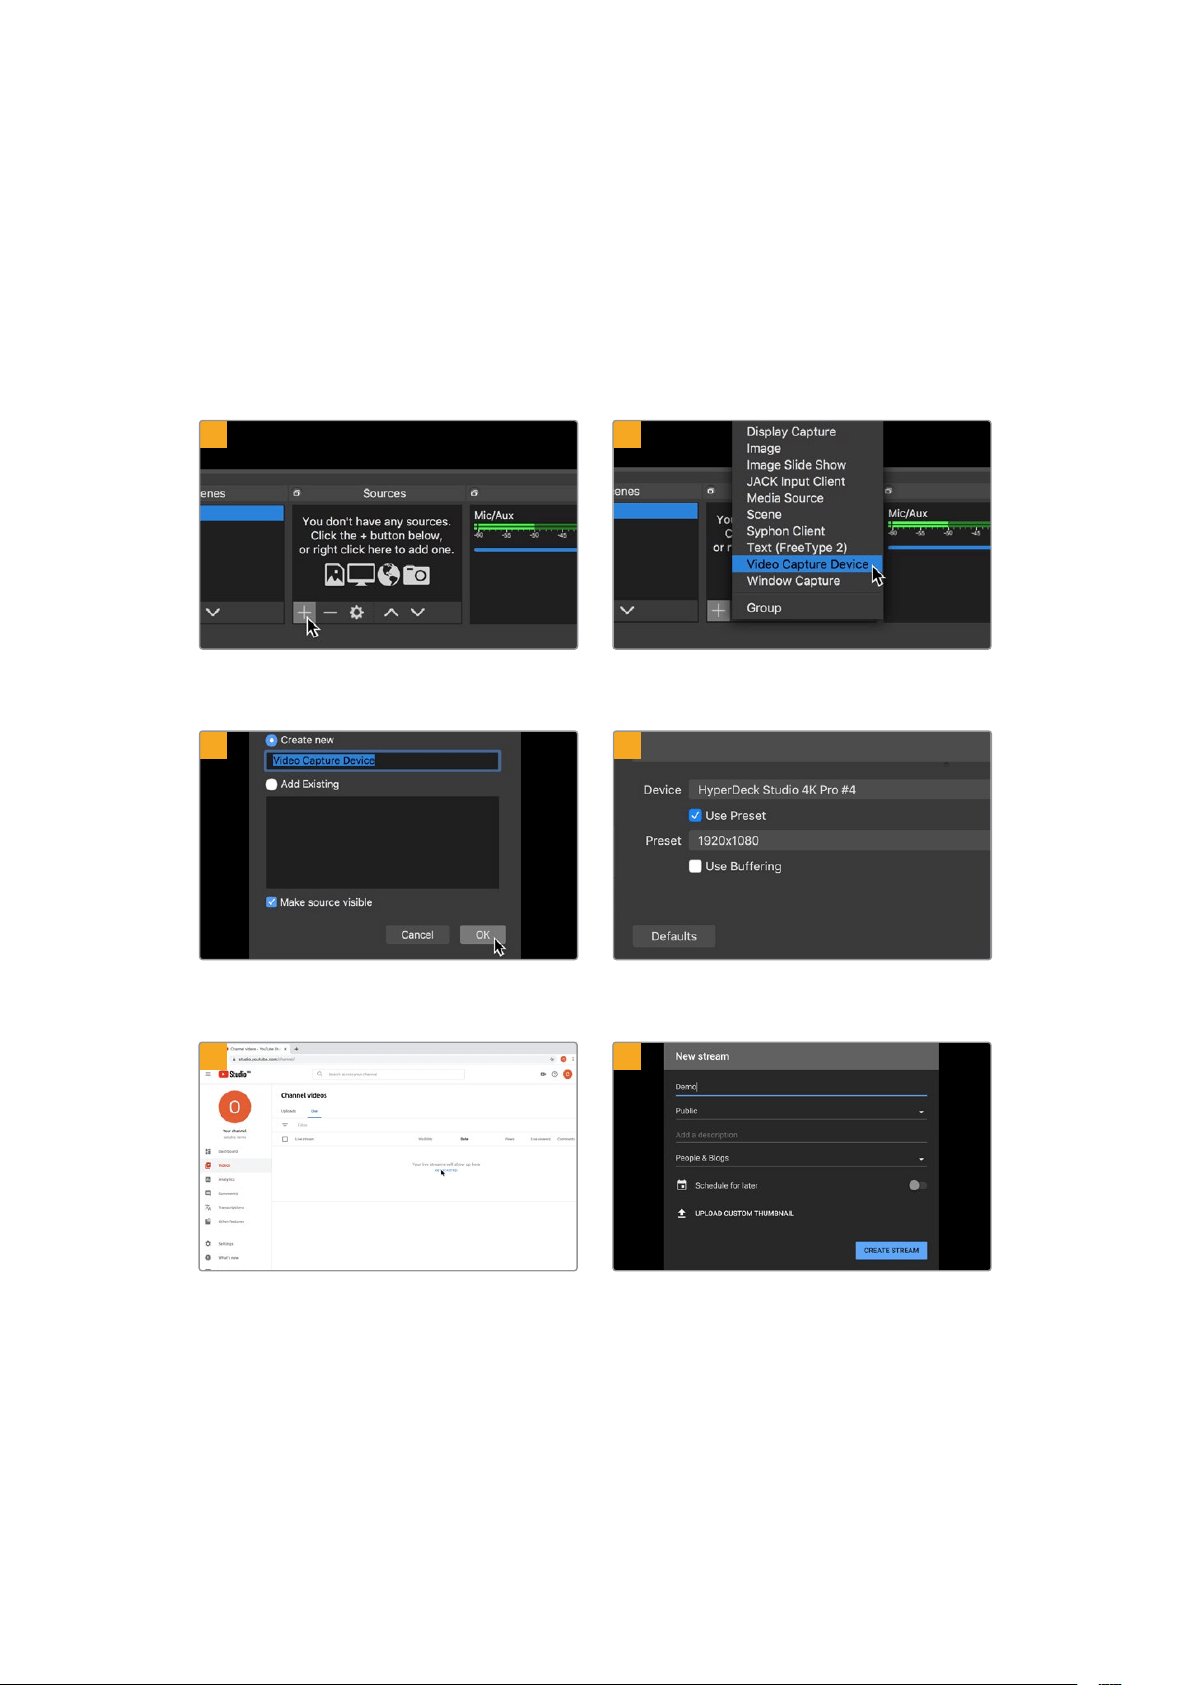
Configurar Open Broadcaster
O Open Broadcaster é um aplicativo de código aberto que funciona como uma plataforma
de streaming entre o seu HyperDeck Studio e o seu software de streaming favorito, como
YouTube, Twitch, Facebook Live, entre outros. O Open Broadcaster faz a compactação do
seu vídeo para uma taxa de bit facilmente gerenciada pelo seu app de streaming.
Uma demonstração de como configurar o Open Broadcaster para transmitir a saída webcam
do seu HyperDeck Studio usando o YouTube como o aplicativo de streaming está
disponibilizada abaixo.
Execute o Open Broadcaster e clique no ícone + na
caixa “Fontes”.
Selecione “Dispositivo de Captura de Vídeo”.
Nomeie a nova fonte e clique em “OK”. No menu “Dispositivo”, selecione o seu modelo
HyperDeck Studio e clique em “OK”.
Agora vá até a sua conta no YouTube. Navegue até
a opção “Vídeo/Ao Vivo” e clique em “Transmissão
ao vivo”.
Nas opções de “Transmissão” do YouTube, insira os
detalhes da sua transmissão e clique em “Criar”.
1
2
3
4
5
6
678Usar o HyperDeck como uma Webcam
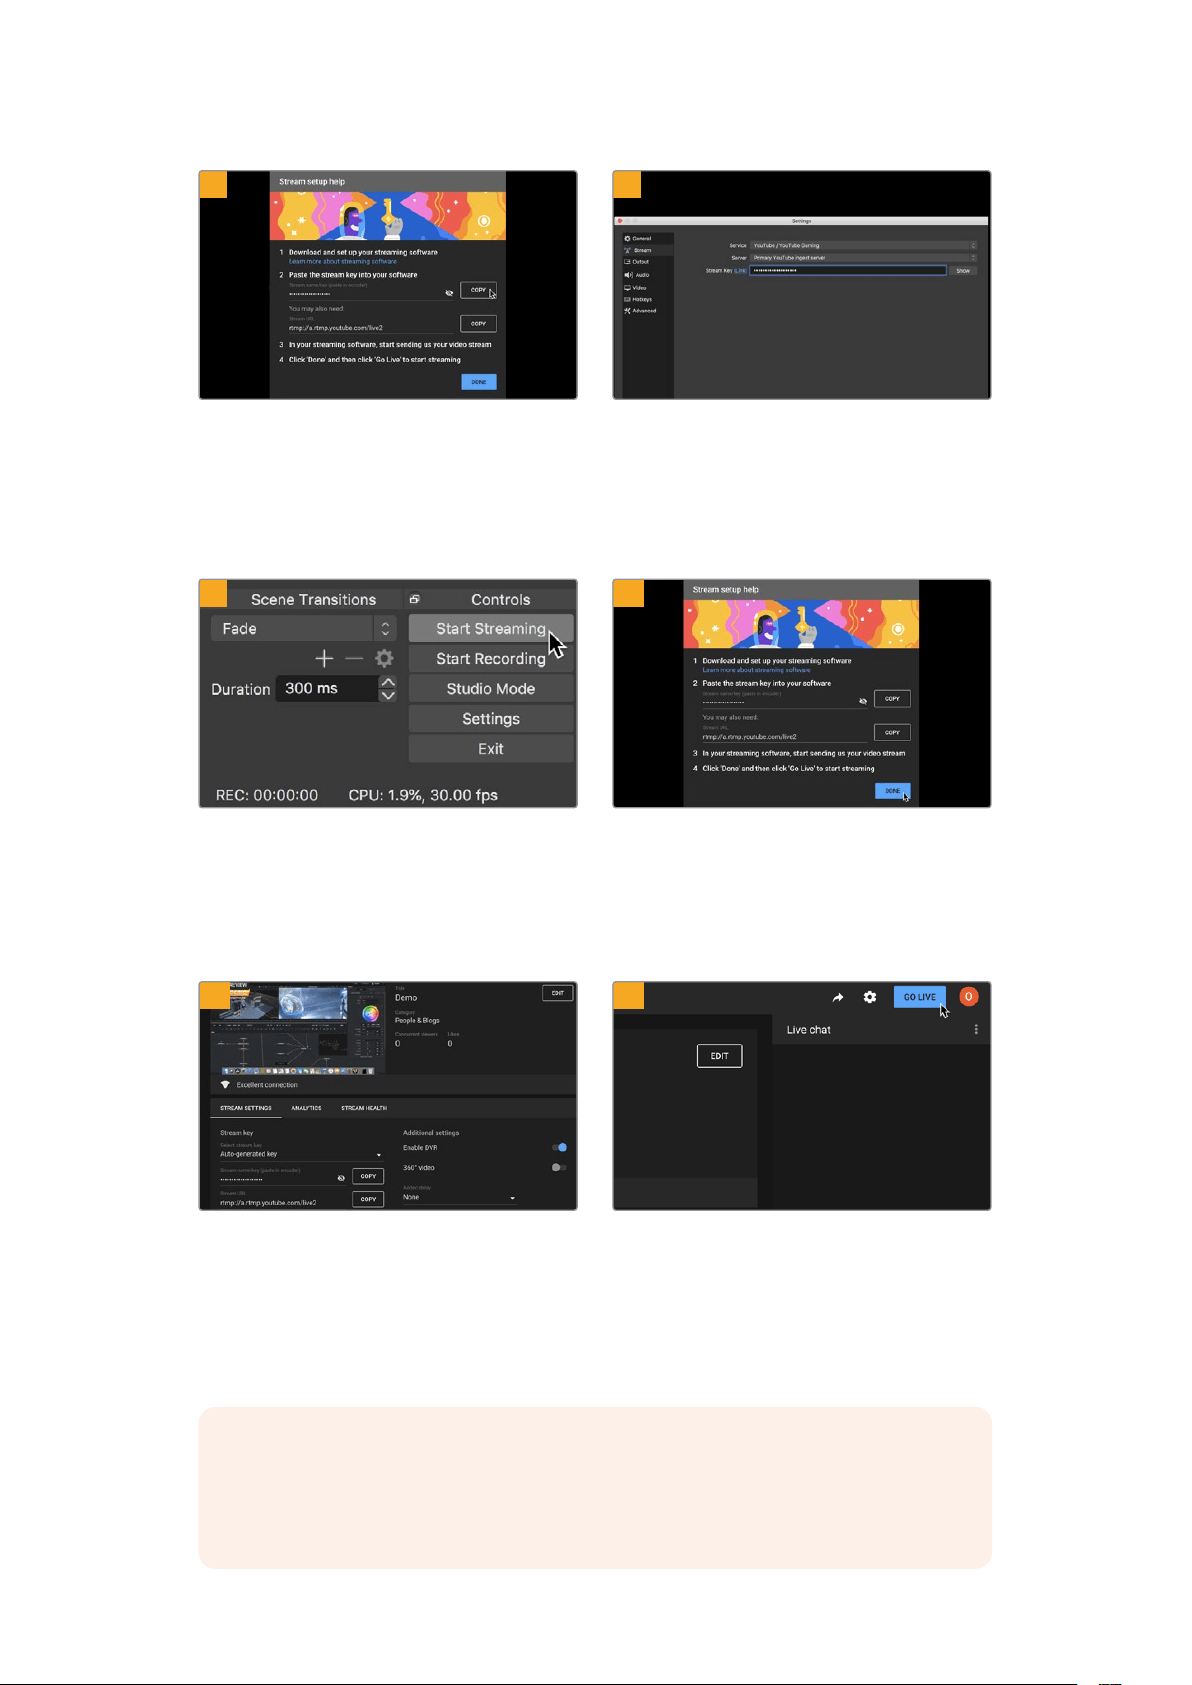
O YouTube gerará um “Nome/chave do stream”
que irá direcionar o Open Broadcaster à sua conta
no YouTube.
Clique no botão “Copiar” ao lado da chave do
stream. Copie a chave de streaming que você
deseja colar no Open Broadcaster.
Retorne ao Open Broadcaster e abra as preferências
ao clicar em “Preferências OBS” na barra de menu.
Selecione “Transmissão”. Agora, cole a chave
de transmissão na janela de pré-visualização de
transmissão do Open Broadcaster.
Para conectar o link de transmissão do Open
Broadcaster ao YouTube, clique em “Iniciar
Transmissão”, no canto inferior direito da tela.
Isso estabelece o link com o YouTube a partir do
Open Broadcaster. A partir deste ponto, tudo será
definido usando o YouTube Live.
Retorne ao YouTube Live e você verá a saída
webcam de programa do seu HyperDeck no
segundo plano. Clique em “Concluído”.
Com o Open Broadcaster se comunicando com
o YouTube Live, você está pronto para começar
sua transmissão. Agora é hora de verificar os
últimos detalhes e assegurar que tudo está
funcionando corretamente.
Se estiver tudo pronto, agora você pode começar
sua transmissão clicando em “Transmitir Ao Vivo”.
Agora, você está transmitindo ao vivo no YouTube com o Open Broadcaster.
OBSERVAÇÃO Devido à natureza do streaming na internet, muitas vezes pode haver
um atraso, por isso é importante assistir à transmissão no YouTube e confirmar se o
seu programa terminou antes de clicar para encerrar a transmissão. Dessa forma, você
evita cortar o final da sua transmissão acidentalmente.
7
8
9
10
11
12
679Usar o HyperDeck como uma Webcam

Blackmagic HyperDeck Setup
Usar HyperDeck Setup
O Blackmagic HyperDeck Setup é utilizado para ajustar configurações e atualizar o software
interno no seu HyperDeck.
Como usar o HyperDeck Setup:
1 Conecte o HyperDeck ao seu computador via USB ou Ethernet.
2 Execute o HyperDeck Setup. O nome do modelo do HyperDeck será exibido na
página inicial do utilitário de configuração.
3 Clique no ícone circular no canto superior direito ou na imagem do seu HyperDeck
para abrir a página de configurações.
Página Setup
Caso você possua mais de um HyperDeck Studio, é recomendável nomear cada unidade para
facilitar a identificação. Isso pode ser feito no campo “Name”.
680Blackmagic HyperDeck Setup

Network
Protocol
Para usar o HyperDeck Studio com switchers ATEM ou controlá-lo remotamente
através do HyperDeck Ethernet Protocol, o HyperDeck Studio precisa estar na
mesma rede que o outro equipamento usando DHCP ou adicionando um endereço
IP fixo manualmente.
DHCP
Os gravadores de disco HyperDeck Studio vêm de fábrica configurados
como DHCP. O protocolo dinâmico de configuração do host, ou DHCP,
é um serviço em servidores de rede que encontra automaticamente o
HyperDeck Studio e atribui um endereço IP. O DHCP é um ótimo serviço
que facilita a conexão de equipamentos via Ethernet e garante que seus
endereços IP não entrem em conflito entre si. A maioria dos computadores
e switchers de rede suporta DHCP.
Static IP
Quando “Static IP” estiver selecionado, você pode inserir as informações
da sua rede manualmente. Ao definir endereços IP manualmente para
que todas as unidades possam se comunicar, elas devem compartilhar as
mesmas configurações de máscara de sub-rede e gateway. Além disso,
os três primeiros campos de números no endereço IP do painel também
precisam corresponder. Se existirem mais dispositivos na rede com o
mesmo número de identificação nos seus endereços IP, haverá um conflito
e as unidades não se conectarão. Caso haja um conflito, basta alterar o
número de identificação no endereço IP da unidade.
Página LUTs
Os modelos HyperDeck com conexões de saída de monitoramento no painel traseiro podem
exibir o vídeo de entrada com LUTs 3D aplicadas. Há suporte para arquivos LUT .cube de 17, 33
e 65 pontos.
Isto pode ser útil ao usar a faixa dinâmica da câmera no modo Filme, que tem um aspecto
intencionalmente “lavado” e dessaturado. Ao aplicar uma LUT de exibição, você pode obter
uma representação de como será a aparência do seu vídeo após o tratamento de cores.
A LUT 3D é usada apenas na exibição da saída de monitoramento e não é gravada no vídeo
em si, assim você não precisa se preocupar sobre sua imagem gravada manter aquela
aparência permanentemente.
Caso queira aplicar a mesma LUT na sua imagem no DaVinci Resolve, basta importar o mesmo
arquivo LUT .cube usado no HyperDeck Studio para o DaVinci Resolve e aplicá-la à
sua gradação.
681Blackmagic HyperDeck Setup

Como visualizar uma LUT:
1 Primeiramente, você precisa selecionar sua LUT de exibição. Clique no botão “Import”.
2 A partir da janela “File”, navegue até a LUT que deseja importar e pressione “Open”.
3 Após importar a LUT, marque a opção “3D LUT” como “On” e pressione o botão “Save”.
A LUT de exibição selecionada aparecerá na saída de monitoramento. Agora você pode
habilitar ou desabilitar a LUT através das configurações de monitoramento no menu LCD.
Atualizar o Software Interno
O utilitário de configuração permite atualizar o software interno do seu HyperDeck, além de
definir as configurações de streaming, configurações de rede e qualidade de streaming.
Como atualizar o software interno:
1 Baixe o instalador do Blackmagic HyperDeck Setup mais recente em
www.blackmagicdesign.com/br/support.
2 Execute o instalador do Blackmagic HyperDeck Setup e siga as instruções na tela.
3 Após a instalação, conecte o seu HyperDeck Setup ao computador via o conector USB
ou Ethernet no painel traseiro.
4 Inicie o Blackmagic HyperDeck Setup e siga as orientações na tela para atualizar o
programa interno. Caso nenhuma instrução apareça, o software interno está atualizado
e não há nada mais que você precise fazer.
682Atualizar o Software Interno

Baixe o utilitário de instalação mais recente para o seu
BlackmagicHyperDeck Studio na central de suporte técnico da
Blackmagic Design em www.blackmagicdesign.com/br/support
Teranex Mini Rack Shelf
A Teranex Mini Rack Shelf é uma prateleira de 1U que permite a instalação dos modelos
Blackmagic HyperDeck Studio HD Mini e HyperDeck Studio HD Plus em um rack broadcast
ou em um case técnico. Seu Blackmagic HyperDeck Studio HD Mini é tão pequeno que você
pode instalá-lo próximo a outros equipamentos da Blackmagic Design que compartilham um
fator de forma semelhante, como os conversores Teranex Mini, o Blackmagic MultiView 4 e o
Blackmagic Web Presenter. Por exemplo, a instalação de um Blackmagic HyperDeck Studio HD
Mini com o ATEM Television Studio HD oferece a capacidade de alternar oito entradas de vídeo
e gravar a saída de programa no seu HyperDeck Studio HD Mini. Este design modular permite
que você crie suas próprias soluções de vídeo personalizadas, portáteis e fáceis de usar.
A Teranex Mini Rack Shelf permite que você instale o seu Blackmagic HyperDeck
Studio HD Mini e HyperDeck Studio HD Plus em rack com outros equipamentos
da Blackmagic Design que compartilhem o mesmo fator de forma.
Para instalar o seu Blackmagic HyperDeck em uma Teranex Mini Rack Shelf, basta remover
os pés emborrachados da unidade, se introduzidos, e ajustar a unidade à base da prateleira
usando os parafusos fornecidos.
A Teranex Mini Rack Shelf é entregue com dois painéis vazios originais que podem ser usados
para cobrir lacunas, se você não precisar instalar equipamentos adicionais da Blackmagic Design.
Para mais informações, consulte o site da Blackmagic Design em www.blackmagicdesign.com/br
683Teranex Mini Rack Shelf

Controle RS-422
O que é controle RS-422?
O RS-422 é um padrão de controle serial de deck usado por teledifusores desde o início
da década de 1980, muito encontrado em decks, editores lineares, editores não lineares e
produtos profissionais de automação. Todos os modelos HyperDeck atuais são compatíveis
com esse padrão, portanto podem ser integrados em sistemas profissionais de automação,
sistemas de controle remoto, sistemas de edição e em qualquer tipo de controle personalizado
que você queira desenvolver.
O HyperDeck Studio também é compatível com comandos baseados em arquivos do
Advanced Media Protocol via RS-422. Isso permite que você controle seu HyperDeck com um
dispositivo externo usando comandos AMP, como adicionar clipes a uma lista de reprodução,
determinar o nome do arquivo do próximo clipe, reproduzir um único clipe ou linha de tempo
em loop ou limpar uma lista de reprodução.
Usar um Controlador RS-422 Externo
Todos os modelos HyperDeck atuais incluem uma porta de comando de deck compatível com o
padrão de indústria RS-422 da Sony™, que tem as conexões de pino corretas para uma conexão
direta com qualquer controlador remoto com RS-422, como o HyperDeck Extreme Control.
Você pode usar cabos de 9 pinos pré-fabricados, desde que cada extremidade do cabo esteja
conectada “pino a pino”, ou seja, os mesmos números de pino em cada extremidade do cabo
são conectados juntos. Caso queira utilizar cabos feitos sob encomenda, por favor consulte o
diagrama de cabeamento abaixo.
Você pode controlar o seu HyperDeck remotamente a partir de um HyperDeck Extreme
Control, em vez de apertar botões localmente.
1 Conecte um sinal de vídeo à entrada de vídeo do HyperDeck.
2 Conecte um cabo RS-422 do HyperDeck Extreme Control ao HyperDeck Studio.
3 Ative o controle remoto pressionando o botão “Remote” no painel de controle
frontal ou através do menu LCD no HyperDeck Studio Mini para ativar o controle
remoto do deck.
Agora você pode iniciar e interromper a gravação e a reprodução do seu HyperDeck
remotamente, além de executar outras funções comuns de jog e shuttle. Confira a lista
completa de comandos suportados pelo RS-422 na próxima seção, intitulada ‘Comandos
RS-422 Suportados’.
5 4 3 2 1
9 8 7 6
Receive
(–)
Receive
(+)
Transmit
(–)
Transmit
(+)
Ground
Pins
2 7 8 3 1, 4, 6, 9
Pinos RS-422 para conexão remota.
684Controle RS-422

Para habilitar o controle de deck RS-422, verifique se a opção “Remoto” do HyperDeck
está habilitada no menu LCD ou através do botão “Remote” no painel frontal.
Todos os modelos HyperDeck suportam controle remoto através da porta RS-422 no painel traseiro.
Comandos RS-422 Suportados
Command Reply No Remote Notes
0 - System Control
0x00 0x11 DeviceTypeRequest
NTSC: 0xF0E0
PAL: 0xF1E0
24P: 0xF2E0
Enabled
1 - Slave Response
0x20 0x00 Stop Acknowledge Disabled
0x20 0x01 Play Acknowledge Disabled
0x20 0x02 Record Acknowledge Disabled
0x20 0x04 StandbyOff Acknowledge Disabled
0x20 0x05 StandbyOn Acknowledge Disabled
0x20 0x0F Eject Acknowledge Disabled
0x20 0x10 FastFwd Acknowledge Disabled
0x21 0x11 JogFwd1 Acknowledge Disabled
0x22 0x11 JogFwd2 Acknowledge Disabled
Treated as N=1;
Same as JogFwd1
0x21 0x12 VarFwd1 Acknowledge Disabled Uses ShuttleFwd1
0x22 0x12 VarFwd2 Acknowledge Disabled
Treated as N=1;
Same as VarFwd1
0x21 0x13 ShuttleFwd1 Acknowledge Disabled
0x22 0x13 ShuttleFwd2 Acknowledge Disabled
Treated as N=1;
Same as ShuttleFwd1
0x20 0x20 Rewind Acknowledge Disabled
0x21 0x21 JogRev1 Acknowledge Disabled
0x22 0x21 JogRev2 Acknowledge Disabled
Treated as N=1;
Same as JogRev1
0x21 0x22 VarRev1 Acknowledge Disabled Uses ShuttleRev1
685Controle RS-422

Command Reply No Remote Notes
0x22 0x22 VarRev2 Acknowledge Disabled
Treated as N=1;
Same as VarRev1
0x21 0x23 ShuttleRev1 Acknowledge Disabled
0x22 0x23 ShuttleRev2 Acknowledge Disabled
Treated as N=1;
Same as ShuttleRev1
0x20 0x30 Preroll Acknowledge Disabled
0x24 0x31 CueData Acknowledge Disabled
0x20 0x34 SyncPlay Acknowledge Disabled
0x20 0x40 Preview Acknowledge Disabled Status bits are set
0x20 0x41 Review Acknowledge Disabled Status bits are set
0x20 0x43 OutpointPreview Acknowledge Disabled
0x22 0x5C DMCSetFwd Acknowledge Disabled
0x22 0x5D DMCSetRev Acknowledge Disabled
0x20 0x60 FullEEOff Acknowledge Disabled
0x20 0x61 FullEEOn Acknowledge Disabled
0x20 0x63 SelectEEOn Acknowledge Disabled
4 - Preset/Select Control
0x40 0x10 InEntry Acknowledge Disabled
0x40 0x11 OutEntry Acknowledge Disabled
0x44 0x14 InDataPreset Acknowledge Disabled
0x44 0x15 OutDataPreset Acknowledge Disabled
0x40 0x18 InShift+ Acknowledge Disabled
0x40 0x19 InShift- Acknowledge Disabled
0x40 0x1A OutShift+ Acknowledge Disabled
0x40 0x1B OutShift- Acknowledge Disabled
0x40 0x20 InReset Acknowledge Disabled
0x40 0x21 OutReset Acknowledge Disabled
0x40 0x22 AInReset Acknowledge Disabled
0x40 0x23 AOutReset Acknowledge Disabled
0x44 0x31 PrerollPreset Acknowledge Disabled
0x40 0x40 AutoModeOff Acknowledge Disabled
ignored, Status bit
remembered
0x40 0x41 AutoModeOn Acknowledge Disabled
ignored, Status bit
remembered
0x41 0x37 InputCheck Acknowledge Disabled
686Controle RS-422

Command Reply No Remote Notes
6 - Sense Request
0x61 0x0A TimeCodeGenSense — —
0x61 0x0C CurrentTimeSense — —
0x60 0x10 InDataSense InData Enabled
0x60 0x11 OutDataSense OutData Enabled
0x60 0x12 AInDataSense AInData Enabled
0x60 0x13 AOutDataSense AOutData Enabled
0x61 0x20 StatusSense StatusData Enabled
0x60 0x2B RemainTimeSense RemainTimeData Enabled
0x60 0x2E SpeedSense SpeedData Enabled
0x60 0x31 PrerollTimeSense PreRollTimeData Enabled
0x60 0x36 TimerModeSense TimerModeData Enabled
0x60 0x3E RecordInhibitSense RecordInhibitStatus Enabled
7 - Sense Reply
0x78 0x00 Timer1Data — —
Current Time and
00:00:00:00
0x78 0x04 LTCUserBitsTimeData — —
Current Time and
00:00:00:00
0x78 0x06 VITCUserBitsTimeData — —
Current Time and
00:00:00:00
0x74 0x06 VITCTimeData — — Current Time
0x74 0x07 UserBitsVITCTimeData — — 00:00:00:00
0x74 0x08 GenTCData — — Current Time
0x78 0x08 GenTCUBData — —
Current Time and
00:00:00:00
0x74 0x09 GenUBData — — 00:00:00:00
0x74 0x10 InData — —
0x74 0x11 OutData — —
0x74 0x12 AInData — —
0x74 0x13 AOutData — —
0x74 0x14 CorrectedLTCTimeData — — Current Time
0x70 0x20 StatusData — —
Please see “Status Bits”
sheet: Limited to 9 bytes
of status, silently
truncated
0x76 0x2B RemainTimeData — —
0x71 0x2E SpeedData — —
0x74 0x31 PrerollTimeData — —
0x71 0x36 TimerModeData — — Returns 0 (TimeCode)
0x72 0x3E RecordInhibitStatus — —
687Controle RS-422

Command Reply No Remote Notes
A - Advanced Media Protocol
0xA1 0x01 AutoSkip Acknowledge Disabled
8-bit signed number of
clips to skip from current
clip
0xAX 0x15 ListNextID IDListing Enabled
when x = 0 single clip
request when x = 1, #
clips can be specified in
the send data
0x20 0x29 ClearPlaylist Acknowledge Disabled
0x41 0x42 SetPlaybackLoop Acknowledge Disabled
Bit 0 loop mode enable,
0=false 1=true
Bit 1 is single clip/timeline
0=single clip
1=timeline
0x41 0x44 SetStopMode Acknowledge Disabled
0 = Off
1 = Freeze on last frame
2 = Freeze on next clip
3 = Show black
0x4f 0x16 AppendPreset Acknowledge Disabled
2 Bytes for the length N
of the clip name
N Bytes for each character
of the clip name
4 Byte in point timecode
(format is FFSSMMHH)
4 Byte out point timecode
(format is FFSSMMHH)
Blackmagic Extensions
0x82 0x02 BMDSeekToTimelinePosition Acknowledge Disabled
16-bit little endian
fractional position
[0..65535]
0x81 0x03 BMDSeekRelativeClip Acknowledge Disabled
One-byte signed integer,
which is the number of
clips to skip (negative for
backwards).
RS-422 Developer Information
bit 7 bit 6 bit 5 bit 4 bit 3 bit 2 bit 1 bit 0
Byte 0
0 0 Cassette out 0 0 0 0 Local
Byte 1
Standby 0 Stop 0 Rewind Forward Record Play
Byte 2
Servo Lock 0 Shuttle Jog Var Direction Still 1
Byte 3
Auto Mode 0 0 0 Aout Set Ain Set Out Set In Set
Byte 4
Select EE Full EE Loop Playback 0 0 0 0 0
Byte 5
0 0 0 0 0 0 0 0
Byte 6
0 Lamp Still Lamp Fwd Lamp Rev 0 0 0 0
Byte 7
0 0 0 0 0 0 0 0
Byte 8
0 0 Near EOT EOT 0 0 0 0
Byte 9
0 0 0 0 0 0 0 0
688Controle RS-422

Variables
Cassette Out
Set if no SSD is present
Local
Set if Remote is disabled (local control)
Standby
Set if a disk is available
Direction
Clear if playback is forwarding, set if playback is reversing
Still
Set if playback is paused, or if in input preview mode
Auto Mode
Set if in Auto Mode
Select EE, Full EE
Set if in input preview mode
Lamp Still/Fwd/Rev
Set according to playback speed and direction
Near EOT
Set if total space left on available SSDs is less than 3 minutes
EOT
Set if total space left on available SSDs is less than 30 seconds
Others
Cue Complete (byte 2, bit 0)
Always 1: Cue requests are always instantaneous
HyperDeck Serial RS-422 Protocol
Protocol
Based on Sony 9-pin protocol
Interface
Baud rate 38.4 Kbps
1 start bit
8 data bits
1 stop bit
1 parity bit
Odd parity
Transferir Arquivos via Rede
O gravador de disco HyperDeck suporta transferência de arquivos via protocolo de
transferência de arquivos, ou FTP. Este recurso poderoso permite que você copie arquivos
diretamente do seu computador para o seu HyperDeck através de uma rede com as
velocidades rápidas que uma rede local pode oferecer. Por exemplo, você pode copiar novos
arquivos para uma unidade HyperDeck remota baseada em outro local para sinalização digital.
Conectar ao HyperDeck Studio
Com o computador e o HyperDeck Studio na mesma rede, você só precisará de um cliente
FTP e do endereço IP do seu HyperDeck Studio.
1 Baixe e instale um cliente FTP no computador ao qual você quer conectar o
HyperDeck. Recomendamos o Cyberduck, FileZilla ou Transmit, mas a maioria dos
aplicativos FTP funcionará. O download do Cyberduck e do FileZilla é gratuito.
689Transferir Arquivos via Rede

2 Conecte o HyperDeck Studio à sua rede utilizando um cabo Ethernet e anote o
endereço IP. Para acessar o endereço IP, pressione o botão “Menu” e gire o seletor
de busca para acessar a tela “Rede”. O endereço IP do HyperDeck Studio aparecerá
na parte inferior dessa tela.
O endereço IP do seu HyperDeck Studio pode ser
encontrado na tela “Rede” do painel inteligente.
3 Insira o endereço IP do HyperDeck na caixa de diálogo de conexão do aplicativo
TCP. O nome e a posição da caixa podem variar dependendo do aplicativo, mas
normalmente é denominada como “Server” ou “Host”. Se o programa FTP possuir
a caixa de seleção “Anonymous Login”, marque esta opção.
Não é preciso digitar um nome de usuário ou senha para se conectar ao HyperDeck
Studio. Basta digitar o endereço IP do gravador de disco no campo “Server” ou “Host”
do aplicativo FTP e marcar a caixa de seleção “Anonymous Login”, se existente.
Transferir Arquivos
Após se conectar ao HyperDeck, você pode transferir arquivos como no programa FTP.
A maioria dos aplicativos tem uma interface de arrastar e soltar, mas verifique o método
apropriado para o aplicativo que você estiver usando.
É possível transferir qualquer arquivo para o HyperDeck ou a partir dele, mas vale a pena ressaltar
que qualquer arquivo que você pretenda reproduzir a partir do HyperDeck Studio precisará ser
compatível com os codecs e as resoluções que o seu HyperDeck suporta. Você pode encontrar
uma lista de codecs suportados na seção ‘Blackmagic HyperDeck Setup’ deste manual.
DICA Você pode transferir arquivos através de uma rede enquanto o HyperDeck
estiver gravando. O HyperDeck ajustará automaticamente a velocidade de
transferência para garantir que a gravação não seja afetada.
690Transferir Arquivos via Rede

Conectar a um Switcher ATEM
Caso esteja usando um switcher ATEM, é possível conectar até quatro gravadores de disco
Blackmagic HyperDeck e controlá-los através do painel de controle ATEM físico ou virtual. Esse
é um recurso muito eficaz que oferece um estúdio de gravação de vídeo completo na ponta de
seus dedos. Você também pode acionar a gravação no HyperDeck a partir de um switcher
ATEM, que é uma ótima maneira de fazer uma cópia de um arquivo de uma transmissão ao vivo
ou de capturar rolo B ao transmitir uma produção ao vivo que será ajustada depois.
Switchers ATEM, como o ATEM 4 M/E Broadcast Studio 4K, podem se
conectar a até quatro gravadores de disco HyperDeck.
Como conectar HyperDecks a um switcher ATEM:
1 Conecte o HyperDeck à mesma rede do switcher ATEM e anote o endereço IP.
Você pode encontrar o endereço IP do HyperDeck no painel frontal e no menu LCD,
acessando o menu de configurações e depois “Ethernet” no menu principal.
Outra maneira de acessar o endereço IP do seu HyperDeck no Mac ou PC é através da
guia “Configure” no Blackmagic HyperDeck Setup.
2 Conecte uma das saídas SDI ou HDMI do HyperDeck a uma fonte de entrada SDI ou
HDMI no switcher ATEM.
3 Caso queira usar seu switcher ATEM para disparar a gravação no seu HyperDeck, você
também precisará conectar uma fonte de vídeo ao HyperDeck.
Basta conectar uma fonte SDI ou HDMI ao seu HyperDeck, como de costume. Para
gravar a saída de programa do switcher ATEM, conecte uma das saídas SDI auxiliares
do switcher à entrada SDI do seu HyperDeck.
4 Habilite o controle remoto a partir do switcher pressionando o botão “Remote” no
painel frontal do HyperDeck ou através do menu LCD no HyperDeck Studio Mini.
5 Conclua o processo de conexão inserindo as informações de origem e endereço IP do
HyperDeck no software ATEM ou no painel broadcast ATEM. O procedimento é muito
simples, e está no manual do switcher ATEM.
691Conectar a um Switcher ATEM

Para habilitar o controle Ethernet com um switcher ATEM, verifique se a opção “Remoto” do
HyperDeck está habilitada no menu LCD ou através do botão “REM” do painel de controle.
Noções Básicas sobre Fluxos de
Trabalho de Pós-Produção
Acessar seus clipes
Para acessar seus clipes, basta conectar o cartão SD ou o SSD ao computador através de
um compartimento para cartão SD, um leitor externo ou uma doca SSD. Você pode arrastar
os arquivos do SSD ou do cartão SD diretamente para um disco rígido local ou trabalhar
diretamente do SSD ou cartão SD. Você também pode conectar os SSDs ao seu computador
usando um cabo adaptador eSATA para USB de 2,5 polegadas, mas isso não será rápido o
suficiente para trabalhar diretamente do SSD, e é recomendado apenas como uma solução
portátil para transferir arquivos de vídeo do SSD para um laptop.
macOS
O QuickTime é integrado ao macOS. Os codecs Apple ProRes, Avid DNxHD e DNxHR, e os
filmes QuickTime gravados pelo HyperDeck, podem ser abertos em praticamente qualquer
software de vídeo no macOS.
Os arquivos MXF DNxHD e DNxHR gravados pelo seu HyperDeck podem ser abertos com
o Avid Media Composer e o DaVinci Resolve para Mac. Você pode baixar os codecs DNxHD
gratuitamente em http://www.avid.com/products/avid-dnxhr-and-dnxhd
Os arquivos de dados de audiodescrição fechada (MCC) gravados pelo HyperDeck
podem ser abertos com o software MacCaption para macOS em
http://www.telestream.net/captioning/overview.htm
Windows
O codec Apple ProRes e filmes QuickTime descompactados gravados pelo HyperDeck
requerem a instalação do QuickTime no seu PC. Quase todos os programas de vídeo no
Windows compatíveis com QuickTime abrem filmes gravados pelo HyperDeck. Você pode
baixar o QuickTime para Windows gratuitamente em http://www.apple.com/quicktime/download/
Os arquivos MXF DNxHD e DNxHR gravados pelo HyperDeck podem ser abertos com o
AvidMedia Composer e o DaVinci Resolve para Windows. Você pode baixar os codecs
DNxHD gratuitamente em http://www.avid.com/products/avid-dnxhr-and-dnxhd
Os arquivos de dados de audiodescrição fechada (MCC) gravados pelo HyperDeck
podem ser abertos com o software CaptionMaker para Windows em
http://www.telestream.net/captioning/overview.htm
692Noções Básicas sobre Fluxos de Trabalho de Pós-Produção

Developer Information
Blackmagic HyperDeck Ethernet Protocol
The Blackmagic HyperDeck Ethernet Protocol is a text based protocol accessed by connecting
to TCP port 9993 on HyperDeck Studio models that have a built in Ethernet connection. If you
are a software developer, you can use the protocol to construct devices that integrate with our
products. Here at Blackmagic Design our approach is to open up our protocols and we eagerly
look forward to seeing what you come up with!
Protocol Commands
Command Command Description
help or ? Provides help text on all commands and parameters
commands return commands in XML format
device info return device information
disk list query clip list on active disk
disk list: slot id: {n} query clip list on disk in slot {n}
quit disconnect ethernet control
ping check device is responding
preview: enable: {true/false} switch to preview or output
play play from current timecode
play: speed: {-5000 to 5000} play at specific speed
play: loop: {true/false} play in loops or stop-at-end
play: single clip: {true/false} play current clip or all clips
playrange query playrange setting
playrange set: clip id: {n} set play range to play clip {n} only
playrange set: clip id: {n} count: {m} set play range to {m} clips starting from clip {n}
playrange set: in: {inT} out: {outT}
set play range to play between:
- timecode {inT} andtimecode {outT}
playrange set: timeline in: {in} timeline out:
{out}
set play range in units of frames between:
- timeline position {in} and position {out} clear/reset play
rangesetting
playrange clear clear/reset play range setting
play on startup query unit play on startup state
play on startup: enable: {true/false} enable or disable play on startup
play on startup: single clip: {true/false} play single clip or all clips on startup
play option query play options
play option: stop mode:
{lastframe/nextframe/black}
set output frame when playback stops
record record from current input
record: name: {name} record named clip
record spill spill current recording to next slot
693Developer Information

Command Command Description
record: spill: slot id: {n}
spill current recording to specified slot
use current id to spill to same slot
stop stop playback or recording
clips count query number of clips on timeline
clips get query all timeline clips
clips get: clip id: {n} query a timeline clip info
clips get: clip id: {n} count: {m} query m clips starting from n
clips get: version: {1/2}
query clip info using specified output version:
version 1: is: name startT duration
version 2: id: startT duration inT outT name
clips add: name: {name} append a clip to timeline
clips add: clip id: {n} name: {name} insert clip before existing clip {n}
clips add: in: {inT} out: {outT} name: {name} append the {inT} to {outT} portion of clip
clips remove: clip id: {n}
remove clip {n} from the timeline
(invalidates clip ids following clip {n})
clips clear empty timeline clip list
transport info query current activity
slot info query active slot
slot info: slot id: {n} query slot {n}
slot select: slot id: {n} switch to specified slot
slot select: video format: {format} load clips of specified format
slot unblock unblock active slot
slot unblock: slot id: {n} unblock slot {n}
cache info query cache status
dynamic range query dynamic range settings
dynamic range: playback override:
{off/Rec709/Rec2020_SDR/HLG/
ST2084_300/ST2084_500/
ST2084_800/ST2084_1000/
ST2084_2000/ST2084_4000/ST2084
set playback dynamic range override
dynamic range: record override:
{off/Rec709/Rec2020_SDR/HLG/
ST2084_300/ST2084_500/
ST2084_800/ST2084_1000/
ST2084_2000/ST2084_4000/ST2048}
set record dynamic range override
notify query notification status
notify: remote: {true/false} set remote notifications
notify: transport: {true/false} set transport notifications
notify: slot: {true/false} set slot notifications
notify: configuration: {true/false} set configuration notifications
notify: dropped frames: {true/false} set dropped frames notifications
notify: display timecode: {true/false} set display timecode notifications
694Developer Information

Command Command Description
notify: timeline position: {true/false} set playback timeline position notifications
notify: playrange: {true/false} set playrange notifications
notify: cache: {true/false} set cache notifications
notify: dynamic range: {true/false} set dynamic range settings notifications
notify: slate: {true/false} set digital slate notifications
goto: clip id: {start/end} goto first clip or last clip
goto: clip id: {n} goto clip id {n}
goto: clip id: +{n} go forward {n} clips
goto: clip id: -{n} go backward {n} clips
goto: clip: {n} goto frame position {n} within current clip
goto: clip: +{n} go forward {n} frames within current clip
goto: clip: -{n} go backward {n} frames within current clip
goto: clip: {start/end} goto start or end of clip
goto: timeline: {n} goto frame position {n} within timeline
goto: timeline: +{n} o forward {n} frames within timeline
goto: timeline: -{n} go backward {n} frames within timeline
goto: timeline: {start/end} goto start or end of timeline
goto: timecode: {timecode} goto specified timecode
goto: timecode: +{timecode} go forward {timecode} duration
goto: timecode: -{timecode} go backward {timecode} duration
goto: slot id: {n} goto slot id {n}
jog: timecode: {timecode} jog to timecode
jog: timecode: +{timecode} jog forward {timecode} duration
jog: timecode: -{timecode} jog backward {timecode} duration
shuttle: speed: {-5000 to 5000} shuttle with speed
remote query unit remote control state
remote: enable: {true/false} enable or disable remote control
remote: override: {true/false} session override remote control
configuration query configuration settings
configuration: video input: SDI switch to SDI input
configuration: video input: HDMI switch to HDMI input
configuration: video input: component switch to component input
configuration: audio input: embedded capture embedded audio
configuration: audio input: XLR capture XLR audio
configuration: audio input: RCA capture RCA audio
configuration: file format: {format} switch to specific file format
configuration: audio codec: PCM switch to PCM audio
configuration: audio codec: AAC switch to AAC audio
695Developer Information

Command Command Description
configuration: timecode input:
{external/embedded/preset/clip}
change the timecode input
configuration: timecode output:
{clip/timeline/internal}
change the timecode output
configuration: timecode preference:
{default/dropframe/nondropframe}
whether or not to use drop frame timecodes when not
otherwise specified
configuration: timecode preset:
{timecode}
set the timecode preset
configuration: audio input channels: {n} set the number of audio channels recorded to {n}
configuration: record trigger:
{none/recordbit/timecoderun}
change the record trigger
configuration: record prefix: {name} set the record prefix name (supports UTF-8 name)
configuration: append timestamp:
{true/false}
append timestamp to recorded filename
configuration: xlr input id: {n} xlr type:
{line/mic}
configure xlr input type
multiple xlr inputs can be configured in a single command
configuration: genlock input resync:
{true/false}
enable or disable genlock input resync
uptime return time since last boot
format: prepare: {format} prepare a disk formatting operation to filesystem {format}
format: confirm: {token} perform a pre-prepared formatting operation using token
identify: enable: {true/false} identify the device
watchdog: period: {period in seconds} client connection timeout
reboot reboot device
slate clips slate clips information
slate project slate project information
slate project:↵
camera: {index}↵
set camera index e.g. A
Command Combinations
You can combine the parameters into a single command, for example:
play: speed: 200 loop: true single clip: true
Or for configuration:
configuration: video input: SDI audio input: XLR
Or to switch to the second disk, but only play NTSC clips:
slot select: slot id: 2 video format: NTSC
Using XML
While you can use the Terminal to talk to HyperDeck, if you are writing software, you can use
XML to confirm the existence of a specific command based on the firmware of the HyperDeck
you are communicating with. This helps your software user interface adjust to the capabilities
of the specific HyperDeck model and software version.
696Developer Information

Protocol Details
Connection
The HyperDeck Ethernet server listens on TCP port 9993.
Basic syntax
The HyperDeck protocol is a line oriented text protocol. Lines from the server will be separated by an ascii
CR LF sequence. Messages from the client may be separated by LF or CR LF.
New lines are represented in this document as a "↵" symbol.
Single line command syntax
Command parameters are usually optional. A command with no parameters is terminated with a new line:
{Command name}↵
If parameters are specified, the command name is followed by a colon, then pairs of parameter names and
values. Each parameter name is terminated with a colon character:
{Command name}: {Parameter}: {Value} {Parameter}: {Value} ...↵
Multiline command syntax
The HyperDeck protocol also supports an equivalent multiline syntax where each parameter-value pair is
entered on a new line. E.g.
{Command name}:↵
{P a r a m e t e r}: { Va lu e}↵
{P a r a m e t e r}: { Va lu e}↵
↵
Response syntax
Simple responses from the server consist of a three digit response code and descriptive text terminated by
a new line:
{Response code} {Response text}↵
If a response carries parameters, the response text is terminated with a colon, and parameter name and
value pairs follow on subsequent lines until a blank line is returned:
{Response code} {Response text}:↵
{P a r a m e t e r}: { Va lu e}↵
{P a r a m e t e r}: { Va lu e}↵
...
↵
Successful response codes
A simple acknowledgement of a command is indicated with a response code of 200:
200 ok↵
Other successful responses carry parameters and are indicated with response codes in the range of 201
to299.
697Developer Information

Failure response codes
Failure responses to commands are indicated with response codes in the range of 100 to 199:
100 syntax error
101 unsupported parameter
102 invalid value
103 unsupported
104 disk full
105 no disk
106 disk error
107 timeline empty
108 internal error
109 out of range
110 no input
111 remote control disabled
112 clip not found
120 connection rejected
150 invalid state
151 invalid codec
160 invalid format
161 invalid token
162 format not prepared
163 parameterized single line command not supported
Asynchronous response codes
The server may return asynchronous messages at any time. These responses are indicated with response
codes in the range of 500 to 599:
5xx {Response Text}:↵
{P a r a m e t e r}: { Va lu e}↵
{P a r a m e t e r}: { Va lu e}↵
↵
Connection response
On connection, an asynchronous message will be delivered:
500 connection info:↵
protocol version: {Version}↵
model: {Model Name}↵
↵
Connection rejection
Only one client may connect to the server at a time. If other clients attempt to connect concurrently,
they will receive an error and be disconnected:
120 connection rejected↵
698Developer Information

Timecode syntax
Timecodes are expressed as non-drop-frame timecode in the format:
HH:MM:SS:FF
Handling of deck "remote" state
The “remote” command may be used to enable or disable the remote control of the deck. Any attempt to
change the deck state over ethernet while remote access is disabled will generate an error:
111 remote control disabled↵
To enable or disable remote control:
remote: enable: {“true”, “false”} ↵
The current remote control state may be overridden allowing remote access over ethernet irrespective of
the current remote control state:
remote: override: {“true”, “false”} ↵
The override state is only valid for the currently connected ethernet client and only while the connection
remains open.
The “remote” command may be used to query the remote control state of the deck by specifying no
parameters:
remote↵
The deck will return the current remote control state:
210 remote info:↵
enabled: {“true”, “false”}↵
override: {“true”, “false”}↵
↵
Asynchronous remote control information change notification is disabled by default and may be
configured with the “notify” command. When enabled, changes in remote state will generate a “510 remote
info:”asynchronous message with the same parameters as the “210 remote info:” message.
Closing connection
The "quit" command instructs the server to cleanly shut down the connection:
quit↵
Checking connection status
The "ping" command has no function other than to determine if the server is responding:
ping↵
Getting help
The "help" or "?" commands return human readable help text describing all available commands and
parameters:
help↵
Or:
?↵
The server will respond with a list of all supported commands:
201 help:↵
{Help Te x t}↵
{Help Te x t}↵
↵
699Developer Information

Switching to preview mode
The "preview" command instructs the deck to switch between preview mode and output mode:
preview: enable: {"true", "false"}↵
Playback will be stopped when the deck is switched to preview mode. Capturing will be stopped when the
deck is switched to output mode.
Controlling device playback
The “play” command instructs the deck to start playing:
play↵
The play command accepts a number of parameters which may be used together in most combinations.
By default, the deck will play all remaining clips on the timeline then stop.
The “single clip” parameter may be used to override this behavior:
play: single clip: {“true”, “false”}↵
By default, the deck will play at normal (100%) speed. An alternate speed may be specified in percentage
between -1600 and 1600:
play: speed: {% normal speed}↵
By default, the deck will stop playing when it reaches to the end of the timeline. The “loop” parameter may
be used to override this behavior:
play: loop: {“true”, “false”}↵
The “playrange” command instructs the deck to play all the clips. To override this behavior: and select a
particular clip:
playrange set: clip id: {Clip ID}↵
To only play a certain timecode range:
playrange set: in: {in timecode} out: {out timecode}↵
To clear a set playrange and return to the default value:
playrange clear↵
The “play on startup command” instructs the deck on what action to take on startup. By default, the deck
will not play. Use the “enable” command to start playback after each power up.
play on startup: enable {“true”, “false”}↵
By default, the unit will play back all clips on startup. Use the “single clip” command to override.
play on startup: single clip: {“true”, “false”}↵
Stopping deck operation
The "stop" command instructs the deck to stop the current playback or capture:
stop↵
700Developer Information

Changing timeline position
The "goto" command instructs the deck to switch to playback mode and change its position within the
timeline.
To go to the start of a specific clip:
goto: clip id: {Clip ID}↵
To move forward/back {count} clips from the current clip on the current timeline:
goto: clip id: +/-{count}↵
Note that if the resultant clip id goes beyond the first or last clip on timeline, it will be clamp at the first or
last clip.
To go to the start or end of the current clip:
goto: clip: {“start”, “end”}↵
To go to the start of the first clip or the end of the last clip:
goto: timeline: {“start”, “end”}↵
To go to a specified timecode:
goto: timecode: {timecode}↵
To move forward or back a specified duration in timecode:
goto: timecode: {“+”, “-”}{duration in timecode}↵
To specify between slot 1 and slot 2:
goto: slot id: {Slot ID}↵
Note that only one parameter/value pair is allowed for each goto command.
Enumerating supported commands and parameters
The "commands" command returns the supported commands:
commands↵
The command list is returned in a computer readable XML format:
212 commands:
<commands>↵
<command name="…"><parameter name="…"/>…</command>↵
<command name="…"><parameter name="…"/>…</command>↵
…
</commands>↵
↵
More XML tokens and parameters may be added in later releases.
701Developer Information

Controlling asynchronous notifications
The “notify” command may be used to enable or disable asynchronous notifications from the server.
To enable or disable transport notifications:
notify: transport: {“true”, “false”}↵
To enable or disable slot notifications:
notify: slot: {“true”, “false”}↵
To enable or disable remote notifications:
notify: remote: {“true”, “false”}↵
To enable or disable configuration notifications:
notify: configuration: {“true”, “false”}↵
Multiple parameters may be specified. If no parameters are specified, the server returns the current state of
all notifications:
209 notify:↵
transport: {“true”, “false”}↵
slot: {“true”, “false”}↵
remote: {“true”, “false”}↵
configuration: {“true”, “false”}↵
dropped frames: {“true”, “false”}↵
display timecode: {“true”, “false”}↵
timeline position: {“true”, “false”}↵
playrange: {“true”, “false”}↵
cache: {“true”, “false”}↵
dynamic range: {“true”, “false”}↵
slate: {“true”, “false”}↵
↵
Retrieving device information
The "device info" command returns information about the connected deck device:
device info↵
The server will respond with:
204 device info:↵
protocol version: {Version}↵
model: {Model Name}↵
unique id: {unique alphanumeric identifier}↵
slot count: {number of storage slots}↵
software version: {software version}↵
↵
702Developer Information

Retrieving slot information
The "slot info" command returns information about a slot. Without parameters, the command returns
information for the currently selected slot:
slot info↵
If a slot id is specified, that slot will be queried:
slot info: slot id: {Slot ID}↵
The server will respond with slot specific information:
202 slot info:↵
slot id: {Slot ID}↵
status: {"empty", "mounting", "error", "mounted"}↵
volume name: {Volume name}↵
recording time: {recording time available in seconds}↵
video format: {disk's default video format}↵
blocked: {“true”, “false”}↵
↵
Asynchronous slot information change notification is disabled by default and may be configured with
the "notify" command. When enabled, changes in slot state will generate a "502 slot info:" asynchronous
message with the same parameters as the "202 slot info:" message.
Retrieving clip information
The “disk list” command returns the information for each playable clip on a given disk. Without parameters,
the command returns information for the current active disk:
disk list↵
If a slot id is specified, the disk in that slot will be queried:
disk list: slot id: {Slot ID}↵
The server responds with the list of all playable clips on the disk in the format of: Index, name, formats, and
duration in timecode:
206 disk list:↵
slot id: {Slot ID}↵
{clip index}: {name} {file format} {video format} {Duration
ti m ecode}↵
{clip index}: {name} {file format} {video format} {Duration
ti m ecode}↵
…
↵
Note that the clip index starts from 1.
Retrieving clip count
The "clips count" command returns the number of clips on the current timeline:
clips count ↵
The server responds with the number of clips:
214 clips count: ↵
clip count: {Count}↵
703Developer Information

Retrieving timeline information
The "clips get" command returns information for each available clip on the current timeline. Without
parameters, the command returns information for all clips on timeline:
clips get↵
The server responds with a list of clip IDs, names and timecodes:
205 clips info:↵
clip count: {Count}↵
{Clip ID}: {Name} {Start timecode} {Duration timecode}↵
{Clip ID}: {Name} {Start timecode} {Duration timecode}↵
…
↵
Retrieving transport information
The “transport info” command returns the state of the transport:
transport info ↵
The server responds with transport specific information:
208 transport info:
status: {“preview”, “stopped”, “play”, “forward”, “rewind”,
“j o g ”, “ s h u t t l e ”,” r e c o r d ” }↵
speed: {Play speed between -5000 and 5000 %}↵
slot id: {Slot ID or “none”}↵
clip id: {Clip ID or “none”}↵
single clip: {“true”, “false”}↵
display timecode: {timecode}↵
timecode: {timecode}↵
video format: {Video format}↵
loop: {“true”, “false”}↵
timeline: {n}↵
input video format: {Video format”}↵
dynamic range: {“off”, “Rec709”, “Rec2020_SDR”, “HLG”,
“ST2084_300”, “ST2084_500”, “ST2084_800”, “ST2084_1000”,
“ST2084_2000”, “ST2084_4000”, “ST2048” or “none”}↵
↵
The "timecode" value is the timecode within the current timeline for playback or the clip for record. The
"display timecode" is the timecode displayed on the front of the deck. The two timecodes will differ in some
deck modes.
Asynchronous transport information change notification is disabled by default and may be configured
with the "notify" command. When enabled, changes in transport state will generate a "508 transport info:"
asynchronous message with the same parameters as the "208 transport info:" message.
704Developer Information

Video Formats
The following video formats are currently supported on HyperDeck Studio:
NTSC, PAL, NTSCp, PALp
720p50, 720p5994, 720p60
1080p23976, 1080p24, 1080p25, 1080p2997, 1080p30
1080i50, 1080i5994, 1080i60
HyperDeck Studio Pro and Plus models support these 4k formats:
4Kp23976, 4Kp24, 4Kp25, 4Kp2997, 4Kp30
HyperDeck Studio 4K Pro adds support for the following 4k formats:
4Kp50, 4Kp5994, 4Kp60
Video format support may vary between models and software releases.
File Formats
All HyperDeck models currently support the following file formats:
H.264High_SDI
H.264High
H.264Medium
H.264Low
QuickTimeProResHQ
QuickTimeProRes
QuickTimeProResLT
QuickTimeProResProxy
QuickTimeDNxHD220x
DNxHD220x
QuickTimeDNxHD145
DNxHD145
QuickTimeDNxHD45
DNxHD45
HyperDeck Studio 4K Pro also supports the following file formats:
H.265High_SDI
H.265High
H.265Medium
H.265Low
QuickTimeDNxHR_HQX
DNxHR_HQX 4Kp60
QuickTimeDNxHR_SQ
DNxHR_SQ
QuickTimeDNxHR_LB
DNxHR_LB
Supported file formats may vary between models and software releases.
705Developer Information

Querying and updating configuration information
The "configuration" command may be used to query the current configuration of the deck:
configuration↵
The server returns the configuration of the deck:
211 configuration:↵
audio input: {“embedded”, “XLR”, “RCA”}↵
audio mapping: {n}↵
video input: {“SDI”, “HDMI”, “component”, “composite”}↵
file format: {format}↵
audio codec: {“PCM”, “AAC”}↵
timecode input: {“external”, “embedded”, “preset”, “clip”}↵
timecode output: {“clip”, “timeline”}↵
timecode preference: {“default”, “dropframe”, “nondropframe”}↵
timecode preset: {timecode}↵
audio input channels: {n}↵
record trigger: {“none”, “recordbit”, “timecoderun”}↵
record prefix: {name}↵
append timestamp: {“true”, “false”}↵
↵
One or more configuration parameters may be specified to change the configuration of the deck.
To change the current video input:
configuration: video input: {“SDI”, “HDMI”, “component”}↵
Valid video inputs may vary between models. To configure the current audio input:
configuration: audio input: {“embedded”, “XLR”, “RCA”}↵
Valid audio inputs may vary between models.
To configure the current file format:
configuration: file format: {File format}↵
Note that changes to the file format may require the deck to reset, which will cause the client connection to
be closed. In such case, response code 213 will be returned (instead of 200) before the client connection is
closed:
“213 deck rebooting”
Asynchronous configuration information change notification is disabled by default and may be configured
with the “notify” command. When enabled, changes in configuration will generate a “511 configuration:”
asynchronous message with the same parameters as the “211 configuration:” message.
Selecting active slot and video format
The "slot select" command instructs the deck to switch to a specified slot, or/and to select a specified
output video format.
To switch to a specified slot:
slot select: slot id: {slot ID}↵
To select the output video format:
slot select: video format: {video format}↵
Either or all slot select parameters may be specified. Note that selecting video format will result in a rescan
of the disk to reconstruct the timeline with all clips of the specified video format.
706Developer Information

Clearing the current timeline
The "clips clear" command instructs the deck to empty the current timeline:
clips clear↵
The server responds with
200 ok↵
Adding a clip to the current timeline
The "clips add:" command instructs the deck to add a clip to the current timeline:
clips add: name: {"clip name"}↵
The server responds with
200 ok↵
or in case of error
1xx {error description}↵
Configuring the watchdog
The “watchdog” command instructs the deck to monitor the connected client and terminate the connection
if the client is inactive for at least a specified period of time.
To configure the watchdog:
watchdog: period: {period in seconds}↵
To avoid disconnection, the client must send a command to the server at least every {period} seconds. Note
that if the period is set to 0 or less than 0, connection monitoring will be disabled.
707Developer Information

Ajuda
Obtendo Ajuda
A maneira mais rápida de obter ajuda é visitando as páginas de suporte online da
Blackmagic Design e consultando os materiais de suporte mais recentes disponíveis
para o seu gravador de disco Blackmagic HyperDeck.
Páginas de Suporte Técnico Online Blackmagic Design
O manual, o programa e as notas de suporte mais recentes podem ser encontrados na Central
de Suporte Técnico da Blackmagic Design em www.blackmagicdesign.com/br/support.
Fórum Blackmagic Design
O fórum da Blackmagic Design no nosso site é um recurso útil que você pode acessar para
obter mais informações e ideias criativas. Também pode ser uma maneira mais rápida de
obter ajuda, pois já podem existir respostas de outros usuários experientes e da equipe
da Blackmagic Design, o que o ajudará a seguir em frente. Você pode visitar o fórum em
https://forum.blackmagicdesign.com
Contatar o Suporte Blackmagic Design
Caso não encontre a ajuda que precisa no nosso material de suporte ou no fórum, por favor
use o botão “Envie-nos um email” na página de suporte para nos encaminhar uma solicitação
de suporte. Ou, clique no botão “Encontre sua equipe de suporte local” na página de suporte
e ligue para a assistência técnica da Blackmagic Design mais próxima.
Verificar a Versão de Software Instalada
Para verificar a versão do software Blackmagic HyperDeck instalada no seu computador,
abra a janela “Sobre Blackmagic HyperDeck Setup”.
No macOS, abra o Blackmagic HyperDeck Setup na pasta de aplicativos.
Selecione “Sobre Blackmagic HyperDeck Setup” no menu de aplicativos para
revelar o número da versão.
No Windows, abra o utilitário Blackmagic HyperDeck Setup a partir do menu
“Iniciar” ou da tela inicial. Clique no menu “Ajuda” e selecione “Sobre Blackmagic
HyperDeck Setup” para revelar o número da versão.
Como Obter as Atualizações de Software Mais Recentes
Após verificar a versão do software Blackmagic HyperDeck Setup instalado no
seu computador, por favor visite a Central de Suporte Técnico da Blackmagic Design
em www.blackmagicdesign.com/br/support para conferir as últimas atualizações. Embora
seja uma boa ideia instalar as últimas atualizações, é recomendável evitar atualizar
qualquer programa caso esteja no meio de um projeto importante.
708Ajuda
Informações Regulatórias
Descarte de Resíduos de Equipamentos Elétricos e Eletrônicos na União Europeia
O símbolo no produto indica que este equipamento não pode ser eliminado com
outros materiais residuais. Para descartar seus resíduos de equipamento, ele deve
ser entregue a um ponto de coleta designado para reciclagem. A coleta separada e
a reciclagem dos seus resíduos de equipamento no momento da eliminação ajudarão
a preservar os recursos naturais e a garantir que sejam reciclados de uma maneira
que proteja a saúde humana e o meio ambiente. Para mais informações sobre onde
você pode eliminar os resíduos do seu equipamento para reciclagem, por favor entre
em contato com a agência de reciclagem local da sua cidade ou o revendedor do
produto adquirido.
Este equipamento foi testado e respeita os limites para um dispositivo digital Classe A,
conforme a Parte 15 das normas da FCC. Esses limites foram criados para fornecer
proteção razoável contra interferências nocivas quando o equipamento é operado
em um ambiente comercial. Este equipamento gera, usa e pode irradiar energia de
radiofrequência e, se não for instalado ou usado de acordo com as instruções, poderá
causar interferências nocivas nas comunicações via rádio. A operação deste produto
em uma área residencial pode causar interferência nociva, nesse caso o usuário será
solicitado a corrigir a interferência às suas próprias custas.
A operação está sujeita às duas condições a seguir:
1 Este dispositivo não poderá causar interferência nociva.
2 Este dispositivo deve aceitar qualquer interferência recebida, incluindo
interferência que possa causar uma operação indesejada.
R-R-BMD-20210202002
R-R-BMD-20210202003
R-R-BMD-20201201003
R-R-BMD-20210301001
Norma Canadense ISED
Este dispositivo está em conformidade com os padrões do Canadá para
equipamentos digitais de Classe A.
Quaisquer modificações ou utilização deste produto fora dos limites previstos
poderão anular a conformidade com estas normas.
A conexão com interfaces HDMI deve ser feita com cabos HDMI protegidos.
Este equipamento foi testado para fins de cumprimento com a sua utilização
pretendida em um ambiente comercial. Se o equipamento for usado em um
ambiente doméstico, ele poderá causar interferência radioelétrica.
709Informações Regulatórias

Informações de Segurança
Para proteção contra choque elétrico, o equipamento deve estar conectado à uma tomada
com conexão de aterramento de proteção. Em caso de dúvida, consulte um eletricista
qualificado.
Para reduzir o risco de choque elétrico, não exponha este equipamento a pingos ou respingos.
O produto é adequado para uso em locais tropicais com temperatura ambiente de até 40
o
C.
Certifique-se de que ventilação adequada seja fornecida ao redor do produto e não esteja
restringida.
Ao montar o produto em rack, certifique-se de que a ventilação não esteja restringida por
equipamentos adjacentes.
Não há componentes internos reparáveis pelo operador. Solicite o serviço de manutenção à
assistência técnica local da Blackmagic Design.
Utilize apenas em altitudes inferiores a 2000 m acima do nível do mar.
Declaração do Estado da Califórnia
Este produto pode expô-lo a produtos químicos, tais como vestígios de bifenilos polibromados
dentro de peças de plástico, que é conhecido no estado da Califórnia por causar câncer e
defeitos congênitos ou outros danos reprodutivos.
Para mais informações, visite www.P65Warnings.ca.gov.
Aviso para Pessoal de Assistência Autorizado
Desconecte a alimentação de ambas as entradas de alimentação antes de
efetuar operações de assistência!
710Informações de Segurança

Garantia
12 Meses de Garantia Limitada
A Blackmagic Design garante que este produto estará livre de defeitos de materiais e fabricação
por um período de 12 meses a partir da data de compra. Se o produto se revelar defeituoso durante
este período de garantia, a Blackmagic Design, a seu critério, consertará o produto defeituoso
sem cobrança pelos componentes e mão-de-obra, ou fornecerá a substituição em troca pelo
produto defeituoso.
Para obter o serviço sob esta garantia você, o Consumidor, deve notificar a Blackmagic Design
do defeito antes da expiração do período de garantia e tomar as providências necessárias para
o desempenho do serviço. O Consumidor é responsável pelo empacotamento e envio do produto
defeituoso para um centro de assistência designado pela Blackmagic Design com os custos de
envio pré-pagos. O Consumidor é responsável pelo pagamento de todos os custos de envio,
seguro, taxas, impostos e quaisquer outros custos para os produtos que nos forem devolvidos
por qualquer razão.
Esta garantia não se aplica a defeitos, falhas ou danos causados por uso inadequado ou manutenção
e cuidado inadequado ou impróprio. A Blackmagic Design não é obrigada a fornecer serviços
sob esta garantia: a) para consertar danos causados por tentativas de instalar, consertar ou fornecer
assistência técnica ao produto por pessoas que não sejam representantes da Blackmagic Design,
b) para consertar danos causados por uso ou conexão imprópria a equipamentos não compatíveis,
c) para consertar danos ou falhas causadas pelo uso de componentes ou materiais que não são
da Blackmagic Design, d) para fornecer assistência técnica de um produto que foi modificado ou
integrado a outros produtos quando o efeito de tal modificação ou integração aumenta o tempo
ou a dificuldade da assistência técnica do serviço. ESTA GARANTIA É FORNECIDA PELA
BLACKMAGIC DESIGN NO LUGAR DE QUAISQUER OUTRAS GARANTIAS, EXPLÍCITAS OU
IMPLÍCITAS. A BLACKMAGIC DESIGN E SEUS FORNECEDORES NEGAM QUAISQUER GARANTIAS
IMPLÍCITAS DE COMERCIALIZAÇÃO OU ADEQUAÇÃO A UMA FINALIDADE ESPECÍFICA.
A RESPONSABILIDADE DA BLACKMAGIC DESIGN DE CONSERTAR OU SUBSTITUIR PRODUTOS
DEFEITUOSOS É A ÚNICA E EXCLUSIVA MEDIDA FORNECIDA AO CONSUMIDOR PARA QUAISQUER
DANOS INDIRETOS, ESPECIAIS OU ACIDENTAIS INDEPENDENTEMENTE DA BLACKMAGIC
DESIGN OU DE FORNECEDORES POSSUÍREM INFORMAÇÕES PRÉVIAS SOBRE A POSSIBILIDADE
DE TAIS DANOS. A BLACKMAGIC DESIGN NÃO É RESPONSÁVEL POR QUAISQUER USOS ILEGAIS
DO EQUIPAMENTO PELO CONSUMIDOR. A BLACKMAGIC NÃO É RESPONSÁVEL POR QUAISQUER
DANOS CAUSADOS PELO USO DESTE PRODUTO. O USUÁRIO DEVE OPERAR ESTE PRODUTO
POR CONTA E RISCO PRÓPRIOS.
© Direitos autorais 2021 Blackmagic Design. Todos os direitos reservados. ‘Blackmagic Design’, ‘DeckLink’, ‘HDLink’, ‘Workgroup
Videohub’, ‘Multibridge Pro’, ‘Multibridge Extreme’, ‘Intensity’ e ‘Leading the creative video revolution’ são marcas comerciais
registradas nos Estados Unidos e em outros países. Todos os outros nomes de empresas e produtos podem ser marcas comerciais
de suas respectivas empresas com as quais elas são associadas.
711Garantia

HyperDeck Disk Kaydediciler
Temmuz 2021
Kurulum ve Kullanım Kılavuzu
HyperDeck Disk
Kaydediciler

Hoş Geldiniz
Blackmagic Hyperdeck disk kaydedici satın aldığınız için teşekkür ederiz!
2011’de orijinal Blackmagic Hyperdeck disk kaydedicileri tasarladığımızda, 2,5 inçlik çıkarılabilir
SSD disklere profesyonel video kaydını ve oynatımını daha kolay ve maliyetini daha uygun hale
getirmek istiyorduk.
Şimdi; SD kartları, SSD’leri ve USB flaş diskleri kullanarak HD ve Ultra HD video kaydetmenizi
sağlayan, yeni Hyperdeck disk kaydecilerimizi sunmaktan heyecan duyuyoruz. Hatta, bir
Blackmagic MultiDock 10G bağlayabilir ve harici disklere kaydedebilir veya disklerdeki
dosyaları oynatabilirsiniz!
Hyperdeck Studio Plus ve Pro modellerinde; hızlı, yavaş ve interaktif hızlı oynatım için bir arama
kadranı ile tanıdık yayın deck kontrolleri bulunur. Arama kadranının kavrama mekanizması,
oynatımı hissetmenizi sağlar, böylece gözünüzü monitörden ayırmadan kliplerinizde
gezinebilirsiniz. Üstelik, önde bir kulaklık bağlantısı ve hoparlör olduğundan, videodaki sesi
doğrudan HyperDeck’ten hızlıca kontrol edebilirsiniz ve daha birçok özelliğe sahiptir!
Hyperdeck disk kaydedicinizi yıllarca kullanacağınızı ve yapımlarınızda çok işe
yarayacağını umarız!
Bu kullanım kılavuzunun en güncel versiyonu ve HyperDeck yazılım güncellemeleri için lütfen,
www.blackmagicdesign.com/tr adresindeki destek sayfamıza gidin. Yazılımınızı güncel tutarak,
daima en son özelliklere sahip olduğunuzdan emin olabilirsiniz. Yeni yazılımlar çıktığında
size duyurabilmemiz için yazılımı indirirken, lütfen sitemize güncel bilgilerinizle kaydolun.
Yeni özellikler ve geliştirmeler üzerinde durmadan çalıştığımız için, yorumlarınızı almaktan
mutluluk duyarız!
Grant Petty
Blackmagic Design CEO

İçindekiler
HyperDeck Disk Kaydedicilerle Tanışın 715
Başlarken 716
Güç Kaynağının Takılması 716
Video ve Sesin Bağlanması 716
Sesin Kontrol Edilmesi 717
Ortamın Takılması 717
Video Kaydı 719
Çoklu ortama kayıt 719
Oynatım 720
HyperDeck ile Video Oynatımı 720
Arama Kadranının Kullanımı 721
Ön Panel Kullanımı 723
Medya Yuvası Göstergeleri 723
LCD Menüsünün Kullanımı 724
Ayarlar 725
Arka Panel 737
Monitör Çıkışının Kullanılması 739
Depolama Ortamı 742
SD Kart 742
SSD 744
Harici Disk 745
Ortamın Formatlanması 747
Ortamın Bir Bilgisayarda Hazırlanması 747
HyperDeck’in Web Kamerası
OlarakKullanımı 748
Webcam Kaynağı Olarak Ayarlanması 748
Open Broadcaster
Uygulamasının Kurulumu 749
Blackmagic HyperDeck Setup 751
HyperDeck Setup Yazılımının Kullanımı 751
LUT’lar Sayfası 752
Dahili Yazılımın Güncellenmesi 753
Teranex Mini Rack Shelf 754
RS-422 Kontrol 755
Bir Ağ Üzerinden Dosyaların Transferi 760
Bir ATEM Switcher’e Bağlanma 762
Post Prodüksiyon İş Akışlarının
Anlaşılması 763
Yazılım Geliştiricileri için Bilgiler
(İngilizce) 764
Blackmagic HyperDeck
Ethernet Protokolü 764
Protocol Commands 764
Protocol Details 768
Yardım/Destek 779
Mevzuata İlişkin Bildirimler 780
Güvenlik Bilgileri 781
Garanti 782
714Blackmagic HyperDeck Studio

HyperDeck Disk Kaydedicilerle Tanışın
Blackmagic Hyperdeck disk kaydediciniz, yapımlarınızdaki iş akışına uyacak şekilde tasarlanmış HD
ve 4K disk kaydedici serisinin bir parçasıdır. Hyperdeck Studio HD Pro ve Hyperdeck Studio 4K Pro,
bir ekipman rafına sığacak şekilde üretilmiştir. Hem SD kartlarla hem de 9.5mm SSD’lerle kayıt ve
mevcut dosyaların oynatımını yapabilecek büyüklüktedir.
Hyperdeck Studio HD Mini ve Hyperdeck Studio HD Plus, masaüstünüzde rahatça kullanabileceğiniz
veya isteğe bağlı bir Teranex Mini Rack Shelf ile bir ekipman rafına takabileceğiniz, küçük disk
kaydedicileridir.
Üstelik, tüm modeller USB flaş disklere kaydedebilir ve 1080p60’a kadar HD video destekler.
Hyperdeck Studio 4K Pro, 2160p60’a kadar Ultra HD video destekler.
Kayıt ve oynatım işlemleri, genellikle tüm modellerde aynı şekilde çalışır ve daha büyük modellerde,
daha iyi oynatım kontrolü ve daha geniş bağlantı seçenekleri veren ekstra özellikler bulunur.
Bu kullanım kılavuzu, HyperDeck disk kaydedicinizi kullanmaya başlamanızın yanında, tüm
kontrollerde ve özelliklerde ustalaşmanız için gereken tüm bilgileri sunar!
HyperDeck Studio HD Mini HyperDeck Studio HD Plus
HyperDeck Studio HD Pro ve HyperDeck Studio 4K Pro
715HyperDeck Disk Kaydedicilerle Tanışın
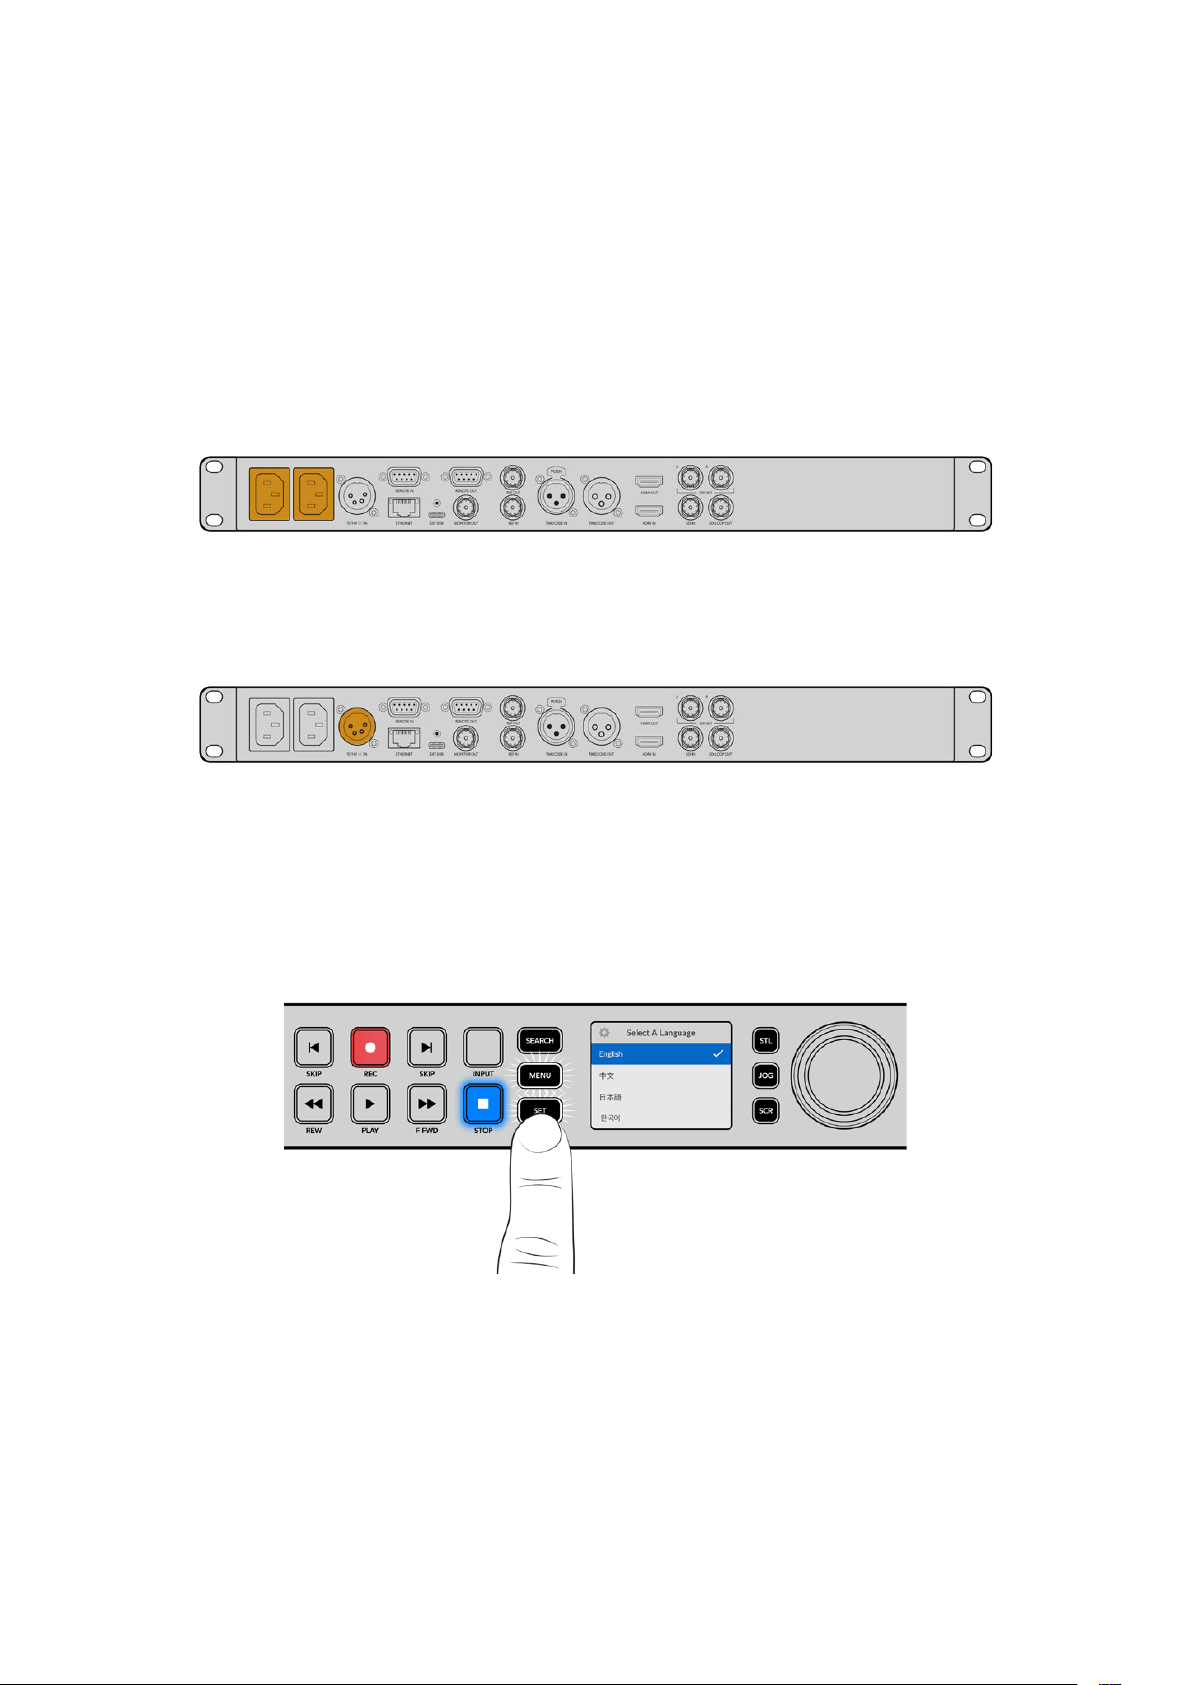
Başlarken
HyperDeck Studio disk kaydedici ile çalışmaya başlamanız son derece kolaydır, çünkü güç kaynağını
bağlamanız, video kaynaklarınızı ve hedeflenen cihazları takmanız ve SSD’leri veya SD kartları
yerleştirmeniz yeterlidir.
Güç Kaynağının Takılması
HyperDeck’e güç sağlamak üzere standart bir IEC elektrik kablosunu, HyperDeck’in arka
panelindeki güç girişine takın.
HyperDeck modelinizde ek bir IEC güç girişi varsa yedeklik için başka bir güç kaynağına
bağlayabilirsiniz. Örneğin, ikinci girişe UPS olarak da bilinen kesintisiz bir güç kaynağı bağladığınızda,
birincil güç kaynağı kesilir kesilmez anında devreye girer.
Tüm modellerde, harici 12V bataryalardan güç almanızı sağlayan, bir 12V DC giriş de bulunur.
Hyperdeck Studio HD Mini, bir AC adaptör üzerinden de çalıştırılabilir. Güç kaynağınızda bir kilitleme
halkası varsa halkayı çevirerek HyperDeck Studio HD Mini’ye bağlantısını sağlamlaştırın. Bu,
kablonun kazayla çıkmasını önlemek için güç kablosunu girişe kilitler.
İlk kez çalıştırıldığında, dil tercihinizi yapmanız için LCD ekranda komutlar belirir. Arama kadranını
kullanarak, tercih ettiğiniz dile gidin ve yanıp sönen ‘set’ ibareli onay düğmesine basın. Bu, sizi ana
ekrana götürür. Ana ekran ve LCD menüleri hakkında daha fazla bilgi için, ‘ön panelin kullanımı’
bölümüne bakın.
Video ve Sesin Bağlanması
Video kaynağınızı, SDI veya HDMI girişlerine ve hedef cihazınızı da SDI veya HDMI çıkışlarına takın.
Örneğin, dijital video kameranız bir kaynak olabilir ve HDMI televizyon veya SDI monitörünüz bir varış
noktası olabilir.
Tüm Hyperdeck modelleri, 1080p60’a kadar HD videoyu destekler. HyperDeck Studio 4K Pro,
12G-SDI bağlantılara sahiptir, yani bir BNC kablo kullanarak, 2160p60’a varan Ultra HD video alabilir
veya çıkarabilirsiniz.
716Başlarken
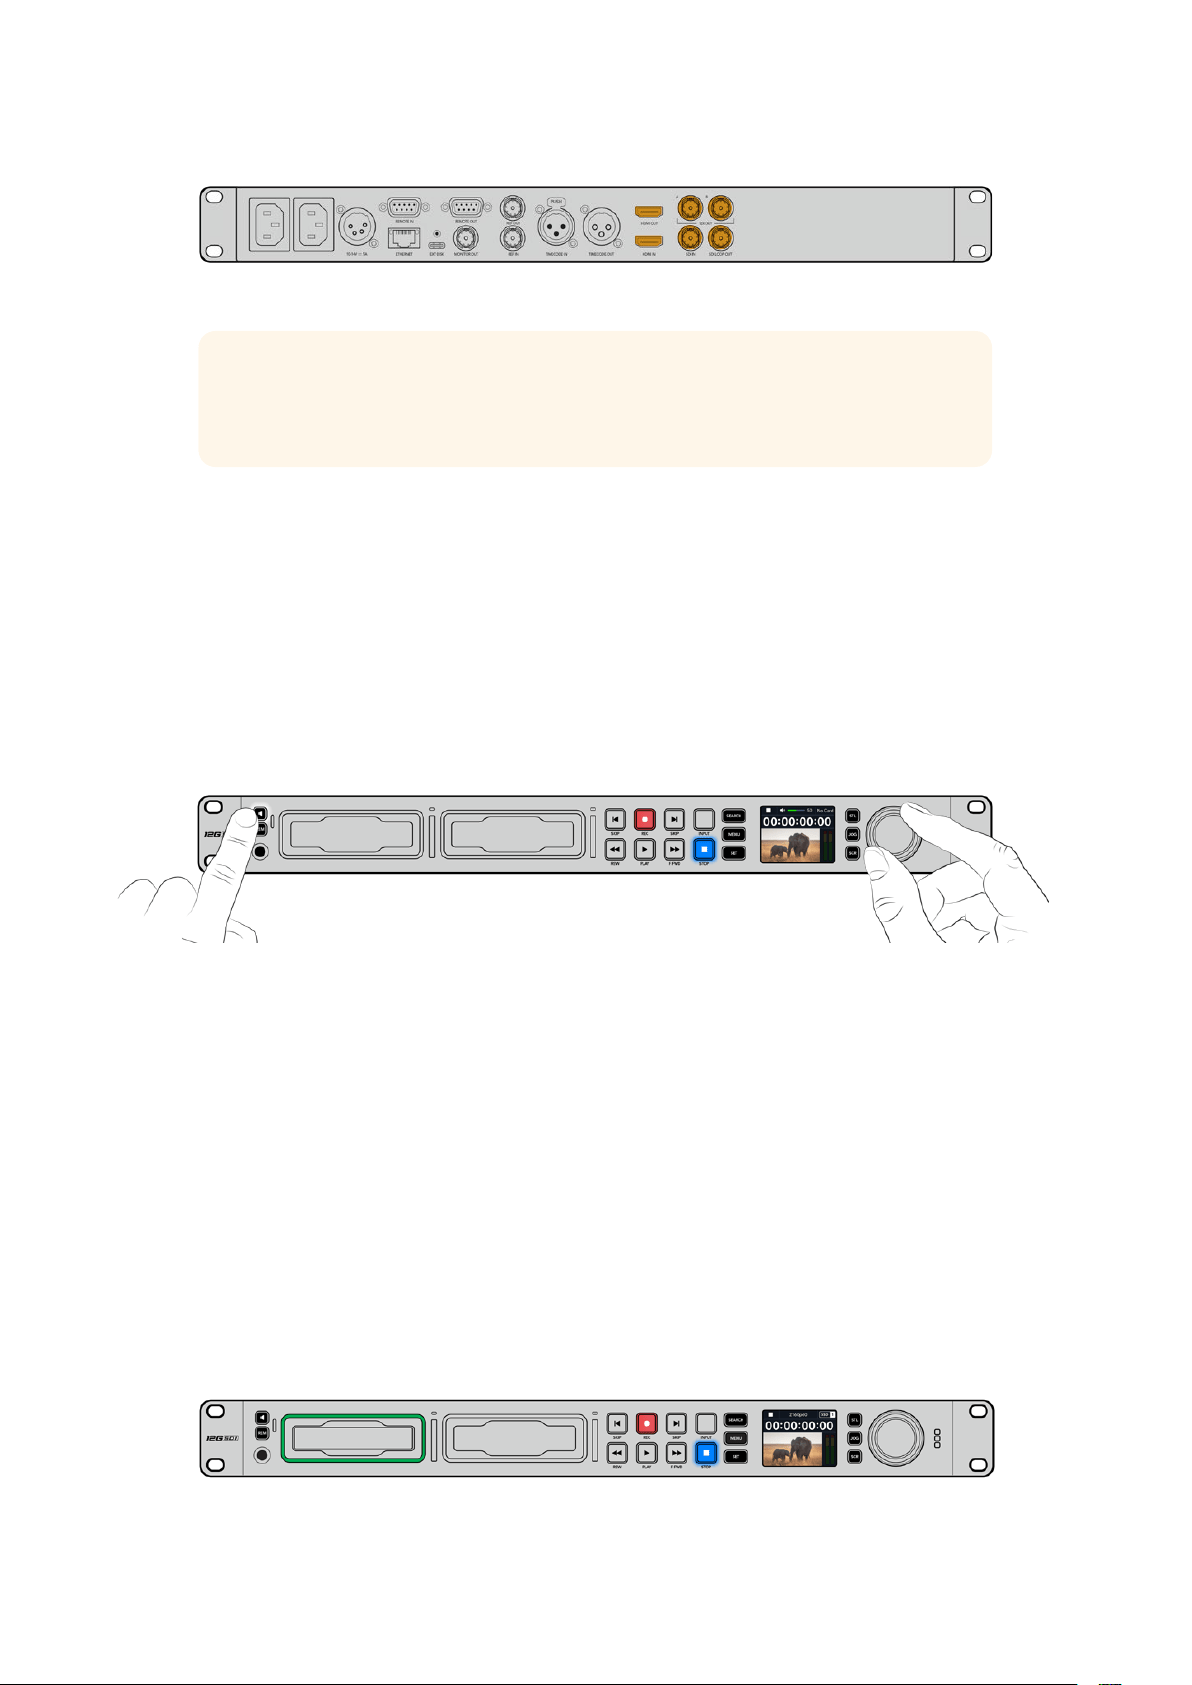
Video sinyalinin SDI veya HDMI olduğunu, ön paneldeki dahili LCD’ye bakarak teyit edebilirsiniz.
BİLGİ Video kaynağını LCD’de görmüyorsanız kaynağı başka girişe bağlamış olabilirsiniz.
SDI veya HDMI kaynaklar arasında gezinmek için ön paneldeki ‘input’ isimli giriş butonuna
basın.
SDI veya HDMI sinyalinde ses gömülü olduğundan, ses bağlantısı için bir şey yapmanıza gerek
yoktur. LCD’deki video görüntüsünün yanındaki göstergelere bakarak ses seviyelerini kontrol
edebilirsiniz.
Sesin Kontrol Edilmesi
HyperDeck’inizin ön panelinde bir hoparlör ve kulaklık bağlantısı varsa dahili hoparlörü kullanarak
veya kulaklıkları takarak hızlı bir şekilde sesi kontrol edebilirsiniz. Dinlemek için, hoparlör düğmesini
basılı tutun ve arama kadranını döndürerek ses seviyesini ayarlayın. LCD ana ekranında bir volüm
göstergesi belirir.
Hoparlörün aktif kalması için hoparlör butonuna çift basın. Etkisiz hale getirmek için tekrar çift basın.
Ortamın Takılması
Tüm HyperDeck Studio modelleri, hiçbir ayarı değiştirmeye gerek kalmadan, hemen kayda hazır
olarak satılırlar. Sadece formatlanmış bir SSD’ye veya bir SD karta ihtiyacınız var.
LCD’deki menü ayarları üzerinden ortamı kolaylıkla formatlayabilirsiniz. Ayrıca, bir bilgisayar
kullanarak da formatlayabilirsiniz. Ortamınızı nasıl formatlayacağınız hakkında daha fazla bilgi için bu
kılavuzdaki ‘Ortamın Formatlanması’ bölümüne bakın. Video kaydetmek için en iyi ortam türleri
hakkında bilgiler ve önerilen disklerin ve kartların bir listesini de orada bulabilirsiniz.
Bir SSD takmak için:
1 9.5mm’lik bir SSD’yi, bağlantı pimleri aşağı bakacak ve HyperDeck’inizin disk yuvasıyla hizalı
şekilde tutun. SSD’yi, oturduğunu hissedene kadar yavaşça yuvaya itin.
2 HyperDeck Studio’nuz, SSD’yi teyit eder. Bu, disk yuvasını çevreleyen göstergenin yeşil
yanması ile gösterilir. Yeşil gösterge durduğunda, HyperDeck’iniz kaydetmeye hazırdır!
Disk göstergesi, ortamı okurken yeşil yanar ve HyperDeck’iniz kaydetmeye hazır olduğunda kapanır.
717Başlarken

SSD’yi çıkarmak için dıştaki kenarından tutun ve cihazdan yavaşça dışarı çekin. SSD’nin yuvadan
ayrıldığını hissedeceksiniz.
SSD’nizi, bağlantı pimleri aşağı bakacak ve HyperDeck’inizin disk yuvasıyla hizalı
olacak şekilde tutun ve oturduğunu hissedene kadar SSD’yi yavaşça yuvaya itin.
Bir SD kart takmak için:
1 SD kartı; altın renkli konektörleri HyperDeck Studio’nun LCD ekranına bakacak şekilde tutun
ve medya yuvasıyla aynı hiza ya getirin. Şimdi, sıkı bir şekilde yerine kilitlendiğini hissedene
kadar kartı yavaşça yuvaya itin.
2 HyperDeck Studio’nuz, SD kartı teyit eder. Bu, SD kart yuvasının üzerinde yeşil yanan bir
gösterge ile gösterilir.
Gösterge ışığı söndüğünde ve ‘stop’ butonunun ışığı yandığında, HyperDeck’iniz kayda hazırdır.
718Başlarken

BİLGİ Kartı çıkartmak için, tık sesi duyana kadar kartı yavaşça içeri itin, sonra bırakın. Kart,
bir miktar dışarı çıkacağı için kenarından tutarak yuvadan çıkarabilirsiniz.
HyperDeck Studio’nuz, kayıt ve oynatım için şimdi hazır!
Video Kaydı
Video kaynağınızın LCD’de görüntülendiğini teyit ettikten sonra, hemen kayda başlayabilirsiniz!
Kaydı başlatmak için, ‘record’ butonuna basın. Bir SD karta kaydederken, kayıt butonu ile yuva
göstergesi kırmızı renkte yanar, oynatım butonunun ışığı yanar ve LCD ana ekranında bir kayıt
simgesi görünür. Bir SSD’ye kaydederken, dinamik ortam göstergesi kırmızı yanar.
HyperDeck Studio kaydederken, LCD ekrandaki depolama göstergesi,
değişimli olarak aktif yuvayı ve ortamda kalan kayıt süresini gösterir.
Kaydı bitirmek için ‘stop’ butonuna basın. Oynatımı hemen başlatmak için ‘play’ butonuna basın.
BİLGİ Kullanılan kodeği değiştirmek istediğinizde, Blackmagic HyperDeck Setup yardımcı
yazılımı kullanarak kodek ayarını değiştirebilirsiniz. Daha fazla bilgi için, bu kılavuzdaki
‘Blackmagic HyperDeck Setup’ bölümüne bakın.
Çoklu ortama kayıt
SD kartınızda veya SSD’nizde 3 dakikadan az kayıt süresi kaldığında, HyperDeck Studio’nuzun LCD
ekranındaki zaman kodu sayacı kırmızıya dönüşür ve ‘stop’ butonu yavaşça yanıp sönmeye başlar.
Bu aynı zamanda, kaydın devam etmesi için boş yere sahip ikinci diskin olmadığı anlamına da gelir.
Bu durumda, kaydın devam edebilmesi için boş yere sahip bir disk takmanız gerekir. Boş yuvaya
veya harici disk girişine boş bir disk taktığınızda, yavaş yanıp sönme durur ve zaman kodu beyaz
renge geri döner. Yani, HyperDeck kaydetmeye devam edebilir, çünkü bu ikinci disk teyit edilmiştir
ve kayda devam etmek boş alana sahiptir.
719Video Kaydı
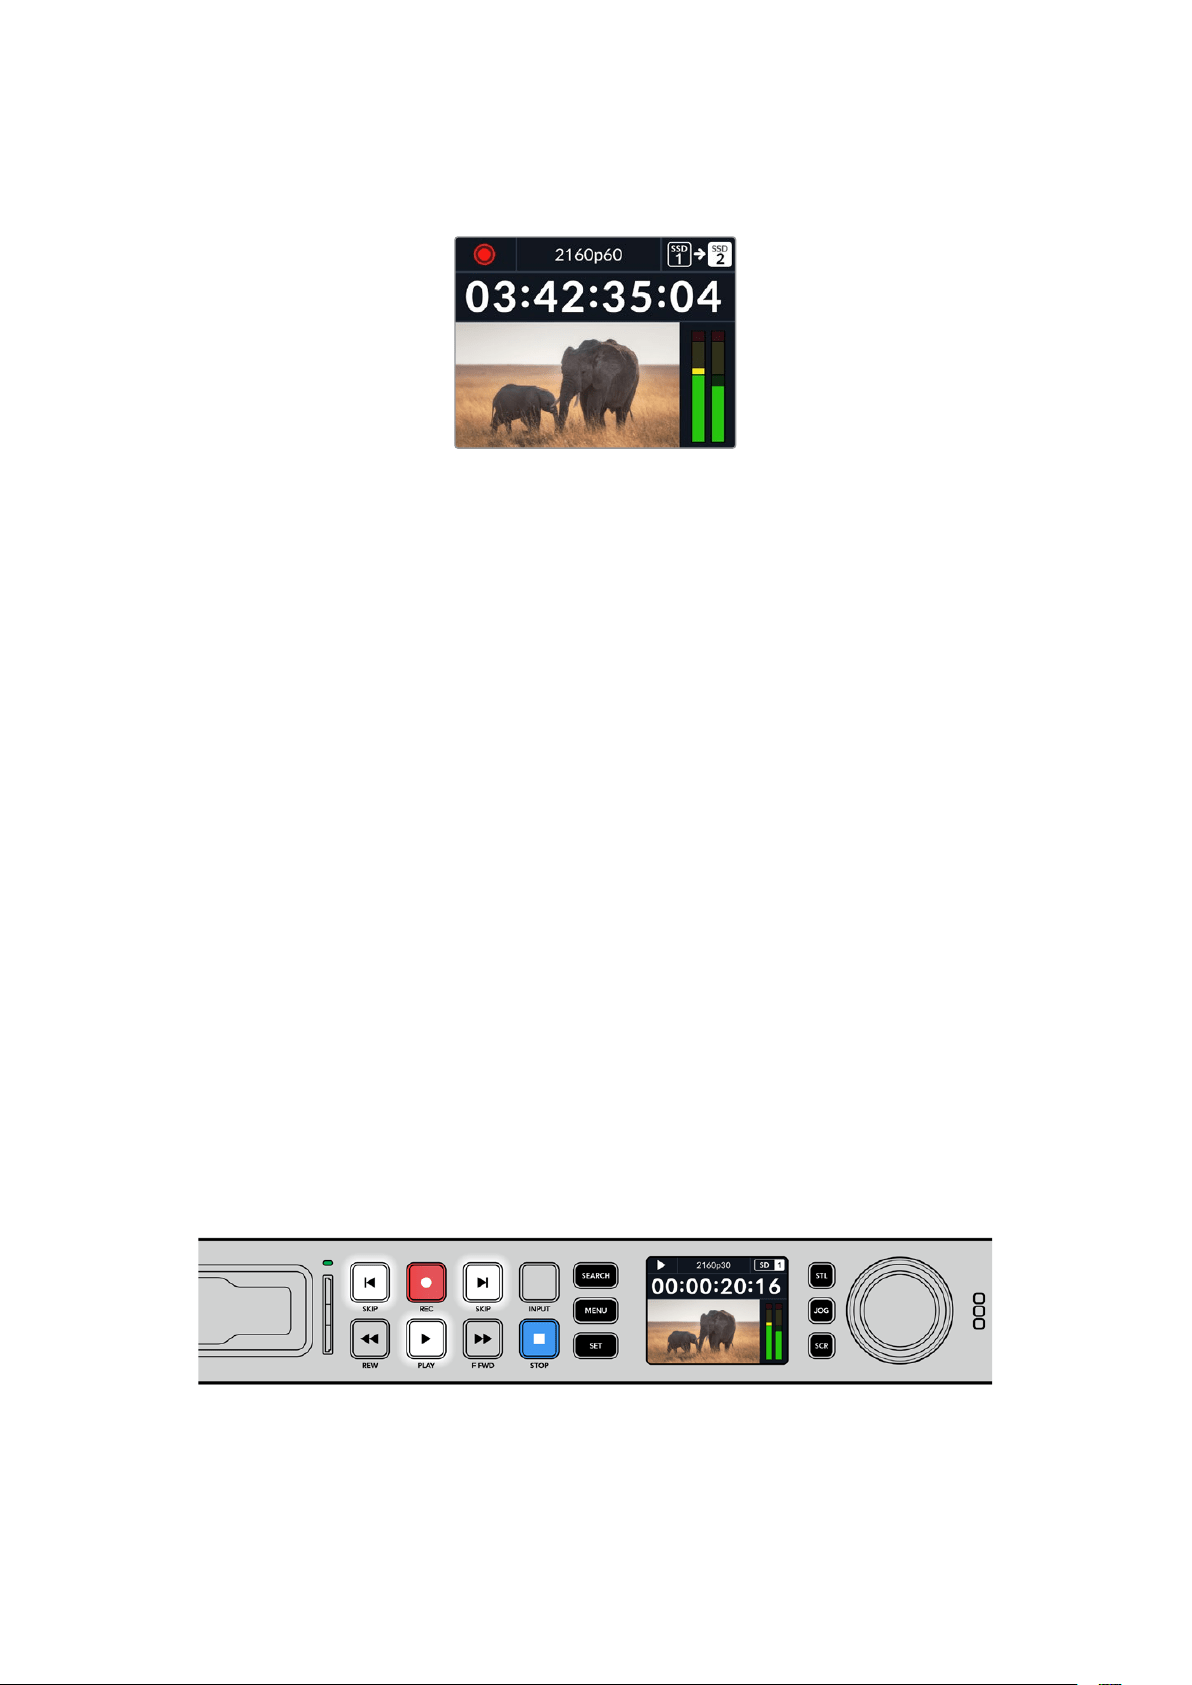
HyperDeck Studio’ya birden fazla ortam bağlandığında, kayıt bir diskten veya bir karttan diğerine
geçer. Bu, ana ekranın sağ üst köşesinde gösterilir.
Kayıt Esnasında Disklerin Değiştirilmesi
Kaydı yaptığınız diski değiştirmeyi istediğinizde ve boş yere sahip ikinci bir diskiniz olduğunda,
sadece ‘record’ butonunu basılı tutun ve kayıt, mevcut diskten ikinci diske geçer. Kaydı durdurmadan
kayıt yapılan diski HyperDeck’ten çıkarmak istediğinizde, bu çok faydalıdır. Bu, canlı etkinliklerde,
yapılan önemli bir kaydı başka bir yere götürmeniz, ama hiçbir şeyi kaçırmamanız gerektiğinde veya
kaydı durdurmak istemediğinizde meydana gelebilir.
Kayıt esnasında kayıt butonu yanıp sönüyorsa ortamınızda düşen karelerle sonuçlanan problemler
olabilir. Bu, daha yavaş ortam kullanarak Ultra HD kayıt yaparken ortaya çıkabilir, örneğin; 2160p30
ProRes HQ kaydı, ProRes Proxy kaydı ile karşılaştırıldığında, daha yüksek bir veri hızı kullanır, yani SD
kartlarınızın veya SSD’lerinizin piyasadaki en hızlı ortamlardan olması gerekir. Onayladığımız
ortamların bir listesi için, bu kılavuzdaki ‘depolama ortamı’ bölümüne bakın.
Oynatım
Aktarım kontrolleri arasında, geleneksel yayın deck’lerinde yaygın olarak bulunan ‘record’ (kaydet),
‘rewind’ (geri sar), ‘play’ (oynat), ‘fast fwd’ (ileri sar) ve ‘stop’ (durdur) gibi butonlar vardır. Geri ve ileri
yöndeki ‘skip’ (atlat) butonları, önceki klip ve sonraki klip düğmeleri gibi çalışır, yani klipten klibe hızlı
bir şekilde geçebilirsiniz.
HyperDeck ile Video Oynatımı
1 Oynatımı anında başlatmak için ‘play’ butonuna bir kez basın ve videonuzu LCD ekranda
ve HyperDeck’in video çıkışlarına bağlı olan ekranlarda göreceksiniz.
2 Bir sonraki klibe geçmek için, kontrol panelindeki ‘next clip’ butonuna basın.
3 Mevcut klibin başlangıcına gitmek için, ‘previous clip’ butonuna bir kez basın veya bir önceki
klibin başlangıcına gitmek için, iki kez basın.
Bir klibi oynatmak için, HyperDeck’inizin kontrol panelindeki ‘play’ butonuna basın ve mevcut klibi
yeniden başlatmak veya başka bir klibe geçmek için geri ve ileri yöndeki ‘skip’ butonlarına basın.
720Oynatım
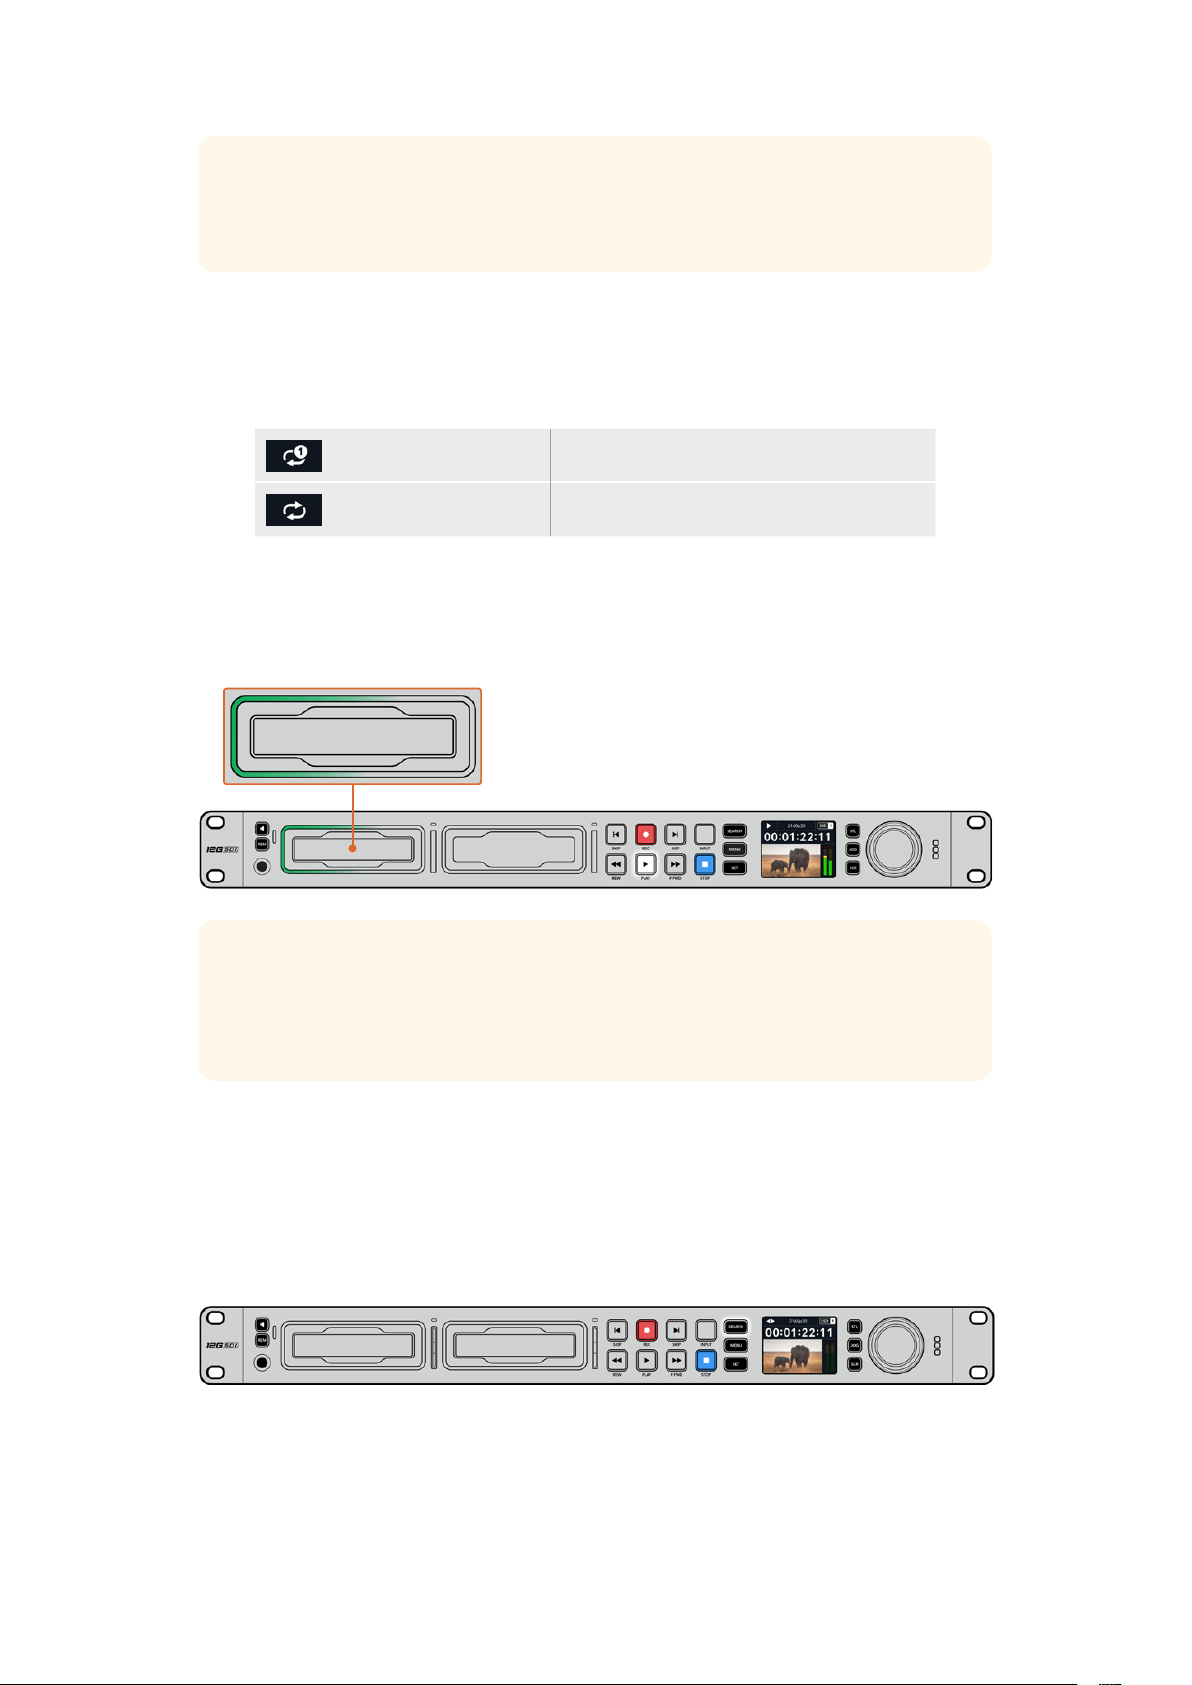
BİLGİ Video dosyalarını oynatmak için HyperDeck’inizi kodekle eşleşecek şekilde
ayarlamanız gerekir. Bunu, LCD menüsünü kullanarak yapabilirsiniz. Daha fazla bilgi için
‘LCD menüsünü kullanma’ ve ‘ayarlar’ bölümlerine bakın.
Döngülü Oynatım
Oynatımın sürekli olarak devam etmesini istiyorsanız, oynatım esnasında tekrar ‘play’ butonuna
basarak HyperDeck’inizi klibi döngüye alması için ayarlayabilirsiniz. Döngülü oynatım aktif
olduğunda, döngü simgesinin LCD’de belirdiğini görürsünüz. Mevcut iki döngü modu vardır.
Klibi döngüye al Şu anda oynatımdaki klibi döngüye alır.
Tüm klipleri döngüye al Ortamınızdaki kayıtlı tüm klipleri döngüye alır.
Dinamik LED Göstergeler
Oynatım esnasında, disk yuvasını çevreleyen ışık şeridi, oynatım hızını ve yönünü göstermek üzere
dairesel bir hareketle yeşil yanar.
BİLGİ SSD’lere kaydeden HyperDeck’lerde play butonu yanıp sönüyorsa bu; diskin
yeterince hızlı olmadığı ve oynatıma devam edemediği anlamına gelir. Kayıt formatını, H.264
gibi daha sıkıştırılmış bir formata değiştirmenizi ya da Ultra HD kayıt için, tavsiye edilen
daha hızlı bir SSD veya harici disk kullanmanızı öneririz.
Arama Kadranının Kullanımı
Kliplerinizin arasında gezinmenin ve oynatım için belirli anları seçmenin veya klipleri kare kare
gözden geçirmenin hızlı bir yolu, oynatım esnasında arama kadranını kullanmaktır. Bu, bir klipteki
belirli bir anı ya kadranı çevirirken klibi gözünüzle takip ederek veya belirli bir zaman kodu noktasını
arayarak bulmanız gerektiğinde önemli olabilir. Bu, canlı bir yayın sırasında yayına alınacak bir klibin
belirli bir noktasında, oynatım çubuğunu bekletmek için de yararlıdır.
Arama kadranı modlarında gezinmek için ‘search’ butonuna basın.
721Oynatım
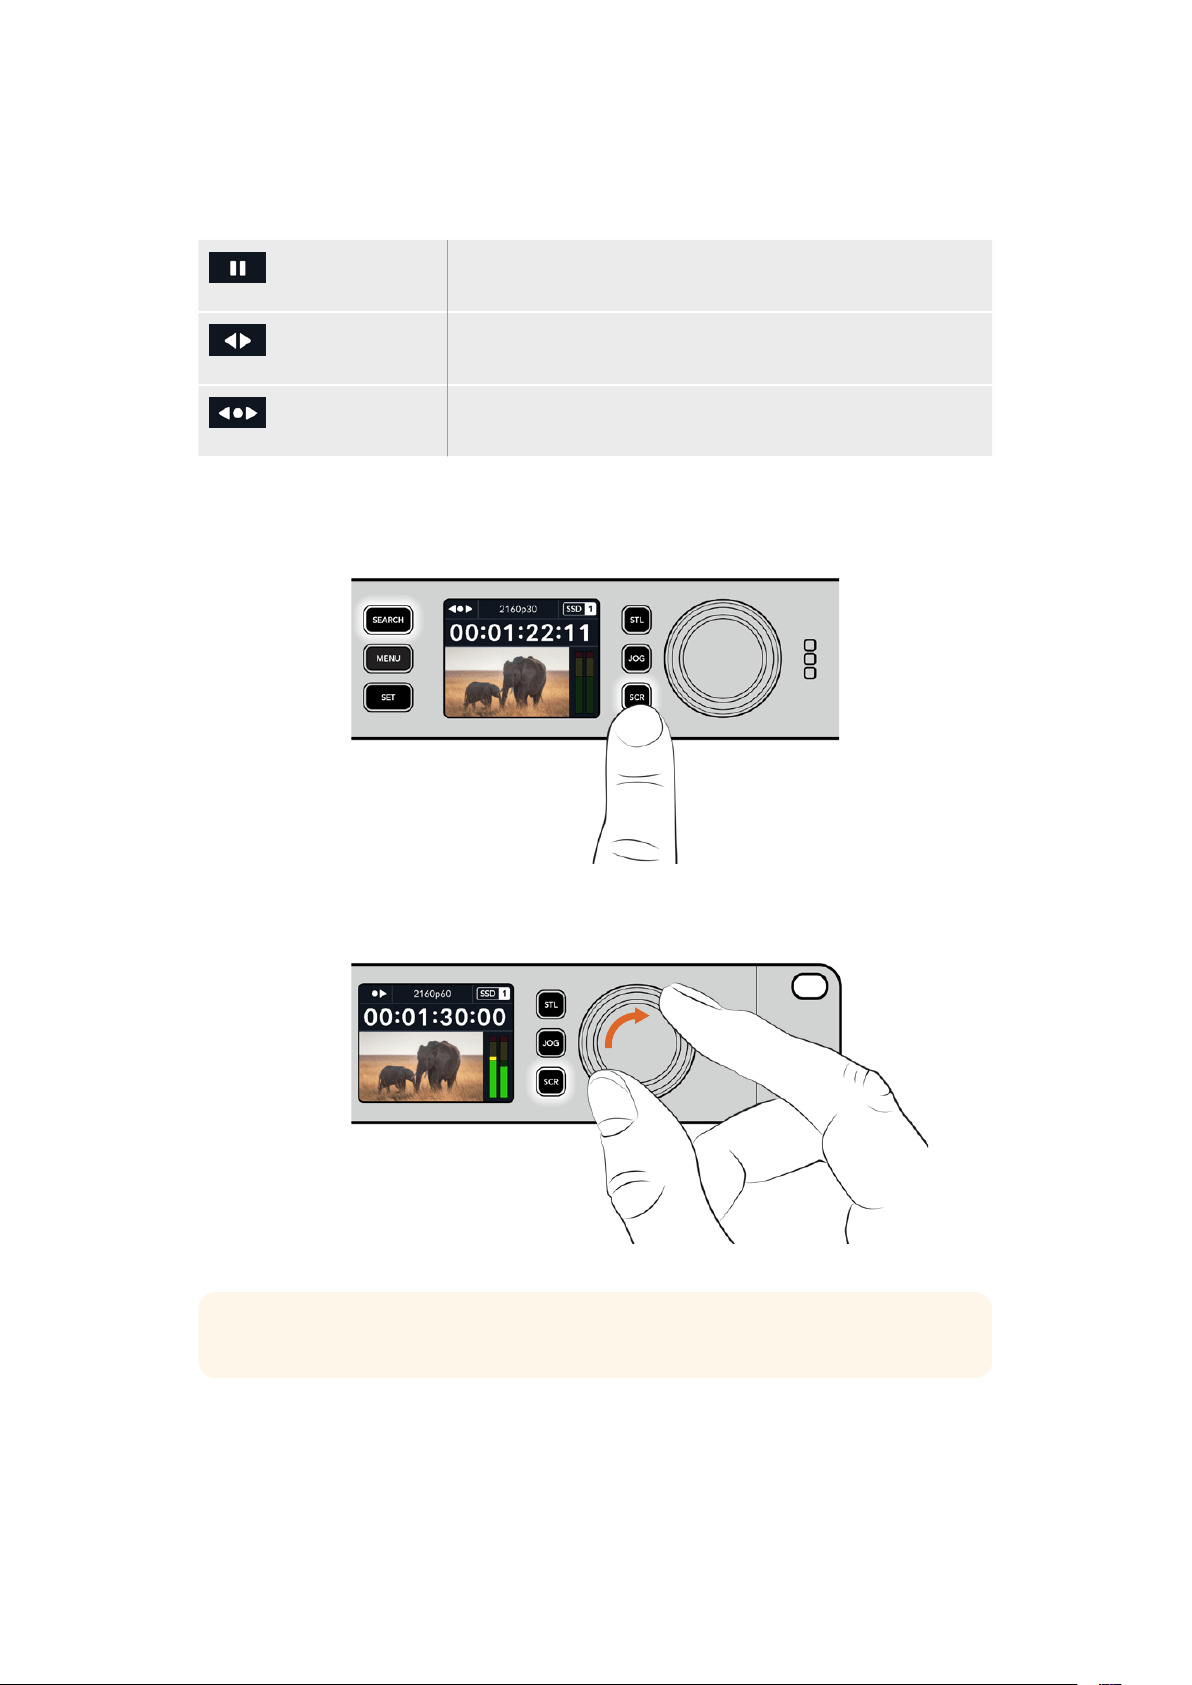
Arama kadranı modları arasında; Jog (yavaş oynatım), Shuttle (hızlı oynatım) ve Scroll (interaktif
oynatım) vardır.
Yavaş Oynatım
(Jog)
Klibi, ileri yönde veya geri yönde kare kare oynatarak hassas
kontrol sağlar.
Hızlı Oynatım
(Shuttle)
Klibi, ileri yönde veya geri yönde daha hızlı oynatır. Kadranı çevirme
hızınıza bağlı olarak oynatım değişir.
İnteraktif Oynatım
(Scroll)
Kadranı çevirme hızınıza bağlı olarak daha da hızlı oynatım. Bu mod,
uzun bir klipteki belirli bir anı ararken, hızla gezinmek için faydalıdır.
Daha büyük modeller, arama modları için özel butonlara ve kullanım esnasında temasınıza tepki
veren dahili kavrama mekanizmalı bir arama kadranına sahiptir. Bu, klibi bir televizyonda veya
monitörde izlerken klipte el yordamıyla ilerlemenizi sağlar.
Yavaş oynatım, hızlı oynatım ve interaktif oynatım arama modlarını
seçmek için özel ‘JOG’, ‘STL’ ve ‘SCR’ butonlarına basın.
BİLGİ Normal oynatıma geçmek için, ‘play’ veya ‘stop’ butonuna basın.
722Oynatım
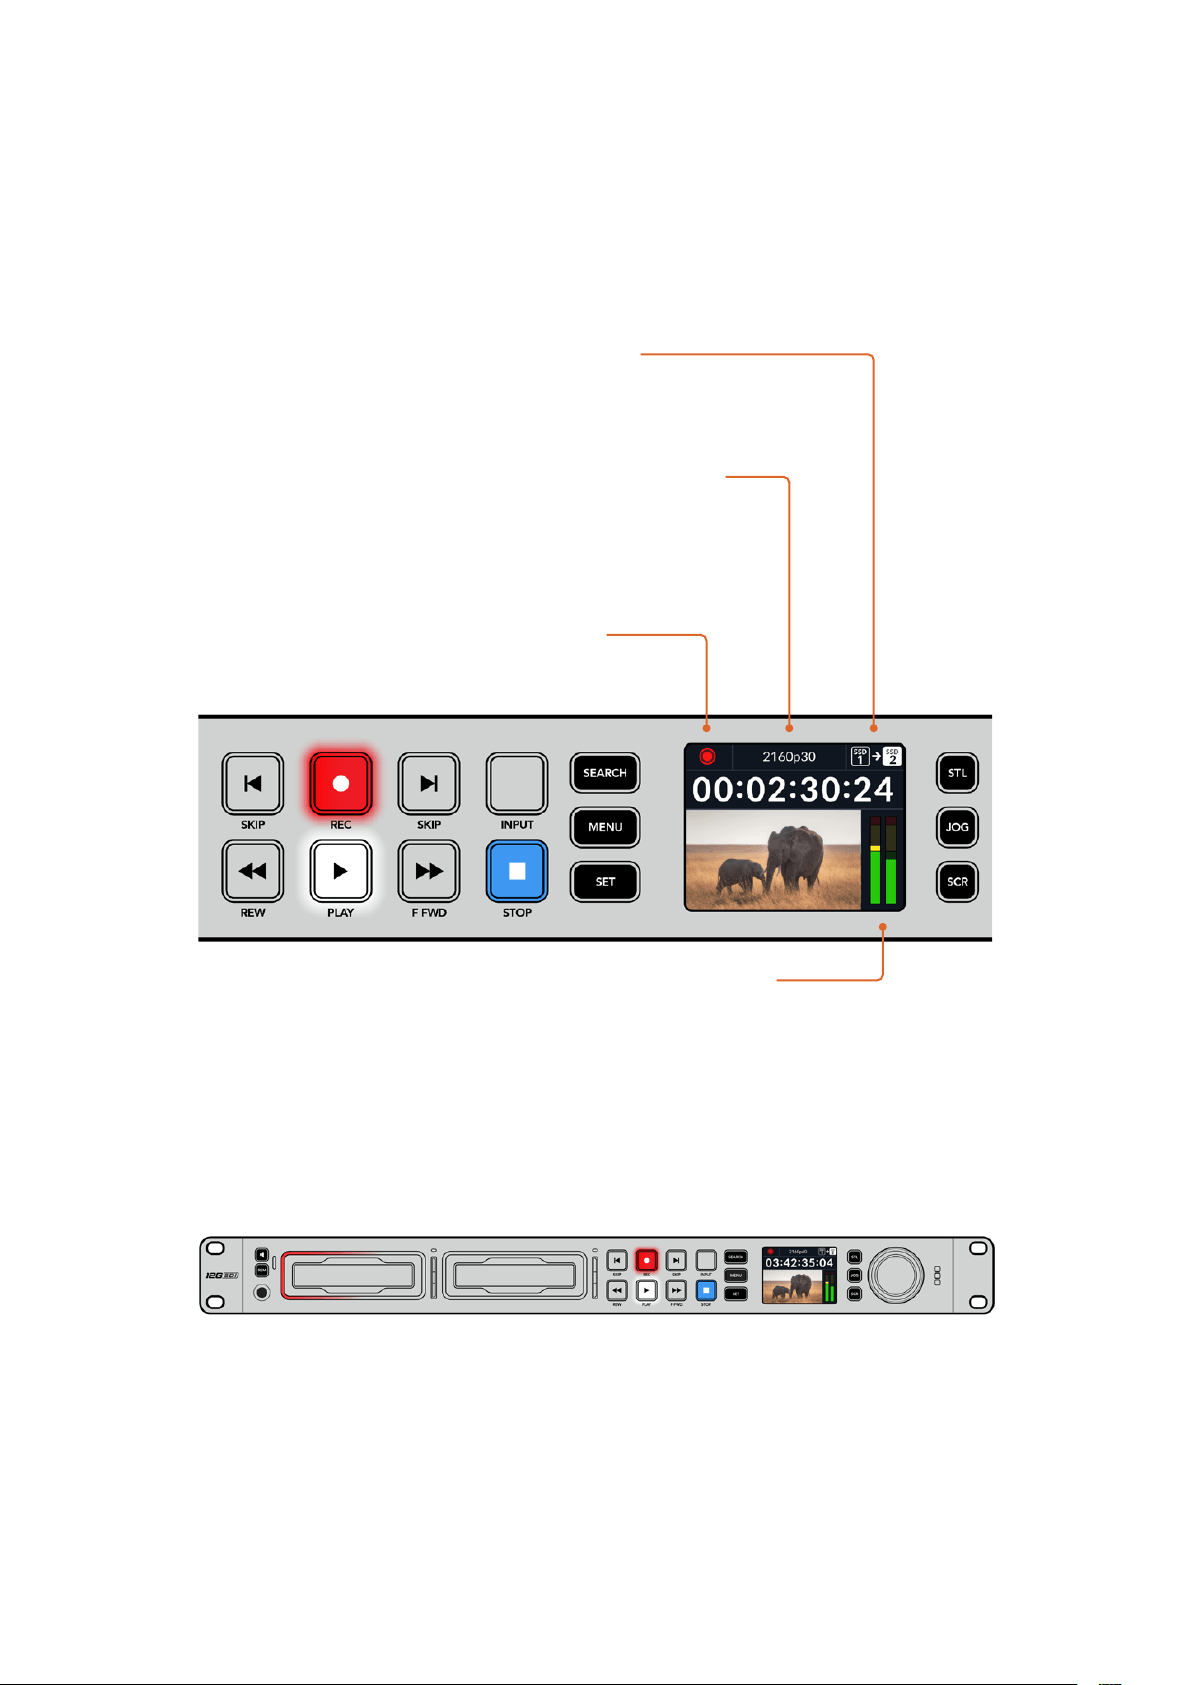
Ön Panel Kullanımı
HyperDeck ile video oynatırken veya kayıt yaparken gerekli bilgilerin hepsi, medya yuvalarının LED
göstergeleri ile cihazın üzerinde ve dahili LCD ekranda gösterilir.
HyperDeck Studio Ana Ekran
Kalan Süre ve Ortam Göstergesi –
Kayıt esnasında, diskte kalan süre ile
kullanımdaki disk arasında bu simge sürekli
olarak değişecektir. Oynatım esnasında,
aktif ortam simgesi görüntülenir.
Format Göstergesi – Giriş videosunun formatını
veya oynatımdaki dosyanın formatını gösterir.
Ayrıca, bazı HyperDeck Studio modellerinde ‘input’
isimli giriş butonuna basıldığında giriş kaynağını
göstermenin yanında, ön panel butonu ve arama
kadranı ile hoparlör ve kulaklık ses seviyelerini
ayarlarken, mevcut ses seviyesini de gösterir.
Durum Göstergesi – Kullanılan
oynatım modu dahil olmak üzere
Deck’in mevcut durumunu gösterir.
Ses Göstergeleri – Kaynaktaki ses
seviyelerini veya oynatılan dosyadaki
ses seviyelerini görüntüler.
Medya Yuvası Göstergeleri
HyperDeck’i ilk çalıştırdığınızda ya da bir SSD veya SD kart takdığınızda, yuva göstergesi ortamı
kontrol ederken yeşil yanar ve kontrölün ardından kapanır. Diskin formatlaması doğru yapılmamışsa
veya disk çalışmazsa yuva göstergesi, disk çıkarılana kadar turuncu renkte yanar. Bu durumda, diskin
doğru formatlandığından ve bir bilgisayarla çalışdığından emin olun.
HyperDeck’in medya yuva göstergeleri, farklı renklerde yanarak diskin durumunu bilmenizi
sağlarlar. Örneğin, kayıt esnasında kırmızı ve oynatım esnasında yeşil yanarlar.
723Ön Panel Kullanımı

LCD Menüsünün Kullanımı
Menü ayarlarını açmak için, ön paneldeki ‘menu’ butonuna basın.
Menü seçenekleri arasında gezinmek için arama kadranını çevirin veya atlatma butonlarına basın ve
bir alt menüyü seçmek için ‘set’ butonuna basın.
Menü ayarlarında gezinmek için arama kadranını çevirin.
Menü öğesi seçili olarak ‘set’ butonuna basın.
Arama kadranını veya ileri atlatma ve geri atlatma butonlarını kullanarak ayarları düzenleyin ve ‘set’
butonuna basarak ayarları onaylayın.
Seçeneklerden çıkmak ve ana ekrana geri dönmek için ‘menu’ butonuna basın.
724Ön Panel Kullanımı
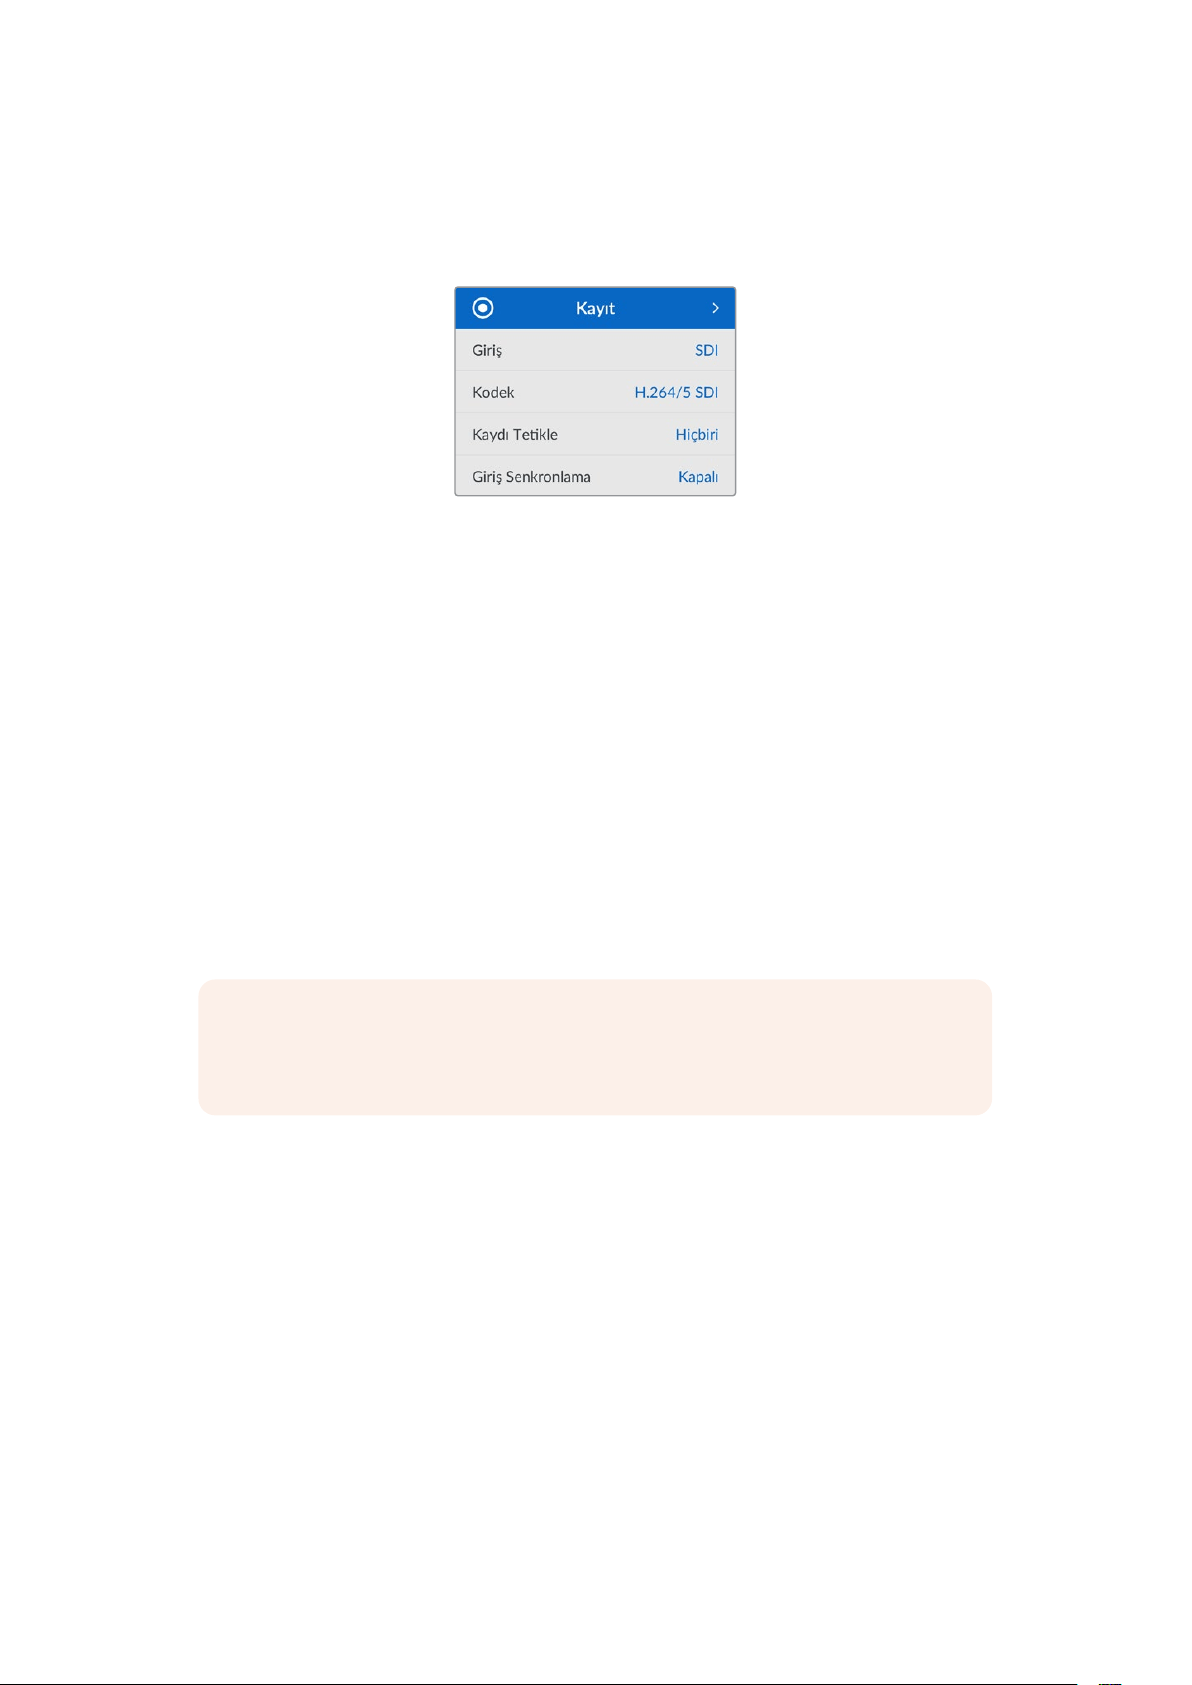
Ayarlar
Kayıt Menüsü
Giriş
Giriş ayarını kullanarak SDI veya HDMI kaynağınızı seçin. Ön paneldeki ‘input’ isimli giriş butonunu
kullanarak da giriş kaynağınızı değiştirebilirsiniz.
Kodek
Tüm HyperDeck Studio modelleri; H.264, Apple ProRes ve DNxHD kodeklerini kullanarak sıkıştırılmış
video kaydedebilir. Hyperdeck Studio 4K Pro Modelleri, 4K video kaydederken H.265 ve DNXHR
kodeklerini de kullanabilir.
Kaydı Tetikleme
Geçerli olan iki kayıt tetikleme modu vardır; video ile başlat/durdur ve zaman kodu ile tetikle.
URSA Mini gibi bazı kameralar, harici kayıt cihazlarında kaydı başlatmak ve durdurmak için SDI
bağlantısı üzerinden bir sinyal gönderir. ‘Video ile başlat/durdur’ seçildiğinde, kamerada kayıt
düğmesine basılınca, kaydı başlatması veya durdurması için Hyperdeck’i tetikler.
Girişleri üzerinden geçerli bir zaman kodu sinyali aldığında kaydı başlatması için cihazı tetiklemek
üzere, ‘zaman kodu ile tetikle’ seçeneğini kullanın. Sinyal durduğunda, kayıt da duracaktır. Kayıt
tetiklemeyi, ‘hiçbiri’ seçeneğine dokunarak etkisiz hale getirin.
NOT Bir HDMI veya SDI kameradan kayıt yaparken, çıkış sinyalinin temiz ve katmanların da
kapalı olduğundan emin olun, çünkü kameranızın video çıkışındaki herhangi bir katman
görüntünüzle birlikte kaydedilir.
Girişi Yeniden Senkronlama
Bu ayar, video girişinde bir yeniden senkronizasyon etkinleştirir ve kayıttan önce videonun harici
referansa kilitlenmesini sağlar. Girişin kendisi yeniden senkronize edildiği için, kayda geçildiğinde
bile video çıkışı referansa kilitli kalır. Birden fazla deck’in zaman kodunun kilitli olmasına ihtiyaç
duyduğunuzda ama bazı kaynakların senkronize olmadığı durumlardaki ISO kaydı için bu özellik
kullanılır. Bu özellik normalde kapalıdır yani, giriş videosuna kare eklenmeden veya videodan kare
çıkarmadan, video girişleri kaydedilir.
Normalde, tüm yayın deck’leri, oynatım esnasında video çıkışını kilitlemek için bir referans girişi
kullanabilir. Yani, HyperDeck oynatım çıkışı, referans girişine kilitlenir ve bu sayede, büyük bir yayın
sistemine bağlandığında yeniden senkronize edilmesi gerekmez.
Ancak, deck kayda başladığında, bu çıkış giriş sinyaline geçer, çünkü normalde, giriş videosunun
dokunulmadan kaydedilmesini ve bu dokunulmamış videonun, HyperDeck video çıkışlarına bağlı
olan diğer downstream ekipmanlara gönderilmesini istersiniz.
725Ayarlar

Halbuki, HyperDeck Studio, ISO kaydına yardımcı olan emsalsiz bir özelliğe sahiptir. Bu özellik, bu
işlemi tamamen tersine çevirmenize ve video girişini, referans girişine yeniden senkronize etmenize
imkan tanır. Yani, HyperDeck’e senkronize olmayan bir kaynak bağlayabilirsiniz ve Hyperdeck, video
referansına göre video girişinin yeniden zamanlamasını yapar ve ardından kaydeder.
Senkronsuz kaynaklar arasında: bilgisayarlar, tüketici kameraları veya kendisine bir referans
bağlanamayan video ekipmanları olabilir. Başka bir stüdyodan veya harici yayıncıdan gelen bir video
sinyali bile olabilir. Sinyalleri ayrı ayrı kaydettiğiniz ISO kayıt yaparken, tüm kayıtlardaki zaman
kodunun zaman içinde mükemmel şekilde eşleşmesine ihtiyacınız olduğundan, senkronize olmayan
kaynaklar, ISO kayıtta sorunlara neden olur. Senkronize olmayan bir kaynak, diğer kaynaklarınızdan
daha hızlı veya daha yavaş çalışacak ve kayıt esnasında, zaman koduna kıyasla hızlı bir şekilde
senkrondan çıkacaktır. Bu, çok kameralı kurgulama sürecini sancılı bir hale getirir, çünkü kaynakların
zaman kodu eşleşmeyecektir.
Girişi yeniden senkronlamanın etkin olmasıyla, HyperDeck video girişi analiz edilir ve referansın
gerisinde kalmaya başladığında bir kare tekrarlanır veya referanstan daha hızlı ilerlemeye
başladığında bir kare kaldırılır. Bunun ismi yeniden senkronlamadır ve girişte yapılan işleme de bir
kareyle yeniden senkronizasyon denir. Yani, tüm deck’lerde kaydedilen klipler, aynı zaman kodunda
aynı anda çekilen sahnelere sahip olacaktır. Bu da çok kameralı kurgulamayı mümkün kılar.
Tabii ki bunun dezavantajı, kayıttan önce girişe bazı kareler eklemeniz veya girişten bazı kareleri
kaldırmanızdır. Bu nedenle, bu özelliği kapalı bırakmak ve sadece bilgisayar veya tüketici tarzı
cihazlar oldukları için, bir referansı bir ISO kaynağına bağlamanın kesinlikle mümkün olmadığı
durumlarda kullanmak, en iyisidir.
Yine de girişi yeniden senkronlama özelliğini açıp kullanabileceğiniz, bir durum vardır. Girişi yeniden
senkronlama aktif edildiğinde, deck kayıttayken bile HyperDeck video çıkışı, referansa kilitlenmiş
olarak kalır. Yani, program dönüş sinyali aracılığıyla bir kamerayı referansa kilitlemek için
HyperDeck’in SDI çıkışını, kameraya bağlayabilirsiniz. Bunun iyi bir örneği, Blackmagic Studio
Camera 4K Pro’dur ve harici video sinyalini referans alabilir. Sonrasında, kamera sinyali
HyperDeck’ten gelen referansa kilitlenir ve kameranın çalışması daha hızlı veya yavaş olmayacağı
için HyperDeck’teki girişi yeniden senkronlama, kare eklemek veya kaldırmak zorunda kalmaz.
Girişi yeniden senkronlama özelliği, sadece video girişi HyperDeck ile aynı referansa
kilitlenmediğinde bir işlem yapar. Bu durumda ise HyperDeck çıkışı, kameranın referans kaynağıdır
ve HyperDeck, video referans girişine kilitlidir. Referans bağlantıları zincirleme bağlanarak birbirine
kilitlenmiş birkaç tane HyperDeck’iniz olduğu zaman, tüm kameralar ve HyperDeck’ler tek bir grup
halinde kilitlenir. Sonrasında, bir gruptaki HyperDeck’lerden birinde bilgisayar gibi senkronsuz bir
kaynak bağlı olduğunda, bu tek giriş yeniden senkronlanır, ama diğer kaynaklara dokunulmaz.
Yeniden senkronlama otomatiktir, yani kaynakları bağladığınızda, çalışır. Girişi yeniden senkronlama
özelliği, son derece güçlü olabilse de neyi, ne zaman yapacağını bilmek önemlidir. Nasıl çalıştığını
görmek için birkaç HyperDeck ve çoklu kamera kurgulama yazılımıyla bazı denemeler yapın! Bu,
çok çabuk program prodüksiyonu yapmanın harika bir yoludur.
726Ayarlar

Monitör Menüsü
Arka panelde monitör çıkış bağlantısı olan Hyperdeck Studio modellerinde, monitör menüsü dahil
edilmiştir.
Temiz Sinyal
Temiz sinyali açık duruma getirme, Hyperdeck Studio’nun arkasındaki monitör çıkışına bağlı
ekranlarda görünen durum metnini kaldıracaktır. Monitör çıkış ekranında görüntülenen bilgiler dahil
olmak üzere, monitör çıkış ekranı hakkında daha fazla bilgi için bu kılavuzdaki Monitör Çıkışı
bölümüne bakın.
3D LUT
Ekran LUT’ları, özellikle HyperDeck Studio’yu bir saha kaydedici olarak kullanırken yararlı olabilir.
LUT’lar, cihaza hangi rengin ve parlaklık sinyalinin gösterileceğini söyleyerek çalışırlar. Bu,
kameranızda bulunan renk doygungunluğu kasıtlı azaltılmış ve ‘düz’ bir görünüme sahip ‘film’ dinamik
aralığını kullandığınızda, faydalı olabilir. Bir ekran LUT’u uygulayarak, çekiminizin renk
derecelendirmesi yapıldıktan sonra nasıl görüneceğine dair fikir edinebilirsiniz.
Ekran LUT’ları, BlackMagic HyperDeck Setup yazılımı üzerinden seçilir ve SDI monitör çıkışında
uygulanabilir.
3D LUT’u etkin veya etkisiz kılmak için:
1 ‘Menü’ düğmesine basın ve arama kadranını kullanarak ‘monitör’ menüsüne gidin.
2 ‘Set’ butonuna basın.
3 Arama kadranını kullanarak, ‘3D LUT’ mavi renkte vurgulanana kadar menüde aşağı inin.
4 LUT’u açık veya kapalı duruma getirmek için set butonuna basın.
Bir LUT seçimi hakkında daha fazla bilgi için, bu kılavuzdaki Blackmagic HyperDeck Setup
bölümüne bakın.
BİLGİ Monitör çıkış görünümü hakkında daha fazla bilgi için, bu kılavuzdaki ‘monitör çıkışı’
bölümüne bakın.
727Ayarlar
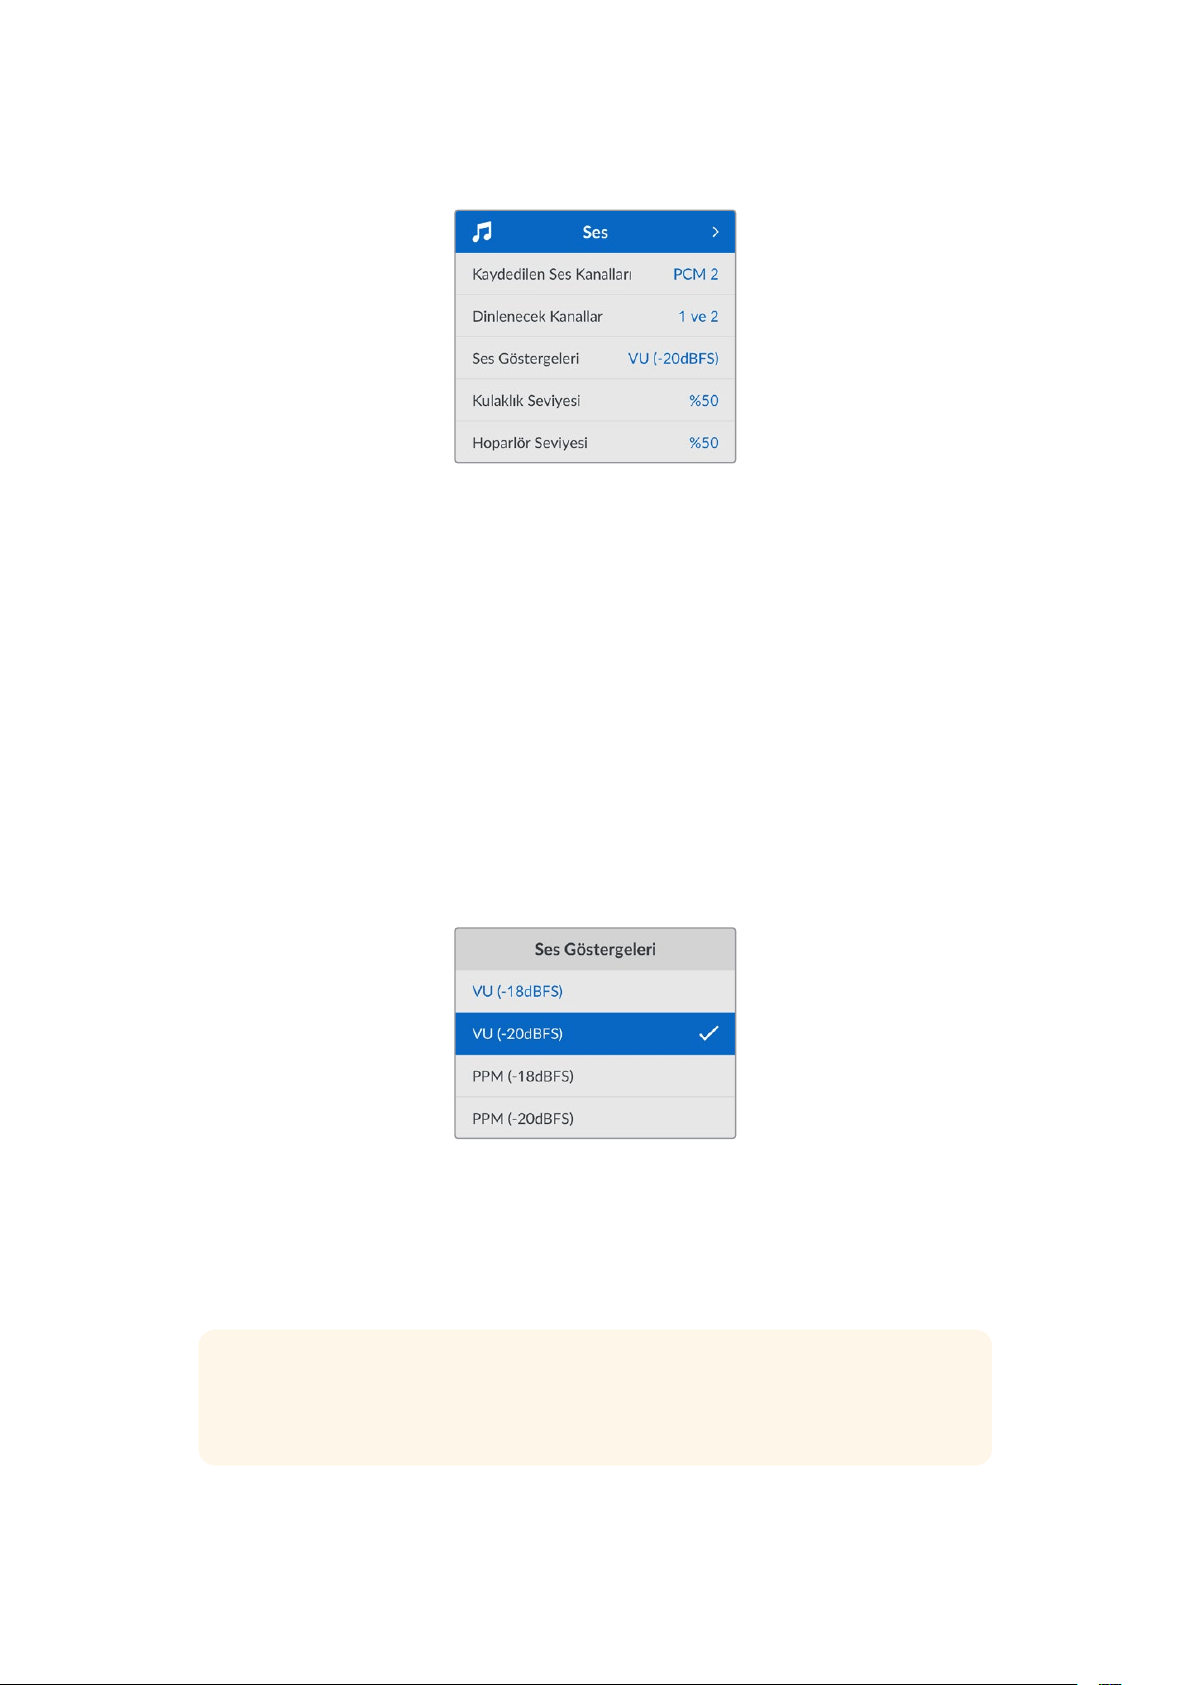
Ses Menüsü
Kaydedilen Ses Kanalları
Hyperdeck Studio, bir seferde 16 kanala kadar PCM ses kaydedebilir. Kaydedilen kanal sayısını
seçmek için, kaydedilen ses kanallarını listesini genişletin ve 2, 4, 8 veya 16 kanalı seçin. Kodek,
H.264 veya H.265 olarak ayarlanmışsa, 2 kanal AAC sesi de seçebilirsiniz, böylece kayıtları
doğrudan YouTube’ye yükleyebilirsiniz. Bu ayar ayrıca, monitör çıkış bağlantısı üzerinden
görüntülenecek kanal sayısını da seçer.
Dinlenecek Kanallar
İkiden fazla kanal kaydederken, ön panel LCD ekranında görmek istediğiniz kanalları seçebilirsiniz.
Bu, ‘dinlenecek kanallar’ seçeneği ile yapılabilir. Ön panel hoparlörüne sahip Hyperdeck Studio
modelleri için, bu ayar aynı zamanda hoparlör ve kulaklık bağlantısı üzerinden duyacağınız ses
kanallarını da belirler.
Ses Göstergeleri
Dahili LCD, gömülü ses kanalları için ses göstergelerini görüntüler. PPM veya VU göstergelerinden
birini seçebilirsiniz. Gösterge türünü değiştirmek için, menü ekranını açın ve seçeneklerden tercih
ettiğiniz ses gösterge ekranını seçin.
Kulaklık Seviyesi
Ön panelde bir kulaklık bağlantısı olan modellerde, kulaklığın ses seviyesini kulaklık seviyesi
ayarından yapabilirsiniz.
Hoparlör Seviyesi
Arama kadranını çevirerek hoparlörün ses seviyesini ayarlayın. Varsayılan ses seviyesi % 50’dir.
BİLGİ Kulaklık ve hoparlör ses seviyesi, doğrudan ön panel üzerinden de ayarlanabilir.
Hoparlör butonunu basılı tutun ve ses seviyesini artırmak veya azaltmak için arama
kadranını çevirin. Ses seviyesi, ön panelin üst tarafında ortada görünecektir.
728Ayarlar

Depolama Menüsü
Ortamı Formatla
SD Kartlar, SSD’ler ve arkadaki harici disk bağlantısı üzerinden bağlı ortam, doğrudan cihazda veya
bir Mac veya Windows bilgisayar aracılığıyla formatlanabilir.
Hyperdeck Studio’da Ortamın Hazırlanması:
1 Arama kadranı ve ‘set’ butonunu kullanarak, ‘Ortamı Formatla’ seçeneğini seçin.
2 Formatlamak için listeden ortamı seçin ve ‘set’ butonuna basın.
3 Formatı seçin ve ‘set’ butonuna basın.
4 Hangi kartın formatlanacağını ve seçilen format seçeneğini ayrıntılı olarak gösteren bir onay
penceresi görünecektir. Formatla komutunu seçin.
5 Bir formatlama penceresi görünecektir. Formatlama biter bitmez ‘Tamam’ butonuna basın.
Aynı zamanda Mac OS X Extended olarak da bilinen HFS+ formatı, ‘journaling’ yani günlükleme
işlemini desteklediğinden, bu format tavsiye edilir. Depolama ortamınızda nadiren olabilecek
bozulmalarda, ‘journaled’ isimli günlüklü ortamdaki verilerin, geri getirilmeleri daha muhtemeldir.
HFS+ yerel olarak Mac tarafından desteklenir. ExFAT, ek yazılıma gerek kalmadan Mac ve Windows
tarafından yerel olarak desteklenir, ama günlüklemeyi desteklemez.
Bir MAC veya Windows bilgisayarda ortamı formatlamak için, bu kılavuzdaki ortamın formatlanması
bölümüne bakın.
Kurulum Menüsü
729Ayarlar

İsim
Ağınızda birkaç Hyperdeck Studio olduğunda, onlara ayrı ayrı isimler vermeyi isteyebilirsiniz.
Bu, Blackmagic HyperDeck Setup yazılımı üzerinden veya bir terminal uygulaması kullanılarak
Blackmagic Hyperdeck Ethernet Protokolü ile yapılabilir.
Dil
HyperDeck Studio 13 dili destekler. Desteklenen diller arasında; İngilizce, Çince, Japonca, Korece,
İspanyolca, Almanca, Fransızca, Rusça, İtalyanca, Portekizce, Türkçe, Ukraynaca ve
Polonyaca bulunur.
Dili seçmek için:
1 Kurulum menüsü vurgulanınca, ‘set’ butonuna basın.
2 Dili seçmek için arama kadranıyla menüde ilerleyin ve ‘set’ butonuna basın.
3 Arama kadranını kullanarak dili seçin ve ‘set’ butonuna basın. Dil seçilir seçilmez, otomatik
olarak kurulum menüsüne dönersiniz.
Tarih
Tarihi ayarlamak için, tarih alanını seçin ve ‘set’ butonuna basın. Arama kadranını kullanarak, gün,
ay ve yılı seçebilirsiniz. Bu, dosya adına tarih ekleme seçeneğini doldurur.
Saat
Saati ayarlamak için, saati seçin ve ‘set’ butonuna basın. Saat ve dakika ayarını yapmak için arama
kadranını kullanın. Hyperdeck Studio’nun saati 24 saate ayarlıdır.
Yazılım
Mevcut yazılım sürümünü görüntüler.
Ön Panel
LCD’nin parlak bir şekilde aydınlatılması için HyperDeck’in ön panelini ‘açık görünüm’ moduna
ayarlayın. Parlak bir LCD’nin dikkat dağıtabileceği, loş ortamlar için ‘koyu görünüm’ modunu kullanın.
Örneğin; bir rafa monte edilmiş birden fazla HyperDeck’in olduğu bir yapım tesisinde.
730Ayarlar

Kamera
Bu ayar; HyperDeck’i birkaç kameradan ISO kayıt, yani ayrı dosyalar halinde kayıt yapmak için
kullanırken ve daha sonra onları DaVinci Resolve’de çok kameralı bir zaman çizelgesinde kurgulamak
için faydalıdır.
Her bir kamerayı temsil eden kimlik harfleri, dosyaların metaverilerinde görünür. Böylelikle
DaVinciResolve, Senkron Bin özelliğini kullanırken, her bir kamerayı kolaylıkla belirler.
A-Z arasında harfleri veya 1-9 arasında rakamları
kullanarak kameranıza bir kimlik verin.
Varsayılan Standart
HyperDeck Studio, kullanmak istediğiniz video standardını bazen bilemez. Bu ayar, en sık kullanmayı
istediğiniz video standardını, HyperDeck’in bilmesini sağlar.
Buna iyi bir örnek; bir HyperDeck Studio’yu açtınız, bağlı video sinyali yok ve 2 farklı video
standardına sahip dosyalar içeren bir disk yerleştirdiniz. HyperDeck’in hangi video standardını
oynatması gerekir? Varsayılan video standardı, HyperDeck’e hangi video standardını tercih ettiğinizi
gösterecek ve deck o formata geçip bu dosyaları oynatacaktır.
Varsayılan video standardı, HyperDeck’i ilk açtığınızda, bir video giriş sinyalinin ve takılı bir diskin
olmadığında kullanışlıdır. Bu durumda HyperDeck Studio, monitör çıkışı için hangi video standardını
kullanacağını bilmez. Varsayılan video standardı, ne yapması gerektiği konusunda rehberlik eder.
Bunların yanında, varsayılan video standardı yalnızca bir kılavuzdur. Hiçbir şeyi geçersiz kılmaz.
Yani, üzerinde sadece 1 tip video dosyası bulunan bir medya diskiniz varsa ve oynat düğmesine
basarsanız HyperDeck Studio o video standardına geçer ve videoyu oynatır. Varsayılan video
standardını dikkate almaz, çünkü sadece diskteki dosyaları oynatmak istediğiniz barizdir.
Kayıt bakımından da durum benzerdir. Kayıt butonuna bastığınızda, HyperDeck, video girişine bağlı
olan video standardında kayıt yapar. Üstelik, kayıt tamamlandıktan sonra, diskte varsayılan video
standardıyla eşleşen başka dosyalar olsa bile, HyperDeck Studio diskteki aynı standart video
dosyalarını oynatır. Az önce kaydettiğiniz video standardının aynısını oynatmak istediğiniz varsayılır.
Medya diski çıkarıp yeniden taktığınız zaman, hangi tip dosyaların oynatılacağını seçmek için
varsayılan video standardı kullanılır.
Varsayılan video standardı, sadece HyperDeck Studio ne yapacağı konusunda emin olmadığında
karar vermesine yardımcı olan bir kılavuzdur. Deck’i belirli bir şekilde davranmaya zorlayan bir
geçersiz kılma işlevi yoktur.
731Ayarlar

Ağ Ayarları
Protokol
Blackmagic Hyperdeck, DHCP’ye ayarlanmış olarak gelir, yani bir kez bağlandıktan sonra, ağ
sunucunuz otomatik olarak bir IP adresi atayacaktır ve başka bir ağ ayarının yapılması gerekmez.
Manuel bir adres belirlemeniz gerekiyorsa, statik bir IP üzerinden bağlanabilirsiniz.
Menüye erişmek için; ‘protokol’ seçiliyken yanıp sönen ‘set’ butonuna basın, ‘Statik IP’ seçeneğine
gidin ve tekrar ‘set’ butonuna basın.
IP Adresi, Alt Ağ Maskesi ve Ağ Geçidi
Statik IP seçildikten sonra, ağ bilgilerinizi manuel olarak girebilirsiniz.
IP adresini değiştirmek için:
1 Arama kadranını kullanarak ‘IP Adresi’ seçeneğini vurgulayın ve HyperDeck’inizin ön
panelindeki yanıp sönen ‘set’ butonuna basın.
2 Arama kadranını kullanarak IP adresini ayarlayın, IP adresinizi ayarlamak için arama kadranını
döndürün, bir sonraki basamağı ayarlamadan önce, girdiğiniz değeri teyit etmek üzere ‘set’
butonuna basın.
3 Yaptığınız değişikliği onaylamak için ‘set’ butonuna basın ve bir sonraki basamağa ilerleyin.
IP adresini girme işlemini tamamladığınızda, alt ağ maskesini ve ağ geçidini ayarlamak için bu
adımları tekrarlayabilirsiniz. İşlemler tamamlandığında, menüden çıkmak ve ana ekrana geri dönmek
için yanıp sönen ‘menü’ butonuna basın.
732Ayarlar

Zaman Kodu Ayarları
Giriş
Kayıt yaparken geçerli beş zaman kodu giriş seçeneği vardır.
Video Girişi Video girişi seçildiğinde, SDI ve HDMI kaynaklardan gömülü zaman kodunu ve
SMPTE RP 188 metaverileri alır. Bu, Hyperdeck Studio’da kaydedilen dosyaların,
SDI veya HDMI kaynak ile senkronizasyonunu sağlar.
Harici Arka paneldeki zaman kodu girişi bağlantısını kullanırken, bu seçeneği tıklayın.
Dahili Dahili zaman kodu üreteci aracılığıyla günlük saat zaman koduyla kaydetmek için,
bu seçeneği kullanın.
Son Klipten Al Zaman kodu girişiniz için ‘son klipten al’ seçeneğini kullandığınızda, her bir dosya,
önce kaydedilen klibin son karesinden bir kare sonra başlar. Örneğin, ilk klibiniz
10:28:30:10’da bitmişse sonraki klibin zaman kodu, 10:28:30:11’de başlar.
Önayar Zaman kodunu manuel olarak ayarlamak istiyorsanız, önayar seçeneğini seçin.
Kaydedilen klipler, önayar üzerinden belirlenen zaman kodundan başlayacaktır.
Kare Düşüren
29.97 veya 59.94 kare hızlarındaki NTSC kaynaklar için, ’kare düşüren’ veya ‘kare düşürmeyen’
zaman kodunu seçebilirsiniz. Kaynak bilinmiyorsa, ‘varsayılan’ı seçin. Bu, girişin standardını devam
ettirecek veya geçerli bir zaman kodu yoksa kare düşüren moduna geçecektir.
Önayar
Zaman kodunuzu; ‘set’ butonuna basarak ve arama kadranı ile ‘set’ butonunu aracılığıyla başlangıç
zaman kodunu girerek manuel olarak ayarlayabilirsiniz. Giriş menüsünde ‘önayar’ seçeneğinin
seçildiğinden emin olun.
Çıkış
Çıkışlarınız için zaman kodu seçeneklerini belirleyin.
Zaman
Çizelgesi
Bir kart veya diskte kayıtlı tüm klipler için kesintisiz bir zaman kodu çıkarmak üzere
zaman çizelgesini seçin.
Klip Klip seçeneği, her bir klibe ait zaman kodunu çıkarır.
SDI Çıkışı
733Ayarlar
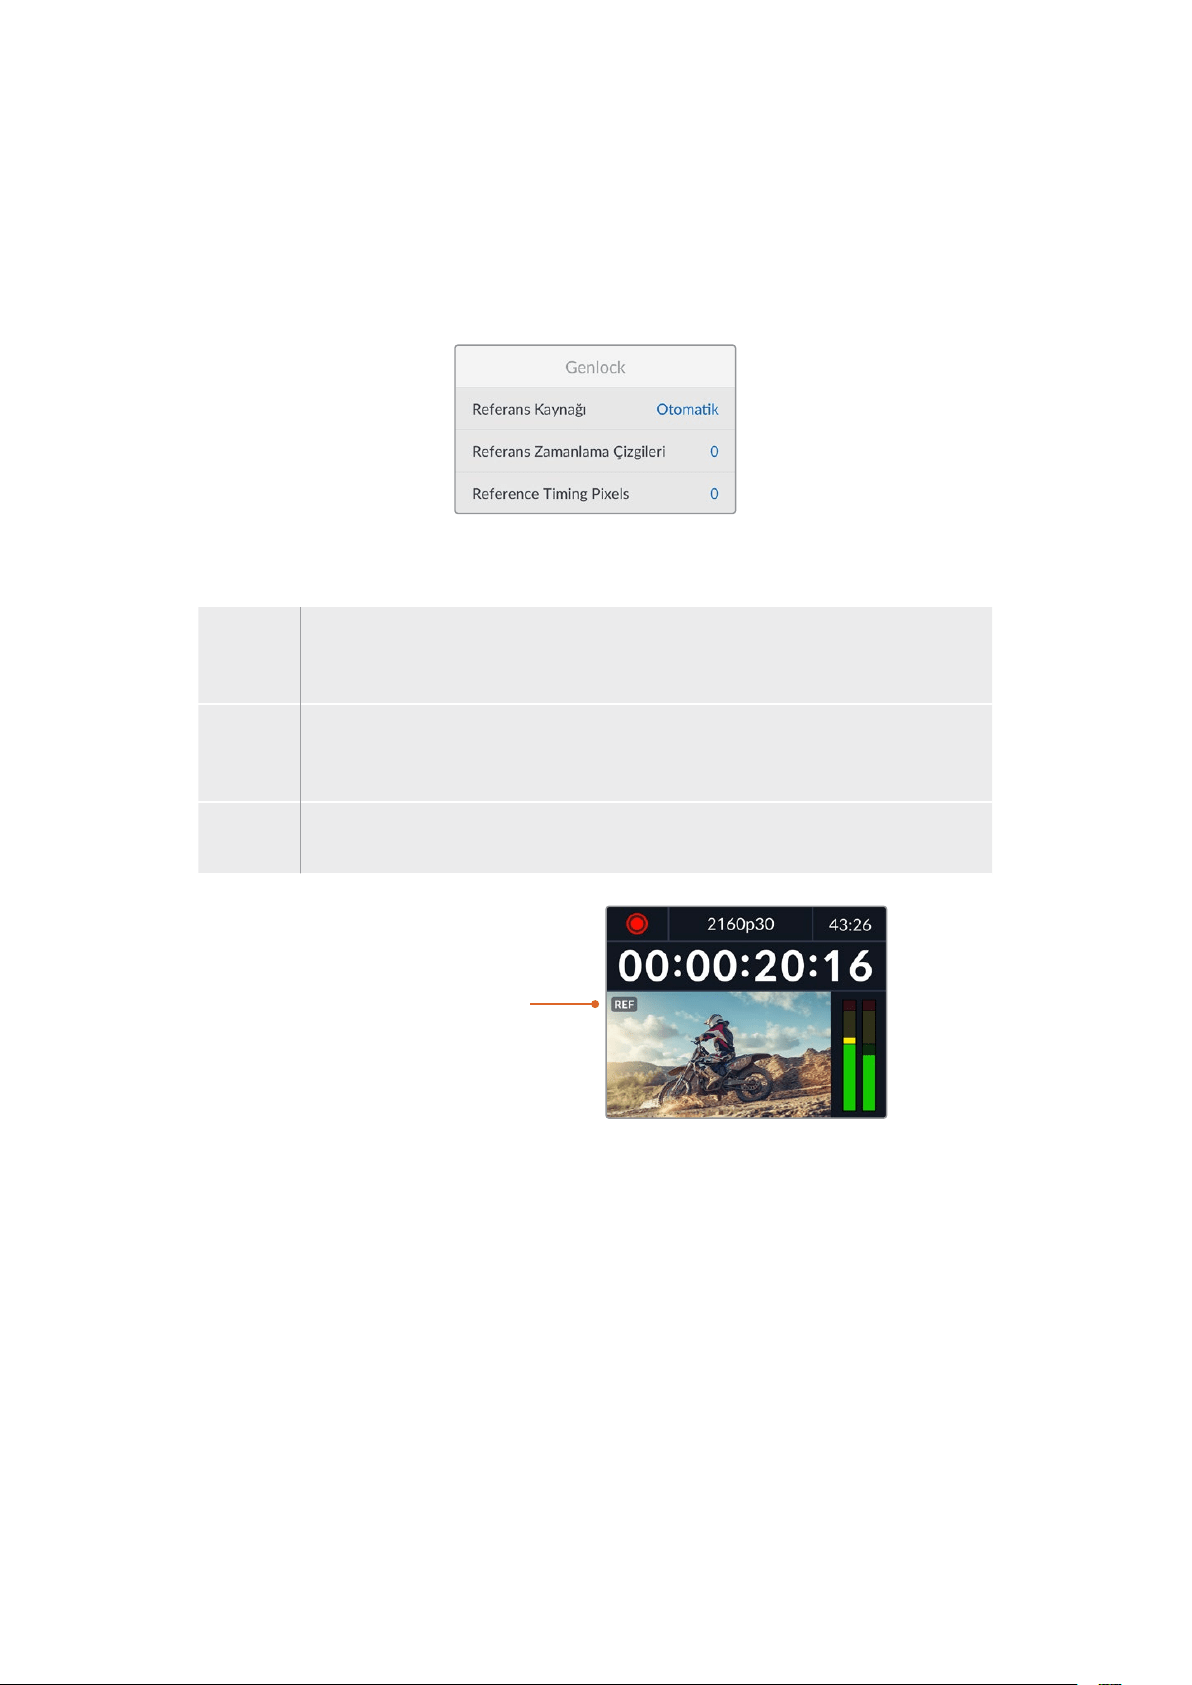
3G-SDI Çıkışı
Bazı yayın ekipmanları, yalnızca A veya B seviye 3G-SDI video sinyallerini alabilir.
Diğer yayın ekipmanlarıyla uyumluluğu sürdürmek için, direkt akışlı 3G-SDI için A Seviyeyi veya çift
akışlı çoğaltılmış 3G-SDI için B Seviyeyi seçin.
Genlock Ayarları
Referans Kaynağı
Aşağıdaki üç seçenekten referans kaynağınızı seçin.
Otomatik Arka paneldeki ‘ref in’ ibareli referans giriş girişine bağlı bir sinyal olduğunda ‘otomatik’
modu, harici referansa geçer. Bağlı bir referans olmadığında, SDI veya HDMI kaynaktan
gelen sinyal girişine geçer.
Giriş Senkronlamayı istediğiniz referans, SDI veya HDMI kaynağınızda gömülü ise ‘giriş’
seçeneğini seçin. Analog deck’inize doğrudan bağlı bir genlock kaynağının olması,
buna bir örnektir.
Harici Arka paneldeki ‘ref in’ ibareli referans girişine bağlı Blackmagic Sync Generator gibi
harici bir referans cihazınız varsa ‘harici’ seçeneğini seçin.
Harici Referans Göstergesi–
HyperDeck Studio’nuz
harici bir referans kaynağına
kilitlendiğinde, yerleşik LCD’de
bir ‘ref’ işareti görüntülenir.
Referans Zamanlama
Analog teyp deck’lerden arşivleme yapıyorsanız ve kare senkronizasyonuna ihtiyacınız olduğunda,
referans zamanlamayı ayarlayabilirsiniz. Referans ayarı, örnek bazında olduğu için örnek seviyesine
kadar inen, azami doğrulukta bir zamanlama ayarı yapabilirsiniz.
Zamanlamayı ayarlamak üzere:
1 Kurulum menüsünde, ‘referans zamanlama çizgileri’ seçeneğini vurgulamak için arama
kadranını kullanın ve yanıp sönen ‘set’ butonuna basın.
2 Zamanlama çizgilerinin değerini; artırmak için arama kadranını saat yönünde çevirerek veya
azaltmak için saat yönünün tersine çevirerek ayarlayın.
3 Tercihinizi onaylamak için yanıp sönen ‘set’ butonuna basın.
4 Pikselleri ayarlamak üzere, kurulum menüsüne dönmek için yanıp sönen ‘menü’ butonuna
basın ve referans zamanlama pikselleri için bu adımları tekrarlayın.
734Ayarlar
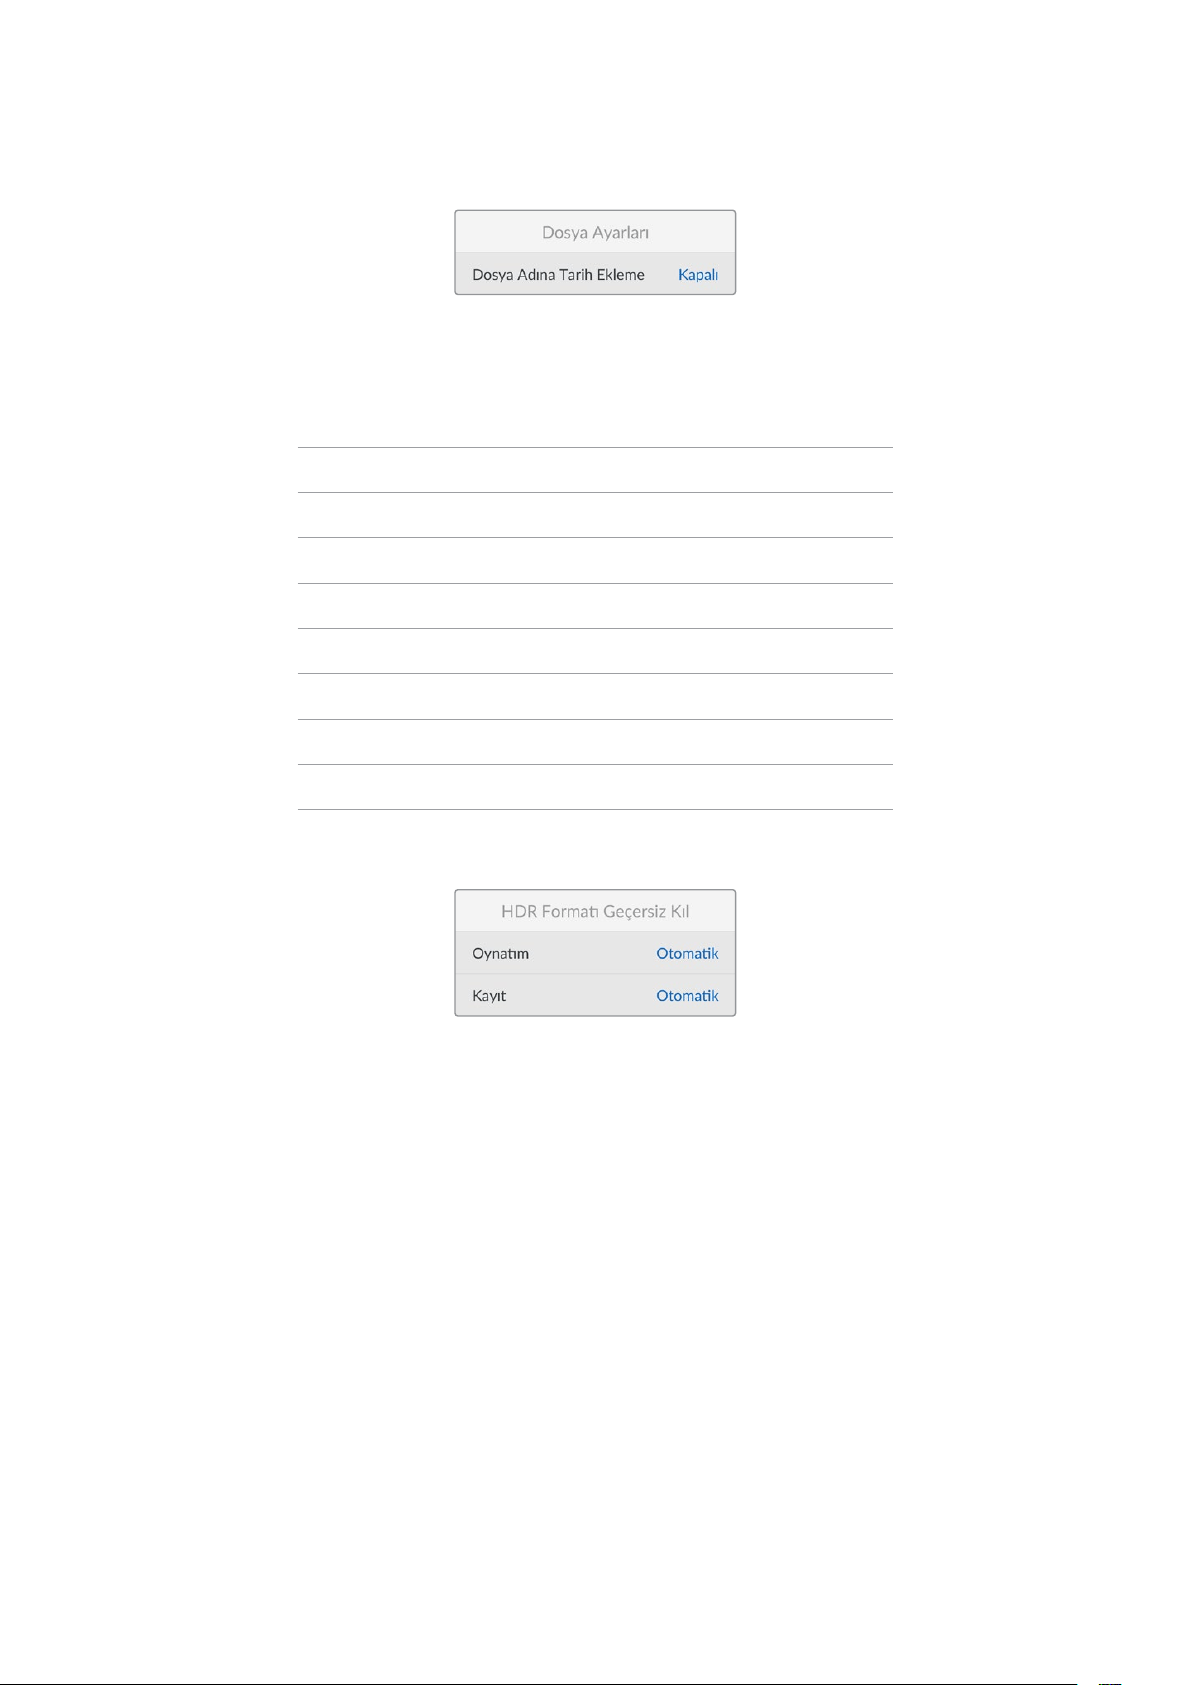
Dosya Ayarları
Dosya Adına Tarih Ekleme
Dosya adına eklenen tarih soneki, varsayılan olarak ‘kapalı’ seçeneğine ayarlıdır. Dosya adına tarih
ve saatin eklenmesini isterseniz, ‘set’ butonuna basın ve ‘Dosya Adına Tarih Ekleme’ seçeneğini açık
hale getirmek için arama kadranını kullanın.
HyperDeck_2105061438_0001
HyperDeck_2105061438_0001 Dosya Adı
HyperDeck_2105061438_0001 Yıl
HyperDeck_2105061438_0001 Ay
HyperDeck_2105061438_0001 Gün
HyperDeck_2105061438_0001 Saat
HyperDeck_2105061438_0001 Dakika
HyperDeck_2105061438_0001 Klip Numarası
HDR Formatı Geçersiz Kıl
Hyperdeck Studio 4K Pro, bir 4K video sinyalinde veya dosyasında gömülü HDR metaverilerini
otomatik olarak algılar ve HDMI çıkışı üzerinden görüntüler. Sinyal veya dosya yanlış etiketlenmişse
ya da ekranınız HDR uyumlu değilse HDR formatını geçersiz kılabilirsiniz.
Bunu yapmak için, ‘HDR formatı geçersiz kıl’ ayarını, REC.2020 SDR gibi bir SDR seçeneğine ayarlayın.
Mevcut HDR oynatım ve kayıt seçenekleri:
Otomatik
Otomatik seçeneği, varsayılan ayardır ve HyperDeck’in, otomatik olarak klibin HDR metaverisiyle
uygun bir çıkış formatını seçmesini sağlar.
Rec.709
Standart dinamik aralık kullanan, yüksek çözünürlüklü video içindir.
Rec.2020 SDR
Bu ayar, standart dinamik aralık kullanan Ultra HD video için kullanılır.
HLG
HLG, ‘hybrid log gamma’ için kısaltmadır. Bu format, HDR oynatabilen televizyon ve ekranlarda,
HDR videonun geri oynatılmasına imkan verir. Bunlara, Rec.2020 SDR’a kadar olan formatları
destekleyenler de dahildir.
735Ayarlar

Aşağıdaki ayarlar, Rec.2020 renk skalasını ve PQ olarak da bilinen ve SMPTE ST2084 olarak
yayınlanmış ‘perceptual quantizer’, yani algısal niceleyiciyi destekler. PQ, daha parlak görüntülerin
görüntülenmesini sağlayan, geniş skala HDR işlevidir. Parlaklık, metrekareye düşen ‘candela,’ yani
kandil değeri ile ölçülür. Örneğin, 1000 cd/m
2
, ilgili format tarafından desteklenen, metrekare başına
düşen azami parlaklığı gösterir.
ST2084 (300)
300 cd/m
2
parlaklık.
ST2084 (500)
500 cd/m
2
parlaklık.
ST2084 (800)
800 cd/m
2
parlaklık.
ST2084 (1000)
1000 cd/m
2
parlaklık.
ST2084 (2000)
2000 cd/m
2
parlaklık.
ST2084 (4000)
4000 cd/m
2
parlaklık.
Uzaktan Kontrol
Uzaktan Kontrol
RS-422 üzerinden uzaktan kontrolü etkinleştirmek için ‘uzaktan kontrol’ü seçin. Bu, Hyperdeck
Extreme Control gibi başka bir cihaz tarafından, HyperDeck’in uzaktan kontrol edilmesine izin verir.
Seçildiğinde, bazı HyperDeck modellerinde olan özel ‘remote’ butonu, aktif olduğunu göstermek
için yanacaktır. Cihazı yerel olarak kontrol etmek için uzaktan kontroldeki seçimini kaldırın.
Deck Kontrolü
Uzaktan kontrol etkinken, bir HyperDeck’teki aktarım kontrollerini, diğer ek HyperDeck ünitelerine
yansıtabilirsiniz. HyperDecklerinizi; ana HyperDeck’teki ‘remote out’ olarak etiketli uzaktan kontrol
çıkışını, ikinci ünitedeki ‘remote in’ girişine bağlayarak zincirleme bağlayın, sonra ek üniteler için bu
RS-422 zincirleme bağlama işlemine devam edin. Tüm ek ünitelerdeki uzaktan kontrol ayarı
etkinleştirildiğinde, ana ünite üzerindeki aktarım kontrolleri, ek üniteleri de kontrol edecektir.
Örneğin, ana HyperDeck’teki ‘record’ butonuna bastığınızda, bağlı tüm ek HyperDeck’ler aynı anda
kayda başlar.
Hyperdeck Studio HD Mini’yi kontrol cihazı olarak kullanamayacağınızı, ama bir Hyperdeck Pro veya
Plus modeli tarafından kontrol edilebileceğini belirtmekte fayda var.
Ayarları Sıfırlama
Fabrika Ayarlarına Sıfırla
HyperDeck’inizi fabrika ayarlarına geri döndürmek için kurulum menüsünde ‘Fabrika Ayarlarına
Sıfırla’yı vurgulayın. ‘Set’ butonuna basar basmaz, sizden seçiminizi onaylamanız istenir.
736Ayarlar

Arka Panel
1 Güç
Tüm Hyperdeck’lerde, AC şebeke elektriğine bağlamak için bir IEC güç girişi bulunur.
Hyperdeck Studio 4K Pro’da, yedeklik için iki tane vardır. Yedek olarak da kullanılabilen DC
girişi, harici 12V batarya gücüne imkan verir. Kullandığınız her DC güç kaynağının, DC giriş
bağlantısının altında işaretli olan giriş voltajı ve akım değeriyle uyumlu olduğundan
emin olun.
2 Ethernet
Ethernet portu, hızlı FTP dosya transferleri için ağınıza bağlanmanıza veya Hyperdeck
Ethernet protokolü kullanarak cihazı uzaktan kontrol etmenize olanak sağlar. Dosya transfer
hızları; HD modellerde 1GBe üzerinden ve Hyperdeck Studio 4K Pro’da 10GBe üzerinden
desteklenir. Bir FTP istemcisi aracılığıyla dosyaların aktarılması hakkında daha fazla bilgi için,
bu kılavuzdaki ‘Bir Ağ Üzerinde Dosyaların Aktarımı’ bölümüne bakın.
Bir ATEM switcher’in bağlı olduğu aynı ağı paylaşdığında, ATEM switcher veya ATEM
donanım paneli kullanarak da HyperDeck’inizi kontrol edebilirsiniz.
3 Uzaktan Kontrol
Bazı Hyperdeck Studio modelleri, uzaktan kontrol girişi ve çıkışı için iki adet RS-422 DE-9
bağlantısına sahiptir. Hyperdeck Studio HD Mini, sadece uzaktan kontrol girişini destekler.
4 Harici Disk
Hyperdeck Studio HD modellerinde 5Gb/sn kadar hızlarda harici disklere kayıt yapabilmek
için USB-C bağlantısına bir flaş disk bağlayın. 10Gb/sn’yeye ulaşan transfer hızları için
Hyperdeck Studio 4K Pro modelleri, 2ci nesil bir USB 3.1 bağlantısına sahiptir. Bir veya daha
çok sayıda SSD bağlamak üzere çok portlu USB-C hub cihazlarını veya Blackmagic
MultiDock 10G’yi bağlayabilirsiniz.
HyperDeck’iniz, USB üzerinden bilgisayarınıza bağlı olduğunda, Open Broadcaster ve
Skype gibi yazılımlarda, HyperDeck’i webcam kaynağı olarak kullanabilirsiniz. Daha fazla
bilgi için, bu kılavuzdaki ‘Open Broadcaster Uygulamasının Kurulumu’ bölümüne bakın.
5 Monitör Çıkışı
3G-SDI monitör çıkışı bağlantısı, harici bir ekranda izleyebilmeniz için katmanlara sahip ve
ölçeği küçültülmüş bir sinyal sağlar. Katmanlar arasında; disk simgeleri, ses göstergeleri ve
bir zaman sayacı ekranının yanı sıra bir ekran LUT’u bulunur. Temiz sinyalin nasıl çıkarılacağı
da dahil olmak üzere, SDI monitör ayarları hakkında daha fazla bilgi için bu kılavuzda daha
önceki ‘Ayarlar’ bölümüne bakın.
2 5 6 8 941
HyperDeck Studio HD Mini,
kablonun kazayla çıkmasını
önleyen kilitleme halkalı bir güç
konektörüne sahiptir.
HyperDeck Studio HDMini
ve Plus modellerinde, zaman
kodugirişive çıkışıiçin BNC
konektörleri bulunur
7
3
737Arka Panel

6 Referans
Tüm HyperDeck modelleri, standart çözünürlüklü black burst ve yüksek çözünürlüklü
tri-sync standartlarına karşılık gelen, stabilize bir video referans çıkışına sahiptir. Ayrıca,
bir senkronizasyon üreteci gibi harici kaynaklardan da referans sinyalleri alabilirsiniz. Yani,
tesisinizdeki tüm cihazları, Blackmagic Sync Generator gibi tek bir kaynaktan gelen bir
referans sinyaline kilitleyerek senkronize edebilirsiniz! Ayarlar menüsünü kullanarak giriş
ve harici referans kaynağı arasında seçim yapın.
Referans kaynağını seçme hakkında daha fazla bilgi için, bu kılavuzdaki ‘Kurulum’
ayarlarına bakın.
7 Zaman Kodu
Zaman kodu girişleri aracılığıyla harici zaman kodu sinyalini alın veya Hyperdeck’ten zaman
kodunu ‘TC Out’ ibareli zaman kodu çıkış bağlantısı üzerinden zincirleme bağlayın. Bazı
modellerde, zaman kodu BNC konnektörler üzerinden bağlanır ve Hyperdeck Studio 4K Pro,
XLR zaman kodu bağlantılarına sahiptir. Zaman kodu seçeneklerini nasıl seçeceğiniz
hakkında daha fazla bilgi için, bu kılavuzdaki ‘Ayarlar’ bölümüne bakın.
8 HDMI
HDMI çıkışını, HDMI televizyonlara ve monitörlere bağlayın.
Sinyal, doğru metaveri ile işaretlenmişse Hyperdeck, otomatik olarak SDR ve HDR video
standartlarını algılar. Ayarlar menüsünü kullanarak HDR işaretini de geçersiz kılabilirsiniz.
Daha fazla bilgi için, bu kullanım kılavuzundaki ‘ayarlar’ bölümüne bakın.
9 SDI
Hyperdeck Studio HD Mini modelleri, 1080p60’a kadar olan sinyaller için bir 3G SDI
bağlantısına sahiptir. Hyperdeck Studio HD Plus ve Hyperdeck Studio HD Pro modelleri,
SD’den 2160P30’a varan sinyallere imkan tanıyan, 6G-SDI bağlantısına sahiptir. Hyperdeck
Studio 4K Pro, 2160p60’a kadar çözünürlüklere olanak veren 12G-SDI giriş ve çıkışlara
sahiptir.
İki adet SDI çıkışına sahip HyperDeck’ler, ATEM switcher’lere bağlı olduğunda, eşzamanlı fill
ve key sinyalleri için ProRes 4444 dosyalarını oynatmak üzere kullanılabilir.
738Arka Panel

Monitör Çıkışının Kullanılması
Monitör çıkışı; kullanılan kodek, video ve sinyal formatı, kare hızı, zaman kodu, dosya adı, aktarım
kontrol durumu, depolama ortamı durumu ve ses seviyeleri gibi önemli durum bilgilerini görüntüleyen
kapmanlarla, kaydınızı veya oynatılan videoyu görsel olarak denetlemenin, hızlı bir yoludur.
Aşağıda görüntülenen bilgilerin açıklamaları vardır.
Kodek
LCD menüsünden seçilen kodeği görüntüler.
Format
Oynatım modundayken, mevcut klibin çözünürlüğünü ve kare hızını görüntüler. Kayıt modundaysanız
şuan seçili kaynağa bağlı videonun çözünürlüğünü ve kare hızını görüntüler.
Zaman Kodu
Oynatım esnasında video klibinizin zaman kodunu ya da video girişi veya zaman kodu girişi
üzerinden şuan kaydedilmekte olan videonun zaman kodunu görüntüler. Ayrıca, klip zaman kodunu
görüntüleme veya zaman çizelgesi için zaman sayacını görüntüleme arasında seçim yapabilirsiniz.
Kaynak
Şuan seçili olan SDI veya HDMI kaynağı görüntüler. Ekranda ‘sinyal yok’ belirirse, geçerli bir sinyalin
algılanmadığı anlamına gelir.
İsim
HyperDeck disk kaydedicinizin ismini gösterir. HyperDeck’in isminin nasıl değiştirildiği hakkında bilgi
için, bu kılavuzun ilerleyen kısımlarındaki ‘Blackmagic HyperDeck Setup’ bölümüne bakın.
739Monitör Çıkışının Kullanılması

Durum
Bir klibi oynattığınızda veya kaydederken, bu gösterge, aktarım kontrol durumunu ve kullanılmakta
olan kontrolleri görüntüler. Bunlar dahilinde:
HyperDeck bekleme modunda. Oynatımın, şuan seçili video
formatını paylaşan tüm kayıtlı
klipleri ‘döngüye almak’ için
ayarlandığını gösterir.
Video oynatılıyor. Oynatımın, tek bir klibi döngüye
almak için ayarlandığını gösterir.
Video kaydediliyor.
Gösterge, kayıt esnasında
kırmızı renkte yanar.
Hızlı oynatım modunun etkin,
ama beklemede olduğunu
gösterir.
Hızlı ileri veya geri sarım
esnasında görüntülenir.
Rakamlar, ileri veya geri
sarımın hızını gösterir.
HyperDeck, yavaş oynatım
modunda.
HyperDeck, interaktif oynatım
modunda.
Depolama Ortamı Durumu
Bu üç gösterge; SD kartların, SSD’lerin ve aktif USB disklerin isimlerini ve durumularını gösterir ve
HyperDeck modeline bağlı olarak biraz farklılık gösterebilir.
HyperDeck
Studio HD Plus
SD Kart yuva 1 SD Kart yuva 2 Aktif harici disk
HyperDeck
Studio Pro Modelleri
Şuan kullanılan SD
veya SSD yuvası
Sıradaki bir sonra
kullanılacak SD veya
SSD yuvası
Aktif harici disk
Tüm HyperDeck modellerinde, üçüncü gösterge USB diski gösterir. Bir USB hub cihazı veya
Blackmagic MultiDock 10G gibi harici bir cihaz kullanıyorsanız, aktif olan disk görüntülenir.
Kart veya Disk Göstergesi
İlerleme çubuğunun üzerindeki yazı, SD kart yuvasını veya SSD yuvasını belirtir. Kayıt
yapıyorsanız, kaydın yapıldığı diski kolayca tespit edebilmeniz için diskin solunda ‘current’
ibaresi görünür. Kaydın yapılacağı bir sonraki kartı veya diski belirtmek için ilerleme
çubuğunun üzerinde ‘Next’ ibaresi belirir.
740Monitör Çıkışının Kullanılması

Ortam Çubuğu
Ortam çubuğu simgesi, mevcut durumuna bağlı olarak mavi, beyaz veya kırmızı renkte olur
ve ortamdaki kullanılan alanı görüntüler.
Mavi disk simgesi, aktif olan diski belirtir. Oynatım ve kayıt için
kullanılacak disk budur.
Beyaz bir disk simgesi, ortamın mevcut olduğunu ancak aktif
olmadığını gösterir. Tamamen beyaz bir çubuk, ortamın dolu
olduğunu gösterir.
Kayıt esnasında, bu çubuk kırmızı renkte yanar.
Ortam çubuğunun altındaki metin ya kalan kayıt süresini ya da yuvanın durumunu görüntüler.
Kalan süre
SD kartınızda veya SSD diskinizde boş alan kaldığında, mevcut kaynak formatına ve seçtiğiniz
kodek ile kalite ayarlarına bağlı olarak kalan süre, saat:dakika:saniye halinde görüntülenir.
Bir saatten daha az bir süre kaldığında, kalan süre dakika:saniye olarak görüntülenir.
Yuva durumu
Ortam yuvasında bir ortam olmadığında, o yuva için “kart yok” ve “disk yok” görüntülenir.
Bir SD kart, SSD veya USB disk dolduğunda, simgede ‘kart dolu’ veya ‘disk dolu’ ibaresi
görüntülenir, böylece depolama ortamını değiştirme zamanının geldiğini bilirsiniz. Başka bir
SD kart veya SSD takılı ise, kayıt otomatik olarak bu kartta veya diskte devam eder. Harici
bir disk bağlıysa tüm SD kartlar ve SSD’ler dolduğunda, kayıt hemen bu diske geçer.
Kilitli olan bir sürücü, ilerleme çubuğunun altındaki ‘kart kilitli’ veya ‘disk kilitli’ ibaresiyle
gösterilir.
741Monitör Çıkışının Kullanılması

Ses Göstergeleri
Ekran üstü ses göstergeleri, kaydetmek istediğiniz kanal sayısına bağlı olarak 16 kanala
kadar ses seviyesini görüntüler. Bunlar, LCD menüsündeki ses sekmesi üzerinden PPM
veya VU göstergeleri olarak ayarlanabilir.
Kaydedilecek ses kanalı sayısını seçmek veya farklı bir ses göstergesine geçmek için LCD
menüsündeki ses sekmesini kullanın. Daha fazla bilgi için, bu kullanım kılavuzundaki ‘ayarlar’
bölümüne bakın.
Depolama Ortamı
SD Kart
Yüksek kalite Ultra HD kayıt için, yüksek hızlı UHS-II SD kartları öneriyoruz. Bu kartların Ultra HD
2160p60’a kadar kayıt yapabilmesi için, yazma hızı kapasitelerinin 220MB/sn’nin üzerinde olması
gerekir. Ancak, daha yüksek sıkıştırmayla daha düşük bit hızlarında kayıt yapıyorsanız daha yavaş
kartları kullanmanız mümkün olabilir. Genel olarak, kartlarınız ne kadar hızlıysa o kadar iyidir.
Daha güncel bilgiler için düzenli olarak bu kılavuzun en güncel sürümüne bakmanızda fayda vardır
ve her zaman www.blackmagicdesign.com/tr/support adresindeki Blackmagic Design internet
sitesinden indirilebilir.
HyperDeck Studio 4K Pro ile hangi SD kartları kullanmalıyım?
60 fps’ye kadar 2160p kayıt için, aşağıdaki SD Kartlar önerilir.
Marka Model Kapasite
Angelbird AV Pro MK2 V90 SDXC 128GB
Angelbird AV Pro MK2 V90 SDXC 256GB
ProGrade Digital SDXC UHS-II V90 300R 128GB
ProGrade Digital SDXC UHS-II V90 300R 256GB
Wise SD2-128U3 SDXC UHS-II 128GB
742Depolama Ortamı
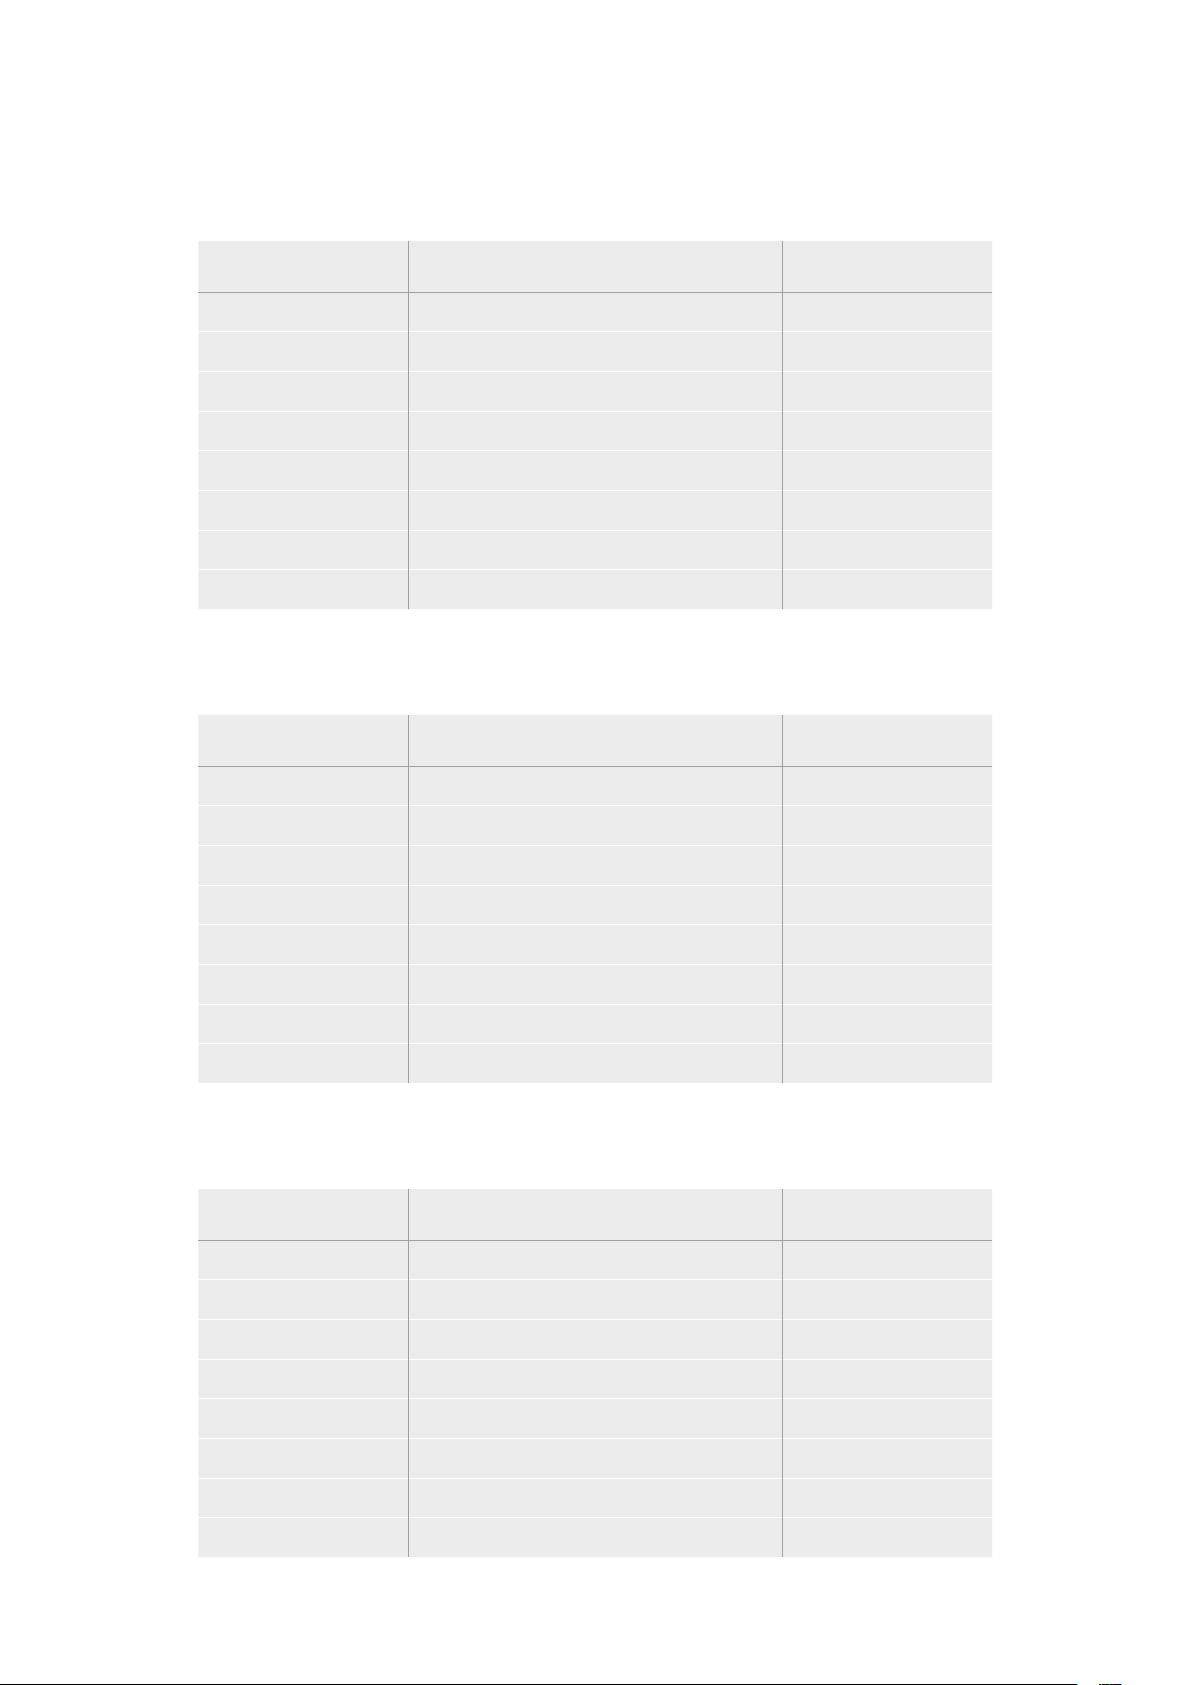
HyperDeck Studio HD Pro ile hangi SD kartları kullanmalıyım?
30 fps’ye kadar 2160p kayıt için, aşağıdaki SD Kartlar önerilir.
Marka Model Kapasite
Angelbird AV Pro MK2 V90 SDXC 64GB
Angelbird AV Pro MK2 V90 SDXC 128GB
Angelbird AV Pro MK2 V90 SDXC 256GB
ProGrade Digital SDXC UHS-II V90 300R 64GB
ProGrade Digital SDXC UHS-II V90 300R 128GB
ProGrade Digital SDXC UHS-II V90 300R 256GB
Wise SD2-64U3 SDXC UHS-II 64GB
Wise SD2-128U3 SDXC UHS-II 128GB
HyperDeck Studio HD Plus ile hangi SD kartları kullanmalıyım?
30 fps’ye kadar 2160p kayıt için, aşağıdaki SD Kartlar önerilir.
Marka Model Kapasite
Angelbird AV Pro MK2 V90 SDXC 64GB
Angelbird AV Pro MK2 V90 SDXC 128GB
Angelbird AV Pro MK2 V90 SDXC 256GB
ProGrade Digital SDXC UHS-II V90 300R 64GB
ProGrade Digital SDXC UHS-II V90 300R 128GB
ProGrade Digital SDXC UHS-II V90 300R 256GB
Wise SD2-64U3 SDXC UHS-II 64GB
Wise SD2-128U3 SDXC UHS-II 128GB
HyperDeck Studio HD Mini ile hangi SD kartları kullanmalıyım?
60 fps’ye kadar 1080p ProRes 422 HQ kayıt için, aşağıdaki SD Kartlar önerilir.
Marka Model Kapasite
Angelbird AV Pro MK2 V90 SDXC 64GB
Angelbird AV Pro MK2 V90 SDXC 128GB
Angelbird AV Pro MK2 V90 SDXC 256GB
ProGrade Digital SDXC UHS-II V90 300R 64GB
ProGrade Digital SDXC UHS-II V90 300R 128GB
ProGrade Digital SDXC UHS-II V90 300R 256GB
Wise SD2-64U3 SDXC UHS-II 64GB
Wise SD2-128U3 SDXC UHS-II 128GB
743Depolama Ortamı

SSD
Yüksek veri hızlı videolar ile çalışırken, kullanmak istediğiniz SSD’yi dikkatlice kontrol etmeniz
önemlidir. Bunun nedeni, bazı SSD’lerin yazma hızlarının, üreticilerin iddia ettiği hızlardan %50 daha
düşük olabilmesidir, yani bir diskin özelliklerinde, SSD’nin video yönetmek için yeterli hızda olduğu
ileri sürülse bile, aslında o disk, gerçek zamanlı video kaydı için yeterli hıza sahip değildir.
Gizli veri sıkıştırması, en çok kaydetmeyi etkiler ve bu diskler, genellikle gerçek zamanlı oynatım için
kullanılabilirler.
Testlerimizde, daha yeni ve daha büyük kapasiteli SSD modellerinin, genellikle daha hızlı olduğunu
bulduk. Kullanım için önerilen SSD’ler aşağıda listelenmiştir.
HyperDeck Studio 4K Pro ile hangi SSD’leri kullanmalıyım?
60 fps’ye kadar 2160p kayıt için, aşağıdaki SSD’ler önerilir.
Marka Model Kapasite
Samsung 860 PRO 512GB
Samsung 860 PRO 1TB
Samsung 870 EVO (MZ-77E250BW) 250GB
Samsung 870 EVO (MZ-77E500BW) 500GB
Samsung 870 EVO (MZ-77E1T0BW) 1TB
Samsung 870 EVO (MZ-77E2T0BW) 2TB
HyperDeck Studio HD Pro ile hangi SSD’leri kullanmalıyım?
30 fps’ye kadar 2160p kayıt için, aşağıdaki SSD’ler önerilir.
Marka Model Kapasite
Samsung 860 PRO 512GB
Samsung 860 PRO 1TB
Samsung 870 EVO (MZ-77E250BW) 250GB
Samsung 870 EVO (MZ-77E500BW) 500GB
Samsung 870 EVO (MZ-77E1T0BW) 1TB
Samsung 870 EVO (MZ-77E2T0BW) 2TB
744Depolama Ortamı

Harici Disk
Tüm HyperDeck modelleri, doğrudan USB-C flaş disklere kayıt yapabilir. Bu hızlı, yüksek kapasiteli
diskler, uzun süreli video kaydetmenize olanak verir. Sonra, aynı flaş diski bilgisayarınıza takabilir
ve doğrudan bu diskten kurgulama yapabilirsiniz!
Daha da yüksek depolama kapasiteleri için bir USB-C çoğaltıcı veya harici bir sabit disk
bağlayabilirsiniz. Blackmagic MultiDock 10G veya USB-C flaş diskinizi bağlamak için, USB-C
kablosunun takılı olduğu cihazdan, HyperDeck’inizin arka panelindeki ‘ext disk’ olarak işaretli
harici disk bağlantısına kabloyu bağlayın.
HyperDeck Studio 4K Pro ile hangi USB-C diskleri kullanmalıyım?
60 fps’ye kadar 2160p kayıt için, aşağıdaki USB-C diskler önerilir.
Marka Model Kapasite
Angelbird SSD2GO PKT MK2 512GB
Angelbird SSD2GO PKT MK2 2TB
DelKinDevices Juggler 1TB
DelKinDevices Juggler 2TB
LaCie Rugged SSD STHR2000800 2TB
LaCie Rugged SSD Pro STHZ1000800 1TB
Wise PTS-512 Portable SSD 512GB
Wise PTS-1024 Portable SSD 1TB
HyperDeck Studio HD Pro ile hangi USB-C diskleri kullanmalıyım?
30 fps’ye kadar 2160p kayıt için, aşağıdaki USB-C diskler önerilir.
Marka Model Kapasite
Angelbird SSD2GO PKT MK2 512GB
Angelbird SSD2GO PKT MK2 2TB
DelKinDevices Juggler 1TB
DelKinDevices Juggler 2TB
LaCie Rugged SSD STHR2000800 2TB
LaCie Rugged SSD Pro STHZ1000800 1TB
Wise PTS-512 Portable SSD 512GB
Wise PTS-1024 Portable SSD 1TB
745Depolama Ortamı

HyperDeck Studio HD Plus ile hangi USB-C diskleri kullanmalıyım?
30 fps’ye kadar 2160p kayıt için, aşağıdaki USB-C diskler önerilir.
Marka Model Kapasite
Angelbird SSD2GO PKT MK2 512GB
Angelbird SSD2GO PKT MK2 2TB
DelKinDevices Juggler 1TB
DelKinDevices Juggler 2TB
LaCie Rugged SSD STHR2000800 2TB
LaCie Rugged SSD Pro STHZ1000800 1TB
Wise PTS-512 Portable SSD 512GB
Wise PTS-1024 Portable SSD 1TB
HyperDeck Studio HD Mini ile hangi USB-C diskleri kullanmalıyım?
60 fps’ye kadar 1080p ProRes 422 HQ kayıt için, aşağıdaki USB-C diskler önerilir.
Marka Model Kapasite
Angelbird SSD2GO PKT MK2 512GB
Angelbird SSD2GO PKT MK2 2TB
DelKinDevices Juggler 1TB
DelKinDevices Juggler 2TB
Wise PTS-512 Portable SSD 512GB
Wise PTS-1024 Portable SSD 1TB
746Depolama Ortamı

Ortamın Formatlanması
Ortamın Bir Bilgisayarda Hazırlanması
Ortamın bir Mac Bilgisayarda Formatlanması
Mac bilgisayarlarda dahil edilen ‘Disk Utility’ yardımcı uygulaması, bir diski HFS+ veya exFAT olarak
formatlayabilir.
Formatlama işlemini yapmadan önce, diskte bulunan önemli dosyalarınızı yedeklediğinizden emin
olun, çünkü formatlandığında diskinizdeki her şey silinir.
1 Harici bir dock veya bir kablo adaptörü ile bilgisayarınıza bir SSD bağlayın ve SSD’nizin Time
Machine yedekleme için kullanılması taleplerini içeren mesajları reddedin. CFast kartları,
harici bir kart okuyucu aracılığıyla bilgisayarınıza bağlayın.
2 Uygulamalar/izlenceler sekmesine girin ve Disk Utility uygulamasını başlatın.
3 SSD’nizin veya CFast kartınızın disk ikonunu tıklayın ve sonra ‘erase’ sekmesini tıklayın.
4 Formatı, ‘Mac OS Extended (Journaled)’ veya “exFAT” olarak ayarlayın.
5 Yeni disk birimi için bir isim girin ve sonra ‘erase’ butonunu tıklayın. Medyanız hızlı bir şekilde
formatlanır ve HyperDeck ile kullanıma hazır hale getirilir.
Ortamın bir Windows Bilgisayarda Formatlanması
Bir Windows PC bilgisayarda, ‘formatlama’ diyalog kutusu, bir diski exFAT olarak formatlayabilir.
Formatlama işlemini yapmadan önce, SSD’de veya SD kartta bulunan önemli dosyalarınızı
yedeklediğinizden emin olun, çünkü formatlandığında ortamdaki her şey silinir.
1 Bir harici dock veya kablo adaptörü ile SSD’yi bilgisayarınıza bağlayın. CFast kartları, harici
bir CFast kart okuyucu aracılığıyla bilgisayarınıza bağlayın.
2 Başlat menüsünü veya başlat ekranını açın ve bilgisayarım sekmesini seçin. SSD veya CFast
kartınızı sağ tıklayın
3 İçerik menüsünden, ‘format’ sekmesini seçin.
4 Dosya sistemini ‘exFAT’ olarak ve ayırma birim sığasını da 128 kilobayt olarak ayarlayın.
747Ortamın Formatlanması

5 Yeni disk birimi için bir isim girin, ‘hızlı formatlama’ sekmesini seçin ve ‘Başlat’
butonunu tıklayın.
6 Medyanız hızlı bir şekilde formatlanır ve HyperDeck ile kullanıma hazır hale getirilir.
HyperDeck’in Web Kamerası
OlarakKullanımı
USB üzerinden bir bilgisayara bağlandığında, HyperDeck disk kaydediciniz bir web kamerası olarak
algılanır. Yani, Open Broadcaster gibi internet yayın yazılımlarını kullanarak, HyperDeck’inizde
oynatılan veya kaydedilen videoyu internette yayınlayabilirsiniz.
Webcam Kaynağı Olarak Ayarlanması
Çoğu durumda, internet yayın yazılımınız, otomatik olarak HyperDeck’i webcam olarak ayarlar. Yani,
internet yayın yazılımınızı başlattığınızda, HyperDeck Studio’nuzdan görüntüyü anında görürsünüz.
Yazılımınız, HyperDeck’i otomatik olarak seçmezse kamera ve mikrofon olarak HyperDeck’i
kullanması için, yazılımı düzenleyin.
Aşağıda, Skype uygulamasında, bilgisayar kamera ayarlarını nasıl düzenleyeceğinizin bir örneğini
bulabilirsiniz.
1 Skype’nin menü çubuğundan, ‘ses ve video ayarları’ sekmesini açın.
2 ‘Kamera’ menüsünü tıklayın ve listeden HyperDeck’inizi seçin. Önizleme penceresinde,
HyperDeck’ten gelen videonun belirdiğini göreceksiniz.
3 Şimdi, ‘mikrofon’ menüsüne girin ve ses kaynağınız olarak HyperDeck’i seçin.
Skype ayarlarınızın doğru olduğunu teyit etmek üzere ve webcam ayarlarınızın çalıştığından emin
olmak için bir arkadaşınızla kısa bir Skype test görüşmesi yapmayı denemenizde yarar var.
Yapmanız gerekenler bu kadar. HyperDeck Studio’nuz, videonuzu dünyaya canlı olarak yayınlamaya,
artık hazır!
748HyperDeck’in Web Kamerası OlarakKullanımı
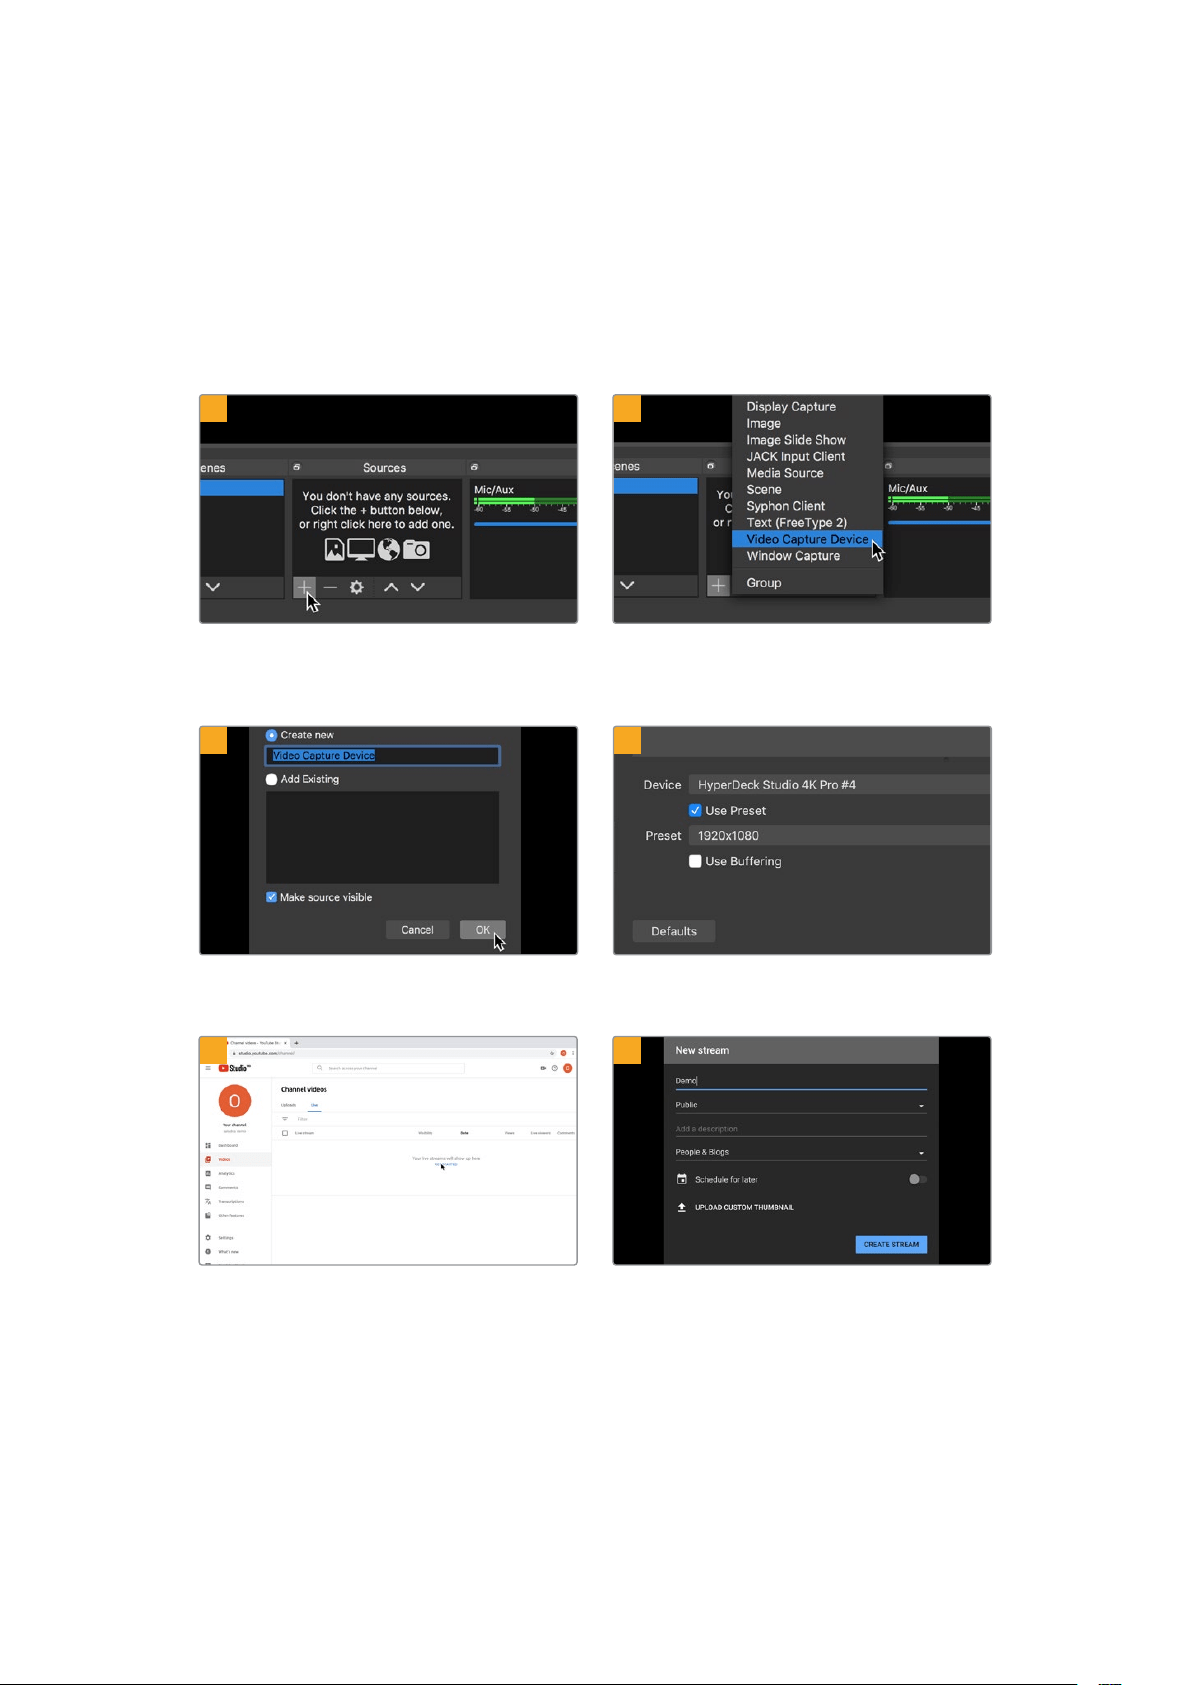
Open Broadcaster Uygulamasının Kurulumu
Open Broadcaster yazılımı; YouTube, Twitch, Facebook Live ve benzeri internet yayın yazılımları
ile HyperDeck Studio’nuz arasında bir internet yayın platformu işlevi gören, açık kaynaklı bir
uygulamadır. Broadcaster, videonuzu internet yayın uygulamanız tarafından kolaylıkla yönetilen
bir bit oranına sıkıştırır.
İnternet yayın servisi olarak YouTube Live’yi kullanarak, HyperDeck Studio’nuzun webcam çıkışını,
internette yayınlaması için Open Broadcaster uygulamasını nasıl hazırlayacağınız, aşağıda gösterilmiştir.
Open Broadcaster uygulamasını başlatın
ve ‘sources’ (kaynaklar) kutusundaki artı (+)
sembolünün üstüne tıklayın.
‘Video Capture Device’ ibareli seçenekten video
yakalama cihazınızı seçin.
Yeni kaynağa bir isim verin ve ‘OK’ butonunu
tıklayın.
Cihaz menüsünde, HyperDeckStudio’nuzun
modelini seçin ve ‘OK’ butonunu tıklayın.
Şimdi YouTube hesabınıza gidin. Canlı yayına
geçmenizi sağlayan ‘go live’ butonunu ve ardından
yayını başlatmak için ‘stream’ butonunu tıklayın.
Youtube ‘stream’ seçeneklerine internet yayın
detaylarınızı girin ve ‘create stream’ butonunu
tıklayarak internet yayınını oluşturun.
1
2
3
4
5
6
749HyperDeck’in Web Kamerası OlarakKullanımı
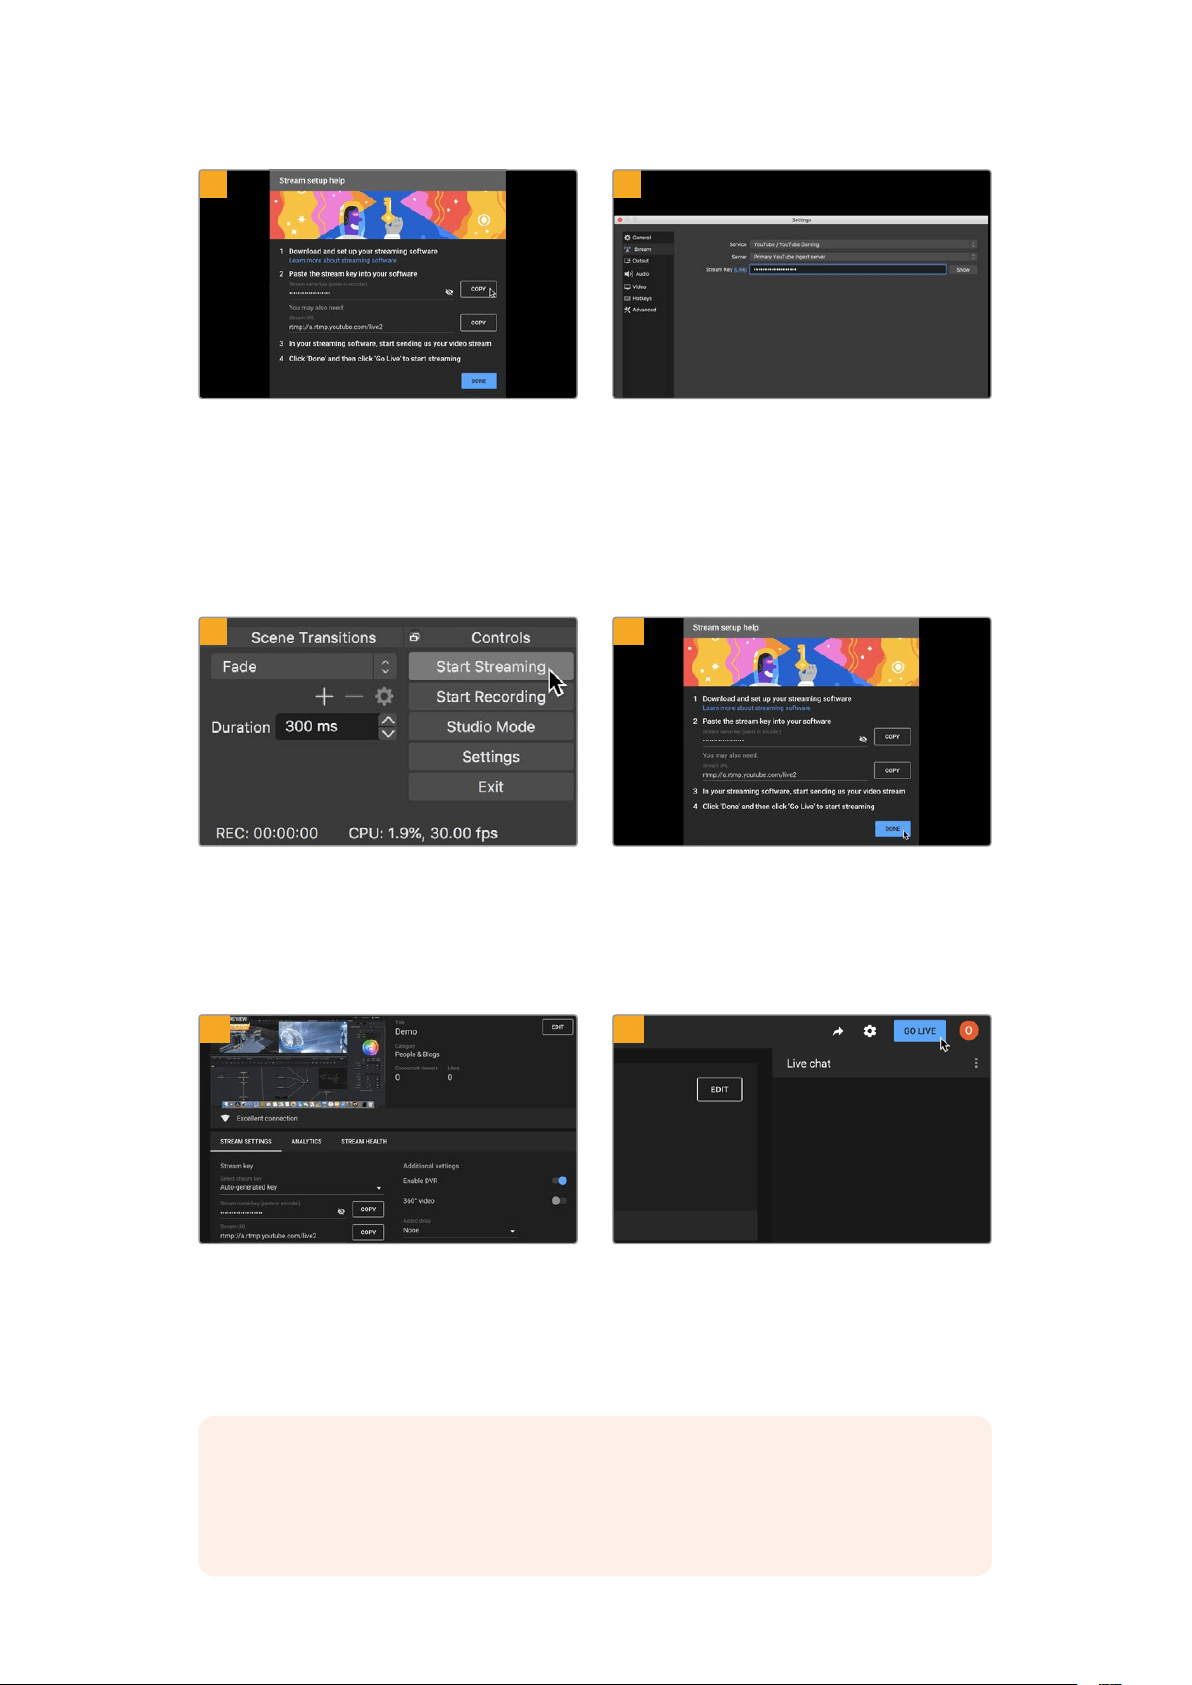
YouTube şimdi, Open Broadcaster uygulamasını
YouTube hesabınıza yönlendirecek bir internet yayın
anahtarı üretecektir.
İnternet yayın anahtarının yanındaki ‘copy’ (kopyala)
butonunu tıklayın. Open Broadcaster uygulamasına
yapıştıracağınız internet yayın anahtarını kopyalayın.
Open Broadcaster uygulamasına geri dönün ve
menü çubuğundaki ‘OBS/preferences’ seçeneğini
tıklayarak tercihleri açın. ‘Stream’ (internette yayınla)
ibaresini seçin. Şimdi, YouTube’den kopyaladığınız
yayın anahtarını yapıştırın ve ‘OK’ ibaresini tıklayın.
Şimdi, HyperDeck’inizden alınan videonun, Open
Broadcaster uygulamasının önizleme penceresinde
yayınlandığını göreceksiniz.
Open Broadcaster’in yayın bağlantısını YouTube ile
bağlamak üzere, ekranın sağ alt köşesindeki ‘start
streaming’ (internet yayınını başlat) ibaresini tıklayın.
Bu işlem, Open Broadcaster uygulamasından
YouTube’ye bağlantıyı kurar ve artık buradan itibaren
her şey YouTube Live kullanarak hazırlanabilir.
YouTube Live’ye geri dönün ve HyperDeck’inizden
alınan webcam program çıkışını, arka planda
göreceksiniz. ‘Done’ (tamam) ibaresini tıklayın.
Open Broadcaster uygulamasının YouTube Live
ile iletişimde olmasıyla, artık yayınınıza başlamaya
hazırsınız. Şimdi, son kontrollerinizi yaparak her
şeyin iyi olduğundan emin olabilirsiniz.
Hazırsanız, ‘go live’ butonunu tıklayarak canlı internet
yayınınıza başlayabilirsiniz.
Şimdi, Open Broadcaster ile YouTube’de canlı internet yayını yapıyorsunuz.
NOT İnternet yayınının doğası nedeniyle, genellikle bir gecikme yaşanması muhtemeldir.
Bu yüzden, internet yayınını YouTube’de izlemek ve ‘end stream’ (yayını bitir) butonuna
basarak yayını bitirmeden önce, kazayla yayınınızın sonunu erken bitirmediğinizden emin
olmak için, programınızın bittiğini teyit etmek önemlidir.
7
8
9
10
11
12
750HyperDeck’in Web Kamerası OlarakKullanımı

Blackmagic HyperDeck Setup
HyperDeck Setup Yazılımının Kullanımı
Blackmagic HyperDeck Setup, ayarları değiştirmek ve HyperDeck’inizdeki dahili yazılımı
güncellemek üzere kullanılır.
HyperDeck Setup yazılımını kullanmak için:
1 Bir USB veya Ethernet aracılığıyla HyperDeck’i bilgisayarınıza bağlayın.
2 HyperDeck Setup uygulamasını başlatın. HyperDeck modeliniz, kurulum uygulamasının
ana sayfasında adlandırılacaktır.
3 Kurulum sayfasını açmak için; yuvarlak ‘setup’ ikonunun üzerine veya HyperDeck
görüntüsünü tıklayın.
Kurulum Sayfası
Bir adetten daha fazla HyperDeck Studio’nuz varsa, kolay tanınabilmeleri için her üniteye ayrı bir isim
vermek isteyebilirsiniz. Bunu ‘isim’ seçeneği üzerinden yapabilirsiniz.
751Blackmagic HyperDeck Setup
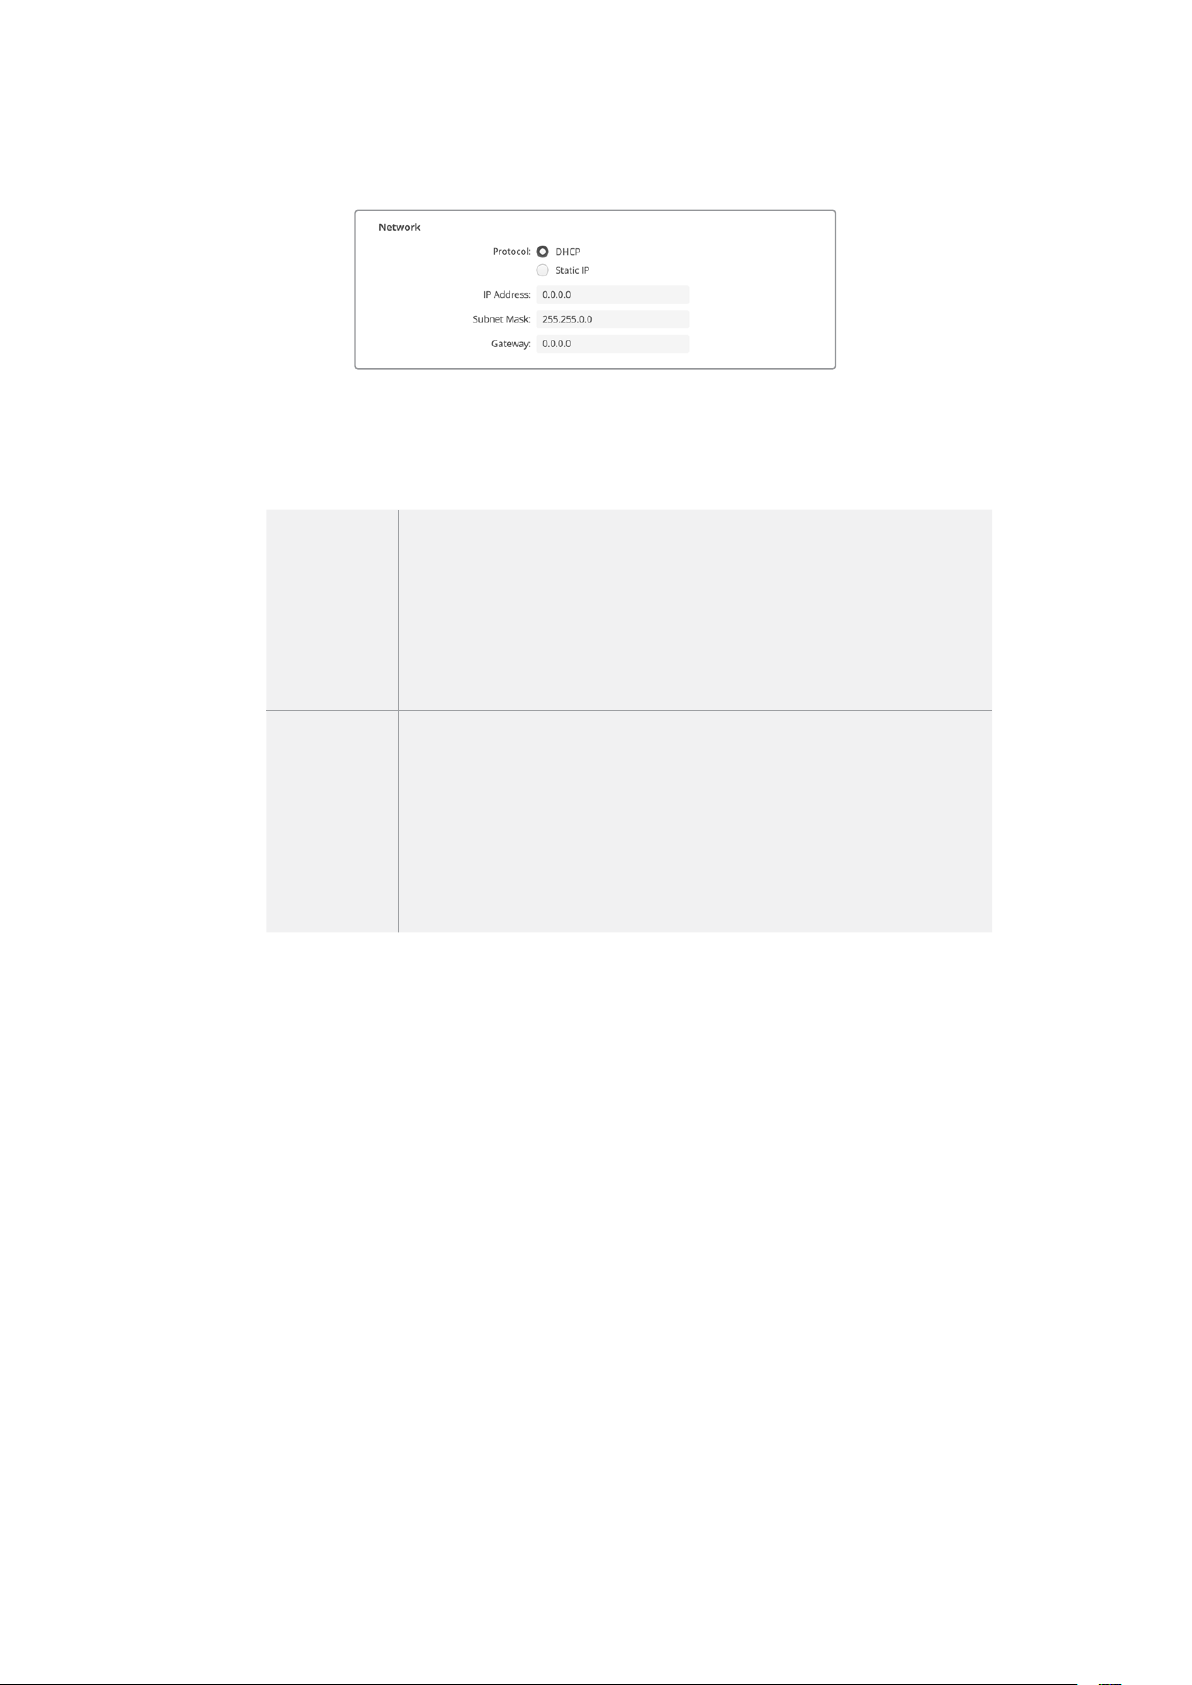
Ağ
Protokol
HyperDeck Studio’nuzu ATEM switcher’lerle kullanmak için veya HyperDeck Ethernet
Protokolü aracılığıyla uzaktan kontrol etmek için, HyperDeck Studio’nun DHCP kullanan
diğer ekipmanınızla aynı ağda olması veya manuel olarak sabit bir IP adresi eklemek gerekir.
DHCP
HyperDeck Studio disk kaydedicileri, varsayılan olarak DHCP’ye
ayarlanmış olarak gelir. Dinamik sunucu yapılandırma protokolü veya diğer
adıyla DHCP, HyperDeck Studio’nuzu otomatikman tespit eden ve bir IP
adresi atayan, ağ sunucularındaki bir hizmettir. DHCP, Ethernet üzerinden
ekipmanların bağlanmasını ve IP adreslerinin birbirleriyle çakışmasını
önlemeyi kolaylaştıran, harika bir servistir. Bilgisayarların
ve ağ switcher’lerinin çoğu DHCP’yi destekler.
Statik IP
‘Statik IP’ seçildiğinde, ağ detaylarınızı manuel olarak girebilirsiniz. Tüm
ünitelerin birbiriyle iletişim kurabilmesi için IP adreslerini manuel olarak
ayarlarken, ünitelerin aynı alt ağ maskesi ve ağ geçidi ayarlarını paylaşıyor
olması şarttır. Bunların yanında, panelin IP adresindeki rakamların ilk
üç hanesinin aynı olması gerekir. Ağda, IP adreslerinde aynı tanımlama
numarasına sahip başka cihazlar olduğunda, bir çelişki ortaya çıkar ve
cihazlar ağa bağlanmaz. Bir uyuşmazlıkla karşılaştığınızda, cihazın IP
adresindeki tanımlayıcı numarayı değiştirmeniz yeterlidir.
LUT’lar Sayfası
Arka panelinde monitör çıkış bağlantıları olan HyperDeck modelleri, 3D LUT’lar uygulanmış halde
giriş videosunu görüntüleyebilir. 17 nokta, 33 nokta ve 65 nokta .cube LUT dosyaları desteklenir.
Bu, kameranızda bulunan renk doygungunluğu kasıtlı azaltılmış ve ‘düz’ bir görünüme sahip ‘film’
dinamik aralığını kullandığınızda, faydalı olabilir. Bir ekran LUT’u uygulayarak, çekiminizin renk
derecelendirmesi yapıldıktan sonra nasıl görüneceğinin bir temsilini görebilirsiniz.
3D LUT, sadece monitör çıkışında kullanılır ve videoya kaydedilmez, yani bu görünümün kaydedilen
görüntünüze kalıcı olarak işlenmesinden endişe duymanız gerekmez.
Aynı LUT’u DaVinci Resolve’de görüntünüze uygulamak istediğinizde yapmanız gereken tek şey,
HyperDeck Studio’da kullandığınız aynı LUT .cube dosyasını DaVinci Resolve’ye aktarmak ve
derecelendirmenize uygulamaktır.
752Blackmagic HyperDeck Setup
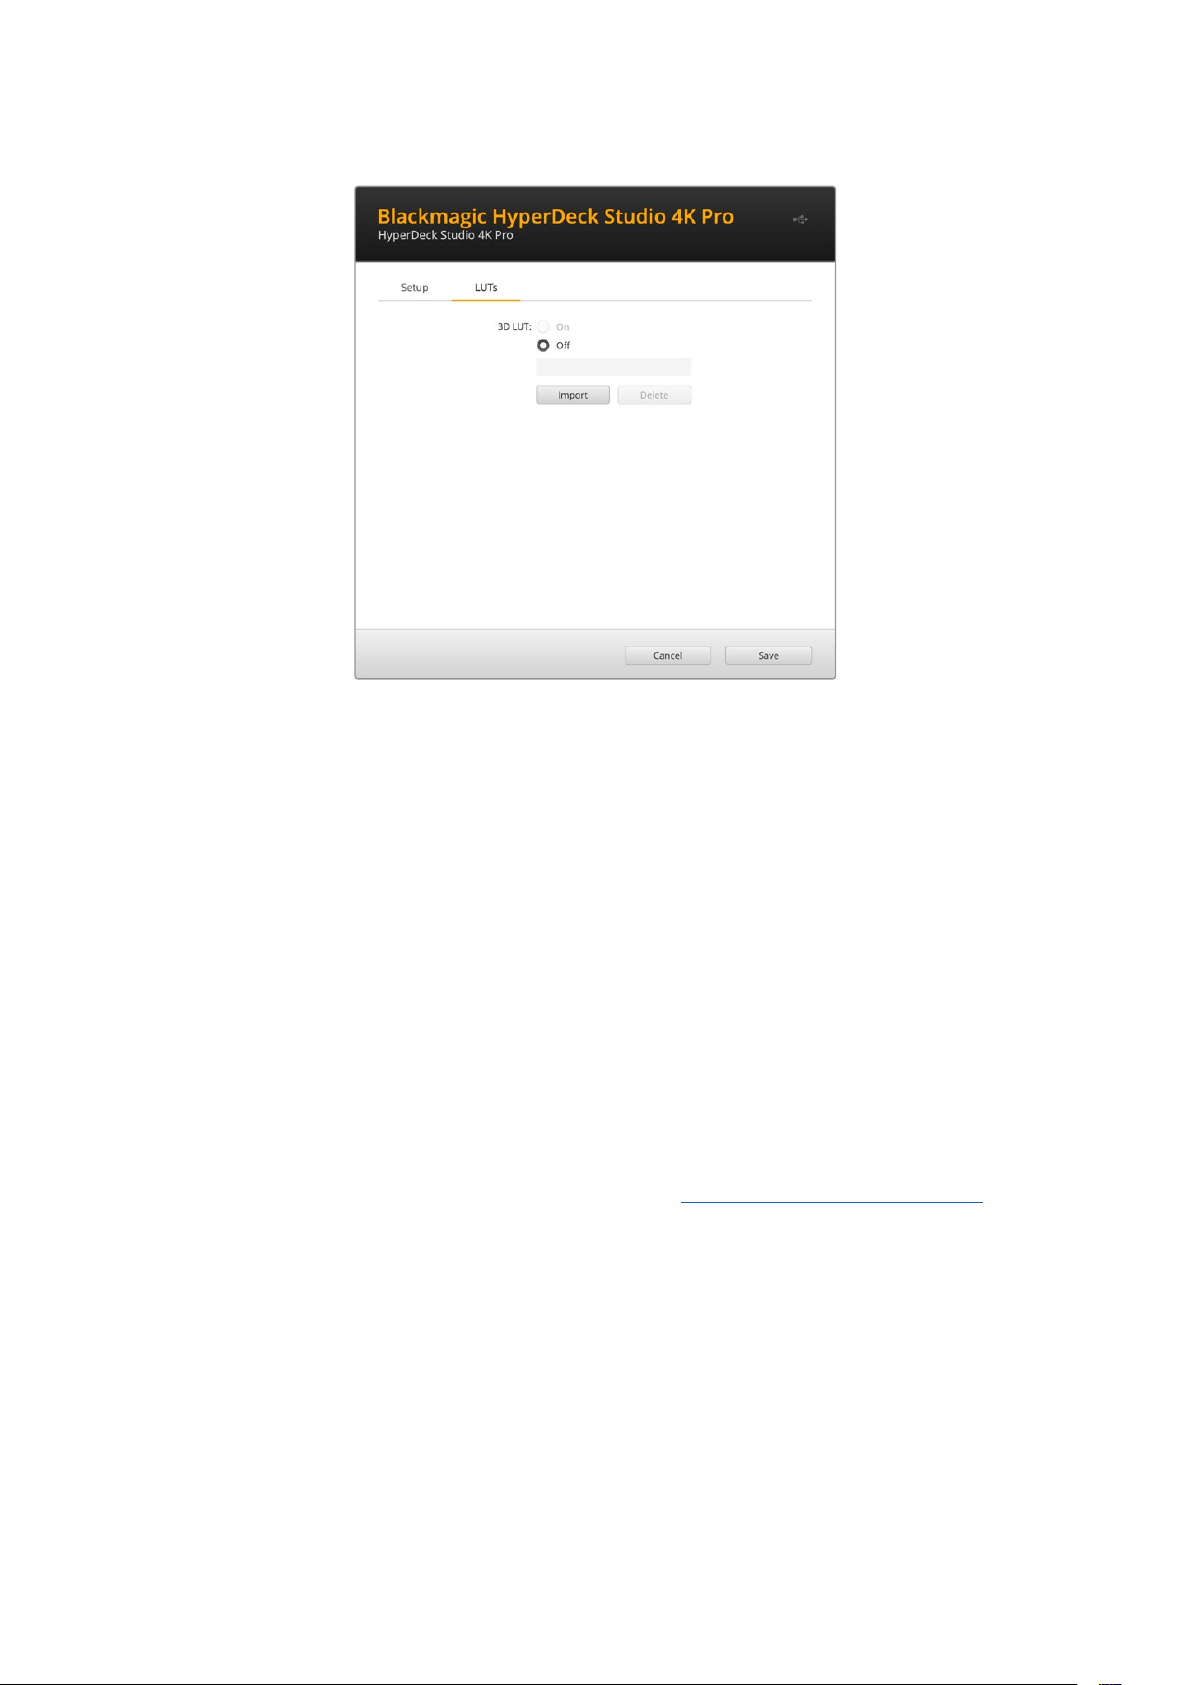
Bir LUT’u görüntülemek için
1 İlk önce ekran LUT’unuzu seçmeniz gerekir. Sonra LUT’u yazılıma aktarmak için ‘import’
butonunu tıklayın.
2 Dosya penceresinden, aktarmak istediğiniz LUT’a gidin ve LUT’u açmak için ‘open’
butonuna basın.
3 LUT’unuz yazılıma aktarıldığında, ‘3D LUT’ seçeneğini ‘on’, yani ‘açık’ olarak değiştirin ve
‘save’ butonuna basarak kaydedin.
Seçilen ekran LUT’u, monitör çıkışına bağlı ekranda görünecektir. Artık, LCD menüsündeki monitör
ayarlarından LUT’u açıp kapatabilirsiniz.
Dahili Yazılımın Güncellenmesi
Kurulum yardımcı yazılımı; internet yayın ayarlarını, ağ ayarlarını ve internet yayın kalitesini
yapılandırmanın yanı sıra, HyperDeck disk kaydedicinin dahili yazılımını da güncellemenizi sağlar.
Dahili yazılımı güncellemek için:
1 En güncel Blackmagic HyperDeck Setup yükleyicisini www.blackmagicdesign.com/tr/support
adresinden indirin.
2 Bilgisayarınızda Blackmagic HyperDeck Kurulum yükleyicisini çalıştırın ve ekran talimatlarını
takip edin.
3 Yükleme tamamlandıktan sonra, HyperDeck Studio’nuzu arka panelindeki USB veya
Ethernet bağlantısı aracılığıyla bilgisayara bağlayın.
4 Blackmagic HyperDeck Setup uygulamasını başlatın ve dahili yazılımı güncellemek için
ekrandaki komutları takip edin. Herhangi bir komut belirmezse bu, dahili yazılımın güncel
olduğunu gösterir ve yapmanız gereken başka bir şey yoktur.
753Dahili Yazılımın Güncellenmesi

Blackmagic HyperDeck Studio’nuz için en son kurulum yardımcı
yazılımını, www.blackmagicdesign.com/tr/support sayfasındaki
Blackmagic Design destek merkezinden indirin.
Teranex Mini Rack Shelf
Teranex Mini Rack Shelf, Blackmagic HyperDeck Studio HD Mini ve HyperDeck Studio HD Plus
modellerini bir ekipman rafına veya taşıma kasasına monte etmenizi sağlayan 1 RU boyundaki bir
raftır. Blackmagic HyperDeck Studio HD Mini o kadar küçüktür ki; Teranex Mini çeviriciler,
Blackmagic MultiView 4 ve Blackmagic Web Presenter gibi benzer büyüklüğe sahip, diğer
Blackmagic Design ekipmanların yanına monte edebilirsiniz. Örneğin, bir Blackmagic HyperDeck
Studio HD Mini’yi ATEM Television Studio HD ile birlikte monte etme, sekiz adet video girişinin
görüntü miksajını yapmanıza ve program çıkışını, HyperDeck Studio HD Mini’de kaydetmenize imkan
tanır. Bu modüler tasarım; portatif ve kullanımı kolay ve size özel video çözümleri oluşturmanızı
mümkün kılar.
Teranex Mini Rack Shelf; Blackmagic HyperDeck Studio HD Mini ve HyperDeck Studio HD Plus cihazlarınızı,
aynı büyüklüğe sahip başka Blackmagic Design ekipmanlarıyla rafa montajlamanıza imkan verir.
Blackmagic HyperDeck’inizi, bir Teranex Mini Rack Shelf’e monte etmek üzere; takılı ise cihazın lastik
ayaklarını çıkarın ve kutuda gelen vidaları kullanarak cihazı, rafın tabanına sabitleyin.
Monte etmeniz gereken ek Blackmagic Design ekipmanı yoksa Teranex Mini Rack Shelf, boşlukları
kapatmanıza yarayan iki adet orijinal boşluk paneli ile gelir.
Daha fazla bilgi için, www.blackmagicdesign.com/tr adresindeki Blackmagic Design internet
sitesine bakın.
754Teranex Mini Rack Shelf
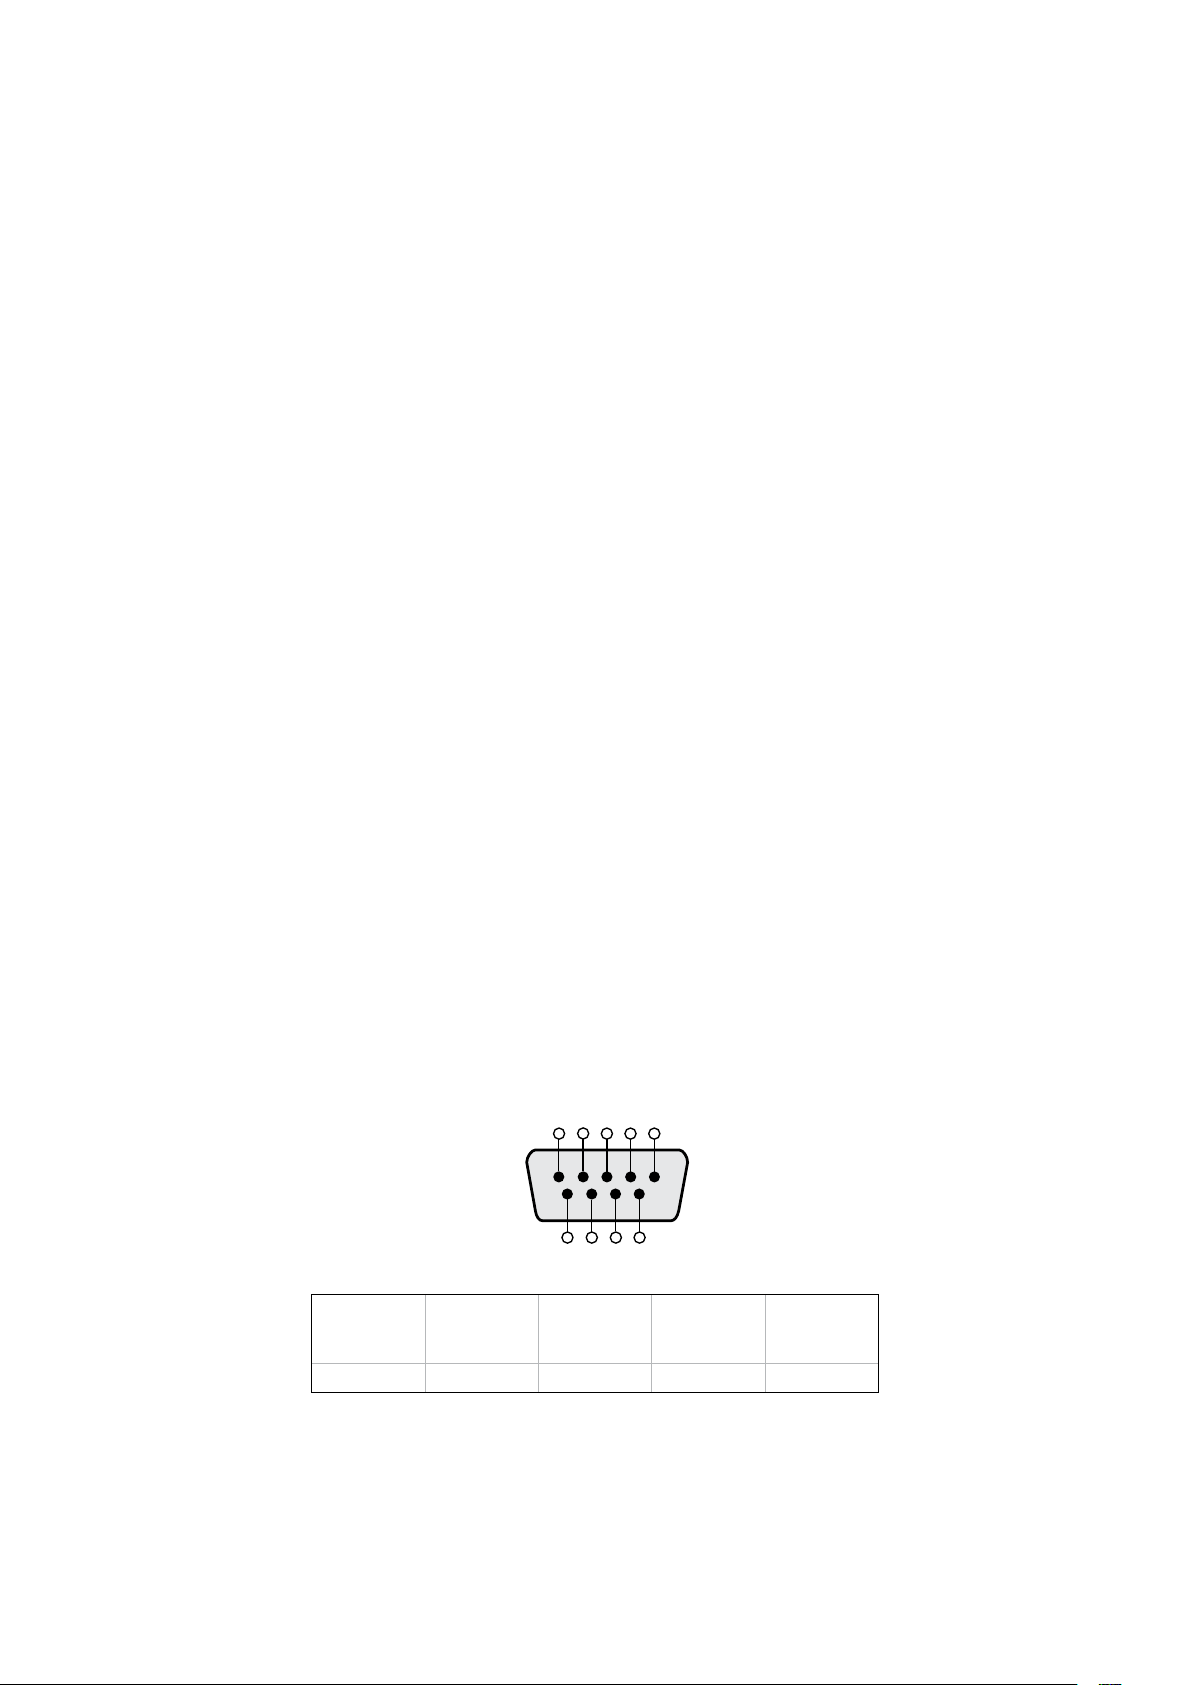
RS-422 Kontrol
RS-422 Kontrol Nedir?
RS-422 standardı, bir deck kontrol yayın standart serisidir ve yayıncılar tarafından 1980’lerin
başlarından beri kullanılmaktadır ve birçok deck’te, doğrusal kurgu makinalarında, sayısal kurgu
sistemlerinde ve yayın otomasyon ürünlerinde bulunur. Tüm güncel HyperDeck modelleri, bu
standardı destekler böylece; yayın otomasyonuna, uzaktan kontrol sistemlerine, kurgulama
sistemlerine ve tasarlamak istediğiniz her hangi bir özel kontrole entegre edilebilir.
HyperDeck Studio ayrıca, RS-422 aracılığıyla Advanced Media Protocol, yani Gelişmiş Medya
Protokolünden gelen dosya bazlı komutları da destekler. Bu; bir çalma listesine kliplerin eklenmesi,
bir sonraki klibin dosya adının belirlenmesi, tek klibin veya zaman çizelgesinin döngüye alınması ve
bir çalma listesinin silinmesi gibi AMP komutlarını kullanan harici bir cihaz ile HyperDeck’inizi kontrol
etmenizi sağlar.
Harici bir RS-422 Kontrol Cihazının Kullanımı
Tüm güncel HyperDeck modellerinde, endüstri standartı Sony™ ile uyumlu bir RS-422 deck kontrol
portu vardır. Bu port, HyperDeck Extreme Control gibi RS-422 kullanan herhangi bir uzaktan kontrol
cihazına direk bağlantı için doğru pim bağlantılarına sahiptir.
Her iki ucu ‘pime pim’ bağlanmış, yani kablonun her iki ucundaki pim numaralarının birbirine aynı
kablo ile bağlandığı, 9 pimli hazır kabloları kullanabilirsiniz. Özel kablolar yapmak istiyorsanız lütfen
birlikte gelen bağlantı şemasına bakınız.
Cihazdaki düğmelere basmak yerine, HyperDeck Extreme Control üzerinden HyperDeck’inizi
uzaktan kontrol edebilirsiniz.
1 HyperDeck’inizin video girişine bir video sinyali bağlayın.
2 HyperDeck Extreme Control’ünüzden HyperDeck Studio’nuza bir RS-422 kablosu bağlayın.
3 Ön kontrol panelindeki ‘remote’ düğmesine basarak uzaktan kontrolü etkin hale getirin veya
HyperDeck Studio Mini’deki LCD menü üzerinden, uzaktan deck kontrolüne izin verin.
Şimdi, bilindik hızlı ve yavaş oynatım gibi işlevlerin yanı sıra, HyperDeck’inizin kaydı başlatıp
durdurmasını uzaktan kontrol edebilirsiniz. Desteklenen RS-422 komutlarının tam listesi, bir sonraki
bölümde ‘desteklenen RS-422 komutları’ adı altındadır.
5 4 3 2 1
9 8 7 6
Receive
(–)
(negatif alış)
Receive
(+)
(pozitif alış)
Transmit
(–)
(negatif yayın)
Transmit
(+)
(pozitif yayın)
Topraklama
Pimleri
2 7 8 3 1, 4, 6, 9
RS-422 uzaktan kontrol pim bağlantıları
755RS-422 Kontrol
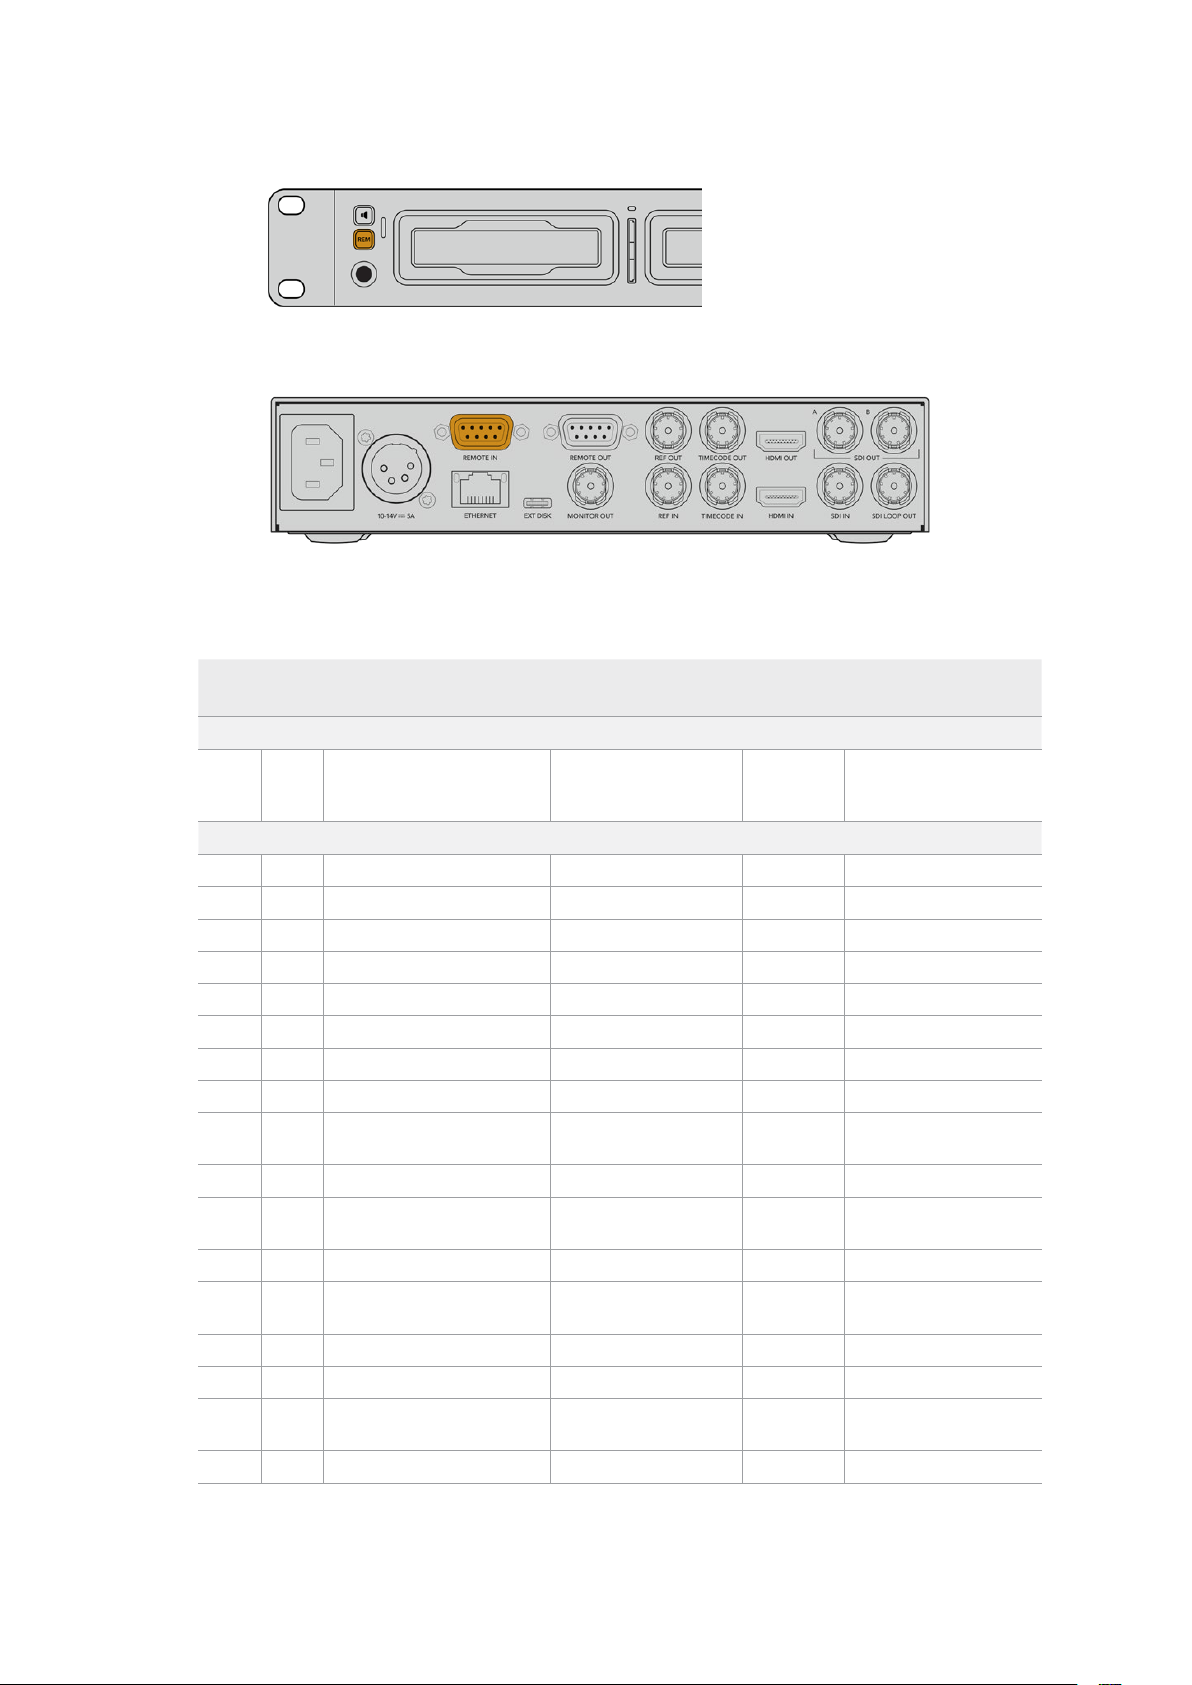
RS-422 deck kontrolü etkinleştirmek için, HyperDeck’inizin LCD menüsünde uzaktan kontrolünün
‘açık’ olarak ayarlı olduğundan emin olun veya ön paneldeki ‘remote’ butonunu kullanın.
Tüm HyperDeck modelleri, arka paneldeki RS-422 portu aracılığıyla, uzaktan kontrolü destekler
Desteklenen RS-422 Komutları
Command Reply No Remote Notes
0 - System Control
0x00 0x11 DeviceTypeRequest
NTSC: 0xF0E0
PAL: 0xF1E0
24P: 0xF2E0
Enabled
1 - Slave Response
0x20 0x00 Stop Acknowledge Disabled
0x20 0x01 Play Acknowledge Disabled
0x20 0x02 Record Acknowledge Disabled
0x20 0x04 StandbyOff Acknowledge Disabled
0x20 0x05 StandbyOn Acknowledge Disabled
0x20 0x0F Eject Acknowledge Disabled
0x20 0x10 FastFwd Acknowledge Disabled
0x21 0x11 JogFwd1 Acknowledge Disabled
0x22 0x11 JogFwd2 Acknowledge Disabled
Treated as N=1;
Same as JogFwd1
0x21 0x12 VarFwd1 Acknowledge Disabled Uses ShuttleFwd1
0x22 0x12 VarFwd2 Acknowledge Disabled
Treated as N=1;
Same as VarFwd1
0x21 0x13 ShuttleFwd1 Acknowledge Disabled
0x22 0x13 ShuttleFwd2 Acknowledge Disabled
Treated as N=1;
Same as ShuttleFwd1
0x20 0x20 Rewind Acknowledge Disabled
0x21 0x21 JogRev1 Acknowledge Disabled
0x22 0x21 JogRev2 Acknowledge Disabled
Treated as N=1;
Same as JogRev1
0x21 0x22 VarRev1 Acknowledge Disabled Uses ShuttleRev1
756RS-422 Kontrol

Command Reply No Remote Notes
0x22 0x22 VarRev2 Acknowledge Disabled
Treated as N=1;
Same as VarRev1
0x21 0x23 ShuttleRev1 Acknowledge Disabled
0x22 0x23 ShuttleRev2 Acknowledge Disabled
Treated as N=1;
Same as ShuttleRev1
0x20 0x30 Preroll Acknowledge Disabled
0x24 0x31 CueData Acknowledge Disabled
0x20 0x34 SyncPlay Acknowledge Disabled
0x20 0x40 Preview Acknowledge Disabled Status bits are set
0x20 0x41 Review Acknowledge Disabled Status bits are set
0x20 0x43 OutpointPreview Acknowledge Disabled
0x22 0x5C DMCSetFwd Acknowledge Disabled
0x22 0x5D DMCSetRev Acknowledge Disabled
0x20 0x60 FullEEOff Acknowledge Disabled
0x20 0x61 FullEEOn Acknowledge Disabled
0x20 0x63 SelectEEOn Acknowledge Disabled
4 - Preset/Select Control
0x40 0x10 InEntry Acknowledge Disabled
0x40 0x11 OutEntry Acknowledge Disabled
0x44 0x14 InDataPreset Acknowledge Disabled
0x44 0x15 OutDataPreset Acknowledge Disabled
0x40 0x18 InShift+ Acknowledge Disabled
0x40 0x19 InShift- Acknowledge Disabled
0x40 0x1A OutShift+ Acknowledge Disabled
0x40 0x1B OutShift- Acknowledge Disabled
0x40 0x20 InReset Acknowledge Disabled
0x40 0x21 OutReset Acknowledge Disabled
0x40 0x22 AInReset Acknowledge Disabled
0x40 0x23 AOutReset Acknowledge Disabled
0x44 0x31 PrerollPreset Acknowledge Disabled
0x40 0x40 AutoModeOff Acknowledge Disabled
ignored, Status bit
remembered
0x40 0x41 AutoModeOn Acknowledge Disabled
ignored, Status bit
remembered
0x41 0x37 InputCheck Acknowledge Disabled
757RS-422 Kontrol

Command Reply No Remote Notes
6 - Sense Request
0x61 0x0A TimeCodeGenSense — —
0x61 0x0C CurrentTimeSense — —
0x60 0x10 InDataSense InData Enabled
0x60 0x11 OutDataSense OutData Enabled
0x60 0x12 AInDataSense AInData Enabled
0x60 0x13 AOutDataSense AOutData Enabled
0x61 0x20 StatusSense StatusData Enabled
0x60 0x2B RemainTimeSense RemainTimeData Enabled
0x60 0x2E SpeedSense SpeedData Enabled
0x60 0x31 PrerollTimeSense PreRollTimeData Enabled
0x60 0x36 TimerModeSense TimerModeData Enabled
0x60 0x3E RecordInhibitSense RecordInhibitStatus Enabled
7 - Sense Reply
0x78 0x00 Timer1Data — —
Current Time and
00:00:00:00
0x78 0x04 LTCUserBitsTimeData — —
Current Time and
00:00:00:00
0x78 0x06 VITCUserBitsTimeData — —
Current Time and
00:00:00:00
0x74 0x06 VITCTimeData — — Current Time
0x74 0x07 UserBitsVITCTimeData — — 00:00:00:00
0x74 0x08 GenTCData — — Current Time
0x78 0x08 GenTCUBData — —
Current Time and
00:00:00:00
0x74 0x09 GenUBData — — 00:00:00:00
0x74 0x10 InData — —
0x74 0x11 OutData — —
0x74 0x12 AInData — —
0x74 0x13 AOutData — —
0x74 0x14 CorrectedLTCTimeData — — Current Time
0x70 0x20 StatusData — —
Please see “Status Bits”
sheet: Limited to 9 bytes
of status, silently
truncated
0x76 0x2B RemainTimeData — —
0x71 0x2E SpeedData — —
0x74 0x31 PrerollTimeData — —
0x71 0x36 TimerModeData — — Returns 0 (TimeCode)
0x72 0x3E RecordInhibitStatus — —
758RS-422 Kontrol
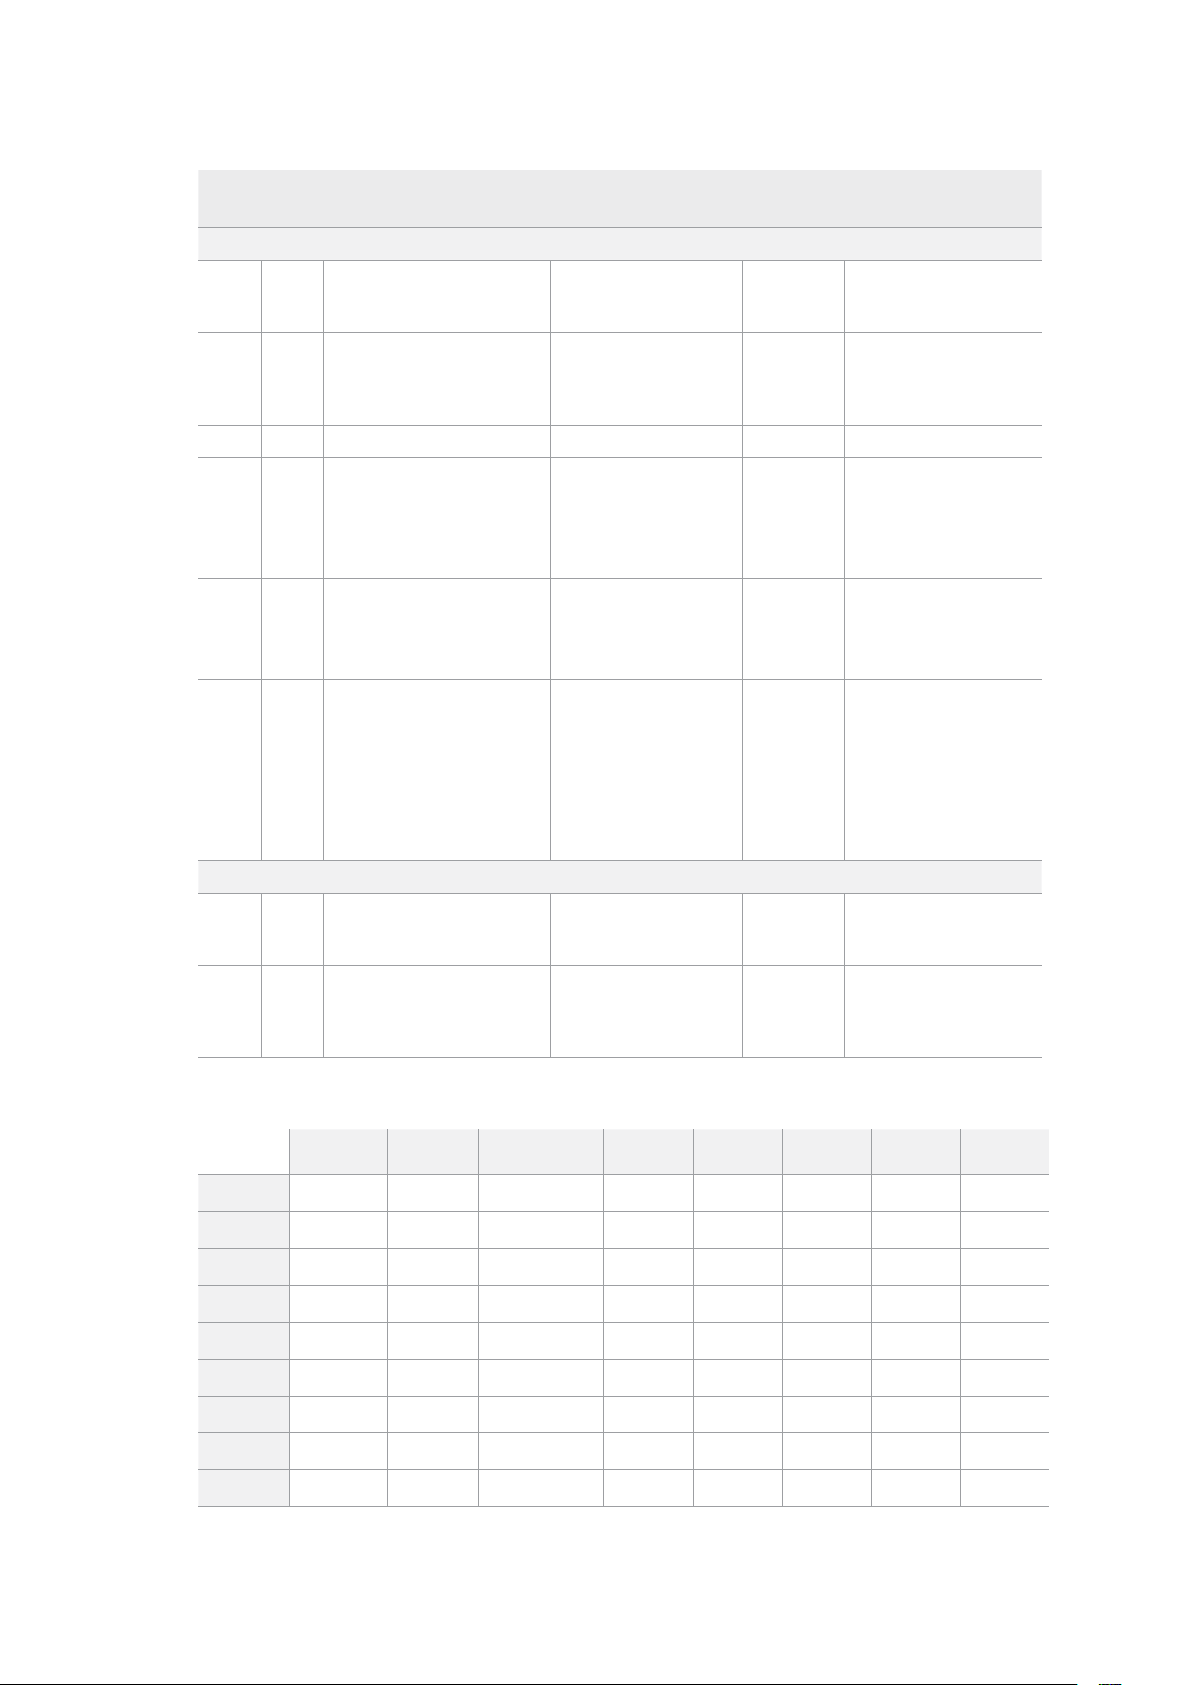
Command Reply No Remote Notes
A - Advanced Media Protocol
0xA1 0x01 AutoSkip Acknowledge Disabled
8-bit signed number of
clips to skip from current
clip
0xAX 0x15 ListNextID IDListing Enabled
when x = 0 single clip
request when x = 1, #
clips can be specified in
the send data
0x20 0x29 ClearPlaylist Acknowledge Disabled
0x41 0x42 SetPlaybackLoop Acknowledge Disabled
Bit 0 loop mode enable,
0=false 1=true
Bit 1 is single clip/timeline
0=single clip
1=timeline
0x41 0x44 SetStopMode Acknowledge Disabled
0 = Off
1 = Freeze on last frame
2 = Freeze on next clip
3 = Show black
0x4f 0x16 AppendPreset Acknowledge Disabled
2 Bytes for the length N
of the clip name
N Bytes for each character
of the clip name
4 Byte in point timecode
(format is FFSSMMHH)
4 Byte out point timecode
(format is FFSSMMHH)
Blackmagic Extensions
0x82 0x02 BMDSeekToTimelinePosition Acknowledge Disabled
16-bit little endian
fractional position
[0..65535]
0x81 0x03 BMDSeekRelativeClip Acknowledge Disabled
One-byte signed integer,
which is the number of
clips to skip (negative for
backwards).
RS-422 Yazılım Geliştirici Bilgileri
bit 7 bit 6 bit 5 bit 4 bit 3 bit 2 bit 1 bit 0
Byte 0
0 0 Cassette out 0 0 0 0 Local
Byte 1
Standby 0 Stop 0 Rewind Forward Record Play
Byte 2
Servo Lock 0 Shuttle Jog Var Direction Still 1
Byte 3
Auto Mode 0 0 0 Aout Set Ain Set Out Set In Set
Byte 4
Select EE Full EE Loop Playback 0 0 0 0 0
Byte 5
0 0 0 0 0 0 0 0
Byte 6
0 Lamp Still Lamp Fwd Lamp Rev 0 0 0 0
Byte 7
0 0 0 0 0 0 0 0
Byte 8
0 0 Near EOT EOT 0 0 0 0
759RS-422 Kontrol
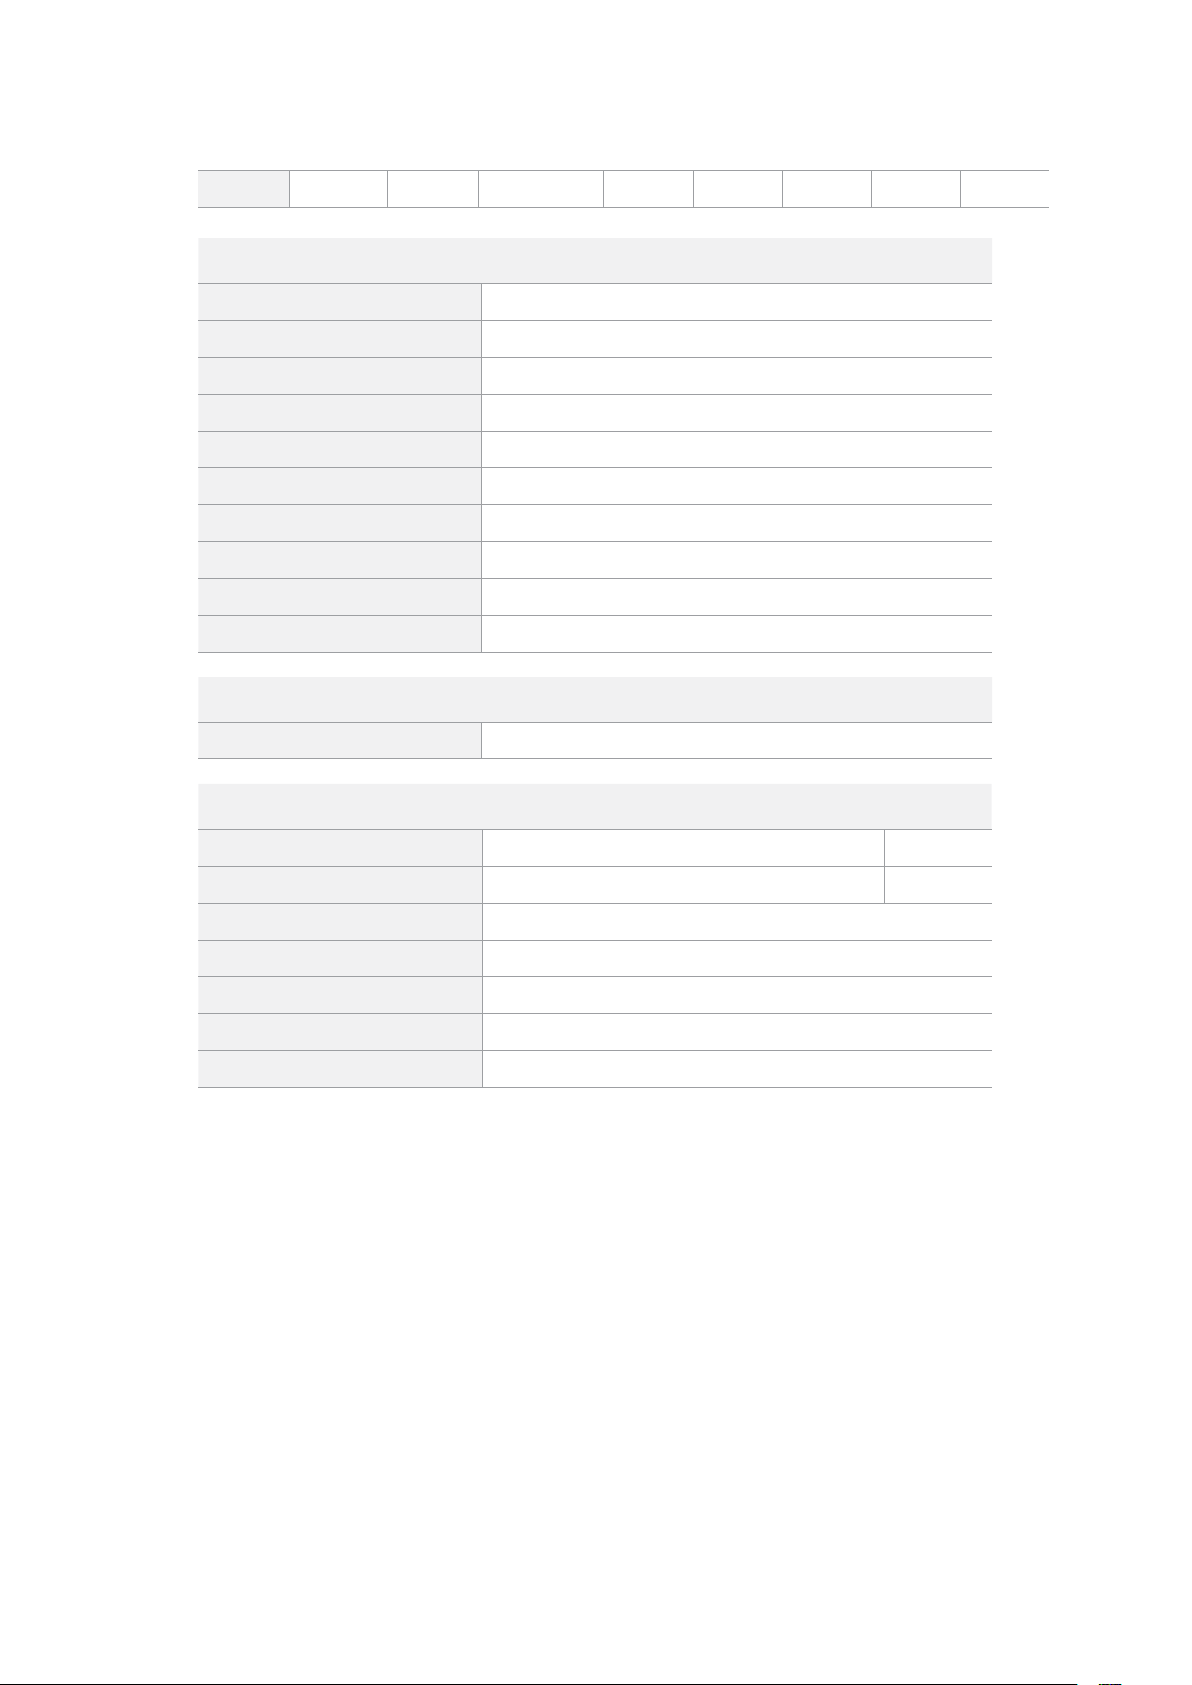
Byte 9
0 0 0 0 0 0 0 0
Variables
Cassette Out
Set if no SSD is present
Local
Set if Remote is disabled (local control)
Standby
Set if a disk is available
Direction
Clear if playback is forwarding, set if playback is reversing
Still
Set if playback is paused, or if in input preview mode
Auto Mode
Set if in Auto Mode
Select EE, Full EE
Set if in input preview mode
Lamp Still/Fwd/Rev
Set according to playback speed and direction
Near EOT
Set if total space left on available SSDs is less than 3 minutes
EOT
Set if total space left on available SSDs is less than 30 seconds
Others
Cue Complete (byte 2, bit 0)
Always 1: Cue requests are always instantaneous
HyperDeck Serial RS-422 Protocol
Protocol
Based on Sony 9-pin protocol
Interface
Baud rate 38.4 Kbps
1 start bit
8 data bits
1 stop bit
1 parity bit
Odd parity
Bir Ağ Üzerinden Dosyaların Transferi
HyperDeck disk kaydediciniz, dosya aktarım protokolü, yani ftp üzerinden dosya transferini
destekler. Bu güçlü özellik, bir ağ aracılığıyla dosyaları doğrudan bilgisayarınızdan HyperDeck’inize,
yerel bir ağın sağlayabileceği yüksek hızlarda kopyalamanızı sağlar. Örneğin, dijital tabela için uzak
bir yerde bulunan bir HyperDeck ünitesine, yeni dosyalar kopyalıyor olabilirsiniz.
HyperDeck Studio’ya Bağlanma
Bilgisayarınız ve HyperDeck Studio’nuz aynı ağa bağlı iken, sadece bir ftp istemci ve HyperDeck
Studio’nuzun IP adresi gerekir.
1 HyperDeck’inizi bağlamak istediğiniz bilgisayara bir FTP istemci indirin ve yükleyin.
Cyberduck, FileZilla veya Transmit’i tavsiye ediyoruz ama FTP uygulamalarının çoğunluğu
işinizi görecektir. Cyberduck ve FileZilla’yı ücretsiz olarak indirebilirsiniz.
760Bir Ağ Üzerinden Dosyaların Transferi
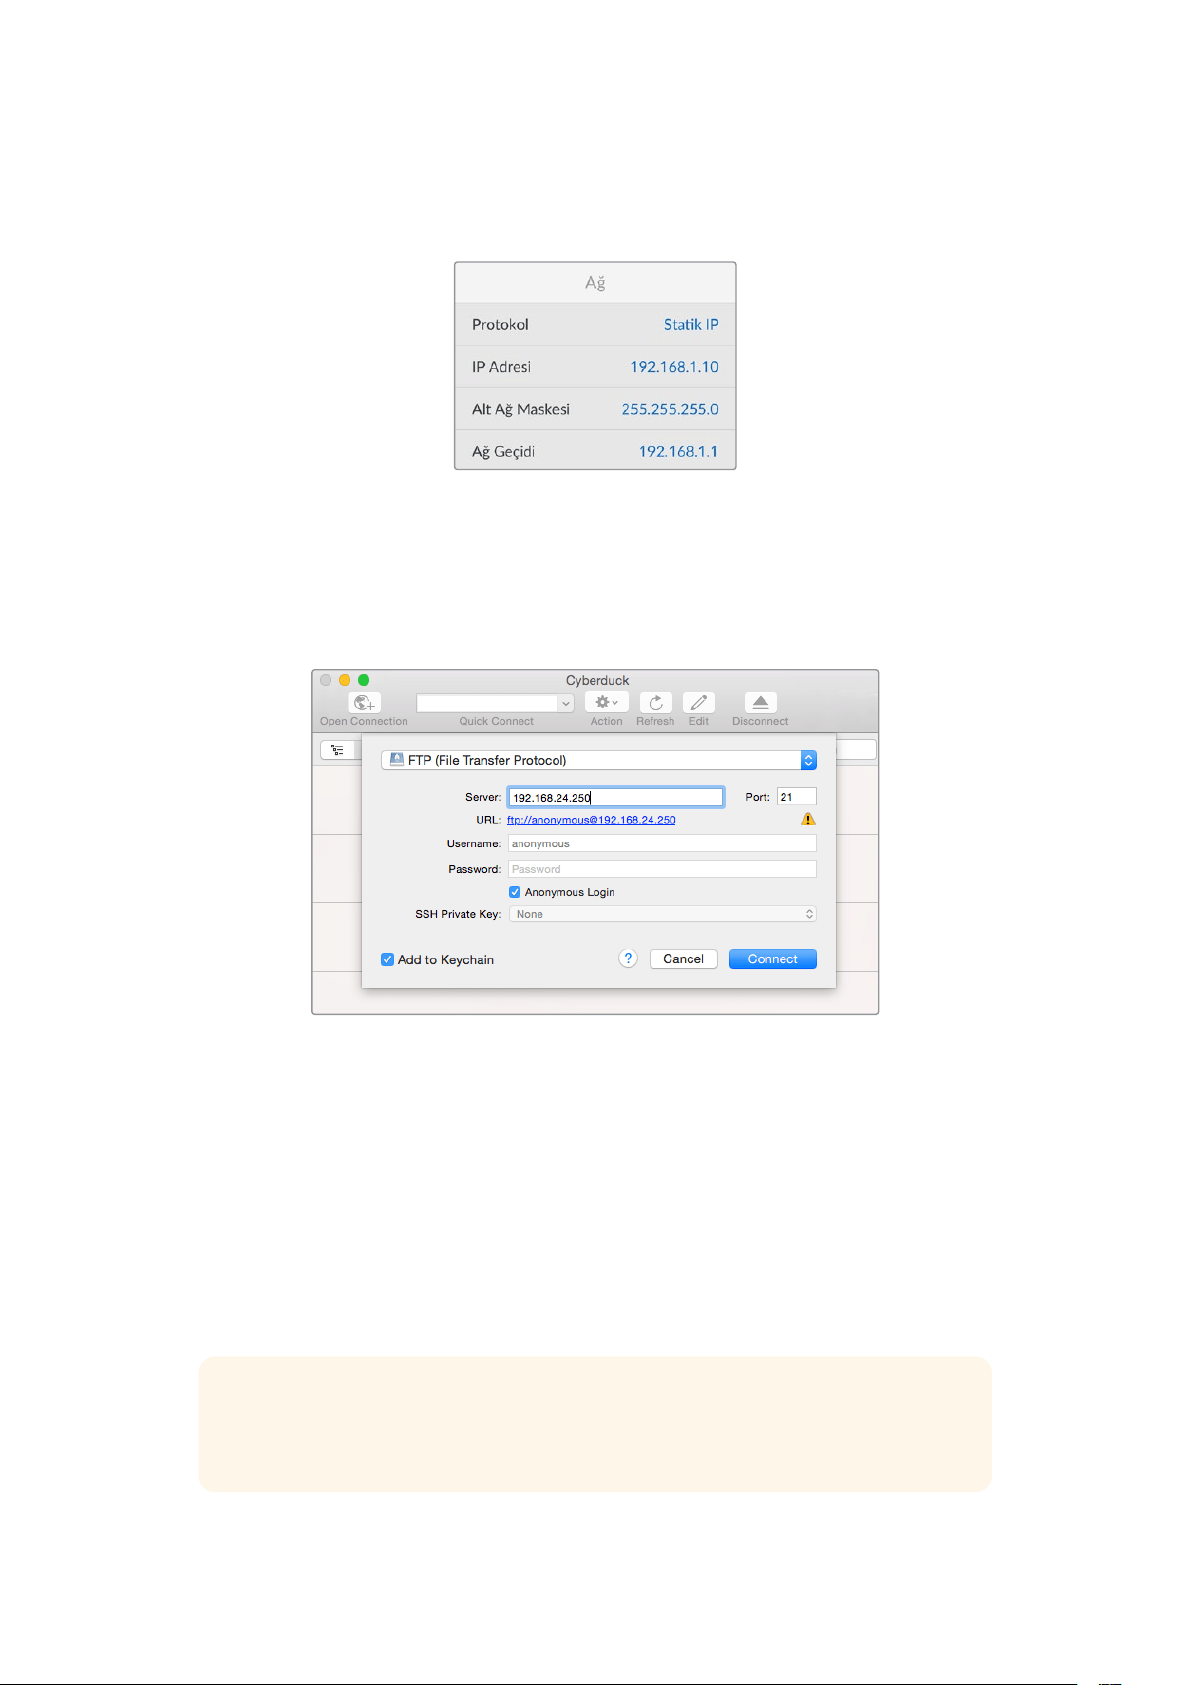
2 HyperDeck Studio’nuzu, bir ethernet kablosu ile ağınıza bağlayın ve IP adresini Not alın. IP
adresine erişmek için ‘menu’ butonuna basın ve ‘ağ’ ekranına erişmek için arama kadranını
çevirin. HyperDeck Studio’nuzun IP adresini, bu ekranın en altında göreceksiniz.
HyperDeck Studio’nun IP adresini, akıllı panelin
‘ayarlar’ ekranında bulabilirsiniz.
3 HyperDeck Studio’nuzun IP adresini, TCP uygulamanın bağlantı diyaloğuna girin. Bu kutunun
ismi ve konumu, uygulamalar arasında değişebilir, fakat genellikle ‘server’ veya ‘host’
olarak adlandırılır. FTP programınızda bir ‘anonymous login’ (isimsiz giriş) onay kutusu varsa
işaretlendiğinden emin olun.
HyperDeck Studio’ya bağlanırken kullanıcı adı ve şifre gibi bilgileri girmenize
gerek yoktur. Disk kaydedicinizin IP adresini, FTP uygulamanızın ‘server’ veya
‘host’ alanına girin ve varsa ‘anonymous login’ onay kutusunu işaretleyin.
Dosya Transferi
HyperDeck Studio’ya bağlanınca, ftp uygulama ile normalde yaptığınız gibi, dosyaları aktarabilirsiniz.
FTP uygulamalarının çoğunluğunda ‘sürükle ve bırak’ arayüzü vardır, ancak uygun metodu, kendi
uygulamanızdan kontrol edin.
HyperDeck’inize her türden dosya gönderebilir ve alabilirsiniz fakat HyperDeck Studio’dan aldığınız
ve oynatmayı planladığınız dosyaları, HyperDeck’inizin desteklediği kodeklere ve çözünürlüklere
uyumlandırmanız gerekeceğini belirtmemizde fayda var. Desteklenen kodeklerin bir listesini, bu
kullanım kılavuzunun ‘Blackmagic HyperDeck Setup’ bölümünde bulabilirsiniz.
BİLGİ HyperDeck’iniz kaydederken, aynı anda bir ağ üzerinden dosyaları transfer
edebilirsiniz. HyperDeck, kaydın etkilenmemesini temin etmek için, transfer hızlarını
otomatikman ayarlayacaktır.
761Bir Ağ Üzerinden Dosyaların Transferi

Bir ATEM Switcher’e Bağlanma
Bir ATEM switcher kullanıyorsanız 4 adede kadar Blackmagic HyperDeck disk kaydedici bağlayabilir
ve ATEM Software Control panel veya donanım panelini kullanarak onları kontrol edebilirsiniz. Bu,
eksiksiz bir video kayıt departmanını parmaklarınızın ucuna getiren, çok etkili bir özelliktir. Ayrıca, bir
ATEM switcher’den HyperDeck’inizde kaydı tetikleyebilirsiniz. Bu, bir canlı yayının arşivini
oluşturmanın veya daha sonra ince düzenlemeler yapılacak bir programın canlı miksajını yaparken
ikincil çekimleri kaydetmenin, harika bir yöntemdir.
ATEM 4 M/E Broadcast Studio 4K gibi ATEM switcher’ler, 4 adete kadar HyperDeck disk kaydedici ile bağlanabilir.
HyperDeck’leri, bir ATEM switcher’e bağlamak için:
1 HyperDeck’inizi, ATEM Switcher’inizin bağlı olduğu aynı internet ağına bağlayın ve IP
adresini NOT edin.
HyperDeck’inizin IP adresi, cihazın ön paneli ve LCD menüsünden, önce ‘kurulum’ ve sonra
‘Ethernet’ menüsüne giderek bulunabilir.
Alternatif olarak HyperDeck’inizin IP adresine, Mac veya PC’nizdeki ‘BlackMagic HyperDeck
Setup Utility’ yardımcı yazılımındaki ‘configure’ (yapılandırma) sekmesi üzerinden
ulaşabilirsiniz.
2 HyperDeck’inizin SDI veya HDMI çıkışlarından birisini, ATEM Switcher’inizdeki bir SDI veya
HDMI kaynak girişine bağlayın.
3 HyperDeck’te kaydı tetiklemek için ATEM Switcher’inizi kullanmak isterseniz,
HyperDeck’inize bir video kaynağı bağlamanız da gerekecektir.
HyperDeck’inize bir SDI veya HDMI kaynağı, her zaman olduğu gibi bağlayın. ATEM
switcher’inizin program çıkışını kaydetmek için, switcher’inizin auxiliary SDI çıkışlarından
birisini, HyperDeck’inizin SDI girişine bağlayın.
4 Switcher’den uzaktan kontrolüne izin vermek için; HyperDeck’in ön panelindeki ‘remote’
butonuna basarak veya HyperDeck Studio Mini’deki LCD menüsü üzerinden, uzaktan
kontrolü etkin hale getirin.
5 HyperDeck’inizin kaynağını ve IP adres bilgisini, ATEM yazılımına veya ATEM yayın paneline
girerek bağlanma işlemini tamamlayınız. Bu oldukça basittir ve ATEM switcher kullanım
kılavuzunda açıklanmıştır.
762Bir ATEM Switcher’e Bağlanma
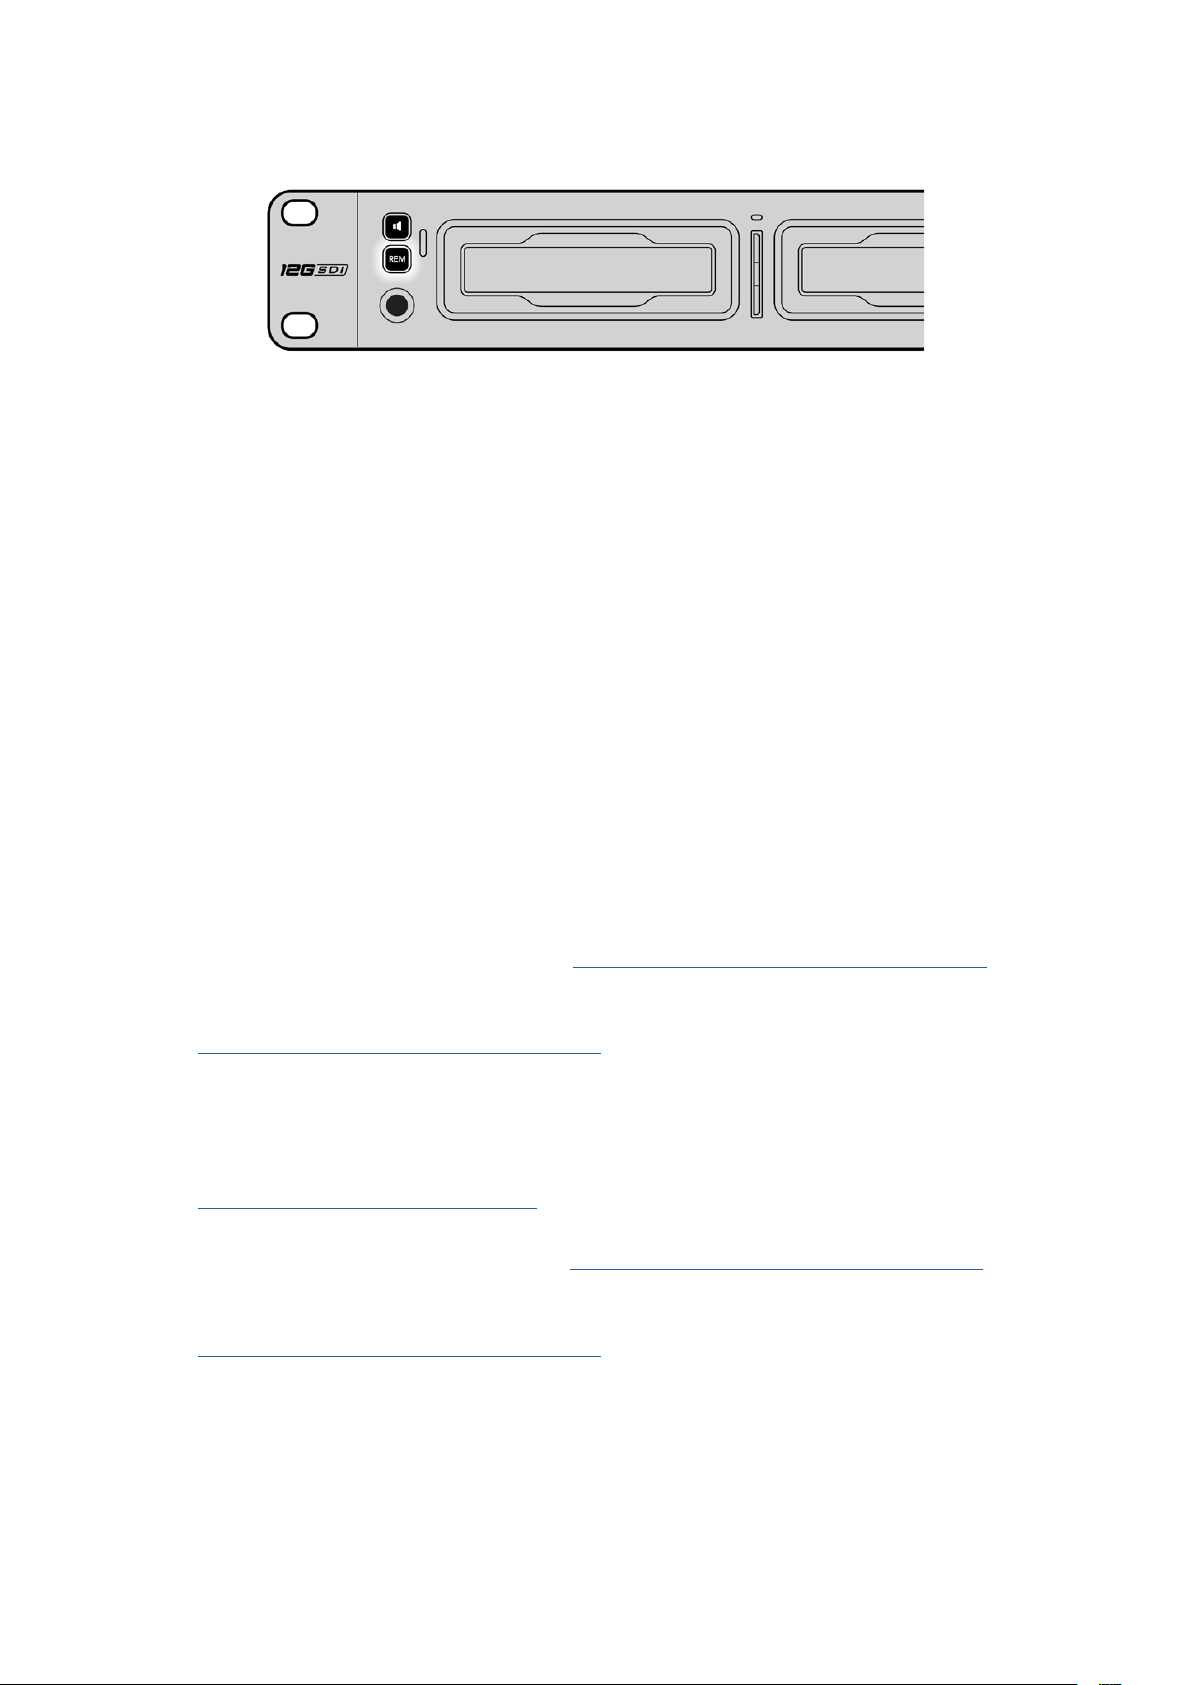
Bir ATEM switcher ile Ethernet üzerinden kontrolü etkinleştirmek için,
HyperDeck’inizin LCD menüsünde uzaktan kontrolün ‘açık’ olarak ayarlandığından
emin olun veya kontrol paneldeki remote butonunu kullanın.
Post Prodüksiyon İş Akışlarının
Anlaşılması
Kliplerinize Erişim
Kliplerinize erişmek için; bir SD kart yuvası, harici okuyucu veya SSD dock aracılığı ile SD kartı veya
SSD’yi bilgisayarınıza bağlayınız. Dosyaları, SSD veya SD kartınızdan bilgisayarınızın sabit diskine
sürükleyip bırakabilir veya doğrudan SSD’den veya SD kartınızdan çalışabilirsiniz. Ayrıca, 2,5 inçlik
bir eSATA-USB adaptör kablosuyla, SSD’leri bilgisayarınıza bağlayabilirsiniz, ancak SSD’den çalışmak
için bu yeterince hızlı değildir ve sadece SSD’nizden dizüstü bilgisayarınıza dosyaları aktarmak için
tavsiye edilir.
Mac OS
QuickTime, Mac OS’de yerleşiktir. HyperDeck ile kaydedilen Apple ProRes, Avid DNxHD ile DNxHR
QuickTime videoları, Mac OS’deki hemen hemen her video yazılımı ile açılabilir.
HyperDeck ile kaydedilen DNxHD ve DNxHR MXF dosyaları, Avid Media Composer ve Mac için
DaVinci Resolve ile açılabilir. DNxHD codec’leri, http://www.avid.com/products/avid-dnxhr-and-dnxhd
adresinden ücretsiz olarak indirilebilir.
HyperDeck ile kaydedilen MCC kapalı altyazı veri dosyaları, Mac OS için
http://www.telestream.net/captioning/overview.htm adresinden MacCaption yazılımı ile açılabilir
Windows
HyperDeck ile kaydedilen Apple ProRes QuickTime videolar, PC’nizde QuickTime uygulamasının
yüklü olmasını gerektirir. Windows’da QuickTime uygulamasını destekleyen video yazılımlarının
hemen hemen hepsi, HyperDeck ile kaydedilen videoları açabilir. Windows için QuickTime yazılımı,
http://www.apple.com/quicktime/download adresinden ücretsiz olarak indirilebilir.
HyperDeck ile kaydedilen DNxHD ve DNxHR MXF dosyaları, Windows için Avid Media Composer ve
DaVinci Resolve ile açılabilir. DNxHD kodekleri, http://www.avid.com/products/avid-dnxhr-and-dnxhd
adresinden ücretsiz olarak indirilebilir.
HyperDeck ile kaydedilen MCC kapalı altyazı veri dosyaları,
http://www.telestream.net/captioning/overview.htm adresindeki Windows için MacCaption yazılımı ile
açılabilir
763Post Prodüksiyon İş Akışlarının Anlaşılması

Yazılım Geliştiricileri için Bilgiler
(İngilizce)
Blackmagic HyperDeck Ethernet Protokolü
Blackmagic HyperDeck Ethernet Protokolü, yerleşik Ethernet bağlantısına sahip HyperDeck Studio
modellerinde, TCP port 9993’e bağlanarak erişilen metin tabanlı bir protokoldür. Bir yazılım
geliştiriciyseniz, ürünlerimizle entegre cihazlar oluşturmak için bu protokolü kullanabilirsiniz.
Blackmagic Design olarak yaklaşımımız, protokollerimizi açık tutmaktır ve ortaya çıkardıklarınızı
görmek için sabırsızlanıyoruz!
Protocol Commands
Command Command Description
help or ? Provides help text on all commands and parameters
commands return commands in XML format
device info return device information
disk list query clip list on active disk
disk list: slot id: {n} query clip list on disk in slot {n}
quit disconnect ethernet control
ping check device is responding
preview: enable: {true/false} switch to preview or output
play play from current timecode
play: speed: {-5000 to 5000} play at specific speed
play: loop: {true/false} play in loops or stop-at-end
play: single clip: {true/false} play current clip or all clips
playrange query playrange setting
playrange set: clip id: {n} set play range to play clip {n} only
playrange set: clip id: {n} count: {m} set play range to {m} clips starting from clip {n}
playrange set: in: {inT} out: {outT}
set play range to play between:
- timecode {inT} andtimecode {outT}
playrange set: timeline in: {in} timeline out:
{out}
set play range in units of frames between:
- timeline position {in} and position {out} clear/reset play
rangesetting
playrange clear clear/reset play range setting
play on startup query unit play on startup state
play on startup: enable: {true/false} enable or disable play on startup
play on startup: single clip: {true/false} play single clip or all clips on startup
play option query play options
play option: stop mode:
{lastframe/nextframe/black}
set output frame when playback stops
record record from current input
record: name: {name} record named clip
record spill spill current recording to next slot
764Yazılım Geliştiricileri için Bilgiler (İngilizce)

Command Command Description
record: spill: slot id: {n}
spill current recording to specified slot
use current id to spill to same slot
stop stop playback or recording
clips count query number of clips on timeline
clips get query all timeline clips
clips get: clip id: {n} query a timeline clip info
clips get: clip id: {n} count: {m} query m clips starting from n
clips get: version: {1/2}
query clip info using specified output version:
version 1: is: name startT duration
version 2: id: startT duration inT outT name
clips add: name: {name} append a clip to timeline
clips add: clip id: {n} name: {name} insert clip before existing clip {n}
clips add: in: {inT} out: {outT} name: {name} append the {inT} to {outT} portion of clip
clips remove: clip id: {n}
remove clip {n} from the timeline
(invalidates clip ids following clip {n})
clips clear empty timeline clip list
transport info query current activity
slot info query active slot
slot info: slot id: {n} query slot {n}
slot select: slot id: {n} switch to specified slot
slot select: video format: {format} load clips of specified format
slot unblock unblock active slot
slot unblock: slot id: {n} unblock slot {n}
cache info query cache status
dynamic range query dynamic range settings
dynamic range: playback override:
{off/Rec709/Rec2020_SDR/HLG/
ST2084_300/ST2084_500/
ST2084_800/ST2084_1000/
ST2084_2000/ST2084_4000/ST2084
set playback dynamic range override
dynamic range: record override:
{off/Rec709/Rec2020_SDR/HLG/
ST2084_300/ST2084_500/
ST2084_800/ST2084_1000/
ST2084_2000/ST2084_4000/ST2048}
set record dynamic range override
notify query notification status
notify: remote: {true/false} set remote notifications
notify: transport: {true/false} set transport notifications
notify: slot: {true/false} set slot notifications
notify: configuration: {true/false} set configuration notifications
notify: dropped frames: {true/false} set dropped frames notifications
notify: display timecode: {true/false} set display timecode notifications
765Yazılım Geliştiricileri için Bilgiler (İngilizce)

Command Command Description
notify: timeline position: {true/false} set playback timeline position notifications
notify: playrange: {true/false} set playrange notifications
notify: cache: {true/false} set cache notifications
notify: dynamic range: {true/false} set dynamic range settings notifications
notify: slate: {true/false} set digital slate notifications
goto: clip id: {start/end} goto first clip or last clip
goto: clip id: {n} goto clip id {n}
goto: clip id: +{n} go forward {n} clips
goto: clip id: -{n} go backward {n} clips
goto: clip: {n} goto frame position {n} within current clip
goto: clip: +{n} go forward {n} frames within current clip
goto: clip: -{n} go backward {n} frames within current clip
goto: clip: {start/end} goto start or end of clip
goto: timeline: {n} goto frame position {n} within timeline
goto: timeline: +{n} o forward {n} frames within timeline
goto: timeline: -{n} go backward {n} frames within timeline
goto: timeline: {start/end} goto start or end of timeline
goto: timecode: {timecode} goto specified timecode
goto: timecode: +{timecode} go forward {timecode} duration
goto: timecode: -{timecode} go backward {timecode} duration
goto: slot id: {n} goto slot id {n}
jog: timecode: {timecode} jog to timecode
jog: timecode: +{timecode} jog forward {timecode} duration
jog: timecode: -{timecode} jog backward {timecode} duration
shuttle: speed: {-5000 to 5000} shuttle with speed
remote query unit remote control state
remote: enable: {true/false} enable or disable remote control
remote: override: {true/false} session override remote control
configuration query configuration settings
configuration: video input: SDI switch to SDI input
configuration: video input: HDMI switch to HDMI input
configuration: video input: component switch to component input
configuration: audio input: embedded capture embedded audio
configuration: audio input: XLR capture XLR audio
configuration: audio input: RCA capture RCA audio
configuration: file format: {format} switch to specific file format
configuration: audio codec: PCM switch to PCM audio
configuration: audio codec: AAC switch to AAC audio
766Yazılım Geliştiricileri için Bilgiler (İngilizce)

Command Command Description
configuration: timecode input:
{external/embedded/preset/clip}
change the timecode input
configuration: timecode output:
{clip/timeline/internal}
change the timecode output
configuration: timecode preference:
{default/dropframe/nondropframe}
whether or not to use drop frame timecodes when not
otherwise specified
configuration: timecode preset:
{timecode}
set the timecode preset
configuration: audio input channels: {n} set the number of audio channels recorded to {n}
configuration: record trigger:
{none/recordbit/timecoderun}
change the record trigger
configuration: record prefix: {name} set the record prefix name (supports UTF-8 name)
configuration: append timestamp:
{true/false}
append timestamp to recorded filename
configuration: xlr input id: {n} xlr type:
{line/mic}
configure xlr input type
multiple xlr inputs can be configured in a single command
configuration: genlock input resync:
{true/false}
enable or disable genlock input resync
uptime return time since last boot
format: prepare: {format} prepare a disk formatting operation to filesystem {format}
format: confirm: {token} perform a pre-prepared formatting operation using token
identify: enable: {true/false} identify the device
watchdog: period: {period in seconds} client connection timeout
reboot reboot device
slate clips slate clips information
slate project slate project information
slate project:↵
camera: {index}↵
set camera index e.g. A
Command Combinations
You can combine the parameters into a single command, for example:
play: speed: 200 loop: true single clip: true
Or for configuration:
configuration: video input: SDI audio input: XLR
Or to switch to the second disk, but only play NTSC clips:
slot select: slot id: 2 video format: NTSC
Using XML
While you can use the Terminal to talk to HyperDeck, if you are writing software, you can use XML
to confirm the existence of a specific command based on the firmware of the HyperDeck you are
communicating with. This helps your software user interface adjust to the capabilities of the specific
HyperDeck model and software version.
767Yazılım Geliştiricileri için Bilgiler (İngilizce)

Protocol Details
Connection
The HyperDeck Ethernet server listens on TCP port 9993.
Basic syntax
The HyperDeck protocol is a line oriented text protocol. Lines from the server will be separated by an ascii
CR LF sequence. Messages from the client may be separated by LF or CR LF.
New lines are represented in this document as a “↵” symbol.
Single line command syntax
Command parameters are usually optional. A command with no parameters is terminated with a new line:
{Command name}↵
If parameters are specified, the command name is followed by a colon, then pairs of parameter names and
values. Each parameter name is terminated with a colon character:
{Command name}: {Parameter}: {Value} {Parameter}: {Value} ...↵
Multiline command syntax
The HyperDeck protocol also supports an equivalent multiline syntax where each parameter-value pair is
entered on a new line. E.g.
{Command name}:↵
{P a r a m e t e r}: { Va lu e}↵
{P a r a m e t e r}: { Va lu e}↵
↵
Response syntax
Simple responses from the server consist of a three digit response code and descriptive text terminated by
a new line:
{Response code} {Response text}↵
If a response carries parameters, the response text is terminated with a colon, and parameter name and
value pairs follow on subsequent lines until a blank line is returned:
{Response code} {Response text}:↵
{P a r a m e t e r}: { Va lu e}↵
{P a r a m e t e r}: { Va lu e}↵
...
↵
Successful response codes
A simple acknowledgement of a command is indicated with a response code of 200:
200 ok↵
Other successful responses carry parameters and are indicated with response codes in the range of 201
to299.
768Yazılım Geliştiricileri için Bilgiler (İngilizce)

Failure response codes
Failure responses to commands are indicated with response codes in the range of 100 to 199:
100 syntax error
101 unsupported parameter
102 invalid value
103 unsupported
104 disk full
105 no disk
106 disk error
107 timeline empty
108 internal error
109 out of range
110 no input
111 remote control disabled
112 clip not found
120 connection rejected
150 invalid state
151 invalid codec
160 invalid format
161 invalid token
162 format not prepared
163 parameterized single line command not supported
Asynchronous response codes
The server may return asynchronous messages at any time. These responses are indicated with response
codes in the range of 500 to 599:
5xx {Response Text}:↵
{P a r a m e t e r}: { Va lu e}↵
{P a r a m e t e r}: { Va lu e}↵
↵
Connection response
On connection, an asynchronous message will be delivered:
500 connection info:↵
protocol version: {Version}↵
model: {Model Name}↵
↵
Connection rejection
Only one client may connect to the server at a time. If other clients attempt to connect concurrently,
they will receive an error and be disconnected:
120 connection rejected↵
769Yazılım Geliştiricileri için Bilgiler (İngilizce)

Timecode syntax
Timecodes are expressed as non-drop-frame timecode in the format:
HH:MM:SS:FF
Handling of deck “remote” state
The “remote” command may be used to enable or disable the remote control of the deck. Any attempt to
change the deck state over ethernet while remote access is disabled will generate an error:
111 remote control disabled↵
To enable or disable remote control:
remote: enable: {“true”, “false”} ↵
The current remote control state may be overridden allowing remote access over ethernet irrespective of
the current remote control state:
remote: override: {“true”, “false”} ↵
The override state is only valid for the currently connected ethernet client and only while the connection
remains open.
The “remote” command may be used to query the remote control state of the deck by specifying no
parameters:
remote↵
The deck will return the current remote control state:
210 remote info:↵
enabled: {“true”, “false”}↵
override: {“true”, “false”}↵
↵
Asynchronous remote control information change notification is disabled by default and may be
configured with the “notify” command. When enabled, changes in remote state will generate a “510 remote
info:”asynchronous message with the same parameters as the “210 remote info:” message.
Closing connection
The “quit” command instructs the server to cleanly shut down the connection:
quit↵
Checking connection status
The “ping” command has no function other than to determine if the server is responding:
ping↵
Getting help
The “help” or “?” commands return human readable help text describing all available commands and
parameters:
help↵
Or:
?↵
The server will respond with a list of all supported commands:
201 help:↵
{Help Te x t}↵
{Help Te x t}↵
↵
770Yazılım Geliştiricileri için Bilgiler (İngilizce)

Switching to preview mode
The “preview” command instructs the deck to switch between preview mode and output mode:
preview: enable: {“true”, “false”}↵
Playback will be stopped when the deck is switched to preview mode. Capturing will be stopped when the
deck is switched to output mode.
Controlling device playback
The “play” command instructs the deck to start playing:
play↵
The play command accepts a number of parameters which may be used together in most combinations.
By default, the deck will play all remaining clips on the timeline then stop.
The “single clip” parameter may be used to override this behavior:
play: single clip: {“true”, “false”}↵
By default, the deck will play at normal (100%) speed. An alternate speed may be specified in percentage
between -1600 and 1600:
play: speed: {% normal speed}↵
By default, the deck will stop playing when it reaches to the end of the timeline. The “loop” parameter may
be used to override this behavior:
play: loop: {“true”, “false”}↵
The “playrange” command instructs the deck to play all the clips. To override this behavior: and select a
particular clip:
playrange set: clip id: {Clip ID}↵
To only play a certain timecode range:
playrange set: in: {in timecode} out: {out timecode}↵
To clear a set playrange and return to the default value:
playrange clear↵
The “play on startup command” instructs the deck on what action to take on startup. By default, the deck
will not play. Use the “enable” command to start playback after each power up.
play on startup: enable {“true”, “false”}↵
By default, the unit will play back all clips on startup. Use the “single clip” command to override.
play on startup: single clip: {“true”, “false”}↵
Stopping deck operation
The “stop” command instructs the deck to stop the current playback or capture:
stop↵
771Yazılım Geliştiricileri için Bilgiler (İngilizce)

Changing timeline position
The “goto” command instructs the deck to switch to playback mode and change its position within the
timeline.
To go to the start of a specific clip:
goto: clip id: {Clip ID}↵
To move forward/back {count} clips from the current clip on the current timeline:
goto: clip id: +/-{count}↵
Note that if the resultant clip id goes beyond the first or last clip on timeline, it will be clamp at the first or
last clip.
To go to the start or end of the current clip:
goto: clip: {“start”, “end”}↵
To go to the start of the first clip or the end of the last clip:
goto: timeline: {“start”, “end”}↵
To go to a specified timecode:
goto: timecode: {timecode}↵
To move forward or back a specified duration in timecode:
goto: timecode: {“+”, “-”}{duration in timecode}↵
To specify between slot 1 and slot 2:
goto: slot id: {Slot ID}↵
Note that only one parameter/value pair is allowed for each goto command.
Enumerating supported commands and parameters
The “commands” command returns the supported commands:
commands↵
The command list is returned in a computer readable XML format:
212 commands:
<commands>↵
<command name=”…”><parameter name=”…”/>…</command>↵
<command name=”…”><parameter name=”…”/>…</command>↵
…
</commands>↵
↵
More XML tokens and parameters may be added in later releases.
772Yazılım Geliştiricileri için Bilgiler (İngilizce)

Controlling asynchronous notifications
The “notify” command may be used to enable or disable asynchronous notifications from the server.
To enable or disable transport notifications:
notify: transport: {“true”, “false”}↵
To enable or disable slot notifications:
notify: slot: {“true”, “false”}↵
To enable or disable remote notifications:
notify: remote: {“true”, “false”}↵
To enable or disable configuration notifications:
notify: configuration: {“true”, “false”}↵
Multiple parameters may be specified. If no parameters are specified, the server returns the current state of
all notifications:
209 notify:↵
transport: {“true”, “false”}↵
slot: {“true”, “false”}↵
remote: {“true”, “false”}↵
configuration: {“true”, “false”}↵
dropped frames: {“true”, “false”}↵
display timecode: {“true”, “false”}↵
timeline position: {“true”, “false”}↵
playrange: {“true”, “false”}↵
cache: {“true”, “false”}↵
dynamic range: {“true”, “false”}↵
slate: {“true”, “false”}↵
↵
Retrieving device information
The “device info” command returns information about the connected deck device:
device info↵
The server will respond with:
204 device info:↵
protocol version: {Version}↵
model: {Model Name}↵
unique id: {unique alphanumeric identifier}↵
slot count: {number of storage slots}↵
software version: {software version}↵
↵
773Yazılım Geliştiricileri için Bilgiler (İngilizce)

Retrieving slot information
The “slot info” command returns information about a slot. Without parameters, the command returns
information for the currently selected slot:
slot info↵
If a slot id is specified, that slot will be queried:
slot info: slot id: {Slot ID}↵
The server will respond with slot specific information:
202 slot info:↵
slot id: {Slot ID}↵
status: {“empty”, “mounting”, “error”, “mounted”}↵
volume name: {Volume name}↵
recording time: {recording time available in seconds}↵
video format: {disk’s default video format}↵
blocked: {“true”, “false”}↵
↵
Asynchronous slot information change notification is disabled by default and may be configured with the
“notify” command. When enabled, changes in slot state will generate a “502 slot info:” asynchronous
message with the same parameters as the “202 slot info:” message.
Retrieving clip information
The “disk list” command returns the information for each playable clip on a given disk. Without parameters,
the command returns information for the current active disk:
disk list↵
If a slot id is specified, the disk in that slot will be queried:
disk list: slot id: {Slot ID}↵
The server responds with the list of all playable clips on the disk in the format of: Index, name, formats, and
duration in timecode:
206 disk list:↵
slot id: {Slot ID}↵
{clip index}: {name} {file format} {video format} {Duration
ti m ecode}↵
{clip index}: {name} {file format} {video format} {Duration
ti m ecode}↵
…
↵
Note that the clip index starts from 1.
Retrieving clip count
The “clips count” command returns the number of clips on the current timeline:
clips count ↵
The server responds with the number of clips:
214 clips count: ↵
clip count: {Count}↵
774Yazılım Geliştiricileri için Bilgiler (İngilizce)

Retrieving timeline information
The “clips get” command returns information for each available clip on the current timeline. Without
parameters, the command returns information for all clips on timeline:
clips get↵
The server responds with a list of clip IDs, names and timecodes:
205 clips info:↵
clip count: {Count}↵
{Clip ID}: {Name} {Start timecode} {Duration timecode}↵
{Clip ID}: {Name} {Start timecode} {Duration timecode}↵
…
↵
Retrieving transport information
The “transport info” command returns the state of the transport:
transport info ↵
The server responds with transport specific information:
208 transport info:
status: {“preview”, “stopped”, “play”, “forward”, “rewind”,
“j o g ”, “ s h u t t l e ”,” r e c o r d ” }↵
speed: {Play speed between -5000 and 5000 %}↵
slot id: {Slot ID or “none”}↵
clip id: {Clip ID or “none”}↵
single clip: {“true”, “false”}↵
display timecode: {timecode}↵
timecode: {timecode}↵
video format: {Video format}↵
loop: {“true”, “false”}↵
timeline: {n}↵
input video format: {Video format”}↵
dynamic range: {“off”, “Rec709”, “Rec2020_SDR”, “HLG”,
“ST2084_300”, “ST2084_500”, “ST2084_800”, “ST2084_1000”,
“ST2084_2000”, “ST2084_4000”, “ST2048” or “none”}↵
↵
The “timecode” value is the timecode within the current timeline for playback or the clip for record. The
“display timecode” is the timecode displayed on the front of the deck. The two timecodes will differ in some
deck modes.
Asynchronous transport information change notification is disabled by default and may be configured
with the “notify” command. When enabled, changes in transport state will generate a “508 transport info:”
asynchronous message with the same parameters as the “208 transport info:” message.
775Yazılım Geliştiricileri için Bilgiler (İngilizce)

Video Formats
The following video formats are currently supported on HyperDeck Studio:
NTSC, PAL, NTSCp, PALp
720p50, 720p5994, 720p60
1080p23976, 1080p24, 1080p25, 1080p2997, 1080p30
1080i50, 1080i5994, 1080i60
HyperDeck Studio Pro and Plus models support these 4k formats:
4Kp23976, 4Kp24, 4Kp25, 4Kp2997, 4Kp30
HyperDeck Studio 4K Pro adds support for the following 4k formats:
4Kp50, 4Kp5994, 4Kp60
Video format support may vary between models and software releases.
File Formats
All HyperDeck models currently support the following file formats:
H.264High_SDI
H.264High
H.264Medium
H.264Low
QuickTimeProResHQ
QuickTimeProRes
QuickTimeProResLT
QuickTimeProResProxy
QuickTimeDNxHD220x
DNxHD220x
QuickTimeDNxHD145
DNxHD145
QuickTimeDNxHD45
DNxHD45
HyperDeck Studio 4K Pro also supports the following file formats:
H.265High_SDI
H.265High
H.265Medium
H.265Low
QuickTimeDNxHR_HQX
DNxHR_HQX 4Kp60
QuickTimeDNxHR_SQ
DNxHR_SQ
QuickTimeDNxHR_LB
DNxHR_LB
Supported file formats may vary between models and software releases.
776Yazılım Geliştiricileri için Bilgiler (İngilizce)

Querying and updating configuration information
The “configuration” command may be used to query the current configuration of the deck:
configuration↵
The server returns the configuration of the deck:
211 configuration:↵
audio input: {“embedded”, “XLR”, “RCA”}↵
audio mapping: {n}↵
video input: {“SDI”, “HDMI”, “component”, “composite”}↵
file format: {format}↵
audio codec: {“PCM”, “AAC”}↵
timecode input: {“external”, “embedded”, “preset”, “clip”}↵
timecode output: {“clip”, “timeline”}↵
timecode preference: {“default”, “dropframe”, “nondropframe”}↵
timecode preset: {timecode}↵
audio input channels: {n}↵
record trigger: {“none”, “recordbit”, “timecoderun”}↵
record prefix: {name}↵
append timestamp: {“true”, “false”}↵
↵
One or more configuration parameters may be specified to change the configuration of the deck.
To change the current video input:
configuration: video input: {“SDI”, “HDMI”, “component”}↵
Valid video inputs may vary between models. To configure the current audio input:
configuration: audio input: {“embedded”, “XLR”, “RCA”}↵
Valid audio inputs may vary between models.
To configure the current file format:
configuration: file format: {File format}↵
Note that changes to the file format may require the deck to reset, which will cause the client connection to
be closed. In such case, response code 213 will be returned (instead of 200) before the client connection is
closed:
“213 deck rebooting”
Asynchronous configuration information change notification is disabled by default and may be configured
with the “notify” command. When enabled, changes in configuration will generate a “511 configuration:”
asynchronous message with the same parameters as the “211 configuration:” message.
Selecting active slot and video format
The “slot select” command instructs the deck to switch to a specified slot, or/and to select a specified
output video format.
To switch to a specified slot:
slot select: slot id: {slot ID}↵
To select the output video format:
slot select: video format: {video format}↵
Either or all slot select parameters may be specified. Note that selecting video format will result in a rescan
of the disk to reconstruct the timeline with all clips of the specified video format.
777Yazılım Geliştiricileri için Bilgiler (İngilizce)

Clearing the current timeline
The “clips clear” command instructs the deck to empty the current timeline:
clips clear↵
The server responds with
200 ok↵
Adding a clip to the current timeline
The “clips add:” command instructs the deck to add a clip to the current timeline:
clips add: name: {“clip name”}↵
The server responds with
200 ok↵
or in case of error
1xx {error description}↵
Configuring the watchdog
The “watchdog” command instructs the deck to monitor the connected client and terminate the connection
if the client is inactive for at least a specified period of time.
To configure the watchdog:
watchdog: period: {period in seconds}↵
To avoid disconnection, the client must send a command to the server at least every {period} seconds. Note
that if the period is set to 0 or less than 0, connection monitoring will be disabled.
778Yazılım Geliştiricileri için Bilgiler (İngilizce)

Yardım/Destek
Yardım İçin
Yardım almanın en hızlı yolu, Blackmagic Design online destek sayfalarına girip, Blackmagic
HyperDeck disk kaydediciniz için olan en son destek materyallerini incelemektir.
Blackmagic Design Online Destek Sayfaları
En güncel kılavuz, yazılım ve destek notlarına, www.blackmagicdesign.com/tr/support adresindeki,
Blackmagic Design destek merkezinde bulabilirsiniz.
Blackmagic Design Forum
Web sitemizdeki Blackmagic Design forum, daha fazla bilgi ve yaratıcı fikirler için ziyaret
edebileceğiniz faydalı bir kaynaktır. Burası, yardım alabilmeniz için daha hızlı bir yol da olabilir;
çünkü başka deneyimli kullanıcılar ya da Blackmagic Design çalışanları tarafından sorularınıza
verilmiş yanıtları bulabilir ve bu sayede çalışmalarınıza devam edebilirsiniz. Foruma,
https://forum.blackmagicdesign.com adresinden ulaşabilirsiniz.
Blackmagic Design Destek Ekibiyle İrtibat
Aradığınız yardımı destek kaynaklarında ya da forumda bulamadığınız durumda, lütfen destek
sayfamıza girip, “Bize e-posta gönderin” butonuna tıklayarak e-posta yoluyla destek talebinde
bulunun. Bunun yerine, destek sayfasındaki “Yerel destek ekibini arayın” butonunu tıklayıp, size
en yakın olan Blackmagic Design destek ofisini arayabilirsiniz.
Şuan Yüklü Yazılım Sürümünün Kontrolü
Bilgisayarınızda Blackmagic HyperDeck yazılımının hangi sürümünün yüklü olduğuna göz atmak
için, ‘About Blackmagic HyperDeck Setup’ penceresini açın.
Mac OS’de, Uygulamalar (applications) klasöründeki Blackmagic HyperDeck Setup
kurulumunu açın. Sürüm numarasını görüntülemek için, uygulamalar menüsünden,
‘About Blackmagic HyperDeck Setup’ sekmesini seçin.
Windows bilgisayarlarında, ‘Başlat’ menüsünden ya da Başlat ekranından, Blackmagic
HyperDeck Setup yardımcı uygulamasını açın. Sürüm numarasını görüntülemek için Help
(Yardım) menüsünü tıklayın ve ‘About Blackmagic HyperDeck Setup’ sekmesini seçin.
En Yeni Yazılım Güncellemelerine Erişim
Bilgisayarınızda yüklü bulunan Blackmagic HyperDeck Setup yazılımının sürümünü denetledikten
sonra, en son güncellemeleri gözden geçirmek için lütfen, www.blackmagicdesign.com/tr/support
adresindeki Blackmagic Design destek merkezini ziyaret edin. En son güncellemeleri çalıştırmak
faydalı olsa da önemli bir projenin ortasındayken, yazılımı güncellemekten kaçınmakta yarar vardır.
779Yardım/Destek

Mevzuata İlişkin Bildirimler
Avrupa Birliği Dahilinde Elektrikli ve Elektronik Cihazlara Dair Atık Kontrol Yönetmeliği.
Ürün üzerindeki sembol, bu cihazın başka atık malzemelerle bertaraf edilmemesi şartını
gösterir. Atık ekipmanlarınızı bertaraf edebilmeniz için geri dönüşümünü sağlamak üzere,
belirlenmiş toplama noktasına teslim edilmeleri gerekmektedir. Bertaraf anında atık
cihazlarınızın ayrı olarak toplanması ve geri dönüşümü, doğal kaynakların korunmasına
yardımcı olacaktır ve insan sağlığını ve çevreyi koruyucu bir şekilde geri dönüşümünü
sağlayacaktır. Geri dönüşüm için atık cihazlarınızı nereye teslim edebileceğiniz konusunda
daha fazla bilgi için, lütfen yerel belediyenizin geri dönüşüm birimini ya da ürünü satın
aldığınız satış bayisini arayın.
Bu cihaz, test edilmiş ve Federal İletişim Komisyonu (FCC) koşullarının 15. bölümü
doğrultusunda A Sınıfı dijital cihazların sınırlarıyla uyumlu olduğu tespit edilmiştir. İlgili sınırlar,
bu cihaz ticari bir ortamda çalıştırıldığı takdirde, zararlı müdahalelere karşı makul koruma
sağlaması için tasarlanmıştır. Bu cihaz; radyo frekans enerjisi üretir, kullanır ve saçabilir ve
talimatlar doğrultusunda kurulmadığı ve kullanılmadığı takdirde, radyo iletişimlerinde zararlı
müdahaleye yol açabilir. Bu ürünün bir yerleşim bölgesinde çalıştırılması, zararlı müdahaleye
yol açabilir. Bu durumda, müdahalenin düzeltilmesi için ilgili maliyeti kullanıcı karşılamak
zorundadır.
Bu cihazın çalıştırılması, aşağıdaki iki şarta bağlıdır:
1 Bu cihaz, zararlı müdahaleye sebebiyet vermemelidir.
2 Bu cihaz, arzu edilmeyen bir çalışma şekline yol açacak müdahale de dahil olmak üzere,
maruz kaldığı her türlü müdahaleyi kabul etmelidir.
R-R-BMD-20210202002
R-R-BMD-20210202003
R-R-BMD-20201201003
R-R-BMD-20210301001
ISED Kanada Beyannamesi
Bu cihaz, A Sınıfı dijital cihazlar için Kanada standartlarıyla uyumludur.
Bu cihaza yapılacak herhangi bir değişiklik veya kullanım amacı dışında kullanılması,
bu standartlara uyumluluğunu hükümsüz kılabilir.
HDMI arayüzlerine bağlantı, yüksek kaliteli korumalı HDMI kablolarıyla yapılmalıdır.
Bu cihaz, ticari ortamda kullanım amacına uygunluk için test edilmiştir. Cihaz ev
ortamında kullanıldığında, radyo parazitine neden olabilir.
780Mevzuata İlişkin Bildirimler

Güvenlik Bilgileri
Elektrik çarpmalarına karşı korunmak için, bu cihaz koruyucu topraklama bağlantısı olan bir şebeke
prizine takılmalıdır. Şüpheli durumlarda, kalifiye bir elektrik teknisyeniyle kontağa geçin.
Elektrik çarpma riskini azaltmak için, bu ekipmanı damlayan veya sıçrayan suya maruz bırakmayın.
Ürün, ortam ısısı 40º C’ye kadar olan tropikal ortamlarda kullanılmaya uygundur.
Ürünün çevresinde yeterli havalandırma olduğundan ve hava akımının kısıtlanmadığından emin olun.
Rafa monte ederken, bitişik cihazlardan dolayı hava akımının kısıtlanmadığından emin olun.
Ürün içinde, kullanıcı tarafından tamir edilebilecek hiçbir parça bulunmamaktadır. Gerekli tamiratları,
yerel Blackmagic Design hizmet merkezine yönlendirin.
Deniz seviyesinden yüksekliğin 2000m’yi aşmadığı yerlerde kullanın.
Kaliforniya Eyalet Beyannamesi
Bu ürün; plastik parçaları dahilinde, eser miktarda polibromine bifeniller gibi kimyasal maddelere sizi
maruz bırakabilir. Kaliforniya eyaletinde, bu maddelerin kansere, doğum kusurlarına veya başka
üreme bozukluklarına sebebiyet verdiği bilinmektedir.
Daha fazla bilgi için, www.P65Warnings.ca.gov adresini ziyaret ediniz.
Yetkili Servis Personeli için Uyarı
Bakım yapmadan önce, her iki güç soketinden güç bağlantısını kesin!
781Güvenlik Bilgileri

Garanti
12 Ay Sınırlı Garanti
Blackmagic Design şirketi, bu ürünün satın alındığı tarihten itibaren malzeme ve işçilik bakımından, 12ay
boyunca kusursuz ve arızasız olacağını garanti eder. Üründe, bu garanti süresi içinde bir arıza ve kusur
söz konusu olursa Blackmagic Design, kendi seçimi doğrultusunda ya arızalı ürünü parça ve işçilik
bedeli talep etmeksizin tamir edecektir ya da arızalı ürünü yenisiyle değiştirecektir.
Bu garanti kapsamındaki hizmetten yararlanmak için, kusur ve hataya ilişkin garanti süresi sona ermeden,
Müşteri Blackmagic Design’i bilgilendirmeli ve söz konusu hizmetin sağlanması için uygun düzenlemeleri
yapmalıdır. Blackmagic Design tarafından özel belirlenmiş ve yetkilendirilmiş bir hizmet merkezine arızalı
ürünün ambalajlanarak nakliyesi, Müşteri’nin sorumluluğudur ve nakliye ücretleri, peşin ödenmiş olmalıdır.
Herhangi bir sebepten dolayı bize iade edilen ürünlerin; tüm nakliye, sigorta, gümrük vergileri, vergi ve
tüm diğer masrafların ödenmesi, Müşteri sorumluluğu altındadır.
Bu garanti; yanlış kullanım ya da yanlış veya kusurlu bakımdan kaynaklanan herhangi bir arızayı, bozukluğu
ya da hasarı kapsamaz. Blackmagic Design, burada açıklanan durumlarda, bu garanti kapsamında hizmet
sağlamak zorunda değildir: a) Blackmagic Design temsilcileri haricindeki başka personelin ürünü kurma,
tamir etme ya da bakımını yapma girişimlerinden kaynaklanan hasarın tamir edilmesi, b) uygun olmayan
kullanım veya uyumlu olmayan ekipmanlara bağlanılmasından kaynaklanan hasarın tamir edilmesi,
c) Blackmagic Design parçaları ya da malzemesi olmayan ürünlerin kullanımından kaynaklanan hasarın
ya da arızanın tamir edilmesi ya da d) Modifiye veya başka ürünlerle entegre edilmiş bir ürünün; söz
konusu modifikasyon ya da entegrasyonun gereken tamiratın süresini uzattığı ya da ürün bakımını
zorlaştırdığı durumlarda, tamir edilmesi. BU GARANTİ, BLACKMAGIC DESIGN TARAFINDAN VERİLMİŞTİR
VE AÇIK YA DA ZIMNİ, HERHANGİ BİR GARANTİNİN YERİNİ TUTAR. BLACKMAGIC DESIGN VE
SATICILARI, ZIMNİ TİCARİ UYGUNLUK GARANTİSİNİ YA DA ÖZEL BİR AMACA UYGUNLUK GARANTİSİNİ
KABUL ETMEZ. KUSURLU BİR ÜRÜNÜN TAMİRİ VEYA DEĞİŞTİRİLMESİ, BLACKMAGIC DESIGN’İN
MÜŞTERİLERİNE SUNDUĞU TAM VE MÜNHASIR ÇÖZÜMDÜR. BLACKMAGIC DESIGN YA DA
SATICILARININ, OLABİLECEK HASARLAR HAKKINDA ÖNCEDEN BİLGİSİ OLMASINI GÖZETMEKSİZİN;
ÜRÜNDE DOLAYLI, ÖZEL, TESADÜFİ YA DA NETİCE OLARAK ORTAYA ÇIKAN HERHANGİ BİR HASAR
İÇİN, BLACKMAGIC DESIGN SORUMLU DEĞİLDİR. BLACKMAGIC DESIGN, MÜŞTERİLER TARAFINDAN
CİHAZIN YASAL OLMAYAN HERHANGİ BİR KULLANIMINDAN, SORUMLU DEĞİLDİR. BLACKMAGIC
DESIGN, BU ÜRÜNÜN KULLANIMINDAN KAYNAKLANAN HERHANGİ BİR HASARDAN, SORUMLU
DEĞİLDİR. BU ÜRÜNÜN ÇALIŞTIRILMASINDAN DOĞAN RİSK, KULLANICININ KENDİSİNE AİTTİR.
© Telif Hakkı Saklıdır 2021 Blackmagic Design. Tüm Hakları Saklıdır. ‘Blackmagic Design’, ‘DeckLink’, ‘HDLink’, ‘Workgroup Videohub’,
‘Multibridge Pro’, ‘Multibridge Extreme’, ‘Intensity’ ve ‘Leading the creative video revolution’ ABD ve diğer ülkelerde tescil edilmiş
ticari markalardır. Diğer tüm şirket ve ürün isimleri, bağlantılı oldukları ilgili şirketlerin ticari markaları olabilir.
782Garanti