
July 2020
Installation and Operation Manual
Blackmagic
Video Assist
English, 日本語, Français, Deutsch, Español, 中文,
한국어, Русский, Italiano, Português and Türkçe.

English
Welcome!
Thank you for purchasing your Blackmagic Video Assist.
In 2015 we launched the original Blackmagic Video Assist to help you shoot better quality video on
any type of camera. We are now excited to introduce Blackmagic Video Assist 12G HDR to the video
assist family!
We are extremely excited to have designed the Blackmagic Video Assist family of products. We
think they are the perfect solution to help you shoot better video on any type of camera. Your video
assist combines the best of our monitoring and recording technologies for on set monitoring and
professional recording into easy to use very compact products.
Blackmagic Video Assist models can be mounted on your camera, or on a desk for general deck
and monitoring use. That’s perfect for use as a master recorder for a live production switcher like
ATEM Mini.
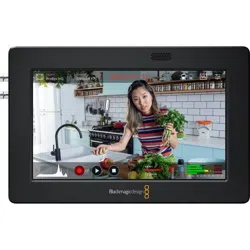
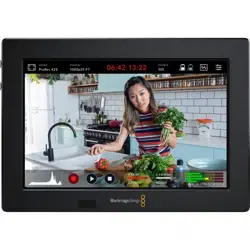
3G-SDI and 12G-SDI inputs let you monitor HD or Ultra HD on high quality LCD screens including HDR
on 12G models. With up to 2,500 nits, the HDR displays can be seen even in bright sunlight.
You can record on fast SD cards including dual card slots on the 7” models for continuous recording.
Your video assist is a very versatile monitor and recorder you can use with any camera on any project.
This instruction manual contains all the information you need to start using your
Blackmagic Video Assist.
Please check the support page on our website at
www.blackmagicdesign.com for the latest version
of this manual and for updates to your video assist’s software. Keeping your software up to date
will ensure you get all the latest features! When downloading software, please register with your
information so we can keep you updated when new software is released. We are continually working
on new features and improvements, so we would love to hear from you!
Grant Petty
CEO Blackmagic Design

Contents
Blackmagic Video Assist
Getting Started 5
Plugging in Power 5
Plugging in Video 7
Plugging in Audio 7
Inserting SD Cards 7
Recording 8
Remote Control via the LANC Connector 9
Continuous Recording 9
Recording Clean HDMI
from DSLR Cameras
10
Playback 10
Looping playback 11
Changing Settings 11
Using the Touchscreen 11
Blackmagic Video Assist
Settings and Features
13
Audio 30
Menu Settings 32
Entering Metadata 36
Digital Slate 36
Recording Blackmagic RAW
on Video Assist 12G HDR
41
Connecting your camera to
Video Assist 12G HDR
41
Blackmagic RAW 42
Recording to Blackmagic RAW 43
Storage Media 45
Choosing a Fast SD Card 45
Choosing a USB-C Flash Disk 46
Formatting Storage Media
using your Video Assist
47
Formatting Media using a Computer 48
Working with Files from SD Cards 50
Checking Disk Speed 50
Blackmagic Video Assist Setup 51
Updating the Internal Software 51
Using DaVinci Resolve 53
Project Manager 53
Editing with the Cut Page 54
Adding Clips to the Timeline 57
Editing Clips on the Timeline 58
Adding Titles 58
Working with Blackmagic RAW Files 59
Color Correcting your Clips
with the Color Page
62
Adding a Power Window 66
Using Plugins 67
Mixing Your Audio 68
Adding VFX and Compositing
on the Fusion Page
73
Mastering Your Edit 81
Quick Export 81
The Deliver Page 82
Post Production Workflow 82
Working with 3rd Party Software 82
Using Final Cut Pro X 83
Using Avid Media Composer 2018 83
Using Adobe Premiere Pro CC 84
Help 85
Regulatory Notices 86
Safety Information 87
Warranty 88
Getting Started
This section shows you how to get started including:
■
Plugging in Power
■
Plugging in Video
■
Plugging in Audio
■
Inserting SD cards
Plugging in Power
Getting started with your Blackmagic Video Assist is as simple as plugging in power,
connecting your video source, plugging in your audio and inserting an SD card.
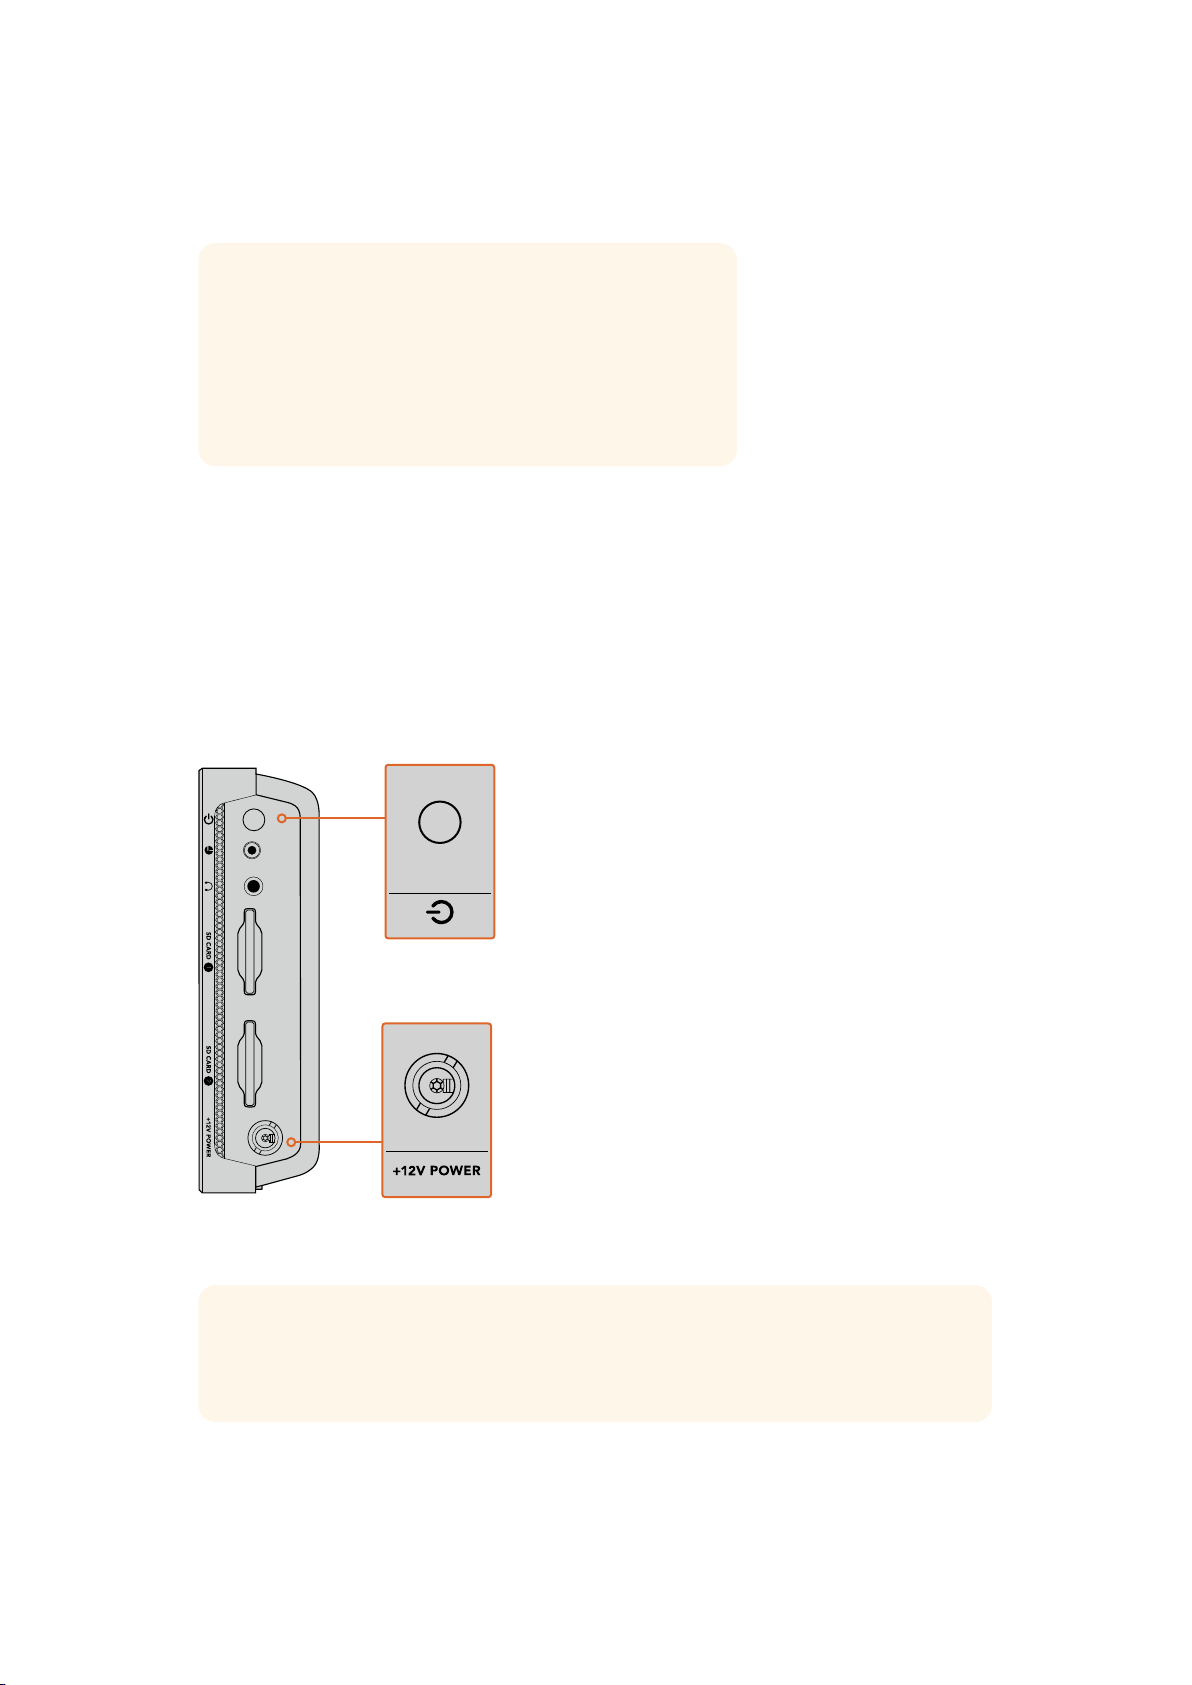
To supply power, plug in the supplied power adapter to your video assist’s power input on
the right side panel. On the 12G models, you can secure the connector to the video assist to
prevent accidental disconnection.
To power on the unit, press the power button on the right side panel. Press and
hold to power off.
Connect external power to the +12V power input.
Press the power button to turn the unit on.
TIP The supplied power cable included with Blackmagic Video Assist 12G HDR
features a locking connector to prevent disconnection, but you can also use any 36W
12V power cable to power the video assist.
5Getting Started
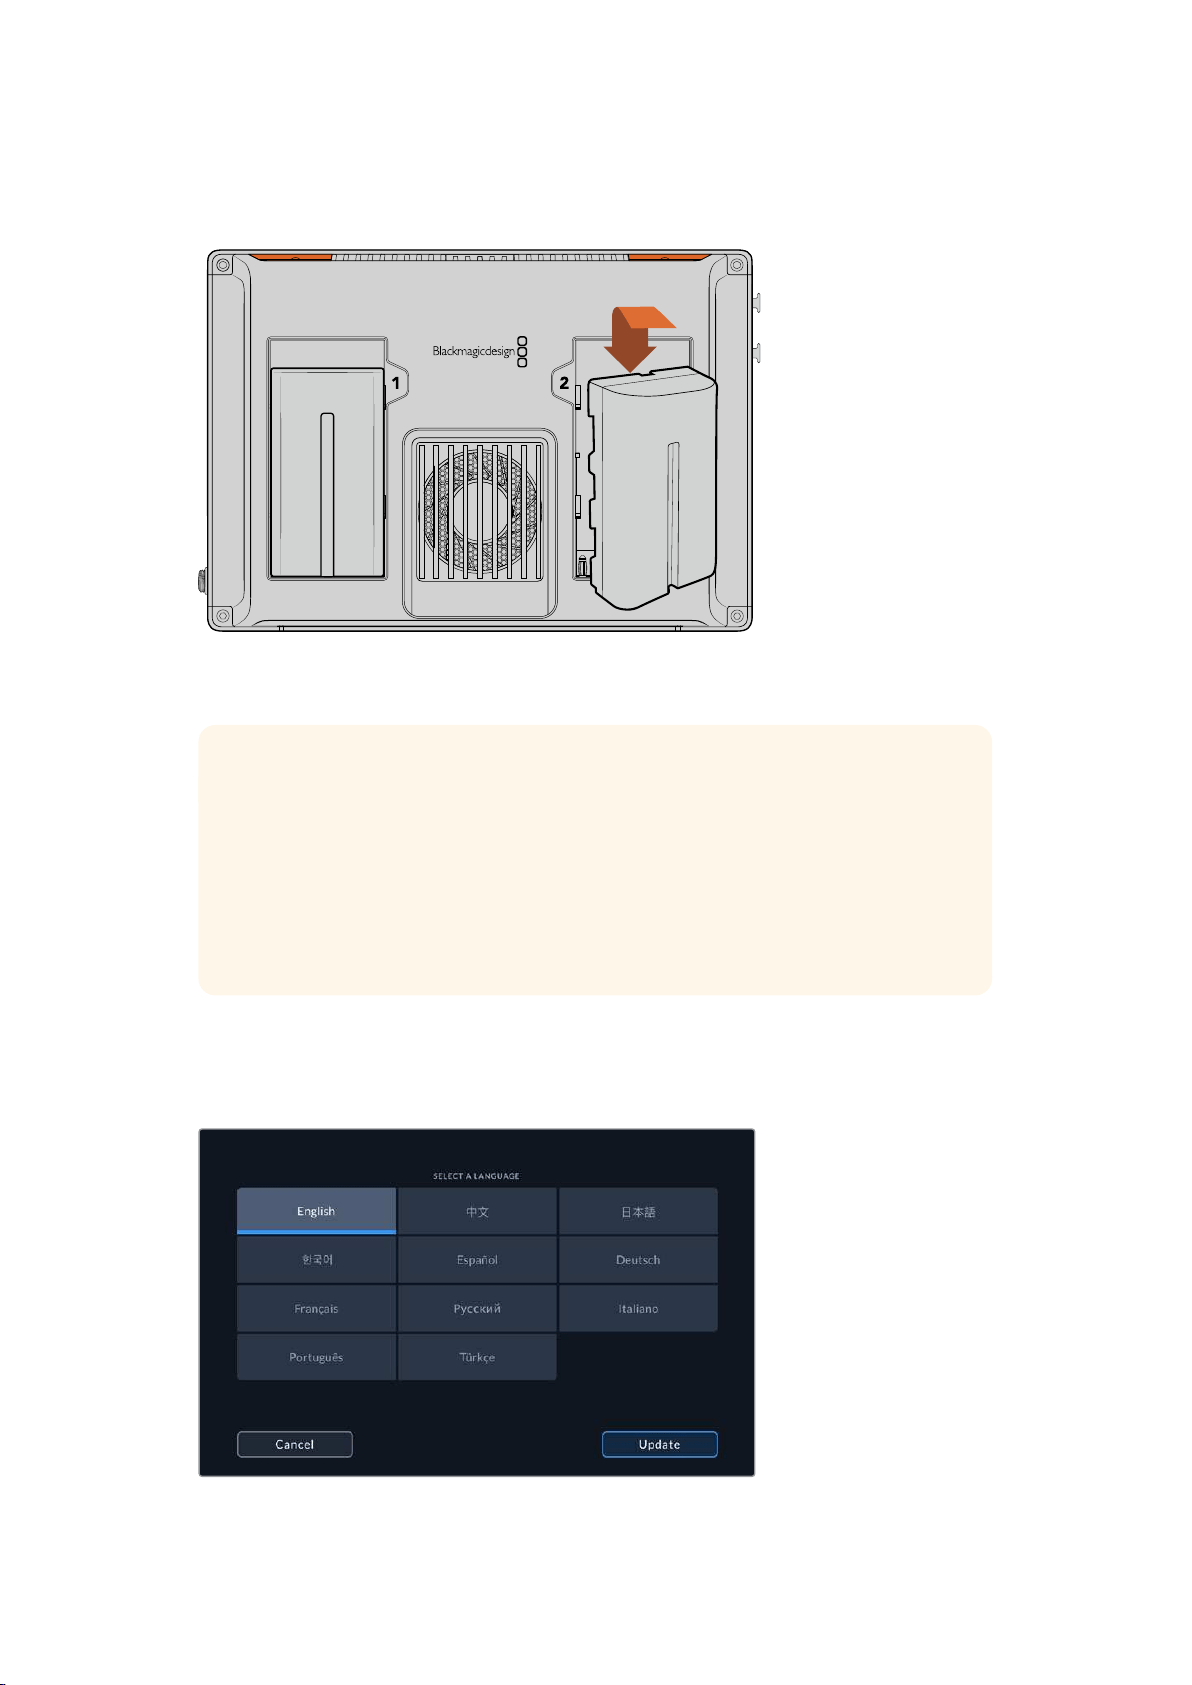
You can also power your video assist using Sony L-series batteries that are very common and
can be purchased in a variety of capacities.
Insert the battery into the slot and slide down until it clicks into place. To remove,
press and hold the button above the battery and slide the battery out
Charging your Batteries
L-series batteries are very common and used in a variety of video equipment. This also
means there is a wide variety of chargers you can use to recharge your batteries.
These include a wall plug style charger with a single battery slot, or dual slot models
with an LCD screen that displays the charge status of your batteries. When selecting a
battery charger, it’s important to make sure it fits into your production workflow. For
example, some chargers are powered via USB so are convenient for when you are on
the go. Other chargers are mains powered so will suit studio and office locations.
The first time you power up your Blackmagic Video Assist you will be prompted to select
your language from the 11 available options. Tap on your selected language and then tap
‘update’. You can change your language settings at any time using the ‘setup’ tab of the
dashboard menu.
6Getting Started
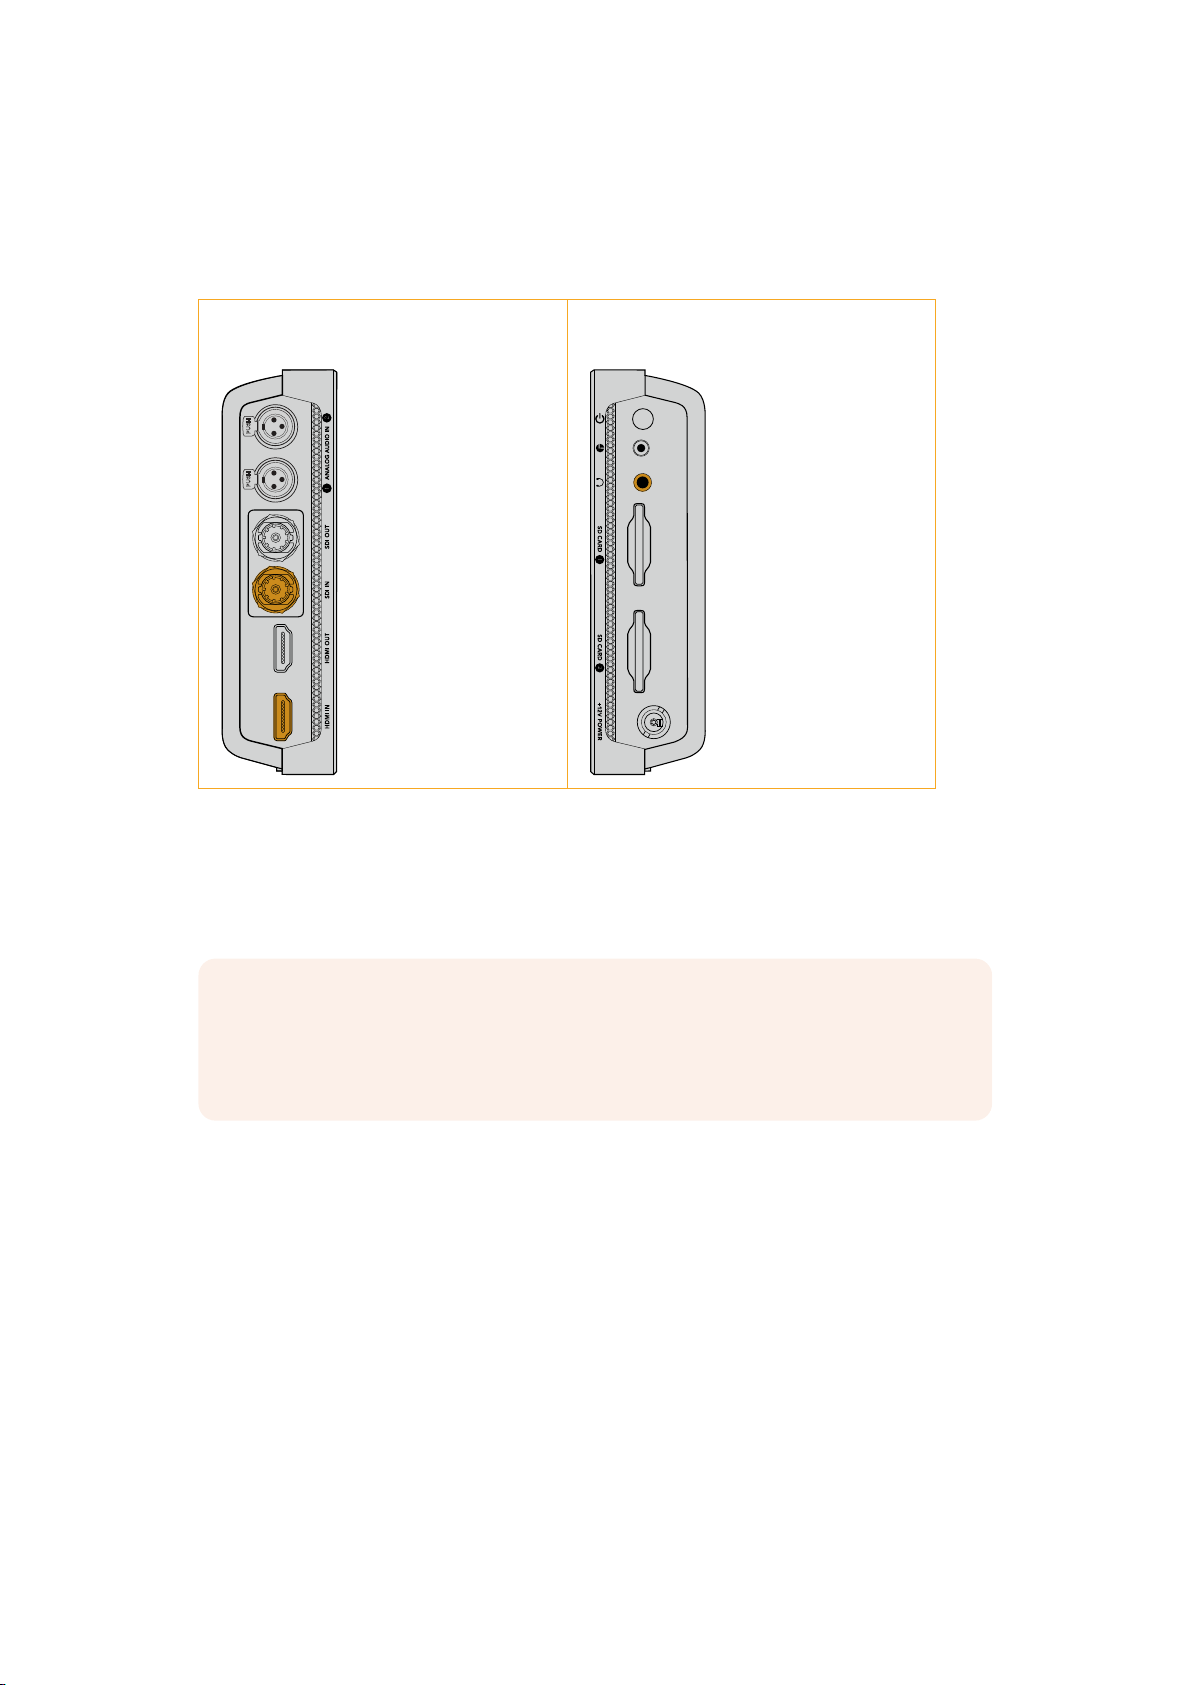
Plugging in Video
The next step is to plug your SDI or HDMI source videointo the MiniBNC, BNC or HDMIinput.
Mini BNC to regular BNC cables can be purchased from your nearest professional video
equipment stores.
Left Side Panel Right Side Panel
Connect your source video
to the SDI or HDMI input
on the left side. Connect
an HDMITV or SDI
monitor by plugging into
the HDMI or SDI output.
You can listen to the audio
via the built in speaker, or
by plugging headphones
into the headphones
jack. The speaker will be
muted during recording
and monitoring.
Plugging in Audio
When plugging in your video, audio is also connected as it’s embedded in the SDI or
HDMI video signal. However, 7” video assist models also have built in mini XLR connectors so
you can plug in external balanced analog audio as well.
NOTE On the 7” video assist model, you can set the audio settings to record
analog channels 1 and 2, orchoose one channel analog audio and one channel SDI
or HDMI audio, depending on your source video. For more information about analog
audio andadjusting levels refer to the ‘audio’ section later in this manual.
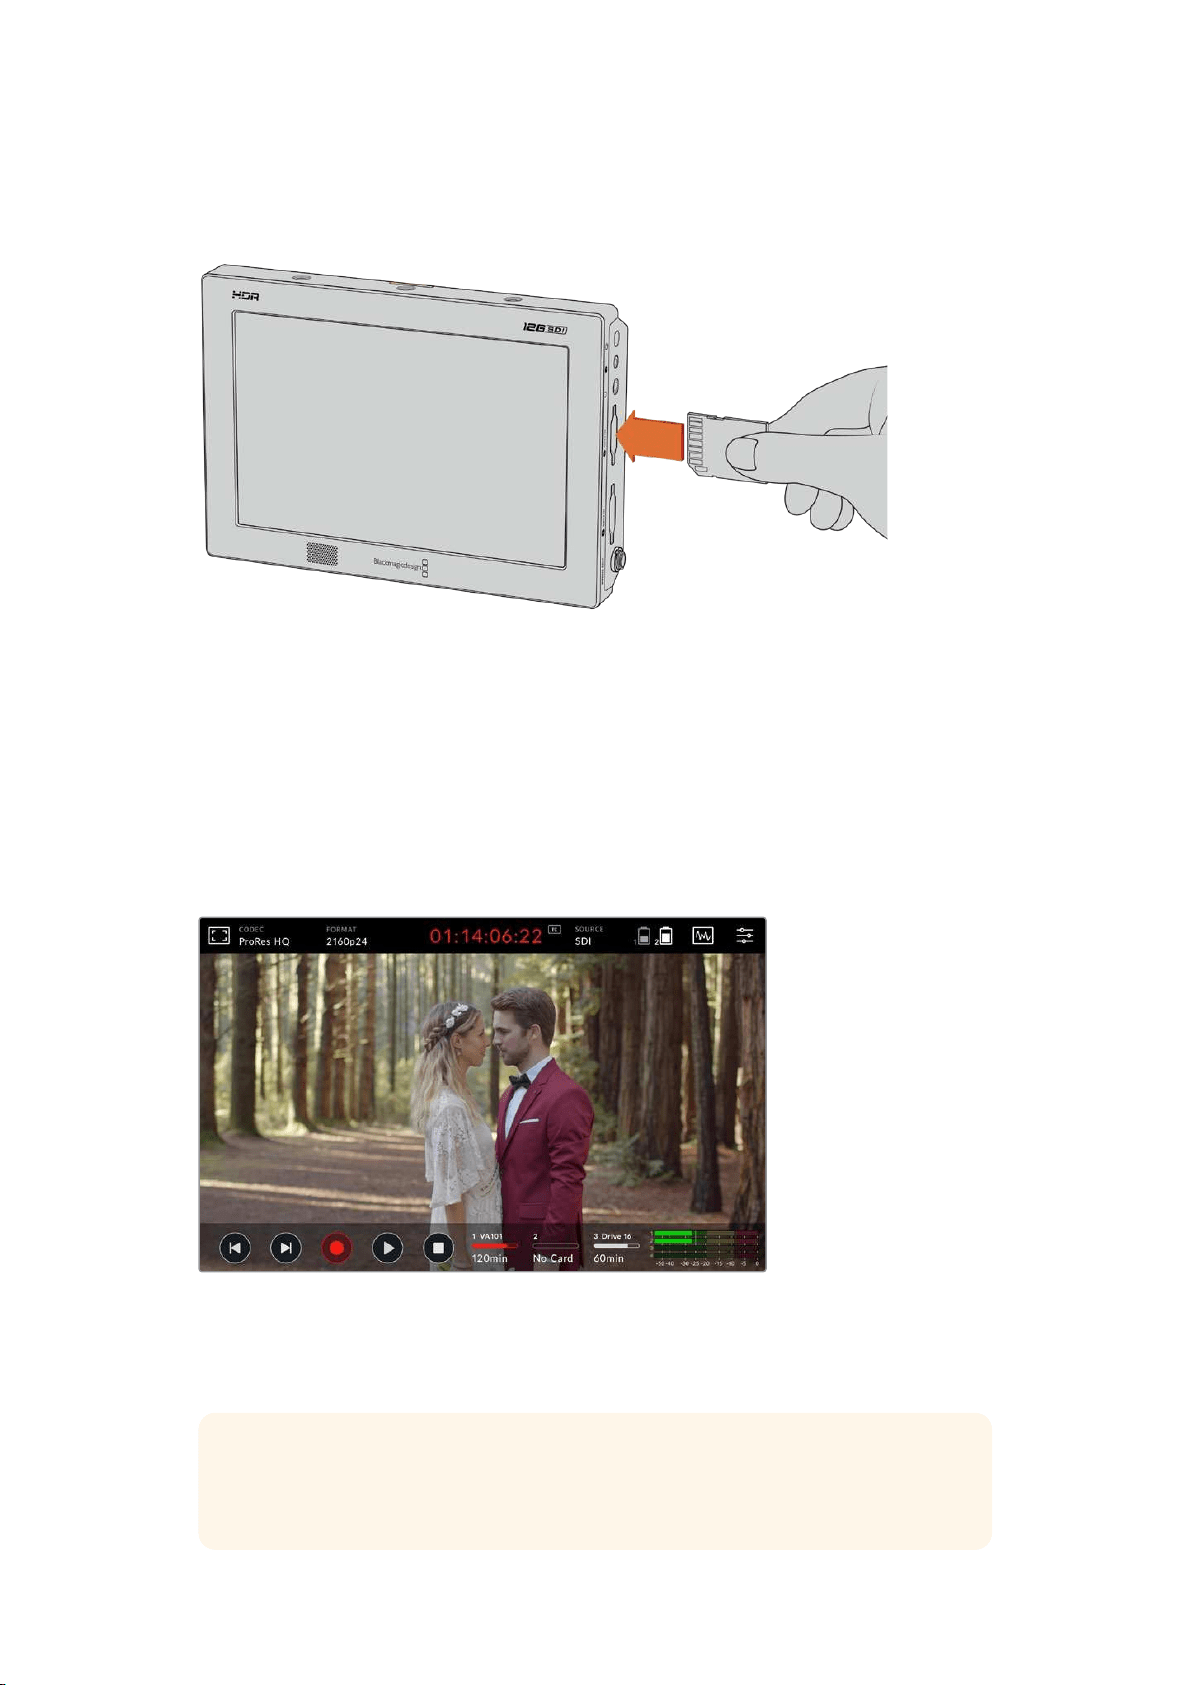
Inserting SD Cards
To start recording clips, first insert a compatible SD card.
For high quality HD recording, we recommend high speed UHS-I SD cards. However, if you are
recording standard definition or lower bit rate, lower quality compression you might be able to
use slower cards. Generally, the faster the cards the better.
If you are recording Ultra HD, then we recommend high speed UHS-II type SD cards.
For Blackmagic Video Assist 12G HDR these cards need to be capable of write speeds above
224MB/s for recording up to ProRes HQ Ultra HD 2160p60.
The 7” video assist models also have two SD card slots. You can record to either one, or insert
two SD cards for continuous recording or fast media change overs.
7Getting Started
Before using your cards, you will need to format them to either HFS+ or exFATformats. It’s easy
to format your media via the ‘storage’ settings. For information on formatting, refer to the
‘storage media’ section for more later in this manual.
To start recording you’ll need to insert an HFS+ or exFAT formatted UHS-I or UHS-II SD card.
You can easily format your SDcard using the ‘storage’ settings in the touchscreen menu.
That’s all there is to getting started. With power, video and a formatted SD card you can now
start recording!
Recording
To start recording straight away, simply tap the circular ‘record’ icon at the bottom of the LCD.
Tap the stop icon to stop recording.
The timecode display in the upper toolbar will illuminate red while recording
Clips can be recorded using AppleProRes and Avid DNx codecs.
You can also set your video assist to use ‘timecode’ or ‘SDI/HDMI start/stop’ trigger recording.
TIP When the upper and lower toolbars are hidden on your 5” video assist, a small
record indicator will be displayed at the bottom of the LCD so you can easily confirm
you’re recording. Swiping the screen up or down brings the toolbars back in view.
8Recording
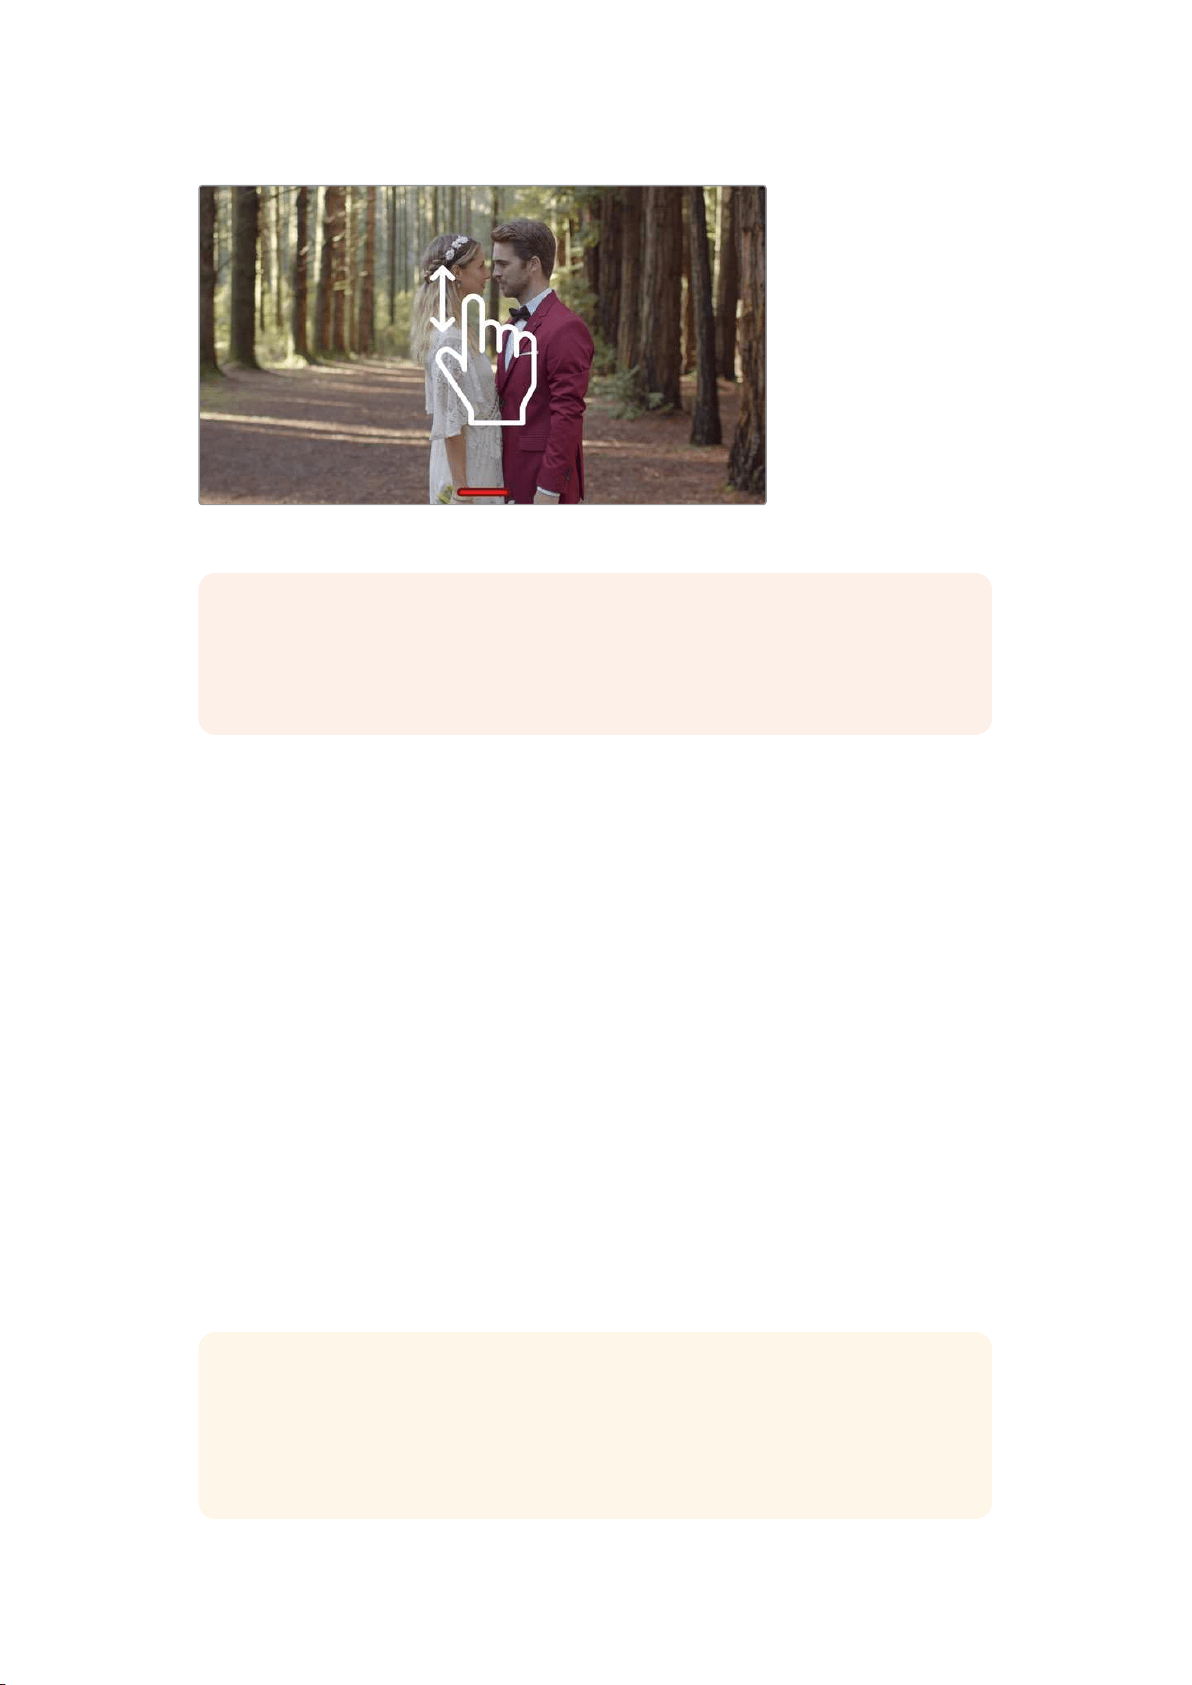
On 5” video assist models, swipe the screen up or down to reveal or hide the toolbars.
NOTE When recording from an HDMI or SDI camera, make sure the output is clean
with overlays turned off as any overlays that are present in your camera’s video output
will be recorded with your image. Please refer to the section titled ‘recording clean
HDMI from DSLR cameras’ for more information.
Remote Control via the LANC Connector
On 7” video assist models you can start and stop recording remotely using an external
LANC controller. Simply plug the LANC controller into the 2.5mm LANC input on the right side
of the unit.
Continuous Recording
7” video assist models support continuous recording when using more than one card, or on an
external drive for 12G video assist models via the USB-C port. If you are recording an important
event and you don’t want to stop recording, simply insert a second SD card or connect an
external drive. Once your current card or drive is full, the recording will automatically spill over
to the next slot. There will be no frames dropped in the process. For example, ifthe first
segment on card 1 stopped at 00:40:01:00, the recording on the second card will start
at 00:40:01:01.
When editing your clips on the timeline, simply place the second clip against the tail of the
firstand they will play through the recording as if it is one complete clip.
Having an additional card or drive connected also lets you quickly change media. If you want to
switch to another card or the active drive, simply hold down the ‘record’ button. The recording
will spill over to the next available slot without missing a frame. Now you can remove the first
card or drive and start using the media right away!
TIP For continuous recording or fast slot change overs, make sure your cards are
formatted before you start your recording. You can format your SD card or external
drive while recording on another slot, simply tap on the storage indicators to reveal
the storage settings. See the ‘storage media’ section later in this manual for
further information on formatting.
9Recording
Recording Clean HDMI from DSLR Cameras
Some DSLR cameras record 8-bit video internally, and some can provide a clean video image
via their HDMI output. By plugging the DSLR camera’s HDMI output into your video assist, you
can bypass the camera’s internal compression and record using high quality 10-bit ProRes or
Avid DNx codecs. Some DSLR cameras can output 10-bit 4:2:2, which is higher quality video
than their internally recorded 8-bit 4:2:0 compression.
Many DSLR cameras are also limited to short recording durations, so an added benefit of
recording externally is bypassing these recording limitations. This is particularly helpful when
recording live events or interviews for documentaries.
To make the most of this feature, you will need to set your camera to output a clean image with
overlays turned off. This is normally done by changing your DSLR camera’s HDMI output
settings so it does not show any status information in the video signal. This is important
because if there are any overlays visible in your image via the HDMI output they will be
recorded in your video, which you probably don’t want.
To check the DSLR camera overlays are not visible:
1 Swipe the touchscreen up or down to hide the on screen meters so you can monitor
only your DSLR camera’s image. On 7” video assist models the upper toolbar at the top
of the LCD is independent and separate from the image. This means you can monitor
the entire image cleanly and still have the upper toolbar visible.
2 With the on screen meters hidden, carefully check the DSLR camera’s output video
does not show any information other than your clean video image. If you can see
camera overlays on your video assist’s LCD, change the HDMI output or display menu
settings on your camera so HDMI overlays are turned off.
With a clean HDMI output from your camera you can now record better quality video!
Playback
The transport controls can be found on the lower toolbar. If your lower toolbar is hidden from
view, simply swipe the screen up or down to reveal it.
Play
To play your clips, tap the ‘play’ icon.
Stop
During playback, tap the ‘stop or ‘pause’ icon to momentarily ‘freeze’
playback on a frame of video.
Skip
You can skip backwards or forwards through your clips by repeatedly
tapping the forward or reverse skip icons. Tapping reverse skip once will
restart the current clip.
Shuttle
Hold down one of the skip buttons to change into shuttle mode.
Now you can fast forward or rewind by tapping either shuttle button
through speeds from x1/2 to x50. Press the stop or play button to revert
the buttons back to skip mode.
10Playback
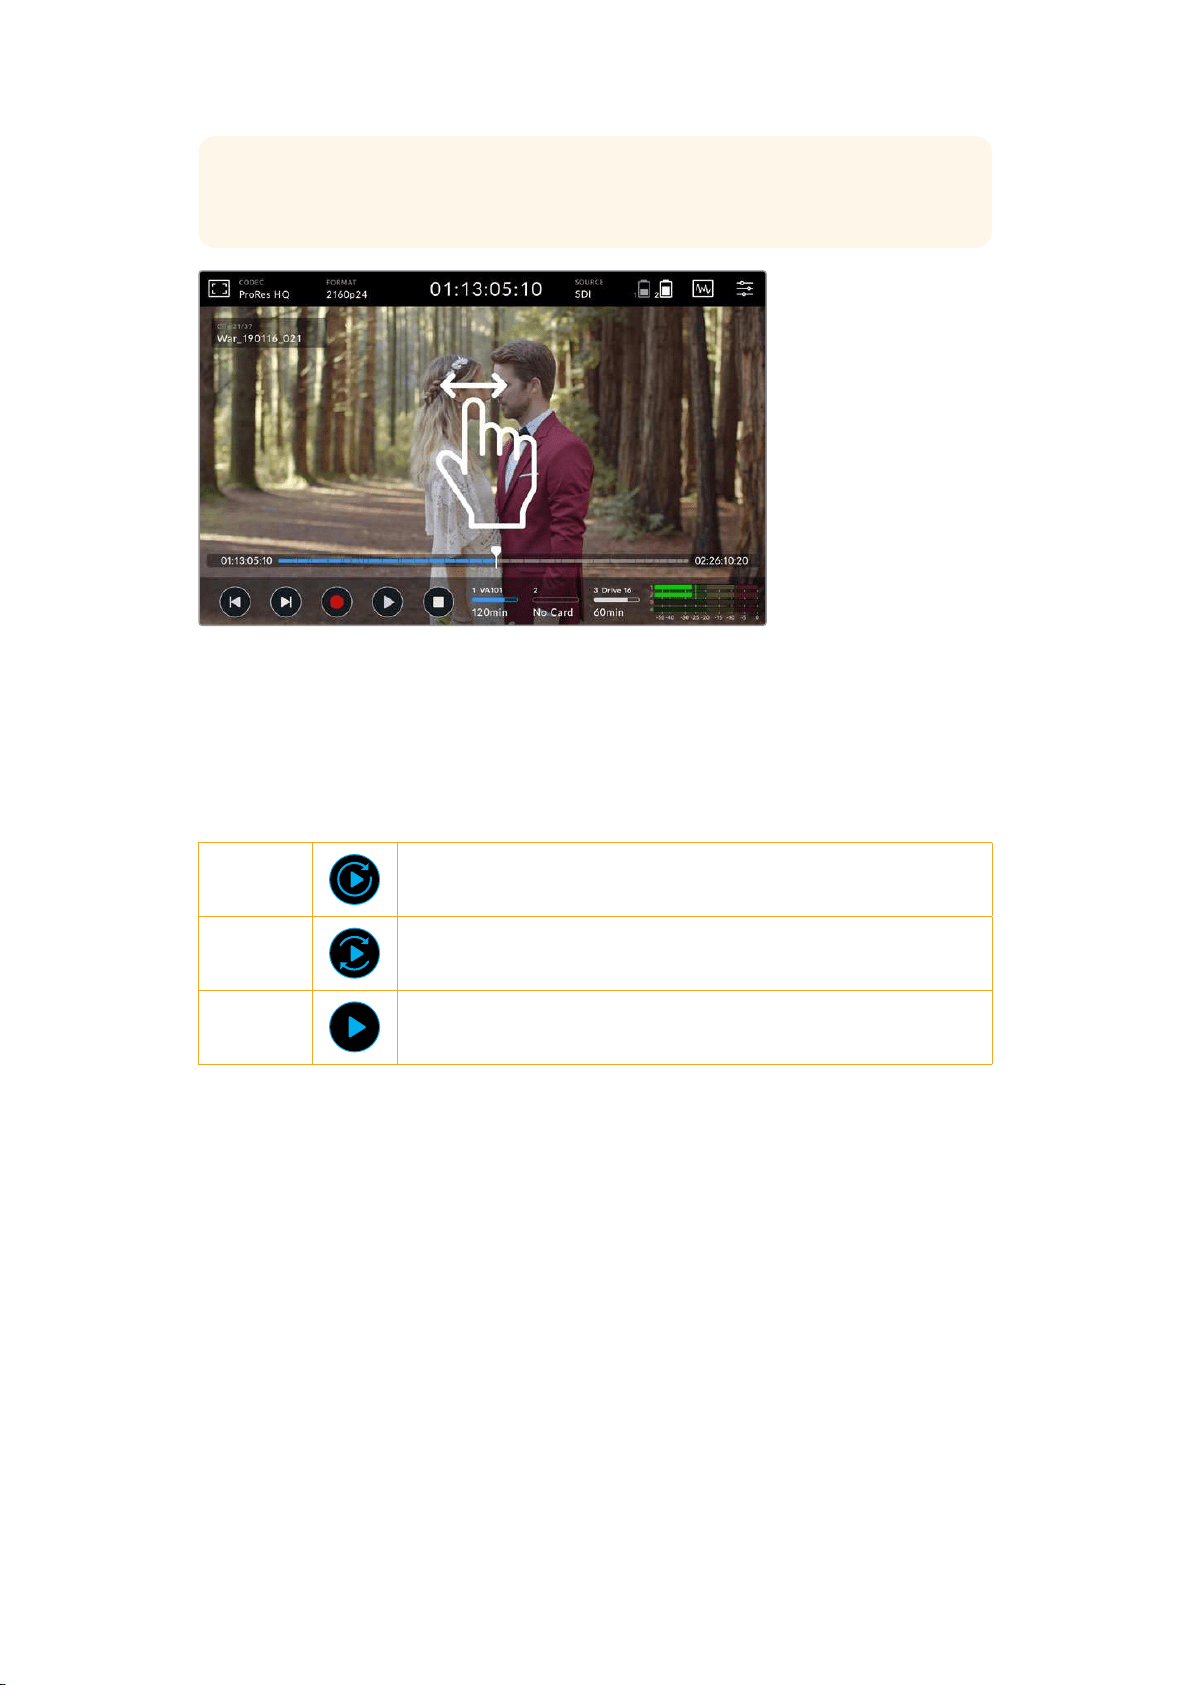
TIP Scrub clips forwards or backwards by dragging the scrubbing slider left orright,
or by swiping the screen to jog through thevideo.
Jog forwards or backwards by swiping the video left or right.
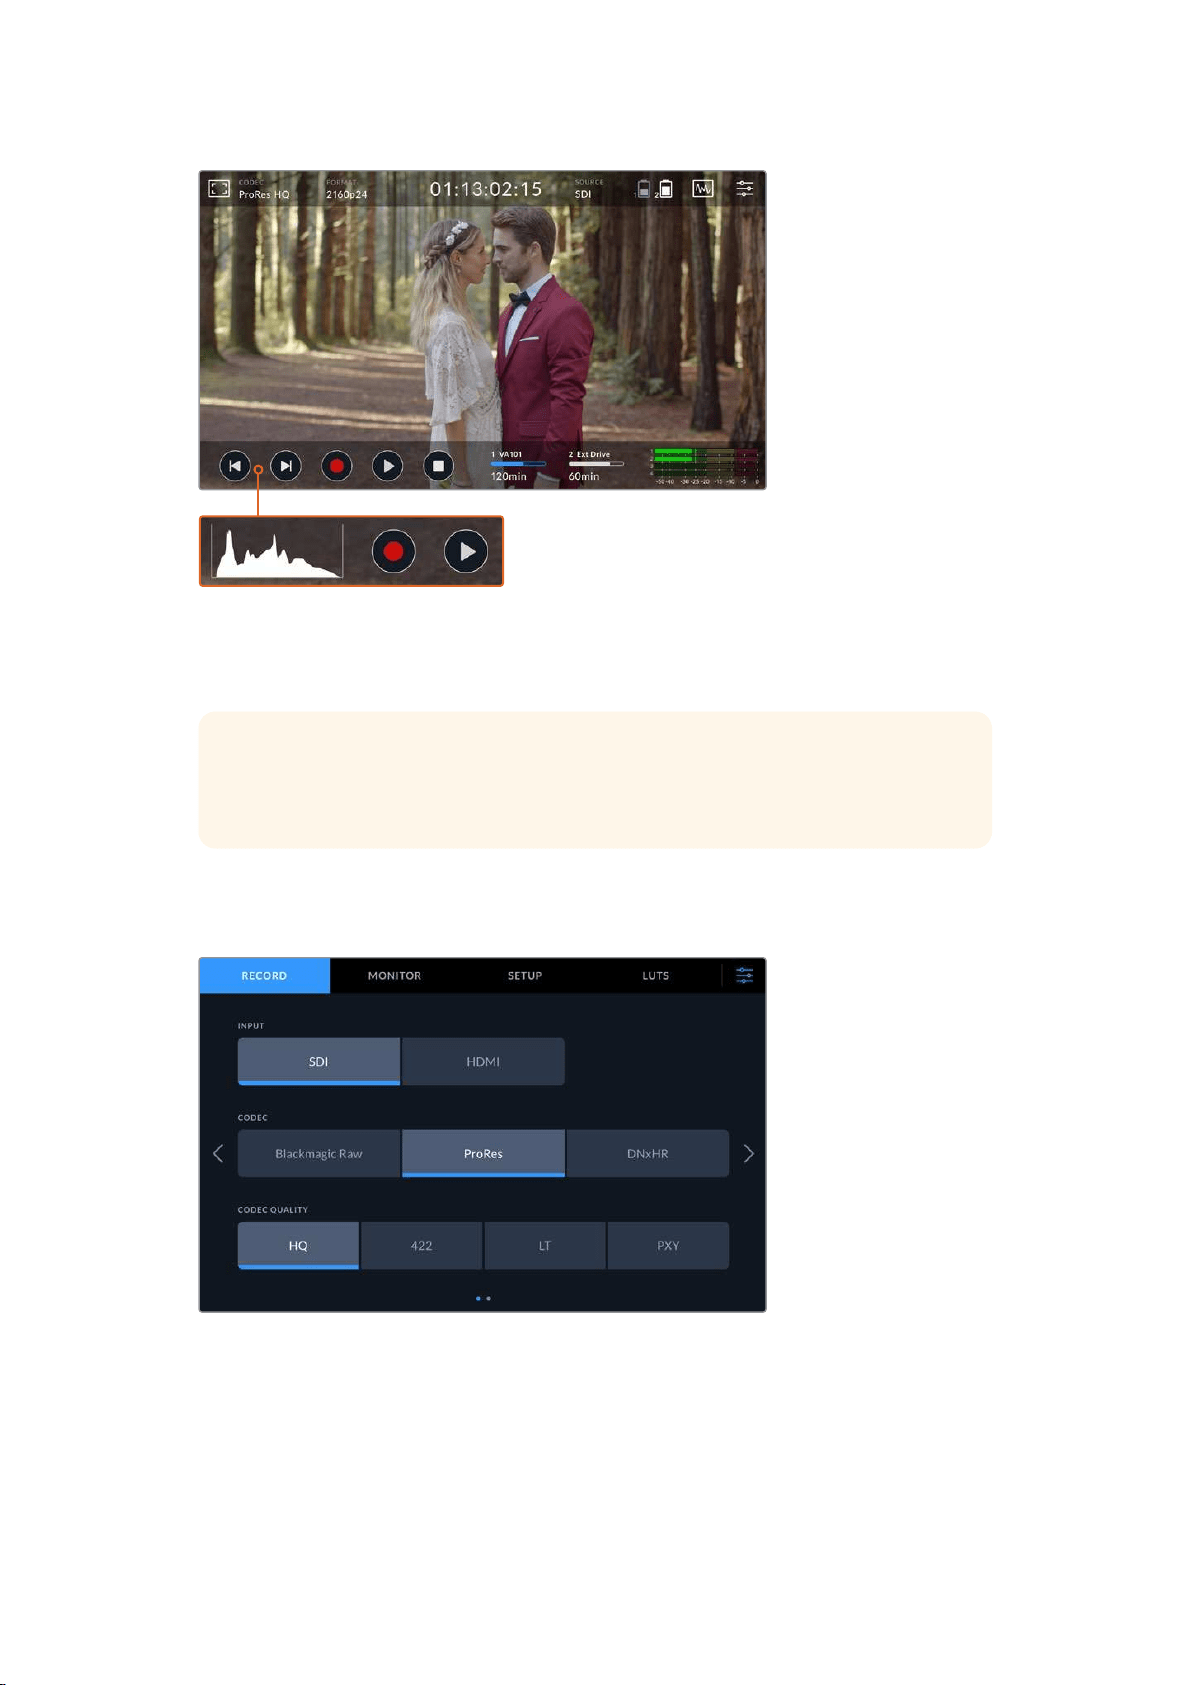
You can choose to display skip buttons or the histogram in the lower toolbar. When the ‘display
histogram’ option in the setup tab of the dashboard menu is switched ‘on’, only the ‘record’,
‘play’ and ‘stop’ buttons will be visible.
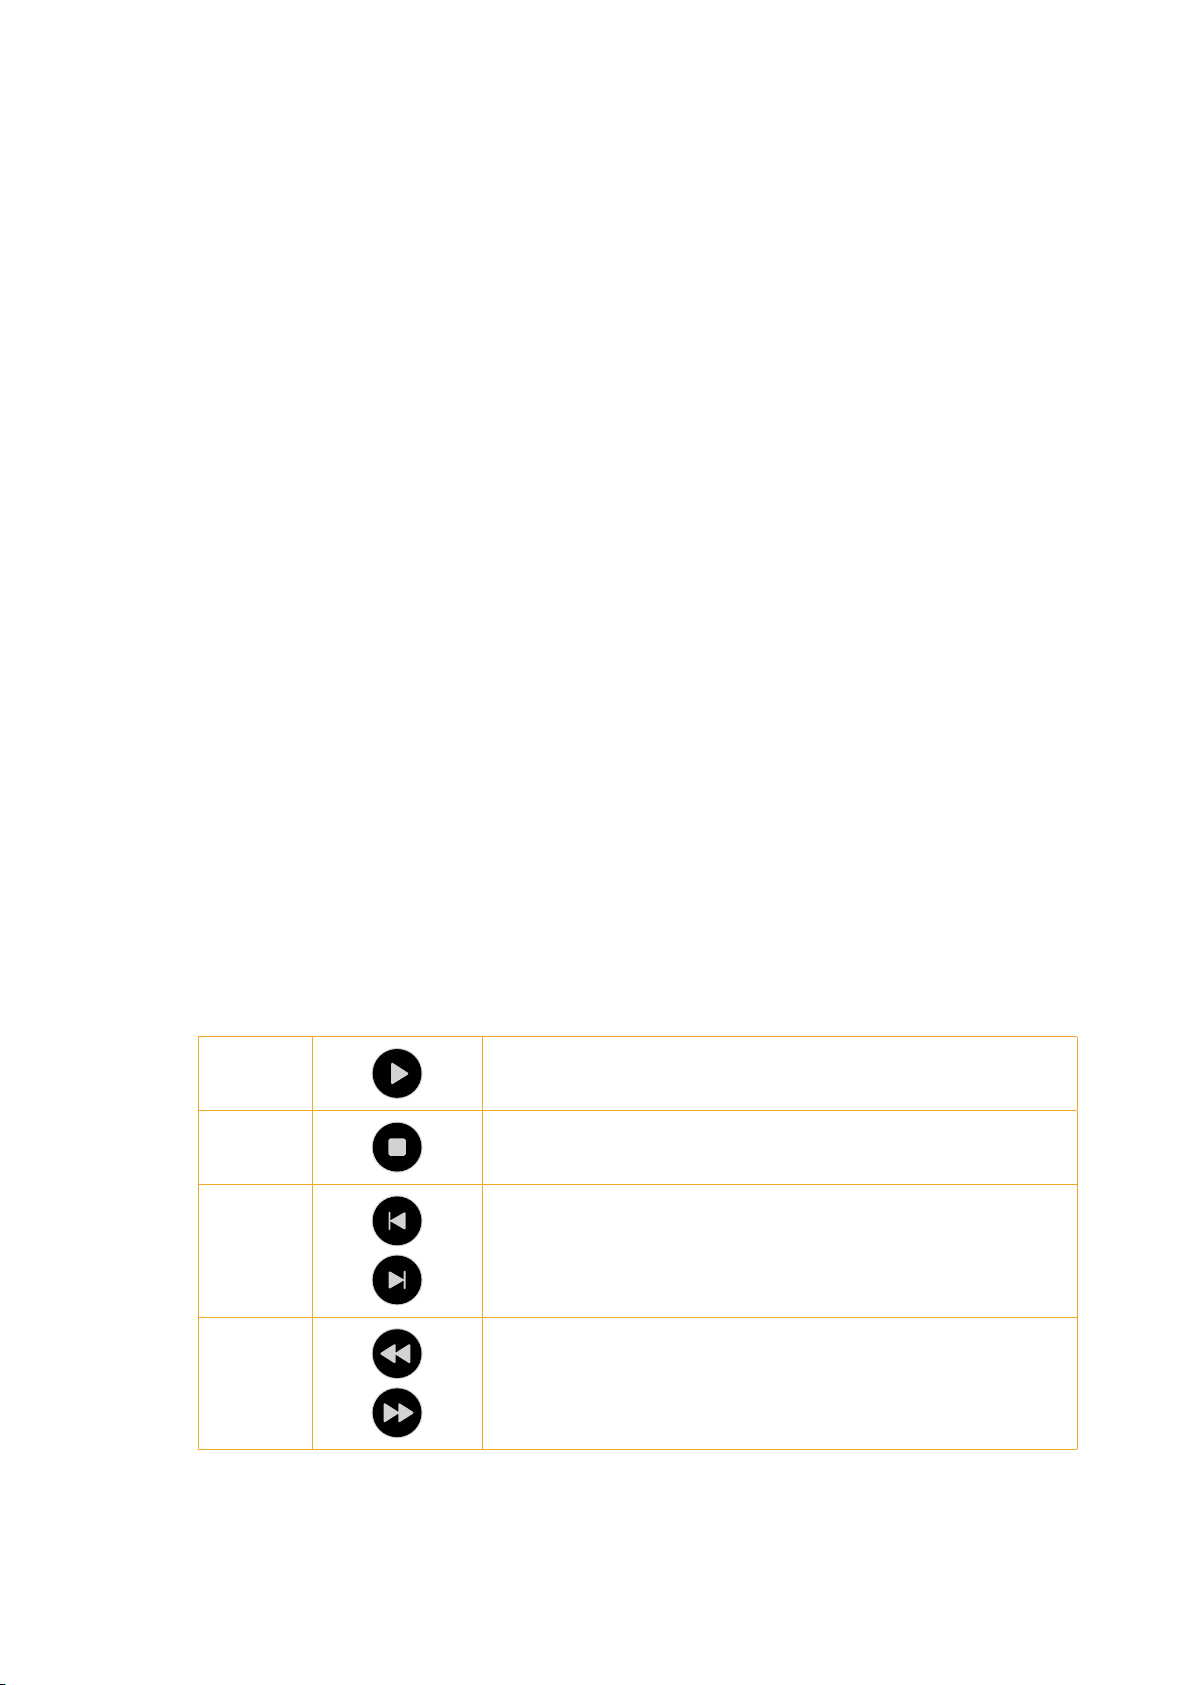
Looping playback
Loop
Once your clip is playing, press the ‘play’ button again to set
your video assist to play the current clip on a continuous loop.
Loop all
Tap ‘play’ again to play all your recorded clips on a continuous loop.
Play
Tap again to return to real time playback.
Changing Settings
Using the Touchscreen
All video assist models come with a great range of features and user adjustable settings.
The main display features upper and lower toolbars. The upper toolbar provides access to
monitor overlays, codec, format, source settings, scopes and the dashboard menu, as well as a
timecode display and battery status indicators.
11Changing Settings
The lower toolbar includes transport controls, storage indicators and audio meters. A display
histogram can also be turned on via the menu to appear over the skip buttons on the lower left
of the toolbar.
TIP Both toolbars on the 5” video assist models can be removed from view by
swiping the screen up or down. On the 7” models, the upper toolbar will remain in
view at all times.
The tabbed dashboard menu is accessed via the settings icon on the upper toolbar and
features record, monitor, setup, and LUTs tabs. The 7” models also include an audio tab so you
can access the additional XLR channel input settings.
Navigate between the pages by swiping from left
to right or tapping the arrows on either side
Each menu tab features two or more pages of options you can navigate by swiping the screen
left or right, or by tapping the arrows on either side. When selecting the codec or source icons
in the upper toolbar, you will open up the record tab of the menu.
12Changing Settings
Blackmagic Video Assist Settings and Features
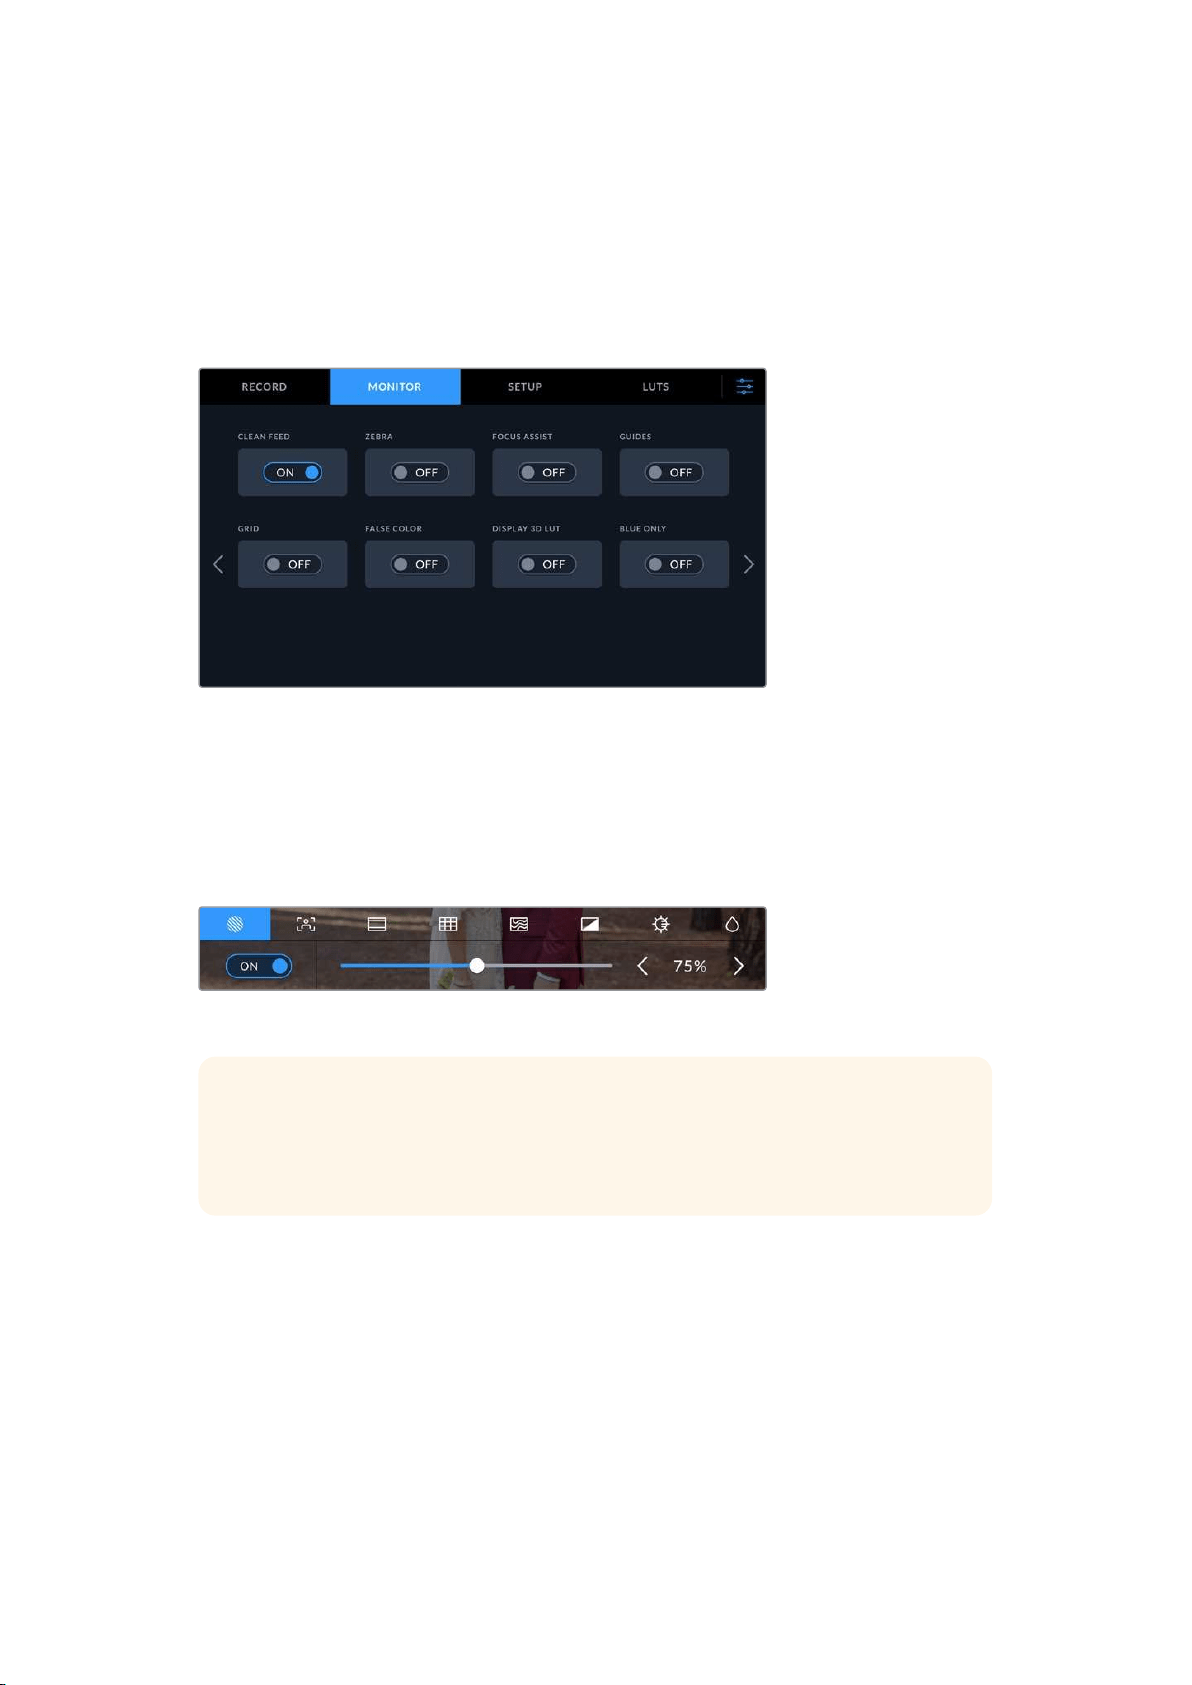
Your video assist displays overlays on the LCD to help with exposure, focus, composition and
framing when connected to a camera.
These settings can be accessed via the ‘monitor overlay’ icon in the top left corner of your
video assist. You can also use the ‘monitor’ tab of the dashboard menu to toggle these settings
on or off individually, or disable them all by selecting ‘clean feed’.
Disable all overlays by selecting clean feed
Zebra
The zebra feature helps you achieve optimum exposure by displaying diagonal lines over areas
of the video that exceed your set zebra level. For example, if you set the zebra level to 100%,
you’ll know that any area of the image displaying the zebra pattern will be clipped. If you set the
zebra to 90%, you can feel confident that you have some extra exposure headroom to protect
the highlights in your shot.
Zebra controls on Blackmagic Video Assist
TIP You can also set the zebra to highlight areas of your image that represent specific
video levels on a waveform, for example setting the zebra for 50% means you can
visually identify which regions of your image will appear at approximately 50% on a
waveform scope.
Focus Peaking and Focus Assist
Focus peaking and focus assist settings give you powerful tools to help focus your images fast.
Focus peaking displays edge lines on the sharpest areas of the image. Sensitivity settings let
you change how strong the lines are.
Change the sensitivity settings by tapping the left and right arrows or drag the slider left or
right. Sensitivity levels include ‘low’, ‘medium’ or ‘high’. In images with lots of detail and high
contrast, the lines can be distracting, so in these conditions you can select ’low’ or ‘medium’.
Alternatively, for low contrast shots with less detail, select ‘high’ so the lines are stronger and
easier to see.
13Changing Settings
Edge lines are extremely effective. They can be so pronounced that you can even monitor the
depth of your focal plane, plus watch it move closer or further into your shot as you adjust your
camera’s focus ring. Changing the color of the edge lines can also make them easier to see in
conditions where their color may match the image. If you find lines are too visually intrusive, you
can select ‘peak’ levels instead. You can change the color of the lines, or switch to using peak
levels via the ‘monitor’ tab in the menu.
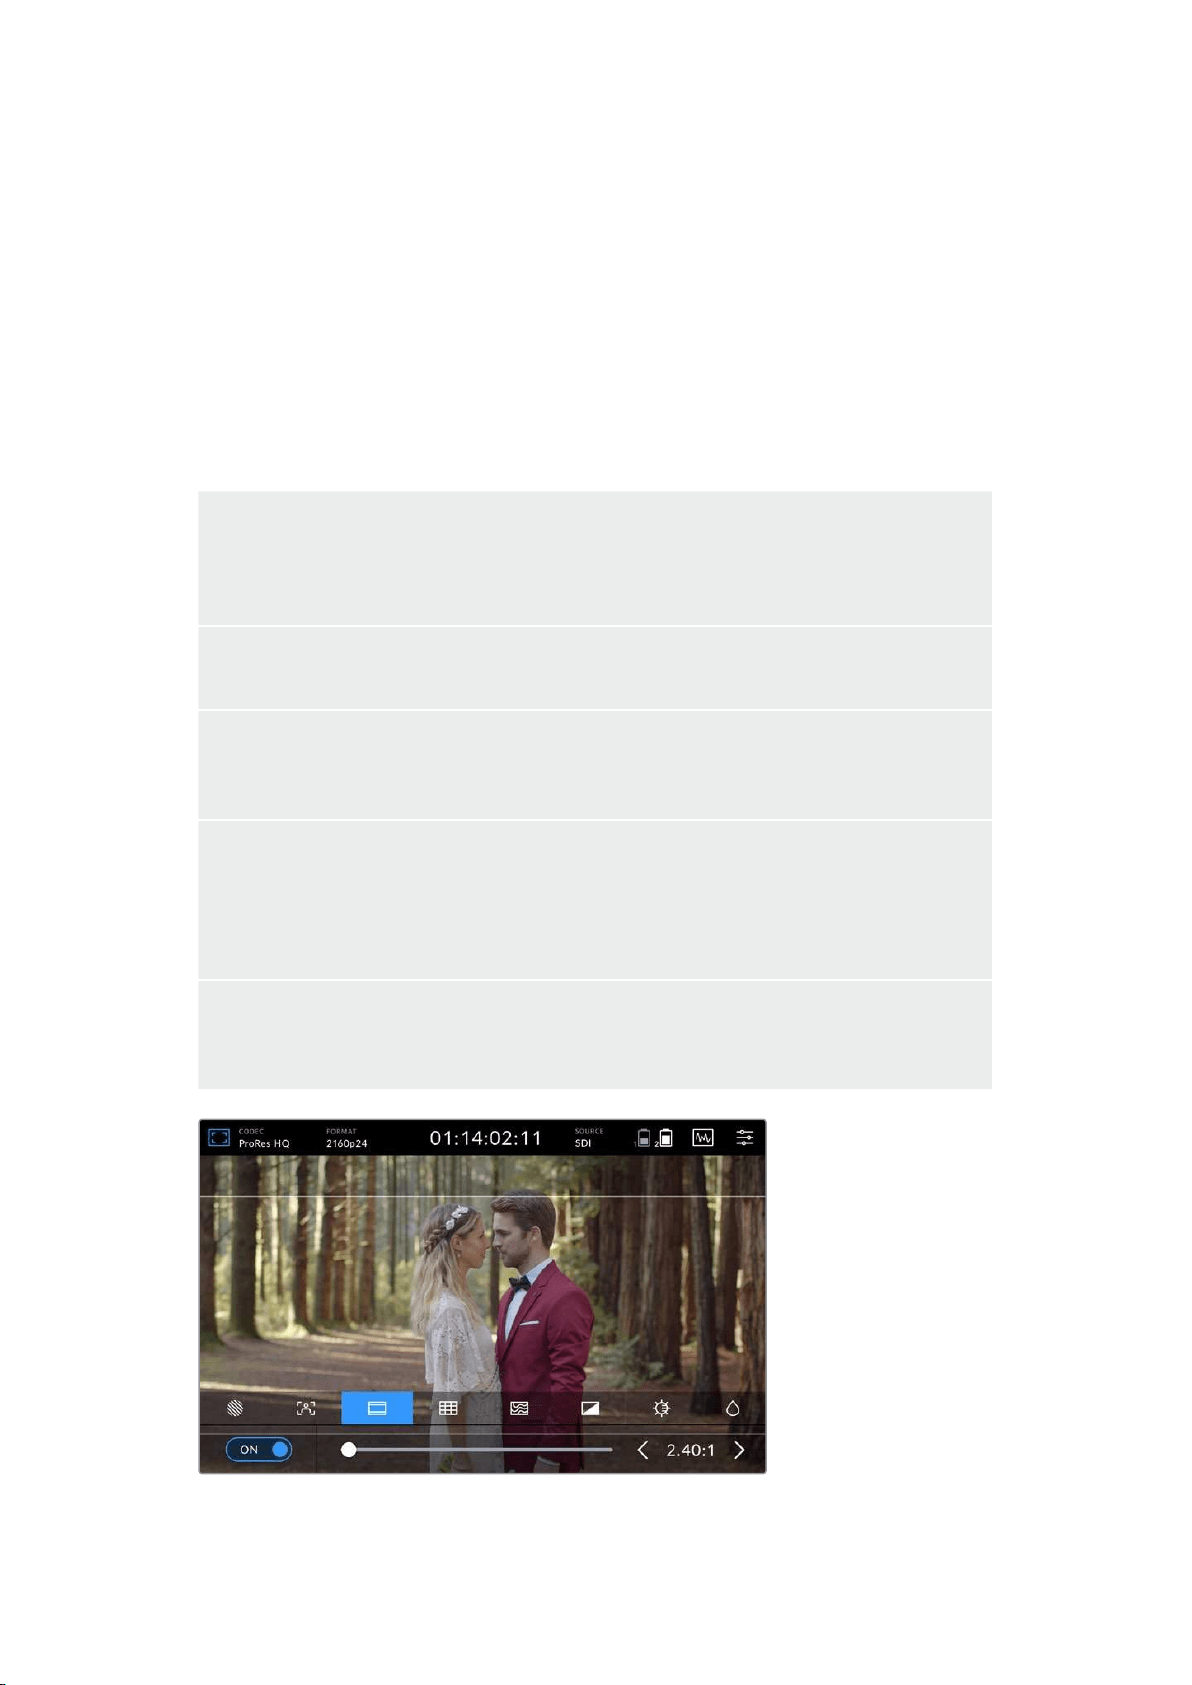
Guides
The frame guides feature provides aspect ratio overlays for various cinema, television and
online standards. With guides selected, tap the left or right arrows, or drag the slider icon left or
right to select your frame guide.
The following frame guides are supported:
2.40:1, 2.39:1 and 2.35:1
Displays the broad widescreen aspect ratio compatible with anamorphic or flat widescreen
cinema presentation. The three widescreen settings differ slightly based on the changing cinema
standards over time. 2.39:1 is one of the most prominent standards in use today.
2:1
Displays a ratio slightly wider than 16:9 but not as wide as 2.35:1.
1.85:1
Displays another common flat widescreen cinema aspect ratio. This ratio is slightly wider than
HDTV, but not as wide as 2.39:1.
14:9
Displays a 14:9 aspect ratio used by some television broadcasters as a compromise between 16:9
and 4:3 television sets. Ideally, both 16:9 and 4:3 footage remains legible when center cropped to
fit 14:9. You can use this as a compositional guide if you know your project may be broadcast by a
television station that uses 14:9 cropping.
4:3
Displays the 4:3 aspect ratio compatible with SD television screens, or to help frame shots when
using 2x anamorphic adapters.
2.40:1 frame guides are useful for framing shots to suit a popular flat widescreen cinema format.
14Changing Settings
Grids
Your video assist features three types of framing assistance.
Thirds Thirds are an extremely powerful tool to help compose your shots with two
vertical and horizontal lines placed in each third of the image.
The human eye typically looks for action near the points where the lines
intersect, so it’s helpful to frame key points of interest in these zones.
Crosshairs The ‘crosshairs’ setting places a crosshair in the center of the frame.
Like thirds, the crosshairs is a very useful compositional tool, making it easy to
frame the subject of a shot in the very center of a frame.
Center Dot The ‘center dot’ setting places a dot in the center of the frame. This works in
exactly the same way as the ‘crosshair’ setting, albeit with a smaller overlay
that you may find less intrusive.
You can enable a combination of ‘thirds’ and ‘crosshairs’ or ‘thirds’ and ‘center
dot’ by tapping both options in the ‘grids’ menu. ‘Crosshairs’ and ‘center dot’
cannot be selected together.
TIP An actor’s eyeline is commonly framed along the top third of the screen, so you
can use the top horizontal third to guide your framing. Thirds are also useful to maintain
framing consistency between shots.
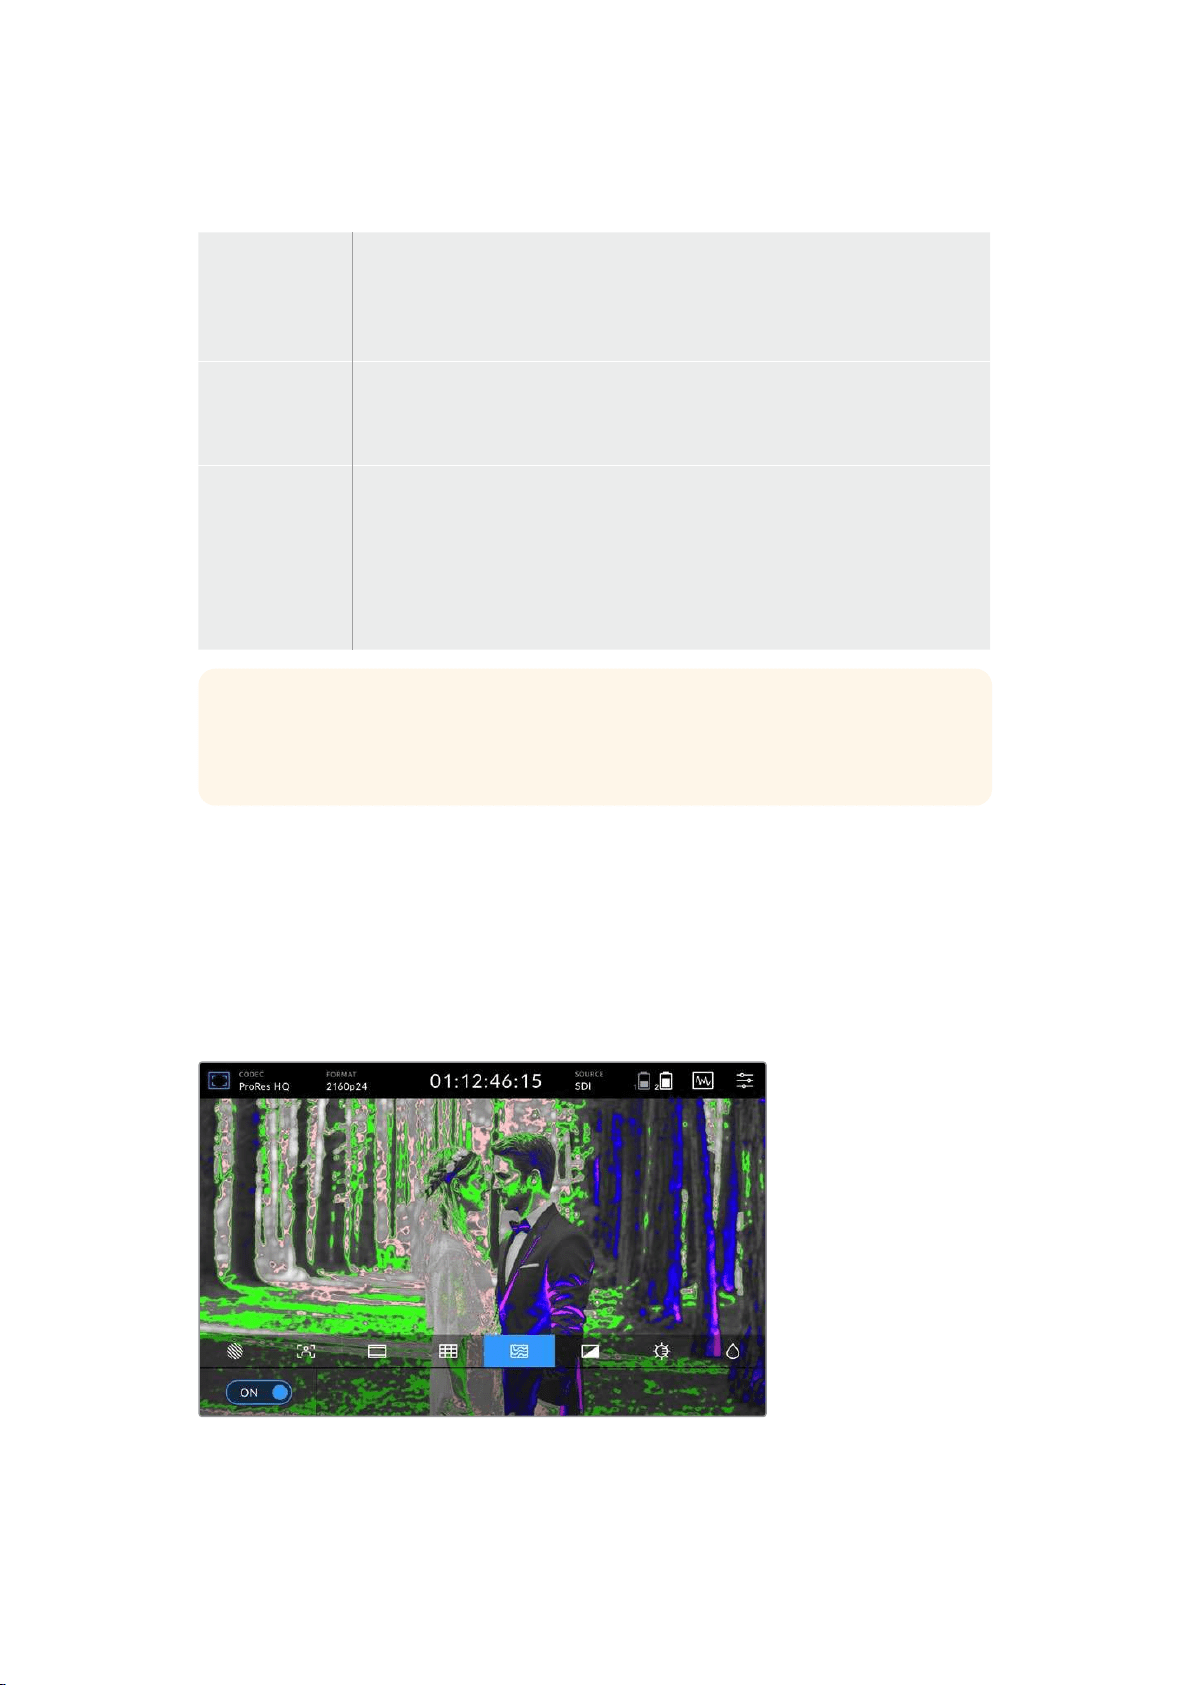
False Color
The false color feature displays color overlays on your image that represent exposure values.
The color values correspond to optimum exposure settings, for example pink for lighter skin
tones and green for 38.4% middle grey. False color is also helpful to know when shadows and
highlights are near clipping or clipping.
With a range of tonal values on the LCD at once, this gives you a broader overview of
your exposure which you can use to refine lighting on set, or make exposure changes
to compensate.
15Changing Settings

The following chart shows how the colors correspond to specific tonal values.
False Color Chart
Your video assist also features controls to adjust the LCD brightness, contrast and saturation.
These controls can be accessed via the ‘monitor overlay’ icon.
Contrast
Increases or decreases the range between the bright and dark areas of
the image. High contrast can reveal detail and depth in the image, and
low contrast can make the image appear soft and flat.
Brightness
Adjusts the general brightness of the LCD. For example, if you are
outside in bright conditions, increase the LCD brightness to make it
easier to view. Brightness values will be displayed in nits on 12G models.
Saturation
Move the slider to increase or decrease the amount of color in your
displayed image.
All settings will be remembered when the unit is powered off. It’s also worth mentioning that
any changes to these settings will affect the image displayed on the LCD, but not your
recorded video.
Auto Dim
Blackmagic Video Assist 12G HDR can display up to 2,500 nits in brightness. To protect the unit
when operating it at high temperatures, the auto dim feature will activate, lowering the
brightness of the display. The brightness level will steadily decrease as the video assist
operating temperature continues to increase. If the unit temperature decreases, the brightness
level will return to the set value.
For example, if your video assist brightness is set to 2,500 nits and you are using it in direct
sunlight on a hot day, the video assist’s temperature will increase.
Once the unit’s operating temperature exceeds approximately 46°C, an alert will appear in the
upper toolbar’s monitor overlay icon.
16Changing Settings
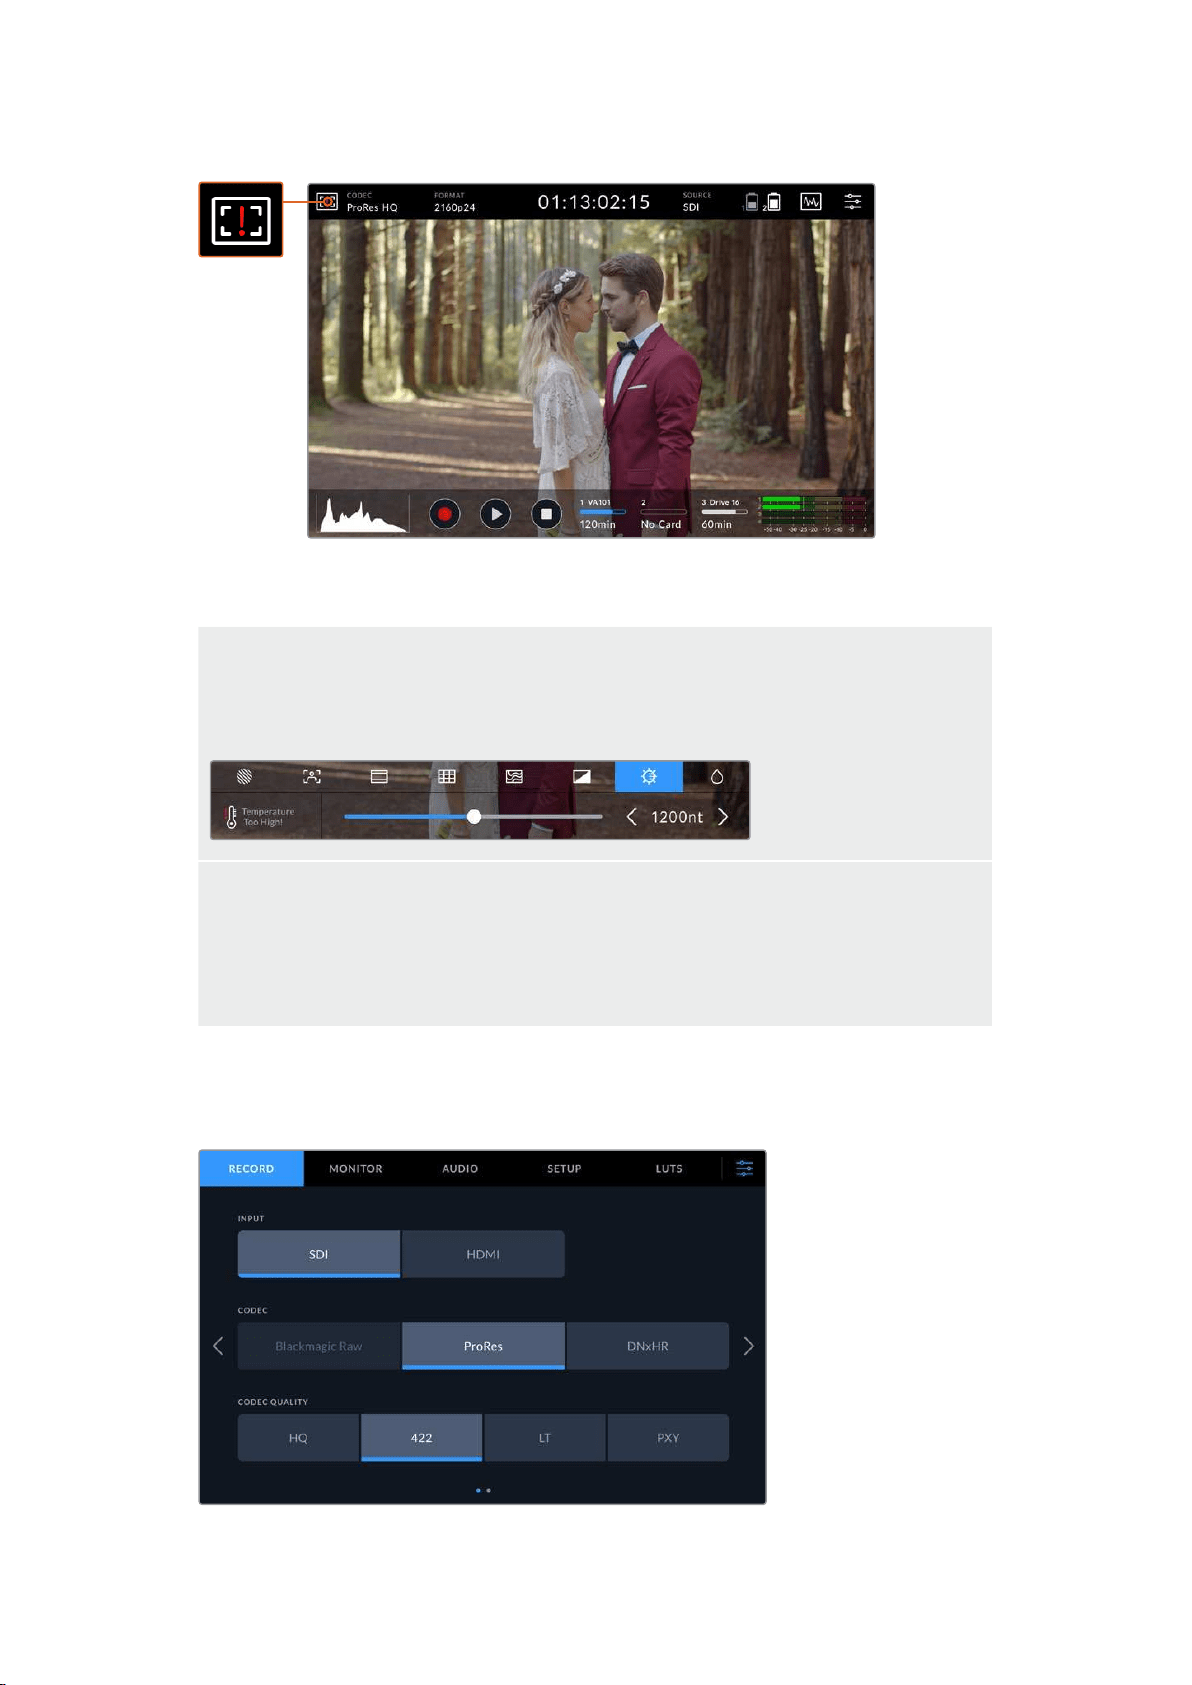
This alert lets you know that you are near the temperature limit for that screen brightness value.
From here you have two options:
Option 1 – Lower the screen brightness manually
Tap on the alert to reveal the brightness slider. The slider control will display the current highest
nit value available. Drag the slider to the left to reduce the value. The temperature alert will
disappear once the unit temperature decreases.
Option 2 – Use the automatic dim feature
Once the temperature reaches the limit, the screen will automatically dim. The auto dim feature
will activate to protect your unit from overheating. As the video assist’s temperature increases,
the brightness level will steadily decrease. If the unit temperature decreases, the brightness level
will increase, eventually returning to the value you set.
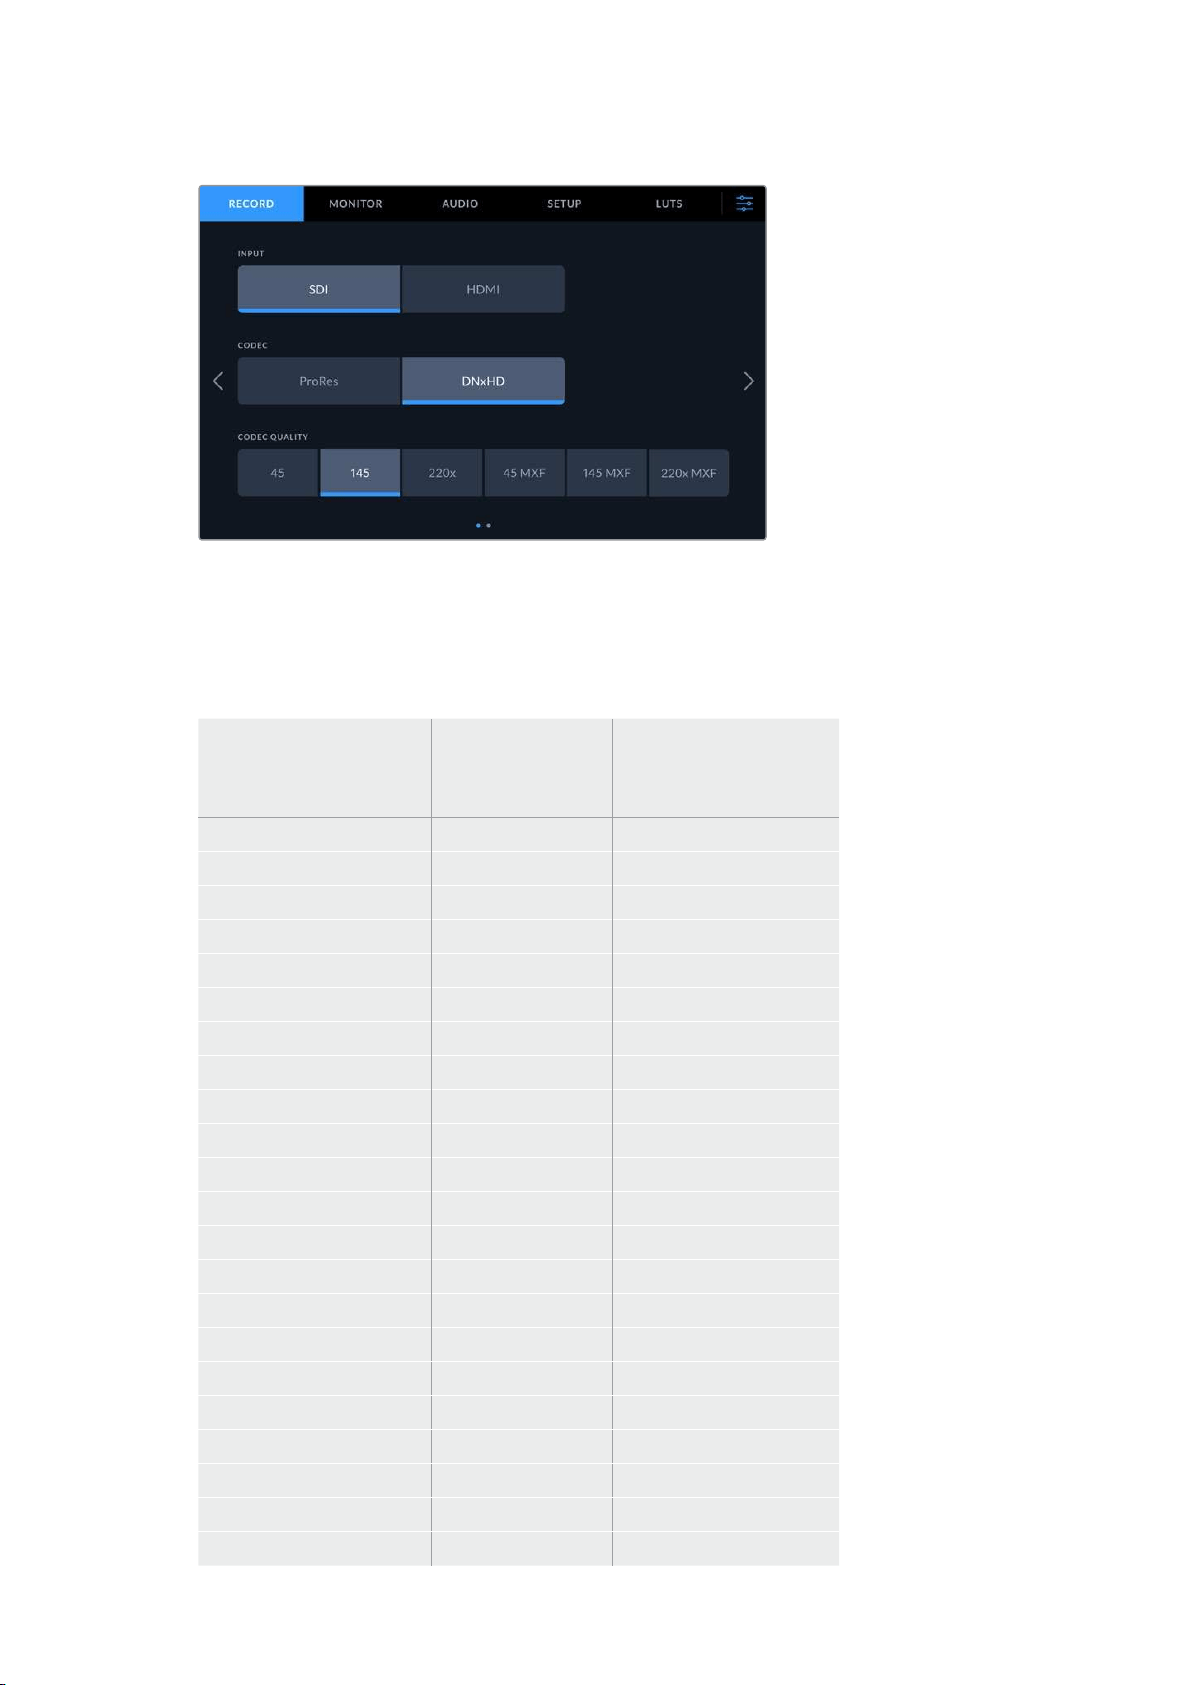
Codec
The codec indicator displays the currently selected codec. Tap the codec icon to select which
codec and quality you want to use.
Blackmagic Video Assist 12G HDR codec options
17Changing Settings
Blackmagic Video Assist 3G codec options
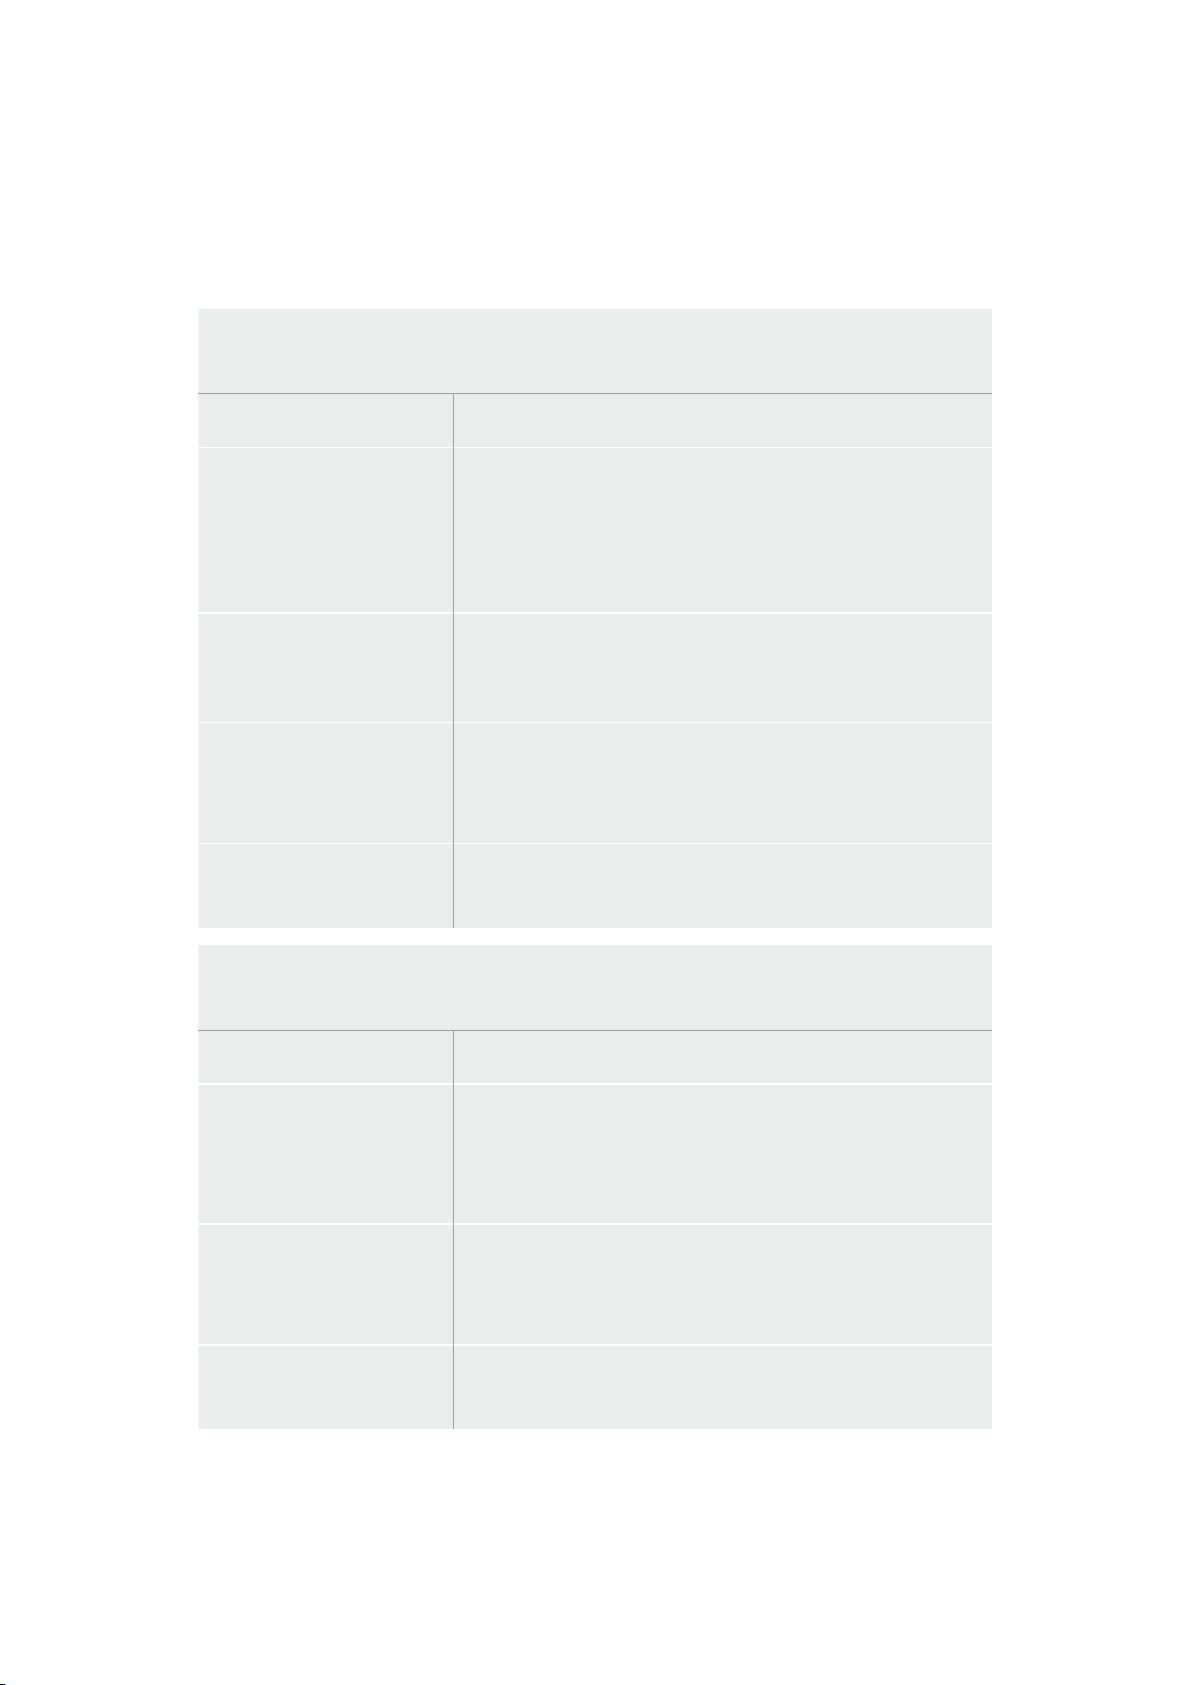
Supported Codecs
ProRes codecs are recorded as QuickTime files. DNxHD and DNxHR files can be recorded as
QuickTime or native MXF files where MXF appears in the codec name. Refer to the following
table for more details regarding the codec options.
Blackmagic
Video Assist 3G
Blackmagic
Video Assist 12G HDR
Codecs Bit Depth Bit Depth
ProRes 422 HQ 10 10
ProRes 422 10 10
ProRes 422 LT 10 10
ProRes Proxy 10 10
DNxHD 220x 8 –
DNxHD 145 8 –
DNxHD 45 8 –
DNxHD 220x MXF 8 –
DNxHD 145 MXF 8 –
DNxHD 45 MXF 8 –
DNxHR HQX – 10
DNxHR SQ – 8
DNxHR LB – 8
DNxHR HQX MXF – 10
DNxHR SQ MXF – 8
DNxHR LB MXF – 8
Blackmagic RAW 3:1 – 12
Blackmagic RAW 5:1 – 12
Blackmagic RAW 8:1 – 12
Blackmagic RAW 12:1 – 12
Blackmagic RAW Q0 – 12
Blackmagic RAW Q5 – 12
18Changing Settings
Format
Input video resolution and frame rate is displayed in the ‘format’ section of the upper toolbar.
Forexample, 2160p29.97, 2160p25, 1080p59.94, etc.
The following video input and output formats are supported:
SDI Input and Output
SD Video Standards 525i59.94NTSC, 625i50PAL
HD Video Standards 720p50, 720p59.94, 720p60
1080p23.98, 1080p24, 1080p25, 1080p29.97, 1080p30,
1080p50, 1080p59.94, 1080p60
1080PsF23.98, 1080PsF24, 1080PsF25, 1080PsF29.97,
1080PsF30 1080i50, 1080i59.94, 1080i60
2K Video Standards Blackmagic Video Assist 12G HDR models:
2Kp23.98DCI, 2Kp24DCI, 2Kp25DCI
2KPsF23.98DCI, 2KPsF24DCI, 2KPsF25DCI
Ultra HD Video Standards Blackmagic Video Assist 12G HDR models:
2160p23.98, 2160p24, 2160p25, 2160p29.97, 2160p30
2160p50, 2160p59.94, 2160p60
4K Video Standards Blackmagic Video Assist 12G HDR models:
4Kp23.98 DCI, 4Kp24 DCI, 4Kp25 DCI
HDMI Input and Output
SD Video Standards 525i59.94 NTSC, 625i50 PAL
HD Video Standards 720p50, 720p59.94, 720p60
1080p23.98, 1080p24, 1080p25, 1080p29.97, 1080p30, 1080p50,
1080p59.94, 1080p60
1080i50, 1080i59.94, 1080i60
Ultra HD Video Standards Blackmagic Video Assist 12G HDR models:
2160p23.98, 2160p24, 2160p25, 2160p29.97, 2160p30
2160p50, 2160p59.94, 2160p60
4K Video Standards Blackmagic Video Assist 12G HDR models:
4Kp23.98DCI, 4Kp24DCI, 4Kp25DCI
19Changing Settings
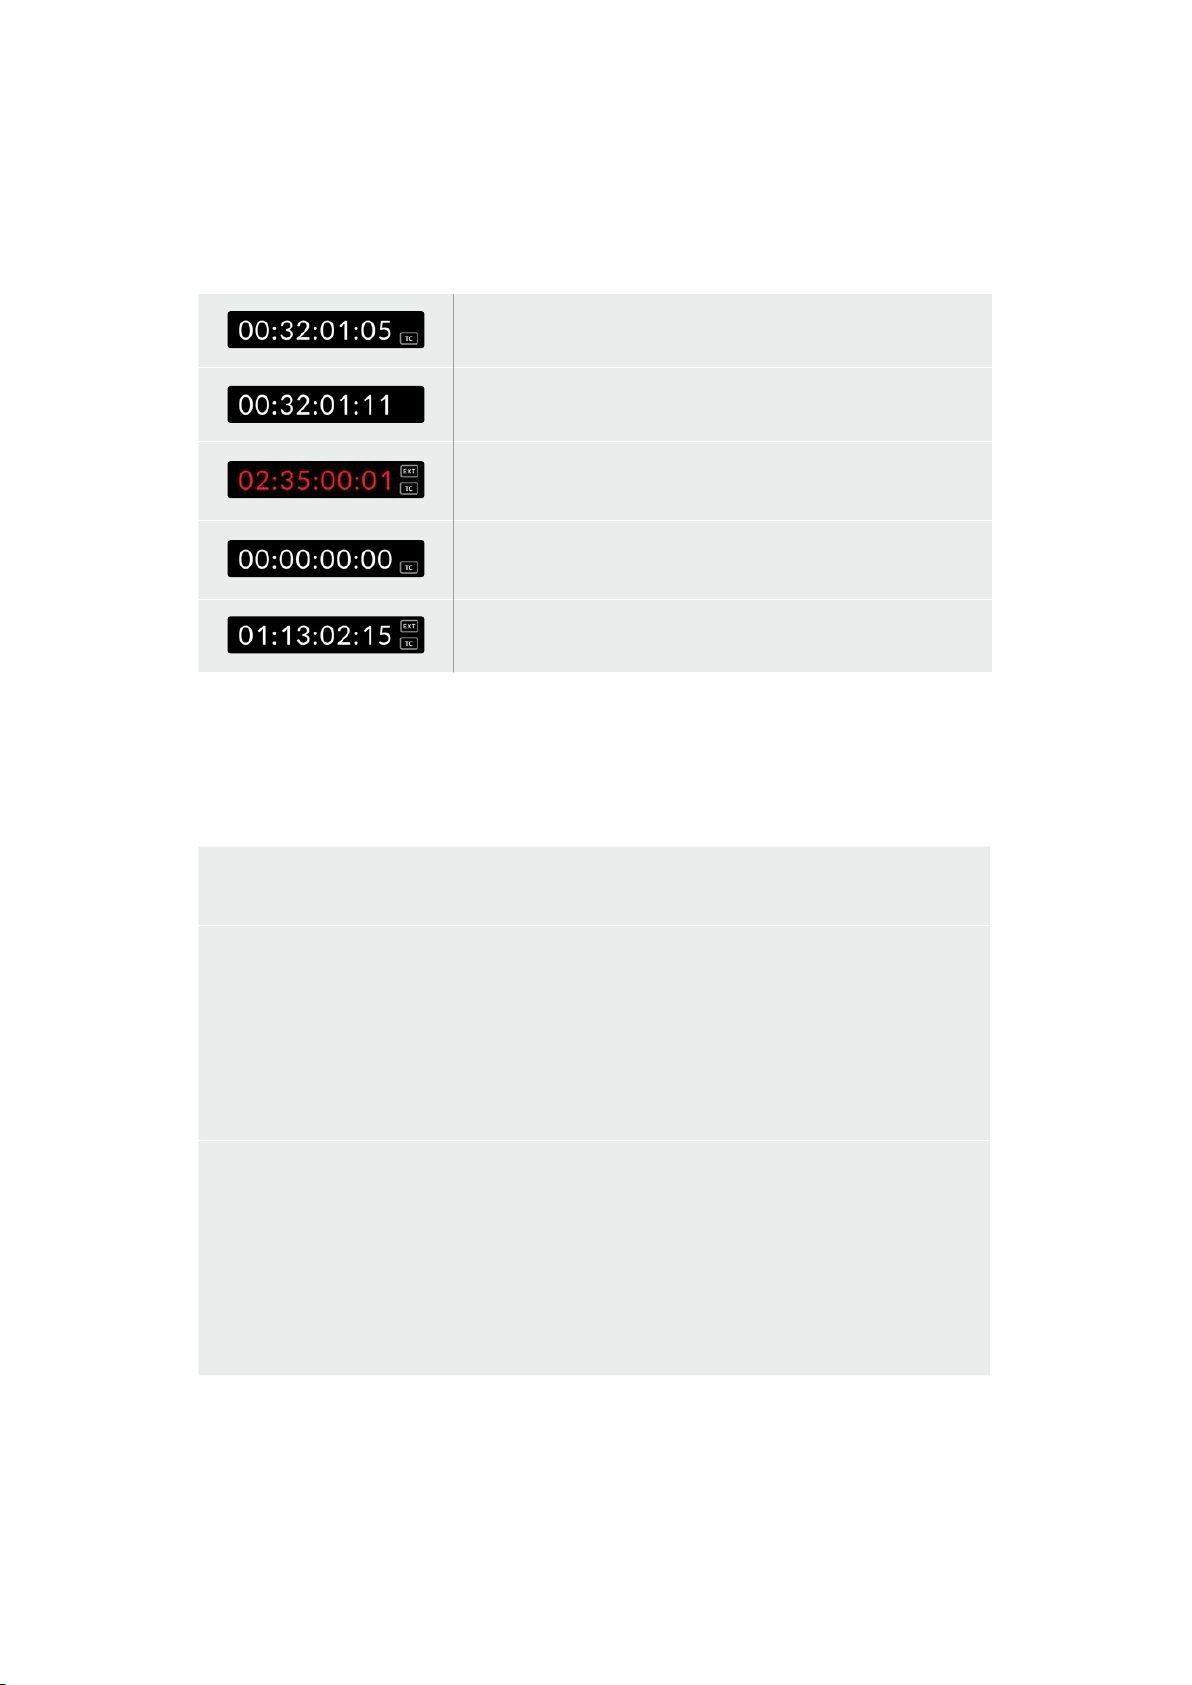
Timecode
During recording or playback, the timecode view at the top of the display will update to show
you the current time of your clip. Select between timeline or clip timecode, or even SMPTE.
Simply tap the timecode display to toggle between SMPTE and clip timecode.
SMPTE timecode mode is indicated by a ‘tc’ icon to the right.
The time counter displays the timeline timecode.
The timecode display will appear red while the unit is recording
in both timecode and time counter modes.
If your source doesn’t have a valid timecode, the timecode for
each recording will begin at 00:00:00:00.
External timecode input is indicated by a ‘ext’ icon to the right.
Trigger Record
This lets you start and stop recording triggered by information received over the SDI or
HDMI connection. Tap on the ‘trigger rec’ icon on the upper status bar to select your trigger
record option. You can turn on trigger recording via the 2nd page of the ‘record’ tab on the
dashboard menu.
None
To disable trigger recording, select ‘none’ or ‘never’.
Video start/stop
This setting will set your video assist to start and stop recording when you press the record start
and stop button on your camera.
For SDI/HDMI start/stop trigger recording you will need to use a camera that can trigger the
record function via HD-SDI or HDMI.
Cameras which support trigger recording may include menu options such as ‘trigger rec’,
HD-SDI remote I/F’ or ‘SDI remote start/stop trigger’.
Timecode Run
When timecode run is selected, your video assist will start recording as soon as it detects
running timecode from your SDI or HDMI source. Recording will stop when the timecode has
ceased. This feature is useful when connecting cameras that don’t support SDI start/stop trigger
recording. You may need to set your camera’s timecode setting to ‘record run’ to make sure
timecode only runs while your camera is recording.
If your camera’s timecode is set differently, for example time of day timecode, the timecode is
always running and will continuously trigger the recording on your video assist.
20Changing Settings
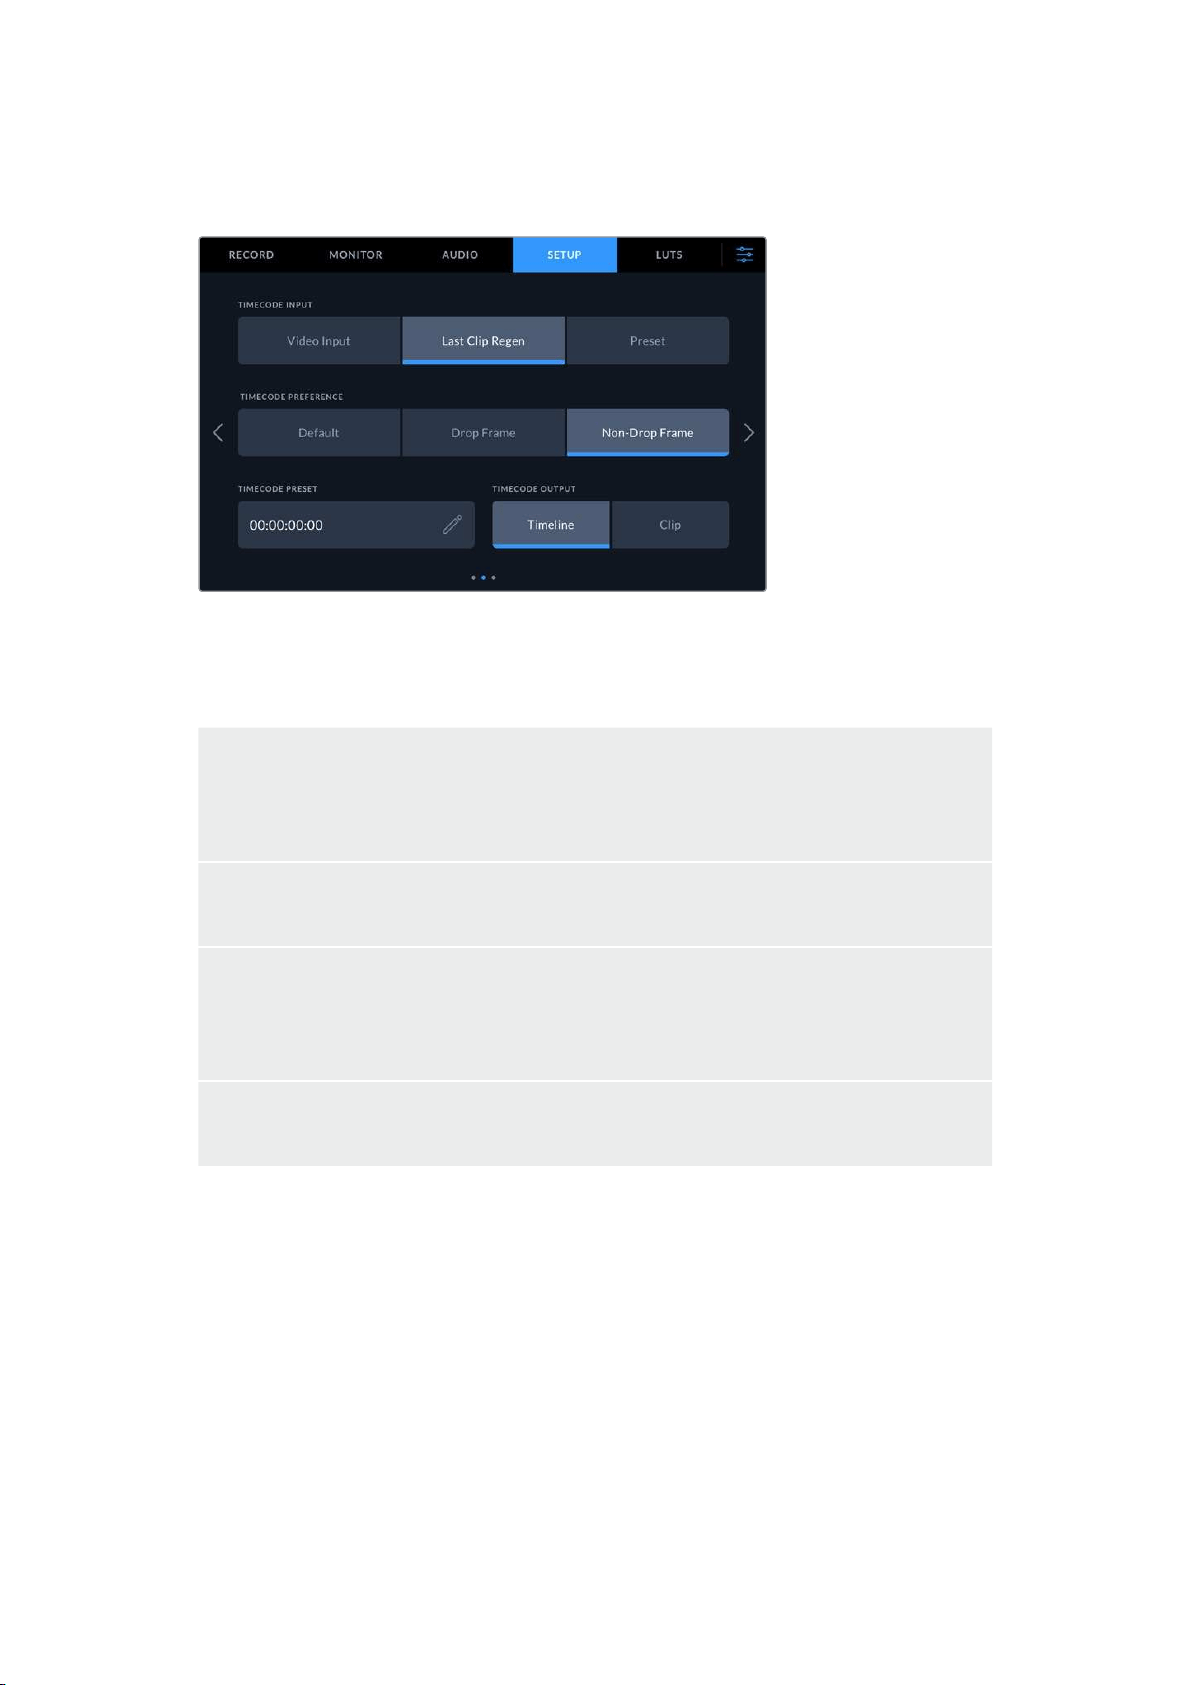
Blackmagic Video Assist features additional timecode functions via the ‘setup’ tab of
the dashboard menu.
Timecode input options on 5” models
Timecode Input
There are three timecode input options available when recording.
Video Input
Selecting video input will take the embedded timecode from SDI and HDMI sources with
embedded SMPTE RP 188 metadata. This will maintain sync between your SDI orHDMI source
and the file recorded on your video assist.
External
To use XLR timecode input on 7” video assist models select ‘external’.
Last Clip Regen
By selecting ‘last clip regen’ for your timecode input, each file will start one frame after the
last frame of the previous clip. For example, if your first clip ends on 10:28:30:10, the next clip
timecode will start at 10:28:30:11.
Preset
Preset uses the timecode entered under the ‘timecode preset’ option.
Timecode Preference
For NTSC sources at frame rates of 29.97 or 59.94, you can select ‘drop frame’ or ‘non-drop
frame’ recording. If you are not sure whether your video is drop frame or non-drop frame, tap on
default. This will maintain the standard of the input, or default to drop frame if there is no
valid timecode.
Timecode Preset
You can set your timecode manually by tapping on the pencil icon and entering the start time
code via the touchscreen keypad.
21Changing Settings
Timecode Output
You can select your timecode output from two options. This also selects your timecode view in
the upper toolbar.
Timeline
Tap the timeline option to output your timeline timecode.
Clip
The clip option will output the timecode of your clip.
HDR
Blackmagic Video Assist 12G HDR’s ultra bright display is perfect for HDR workflows. The wide
color gamut displays 100% of the DCI-P3 color space and brightness controls let you work even
outside in bright sunlight.
If you are recording or playing HDR content, ‘HDR’ will appear to the right of the timecode
display. The HDR information will be tagged on the SDI and HDMI output connectors so you
can connect an HDR enabled device, such as an HDR television, to view the full gamut on a
larger display.
When recording .mov files in Apple ProRes or DNxHR, the HDR information will be included in
the metadata of the file.
Source
Displays the selected SDI or HDMI input source. To select your source, tap on the source icon
to open the source settings and select SDI or HDMI.
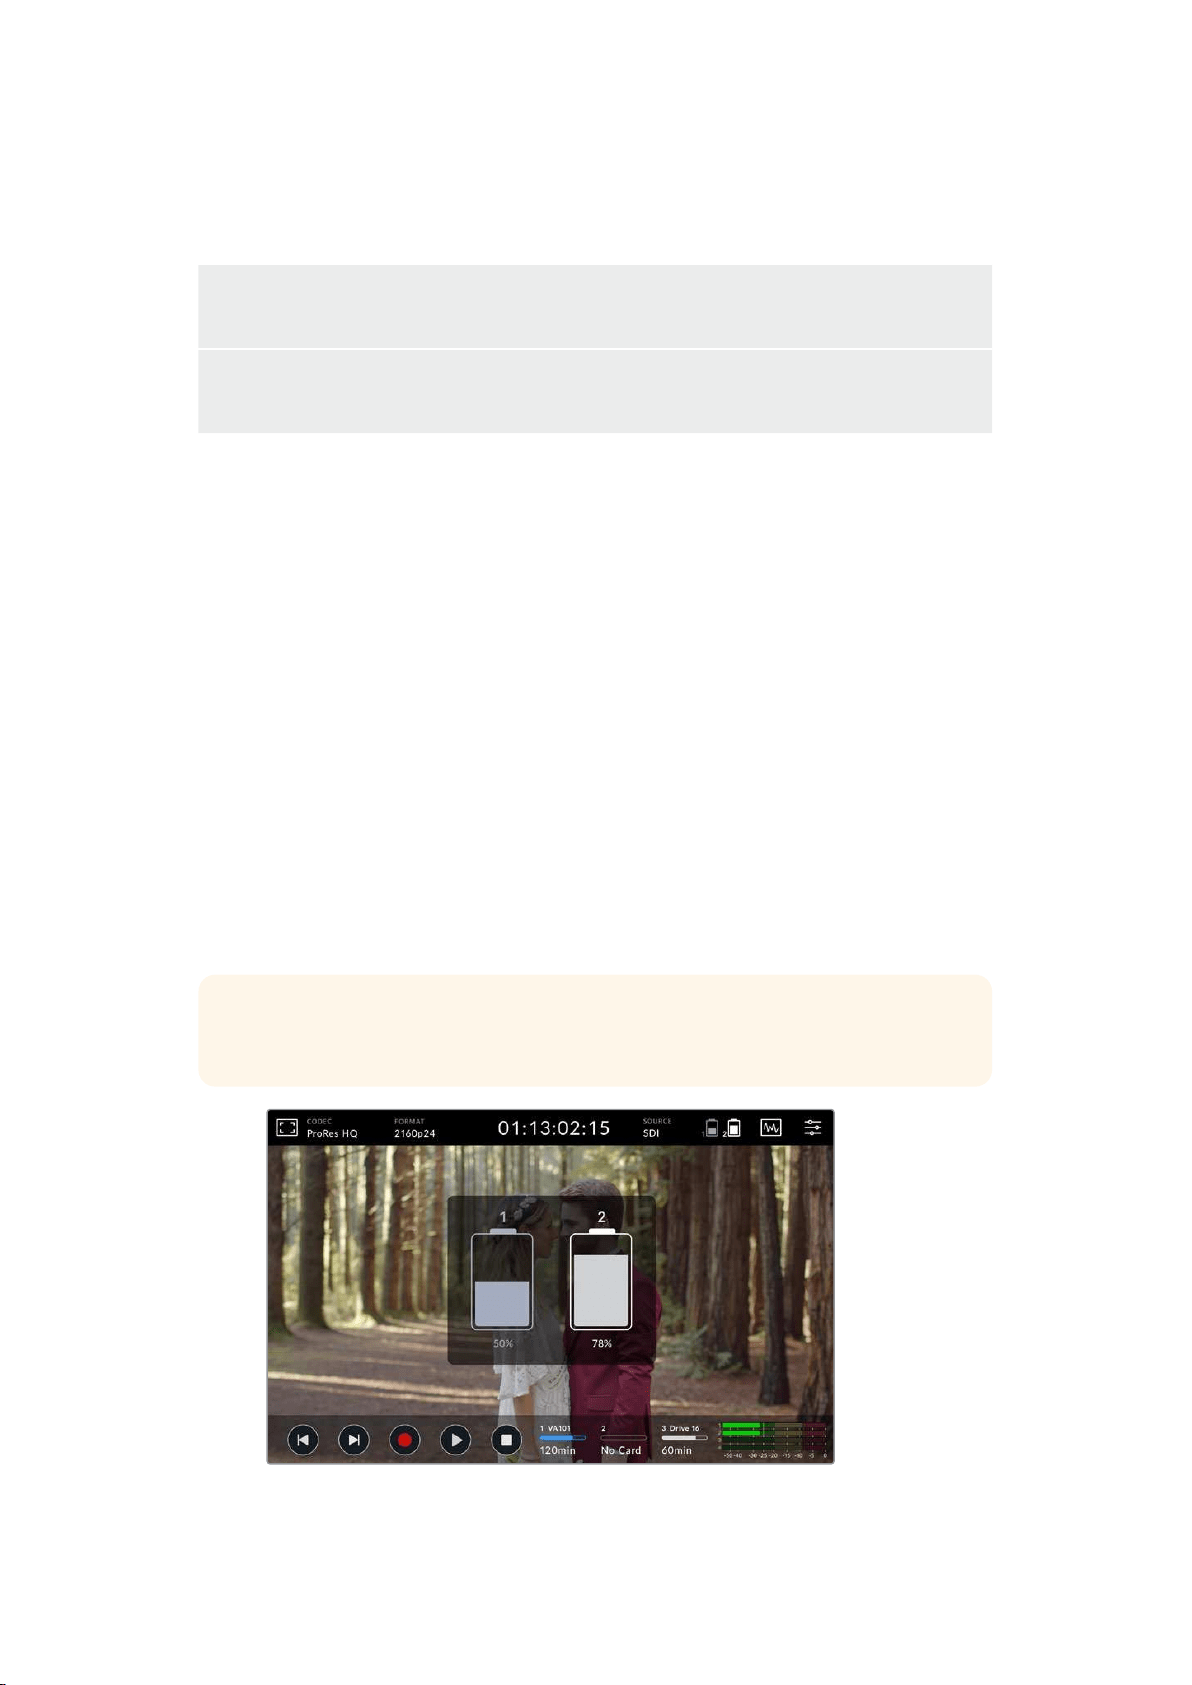
Battery Status
The battery status indicator displays the amount of power remaining in your batteries. Tap the
battery icon to open a larger display with more precise information about your battery levels.
TIP When using 12V power instead of batteries, ‘AC’ will appear in place of the
battery icons.
22Changing Settings
During operation, your video assist will use the battery with the lowest charge first, then swap
over to the other when depleted without interruption. The battery icon will turn red once the
remaining capacity is lower than 25%.
Video Scopes
Blackmagic Video Assist features a set of four real time video scopes that you can use to
monitor the luminance and chroma levels of your video signal. You can choose to display a
waveform, parade, vectorscope or histogram. Using these scopes you can monitor your tonal
balance and check the levels of your video to avoid crushing your blacks and clipping the
highlights, plus monitor any potential color cast in your clips.
Each scope provides an accurate graphical analysis of the various characteristics of the video
signal, showing you the relative strength and range of individual video components including
luma, chroma, saturation, hue, and the red, green, and blue channels that together, comprise
the color and contrast of your video signal.
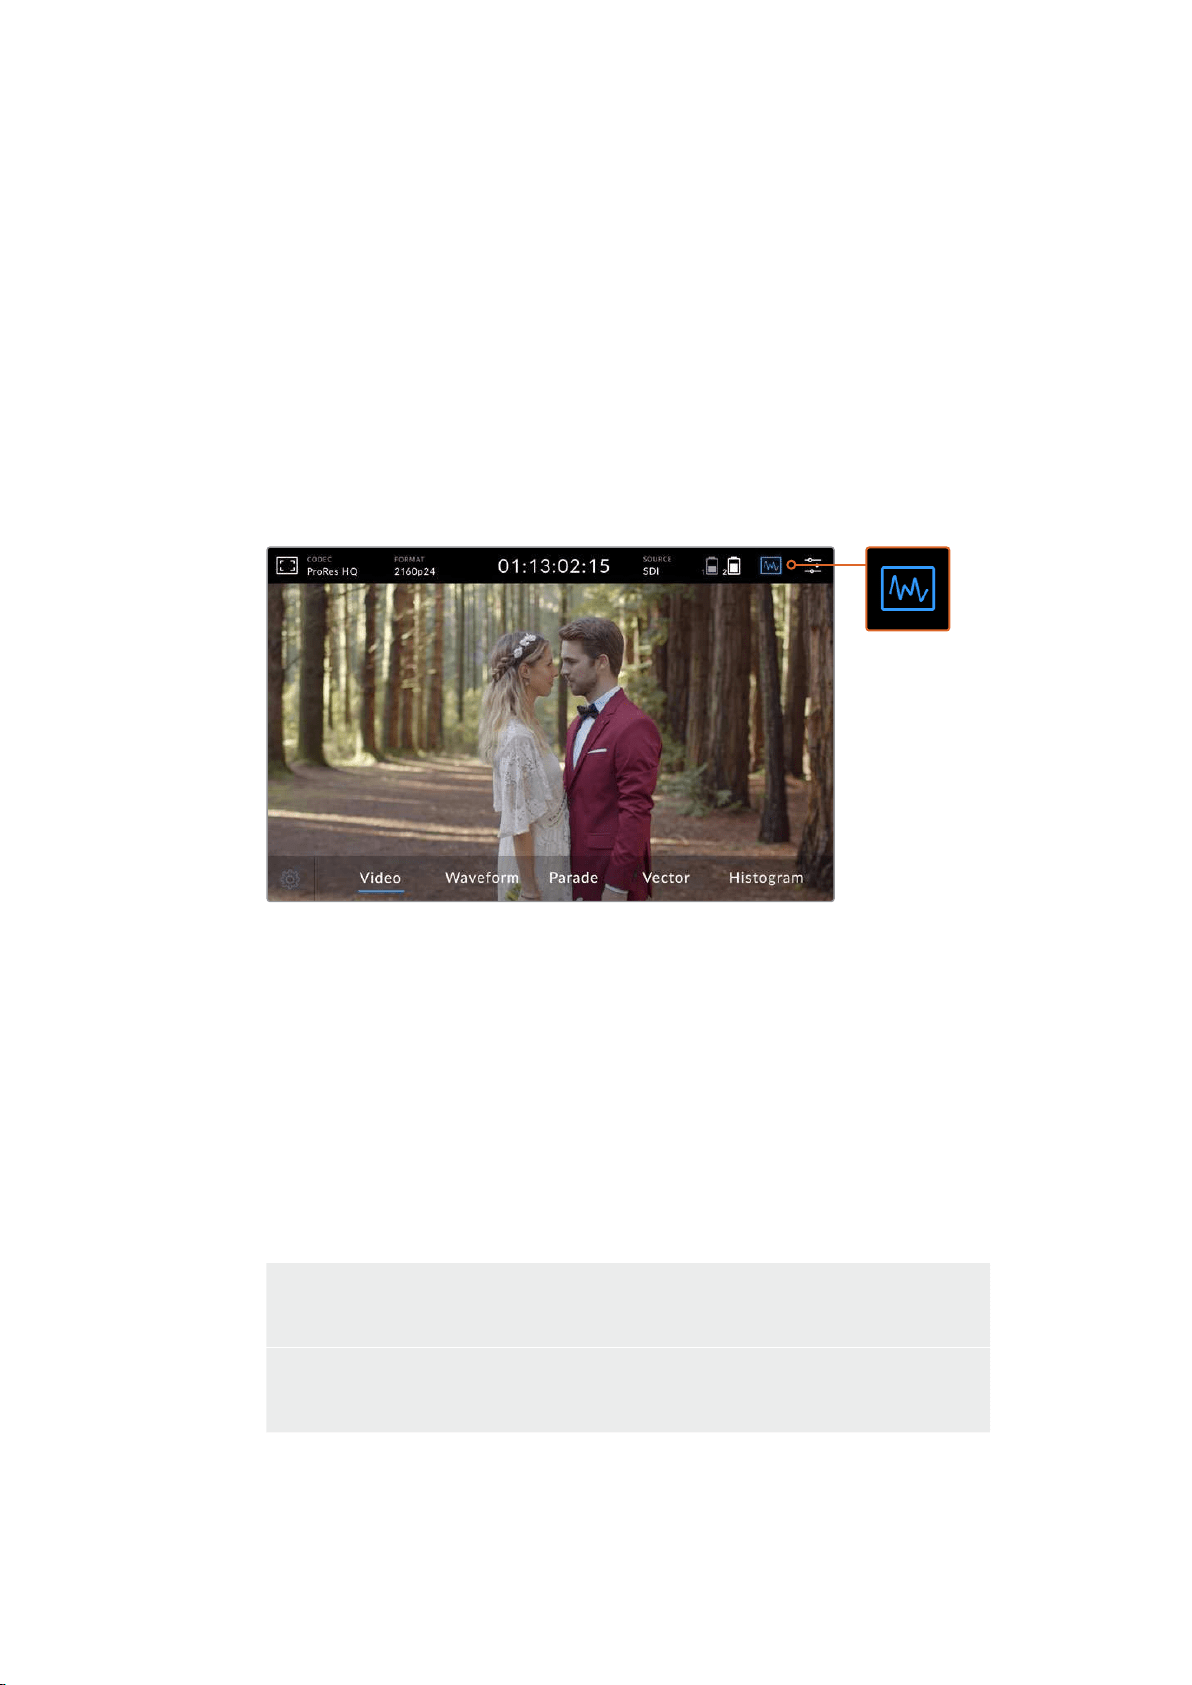
The video scopes menu bar showing the scope display options
Enabling the scopes
To access the video scopes, tap the scopes icon or the display histogram, depending
on your model. From here, you can choose the scope you want, for example, waveform,
parade, vectorscope or histogram. To view the video image without a scope,
select ‘video’.
Tap the scopes icon to close the menu. You can now access the transport controls and
view the audio meters.
Adjusting the scopes
With a scope selected, tap the scope settings icon on the left hand side of the display
to open the scope brightness and opacity settings.
Scope Brightness
Adjust the brightness to make fine details in the scope graph more or less defined.
Background Opacity
Adjust the opacity to set the amount of transparency for the scope background.
Making adjustments to both settings lets you find the perfect combination so you can
monitor the video and scopes at the same time.
23Changing Settings
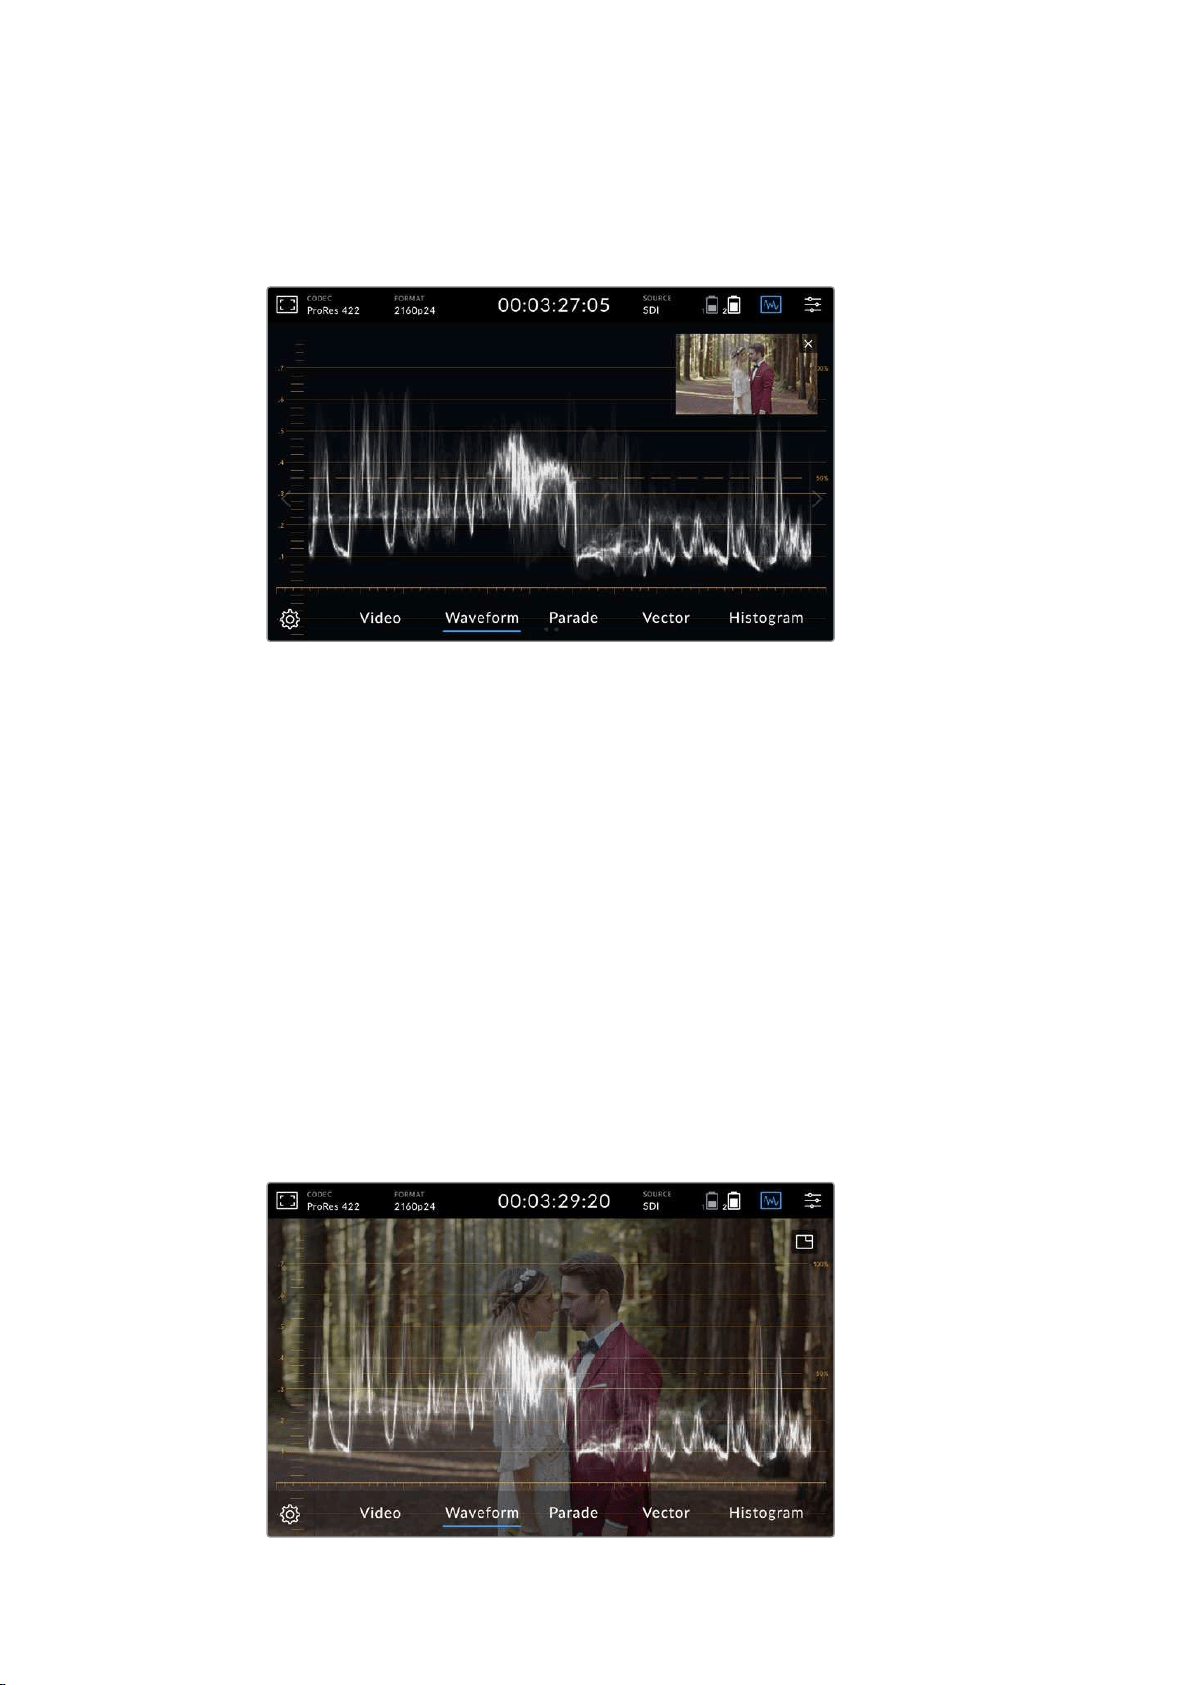
Tapping the ‘preview icon’ displays the scopes full screen, while displaying the video
image in the top right corner. This provides another option to view both scopes and the
video image at the same time, but lets you study the scopes in greater detail. You can
also move the preview to a different area by dragging it to a new location.
Tapping the preview icon will display the scopes full screen with
the video image in the top right corner of the screen
Waveform
The waveform display provides a digitally encoded waveform similar to traditional luminance
waveform monitors, which is used to monitor the luma or brightness levels of your video signal.
The bottom of the graph indicates the black level, or shadows, of the image, while the top of the
graph indicates the white level, or highlights. The range between the top and bottom of the
graph indicates the overall contrast ratio of the image you’re evaluating. Depending on your
footage, your waveform will look different. If you are monitoring video which is high contrast,
you might not see any values in the mid grays.
For perfect video levels without clipping, you will want to make sure the blacks in your
waveform do not drop below 0% and the whites do not exceed 100%. If the levels exceed these
boundaries, the video image will be clipping and you will see the results as lost detail in the
shadows and highlights of your image.
The waveform monitor is a graphical representation of the image, showing luma values
corresponding to the same horizontal position within the video image. For example, if filming an
outdoor scene where the left side of your sky is overexposed, you will see the left side of the
waveform graph above 100%.
The waveform display showing luminance values
24Changing Settings
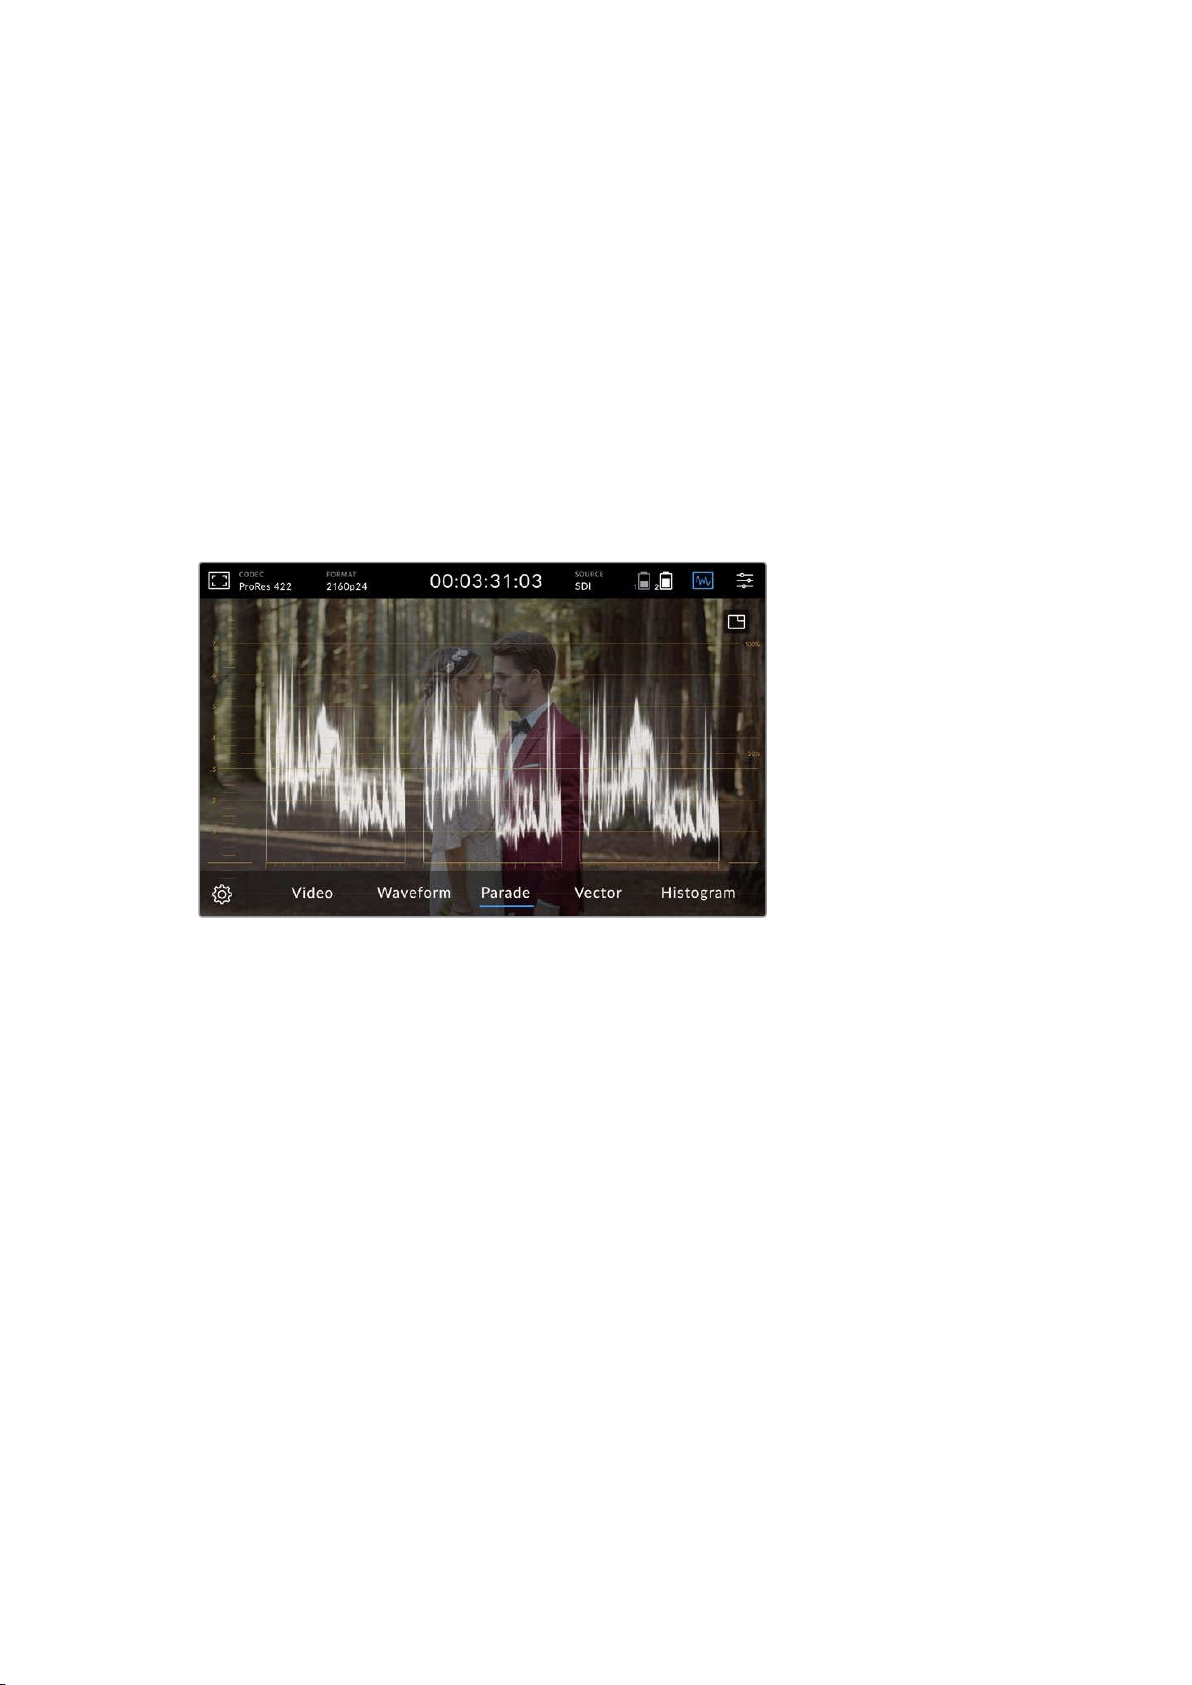
RGB Parade
The RGB parade shows separate waveforms displaying the luminance of each red, green and
blue color channel. By showing a comparison of each channel, the parade scope makes it
possible to monitor the levels of each channel, plus spot color casts by comparing the
highlights, midtones and shadows between each channel. For example, if the shadows are
higher in the blue channel, your blacks will have a shade of blue to them.
Having the ability to see how the differences between all the tonal ranges compare within each
channel gives you an extremely detailed overview of color in your image. You can immediately
spot white balance issues and color casts, and because the parade scope shows a waveform
for each channel, you can also see if one specific color channel is clipping, which you may not
see if you are looking at a single combined waveform.
The three separate RGB waveforms follow the same principles displayed in the waveform
scope, with the top, middle and bottom positions representing the highlights, mid tones and
shadows along the horizontal axis of the video image.
The RGB parade displays separate waveforms displaying
theluminance of the red, green and blue channels
Vectorscope
The vectorscope measures the overall range of color hue and saturation within an image.
Blackmagic Video Assist has a traditional vectorscope, emulating a trace drawn graph,
with 100 percent color bar saturation targets positioned at the graticule markers surrounding
the graph.
Heavily saturated colors in the frame stretch those parts of the graph closer to the edge, while
less saturated colors remain closer to the center of the vectorscope, which represents
0 saturation. By judging how many parts of the vectorscope graph branch out at different
angles, you can see how many hues there are in the image, with the specific angle of each part
of the graph showing you which hues they are.
Additionally, by judging how well centered the middle of the vectorscope graph is relative to the
center of the vectorscope, you can get an idea of whether there is a color imbalance in the
image. For example, if the vectorscope graph is off centered, the direction in which it leans lets
you know that there is a color cast or tint in your image.
While color balance can be monitored on both the RGB parade display and vectorscope
display, color balance issues will often be easier to see in the vectorscope display.
25Changing Settings
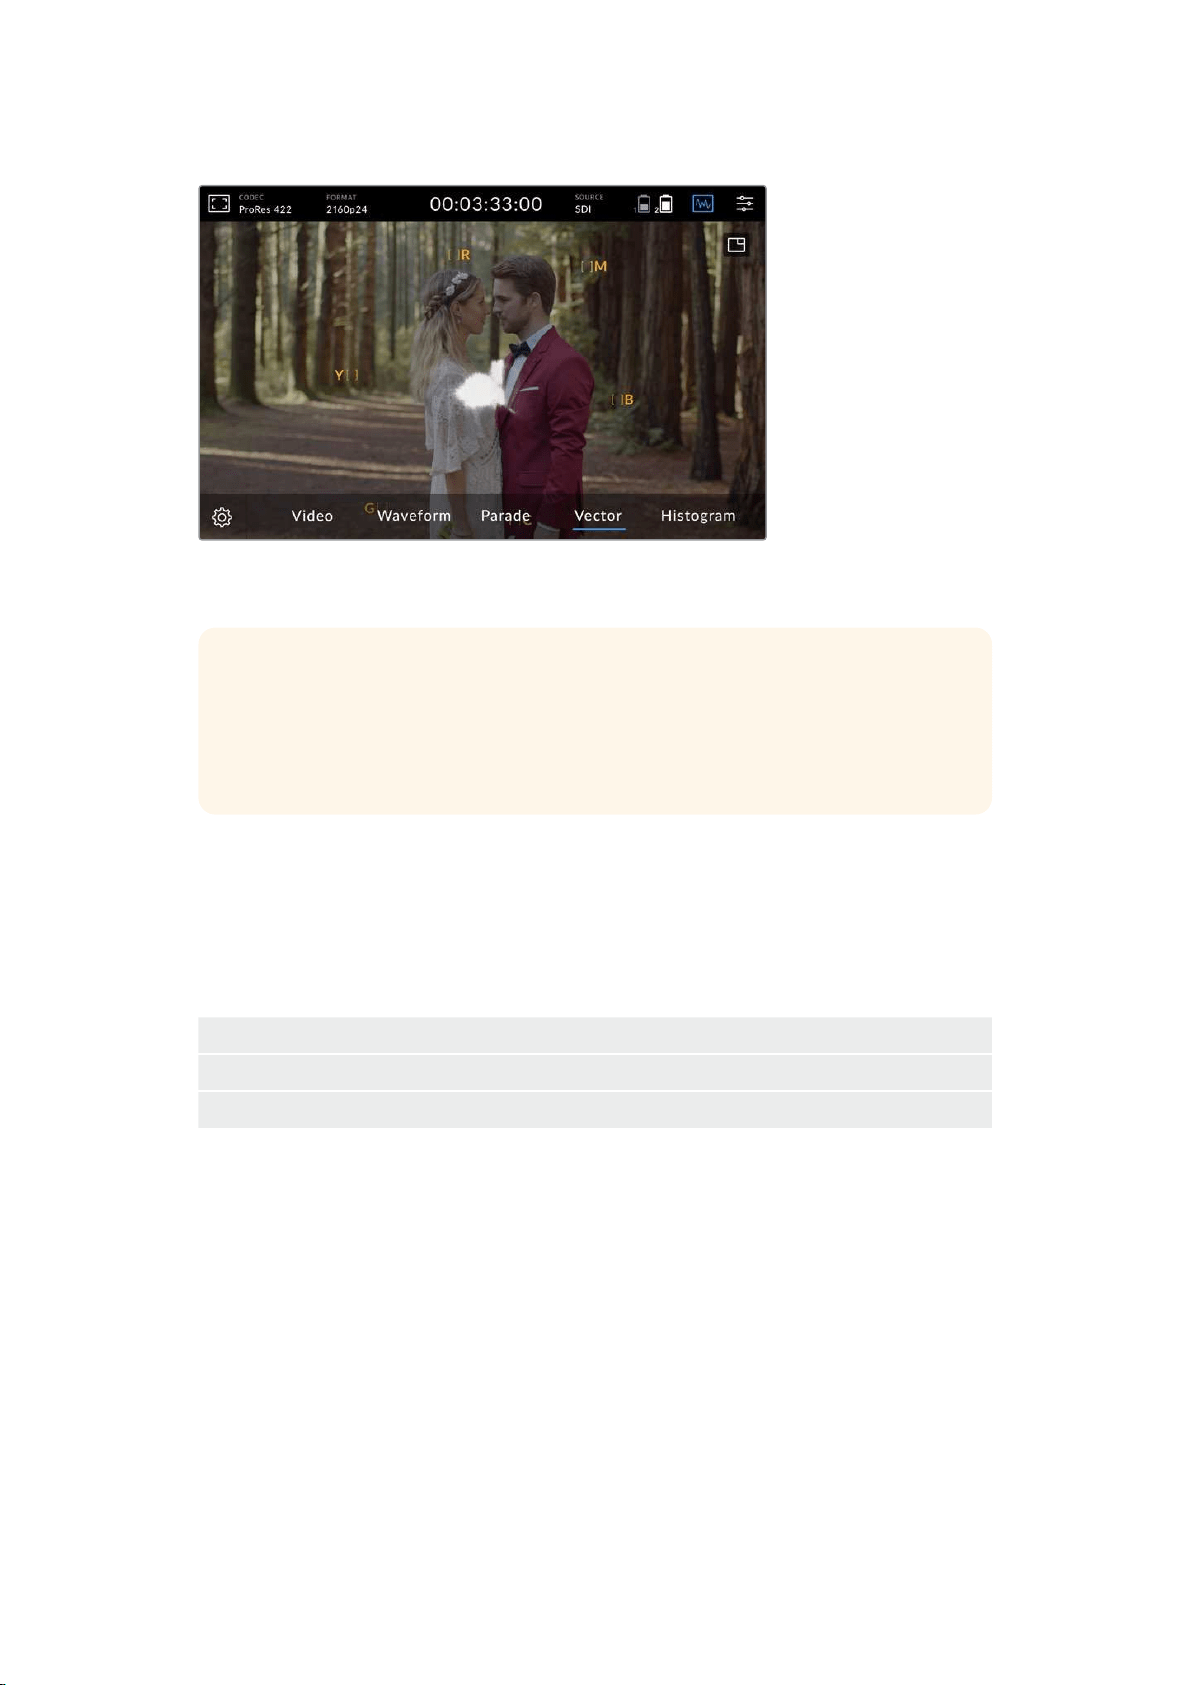
The vectorscope displays the overall range of
color hue and saturation within the image
TIP When monitoring a video signal that contains skin tone, you will want to keep
your warm color saturation along a line at approximately 10 o’clock on the vectorscope.
This is known as the “fleshtone line” and is based on the color of blood beneath the
skin’s surface. The fleshtone line is therefore applicable to all skin pigmentations and
is the best way to ensure the skin tones look natural.
Zooming into the Vectorscope Graph
The ‘zoom’ feature on the vectorscope display lets you magnify the graph so you can get a
closer look at the color information in your image. This is helpful when monitoring images that
are desaturated, as they can typically appear as a small cluster of data around the center of
the chart.
To zoom into the vectorscope display:
1 Double tap the display for 2x magnification.
2 Double tap again for 4x magnification.
3 Double tap a third time to return to standard viewing size.
Histogram
The histogram shows the distribution of the luminance or the black to white information along a
horizontal scale, and lets you monitor how close the detail is to being clipped in the blacks or
whites of the video. The histogram also lets you see the effects of gamma changes in the video.
The left edge of the histogram displays shadows, or blacks, and the far right displays highlights,
or whites. If monitoring the image from a camera, when you close or open the lens aperture
you will notice the information in the histogram moves to the left or right accordingly. You can
use this to check ‘clipping’ in your image shadows and highlights, and also for a quick overview
of the amount of detail visible in the tonal ranges. For example, a tall and broad range of
information around the middle section of the histogram corresponds to good exposure for
details in the midtones of your image.
26Changing Settings
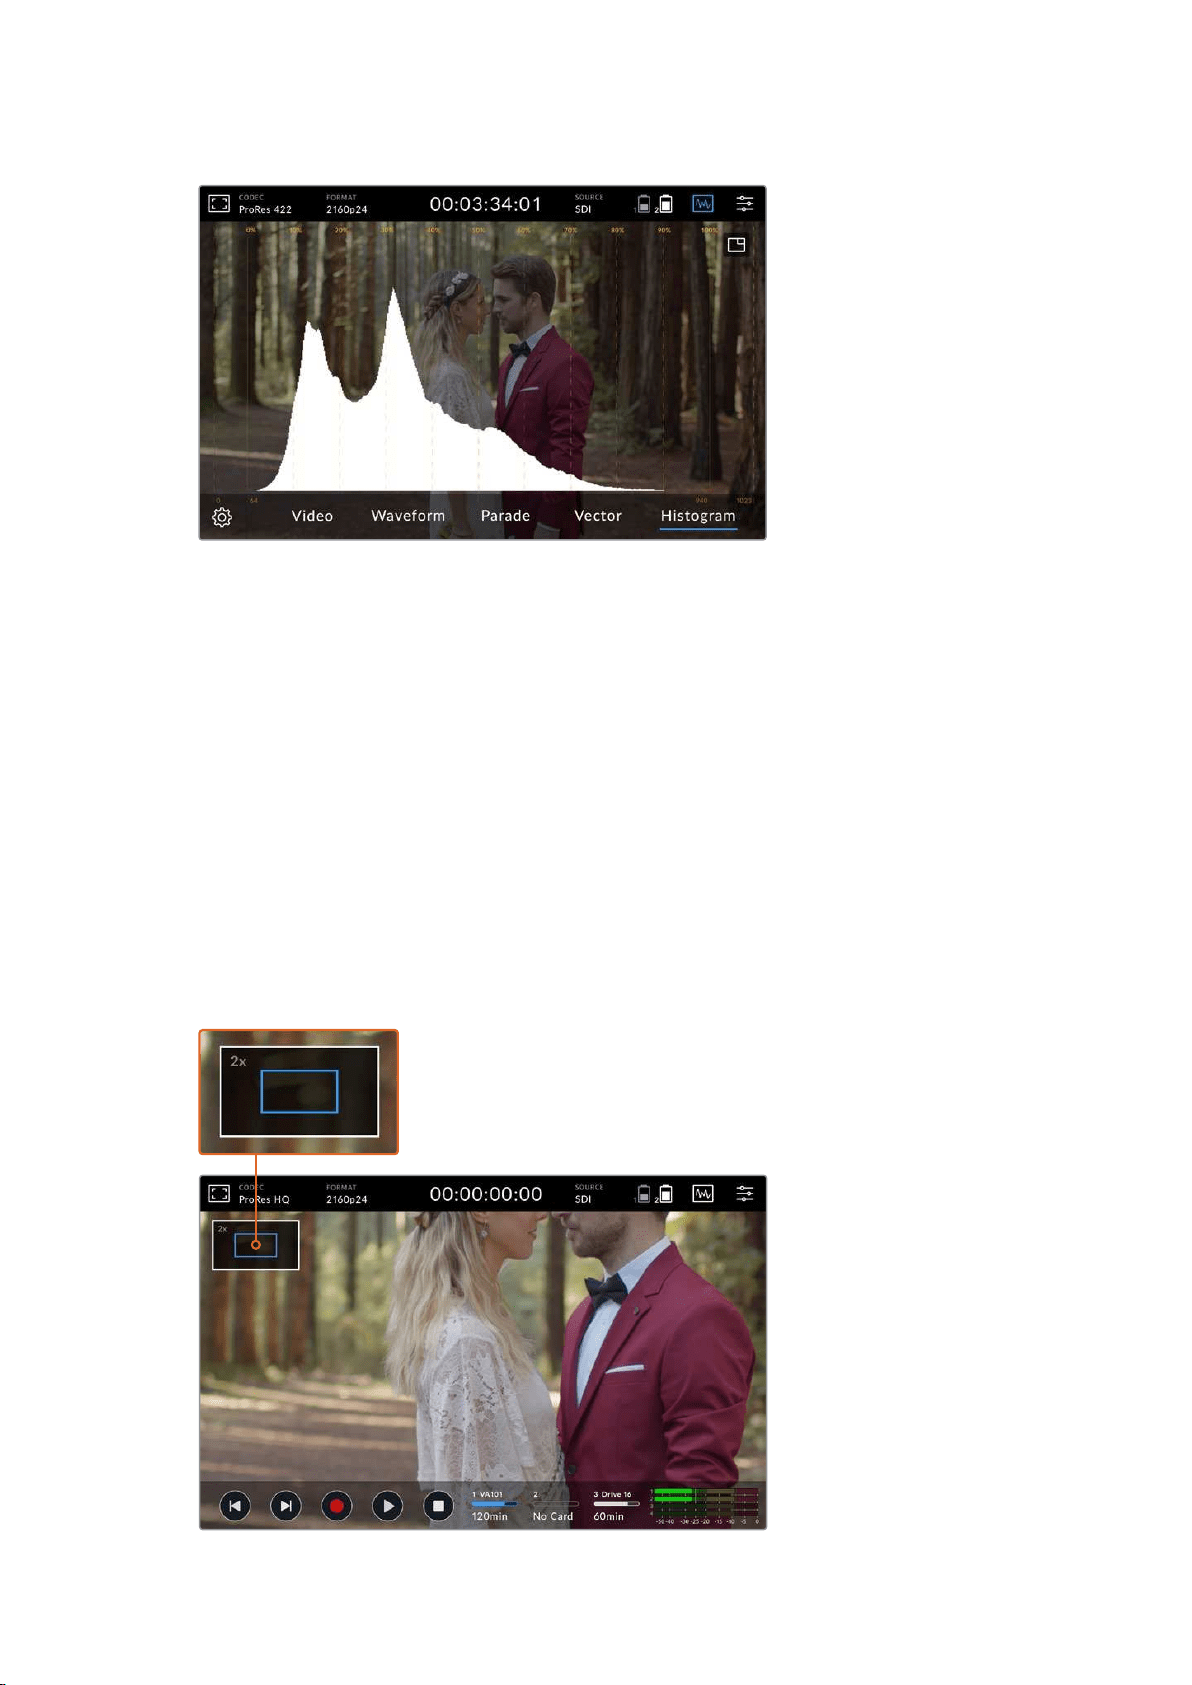
The histogram shows the distribution of the luminance, or
the black to white information along a horizontal scale
Your video is likely being clipped if the information bunches to a hard edge at 0% or above
100% along the horizontal scale. Video clipping is undesirable when you are shooting, as
detail in the blacks and whites must be preserved if you subsequently want to perform color
correction in a controlled environment. When shooting, try to maintain your exposure so
information falls off gradually at the edges of the histogram with most forming around the
middle. This will give you more freedom later to adjust colors without whites and blacks
appearing flat and lacking in detail.
Zoom
The zoom feature lets you zoom into your image so you can carefully check your focus when
connected to a camera, or study fine details in your video image. The zoom feature can be
used when framing a shot before and during recording and playback.
Simply double tap the screen to zoom in. The zoom window will appear in the upper left hand
corner of the display. Touch and drag the screen to view different areas of the image. Toreturn
to the normal display, double tap the screen again.
Zoom status indicator on Blackmagic Video Assist
27Changing Settings
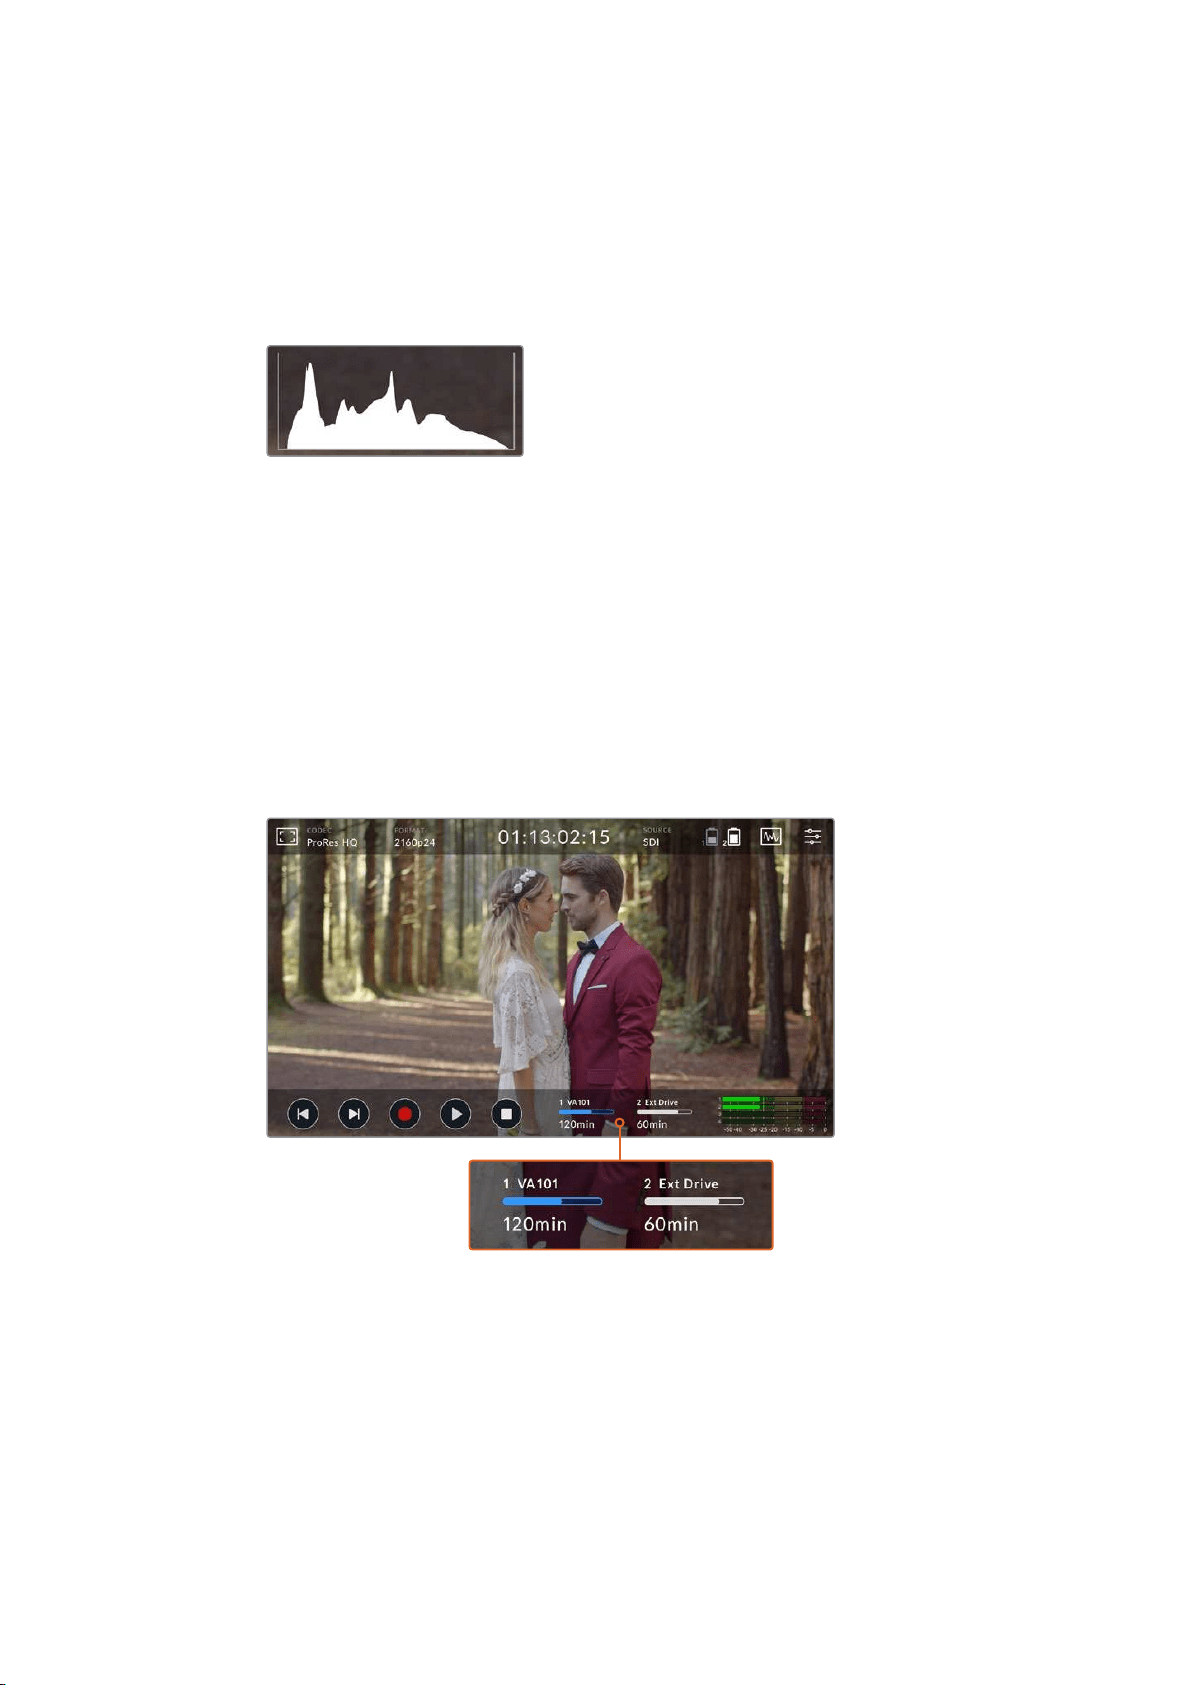
Display Histogram
The left side of the on screen meters displays a histogram showing the distribution of the
luminance in your video. Pure black is on the far left side of the display and pure white is on the
far right of the display. When the video signal sharpens to a point at the bottom edges within
these limits you’ll know your shadows and highlights are not clipping, which means details in
the tonal ranges of your video are preserved.
You can toggle the display
histogram on or off via the setup
tab of the dashboard menu
Storage Indicators
Displays the status of the storage media. Blackmagic Video Assist supports up to
2 SD card slots. 12G models also include an external drive.
To select a card to record to:
1 Tap the ‘card’ status icon to open the storage settings.
2 In the storage settings select the card you wish to record to.
3 Press ‘exit’ or the arrow to leave the storage settings page.
Storage indicator icons on Blackmagic Video Assist 5” 12G HDR
display the status of the SD card slot and external drive
Blackmagic Video Assist 12G HDR features a USB-C connection so you can connect a single
drive or a Blackmagic MultiDock 10G with up to 4 SSD’s.
28Changing Settings
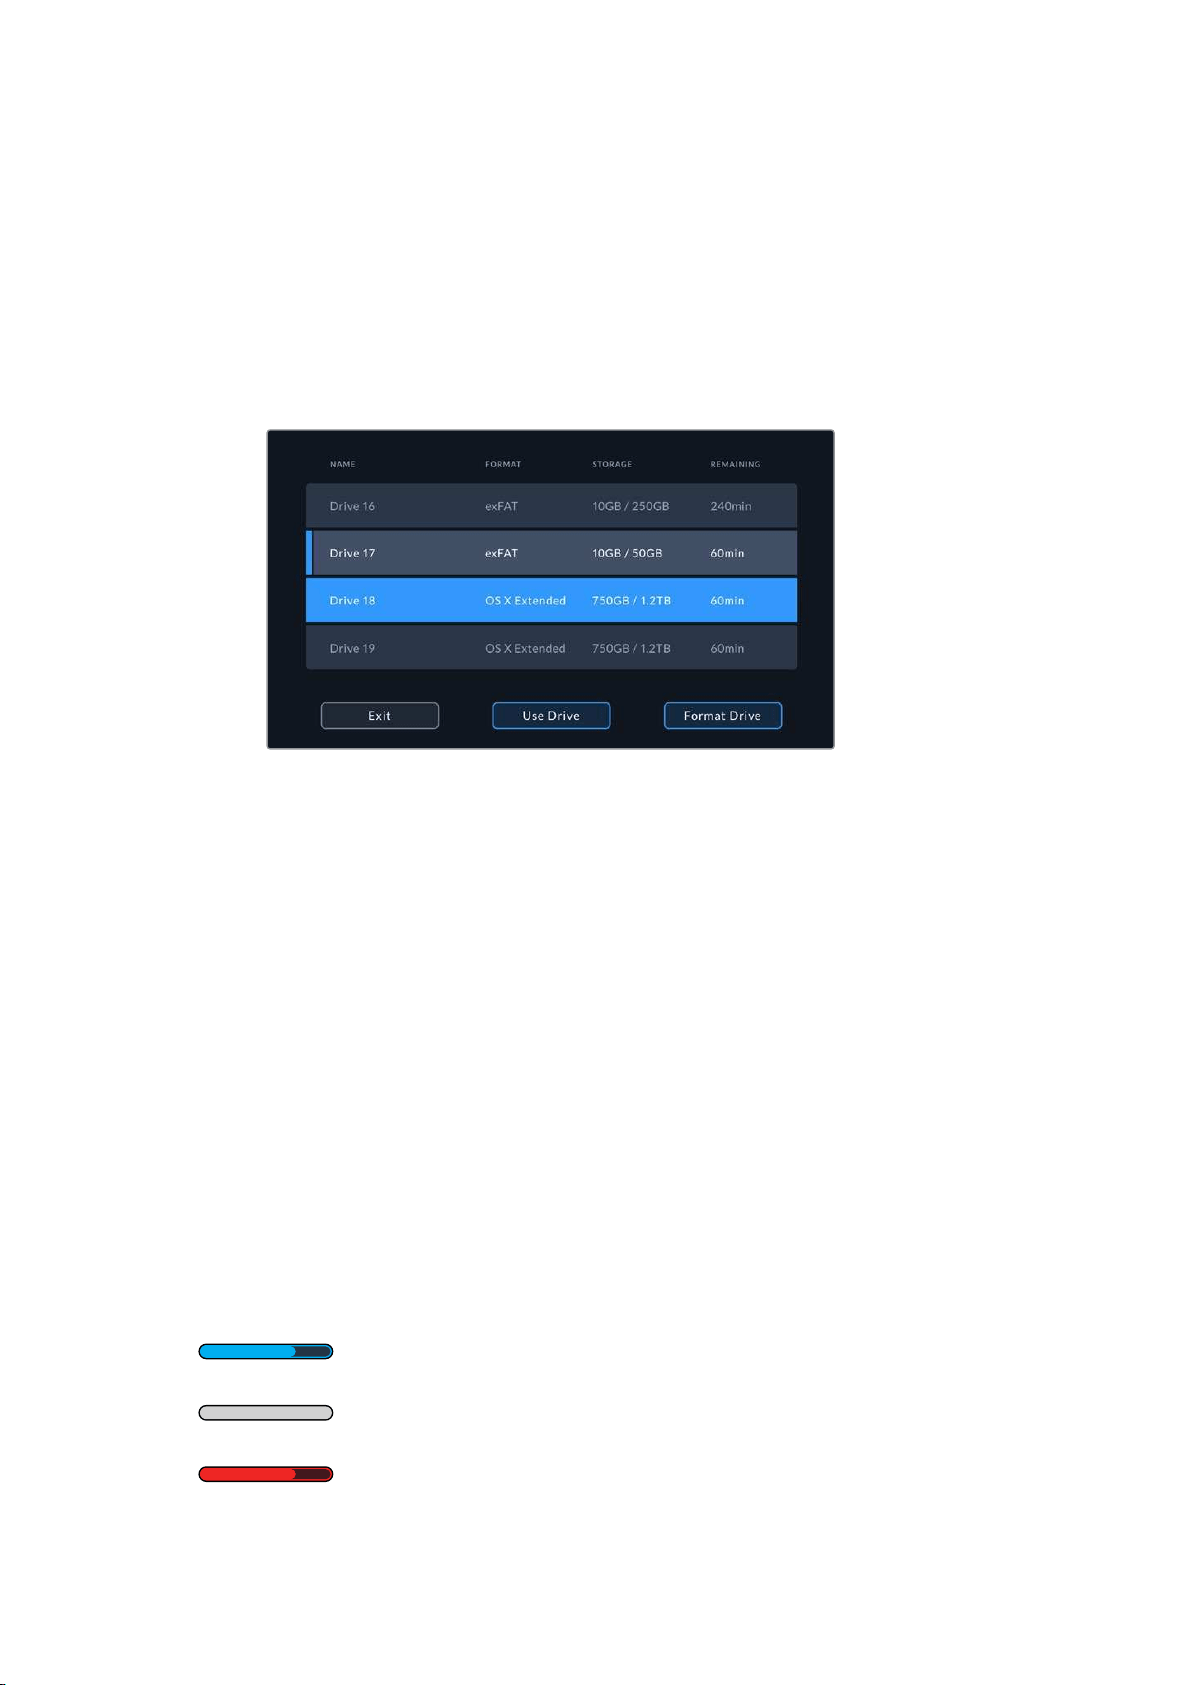
To select your active drive on Blackmagic Video Assist 12G HDR:
1 Tap the ‘drive’ icon to open the storage settings.
2 Tap on ‘drive list’.
3 Tap the drive you want to select, it will highlight blue. Tap ‘use drive’. The active drive is
identified by the blue vertical line to the left of the drive icon.
4 Tap ‘exit’ to return to the previous storage settings screen.
5 Tap ‘exit’ again to leave the storage settings screen.
Drive list view on 12G video assist models
It’s worth noting that the ‘use drive’ button will be disabled when the selected drive is already
active, or there is only one drive available.
You can also format your storage via the storage settings menu. Refer to the ‘formatting storage
media using your video assist’ section later in this manual for more information.
Storage indicator icons slightly vary between video assist models, and can display the number,
name, progress bar and status of the media slots, or just the number and status.
Number
The number indicates the storage slot. For example, Blackmagic Video Assist 12G HDR slot
‘1’ and ‘2’ are the two SD card slots and slot ‘3’ is for the external drive. Slot ‘2’ on the 5”
12G video assist is for any external drive connected via USB-C. You can add the media name
inthe formatting process.
Name
The name of your storage will display to the right of the slot number so you can make sure you
are recording to the right card or drive at all times.
Progress Bar
The bar icon will be either blue, white or red depending on its current status. The intensity of
the color will also display the used space on the card.
A blue bar indicates the active drive. If you press play, playback will start from this
card or drive. If you want to record video, it will be to this card or drive.
A white bar indicates there is an SD card or external drive connected,
but not active. A solid white icon indicates the drive is full.
The bar will be red during recording.
29Changing Settings

Status
Media status will show either the capacity remaining on the media or the slot status.
Capacity remaining
When your SD card or drive has space remaining, the duration available will be displayed in
hours:minutes:seconds based on the current source format and your chosen codec and quality
settings. If there is less than an hour left, it will display minutes:seconds remaining only.
When recording, the duration will change to red when there is less than 5 minutes available.
Once there is less than 3 minutes of space, the duration will flash from red to white.
If your video assist is not connected to a source, the display will show the remaining space on
the SD Card or external drive.
Slot status
‘No card’ or ‘no drive’ will display if there is no media connected to that drive slot. Once an SD
card or active external drive is full, the icon will display ‘card full’ or ‘drive full’ so you know it’s
time to swap out the storage media. If you have another SD card inserted, the recording will
automatically spill over and start recording onto it. If you have an external drive connected, the
recording will spill over to the active drive once the second SD card is full.
Audio
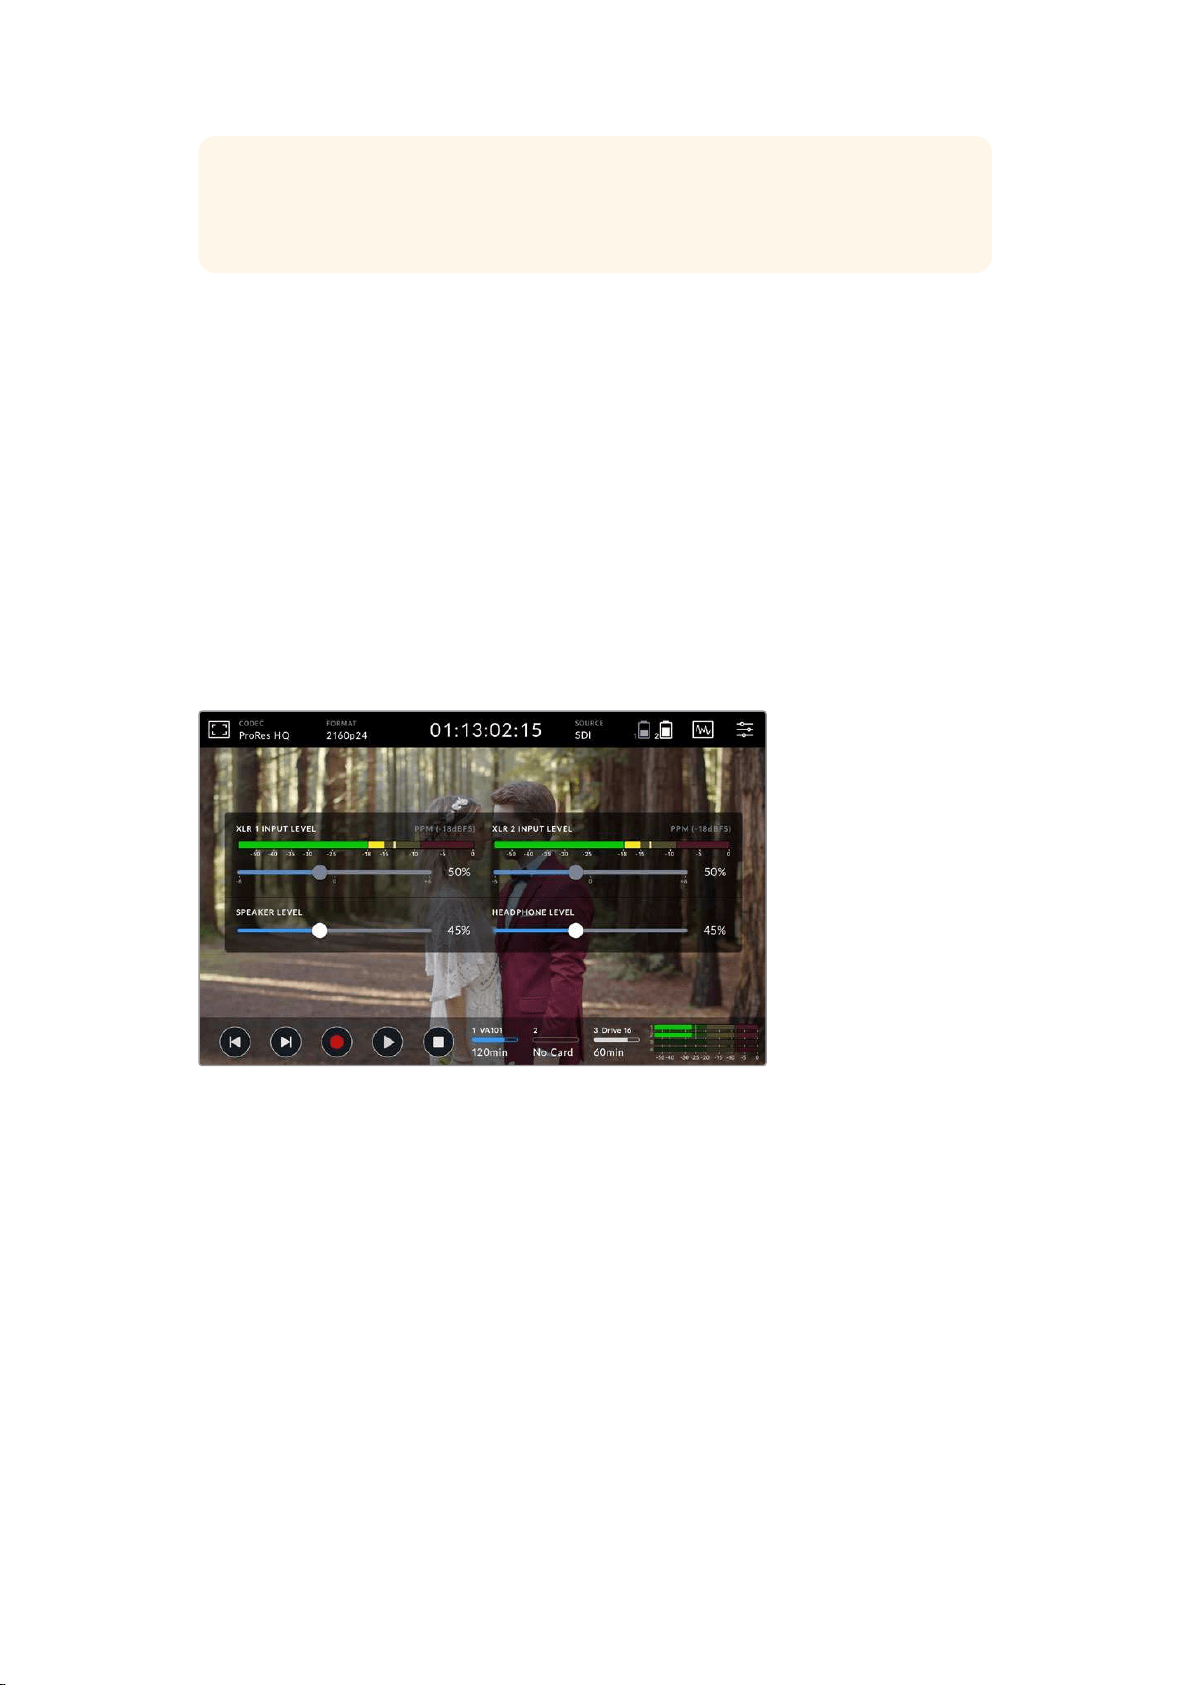
Audio Meters
The audio meters in the lower toolbar display up to four audio channels. These can be set to
either PPM or VU meters via the setup tab in the dashboard menu. On 12G models you can also
change which channels will appear in the lower two meters. This is available in the ‘monitor
channels’ setting in the audio tab of the dashboard menu. When other channels are selected,
the channel number will change in the on screen audio meters.
Speaker and Headphone Level
To adjust the volume for the built in speaker or headphones on your video assist, swipe
the LCD up or down to reveal the lower toolbar, then tap the audio meters to open the audio
level settings. Simply drag the volume slider to increase or decrease the volume for the
speaker or headphone.
30Changing Settings
TIP To avoid potential feedback when a microphone is connected, the speaker
is enabled during playback, but is disabled while your video assist is recording
or monitoring the video input.
In addition to speaker and headphone levels, on 7” video assist models you can also
adjust the XLR input levels.
To record optimum audio without clipping, adjust the sliders on each input. Ideally your peak
audio levels should fall in the yellow zone. If your peaks enter into the red zone, your audio is in
danger of clipping.
To adjust your analog audio levels on 7” video assist models, simply tap the audio meter and
then drag the sliders for each channel left or right. You can also adjust your analog audio levels
and other audio controls via the ‘audio’ tab in the dashboard menu.
The 7” video assist models are also powerful audio recorders. Each XLR input has
independent settings including:
Recorded Audio Channels
Blackmagic Video Assist can record up to 16 channels of audio at a time. Select how many
channels of audio to record from 2 to 16 channels. On some models you can find this setting via
the record tab in the dashboard menu.
On 7” video assist models XLR audio levels can be adjusted
Record XLR Inputs To
When you are recording more than two audio channels you can assign which channels will
record your XLR inputs. For example, when recording 8 channels of audio, you can record your
XLR inputs to channels 7-8 by tapping the arrows. If you are not using XLR audio, simply select
the none option.
Audio meters display up to 16 channels of audio. The channels will be enabled or disabled
based on how many recorded audio channels are selected.
XLR Line or Mic
When connecting professional audio equipment other than microphones to the analog XLR
inputs, make sure you set the recording level to ‘XLR line’. Most professional audio equipment
outputs ‘line’ level audio which is a stronger signal compared to ‘mic’ level. Alternatively, when
connecting microphones to the XLR inputs, set the respective input to ‘XLR mic’ level. This is
because microphones typically output a signal that is slightly weaker in strength compared to
equipment with line level output, so the signal is boosted slightly by your 7” video assist to
31Changing Settings

optimize the recording level. To bypass the XLR analog inputs and maintain the embedded
SDI or HDMI channels 1 and 2 from your source video, on 12G video assist models you can set
to record your xlr inputs to none. On 3G video assist models, select video.
NOTE Your video assist remembers your settings even after power cycling.
Make sure you reset your audio settings when changing your connections.
Pad XLR
If you are shooting in a noisy environment or near unpredictably loud sounds, you can set the
XLR padding feature to ‘on’. This will drop your audio levels down by a small amount and give
you slightly more range in levels which may help you prevent clipping. If you are shooting in
normal audio conditions, set this feature to ‘off’.
Phantom Power
When connecting microphones that are not self powered, you can power them using phantom
power via the XLR connector. Simply turn the setting to ‘on’.
NOTE Make sure you have phantom power turned ‘OFF’ when using microphones
that are battery powered as some battery powered microphones can be damaged
when phantom power is supplied.
Menu Settings
Your video assist also features additional settings available via the tabbed menus.
Record
If Card Drops Frame
Sometimes you may encounter dropped frames when using slower media, such as UHS-I
SD cards, to record higher rate formats. Depending on your workflow, you may want recording
to stop when dropped frames are encountered. You can do this by selecting ‘stop recording’.
If you want to continue recording but be alerted if your storage drops a frame, select ‘alert’.
An exclamation mark will appear in the lower right hand corner of the display.
Apply LUT in File
If you are shooting with the Blackmagic RAW codec and applying a LUT on Video Assist 12G
HDR, the selected LUT will be embedded into the Blackmagic RAW file you are recording.
This means that the LUT will be saved in the header of the file and can easily be applied to the
clip in post production without needing to handle a separate file. When the ‘apply LUT in file’
switch is set to ‘on’ in the record menu, this clip will open in Blackmagic RAW Player and
DaVinci Resolve with the chosen LUT already applied to it. The LUT can then be easily toggled
‘on’ or ‘off’ but will always travel with the Blackmagic RAW file as it is written into the clip itself.
DaVinci Resolve also has an ‘Apply LUT’ switch in the RAW settings palette for enabling or
disabling the 3D LUT in the Blackmagic RAW file. The ‘Apply LUT’ setting in DaVinci Resolve is
the same setting as in the camera. This means that when shooting you can direct the colorist to
use the LUT by setting it in the camera, but they can switch it off easily in DaVinci Resolve by
setting ‘Apply LUT’ to ‘off’.
32Changing Settings

Monitor
Display 3D LUT
Tap the settings toggle switch to turn your selected display 3D LUT on or off. The display
3D LUT option will be disabled when no display LUT is selected. For information on how to load
a LUT, see the ‘LUTs’ tab in the dashboard menu later in this manual.
Blue Only
Your video assist features a ‘blue only’ mode that displays only the blue channel, represented
as a black and white image. If there is noise in a digital video signal, it is most visible within the
blue channel, so you can easily check for noise by using this feature. The black and white image
can also be used for assistance when checking camera focus. To enable ‘blue only’ mode,
select ‘on’.
LCD Screen Rotation
If you want to disable the automatic display rotation, simply set this setting to ‘none’. Now the
display will stay locked to the current position even if you turn it upside down. You can also set
the display to flip 180º. This will keep it locked to that position and is helpful when the unit is
mounted to a camera rig in an upside down position. To enable the automatic screen rotation,
select ‘auto’.
Anamorphic De-squeeze
Blackmagic Video Assist features an ‘anamorphic de-squeeze’ setting. This allows you to
correctly display horizontally ‘squeezed’ images from a camera using an anamorphic lens.
The de-squeeze amount required to correct your image will vary, as each anamorphic lens has
a different squeeze factor. You can select the de-squeeze amount of ‘1.33x’, ‘1.66x’, ‘2x’ to
correspond with the level of squeeze on different anamorphic lenses. Select ‘off’ to disable
the setting.
Setup
The following options are included in the setup tab of the dashboard menu.
Video Assist/Device Name
You can change the name of your video assist by clicking on the pencil icon to the right of the
name. This makes it easier to identify in situations where there may be more than one video
assist in use.
Date and Time
When these settings are maintained and accurate, useful information is recorded in your clip
files to inform you of the date and time each clip was recorded.
To adjust the date and time settings:
1 Tap the ‘pen’ icon to edit the settings.
2 Tap the day, month, year or time edit arrows to change a setting.
3 Tap ‘save’ to confirm the change.
Language
Blackmagic Video Assist supports many languages including Chinese, Japanese, German,
French, Russian, Italian, Portuguese and Turkish.
To select your language:
1 Tap on the ‘language’ and select your language from the list.
2 Select ‘update’ to return to the setup menu.
33Changing Settings
Software Version
Displays the current software version.
Tally Light LED
A tally light on the top that illuminates red when your video assist is recording. This is a
particularly useful feature when recording with a DSLR that does not provide an option to
display a tally light during recording. Toggle the option to turn tally on or off.
LED Brightness
To set the brightness of the tally light LED, tap ‘low,’ ‘medium,’ or ‘high.’
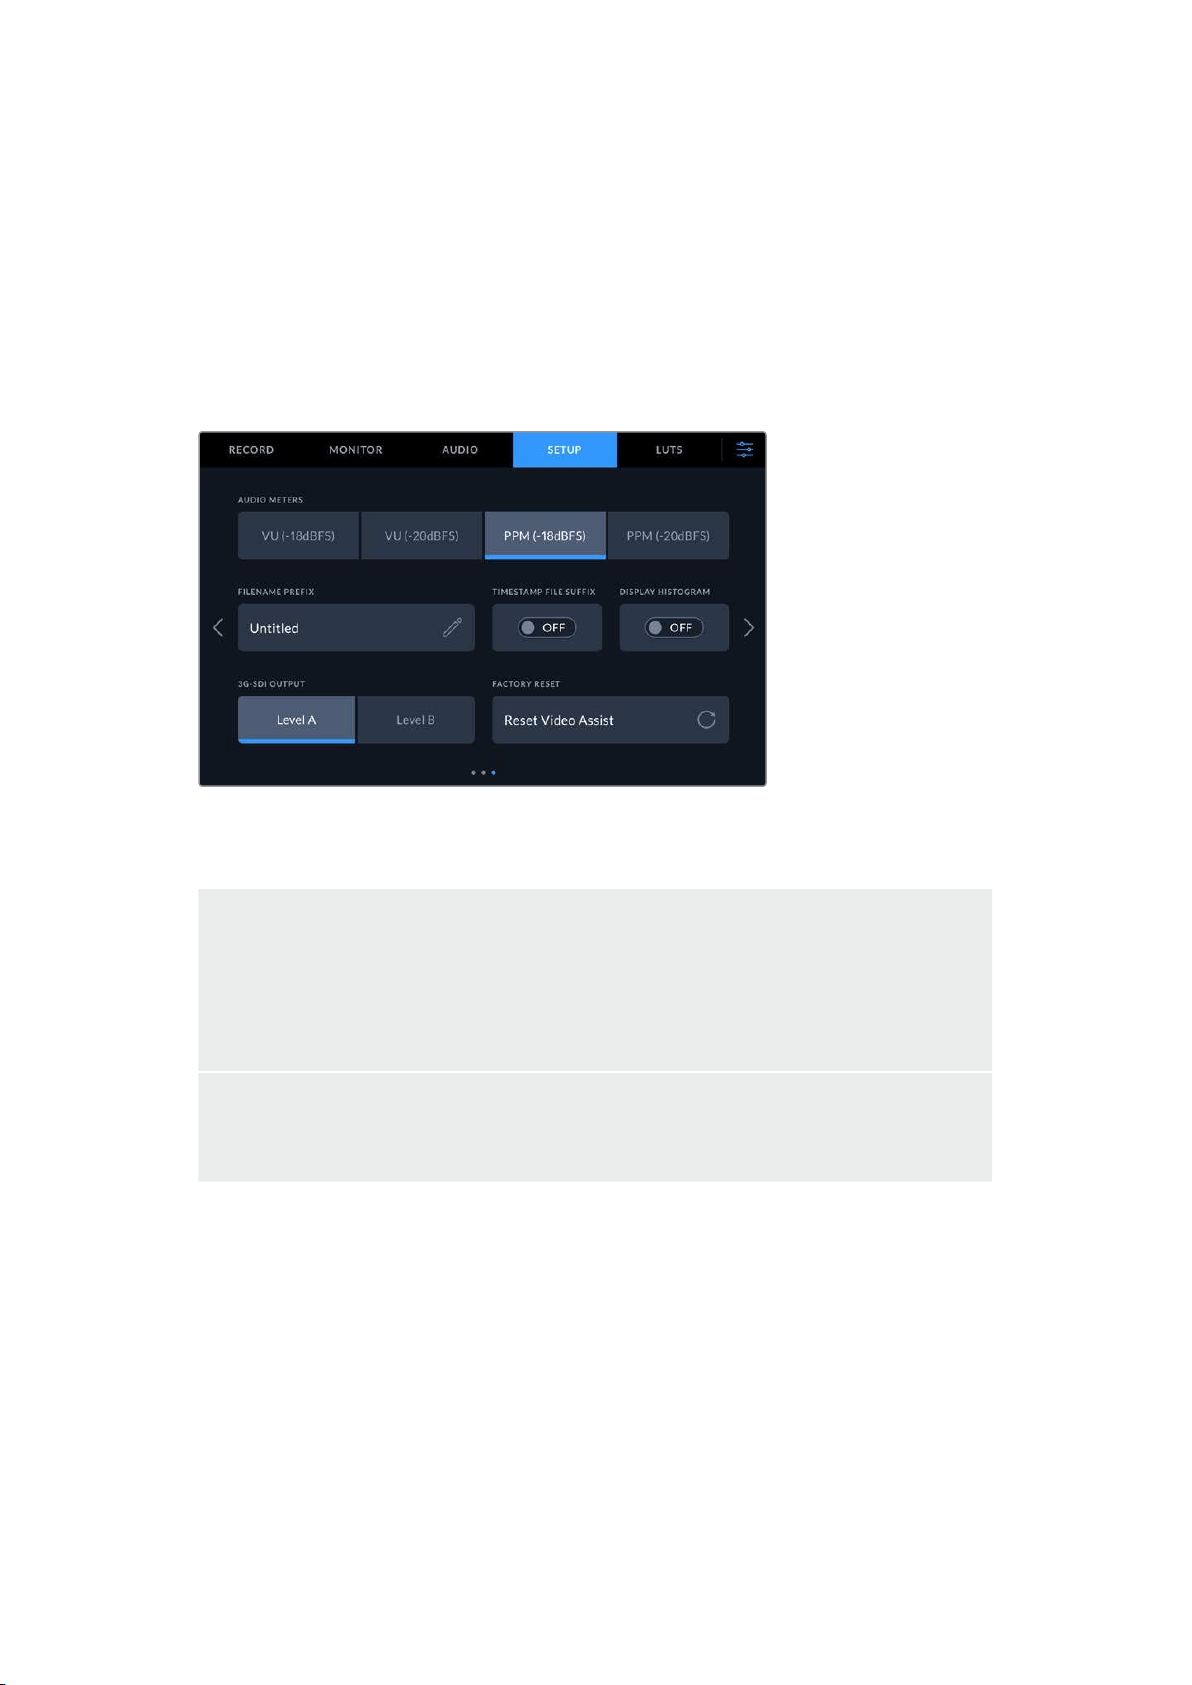
Audio Meters
Blackmagic Video Assist features two different audio meter display types.
VU
The VU meter, or ‘volume units’ meter, averages out short peaks and troughs in your audio signal.
If you are using VU metering, adjust the input levels on the video assist so that the meter peaks
at the 0db indicator on the audio meter. This maximizes the signal to noise ratio and ensures your
audio is at the highest quality. If your audio peaks beyond the 0dB indicator there is a high risk of
sound distortion.
PPM
PPM meters, or ‘peak program meters’ displays a ‘peak hold’ feature that momentarily holds the
signal peaks and a slow fall back so you can easily see where your audio is peaking.
Both VU and PPM meters are available at reference levels of -18dB or -20dB so you can monitor
your audio to suit different international broadcasting standards. To adjust your input levels via
the touchscreen, tap on the audio meter in the bottom right corner.
Filename Prefix
Edit the filename of your recorded files by tapping the ‘edit’ pencil icon. A touchscreen
keyboard will appear letting you type in a new name.
Timestamp File Suffix
The timestamp added to the filename is turned off by default. If you would like the date and
time recorded in your filename, toggle the ‘timestamp file suffix’ option to on.
34Changing Settings
Display Histogram
The histogram display on the lower toolbar will be off by default. If you want to turn the
histogram display on, toggle the ‘display histogram’ switch to on.
3G-SDI Output
Some broadcast equipment can only receive level A or level B 3G-SDI video. To maintain
compatibility, tap either ‘level A’ or ‘level B’.
Factory Reset
To reset the video assist to its default factory settings, tap the ‘reset’ button. After you approve
this action on the confirmation page, your video assist erases any stored LUTs and presets,
plus resets all settings.
LUTs
Your video assist can display the input video with 3D LUTs applied to the image. A 3D LUT is
only used on the display and not actually recorded into the video itself, so you don’t need to
worry that your recorded image will have the look permanently applied. However, if you want to
apply the same LUT to your image in DaVinci Resolve, you can simply import the exact same
LUT .cube file used in your video assist into DaVinci Resolve and apply it to your grade.
This gives you powerful options such as matching a look in post that you monitored on set, or
conforming to a specific color profile. Refer to the DaVinci Resolve instruction manual for more
information on how to use 3D LUTs in your color correction, including exporting LUTs as .cube
files so you can import them into your video assist.
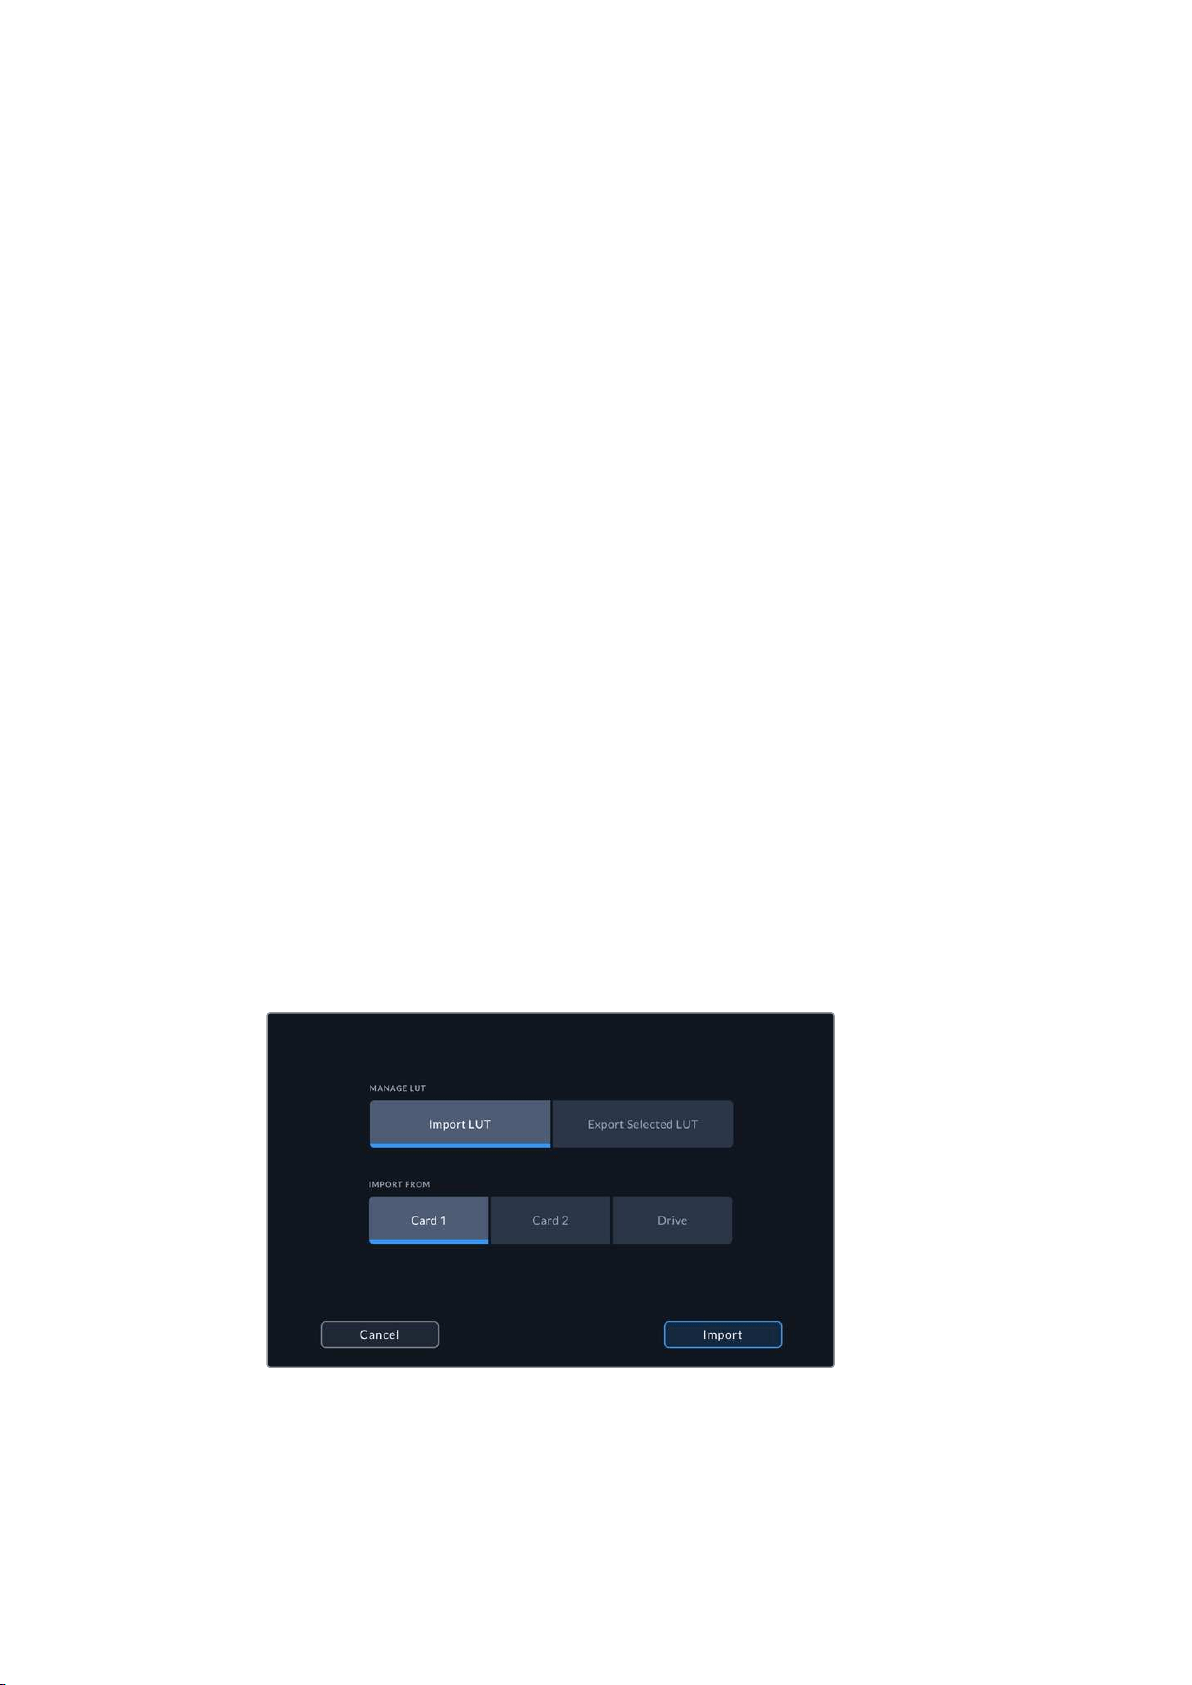
To import a 3D LUT:
1 Click on the LUTs menu tab.
2 Tap the double arrow icon at the bottom of the LUT display.
3 From the ‘manage lut’ option, select ‘import LUT’.
4 Select the location of your LUT and tap the ‘import’ icon.
5 Select the LUT you wish to import from the list and tap on ‘import’. A progress screen
will let you know the LUT is importing. Once done, the LUT will appear in the list.
35Changing Settings
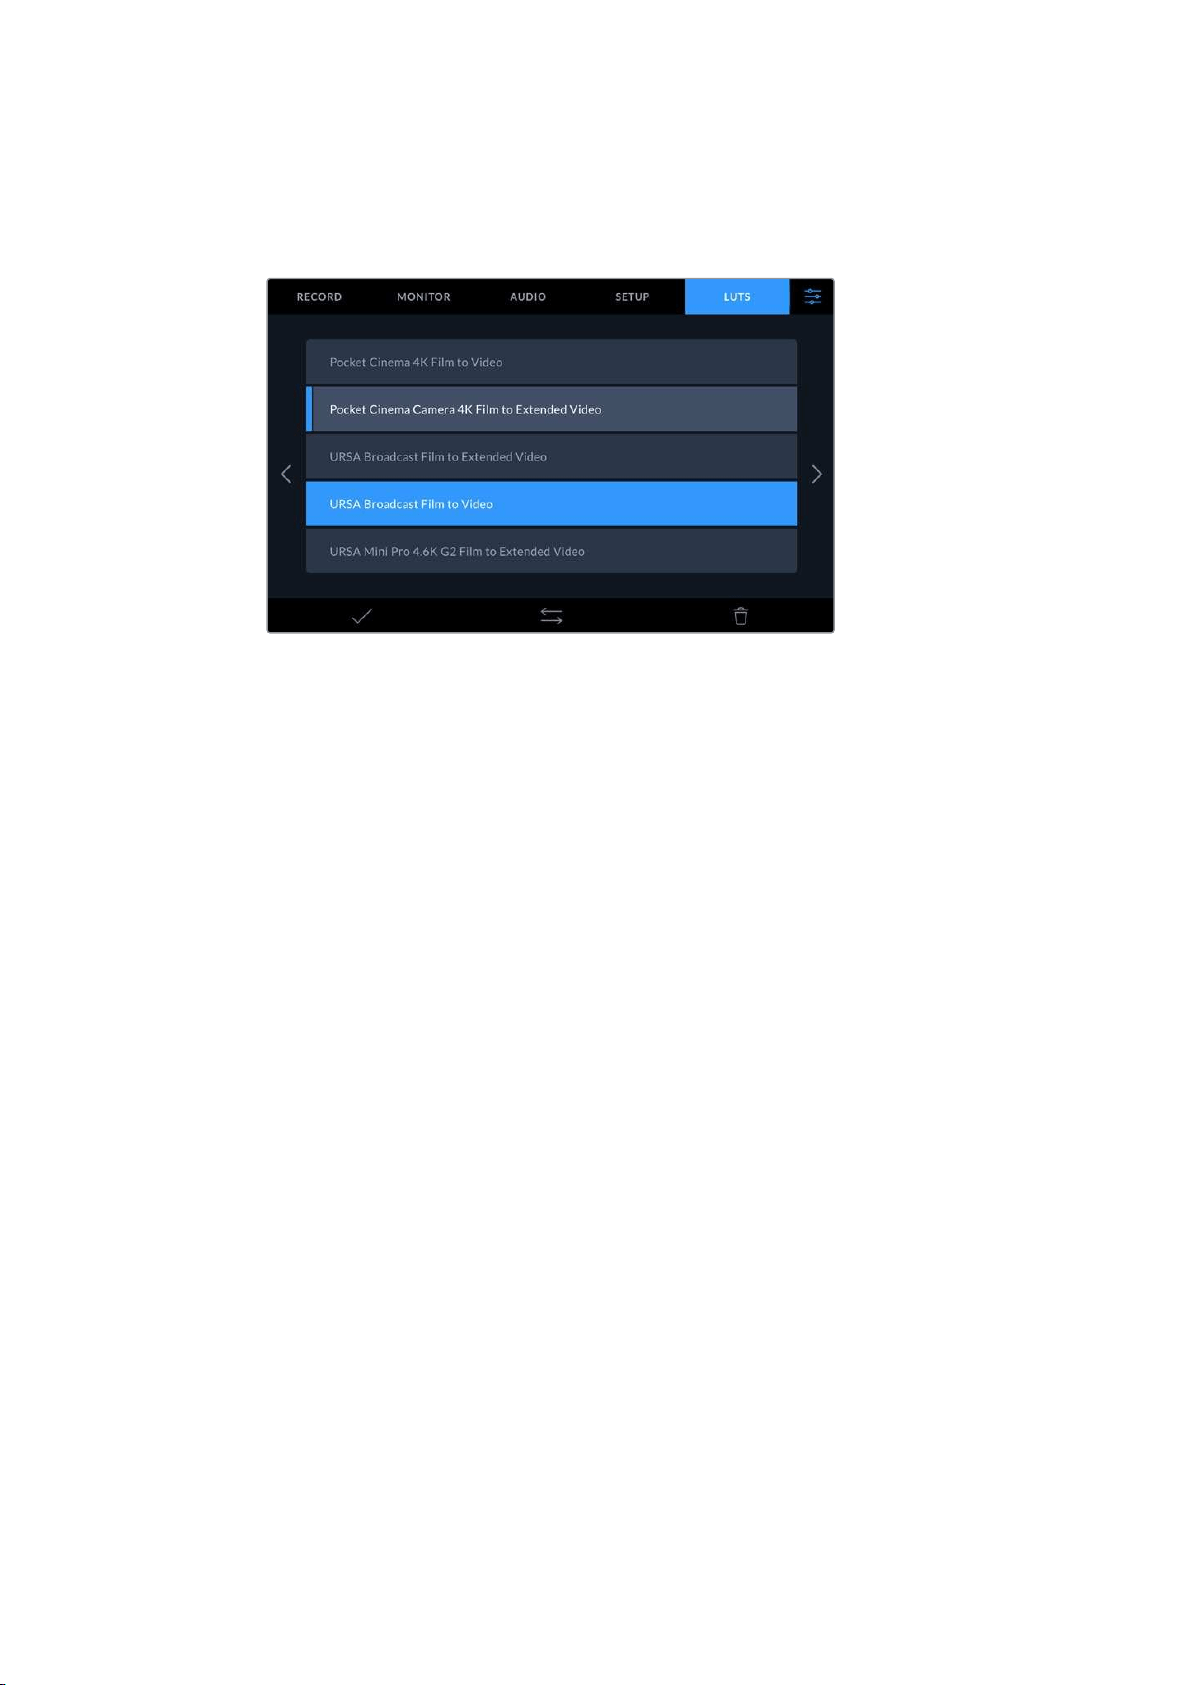
To select your display LUT:
1 Tap the ‘LUTS’ tab on your video assist dashboard menu.
2 Select the LUT you wish to use by tapping on it to highlight it blue.
3 Tap the tick icon to select the LUT. A blue vertical line will appear on the left of the
LUT icon to indicate it is selected.
Entering Metadata
Metadata is information saved inside your clip, such as take numbers, lens information and
other identifying details. This is extremely useful when sorting and processing footage in post
production. For example, take, shot and scene numbers are essential organizational tools, while
lens information can be used to automatically remove distortion or better match VFX assets
to plates.
Blackmagic Video Assist automatically saves some metadata to each clip, such as timecode,
date and time. You can use the digital slate to add many additional details.
Digital Slate
Swipe from the far left edge on the video assist to reveal the slate. The slate is divided into
‘clips’, ’project’ and ‘lens data’ tabs. The ‘clips’ tab contains information that may vary clip by clip,
while ‘project’ is where you enter details common between clips, such as the project name,
director, and camera and operator ID. The ‘lens data’ tab is where you can enter information
about the lens in use.
Clips
Making changes to clip metadata works differently in standby mode to playback mode. In
standby mode, when your video assist is ready to record, clip metadata gets saved to the next
clip recorded, except the ‘good take last clip’ button applies a ‘good take’ tag to the most
recently recorded clip. In ‘playback’ mode, when you are reviewing footage already shot, the
‘good take’ button is shown and clip metadata is always attached to the current clip
being viewed.
36Entering Metadata
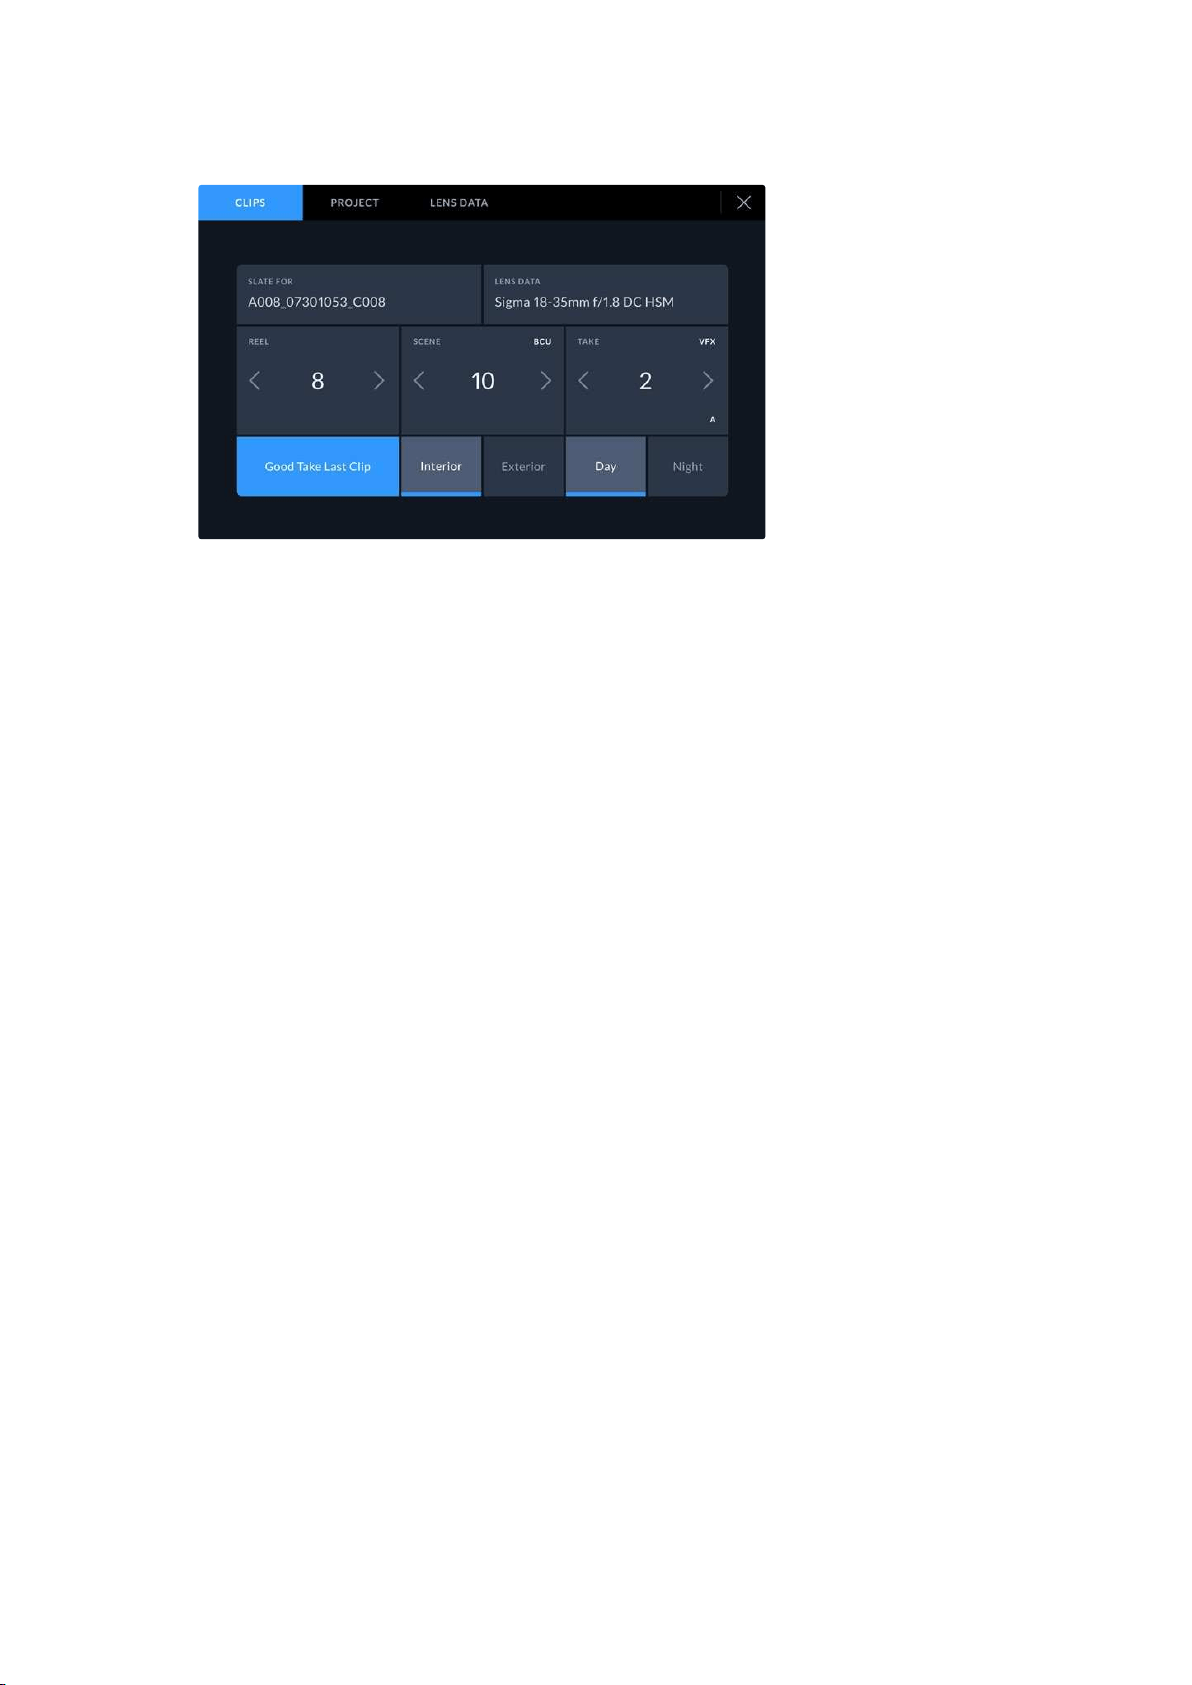
When the video assist is in playback mode, ‘slate for’ displays the clip
the slate applies to and shows the ‘good take’ button. In standby mode,
the slate is for ‘next clip’ and shows the ‘good take last clip’ button.
Slate for
This setting shows the clip which the metadata currently displayed in the ‘clip’ applies to. In
‘playback’ mode it applies to the current clip. In ‘standby’ mode it refers to the next clip
you record.
Lens Data
The lens data field displays the lens type information. To manually add lens data information,
including lens model, focal length and filter, tap on the ‘lens data’ tab at the top. For information
on entering lens data, see the lens data section later in this manual.
Reel
Displays the current reel. Adjust the reel number manually by tapping the arrow right. When you
are moving to a new project and want to start from reel ‘1’ again, tap the arrow on the left until
you reach ‘1’.
Scene
The ‘scene’ indicator shows the current scene number, and can also show the current shot
number and type. The number on this indicator always refers to the current scene. You can
adjust it with the left and right arrows on either side of the scene number, or tap the scene
number to enter the scene number editor.
Scene numbers range from 1 to 999.
By adding a letter to the scene number in the scene number editor, you can also indicate the
current shot. For example 23A indicates scene twenty three, shot one. If you have a shot letter
added to your scene number, your camera suggests the next scene number and shot letter
whenever you enter the scene number editor. For example, if your current scene number is 7B,
the camera suggests ‘8’ and ‘7C’.
The scene number indicator can also show information about the current shot type in the top
right corner. You can select these in the scene number editor at the right hand side of the
shot keyboard.
37Entering Metadata
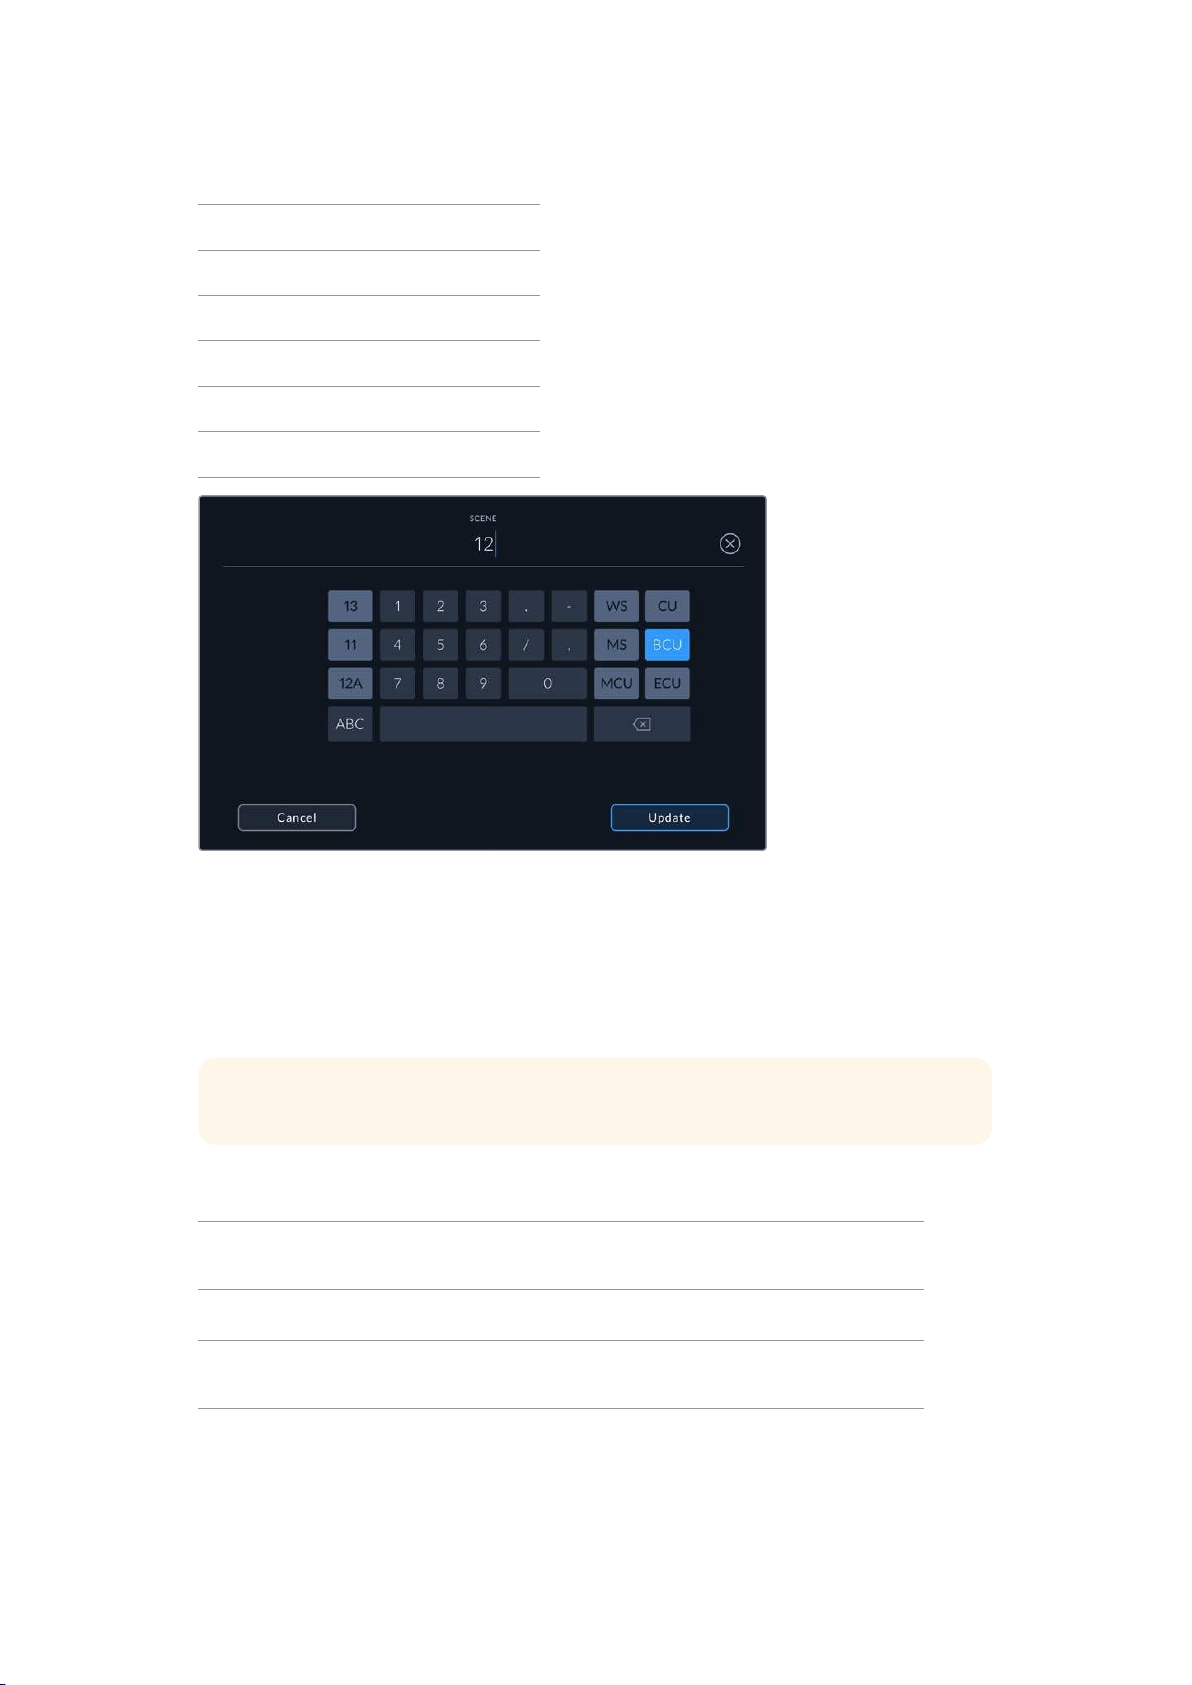
The shot types available are:
WS wide shot
MS medium shot
MCU medium close up
CU close up
BCU big close up
ECU extreme close up
When entering ‘scene’ metadata, the video assist prompts you with scene number
suggestions to the left of the touch keyboard, and shot types to the right
Take
The ‘take’ indicator shows the take number for the current shot. You can adjust it by tapping the
left or right arrows on either side of the take number, or tapping the indicator to enter the take
number editor.
TIP When the shot number or scene letter advance the take number reverts to ‘1.’
You can add descriptions in the take number editor. These are on the right of the take number
keyboard and correspond to the following scenarios:
PU
‘Pick up.’ This refers to a reshoot of a previous take to add additional material
after principal photography has wrapped.
VFX ‘Visual effects.’ This refers to a take or shot for visual effect use.
SER
'Series.' This refers to a situation in which multiple takes are shot while the
camera is kept running.
38Entering Metadata
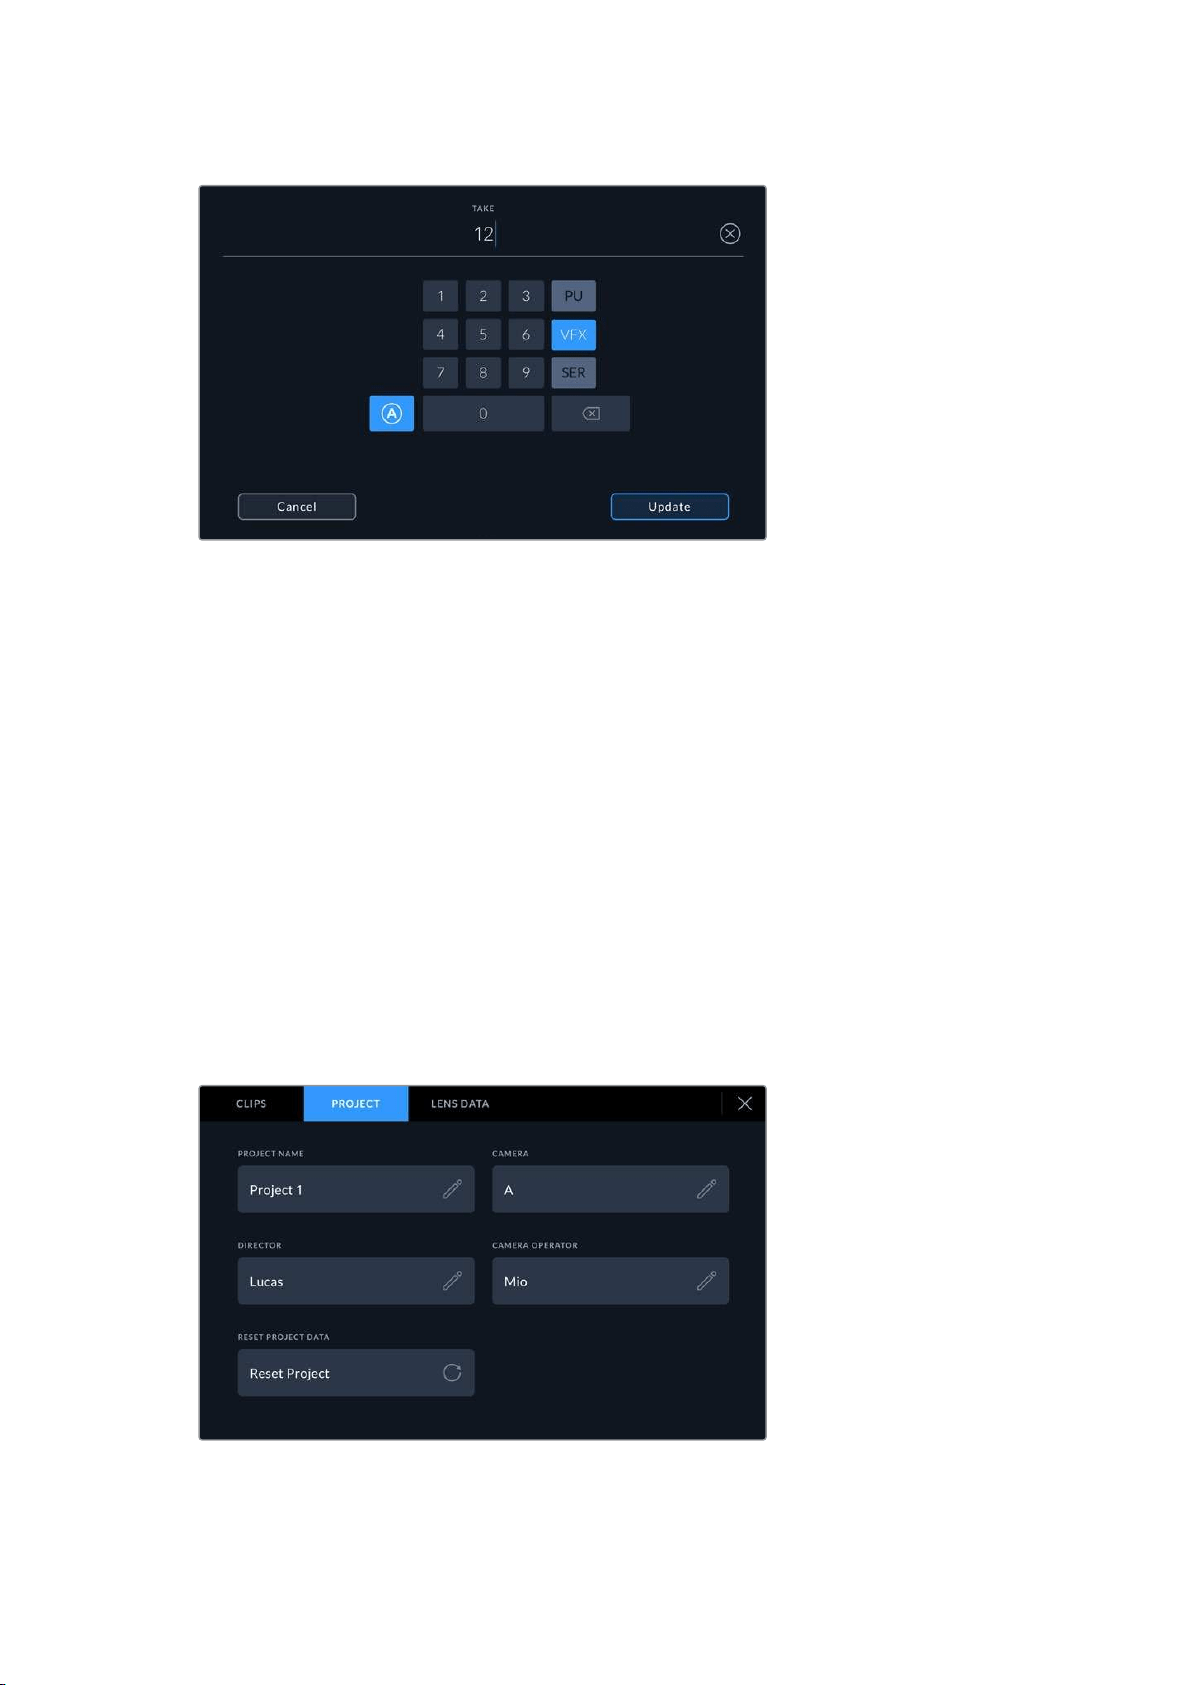
Tap ‘A’ to enable ‘auto take increment’ when in ‘standby’ mode. This will automatically advance the take
number for each clip recorded. A small ‘A’ appears next to the take number on the slate when enabled. When
entering ‘take’ metadata, prompts for additional shot types will appear to the right of the touch keyboard
Good take
Tap the ‘good take’ indicator to tag good takes for easy recall in post production. This button
applies the ‘good take’ tag to the clip currently being viewed in ‘playback’ mode. If the camera
is in ‘standby’ mode and ready to record, the ‘good take last clip’ button applies a ‘good take’
tag to the last clip recorded.
Interior / Exterior
Tap ‘interior’ or ‘exterior’ to add a tag to the next clip in standby mode, or the current clip in
playback mode.
Day / Night
Tap the ‘day’ or ‘night’ icons to add a ‘day’ or ‘night’ tag to the next clip in standby mode, or the
current clip in playback mode.
Project
Project metadata behaves the same way whether you are in ‘standby’ or ‘playback’ mode. This
metadata always refers to your project as a whole and is independent of clip numbers.
Enter project details using your camera’s ‘project’ slate tab
39
Entering Metadata
Project name
Displays your current project name. Tap the pencil icon to change the project name.
Director
Displays the director’s name for the current project. Tap the pencil icon to change the
director name.
Camera
Displays a single letter camera index. Tap the pencil icon to change the camera index.
Camera Operator
Displays the camera operator. Tap the pencil icon to change the camera operator name.
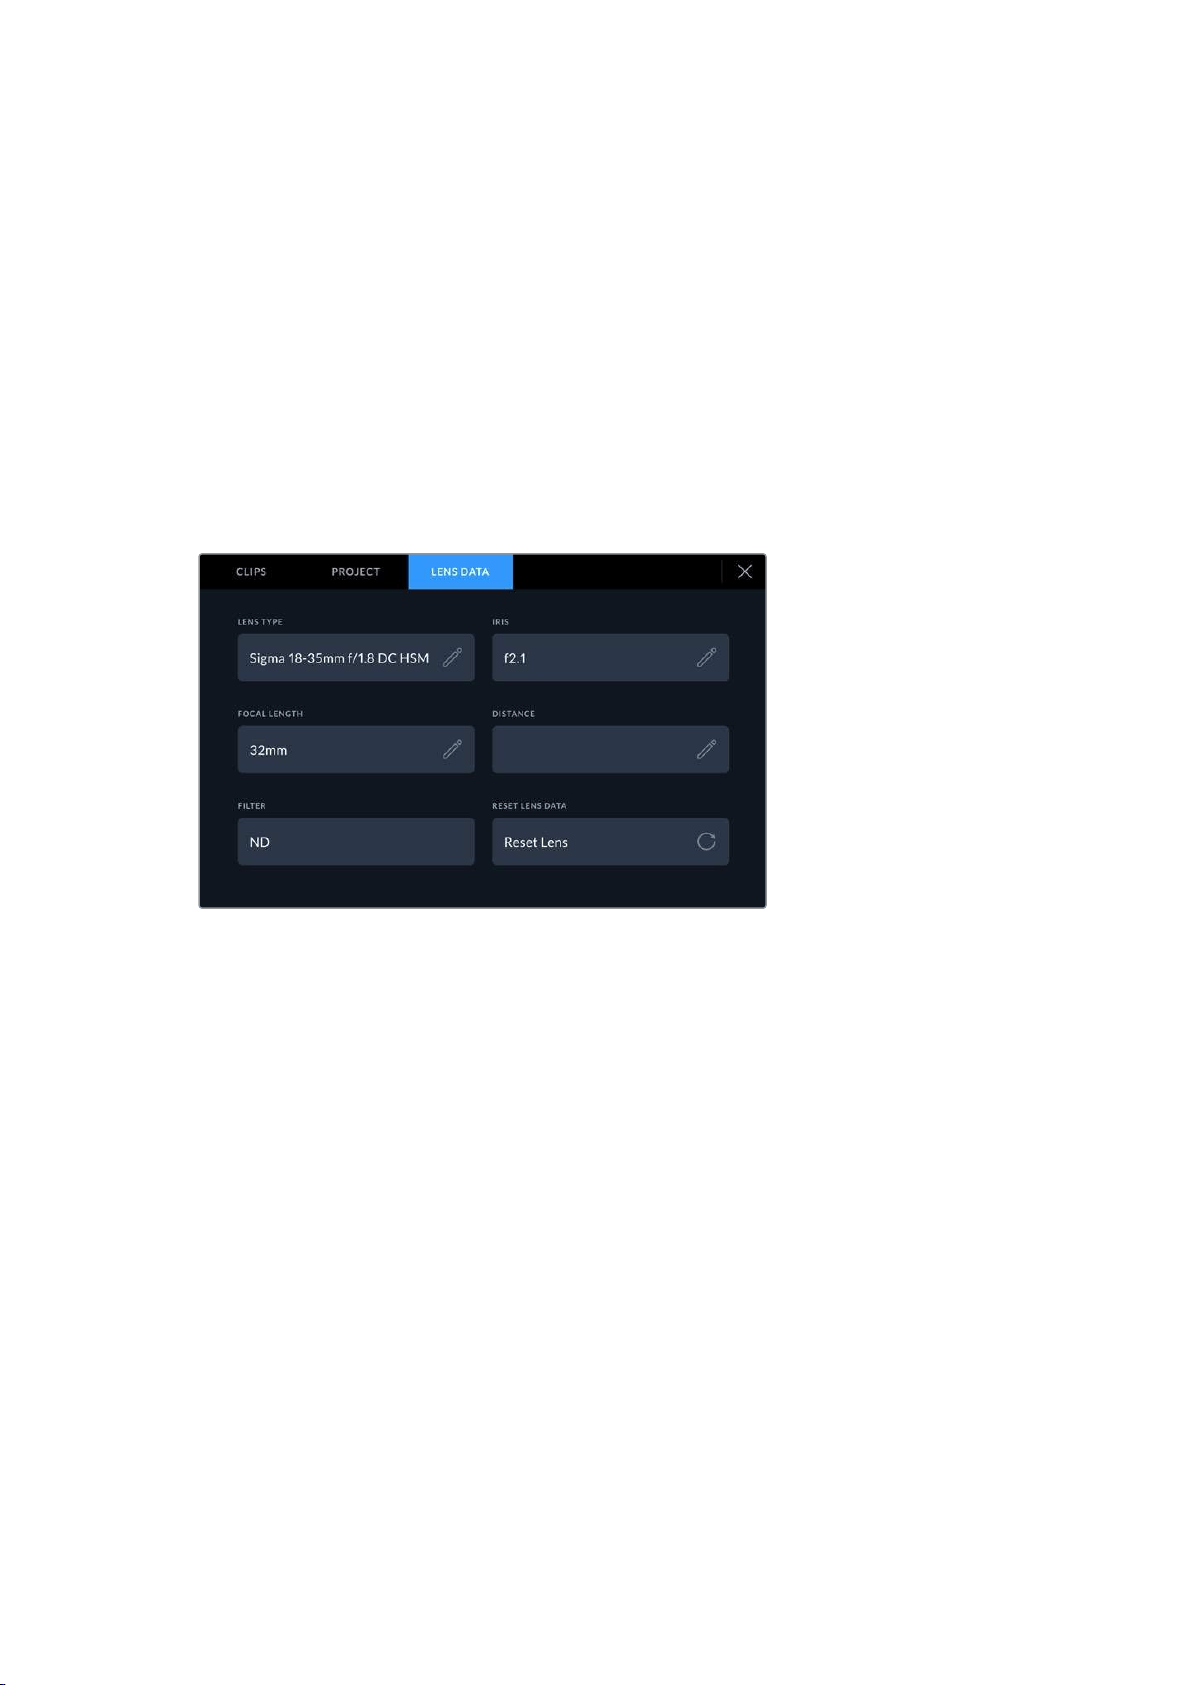
Lens Data
The ‘lens data’ menu contains the following information:
The ‘lens data’ menu showing information that has been manually entered
Lens Type
Shows the lens model. Tap this setting to enter the data manually. The video assist has an
internal database stored for many commonly used lenses, so it will suggest names automatically
as you type. This makes entering data much faster.
Iris
Shows the iris aperture setting at the start of your clip. This information can be displayed in f- or
T-stops depending on the lens used. Tap this setting to enter data.
Focal length
Shows the focal length setting of the lens at the start of the recorded clip and is shown in
millimeters. Tap this setting to enter the focal length manually.
Distance
Shows the focus distance settings of the lens for the recorded clip in millimeters. Tap to enter
this data manually.
Filter
Shows the current lens filters used. Tap this setting to enter data manually. You can make
multiple entries separated by commas.
40Entering Metadata

NOTE You can clear lens data at any time by tapping the ‘reset lens data’ icon in the
‘lens data’ menu. If you have manually entered any information into these fields, you
will need to reset the lens data the next time you mount a lens, otherwise the manually
entered value will remain.
Recording Blackmagic RAW
on Video Assist 12G HDR
With 12G video assist models you can record Blackmagic RAW from Canon C300 II, Panasonic
EVA1 and SIGMA fp directly to your video assist. All you need to do is output a RAW signal via
either your camera’s SDI out connection or HDMI out when using SIGMA fp.
Connecting your camera to Video Assist 12G HDR
1
Connect your camera’s SDI or HDMI out to the SDI or HDMI in on your 12G video assist.
On Canon C300 Mark II, you can use either the ‘rec out’ SDI or ‘mon’ SDI ports. On
Panasonic EVA1, use the ‘SDI out’ port and on SIGMA fp use HDMI out.
2 On the video assist, set the codec to Blackmagic RAW and select the quality option
you want to record. For detailed information on the Blackmagic RAW codec options
available, see ‘Recording to Blackmagic RAW’ later in this manual. Now you can set
your camera to output a RAW signal via the SDI or HDMI output.
It’s worth noting that Panasonic EVA1 requires the use of a 6G-SDI compatible cable. For Canon
C300 Mark II, a 3G-SDI cable is fine.
Canon C300 Mark II
1 Click on the ‘menu’ button on the monitor unit to open the menu on the monitor.
2 Using the joystick or touchscreen menu if available, navigate to the ‘recording/media
setup’ submenu and select the ‘rec out 4K RAW mode’ option.
3 Select the ‘4K RAW’ option, this is the only RAW output over SDI option on the Canon
C300 Mark II.
4 Wait for the display to reboot and return to the menu.
5 Now select your color space by using the joystick or touchscreen to select ‘4K RAW
color space’.
6 Select either ‘BT. 2020 gamut’ or ‘cinema gamut’. It’s worth noting that these are
‘baked in’ to the raw output, so selecting ‘cinema gamut’ will offer more latitude in
post production.
7 Press the ‘menu’ twice to return to the monitor view.
TIP To make sure the RAW output is compatible with Blackmagic RAW, the gamma
must be set to Canon Log 2. For more information on setting your gamut and
gamma settings, refer to the Canon C300 Mark II instruction manual available on the
Canon website.
41Recording Blackmagic RAW on Video Assist 12G HDR

Panasonic EVA1
1 Press the ‘menu’ button on the side of the camera to reveal the menu in the viewfinder.
2 Using the touchscreen or menu jog/dial wheel, select ‘system settings’ followed by
‘system mode’.
3 From the ‘SDI RAW’ option, select either S35 5.7K for native resolution, crop 4K
or crop and mix 2K.
4 Press the ‘menu’ button to return to the previous menu.
When an ‘SDI RAW’ option is selected, the option to record internally is disabled. It’s worth
noting that the SDI out option will be disabled when incompatible frame rates are selected,
such as 50i and 59.94i. For more information on frame rates and which SDI RAW option is best
for you, refer to the operating instructions available from the Panasonic website.
SIGMA fp
1 Make sure the camera is in cine mode by selecting the ‘cine’ switch on top of
the camera.
2 Press the ‘menu’ button on the rear to open the menu.
3 Using the front dial, navigate to the ‘system’ sub menu and from the ‘HDMI output’
option, select ‘recorded image output’.
4 In the ‘output format’ sub menu, select ‘RAW’.
With RAW selected you can now choose your resolution and frame rate from the options. If you
plan on editing Blackmagic RAW together with files recorded internally, make sure you turn the
color mode setting off. This can be found in the shoot menu under ‘color mode’ or by pressing
the ‘color’ button on the rear. Automatically disabled when using the HDMI output for external
recorders, turning this off will prevent any color effects such as saturation or tonal changes
being embedded in your SIGMA fp files or displaying on the camera’s LCD. Now both files will
look similar when bought into DaVinci Resolve. For more information on available frame rates,
resolutions and color mode, refer to the manual available from the SIGMA website.
TIP If you cannot see a video signal on your video assist when a Blackmagic RAW
codec is selected, switch the codec on the video assist to ProRes. If the video signal
now appears, it means your camera is not outputting a RAW signal correctly, or the
color gamut is incorrect.
For more information on your camera’s RAW output, including supported frame rates and color
gamuts, refer to your camera’s user manual available via the Canon, Panasonic or SIGMA
support sites.
Blackmagic RAW
Blackmagic Video Assist 12G HDR supports Blackmagic RAW recording from cameras such as
Canon C300 Mark II, Panasonic EVA1 and SIGMA fp. Preserving the quality of sensor data from
the cameras, this format offers superior image quality, wide dynamic range and a broad
selection of compression ratios. Blackmagic RAW features all the user benefits of RAW
recording, but the files are very fast because much of the processing is performed in the
video assist.
42Recording Blackmagic RAW on Video Assist 12G HDR

Blackmagic RAW also includes powerful metadata support so the software reading the files
knows your camera settings. If you like shooting in video gamma because you need to turn
around edits quickly and you don’t have time for color correction, then this metadata feature
means you can select video gamma, shoot in video gamma, and the file will display with video
gamma applied when you open it in software. However underneath, the file is actually film
gamma and the metadata in the file is what’s telling the software to apply the video gamma.
So what all this means is if you want to color grade your images at some point, then you have
allthat film dynamic range preserved in the file. You don’t have your images hard clipped in the
whites or the blacks, so you retain detail and you can color grade to make all your images look
cinematic. However, if you don’t have time for color grading, that’s fine because your images
will have the video gamma applied and look like normal video camera images. You are not
locked in on the shoot and you can change your mind later during post production.
Blackmagic RAW files are extremely fast and the codec is optimized for your computer’s
CPU and GPU. This means it has fast smooth playback and eliminates the need for hardware
decoder boards, which is important for laptop use. Software that reads Blackmagic RAW also
gets the advantage of processing via Apple Metal, Nvidia CUDA and OpenCL.
This means that Blackmagic RAW plays back at normal speed like a video file on most
computers, without needing to cache it first or lower the resolution.
It’s also worth mentioning that lens information is recorded in the metadata on a frame by frame
basis. For example, when using compatible lenses, any zoom or focus changes performed over
the length of a clip will be saved, frame by frame, to the metadata in the Blackmagic RAW file.
Recording to Blackmagic RAW
Blackmagic RAW works in 2 different ways. You have a choice to use either the constant bitrate
codec, or the constant quality codec.
The constant bitrate codec works in a similar way to most codecs. It tries to keep the data rate
at a consistent level and won’t let the data rate go too high. This means even if you are shooting
a complex image that might need a bit more data to store the image, a constant bitrate codec
will just compress the image harder to make sure the images fit within the space allocated.
This can be fine for video codecs, however when shooting Blackmagic RAW you really want to
ensure the quality is predictable. What would happen if the images you were shooting needed
more data, but the codec just compresses harder to make a specified data rate? It’s possible
you could lose quality, but not be sure it’s happening until you return from a shoot.
To solve this problem, Blackmagic RAW also has an alternative codec choice called constant
quality. This codec is technically called a variable bitrate codec, but what it’s really doing is
allowing the size of the file to grow if your images need extra data. There is no upper limit on
the file size if you need to encode an image but maintain quality.
So Blackmagic RAW set to the constant quality setting will just let the file grow as big as it
needs to be to encode your images. It also means the files could be larger or smaller
depending on what you are shooting. I guess if you leave your lens cap on the lens, you won’t
waste space on your media!
It is also worth noting that the quality settings for Blackmagic RAW are not obscure names,
butare more meaningful as they are derived from what’s happening technically. So for example
when you have selected the constant bitrate codec, you will see quality settings of 3:1, 5:1,
8:1and 12:1. These are the ratios of the uncompressed RAW file size vs the file sizes you should
expect when shooting in Blackmagic RAW. 3:1 is better quality as the file is larger, while 12:1 is
the smallest file size with the lowest quality. Many users of Blackmagic RAW find that 12:1 has
been perfectly ok and they have not seen any quality limitations. However it’s best to
experiment and try various settings for yourself.
43Recording Blackmagic RAW on Video Assist 12G HDR

When using Blackmagic RAW in constant quality you will see the settings are Q0 and Q5.
Theseare the compression parameters passed to the codec and they are setting how much
compression is applied in a more technical way. This setting is different because the codec
operates differently between constant bitrate vs constant quality. In this constant quality setting,
you really cannot tell what the file size ratio will become as it varies a lot based on what you
areshooting. So in this case the setting is different and the file will become the size needed
tostore your media.
Constant Bitrate Settings
The names for 3:1, 5:1, 8:1 and 12:1 represent the compression ratio. For example,
12:1compression produces a file size roughly 12 times smaller than uncompressed RAW.
Constant Quality Settings
Q0 and Q5 refer to different levels of quantization. Q5 has a greater level of quantization but
offers a greatly improved data rate. As mentioned above, the constant quality setting can result
in files that grow and shrink quite a lot, depending on what you are shooting. This also means
it’s possible to shoot something and see the file size increase to beyond what your media card
can keep up with. It could result in dropped frames. However the benefit is that you can
instantly see if this happens on a shoot and then investigate your settings vs quality.
Blackmagic RAW Player
The Blackmagic RAW player included in your Blackmagic camera’s software installer is a
streamlined application for reviewing clips. Simply double click on a Blackmagic RAW file to
open it, and you can quickly play and scroll through the file with its full resolution and bit depth.
When decoding frames, the CPU acceleration in the SDK library supports all main architectures,
and also supports GPU acceleration via Apple Metal, Nvidia CUDA and OpenCL. It also works
with the Blackmagic eGPU for extra performance. Blackmagic RAW player is available for Mac,
Windows and Linux.
Sidecar Files
Blackmagic RAW sidecar files let you override metadata in a file without overwriting embedded
metadata in the original file. This metadata includes the Blackmagic RAW settings as well as
information on iris, focus, focal length, while balance, tint, color space, project name, take
number and more. Metadata is encoded frame by frame over the duration of the clip, which is
important for lens data if the lens is adjusted during a shot. You can add or edit metadata in
sidecar files with DaVinci Resolve or even a text editor because it’s a human readable format.
Sidecar files can be used to automatically add new Blackmagic RAW settings to a playback
simply by moving the sidecar file into the same folder as the corresponding Blackmagic RAW
file. If you move the sidecar file out of the folder and reopen the Blackmagic RAW file,
thechanged settings are not applied and you see the file as it was originally shot. Any software
that uses the Blackmagic RAW SDK can access these settings. Changes made are saved in the
sidecar file and can then be seen by Blackmagic RAW Player or any other software capable of
reading Blackmagic RAW files.
When shooting video gamma, the file stays in film gamma, and the metadata tells the
Blackmagic RAW processing to display using video gamma. Video gamma is great when you
don’t want to grade the image and want to deliver content quickly, however if you want to pull
up the black parts of the image, or pull down the white areas, all the detail is retained. You
never clip the video and all the detail is still there if you want to access it at any time.
44Recording Blackmagic RAW on Video Assist 12G HDR
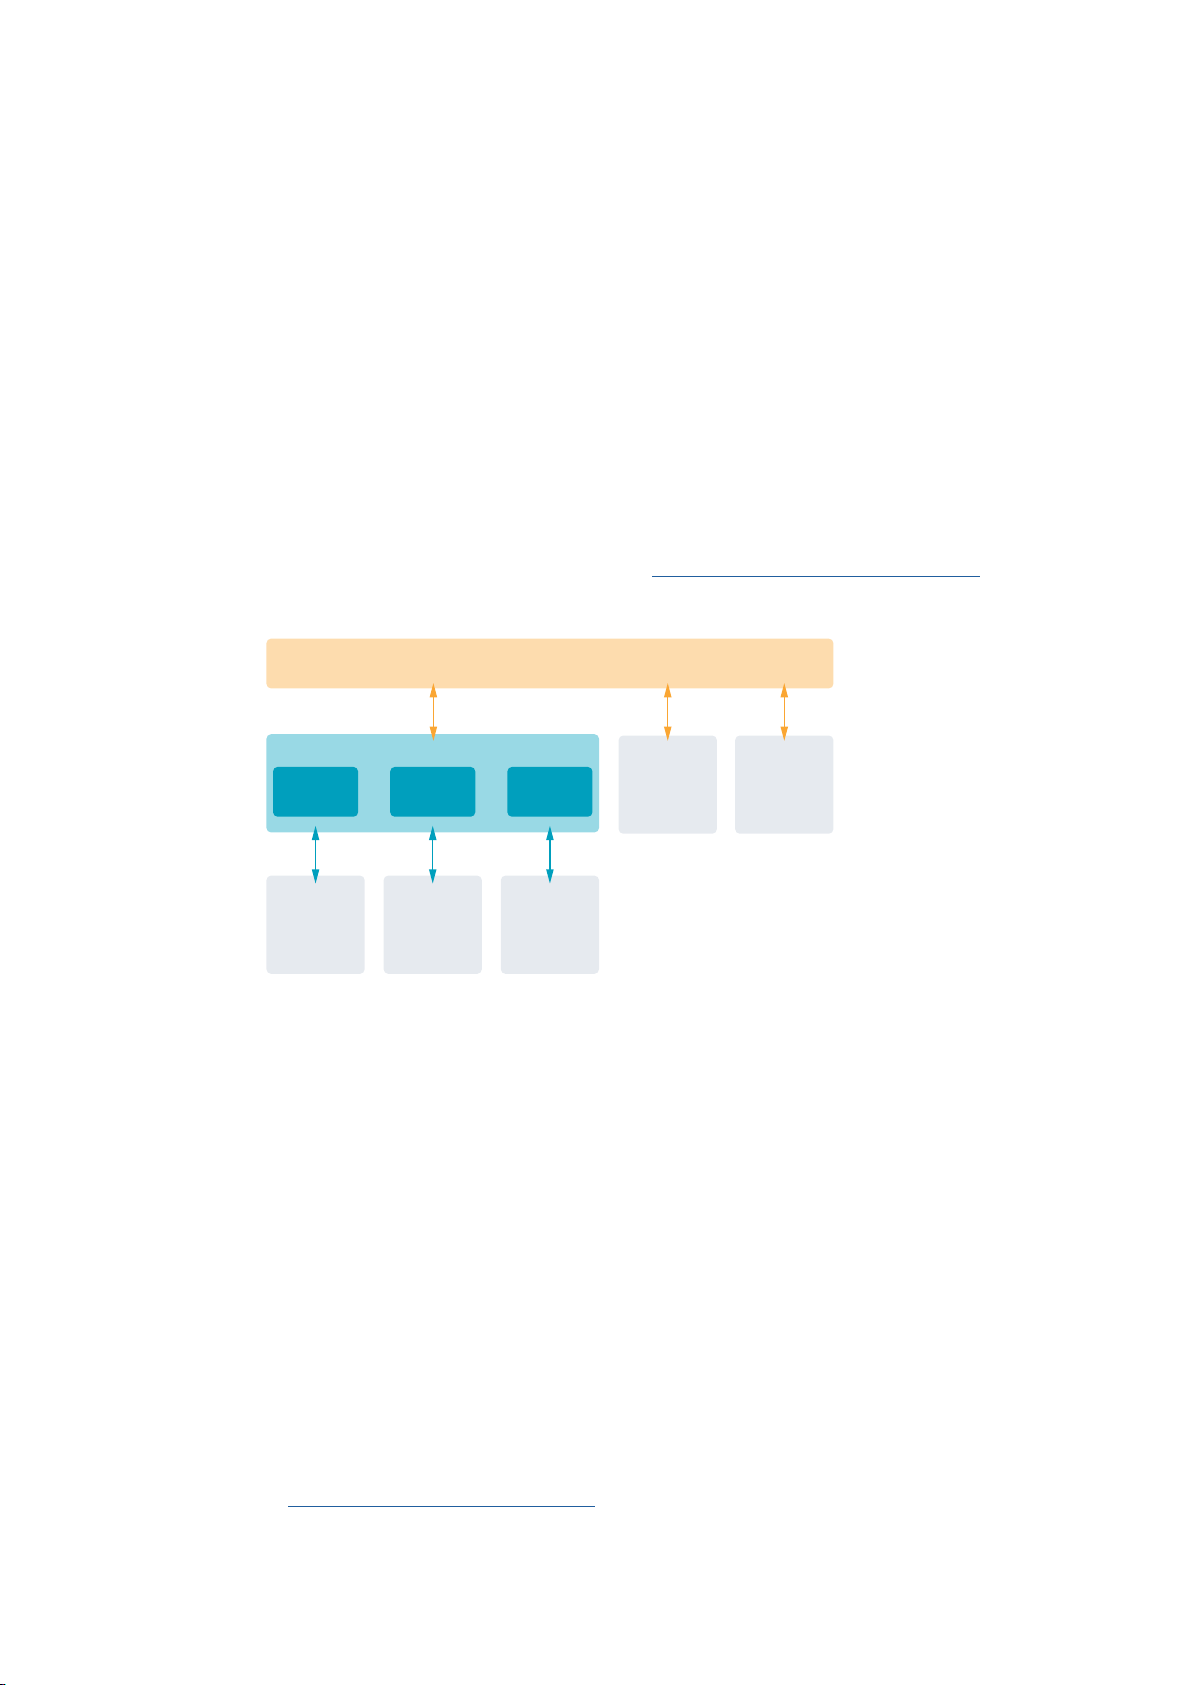
Blackmagic RAW in DaVinci Resolve
Settings can be adjusted for each Blackmagic RAW file, and then saved as a new sidecar file
from the ‘Camera RAW’ tab in DaVinci Resolve for creative effect or optimized viewing. This also
means you can copy your media for another DaVinci Resolve artist and they will have access to
your modified gamma settings automatically on import.
For more information on how to use Blackmagic RAW in DaVinci Resolve, see the
‘Using DaVinci Resolve’ chapter in this manual.
Blackmagic RAW Software Development Kit
The Blackmagic RAW Software Development Kit is an API developed by Blackmagic Design.
You can use the Blackmagic RAW SDK to write your own applications to use the Blackmagic
RAW format. This SDK library can be used by any developer to add support for reading, editing,
and saving Blackmagic RAW files. The Blackmagic RAW SDK includes all the generation 4 color
science so you can achieve organic cinematic images across any app that supports it. The
Blackmagic RAW SDK supports Mac, Windows and Linux, and is available as a free download
from the developer page of the Blackmagic website at
www.blackmagicdesign.com/developer
The following diagram illustrates the components of the Blackmagic RAW API:
Blackmagic RAW API
METAL
SSE
CUDA
AVX
Decoder
OPENCL
AVX2
.Braw
Reader
.Sidecar
Reader
Storage Media
Choosing a Fast SD Card
Generally, we recommend using UHS-II cards for recording UltraHD, and UHS-I for
recording HD.
For Ultra HD recording on Blackmagic Video Assist 12G HDR, you will need to use the fastest
UHS-II cards available.
Most UHS-I and UHS-II SD cards should be fast enough to record compressed HD video up to
60 frames per second, however it’s worth testing your card’s record speed to be sure. You can
do this using Blackmagic Disk Speed Test software which can be downloaded from the
Blackmagic Design support center. For information on using Disk Speed Test, refer to the
‘checking disk speed’ section of the manual.
We have included a table below that shows the latest compatible SD cards for recording
Ultra HD, HD and SD video. It’s worth regularly checking the latest version of this manual for
more up to date information and can always be downloaded from the Blackmagic Design
website at
www.blackmagicdesign.com/support
45Storage Media
Which SD cards should I use with Blackmagic Video Assist 12G?
The following SD cards are recommended for Ultra HD using Apple ProRes and Avid DNx
codecs up to 60 frames per second:
Brand Card Name Storage
Wise Wise SD2-128U3 SDXC UHS-II 128GB
Sony Sony Tough SF-G128T 128GB
SanDisk SanDisk Extreme Pro 32GB
The following SD cards are recommended for HD using Apple ProRes and Avid DNx codecs up
to 60 frames per second:
Brand Card Name Storage
SanDisk Extreme Pro UHS-I 95MB/s 64GB
The following SD cards are recommended for HD ProRes HQ up to 60 frames per second:
Brand Card Name Storage
Lexar SDHC UHS-II 1000x 150MB/s 32GB
Lexar SDXC UHS-II 1000x 150MB/s 64GB
Lexar SDXC UHS-II 1000x 150MB/s 128GB
Lexar SDXC UHS-II 1000x 150MB/s 256GB
The following SD cards are recommended for HD using Apple ProRes and Avid DNx codecs up
to 30 frames per second:
Brand Card Name Storage
Lexar SDHC UHS-I 633x 95MB/s 32GB
Lexar SDXC UHS-I 633x 95MB/s 64GB
Choosing a USB-C Flash Disk
Blackmagic Video Assist 12G HDR features a high speed USB-C expansion port, which allows
you to record video directly to USB-C flash disks or SSD’s via Blackmagic MultiDock 10G and
also to perform software updates. USB-C flash disks are fast, high capacity drives allow you to
record video for long periods, which can be important when filming events or interviews.
Once you have finished recording you can connect the same drive directly to your computer
forediting and post production, without having to copy media across.
To connect to a USB-C flash disk:
1 Connect one end of a USB type-C cable to your USB-C flash disk.
2 Connect the other end of the cable to the USB-C port on the base of your
12G video assist.
46Storage Media
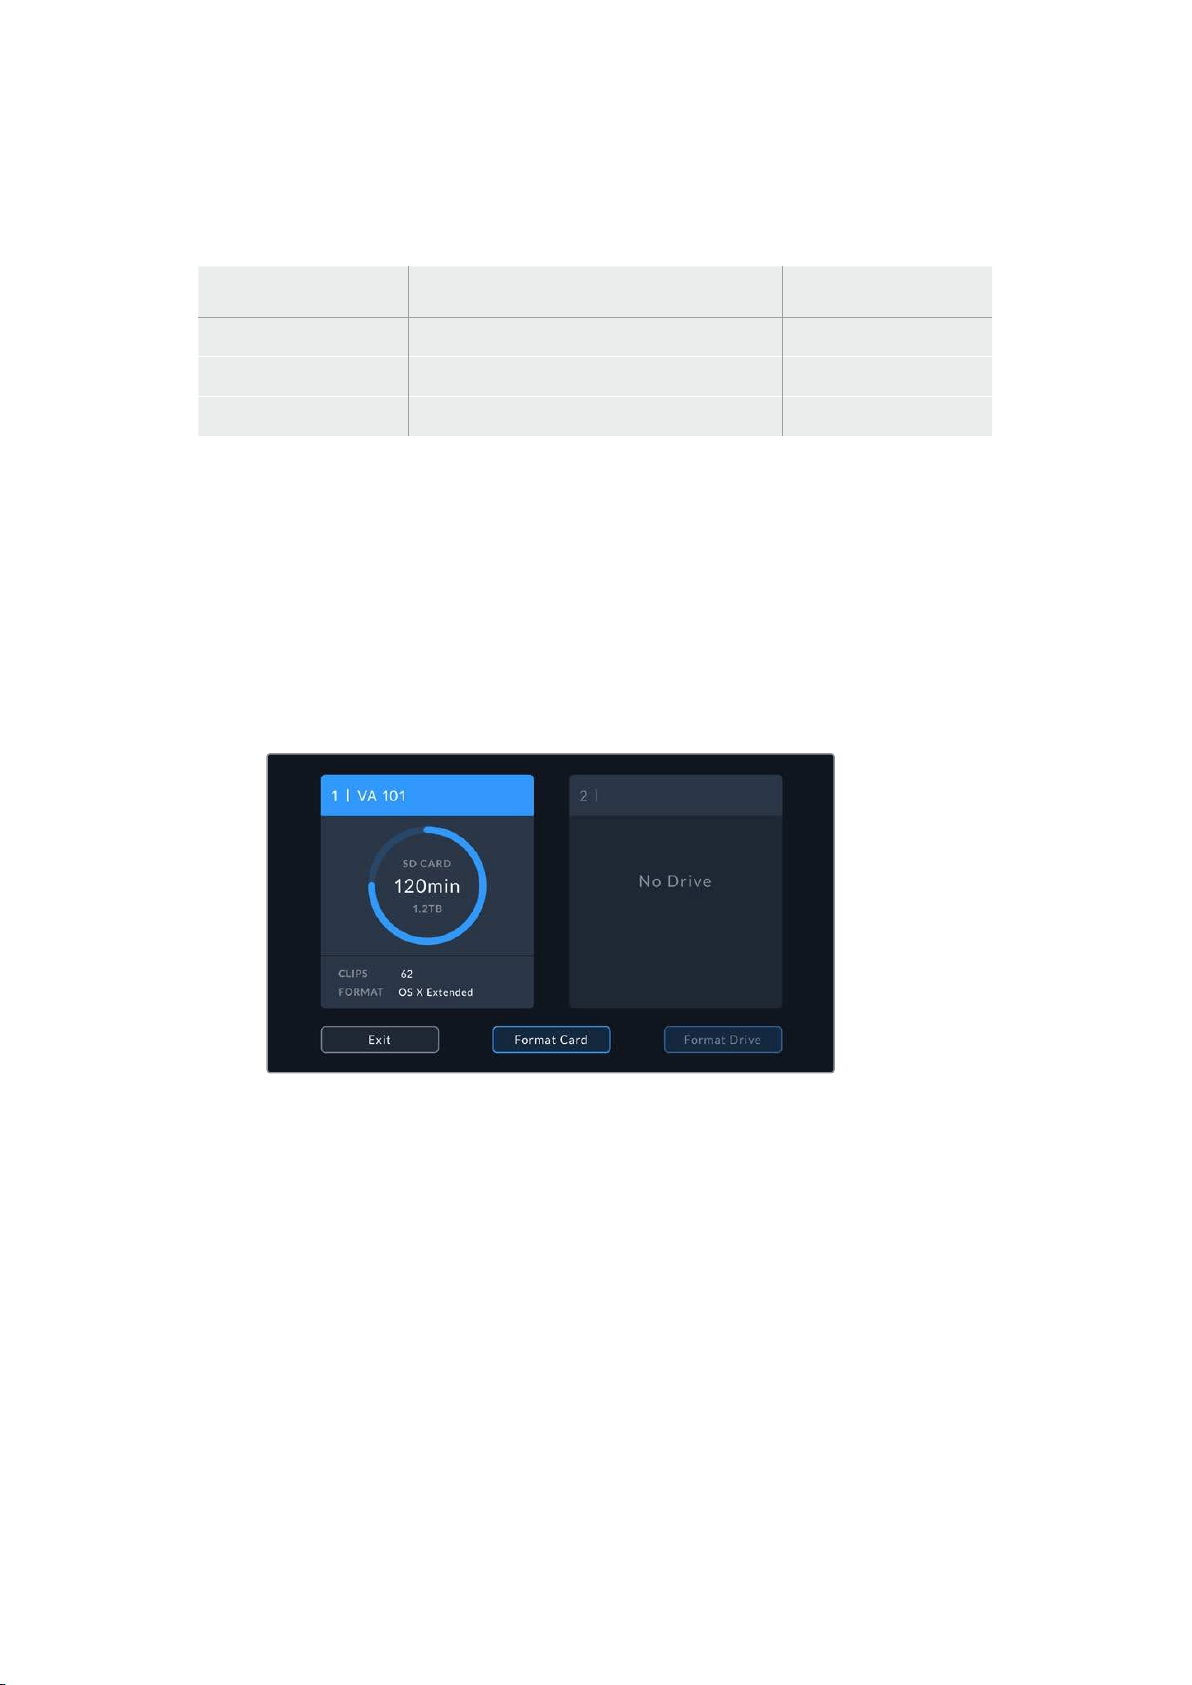
Which disk should I use with Blackmagic Video Assist 12G?
The following USB-C drives are recommended for Ultra HD using Apple ProRes and Avid DNx
codecs up to 60 frames per second:
Brand Card Name Storage
Wise Wise PTS-256 Portable 4K SSD 256GB
Wise Wise PTS-512 Portable 4K SSD 512GB
Wise Wise PTS-1024 Portable 4K SSD 1TB
Formatting Storage Media using your Video Assist
It’s very easy to format your storage media using the storage settings. You can format your
card or drive using HFS+ or exFAT formats.
HFS+ is also known as Mac OS Extended. It is the recommended format as it supports
“journaling”. Data on journaled media is more recoverable and less likely to be corrupted.
HFS+ is natively supported by Mac.
ExFAT is supported natively by Mac and Windows computers without needing to purchase any
additional software. However, exFAT does not support journaling which means data is less
protected against the rare event your media card is corrupted.
Your video assist can format your media in HFS+ or exFAT.
Tap on the storage media icon to access settings.
To format your storage media:
1 Tap the storage status icons to open the storage settings.
2 Select the card or drive you want to format. This could be an SD card or external USB-C
flash disk. To format a drive on 12G video assist models, tap ‘drive list’ and then select
the drive you want to format to highlight it. Tap ‘format drive’.
47Storage Media
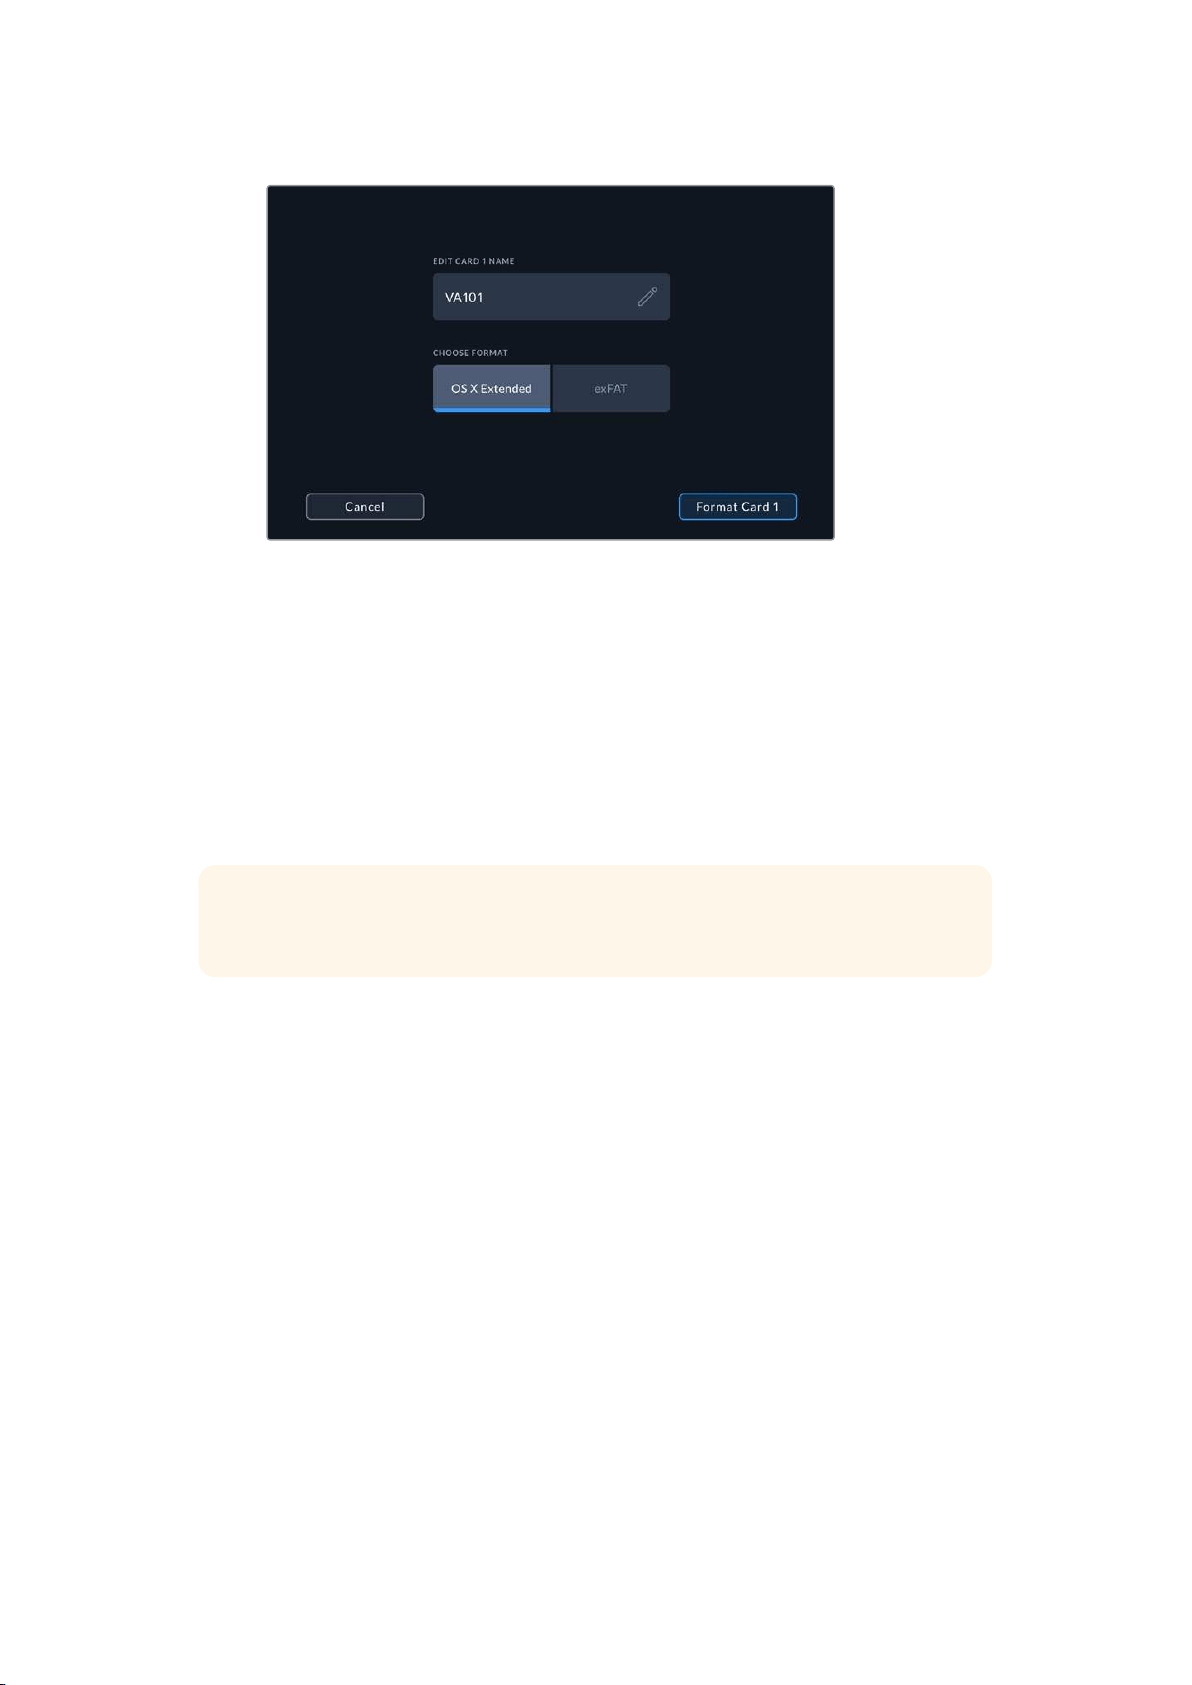
When formatting you can also add the name for your card or drive using the edit box
3 Select your desired HFS+ or exFAT format type, then tap the ‘format card’ icon again.
4 A warning will appear asking you to confirm the format. If your storage media contains
data already recorded, make sure you back it up before formatting as this action
cannot be undone. Hold down the ‘format’ icon for three seconds until the tick appears
continue, or ‘cancel’ to cancel the format.
5 A progress bar shows you the progress of the format. ‘Formatting complete’ will appear
when the formatting has finished.
6 Tap the ‘ok’ icon to return to the storage settings.
TIP You can also format storage while recording on another storage slot, for example,
on the 7” video assist models you can format card 2 while recording to card 1.
Formatting Media using a Computer
SD cards and USB-C flash disks can also be formatted using a Mac or Windows computer.
Preparing SD Cards on a Mac computer
Use the ‘disk utility’ application included with Mac to format your media in the HFS+ or exFAT
formats. If your storage media already has files recorded on them, remember to back up your
media as all data will be lost when it is formatted.
1 Plug the SD card into your computer’s SD card slot or via an SD card reader. For
external drives, connect the drive to your computer via a USB-C cable.
2 Go to ‘applications/utilities’ and launch ‘disk utility’.
3 Click on the disk icon of your SD card or drive and then click the ‘erase’ tab.
4 Set the format to ‘Mac OS Extended ( journaled)’ or “exFAT”.
5 Type a ‘name’ for the new volume and then click ‘erase’. Your SD card or drive will
quickly be formatted and made ready for use.
48Storage Media
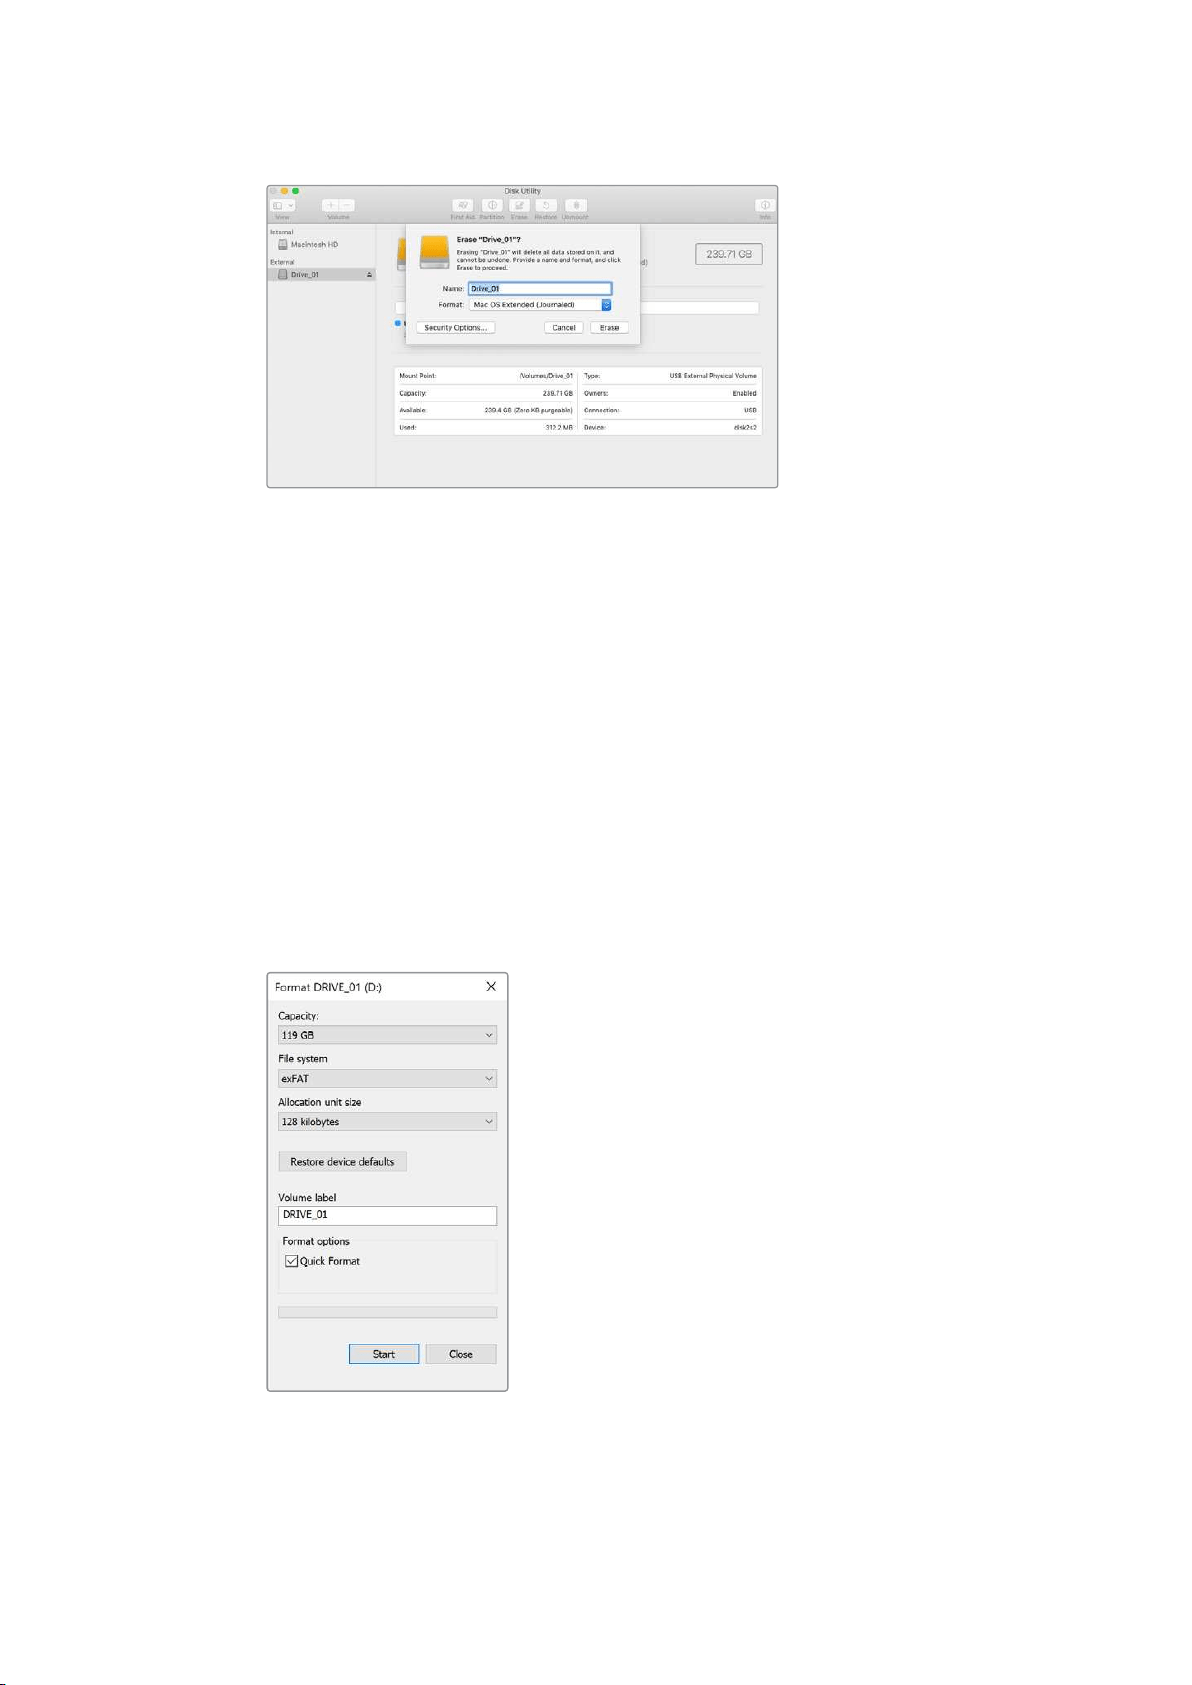
Use ‘disk utility’ on Mac to erase your USB-C flash disk in the
Mac OS Extended (journaled) or exFAT format.
Preparing Storage Media on a Windows computer
The ‘format’ dialog box can format an SD card in the exFAT format on a Windows PC.
Remember to back up anything important from your media as all data will be lost when
it is formatted.
1 Plug an SD card into your computer’s SD card slot or via an SD card reader. For external
drives, connect the drive to your computer via a USB-C cable.
2 Open the ‘start menu’ or ‘start screen’ and choose ‘computer’. Right-click on
your SD card.
3 From the contextual menu, choose ‘format’.
4 Set the file system to ‘exFAT’ and the allocation unit size to 128 kilobytes.
5 Type a volume label, select ‘quick format’ and click ‘start’.
6 Your SD card or external disk will quickly be formatted and made ready for use.
Use the ‘format’ dialog box feature in Windows
to format your storage media in the exFAT format
49
Storage Media
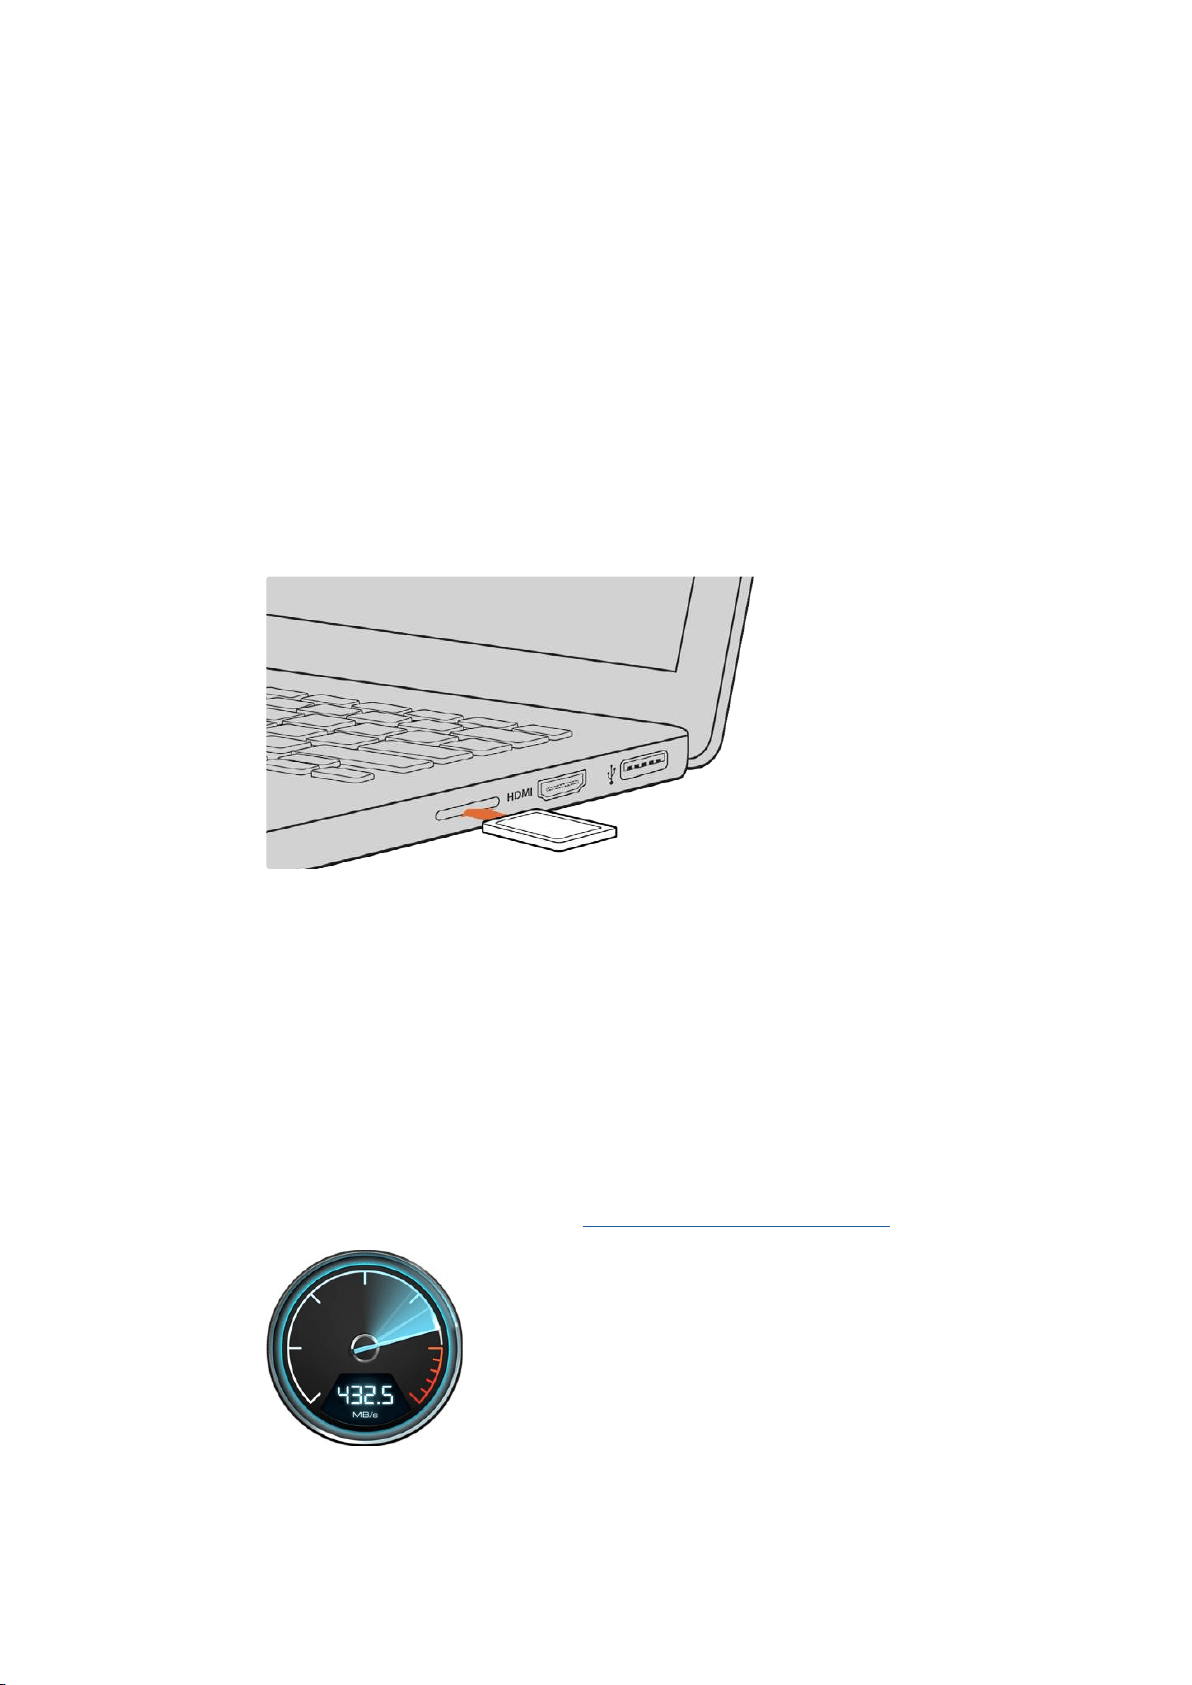
Working with Files from SD Cards
You can access your ProRes or DNx files straight from your SD cards with any Mac or Windows
computer that features an SD card slot or by using an SD card reader.
1 Remove the SD card from your video assist and insert it into the SDcard slot of your
computer, or SD card reader. The SD card can be accessed the same way as you
would an external hard drive, USB drive or any other media storage device attached to
your computer.
2 Double click on the SD card to open it and you should see a list of QuickTime or
MXFmovie files.
3 Now you can simply drag the files you want from the card onto your desktop or another
hard drive, or you can access the files straight from the card using your NLE software.
4 Before you physically remove the SD card from the SD card slot, it’s always a good idea
to eject the card safely using either Mac or Windows first.
Insert your SD card into any computer with an SDcard slot to access your clips immediately.
Checking Disk Speed
Blackmagic Disk Speed Test is a fun application that measures the read and write performance
of storage media, then displays the results using video formats.
If you have ever wondered whether your storage media is suitable for recording (“write”) or
playback (“read”) of a particular video format, you can use Disk Speed Test to find out. Test the
performance of your media drives with a single click of the ‘start’ button! Disk Speed Test will
even show you how many streams of video your storage is capable of handling.
Blackmagic Disk Speed Test software is available to download from the App Store. Windows
and Mac installers are also included in Blackmagic Desktop Video, which you can download
from the Blackmagic Design support center at
www.blackmagicdesign.com/support.
Use Blackmagic Disk Speed Test to find
out the performance of your SD card.
50
Storage Media
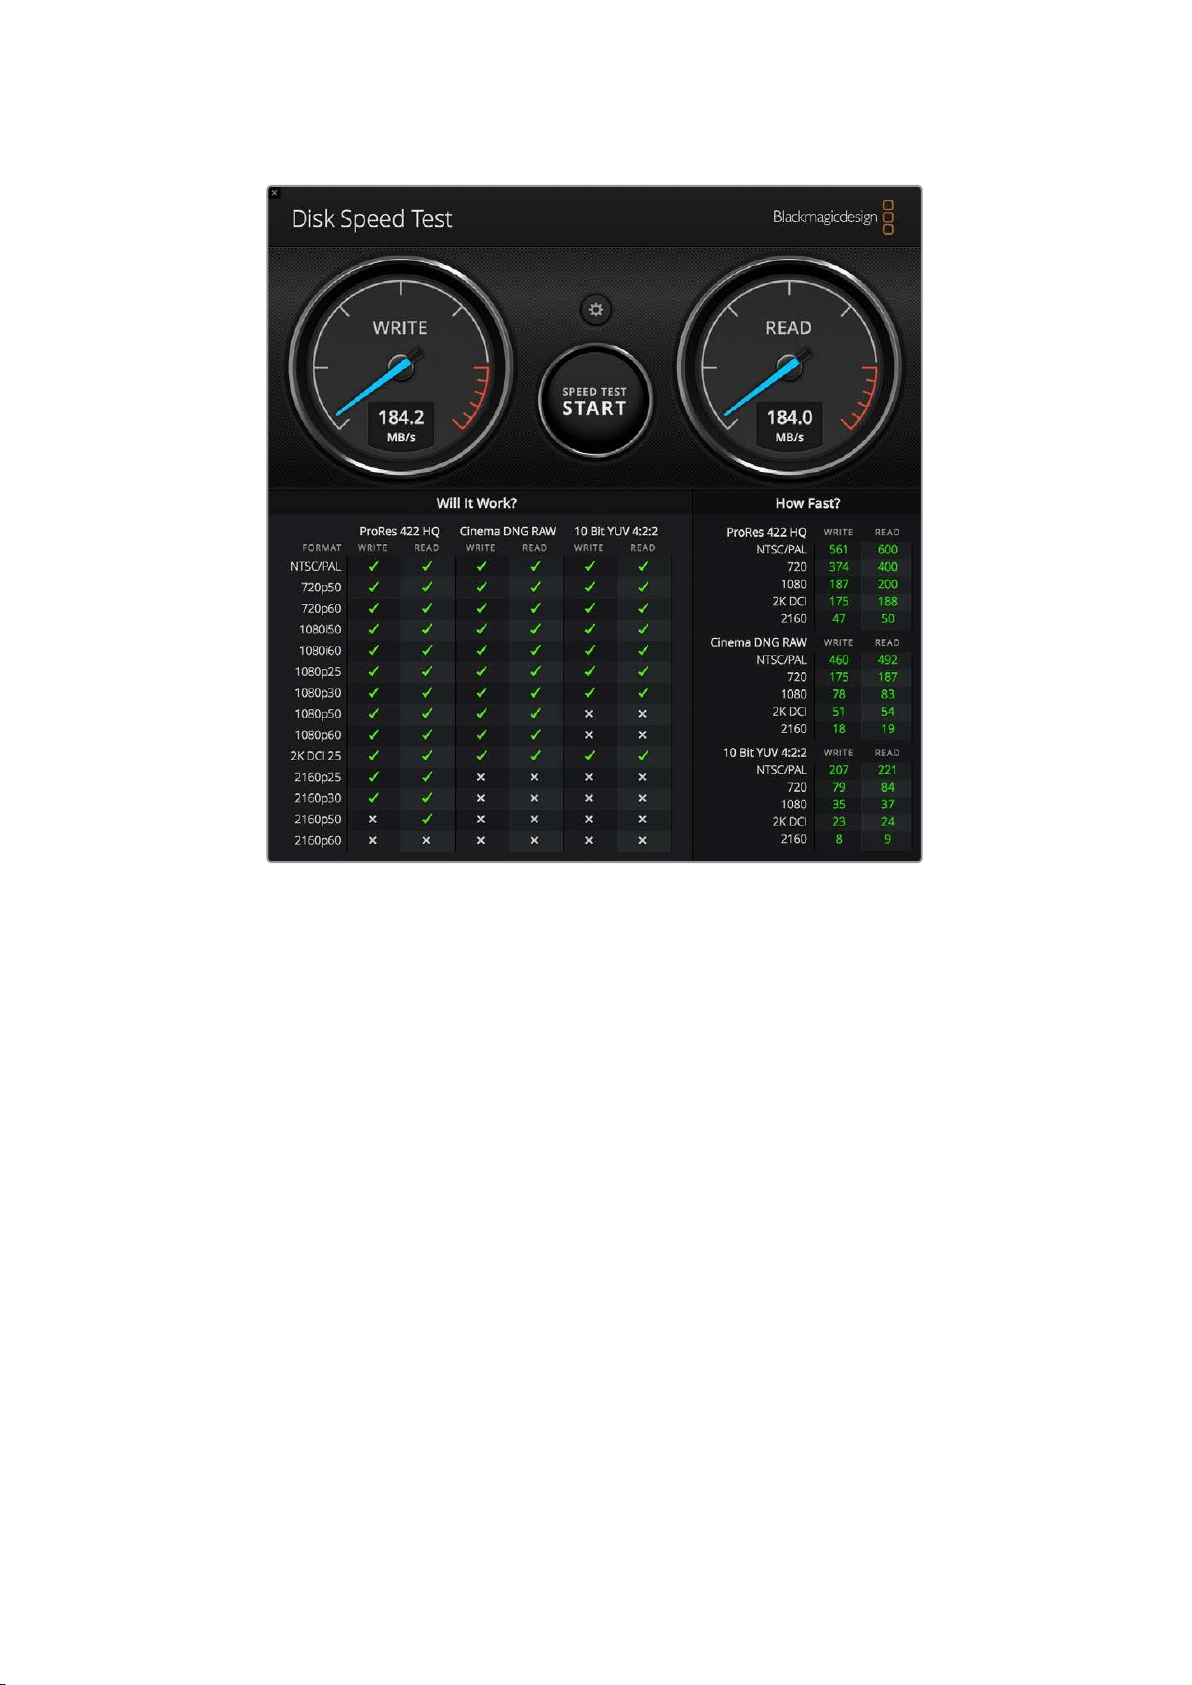
Blackmagic Disk Speed Test interface
Blackmagic Video Assist Setup
Updating the Internal Software
Updates for your video assist’s internal software will be available on the Blackmagic Design
website. We recommend downloading the software and updating your video assist so you can
benefit from new features and improvements.
To update the internal software using Mac:
1 Download and unzip Blackmagic Video Assist Setup.
2 Open the resulting disk image and launch the Blackmagic Video Assist Setup Installer.
Follow the onscreen instructions.
3 After installing the latest Blackmagic Video Assist Setup, connect a USB type C cable
from your Video Assist to your computer.
4 Launch Blackmagic Video Assist Setup and follow any onscreen prompt to update the
internal software. If no prompt appears, the internal software is up to date and there is
nothing further you need to do.
51Storage Media
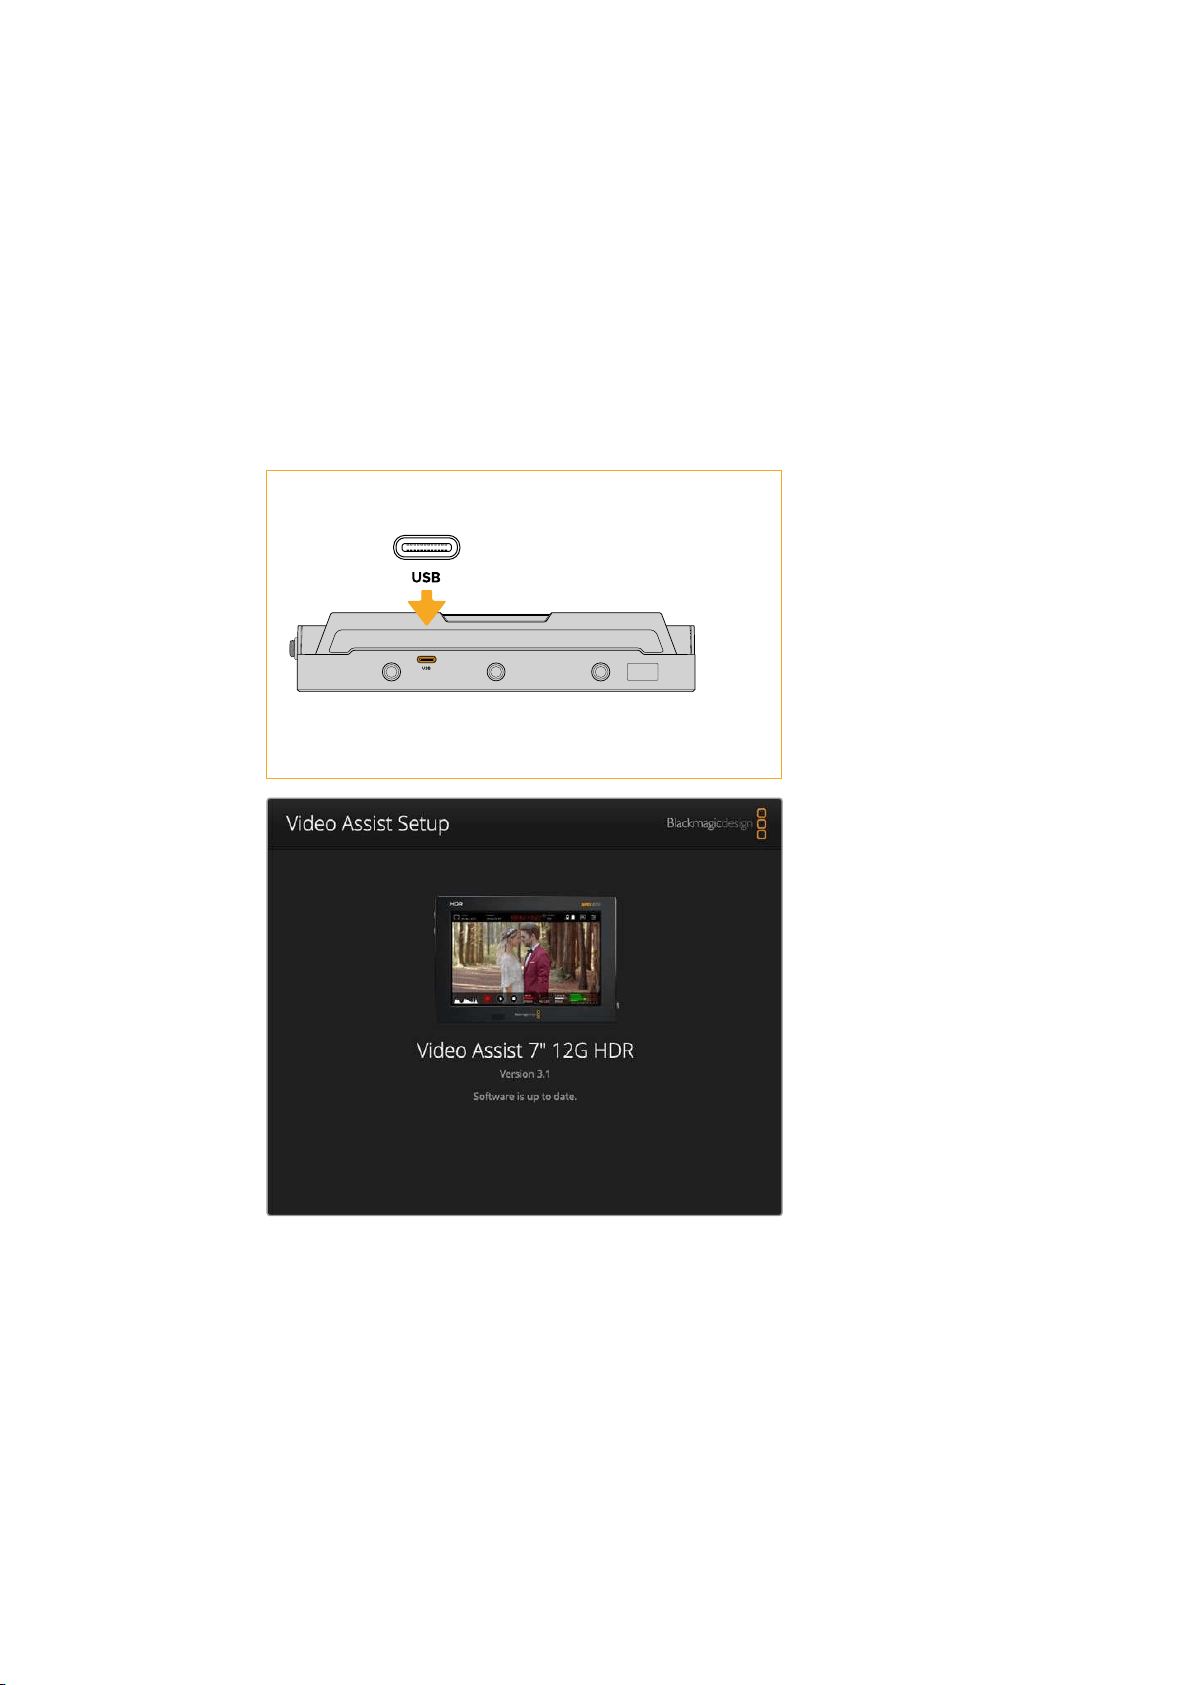
To update the internal software using Windows:
1 Download and unzip Blackmagic Video Assist Setup.
2 You should see a Blackmagic Video Assist Setup folder containing this manual and
the Blackmagic Video Assist Setup installer. Double-click the installer and follow the
onscreen prompts to complete the installation.
3 After installing the latest Blackmagic Video Assist Setup, connect a USB type C cable
from your video assist to your computer.
4 Launch Blackmagic Video Assist Setup and follow any onscreen prompt to update the
internal software. If no prompt appears, the internal software is up to date and there is
nothing further you need to do.
Underside Panel
Blackmagic Video Assist has a USB-C port on the base of the
unit for software updates and for connecting external drives
To update the internal software on your video assist, pluginto your computer via the USB
port, then download and launch thelatest Blackmagic Video Assist Setup. Follow any on
screen prompts. Ifno prompt appears, your internal software is already up to date.
52
Storage Media
Using DaVinci Resolve
Recording clips with your video assist is only part of the process of creating film and television
content, and just as important is the process of media backup and management as well as
editing, color correction and encoding final master files. DaVinci Resolve for Mac and
Windowsis included with your video assist so you have a complete solution for recording
andpost production!
NOTE We recommend using the latest version of DaVinci Resolve for accurate color
treatment of clips recorded with your Blackmagic Video Assist. For example, version 16
or later will ensure accurate color.
After connecting your SD card to your computer, you can use DaVinci Resolve’s ‘clone’ tool, in
the ‘media’ page, to create running backups as you shoot. This is recommended as any type of
media is susceptible to becoming damaged or developing a fault so creating backups means
your shots will be immune to loss. Once you have used DaVinci Resolve to back up your media,
you can then add your clips to the DaVinci media pool, then edit, color correct, and finish your
production without ever having to leave DaVinci Resolve.
DaVinci Resolve is the same tool used on most major blockbuster movies, so it’s much more
than a simple NLE software tool, as it has extremely advanced technology built in for high end
digital film. You get the advantage of this technology when you use DaVinci Resolve to edit and
color correct your work.
Included here is information on how to get started using DaVinci Resolve with your recorded
clips. Of course, DaVinci Resolve is extremely advanced and includes a lot more features than
you immediately see when first looking at its user interface. To learn more about how to use
DaVinci Resolve, please check for the DaVinci Resolve instruction manual on the Blackmagic
website, where you can also find many training courses and tutorial videos.
Project Manager
Before you import your clips and start editing, you will need to set up your project using the
project manager.
The project manager is the first screen you will see when launching DaVinci Resolve, but you
can open the manager at any time by clicking on the ‘home’ icon at the bottom right of the user
interface. This is helpful when you want to open previous projects and create new ones.
53Using DaVinci Resolve
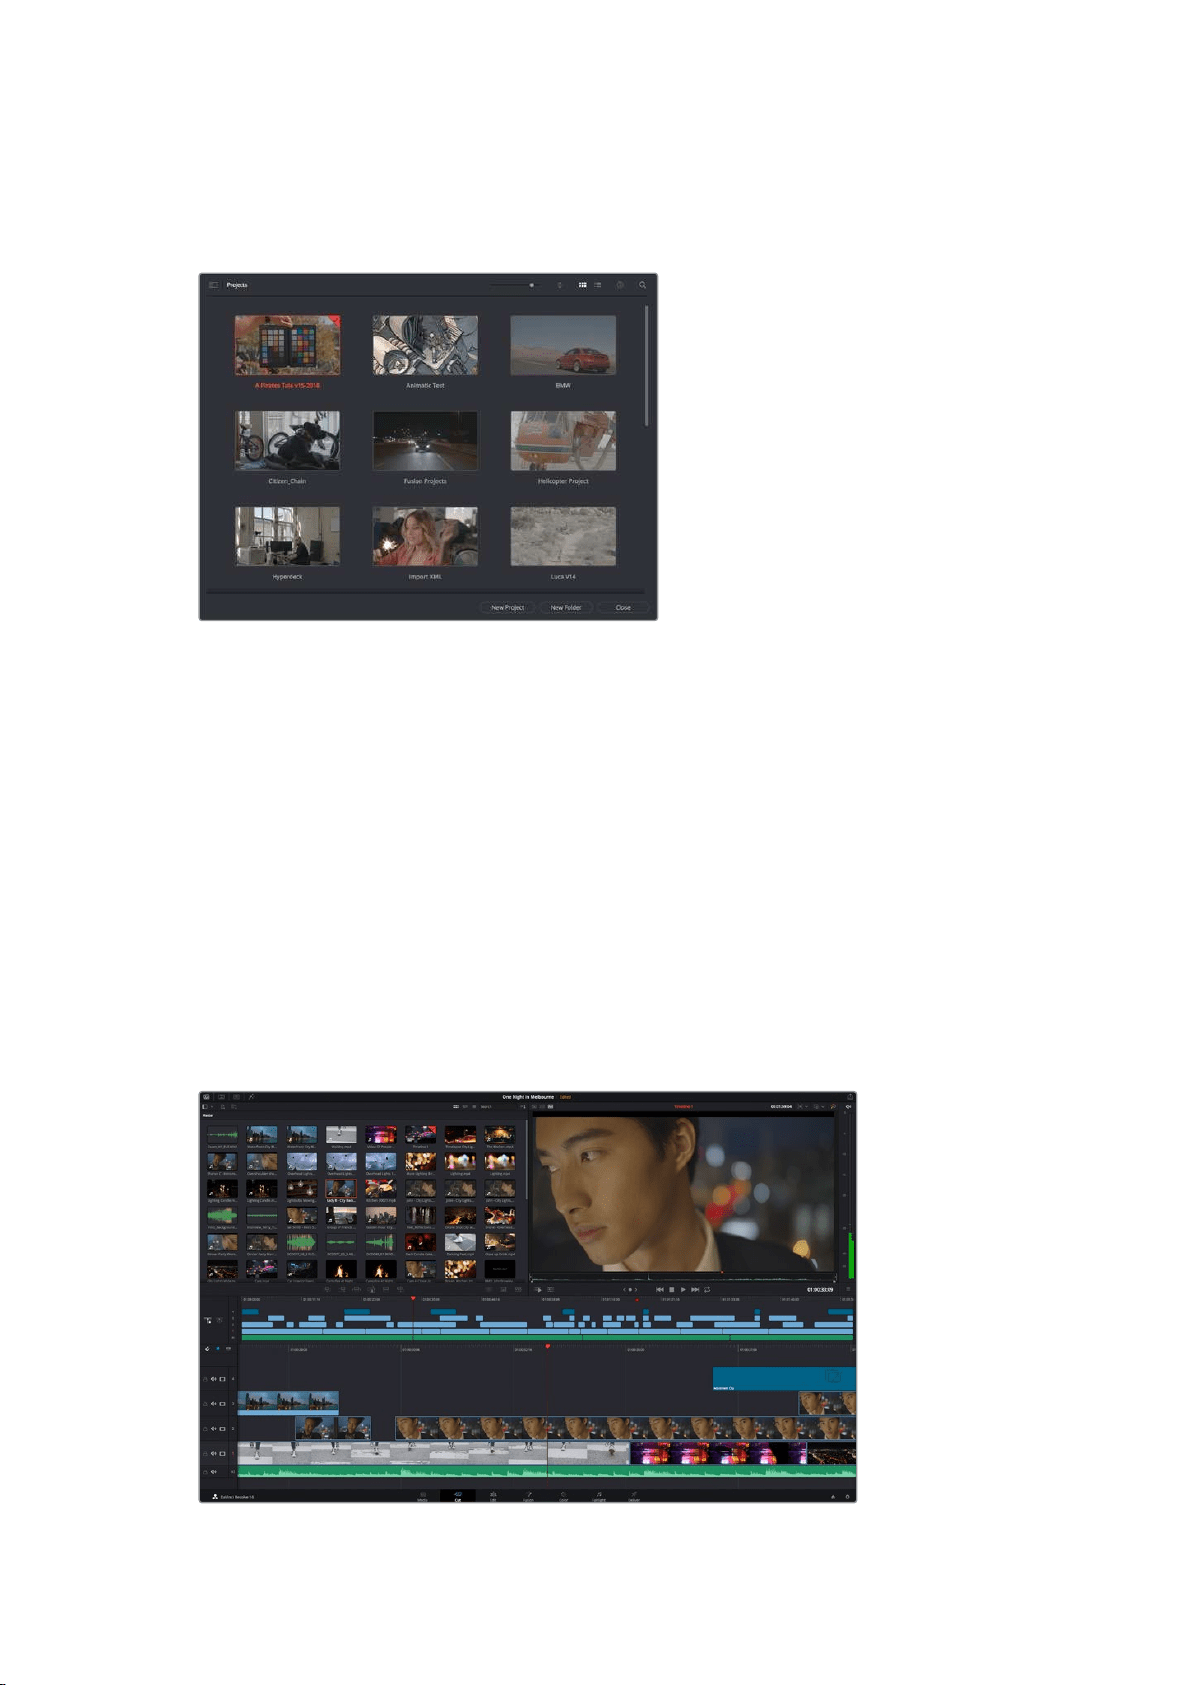
To create a new project, click on ‘new project’ at the bottom of the window and give your
project a name. Click ‘create’.
Using the ‘cut’ page, you can start working on your edit immediately.
The project manager shows all projects belonging to the current user
For more information about the Project Manager, refer to the DaVinci Resolve manual which is
available to download on the Blackmagic Design website support page.
Editing with the Cut Page
The ‘cut’ page gives you a fast, dynamic editing workflow that lets you quickly assemble, trim
and edit clips efficiently.
Two active timelines let you work with your entire edit plus a detailed area simultaneously.
This means you can drop clips anywhere on a large timeline, then refine your edit in a detailed
timeline within the same workspace. Using this workflow, you can edit on a laptop without
needing to zoom in and out and scroll as you work, which can be an enormous time saver.
The Cut Page Layout
When you open the cut page, you will see the media pool, viewer window and timeline.
These three primary windows give you complete control over your edit.
The ‘cut’ page default workspace, with the media pool in icon view
54
Using DaVinci Resolve
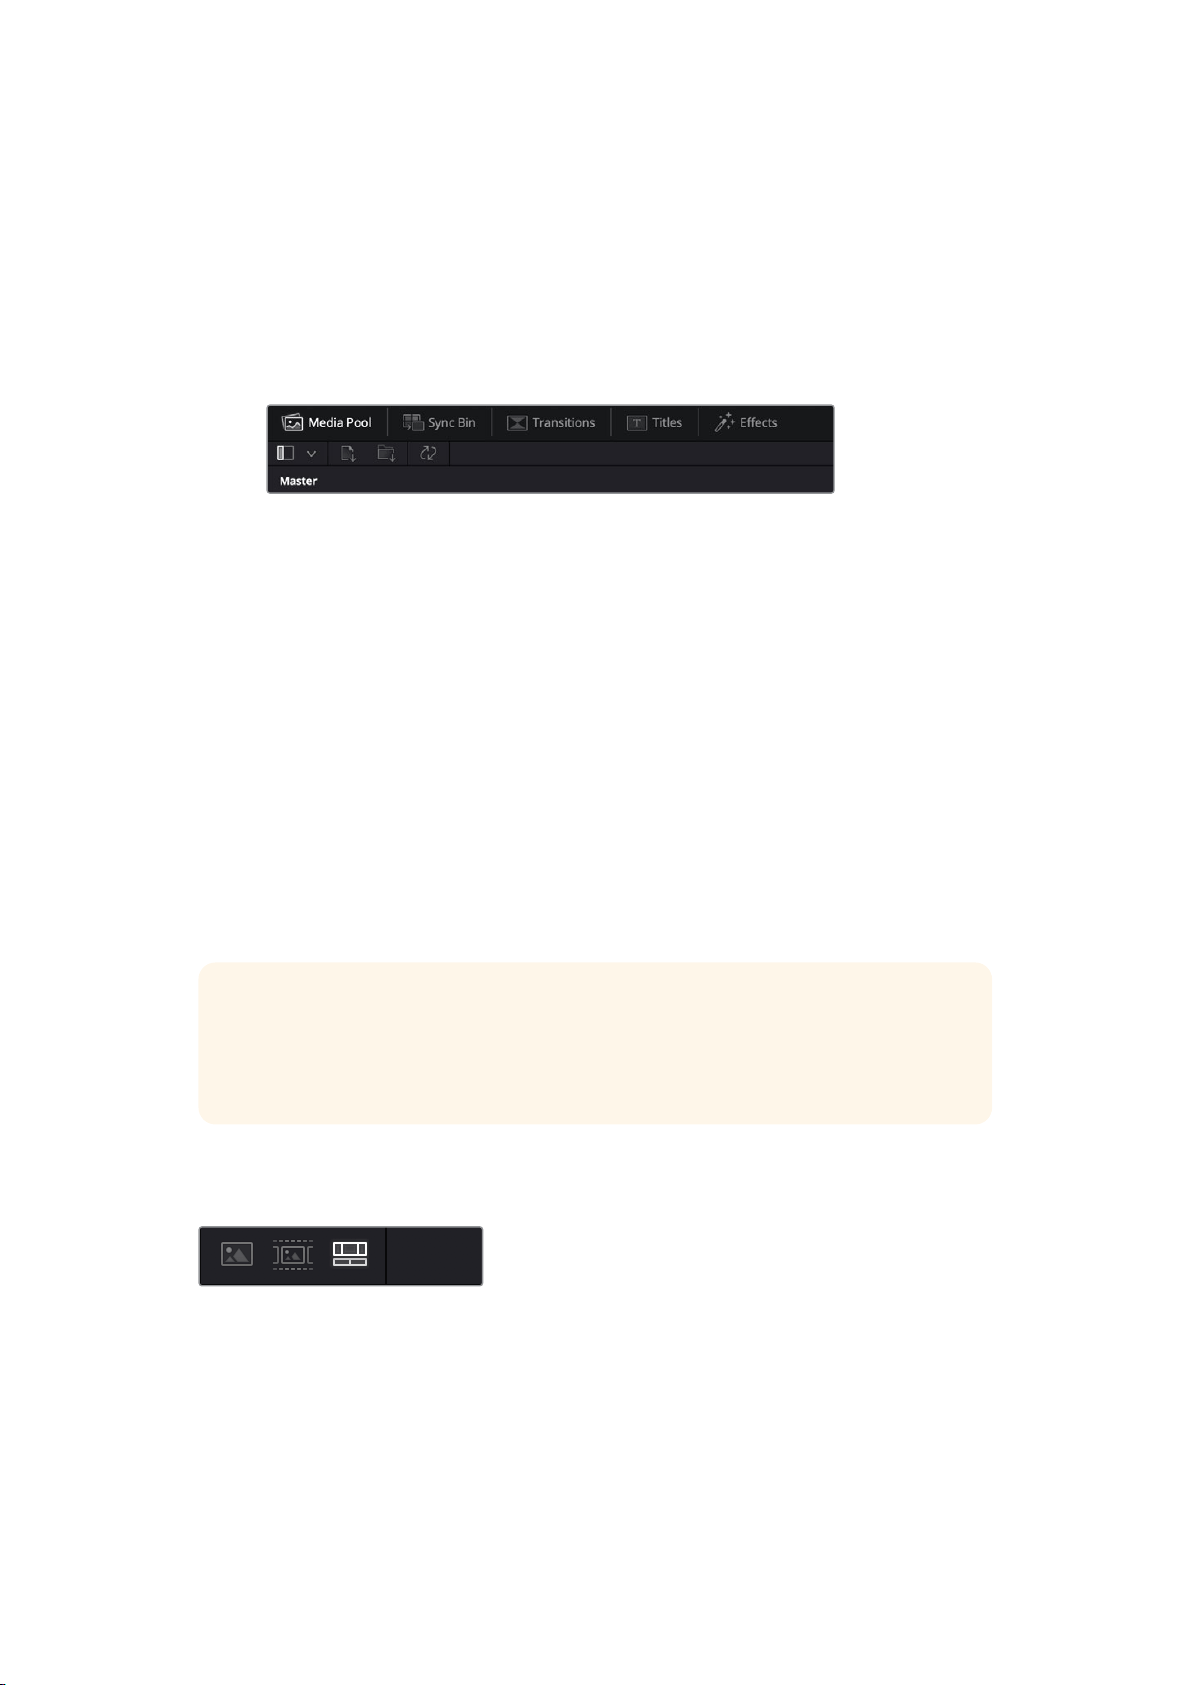
For more information on the Cut page, see the ‘Using the Cut Page’ chapter in the
DaVinci Resolve manual.
Media Tabs
At the top left corner of the user interface you will see five tabs.
Click on these tabs to open the media toolsets you will use when creating your edit.
For example, the first tab is the media pool and you can see it is already selected. The other
tabs are for the sync bin, media transitions, titles and effects.
Media Pool: The media pool contains all your clips, folders and files you imported using
the media page. You can also import files directly from the cut page, so you don’t have
to go back to the media page if you want to import a new clip.
Sync Bin: This powerful feature automatically syncs all your clips via timecode, date
and time so you can choose angles from all cameras on a multi camera project.
Transitions: If you click on the neighboring transitions tab, you will see all the video and
audio transitions you can use in your edit. These include common transitions such as
cross dissolves and motion wipes.
Titles: Next to transitions is the ‘titles’ tab. Here you can select the title type you
want to use. For example a scroll, standard text or lower thirds title. There are also a
list of Fusion templates you can use for more animated dynamic titles which can be
customized in DaVinci Resolve’s ‘Fusion’ page.
Effects: The fifth tab is the ‘effects’ tab. This provides all the different filters and effects
you can use to bring more life to your edit, for example customizable blurs, glows and
lens effects. There are many powerful effects to choose from and you can find them
quickly using the search tool.
TIP Use the search tool near the media tab icons to find the exact items you are
looking for. For example, if you have the transitions tab selected, type “dissolve” in the
search tool and only dissolve transition types will be shown in the viewer, making it
quicker for you to find the dissolve transition you want.
Viewer Tabs
In the top left corner of the viewer window you will see the viewer mode buttons.
The viewer mode buttons
These buttons control which viewer is currently being used, including ‘source clip’, ‘source tape’,
and ‘timeline’. These viewer modes give you an enormous amount of control when selecting
clips for your edit and it’s worth spending a moment to look at how they work.
55Using DaVinci Resolve
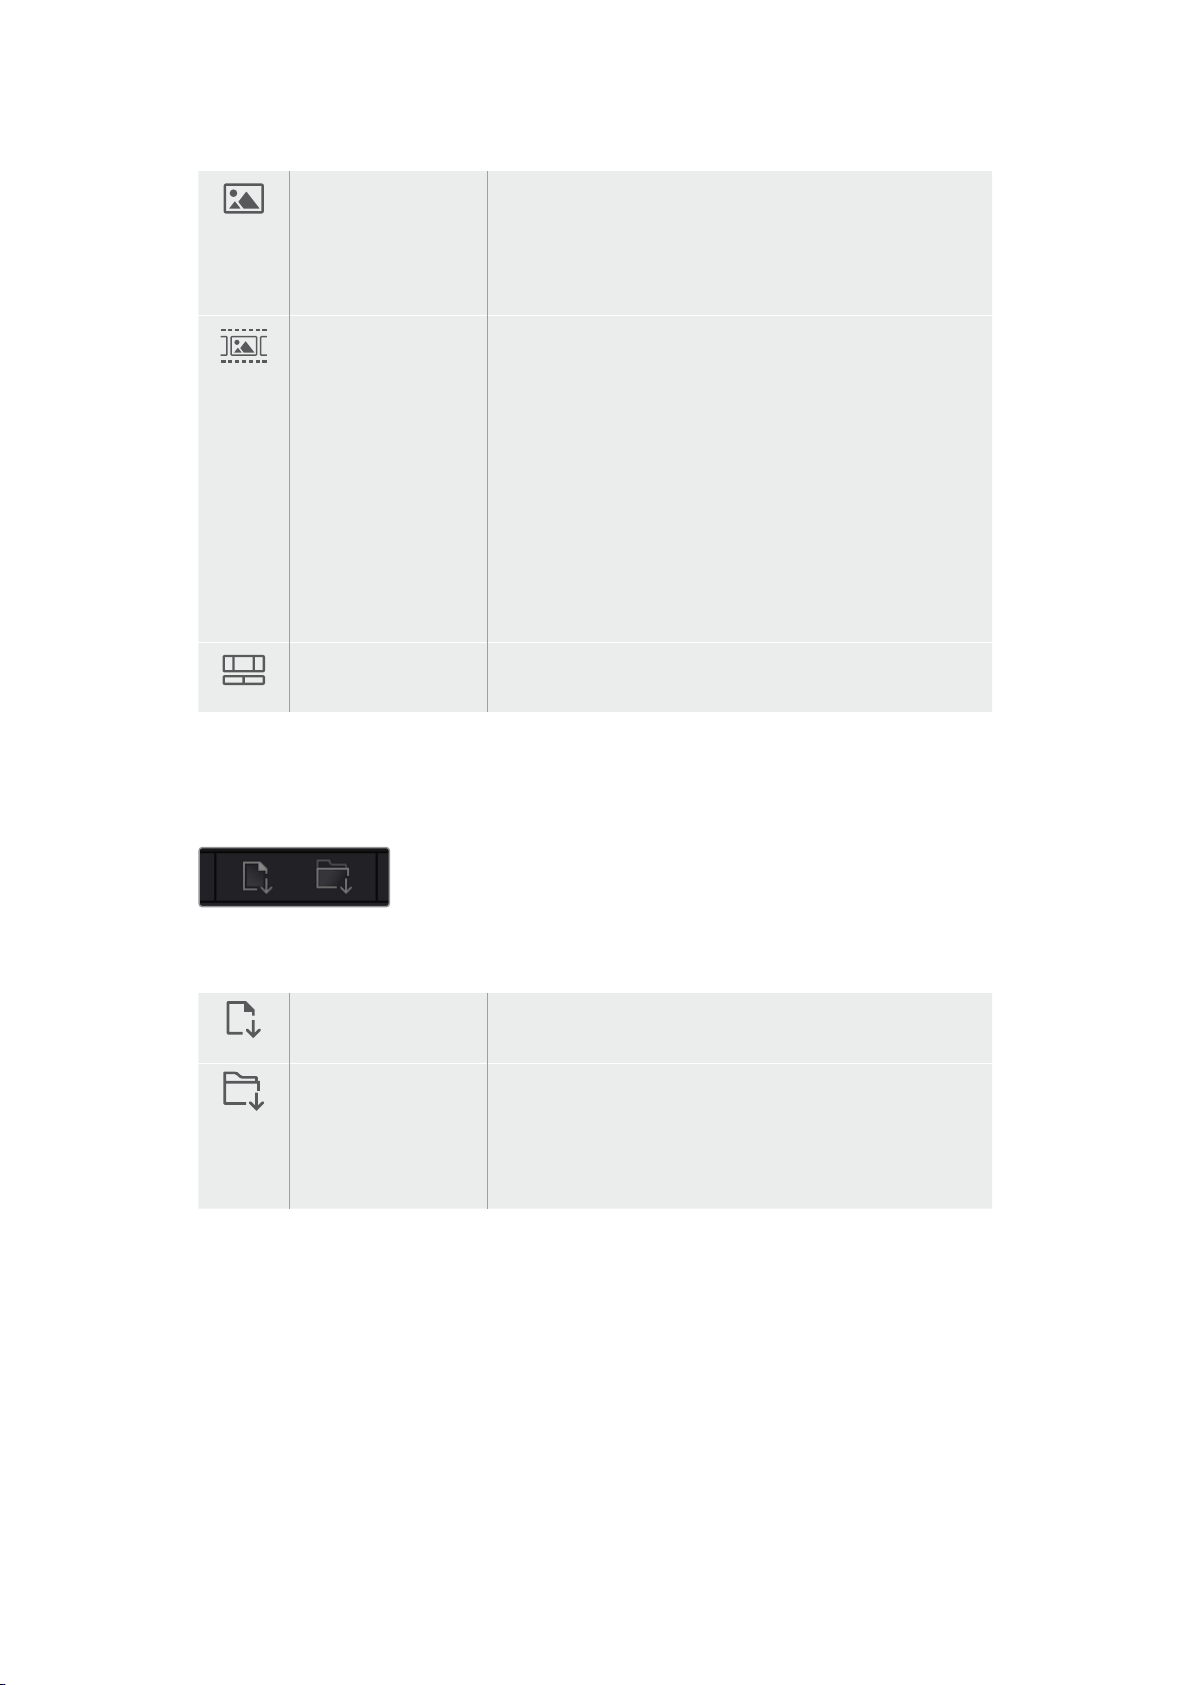
Source Clip The source clip viewer displays a single clip from the media
pool and you can set in and out points along the entire
length of the viewer timeline. This gives you greater control.
Select a source clip to view by double clicking on a clip in
the media pool, or dragging it into the viewer.
Source Tape Source tape lets you view all the source clips in the media
pool. This powerful feature is helpful if you want to quickly
search through all your clips to find a specific event. As
you scrub the playhead over the clips, you will see their
thumbnails selected in the media pool. This means once you
have found the clip you want to edit, you can click on the
source clip tab and its corresponding source clip will appear
in the viewer automatically.
The source tape viewer really lets you take advantage
of non-linear editing, giving you the freedom to work on
your edit, find shots quickly, try new ideas and stay in
the moment.
Timeline The timeline viewer lets you view the edit timeline so you
can play back your project and refine your edits.
Importing Clips to the Media Pool
Now you can start importing media into your project. You can do this in the media pool window
of the cut page using the import tools at the top.
Select one of the import options to
add media to your project
Import Media The import media option will import individual media files
selected from your storage location.
Import Media Folder To import a folder from your media storage, select the import
folder option. When importing a folder, DaVinci Resolve will
keep the file structure, treating each folder as a separate bin
so you can navigate between bins to find your videos and
other media files.
To import media:
1 Click on the import file or import media icon.
2 Navigate to your media storage for the media you want to import.
3 Select the file or folder and click ‘open’.
Once you’ve added media to your project, it is a good time to save your changes. DaVinci
Resolve features a fast, on the go autosave called ‘live save’. Once you save you project once,
‘live save’ will save further changes as you make them, removing the risk of losing your work.
For more information on ‘live save’ and other auto save functions, refer to the DaVinci
Resolve Manual.
56Using DaVinci Resolve

Adding Clips to the Timeline
Now that you are familiar with the media tabs and viewer mode buttons, you can open the
media pool and quickly start adding clips to your timeline.
The timeline of the cut page, comprising the upper timeline and the zoomed in timeline below
The timeline is where you will build your edit and is like a board with tracks you can attach clips
to, move them around and trim their edits. Tracks let you layer clips over others which gives you
more flexibility to try different edits and build transitions and effects. For example, you can try
an edit with a clip on one track without affecting other clips on tracks below it.
There are different ways to add clips to the timeline, such as smart insert, append, place on
top and more.
Appending Clips
When selecting takes and assembling an edit, you will likely want to add these shots to your
timeline one after the other. The append tool is perfect for this task and will get you editing
very fast.
Click on the append icon to quickly
add clips to the end of the last clip
To append a clip:
1 Double click on a clip in the media pool to open it in the viewer.
2 Using the scratch trim tool, drag the in and out points to select the precise duration of
your shot. You can also press the ‘i’ and ‘o’ keyboard shortcuts to set in and out points.
57Using DaVinci Resolve
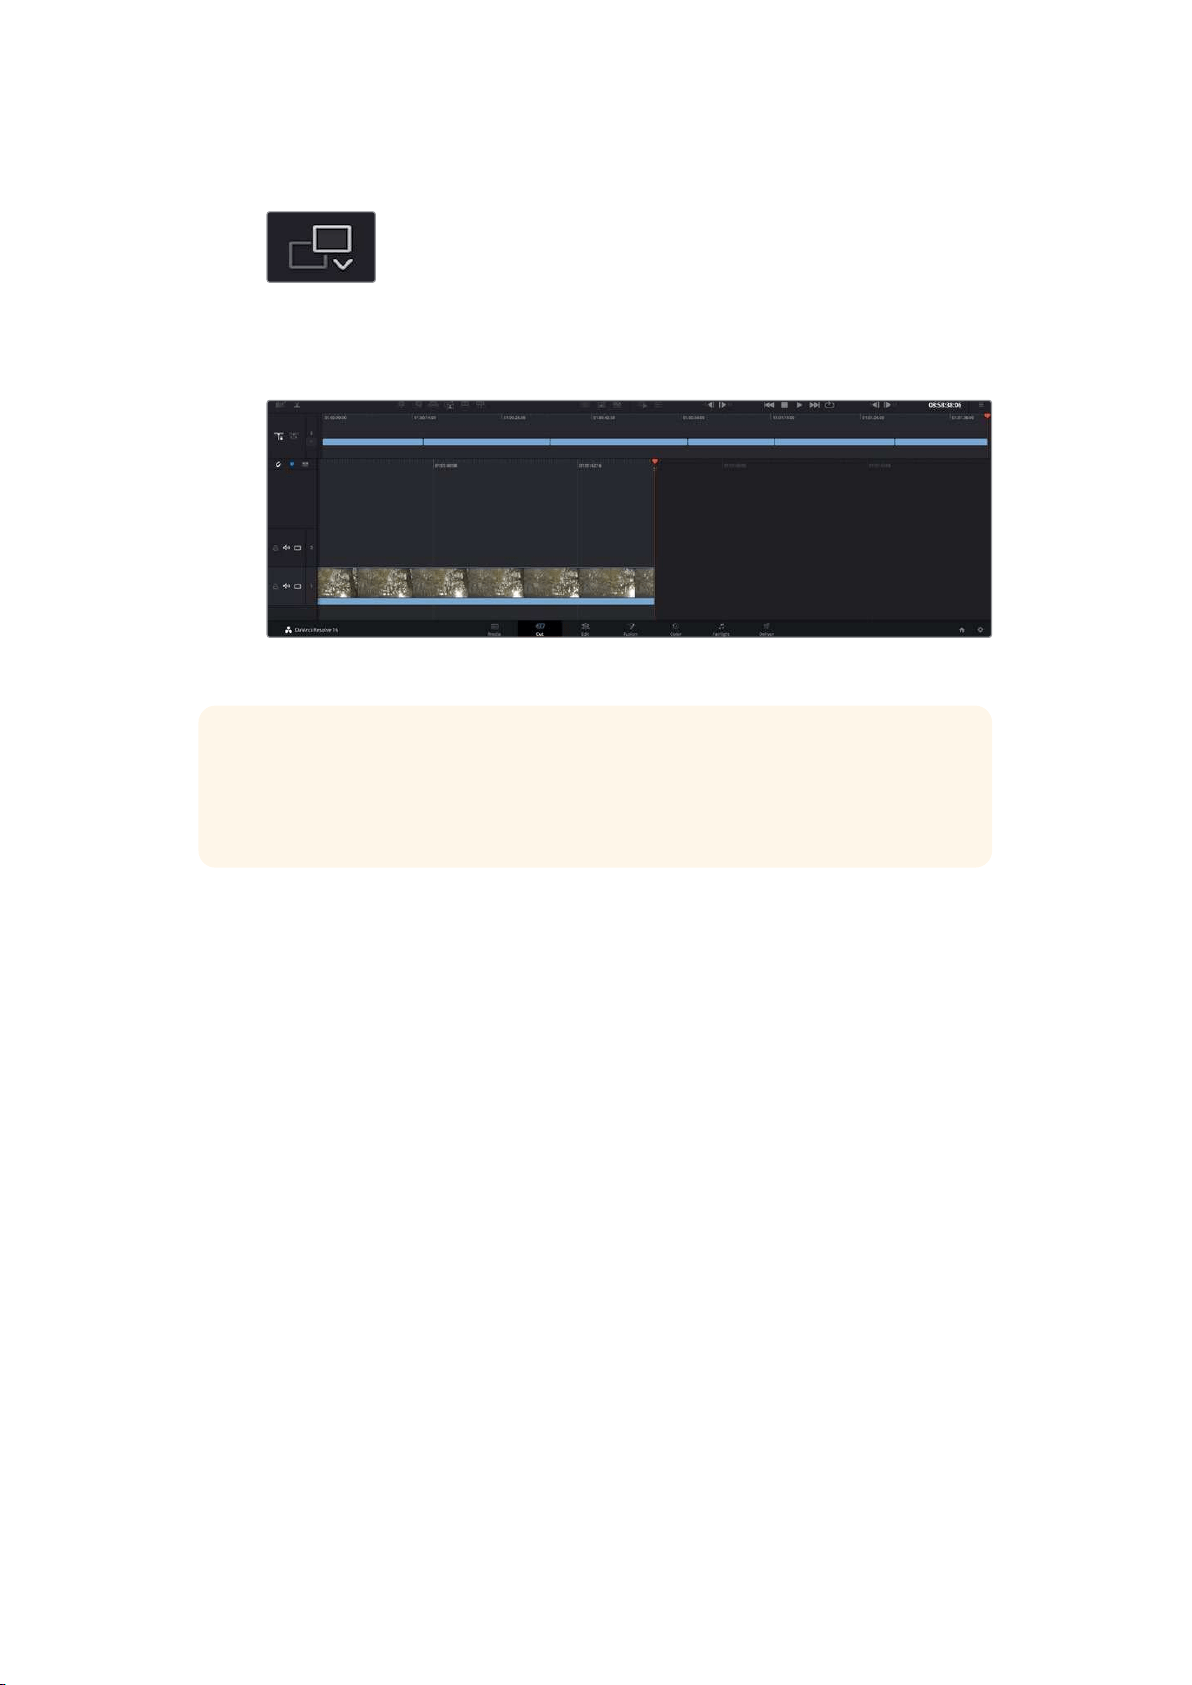
3 Now click the ‘append’ icon underneath the media pool.
Your first clip will be placed at the head of the timeline.
Repeat steps 1 to 3 to keep adding more clips and they will automatically append,
ensuring there are no gaps in the timeline.
Appending clips ensures there are no gaps between them on the timeline
TIP You can speed up the process further by assigning a keyboard shortcut to the
‘append’ icon. For example, if you assign the ‘P’ key, you can set your in and out points
using ‘I’ and ‘O’ then press ‘P’ to append the clip. Refer to the DaVinci Resolve manual
for information on how to assign shortcut keys.
Editing Clips on the Timeline
With clips added to the timeline, you have complete control to move them around and
trim edits.
To trim an edit, hover the mouse over the start or end of a clip, then click and drag it left or right.
For example, drag the end of the clip left or right to decrease or increase its duration. You might
notice that all clips after that edit will shift on the timeline to accommodate the new adjustment.
This is one way the ‘cut’ page helps to save you time.
You can even pick the clip up and drop it on a new video track in the large timeline without
having to zoom in or out. This speeds up the edit process because it minimizes time navigating
a long timeline.
After you have finished editing clips using the ‘cut’ page, you might want to add a title. The next
section will show you how.
Adding Titles
Placing a title on your timeline is easy and you have many options.
To see the different types of titles you can use, click on the ‘titles’ media tab at the top left
corner of the user interface. In the selection window you will see all the different title generators
you can use, from lower thirds, scrolls, to a standard text title. You can even add any of the
Fusion titles which are animated titles that you can customize.
58Using DaVinci Resolve

A good example is to add a standard title.
To do this:
1 Click on the ‘text’ title and drag it onto the timeline. It doesn’t matter which timeline,
but for greater accuracy we recommend using the detailed timeline. The title will
automatically create a new video track for the title and will snap to the playhead.
2 Release the mouse and the title will appear on the new track. You can now move it or
change its duration like you would another video clip.
3 To edit the title, click on the new title clip and a ‘tools’ icon will appear underneath the
clip viewer. Click on the tools icon.
You will now see a row of tools you can use to modify the title clip. For example
transform, crop, dynamic zoom and more. For this example, click on the ‘title’ tool.
4 Now click ‘open inspector’.
This will open the inspector window where you can type in the title you want and edit the text
settings, for example tracking, line spacing, font type, color and more.
You have a lot of options to customize the title exactly how you want it. We recommend playing
with all the different settings to see how they can change the appearance and shape of
your title.
Working with Blackmagic RAW Files
Blackmagic RAW clips give you maximum flexibility in post production. This lets you make
adjustments to clips, such as white balance and ISO settings, as if you were changing the
original camera settings. Working with Blackmagic RAW also retains more tonal information
within shadows and highlights, which is useful for recovering details, for example in blown out
skies and dark areas of the picture.
It’s worth shooting in Blackmagic RAW if you are after the highest possible quality, or for shots
where there is an extreme variance between highlights and shadows and you may need to
push and pull those regions as much as possible in the grade.
The speed and small file size of Blackmagic RAW means you don’t need to make proxy files
and playback is just like a standard video clip. This section of the manual describes the features
of Blackmagic RAW and how to use Blackmagic RAW files in your DaVinci Resolve workflow.
TIP It is a good practice to adjust the Blackmagic RAW settings for your clips on the
‘color’ page before you start color grading.
Clip Settings for Blackmagic RAW
When you first import Blackmagic RAW files, DaVinci Resolve will decode the camera data
contained in the files using the ISO, white balance and tint settings used at the time of shooting.
If you’re happy with the look of these settings, you can start editing right away.
The great thing about shooting Blackmagic RAW is that you’re not tied to these settings at all!
The breadth of available post processing options when working with Blackmagic RAW files
mean that you’ll develop your own workflow over time. Experimenting with the ‘clip’ settings for
each clip in the ‘camera raw’ tab will show you just how powerful and flexible working with
Blackmagic RAW can be.
59Using DaVinci Resolve
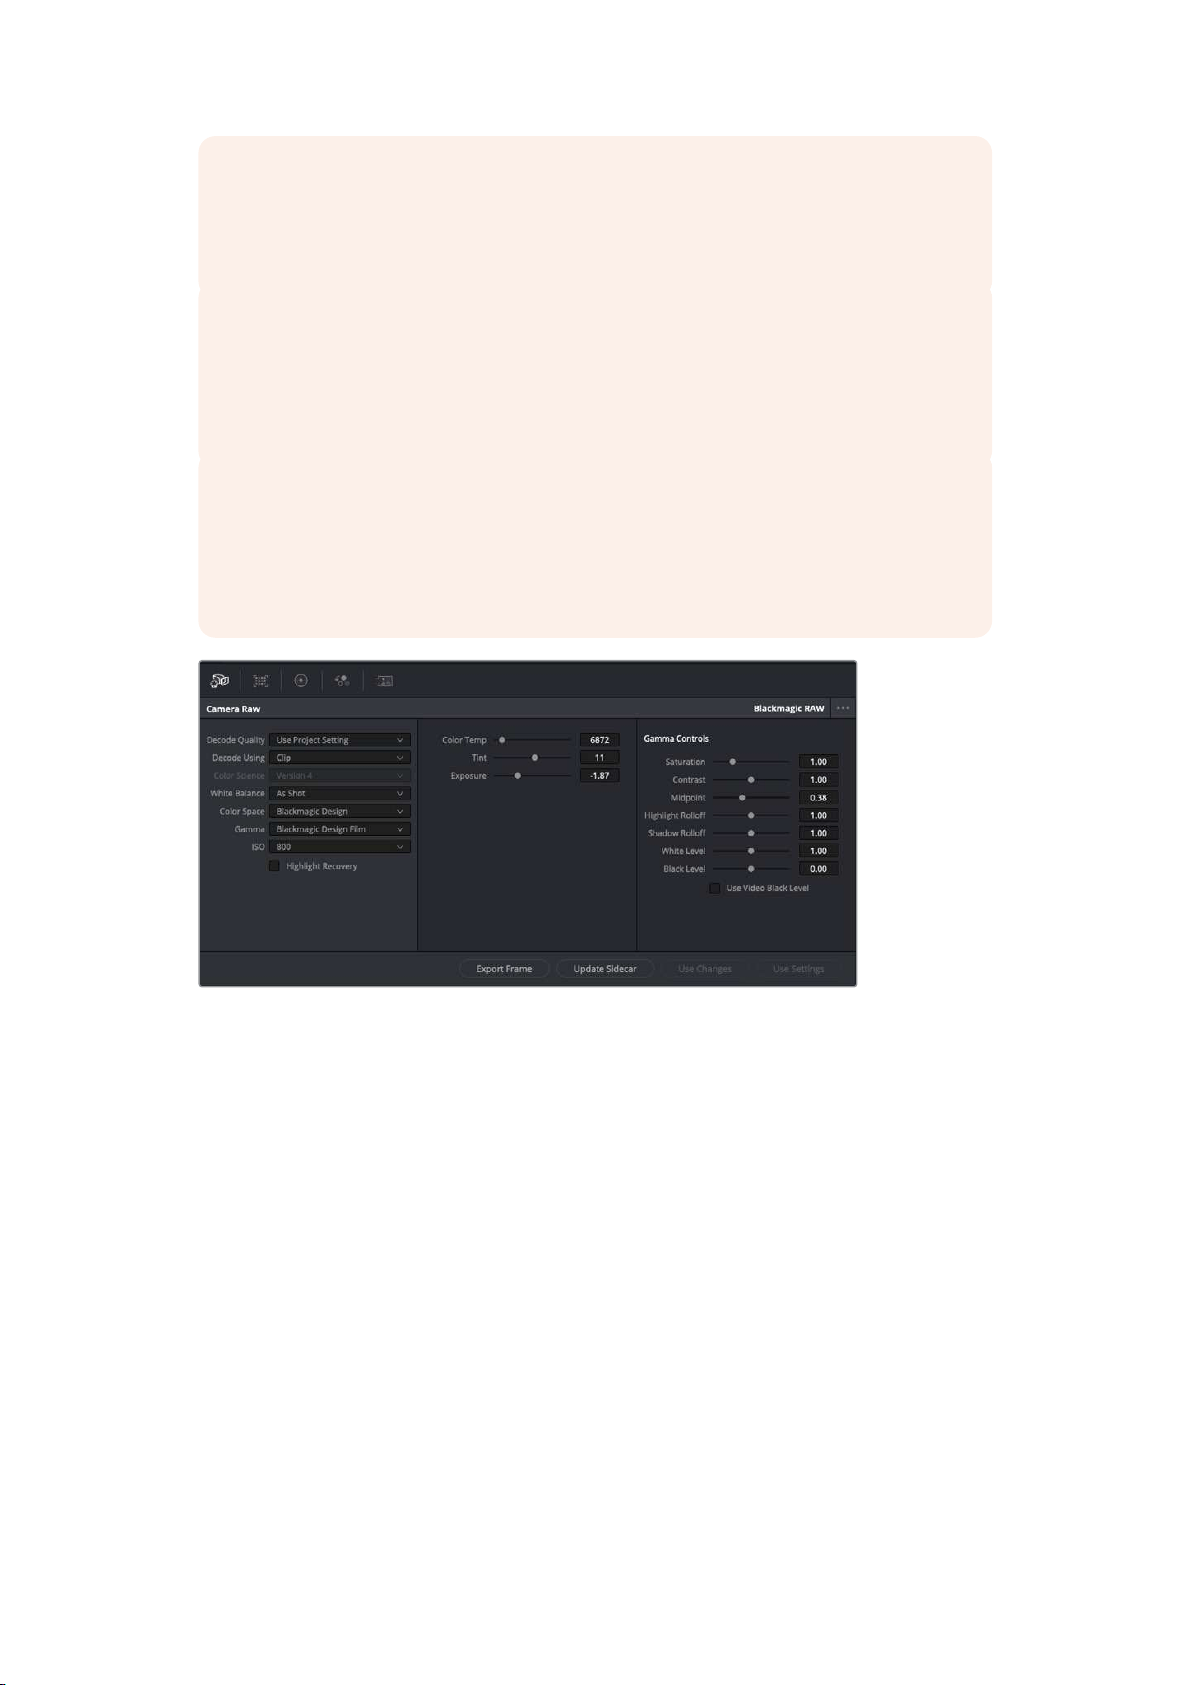
For Blackmagic RAW files from 12G video assist models, you have the flexibility to use
the camera’s original gamut and gamma, or treat them as you would other .braw files
using the Blackmagic Design color space and a Blackmagic gamma, such as
Blackmagic Design Film.
Using the default camera settings
With your clip selected on the ‘color’ page, go to the ‘camera raw’ tab in the lower
left corner. You will notice on the left hand side that the color space and gamma
settings match your camera settings. You can change the exposure for any file by
dragging the slider control. You can also adjust the white balance for files shot using
Panasonic EVA1 using the color temp and tint sliders.
Using Blackmagic RAW settings
To use the Blackmagic color space, simply select Blackmagic Design from the
drop down ‘color space’ menu and then select a Blackmagic Design gamma. Now you
have all the gamma controls of .braw files recorded on Blackmagic Design cameras.
It’s worth noting that highlight recovery and ISO controls are disabled for Blackmagic
RAW clips recorded on Video Assist 12G HDR.
In the ‘camera raw’ tab, select ‘clip’ from the ‘decode using’ drop down menu
to make adjustments to your clip’s Blackmagic RAW settings
Once you have set DaVinci Resolve to enable clip settings for Blackmagic RAW, the clip settings
and gamma controls are now adjustable. Adjusting these settings to optimize your clips can
bring them close to a full primaries grade. This is especially powerful when using DaVinci
Resolve’s scopes which can help you neutralize and balance the clips ready for applying a look.
The following information contains descriptions for the clip and gamma controls.
ISO
The ISO value can be changed by increasing or decreasing this setting. This setting is helpful
if you need to set the clip to a brighter or darker starting point for optimization.
Highlight Recovery
Check the box to reconstruct highlight information in clipped channels using information from
non-clipped channels.
Color Temp
Adjust the color temperature to warm or cool the image. This can be used to help neutralize
the color balance in each image.
Tint
Adjusting this setting will add green or magenta into the image to help balance the color.
60Using DaVinci Resolve
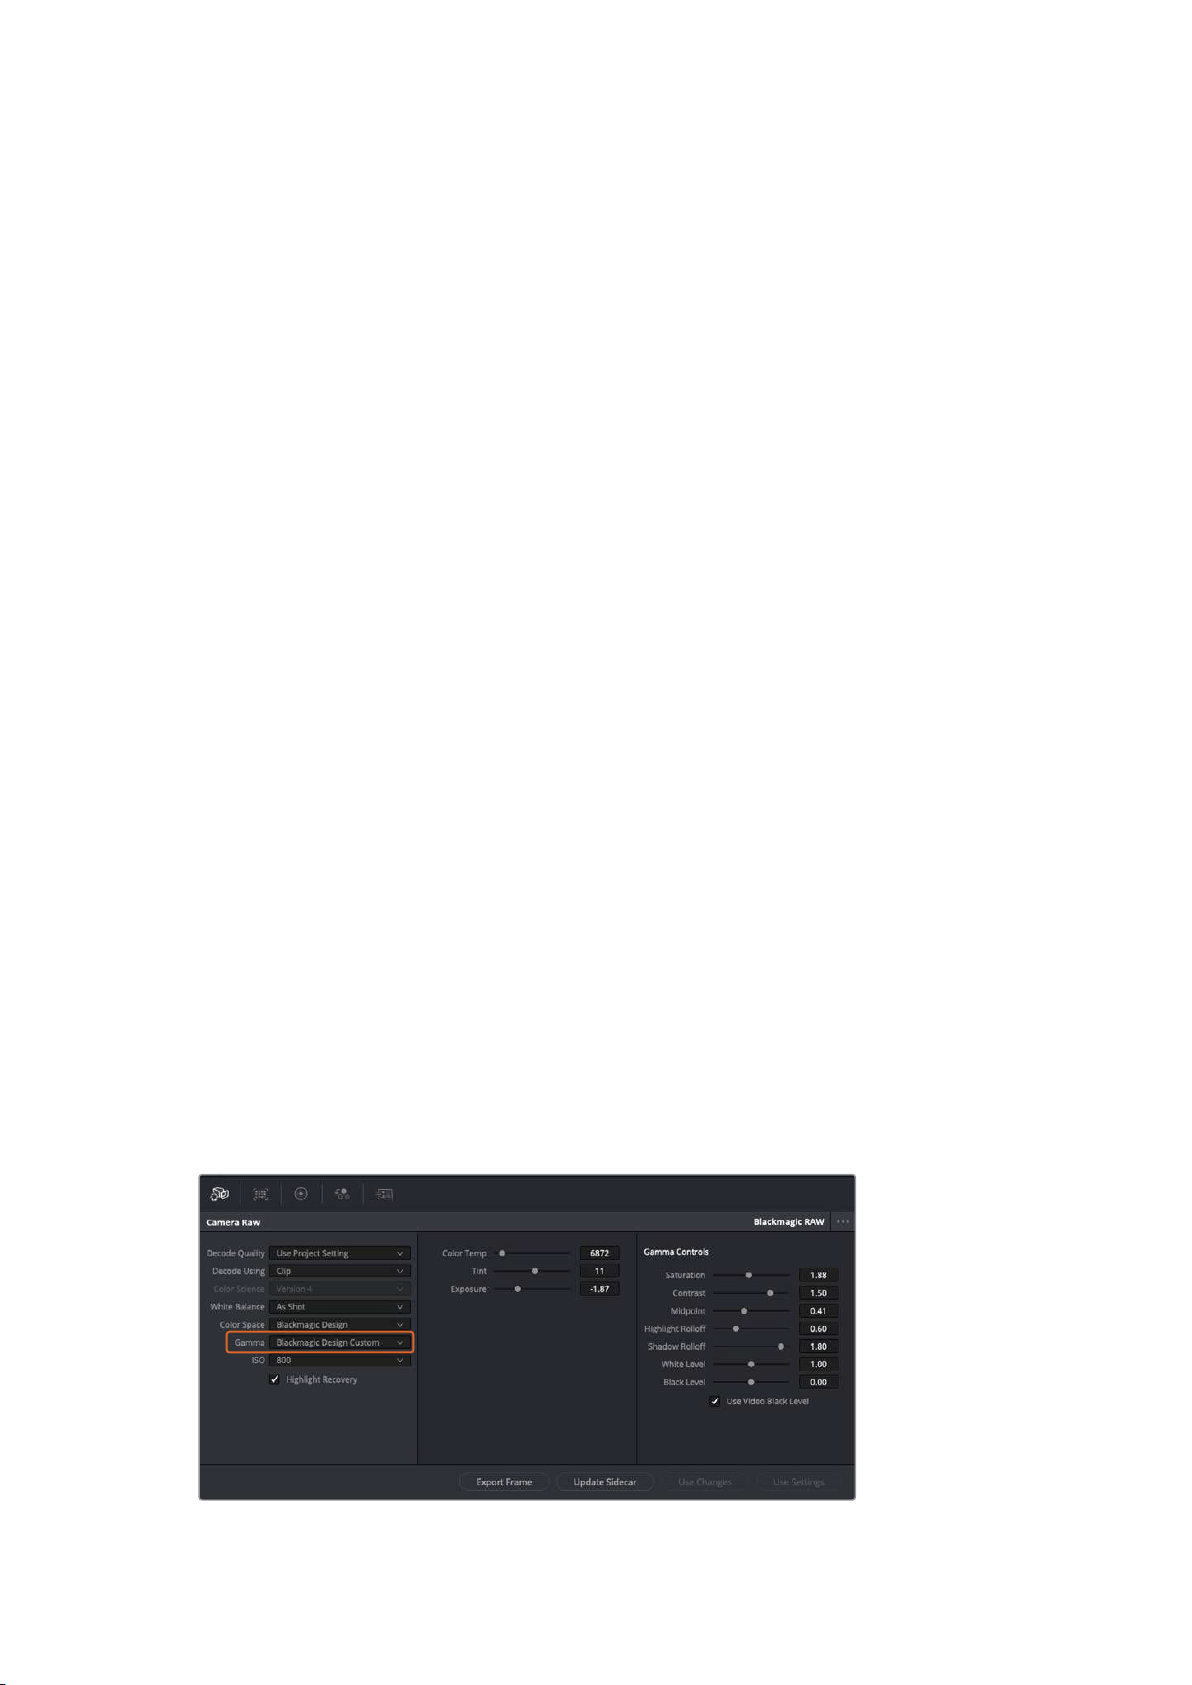
Exposure
Use this setting to refine the overall brightness of the image.
Saturation
Saturation controls default at 1 and range from -1 for the minimum saturation to +4 for
maximum saturation.
Contrast
Defaulting at 1.0, drag the slider to the left for the least amount of contrast at 0 or to the right
to increase the contrast up to 2.
Midpoint
In Blackmagic Design Film, your middle gray value defaults to 0.38, or 38.4%. Drag the slider
to the left to lower your midpoint or to the right to raise it to 100. When contrast is adjusted away
from the default setting, you can modify your highlight and shadow rolloff.
Highlight Rolloff
Adjust the highlights by dragging the slider to the left to lower the value to 0, or to the right to
increase the highlights to 2. The default value is 1.
Shadow Rolloff
Drag the slider to the left to lower your shadows to 0 or to the right to raise your shadows to 2.
White Level
Adjust the white point of the gamma curve by dragging the slider from the highest value
of 2 to the lowest value of 0. The default value is 1.
Black Level
Raise the black point of the custom gamma curve by dragging the slider to the right from
the lowest value of -1 to a maximum of 1. The default value is 0.
Use Video Black Level
Check the box to set your black levels to video.
Export Frame
Clicking the ‘export frame’ button lets you export a single frame from your Blackmagic RAW clip.
Update Sidecar
Click this button to update the Blackmagic RAW sidecar file for the current clip.
Any changes you have made to your Blackmagic RAW clips will be identified by the gamma
setting changing to Blackmagic Design Custom.
If you want to revert your clip to one of the default gamma options
available, simply select it from the gamma dropdown menu.
61Using DaVinci Resolve

TIP Gamma controls are disabled for footage shot with the ‘video’ dynamic range,
butyou have not lost your Blackmagic RAW data. Simply select Blackmagic Design
Film or Blackmagic Design Extended Video from the dropdown gamma menu and
make your adjustments.
Saving your Blackmagic RAW changes
1 Adjust the gamma controls for your Blackmagic RAW clip.
2 Click the ‘update sidecar’ button.
A ‘sidecar’ file will now be created in the same folder as your .braw file. When another user
imports the Blackmagic RAW files, the sidecar files will automatically be read by DaVinci
Resolve. If you make additional adjustments, press ‘update sidecar’ again.
TIP To remove your sidecar file, you can simply delete it from its location on your
media drive.
Project Settings for Blackmagic RAW
If you need to make a setting change that is common to all the clips, for example a global
change to the white balance or ISO setting, you can set the clips to use the project ‘camera raw’
settings and make global changes from there.
To set project settings for Blackmagic RAW:
1 Enter the project settings menu by clicking ‘file,’ and selecting ‘project settings.’
2 In the ‘Camera RAW’ tab, you’ll see a dropdown menu next to RAW profile. Click on the
arrow to select Blackmagic RAW from the list.
3 Select ‘project’ in the ‘Decode Using’ dropdown menu.
4 Set the white balance setting to ‘custom’.
5 Select ‘Blackmagic Design Custom’ from the dropdowngamma menu. Set the
color space to ‘Blackmagic Design’. This will also set the gamma setting to
‘Blackmagic Design Film’.
6 Choose your resolution from the ‘Decode Quality’ menu. A lower resolution will give
you better playback on limited systems. You also have the flexibility to change to full
resolution later on before delivery for the highest quality output.
Now you can adjust the camera settings for your clips such as saturation, contrast and midpoint.
This will affect all clips in your project that are set to decode using ‘project’.
Color Correcting your Clips with the Color Page
Now with your clips on the timeline and titles added, you can start color correcting using the
‘color’ page. The color page is extremely powerful and will define the overall look of your film,
but for this example a good place to start is to neutralize all your clips so they are consistent.
You can also return to the ‘cut’ or ‘edit’ page at any time if you want to make changes to
your edit.
62Using DaVinci Resolve
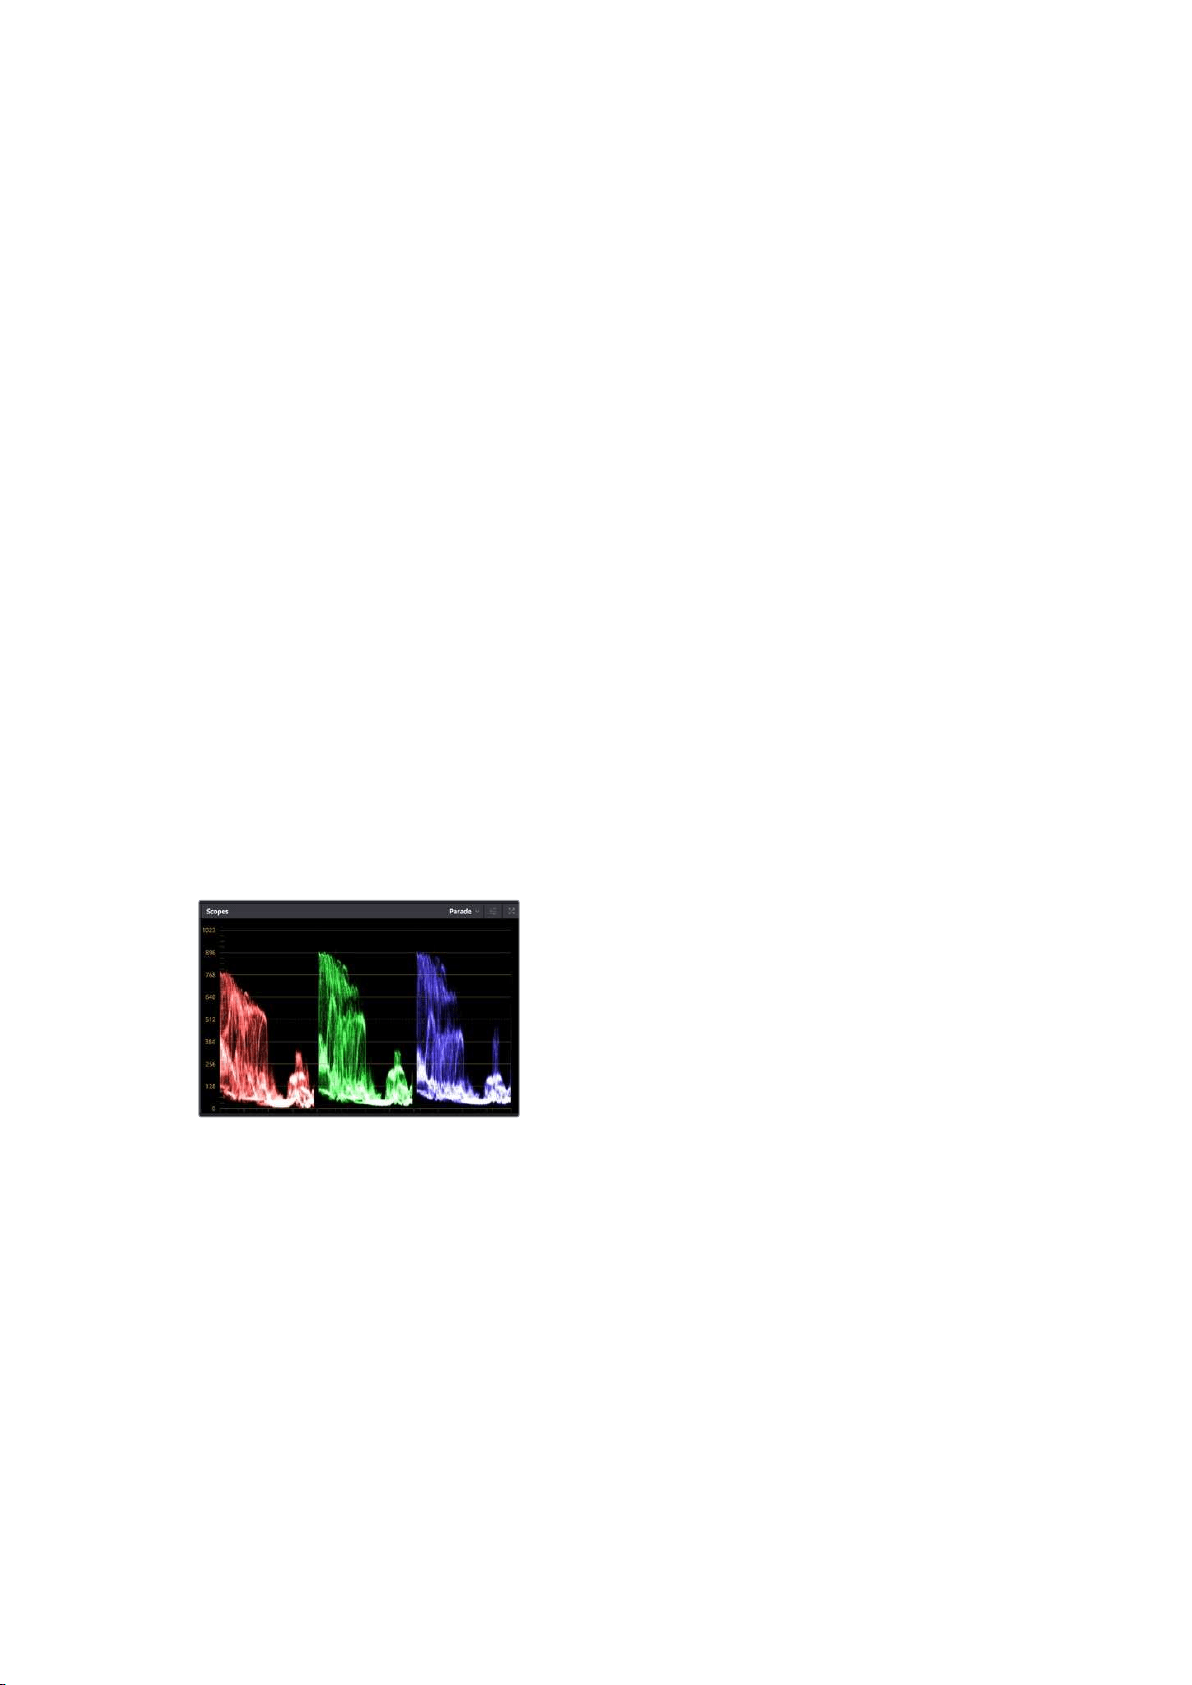
The color page lets you adjust the look of your edit and in many ways color correction is an art
form in itself. You are really adding emotion to your work when you add color correction. It’s an
incredibly creative part of the workflow and very satisfying when you learn these skills and can
see your work come alive! This is usually the first step and is referred to as primary color
correction, or adjusting the primaries. After primary color correction is done, you can then make
secondary color correction adjustments which is where you can make extremely precise color
adjustments of specific objects in your images. That is a lot of fun, but is normally done after
primaries because it helps make the process more efficient and you will get a better result!
First click on the ‘color’ tab to open the color page.
You’ll see the camera raw settings, color wheels, curves palettes and general color correction
tools as well as the preview and nodes window. Don’t feel overwhelmed by the vast array of
features in front of you, they are all there to help you get the most amazing looking pictures.
This getting started section will show the basics, but for more detailed information refer to the
relevant sections in the manual. They will show you exactly what all the tools are for and how to
use them in easy to follow steps. You’ll learn the same techniques the professionals use in high
end color correction facilities.
Generally, the first step for primary color correction is to optimize the levels for shadows, mid
tones and highlights in your clips. In other words adjust the ‘lift’, ‘gamma’ and ‘gain’ settings.
This will help get your pictures looking their brightest and best with a clean, balanced starting
point from where you can begin grading the ‘look’ of your film. To optimize the levels, it’s helpful
to use the scopes.
Using Scopes
Most colorists make creative color choices by focusing on the emotion and the look they want
their program to have and then simply work using the monitor to achieve that look. You can look
at everyday objects and how different types of light interact with them to generate ideas on
what you can do with your images and a little practice.
The parade scope helps you optimize
highlights, mid tones and shadows
Another way to color grade is to use the built in scopes to help you balance shots. You can
open a single video scope by clicking the ‘scope’ button, which is the second from the right on
the palette toolbar. You can choose to display a waveform, parade, vectorscope and histogram.
Using these scopes you can monitor your tonal balance, check the levels of your video to avoid
crushing your blacks and clipping the highlights, plus monitor any color cast in your clips.
The ‘color wheels’ palette contains the ‘lift’, ‘gamma’ and ‘gain’ controls which will generally
constitute your first adjustment. If you’ve previously had experience with color correction,
these should resemble controls you’ve seen in other applications for doing color and
contrast adjustments.
63Using DaVinci Resolve
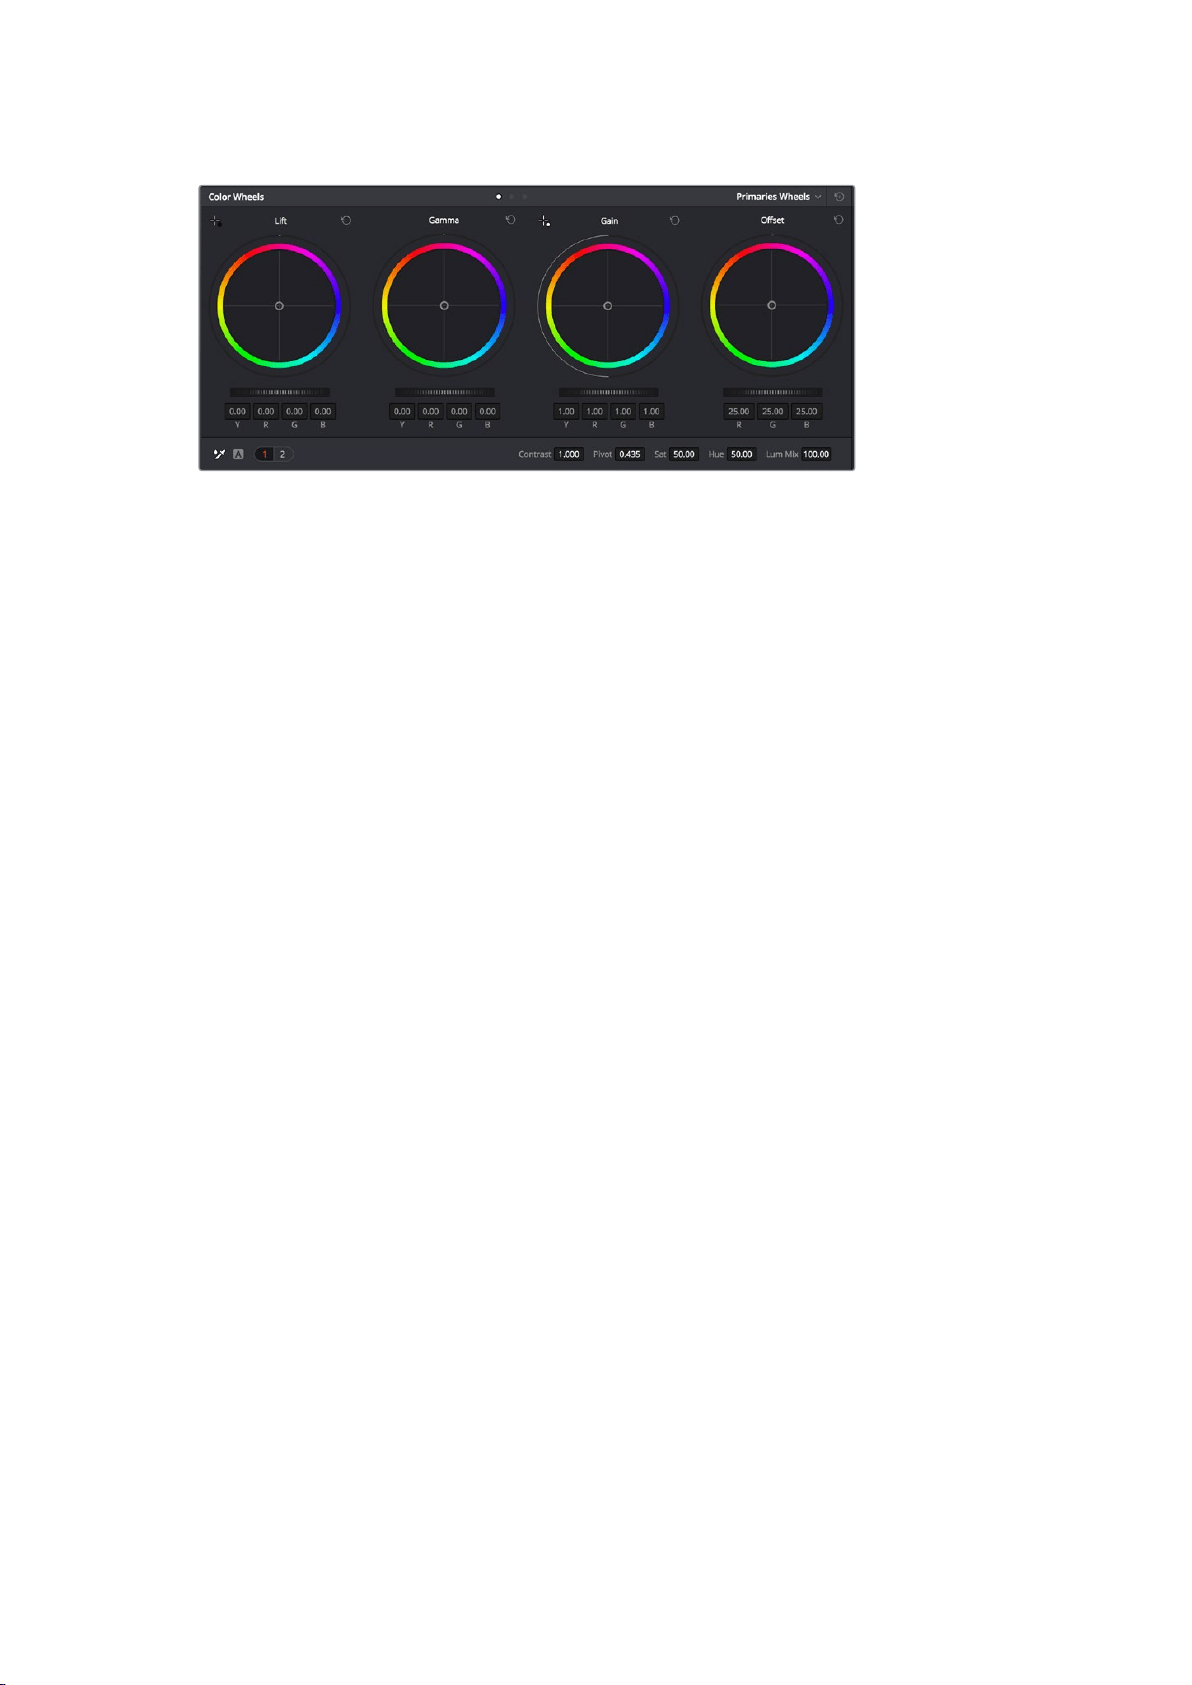
The ‘lift, ‘gamma’, ‘gain’ and ‘offset’ color wheels give you total control over the
color and tonal balance of your clips. To make a uniform adjustment to all colors for
each tonal region, drag the dial underneath the color wheels back and forth
For more accurate control of each color using a mouse, you can change the color wheels to
‘primaries bars’ which let you adjust each color and luminance channel for the lift, gamma and
gain controls separately. Simply select ‘primaries bars’ from the dropdown menu near the top
right of the color wheels.
Adjusting the ‘lift’: With your clip selected on the color timeline, click on the ‘lift’
dial underneath the first color wheel. Slide it back and forth and watch how it affects
your image. You’ll see the brightness of the dark regions of your picture increase
and decrease.
Set it to where you want the dark areas to look their best. If you decrease the lift too
much, you’ll lose details in the blacks and you can use the parade scope to help avoid
this. The optimal position for blacks on the waveform is just above the bottom line of
the parade scope.
Adjusting the ‘gain’: Click on the ‘gain’ dial and slide it back and forth. This adjusts
the highlights which are the brightest areas of your clip. The highlights are shown on
the top section of the waveform on the parade scope. For a brightly lit shot, these are
best positioned just below the top line of the waveform scope. If the highlights rise
above the top line of the waveform scope, they will clip and you will lose details in the
brightest regions of your image.
Adjusting the ‘gamma’: Click on the ‘gamma’ dial underneath the color wheel and slide
it back and forth. Asyou increase the gamma you’ll see the brightness of the image
increase. Notice the middle section of the waveform will also move as you adjust the
gamma. This represents the mid tones of your clip. The optimal position for mid tones
generally falls between 50 to 70% on the waveform scope. However, this can be
subjective based on the look you are creating and the lighting conditions in the clip.
You can also use the curves palette to make primary color corrections. Simply click to create
control points on the diagonal line inside the curve graph, and drag them up or down to adjust
the master RGB contrast at different areas of image tonality. The optimum points to adjust are
the bottom third, mid, and top third of the curve line.
There are many more ways of doing primary color correction in DaVinci Resolve.
64Using DaVinci Resolve
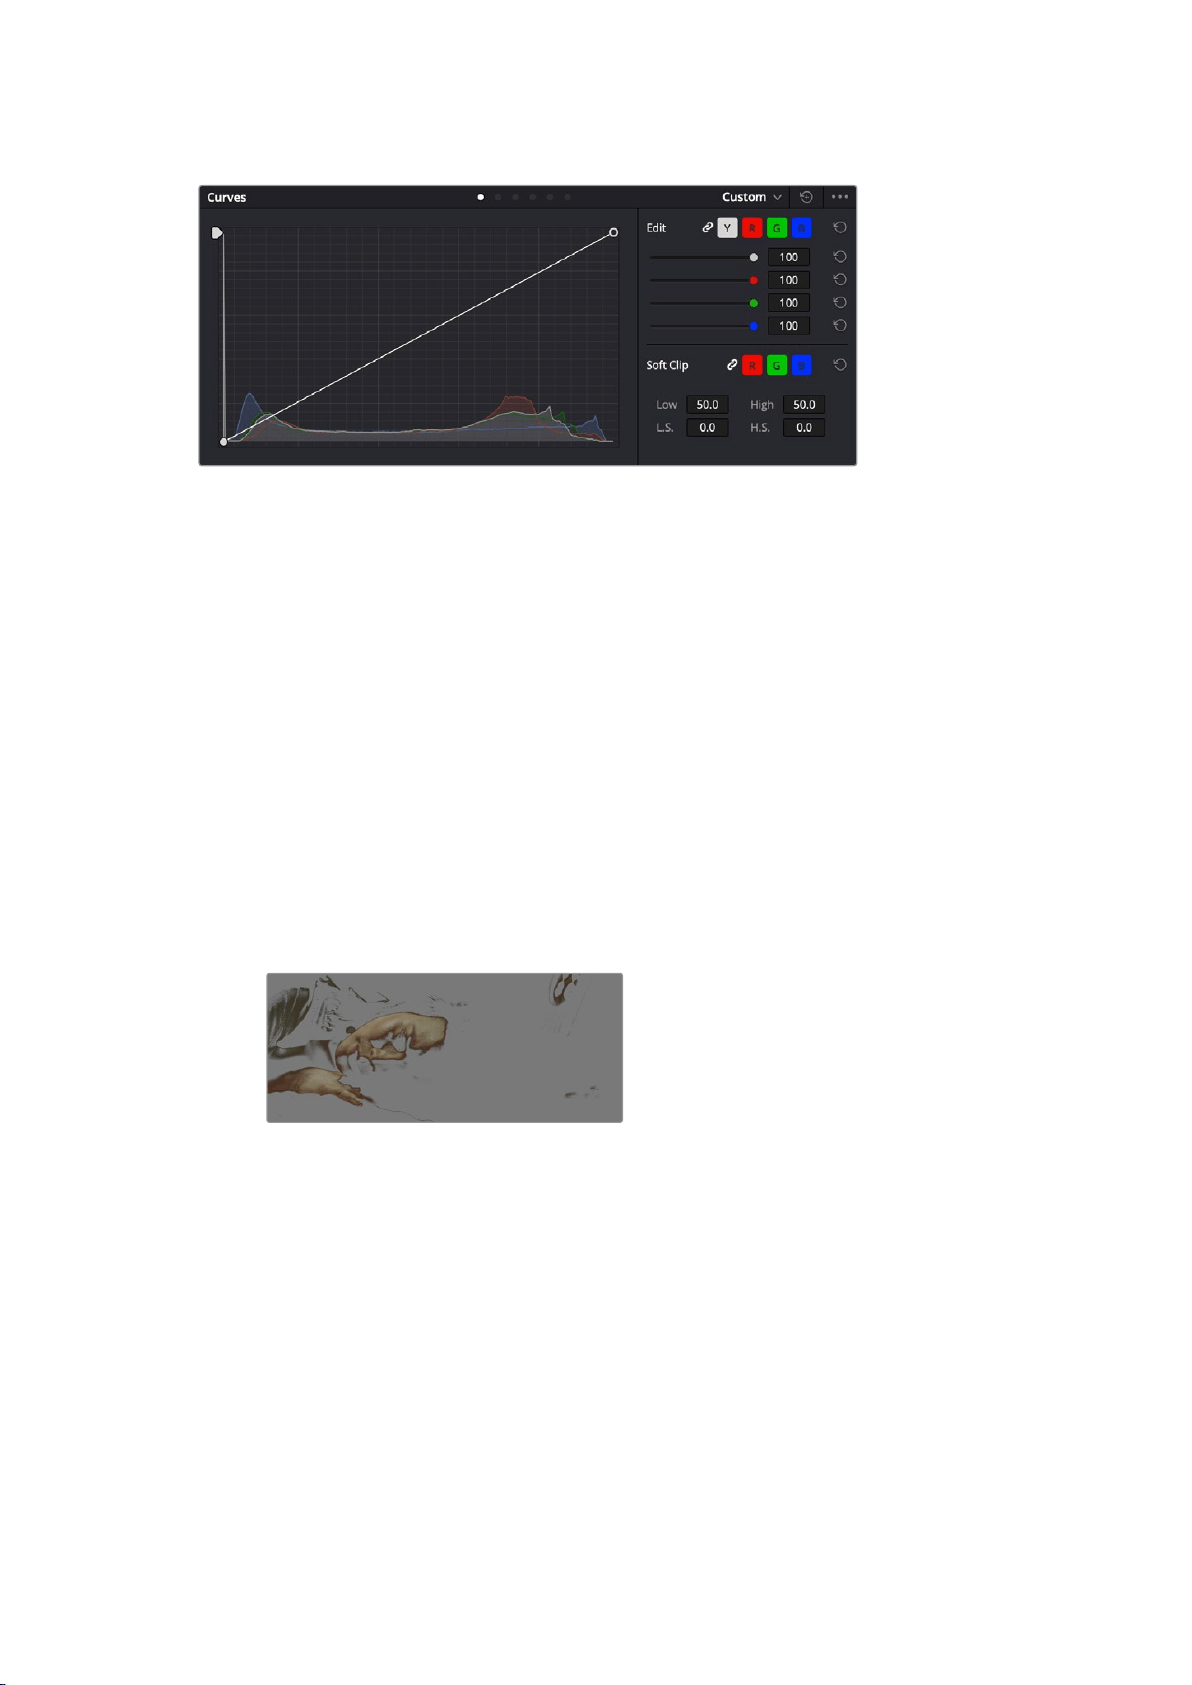
The curves palette is another tool you can use to make primary color corrections,
or enhance specific areas of your clip when using a power window
Secondary Color Correction
If you want to adjust a specific part of your image then you need to use secondary corrections.
The adjustments you have been doing up until now using the lift, gamma andgain adjustments
affect the whole image at the same time and so they are called primary color corrections.
However, if you need to adjust specific parts of your image, say for example you wanted to
improve the color in the grass in a scene, or you wanted to deepen the blue in a sky, then you
can use secondary corrections. Secondary color corrections are where you select a part of the
image and then adjust only that part. With nodes, you can stack multiple secondary corrections
so you can keep working parts of your image until everything is just right! You can even use
windows and tracking to allow the selections to follow movement in your images.
Qualifying a Color
Often you’ll find a specific color in your clip can be enhanced, for example grass by the side
ofa road, or the blue in a sky, or you may need to adjust color on a specific object to focus the
audience’s attention on it. You can easily do this by using the HSL qualifier tool.
Using the HSL qualifier to select colors in your image is helpful when
you want to make areas of your image ‘pop’, to add contrast, or to
help draw the audience’s attention to certain areas of your shot
To qualify a color:
1 Add a new serial node.
2 Open the ‘qualifier’ palette and make sure the ‘selection range’ picker tool is selected.
3 Click on the color in your clip you want to affect.
4 Usually you’ll need to make some adjustments to soften the edges of your selection
and limit the region to only the desired color. Click on the ‘highlight’ button above the
viewer to see yourselection.
5 Adjust the ‘width’ control in the ‘hue’ window to broaden or narrow your selection.
65Using DaVinci Resolve
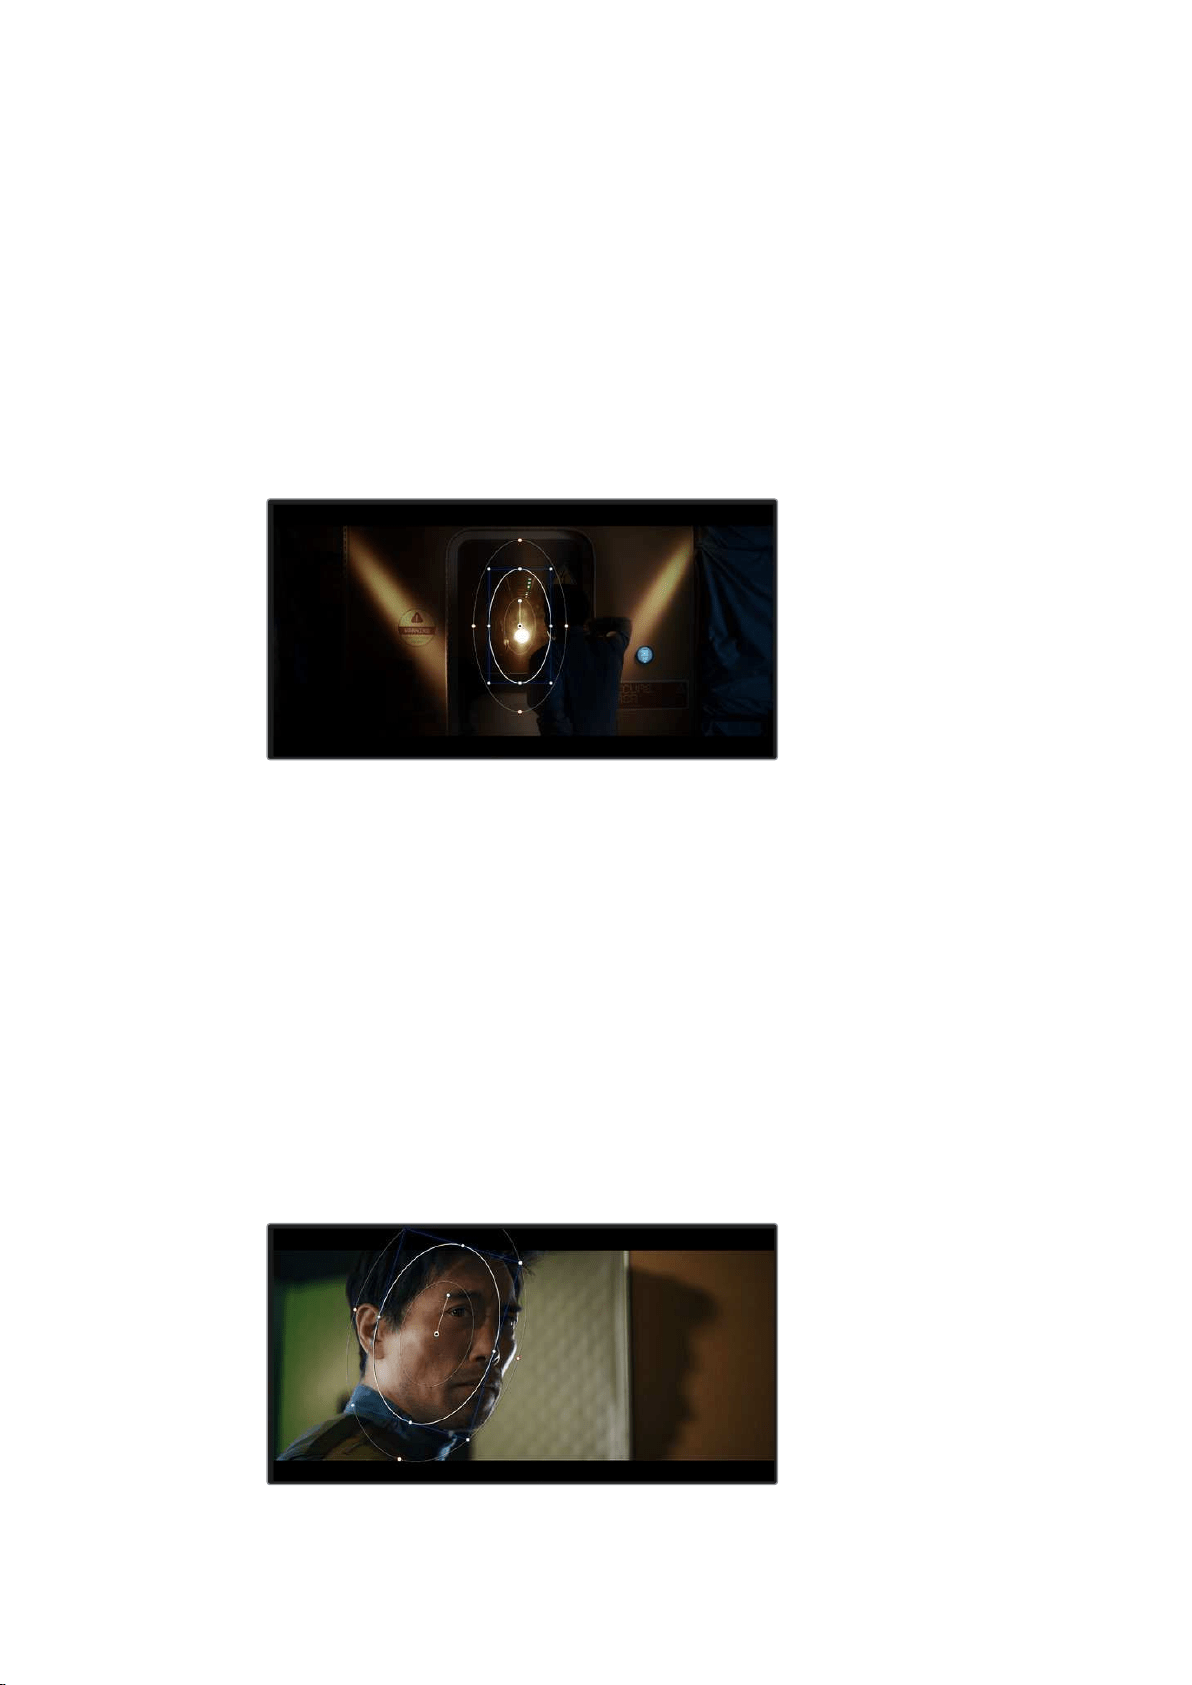
Experiment with the high, low and softness controls to see how to refine your selection.
Nowyou can make corrections to your selected color using the color wheels or custom curves.
Sometimes your selection can spill into areas of the shot you don’t want to affect. You can easily
mask out the unwanted areas using a power window. Simply create a new window and shape it
to select only the area of color you want. If your selected color moves in the shot, you can use
the tracking feature to track your power window.
Adding a Power Window
Power windows are an extremely effective secondary color correction tool that can be used to
isolate specific regions of your clips. These regions don’t have to be static, but can be tracked
to move with a camera pan, tilt or rotation, plus the movement of the region itself.
Use power windows to mask out areas you don’t want
to be affected by the HSL qualifier secondary adjustments
For example, you can track a window on a person in order to make color and contrast changes
just to that person without affecting his or her surroundings. By making corrections like this you
can influence the audience’s attention on areas you want them to notice.
To add a power window to your clip:
1 Add a new serial node.
2 Open the ‘window’ palette and select a window shape by clicking on a shape icon.
Your selected window shape will appear on the node.
3 Resize the shape by clicking and dragging the blue points around the shape. The red
points adjust the edge softness. You can position the shape by clicking the center
point and moving it to the area you want to isolate. Rotate the window using the point
connected to the center.
Now you can make color corrections to your image in just the area you want.
Power windows let you make secondary corrections to specific parts of your image
66
Using DaVinci Resolve
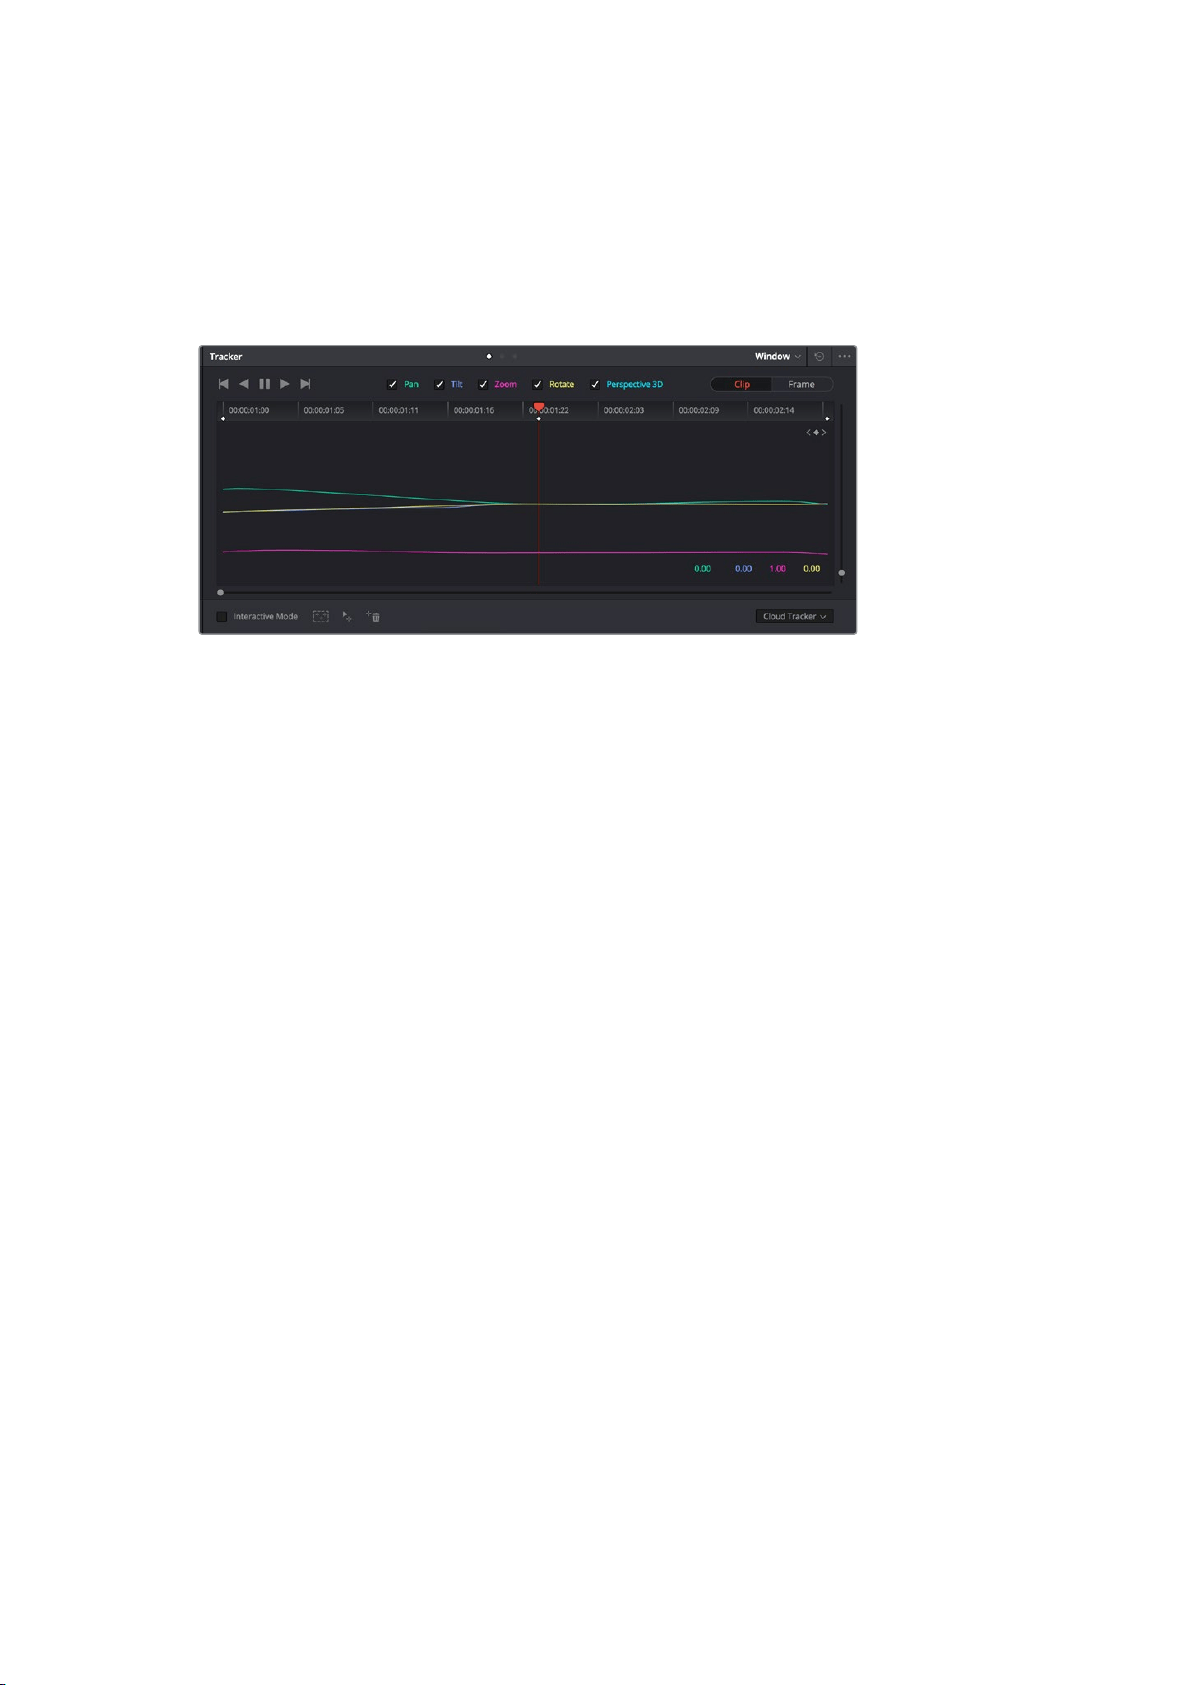
Tracking a Window
The camera, object or area in your shot may be moving, so to make sure your window stays on
your selected object or area, you can use DaVinci Resolve’s powerful tracking feature. The
tracker analyzes the pan, tilt, zoom and rotation of the camera or object in your clip so you can
match your windows to that movement. If this isn’t done, your correction can move off the
selected target and call attention to itself, which you probably don’t want.
You can track objects or areas in your clip using the tracker
feature so power windows can follow the action
To track a window to a moving object:
1 Create a new serial node and add a power window.
2 Go to the start of your clip and position and size the window to highlight just the object
or area you want.
3 Open the ‘tracker’ palette. Select the pan, tilt, zoom, rotate, and perspective
3D settings appropriate for the movement in your clip by checking or unchecking
the relevant ‘analyze’ checkboxes.
4 Click on the ‘forward’ arrow to the left of the checkboxes. DaVinci Resolve will now
apply a cluster of tracking points on your clip and then step through the frames to
analyze the movement. When the tracking is done, your power window will follow the
path of the movement in your clip.
Most of the time automatic tracking is successful, but scenes can be complex and sometimes
an object can pass in front of your selected area, interrupting or affecting your track. This can
be solved manually using the keyframe editor. Refer to the DaVinci Resolve manual to
find out more.
Using Plugins
While making secondary color corrections you can also add ResolveFX or OpenFX plugins to
create fast, interesting looks and effects using the ‘color’ page, or imaginative transitions and
effects on your clips on the ‘edit’ page. ResolveFX are installed with DaVinci Resolve, OFX
plugins can be purchased and downloaded from third party suppliers.
After installing a set of OFX plugins, you can access them or ResolveFX plugins on the color
page by opening the OpenFX inspector to the right of the ‘node editor’. Once you create a new
serial node, simply click the ‘OpenFX’ button to open the FX library and drag and drop a plugin
onto the new node. If the plugin has editable settings, you can adjust these in the adjoining
‘settings’ panel.
67Using DaVinci Resolve

In the ‘edit’ page you can add plugin filters, generators and transitions to clips by opening the
‘OpenFX’ panel in the ‘effects library’ and dragging your selected plugin onto the video clip or
track above your clip on the timeline depending on the plugin requirements.
OFX plugins are a quick and easy way to create an imaginative and interesting look
Mixing Your Audio
Mixing Audio in the Edit Page
Once you have edited and color corrected your project, you can begin to mix your audio.
DaVinciResolve has a helpful set of features for editing, mixing and mastering audio for your
project directly in the ‘edit’ page. For projects requiring more advanced audio tools, the
Fairlight page provides you with a full audio post production environment. If you are already
familiar with the edit page and want to move straight to Fairlight, skip this section and move
onto the next.
Adding Audio Tracks
If you are working in the edit page and want to mix a basic sound edit with lots of sound effects
and music, you can easily add more audio tracks when you need them. This can be helpful
when building your sound, and separating your audio elements into individual tracks, for
example, dialogue, sound effects and music.
To Add an Audio Track to the Edit Page
Right click next to the name of any audio track on your timeline and select ‘add track’ and
choose from the options, including ‘mono’, ‘stereo’, and ‘5.1’. This will add the track to the
bottom of the track list. Alternatively select ‘add tracks’ and select the position you would like
the new track or multiple tracks placed.
Your new audio track will appear on the timeline.
TIP If you wish to change the type of track after creating it, right click next to the name
of the track and select ‘change track type to’ and select the type of audio track you
want, such as stereo, mono or 5.1.
Adjusting Audio Levels in the Timeline
Each clip of audio in the timeline has a volume overlay that lets you set that clip’s level by simply
dragging it up or down with the pointer. This overlay corresponds to the Volume parameter in
the Inspector.
68Using DaVinci Resolve
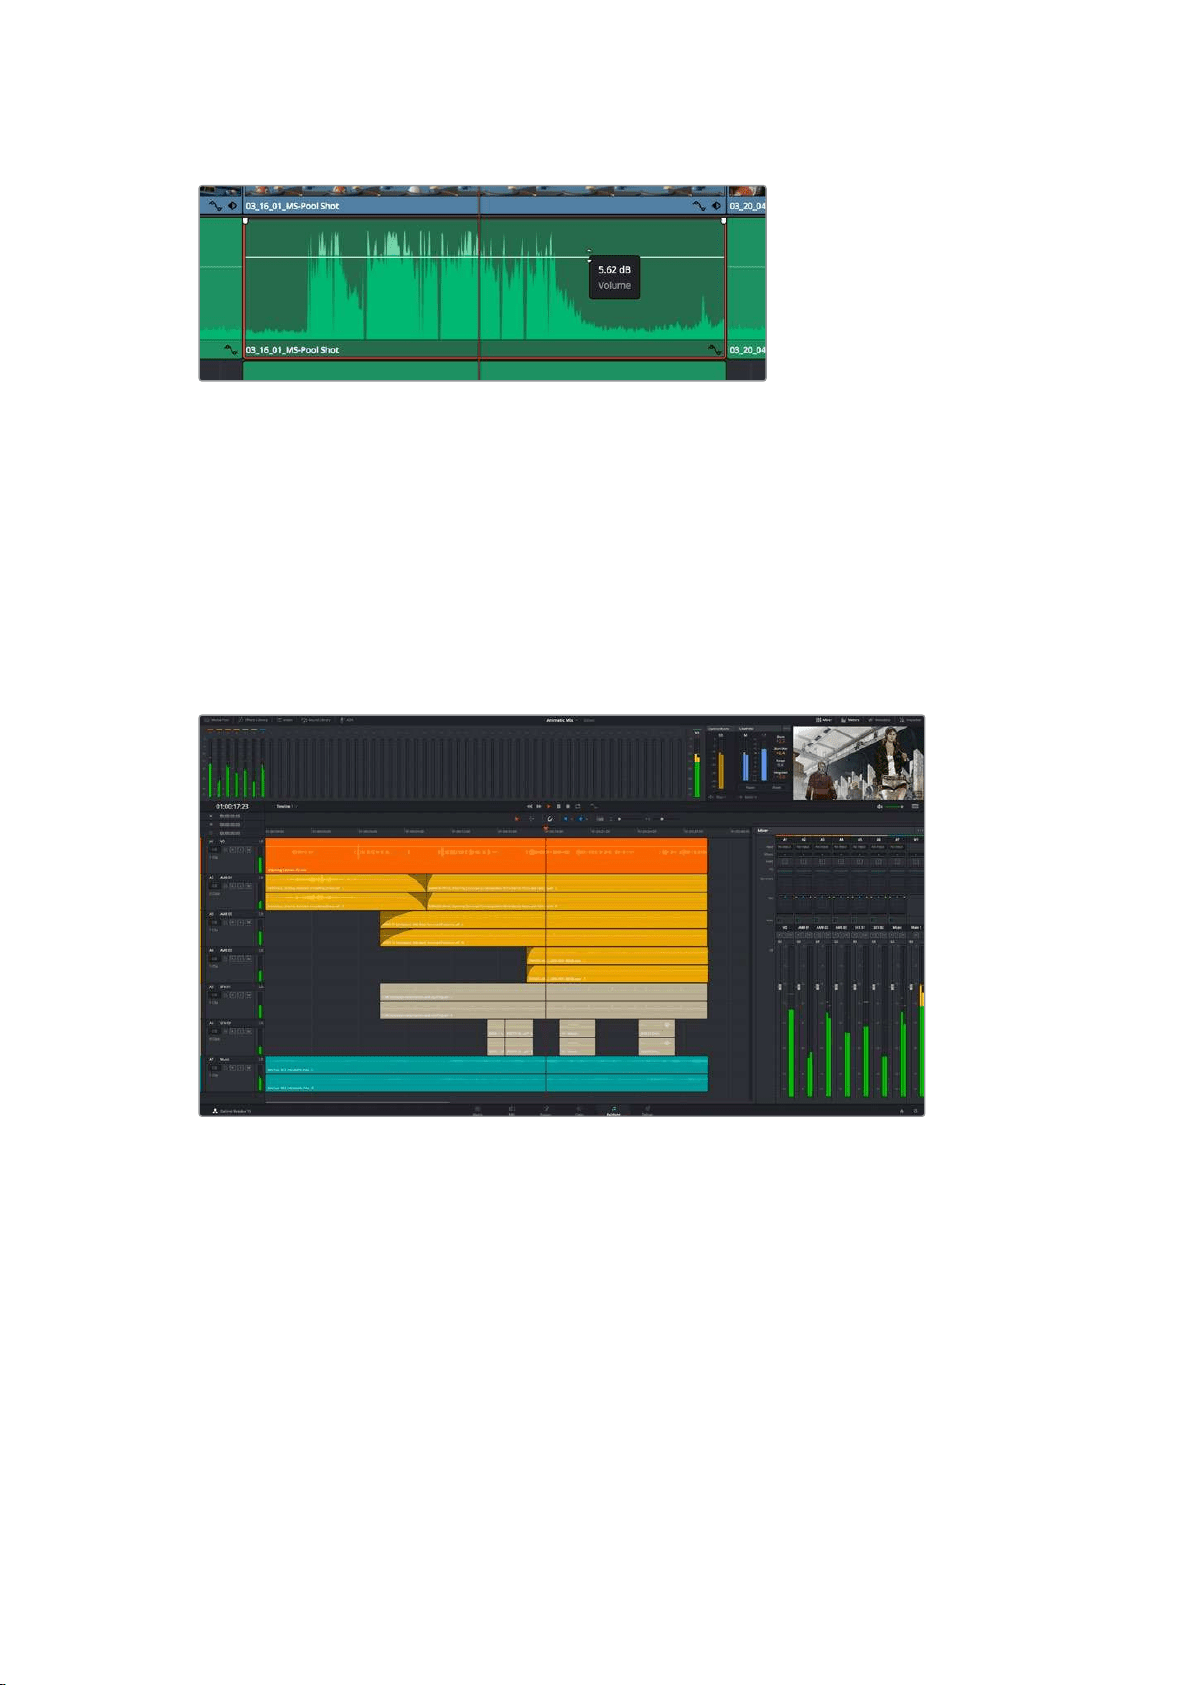
Dragging a volume overlay to adjust the clip level
For projects requiring more advanced audio tools, the Fairlight page provides you with a full
audio post production environment.
The Fairlight Page
The ‘Fairlight’ page in DaVinci Resolve is where you adjust your project audio. In single
monitormode, this page gives you an optimized look at the audio tracks of your project, with
anexpanded mixer and custom monitoring controls that make it easy to evaluate and adjust
levels in order to create a smooth and harmonious mix. Don’t feel overwhelmed by the vast
array of features in front of you, they are all there to help you deliver the best audio quality
for your project.
This guide provides a basic overview of the features on the Fairlight page, but to learn more
about all the details for each feature, refer to the DaVinci Resolve manual. The DaVinci Resolve
manual provides details on the purpose of each tool and describes how to use them in easy to
follow steps.
The Audio Timeline
Track Header: At the left of each track is a header area that displays the track number,
track name, track color, audio channels, fader value and audio meters. The track
header also contains different controls for locking and unlocking tracks, plus solo and
muting controls. These controls can help to keep your tracks organized, and let you
preview individual tracks one at a time.
Tracks: Each track on the Fairlight page is divided into lanes, which show each
individual channel of clip audio for editing and mixing. The edit page hides these
individual audio channels, displaying only a single clip in the timeline to make it easier
to edit multi channel sources without needing to manage a huge number of tracks.
69Using DaVinci Resolve
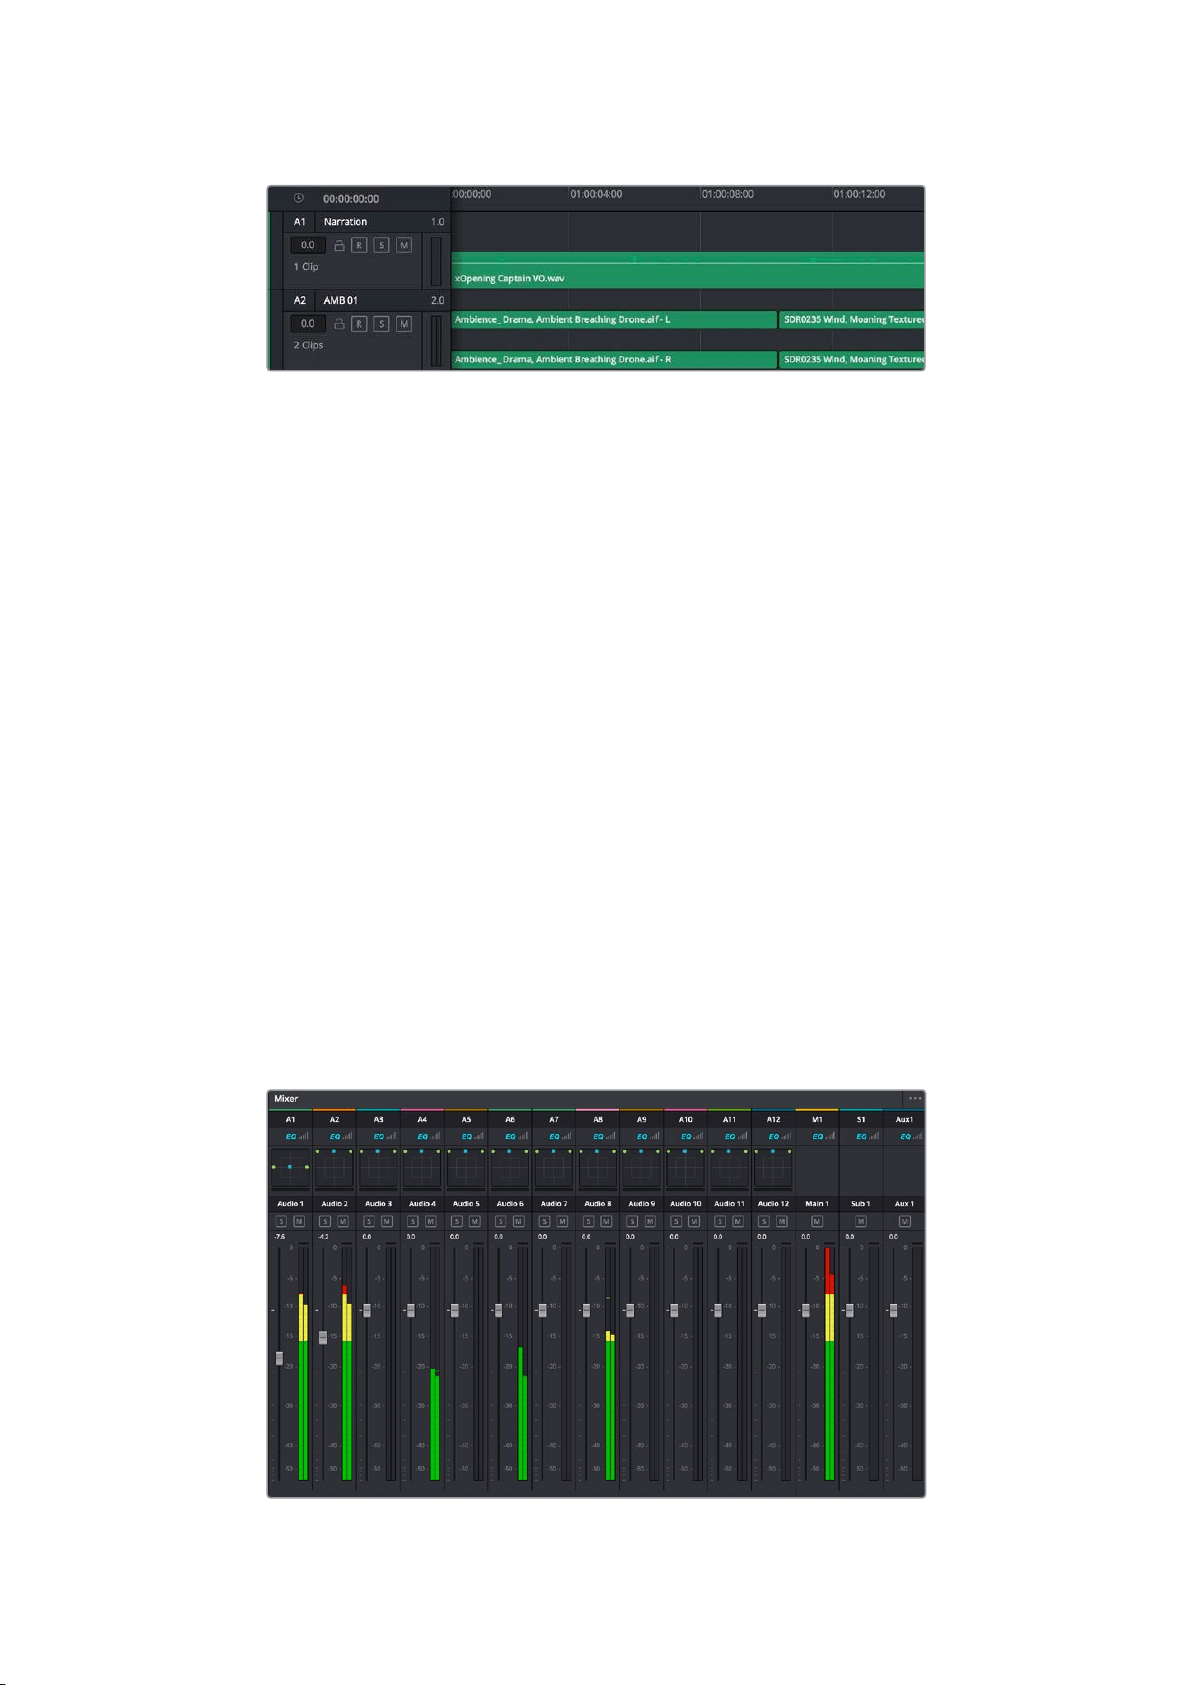
The track header on track A1 indicates a mono track with a single lane for mono audio,
and the A2 track header indicates a stereo track with two lanes to accommodate stereo audio
What is a Bus?
A bus is essentially a destination channel to which you can route multiple audio tracks from the
timeline, so that they are mixed together into a single signal that can be controlled via a single
channel strip.
Main Bus: ‘Main busses’ are typically the primary output of a program and each new
project you create starts out with a single ‘main bus’, to which all tracks are routed by
default. The ‘main bus’ combines all of the tracks in the timeline into one signal so that
you can adjust the overall level of the audio mix once you have adjusted the level of
each individual track.
Sub Bus: ‘Sub busses’ allow you to combine multiple tracks of audio that belong to the
same category such as dialogue, music or effects so that everything in that category
can be mixed as a single audio signal. For example, if you have five dialogue tracks,
you can route the output of all five dialogue tracks to a ‘submix bus’, and the level of all
dialogue can then be mixed with a single set of controls. This submix can be rendered
separately or sent to the main bus for render.
The Mixer
Each audio track in your timeline corresponds to an individual channel strip in the Mixer, and by
default there’s a single strip on the right for the ‘main bus’ labeled ‘M1’. Additional channel strips
will appear on the right hand side with a set of controls for each additional ‘main’ and ‘submix
bus’ you create. A set of graphical controls allows you to assign track channels to output
channels, adjust EQ and dynamics, set levels and record automation, pan stereo and surround
audio, and mute and solo tracks.
The audio mixer, with channel strips corresponding to the tracks in the timeline
70Using DaVinci Resolve
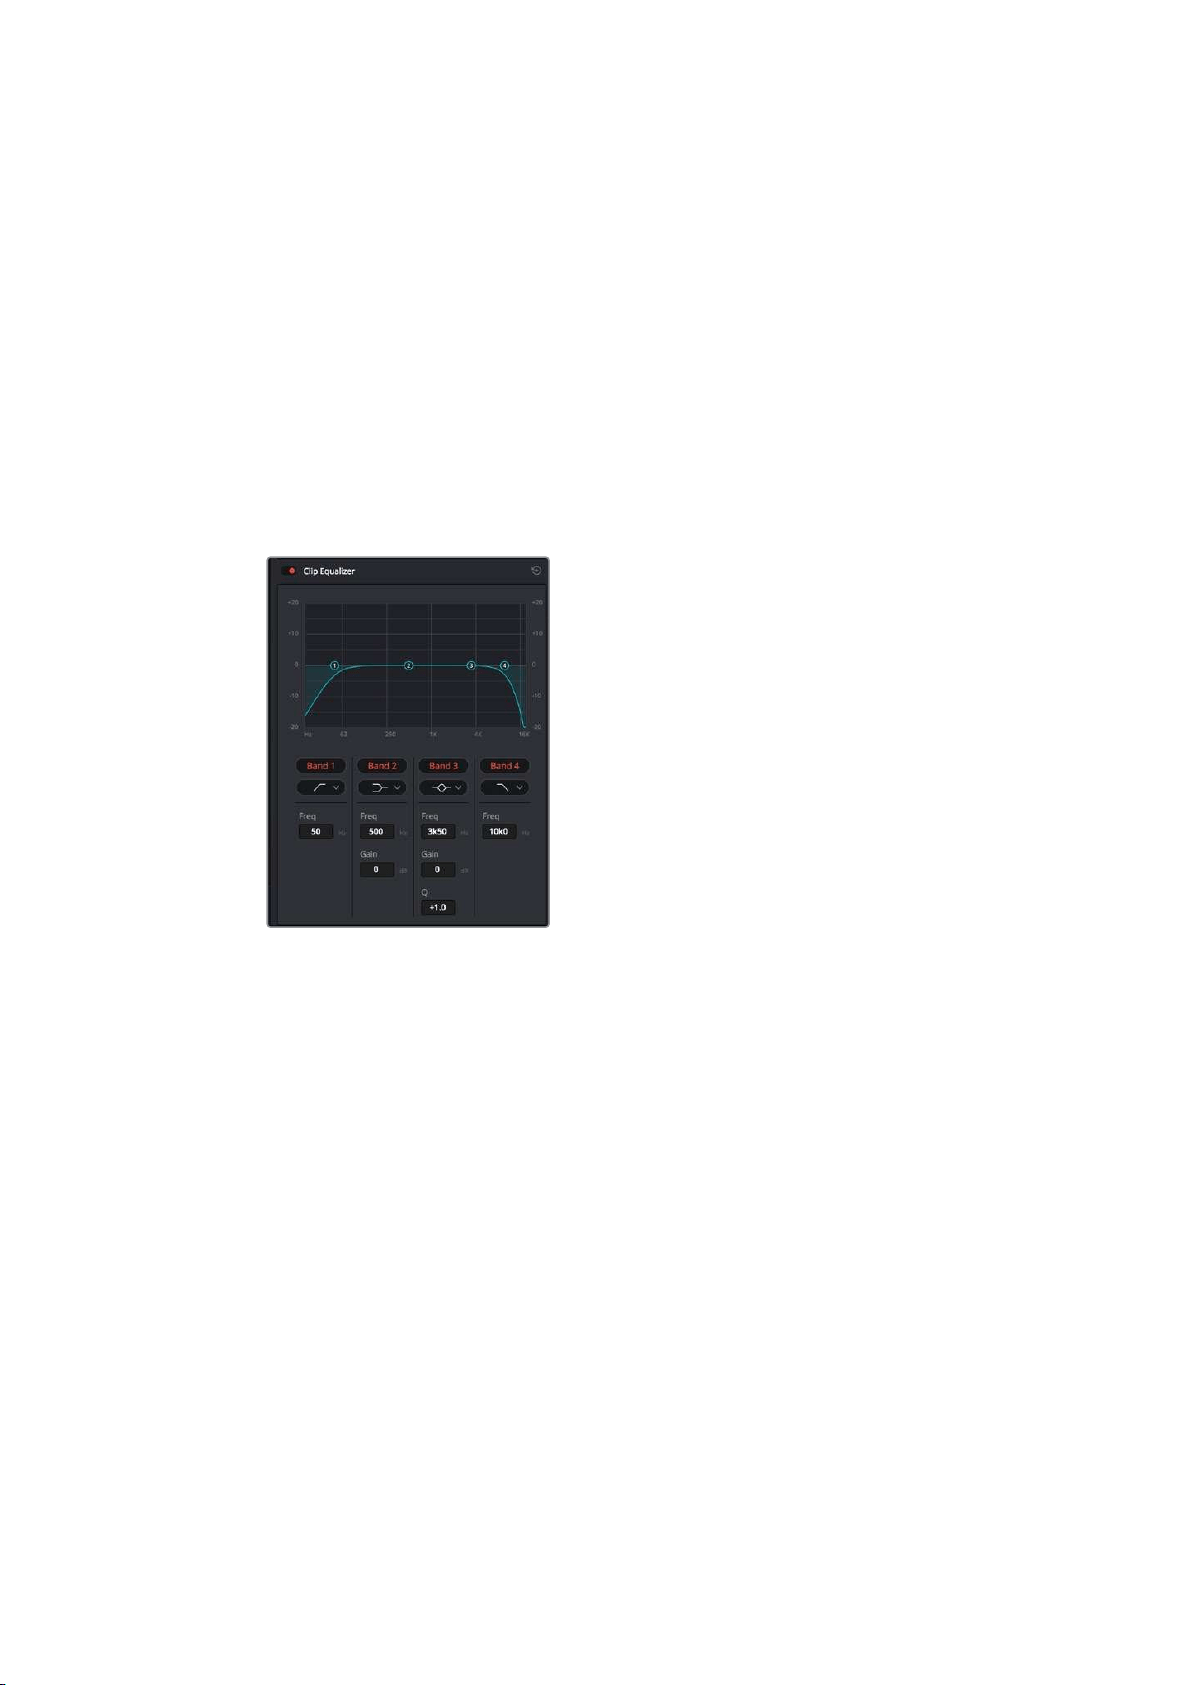
Using the Equalizer to Enhance your Audio
After adjusting the audio levels of your audio clips in your project, you may find that the audio
needs further finessing. In some cases you may find that the dialogue, music and sound effects
are competing for the same frequency on the audio spectrum, making your audio too busy and
unclear. This is where using EQ can help, as it allows you to specify the parts of the audio
spectrum that each track occupies. You can also use an equalizer to help remove unwanted
elements from your audio by isolating and reducing the level on particular frequencies that
contain low rumbles, hums, wind noise and hiss, or simply to improve the overall quality of your
sound so it is more pleasing to listen to.
DaVinci Resolve provides EQ filters that can be applied at a clip level to each individual clip or
at the track level to affect entire tracks. Each audio clip in the timeline has a four band equalizer
in the inspector panel, and each track has a 6 band parametric equalizer in the mixer panel.
The graphical and numeric controls for boosting or attenuating different ranges of frequencies,
and different filter types allow you to define the shape of the EQ curve.
The four band equalizer can be
applied to every clip in the timeline
Outer bands let you make band filter adjustments using hi-shelf, lo-shelf, hi-pass and lo-pass
filters. A pass filter affects all the frequencies above or below a particular frequency, by
removing those frequencies completely from the signal. For example, a high pass filter will
allowthe high frequencies to pass through the filter while cutting the low frequencies.
Anyfrequencies outside the cutoff frequency are cut gradually in a downward sloping curve.
A shelf filter is less aggressive, and is useful when you want to shape the overall top end or low
end of the signal without completely removing those frequencies. The shelf filter boosts or cuts
the target frequency and every frequency either above or below it evenly, depending on
whether you use a high shelf or low shelf.
The middle sets of band controls let you make a wide variety of equalization adjustments, and
can be switched between lo-shelf, bell, notch, and hi-shelf filtering options.
Bell: Bell filters boost or cut frequencies around a given center point of the bell curve,
and as the name suggests the shape of the curve is like a bell.
Notch: Notch filters allow you to specifically target a very narrow range of frequencies.
For example, removing a mains hum at 50 or 60Hz.
Lo-Shelf: Low shelf filters boost or cut the target frequency at the low end, and every
frequency below it
Hi-Shelf: High shelf filters boost or cut the target frequency at the high end, and every
frequency above it
71Using DaVinci Resolve
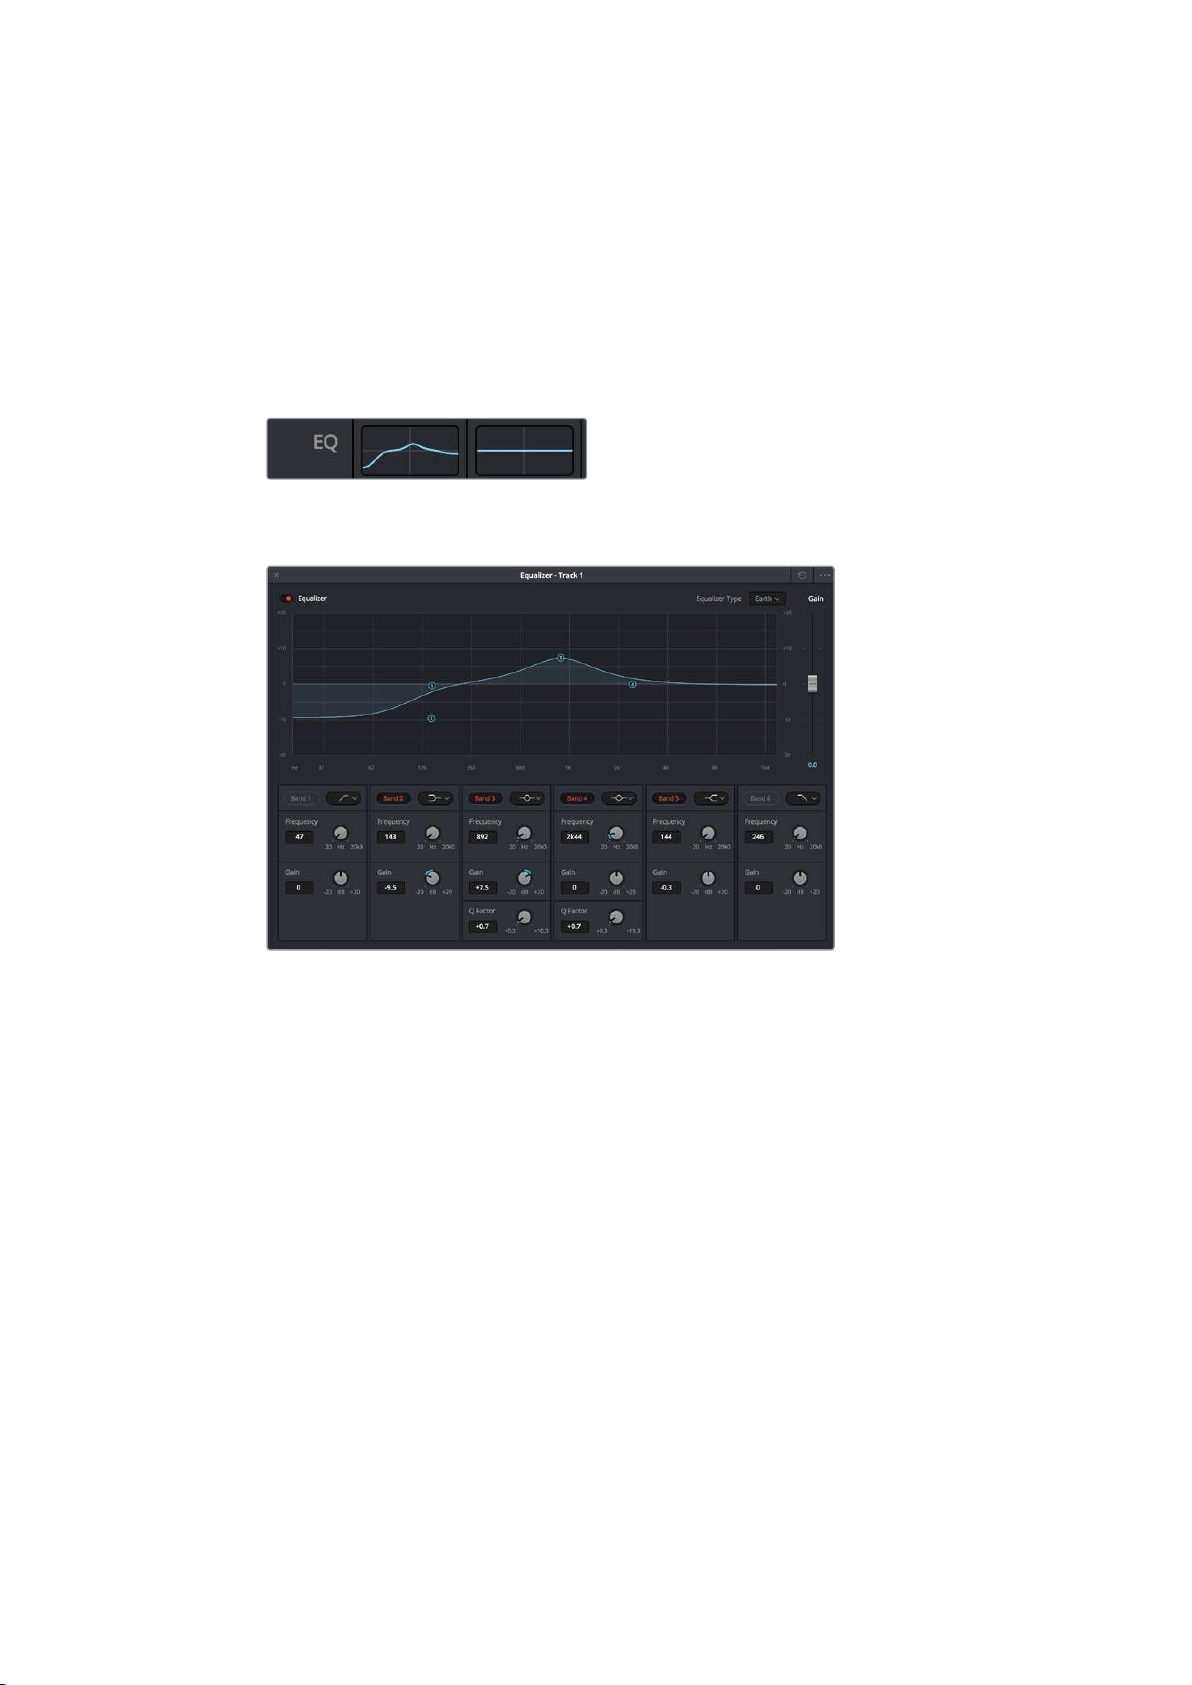
To add EQ to an individual clip:
1 Select the clip in the timeline that you want to add the EQ filter to.
2 Click on the inspector and then click the ‘clip equalizer’ enable button.
To add EQ to a track:
1 Double click in the EQ section for one of your tracks in the mixer to open the equalizer
for that track.
2 Select the band filter type from the dropdown menu for the band you want to adjust.
The EQ section in the mixer panel indicating an
EQ curve has been applied to track one
The 6 Band parametric equalizer that can be applied to every track
Once you have added EQ to your clip or track, you can adjust the EQ for each band. Note that
controls may vary depending on which band filter type is selected.
To adjust the EQ for a band filter:
1 Select the band filter type from the dropdown menu for the band you want to adjust.
2 Adjust the ‘frequency’ value to select the center frequency of the EQ adjustment.
3 Adjust the ‘gain’ value to boost or attenuate the frequencies governed by that band.
4 Use the ‘Q factor’ value to adjust the width of affected frequencies.
Use the reset button to reset all controls in the EQ window to their defaults.
Fairlight has many controls you can use to improve the quality of each audio track. You can add
more tracks and arrange buses to organize them, plus add effects like delay or reverb, and
generally perfect your audio mix.
72Using DaVinci Resolve
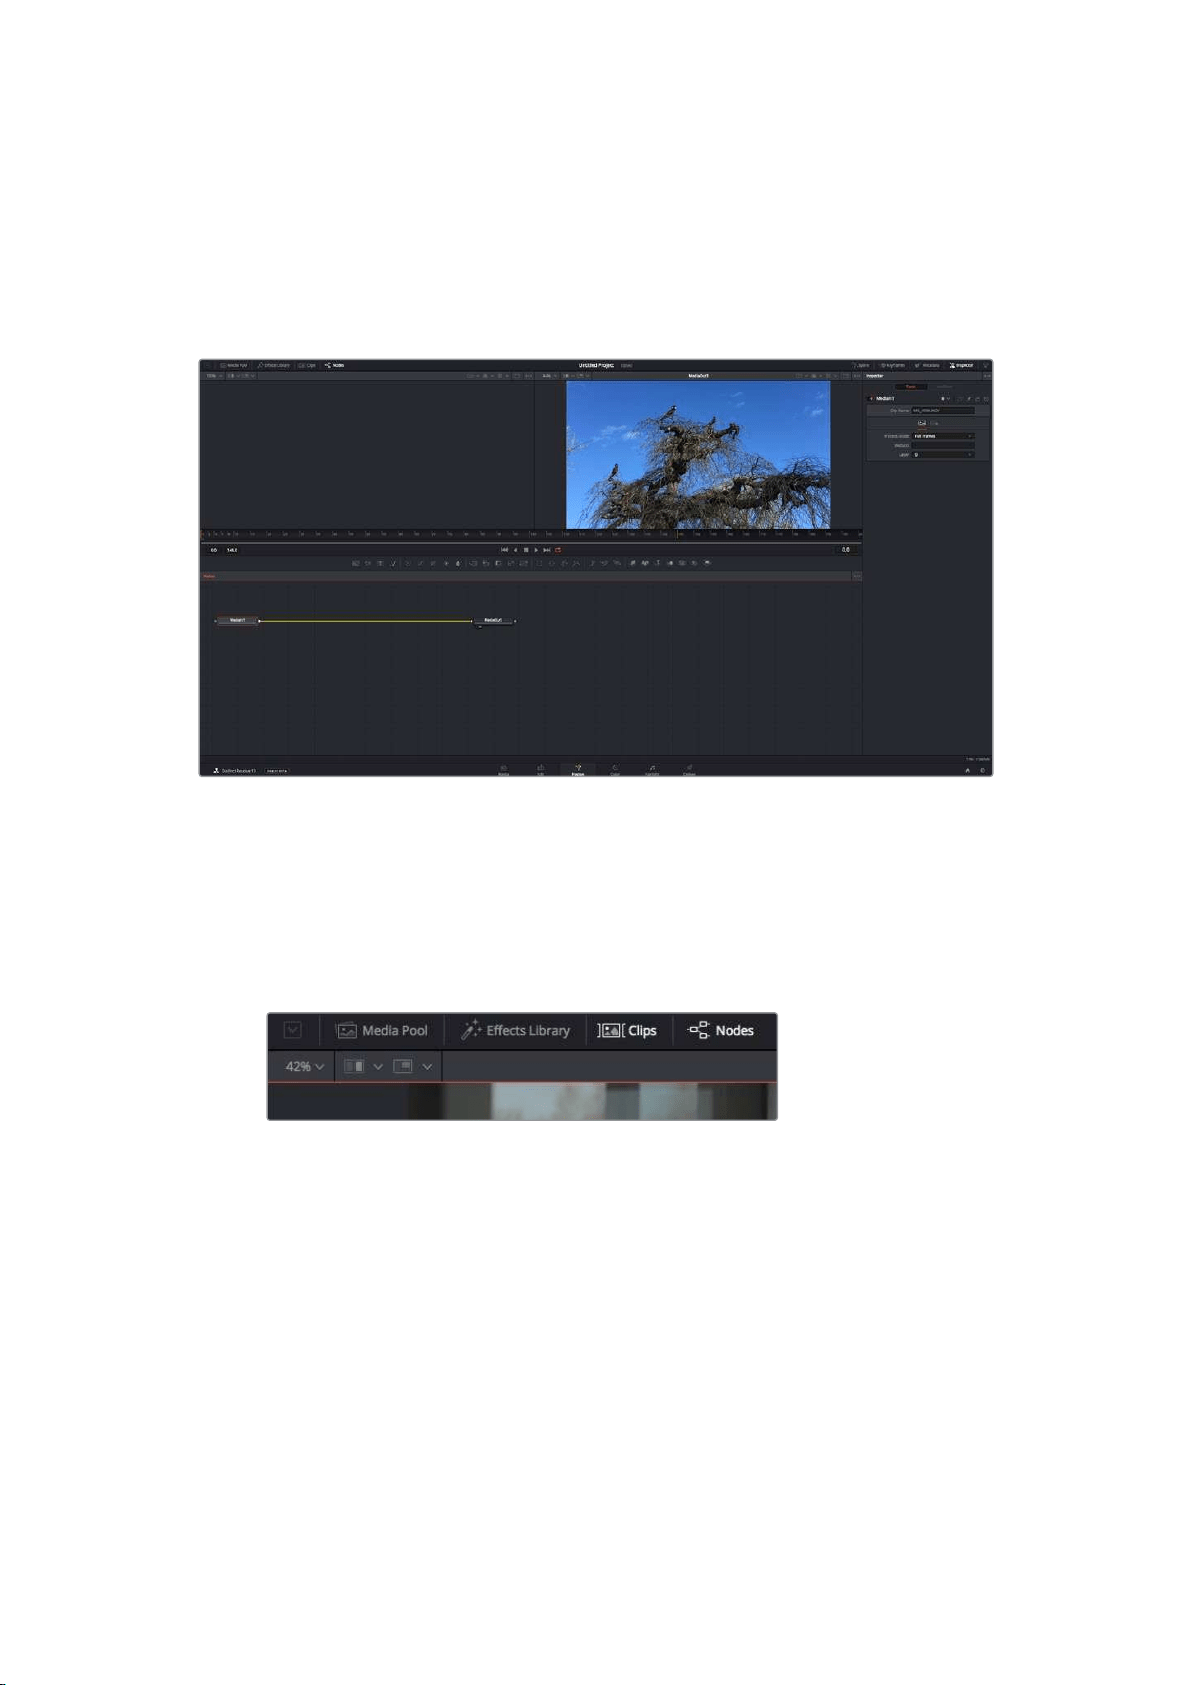
Adding VFX and Compositing on the Fusion Page
Now that you have completed your edit, you can open the Fusion page to add 2D or 3D visual
effects and motion graphics right within DaVinci Resolve. Unlike layer based compositing
software, Fusion uses nodes, giving you the freedom to build complex effects while routing
image data in any direction. The nodes window clearly shows every tool used along the way.
Ifyou have experienced the node workflow in the color page, this will feel familiar to you.
The Fusion Page
The Fusion page features 2 viewer windows across the top with transport controls to view your
media, an inspector window to the right to access tool settings, and a nodes window at the
bottom where you build your composition. While the viewers and transport controls are always
visible, clicking on the icons on the interface toolbar at the very top of the display will let you
show or hide the nodes and inspector windows, or reveal or hide additional windows including
the effects library and editors for spline and keyframes.
Media Pool: The media pool functions the same way as it appears in the edit page.
Simply drag additional media from your bins directly to your composition.
Effects Library: The effects library is where you will find your Fusion tools and
templates sorted into categories including particle, tracking, filters and generators.
You can either click on the tool or drag it to the nodes area to add it to your
composition. The media pool and effects library take up the same screen area, so you
can swap between the two to keep your viewers as large as possible.
Clips: Clicking the clips tab will reveal or hide thumbnails representing clips on your
timeline. The thumbnails are located underneath the nodes editor, letting you instantly
navigate to other clips.
73Using DaVinci Resolve

Create a new version of your composition by right clicking on a
thumbnail and selecting ‘create new composition’.
Viewers: The viewers are always visible and let you see the different views of your
composition, for example an overall 3D perspective via the merge 3D node, a camera
output, oryour final render output. These viewers also let you see how your changes
are affecting aspecific element.
You can choose which nodes to view by clicking on a node and typing ‘1’ for the left
viewer or ‘2’ for the right viewer. White button icons appear beneath the node to let
you know which viewer itis assigned to. If you’re using external video monitoring, there
will be a third button available to route your media to your external video monitor.
TIP You can also assign a node to a viewer by dragging the node
into the viewer itself.
The transport controls underneath the viewers let you skip to the start or end of the
clip, play forward or reverse, or stop playback. The time ruler displays the entire range
of a clip, with yellow marks indicating the in and out points.
The yellow marks on the time ruler indicate your clip’s in and out points on your
timeline. If you are using a Fusion clip or compound clip, the time ruler will only show
you the duration of the clip as it appears on the timeline, without handles.
Nodes: The nodes window is the heart of the Fusion page where you build your node
tree byconnecting tools together from one node’s output to another node’s input.
Thisarea will change size depending on which editors are open, for example the spline
or keyframes editor. A toolbar atthe top of the nodes area features the most commonly
used tools for fast access.
74Using DaVinci Resolve
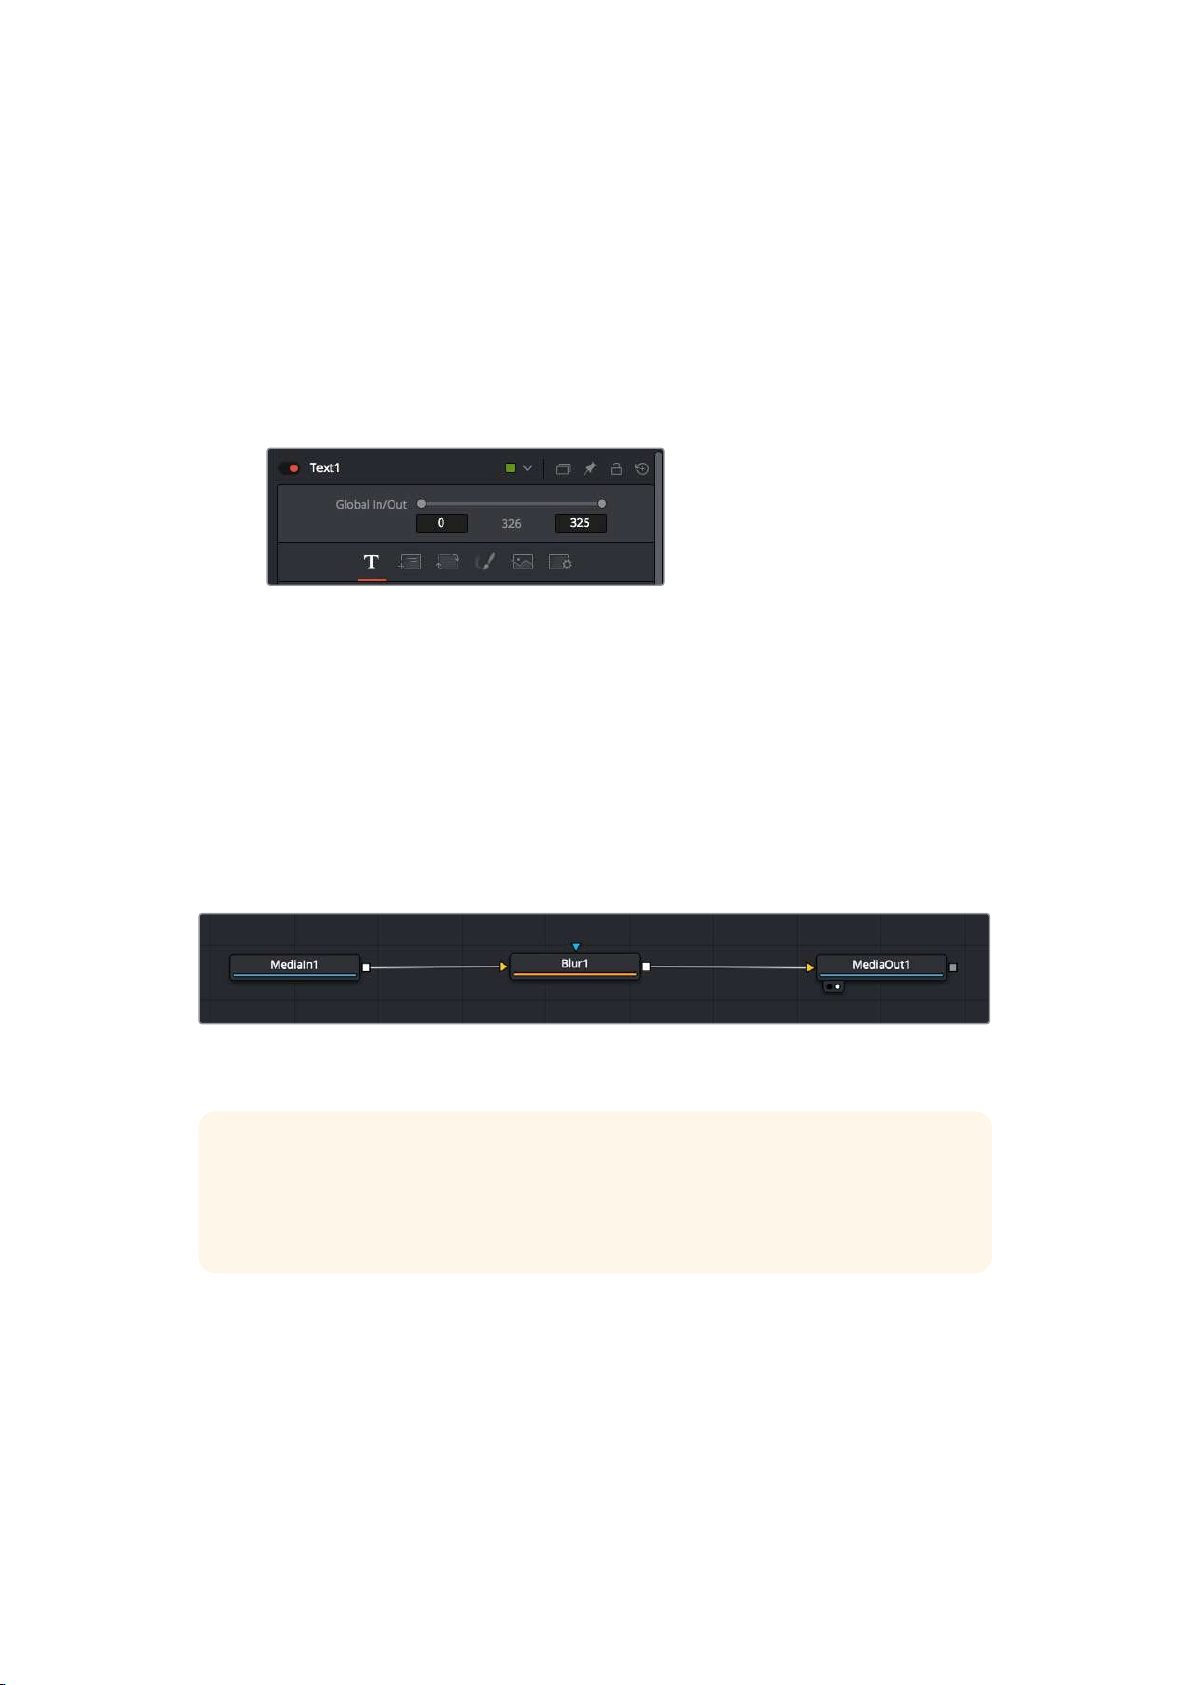
Spline: When the spline editor is open, it will appear to the right of the nodes window.
This editor lets you make precise adjustments to each node, such as smoothing the
animation between two keyframes using bezier curves.
Keyframes: Keyframes for each tool can be added, removed or modified using the
keyframes editor. This also appears to the right of the nodes viewer.
Metadata: The metadata window will show you metadata available for the active clip,
including the codec, frame rate and timecode.
Inspector: The inspector in the top right corner displays all settings and modifiers
available for one or more selected nodes. Additional tab options will appear to provide
quick access to other settings for nodes sorted by category.
The text inspector contains additional tabs for text,
layout, transform, shading, image and settings.
Getting Started with Fusion
To get started with Fusion, simply position your playhead over any clip on your timeline and
click on the ‘Fusion’ tab to open the Fusion page.
On the Fusion page, your clip is immediately available in a media input node labelled ‘MediaIn’.
Every composition will begin with a ‘mediain’ and a ‘mediaout’ node. This mediain node
represents the top most clip of your timeline at the playhead, and ignores any clips underneath.
Any adjustments you’ve applied to the clip on the edit page, such as transform tools and
cropping changes, are also included.
The media output node, named ‘MediaOut’, is the node that sends the output
back to your timeline on DaVinci Resolve’s edit page.
TIP ResolveFX or OFX plug-ins applied to clips in the edit page are not applied in
the Fusion page. This is because Fusion effects occur prior to color correction and
OFX/ResolveFX processing. If you want OFX applied before Fusion effects, right click
the clip in the edit page and select ‘new fusion clip’ before clicking on the Fusion page.
Understanding Nodes
It can be helpful to think of each node as a visual icon representing a single tool or effect.
Nodes are connected to other nodes to build the overall composition, much like ingredients
inacake. It’s important to understand the inputs and outputs of each node as this will help you
navigate the flow of your composition while building detailed visual effects.
Some tools have multiple inputs and outputs you can connect to other nodes. The merge node,
for example, lets you attach a foreground input, background input, and a mask input for
mattes or keys.
75Using DaVinci Resolve
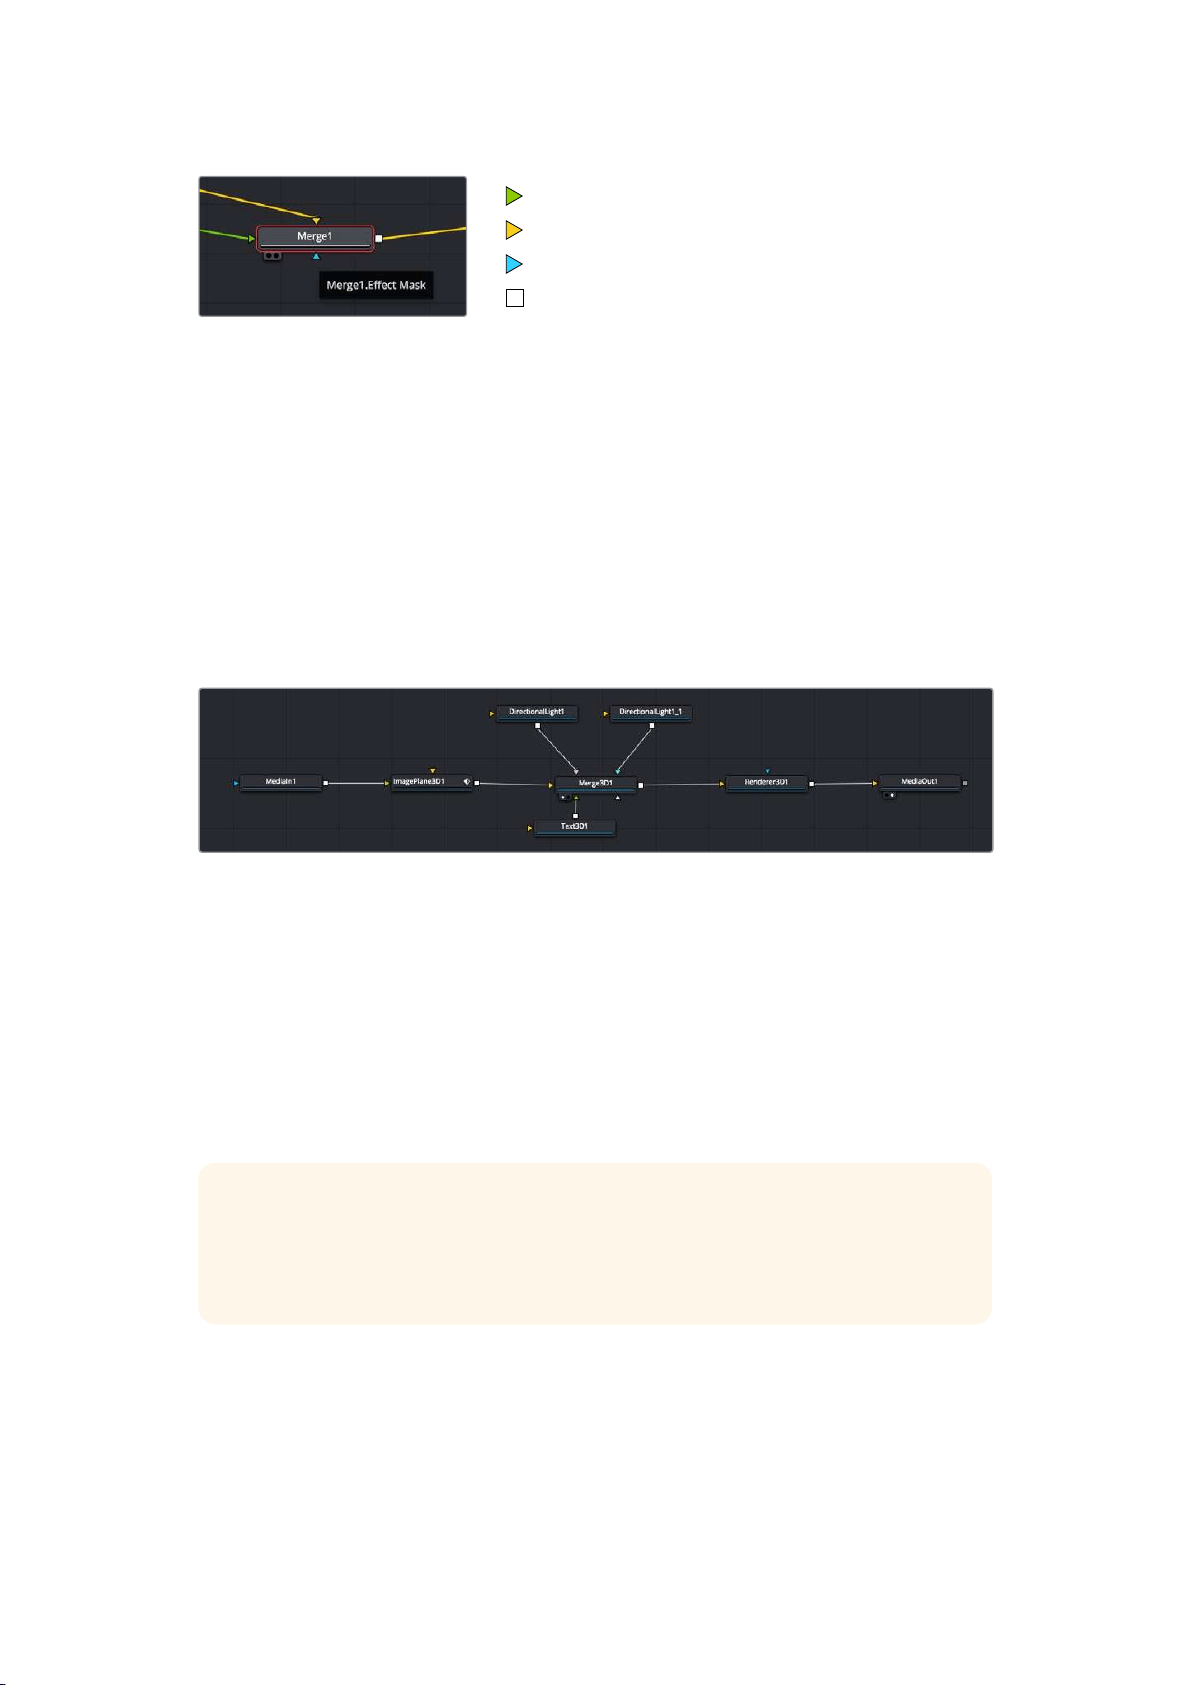
foreground input
background input
effect mask input
output
Multiple outputs on nodes means a single node can connect to many different nodes in your
composition, so you don’t have to duplicate clips as you would in layer based software.
Arrows on the line between connected nodes are a great visual indicator to show you which
direction the image data is flowing.
Adding Nodes to the Node Editor
Adding effects is as simple as placing nodes on the line between the ‘mediain’ and
‘mediaout’ nodes.
There are a few ways you can do this. You can hold down the shift button and drop a node
between two nodes, or click on the node you want to attach an effect to and select the
tool you want to add. The new node will automatically connect to the tool selected. You can
also add a node anywhere on the node window and manually connect nodes by dragging the
output of one to the input on another.
The most commonly used tool is the 2D or 3D merge node. This node is like
a central hub that combines tools on the node editor into a single output.
The merge node has controls for how the inputs are managed, including settings for size,
position, and blend. These settings are all accessible in the inspector panel when the merge
node is selected.
The toolbar above the node panel contains the most commonly used tools as icons that you
can either click on to add the node, or drag the tool to the node panel. If you want to see all the
complete tools available, click on the ‘effects library’ in the top left corner and expand the ‘tools’
option. Here you’ll find all the tools sorted by category, as well as a set of pre-built ‘templates’
you can use, for example lens flares, shaders and backgrounds.
TIP Once you’re familiar with the tool names, you can hold down ‘shift’ and press
‘spacebar’ on your keyboard and a ‘select tools’ menu will appear. As you type the tool
name, the menu will suggest the relevant tool. This is a very fast way to select the tool
you want.
Adjusting Nodes Using the Inspector Panel
Adjust your node settings using the inspector panel. Simply click on the node you want to
modify and the panel will update to display its settings and controls.
With Fusion, you don’t have to be viewing the node you’re editing, as you can modify one node
while viewing another in your composition. For example, you can modify the size and center
position of a ‘text+’ node while the merge node is in the viewer, letting you view the text relative
to the background.
76Using DaVinci Resolve
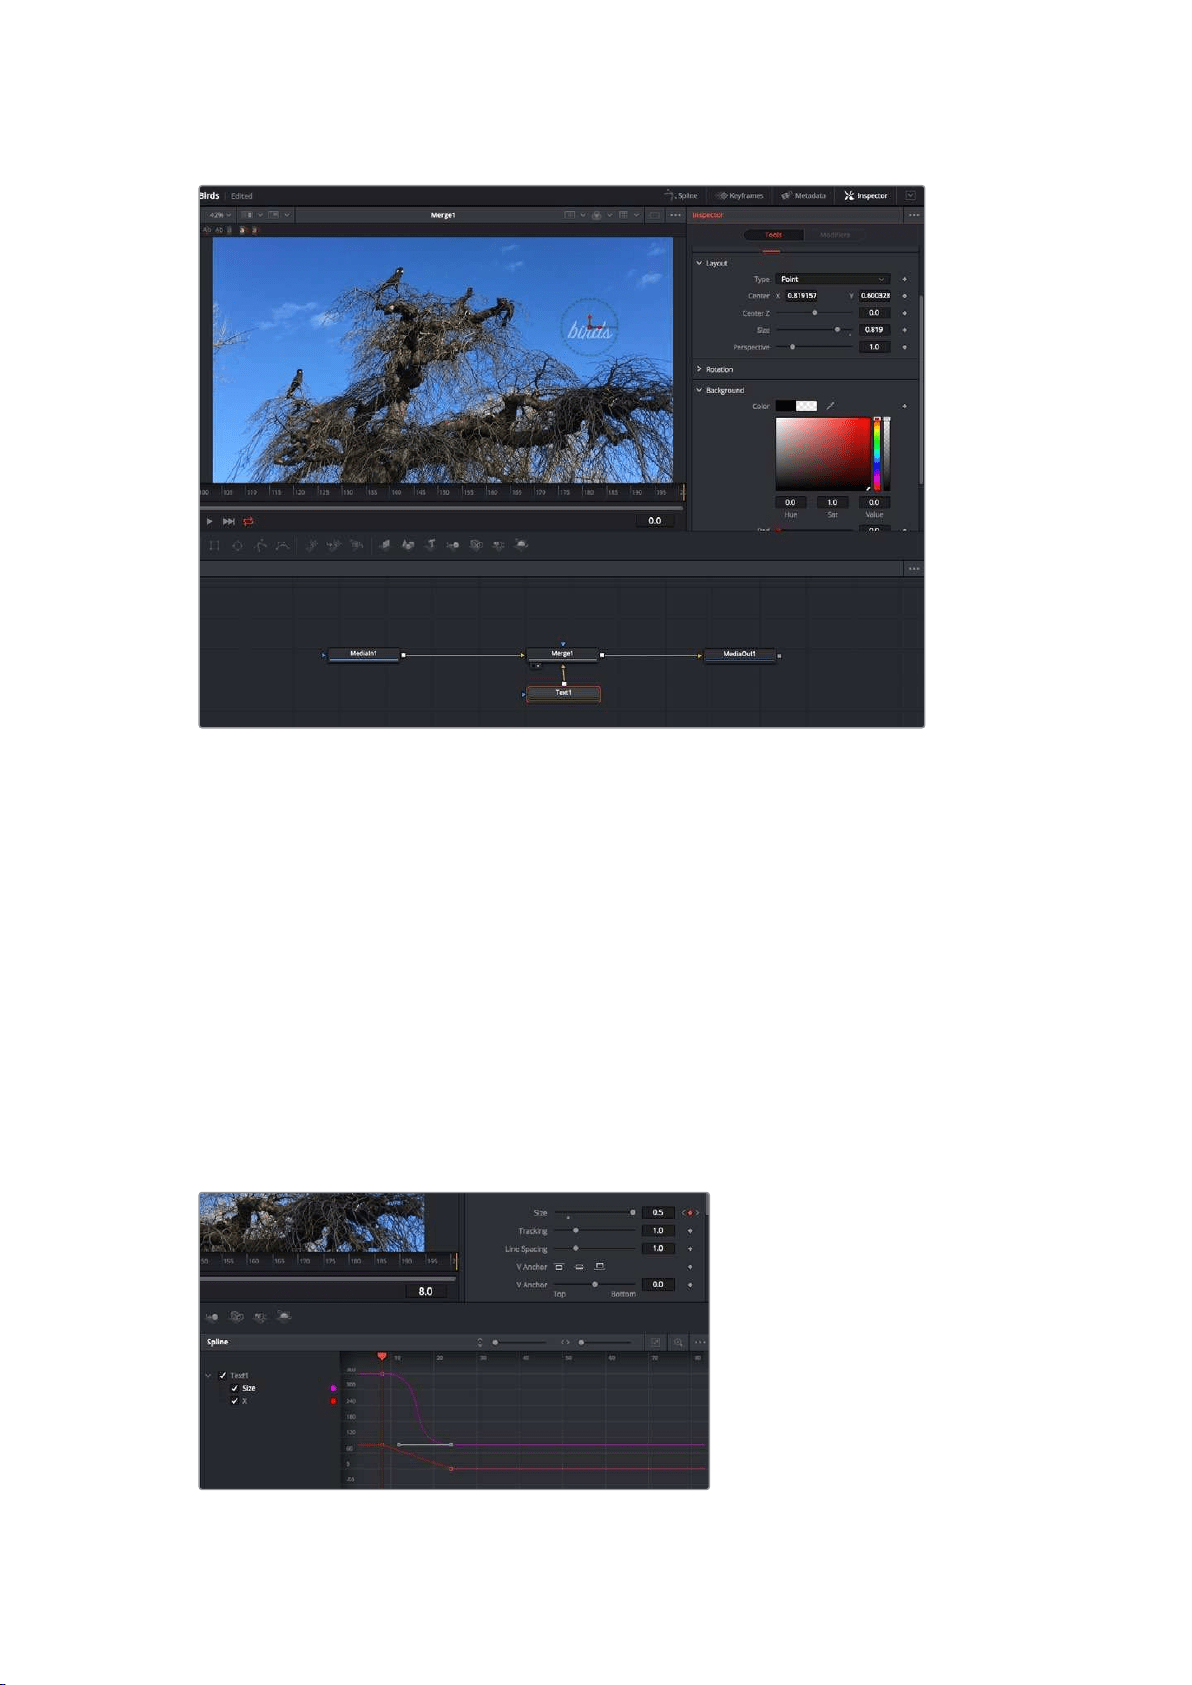
Selected nodes appear with a red border. Here the inspector
panel is displaying the layout tab controls for the text node.
There are different parameters and settings you can adjust for every node depending on its
task, from sizing and center positions to changing the number of particles in an emitter node.
Setting keyframes and changing the settings over time will animate the effect.
Working with Keyframes
In the inspector window, set a keyframe by right clicking on a setting and choosing ‘animate’
from the contextual menu. The keyframe icon to the right of the setting will turn red. This means
keyframes are now active and any changes you make will be applied to the current frame only.
When two or more keyframes are created by changing the setting parameters on a different
frame, a transition is interpolated between them. Arrows on each side of the keyframe icon let
you move the playhead to those exact positions on the timeline.
The splines panel gives you further control over keyframe animation. You can select keyframes,
such as the first and last, and smooth the animation between them into a bezier curve by typing
‘shift’ + ’s’, or right clicking on a keyframe and selecting ‘smooth’.
Here, the ‘size’ keyframe animation has been smoothed into a bezier
curve. You can click the bezier handles to shorten or lengthen the
curve, or the keyframe square icons to move the keyframe location.
77Using DaVinci Resolve

Using the Motion Tracker and Adding Text
To get a better idea of how to use Fusion, we have included the following examples to show
how to use the tracker tool to track an element in a clip, plus add text and attach it to the
element using the tracking data.
The ‘tracker’ tool tracks pixels over time on the x & y axis, and generates data you can use to
attach other elements. This is great for when you want to match the position of text to a moving
object, such as a car driving along the road, or a bird as it flies across frame.
1 In the ‘effects library’, select the ‘tracking’ tool and drag it to the line between the
‘mediain’ and the ‘mediaout’ nodes. Now click the tracker node to reveal its properties
in the inspector.
2 Type ‘1’ on your keyboard to see the ‘tracker’ node on the left viewer. The clip will
appear in the viewer together with the tracker at its default position. Hover your mouse
pointer over the tracker to reveal the tracker handle. Click on the tracker handle at the
top left corner and drag the tracker to an area of interest on your clip. High contrast
areas work well, for example the badge on the hood of a car. The tracker will magnify
the image area for extra precision.
3 In the inspector window, click on the ‘track forward’ button to start tracking.
A notification window will appear when the tracking is done. Click OK.
Tracking options in the inspector panel include track reverse from last frame or
current frame, stop track or track forward from current frame or first frame.
TIP Track reverse or forward from current frame is great for situations where
your area of interest disappears during the render range, such as a car or bird
moving out of frame. This lets you track only the relevant footage.
Now you can take that tracking data and apply the motion path to a text tool.
4 Click on the ‘text+’ node icon from the toolbar of commonly used nodes and drag it to
the node panel near the ‘tracker’ node. Connect the ‘text’ output square to the green
foreground input on the ‘tracker’.
78Using DaVinci Resolve
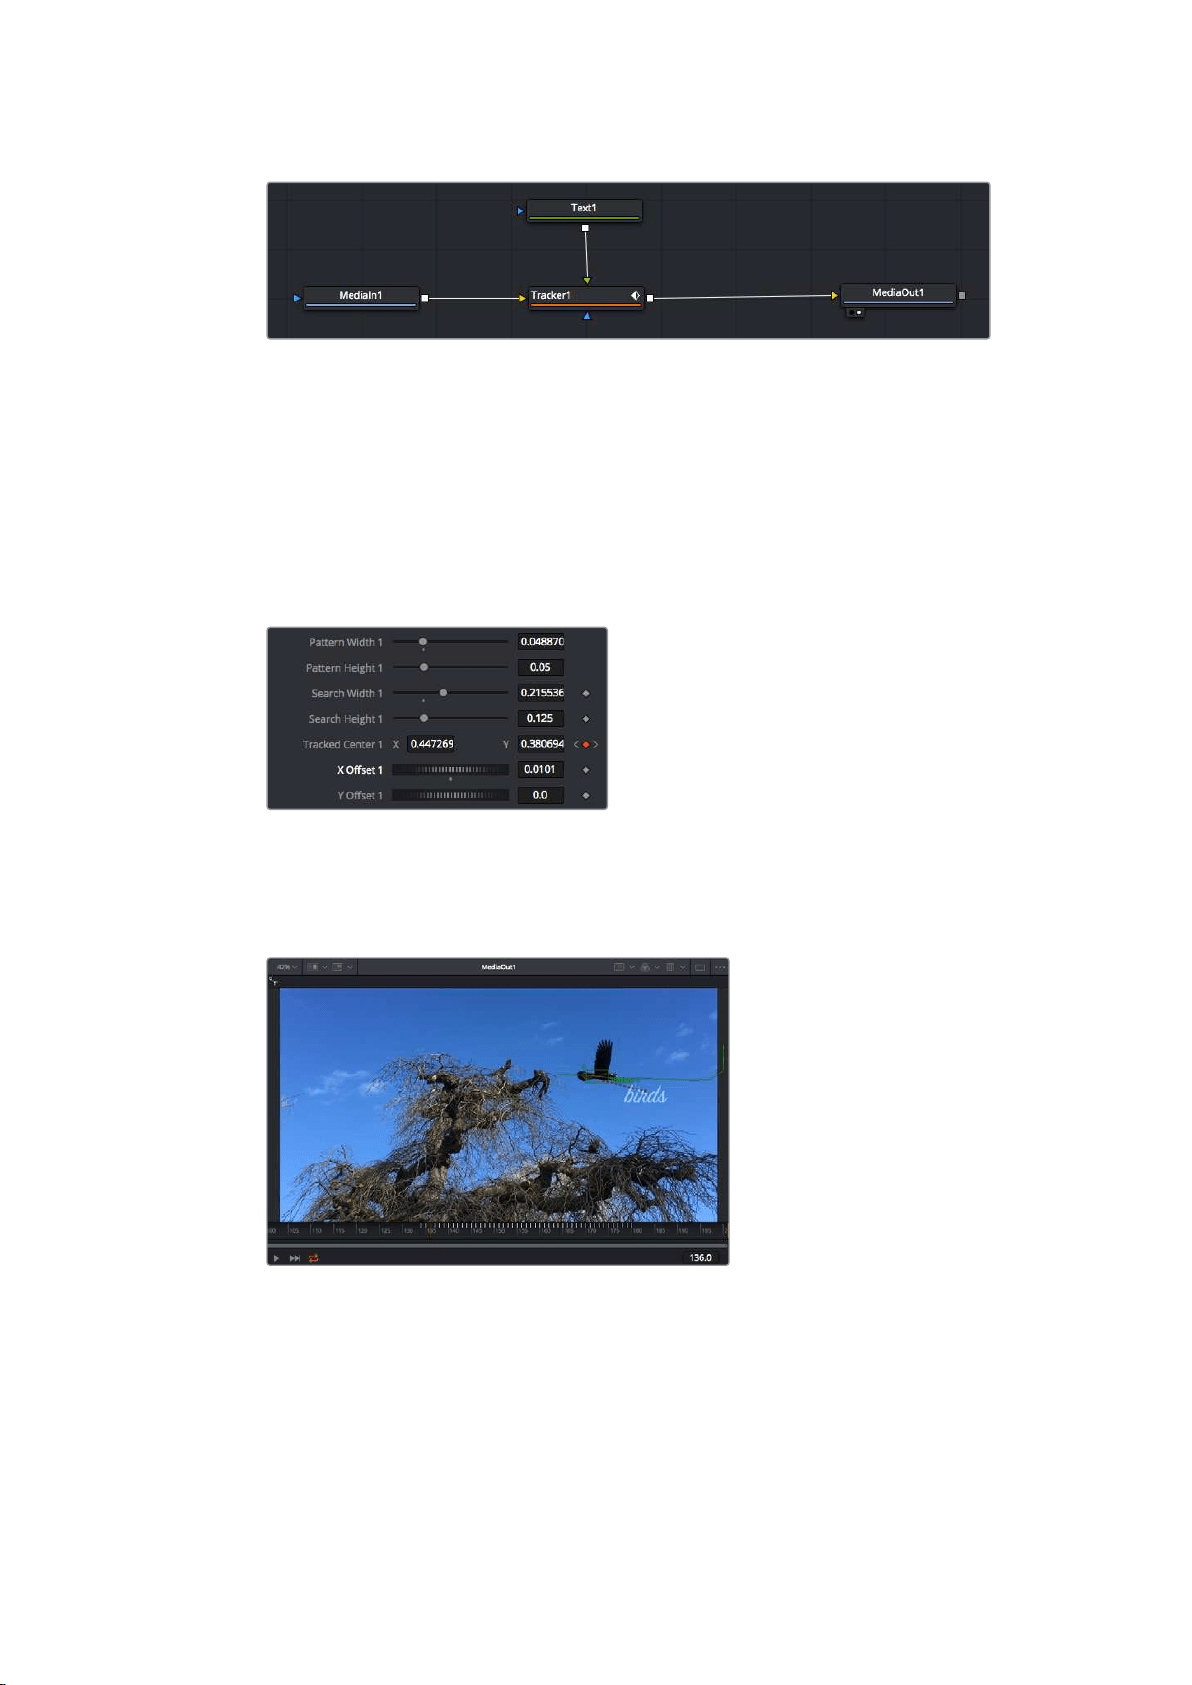
5 Click on the ‘tracker’ node and type ‘1’ so you can see the merged results on your left
hand viewer. In the ‘tracker’ inspector panel, click on the ‘operations’ tab. You can see
the tab’s name by hovering the mouse pointer over it. Click the dropdown menu next to
operation and select ‘match move’.
6 Click the ‘text’ node to reveal the properties in the inspector. Type your text into the
text box and change the font, color and size to suit your composition.
This will apply the tracking position data from your tracker to your text. If you want to
change the text offset, click on the ‘trackers’ tab back in the inspector panel and use
the x and y offset scroll wheels to modify the position.
Scroll wheels at the bottom of the tracker inspector
panelletyou adjust the offset position for the text.
Now you can play back your composition and see your text attached to the object you
have tracked!
The green square is the tracker’s current position along the green path,
and the red dashed line is the offset position used to animate the text.
For some shots you might want to remove track points after tracking, such as when the
object you are tracking disappears off the screen. The keyframe editor makes this a
very simple process.
79Using DaVinci Resolve
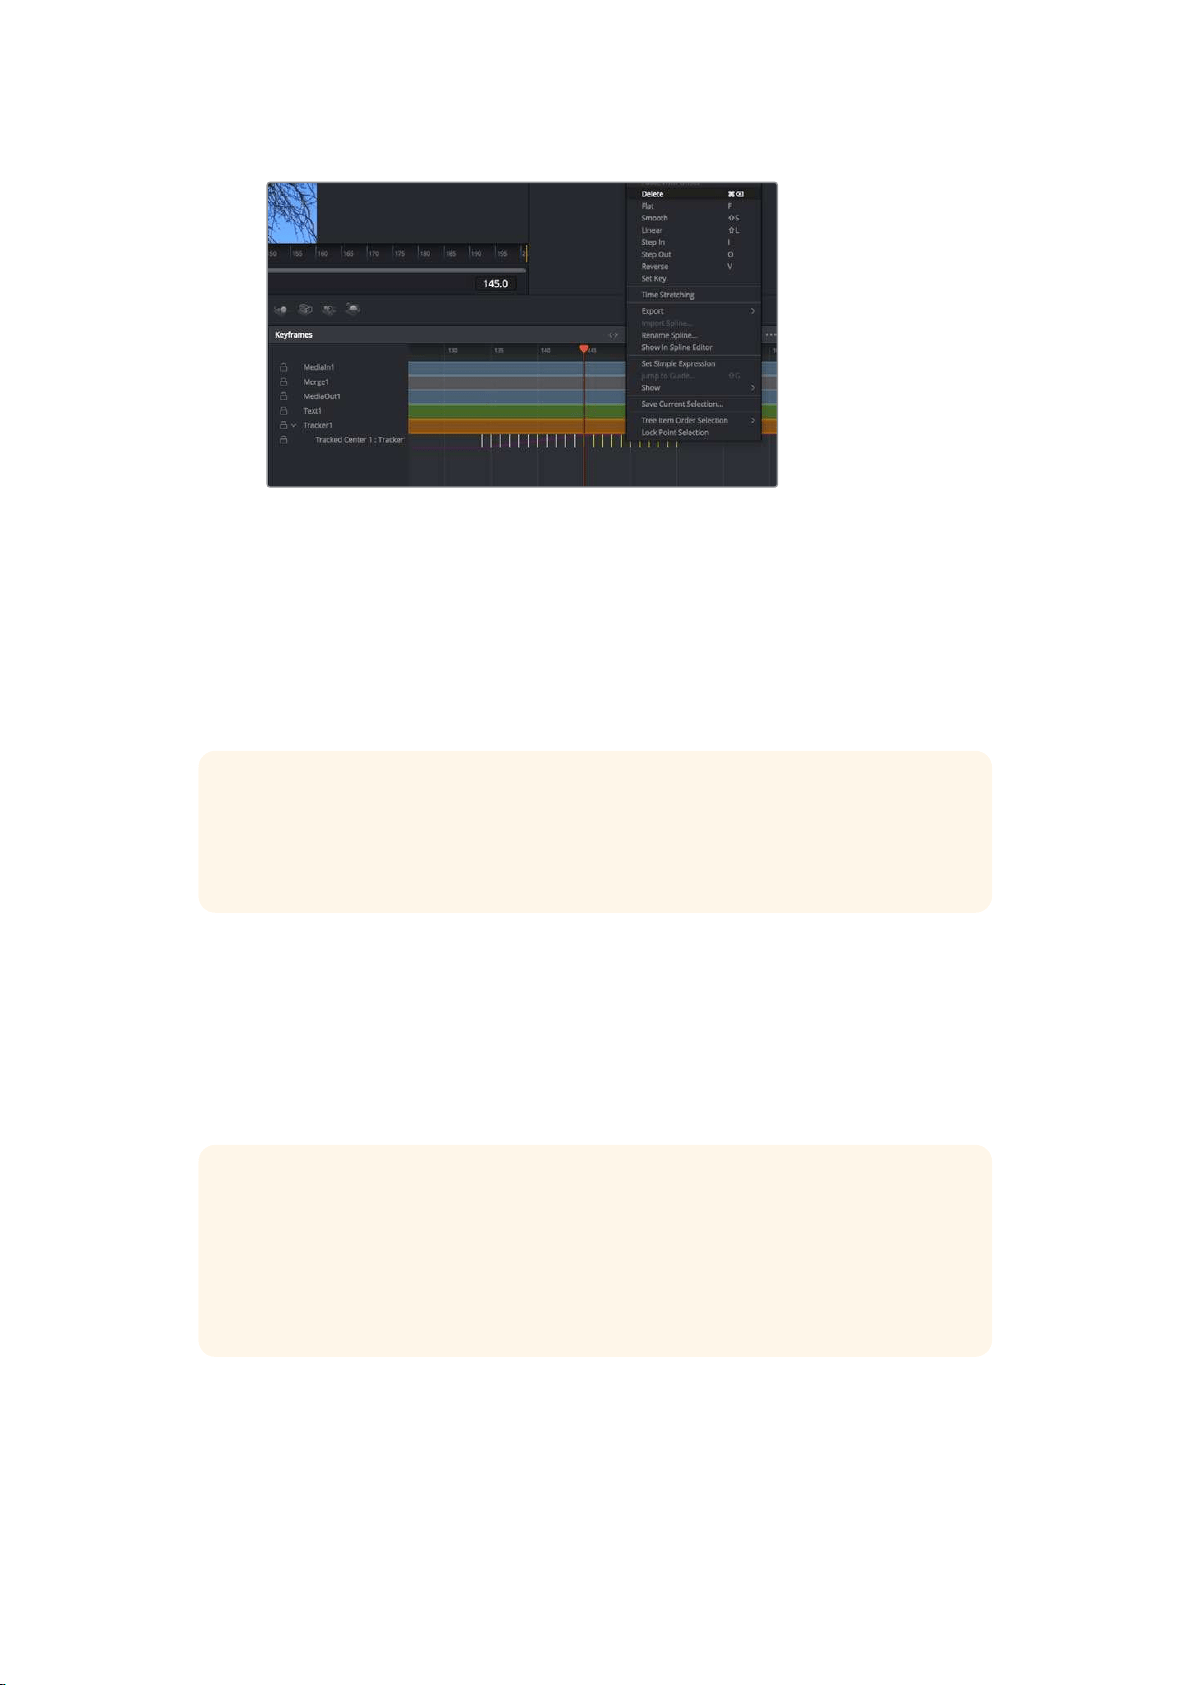
7 Click on the keyframes tab above the inspector to open the keyframes editor.
Any nodes with keyframes applied will have a small arrow next to the node label, and
only the parameter with keyframes added will appear in the list below. Click on the
magnify icon and drag a box around the area you want to edit. This will zoom into that
area so you can see the keyframes easier.
8 Move the playhead to the location of the last keyframe you want. Now select the
keyframes you wish to remove by drawing a box around them with your mouse.
The keyframes will highlight yellow. Right click and choose delete from the menu.
TIP If your effects are particularly system intensive, right clicking on the transport
controls area will give you viewer options, including proxy playback, helping you get
the most out of your system while you build your composition. Refer to the
DaVinci Resolve manual for further detail on all the playback options.
You have now completed your first composition animating text to match a movement in
your footage!
If you want to track an area of the image that contains a flat surface you want to enhance or
replace, you can use the planar tracker. Tracking 2D planes can be helpful for changing labels
and signs in a moving image, or even adding an image to a monitor or TV in your shot.
For more information about the planar tracker and the many powerful tools in the
DaVinci Resolve Fusion page, see the DaVinci Resolve manual.
TIP As you build visual effects in the Fusion page, it’s worth noting if the effect you are
building is a 2D effect, or a 3D effect, as this will determine which merge tool is used.
You may discover yourself frequently combining 2D and 3D effects in the one
composite. In this scenario, it’s helpful to remember that any visual effect using the
3D space needs to be rendered as a 2D image before it can be merged into a
2D composite.
We believe you will have lots of fun with Fusion and exploring Fusion’s visual effects with the
power of DaVinci Resolve’s edit, color, and Fairlight pages. With all these tools at your finger
tips, DaVinci Resolve is incredibly powerful and there is really no limit to what you can create!
80Using DaVinci Resolve
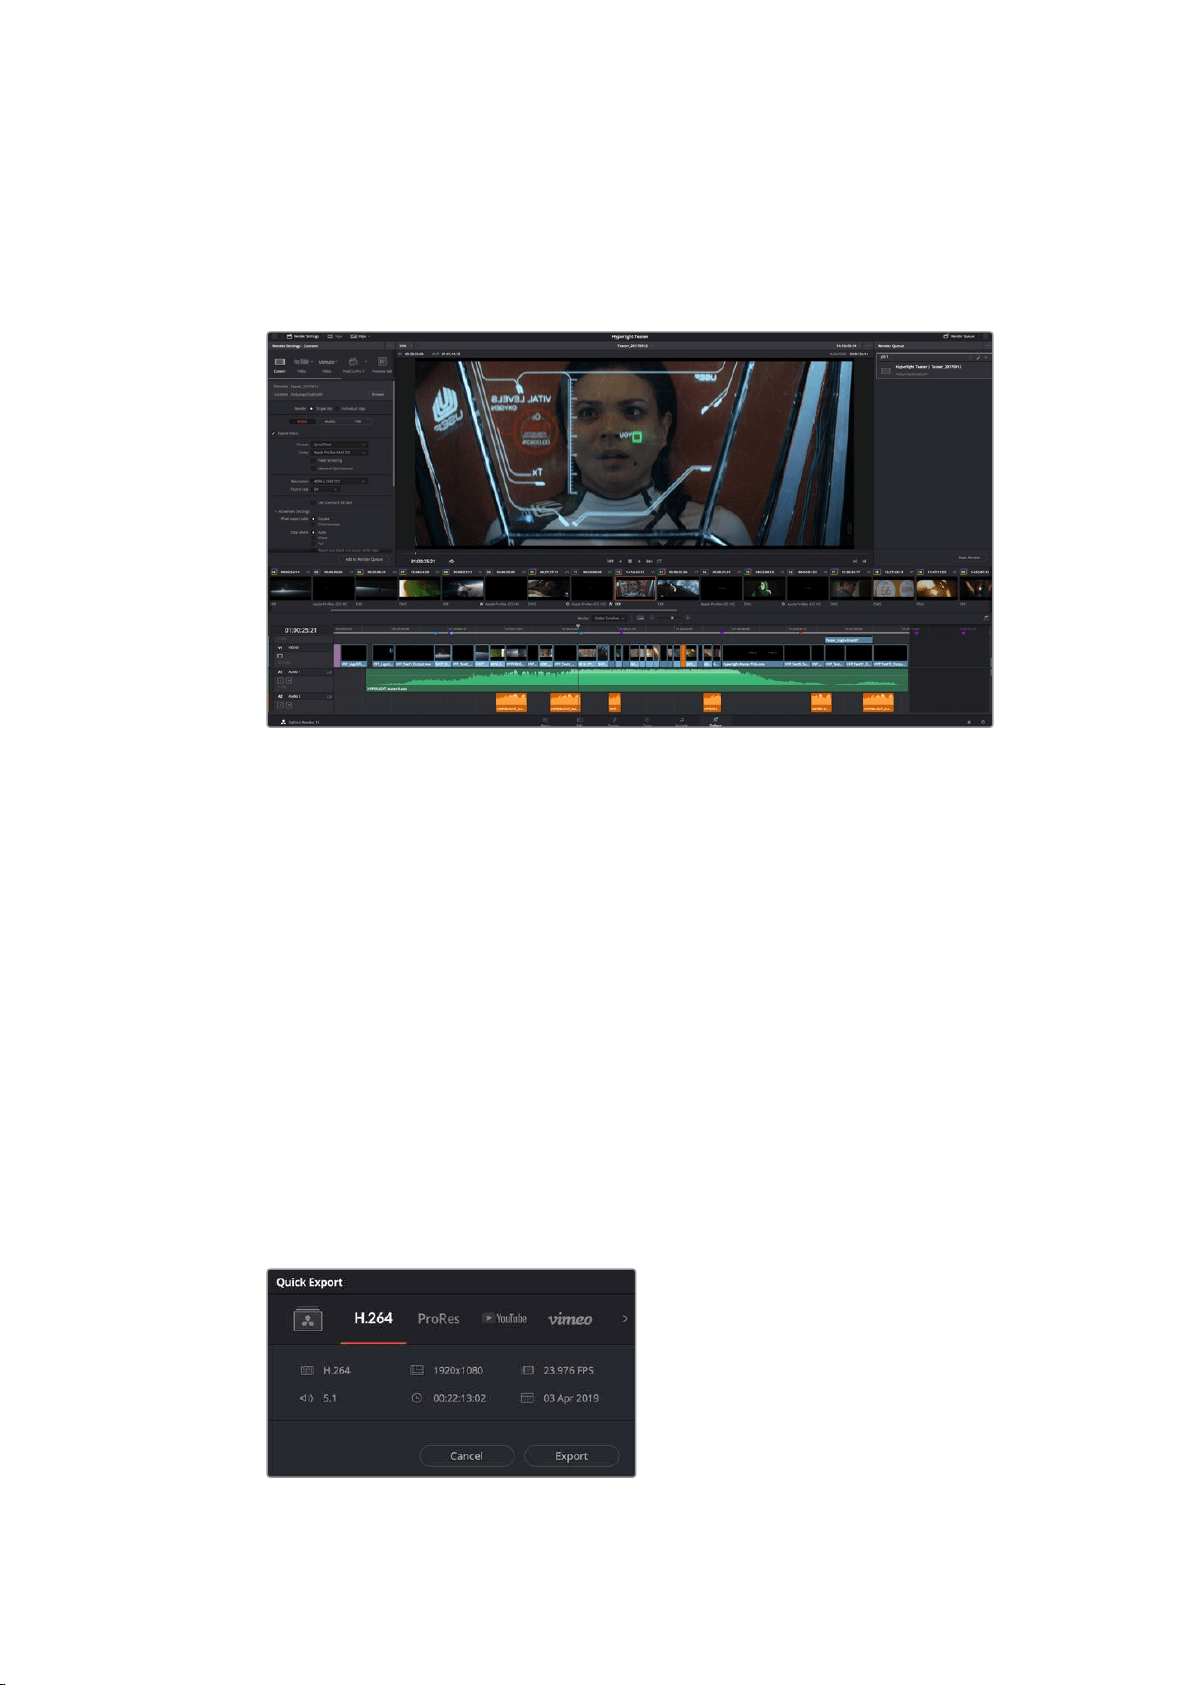
Mastering Your Edit
Now you’ve edited, graded, added vfx and mixed your audio, you’ll want to share it with others.
You can use the Quick Export button, or menu selection, to output the contents of the Timeline
as a self contained file in one of a variety of different formats, or use the additional features of
the ‘deliver’ page.
The ‘deliver’ page is where you export your edit. You can select
from many different video formats and codecs
Quick Export
You can choose File > Quick Export to use one of a variety of export presets to export your
program from any page of DaVinci Resolve. You can even use quick export to export and
upload your program to one of the supported video sharing services, including YouTube,
Vimeo, and Frame.io.
To use Quick Export:
1 In the ‘edit’, ‘fusion’, or ‘color’ page, optionally set in and out points in the timeline to
choose a range of the current program to export. If no timeline in or out points have
been set, the entire timeline will be exported.
2 Choose File > Quick Export.
3 Select a preset to use from the top row of icons in the quick export dialog,
and click ‘export’.
4 Choose a directory location and enter a file name using the export dialog, then click
‘save’. A progress bar dialog appears to let you know how long the export will take.
The quick export dialog
81Using DaVinci Resolve

The Deliver Page
This page lets you select the range of clips you want to export, plus the format, codec and
resolution you want. You can export in many types of formats such as QuickTime, AVI, MXF
and DPX using codecs such as 8-bit or 10-bit uncompressed RGB/YUV, ProRes, DNxHD, H.264
and more.
To export a single clip of your edit:
1 Click on the ‘deliver’ tab to open the deliver page.
2 Go to the ‘render settings’ window on the top left of the page. Choose from a number
of export presets, for example YouTube, Vimeo and audio presets, or you can set
your own export settings manually by leaving it set to the default ‘custom’ preset and
entering your own parameters. Forthis example, select YouTube, then click on the
arrow next to the preset and select the 1080p video format.
The frame rate will be locked to your project frame rate setting.
3 Underneath the presets you will see the timeline filename and the target location for
your exported video. Click the ‘browse’ button and choose the location where you want
to save your exported file and then select ‘single clip’ from the render option.
4 Immediately above the timeline, you’ll see an options box with ‘entire timeline’ selected.
This will export the entire timeline, however you can select a range of the timeline if
you want to. Simply choose ‘in/out range’ and then use the ‘i’ and ‘o’ hot key shortcuts
to choose the in and out points in your timeline.
5 Go to the bottom of the ‘render settings’ and click on the ‘add to render queue’ button.
Your render settings will be added to the render queue on the right side of the page.
Now all you have to do is click ‘start render’ and monitor the progress of your render in
the render queue.
When your render is complete you can open the folder location, double click on your
new rendered clip and watch your finished edit.
Now that you have a basic knowledge of how to edit, color, mix audio and add
visual effects, we recommend experimenting with DaVinci Resolve. Refer to the
DaVinci Resolve manual for more details on how each feature can help you make the
most of your project!
Post Production Workflow
Working with 3rd Party Software
If you have your own favorite editing software you’d like to use, you can easily copy your clips to
an internal/external drive or RAID and then import your clips into the software.
If you want to, you can even edit your clips directly from the SD card.
82Post Production Workflow
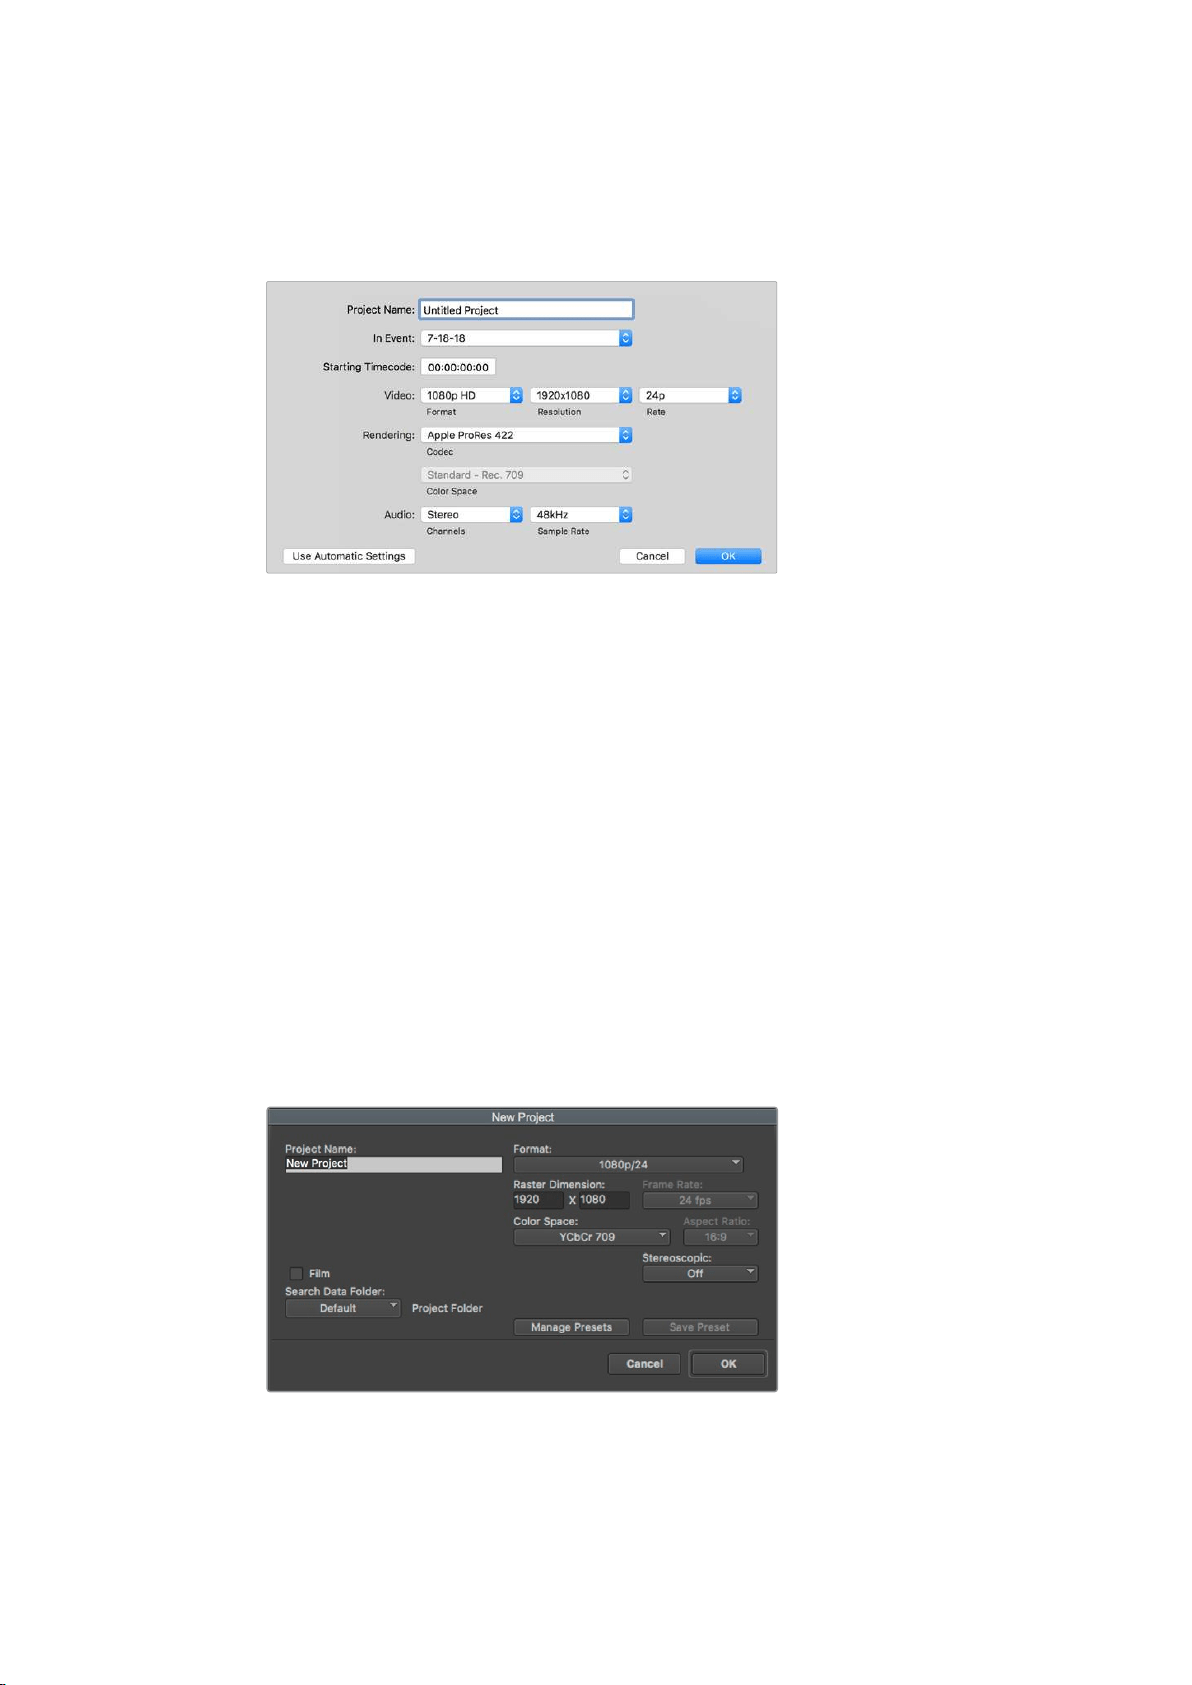
Using Final Cut Pro X
To edit your clips using Final Cut Pro X, you need to create a new project and set a suitable
video format and frame rate. This example uses ProRes 422 HQ 1080p24.
Final Cut Pro X project settings
1 Launch Final Cut Pro X, go to the ‘menu’ bar and select ‘file/new project’.
A window will open containing project settings.
2 Name your project and select the ‘custom’ checkbox.
3 Set the ‘video properties’ settings to 1080p HD, 1920x1080 and 24p.
4 Set your ‘audio’ and ‘render properties’ settings to ‘stereo, 48kHz, and Apple
ProRes 422 HQ’
5 Click OK.
To import your clips into your project, go to the ‘menu’ bar and select ‘file/import/media’.
Choose your clips from your hard drive.
You can now drag your clips onto the timeline for editing.
Using Avid Media Composer 2018
To edit your clips using Avid Media Composer 2018, create a new project and set a suitable
video format and frame rate. For this example, clips are set using 1080p24.
Setting the project name and project options in Avid Media Composer 2018
83
Post Production Workflow
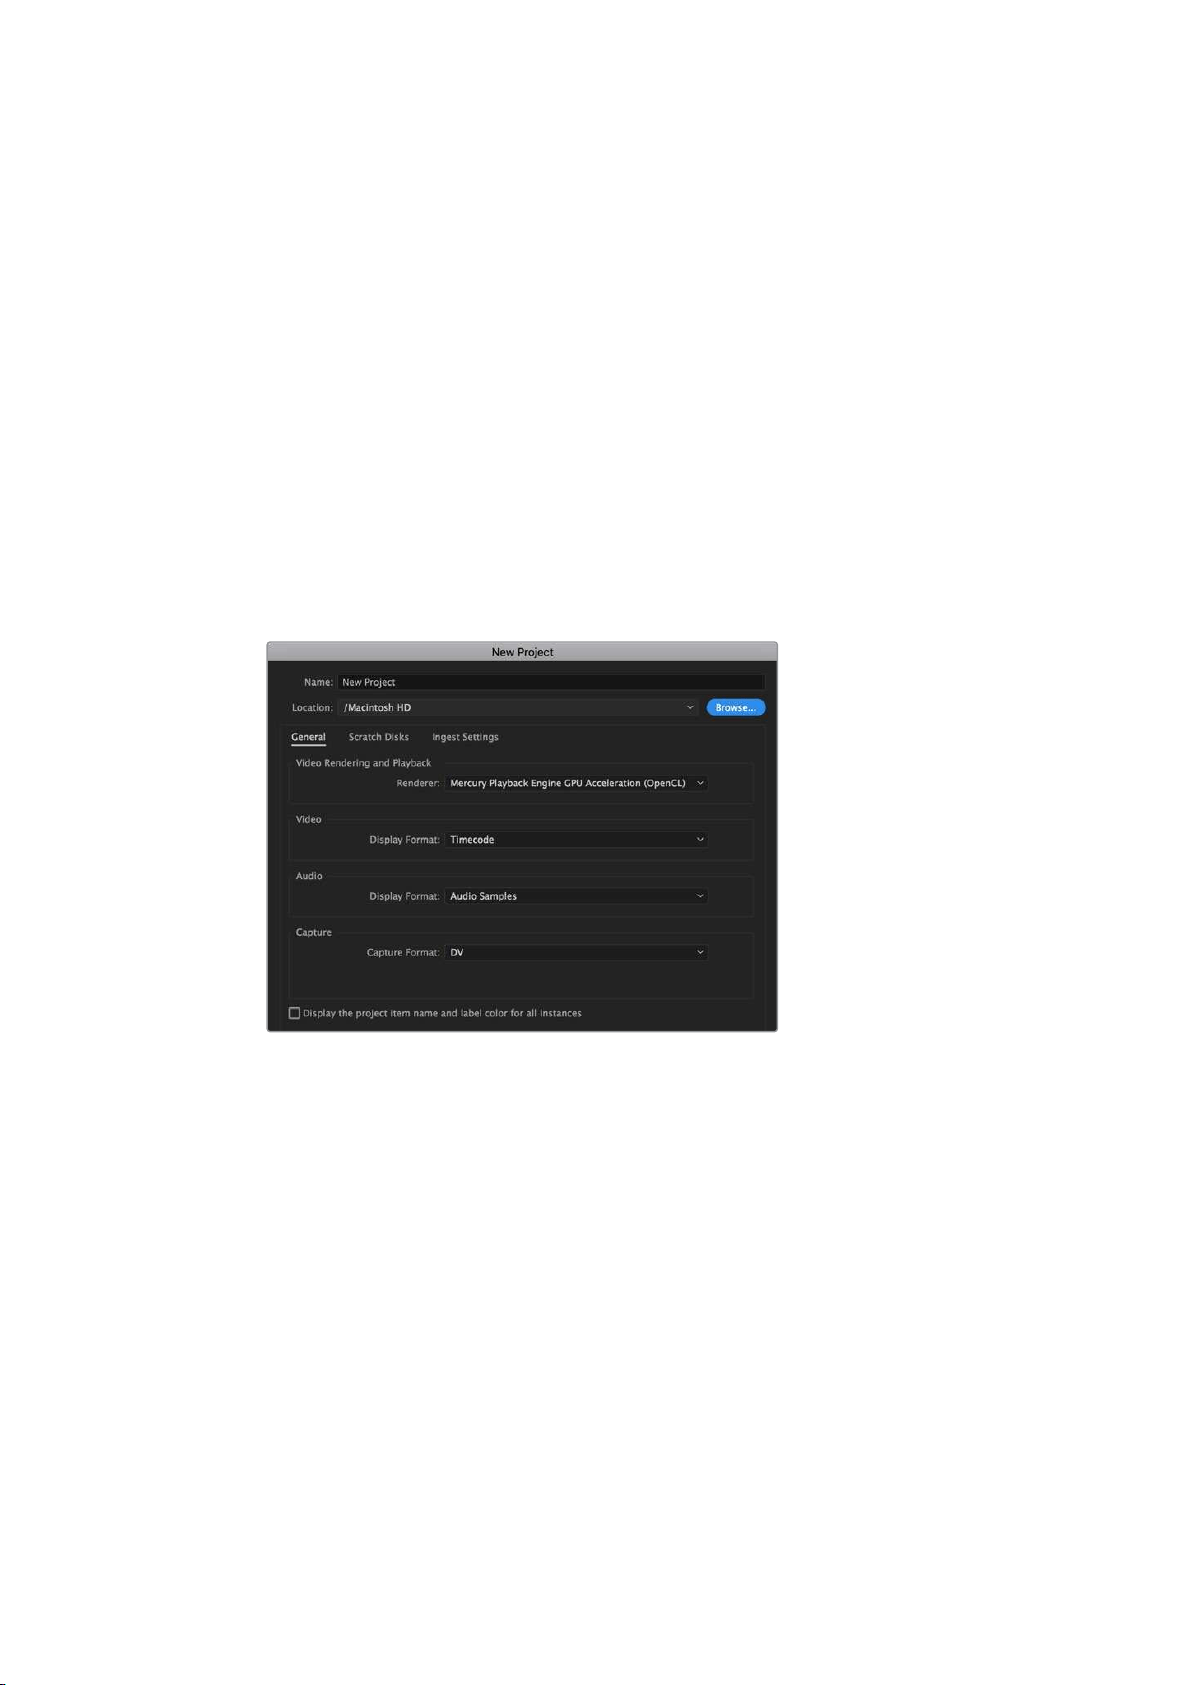
1 Launch Avid Media Composer 2018 and the ‘select project’ window will appear.
2 Click the ‘new project’ button and name your project in the ‘new project’ window.
3 In the ‘format’ drop down menu select HD 1080 > 1080p/24 and click ‘ok’ to create
the project.
4 Double click the project in the ‘select project’ window to open it.
5 Select file > input > source browser and navigate to the files you wish to import.
6 Select your ‘target bin’ from the drop down menu and click ‘import’.
When the clips appear within the media bin you can drag your clips onto the timeline and
begin editing.
Using Adobe Premiere Pro CC
To edit your Apple ProRes 422 HQ clips using Adobe Premiere Pro CC, you need to create a
new project and set a suitable video format and frame rate. For this example, clips are set using
ProRes 422 HQ 1080p25.
Setting the project name and project options in Adobe Premiere Pro CC
1 Launch Adobe Premiere Pro CC. In the ‘welcome’ window select ‘new project’.
Awindow will open containing project settings.
2 Name your project. Choose the location for your project by clicking ‘browse’ and
selecting your desired folder. Once you’ve selected your location folder click OK in the
‘new project’ window.
3 Go to the Adobe Premiere Pro CC ‘menu’ bar, select ‘file/import’ and choose the clips
you want to edit. Your clips will appear in the project window.
4 Drag the first clip you wish to edit onto the ‘new item’ icon at the bottom right of the
project window. A new sequence will be created matching your clip settings.
You can now drag your clips onto the sequence timeline for editing.
84Post Production Workflow

Help
Getting Help
The fastest way to obtain help is to go to the Blackmagic Design online support pages and
check the latest support material available for your video assist.
Blackmagic Design Online Support Pages
The latest manual, software and support notes can be found at the Blackmagic Design support
center at
www.blackmagicdesign.com/support.
Blackmagic Design Forum
The Blackmagic Design forum on our website is a helpful resource you can visit for more
information and creative ideas. This can also be a faster way of getting help as there may
already be answers you can find from other experienced users and Blackmagic Design staff
which will keep you moving forward. You can visit the forum at
https://forum.blackmagicdesign.com
Contacting Blackmagic Design Support
If you can’t find the help you need in our support material or on the forum, please use the
“Send us an email” button on the support page to email a support request. Alternatively,
click on the “Find your local support team” button on the support page and call your nearest
Blackmagic Design support office.
Checking the Software Version Currently Installed
To check which version of Blackmagic Video Assist software is installed on your computer,
open the About Blackmagic Video Assist Setup window.
ͽ On macOS, open Blackmagic Video Assist Setup from the Applications folder.
Select About Blackmagic Video Assist Setup from the application menu to reveal the
version number.
ͽ On Windows 8, open Blackmagic Video Assist Setup from the Blackmagic
Video Assist Setup tile on your Start page. Click on the Help menu and select
About Blackmagic Video Assist Setup to reveal the version number.
ͽ In Windows 8.1, select the down arrow icon from the ‘start’ screen, and scroll down
to the Blackmagic Design folder. From here you can launch Blackmagic Video
Assist Setup.
ͽ In Windows 10, click the start button and select ‘all apps’. Scroll down to the
Blackmagic design folder. From here you can launch Blackmagic Video Assist Setup.
How to Get the Latest Software Updates
After checking the version of Blackmagic Video Assist Setup software installed
on your computer, please visit the Blackmagic Design support center at
www.blackmagicdesign.com/support to check for the latest updates.
While it is usually a good idea to run the latest updates, it is wise to avoid updating any software
if you are in the middle of an important project.
85Help
Regulatory Notices
Disposal of Waste of Electrical and Electronic Equipment Within the European Union.
The symbol on the product indicates that this equipment must not be disposed of with
other waste materials. In order to dispose of your waste equipment, it must be handed
over to a designated collection point for recycling. The separate collection and
recycling of your waste equipment at the time of disposal will help conserve natural
resources and ensure that it is recycled in a manner that protects human health and
theenvironment. For more information about where you can drop off your waste
equipment for recycling, please contact your local city recycling office or the dealer
from whom you purchased the product.
This equipment has been tested and found to comply with the limits for a Class A
digitaldevice, pursuant to Part 15 of the FCC rules. These limits are designed to provide
reasonable protection against harmful interference when the equipment is operated
inacommercial environment. This equipment generates, uses, and can radiate radio
frequency energy and, if not installed and used in accordance with the instructions,
maycause harmful interference to radio communications. Operation of this product in
aresidential area is likely to cause harmful interference, in which case the user will be
required to correct the interference at personal expense.
Operation is subject to the following two conditions:
1 This device may not cause harmful interference.
2 This device must accept any interference received, including interference that
may cause undesired operation.
–
R-R-BMD-20200131001
R-R-BMD-20200131002
R-R-BMD-201907002
R-R-BMD-201907003
ISED Canada Statement
This device complies with Canadianstandards for Class A digital apparatus.
Any modifications or use of this product outside its intended use could void compliance to
these standards.
Connection to HDMI interfaces must be made with high quality shielded HDMI cables.
This equipment has been tested for compliance with the intended use in a commercial
environment. If the equipment is used in a domestic environment,
it may cause radio interference.
86Regulatory Notices

Safety Information
Product is suitable for use in tropical locations with an ambient temperature of up to 40
o
C.
Ensure that adequate ventilation is provided around the product and that it is not restricted.
No operator serviceable parts inside product. Refer servicing to your local Blackmagic Design
service center.
During sunny conditions, consider shading of the unit to prevent exposure of the lithium battery
to extended periods of sunlight. Keep lithium batteries awayfrom all sources of heat.
State of California statement
This product can expose you to chemicals such as trace amounts of polybrominated biphenyls
within plastic parts, which is known to the state of California to cause cancer and birth defects
or other reproductive harm.
For more information go to
www.P65Warnings.ca.gov.
Singapore Notice
The power adapter supplied with your Blackmagic Design equipment has interchangeable
plugs to suit the mains socket outlets in a number of countries. Each plug marked with the
model numbers APD2-UK or APD2-EU are approved and suitable for use in Singapore.
87Safety Information

Warranty
12 Month Limited Warranty
Blackmagic Design warrants that this product will be free from defects in materials and workmanship
for a period of 12 months from the date of purchase. If a product proves to be defective during this
warranty period, Blackmagic Design, at its option, either will repair the defective product without
charge for parts and labor, or will provide a replacement in exchange for the defective product.
In order to obtain service under this warranty, you the Customer, must notify Blackmagic Design
of the defect before the expiration of the warranty period and make suitable arrangements for the
performance of service. The Customer shall be responsible for packaging and shipping the
defective product to a designated service center nominated by Blackmagic Design, with shipping
charges pre paid. Customer shall be responsible for paying all shipping charges, insurance, duties,
taxes, and any other charges for products returned to us for any reason.
This warranty shall not apply to any defect, failure or damage caused by improper use or improper
or inadequate maintenance and care. Blackmagic Design shall not be obligated to furnish service
under this warranty: a) to repair damage resulting from attempts by personnel other than
Blackmagic Design representatives to install, repair or service the product, b) to repair damage
resulting from improper use or connection to incompatible equipment, c) to repair any damage or
malfunction caused by the use of non Blackmagic Design parts or supplies, or d) to service a
product that has been modified or integrated with other products when the effect of such a
modification or integration increases the time or difficulty of servicing the product.
THIS WARRANTY IS GIVEN BY BLACKMAGIC DESIGN IN LIEU OF ANY OTHER WARRANTIES,
EXPRESS OR IMPLIED. BLACKMAGIC DESIGN AND ITS VENDORS DISCLAIM ANY IMPLIED
WARRANTIES OF MERCHANTABILITY OR FITNESS FOR A PARTICULAR PURPOSE. BLACKMAGIC
DESIGN’S RESPONSIBILITY TO REPAIR OR REPLACE DEFECTIVE PRODUCTS IS THE WHOLE
AND EXCLUSIVE REMEDY PROVIDED TO THE CUSTOMER FOR ANY INDIRECT, SPECIAL,
INCIDENTAL OR CONSEQUENTIAL DAMAGES IRRESPECTIVE OF WHETHER BLACKMAGIC
DESIGN OR THE VENDOR HAS ADVANCE NOTICE OF THE POSSIBILITY OF SUCH DAMAGES.
BLACKMAGIC DESIGN IS NOT LIABLE FOR ANY ILLEGAL USE OF EQUIPMENT BY CUSTOMER.
BLACKMAGIC IS NOT LIABLE FOR ANY DAMAGES RESULTING FROM USE OF THIS PRODUCT.
USER OPERATES THIS PRODUCT AT OWN RISK.
© Copyright 2020 Blackmagic Design. All rights reserved. ‘Blackmagic Design’, ‘DeckLink’, ‘HDLink’, ‘Workgroup Videohub’,
‘Multibridge Pro’, ‘Multibridge Extreme’, ‘Intensity’ and ‘Leading the creative video revolution’ are registered trademarks in the
US and other countries. All other company and product names may be trade marks of their respective companies with which
they are associated.
88Warranty