
Loading ...
Loading ...
Loading ...
19
● To avoid injury, never use the saw without the cover plate securely in place. It keeps the arbor
bolt from falling out if it accidentally loosens and helps prevent the spinning blade from coming
o the saw.
● Make sure the collars are clean and properly arranged. Lower the blade into the lower table
and check for any contact with the metal base or the miter table.
● To avoid injury from an accidental start, make sure the switch is in the OFF position and the
plug is not connected to the power source outlet.
● Never cut metals or masonry products with this tool. This miter saw is designed for use on
wood and wood-like products only.
● ALWAYS MAKE DRY RUNS (UNPOWERED) BEFORE FINISH CUTS TO CHECK THE PATH
OF THE BLADE AND THE OPERATION OF THE GUARDS.
BEVEL STOP ADJUSTMENT (FIG. 13, 14, 15)
WARNING: To avoid injury from an
accidental start, make sure the switch is
in the OFF position and the plug is not
connected to the power source outlet.
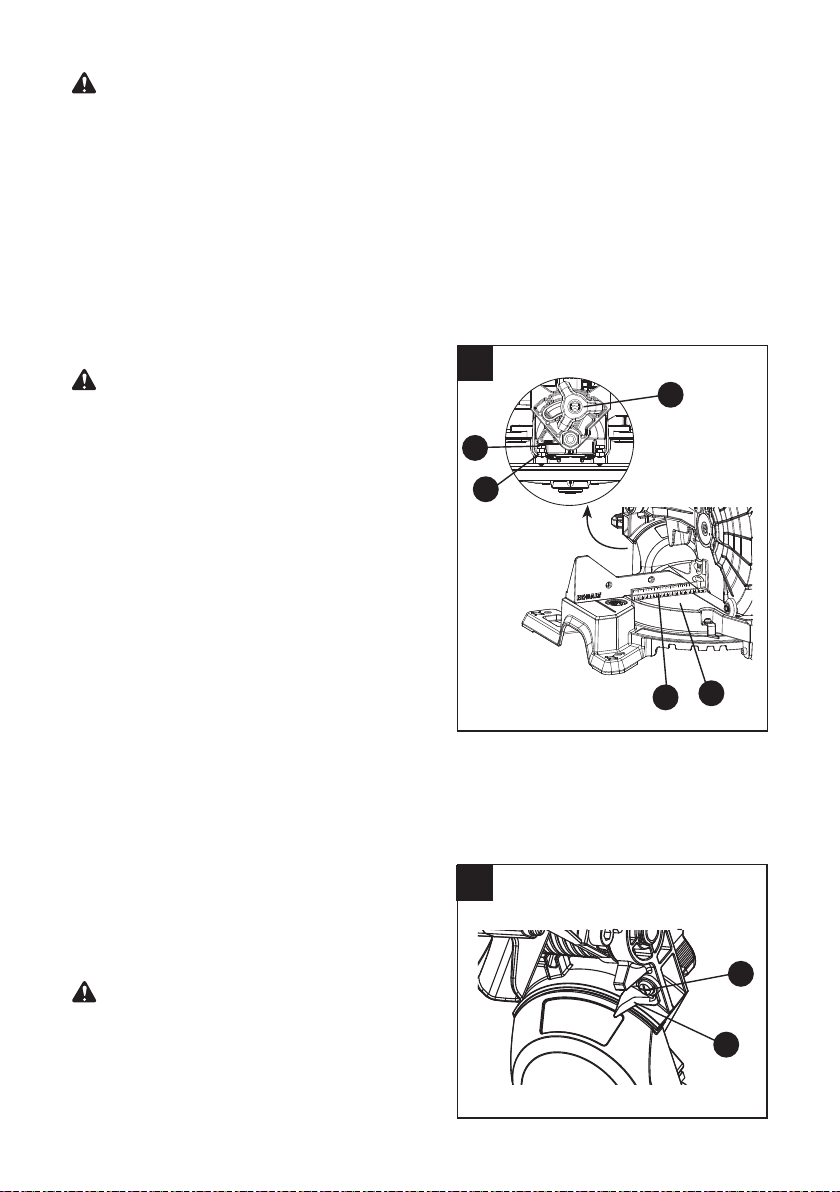
90° (0°) Bevel Adjustment (Fig. 13):
● Loosen bevel lock handle (Q) and tilt the
cutting arm completely to the right. Tighten
the bevel lock handle.
● Place a combination square (1) on the miter
table (N) with the ruler against the table and
the heel of the square against the saw blade.
● If the blade is not 90° square with the miter
table (N), loosen the bevel lock handle (Q),
tilt the cutting head to the left, loosen the
locknut (2) and turn the bevel angle
adjustment bolt (3) in or out with a 10 mm
wrench until the blade is square with the table.
● Tilt the cutting arm back to the right at
90° (0°) bevel and recheck for alignment.
● Repeat steps 1 through 4 if further
adjustment is needed.
● Tighten bevel lock handle and locknut (2)
when alignment is achieved.
90° Bevel Indicator Adjustment (Fig. 14):
● When the blade is exactly 90° to the table,
loosen the bevel indicator screw (1) using a
Phillips screwdriver.
● Adjust bevel indicator (2) to the “0” mark on
the bevel scale and retighten the screw.
WARNING: To avoid injury from an
accidental start, make sure the switch is
in the OFF position and the plug is not
connected to the power source outlet.
WARNING
13
14
3
2
1
1
2
Q
N
Loading ...
Loading ...
Loading ...