
www.blackanddecker.com
3
5
7
8
6
4
21
9
10
11
12
13
14
BHFEA520J
Cordless stick vac
无线手持吸尘器
简体中文 4
English 8
2
3
7
7a
8
12
12a
2
A B
3
C
11
11a
7a
D
1
E
4
5
F
3
2
3
5
6
G
6
H
6 6a
I
9
9a
J
9b
K
13
L

4
简体中文
4
简体中文
设计用途
您的 BLACK+DECKER BHFEA520J无线手持吸尘器被设计用于清洁
用途。本设备仅供家用。
使用设备前,请仔细阅读本手册。
安全说明
警告!请仔细阅读所有安全警告和
说明。如不遵守以下任何警告和说
明,可能会导致触电、火灾和/或严
重伤害。
w 本手册描述了设备的设计用途。如果配
件或附件的使用、本设备的操作超出本
手册建议的范围,则可能出现人身伤害
的危险。
w 请保存好本手册,以备将来查阅。
w 该设备包含电池。该电池需由技术熟练
的人员更换。
使用设备时
w 请勿使用本无线手持吸尘器吸水或其他
液体或任何可能会引起火灾的材料。
w 请勿在未安装集尘桶和/或过滤器的情
况下使用该设备。
w 请勿在靠近水的地方使用本无线手持
吸尘器。
w 请勿将本无线手持吸尘器浸泡在水中。
w 禁止猛力拉扯电源线以使设备断开与插
座的连接。请确保电源线远离热源、油脂
及尖锐的边缘。
w 8岁或以上的儿童,以及身体、感官或精
神较差的人员,或者缺少使用经验和认
识的人员也可以使用本设备。前提是在
有他人监督的情况下,或在接受过安全
使用该产品的指导并已了解了可能存在
的危险的情况下。确保儿童没有耍玩本
设备。在没有他人监督的情况下,禁止儿
童使用本设备或对其进行维护保养。
检查与维修
使用前,请检查设备是否受损或存在缺陷
部件。检查部件是否破裂、开关是否损坏,
以及是否存在影响设备操作的其它情况。
w 如果部件损坏或存在缺陷,请勿使用
设备。
w 损坏或缺陷部件必须交由授权维修代理
处维修与更换。
w 定期检查导线是否损坏。如导线损坏或
有缺陷,请更换导线。
w 禁止试图拆卸或更换本手册规定之外的
任何部件。
附加安全警告
使用设备后
w 先拔下充电器的插头,然后再清洁充电
机或充电器底座。
w 如果不使用,请将设备存放在干燥处。
w 避免让儿童接触到存放的设备。
剩余风险
使用工具时,可能出现本安全警示之外的
其他剩余风险。这些风险可能来自使用不
当、使用时间过长等。
尽管遵守了相关的安全法规并采用了安全
装备,某些剩余风险仍然是无法避免的。这
些风险包括:
w 接触旋转/运动部件时所导致的伤害风险。
w 更换零件、锯片或配件时所导致的伤害风险。
w 长期使用工具所导致的伤害风险。长期
使用任何工具时,均应定期休息。
w 听力损伤风险。
5
简体中文
5
简体中文
w
吸入工具使用过程中产生的粉尘导致的
健康危害(例如,锯切木材,特别是橡木、
山毛榉和中密度纤维板时)。
电池和充电器电池
电池
w 勿以任何理由试图打开电池包。
w 请勿让电池暴露在水中。
w 请勿让电池暴露在热源中。
w 请勿将电池存放在温度超过40℃的环
境 中 。
w 仅在室温在10℃到40℃的环境中充电。
w 仅使用设备/工具随附的充电器充电。
使用不适合的充电器可能会造成触电
或电池过热。
w 在丢弃电池时,请遵循“保护环境”部分
给出的说明。
w 请勿通过针刺或撞击的方式损坏电池
或使其变形,这可能会引发受伤和火灾
的风险。
w 请勿对损坏的电池包充电。
w 在极端条件下,可能会出现电池渗漏。
当您发现电池上出现液体,请用软布小
心擦拭。避免接触到皮肤。
w 如果皮肤或眼睛接触到该液体, 请按
以下指示。
警告!电池液可能会造成人员受伤或财产
损坏。如果皮肤接触到该液体,请立即用水
冲洗。如果出现发红、疼痛或瘙痒,请立即
就医。如果眼睛接触到该液体,请立即用清
水冲洗并就医。
充电器
该充电器设计用于特定电压。请务必检查
电源电压是否与铭牌以及技术参数表上的
信息一致。
警告!切勿尝试使用一般的电源插头取代
充电器装置。
w 只能使用无线手持吸尘器随附的
BLACK+DECKER充电器为随附的电池充
电。其他电池可能会爆裂,导致人身伤害
和损害。
w 切勿尝试为不可再充电的电池充电。
w 如果电源线损坏, 必须让制造商或授权
的BLACK+ECKER服务中心更换以避免发
生危险。
w 请勿将充电器暴露在水中。
w 请勿打开充电器。
w 请勿刺破充电器。
w 在充电时,必须将设备/电池置于通风良
好的区域。
电气安全
充电器上的标签
使用前请阅读使用手册。
本工具为双重绝缘,因此无需接地线。请务必检查电
源电压是否与铭牌上的电压一致。
充电底座仅供室内使用。
无线手持吸尘器上的标签
无线手持吸尘器上显示下列符号和日期码:
使用前请阅读使用手册。
S010QC2300040
使用充电器S010QC2300040

6
简体中文
6
简体中文
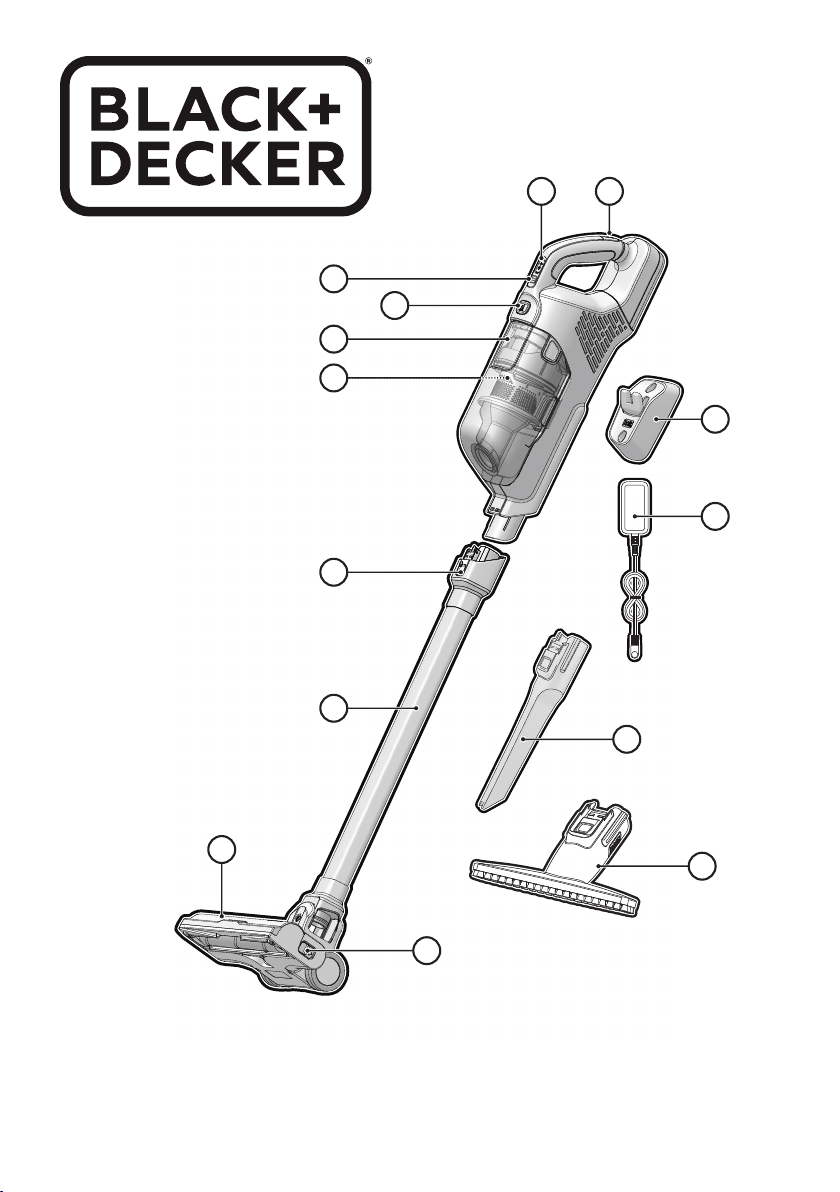
功能部件
本无线手持吸尘器包括以下部分或全部功能部件。
1. 开关按钮
2. 充电端口
3. 充电状态指示器
4. 集尘桶释放按钮
5. 清除集尘桶
6. 旋风过滤器集成
7. 延长杆释放按钮
8. 延长杆
9. 吸头(带内置地板感应)
10. 搅拌器杆释放按钮
11. 缝隙工具
12. 充电器
13. 墙挂
14. 宽嘴尘刷
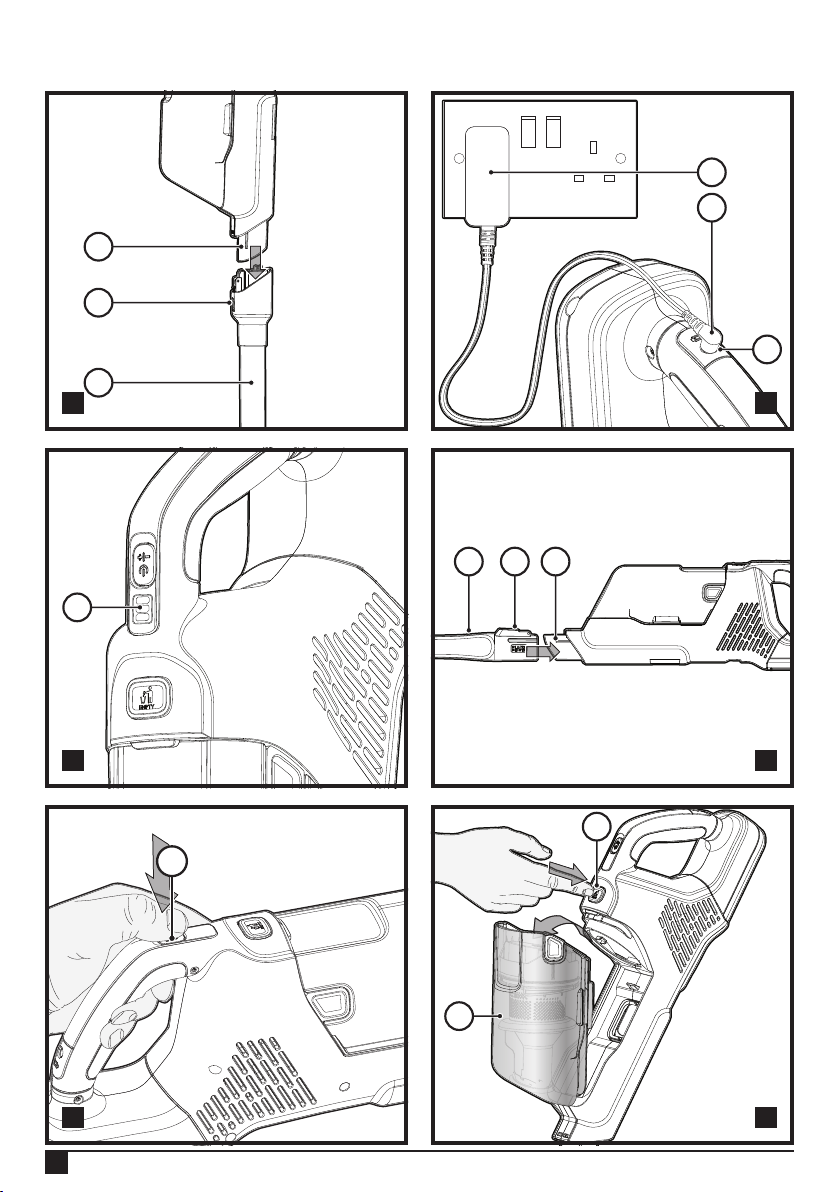
组装 (图 A)
w 将延长管(8)的顶部与真空入口(7a)对齐,如图A所示。
w 将延长管(8)推入真空入口(7a),使其锁定到位。
w 如需拆除延长管,请按下延长管释放按钮(7)并轻轻拉下延
长管。
警告! 在不用时,请将设备的后部朝墙放置。这样,如果设备无意
掉落,就会碰到墙壁而非人员或宠物。
为电池充电 (图 B)
警告! 只能与随附的充电器使用。
对于新购买的产品而言,其中可充电的电池需要至少充电5小时,
才能确保电量满格。
w 必须先关闭设备,才能充电。
w 将充电器(12)的插头(12a)插入无线手持吸尘器的充电端口(2)。
w 将充电器的插头插入标准电气插座中。
w 充电器在充电时会发热,这是正常现象,没有危险。可以让设
备长时间连接到充电器上。在完成充电后,充电器能自动减
少电力消耗。
警告! 请勿在室温低于4℃或高于40℃的情况下为电池充电。请遵
守所有的充电说明且请勿在说明给出的温度范围外为设备充电。
不当充电或在指定范围以外的温度下充电,可能导致电池损坏并
增加火灾风险。
充电状态指示器 (图 C)
该设备包含一个充电状态指示器(3)开关。它由三个LED灯组成,
能显示电池的剩余电量。仅在无线手持吸尘器被打开以及在为充
电器充电时,该功能才会被激活。
充电状态指示器能显示电池包中剩余电量的大致水平。
LED电池显示器显示剩余电量并在电量较低时发出警示。最终,当
电量仅能维持很短时间时,LED灯将不断闪烁。
注意:充电状态指示器仅能显示电池中的剩余电量。
它并不表示该工具的功能,且将根据产品组件、温度和最终用户
的使用情况而有所不同。
使用
这款无线手持吸尘器可通过以下2种方式使用。
w 装上延长管(8)和 吸 头( 9)。
w 装上缝隙工具(11)和无线手持吸尘器。
安装附件 (图 D)
w 缝隙工具(11)可让您对狭窄且难以触及的地方进行清洁。
w 如需安装缝隙工具(11),将其按入真空入口(7a),使其锁定到
位 ,如 图 D所示。
w 如需拆下缝隙工具(11),请按下缝隙工具按钮(11a)并轻轻拉
下延长管。
打开与关闭电源 (图 E)
w 如需打开,推动开关按钮(1)。
w 如需增大功率,再次推动开关按钮(1)。
w 第三次推动开关按钮(1),关闭设备。
注意:充电状态指示器LED(3)会在无线手持吸尘器开启时亮起。
w 如需关闭,将开关按钮(1)滑动到“O”位 置 。
w 在使用后,请立即将产品接上充电器,让产品及时充满电量,
以供下次使用。确保产品与充电器插头充分接触。
地面探测
地面探测功能会在低速状态下激活。当探测到地毯时,设备会自动
提升到高速状态。当探测到硬质底板时,设备会降低到低速状态。
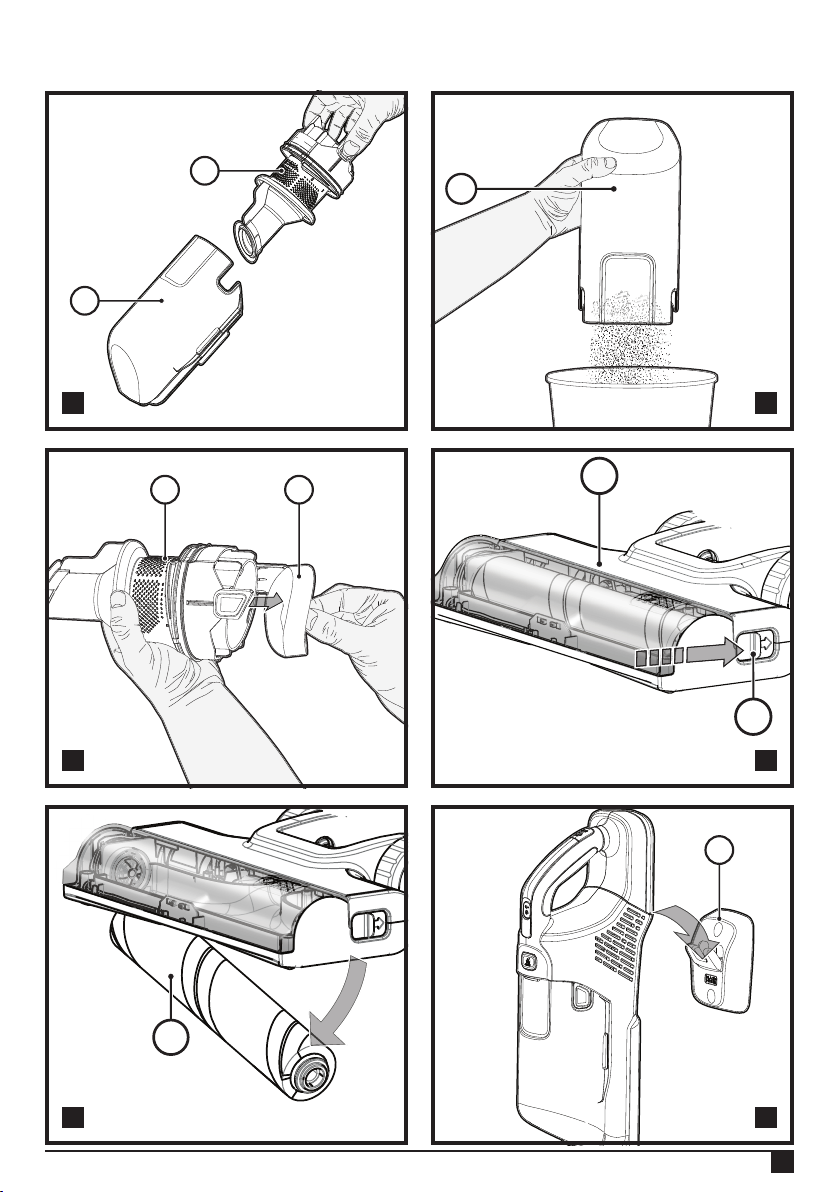
清洁并清空无线手持吸尘器
警告! 弹射/呼吸危害:不得在未安装过滤器的情况下使用无线手
持吸尘器。
警告! 过滤器可重复使用,请勿将其与一次性集尘桶混淆,也请勿
在产品被清空后将其丢弃。我们建议您根据使用频率,每隔6-9个
月更换一次过滤器。
如需清空集尘桶 (图 F, G, H, I)
w 按下集尘桶释放按钮(4),从无线手持吸尘器上释放并移除
集尘桶(5)。
w 使用您的食指和大拇指夹住过滤器的外壳突耳并将过滤器外
壳( 6)从集尘桶上拉出,如图G所示。
w 请将集尘桶放在垃圾桶上并清空集尘桶,如图H所示。
w 将泡沫过滤器(6a)从过滤器外壳上拆下,如图I所示。
w 摇晃或轻轻刷掉泡沫过滤器(6a)和过滤器(6)上的任何浮灰
和泡沫。
w 用温热的肥皂水冲洗集尘桶(5)。
w 用温热的肥皂水冲洗过滤器。
w 先确保过滤器完全干燥,再将其重新装回过滤器外壳中。
w 将干净且干燥的泡沫过滤器(6a)装回过滤器外壳(6)中 。
w 将过滤器外壳装入集尘桶(5)内 。
w 将集尘桶撞到无线手持吸尘器上,直到安装到位发出“咔哒”
声响为止。
7
简体中文
7
简体中文
拆除和清洁搅拌器杆
(
图
J, K)
警告! 为降低因活动部件导致受伤的风险,请从无线手持吸尘器
上拆下吸头和延长管,再进行清洁或维修。
w 如需从吸头(9)上移除搅拌器杆(9b),请将搅拌器杆释放按钮
(9a)滑动到设备的后面。
w 现在,可移除搅拌器杆(9b)并将其清洁。
安全存放 (图 L)
在不用时,可将电机后部的锁销放在存储站(13)上,从而安全存放
该设备,如图L所示。
壁挂式安装
可将产品挂在墙上,以方便存放该设备。在将产品挂在墙上时,请
确保安装方法适合墙体类型以及设备的重量。
w 在墙面上标记充电站螺丝孔的位置(在为放在存储站上的无
线手持吸尘器充电的电源插座的范围内)。
w 针对墙体类型和设备重量,用适当的螺丝将存储站安装到墙
面上并使用适当的插头。
维护
您 的 BLACK+DECKER工具设计精良,可以长期使用,仅需极少维
护。若要持续令人满意的工作效果,则需对工具进行适当的保养
和定期清洁。
警 告 !对工具进行任何维护工作之前:
w 如果是一体式电池,请完全耗尽其电量,然后关闭设备。
w 清洁之前请拔下充电器的插头。本充电器无需其他保养。
w 使用软刷或干布定期清洁工具和充电器内的通风槽。
w 定期使用湿布清洁电机外壳。请勿使用任何研磨性或溶剂型
清 洁 剂 。
更换滤芯
建议每6到9个月,或当滤芯磨损或损坏时,即应更换滤芯。
BLACK+DECKER零售商均有提供滤芯备件。
w 按照上述说明取下旧滤芯。
w 按照上述说明安装新滤芯。
保护环境
Z
分类回收。带有此符号标记的产品与电池不得与普通
家庭垃圾一起处理。
产品和电池包含可恢复或回收的材料,从而降低对原材料的
需求。请根据当地规定回收电气产品和电池。更多信息,请访问
www.2helpU.com。
服务信息
BLACK+DECKER提供覆盖整个亚洲的公司隶属和授权服务地点。
所有的BLACK+DECKER服务中心都具备训练有素的人员,为客户
提供高效和可靠的产品服务。
不论您是需要技术建议、维修或原厂替换部件,请联系距离您最
近的BLACK+DECKER服务地点。
备注
w BLACK+DECKER秉持精益求精,不断完善产品,因此我们保留
随时更改产品规格的权利,恕不另行通知。
w 标准设备和附件可能会因国家(地区)而异。
w 不同国家(地区)的产品规格也可能会有所不同。
w 并非所有的国家(地区)都可提供完整的产品系列。如需有
关各产品系列的供货情况,请联系您当地的BLACK+DECKER
代理商。
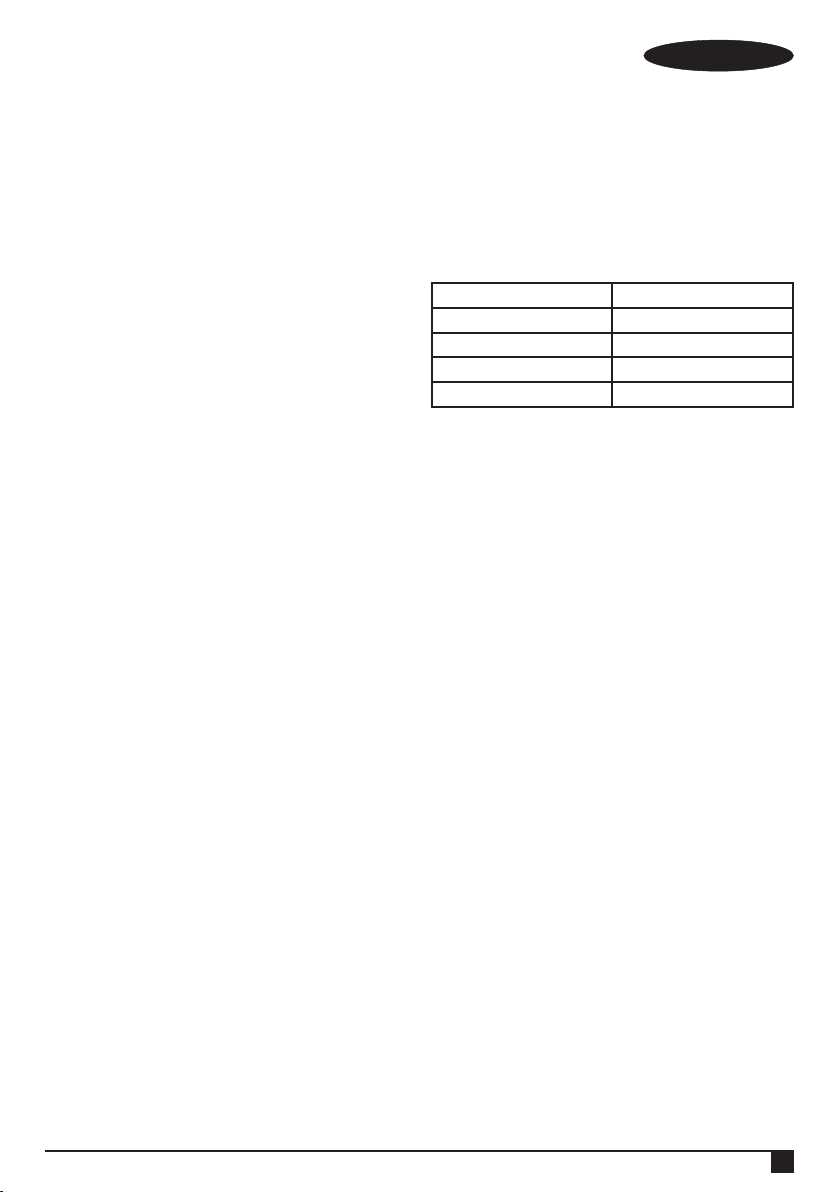
技术参数
BHFEA520J
电压
18V (20V Max)
额定容量
36Wh
大约充电时间
5小时
重量
2.62KG
制造商:百得(苏州)精密制造有限公司
地址:苏州工业园区苏虹中路200号出口加工区
产地:江苏苏州

8
ENGLISH
(Original instructions)
Intended use
Your BLACK+DECKER BHFEA520J cordless vacuum
cleaners have been designed for vacuum cleaning purposes.
These appliances are intended for household use only.
Read all of this manual carefully
before operating the appliance.
Safety instructions
@
Warning! Read all safety
warnings and all instructions.
Failure to follow the warnings
and instructions listed below may
result in electric shock, re and/or
serious injury.
u The intended use is described in this
manual. The use of any accessory
or attachment or the performance
of any operation with this appliance
other than those recommended in this
instruction manual may present a risk
of personal injury.
u Retain this manual for future
reference.
u This appliance contains batteries
that are only replaceable by skilled
persons.
Using your appliance
u Do not use the appliance to pick up
liquids or any materials that could
catch re.
u Do not use without dust bag and/or
lters in place
u Do not use the appliance near water.
u Do not immerse the appliance in water.
u Never pull the charger lead to
disconnect the charger from the
socket.
Keep the charger lead away from heat,
oil and sharp edges.
u This appliance can be used by
children aged from 8 years and above
and persons with reduced physical,
sensory or mental capabilities or
lack of experience and knowledge
if they have been given supervision
or instruction concerning use of
the appliance in a safe way and
understand the hazards involved.
Children shall not play with the
appliance. Cleaning and user
maintenance shall not be made by
children without supervision.
Inspection and repairs
Before use, check the appliance for
damaged or defective parts. Check for
breakage of parts, damage to switches
and any other conditions that may affect
its operation.
u Do not use the appliance if any part is
damaged or defective.
u Have any damaged or defective parts
repaired or replaced by an authorized
repair agent.
u Regularly check the charger lead for
damage. Replace the charger if the
lead is damaged or defective.
u Never attempt to remove or replace
any parts other than those specied in
this manual.

9
ENGLISH
(Original instructions)
Additional safety instructions
After use
u Unplug the charger before cleaning the
charger or charging base.
u When not in use, the appliance should
be stored in a dry place.
u Children should not have access to
stored appliances.
Residual risks
Additional residual risks may arise when
using the tool which may not be included
in the enclosed safety warnings. These
risks can arise from misuse, prolonged
use etc.
Even with the application of the relevant
safety regulations and the implementa-
tion of safety devices, certain residual
risks can not be avoided. These include:
u Injuries caused by touching any
rotating/moving parts.
u Injuries caused when changing any
parts, blades or accessories.
u Injuries caused by prolonged use
of a tool. When using any tool for
prolonged periods ensure you take
regular breaks.
u Impairment of hearing.
u Health hazards caused by breathing
dust developed when using your
tool (example:- working with wood,
especially oak, beech and MDF.)
Batteries and chargers
Batteries
u Never attempt to open for any reason.
u Do not expose the battery to water.
u Do not expose the battery to heat.
u Do not store in locations where the
temperature may exceed 40°C.
u Charge only at ambient temperatures
between 10°C and 40°C.
u Charge only using the charger
provided with the appliance/tool.
Using the wrong charger could result
in an electric shock or overheating of
the battery.
u When disposing of batteries, follow
the instructions given in the section
“Protecting the environment”.
u Do not damage/deform the battery
pack either by puncture or impact, as
this may create a risk of injury and re.
u Do not charge damaged batteries.
u Under extreme conditions, battery
leakage may occur. When you notice
liquid on the batteries carefully wipe
the liquid off using a cloth. Avoid skin
contact.
u In case of skin or eye contact, follow
the instructions below.
Warning! The battery uid may cause
personal injury or damage to property. In
case of skin contact, immediately rinse
with water. If redness, pain or irritation
occurs seek medical attention. In case of
eye contact, rinse immediately with clean
water and seek medical attention.
Chargers
Your charger has been designed for a
specic voltage. Always check that the
mains voltage corresponds to the voltage
on the rating plate.
Warning! Never attempt to replace the

10
ENGLISH
(Original instructions)
charger unit with a regular mains plug.
u Use your BLACK+DECKER charger
only to charge the battery in the
appliance with which it was supplied.
Other batteries could burst, causing
personal injury and damage.
u Never attempt to charge non-
rechargeable batteries.
u If the supply cord is damaged, it must
be replaced by the manufacturer or an
authorised BLACK+DECKER Service
Centre in order to avoid a hazard.
u Do not expose the charger to water.
u Do not open the charger.
u Do not probe the charger.
u The appliance/battery must be
placed in a well ventilated area when
charging.
Electrical safety
Symbols on the charger
Read all of this manual carefully before using the
appliance.
#
This tool is double insulated; therefore no earth wire
is required. Always check that the power supply
corresponds to the voltage on the rating plate.
$
The charging base is intended for indoor use only.
Labels on appliance
The following symbols appear on this appliance along with the
date code
Read all of this manual carefully before
using the appliance
use charger S010QC2300040
Features
This tool includes some or all of the following features.
1. On/off power button
2. Charging port
S010QC2300040
3. State of charge indicator
4. Dust bowl relase button
5. Clear dust bowl
6. Cyclonic lter assembly
7. Extension pole release button
8. Extension pole
9. Floorhead (with in-built oor sense)
10. Beater bar release button
11. Crevice tool
12. Charger
13. Storage station
14. Wide mouth dust brush
Assembly (Fig. A)
u Align the top of the extension tube (8) with the vacuum
inlet (7a) as shown in Fig. A.
u Push the extension tube (8) onto the vacuum inlet (7a) so
it locks into position.
u To remove an the extension tube, press the extension
tube release button (7) and gently pull the extension tube
off.
Warning! When not in use position the unit with the rear of
the vacuum facing a wall so that any inadvertent fall of the unit
would contact a wall and not people or pets.
Charging the battery (Fig. B)
Warning! Use only with the supplied charger.
From new, the rechargeable cells of the product need a
minimum charge time of 5 hours to ensure full power.
u The unit must be turned Off in order to charge.
u Plug the jack plug (12a) of the charger (12) into the charg-
ing port (2) of the vacuum.
u Plug the charger into a standard electrical outlet.
u While charging, the charger may get warm, this
is perfectly normal and safe. It is safe to leave the
appliance connected to the charger indenitely. The
charger automatically reduces power consumption
when charging is complete.
Warning! Do not charge the battery at ambient temperatures
below 4 °C or above 40 °C. Follow all charging instructions
and do not charge the appliance outside of the temperature
range specified in the instructions. Charging improperly or at
temperatures outside of the specified range may damage the
battery and increase risk of fire.
State of charge indicator (Fig. C)
This appliance include a state of charge indicator (3) which
consists of three LED lights that indicate the level of charge
remaining in the battery. This feature is only activated when
the vacuum is powered on and when the vacuum is on
charge.
The state of charge indicator is an indication of approximate
levels of charge remaining in the battery pack.

11
ENGLISH
(Original instructions)
The LED battery indicator displays the remaining charge
and warns you when the battery is low. The nal LED will
ash continuously when there is only very little runtime
remaining.
Note: The state of charge indicator is only an indication
of the charge left on the battery.
It does not indicate tool functionality and is subject to variation
based on product components, temperature and end-user
application.
Use
This vacuum cleaner can be used in one of two ways.
u With the extension tube (8) and the oor head (9) as.
u With the crevice tool (11) and the vacuum.
Mounting accessories (Fig. D)
u The crevice tool (11) allows for vacuuming in narrow and
hard to-reach places.
u To attach the crevice tool (11) press into vacuum inlet (7a)
so it locks into position as shown in gure D.
u To release the crevice tool (11) press the crevice tool
release button (11a) and gently pull the extension tube off.
Switching ON and OFF (Fig. E)
u To switch ON, push the on/off power button (1).
u For increased power, push the On/Off button (1) again.
u Push the On/Off button (1) a third time to turn the unit off.
Note: The state of charge indicator LEDs (3) will illuminate
while the vacuum is ON.
u To switch OFF, slide the on/off power switch (1) to the “O“
position.
u Return the product to the charger immediately after use
so that it will be ready and fully charged for the next
use. Ensure that the product is fully engaged with the
charger plug.
Floorsense
Floorsense is active in the low speed. When a carpet is
detected, the performance of the unit is automatically
increased to high speed. When a hardoor is detected, the
performance of the unit reduces to low speed.
Cleaning and emptying the vacuum
Warning! Projectile/Respiratory Hazard: Never use the vac
without its filter.
Warning! The filter is re-usable, do not confuse it with a
disposable dust bag, and do not throw it away when the
product is emptied. We recommend that you replace the
filter every 6–9 months depending on frequency of use.
To empty the dust canister (Fig. F, G, H, I)
u Push down the dust canister release button (4) to
release and remove the dust canister (5) from the vacuum.
u Use your index nger and thumb to pinch the lter
housing tabs and pull the lter housing (6) from the
dust canister as shown in gure G.
u Place the dust canister over a trash can and empty the
dust canister as illustrated in gure H.
u Remove the foam lter (6a) from the lter housing as
shown in gure I.
u Shake or lightly brush any loose dust off of the foam
lter (6a) and lter (6).
u Rinse out the dust canister (5) with warm soapy water.
u Wash the lters with warm soapy water.
u Ensure the lters are completely dry before retting the
lters into the lter housing.
u Ret the clean and dry foam lter (6a) into the lter
housing (6).
u Install the lter housing into the dust canister (5).
u Install the dust canister onto the vacuum, until it “clicks”
rmly into position.
Removing and cleaning the beater bar
(Fig. J, K)
Warning! To reduce the risk of injury from moving parts,
disconnect the oor head and extension tube from the vacuum
before cleaning or servicing.
u To remove the beater bar (9b) from the oor head (9) Slide
the beater bar release button (9a) to the rear of the unit.
u The beater bar (9b) can now be removed and cleaned.
Safe storage (Fig. L)
The unit can be safely stored, when not in use, by placing the
catch on the rear of the motor unit onto the storage station
(13) as shown in gure L.
Wall mounteing
The product can be attached to a wall to provide a
convenient storage for the appliance.
When mounting to a wall, make sure the mounting method
is suitable for the wall type and is appropriate to the weight
of the appliance.
u Mark the location of the charging station screw holes on
the wall (within reach of an electrical outlet for charging
the vacuum while it is on the storage station.
u Fix the storage station to the wall using appropriate
screws and plugs for the type of wall, and weight of the
appliance.
Maintenance
Your BLACK+DECKER cordless appliance has been designed
to operate over a long period of time with a minimum of main-
tenance. Continuous satisfactory operation depends upon
proper tool care and regular cleaning.
Warning! Before performing any maintenance on cordless
12
ENGLISH
(Original instructions)
appliances:
u Run the battery down completely if it is integral and then
switch off.
u Unplug the charger before cleaning it. Your charger does
not require any maintenance apart from regular cleaning.
u Regularly clean the ventilation slots in your appliance/
charger using a soft brush or dry cloth.
u Regularly clean the motor housing using a damp cloth. Do
not use any abrasive or solvent-based cleaner.
Replacing the lters
The lters should be replaced every 6 to 9 months and when-
ever worn or damaged. Replacement lters are available from
your BLACK+DECKER dealer.
u Remove the old lters as described above.
u Fit the new lters as described above.
Protecting the environment
Z
Separate collection. Products and batteries
marked with this symbol must not be disposed of
with normal household waste.
Products and batteries contain materials that can be recov-
ered or recycled reducing the demand for raw materials.
Please recycle electrical products and batteries according to
local provisions. Further information is available at
www.2helpU.com
Service Information
Black & Decker offers a full network of company-owned and
authorized service locations throughtout Asia. All Black &
Decker Service Centers are staffed with trained personnel to
provide customers with efcient and reliable product service.
Whether you need technical advice, repair, or genuine factory
replacement parts, contact the Black & Decker location
nearest to you.
Note
u Black & Decker’s policy is one of continuous improvement
to our products and, as such, we reserve the right to
change product specications without prior notice.
u Standard equipment and accessories may vary by coun-
try.
u Product specications may differ by country.
u Complete product range may not be available in all coun-
tries. Contact your local Black & Decker dealers for range
availability.
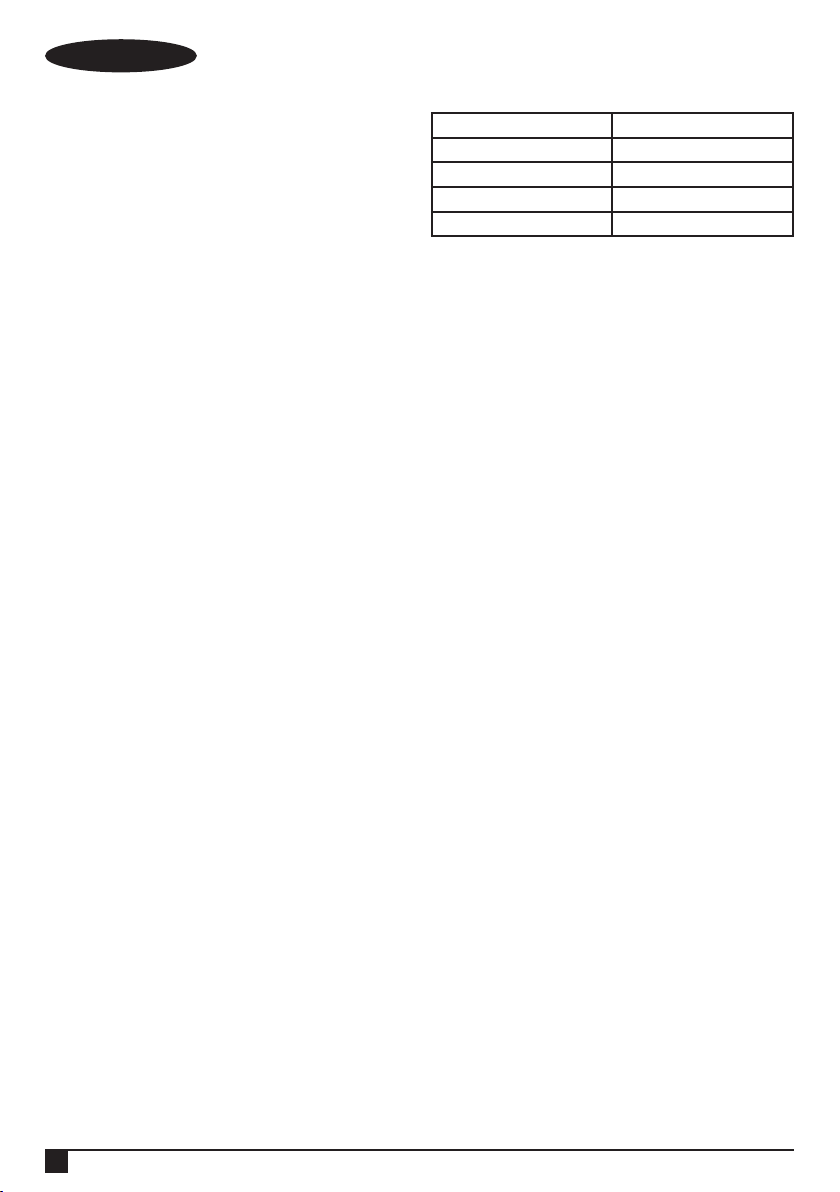
Technical Data
BHFEA520J
Voltage 18V (20V Max)
Watt Hours 36Wh
Approx Charge Times 5 hours
Weight 2.62KG
NA082165 09/2021
