

BHFEB520D
www.blackanddecker.co.uk

B
Copyright BLACK+DECKER
English (original instructions) 4
1
Fig. A
Fig. B
1
4
2
3
5
6
8
7
11
12
8
17
16
9
10
18
19
20
21
14
15
13
23
22
33
XXXX XX XX
3
11
2
Fig.K
Fig.C
Fig.D
Fig.E Fig.F
Fig.G
Fig.I
Fig.J
20
19
21
16
16
6
20
21
19
16
22
1
2
4
5
7
11
8
8
Fig.H
19
16
17
17
3
Fig. L
Fig.M
5
13
7
10
24
Fig.Q Fig. R
31
32
11
20
Fig.N
Fig.O
Fig.P
25
10
9
9
26
10
27
25
30
9
29
28
26
24

4
ENGLISH
• Never pull the charger lead to disconnect the
charger from the socket. Keep the charger
lead away from heat, oil and sharp edges.
• Keep hair, loose clothing, fingers, and all
parts of body away from openings and
moving parts.
• This appliance can be used by children
aged from 8 years and above and
persons with reduced physical, sensory or
mental capabilities or lack of experience
and knowledge if they have been given
supervision or instruction concerning
use of the appliance in a safe way and
understand the hazards involved. Children
shall not play with the appliance. Cleaning
and user maintenance shall not be made
by children without supervision.
Inspection and repairs
Before use, check the appliance for damaged
or defective parts. Check for breakage of parts,
damage to switches and any other conditions
that may affect its operation.
• Do not use the appliance if any part is
damaged or defective.
• Have any damaged or defective parts
repaired or replaced by an authorized
repair agent.
• Regularly check the charger lead for
damage. Replace the charger if the lead is
damaged or defective.
• Never attempt to remove or replace any parts
other than those specified in this manual.
Read all of this manual carefully
before operating the appliance.
Safety Instructions
WARNING: Read all safety
warnings and all instructions.
Failure to follow the warnings and
instructions may result in electric
shock, fire and/or seriousinjury.
• The intended use is described in this manual.
The use of any accessory or attachment or
the performance of any operation with this
appliance other than those recommended in
this instruction manual may present a risk of
personal injury.
• Retain this manual for future reference.
Using Your Appliance
• Do not use the appliance to pick up liquids
or any materials that could catch fire.
• Do not use the appliance near water.
• Do not immerse the appliance in water.
BHFEB520D
Type 1
Power source DC
Battery voltage V
DC
18
Weight (without battery pack) kg 2,80
Intended Use
Your BLACK+DECKER vacuum has been designed for vacuuming
everyday dry messes. This appliance is intended for household
useonly. The vacuum cleaner is intended for vacuuming
materials that are not harmful tohealth. This product is NOT to
be used for filtering of pathogens, for example COVID-19.
Technical Data
18V 4 IN 1 CORDLESS VACUUM
BHFEB520D

5
ENGLISH
Chargers
BLACK+DECKER chargers require no adjustment and are
designed to be as easy as possible tooperate.
BLACK+DECKER chargers are designed to charge
BLACK+DECKER battery packs.
NOTE: To ensure maximum performance and life of lithium ion
battery packs:
- Fully charge the battery pack before first use.
- Recharge discharged batteries as soon as possible after
every use.
- Do not fully discharge batteries.
WARNING:
Only charge batteries in air
temperature over 4.5° C (40° F) and below +40.5°C (105° F).
Electrical Safety
Symbols on the charger
Read all of this manual carefully before using
the appliance.
This tool is double insulated; therefore no earth wire
is required. Always check that the power supply
corresponds to the voltage on the rating plate.
The charging base is intended for indoor use only.
WARNING: Never attempt to
replace the charger unit with a regular
mains plug.
• Use your BLACK+DECKER charger only to
charge the battery in the appliance with
which it was supplied. Other batteries could
burst, causing personal injury and damage.
• Never attempt to charge
nonrechargeable batteries.
• If the supply cord is damaged, it must
be replaced by the manufacturer or an
authorised BLACK+DECKER service centre
in order to avoid a hazard.
• Do not expose the charger to water.
• Do not open the charger.
• Do not probe the charger.
• The appliance/battery must be placed in a
well ventilated area when charging.
Chargers
Your charger has been designed for a
specific voltage. Always check that the
mains voltage corresponds to the voltage
on the rating plate.
Residual Risks
Additional residual risks may arise when
using the tool which may not be included
in the enclosed safety warnings. These risks
can arise from misuse, prolonged use etc.
Even with the application of the relevant
safety regulations and the implementation
of safety devices, certain residual risks can
not be avoided. These include:
• Injuries caused by touching any rotating/
moving parts.
• Injuries caused when changing any parts,
blades oraccessories.
• Injuries caused by prolonged use of a
tool. When using any tool for prolonged
periods ensure you take regular breaks.
• Impairment of hearing.
• Health hazards caused by breathing
dust developed when using your tool
(example:- working with wood, especially
oak, beech and MDF.)
Additional safety instructions
After Use
• Unplug the charger before cleaning the
charger or chargingbase.
• When not in use, the appliance should be
stored in a dryplace.
• Children should not have access to
stored appliances.

6
ENGLISH
Wall mounted vacuum storage and battery
charging (Fig. E)
The product can be attached to a wall to provide a convenient
storage and charging point for the appliance. When mounting
to a wall, make sure the mounting method is suitable for the
wall type and is appropriate to the weight of the appliance.
1. Mark the location of the charging station screw holes on the
wall (at a height that allows the unit to hang without hitting
the floor and within reach of an electrical outlet for charging
the vacuum while it is on the charging station
20
.
2. Fix the charging station
20
to the wall using appropriate
screws and plugs for the type of wall, and weight of
theappliance.
3. Install the cup charger
19
into the charging station (Fig D.).
Ensure it is locked into place before proceeding.
NOTE: To remove the cup charger from the charging base pull
out on the retaining tabs
21
and lift the cup charger out.
4. Plug the charger into an appropriate outlet.
5. With the battery
16
installed on the vacuum slide the
charge port
6
,located on the vacuum base, onto the
slots
22
of the charging station.
6. The white LED on the vaccum will flash indicating that the
battery is beingcharged.
7. The white LEDs will illuminate in segments, displaying the
state of charge in the battery
8. The completion of charge is indicated by the white LEDs will
turn off. The pack is fully charged and may be used at this
time or left on thecharger.
Wall mounted vacuum storage and battery
charging (Fig. E)
The product can be attached to a wall to provide a convenient
storage and charging point for the appliance. When mounting
to a wall, make sure the mounting method is suitable for the
wall type and is appropriate to the weight of the appliance.
1. Follow the instructions in the Wall mounted cup charging
section for instructions on mounting the charging
station
20
to a wall.
2. With the battery
16
installed on the vacuum slide the
charge port
6
,located on the vacuum base, onto the
slots
22
of the charging station.
3. The white LED on the vaccum will flash indicating that the
battery is beingcharged.
4. The white LEDs will illuminate in segments, displaying the
state of charge in the battery
5. The completion of charge is indicated by the white LEDs will
turn off. The pack is fully charged and may be used at this
time or left on thecharger.
Charging a Battery (Fig. C–E)
The supplied charger offers three possible ways to charge yourbattery.
- Cup charging
- Wall mounted cup charging
- Unit wall mounted charging
Standard cup charging (Fig. C)
1. Plug the charger into an appropriate outlet before inserting
the batterypack
16
.
2. Insert the battery pack into the cup charger
19
.
3. The green LED will flash indicating that the battery is
beingcharged.
4. The completion of charge is indicated by the green LED
remaining on continuously. The pack is fully charged and
may be used at this time or left on thecharger.
Wall mounted cup charging (Fig. D)
1. Mark the location of the charging station screw holes on
the wall (within reach of an electrical outlet for charging the
vacuum while it is on the charging station
20
.
2. Secure the charging station
20
to the wall using
appropriate screws and plugs for the type of wall, and
weight of the appliance.
3. Install the cup charger
19
into the charging station
20
(Fig. D). Ensure it is locked into place before proceeding.
NOTE: To remove the cup charger from the charging base
pull out on the retaining tabs
21
and lift the
cupcharger
19
out.
4. Plug the charger into an appropriate outlet before inserting
the batterypack.
5. Slide the battery pack
16
onto the charging station
20
.
The charger will not charge a faulty battery pack, which may
be indicated by the light staying OFF or the red light rapidly
blinking. Take charger and battery pack to an authorized service
centre if light staysOFF or red light rapidlyblinks.
NOTE: Refer to label near charging light on charger for
blinkpatterns.
Important Charging Notes
1. The charger and battery pack may become warm to the
touch while charging. This is a normal condition, and does
not indicate a problem. To facilitate the cooling of the
battery pack after use, avoid placing the charger or battery
pack in a warm environment such as in a metal shed or an
uninsulatedtrailer.
2. If the battery pack does not charge properly:
a. Check operation of receptacle by plugging in a lamp or
other appliance;
b. Check to see if receptacle is connected to a light switch
which turns power off when you turn out the lights;
c. If charging problems persist, take the tool, battery pack
and charger to your local servicecentre.
3. You may charge a partially used pack whenever you desire
with no adverse effect on the batterypack.
SAVE THESE INSTRUCTIONS FOR FUTURE USE
Battery Type
The BHFEB520D operates on a 18 volt battery pack.
These battery packs may be used: BL1518, BL1518ST, BL2018,
BL2018ST, BL2518, BL4018, BL5018.

7
ENGLISH
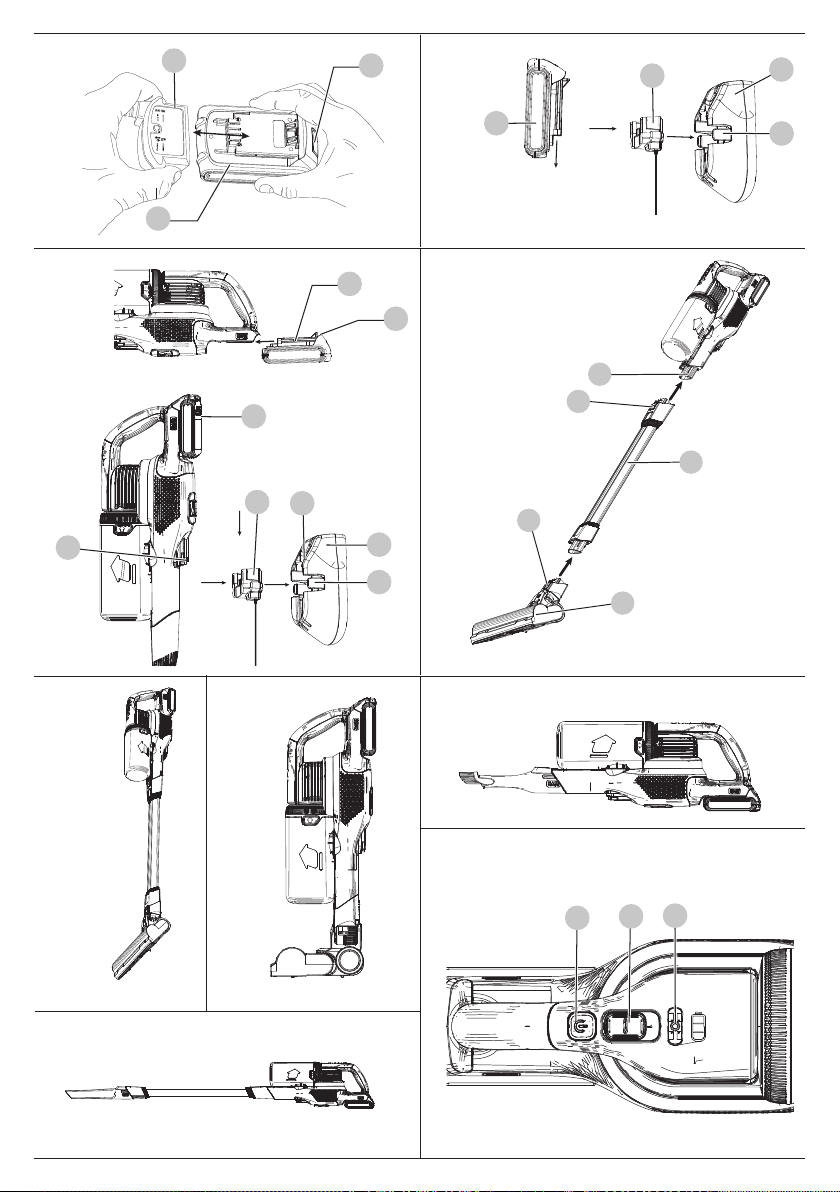
Assembly (Fig. F)
WARNING: When not in use position the
unit with the rear of the vacuum facing a wall so that any
inadvertent fall of the unit would contact a wall and not
people orpets.
1. Align the top of the extension tube
7
with the
vacuuminlet
5
as shown in Fig.F.
2. Push the extension tube
7
onto the vacuum inlet
5
so it
locks intoposition.
3. Align the bottom of the extension tube
7
with the floor
head
11
as shown in Fig.F.
Using an Accessory Tool (Fig. L)
Your vacuum may come with some of the followingtools.
- Crevicetool.
- 2 in 1 brush
- Pet hairtool.
Switching the Floorhead OFF and ON (Fig. K)
• To switch the floorhead OFF, press the Floorhead ON/OFF
button
4
.
• To switch the floorhead ON, press the floorhead ON/OFF
button
4
a secondtime.
NOTE: The LED worklights
12
will illuminate whenever the
floorhead is switched ON.
Switching ON and OFF (Fig. K)
1. To switch ON, push the ON/OFF button
1
.
2. For increased power, slide the
variable power switch
2
forward.
NOTE: The state of charge indicator LEDs will illuminate
while the vacuum is ON.
3. To switch OFF, press the ON/OFF button
1
a secondtime.
4. Return the product to the charger immediately after use so
that it will be fully charged and ready for the next use.
NOTE: Ensure that the product is fully engaged with the
charger plug.
Use (Fig. A, G–J)
This vacuum can be used in one of fourways.
- With the extension tube
7
and the
floorhead
11
. (Fig. G)
- With the floorhead
11
. (Fig. H)
- With the extension tube
7
and an
accesssory tool
15
,
14
,
13
. (Fig. I)
- With an accesssory tool
15
,
14
,
13
. (Fig. J)
Inserting and Removing the Battery Pack
from the Tool (Fig. E)
NOTE: Make sure your battery pack
16
is fullycharged.
To Install the Battery Pack into the Tool Handle
1. Align the battery pack with the rails inside the tool’s
handle(Fig. E).
2. Slide it into the handle until the battery pack is firmly seated
in the tool and ensure that you hear the lock snap intoplace.
To Remove the Battery Pack from the Tool
1. Press the battery release button
17
and firmly pull the
battery pack out of the toolhandle.
2. Insert battery pack into the charger as described in the
charger section of thismanual.
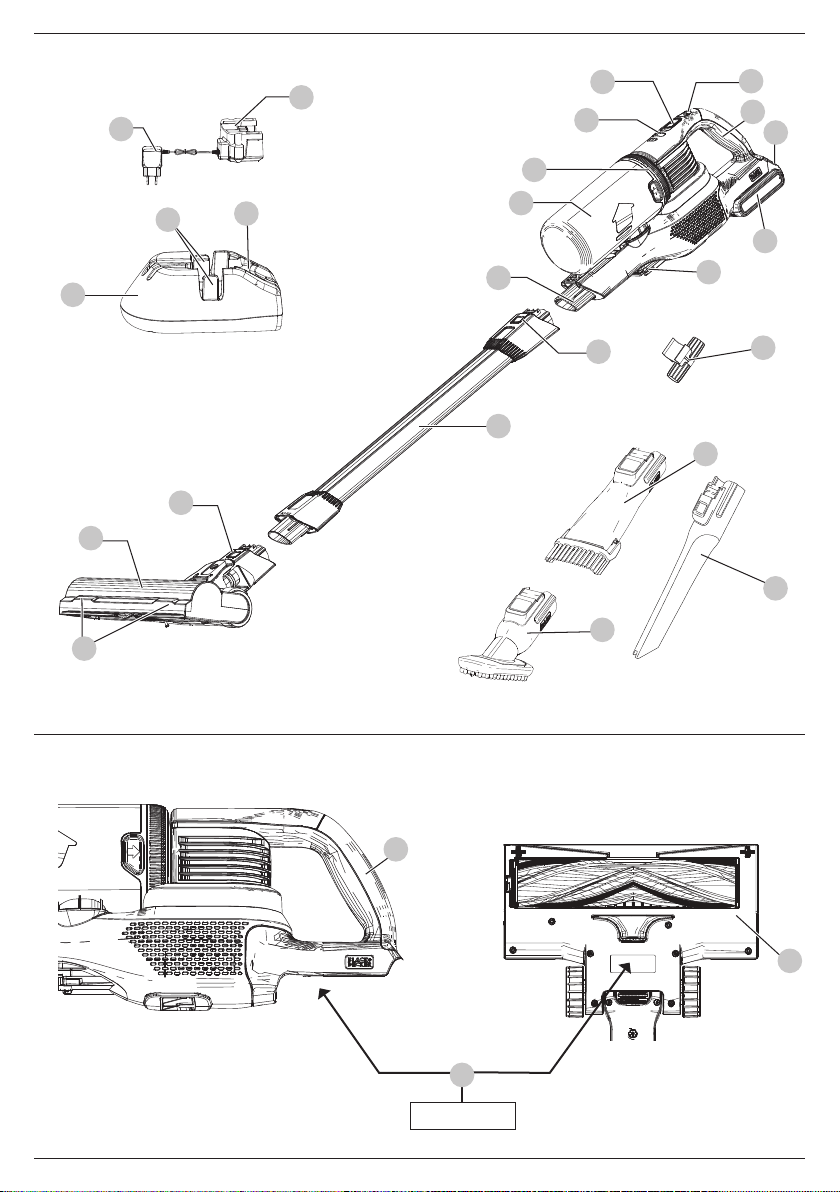
Features (Fig. A)
This tool includes some or all of the following features.
1
ON/OFF button
2
Variable power switch
3
Main handle
4
Floorhead ON/OFF button
5
Vacuum inlet
6
Charge port
7
Extension tube
8
Accessory release latch
9
Dust canister cap
10
Lift away dust canister
11
Floorhead
12
LED worklight
13
2 in 1 brush
14
Crevice tool
15
Pet hair tool
16
Battery pack
17
Battery release button
18
Charger plug
19
Cup Charger
20
Charging station
21
Retaining tabs
22
Charging station slots
23
Accessory storage clip
Date Code Position (Fig.B)
The production date code
33
consists of a 4-digit year followed
by a 2-digit week and is extended by a 2-digit factorycode.
Markings on Appliance
The following symbols appear on this appliance along with
the date code.
Read instruction manual beforeuse.
Keep hair away from brushes, openings and other
moving parts.
BHFEB520D uses charger
S010**2400040/ SSC-250040**
.
4. Push the bottom of the extension tube
7
onto the floor
head
11
so it locks into position.
5. To remove an accessory, press the extension pole release
button
8
located on the vacuum inlet or the bottom of the
extension tube and gently pull the connected accessoryoff.

8
ENGLISH
Cleaning
WARNING: Before performing any
maintenance on cordless appliance remove the battery.
Replacement Filter
The filter should be replaced every 6to 9months and whenever
worn or damaged. Replacement filters are available from your
BLACK+DECKERservice centre.
Visit www.2helpu.com to locatea service centre.
2. Rinse out the dust canister
10
with warm soapywater.
3. Wash the foam filter
29
and felt filter
28
with warm
soapywater.
4. Ensure the foam filter
29
and felt filter
28
are completely
dry before refitting the filters into the dust canister cap
9
.
5. Once the filters
29
,
28
are clean and completely dry, place
them inside the dust canister cap
9
with the white felt
28
side in the upwards position.
NOTE: The black foam
29
side will be visible when looking
into the dust canister cap from the underside.
6. With the filters
29
,
28
fitted, screw the dust canister
cap
9
clockwise onto the pre-filter
26
.
7. The pre-filter
26
can now be inserted into the lift away
dust canister
10
according to instructions in the Inserting
Pre-Filter section.
• IMPORTANT:
- Wash the filters regularly using warm, soapy water and
ensure that it is completely dry before using again. The
cleaner the filter is, the better the product will perform.
- It is very important that the filters are completely dry
and correctly in position beforeuse.
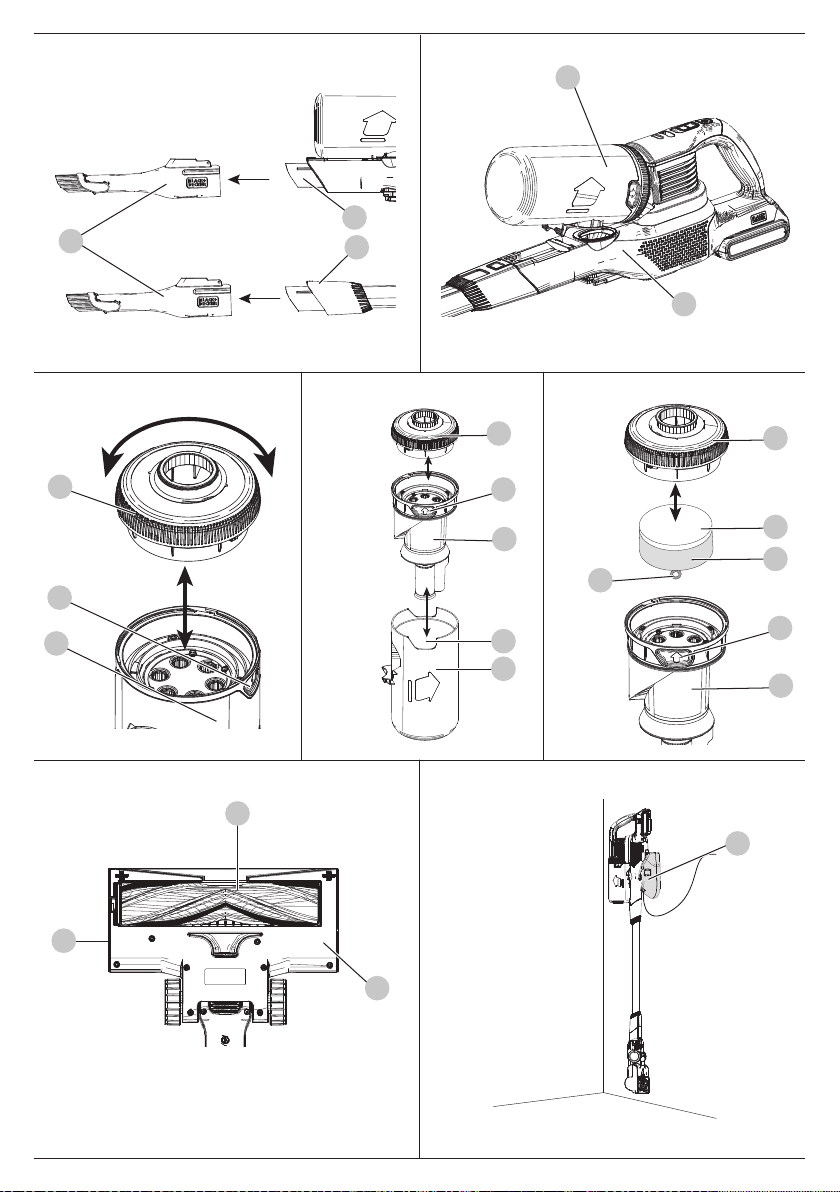
Removing and Cleaning the Rotary Brushes
(Fig. Q)
WARNING: To reduce the risk of injury from
moving parts, disconnect the floor head and extension tube
from the vacuum before cleaning orservicing.
1. To remove the rotary brush
31
from the floorhead
11
slide
the release latch
32
towards the rear of the floorhead
11
.
2. With the rotary brush
31
released from the floorhead
11
,
grab and lift the rotary brush
31
completely out of the
floorhead
11
to clean.
3. Wipe away any dust or debris on the rotary brush
31
.
4. Reinstall the rotary brush
31
into the floorhead
11
by
aligning the keyed end of the rotary brush
31
with the gear
located in the floorhead
11
.
5. Align the squared end of the rotary brush
31
with the
square slot on the floorhead
11
.
6. Press firmly on the rotary brush
31
to secure it into the
floorhead
11
. Ensure you hear an audible click as the
release latch
32
snaps into its locked position.
Cleaning and Emptying the Vacuum
WARNING: Projectile/Respiratory Hazard:
never use the vac without itsfilter.
IMPORTANT: Maximum dust collection will only be obtained
with clean filters and an empty dust canister. If dust begins to
fall back out of the product after it is switched off, this indicates
that the dust canister is full and requiresemptying.
NOTE: The filter is re-usable do not throw it away when the
product is emptied. We recommend that you replace the filters
29
,
28
every 6–9 months depending on frequency ofuse.
To Empty the Dust Canister and Remove the Pre-
filter (Fig.M–P)
1. Lift and remove the lift away dust canister
10
from the
chassis
24
as shown in Fig.M.
2. While over top of a trash can, grip the recessed tabs
25
of the
pre-filter
26
and pull upwards to remove the pre-filter with
cyclones and dust canister cap
9
.
3. Empty the contents of the dust canister
10
.
4. Tap the pre-filter
26
as necessary to remove any debris.
Inserting Pre-filter (Fig. O)
NOTE: The filter housing fits snuggly in the dust canister and
may be difficult to remove at first.
1. Install the pre-filter
26
into the dust canister
10
ensuring
the dust canister tab
27
aligns with the recessed tabs
25
as
shown in Fig.O.
2. Install the dust canister onto the chassis
24
, until it clicks
firmly intoposition.
Removing filters (Fig. M–P)
1. Lift and remove the lift away dust canister
10
from the
chassis
24
as shown in Fig.M.
2. Unscrew the dust canister cap
9
anticlockwise and lift off
the dust canister
10
.
3. Remove the foam filter
29
and felt filter
28
by pulling on
the plastic loop
30
.
Cleaning the filters
1. Once the filters and pre-filter are removed from the dust
canister
10
shake off or lightly brush any loose dust from
the pre-filter
26
and foam filter
29
and felt filter
28
.
MAINTENANCE
WARNING: To reduce the risk of serious
personal injury, turn unit off and remove battery
pack before making any adjustments or removing/
installing attachments or accessories. An accidental
start-up can causeinjury.
• The accessories
15
,
14
,
13
can be fitted either directly to
the extension tube
7
or to the vacuum inlet
5
as shown
in Fig. L.
• Align the top of the accessories
15
,
14
,
13
with the
vacuum inlet
5
or extension tube
7
and push into place so
it locks into position as shown in Fig.L.

9
ENGLISH
Protecting the Environment
w
Separate collection. Products and batteries marked
with this symbol must not be disposed of with
normal householdwaste.
Products and batteries contain materials that can be
recovered or recycled, reducing the demand for raw materials.
Please recycle electrical products and batteries according to local
provisions. Further information is available at
www.2helpU.com.
Troubleshooting
If the product does not work, check the following:
Problem Possible Cause Possible solution
Unit will not start. Battery pack
not charged.
Check battery pack
charging requirements.
Blockage. Check floorhead tube.
Check extension tube.
Check between extension
tube and bowl.
Battery pack will
not charge.
Charger not
plugged in.
Plug charger into a working
outlet. Refer to Important
Charging Notes for
more details.
Surrounding air
temperature too hot
or too cold.
Move charger and battery
pack to an area above
4 °C or below +40 °C.
Rotarty brush
stops working.
Obstruction.
The unit is equipped with
a rotary brush overload
protection feature. (See
Removing and Cleaning the
Rotarty Brushes section.)
Vacuum performance
is poor.
Clogged dust bowl. Empty the dust bowl. (See
Cleaning and Emptying the
vacuum section.)
Filters are dirty. Clean the filters. (See
Cleaning and Emptying the
vacuum section.)
Rotary brush Clean the rotary brush. (See
Removing and Cleaning the
Rotarty Brushes section.)
Safe Storage (Fig.R)
The unit can be safely stored, when not in use, by placing
the catch on the rear of the motor unit onto the charging
station
20
as shown in Fig. R.
- Unplug the charger before cleaning it. Your charger
does not require any maintenance apart from regular
cleaning.
- Regularly clean the ventilation slots in your appliance/
charger using a soft brush or dry cloth.
- Regularly clean the motor housing, using a damp cloth.
- Do not use any abrasive or solvent-based cleaner.
Guarantee
Black & Decker is confident of the quality of its products and offers
consumers a 24-month guarantee from the date
of purchase.
This guarantee is in addition to and in no way prejudices your
statutory rights.
The guarantee is valid within the territories of the Member States
of the European Union and the European Free Trade Area and the
United Kingdom.
To claim on the guarantee, the claim must be in accordance with
Black&Decker Terms and Conditions and you will need to submit
proof of purchase to the seller or an authorised repair agent.
Terms and conditions of the Black&Decker 2-year guarantee
and the location of your nearest authorised repair agent can be
obtained on the Internet at
www.2helpU.com
, or
by contacting your local Black & Decker office at the address
indicated in this manual.
Please visit our website
www.blackanddecker.co.uk
to register
your new Black & Decker product and receive updates on new
products and special offers.

NA373453 05/23
België/Belgique/Luxembourg Stanley Black & Decker Belgium BVBA Tel. NL +32 15 47 37 65
www.blackanddecker.be Egide Walschaertsstraat 16 Tel. FR +32 15 47 37 66
Danmark Black & Decker [email protected]
Roskildevej 22 www.blackanddecker.dk
2620 Albertslund
Deutschland Stanley Black & Decker Deutschland Gmbh Tel. 06126 21-0
www.blackanddecker.de Black & Decker Str. 40, D - 65510 Idstein Fax 06126 21-2980
Ελλάδα StanleyBlack&Decker(ΕΛΛΑΣ)Ε.Π.Ε Τηλ. 210-8981616
www.blackanddecker.gr ΓΡΑΦΕΙΑ:Στράβωνος7&Βουλιαγμένης Φαξ 210-8983570
[email protected] 16674Γλυφάδα-Αθήνα
SERVICE: ΗμεροςΤόπος2-ΧάνιΑδάμ Τηλ.Service 210-8985208
19300Ασπρόπυργος-Αθήνα Φαξ 210-5597598
España Stanley Black & Decker Ibérica, S.C.A. Tel. 934 797 400
www.blackanddecker.es Parc de Negocis “Mas Blau” Fax 934 797 419
[email protected] EdicioMuntadas,c/Bergadá,1,Of.A6
08820ElPratdeLlobregat(Barcelona)
France Stanley Black & Decker. Tel. 04 72 20 39 20
www.blackanddecker.fr 62 chemin de la Bruyère Fax 04 72 20 39 00
69570 Dardilly, France
Helvetia ROFOAG Tel. 026-6749393
www.blackanddecker.ch Gewerbezone Seeblick Fax 026-6749394
Italia Stanley Black & Decker Italia Tel. 039-9590200
www.blackanddecker.it Via Energypark 6 Fax 039-9590313
Nederland Stanley Black & Decker Netherlands BV Tel. +31 164 283 065
www.blackanddecker.nl HoltumNoordweg35,6121REBORN Fax +31164283200
enduser[email protected] Postbus83,6120ABBORN
Norge Black & Decker [email protected]
Postboks 4613, Nydalen www.blackanddecker.no
0405Oslo
Österreich Stanley Black & Decker Austria GmbH Tel. 01 66116-0
www.blackanddecker.at Oberlaaerstraße248,A-1230Wien Fax 0166116-614
Portugal Black & Decker Limited SARL Tel. 214667500
www.blackanddecker.pt Quinta da Fonte - Edifício Q55 D. Diniz Fax 214667580
[email protected] Rua dos Malhões, 2 e 2A - Piso 2 Esquerdo
2770 - 071 Paço de Arcos
Suomi Black&Decker asiakaspalvelu.@sbdinc.com
PL47 www.blackanddecker.
00521, Helsinki
Sverige Black & Decker AB [email protected]
Box 94, 431 22 Mölndal www.blackanddecker.se
Türkiye KALEHırdavatveMakinaA.Ş. Tel. 02125335255
www.blackanddecker.com.tr DefterdarMah.SavaklarCad.No:15 Fax. 02125331005
Edirnekapı/Eyüp/İstanbul34050
United Kingdom & Black & Decker Tel. 01753 511234
Republic Of Ireland 270 Bath Road Fax 01753 512365
www.blackanddecker.co.uk Slough, Berkshire SL1 4DX
Middle East & Africa Black & Decker Tel. +971 4 8863030
www.blackanddecker.ae P.O.Box-17164 Fax +97148863333
[email protected] JebelAliFreeZone(South),Dubai,
UAE
