Loading ...
Loading ...
Loading ...
Memo :
0
Use the cross-shaped button (I) to switch
between the Color Temperature Selection
screen and the Color Temperature Detailed
Selection screen.
0
If [White Balance] has been assigned to the user
button, pressing the assigned user button will
display the Color Temperature Selection
screen.
(A P42 [Assignment of Functions to User
Buttons] )
Memory A Mode (A), Memory B Mode
(B)
0
Set to the white balance saved in Memory A or
Memory B.
0
When the [WHT.BAL B/A/PRESET] switch is set
to “A” or “B”, pressing the user button assigned
with “AWB” executes Auto White Balance. The
white balance will be automatically adjusted and
the adjusted value will be saved in Memory A or
Memory B.
1
Prepare the camera recorder.
A
Set the [POWER ON/OFF] switch to “ON”.
B
Set the [IRIS A/M] mode switch on the lens to “A”.
C
Set the [FULL AUTO] switch to “OFF”.
2
Set the [ND FILTER] switch according to the
lighting.
(A P62 [Setting the ND Filter] )
3
Set the [WHT.BAL B/A/PRESET] switch to “A”
or “B”.
4
Locate a place with similar lighting conditions
as the object to be shot, place a white object
near the center of the screen and zoom in to
fill the screen with white.
5
Press the [AWB/9] (Auto White Balance)
button.
0
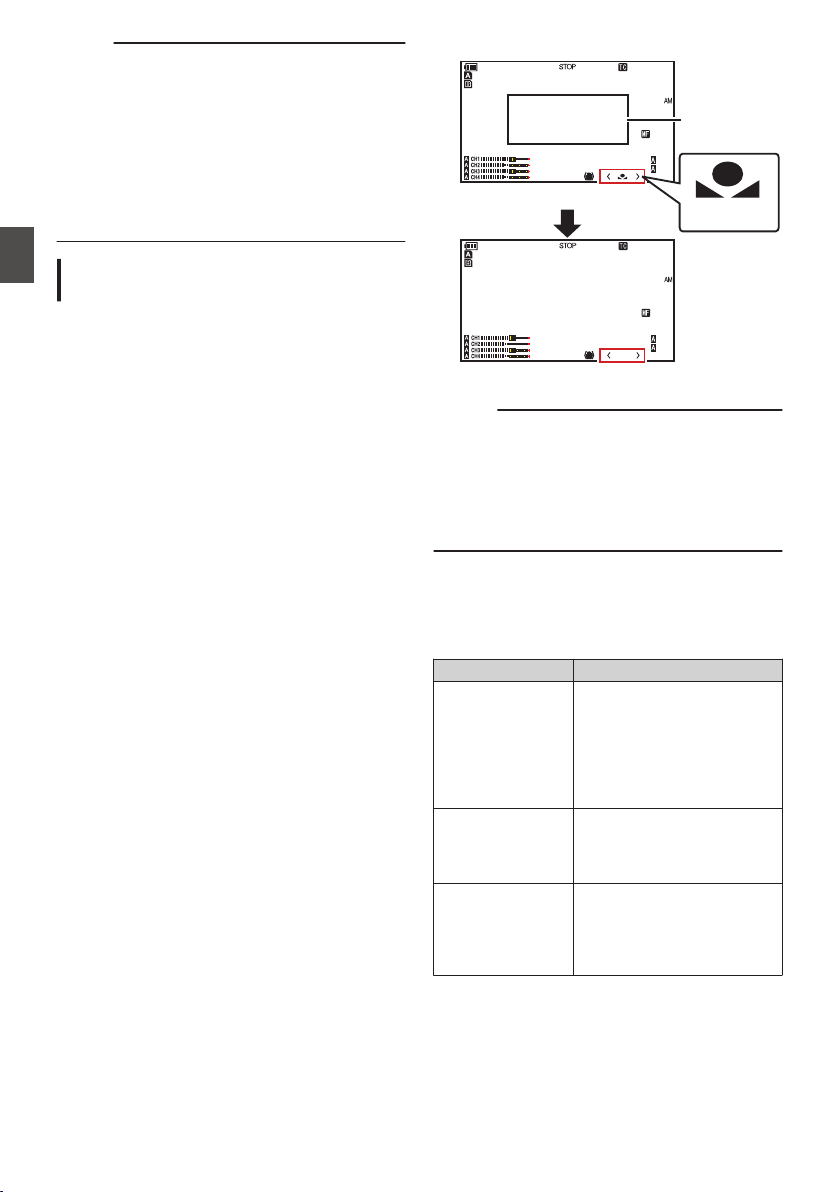
The white detection frame appears when Auto
White Balance is activated. Fill the frame with
white completely.
0
While Auto White is starting up, “A<
y
>” or
“B<
y
>” appears on the screen. (
y
mark
appears blinking)
0
After the correct white balance is obtained, an
estimated value of the current color
temperature is displayed.
.
100min
50min
282min
A
1/100
F1. 6
0
dB
AE+6
ND 1 /64
5 . 6 f t
12 :34 :56
Jan 24 , 2014
00: 00:00.00
1920x1080
60 i HQ
100min
50min
282min
A
1/100
F1. 6
0
dB
AE+6
ND 1 /64
5 . 6 f t
12 :34 :56
Jan 24 , 2014
00: 00:00.00
1920x1080
60 i HQ
3700K
Result Display
[AWB] Activating
White Detection
Frame
Blinking
Caution :
0
Do not use highly reflective objects, such as
metals. Doing so may result in improper white
balance adjustment.
0
The Auto White function cannot provide optimum
white balance with an object outside the
adjustment range, for example when it contains
only a single color or not enough white color.
Error Message
If the white balance adjustment is not correctly
completed, one of the following messages will
appear for about 3 seconds.
Message Status
Auto White * NG:
Object
(*A or B)
Displayed when there is not
enough white color on the
object, or when the color
temperature is not suitable.
Use another white object and
adjust the white balance
again.
Auto White * Error:
Low Light
(*A or B)
Displayed when the lighting is
dark. Increase the lighting
and adjust the white balance
again.
Auto White * Error:
Over Light
(*A or B)
Excessive illumination.
Displayed when the lighting is
too bright. Decrease the
lighting and adjust the white
balance again.
64
Adjusting the White Balance
Shooting
Loading ...
Loading ...
Loading ...