
Anker Innovations Limited. All rights reserved. eufy Security and eufy Security Logo
are trademarks of Anker Innovations Limited, registered in the United States and other
countries. All other trademarks are the property of their respective owners.
51005002808 V01
QUICK START
GUIDE
EUFY FLOODLIGHT CAM 2 PRO


Table of Contents
SAFETY INSTRUCTIONS 01
WHAT'S IN THE BOX 01
PRODUCT OVERVIEW 02
DECLARATIONS 03
POWERING ON YOUR FLOODLIGHT CAMERA 05
SETTING UP THE FLOODLIGHT CAMERA 06
PREPARING FLOODLIGHT CAMERA FOR INSTALLATION 07
MOUNTING YOUR FLOODLIGHT CAMERA 09
ADJUSTING THE LIGHTING ANGLE 19
NOTICE 23
01
SAFETY INSTRUCTIONS
• Disconnect power at the fuse or circuit breaker before installing.
• Do not install the product near flammable surfaces.
• To avoid risk of shock, injury or death, always be cautious when working
with electricity.
• Consult a licensed electrician if you are uncomfortable working with
electrical wiring.
• Make sure the Floodlight Camera is properly grounded.
• Floodlight Camera must be installed on a wall and on a UL-listed junction
box.
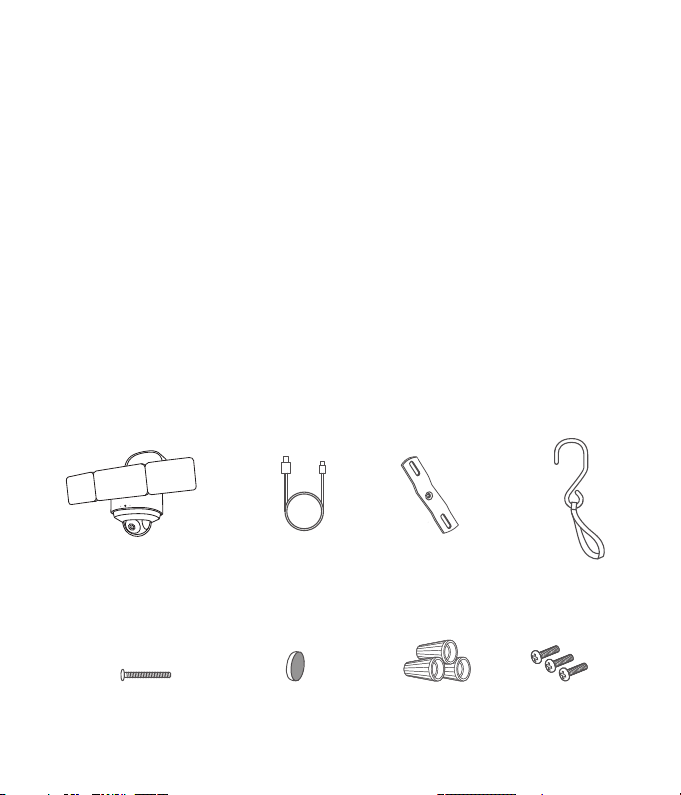
WHAT'S IN THE BOX
eufy Floodlight Cam 2 Pro
(T8423)
Charging Cable
Central Screw Central Screw Cap
Wire Nuts Plate Screws
Mounting Plate Installation Hook
& String
02
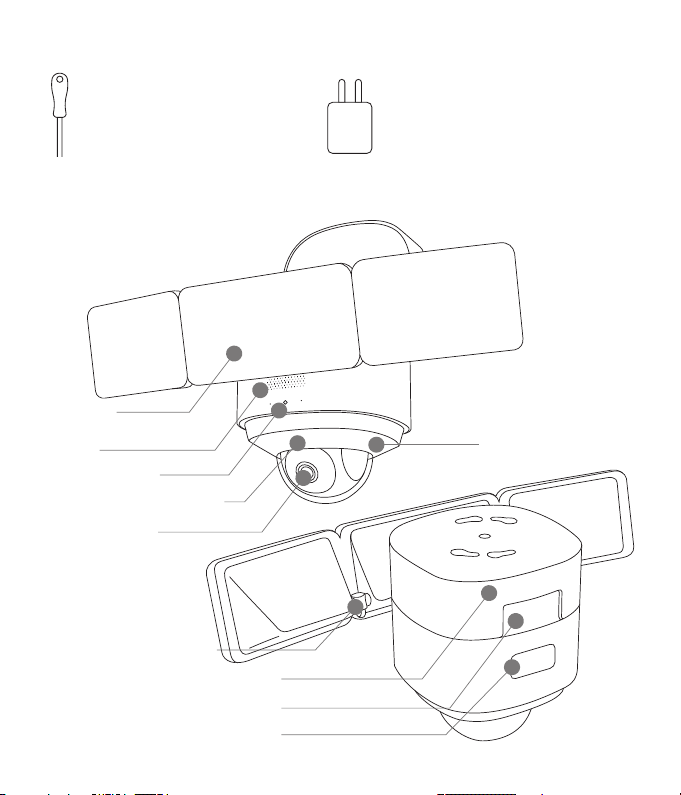
Required (not included):
USB Power Adapter
(5V/1A)
Crosshead
Screwdriver
PRODUCT OVERVIEW
Floodlight
Speaker
System Indicator
Cam Component
Infrared Component
Light Adjustment Knob
Mounting Base
Tilt Adjustment Slide Block
SYNC Button / USB Port
Motion Sensor Component
03
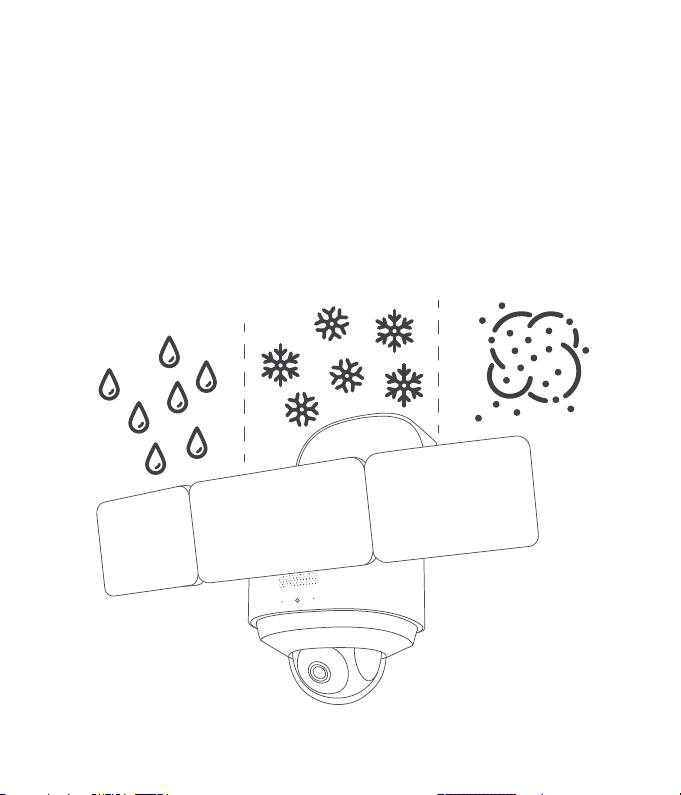
DECLARATIONS
IP65-rated dustproof and waterproof
This product meets IP65 (dustproof and waterproof) requirements.
For dustproof testing, the product was vacuumed and placed in a dust box. After
8 hours of testing, no dust was found in the product.
For waterproof testing, the product was sprayed by a nozzle with an inner
diameter of 6.3mm, and water flow of 12.5 L/min. After the test, the product
operated normally with no water found inside.
04
Anti-corrosion
The metal surface of the product is galvanized, and can survive continuous
exposure to salt spray at 35 ° C +/- 2 ° C (relative humidity: 90%-95%) with a salt
concentration of 5% NaCl for 48 hours in the salt spray test.
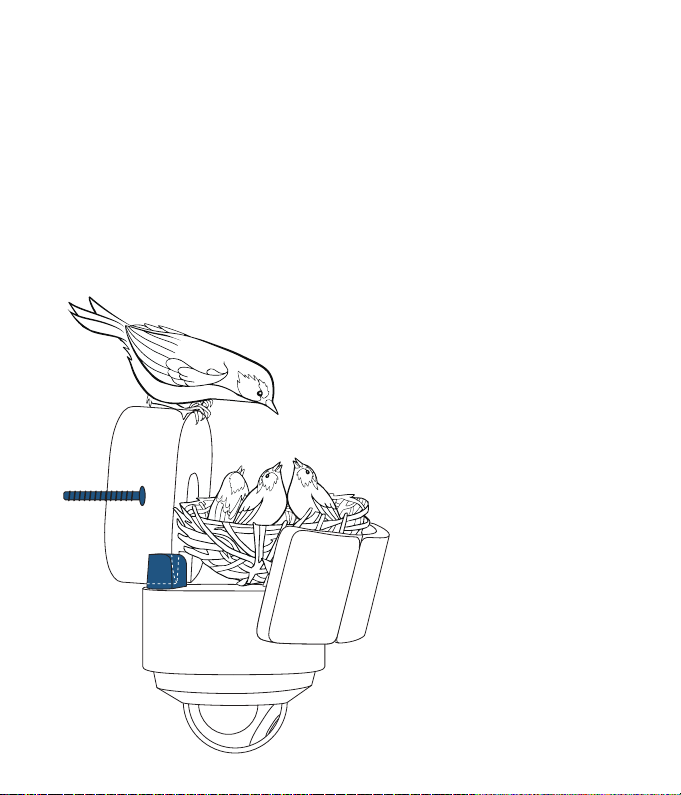
Load-bearing tests
The L-shaped bracket and center screw of the product are made of SUS304 steel
and have passed industrial-grade outdoor reliability and durability tests.
NOTE: The total weight of the product is 2.2kg (4.9lbs), and the L-shaped bracket
and center screw is strong enough to carry a load of 10kg (22lbs).
10kg
05
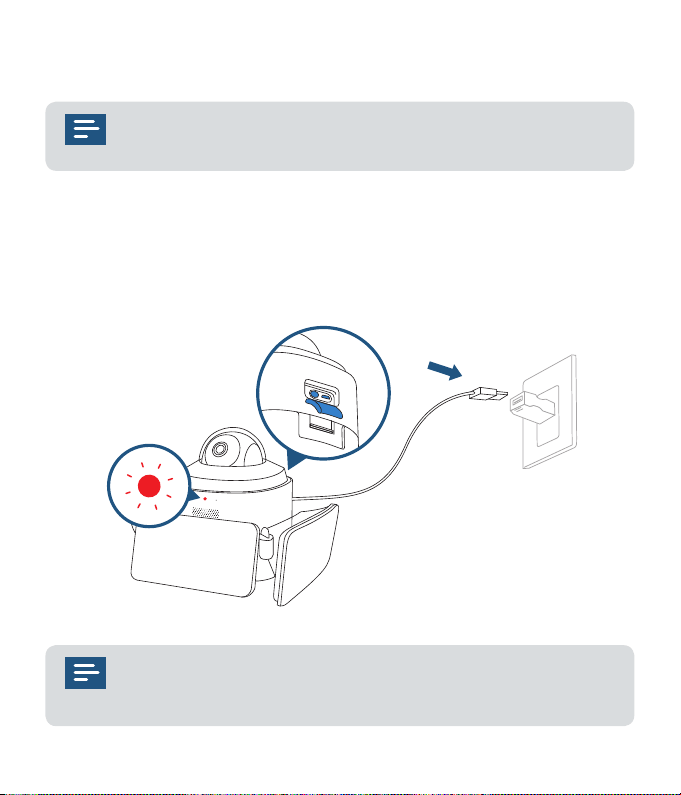
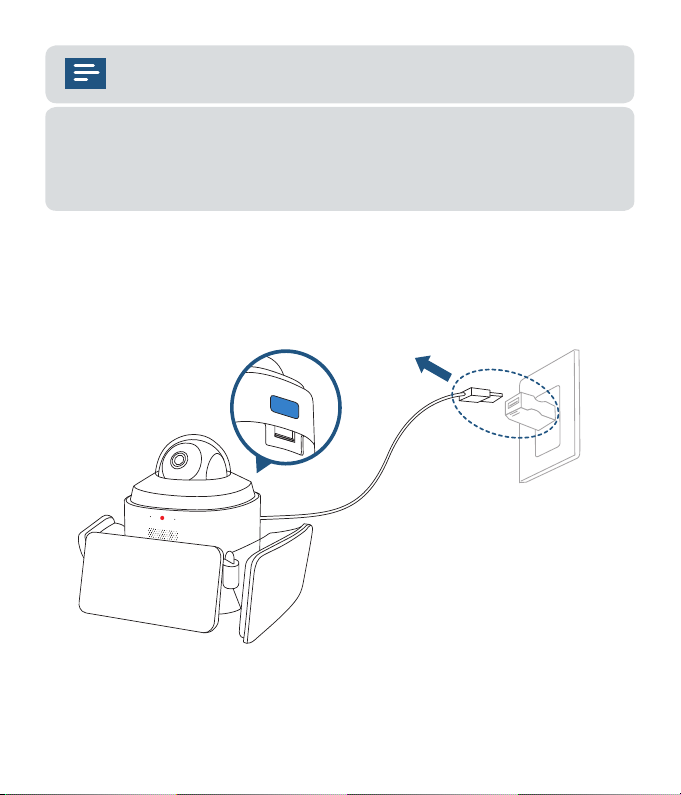
POWERING ON YOUR FLOODLIGHT CAMERA
To avoid scratching the Floodlight Camera, do not peel off the
protective film for the time being
.
Put your Floodlight Camera in the direction as illustrated on a table, and open
the USB port cover. Connect the device to a power source inside your home using
the micro USB charging cable and a power adapter (5V/1A, not provided). Wait 1
minute or until the LED indicator blinks red.
The Floodlights will only light up when in wired power mode. The
USB-powered connection is used for setting up the camera safely
inside your home.
06
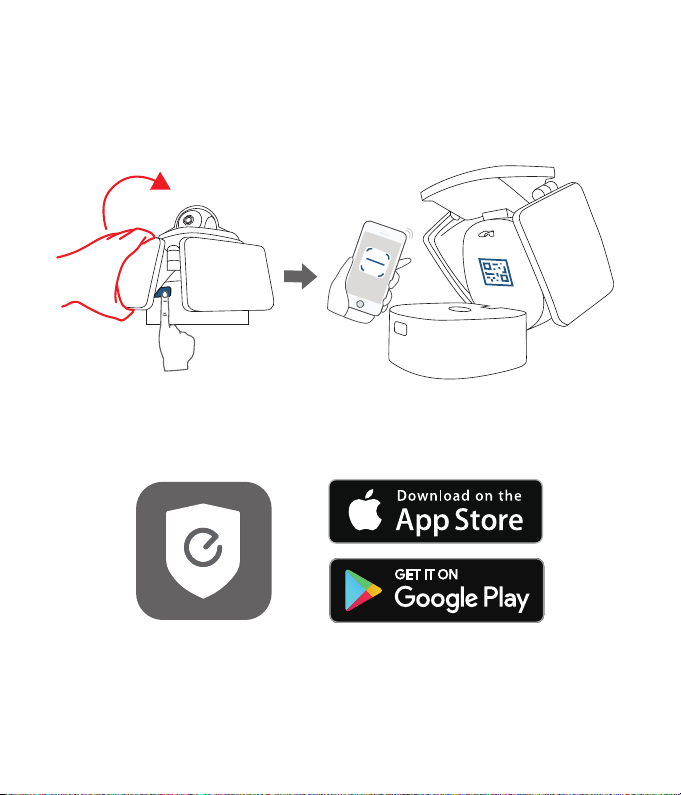
SETTING UP THE FLOODLIGHT CAMERA
Push and hold the button to open the mounting base and find a QR Code.
Download the eufy Security app from the App Store (iOS devices) or Google
Play (Android devices).
Log in or sign up for a eufy Security account, then follow the on-screen
instructions to complete the setup.
07
Make sure you can livestream video from Floodlight Camera
before mounting.
If the Floodlight Camera LED keeps blinking red, it means the floodlight is
not connected to the Internet. Please make sure the Wi-Fi signal is strong
at the desired location. You may consider moving the wireless router closer
to Floodlight Camera or using a Wi-Fi range extender.
PREPARING FLOODLIGHT CAMERA FOR
INSTALLATION
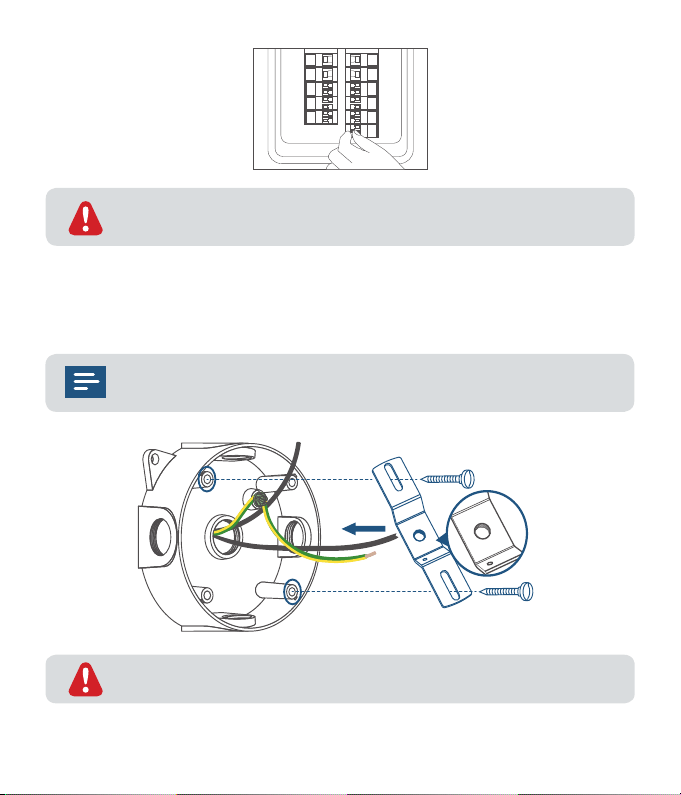
1. Unplug the power adapter. Close the mounting base and USB port cover.
2. Shut down the circuit breaker in your house. Switch on/off the lights to
make sure the electricity in your house is properly shut off.
08
To avoid risk of shock, injury or death, always be cautious when
working with electricity.
3. Remove the previous Floodlight or Floodlight Camera from the junction box
and install the mounting plate.
The junction box and existing electrical wires are required for
installing the Floodlight Camera.
The concaved side of the mounting plate must face outwards.

09
MOUNTING YOUR FLOODLIGHT CAMERA
To ensure the best motion detection range, we recommend
installing the Floodlight Camera within 2-3 meters above the
ground.
You can hang Floodlight Camera or install it vertically on the wall. Select the
installation method that best suits the position of your junction box.
Wall Mount
Upside-down Mount
10
Mount Floodlight Camera onto a Wall
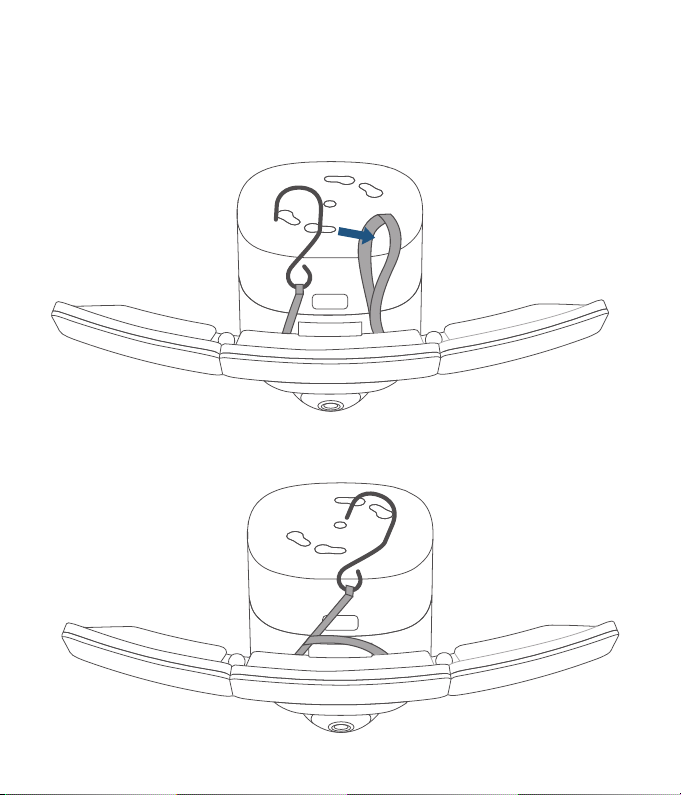
STEP 1. Before Mounting
1. Pass the hook through the other end of the string as illustrated.
11
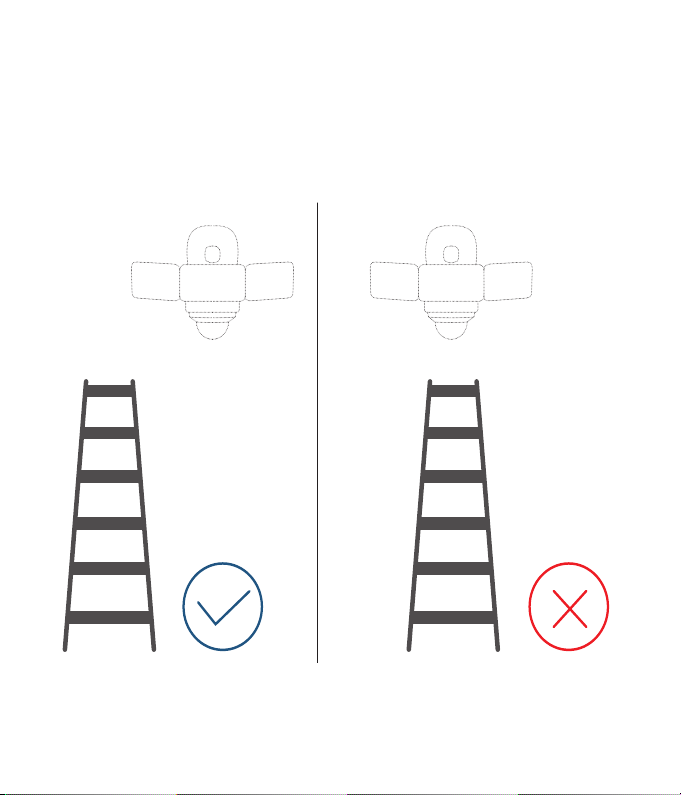
2. You need a ladder to mount your Floodlight Camera on the wall. Make sure
you do not place your ladder right under the Floodlight Camera. Place it to
the lower left or right of the Floodlight Camera as illustrated below to avoid
obstructing your view while mounting.
12
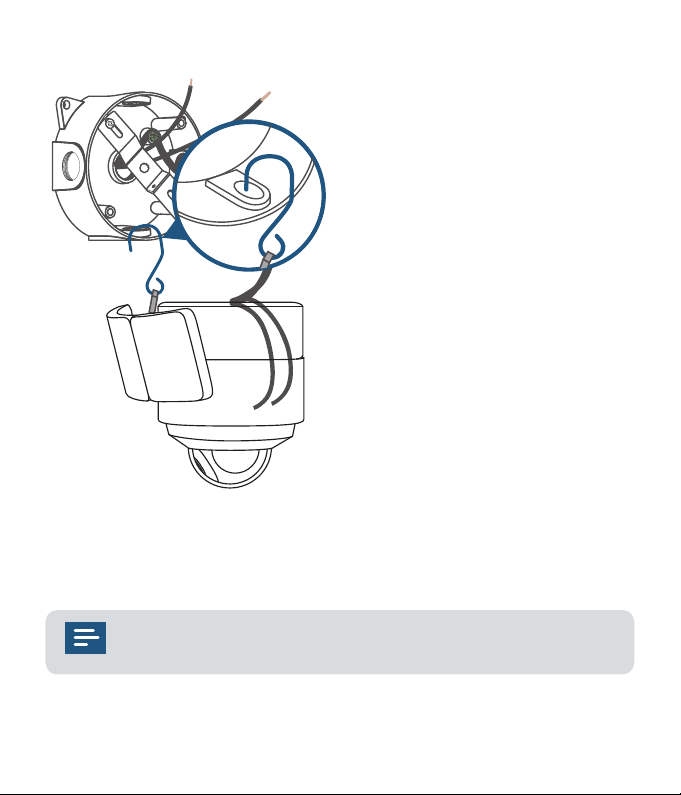
3. Hang your Floodlight Camera on the junction box with the hook provided.
1
If the junction box has been installed in the wall, hang the
Floodlight Camera on the mounting plate.
13
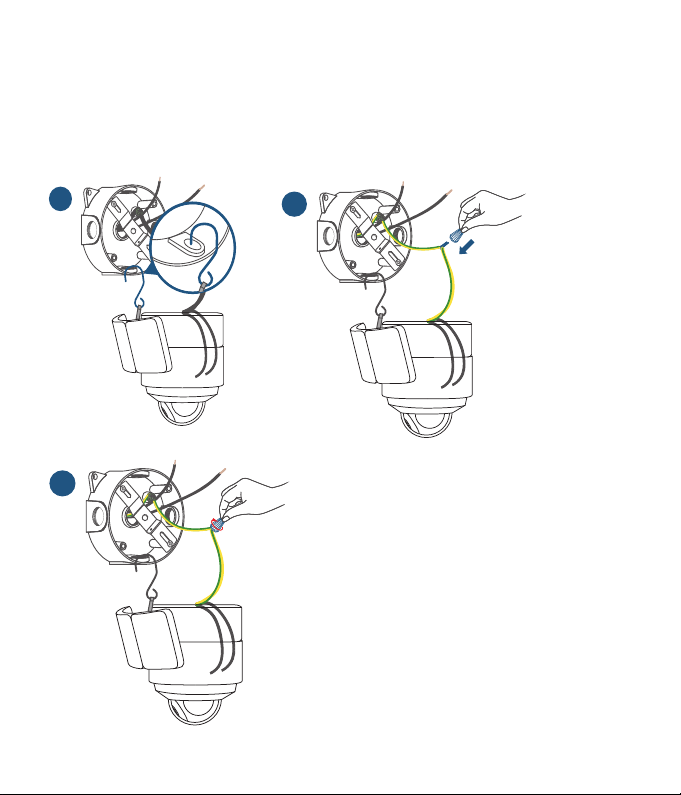
STEP 2. Connect Wires
1. Connect both ground wires (yellow or green) from the junction box and
Floodlight Camera and join the wires by using a wire nut. If the existing
ground wire has been connected to the junction box or there is no ground
wire, connect the ground wire of the Floodlight Camera to the junction box or
mounting plate directly.
1
2
3
14
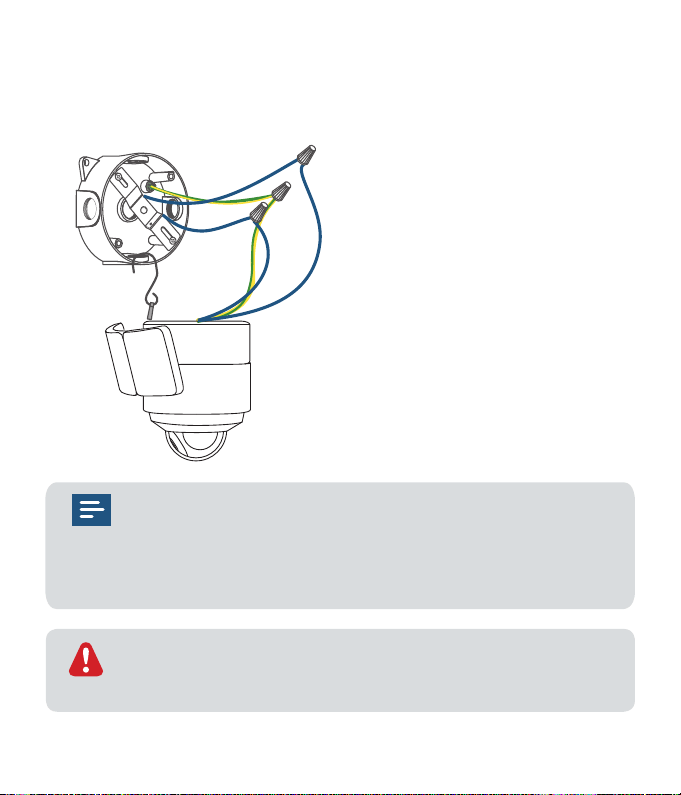
2. Use wire nuts to connect the Floodlight Camera wires to the rest of the
wires from the junction box. Connect the white wire on the Floodlight Camera
to the white wire (neutral) from the junction box. Connect the black wire on
the Floodlight Camera to the black wire (hot) from the junction box.
The GROUND wire is green and yellow in color. Make sure the
GROUND wire on Floodlight Camera connects to the GROUND
wire of the junction box. The other 2 wires on the Floodlight
Camera do not require a specific connection order. Use the wire
nuts to protect the joints of wires.
To avoid risk of shock, injury or death, always be cautious when
working with electricity. Remember, do hire a professional
electrician if you’re uncomfortable working with electrical wiring.
15
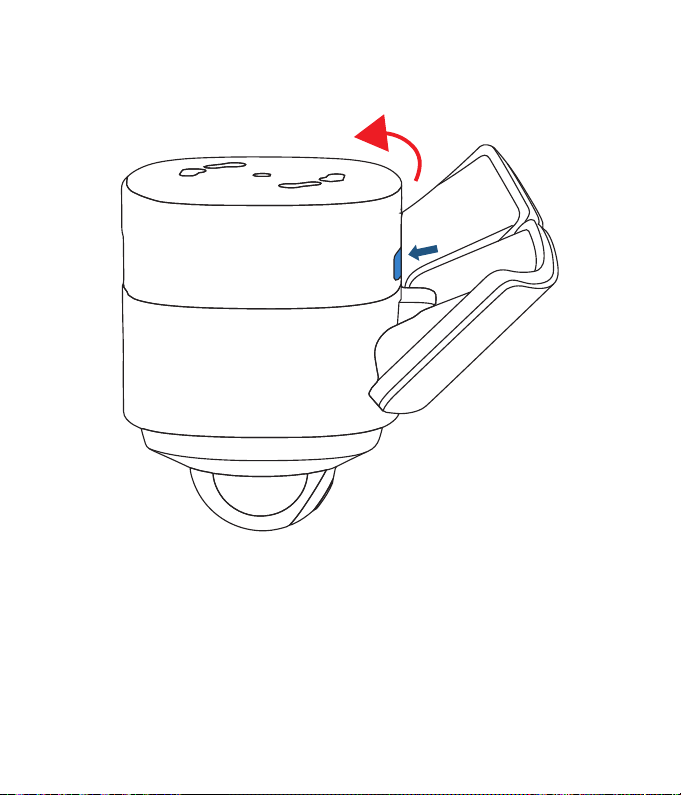
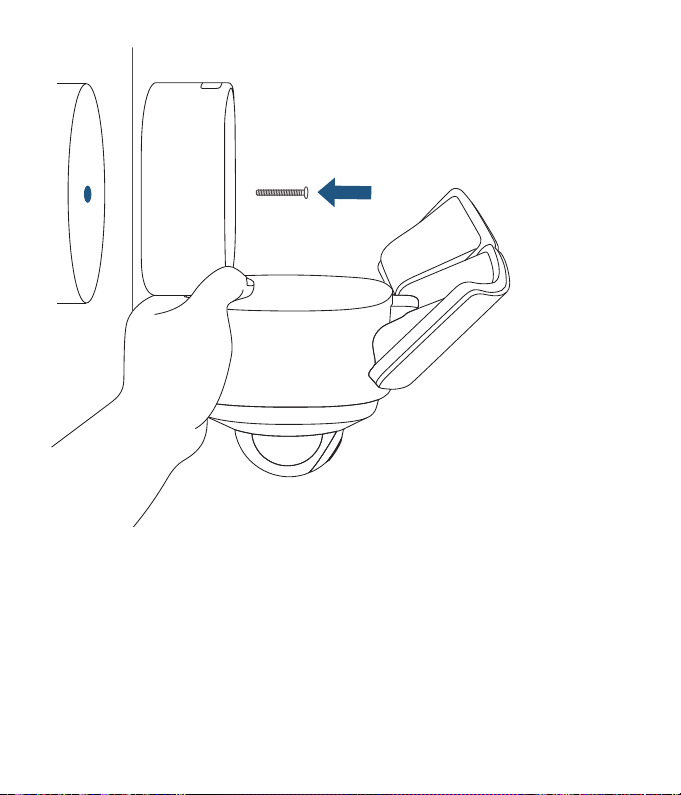
STEP 3. Mount the Floodlight Camera
1. Remove the hook, and press the button to open the mounting base.
2. Hold the mounting base, and insert the central screw through the center of
the mounting base and screw it tightly. Use the central screw cap to cover the
central screw to prevent it from rusting.
3. Cover the central screw with the provided cap.
16
Side view makes it easier for you to align the screws.
4. Adjust the angle as mentioned in the section "
Adjusting the Lighting Angle
"
to get the best view.
5. Remove the label and protective film on the Floodlight.
17
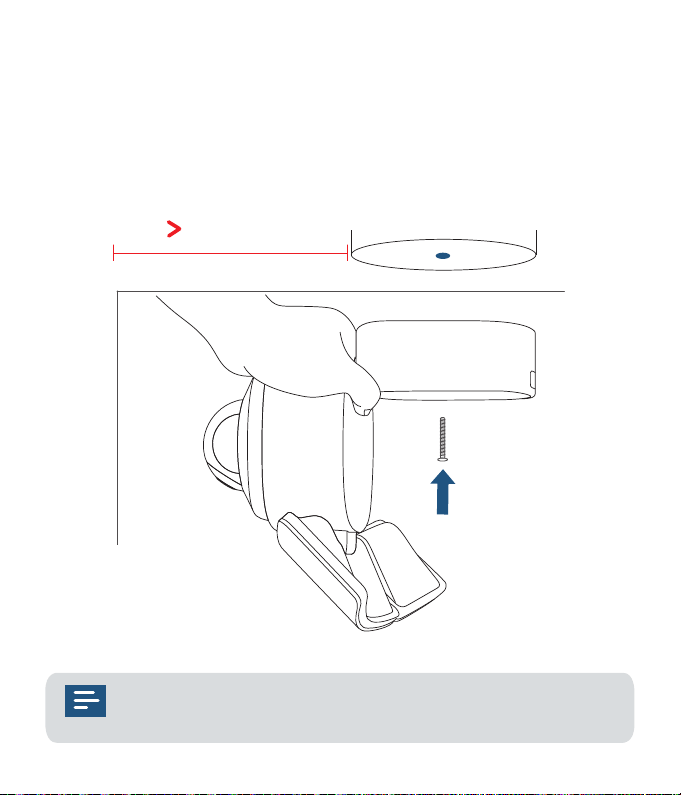
Mount Floodlight Camera on the Ceiling
1. Follow steps mentioned in the section “
Mount Floodlight Camera onto a
Wall
” to choose the place for mounting and connect wires.
2. Insert the central screw through the center of the mounting base and screw
it tightly.
3. Cover the central screw with the provided cap.
6 in / 15 cm
Make sure you place the Floodlight Camera more than 6 in / 15 cm
away from a side wall.
18
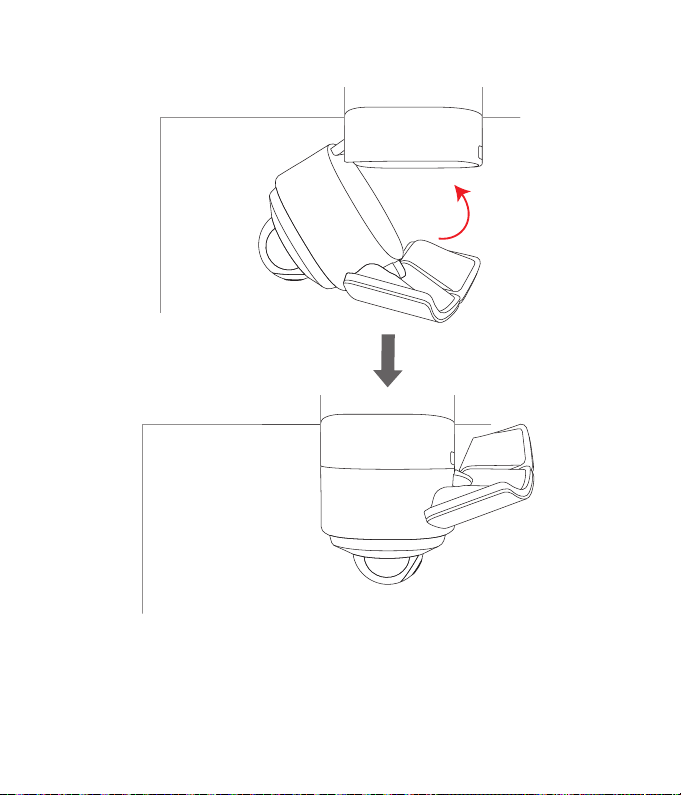
4. Snap the camera onto its base.
5. Adjust the angle as mentioned in the section “
Adjusting the Lighting Angle
”
to get the best view.
6. Remove the label and protective film on the Floodlight.
7. Switch on the main circuit breaker in the house.
19
In case Floodlight Camera is not powered on, switch off the circuit
breaker before checking the wiring of Floodlight Camera.
To avoid risk of shock, injury or death, always be cautious when
working with electricity. Remember, do hire a professional
electrician if you’re uncomfortable working with electrical wiring.
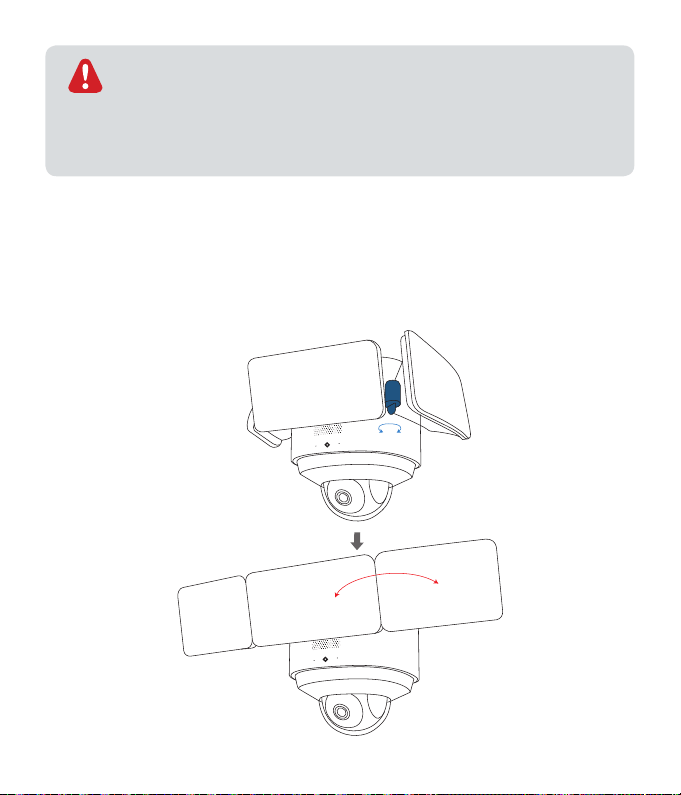
ADJUSTING THE LIGHTING ANGLE
1. Turn the knobs counter-clockwise to extend the Floodlight. Adjust the
Floodlight horizontally and then tighten the knobs by turning them clockwise.
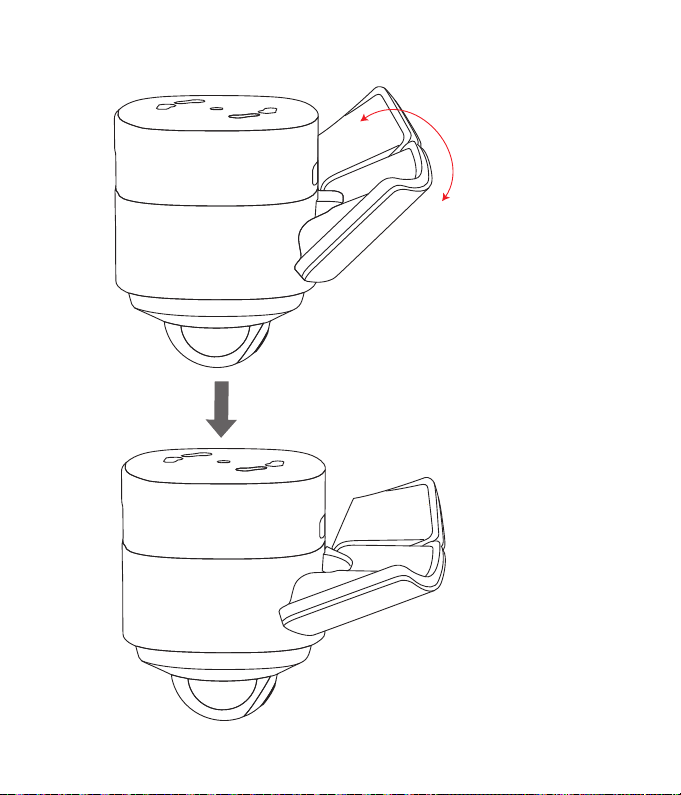
20
2. Manually pull down the Floodlight in the middle.
21
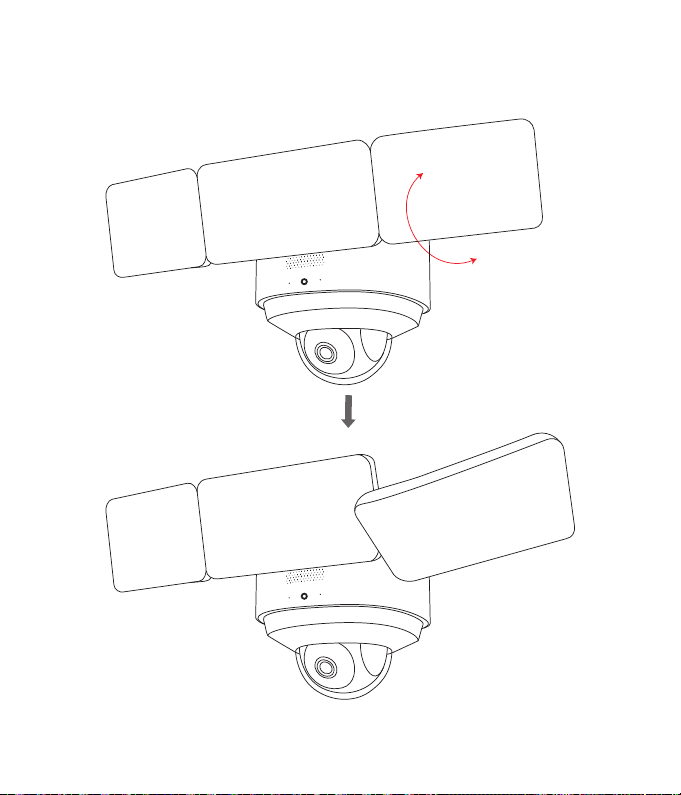
3. Manually pull down the Floodlight on the side.

22
To check whether Floodlight Camera is operating, confirm the LED
indicator has turned solid white.
For troubleshooting, check the Help section in the eufy Security app.
Refer to the app page for what the LED indicator status lights mean.

23
NOTICE
FCC Statement
This device complies with Part 15 of the FCC Rules. Operation is subject to the following two conditions:
(1) this device may not cause harmful interference, and (2) this device must accept any interference
received, including interference that may cause undesired operation.
Warning:
Changes or modifications not expressly approved by the party responsible for compliance
could void the user's authority to operate the equipment.
Note:
This equipment has been tested and found to comply with the limits for a Class B digital device,
pursuant to Part 15 of the FCC Rules. These limits are designed to provide reasonable protection
against harmful interference in a residential installation.
This equipment generates uses and can radiate radio frequency energy and, if not installed and used in
accordance with the instructions, may cause harmful interference to radio communications. However,
there is no guarantee that interference will not occur in a particular installation. If this equipment does
cause harmful interference to radio or television reception, which can be determined by turning the
equipment off and on, the user is encouraged to try to correct the interference by one or more of the
following measures: (1) Reorient or relocate the receiving antenna. (2) Increase the separation between
the equipment and receiver. (3) Connect the equipment into an outlet on a circuit different from that to
which the receiver is connected. (4) Consult the dealer or an experienced radio/ TV technician for help.
FCC Radio Frequency Exposure Statement
The device has been evaluated to meet general RF exposure requirements. The device can be used in
fixed/mobile exposure condition. The min separation distance is 20cm.
Notice:
Shielded cables
All connections to other computing devices must be made using shielded cables to maintain compliance
with FCC regulations.
The following importer is the responsible party
Company Name: POWER MOBILE LIFE, LLC
Address: 400 108th Ave NE Ste 400, Bellevue, WA 98004-5541
Telephone: 1-800-988-7973
IC Statement
This device complies with Industry Canada licence-exempt RSS standard(s).
Operation is subject to the following two conditions:
(1) this device may not cause interference, and
(2) this device must accept any interference, including interference that may cause undesired
operation of the device."
Le présent appareil est conforme aux CNR d'Industrie Canada applicables aux appareils radio

24
exempts de licence. L'exploitation est autorisée aux deux conditions suivantes:
(1) l'appareil nedoit pas produire de brouillage, et
(2) l'utilisateur de l'appareil doit accepter tout brouillage radioélectrique subi, même si le brouillage est
susceptible d'en compromettre le fonctionnement."
This Class B digital apparatus complies with Canadian ICES-003.
Cet appareil numérique de la classe B est conforme à la norme NMB-003 du Canada.
IC RF Statement:
When using the product, maintain a distance of 20cm from the body to ensure compliance with RF
exposure requirements.
Lors de l'utilisation du produit, maintenez une distance de 20 cm du corps afin de vous conformer aux
exigences en matière d'exposition RF.
Anker Innovations Limited
Room 1318-19, Hollywood Plaza, 610 Nathan Road, Mongkok, Kowloon, Hong Kong

25
Customer Service
• Warranty
12-month limited warranty
• Call Us
United States +1 (800) 988 7973 Mon-Fri 9AM-5PM (PT)
United Kingdom +44 (0) 1604 936 200 Mon-Fri 6AM-11AM (GMT)
Germany +49 (0) 69 9579 7960 Mon-Fri 6:00-11:00
• Email Us
Customer Support: [email protected]
@EufyOfficial
@EufyOfficial
@EufyOfficia
l

26

27

28
