Loading ...
Loading ...
Loading ...
3.
4.
5.
6.
2.
1.
6
BEFORE FIRST USE
Remove any packing materials and promotional labels
from your electric multicooker.
Be sure all parts have been included before discarding
any packing materials. You may want to keep the box
and packing materials for use at a later date.
Before using your Cuisinart
®
Electric Multicooker for
the first time, remove any dust from shipping by
wiping clean with a damp cloth. Thoroughly clean the
cooking pot and sealing ring assembly in the
dishwasher or with warm, soapy water. Rinse, towel
dry, or air-dry, and place in the multicooker.
1. Place the multicooker on a clean, flat surface.
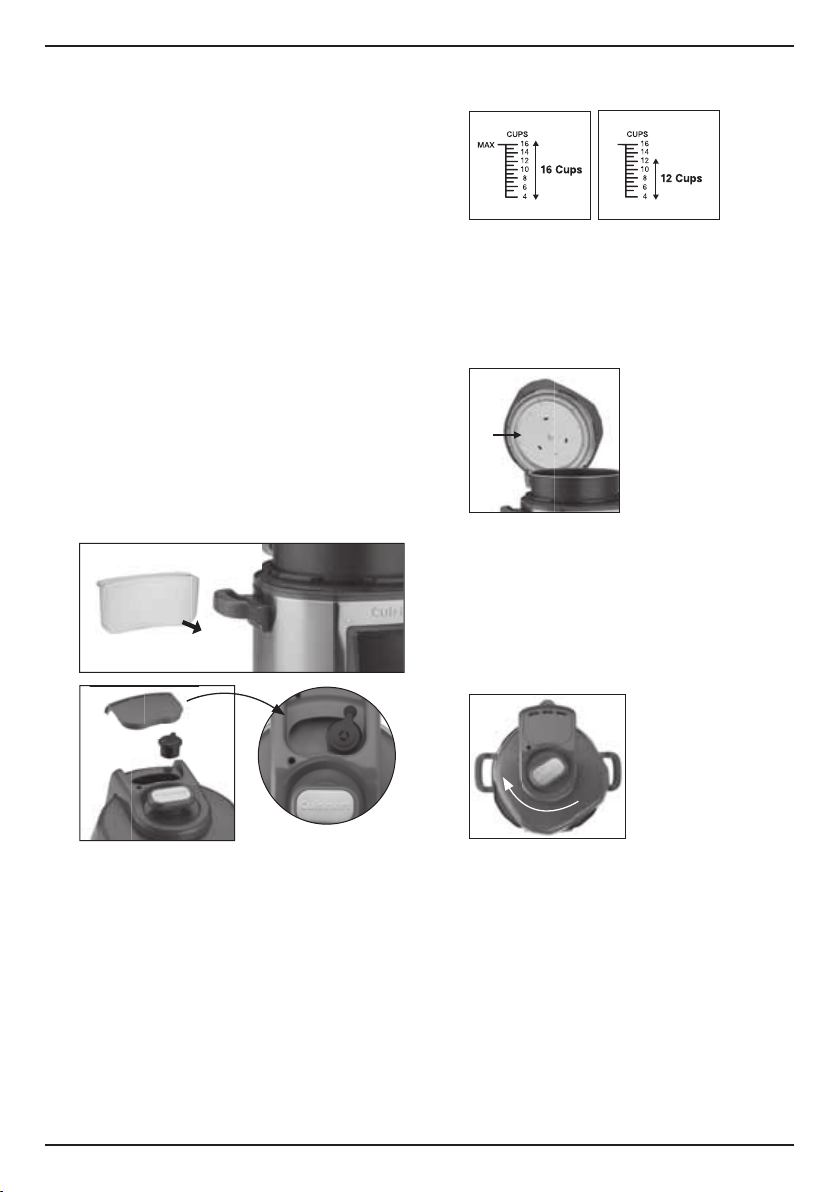
2. Ensure the condensation collector in rear of the unit
is in place (as shown below in figure 1; and #5 on
diagram, page 3).
3. Remove the Steam Cover (#11 on diagram). Ensure
the pressure limit valve on the hinge area of the lid is
in place, as shown in figure 2. NOTE: The pressure
limit valve does not click or lock into place. Even
though it will have a loose fit, it is safely secured.
INSTRUCTIONS FOR USE
1. To open lid, grasp handle, turn counterclockwise.
Lift to open the lid. The unit will beep two times
when turning the handle and two times when the lid
is raised.
2. Add food and liquids to the cooking pot as the
recipe directs. NOTE: The total volume of food and
liquid must not exceed 16 cups/Max Fill line of the
cooking pot (figure 3). For foods such as dried
vegetables and beans, or rice and grains, the total
volume must not exceed 12 cups (figure 4).
NOTE: Overfilling may clog the pressure limit valve,
which can cause excess pressure to develop.
Always use at least ½ cup liquid when
pressure cooking.
3. If sealing ring assembly has been removed from lid,
check to ensure flexible ring is securely in place on
the metal plate. Then, holding the knob on the metal
plate, place the assembly over the center post of
inner lid and press down firmly to secure (figure 5).
BE SURE KNOB FACES OUT.
4. To close the lid, remove any food residue from upper
rim of cooking pot to ensure a proper seal. Lower the
lid, then turn the lid handle clockwise to close into
place (figure 6). The unit will beep two times when
turning the handle and two times when the lid is
lowered. NOTE: If the lid is not closed correctly,
scalding may result. LID will appear flashing in the
LCD and the unit will beep.
5. Position the pressure limit valve (located on hinge
area of the lid) as directed in figure 2. The float in
handle area must be fully down to properly seal the
pot before cooking.
MULTICOOKER FUNCTIONS
Pressure Cooking Functions
1. Meat – This preset is programmed for larger pieces
or chunks of meat, such as brisket and pork, as well
as the perfect setting for cooking a whole chicken.
The default is High+ pressure for 35 minutes, but
High and Low pressures are available as well. The
time is adjustable from 1 minute to 4 hours. In most
Loading ...
Loading ...
Loading ...